Domain Orders Extended For WHMCS
Contents |
About Domain Orders Extended For WHMCS
| Domain Orders Extended For WHMCS allows you to group domains into categories and perform bulk actions on multiple domains. You will be free to import predefined sets of TLDs, apply easily adjustable domain labels, plus regulate the priority and order of TLDs. |
- Client Area Features:
| ✔ Supports Three External Domain Search Forms |
| ✔ Fast Cron Domain Lookup |
| ✔ Simultaneous Domain Searches In Multiple Spinners |
| ✔ Display Domain Name Suggestions |
| ✔ Display Domain Labels |
| ✔ Display TLDs Basing On Defined Prioritization And Order |
| ✔ Display Dynamic Prices Of Premium Domains Based On Registrar Values And WHMCS Price Markups |
| ✔ Display TLD Prices To Client Groups Based On Set Pricing Slabs |
| ✔ Multiple Checkout Of Domains In One Request |
- Admin Area Features:
| ✔ Group TLDs Into Categories & Subcategories |
| ✔ Set Promoted Categories And TLDs |
| ✔ Set Order Of Categories, Subcategories And TLDs |
| ✔ Perform Bulk Changes On Multiple TLDs: |
| ✔ Change TLD Categories And Registrars |
| ✔ Set Domain Pricing |
| ✔ Set Domain Labels |
| ✔ Toggle Promoted TLDs |
| ✔ Delete TLDs From Categories |
| ✔ Import TLD Sets To Categories From Predefined List |
| ✔ Choose Domain Lookup Submodules: |
| ✔ Default Or Custom WHMCS Provider |
| ✔ OpenSRS |
| ✔ Enom |
| ✔ Add Your Own Lookup Submodules |
| ✔ Set TLDs Searched By Default |
| ✔ Toggle Search Of Domain Suggestions |
| ✔ Add Customized TLD Labels |
| ✔ Choose Domain Search Form: |
| ✔ List View |
| ✔ General Category View |
| ✔ Multi Category View |
| ✔ Configure Cron Domain Lookup: |
| ✔ Define Number Of Simultaneous Processes |
| ✔ Define Number Of Search Records Per Process |
| ✔ View Logs |
- General Info:
| ✔ gTLDs & ccTLDs Support |
| ✔ IDN Support |
| ✔ Multi-Language Support |
| ✔ Supports PHP 5.6 Up To PHP 7.2 |
| ✔ Supports WHMCS Template Six |
| ✔ Supports WHMCS 7.2 And Later |
Installation
| This tutorial will show you how to successfully install Domain Orders Extended For WHMCS. We will guide you step by step through the whole installation and configuration process. |
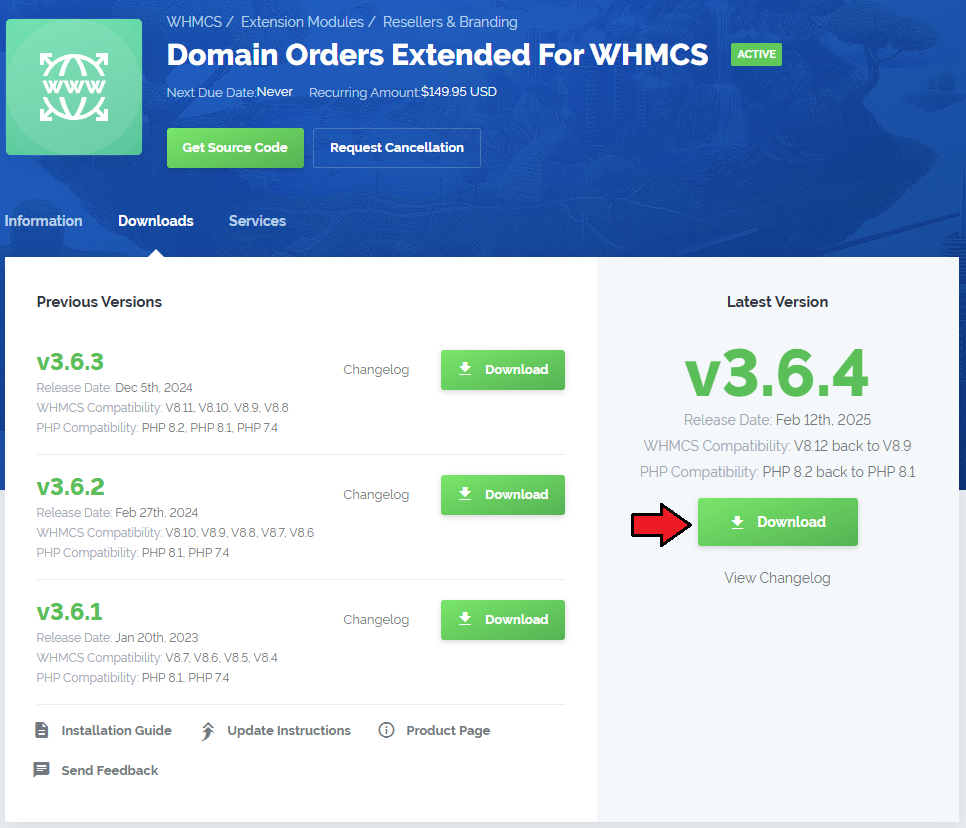
| 1. Log in to our client area and download the module. |
|
| 2. In the downloaded file you will find two packages that support different PHP versions. As presented on the screen below, the first one is dedicated to PHP 5.6 up to PHP 7.0, while the second one is aimed at PHP 7.1 up to PHP 7.2. It does not apply to open source versions. Note: You can check the current PHP version in your WHMCS. To do so, proceed to 'Utilities' › 'System' › 'PHP Info'. |

|
| 3. Extract the downloaded file and choose the one with the right PHP version. Upload and extract the PHP file into the main WHMCS directory. The content of PHP version files should look like this. |
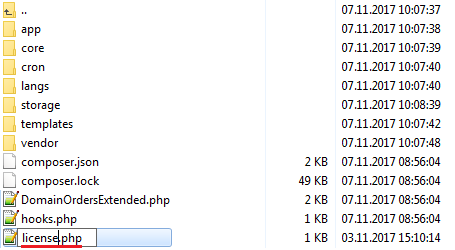
| 4. When you install Domain Orders Extended For WHMCS for the first time you have to rename 'license_RENAME.php' file. You can find it in 'modules/addons/DomainOrdersExtended/license_RENAME.php'. Rename it from 'license_RENAME.php' to 'license.php'. |
|
| 5. In order to configure your license key, you have to edit the previously renamed 'license.php' file. Enter your license key between quotation marks as presented on the following screen. You can find your license key in our client area → 'My Products'. |

|
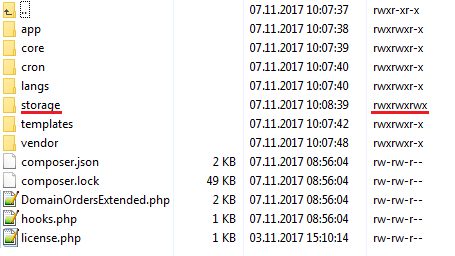
| 6. Now, set up the 'storage' folder as writable. This folder should be available at 'your_whmcs/modules/addons/DomainOrdersExtended/' . If not, create one manually. |
|
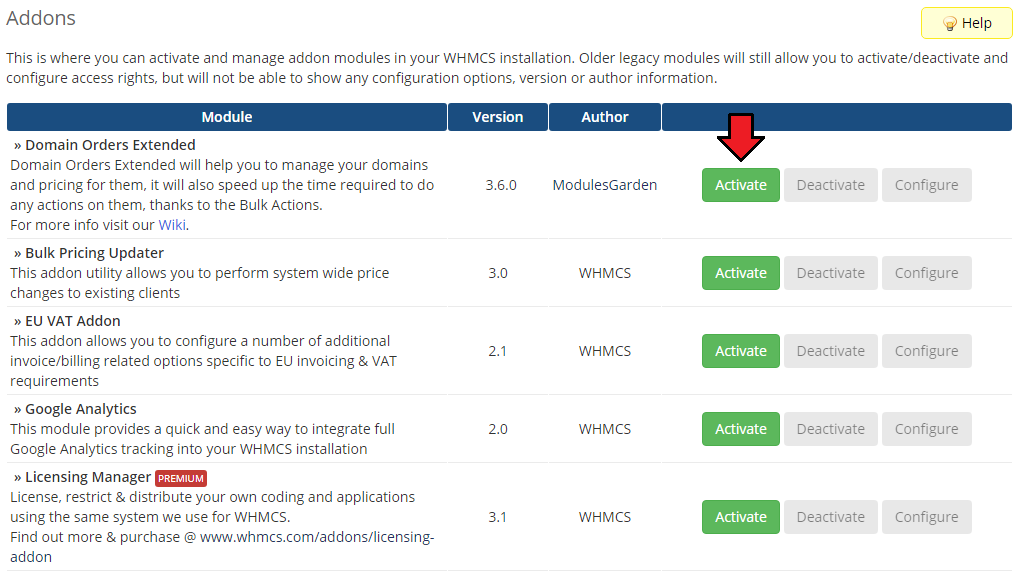
| 7. Now you have to activate the module in your WHMCS system. Log in to your WHMCS admin area. Go to 'Setup' → 'Addon Modules'. |
|
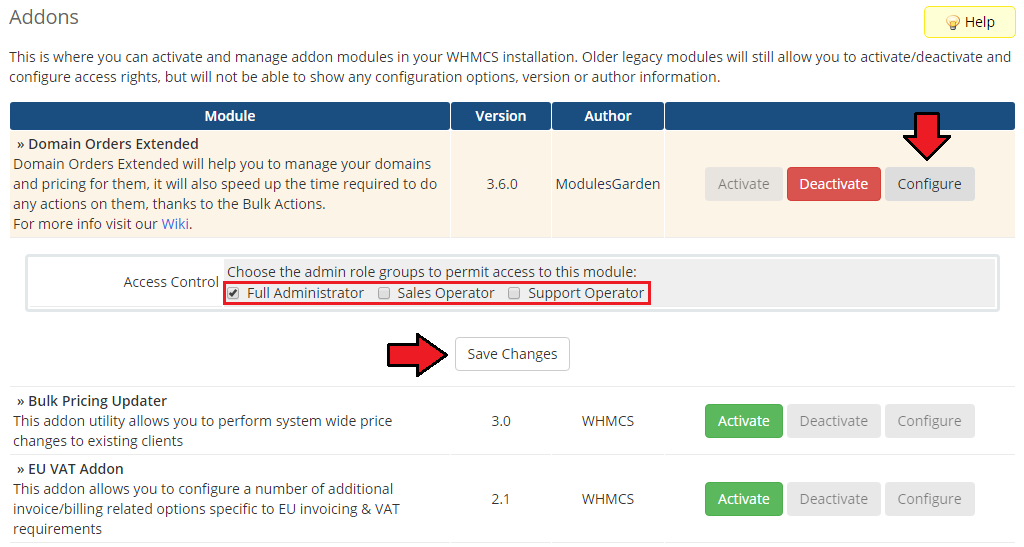
| 8. In the next step you need to permit access to this module. To do so, click on 'Configure' button, select administrator groups which should have access to this addon and press 'Save Changes'. |
|
| 9. You have just successfully installed Domain Orders Extended For WHMCS! You can access your module in 'Addons' → 'Domain Orders Extended'. |
Configuration and Management
| Domain Orders Extended will help you with the management of your domains and their pricing. It will also reduce the time required for performing actions on domains due to the implemented bulk actions feature. |
TLDs Configuration
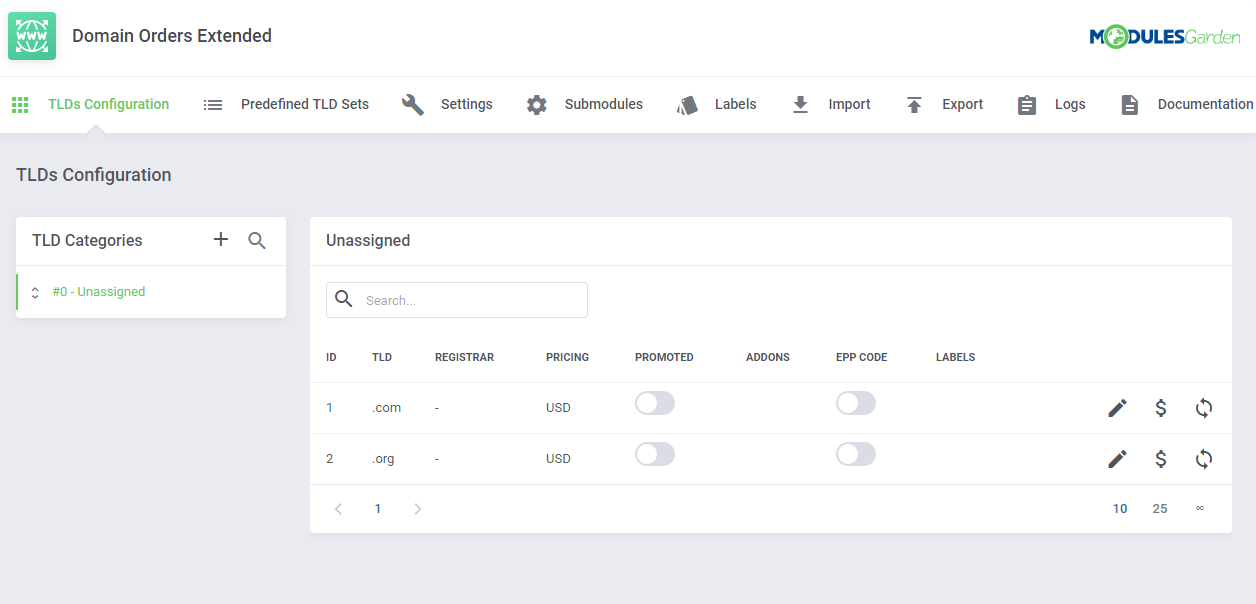
| In 'TLDs Configuration' tab you can view all the information related to your domains, such as: categories, assigned registrars, prices and labels. By default, the 'Unassigned' category is created where not yet assigned TLDs are stored. |
|
Add Category
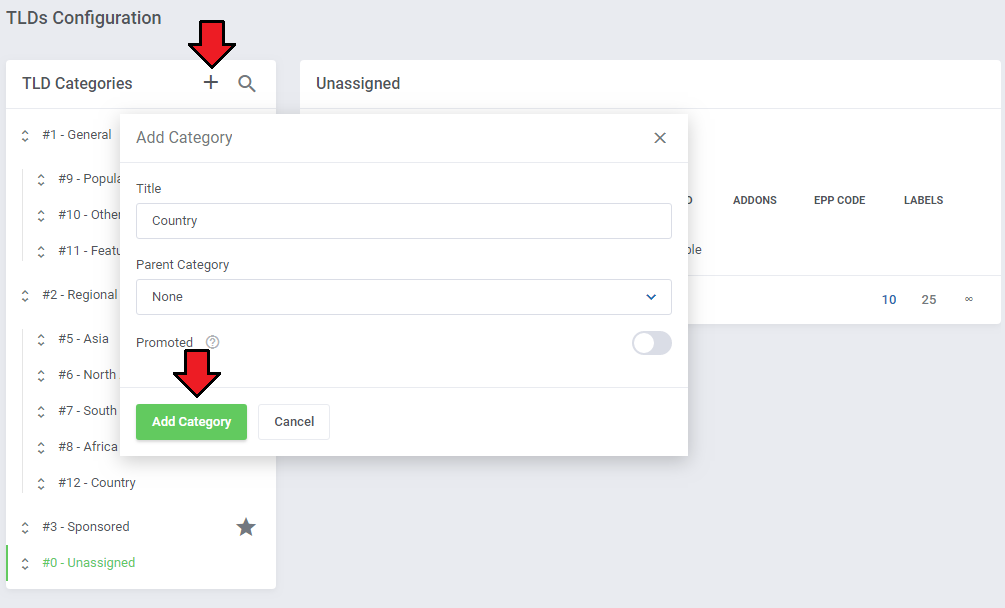
| Let's start with creating a category, go to your addon → 'TLDs Configuration'. Click on 'Add TLDs Group' button, enter the category name into the 'Title' field. |
|
| You can also edit or delete a created category at any time by clicking on the corresponding button in the upper right corner. |

|
Assign TLDs
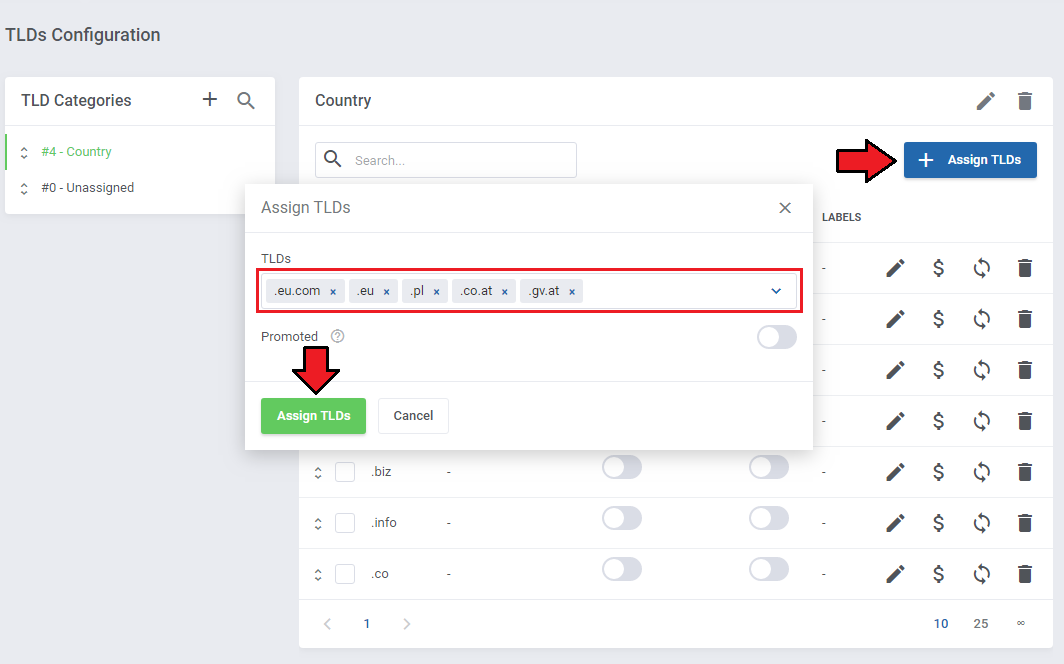
| In order to add new TLDs to a category, press the 'Assign TLDs' button. You can assign multiple TLDs at once and decide whether the searched domains should be promoted at the top within this category, regardless of the order of the remaining, not promoted TLDs. |
|
Edit TLD Configuration
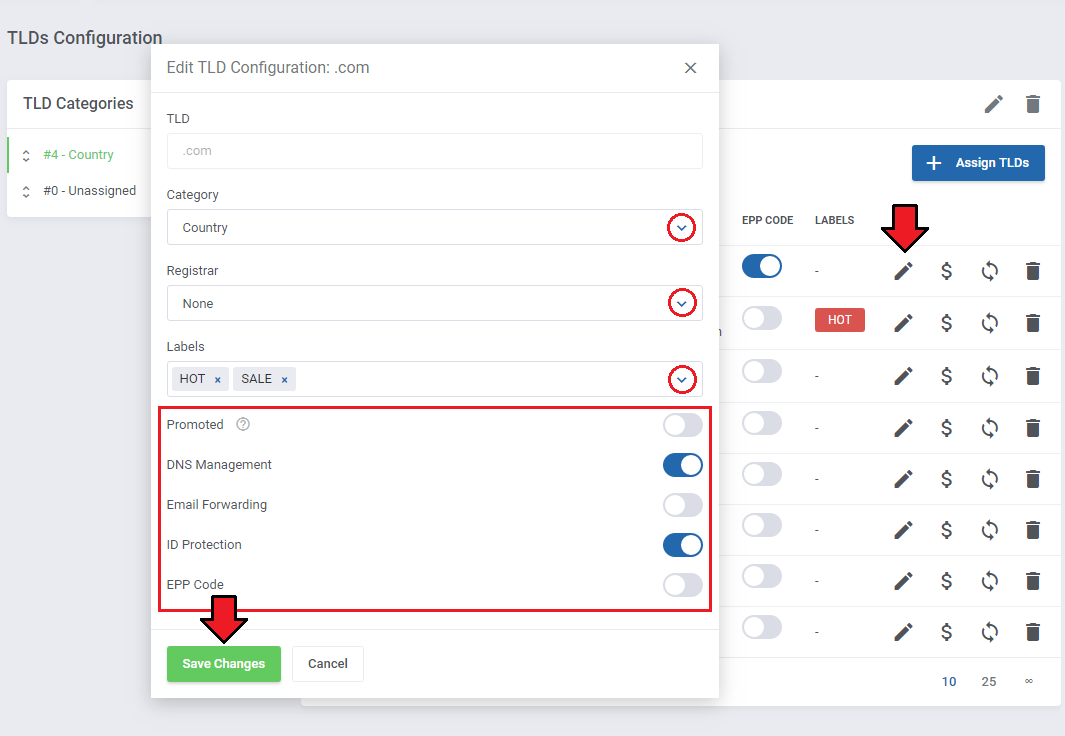
| Click the 'Edit TLD Configuration' button to access the settings of the selected TLD. Here you can change the category to which a given TLD belongs, set the domain registrar, assign labels or decide whether to promote searched domains on top of the category. |
|
Edit TLD Pricing
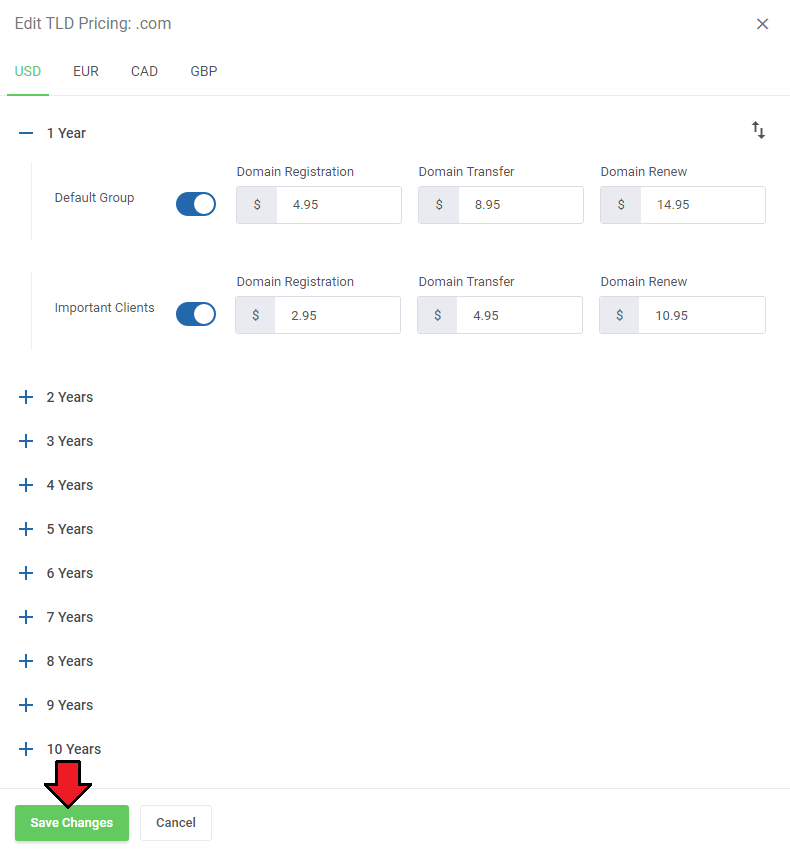
| In the Edit TLD Pricing tab, you can set the domain pricing for each of registration periods in each available currency. Please be also advised that if you provide:
Please also note that these prices are applied only to the default base slab. If you also use other custom domain pricing slabs, they are applied according to the settings of the client groups. |
|
Edit Grace and Redemption Periods Pricing
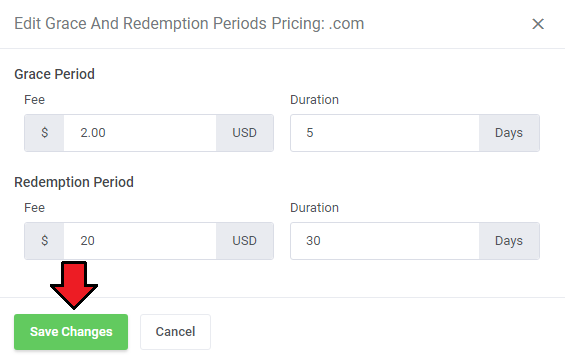
| This option allows to set up and edit the Domain Grace and Redemption Grace Periods fees and duration. If you have already set up Grace/Redemption Periods in WHMCS, the values will be overwritten by the module. Note: This option is available for WHMCS V7.5 and later. If you are using previox version of teh system, you will not have access to this feature. |
|
Bulk Actions
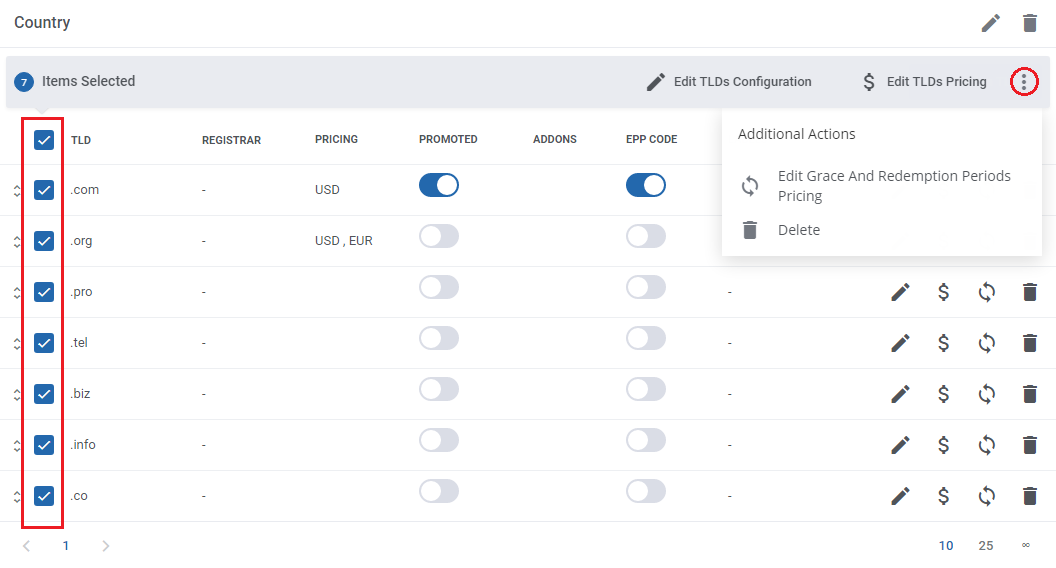
| Our module allows you to perform actions simultaneously on multiple TLDs. You can mass edit TLDs configuration, pricing or delete TLDs from the assigned categories. |
|
Order of Categories and TLDs
| Using drag & drop allows you to change the order of the categories, subcategories and TLDs. This enables you to decide on the order in which categories and TLDs appear in the domain search list. |
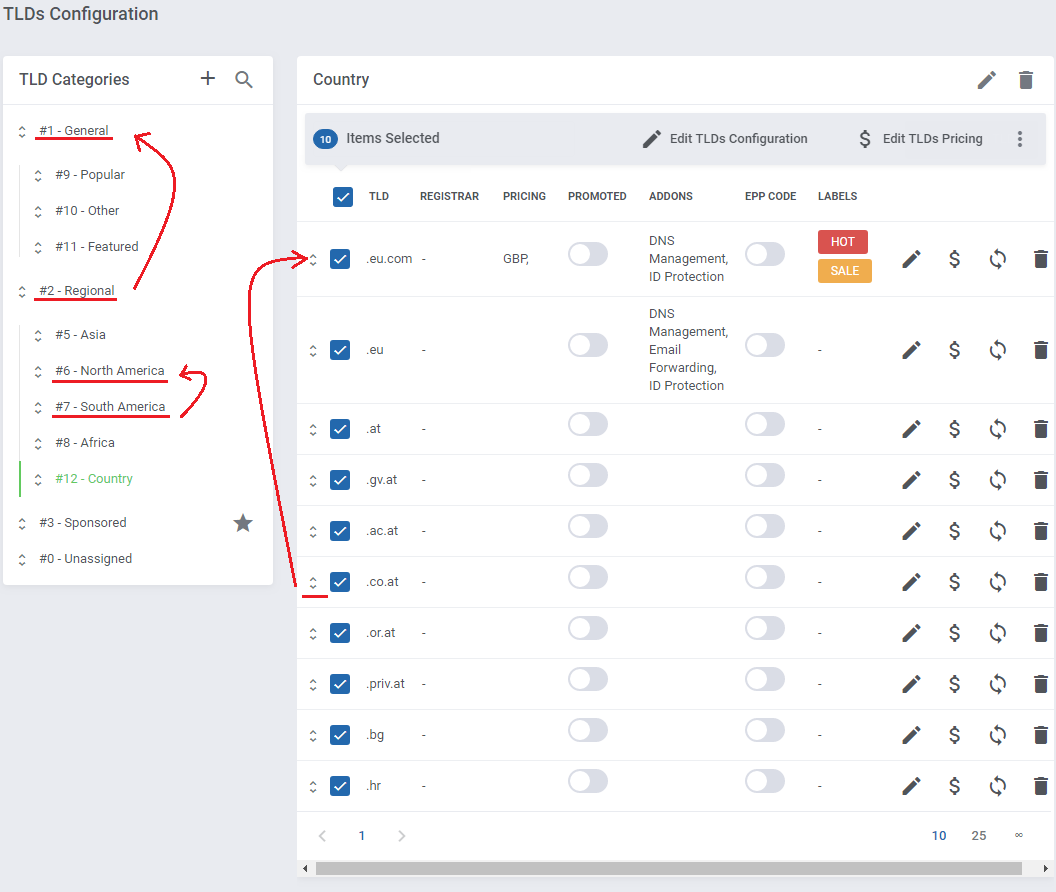
|
| After dragging, the new order is automatically saved. |
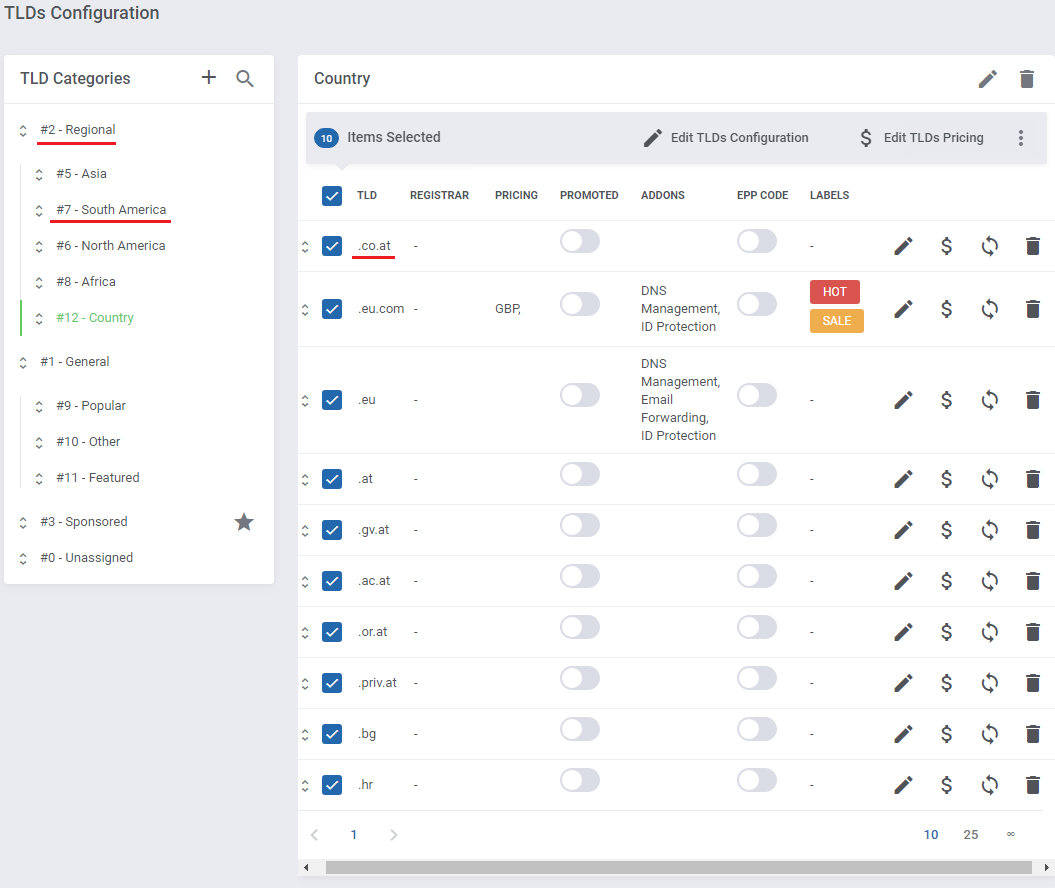
|
|
Depending on the selected domain search type, the order of TLDs display in search results will be set in the following sequence (from the most important to least):
|
Predefined TLD Sets
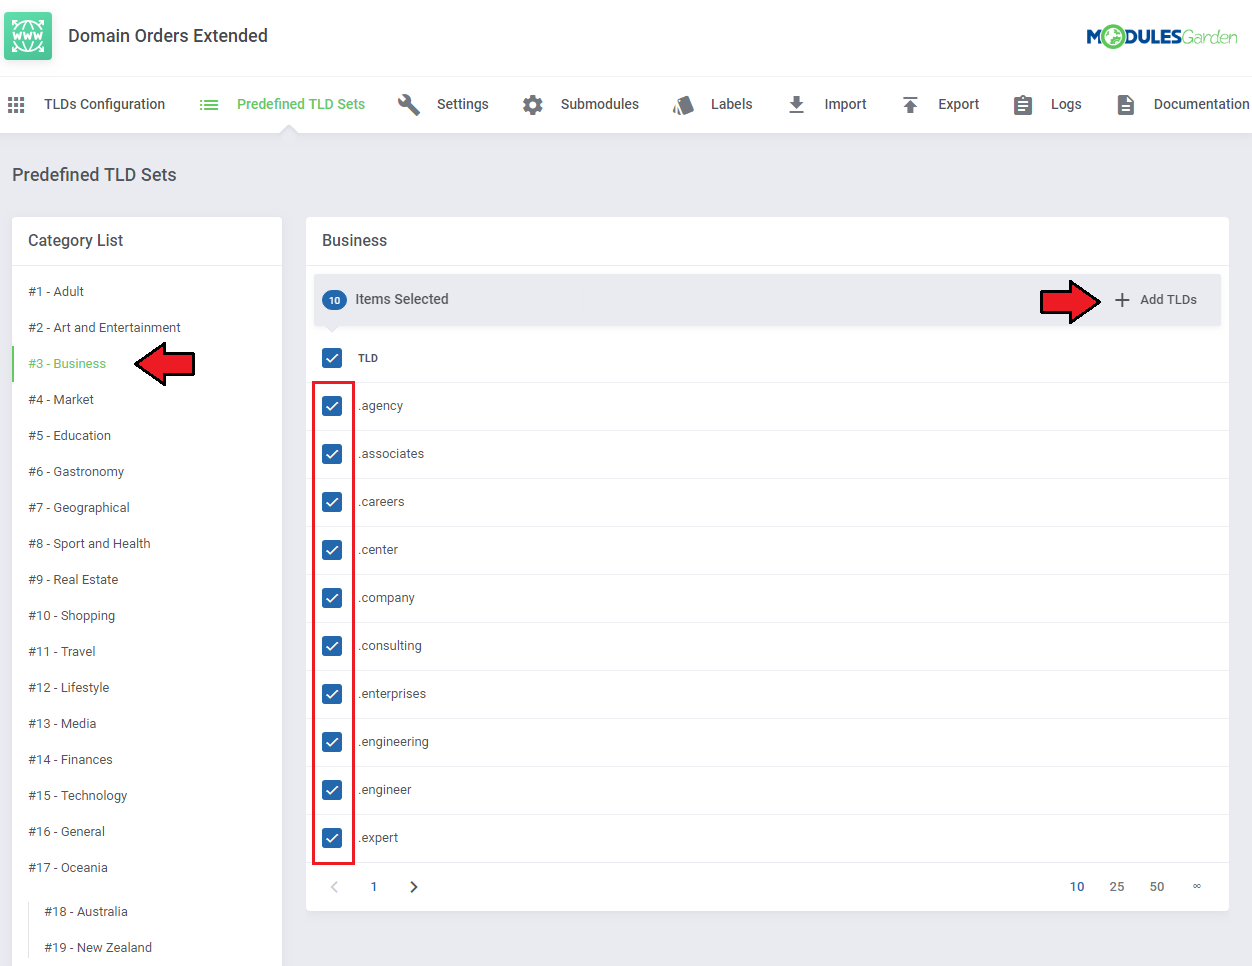
| You can install predefined sets of TLDs. Proceed to 'Predefined TLD Sets' tab. As you can see, TLDs are sorted into categories. Some of them can have their own subcategories. |
|
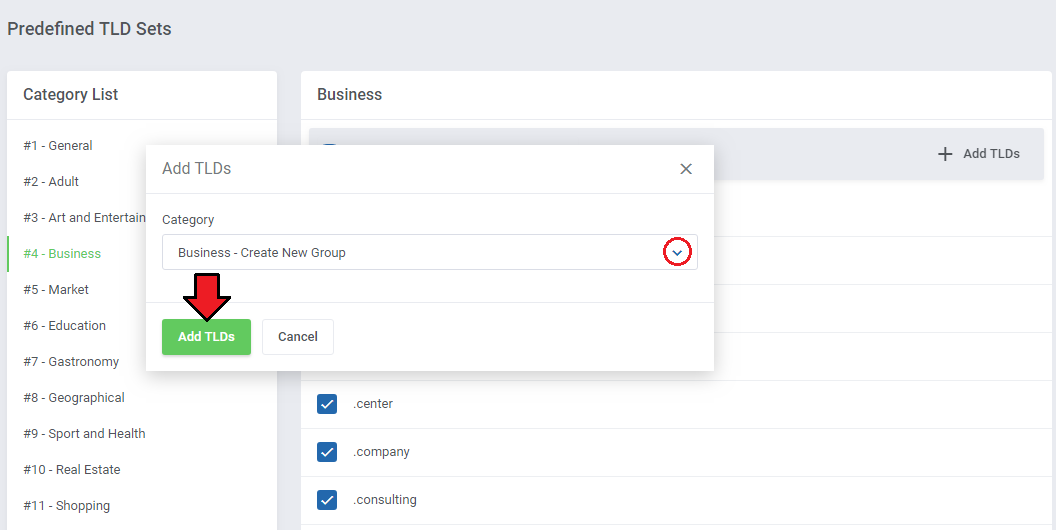
| Now you can create a new category from the set with the same name or add the selected TLDs to one of the previously created categories or subcategories in the 'TLDs Configuration' . Press 'Add TLDs' when ready. |
|
Settings
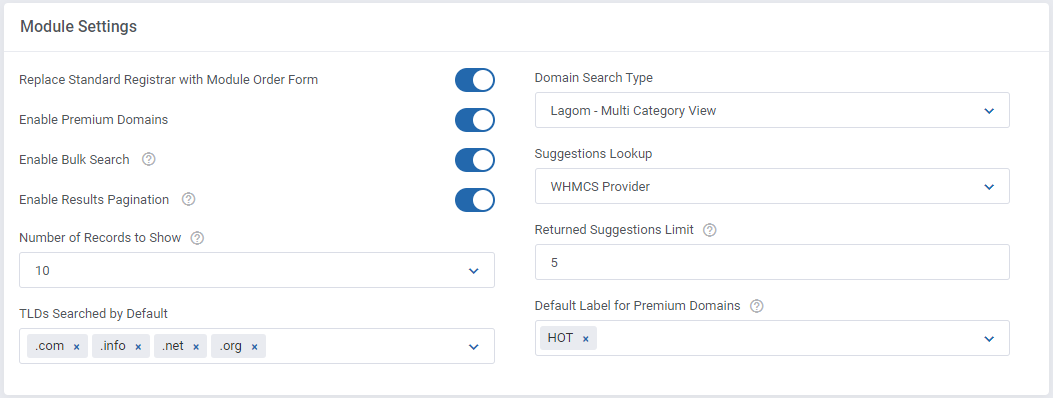
| In 'Settings' tab you are able to define behavior of the module domain search, suggestions as well as configure the lookup cron. |
Module Settings
Here you can set up domain searching and suggestions' behavior in the client area. These options are:
Note: Check the 'Client Area' section to see the visual differences between the domain search types.
Note: For your convenience, suggested domains available for registration will be shown in the search results, despite that the provider might also suggest the already taken domains. |
|
Cron Settings
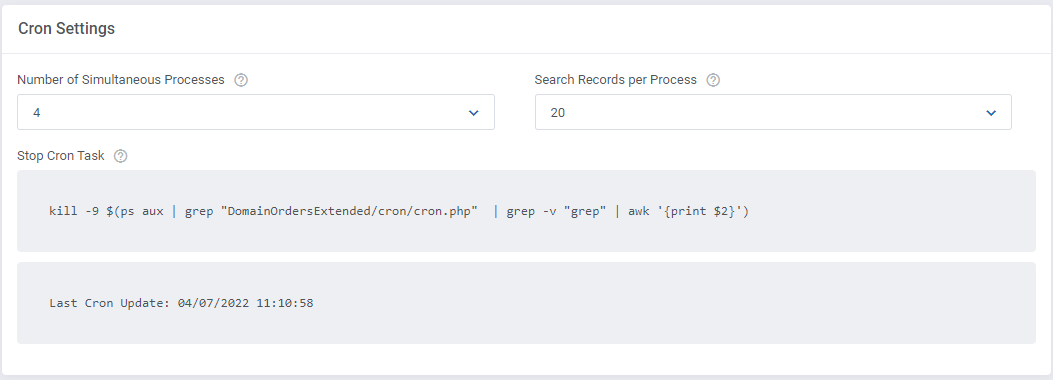
| The default WHMCS lookup may work extremely slowly while checking a large number of domains, therefore we have introduced an additional cron solution. The cron processes are responsible for searching a large number of domains and suggestions.
Note: The higher the number of processes and search records per process, the faster the search for domains, but also the increased usage of server resources and number of requests to the lookup provider. |
|
To run cron processes, simply add a cron job as shown below (every 5 minutes suggested).
php -q /yourWHMCS/modules/addons/DomainOrdersExtended/cron/cron.php DemonTask Do not forget to replace 'yourWHMCS' with your WHMCS root location. |
Logs Settings
| In the end you may turn on the Debug Mode to have insight into any errors occurrences, you will find a list of any log entries in the log section. Note: It is adviced to keep it turned off on daily basis and enble only when necessary. |

|
Submodules
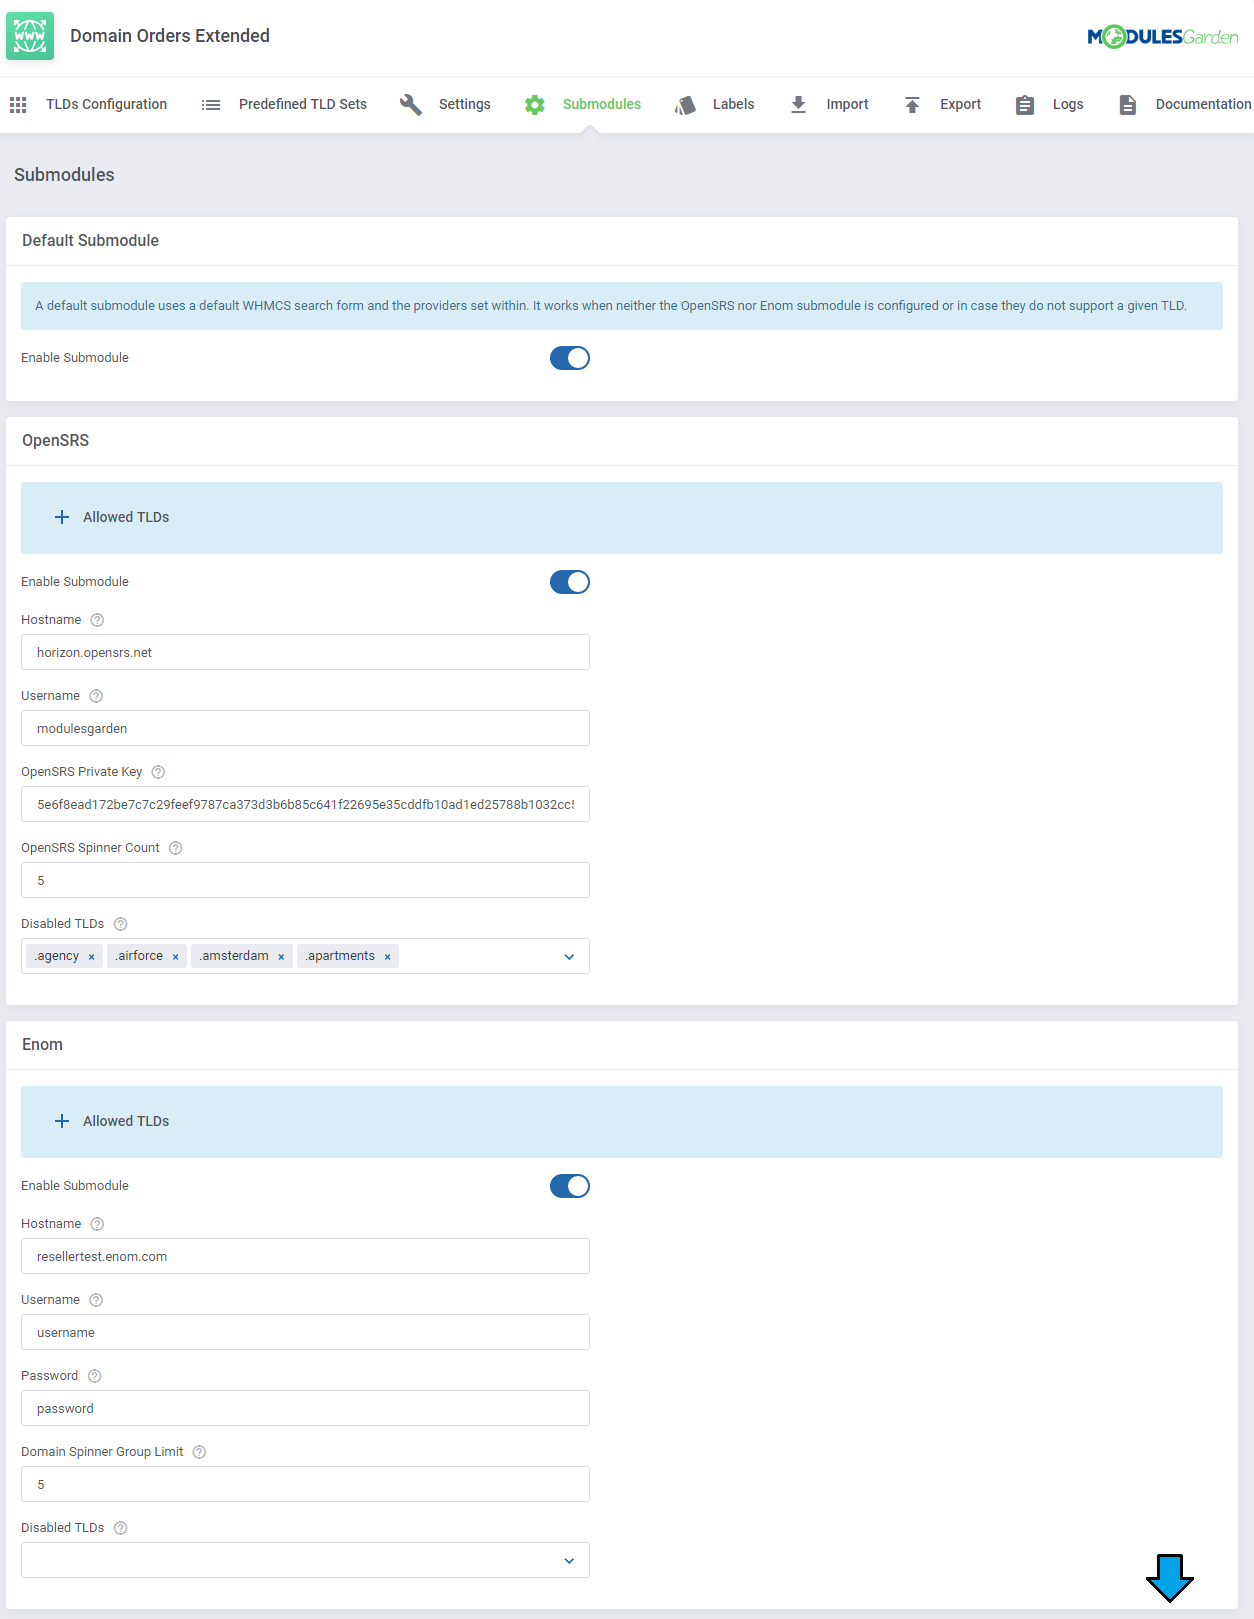
In this section, you can configure the connection data to use an external domain lookup provider. The currently available are:
You can use these providers at the same time, but make sure they actually support the available TLDs. |
|
Labels
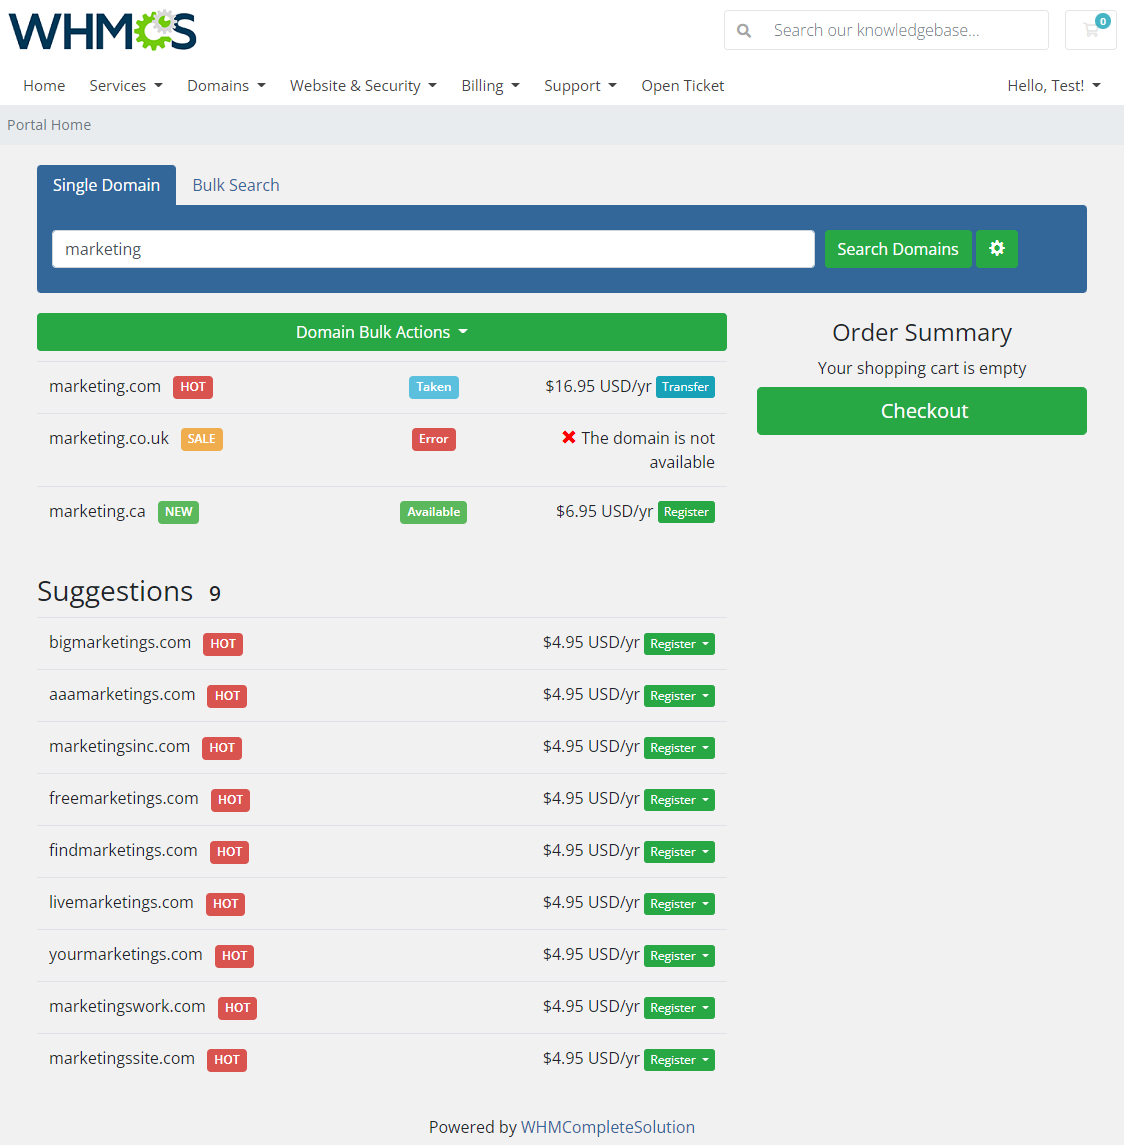
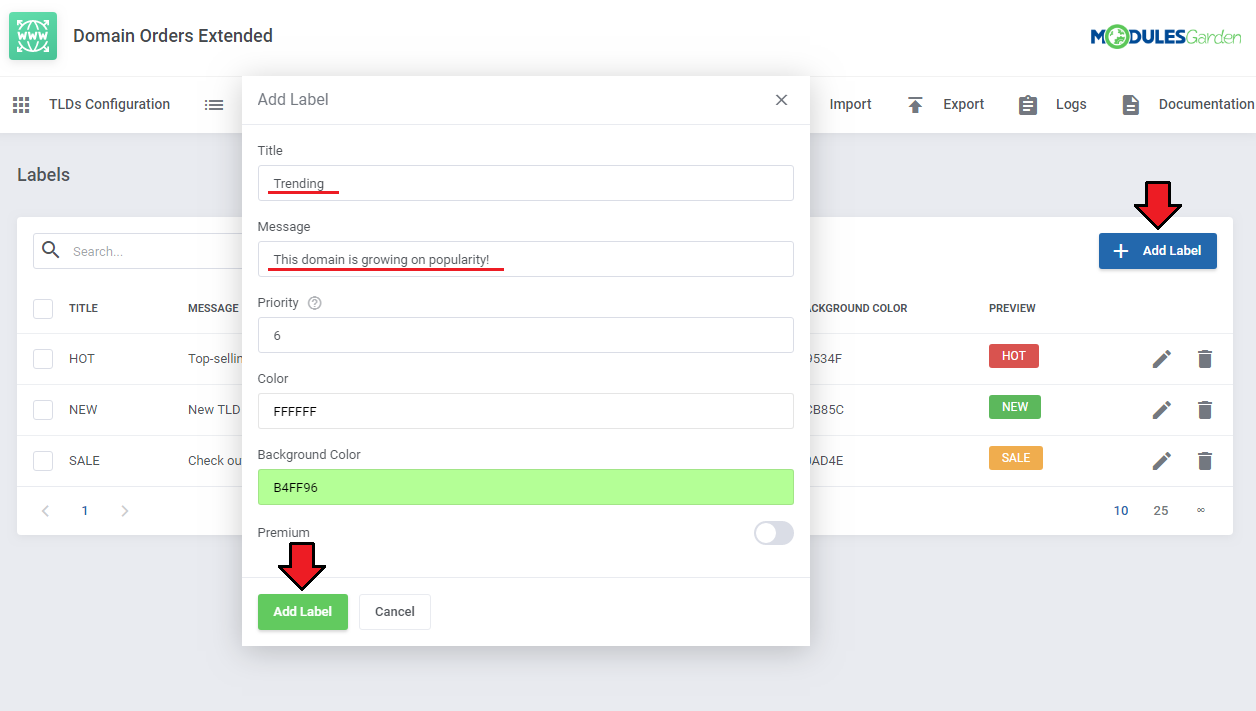
| Here you can create labels that can then be assigned to the selected TLDs. Each label may be distinguished by its own color and may receive priority. |
|
| To start, press the 'Add Label' button to create the first one. Then, set a title that will appear on the label and message that appears when you move the cursor over the label. |
|
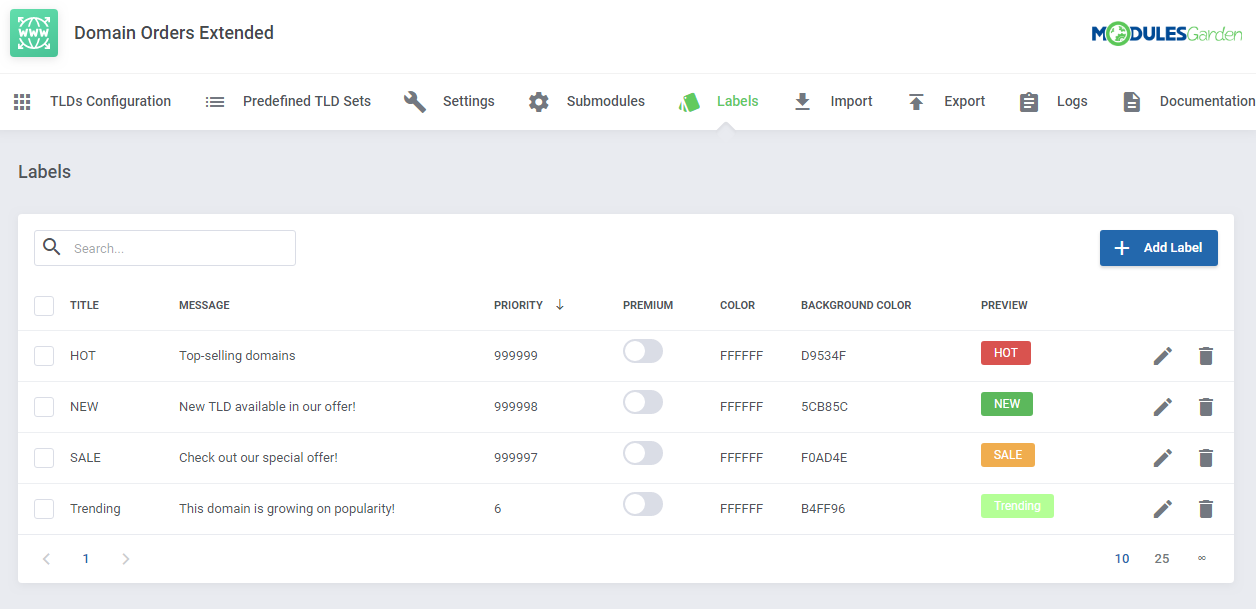
| Once the label has been created, it will appear on the list, where you can edit or delete it. Please be aware that 'Premium' labels will be displayed with premium domains only. To learn how to assign the label to a particular TLD, see the 'Edit TLD Configuration' section. |
|
Logs
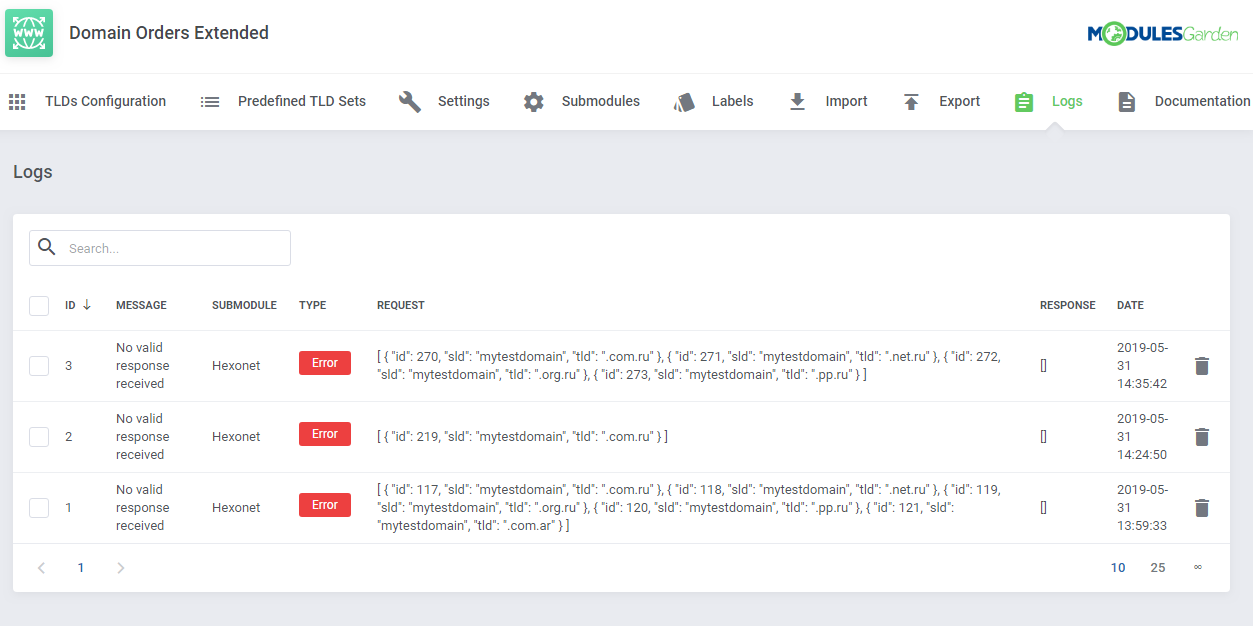
| If there are any problems with the operation of submodules, you will find corresponding errors from the API responses in the 'Logs' section. |
|
Client Area
| Now, we are about to show you the main functionality of this module, which is located in the client area. |
Domains Lookup
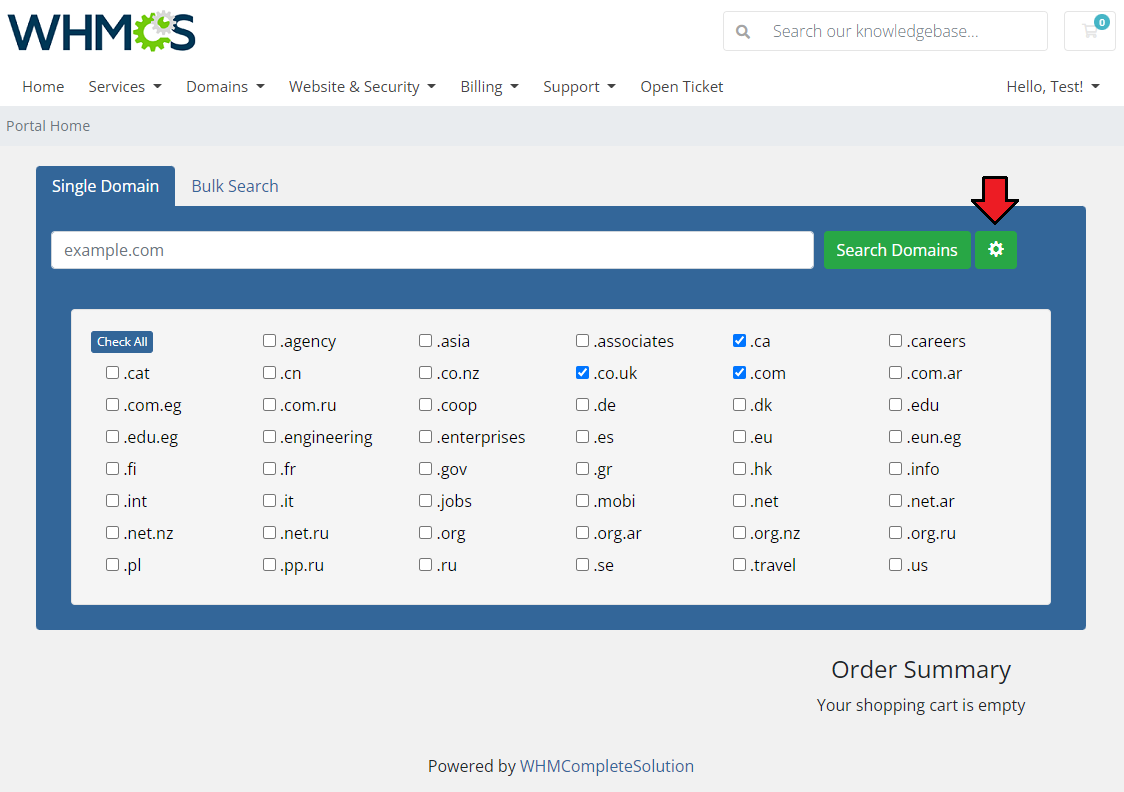
| As soon as you check 'Replace Standard Registrar With Module Order Form' in 'Settings ', your clients will see a different domain order form under 'Domains' → 'Register a New Domain'. Your clients have access only to the TLDs assigned to categories and with the pricing set. |
|
| Below you can also see the differences in the display of the domain search depending on the previously chosen settings. |
List View
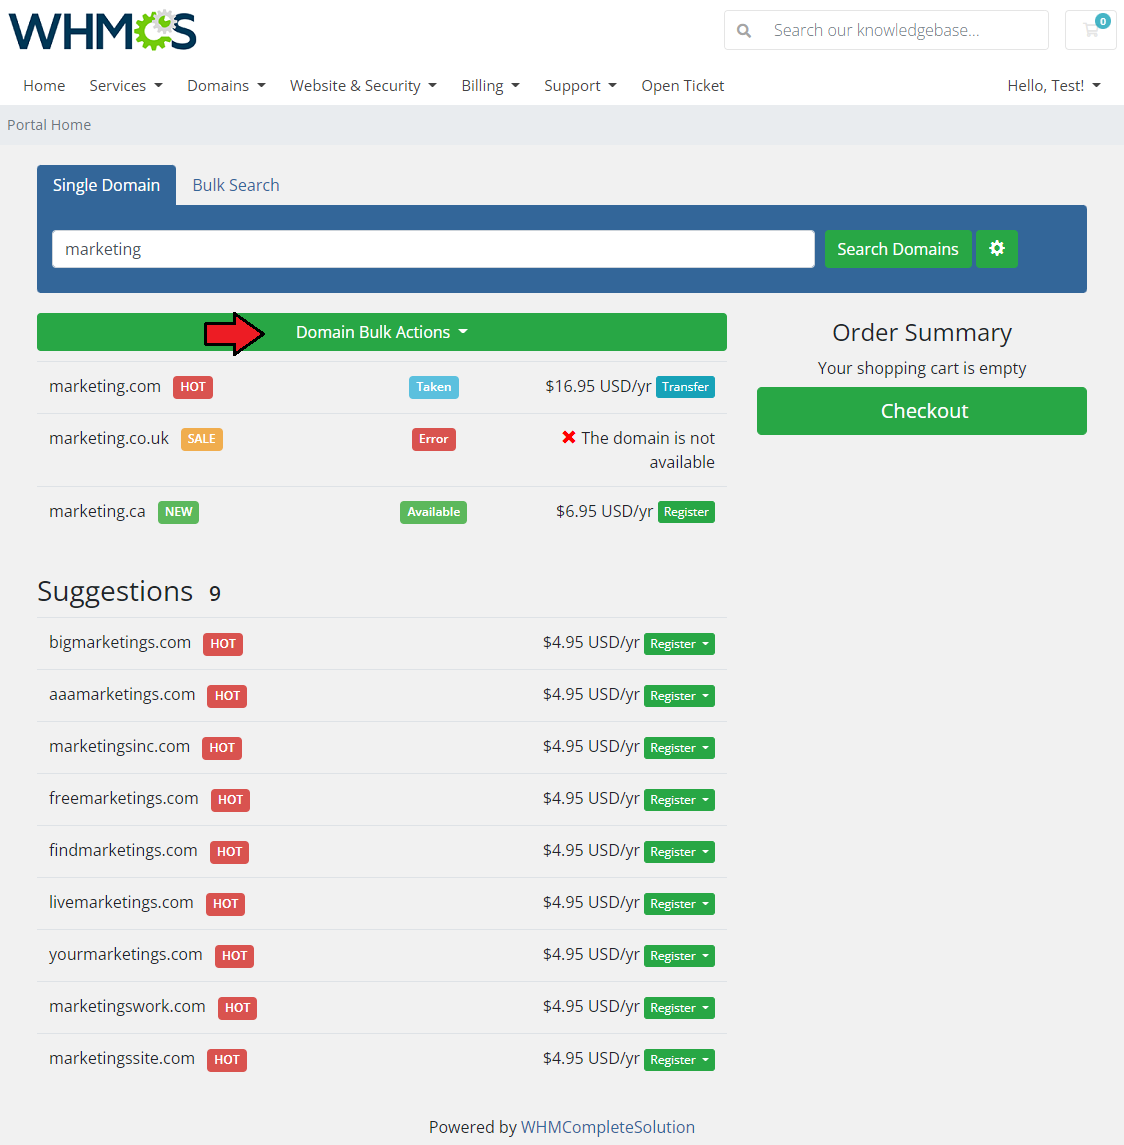
| The list view represents all the domains searched in one common list. Your customers will not see the search results divided into previously created categories and subcategories. Nevertheless, the order of the displayed domains will still depend on the set order of categories and TLDs in the configuration but the promoted TLDs will be displayed at the top of the list. If enabled, the list also contains domain suggestions. |
|
General Category View
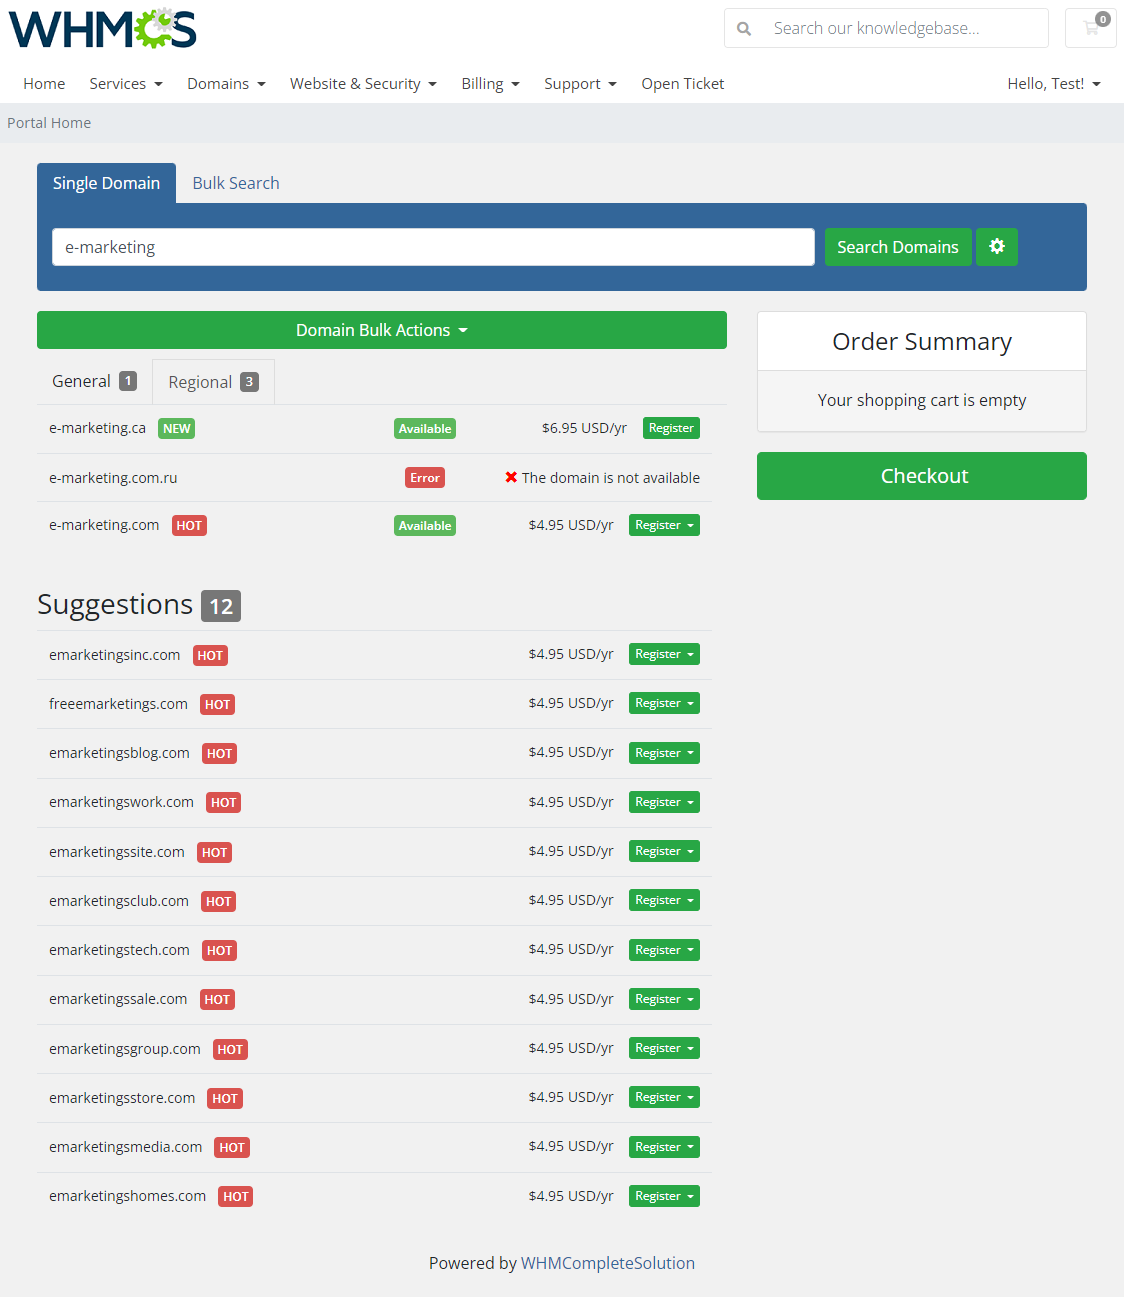
| In this view, your clients will see a categorization of the searched domains in tabs, but without showing their subcategories. TLDs from the subcategories will be displayed in the main categories. If none of the TLDs in a given category is included in the search results, this subcategory will not be displayed in the results list. The order of the displayed results depends on the first set order of the categories, and then on the order of the TLDs within them. Promoted TLDs will be displayed at the top. |
|
Multi Category View
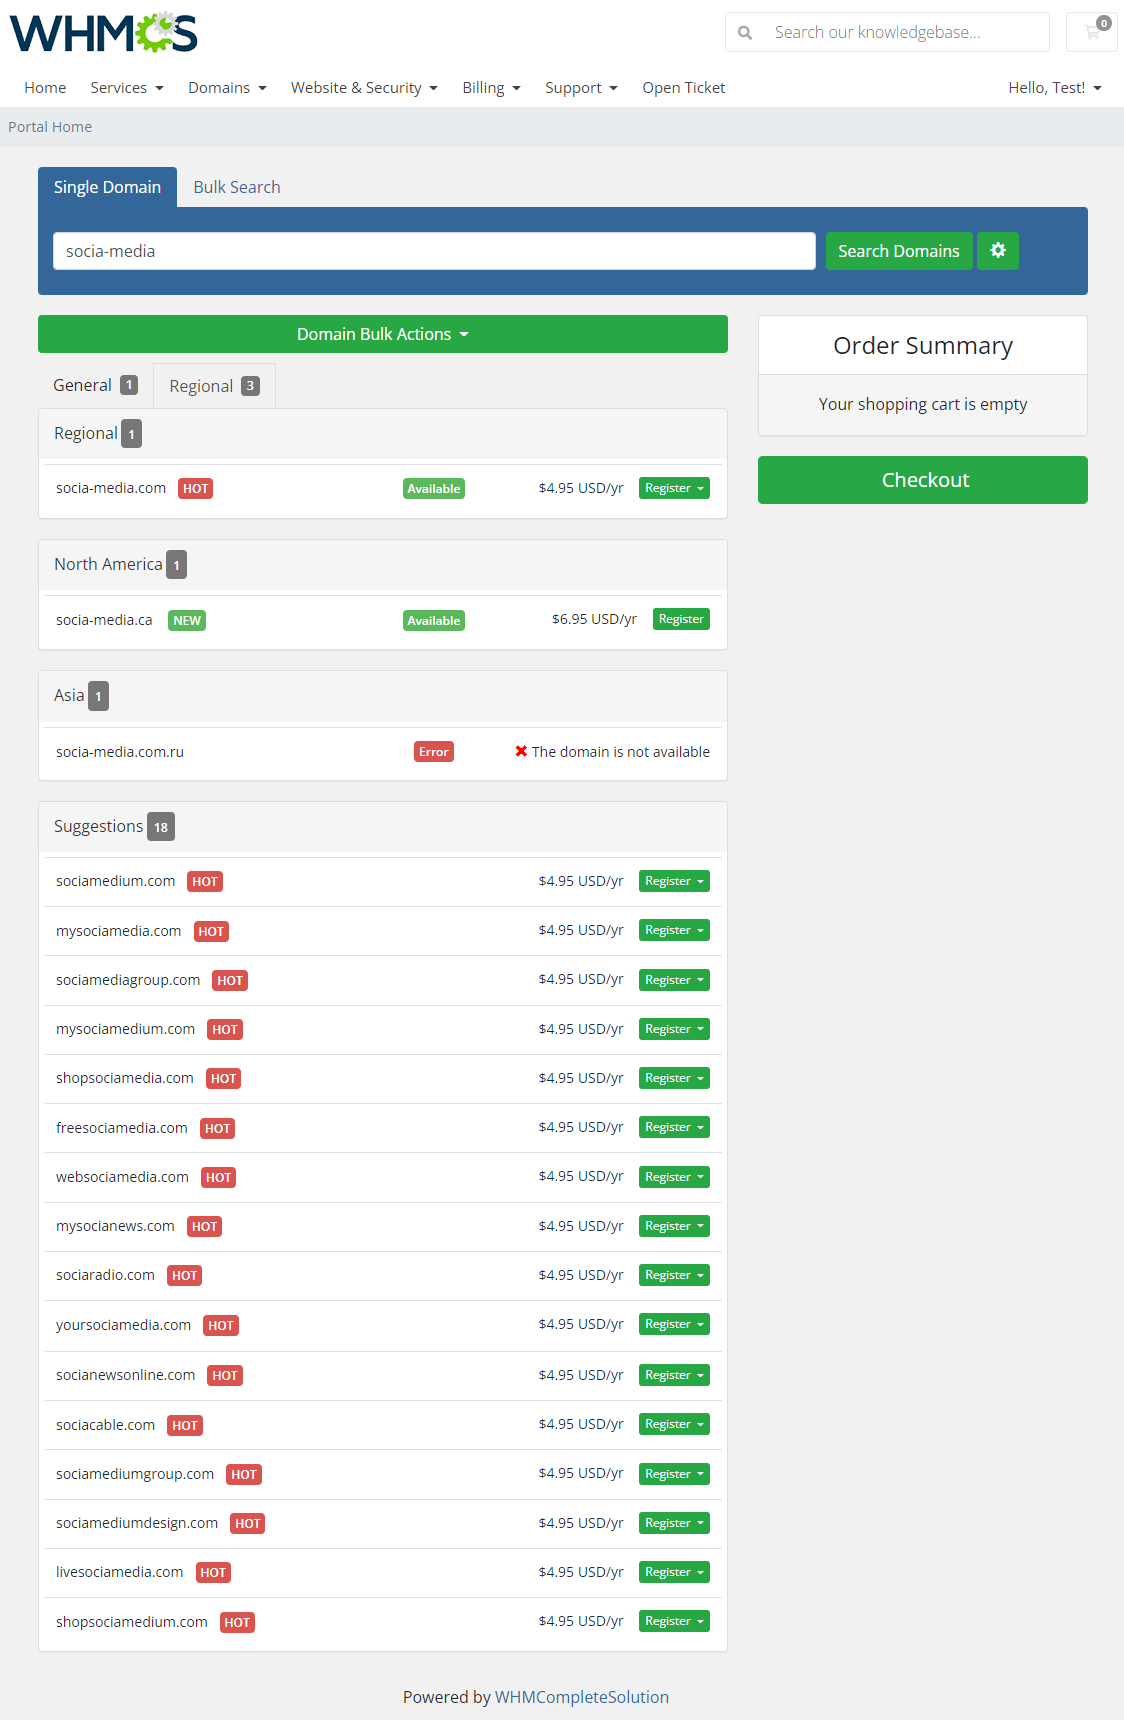
| This view works similarly to the 'General Category View' , but also includes a subcategorization of search results that customers will be able to expand from category tabs. |
|
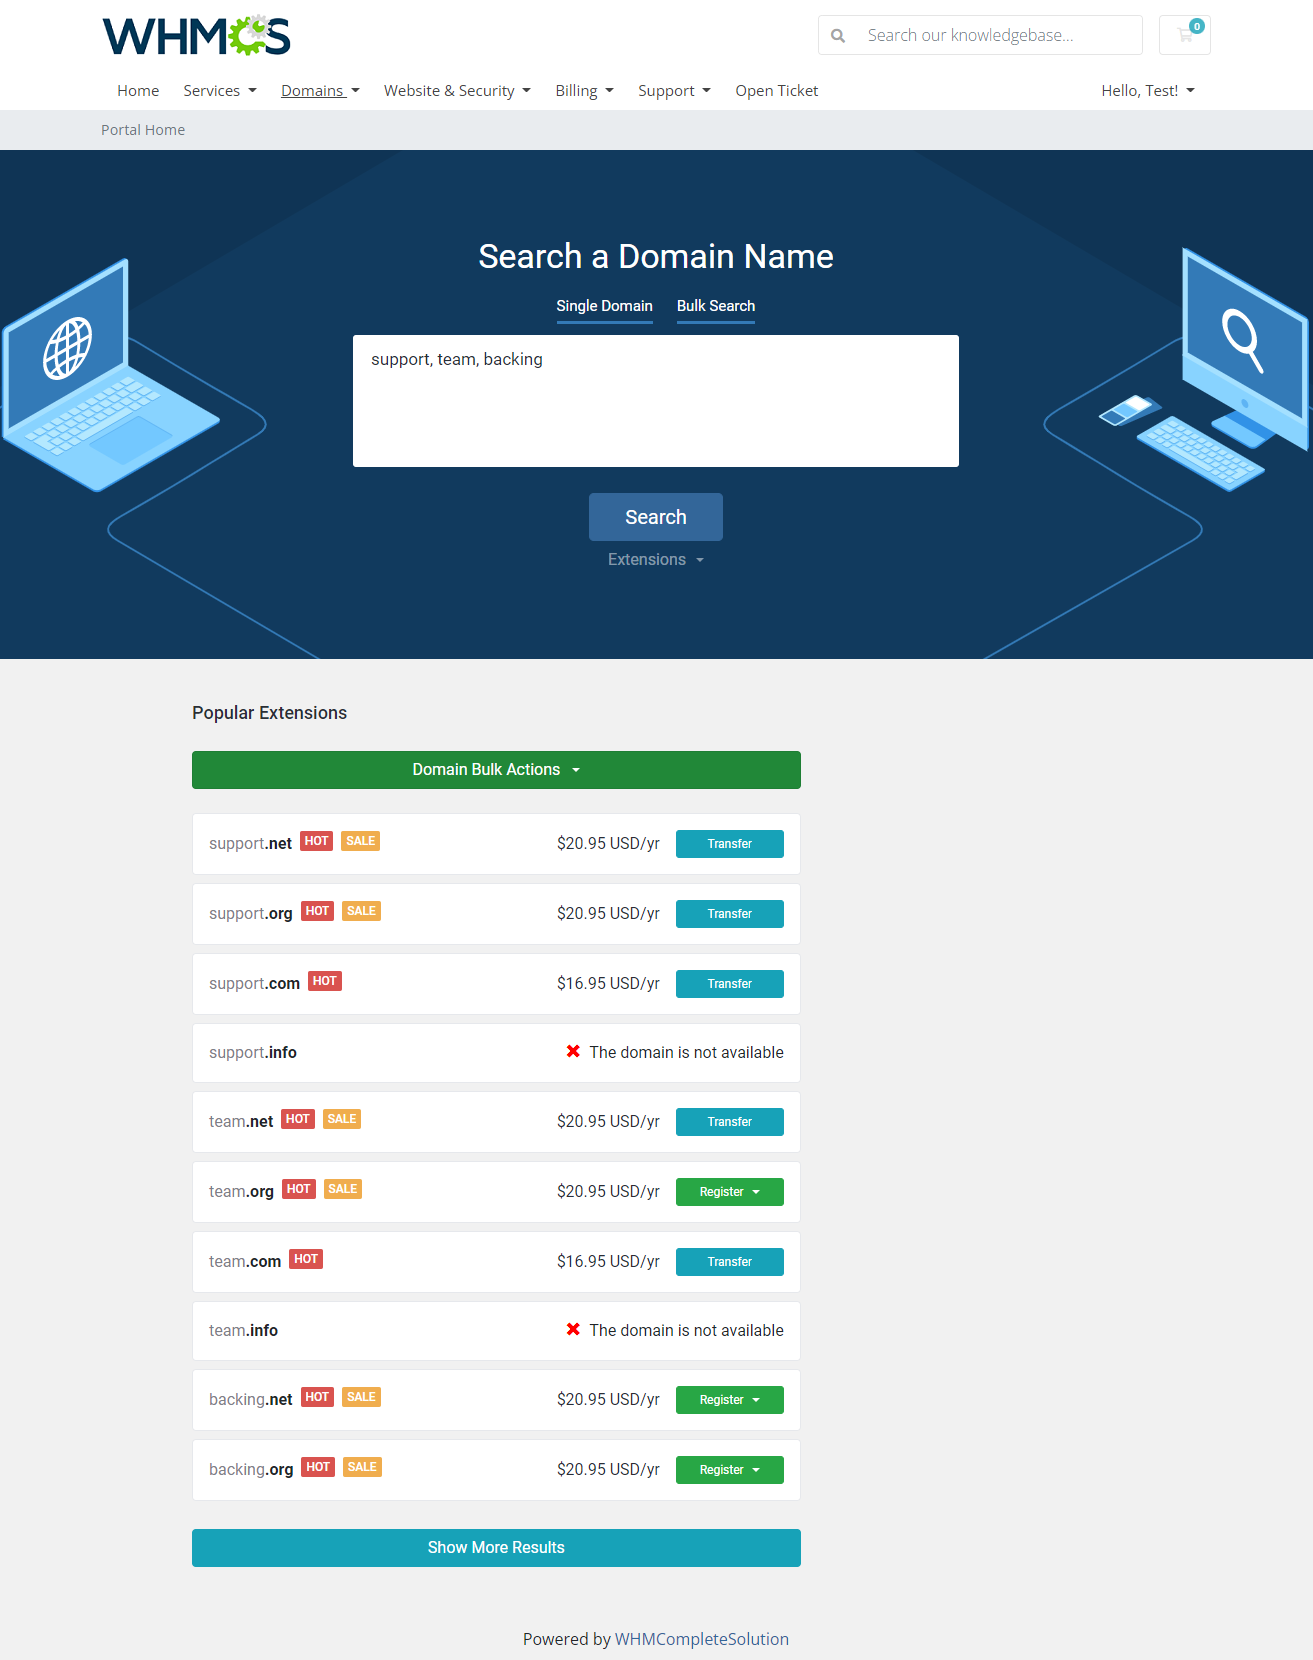
Lagom View
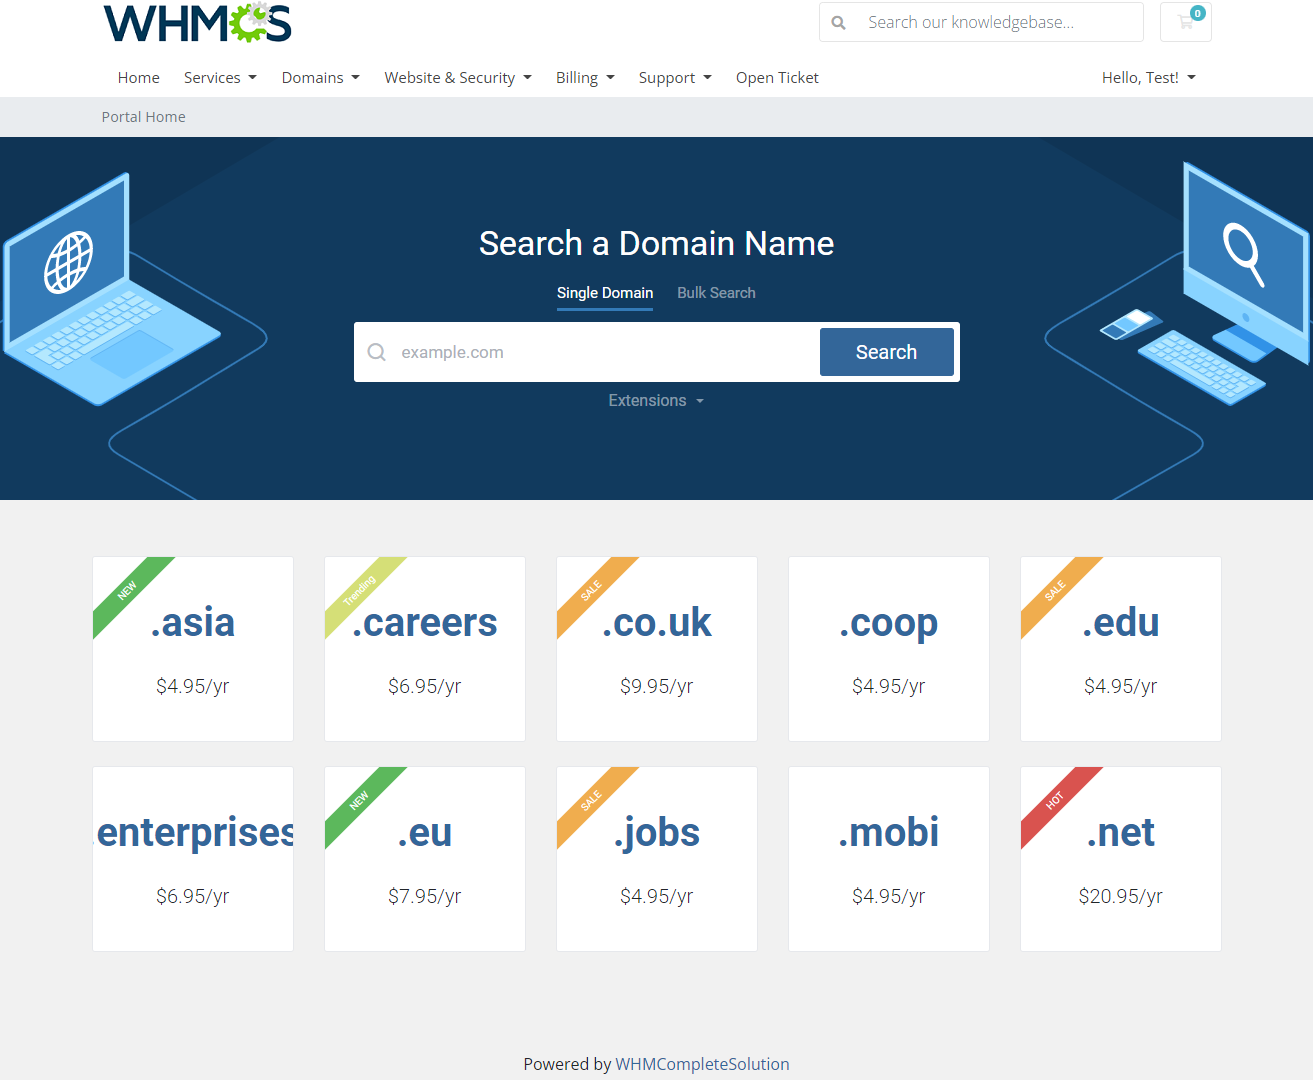
| This view type shows promoted TLDs on the very first search page. Note: The Lagom theme allows only one label to be visible here. If you have more, only the first in line will be added. |
|
| Notice that only 10 promoted TLDs are displed and they are in an alphabetical order. |
|
Tips
| 1. TLDs are hidden for clients as long as they are not assigned to any category. |
| 2. The module does not support the migration from previous versions 2.X. All settings have to be defined anew. |
| 3. The bulk domain search is not yet implemented. It will be reimplemented in the future updates. |
| 4. In the case of certain registrars, like OpenSRS and Enom, the pricing of premium domains is returned by the API only in the USD currency. For this reason, when using other currencies, it is required that the 'USD' currency code is still available in your WHMCS system. |
| 5. If you want to lang the category or subcategory name (CA view only), simply add a new entry into the english.php file with a new name. See the below example: $LANG['categoryLang']['CategoryName'] = "YourCategoryNewName"; In your file: $_LANG['categoryLang']['General'] = "GeneralGroup"; $_LANG['categoryLang']['European Union'] = "EU"; |
Update Instructions
| Essential guidance through the process of updating the module is offered here. Keep in mind there is a quick and easy option in our client area that will let you upgrade the license of your module to an open source version at any time - and at a lower price! |
Common Problems
| 1. When you have problems with connection, check whether your SELinux or firewall does not block ports. |
| 2. If you face any problems with searching domains using cron task and there is no information in logs, you might take a look at the cronLog file content. You will find this file at: yourWHMCS/modules/addons/DomainOrdersExtended/storage/crons |
| 3. In case no logs are visible in the 'Logs' section, and the debug mode is on, then please clear the DomainOrdersExtended_Logger tables manually in your database. The problem might be caused by a too hingh number of log entries. |
4. If you encounter the below error with the OpenSRS submodule:
oSRS Error Code #400: Could not get credentials for reseller RESELLER_NAME Please make sure you have provided correct API details and that the main user has been used to connect with API. |