Expense Tracker For WHMCS
Contents |
About Expense Tracker For WHMCS
| Expense Tracker For WHMCS is an effective tool that gives you all the means to track, manage, and most importantly optimize your business expenses. Adjust the module to fit your business needs by adding expense categories, vendors, and recurring expenses. View charts and reports to search for the data and projections you need. |
- Addon Module:
| ✔ Track Company Expenses |
| ✔ View Expenses Statistics On Dashboard: |
| ✔ Monthly Expenses |
| ✔ Expense Vendors Per Month |
| ✔ Expense Categories Per Month |
| ✔ Pending Expenses |
| ✔ Add And Manage Registered And Recurring Expenses: |
| ✔ Define Name And Description |
| ✔ Assign Product Item: |
| ✔ Products |
| ✔ Servers |
| ✔ TLDs |
| ✔ Assign Category And Vendor |
| ✔ Add Payment With Transaction Number |
| ✔ Provide Expense Amount In Chosen Currency |
| ✔ Set Exact Date Or Time Period |
| ✔ Attach File |
| ✔ Add And Manage Expenses Categories |
| ✔ Add And Manage Payments: |
| ✔ Select Related Expense |
| ✔ Add Transaction Number |
| ✔ Set Amount, Currency And Date |
| ✔ Add Payment Description |
| ✔ Add And Manage Vendors: |
| ✔ Set Vendor Predefined Contact Details |
| ✔ Create Additional Fields To Provide Extra Data |
| ✔ Add And Manage Currencies |
| ✔ View Expense Reports: |
| ✔ Select From Predefined Reports: |
| ✔ Expenses Per Category |
| ✔ Expenses Per Currency |
| ✔ Expenses Per Vendor |
| ✔ Expenses Vs Income |
| ✔ Pending Expenses |
| ✔ Adjust Currency, Period, Vendor, Category And Sampling Frequency Filters |
| ✔ View Statistics In Graph And Table Form |
| ✔ Generate CSV File |
- General Info:
| ✔ Multi-Language Support |
| ✔ Supports PHP 8.3 Back To PHP 8.1 |
| ✔ Supports WHMCS V8.13 Back To WHMCS V8.10 |
| ✔ Requires ionCube Loader V14 Or Later |
| ✔ Easy Module Upgrade To Open Source Version |
Installation
| This tutorial will show you how to successfully install and configure Expense Tracker For WHMCS. We will guide you step by step through the whole installation and configuration process. |
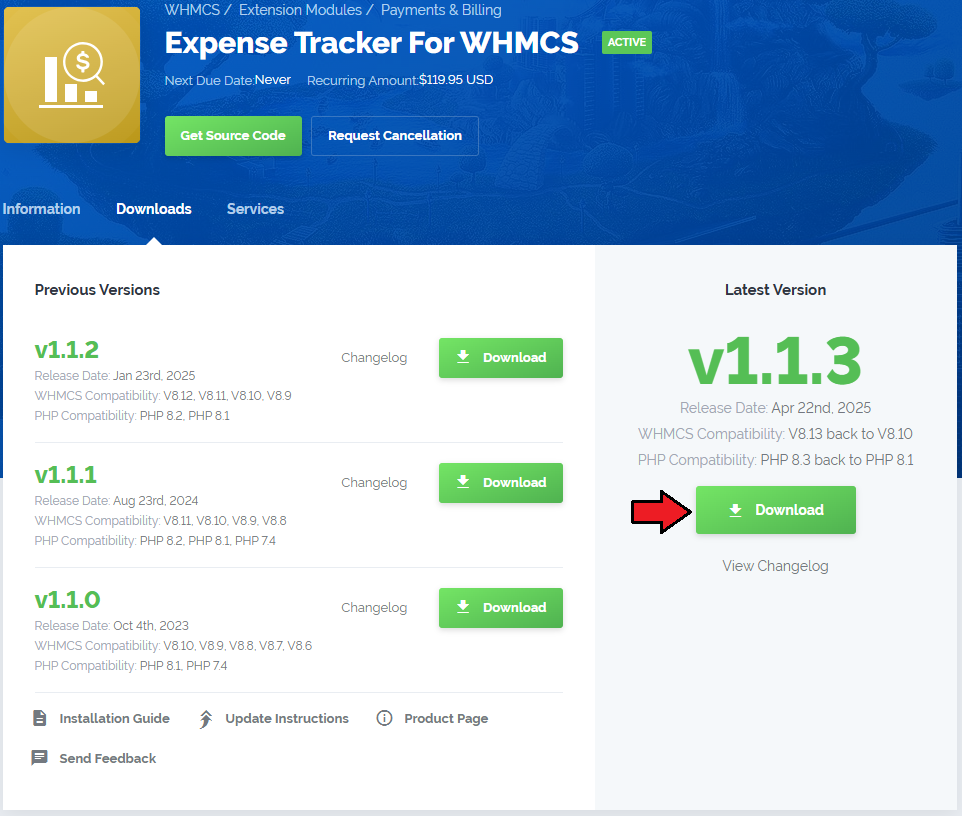
| 1. Log in to our client area and download the module. |
|
| 2. Extract the package and upload its content into the main WHMCS directory.
The content of the package to upload should look like this. |

|
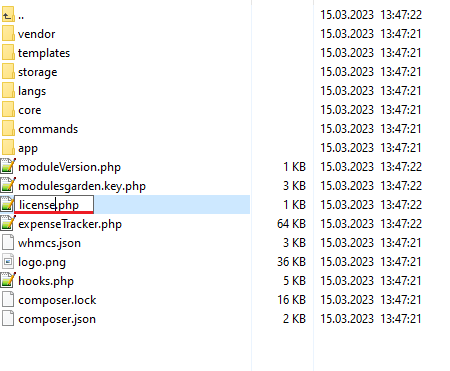
| 3. When installing Expense Tracker For WHMCS for the first time, you have to rename the 'license_RENAME.php' file. The file is located in 'your_whmcs/modules/addons/ExpenseTracker/license_RENAME.php'. Rename it from 'license_RENAME.php' to 'license.php'. |
|
| 4. In order to configure your license key, you have to edit the previously renamed 'license.php' file. Enter your license key between the quotation marks as presented on the following screen. You can find your license key in our client area → 'My Products'. |

|
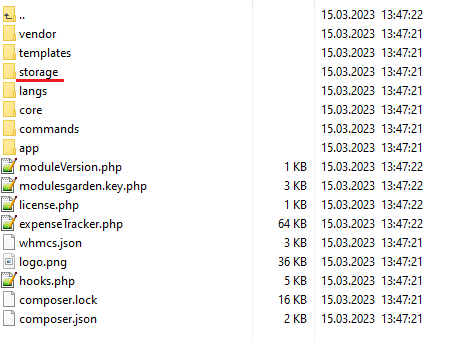
| 5. Now, set up the 'storage' folder as recursively writable. This folder is available at 'your_whmcs/modules/addons/ExpenseTracker/'. |
|
Configuration of Addon
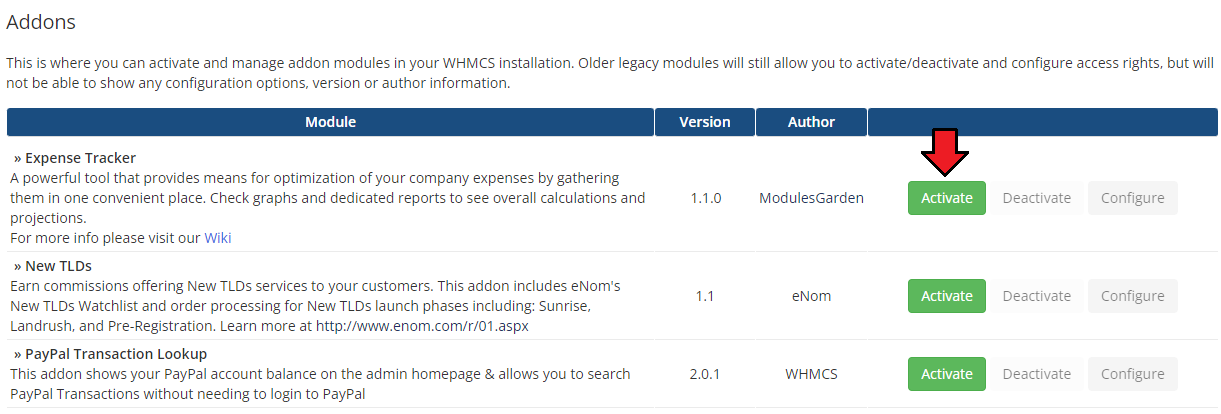
| 6. Now you have to activate the module in your WHMCS system. Log in to your WHMCS admin area. Go to 'System Settings' → 'Addon Modules'. Afterwards, find 'Expense Tracker' and press the 'Activate' button. |
|
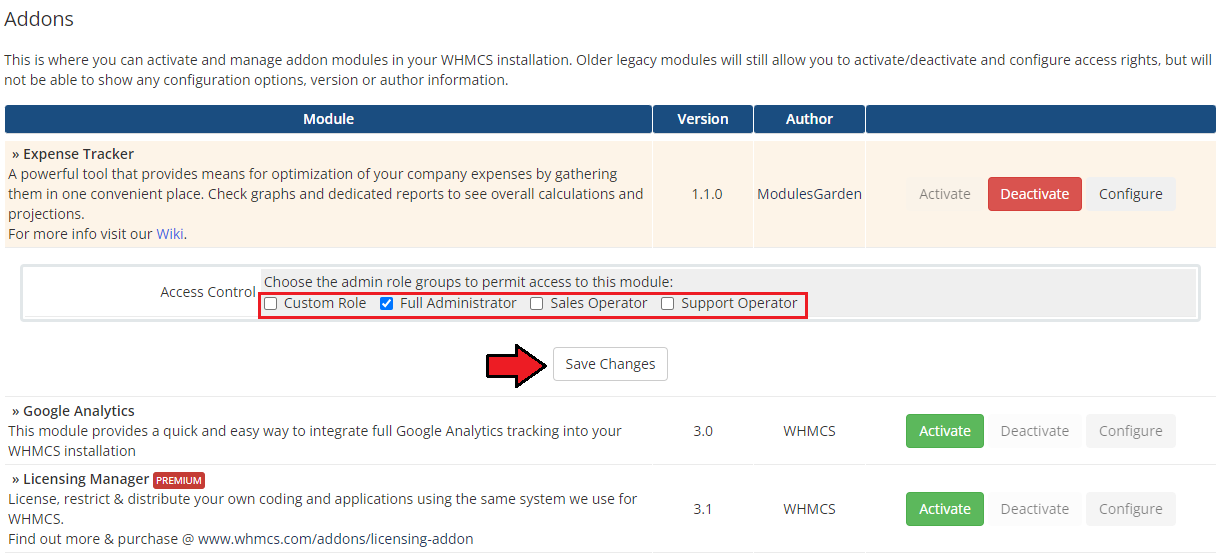
| 7. In the next step, you need to permit access to this module. To do so, click on the 'Configure' button, tick 'Full Administrator' and press 'Save Changes'. |
|
Management
| Read through the below sections to learn about all the possibilities of the Expense Tracker For WHMCS module. You will find out how to adjust the module to your business's individual attributes. |
Addon Configuration
Expenses
| At the 'Expenses' tab you can set up the module's behavior. Configure categories to easily reassign expenses among several types, create a list of your regular expenses, and enter every single expense that occurred and that you wish to calculate and include in reports. |
Categories
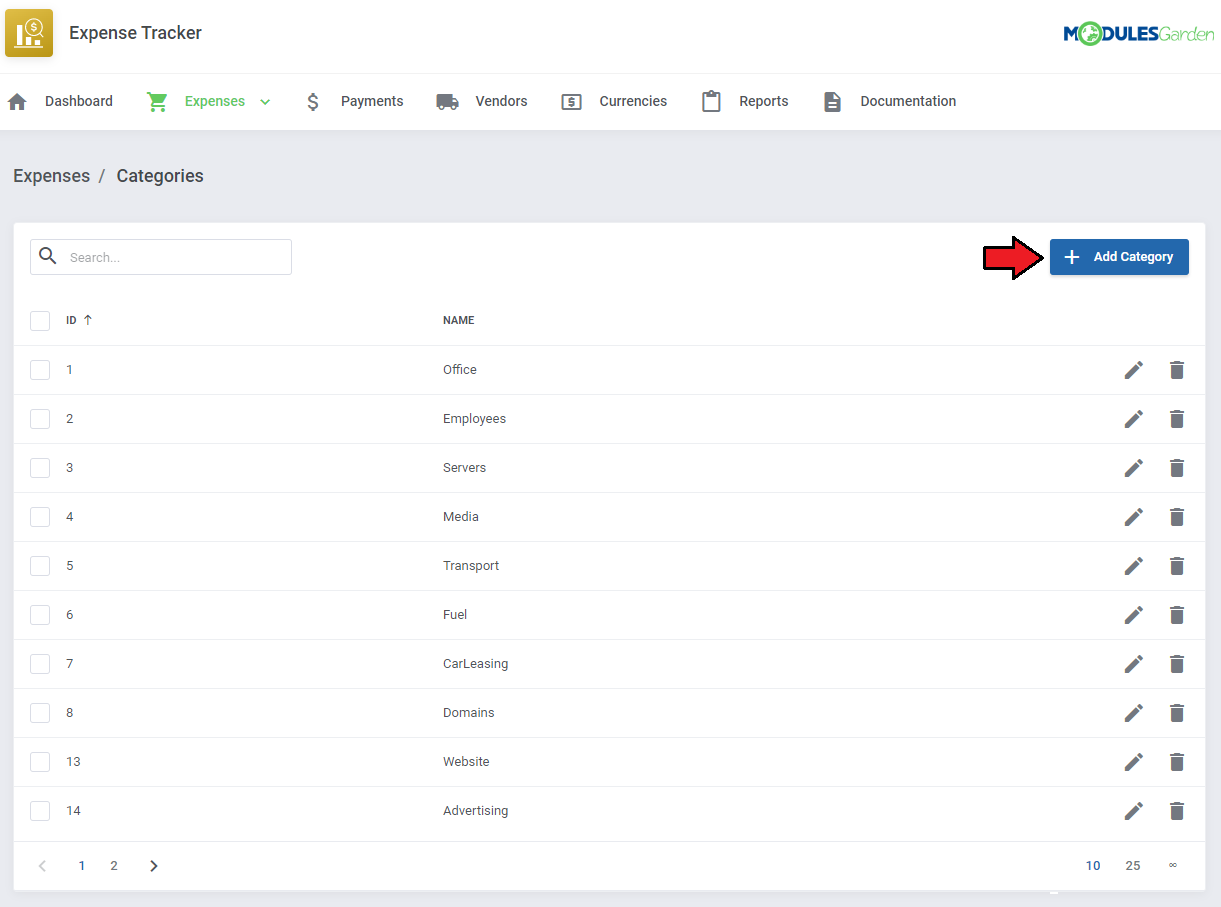
| In order to start utilizing this module, you have to provide some information in it firstly. You may start by entering several categories of expenses you have, for example: Office, Servers, Fuel, Car Leasing and so on. We advise adding a general category for the uncategorized, one-time expenses, for example 'Other' to be able to add them to the list, since the 'Category' field is required. Press the 'Add Category' button to begin. |
|
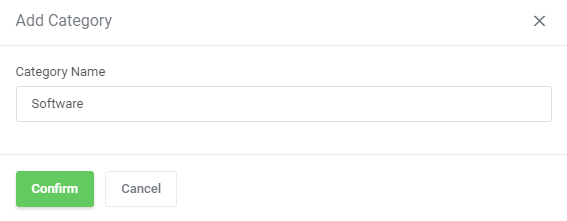
| All you need to do is type in the new category name, to make it distinguishable and undeniable. |
|
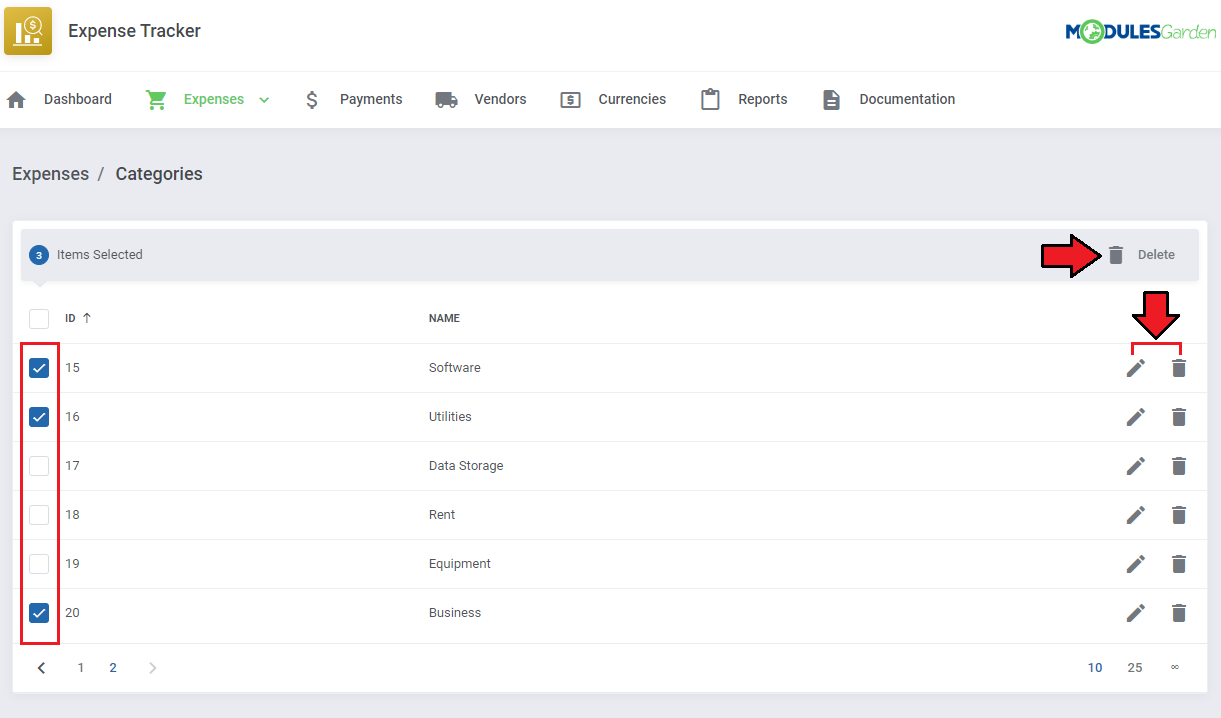
| When the list of expense categories is ready, you will be allowed to assign them to one-time and recurring expenses. You will read about them in the following sections. For now, note that you may also edit, delete single categories, or use the mass action button to delete multiple ones when there are no co-related expenses in the module. |
|
Recurring Expenses
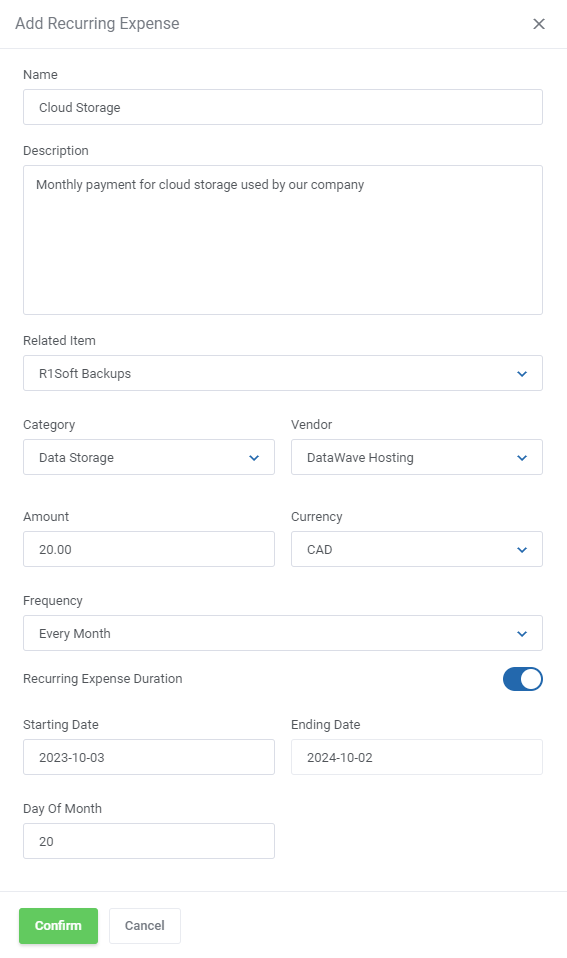
| Recurring expenses are the company's ongoing costs. They may include for example administrative costs, like office rent, debts, such as car leasing, and other long-term costs that help the business function. In this section, you have to manually type in all your recurring expenses, provide any necessary data such as occurrence frequency, assign a category and specify the paid amount. |
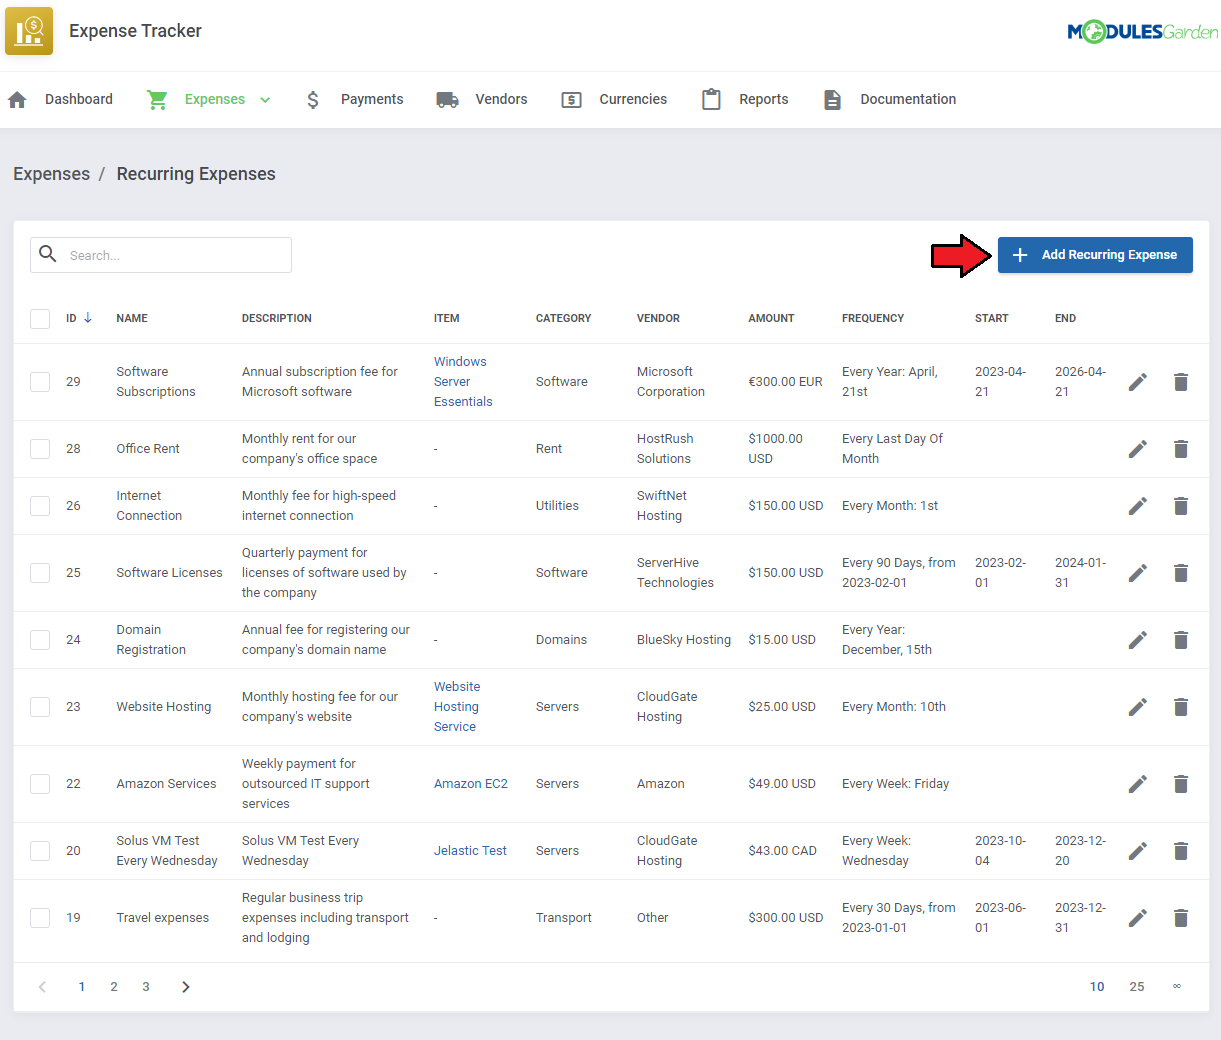
|
Fill out the detailed form to provide as much data on the expense as possible:
|
|
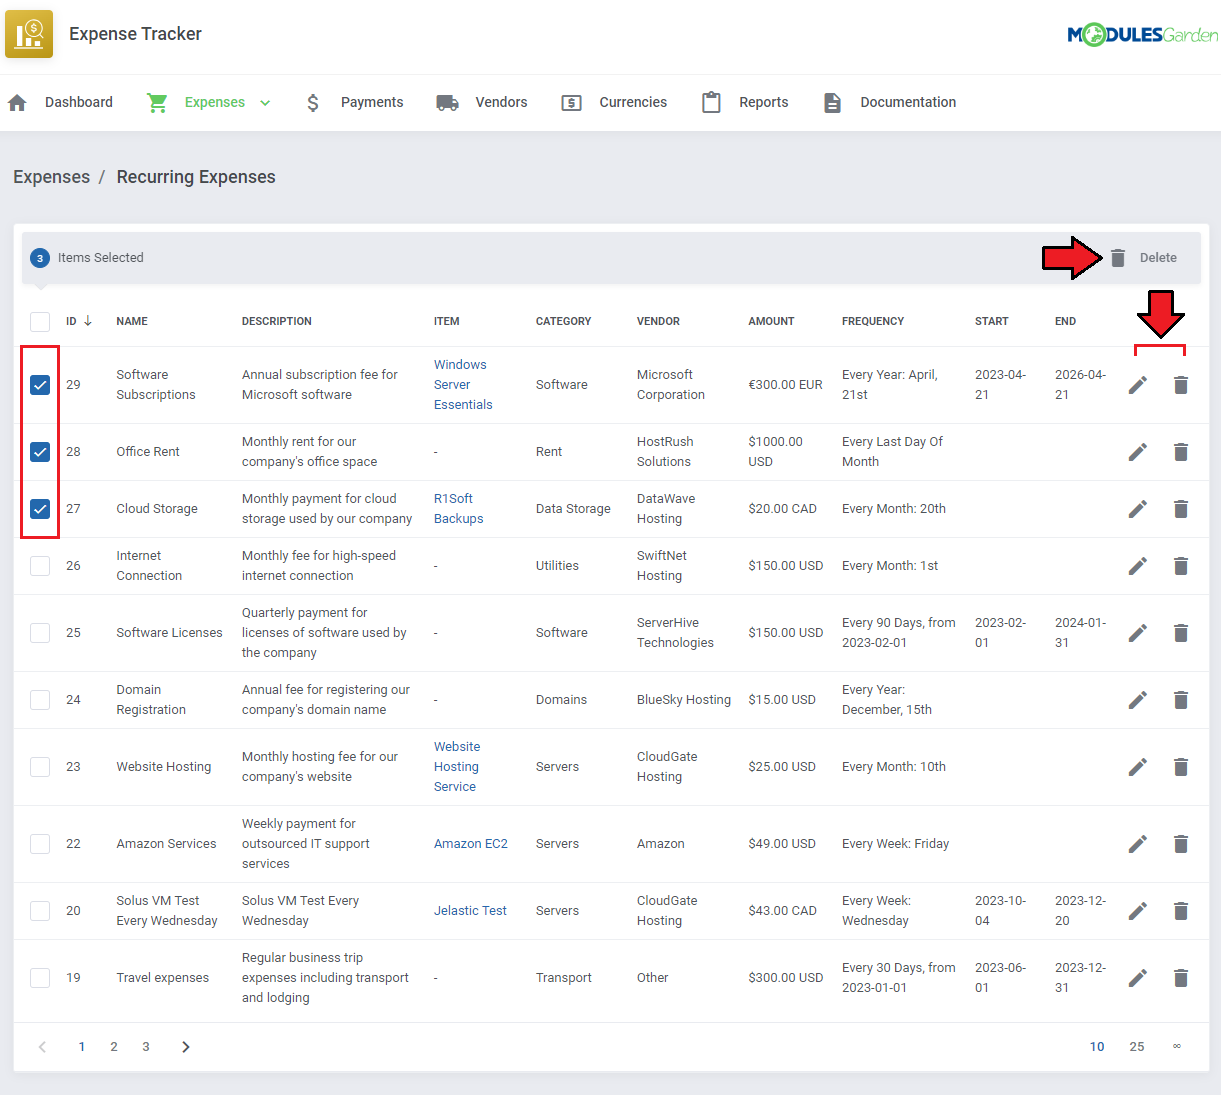
| Your list of recurring expenses is ready now, you may easily manage it by adding new items, editing existing ones, or deleting single or multiple items from the list. Once everything is set up correctly, WHMCS daily cron job checks if any of the recurring expenses took place that day. If yes, the detected expense will be automatically added to the list of your registered expenses. |
|
Registered Expenses
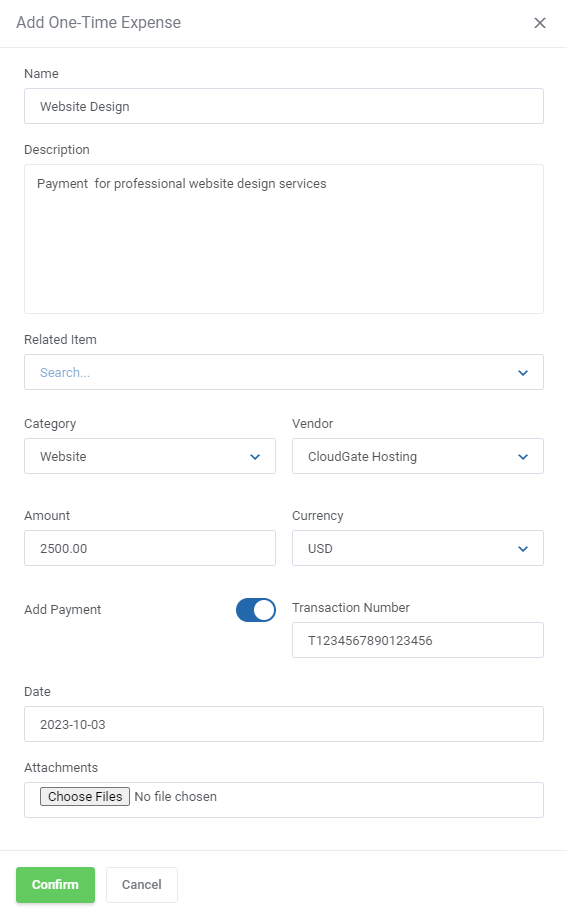
| Registered Expenses is a place where each registered expense is enumerated and described. You will find here entries on every recurring expense that has been detected by the cron job. They will be visible on the list as you have added, named, and described them in the 'Recurring Expenses' section, see the previous step for details. Apart from them, you may add here all your one-time expenses that occurred in time and are not treated as repeated ones. Press the 'Add One-Time Expense' button to begin. |
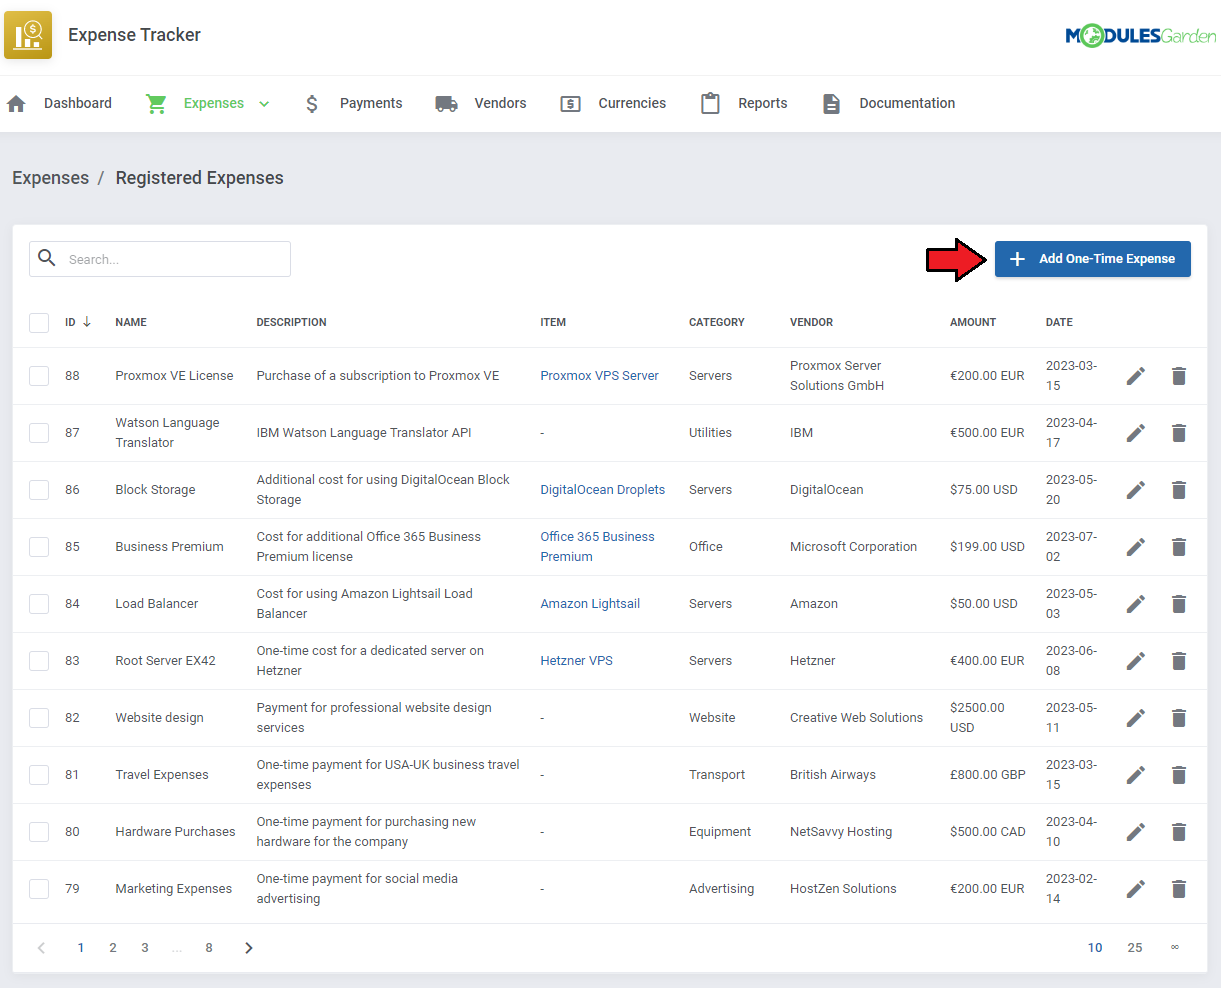
|
Fill out the form and provide as many details on the expense as possible.
|
|
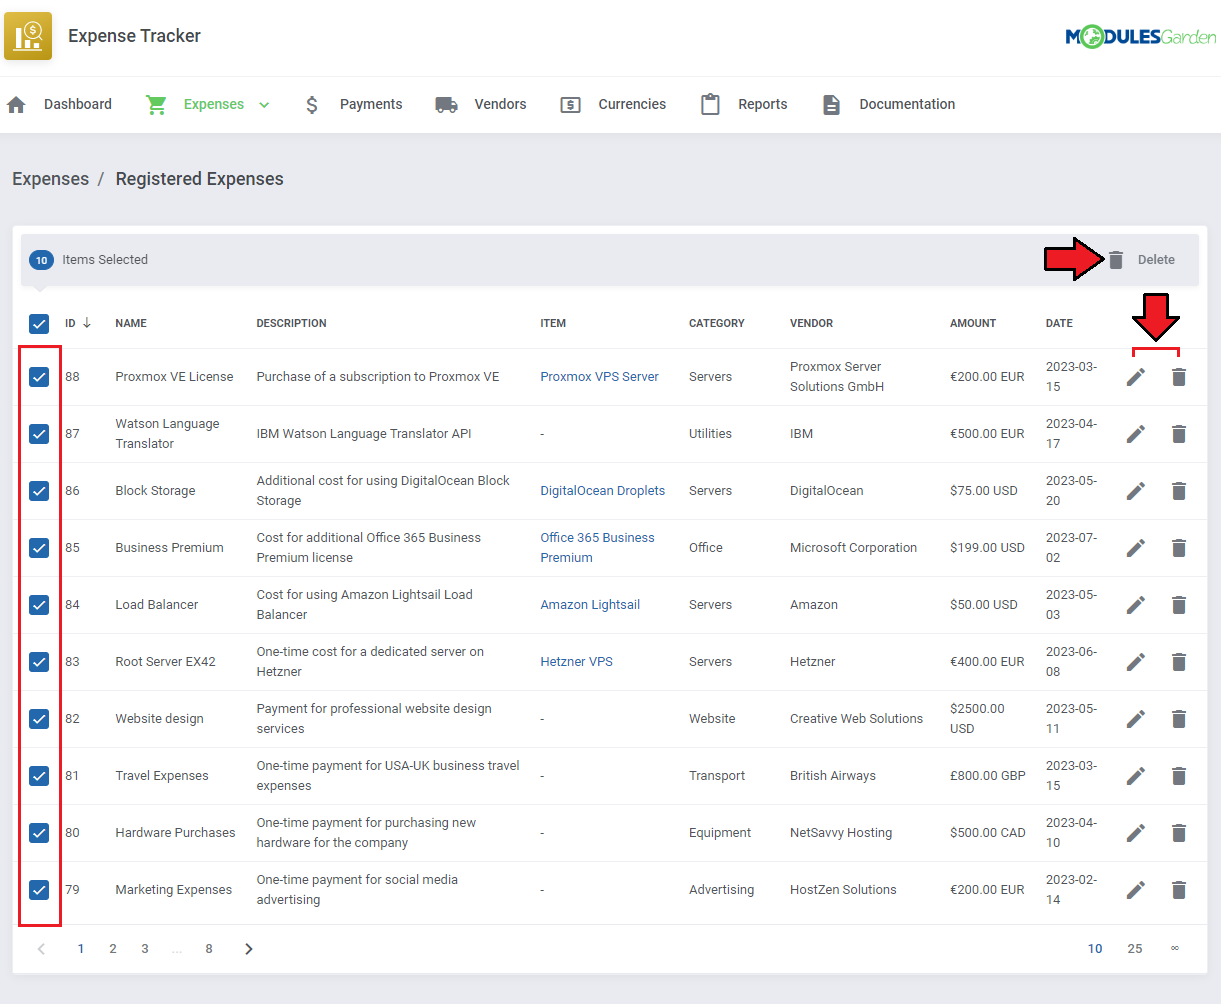
| The module allows easy management of the expenses list. Use action buttons to edit or delete single items, use mass actions to delete numerous entries at once. |
|
| Expenses visible on the 'Registered Expenses' list, are used to generate all the module reports, except the 'Pending Expenses' report and graph, which are generated based on the data from the 'Recurring Expenses' section. |
Payments
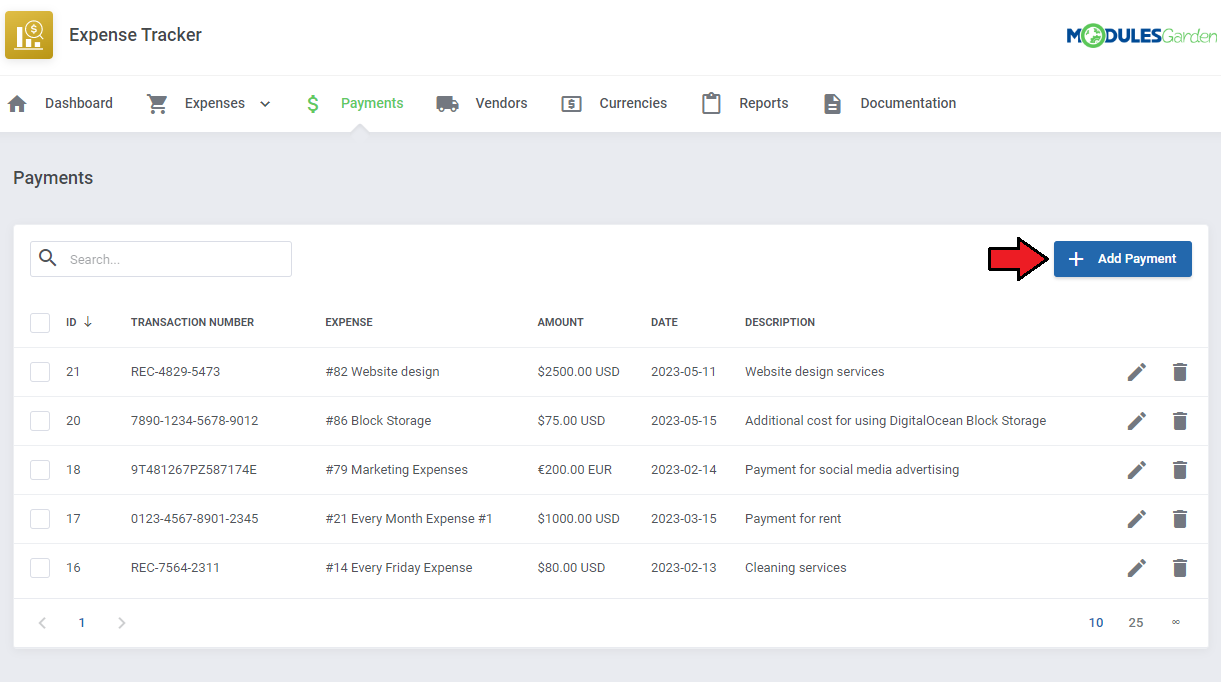
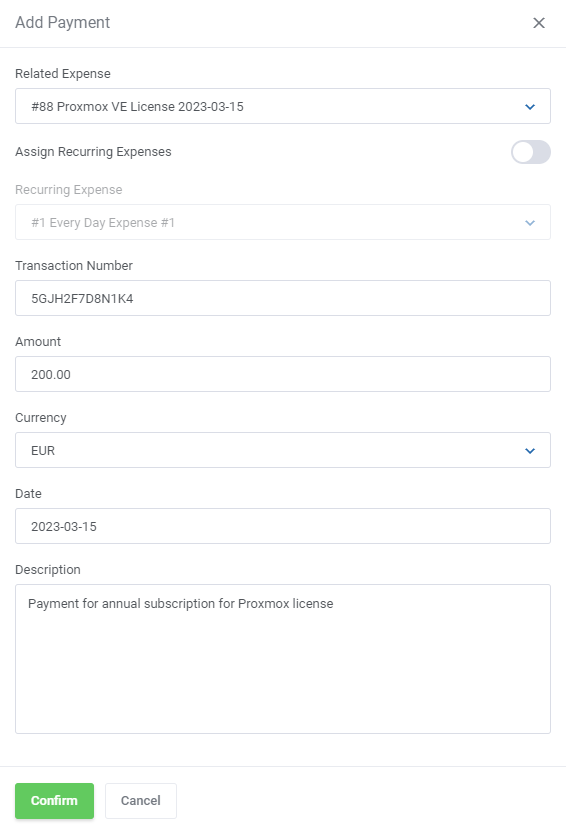
| In the 'Payments' section, you will find a list of all existing transactions. The entries can be added automatically while adding a one-time expense and providing the dedicated transaction number. |
|
Fill out the form to add the payment:
|
|
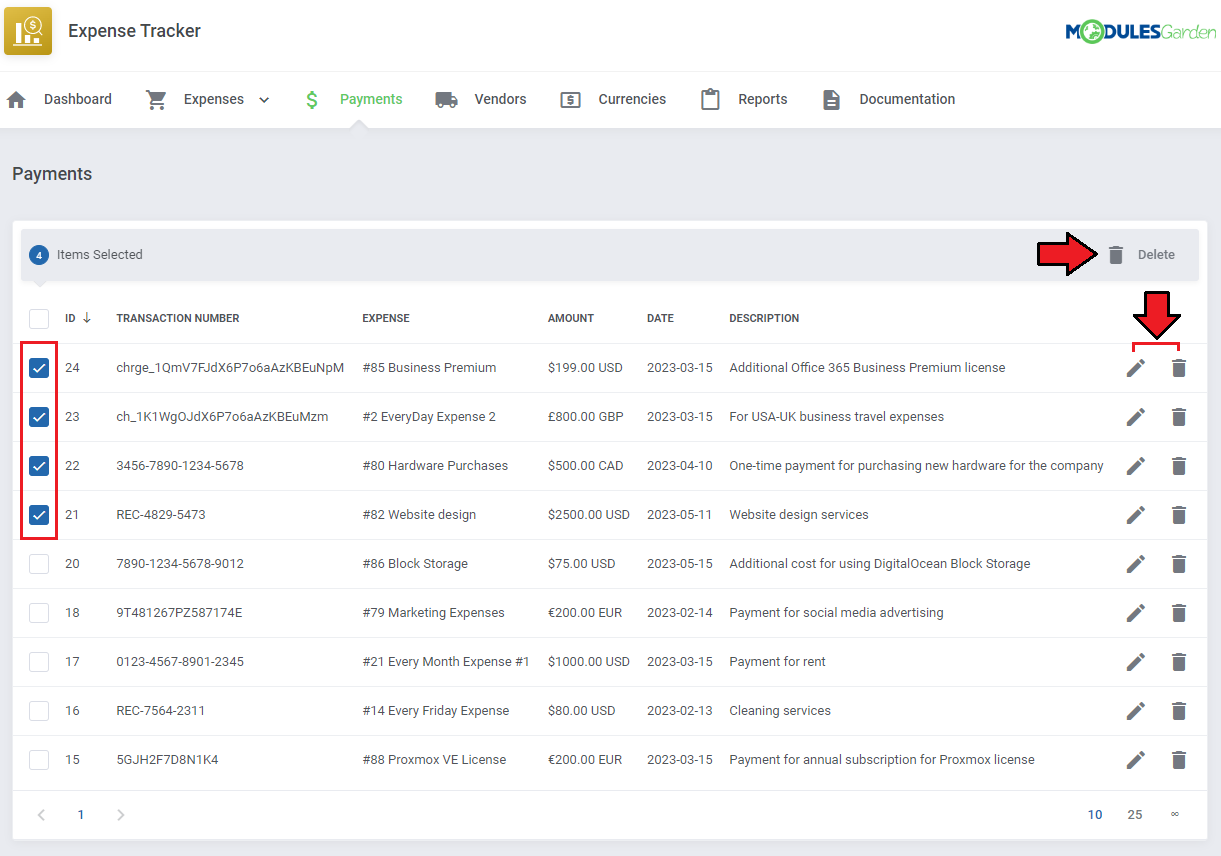
| Existing payments can be easily managed. Edit, delete single payments, or mark more than one to delete multiple payments at once. |
|
Vendors
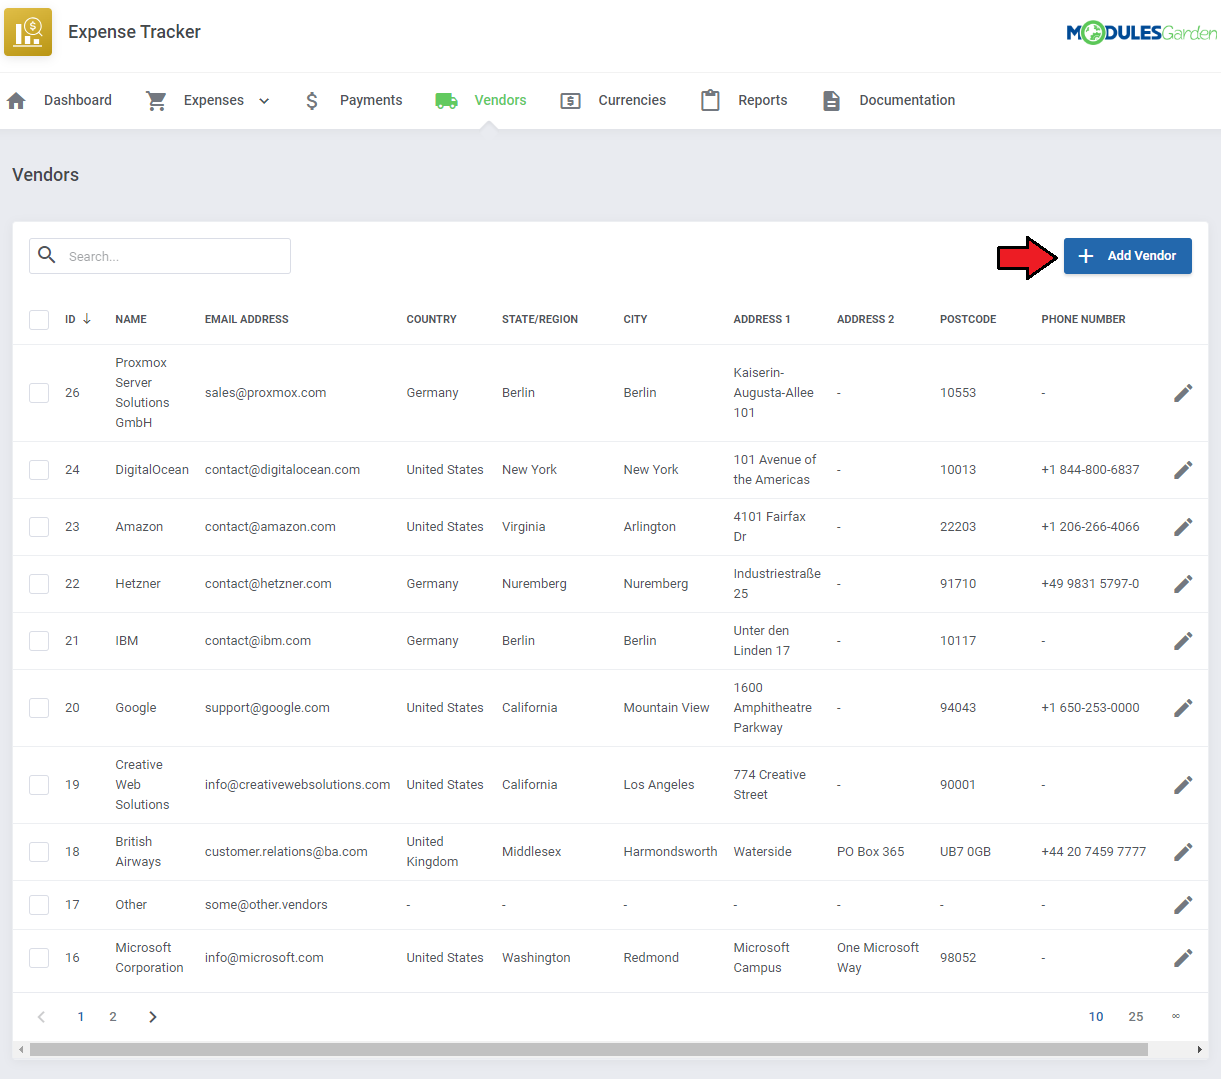
| This section includes a list of all vendors you may wish to assign to an expense. Manage your vendors, change their details, or delete them if you no longer use their services. Press the 'Add Vendor button to create the first entry on the list. |
|
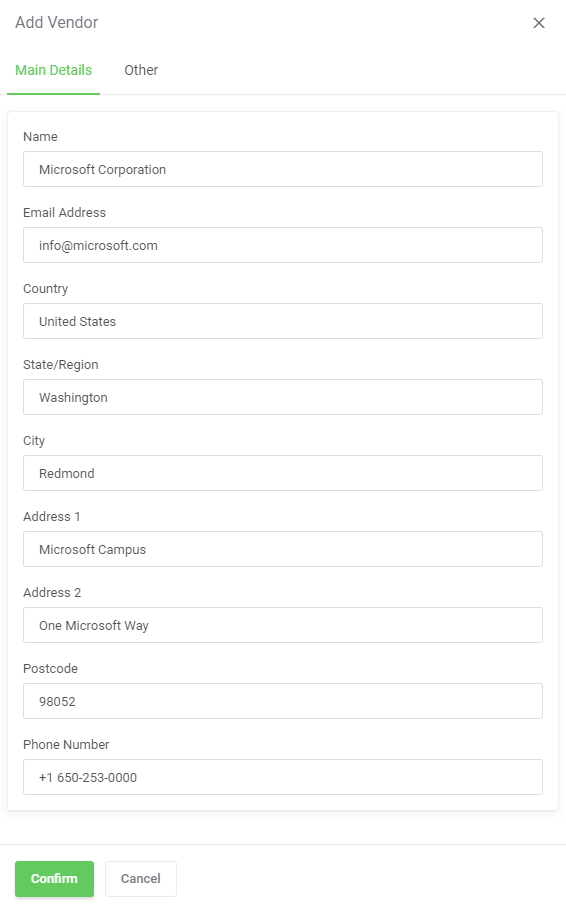
| Fill out the form with vendor details, such as its name, email address and address. 'Confirm' the changes once ready. Keep in mind that only the 'Name' field is required. |
|
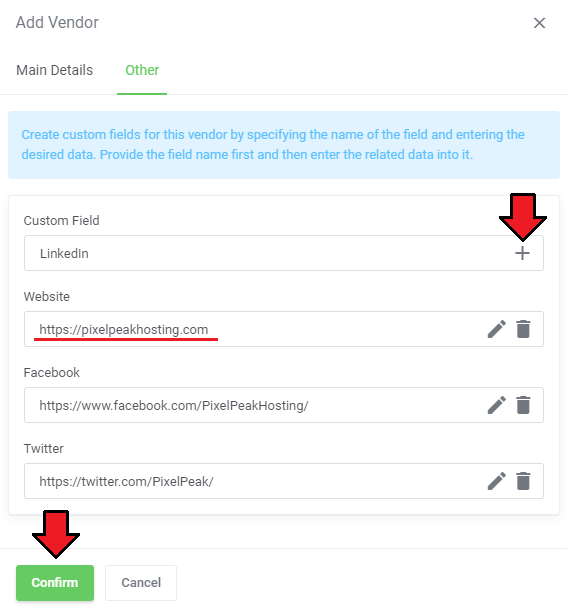
| In the 'Other' section you may freely create your own extra fields for this vendor. Simply enter the name of the field into 'Custom Field', press the '+' button to create it. Then enter the related data into the newly created vendor field. |
|
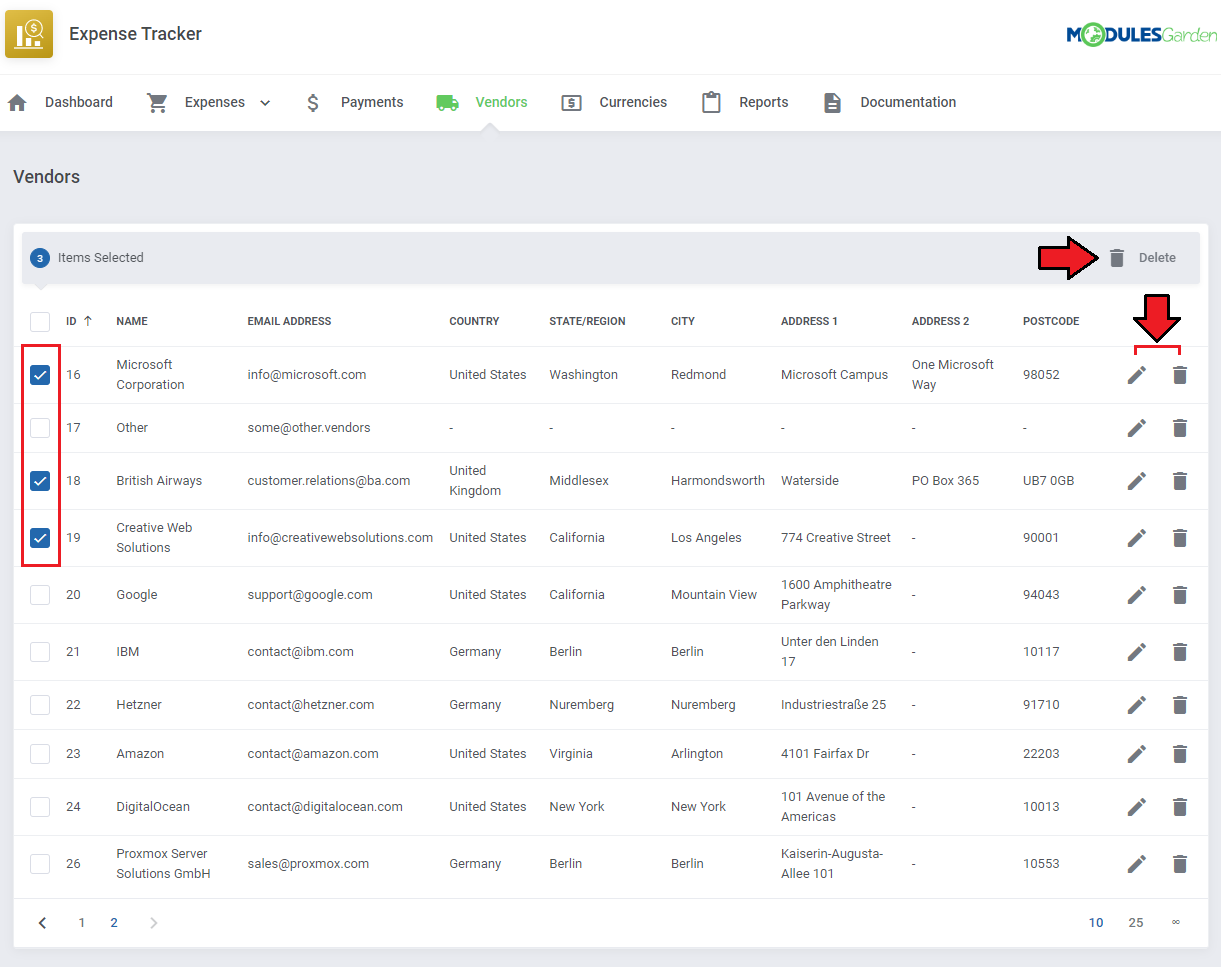
| When the list of vendors is ready you may manage it easily. Edit the vendor details, delete single items, or use the mass actions button to delete them in bulk. |
|
Currencies
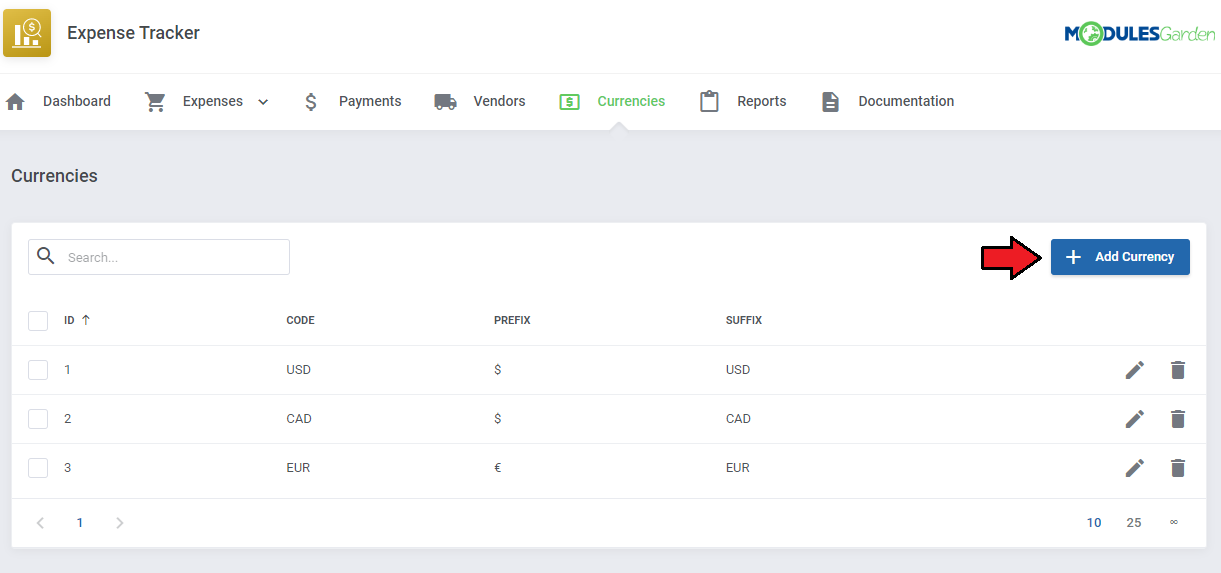
| Prepare a list of used 'Currencies'. Press 'Add Currency' to start. |
|
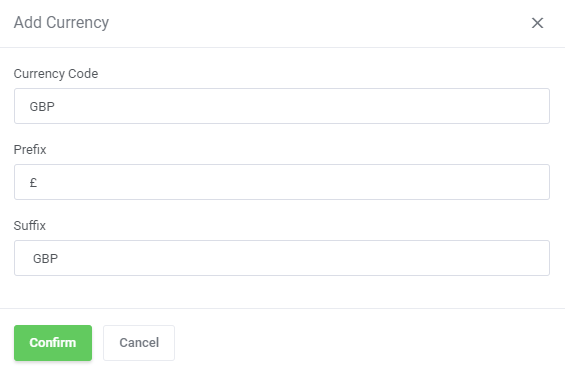
| Enter the official code of the currency you aim to add, its prefix and suffix to display it correctly in the reports, tables and statistics. |
|
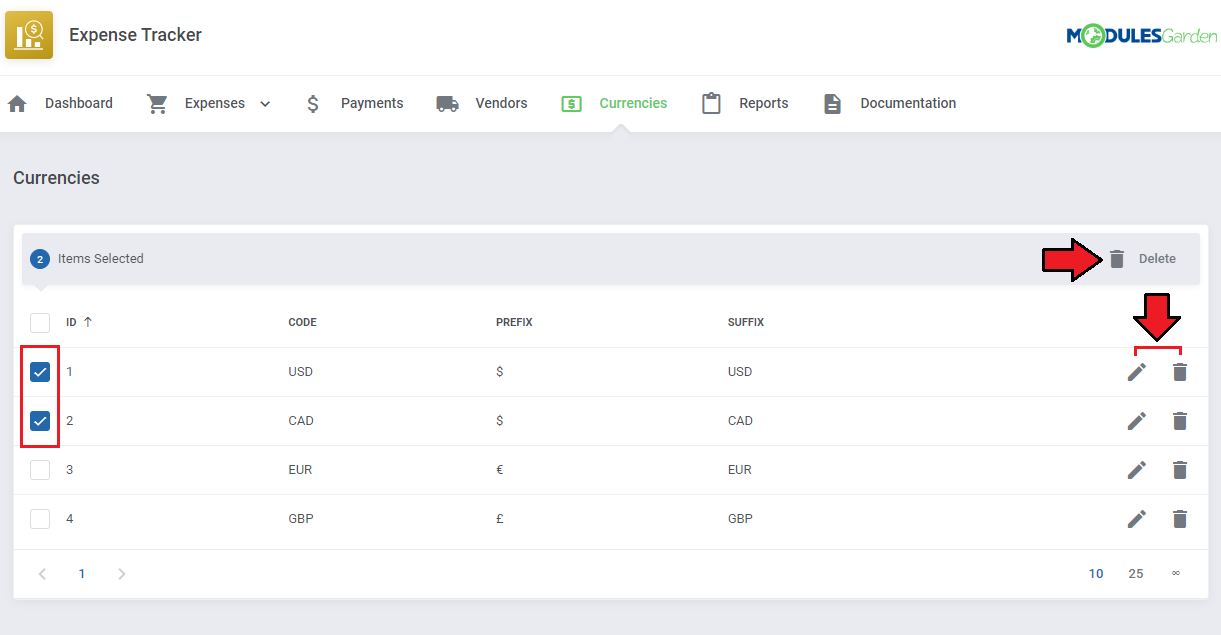
| You may manage the list of currencies at any time. Add, edit, and delete single or multiple items from the list. |
|
Reports
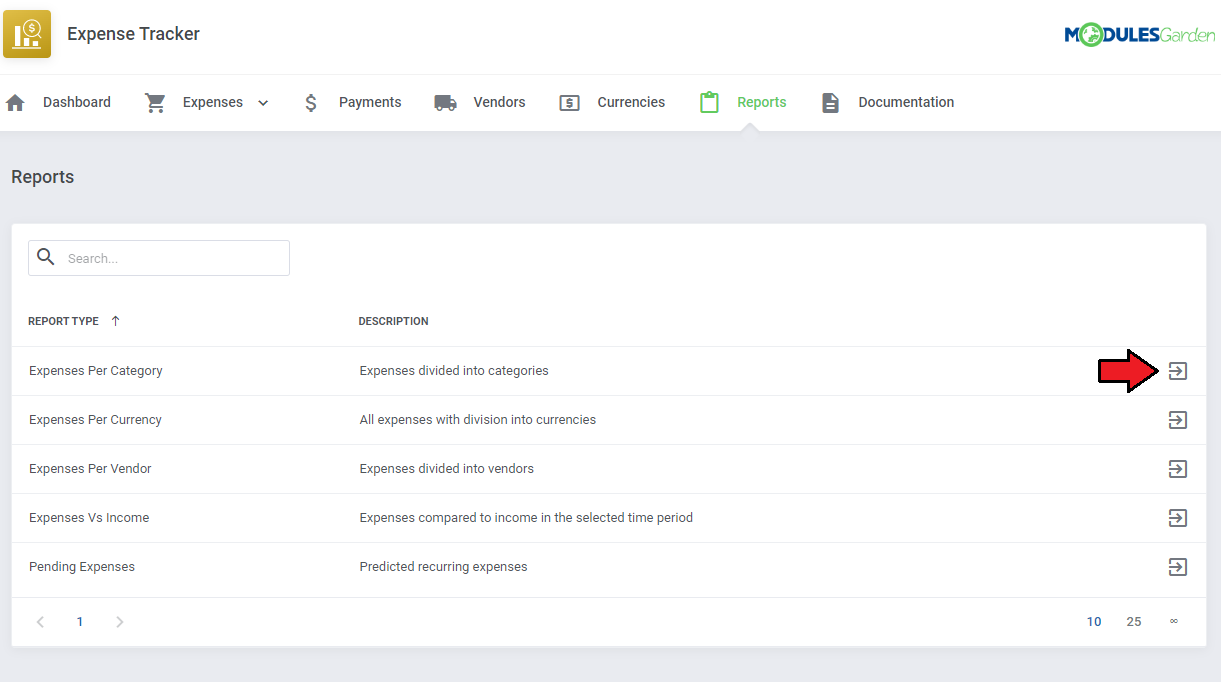
| The last sections 'Reports' might turn out the most demanded. Here are all the data gathered, divided into 5 of the most required types and displayed in the form of charts and tables, which can also be downloaded onto your disk as a CSV file. Open a single report details to filter it for the data, period, category, and vendor you need. |
|
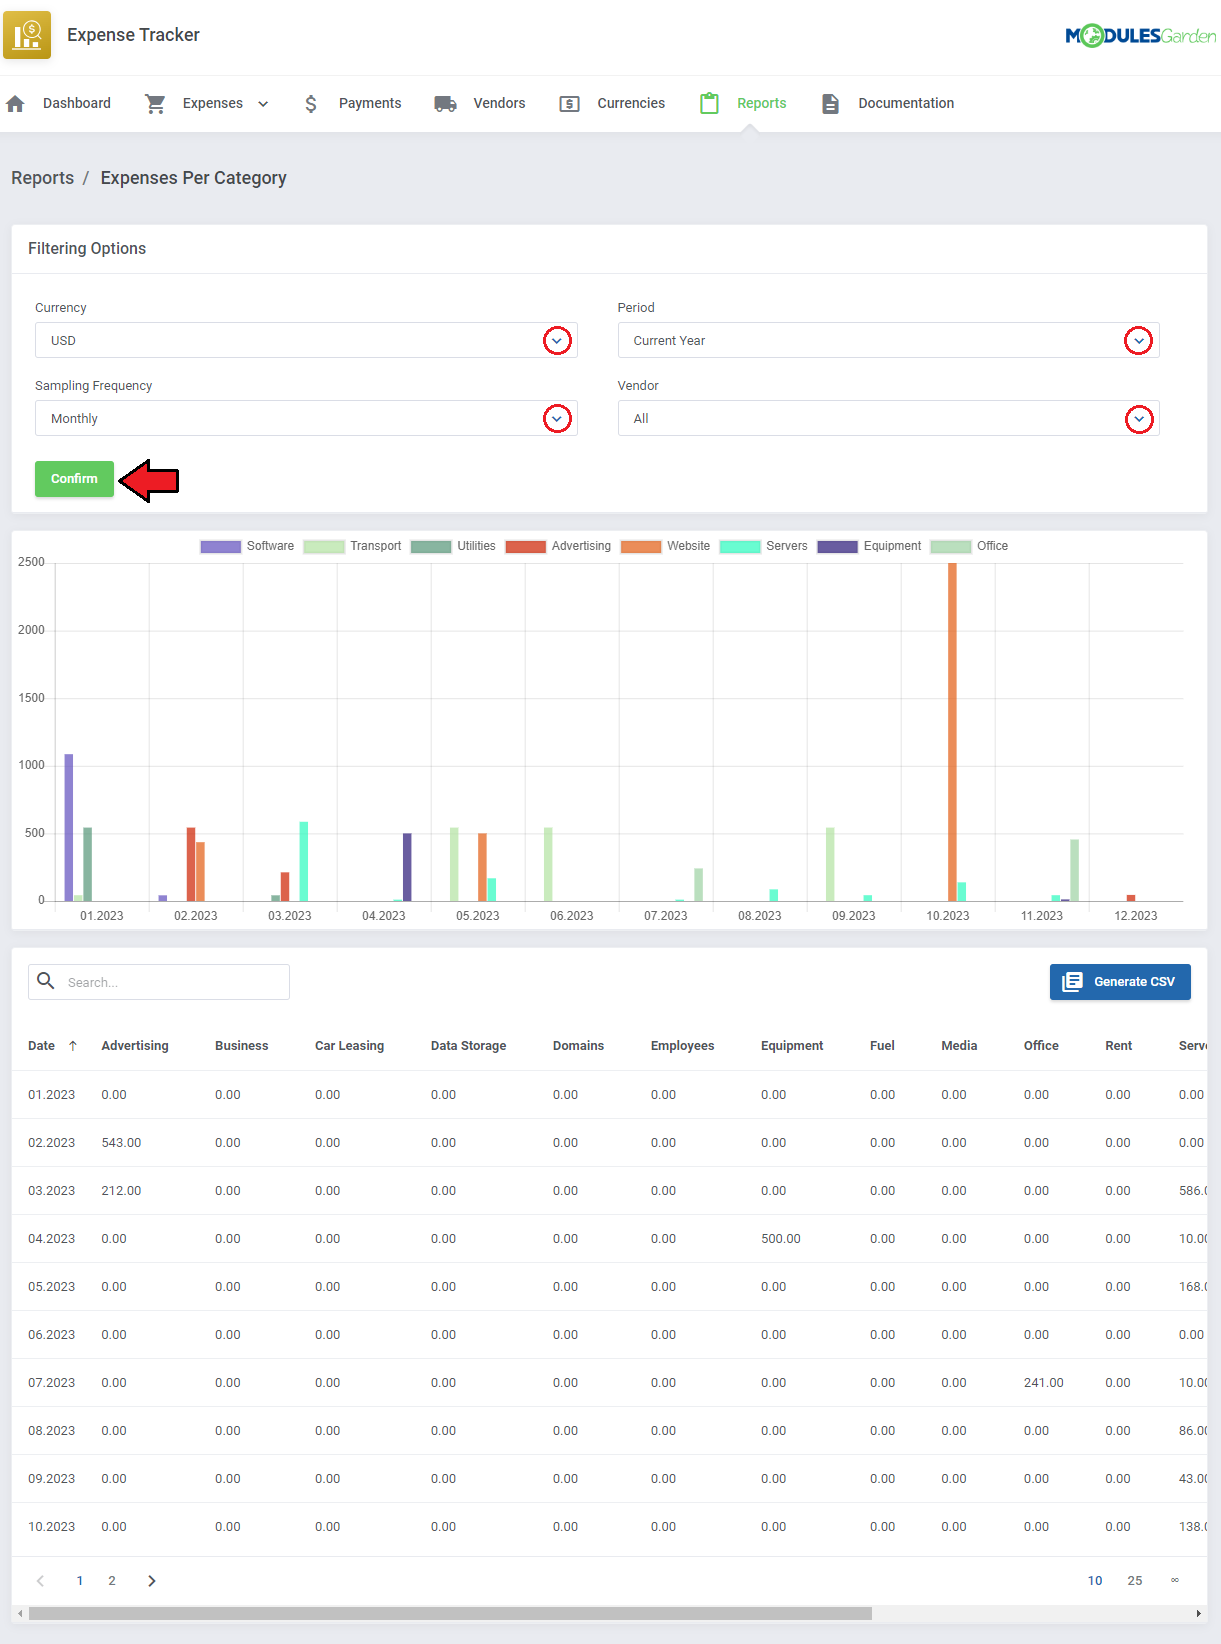
| The Expenses Per Category report illustrates all the expenses divided into assigned categories. Data are taken from the 'Registered Expenses' section. You may filter the data:
Check the data in the chart or in the table, the latter can be always saved in the CSV format file. |
|
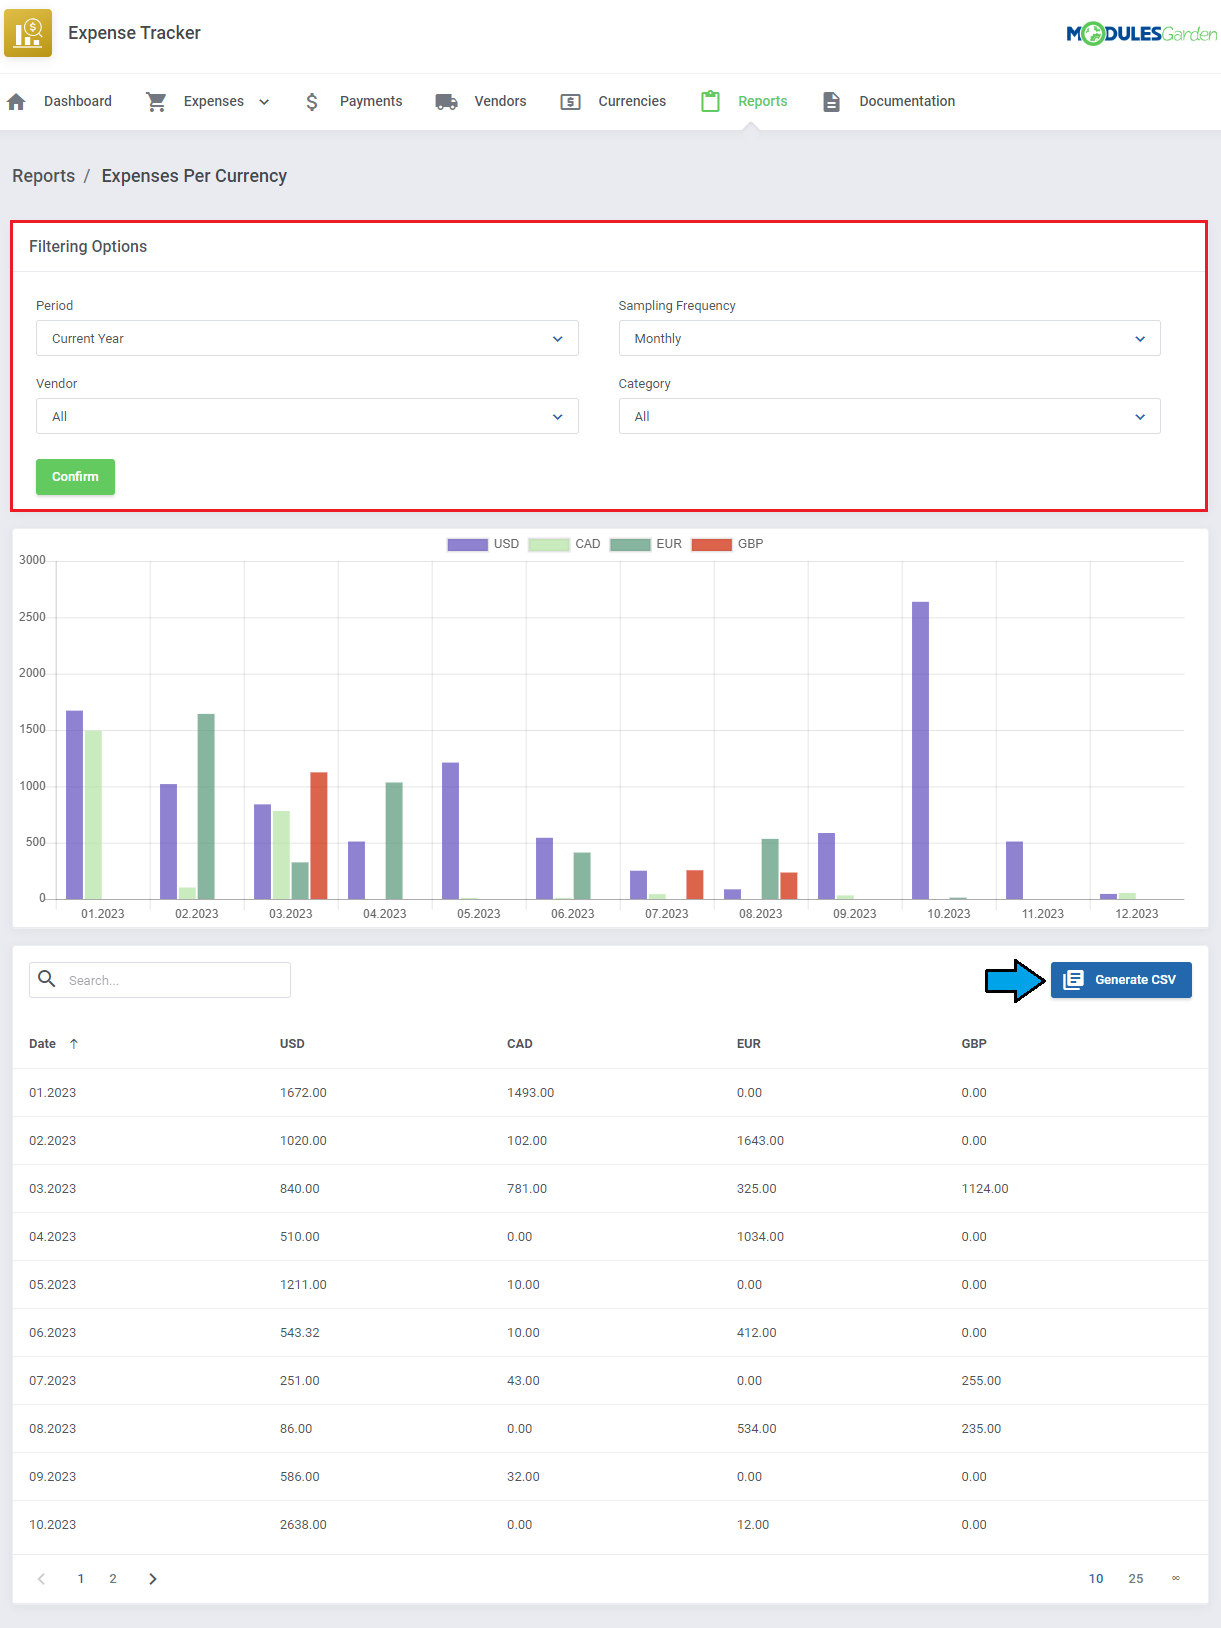
| The next report is dedicated to the Expenses Per Currency. When you open it, you will find statistics on all the tracked expenses divided by assigned currency. Data are taken from the 'Registered Expenses' section. Just like in the case of the previous report, you may filter the data by 'Period', change the sampling frequency of displayed data, choose vendor and/or category to narrow down the results. |
|
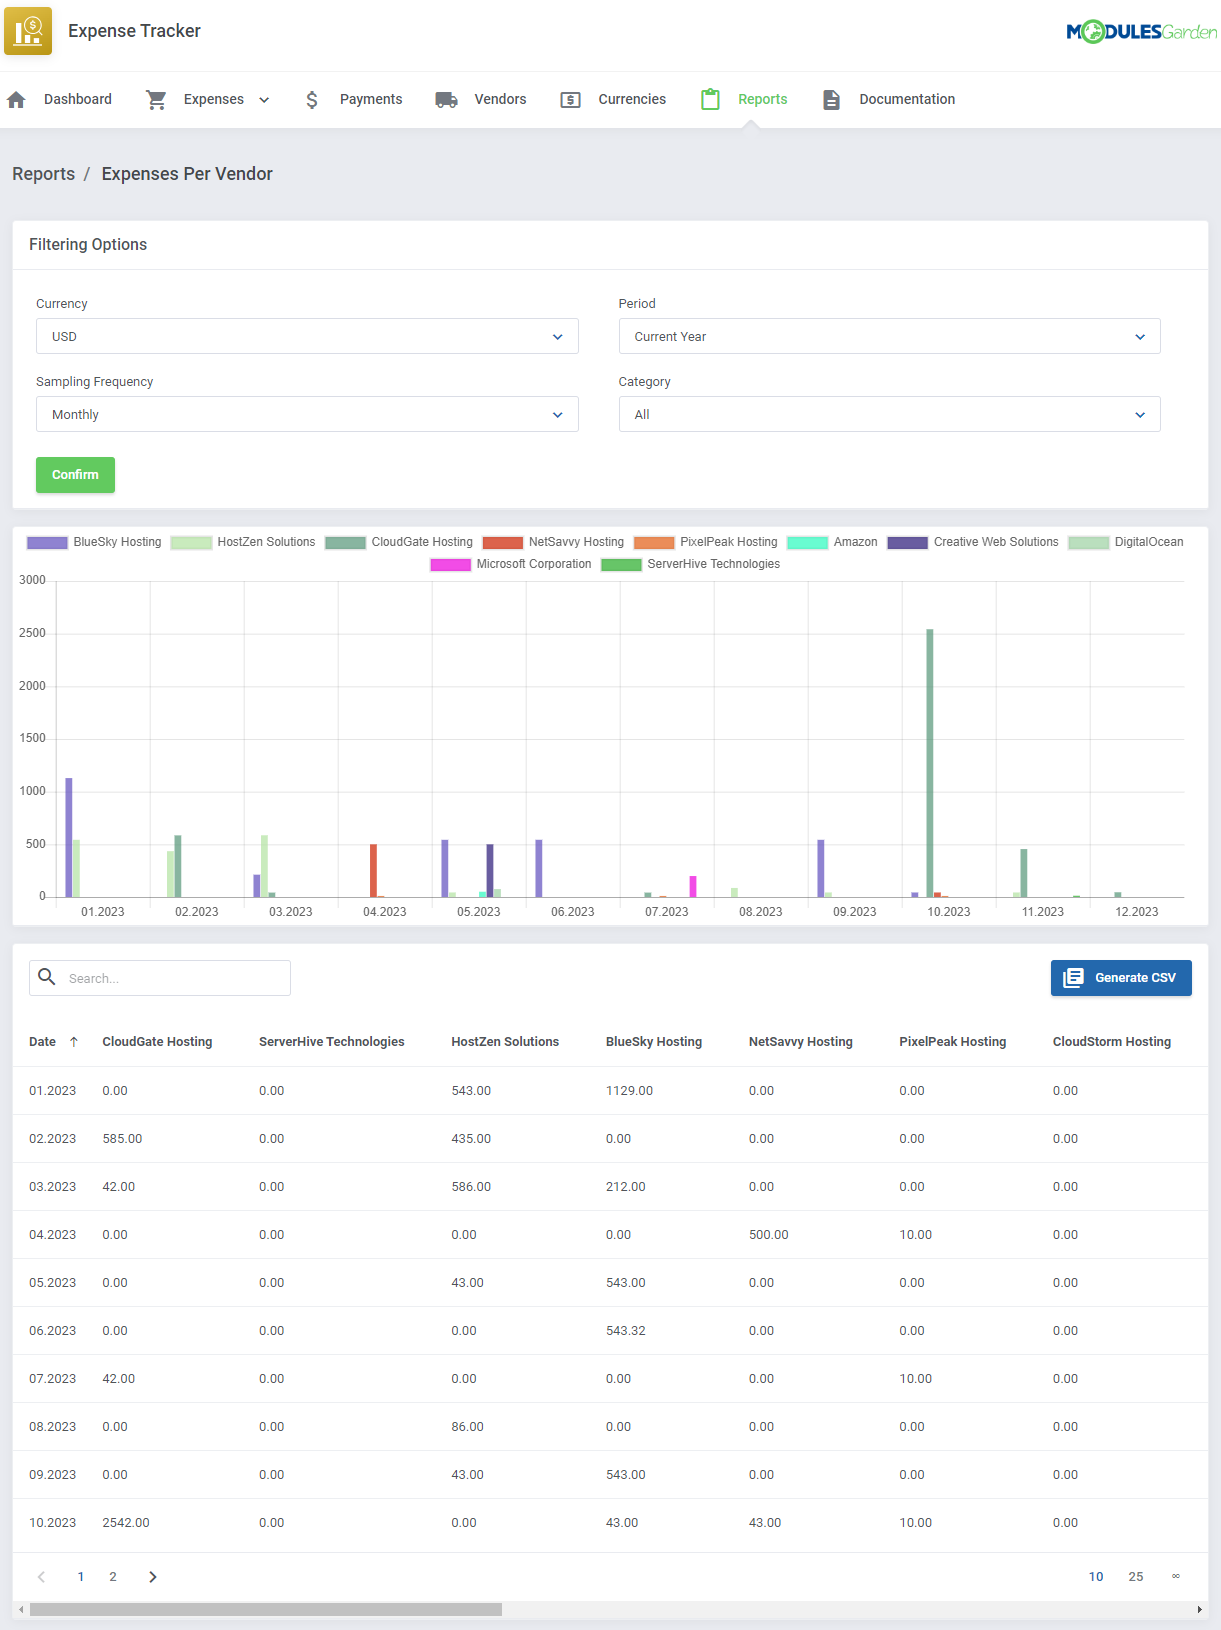
| The next report Expenses Per Vendor illustrates the division of vendors on all registered expenses in the selected time period. Filtering options:
|
|
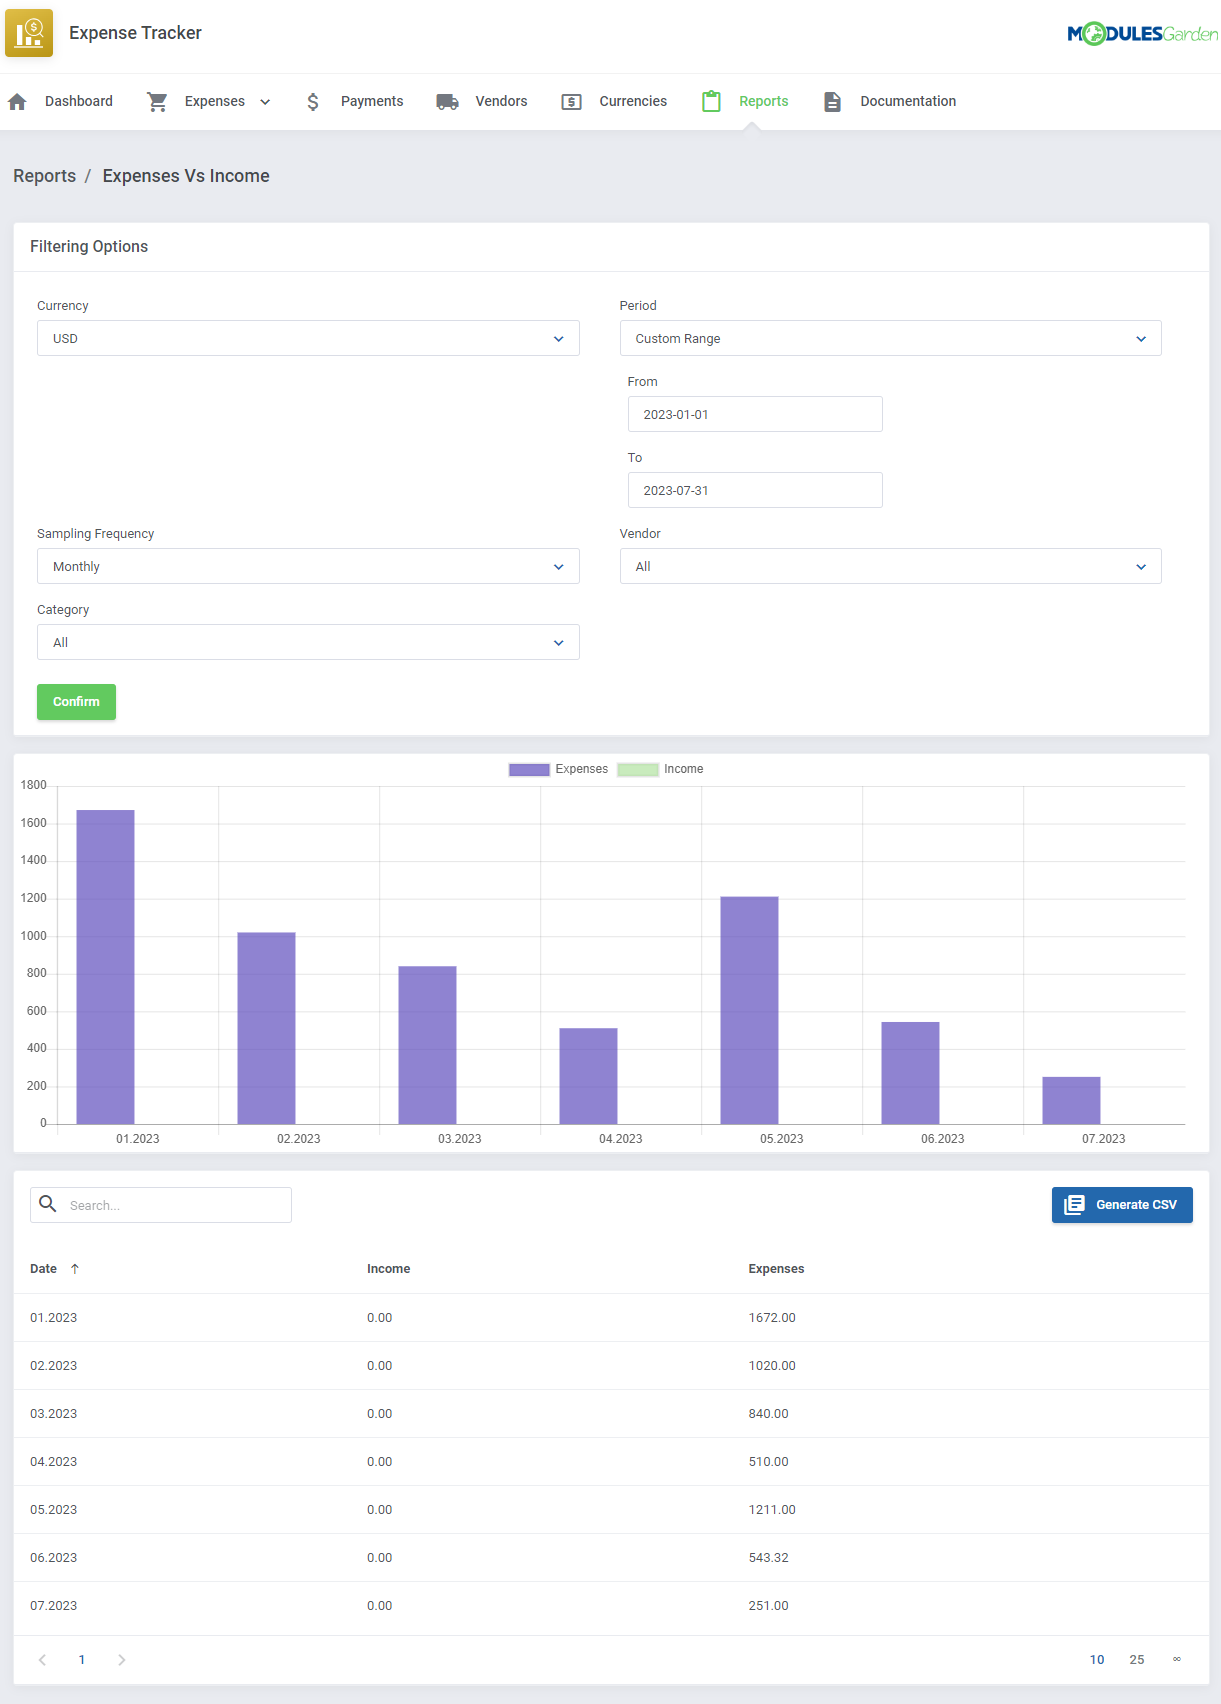
| In the following summary, that is Expenses Vs Income report, you may see your registered expenses compared with income ("Paid" invoices with corresponding currency) in the selected period of time. |
|
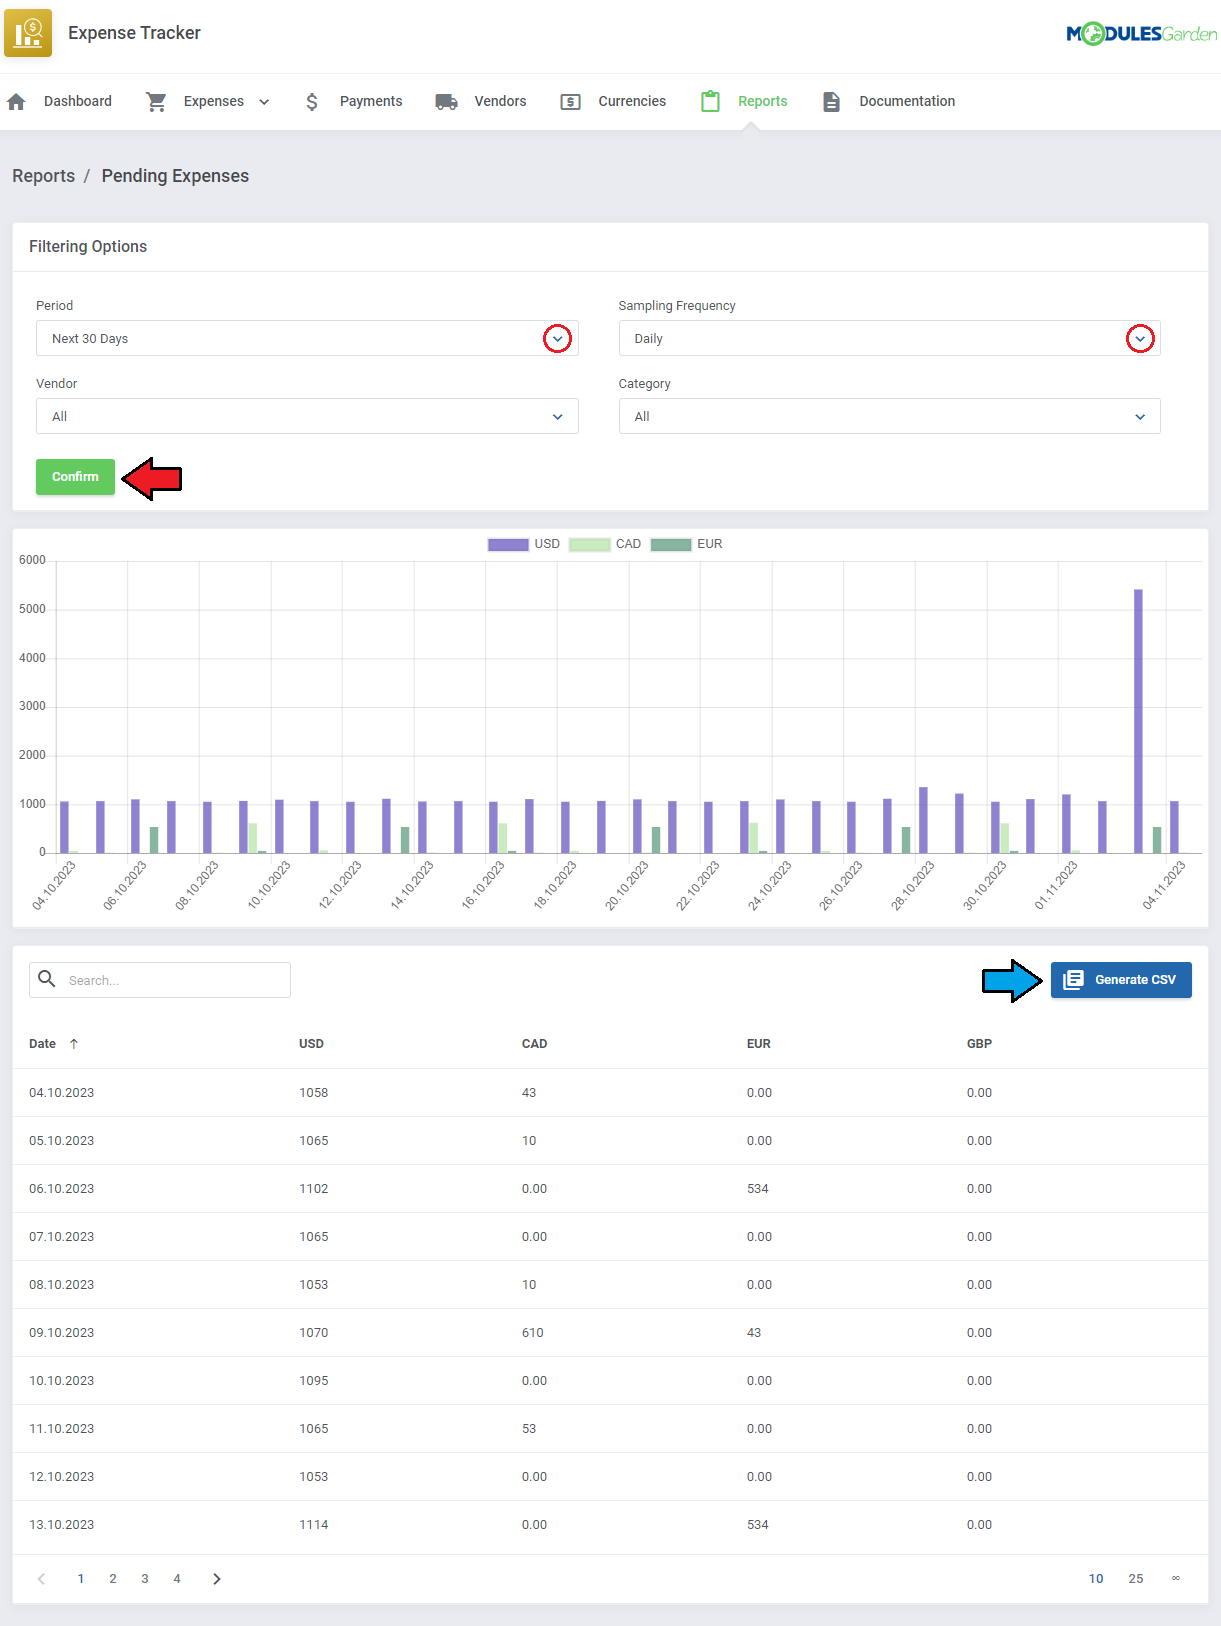
| The Pending Expenses report with details on predicted expenses based on the provided expenses in the 'Recurring Expenses' section and their future payment projections. Filtering options:
|
|
Dashboard
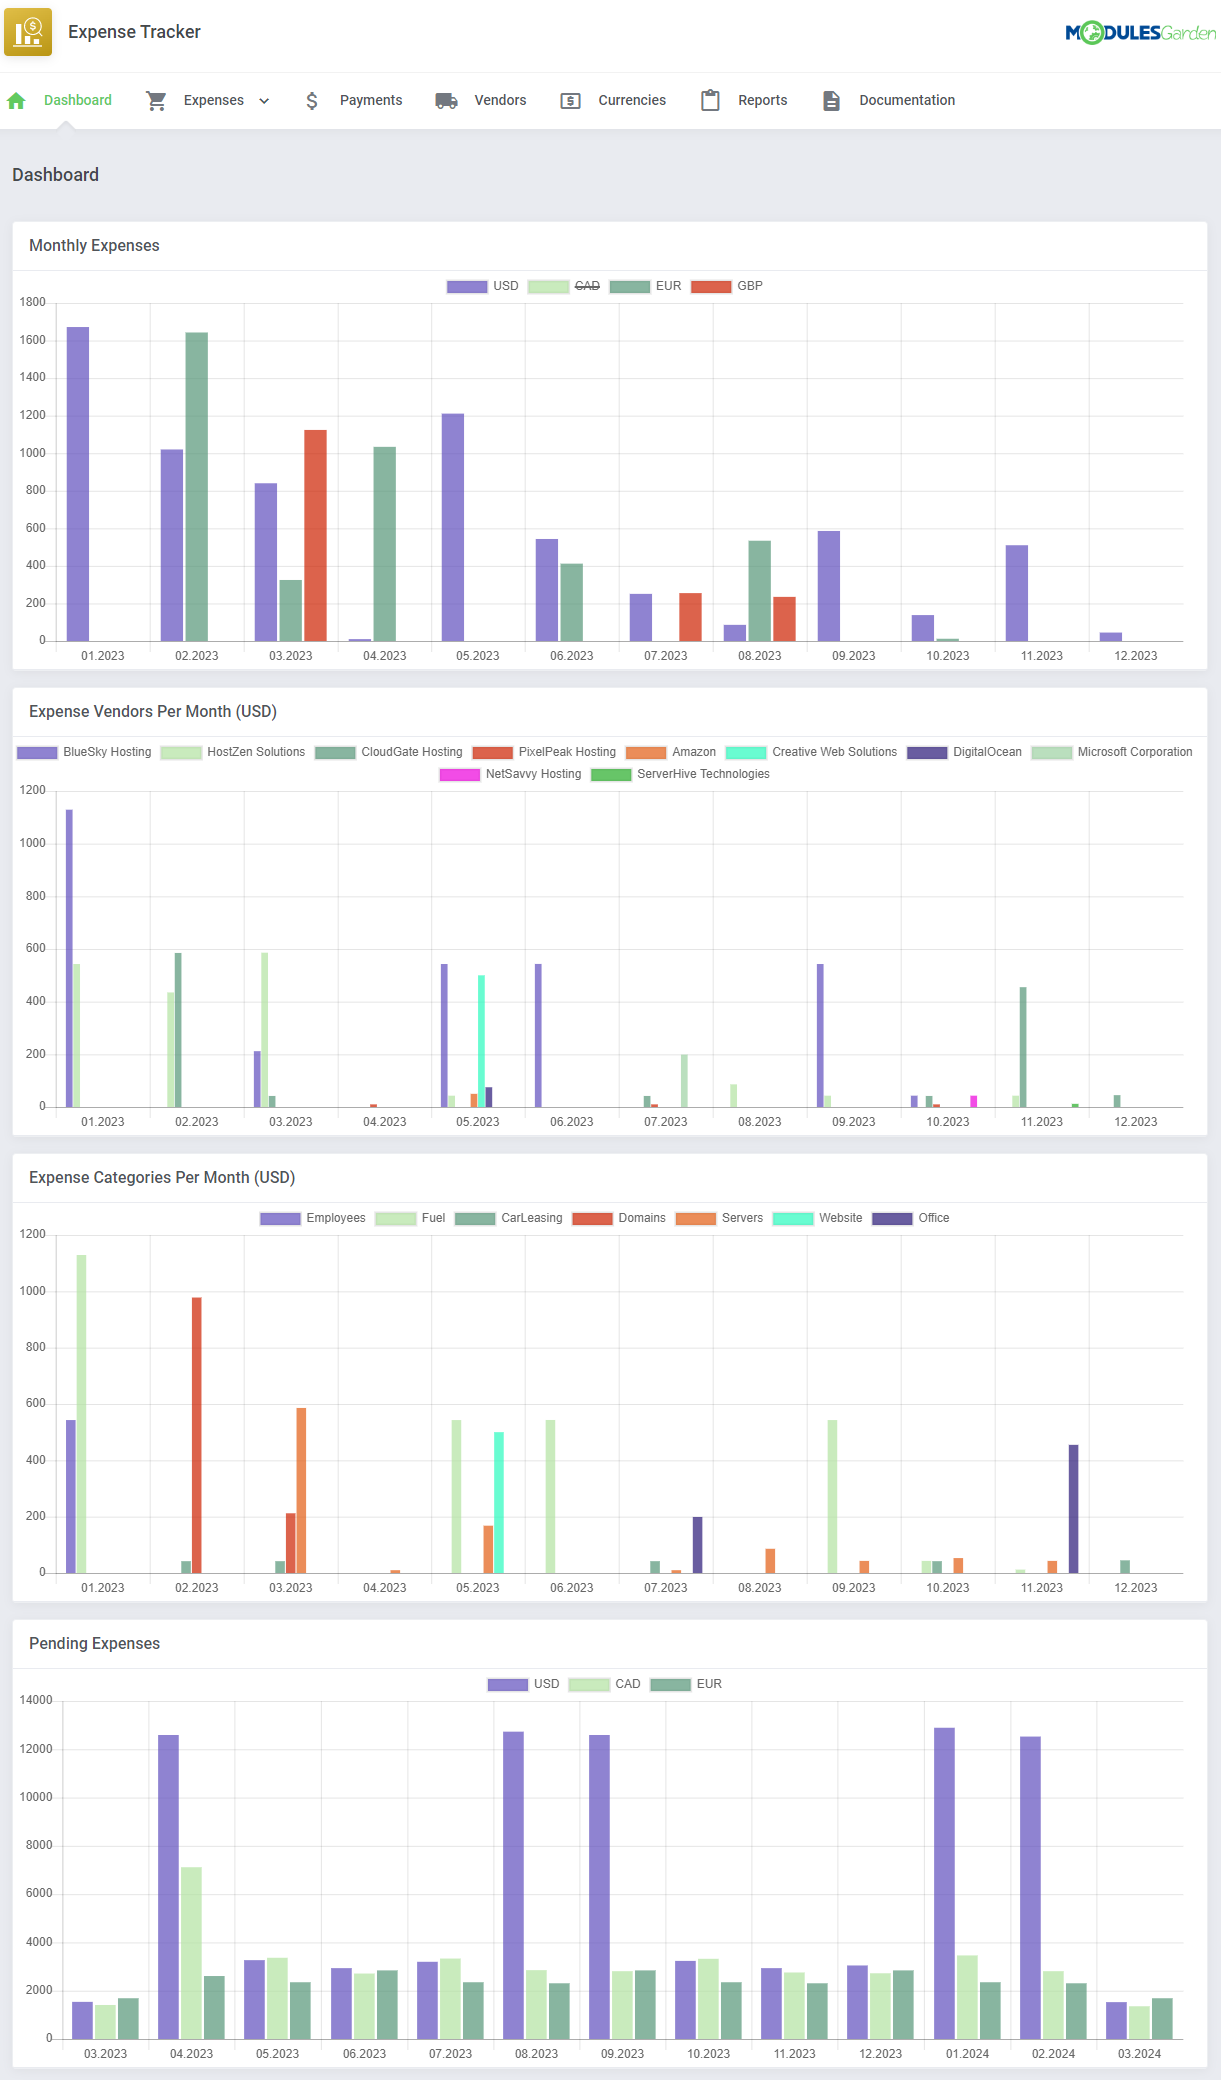
| Take a quick glance at the most crucial conclusions drawn from the information gathered in the module and shown in the form of clear but detailed graphs. |
|
Tips
| 1. If you do not want to include a given item, category or vendor on a graph on the Dashboard, simply click it and it will be immediately crossed out and the graph instantly refreshed. |
How To Use Language Overrides
| Incorporating language customizations - the module readily accommodates language overrides, allowing you to tailor the language files to your preferences. The language file english.php remains unencoded and can be modified to suit your needs. However, it's recommended to avoid altering the core file itself, and instead, leverage the capability of using overrides. |
Here's how to apply language overrides:
~/langs/overrides/english.php.
For example: Original yourWHMCS/modules/servers/moduleName/langs/english.php: $_LANG['Search'] = 'Search'; Override yourWHMCS/modules/servers/moduleName/langs/overrides/english.php: $_LANG['Search'] = 'Look for'; |
| By following these steps, you can seamlessly implement language customizations without altering the core language file, ensuring your changes will not be lost after every module update. Remember that some of the modules have more than one language file, located under /addons and /servers paths. You may create the override files for both of them. |
Update Instructions
| An essential guidance through the process of updating the module is offered here. Ensure successful completion of the module update by carefully following each step, thereby preventing data loss or any unforeseen issues. |
Upgrade Guide
| Seeking a solution that offers greater flexibility, customization tailored to your precise needs, and unrestricted availability? There is an option that not only proves to be cost-effective in the long run but also includes prioritized support services, making it a truly valuable investment. Opt for the Open Source version of your Expense Tracker For WHMCS module to unlock these benefits. Follow a comprehensive guide covering the transition process, the advantages it brings, and step-by-step instructions on what to do next after the order has been successfully finalized. |
Common Problems
| 1. When you have problems with connection, check whether your SELinux or firewall does not block ports. |