Unban Center For WHMCS
(→Configuration of Products) |
(→About Unban Center For WHMCS) |
||
| (44 intermediate revisions by 5 users not shown) | |||
| Line 4: | Line 4: | ||
=About [https://www.modulesgarden.com/products/whmcs/unban-center Unban Center For WHMCS]= | =About [https://www.modulesgarden.com/products/whmcs/unban-center Unban Center For WHMCS]= | ||
{| | {| | ||
| − | |style="padding: 10px 0px 10px 0px;"|'''Unban Center For WHMCS''' allows your clients to easily unban IP addresses in such submodules as cPanel, DirectAdmin | + | |style="padding: 10px 0px 10px 0px;"|'''Unban Center For WHMCS''' allows your clients to easily unban IP addresses in such submodules as cPanel, DirectAdmin and Plesk, directly from your WHMCS.<br/> |
As an appealing alternative, the module will let you create your own submodules so as to integrate them with other systems and control panels.<br/> | As an appealing alternative, the module will let you create your own submodules so as to integrate them with other systems and control panels.<br/> | ||
You will be also able to manage blacklists with IP addresses and IP ranges that cannot be unbanned, as well as unban your customers automatically after they log in to your client area. | You will be also able to manage blacklists with IP addresses and IP ranges that cannot be unbanned, as well as unban your customers automatically after they log in to your client area. | ||
| Line 107: | Line 107: | ||
{| | {| | ||
|style="padding: 0px 0px 00px 30px;"|✔ Check If Client IP Address Is Banned | |style="padding: 0px 0px 00px 30px;"|✔ Check If Client IP Address Is Banned | ||
| + | |} | ||
| + | {| | ||
| + | |style="padding: 0px 0px 00px 30px;"|✔ Enable Automatic Log Cleaning After Specified Time | ||
|} | |} | ||
{| | {| | ||
| Line 116: | Line 119: | ||
|} | |} | ||
{| | {| | ||
| − | |style="padding: 0px 0px 0px 30px;"|✔ Plesk & [https://www.modulesgarden.com/products/whmcs/plesk-extended#features Plesk Extended For WHMCS] - Fail2Ban | + | |style="padding: 0px 0px 0px 30px;"|✔ Plesk & [https://www.modulesgarden.com/products/whmcs/plesk-extended#features Plesk Extended For WHMCS] - CSF And Fail2Ban |
|} | |} | ||
{| | {| | ||
| Line 122: | Line 125: | ||
|} | |} | ||
{| | {| | ||
| − | |style="padding: 0px 0px 10px 30px;"|✔ InterWorx | + | |style="padding: 0px 0px 10px 30px;"|✔ InterWorx - Native Firewall |
|} | |} | ||
| + | |||
*'''General Info:''' | *'''General Info:''' | ||
{| | {| | ||
| Line 130: | Line 134: | ||
{| | {| | ||
|style="padding: 0px 0px 0px 30px;"|✔ Requires MySQL 5.7 And Later For IPv6 | |style="padding: 0px 0px 0px 30px;"|✔ Requires MySQL 5.7 And Later For IPv6 | ||
| + | |} | ||
| + | {| | ||
| + | |style="padding: 0px 0px 0px 30px;"|✔ Plesk Functionality Requires SSH Access And Root Account | ||
|} | |} | ||
{| | {| | ||
|style="padding: 0px 0px 0px 30px;"|✔ Intuitive Creation Of Additional Submodules | |style="padding: 0px 0px 0px 30px;"|✔ Intuitive Creation Of Additional Submodules | ||
| + | |} | ||
| + | {| | ||
| + | |style="padding: 0px 0px 0px 30px;"|✔ Fully Integrated With [https://lagom.rsstudio.net/extensions/whmcs-modules-integration/unban-center-by-modulesgarden Lagom WHMCS Client Theme] | ||
|} | |} | ||
{| | {| | ||
| Line 138: | Line 148: | ||
|} | |} | ||
{| | {| | ||
| − | |style="padding: 0px 0px 0px 30px;"|✔ Supports PHP | + | |style="padding: 0px 0px 0px 30px;"|✔ Supports PHP 8.2 Back To PHP 8.1 |
| + | |} | ||
| + | {| | ||
| + | |style="padding: 0px 0px 0px 30px;"|✔ Supports WHMCS Themes "Six" And "Twenty-One" | ||
|} | |} | ||
{| | {| | ||
| − | |style="padding: 0px 0px 0px 30px;"|✔ Supports WHMCS | + | |style="padding: 0px 0px 0px 30px;"|✔ Supports WHMCS V8.12 Back To WHMCS V8.9 |
|} | |} | ||
{| | {| | ||
| − | |style="padding: 0px 0px 0px 30px;"|✔ | + | |style="padding: 0px 0px 0px 30px;"|✔ Requires ionCube Loader V12 Or Later |
|} | |} | ||
{| | {| | ||
| − | |style="padding: 0px 0px 30px 30px;"|✔ Easy Module Upgrade To [https://www.modulesgarden.com/products/whmcs/unban-center#open-source-version Open Source Version] | + | |style="padding: 0px 0px 30px 30px;"|✔ Easy [https://www.docs.modulesgarden.com/How_To_Upgrade_WHMCS_Module Module Upgrade] To [https://www.modulesgarden.com/products/whmcs/unban-center#open-source-version Open Source Version] |
|} | |} | ||
| Line 164: | Line 177: | ||
{| | {| | ||
|style="padding: 0px 0px 15px 15px;"|'''2. In the downloaded file you might find one or two packages that support different PHP versions.'''<br/> | |style="padding: 0px 0px 15px 15px;"|'''2. In the downloaded file you might find one or two packages that support different PHP versions.'''<br/> | ||
| − | In the most recent versions of the module, you will find only one package that supports PHP 7. | + | In the most recent versions of the module, you will find only one package that supports PHP 7.4 and later.<br/> <!-- If you need a package for the previous versions of PHP, please [https://www.modulesgarden.com/support/ticket/general-support contact our support]. --> |
|} | |} | ||
{| | {| | ||
| − | |style="padding: 0px 0px 20px 25px;"|[[File: | + | |style="padding: 0px 0px 20px 25px;"|[[File:PHP74_81.png]] |
|} | |} | ||
{| | {| | ||
|style="padding: 0px 0px 15px 15px;"|'''Previous updates of the module may contain two packages dedicated to various PHP versions.'''<br/> | |style="padding: 0px 0px 15px 15px;"|'''Previous updates of the module may contain two packages dedicated to various PHP versions.'''<br/> | ||
| − | The first one | + | The first one supports PHP 5.6 up to PHP 7.3, and the second one addresses PHP 7.4 up to PHP 8.1.<br/> |
| − | '''''Note:''' Keep in mind that PHP versions 5.6 up to 7. | + | '''''Note:''' Keep in mind that PHP versions 5.6 up to 7.3 are no longer officially supported and their security issues are not fixed or released anymore. Find more info [http://php.net/supported-versions.php here].'' |
|} | |} | ||
{| | {| | ||
| − | |style="padding: 0px 0px 20px 25px;"|[[File: | + | |style="padding: 0px 0px 20px 25px;"|[[File:PHP56_74_81.png]] |
|} | |} | ||
{| | {| | ||
| − | |style="padding: 0px 0px 10px 15px;"|'' '''Important''': This situation does not affect [https://www.modulesgarden.com/products/whmcs/unban-center#open-source-version '''the open source version'''] of this module which can be applied to any PHP from version 5.6 and later.''<br/>'' '''Note''': You can check the current PHP version in your WHMCS. To do so, proceed to ''' 'Utilities' → 'System' → 'PHP Info'.''' | + | |style="padding: 0px 0px 10px 15px;"|<!-- '' '''Important''': This situation does not affect [https://www.modulesgarden.com/products/whmcs/unban-center#open-source-version '''the open source version'''] of this module which can be applied to any PHP from version 5.6 and later.''<br/>'' --> '''Note''': You can check the current PHP version in your WHMCS. To do so, proceed to ''' 'Utilities' → 'System' → 'PHP Info'.''' |
|} | |} | ||
{| | {| | ||
| − | |style="padding: 0px 0px 15px 15px;"|'''3. | + | |style="padding: 0px 0px 15px 15px;"|'''3. Extract the package and upload its content into the main WHMCS directory. <br/> |
| − | The content of the | + | The content of the package to upload should look like this. |
|} | |} | ||
{| | {| | ||
| Line 216: | Line 229: | ||
|} | |} | ||
{| | {| | ||
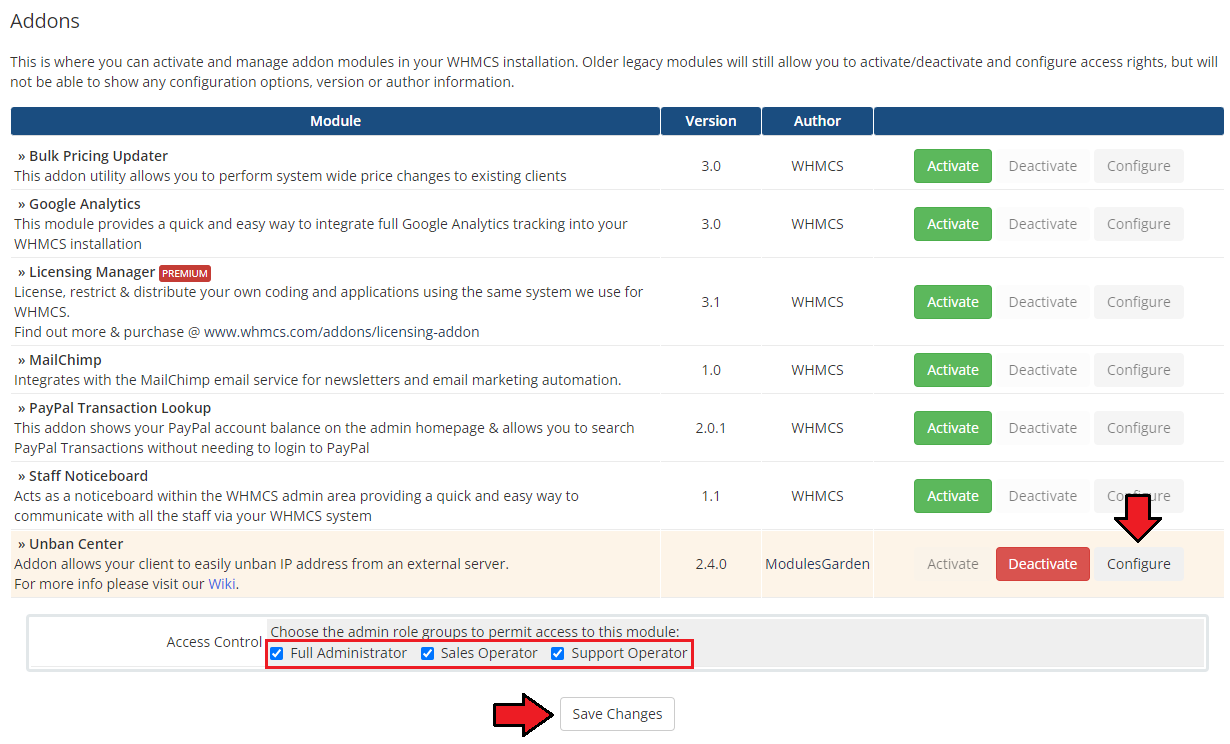
| − | |style="padding: 0px 0px 15px 15px;"|'''8. In the next step you need to permit access to this module.'''<br /> | + | |style="padding: 0px 0px 15px 15px;"|'''8. In the next step, you need to permit access to this module.'''<br /> |
To do so, click on the '' 'Configure' '' button, tick '' 'Full Administrator' '' and press '' 'Save Changes'. '' | To do so, click on the '' 'Configure' '' button, tick '' 'Full Administrator' '' and press '' 'Save Changes'. '' | ||
|} | |} | ||
| Line 223: | Line 236: | ||
|} | |} | ||
{| | {| | ||
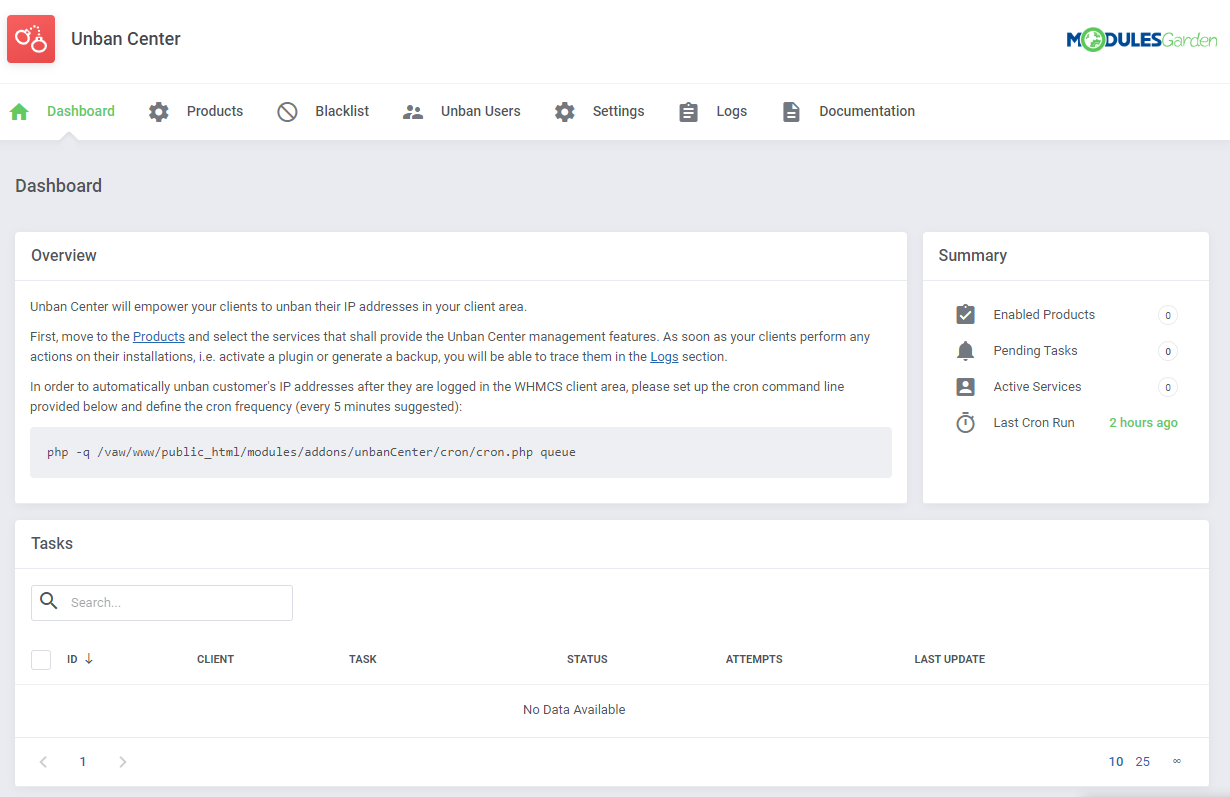
| − | |style="padding: 0px 0px 15px 15px;"|'''9. Finally, set up the cron command line provided below and define its frequency ( | + | |style="padding: 0px 0px 15px 15px;"|'''9. Finally, set up the cron command line provided below and define its frequency (1-minute interval is suggested).''' |
| − | php -q /yourWHMCS/modules/addons/unbanCenter/cron/cron.php | + | php -q /yourWHMCS/modules/addons/unbanCenter/cron/cron.php queue |
| − | This will allow to enable the feature | + | This will allow us to enable the feature that automatically unbans customers' IP addresses after they log in to the WHMCS client area.<br/> |
| − | + | <!-- | |
| − | + | ||
| − | + | ||
If you '''stop''' the cron processes manually, please delete the entire content of the '' '/yourWHMCS/modules/addons/unbanCenter/storage/crons/' '' folder or execute the command below: | If you '''stop''' the cron processes manually, please delete the entire content of the '' '/yourWHMCS/modules/addons/unbanCenter/storage/crons/' '' folder or execute the command below: | ||
rm -r /yourWHMCS/modules/addons/unbanCenter/storage/crons/* | rm -r /yourWHMCS/modules/addons/unbanCenter/storage/crons/* | ||
This will allow you to run the cron process again next time. Do not forget to replace '' 'yourWHMCS' '' with your WHMCS root location. | This will allow you to run the cron process again next time. Do not forget to replace '' 'yourWHMCS' '' with your WHMCS root location. | ||
| + | --> | ||
|} | |} | ||
{| | {| | ||
| Line 250: | Line 262: | ||
|style="padding: 10px 0px 15px 15px;"|Our module has been designed in such a way so as to allow you to manage banned IP addresses on several different panels of a particular type.<br/> | |style="padding: 10px 0px 15px 15px;"|Our module has been designed in such a way so as to allow you to manage banned IP addresses on several different panels of a particular type.<br/> | ||
These are: | These are: | ||
| − | *'''cPanel''' - unban on '''CSF, cPHulk''' ''(Blacklist Management and History Reports)'' or '''Imunify360''' | + | *'''cPanel''' - unban on '''CSF, cPHulk''' ''(Blacklist Management and History Reports)'' or '''Imunify360''' (you may use one or more unban types at once) |
*'''DirectAdmin''' - unban on '''CSF''', '''IPs blacklist''' ''(/usr/local/directadmin/data/admin/ip_blacklist)'' or '''both''' at once | *'''DirectAdmin''' - unban on '''CSF''', '''IPs blacklist''' ''(/usr/local/directadmin/data/admin/ip_blacklist)'' or '''both''' at once | ||
| − | *''' | + | *'''Plesk''' - unban on '''CSF''' or '''Fail2Ban'''<br/> '''''Important:''' On the Plesk server there must be an SSH account that works on port '''22''' and uses the same login data ('Username' and 'Password') as the one used with Plesk server configured in WHMCS.<br/> This account must have proper permissions to run this [https://docs.plesk.com/en-US/obsidian/cli-linux/using-command-line-utilities/ip_ban-ip-address-banning-fail2ban.73594/ command]:'' |
| − | + | ip_ban <command> | |
| + | |||
*You may also create your own submodules. To learn how to do that, please read carefully this [https://www.docs.modulesgarden.com/Unban_Center_For_WHMCS#Creating_3rd_Party_Submodule section]. | *You may also create your own submodules. To learn how to do that, please read carefully this [https://www.docs.modulesgarden.com/Unban_Center_For_WHMCS#Creating_3rd_Party_Submodule section]. | ||
| Line 261: | Line 274: | ||
==Dashboard== | ==Dashboard== | ||
{| | {| | ||
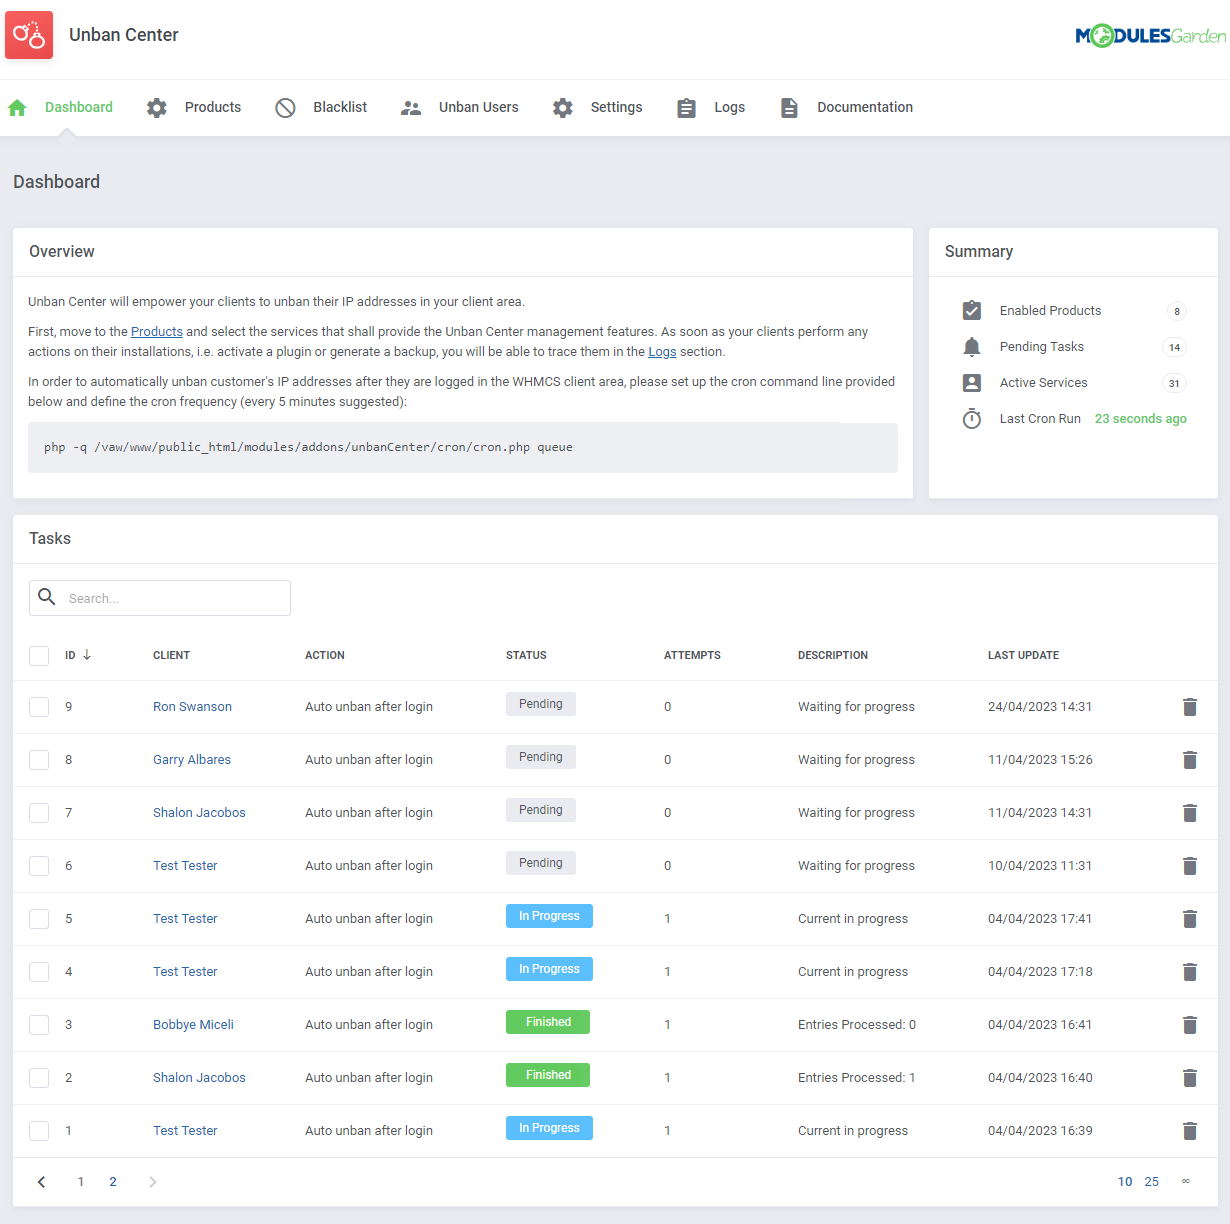
| − | |style="padding: 10px 0px 15px 15px;"|In dashboard you can find the summary of currently enabled unban configuration for products, pending tasks, active services and last cron run. <br/>The tasks list allows you to follow the current auto-unbans for the clients who log in to their WHMCS client area (the option may be enabled in | + | |style="padding: 10px 0px 15px 15px;"|In the dashboard you can find the summary of currently enabled unban configuration for products, pending tasks, active services, and the last cron run. <br/>The tasks list allows you to follow the current auto-unbans for the clients who log in to their WHMCS client area (the option may be enabled in product configuration). <br/>These will be performed via cron. |
|} | |} | ||
{| | {| | ||
| Line 278: | Line 291: | ||
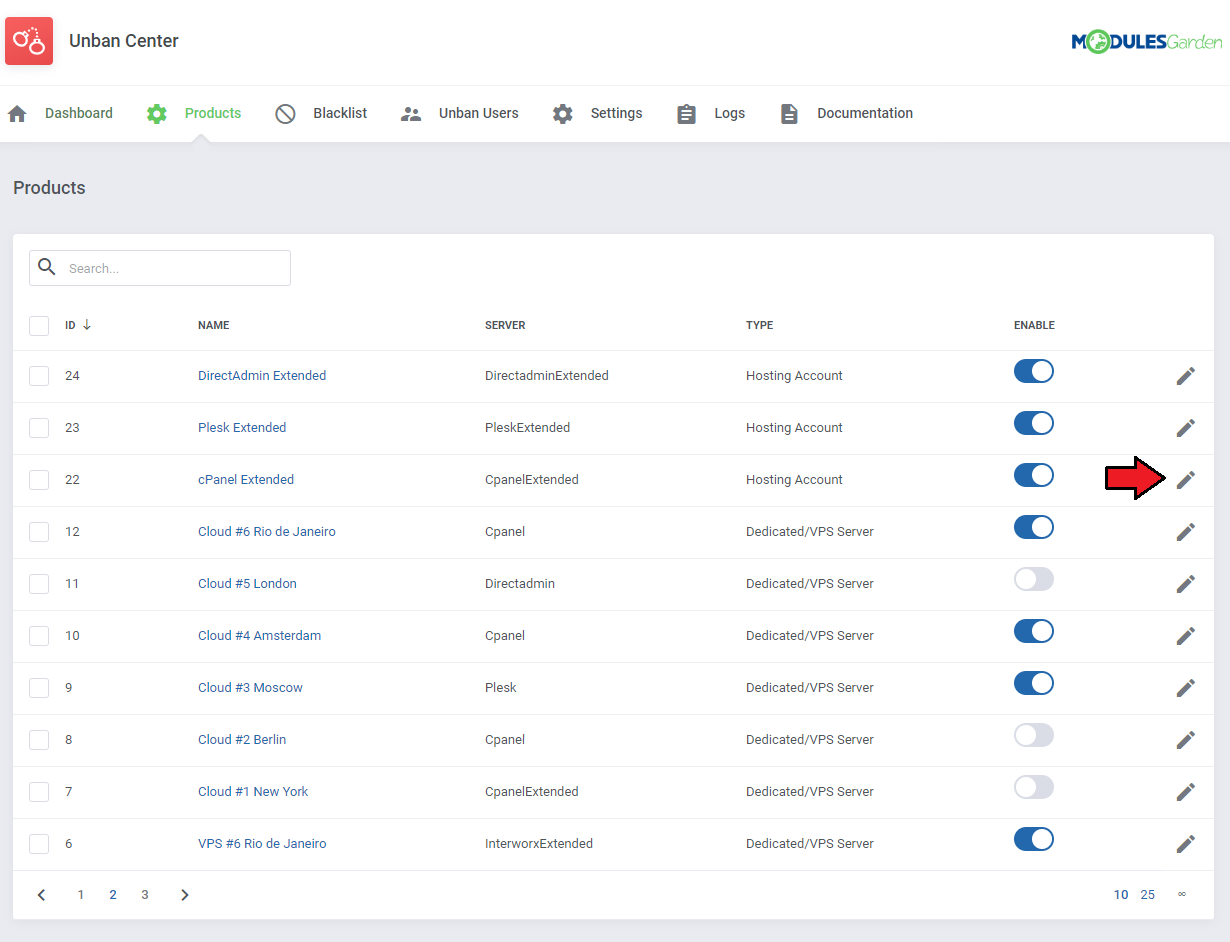
{| | {| | ||
|style="padding: 0px 0px 15px 15px;"|Press '' 'Enable' '' and then define '' 'Minimum Delay Time' '' intervals to declare how often your client will be able to perform unban action on a specific product.<br /> | |style="padding: 0px 0px 15px 15px;"|Press '' 'Enable' '' and then define '' 'Minimum Delay Time' '' intervals to declare how often your client will be able to perform unban action on a specific product.<br /> | ||
| − | Next, | + | Next, enable the desired unban type/types. For cPanel there are: |
*CSF | *CSF | ||
*cPHulk | *cPHulk | ||
| Line 286: | Line 299: | ||
Select the email template that will be used to '''notify clients when their IP address has been automatically unbanned'''.<br/> You may easily preview and edit the default, inbuilt with the module template content at '' 'Setup' → 'Email Templates','' read more [https://docs.whmcs.com/Email_Templates here].<br/> | Select the email template that will be used to '''notify clients when their IP address has been automatically unbanned'''.<br/> You may easily preview and edit the default, inbuilt with the module template content at '' 'Setup' → 'Email Templates','' read more [https://docs.whmcs.com/Email_Templates here].<br/> | ||
| + | |||
| + | '''''Important:''' Since version 2.4.0 of the module, the inbuilt template has been updated and new variables added: '''"unban_reason"''' and '''"unban_ip"'''. <br>Please update your email template manually to include these data in the notifications sent to clients. See [[#Tips|Tips]] section for more info.''<br/> ''*This does not apply to clients who install the module in version 2.4.0 or higher for the first time.'' | ||
You can also allow your clients to '''see all banned IP addresses''' from the panel on their '''VPS/Dedicated Servers.'' <br/> | You can also allow your clients to '''see all banned IP addresses''' from the panel on their '''VPS/Dedicated Servers.'' <br/> | ||
| − | In case of Hosting Account, your clients may get an option to '''show the reason of ban''' before any attempt to unban the IP address.<br/> | + | In the case of a Hosting Account, your clients may get an option to '''show the reason of ban''' before any attempt to unban the IP address.<br/> |
| Line 308: | Line 323: | ||
|} | |} | ||
{| | {| | ||
| − | |style="padding: 0px 0px 15px 15px;"|Next, provide IP address you want to add to the blacklist (either in '''IPv4''' or '''IPv6''' format).<br/> | + | |style="padding: 0px 0px 15px 15px;"|Next, provide the IP address you want to add to the blacklist (either in '''IPv4''' or '''IPv6''' format).<br/> |
Additionally, you can provide a description for easier identification. | Additionally, you can provide a description for easier identification. | ||
|} | |} | ||
| Line 332: | Line 347: | ||
{| | {| | ||
|style="padding: 10px 0px 15px 15px;"|This section allows you to unban your client's IP address from any external server on which they own an account.<br /> | |style="padding: 10px 0px 15px 15px;"|This section allows you to unban your client's IP address from any external server on which they own an account.<br /> | ||
| − | You can unban IP address assigned to your client's account as well as any custom IP address. <br/> | + | You can unban the IP address assigned to your client's account as well as any custom IP address. <br/> |
When ready, press '' 'Unban' '' as shown on the following screen.<br /> | When ready, press '' 'Unban' '' as shown on the following screen.<br /> | ||
'' '''Note:''' You are able to unban IP addresses only from external servers enabled at the 'Products' section. '' | '' '''Note:''' You are able to unban IP addresses only from external servers enabled at the 'Products' section. '' | ||
| Line 362: | Line 377: | ||
{| | {| | ||
|style="padding: 0px 0px 30px 25px;"|[[File:UB2_23.png]] | |style="padding: 0px 0px 30px 25px;"|[[File:UB2_23.png]] | ||
| + | |} | ||
| + | |||
| + | ==Settings== | ||
| + | {| | ||
| + | |style="padding: 10px 0px 20px 15px;"|Define the setting responsible for the automatic removal of old log entries after the desired number of days. <br/> Enter a number between 1 and 10000 to specify the time after which the log will be deleted. If you enter "0", this option will be disabled and logs will not be cleared.<br/> | ||
| + | |||
| + | Please keep in mind that it is the WHMCS daily cron that is responsible for clearing logs, you do not have to set any other cron job. | ||
| + | |} | ||
| + | {| | ||
| + | |style="padding: 0px 0px 30px 25px;"|[[File:UB2_16_0.png]] | ||
|} | |} | ||
| Line 367: | Line 392: | ||
{| | {| | ||
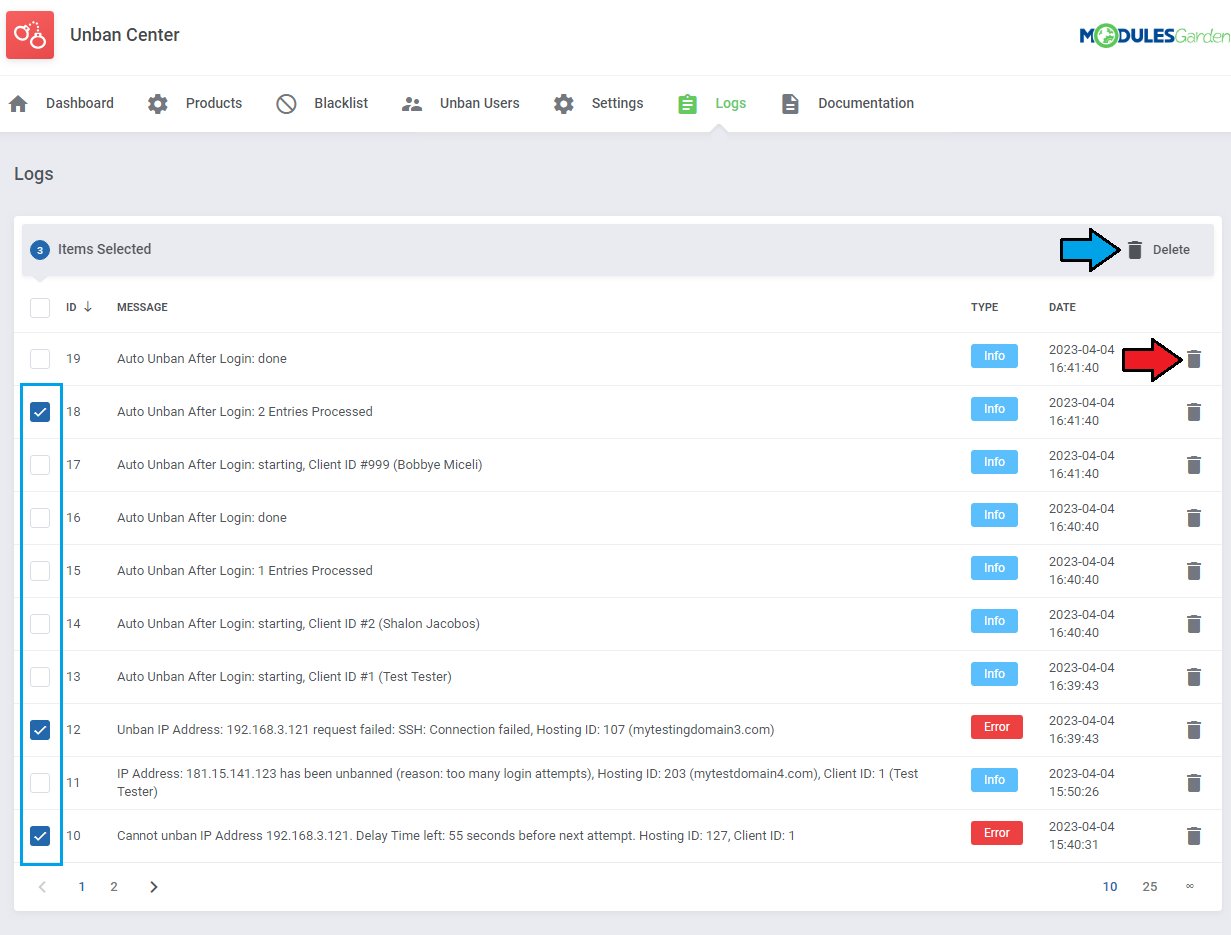
|style="padding: 10px 0px 15px 15px;"|All unban requests and their results can be found in the '' 'Logs' '' section.<br /> | |style="padding: 10px 0px 15px 15px;"|All unban requests and their results can be found in the '' 'Logs' '' section.<br /> | ||
| − | You can find here information related to user or admin who requested unban action and its date.<br/> | + | You can find here information related to the user or admin who requested unban action and its date.<br/> |
You can also clear old and unnecessary log entries by selecting them and pressing the '' 'Delete '' button. | You can also clear old and unnecessary log entries by selecting them and pressing the '' 'Delete '' button. | ||
|} | |} | ||
| Line 379: | Line 404: | ||
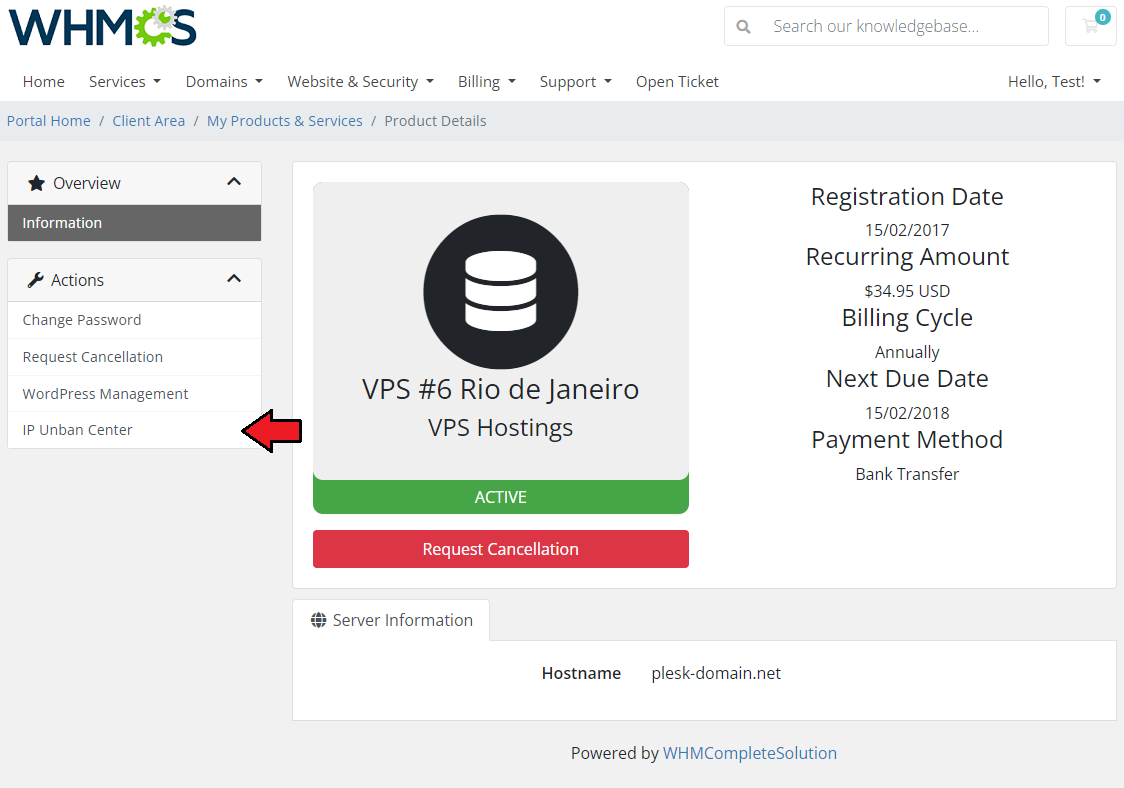
Let us proceed to the client area → '' 'Services' '' → '' 'My Services' '' in order to try out the unban action.<br /> | Let us proceed to the client area → '' 'Services' '' → '' 'My Services' '' in order to try out the unban action.<br /> | ||
Press '' 'IP Unban Center' '' on the sidebar menu to proceed to '' 'Unban Center'. ''<br/> | Press '' 'IP Unban Center' '' on the sidebar menu to proceed to '' 'Unban Center'. ''<br/> | ||
| − | '' '''Note 1:''' This button is visible only if you have enabled unban support in | + | '' '''Note 1:''' This button is visible only if you have enabled unban support in product configuration.''<br/> |
'' '''Note 2:''' If the option '' 'Auto Unban After Login' '' is enabled, clients' IP addresses will be automatically unbanned from all configured control panels the moment they log in to the WHMCS client area. | '' '''Note 2:''' If the option '' 'Auto Unban After Login' '' is enabled, clients' IP addresses will be automatically unbanned from all configured control panels the moment they log in to the WHMCS client area. | ||
| Line 387: | Line 412: | ||
|} | |} | ||
{| | {| | ||
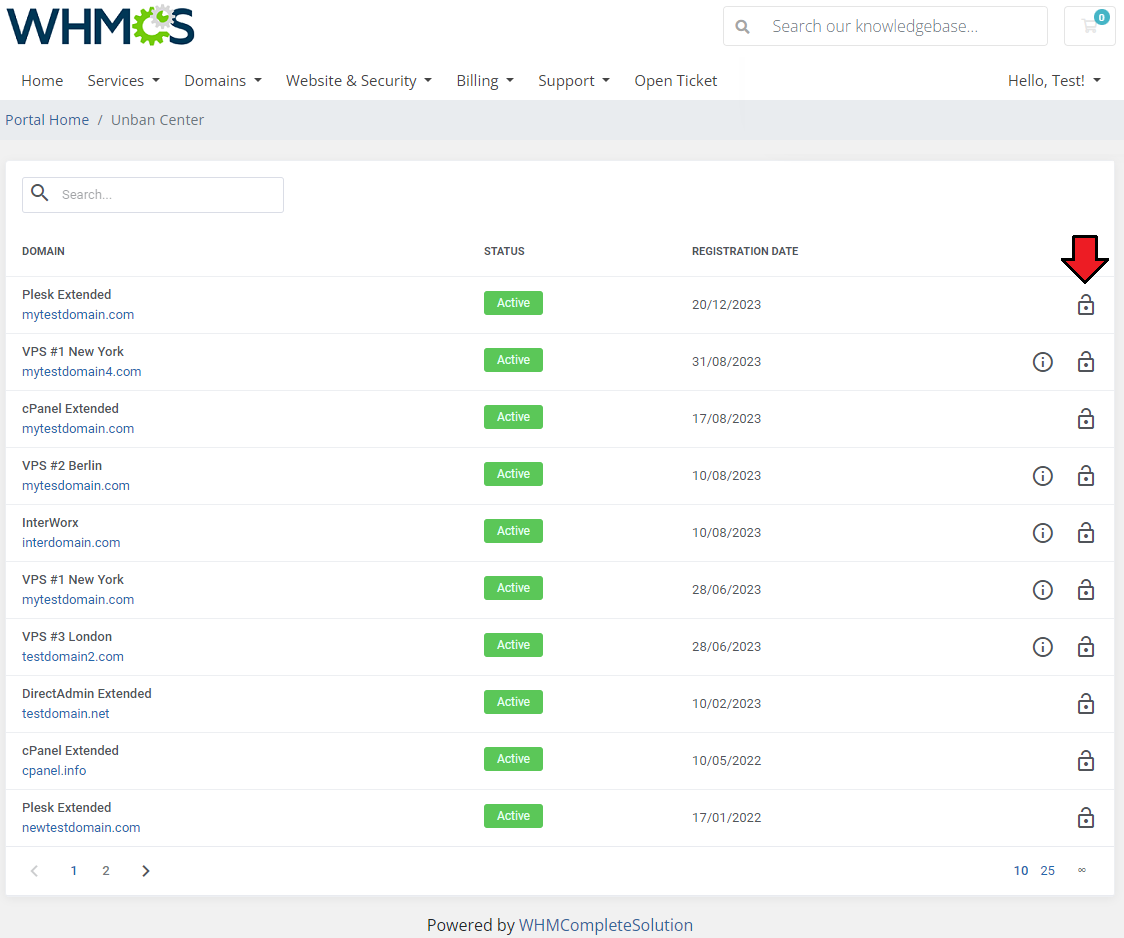
| − | |style="padding: 0px 0px 20px 15px;"|Now, select the product for which you want to | + | |style="padding: 0px 0px 20px 15px;"|Now, select the product for which you want to unban an IP address. |
|} | |} | ||
{| | {| | ||
| Line 395: | Line 420: | ||
|style="padding: 0px 0px 20px 15px;"|Data on '' 'Username' '', '' 'Password' '' and '' 'IP address' '' will be filled in automatically. <br/> | |style="padding: 0px 0px 20px 15px;"|Data on '' 'Username' '', '' 'Password' '' and '' 'IP address' '' will be filled in automatically. <br/> | ||
Optionally, you can also add a custom hostname as well as add port number and select SSL connection.<br/> | Optionally, you can also add a custom hostname as well as add port number and select SSL connection.<br/> | ||
| − | '' '''Note:''' If you leave the hostname empty, the | + | '' '''Note:''' If you leave the hostname empty, the server details assigned to that product will be used instead. |
Next, leave the default client's IP address to unban or provide a custom one. | Next, leave the default client's IP address to unban or provide a custom one. | ||
| Line 409: | Line 434: | ||
|} | |} | ||
{| | {| | ||
| − | |style="padding: 0px 0px | + | |style="padding: 0px 0px 15px 15px;"|Once the action is completed, the IP address will be unbanned immediately and you will be notified about the results. <br/> |
| + | '''''Note:''' In case a low delay time has been set up, you will need to wait for the next unban attempt.'' | ||
|} | |} | ||
{| | {| | ||
|style="padding: 0px 0px 20px 25px;"|[[File:UB2_19.png]] | |style="padding: 0px 0px 20px 25px;"|[[File:UB2_19.png]] | ||
|} | |} | ||
| + | <!-- | ||
{| | {| | ||
|style="padding: 0px 0px 20px 15px;"|In case you have set up a low delay time, you will need to wait for the next unban attempt. | |style="padding: 0px 0px 20px 15px;"|In case you have set up a low delay time, you will need to wait for the next unban attempt. | ||
| Line 420: | Line 447: | ||
|style="padding: 0px 0px 20px 25px;"|[[File:UB2_19_2.png]] | |style="padding: 0px 0px 20px 25px;"|[[File:UB2_19_2.png]] | ||
|} | |} | ||
| + | --> | ||
{| | {| | ||
|style="padding: 0px 0px 15px 15px;"|If enabled, the option will allow your clients to preview all banned IP addresses on the server.<br/> | |style="padding: 0px 0px 15px 15px;"|If enabled, the option will allow your clients to preview all banned IP addresses on the server.<br/> | ||
| Line 442: | Line 470: | ||
=Tips= | =Tips= | ||
{| | {| | ||
| − | |style="padding: 10px 0px | + | |style="padding: 10px 0px 5px 15px;"| 1. Provided data to connect with a server and view a list of banned IP addresses will be stored and available to use when trying to connect another time.<br/>Keep in mind that in case the connection data have changed, simply provide new data in the adequate fields and they will override the previous ones. |
| + | |} | ||
| + | {| | ||
| + | |style="padding: 0px 0px 30px 15px;"|2. The module uses an inbuilt email template to notify clients that their service has been unbanned.<br/> If you used the module in version previous than 2.4.0 you have to manually add following variables to the template ''("ModulesGarden Unban Center - Unban Notification")'': | ||
| + | |||
| + | *''unban_reason'' - provides the reason of banning a service | ||
| + | *''unban_ip'' - provides the banned service IP address | ||
| + | |||
| + | If you install the module for the first time in version 2.4.0 or higher, you do not have to introduce any changes in the template as all the variables are added by default. | ||
|} | |} | ||
| Line 467: | Line 503: | ||
{| | {| | ||
|style="padding: 10px 0px 30px 15px;"|An essential guidance through the process of updating the module is offered '''[https://www.docs.modulesgarden.com/How_To_Update_WHMCS_Module here]'''.<br/><br/> | |style="padding: 10px 0px 30px 15px;"|An essential guidance through the process of updating the module is offered '''[https://www.docs.modulesgarden.com/How_To_Update_WHMCS_Module here]'''.<br/><br/> | ||
| − | '''Note:''' Updating the module from any version prior to '''2.0.0''' will start the migration process to move settings | + | '''Note:''' Updating the module from any version prior to '''2.0.0''' will start the migration process to move settings configured in the previous version to the new one.<br/>These cover: the configuration status, unban type, minimum delay time, and option to unban only current IP address. Any created blacklists of IP addresses will '''not''' be migrated!<br/> |
You also need to set '''recursively writable permissions''' for '''storage''' directory in '' 'yourWHMCS/modules/addons/unbanCenter/' '' location. | You also need to set '''recursively writable permissions''' for '''storage''' directory in '' 'yourWHMCS/modules/addons/unbanCenter/' '' location. | ||
| − | <br/><br/> | + | |} |
| − | + | =Upgrade Guide= | |
| − | + | {| | |
| + | |style="padding: 10px 0px 30px 15px;"|Seeking a solution that offers greater flexibility, customization tailored to your precise needs, and unrestricted availability?<br/> There is an option that not only proves to be cost-effective in the long run but also includes prioritized support services, making it a truly valuable investment.<br/> | ||
| + | |||
| + | Opt for the [https://www.modulesgarden.com/products/whmcs/unban-center#open-source-version Open Source version] of your Unban Center For WHMCS module to unlock these benefits.<br/> Simply click on either the '''Get Source Code''' or '''Upgrade To Lifetime''' button found on the product's page in our client area to complete the one-step upgrade process, with a '''dedicated discount''' already applied.<br/> | ||
| + | |||
| + | Follow a [https://www.docs.modulesgarden.com/How_To_Upgrade_WHMCS_Module comprehensive guide] covering the transition process, the advantages it brings, and step-by-step instructions on what to do next after the order has been successfully finalized. | ||
|} | |} | ||
| Line 479: | Line 520: | ||
|} | |} | ||
{| | {| | ||
| − | |style="padding: 0px 0px 10px 15px;"|2. After update, some functionalities are not working properly.<br /> | + | |style="padding: 0px 0px 10px 15px;"|2. After the update, some functionalities are not working properly.<br /> |
''Cause:'' Your browser stores old JavaScript in its cache.<br /> | ''Cause:'' Your browser stores old JavaScript in its cache.<br /> | ||
| − | ''Solution:'' Reload full page by using the appropriate key combination to [https://en.wikipedia.org/wiki/Wikipedia:Bypass_your_cache bypass your cache]. | + | ''Solution:'' Reload the full page by using the appropriate key combination to [https://en.wikipedia.org/wiki/Wikipedia:Bypass_your_cache bypass your cache]. |
|} | |} | ||
{| | {| | ||
| Line 487: | Line 528: | ||
|} | |} | ||
{| | {| | ||
| − | |style="padding: 0px 0px | + | |style="padding: 0px 0px 10px 15px;"|4. If you are getting '' 'Syntax error or access violation' '' errors when using an address in '''IPv6''' format, make sure that '''MySQL 5.7''' or a higher version is installed. |
| + | |} | ||
| + | {| | ||
| + | |style="padding: 0px 0px 10px 15px;"|5. '''Imunify360:''' In case you encounter an error while checking the IP address status: '' 'Imunify METHOD: GetBlackListBylp CODE: 403', '' open the ''templates_c'' folder and remove the ''cookies.txt'' file. | ||
| + | |} | ||
| + | {| | ||
| + | |style="padding: 0px 0px 30px 15px;"|6. In case "Auto Unban After Login" tasks are not added to the queue, make sure you have logged in to the client area manually. If masquerading as a client, the tasks will not be created. | ||
|} | |} | ||
Latest revision as of 10:30, 28 January 2025
Contents |
[edit] About Unban Center For WHMCS
| Unban Center For WHMCS allows your clients to easily unban IP addresses in such submodules as cPanel, DirectAdmin and Plesk, directly from your WHMCS. As an appealing alternative, the module will let you create your own submodules so as to integrate them with other systems and control panels. |
- Client Area Features:
| ✔ Automatically Detect And Unban IP Addresses From: |
| ✔ Control Panel |
| ✔ Control Panel Hosted On Client's VPS/Dedicated Servers |
| ✔ Unban IP Addresses From Control Panels Automatically After Logging In To WHMCS Client Area |
| ✔ Check If IP Address Is Banned |
| ✔ Show Reason Of Ban |
| ✔ Show All Banned IP Addresses On VPS/Dedicated Servers |
| ✔ View Time Left Until Next Available Unban Action |
| ✔ Auto Complete VPS/Dedicated Server Credentials To Unban IP Addresses |
| ✔ Receive Email Notification After Unbanning IP Address Automatically |
- Admin Area Features:
| ✔ View Dashboard Summary: |
| ✔ Enabled Products |
| ✔ Pending Tasks |
| ✔ Available Services |
| ✔ Last Cron Run |
| ✔ Configure Unban Features Per Product: |
| ✔ Toggle Unban Availability |
| ✔ Define Minimum Unban Delay - Protection From Abuse |
| ✔ Configure Unban Location On Control Panel |
| ✔ Prevent Clients From Unbanning IP Addresses Different Than Their Current One |
| ✔ Automatically Unban Clients After They Log In To WHMCS Client Area |
| ✔ Choose Email Template To Notify Clients About Auto Unban |
| ✔ Show Ban Reason Before Unban Attempt |
| ✔ Show All Banned IP Addresses On Client's Dedicated/VPS Server |
| ✔ Toggle Debug Mode |
| ✔ Define Global Blacklists Of Elements Not To Be Unbanned: |
| ✔ IP Addresses |
| ✔ IP Ranges |
| ✔ Unban Single Client From Chosen Product: |
| ✔ Hosting Account |
| ✔ Dedicated/VPS Server |
| ✔ Check If Client IP Address Is Banned |
| ✔ Enable Automatic Log Cleaning After Specified Time |
| ✔ View And Delete Logs |
- Supported Modules:
| ✔ cPanel & cPanel Extended For WHMCS - CSF, cPHulk And Imunify360 |
| ✔ Plesk & Plesk Extended For WHMCS - CSF And Fail2Ban |
| ✔ DirectAdmin & DirectAdmin Extended For WHMCS - CSF And IPs Blacklist |
| ✔ InterWorx - Native Firewall |
- General Info:
| ✔ Supports IPv4 And IPv6 |
| ✔ Requires MySQL 5.7 And Later For IPv6 |
| ✔ Plesk Functionality Requires SSH Access And Root Account |
| ✔ Intuitive Creation Of Additional Submodules |
| ✔ Fully Integrated With Lagom WHMCS Client Theme |
| ✔ Multi-Language Support |
| ✔ Supports PHP 8.2 Back To PHP 8.1 |
| ✔ Supports WHMCS Themes "Six" And "Twenty-One" |
| ✔ Supports WHMCS V8.12 Back To WHMCS V8.9 |
| ✔ Requires ionCube Loader V12 Or Later |
| ✔ Easy Module Upgrade To Open Source Version |
[edit] Installation
| This tutorial will show you how to successfully install and configure Unban Center For WHMCS. We will guide you step by step through the whole installation and configuration process. |
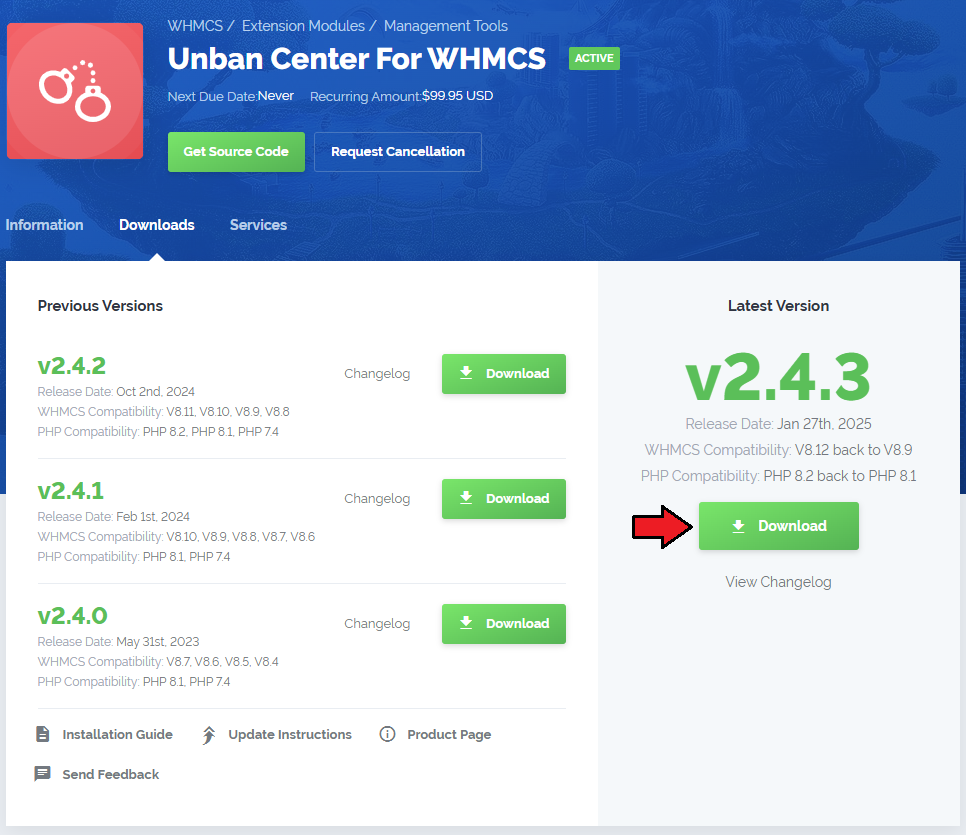
| 1. Log in to our client area and download the module. |
|
| 2. In the downloaded file you might find one or two packages that support different PHP versions. In the most recent versions of the module, you will find only one package that supports PHP 7.4 and later. |
| Previous updates of the module may contain two packages dedicated to various PHP versions. The first one supports PHP 5.6 up to PHP 7.3, and the second one addresses PHP 7.4 up to PHP 8.1. |

|
| Note: You can check the current PHP version in your WHMCS. To do so, proceed to 'Utilities' → 'System' → 'PHP Info'. |
| 3. Extract the package and upload its content into the main WHMCS directory. The content of the package to upload should look like this. |
| 4. When you install Unban Center For WHMCS for the first time, you have to rename the 'license_RENAME.php' file. The file is located in 'modules/addons/unbanCenter/license_RENAME.php'. Rename it from 'license_RENAME.php' to 'license.php'. |
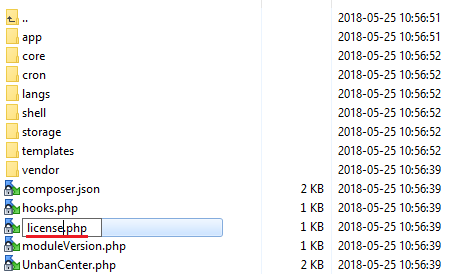
|
| 5. In order to configure your license key, you have to edit the previously renamed 'license.php' file. Enter your license key between the quotation marks as presented on the following screen. You can find your license key in our client area → 'My Products'. |

|
| 6. In the next step, set up the 'storage' folder as recursively writable. This folder is available at 'your_whmcs/modules/addons/unbanCenter/' . |
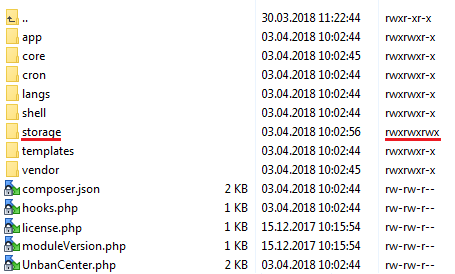
|
| 7. Now you have to activate the module in your WHMCS system. Log in to your WHMCS admin area. Go to 'Setup' → 'Addon Modules'. Afterwards, find 'Unban Center' and press the 'Activate' button. |
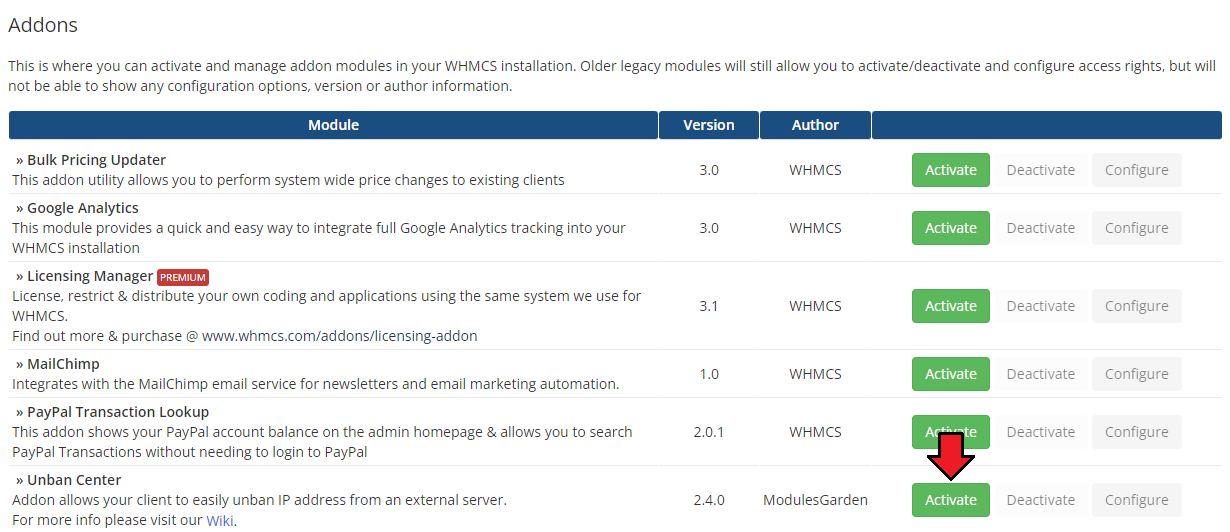
|
| 8. In the next step, you need to permit access to this module. To do so, click on the 'Configure' button, tick 'Full Administrator' and press 'Save Changes'. |
|
9. Finally, set up the cron command line provided below and define its frequency (1-minute interval is suggested).
php -q /yourWHMCS/modules/addons/unbanCenter/cron/cron.php queue This will allow us to enable the feature that automatically unbans customers' IP addresses after they log in to the WHMCS client area. |
| 10. You have just successfully installed Unban Center For WHMCS! You can access your module at 'Addons' → 'Unban Center'. |
|
[edit] Configuration and Management
| Unban Center For WHMCS allows you to provide your clients with an ability to easily unban desired IP addresses from external servers. Additionally, you are able to protect specific IP addresses from the unban action. |
[edit] Unban Types
| Our module has been designed in such a way so as to allow you to manage banned IP addresses on several different panels of a particular type. These are:
ip_ban <command>
It is also possible to unban only the current IP address. You simply need to select such option (i.e. Allow User To Unban Current IP Address Only) |
[edit] Dashboard
| In the dashboard you can find the summary of currently enabled unban configuration for products, pending tasks, active services, and the last cron run. The tasks list allows you to follow the current auto-unbans for the clients who log in to their WHMCS client area (the option may be enabled in product configuration). These will be performed via cron. |
|
[edit] Configuration of Products
| Here we show you how you can easily enable and configure unban action for your selected products. Let us show you how to enable unban functionality for cPanel Extended product. |
|
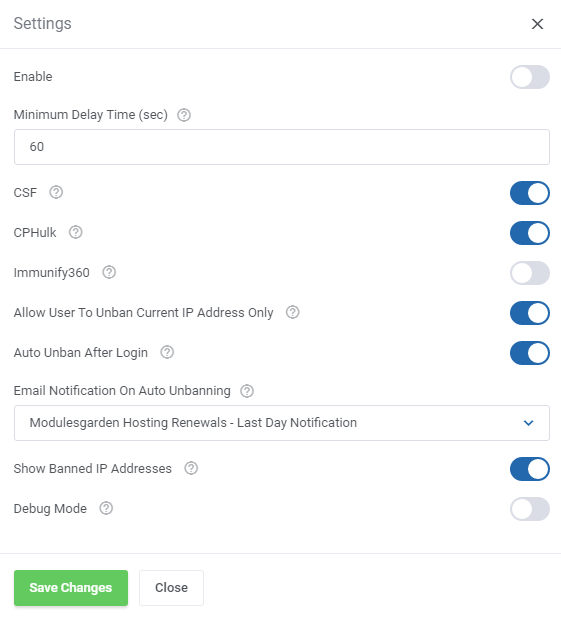
| Press 'Enable' and then define 'Minimum Delay Time' intervals to declare how often your client will be able to perform unban action on a specific product. Next, enable the desired unban type/types. For cPanel there are:
Additionally, you can permit your clients to unban their current IP address as well as automatically unban them after they log in - Auto Unban After Login to client area (cron execution is required). Select the email template that will be used to notify clients when their IP address has been automatically unbanned. Important: Since version 2.4.0 of the module, the inbuilt template has been updated and new variables added: "unban_reason" and "unban_ip". You can also allow your clients to see all banned IP addresses' from the panel on their VPS/Dedicated Servers.
|
|
[edit] Configuration of Blacklists
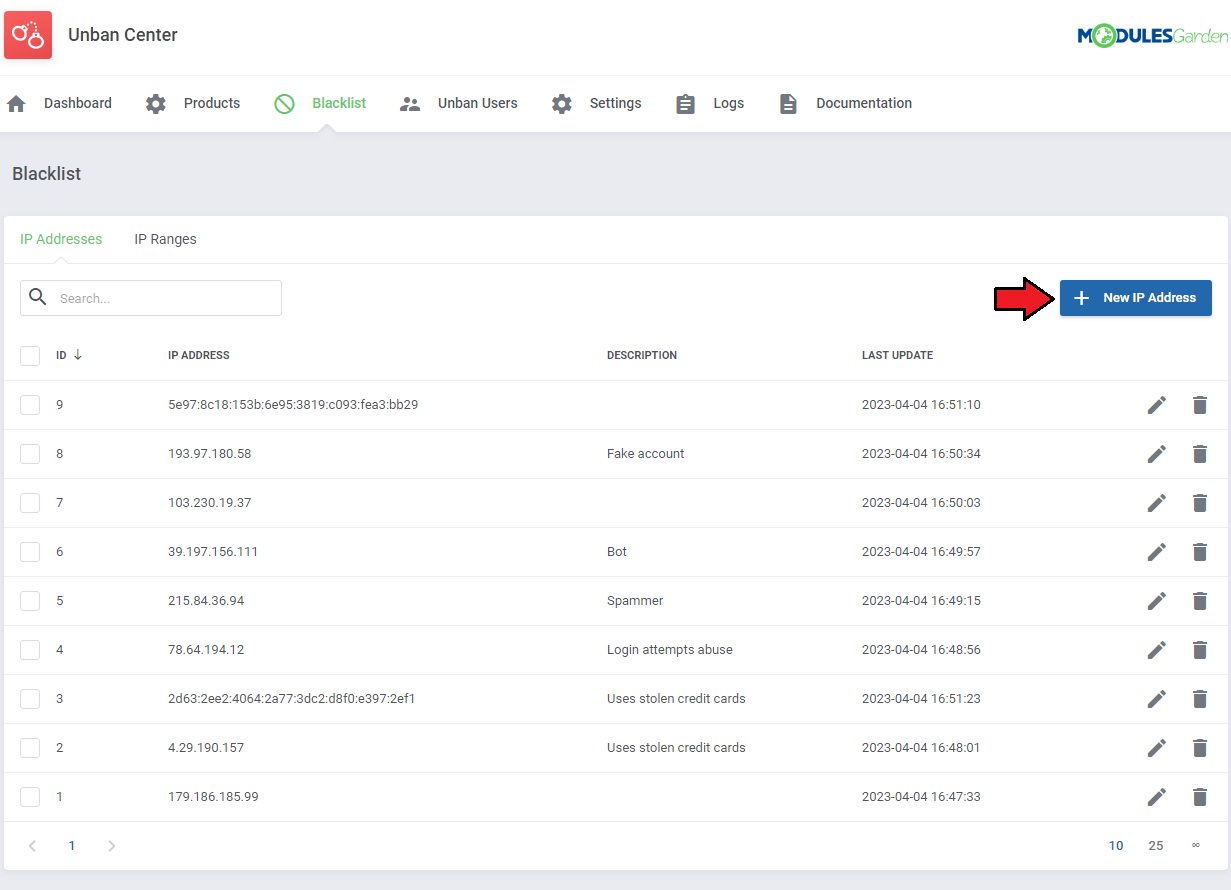
| The blacklist section allows you to create lists of IP addresses that cannot be unbanned from your panels. This section is divided into two tabs. The first one allows you to create a blacklist of a single IP addresses. |
|
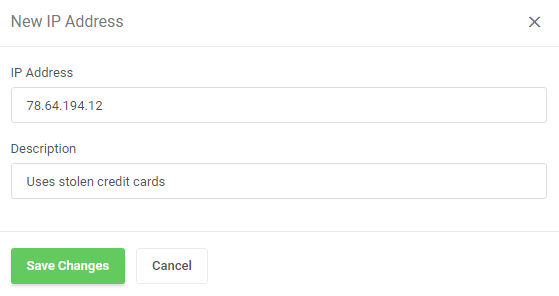
| Next, provide the IP address you want to add to the blacklist (either in IPv4 or IPv6 format). Additionally, you can provide a description for easier identification. |
|
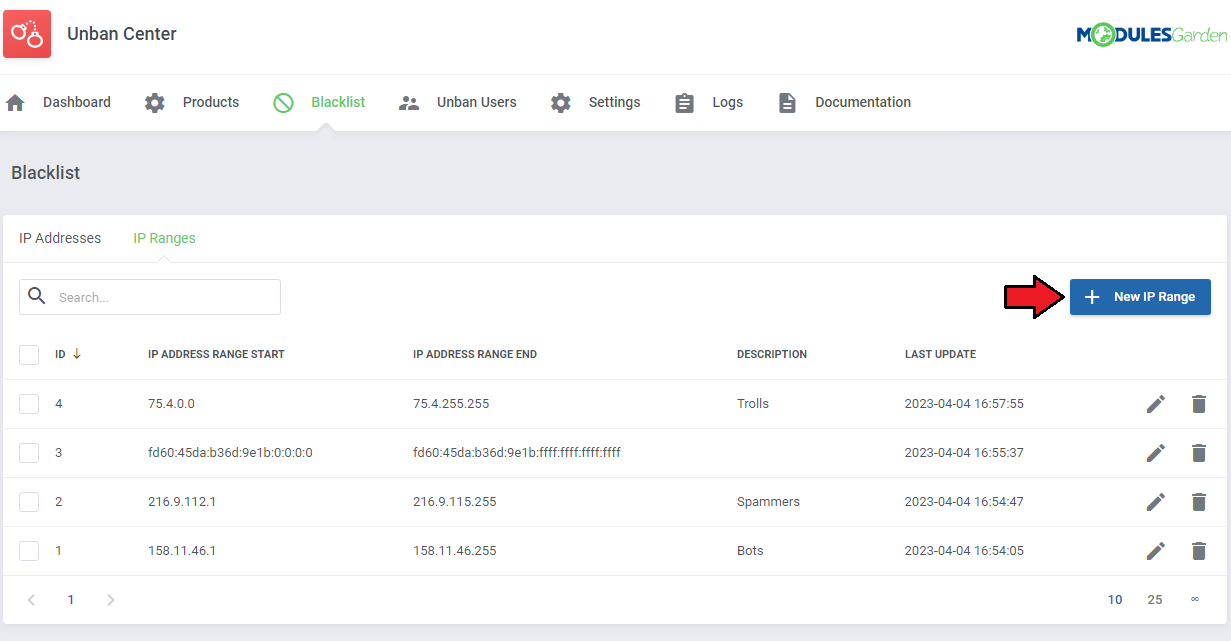
| The second, 'IP Ranges' tab allows you to define entire ranges of IP addresses that will be prevented from being unbanned. Press 'New IP Range' to add a new blacklisted range. |
|
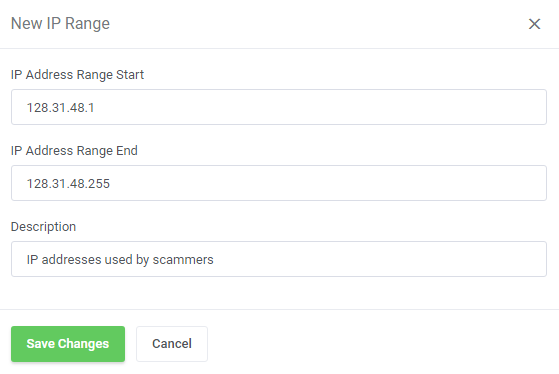
| Now, provide the start and end of IP addresses range (in either IPv4 or IPv6 format). Additionally, you can provide a description for easier identification. |
|
[edit] Unban Users
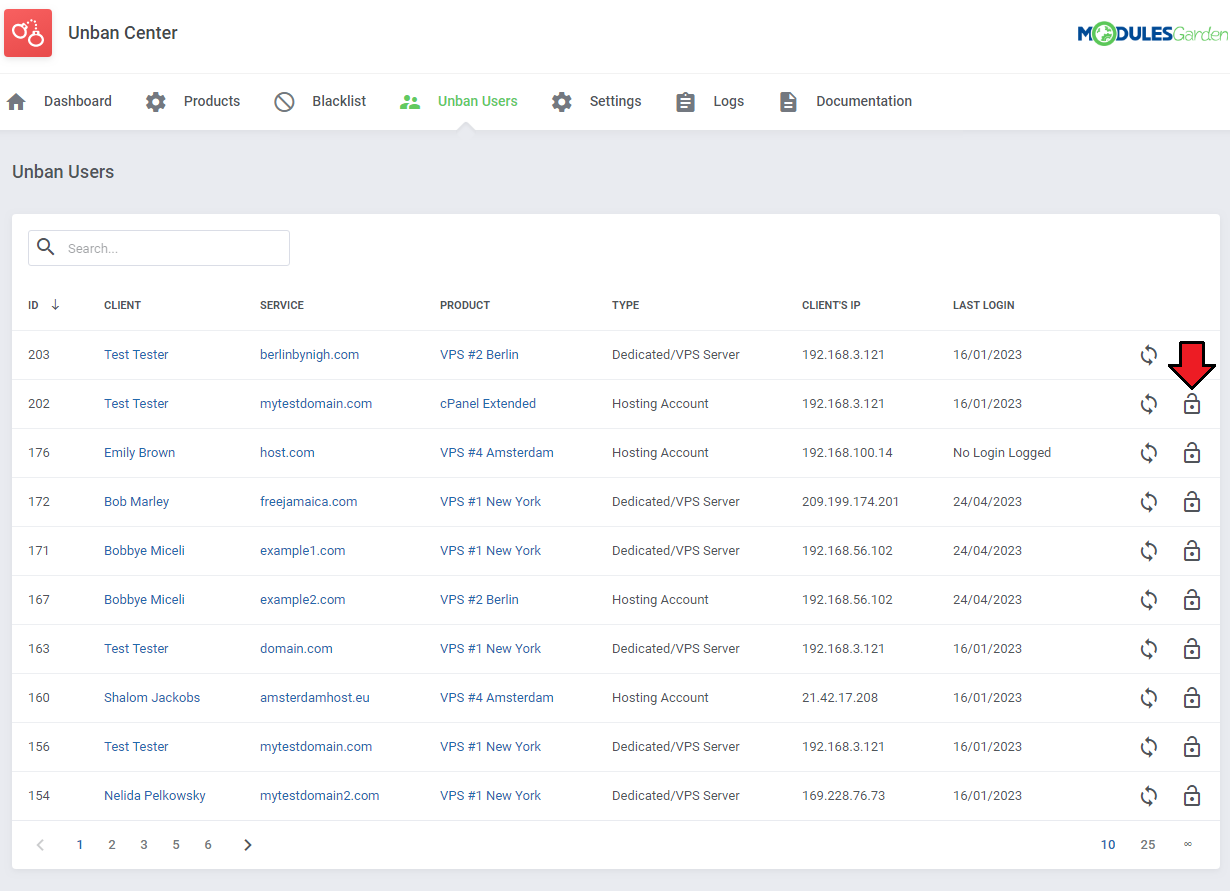
| This section allows you to unban your client's IP address from any external server on which they own an account. You can unban the IP address assigned to your client's account as well as any custom IP address. |
|
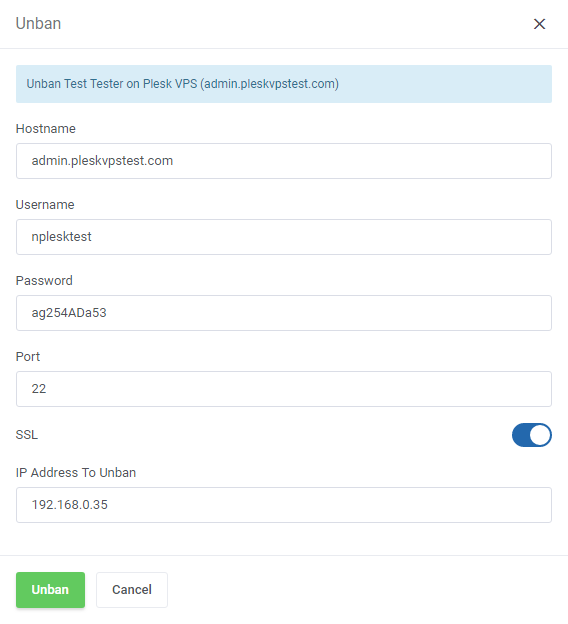
| Data on 'Username' , 'Password' and IP address will be filled in automatically. You can optionally add a custom hostname as well as add port number and select SSL connection. Next, leave the default client's IP address to unban or provide a custom one. Note: These connection details will appear only in case of dedicated/VPS products used by the client. For hosting accounts, only 'IP Address To Unban' field is available. |
|
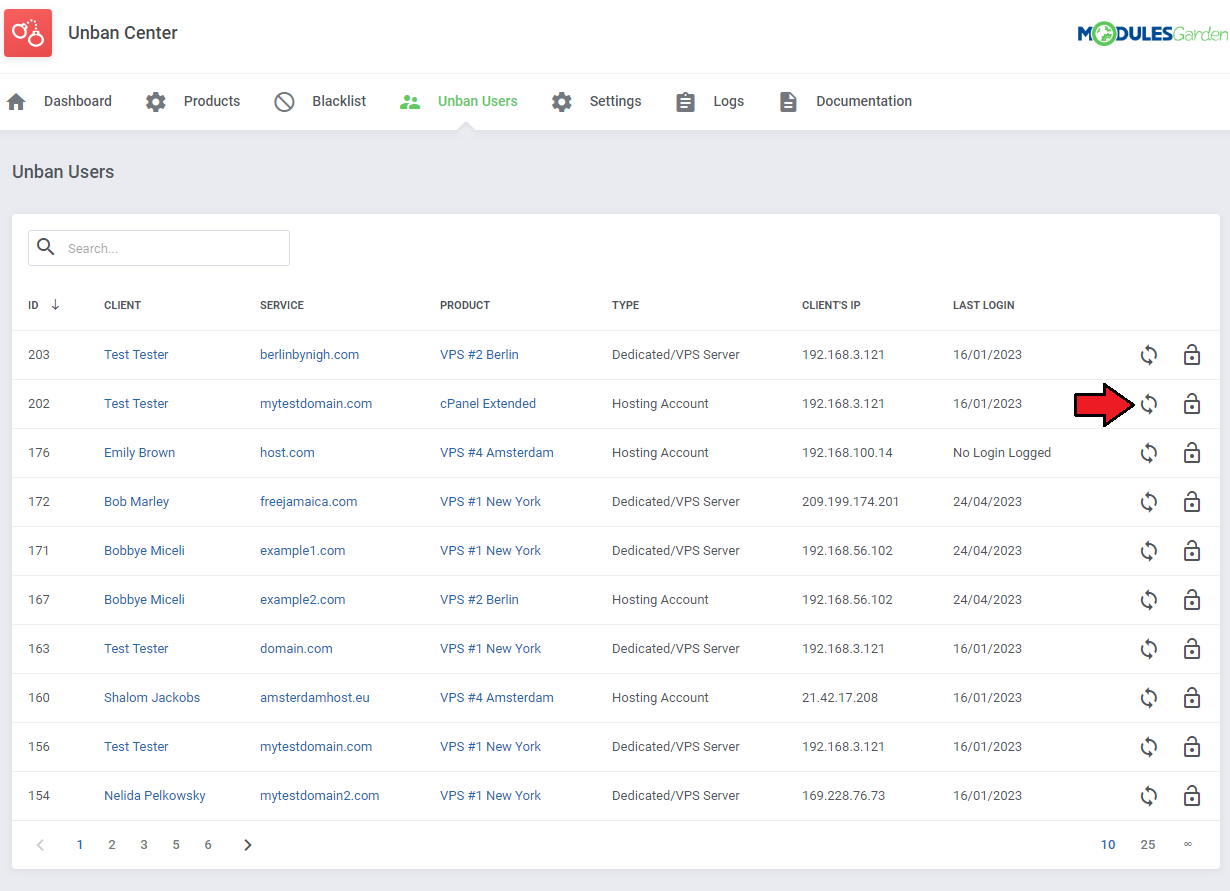
| You may also check if the client's IP address has a banned status without unbanning it. Simply press 'Check Status' on the users list. |
|
| Now, use the default client's IP address or, alternatively, provide a custom IP address to check its ban status on the control panel. |
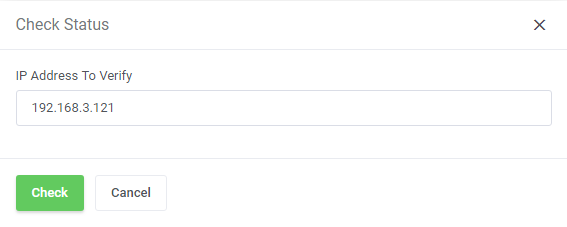
|
[edit] Settings
| Define the setting responsible for the automatic removal of old log entries after the desired number of days. Enter a number between 1 and 10000 to specify the time after which the log will be deleted. If you enter "0", this option will be disabled and logs will not be cleared. Please keep in mind that it is the WHMCS daily cron that is responsible for clearing logs, you do not have to set any other cron job. |

|
[edit] Logs
| All unban requests and their results can be found in the 'Logs' section. You can find here information related to the user or admin who requested unban action and its date. |
|
[edit] Client Area
|
Let us proceed to the client area → 'Services' → 'My Services' in order to try out the unban action. |
|
| Now, select the product for which you want to unban an IP address. |
|
| Data on 'Username' , 'Password' and 'IP address' will be filled in automatically. Optionally, you can also add a custom hostname as well as add port number and select SSL connection. Next, leave the default client's IP address to unban or provide a custom one. |
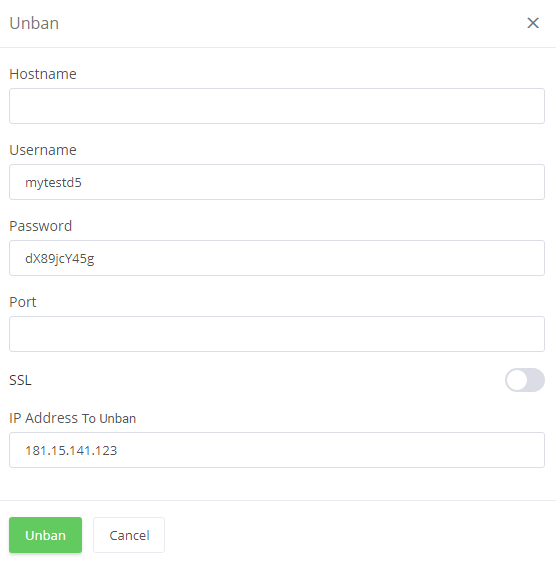
|
| Note: These connection details will appear only in case of dedicated/VPS products used by the client. For hosting accounts, only 'IP Address To Unban' field is available. |
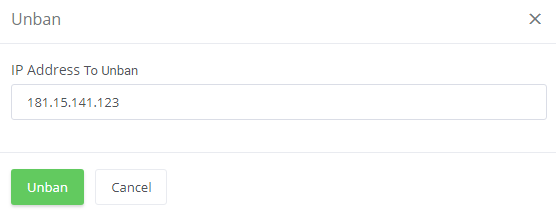
|
| Once the action is completed, the IP address will be unbanned immediately and you will be notified about the results. Note: In case a low delay time has been set up, you will need to wait for the next unban attempt. |

|
| If enabled, the option will allow your clients to preview all banned IP addresses on the server. Important: This feature is only valid for dedicated/VPS servers. |
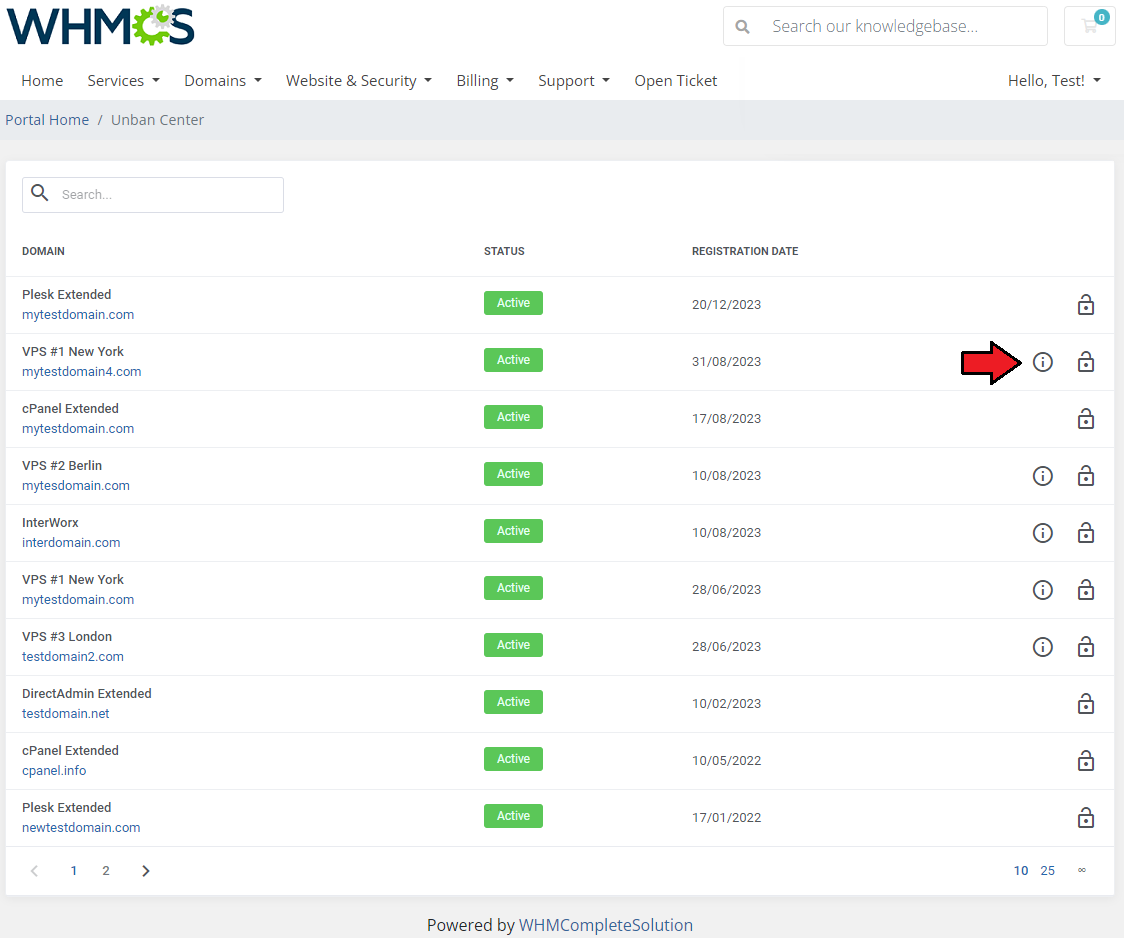
|
| When you try to open this section for the first time, the 'Server Details popup may show up. Provide your control panel credentials and press 'Connect' . |
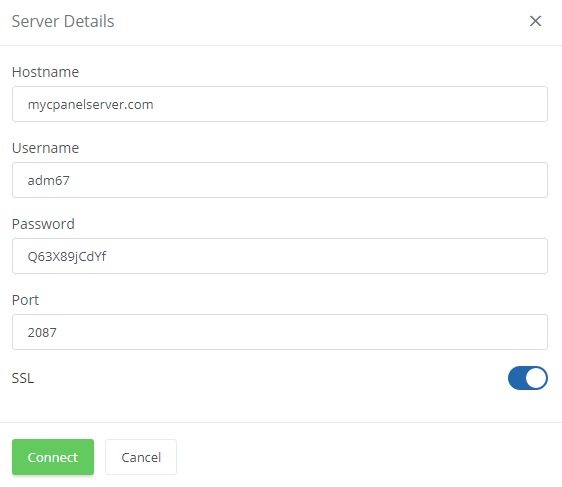
|
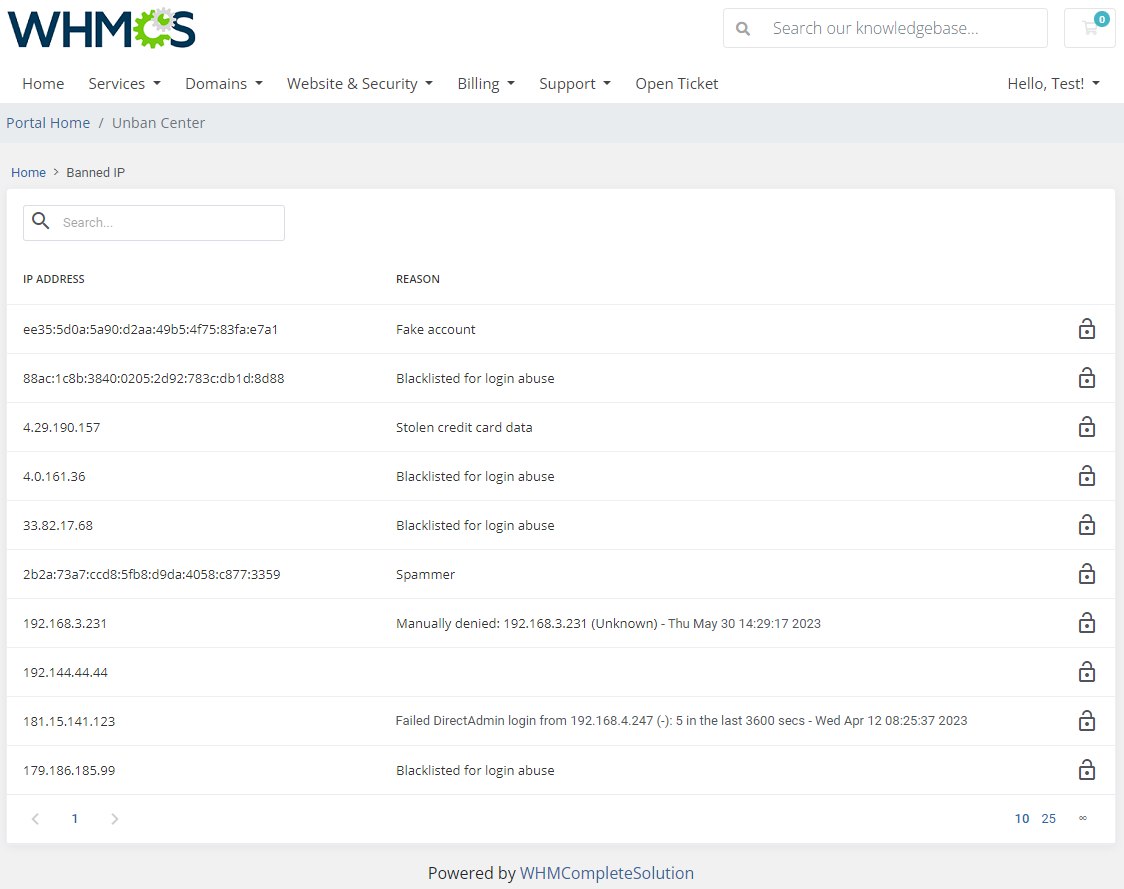
| Here you can see the list of all banned IP addresses on the control panel of a server. You can unban them in the same way as explained in the previous steps. |
|
[edit] Tips
| 1. Provided data to connect with a server and view a list of banned IP addresses will be stored and available to use when trying to connect another time. Keep in mind that in case the connection data have changed, simply provide new data in the adequate fields and they will override the previous ones. |
| 2. The module uses an inbuilt email template to notify clients that their service has been unbanned. If you used the module in version previous than 2.4.0 you have to manually add following variables to the template ("ModulesGarden Unban Center - Unban Notification"):
If you install the module for the first time in version 2.4.0 or higher, you do not have to introduce any changes in the template as all the variables are added by default. |
[edit] Creating 3rd Party Submodule
| The main goal of Unban Center For WHMCS is to allow you to quickly and easily create additional submodules. All you need is a little knowledge of PHP programming language and documentation of integrated module API. |
| Start with renaming the copy of the 'Sample' folder to the name used by your 3rd party module. Let us say that the folder with the module you wish to integrate with Unban Center For WHMCS is located in 'your_whmcs/modules/servers/' and is named 'DummyIntegration'. |
[edit] Update Instructions
| An essential guidance through the process of updating the module is offered here. Note: Updating the module from any version prior to 2.0.0 will start the migration process to move settings configured in the previous version to the new one. |
[edit] Upgrade Guide
| Seeking a solution that offers greater flexibility, customization tailored to your precise needs, and unrestricted availability? There is an option that not only proves to be cost-effective in the long run but also includes prioritized support services, making it a truly valuable investment. Opt for the Open Source version of your Unban Center For WHMCS module to unlock these benefits. Follow a comprehensive guide covering the transition process, the advantages it brings, and step-by-step instructions on what to do next after the order has been successfully finalized. |
[edit] Common Problems
| 1. When you have problems with connection, check whether your SELinux or firewall does not block ports. |
| 2. After the update, some functionalities are not working properly. Cause: Your browser stores old JavaScript in its cache. |
| 3. If you were using any version of the module prior to 2.0.0, note that after upgrading to the latest version the template integration code is no longer needed. |
| 4. If you are getting 'Syntax error or access violation' errors when using an address in IPv6 format, make sure that MySQL 5.7 or a higher version is installed. |
| 5. Imunify360: In case you encounter an error while checking the IP address status: 'Imunify METHOD: GetBlackListBylp CODE: 403', open the templates_c folder and remove the cookies.txt file. |
| 6. In case "Auto Unban After Login" tasks are not added to the queue, make sure you have logged in to the client area manually. If masquerading as a client, the tasks will not be created. |