Unban Center 1.X For WHMCS
Contents |
About Unban Center For WHMCS
| Unban Center For WHMCS allows your clients to easily unban IP addresses in submodules such as cPanel, DirectAdmin, InterWorx and Plesk directly from your WHMCS client area. Additionally, the module lets you create your own submodules in order to integrate them with other systems and control panels. |
- Client Area Features:
| ✔ Automatically Detect And Unban IP Address From: |
| ✔ Control Panel |
| ✔ Control Panel Hosted On Client's VPS |
| ✔ Check If IP Address Is Banned |
| ✔ Show Reason Of Ban |
| ✔ View Time Until Next Available Unban Action |
- Admin Area Features:
| ✔ Configure Per Product: |
| ✔ Enable/Disable Unban Ability |
| ✔ Configure Unban Behavior |
| ✔ Define Black List Of IP Addresses - Protected From Unban Action |
| ✔ Define Unban Delay - Protection From Abuse |
| ✔ Define If Customer Can Unban Other IP Address Than Their Current One |
| ✔ Set Up Default Settings |
| ✔ Define Products Using Product Group Settings - Control Panel |
| ✔ Define Products Using Default Settings - VPS / Dedicated Server |
| ✔ Unban Single Client From Chosen Product |
| ✔ Unban Multiple Clients From Chosen Control Panel |
| ✔ Check If Client IP Address Is Banned |
| ✔ View And Clear Logs |
- Supported Modules:
| ✔ cPanel & cPanel Extended For WHMCS - CSF and cPHulk |
| ✔ Plesk & Plesk Extended For WHMCS - Fail2Ban |
| ✔ DirectAdmin & DirectAdmin Extended For WHMCS - CSF |
| ✔ InterWorx & InterWorx Extended For WHMCS - Native Firewall |
- General Info:
| ✔ Supports IPv4 and IPv6 |
| ✔ Intuitive Creation Of Additional Submodules |
| ✔ Multi-Language Support |
| ✔ Supports PHP 5.4 Up To PHP 7 |
| ✔ Supports WHMCS Templates Five and Six |
| ✔ Supports WHMCS V6 and V7 |
Installation
| This tutorial will show you how to successfully install and configure Unban Center For WHMCS. We will guide you step by step through the whole installation and configuration process. |
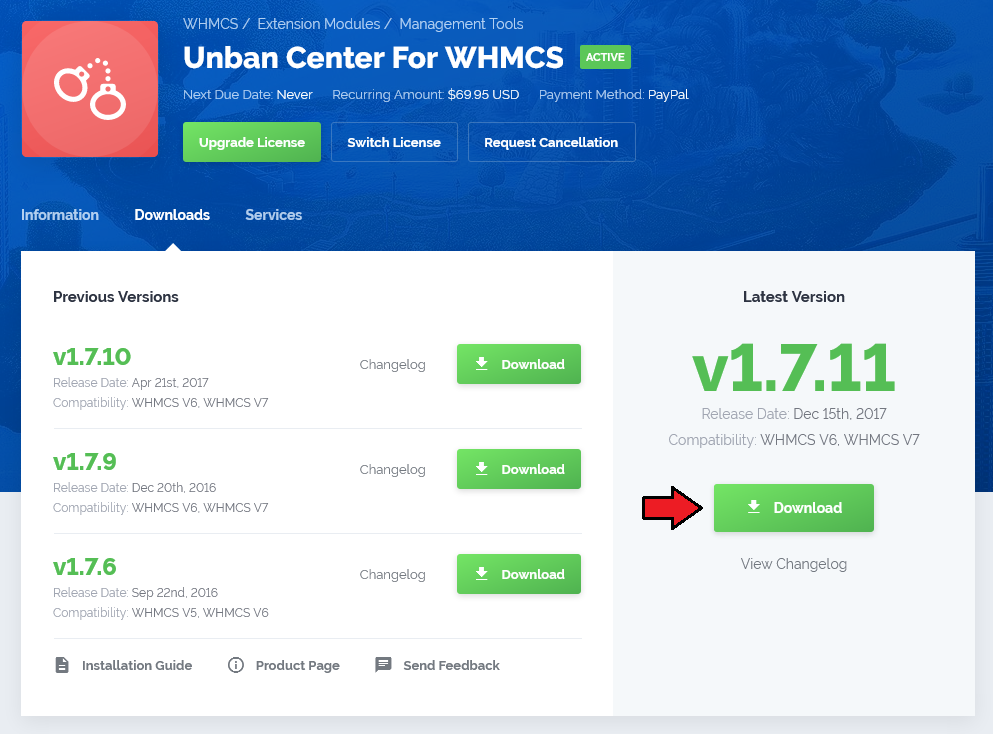
| 1. Log in to our client area and download the module. |
|
| 2. In the downloaded file you will find two packages that support different PHP versions. As presented on the screen below, the first one is dedicated to PHP 7, while the second one is aimed at PHP 5.4 up to PHP 5.6. It does not apply to open source versions. Note: You can check current PHP version in your WHMCS. To do so proceed to 'Utilities' → 'System' → 'PHP Info'. |

|
| 3. Extract the downloaded file and choose the one with the right PHP version. Upload and extract the PHP file into the main WHMCS directory. The content of PHP version files should look like this. |

|
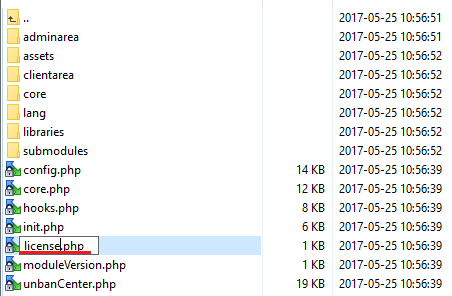
| 4. When you install Unban Center For WHMCS for the first time you have to rename 'license_RENAME.php' file. File is located in 'modules/addons/unbanCenter/license_RENAME.php'. Rename it from 'license_RENAME.php' to 'license.php'. |
|
| 5. In order to configure your license key, you have to edit the previously renamed 'license.php' file. Enter your license key between quotation marks as presented on the following screen. You can find your license key in our client area → 'My Products'. |

|
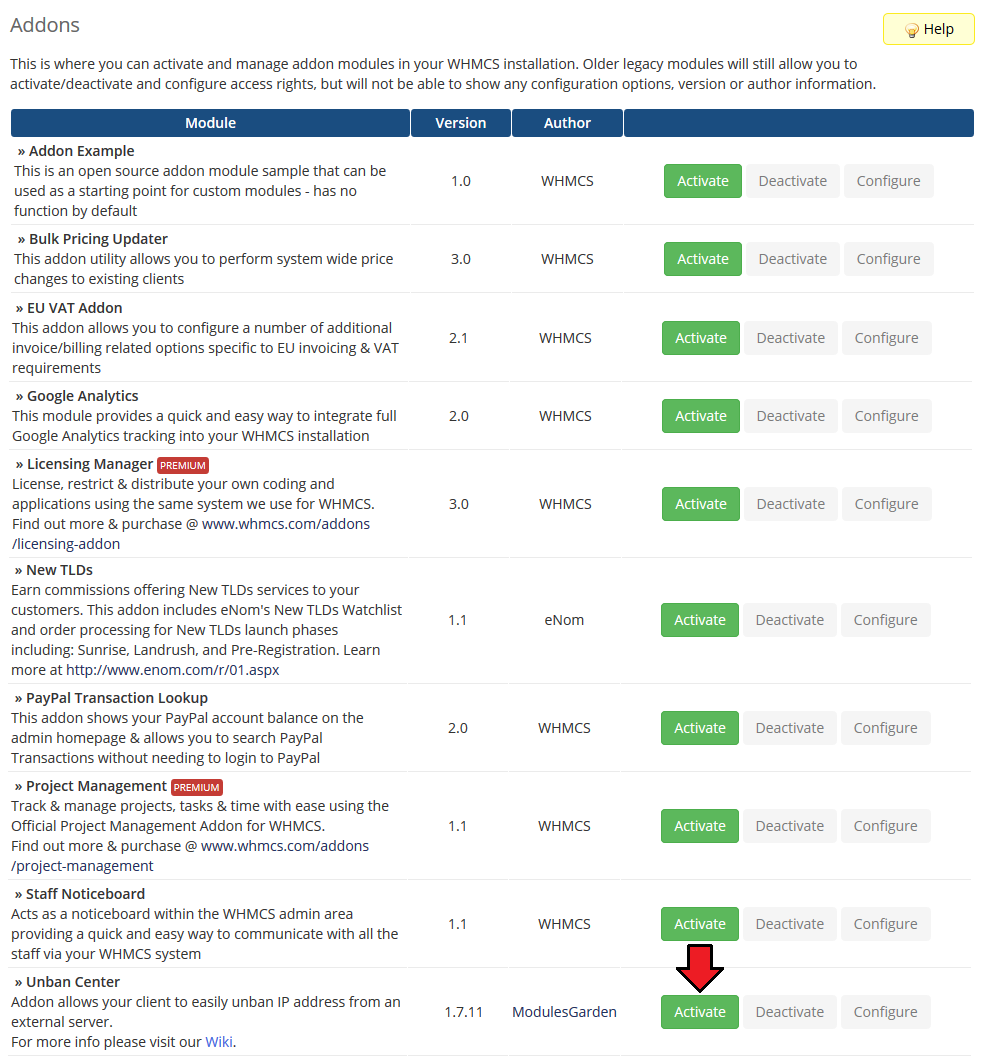
| 6. Now you have to activate the module in your WHMCS system. Log in to your WHMCS admin area. Go to 'Setup' → 'Addon Modules'. Afterwards, find 'Unban Center' and press 'Activate' button. |
|
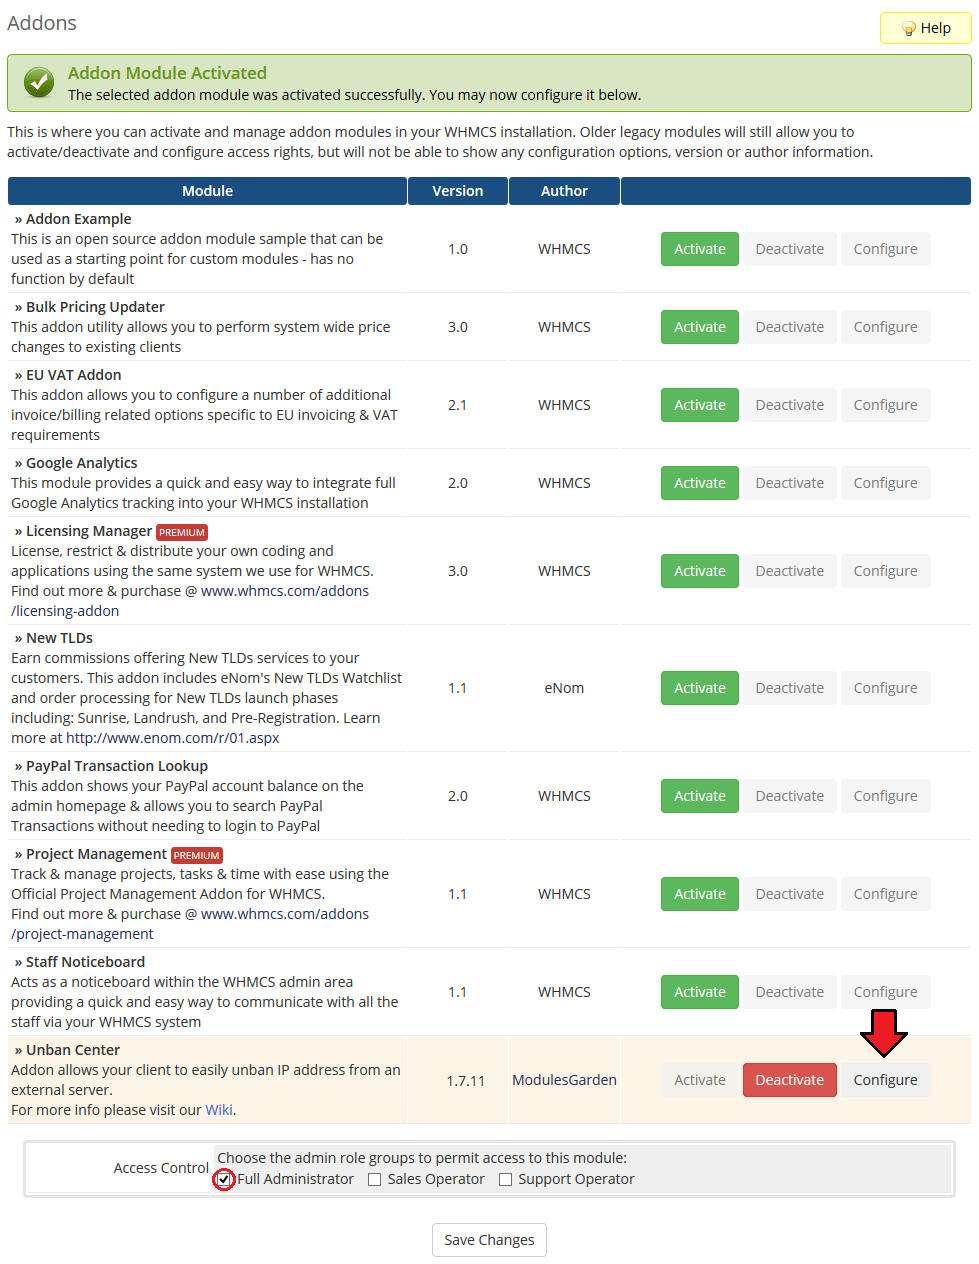
| 7. In the next step you need to permit access to this module. To do so, click on 'Configure' button, tick 'Full Administrator' and press 'Save Changes'. |
|
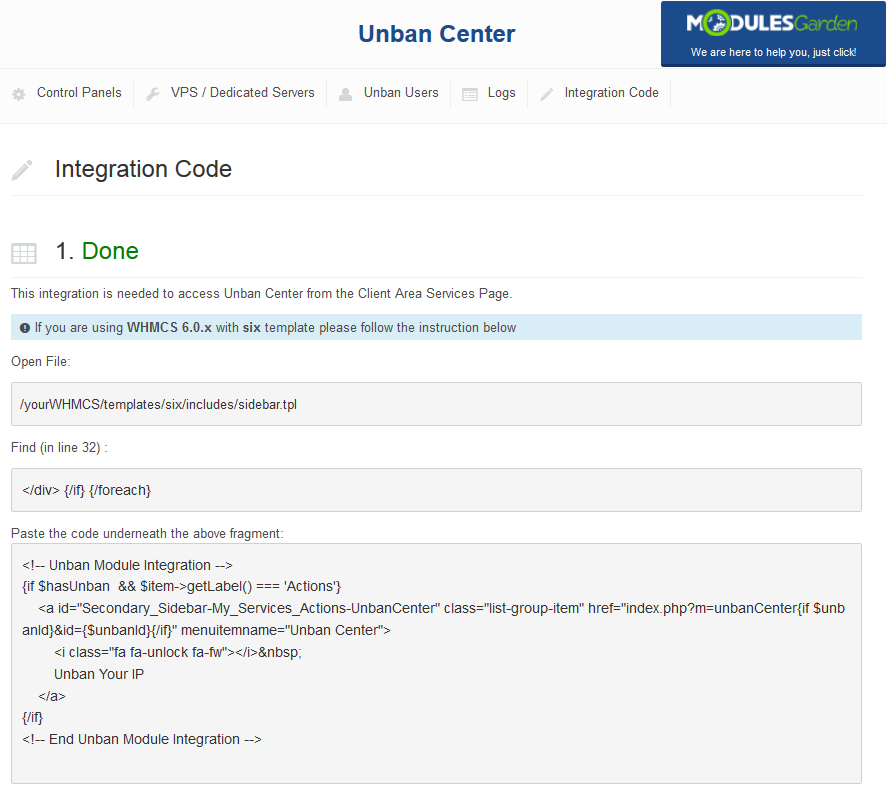
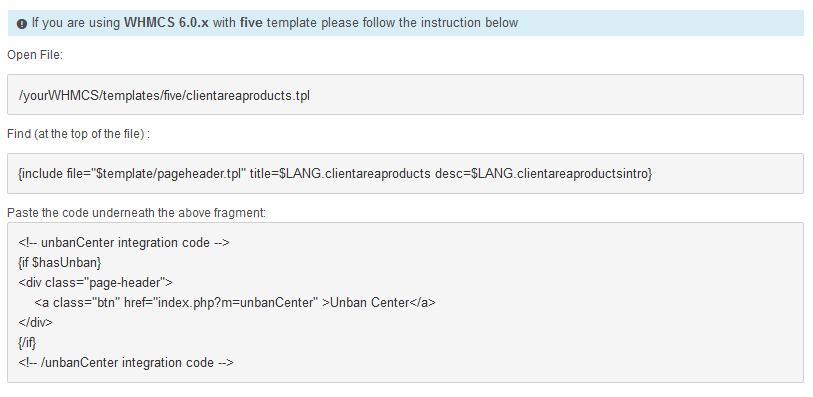
| 8. Go to 'Addons' → 'Unban Center' → 'Integration Code' tab and follow the instructions of integration to allow access from the client area. The integration codes differ depending on the WHMCS version and template you are using. |
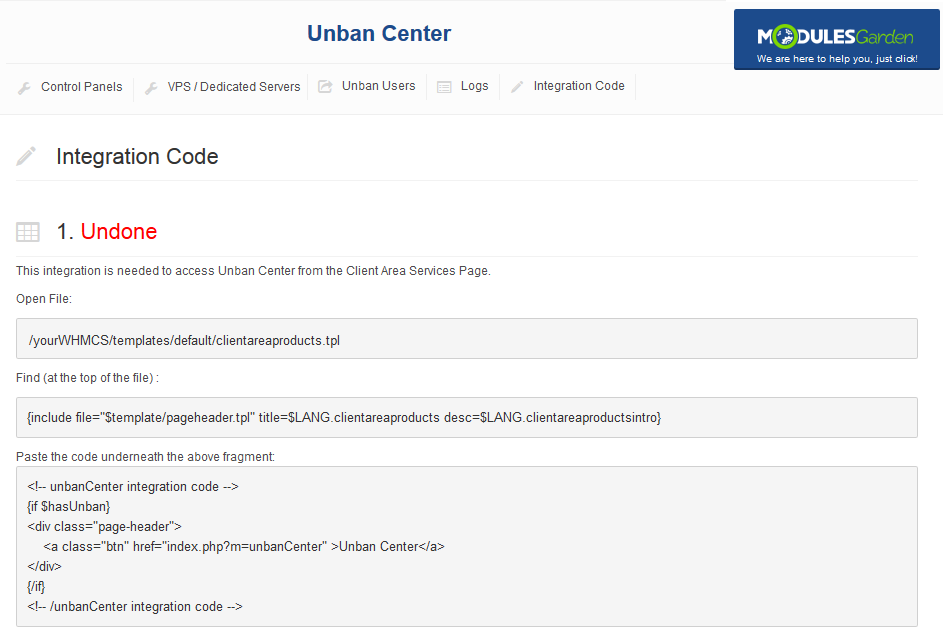
|
If you run Unban Center on the latest WHMCS V6.x.x then you will have to firstly decide which template you use:
|
|
|
|
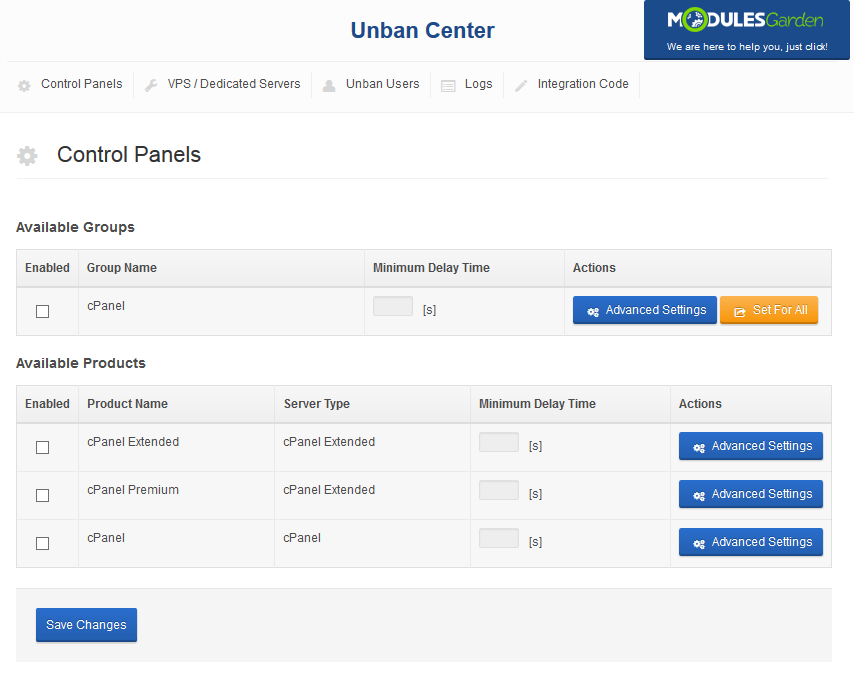
| 9. You have just successfully installed Unban Center For WHMCS! You can access your module at 'Addons' → 'Unban Center'. |
|
Configuration and Management
| Unban Center For WHMCS allows you to provide your clients with an ability to easily unban desired IP addresses from external server. Additionally, you are able to protect specific IP addresses from the unban action. |
Unban Types
| Our module has been designed in a way that you may now manage banned IP addresses on several different panels of particular type. These are:
It is also possible to unban only the current IP address. You simply need to select such option (i.e. Allow the user to unban a current IP address only) |
| Now read the below sections to learn about advanced configuration of banned IPs management in both control panels and VPS/dedicated servers. |
Control Panels
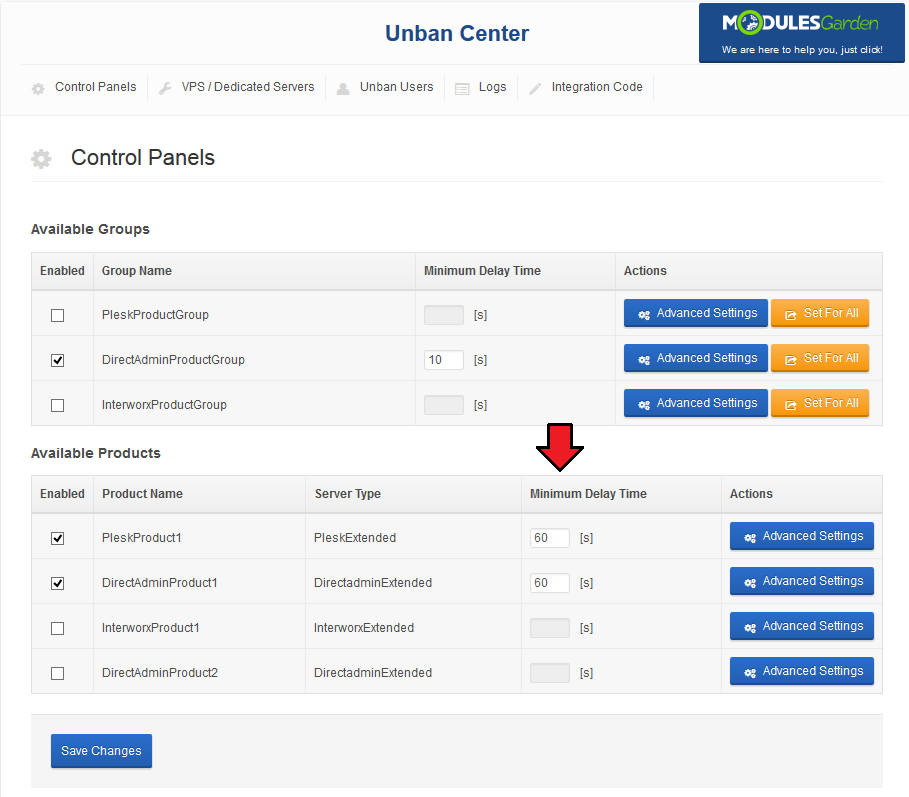
| At the 'Control Panels' tab you can easily enable and configure unban action for all or for chosen servers only. |
Configuration of Single Product
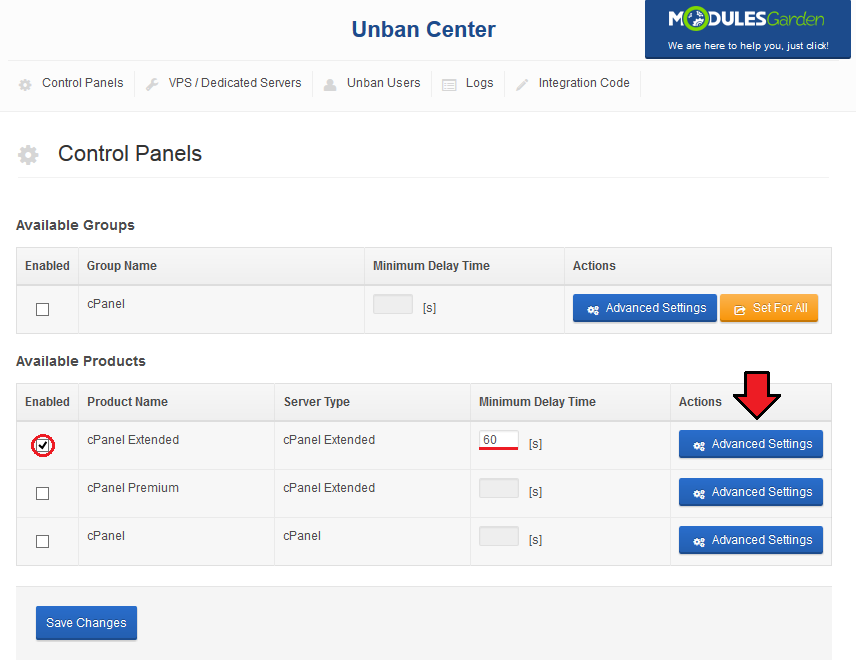
| Let's show you how to enable unban functionality for cPanel Extended product. Start with marking 'Enabled' checkbox and then define time intervals to declare how often your client will be able to perform unban action on a specific product. |
|
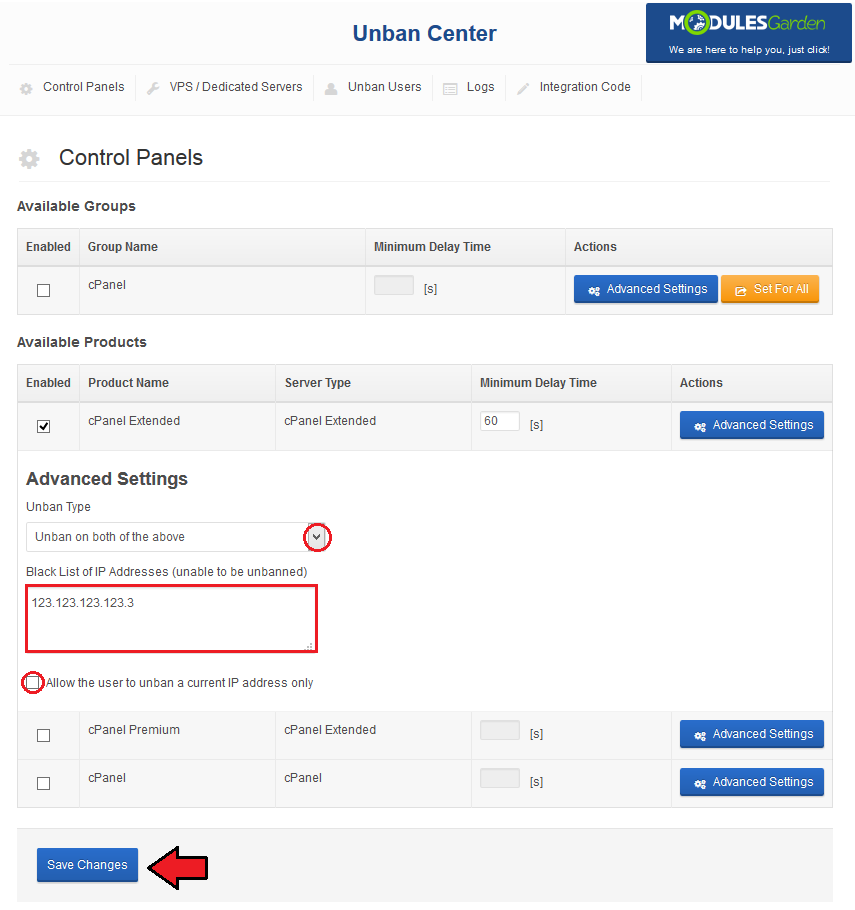
Next, select desired value from 'Unban Type', remember that in case of cPanel you may choose between:
Enter IP addresses that will be unable to be unbanned into 'Black List of IP Addresses' textbox if there are such. |
|
Configuration of Multiple Products
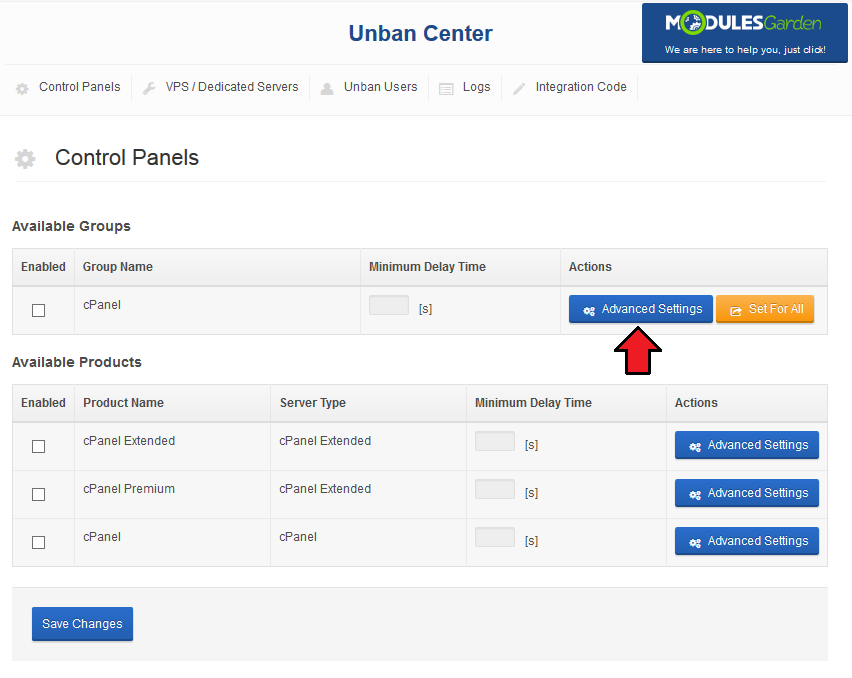
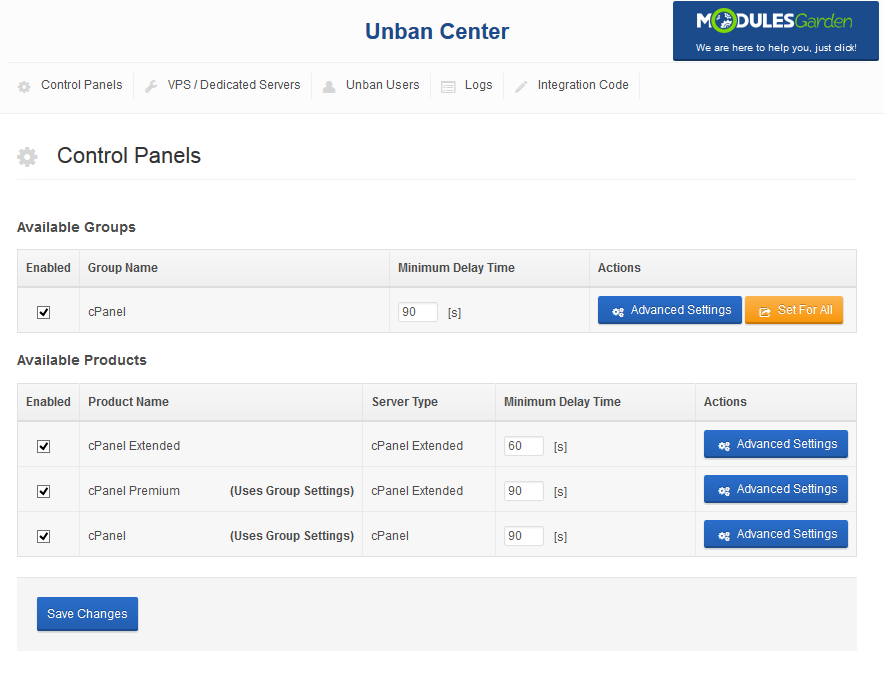
| You can configure multiple products from one product group at once. All product groups containing at least one supported module will be displayed in our module → 'Control Panels' tab. |
|
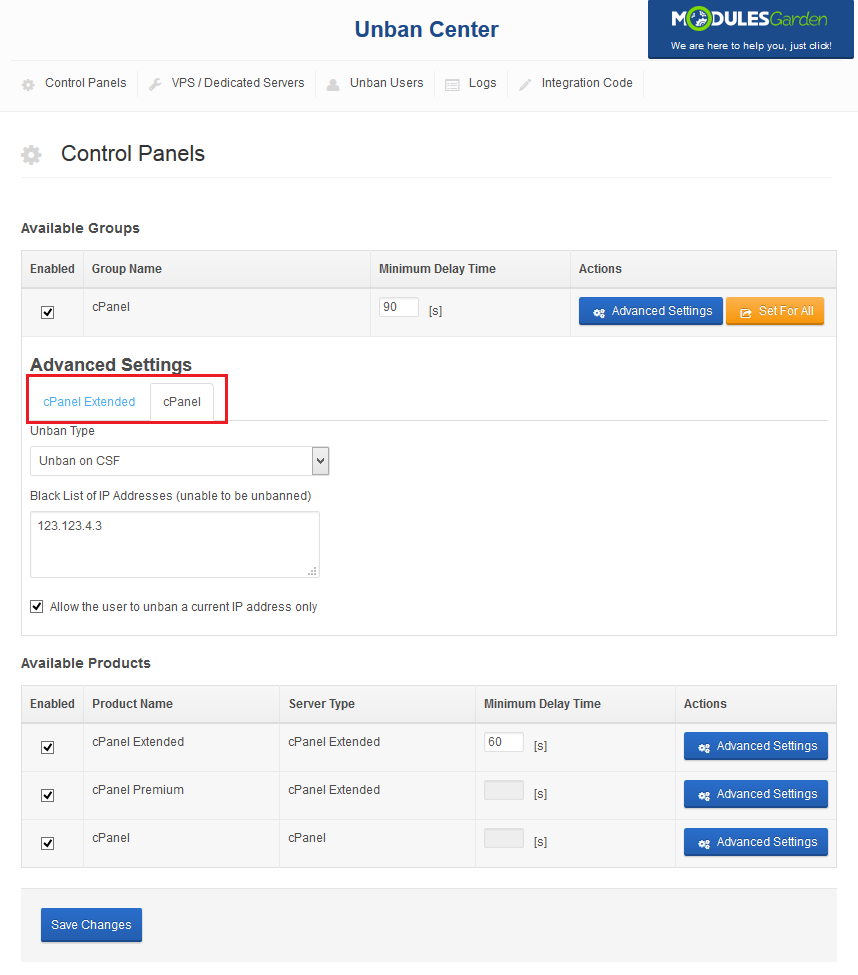
| On the following screen you can see unban functionality settings for a product group. As you may have noticed there are two tabs, 'cPanel' and 'cPanel Extended For WHMCS'. |
|
| Product group settings apply only to disabled products or products marked as 'Uses Group Settings'. Therefore, unban feature settings of product group will not be applied to modified product even if it belongs to that group. |
|
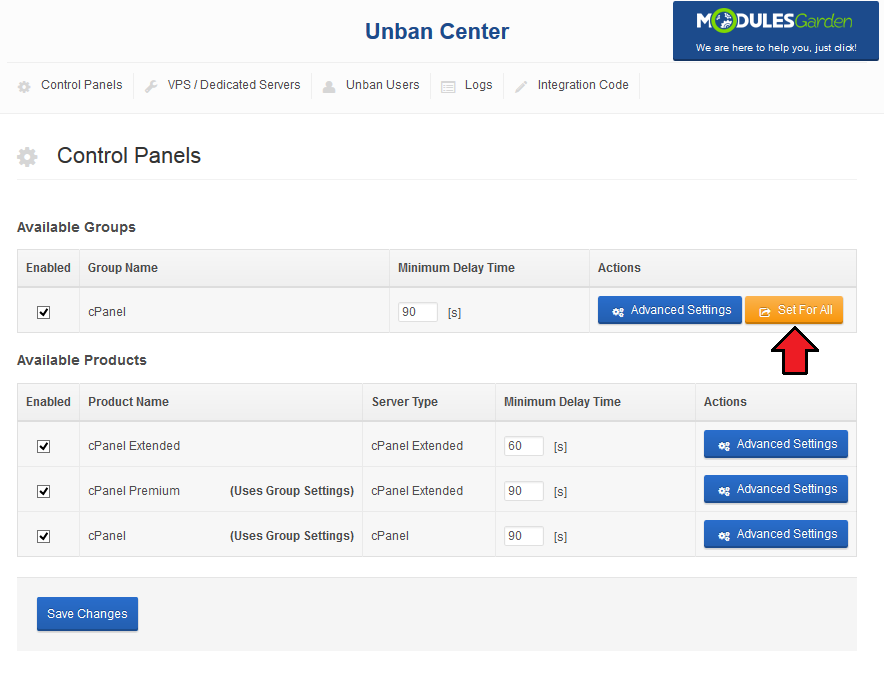
| You can force group settings for all products in that group through using 'Set For All' button. Note: 'Set For All' will force group settings only for enabled products. |
|
VPS/Dedicated Servers
| VPS/Dedicated Servers tab allows you to set configuration for default submodules and all available products. Unban IP addresses in several different panels set up on any VPS or dedicated server. |
Default Submodules
Our product offers four already configured submodules to perform unban action in. These are:
You may also create your own submodules, to learn how to do that, please read carefully this section. |
Settings
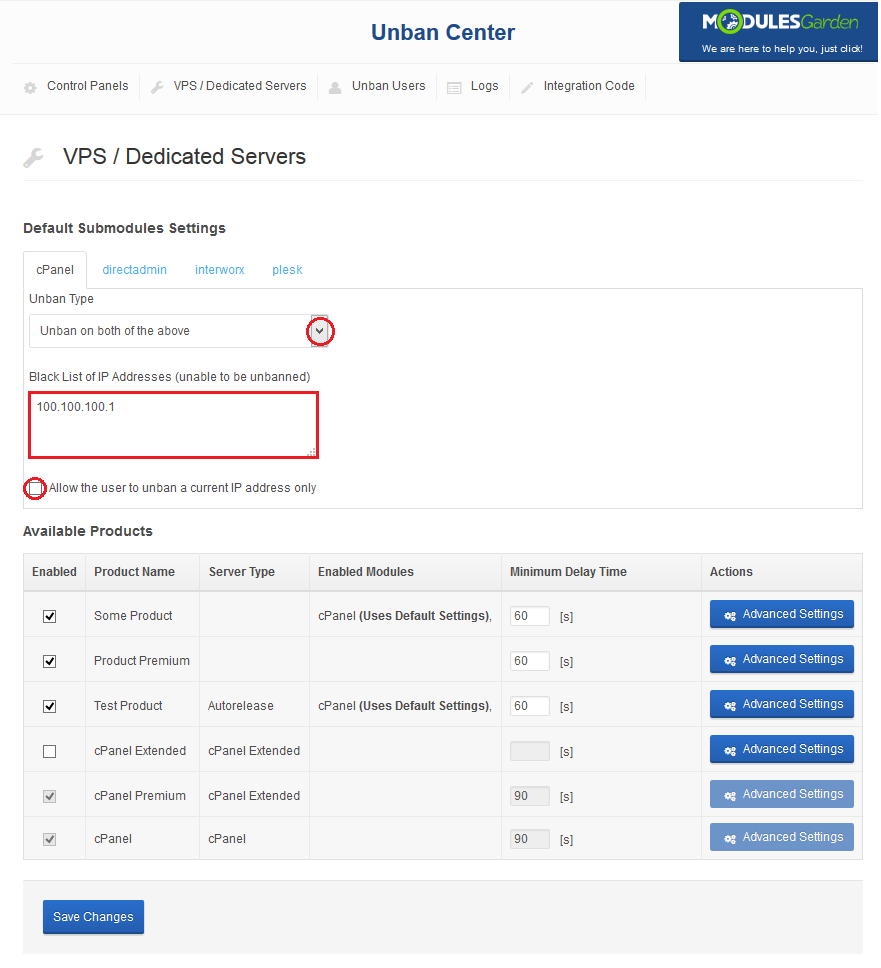
| Select desired value from 'Unban Type' and enter IP addresses that will be unable to be unbanned into 'Black List of IP Addresses' text area. What is more, you can allow your clients to unban any IP address if you unmark checkbox as shown on the following screen. |
|
Available Products
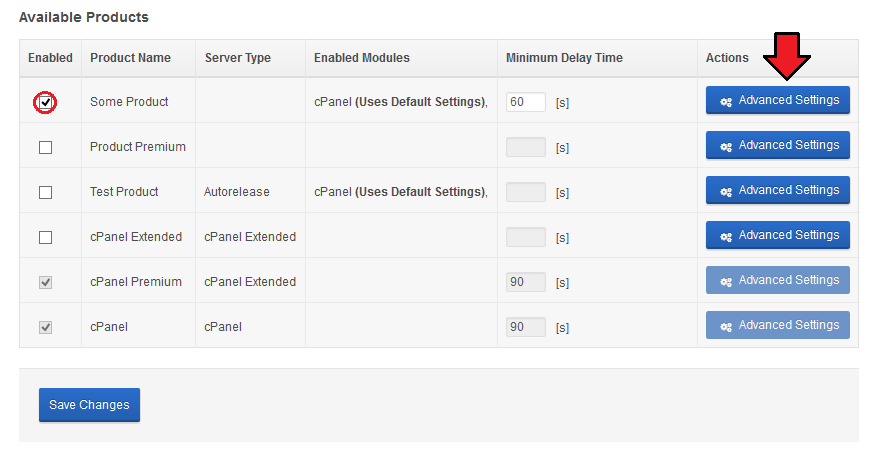
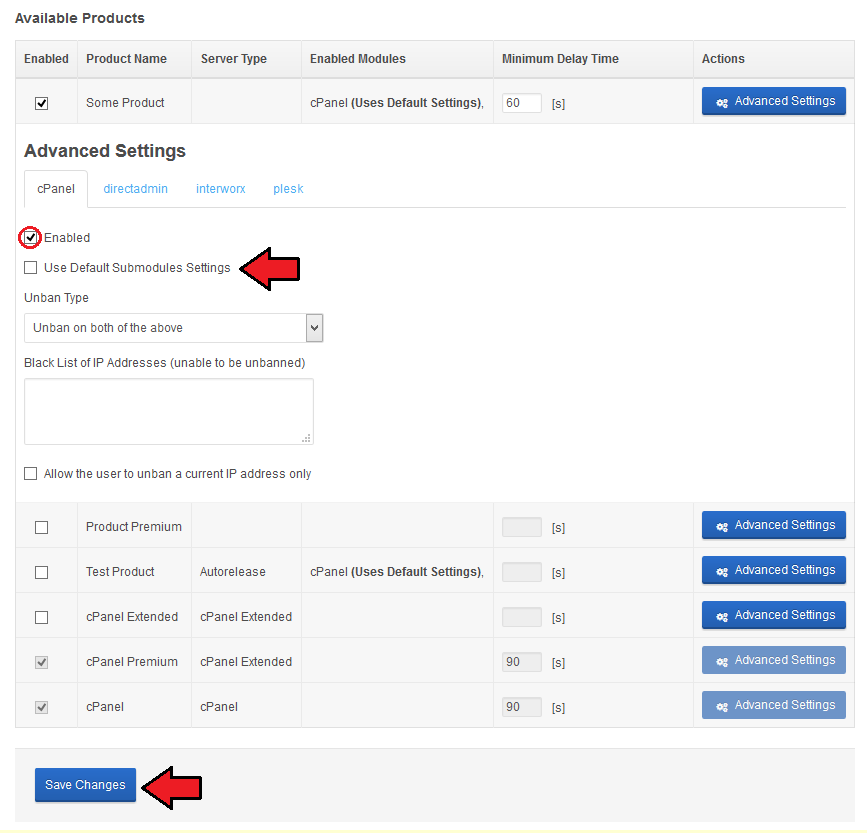
| Check selected product and press 'Advanced Settings'. |
|
| Enable unban functionality for that product. Now you can either choose to use 'Default' settings (declared for default submodule) or configure new settings for the product separately. Remember to 'Save Changes'. |
|
Unban Users
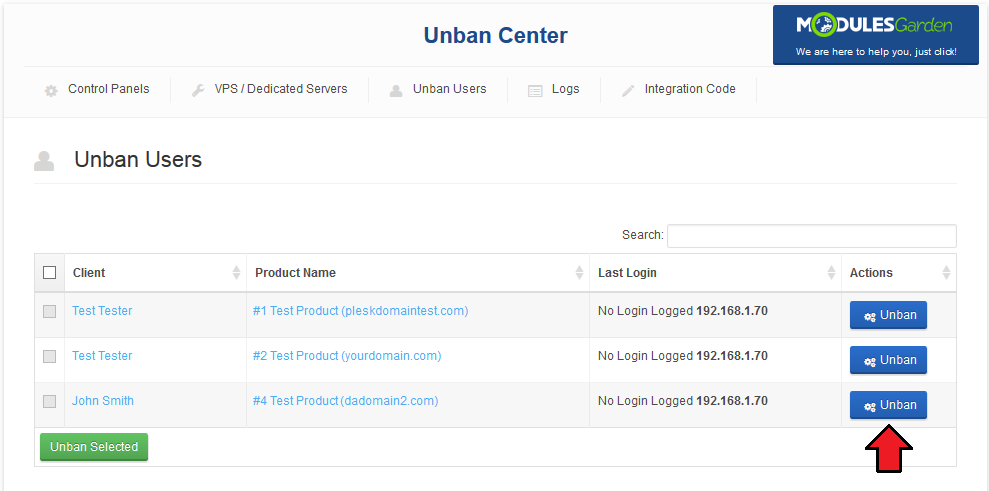
| 'Unban Users' tab allows you to unban your clients IP address from any of the external servers on which they own an account. You can unban IP address assigned to your client accounts as well as custom IP address. Press 'Unban' as shown on the following screen. |
|
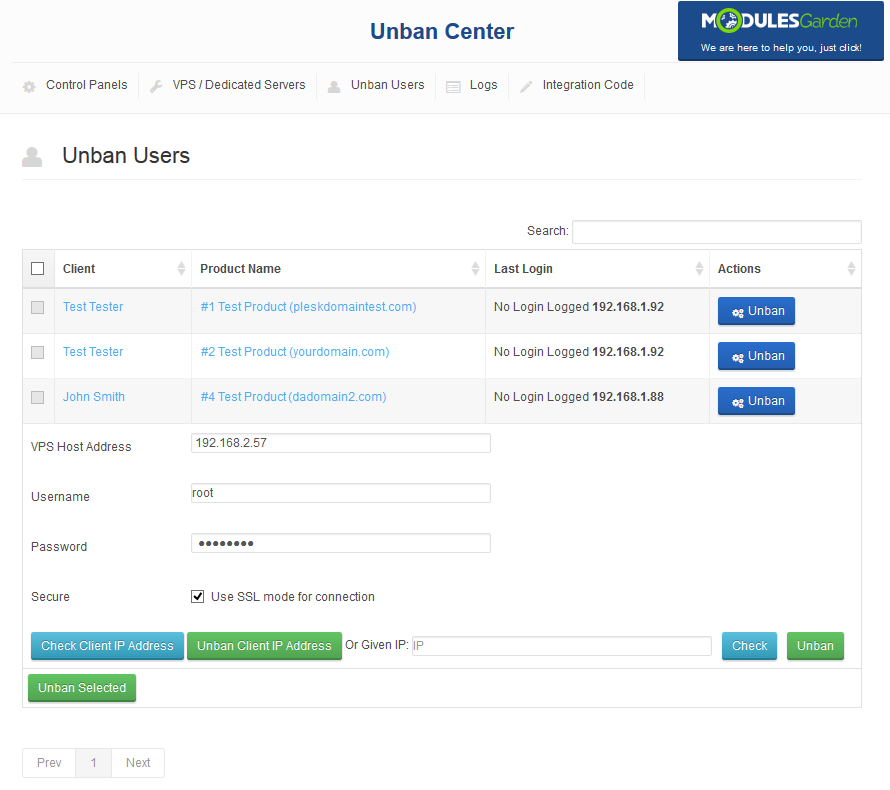
| Data on 'VPS host Address', 'Username', 'Password' will be filled in automatically. Select 'SSL Connection' ' if you wish. Note! These details will appear only in case of VPS products used by the client. |
|
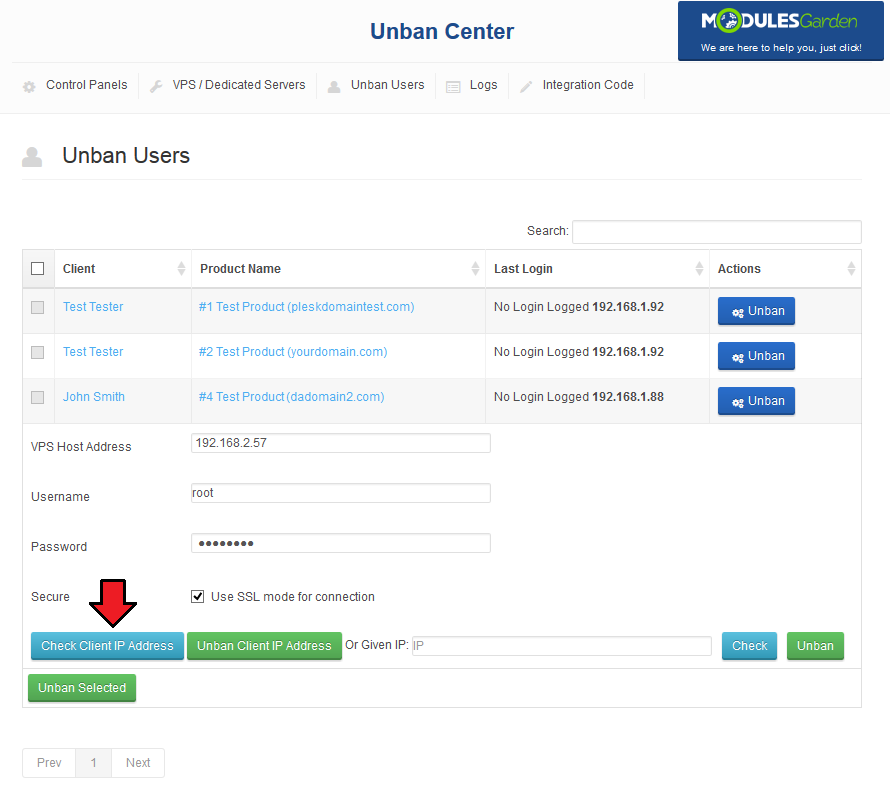
| You may now check the status of the client's IP. Press 'Check Client IP Address'. |
|
| Alternatively, fill in IP address to check. |
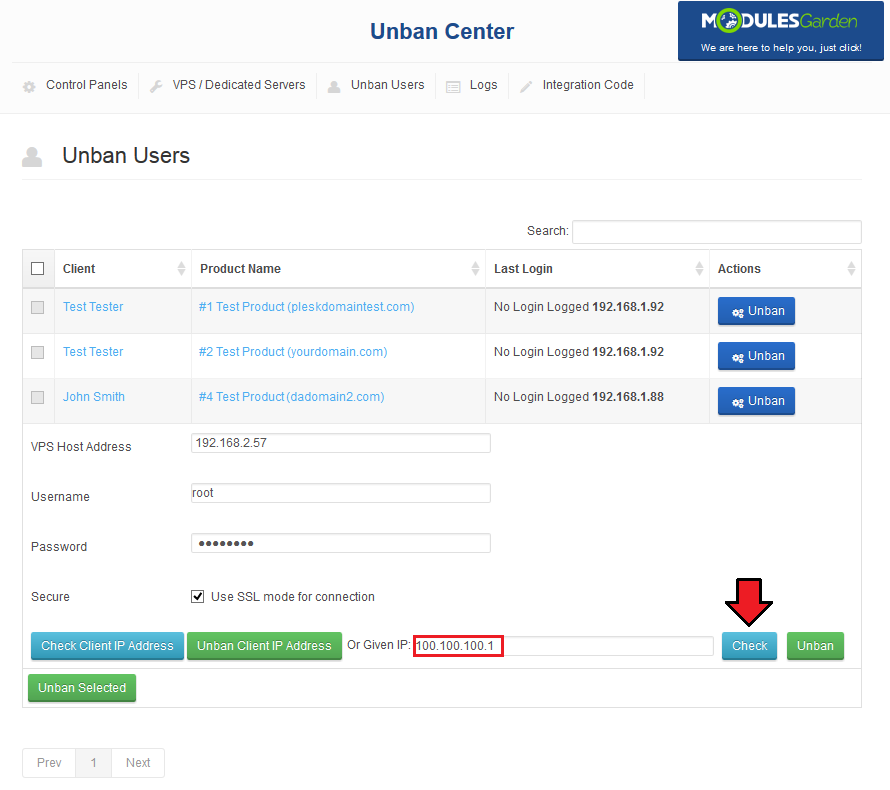
|
| To unban client's IP, fill in the data just like in case of checking IP status and press 'Unban Client IP Address'. |
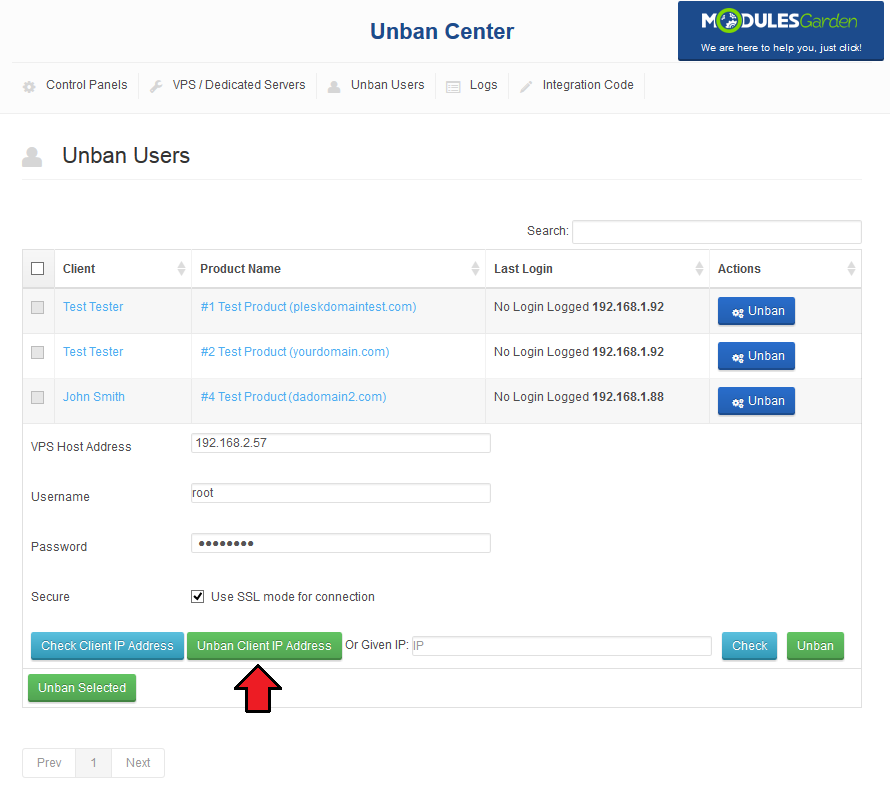
|
| You can also type in a given IP and press 'Unban' then. |
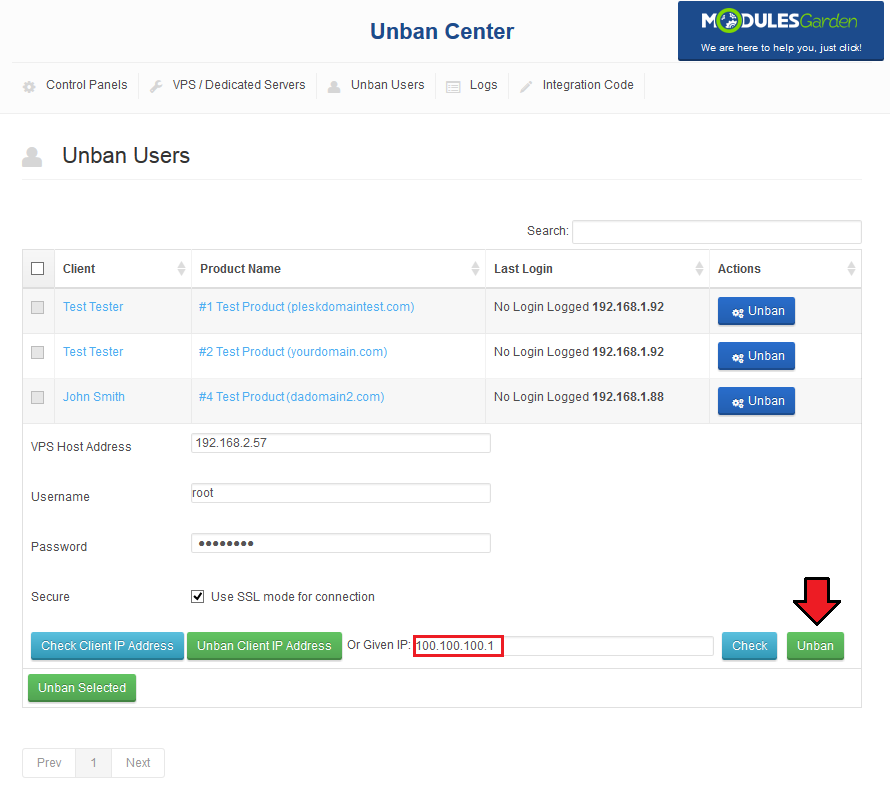
|
| To unban multiple accounts at once, select checkbox near accounts to unban and press 'Unban Selected' as shown on the screen below. |
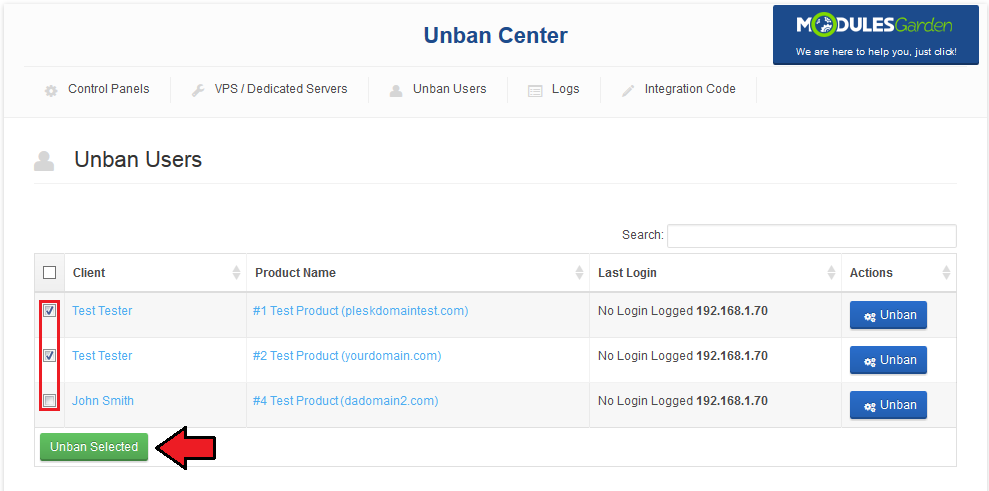
|
Client Area
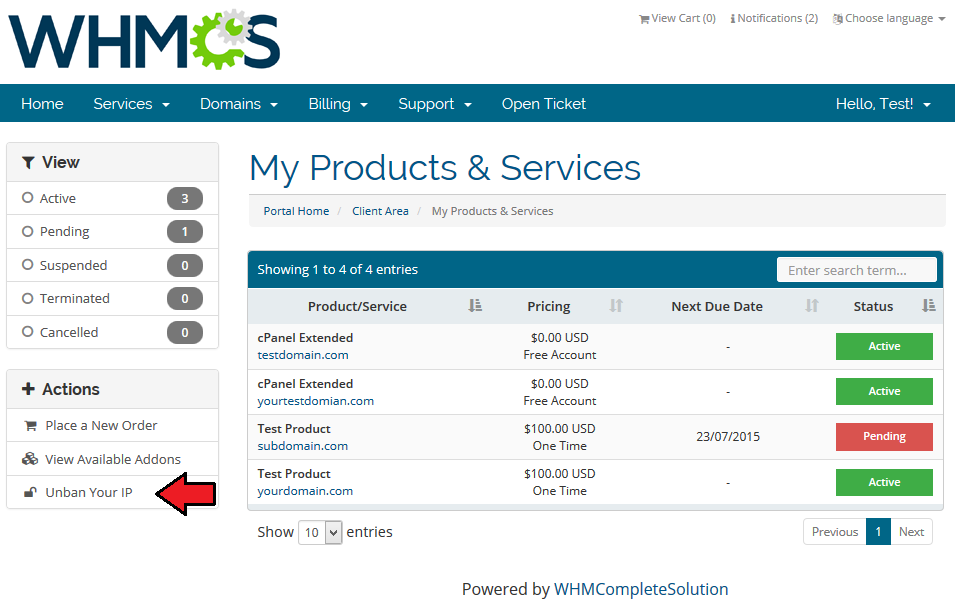
| Please note that client area button 'Unban Your IP' is visible only if you have properly inserted integration codes, the integration is precisely described in installation section point 7. Let's proceed to the client area → 'Services' → 'My Services' in order to try out unban action. |
|
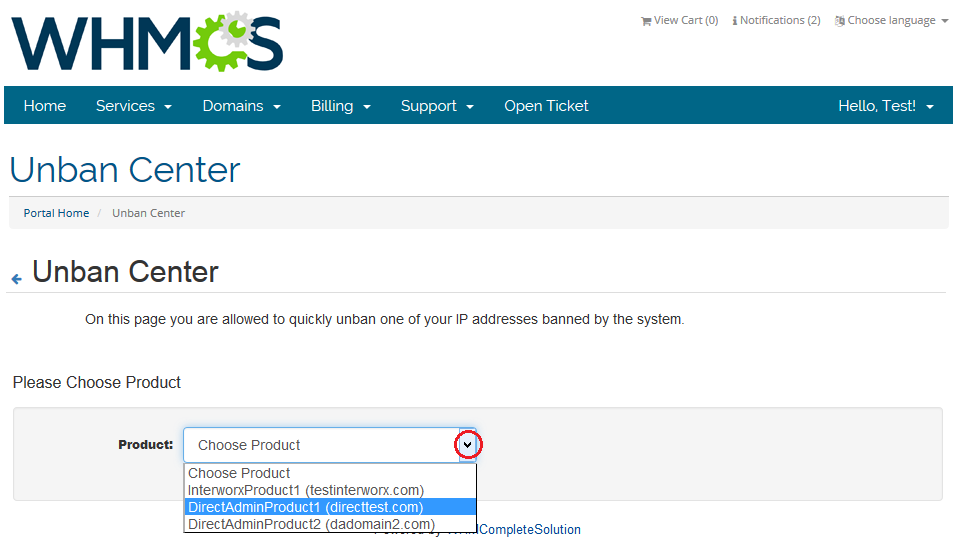
| Now, select product for which you want to perform unban IP address action. |
|
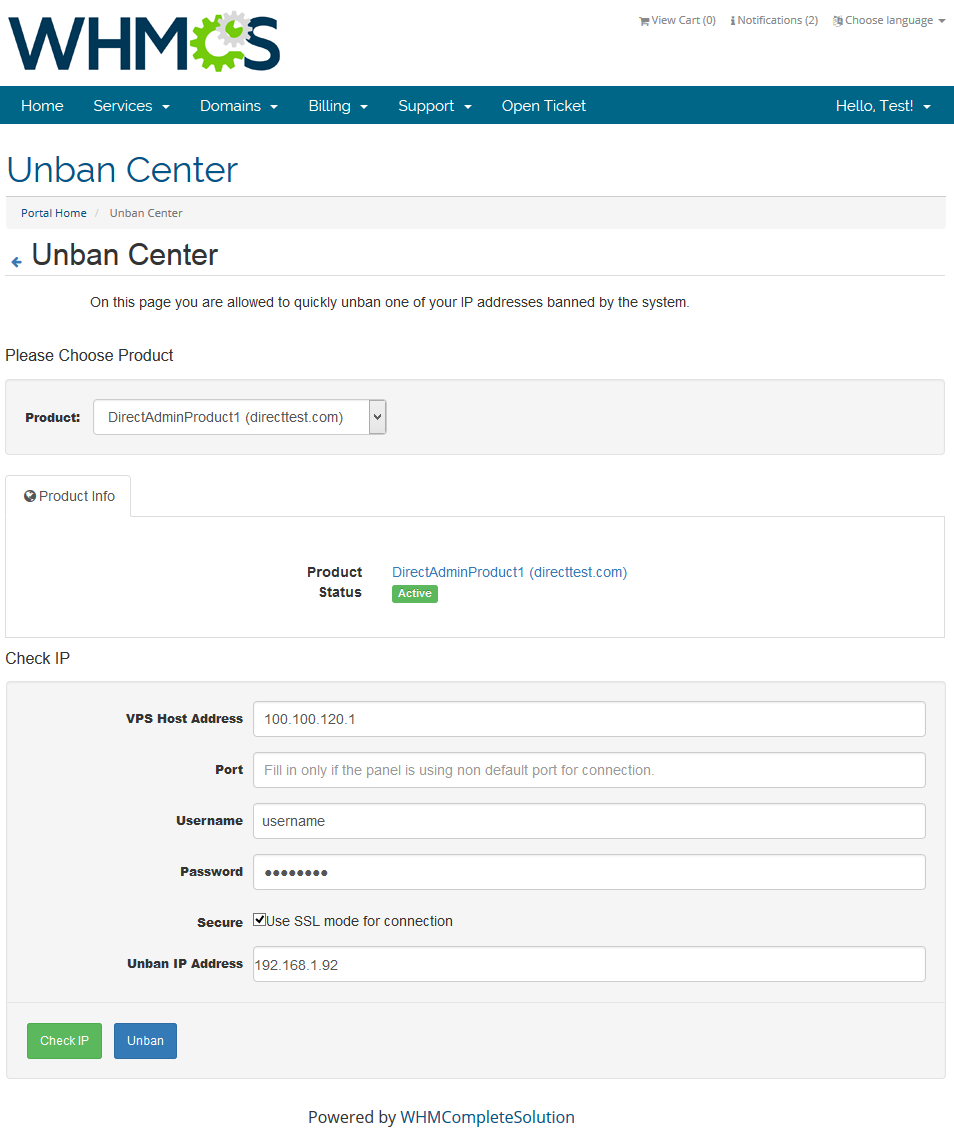
| You will see a full product name and its status, underneath you will find IP address to be unbanned and VPS host details (provided you have selected a VPS product). |
|
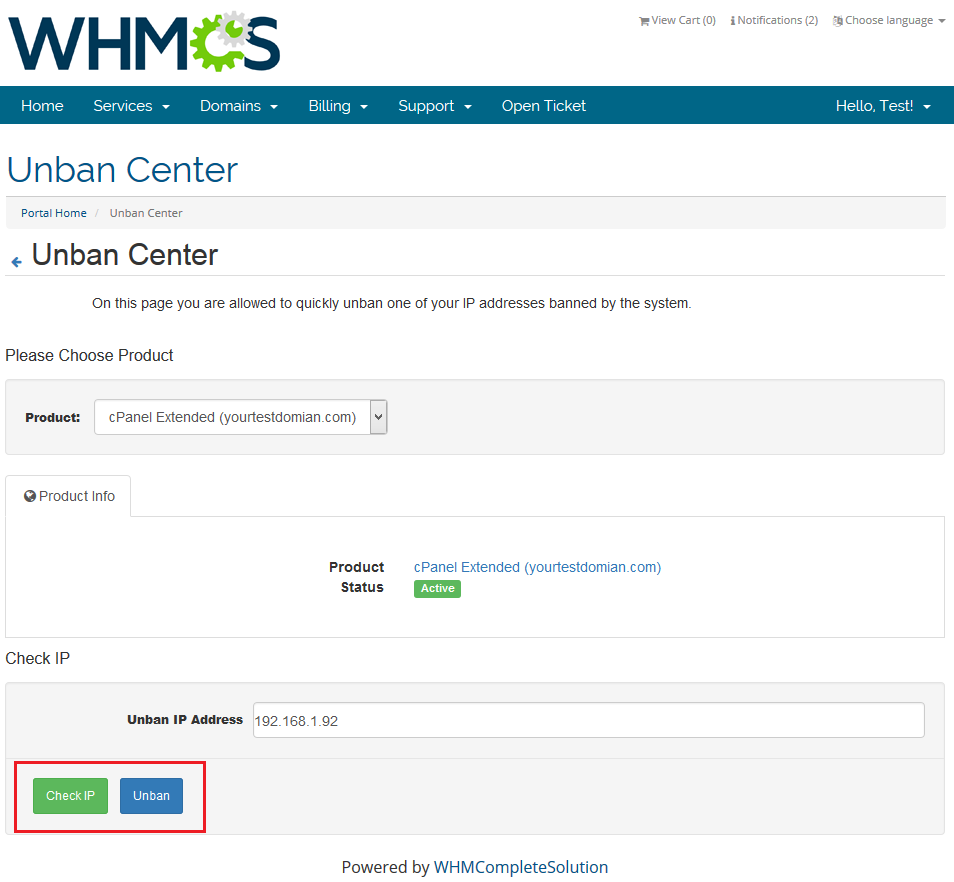
| Check if your IP is banned or unban it immediately. Once the action is completed you will be notified about the results. |
|
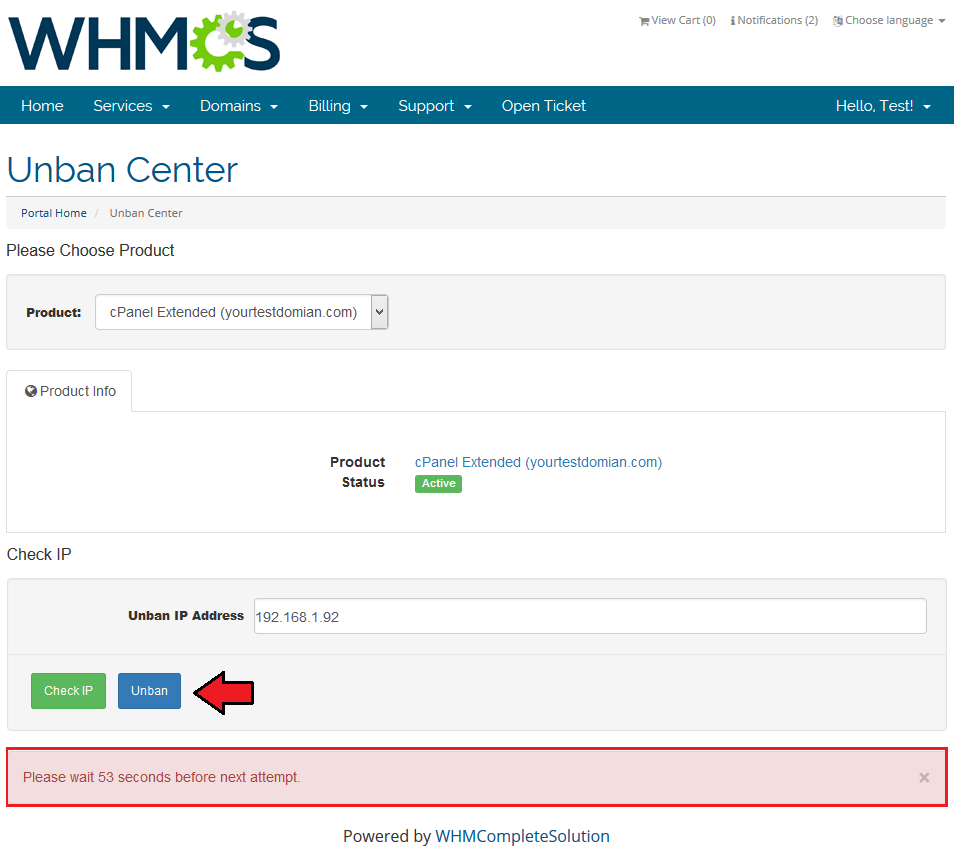
| In case you have set up a low delay time, you will need to wait for the next unban attempt. |
|
|
Logs
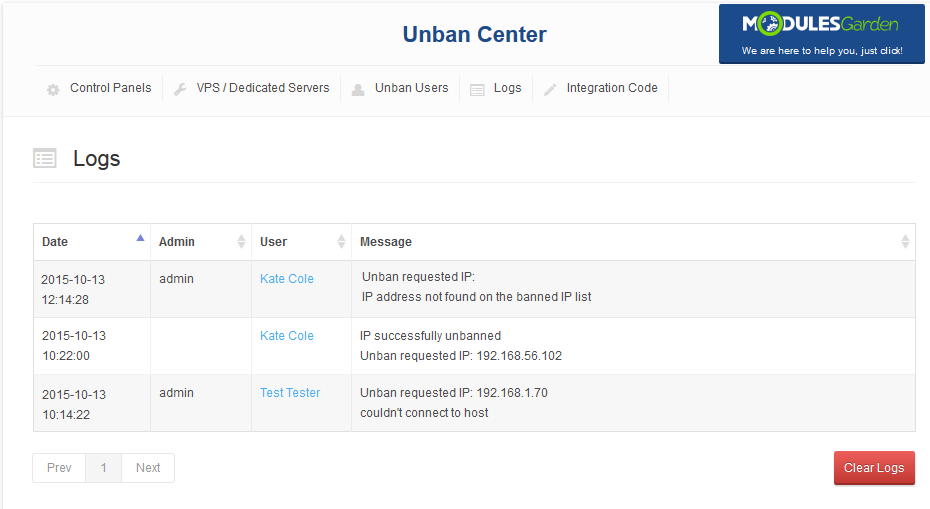
| All unban requests and their results can be found at 'Unban Center' → 'Logs' tab. You can find here information related to user or admin who requested unban action and its date. |
|
Creating 3rd Party Submodule
| The main goal of Unban Center For WHMCS is allowing you to quickly and easily create additional submodules. All you need is a little knowledge of PHP programming language and documentation of integrated module API. |
| Start with renaming copy of 'sample' folder to the name used by 3rd party module. Let's say folder with module to integrate with Unban Center For WHMCS, which is located in 'your_whmcs/modules/servers/' is named 'dummyIntegration'. |
Update Instructions
| Essential guidance through the process of updating the module is offered here. Keep in mind there is a quick and easy option in our client area that will let you upgrade the license of your module to an open source version at any time - and at a lower price! |
Common Problems
| 1. When you have problems with connection, check whether your SELinux or firewall does not block ports. |
| 2. After update some functionalities are not working properly. Cause: Your browser store old JavaScript in its cache. |
| 3. When upgrading your module to the latest version to run on WHMCS V6.x.x, remember to insert appropriate integration code for the template you are using. There is a different code for template Five and for template Six. |