SolusVM Extended VPS For WHMCS
Contents |
About SolusVM Extended VPS For WHMCS
| SolusVM Extended VPS For WHMCS allows you to automatically provision virtual servers to your clients. Owing to well-thought module configuration, you will be able to quickly and capably set up ready products in WHMCS and offer them to your customers. |
- Features Included:
| ✔ Provisioning Module |
| ✔ Virtual Server Management From The Client Area |
| ✔ Complete Product Management From The Admin Area |
| ✔ Simple Installation |
| ✔ Dynamic Server Resources Setup With Configurable Options |
- Admin Area Features:
| ✔ Create Server |
| ✔ Terminate Server |
| ✔ Suspend/Unsuspend Server |
| ✔ Rebuild Server |
| ✔ Upgrade/Downgrade Server And Resources |
| ✔ Boot/Reboot/Shutdown Server |
| ✔ Enable TUN/TAP And PAE |
| ✔ Change Password: Root, Client, SSH Console And VNC Console |
| ✔ Mount/Unmount ISO |
| ✔ Change Boot Order |
| ✔ Get Server Status |
| ✔ Graphs: Traffic, Load, Memory |
| ✔ Configurable Client Area Features |
| ✔ OS Templates Allowed For Rebuild |
| ✔ Friendly Names For OS Templates |
| ✔ Possibility To Create New User For Each VPS Ordered By Client |
| ✔ Possibility To Turn Off Root Password Storing In The System Database |
- Client Area Features:
| ✔ Boot/Reboot/Shutdown/Delete Server |
| ✔ Rebuild Server |
| ✔ SSH Console (OpenVZ & Xen Virtualizations) |
| ✔ VNC Console (KVM & Xen HVM Virtualizations) |
| ✔ Control Panel Button |
| ✔ Enable TUN/TAP And PAE |
| ✔ Change Password: Root, Client, SSH Console And VNC Console |
| ✔ Change Hostname |
| ✔ Mount/Unmount ISO |
| ✔ Change Boot Order |
| ✔ Get Server Status |
| ✔ Graphs: Traffic, Load, Memory |
| ✔ Send Email Templates After Server Creation Based On Type |
| ✔ Two Layouts |
- Additional Functionality:
| ✔ Integrated With DNS Manager For WHMCS - Supports PowerDNS (read more) |
| ✔ Integrated With Advanced Billing For WHMCS - Server Resource Usage Billing (read more) |
| ✔ Extended API Connection Test |
| ✔ Multi-Language Support |
| ✔ Supports WHMCS V5 and Later |
- Available Configurable Options:
| ✔ Operating System |
| ✔ Memory |
| ✔ Disk Space |
| ✔ Bandwidth |
| ✔ CPU |
| ✔ Extra IP Address |
| ✔ Control Panel |
| ✔ Location |
Installation and Configuration
| In this tutorial we will show you how to successfully install SolusVM Extended VPS For WHMCS. We will guide you step by step through the whole installation and configuration process. |
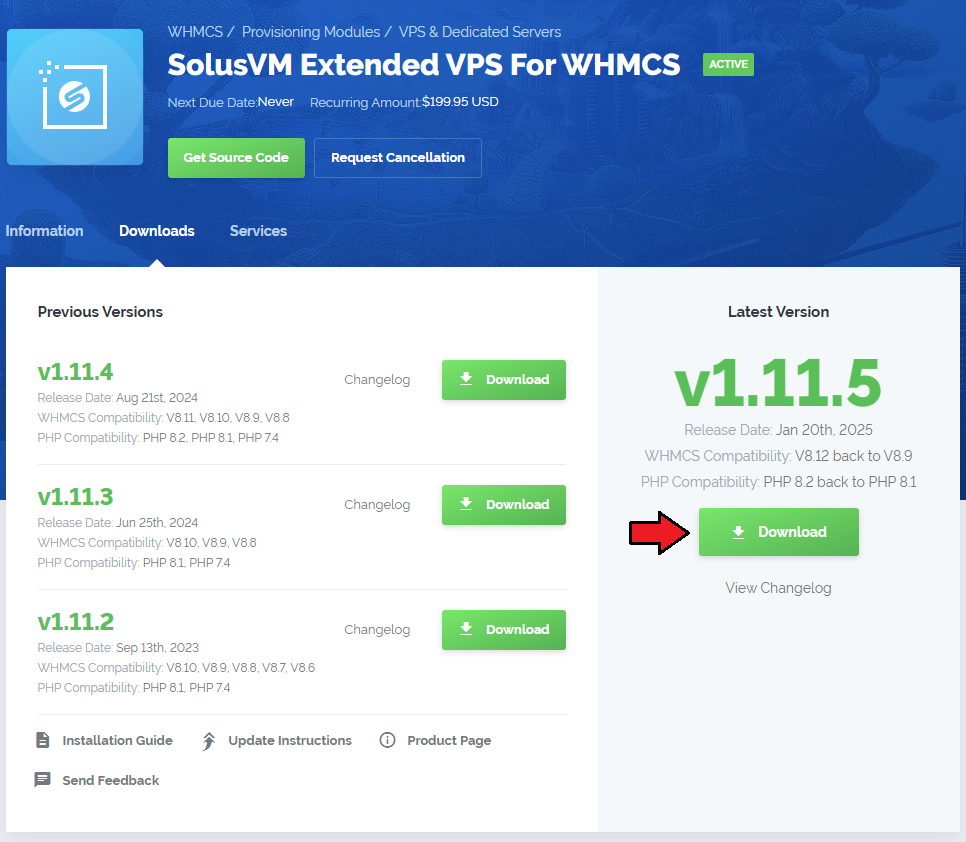
| 1. Log in to your client area and download SolusVM Extended VPS For WHMCS. |
|
| 2. Upload and extract the module into the main WHMCS directory. Files in your WHMCS directory should look like on the following screen. |

|
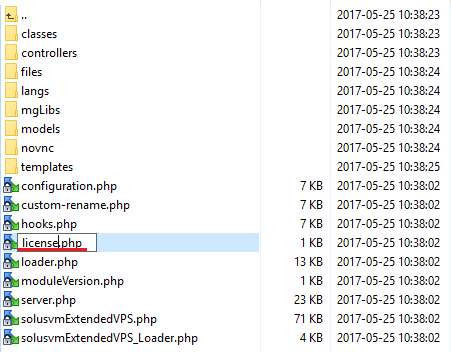
| 3. When you install SolusVM Extended VPS for the first time you have to rename 'license_RENAME.php' file. File is located at 'modules/servers/solusvmExtendedCloud/license_RENAME.php' . Rename it from 'license_RENAME.php' to 'license.php' . |
|
| 4. In order to configure your license key, you have to edit a previously renamed 'license.php' file. Enter your license key between quotation marks as presented on the following screen. You can find your license key at your client area → 'My Products' . |

|
Configuration of API Access
| 5. Now, we will show you how to configure a new product. First, log in to your SolusVM admin area, go to 'CONFIGURATION' → 'API Access' and add API User. |

|
| 6. Enter your current IP and once again click on 'Add API User' button. |

|
Configuration of Server
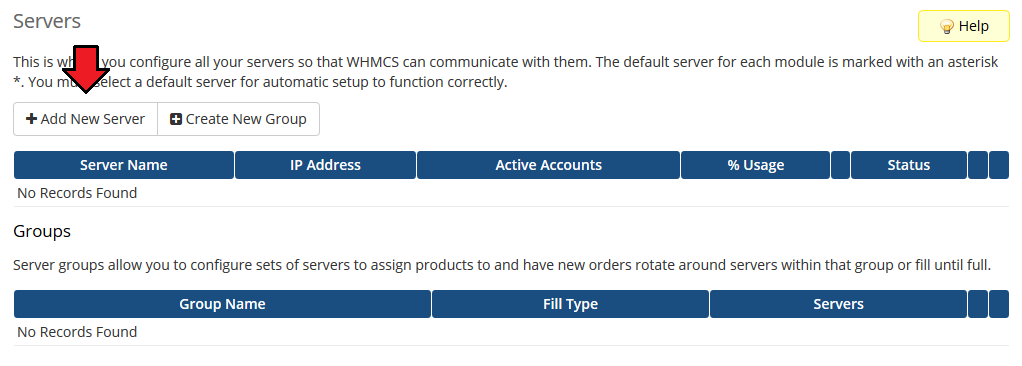
| 7. Now log in to your WHMCS admin area. Press 'Setup' → 'Products/Services' → 'Servers' . Afterwards, press 'Add New Server' . |
|
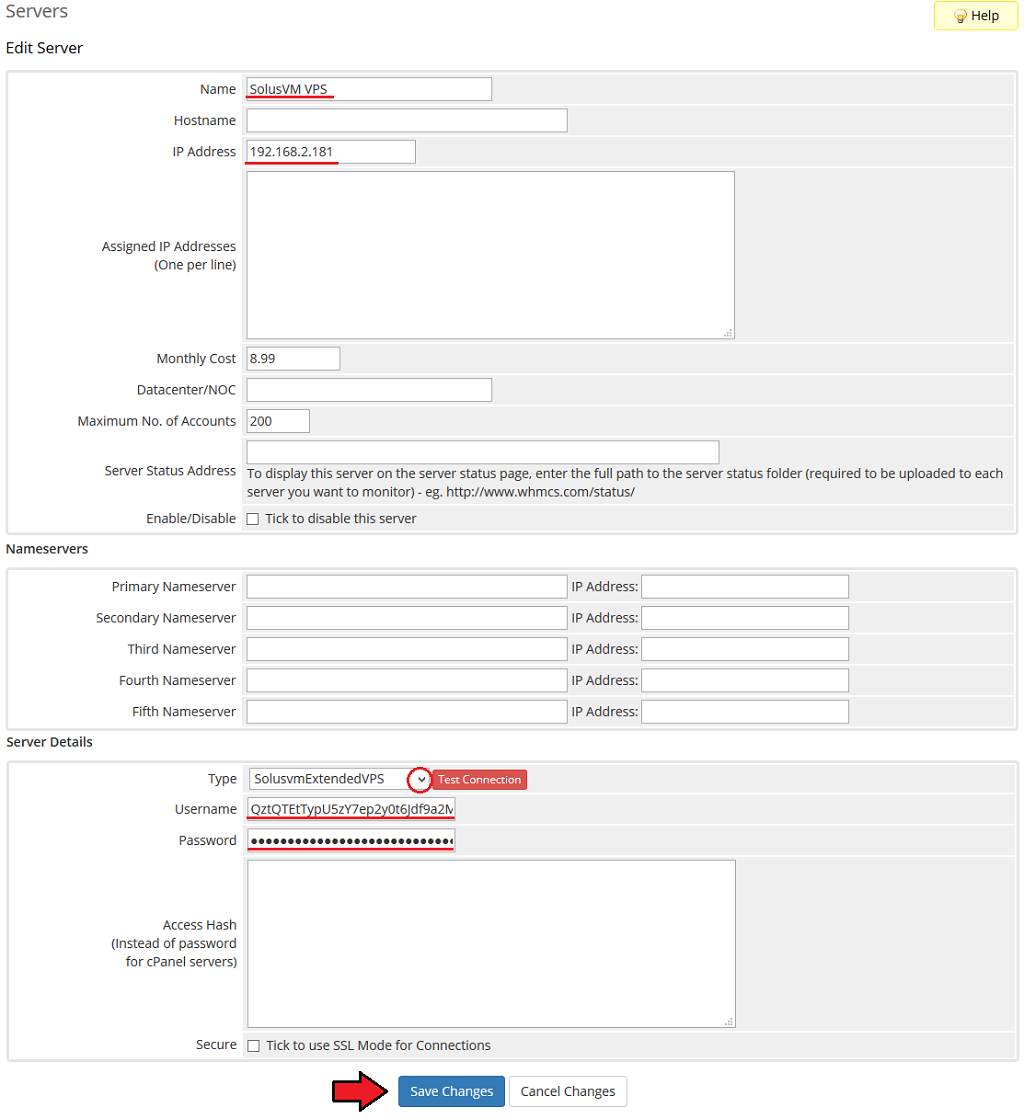
| 8. Enter your server name and IP address. Next, enter your API User ID into 'Username' field and your API User Key into 'Password' field. |
|
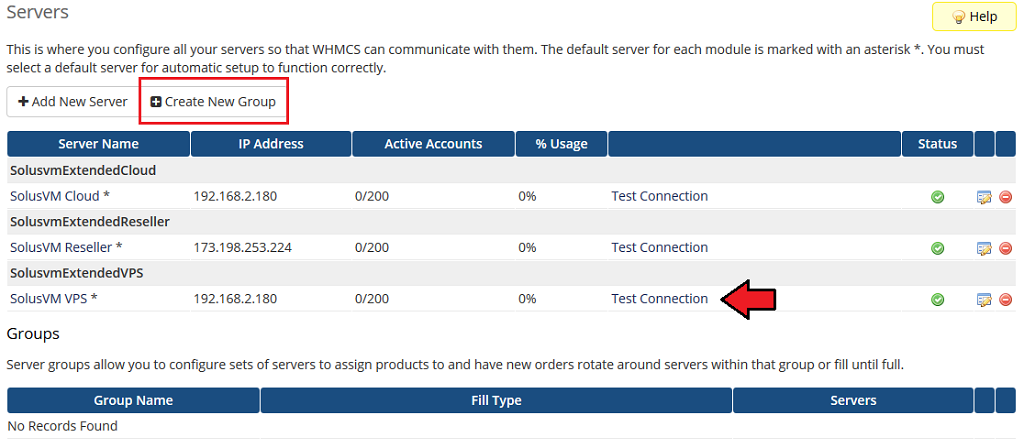
| 9. After you configure your server correctly, you will see a following screen. Test your connection and API key through pressing on 'Test Connection' . |
|
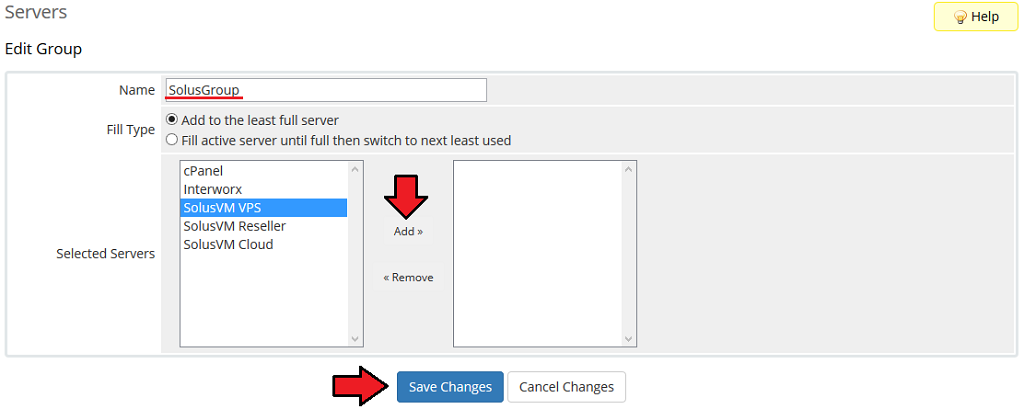
| 10. Enter name, click on your previously created server, press 'Add' then click on 'Save Changes' . |
|
Configuration of Product
| 11. In order to create and configure product, click on 'Setup' → 'Products/Services' → 'Products/Services' . If you do not have a product group, click on 'Create a New Group' . If you do, simply go to the step 13. |

|
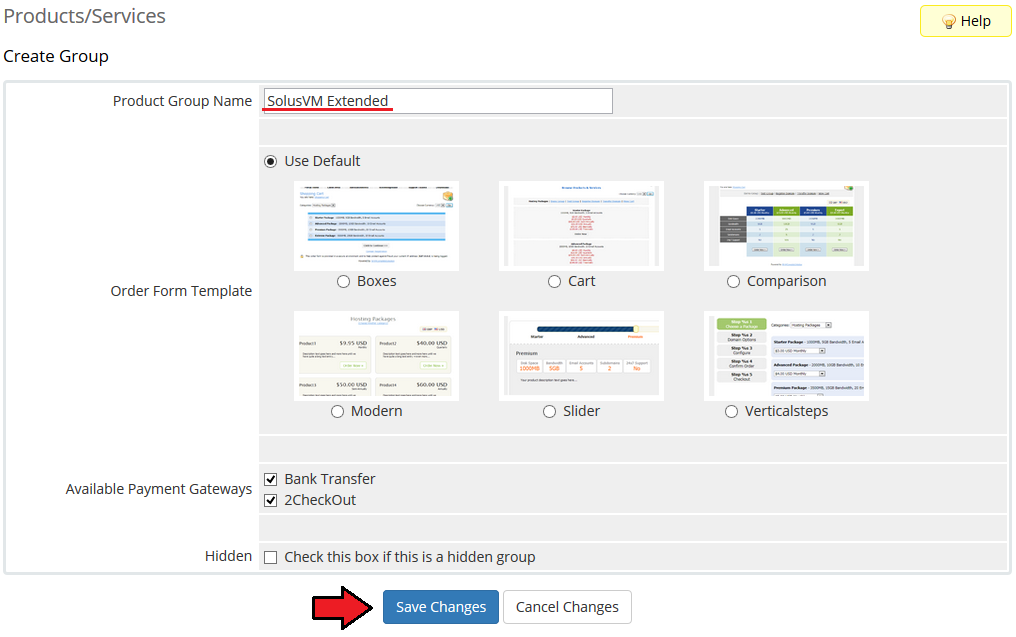
| 12. Enter product group name and press 'Save Changes' . |
|
| 13. When you have a product group, you can create your product and assign it with SolusVM Extended VPS. If you already have a product, go to the step 15. To create a product click on 'Create a New Product' . |

|
| 14. Afterwards, choose your product type and product group from dropdown menus, enter your product name and press 'Continue' . |

|
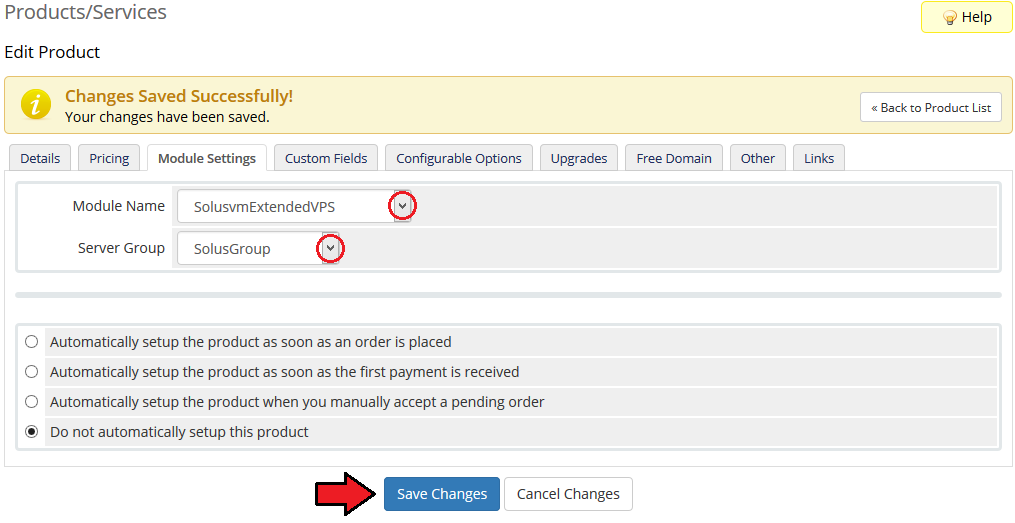
| 15. Now, go to the 'Module Settings' section, choose both 'SolusvmExtendedVPS' and your previously created server group from dropdown menus. Afterwards, press 'Save Changes' . |
|
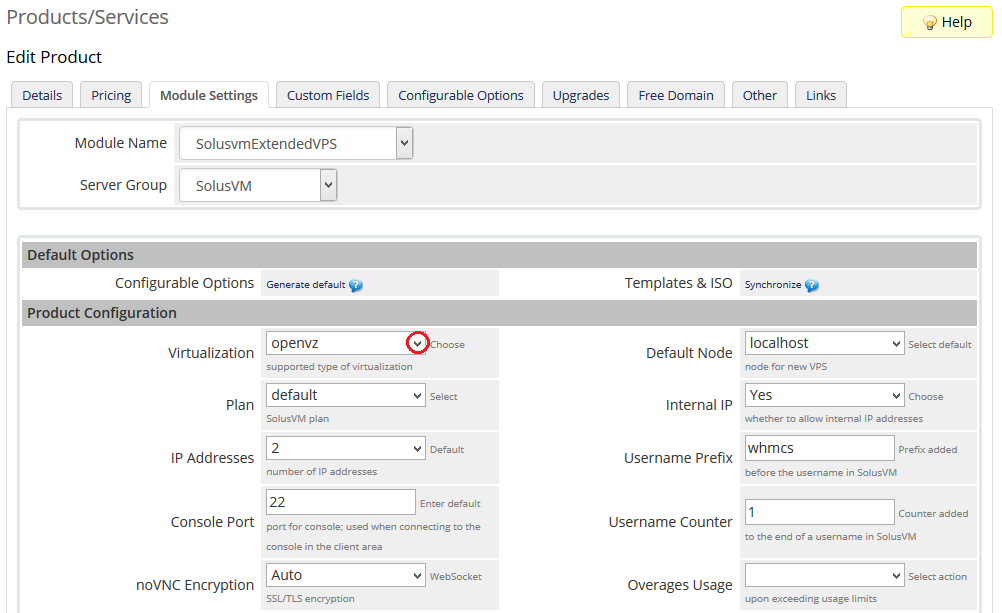
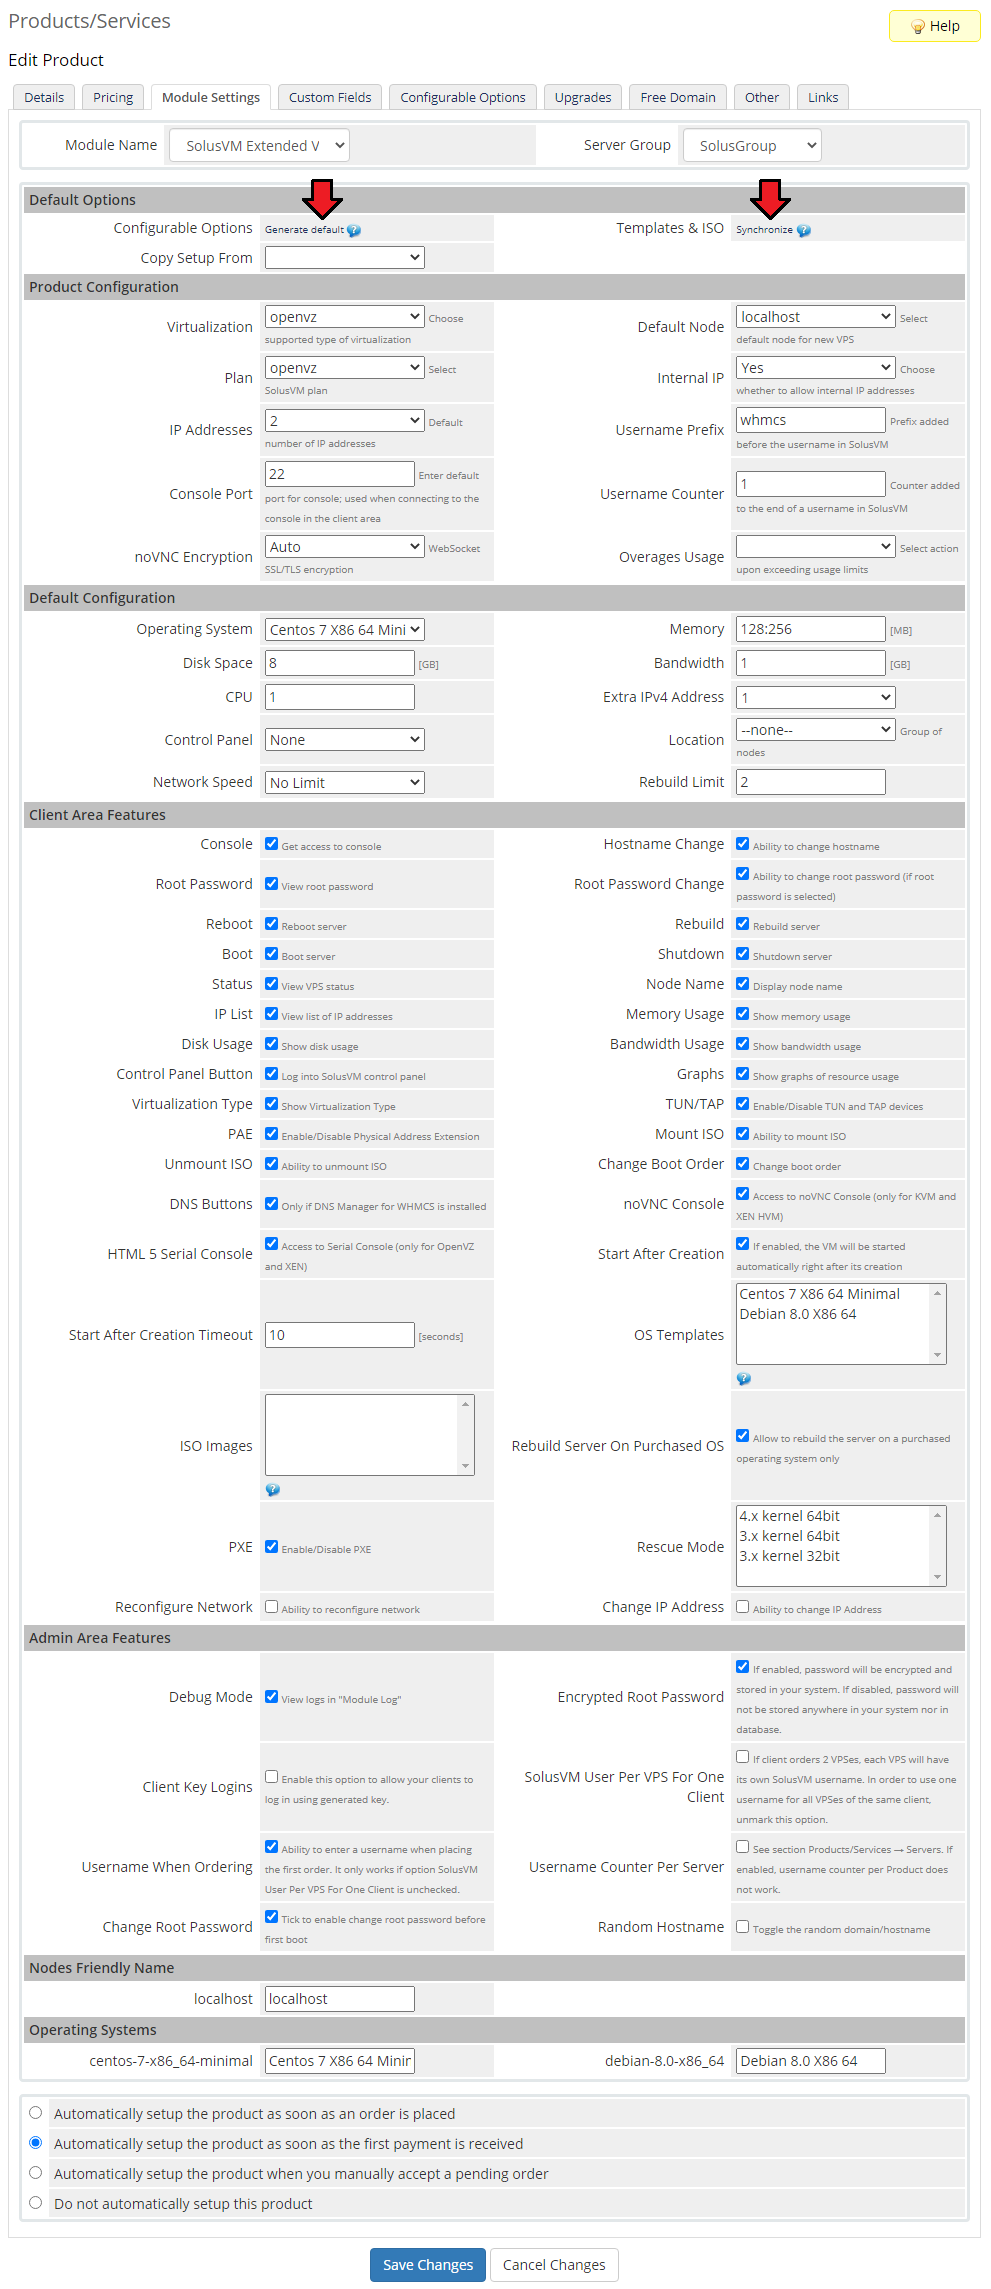
| 16. Start configuration of a product from 'Product Configuration' section. Select desired 'Virtualization Type' and press 'Save Changes' in order to load options bounded to chosen virtualization. |
|
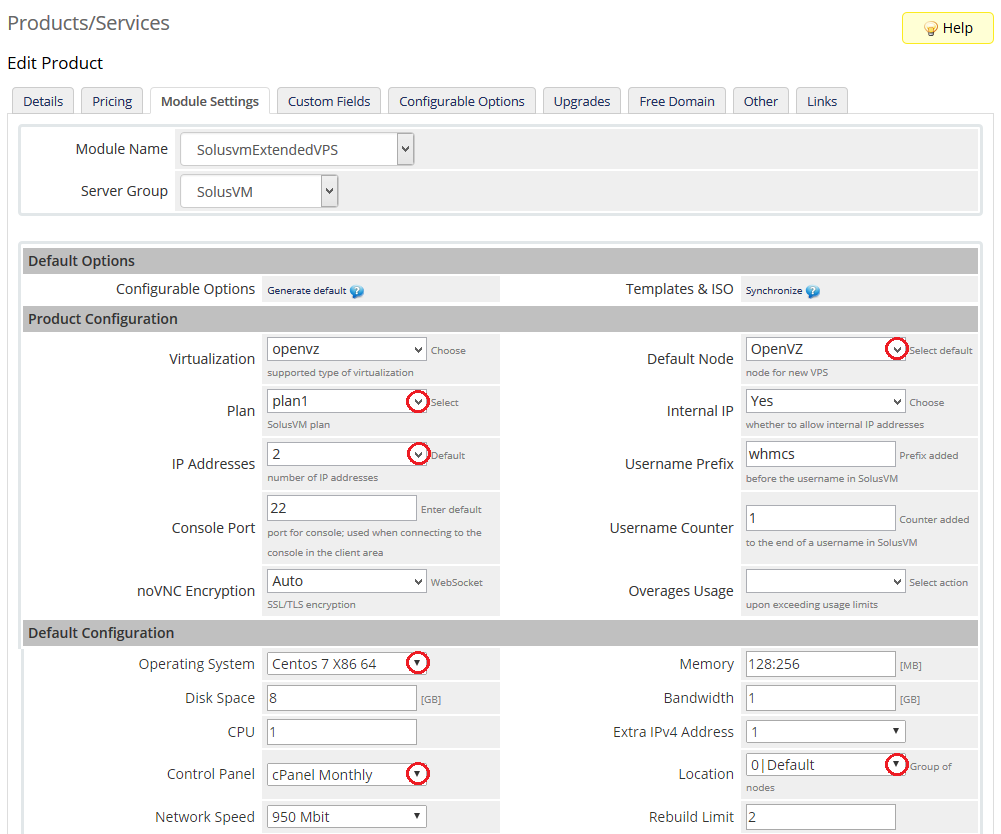
| 17. Now, choose 'Default Node' , 'Plan' , 'Default Operating System' , 'Amount of IP' and 'Default Node Group' . |
|
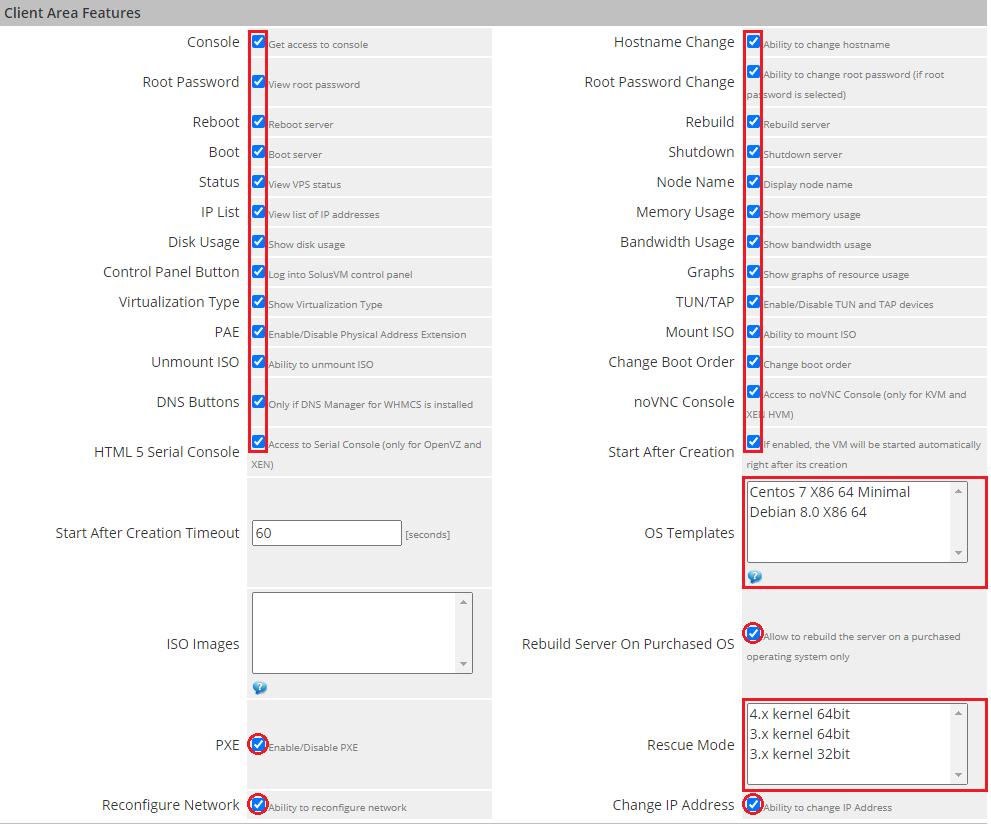
| 18. Define features available at the client area through marking/unmarking them at the 'Client Area Features' section. |
|
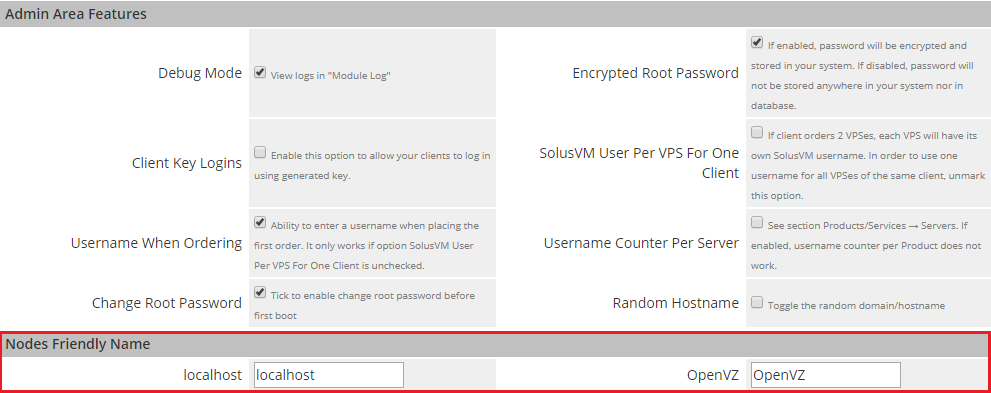
| 19. At the 'Templates Friendly Name' section you can set up custom names for templates. OS templates will be displayed at the client area under those names. |
|
| 20. Final step is generating default configurable options. To do so, press 'Generate Default' near 'Configurable Options' as shown on the screen below. |
|
| You have just finished the installation and configuration of the module. From this moment your customers can start to place orders! |
Management
| SolusVM Extended VPS For WHMCS offers very intuitive management of virtual servers both for your admin and clients. In addition to that, it provides you with ability to offer your clients VPS tailored to their needs. |
Interface
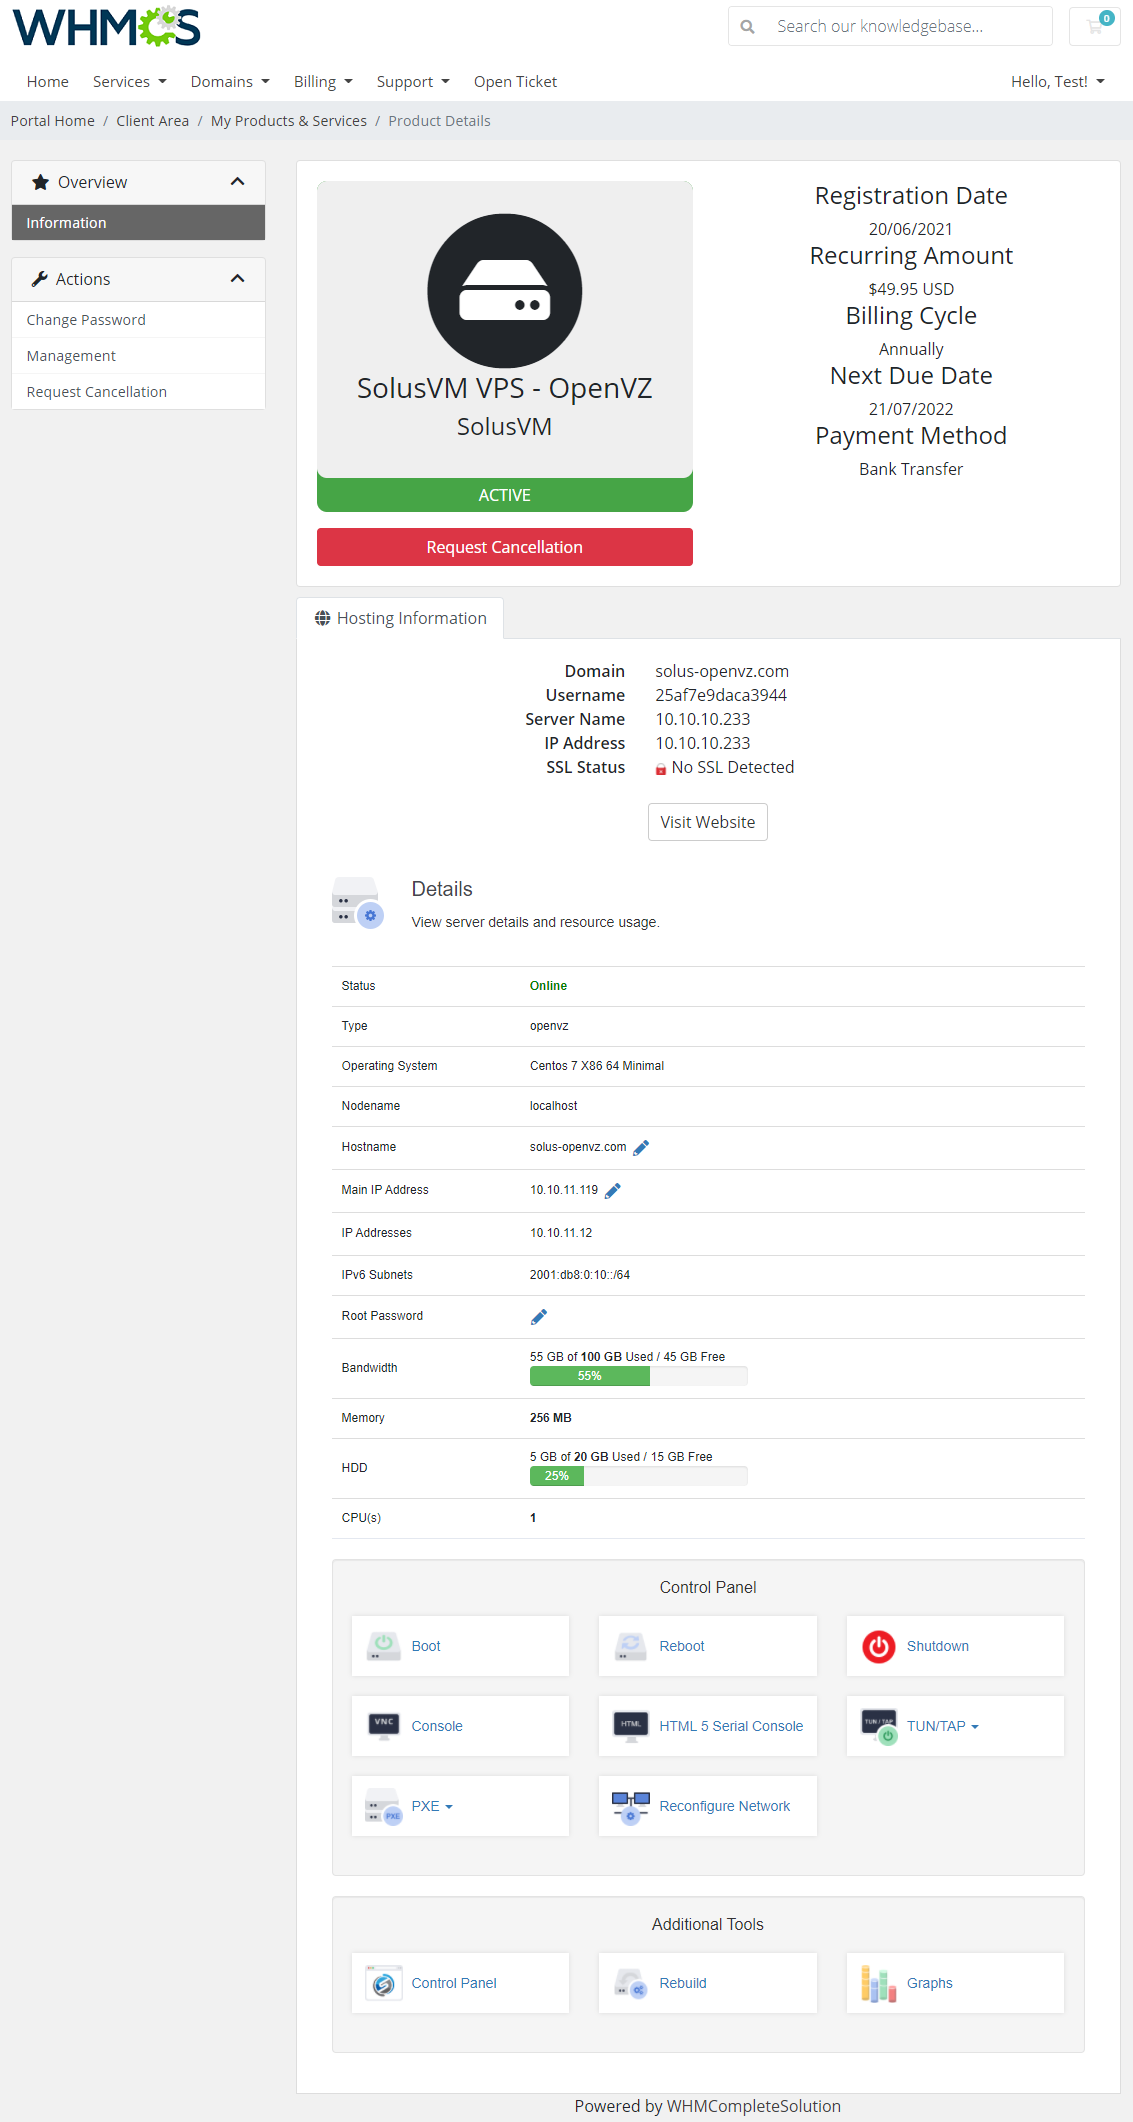
| Now let's check the interface of the module in your WHMCS client area. As you can see, everything your customers need is in one place. Note: List of available features depends of selected virtualization. |
|
| The above screen presents a 'Classic Design' introduced in version 1.2. A following screen shows basic design. You can switch between designs by ticking 'Classic Design' at the 'Module Settings' → 'Client Area Features' . |
| File:SV19.png |
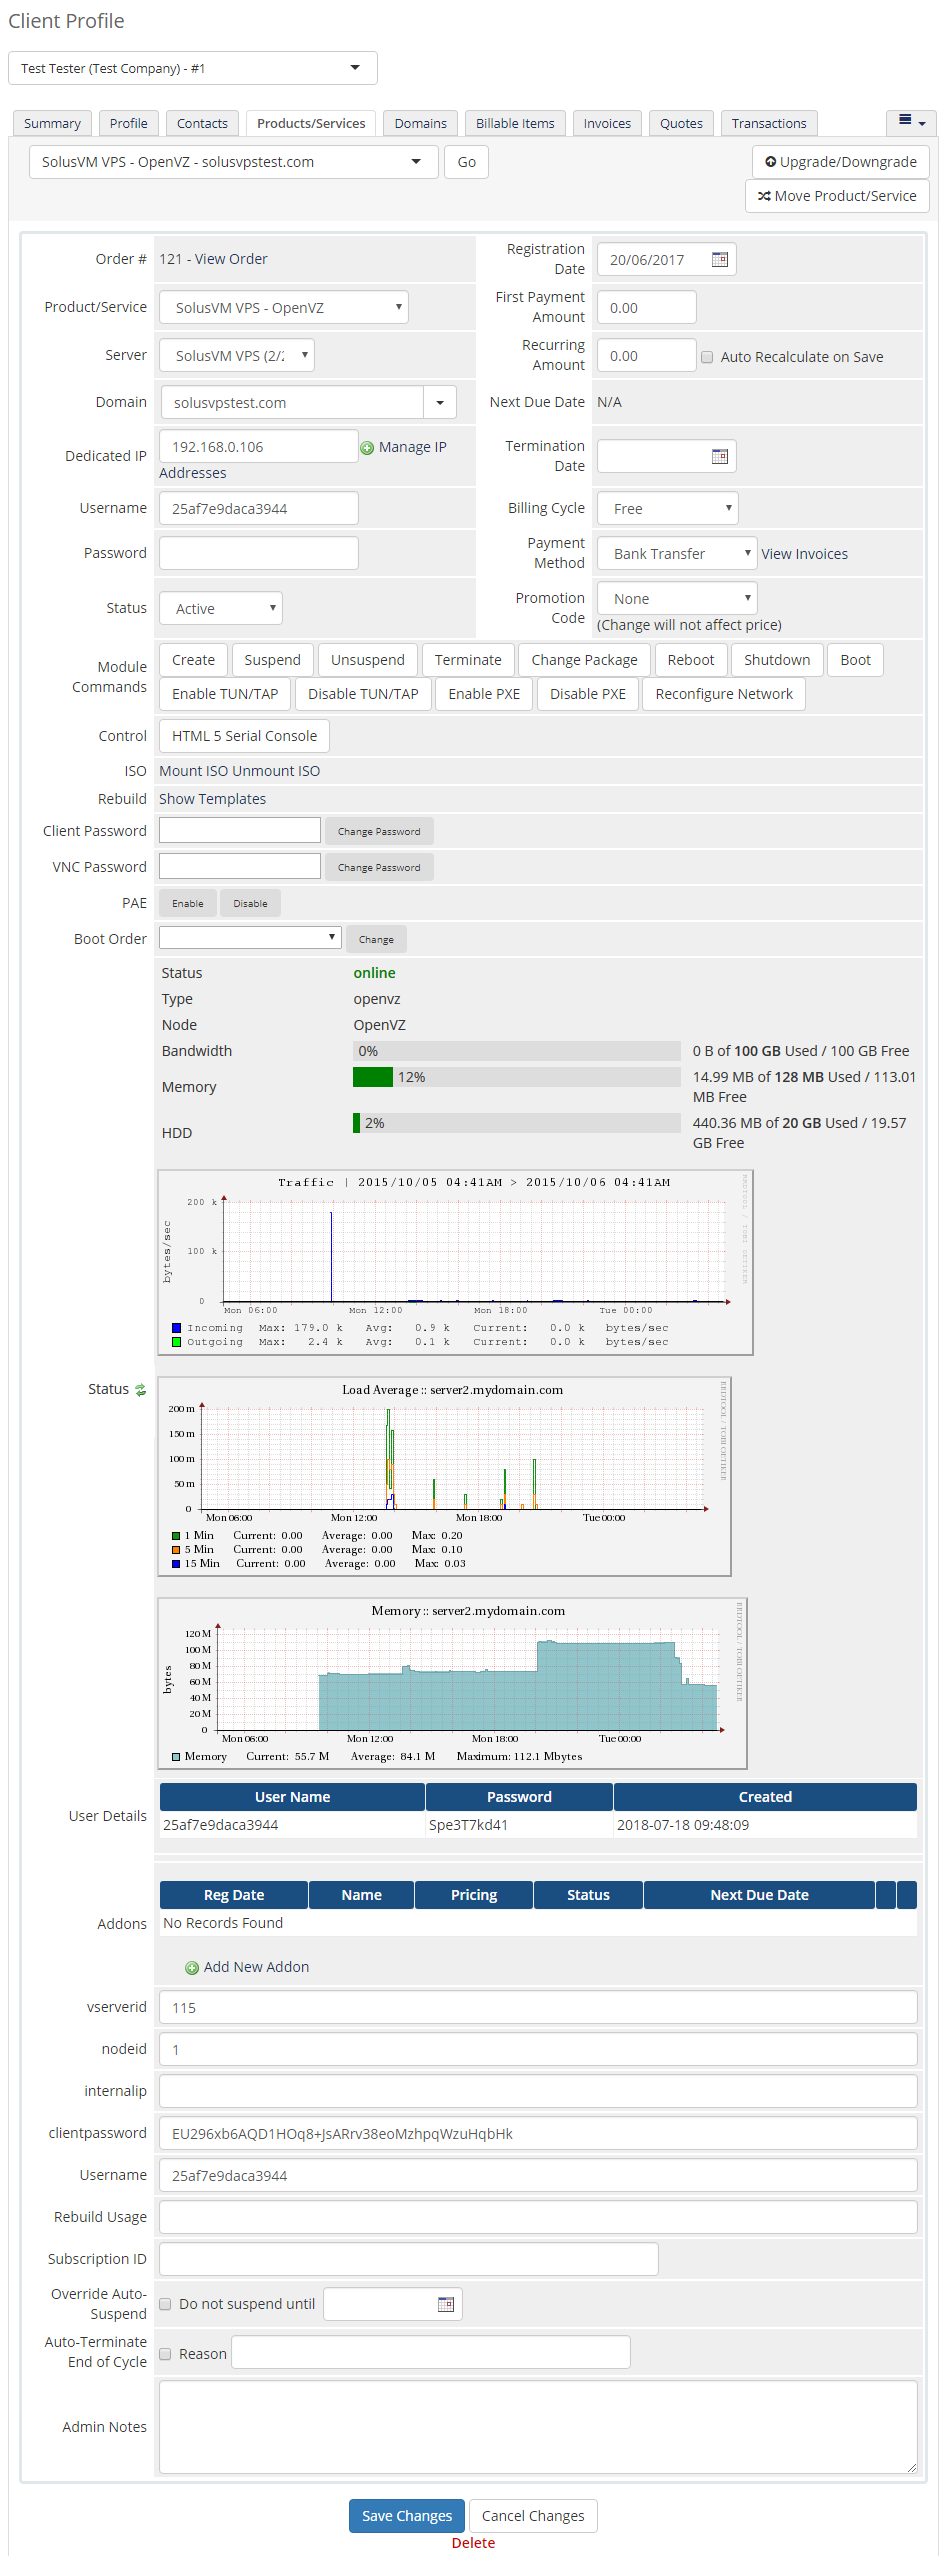
| You can monitor and manage each product from your WHMCS admin area. |
|
Management of Server
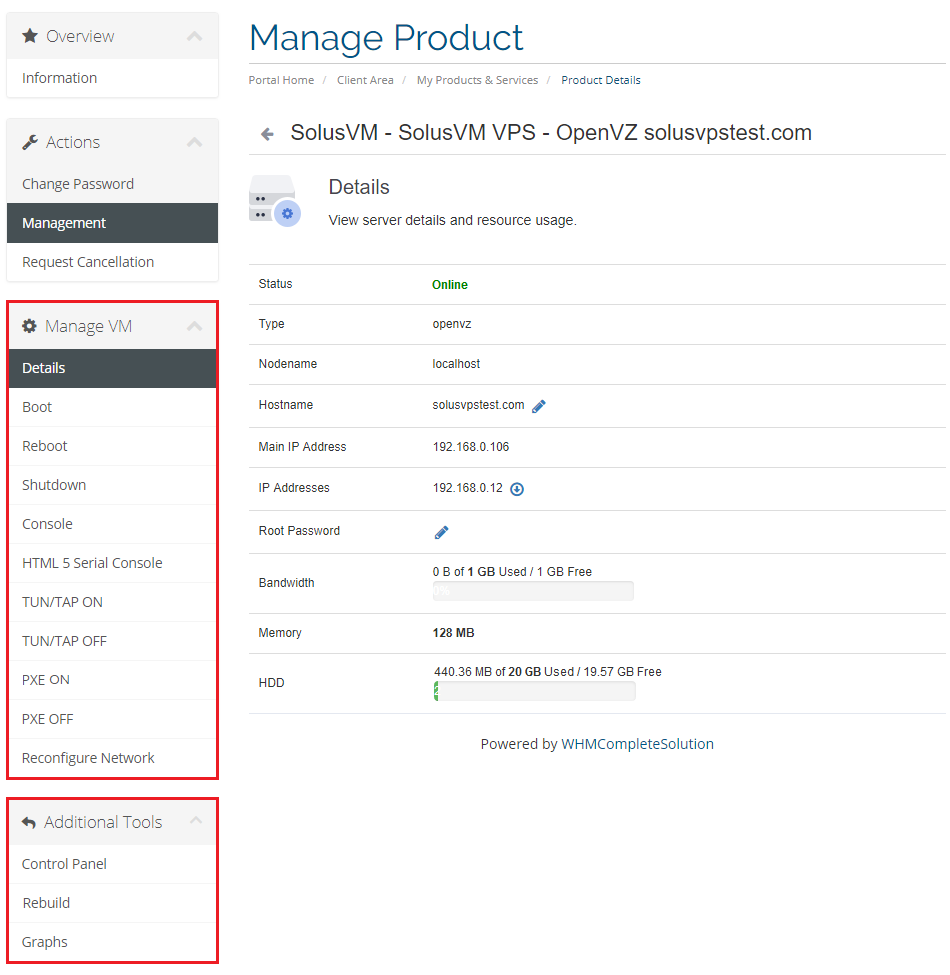
| Module allows your customers to easily log into control panel (1), access SSH/VNC console (2), boot, reboot (3), shutdown (4), rebuild (5) and delete (6) their VPSes. In an addition to that, your clients can change hostname (7) and root password (8), set up boot order (9), mount ISO (10) and unmount ISO (11). |
|
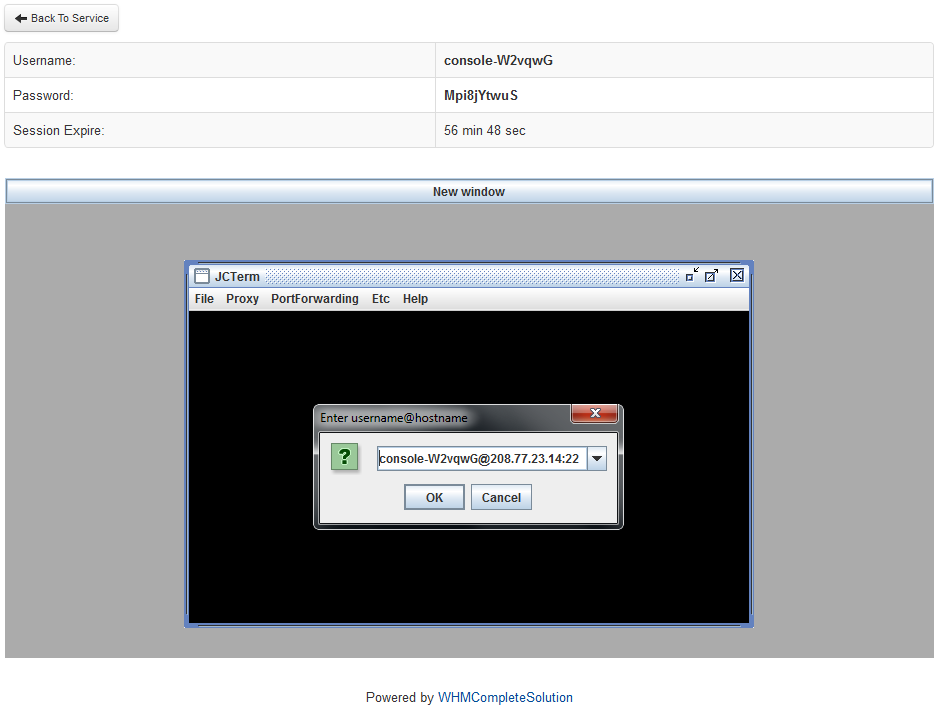
| One of the most interesting functionality is SSH console where your clients can remotely manage server. To access it, simply press on the 'Console' button. Note: This type of console is available only for OpenVZ & Xen virtualizations. |
|
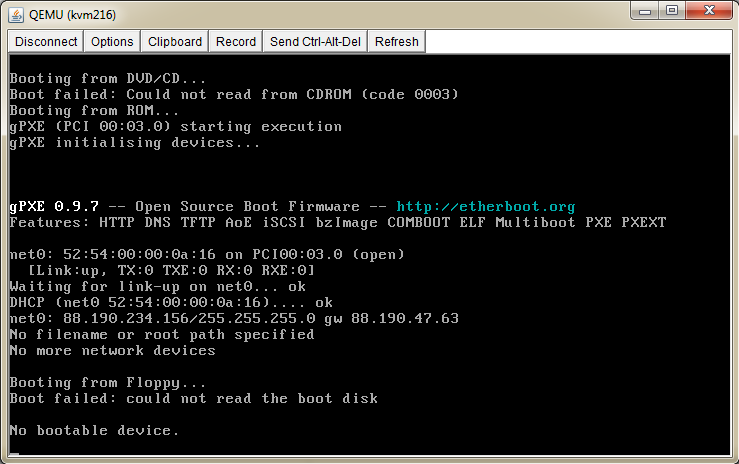
| The module also enables remote access to VNC console. Note: VNC console is used by KVM and Xen HVM virtualizations. |
|
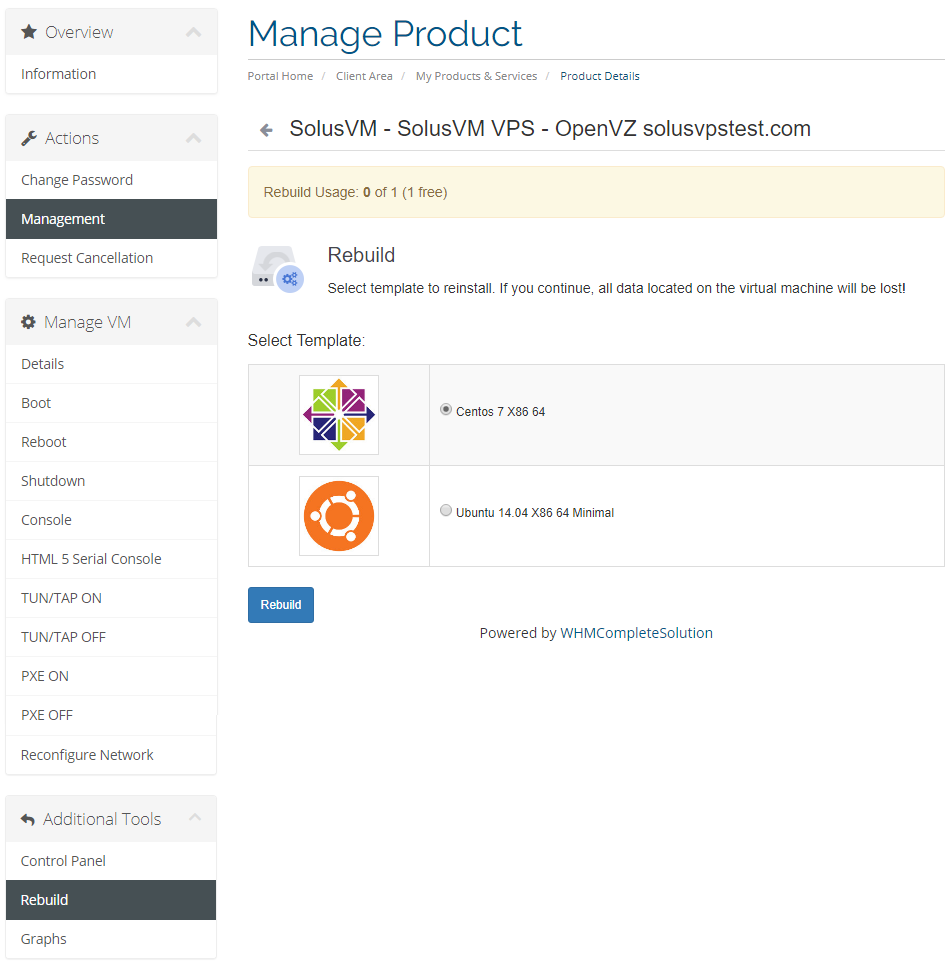
| Rebuild feature allows to change OS template from available OS templates list. To rebuild your server click on 'Rebuild' button, choose template and click on the blue 'Rebuild' button. |
|
Management of Email Templates
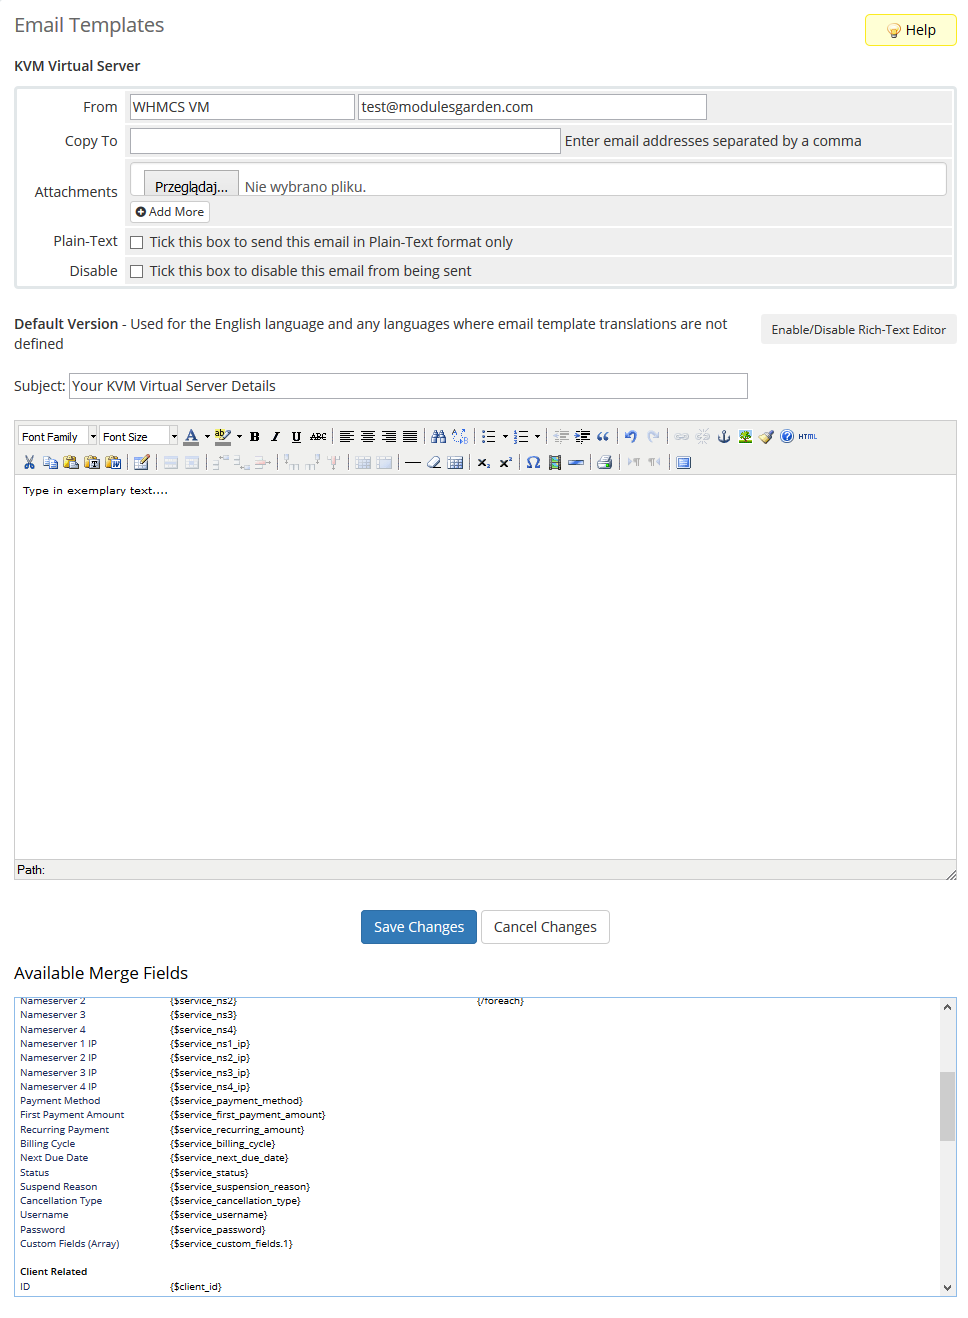
| You can automatically send your customers the emails with details of newly created virtual servers. To do so, create new email template with 'Product' type and 'Unique Name' specified in SolusVM Documentation, in our case it is 'KVM Virtual Server' . |

|
| You can paste the email content from SolusVM Documentation or create your own. Owing to our module, you can also use these 4 variables: {$service_custom_field_rootpassword}, {$service_custom_field_vncip}, {$service_custom_field_vncport} and {$service_custom_field_vncpassword}. |
|
Management of Custom Hooks
| Our module allows you to use custom hooks. All you have to do is to create some functions using PHP programming language. Here you can see possible hooks: solusvmExtendedVPS_customclientarea($params) solusvmExtendedVPS_hostname($params) solusvmExtendedVPS_username($params) solusvmExtendedVPS_AdminLink($params) solusvmExtendedVPS_create_one($params) solusvmExtendedVPS_create_two($params) solusvmExtendedVPS_create_three($params) solusvmExtendedVPS_create_four($params) solusvmExtendedVPS_create_five($params) solusvmExtendedVPS_terminate_pre($params) solusvmExtendedVPS_terminate_post_success($params) solusvmExtendedVPS_terminate_post_error($params) solusvmExtendedVPS_suspend_pre($params) solusvmExtendedVPS_suspend_post_success($params) solusvmExtendedVPS_suspend_post_error($params) solusvmExtendedVPS_unsuspend_pre($params) solusvmExtendedVPS_unsuspend_post_success($params) solusvmExtendedVPS_unsuspend_post_error($params) solusvmExtendedVPS_changepackage_pre($params) solusvmExtendedVPS_changepackage_post_success($params) solusvmExtendedVPS_changepackage_post_error($params) But before editing any of these hooks you have to rename file 'custom-rename.php' to 'custom.php' . |

|
| Now your hooks are active, but they are empty, so they do nothing. To find details about hooks you need to read the file you previously edited. In the mentioned file you will find the hook, information about its time of run, returned values and parameters. |

|
Dynamic Server Resources Setup With Configurable Options
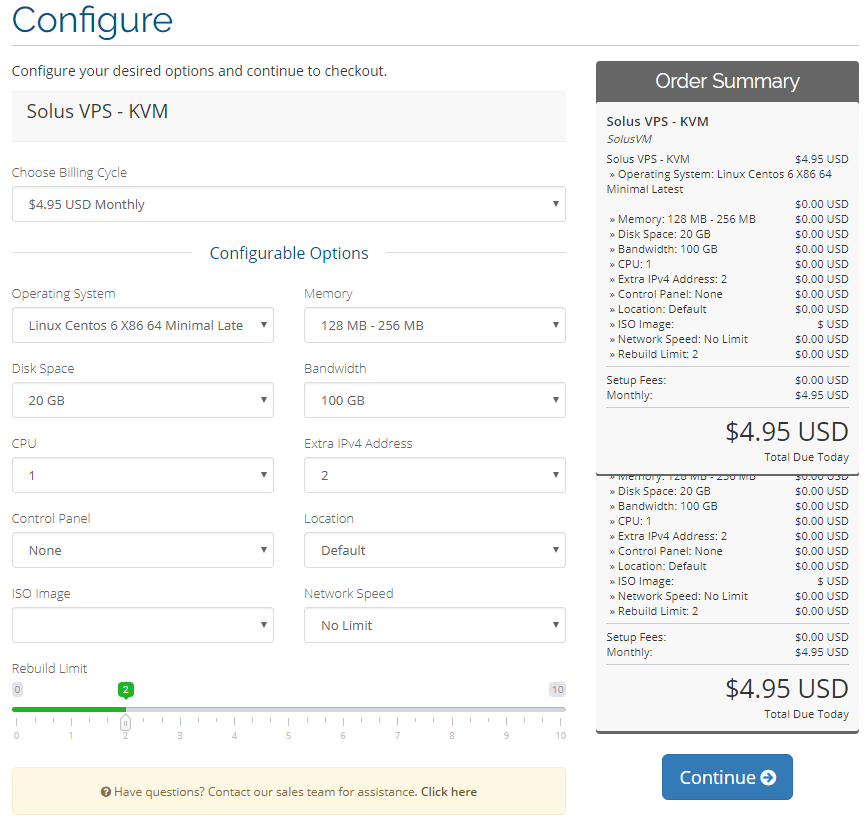
| If you want to allow your clients to dynamically set server with resources they choose, follow the steps below. Firstly, you should have a ready product. For more information on how to create one, head to 'Configuration of Product' instruction. |
|
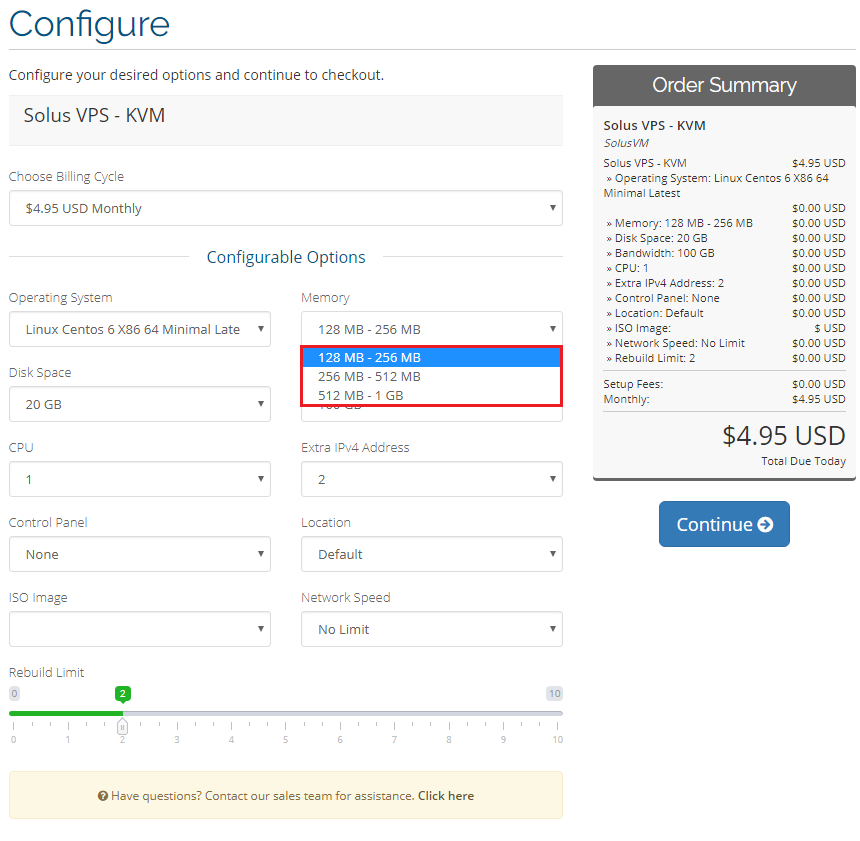
| If automatically generated configurable options do not seem to fill your clients' needs, you can edit them using this guide to change them. |
|
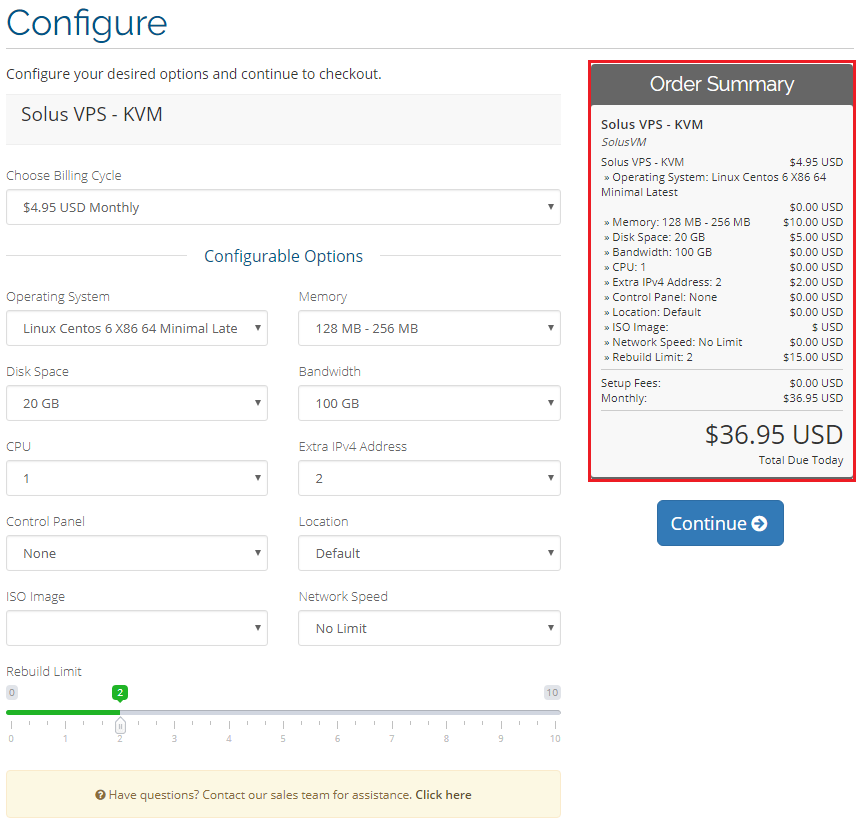
| If you decide to set pricing per server resource ordered, you can find instruction how to proceed here. |
|
| If you prefer to charge your clients for server resources they actually use, you can use our Advanced Billing For WHMCS module. |
Management of DNS
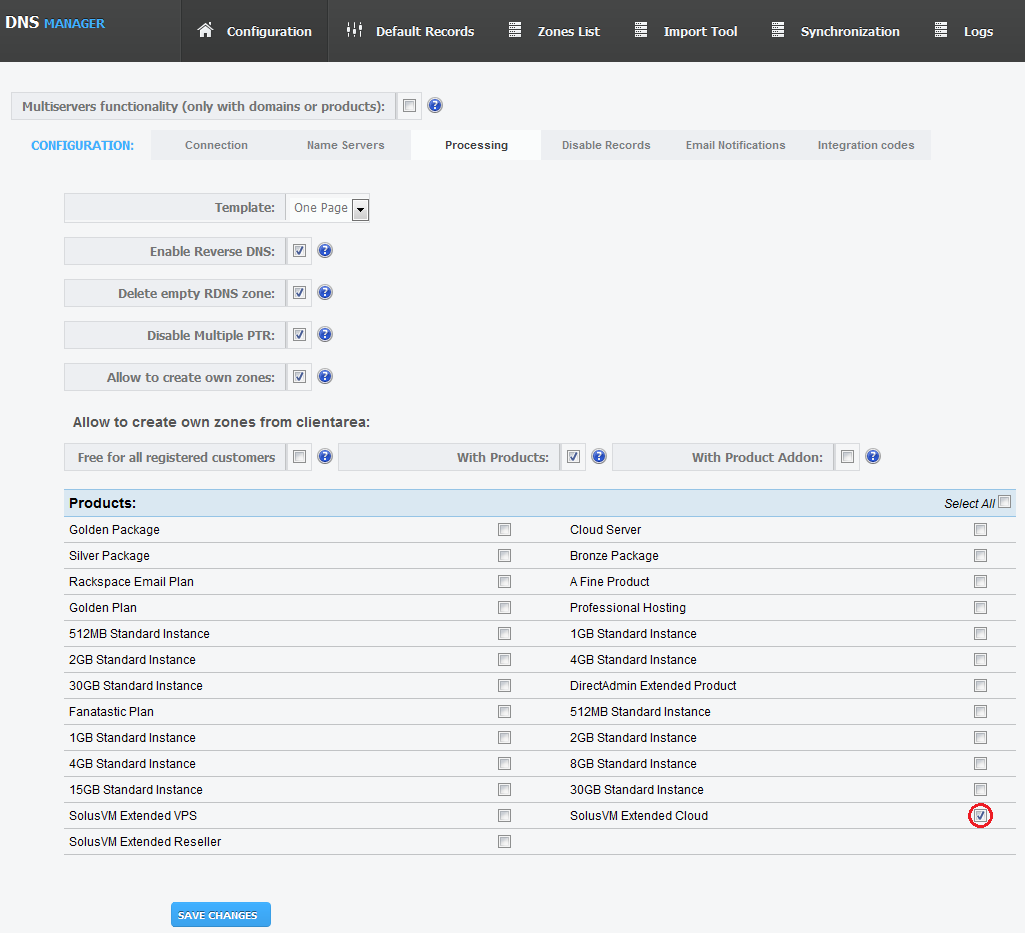
| When you combine SolusVM Extended VPS For WHMCS With DNS Manager For WHMCS, your clients will be able to manage PowerDNS from the client area. DNS Manager For WHMCS will allow your customers to manage DNS zones, records and ReverseDNS. |
|
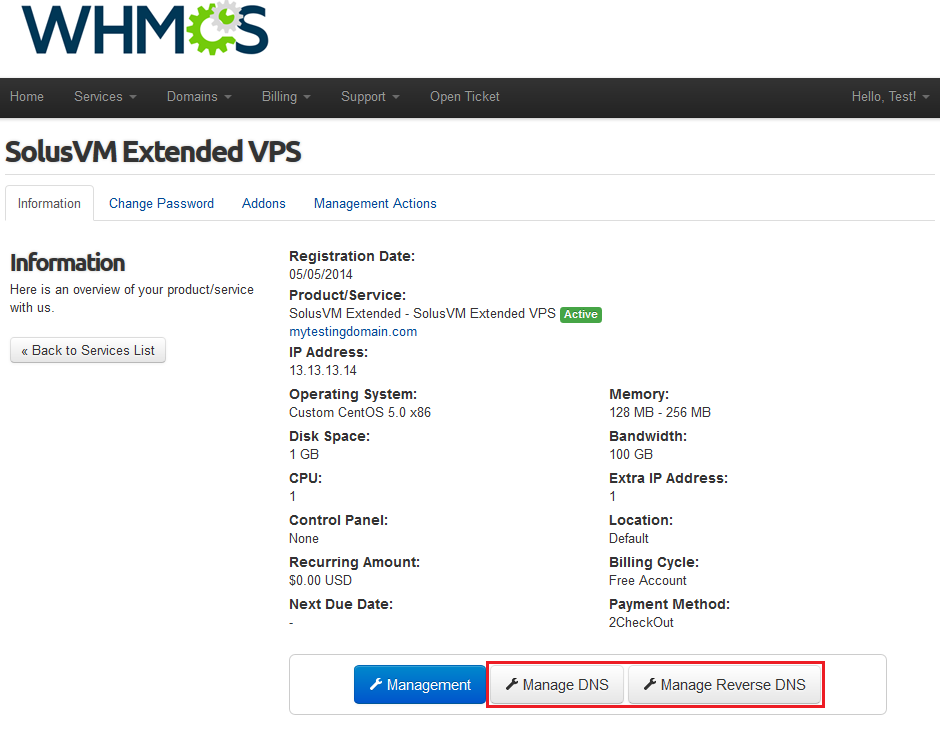
| Afterwards, buttons 'Manage DNS' and 'Manage Reverse DNS' will appear in the client area as shown on the screen below. |
|
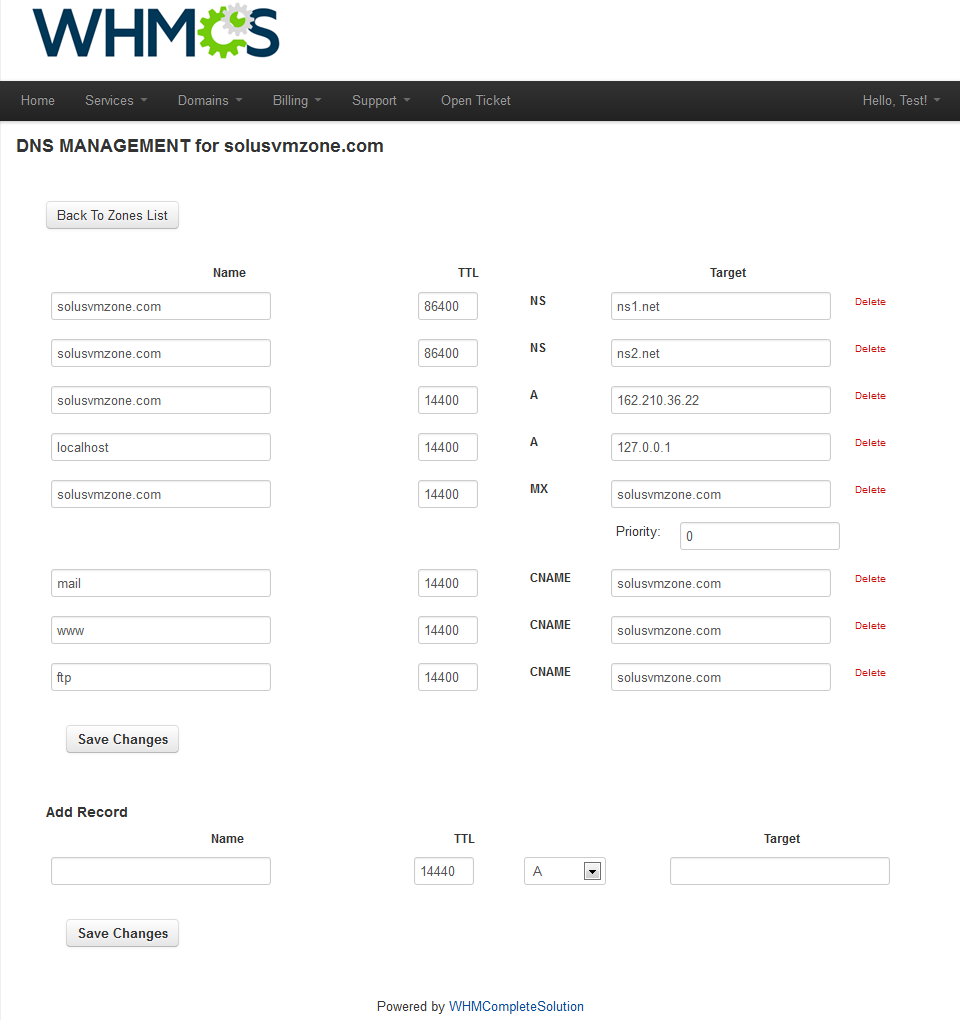
| Dependant on your previously chosen settings, your customers will be able to add, edit and remove DNS zones and records. |
|
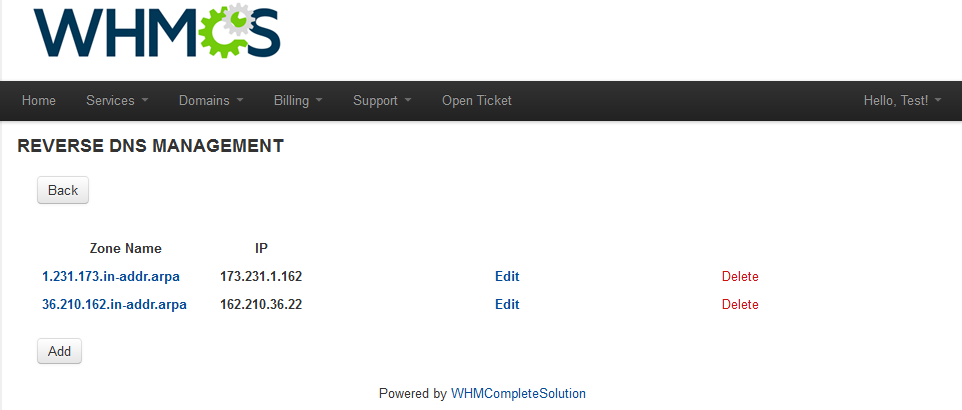
| Module will also allow your customers to add, edit and remove Reverse DNS zones and records. |
|
Management of Billing
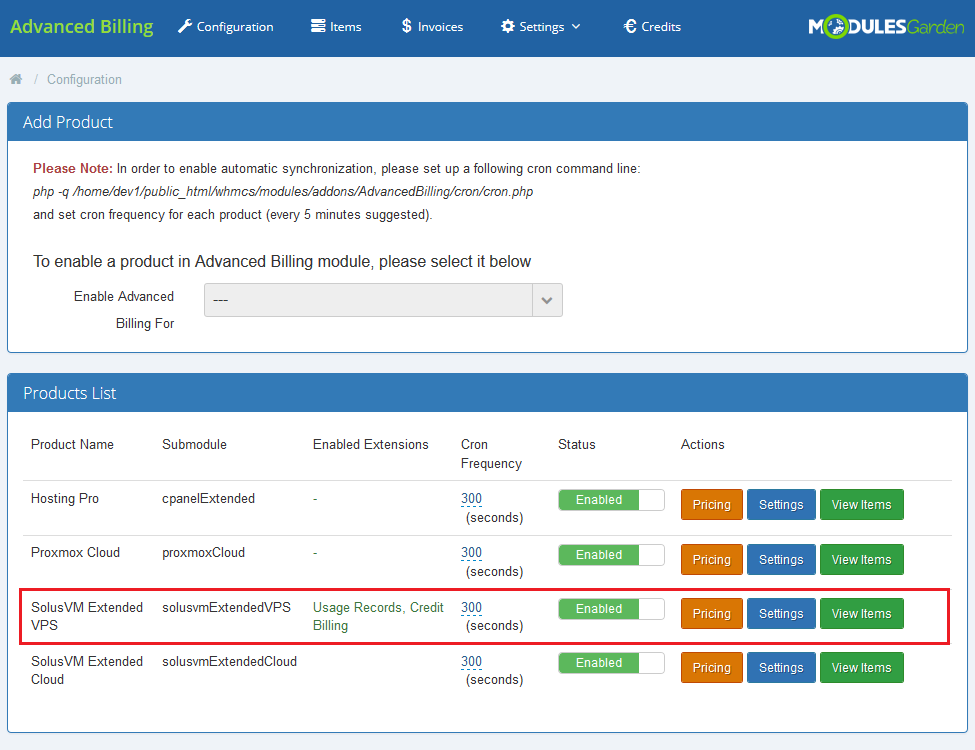
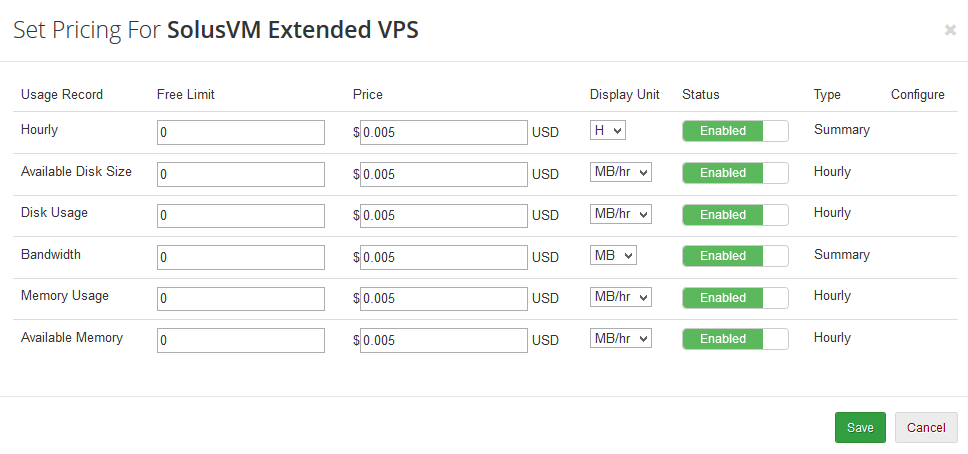
| When you combine SolusVM Extended VPS For WHMCS with Advanced Billing For WHMCS, you will be able to set up additional billing options. Module allows you to charge your customers based on the server resources used by them. |
|
| With Advanced Billing module, you can also display your customers the current server resource usage and their cost. |
|
Update of Products
| Our module is entirely compatible with SolusVM Pro module and you can easily upgrade your existing products without losing your settings. 1. Go to the 'Setup' → 'Products/Services' → 'Products/Services' → 'Module Settings' of your product and switch 'Module Name' from 'Solusvmpro' to 'SolusvmExtendedVPS' . |
Debug Mode
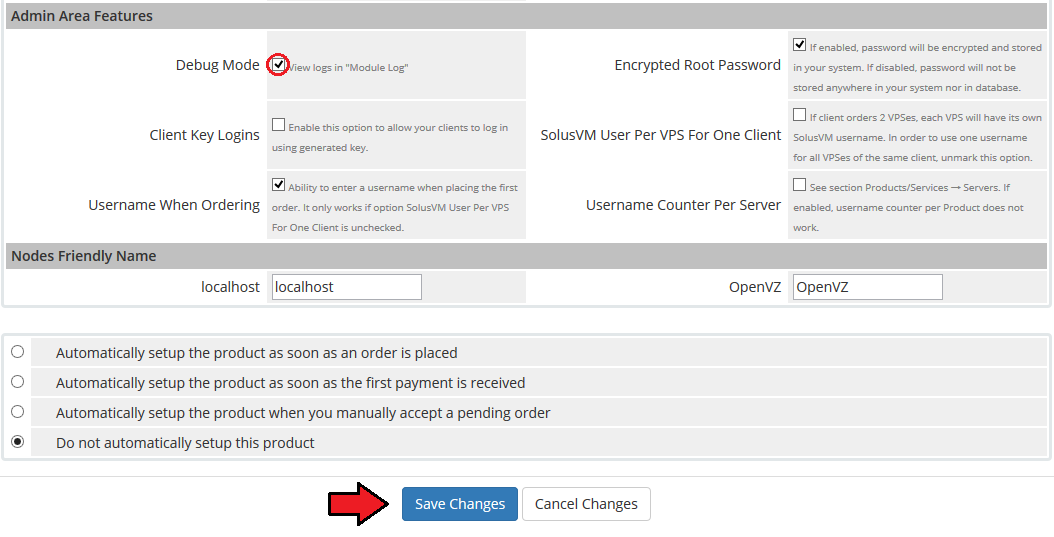
| SolusVM Extended VPS is very complex module. Therefore many things might go wrong. To help you quickly solve various problems usually connected with WHMCS product/server configuration and SolusVM server configuration, we created a 'Debug Mode' . |
|
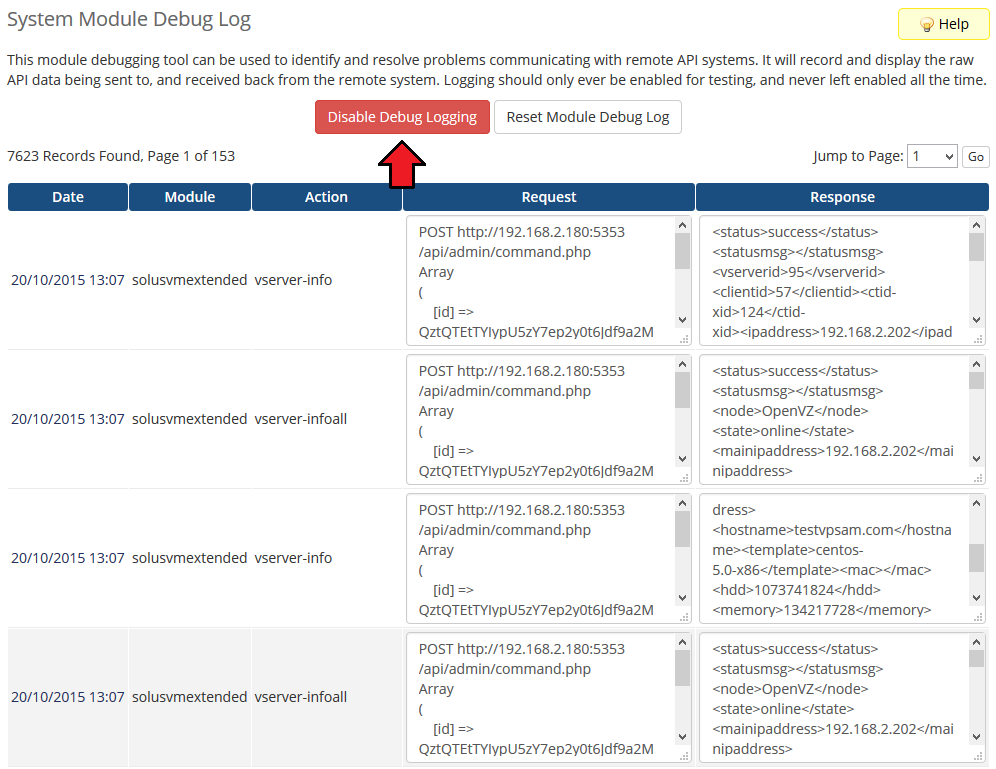
| Afterwards go to the 'Utilities' → 'Logs' → 'Module Log' and click on 'Enable Debug Logging' in order to enable it. Button should change value for 'Disable Debug Logging' . From that moment, each action performed by module will be recorded in the log. |
|
| Remember to turn off Debug Mode after you fix the problem. |
Tips
| 1. We made every effort to make our module as easy to install, configure and use, as possible. Therefore we paid special attention to displayed messages. Read carefully each message, follow the instructions and you shall have no problems with using the module. |
| 2. Operations performed on the virtual servers are not executed immediately. Give your SolusVM server some time for processing the request and execution of operation. |
| 3. In the current version of SolusVM API there is no possibility to automatically upgrade Virtual Machine therefore you have to perform this action manually. Upgrading package in the SolusVM VPS Extended module means upgrading of Solus Plan. |
Common Problems
| 1. By default our module connects with SolusVM server on port 5353. If you are using different port, you need to specify it in the 'Hostname' field. Default port for SSL connections is 5656. To connect on that port enter your hostname as follows: 'yourhostname.com:5656' . Keep in mind that you can connect on any port. |
| 2. The vast majority of problems are connected with misconfigured SolusVM server or misconfigured servers/products in your WHMCS. First, make sure that your SolusVM server has properly configured virtual servers, nodes, node groups, templates, plans and API access. |
| 3. Your client get white page with '{"success":"1","status":"1"}' while entering 'Control Panel' . Cause: SolusVM client area template is based on Bootstrap, which may sometimes cause such errors. |
| 4. When you have problems with connection, check whether your SELinux or firewall is not blocking ports. |