Office 365 For WHMCS
From ModulesGarden Wiki
(Difference between revisions)
|
|
| Line 258: |
Line 258: |
| | |} | | |} |
| | {| | | {| |
| − | |style="padding: 10px 0px 15px 15px;"|'''7. To create a customer, user and make an order, you need to perform the following cron job.<br/>''' It is recommended to set up the cron job with 5 minutes intervals. <br/> | + | |style="padding: 10px 0px 15px 15px;"|'''7. There are two cron commands that should be performed.''' |
| | + | 1. To create a customer, user and make an order (recommended 5 minute intervals):<br/> |
| | <pre> php -q /your_whmcs/modules/servers/office365/cron/cron.php queue </pre> | | <pre> php -q /your_whmcs/modules/servers/office365/cron/cron.php queue </pre> |
| | + | 2. To update the API token (recommended once a day): |
| | + | <pre> php -q /your_whmcs/modules/servers/office365/cron/cron.php token:refresh </pre> |
| | |} | | |} |
| | + | |
| | | | |
| | ==Obtaining API Details== | | ==Obtaining API Details== |
Revision as of 13:06, 22 April 2020
Office 365 For WHMCS has been designed to let you automatically provision Microsoft Office 365 plans and remotely manage their key features.
With this module, you will easily supervise all subscriptions, perform switches and suspensions as well as password changes right in your WHMCS.
|
| ✔ Create/Suspend/Unsuspend Office 365 Subscriptions
|
| ✔ Choose Standard/Extended Provisioning Type
|
| ✔ Enable/Disable User Management
|
| ✔ Create/Suspend/Unsuspend Addon Services For Standard Provisioning Type
|
| ✔ Create Office 365 Customer During First Or Every Order
|
| ✔ Create Office 365 Client With Every Order
|
| ✔ Accept Microsoft Customer Agreement
|
| ✔ View And Accept Microsoft Customer Agreement
|
| ✔ Standard Provisioning Type:
|
| ✔ Automatically Create Office 365 Customer/User/Subscription
|
| ✔ Upgrade/Downgrade Office 365 Subscriptions
|
| ✔ Extended Provisioning Type:
|
| ✔ Order Chosen Number Of Licenses
|
| ✔ View/Create/Delete Office 365 Users
|
| ✔ Assign Available Subscriptions To Users
|
| ✔ Upgrade/Downgrade Number Of Office 365 Subscriptions
|
| ✔ Office 365 Business/Business Essentials/Business Premium
|
| ✔ Office 365 Education/Education E5
|
| ✔ Office 365 ProPlus/Enterprise E1/E3/E5/F1
|
| ✔ Advanced eDiscovery Storage
|
| ✔ Business Intelligence Service
|
| ✔ Exchange Online Archiving
|
| ✔ Information Rights Management
|
| ✔ Microsoft 365 Audio Conferencing
|
| ✔ Microsoft 365 Calling Plan
|
| ✔ Microsoft 365 Compliance
|
| ✔ Microsoft 365 Phone System
|
| ✔ Microsoft Stream Storage Add-On
|
| ✔ Office 365 Advanced Compliance
|
| ✔ Office 365 Advanced Threat Protection
|
| ✔ Office 365 Data Loss Prevention
|
| ✔ Office 365 Extra File Storage
|
| ✔ Online Diagram Software
|
| ✔ Project Portfolio Management
|
| ✔ Skype For Business Online
|
| ✔ Skype For Business Plus CAL
|
| ✔ And Others Based On Availability In Microsoft Offer
|
| ✔ Requires Microsoft Partner Network
|
| ✔ Requires Microsoft Cloud Solution Provider - Direct (Tier 1) Model
|
| ✔ Supports PHP 5.6 Up To PHP 7.3
|
| ✔ Supports WHMCS Template Six
|
| ✔ Supports WHMCS V7.8 And Later
|
Installation
This tutorial will show you how to successfully install and authenticate Office 365 For WHMCS.
We will guide you step by step through the whole installation and configuration process.
Important: This module configuration requires a Microsoft Partner Network account with CSP Direct (Tier 1) Model.
|
| 1. Log in to our client area and download the module.
|
2. In the downloaded file you might find one or two packages that support different PHP versions.
In the most recent versions of the module, you will find only one package that supports PHP 7.1 and later.
If you need a package for the previous versions of PHP, please contact our support.
|
Previous updates of the module may contain two packages dedicated to various PHP versions.
The first one that supports PHP 5.6 up to PHP 7.0, and the second one addressed to PHP 7.1 up to PHP 7.3.
Note: Keep in mind that PHP versions 5.6 up to 7.0 are no longer officially supported and their security issues are not fixed or released any more. Find more info here.
|
Important: This situation does not affect the open source version of this module which can be applied to any PHP from version 5.6 and later.
Note: You can check the current PHP version in your WHMCS. To do so, proceed to 'Utilities' → 'System' → 'PHP Info'.
|
3. Extract the downloaded file and choose the one with the right PHP version. Upload and extract the PHP file into the main WHMCS directory.
The content of PHP version files should look like this.
|
4. When you install Office 365 For WHMCS for the first time, you have to rename the 'license_RENAME.php' file.
The file is located in 'modules/servers/office365/license_RENAME.php'. Rename it from 'license_RENAME.php' to 'license.php'.
|
5. In order to configure your license key, you have to edit the previously renamed 'license.php' file.
Enter your license key between quotation marks as presented on the following screen. You can find your license key in our client area → 'My Products'.
|
6. Now, set up the 'storage' folder as recursively writable.
This folder is located in 'your_whmcs/modules/servers/office365'.
|
| 7. There are two cron commands that should be performed.
1. To create a customer, user and make an order (recommended 5 minute intervals):
php -q /your_whmcs/modules/servers/office365/cron/cron.php queue
2. To update the API token (recommended once a day):
php -q /your_whmcs/modules/servers/office365/cron/cron.php token:refresh
|
Obtaining API Details
Before you start to configure the server, you need to obtain some neccessary data to connect to API.
The data you need:
- APP ID
- APP Secret
- Common Name / Tenant ID
- Key Vault APP ID
- Key Vault Secret ID
- Key Vault Directory ID
- Key Vault Domain
In the next steps, we will guide you through the process of getting the data.
Note: All of the following data is only an example, so please be aware that some discrepancies can appear on the screens below.
The process of obtaining the data needs to be carried out on your Microfost account (or accounts) on your own.
Please keep in mind that since the date of this publication, some changes to the interface or the process of getting the neccessary data from Microsoft may have occured.
Therefore, the steps and screens presented below may not always be accurate and refect the actual starte of affairs.
If any inaccuracies are found, try to adjust to them as much as possible, or contact our support for assistance.
|
Creating Application in Microsoft Azure
The first step is to create an application in your Azure Active Directory if you do not have it yet.
Log in to your panel in Microsoft Azure.
Then, expand the left sidebar and select 'Azure Active Directory' from the menu.
|
| On the newly opened page, choose 'App registrations' from the left menu, and then click on 'New registration' .
|
Enter an application name on the newly opened page. Leave the selected by default 'Supported account types' unchanged .
Later, you need to provide the web 'Redirect URI' . This address must directly lead to the 'auth.php' file located in the folder with the module on your WHMCS server. For example:
https://my-whmcs.com/modules/servers/office365/auth.php
Please make sure that it is correct and reachable from outside - your WHMCS server must accept SSL connections.
|
| After clicking on the 'Register' button, you will be redirected to the page that generated your application data.
There you will find:
- Application (client) ID
- Directory (tenant) ID
Write it down, as you will need it afterwards to configure the server in WHMCS.
|
| Next, go to the 'Certificates & secrets' tab from the side menu and click on 'New client secret' .
|
| Before adding, provide it with a description and set 'never' in the 'Expire' option.
|
A new Client Secret will be created. Copy it to a safe place, as you will need it later for the server configuration in WHMCS.
Important: Copy the new client secret value now. You will not be able to retrieve it after you perform another operation or leave this blade!
|
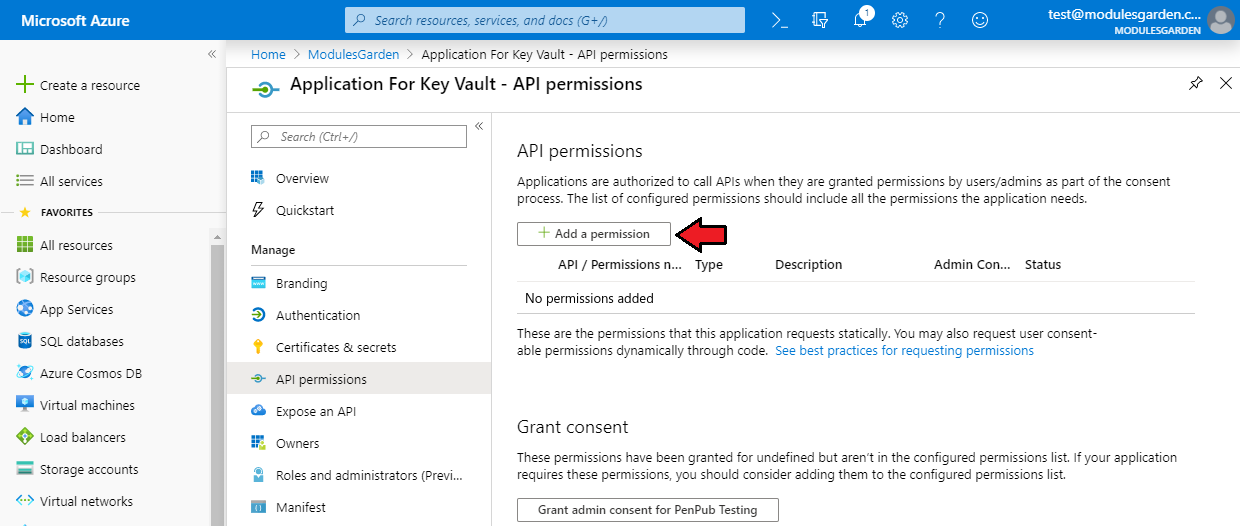
| Now, you need to set appropriate permissions. To do so, move to the 'API permissions' tab and click on 'Add a permission' .
|
| Choose 'APIs my organization uses' and then 'Microsoft Partner Center' from the list.
|
| Tick the 'user_impersonation' permission and click on 'Add permissions' .
|
| After adding permissions, click again on 'Add a permission' and then, from the 'Microsoft APIs' tab, choose 'Microsoft Graph'
|
| Select the 'Delegated pemissions' type as well as find and tick 'offline_access' on the list.
|
| Moreover, on the same list, find and mark 'User.Read' and finally click on 'Add permissions' .
|
Lastly, the scheme of allocated permissions should look as presented below.
If it is correct, click on 'Grant admin consent for <your company name>' and confirm this action.
|
Creating Key Vault
The final step in getting the data needed to connect to API is to generate Key Vault.
Azure Key Vault is a cloud service used to manage keys, secrets, and certificates.
It is required, so that the application and Office 365 For WHMCS that uses it, can operate properly.
To create Key Vault, you will need the application again, but this time with other permissions.
Note: Key Vault can be generated in another Microsoft account, including live environment, if it turns out that you do not have access to it for some reasons, for example from your test environment.
At the beginning, follow the same steps as when setting up the application in Microsoft Azure. That is:
- Go to 'App registrations' and create a new application using the 'New registration' button
- Provide it with a name, for example 'Application For Key Vault' and as previously, enter 'Redirect URI' which leads to the 'auth.php' file in your WHMCS
- After generating the application, copy its 'Application (client) ID' as well as 'Directory (tenant) ID'
- Then, in the 'Certificates & secrets' section, create 'New client secret' and do not forget to copy it after creating
- Move to the 'Api permissions' section
Here, the differences appear, because Application For Key Vault demands different permissions. This is:
- user_impersonation for Azure Key Vault
As before, let's add permissions.
|
|
| Select 'Azure Key Vault' from 'Microsoft APIs' .
|
| Next, tick 'user_impersonation' .
|
After adding permissions, you should see the same result as below.
Finally, do not forget to click on 'Grant admin consent for <your company name>' .
Note: In theory, it is possible to generate Key Vault with only one application, that combines all the previously granted permissions for two applications in one.
However, while testing and in test environments, we encountered problems, that is why we recommend using two separate applications.
|
| Now, move to the 'Key Vaults' section. The fastest way is to use the search engine.
|
If you do not have Key Vault yet, you can create it here by following the on-screen instructions.
Add a name, subscription, region, pricing tier and other targets.
More info about creating and using Azure Key Vault, can be found here.
If you already have Key Vault generated, select it from the list.
|
Before you gather all required data, you need to give appropriate permissions in your Key Vault to the previously created application.
To do so, proceed to the 'Access policies' section in your Key Vault and click 'Add Access Policy' .
|
Next, from the 'Secret permissions' dropdown, select the following permissions in the 'Secret Management Operations' part:
- Get
- List
- Set
- Delete
- Recover
|
As a next step, in the 'Select a principal' tab, find your previosuly created application then mark it and press 'Select' in order to give your application formerly defined permissions.
Finally, to confirm adding the access policy, click 'Add' .
|
Finally, go to the 'Overview' section and write down the generated:
- DNS Name - but without the 'https://' part
- Directory ID
which are needed to configure the server in WHMCS properly.
|
Registration of Application in Microsoft Partner Center
Lastly, once two applications in Microsoft Azure and Key Vault are ready, you need to register the first created application in Microsoft Partner Center.
Log in to the dashboard of Partner Center, and then go to 'Partner Settings' from the dropdown menu in the top right corner.
Note: To log in, use the account where the first application was created.
|
| From the 'Account Settings' submenu, choose 'App Management' , and for the 'Web App' type, click on 'Register Existing App' .
|
| On the list, find the first created application in Microsoft Azure in the previous steps of this manual and click 'Register your app' .
|
| From now on, your application should be properly registered in Microsoft Partner Center, and you already have all the data required to connect the module to API.
|
Configuration of Server
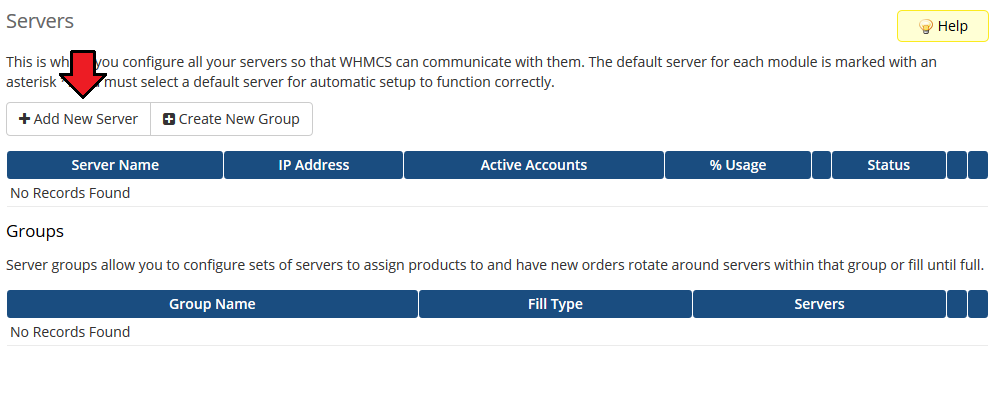
7. To begin, you must add a new server.
Go to 'Setup' → 'Products/Services' → 'Servers' and press 'Add New Server'.
Note: If you have WHMCS V7.8.X or later, we recommend using your 'previous experience' of the server configuration instead of the new wizard tool.
|
|
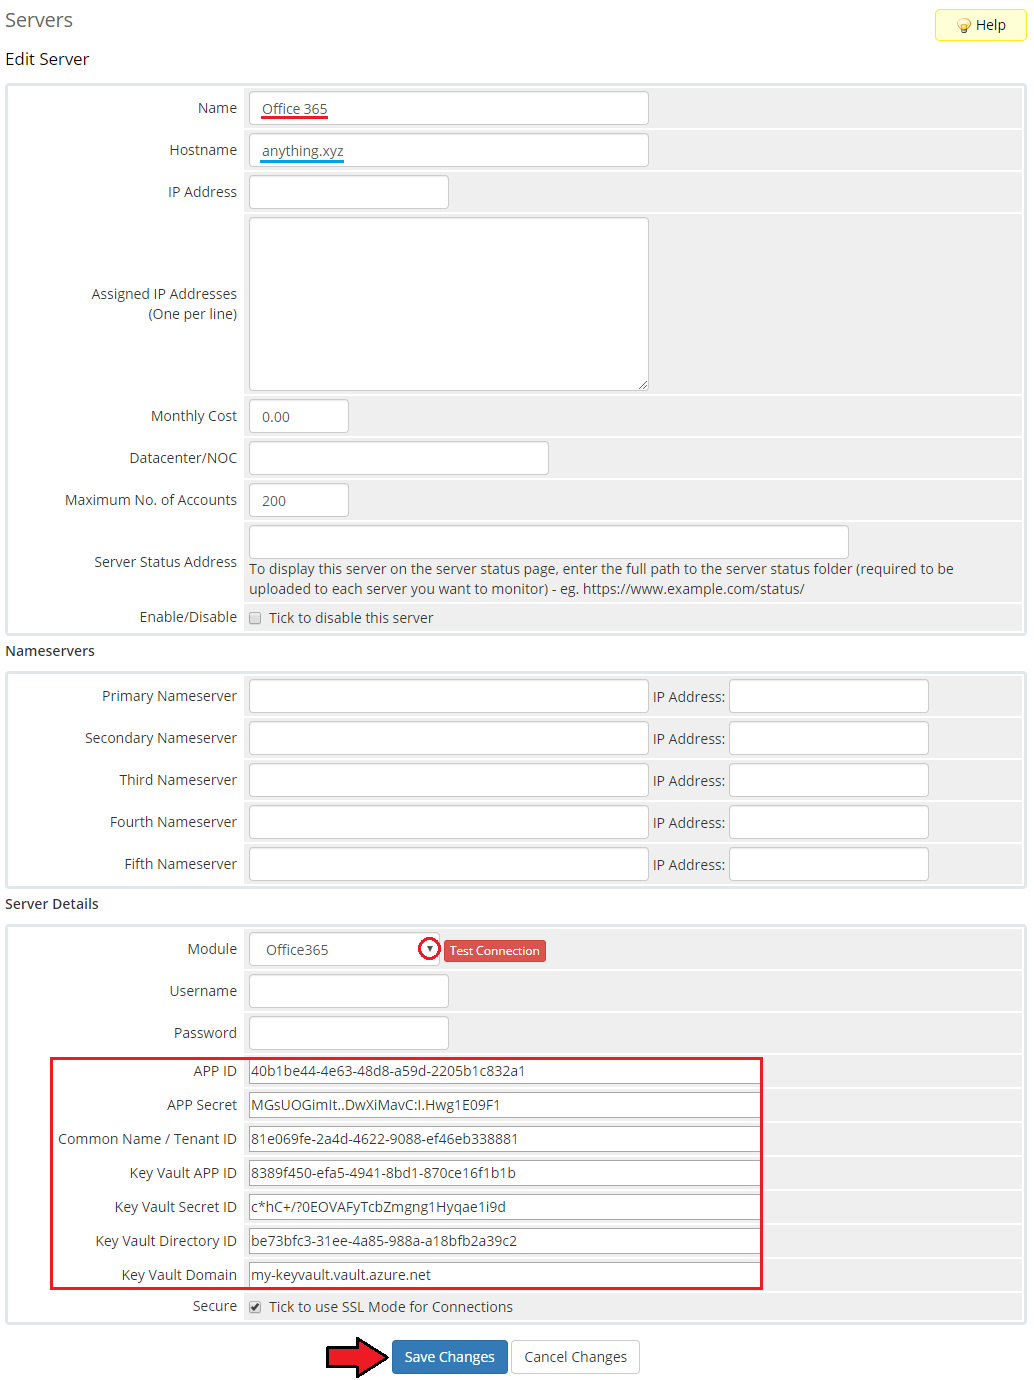
| 8. When the server configuration page opens, enter a server name at first.
Note: The 'Hostname' field is not used by the module, but if you use WHMCS V7.8.X, then a fatal error may occur when trying to save server settings without it providing any hostname or IP address details.
In this case, try to provide anything in the hostname field. Please note that this is a bug occurring in WHMCS, not the module itself, and it may also occur in further versions of WHMCS.
Next, choose 'Office365' from the dropdown menu.
The 'Username' and 'Password' fields should be felt empty- they are not used by the module.
Now, fill in the previously obrained API data. They are as follows:
- APP ID - is the Application (client) ID of the first application that you created here
- APP Secret - stands for the Client secret from the first application which was generated here
- Common Name / Tenant ID - is the Directory (tenant) ID of the first created application here
- Key Vault APP ID - stands for the Application (client) ID of the second application that you formed here
- Key Vault Secret ID - is the Client secret from the second application that was established here
- Key Vault Directory ID - is the Directory ID from Key Vault that you might have received here
- Key Vault Domain - is the DNS Name from Key Vault (but without the https:// part) that you may have got here
After completing the data, remember to 'Save Changes' .
|
|
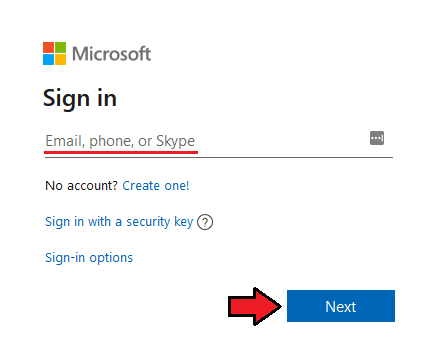
You will be redirected to your Microsoft account for a moment.
Use the same data as for the Azure account, on which you generated the first application.
Finally, you will be asked to grant access to your account - agree.
|
|
If everything proceeded correctly, you will be redirected to your WHMCS again.
Now, you can run the test connection of your server to make sure that all data is proper.
|
9. Once your server has been configured correctly, you will see the following screen.
Create a new group for your server. Press 'Create New Group' to follow.
|
| 10. Enter a name, click on your previously created server, press 'Add' , then 'Save Changes'.
|
Configuration of Product
11. In order to create a product, go to 'Setup' → 'Products/Services' → 'Products/Services' .
If you do not have a product group, click on 'Create a New Group' . If you do, simply move to the 12th step.
|
| 12. Fill in a product group name and press 'Save Changes'.
|
| 13. When you have a product group added, you can create your product and assign it to the Office 365 module.
|
| 14. Afterwards, choose your product type and product group from dropdown menus, enter your product name and press 'Continue' .
|
| 15. Now, go to the 'Module Settings' section, choose both 'Office365' and the previously created server group from the dropdown menu, and press 'Save Changes' .
|
16. Then, go to the 'Custom Fields' tab and make sure that it displays the four created 'text box' custom fields.
These are: userid|User ID, orderid|Order ID , customerid|Customer ID and acceptAgreement|Accept Agreement.
If they were not automatically created, then add them manually as shown on the following screen.
|
Configuration and Management
Configuration and management of Office 365 For WHMCS is very intuitive.
Before you start, please note that there are two provisioning types you can offer to your clients.
- Standard - this will automatically create for your WHMCS client the new Office 365 customer with user and subscription based on the chosen module settings.
You can also enable/disable the 'User Management' option in the client area.
- Extended - this type has two available options:
- 'Only with first order' - the Office 365 customer is generated only once when the first order is placed.
Next time, when the same WHMCS client makes another order, then it will be assigned to the same Office 365 customer that was created along with the first order.
- 'With every order' - creates the Office 365 customer every time the order is placed so there are as many Office 365 customers as orders.
Note that with 'Extended Provisioning Type' , it will be also up to the WHMCS client to choose how many licenses to buy during an order.
|
Standard Provisioning Type
| Let's start the module configuration by choosing the 'Standard' provisioning type.
|
|
Now, choose 'Country'. that you will offer your Office 365 services from.
With the Standard Provisioning Type the user is created automatically.
Moreover, you are allowed to select the 'Agreement Type' if there are more than one available and decide if your client will be able to manage the product.
There are also a few types of 'Billing Cycle' that can be modified according to your preferences.
You may also assign additional services to the main plan as addons - they will be described in further parts of this documentation.
Note: Available subscription offers and additional services depend on your Microsoft membership coverage and may be limited by the location.
|
Additional Services
|
In order to offer additional services for a standard product plan, you need to create a new addon first.
In your WHMCS system press 'Setup' → 'Products/Services' → 'Product Addons' and select 'Add New Addon' .
Important: addons are applicable only to standard provisioning types, not to extended ones.
|
| Enter a name of the addon, choose the addon to be visible during the ordering process and configure the rest of the desired options.
|
| Go to the 'Applicable Products' tab and select the product that you want to offer this addon for. Then press 'Save Changes' .
|
Important! Please leave both: 'Module Name' and 'Server Group' set to NONE in the addon module settings.
Selecting any server or module here will surely end up with an error!
|
| Go back to your product and connect the created addon with one of the available additional services in the 'Module Settings' tab.
|
| Finally, 'Save Changes' . Remember that you can also add more addons for services.
|
Client Area
Once the product configuration is complete, clients will be able to order the selected subscription and addons.
Moreover, clients have to accept the required agreement which was set in the product configuration.
|
|
The customer can order additional services to their subscription, change their password to the Office 365 panel, upgrade a subscription plan or request.
If you enable the 'User Management' option in the product configuration section, then clients will be able to add/delete users, check more information about users as well as assign one license to one user.
There is also a possibility to automatically redirect to the Office 365 panel once pressing the the proper button.
|
Extended Provisioning Type
The extended provisioning type allows your client to order the chosen number of licenses using configurable options and then manually redistribute them in their client area among the created Office 365 users.
Enable this configuration type by choosing the 'Extended' provisioning type in the module settings of the product.
|

|
|
Now, choose 'Country' that you will offer your Office 365 services from.
Similarly as previously, select the 'Company Domain' and 'Agreement Type' if there are more than one available and choose one of the desired Office 365 plan.
There are also a few types of 'Billing Cycle' that can be modified according to your preferences.
In this type of provisioning, the 'User Management' option is enabled by default.
Next, decide which type of generating customers is acceptable for you. There are two possibilities:
- 'Only with first order' - the Office 365 customer is generated only once when the first order is placed.
- 'With every order' - creates the Office 365 customer every time the order is placed so there are as many Office 365 customers as orders.
Note that for this mode you cannot assign any additional services to the main plan as addons.
|
Configurable Options
To allow your clients to purchase multiple licenses at a single order, you must create configurable options for a product .
Start by going to 'Setup' → 'Products/Services' → 'Configurable Options' and press the 'Create a New Group' button.
|
| Enter a group name for the addon and select products that you want to offer this option for. Then press the 'Save Changes' option.
|
| Now, press 'Add New Configurable Option' and a new popup window should open.
|
Name this configurable option as 'office365licenseQty' with the desired friendly name. Next, chose the 'Option Type' you want to use and add pricing for the desired quantity.
Note: More information about setting up configurable options can be found here.
|
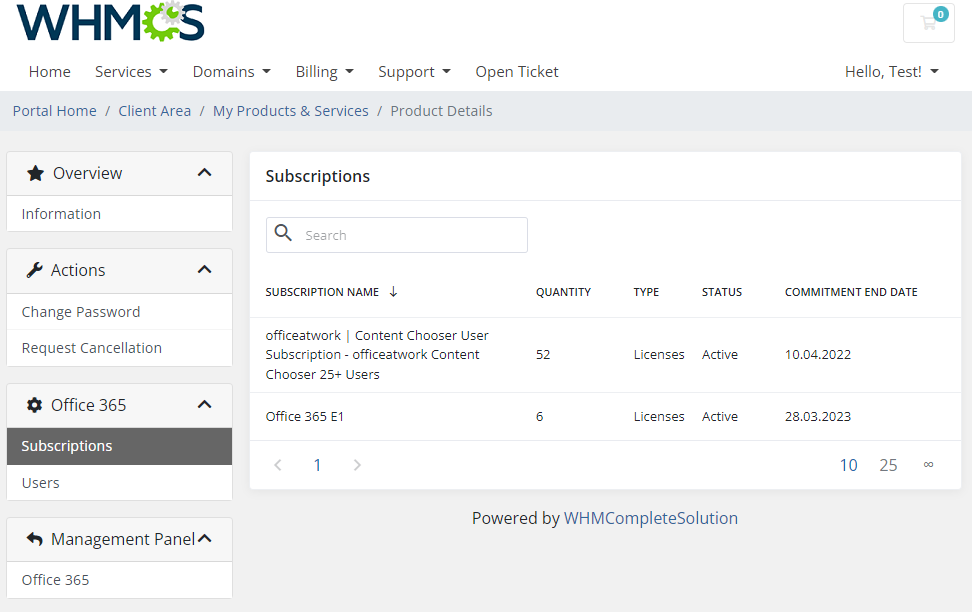
Client Area
| Once the product configuration is complete, clients will be able to order the selected number of licenses.
|
After order your clients will be able to manage Office 365 users and subscriptions by themselves.
The menu also displays information about the number of ordered and unassigned licenses.
|
Before you start assigning licenses, you have to create a new user.
By default there is already one Office 365 user created based on the customer account.
Your can add more users and then assign to them the purchased licenses.
|
| Fill in the required data to create a new user.
|
| Then, after successfully creating a new user, you can view their account details.
|
In the user profile you can view account details as well as assigned subscriptions.
Press the 'Assign License' button to assign a new license to this account.
|
| You can assign one license to one user, provided that the number of used subscriptions is not exceeded already.
|
The 'Subscriptions' section displays the number of ordered licenses.
|
|
Admin Area
| Let's check your new product in the product page in the admin area.
In order to create a customer, user and make an order, the cron job is required as described in point 7 of this section.
After a successful creation, it should look exactly like presented on the screen below.
Note The admin area for both standard and extended provisioning types looks basically the same.
|
| The 'Username' and 'Password' are used to sign up to the Office 365 panel.
|
|
The 'User ID' , 'Order ID' , 'Customer ID' and 'Subscription ID' are custom fields used to connect the product with the created subscription in your Microsoft Partner Center.
Depending on the product settings, the common 'Customer ID' and 'User ID' can be used for connection if one client buys more than one subscription.
|
Suspend/Terminate
| Due to API limitations, ordered subscriptions can only be suspended or unsuspended. For this reason, the 'Terminate' command will work in the same way as the 'Suspend' option.
|
|
In case of standard product suspension, all addons that belong to the product will also be suspended. If the product is unsuspended, its addons will remain suspended.
For extended provisioning type this action action will also cause the suspension of all subscriptions assigned to the customer and their users.
Information about product suspension will be shown in the 'Admin Notes' field.
|
Change Password
|
The 'Change Password' option will change the password for all services assigned to the user. To change it into a new one, you need to:
- Provide a new password → Press 'Save Changes' → Press 'Change Password' .
|
Note that the password must also meet the following requirements:
- At least 8 characters in length
- At least 1 uppercase character
- At least 1 special character
- At least 1 numeric character
|
Product Upgrade/Downgrade
By using upgrade/downgrade feature you can change the subscription type for the standard provisioning type.
However, for the extended provisioning type you can only change the number of assigned licenses by configurable options, not the subscription type itself.
Note that you cannot also downgrade the number of licenses to smaller quantity if that number already exceeds the number of used licenses.
|
Addons
Information about addons will depend on their status and will be shown in the 'Admin Notes' field. By default, the 'Subscription ID' service should be provided.
Note that the addon can only be used for the standard provisioning type.
|
| For example, if the addon is suspended, the information will also appear in this field.
|
Tips
| 1. For more information on how the Microsoft Partner program works, check here.
|
2. API responses can be translated in the module's language file. To do this, add a new record in the file with the received API message and your translation.
See below to find an exemplary entry:
$_LANG['ApiResponse']['Can\'t contain username paramName: User.Password, paramValue: , objectType: System.String'] = 'Password field cannot contain a username.';
|
| 3. Please remember that if the product belongs to the 'Standard Provisioning Type' then the 'Upgrade' action is not supported.
|
Update Instructions
An essential guidance through the process of updating the module is offered here.
Important: If you update the module from any version prior to 2.2.0 up to 2.2.0 or higher, please remember that due to the changes in the product configuration,
we highly recommend you review the settings and make changes if necessary. From the version 2.2.0, to create a customer, user and make an order, the cron job is required as described in point 7 of this section.
Keep in mind there is a quick and easy option in our client area that will let you upgrade the license of your module to an open source version at any time - and at a lower price!
To take advantage of it, simply use the License Upgrade button located on the product's page and a discounted invoice will be generated automatically.
|
Migration
While using the 2.X version of our module, note that no data can be migrated from the Office 365 For WHMCS version 1.0.0, so the module needs to be configured from scratch.
This also means that previously placed orders for subscriptions will not work on the new version, even after module reconfiguration.
|
Common Problems
| 1. When you have problems with connection, make sure that SELinux or firewall does not block ports.
|
2. The list of users and their subscriptions assigned to the customer directly in the Microsoft panel are not automatically assign to the WHMCS client and their users.
This is due to the API limitations, so this list is only kept locally on the WHMCS server.
In case of changes made directly in the Microsoft panel, such modifications might then be made manually in the module to reflect changes locally.
|
3. This error encountered in the module:
Use limit is exceeded for Offer Id
indicates that a single customer may purchase only one license (e.g. Office 365 Business, Office 365 Business Essentials, Office 365 Business Premium license).
|
|
|


