Domain Orders Extended 2.X For WHMCS
From ModulesGarden Wiki
(Difference between revisions)
|
|
| Line 115: |
Line 115: |
| | |} | | |} |
| | {| | | {| |
| − | |style="padding: 0px 0px 30px 25px;"|[[File:DOE7.png]] | + | |style="padding: 0px 0px 20px 25px;"|[[File:DOE7.png]] |
| | |} | | |} |
| | {| | | {| |
Revision as of 16:24, 6 February 2014
Domain Orders Extended For WHMCS allows you to group domains into categories and perform bulk actions on multiple domains.
Module lets your clients to perform multiple lookup and checkout for domains in a single request in entirely new domain order form in your own WHMCS client area.
|
| ✔ Grouping Domains Into Categories
|
| ✔ Possibility To Make Bulk Changes On Multiple Domains:
|
| ✔ Update Domain Prices - Fixed Or Percentage
|
| ✔ Delete Categories, Prices And Domains
|
| ✔ Possibility To Add Your Own Lookup Submodules
|
| ✔ Configurable Domain Lookup Submodules:
|
| ✔ Predefined OpenSRS Submodule
|
| ✔ Predefined Submodule Based On Default PHP Functions
|
| ✔ Predefined TLD Sets To Import
|
| ✔ Completely New Domain Order Form In The Client Area:
|
| ✔ Multiple Lookup For Domains In One Request
|
| ✔ Multiple Lookup For Domains In One Request
|
| ✔ Supports WHMCS V5 and Later
|
Installation
This tutorial will show you how to successfully install Domain Orders Extended For WHMCS.
We will guide you step by step through the whole installation and configuration process.
|
| 1. Log in to your client area and download Domain Orders Extended For WHMCS.
|
2. Upload and extract the module into the main WHMCS directory.
Files in your WHMCS directory should look like this.
|
3. When you install Domain Orders Extended for the first time you have to rename 'license_RENAME.php' file.
File is located at 'modules/addons/TLDsForm/license_RENAME.php' . Rename it from 'license_RENAME.php' to 'license.php' .
|
4. In order to configure your license key, you have to edit a previously renamed 'license.php' file.'
Enter your license key between quotation marks as presented on the following screen. You can find your license key at your client area → 'My Products' .
|
5. Now you have to activate the module in your WHMCS system.
Log in to your WHMCS admin area. Go to 'Setup' → 'Addon Modules' . Afterwards, find 'Domain Orders Extended' and press 'Activate' button.
|
6. In the next step you need to permit access to this module.
To do so, click on 'Configure' button, select administrator groups which should have access to this addon and press 'Save Changes' .
|
7. You have just successfully installed Domain Orders Extended For WHMCS!
You can access your module at 'Addons' → 'Domain Orders Extended' .
|
8. Last step is confirming chosen lookup module, go to 'Settings' tab.
Afterwards, press 'Update Settings' button.
|
Configuration and Management
Domain Orders Extended will help you with management of your domains and their pricing.
It will also reduce the time required to do any actions on domains, owing to the Bulk Actions.
Additionally, you can group TLDs into categories and decide which TLD is assigned to which registrar.
|
Add Category
Let's start from creating a category, go to your addon → 'Domain Categories' .
Afterwards, enter category name into 'Categories Names' field and press 'Create Categories' button.
Note: You can create multiple quantity of categories at once. To do so, simply enter one category per line into 'Categories Names'.
|
New TLD
In order to add TLD, go to your addon → 'Bulk Actions' .
Afterwards, press 'Add TLD' button and type your TLD (both 'com' and '.com' forms are accepted).
Note: You can create multiple quantity of categories at once by repeating this step.
|
Now select previously created category, unmark 'Toggle Autoupdate Mode' and enter pricing for TLD you are adding.
To disable pricing term, type '0' for Register or '-1' for Transfer and Renew.
On the following screen you can see 3 TLDs with only 2 payment terms enabled for Register, Transfer and Renew.
Note: Autoupdate mode will automatically fill fields, on the right side of field you are currently filling, with incremented values.
|
Last step is assigning registrars to TLDs, go to 'TLDs Configuration' tab.
Afterwards, press 'None' at 'Registrar' column in TLD row you want to set registrar for.
|
| Select registrar from a dropdown menu, your choice will be automatically saved.
|
TLDs Configuration
At 'TLDs Configuration' tab you can view all informations related to your TLDs, like their categories, assigned registrars and prices.
To switch between Register/Renew/Transfer pricing, select it from marked dropdown menu and press 'Filter Results' .
|
Another useful feature enables you to make quick changes, like changing assigned registrar, category or pricing at specific term.
To make such a change, simply press value you desire to change and enter changes.
Value for registrar and category will be saved automatically, at price change you have to confirm changes as shown on the following screen.
|
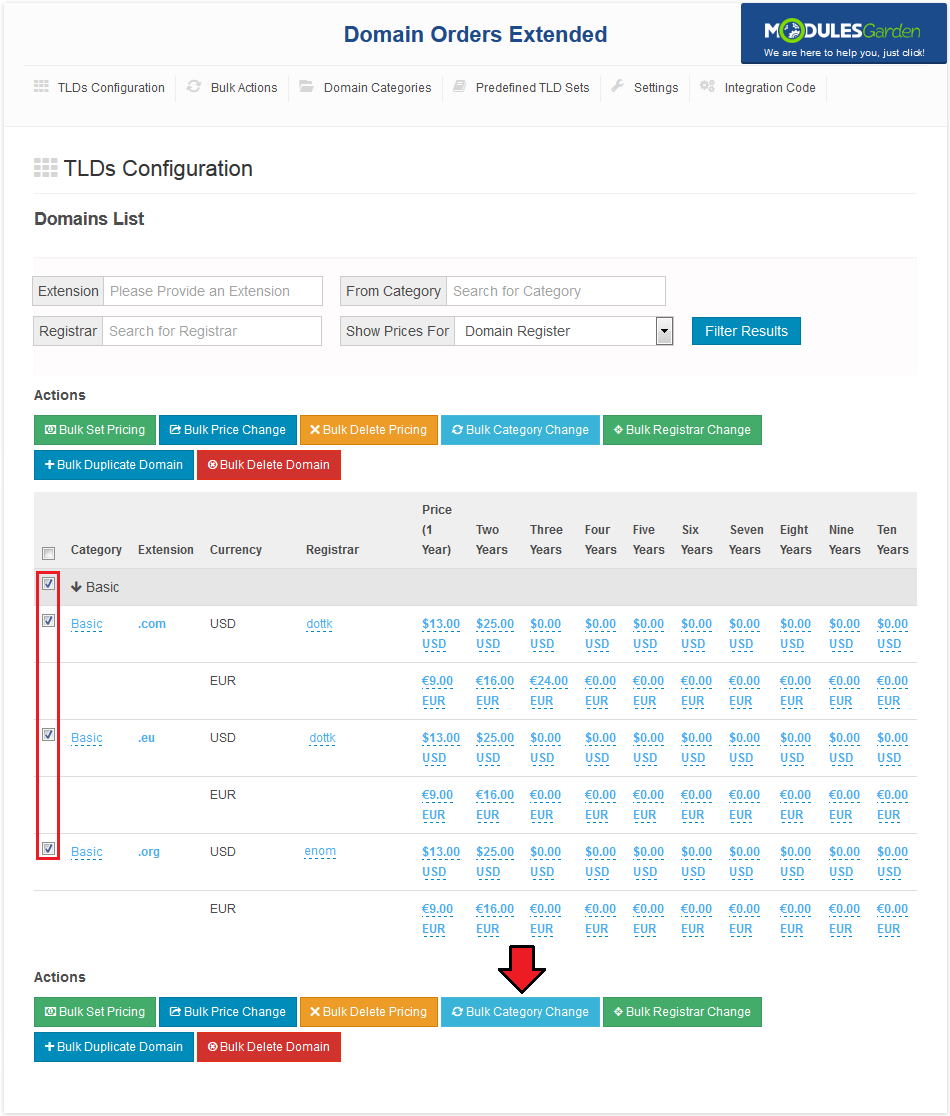
Bulk Actions
Our module allows you to order actions on multiple TLDs simultaneously. There are three methods to do it.
For first one, go to 'TLDs Configuration' tab and mark checkboxes next to TLD you want to order action for.
Afterwards, press button bounded to certain action. For example, to change category of all selected TLDs press 'Bulk Category Change' .
For second one, go to 'Category' tab and press 'Bulk Actions For Domains' .
And last but not least, third method which consists of going to 'Bulk Actions' tab and manually adding TLDs to 'Domains List' .
In subtabs below we will guide you through available bulk actions.
Note: On the following screen you can see the first method.
|
|
As soon as you are moved to bulk actions, you can switch between them via entering different subtabs marked on the following screen.
Note: As soon as you will be moved, you can add new TLDs or already existing ones to bulk action you are currently performing.
Simply, press 'Add TLD' button under TLD list and type TLD you wish to add.
|
Pricing
At bulk set pricing action you can set up new pricing or copy pricing assigned to any of existing TLDs.
Disable 'Toggle Autoupdate Mode' if you are not going to set up all payment terms.
Afterwards, fill fields and press 'Save Pricing' .
|
If you desire to copy pricing from older TLD, choose it from 'Copy Pricing From' dropdown menu. Pricing will be automatically updated.
You can also reassign category for selected TLDs, simply type its name into 'Assign To Category' auto-complete box.
If category you entered does not exist, it will be automatically created.
|
Pricing Change
If from some reason you will need to change payment for TLDs by fixed or percentage quantity, then our module makes it available to you.
At 'Price Change' you can change pricing for selected TLDs by fixed or percentage value specified by you.
Start by selecting change way from an 'Increase/Decrease ' dropdown menu and change type from 'Percentage/Fixed' dropdown menu.
Afterwards, type value to change by and press 'Submit Changes' .
Setup shown on the following screen will remove 10% value of prices from every fields.
|
Delete Pricing
At 'Delete Pricing' subtab, you can remove pricing from selected TLDs.
To do so, simply press 'Yes, Proceed' button.
|
Change Category
To assign selected TLDs to one category, go to 'Change Category' subtab.
Afterwards, type category name into 'New Category' auto-complete box.
If category you entered does not exist, it will be automatically created during process.
|
Delete Domain
You can also remove chosen TLDs.
To do so, move to 'Delete Domain' subtab and press 'Yes, Proceed' .
|
Domain Categories
At 'Domain Categories' you can add new categories and manage existing ones.
You can also order bulk actions for TLDs assigned to specified category by pressing 'Bulk Actions For Domains' .
|
| Additionally, you can view TLDs assigned to categories. Simply, move mouse cursor over fields in 'Domains' column.
|
Predefined TLDs
You can install predefined sets of TLDs sorted into categories.
To do so, go to 'Predefined TLD Sets' tab.
Next, press button of set you want to install.
|
Settings
Ability of ordering group of domains entails large quantity of requests.
Default WHMCS lookup module may work extremely slow at look up of large order, therefore we integrated OpenSRS lookup module.
To use OpenSRS, select it from a 'Domain Lookup Module' dropdown menu.
Next, enter OpenSRS hostname, username and private key. Press 'Update Settings' to save them.
|
Additionally, you can define here whether lookup result should be loaded on the same page or it should be reloaded.
Simply, mark/unmark 'Load Results On Lookup Page' checkbox and press 'Update Settings' .
|
Integration Code
'Integration Code' tab contains integration code allowing your client to access bulk domain order form in place of standard domain order form.
Therefore it allows your client to order multiple domains with TLDs defined at Domain Orders Extended addon.
|
Client Area Domains Lookup & Order
As soon as you add integration code, your client will see way different domain order form under 'Domains' → 'Register a New Domain' .
Using marked field, your client can define multiple domains to order.
|
As you can see, your client have access only to TLDs assigned to categories.
Client can select TLDs from categories or switch back to 'All Categories' and use quick search.
After typing domain and selecting TLDs he needs to press 'Check Availability' .
Important: There is disjunction relation between entered domain and selected TLDs.
For example, client type 'example' and 'mytestingdomain' domains and select '.com' and '.org' TLDs.
He will lookup 'example.com', 'example.org', 'mytestingdomain.com' and 'mytestingdomain.org'.
Note: When switching between categories, TLDs chosen at other categories are not cleared.
Therefore your client can order domains with TLDs from different categories during one order.
|
After lookup, your client will see a screen similar to the one on the following screen.
If some of the domains are unavailable, client can go to domains www address, view its whois and transfer it.
|
For available domains, client can decide if he wants to order domains and select registration period from a dropdown menu.
If client does not want to order some of the domains, he has to unmark checkboxes next to them.
Afterwards, customer has to press 'Proceed To The Cart' .
|
Tips
| 1. TLDs are hidden for clients as long as they are not assigned to any category.
|
Common Problems
1. Predefined TLD set button is inactive at 'Predefined TLD Sets' despite of removing TLDs created by it.
Solution: Remove categories created earlier by using preset button.
|


