DigitalOcean Droplets For WHMCS
Contents |
About DigitalOcean Droplets For WHMCS
| DigitalOcean Droplets For WHMCS XXXXXXXXXXXXXXXXXXXXXXXXXXXXXXXXXXXXXXXXXXXXXXXX. XXXXXXXXXXXXXXXXXXXXXXXXXXXXXXXXXXXXXXXXXXXXXXXX. |
- Admin Area Features:
| ✔ Create/Suspend/Unsuspend/Terminate Server |
| ✔ Change Package - Supports Configurable Options |
| ✔ Change Password - Xen Virtualization Only |
| ✔ Rescue/Unrescue Server |
| ✔ View Server Status And Details |
| ✔ View Interface Details |
| ✔ View List Of Scheduled Tasks |
| ✔ Configure Client Area Features Per Product |
| ✔ Define Backup Quantity Limit |
| ✔ Set Security Groups |
| ✔ Enable Backups Routing |
| ✔ Toggle VM Protection |
| ✔ Execute Custom Scripts On Boot |
| ✔ Choose Welcome Email For VM Creation |
| ✔ Run Extended Connection Test |
- Client Area Features:
| ✔ View Server Status And Details |
| ✔ Start/Stop/Pause/Unpause/Resume/Rebuild Server |
| ✔ Reboot Server - Soft/Hard |
| ✔ Reset Network |
| ✔ Rescue/Unrescue Server |
| ✔ Toggle VM Protection From WHMCS Termination And Rebuilding |
| ✔ Change Password For Xen Virtualization |
| ✔ Access noVNC VNC, RDP, SPICE Or Serial Console |
| ✔ Create/Restore/Delete Backups |
| ✔ View/Add/Delete Firewall Rules |
| ✔ Download Public & Private SSH Keys |
| ✔ View List Of Scheduled Tasks |
| ✔ View Volumes Information |
| ✔ Receive Email Notification After VM Creation |
- Configurable Options:
| ✔ Flavor |
| ✔ VM Image |
| ✔ IP Addresses |
| ✔ Backups Files Limit |
| ✔ Disk |
| ✔ RAM |
| ✔ VCPUs |
| ✔ Region |
| ✔ Custom Script Files |
- Required Components:
| ✔ Keystone |
| ✔ Glance |
| ✔ Nova |
| ✔ Neutron |
| ✔ Ceilometer (Required For Advanced Billing For WHMCS) |
- General Info:
| ✔ Automated Generation Of SSH Keys - Public SSH Key Is Injected To VM Automatically |
| ✔ Integrated With Advanced Billing For WHMCS v3.2.2 And Later - Actual Server Resource Usage Billing (read more) |
| ✔ Integrated With Server Allocator For WHMCS - Automatic Assignment Of Specified Servers To Products (read more) |
| ✔ Multi-Language Support |
| ✔ Supports Cloud-Init Scripts |
| ✔ Supports DigitalOcean Queens and Previous |
| ✔ Supports DigitalOcean Gnocchi |
| ✔ Supports PHP 5.6 Up To PHP 7.2 |
| ✔ Supports WHMCS Template Six |
| ✔ Supports WHMCS V7 |
Installation and Configuration
| This tutorial will show you how to successfully install and configure DigitalOcean Droplets For WHMCS. We will guide you step by step through the whole installation and configuration process. |
Installation
| 1. Log in to our client area and download the module. |

|
| 2. In the downloaded file you will find two packages that support different PHP versions. As presented on the screen below, the first one is dedicated to PHP 5.6 up to PHP 7.0, while the second one is aimed at PHP 7.1 up to PHP 7.2. It does not apply to open source versions. Note: You can check the current PHP version in your WHMCS. To do so, proceed to 'Utilities' › 'System' › 'PHP Info'. |

|
| 3. Extract the downloaded file and choose the one with the right PHP version. Upload and extract the PHP file into the main WHMCS directory. The content of PHP version files should look like this. |
| 4. When you install DigitalOcean Droplets For WHMCS for the first time you have to rename 'license_RENAME.php' file. File is located in 'modules/servers/DigitalOceanDroplets/license_RENAME.php' . Rename it from 'license_RENAME.php' to 'license.php' . |

|
| 5. In order to configure your license key, you have to edit the previously renamed 'license.php' file. Enter your license key between quotation marks as presented on the following screen. |

|
| 6. Now, set up the 'storage' folder as recursively writable. This folder is available at '/your_whmcs/modules/servers/DigitalOceanDroplets/' . |

|
7. The last step is setting up a two cron jobs.
|
Configuration of Server
| 8. Now, we will show you how to configure a new product. Go to the 'Setup' → 'Products/Services' → 'Servers' and press 'Add New Server' . |

|
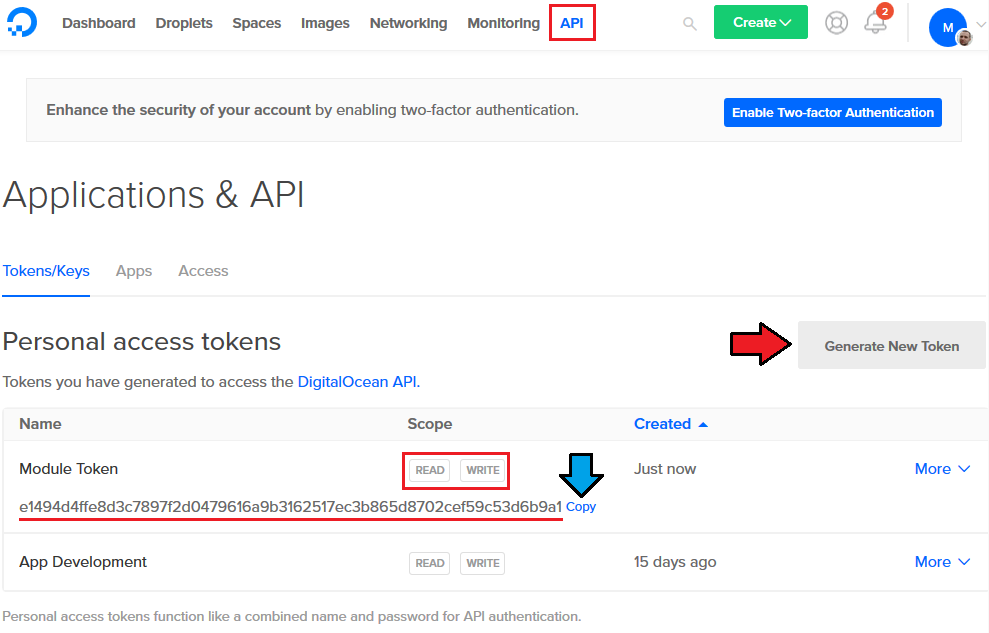
| 9. Next, enter your server name and select 'DigitalOcean Droplets' from type. Now in the 'Password' field provide your DigitalOcean API token and check the connection. If successful save changes. Note: To find your API token log in to your DigitalOcean panel and go to the API section where you can generate a new one. |

|
| 10. It is time to create a server group. To do so, click on 'Create Server Group' . |

|
| 11. Enter a name, click on your previously created server, press 'Add' and afterward 'Save Changes' . |

|
Configuration of Product
| 12. In order to create and configure a product, go to the 'Setup' → 'Products/Services' → 'Products/Services' . Click on 'Create a New Group' . |

|
| 13. Enter product group name and press 'Save Changes' . |

|
| 14. When you have a product group, you can create your product. To create a product click on 'Create a New Product' . |

|
| 15. Afterward, choose your product group and type from the dropdown menus, enter your product name and press 'Continue'. |

|
| 16. Now, go to the 'Module Settings' section, choose both 'DigitalOceanDroplets' and your previously created server group from the dropdown menus. Module should automatically save and reload settings. If not, click on 'Save Changes' manually. |

|
| 17. Now you can start configuring the settings of the Droplet you sell. In a similar way as when creating virtual machine in your DigitalOcean panel, you can configure such options as:
Important: Before providing any extra features to your WHMCS clients, remember to familiarize yourself with the additional costs that may be incurred on your DigitalOcean account. |

|
| 18. Afterward, set up incoming mail configuration. Due to API limitations all email massages with Droplets credentials can only be send to your DigitalOcean profile email address set in the panel here. Note: Even the module will accordingly filter the received messages from your mailbox, we recommend that you should use a separate mailbox for your main DigitalOcean profile account to avoid any issues with non DigitalOcean content. After setting up the dedicated mailbox, provide its valid creadentials below and test whether the connection is established correctly. |

|
| After successfull connection remember to save your module settings. From now the cron set at the last point of the module's installation should periodically check that mailbox for DigitalOcean messages. If any new received it will be then convert to your email template and send to corresponding client. These default email templates for product creation and password reset can be selected below. To edit their content, go to your WHMCS email templates section and edit them according to your needs. |

|
| 19. At the end of the configuration you can decide if you want to generate configurable options for the product. The configurable options can be used by your clients to select each Droplet parameters individually during order placement. |

|
Management
Admin Area
| DigitalOcean Droplets For WHMCS allows you to monitor and manage your customers Droplets via the admin area in your WHMCS system. These include features like:
|

|
|

|
Ordering
| Owing to configurable options, you are able to offer a product which your clients can tailor according to their needs. Additionally, you are able to set up pricing for each configurable option, which make your offer even more competitive. |

|
Client Area
| Client area interface of DigitalOcean Droplets should look like the one on the screen below. As you can see, the control panel contains useful options needed for managing a Droplet. Module allows your customers to easily start/stop, pause/unpause, resume, soft reboot, hard reboot and reset network of their servers through pressing the specific button. |
|
|
Volumes
| In case your DigitalOcean Droplets is running with the Use Volumes option, the client area may look a bit different. It will now include an additional section named Volumes |

|
Rebuild
| The rebuild feature allows your clients to change a server image. Press the 'Rebuild' button as shown on the following screen in order to move to the rebuild page. |

|
| To reinstall your server, choose an image and confirm through clicking on 'Rebuild' . |

|
Rescue Mode
| The rescue mode provides a mechanism for a VM access even in case the VM's image renders the instance inaccessible - e.g. if instance's filesystem becomes corrupted. The rescue VM will be launched to permit the user to fix their VM. |

|
|
Before you continue please note that the rescue VM will be set up with the same network configuration as the real VM. |

|
| When you want to disable the rescue mode, click the 'Unrescue' buton. TheVM status will then also return to 'ACTIVE'. |

|
Backups
| Your customers can also create a backup of Droplet. To do so, press the 'Backups' button. |

|
| Now, choose a backup name and click 'Backup Now' . |

|
| To restore a Droplet from backup, simply press the 'Restore' button next to it. As you may notice on the following screen, presented earlier the 'First Backup' backup was replaced with the 'New Backup' . |

|
noVNC Console
| One of the most interesting functionality is a noVNC console where your clients can remotely manage their server. To access it, simply click on the 'Console' button. |

|
| noVNC is a browser based VNC client. It was implemented using HTML5 Canvas and WebSockets. |

|
VM Protection
| In the product configuration page you can enable the 'Protect VM After Creation' option which prevents the termination or rebuilt of VM. The selected status of this protection will be applied to both admin area and client area. |

|
| Moreover, if the 'Protect VM' option is enabled in the client area, the client will be empowered to toggle the current protection status. |

|
Firewall
| The firewall management page allows your customers to view, add or delete existing rules on a security group assigned to the product. To add a new firewall rule, use the button marked on the following screen. |
| File:DOD 35.png |
| Next, choose the rule type (TCP or UDP), direction (inbound or outbound) and ether type (IPv4 or IPv6). Depending on the port you choose, you will be able to add a rule for a single port only, a range of ports or all ports at once. You can also select one of the predefined ports or use a custom one. Finally, provide a single IP address or specify the range of addresses using the CIDR format (e.g. 10.10.10.1/24) and add rule description if you wish. Press 'Add' when ready. |
| File:DOD 36.png |
Network Configuration Cases
| DigitalOcean Droplets For WHMCS allows you to set up two types of network. The first one is a network without a floating IP address. |
| File:DOD 36.png |
| The second type of network is the network with a floating IP address. Select 'Shared Network' as 'Fixed Network' and 'Public' as 'Floating Network' . |
| File:DOD 37.png |
Configurable Options
| In case that standard configuration is not fitting your needs, you can adjust it through configurable options. To do so, go to 'Setup' → 'Products/Services' → 'Configurable Option' and press the edit button next to a configurable option used by your product. |
| File:DOD 38.png |
| Here you can view the products that this configurable option group is assigned to. Now we will show you how to edit options. Let's say that you want to add an option to order Droplet with 8GB (8192 MB) RAM. |
| File:DOD 39.png |
| You will see a popup window, so make sure that your browser will not block it. To add a new option, enter it in a textbox under all other options. If you want to replace it with an option you currently have, simply edit its text box. |
| File:DOD 40.png |
Management of Billing
| When you combine DigitalOcean Droplets For WHMCS with Advanced Billing For WHMCS, you will be able to set up additional billing options. Module allows you to charge your customers based on the server resources used by them. |
| File:DOD 42.png |
| With Advanced Billing module, you can also display your customers the current server resource usage, their cost, usage history and charts. |
| File:DOD 43.png |
Tips
| 1. Due to some requests may take time to be completed, we implemented 'Scheduled Tasks' . Tasks visible at 'Scheduled Tasks' are subsequently performed by a cron job. |
| 2. Important: module has to use admin endpoints instead of public endpoints. In properly configured DigitalOcean server, wget from WHMCS server should be able to get any data from any admin endpoint. wget DigitalOcean:9292 --2014-03-31 09:35:24-- http://DigitalOcean:9292/ Resolving DigitalOcean(DigitalOcean)... 192.168.1.222 Connecting to DigitalOcean(DigitalOcean)|192.168.1.222|:9292... connected. HTTP request sent, awaiting response... 300 Multiple Choices Length: 520 [application/json] Saving to: `index.html' 100%[==========================================================>] 520 --.-K/s in 0s 2014-03-31 09:35:24 (118 MB/s) - `index.html' saved [520/520]
wget DigitalOcean:8777 --2014-03-31 09:41:05-- http://DigitalOcean:8777/ Resolving DigitalOcean(DigitalOcean)... 192.168.1.222 Connecting to DigitalOcean(DigitalOcean)|192.168.1.222|:8777... connected. HTTP request sent, awaiting response... 401 Unauthorized Authorization failed. |
| 3. A primary IP address is always assigned by DigitalOcean server when a VM is created Therefore, if you decide to order 2 IP addresses, then 3 addresses will be assigned. The primary one and the two additionally ordered. If you wish only one IP address to be assigned to a single product, please set the filed 'Default Number Of IP Addresses' to '0' or leave it empty in the product's 'Module Settings'. |
Update Instructions
| Essential guidance through the process of updating the module is offered here. Keep in mind there is a quick and easy option in our client area that will let you upgrade the license of your module to an open source version at any time - and at a lower price! |
Common Problems
| 1. When you have problems with connection, check whether your SELinux or firewall does not block ports. |
2. In case of persisting connection problems, please make sure you have the following ports open:
8774, 35357, 9292, 5000, 8777, 9696, 8776 |