Payment Gateway Charges For WHMCS
Contents |
About Payment Gateway Charges For WHMCS
| Payment Gateway Charges For WHMCS allows you to charge additional fees and set up discounts for usage of chosen payment gateway. With this module you can easily set up products, addons, domains and other, which require an additional fee. |
- Features:
| ✔ Set Different Rates For Different Payment Gateways (Percentage Or Fixed) |
| ✔ Set Different Discounts For Different Payment Gateways (Percentage Or Fixed) |
| ✔ Set Minimum Invoice Value To Charge Payments And Discounts |
| ✔ Include/Exclude From Charges And Discounts Certain Clients |
| ✔ Include/Exclude From Charges Certain Products, Addons, Domains And Other |
| ✔ Automatic Conversion Of Charges And Discounts In Different Currencies |
| ✔ PayPal Subscription Charging |
| ✔ Apply Taxes On Charges |
| ✔ Display/Hide Information About Additional Charges And Discounts During Ordering |
| ✔ Integration With The Following Order Form Templates: Ajaxcart, Boxes, Cart, Comparison, Modern, Slider, Verticalsteps and Web20cart |
- Additionally:
| ✔ Easy Integration Which Automatically Adjusts To Each Order Form Template |
| ✔ Multi-Language Support |
| ✔ Supports WHMCS V5 and Later |
Installation
| This tutorial will show you how to successfully install and configure Payment Gateway Charges For WHMCS. We will guide you step by step through the whole installation and configuration process. |
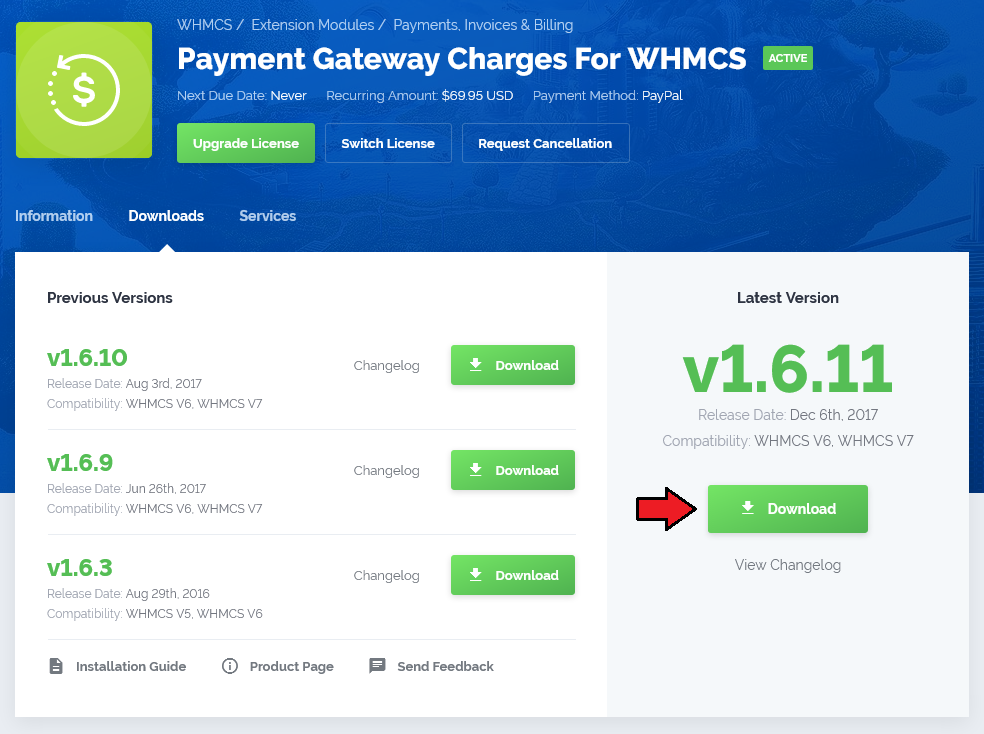
| 1. Log in to your clientarea and download Payment Gateway Charges For WHMCS. |
|
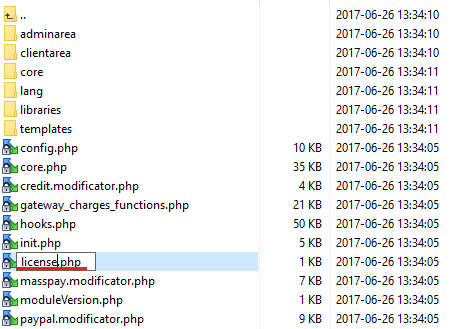
| 2. Upload and extract the module into the main WHMCS directory. Files in your WHMCS directory should look like this. |

|
| 3. When you install Payment Gateway Charges for the first time you have to rename 'license_RENAME.php' file. File is located at 'modules/addons/gateway_charges_functions/license_RENAME.php' . Rename it from 'license_RENAME.php' to 'license.php' . |
|
| 4. In order to configure your license key, you have to edit a previously renamed 'license.php' file.' Enter your licence key between quotation marks as presented on the following screen. You can find your license key at your client area → 'My Products' . |

|
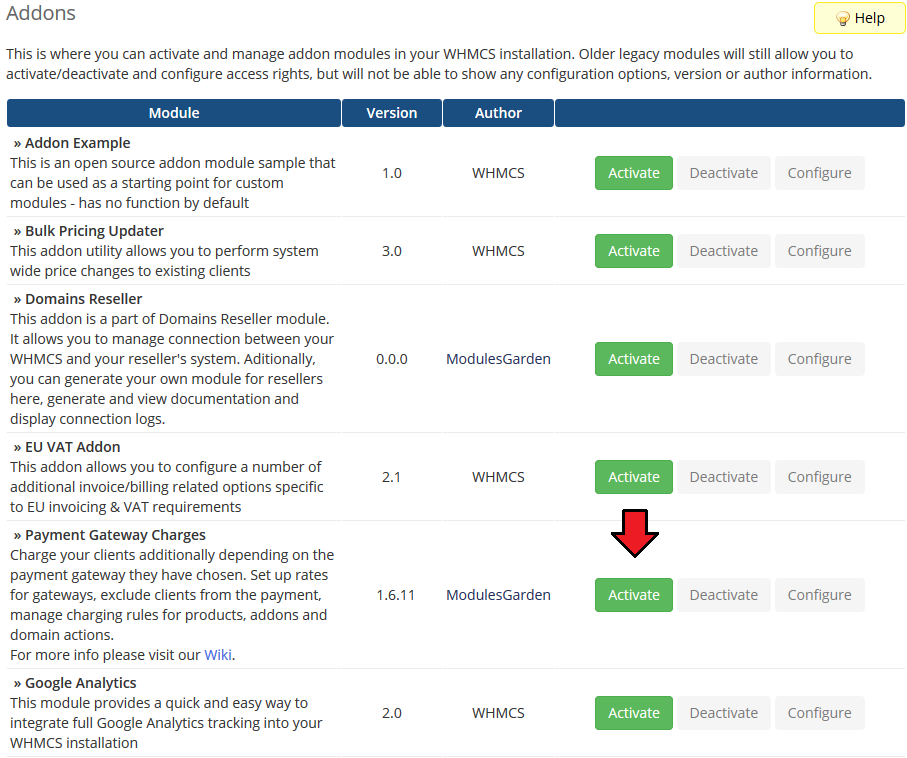
| 5. Now you have to activate the module in your WHMCS system. Login to your WHMCS admin area. Go to 'Setup' → 'Addon Modules' . Afterwards find 'Payment Gateway Charges' and press 'Activate' button. |
|
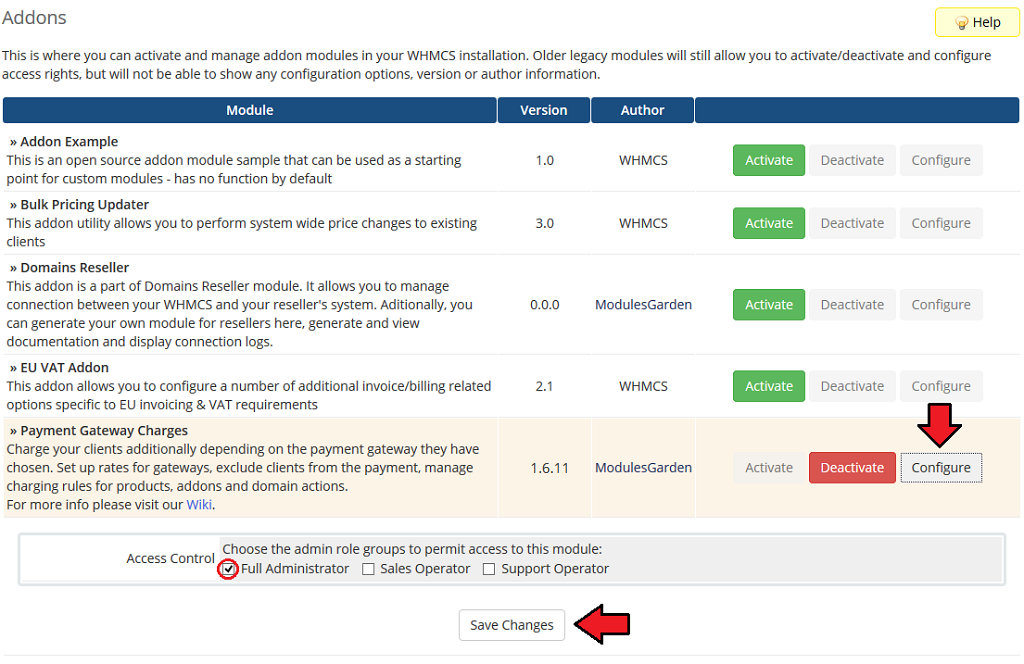
| 6. In next step you need to permit access to this module. To do so click on 'Configure' button, tick 'Full Administrator' and press 'Save Changes' . |
|
| 7. You have just successfully installed Payment Gateway Charges! You can access your module at 'Addons' → 'Payment Gateway Charges' . |
|
Configuration and Management
| Payment Gateway Charges For WHMCS allows your customers to manage charges in your WHMCS system. In this short guide we will present you the possibilities of our module. |
Integration Code
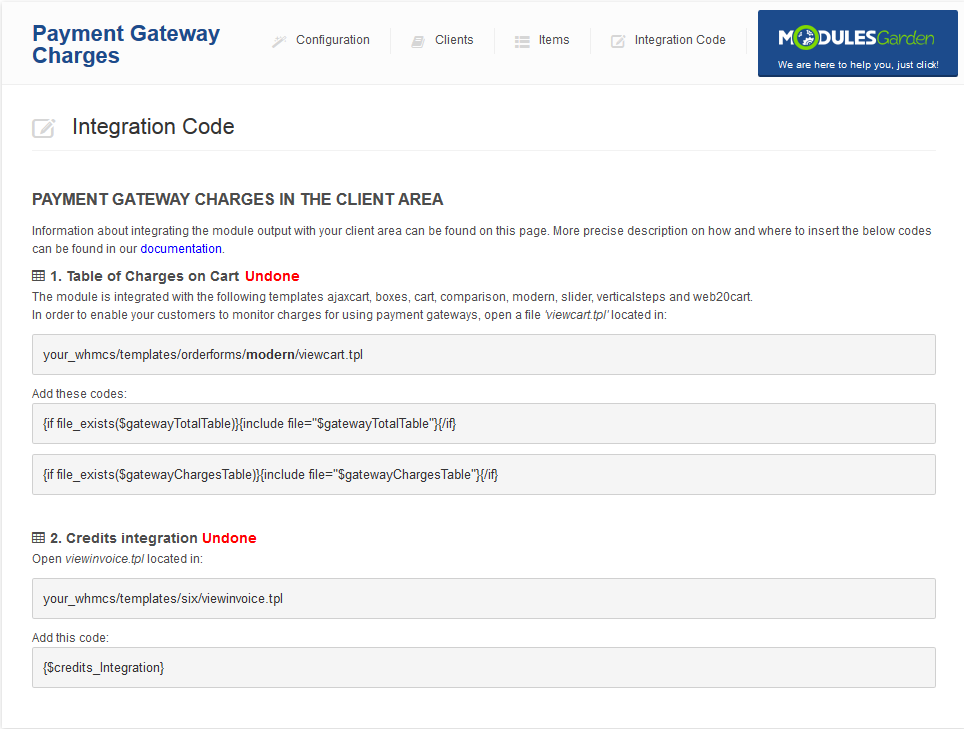
| Integration described below is not obligatory. Module allows your customers to view charges for using payment gateways when ordering. |
|
| Correctly placed code in 'modern' order form template is presented on the following screen. |

|
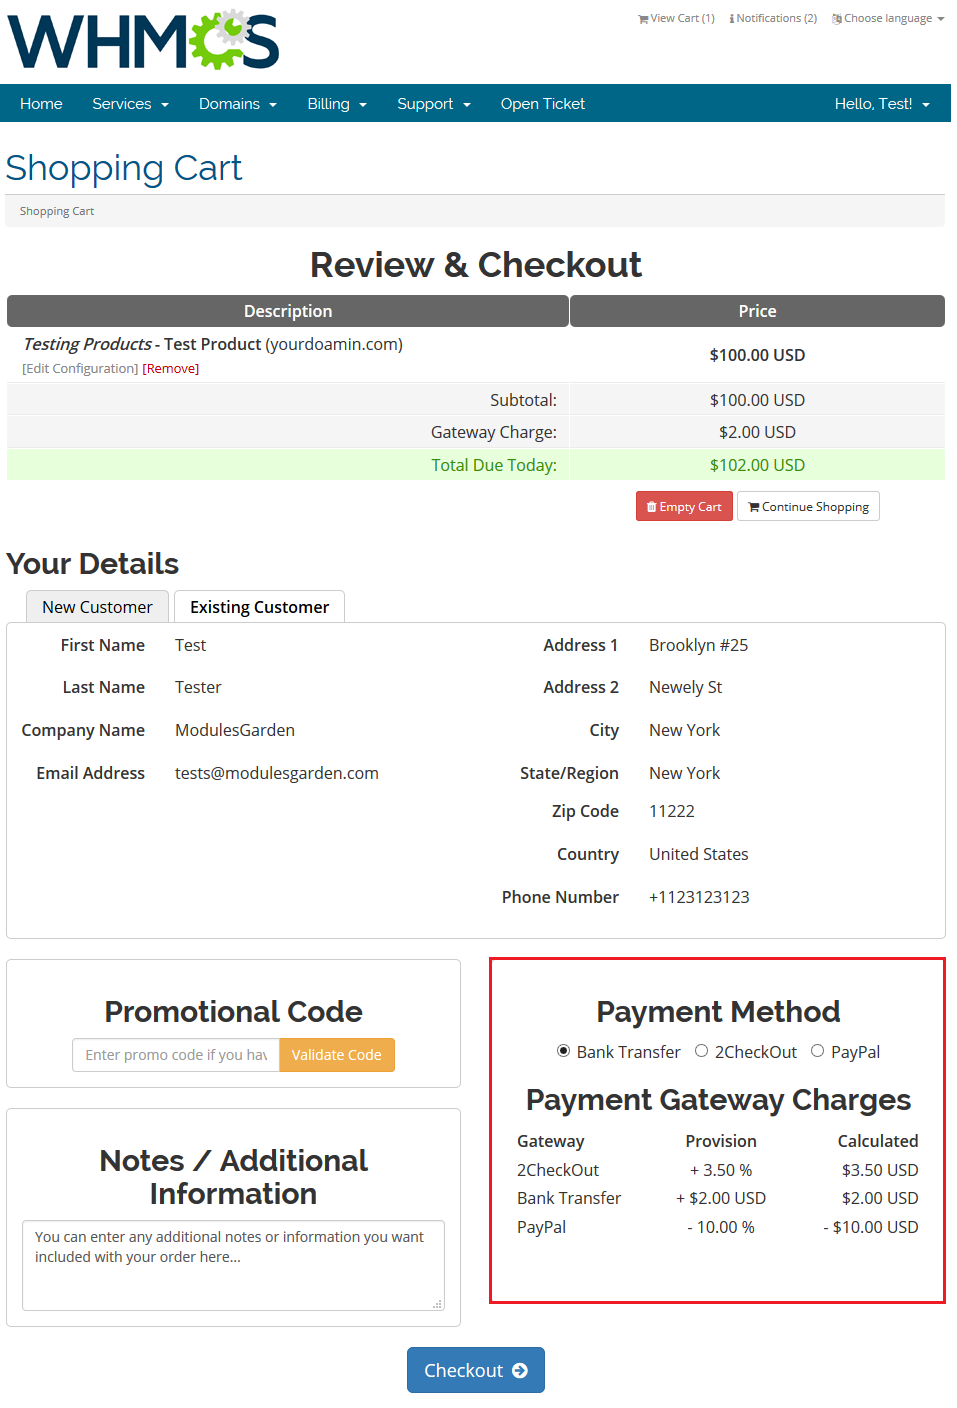
| In the client area it should look like on the screen below. |
|
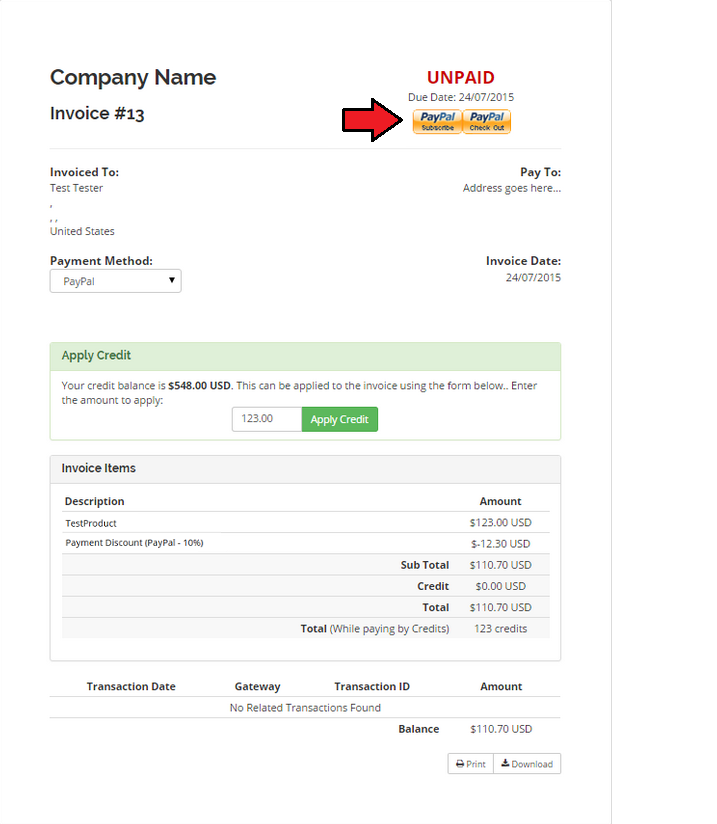
| You can also integrate PayPal subscription for payment, it allows you to pay automatically for recurring payments. In order to do so follow instruction from 'Integration Code' tab marked on the screen below. |

|
| When you integrate it properly, new button will show up on client view invoice page using PayPal payment, but only for product with recurring pricing. |
|
Configuration
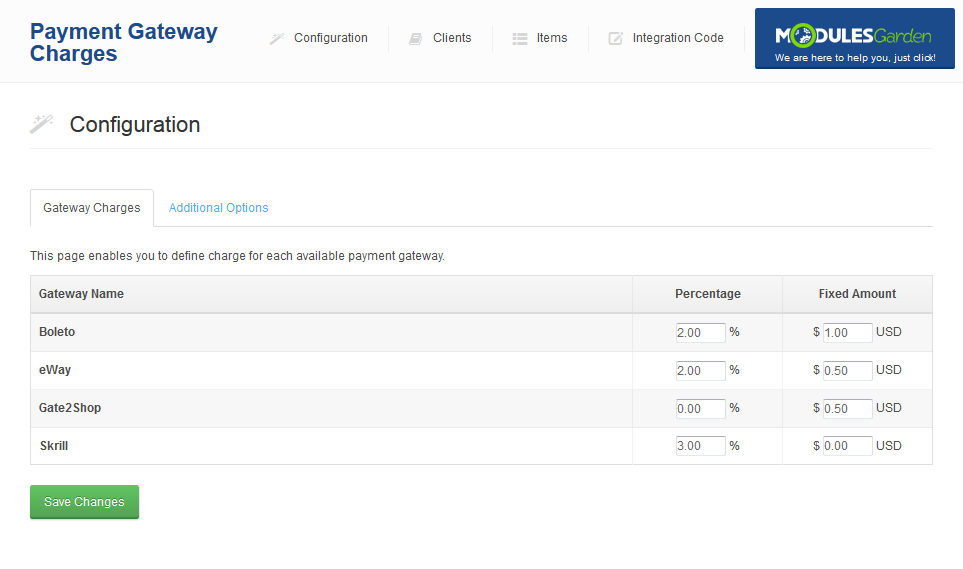
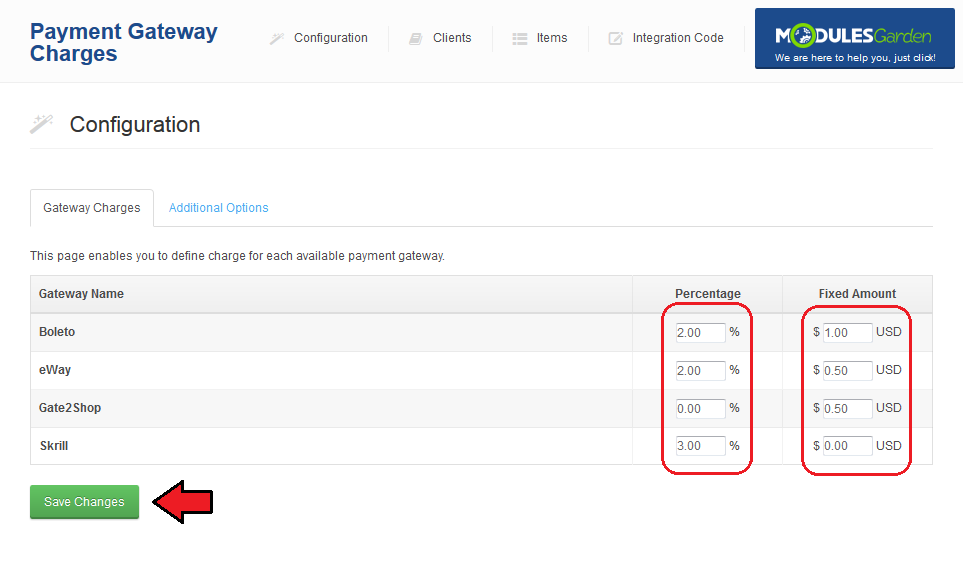
| To set additional charge for payment gateway, simply enter desired values in coresponding column. You can add fixed amount and/or percentage value of invoice to charge. When you are finished, click on 'Save Changes' button. |
|
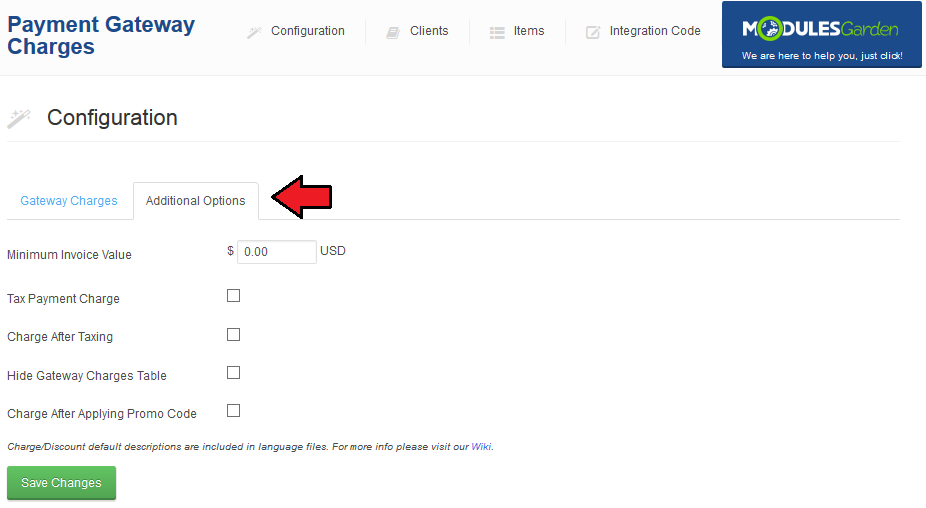
| In order to set minimum value of invoice to charge or place discount, type value in 'Minimum Invoice Value' as shown on screen below. Afterwards press 'Save Changes' . |
|
| To change charge and discount description displayed on invoice, edit accordingly 'Charge Description' and 'Discount Description' textboxes as presented on the screen below. Next, click 'Save Changes' button. |
| File:GC12.png |
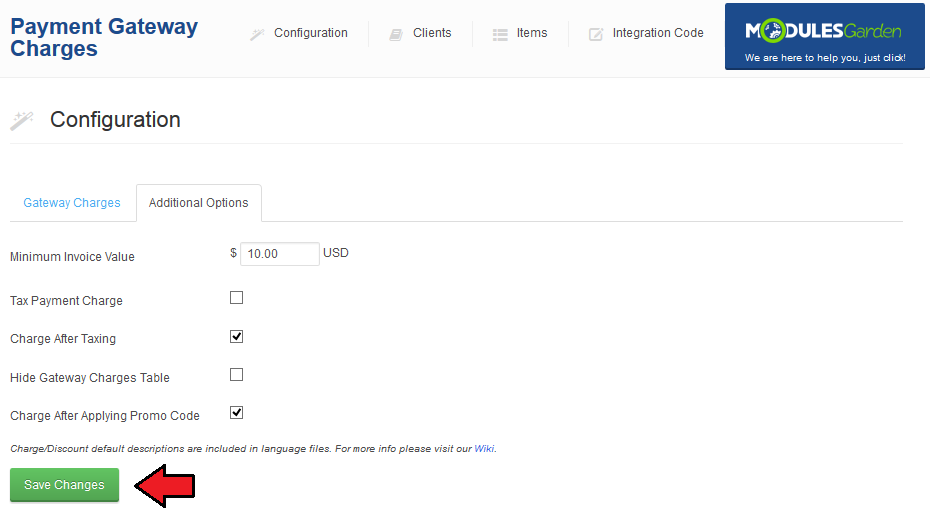
| You can enable tax applying for charges by marking 'Tax' checkbox, afterwards press 'Save Changes' . |
|
Management of Clients
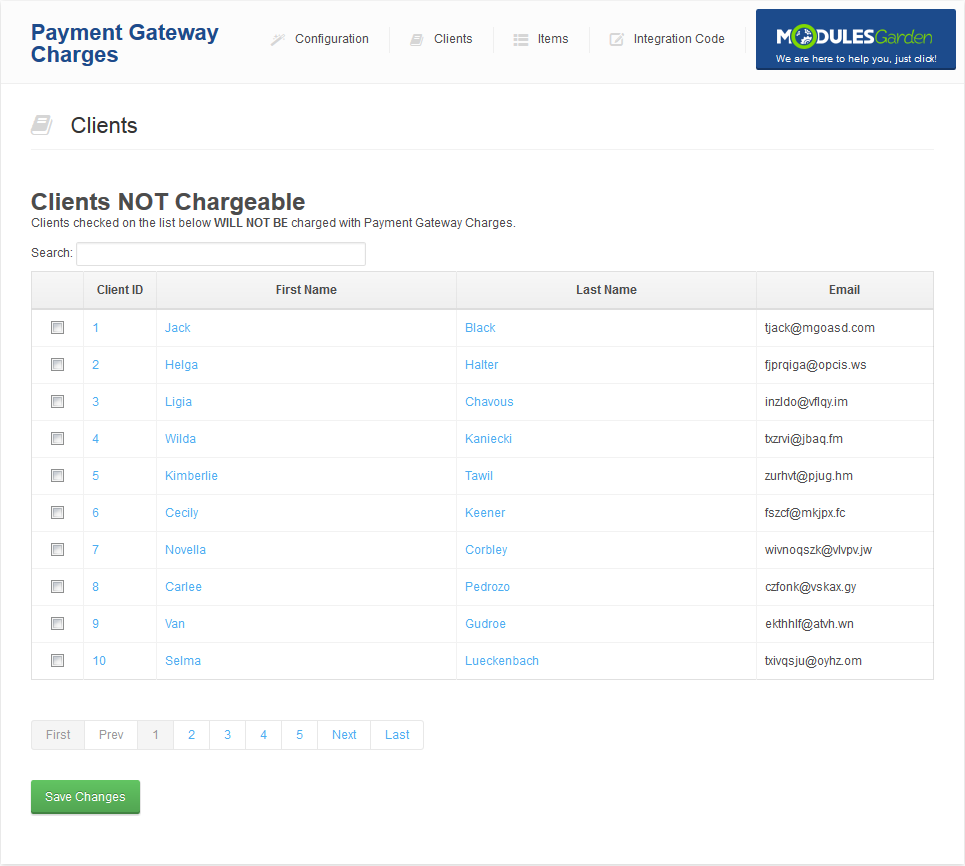
| In order to enable/disable charges for specific clients go to 'Client' tab as shown on the following screen. |
|
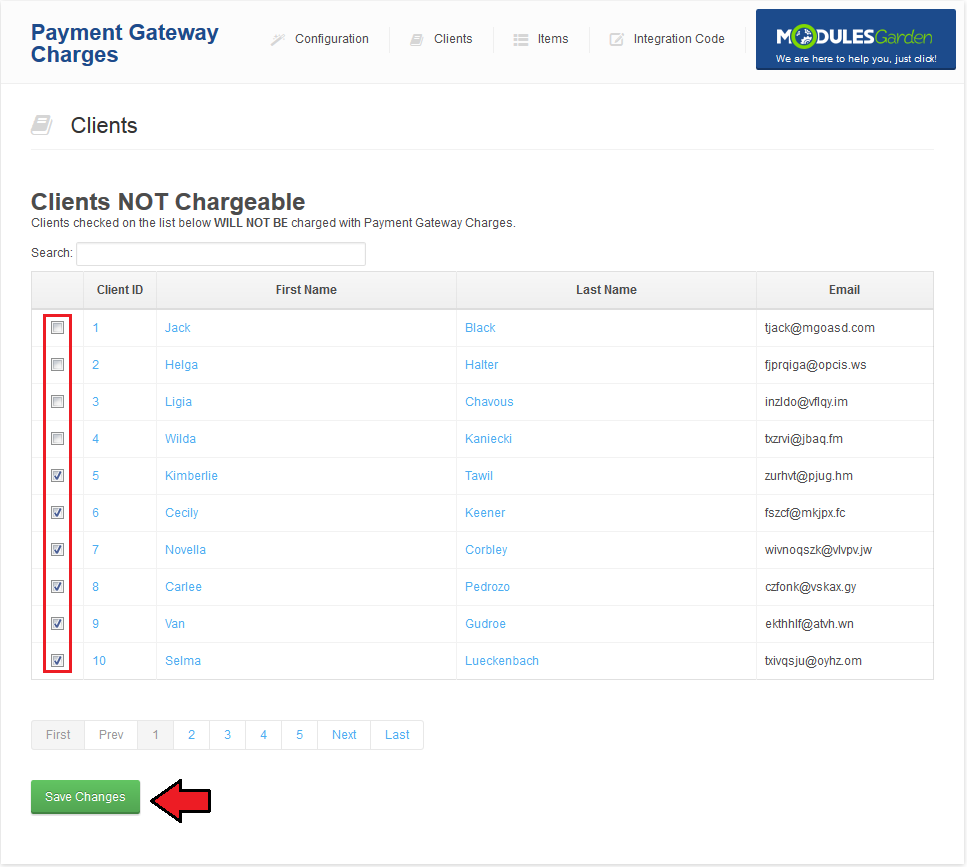
| Here you can exclude clients from charge. To do so, mark checkbox next to client ID and press 'Save Changes' . |
|
Management of Items
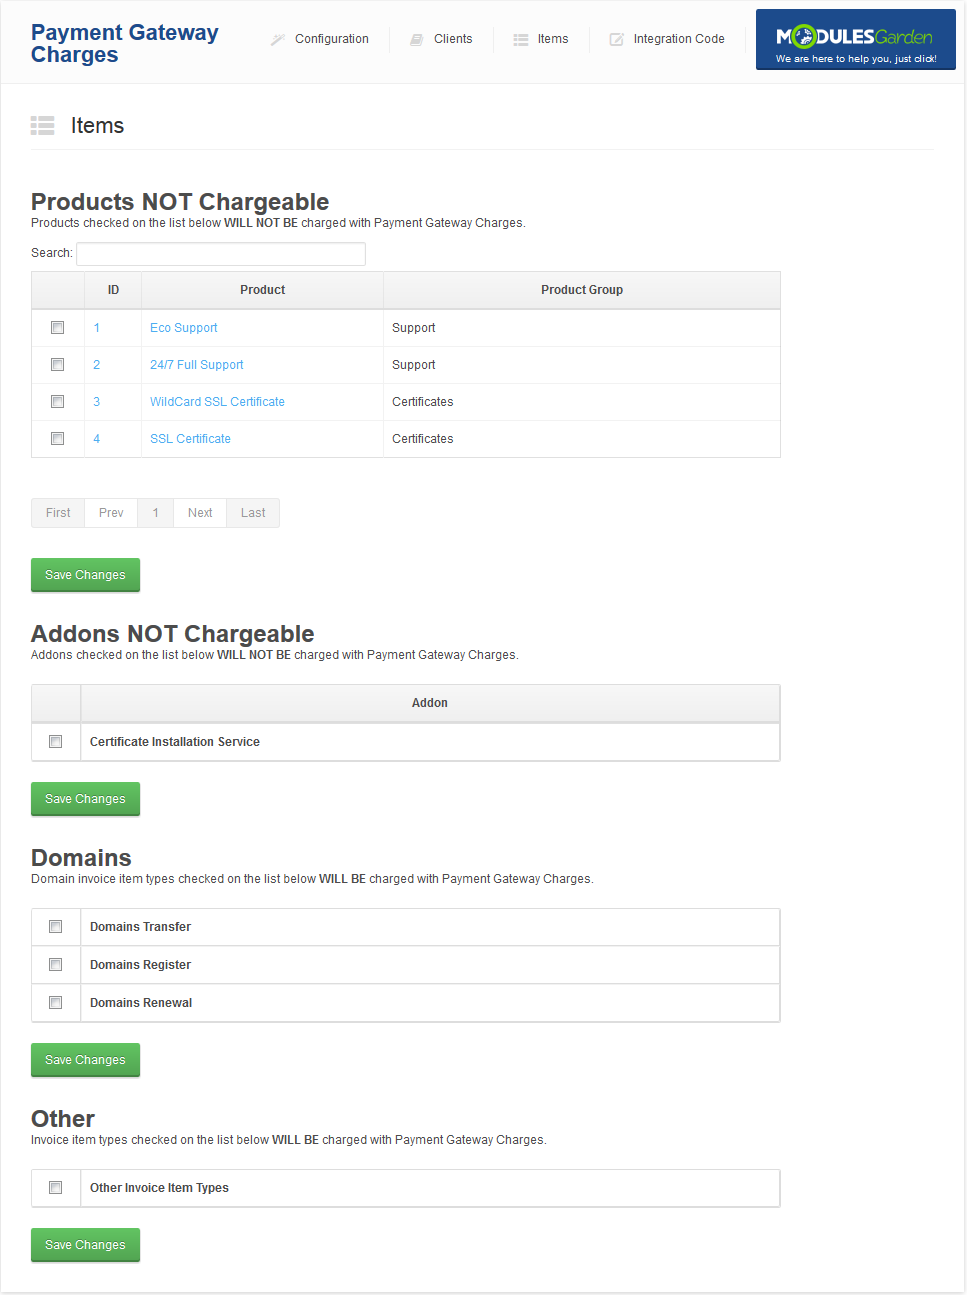
| To enable/disable charges for products and actions, go to 'Items' tab as presented on the following screen. |
|
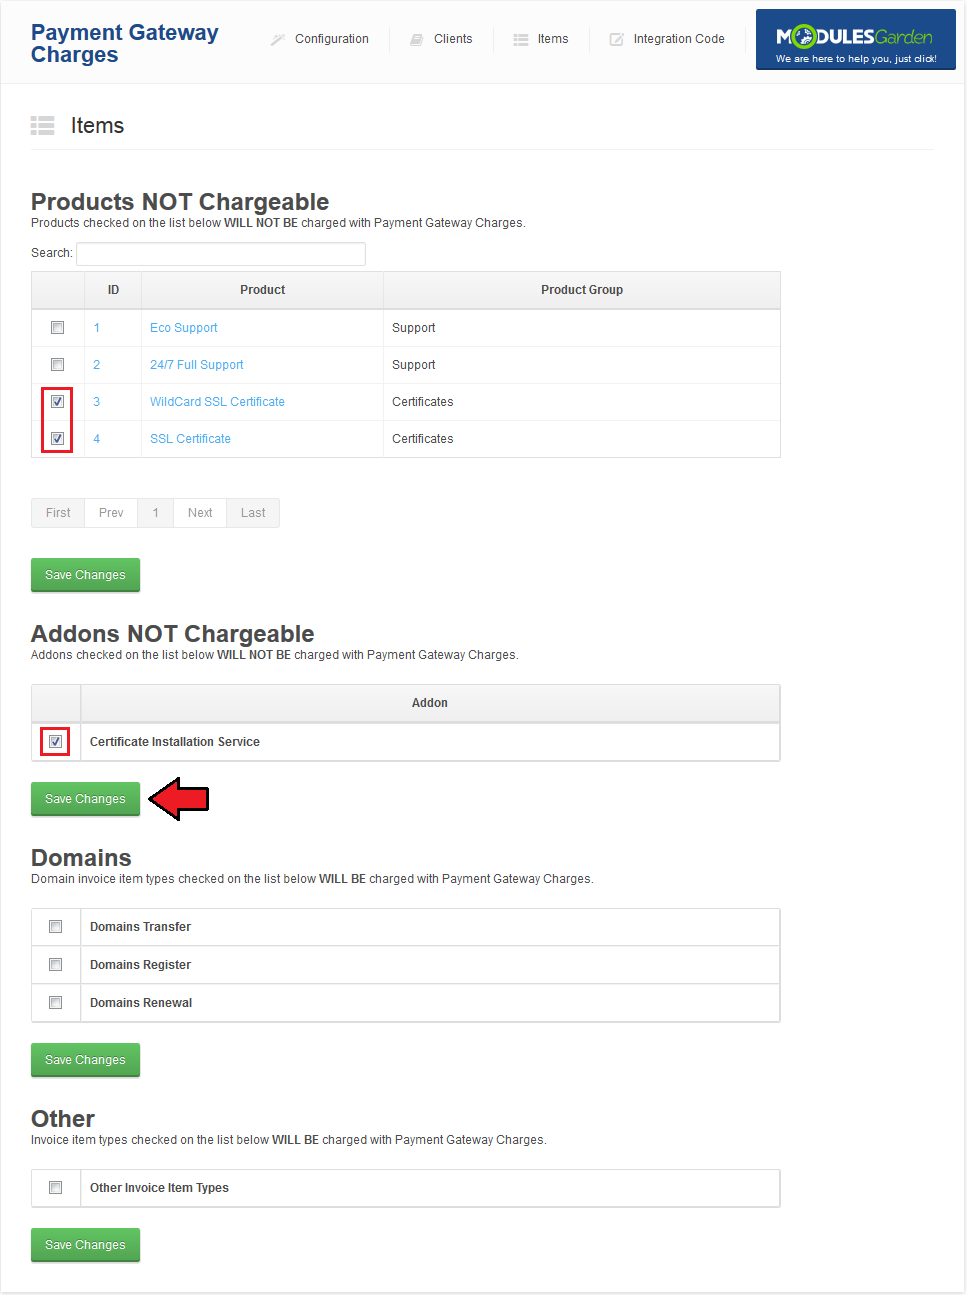
| In order to disable charges for product or addons, mark checkbox next to it and press 'Save Changes' . |
|
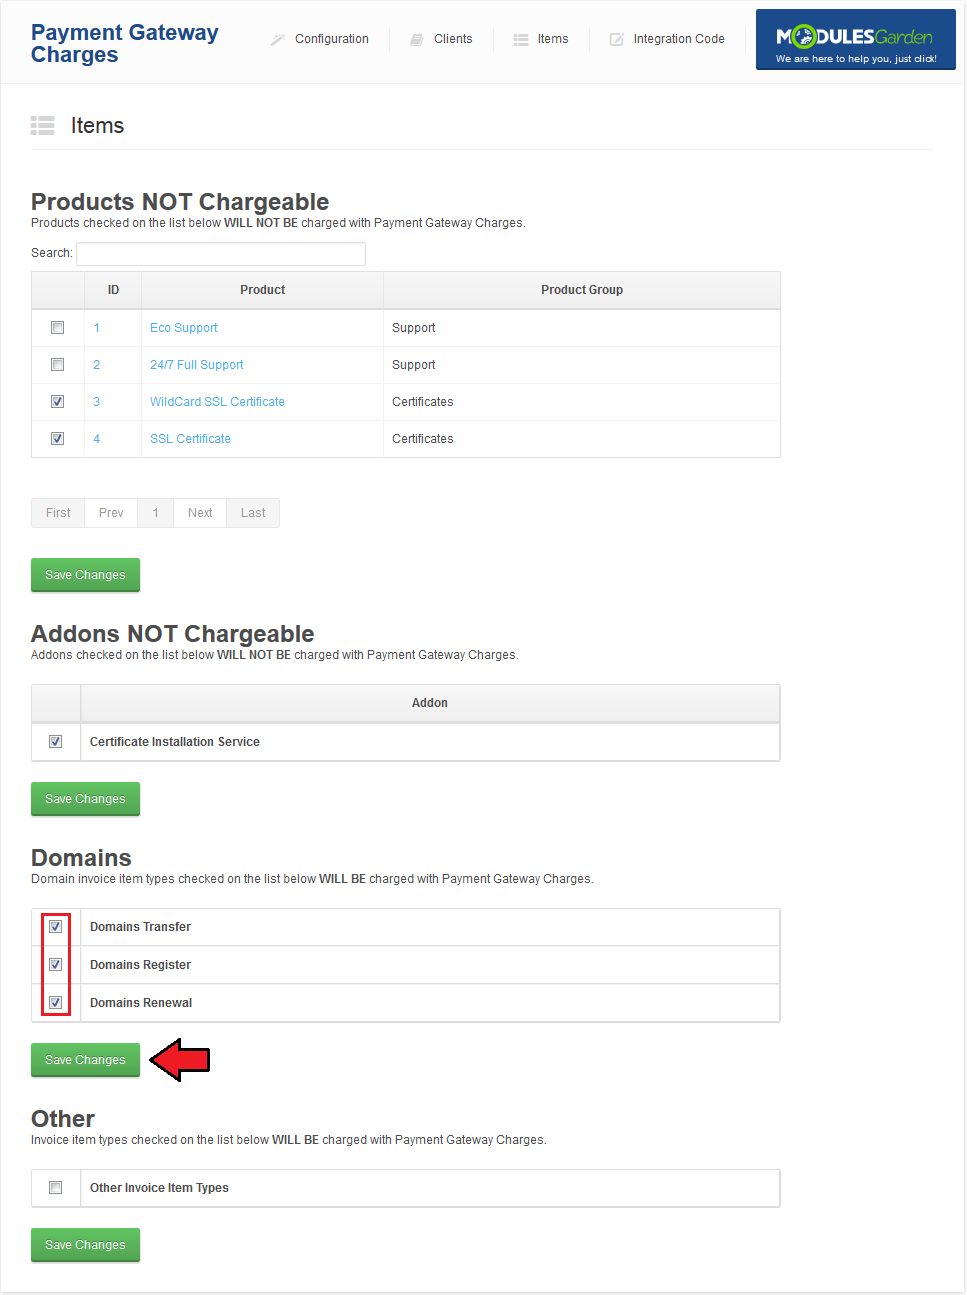
| In order to enable charges for domain actions and items, mark checkbox next to it and press 'Save Changes' . |
|
Automatic Conversion of Charges
| This functionality will make you forget about all the problems with currencies. Module automatically calculates the value based on your default currency. 1. Module automatically calculates fixed amount discount depending on the currency selected by the customer. Example: |
Tips
| 1. For your convenience, payments gateway charges are enabled by default for clients, products and addons. Charges for domains and other are disabled by default. |
Common Problems
| 1. When you have problems with connection, check whether your SELinux or firewall is not blocking ports. |