Important: If your certificate expires in the meantime, you will need to buy/generate a new one and follow the below steps:
- move to the '/root/proxmox-proxy catalog (the directory may differ depending on your setup)
- replace the nginx/localhost.crt and nginx/localhost.key files
- run the following command:
docker-compose up --build -d
Cloud-Init (KVM)
Use Cloud-Init to configure the system during installation, first boot and package change. Cloud-Init was originally developed to provide early initialization of cloud instances.
Click here to learn more about the initial Cloud-Init configuration.
Note: Cloud-Init functionality is supported for the KVM virtualization only.
|
Custom Configuration In Addon
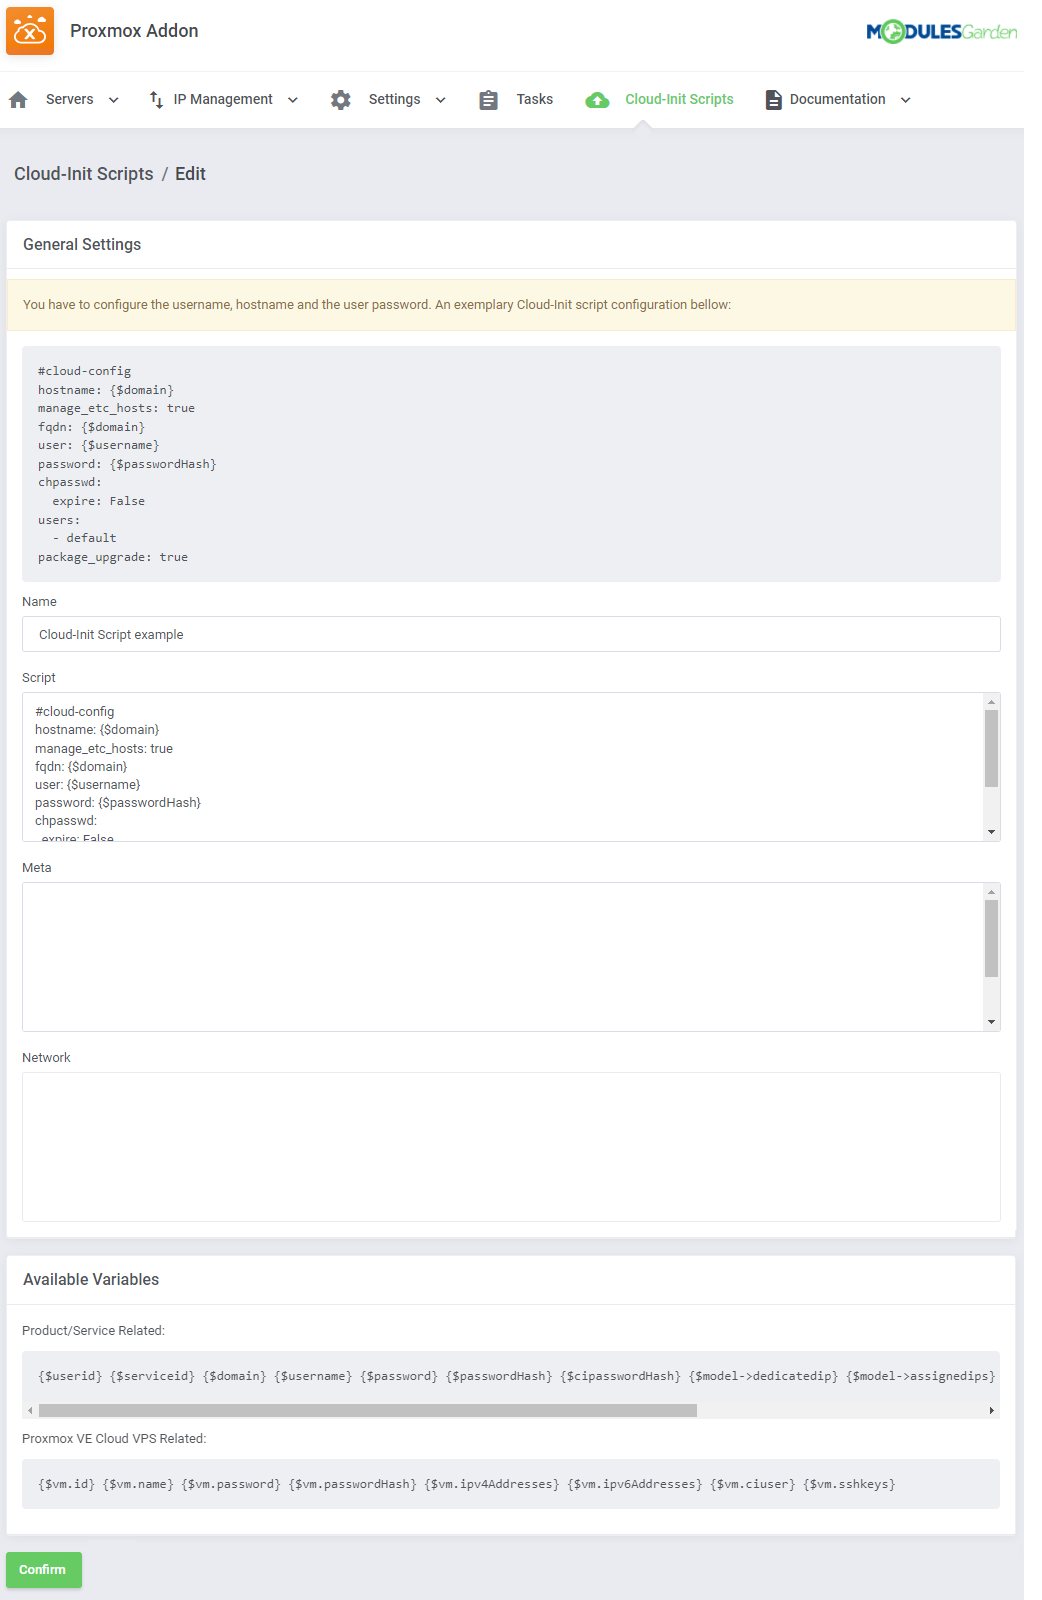
Cloud-Init Scripts
The Cloud-Init Scripts section allows adding ready scripts that will be available to choose from in the products' configuration page.
The selected there script will be used while crating the virtual machine.
Press 'Add New' to manually add your script.
|
Name your new Cloud-Init script and type in or paste a ready configuration. The configuration must include:
- Username
- Hostname
- Password
Here is an exemplary configuration of a Cloud-Init script. You may alter it to fit your settings and paste into the 'Script' field:
#cloud-config
hostname: {$domain}
manage_etc_hosts: true
fqdn: {$domain}
user: {$username}
password: {$passwordHash}
chpasswd:
  expire: False
users:
  - default
package_upgrade: true
|
|
A full list of available variables related to a Proxmox VPS type of the product/service:
{$userid} {$serviceid} {$domain} {$username} {$password} {$passwordHash} {$model->dedicatedip} {$model->assignedips} {$customfields.sshkeys}
Where:
- $model variables - stands for following services
- $customfields variable - stands for all custom fields that exist in your service
Important: If you want to use a {} sign in your script that has no variable inside, you must place it inside: {literal}{/literal}, for example: '{literal}{"X": "Y"}{/literal}'.
Otherwise, errors will occur.
|
| Manage created Cloud-Init scripts, edit/delete singe scripts or use mass action to delete numerous scripts.
|
Server Details
In order to use the Cloud-Init successfully, you need to also provide SSH details to let the script send the IP addresses to the Proxmox server.
Move to Servers → Servers List → Details → Settings, there you will find fields that are responsible for the correct SSH connection.
- SSH Host
- SSH Port
- SSH User
- SSH Password or SSH Private Key
You also have to select the 'Snippet Storage' to locate the Cloud-Init script in the correct catalog.
|
Configuration Of Product
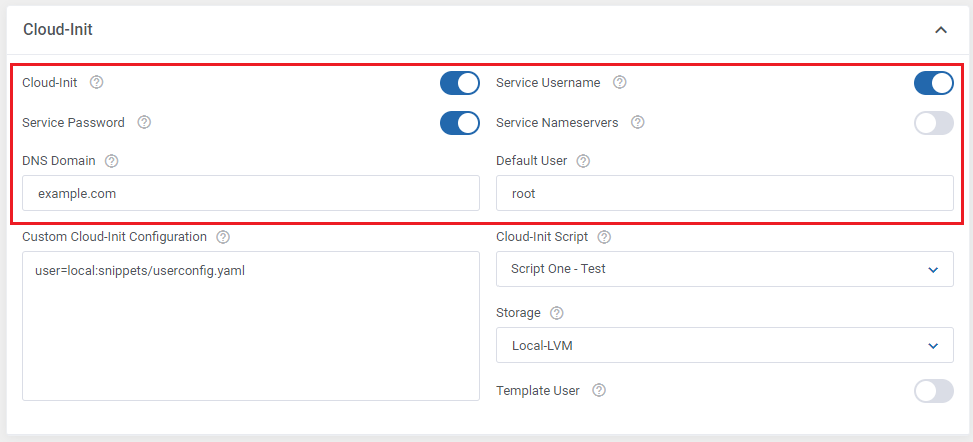
To to use Cloud-Init, you need to enable it in the configuration of the Proxmox product.
Before you start, we highly recommend that you learn the details of Cloud-Init configuration on your Proxmox server first. Click here for more information included directly in the Proxmox wiki article.
Once you get familiar with Proxmox Cloud-Init, proceed to the Cloud-Init group of your KVM configuration where you can enable it as well as configure the following options:
- Service Username - if enabled, the username for the VM will be taken from the details of the WHMCS 'Products/Services' tab. Otherwise, it will remain unchanged and set by default as in the template or taken from the 'Default User' field if provided.
- Service Password - if enabled, the password for the VM will be taken from the details of the WHMCS 'Products/Services' tab. Otherwise, it will remain unchanged and set by default as in the template.
- Service Nameservers - if enabled, the nameservers for the VM will be taken from the details of the WHMCS 'Products/Services' tab. Otherwise, they will remain unchanged and set by default as in the template.
- DNS Domain - provide a DNS domain for the container. During VM creation, the setting from the host will be automatically used if neither a search domain nor a nameserver is set.
- Default User - provide the username that will be used for the VM instead of using the 'Service Username' field or the default user of the configured image. Otherwise, leave empty.
- Custom Cloud-Init Configuration - here you can optionally specify your custom config files that will be used instead of the automatically generated ones.
- Cloud-Init Script - you may also select one of your previously created in the addon scripts, it will be executed on VM creation or package change.
- Storage - the directory on which the CD-ROM ISO image is stored
|
|
What is more, you can let your clients provide their own password to the VM when 'Cloud-init' is used.
To do so, use the custom field that is presented below and do not forget to tick the 'Show on Order Form' option.
|
In addition, you can allow clients to enter their own public keys for the VM during the ordering process, so they can log in to the server using their private key instead of a password.
To enable this function, go to the 'Custom Fields' tab and add a new 'sshkeys|SSH Public Key' field, select the 'Text Area' type and the 'Show on Order Form' checkbox.
Note: This custom field is also auto-generated from the module settings, but with the 'Admin Only' option enabled. Remember to uncheck it in order to make this field visible to clients.
|
| Now, when the client places a new order, they will be able to enter the public key here in the OpenSSH format.
|
| The SSH public key can also be inserted once the order has been completed. Simply click on the 'Edit' icon on the product's 'Information' panel.
|
| The public key can be entered right there in the OpenSSH format. It can be inserted from the admin area as well.
|
Configuration Of Proxmox Server
The process of setting up Cloud-Init on the Proxmox server is described here.
Additionally, you can use the following commands that can be useful for debugging purposes:
- Re-run Cloud-Init scripts
rm -rf /var/lib/cloud/sem/* /var/lib/cloud/instance /var/lib/cloud/instances/* &&
cloud-init init  &&
cloud-init modules -m final
cat /var/log/cloud-init.log
cat /var/log/cloud-init-output.log
|
Management
Proxmox VPS allows your customers to manage their PVE accounts via the client area in your WHMCS system.
At the same time, you can monitor and manage each product from your WHMCS admin area.
|
Admin Area
In the admin area, you are able to view details and manage your clients' machines, access remote consoles, migrate VMs between nodes, assign IP addresses and view resource usage graphs.
All visible features can be turned on and off in the Proxmox Addon → Settings → Admin Area Features.
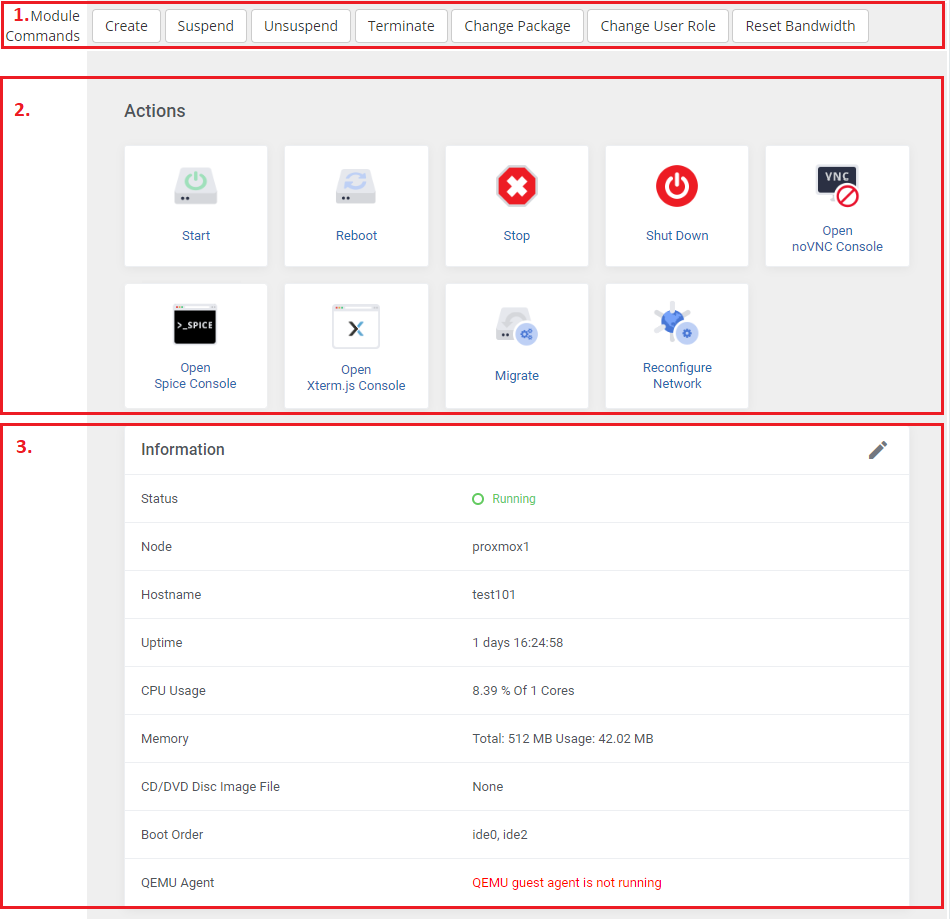
- Firstly, there are the standard module commands that you can perform on the VM.
- Among them, you will find actions to:
- Manage the status of the machine,
- Access to remote consoles
- Migrate the server between nodes.
You may enable 'Online' migration (no need to shut down the server before migration) and toggle 'Migration With Local Disks' which might take a while.
- In this panel you will also find the basic information about the VM.
- Moreover, you can change the VM hostname, ISO image, bootable devices as well as insert the SSH public key.
|
|
It is possible to fetch information of network interfaces and OS using the 'Qemu Guest Agent' tool.
This option must be previously enabled in the product configuration, and successfully installed on the VM. Afterward, it should look similar to the image below.
|
In the next panel, you can find IPv4 and IPv6 addresses assigned to the VM.
You can either delete or add an IP address to a product. To perform the latter action, press 'Add New IP' as shown on the following screen.
|
Fill in the fields to add a new IP address. At the bottom, there is a switcher 'Create Network' which, when on, forces assigning this IP address via Cloud-Init if that has been enabled and configured properly.
Important: Create Network option works for KVM configuration only.
|
Additionally, until the VM has been provisioned, you can manually assign to it the desired IP addresses from the pool by typing them in the 'Assigned IPs' field (available for the 'Dedicated/VPS Server' product type).
This will override the automatic IP address assignment, and the VM will use only the IP addresses you have entered in the mentioned field.
Note: The IP addresses you provide must already exist in the IP Management pool, and cannot be assigned to any other VM. This feature will not work if you already use the IP Manager For WHMCS module.
|
| In the next two panels, you can view IPSet information as well as reinstall the VM based either on the OS or ISO template.
|
| Graphs can be useful to monitor the usage of VM resources. You can change the interval by pressing the 'Edit' button, and simply providing a new one.
|
| In the last part of product management, you can view the user details on your Proxmox servers along with the assigned VMID, node, VLAN tag, and SSH public key provided before the VM creation.
|
Management of Addon
Servers Management
Servers List
In 'Addons' → 'Proxmox Addon' → 'Servers' → 'Servers List' you can find the configured Proxmox servers.
RAM details:
- Assigned - the RAM assigned to the server (hosting services only)
- Total - the full server RAM
- Free - the difference between the Total and Assigned values
Suspended - the number of suspended accounts per size in MB E.g.: (1/500 MB) in case there is only one suspended account that takes up 500MB assigned to the Proxmox VPS server.
|
Through pressing the 'Edit' icon, you will be moved to the server edit page - see the point 10 of Server Configuration.
Press the 'More Details' icon, and you will obtain extended information on the selected server. Look below for more details.
|
VMs
The 'VMs' tab includes the list of virtual machines created on this server. Take a quick look at information on the domain, status, bandwidth, and IP addresses.
To view information about the VM, simply press the "More Info" icon located on the right side of the page.
|
Clusters
The next tab contains the list of clusters with information on uptime, VMS and resource limits, as well as CPU, SWAP, memory and disk usage data.
Important: Defined here node limits are strongly connected with the Load Balancer and node prioritization method used by the module to create new virtual machines.
|
Press the "Edit" icon to manage the node and its limits.
- Allow To Create VM - if enabled, a VM can be created on this node
- Virtual Machines Number - define the maximum number of VM that can be created on this node
- Maximum Number of CPUs - set the top limit of CPUs on this single node
- Maximum Disk Size - set the top storage size allowed on this node
- Maximum RAM Size - set the maximum amount of RAM allowed on this node
- Default Storage - select the default storage for the VM created on this node
Setting node limits is crucial as creating virtual machines is largely based on them, once reached, a new virtual machine cannot be created on that node.
|
| Press 'Node Details' , and you will obtain all the summary and usage graphs:
|
VM Cleaner
VM Cleaner allows you to track VMs existing only on your Proxmox server, and not in your WHMCS.
Consequently, you are allowed to sort and delete only those VMs that cannot be managed in your WHMCS system.
|
Templates
You can view the list of templates on this page. You can easily convert any KVM machine on your server to a template.
In order to convert a VM, press the 'Create Template' button.
|
Next, choose a VM that shall be converted.
Fill out the 'Description' field, and press 'confirm'.
Important: The selected VM will be destroyed in the process.
|
| You may also delete unused templates here. Delete single templates or use the mass action feature to delete templates in bulk.
|
Server Settings
Here you can define the VM IDs range that will be used for newly created machines on this server. Please note that you need to enable the "Use VM Ranges" setting in the product configuration in order to use this feature.
To proceed, define the ID range and save changes.
Note: VM ID range allows you to sort created machines depending on the server they were created on..
SSH Data - fill out the SSH connection details (Host, User, Posrt, Password or Private Key) to allow to locate the IP addresses on the Proxmox server (Cloud-Init)
Snippet Storage - select the catalog where the file will be uploaded (Cloud-Init)
|
Node Groups
| Under the 'Node Groups' subsection, you can create new groups and assign nodes to them.
|
| Provide a name of your group and allot preferred nodes from the dropdown menu.
|
Now, navigate to the 'Module Settings' of your product and find the 'Miscellaneous' and 'Load Balancer' sections.
Firstly, provide the 'Minimum VMID' for a VM and then select one or more of the previously created groups.
|
VMs List
In 'Addons' → 'Proxmox Addon' → 'Servers' → 'VMs List' you can find details of any Proxmox product.
|
| Press the 'More Details' button to preview the node and VMID information.
|
Recovery VM Lists
In 'Addons' → 'Proxmox Addon' → 'Servers' → 'Recovery VM List' you can view details of the created machine.
Run the 'VM recovery synchronization' cron job to create and store full backups of VM configuration - you can find it in the point 26 of the configuration instructions.
Use the 'Export to File' button to save information in a TXT copy file.
|
| Upon pressing the 'Details' icon, you will obtain the information on configuration, status, and DNS:
|
Tasks History
The "Tasks History" section includes the list of all module tasks with their most crucial details.
You may delete single tasks or use the mass action button to remove them in bulk.
Run the 'Tasks synchronization' cron job to synchronize the tasks, and view all tasks from the server - you can find it in the point 26 of the configuration instructions.
|
IP Management
In the 'IP Management' tab, you can manage the IP addresses of Proxmox products.
You can create both single IP addresses (IPv4 and IPv6 are supported), and IP pools which then can be assigned to created VMs.
Important!: Before creating a virtual machine, you must previously add public IP addresses.
|
When you create a new IP address or a pool, you may define:
- private/public address
- servers or nodes that will use them
- virtualization types (different VMs will use different IP pools)
|
IP Logs
The 'IP Logs' includes the history of the IP addresses that were removed by the admin and which are again available in the proxmox addon IP Management pool.
Keep in mind that only addresses that were automatically added when creating the VM. Removed IP addresses, that were the manually assigned, are not logged here.
|
IP Manager Integration
Owing to the integration with IP Manager For WHMCS, you are able to easily create subnets with IP addresses, and assign them to the desired products.
By activating the IP Manager submodule, settings concerning IP addresses such as 'Configurable Options' and 'Default Options' will be ignored by Proxmox VPS.
Note: This integration works for LXC and KVM virtualization types.
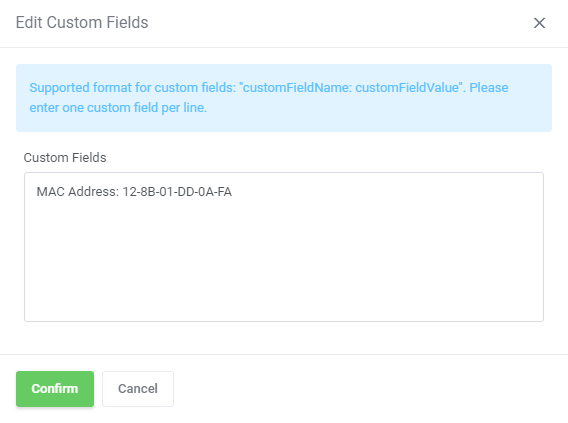
1. Proceed to the IP Manager For WHMCS → Subnets tab in order to prepare the IP addresses subnet for Proxmox VPS For WHMCS.
2. Edit the previously created subnet, and create a custom field 'MAC Address' with a desired MAC address at each IP address in the subnet.
Note: Setting up the MAC address is optional and can be skipped.
More details about creating custom fields can be found here.
|
|
3. Afterward, create a new configuration, and assign the previously created subnet to it.
Note: Multiple subnets can be assigned to a single configuration.
4. Now, link the configuration with Proxmox VPS product via a product, server or a configurable option.
On the following screen, we have carried out the linking via the configurable option assigned to the Proxmox VPS product, where each of the fields represents the number of assigned IP addresses.
You can, of course, mix them according to your needs, e.g. a single configurable option will assign the provided numbers for both IPv4 and IPv6 addresses.
|
5. Next, enable the integration by moving to the '3rd Party Integration' tab.
Press 'Activate' next to the 'proxmoxVPS' module type as shown on the following screen.
|
6. Afterward, assign the previously created configuration to the submodule.
Press 'Configure' , choose a configuration, and press 'Save Changes'.
|
If you encounter an error like the one on the screen below, while integrating the two products, it may mean the function 'mb_strlen' is not enabled by default.
In this case, please read this manual for installation instructions.
|
It is possible to add VLAN Tag Custom Filed in the very same way as the "MAC Address" field.
Look above for the detailed instruction on how to proceed, follow the steps 1-6 to create a new custom field.
The only element you need to change is the custom field name, which should be 'Tag' in this case.
|
Settings
Load Balancer
Load Balancer is an advanced tool that allows smooth rotation between nodes so as to find the most preferable one, and create virtual machine on it.
Set the weight of the resource that will prioritize its selection when sorting the nodes according to the free resources.
Note: The lowest possible weight is 1. You cannot set, e.g. 0.5.
To learn more about nodes and their allowed limits please go back to the Clusters section of this documentation.
|
In order to use the Load Balancer, you need to enable it in the product's configuration:
Define the behavior of the tool:
- On Upgrade - select the action to perform:
- None - no action will be triggered
- Block - the upgrade process will be blocked as there are insufficient resources on the node
- Migrate - the upgrade process will be performed after the previous migration of the VM to a server with sufficient free space
- Shutdown VM on Upgrade
- Stop VM If Shutdown Fails
- Enable to allow migrating the VM with local disks
|
Node Prioritization Method
Have a look at how the sorting process works, and the rules that it goes by.
Let's take exemplary weights for each resource just like the ones presented on the screen above.
VMs Number Weight: 1,5

CPU Weight: 2

Disk Weight: 4

RAM Weight: 2,5
"Disk Weight" with the highest weight, which means it has the highest priority, and "VMs Number Weight" as the least crucial factor on a given node.
In this case, there are four nodes created, named A, B, C, and D, with current resources as shown below:
Node A (Free Ram: 60%, Free CPU: 20%, Free Disk Space: 50%, Number of VMs: 5)

Node B (Free Ram: 30%, Free CPU: 70%, Free Disk Space: 40%, Number of VMs: 10)

Node C (Free Ram: 90%, Free CPU: 50%, Free Disk Space: 20%, Number of VMs: 20)

Node D (Free Ram: 80%, Free CPU: 60%, Free Disk Space: 70%, Number of VMs: 15)
The next step is sorting the nodes according to each resource, it is done by assigning them corresponding priorities from 1 to 4.
The higher the priority, the more free resources available.
|
| Priority
|
Free Ram
|
Free CPU
|
Free Disk Space
|
Number of VMs
|
| 4
|
Node C
|
Node B
|
Node D
|
Node A
|
| 3
|
Node D
|
Node D
|
Node A
|
Node B
|
| 2
|
Node A
|
Node C
|
Node B
|
Node D
|
| 1
|
Node B
|
Node A
|
Node C
|
Node C
|
Now, the final calculation of sorting nodes according to free resources is performed, taking into account the previously defined weights.
The process of sorting nodes is based on the following calculation method:
Final Node Priority = (RAM Priority x RAM Weight) + (CPU Priority x CPU Weight) + (Free Disk Priority x Disk Weight) + (No. VMs Priority x VMs Weight)
The results for nodes A, B, C and D (with weights and sorting priority) are as follows:
Node A: (2 x 2,5) + ( 1 x 2 ) + ( 3 x 4 ) + ( 4 x 1,5 ) = 25
Node B: (1 x 2,5) + ( 4 x 2 ) + ( 2 x 4 ) + ( 3 x 1,5 ) = 23
Node C: (4 x 2,5) + ( 2 x 2 ) + ( 1 x 4 ) + ( 1 x 1,5 ) = 19,5
Node D: (3 x 2,5) + ( 3 x 2 ) + ( 4 x 4 ) + ( 2 x 1,5 ) = 32,5
As you can see, Node D has got the highest priority value with the result: 32,5.
It will be selected by Load Balancer to create a new VM on, or to migrate or upgrade an existing VM if its current node does not have sufficient resources.
The above described calculations are performed every time, 'Create' or 'Upgrade' actions are executed based on the current usage of resources on available nodes.
Important: In case a given client already has a VM existing on a node, this very node will NOT be taken into account during the prioritization of resources.
These security measures are taken to ensure that, in case of node failure, the client will still have access to the other VM server, created on another, properly working node.
At the same time, if this client has VMs on every node already, all of them will be taken into account during the prioritization process again.
If you decide to use the Load Balancer tool, define the resource weights to adjust the prioritization of nodes according to your needs.
|
Admin Area Features
The 'Admin Area Features' section includes a list of all possible features that can be activated and then available or not for the admin under the product's details.
Below you can find a list of features dedicated to:
- Proxmox VE VPS
- Start
- Stop
- Reboot
- Shutdown
- Reinstall
- Spice Console
- noVNC console
- Xterm.js Console
- Information
- IP Set
- Graphs
- Both
- Available Resources
- IP Addresses
- Migrate
- User Details
|
Tasks
In the "Tasks" section, you will find tasks that have already been completed, are still in progress, or are yet to be executed by the cron.
Moreover, by clicking the 'Information' button, you can display more data on the particular task.
|
In the information tab, you can see which specific product/service the chosen task was related to.
Moreover, in logs, you can check the API response errors with each timestamp it was returned.
Note: The logs will be displayed only in case the errors occurred. If the task has finished successfully, there will be nothing to see.
|
If you notice that, for instance, a certain task cannot be completed due to some errors, you can remove it, so the cron no longer attempts to execute it after each iteration.
After you figure out what went wrong, you can try to add it again, and check the results.
|
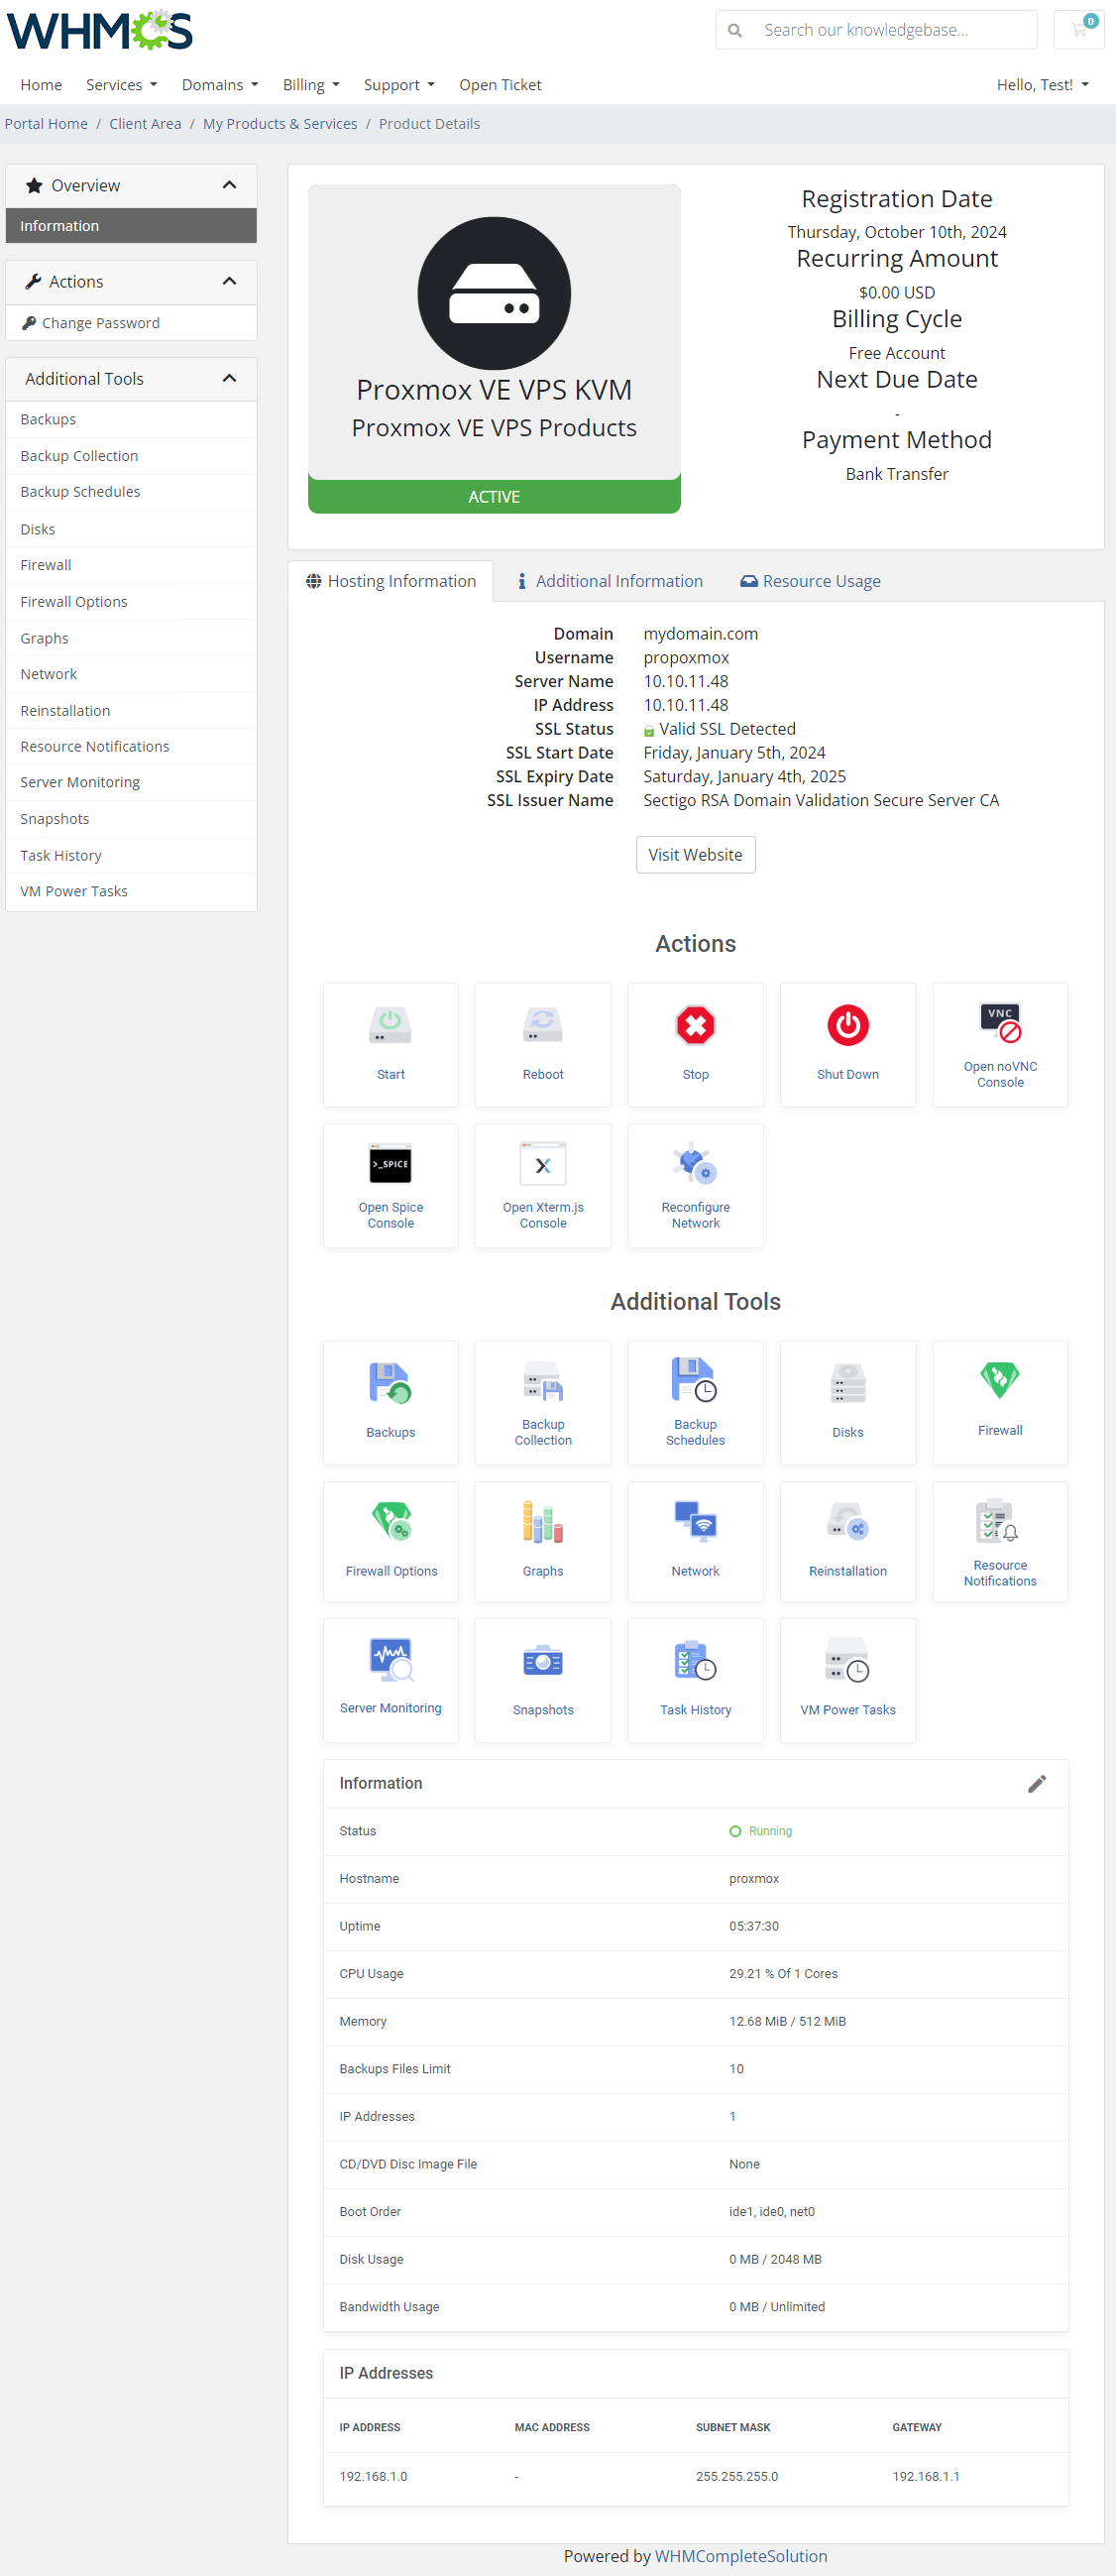
Client Area
The client area interface of Proxmox VPS For WHMCS should look like the one on the screen below.
As you can see, the control panel contains assorted options that will prove highly useful in VM management.
The module allows your customers to easily 'start', 'reboot', 'stop' and 'shutdown' their servers through pressing specific buttons.
Clients can also access the 'noVNC' , 'SPICE' and 'Xterm.js' consoles. Among 'Additional Tools' , you will find options to 'reinstall' a server, create a 'backup' or set up 'backup jobs'.
Your clients are able to access resource usage 'graphs', view the VM 'history', manage the 'network' interface device, and set up the 'firewall' rules. Additionally, clients may take 'snapshots' , and manage 'disks'.
On the main product page in the client area, under the 'Information' headline, your clients can find such details as the current usage of CPU, memory, disk (LXC only) and SWAP (LXC only).
Customers can also view 'DNS' (LXC only) as well ass assigned 'IP addresses'.
Note: The bellow example image was taken from the KVM-based VM, but it looks very similar in the case of LXC.
|
|
By clicking the 'Edit' button next to the 'Information' headline, your clients can additionally change the VM hostname and ISO image, choose boot devices, as well as insert their SSH public key.
Important: If you do not see the Edit icon, it means the option to change hostname has been turned off by the admin.
Note: Information elements included in the below table are managed by the admin in the product's configuration section under Cleat Area Features.
|
Client Area - VM Management
noVNC Console
| noVNC console allows your clients to connect to their server in the easiest possible way.
|
SPICE Console
SPICE console enables you to connect to the virtual machine using SPICE.
Note: Since the 2.7.0 version of the module, your clients no longer need to download and install the client side SPICE application in order to connect with a VM. The console will be now opened in the virt-viewer instead.
|
Xterm.js Console
Xterm.js console enables you to connect to the virtual machine using Xterm.js.
You have to update the scripts on Proxmox v2.6.0. To do so, open the folder: UploadOnProxmoxServer/5.2-10 and upload the content on all your Proxmox servers.
|
Client Area - Additional Tools
Reinstall
The "Reinstall" feature can be used to reinstall a new OS on the VM directly by the clients.
You can allow your clients to either select a new OS from the provided KVM templates to automatically replace the system, or let them choose the ISO image for manual system installation.
Note: The ISO images can only be used for the KVM virtualization type, while VM templates can be used either for KVM or LXC.
Additionally, both KVM and LXC users can define the new OS password before a new installation.
|
| Remember to grant your clients access to the selected reinstallation types in the 'Client Area Features' , as well as choose the available 'OS Images' and 'ISO Images' .
|
Backups
| To create a single backup, press the 'Backups' button, and click on 'New Backup' as shown on the following screen.
|
Now, choose the compression type ( 'None' , 'LZO' or 'GZIP' ) and the backup mode ( 'Snapshot' , 'Suspend' or 'Stop' ) from dropdown menus.
Afterward, press 'Confirm'.
|
| To restore a VM from the backup, press 'Restore' , and then click the 'Confirm' button in a popup window.
|
Above the backups list, there is a table with information on 'Available Resources'.
You will find there data on limits put on backups:
- Backup Size: used/allowed
- Backup Files: used/allowed
Next to the statistics there is a comfortable and easy to read progressive chart to illustrate the usage. If size is set to 'Unlimited', the chart does not show any progress.
Once you have reached the limits, the option to create new backups is blocked.
|
Backup Jobs
By pressing 'Backup Jobs' in the client area, you will be moved to the backup jobs management page.
You can easily edit or delete, as well as preview the details of existing backup jobs there.
To add a new backup job, press 'New Job' as shown on the following screen.
|
Now, define the backup start time, choose the days when to run it, and select 'Compression Type' and 'Backup Mode' from dropdown menus.
Also, select if you want to receive the notification when the backup is ready.
Finally, press the 'Confirm' button.
|
Graphs
Through pressing the 'Graphs' button, clients will be moved to the page with the generated graphs showing the CPU and memory usage, network traffic, and disk I/O.
They can also switch the timeline of graphs by choosing a new one from a dropdown menu indicated on the following screen. Clients can pick between 'Hour', 'Day', 'Week', 'Moth' and 'Year'.
|
Tasks History
To access the history of a machine, simply press the 'Task History' button. Afterward, the customer can see all the actions performed on the VM, as well as their status.
If an error has occurred during the execution of a task, the client can view the API response error by clicking on the 'Information' icon.
|
Network
Your clients are allowed to add and remove only private network interface devices. Upon clicking the 'Information' button, the new popup will open with more network details.
Keep in mind that ' Network device' options have to be set to 'Private'.
Also, after the network creation, the button to add another one or delete a newly created private network may not be longer available, depending on your Proxmox configuration.
|
Snapshots
Use a snapshot to remember the current contents of the virtual machine memory. You may use them later to restore the VM's settings.
Please remember that it is necessary to run the following cron command for snapshot jobs.
You may set the cron command once a day or every hour. Do not forget to replace 'your_whmcs' with your WHMCS root location.
php -q /your_whmcs/modules/addons/proxmoxAddon/cron/cron.php snapshots
|
Press the 'Take Snapshot' button and fill out the form to take a snapshot.
Name it (use the alphabetical characters and no spaces), choose whether to include RAM, and add a description.
|
| It is also possible to set up 'Snapshot Jobs' where snapshots can be created according to your preferences (daily or hourly). Click on 'New Job' in order to add a new snapshot job.
|
| As you complete the form, remember to fill in the 'Name' field without spaces or special characters- only capital letters and numbers are allowed here.
|
Firewall
Owing to the 'Firewall' page, your clients can set up firewall rules and enable a security group for their servers from the WHMCS client area.
As you can see, you can easily modify and remove the previously added rules and security groups.
To add a new firewall rule press the 'Add' button.
|
You can add a firewall rule in two ways. Both of them require choosing a direction, action, interface, source, and a destination.
The first way (orange) is to choose macro from the 'Macro' dropdown field.
The second way (blue) requires you to choose a protocol and fill in both the source and destination ports.
Additionally, you can enable a rule, and add a comment to it.
Press 'Add' to create a rule.
|
Among 'Additional Actions' you will find three options:
- Add Security group - choose a security group and an interface which the group will be used on.
Additionally, you can enable a security group, and add a comment to it. Click 'Add' to use the security group.
|
- Download Rules - use this option to simply create a backup, once pressed, a file will be downloaded
- Restore Rules - restore any of the previously created backups created. Select one of the previously downloaded files with rules
|
You may manage the hierarchy of rules on the list. In front of each rule, you can find its 'Position' marker.
The higher the rule is on the list, the higher priority the rule has assigned.You may change the rule position using the 'Move up/down' arrows.
|
Firewall Options
| Here you can view the current firewall settings. To decide on its options, press the 'Edit' button, and adjust them to your needs.
|
Disks (KVM only)
| View available disks and add new ones.
|
| Define the additional disk size, choose its bus (the available options may be 'IDE', 'SATA', 'VIRTIO' or 'SCSI' ), as well as define a disk format - you can choose from 'Raw disk image (raw)', 'QEMU image format (qcow2)', or 'VM image format (VMDK)' .
|
Configurable Options
When you successfully set up a product, your client can order it by choosing from the default configurable options.
Important: Storage Disc Space configurable option, when used by the client, overwrites the product configuration 'Disk Space ' option.
|
In case those options do not suit your needs, you can edit them.
Go to 'Setup' → 'Products/Services' → 'Configurable Option' and press the edit button next to the configurable option used by your product.
|
Here you can view all the products this configurable option group is assigned to.
Now, we will show you how to edit options. Let's say you want to add an option to order a VPS with 4 cores per socket.
To do so, edit 'The number of cores per socket' by pressing the edit button as shown on the screen below.
|
You will see a popup window, so make sure your browser does not block it.
To add a new option, enter it in the textbox located below all other options. If you want to replace the option you currently have, simply edit the textbox.
Finish by pressing 'Save Changes'.
|
| More information about WHMCS configurable options and their editing can be found here.
|
List of Configurable Options
|
The table below lists all configurable options used by the module for the chosen virtualization type.
Note that the name on the left is a variable (which you should not edit), separated by the | from the editable custom name.
|
KVM
|
LXC
|
The number of CPU sockets|CPU Sockets
|
cores|CPU Cores
|
The number of cores per socket|CPU Cores
|
cpulimit|Limit Of CPU
|
cpulimit|Limit Of CPU
|
CPU weight for a VM|CPU Weight For The VM
|
CPU weight for a VM|CPU Weight For The VM
|
Amount of RAM|Amount Of RAM
|
Amount of RAM|Amount Of RAM
|
Disk Space|Disk Space
|
Disk Space|Disk Space
|
Amount of SWAP|Amount Of SWAP
|
additionalDisksSpace|Additional Disks Space
|
additionalDisksSpace|Additional Disks Space
|
IP Addresses|IPv4 Addresses
|
IP Addresses|IPv4 Addresses
|
IPv6 Addresses|IPv6 Addresses
|
IPv6 Addresses|IPv6 Addresses
|
Backups Limit|Backups Size
|
Backups Limit|Backups Size
|
Backups Files Limit|Backup Files
|
Backups Files Limit|Backup Files
|
snapshots|Snapshots
|
snapshots|Snapshots
|
snapshotJobs|Snapshot Jobs
|
snapshotJobs|Snapshot Jobs
|
Bandwidth|Bandwidth
|
Bandwidth|Bandwidth
|
VM Template|VM Template
|
VM Template|VM Template
|
archive|Archive
|
archive|Archive
|
Network Rate|Network Rate
|
Network Rate|Network Rate
|
vcpus|VCPUs
|
tag|Tag
|
ISO Image|ISO Image
|
storage|Storage Disk Space
|
osType|OS Type
|
|
cicustom|Custom Cloud-Init Configuration
|
|
ciscript|Cloud-Init Script
|
|
tag|Tag
|
|
storage|Storage Disk Space
|
|
Integration with Products Reseller For WHMCS
The close integration of Products Reseller For WHMCS with Proxmox VE VPS For WHMCS will certainly bring advantages to your business.
You will be able to resell your Proxmox VE VPS servers using WHMCS or any other platform.
Thanks to extra settings available only for 'Proxmox VE VPS' products, your resellers are granted the possibility to customize offered services to meet clients’ needs.
Moreover, you can easily monitor the income and manage your reseller groups.
|
| In the 'Products Reseller For WHMCS' module, you can handily create your own integrations as well as assign as many various 'Proxmox VE VPS' products as you wish.
|
| In addition, the extra setting options that are available only for 'Proxmox VE VPS' products will definitely make your offer more competitive.
|
Once an order is placed, the enabled setting options will appear in the side menu along with additional information about the 'Proxmox VE VPS' product at the bottom of the page.
Now, the 'Proxmox VE VPS' product can be simply administered straight from the client area.
|
What is also important is that you can keep under control all key details such as orders, income, and groups of resellers straight from the 'Products Reseller' panel.
If you want to find out more about the Products Reseller For WHMCS module, please proceed here
|
Management of Billing
When you combine Proxmox VPS For WHMCS with Advanced Billing For WHMCS, you will be able to set up additional billing options.
The module allows you to charge your customers based on the server resources they have used.
Note: Advanced Billing supports OpenVZ (prior to Proxmox v2.3.0), KVM and the LXC virtualization type.
|
| With Advanced Billing For WHMCS module, you can also display the current resource usage of your customer's server, as well as its total cost.
|
Management of Existing Accounts
|
You can easily use Proxmox VPS module with your existing Proxmox accounts. To do so, follow the instructions below:
1. Create and configure a Proxmox VPS server, and a server group.
2. Create and configure a Proxmox VPS product.
3. Place a new order with the previously created product for your customer. Do not activate the product yet.
4. Access the just created product from the admin area via the Client Profile → 'Products/Services' section and fill out 2 custom fields.
They are 'VMID' and 'Node' .
|
|
5. If possible, enter IP addresses into fields 'Dedicated IP' and 'Assigned IPs' .
|
|
6. Set the product status to 'Active' .
Remember not to click the 'Create' button during the entire process. That would unnecessarily create a new virtual machine.
|
Servers Location Management
Important: Server Allocator For WHMCS is required to allow location management.
In order to allow defining locations for Proxmox VPS, follow the below steps:
1. In your product's 'Module Settings' , set up 'Default Node' to 'Server-Node'.
2. Create a WHMCS server for each Proxmox node.
3. Manually create a configurable option, name it e.g.: 'Location'. Add options for each server within that configurable option.
4. Install our Server Allocator For WHMCS module and configure it properly.
- It must assign a server to a product depending on the selected option in 'Location' configurable option.
Keep in mind that all locations need to have exactly the same configuration.
|
Now, a client may order a VPS, and select 'Location'. Server Allocator For WHMCS will change the server assigned to the product.
The "Create" action is triggered on the assigned server due to the 'Server-Node' option enabled.
|
Tips
| 1. Operations performed on the virtual servers are not executed immediately. Give your Proxmox Virtual Environment some time to process the request and execute the operation.
|
2. Multiple physical Proxmox servers can be joined into one cluster.
When they are joined into one cluster, you can access all of them by connecting to just one.
- Auto-node - creates a new VM on the server (node) with the most free resources, so the administrator cannot control it
- Server-node - creates a VM on the server (node) whose IP address or node host (e.g. node1.yourproxmox.com) was provided during the WHMCS's server configuration,
allowing the administrator to control the node choice
|
3. If you set the product type to 'Hosting Account' when adding a new product, you will not need to fill out nameservers as they will be automatically set up.
But if you still want to use the 'Server/VPS' product type, this article might help you in learning how to remove nameservers from your order template.
|
4. OS Templates are not automatically downloaded while configuring a product.
For each virtualization type, templates are downloaded from the Proxmox server depending on which one they are generated on.
|
| 5. OS Templates are loaded from the storage. Make sure the module can access its content by selecting appropriate permissions for the chosen storage.
|
| 6. When the PAM authentication is used, it is necessary to create a client first in order to change the password correctly. Read more about it here.
|
| 7. As this module supports the templates system, any changes made in the module's template files will be saved after the upgrade process.
|
| 8. If you are using the module in the 2.3.2 version or any previous one, and would like to migrate to Proxmox VE V5.X, you need to update the files on your Proxmox server to the new version from the 'UploadOnProxmoxServer' folder.
|
| 9. OS Templates serve only as operating systems for the VM, while VM Templates contain complete configuration of the VM, the amount of resources included.
|
10. You can use the {$service_assigned_ips} tag in your welcome email template to display automatically assigned IP addresses for the created VM (either the KVM or LXC virtualization type).
Other available tags in the 'Client Notifications' emails:
{$user.username}
{$user.password}
{$user.realm}
If you wish you may add other information, like password, into the email, just refer to e.g. 'VPS Server Welcome Email' email template in your WHMCS to find appropriate merge fields.
Important: Remember that if the client's email address is incorrect or WHMCS is not able to correctly send it because of any reason, the module will not create the VM for that client correctly.
|
| 11. 'One User Per VPS' option allows you to either create a new username for each new client's VM, or create only one that will be then used for every new VM owned by your client.
|
12. You can use the 'IPSet IP Filter' option for firewall to prevent IP spoofing. Click here to read more about IP Sets.
Inside the admin area, in the product details view, you can preview the current IP Sets on VM:
|

|
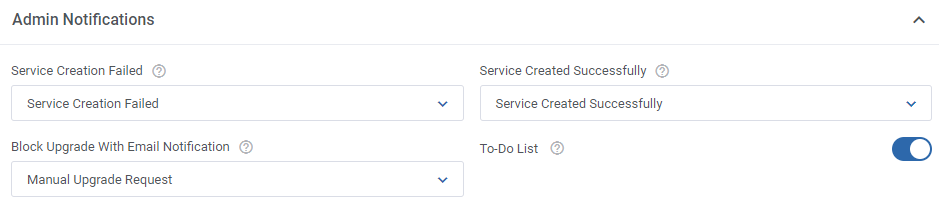
13. You can enable 'Admin Notifications' on product configuration to be informed via email about certain actions. These are:
- Service Creation Failed - if there were any errors that prevented the VM from being successfully created, then the selected email template will be sent to the administrator
- Upgrade - select the email notification template you want to receive if the client requests the product upgrade.
This will also block the automatic sending of an upgrade request to the Proxmox API, so the administrator can review it first.
Note that, if chosen, the product will still be upgraded in the WHMCS itself, but the upgrade request will not be passed to the API.
To finalize the upgrade, use the "Change Package" module command in your admin area.
- To-Do List - if checked, in addition to sending any of the above notifications, it will also add them as tasks on the WHMCS To-Do List.
|
|
14. The 'Minimum Network Rate Limit' option allows you to change the previously entered 'Network Rate Limit' value to a new one if the current 'Bandwidth Limit' is already reached.
Note that the 'Bandwidth Limit' can also be used for the WHMCS overage billing calculation as described here.
|
| 15. 'Default Username Prefix' - when filling in this field you may use the {$serviceid} parameter to avoid problems with creating usernames that already exist.
|
16. You can easily import and assign any already existing VM from Proxmox to your WHMCS.
First, you need order Proxmox VPS product to your client account without processing the VM creation process.
Next, in the client's 'Products/Services' management tab of your admin area, fill the 'VMID' and 'Node' custom fields with the VMID of the virtual machine you want to import from your Proxmox server
Afterward, change the product status to 'Active' , save changes and use the 'Change User Role' module command.
|
17. It is possible to display more information about your VM in Proxmox Environment.
To do so, you need to provide the preferred records in the 'Container Notes' tab under the ' KVM or LXC Configuration' section.
The following records can be used:
Client: {$client_name} (ID: {$client_id})
Email: {$client_email} Service ID: {$service_id}
Product: {$product_name} (ID: {$product_id})
Hostname: {$service_domain}
Main IP: {$service_dedicated_ip} {if $service_assigned_ips}
IP Address Allocation: {$service_assigned_ips} {/if}
|
| 18. When the interface names on the VM are Net\d+, you need to choose Eth\d+ in the 'Firewall' section of the product configuration.
|
19. If you want your clients to provide their own hostname, you need to add the following custom field in the 'Custom Fields' tab of the product configuration.
proxmoxHostname|Hostname
|
20. Create Linux VM:
- Create a VM template according to descriptions here
- Move to Module Settings → Virtual Machine Configuration → OS Template, select the previously created template (e.g. Ubuntu)
- In Module Settings → Cloud-Init: Cloud-Init: On, Service Username: On, Service Password: On
|
- Place a new order, wait until all tasks in Proxmox Addon → Tasks have 'finished' status.
|
21. Create Windows VM:
- Create a new virtual machine using an ISO image in Proxmox panel
- Install Guest Agent on the windows system, read more here
- Convert the created machine into a KVM template
- Move to the product Module Settings → Guest Agent and switch options as below:
|
- Module Settings → Virtual Machine Configuration: select the previously created Windows template under OS Template
- Place a new order, wait until all tasks in Proxmox Addon → Tasks have 'finished' status.
|
22. Configuring 'Default User' per template. Move to 'Proxmox Addon' → 'Servers' → 'Server Details' → 'Templates' → 'Create/Edit Template'.
You may assign a default user to a single template, that user will be automatically assigned to the newly created VM.
|
23. Configurable option field: 'Storage Disc Space' - this option allows to define the type and space on disc via a configurable option when placing an order.
It also allows to extend the space as well as change the disc type. This CO overwrites the ordinary 'Disc Space' field available in the product configuration section.
Important: To migrate the disc, you must previously 'Stop' your VM.
Note: Values provided in configurable option must be integers.
|
24. Usage of VLAN Tags:
VLAN Tags Range Minimum and Maximum Numbers simply play the role of network separation measures. The minimum and maximum numbers cause the module to select the next free VLAN Tag from this range for each virtual machine it creates.
VLAN Tag is actually a drop-down list, and to select anything in this section, firstly, it is necessary to configure appropriate IP addresses in your Proxmox addon → IP Management section:
|
25. SDN Support:
The module supports SDN private network type. It is possible to create virtual networks (vnets) at datacenter level thanks to the Software Defined Network (SDN).
To learn all the details on SDN in proxmox, please navigate to the official proxmox documentation.
In the module, the whole configuration of SDN is located in 'Module Settings' → 'Private Network' section. There you will find dedicated options, these are:
- Private Network Type
- SDN Zone
- SDN TAG Range Minimum Number
- SDN TAG Range Maximum Number
|
| 26. The "fetchBackupsForArchive" parameter in the "global_options.yml" file allows skipping the backups from being loaded into the "Archive" list in the product configuration.
By default the parameter is set to 'true' and backups are loaded. You may change it manually to 'false' and no backups will be loaded in the 'Archive' dropdown list as on the screens below:
|
Update Instructions
Essential guidance through the process of updating the module is offered here.
Please note that each time you update the module, you have to also update the files on the Proxmox server described in the step 4 of the installation guide.
Important: After upgrading the module to the newest version please first enter to the Proxmox addon in your WHMCS before setting up the product or opening it from admin or client area!
Otherwise, when you try to open the product's module settings, you may get SQLSTATE" "Base table or view not found" errors.
Please also note that since 2.7.0 module version the commands for the crons execution have slighty changed - although the old ones should still work, we recommend that you update their entries.
Keep in mind there is a quick and easy option in our client area that will let you upgrade the license of your module to an open source version at any time - and at a lower price!
To take advantage of it, simply use the License Upgrade button located on the product's page and a discounted invoice will be generated automatically.
|
Common Problems
| 1. When you have problems with connection, check whether your SELinux or firewall does not block ports.
|
2. Error 'Could not create PVE2_API object' during connecting via the noVNC console.
Reason: The user account does not have permission to access the noVNC console.
Solution: Proceed to the product's 'Module Settings' tab and check whether the selected user's permission grants access to the noVNC console.
Afterward, proceed to the client's hosting and run 'Change User Role' on it.
To change the user role for all clients, please use the 'Cron job users synchronization (run only once)' cron command.
You will find it in the 'Proxmox Addon' → 'General Settings'.
|
3. Error 'This connection is untrusted' during connecting via the noVNC console.
Reason: Your certificate is not valid.
Quick Solution: Your client needs to add the Proxmox address to the certificate exception list.
Best Solution: Configure a valid certificate.
|
4. The blank page during connecting via noVNC console, '501 Error' visible in the proxmox panel.
Reason: You have not uploaded the additional files on the Proxmox server.
Solution: Open 'UploadOnProxmoxServer' and upload content of the proper version on all Proxmox servers into the '/' path.
|
5. Error 'Change password failed: user 'xxx' does not exist'
Reason: You have not created a client yet.
Solution: When the PAM authentication is used, it is necessary to create a client first in order to change the password correctly. Read more about it here.
|
6. Error 'Function "ssh2_connect" does not exist. Please Install SSH2 PECL before you start using the script.'
Reason: You have not updated the php.ini file.
Solution: After SSH2 PECL installation, make sure that you have updated the php.ini files for CLI and webserver.
|
7. Once you have updated your Proxmox VPS For WHMCS to Proxmox VPS For WHMCS V2.0.0, it is always required to save your product configuration
in the module settings again.
|
8. The current disk usage for the KVM virtualization type is not properly displayed.
This is due to API limitations that lead to returning the incorrect value, which is always set to '0' .
|
| 9. If you want to use Cloud-Init on Debian, we recommend using the Cloud-Init's version 18.2 or later to avoid assorted problems occurring in previous versions.
|
10. Error: "Only root can set 'serial0' config".
Solution: Turn off the Xterms.js console in the product configuration.
|
11. Error "Parameter verification failed. ([maxfiles] - Only root may set this option.)"
Reason: The user is other than "root" or the server authentication is set to Proxmox VE.
Solution: In the server configuration, set the root details, and select PAM as the authentication type.
|
12. Error "Node for IP Address 10.10.10.10 not found"
Reason: An interface with the IP Address 10.10.10.10 cannot be found.
Solution: You need to provide your private IP Address node in the 'Assigned IP Addresses' field in the server configuration in your WHMCS.
|
| 13. Please remember that the disk size cannot be downgraded. Such a possibility is not supported.
|
| 14. Error: "Cannot clone to non-shared storage 'local"
Reason: Option 'Search For Templates On All Nodes' is enabled in the product configuration under KVM configuration.
Solution: Keep the above option disabled as shown on the screen.
|
|
Remember that cloning from node "A" to node "B" does not work on the local storage.
We do recommend using "Shared Storage" or creating the machine on the same node on which the KVM template is located.
It is important to keep every template named the same on every node, otherwise cloning will not work either, eg.:
node1: Ubuntu, CentOS, Debian
node2: Ubuntu, CentOS, Debian
|
15. Error: "Nameserver '%' cannot be resolved"
Reason: The nameserver IP must be provided for the virtual machine of LXC configuration type.
By default, the module uses the content provided by the client during order, eg. ns1, then WHMCS completes the nameserver with a domain.
If the nameserver field is left empty or the client orders a new domain, the system is not able to process the data correctly and create a full address.
Solution: Enable the 'Use Server Nameservers' option in the product's configuration or manually correct the nameserver per the order.
|
|


