| Servertastic For cPanel provides a simple and convenient way for the end-customers to automatically install an SSL Certificate on their website. The module currently supports only Basic SSLs provisioning.
|
| ✔ View Basic Certificate Details
|
| ✔ Download Generated Certificate
|
| ✔ Supports PHP XXX Up To PHP XXX
|
Installation and Configuration
This tutorial will show you how to successfully install and configure Servertastic SSL For cPanel.
We will guide you step by step through the whole installation and configuration process.
|
Installation
This tutorial will show you how to successfully install Servertastic SSL For cPanel.
We will guide you step by step through the whole installation and configuration process.
|
| 1. Log in to your client area and download Rage4 For cPanel.
|
2. Upload and extract the module into the /root cPanel directory.
Files in your cPanel directory should look like this.
|
3. Next run the following command from the console
sudo sh /root/HTTPInstaller/install
Follow the instruction displayed on console. After a few moments you should see confirmation if plugin installed successfully:
|
Configuration
4. In order to configure plugin, go to 'WHM' → 'Plugins' → 'Servertastic SSL' .
Click on 'Configuration' and fill the followings records:
- API Key – provide the key to successfully connect with your API
- Test Mode - select to test the plugin
- API Logs – if selected all requests and API responses will be noted in Logs section
- Cron Retry Limit – define the number of maximum allowed repetitions of of a single request
- Notifications Email – provide e-mail address where notifications will be delivered
- Verification Method – choose File or DNS verification method to validate ownership automatically
- Auto Renew – if selected, certificate will be automatically renewed 30 days before its expiry date
When ready, test the connection and save the configuration.
|
| Congratulations! Your module is ready for use.
|
Management
Servertastic SSL For cPanel allows you to offer Basic SSLs Servertastic certificates to your clients.
Additionally, you have the ability to view certificate details and manage each provisioned certificate.
|
WHM Area
In the admin area you can view the details of a product and find SSL configuration status.
Additionally, you can create/terminate product, resend configuration email and even change approver email.
|
Domains
In this section you will find all available in WHM domains and all the information about their certificate.
If it was installed, expiry dates, type, status and options to Renew or Remove if installed.
|
Cron
Under Cron tab, you will find all existing cron tasks added when any kind of error appeared while verifying a request on certificate installation.
As you can see, administrator may manually trigger the action again or wait for the next cron run.
|
Logs
Logs section includes a list of all failed actions that had place in the module.
Please remember that you may always turn logging off in the configuration tab or by switching button On to Off. Clear logs if necessary.
|
cPanel Area
Servertastic SSL For cPanel allows your customers to order and configure Basic SSL certificates.
As you can see on the following screen, it also allows to choose from configurable options during an order.
|
Order
Client logs into their cPanel account. Then proceeds to 'Security' → 'Servertastic SSL' .
There appears a list of client's domains with their current status. Press Install New Certificate for the domain.
|
| Then select to activate free SSL. Currently only this option is allowed.
|
|}
Next you have to fill out the admin and tech contact details before you can continue.
Please note that Technical contact details are automatically filled out with the same details as Admin contact.
If you want to use different details, simply change them.
Press Add Certificate when ready.
|
|style="padding: 0px 0px 30px 25px;"|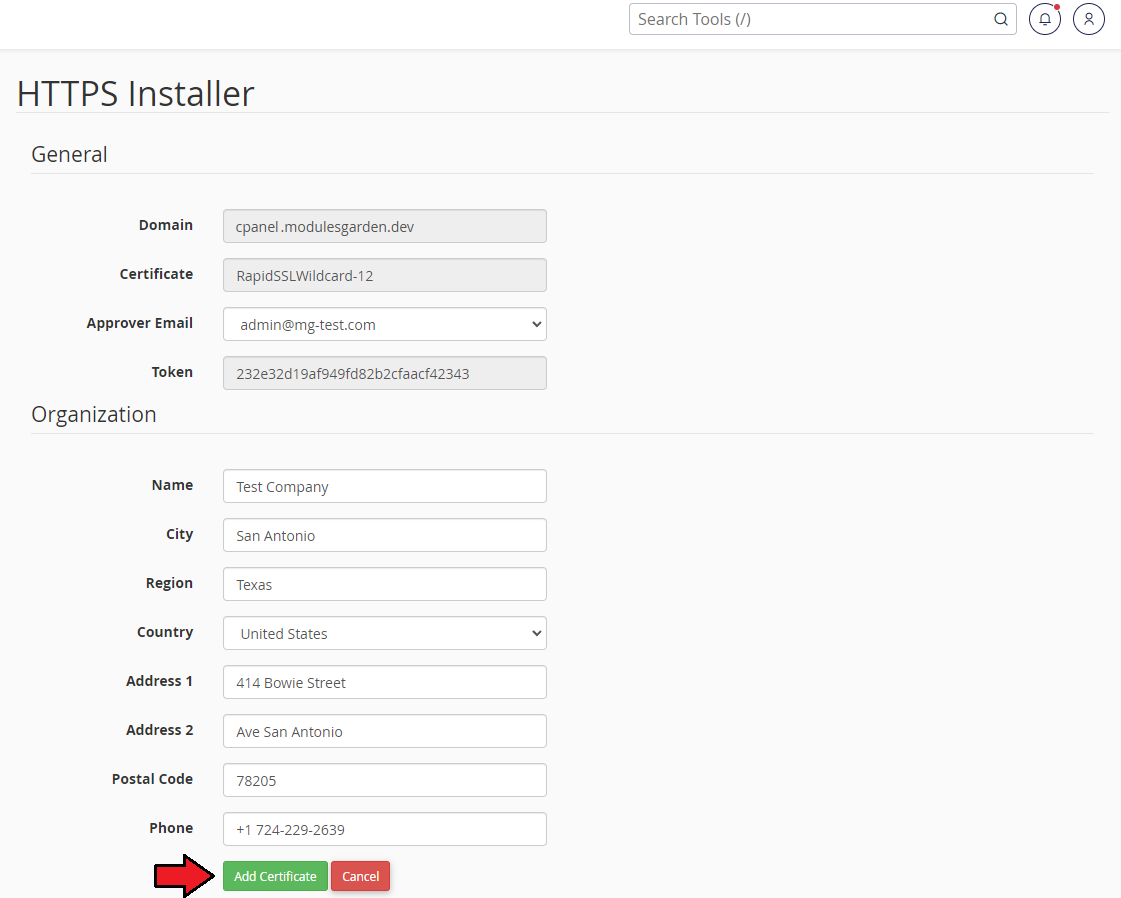
Management
In case there are any issues encountered while verifying the request, a cron task is automatically added to the line.
There administrator may trigger the action again or wait until system runs cron again and processes the request.
|
| If the verification is successful and domain certificate is installed, it appears on the list with adequate status on the client's account.
|
|}
There are three actions available on the certificate:
- See certificate details
- Renew the certificate manually
- Remove the certificate
|
Configurable Options
The module enables you to set up configurable options allowing clients to define the products they order.
Below you can find the list of configurable options with descriptions of how they will affect an order:
Certificate Type - allows client to choose from types provided in configuration, a chosen type will overwrite configuration in 'Module Settings' .
Years - client can choose the amount of years when certificate is valid. Make sure you will not exceed the maximum number of years for a particular certificate.
Maximum number of years for a particular certificate type can be found after a brand name followed by '| ' on the 'Certificate Type' in 'Module Settings' tab.
Servers Count - (required for Thawte and most of VeriSign certificates) if applicable, its range stretches from 1 to 500.
SAN Count - (SAN certificates only) client can define the maximum number of domains supported by a certificate.
|
1. Let's create configurable options group containing each one of presented configurable options.
Start by proceeding to 'Setup' → 'Products/Services' → 'Configurable Options' and pressing 'Create a new Group' .
|
2. Afterwards, fill out the form with a group name and a description, select products you wish to apply to this group by holding Ctrl and clicking on each of the products.
Afterwards, press 'Save Changes' .
|
| 3. Press 'Add New Configurable Options' .
|
4a. (Years, Servers Count, SAN Count) Now, fill in option name, select 'Quantity' option type and fill in minimum and maximum allowed quantity.
Afterwards, set up price per one unit and press 'Save Changes' .
|
| 4b. (Certificate Type, Years, Servers Count, SAN Count) Fill in option name and select 'Dropdown' from option type.
|
5. Now, you have to add each option separately.
Do it by filling in its name, setting up its price and pressing 'Save Changes' for each of the options.
Note: As you may notice on the following screen, name is divided by 'I' sign.
The first part concerns system name of an option (or value) while the second part is a name under which option will be visible for client.'
|
6. Now, let's order a product using previously created configurable options.
As you can see, using configurable option allows you to use fewer product while still allowing a full customization of the product.
|
Tips
1. When you press 'Renew' button in the admin area ('Client Profile → Products/Services') , a new order for selected domain will be created.
- The admin can place it as 'Renewal' order type but only 90 days before the expiration date.
|
Common Problems
| 1. When you have problems with connection, check whether your SELinux or firewall does not block ports.
|


