Proxmox VE VPS For WHMCS
Article update is ongoing on this page, watch out for broken links, unclear descriptions and images!
We are sorry for the inconvenience caused.
About Proxmox VPS For WHMCS
| Proxmox VPS For WHMCS is a powerful module which allows you to automatically provision virtual servers to your clients. Your customers will be able to manage virtual servers, backups, firewall, as well as access noVNC, SPICE, or Xterm.js console, and much more - all this directly in your WHMCS. |
- Admin Area Features:
| ✔ Create/Suspend/Unsuspend/Terminate Server |
| ✔ Create/Terminate User Account |
| ✔ Change Package - Supports Configurable Options |
| ✔ Boot/Reboot/Stop/Shutdown Server |
| ✔ Change User Role |
| ✔ Access noVNC, SPICE And Xterm.js Console |
| ✔ Migrate Server Between Nodes In The Same Cluster |
| ✔ Reinstall Server |
| ✔ View Server Status, Details And Statistics |
| ✔ View Graphs - With Ability To Change Time Scale of MRTG Graphs |
| ✔ Display Disk And Bandwidth Usage Of Each Product |
| ✔ Display CPU And Memory Usage Of Each Product |
| ✔ Display IP Sets (KVM) |
| ✔ Auto Node - Possibility To Automatically Create VM On Node With Most Free Space |
| ✔ Configure Client Area Features Per Product |
| ✔ Import IP Address To Hosting IP Addresses Table |
| ✔ Return IP Address To IP Addresses Subnet |
| ✔ Add Additional IP Address To VM |
| ✔ Add Additional Storage To VM (KVM) |
| ✔ Enable Quemu Guest Agent (KVM) |
| ✔ Enable Backups Routing |
| ✔ Enable Auto VM Backups Before Reinstall |
| ✔ Enable Load Balancer |
| ✔ Receive Notifications About VM Upgrades And Creation Failures |
- Proxmox Addon Features:
| ✔ Display Servers: List Per VPS And Cloud |
| ✔ List Per VPS And Cloud |
| ✔ Clusters List |
| ✔ VMs List |
| ✔ KVM Templates |
| ✔ Recovery VM Configurations List With Export To Backup File |
| ✔ Tasks History |
| ✔ Statuses, Resources Usage, IP Assignments And Details |
| ✔ Manage Public & Private IP Addresses Per Server, VLAN, Tag And Node |
| ✔ VM Cleaner - Manage VM Not Existing In Your WHMCS |
| ✔ Convert KVM VPS To KVM Template |
| ✔ Define VM IDs Ranges Per Server |
| ✔ Set Minimum VM ID For Product Without ID Ranges Defined |
| ✔ Configure Resources Weights For Load Balancer Prioritization |
| ✔ Synchronize Users Permissions |
- Client Area Features:
| ✔ Boot/Reboot/Stop/Shutdown Server |
| ✔ Reinstall Server Using Templates (KVM) And ISO Images |
| ✔ Access noVNC, SPICE And Xterm.js Console |
| ✔ Create/Restore/Delete Backups |
| ✔ Manage Backups Within Defined Limits (Max Number Of Files & Max Size Of Files) |
| ✔ Manage Backup Jobs Within Defined Limits (Max Number Of Files & Max Size Of Files) |
| ✔ View Graphs - With Ability To Change Time Scale of MRTG Graphs |
| ✔ View Task History |
| ✔ View Network Devices And Manage Private Interface |
| ✔ Create Server Snapshot (KVM) |
| ✔ Manage Firewall |
| ✔ View And Edit Public SSH Key (KVM) |
| ✔ Download Public And Private SSH Keys (LXC) |
| ✔ View Server Status, Details And Statistics |
| ✔ Display Disk And Bandwidth Usage |
| ✔ Display CPU And Memory Usage |
| ✔ Choose Server Resources While Ordering And Upgrade/Downgrade Them Freely |
- Configurable Options:
| ✔ KVM: |
| ✔ Number of CPU Sockets |
| ✔ Number of Cores Per Socket |
| ✔ CPU Limit |
| ✔ CPU Weight For VM |
| ✔ Amount of RAM |
| ✔ Disk Space |
| ✔ Additional Disk Space |
| ✔ Network Rate |
| ✔ IPv4 Addresses |
| ✔ IPv6 Addresses |
| ✔ Backups Size Limit |
| ✔ Backups Files Limit |
| ✔ Bandwidth Limit |
| ✔ VM Template |
| ✔ Network Rate |
| ✔ VCPUs |
| ✔ ISO Image |
| ✔ OS Type |
| ✔ LXC: |
| ✔ Number of CPU Cores |
| ✔ CPU Limit |
| ✔ Amount of SWAP |
| ✔ CPU Weight For a VM |
| ✔ Amount of RAM |
| ✔ Disk Space |
| ✔ Additional Disk Space |
| ✔ Amount of SWAP |
| ✔ IPv4 Addresses |
| ✔ IPv6 Addresses |
| ✔ Backups Size Limit |
| ✔ Backups Files Limit |
| ✔ Bandwidth Limit |
| ✔ VM Templates |
| ✔ Network Rate |
- General Info:
| ✔ Supports Cloud-Init (KVM) |
| ✔ Supports PVE And PAM Authentication |
| ✔ Supports KVM and LXC Virtualization |
| ✔ Integrated With Advanced Billing For WHMCS - Actual Server Resource Usage Billing (read more) |
| ✔ Integrated With IP Manager For WHMCS - Complete Management of IP Subnets (read more) |
| ✔ Integrated With Server Allocator For WHMCS - Automatic Assignment Of Specified Servers To Products (read more) |
| ✔ Multi-Language Support |
| ✔ Supports Proxmox VE V5.3 And Previous |
| ✔ Supports IPv4 And IPv6 |
| ✔ Supports PHP 5.6 Up To PHP 7.3 |
| ✔ Supports WHMCS Template Six |
| ✔ Supports WHMCS 7.4 And Later |
| ✔ Easy Module Upgrade To Open Source Version |
Installation and Configuration
| This tutorial will show you how to successfully install and configure Proxmox VPS For WHMCS. We will guide you step by step through the whole installation and configuration process. |
Installation
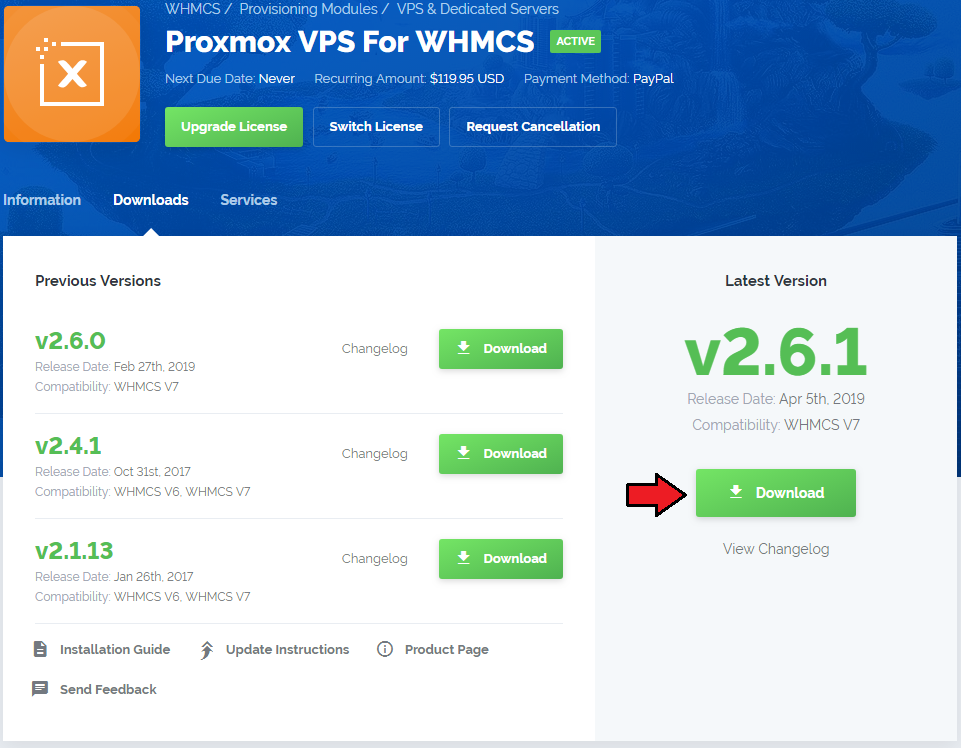
| 1. Log in to our client area and download the module. |
|
| 2. In the downloaded file you will find two packages that support different PHP versions. As presented on the screen below, the first one is dedicated to PHP 5.6 up to PHP 7.0, while the second one is aimed at PHP 7.1 up to PHP 7.3. It does not apply to open source versions. Note: You can check the current PHP version in your WHMCS. To do so, proceed to 'Utilities' → 'System' → 'PHP Info'. |

|
| 3. Extract the downloaded file and choose the one with the right PHP version. Upload and extract the PHP file into the main WHMCS directory. The content of the PHP version files should look like this. |

|
| 4. Open 'UploadOnProxmoxServer' and upload the content of the proper version on all Proxmox servers into the '/usr/share/novnc-pve/' folder. You should upload these files not only during the first installation of the module, but also each time you update it. Note: If you wish to allow noVNC consoles, you need to configure a product using the PVE realm and set user permissions to 'PVEVMUser.' |
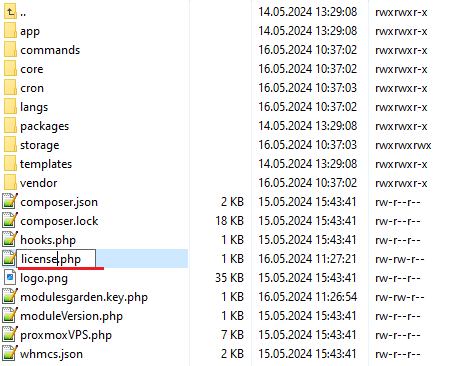
| 5. When you install Proxmox VPS For WHMCS for the first time, you have to rename the 'license_RENAME.php' file. The file is located in 'modules/servers/proxmoxVPS/license_RENAME.php'. Rename it from 'license_RENAME.php' to 'license.php'. |
|
| 6. In order to configure your license key, you have to edit the previously renamed 'license.php' file. Enter your license key between the quotation marks as presented on the following screen. |

|
Activation of Proxmox Addon
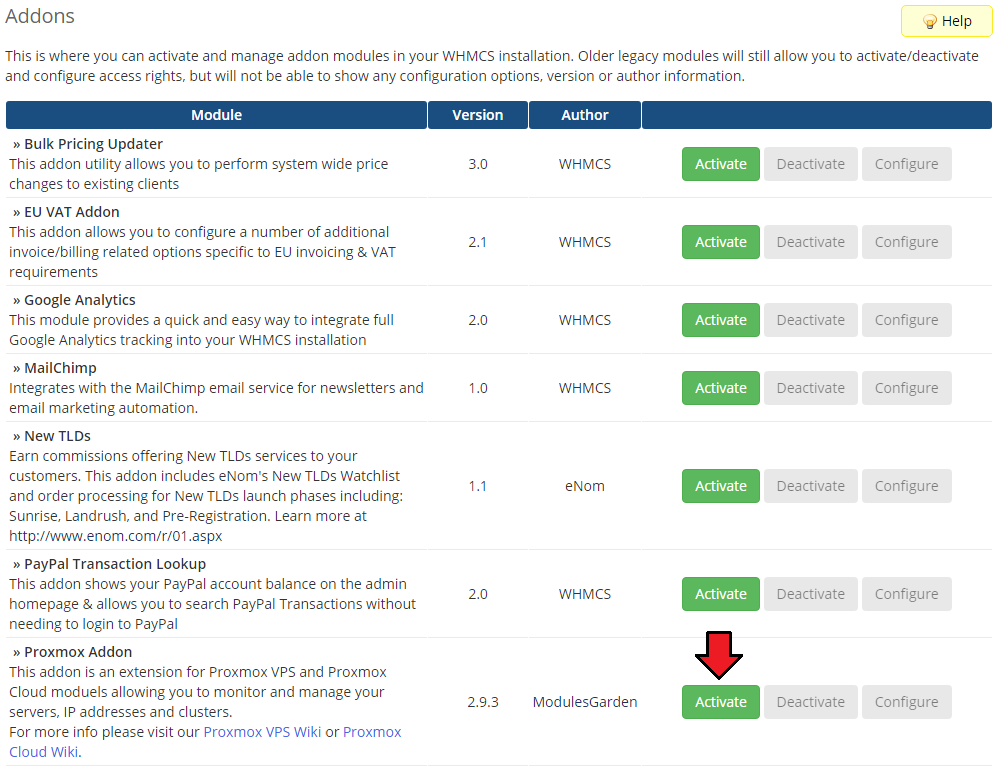
| 7. Firstly, activate the Proxmox Addon. To do so, log in to your WHMCS and press 'Setup' → 'Addon Modules'. Find 'Proxmox Addon' and press 'Activate'. |
|
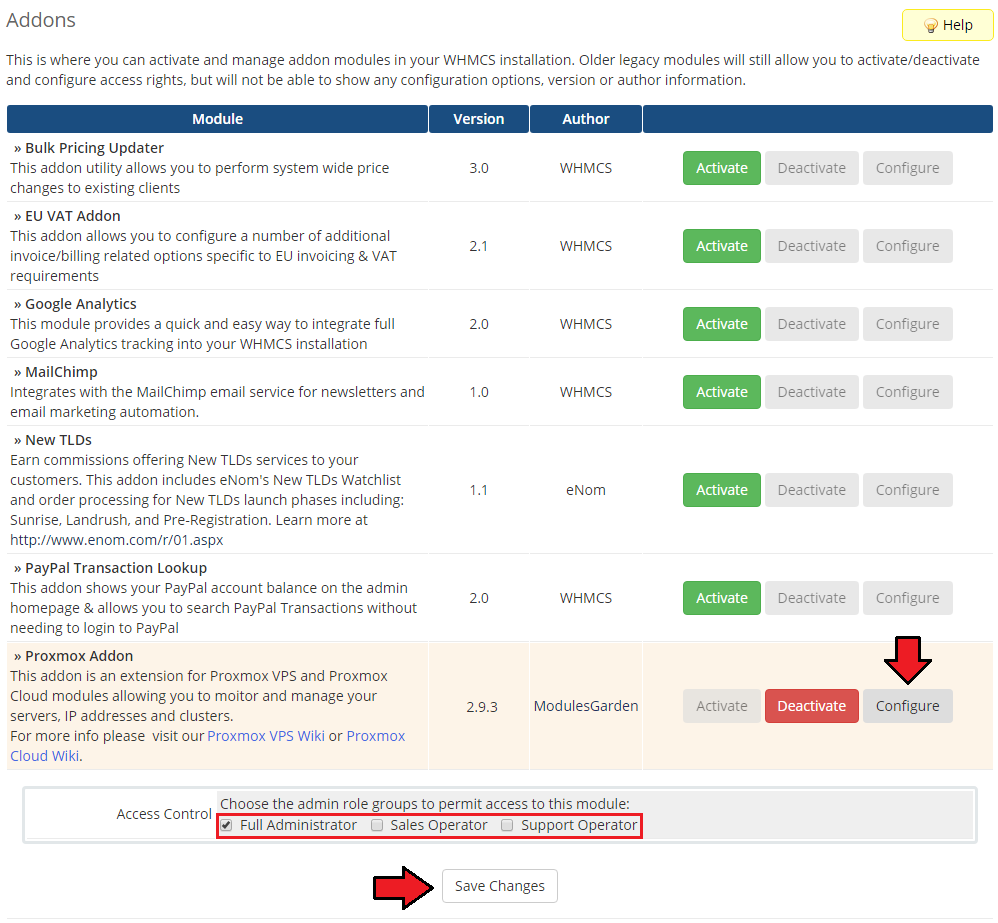
| 8. In the next step, you need to permit access to this module. To do so, click on the 'Configure' button, tick 'Full Administrator' and press 'Save Changes'. |
|
Configuration of Server
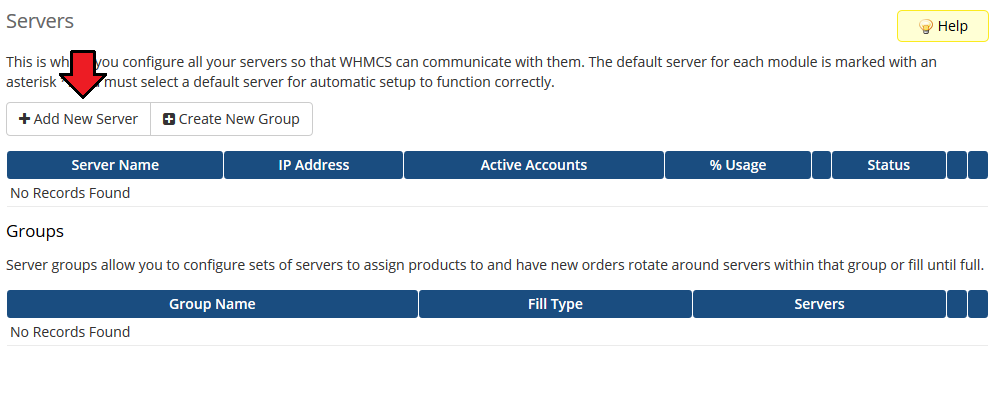
| 9. Now, we will show you how to configure a new product. Go to 'Setup' → 'Products/Services' → 'Servers' and press the 'Add New Server' button. |
|
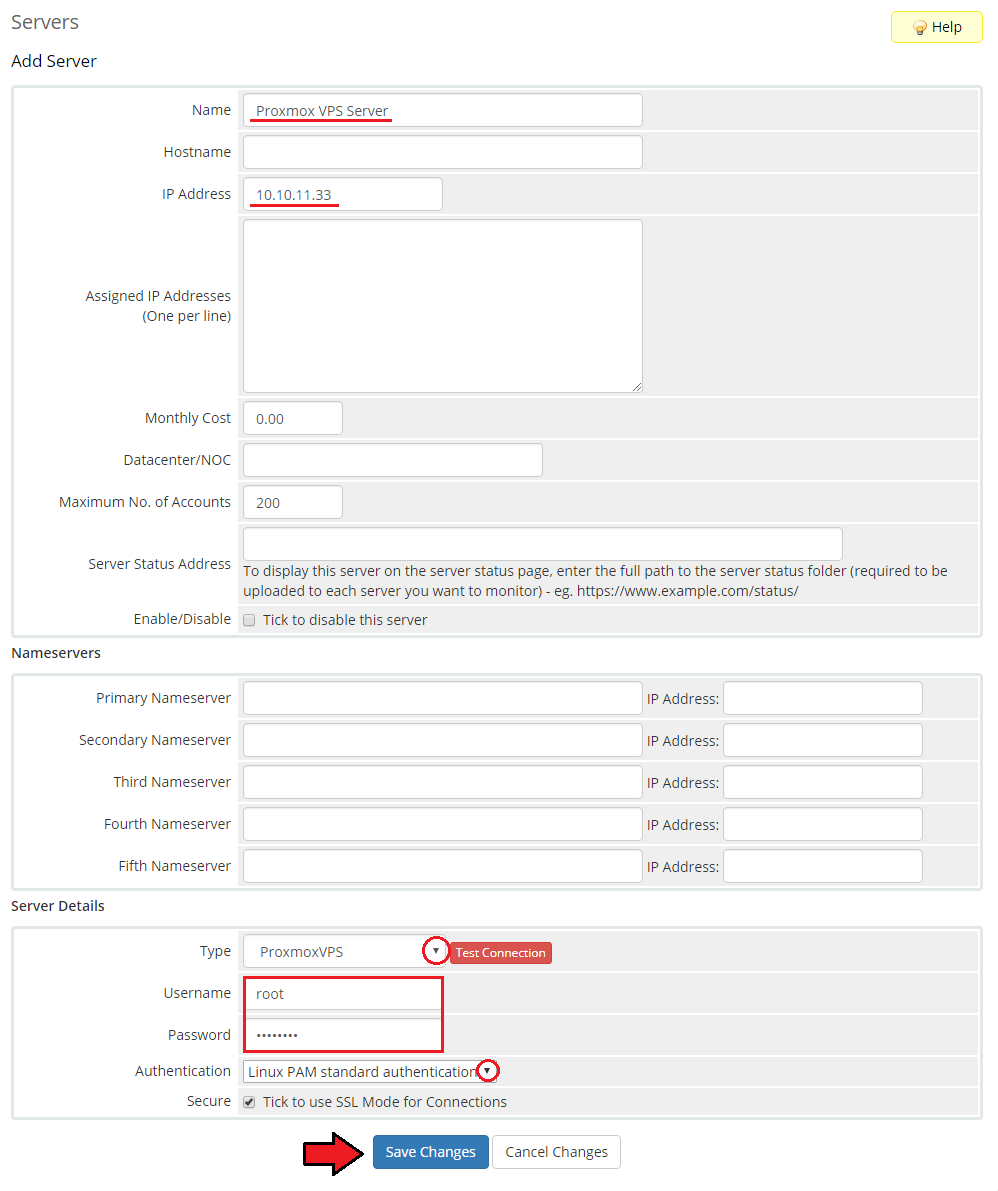
| 10. Next, enter your server name, IP address, username and password. Choose an authentication type from 'Authentication' and 'Proxmox VPS' from the 'Type' dropdown menus. 'Save Changes'. |
|
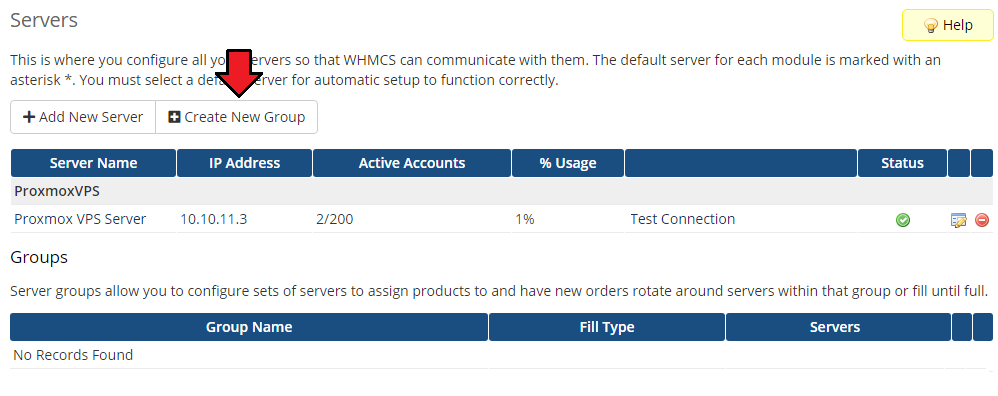
| 11. It is time to create a server group. To do so, click on 'Create Server Group'. |
|
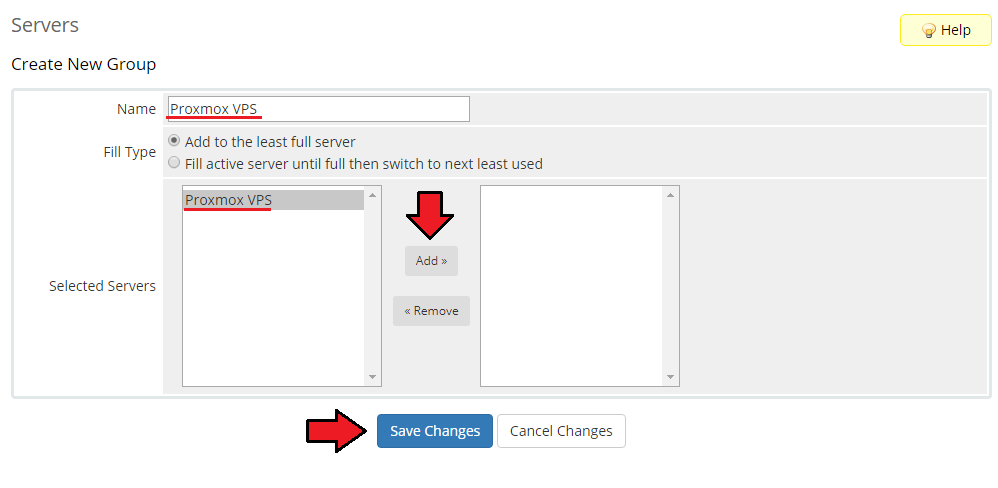
| 12. Enter the name, click on your previously created server, press 'Add' and afterward 'Save Changes'. |
|
Configuration of Product
| 14. In order to create and configure a product, go to 'Setup' → 'Products/Services' → 'Products/Services'. Click on 'Create a New Group'. |

|
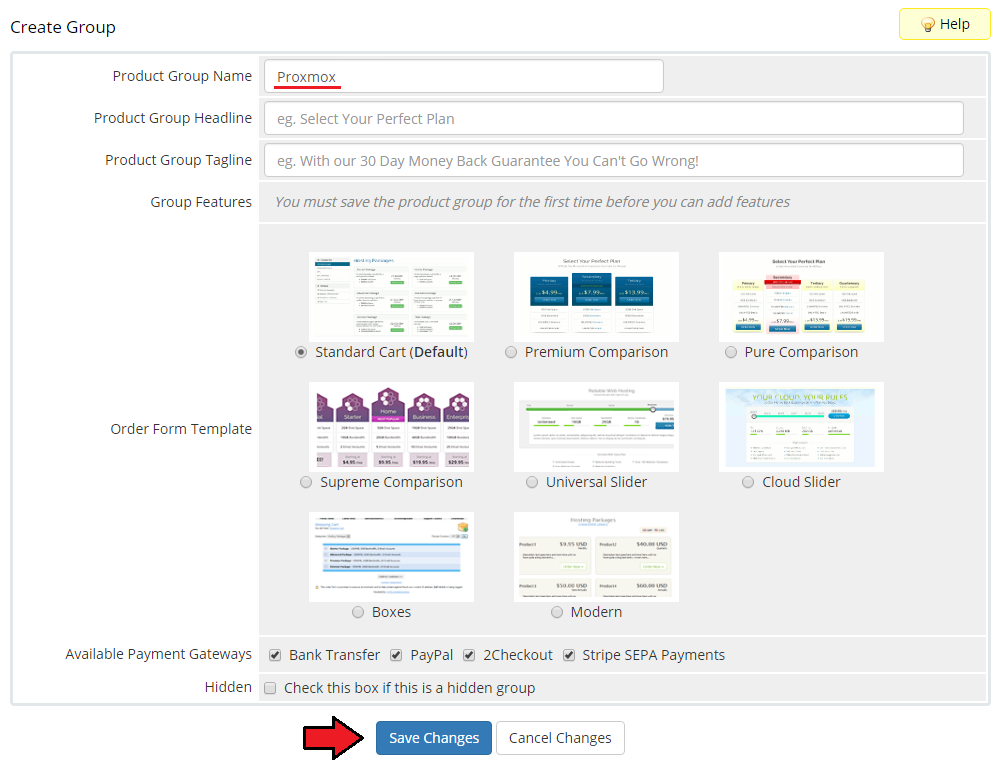
| 15. Enter a product group name and press 'Save Changes'. |
|
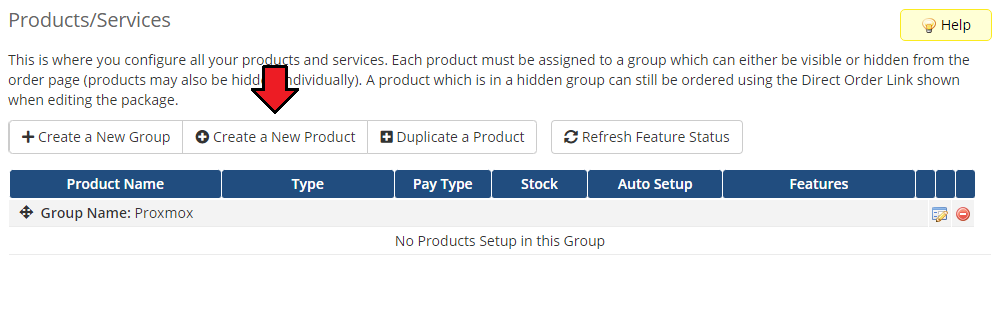
| 16. When you have a product group, you can assign your product to it. To create a product, click on 'Create a New Product'. |
|
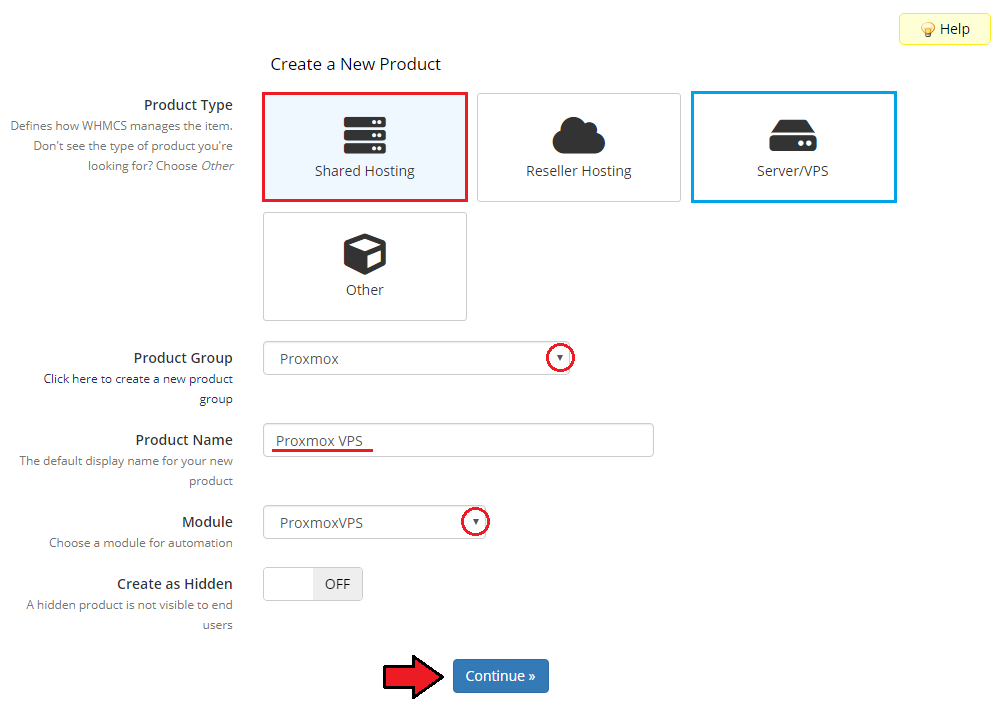
| 17. Afterward, choose your product group and its type from dropdown menus, enter your product name and press 'Continue'. 'Product Type' can be set to 'Dedicated/VPS Server' but nameservers will need to be added later. |
|
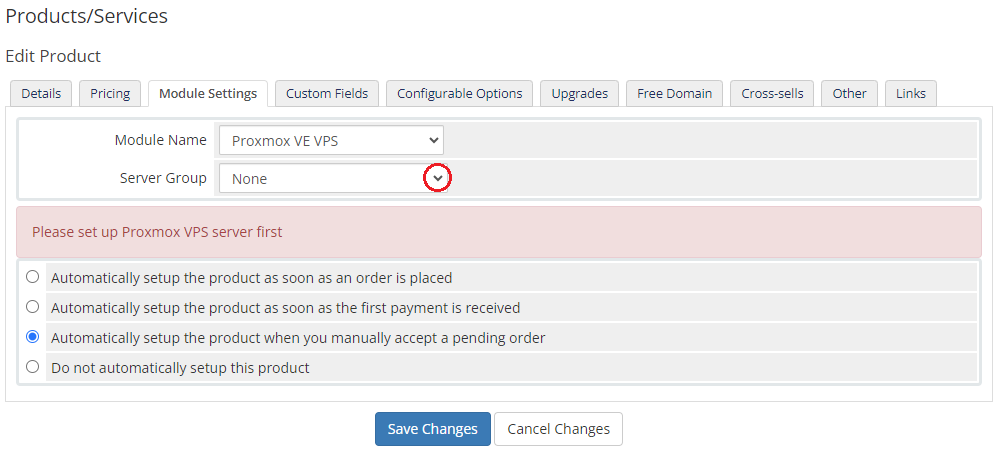
| 18. Now, go to the 'Module Settings' section, choose both 'Proxmox VPS' and your previously created server group from the dropdown menus. Next, 'Save Changes'. |
|
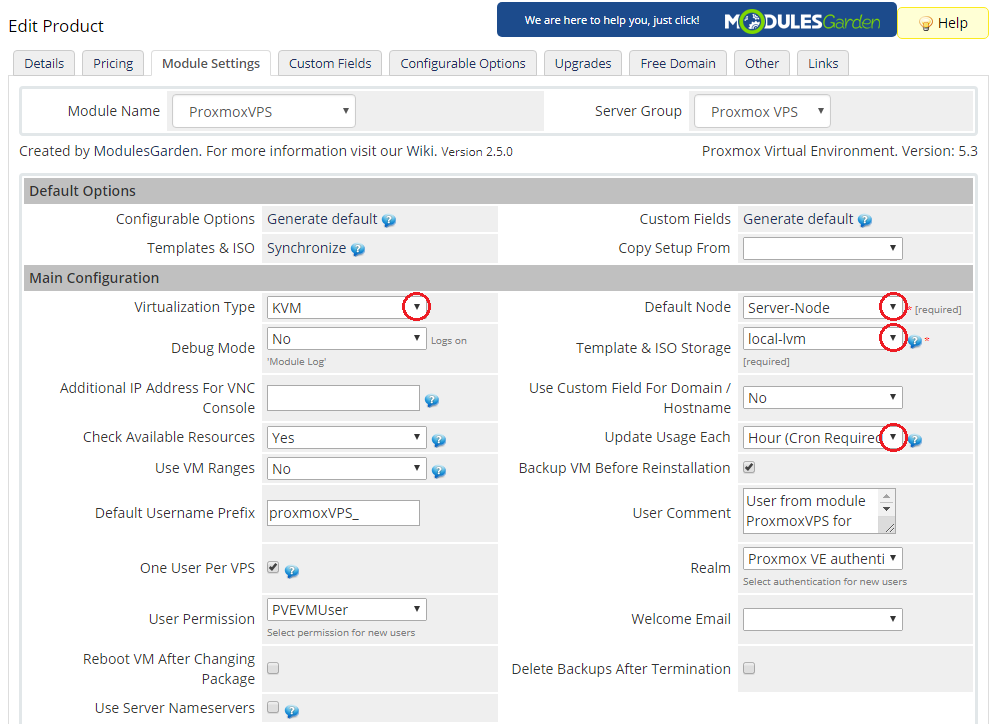
| 19. From the dropdown menus choose 'Virtualization Type', 'Default Node' and 'Template & ISO Storage'. Available virtualization types:
You can also specify how often the bandwidth usage should be counted. |
|
KVM Virtualization Type
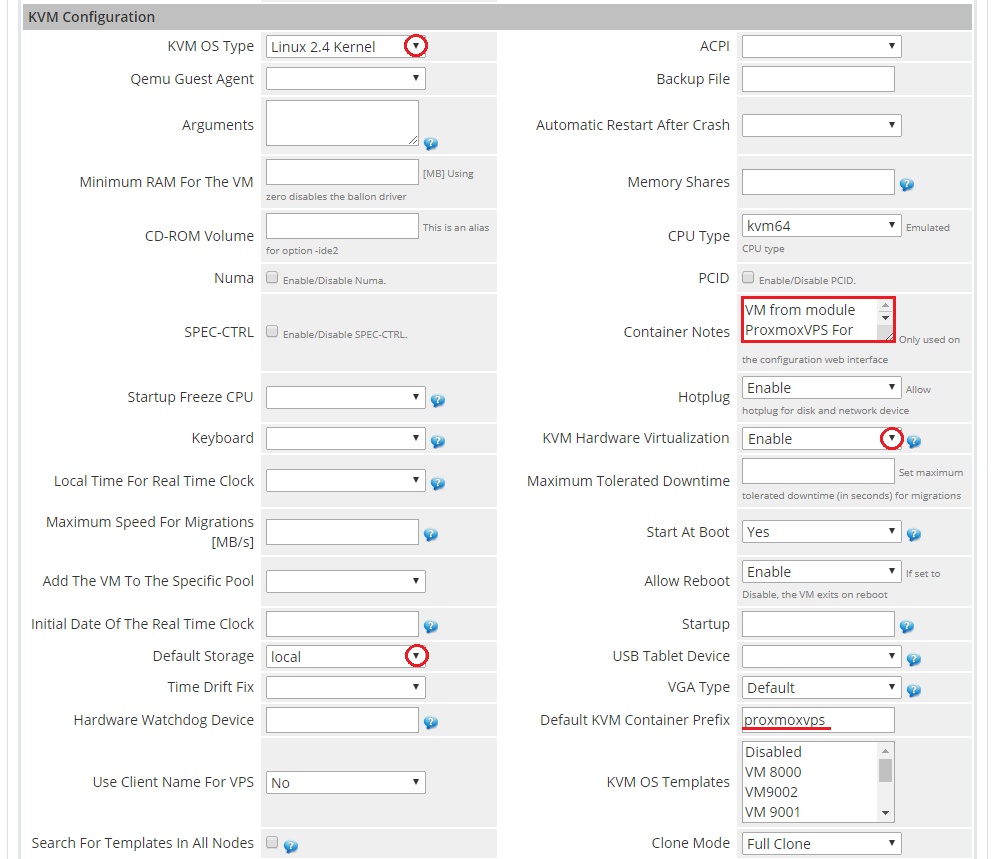
| 20. Setting the KVM virtualization type (skip, if you have chosen the LXC virtualization type). From dropdown menus choose 'KVM OS Type' and 'Default Storage'. |
|
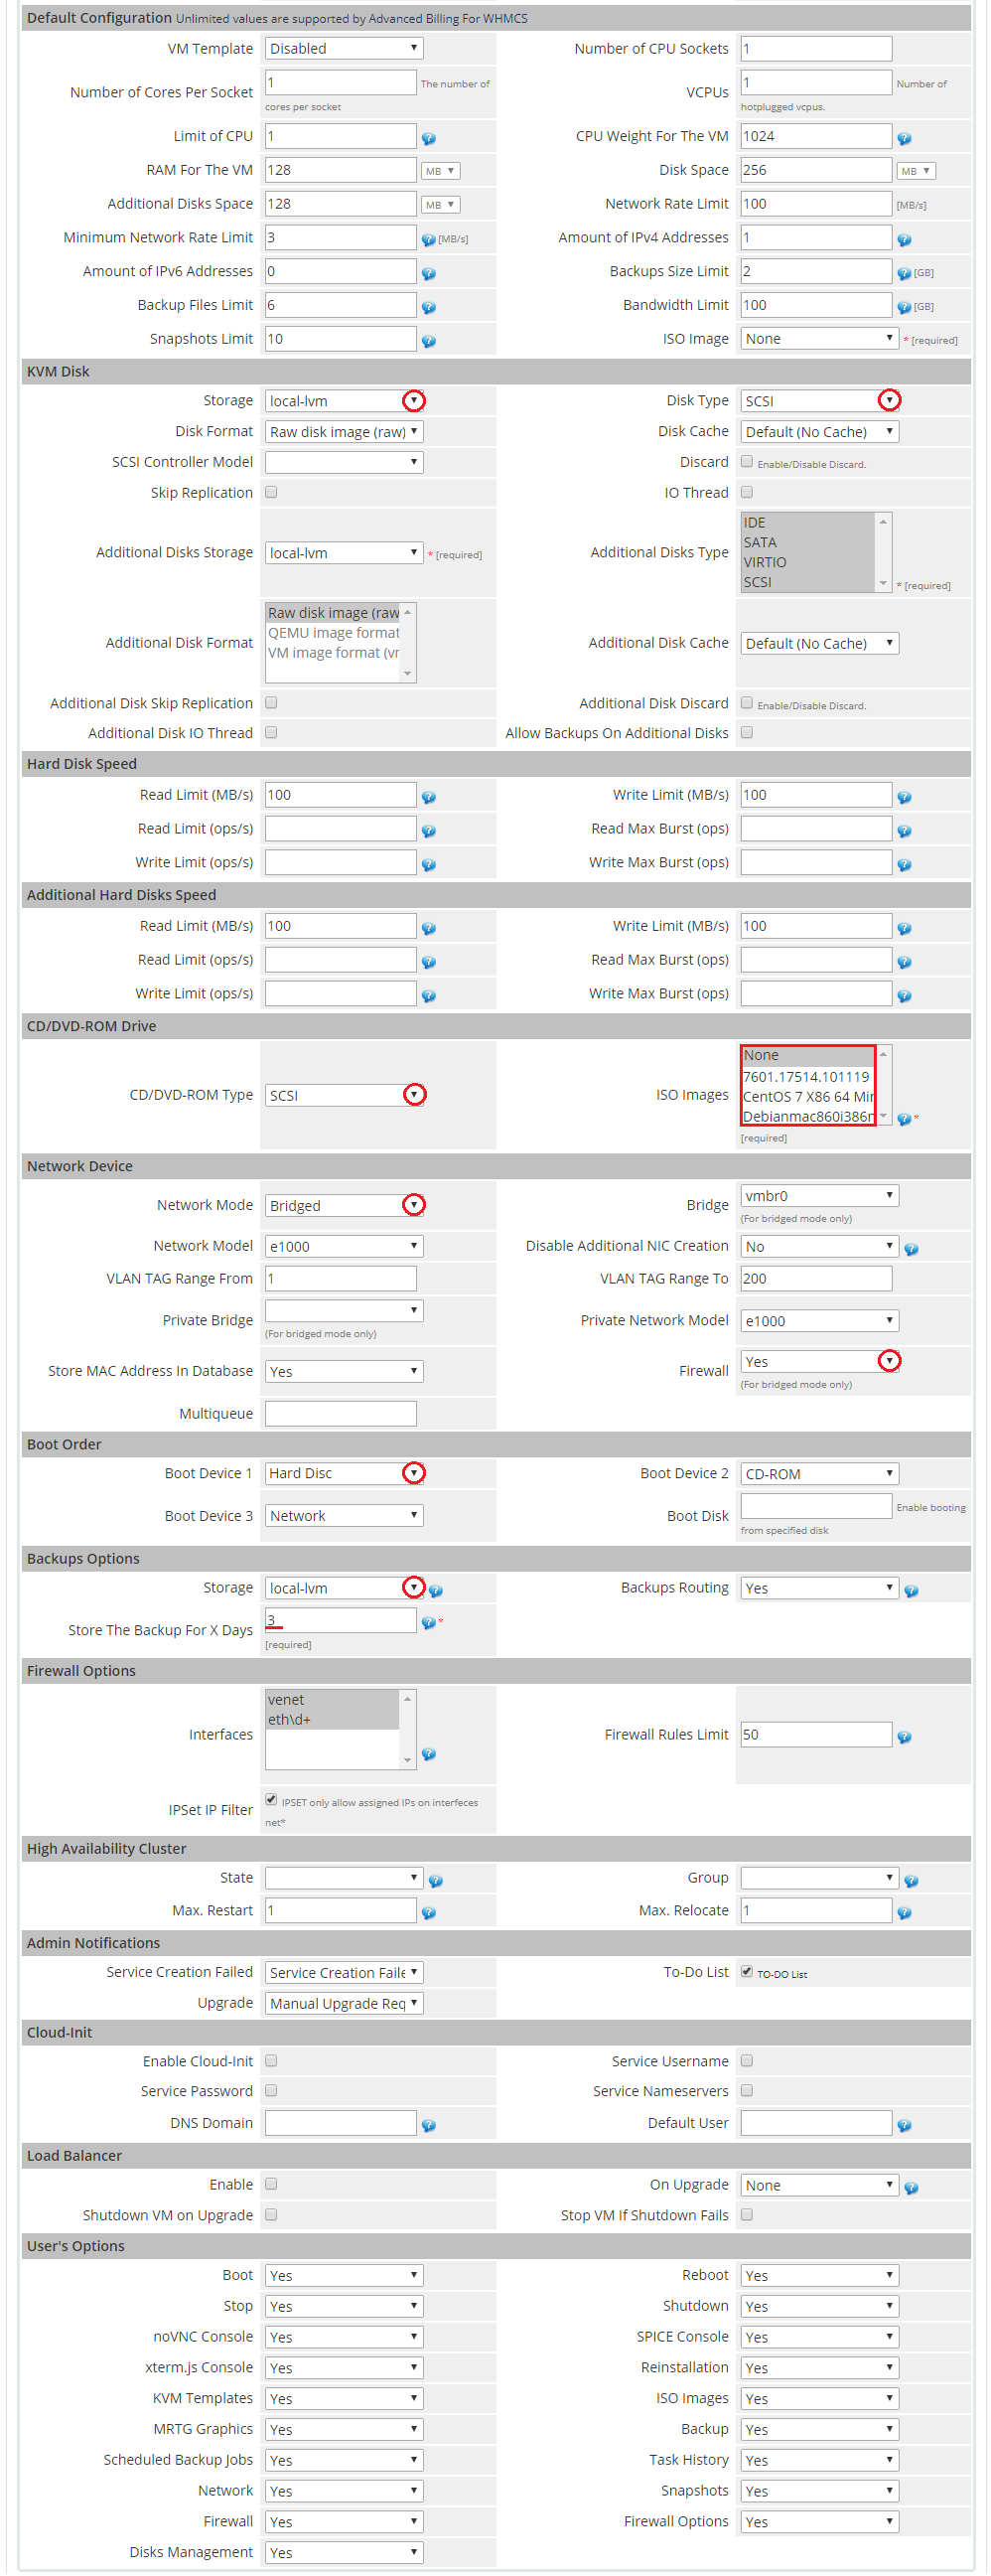
| 21. Now, select the desired values in the following fields: 'Storage', 'Disk Type', 'CD/DVD-ROM Type', 'ISO Image', 'Network Mode' and 'Network Model'. Additionally, set up backups in the 'Backups' section by choosing values from the 'Storage' and 'Backups Routing' dropdown menus. |
|
LXC Virtualization Type
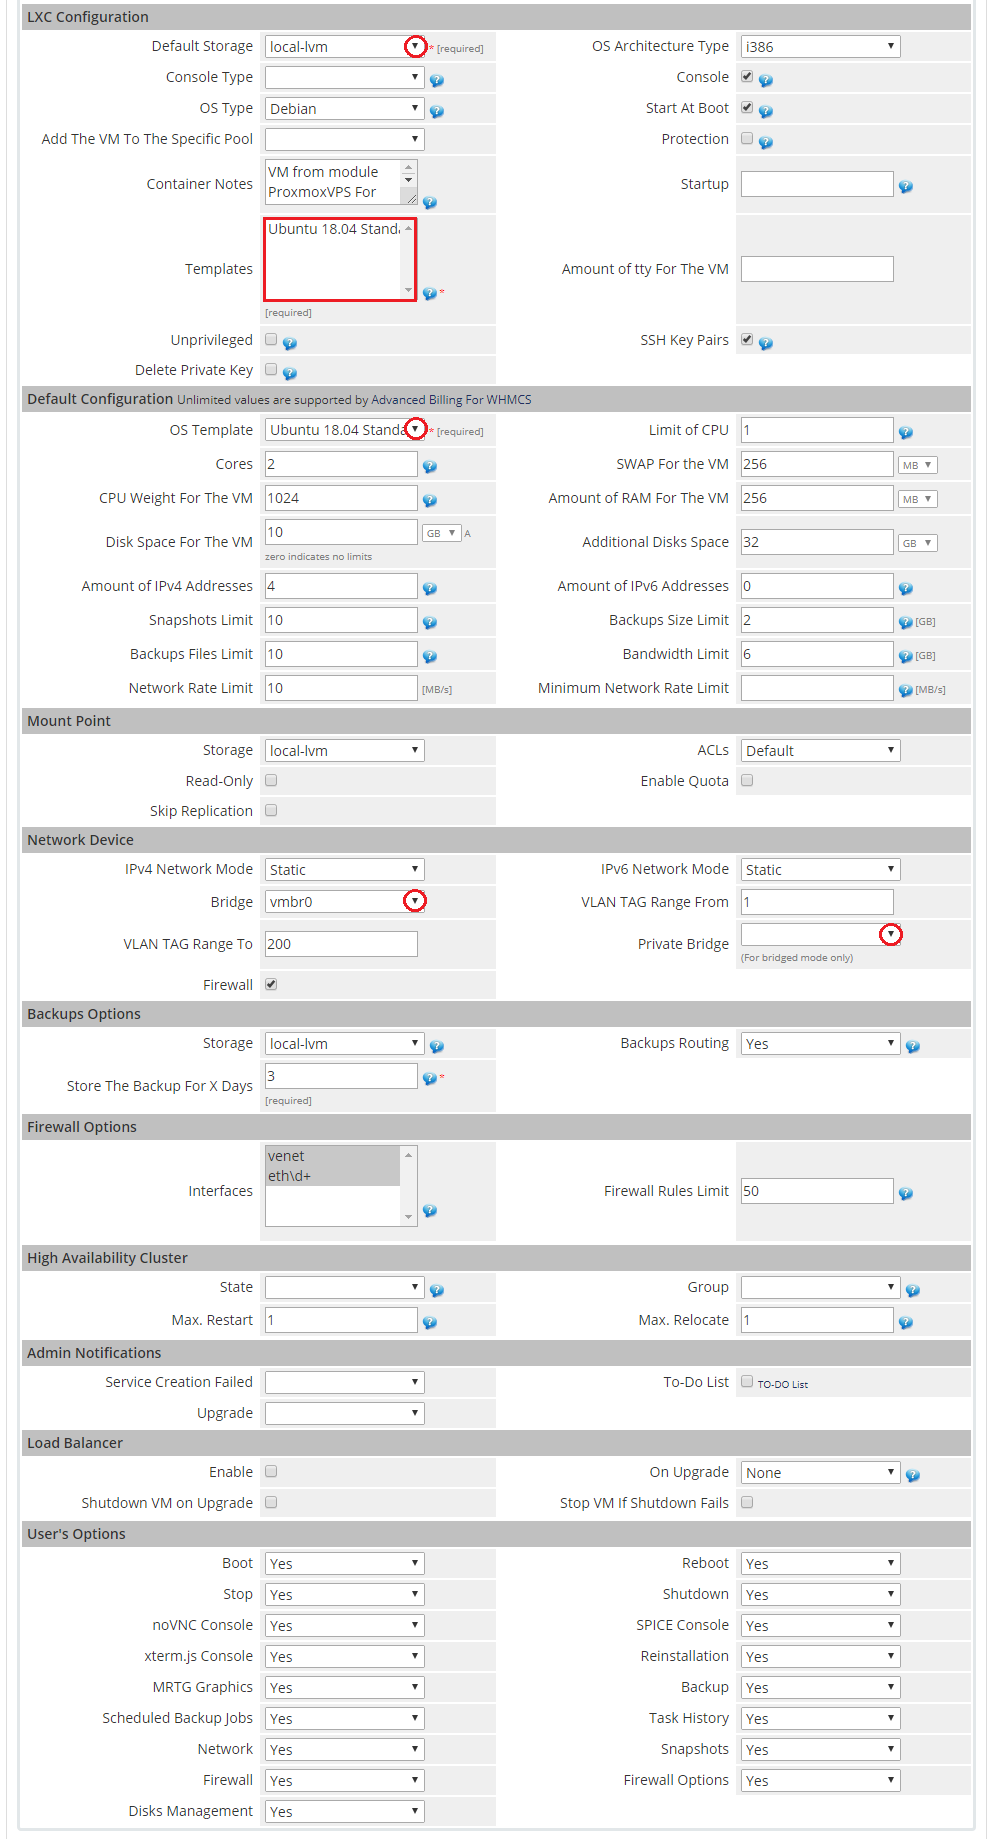
| 22. Setting the LXC virtualization type (skip, if you have chosen the KVM virtualization type). From dropdown menus choose 'Default Storage' , 'Template' and 'Bridge'. |
|
Finalizing The Configuration
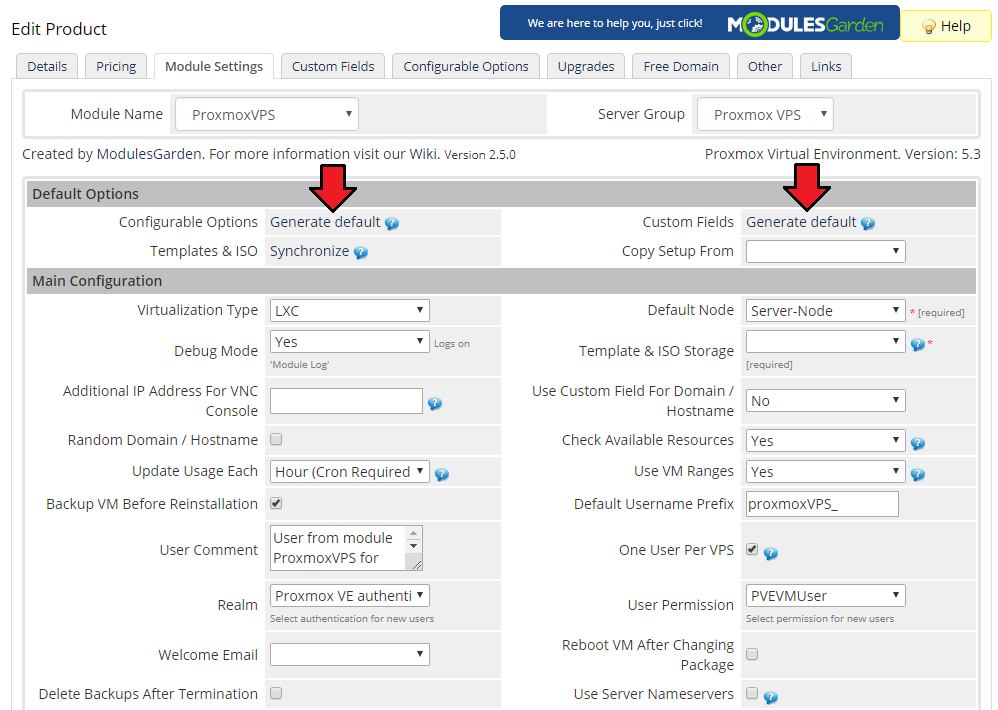
| 24. Afterward, press 'Generate default' nearby 'Configurable Options' and 'Custom Fields'. |
|
| By doing so, you will add the required custom fields and optional configurable options listed in this table. Note that while generating 'Configurable Options' it is advisable to delete all options which you no longer use, e.g. for the KVM virtualization delete the swap option or IPv6. |
25. At the end of the product configuration you have to add a cron job as shown below (5 minutes intervals are recommended).
php -q /your_whmcs/modules/servers/proxmoxVPS/cron/cron.php Do not forget to replace 'your_whmcs' with your WHMCS root location. The cron can also be run every single minute in order to perform the action more often. |
| Congratulations! You have just finished the installation and configuration of the module. |
Configuration of Addon
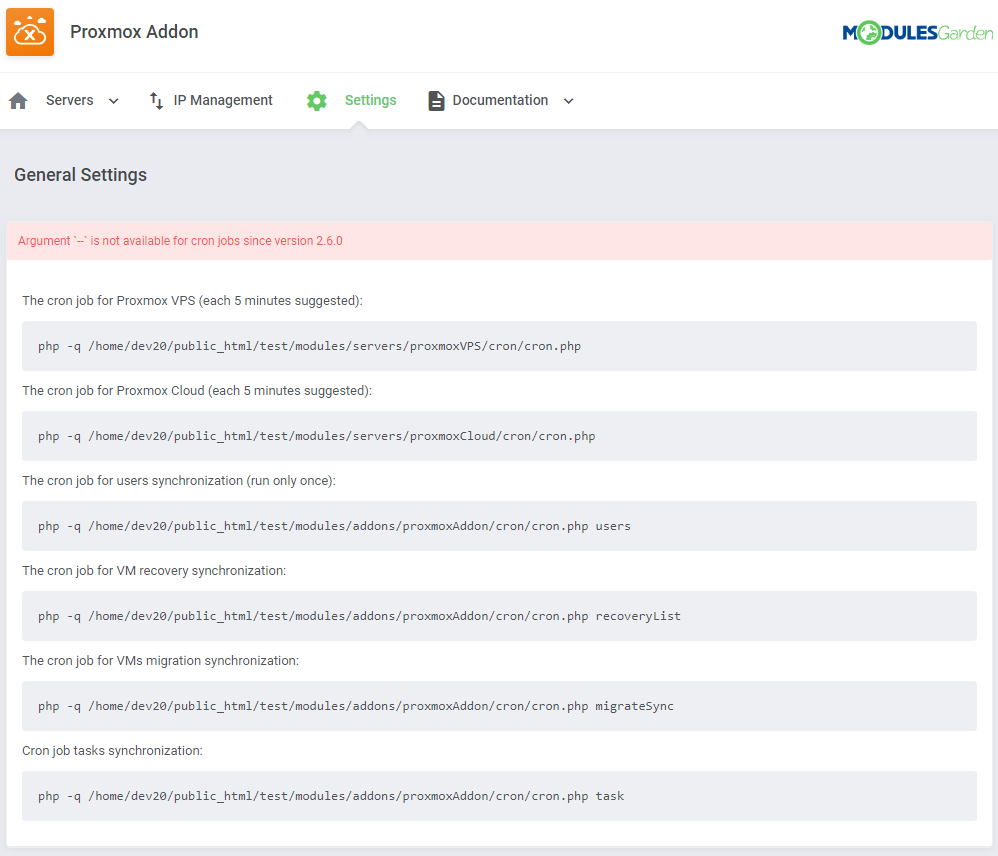
| 26. Proceed to 'Addons' → 'Proxmox Addon' → 'Settings' → 'General Settings' and set up cron jobs listed under the 'Cron' section. Please note that there are separate cron jobs dedicated to Proxmox VPS and Proxmox Cloud modules - these jobs are the most important to assure fluent work of the modules, suggested frequency is 5 minutes.
|
|
| 27. Next, under the Cron settings, find the 'Minimum VMID' field. Fill it in with a number that will be used as an ID of the first VM, the second VM will be asigned the next ID number. |

|
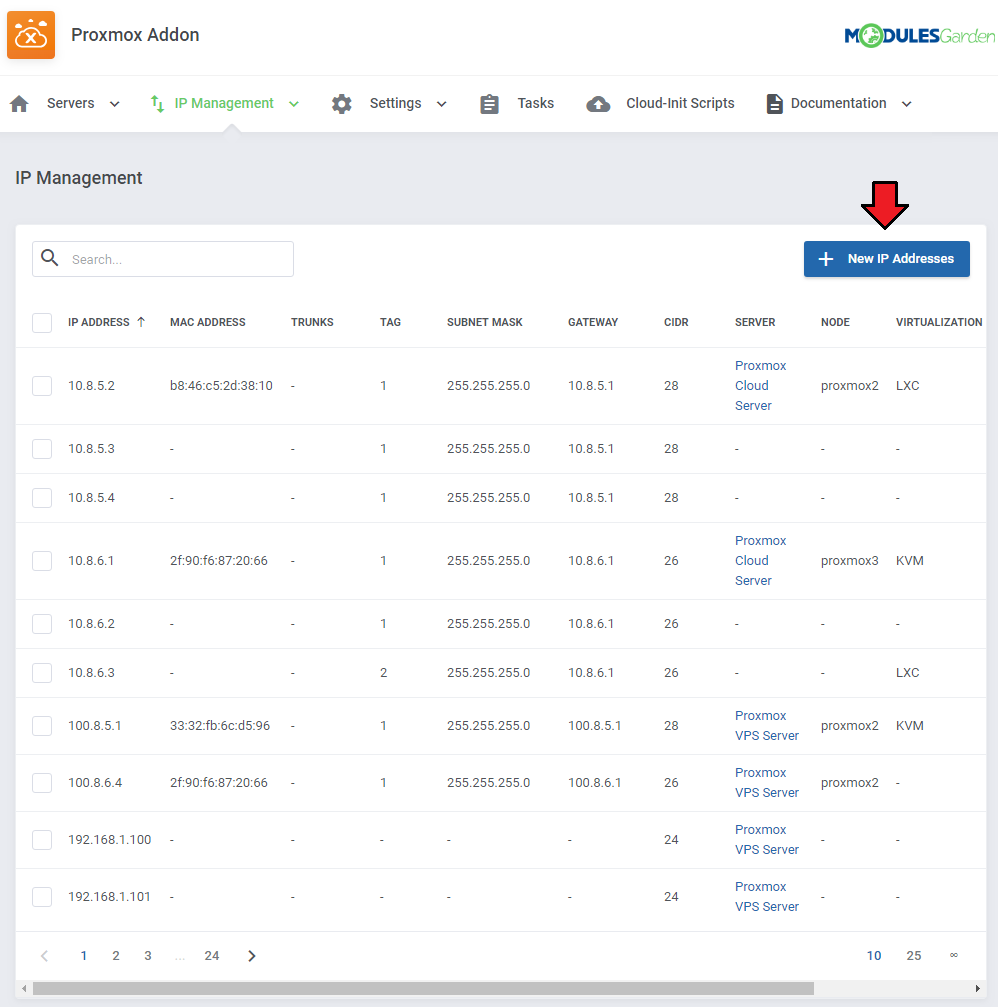
| 28. Adding a new IP address (if you are not using IP Manager For WHMCS). In order to create a new product, you have to add 'Dedicated IP ' to the 'IP Addresses' list in 'Proxmox' addon module. |
|
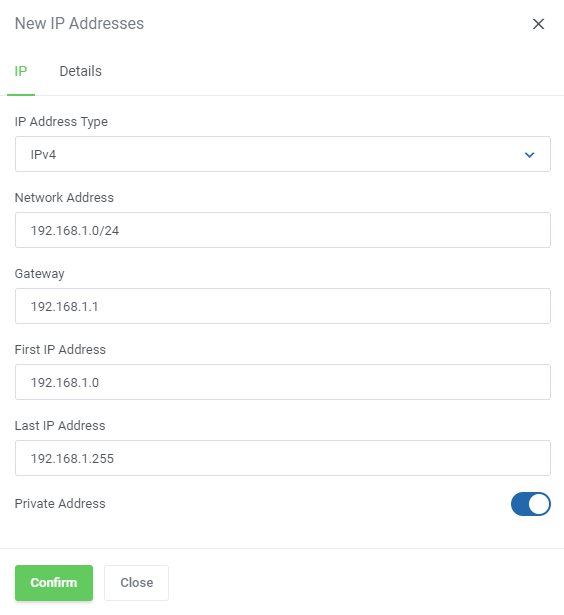
| 29. Start by typing a desired IP address and mask into 'IP Pool'. Next, choose a server from the 'Server' dropdown menu and define which virtualization it should be applied to through selecting it from the 'Virtualization' dropdown menu. |
|
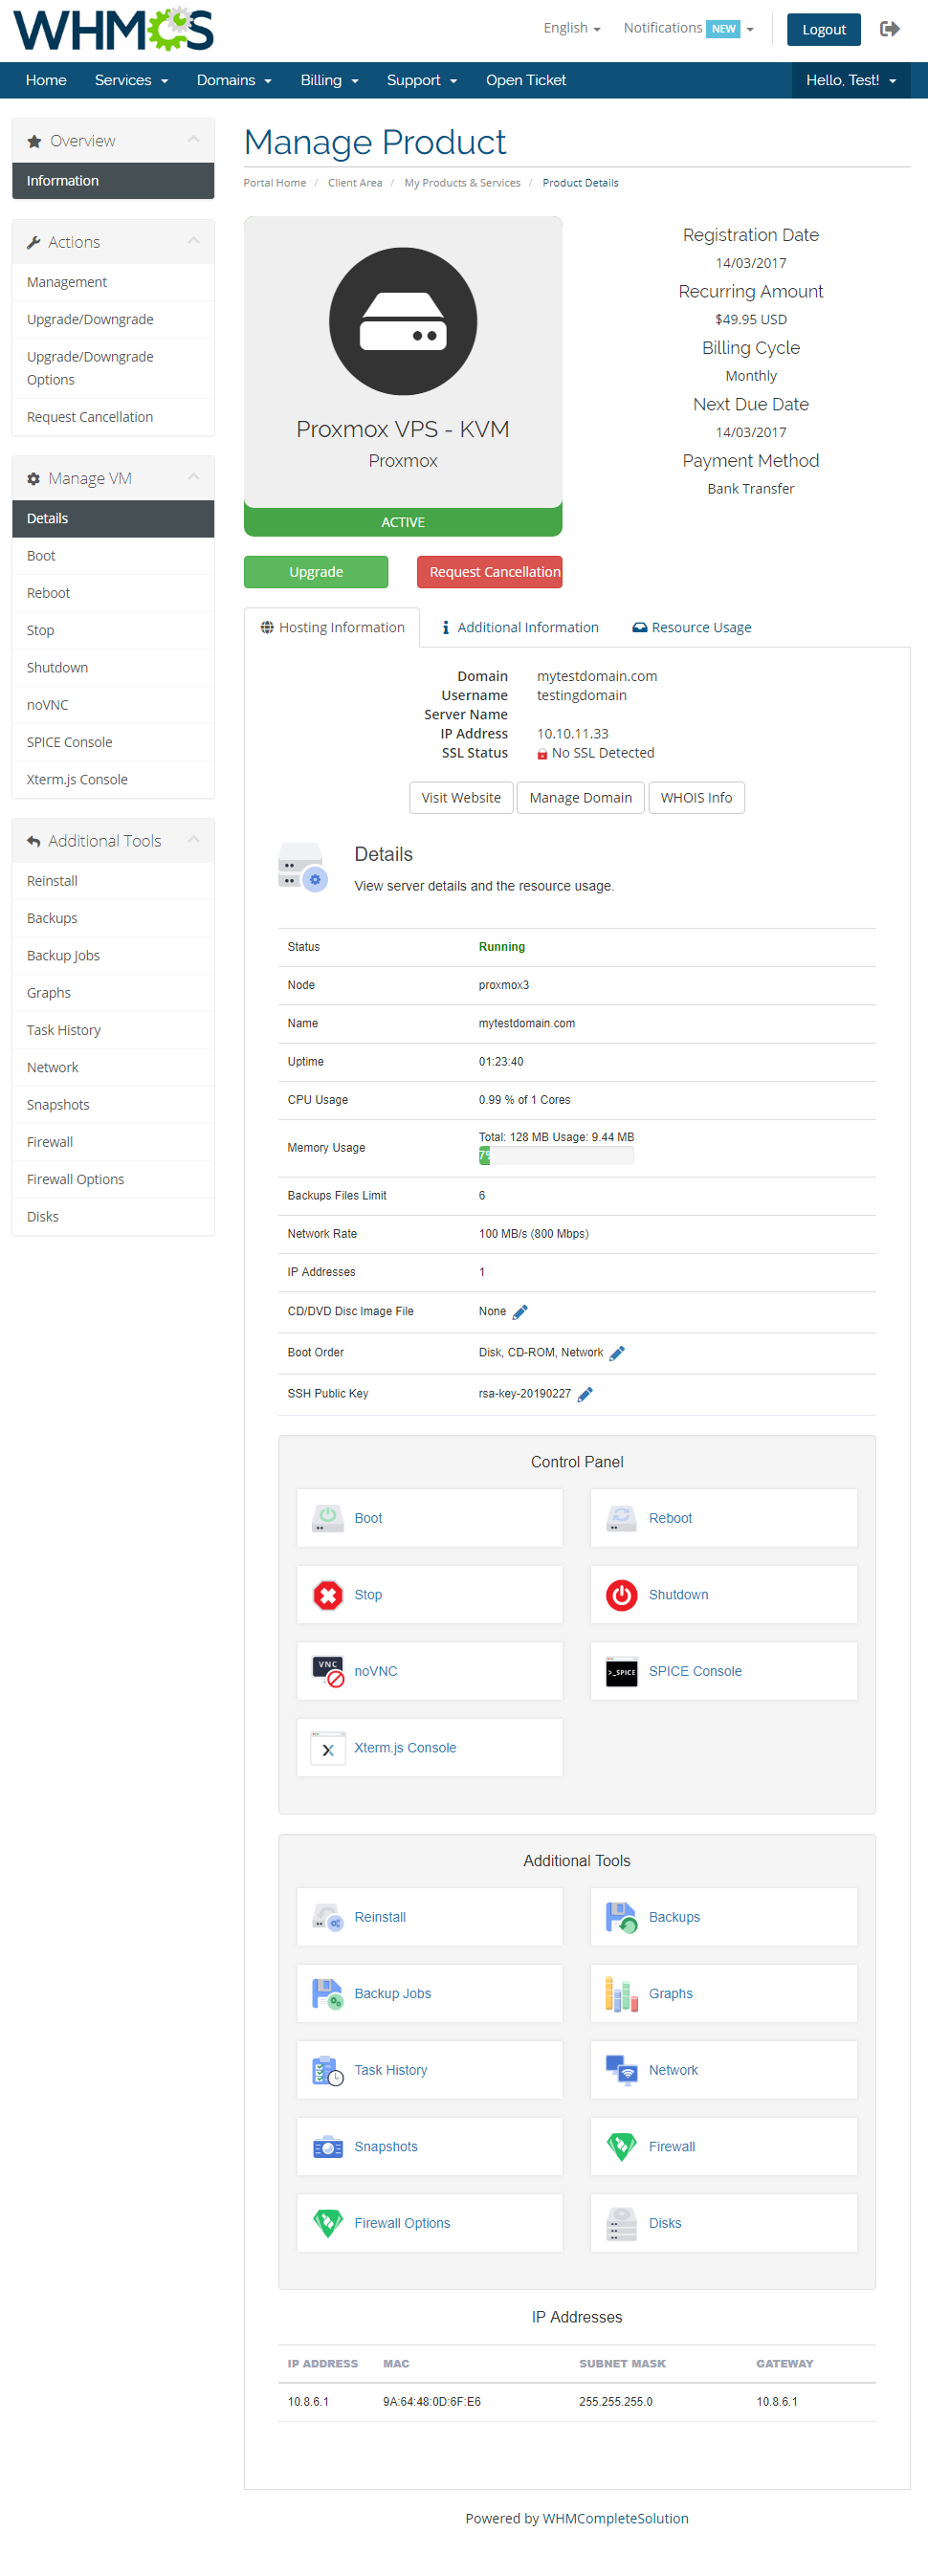
| 30. You are now able to create a new product using the previously added IP address. If you are using the KVM virtualization type, the client area with a successfully created product should look similar to the one on the screen below. |
|
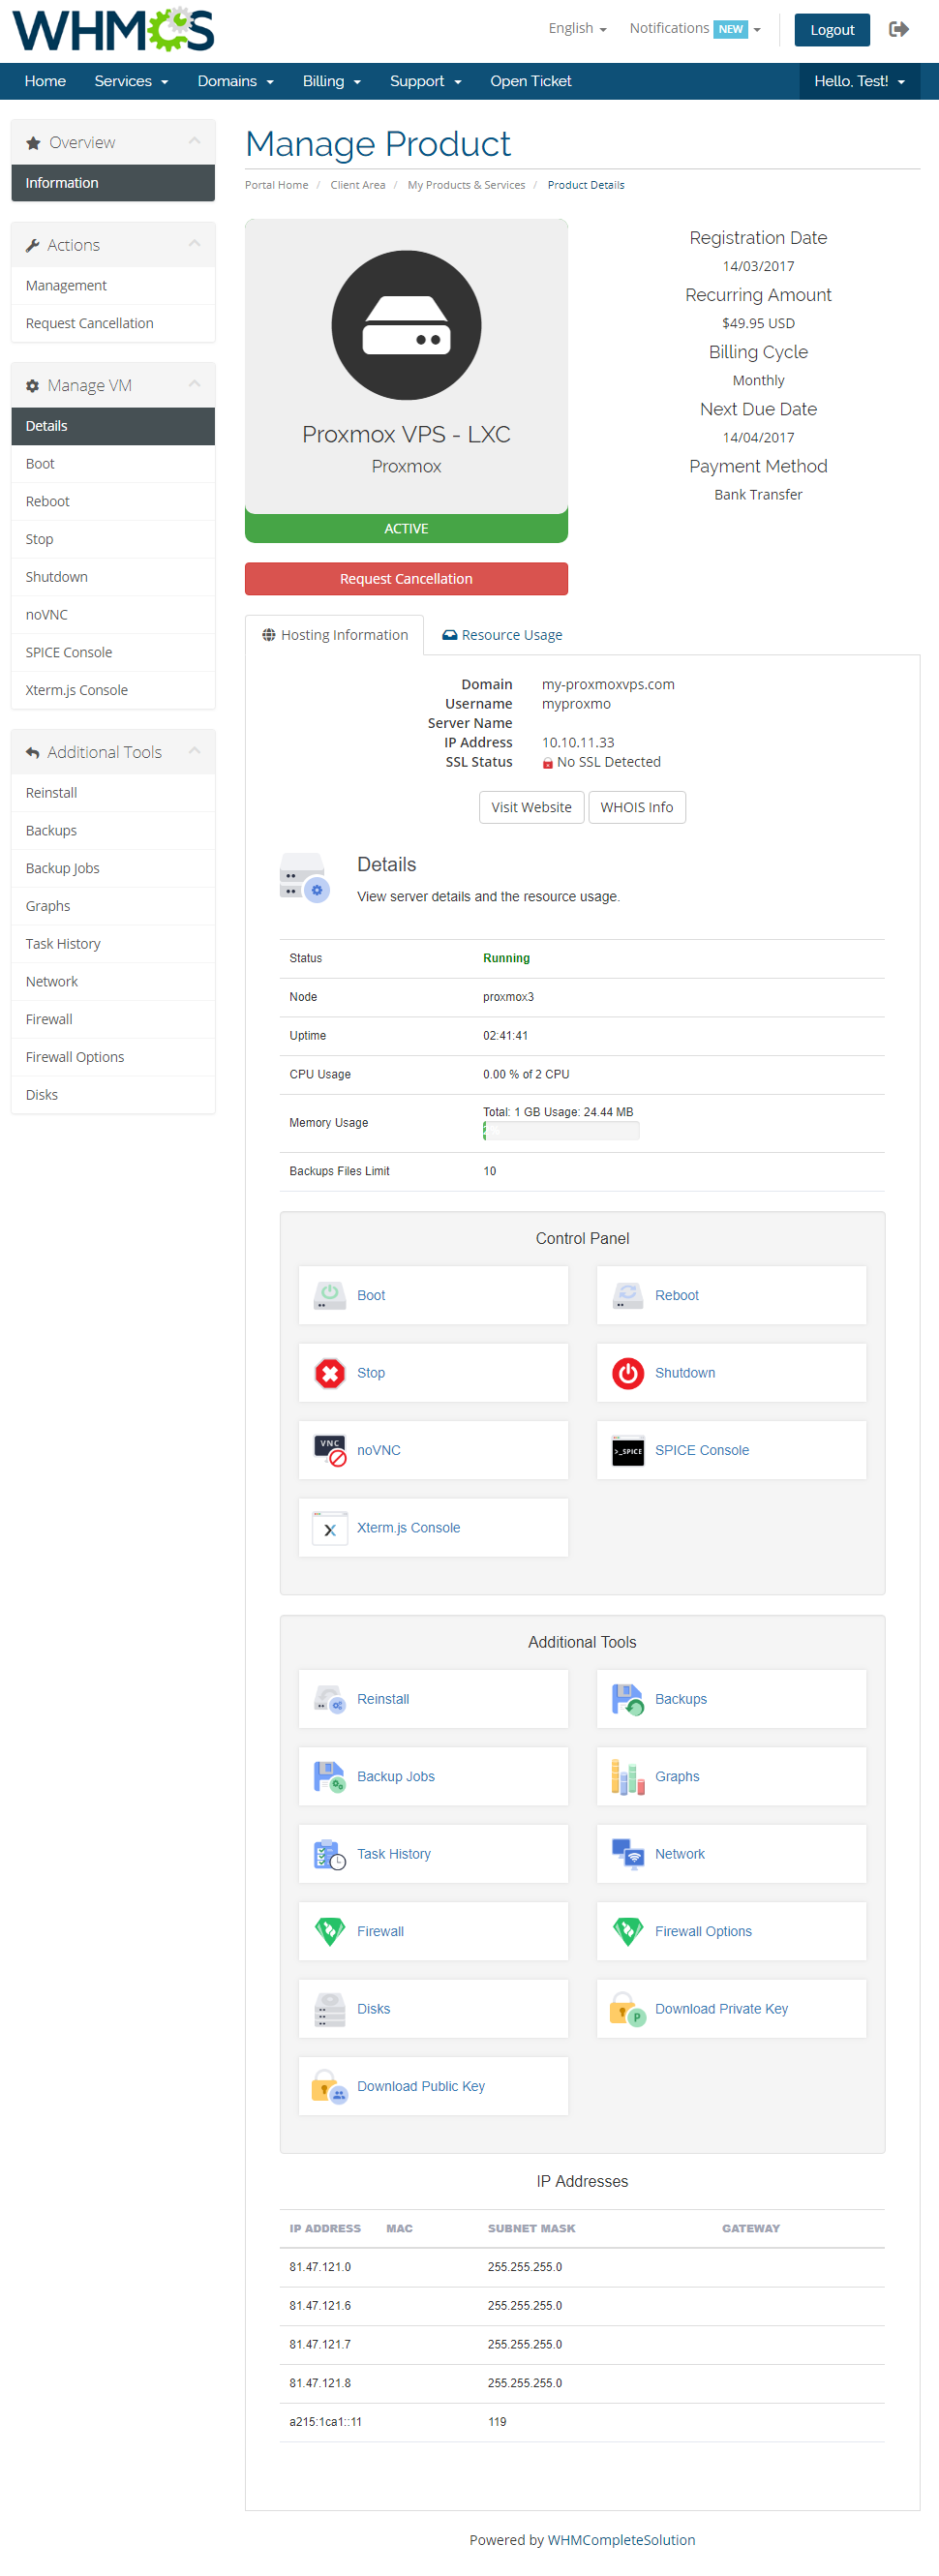
| 31.The client area with the LXC virtualization type product looks quite similar. |
|
Cloud-Init (KVM)
| Use cloud-init to configure the system during installation, first-boot and package change. Cloud-init was initially developed to provide early initialization of cloud instances. Click here to learn more about cloud-init configuration. Note: Cloud-Init functionality is supported for the KVM virtualization only. |
Configuration Of Product
| To to use cloud-init, you need to enable it in the configuration of the Proxmox product. Before you start, we recommend that you learn the details of cloud-init configuration on your Proxmox server first. Click here for more information.
|

|
| In addition, you can allow clients to enter their own public keys for the VM during order so that they can log in to it using their private key instead of a password. To enable this function, go to the 'Custom Fields' tab and add a new 'sshkeys|SSH Public Key' field, select the 'Text Area' type and the 'Show on Order Form' checkbox. Note: This custom field is also auto-generated from the module settings, but with the 'Admin Only' option enabled. Remember to uncheck it to make this field visible to clients. |

|
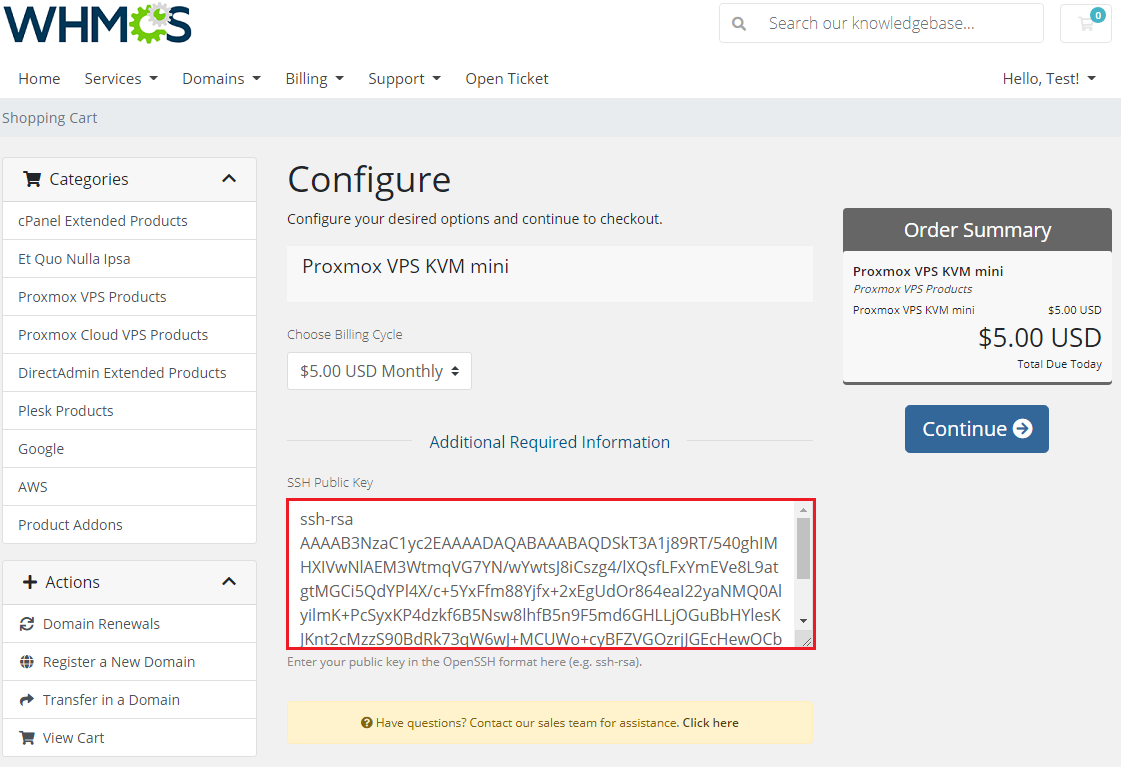
| Now, when the client places a new order, they will be able to enter the public key here in the OpenSSH format. |
|
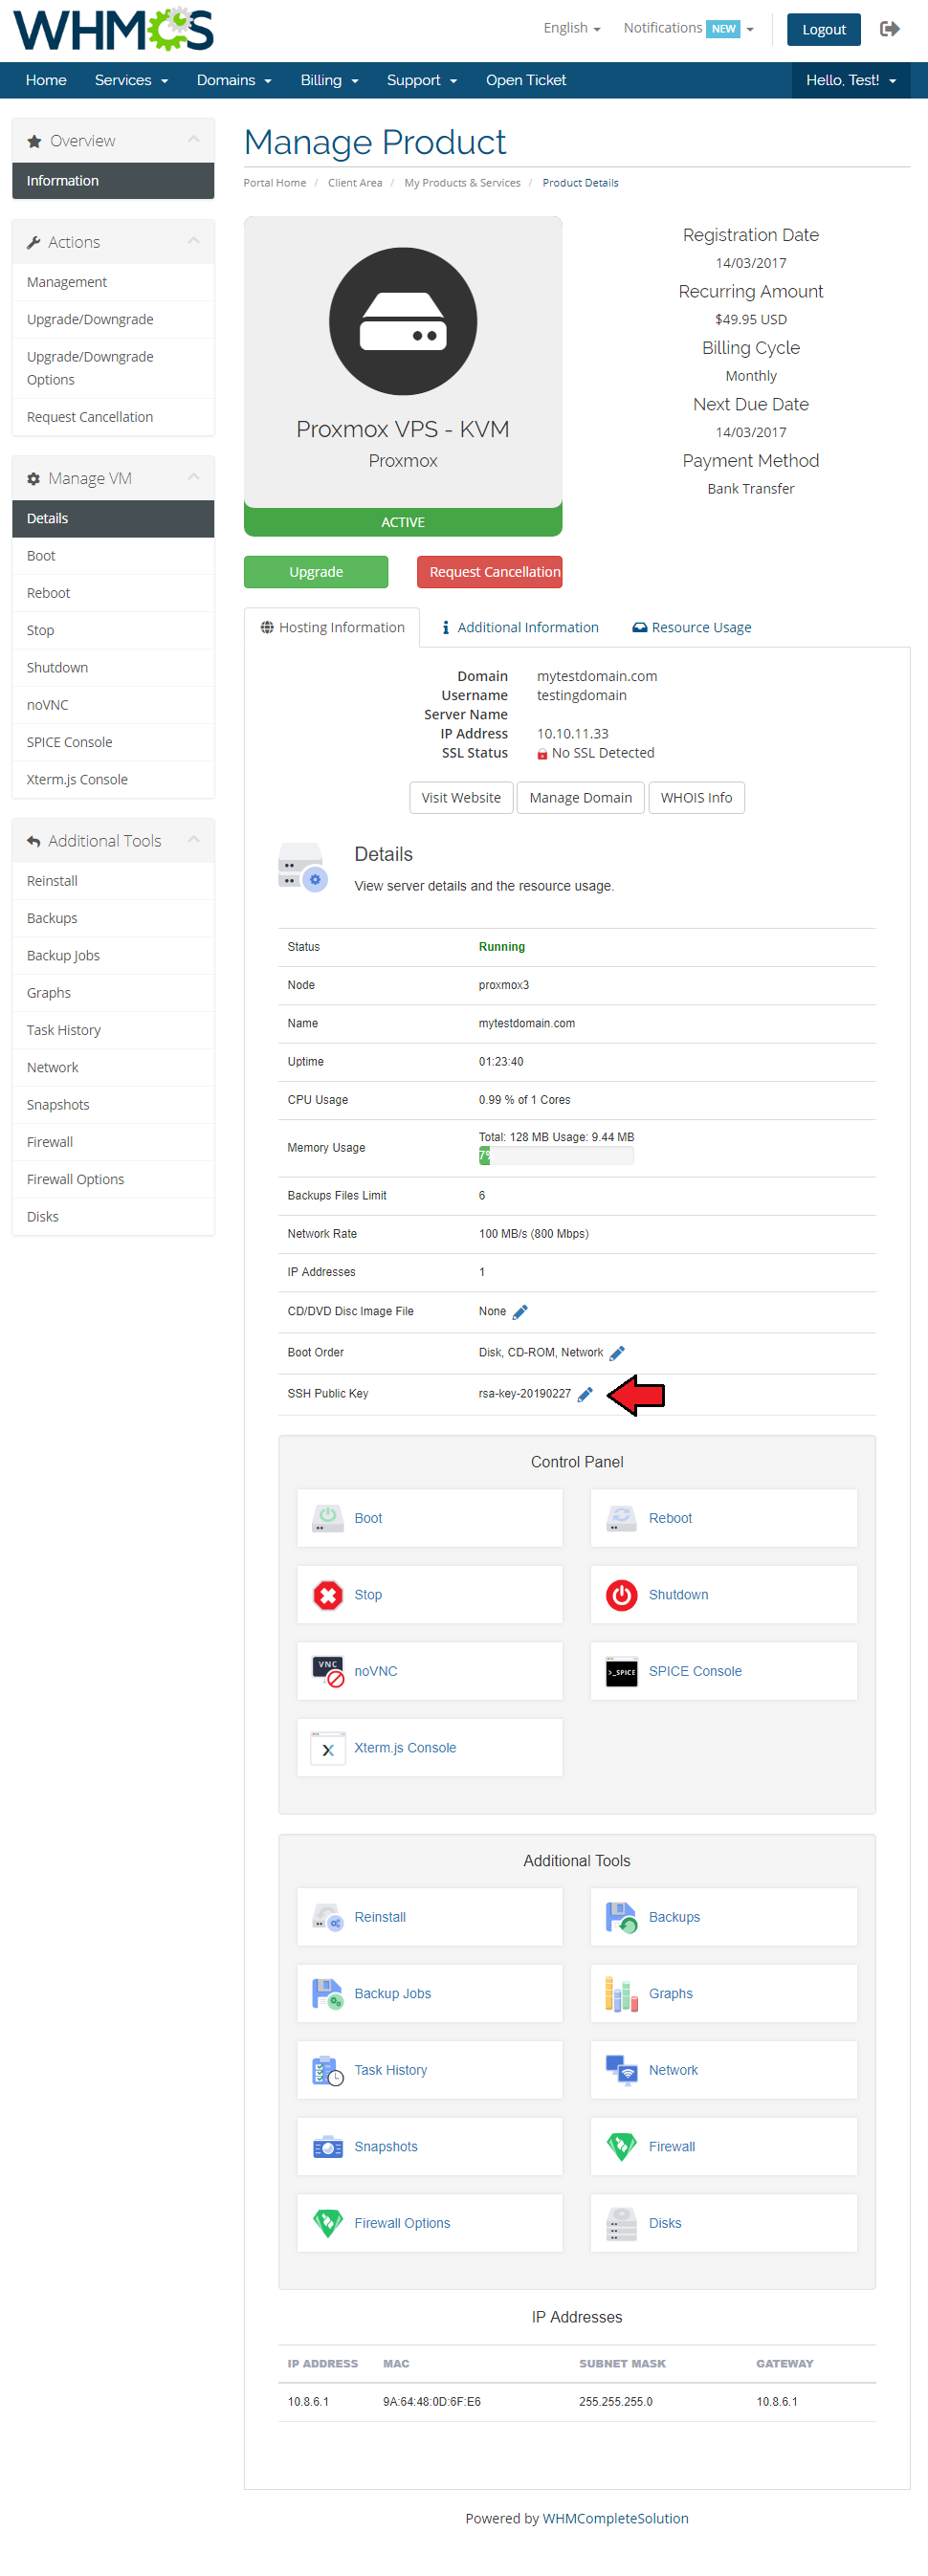
| The SSH Public Key can also be inserted once the order has been completed. Find the adequate field on the product's details page. |
|
Configuration Of Proxmox Server
| The process of setting up Cloud-Init on the Proxmox server is described here. Additionally, you can use the following commands that can be useful for debugging:
rm -rf /var/lib/cloud/sem/* /var/lib/cloud/instance /var/lib/cloud/instances/* &&
cloud-init init  &&
cloud-init modules -m final
cat /var/log/cloud-init.log cat /var/log/cloud-init-output.log |
Management
| Proxmox VPS allows your customers to manage their PVE accounts via client area in your WHMCS system. You can monitor and manage each product from your WHMCS admin area. |
Admin Area
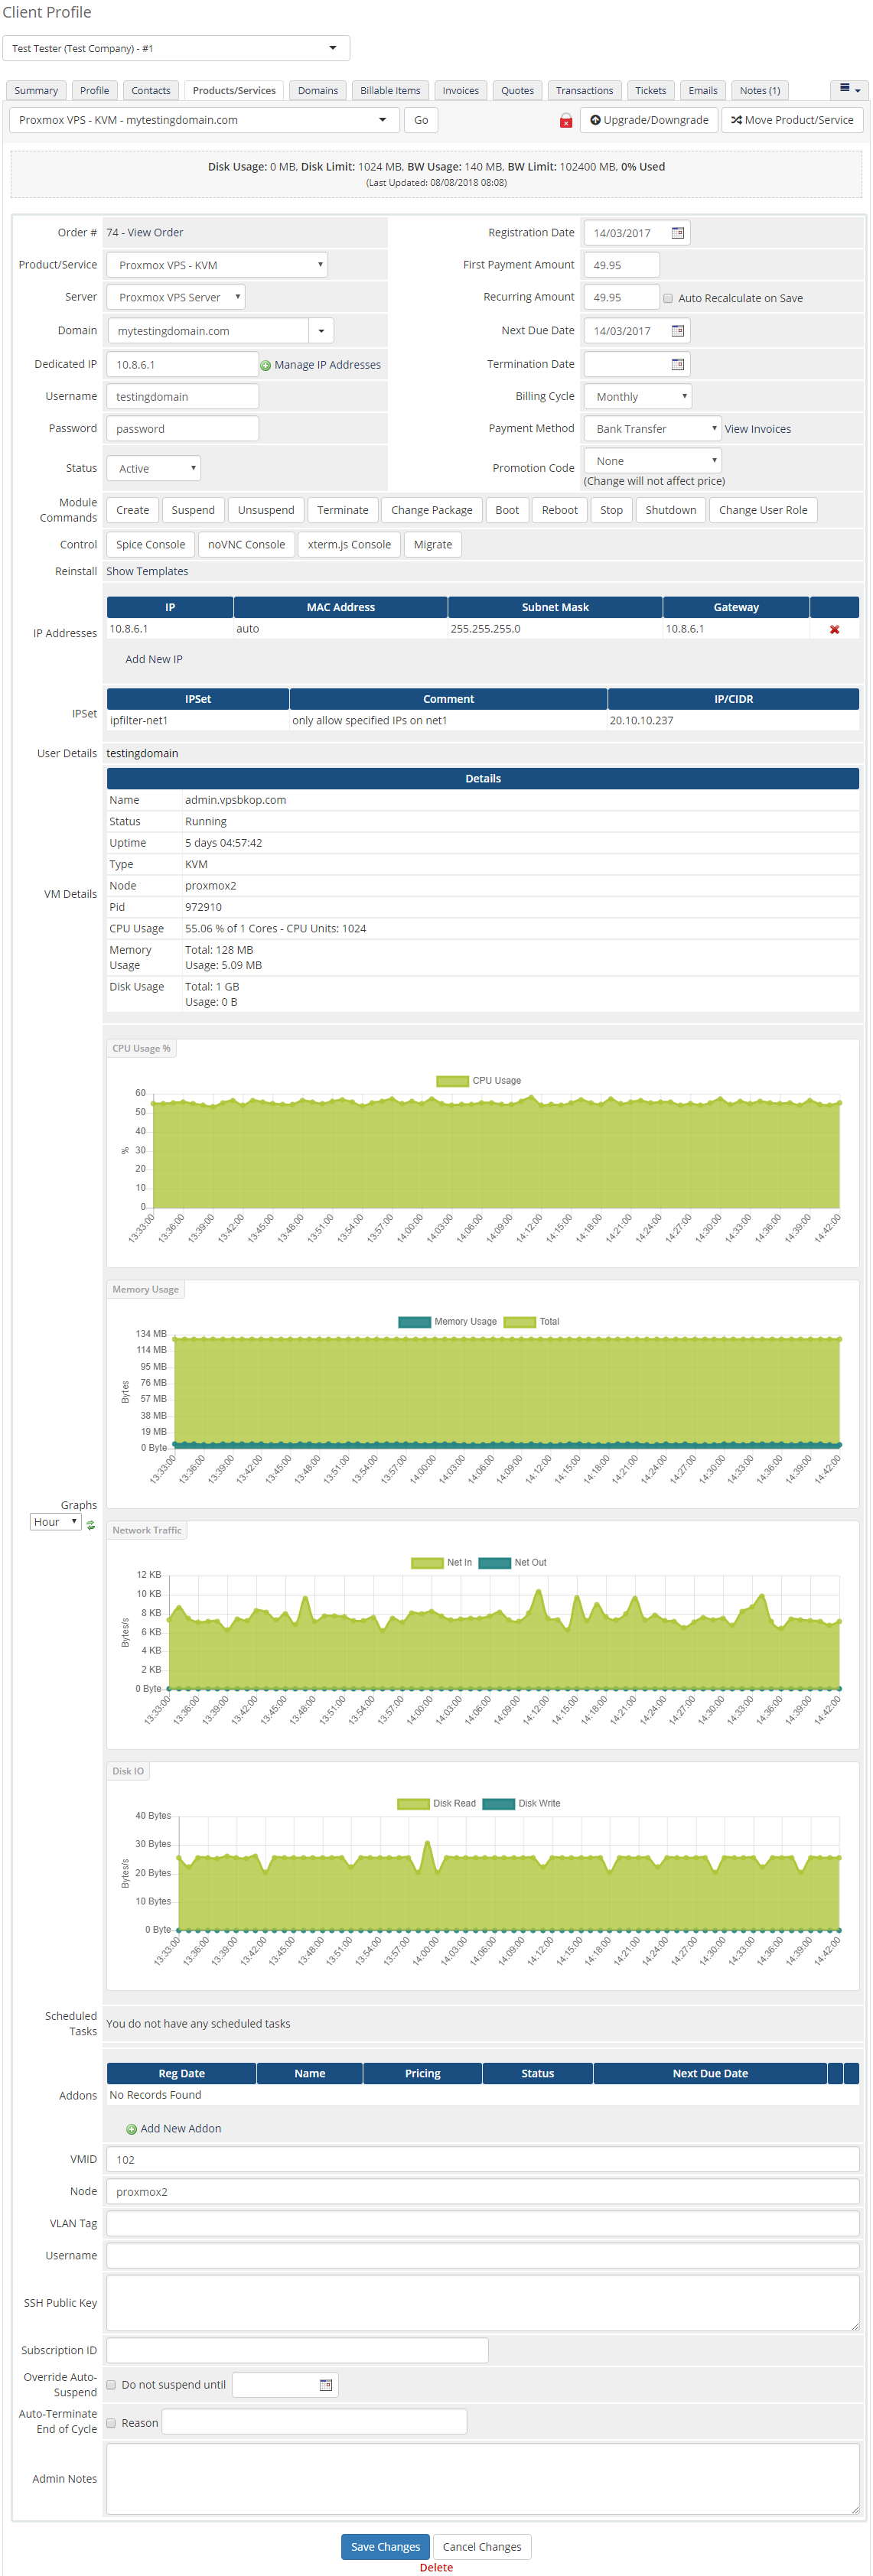
| In the admin area you are able to view details and manage your client's VMs, access VMs consoles and even migrate VMs between nodes. You are also able to add an IP address to a product. To do so, press 'Add New IP' as shown on the following screen. |
|
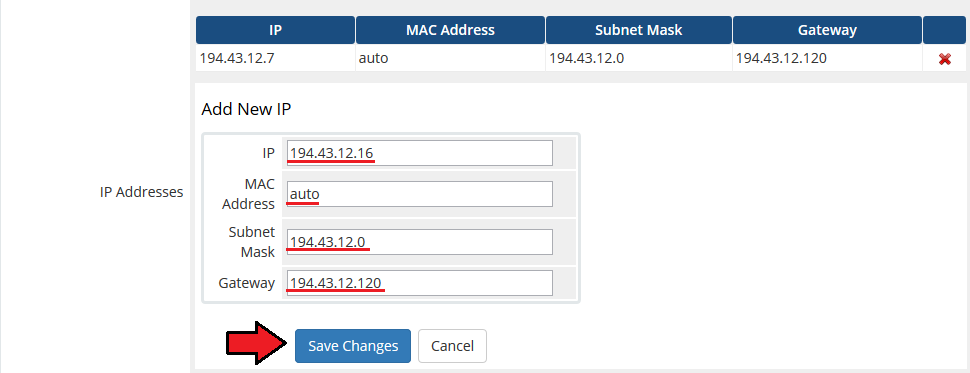
| Afterward, enter IP address in a textbox and confirm through pressing 'Save Changes'. |
|
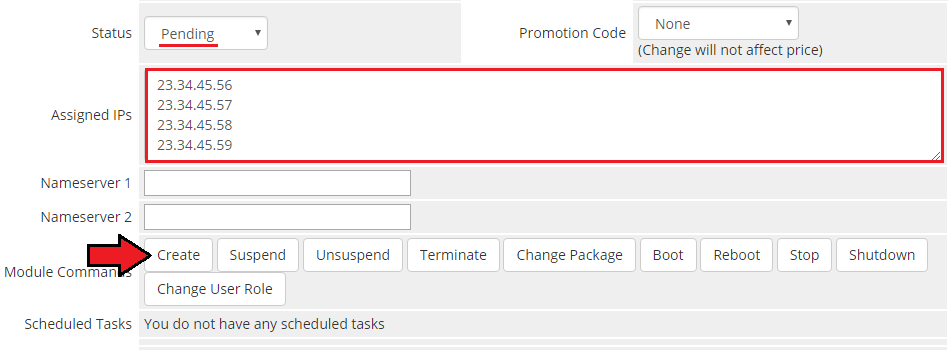
| Additionally, until the VM has been provisioned, you can manually assign to it the desired IP addresses from the pool by typing them in the 'Assigned IPs' field (available for 'Dedicated/VPS Server' product type). This will override the automatic IP address assignment and the VM will use only the IP addresses you have entered to that field. Note: The IP addresses you enter must already exist in the IP Management pool and cannot be assigned to any other VM. This feature will also not work if you already use the IP Manager For WHMCS module. |
|
| It is possible to fetch information of Network Interfaces and OS using 'Quemu Guest Agent' tool. This option must be previously enabeld in the product configuration page. |

|
Management of Addon
Servers Management
Servers List
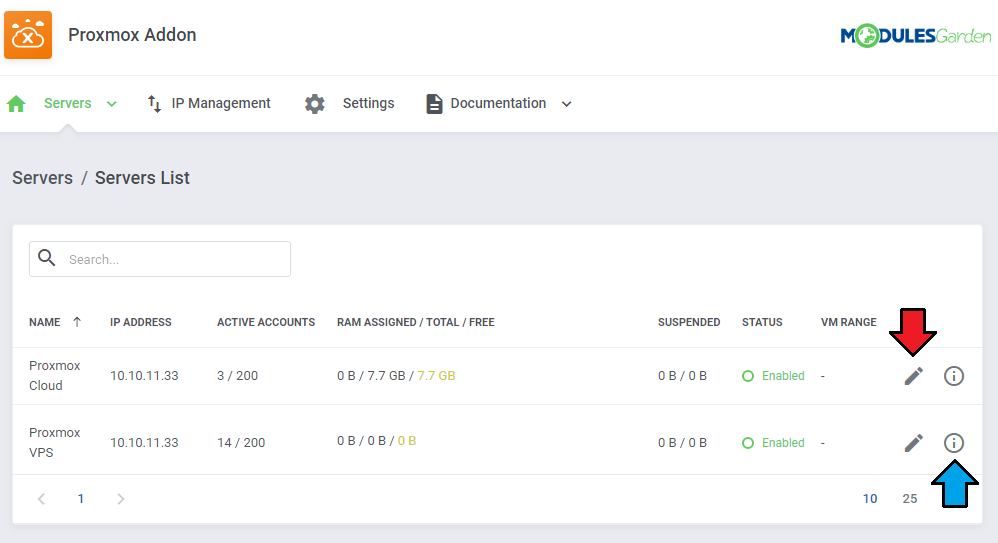
| In 'Addons' → 'Proxmox Addon' → 'Servers' → 'Servers List' you can find the configured Proxmox servers. RAM details:
Suspended - number of suspended accounts per size in MB E.g.: (1/500 MB) when there is only one suspended account (occupying 500MB of that account) assigned to Proxmox VPS server. |
|
| Through pressing 'Edit' icon you will be moved to the server edit page - see point number 10 of Server Configuration. Press 'More Details' icon and you will get extended information on the selected server. See below for more details. |
VMs
| The 'VMs' tab includes a list of created virtual machines on this server. Take a quick look at information on domain, status, bandwidth and IP addresses. To view information about a VM, simply press the more info icon. |
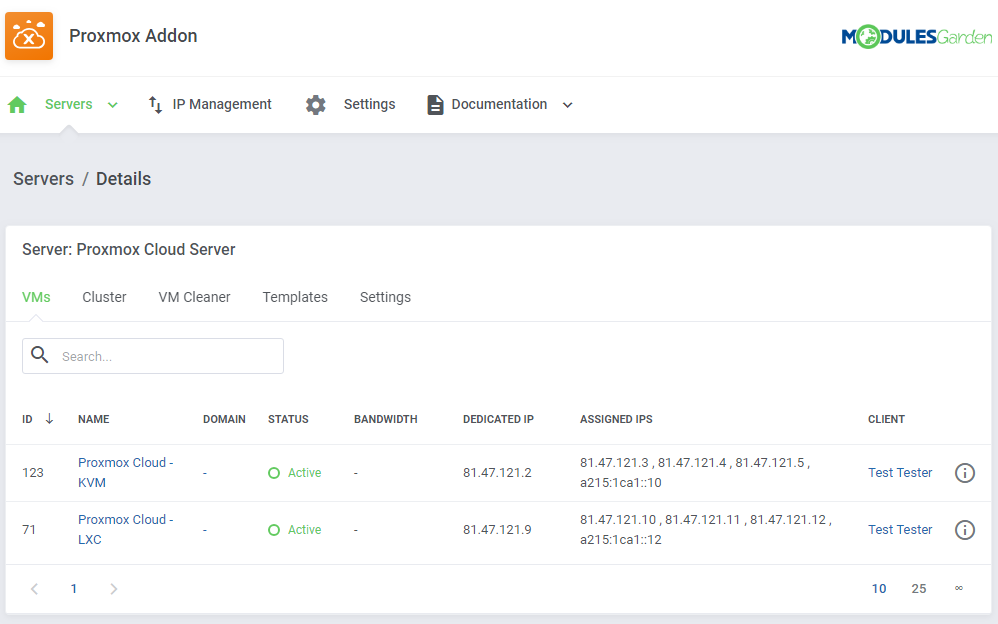
|
| Check the node and VMID: |
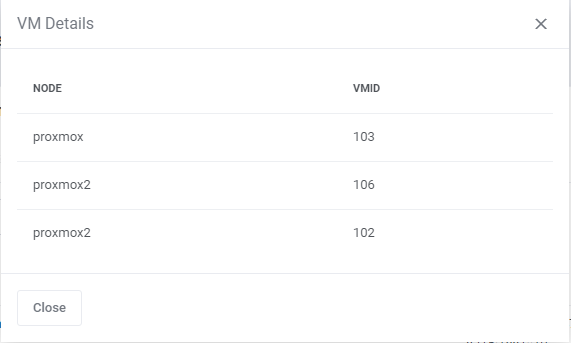
|
Clusters
| The next tab contains the list of clusters with information on uptime, CPU as well as CPU, SWAP, memory and disk usage data. |
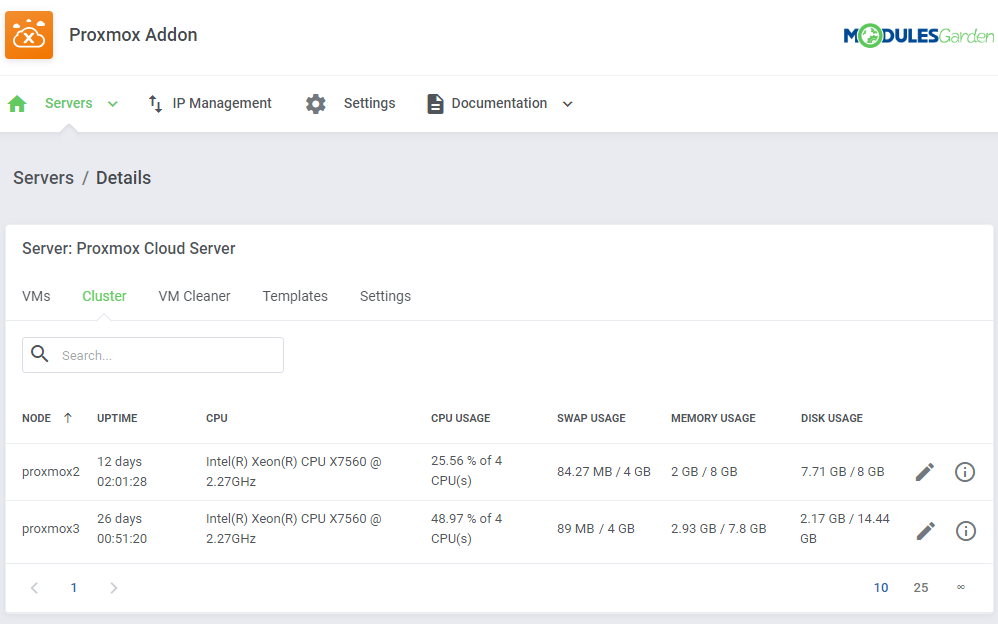
|
| Press the Edit icon to manage the node: |
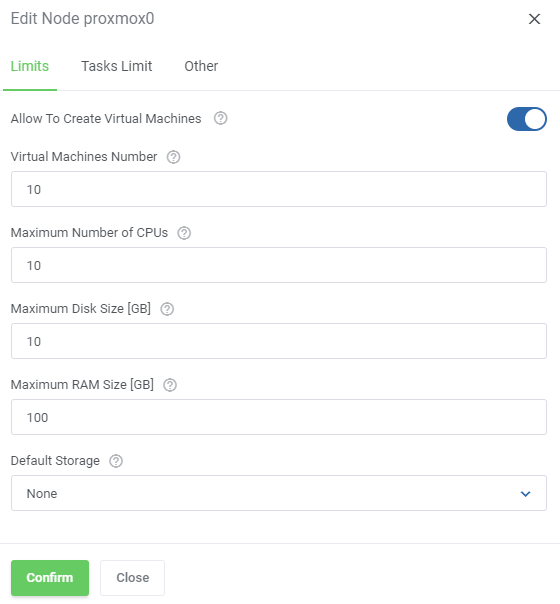
|
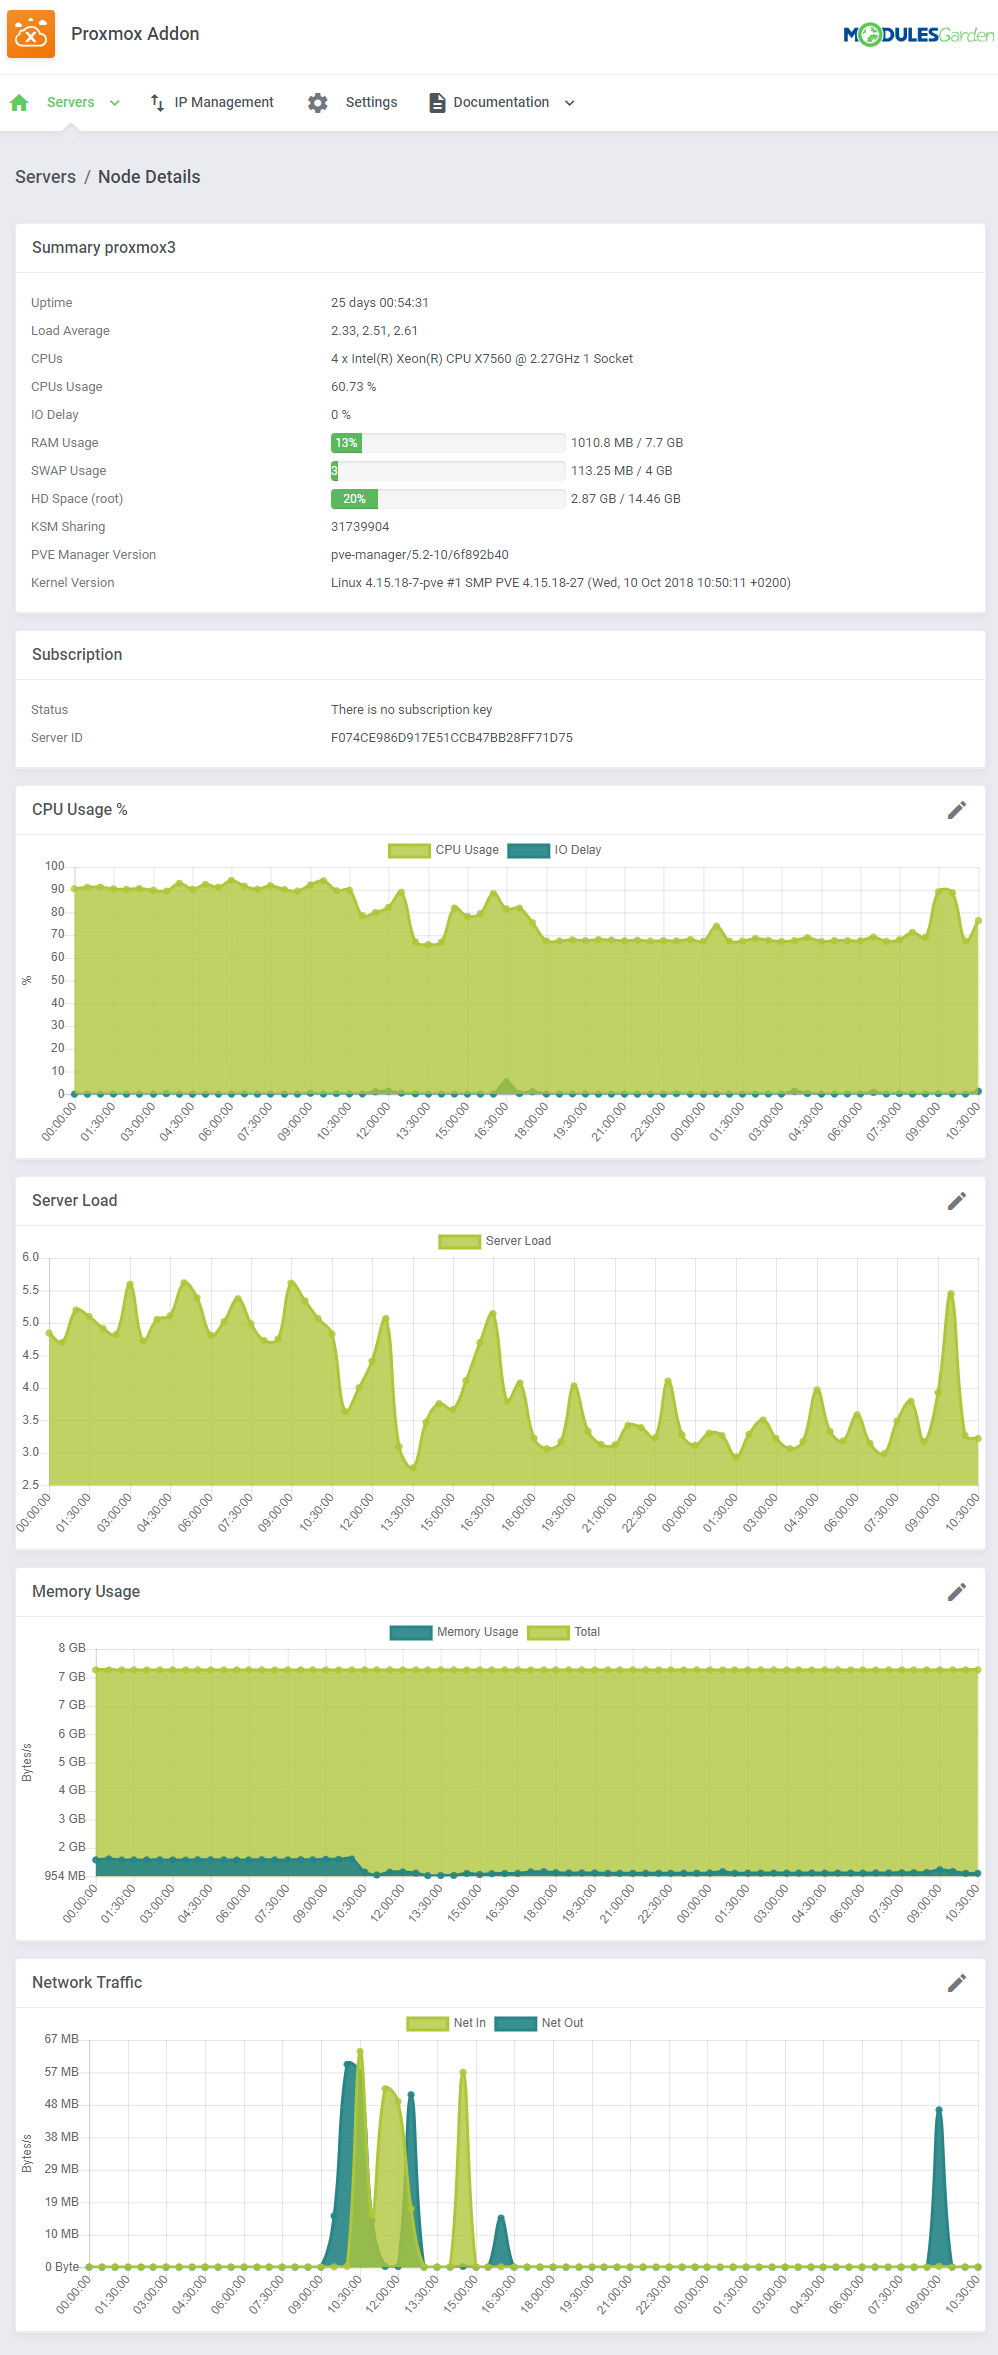
| Press 'Node Details' and you will get all the summary and usage graphs: |
|
VM Cleaner
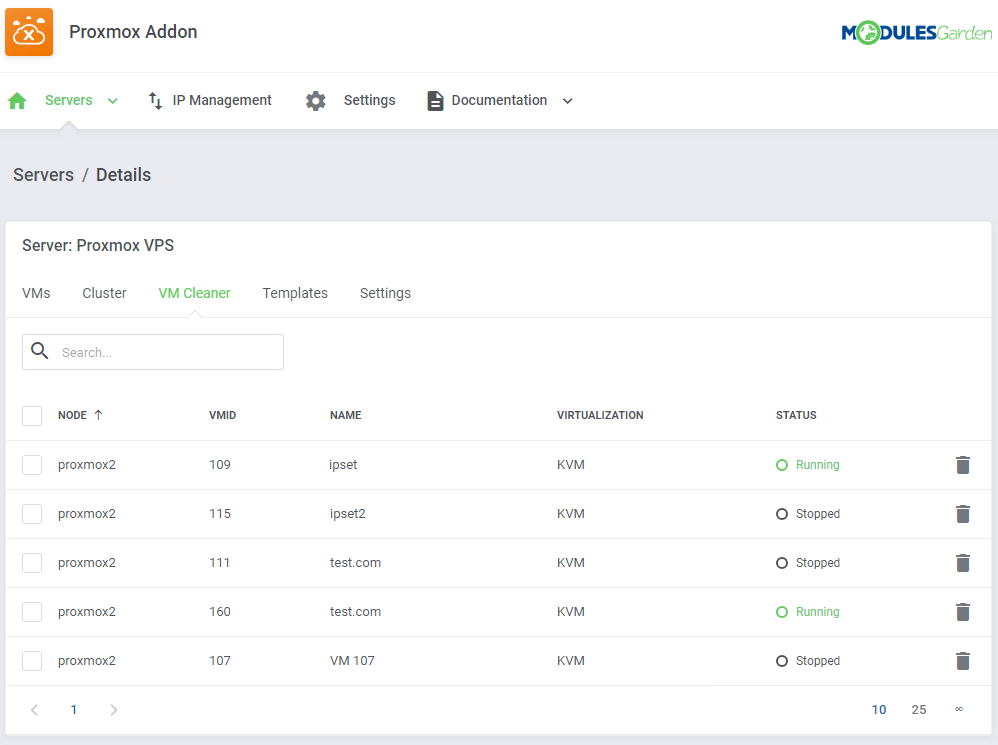
| VM Cleaner allows you to track VMs existing only on your Proxmox server and that are not visible in your WHMCS. Consequently, you are allowed to sort and delete only those VMs that cannot be managed from your WHMCS. |
|
Templates
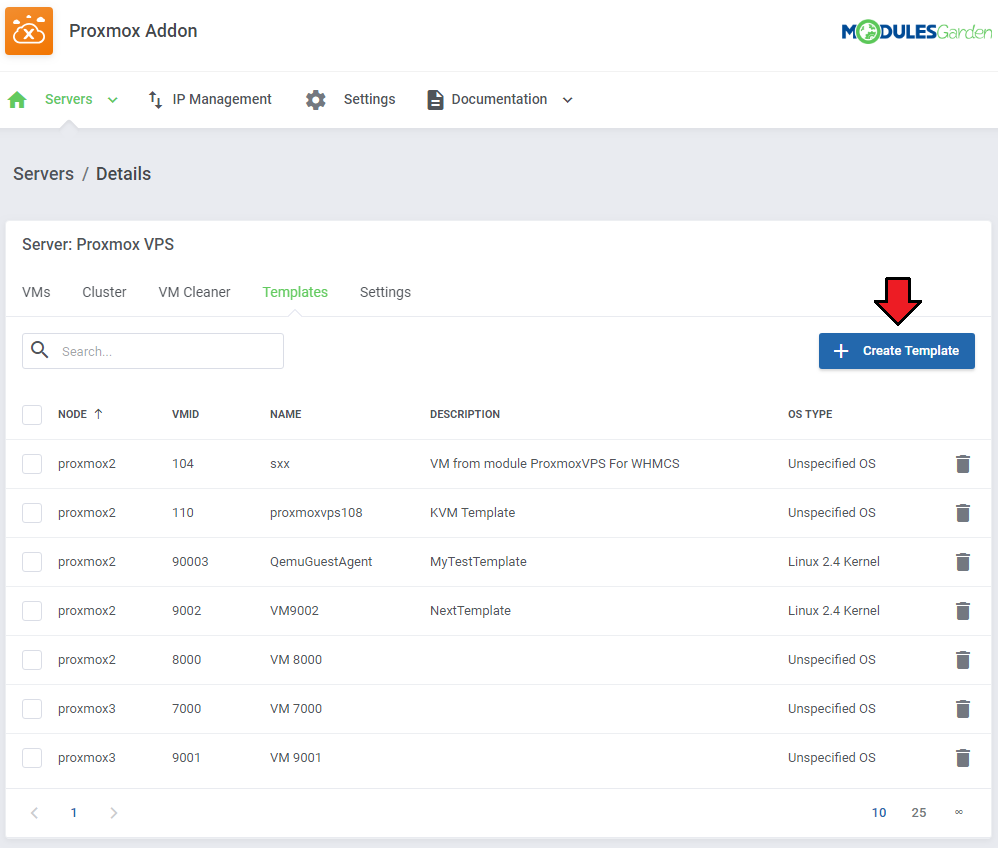
| Under this page you can view the list of templates. You can easily convert any KVM VM on your server to a template. In order to convert a VM, press 'Create Template' button. |
|
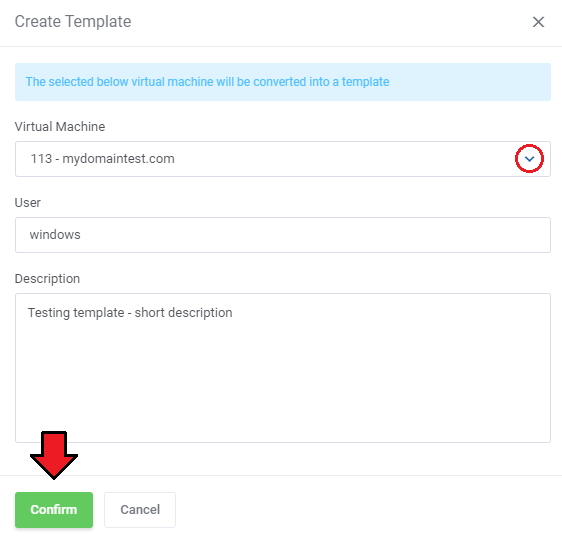
| Next, choose a VM to convert. Fill out 'Description' field and press 'confirm'. |
|
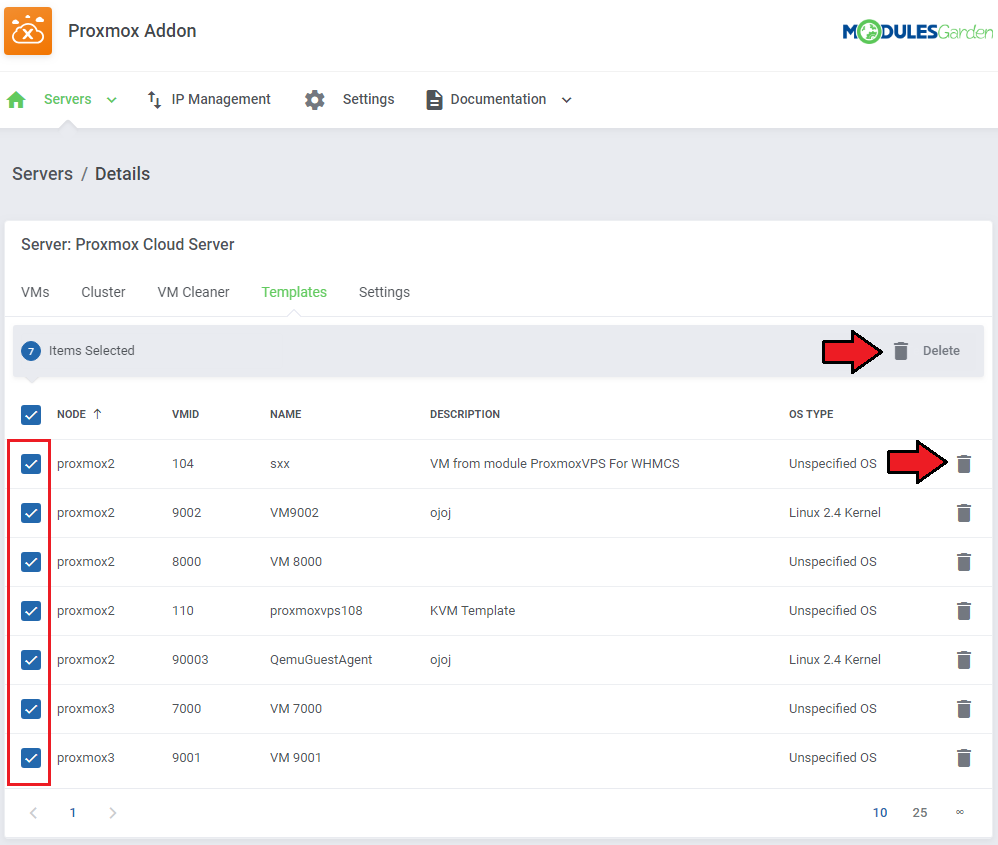
| You may also delete unused templates here. Delete single templates or use the mass action to delete templates in bulk. |
|
Settings
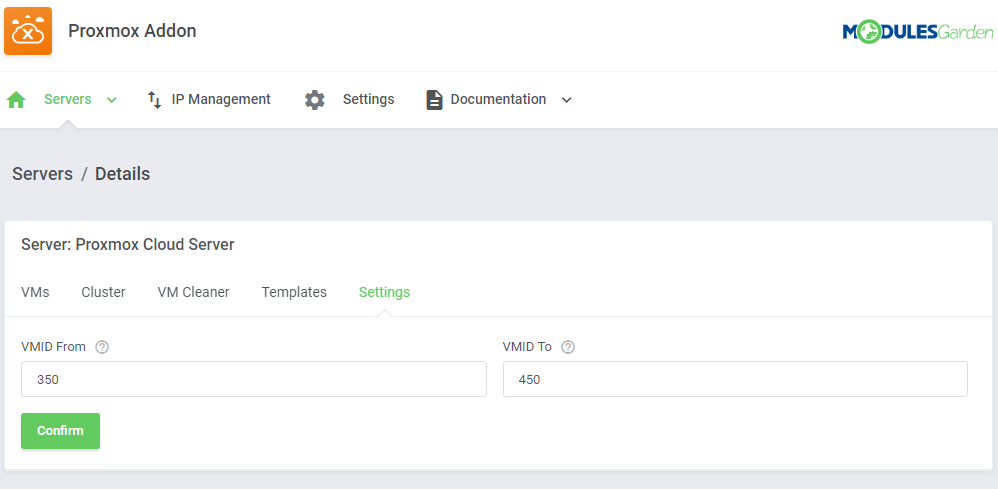
| Here you can define the VM IDs range that will be used for newly created VMs on this server. Please note that to use this feature, you also need to enable the "Use VM Ranges" setting in the product configuration. Define ID range and save changes. Note: VM ID range allows you to sort created VMs depending on the server they were created on.. |
|
VMs List
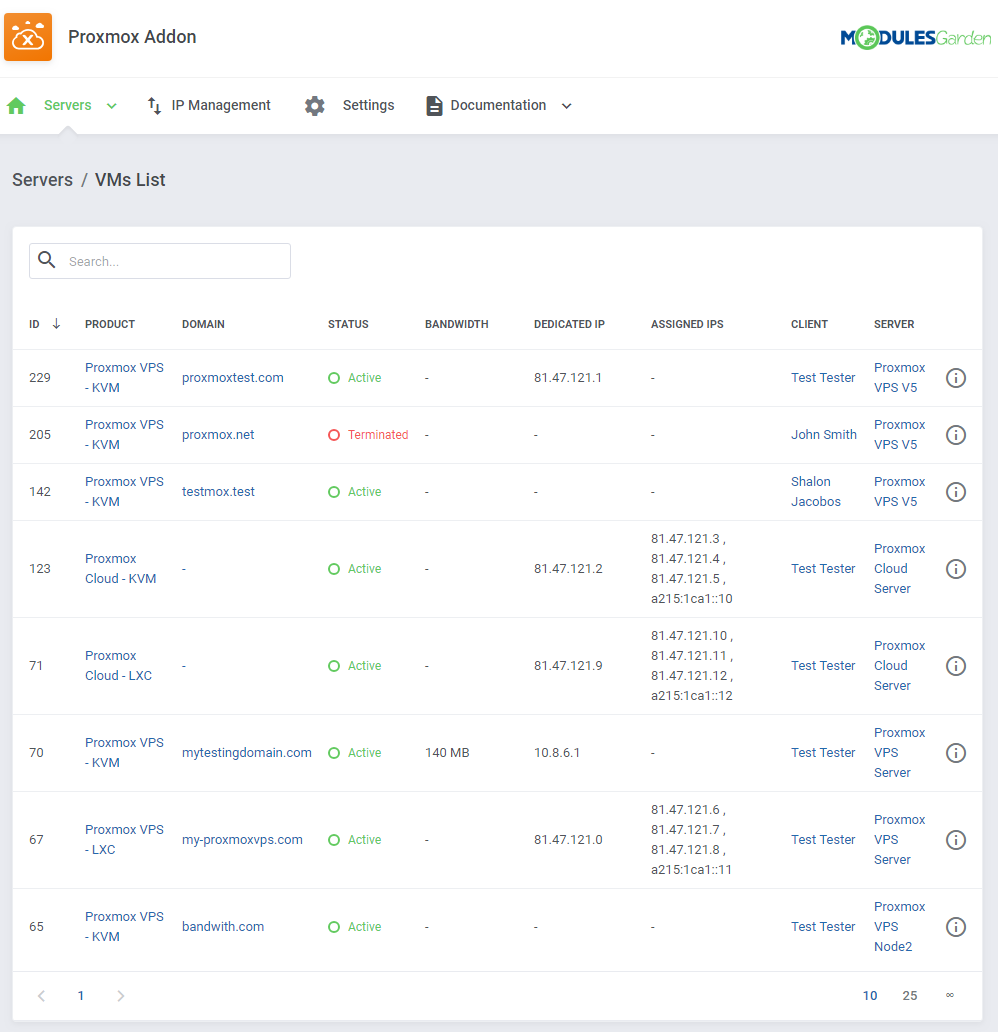
| In 'Addons' → 'Proxmox Addon' → 'Servers' → 'VMs List' you can find details of any Proxmox product. |
|
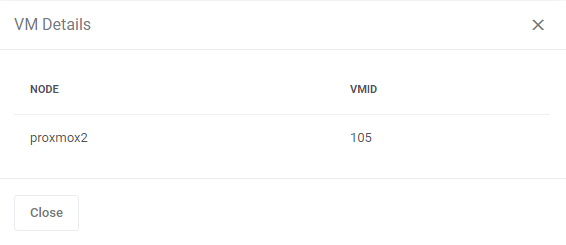
| Press 'More Details' button to get the node and VMID information. |
|
Recovery VM Lists
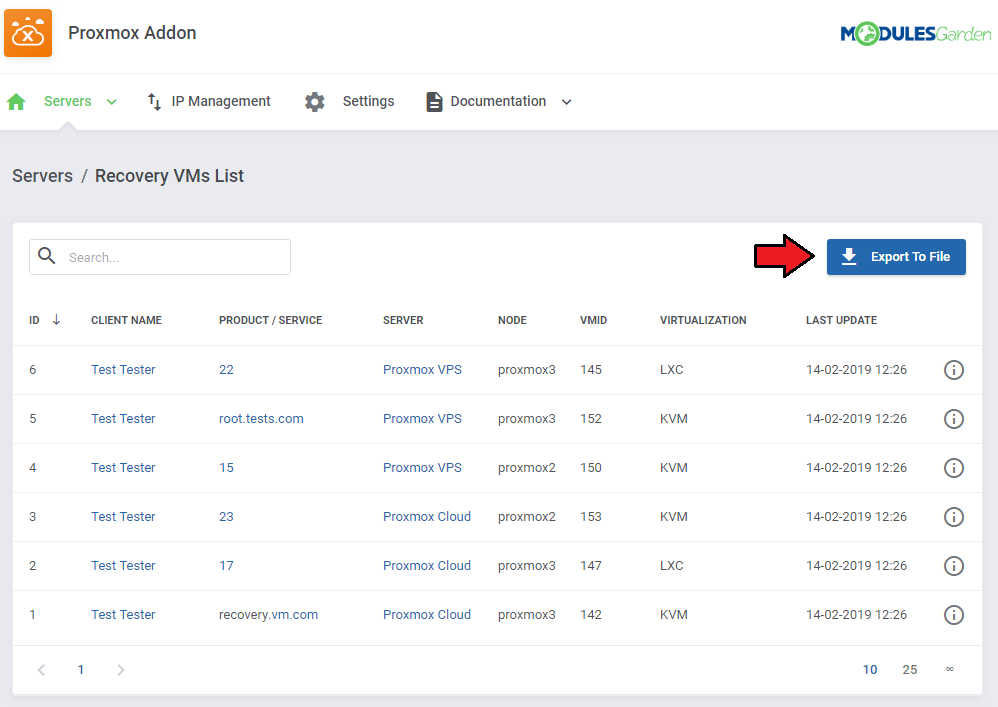
| In 'Addons' → 'Proxmox Addon' → 'Servers' → 'Recovery VM List' you can view details on the created VM. Run the 'VM recovery synchronization' cron job to create and store full backups of VMs configuration, you can find it at point no 26 of the configuration instructions. |
|
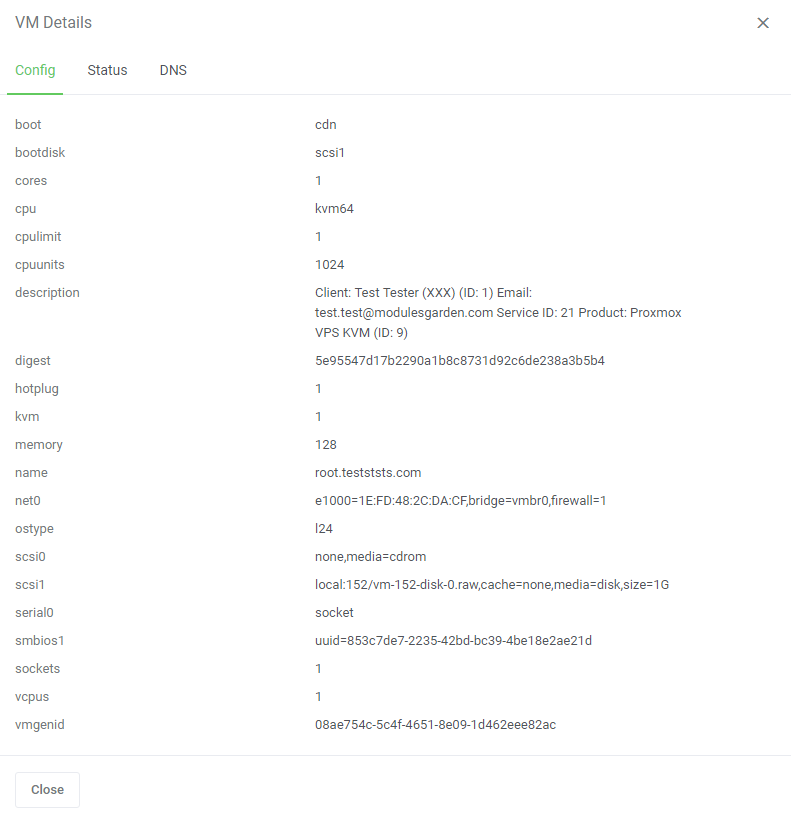
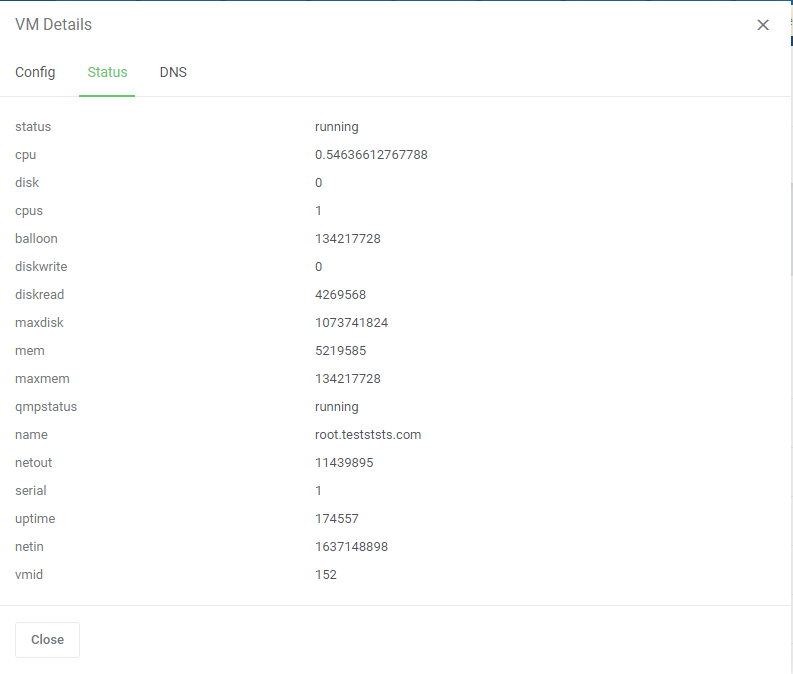
| On pressing the 'Details' icon, you will get any information on Configuration, Status and DNS: |
|
|

|
Tasks History
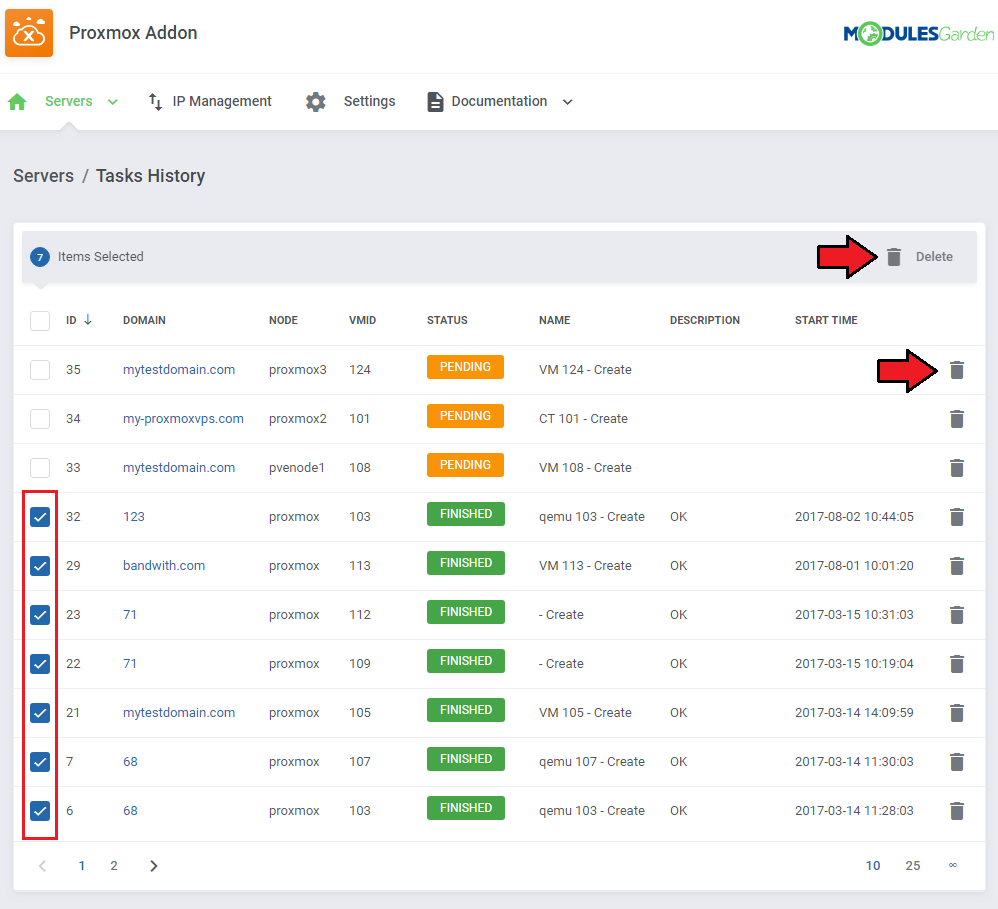
| Tasks History includes a list o all module tasks with the most crucial details on them. You may delete single tasks or use mass action button to remove them in bulk. Run the 'Tasks synchronization' cron job to synchronize the tasks and view all tasks from the server, you can find it at point no 26 of the configuration instructions. |
|
IP Management
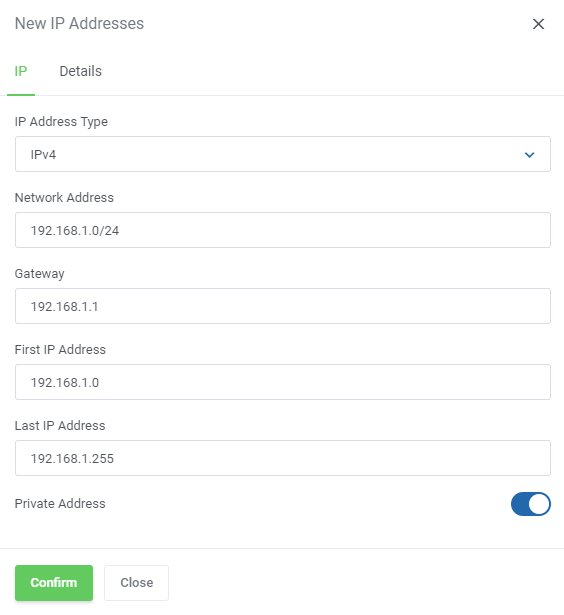
| In the 'IP Management' tab you can manage the IP addresses of Proxmox products. You can create both single IP addresses and IP pools which then can be assigned to created VMs. |

|
When you are creating a new IP address or a pool, you may define:
|
|
IP Manager Integration
| Owing to the integration with IP Manager For WHMCS, you are able to easily create subnets with IP addresses and assign them to the desired products. By activating the IP Manager submodule, settings concerning IP addresses such as 'Configurable Options' and 'Default Options' will be ignored by Proxmox VPS. |
|
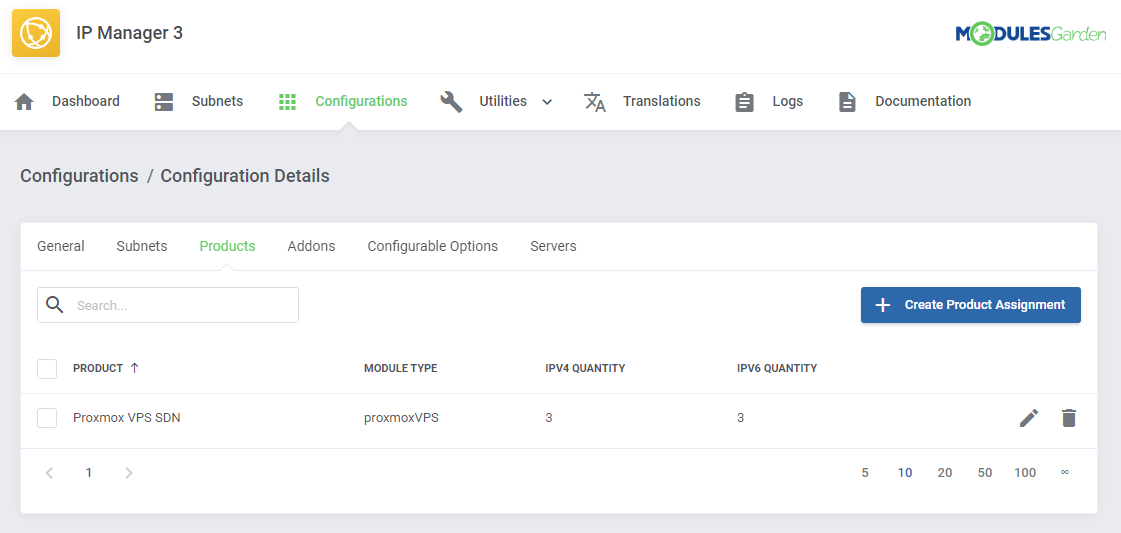
| 3. Afterward, create a new configuration and assign the previously created subnet to it. Note: Multiple IP addresses subnets can be assigned to a single configuration. |
|
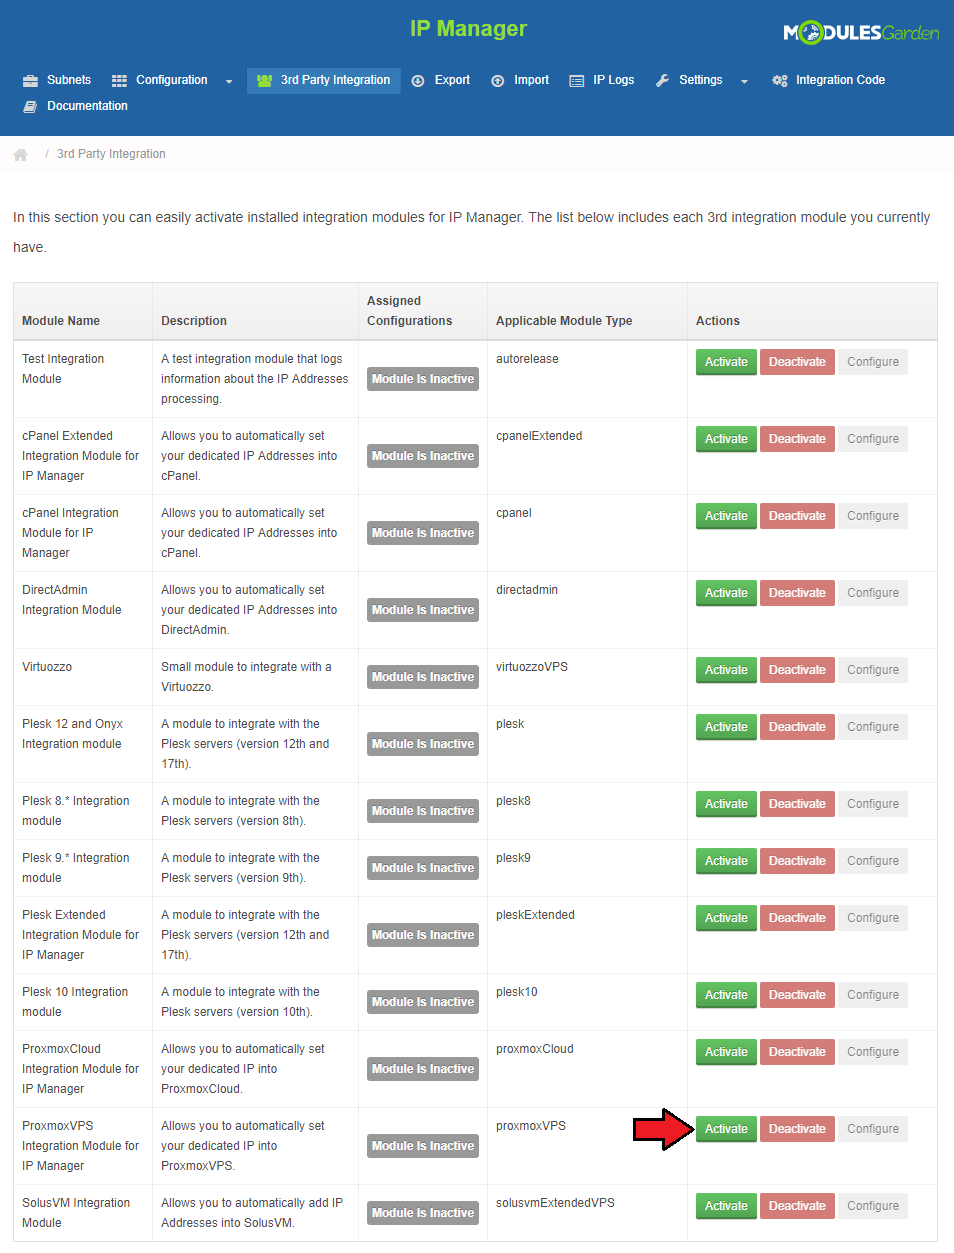
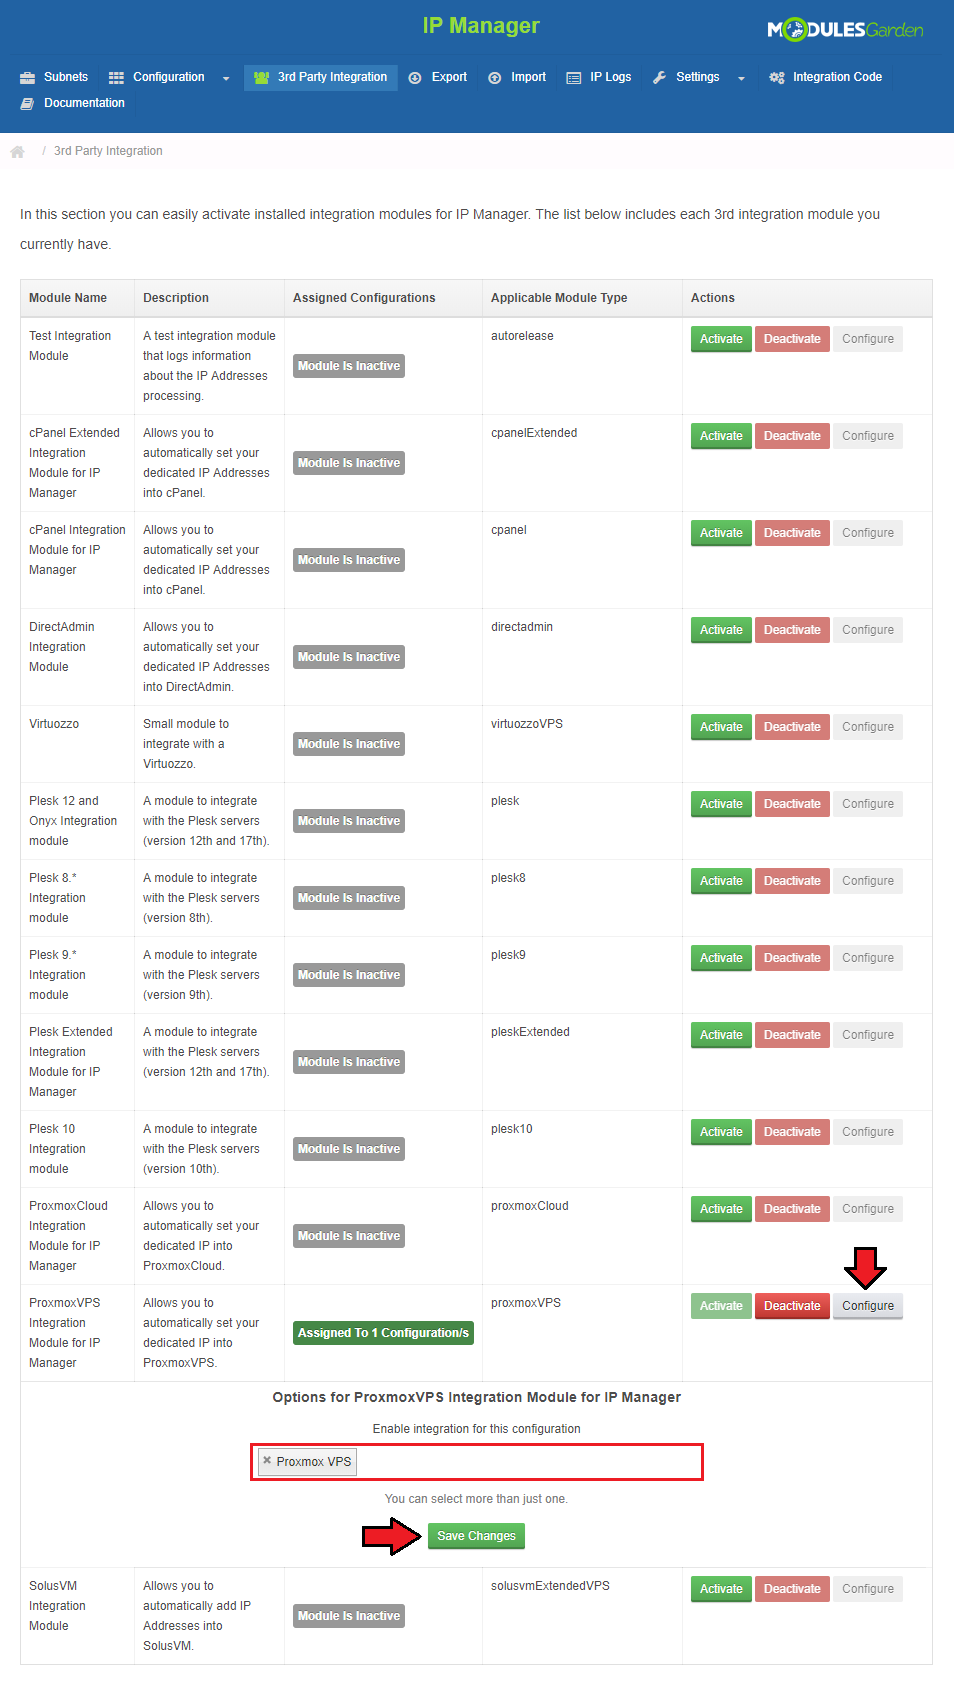
| 5. Now, enable the integration by proceeding to the '3rd Party Integration' tab. Press 'Activate' next to the 'proxmoxVPS' module type as shown on the following screen. |
|
| 6. Next, assign the previously created configuration to the submodule. Press 'Configure' , choose a configuration and press 'Save Changes'. |
|
| If you encounter an error like the one on the below screen while integrating the two products, probably the function 'mb_strlen' is not enabled by default. Please read the manual here for installation instructions. |

|
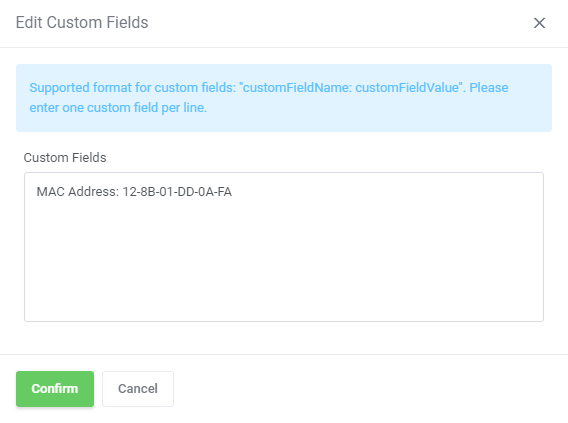
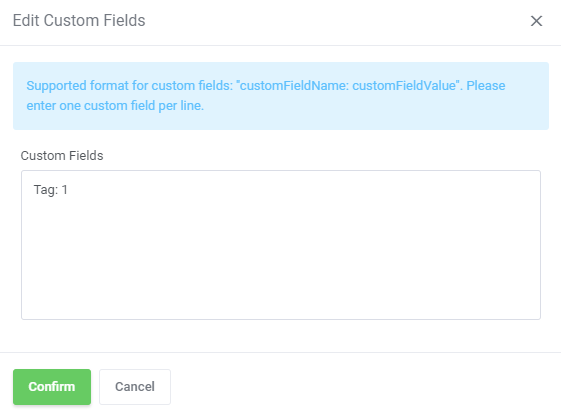
| It is possible to add a VLAN Tag Custom Filed in the very same way as the MAC Address field. Look above for the detailed instruction on how to proceed, follow steps 1-6 to create the new custom field. |
|
Settings
Load Balancer
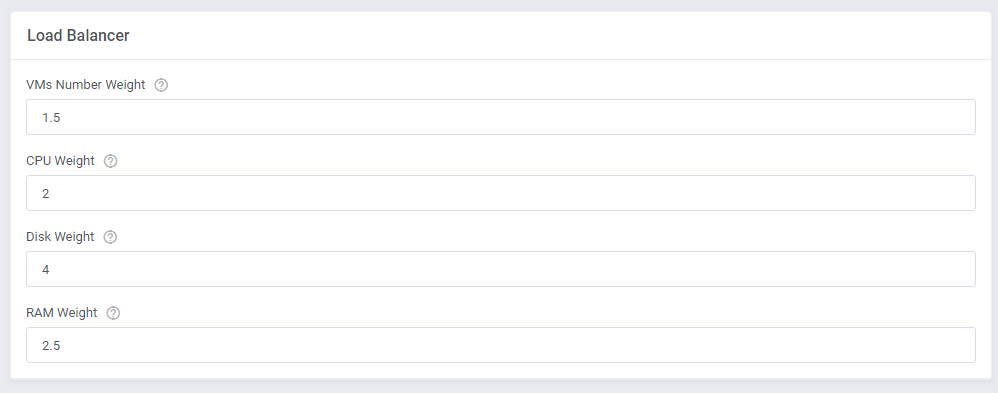
| Load Balancer is an advanced tool that allows smooth rotation between nodes to find the most preferable one and create virtual machine on it. Set the weight of the resource that will prioritize its selection when sorting the Nodes according to the free resources. |
|
| In order to use Load Balancer you must previously enable it in the product's configuration: Define the behavior of the tool:
|

|
Node Prioritization Method
| Let us take a look at how the sorting process works and the rules that it obeys. Let's take exemplary weights for each resource just like presented on the screen above. VMs Number Weight: 1,5 Disk Weight with the highest weight which means it has the highest priority and VMs Number Weight as the least crucial factor on a given node.
Node A (Free Ram: 60%, Free CPU: 20%, Free Disk Space: 50%, Number of VMs: 5) The next step is sorting the nodes according to each resource, by assigning them corresponding priorities from 1 to 4. |
| Priority | Free Ram | Free CPU | Free Disk Space | Number of VMs |
|---|---|---|---|---|
| 4 | Node C | Node B | Node D | Node A |
| 3 | Node D | Node D | Node A | Node B |
| 2 | Node A | Node C | Node B | Node D |
| 1 | Node B | Node A | Node C | Node C |
| Now, the final calculation to sort nodes according to free resources, taking into account previously defined weights, is performed Sorting nodes is based on the following calculation method: Final Node Priority = (RAM Priority x RAM Weight) + (CPU Priority x CPU Weight) + (Free Disk Priority x Disk Weight) + (No. VMs Priority x VMs Weight) The results for nodes A, B, C and D (with weights and sorting priority) are following: Node A: (2 x 2,5) + ( 1 x 2 ) + ( 3 x 4 ) + ( 4 x 1,5 ) = 25 Node B: (1 x 2,5) + ( 4 x 2 ) + ( 2 x 4 ) + ( 3 x 1,5 ) = 23 Node C: (4 x 2,5) + ( 2 x 2 ) + ( 1 x 4 ) + ( 1 x 1,5 ) = 19,5 Node D: (3 x 2,5) + ( 3 x 2 ) + ( 4 x 4 ) + ( 2 x 1,5 ) = 32,5 As you can see, Node D has got the highest priority value with a result: 32,5. The above described calculations are performed every time, a 'Create' or 'Upgrade' actions are executed based on the current usage of resources on available nodes. Important: In case a given client already has an existing VM on a node, this very node will NOT be taken into account during the prioritization of resources process. If you decide to use Load Balancer tool, define the resources weights to adjust their prioritization of nodes according to your needs. |
Client Area
| Client area interface of Proxmox VPS For WHMCS should look like the one on the screen below. As you can see, control panel contains options useful for managing a VM. |

|
| On the main product page in the client area, under the 'Details' headline your clients can find information about current usage of CPU, memory, disk (LXC only) and SWAP (LXC only). Customers can also view 'DNS' (LXC only) and 'IP Addresses'. |
Client Area - VM Management
noVNC Console
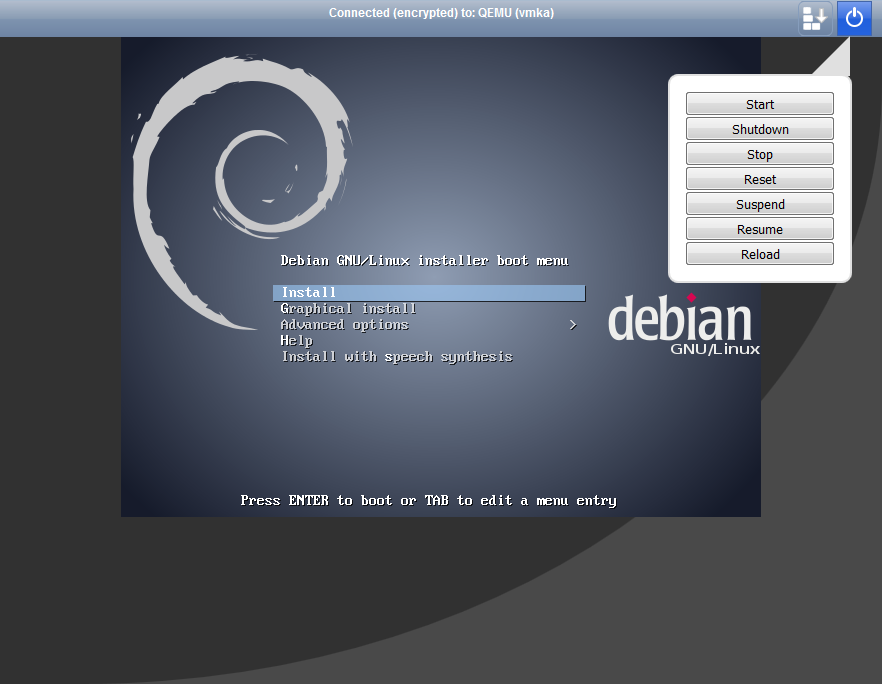
| noVNC console allows your clients to connect to their server in the easiest possible way. |
|
SPICE Console
| SPICE console enables you to connect to virtual machine using SPICE. Note: Your client needs to download and install client side SPICE application in order to connect with a VM. |
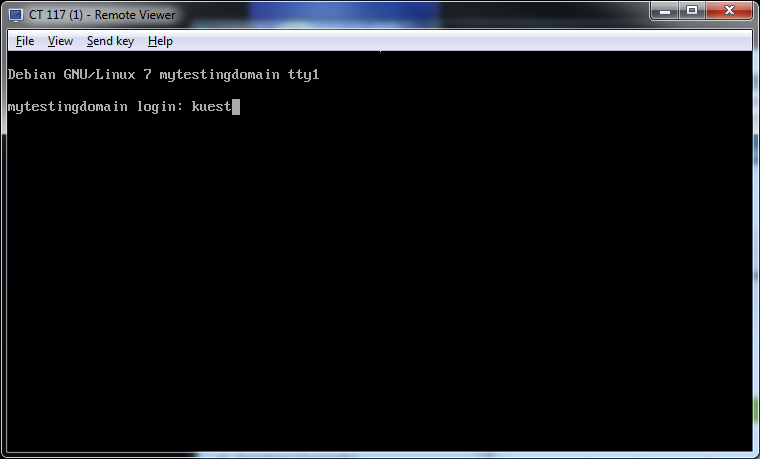
|
Xterm.js Console
| Xterm.js console enables you to connect to virtual machine using Xterm.js. You must update the scripts on Proxmox v2.6.0. To do so open folder: UploadOnProxmoxServer/5.2-10 and upload content on all your proxmox servers. |
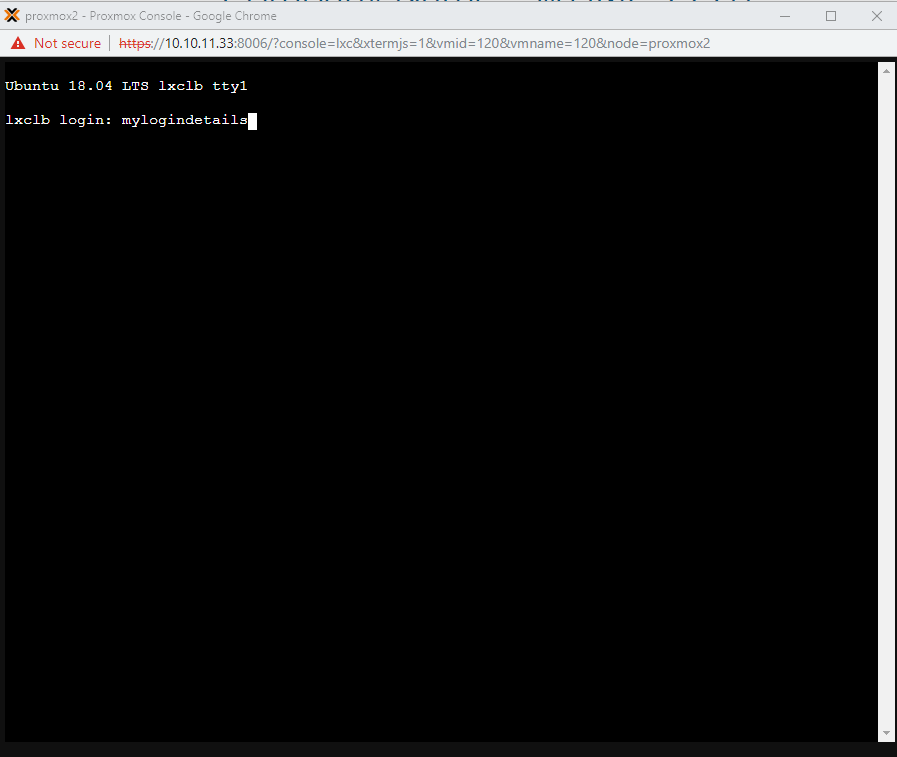
|
Client Area - Additional Tools
Reinstall
| Reinstall feature can be used to reinstall a new OS on the VM by the clients on their own. You can allow your clients to either select a new OS from the provided KVM templates to automatically replace the system, or let them choose the ISO image for manual system installation.
|
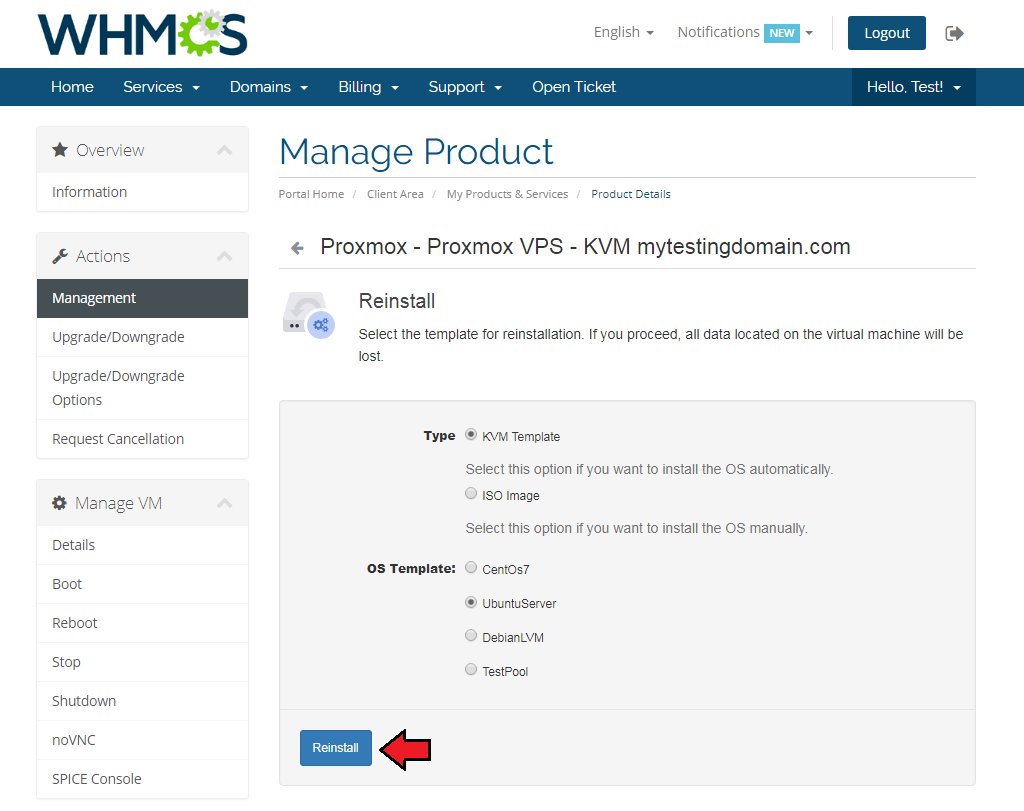
|
| You can choose the available 'ISO Images' from 'CD/DVD-ROM Drive'. |

|
| Remember to also give your clients access to the selected reinstallation types in the 'User's Options' . |

|
Backups
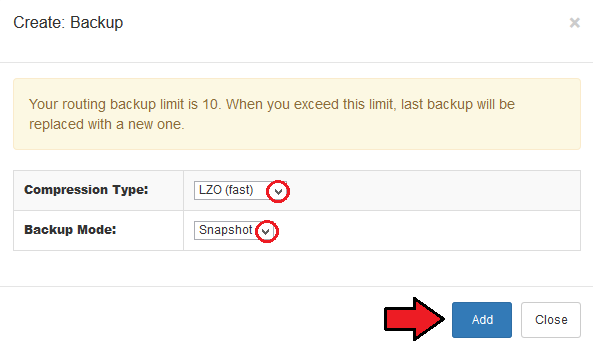
| To create a single backup, press the 'Backups' button and click on 'New Backup' as shown on the following screen. |
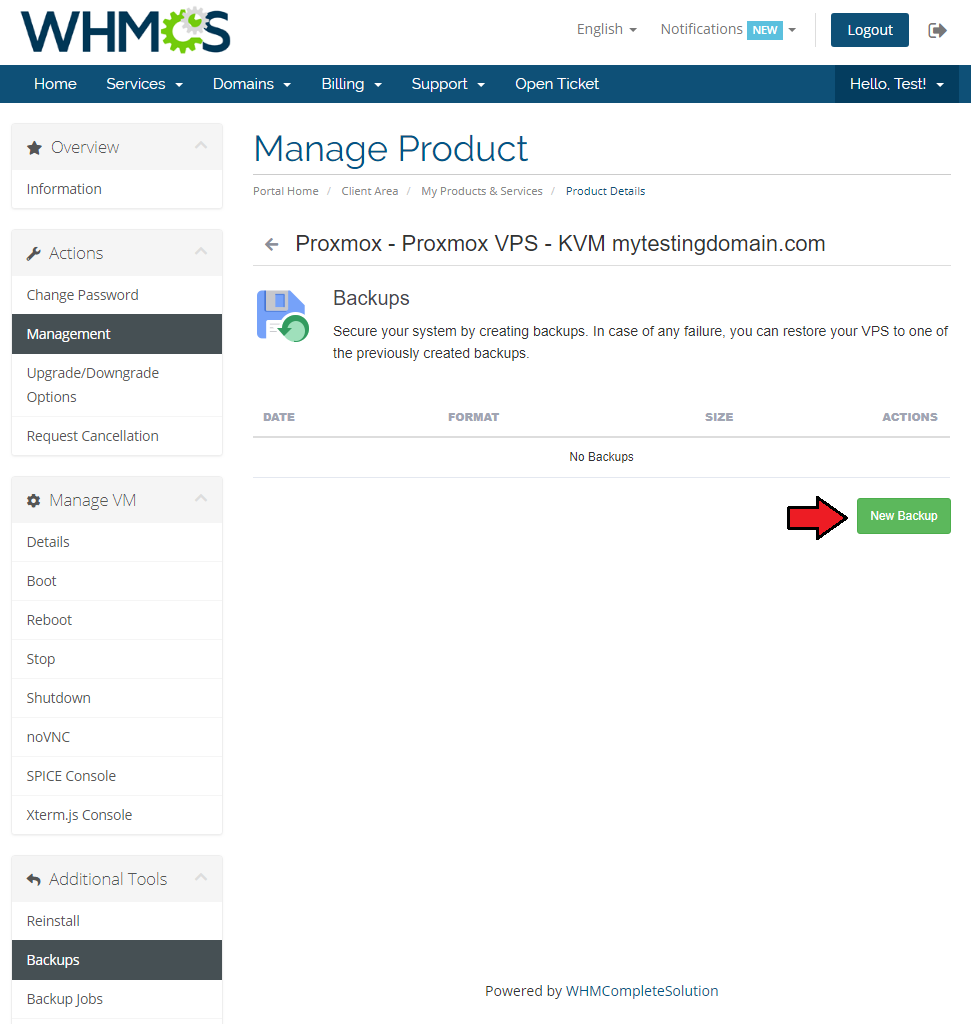
|
| Now, choose 'Compress Dump File' and 'Backup Mode' from dropdown menus. Afterward, press 'Add'. |
|
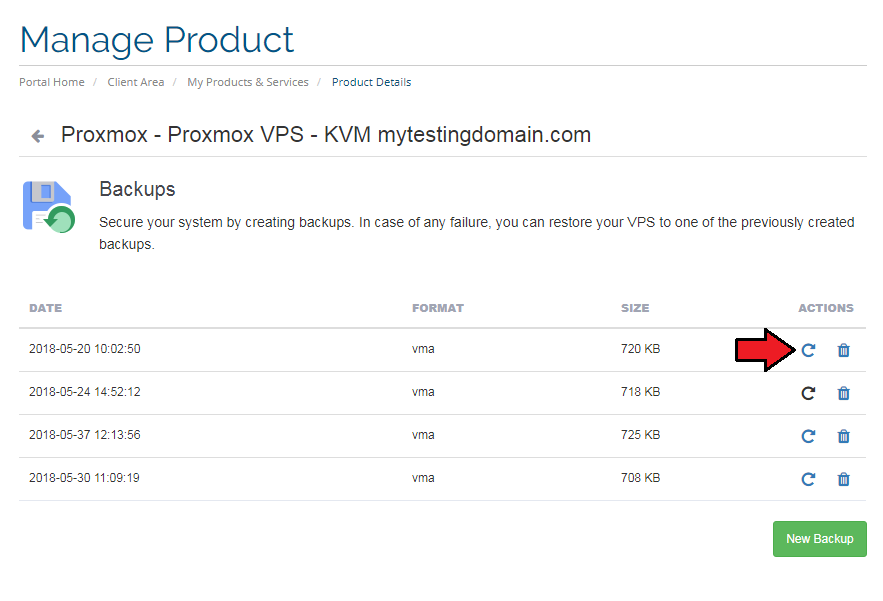
| To restore a VM from backup, press 'Restore' and then click the 'OK' button in a popup window to confirm. |
|
Backup Jobs
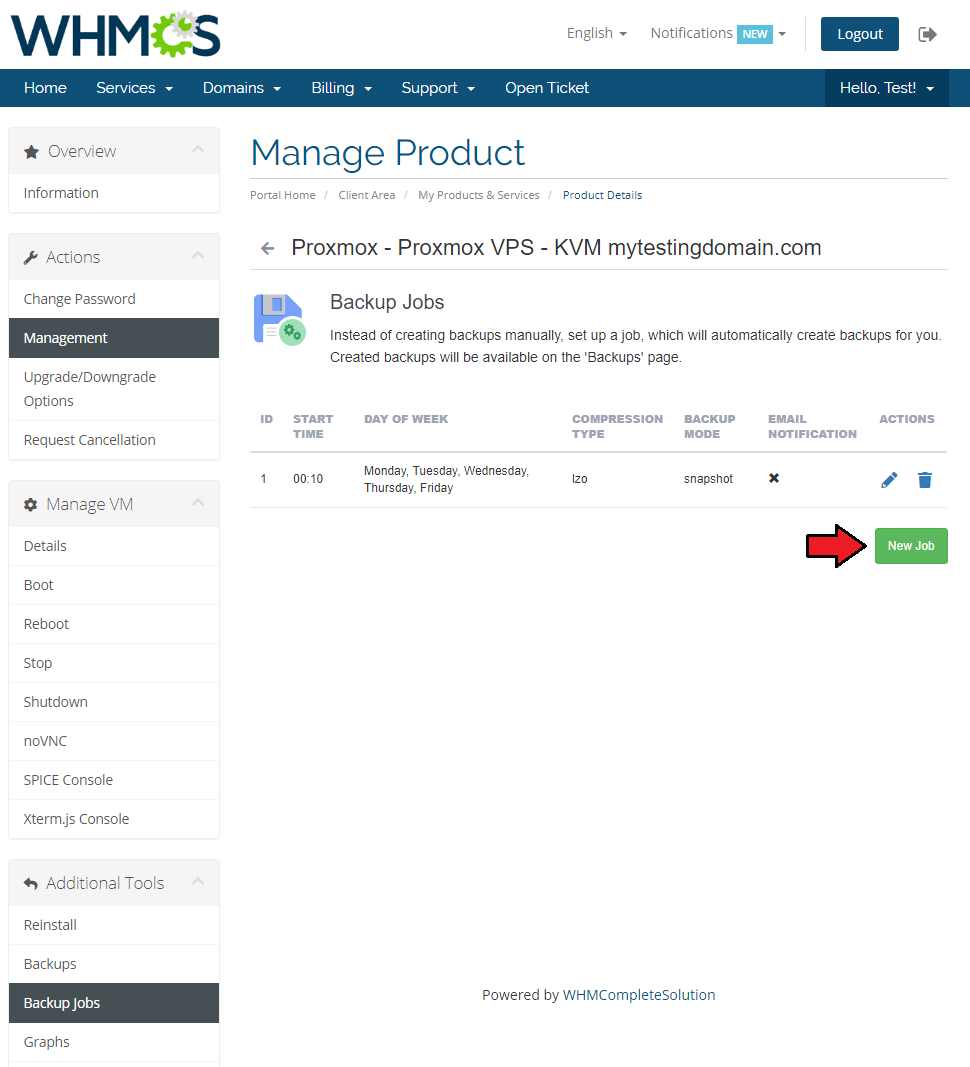
| By pressing 'Backup Jobs' in the client area, you will be forwarded to the backup jobs management page. There you can easily edit/delete and preview details of existing backup jobs. |
|
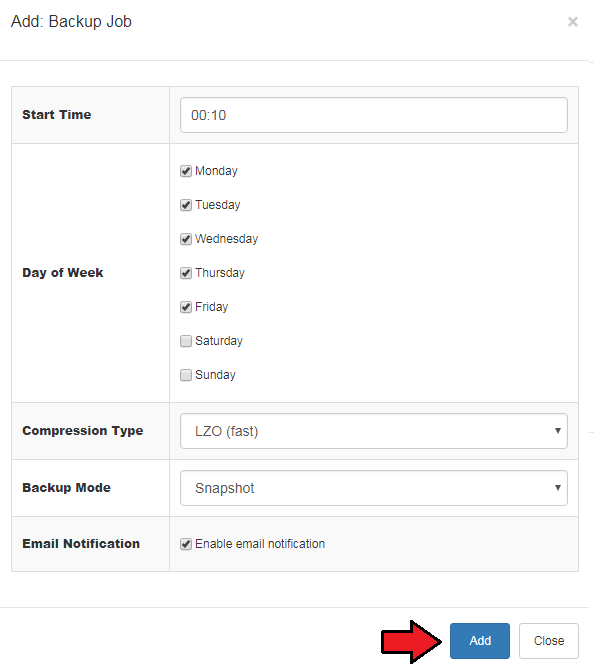
| Now, define a backup time, mark days to run it and choose 'Compression Dump File' and 'Backup Mode' from dropdown menus. Next, press the 'Add' button. |
|
Graphs
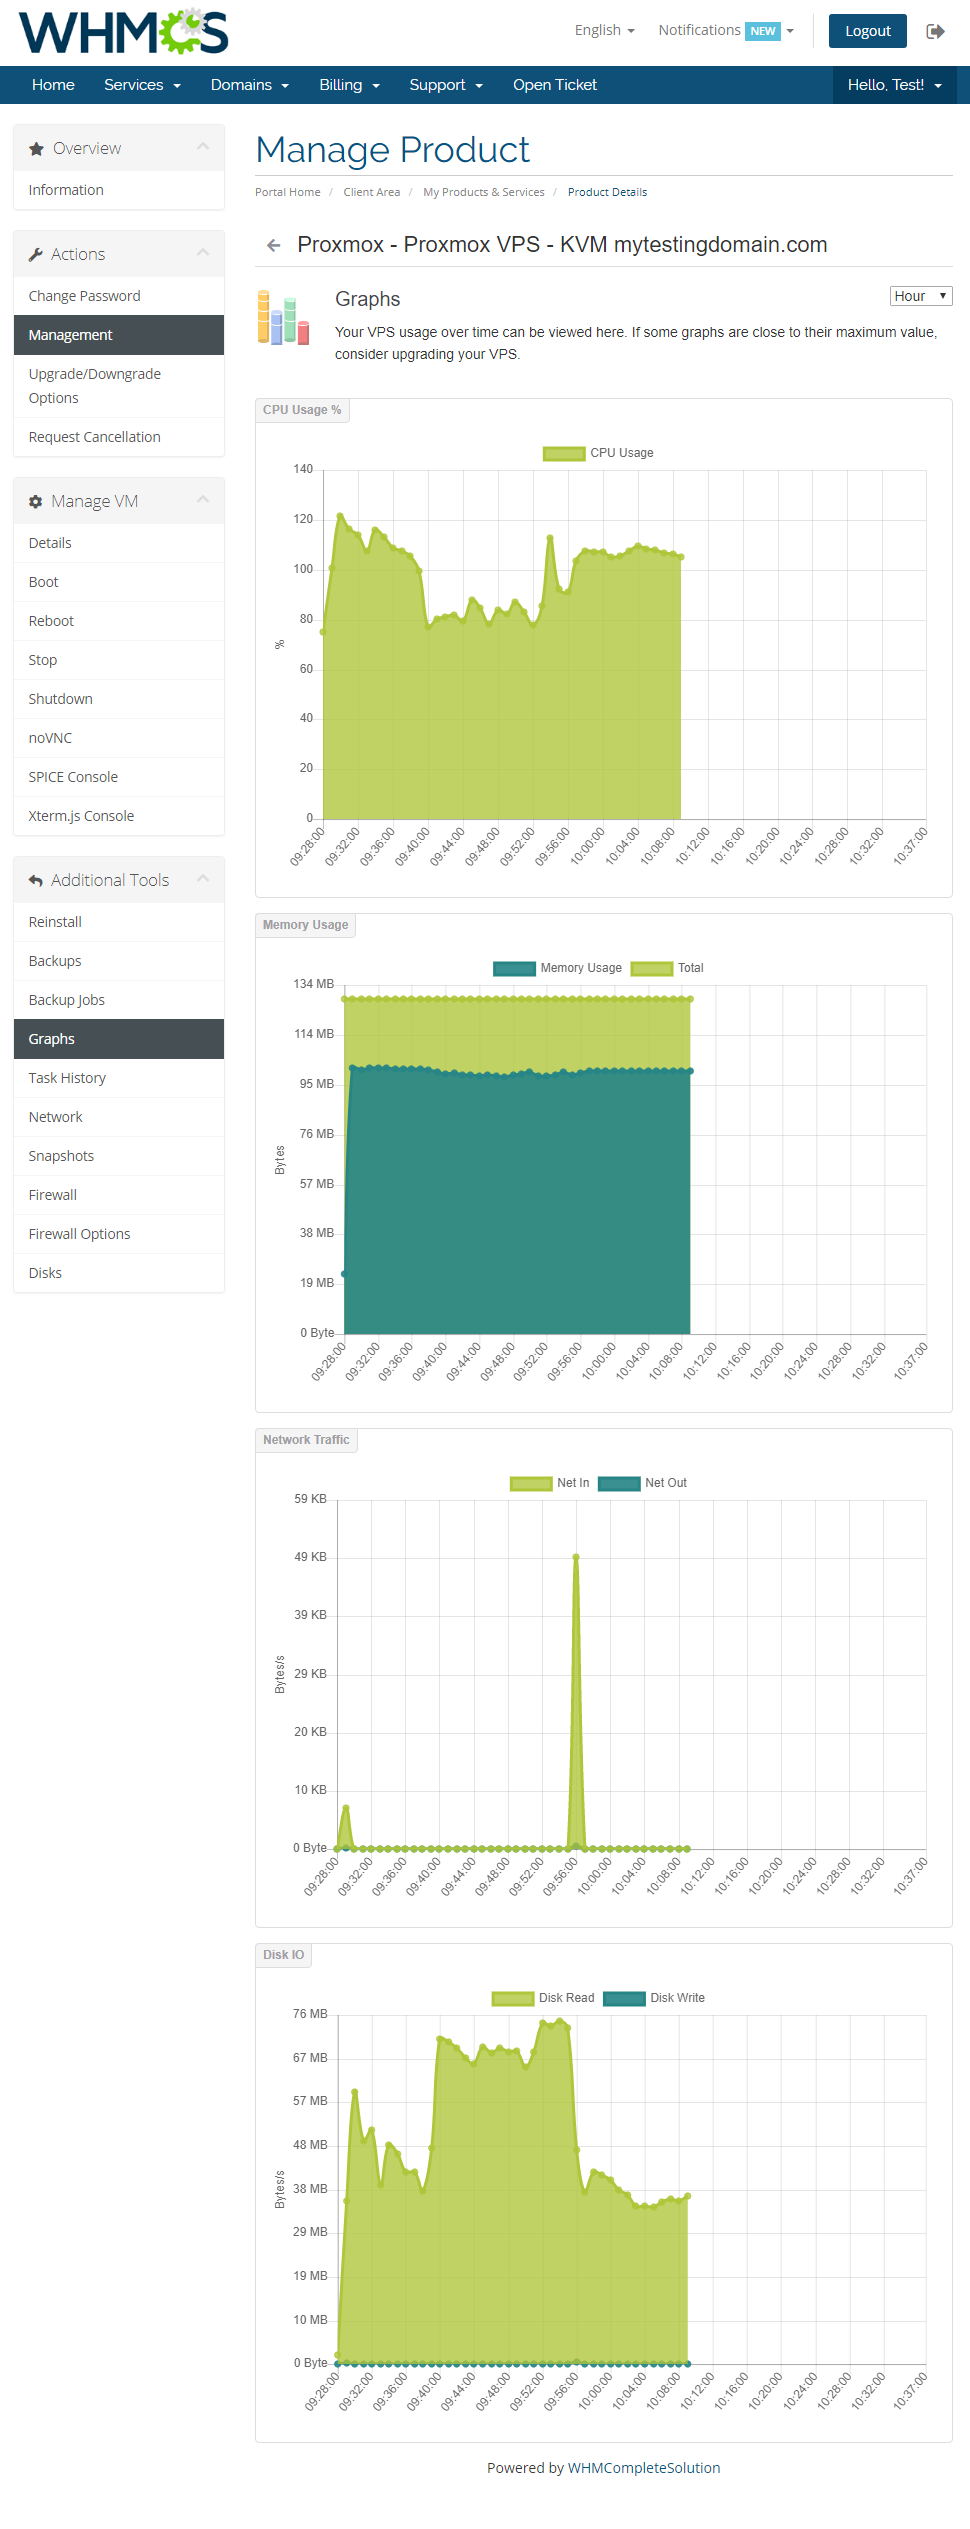
| Through pressing the 'Graphs' button clients will be moved to the page with generated graphs of CPU usage, memory usage, network traffic and disc I/O. They can also switch the timeline of graphs by choosing it from a dropdown menu pointed on the following screen. Choose from 'Hour', 'Day', 'Week', 'Moth' and 'Year'. |
|
Task History
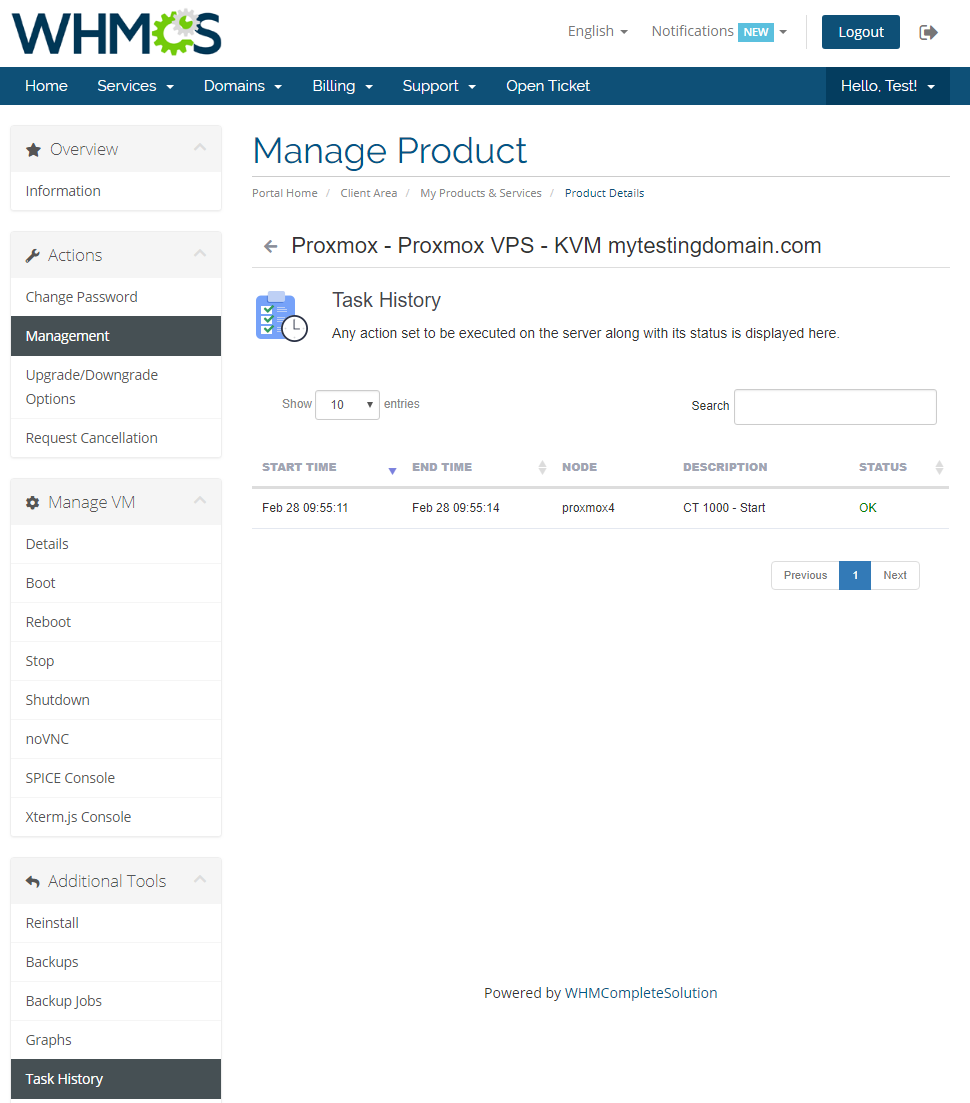
| To access the history of a VM, simply press the 'Task History' button. |
|
Network
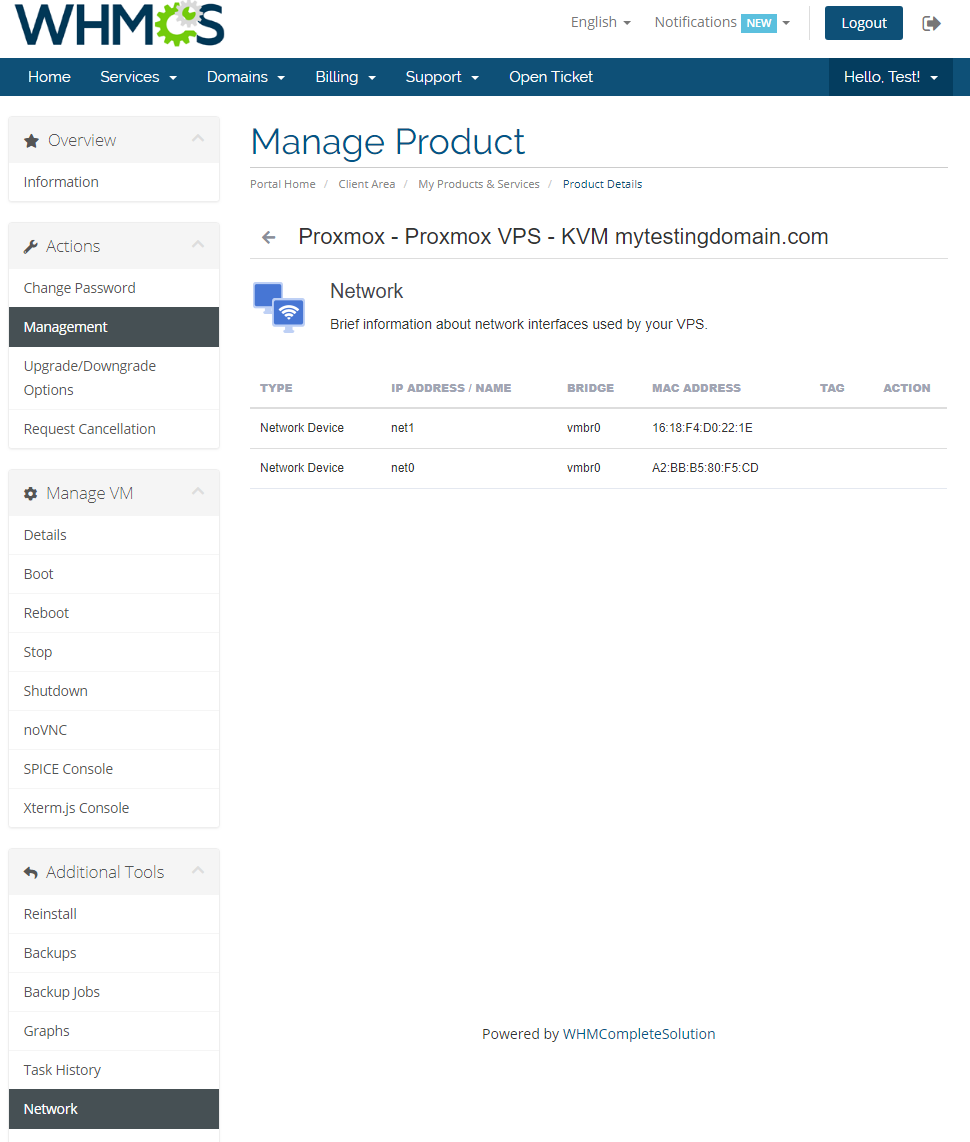
| Your clients are allowed to add/remove only private network interface devices. Keep in mind that ' Network device' options must be set to 'Private'. |
|
Snapshots (KVM only)
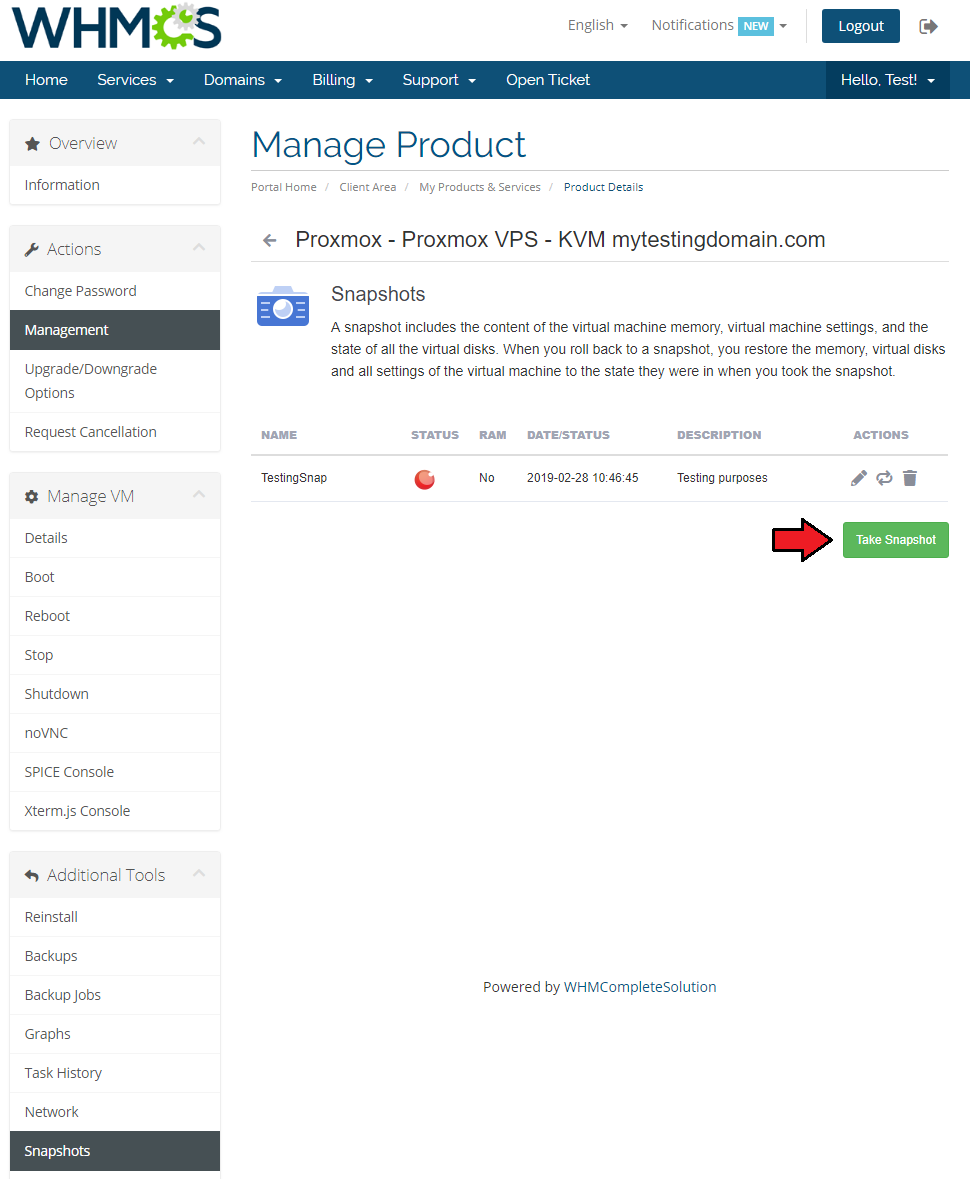
| Use a snapshot to remember a current state contents of the virtual machine memory. You may use them later to restore the VM's settings. |
|
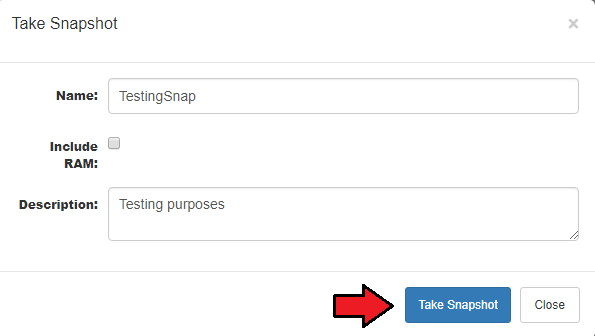
| Press the 'Take Snapshot' button and fill out the form to take a snapshot. Name it (use alphabetical characters only), choose whether to include RAM and add a description. |
|
Firewall
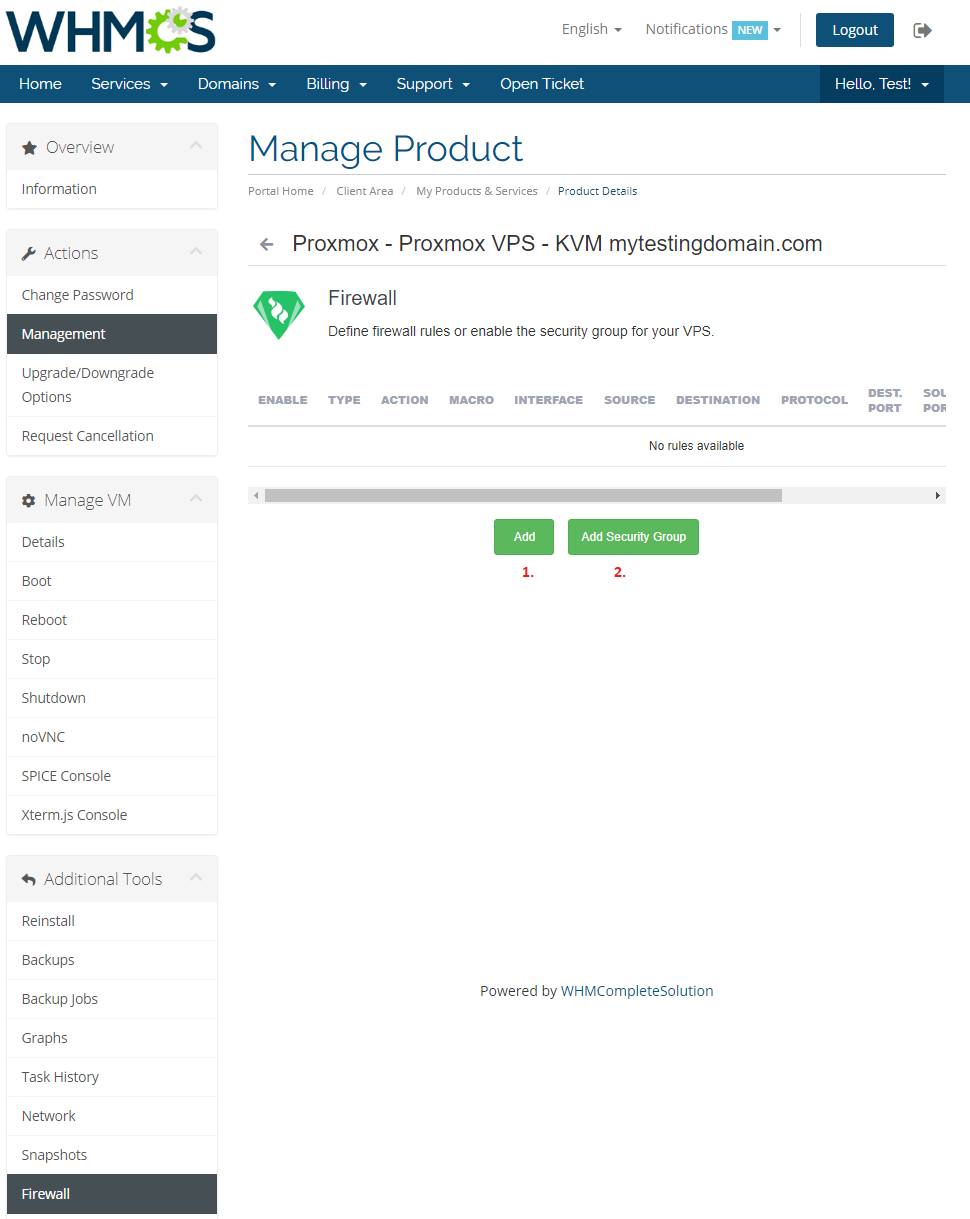
| Owing to the 'Firewall' page, your clients can set up firewall rules and enable a security group for their servers from the WHMCS client area. As you can see, you can easily modify and remove the previously added rules and security groups. |
|
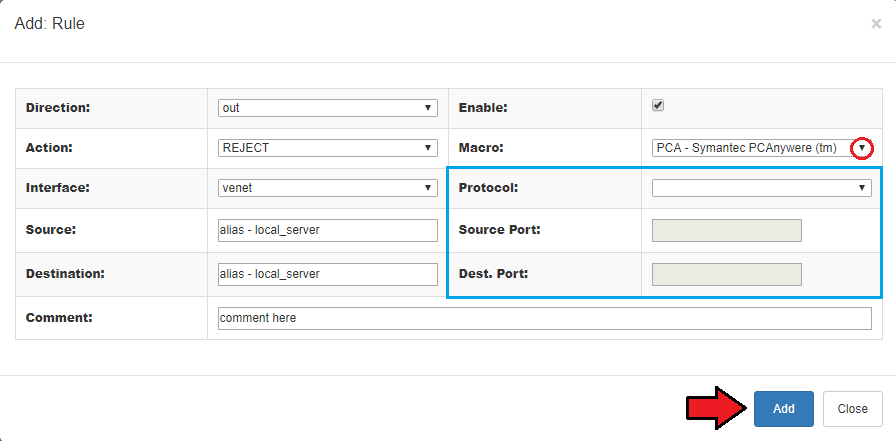
| You can add a firewall rule in two ways. Both of them require choosing a direction, action, interface, source and a destination. The first way (red) is to choose macro from the 'Macro' dropdown field. |
|
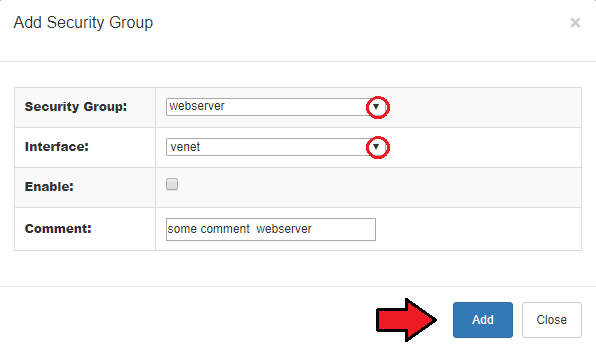
| Choose a security group and an interface on which the group will be used. Additionally, you can enable a security group and add a comment to it. |
|
Firewall Options
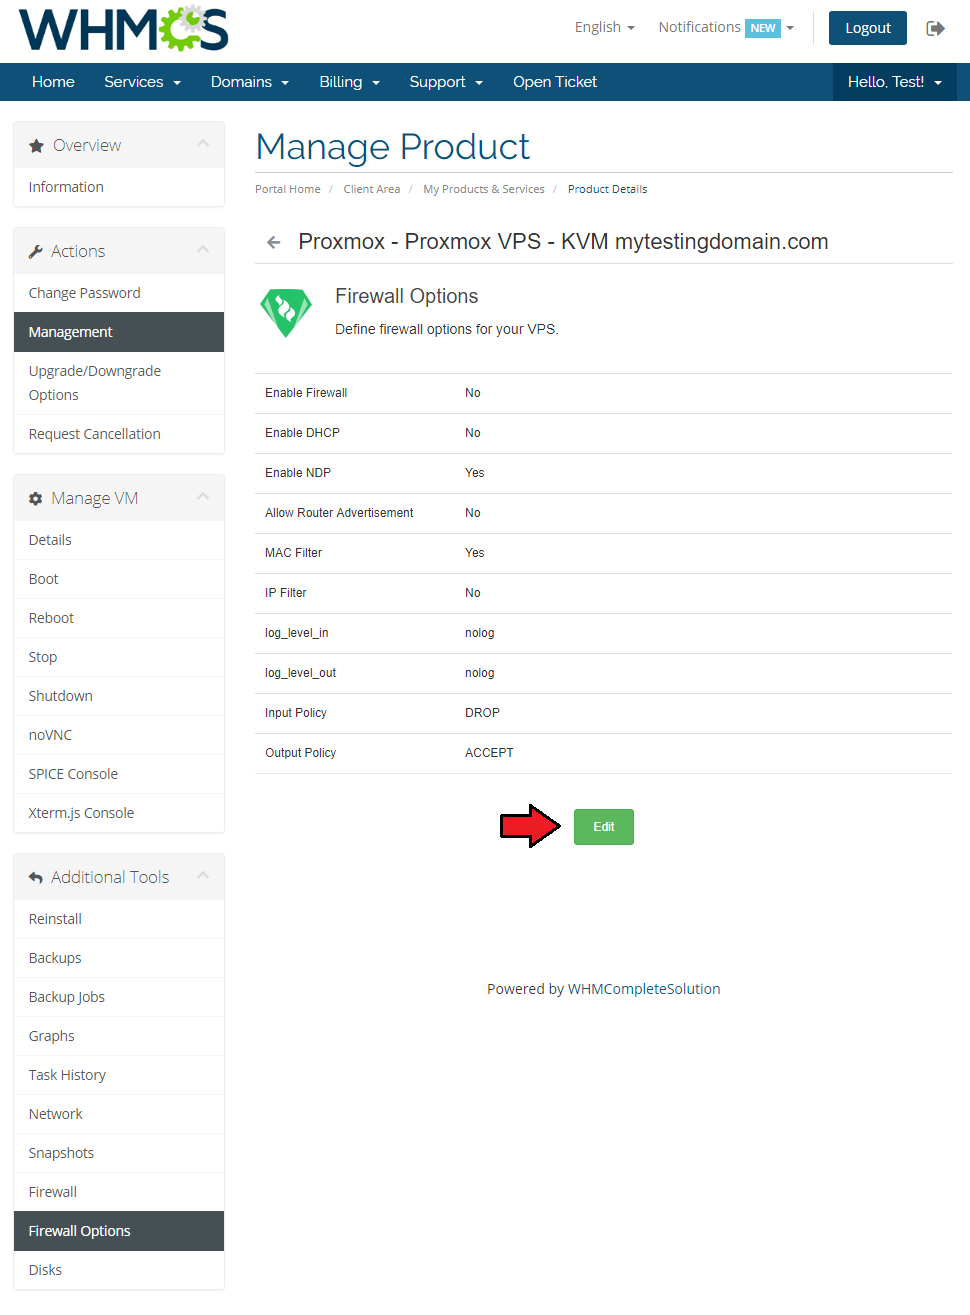
| View and edit firewall options. |
|
Disks (KVM only)
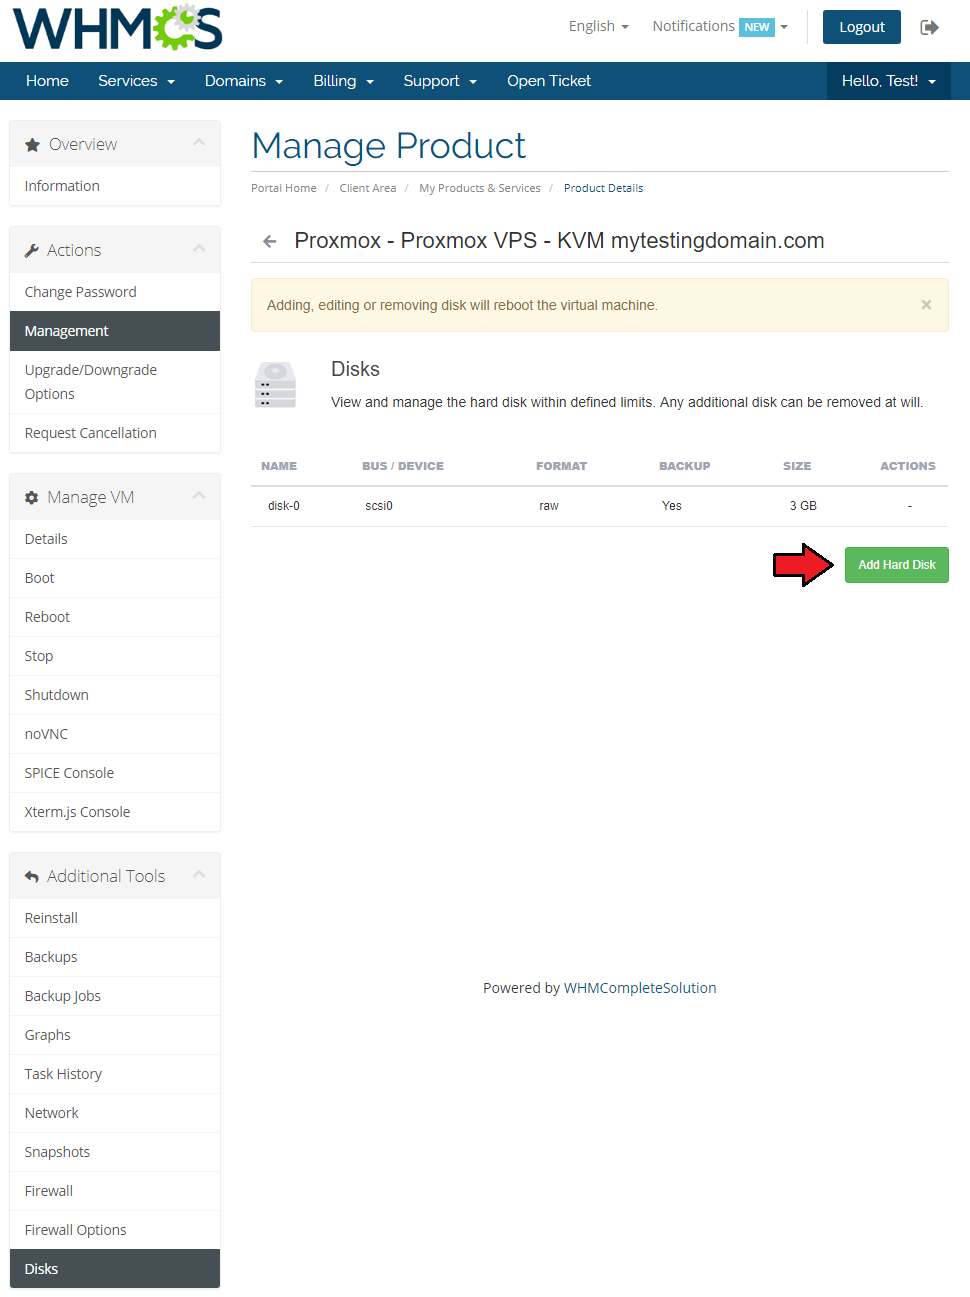
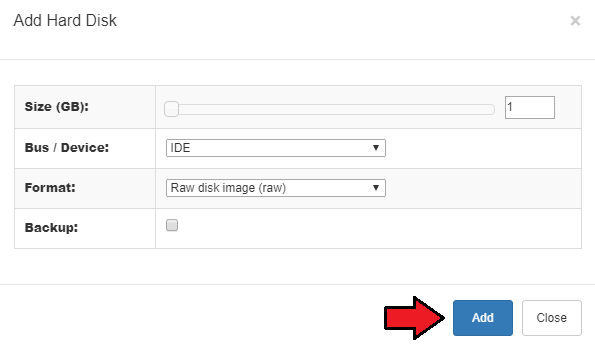
| View available disks and add new ones. |
|
|
Configurable Options
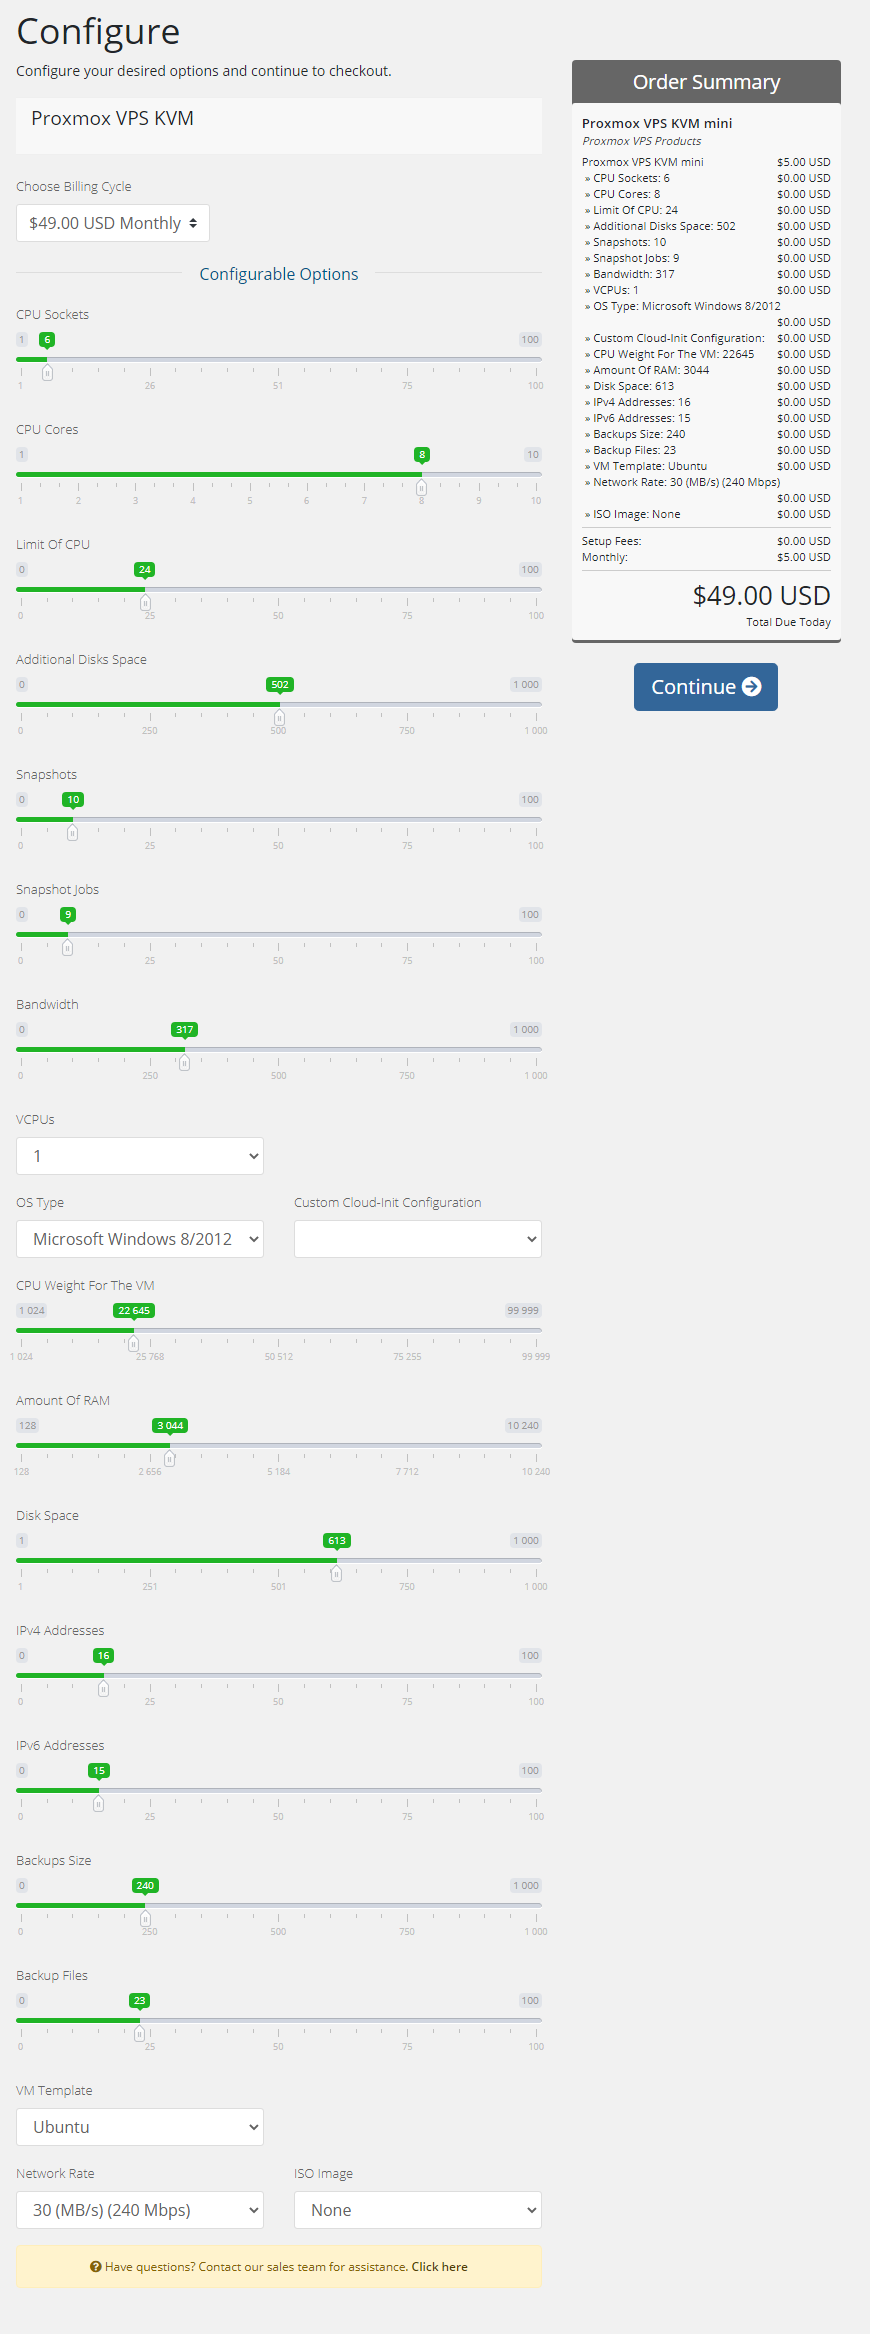
| When you successfully set up a product, your client can order it by choosing from the default configurable options. |
|
| In case those options do not suit your needs, you can edit them. Go to 'Setup' → 'Products/Services' → 'Configurable Option' and press the edit button next to the configurable option used by your product. |

|
| Here you can view all the products this configurable option group is assigned to. Now, we will show you how to edit options. Let's say you want to add an option to order a VPS with 4 cores per socket. |
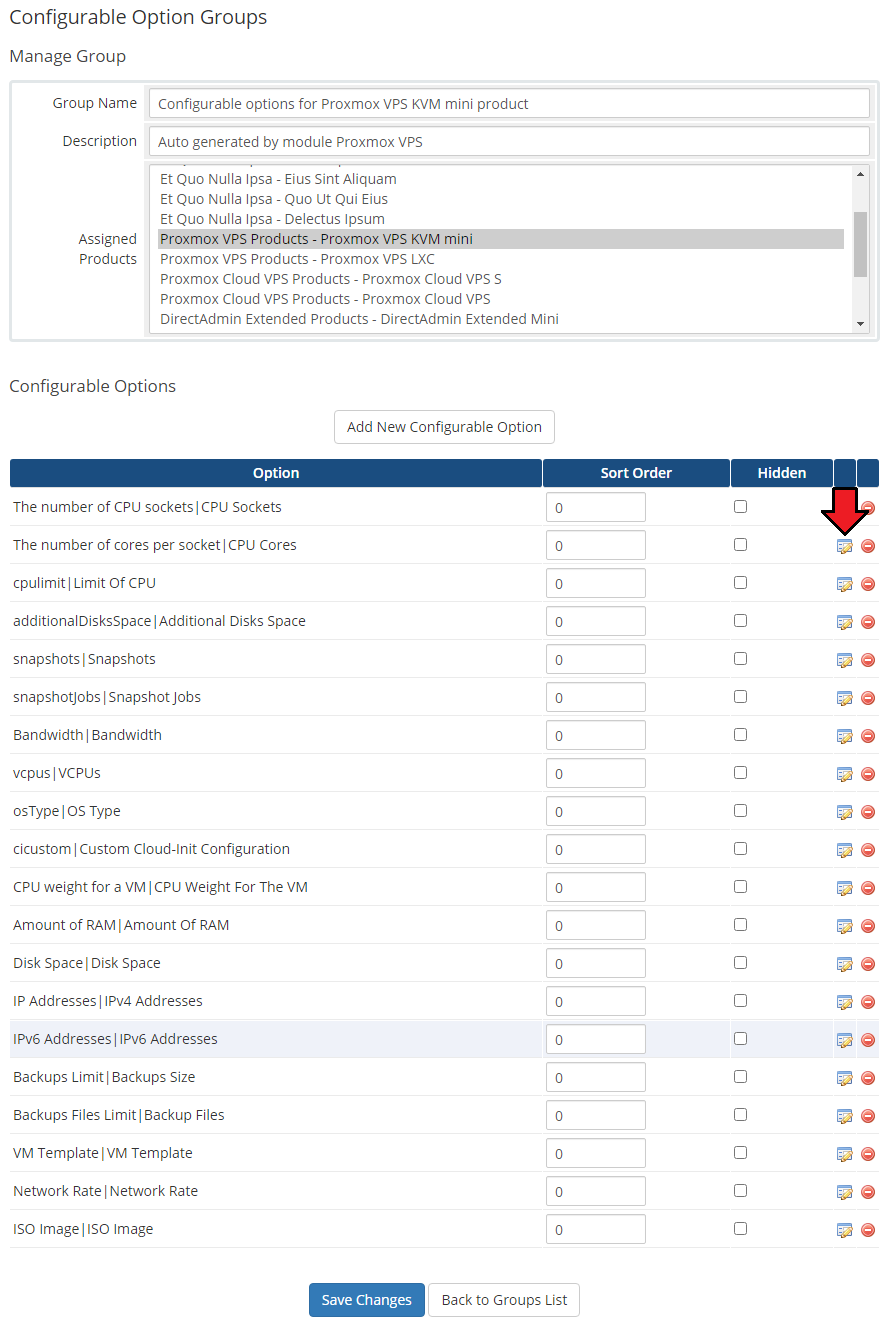
|
| You will see a popup window, so make sure your browser does not block it. To add a new option, enter it in the textbox below all other options. If you want to replace the option you currently have, simply edit the textbox. |
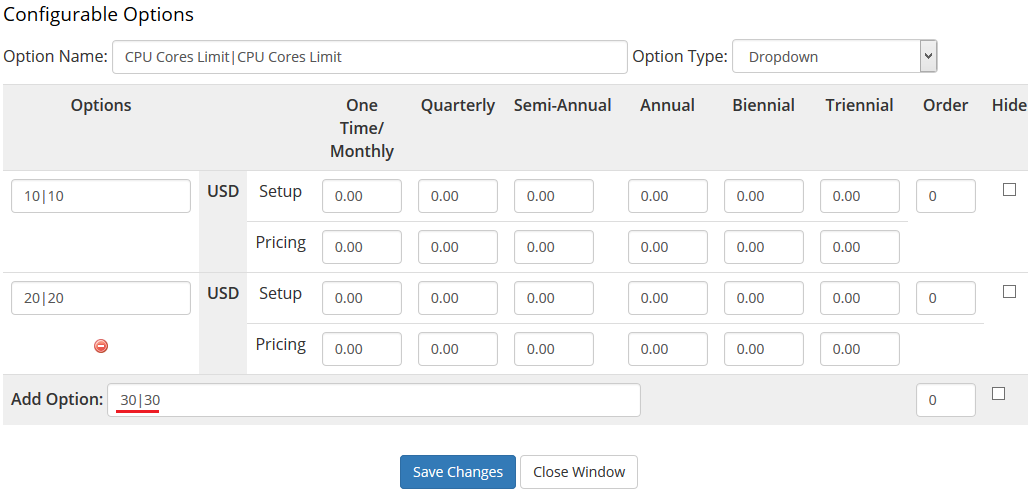
|
List of Configurable Options
|
The table below lists all configurable options used by the module for the chosen virtualization type. |
| KVM |
LXC |
|---|---|
| The number of CPU sockets|CPU Sockets |
cores|CPU Cores |
| The number of cores per socket|CPU Cores |
cpulimit|Limit Of CPU |
| cpulimit|Limit Of CPU |
CPU weight for a VM|CPU Weight For The VM |
| CPU weight for a VM|CPU Weight For The VM |
Amount of RAM|Amount Of RAM |
| Amount of RAM|Amount Of RAM |
Disk Space|Disk Space |
| Disk Space|Disk Space |
Amount of SWAP|Amount Of SWAP |
| additionalDisksSpace|Additional Disks Space |
IP Addresses|IPv4 Addresses |
| IP Addresses|IPv4 Addresses |
IPv6 Addresses|IPv6 Addresses |
| IPv6 Addresses|IPv6 Addresses |
Backups Limit|Backups Size |
| Backups Limit|Backups Size |
Backups Files Limit|Backup Files |
| Backups Files Limit|Backup Files |
Bandwidth|Bandwidth |
| Bandwidth|Bandwidth |
VM Template|VM Template |
| VM Template|VM Template |
Network Rate|Network Rate |
| Network Rate|Network Rate |
|
| vcpus|VCPUs | |
| ISO Image|ISO Image |
|
| osType|OS Type |
Management of Billing
| When you combine Proxmox VPS For WHMCS with Advanced Billing For WHMCS, you will be able to set up additional billing options. The module allows you to charge your customers basing on the server resources used by them. |
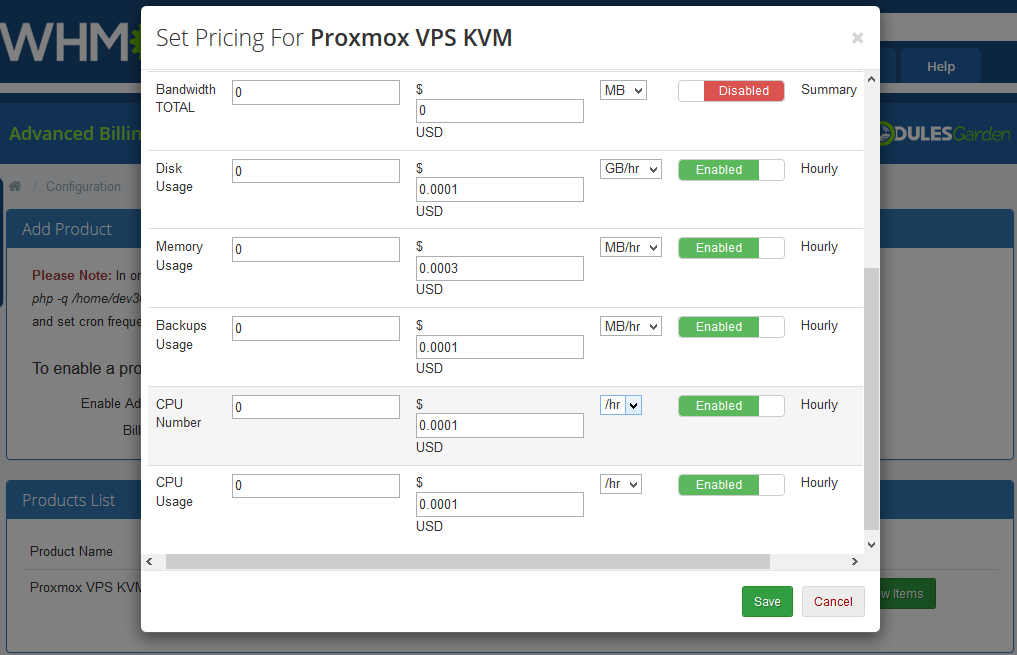
|
| With Advanced Billing For WHMCS module, you can also display the current resource usage of your customer's server and its total cost. |
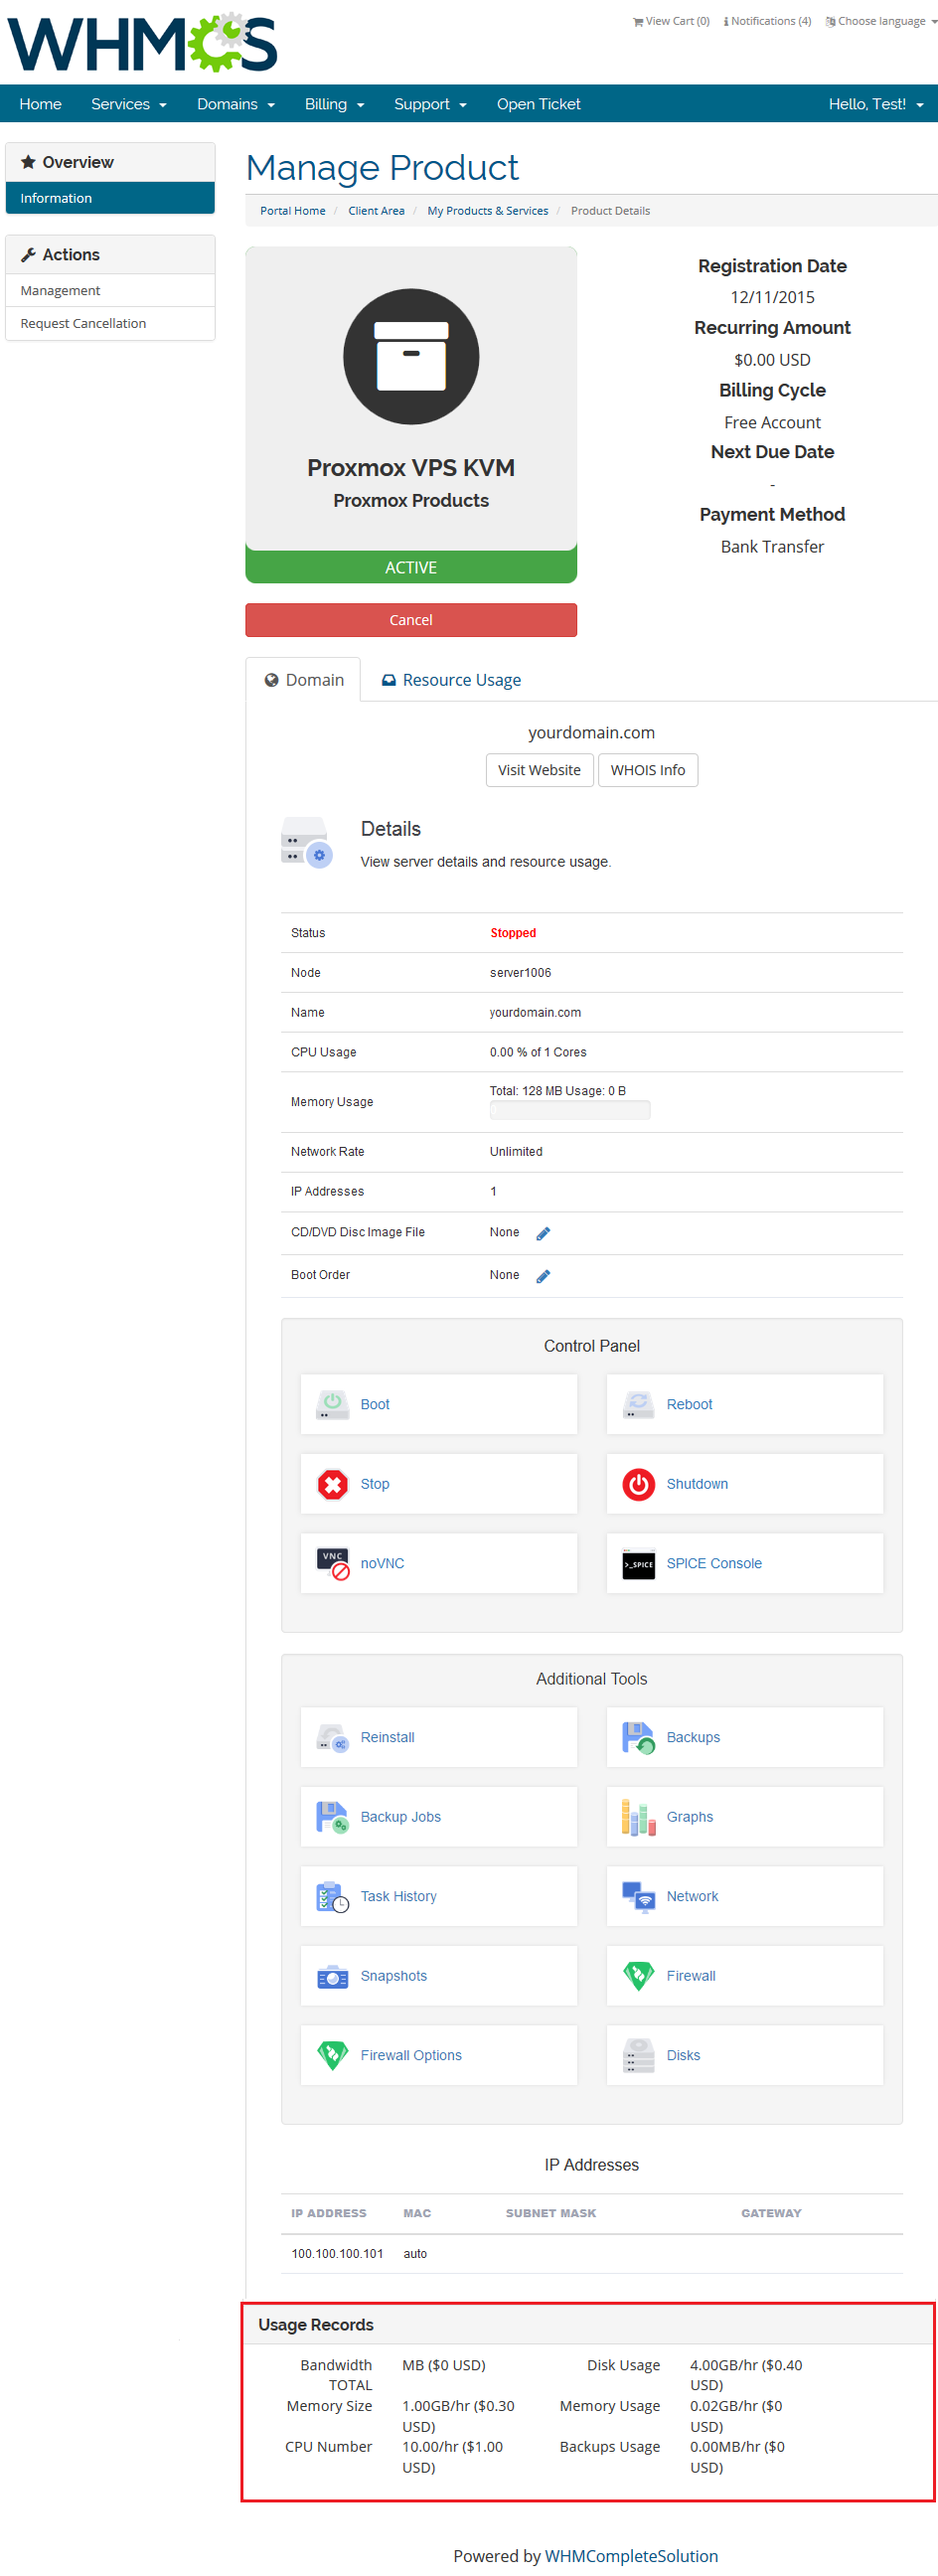
|
Management of Existing Accounts
| You can easily use Proxmox VPS module with your existing Proxmox accounts. To do so, follow the instructions below: 1. Create and configure a Proxmox VPS server and a server group. |
Servers Location Management
| Important: Server Allocator For WHMCS is required to allow locations management. In order to allow defining locations for Proxmox VPS, follow the below steps:
Keep in mind that all locations must have exactly the same configuration. |
| Now, a client may order a VPS and select 'Location'. Server Allocator For WHMCS will change the server assigned to the product. Create action is triggered on the assigned server due to the 'Server-Node' option enabled. |
Tips
| 1. Operations performed on the virtual servers are not executed immediately. Give your Proxmox Virtual Environment some time to process the request and execute the operation. |
| 2. Multiple physical Proxmox servers can be joined into one cluster. When they are joined into one cluster, you can access all of them by connecting to just one.
|
| 3. If you set the product type as 'Hosting Account' when adding a new product, you will not need to fill out nameservers as they will be automatically set up. |
| 4. OS Templates are not automatically downloaded while configuring a product. For each virtualization type, templates are downloaded from the Proxmox server depending on which one they are generated. |
| 5. OS Templates are loaded from the Storage. Make sure the module can access its content by selecting appropriate permissions for the chosen Storage. |
| 6. KVM virtualization supports only graphs concerning 'Bandwidth'. Other virtualizations support all graphs. This is due to API limitations. |
| 7. When PAM authentication is used, it is necessary to create a client first in order to change the password correctly. Read more about it here. |
| 8. As this module supports templates system, any changes made in the module's templates files will be saved after the upgrade process. |
| 9. If you are currently using the module in the 2.3.2 version or previous, and would like to migrate to Proxmox VE V5.X, you need to update the files on your Proxmox server to the new version from the 'UploadOnProxmoxServer' folder. |
| 10. OS Templates serve only as operating systems for a VM, while VM Templates contain complete configuration of a VM, the amount of resources included. |
| 11. You can use the {$service_assigned_ips} tag in your welcome email template to display automatically assigned IP addresses for created VM (either KVM or LXC virtualization type). |
| 12. 'One User Per VPS' option allows you to either create a new username for each new client's VM, or create only one that will be then used for every new VM owned by your client. |
| 13. You can use the 'IPSet IP Filter' option for firewall to prevent IP spoofing. Click here to read more about IP Sets. In the product details view in admin area you can preview the current IP Sets on VM: |

|
14. You can enable 'Admin Notifications' on product configuration to be informed via email about certain actions. These are:
|

|
| 15. 'Minimum Network Rate Limit' option allows you to change the previously entered 'Network Rate Limit' value to a new one if the current 'Bandwidth Limit' is already reached. Note that the 'Bandwidth Limit' can also be used for WHMCS overage billing calculation as described here. |

|
| 16. 'Default Username Prefix' - when filling in this field you may use the {$serviceid} parameter to avoid problems with creating usernames that already exist. |
Update Instructions
| Essential guidance through the process of updating the module is offered here. Please note that each time you update the module, you have to also update the files on the Proxmox server described in the step 4 of the installation guide.
|
Common Problems
| 1. When you have problems with connection, check whether your SELinux or firewall does not block ports. |
| 2. Error 'Could not create PVE2_API object' during connecting via the noVNC console. Reason: User account does not have permission to access the noVNC console. To change user role for all clients please use the 'Cron job users synchronization (run only once)' cron command. |
| 3. Error 'This connection is untrusted' during connecting via the noVNC console. Reason: Your certificate is not valid. |
| 4. Blank page during connecting via noVNC console. Reason: You have not uploaded the additional files on the Proxmox server. |
| 5. Error 'Change password failed: user 'xxx' does not exist' Reason: You have not created a client yet. |
| 6. Error 'Function "ssh2_connect" does not exist. Please Install SSH2 PECL before you start using the script.' Reason: You have not updated the php.ini file |
| 7. Once you have updated your Proxmox VPS For WHMCS to Proxmox VPS For WHMCS V2.0.0, it is always required to save your product configuration in module settings again. |
| 8. The current disk usage for the KVM virtualization type is not properly displayed. This is due to API limitations which currently do not return the correct value, which is always set to '0' . |
| 9. Proxmox VPS For WHMCS does not provide a direct support for HA clusters. |
| 10. If you want to use cloud-init on Debian, we recommend using the cloud-init's version 18.2 or later to avoid assorted problems occurring in previous versions. |