Advanced Billing For WHMCS
From ModulesGarden Wiki
(Difference between revisions)
|
|
| Line 1,059: |
Line 1,059: |
| | {| | | {| |
| | |style="padding: 10px 0px 30px 15px;"|The cron settings should be configured when you first set up the cron job for the module. | | |style="padding: 10px 0px 30px 15px;"|The cron settings should be configured when you first set up the cron job for the module. |
| − | In depth information regarding these settings can be found in the [[#kotwica |Installation]] section.
| + | |
| | + | |} |
| | + | {| |
| | + | |style="padding: 10px 0px 30px 15px;"|The cron can be customized with the following options: |
| | + | *'''Cron Memory Limit''' - limit how much memory the cron can use (in megabytes). If exceeded, the cron will restart. Leave empty or set to '' 0' '' to disable the limit. |
| | + | *'''Cron Threads''' - toggle to enable cron threading. |
| | + | *'''Threads Limit''' - limit the number of threads for the above function. |
| | + | *'''Thread Accounts''' - limit the number of accounts per thread |
| | + | *'''Clear Logs''' - toggle to have the cron clear logs. |
| | + | *'''Clear After [days]''' - enter how old the logs have to be to be subject to clearing (in days). The default is 365 days. |
| | + | |
| | + | Cron job additional options: |
| | + | * <code>--force</code> → Runs a single cron loop immediately. |
| | + | * <code>--single</code> → Forces execution of the module-specific cron. |
| | + | * <code>--ignore-product-frequency</code> → Runs cron without applying product frequency settings. <br/ > '''''Note:''' If you prefer not to run the module in daemon mode (as the module runs continuously by default), you can use these cron options to control execution manually.'' |
| | + | |} |
| | + | {| |
| | + | |style="padding: 0px 0px 30px 25px;"|[[File:AB4_5.png]] |
| | |} | | |} |
| | | | |
Revision as of 10:28, 23 April 2025
Advanced Billing For WHMCS enables you to implement flexible billing models based on the actual usage of resources such as bandwidth, CPU, and other server capabilities.
This module supports multiple currencies and offers various billing options, including hourly billing, credit billing, and recurring billing.
It automatically generates invoices according to your preferred settings and at customizable intervals, sending them directly to your customers.
Additionally, clients can set up email reminders to notify them when they reach or exceed specified resource usage limits.
Advanced Billing For WHMCS is compatible with many popular modules, including cPanel, Plesk, and SolusVM, as well as a variety of ModulesGarden products.
The Wiki page for Advanced Billing For WHMCS 3.x can be found here.
|
| ✔ Hourly Billing For Any WHMCS Module
|
| ✔ Specific Resources Billing For Integrated WHMCS Modules
|
| ✔ Configure And Manage Individual Product Billing
|
| ✔ View Billing Calculated Per:
|
| ✔ View List Of Current And Archived Billable Items For Next Invoices
|
| ✔ View Item Resource Usage History
|
| ✔ Manage Awaiting Invoices And Convert Them To Invoices
|
| ✔ Define Summary Calculation Method
|
| ✔ Define Time Period Between Resource Usage Checks
|
| ✔ Configure Multithreaded Cron Job Settings
|
| ✔ Set Clearance Automation For Item Archive
|
| ✔ Customize Module Language Files With "Translations" Tool
|
| ✔ Control Staff Access Level To Specific Resources With ACL
|
- 'Credit Billing' Configuration:
| ✔ Generate Invoice Every X Days
|
| ✔ Define Minimum Amount Of Credits To Charge
|
| ✔ Notify Clients Via Email About Low Credit Amount On Their Account
|
| ✔ Automatically Suspend Account When Client Is Out Of Credits - With Override Support
|
| ✔ Define Invoice Payment Due Date
|
| ✔ List Summary Credit Billing Charges Of Any Hosting
|
| ✔ Refund Credit Payment To Client
|
| ✔ Use Client Credits To Pay Invoices
|
- 'Fixed Pricing' Configuration:
| ✔ Bill Clients With Fixed Amount For Active Service Usage After X Hours
|
| ✔ Define Number Of Hours For Service To Be Active
|
| ✔ Automatically Apply Credits If Available In Client Balance
|
| ✔ Add Tax To Generated Invoices
|
| ✔ Define Invoice Payment Due Date
|
| ✔ Define Fixed Payment Amounts In Available Currencies
|
- 'Prepaid Billing' Configuration:
| ✔ Enable Clients To Top Up Account With Credits Available For Hosting
|
| ✔ Define Minimum Amount Of Credits To Top Up Account
|
| ✔ Generate Billing Overview Every X Days
|
| ✔ Access Billing Overview Of Credit Usage By Client
|
| ✔ Notify Clients Via Email About Low Credit Amount On Their Account
|
| ✔ Automatically Suspend Account When Client Is Out Of Credits
|
| ✔ Automatically Refill Client Credit Balance With Their WHMCS Credits
|
| ✔ Define Invoice Payment Due Date When Topping Up Account
|
- 'Recurring Billing' Configuration:
| ✔ Bill On Account Termination
|
| ✔ Bill When Invoice Is Generated For Hosting
|
| ✔ Bill On Specific Day Of Month
|
| ✔ Define Minimum Billing Amount
|
| ✔ Automatically Generate Invoice
|
| ✔ Define Invoice Payment Due Date
|
| ✔ Automatically Apply Credits
|
| ✔ Display Advanced Billing Information
|
| ✔ Apply Discounts To Client Groups
|
- 'Notifications' Configuration:
| ✔ Allow Clients To Create Multiple Resource Usage Reminders:
|
| ✔ Define Frequency Of Resource Checks
|
| ✔ Define Frequency Of Notifications
|
| ✔ Define Resource Usage Limits
|
| ✔ Define Maximum Number Of Reminders That Clients May Create
|
| ✔ Send Email Reminders To Clients Once Limit Is Reached Or Exceeded
|
| ✔ Choose Reminder Email Template
|
- 'Usage Records' Configuration:
| ✔ Define Period For Counted Resource Usage
|
| ✔ Define Resource Usage Counting Precision
|
| ✔ Show History Of Resource Usage
|
| ✔ Display Usage Records Pricing
|
| ✔ Show Usage Details Per Subitem
|
- 'Free Limit' Configuration:
| ✔ Use Product Configurable Options To Define Maximum Amount Of Usage Records That Will Not Be Charged
|
| ✔ View Graphs In Admin And Client Area
|
| ✔ Generate Time Graphs Of Chosen Resource Usage
|
| ✔ Show Data For Selected Time Period
|
| ✔ View Disk Storage Used To Archive Data
|
- 'Product Auto Upgrade' Configuration:
| ✔ Live Upgrade/Downgrade Of Products Along With Their Configurable Options Depending On Used Resources
|
| ✔ Define Product Auto Upgrade Groups
|
| ✔ Enable/Disable Product Auto Upgrade Groups
|
| ✔ Create Product Auto Upgrade Options
|
| ✔ Assign Product To Option - Configurable Options Support
|
| ✔ Define Options Upgrade/Downgrade Rules
|
| ✔ Set Up Minimum Upgrade/Downgrade Interval
|
| ✔ Enable/Disable Any Product Auto Upgrade Option
|
| ✔ Drag & Drop To Reorder Options
|
| ✔ Define Client Area Features
|
| ✔ View List Of Hosting Accounts Altered By Product Auto Upgrade
|
| ✔ Access Product Auto Upgrade History Of Any Hosting
|
| ✔ Enable/Disable Product Auto Upgrade And Product Auto Upgrade Options
|
| ✔ Manage Product Auto Upgrade Option Rules
|
| ✔ Set Up Minimum Upgrade/Downgrade Interval
|
| ✔ View Product Auto Upgrade History Per Product
|
| ✔ Set Up Notifications Rules
|
| ✔ Define Minimum Notification Interval
|
- Service Cancellation' Configuration:
| ✔ Allow Clients To Instantly Terminate Their Services, Stop Billing And Issue Applicable Refund
|
| ✔ cPanel Extended & cPanel Integration: Hourly, Bandwidth, Storage, Databases, Addon Domains, Subdomains, Parked Domains, Domain Forwarders, FTP Accounts, Installed Applications, Email Accounts
|
| ✔ DirectAdmin Extended & DirectAdmin Integration: Hourly, Bandwidth, Storage, Subdomains, Domain Pointers, FTP Accounts, MySQL Databases, Virtual Domains, Mailing Lists, POP Accounts, Email Forwarders, Email Autoresponders
|
| ✔ EasyDCIM Colocation Integration: Bandwidth IN/OUT/TOTAL, 95th Percentile Bandwidth IN/OUT/TOTAL Overages, Power Usage
|
✔ Hetzner Cloud Servers Integration: Backups, CPU Usage, CPUs, Disk, Disk Bandwidth Read, Disk Bandwidth Write, Disk IOPS Read, Disk IOPS Write, Floating IP Addresses, Hourly, Ingoing Traffic, Memory, Network Bandwidth In, Network Bandwidth Out,
Network PPS In, Network PPS Out, Outgoing Traffic, Snapshots, Volumes
|
✔ OpenStack Projects Integration (V1.9.0 And Higher): CPU Time, Disk Device Read Bandwidth, Disk Device Read Requests, Disk Device Write Bandwidth, Disk Device Write Requests, (Custom) Floating IPs, Image Size, (Custom) IP Addresses, Load Balancers, Memory,
Memory Usage, (Custom) Network Incoming Bytes Bandwidth, (Custom) Network Incoming Packets, (Custom) Network Outgoing Bytes Bandwidth, (Custom) Network Outgoing Packets, OS Images, Snapshot Size, Storage Volumes, VCPU Cores, Volume Size
|
| ✔ OpenStack VPS & Cloud Integration: Hourly, vCPU Cores, Memory Usage, CPU Utilization, Incoming Bandwidth, Outgoing Bandwidth, Disk Root Used, Disk I/O Read, Disk I/O Write, Floating IP Address, Fixed IP Address, Backups Number, Load Balancers
|
| ✔ Plesk Extended & Plesk Integration: Hourly, Subdomains, Disk Space, Email Boxes, Sites, Redirects, Mail Groups, Autoresponders, Mailing Lists, Users, Databases, Webapps, Traffic
|
| ✔ Proxmox VE Cloud VPS Integration: Disk Usage (LXC), Disk Size, Bandwidth IN, Bandwidth OUT, Bandwidth Total, Memory Usage, Memory Size, Backups, CPU Number, CPU Usage, CPU Cores Usage, Snapshots
|
| ✔ Proxmox VE VPS & Cloud Integration: Hourly, Disk Usage (LXC), Bandwidth IN, Bandwidth OUT, Bandwidth Total, Memory Usage, Backups Usage, CPU Number, CPU Usage, CPU Cores Usage, Snapshots
|
| ✔ Rackspace Email Extended Integration: Hourly, Mailbox Storage, Mailboxes, Sync Licenses, Blackberry Licenses, Exchange Storage, Exchange Mailboxes
|
| ✔ SolusVM Extended Cloud Integration: Available Disk Size, Disk Usage, Available Bandwidth, Available Memory, Cores, IP Addresses, Disk Usage, Memory Usage (except KVM virtualization), Bandwidth Used
|
| ✔ SolusVM Extended VPS & SolusVM Integration: Hourly, Disk Usage, Available Disk Size, Memory Usage (except KVM virtualization), Available Memory, Bandwidth Used, Bandwidth Total, CPU Number, Swap-Burst, IPv4, IPv6, Internal IP Addresses
|
| ✔ SolusVM 2 VPS & Cloud & SolusVM 2.0 Integration: Backups, CPU Units, Disk, Hourly, Images, IPv4, IPv6, Memory Usage
|
| ✔ Virtualizor Integration: Bandwidth Usage, CPU Units, CPU Cores, CPU Usage, Disk Size, Disk Usage, RAM Size, RAM Usage, Network Speed IN, Network Speed OUT, I/O Disk Read, I/O Disk Write, IPv4 Addresses, IPv6 Addresses
|
| ✔ Virtuozzo Hybrid Server Integration: Templates, CPU Usage, Memory, Bandwidth IN, Bandwidth OUT, Disk Used, Backups Usage
|
| ✔ Fast Billing Calculation Via Multithreading Cron Jobs
|
| ✔ Multi-Language Support With Custom Translations Tool
|
| ✔ Supports PHP 8.3 Back To PHP 8.1
|
| ✔ Supports WHMCS Themes "Six" And "Twenty-One"
|
| ✔ Supports WHMCS V8.13 Back To WHMCS V8.9
|
| ✔ Requires ionCube Loader V14 Or Later
|
Installation
In this tutorial, we will show you how to successfully install and manage Advanced Billing For WHMCS.
We will guide you step by step through the whole installation and configuration process.
|
| 1. Log in to our client area and download the module.
|
| 2. Extract the package and upload its content into the main WHMCS directory.
The content of the package to upload should look like this.
|
3. When you install Advanced Billing For WHMCS for the first time you have to rename 'license_RENAME.php' file.
File is located in 'modules/addons/AdvancedBilling4/license_RENAME.php'. Rename it from 'license_RENAME.php' to 'license.php'.
|
4. In order to configure your license key, you have to edit a previously renamed 'license.php' file.
Enter your license key between the quotation marks as presented on the following screen. You can find your license key in our client area → 'My Products'.
|
5. Now you have to activate the module in your WHMCS system.
Log in to your WHMCS admin area. Click 'System Settings' , then choose 'Addon Modules'.
Afterward, find 'Advanced Billing' and press the 'Activate' button.
|
6. In the next step, you need to permit access to this module.
To do so, click on the 'Configure' button, tick the desired admin roles, and press 'Save Changes'.
|
7. The last step is setting up a cron job. You can find it following the path: WHMCS → 'Addons' → 'Advanced Billing' → 'Settings' → 'Cron Job Settings' page.
php -q /your_WHMCS/modules/addons/AdvancedBilling4/cron/cron.php cron
We recommend setting it to run at 5-minute intervals. If there are any issues with cron execution, you will be notified about the time it stopped running.
|
Configuration and Management
Advanced Billing For WHMCS is a module that allows you to set up flexible billing models based on your client's actual usage of resources like bandwidth and CPU.
Refer to the manual below to learn how to configure the module and make full use of its extensive features.
|
Products
To enable Advanced Billing For WHMCS features for a product, navigate to 'Addons' → 'Advanced Billing' → 'Products' and click on the 'Add Product' button.
Select your product from the dropdown list.
|
Once your products are added use the action buttons to:
- Set Pricing
- Configure Settings
- Show Related Items
- Delete Product from the List
|
Pricing
Set pricing for each usage record for a product.
The pricing list includes information on each usage record:
- Name
- Unit
- Billing Status
- Extended Pricing
Click on the 'Edit' button to set up billing for a usage record.
|
Under the general tab you can:
- Enable or Disable Billing for the Record
- Select Billing Type
- Last - calculates the total based on the most recent reading only.
- Summary - sums all collected records and bills based on the cumulative amount.
- Hourly - averages hourly readings and bills according to that average.
- Select Unit
|
The pricing tab is where you set:
- Price - the value per unit that clients will be billed with.
- Free Usage Amount - the number of set units that, when exceeded, will enable billing.
|
Product Configuration
| The 'Settings' action will take you to the configuration window where you can adjust various features for the product.
|
Product Settings
Set general product settings related to summaries, cron frequency and client area integration.
- Cron Frequency - define how often the cron will run for the product. Use seconds as the unit.
- Summary Calculation Method - choose how summaries are calculated:
- Total Sum
- Total Average (Hourly only)
- Client Area Integration - toggle to enable client area integration for the product, this option does not add features on its own but is a requisite for other functions to be displayed in the client area.
|
Module Settings
| Configure product module-specific settings such as:
cPanel Extended
- Application Manager
- cPanel Theme
Proxmox VE Cloud VPS
- Free IPv4 Addresses
- Free IPv6 Addresses
OpenStack
- OpenStack Timezone
- Local Timezone
and more.
|
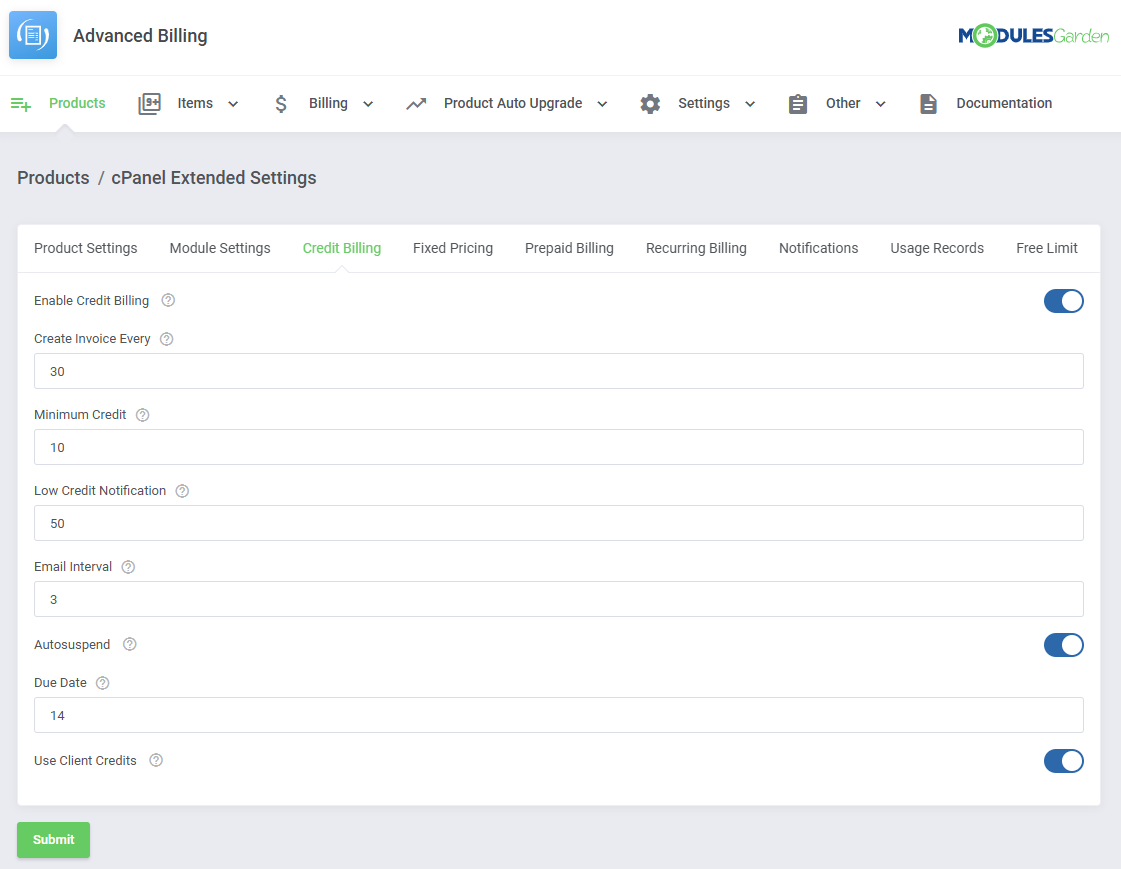
Credit Billing
Credit Billing allows your clients to be charged with their credits instead of the standard methods.
Note: This function is separate from the WHMCS 'Credit Balance'.
Enable the functionality with the 'Enable Credit Billing' toggle and configure the details:
- Create Invoice Every - dictates how often invoices are generated for the product.
- Minimum Credit - the minimum amount that will be charged from the client account credit balance.
- Low Credit Notification - if this value is higher than the credits on the client's account, an email will be sent to your client regarding the low credit amount.
- Email Interval - defines how often low credit notification email will be sent, the interval refers to the number of days.
- Autosuspend - when the credit balance reaches 0, the product ordered by the client is automatically suspended and an invoice reminding of the lacking amount will be generated.
Note: This function also takes account of the ''Override Auto-Suspend' feature.
- Due Date - determines how many days after the invoice is generated the payment is due.
- Use Client Credits - if enabled, the invoices can be paid with the client credits. If disabled, the default payment method will be used.
|
|
Fixed Pricing
Fixed Billing charges clients a set amount after a specified number of hours of active service usage.
This feature lets you define a fixed price per product, billed automatically once the usage threshold is reached.
- Auto Apply Credits - enable to automatically apply user credits if available.
- Tax - if enabled, the tax will be added to the created invoice.
- Hours - define a number of hours that must pass before the service is billed at a monthly rate.
- Due Date - define payment due date.
- Currency - set the pricing amount in any currency to bill clients after a declared number of hours has passed.
|
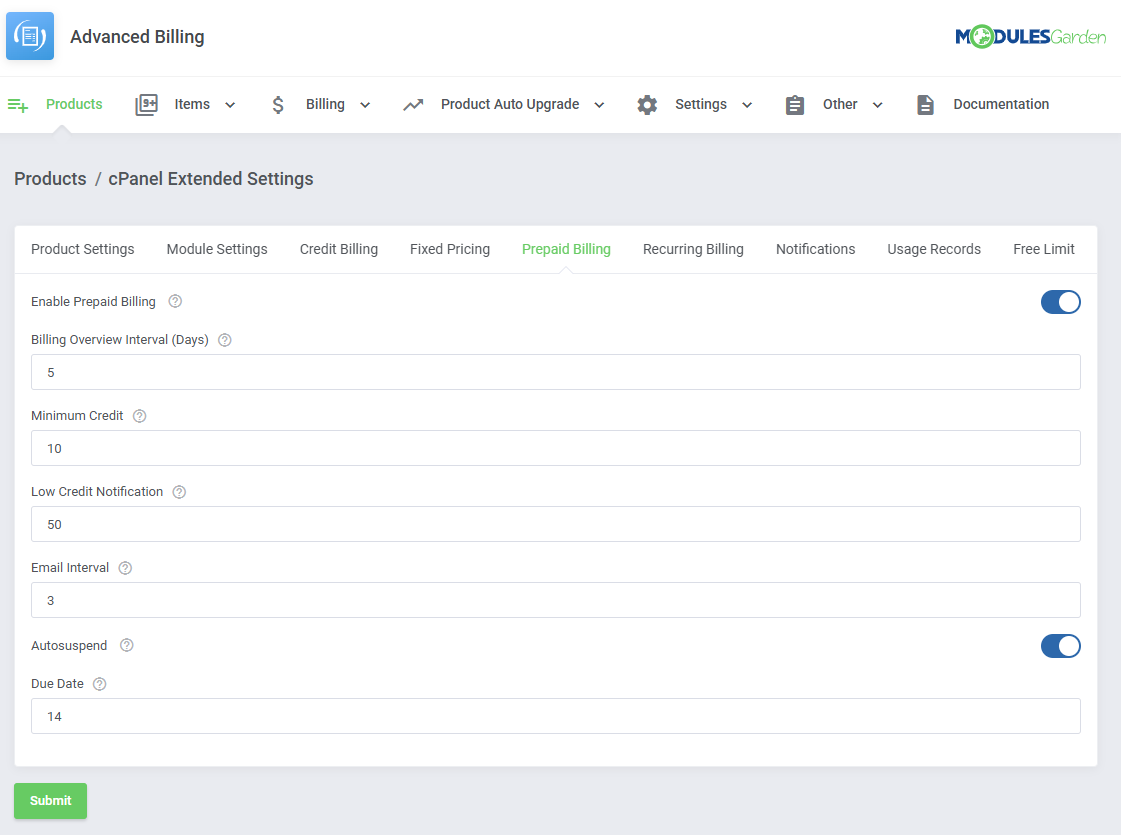
Prepaid Billing
Prepaid Billing enables charging clients directly from their prepaid credit balance.
It also provides summary billing, combining charges into a single summary instead of generating separate invoices.
- Billing Overview Interval (Days) - define how often billing overviews should be refreshed.
- Minimum Credit - determine the minimum amount that will be charged from the client's account.
- Low Credit Notification - define the credit balance low point when an email notification will be sent.
- Email Interval - set interval for email notifications, measured in days.
- Autosuspend - suspend the account automatically if the user does not have sufficient funds.
- Due Date - number of days between the invoice being generated and due date.
|
|
The client area will include the summations and a way for the client to top up his credit balance.
After the client indicates the amount of credits to be added to his account, an invoice will be generated for it.
Only after the invoice is paid, will the client receive the credits.
|
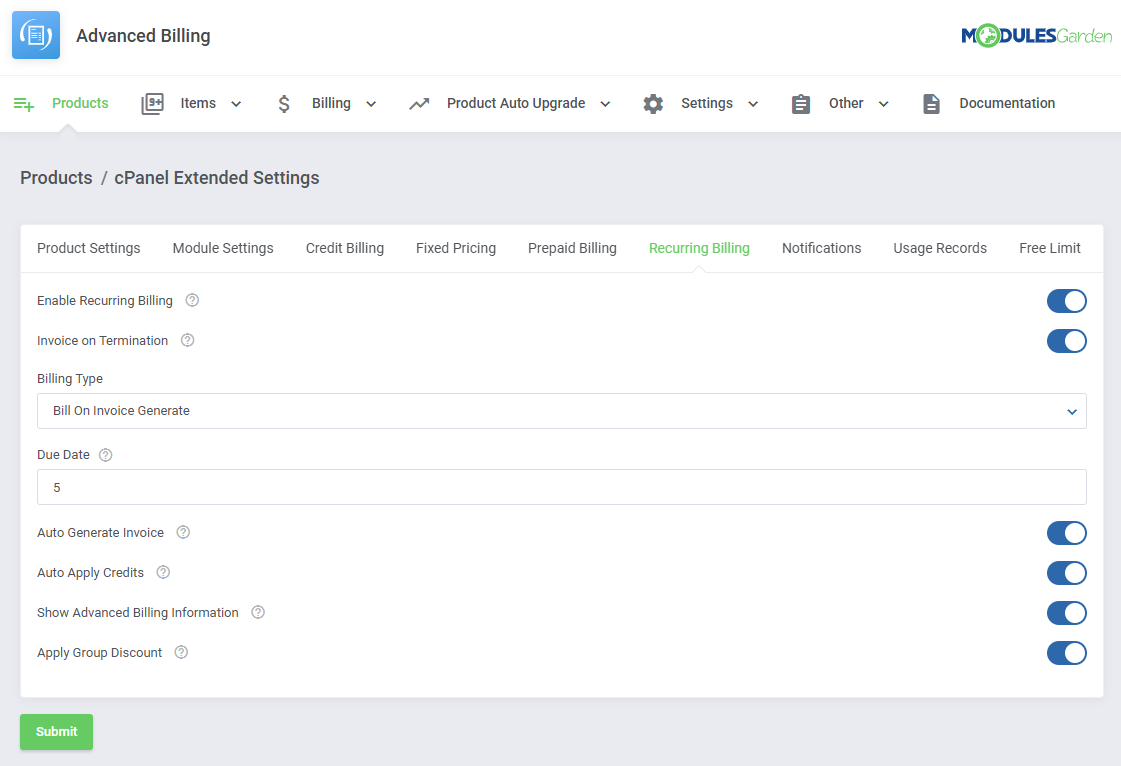
Recurring Billing
Recurring Billing automatically charges clients on a regular schedule for their products.
This feature simplifies ongoing payments by setting up recurring billing cycles.
- Invoice on Termination - when the account connected with your module is terminated, an invoice for the account will be generated.
- Billing Type - enables you to choose how to bill your client.
- Bill On Invoice Generated - new items will appear on the renewal invoice for the hosting account just as it is generated by WHMCS.
- Bill On Specific Day - generates invoices each month on the day specified in the 'Billing Type Value'.
- Bill Every X Days - generates an invoice each X days where X is the number specified in the 'Billing Type Value' field.
- Due Date - the number of days in which your customers will have to pay the invoice.
- Auto Generate Invoice - if enabled, the invoices are automatically generated and sent directly to your customers.
- Auto Apply Credits - automatically applies any available credits when an invoice is created. Works only if the 'Auto Generate Invoice' option is enabled.
- Show Advanced Billing Information - this will replace any 'Billing Cycle' with 'Hourly Billing' on the product management page in the client area.
- Apply Group Discount - enable if you want to apply the discount to the invoice set in the client group.
|
|
Notifications
Notifications allow clients to set up email reminders that are sent when their resource usage reaches or exceeds specified limits.
This feature helps clients stay informed about their usage and avoid unexpected charges.
- Reminder Limit - limit how many reminders a client can create.
- Email Template - email template that will be used.
|
The predefined 'Advanced Billing Resource Usage Reminder' features variables that you can also use in your own templates:
- {$reminder_name} - the name of a reminder set by a client.
- {$type} - the resource type for which the limit has been set by a client. E. g. 'Storage' , 'Bandwidth' etc.
- {$usage} - the current recorded usage value of the resource type the limit is set for.
- {$limit} - the limit value defined by a client whose reaching or exceeding results in sending the notification.
- {$unit} - the unit of the billed record. E.g. 'MB' , 'GB' etc.
|
Once the function is enabled, clients will see the 'Reminders' table where they can add and manage their notifications.
To add a new notification click on the 'Add Reminder' button.
|
Provide the following:
- Name - name your reminder, it is used in the default notification template.
- Checks Frequency - how often a resource check is performed, in hours.
- Reminders Frequency - limits how often a reminder can be sent, in hours.
|
Once the reminder is added, it can be managed using the action buttons:
- Edit Reminder
- Define Limits
- Delete
|
While defining the limits, you can scroll the list of resources horizontally.
The fields for each include:
- Used - current recorded usage of the given resource.
- Operator - logical operator used for the argument.
- Value - the value for the logical operation.
For example, we can set the reminder to be sent after the bandwidth is 'is more' than 20000MB, as shown on the screen below.
|
| Make sure to enable the reminder after the limits are defined for it.
|
Usage Records
Usage Records displays clients' resource usage data and usage history directly on the product page in the client area.
This feature allows clients to easily track their resource consumption over time.
- Display Summary From - defines the period for which usage records will be counted.
- Usage Records Precision - the number of decimal digits indicating the precision of usage records.
- Records History - displays history of usage records.
- Display Usage Records Pricing - displays usage record pricing for the product during the order process.
- Show Usage Details Per Subitem - display detailed usage history for subitems in cloud services.
Additional usage details will be listed in the 'Usage Details Per Subitems' on the service page in the client area.
|
Enabling the extension will display the current usage in the client area.
Enabling the 'Records History' function will also display usage from previous periods.
|
| The 'Display Usage Records Pricing' will display the pricing table when clients prepare thier order.
|
The 'Show Usage Details Per Subitem' will display detailed usage history for subitems in cloud services.
Additional usage details will be listed in the Usage Details Per Subitems on the service page in the client area.
Note: The screen below is taken from the Proxmox VE Cloud VPS product view, not cPanel Extended, as all other illustrations in this section.
|
Free Limit
| Free Limit allows you to set free usage limits for a product based on its Configurable Options.
This feature enables precise control over complimentary usage thresholds before charges apply.
After enabling the feature with the 'Enable Free Limit' toggle, select the configurable options responsible for the resources below.
The configurable option has to be created for the product first. The configurable option value represents the resource in units selected under 'Products' → 'Pricing'.
Leave fields empty, to not enable the free limit on selected resources.
|
Graphs
Graphs provide a graphical display of usage records for each configured service.
This feature helps visualize resource consumption trends over time.
Use the 'Show Enabled Records Only' option to hide records with no pricing enabled.
|
With the functionality enabled, clients will find a graph of their usage displayed in the client area.
They will be able to change the graph's scope and resources displayed.
|
Product Auto Upgrade
Product Auto Upgrade automatically upgrades or downgrades products based on resource usage, following the rules you set.
Clients can choose whether to allow automatic adjustments and can even configure their own rules for product resizing.
After enabling the function, take a look at the Product Auto Upgrade Management section to prepare the options.
|
Depending on the settings, clients will be able to:
- Enable/disable automatic upgrades for their product.
- Set a minimum time interval that has to pass between upgrades.
- Include/exclude certain upgrade options.
- See and/or change upgrade conditions.
- See their upgrade history.
- Set upgrade notifications based on resource usage.
|
Service Cancellation
When enabled, this setting allows clients to immediately terminate their service directly from the product page in the client area.
The cancellation bypasses the standard queue, and the service is terminated right away.
Billing is stopped instantly, and if applicable, any remaining balance is refunded.
|
In the client area, an additional box will appear at the very bottom of the product page with a "Cancel Service" button.
Clients can click this button, provide a reason for cancellation, and confirm the action. The service will then be terminated immediately.
|
Items
Items with resource usage counted can be found in the 'Items' section.
The 'Item List' includes current billable items, while the 'Item Archive' lists historical items that are already billed.
|
Item List
You can find the 'Item List' under 'Items'.
The list includes information such as:
- Item ID
- Hosting Name
- Client Name
- Total Amount
- Last update
And action button responsible for:
- Viewing details
- Viewing the graph
- Deleting the item from the list
|
| You can mark multiple items with the mass delete function when necessary as well.
|
Clicking on the 'View Details' button will display the page with all the usage recorded.
The page includes action buttons responsible for:
- Deleting the item
- Generating an invoice for the item
|
The 'View Graph' button will in turn display a resource usage graph for the item.
You can aspects of the graph scope by clicking on the 'Edit' button.
|
| Select the resources and time scope you would like the graph to include.
|
Item Archive
You can find the 'Item Archive' under 'Items'.
It included items that are already billed.
The list includes information such as:
- Item ID
- Hosting Name
- Client Name
And action button responsible for:
- Viewing details
- Deleting the item from the list
|
| You can mark multiple items with the mass delete function when necessary as well.
|
Billing
All billing related management can be found under the 'Billing' section.
This includes 'Invoices' and 'Credits'.
|
Invoices
Invoices created both automatically and manually can be found here.
The invoice list includes:
- Invoice ID
- Client Name
- Hosting Name
- Product Name
- Total
- Date
- Due Date
And action buttons responsible for:
- Generating the invoice
- Displaying details
- Deleting the invoice
|
| You can also utilize the mass function to generate or delete multiple invoices at once.
|
Invoice details consist of editable fields such as:
- Invoice Date
- Invoice Due Date
and every billed item with its:
- Description
- Amount
- Tax toggle
|
Credits
This tab lists all credit top-ups issued by the clients with the 'Credit Billing' function.
The list includes:
- Client Name
- Hosting
- Credits Reserved
- Amount Paid
and an action button allowing the admin to 'Refund' the credits to WHMCS 'Credit Balance'.
|
| Multiple top-ups can be selected to refund them at the same time.
|
Product Auto Upgrade Management
Under the 'Product auto Upgrade' you will be able to find tools to create and manage the auto upgrades based on resource usage.
This section is only relevant for products with the Product Auto Upgrade function enabled.
|
Configuration
| Find the 'Configuration' tab under ' Product Auto Upgrade' and click on 'Add Group' to add a new group.
|
As you create the group, complete the following fields:
- Name - name the group, the name will not be visible to clients.
- Product - select the product the group will be applicable for.
- Configurable Options Group - optionally include a configurable options group.
|
Once the group is added, the action buttons will allow you to:
- Edit the group's settings.
- Add and manage upgrade options within the group.
- Delete the group from the list.
|
While editing the settings you will be able to change:
- Group Name
- Server Type
- Time Interval - how often upgrades can happen (in minutes).
- Notification Time Interval - how often the notification can be sent (in minutes).
|
You can also change what the client is allowed to do:
- Client Rules Configuration - display rules configuration in the client area.
- Rules Configuration - enable clients to change the upgrade rules for themselves.
- Rules Disable - permit clients to disable some of the upgrade rules.
- Time Interval - give clients the option to modify upgrades time interval.
- Time Interval Values - define the allowed range for upgrades time interval (minutes).
- Notifications - allow clients to manage notifications.
- Notifications Time Interval - allow clients to modify notifications time interval.
- Notifications Time Interval Values - define the allowed range for notifications time interval (minutes).
|
The 'Options' action will take you to a page where you can define upgrade options within the group.
To begin, click on the 'Add Option' button and name the option.
|
Use the action buttons to:
- Edit - define the upgrade and downgrade rules.
- Change Package - select which package will be used for the option.
- Change Description - add descriptions to each option's configuration.
- Delete - delete the option from the group.
|
| The mass action feature can also be used to delete or change packages for multiple options at once.
|
| Click the 'Edit' button and define rules for both upgrades and downgrades, by selecting the 'Comparison Type' and 'Threshold' for any of the options.
|
Accounts
Services or 'Accounts' that make use of the 'Product Auto Upgrade' are recorded and listed in the 'Accounts' section under 'Product Auto Upgrades'.
The list includes information such as:
- Hosting ID
- Client Name
- Product Name
- Option ID
The 'Details' action button will display more information on a specific account.
|
The details include a list of auto upgrades complete with:
- Date of the update
- Type
- Option before the upgrade
- Option after the upgrade
- Message regarding the action taken
|
Client Area
Depending on the option's setting, several features can be made available to the client.
Assuming 'Client Rules Configuration' is enabled, clients will be able to change how their service interacts with the system by clicking on the 'Settings' icon under 'Auto Upgrade'.
|
Options may include:
- Enable Auto Upgrade - can be turned off to disable auto upgrades altogether.
- Time Interval - change the minimum time that has to pass between upgrades.
|
| Under the 'Rules Options' tab, the client can select which rules to enable.
|
| Service upgrades are recorded and displayed in the 'Auto Upgrade History' table.
|
| Notification messages for upgrades can be set up by the user, first, click on the additional actions button.
|
| Enable the function and select the interval between each message.
|
| To add a new notification use the 'Add Notification' button.
|
| Select the resource, comparison and unit for the notification.
|
You can add as many notifications as you would like.
Action buttons allow you to edit or delete the notification.
|
Settings
Cron Job Settings
| The cron settings should be configured when you first set up the cron job for the module.
|
The cron can be customized with the following options:
- Cron Memory Limit - limit how much memory the cron can use (in megabytes). If exceeded, the cron will restart. Leave empty or set to 0' to disable the limit.
- Cron Threads - toggle to enable cron threading.
- Threads Limit - limit the number of threads for the above function.
- Thread Accounts - limit the number of accounts per thread
- Clear Logs - toggle to have the cron clear logs.
- Clear After [days] - enter how old the logs have to be to be subject to clearing (in days). The default is 365 days.
Cron job additional options:
-
--force → Runs a single cron loop immediately.
-
--single → Forces execution of the module-specific cron.
-
--ignore-product-frequency → Runs cron without applying product frequency settings.
Note: If you prefer not to run the module in daemon mode (as the module runs continuously by default), you can use these cron options to control execution manually.
|
Item Archive Configuration
In this section, you can set up the item archive to your preferences. The top of the tab includes a counter that lists the total archived items and how much disk space it occupies.
- Clear Automatically - Enable to automatically clear the item archive under specified conditions.
- Flush Interval - Decide how often (in days) the flush should happen.
- Delete Archive Items Older than - Decide how old the archive items have to be to be subject for deletion during flush.
|
Other
Other useful tools and features directly related to the module functioning can be found in the 'Other' section.
This includes:
- Translations Tool
- Access Control
- Module Logs
|
Customizing language files is now extremely easy with the "Translations" tool that is now available directly in the addon.
Its user-friendly design makes managing various language file tweaks a smooth and efficient process.
Prepare translations for the original English files with this handy built-in tool. For specific instructions on how to use this tool please refer to its dedicated article, you will find it here.
|
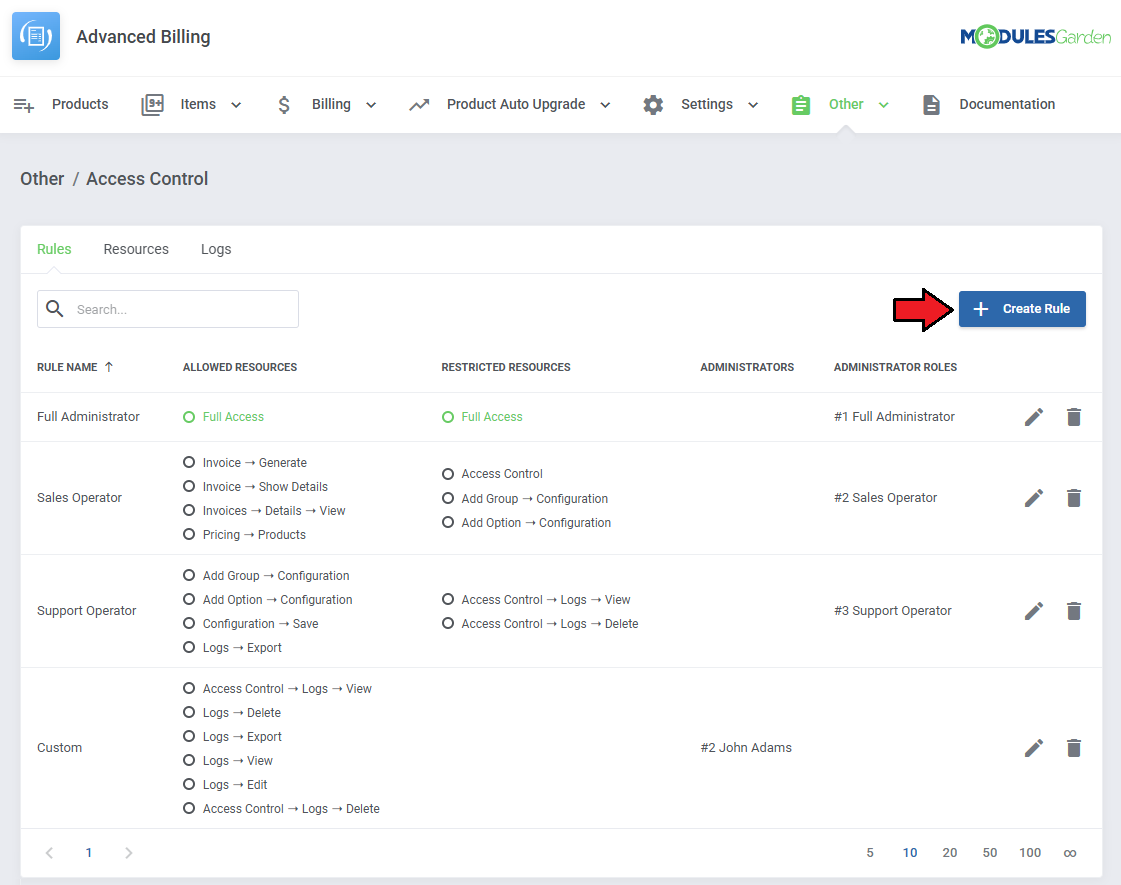
Access Control
'Access Control' allows you to specify and control exactly which sections of the module can be accessed by your administrators.
The way it works is that you create access control rules in which you decide if a specific admin, or admin role has full access, or is restricted to only specific sections.
For more detailed information on the available modules that include this tool, please refer to the Access Control Tools Wiki Page.
|
Rules
|
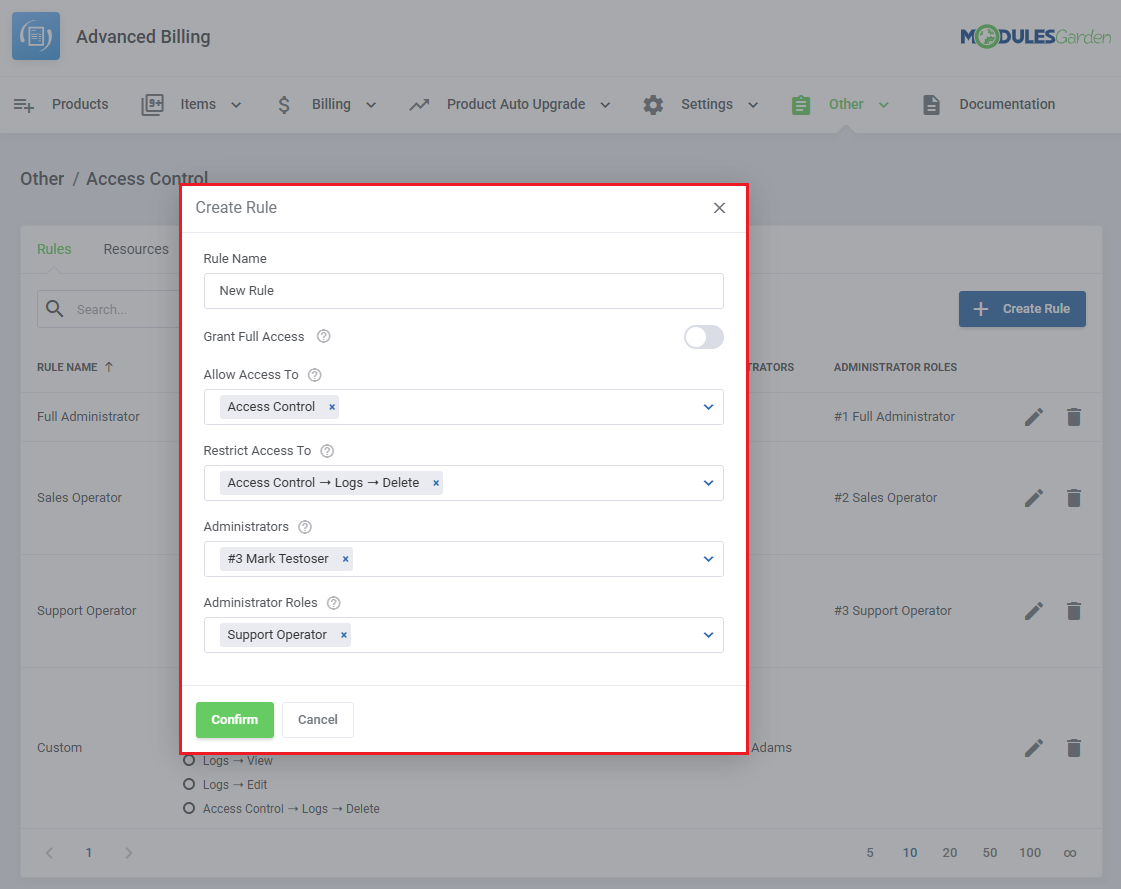
Start with creating a new rule, click on the 'Create Rule' button and a dedicated form will appear. Below you will find a description of every field required in the form.
|
|
Fill out the following fields to create resources access rule:
- Rule Name - Pick a name for your rule.
- Grant Full Access - Enable to grant full access to all sections of the module to the specified personnel. Disable to specify in two additional fields below, to which resources access will be granted, and to which it will be denied.
- Allow Access To - Designate the resources that the specified personnel will have access to.
- Restrict Access To - Specify the resources that the specified personnel will not have access to.
- Administrators - Specify which singular administrators will be subject to the new rule. If the specific administrator is already included in the group you have picked, you do not need to add him separately.
Note: All restrictions for specific administrators are summed with the restrictions on their role groups, across all rules.
- Administrator Roles - Specify which administrator role groups will be subject to the new rule.
Important: When picking specific sections, keep in mind that allowing a parent section will also allow all of its children.
For example by allowing 'Access Control' you allow every section of it
If you would like to give access to everything about Access Control, but the ability to delete logs, you can pick 'Access Control' in 'Allow Access To' and then 'Access Control → Logs → Delete' in 'Restrict Access To.'
Restrict takes precedence over Allow, so if a specific section is included in both, it will be restricted.
|
|
| To edit or delete existing rules, use the icons to the right.
|
Resources
Use the toggles in the 'Resources' section to specify which of them should be subject to logging, found in the 'Logs' section.
Every time an administrator requests a toggled resource, it will be recorded.
|
Access Control Logs
The logs section includes:
- Log ID
- Name of the administrator
- Requested resource
- Applied Resource
- Rule Name
- Date
Use the trash bin icons to delete specific logs, or utilize the mass action function to delete multiple logs at once.
|
Logs
The 'Logs' section under 'Other' is where the module logs are stored.
You can filter the module logs by type with the 'Show' buttons:
|
| You can delete logs either one by one or with the mass function.
|
Additional actions include:
- Logging Settings
- Log Export
- Rule Based Deletion
|
In the settings you may decide:
- Log Types - which type of logs should be recorded.
- Clear automatically - if you would like to automatically delete logs older than defined number of days.
- Delete Logs Older Than - how many days should pass before logs are automatically deleted.
|
| While exporting you will have to specify which logs to export:
|
You may also delete specific logs without finding them manually.
Simply define:
- Log Types
- Delete Logs Older Than
|
Use Cases
This section provides sample scenarios that demonstrate common use cases, showing how the module’s features can be applied in real-world situations.
Explore the examples below for practical insights into how the module works.
|
Flexible Cloud Services with Prepaid Billing and Cost Control
With Advanced Billing For WHMCS, you can deliver a cloud-like experience that gives clients full control over resource selection, deployment, and billing preferences.
Clients can top up their account balance and then deploy and manage virtual machines on demand, eliminating the need for separate orders.
You benefit from full cost transparency, a secure prepaid system, and automated billing, while your clients enjoy fast provisioning and real-time insights into their usage and expenses.
|
Key Benefits
- Client autonomy - Clients pay once, top up their accounts, and deploy services anytime, without additional steps for approval.
- Real-time cost overview - Clients can monitor daily costs, projected expenses, and pricing per resource (CPU, RAM, bandwidth).
- Secure prepaid billing - Services activate only after funds are deposited, eliminating unpaid usage risks.
- Self-service top-ups - Clients add credit anytime from the WHMCS client area.
|
- Usage analytics - Clients gain access to detailed, near real-time tracking of individual resource usage.
|
- Visual insights - Clients can view usage patterns through clear, intuitive graphical representations.
|
Billing options available in the module:
- Prepaid Billing - Deducts charges from the client's prepaid credit balance, consolidating multiple charges into a single summary invoice, making it ideal for dynamic cloud environments.
- Credit Billing - Deducts costs from a client's available credit instead of using standard payment methods.
- Recurring Billing - Automatically charges clients at set intervals for their services.
- Fixed Pricing - Bills a fixed amount after a defined number of usage hours. Suitable for predefined pricing plans.
|
Recommended Integrations
| For cloud deployments, we recommend starting with:
For enterprise-level solutions, you may use:
|
Configuration steps
1. Install and configure your provisioning module. In this example, we use OpenStack Projects For WHMCS module.
Follow the installation guide to prepare the product for Advanced Billing integration.
|
| 2. Define pricing for each usage record.
|
3. Move to Product Settings of the OpenStack Projects product and adjust the following:
- Cron Frequency - Set how often the cron should run (in seconds).
- Summary Calculation Method - Choose between:
- Total Sum
- Total Average (Hourly only)
- Client Area Integration - Enable to allow features like usage overviews and resource summaries to appear in the client area.
|
4. Enable and configure Prepaid Billing for the product an dfine-tune the billing behaviour:
- Billing Overview Interval (Days) - Frequency for generating billing summaries.
- Minimum Credit - Minimum charge amount per deduction cycle.
- Low Credit Notification - Credit threshold that triggers a low balance warning.
- Email Interval - Time (in days) between low balance reminder emails.
- Autosuspend - Automatically suspend service if the client has insufficient funds.
- Due Date - Days between invoice creation and due date (used if invoice generation is active).
|
5. Activate optional extensions for advanced usage visibility. We recommend activating:
- Usage Records – for precise, near real-time tracking of resource consumption.
- Graphs – for graphical visualization of usage trends in the client area.
|
6. That is all. Your configuration is complete. From this point on, Advanced Billing For WHMCS will handle cost tracking and charging automatically.
Your clients can now top up their balance, deploy services, monitor usage, and manage everything directly from the WHMCS client area.
|
Tips
1. In version 4.0, the "Extensions" section has been removed, so the module license must now be placed in the "license.php" file.
If upgrading from version V3.X, re-add the license to the "license.php" file and reissue it from your client area panel.
|
Update Instructions
Essential guidance through the process of updating the module is offered here
Ensure successful completion of the module update by carefully following each step, thereby preventing data loss or any unforeseen issues.
Additionally, you will find a current list of supplementary actions necessary for a smooth update process there.
|
Module Upgrade From V3.X to V4.X
Upgrading from version 3.X to 4.0 requires additional steps due to the changes in the module structure. Please follow the instructions carefully to ensure a smooth transition.
- Optionally backup your language files and license.
- Delete all old module files.
- Upload new module files from version 4.0.
- Re-add the license to license.php and reissue it in your client area.
- Cron Job Update:
|
Upgrade Guide
Seeking a solution that offers greater flexibility, customization tailored to your precise needs, and unrestricted availability?
There is an option that not only proves to be cost-effective in the long run but also includes prioritized support services, making it a truly valuable investment.
Opt for the Open Source version of your Advanced Billing For WHMCS module to unlock these benefits.
Simply click on either the Get Source Code or Upgrade To Lifetime button found on the product's page in our client area to complete the one-step upgrade process, with a dedicated discount already applied.
Follow a comprehensive guide covering the transition process, the advantages it brings, and step-by-step instructions on what to do next after the order has been successfully finalized.
|
Common Problems
| 1. When you have problems with connection, check whether your SELinux or firewall does not block ports.
|
2. Cron Threads feature currently does not work for the EasyDCIM submodule. In case you have enabled Cron Threads, cron tasks for EasyDCIM submodule will be executed in a basic way.
This option will be implemented in future releases of the Advanced Billing module.
|
| 3. If you encounter metric calculation problems with OpenStack Projects products, make sure you are using version 1.9.0 or newer of OpenStack Projects, as earlier versions are not supported.
|


