Marketing Triggers Automation For WHMCS
From ModulesGarden Wiki
(Difference between revisions)
|
|
| Line 368: |
Line 368: |
| | {| | | {| |
| | |style="padding: 0px 0px 15px 15px;"|Besides the guide, the dashboard features '' 'Recently Triggered Actions' '' table which presents the history of actions including: | | |style="padding: 0px 0px 15px 15px;"|Besides the guide, the dashboard features '' 'Recently Triggered Actions' '' table which presents the history of actions including: |
| − | * ID | + | *'''ID''' - event ID. |
| − | * Client/Admin that triggered it | + | *'''Triggered by''' - client/admin that triggered it. |
| − | * Trigger | + | *'''Trigger''' - which trigger was the cause for the event. |
| − | * Action | + | *'''Action''' - which action was taken. |
| − | * Status<br/>'''''Note:''' The 'Ready' status indicates that an action is prepared and waiting for the customer. | + | *'''Status''' - event status, 'Pending', 'Finished', 'Error' and 'Ready'.<br/>'''''Note:''' The 'Ready' status indicates that an action is prepared and waiting for the customer. |
| | |} | | |} |
| | {| | | {| |
Revision as of 14:29, 4 December 2024
Marketing Triggers Automation For WHMCS is a tool that automates tasks by triggering specific actions based on customer behavior or initiated processes.
Configure triggers for various events to automatically perform actions such as sending email or ticket notifications, displaying custom popups, or creating admin to-do items.
Use the module to eliminate repetitive tasks and maximize your marketing potential.
|
| ✔ Create Triggers That Will Lunch Specific Automated Actions
|
| ✔ View Dashboard With Recently Triggered Actions And Summaries
|
| ✔ Create And Manage Actions:
|
| ✔ Select Trigger On Specific Actions:
|
| ✔ Configure Related Trigger Settings
|
| ✔ Select Action To Lunch Based On Trigger
|
| ✔ Enable Overwriting Pending Action
|
| ✔ Specify Action Delay In:
|
| ✔ Customize Module Language Files With "Translations" Tool
|
| ✔ Email Notification For Admin
|
| ✔ Email Notification For Customer
|
| ✔ Send SMS Notification For Admin
|
| ✔ Send SMS Notification For Customer
|
| ✔ Show Popup Notification
|
| ✔ Affiliate Withdrawal Requested
|
| ✔ Client - Contact Deleted
|
| ✔ Client - Contact Edited
|
| ✔ Client - Details Updated
|
| ✔ Client - Email Verified
|
| ✔ Client - Knowledgebase Page Viewed
|
| ✔ Client - Password Changed
|
| ✔ Client - Quote Accepted
|
| ✔ Client - Status Changed
|
| ✔ Domain Contact Details Updated
|
| ✔ Domain DNS Records Updated
|
| ✔ Domain EPP Code Requested
|
| ✔ Domain Nameservers Updated
|
| ✔ Invoice Gateway Changed
|
| ✔ Order Marked As Fraudulent
|
| ✔ Service Package Changed
|
| ✔ Service Password Changed
|
| ✔ Ticket Opened By Client
|
| ✔ URL Post Data Contains Parameters
|
| ✔ Multi-Language Support With Custom Translations Tool
|
| ✔ Supports Google Analytics 4
|
| ✔ Supports PHP 8.2 Back To PHP 8.1
|
| ✔ Supports WHMCS V8.11 Back To WHMCS V8.8
|
| ✔ Requires ionCube Loader V13 Or Later
|
Installation
| 1. Log in to our client area and download the module.
|
2. Extract the package and upload its content into the main WHMCS directory.
The content of the package to upload should look like this.
|
3. When you install Marketing Triggers Automation For WHMCS for the first time you have to rename 'license_RENAME.php' file.
The file is located in 'modules/addons/MarketingTriggersAutomation/license_RENAME.php'. Rename it from 'license_RENAME.php' to 'license.php'.
|
4. In order to configure your license key, you have to edit the previously renamed 'license.php' file.
Enter your license key between quotation marks as presented on the following screen. You can find your license key in our client area → 'My Products'.
|
5. Now, set up the 'storage' folder as recursively writable.
This folder is available at '/yourWHMCS/modules/addons/MarketingTriggersAutomation/'.
|
6. Now you have to activate the module in your WHMCS system.
Log in to your WHMCS admin area. Go to 'System Settings' → 'Addon Modules'. Afterwards, find 'Marketing Triggers Automation' and press the 'Activate' button.
|
7. In the next step, you need to permit access to this module.
To do so, click on the 'Configure' button, tick 'Full Administrator' and press 'Save Changes'.
|
8. The final step of the module installation is setting up a cron command that is required for several module features to work properly.
php -q /yourWHMCS/modules/addons/MarketingTriggersAutomation/cron/cron.php actions:run
Note that the above directory is exemplary, please adjust the cron line to your own needs. 5 minute interval is recommended.
|
9. You have just successfully installed Marketing Triggers Automation!
You can access your module under 'Addons' → 'Marketing Triggers Automation'.
|
Management
| Marketing Triggers Automation For WHMCS lets you automate tasks based on customer actions.
In this guide, we will walk you through the management features of the module.
|
Dashboard
| The dashboard provides crucial information regarding the module operating processes.
At the top, you will find the 'Configuration Guide' make sure to read it thoroughly to learn how to set up actions and triggers.
This documentation will cover the same topics in detail as well.
|
Besides the guide, the dashboard features 'Recently Triggered Actions' table which presents the history of actions including:
- ID - event ID.
- Triggered by - client/admin that triggered it.
- Trigger - which trigger was the cause for the event.
- Action - which action was taken.
- Status - event status, 'Pending', 'Finished', 'Error' and 'Ready'.
Note: The 'Ready' status indicates that an action is prepared and waiting for the customer.
|
The 'Actions Summary' counts actions taken by the module, the counters include:
- Actions Triggered in the Last 24 Hours
- Actions Triggered in the Last 7 Days
- Actions Triggered in the Last 30 Days
- Total Actions Triggered
|
Actions
After triggers are triggered, the actions will be taken. To create a new action, navigate to the 'Actions' section of the addon.
To create a new action, click on the 'Create Action' button.
|
| Choose a name for easy identification when adding triggers and select the action that should be performed.
|
| After an action is created, you can use the mass action function and the action button to delete it.
|
| To configure the action click on the 'Edit' button.
|
Add To-Do Item
This action will create an item in the WHMCS to-do list. Use it to assign and track specific tasks related to triggers within your workflow.
Complete the following fields and click 'Submit' to create the action.
If you want, you can use merge fields, they can be found below the action form. Find the trigger you plan to use to see merge fields available for it.
- Action Name - name the action, this will help identify it when creating a trigger later.
- Title - enter a title, it will be used to name the to-do item.
- Description - provide a description for the to-do item.
- Due Date Delay (Days) - enter how many days after the trigger should the action be taken.
- Admin Assignment - select which admin will be assigned to the to-do item.
- Initial Status - select the status of the to-do item with which it should be created.
|
Send Email Notification to Admin
Send an email to selected admins. This can be used to notify specific team members about important updates or actions that require their attention.
- Action Name - name the action, this will help identify it when creating a trigger later.
- Email Recipient - select which admins will receive the email, the Triggering Admin, is the admin that is responsible for triggering the event.
- Email Template - select the email template that will be used for the action.
|
Send Email Notification to Customer
Send an email to clients when they trigger the action. This is useful for keeping clients informed or confirming actions they have initiated.
- Action Name - name the action, this will help identify it when creating a trigger later.
- Email Template - select the email template that will be used for the action.
|
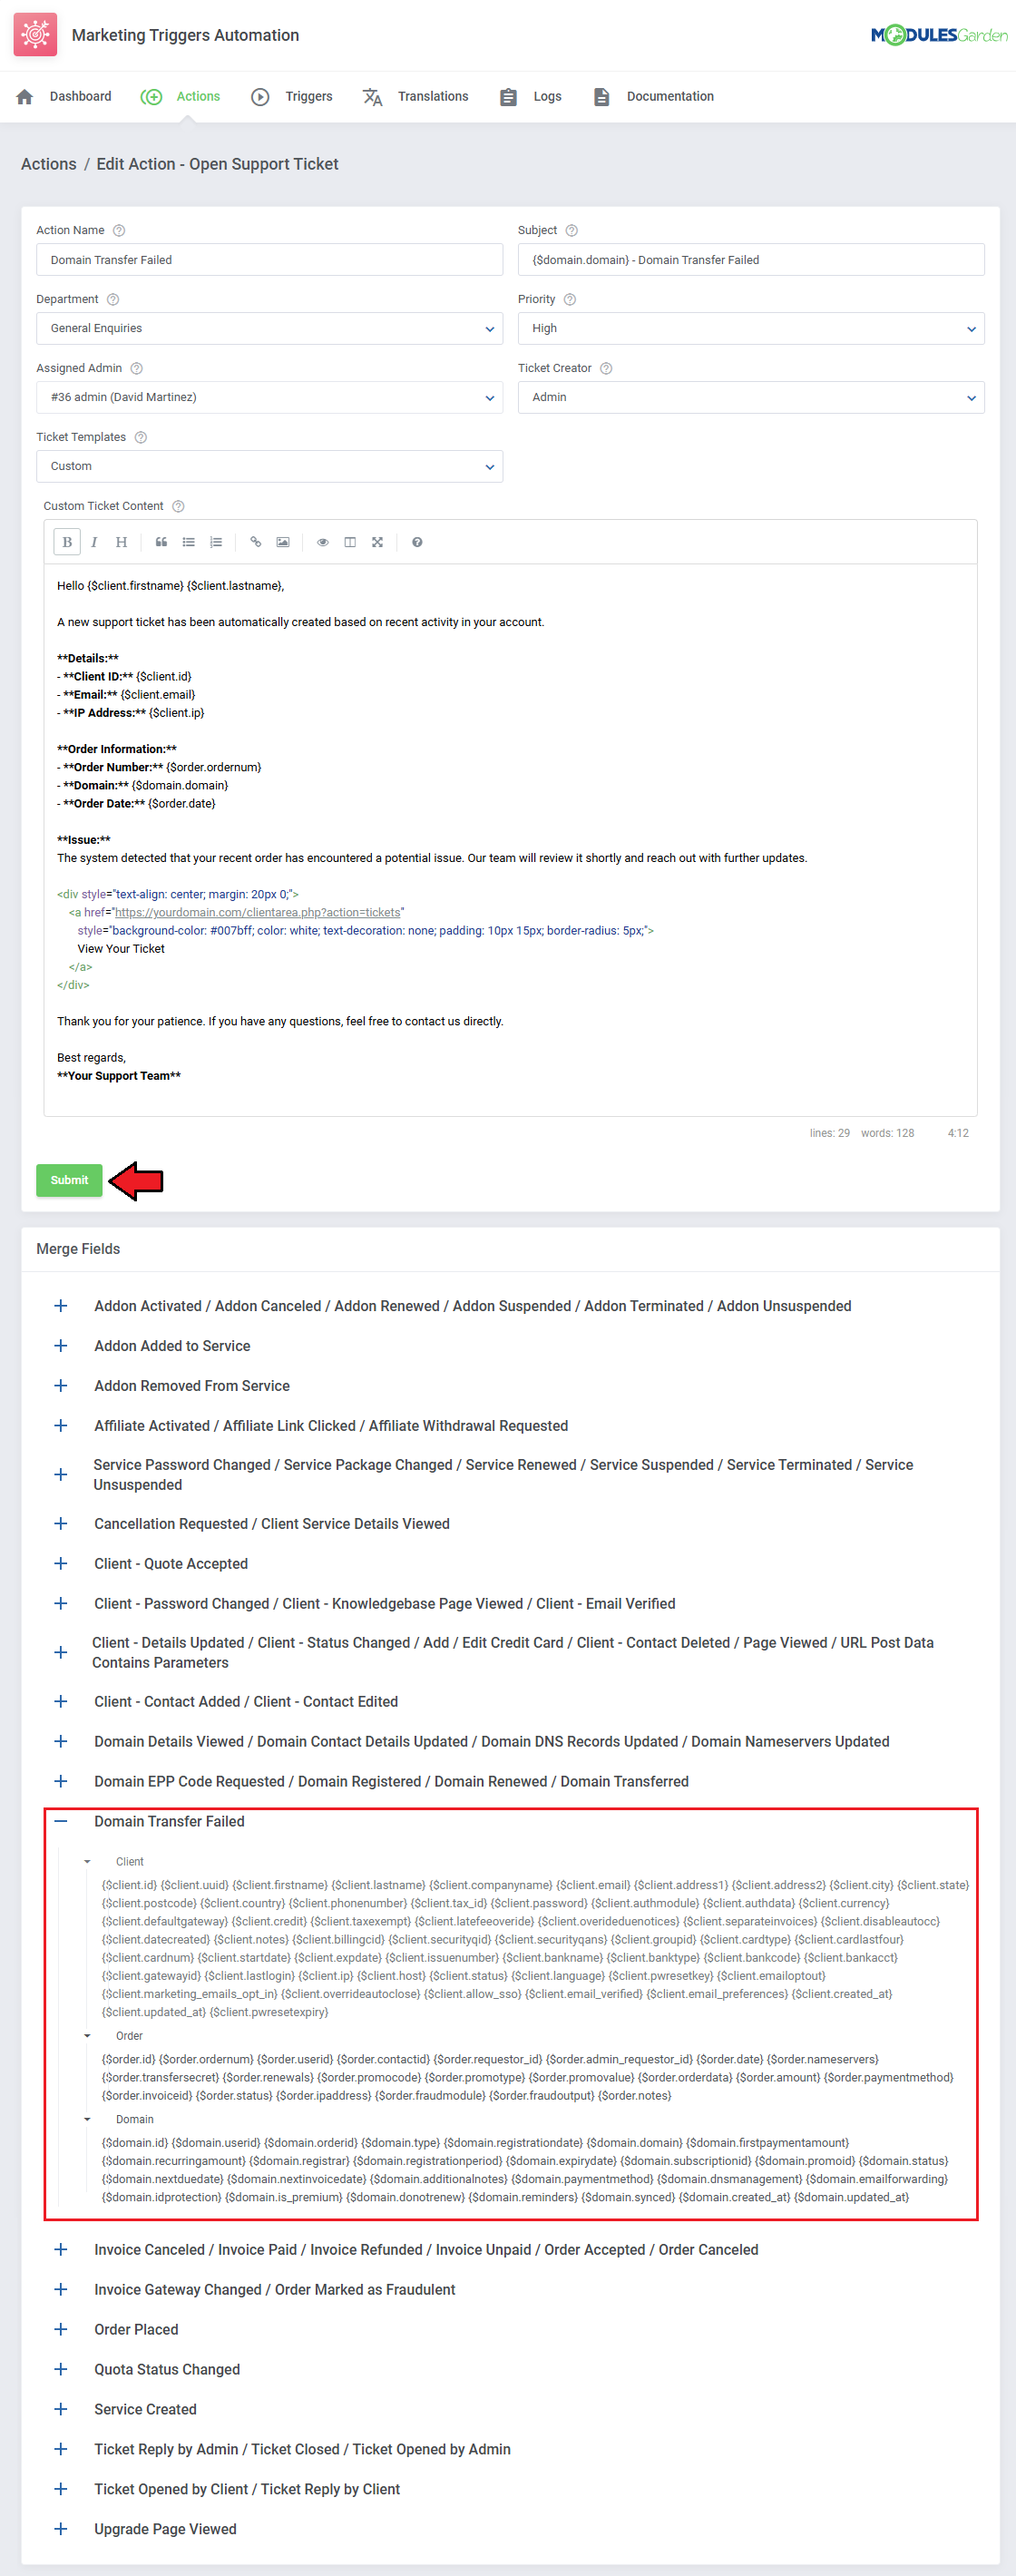
Open Support Ticket
This action will create an open support ticket for the customer that triggers it.
It helps automate the process of addressing customer issues by automatically generating a ticket for prompt follow-up.
- Action Name - name the action, this will help identify it when creating a trigger later.
- Department - select the department to assign the ticket to.
- Assigned Admin - select the admin that will be assigned to the ticket.
- Ticket Templates - select a ticket template for its contents, or pick 'Custom' to create a new one.
Note: Ticket templates can be found in WHMCS under 'System Settings' → 'Email Templates' → 'Support Messages'.
- Subject - enter a subject for the ticket, you can use merge fields here. The full list of merge fields can be found at the bottom of the page.
- Priority - select the priority level of the ticket.
- Ticket Creator - select who should be the creator of the ticket.
- Custom Ticket Content - if you decide to create your custom ticket template, an editor will be displayed where you can write its contents including merge fields, HTML tags and CSS styles.
|
|
Send SMS Notification to Admin
Send an SMS message to selected admins. This can be used to notify admins about important updates or actions that require their attention via SMS.
- Action Name - name the action, this will help identify it when creating a trigger later.
- API Execution Admin - select which admin will be used to execute the API.
- Notified Admins - select which admins will receive the message. 'Triggering Admin' is the admin that has triggered the action.
- Instant Delivery - enable to skip the SMS Center For WHMCS queue and send the message immediately.
- Message Type - select a message type from SMS Center For WHMCS or create a 'Custom Message'.
- SMS Custom Message - if 'Custom Message' is selected this field will appear. You can enter the message text including merge fields found under it.
|
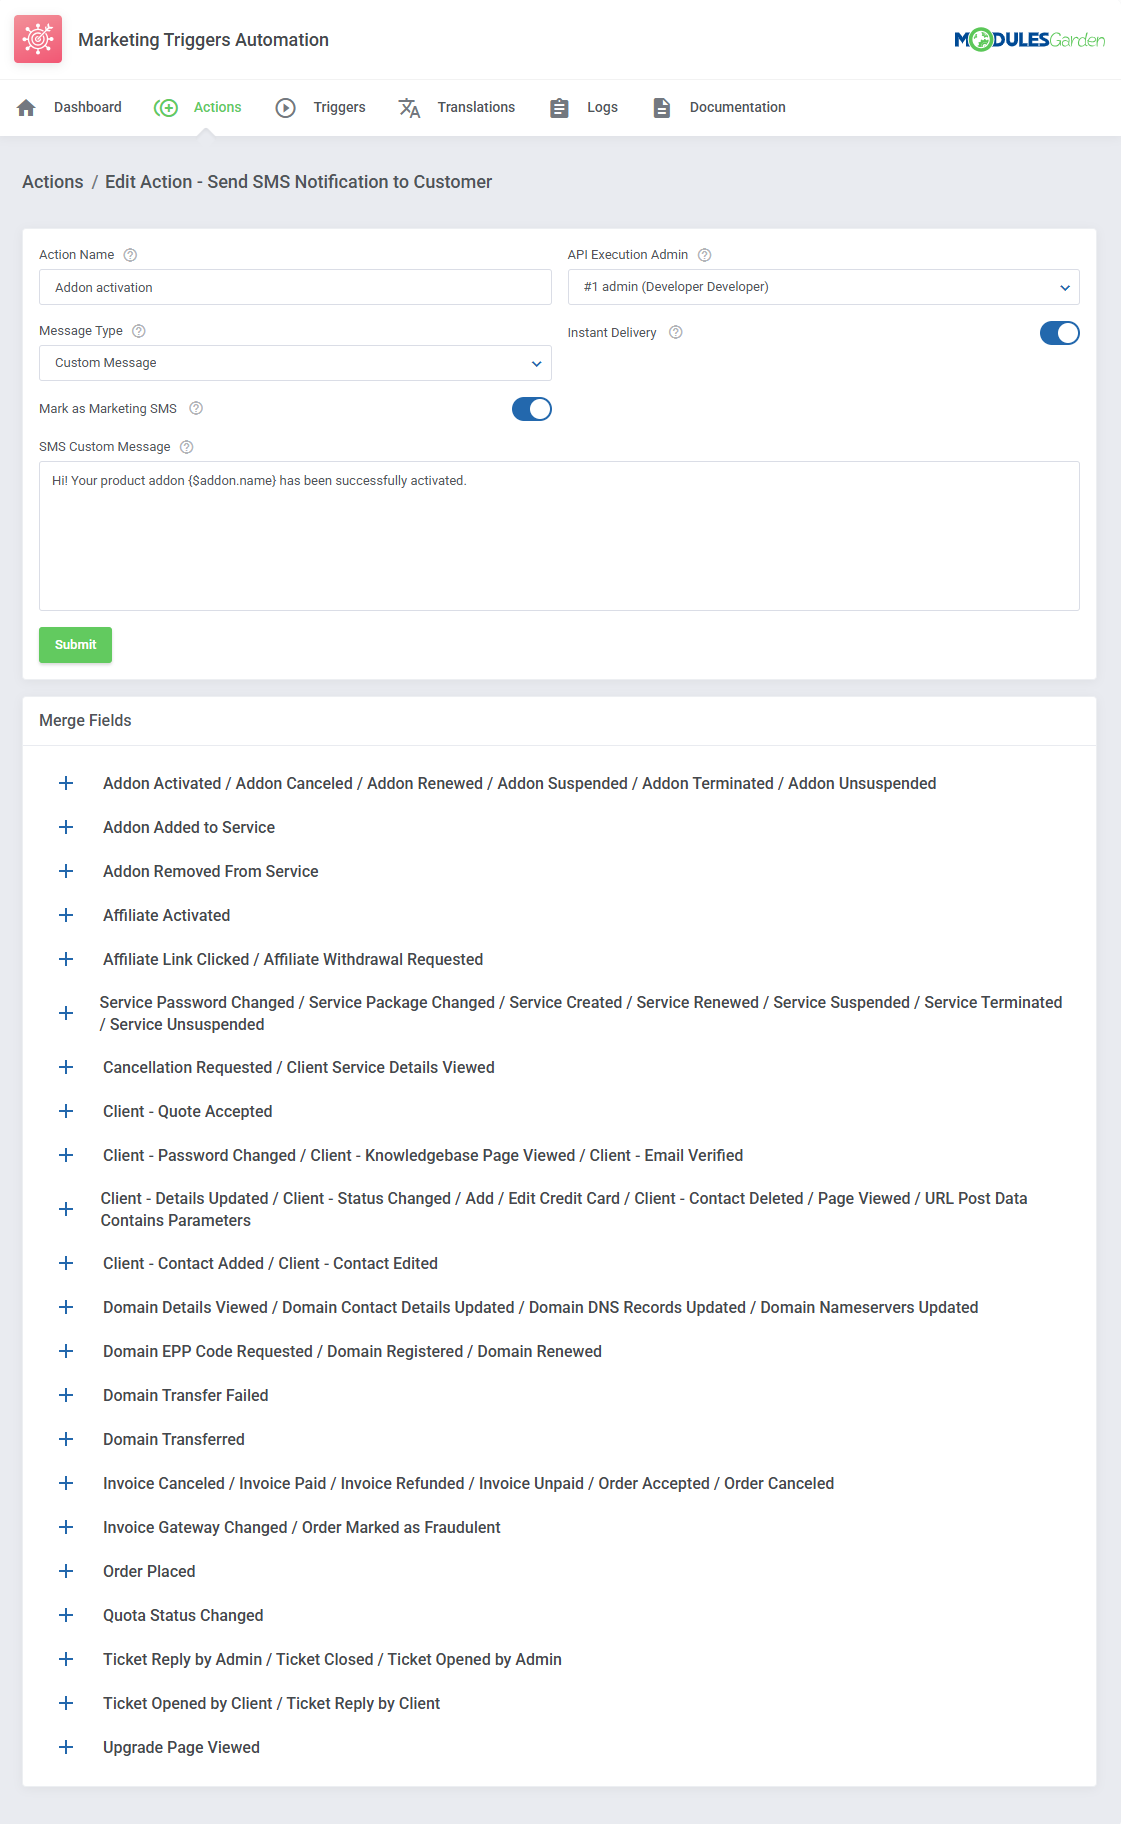
Send SMS Notification to Customer
Send an SMS message to the triggering client. This allows you to quickly notify the client via SMS about important updates or actions they have initiated.
- Action Name - give the action a name to help you identify it when setting up a trigger later.
- API Execution Admin - choose the admin who will execute the API for this action.
- Instant Delivery - turn this on to bypass the SMS Center For WHMCS queue and send the message right away.
- Message Type - pick a message type from SMS Center For WHMCS or create your own 'Custom Message'.
- SMS Custom Message - If you select 'Custom Message', this field will appear, allowing you to enter the message content, including any applicable merge fields.
|
|
Show a popup window with a notification you customize. This can be used to alert users or display important messages in a visually engaging way.
- Action Name - name the action, this will help identify it when creating a trigger later.
- Popup Size - select the size of the popup.
- Show Close Button - if enabled, the popup will include the close button.
- Popup Title - include the title of the popup.
- Popup Template - select a template for the popup or pick 'Custom' to create a new one.
Note: You can include templates by adding a new .tpl file under 'modules/addons/MarketingTriggersAutomation/resources/popupTemplates'.
- Popup Message - if 'Custom' popup template is selected, you can create your message here, including merge fields, HTML, JS and CSS code.
|
| This is how the notification is displayed to the user.
|
Triggers
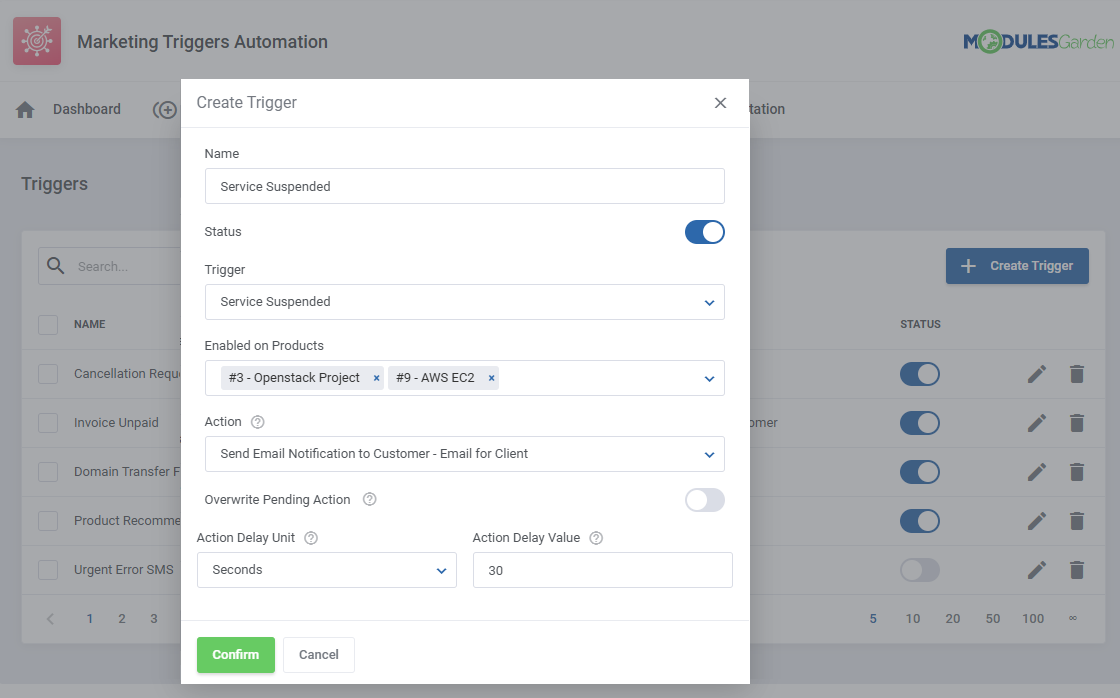
With action prepared, we can proceed to set up triggers.
Move to the 'Triggers' section and click on 'Create Trigger'.
|
While creating a trigger, you will need to specify:
- Name - name the trigger.
- Status - enable or disable the trigger, you can always change the status later.
- Trigger - select the trigger for the action.
- Action - select the action to be taken when the trigger occurs.
- Overwrite Pending Action - enable to ensure only the latest data update occurs.
- Action Delay Unit - select the unit for action delay (seconds, minutes, hours, days)
- Action Delay Value - enter the value for action delay
- Additional Trigger-specific Fields - some triggers might include additional configuration fields.
|
|
Here is a list of all available triggers:
Add/Edit Credit Card               Client - Email Verified               Order Cancelled
Addon Activated                    Client - Knowledgebase Page Viewed    Order Marked as Fraudulent
Addon Added to Service             Client - Password Changed             Order Placed
Addon Cancelled                    Client - Quote Accepted               Page Viewed
Addon Removed                      Client - Status Changed               Quota Status Changed
Addon Renewed                      Domain Contact Details Updated        Service Created
Addon Suspended                    Domain DNS Records Updated            Service Details Viewed
Addon Terminated                   Domain Details Viewed                 Service Package Changed
Addon Unsuspended                  Domain EPP Code Requested             Service Password Changed
Addon Suspended                    Domain Nameservers Updated            Service Renewed
Addon Terminated                   Domain Registered                     Service Suspended
Addon Unsuspended                  Domain Renewed                        Service Terminated
Affiliate Activated                Domain Transfer Failed                Service Unsuspended
Affiliate Link Clicked             Domain Transferred                    Ticket Closed
Affiliate Withdrawal Requested     Invoice Cancelled                     Ticket Opened by Admin
Cancellation Requested             Invoice Gateway Changed               Ticket Opened by Client
Client - Contact Added             Invoice Paid                          Ticket Reply by Admin
Client - Contact Deleted           Invoice Refunded                      Ticket Reply by Client
Client - Contact Edited            Invoice Unpaid                        URL Post Data Contains Parameters
Client - Details Updated           Order Accepted                        Upgrade Page Viewed
|
| After a trigger is added, you can disable/enable it with the 'Status' toggle, as well as edit or delete it with the action buttons.
|
| You can also use the mass function to delete multiple triggers at once.
|
Customizing language files is now extremely easy with the "Translations" tool that is now available directly in the addon.
Its user-friendly design makes managing various language file tweaks a smooth and efficient process. Prepare translations for the original English files with this handy built-in tool.
For specific instructions on how to use this tool please refer to its dedicated article, you will find it here.
|
The "Logs" tool makes monitoring and managing module activity records simple and efficient. It provides options to categorize, filter, and view detailed entries, giving you control over the logs.
Features like bulk deletion, rule-based deletion, and export options make it easy to organize and maintain your logs.
For detailed guidance on using this tool, check its dedicated article, which is available here.
|
Update Instructions
An essential guidance through the process of updating the module is offered here.
Ensure successful completion of the module update by carefully following each step, thereby preventing data loss or any unforeseen issues.
Additionally, you will find a current list of supplementary actions necessary for a smooth update process there.
|
Upgrade Guide
Seeking a solution that offers greater flexibility, customization tailored to your precise needs, and unrestricted availability?
There is an option that not only proves to be cost-effective in the long run but also includes prioritized support services, making it a truly valuable investment.
Opt for the Open Source version of your Marketing Triggers Automation For WHMCS module to unlock these benefits.
Simply click on either the Get Source Code or Upgrade To Lifetime button found on the product's page in our client area to complete the one-step upgrade process, with a dedicated discount already applied.
Follow a comprehensive guide covering the transition process, the advantages it brings, and step-by-step instructions on what to do next after the order has been successfully finalized.
|
Common Problems
| 1. When you have problems with connection, check whether your SELinux or firewall does not block ports.
|


