DigitalOcean Droplets For WHMCS
(→Common Problems) |
|||
| Line 3: | Line 3: | ||
<meta name="description" content="ModulesGarden Wiki Contains All The Information You Need About The DigitalOcean Droplets For WHMCS Module."></meta> | <meta name="description" content="ModulesGarden Wiki Contains All The Information You Need About The DigitalOcean Droplets For WHMCS Module."></meta> | ||
| − | |||
| − | |||
=About [https://www.modulesgarden.com/products/whmcs/digitalocean-droplets DigitalOcean Droplets For WHMCS]= | =About [https://www.modulesgarden.com/products/whmcs/digitalocean-droplets DigitalOcean Droplets For WHMCS]= | ||
| Line 31: | Line 29: | ||
{| | {| | ||
|style="padding: 0px 0px 0px 30px;"|✔ Enable Private Networking | |style="padding: 0px 0px 0px 30px;"|✔ Enable Private Networking | ||
| + | |} | ||
| + | {| | ||
| + | |style="padding: 0px 0px 0px 30px;"|✔ Enable Floating IPs | ||
|} | |} | ||
{| | {| | ||
| Line 79: | Line 80: | ||
{| | {| | ||
|style="padding: 0px 0px 0px 45px;"|✔ Define Firewalls Limit | |style="padding: 0px 0px 0px 45px;"|✔ Define Firewalls Limit | ||
| + | |} | ||
| + | {| | ||
| + | |style="padding: 0px 0px 0px 45px;"|✔ Define Inbound/Outbound/Total Firewall Rules Limit | ||
|} | |} | ||
{| | {| | ||
| Line 88: | Line 92: | ||
{| | {| | ||
|style="padding: 0px 0px 0px 45px;"|✔ Toggle Monitoring | |style="padding: 0px 0px 0px 45px;"|✔ Toggle Monitoring | ||
| + | |} | ||
| + | {| | ||
| + | |style="padding: 0px 0px 0px 45px;"|✔ Toggle Floating IPs | ||
|} | |} | ||
{| | {| | ||
| Line 126: | Line 133: | ||
|} | |} | ||
{| | {| | ||
| − | |style="padding: 0px 0px 0px 45px;"|✔ Available Images To Rebuild Droplet: | + | |style="padding: 0px 0px 0px 45px;"|✔ Change Hostname |
| + | |} | ||
| + | {| | ||
| + | |style="padding: 0px 0px 0px 45px;"|✔ Rebuild Initially Chosen Image Only | ||
| + | |} | ||
| + | {| | ||
| + | |style="padding: 0px 0px 0px 45px;"|✔ Select Available Images To Rebuild Droplet: | ||
|} | |} | ||
{| | {| | ||
| Line 179: | Line 192: | ||
|} | |} | ||
{| | {| | ||
| − | |style="padding: 0px 0px 0px 45px;"|✔ Administrator Snapshot | + | |style="padding: 0px 0px 0px 45px;"|✔ Administrator's Snapshot |
|} | |} | ||
{| | {| | ||
| Line 185: | Line 198: | ||
|} | |} | ||
{| | {| | ||
| − | |style="padding: 0px 0px 0px 30px;"|✔ View/Create/Delete Firewalls And Inbound/Outbound Rules For: | + | |style="padding: 0px 0px 0px 30px;"|✔ View/Create/Edit/Delete Firewalls And Inbound/Outbound Rules For: |
|} | |} | ||
{| | {| | ||
| Line 230: | Line 243: | ||
{| | {| | ||
|style="padding: 0px 0px 0px 30px;"|✔ Private Networking | |style="padding: 0px 0px 0px 30px;"|✔ Private Networking | ||
| + | |} | ||
| + | {| | ||
| + | |style="padding: 0px 0px 0px 30px;"|✔ Floating IPs | ||
|} | |} | ||
{| | {| | ||
|style="padding: 0px 0px 0px 30px;"|✔ Firewalls Limit | |style="padding: 0px 0px 0px 30px;"|✔ Firewalls Limit | ||
| + | |} | ||
| + | {| | ||
| + | |style="padding: 0px 0px 0px 30px;"|✔ Inbound Rules | ||
| + | |} | ||
| + | {| | ||
| + | |style="padding: 0px 0px 0px 30px;"|✔ Outbound Rules | ||
| + | |} | ||
| + | {| | ||
| + | |style="padding: 0px 0px 0px 30px;"|✔ Total Rules | ||
|} | |} | ||
{| | {| | ||
| Line 341: | Line 366: | ||
|style="padding: 0px 0px 30px 15px;"|'''7. The last step is setting up three cron jobs.'''<br /> | |style="padding: 0px 0px 30px 15px;"|'''7. The last step is setting up three cron jobs.'''<br /> | ||
| − | * Mail cron - will be used to send emails to clients after Droplet creation, rebuilt or password reset.<br/>You will find more information on this topic in the product configuration section. We suggest the cron | + | * Mail cron - will be used to send emails to clients after Droplet creation, rebuilt or password reset.<br/>You will find more information on this topic in the product configuration section. We suggest running the cron every 5 minutes: <pre>php -q /your_whmcs/modules/servers/DigitalOceanDroplets/cron/cron.php MailCron</pre> |
| − | * Tasks cron - will be used to remove volumes from the panel after their termination. If not set, the admin will have to delete them manually.<br/>We suggest | + | * Tasks cron - will be used to remove volumes from the panel after their termination. If not set, the admin will have to delete them manually <br/> Moreover, from the 1.4.0 module version it will also assign/unassign floatings IPs on the Droplet creation or its upgrade ('' 'Change Package' '' module command).<br/>We suggest the cron to run every 5 minutes: <pre>php -q /your_whmcs/modules/servers/DigitalOceanDroplets/cron/cron.php Tasks</pre> |
* Firewall cron - will be used to synchronize Firewalls assigned to Droplets directly in the panel.<br/>You will find more information on this topic in the product configuration section. We suggest that the cron should run every hour: <pre>php -q /your_whmcs/modules/servers/DigitalOceanDroplets/cron/cron.php Firewall</pre> Remeber to replace '' 'your_whmcs' '' with your WHMCS root path. | * Firewall cron - will be used to synchronize Firewalls assigned to Droplets directly in the panel.<br/>You will find more information on this topic in the product configuration section. We suggest that the cron should run every hour: <pre>php -q /your_whmcs/modules/servers/DigitalOceanDroplets/cron/cron.php Firewall</pre> Remeber to replace '' 'your_whmcs' '' with your WHMCS root path. | ||
| Line 351: | Line 376: | ||
{| | {| | ||
|style="padding: 10px 0px 15px 15px;"|'''8. Now, we will show you how to configure a new product.'''<br /> | |style="padding: 10px 0px 15px 15px;"|'''8. Now, we will show you how to configure a new product.'''<br /> | ||
| − | Go to '' 'Setup' '' → '' 'Products/Services' '' → '' 'Servers' '' and press '' 'Add New Server' ''. | + | Go to '' 'Setup' '' → '' 'Products/Services' '' → '' 'Servers' '' and press '' 'Add New Server' ''.<br/> |
| + | |||
| + | '' '''Note:''' If you have WHMCS V7.8.X or later, we recommend using your ''' 'previous experience' ''' of the server configuration instead of the new wizard tool.'' | ||
|} | |} | ||
{| | {| | ||
| Line 360: | Line 387: | ||
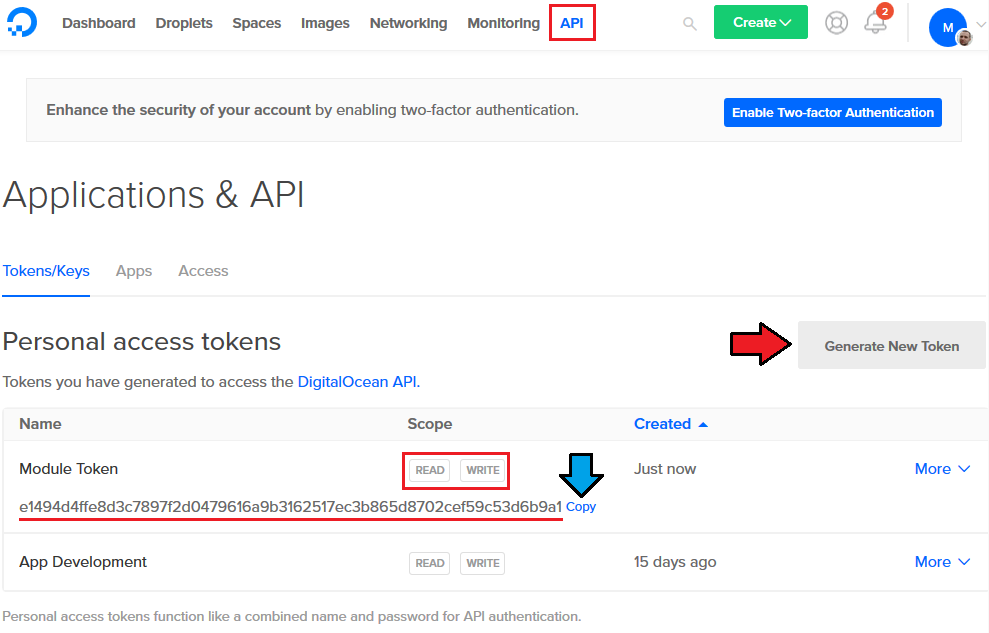
Now, in the '' 'Password' '' field provide your DigitalOcean '' '''API token''' '' and check the connection. If successful, save changes. <br/> | Now, in the '' 'Password' '' field provide your DigitalOcean '' '''API token''' '' and check the connection. If successful, save changes. <br/> | ||
| − | '' '''Note:''' To find your '''API token''', log in to your DigitalOcean panel and go to the [https://cloud.digitalocean.com/settings/api '''API''' section] where you can generate a new token.<br/> You will need a token with '''read''' and '''write''' permissions. Remember to copy and store the token in the safe place because it will no longer be visible in the panel.<br/> Click [https://www.docs.modulesgarden.com/images/b/bf/DO_API_Token.png here] to see an example where to find it.'' | + | '' '''Note:''' To find your '''API token''', log in to your DigitalOcean panel and go to the [https://cloud.digitalocean.com/settings/api '''API''' section] where you can generate a new token.<br/> You will need a token with '''read''' and '''write''' permissions. Remember to copy and store the token in the safe place because it will no longer be visible in the panel.<br/> Click [https://www.docs.modulesgarden.com/images/b/bf/DO_API_Token.png here] to see an example where to find it.''<br/> |
| + | |||
| + | '' '''Note 2:''' The 'Hostname' field is not used by the module, but if you use WHMCS V7.8.X, then a fatal error may occur when trying to save server settings without providing any hostname or IP address details.<br/>In this case, try to provide anything in the hostname field. Please note that this is a bug that occurs in WHMCS, not in the module itself, and it may also appear in further versions of WHMCS.'' | ||
|} | |} | ||
{| | {| | ||
| Line 427: | Line 456: | ||
* '''User Data''' - Choose the execution script which will be used to configure Droplet on the first boot. Go [[#User_Data_Scripts|here]] to find more information about how to use these scripts.<br/> '' '''Note:''' User Data scripts are '''optional''' for product configuration if you do not want to use them, simply set this field to the 'Do not use' option.'' | * '''User Data''' - Choose the execution script which will be used to configure Droplet on the first boot. Go [[#User_Data_Scripts|here]] to find more information about how to use these scripts.<br/> '' '''Note:''' User Data scripts are '''optional''' for product configuration if you do not want to use them, simply set this field to the 'Do not use' option.'' | ||
| + | |||
| + | * '''Floating IPs''' - Enable to automatically assign floating IP address to Droplet on creation. Click [https://www.digitalocean.com/docs/networking/floating-ips/ here] to find out more about floating IPs. | ||
| + | |||
| + | * '''Backups''' - Enables automatic system-level backups. It can be used for backup images, to revert the server or create new Droplets. Click [https://www.digitalocean.com/community/tutorials/an-introduction-to-digitalocean-backups here] for more information. | ||
| + | |||
| + | * '''Monitoring''' - Enables additional Droplet metrics collection, monitoring, and alerting. [https://www.digitalocean.com/community/tutorials/an-introduction-to-digitalocean-monitoring Here] you can find out more. | ||
* '''Snapshots Limit''' - [https://www.digitalocean.com/docs/images/snapshots/ Snapshots] provide a full copy of a Droplet, saving everything from a Droplet's disk to a disk image. Here you can define the maximum number of snapshots that can be stored at one time. | * '''Snapshots Limit''' - [https://www.digitalocean.com/docs/images/snapshots/ Snapshots] provide a full copy of a Droplet, saving everything from a Droplet's disk to a disk image. Here you can define the maximum number of snapshots that can be stored at one time. | ||
| Line 432: | Line 467: | ||
* '''Firewalls Limit''' - [https://www.digitalocean.com/docs/networking/firewalls/ Firewalls] block your servers and machines from external attacks. Here you can define the maximum number of firewalls that a client may add per virtual machine. Enter '0' to disable firewalls, leave empty to set no limits.<br/>'''''Note 1:''' You may create more firewalls in the panel which will be assigned with a cron run, the limit in such case can be exceeded.''<br/>'''''Note 2:''' A cron command is required to synchronize firewalls assigned and managed in the DigitalOcean Droplets Panel.'' | * '''Firewalls Limit''' - [https://www.digitalocean.com/docs/networking/firewalls/ Firewalls] block your servers and machines from external attacks. Here you can define the maximum number of firewalls that a client may add per virtual machine. Enter '0' to disable firewalls, leave empty to set no limits.<br/>'''''Note 1:''' You may create more firewalls in the panel which will be assigned with a cron run, the limit in such case can be exceeded.''<br/>'''''Note 2:''' A cron command is required to synchronize firewalls assigned and managed in the DigitalOcean Droplets Panel.'' | ||
| − | * ''' | + | * '''Inbound Firewall Rules Limit''' - Enter how many inbound rules a user can create per one firewall. Enter -1 for unlimited. |
| − | * ''' | + | * '''Outbound Firewall Rules Limit''' - Enter how many outbound rules a user can create per one firewall. Enter -1 for unlimited. |
| − | * ''' | + | * '''Total Limit of Firewall Rules''' - Enter the total number of rules that a user can create per one firewall. Enter -1 for unlimited. |
| + | |||
| + | * '''Tags''' - Here you can apply custom labels for the Droplet. If you want to add multiple tags, separate them with a comma. Read more about tags [https://www.digitalocean.com/community/tutorials/how-to-tag-digitalocean-droplets here]. | ||
* '''IPv6''' - Enables public [https://www.digitalocean.com/community/tutorials/how-to-enable-ipv6-for-digitalocean-droplets IPv6] networking for Droplet. | * '''IPv6''' - Enables public [https://www.digitalocean.com/community/tutorials/how-to-enable-ipv6-for-digitalocean-droplets IPv6] networking for Droplet. | ||
| Line 443: | Line 480: | ||
* '''Debug''' - Enables logging of API requests and responses to WHMCS [https://docs.whmcs.com/Troubleshooting_Module_Problems module log] which may be useful if you experience any problems with the module. | * '''Debug''' - Enables logging of API requests and responses to WHMCS [https://docs.whmcs.com/Troubleshooting_Module_Problems module log] which may be useful if you experience any problems with the module. | ||
| + | |||
'' '''Important:''' Before providing any extra features to your WHMCS clients, remember to familiarize yourself with the [https://www.digitalocean.com/pricing/ additional costs] that may be applied to your DigitalOcean account. | '' '''Important:''' Before providing any extra features to your WHMCS clients, remember to familiarize yourself with the [https://www.digitalocean.com/pricing/ additional costs] that may be applied to your DigitalOcean account. | ||
| Line 457: | Line 495: | ||
After setting up the dedicated mailbox, provide its valid credentials below and test whether the connection has been established correctly.<br/> | After setting up the dedicated mailbox, provide its valid credentials below and test whether the connection has been established correctly.<br/> | ||
| − | '''''Note:''' There is available an option to 'Disable Certificate Validation'. Please toggle this option ONLY if you | + | '''''Note:''' There is available an option to 'Disable Certificate Validation'. Please toggle this option ONLY if you are having troubles with the connection. The certificate validation will be omitted when connecting to an email box.'' |
|} | |} | ||
{| | {| | ||
| Line 463: | Line 501: | ||
|} | |} | ||
{| | {| | ||
| − | |style="padding: 0px 0px 15px 15px;"|Once the connection is successful, remember to '''save''' your module settings.<br/>From now on, the cron set during the last stage of the module's installation should periodically check that mailbox for DigitalOcean messages. <br/>If any new emails are received, they will be then converted to your email template and sent to the corresponding client.<br/>The default email templates for product creation and password reset can be specified below. Take a look at the [[#Tips|Tips]] section - tip no 4, and check the | + | |style="padding: 0px 0px 15px 15px;"|Once the connection is successful, remember to '''save''' your module settings.<br/>From now on, the cron set during the last stage of the module's installation should periodically check that mailbox for DigitalOcean messages. <br/>If any new emails are received, they will be then converted to your email template and sent to the corresponding client.<br/>The default email templates for product creation and password reset can be specified below. Take a look at the [[#Tips|Tips]] section - tip no 4, and check the tempalte content. |
|} | |} | ||
{| | {| | ||
| Line 487: | Line 525: | ||
*'''Change Hostname''' - if enabled, clients may give their hostname a unique name | *'''Change Hostname''' - if enabled, clients may give their hostname a unique name | ||
| − | *'''Available Images To Rebuild''' - Select OS images, One-click apps, and Snapshots from available to allow the client to use when rebuilding a droplet.<br/> Please note, that if you leave this field empty then all available OS images and One-click apps provided by DigitalOcean will be displayed in the client area to rebuild except the snapshots.<br/> Keep in mind that the available here list of OS Images includes all the snapshots, including the clients' private ones. Be careful when selecting them. | + | *'''Rebuild Initially Chosen Image Only''' - if enabled, clients will be able to rebuild the droplet only on the OS that was originally chosen for the purchased product instead of to any images that you can select below. |
| + | |||
| + | *'''Available Images To Rebuild''' - Select OS images, One-click apps, and Snapshots from available to allow the client to use when rebuilding a droplet.<br/> Please note, that if you leave this field empty then all available OS images and One-click apps provided by DigitalOcean will be displayed in the client area to rebuild except the snapshots.<br/> Keep in mind that the available here list of OS Images includes all the snapshots, including the clients' private ones. Be careful when selecting them.<br/> You can also ignore this option if you want to allow rebuild Droplet with only initially chosen image. | ||
| + | |||
|} | |} | ||
{| | {| | ||
| Line 521: | Line 562: | ||
More information about how DigitalOcean handles SSH keys and how to create them can be found [https://www.digitalocean.com/docs/droplets/how-to/add-ssh-keys/ here]. <br/> | More information about how DigitalOcean handles SSH keys and how to create them can be found [https://www.digitalocean.com/docs/droplets/how-to/add-ssh-keys/ here]. <br/> | ||
| − | If you do not want this field to be available to customers during the ordering process, simply uncheck | + | If you do not want this field to be available to customers during the ordering process, simply uncheck '' 'Shown on Order Form' '' option.<br/> Remember that API allows such action only '''once''', during the initial VM creation. <br/> |
'' '''Important:''' During tests we discovered that some OS images such as 'CoreOS', 'CentOS' or 'FreeBSD', may '''require''' the SSH key to create a Droplet.<br/>In such cases, we recommend that you additionally check the 'Required Field' option for such products. ''<br/> | '' '''Important:''' During tests we discovered that some OS images such as 'CoreOS', 'CentOS' or 'FreeBSD', may '''require''' the SSH key to create a Droplet.<br/>In such cases, we recommend that you additionally check the 'Required Field' option for such products. ''<br/> | ||
| Line 533: | Line 574: | ||
===User Data Scripts=== | ===User Data Scripts=== | ||
{| | {| | ||
| − | |style="padding: 10px 0px 15px 15px;"|User data is arbitrary data that can be executed during | + | |style="padding: 10px 0px 15px 15px;"|User data is arbitrary data that can be executed during Droplet creation, typically during the first boot of a cloud server.<br/>This allows you to perform tasks or run scripts as the root user which can be extremely useful when provisioning a server.<br/> |
You can provide your own scripts using 'cloud-config' or 'Bash'. By default, we provide two exemplary scripts for changing the OS password or inserting SSH key, which you can use as a reference.<br/> | You can provide your own scripts using 'cloud-config' or 'Bash'. By default, we provide two exemplary scripts for changing the OS password or inserting SSH key, which you can use as a reference.<br/> | ||
| Line 542: | Line 583: | ||
|} | |} | ||
{| | {| | ||
| − | |style="padding: 0px 0px 15px 15px;"|Once you create your own script, it can be chosen for | + | |style="padding: 0px 0px 15px 15px;"|Once you create your own script, it can be chosen for product execution.<br/> |
| − | You can provide multiple scripts for configurable options, but only one can be chosen for | + | You can provide multiple scripts for configurable options, but only one can be chosen for Droplet creation.<br/> |
If you would like to execute several different scripts at once, you should try combining them within a single file.<br/> | If you would like to execute several different scripts at once, you should try combining them within a single file.<br/> | ||
| Line 557: | Line 598: | ||
{| | {| | ||
|style="padding: 10px 0px 15px 15px;"|''' DigitalOcean Droplets For WHMCS allows you to monitor and manage your customer Droplets from the admin area of your WHMCS system.'''<br /> | |style="padding: 10px 0px 15px 15px;"|''' DigitalOcean Droplets For WHMCS allows you to monitor and manage your customer Droplets from the admin area of your WHMCS system.'''<br /> | ||
| − | This includes supervision of such features | + | This includes supervision of such features like: |
| − | # Configurable options which enable you to view the chosen Droplets resources.<br/>'' '''Important:''' Due to API limitations, the only | + | # Configurable options which enable you to view the chosen Droplets resources.<br/>'' '''Important:''' Due to API limitations, the only two configurations possible to modify for the already created VM through the 'Change Package' functionality are the ''' 'Size Slug Plan' ''' option for Droplet resizing and ''' 'Floating IPs' ''' for assign/unassign.<br/> And even this actions may not always be allowed! You can also change the snapshots, backups, firewalls and rules limits, which values are only kept locally on the WHMCS server.'' |
# Module commands, service action and additional options enable you to manage Droplet status and features. | # Module commands, service action and additional options enable you to manage Droplet status and features. | ||
# Server information provides you with the current status, resources and options set for the Droplet. | # Server information provides you with the current status, resources and options set for the Droplet. | ||
| Line 567: | Line 608: | ||
{| | {| | ||
|style="padding: 0px 0px 15px 15px;"|<ol start="4"> | |style="padding: 0px 0px 15px 15px;"|<ol start="4"> | ||
| − | <li>Network information presents assigned IPv4 and IPv6 addresses to the Droplet along with their gateway, interface type | + | <li>Network information presents assigned IPv4 and IPv6 addresses to the Droplet along with their gateway, interface type, used netmask or CIDR as well as floating IP, if assigned.</li> |
<li>You can easily view and make new snapshots of the Droplet.</li> | <li>You can easily view and make new snapshots of the Droplet.</li> | ||
<li>The automatic Droplet backups can be restored here as well.</li> | <li>The automatic Droplet backups can be restored here as well.</li> | ||
| Line 631: | Line 672: | ||
{| | {| | ||
|style="padding: 10px 0px 15px 15px;"|If the automatic backups have been enabled for the Droplets products, then your client will be able to restore them from this section.<br/>DigitalOcean uses a snapshot-based backup system. This provides system-level backups of a server without powering it down. <br/> | |style="padding: 10px 0px 15px 15px;"|If the automatic backups have been enabled for the Droplets products, then your client will be able to restore them from this section.<br/>DigitalOcean uses a snapshot-based backup system. This provides system-level backups of a server without powering it down. <br/> | ||
| − | '' '''Note:''' This process happens '''automatically''' within a pre-determined scheduling window, and is completed in the background while the Droplet is running.<br/>Client cannot force the creation of an additional copy on demand or delete it - this however can be achieved by using | + | '' '''Note:''' This process happens '''automatically''' within a pre-determined scheduling window, and is completed in the background while the Droplet is running.<br/>Client cannot force the creation of an additional copy on demand or delete it - this however can be achieved by using [[#Snapshots|snapshots]] feature.'' |
|} | |} | ||
{| | {| | ||
| Line 639: | Line 680: | ||
===Kernels=== | ===Kernels=== | ||
{| | {| | ||
| − | |style="padding: 10px 0px 15px 15px;"|In | + | |style="padding: 10px 0px 15px 15px;"|In '' 'Kernels' '' section you may see kernels available and change your current one.<br/> Use the marked on the screen button to upgrade your Kernel. |
|} | |} | ||
{| | {| | ||
| Line 647: | Line 688: | ||
===Firewalls=== | ===Firewalls=== | ||
{| | {| | ||
| − | |style="padding: 10px 0px 15px 15px;"| | + | |style="padding: 10px 0px 15px 15px;"|'' 'Firewalls' '' section allows to view and create firewalls that will protect your Droplet from external attacks.<br/> |
| − | Press | + | Press '' 'Create Firewall' '' button to create one. |
|} | |} | ||
{| | {| | ||
| Line 654: | Line 695: | ||
|} | |} | ||
{| | {| | ||
| − | |style="padding: 0px 0px 20px 15px;"|Type | + | |style="padding: 0px 0px 20px 15px;"|Type in the just created firewall a name. |
|} | |} | ||
{| | {| | ||
| Line 661: | Line 702: | ||
{| | {| | ||
|style="padding: 0px 0px 15px 15px;"|A new firewall will appear on the list, note that it will have an ID assigned and a default inbound rule automatically created. <br/> | |style="padding: 0px 0px 15px 15px;"|A new firewall will appear on the list, note that it will have an ID assigned and a default inbound rule automatically created. <br/> | ||
| − | Press | + | Press '' 'Edit' '' icon to move to the firewall rules management page. |
|} | |} | ||
{| | {| | ||
| Line 674: | Line 715: | ||
|} | |} | ||
{| | {| | ||
| − | |style="padding: 0px 0px 15px 15px;"|Finally, | + | |style="padding: 0px 0px 15px 15px;"|Finally, setup the rule by selecting: |
| − | *'''Rule Type''' - configure the firewall rules for incoming or outbound traffic | + | *'''Application''' - you can select one of the predefined applications on the basis of which the default port will be automatically filled in |
| − | **Inbound - the specified ports will accept inbound connections only, any other traffic will be blocked | + | *'''Rule Type''' - configure the firewall rules for incoming or outbound traffic |
| − | **Outbound - the outbound traffic will be allowed for the specified ports, any other traffic will be blocked | + | **Inbound - the specified ports will accept inbound connections only, any other traffic will be blocked |
| + | **Outbound - the outbound traffic will be allowed for the specified ports, any other traffic will be blocked | ||
*'''Protocol''' - Select the type of allowed traffic: | *'''Protocol''' - Select the type of allowed traffic: | ||
| Line 729: | Line 771: | ||
Please note that the last merge field has been added into the template in version 1.3.0. In case you started using the module earlier, you may add it manually.<br/> | Please note that the last merge field has been added into the template in version 1.3.0. In case you started using the module earlier, you may add it manually.<br/> | ||
| − | Underneath, you can see | + | Underneath, you can see how the custom template looks like. You may surely edit it at '' 'WHMCS' → 'Setup' → 'Email Templates'.'' <br/> You will find there the second custom eamil template: '' 'Digital Ocean Password Reset Email' '' as well. |
|} | |} | ||
{| | {| | ||
| Line 737: | Line 779: | ||
=Update Instructions= | =Update Instructions= | ||
{| | {| | ||
| − | |style="padding: 10px 0px 30px 15px;"|An essential guidance through the process of updating the module is offered '''[https://www.docs.modulesgarden.com/How_To_Update_WHMCS_Module here]'''.<br/><br/> | + | |style="padding: 10px 0px 30px 15px;"|An essential guidance through the process of updating the module is offered '''[https://www.docs.modulesgarden.com/How_To_Update_WHMCS_Module here]'''.<br/> |
| + | |||
| + | If you are upgrading a module from the version prior to 1.4.0 to a newer one, we also suggest updating the frequency of execution '' 'cron.php Tasks' '' as suggested on step 7 of the [[#Installation|installation]] guide.<br/><br/> | ||
| + | |||
Keep in mind there is a quick and easy option in our client area that will let you upgrade the license of your module to an open source version at any time - and at a lower price!<br/> | Keep in mind there is a quick and easy option in our client area that will let you upgrade the license of your module to an open source version at any time - and at a lower price!<br/> | ||
To take advantage of it, simply use the '''License Upgrade''' button located on the product's page and a discounted invoice will be generated automatically.<br/> | To take advantage of it, simply use the '''License Upgrade''' button located on the product's page and a discounted invoice will be generated automatically.<br/> | ||
| Line 751: | Line 796: | ||
|} | |} | ||
{| | {| | ||
| − | |style="padding: 0px 0px 10px 15px;"|3. Inserting the SSH key may prevent the welcome email being sent by DigitalOcean after | + | |style="padding: 0px 0px 10px 15px;"|3. Inserting the SSH key may prevent the welcome email being sent by DigitalOcean after Droplet creation.<br/> |
|} | |} | ||
{| | {| | ||
Revision as of 15:41, 27 November 2019
Contents |
About DigitalOcean Droplets For WHMCS
| DigitalOcean Droplets For WHMCS is a tool of invaluable usefulness which will allow you to provide Droplets to your audience in a completely automated manner. The module will empower your clients to exert full control over their virtual machines through such actions as power on/off, reboot, server rebuild and many more. |
- Admin Area Features:
| ✔ Create/Suspend/Unsuspend/Terminate Server |
| ✔ Resize Server By Changing Size Slug For Droplet Plan |
| ✔ Power On/Power Off/Shut Down/Reboot Server |
| ✔ Reset Server Password |
| ✔ Toggle Automatic Backups |
| ✔ Enable Private Networking |
| ✔ Enable Floating IPs |
| ✔ Enable IPv6 |
| ✔ Change Server Hostname |
| ✔ View Server Status And Details |
| ✔ View Server Network Information |
| ✔ View/Create/Restore/Delete Snapshots |
| ✔ View And Restore Backups |
| ✔ Rebuild Server With Chosen OS Distribution |
| ✔ View Tasks History |
| ✔ Configure Product Details: |
| ✔ Choose Project |
| ✔ Choose Region |
| ✔ Choose Size Slug Plan |
| ✔ Choose OS Image |
| ✔ Define Additional Volume Size |
| ✔ Define Snapshots Limit |
| ✔ Define Firewalls Limit |
| ✔ Define Inbound/Outbound/Total Firewall Rules Limit |
| ✔ Define Droplet Tags |
| ✔ Toggle Automatic Backups |
| ✔ Toggle Monitoring |
| ✔ Toggle Floating IPs |
| ✔ Toggle IPv6 |
| ✔ Toggle Private Networking |
| ✔ User Data - Execute Custom Cloud-Config Or Bash Script To Customize Server On First Boot |
| ✔ Allow SSH Key Inserting - Enable Logging In To Server Without Password |
| ✔ Choose Features Available In Client Area: |
| ✔ Rebuild Droplet |
| ✔ Snapshots |
| ✔ Tasks History |
| ✔ Backups |
| ✔ Kernels |
| ✔ Firewalls |
| ✔ Reset Password |
| ✔ Change Hostname |
| ✔ Rebuild Initially Chosen Image Only |
| ✔ Select Available Images To Rebuild Droplet: |
| ✔ OS Distributions |
| ✔ One-Click Install Apps |
| ✔ Snapshots |
| ✔ Generate Configurable Options |
| ✔ Choose Welcome Email And Password Reset Email Templates |
| ✔ Configure Email Piping |
| ✔ Run Server Connection Test |
| ✔ Toggle Debug For Logging API Requests And Responses |
- Client Area Features:
| ✔ Power On/Power Off/Shut Down/Reboot Server |
| ✔ View Server Status And Details |
| ✔ View Server Network Information |
| ✔ View/Create/Restore/Delete Snapshots |
| ✔ View And Restore Backups |
| ✔ Rebuild Server With Chosen: |
| ✔ OS Distribution |
| ✔ One-Click App |
| ✔ Administrator's Snapshot |
| ✔ Change Server Kernel |
| ✔ View/Create/Edit/Delete Firewalls And Inbound/Outbound Rules For: |
| ✔ TCP Protocol |
| ✔ UDP Protocol |
| ✔ ICMP Protocol |
| ✔ Reset Server Password |
| ✔ Change Server Hostname |
| ✔ View Tasks History |
| ✔ Choose Server Parameters During Order |
| ✔ Provide SSH Key During Order |
| ✔ Receive Email Notification After VM Creation And Password Reset |
- Configurable Options:
| ✔ Region |
| ✔ Image |
| ✔ Additional Volume Size |
| ✔ Monitoring |
| ✔ Private Networking |
| ✔ Floating IPs |
| ✔ Firewalls Limit |
| ✔ Inbound Rules |
| ✔ Outbound Rules |
| ✔ Total Rules |
| ✔ Size Slug Plan |
| ✔ Snapshots Limit |
| ✔ Backups |
| ✔ IPv6 |
| ✔ User Data |
- General Info:
| ✔ Supports Both Standard Droplets And CPU Optimized Droplets Types |
| ✔ Integrated With Advanced Billing For WHMCS - Actual Server Resource Usage Billing (read more) |
| ✔ Integrated With DNS Manager For WHMCS - Manage DNS Records On DigitalOcean Directly (read more) |
| ✔ Integrated With Server Allocator For WHMCS - Automatic Assignment Of Most Suitable Servers To Products (read more) |
| ✔ Multi-Language Support |
| ✔ Supports PHP 5.6 Up To PHP 7.3 |
| ✔ Supports WHMCS Template Six |
| ✔ Supports WHMCS V7.6 And Later |
| ✔ Easy Module Upgrade To Open Source Version |
Installation and Configuration
| This tutorial will show you how to successfully install and configure DigitalOcean Droplets For WHMCS. We will guide you step by step through the whole installation and configuration process. |
Installation
| 1. Log in to our client area and download the module. |

|
| 2. In the downloaded file you might find one or two packages that support different PHP versions. In the most recent versions of the module, you will find only one package that supports PHP 7.1 and later. |
| Previous updates of the module may contain two packages dedicated to various PHP versions. The first one that supports PHP 5.6 up to PHP 7.0, and the second one addressed to PHP 7.1 up to PHP 7.3. |

|
| Important: This situation does not affect the open source version of this module which can be applied to any PHP from version 5.6 and later. Note: You can check the current PHP version in your WHMCS. To do so, proceed to 'Utilities' → 'System' → 'PHP Info'. |
| 3. Once you have chosen the package with the right PHP version, extract it and upload its content into the main WHMCS directory. The content of the chosen PHP version files to upload should look like this. |
| 4. When you install DigitalOcean Droplets For WHMCS for the first time, you have to rename the 'license_RENAME.php' file. The file is located in 'modules/servers/DigitalOceanDroplets/license_RENAME.php'. Rename it from 'license_RENAME.php' to 'license.php'. |

|
| 5. In order to configure your license key, you have to edit the previously renamed 'license.php' file. Enter your license key between the quotation marks as presented on the following screen. |

|
| 6. Now, set up the 'storage' folder as recursively writable. This folder is available at '/your_whmcs/modules/servers/DigitalOceanDroplets/'. |

|
7. The last step is setting up three cron jobs.
|
Configuration of Server
| 8. Now, we will show you how to configure a new product. Go to 'Setup' → 'Products/Services' → 'Servers' and press 'Add New Server' . Note: If you have WHMCS V7.8.X or later, we recommend using your 'previous experience' of the server configuration instead of the new wizard tool. |

|
| 9. Next, enter your server name and select 'DigitalOcean Droplets' from the 'Type' field. Now, in the 'Password' field provide your DigitalOcean API token and check the connection. If successful, save changes. Note: To find your API token, log in to your DigitalOcean panel and go to the API section where you can generate a new token. Note 2: The 'Hostname' field is not used by the module, but if you use WHMCS V7.8.X, then a fatal error may occur when trying to save server settings without providing any hostname or IP address details. |

|
| 10. It is time to create a server group. To do so, click on 'Create Server Group' . |

|
| 11. Enter a name, click on your previously created server, press 'Add' and afterward 'Save Changes' . |

|
Configuration of Product
| 12. In order to create and configure a product, go to 'Setup' → 'Products/Services' → 'Products/Services' . Click on 'Create a New Group' . |

|
| 13. Enter your product group name and press 'Save Changes' . |

|
| 14. Once you have a product group, you can create a new product. To do so, first click on 'Create a New Product' . |

|
| 15. Afterward, choose your product type, enter your product name and choose the product group from the dropdown menu. Press 'Continue'. |

|
| 16. Now, go to the 'Module Settings' section, choose both your previously created server group from the dropdown menu. The module should automatically save and reload the settings. If not, click on the 'Save Changes' option manually. |

|
| 17. Now, you can start configuring the settings of the Droplet you sell. Just like when creating a new virtual machine in your DigitalOcean panel, here also you can configure such options as:
|

|
| 18. Afterward, set up incoming mail configuration. Due to API limitations, all emails with Droplet credentials can only be sent to your DigitalOcean profile email address set in the panel here. Note: Even though the module filters the received messages in your mailbox, we recommend that you use a separate mailbox for your main DigitalOcean profile account to avoid any issues with non-DigitalOcean content. After setting up the dedicated mailbox, provide its valid credentials below and test whether the connection has been established correctly. Note: There is available an option to 'Disable Certificate Validation'. Please toggle this option ONLY if you are having troubles with the connection. The certificate validation will be omitted when connecting to an email box. |
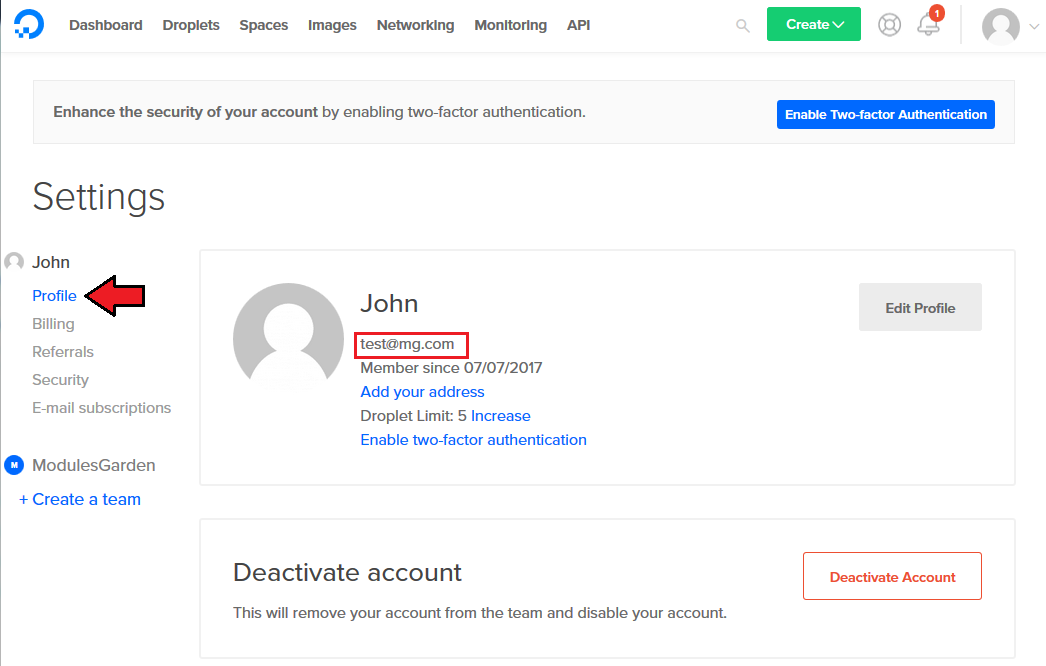

|
| Once the connection is successful, remember to save your module settings. From now on, the cron set during the last stage of the module's installation should periodically check that mailbox for DigitalOcean messages. If any new emails are received, they will be then converted to your email template and sent to the corresponding client. The default email templates for product creation and password reset can be specified below. Take a look at the Tips section - tip no 4, and check the tempalte content. |

|
| 19. The following section is dedicated to the Client Area Features. You will find here six options that can be enabled and then will be available to your clients in their client area. These options are:
|

|
| 20. At the end of the configuration process, you can decide whether you want to generate configurable options for the product. Configurable options can be used by your clients to select each Droplet parameters individually during order placement. |

|
| If you decide to use configurable options, press on the 'Create' button and select which options you want to generate. Note that the configuration for disabled options will still be taken from the configuration of the main product. More information about how to use configurable options can be found here or in the official WHMCS documentation. |

|
SSH Keys
| In the 'Custom Fields' tab you will find a 'SSH Public Key' field which is displayed to clients on the order form by default. This field is optional. It allows your clients to insert their public key in order to be able to log in to Droplet without using a password.
If you would like to limit the possibility of entering the key e.g. only to the 'ssh-rsa' format, you can use the regular expression in the validation field, such as: #ssh-rsa AAAA[0-9A-Za-z+/]+[=]{0,3}( [^@]+@[^@]+)?#
More information about how DigitalOcean handles SSH keys and how to create them can be found here. Important: During tests we discovered that some OS images such as 'CoreOS', 'CentOS' or 'FreeBSD', may require the SSH key to create a Droplet. Please also note that when the SSH key is provided, DigitalOcean may not send the welcome email after Droplet creation. |

|
User Data Scripts
| User data is arbitrary data that can be executed during Droplet creation, typically during the first boot of a cloud server. This allows you to perform tasks or run scripts as the root user which can be extremely useful when provisioning a server. You can provide your own scripts using 'cloud-config' or 'Bash'. By default, we provide two exemplary scripts for changing the OS password or inserting SSH key, which you can use as a reference. |

|
| Once you create your own script, it can be chosen for product execution. You can provide multiple scripts for configurable options, but only one can be chosen for Droplet creation. Remember that the scripts you provide should be compatible with the given distribution. |

|
Management
Admin Area
| DigitalOcean Droplets For WHMCS allows you to monitor and manage your customer Droplets from the admin area of your WHMCS system. This includes supervision of such features like:
|

|
|

|
Ordering
| Owing to configurable options, you are able to offer a product which your clients can tailor according to their needs. Additionally, you are able to set up pricing for each configurable option, which makes your offer even more competitive. Based on the custom SSH key field configuration, you might also insert your public SSH key, which will allow you to log in to a Droplet without the need to use the password. After the order placement and successful VM creation, the Droplet credentials will be sent to the client's email address according to the set cron execution intervals. |

|
Client Area
| Client area interface of DigitalOcean Droplets should look like the one on the screen below. As you can see, the control panel contains useful options required for managing a Droplet. The module allows your customers to easily power on/off, shutdown, reboot and reset password of their servers through pressing the corresponding buttons. |

|
Rebuild Droplet
| This feature allows your clients to rebuild their virtual machine and change a server's OS image. Press the shown below button in order to reinstall your server to the chosen image and confirm your choice. |

|
Snapshots
| Use snapshots to save the current contents of the virtual machine memory. You may use them later to restore the VM's settings. |

|
| Press the 'Create New Snapshot' button and enter the unique snapshot name. Please note that the spaces in the snapshot name will be ignored by the API and saved as a single string name anyway . |

|
| Creating a snapshot may take a while, so it will not appear on the list right away. Its progress status can be tracked in Tasks History or by refreshing the snapshot list manually. |
Backups
| If the automatic backups have been enabled for the Droplets products, then your client will be able to restore them from this section. DigitalOcean uses a snapshot-based backup system. This provides system-level backups of a server without powering it down. Note: This process happens automatically within a pre-determined scheduling window, and is completed in the background while the Droplet is running. |

|
Kernels
| In 'Kernels' section you may see kernels available and change your current one. Use the marked on the screen button to upgrade your Kernel. |

|
Firewalls
| 'Firewalls' section allows to view and create firewalls that will protect your Droplet from external attacks. Press 'Create Firewall' button to create one. |

|
| Type in the just created firewall a name. |

|
| A new firewall will appear on the list, note that it will have an ID assigned and a default inbound rule automatically created. Press 'Edit' icon to move to the firewall rules management page. |

|
Firewall Rules
| Every newly created firewall has a default, exemplary rule created. To create your own rules, just click the marked button. |

|
Finally, setup the rule by selecting:
|

|
Tasks History
| Tasks history allows you to view all tasks performed on your VM with the current progress status. Please note that this actions are also collected from the DigitalOcean API. |

|
Tips
| 1. You can use the DNS Manager For WHMCS module to manage your Droplet DNS records. It already has a built-in support for DigitalOcean DNS server. |
| 2. Some of the features like IPv6, private networking or monitoring can only be activated once and cannot be disabled later on. Use these features wisely as they can increase your Droplets maintenance costs. |
| 3. There is an additional custom field named 'Firewalls'. It should be generated automatically when you upgrade the product. In case something goes wrong, please add the custom field manually. Take a look at the screen below to check its specification. |

|
4. 'DigitalOcean Droplet Create Droplet' email template includes information on:
Please note that the last merge field has been added into the template in version 1.3.0. In case you started using the module earlier, you may add it manually. |

|
Update Instructions
| An essential guidance through the process of updating the module is offered here. If you are upgrading a module from the version prior to 1.4.0 to a newer one, we also suggest updating the frequency of execution 'cron.php Tasks' as suggested on step 7 of the installation guide. Keep in mind there is a quick and easy option in our client area that will let you upgrade the license of your module to an open source version at any time - and at a lower price! |
Common Problems
| 1. When you have problems with connection, check whether your SELinux or firewall does not block ports. |
| 2. Certain OS distributions may cause the 'Action did not complete' error in task when trying to reset Droplet's password, even if the success notification is initially returned. This may be caused by the requirement to use the SSH key by given distribution instead of a password. |
| 3. Inserting the SSH key may prevent the welcome email being sent by DigitalOcean after Droplet creation. |
| 4. Some features like monitoring might not be supported by all configurations. Please try choosing for example a different region or distribution. |