Hosting Quota Notifications 1.X For WHMCS
From ModulesGarden Wiki
(Difference between revisions)
|
|
| Line 287: |
Line 287: |
| | ===Brand Information=== | | ===Brand Information=== |
| | ===Settings=== | | ===Settings=== |
| | + | {| |
| | + | |style="padding: 10px 0px 30px 15px;"|In this window you will be able to configure all the most important settings of your brand, including billing, payment gateways, SMTP and email templates configuration. |
| | + | |} |
| | + | |
| | ====General==== | | ====General==== |
| | {| | | {| |
| − | |style="padding: 0px 0px 15px 15px;"|In general settings you will configure the main brand options. <br/> | + | |style="padding: 10px 0px 15px 15px;"|In general settings you will configure the main brand options. <br/> |
| | First fill out brand's '' 'Email Address', 'Company Name' '' and '' 'TOS URL' ''. Next choose brand's '' 'Color', 'Ticket Departments' , 'Default Language', 'Template' '' and '' 'Order Template' ''.<br /> | | First fill out brand's '' 'Email Address', 'Company Name' '' and '' 'TOS URL' ''. Next choose brand's '' 'Color', 'Ticket Departments' , 'Default Language', 'Template' '' and '' 'Order Template' ''.<br /> |
| | Be sure that chosen template is integrated correctly with Multibrand (see the [Integration Code] section). Finally toogle '' 'Auto Client Assign' '' if you desire. <br/> | | Be sure that chosen template is integrated correctly with Multibrand (see the [Integration Code] section). Finally toogle '' 'Auto Client Assign' '' if you desire. <br/> |
| Line 299: |
Line 303: |
| | |} | | |} |
| | {| | | {| |
| − | |style="padding: 0px 0px 20px 25px;"|[[File:MB2_11_3.png]] | + | |style="padding: 0px 0px 30px 25px;"|[[File:MB2_11_3.png]] |
| | |} | | |} |
| | {| | | {| |
| Line 307: |
Line 311: |
| | ====SMTP==== | | ====SMTP==== |
| | ====Email Templates==== | | ====Email Templates==== |
| | + | |
| | ===Services Pricing=== | | ===Services Pricing=== |
| | ====Products==== | | ====Products==== |
Revision as of 14:33, 13 September 2017
| Multibrand For WHMCS will allow you to manage multiple brands on multiple websites while using just a single WHMCS installation.
You will be able to customize your brand through modifying factors like client area template, logo or brand language, and preview the changes with just a single click.
The module enables you to easily assign your clients to and migrate them between brands, as well as assign products and ticket departments to each brand.
Owing to Multibrand For WHMCS your customers will be able to log into specified client areas in accordance with the brand under which they purchased a product or service.
|
| ✔ User Friendly Management Of Multiple Brands
|
| ✔ Easy Modification Of Existing Brands
|
| ✔ Assign/Unassign Clients To Multiple Brands
|
| ✔ Assign Products To Brands
|
| ✔ Assign Product Bundles To Brands
|
| ✔ Assign Ticket Departments To Brands
|
| ✔ Configure Payment Gateways For Each Brand Separately:
|
| ✔ PayPal - Single Payment And Subscription
|
| ✔ 2CheckOut - Single Payment Only
|
| ✔ Display Active Clients, Invoices, Orders, Tickets And Services Associated To Brands
|
| ✔ Quick Preview Of Branded Client Area
|
| ✔ Publish/Unpublish Brands On Click
|
| ✔ Set Brand As Default - Automatic Assignment Of New Clients
|
| ✔ View Brand Reports - List Of Clients, Invoices, Orders, Tickets And Services
|
| ✔ View Dynamic Brands Comparison Reports - Various Graph Types
|
| ✔ Generate Separate Email Templates For Each Brand
|
| ✔ Verify Integration Of Templates Used By Brands
|
| ✔ Create Branded Invoices
|
| ✔ Create Branded Announcements
|
| ✔ Add Branded Knowledgebase Articles
|
| ✔ Log In As Client To Chosen Brand
|
| ✔ Displayed Client Area Template And Default Language Depend On Brand
|
| ✔ Access To Products, Invoices, Downloads, Ticket Departments and Payment Gateways Assigned To Brand
|
| ✔ View Articles And Announcements Assigned To Brand
|
| ✔ Receive Branded Emails And Invoices
|
| ✔ Branded Clients Can Only Log Into Brand They Are Assigned To
|
| ✔ Multibranded Clients Can Log Into All Existing Brands With The Same Access Details
|
| ✔ Default Brand For New Accounts
|
| ✔ Brand Terms Of Service URL
|
| ✔ Supports PHP 5.4 Up To PHP 7
|
| ✔ Supports WHMCS Templates Five and Six
|
| ✔ Supports WHMCS V6 and V7
|
Installation
This tutorial will show you how to successfully install and configure Multibrand For WHMCS.
We will guide you step by step through the whole installation and configuration process.
Note: If you are still using any of Multibrand For WHMCS previous versions prior to v2.x, read about it here.
|
Installation
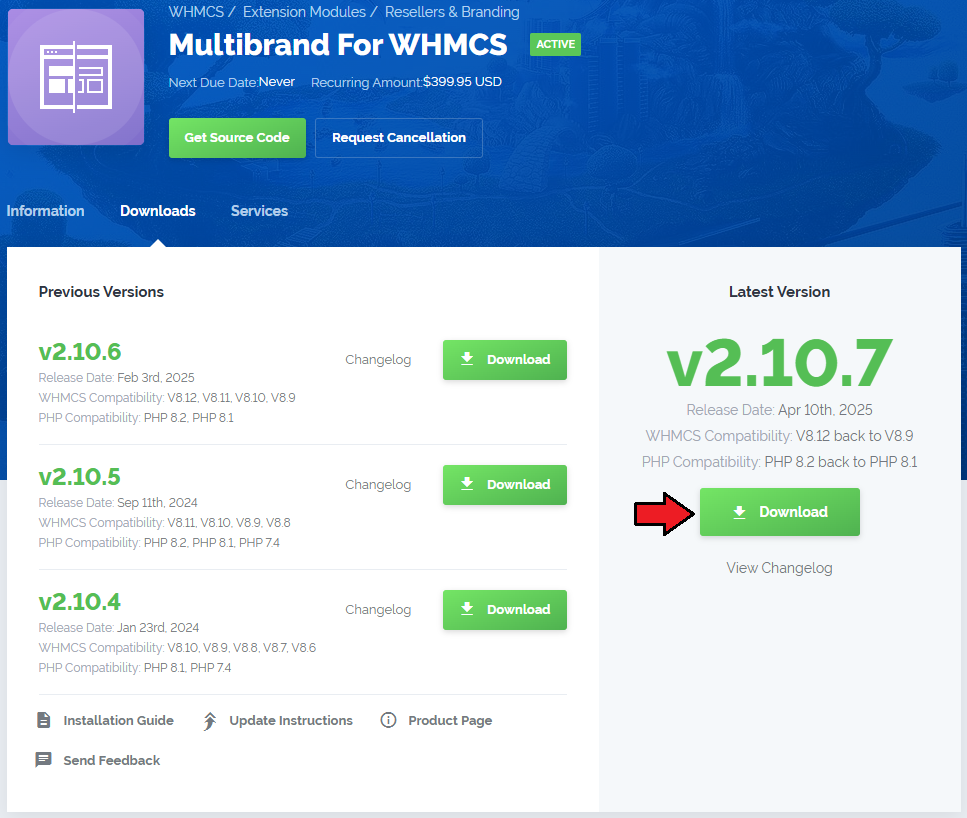
| 1. Log in to your client area and download the module.
|
2. In the downloaded file you will find two packages that support different PHP versions.
As presented on the screen below, the first one is dedicated to PHP 7, while the second one is aimed at PHP 5.4 up to PHP 5.6.
It does not apply to open source versions.
Note: You can check current PHP version in your WHMCS. To do so proceed to 'Utilities' → 'System' → 'PHP Info'.
|
3. Extract the downloaded file and choose the one with the right PHP version. Upload and extract the PHP file into the main WHMCS directory.
The content of PHP version files should look like this.
|
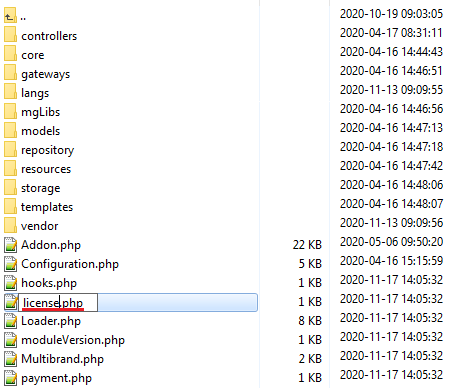
4. When you install Multibrand For WHMCS for the first time you have to rename 'license_RENAME.php' file.
File is located in 'modules/addons/MultibrandFunctionality/license_RENAME.php'. Rename it from 'license_RENAME.php' to 'license.php'.
|
5. In order to configure your license key, you have to edit a previously renamed 'license.php' file.
Enter your license key between quotation marks as presented on the following screen. You can find your license key in your client area → 'My Products'.
|
Activating Addon Module
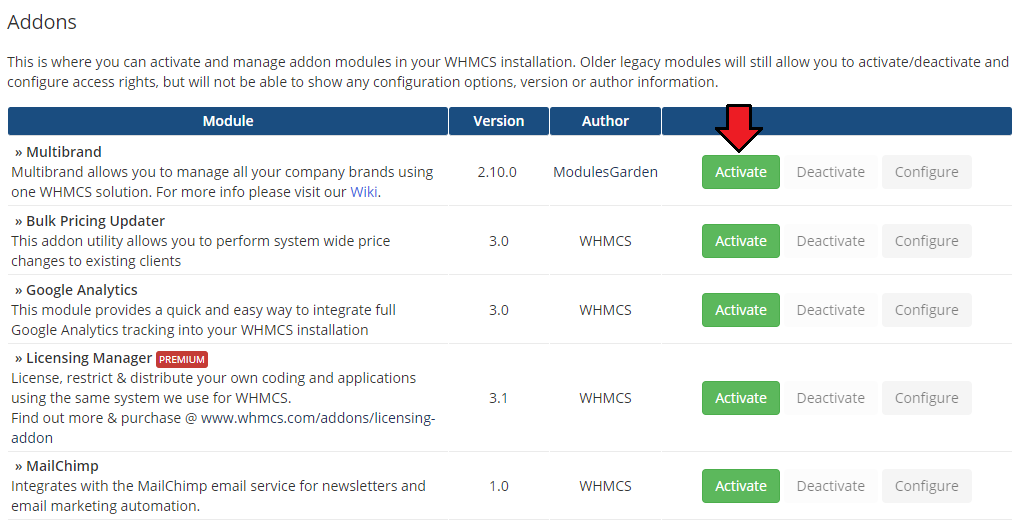
6. Now you have to activate the module in your WHMCS system.
Log in to your WHMCS admin area. Go to 'Setup' → 'Addon Modules'. Afterwards, find 'Multibrand' and press 'Activate' button.
|
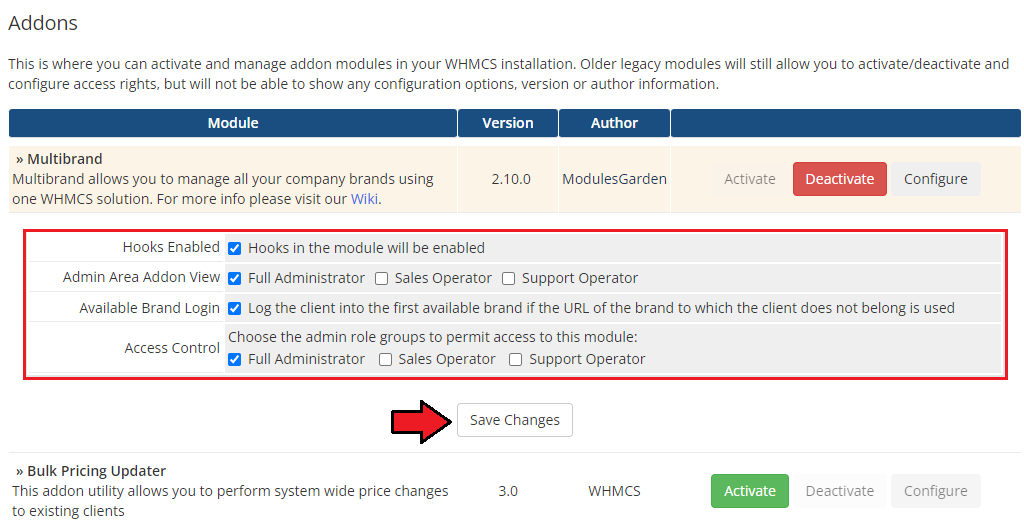
7. In the next step you need to allow to hooks beeing enabled and permit access to this module.
To do so click on 'Configure' button, tick 'Access Control' near required admin role groups and press 'Save Changes'.
|
Additional Settings
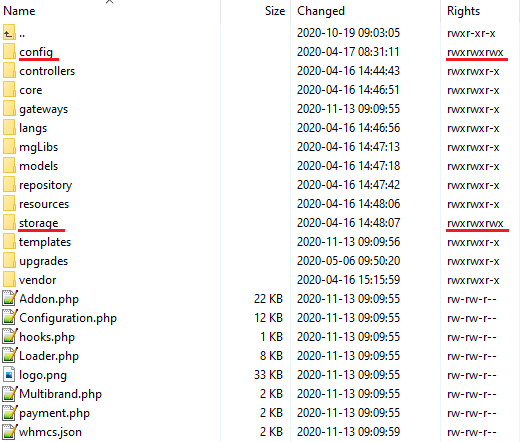
8. Now, set up the 'storage' folder as recursively writable (with all subfolders).
This older is located in 'your_whmcs/modules/addons/Multibrand/storage/'.
|
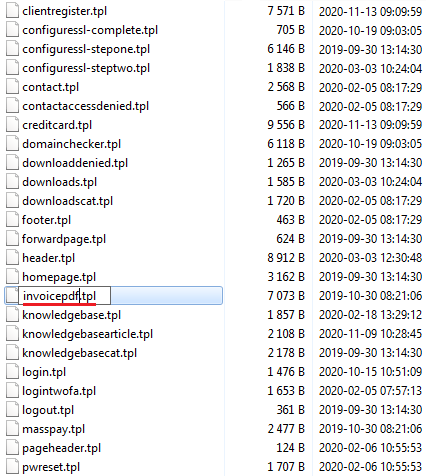
9. The next step is replacing 'invoicepdf.tpl' file with 'invoicepdf_rename.tpl' for each of the templates used.
'invoicepdf_rename.tpl' file is located in 'your_whmcs/templates/six/' folder.
Simply, remove default 'invoicepdf.tpl' file from template folder and rename 'invoicepdf_rename.tpl' file to 'invoicepdf.tpl' in that folder.
|
Integration Code
10. Now you can access your Multibrand For WHMCS module.
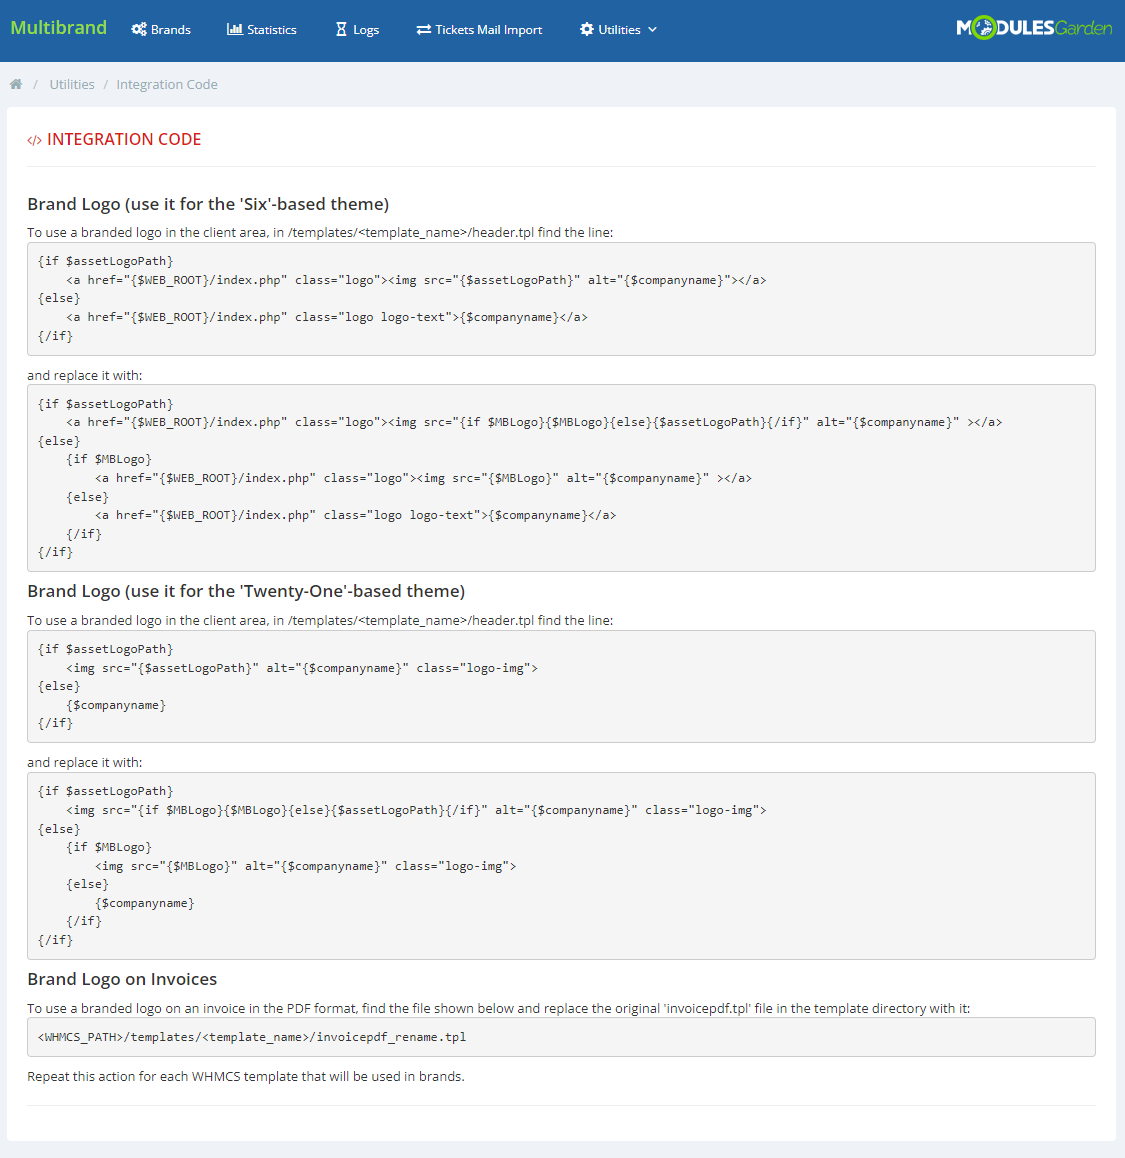
Simply go to the 'Addons' → 'Multibrand'. But before you start using the module you still need to do an 'Integration Code'. It is required for correct branding.
So go to the 'Utilities' → 'Integration Code' and follow the instructions given there, depending on the version of WHMCS you are using.
|
11. And that's all! You have now completed the installation of the module.
|
Configuration and Management
| In this section we will show you how to properly set up and use Multibrand For WHMCS.
|
Brands
| Under 'Brands' tab you can create and manage your brands using a single instance of WHMCS solution.
|
New Brand
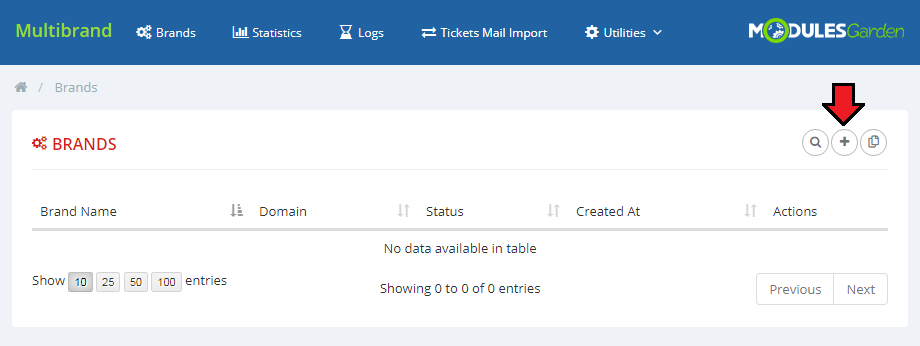
| Let's start by creating a new brand. For that purpose go to 'Brands' tab and press 'Add a new brand' button.
|
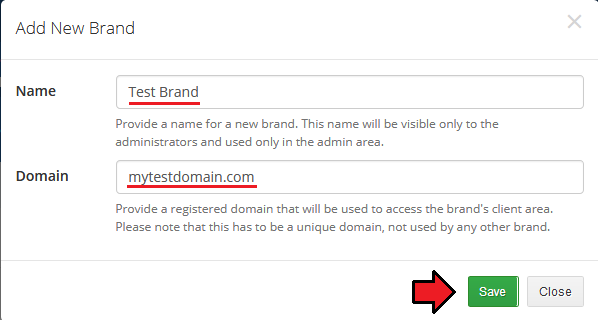
| Fill out brand's 'Name' and 'Domain' with desired values, and press 'Save' button.
|
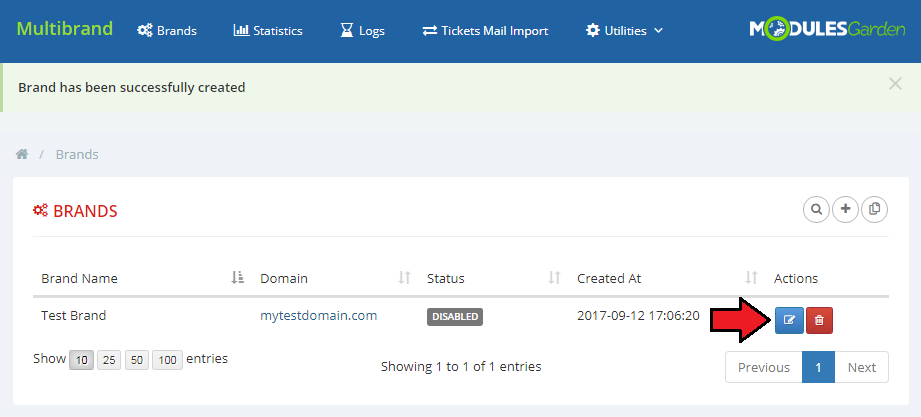
| Your first brand will be created. Next press the 'Edit' ' action button.
|
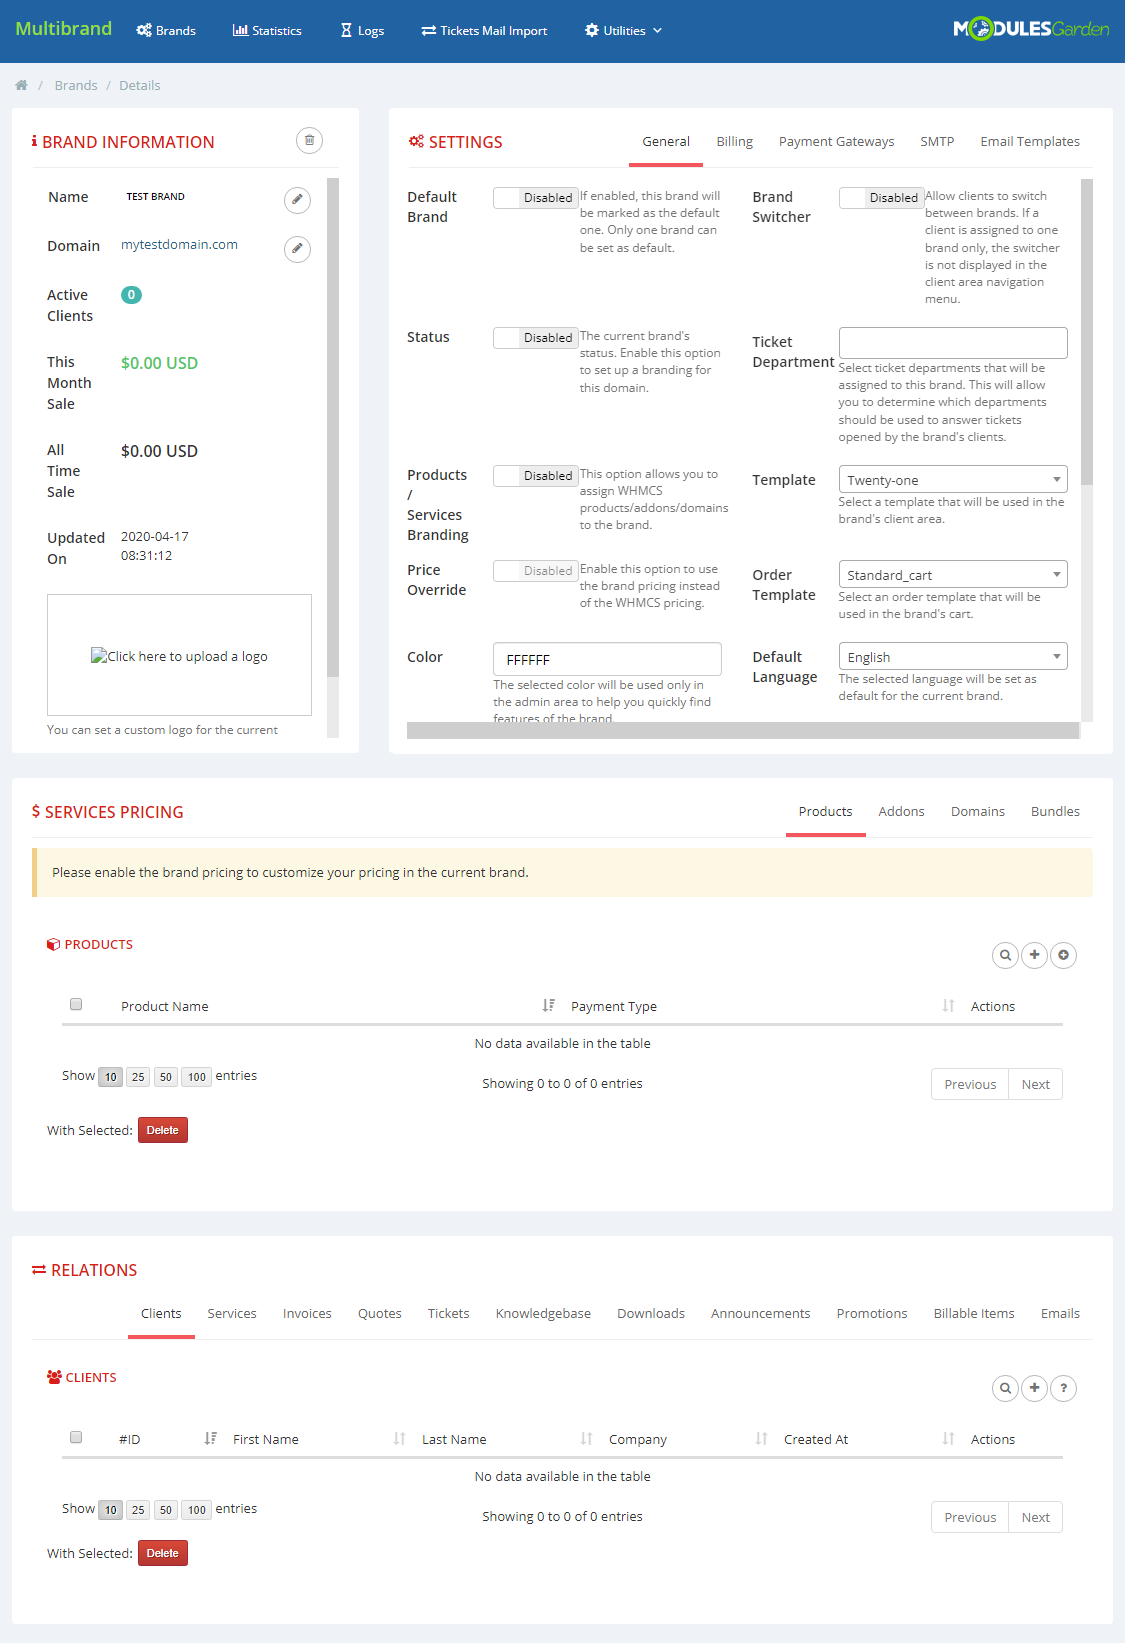
| You will be moved to the brand configuarion, where you can manage all brand's information and settings.
|
Note: once the configuration of your brand is complete, will still need to set up a CNAME DNS record before the brand is published (status: enabled).
This record will point from branded domain towards your main domain used by WHMCS.
To learn more about setting up CNAME records, proceed to the Creating CNAME Records section.
Do not forget to publish the brand as soon as the CNAME record propagates worldwide.
|
Brand Information
Settings
| In this window you will be able to configure all the most important settings of your brand, including billing, payment gateways, SMTP and email templates configuration.
|
General
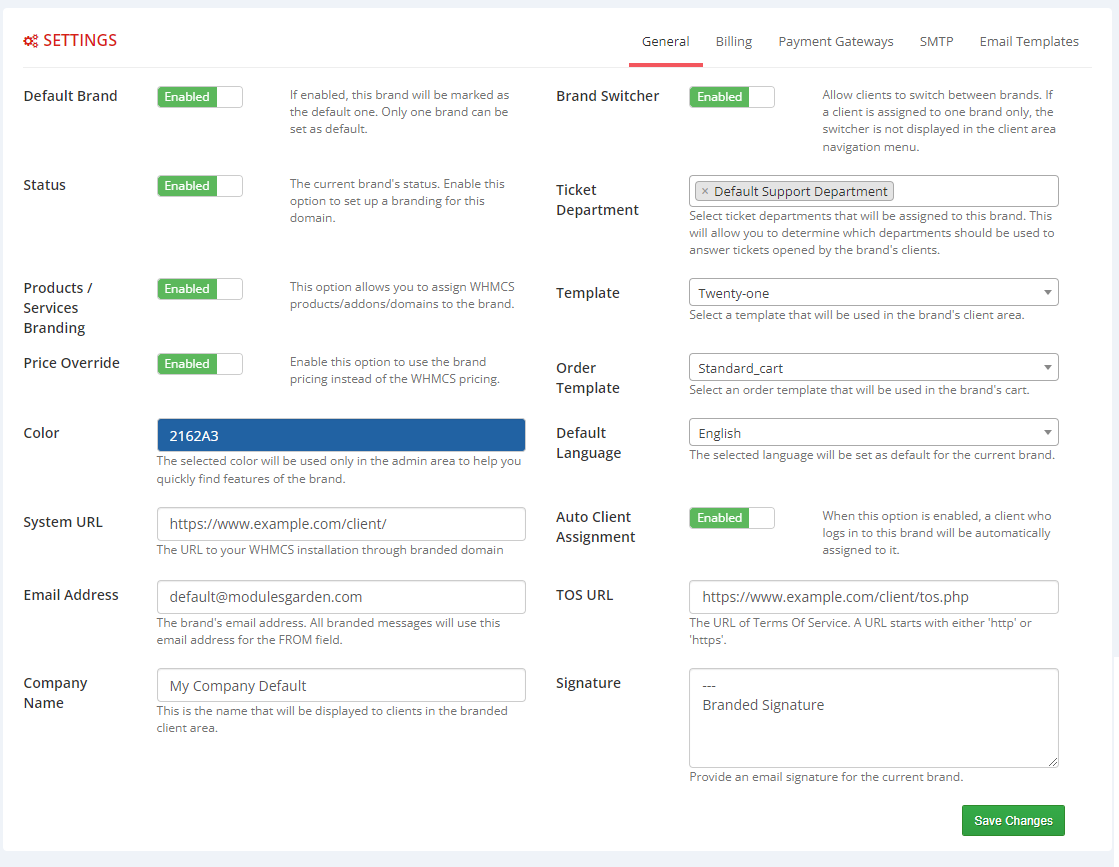
In general settings you will configure the main brand options.
First fill out brand's 'Email Address', 'Company Name' and 'TOS URL' . Next choose brand's 'Color', 'Ticket Departments' , 'Default Language', 'Template' and 'Order Template' .
Be sure that chosen template is integrated correctly with Multibrand (see the [Integration Code] section). Finally toogle 'Auto Client Assign' if you desire.
Here you can also manage brand publication 'Status' , but you should change it to 'Enable' only after you have configured the rest of the settings.
Do not forget to 'Save Configuration' .
Note: Only published brands can be set as default.
New users created by admin or through API will be assigned to the default brand.
|
|
Billings
Payment Gateways
SMTP
Email Templates
Services Pricing
Products
Addons
Domains
Relations
Clients
Services
Invoices
Tickets
Knowledgebase
Downloads
Announcements
Statistics
Logs
Branded Admin Area Functionalities
Membership In The Admin Area
Invoices/Tickets/Quotes Creation From Admin Area
Announcements
Downloads
Knowledgebase
Branded Client Area Functionalities
Domains & CNAME Records Configuration
cPanel
DirectAdmin
Plesk
SSL Certificates
cPanel
Branding Limitations & Requirements
Limitations
Requirements
Tips
Common Problems
|
