Hosting Quota Notifications 1.X For WHMCS
| Line 1: | Line 1: | ||
| − | === | + | <meta name="keywords" content="g suite for whmcs, g suite configuration, g suite management, g suite installation, g suite guide, modulesgarden g suite, g suite wiki, g suite tutorial, g suite tips, whmcs google module wiki, g suite common problems, about g suite for whmcs, g suite documentation, g suite faq, g suite help"></meta> |
| + | <meta name="description" content="ModulesGarden Wiki Contains All The Information You Need About The G Suite For WHMCS Module."></meta> | ||
| + | |||
| + | |||
| + | |||
| + | =About [https://www.modulesgarden.com/products/whmcs/g-suite G Suite For WHMCS]= | ||
{| | {| | ||
| − | |style="padding: 10px 0px | + | |style="padding: 10px 0px 10px 0px;"|'''G Suite For WHMCS''' will enable you to provision and manage Google accounts in your own WHMCS system.<br /> |
| − | + | Authenticate through OAuth 2.0, create flexible products and let your clients order ready Google services directly from your website. | |
|} | |} | ||
| + | <!--a comment maybe? --> | ||
| + | *'''Admin Area Features:''' | ||
{| | {| | ||
| − | |style="padding: 0px 0px | + | |style="padding: 10px 0px 0px 30px;"|✔ Create/Suspend/Unsuspend/Terminate Account |
|} | |} | ||
{| | {| | ||
| − | |style="padding: 0px 0px | + | |style="padding: 0px 0px 0px 30px;"|✔ Change Package |
| − | + | ||
|} | |} | ||
{| | {| | ||
| − | |style="padding: 0px 0px | + | |style="padding: 0px 0px 0px 30px;"|✔ Set Configurable Options Per Product: |
|} | |} | ||
{| | {| | ||
| − | |style="padding: 0px 0px | + | |style="padding: 0px 0px 0px 45px;"|✔ Product SKU ID |
|} | |} | ||
{| | {| | ||
| − | |style="padding: 0px 0px | + | |style="padding: 0px 0px 0px 45px;"|✔ Number of Seats |
|} | |} | ||
{| | {| | ||
| − | |style="padding: 0px 0px | + | |style="padding: 0px 0px 10px 45px;"|✔ Max Number of Seats |
|} | |} | ||
| + | *'''Client Area Features:''' | ||
{| | {| | ||
| − | |style="padding: 0px 0px | + | |style="padding: 10px 0px 0px 30px;"|✔ View Customer Info |
|} | |} | ||
{| | {| | ||
| − | |style="padding: 0px 0px | + | |style="padding: 0px 0px 0px 30px;"|✔ Log In To Control Panel |
|} | |} | ||
{| | {| | ||
| − | |style="padding: 0px 0px | + | |style="padding: 0px 0px 10px 30px;"|✔ Log In To Webmail |
|} | |} | ||
| + | *'''Available Google Services:''' | ||
{| | {| | ||
| − | |style="padding: 0px 0px | + | |style="padding: 10px 0px 0px 30px;"|✔ Google Apps For Business |
| − | + | ||
| − | + | ||
| − | + | ||
| − | + | ||
| − | + | ||
| − | + | ||
|} | |} | ||
{| | {| | ||
| − | |style="padding: 0px 0px | + | |style="padding: 0px 0px 0px 30px;"|✔ Google Vault |
|} | |} | ||
{| | {| | ||
| − | |style="padding: 0px 0px | + | |style="padding: 0px 0px 10px 30px;"|✔ Google Drive Storage |
|} | |} | ||
| + | *'''General Info:''' | ||
{| | {| | ||
| − | |style="padding: 0px 0px 30px 25px;"|[[File: | + | |style="padding: 10px 0px 0px 30px;"|✔ Authentication And API Calls Utilize OAuth 2.0 |
| + | |} | ||
| + | {| | ||
| + | |style="padding: 0px 0px 0px 30px;"|✔ Multi-Language Support | ||
| + | |} | ||
| + | {| | ||
| + | |style="padding: 0px 0px 0px 30px;"|✔ Supports PHP 5.3 Up To PHP 7 | ||
| + | |} | ||
| + | {| | ||
| + | |style="padding: 0px 0px 0px 30px;"|✔ Supports WHMCS Templates Five and Six | ||
| + | |} | ||
| + | {| | ||
| + | |style="padding: 0px 0px 30px 30px;"|✔ Supports WHMCS V6 and V7 | ||
| + | |} | ||
| + | |||
| + | =Installation and Authentication= | ||
| + | {| | ||
| + | |style="padding: 10px 0px 0px 0px;"|'''This tutorial will show you how to successfully install and authenticate G Suite For WHMCS.'''<br /> | ||
| + | We will guide you step by step through the whole installation and authentication process. | ||
| + | |} | ||
| + | {| | ||
| + | |style="padding: 20px 0px 20px 15px;"|'''1. Log in to your client area and download the module.''' | ||
| + | |} | ||
| + | {| | ||
| + | |style="padding: 0px 0px 20px 25px;"|[[File:GA1.png]] | ||
| + | |} | ||
| + | {| | ||
| + | |style="padding: 0px 0px 10px 15px;"|'''2. In the downloaded file you will find two packages that support different PHP versions.'''<br/>As presented on the screen below, the first one is dedicated to PHP 7, while the second one is aimed at PHP 5.3 up to PHP 5.6.<br/>It does not apply to open source versions.<br/> | ||
| + | '' '''Note''': You can check current PHP version in your WHMCS. To do so proceed to ''' 'Utilities' → 'System' → 'PHP Info'.''' | ||
| + | |} | ||
| + | {| | ||
| + | |style="padding: 0px 0px 20px 25px;"|[[File:GA2.png]] | ||
| + | |} | ||
| + | {| | ||
| + | |style="padding: 0px 0px 15px 15px;"|'''3. Extract the downloaded file and choose the one with the right PHP version. Upload and extract the PHP file into the main WHMCS directory.'''<br /> | ||
| + | The content of PHP version files should look like this. | ||
| + | |} | ||
| + | {| | ||
| + | |style="padding: 0px 0px 20px 25px;"|[[File:ftgt.png]] | ||
| + | |} | ||
| + | {| | ||
| + | |style="padding: 0px 0px 15px 15px;"|'''4. When you install G Suite For WHMCS for the first time you have to rename '' 'license_RENAME.php' '' file.'''<br /> | ||
| + | File is located in '' 'modules/servers/googleapps/license_RENAME.php'. '' Rename it from '' 'license_RENAME.php' '' to '' 'license.php'. '' | ||
| + | |} | ||
| + | {| | ||
| + | |style="padding: 0px 0px 20px 25px;"|[[File:GA3.png]] | ||
| + | |} | ||
| + | {| | ||
| + | |style="padding: 0px 0px 15px 15px;"|'''5. In order to configure your license key you have to edit a previously renamed '' 'license.php' '' file.'''<br /> | ||
| + | Enter your license key between quotation marks as presented on the following screen. You can find your license key in your client area → '' 'My Products'. '' | ||
| + | |} | ||
| + | {| | ||
| + | |style="padding: 0px 0px 20px 25px;"|[[File:GA4.png]] | ||
| + | |} | ||
| + | ==API Configuration== | ||
| + | {| | ||
| + | |style="padding: 10px 0px 15px 15px;"|'''6. Now you have to authenticate the module through setting up API Access.'''<br /> | ||
| + | Create API Access in Google Console. You can do it here → [https://code.google.com/apis/console/ https://code.google.com/apis/console/] | ||
| + | |} | ||
| + | {| | ||
| + | |style="padding: 0px 0px 20px 15px;"|'''7. After you have logged in, create a new project.''' | ||
| + | |} | ||
| + | {| | ||
| + | |style="padding: 0px 0px 20px 25px;"|[[File:GA5.png]] | ||
| + | |} | ||
| + | {| | ||
| + | |style="padding: 0px 0px 15px 15px;"|'''8. You have just entered Google API Manager. Firstly, go to '' 'OAuth consent screen' '' under '' 'Credentials' '' section.<br /> | ||
| + | Afterwards, enter email address and product name, they will be visible during your requests.<br /> | ||
| + | Save changes through pressing '' 'Save' '' button. | ||
| + | |} | ||
| + | {| | ||
| + | |style="padding: 0px 0px 20px 25px;"|[[File:GA5_1.png]] | ||
| + | |} | ||
| + | {| | ||
| + | |style="padding: 0px 0px 15px 15px;"|'''9. To proceed, go to '' 'Google APIs' '' under '' 'Overview' '' tab.'''<br /> | ||
| + | Find '' 'Google Apps Reseller API' '' among all applications. | ||
| + | |} | ||
| + | {| | ||
| + | |style="padding: 0px 0px 20px 25px;"|[[File:GA5_2.png]] | ||
| + | |} | ||
| + | {| | ||
| + | |style="padding: 0px 0px 15px 15px;"|'''10. You have to enable '' 'Google Apps Reseller API' '' as shown on the following screen.''' | ||
| + | |} | ||
| + | {| | ||
| + | |style="padding: 0px 0px 20px 25px;"|[[File:GA5_2.1.png]] | ||
| + | |} | ||
| + | {| | ||
| + | |style="padding: 0px 0px 20px 15px;"|'''11. Now, switch to '' 'Credentials' '' tab and add new credentials .''' | ||
| + | |} | ||
| + | {| | ||
| + | |style="padding: 0px 0px 20px 25px;"|[[File:GA5_4.png]] | ||
| + | |} | ||
| + | {| | ||
| + | |style="padding: 0px 0px 15px 15px;"|'''12. Afterwards, tick '' 'Web application'. '''''<br /> | ||
| + | Next, enter website URL into '' 'Authorized JavaScript origins' '' field and path to '' 'oauth_callback.php' '' into '' 'Authorized redirect URI' '' field.<br /> | ||
| + | Confirm changes through pressing '' 'Create'. '' | ||
| + | |} | ||
| + | {| | ||
| + | |style="padding: 0px 0px 20px 25px;"|[[File:GA5_5.png]] | ||
| + | |} | ||
| + | {| | ||
| + | |style="padding: 0px 0px 20px 15px;"|'''13. Well done, now when you have all the necessary details you can proceed to authenticate Google Apps.''' | ||
| + | |} | ||
| + | {| | ||
| + | |style="padding: 0px 0px 30px 25px;"|[[File:GA5_6.png]] | ||
| + | |} | ||
| + | |||
| + | ==Product Configuration== | ||
| + | {| | ||
| + | |style="padding: 10px 0px 20px 15px;"|'''14. Now go back to your WHMCS system and create a new product for your GoogleApps.'''<br/> | ||
| + | Move to '' 'Setup' → 'Products/Services' → 'Products/Services' '' and add a new product. | ||
| + | |} | ||
| + | {| | ||
| + | |style="padding: 0px 0px 20px 25px;"|[[File:GA5_6_1.png]] | ||
| + | |} | ||
| + | {| | ||
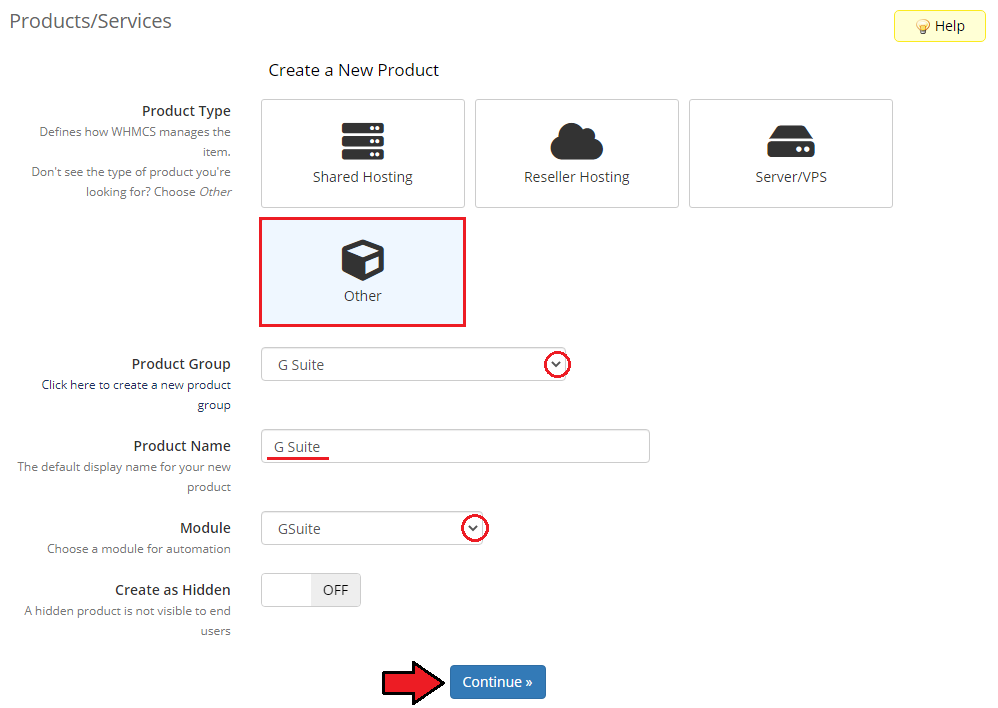
| + | |style="padding: 0px 0px 20px 15px;"|'''15. Choose product type and product group from dropdown menus and enter your new product's name. '' 'Continue'. '' | ||
| + | |} | ||
| + | {| | ||
| + | |style="padding: 0px 0px 20px 25px;"|[[File:GA5_6_2.png]] | ||
| + | |} | ||
| + | {| | ||
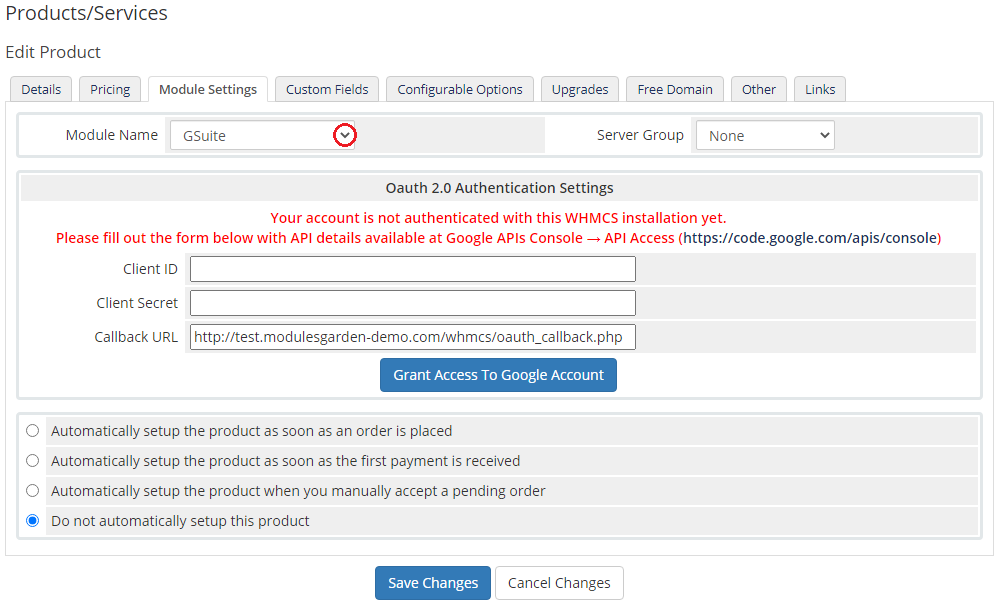
| + | |style="padding: 0px 0px 20px 15px;"|'''16. Go to '' 'Module Settings' '' of your product and choose '' 'Googleapps' '' from a '' 'Module Name' '' dropdown menu.''' | ||
| + | |} | ||
| + | {| | ||
| + | |style="padding: 0px 0px 20px 25px;"|[[File:GA5_7.png]] | ||
| + | |} | ||
| + | {| | ||
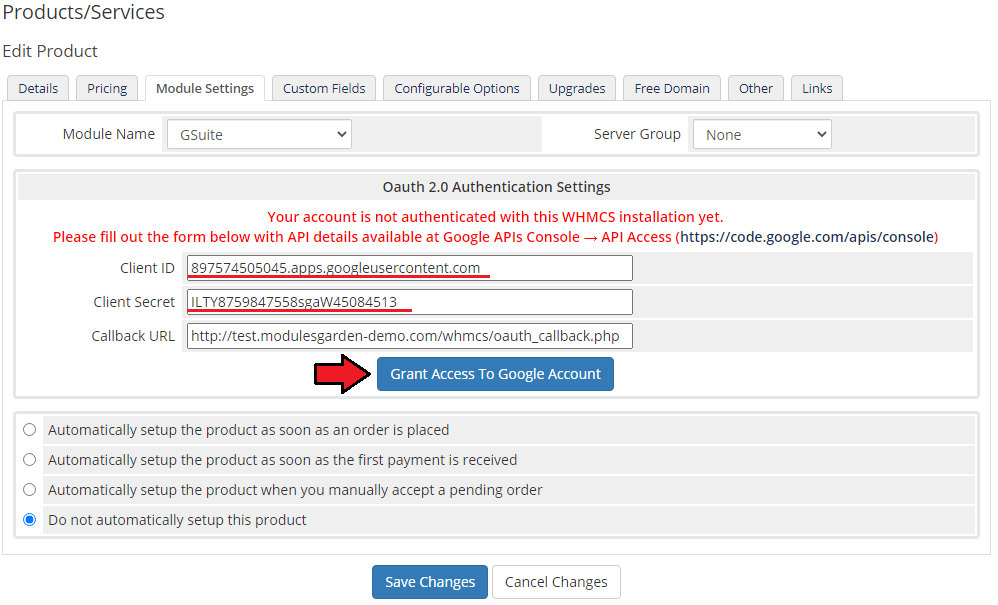
| + | |style="padding: 0px 0px 20px 15px;"|'''17. Enter your previously obtained '' 'Client ID', 'Client Secret' '' and make sure that '' 'Callback URL' '' is correct.<br/> | ||
| + | Then press '' 'Grant access with Google account'. ''''' | ||
| + | |} | ||
| + | {| | ||
| + | |style="padding: 0px 0px 20px 25px;"|[[File:GA5_8.png]] | ||
| + | |} | ||
| + | {| | ||
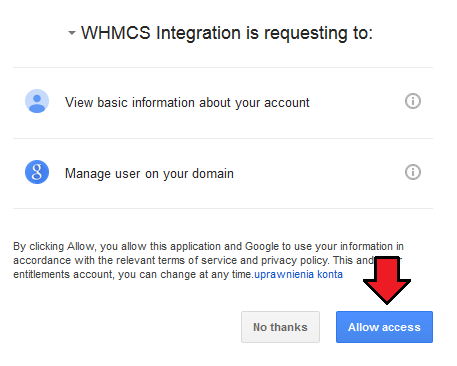
| + | |style="padding: 0px 0px 20px 15px;"|'''18. If your entered data are correct, you will be redirected to the page with permission request. Press '' 'Allow access' '' button.''' | ||
| + | |} | ||
| + | {| | ||
| + | |style="padding: 0px 0px 20px 25px;"|[[File:GA5_9.png]] | ||
| + | |} | ||
| + | {| | ||
| + | |style="padding: 0px 0px 15px 15px;"|'''19. And that is all. You will be redirected back to your WHMCS and you will see a following screen.'''<br /> | ||
| + | Move to '' 'Custom Fields' '' now. | ||
| + | |} | ||
| + | {| | ||
| + | |style="padding: 0px 0px 20px 25px;"|[[File:GA14.png]] | ||
| + | |} | ||
| + | {| | ||
| + | |style="padding: 0px 0px 15px 15px;"|'''20. Fields called '' 'GoogleApps Domain' '' and '' 'GoogleApps PurchaseOrderID' '' are added automatically.'''<br /> | ||
| + | |} | ||
| + | {| | ||
| + | |style="padding: 0px 0px 30px 25px;"|[[File:GA19.png]] | ||
| + | |} | ||
| + | |||
| + | =Configuration and Management= | ||
| + | {| | ||
| + | |style="padding: 10px 0px 30px 0px;"|Configuration and management of G Suite For WHMCS is very intuitive. Read the below sections to see how easy it is. | ||
| + | |} | ||
| + | ==Basic Configuration== | ||
| + | {| | ||
| + | |style="padding: 10px 0px 15px 15px;"|Let's start the module settings from choosing '' 'Default Product SKU ID'. '' In other words Google services.<br /> | ||
| + | As you can see on the following screen our module supports Google Apps For Business, Google Drive Storage and Google Vault. | ||
| + | |} | ||
| + | {| | ||
| + | |style="padding: 0px 0px 20px 25px;"|[[File:GA16.png]] | ||
| + | |} | ||
| + | {| | ||
| + | |style="padding: 0px 0px 20px 15px;"|'' 'Plan Name' '' allows you to select the method of payment. You can pay once per year (Annual), once per month (Flexible) or as the client chooses (Automatic). | ||
| + | |} | ||
| + | {| | ||
| + | |style="padding: 0px 0px 20px 25px;"|[[File:GA17.png]] | ||
| + | |} | ||
| + | {| | ||
| + | |style="padding: 0px 0px 20px 15px;"|Here you can decide whether on terminate you want to suspend or cancel customer's services. | ||
| + | |} | ||
| + | {| | ||
| + | |style="padding: 0px 0px 30px 25px;"|[[File:GA18.png]] | ||
| + | |} | ||
| + | |||
| + | ==Configurable Options== | ||
| + | {| | ||
| + | |style="padding: 10px 0px 15px 15px;"|In order to automatically generate configurable options, simply press button marked on the screen. <br/> | ||
| + | |} | ||
| + | {| | ||
| + | |style="padding: 0px 0px 20px 25px;"|[[File:GA21.png]] | ||
| + | |} | ||
| + | {| | ||
| + | |style="padding: 0px 0px 20px 15px;"|In your WHMCS system press '' 'Setup' '' → '' 'Products/Services' '' → '' 'Configurable Options'. ''<br /> | ||
| + | Find '' 'GoogleApps' '' options on the list. | ||
| + | |} | ||
| + | {| | ||
| + | |style="padding: 0px 0px 20px 25px;"|[[File:GA22.png]] | ||
| + | |} | ||
| + | {| | ||
| + | |style="padding: 0px 0px 20px 15px;"|Here you can manage and alter added configurable options. | ||
| + | |} | ||
| + | {| | ||
| + | |style="padding: 0px 0px 20px 25px;"|[[File:GA23.png]] | ||
| + | |} | ||
| + | {| | ||
| + | |style="padding: 0px 0px 20px 15px;"|Provide values for your new option and enter your desired price. '' 'Save Changes'. '' | ||
| + | |} | ||
| + | {| | ||
| + | |style="padding: 0px 0px 20px 25px;"|[[File:GA24.png]] | ||
| + | |} | ||
| + | {| | ||
| + | |style="padding: 0px 0px 20px 15px;"|At your product '' 'Module Settings' '' you can fill out the fields for ' ''Default Number of Seats' '' and '' 'Default Max Number of Seats'. ''<br/>Remember, however, that these values will be used only if configurable options are NOT generated. | ||
| + | |} | ||
| + | {| | ||
| + | |style="padding: 0px 0px 20px 25px;"|[[File:GA25.png]] | ||
| + | |} | ||
| + | {| | ||
| + | |style="padding: 0px 30px 15px 15px;"|From now on you can easily and quickly change value of your product. Remember that you can add more configurable options for other values.<br /> | ||
| + | |} | ||
| + | ==Admin Area== | ||
| + | {| | ||
| + | |style="padding: 10px 0px 15px 15px;"|Let's check your new product in admin area product page. It should look like on the screen below.<br /> | ||
| + | |} | ||
| + | {| | ||
| + | |style="padding: 0px 0px 30px 25px;"|[[File:GA19.1.png]] | ||
| + | |} | ||
| + | |||
| + | ==Client Area== | ||
| + | {| | ||
| + | |style="padding: 10px 0px 20px 15px;"|This is how the module will look like in the client area. G Suite For WHMCS also allows your customers to quickly access Google account services. | ||
| + | |} | ||
| + | {| | ||
| + | |style="padding: 0px 0px 30px 25px;"|[[File:GA20.png]] | ||
| + | |} | ||
| + | |||
| + | ==Update of Existing Customers== | ||
| + | {| | ||
| + | |style="padding: 10px 0px 15px 15px;"|You can link existing customers accounts by properly filling in the Custom Fields: '' 'GoogleApps Domain' '' and '' 'GoogleApps PurchaseOrderID'. ''<br /> | ||
| + | After your customers order a new subscription, they should insert their primary Google account domain name in the '' 'GoogleApps Domain' '' field.<br /> | ||
| + | Then, the new subscription will be added to that account.<br /> | ||
| + | If you want to manually create an order for existing subscription, additionally to the above, you need to find the '' 'Purchase Order ID' '' (usually on the invoice).<br /> | ||
| + | Copy the ID and paste it to the '' 'GoogleApps PurchaseOrderID'' ' field.<br /> | ||
| + | Afterwards '''do not''' run the create command - just press '' 'Save Changes' '' button. You can also change the status to '' 'Active'. '' | ||
| + | |} | ||
| + | {| | ||
| + | |style="padding: 0px 0px 30px 25px;"|[[File:GA28.png]] | ||
| + | |} | ||
| + | |||
| + | =Tips= | ||
| + | {| | ||
| + | |style="padding: 10px 0px 10px 15px;"|1. Our module allows to use Google Apps Reseller account. | ||
| + | |} | ||
| + | {| | ||
| + | |style="padding: 0px 0px 10px 15px;"|2. Avoid using localhost and Raw IP during the authorization. | ||
| + | |} | ||
| + | {| | ||
| + | |style="padding: 0px 0px 10px 15px;"|3. Callback URL is fetched from your WHMCS System URL. You can set it in the '' 'General Settings' '' of your system. | ||
| + | |} | ||
| + | {| | ||
| + | |style="padding: 0px 0px 5px 15px;"|4. To change your API access and OAuth, go to product configuration page and add <code>&logout=1&revoke=1</code> to the URL.<br/> Example:<br /> | ||
| + | http://yourwebsite/whmcs/admin/configproducts.php?action=edit&id=28&logout=1&revoke=1 | ||
| + | |} | ||
| + | {| | ||
| + | |style="padding: 0px 0px 10px 15px;"|5. If you want to better understand Google Apps Reseller API and our module concept, visit this [https://developers.google.com/admin-sdk/reseller/v1/how-tos/concepts page] | ||
| + | |} | ||
| + | {| | ||
| + | |style="padding: 0px 0px 30px 15px;"|6. To set up a trial product, go to the module settings, mark '' 'Trial' '' checkbox and switch '' 'Plan Name' '' to '' 'FLEXIBLE'. '' | ||
| + | |} | ||
| + | |||
| + | =Common Problems= | ||
| + | {| | ||
| + | |style="padding: 10px 0px 5px 15px;"|'''1. When you have problems with connection, check whether your SELinux or firewall does not block ports.''' | ||
| + | |} | ||
| + | {| | ||
| + | |style="padding: 0px 0px 5px 15px;"|2. It is possible that while authenticating our module you will get an error: | ||
| + | Error: redirect_uri_mismatch | ||
| + | If you do, make sure that URLs provided in Google account and your WHMCS system are same.<br/> Keep in mind that address with prefix '' 'www' '' varies from address without prefix '' 'www'. '' | ||
| + | |} | ||
| + | {| | ||
| + | |style="padding: 0px 0px 30px 15px;"|3. In case you encounter error similar to the one below, you most probably disabled the output buffering in the PHP configuration. | ||
| + | Notice: ob_clean(): failed to delete buffer. | ||
| + | To solve the problem, please set the '' 'output_buffering' '' value to '' 'On' '' in the php.ini file. | ||
|} | |} | ||
Revision as of 13:40, 28 August 2017
Contents |
About G Suite For WHMCS
| G Suite For WHMCS will enable you to provision and manage Google accounts in your own WHMCS system. Authenticate through OAuth 2.0, create flexible products and let your clients order ready Google services directly from your website. |
- Admin Area Features:
| ✔ Create/Suspend/Unsuspend/Terminate Account |
| ✔ Change Package |
| ✔ Set Configurable Options Per Product: |
| ✔ Product SKU ID |
| ✔ Number of Seats |
| ✔ Max Number of Seats |
- Client Area Features:
| ✔ View Customer Info |
| ✔ Log In To Control Panel |
| ✔ Log In To Webmail |
- Available Google Services:
| ✔ Google Apps For Business |
| ✔ Google Vault |
| ✔ Google Drive Storage |
- General Info:
| ✔ Authentication And API Calls Utilize OAuth 2.0 |
| ✔ Multi-Language Support |
| ✔ Supports PHP 5.3 Up To PHP 7 |
| ✔ Supports WHMCS Templates Five and Six |
| ✔ Supports WHMCS V6 and V7 |
Installation and Authentication
| This tutorial will show you how to successfully install and authenticate G Suite For WHMCS. We will guide you step by step through the whole installation and authentication process. |
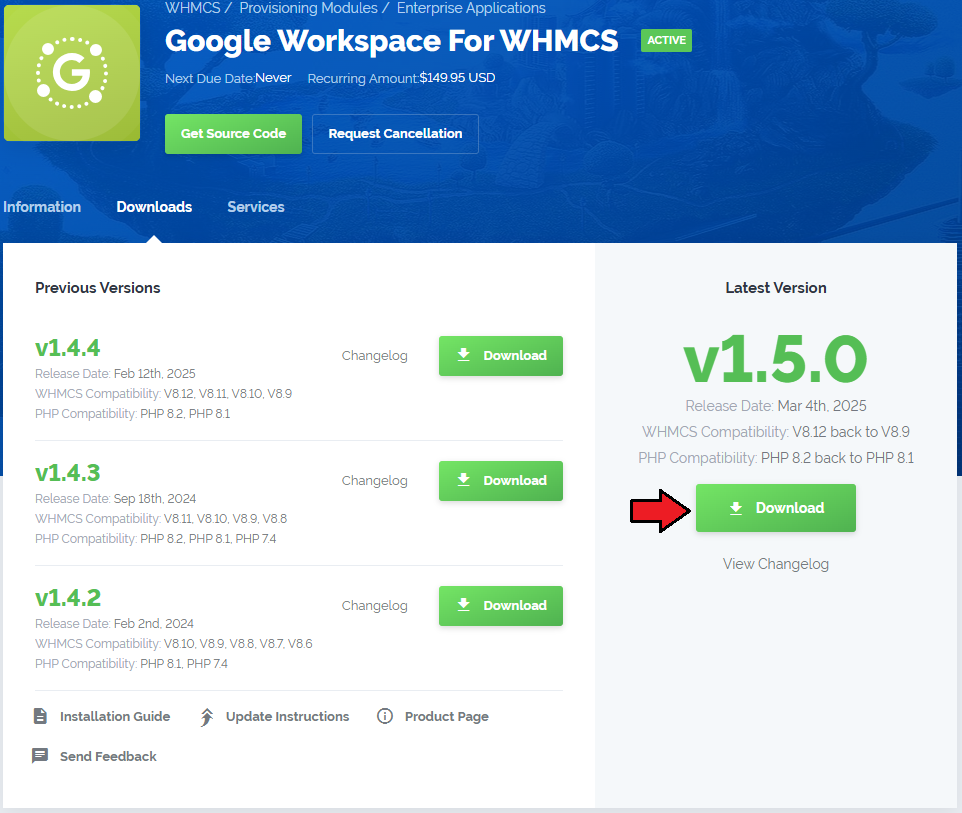
| 1. Log in to your client area and download the module. |
|
| 2. In the downloaded file you will find two packages that support different PHP versions. As presented on the screen below, the first one is dedicated to PHP 7, while the second one is aimed at PHP 5.3 up to PHP 5.6. It does not apply to open source versions. Note: You can check current PHP version in your WHMCS. To do so proceed to 'Utilities' → 'System' → 'PHP Info'. |

|
| 3. Extract the downloaded file and choose the one with the right PHP version. Upload and extract the PHP file into the main WHMCS directory. The content of PHP version files should look like this. |

|
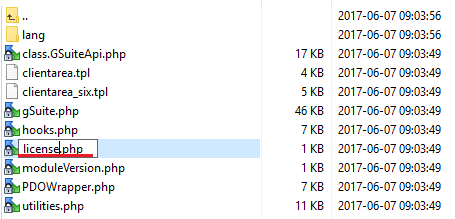
| 4. When you install G Suite For WHMCS for the first time you have to rename 'license_RENAME.php' file. File is located in 'modules/servers/googleapps/license_RENAME.php'. Rename it from 'license_RENAME.php' to 'license.php'. |
|
| 5. In order to configure your license key you have to edit a previously renamed 'license.php' file. Enter your license key between quotation marks as presented on the following screen. You can find your license key in your client area → 'My Products'. |

|
API Configuration
| 6. Now you have to authenticate the module through setting up API Access. Create API Access in Google Console. You can do it here → https://code.google.com/apis/console/ |
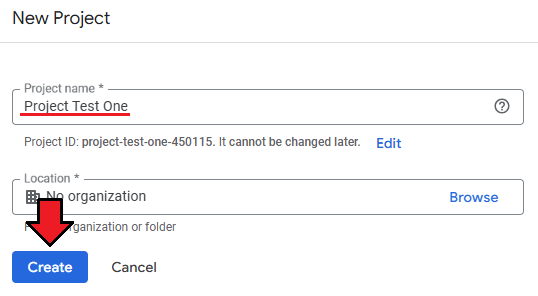
| 7. After you have logged in, create a new project. |
|
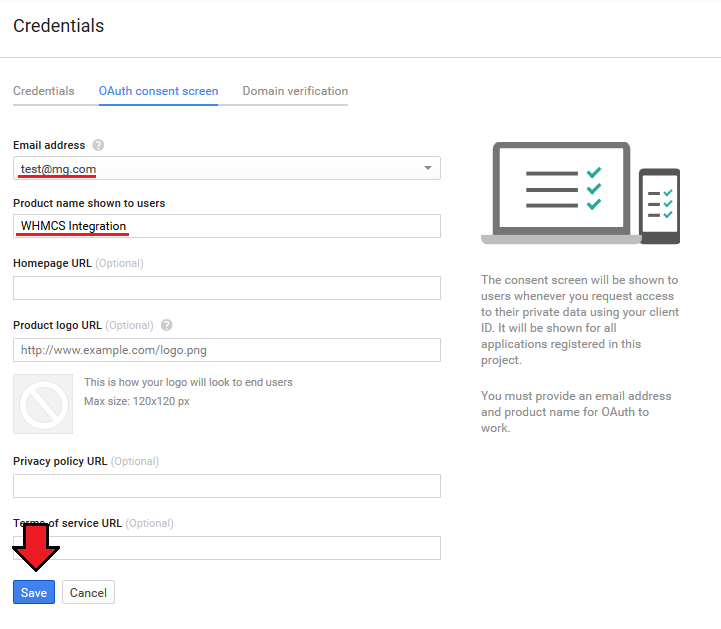
| 8. You have just entered Google API Manager. Firstly, go to 'OAuth consent screen' under 'Credentials' section. Afterwards, enter email address and product name, they will be visible during your requests. |
|
| 9. To proceed, go to 'Google APIs' under 'Overview' tab. Find 'Google Apps Reseller API' among all applications. |

|
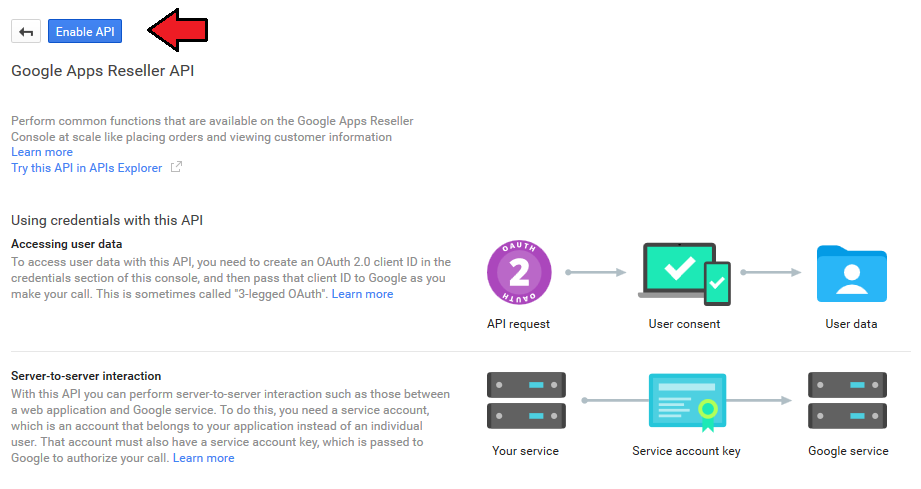
| 10. You have to enable 'Google Apps Reseller API' as shown on the following screen. |
|
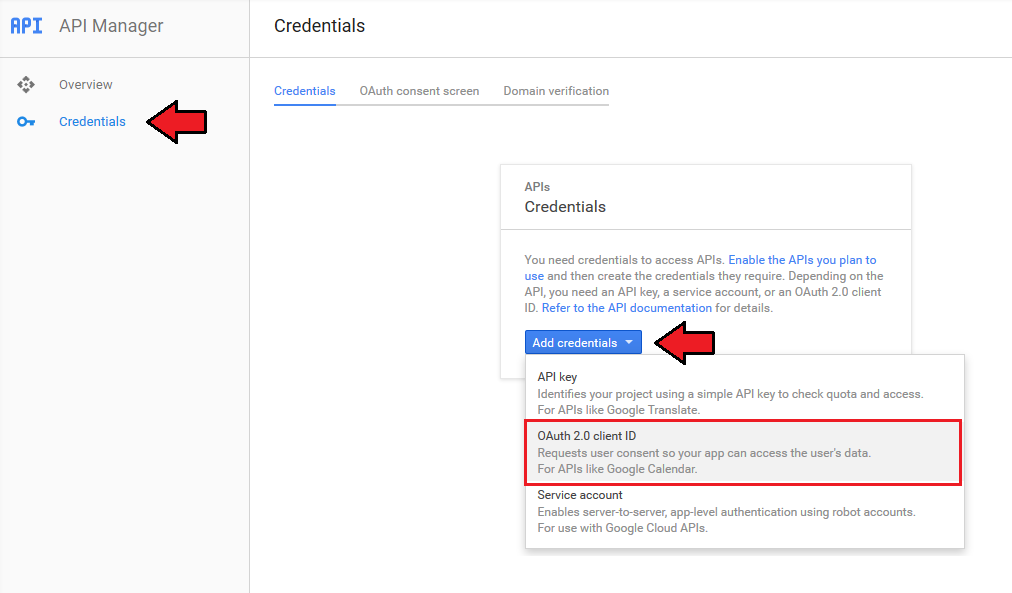
| 11. Now, switch to 'Credentials' tab and add new credentials . |
|
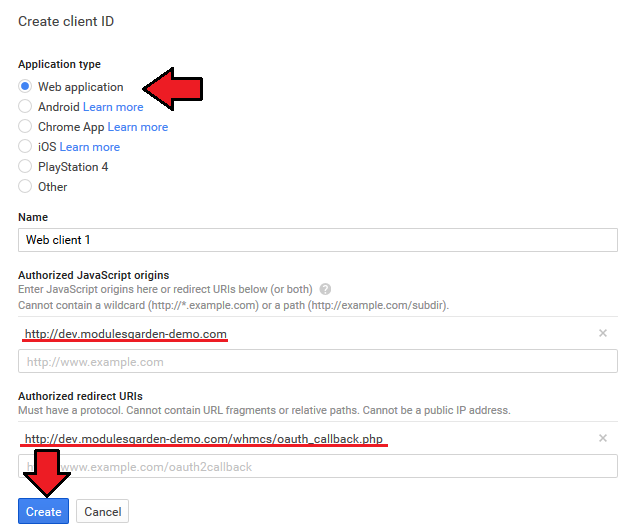
| 12. Afterwards, tick 'Web application'. Next, enter website URL into 'Authorized JavaScript origins' field and path to 'oauth_callback.php' into 'Authorized redirect URI' field. |
|
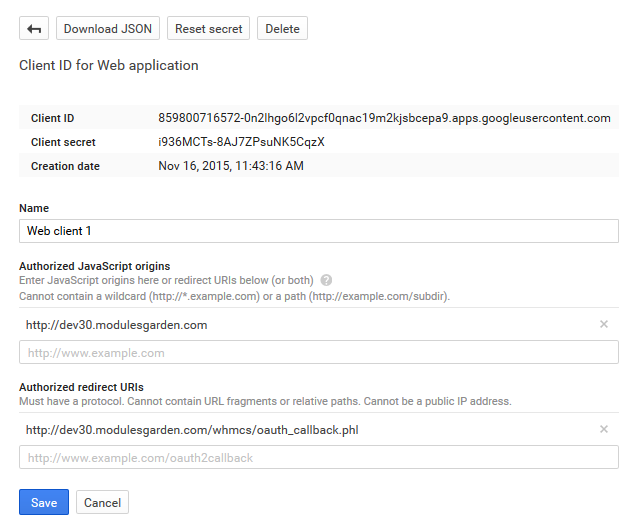
| 13. Well done, now when you have all the necessary details you can proceed to authenticate Google Apps. |
|
Product Configuration
| 14. Now go back to your WHMCS system and create a new product for your GoogleApps. Move to 'Setup' → 'Products/Services' → 'Products/Services' and add a new product. |

|
| 15. Choose product type and product group from dropdown menus and enter your new product's name. 'Continue'. |
|
| 16. Go to 'Module Settings' of your product and choose 'Googleapps' from a 'Module Name' dropdown menu. |
|
| 17. Enter your previously obtained 'Client ID', 'Client Secret' and make sure that 'Callback URL' is correct. Then press 'Grant access with Google account'. |
|
| 18. If your entered data are correct, you will be redirected to the page with permission request. Press 'Allow access' button. |
|
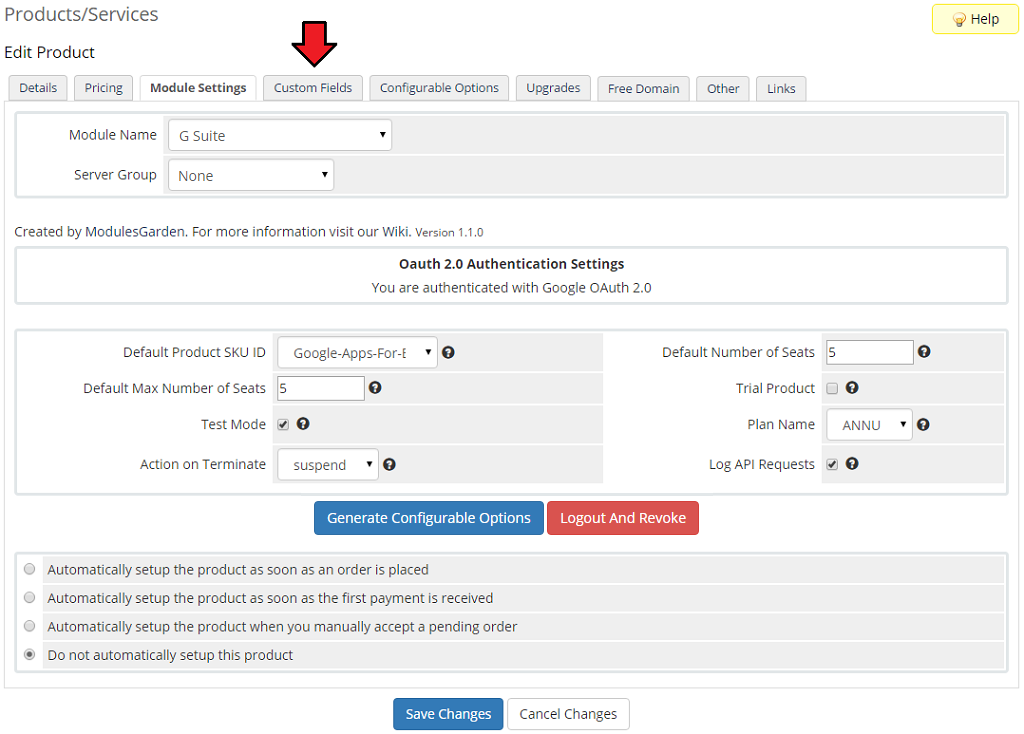
| 19. And that is all. You will be redirected back to your WHMCS and you will see a following screen. Move to 'Custom Fields' now. |
|
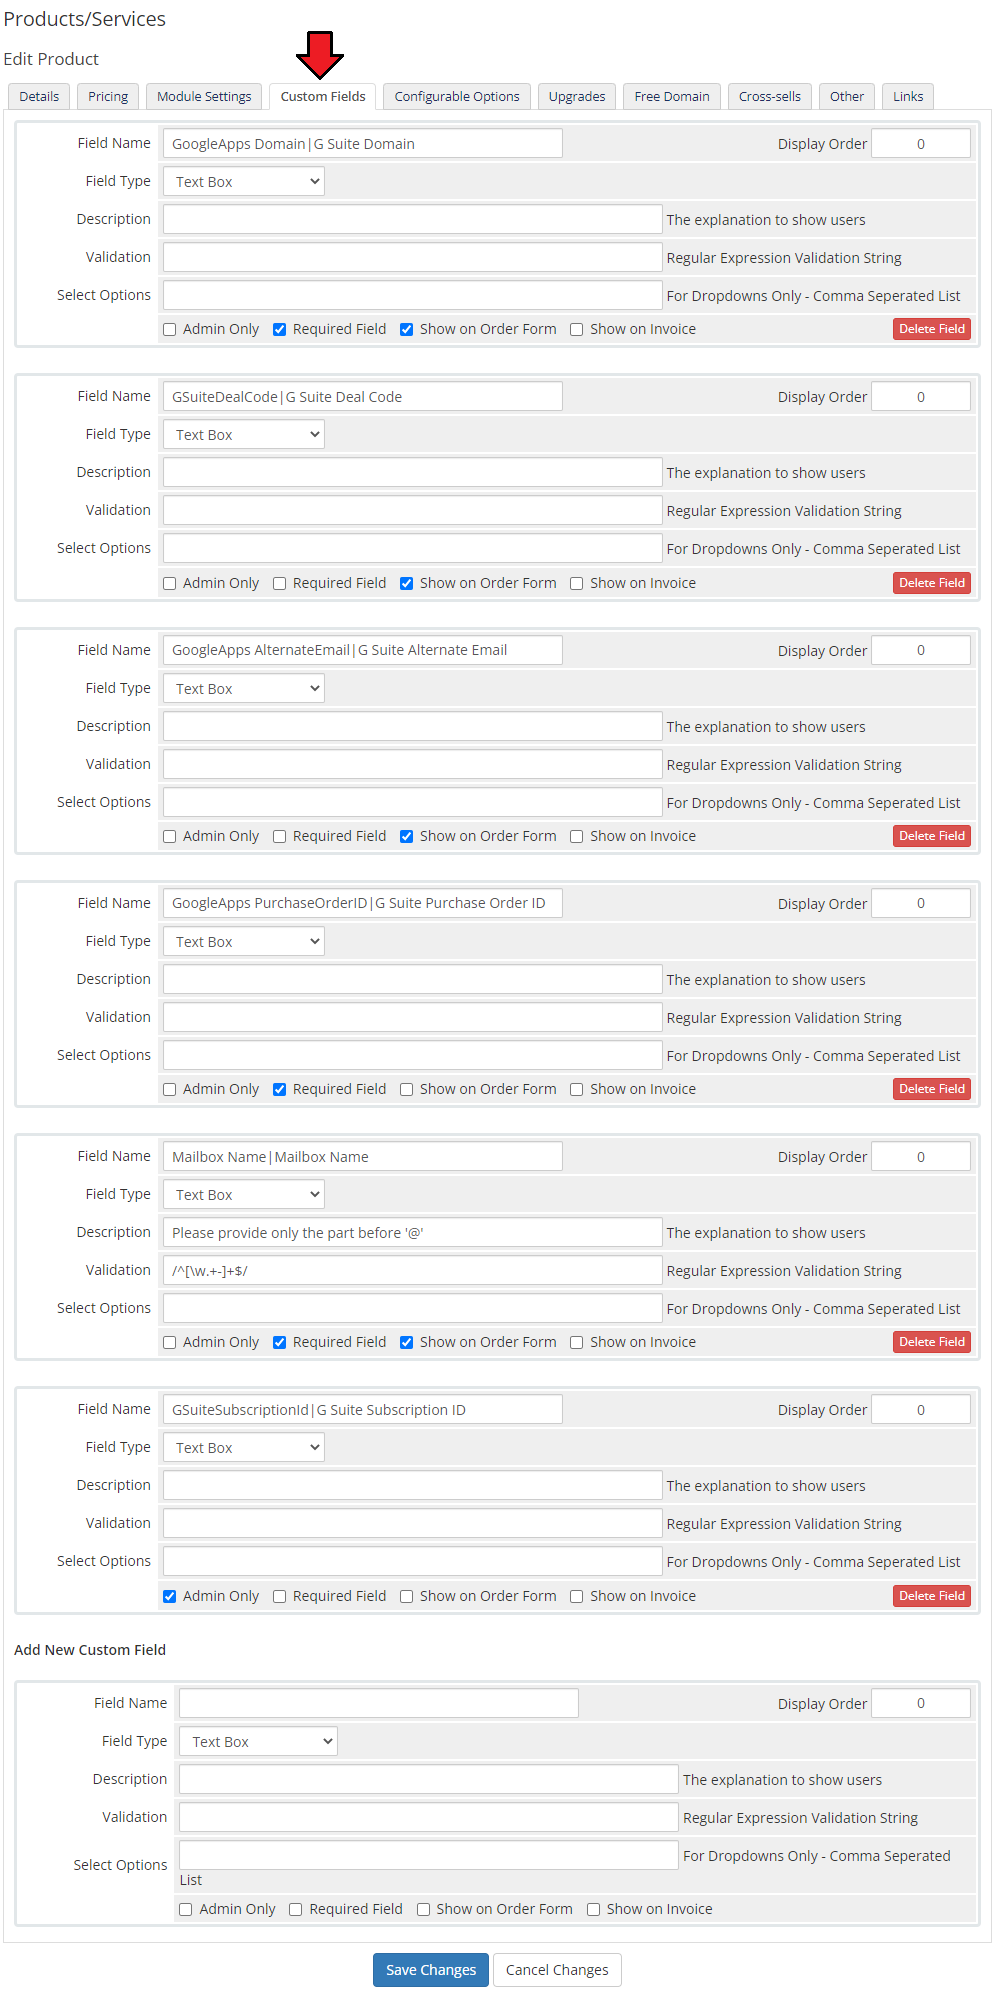
| 20. Fields called 'GoogleApps Domain' and 'GoogleApps PurchaseOrderID' are added automatically. |
|
Configuration and Management
| Configuration and management of G Suite For WHMCS is very intuitive. Read the below sections to see how easy it is. |
Basic Configuration
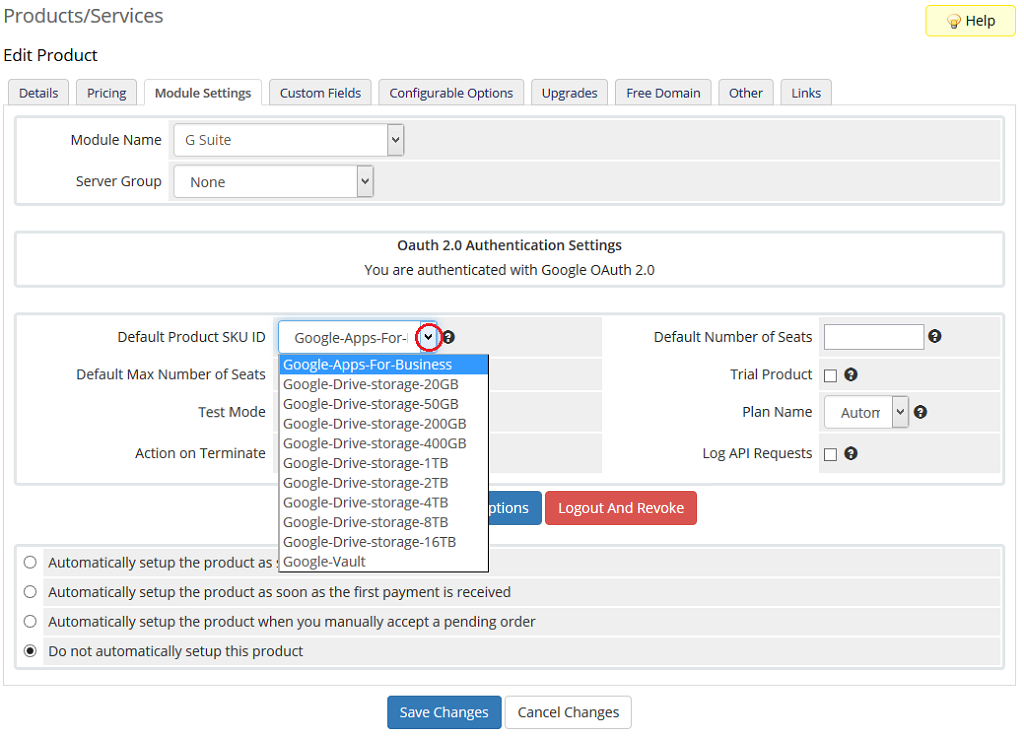
| Let's start the module settings from choosing 'Default Product SKU ID'. In other words Google services. As you can see on the following screen our module supports Google Apps For Business, Google Drive Storage and Google Vault. |
|
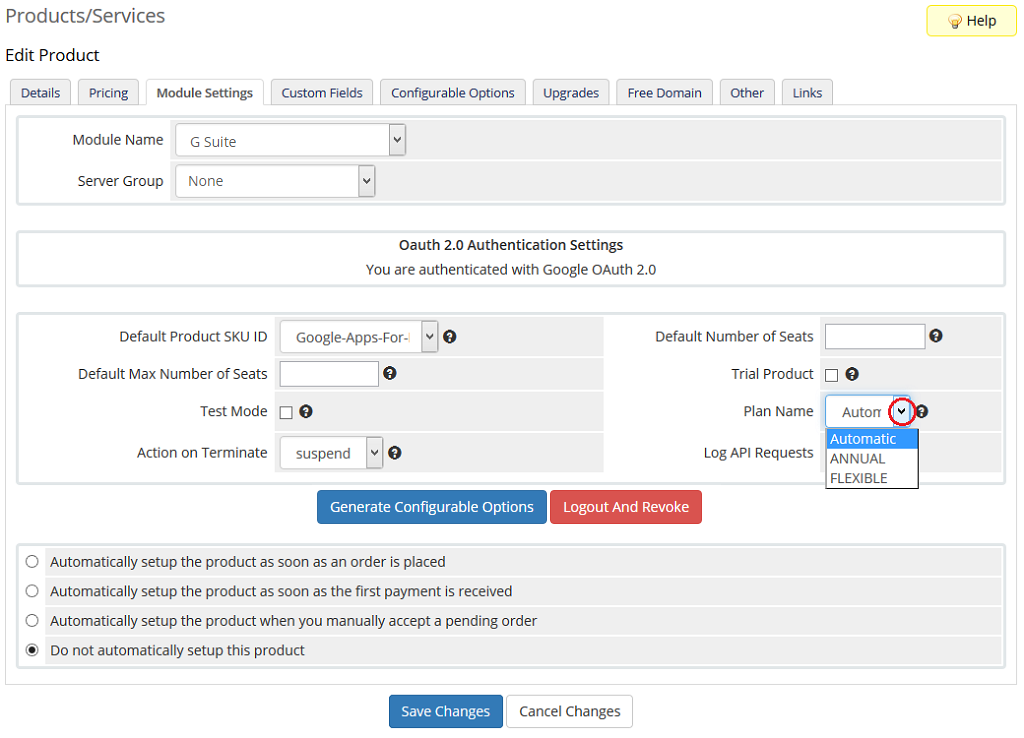
| 'Plan Name' allows you to select the method of payment. You can pay once per year (Annual), once per month (Flexible) or as the client chooses (Automatic). |
|
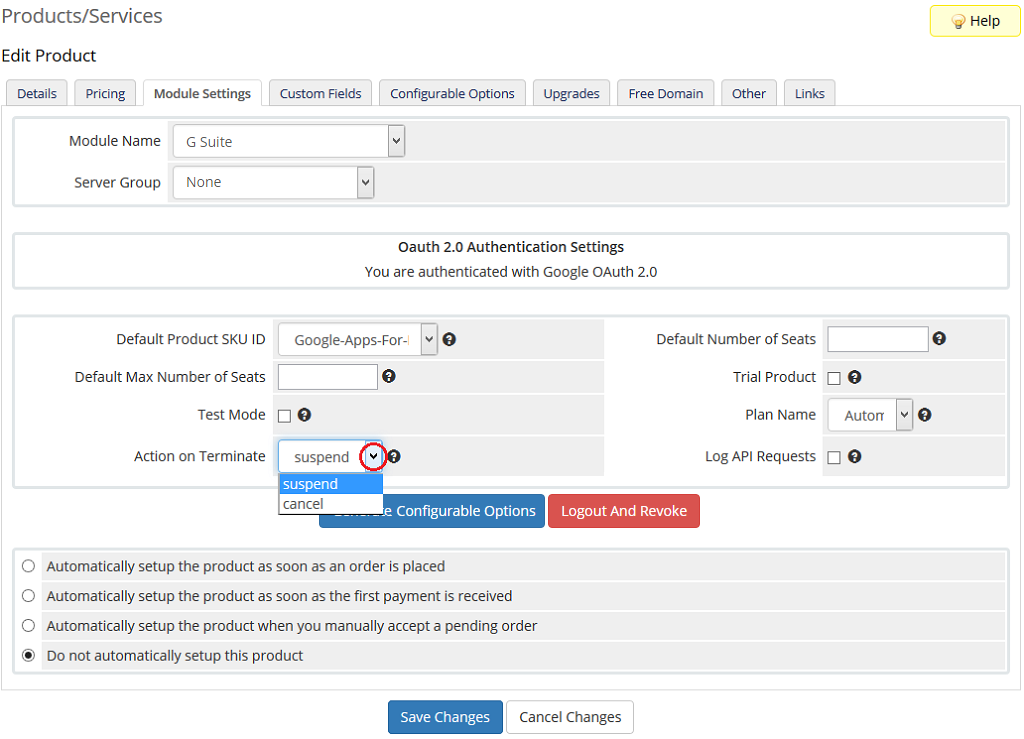
| Here you can decide whether on terminate you want to suspend or cancel customer's services. |
|
Configurable Options
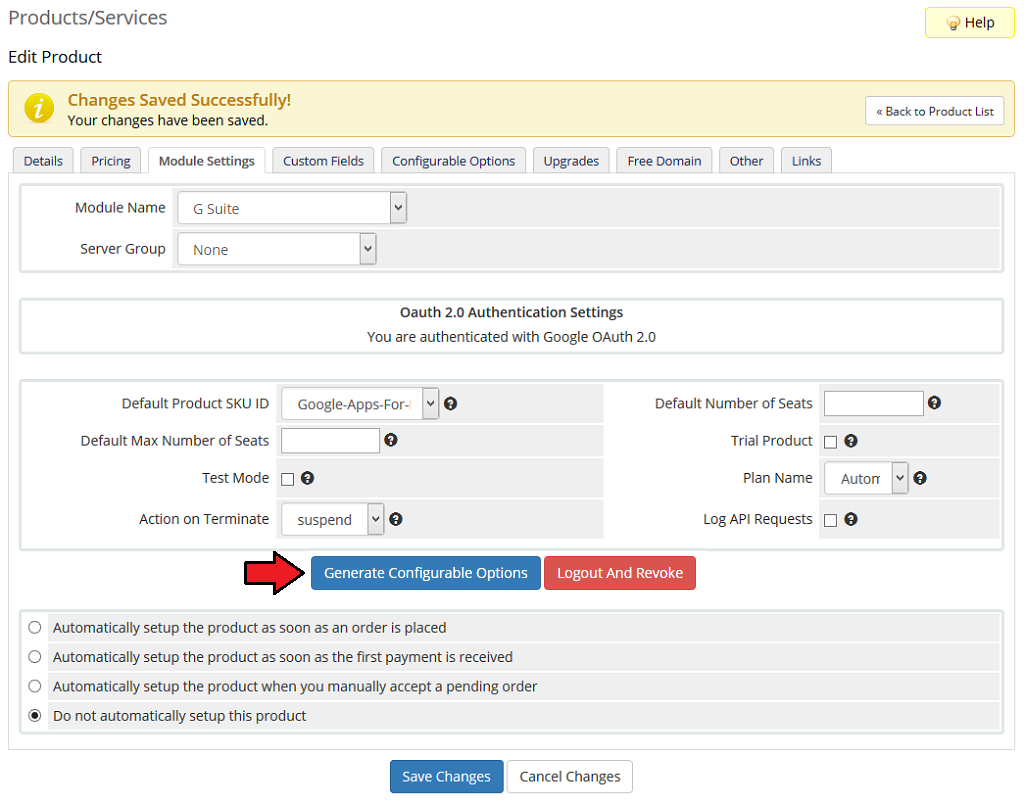
| In order to automatically generate configurable options, simply press button marked on the screen. |
|
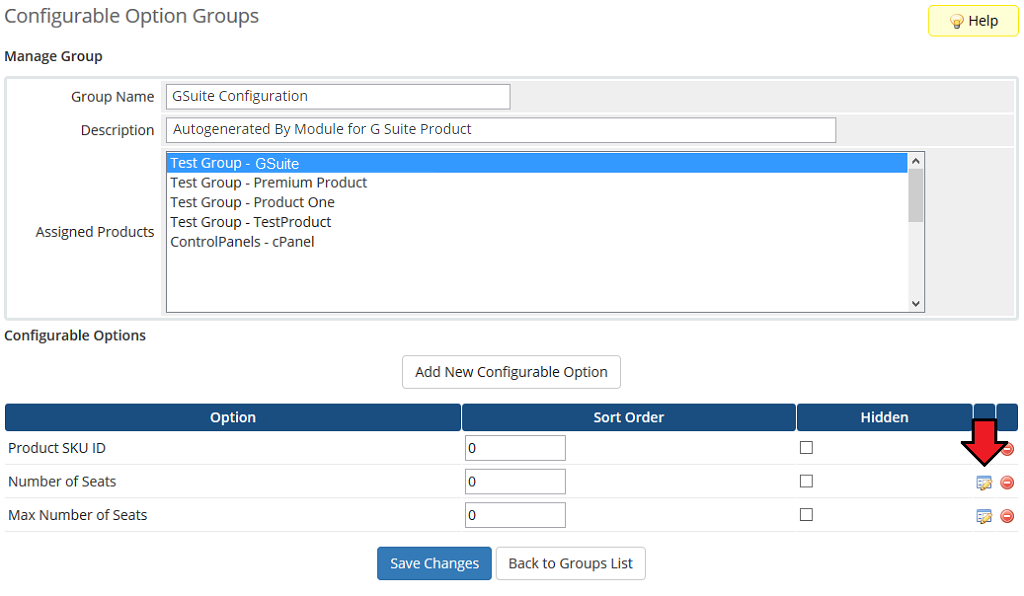
| In your WHMCS system press 'Setup' → 'Products/Services' → 'Configurable Options'. Find 'GoogleApps' options on the list. |

|
| Here you can manage and alter added configurable options. |
|
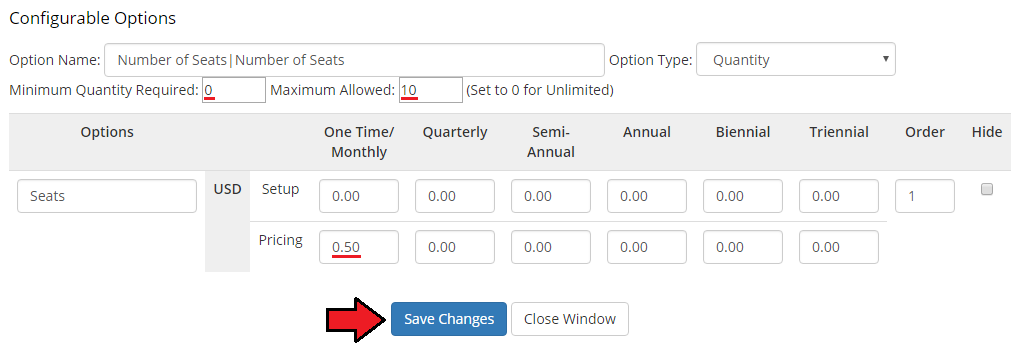
| Provide values for your new option and enter your desired price. 'Save Changes'. |
|
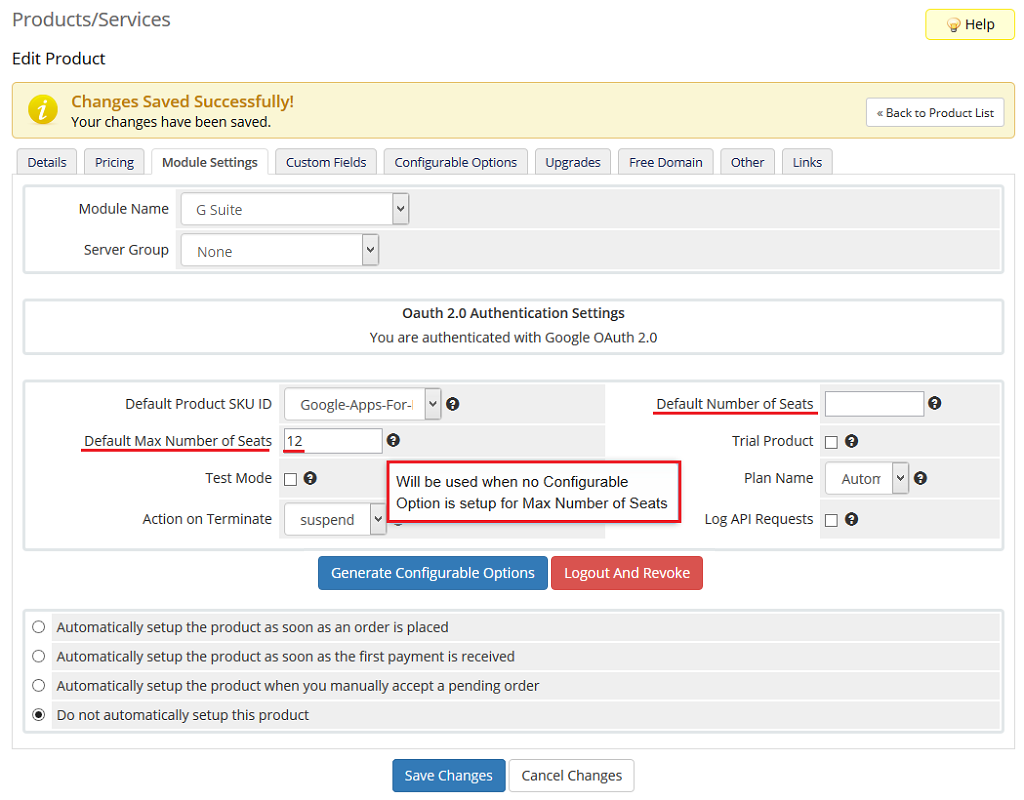
| At your product 'Module Settings' you can fill out the fields for ' Default Number of Seats' and 'Default Max Number of Seats'. Remember, however, that these values will be used only if configurable options are NOT generated. |
|
| From now on you can easily and quickly change value of your product. Remember that you can add more configurable options for other values. |
Admin Area
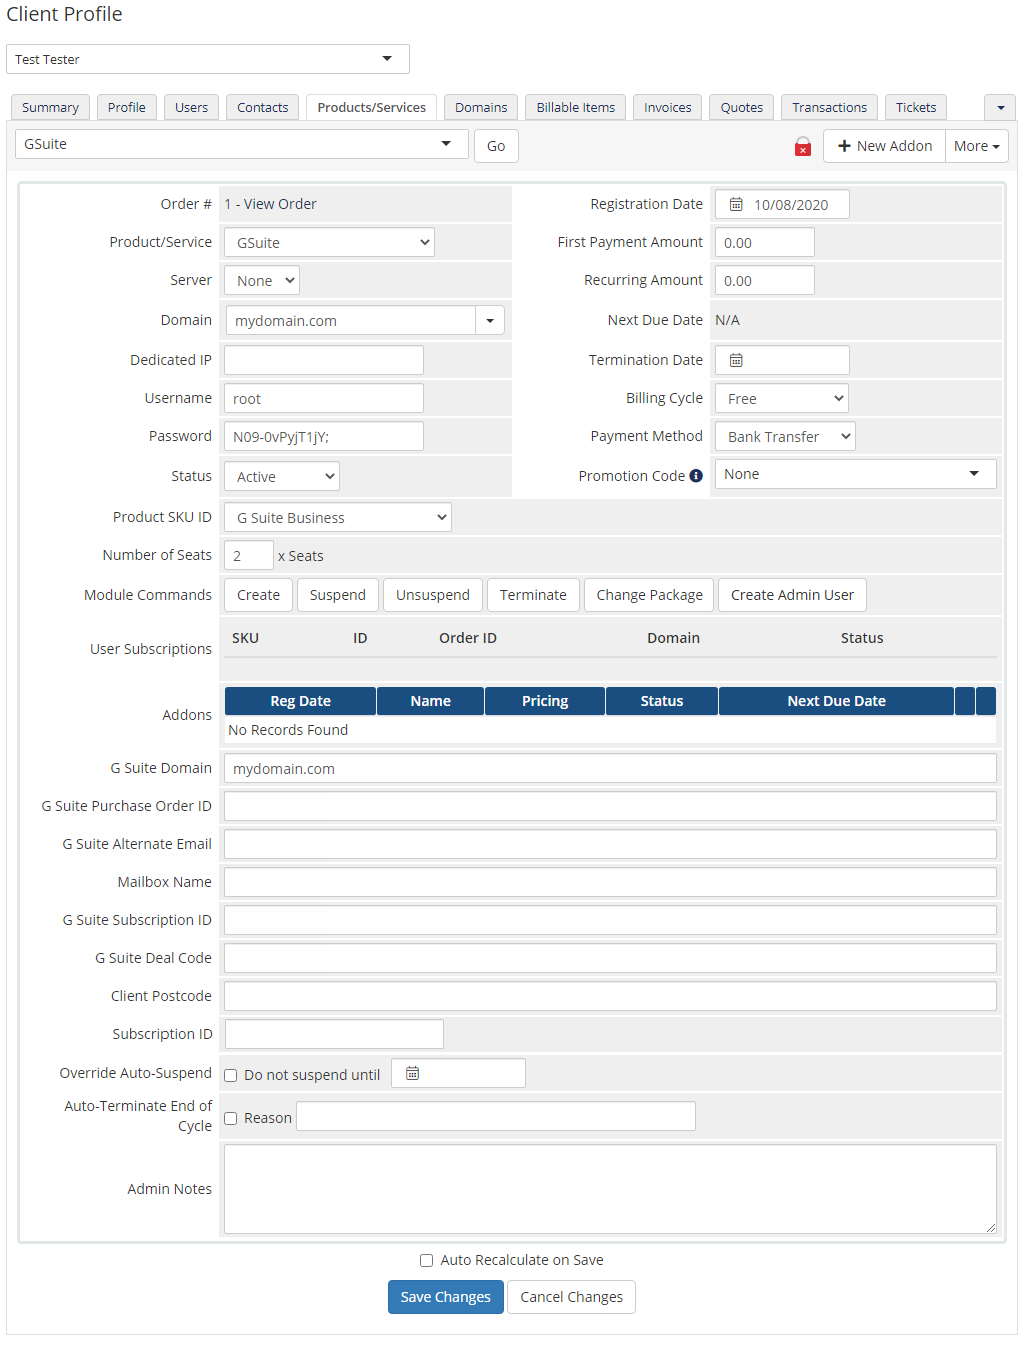
| Let's check your new product in admin area product page. It should look like on the screen below. |
|
Client Area
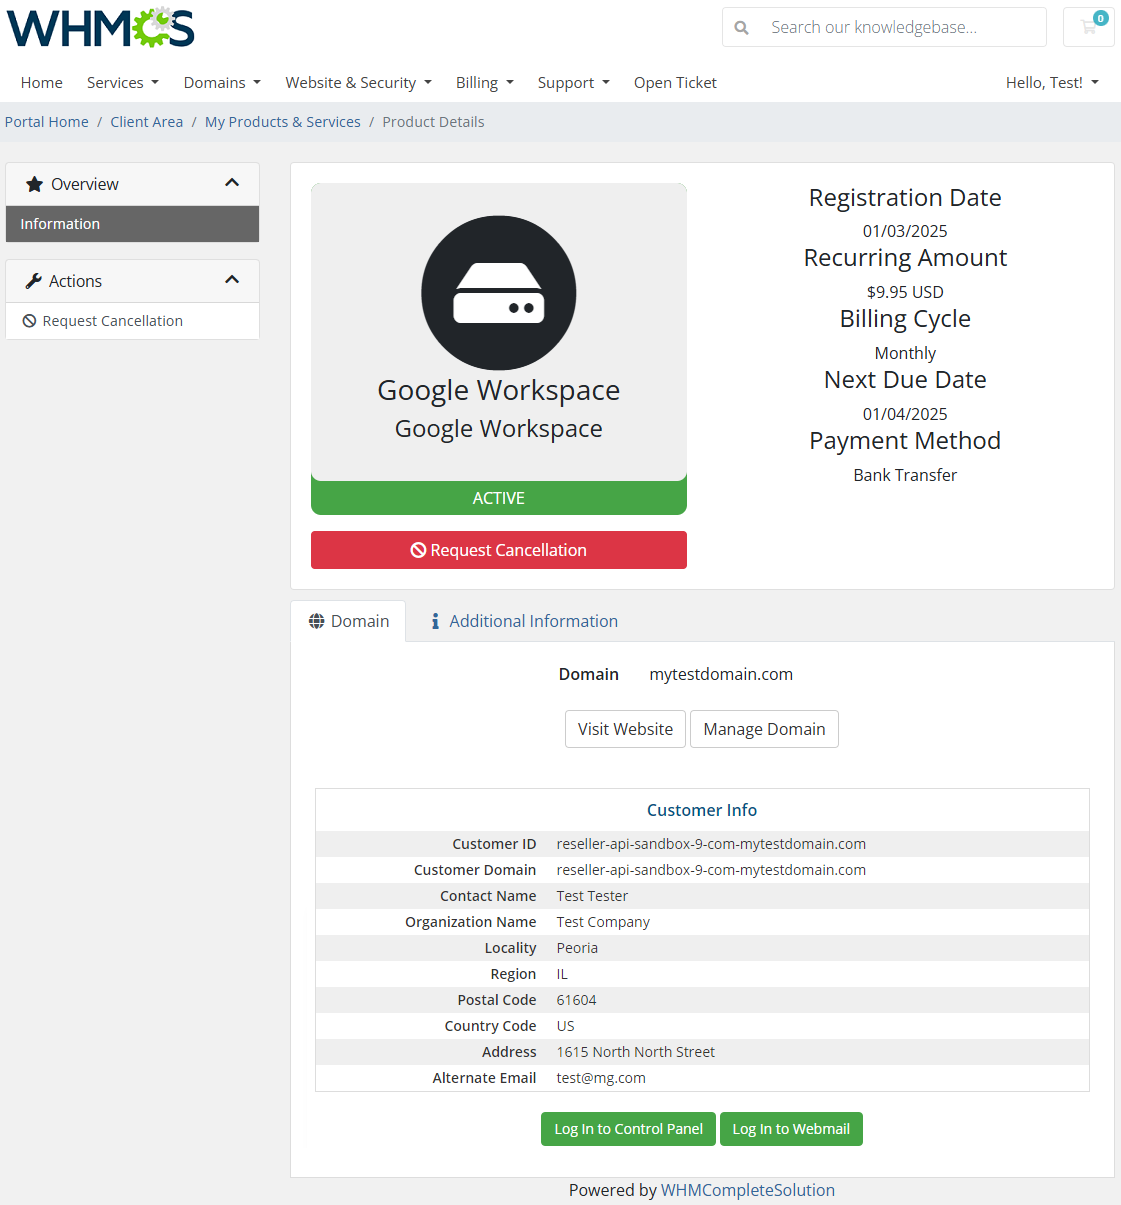
| This is how the module will look like in the client area. G Suite For WHMCS also allows your customers to quickly access Google account services. |
|
Update of Existing Customers
| You can link existing customers accounts by properly filling in the Custom Fields: 'GoogleApps Domain' and 'GoogleApps PurchaseOrderID'. After your customers order a new subscription, they should insert their primary Google account domain name in the 'GoogleApps Domain' field. |

|
Tips
| 1. Our module allows to use Google Apps Reseller account. |
| 2. Avoid using localhost and Raw IP during the authorization. |
| 3. Callback URL is fetched from your WHMCS System URL. You can set it in the 'General Settings' of your system. |
4. To change your API access and OAuth, go to product configuration page and add &logout=1&revoke=1 to the URL.Example: http://yourwebsite/whmcs/admin/configproducts.php?action=edit&id=28&logout=1&revoke=1 |
| 5. If you want to better understand Google Apps Reseller API and our module concept, visit this page |
| 6. To set up a trial product, go to the module settings, mark 'Trial' checkbox and switch 'Plan Name' to 'FLEXIBLE'. |
Common Problems
| 1. When you have problems with connection, check whether your SELinux or firewall does not block ports. |
2. It is possible that while authenticating our module you will get an error:
Error: redirect_uri_mismatch If you do, make sure that URLs provided in Google account and your WHMCS system are same. |
3. In case you encounter error similar to the one below, you most probably disabled the output buffering in the PHP configuration.
Notice: ob_clean(): failed to delete buffer. To solve the problem, please set the 'output_buffering' value to 'On' in the php.ini file. |