DNS Manager For WHMCS
(→About DNS Manager For WHMCS) |
|||
| Line 180: | Line 180: | ||
{| | {| | ||
|style="padding: 0px 0px 0px 30px;"|✔ AWS Route 53 | |style="padding: 0px 0px 0px 30px;"|✔ AWS Route 53 | ||
| + | |} | ||
| + | {| | ||
| + | |style="padding: 0px 0px 0px 30px;"|✔ Cloudflare | ||
|} | |} | ||
{| | {| | ||
|style="padding: 0px 0px 0px 30px;"|✔ cPanel & cPanel DNSOnly | |style="padding: 0px 0px 0px 30px;"|✔ cPanel & cPanel DNSOnly | ||
| + | |} | ||
| + | {| | ||
| + | |style="padding: 0px 0px 0px 30px;"|✔ DigitalOcean | ||
|} | |} | ||
{| | {| | ||
| Line 219: | Line 225: | ||
{| | {| | ||
|style="padding: 0px 0px 0px 30px;"|✔ PowerDNS Hosted | |style="padding: 0px 0px 0px 30px;"|✔ PowerDNS Hosted | ||
| + | |} | ||
| + | {| | ||
| + | |style="padding: 0px 0px 0px 30px;"|✔ PowerDNS V4 | ||
|} | |} | ||
{| | {| | ||
| Line 325: | Line 334: | ||
|} | |} | ||
{| | {| | ||
| − | |style="padding: 0px 0px 0px 30px;"|✔ Integrated With <u>IP Manager For WHMCS</u> - Complete Management of IP Subnets [ | + | |style="padding: 0px 0px 0px 30px;"|✔ Integrated With <u>IP Manager For WHMCS</u> - Complete Management of IP Subnets [https://www.modulesgarden.com/products/whmcs/ip-manager (read more)] |
|} | |} | ||
{| | {| | ||
| Line 334: | Line 343: | ||
|} | |} | ||
{| | {| | ||
| − | |style="padding: 0px 0px 0px 30px;"|✔ Supports PHP 5. | + | |style="padding: 0px 0px 0px 30px;"|✔ Supports PHP 5.4 Up To PHP 7 |
|} | |} | ||
{| | {| | ||
| Line 355: | Line 364: | ||
|} | |} | ||
{| | {| | ||
| − | |style="padding: 0px 0px 15px 15px;"|'''2. In the downloaded file you will find two packages that support different PHP versions.'''<br/>As presented on the screen below, the first one is dedicated to PHP 7, while the second one is aimed at PHP 5. | + | |style="padding: 0px 0px 15px 15px;"|'''2. In the downloaded file you will find two packages that support different PHP versions.'''<br/>As presented on the screen below, the first one is dedicated to PHP 7, while the second one is aimed at PHP 5.4 up to PHP 5.6.<br/>It does not apply to open source versions.<br/> |
'' '''Note''': You can check current PHP version in your WHMCS. To do so proceed to ''' 'Utilities' → 'System' → 'PHP Info'.''' | '' '''Note''': You can check current PHP version in your WHMCS. To do so proceed to ''' 'Utilities' → 'System' → 'PHP Info'.''' | ||
|} | |} | ||
| Line 383: | Line 392: | ||
|} | |} | ||
{| | {| | ||
| − | |style="padding: 0px 0px 15px 15px;"|<span style="color: red">'''6. This steps is required only if you are using WHMCS V5.x.x'''</span><br /> | + | |style="padding: 0px 0px 15px 15px;"|<span style="color: red">'''6. This steps is required only if you are still using WHMCS V5.x.x'''</span><br /> |
Open your currently used template: ''yourWHMCS → Templates → Default → header.tpl''<br/> | Open your currently used template: ''yourWHMCS → Templates → Default → header.tpl''<br/> | ||
Find line (usually it is line no 66): | Find line (usually it is line no 66): | ||
| Line 395: | Line 404: | ||
|} | |} | ||
{| | {| | ||
| − | |style="padding: 0px 0px 20px 15px;"|'''Note! There is no integration required for WHMCS V6 | + | |style="padding: 0px 0px 20px 15px;"|'''Note! There is no integration required for WHMCS V6 and V7!''' |
|} | |} | ||
{| | {| | ||
| Line 468: | Line 477: | ||
{| | {| | ||
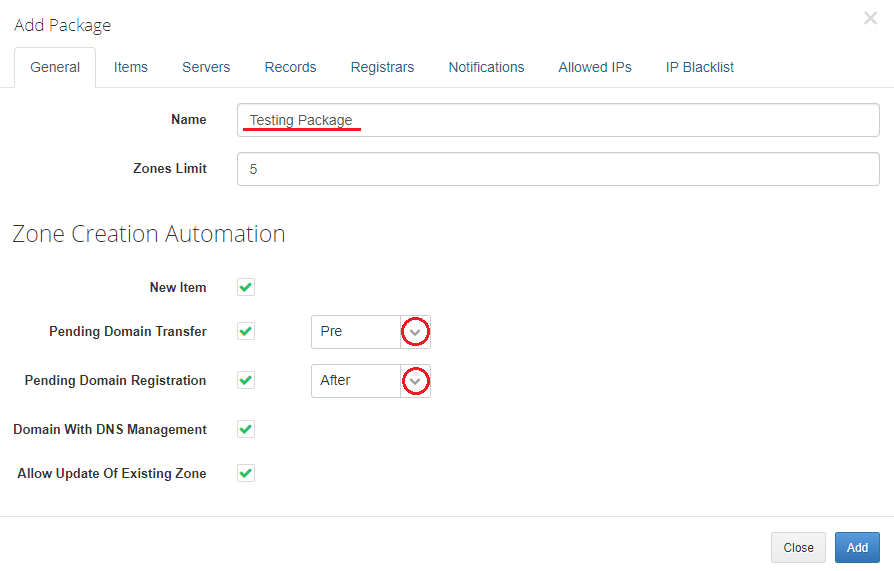
|style="padding: 0px 0px 20px 15px;"|In general section you must obviously name the newly created package and define the number of zones per item ''(limit of zones that a client may then create within this package).''<br/> Here, you can also decide if zones should be created automatically after defined actions.<br/> These are: | |style="padding: 0px 0px 20px 15px;"|In general section you must obviously name the newly created package and define the number of zones per item ''(limit of zones that a client may then create within this package).''<br/> Here, you can also decide if zones should be created automatically after defined actions.<br/> These are: | ||
| − | *New Item | + | *'''New Item''' - zones will be created automatically for each new activated product |
| − | *Pending Transfer Domain | + | *'''Pending Transfer Domain''' - zones will be automatically created for the domains that are waiting for the transfer |
| − | *Pending Registration Domain | + | *'''Pending Registration Domain''' - zones will be created automatically for newly registered domains |
| − | *Domain with DNS Management | + | *'''Domain with DNS Management''' - zones will be created automatically for domains that have been ordered with the 'DNS Management' domain addon |
| + | *'''Allow Update Of Existing Zone''' - if zone already exist it will be updated with newly added record sets | ||
|} | |} | ||
{| | {| | ||
| Line 494: | Line 504: | ||
====Record==== | ====Record==== | ||
{| | {| | ||
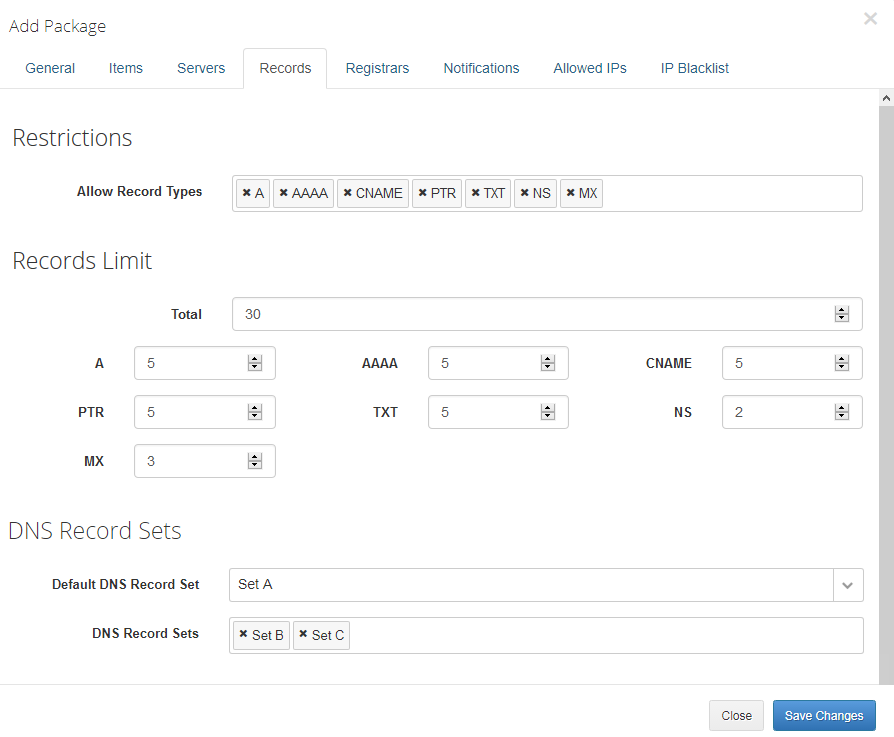
| − | |style="padding: 10px 0px 20px 15px;"|In this part you may define which type of records you want to allow | + | |style="padding: 10px 0px 20px 15px;"|In this part you may define which type of records you want to allow and declare their limit. |
|} | |} | ||
{| | {| | ||
| − | |style="padding: 0px 0px | + | |style="padding: 0px 0px 20px 25px;"|[[File:DNS_15.png]] |
|} | |} | ||
| + | {| | ||
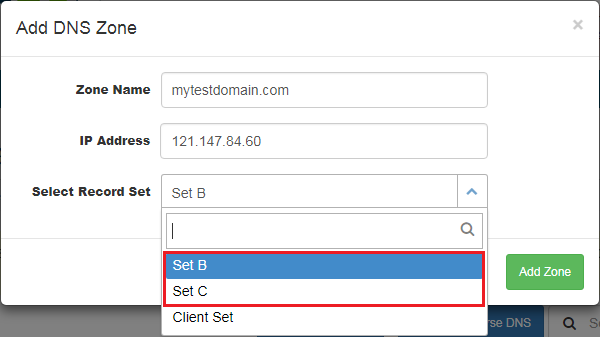
| + | |style="padding: 10px 0px 15px 15px;"|You may also choose [https://www.docs.modulesgarden.com/DNS_Manager_For_WHMCS#DNS_Records_Sets DNS Records Sets] that will apply for this package. | ||
| + | *'''Default DNS Record Set''' - this default set will be automatically applied upon the zone creation | ||
| + | *'''DNS Record Sets''' - choose the sets created by the administrator that will also be available for clients to choose from when adding a new zone | ||
| + | |} | ||
| + | {| | ||
| + | |style="padding: 0px 0px 30px 25px;"|[[File:DNS_15_0.png]] | ||
| + | |} | ||
| + | |||
====Registrars==== | ====Registrars==== | ||
{| | {| | ||
| Line 744: | Line 763: | ||
|} | |} | ||
{| | {| | ||
| − | |style="padding: 0px 0px 20px 15px;"|'''Related Service | + | |style="padding: 0px 0px 20px 15px;"|'''Related Service IP Addresses Only''' - create zones and PTR records with a related IP address only.<br/> When adding a new zone/PTR record you can choose from available hosting related IP addresses only as marked on the screen below. |
|} | |} | ||
{| | {| | ||
| Line 769: | Line 788: | ||
|} | |} | ||
{| | {| | ||
| − | |style="padding: 0px 0px 20px 15px;"|'''Custom IP''' - create zones with a custom IP, you have no IP addresses to choose from, you have to enter a new IP address.<br/> ''Note! Both IPv4 and IPv6 are supported by DNS Manager For WHMCS.'' | + | |style="padding: 0px 0px 20px 15px;"|'''Custom Subnet IP Address''' - create zones with a custom IP address, you have no IP addresses to choose from, you have to enter a new IP address.<br/> ''Note! Both IPv4 and IPv6 are supported by DNS Manager For WHMCS.'' |
|} | |} | ||
{| | {| | ||
| Line 804: | Line 823: | ||
{| | {| | ||
|style="padding: 0px 0px 15px 15px;"|'''Cron Cleaner''' - this option is a little bit more complex. Just like in case of other cron jobs, firstly choose interval and declare how many zones shall be cleared<br/> during a single execution. Then you may specify conditions of clearing zones and records.<br /> | |style="padding: 0px 0px 15px 15px;"|'''Cron Cleaner''' - this option is a little bit more complex. Just like in case of other cron jobs, firstly choose interval and declare how many zones shall be cleared<br/> during a single execution. Then you may specify conditions of clearing zones and records.<br /> | ||
| + | '' '''Warning!''' By default, the cron job is disabled and the 'Notify Only' option is enabled.<br/> | ||
| + | ''You will need to change these settings manually if you would like to have the zones removed.''<br/> | ||
| + | ''What is more, when the cron will be enabled and the 'Notify Only' feature disabled, the module will send the warning about the zones deletion as an additional layer of safety.'' <br/><br/> | ||
Zones are removed: | Zones are removed: | ||
| − | *if no longer match with any package | + | *'''Not Included In Package''' - if no longer match with any package |
| − | *have not been modified for a specified period of time | + | *'''Not Modified For''' - have not been modified for a specified period of time |
| − | *their domain is not found in WHOIS Lookup | + | *'''Not Found In WHOIS''' - their domain is not found in WHOIS Lookup |
| − | *no records are included | + | *'''Without Records''' - no chosen records are included |
| − | *with cancelled | + | *'''Inactive Services''' - with cancelled, terminated or suspended status |
PTR Records are removed: | PTR Records are removed: | ||
| − | *if service is terminated or canceled | + | *'''Inactive Services''' - if service is terminated or canceled |
|} | |} | ||
{| | {| | ||
| Line 1,179: | Line 1,201: | ||
5. Migrated rDNS records are visible in edition page of its zone as PTR records. | 5. Migrated rDNS records are visible in edition page of its zone as PTR records. | ||
|} | |} | ||
| − | + | ==API Methods== | |
| − | = | + | |
{| | {| | ||
| − | |style="padding: 10px 0px | + | |style="padding: 10px 0px 30px 15px;"|You may access your DNS Manager For WHMCS '''API'''. Here is a short instruction how to do that:<br/> |
| − | + | ||
| − | + | ||
| − | + | ||
| − | + | ||
| − | + | ||
| − | + | ||
| − | + | ||
The main, required command that must be used is: | The main, required command that must be used is: | ||
*'' 'dnsmanager' ''<br/> | *'' 'dnsmanager' ''<br/> | ||
| − | Additionally, you must define '' ' | + | Additionally, you must define '' 'dnsaction' '' with some specific value.<br> |
| − | These can be: | + | ''Note: 'action' parameter is no longer used since 2.7.0 version due to it did not allowed method to be executed as external.'' |
| + | <br> | ||
| + | These specific values can be: | ||
*'' 'getServerList' '' - returns the list of servers in DNS Manager | *'' 'getServerList' '' - returns the list of servers in DNS Manager | ||
*'' 'saveRDNS' '' - allows adding new rDNS record. Additional parameters are required here, these are: | *'' 'saveRDNS' '' - allows adding new rDNS record. Additional parameters are required here, these are: | ||
| Line 1,204: | Line 1,220: | ||
**'' 'serverid' '' - ID of a server | **'' 'serverid' '' - ID of a server | ||
**'' 'ip' '' - IP address that will be used | **'' 'ip' '' - IP address that will be used | ||
| − | < | + | Exemplary use: |
| − | + | <pre> | |
| + | <?php | ||
| + | // Set Vars | ||
| + | $command = 'dnsmanager'; | ||
| + | $values = array( 'dnsaction' => 'getServerList', 'params' => array() ); | ||
| + | $adminuser = 'DemoAdmin'; | ||
| − | + | // Call API | |
| − | + | $results = localAPI($command, $values, $adminuser); | |
| − | + | var_dump($results); | |
| − | + | ?> | |
| − | $ | + | </pre> |
| − | + | Since DNS Manager 2.7.0 version there are also a new methods available: | |
| − | + | *'' 'createZone' '' - creates the zone. Additional parameters are required here, these are: | |
| − | // | + | **'' 'action = dnsmanager' '' |
| − | + | **'' 'dnsaction = createZone ' '' - DNS action, that DNS Manager should execute | |
| − | + | **'' 'zone_name' '' - name of the zone being created | |
| − | + | **'' 'type = 1 ''or'' 2' '' - type of related item. Use ''1'' for ''domain'' or ''2'' for the ''product'' | |
| − | + | **'' 'relid' '' - ID of the related item (hosting ID, domain ID) | |
| + | **'' 'userid - ID of user | ||
| + | **'' 'zone_ip' '' - IP address assigned to the zone. If empty, a default IP address will be used | ||
| + | Exemplary use: | ||
| + | <pre> | ||
| + | $postfields = array( | ||
| + | 'action' => 'dnsmanager', | ||
| + | 'dnsaction' => 'createZone', | ||
| + | 'type' => '1', | ||
| + | 'relid' => '2', | ||
| + | 'zone_ip' => '192.168.56.101', | ||
| + | 'userid' => '1', | ||
| + | ); | ||
| + | </pre> | ||
| + | *'' 'updateZone' '' - updates records of the zone. Use with these parameters: | ||
| + | **'' 'action = dnsmanager' '' | ||
| + | **'' 'dnsaction = updateZone' '' - DNS action that DNS Manager should execute | ||
| + | **'' 'zone_id - ID of the zone that should be updated (use ID from WHMCS) | ||
| + | **'' 'records - array of the records that should be updated (added/changed/removed) if DNS Manager compare these records and add/change/remove corresponding difference. These are: | ||
| + | ***'' 'name' '' - name of the node to which this record pertains | ||
| + | ***'' 'type' '' - type of the updating resurce record (e.g. MX) | ||
| + | ***'' 'class' '' - class node | ||
| + | ***'' 'ttl' '' - count of seconds that the RR stays valid (e.g. 14400) | ||
| + | ***'' 'data' '' - additional specific RR data | ||
| + | Exemplary use: | ||
| + | <pre> | ||
| + | $result = localAPI('dnsmanager' , | ||
| + | array( | ||
| + | 'dnsaction' => 'updateZone', | ||
| + | 'zone_id' => 2, | ||
| + | 'records' => array( | ||
| + | array( | ||
| + | 'name' => 'example.website.com', | ||
| + | 'type' => 'A', | ||
| + | 'class' => 'IN', | ||
| + | 'ttl' => '14440', | ||
| + | 'data' => '192.168.56.101', | ||
| + | ), | ||
| + | array( | ||
| + | 'name' => 'example.website.com', | ||
| + | 'type' => 'A', | ||
| + | 'class' => 'IN', | ||
| + | 'ttl' => '14440', | ||
| + | 'data' => '192.168.56.102', | ||
| + | ), | ||
| + | ) | ||
| + | ),'admin'); | ||
| + | </pre> | ||
| + | *'' 'getZone' '' - returns the zone with records. Use with these parameters: | ||
| + | ***'' action = dnsmanager' '' | ||
| + | ***'' dnsaction = getZone' '' - DNS action that DNS Manager should execute | ||
| + | ***'' zone_id' '' - ID of the zone that should be retrieved (use ID from WHMCS) | ||
| + | |||
| + | *'' 'removeZone' '' - deletes the zone. Use with these parameters: | ||
| + | ***'' action = dnsmanager' '' | ||
| + | ***'' dnsaction = removeZone' '' - DNS action that DNS Manager should execute | ||
| + | ***'' zone_id' '' - ID of the zone that should be removed (use ID from WHMCS) | ||
| + | |} | ||
| + | |||
| + | =Tips= | ||
| + | {| | ||
| + | |style="padding: 10px 0px 5px 15px;"|1. Keep track of your '' 'pending' '' and in '' 'progress' '' ''' 'Tasks' ''' to set an optimum interval time for the tasks execution. <br/> | ||
| + | For example, set interval in the way that half of the time task is set to pending status. | ||
| + | |} | ||
| + | {| | ||
| + | |style="padding: 0px 0px 10px 15px;"|2. 255 characters in ''TXT'' records is a maximum limit for '' 'PowerDNS' '' submodule. | ||
|} | |} | ||
{| | {| | ||
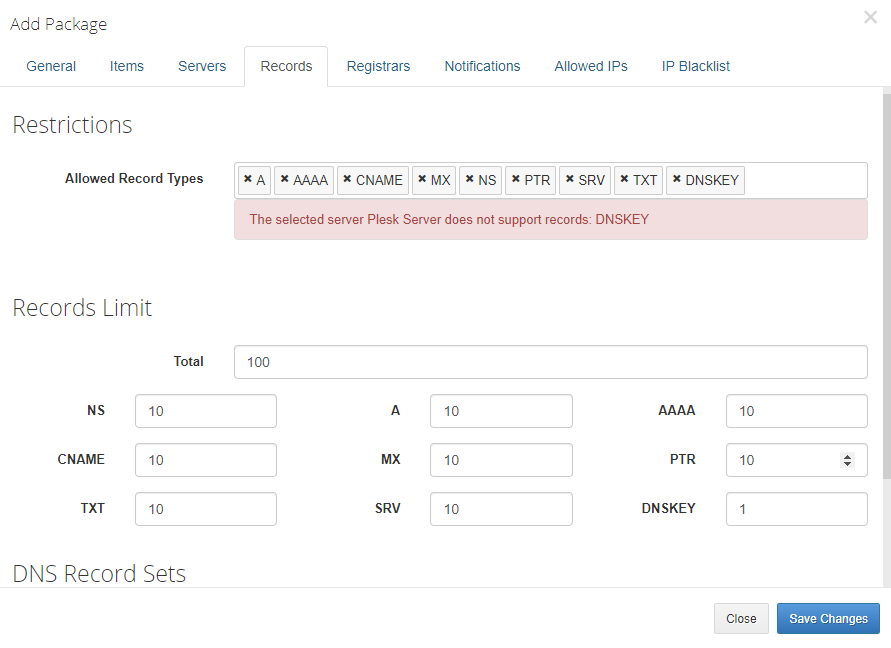
| − | |style="padding: 0px 0px 10px 15px;"| | + | |style="padding: 0px 0px 10px 15px;"|3. When you try to add a record of not supported type to a package, you will be informed about the lack of support with a note as on the screen below. |
|} | |} | ||
{| | {| | ||
| Line 1,227: | Line 1,313: | ||
|} | |} | ||
{| | {| | ||
| − | |style="padding: 0px 0px 30px 15px;"| | + | |style="padding: 0px 0px 30px 15px;"|4. As this module supports templates system, any changes made in the module's templates files will be saved after the upgrade process. |
|} | |} | ||
<!-- | <!-- | ||
Revision as of 14:51, 23 August 2017
Contents |
About DNS Manager For WHMCS
| DNS Manager For WHMCS is fully featured addon module that allows your customers to manage their DNS zones. A great choice of submodules together with options such as creating ready packages make DNS Manager for WHMCS perfectly adapt to your specific needs. |
- Admin Area Features:
| ✔ Define DNS Servers |
| ✔ Define Packages |
| ✔ View And Edit Existing Zones |
| ✔ Migrate Zones Between Chosen Servers |
| ✔ Import Zones From Chosen Server |
| ✔ Manage Zones Backups |
| ✔ Define DNS Records Set |
| ✔ Set Up Automated Tasks And Execution Time |
| ✔ Select Default Client Area Template |
| ✔ Allow To Create PTR Record Without DNS Zone |
| ✔ Toggle Administrator Notifications And Choose Who Send Them To |
| ✔ Modify Notifications Email Templates |
| ✔ Define Logs And Notifications Settings |
| ✔ View Details And Notifications Related To Zones And Servers Load |
| ✔ View Information About Automated Tasks |
| ✔ View Scheduled Tasks Progress |
| ✔ Display Usage Of DNS Servers |
| ✔ View Email Notifications Statistics |
| ✔ View Logs |
- Client Area Features:
| ✔ View List Of Owned Packages |
| ✔ Add And Manage New Zones Within Package Limit |
| ✔ Add And Manage Zones Records Within Records Limits |
| ✔ Add And Manage PTR Records Without DNS Zone |
| ✔ Toggle DNSSEC For Zone |
| ✔ View DNSSEC Details Of Zone |
| ✔ Add And Manage DNS Records Sets |
| ✔ Create Zone From DNS Records Set |
| ✔ View Zones Limit Per Package |
| ✔ View DNS Records Limits Per Zone |
- Automation Features:
| ✔ Provision Packages |
| ✔ Migrate Zones |
| ✔ Import Zones |
| ✔ Clear Unused Zones |
| ✔ Clear Logs |
- Server Settings:
| ✔ Allow rDNS |
| ✔ Enable DNSSEC |
| ✔ Allow Multiple PTR |
| ✔ Use Cache To Optimize Loading Time |
| ✔ Define Nameservers |
- Package Settings:
| ✔ Define Zones Limit Per Package |
| ✔ Define Items (Products/Domains/Products Addons) Purchase Of Which Results In Receiving Package |
| ✔ Define If Single Instance Of Package Should Be Assigned To Each Client |
| ✔ Define Servers Used By Package |
| ✔ Define Allowed Record Types |
| ✔ Define Total Records Limit |
| ✔ Define Record Limits Per Type |
| ✔ Define Automation Settings For Creating First Zone |
| ✔ Assign Default DNS Records Set |
| ✔ Allow Client To Create Zone Using Chosen DNS Records Sets |
| ✔ Introduce DNS Management Functionality If Domain Registrar Does Not Support It By Default |
| ✔ Toggle Client And Administrator Notifications |
- Supported DNS Servers:
| ✔ 4PSA |
| ✔ AtomiaDNS |
| ✔ AWS Route 53 |
| ✔ Cloudflare |
| ✔ cPanel & cPanel DNSOnly |
| ✔ DigitalOcean |
| ✔ DirectAdmin (DNSSEC Support) |
| ✔ DNS Made Easy |
| ✔ DNS Pod |
| ✔ DNS.com |
| ✔ DynECT |
| ✔ EuroDNS |
| ✔ Freenom |
| ✔ Nettica |
| ✔ OpenSRS |
| ✔ Plesk |
| ✔ PowerDNS (DNSSEC Support) |
| ✔ PowerDNS Hosted |
| ✔ PowerDNS V4 |
| ✔ Rackspace |
| ✔ Rage4 DNS |
| ✔ RRPProxy |
| ✔ SimpleDNS |
| ✔ Storm On Demand |
| ✔ Zonomi |
- Supported DNS Record Types:
| ✔ A |
| ✔ AAAA |
| ✔ AFSDB |
| ✔ CNAME |
| ✔ DNAME |
| ✔ DS |
| ✔ HINFO |
| ✔ ISDN |
| ✔ LOC |
| ✔ MB |
| ✔ MD |
| ✔ MF |
| ✔ MG |
| ✔ MINFO |
| ✔ MR |
| ✔ MX |
| ✔ NAPTR |
| ✔ NS |
| ✔ PTR |
| ✔ RP |
| ✔ SOA |
| ✔ SRV |
| ✔ TXT |
| ✔ WKS |
| ✔ X25 |
- General Info:
| ✔ IDN Zones Supported |
| ✔ AJAX Loaded Pages In Admin Area |
| ✔ Template Customization Support |
| ✔ Integrated With IP Manager For WHMCS - Complete Management of IP Subnets (read more) |
| ✔ Connect With DNS Manager Using Its API |
| ✔ Multi-Language Support |
| ✔ Supports PHP 5.4 Up To PHP 7 |
| ✔ Supports WHMCS Templates Five and Six |
| ✔ Supports WHMCS V6 and V7 |
Installation
| In this short tutorial we will show you how to successfully install DNS Manager For WHMCS. We will guide you step by step through the whole installation process. |
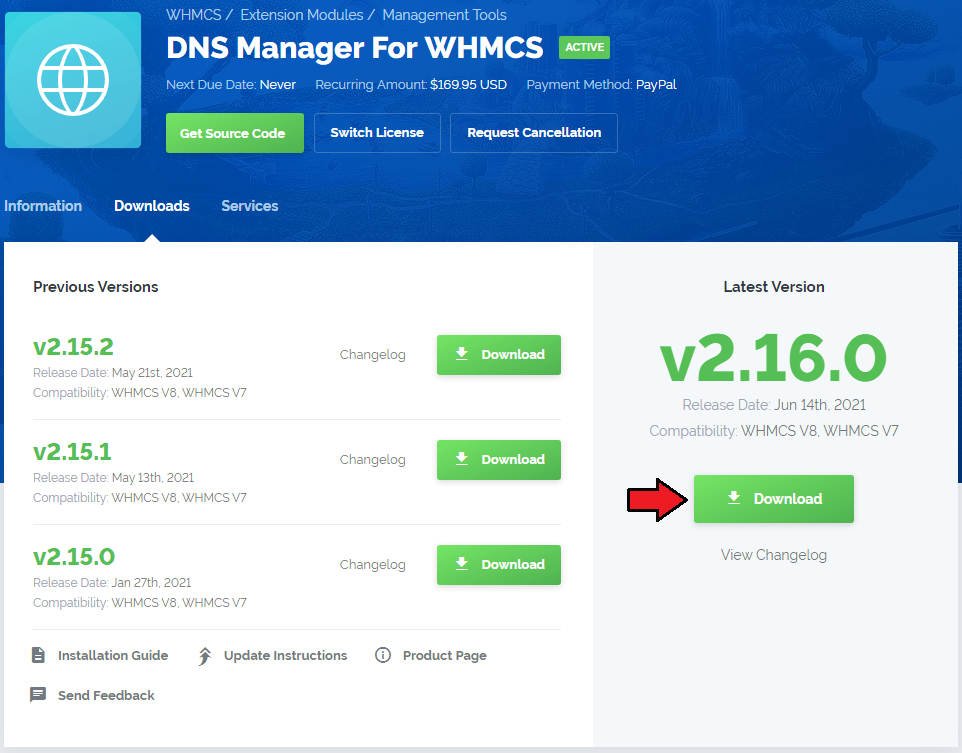
| 1. Log in to your client area and download the module. |
|
| 2. In the downloaded file you will find two packages that support different PHP versions. As presented on the screen below, the first one is dedicated to PHP 7, while the second one is aimed at PHP 5.4 up to PHP 5.6. It does not apply to open source versions. Note: You can check current PHP version in your WHMCS. To do so proceed to 'Utilities' → 'System' → 'PHP Info'. |

|
| 3. Extract the downloaded file and choose the one with the right PHP version. Upload and extract the PHP file into the main WHMCS directory. The content of PHP version files should look like this. |

|
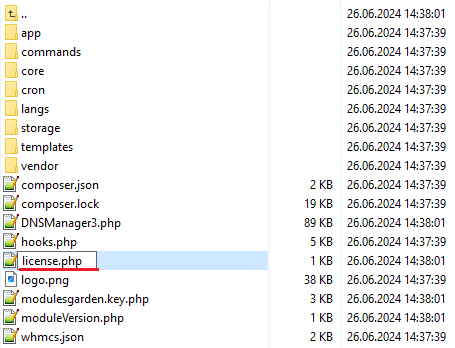
| 4. When you install DNS Manager For WHMCS for the first time you have to rename 'license_RENAME.php' file. File is located in 'modules/addons/dns_manager/license_RENAME.php.' Rename it from 'license_RENAME.php' to 'license.php'. |
|
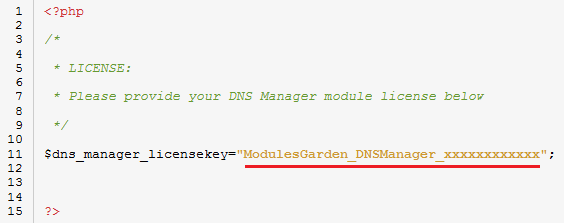
| 5. In order to configure your license key you have to edit a previously renamed 'license.php' file. Enter your licence key between quotation marks as presented on the following screen. You can find your license key in your client area → 'My Products'. |
|
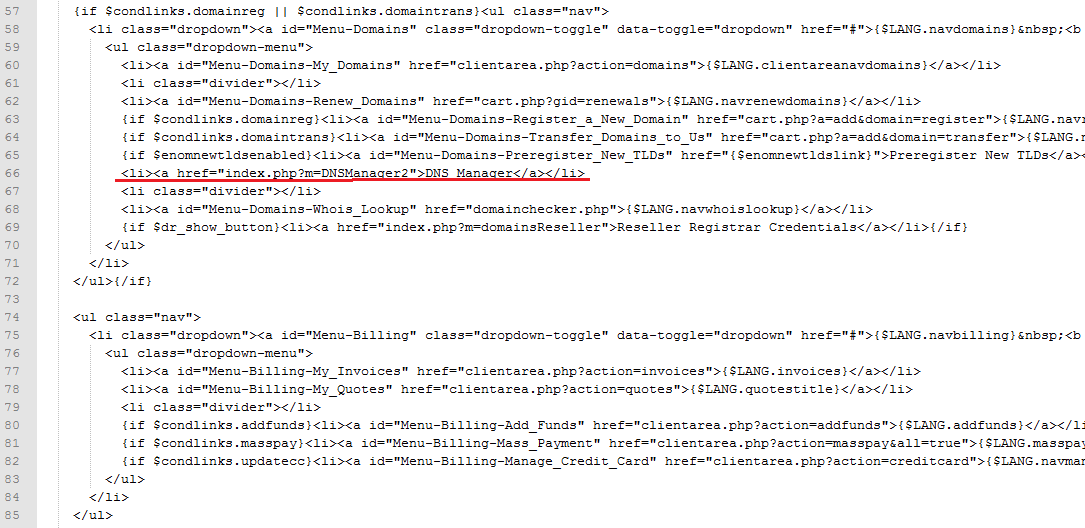
| 6. This steps is required only if you are still using WHMCS V5.x.x Open your currently used template: yourWHMCS → Templates → Default → header.tpl <li class="divider"></li> Insert this code snippet above that line: <li><a href="index.php?m=DNSManager2">DNS Manager</a></li> Correctly inserted code should look like these: |
|
| Note! There is no integration required for WHMCS V6 and V7! |
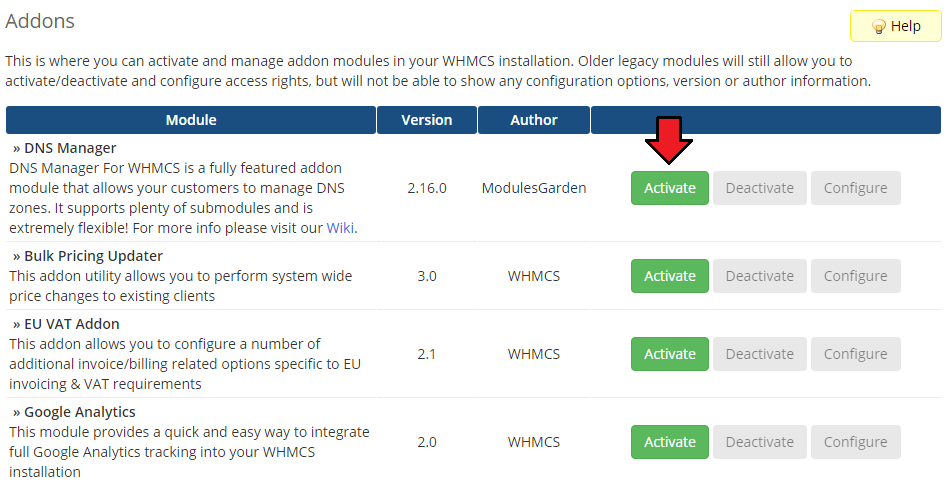
| 7. Now you have to activate the module in your WHMCS system. Login to your WHMCS admin area. Click 'Setup' then choose 'Addon Modules'. |
|
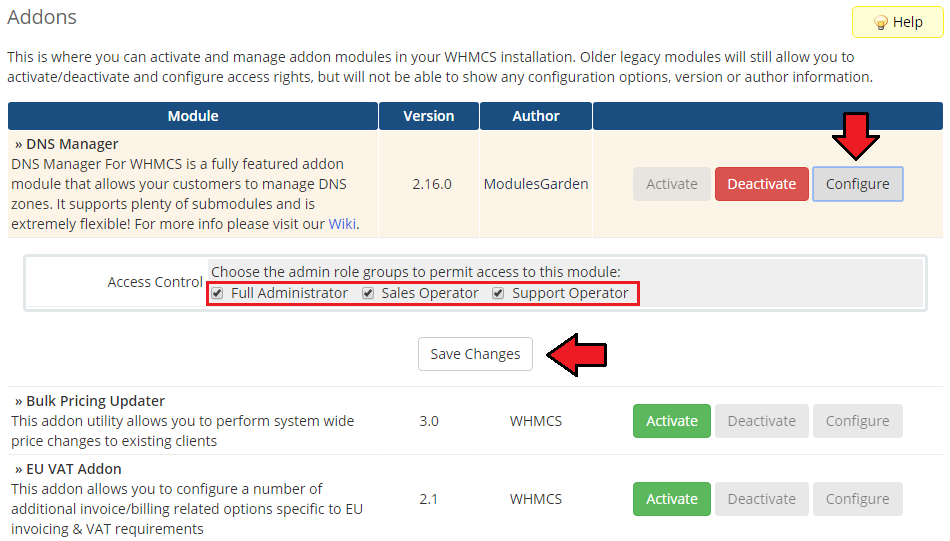
| 8. In the next step you need to permit access to this module. To do so click on 'Configure' button, choose 'Full Administrator' and press 'Save Changes'. |
|
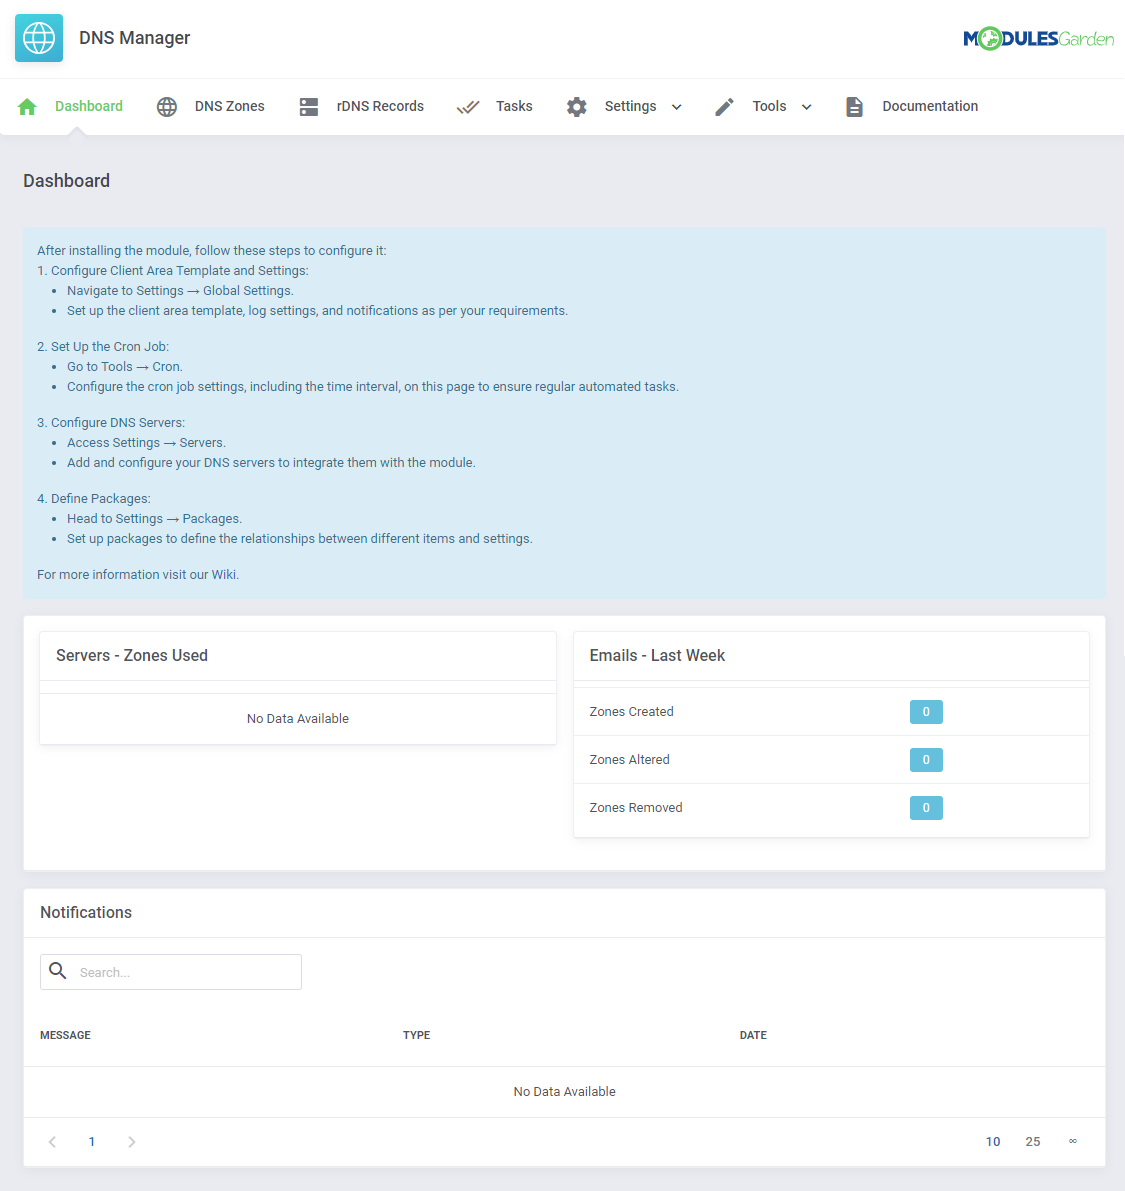
| 9. Good job! You have just successfully installed DNS Manager For WHMCS! Now in your WHMCS system press 'Addons' then press 'DNS Manager'. |
|
Configuration and Management
| This section has been divided into two main parts to allow full and, at the same time, easy understanding of the whole module functionality. In the first part 'Basic Configuration' an exemplary flow of basic configuration of servers, through creating packages and then zones management from both the client and the administrator side has been presented. In the second part, there are described additional settings and tools that can be used while working with DNS Manager For WHMCS. |
Basic Configuration
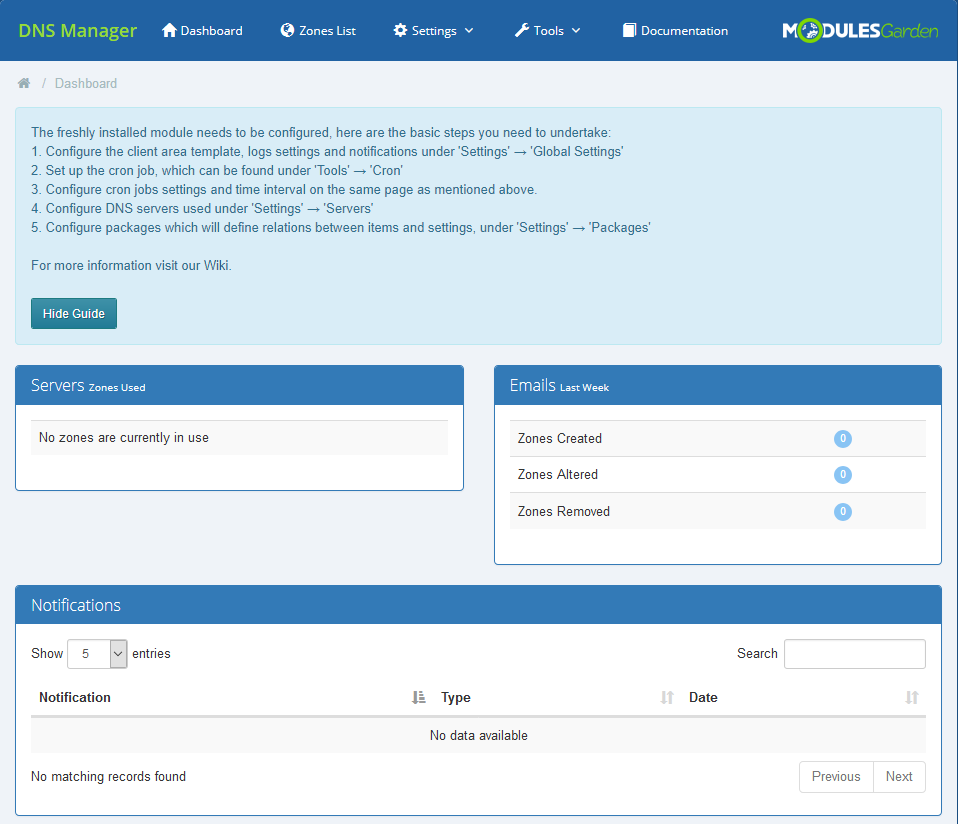
| In the first place we would like to show you the process of configuring your DNS manager on a simple example. Follow the steps below to see how the process looks like in practice. Proceed to 'Addons' → 'DNS Manager'. There are several sections, but the one that you should be interested in the most in the beginning is named 'Servers', |
|
Servers Configuration
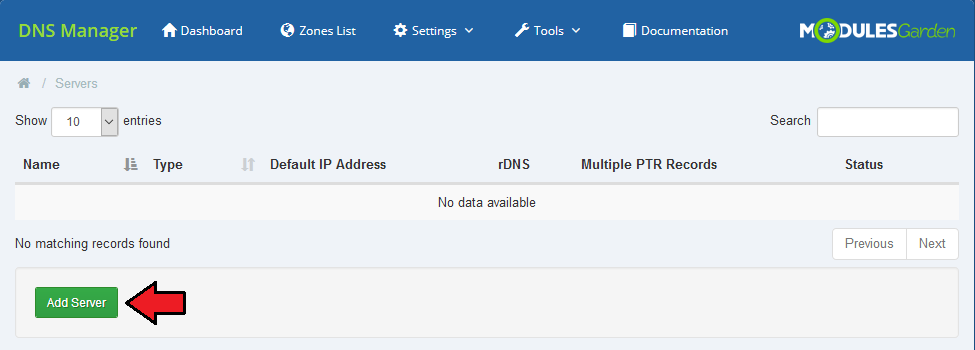
| To start your work, add a new server. |
|
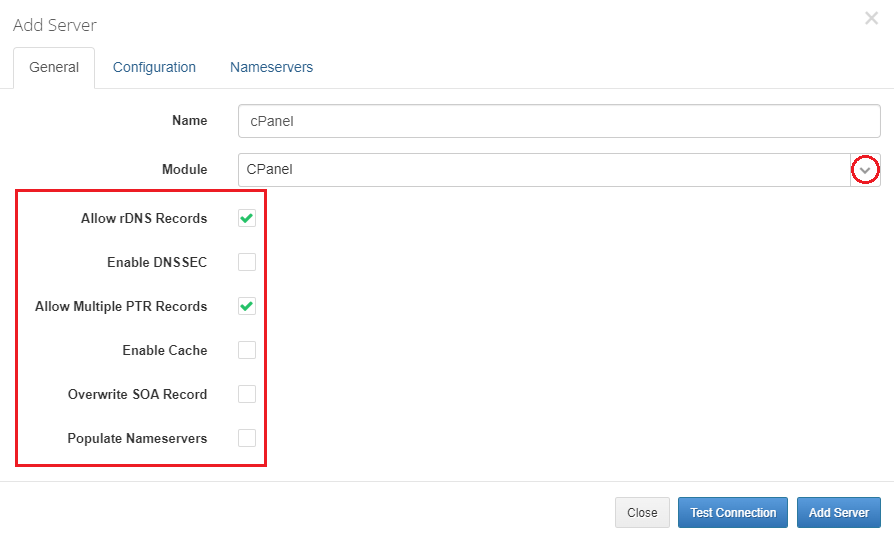
| To add a new server you must fill out some data to allow connection with it. As an example, we will try to connect with cPanel server. Additionally, you may declare here whether you need rDNS, Multiple PTR or Cashe. Select the chosen options. Please note, that there is also option Enable DNSSEC available. However, it is currently compatible only with DirectAdmin and PowerDNS submodules. |
|
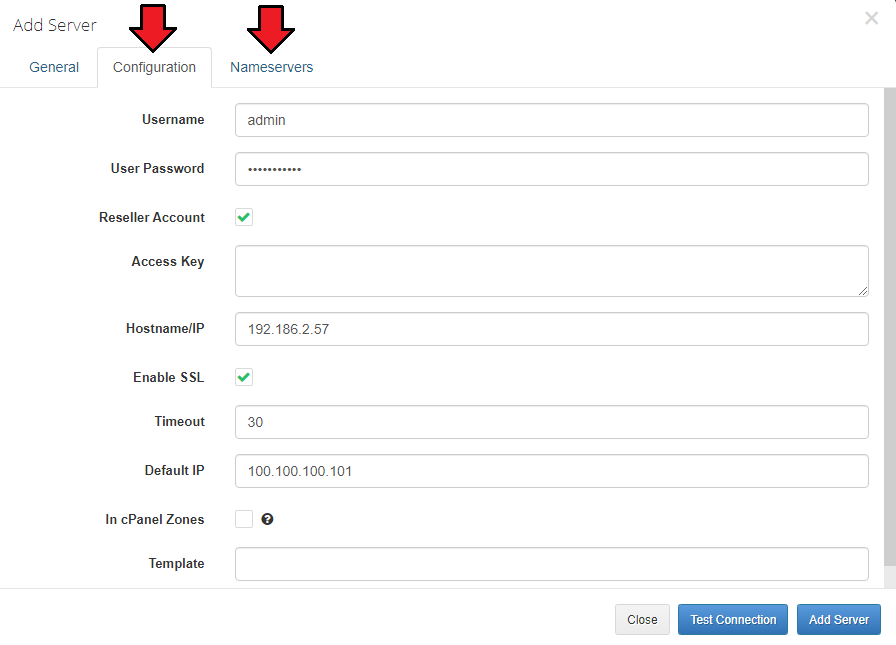
| Once you have chosen a server from the dropdown menu, 'Configuration' and 'Nameservers' tabs appear. Enter your username, password, Hostname/IP and any other details needed to connect successfully. Now, press 'Nameservers' and enter the nameservers that will be visible for your customers in their client area. Before you save the changes remember to test the connection. |
|
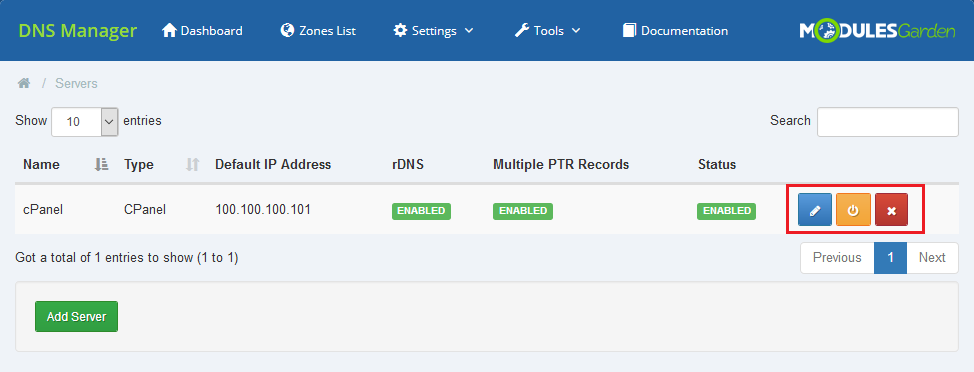
| Now, that you have a ready server on the list of servers you may manage it. Turn it on/off, edit or delete. |
|
Management of Packages
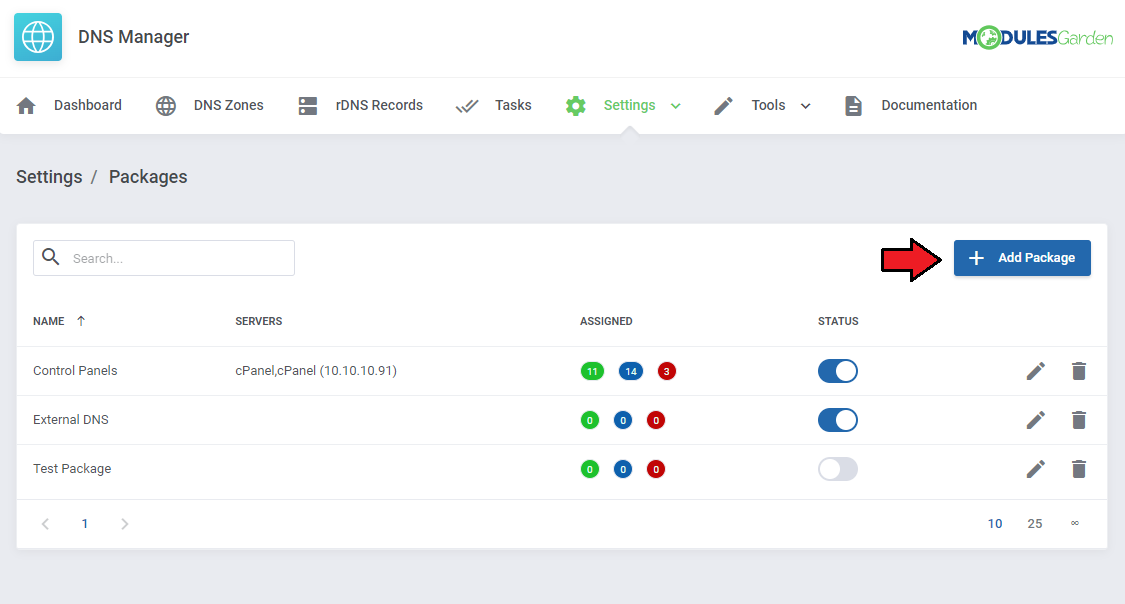
| Packages - these are sets of products that will be sold and within which zones can be created by a client. 'Add' a new package to see how to configure it and what exactly you may specify there. |
|
| In general section you must obviously name the newly created package and define the number of zones per item (limit of zones that a client may then create within this package). Here, you can also decide if zones should be created automatically after defined actions. These are:
|
|
Items
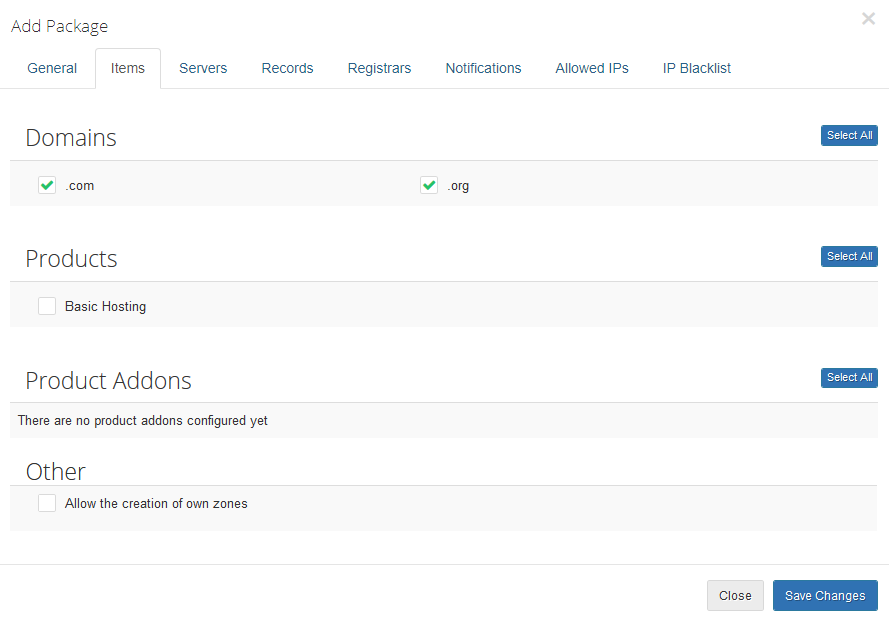
| Assign Domains, Products or/and Product Addons from available to the package. Here you can also allow clients to create their own free zones. Simply select option under 'Other' section. Remember that you may use this option for one package only. |
|
Servers
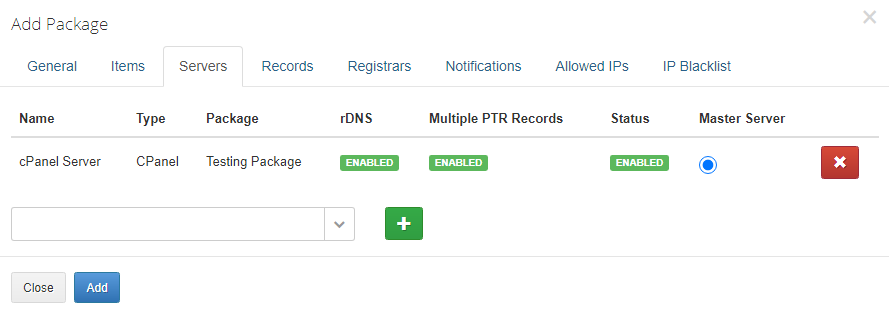
| Assign the package to the previously added server. Note! You may always assign the package to more than one server. |
|
Record
| In this part you may define which type of records you want to allow and declare their limit. |
|
You may also choose DNS Records Sets that will apply for this package.
|
|
Registrars
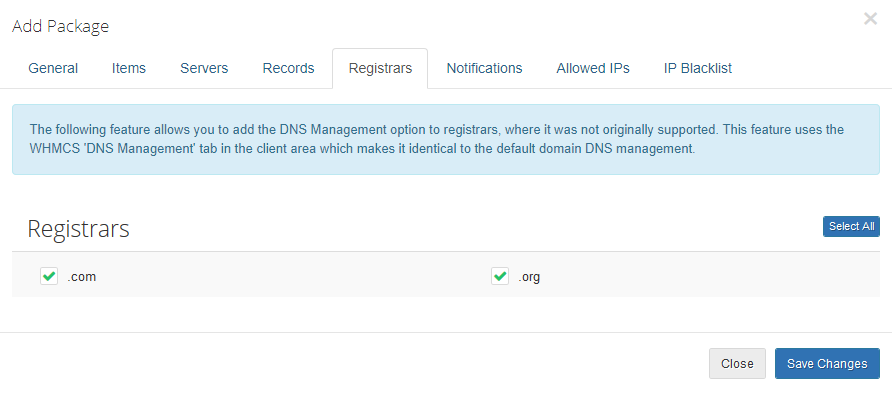
| In this part, you may allow 'DNS Management ' option to selected here registrars that do not support DNS management by default. |
|
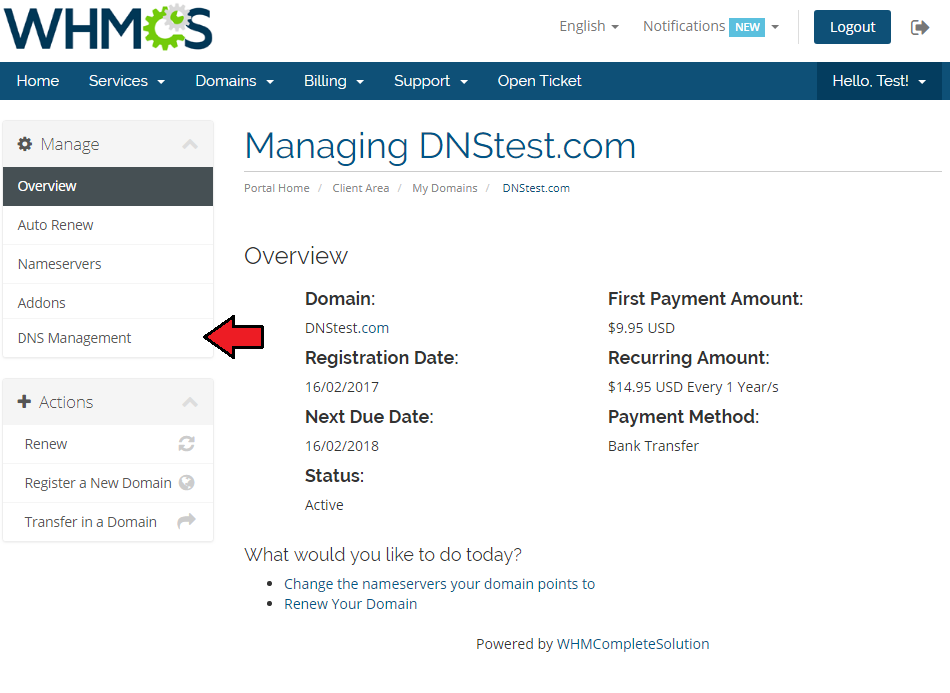
| Please note that the inbuilt WHMCS DNS Management will be used to handle the above functionality. |
|
Notification
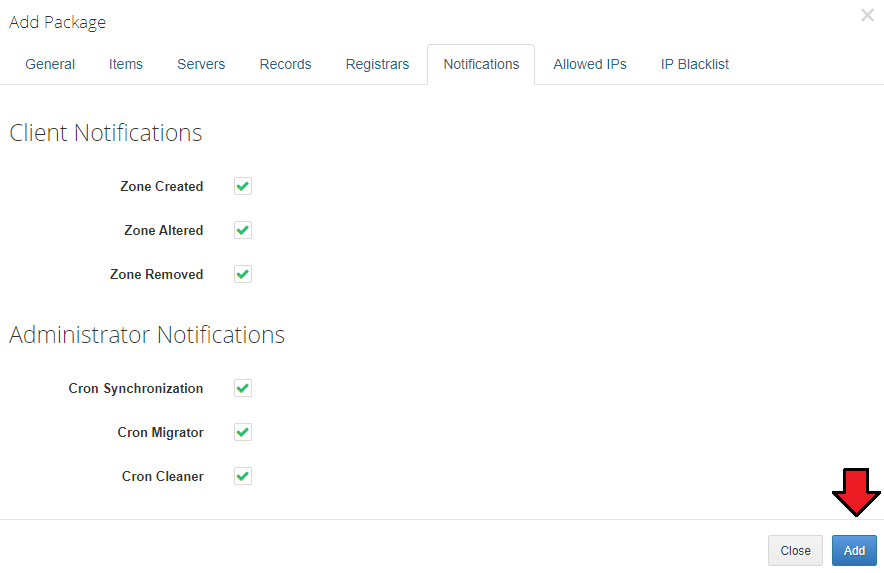
| In the last part you may configure which notification will be sent to clients and administrators. Do not forget to 'Add' the newly configured package. |
|
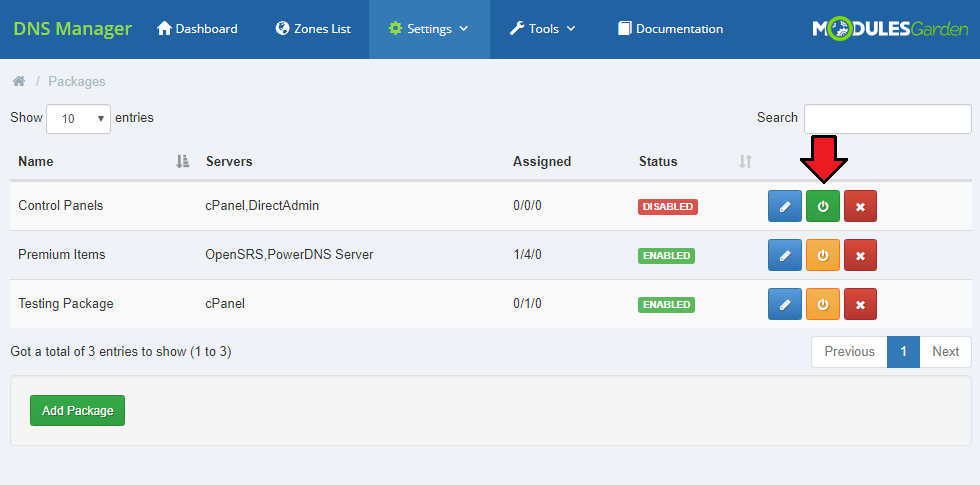
| Enable the newly created package to allow it to be used! |
|
DNS Management in Client Area
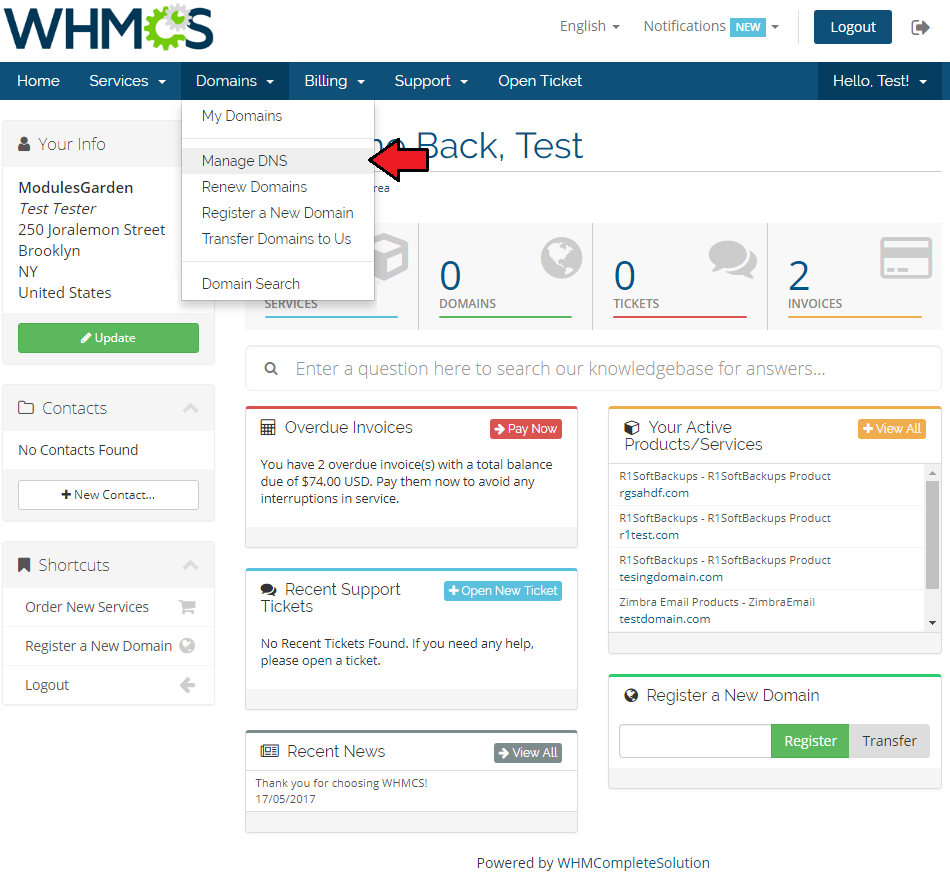
| Now, that we already have the module configured you may see how clients will add and then manage their zones. In client area find button 'DNS Management', it will redirect you to the management page. |
|
New Zones
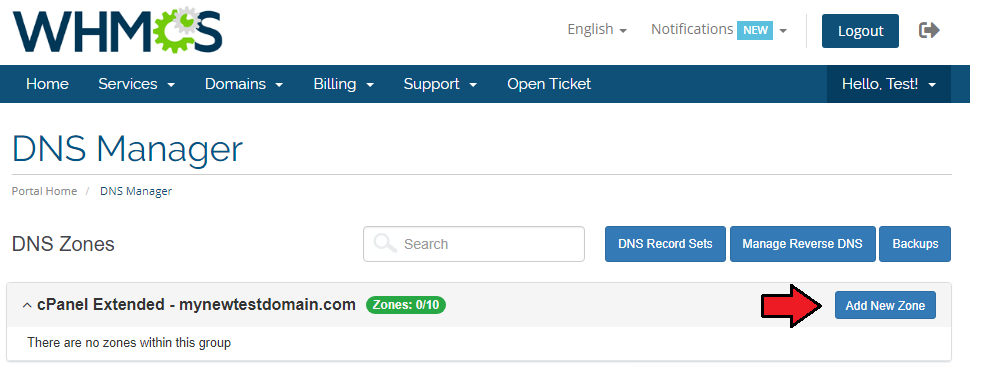
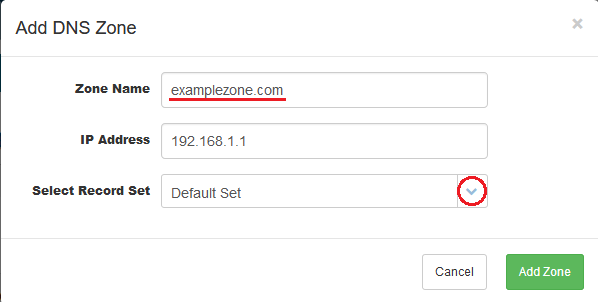
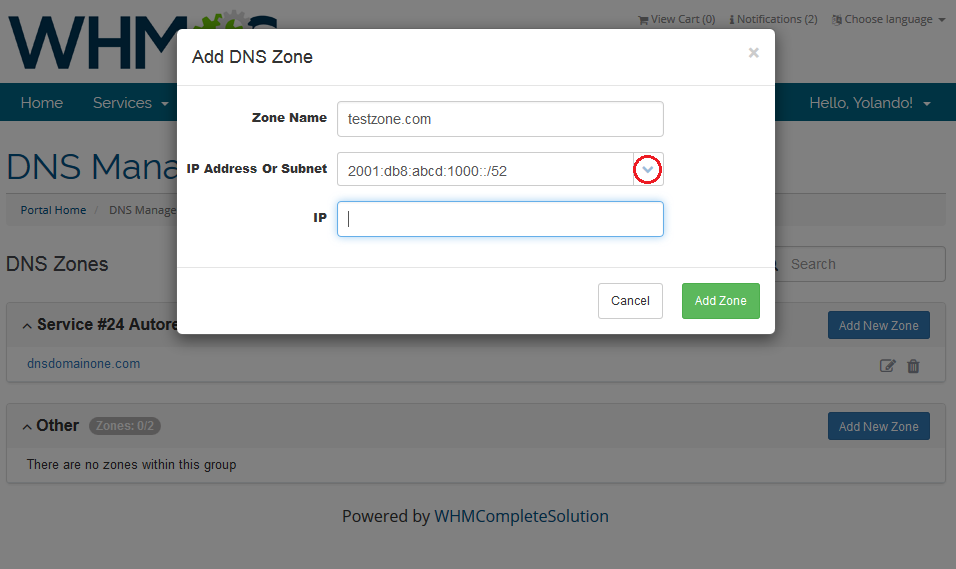
| In here, clients may add new zones. To do so, simply type in the name of the zone and choose IP address from the available or enter your custom IP. It depends on your configuration - read more about possible options here. From the dropdown menu clients can also define record set. If they do not have any added, the default one created by the administrator in the admin area will be selected. When clients create sets themselves, they can use the one defined by them as default, or choose other one from the list. |
|
|
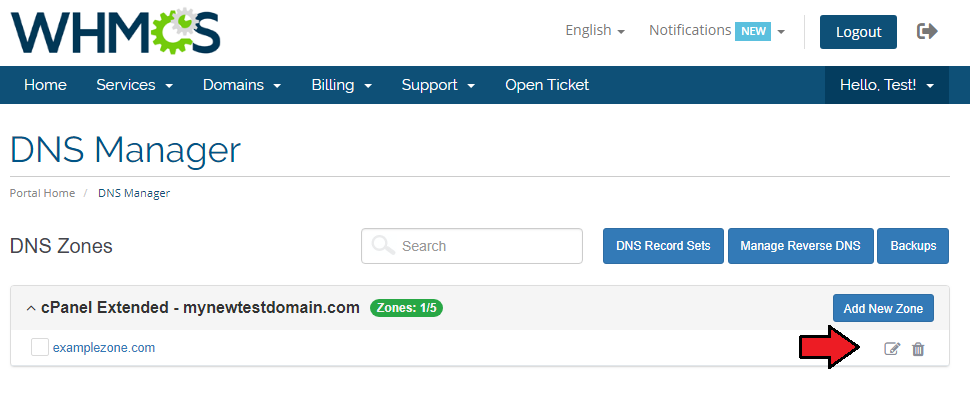
Allowed actions on a zone:
|
|
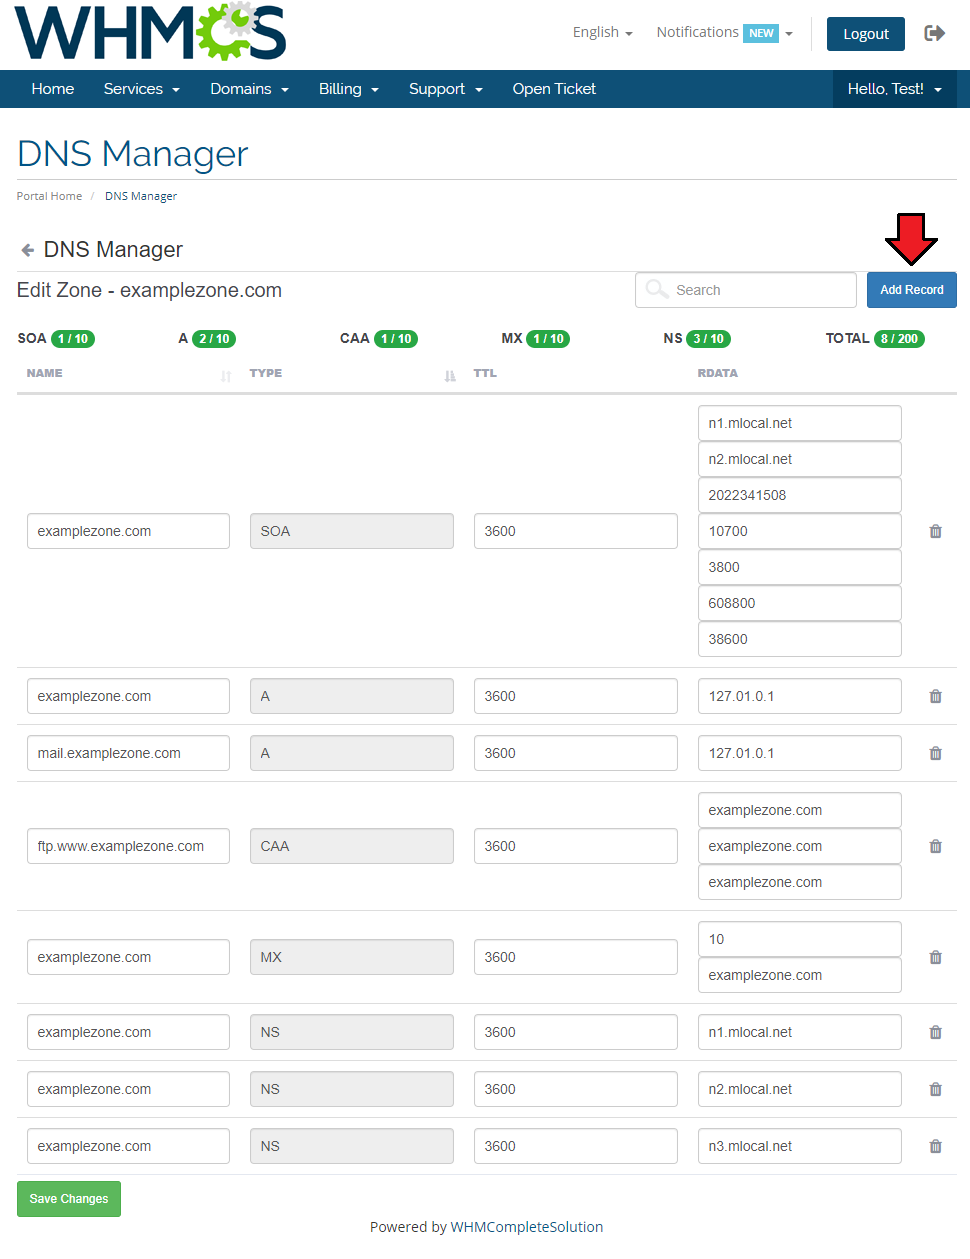
| Press 'Edit' to see details of the zone, you may edit the zone here and add new records if limits allow you. |
|
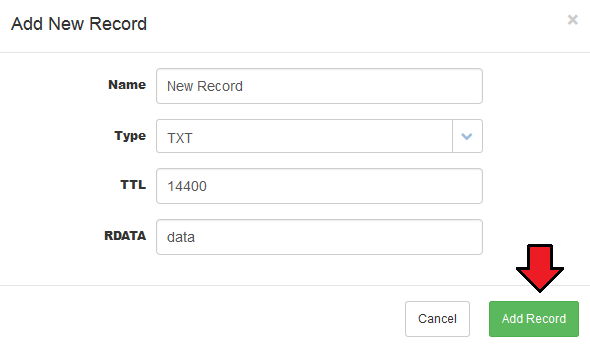
| Enter new record's name, choose type from available etc. |
|
Enable DNSSEC
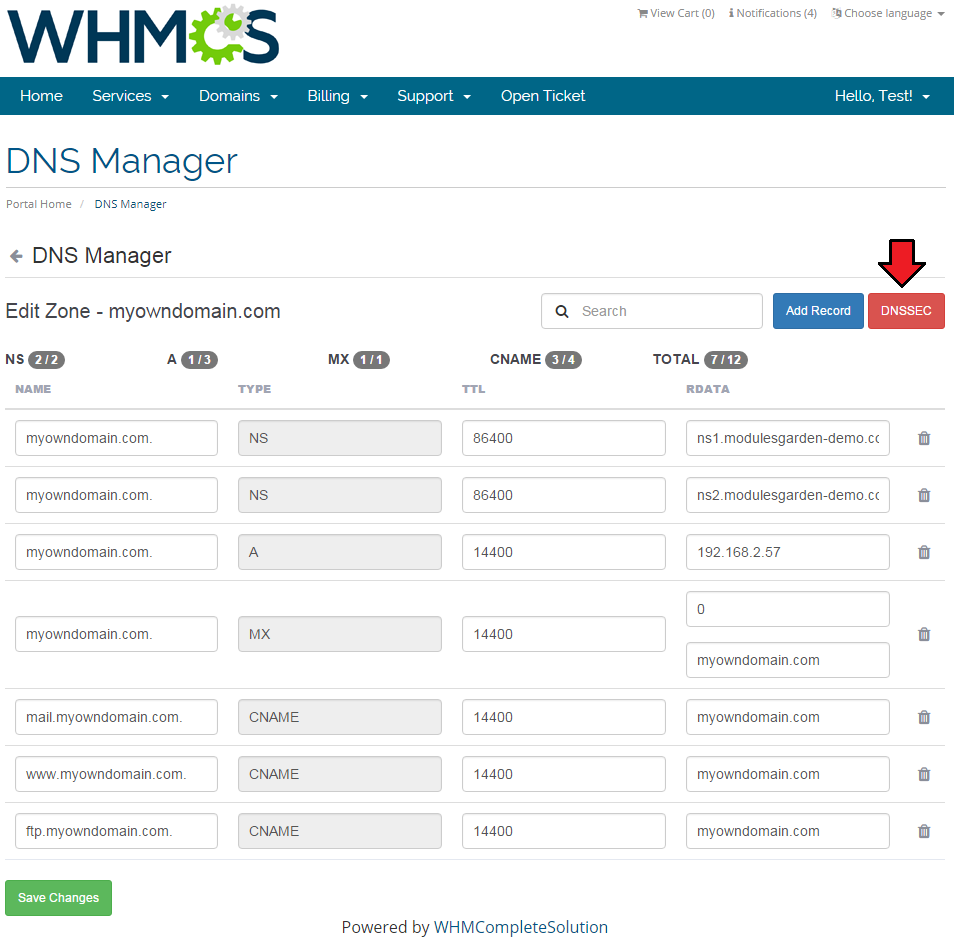
| If 'Enable DNSSEC' option has been selected ('DirectAdmin' and 'PowerDNS' submodules), client may turn it on. To do so, press 'DNSSEC' button. |
|
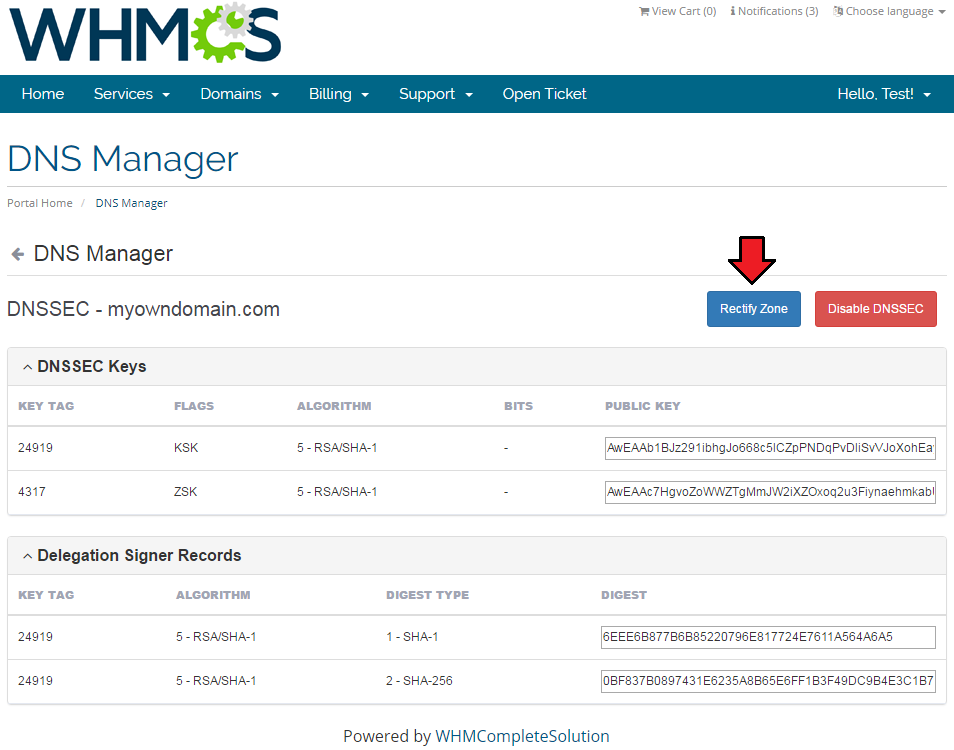
| Enable DNSSEC here, you will then get access to DNNSSEC details for the zone, including keys and delegation signer records. Press 'Rectify Zone' to comply with DNSSEC. |
|
Add rDNS Records
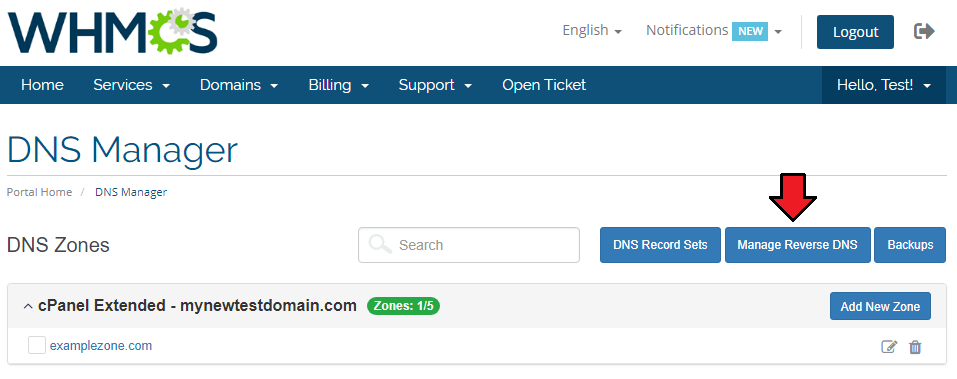
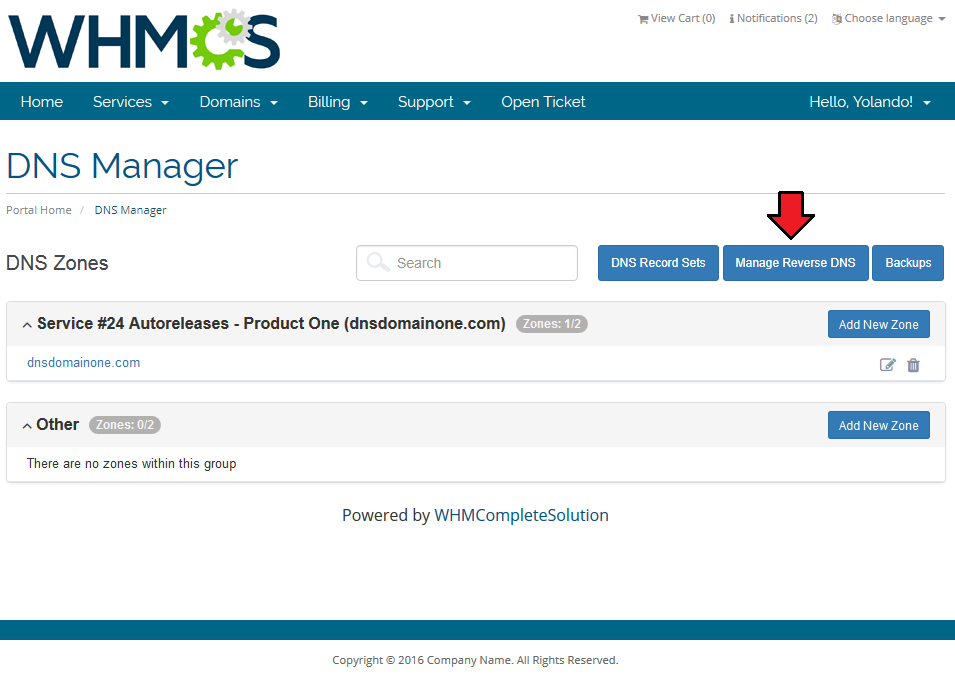
| If you have enabled 'Standalone rDNS' option (read more here) in global settings, your clients can create PTR records for IPv4 and IPv6 addresses without any related zone. To do so press 'Manage Reverse DNS'. |
|
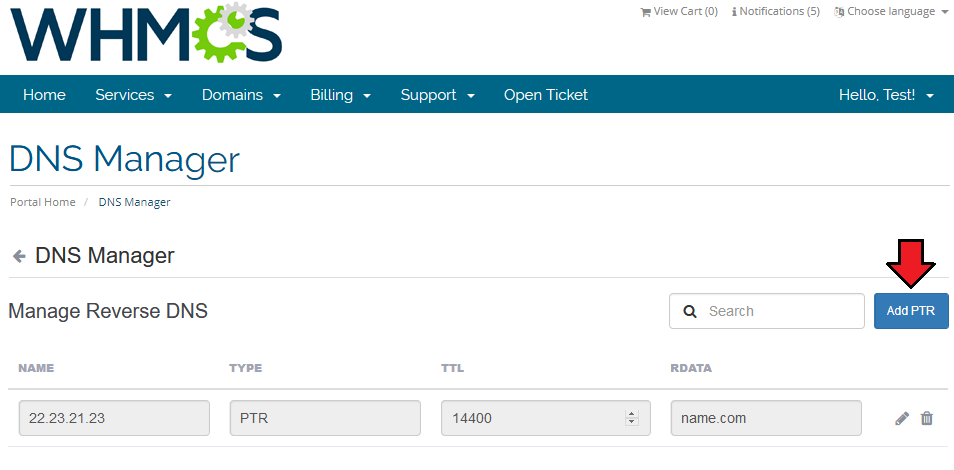
| Find and press 'Add PTR' button. |
|
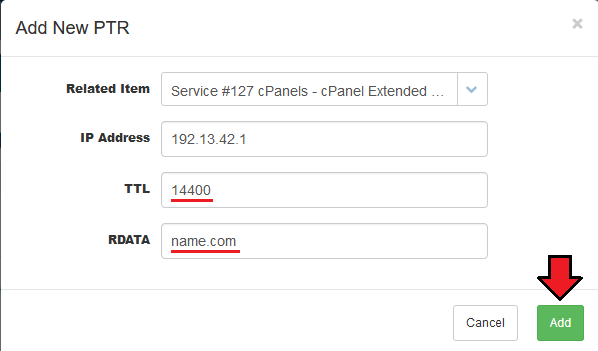
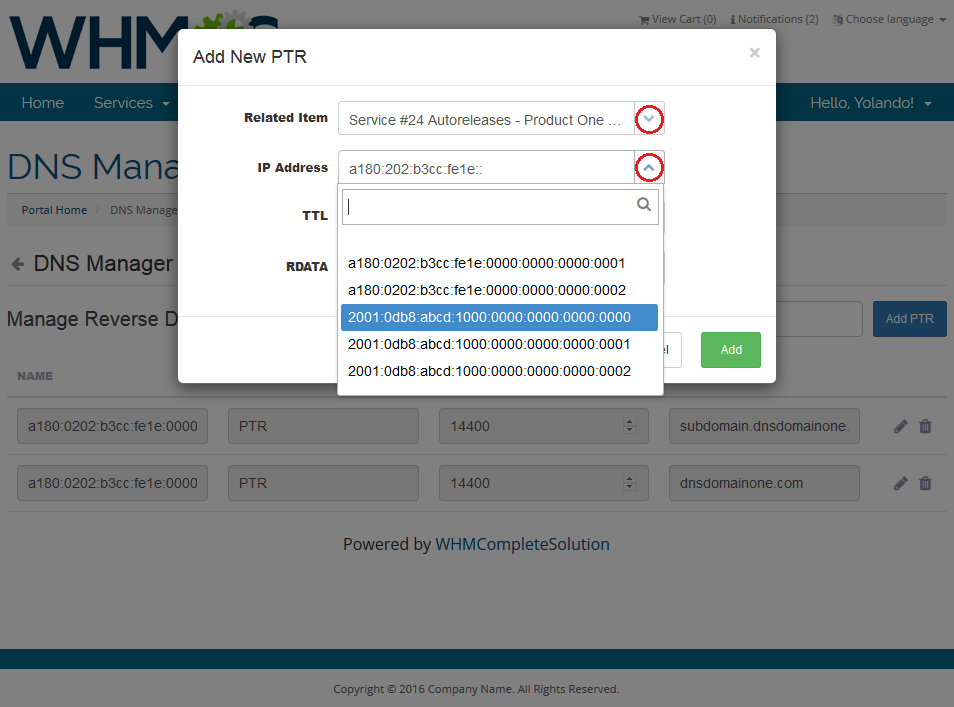
| Select related item, then depending on the configuration enter IP address or choose IP or Subnet from the available list. Note! Subnets are available only if you have integrated your DNS Manager with IP Manager For WHMCS - see below options for more details. |
|
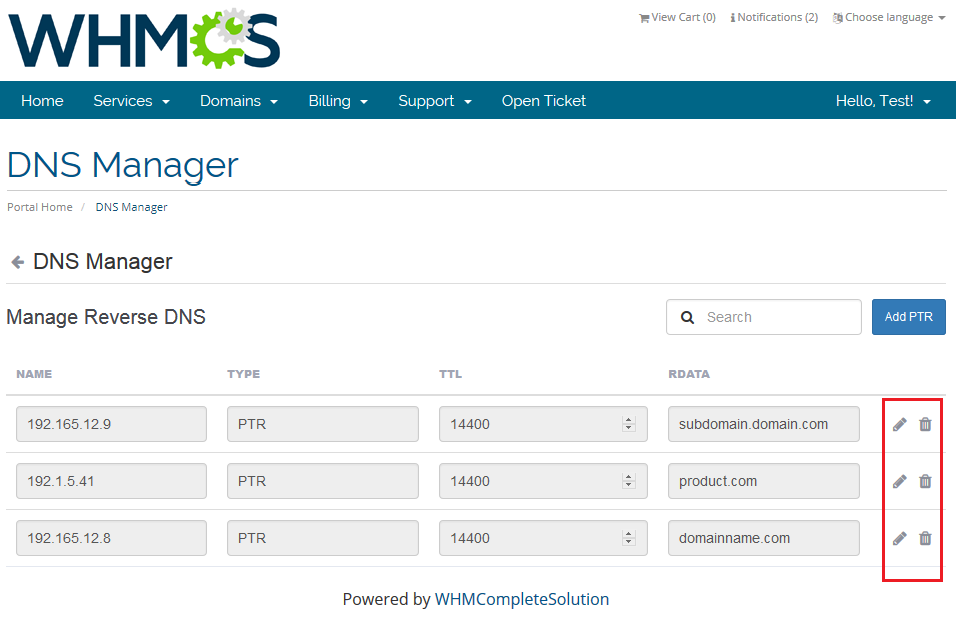
| You newly created rDNS record should appear on the list. You may edit RDATA or delete the record completely. |
|
Add DNS Records Sets
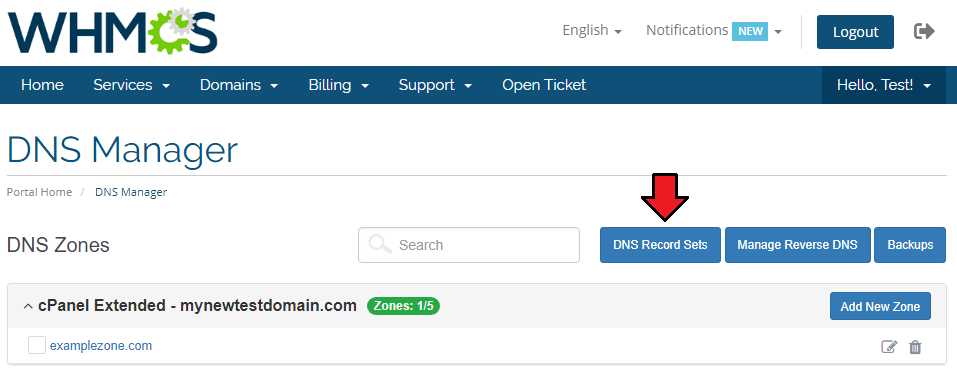
| You can add and manage records sets in the DNS Records Sets section as shown below. |
|
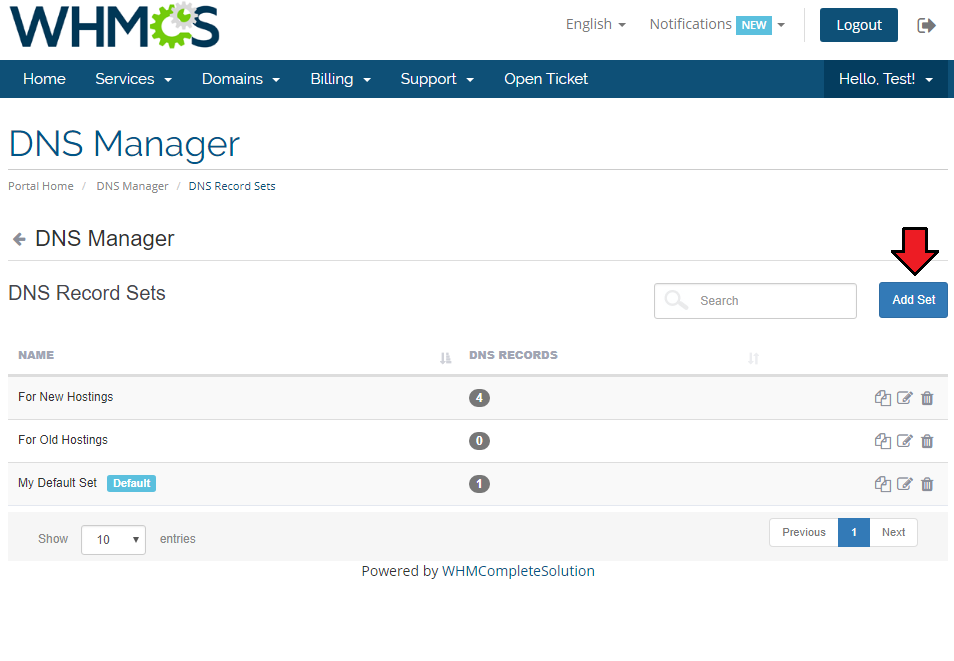
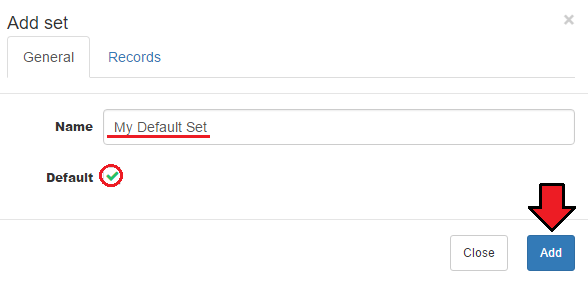
| Click 'Add set' button and provide the necessary details. It can be also set as default. |
|
|
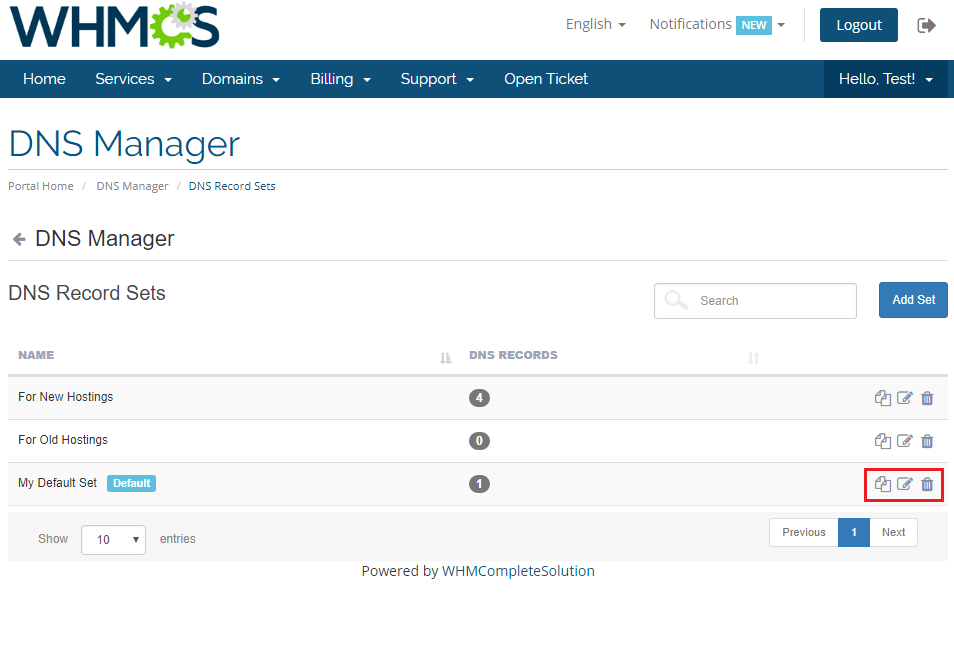
| You newly created DNS record should appear on the list. You may edit or delete the record completely. |
|
Zones Management
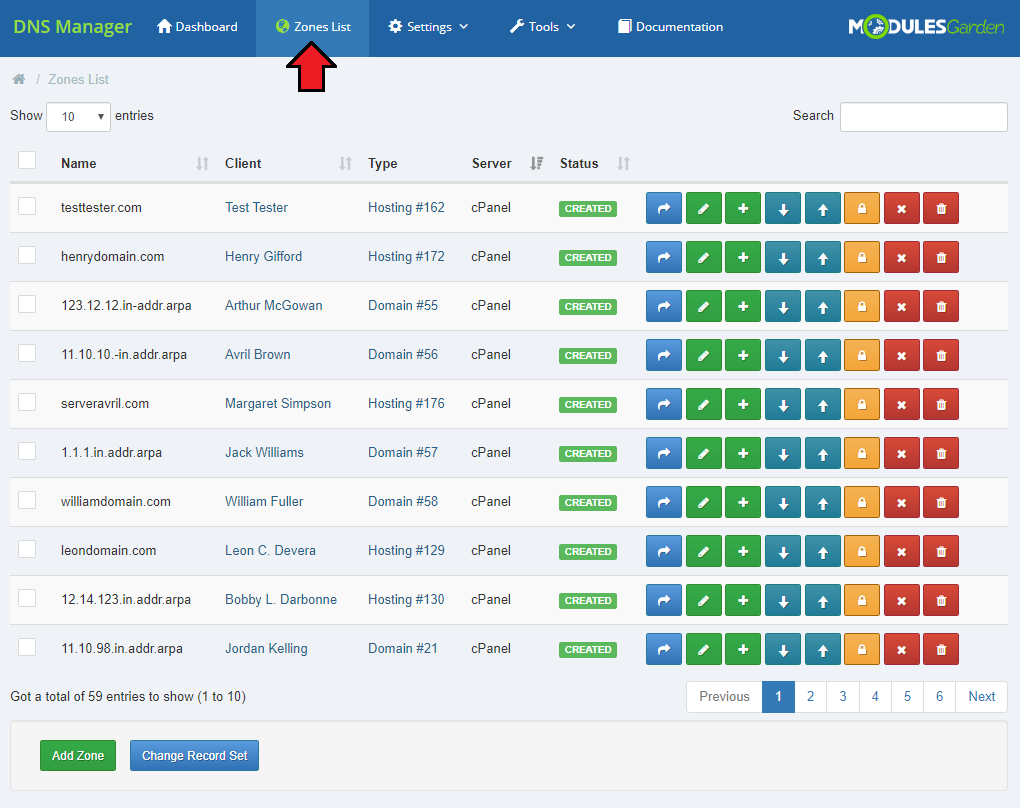
| In administrator panel, there are visible all clients' zones. As an admin, you will see whose zone it is, its type, on which server it is created and its status (created/deleted). |
|
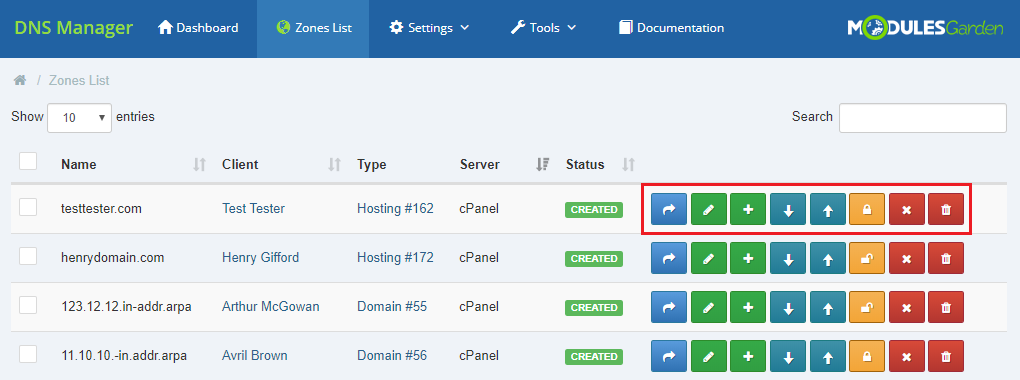
Actions on zones from the admin area:
|
|
Additional Tools
DNS Records Sets
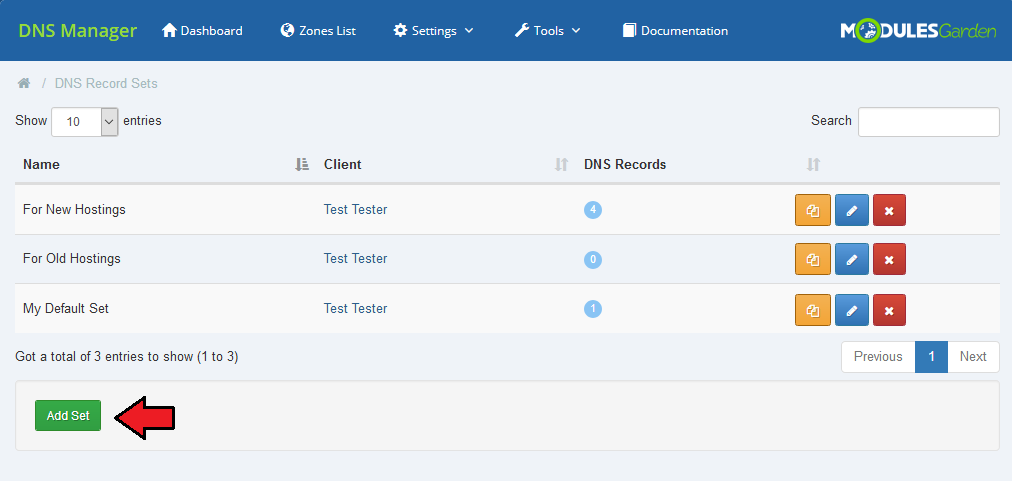
| Create ready made sets of DNS records. You will find them in 'Settings' → 'DNS Records Sets'. Press 'Add Set' to create a new one. |
|
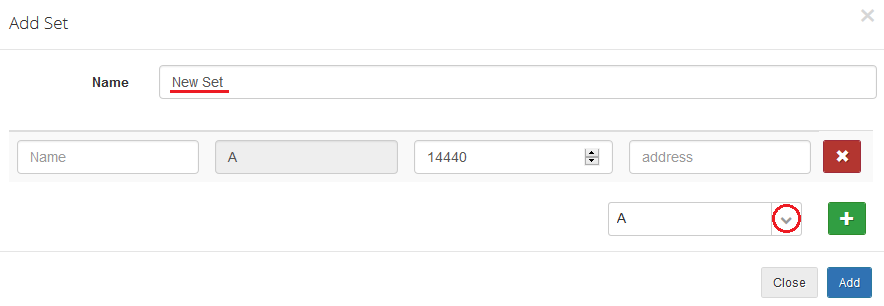
| Enter the newly created set name and then choose records from the dropdown menu, press '+'. |
|
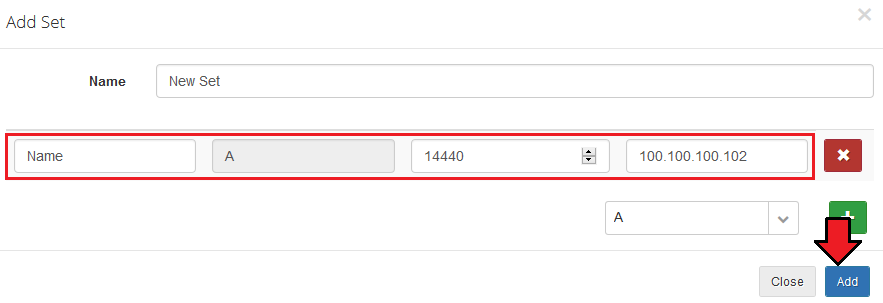
| Now, fill out the data as required. Note: You may add adequate variables for domain and IP address and then these fields will be automatically changed to domain/zone IP when this record set is used. |
|
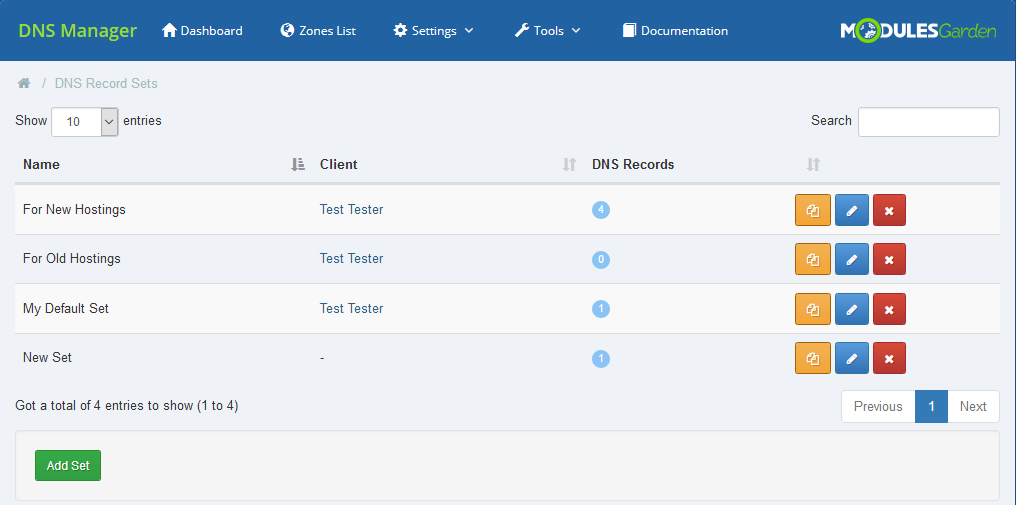
| Created DNS Records Sets can be then used while preparing ready packages, as it was described. Ready made sets allow much faster and more personal configuration of packages. |
|
Global Settings
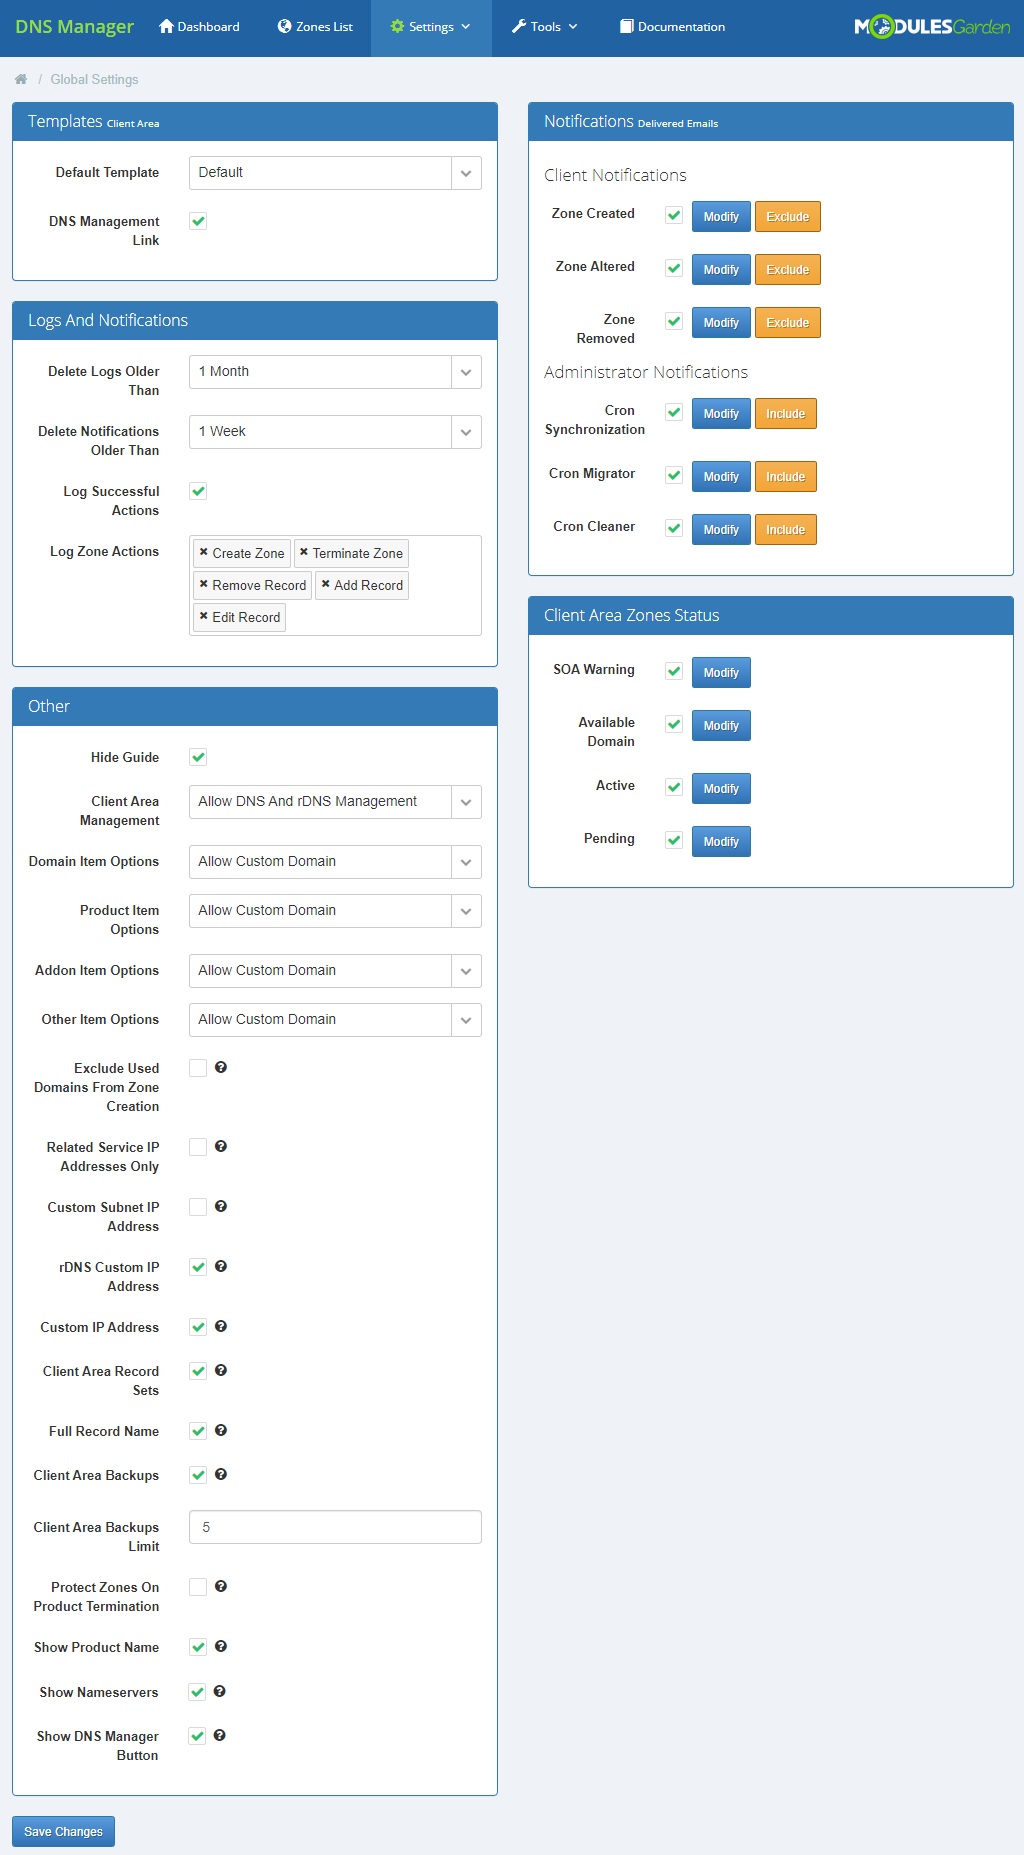
| This section has been designed to allow quick and simple configuration of global settings from one place. |
|
Templates
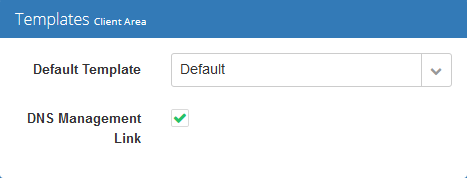
| Choose a default template that will be used in client area. If you have more than one template then you may allow your clients switch between them. |
|
Notifications
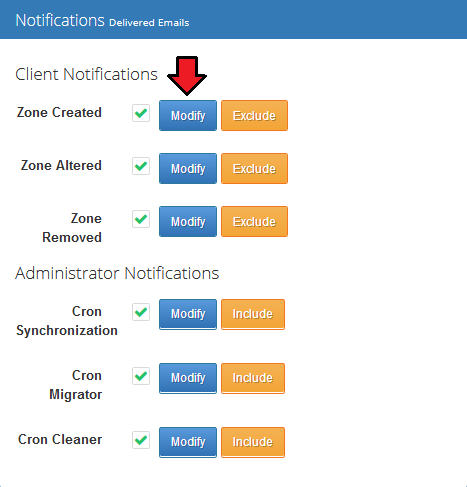
| In this part, set which notification should be sent to clients and which to administrator. Select the ones that interest you. Press 'Modify' and you will be quickly redirected to the email template page where you can adjust it to your needs. |
|
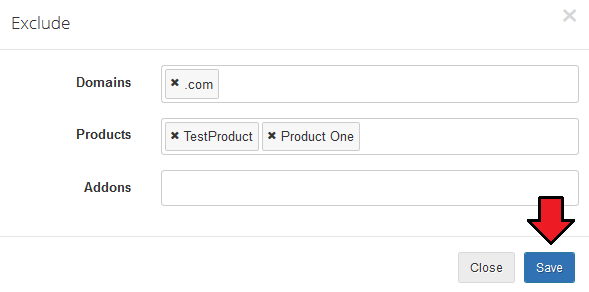
| Use 'Exclude' button to specify domains, products and addons that zones assigned to them will NOT be included in notifications. |
|
| Use 'Include' button to specify which admin users notifications will be sent to. |

|
Logs And Notifications
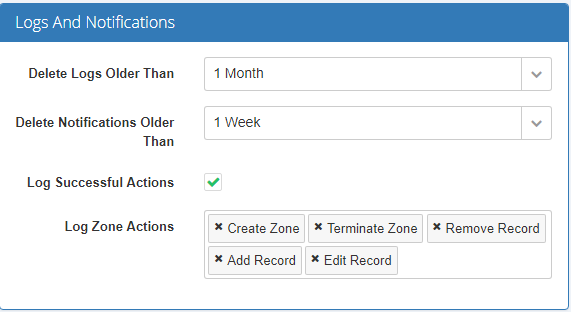
| In this part you may impose when log entries and notifications should be removed from the system database. If you wish you may also check option 'Log Successful Actions' to store all entries in logs (DNS Manager → Settings → Logs). |
|
Other
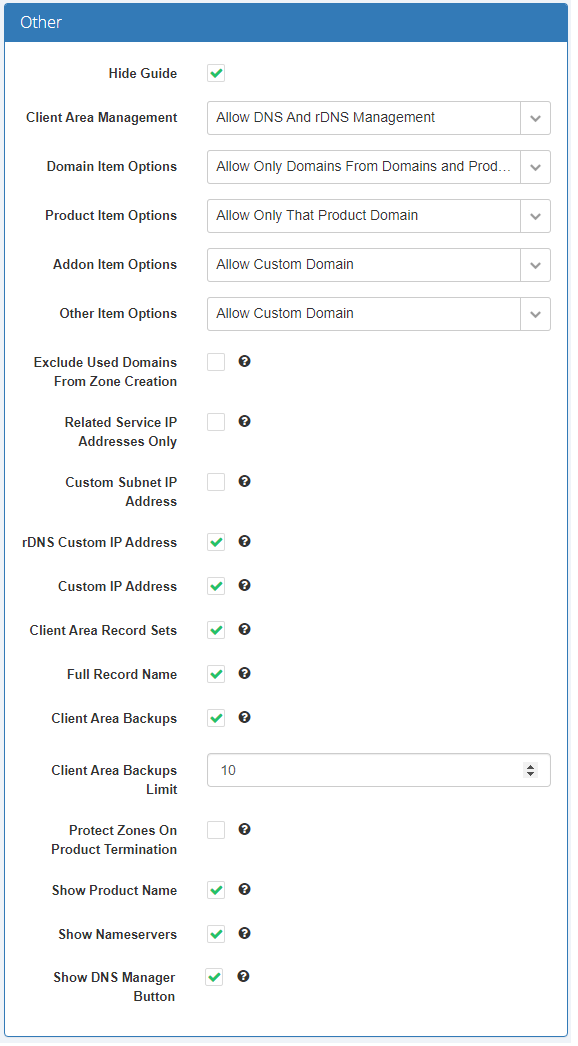
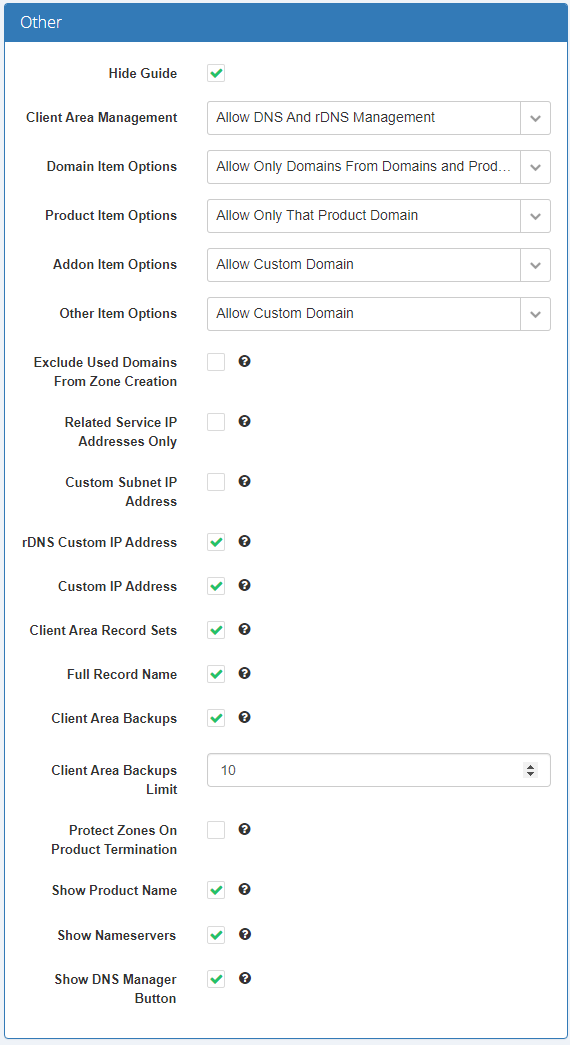
| Box with 'Other' options available is a crucial part of configuration where you can manage IP Manager For WHMCS module integration and manage PTR records creation. Besides, here you can switch off the guide with simple instructions visible on dashboard. |
|
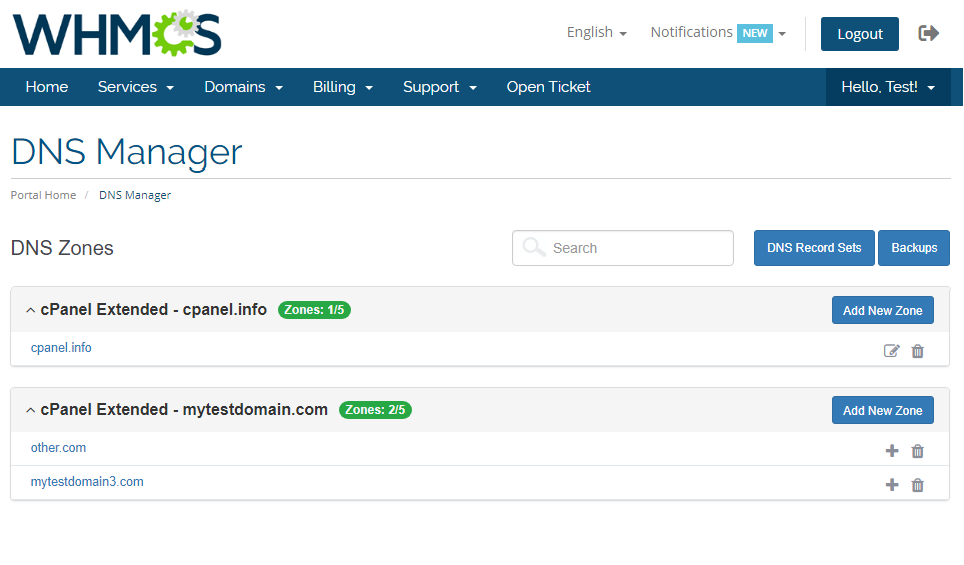
| Standalone rDNS - Create PTR records for IPv4 and IPv6 addresses without a related zone. If this option is enabled your clients will be allowed to add reverse DNS with no zone related. To do so proceed to 'Manage DNS' → 'Manage Reverse DNS' in your client area. |
|
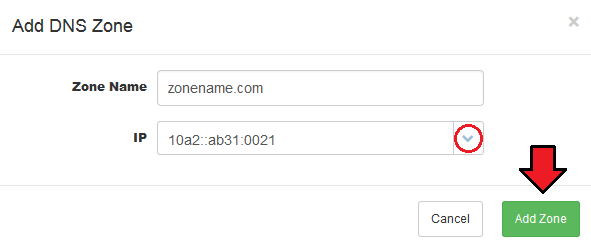
| Related Service IP Addresses Only - create zones and PTR records with a related IP address only. When adding a new zone/PTR record you can choose from available hosting related IP addresses only as marked on the screen below. |
|
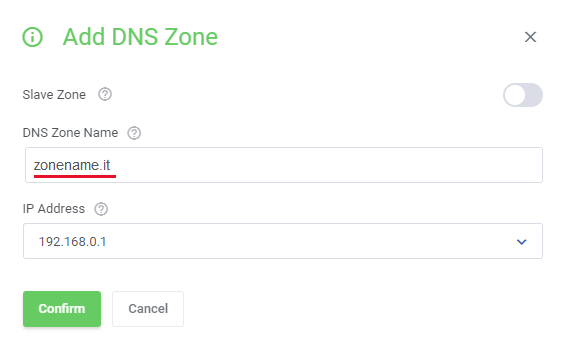
| Owned Domains Only - restrict clients to manually create zones using their own domains only. |
|
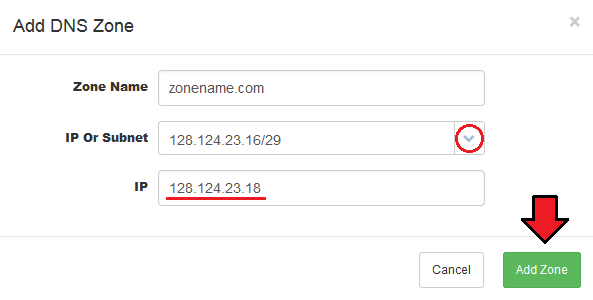
| Custom Subnet IP - create zones and PTR records with an IP address included in a subnet related to the product. Note! This option works only if you have integrated your DNS Manager with IP Manager For WHMCS. |
|
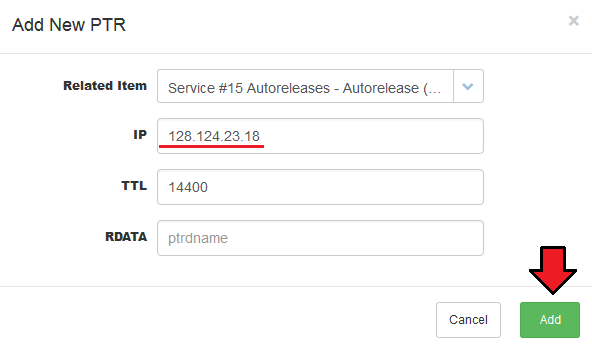
| revDNS Custom IP - create PTR records with a custom IP, enter a new IP address to create a new PTR. Note! Both IPv4 and IPv6 are supported by DNS Manager For WHMCS. |
|
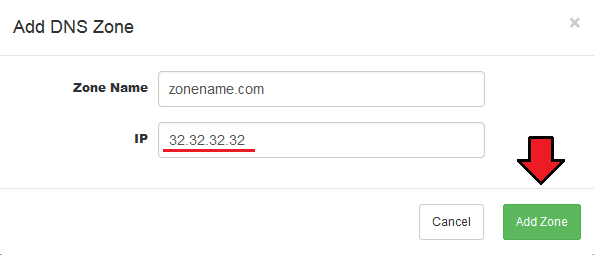
| Custom Subnet IP Address - create zones with a custom IP address, you have no IP addresses to choose from, you have to enter a new IP address. Note! Both IPv4 and IPv6 are supported by DNS Manager For WHMCS. |
|
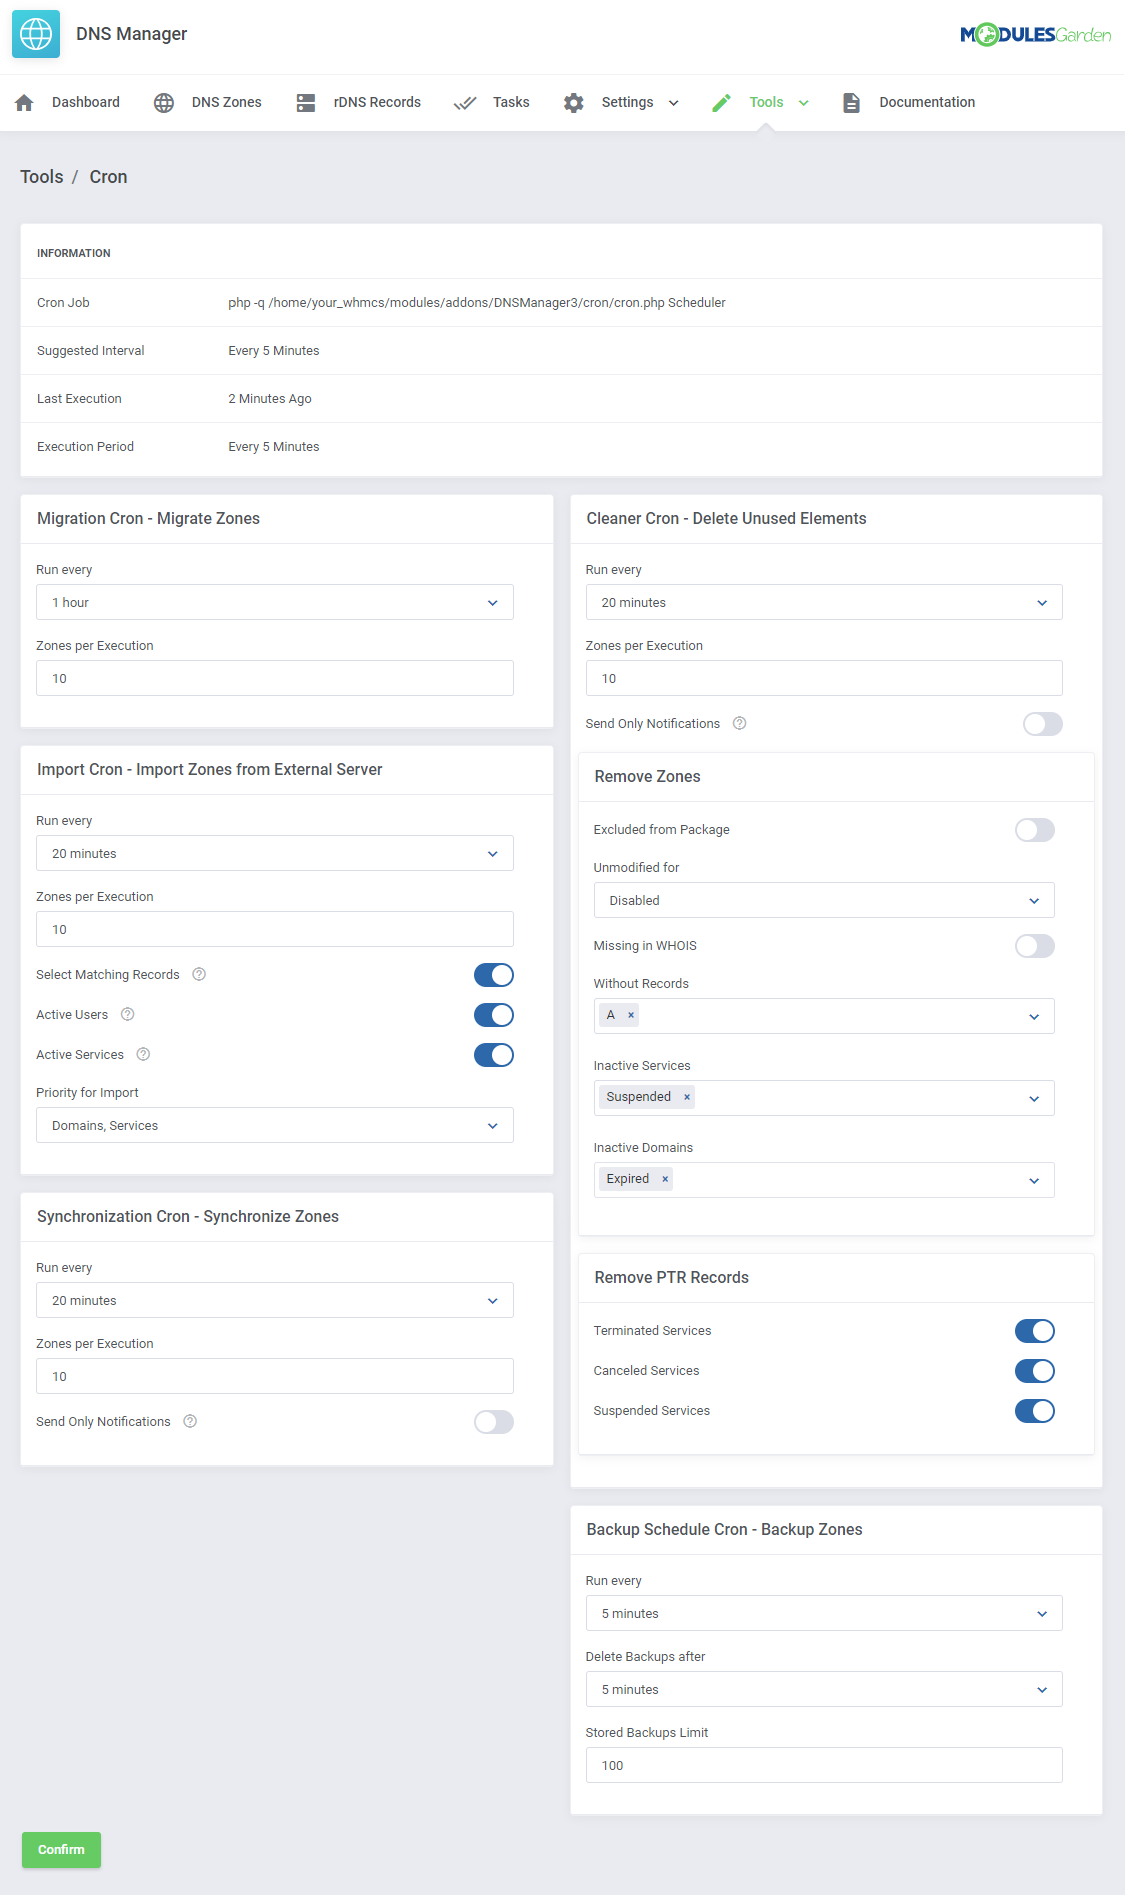
Cron Jobs
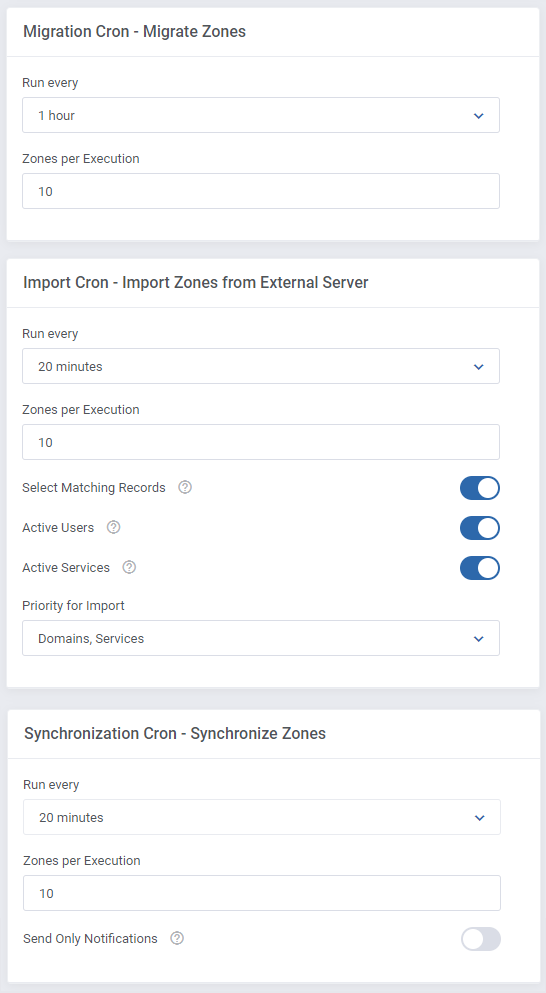
| In order to manage your cron job tasks proceed to 'Tools' → 'Cron'. Here, you will find four information boxes, each one responsible for management of a separate cron task. These are: migration, import, synchronization and cleaner. |
|
| At the very top, there is an info box with general cron details, such as recommended time interval of cron execution (5 minutes is suggested), the last execution time and run time period. (Keep it as frequent as possible!) |

|
|
|
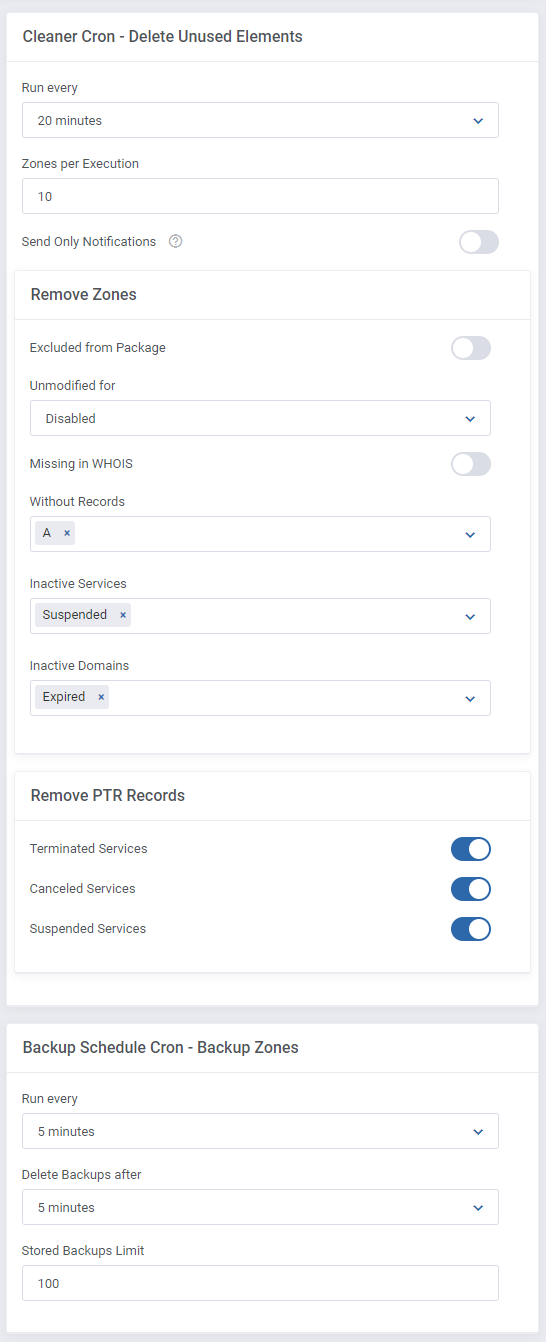
| Cron Cleaner - this option is a little bit more complex. Just like in case of other cron jobs, firstly choose interval and declare how many zones shall be cleared during a single execution. Then you may specify conditions of clearing zones and records. Warning! By default, the cron job is disabled and the 'Notify Only' option is enabled.
PTR Records are removed:
|
|
Import
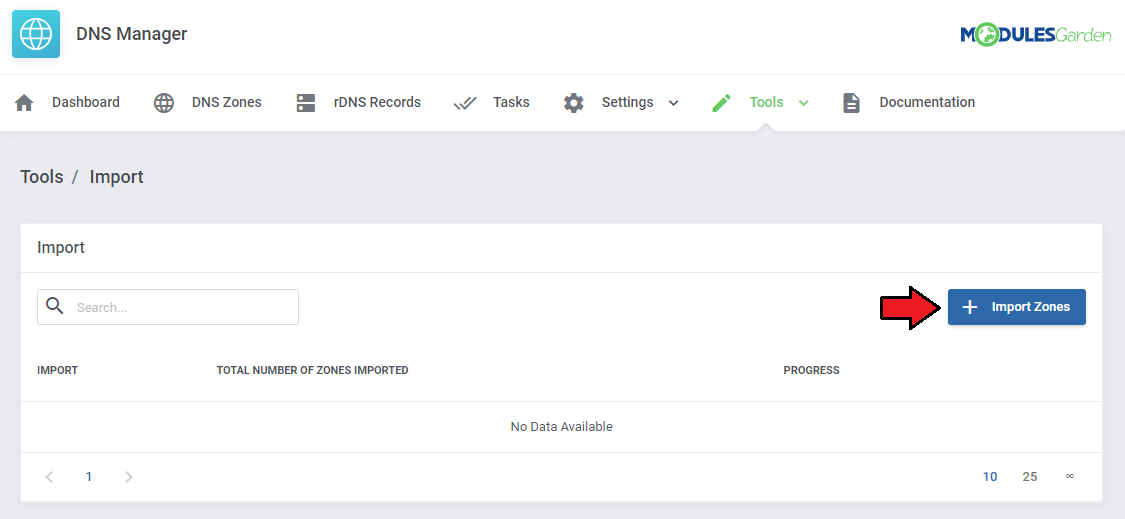
| Import - this is an additional tool that allows import of zones that exist on outside servers to WHMCS. Move to Tools' → 'Import' in your admin panel. You will find here a list of Import assignments with information on which server they are imported from, total number of already imported zones and the number of all zones, progress of import task. To add a new import task press 'Add Import'. |
|
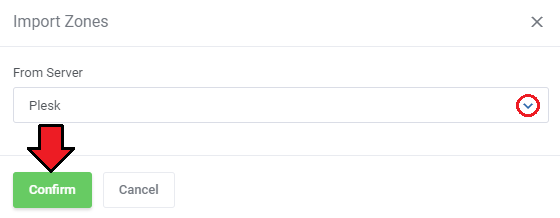
| Choose server that you want to import zones from. |
|
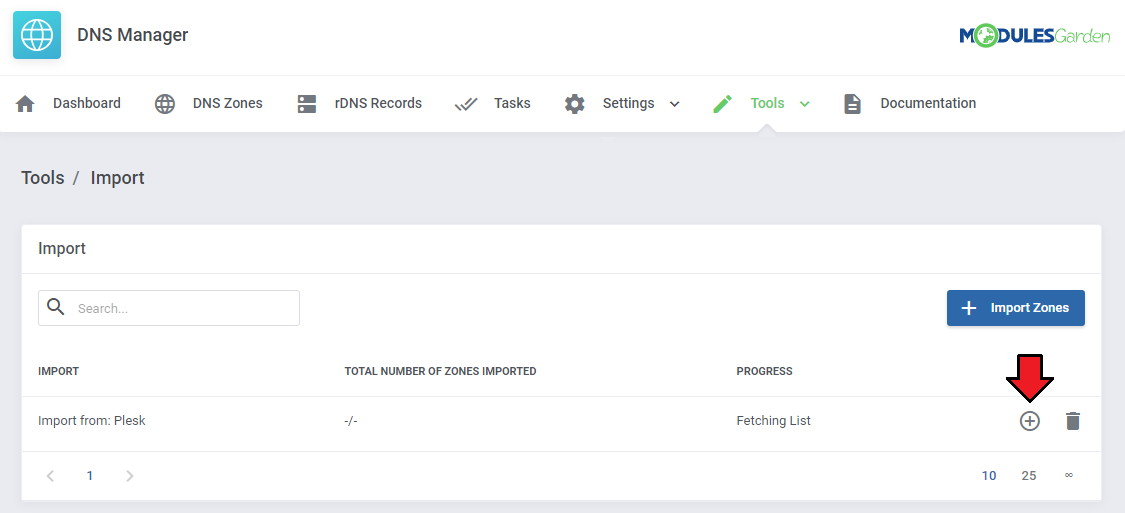
| Now, when the new import task appeared on the list of awaiting imports, schedule the import. |
|
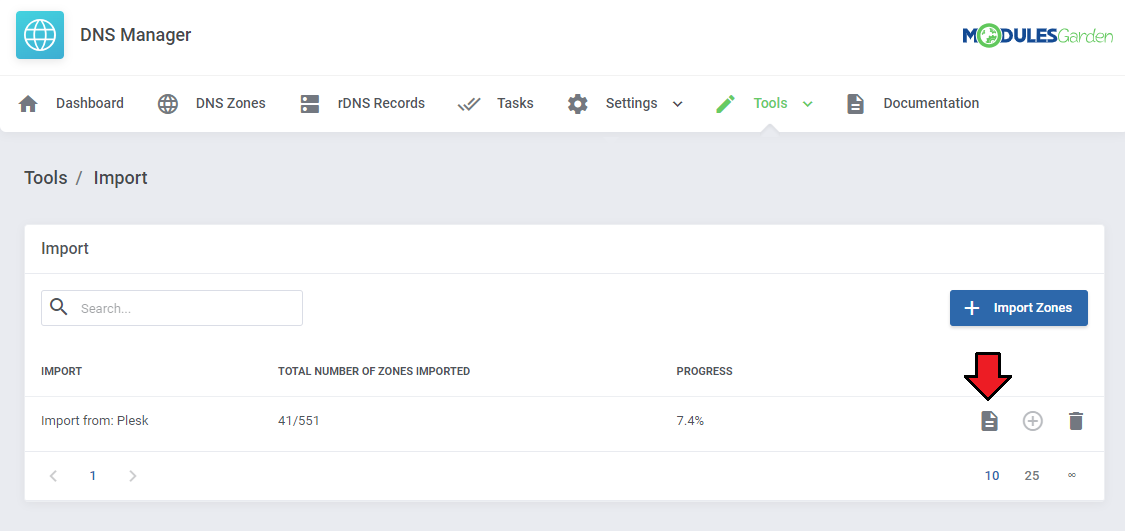
| When schedule is confirmed, preview the list of imported zones to assign a client and a related product to the zone. To do so, press the button as marked on the screen. |
|
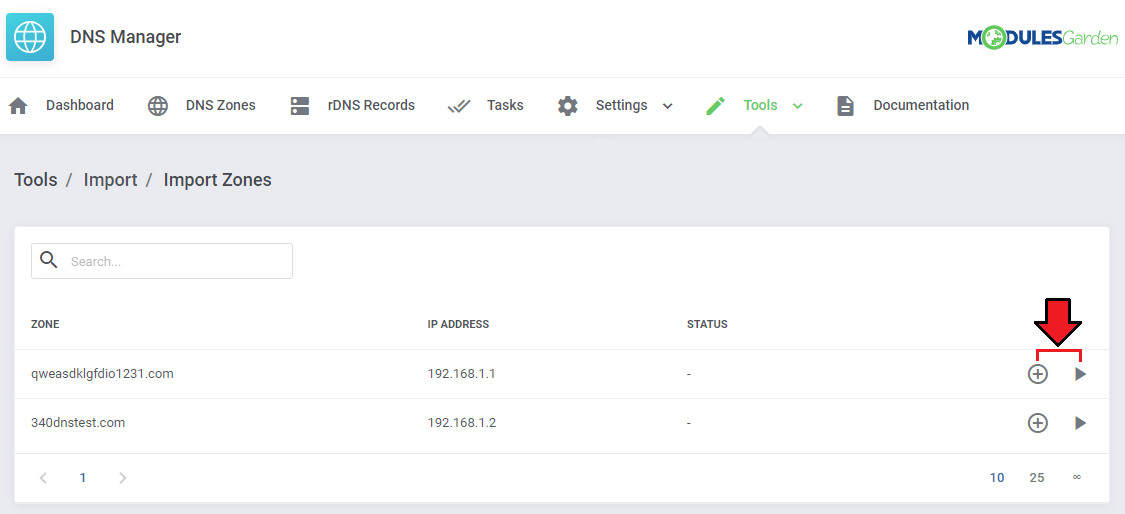
| A list of zones appears. DNS Manager Import tool detects which client and product a domain and IP address is assigned to and automatically assigns related client and product to migrate. |
|
| If you do not schedule import tasks, regular cron execution will trigger the import. However, you always have to make sure that selected zones are assigned to related clients and products. |
Migration
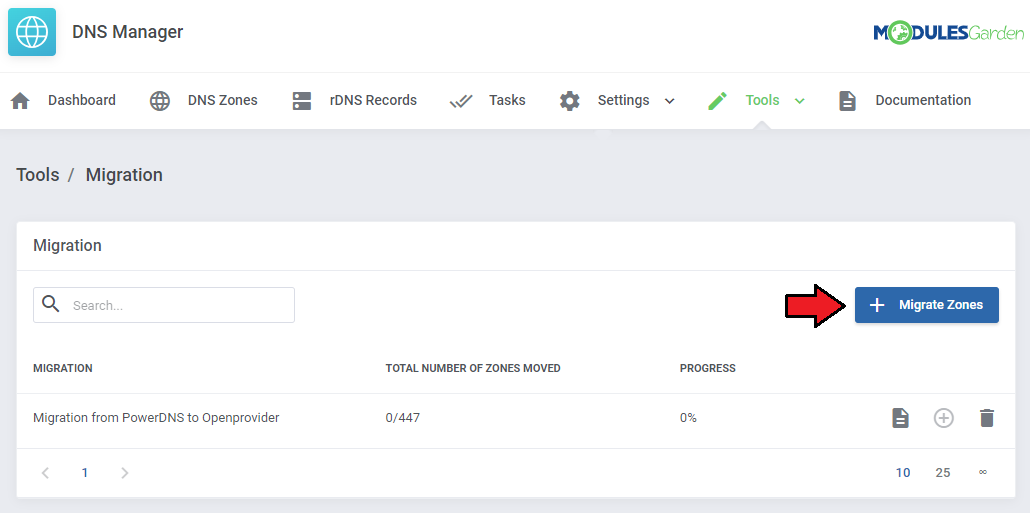
| 'Migration' is another useful tool that you may use to manage zones efficiently. With this tool you may migrate zones between servers. Keep in mind, that when you are migrating zones from one server to another they are not imported to your WHMCS in the meantime! |
|
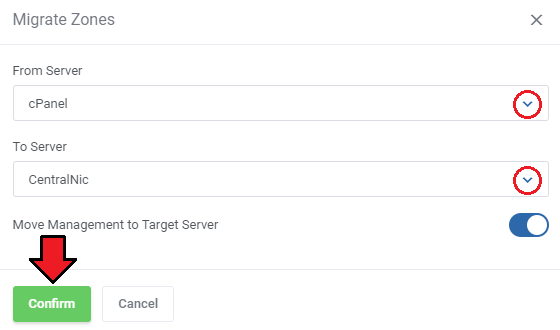
| To add migration task, press 'Add migration', specify from which server you wish to migrate zones, and the target server, as simple as that. Note! Migration does not copy DNS Manager settings, to illustrate: if you are migrating zones that exist in DNS Manager their locations for example are not updated. |
|
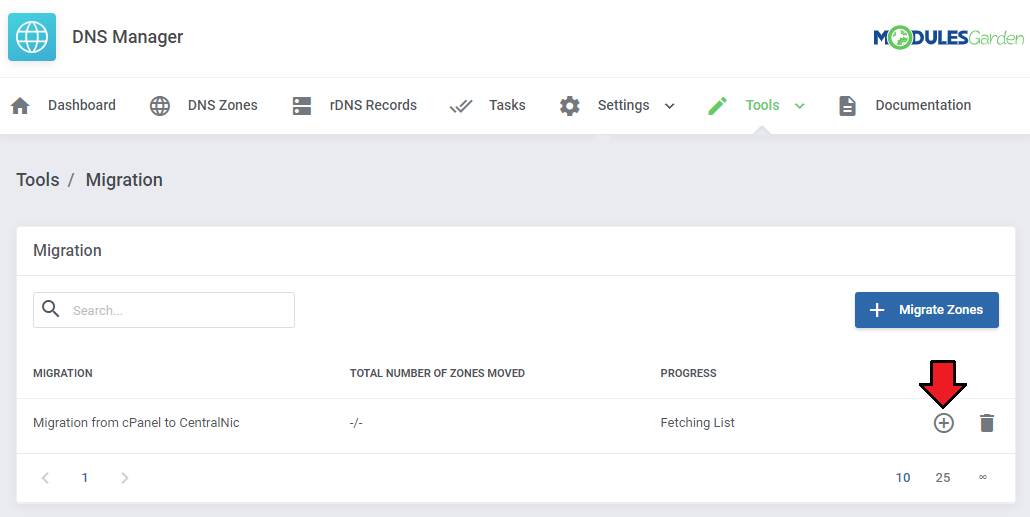
| Schedule the migration. Remember to confirm the action. |
|
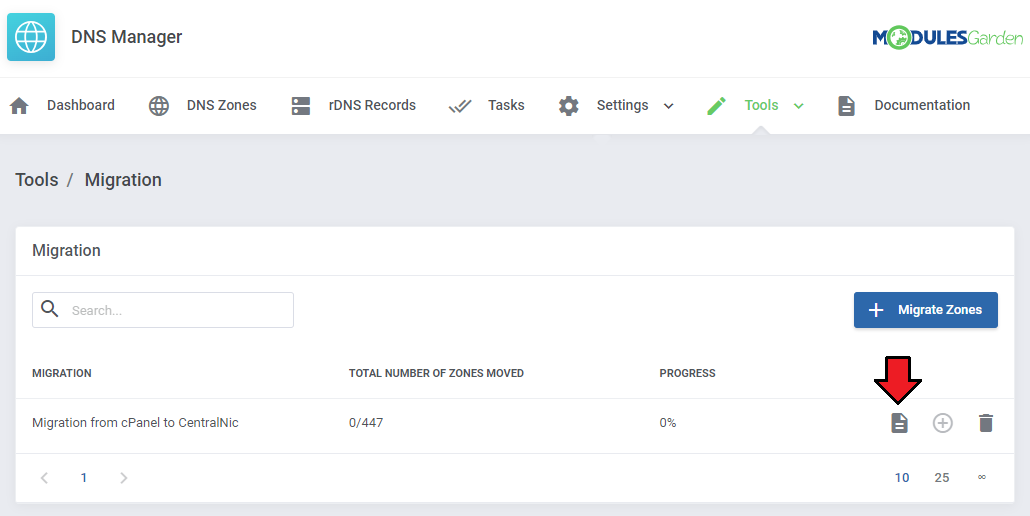
| Move to the list of zones to assign clients and products. Press button marked on the screen. |
|
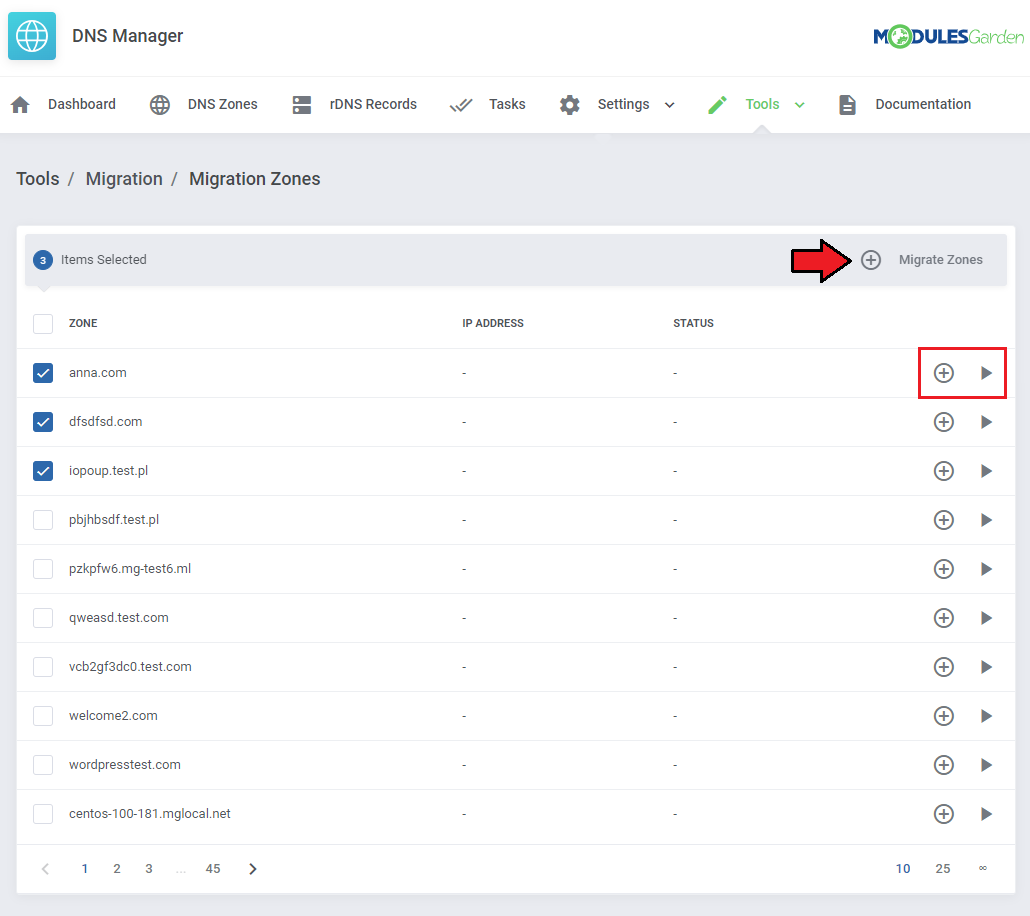
| Select zones and 'Migrate Zones' for mass migration or use action buttons next to single zones. |
|
Zone Backups
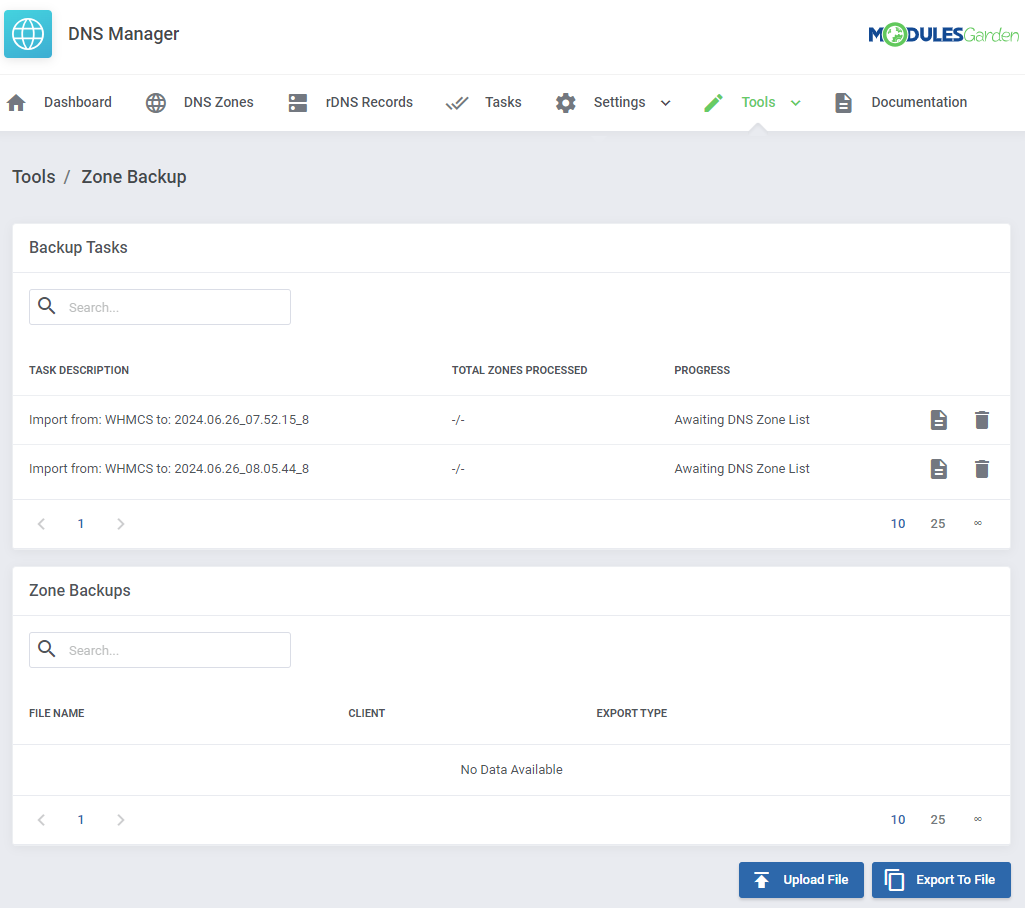
| 'Zone Backups' section allows you to export your zones to the file and, when needed, easily import them on the server. |
|
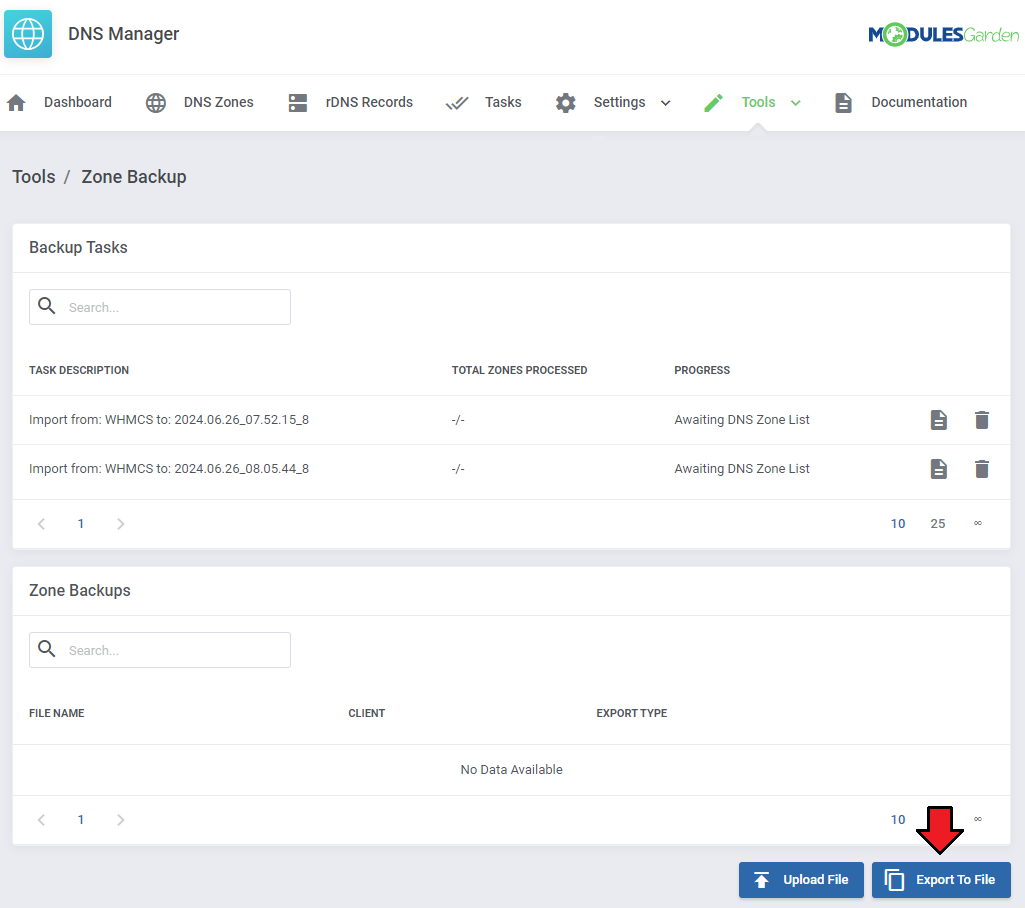
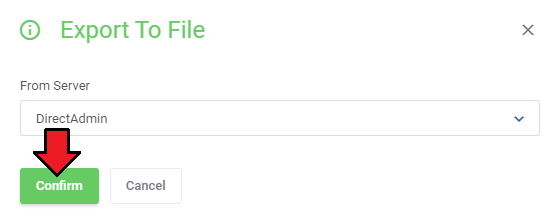
| To export zone automatically, press 'Export To File', define from which server you wish to export it and click on Add button. |
|
|
| Schedule the task. Remember to confirm the action. |
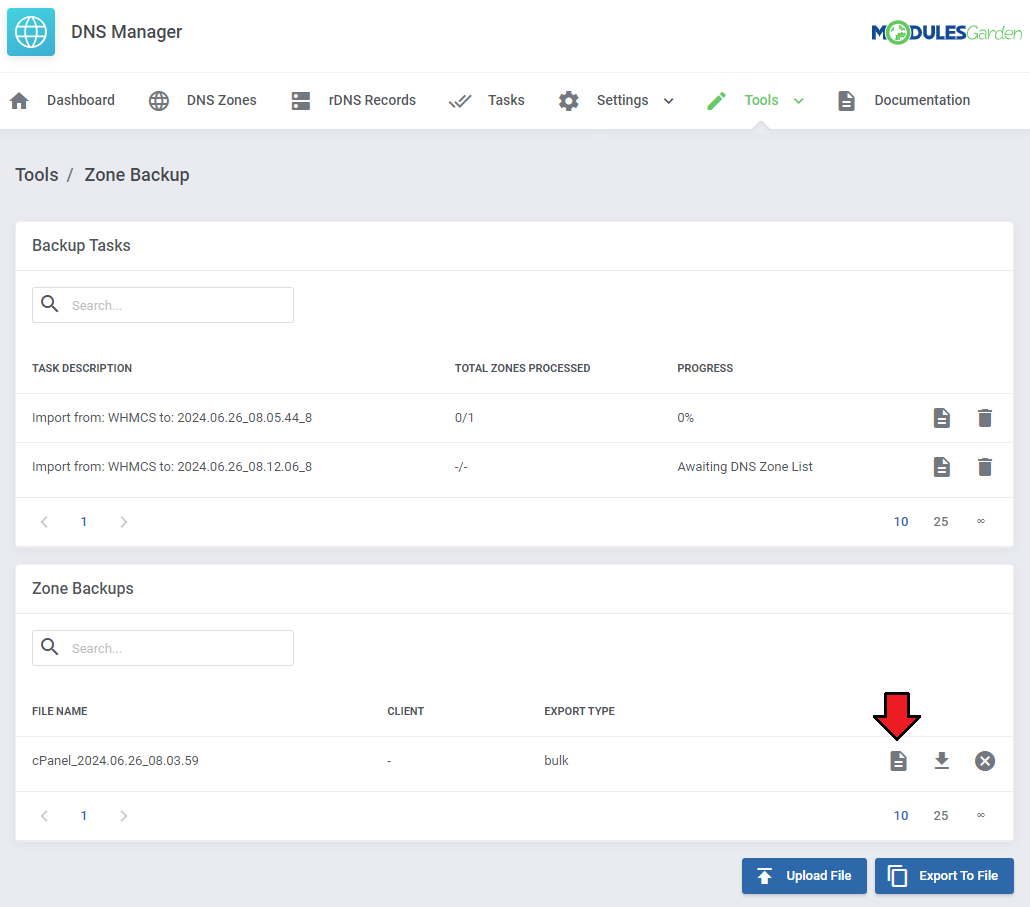
|
| You can now move to the list of zones to assign clients and products. Press button marked on the screen. |
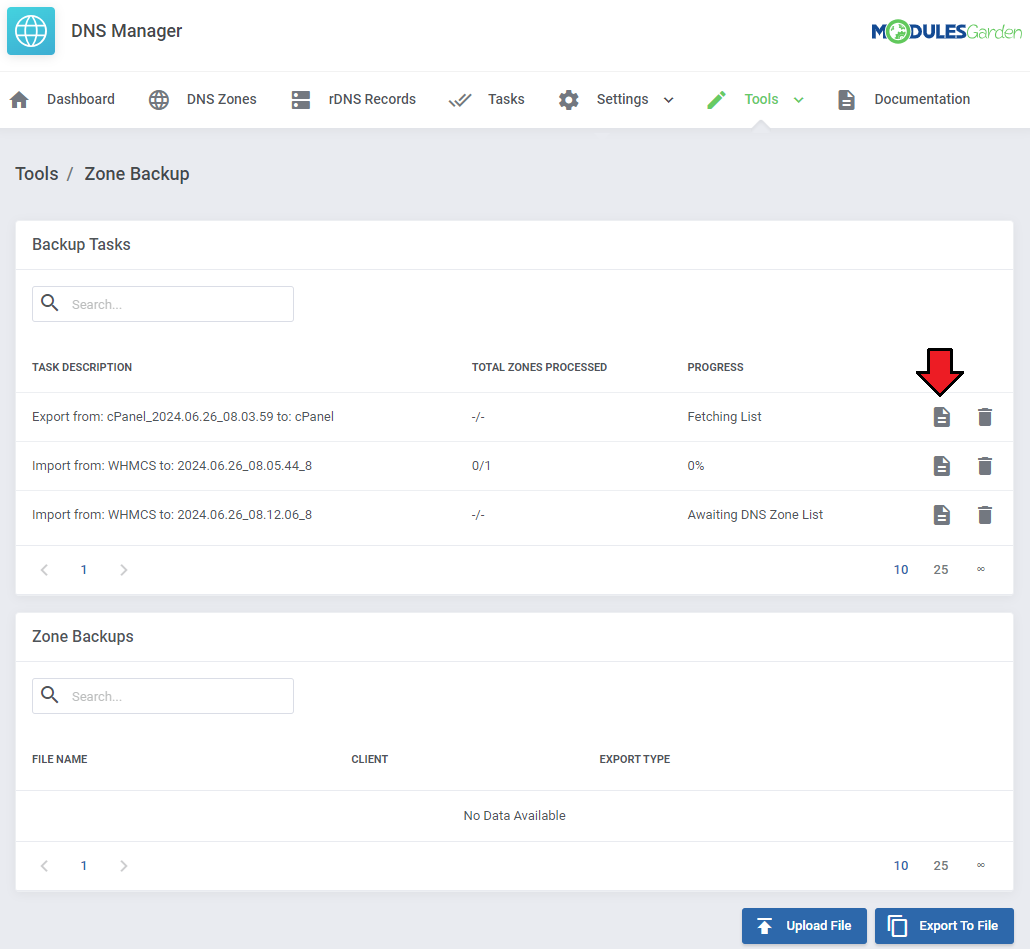
|
| Select zones using action buttons next to single zones and 'Import Zones' for mass import. |
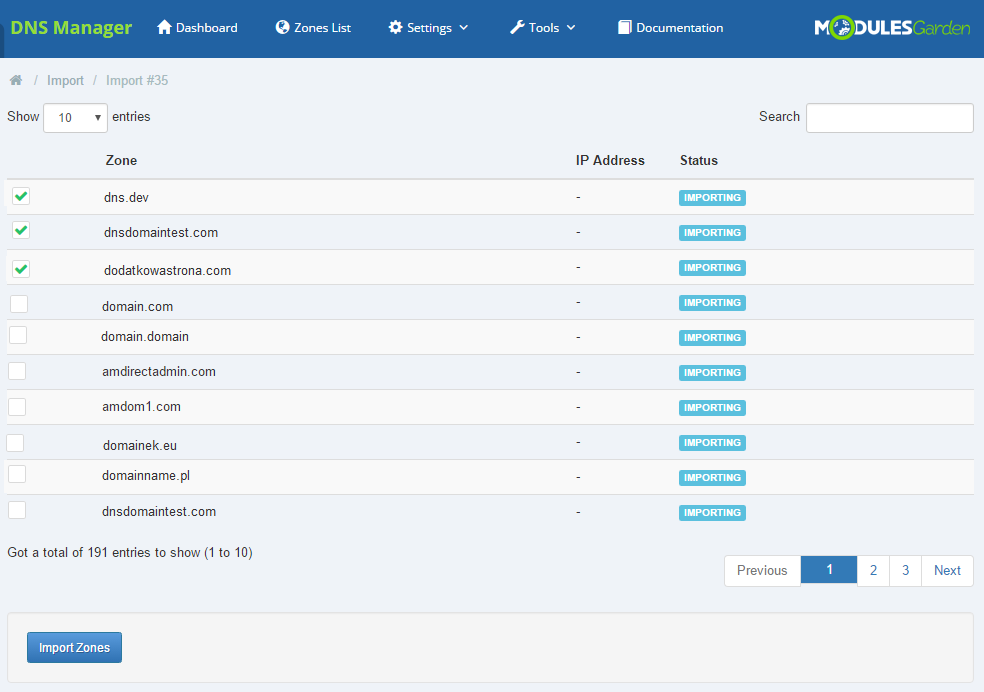
|
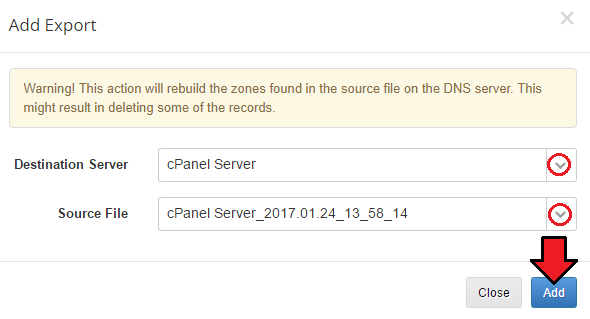
| You can also manually export zones. All you have to do is press Add Export button, then choose the appropriate server and source file. |
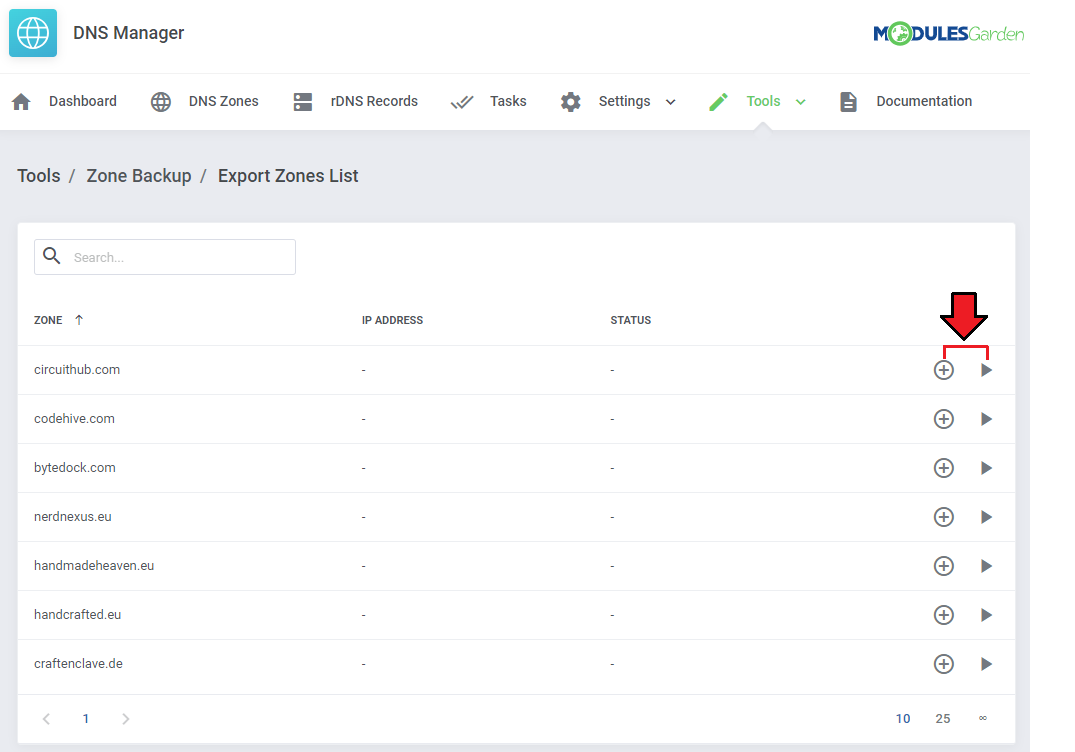
|
|
Tasks
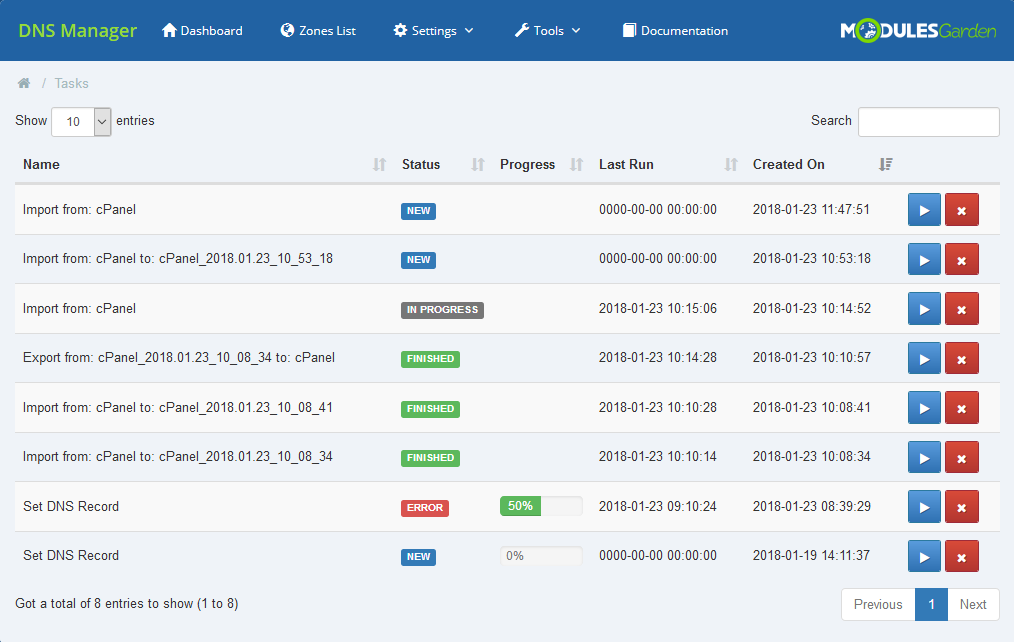
| You will find a list of current tasks in 'Tools' → 'Tasks' section. Among all tasks there are import tasks, migration and synchronization tasks. |
|
| According to specifically set-up cron jobs all created tasks are regularly executed. Here, you can see current status of each task. If it is queuing for the next cron run, is currently executed, aborted or complete. Check when they were executed for the last time (Last Execution) and when the task was added. Available actions: call execution manually and remove the task. |
Dashboard
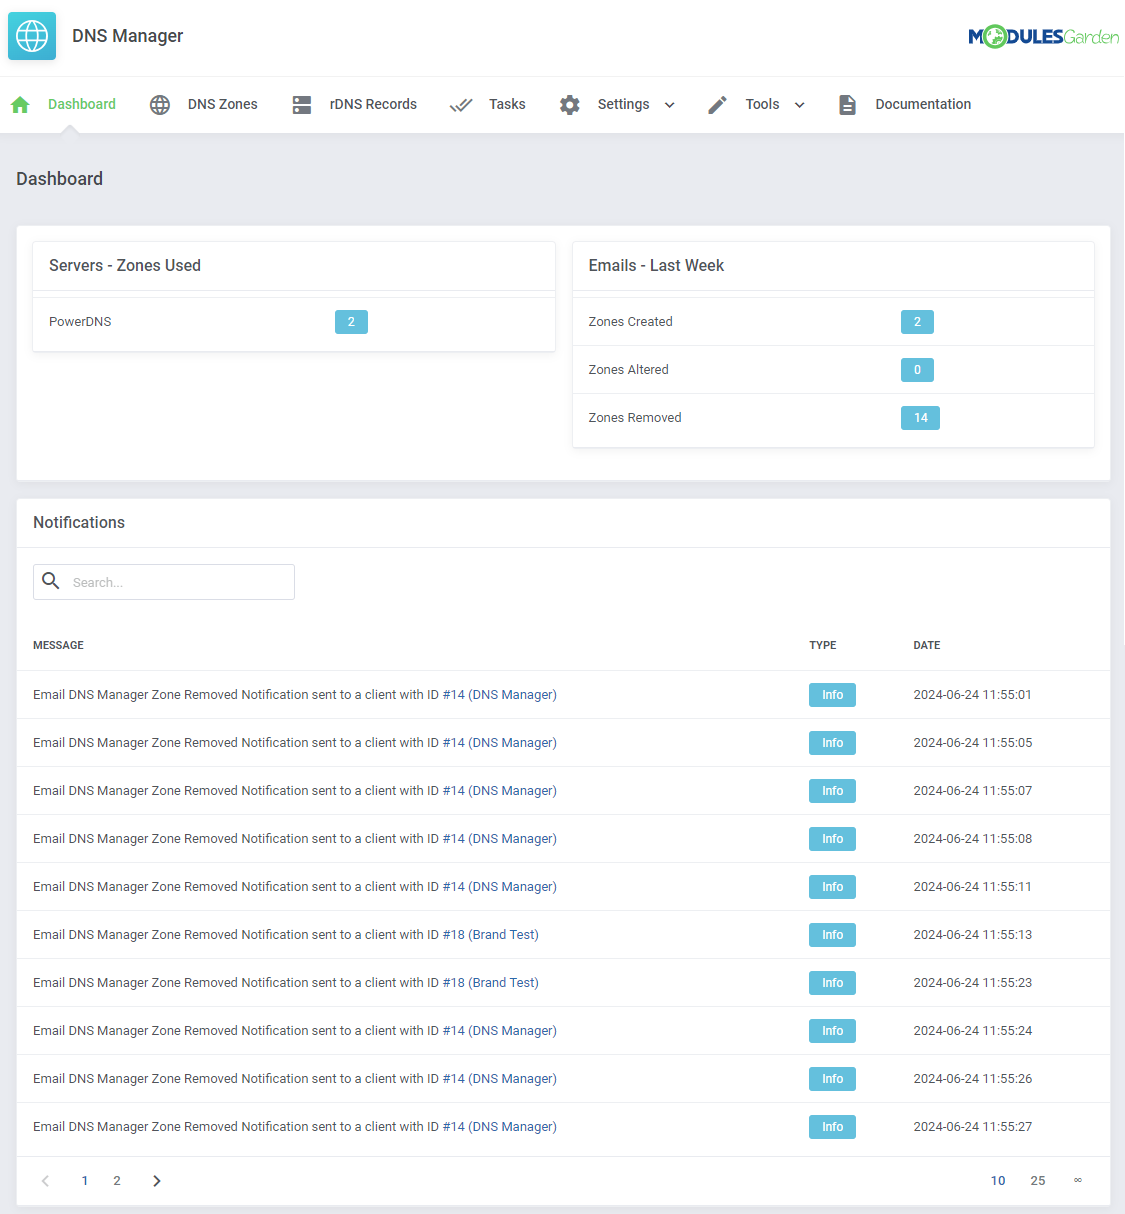
| Home page of DNS Manager which can be used to get a quick and clear preview on the crucial parts of the module: added servers with number of zones created on them, summary of email messages sent to clients and finally the most important notifications. |
|
Custom cPanel Zone Templates
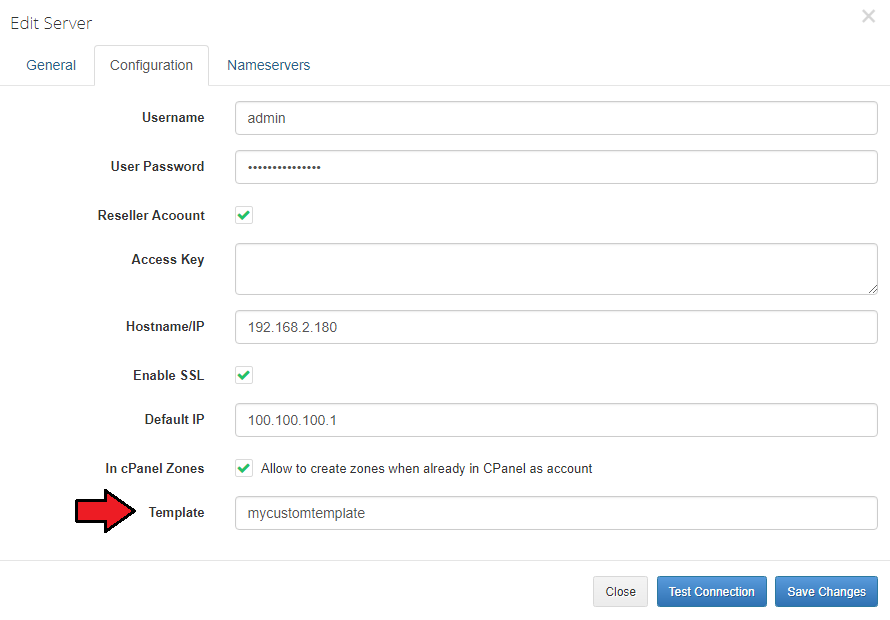
| You can allow your customers to create zones without cPanel Default Records. To do so you need to create your own Zone Template in the WHM. If you don't know how to create your own Zone Template you can follow this short guide made by cPanel: Edit Zone Templates Guide |
|
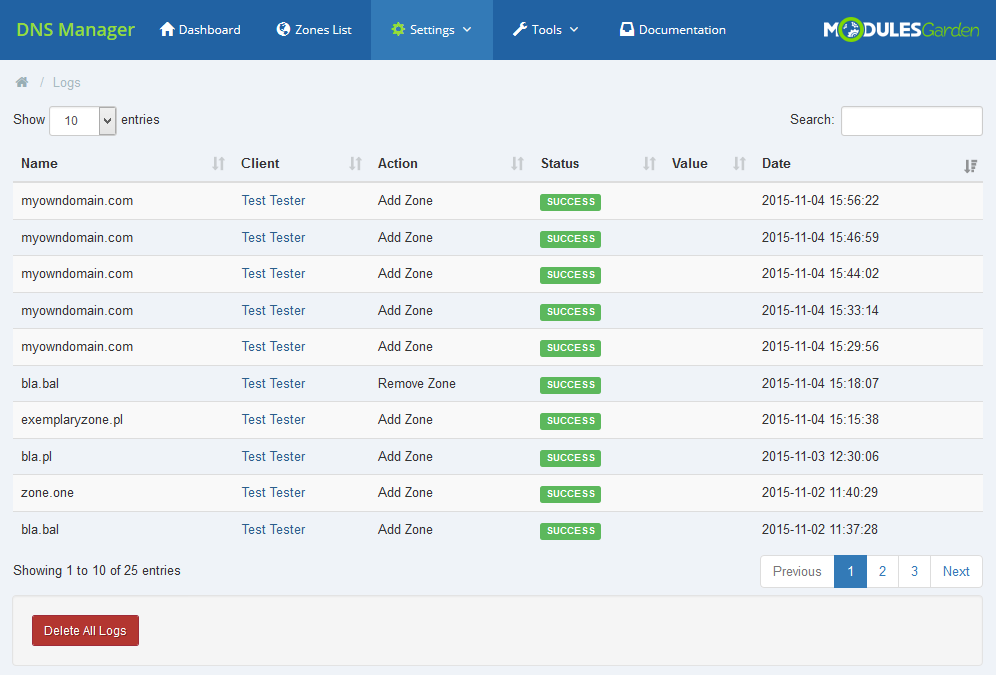
DNS Manager Logs
| Logs help you keep track of all the activities carried out in DNS Manager. Find them here: 'Settings' → 'Logs'. |
|
IP Manager For WHMCS Integration
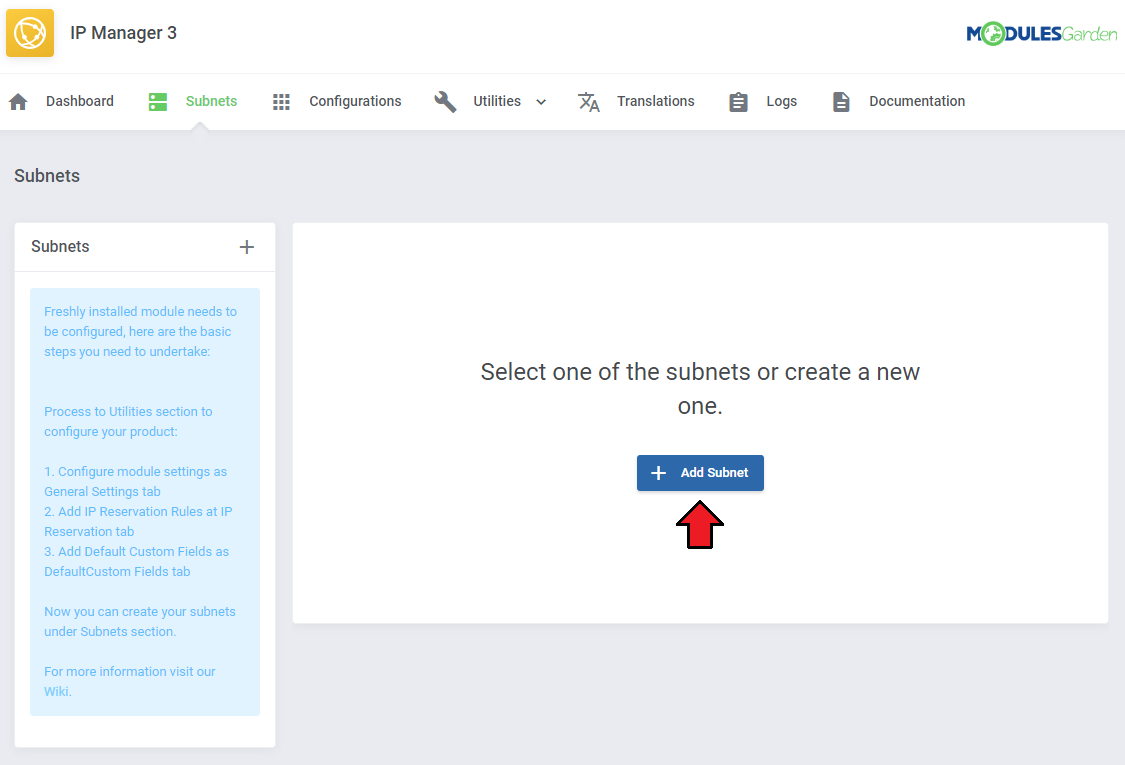
| As it has been mentioned above, some of the options in our DNS Manager For WHMCS are available if you are also using IP Manager For WHMCS simultaneously. In this section you will learn how to integrate the two products to work together. Let us take a look at the IP Manager module firstly. There you have to create a subnet. |
|
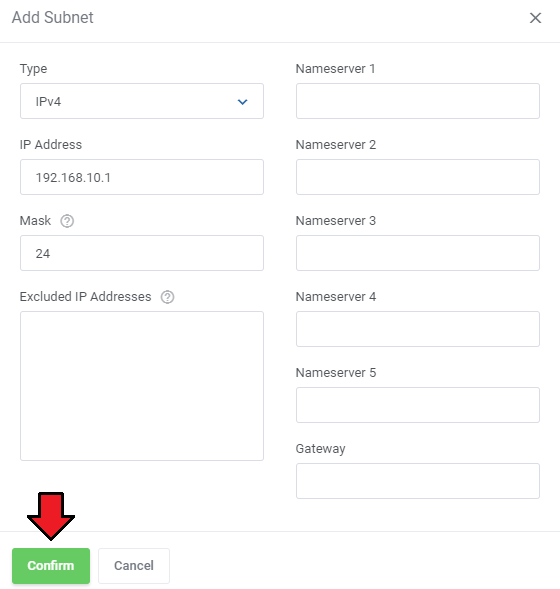
| You can do it ether for IPv4 or IPv6 type. DNS Manager For WHMCS supports both types. |
|
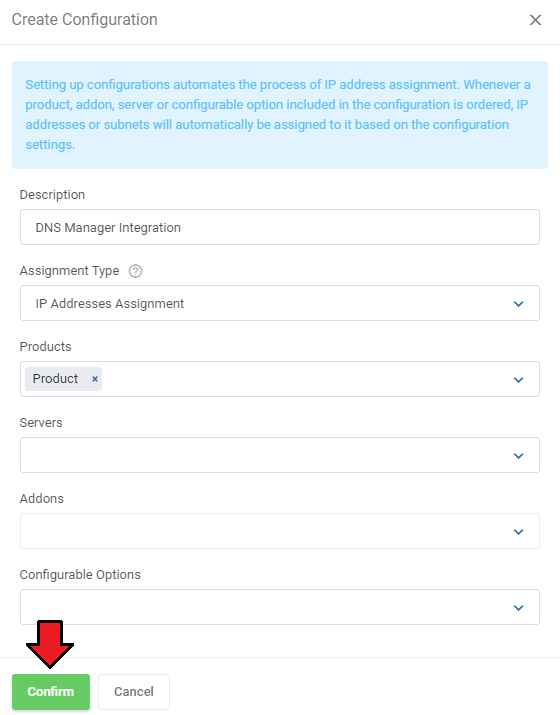
| When ready, create a proper configuration and assign required products to it. |
|
| Assign created subnet to this configuration. |
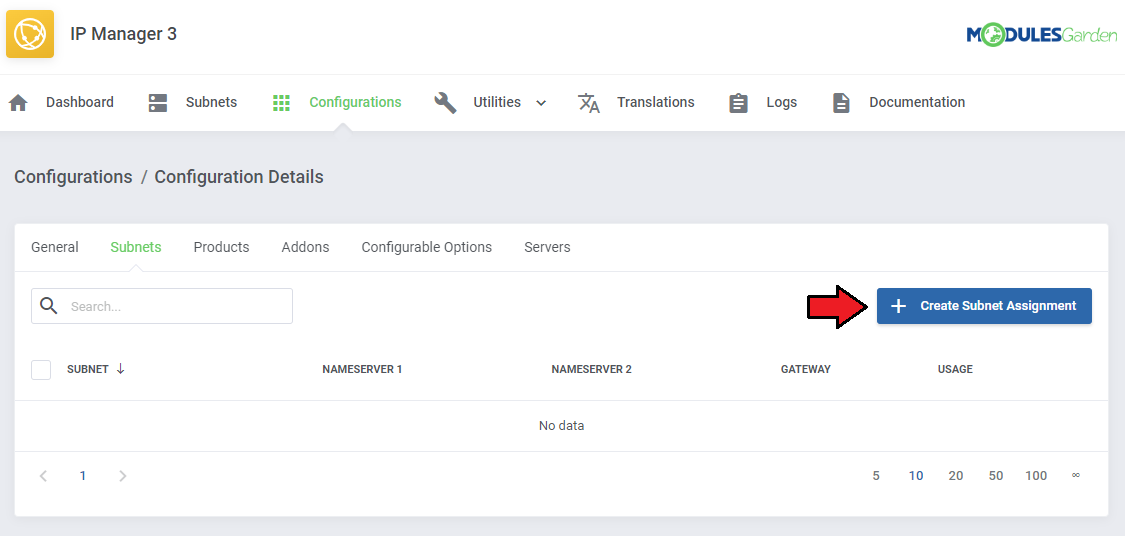
|
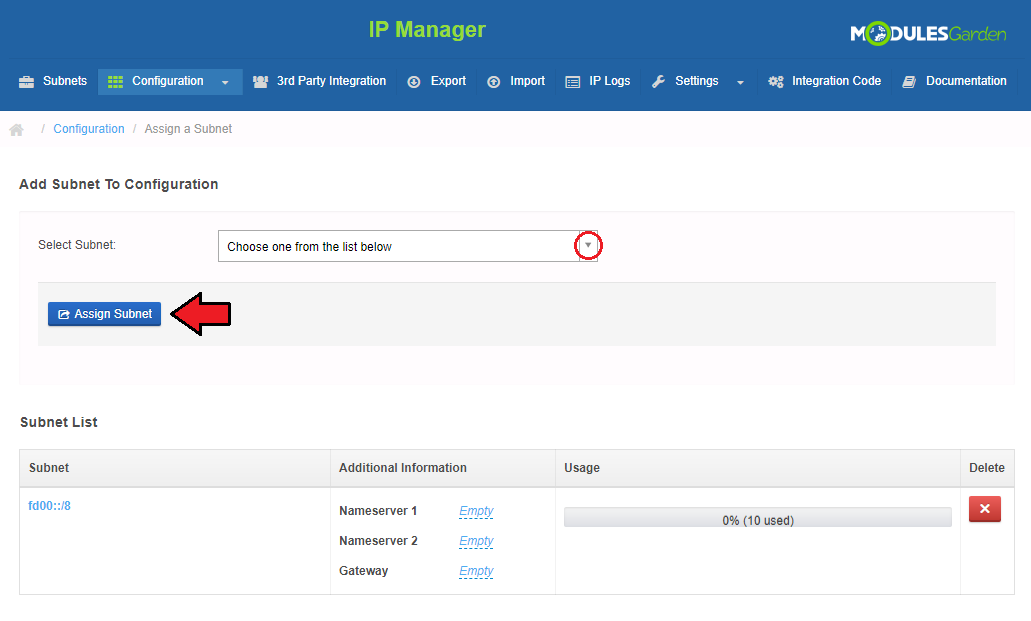
|
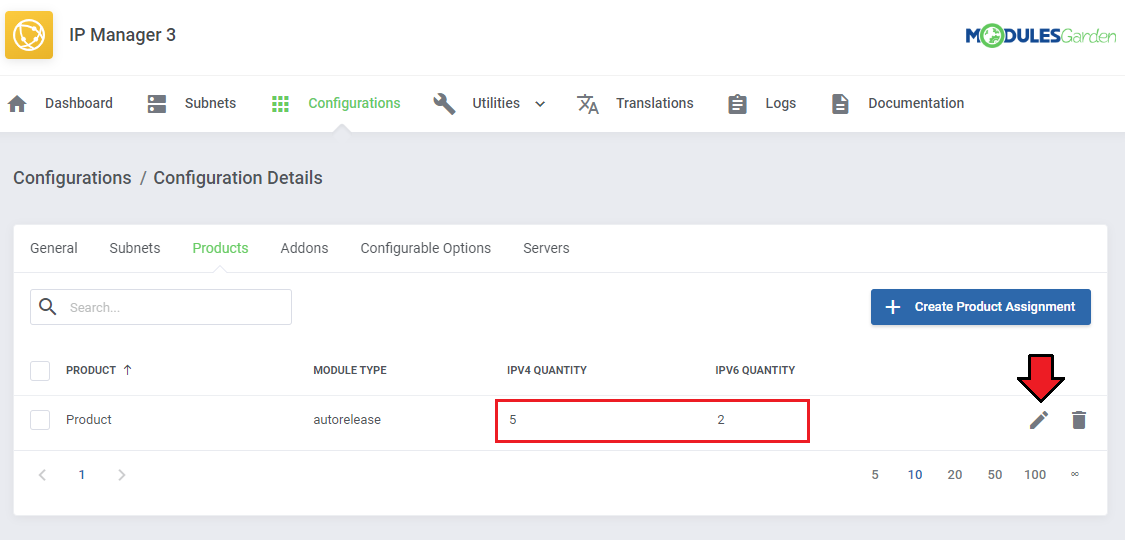
| Under 'Relations Configuration' → 'Products' define the number of IP addresses that will be allowed for a client. By default this is only one address. |
|
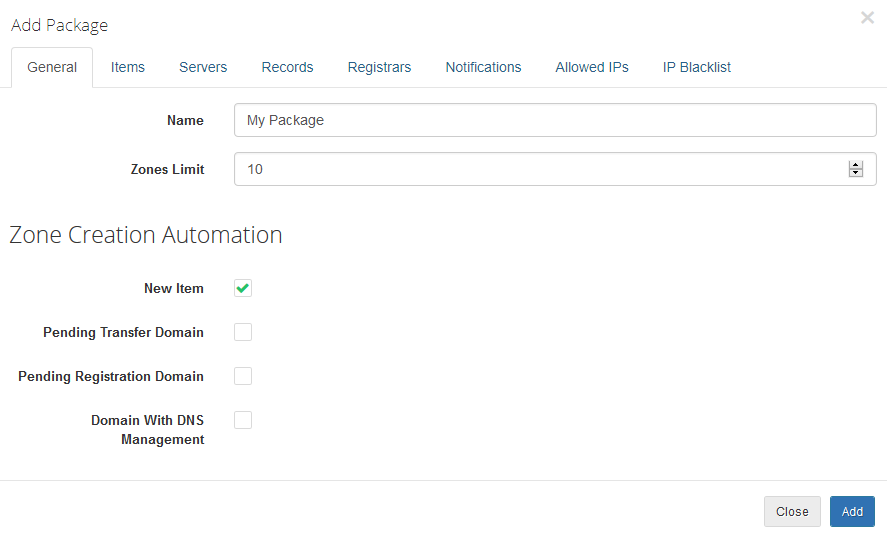
| Move to DNS Manager now and create an appropriate package where you declare limits for zones, select the product and allow records types and limits that will be provided within the purchased service. |
|
| Now, a client upon purchase of such service may now use assigned IP addresses from the subnet and manage the dns zones and rdns zones according to limits specified in the package. |
|
| Client may now add PTR records within the related service. |
|
| Create zones with IP addresses included in a subnet related to a service in IP Manager. |
|
| You only need to remember that relevant options must be enabled in 'General Settings' section. |
|
DNS Manager Migrator
| If you have been already using DNS Manager For WHMCS, you can migrate data from your current system to the latest version. To do so follow the below steps: 1. Activate DNS Manager For WHMCS V2.x.x. your_whmcs_path\modules\addons\DNSManager2\cron\migration.php 3. Follow the steps that you see on your screen now! |
| Once the migration of zones is ready you can migrate rDNS records. To do so: your_whmcs_path\modules\addons\DNSManager2\cron\ptr_migration.php 3. Follow the steps that you see on your screen now! |
API Methods
| You may access your DNS Manager For WHMCS API. Here is a short instruction how to do that: The main, required command that must be used is:
Additionally, you must define 'dnsaction' with some specific value.
Exemplary use: <?php // Set Vars $command = 'dnsmanager'; $values = array( 'dnsaction' => 'getServerList', 'params' => array() ); $adminuser = 'DemoAdmin'; // Call API $results = localAPI($command, $values, $adminuser); var_dump($results); ?> Since DNS Manager 2.7.0 version there are also a new methods available:
Exemplary use: $postfields = array( 'action' => 'dnsmanager', 'dnsaction' => 'createZone', 'type' => '1', 'relid' => '2', 'zone_ip' => '192.168.56.101', 'userid' => '1', );
Exemplary use:
$result = localAPI('dnsmanager' ,
    array(
      'dnsaction' => 'updateZone',
      'zone_id' => 2,
      'records' => array(
        array(
          'name' => 'example.website.com',
          'type' => 'A',
          'class' => 'IN',
          'ttl' => '14440',
          'data' => '192.168.56.101',
        ),
        array(
          'name' => 'example.website.com',
          'type' => 'A',
          'class' => 'IN',
          'ttl' => '14440',
          'data' => '192.168.56.102',
        ),
      )
      ),'admin');
|
Tips
| 1. Keep track of your 'pending' and in 'progress' 'Tasks' to set an optimum interval time for the tasks execution. For example, set interval in the way that half of the time task is set to pending status. |
| 2. 255 characters in TXT records is a maximum limit for 'PowerDNS' submodule. |
| 3. When you try to add a record of not supported type to a package, you will be informed about the lack of support with a note as on the screen below. |
|
| 4. As this module supports templates system, any changes made in the module's templates files will be saved after the upgrade process. |
Common Problems
| 1. When you have problems with connection, check whether your SELinux or firewall does not block ports. |
| 2. jQuery 1.9 is required to work properly. |
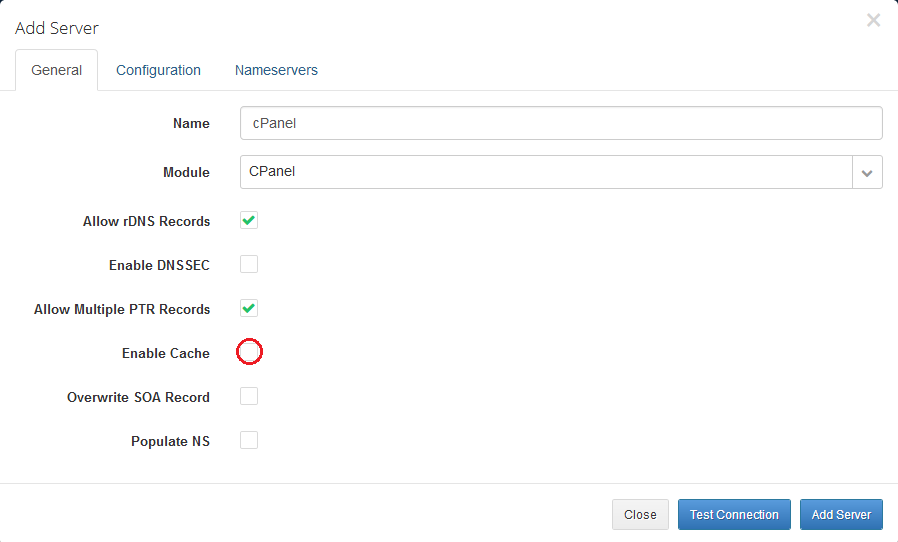
3. In case you cannot see any zone records in your client area after import or migration actions, then disable cache for the DNS server.
|
|