Zendesk For WHMCS
From ModulesGarden Wiki
(Difference between revisions)
|
|
| Line 108: |
Line 108: |
| | |} | | |} |
| | {| | | {| |
| − | |style="padding: 0px 0px 15px 15px;"|'''2. Upload and extract the module into the main WHMCS directory.'''<br /> | + | |style="padding: 0px 0px 15px 15px;"|'''2. In the downloaded file you will find two packages that support different PHP versions.'''<br/>As presented on the screen below, the first one is dedicated to PHP 7, while the second one is aimed at PHP 5.3.7 up to PHP 5.6.<br/>It does not apply to open source versions.<br/> |
| − | Files in your WHMCS directory should look like on the following screen.
| + | '' '''Note''': You can check current PHP version in your WHMCS. To do so proceed to ''' 'Utilities' → 'System' → 'PHP Info'.''' |
| | |} | | |} |
| | {| | | {| |
| Line 115: |
Line 115: |
| | |} | | |} |
| | {| | | {| |
| − | |style="padding: 0px 0px 15px 15px;"|'''3. When you install Zendesk For WHMCS for the first time you have to rename '' 'license_RENAME.php' '' file.'''<br /> | + | |style="padding: 0px 0px 15px 15px;"|'''3. Extract the downloaded file and choose the one with the right PHP version. Upload and extract the PHP file into the main WHMCS directory.'''<br /> |
| | + | The content of PHP version files should look like this. |
| | + | |} |
| | + | {| |
| | + | |style="padding: 0px 0px 20px 25px;"|[[File:Z2_2_1.png]] |
| | + | |} |
| | + | {| |
| | + | |style="padding: 0px 0px 15px 15px;"|'''4. When you install Zendesk For WHMCS for the first time you have to rename '' 'license_RENAME.php' '' file.'''<br /> |
| | File is located in '' 'modules/addons/Zendesk/license_RENAME.php'.'' Rename it from '' 'license_RENAME.php' '' to '' 'license.php'. '' | | File is located in '' 'modules/addons/Zendesk/license_RENAME.php'.'' Rename it from '' 'license_RENAME.php' '' to '' 'license.php'. '' |
| | |} | | |} |
| Line 122: |
Line 129: |
| | |} | | |} |
| | {| | | {| |
| − | |style="padding: 0px 0px 15px 15px;"|'''4. In order to configure your license key, you have to edit the previously renamed '' 'license.php' file. '' '''<br /> | + | |style="padding: 0px 0px 15px 15px;"|'''5. In order to configure your license key, you have to edit the previously renamed '' 'license.php' file. '' '''<br /> |
| | Enter your license key between quotation marks as presented on the following screen. You can find your license key in your client area → '' 'My Products'. '' | | Enter your license key between quotation marks as presented on the following screen. You can find your license key in your client area → '' 'My Products'. '' |
| | |} | | |} |
Revision as of 10:57, 14 March 2017
Zendesk For WHMCS allows your customers to use a complex support system solution in your own WHMCS.
With our module your clients will be able to manage Zendesk tickets as if they were a part of your system.
This product replaces a standard WHMCS client area support system with Zendesk, allowing you to easily manage all the tickets.
|
| ✔ View Zendesk Departments
|
| ✔ Manage Existing Tickets
|
| ✔ Fill Out Zendesk Ticket Fields
|
| ✔ Configure And Test Server Connection
|
| ✔ Toggle SSL Verification
|
| ✔ Define Available Support Departments
|
| ✔ Manually Export To Zendesk:
|
| ✔ Define Ticket Status Colors
|
| ✔ Single Sign On (SSO) Integration
|
| ✔ Automatically Export To Zendesk:
|
| ✔ Clients On Tickets Creation
|
| ✔ Synchronize Ticket Responses Between WHMCS And Zendesk
|
| ✔ Transfer Ticket Fields Settings
|
| ✔ Transfer Attachments Settings
|
| ✔ Convert Markdowns To HTML
|
| ✔ Custom Templates Support
|
| ✔ Supports PHP 5.6 Up To PHP 7
|
| ✔ Supports WHMCS Templates Five and Six
|
| ✔ Supports WHMCS V6 and V7
|
Installation and Configuration
This tutorial will show you how to successfully install and configure Zendesk For WHMCS.
We will guide you step by step through the whole installation and configuration process.
|
Installation
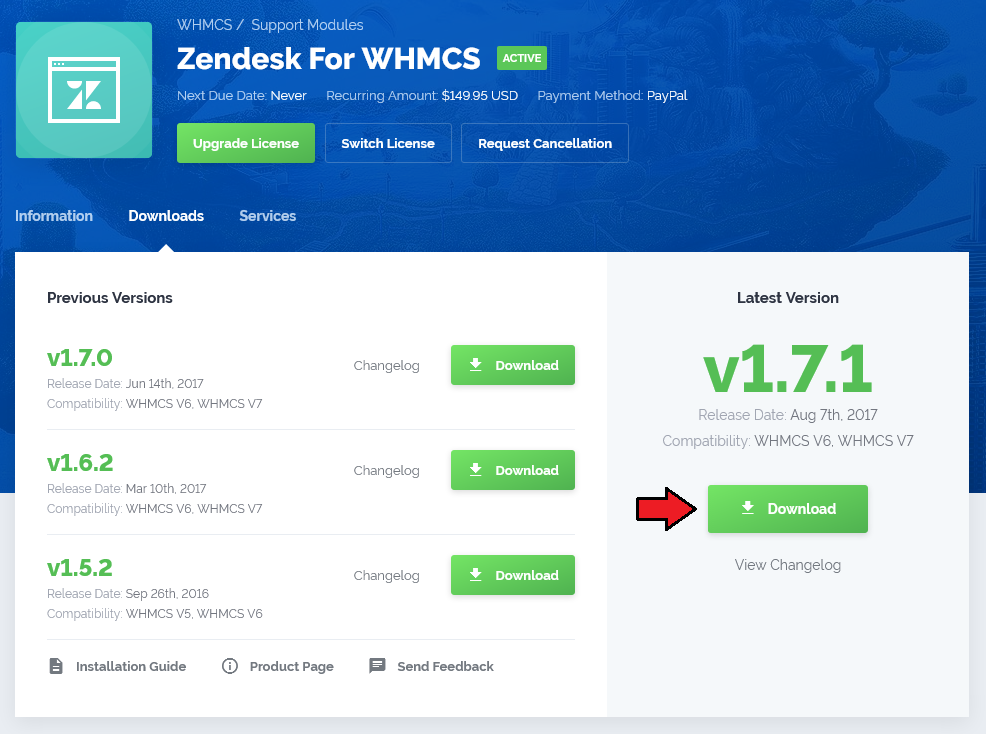
| 1. Log in to your client area and download Zendesk For WHMCS.
|
2. In the downloaded file you will find two packages that support different PHP versions.
As presented on the screen below, the first one is dedicated to PHP 7, while the second one is aimed at PHP 5.3.7 up to PHP 5.6.
It does not apply to open source versions.
Note: You can check current PHP version in your WHMCS. To do so proceed to 'Utilities' → 'System' → 'PHP Info'.
|
3. Extract the downloaded file and choose the one with the right PHP version. Upload and extract the PHP file into the main WHMCS directory.
The content of PHP version files should look like this.
|
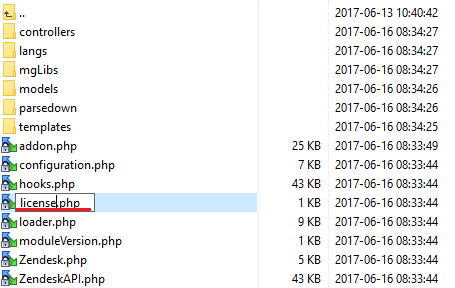
4. When you install Zendesk For WHMCS for the first time you have to rename 'license_RENAME.php' file.
File is located in 'modules/addons/Zendesk/license_RENAME.php'. Rename it from 'license_RENAME.php' to 'license.php'.
|
5. In order to configure your license key, you have to edit the previously renamed 'license.php' file.
Enter your license key between quotation marks as presented on the following screen. You can find your license key in your client area → 'My Products'.
|
Activation
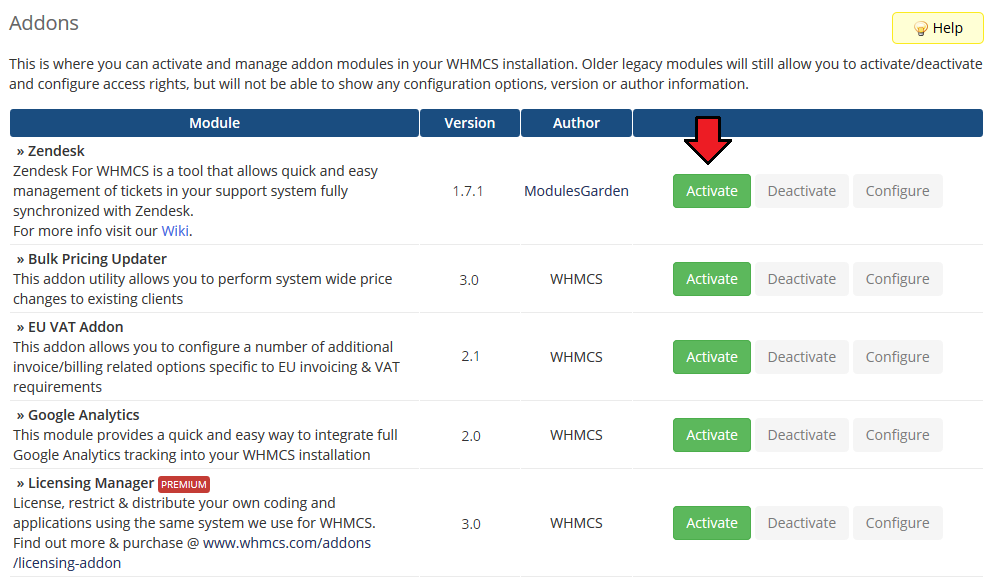
5. Now, you have to activate the module in your WHMCS system.
Log in to your WHMCS admin area and proceed to 'Setup' → 'Addon Modules'.
Afterwards, find 'Zendesk' and press 'Activate' button.
|
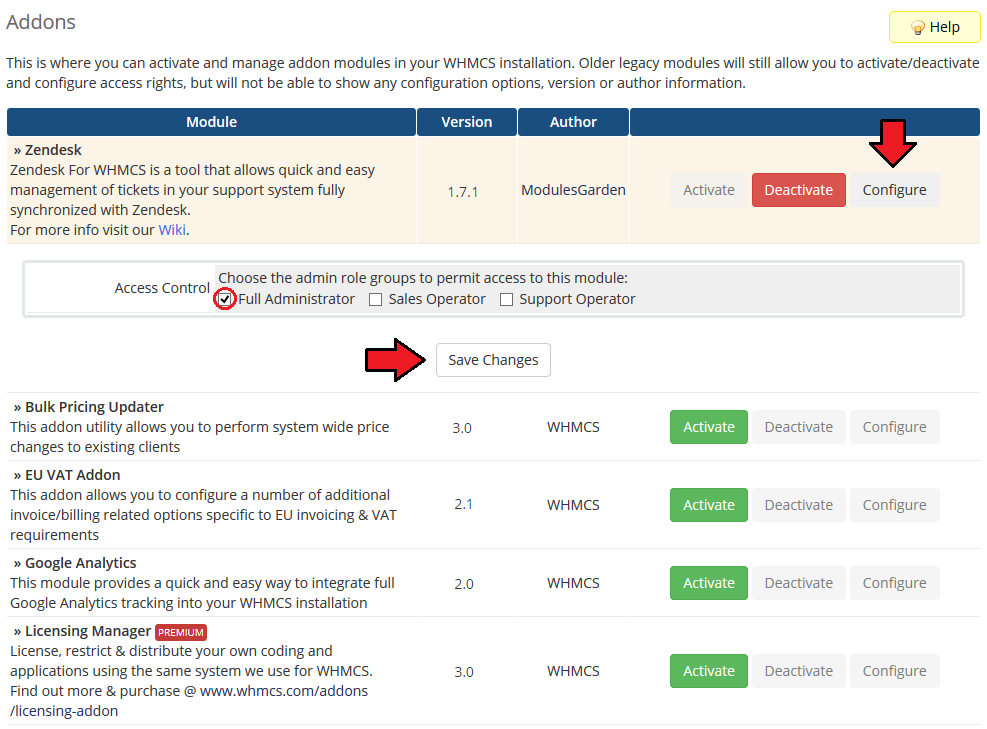
6. In the next step you need to permit access to this module.
To do so, click on 'Configure' button, tick checkboxes to assign desired admin roles.
|
| 7. You have just successfully installed Zendesk For WHMCS!
|
Configuration
Now you have to configure your newly installed module.
Before we proceed to the configuration itself, you have to generate your API details to connect with your Zendesk account.
|
API Connection
Firstly, log in to your Zendesk admin area in order to enable API access.
|
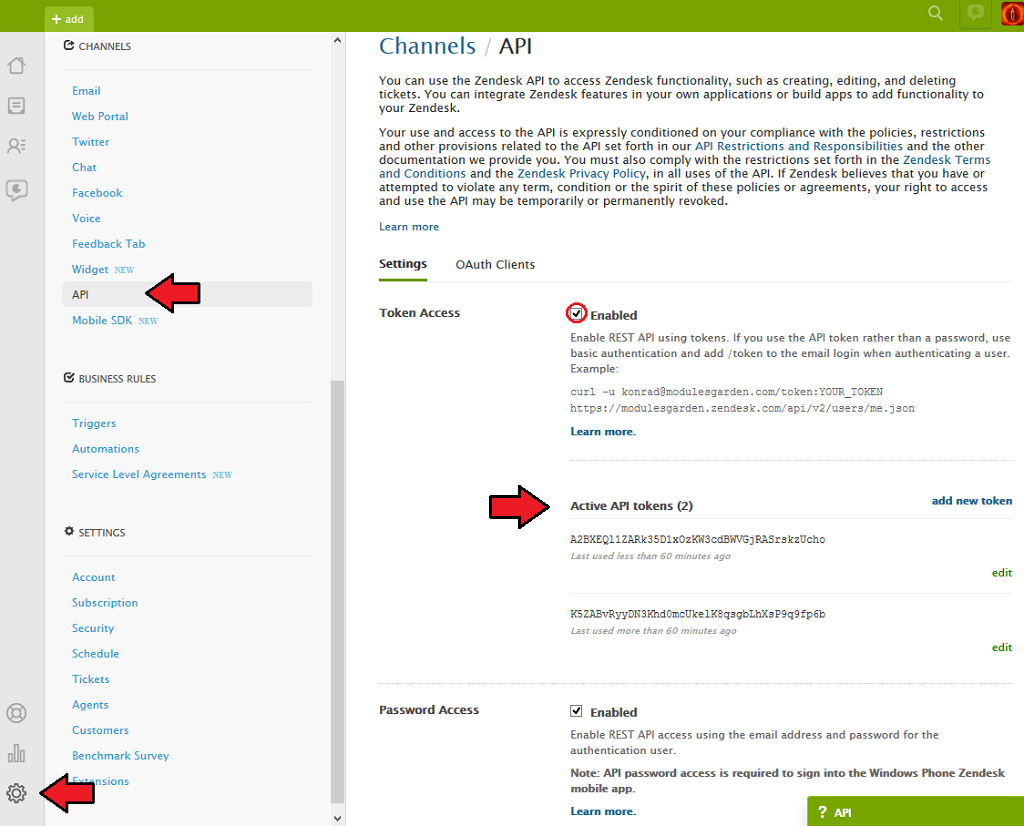
Go to 'Admin' → 'Channels:' 'API'. There, in 'Settings' section find 'Token Access' and enable it.
Add new token or use existing one. Copy an active API token.
IMPORTANT: Copy and keep your API token in a safe place. You will need it in a moment to complete the configuration of the module.
|
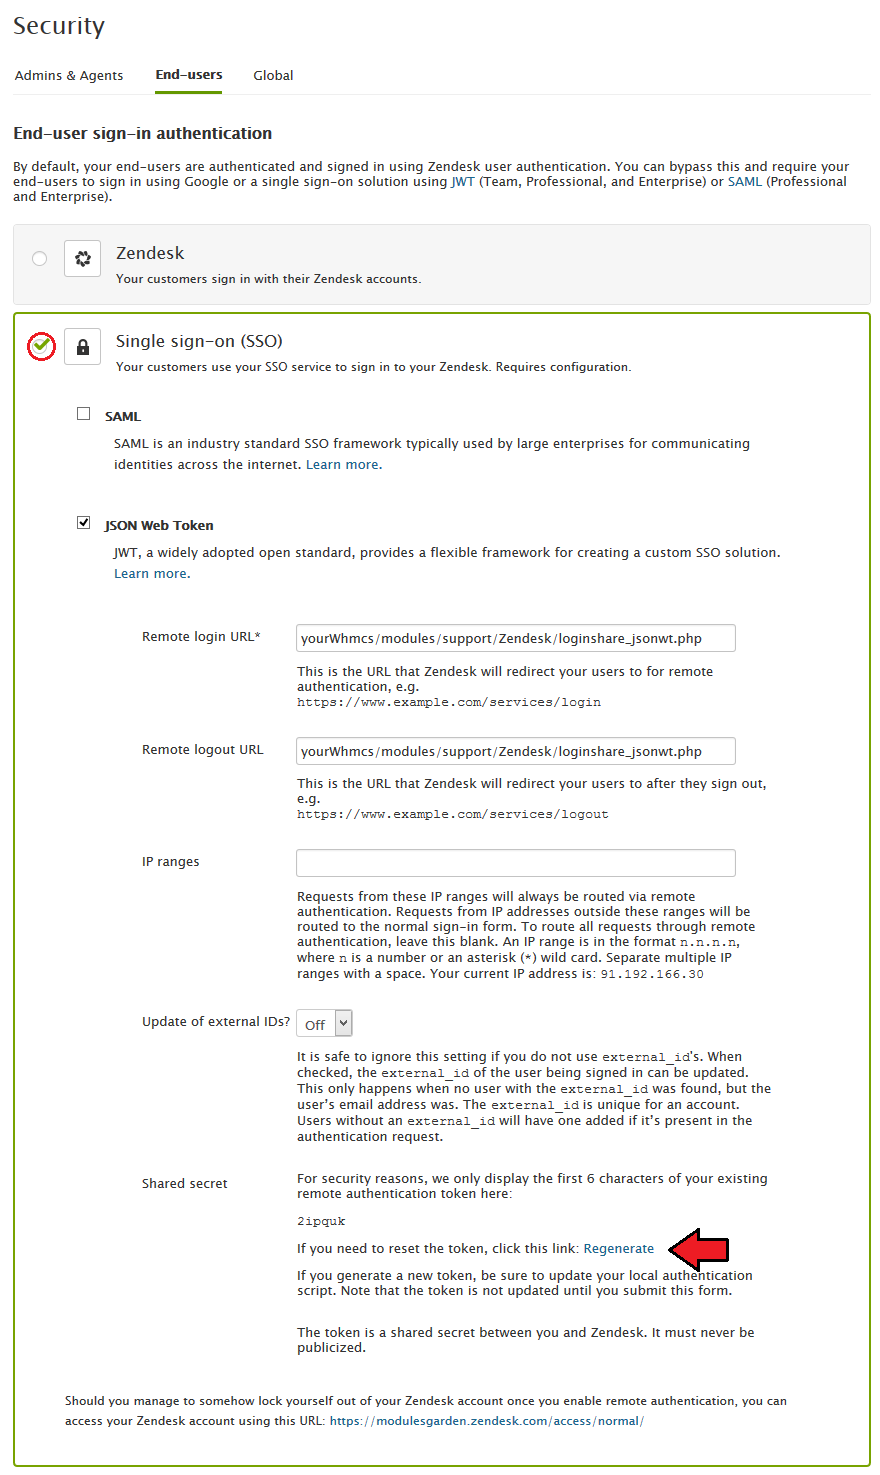
Now go to 'Settings' → 'Security' section and enable 'Single-Sign On'.
Here you can also check your remote login URL and remote logout URL.
Don't forget to press 'Save tab', you will find at the bottom of the page.
Scroll down to the bottom of page and find 'Shared Secret' section. Press 'Regenerate' to get a new shared secret token or use an existing one.
|
Copy and keep your 'shared secret' in a safe place. We will need it in the next step.
Note that Shared secret is not required for Zendesk module to work itself. It is needed for SSO only.
|
Server Configuration
Now, that you have safely stored API and Shared Secret tokens, you may move to the second part of configuration.
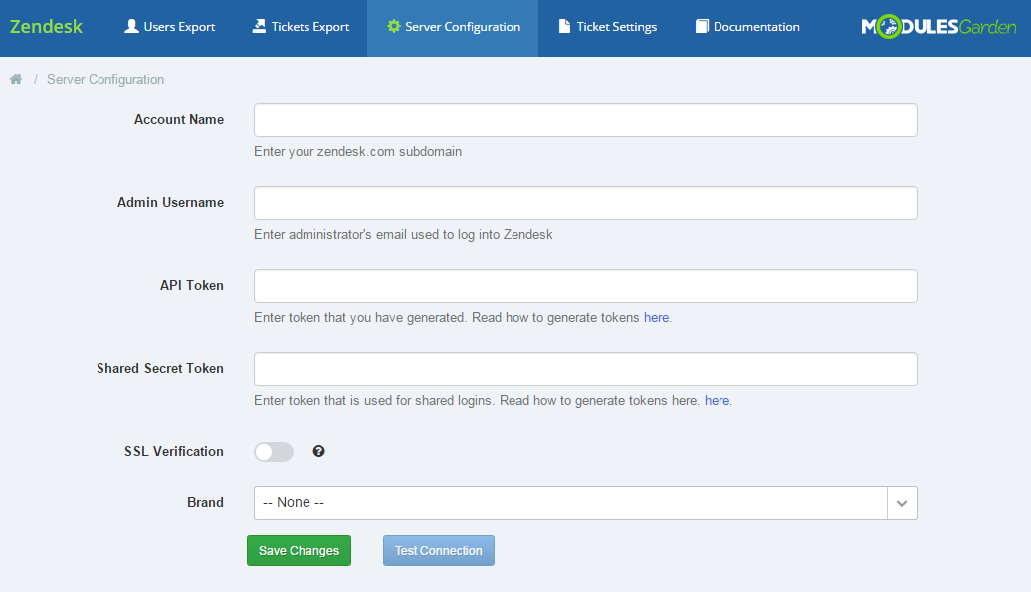
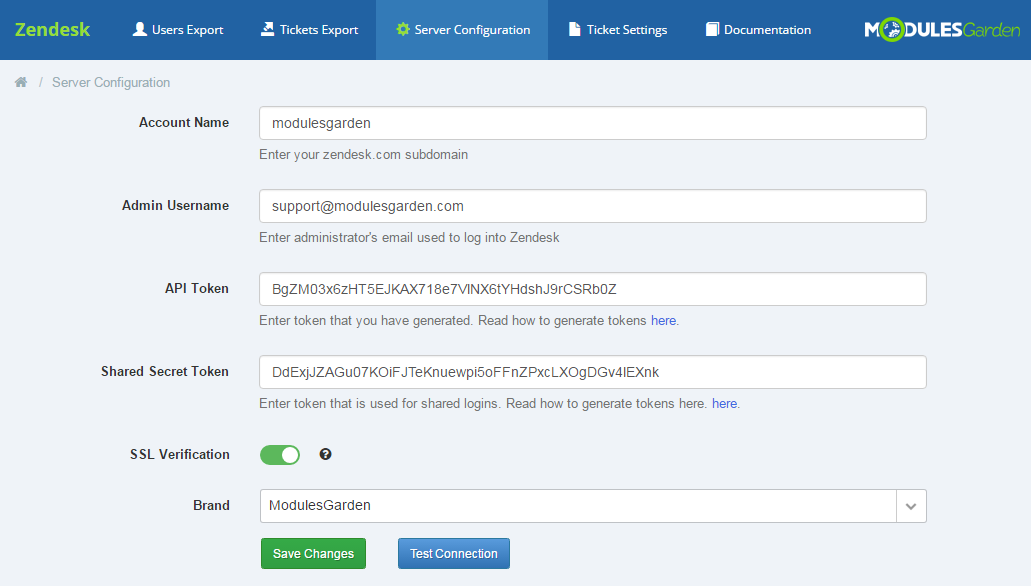
Proceed to 'Addons' → 'Zendesk' → 'Server Configuration', here you have to enter any data required to connect your WHMCS with Zendesk server.
Note! If you have used previous versions of our product, you have to copy the tokens from your 'configuration.php' file into the addon to do the update.
|
Enter your Zendesk details:
- Account Name - this is your subdomain e.g. in https://modulesgarden.zendesk.com account name will be modulesgarden
- Admin Username - administrator's email used to log into your Zendesk account
- API Token - API key generated in the previous steps
- Shared Secret Token - Shared Secret key generated in the previous steps
- Disable SSL Connection - check this box if you want to turn off SSL certificate verification.
Finally, test connection, if it is successful save the changes.
|
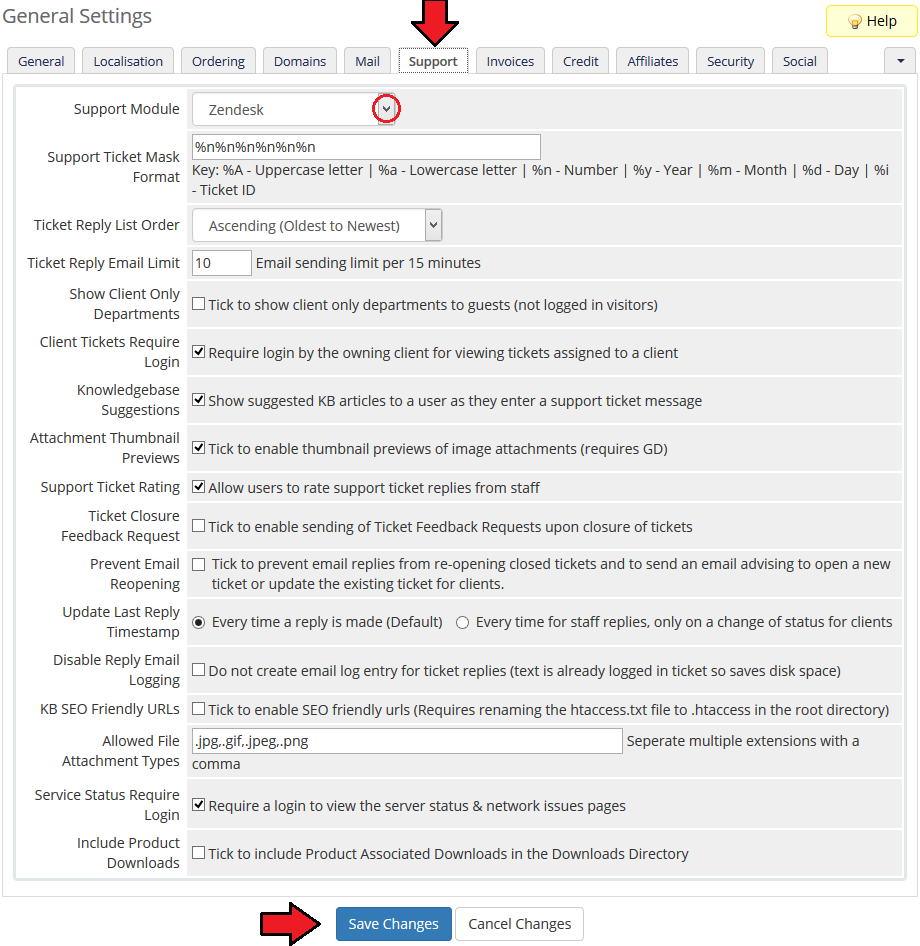
Finally, move to 'Setup' → 'General Settings' → 'Support'.
There choose 'Zendesk' support module form dropdown menu. Save changes.
From now on, your clients will see Zendesk tickets and departments (not WHMCS).
|
| Good job! Now your WHMCS is connected with Zendesk support system.
|
Management
Once Zendesk For WHMCS is installed and connection configured, you can create/update your ticket departments and begin using it.
Each ticket department you create in the Zendesk will be available for your customers in WHMCS client area.
|
Settings
WHMCS
Before you start your actual work on support tickets with Zendesk For WHMCS, move again to 'Addons' → 'Zendesk' → 'Ticket Settings'.
This section of the addon allows easy and comfortable management of the way tickets are displayed in your client area, their visibility, sorting etc.
|
|
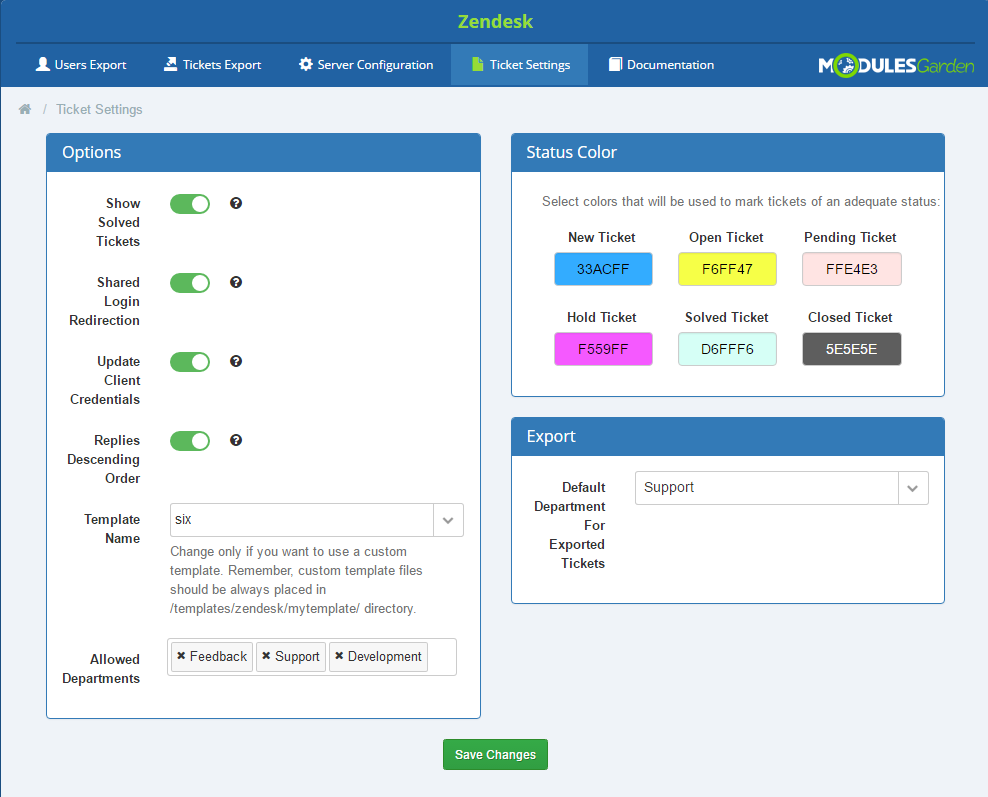
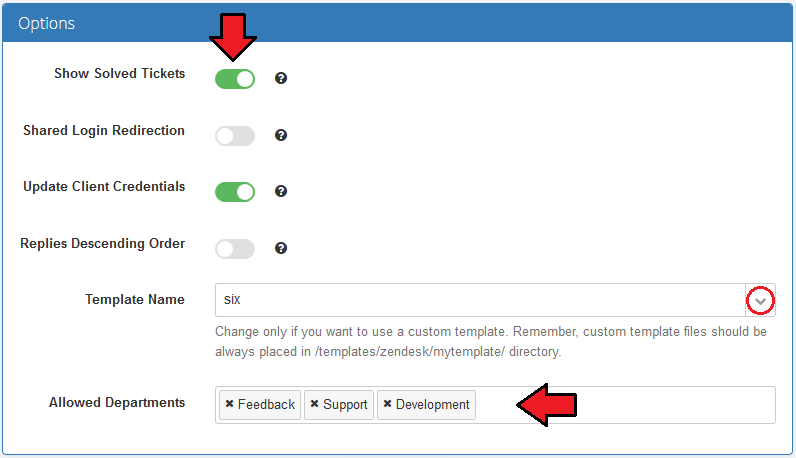
In the first box 'Options', you may enable some basic settings that will be applied to tickets view in the client area.
Let's now discuss their functionality in details:
- Show Solved Tickets - if you enable this option, all tickets no matter what status they have will be displayed on the list of the latest tickets (e.g. open/new/solved/closed tickets etc.);
- Shared Login Redirection - if enabled, user is redirected to Zendesk panel after successful shared login
- Update Client Credentials - if client's email is updated in WHMCS, it's updated in Zendesk accordingly (name is also updated but only if email is changed)
- Replies Descending Order - enable this option and ticket replies will be sorted by date in descending order when viewing a ticket
- Template Name - if you decide to change your current template in your WHMCS, then change it here as well. Your custom templates are also available.
- Allowed Departments - select which of your departments from Zendesk shall be available in WHMCS ticket system
|
|
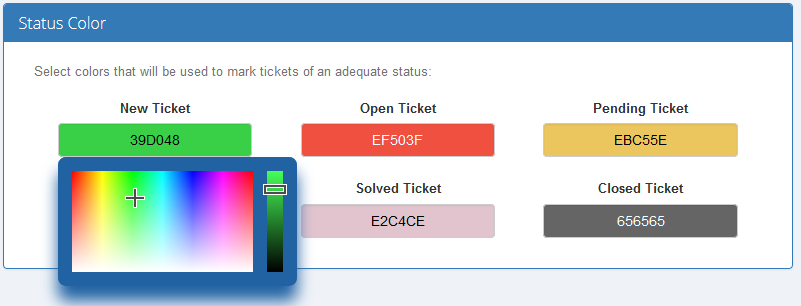
Next to the 'Options' box you will find a box where you can assign some colors to a specific ticket status.
Click on the field to choose a color from the palette of colors or type in the number of the color you like.
Tickets of each status will be marked with selected colors on homage.
Remember to save the changes if you make any changes in ticket settings.
|
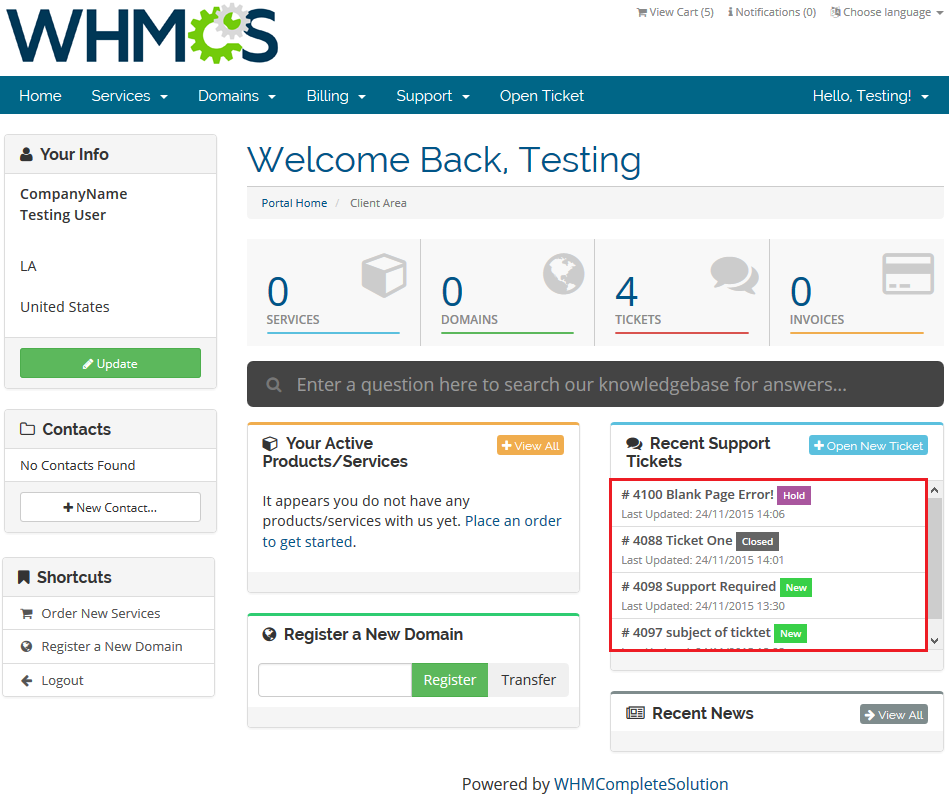
| Tickets of each status are now marked with selected colors on homepage.
|
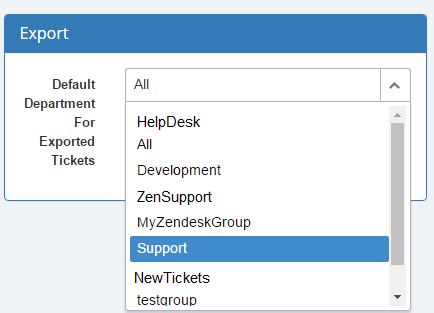
Below the 'Status Color' you will find a box where you can define what the default department for exported tickets will be.
You can choose from your existing Zendesk departments.
Remember to click 'Save Changes' button before you move to another section.
|
Zendesk
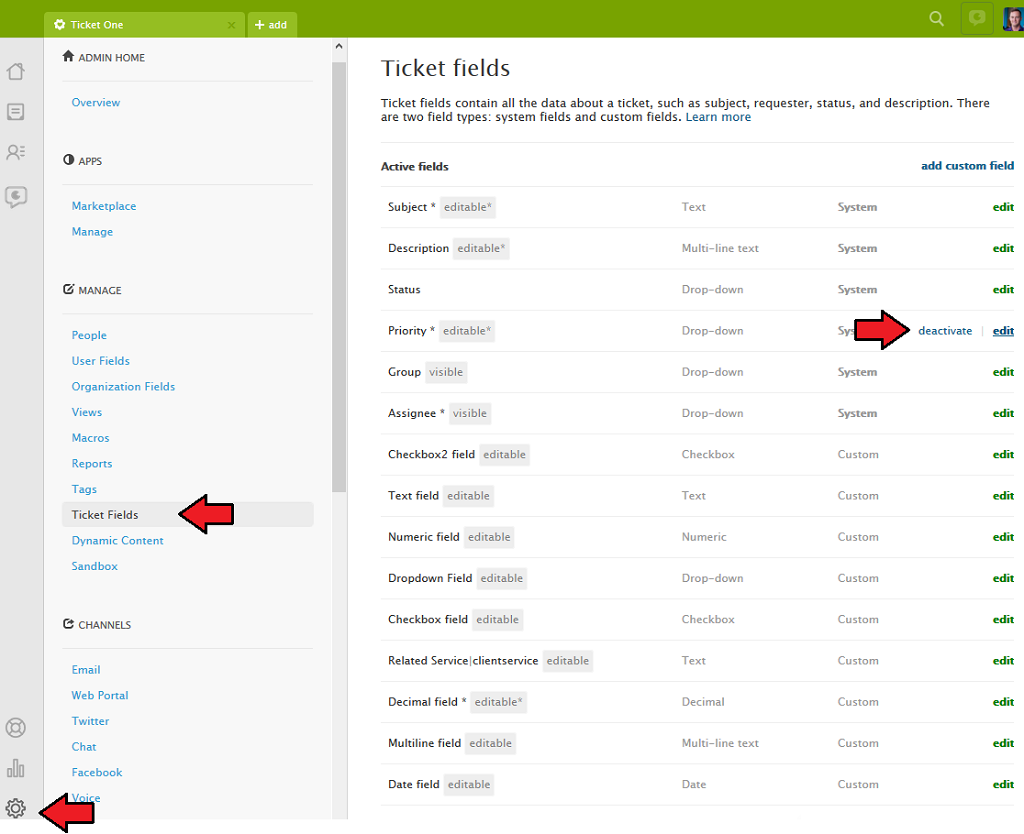
You can also manage ticket fields, that are available in WHMCS on a new ticket form, directly in Zendesk.
Move to 'Zendesk' → 'Admin' → 'Manage' → 'Ticket Fields'. On this site you can activate/deactivate/edit any system and custom fields or add new ones.
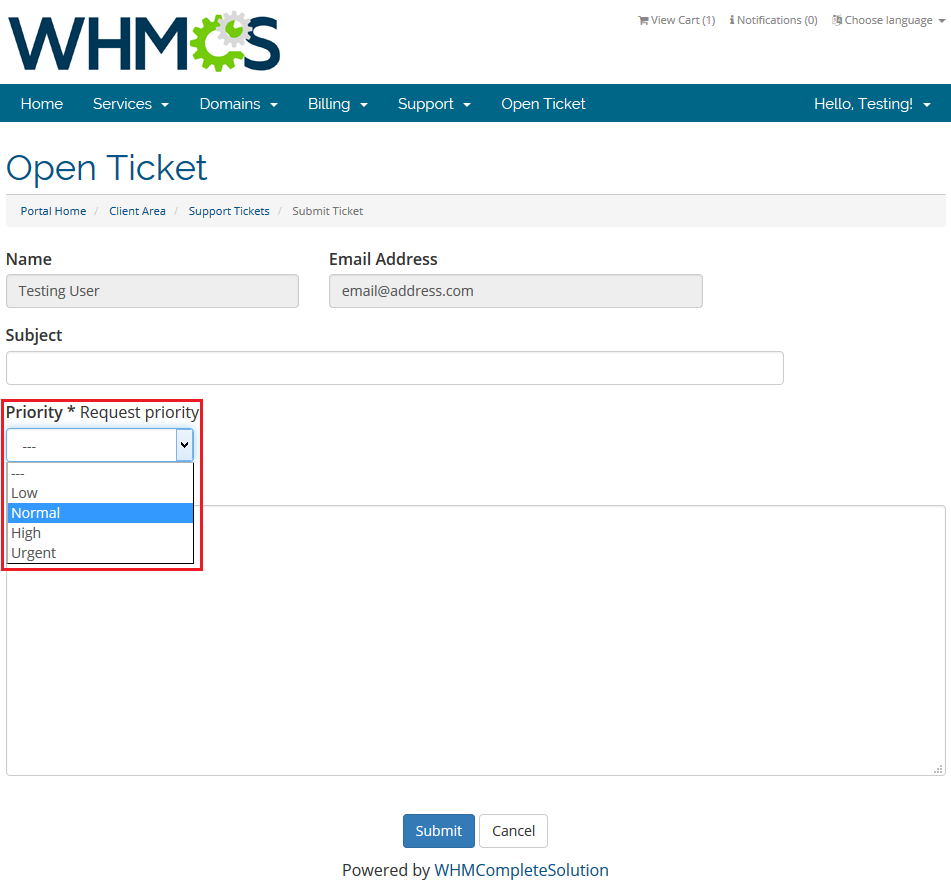
For test purposes we activated and adjusted 'Priority' field according to our needs.
|
As you can see on the screen below, a new field appeared in WHMCS client area.
Edit/add ticket fields to adjust the ticket form perfectly to your needs.
|
Export
Our module allows to export data gathered in your WHMCS, more specifically, all the users and tickets generated before the installation of the product.
Read the below points to learn what data can be synchronized with Zendesk and what are the possible means of such synchronizations.
|
Users
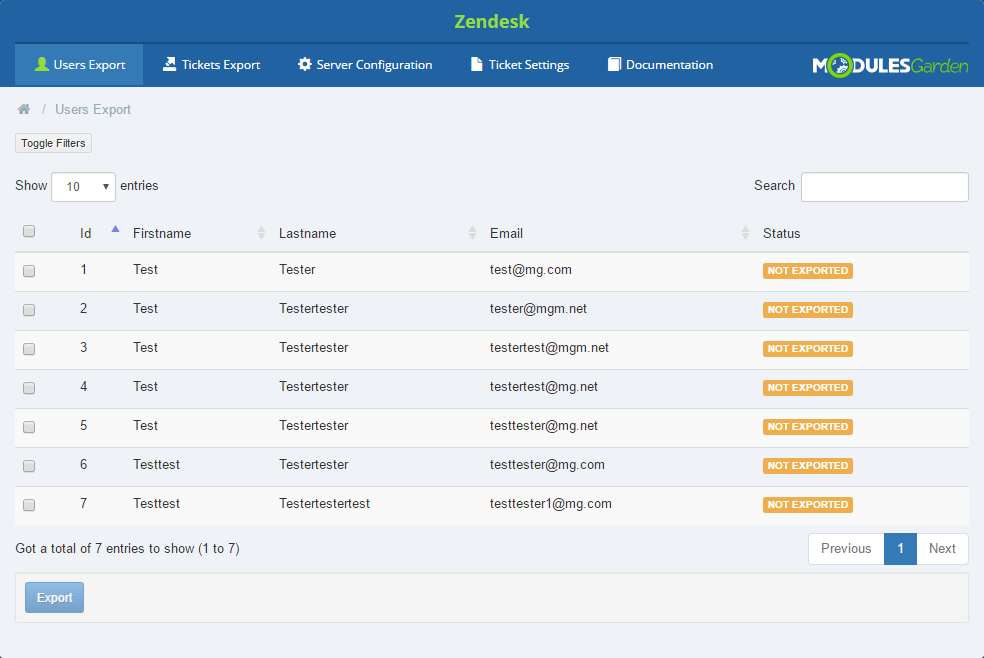
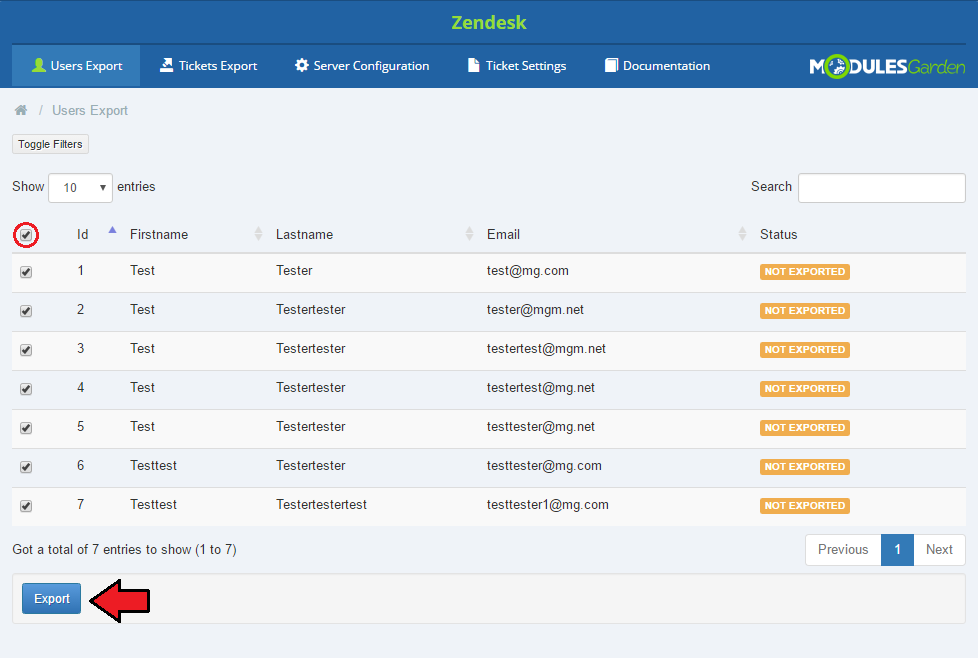
The first option offered by our module is the export of users from WHMCS to Zendesk, proceed to 'Users Export' .
If you are using Zendesk For WHMCS for the first time, you will see here a list of all users who exist in your WHMCS and have not been synchronized with Zendesk yet.
|
Now, you can manually export all of the users available on the list or choose only some of them.
Check boxes next to the users you are going to export and press 'Export' button as marked on the screen.
|
If a user has already been exported from WHMCS to Zendesk, they will no longer be visible on the list.
All users newly added to WHMCS will be automatically synchronized with Zendesk unless otherwise stated in 'Synchronization Settings'.
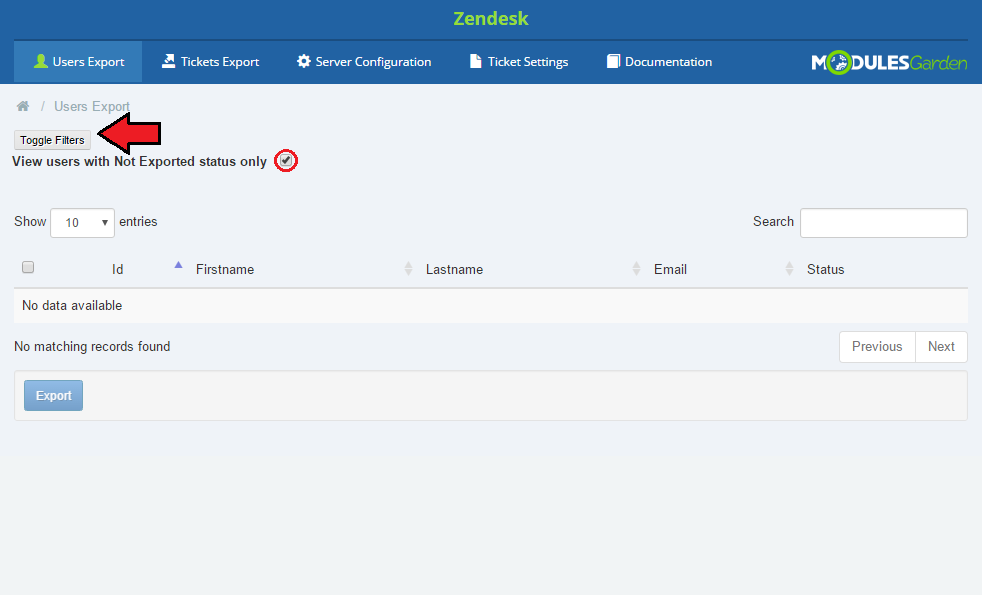
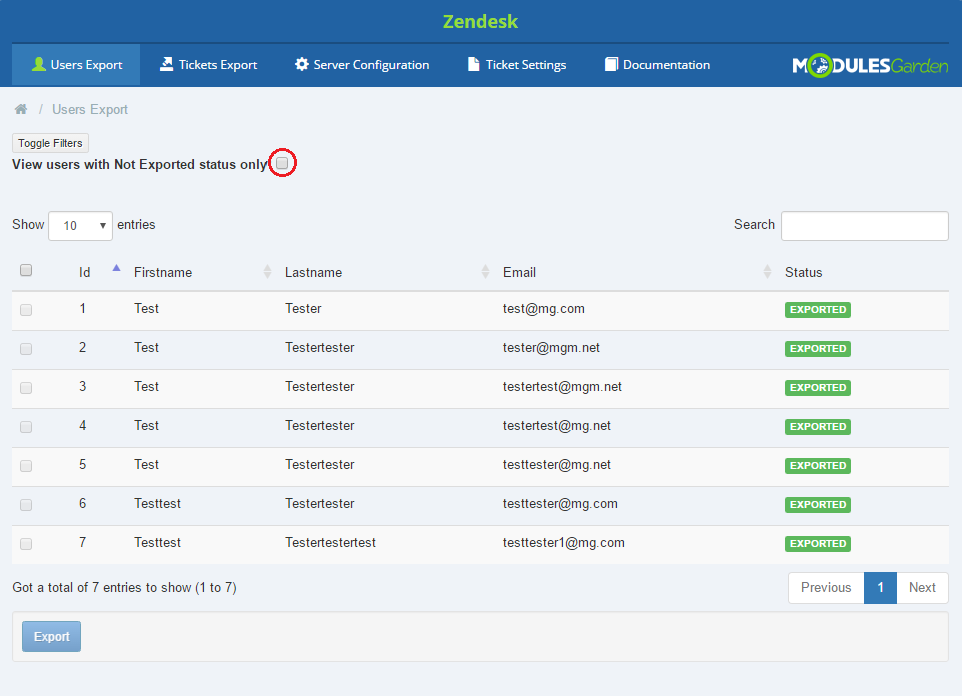
After the successful export you may no longer see your users. To change the view proceed to 'Toggle Filters' to see whether the box defining the view is checked.
|
| When the box is not checked, you will see the list of users that have been exported.
|
Tickets
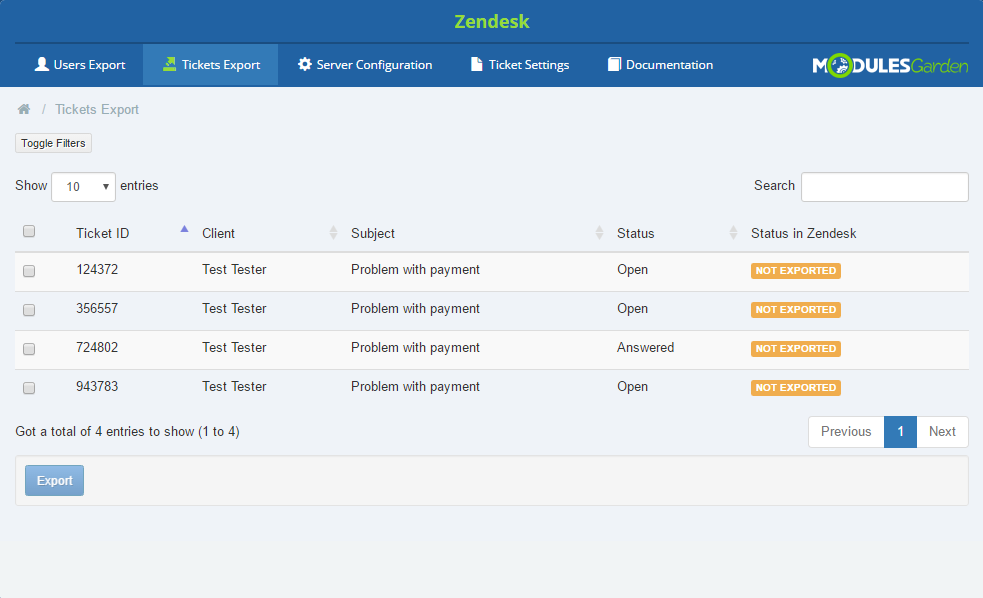
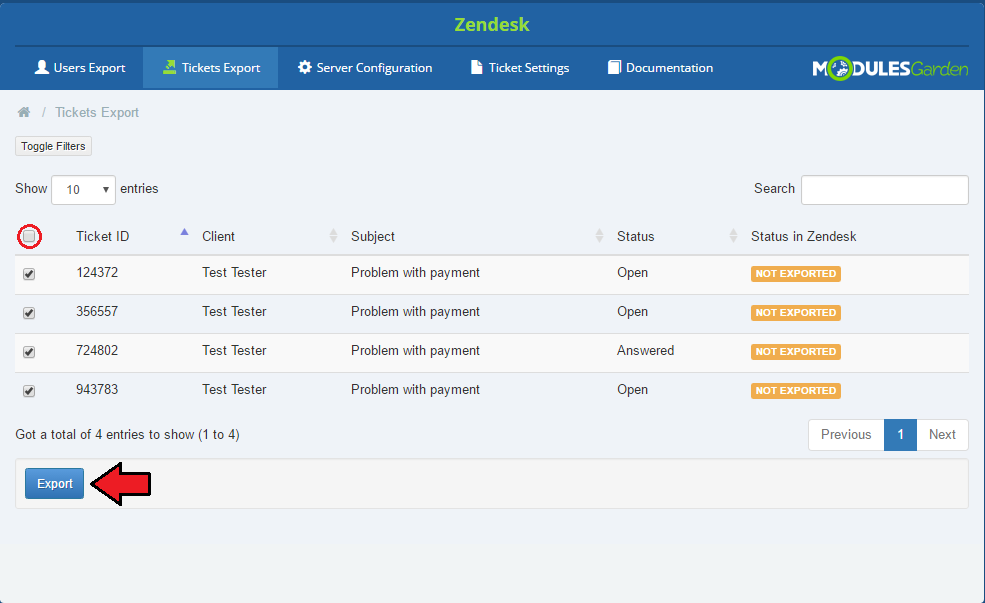
The next option offered by our module is the export of tickets from WHMCS to Zendesk, proceed to 'Tickets Export'.
If you are using Zendesk For WHMCS for the first time, you will see here a list of all tickets which exist in your WHMCS and have not been synchronized with Zendesk yet.
|
Now, you can manually export all of the tickets available on the list or choose only some of them.
Check boxes next to the tickets you are going to export and press 'Export' button as marked on the screen.
|
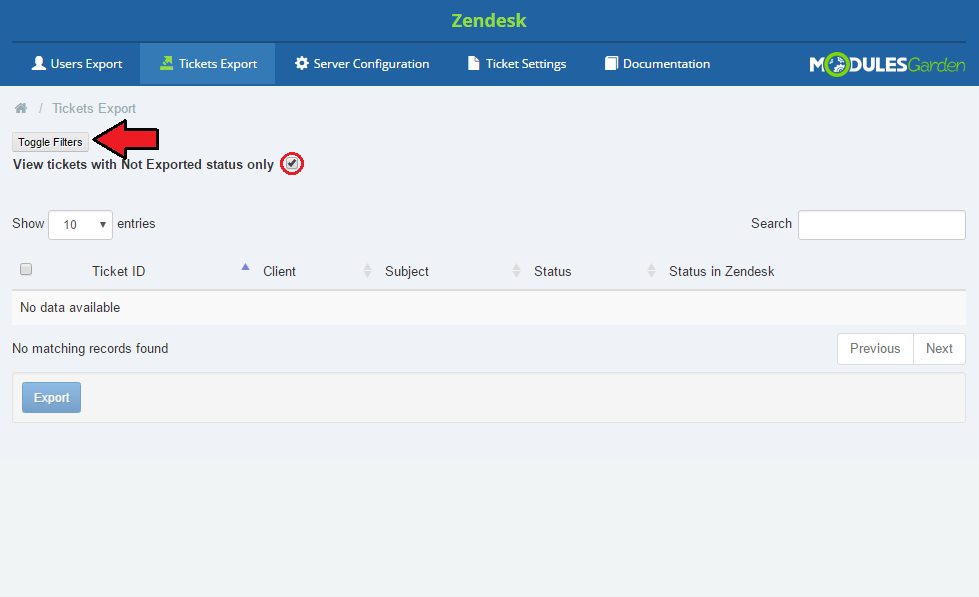
If a ticket has already been exported from WHMCS to Zendesk, they will no longer be visible on the list.
All tickets newly created to WHMCS will be automatically synchronized with Zendesk unless otherwise stated in 'Synchronization Settings'.
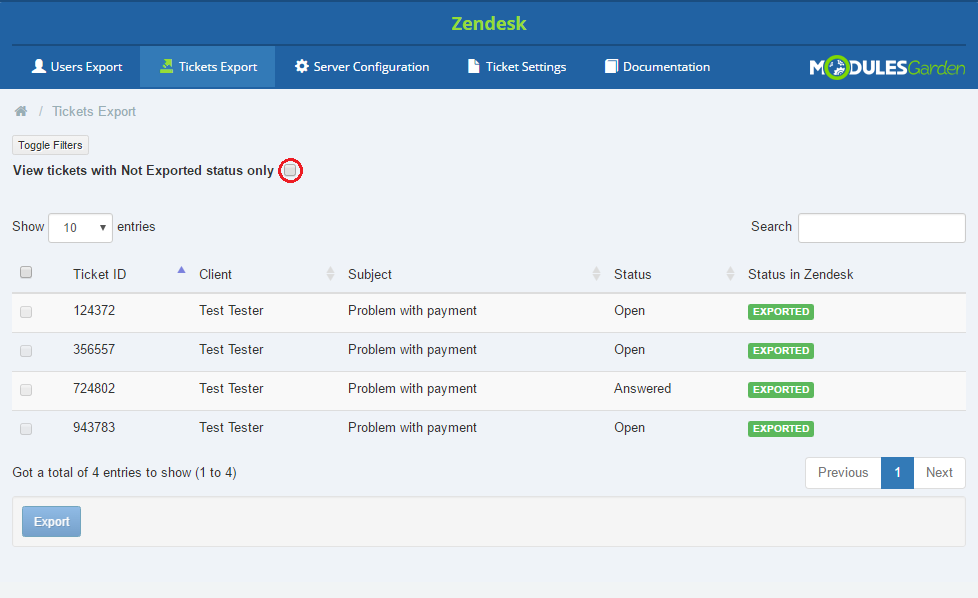
After the successful export you may no longer see your tickets. To change the view proceed to 'Toggle Filters' to see whether the box defining the view is checked.
|
| When the box is not checked, you will see the list of tickets that have been exported.
|
Support Tickets
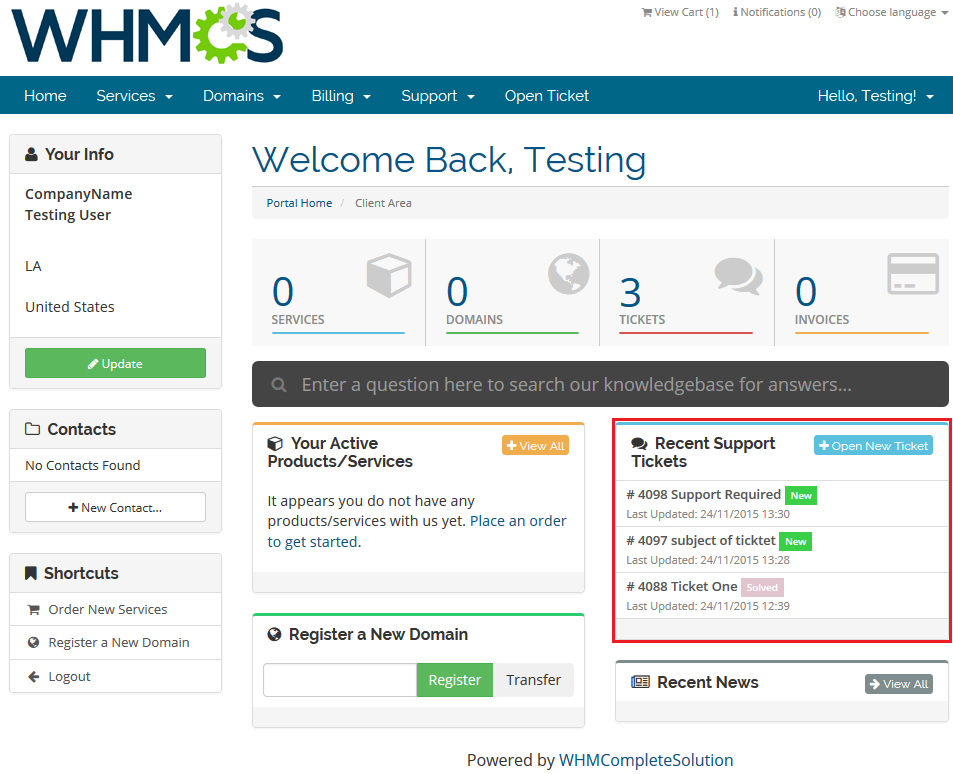
Move to your Client Area. There, on your homepage, is a 'Recent Support Tickets' box.
You will find the latest tickets available in your system. The visible tickets are marked with colors related to their current status.
|
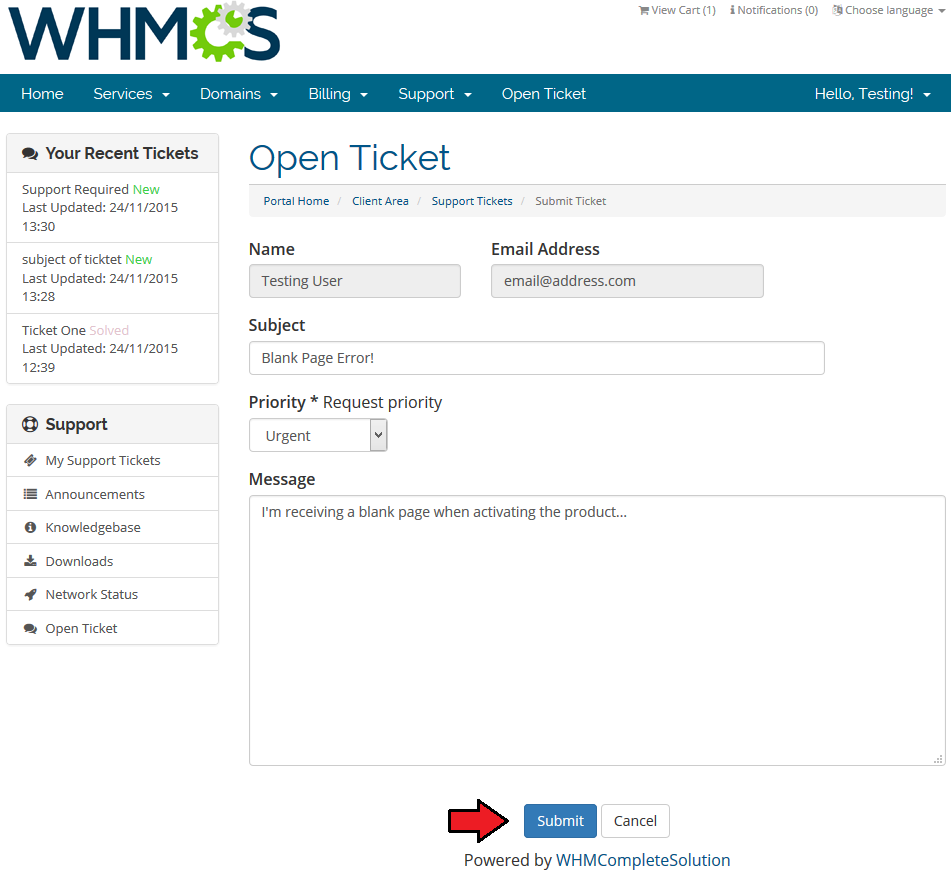
Now, we will create a ticket message to show the flow. Just like in case of standard WHMCS support ticket, choose department,
then enter subject, type in the ticket message and fill out any additional ticket fields that you feel are useful and will help you get a satisfactory answer faster.
Submit the ticket.
|
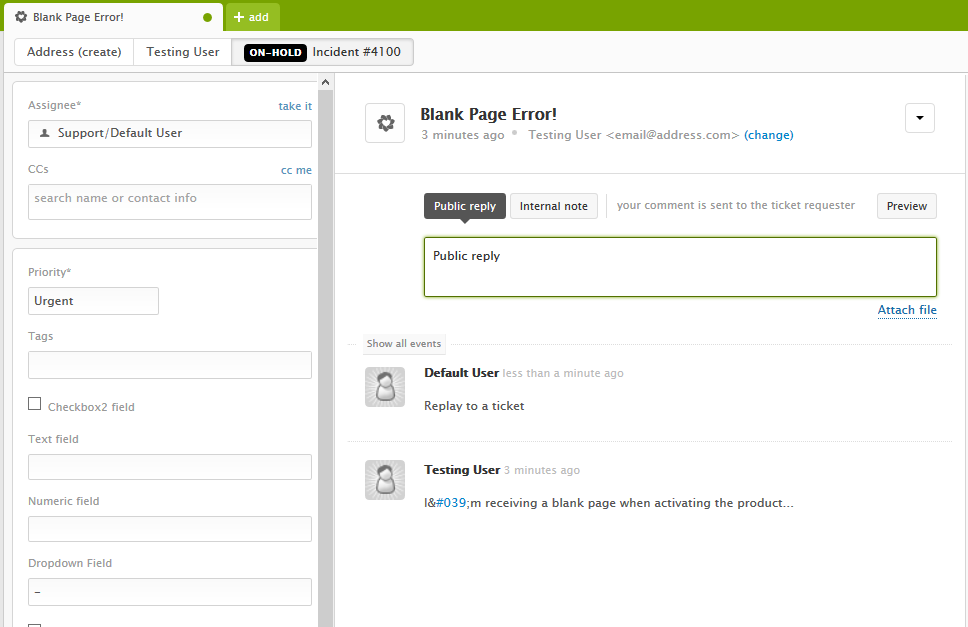
| A new ticket, sent with Zendesk For WHMCS module, is immediately visible in Zendesk admin area.
|
| Do not hesitate and send a reply to this ticket.
|
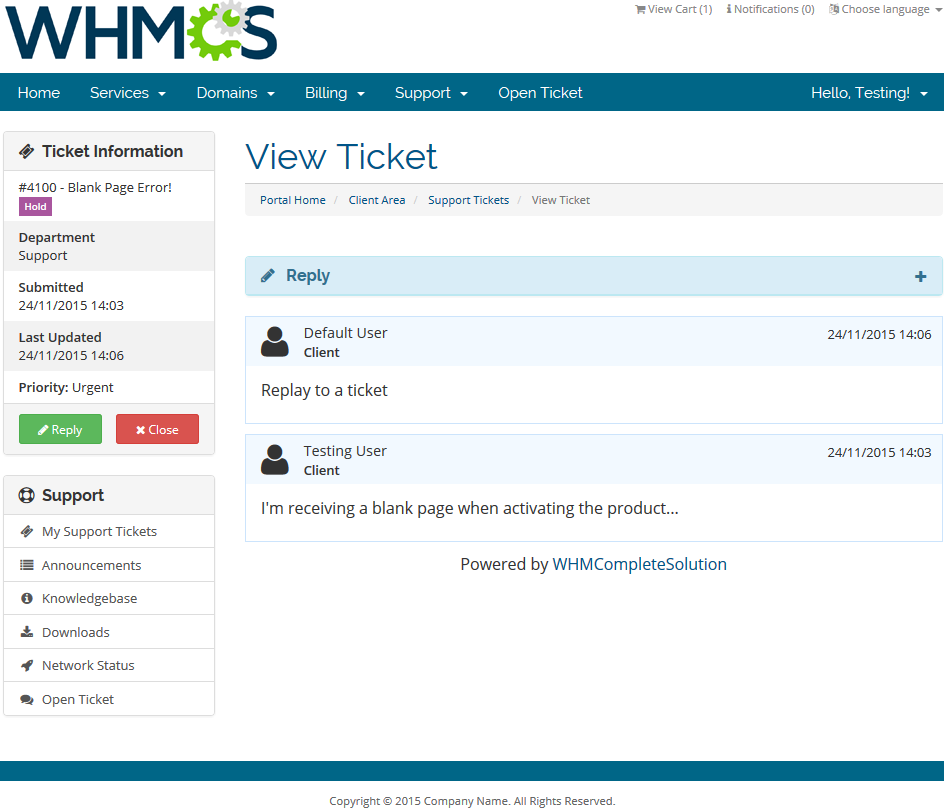
| Client has received an answer. Note that the ticket status has been updated as well.
|
Tips
| 1. If you create a custom field in Zendesk, it will be also visible in WHMCS. Custom fields need to be enabled/visible/editable_by_client.
|
| 2. When you add ' |clientservice' at the end of the custom field title, a select with list of products and domains will show up.
|
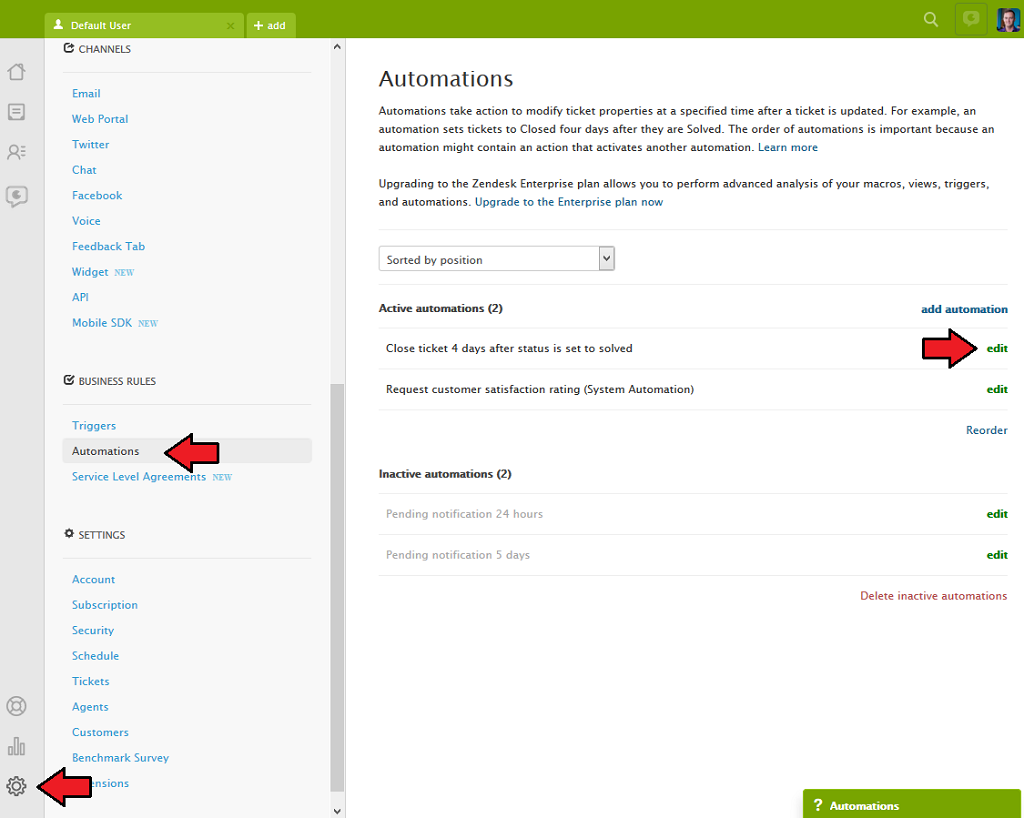
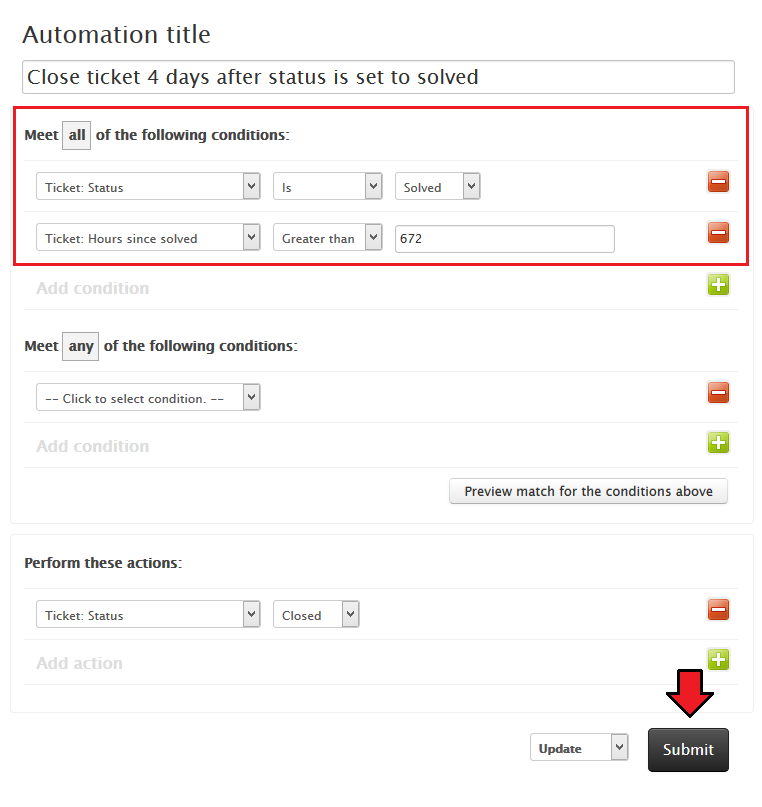
3. Since Zendesk does not fully support WHMCS option to reopen closed tickets, 'Close ticket 4 days after status is set to solved'
option is currently the only possibility to get around it. To enable configure this option proceed to Zendesk → Business Rules → Automations.
Find there the option and edit it.
|
Here you can configure the time until when tickets can be reopened by an answer from the client.
Maximum possible time is now 672 hours (28 days).
|
4. Attachments are managed in Zendesk, therefore if you do not enable them in Zendesk, your clients will not be allowed to add any in their tickets.
To enable attachments in Zendesk please move to 'Zendesk' → 'Settings' → 'Tickets' → 'Attachments'. There enable both options:
- Customers can attach files
- Require authentication to download
|
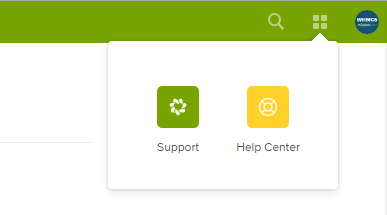
| In case you can see only one option, make sure you have your 'Help Center' active.
|
Common Problems
| 1. When you have problems with connection, check whether your SELinux or firewall does not block ports.
|
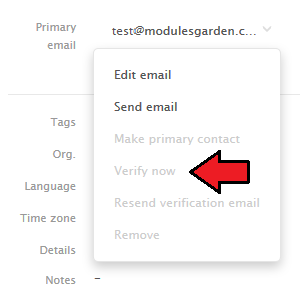
2. When you try to open a new ticket and you get error 'Unable to authenticate' , this means that the user's email is already registered in Zendesk, but it's not verified yet.
To solve the problem log in to your Zendesk admin area and verify the email through clicking 'Verify now' as presented on the screen below.
|
