You may access your DNS Manager For WHMCS API. Here is a short instruction on how to do that:
The main required command that has to be used is:
Additionally, you have to define 'dnsaction' with some specific value.
Note: the 'action' parameter is no longer used since the 2.7.0 version due to not being allowed as a method to be executed as external.
These specific values can be:
- 'getServerList' - returns the list of servers in DNS Manager
- 'saveRDNS' - allows adding new rDNS record. Additional parameters are required here, these are:
- 'serverid' - ID of a server
- 'ip' - IP address that will be used
- 'clientid' - ID of a client, record will be assigned to that client
- 'ttl' - value of TTL for record
- 'rdata' - record's value
- 'removeRDNS' - allows removing existing rDNS record. Additional, required parameters:
- 'serverid' - ID of a server
- 'ip' - IP address that will be used
Exemplary use:
<?php
  // Set Vars
  $command = 'dnsmanager';
  $values = array( 'dnsaction' => 'getServerList', 'params' => array() );
  $adminuser = 'DemoAdmin';

  // Call API
  $results = localAPI($command, $values, $adminuser);
  var_dump($results);
?>
Since the 2.7.0 version, there are new methods available:
- 'createZone' - creates a zone. Additional parameters are required here, these are:
- 'action = dnsmanager'
- 'dnsaction = createZone ' - DNS action, that DNS Manager should execute
- 'zone_name' - name of the zone being created
- 'type = 1 or 2' - type of related item. Use 1 for domain or 2 for the product
- 'relid' - ID of the related item (hosting ID, domain ID)
- 'userid' - ID of user
- 'zone_ip' - IP address assigned to the zone. If empty, a default IP address will be used
- 'recordSet' - ID of the DNS Record Set, it can be downloaded from the base, table: 'DNSManager3_SetRecord', field: 'setid'
(In module version 3.3.2 and earlier, the mentioned table name was: "dns_manager2_setrecord")
Exemplary use:
$postfields = array(
 'action' => 'dnsmanager',
 'dnsaction' => 'createZone',
 'zone_name' => 'zonename.com',
 'type' => '1',
 'relid' => '2',
 'zone_ip' => '192.168.56.101',
 'userid' => '1',
 'recordSet' => '2',
);
- 'updateZone' - updates the zone with the records specified in the request. Any records not included in the request are removed.
Use these parameters:
- 'action = dnsmanager'
- 'dnsaction = updateZone' - DNS action that DNS Manager should execute
- 'zone_id' - ID of the zone that should be updated (use ID from WHMCS)
- 'records' - array of the records that should be updated (added/changed/removed) if DNS Manager compares these records and add/change/remove the corresponding difference. These are:
- 'name' - name of the node to which this record pertains
- 'type' - type of the updating resource record (e.g. MX)
- 'class' - class node
- 'ttl' - number of seconds that the RR stays valid (e.g. 14400)
- 'data' - additional specific RR data
Exemplary use:
$result = localAPI('dnsmanager' ,
    array(
      'dnsaction' => 'updateZone',
      'zone_id' => 2,
      'records' => array(
        array(
          'name' => 'example.website.com',
          'type' => 'A',
          'class' => 'IN',
          'ttl' => '14440',
          'data' => '192.168.56.101',
        ),
        array(
          'name' => 'example.website.com',
          'type' => 'A',
          'class' => 'IN',
          'ttl' => '14440',
          'data' => '192.168.56.102',
        ),
      )
      ),'admin');
- 'getZone' - returns the zone with records. Use these parameters:
- 'action = dnsmanager'
- 'dnsaction = getZone' - DNS action that DNS Manager should execute
- 'zone_id' - ID of the zone that should be retrieved (use ID from the dns_manager2_zone table)
- 'zone_name' - name of the zone
- 'removeZone' - deletes the zone. Use these parameters:
- 'action = dnsmanager'
- 'dnsaction = removeZone' - DNS action that DNS Manager should execute
- 'zone_id' - ID of the zone that should be removed (use ID from WHMCS)
- 'createRecords' - adds new record. Use these parameters:
- 'action = dnsmanager'
- 'dnsaction = createRecords' - DNS action that DNS Manager should execute
- 'zone_id' - ID of the zone that should be removed (use ID from WHMCS)
Use Cases
This section provides exemplary scenarios that demonstrate common use cases and detail how the module's functionalities can be applied in practice.
Review the following scenarios to see practical examples of module usage.
|
Offering DNS Management For Ordered Services
Offering your clients a way to manage DNS zones for products they purchase is one of the core features of the DNS Manager For WHMCS module.
First, open the addon and navigate to 'Settings' → 'Servers' to configure a server that will be used to handle DNS Zones.
In our case, this will be a cPanel server.
Note: More information on how to configure a server can be found in the Server Configuration section.
|
Next, navigate to 'Settings' → 'Packages' to configure a package.
Enable zone creation on 'New Items' and set up the 'Limits'.
Note: More information on packages can be found in the Management of Packages section.
|
| Include your products and domains under Items.
|
| Select the server prepared in the previous step.
|
Make sure either (or both) the 'DNS Management Link' or 'Show DNS Manage Button' is enabled under 'Settings' → 'Global Settings'.
Note: Detailed explanation of the other settings can be found in the Global Settings section.
|
Once clients purchase a product with an appropriate TLD in the domain, they can manage its DNS zones.
This option will be available in the client area under 'Domains' → 'Manage DNS' or on the product page under 'Actions', depending on the global settings.
Note: More information on the options available to the client can be found in the Client Area section.
|
Deploying Backup DNS Server For External DNS Zones
If you would like to create a backup of an external DNS zone, a great way to do that would be to utilize the DNS Manager For WHMCS 'slave zone' functionality.
Follow the instructions below to see how you can do that.
1. Make sure your package allows for the creation of slave zones.
|
|
2. Under 'Domains' → 'Manage DNS' clients can create a slave zone by clicking on the 'Add DNS Zone' button.
|
|
3. Select the related item, enable the 'Slave Zone' toggle, and input the slave zone details. Click on 'Confirm' to create the zone.
|
Delivering DNS Zone Management With rDNS For Ordered Servers
Offering DNS zone management along with rDNS for ordered servers is another core feature of 'DNS Manager For WHMCS'.
First, open the addon and navigate to 'Settings' → 'Servers' to configure a server that will be used to handle DNS Zones.
In our case, this will be a cPanel server. Make sure to allow rDNS Records at this stage
Note: More information on how to configure a server can be found in the Server Configuration section.
|
Next, navigate to 'Settings' → 'Packages' to configure a package.
Remember to include your product, for example, a Proxmox VM.
Note: More information on packages can be found in the Management of Packages section.
|
| Select the server prepared in the previous step.
|
Make sure either (or both) the 'DNS Management Link' or 'Show DNS Manage Button' is enabled under 'Settings' → 'Global Settings'.
Note: Detailed explanation of the other settings can be found in the Global Settings section.
|
Once a client purchases the VM with an appropriate TLD in the domain, they can manage its DNS zones.
This option will be available in the client area under 'Domains' → 'Manage DNS' or on the product page under 'Actions', depending on the global settings.
Note: More information on the options available to the client can be found in the Client Area section.
|
Provided the relevant option is enabled in the package settings (step 1), the rDNS tab will be available as well.
Note: More information on rDNS can be found in the rDNS section.
|
Managing Client rDNS Records As Admin
Admins have the ability to manage all of their clients' rDNS records from a single place.
First, make sure rDNS record management is enabled.
Open the addon and navigate to 'Settings' → 'Servers' to configure a server. Make sure to allow rDNS Records here.
Note: More information on how to configure a server can be found in the Server Configuration section.
|
Next, navigate to 'Settings' → 'Packages' to configure a package.
Remember to include the products you want to manage rDNS records for.
Note: More information on packages can be found in the Management of Packages section.
|
| Select the server prepared in the previous step.
|
After the product is deployed and reaches your client, you will be able to manage its rDNS records in the addon.
Open the 'rDNS Records' tab in the addon. You will see a list of rDNS records across your clients and their services.
|
You can use the search function to find specific records.
The action button allows you to edit or delete them as needed.
|
Finally the 'Add PTR Record' button can be found above the list, and will allow you to add new records for any of your clients.
Important: Remember that your clients will be able to manage rDNS Records on their own if you enable the 'DNS Management Link' or 'Show DNS Manage Button' options under 'Settings' → 'Global Settings' .
|
Using Reseller Account For cPanel Server
DNS Manager For WHMCS can be used not only with the root account of cPanel but also with reseller accounts.
1. First, make sure that the reseller account has DNS-related privileges granted in the WHM panel.
|
| 2. Open the DNS Manager addon and navigate to 'Settings' → 'Servers' to add a new server or edit an existing cPanel server.
|
3. Fill in the necessary fields as explained in Servers Configuration.
For the 'Username' and 'User Password' use the reseller credentials and enable the 'Reseller Account' switch.
|
| 4. Click on 'Confirm' when ready.
|
| 5. All that remains is to change the server's status to 'Enabled'.
|
Providing DNS Zone Management For Domains Without It
If you use a domain registrar that does not support DNS management by default, you may use DNS Manager For WHMCS to introduce such an option.
Navigate to 'System Settings' → 'Domain Pricing'.
Find the domain you want to use and enable 'DNS Management', then set the registrar that does not support DNS Management under 'Auto Registration'.
You can set its price in the 'Domain Addons' table at the bottom.
|
Now open the DNS Manager addon, navigate to 'Settings' → 'Packages' and prepare a package.
Move to the 'Registrars' tab and select your TLD.
Note: The TLD has to be included in the package under 'Item' first.
|
When the domain is ordered, there will be an option to include DNS Management as an addon on the order form.
Later on, the option will still be available in the client area under 'Domains' → 'My Domains' → 'Addons'.
|
After the option is purchased, the in-build WHMCS DNS Management will be available, just as it would for a registrar that does support DNS Management.
Note: If the function does not seem to work, make sure that you have set up the 'your_whmcs/modules/addons/DNSManager3/app/Legacy/DNSManager2/storage' folder as recursively writable.
|
Tips
1. Keep track of your 'pending' and 'progress' 'Tasks' to set an optimum interval time for the task's execution.
For example, set an interval in the way that half of the time the task is set to the pending status.
|
| 2. While using the OVH submodule, note that each time a client wants to remove a zone, the administrator will receive an email sent by OVH. Only after its confirmation, a given zone will be terminated successfully.
|
| 3. 255 characters in TXT records is a maximum limit for the 'PowerDNS' and 'cPanel' submodules.
|
| 4. As this module supports template system, any changes made in the module's template files will be saved after the upgrade process.
|
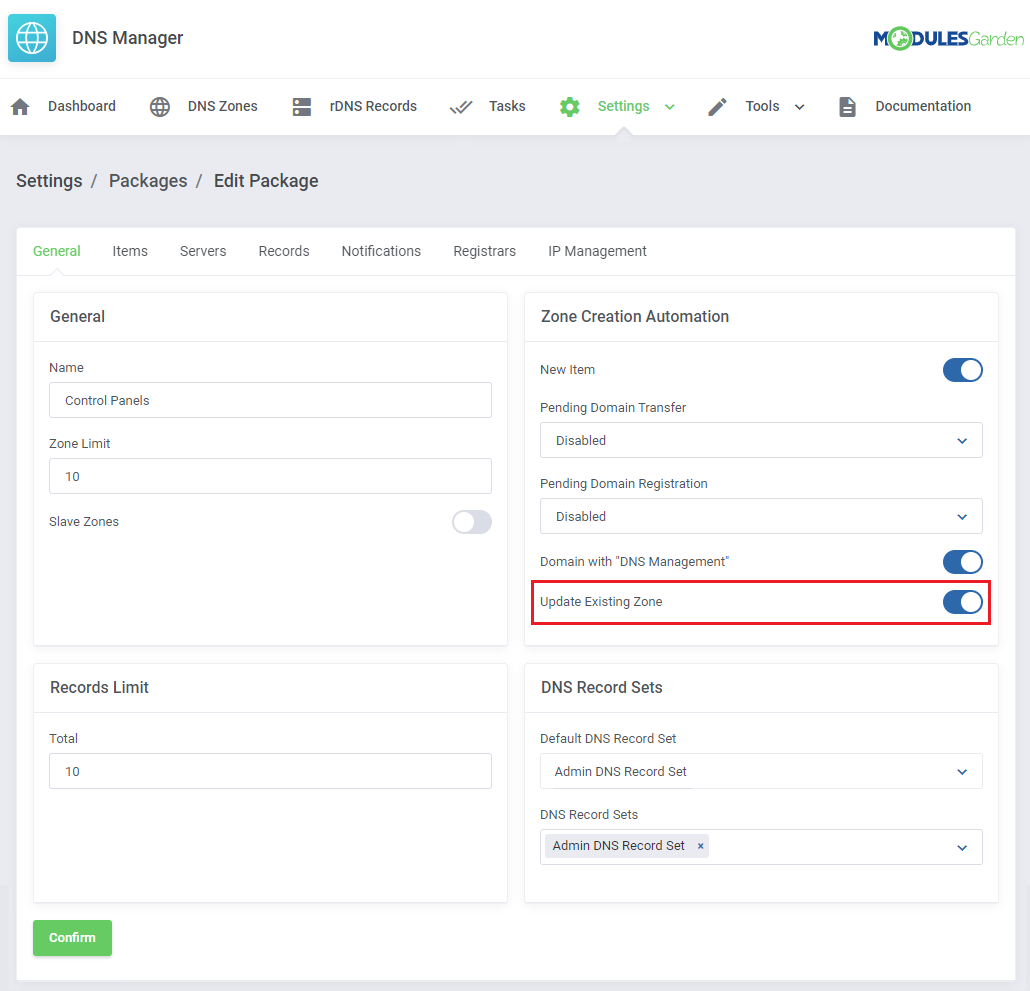
5. In case you are using cPanel or cPanel Extended provisioning modules with DNS Manager, it is highly advised to enable the Existing Zone Update option.
Otherwise, the DNS zone will be previously created by the provisioning module, not by the DNS Manager where an error notification on the already existing zone will appear. That will cause such a zone not to be visible on the Zones List.
If the mentioned option is enabled, DNS Manager will fail to check whether the zone already exists and consequently the created by the provisioning module entry will be added to the Zones List.
|
|
6. Please note that from the 2.13.0 version of the module, it is obligatory to use a dot at the end of each domain while adding or editing 'DNS Records' and 'DNS Record Sets' .
If you do not provide a dot, the module will double your domain. Take a look at the following examples, on the left side we present what is typed by a client, and on the right side you can see the module’s interpretation:
An exemplary zone name is example.com
@ → example.com.
example.com → example.com.example.com.
example.com. → example.com.
www.example.com. → www.example.com.
www.example.com → www.example.com.example.com.
www → www.example.com.
www. → www.example.com.
www.@ → www.example.com.
|
7. Now you may use 'API Token' instead of 'API Key' to configure the Cloudflare submodule. Before you generate your 'API Token' in your Cloudflare panel, please remember to set the following read/edit permissions there:
- User/User Details – Read
- Zone/Zone – Edit
- Zone/Zone Settings - Edit
- Zone/DNS - Edit
|
8. How to correctly add translations of the DNS server errors into the language file:
Most errors include a string with a domain name, to add a custom error message, you have to replace this string with :domain_word: phrase.
An example of a currently displayed error message:
RRset A.testdnsipdefault.by. IN CNAME: Conflicts with pre-existing non-CNAME RRset
In this case A.testdnsipdefault.by. must be replaced with :domain_word:
A correctly generated lang snippet will look as follows:
$_LANG['addonCA']['dashboard']['errors']['RRset :domain_word: IN CNAME: Conflicts with pre-existing non-CNAME RRset'] = "Some serious problem occurred with :domain_word:";
As a result the below message will be displayed in the module:
Some serious problems occurred with A.testdnsipdefault.by.
Of course, you may skip the domain name in the final output or add a fully customized error message:
 $_LANG['addonCA']['dashboard']['errors']['RRset :domain_word: IN CNAME: Conflicts with pre-existing non-CNAME RRset'] = "Some serious problem occurred";
 $_LANG['addonCA']['dashboard']['errors']['RRset :domain_word: IN CNAME: Conflicts with pre-existing non-CNAME RRset'] = 'My custom translation';
If you do not add any translation into the lang file, an original error message will be displayed.
|
Update Instructions
The essential guidance through the process of updating the module is offered here.
Ensure successful completion of the module update by carefully following each step, thereby preventing data loss or any unforeseen issues.
Additionally, you will find a current list of supplementary actions necessary for a smooth update process there.
|
Migration from V2x.x to V3.x.x
If you want to migrate your DNS Manager For WHMCS to version 3.0, please follow the below steps:
- Keep both module addons DNS Manager and DNS Manager v3 active
- Full module configuration is still located in the DNS Manager addon module, your old data are not lost
- Move to DNS Manager v3 addon module → 'Settings' to enable access to Client Area with support for 'Twenty-One' theme
- Set up a new cron task (DNS Manager v3 addon module → Settings)
- Go back to DNS Manager addon module → 'Settings' → 'Global Settings' → 'Client Area Zones Status' and again save the content.
Note: Entered content might not be correctly displayed in the new client area view, saving the changes will ensure there are no unexpected errors or missing information.
|
Migration from V3x.x to V3.4.0
When updating the module to version 3.4.0 keep in mind that:
- With version 3.4.0 all DNS Manager For WHMCS functionality can be found in one addon.
The DNS Manager V2 addon can be safely deactivated and deleted after the module update as it is no longer required for module configuration or management.
- You need to reissue your module license to ensure proper functionality and avoid any interruptions.
- Database migration will be done automatically after module update, but can also be triggered manually via script:
php -q /yourwhmcs/modules/addons/DNSManager3/cron/cron.php upgrade-3-3-to-3-4
|
Migration from V2 to V3.5.0
If you are still using the module in version V2 and wish to upgrade it directly to version 3.5.0, please follow the steps below precisely. Any deviation may cause errors and impact module functionality.
1. Update to the latest V2 version:
Begin by updating the module to the latest V2 version, which is 2.16.0. Ensure this version is installed before starting the upgrade process.
2. Install the 3.0.0 Beta Version:
Follow these steps to install the 3.0.0 Beta version:
- Keep both module addons DNS Manager and DNS Manager v3 active.
- Full module configuration is still located in the DNS Manager addon module, your old data are not lost.
- Move to DNS Manager v3 addon module → 'Settings' to enable access to Client Area with support for 'Twenty-One' theme.
- Set up a new cron task (DNS Manager v3 addon module → Settings)
- Go back to DNS Manager addon module → 'Settings' → 'Global Settings' → 'Client Area Zones Status' and again save the content.
Note: Entered content might not be correctly displayed in the new client area view, saving the changes will ensure there are no unexpected errors or missing information.
3. Important! Now you must update the module to every next version one by one!
- Update the module in the following order: 3.1.0 → 3.1.1 → 3.2.0 → 3.2.1 → 3.3.0 → 3.3.1 → 3.3.2
4. Upgrade to version 3.4.0:
When updating to version 3.4.0, note the following:
- With version 3.4.0 all DNS Manager For WHMCS functionality can be found in one addon.
The DNS Manager V2 addon can be safely deactivated and deleted after the module update as it is no longer required for module configuration or management.
- You need to reissue your module license to ensure proper functionality and avoid any interruptions.
- Database migration will be done automatically after module update, but can also be triggered manually via script:
php -q /yourwhmcs/modules/addons/DNSManager3/cron/cron.php upgrade-3-3-to-3-4
5. Final updates:
Complete the migration by updating the module through the following versions, in order: 3.4.1 → 3.4.2 → 3.5.0
Important: Contact our support team by opening a ticket to request the necessary module packages. These packages are no longer available for direct download from your ModulesGarden account.
|
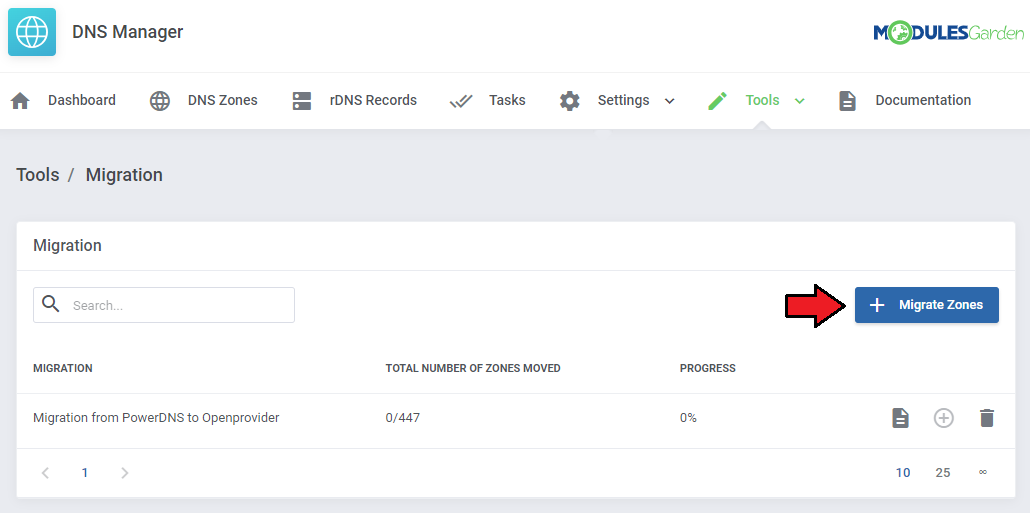
Migration of Zones
'Migration' is another useful tool that you may use to manage zones efficiently. With this tool, you may migrate zones between servers.
Keep in mind, that if you wish to transfer the relation that exists in the DNS Manager module to the target server, you must select the 'Move Management To Target Server' option.
Otherwise, only the zone will be copied from the original to the target server, the relation to the original server will remain in the module.
Remember that migrated zones are available on both servers now! Migration does not delete zones, just copy them to the new server!
|
|
To add a migration task, press 'Add Migration', specify from which server you wish to migrate zones, and the target server, as simple as that.
Note 1: Migration does not copy DNS Manager settings, to illustrate: if you are migrating zones that exist in DNS Manager their locations for example are not updated.
Note 2: You can decide if the option of managing zones should be transferred to the target server. To do it, please tick 'Move Management To Target Server'.
|
| Schedule the migration. Remember to confirm the action.
|
| Move to the list of zones to assign clients and products. Press the button marked on the screen.
|
| Select zones and 'Migrate Zones' for mass migration or use action buttons next to single zones.
|
Upgrade Guide
Seeking a solution that offers greater flexibility, customization tailored to your precise needs, and unrestricted availability?
There is an option that not only proves to be cost-effective in the long run but also includes prioritized support services, making it a truly valuable investment.
Opt for the Open Source version of your DNS Manager For WHMCS module to unlock these benefits.
Simply click on either the Get Source Code or Upgrade To Lifetime button found on the product's page in our client area to complete the one-step upgrade process, with a dedicated discount already applied.
Follow a comprehensive guide covering the transition process, the advantages it brings, and step-by-step instructions on what to do next after the order has been successfully finalized.
|
Common Problems
| 1. When you have problems with connection, check whether your SELinux or firewall does not block ports.
|
| 2. jQuery 1.9 is required to work properly.
|
3. In case you cannot see any zone records in your client area after import or migration actions, then disable the cache for the DNS server.
- To do so, edit the 'General' section of the server.
|
4. Once you have problems with manually created zones for specific domains, along with the 'Subdomain is not allowed' or 'Invalid zone name' error,
make sure to add the .tld that you would like to use to the following file:
modules\addons\DNSManager2\storage\tld.list
|
| 5. In case your backup task started in your client area is not being processed, make sure that your Cron Import job is not disabled or set to a low frequency.
|
6. Error: "The selected zone is already taken"
Reason 1: A zone with the same name already exists in dns_manager2_zone table (you can also find it on the 'Zones List' in the addon)
Reason 2: Other client is using such domain with a product or has it registered. It is allowed as long as the other client's domain status is: Cancelled, Transferred Away, Fraud or Terminated
Solution: Find the domain in WHMCS and cancel it
Reason 3: Zone already exists on the DNS server (e.g. cPanel)
|
7. Error: "Message: API failure: (XID 2ugbb6) You do not have access to a domain named “domain.tld”."
If you encounter the above error for a zone associated with a cPanel server, it means that you need to set root user permissions for the token that is used in the cPanel submodule configuration.
|
8. Problem: The DNS Manager button in the client area menu with the Lagom Client Theme is missing.
Solution: Use the Lagom Client Theme addon to manually add the missing item to the menu via the menu manager.
|
|


