|
|
| Line 11: |
Line 11: |
| | *'''Client Area Functionality:''' | | *'''Client Area Functionality:''' |
| | {| | | {| |
| − | |style="padding: 10px 0px 0px 30px;"|✔ FTP | + | |style="padding: 10px 0px 0px 30px;"|✔ Apps Installation With Softaculous and Installatron |
| | + | |} |
| | + | {| |
| | + | |style="padding: 0px 0px 0px 30px;"|✔ FTP |
| | |} | | |} |
| | {| | | {| |
| Line 36: |
Line 39: |
| | {| | | {| |
| | |style="padding: 0px 0px 0px 30px;"|✔ Site Redirections | | |style="padding: 0px 0px 0px 30px;"|✔ Site Redirections |
| | + | |} |
| | + | {| |
| | + | |style="padding: 0px 0px 0px 30px;"|✔ Backups |
| | + | |} |
| | + | {| |
| | + | |style="padding: 0px 0px 0px 30px;"|✔ SSL Certificates |
| | + | |} |
| | + | {| |
| | + | |style="padding: 0px 0px 0px 30px;"|✔ Display Of Account Usage |
| | |} | | |} |
| | {| | | {| |
| Line 42: |
Line 54: |
| | {| | | {| |
| | |style="padding: 0px 0px 0px 30px;"|✔ Log In To Webmail | | |style="padding: 0px 0px 0px 30px;"|✔ Log In To Webmail |
| | + | |} |
| | + | {| |
| | + | |style="padding: 0px 0px 0px 30px;"|✔ Log In To phpMyAdmin |
| | |} | | |} |
| | {| | | {| |
Revision as of 09:53, 8 October 2013
Documentation concerns DirectAdmin Extended For WHMCS 1.4. Version 1.6 will be finished on 09.10.2013.
ModulesGarden DirectAdmin Extended For WHMCS addon module allows your customers to manage DirectAdmin accounts without even leaving your website!
The most commonly used DirectAdmin functionality has been relocated directly to the WHMCS client area.
Management of FTP, subdomains, databases, SSL certificates, backups and more has never been so convenient and easy!
|
- Client Area Functionality:
| ✔ Apps Installation With Softaculous and Installatron
|
| ✔ Display Of Account Usage
|
| ✔ Change Password Functionality
|
| ✔ Password Generator Functionality
|
- Additional Functionality:
| ✔ Functions Manager Addon - Enable/Disable Functionality Per Each Product
|
| ✔ Functionality For Automatic Suspension Of Accounts Upon Reaching The Bandwidth Limit
|
| ✔ Integrated With Advanced Billing For WHMCS - Server Resource Usage Billing (read more)
|
| ✔ Supports WHMCS Version V4.5 and Later
|
Installation and Configuration
This tutorial will focus on how to successfully install and manage DirectAdmin Extended For WHMCS.
We will guide you step by step through the whole installation process.
|
| 1. Log in to your client area and download DirectAdmin Extended For WHMCS.
|
| 2. Upload and extract the module into the main WHMCS directory.
|
| Files in your WHMCS directory should look like this.
|
| 3. When you install DirectAdmin Extended for the first time you have to rename 'license_RENAME.php' file.
|
| File is located at 'modules/servers/directadminExtended/license_RENAME.php' . Rename it from 'license_RENAME.php' to 'license.php' .
|
| 4. In order to configure your license key you have to edit a previously renamed 'license.php' file.
|
| Enter your licence key between quotation marks as presented on the following screen. You can find your license key at your client area → 'My Products' .
|
| 5. Now you have to activate the module in your WHMCS system.
|
| Log in to your WHMCS admin area. Click 'Setup' then choose 'Addon Modules' .
|
| Afterwards find 'DirectAdmin Extended Functions' and press Activate button.
|
| 6. In next step you need to permit access to this module.
|
| To do so click on 'Configure' button, tick 'Full Administrator' and press 'Save Changes' .
|
7. Well done! You have just successfully installed DirectAdmin Extended For WHMCS!
Now in your WHMCS system press 'Addons' then press 'DirectAdmin Extended Functions' . You will see a following screen.
Let's proceed to configuration of your freshly installed module.
|
| 8. Now we will show you how to configure a new product.
|
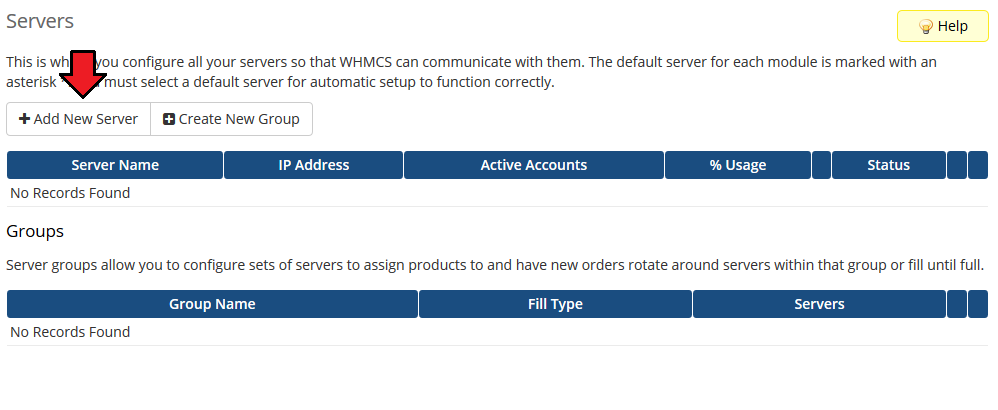
| To do so log in into your WHMCS. Now press 'Setup' → 'Products/Services' → 'Servers' (or 'Setup' → 'Servers' in WHMCS v4.x).
|
| Afterwards press 'Add New Server' .
|
9. Next, enter your server name, IP address, username and password. Choose 'DirectadminExtended' from a dropdown menu and press 'Save Changes' .
Keep in mind that values of client area buttons 'Log In Io Webmail' and 'Log In To DirectAdmin' are taken from a 'Hostname' field. If field is empty, they are taken from an 'IP Address' field.
Here you can also provide other server details like nameservers or maximum number of accounts.
|
| 10. After you configure your server correctly, you will see a following screen.
|
| Now you need to create a new group for your server. For that purpose press 'Create New Group' .
|
| 11. Enter name, click on your previously created server, press 'Add' then press 'Save Changes' .
|
| 12. In order to create and configure product click on 'Setup' → 'Products/Services' → 'Products/Services' .
|
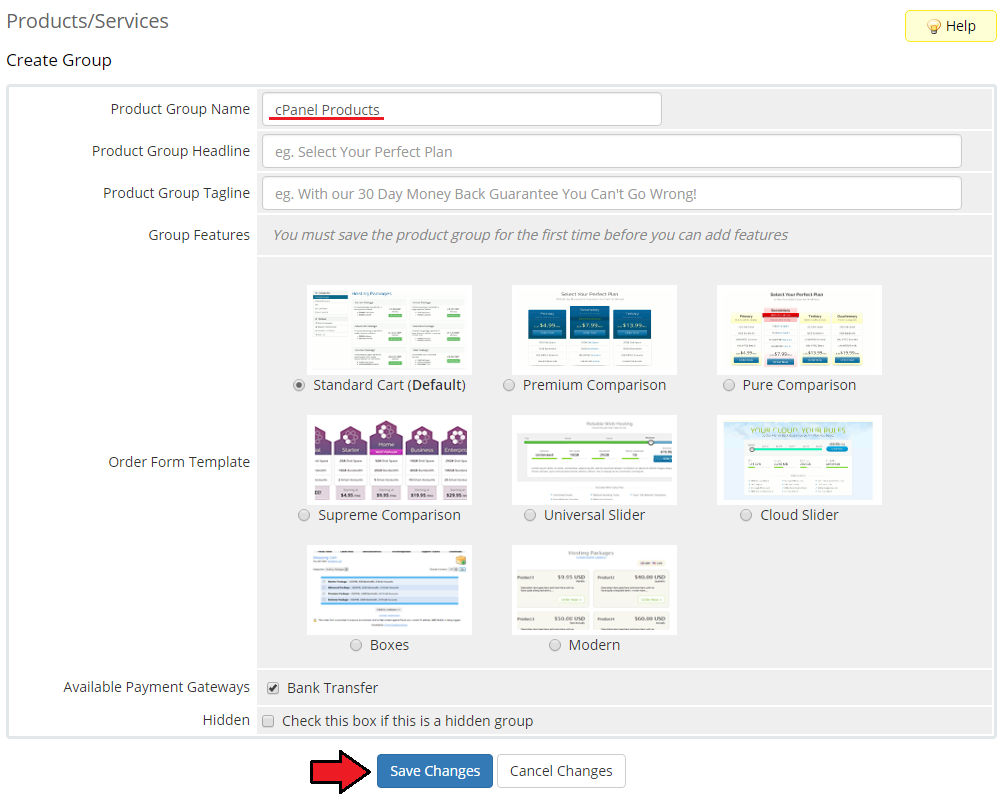
| If you don't have a product group, click on 'Create a New Group' . If you do, simply go to step 14.
|
| 13. Enter product group name and press 'Create Group' .
|
| 14. When you have a product group, you can create your product and assign it with DirectAdmin Extended. If you already have a product, go to step 16.
|
| To create a product click on 'Create a New Product' .
|
| 15. Afterwards choose your product type and product group from a dropdown menus, enter your product name and press 'Continue' .
|
16. Now go to 'Module Settings' section, choose both 'DirectadminExtended' and your previously created server group from a dropdown menus.
Enter your Package Name and choose your Reseller IP if required. DirectAdmin Extended won't work properly without specified package name.
You can also activate the functionality for automatic suspension of accounts upon reaching the bandwidth limit by ticking 'Suspend at Limit' . Don't forget to press 'Save Changes'.
|
That's all. You have just correctly created and customized new product which will appear in DirectAdmin Extended admin area.
Let's check it out. Go to 'Addon Modules' → 'DirectAdmin Extended Functions' and click on 'Configure' button.
|
In the newly opened window, tick the features you would like to activate for your customers and choose the webmail from a dropdown menu.
Afterwards press on 'Save Changes' button.
|
| Now you can check the results. This is what your customers should see in their client area.
|
Management
| DirectAdmin Extended allows your customers to manage their DirectAdmin account via client area in your WHMCS system.
|
| In this short guide we will present you the possibilities of our addon module.
|
Management of FTP Accounts
| 1. You can manage your FTP accounts through creating, modifying and deleting.
|
Management of Emails
| 2. You can manage all aspects related to email accounts.
|
Management of Email Forwarders
| 3. In addition to managing email accounts, you can create and delete email forwarders.
|
Management of Databases
| 4. Owing to MySQL Management you can create/delete new databases and users. You can also add users to particular databases and set up privileges.
|
Management of Cron
| 5. Cron Jobs Management allows you to easily add and remove your cron jobs.
|
Management of Subdomains
| 6. You can create and manage your subdomains.
|
Management of Addon Domains
| 7. You can add and manage your addon domains.
|
Management of Parked Domains
| 8. You can also manage your parked domains.
|
Management of Site Redirections
| 9. Easy access to site redirections is very useful. Within a few seconds, you can redirect the page to point to another.
|
Log In To DirectAdmin
| 10. With a single click of a button 'Log In To DirectAdmin' you can log in to your DirectAdmin.
|
Log In To Webmail
11. You can easily log in to your webmail by clicking 'Log In To Webmail' .
|
Management of Existing Products
You can easily use DirectAdmin Extended module with your already configured DirectAdmin products.
To do so change type of servers and module names of products from 'Directadmin' to 'DirectadminExtended' .
Additional information about how to correctly configure your servers and products you can find at points 8-16 in 'Installation and Configuration' section.
|
Management of Billing
When you combine DirectAdmin Extended For WHMCS with Advanced Billing For WHMCS, you will be able to set up additional billing options.
Module allows you to charge your customers based on the server resources used by them.
|
| With Advanced Billing module, you can also display your customers the current server resource usage and their cost.
|
Tips
Common Problems
1. If after install, you will get an ionCube encoder problem (wrong version), please open a support ticket.
We will provide you with different version of the module encrypted with the older version of ionCube.
|
| 2. If you have problems with connection make sure that both ports 2082 and 2083 are open.
|
| 3. When you have problems with connection, check whether your SELinux or firewall is not blocking ports.
|


