Report Generator For WHMCS
From ModulesGarden Wiki
(Difference between revisions)
|
|
| Line 402: |
Line 402: |
| | {| | | {| |
| | |style="padding: 0px 0px 15px 15px;"|'''6. Now you have to activate the module in your WHMCS system.'''<br /> | | |style="padding: 0px 0px 15px 15px;"|'''6. Now you have to activate the module in your WHMCS system.'''<br /> |
| − | Log in to your WHMCS admin area. Go to '' 'Setup' '' → '' 'Addon Modules'. '' Afterwards, find '' 'Report Generator' '' and press '' 'Activate' '' button. | + | Log in to your WHMCS admin area. Go to '' 'Setup' '' → '' 'Addon Modules'. '' Afterwards, find '' 'Report Generator' '' and press the '' 'Activate' '' button. |
| | |} | | |} |
| | {| | | {| |
Revision as of 10:19, 12 November 2019
Report Generator For WHMCS allows you not only to access several dozen predefined reports, but also to generate any required custom ones using two inbuilt creators.
The module lets you adjust reports to your needs through using various filters and even your own PHP code.
It also permits export, printing, and reports comparison, as well as display of results in tables, graphs or charts.
You can also schedule the reports creation and send them to the SFTP/FTP server, chosen staff members, or even any email address.
|
| ✔ Generate Your Own Reports
|
| ✔ Access 31 Predefined Reports
|
| ✔ Modify Report Results With Dynamic Filtering Options
|
| ✔ Compare Side-By-Side Report Results With Different Filters
|
| ✔ Generate PDF And CSV Files From Reports
|
| ✔ Display Print Preview And Print Raports
|
| ✔ Create Reports On Demand Or Schedule Their Generation As Background Task:
|
| ✔ Choose Report Filtering Options
|
| ✔ Define Date Range Of Scheduled Reports
|
| ✔ Upload Report To FTP/SFTP Server
|
| ✔ Send Report To Selected Staff Members
|
| ✔ Send Report To Any Email Address
|
| ✔ Export And Import Reports Structure To File
|
- Report Creation Features:
| ✔ Add Varied Widget Sections To Created Reports:
|
| ✔ Choose Reports Creation Advancement Level:
|
| ✔ Generate Reports In Several Simple Steps
|
| ✔ Join Tables With Known Relations Only
|
| ✔ WHMCS Tables Available Only
|
| ✔ All Database Tables Available
|
| ✔ Create Dynamic Filter Types:
|
| ✔ Data Range Filter - Available On Report View
|
| ✔ Dropdown Filter - Specify Available Options During Report Creation
|
| ✔ Display Live Preview Of:
|
| ✔ Data Returned By Report Creator
|
| ✔ SQL Query Built By Report Creator
|
| ✔ Section Generated By Report Creator
|
- Additional Beginner Creator Components Features:
| ✔ Add Tables With Known Relations And Automatically Configure Join-in Table
|
| ✔ Choose Column Types For Data Presentation And Provide Friendly Aliases:
|
| ✔ Field - Display Field As Is
|
| ✔ CONCAT - Join Multiple Fields Into One
|
| ✔ COUNT - Count All Values With The Same Value Of Group By Field
|
| ✔ SUBSTR - Display Part Of Chosen Field Only
|
| ✔ SUM - Summarize All Values With The Same Value Of Group By Field
|
| ✔ MAX - Display Maximum Value Found Within Fields With The Same Value Of Group By Field
|
| ✔ MIN - Display Minimum Value Found Within Fields With The Same Value Of Group By Field
|
| ✔ AVG - Display Average Of Fields With The Same Value Of Group By Field
|
| ✔ Refine Specified Data Using:
|
| ✔ Expression Conditions With:
|
| ✔ Relation Between Two Fields
|
| ✔ Dynamic Filter Condition
|
| ✔ Order By/Group By/Limit Data Displayed On Report
|
| ✔ Skip Chosen Number Of First Records Displayed On Report
|
| ✔ "Clients Information" Section:
|
| ✔ Business Health Status:
|
| ✔ Closed & Answered Tickets
|
| ✔ To-Do Tasks Stats Per Status
|
| ✔ Tasks And Tickets In Progress:
|
| ✔ Number Of Created User Accounts
|
| ✔ List Of Created User Accounts
|
| ✔ Product Income In Location
|
| ✔ Sales Summary Per Product
|
| ✔ Transferred Domains Report
|
| ✔ "Staff Members" Section:
|
| ✔ Comments On Course Of Ticket Solving
|
| ✔ Ratings Of Ticket Solving Course
|
| ✔ Ticket Replies By Admin
|
| ✔ Tickets Responding Time
|
| ✔ Report Import/Migration Tool
|
| ✔ Integrated With CRM For WHMCS - Powerful Customer Relationship Management Tool (read more)
|
| ✔ Supports PHP 7.1 Up To PHP 7.3
|
| ✔ Supports WHMCS V7.6 And Later
|
| ✔ Requires PhantomJS Library
|
Installation
This tutorial will show you how to successfully install and configure Report Generator For WHMCS.
We will guide you step by step through the whole installation and configuration process.
Note: If you are still using any of the module's previous versions prior to v4.x, follow these instructions.
|
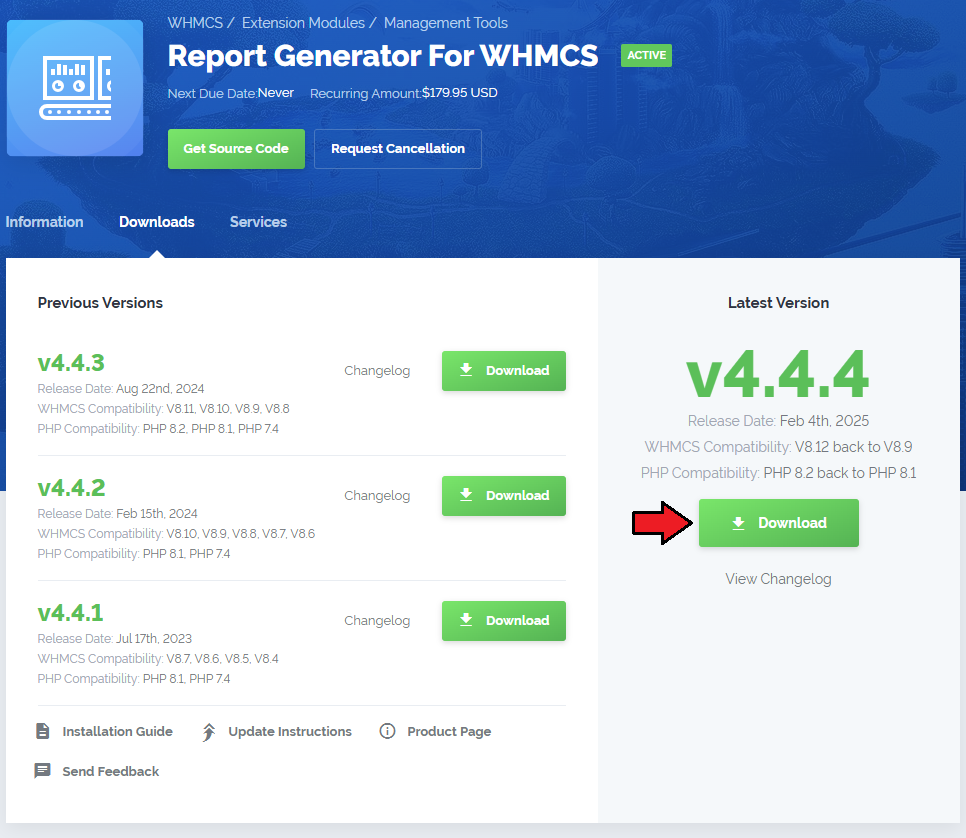
| 1. Log in to our client area and download the module.
|
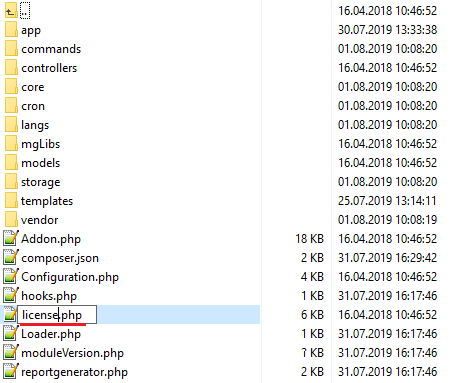
2. Upload and extract the extension into the main WHMCS directory.
Extracted files in your WHMCS directory should look like this:
|
3. When you install Report Generator For WHMCS for the first time you have to rename the 'license_RENAME.php' file.
The file is located in 'modules/addons/reportgenerator/license_RENAME.php'. Rename it from 'license_RENAME.php' to 'license.php'.
|
4. In order to configure your license key, you have to edit the previously renamed 'license.php' file.'
Enter your license key between quotation marks as presented on the following screen. You can find your license key in our client area → 'My Products'.
|
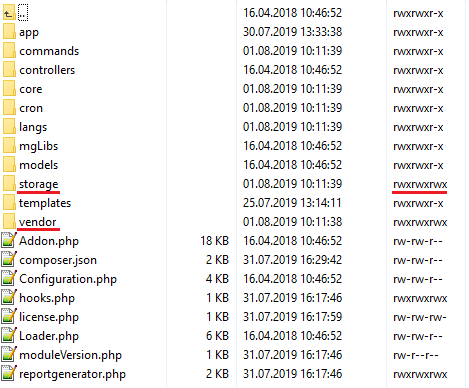
5. Now, set up the 'storage' folder as recusrively writable.
This folder should be available at 'your_whmcs/modules/addons/reportgenerator/' .
In addition, you will also neeed to set the 'your_whmcs/modules/addons/reportgenerator//vendor/microweber'
directory as writable and 'your_whmcs/modules/addons/reportgenerator/vendor/microweber/screen/bin' as writable and executable.
|
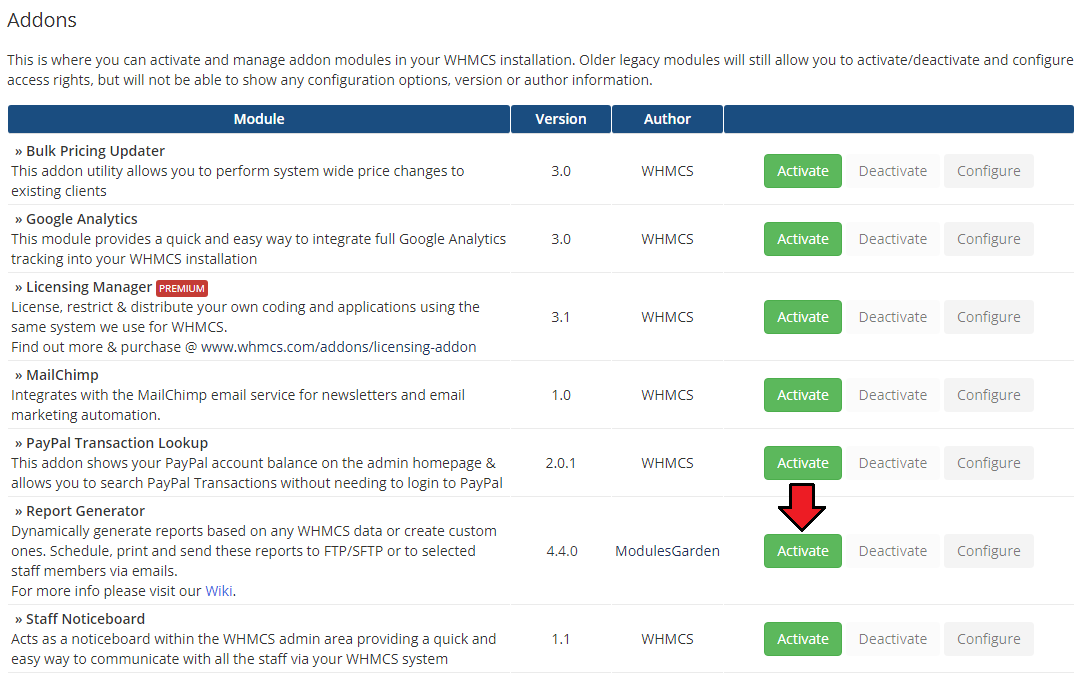
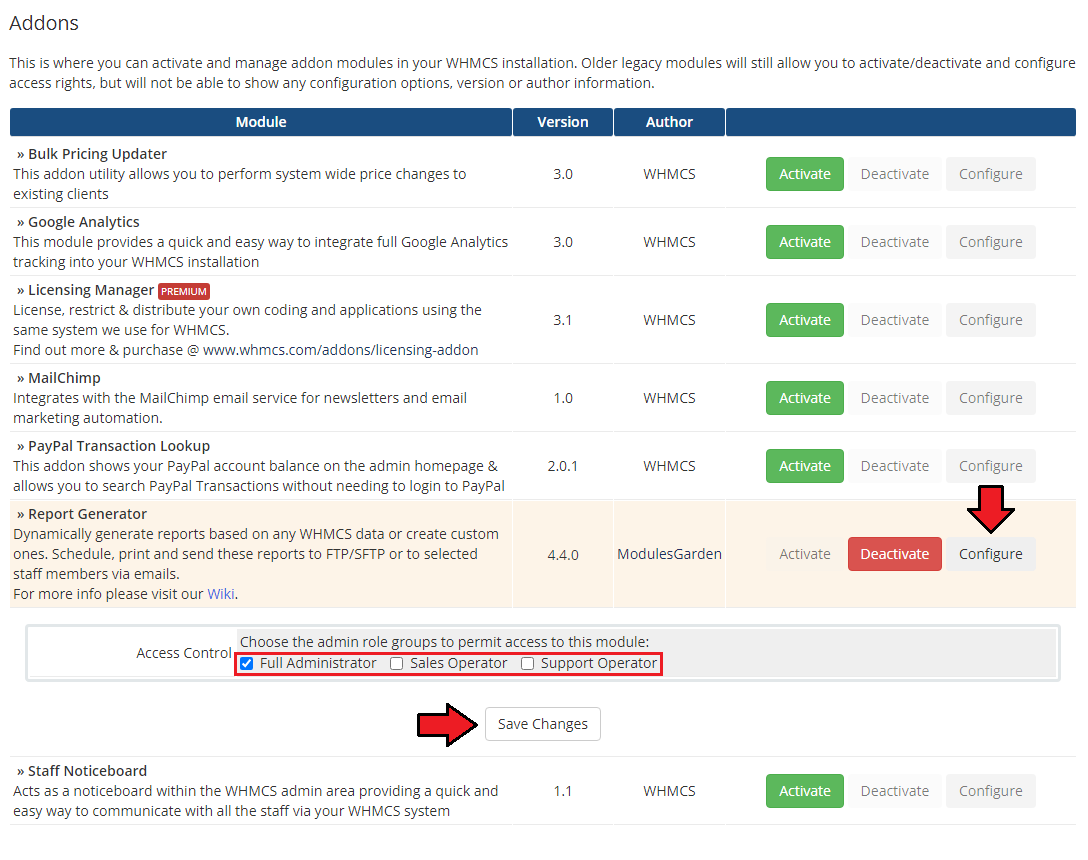
6. Now you have to activate the module in your WHMCS system.
Log in to your WHMCS admin area. Go to 'Setup' → 'Addon Modules'. Afterwards, find 'Report Generator' and press the 'Activate' button.
|
7. In the next step you need to permit access to this module.
To do so, click on 'Configure' button, tick 'Full Administrator' and press 'Save Changes'.
|
8. The last step is setting up three cron jobs:
- To assure proper work of the module you will need to install the Phantom JS library.
To do so, move to 'your_whmcs/modules/addons/reportgenerator/cron/' and run the below command:
php cron.php install:phantomjs
Then, run in the terminal:
chmod +x your_whmcs/modules/addons/reportgenerator/vendor/microweber/screen/bin/phantomjs
- The next cron job is responsible for sending reports to email or to FTP/SFTP. It is advised to run it every 5 minutes:
php -q your_whmcs/modules/addons/reportgenerator/cron/cron.php queue
- The last cron job allows to execute scheduled in the module tasks. It is advised to run it once for 24 hours:
php -q your_whmcs/modules/addons/reportgenerator/cron/cron.php task:scheduledTasks
|
9. You have just successfully installed Report Generator!
You can access the module at 'Addons' → 'Report Generator'.
|
Configuration and Management
Report Generator For WHMCS allows you to create custom reports by adding report widgets either on an advanced or a beginner level.
The module also offers additional useful features like predefined reports, import of the reports, generating reports in PDF and CSV, ability to send them to admins and much more.
|
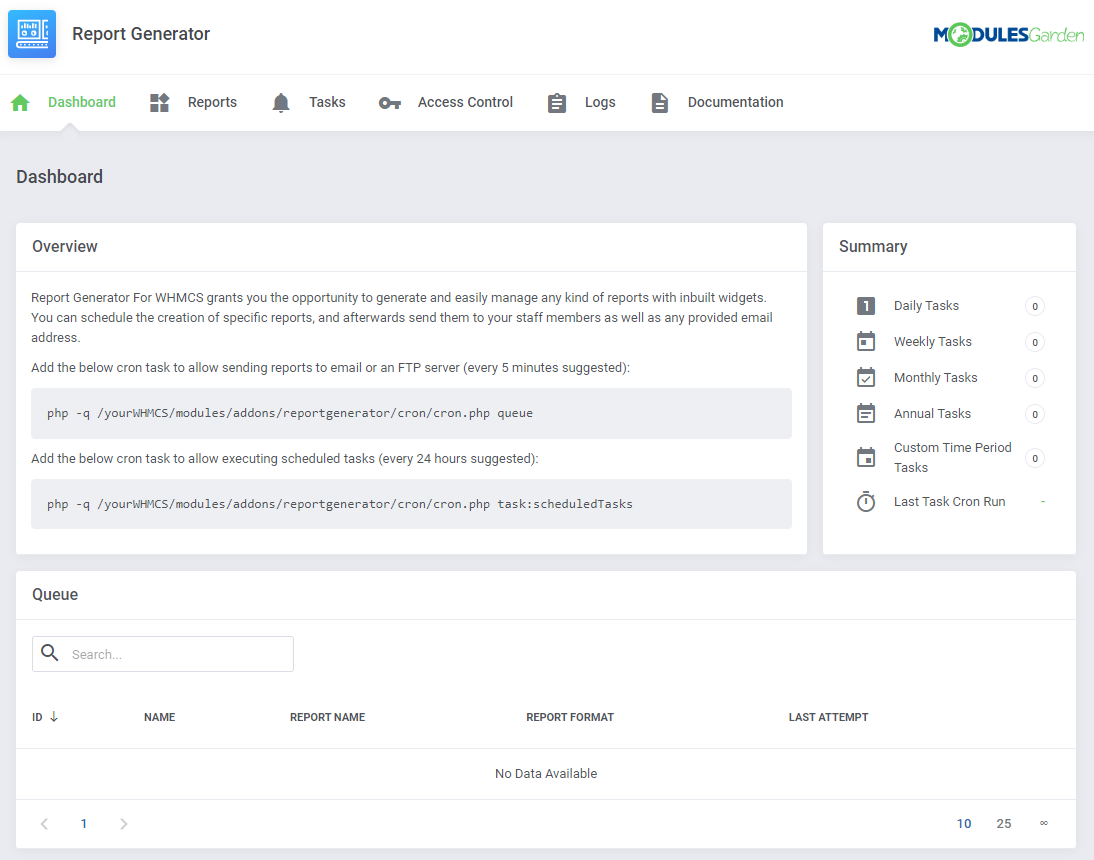
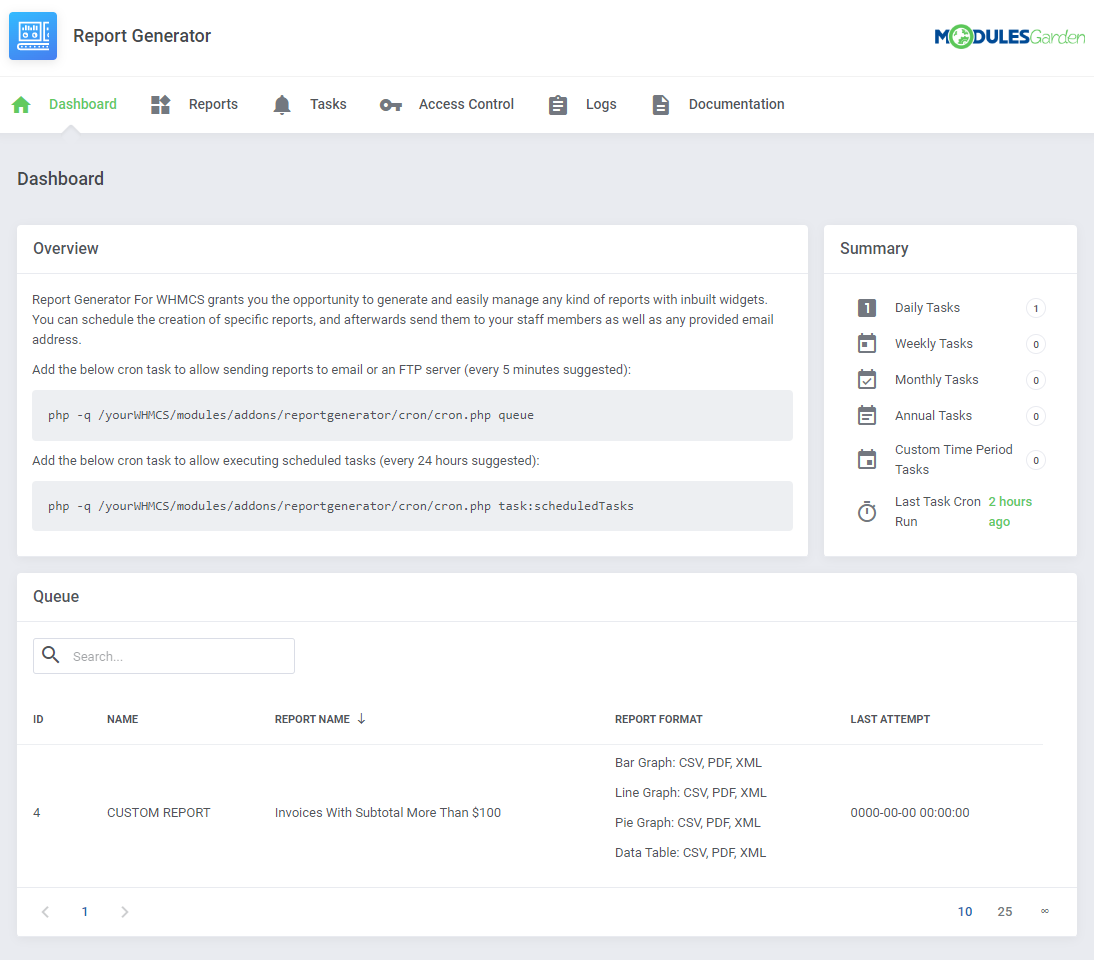
Dashboard
| On dashboard you can find a quick summary of scheduled tasks and a queue with the latest tasks.
|
Reports
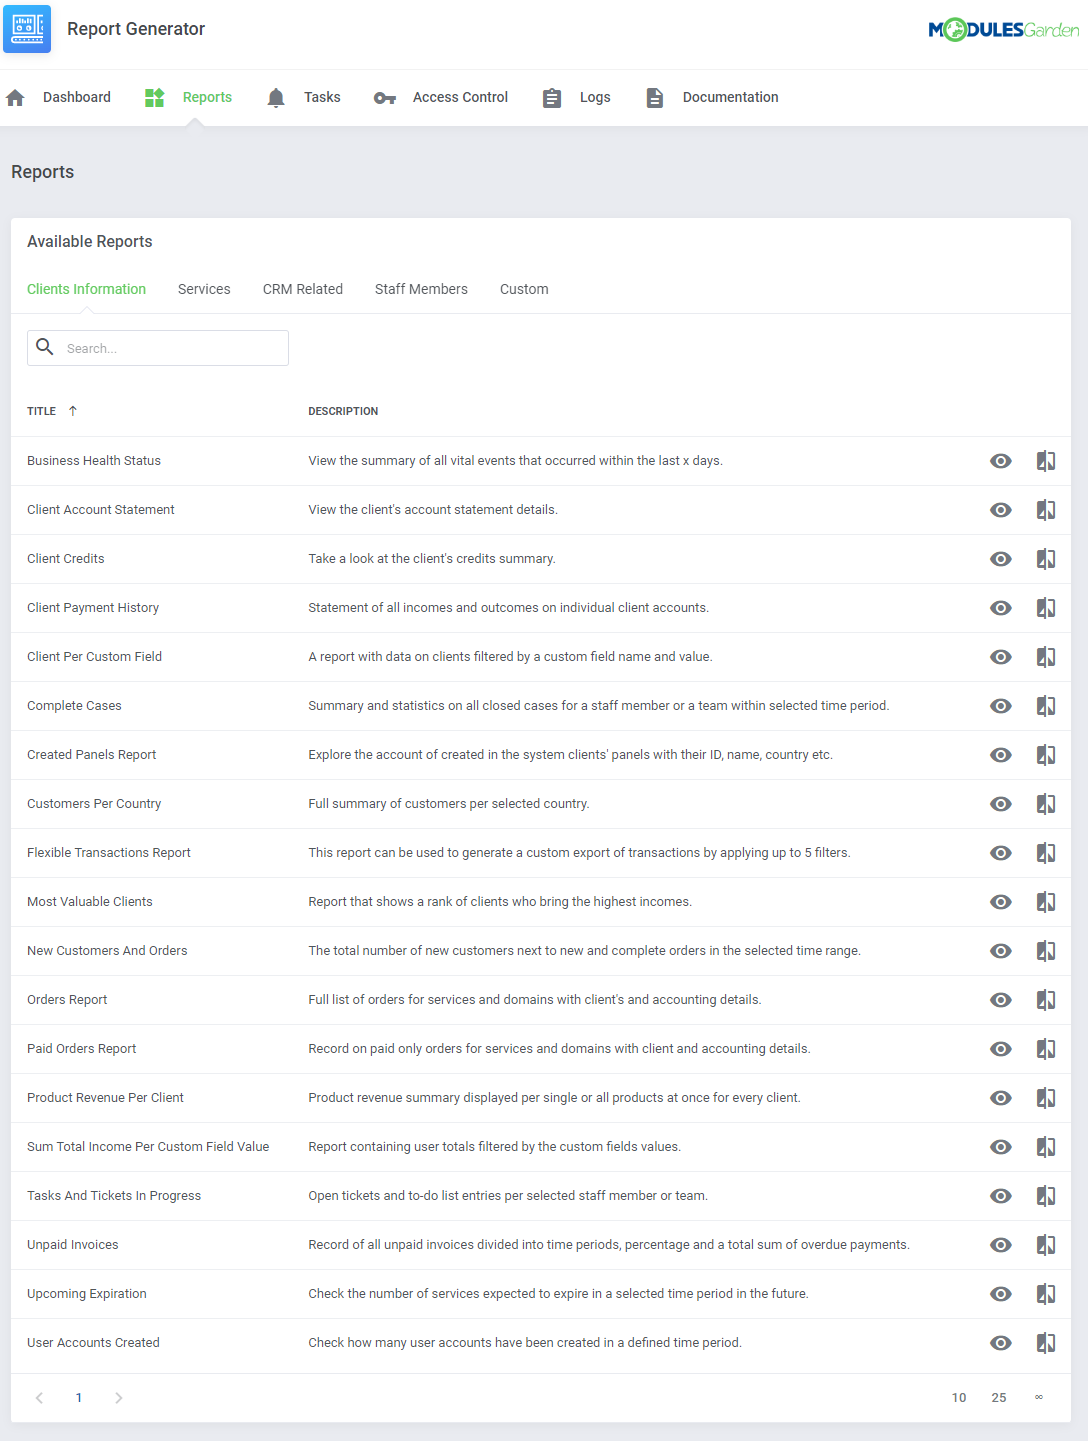
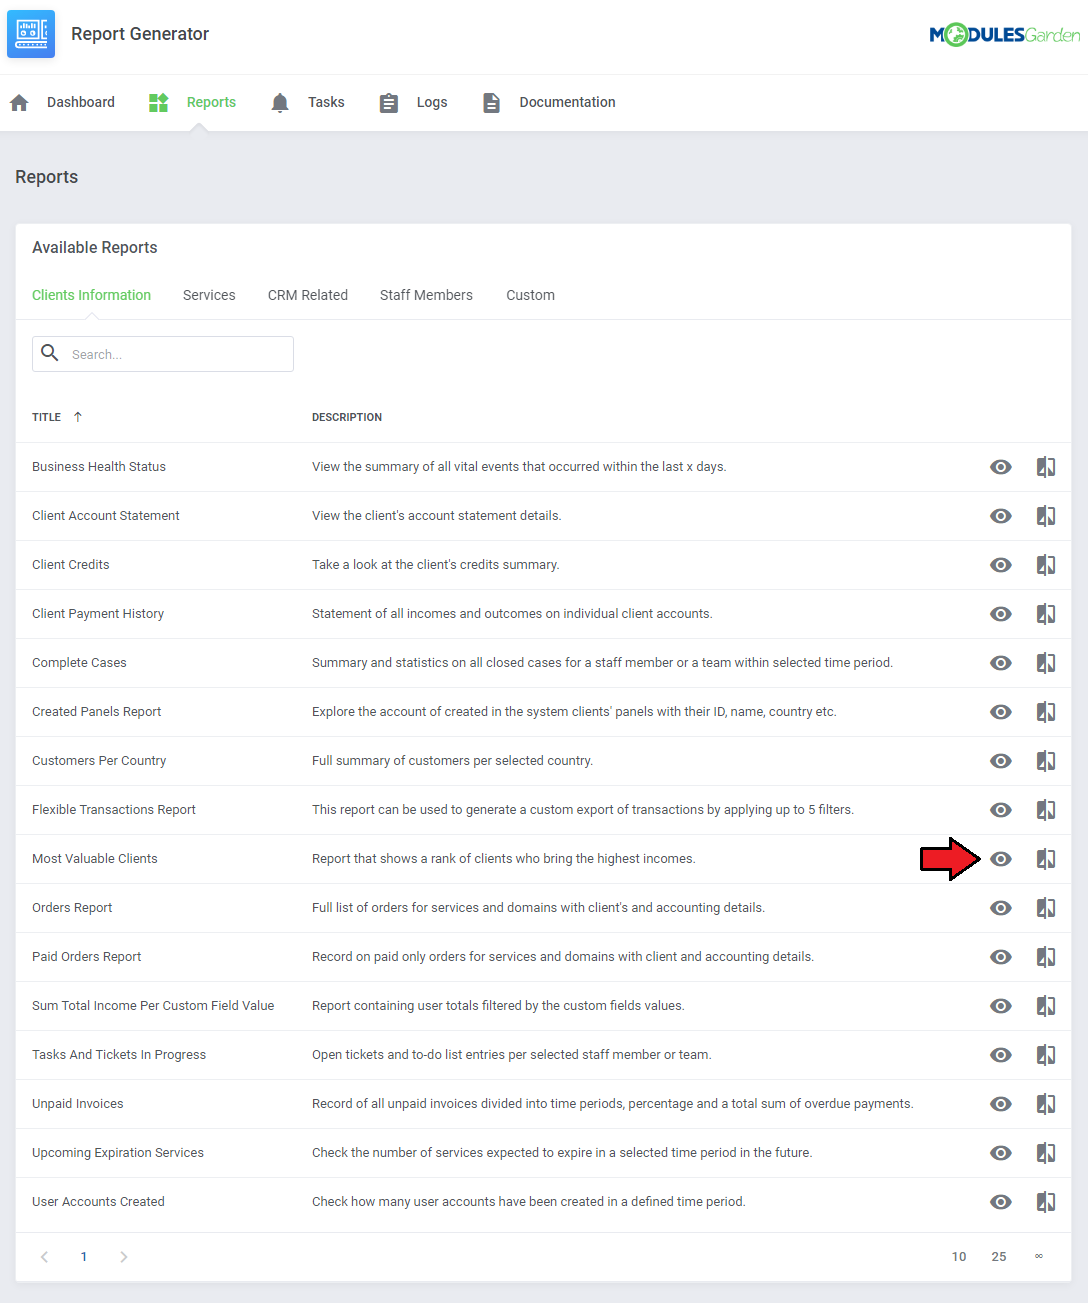
'Reports', the main section of the module, gives a preview of all available reports, those predefined as well as those you create by yourself.
Predefined reports are divided into four categories plus custom reports if you have some.
|
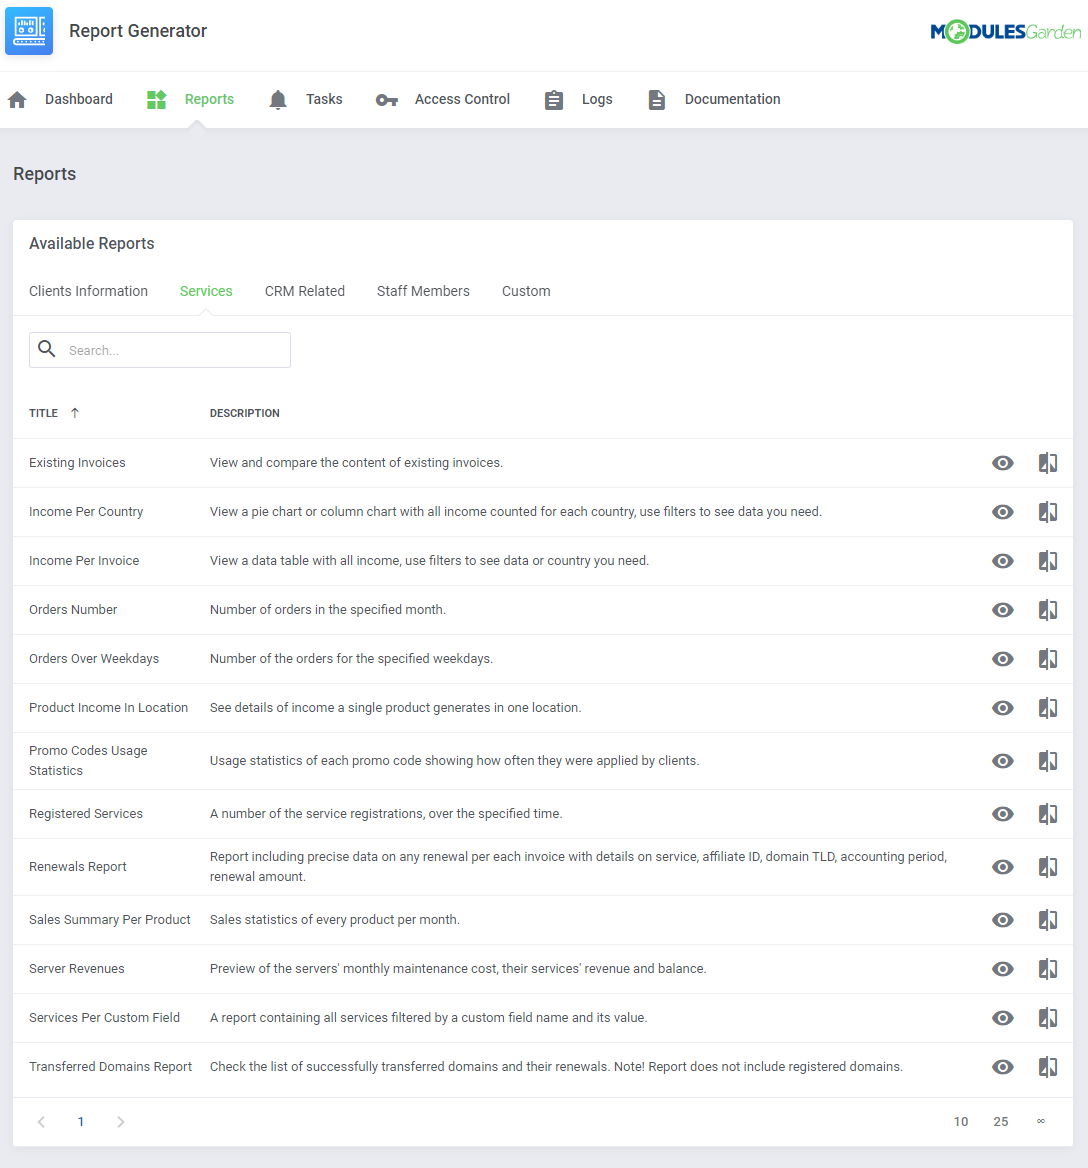
| Clients Information - twelve predefined reports that will show statistics on data related to your clients, for example statistics on placed orders, tasks, etc.
|
| Services - eight different reports ready to analyze any services related data like income, renewals or transfers in your system.
|
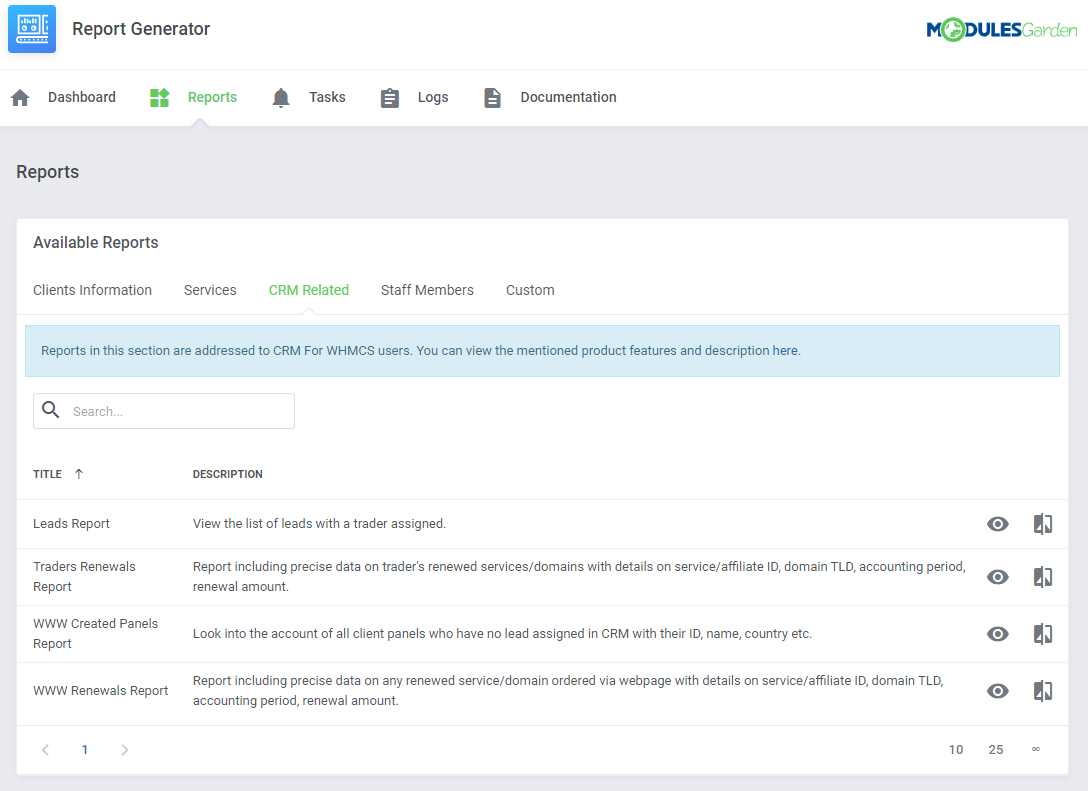
CRM Related - four ground reports based on your CRM data. Please note that you can see them only if you are using our CRM For WHMCS module.
More about CRM For WHMCS can be found here, instructions how to configure your CRM.
|
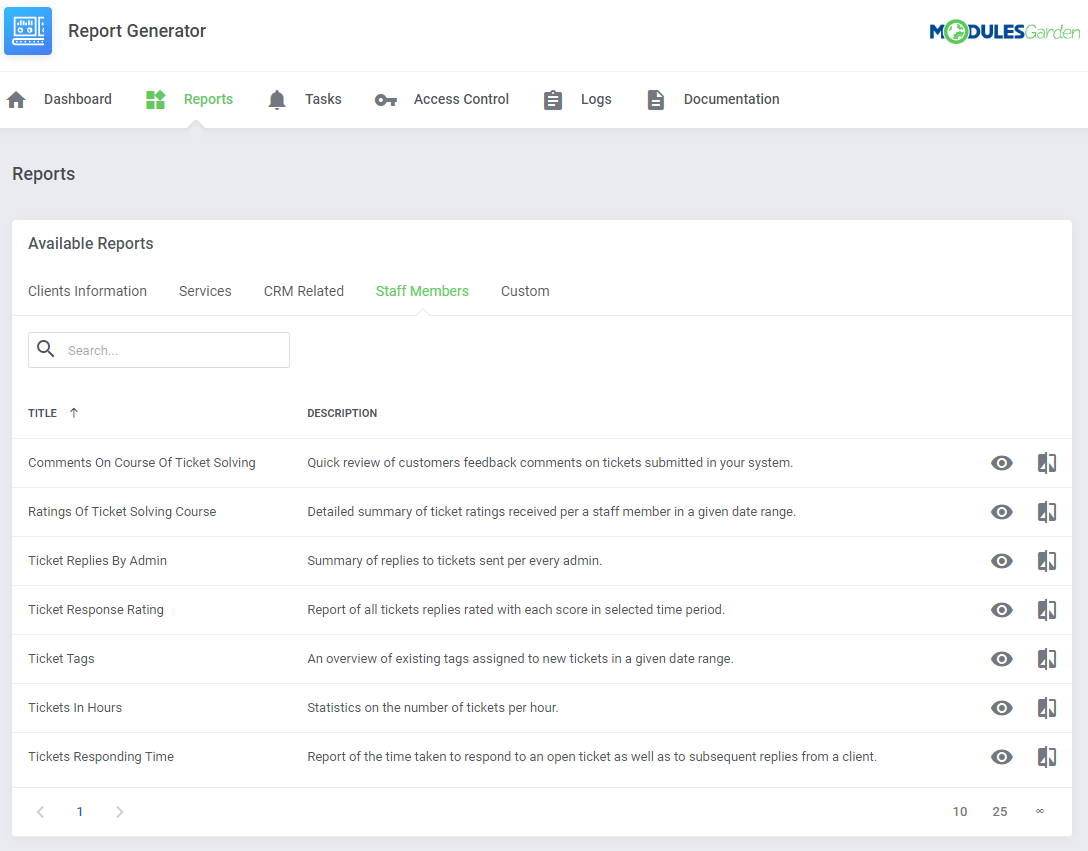
| Staff Members - five predefined reports related to staff members and tickets department.
|
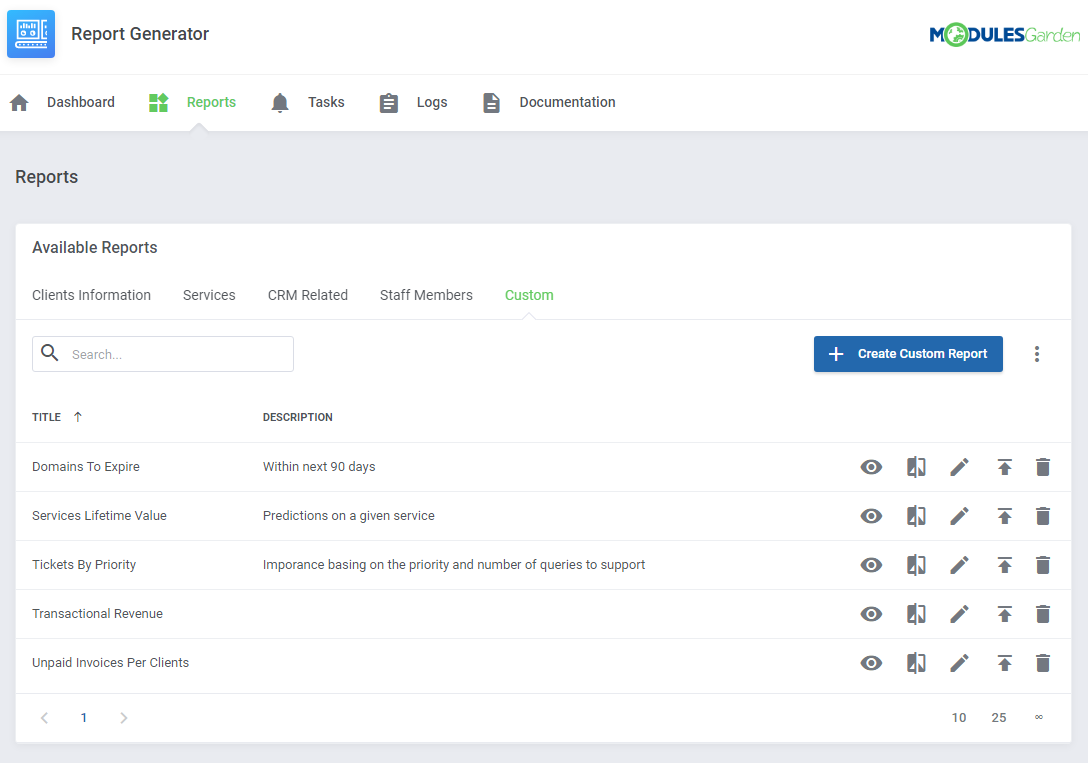
| Custom - all reports that you have personally created using our widgets.
|
Report View
| Press 'View' icon next to a report you are interested in.
|
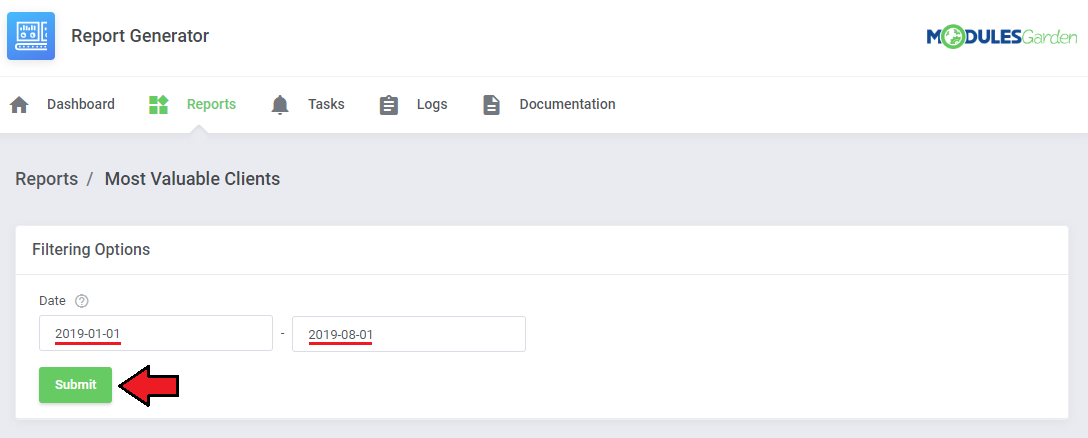
Depending on the type of report you choose, you can set the time frames within which you want to see the statistics.
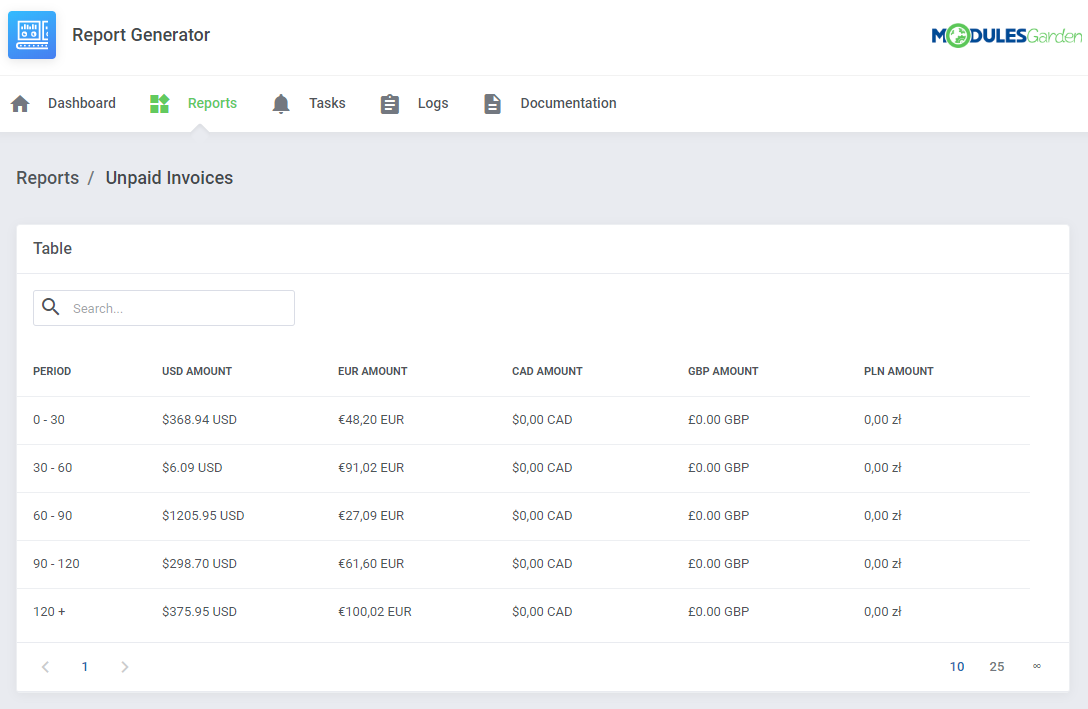
Provide the beginning and ending dates, then press 'Submit' button. Fresh report will be generated on the run.
|
| In case of some reports, filtering is impossible due to the stable content of the report.
|
| You can always view a printable version of the report or generate a PDF or CSV which can be saved on your disk. The corresponding buttons can be found at the bottom of the report.
|
Generate task to schedule sending the regularly generated report either to FTP/SFTP server or to selected admin users via email.
Keep in mind that to assure sending these reports, cron task 'queue' must run every 5 minutes.
|
Compare Reports
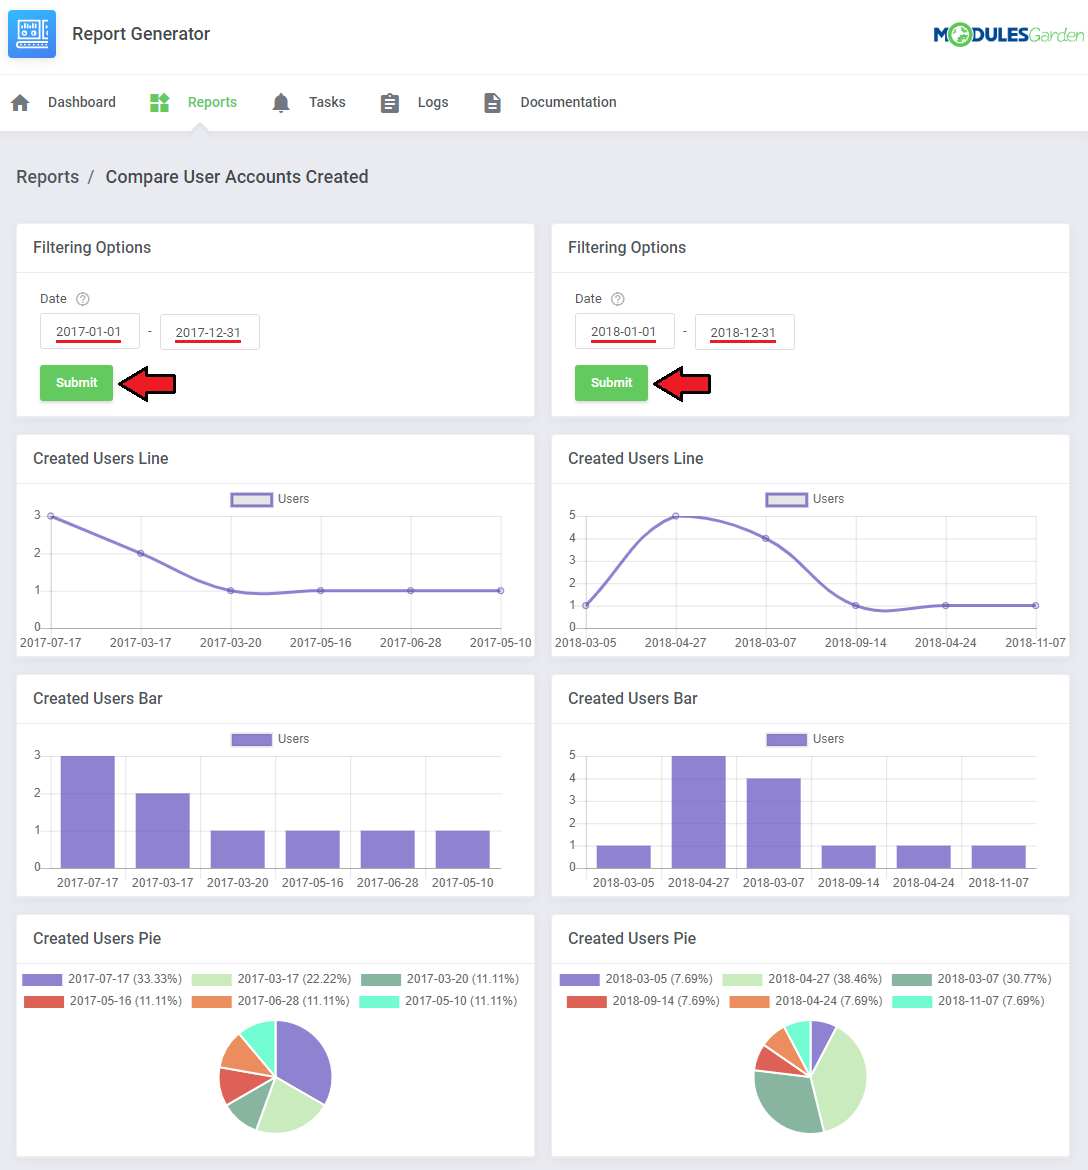
| It is a great tool that allows to quickly compare data.
|
You do not need to search for stored files on your disk, simply set dates which you need to analyze and check instant results.
Two reports will appear next to one another to allow easy examination.
|
Creating Report
In this section we will show you how to prepare a few exemplary reports.
We will now show you how to develop two different reports, each one will be slightly more complicated than the previous one.
The first steps are the same for each advancement level.
|
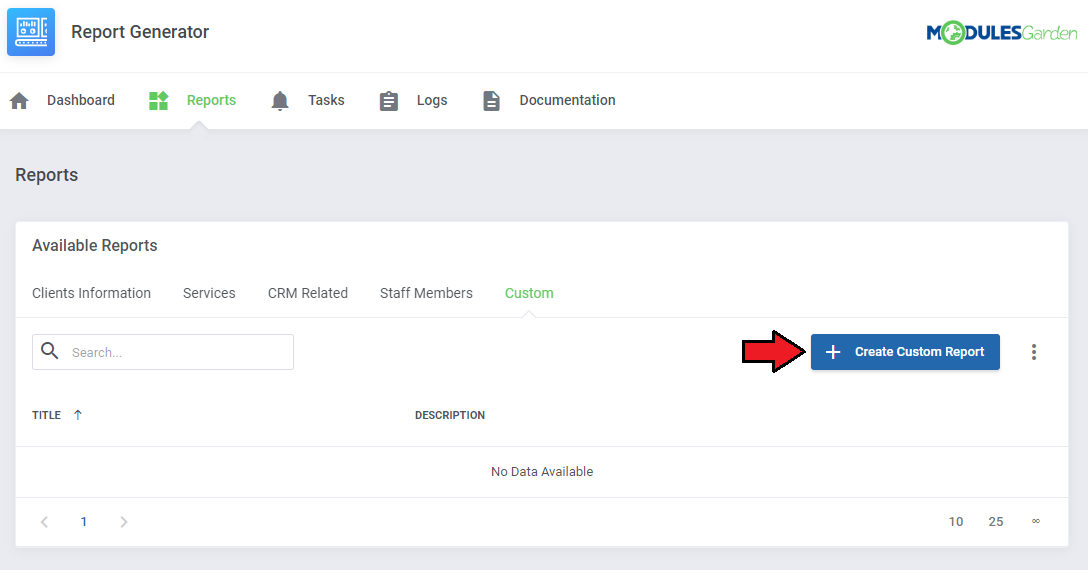
| Move to 'Reports' → 'Custom' and press 'Create Custom Report'.
|
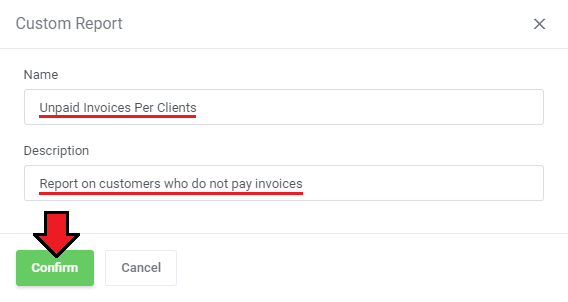
| Now, name your report and add a short description. Press 'Confirm'.
|
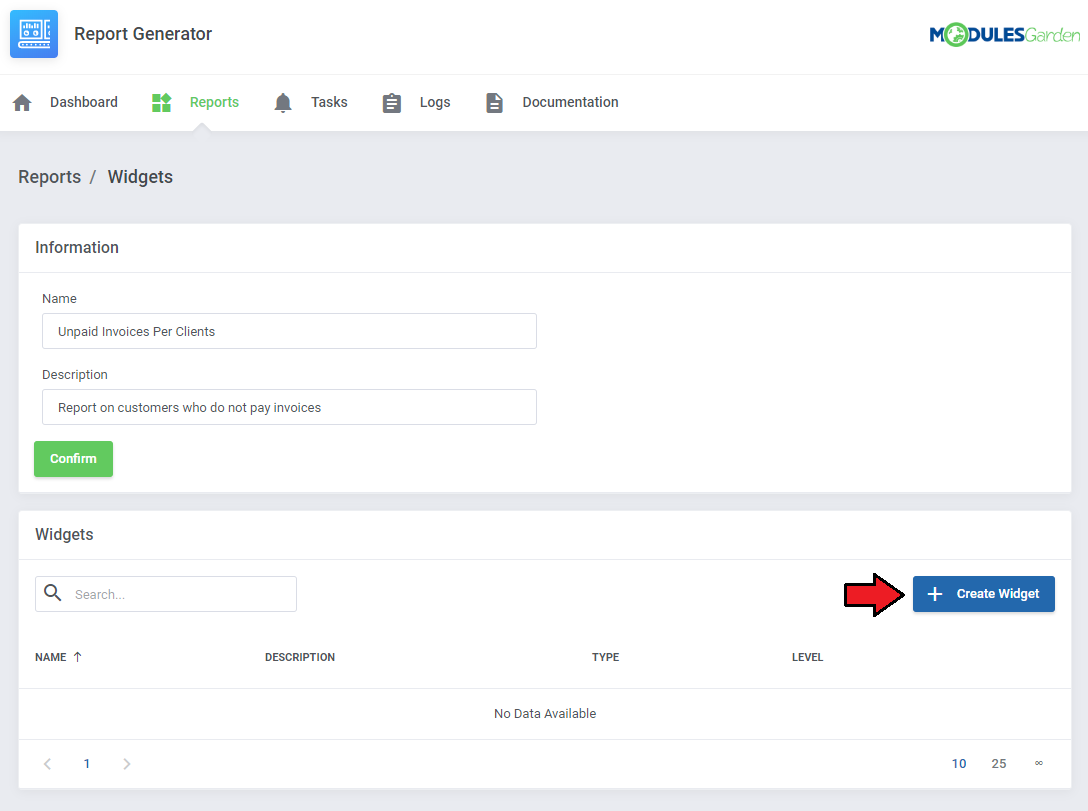
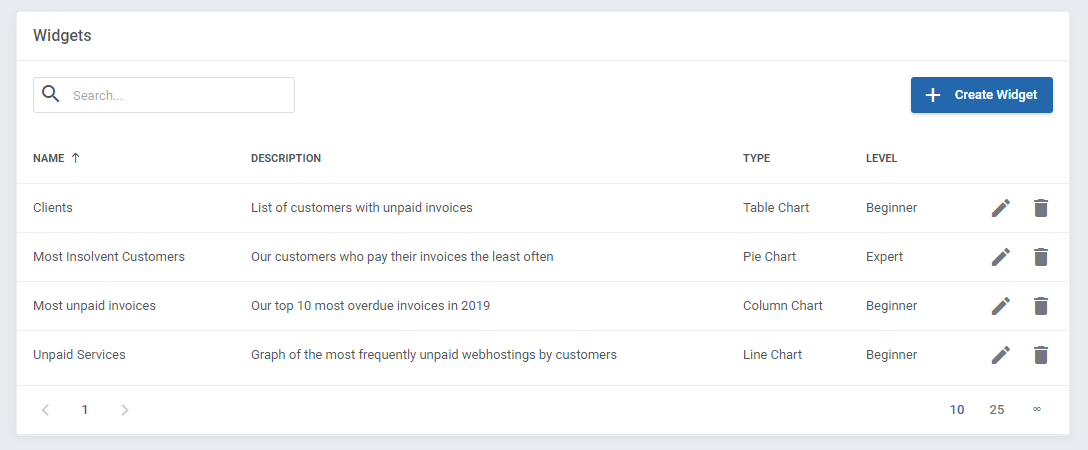
You will be automatically moved to the 'Widgets' section where you need to build the newly created report.
Start with the first widget.
|
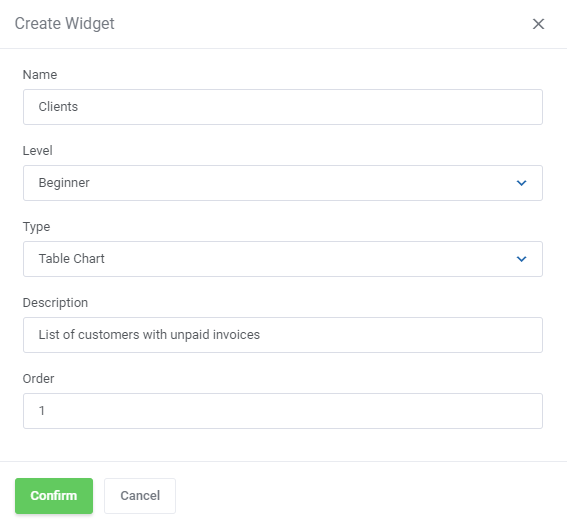
1. Name the widget to easily note the data type.
2. Now select the advancement level of the widget creator:
Let's begin with 'Beginner'.
3. Select the chart type that shall be used to view data in this widget.
4. Add a short description.
|
Beginner
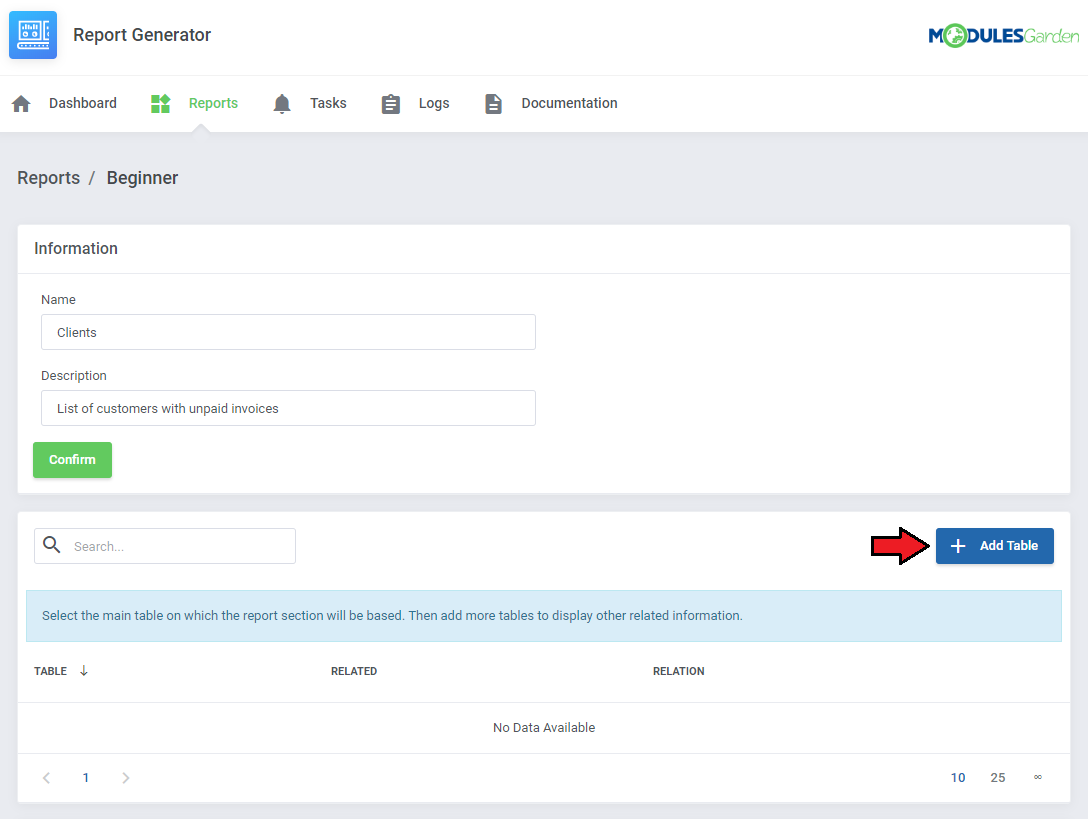
The very first steps of creating a report is defining a base table, only when it is added, you may move to the next steps.
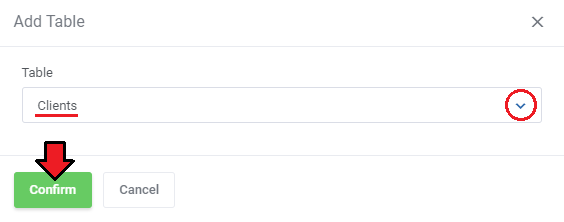
Depending on what your report is going to analyze, you must now find appropriate table.
|
| For example, if you want to create a report that will base on clients, then find such WHMCS table.
|
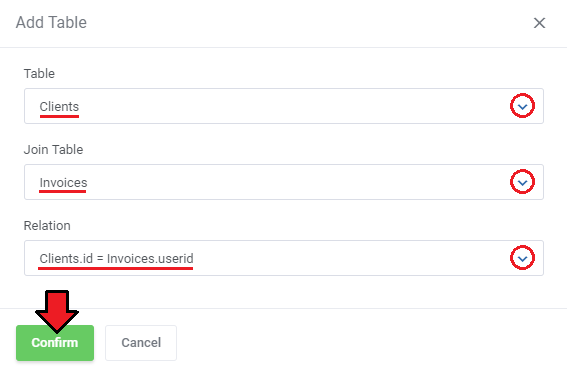
| If you want to join it with another table, then press 'Add Table' button again. Note that now, you may join only tables that are related to each other.
|
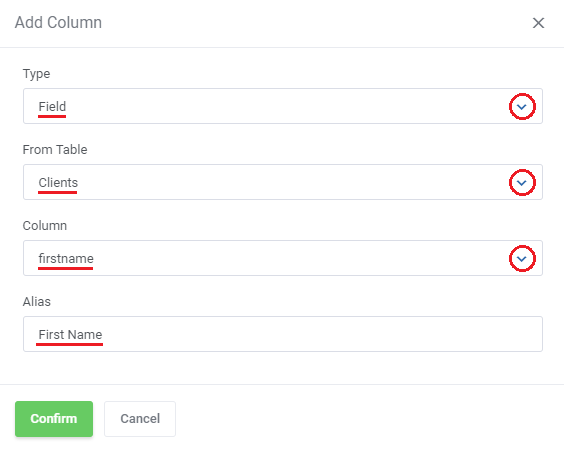
| From available 'Fields', select the column you wish to see on your report. Optionally, you can also add a friendly alias to it.
|
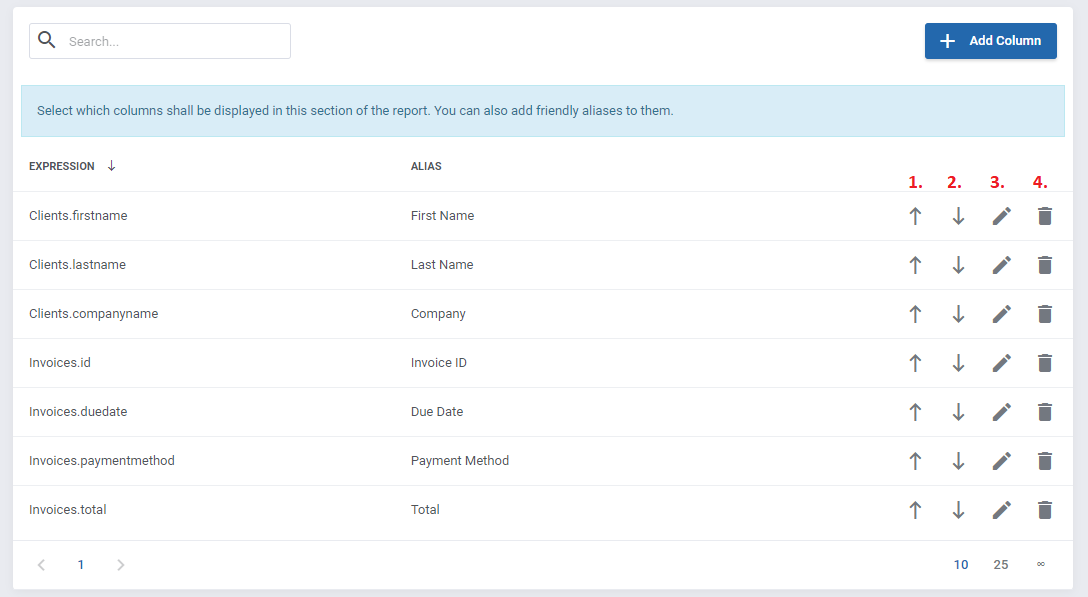
| Repeat that step until you get the desired number of columns.
|
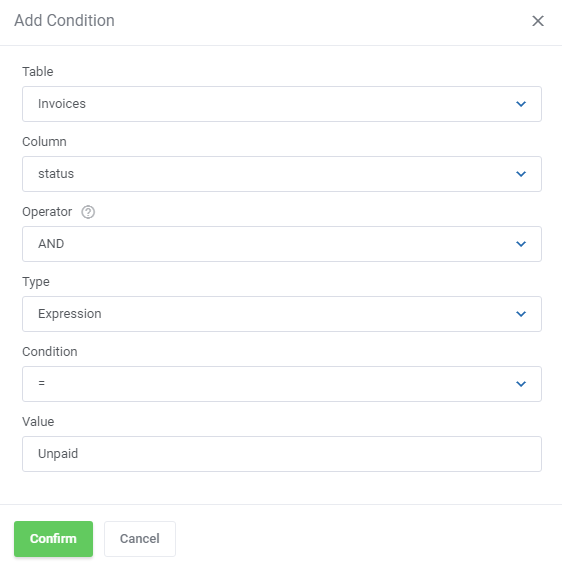
| Now let's add a condition, which will determine on the basis of which invoices, the list of clients will be displayed.
|
In our example, we have decided that it will be a list of customers who have any unpaid invoices.
So let's select 'status' from the 'Invoices' table, and add 'Expression' condition type that is equal to 'Unpaid' value.
|
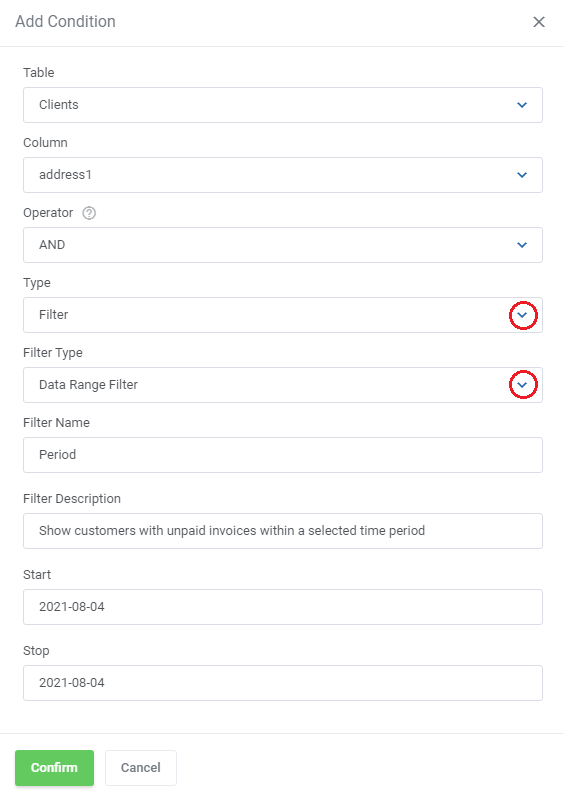
| If you want, you can also add a filter here, which will e.g. narrow down the number of results to a selected time interval.
|
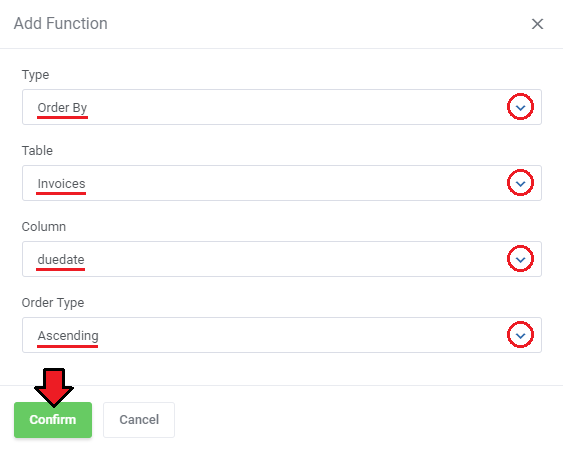
| You can also decide the way the entries will be sorted. To do that, press 'Add Function' in the next section.
|
| On the screen below you can see, that we choose sorting by invoice's due date in an ascending order.
|
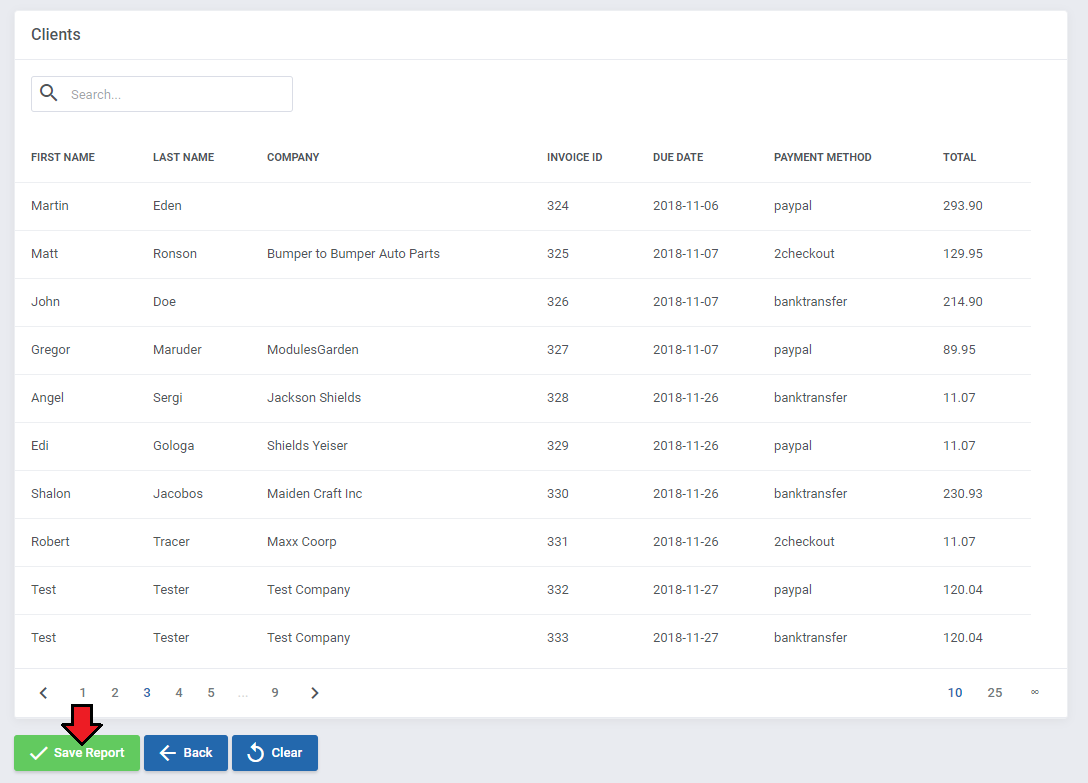
Finally, let's check how our report will look like.
You can see there a list of clients, due date of their unpaid invoices together with the amount to pay and a selected payment method.
Do not forget to save the changes when your report is ready.
|
In addition, when creating the report, you will have access to the generated SQL code.
All changes in the report will automatically update the SQL code as well as the preview of the results.
|
Apart form the options used to generate this report, there are also many more settings that can help you create your ideal report without any specialist knowledge.
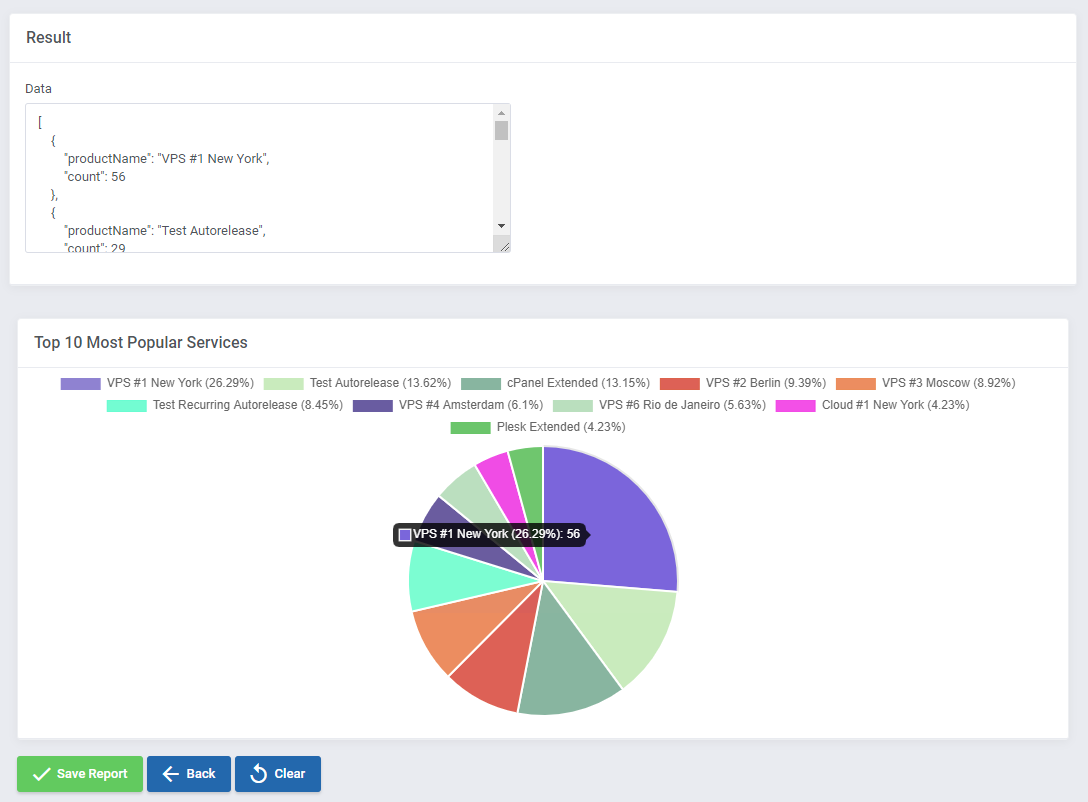
Discover them on your own and instantly see the results in the live preview. Try also other types of widgets that you can add to your report, such as pie, column or line graphs.
Of course, if you find this simple report generation mode not sufficient for you, you can always use the expert mode!
|
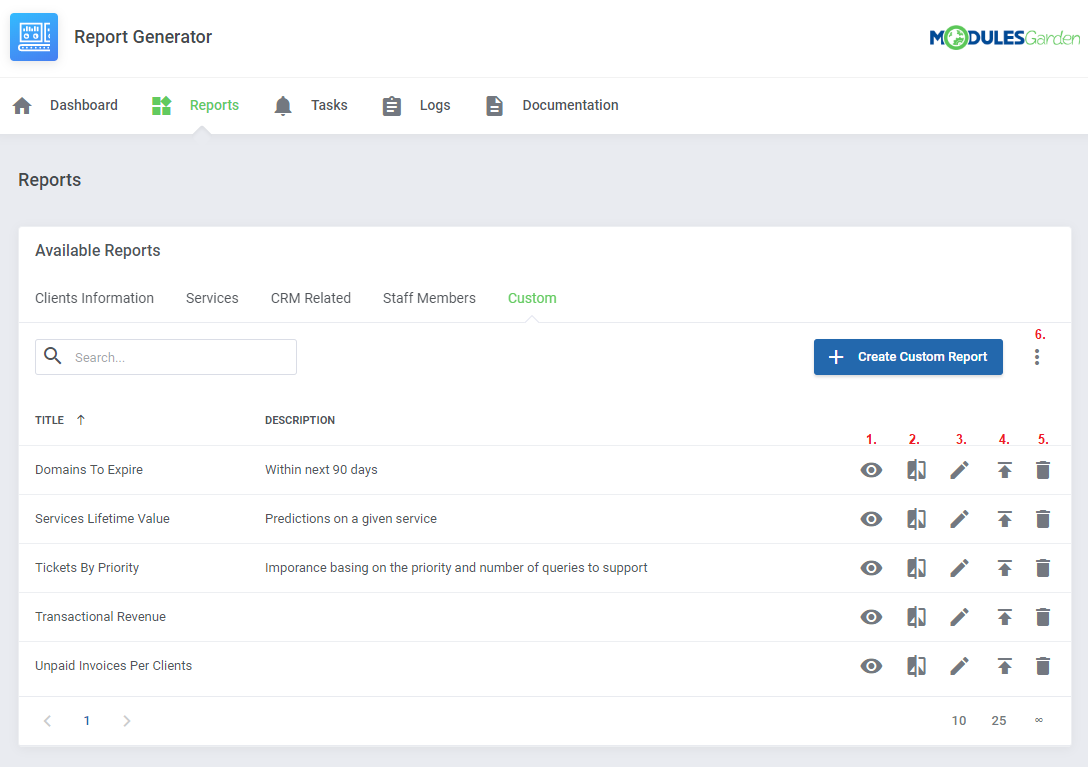
Once your report is ready, you will find it in the 'Custom' tab.
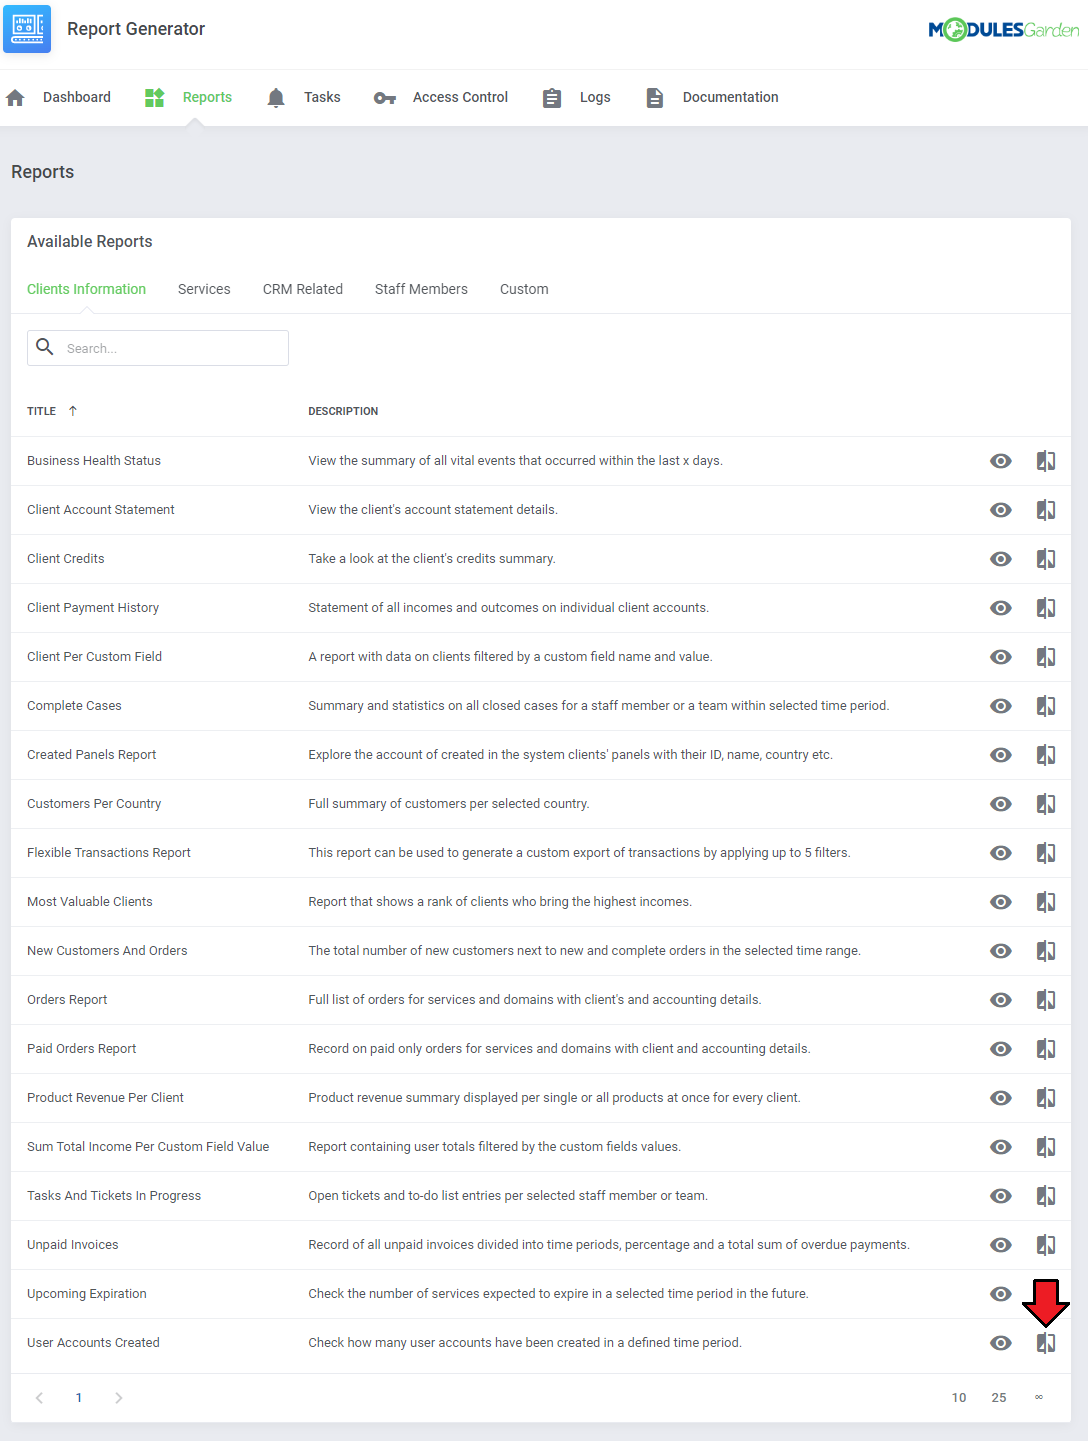
From there you can (1) view report details, (2) compare side-by-side, (3) go back to edition, (4) export its whole structure to a file or (5) delete it.
You can also import exported reports by using (6) import tool from additional actions menu.
|
Expert
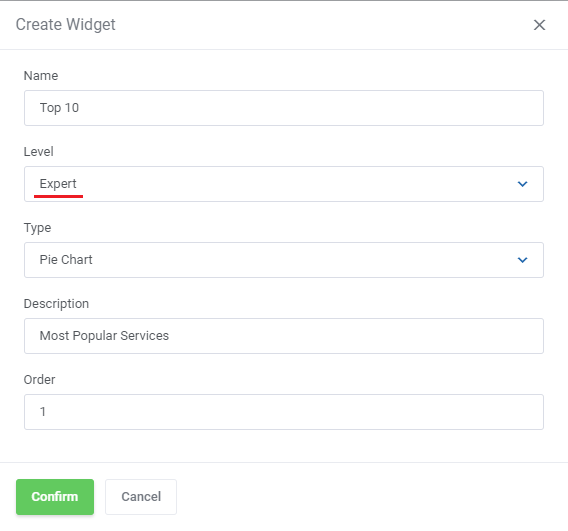
When you create a new widget for your report, in addition to the beginner mode, you can also select the expert mode as creator.
This allows you to use advanced options, such as writing an SQL query or using the PHP code.
|
| Start by writing your own SQL query. It can be as complex as you need it to be.
|
| You can still add an optional filter that can be used while searching through the report.
|
| There is also a possibility to make adjustments to your report using the PHP language.
|
| As always, the results of your changes will be automatically updated in the live preview.
|
Tasks
At 'Tasks' section, you can schedule your reports to be generated in a given time period.
Then, the generated reports can be uploaded to any SFTP/FTP server you provide or be directly sent to your chosen personnel members or any email addresses you provide.
This tool can also be useful when you want to generate on-demand a large report that can take some time to be prepared.
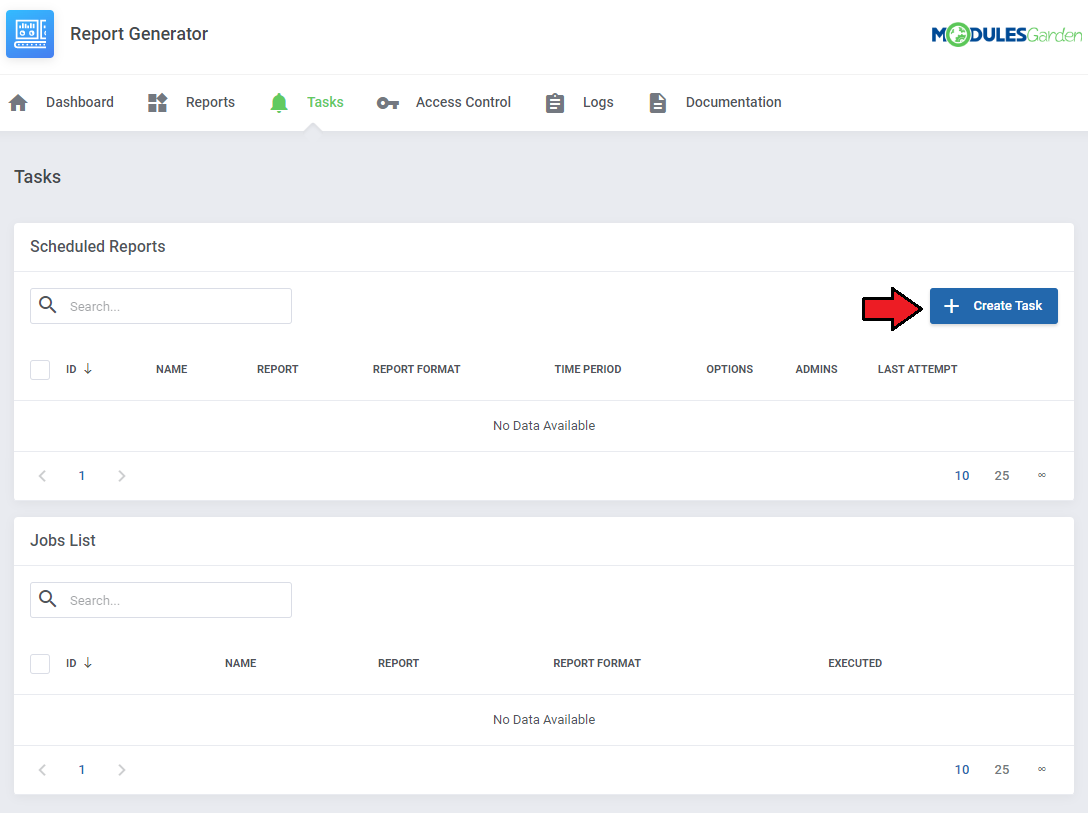
Press 'Create Task' to begin.
|
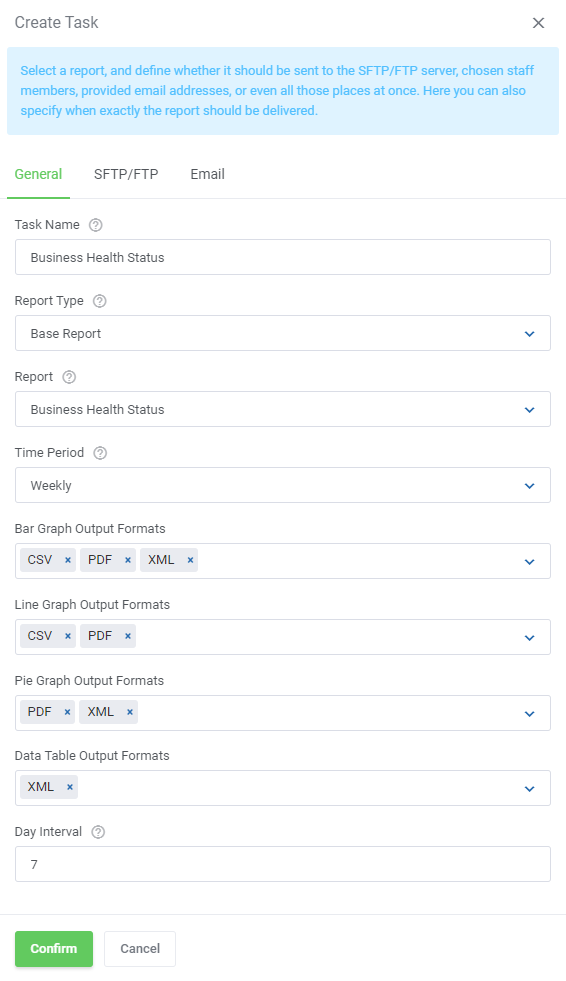
A box with a form to fill in will appear. Start by selecting the report type you want to schedule, either base or a custom one.
In the 'Report' dropdown menu, only the reports of selected type will appear.
Note: The form may slightly differ depending on the selected report type.
Afterwards, specify the conditions: if the report shall be generated right now or how often, as well as the time period for which the report shall be generated etc.
Optionally, you can also change the name of the task to a more friendly.
|
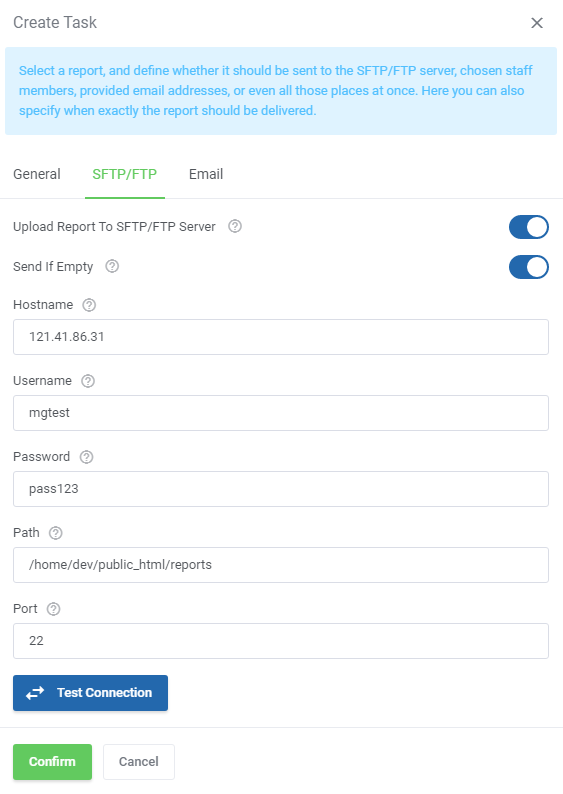
| Next, decide whether the report should be sent to an SFTP/FTP server.
If so, enable this option and then fill out any server data to successfully connect and allow the task to be completed in timely manner.
|
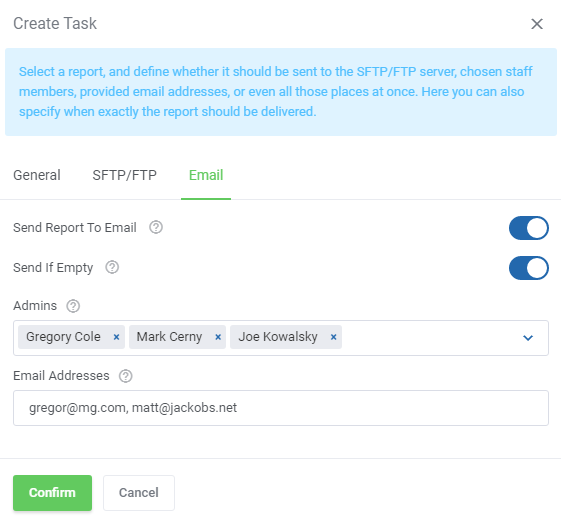
In case you wish the report to be delivered to your personnel members via email, simply enable this option and then select admin users and/or type in email addresses manually.
Press 'Confirm' button when the task is correctly configured.
|
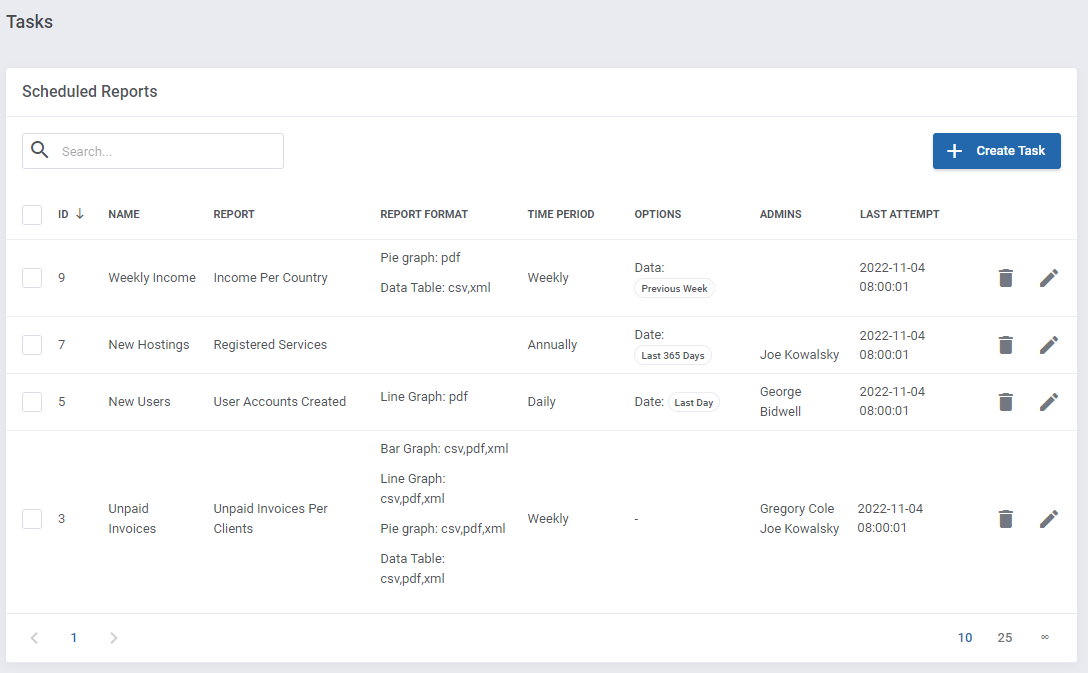
As you can see on the following screen, all scheduled reports are listed in the table with the report name, frequency, assigned admin users etc.
Each of the planned relations can be removed or edited at any time, use action buttons to do so.
|
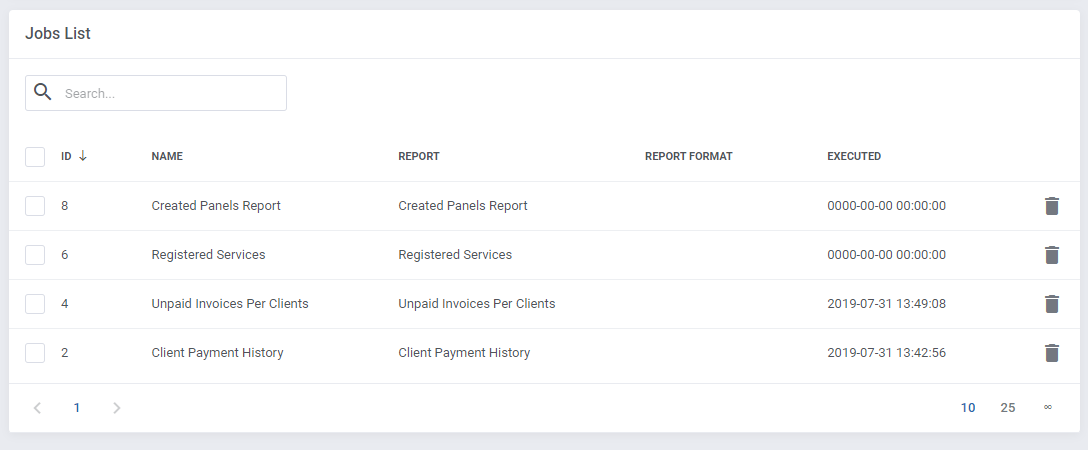
| Underneath, you will find a list of current jobs. In case of necessity, you may remove any.
|
| Note, that tasks can also be created straight from the view of any report.
|
| Remember that a cron job is responsible for scheduled tasks, make sure it is set up correctly.
You can find any details in point 8 of this instruction.
|
Logs
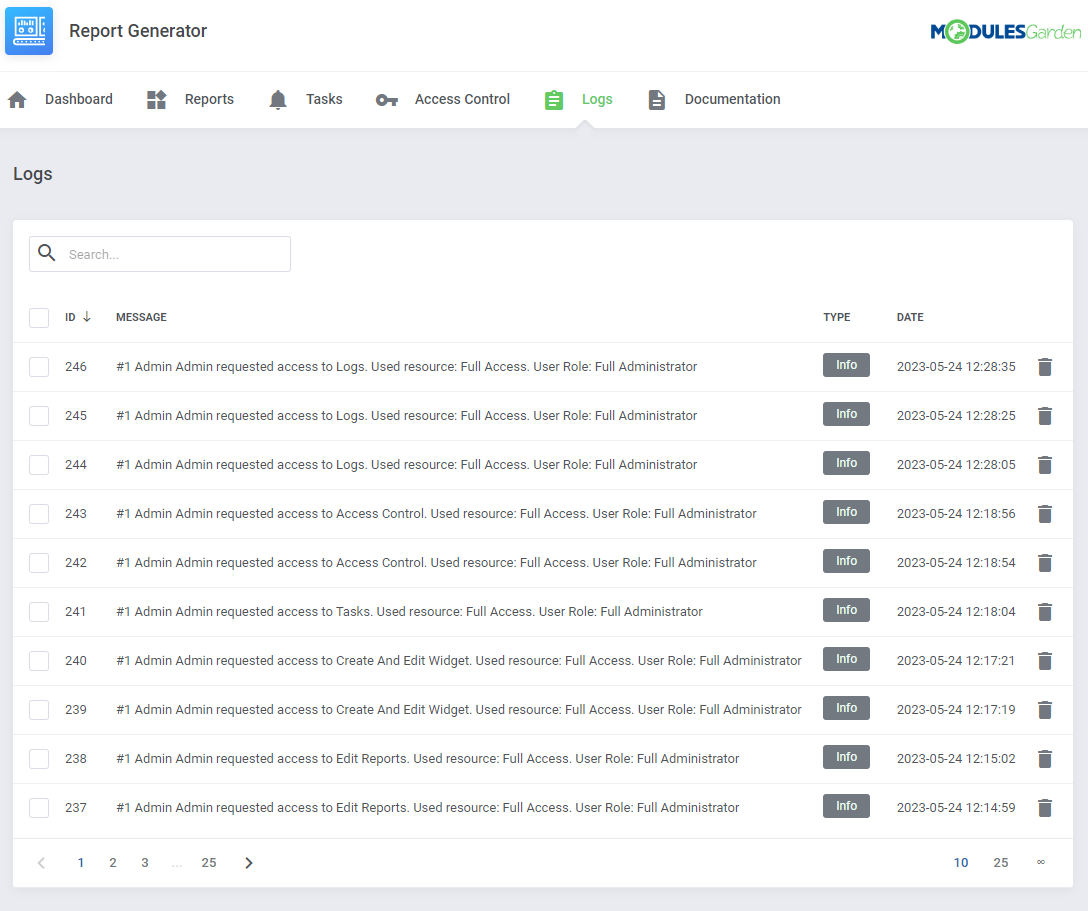
The last section includes logs on any actions performed in the module.
Delete single logs or use mass action button to delete them in bulks.
|
Tips
1. If you want to edit your custom report and make it more complicated, you may do it with a more advanced creator.
When you are editing a report you may choose from the beginning which creator type you are going to use.
|
| 2. Report Generator For WHMCS requires ZipArchive PHP library installed on your server.
|
Update Instructions
Essential guidance through the process of updating the module is offered here.
Keep in mind there is a quick and easy option in our client area that will let you upgrade the license of your module to an open source version at any time - and at a lower price!
To take advantage of it, simply use the License Upgrade button located on the product's page and a discounted invoice will be generated automatically.
|
Reports migration from 3.x o 4.x
In order to successfully migrate your reports from the 3.x.x module version to the latest one, please execute the cron task:
yourWHMCS/modules/addons/reportgenerator/cron php cron.php migration:reports
Important: Reports created with PHP code are not migrated, only the ones in SQL.
|
Common Problems
| 1. When you have problems with connection, check whether your SELinux or firewall does not block ports.
|
