Hetzner Cloud Servers For WHMCS
(→Configuration of Product) |
(→About Hetzner Cloud Servers For WHMCS) |
||
| (37 intermediate revisions by 3 users not shown) | |||
| Line 1: | Line 1: | ||
| − | <meta name="keywords" content="hetzner cloud servers for whmcs, hetzner cloud servers configuration, hetzner cloud servers management, hetzner cloud servers installation, hetzner cloud servers guide, modulesgarden hetzner cloud servers, hetzner cloud servers wiki, hetzner cloud servers tutorial, hetzner cloud servers tips, hetzner cloud servers module wiki, hetzner cloud servers common problems, about hetzner cloud servers, hetzner cloud servers documentation, hetzner cloud servers faq, hetzner cloud servers help, hetzner whmcs, hetzner servers whmcs, hetzner virtual machines whmcs | + | <meta name="keywords" content="hetzner cloud servers for whmcs, hetzner vps for whmcs, hetzner cloud servers configuration, hetzner vps configuration, hetzner cloud servers management, hetzner cloud servers installation, hetzner cloud servers guide, modulesgarden hetzner cloud servers, modulesgarden hetzner vps, hetzner cloud servers wiki, hetzner cloud servers tutorial, hetzner cloud servers tips, hetzner cloud servers module wiki, hetzner cloud servers common problems, about hetzner cloud servers, hetzner cloud servers documentation, hetzner cloud servers faq, hetzner cloud servers help, hetzner whmcs, hetzner servers whmcs, hetzner virtual machines whmcs"></meta> |
| − | + | ||
| − | < | + | <meta name="description" content="ModulesGarden Wiki Contains All The Information You Need About The Hetzner Cloud Servers For WHMCS Module."></meta> |
| − | + | ||
=About [https://www.modulesgarden.com/products/whmcs/hetzner-cloud-servers Hetzner Cloud Servers For WHMCS]= | =About [https://www.modulesgarden.com/products/whmcs/hetzner-cloud-servers Hetzner Cloud Servers For WHMCS]= | ||
| Line 21: | Line 19: | ||
{| | {| | ||
|style="padding: 0px 0px 0px 30px;"|✔ View/Reset Server Password | |style="padding: 0px 0px 0px 30px;"|✔ View/Reset Server Password | ||
| + | |} | ||
| + | {| | ||
| + | |style="padding: 0px 0px 0px 30px;"|✔ Change Server Primary IP Address | ||
|} | |} | ||
{| | {| | ||
| Line 42: | Line 43: | ||
{| | {| | ||
|style="padding: 0px 0px 0px 30px;"|✔ View CPU/Memory/Network Usage Graphs | |style="padding: 0px 0px 0px 30px;"|✔ View CPU/Memory/Network Usage Graphs | ||
| + | |} | ||
| + | {| | ||
| + | |style="padding: 0px 0px 0px 30px;"|✔ View Task History | ||
|} | |} | ||
{| | {| | ||
| Line 56: | Line 60: | ||
|} | |} | ||
{| | {| | ||
| − | |style="padding: 0px 0px 0px 45px;"|✔ | + | |style="padding: 0px 0px 0px 45px;"|✔ Number Of Floating IPv4 And IPv6 Addresses |
|} | |} | ||
{| | {| | ||
| − | |style="padding: 0px 0px 0px 45px;"|✔ Define | + | |style="padding: 0px 0px 0px 45px;"|✔ Define Additional Volume Size And Filesystem |
|} | |} | ||
{| | {| | ||
| − | |style="padding: 0px 0px 0px 45px;"|✔ Define | + | |style="padding: 0px 0px 0px 45px;"|✔ Define Snapshots Size Limit |
|} | |} | ||
{| | {| | ||
| − | |style="padding: 0px 0px 0px 45px;"|✔ Define | + | |style="padding: 0px 0px 0px 45px;"|✔ Define Random Domain Prefix |
|} | |} | ||
{| | {| | ||
| Line 77: | Line 81: | ||
|} | |} | ||
{| | {| | ||
| − | |style="padding: 0px 0px 0px 45px;"|✔ | + | |style="padding: 0px 0px 0px 45px;"|✔ Select Email Template Sent After Rebuild Action |
|} | |} | ||
{| | {| | ||
| − | |style="padding: 0px 0px 0px 45px;"|✔ | + | |style="padding: 0px 0px 0px 45px;"|✔ Choose User Data |
|} | |} | ||
{| | {| | ||
| Line 117: | Line 121: | ||
{| | {| | ||
|style="padding: 0px 0px 0px 45px;"|✔ Networks | |style="padding: 0px 0px 0px 45px;"|✔ Networks | ||
| + | |} | ||
| + | {| | ||
| + | |style="padding: 0px 0px 0px 45px;"|✔ Task History | ||
| + | |} | ||
| + | {| | ||
| + | |style="padding: 0px 0px 0px 45px;"|✔ Rescue Mode | ||
| + | |} | ||
| + | {| | ||
| + | |style="padding: 0px 0px 0px 45px;"|✔ Soft Reboot | ||
| + | |} | ||
| + | {| | ||
| + | |style="padding: 0px 0px 0px 45px;"|✔ Change Primary IP Address | ||
| + | |} | ||
| + | {| | ||
| + | |style="padding: 0px 0px 0px 45px;"|✔ Reset Password | ||
|} | |} | ||
{| | {| | ||
| Line 126: | Line 145: | ||
{| | {| | ||
|style="padding: 0px 0px 0px 45px;"|✔ Firewalls | |style="padding: 0px 0px 0px 45px;"|✔ Firewalls | ||
| + | |} | ||
| + | {| | ||
| + | |style="padding: 0px 0px 0px 45px;"|✔ Available Images To Rebuild | ||
| + | |} | ||
| + | {| | ||
| + | |style="padding: 0px 0px 0px 45px;"|✔ Available ISO Images | ||
|} | |} | ||
{| | {| | ||
| Line 131: | Line 156: | ||
|} | |} | ||
{| | {| | ||
| − | |style="padding: 0px 0px 0px 30px;"|✔ Select Action On Service Suspension | + | |style="padding: 0px 0px 0px 30px;"|✔ Select Action On Service Suspension And Termination |
| + | |} | ||
| + | {| | ||
| + | |style="padding: 0px 0px 0px 30px;"|✔ Power Off VM Before Upgrade | ||
| + | |} | ||
| + | {| | ||
| + | |style="padding: 0px 0px 0px 30px;"|✔ Enable Static VM Domain Name | ||
|} | |} | ||
{| | {| | ||
| Line 146: | Line 177: | ||
{| | {| | ||
|style="padding: 0px 0px 0px 30px;"|✔ View/Reset Server Password | |style="padding: 0px 0px 0px 30px;"|✔ View/Reset Server Password | ||
| + | |} | ||
| + | {| | ||
| + | |style="padding: 0px 0px 0px 30px;"|✔ Change Server Primary IP Address | ||
|} | |} | ||
{| | {| | ||
| Line 188: | Line 222: | ||
{| | {| | ||
|style="padding: 0px 0px 0px 30px;"|✔ Create/Restore Snapshots | |style="padding: 0px 0px 0px 30px;"|✔ Create/Restore Snapshots | ||
| + | |} | ||
| + | {| | ||
| + | |style="padding: 0px 0px 0px 30px;"|✔ View Task History | ||
|} | |} | ||
{| | {| | ||
| Line 208: | Line 245: | ||
{| | {| | ||
|style="padding: 0px 0px 0px 30px;"|✔ Additional Volume Size | |style="padding: 0px 0px 0px 30px;"|✔ Additional Volume Size | ||
| + | |} | ||
| + | {| | ||
| + | |style="padding: 0px 0px 0px 30px;"|✔ Filesystem For Additional Volume Size | ||
|} | |} | ||
{| | {| | ||
| Line 219: | Line 259: | ||
|} | |} | ||
{| | {| | ||
| − | |style="padding: 0px 0px 0px 30px;"|✔ Number Of Floating | + | |style="padding: 0px 0px 0px 30px;"|✔ Number Of Floating IPv4 Addresses |
| + | |} | ||
| + | {| | ||
| + | |style="padding: 0px 0px 0px 30px;"|✔ Number Of Floating IPv6 Addresses | ||
|} | |} | ||
{| | {| | ||
| Line 255: | Line 298: | ||
{| | {| | ||
|style="padding: 0px 0px 0px 45px;"|✔ Clonezilla | |style="padding: 0px 0px 0px 45px;"|✔ Clonezilla | ||
| + | |} | ||
| + | {| | ||
| + | |style="padding: 0px 0px 0px 45px;"|✔ collab-tools | ||
|} | |} | ||
{| | {| | ||
| Line 273: | Line 319: | ||
{| | {| | ||
|style="padding: 0px 0px 0px 45px;"|✔ GitLab | |style="padding: 0px 0px 0px 45px;"|✔ GitLab | ||
| + | |} | ||
| + | {| | ||
| + | |style="padding: 0px 0px 0px 45px;"|✔ Go | ||
|} | |} | ||
{| | {| | ||
|style="padding: 0px 0px 0px 45px;"|✔ IPFire | |style="padding: 0px 0px 0px 45px;"|✔ IPFire | ||
| + | |} | ||
| + | {| | ||
| + | |style="padding: 0px 0px 0px 45px;"|✔ Jitsi | ||
|} | |} | ||
{| | {| | ||
| Line 285: | Line 337: | ||
{| | {| | ||
|style="padding: 0px 0px 0px 45px;"|✔ Kali Linux | |style="padding: 0px 0px 0px 45px;"|✔ Kali Linux | ||
| + | |} | ||
| + | {| | ||
| + | |style="padding: 0px 0px 0px 45px;"|✔ mfsBSD | ||
|} | |} | ||
{| | {| | ||
|style="padding: 0px 0px 0px 45px;"|✔ NetBSD | |style="padding: 0px 0px 0px 45px;"|✔ NetBSD | ||
| + | |} | ||
| + | {| | ||
| + | |style="padding: 0px 0px 0px 45px;"|✔ Nextcloud | ||
|} | |} | ||
{| | {| | ||
| Line 299: | Line 357: | ||
|} | |} | ||
{| | {| | ||
| − | |style="padding: 0px 0px 0px 45px;"|✔ | + | |style="padding: 0px 0px 0px 45px;"|✔ openSUSE |
| + | |} | ||
| + | {| | ||
| + | |style="padding: 0px 0px 0px 45px;"|✔ Oracle Linux | ||
| + | |} | ||
| + | {| | ||
| + | |style="padding: 0px 0px 0px 45px;"|✔ Owncast | ||
|} | |} | ||
{| | {| | ||
|style="padding: 0px 0px 0px 45px;"|✔ pfSense CE | |style="padding: 0px 0px 0px 45px;"|✔ pfSense CE | ||
| + | |} | ||
| + | {| | ||
| + | |style="padding: 0px 0px 0px 45px;"|✔ PhotoPrism | ||
| + | |} | ||
| + | {| | ||
| + | |style="padding: 0px 0px 0px 45px;"|✔ Prometheus Grafana | ||
|} | |} | ||
{| | {| | ||
| Line 318: | Line 388: | ||
{| | {| | ||
|style="padding: 0px 0px 0px 45px;"|✔ Ruby | |style="padding: 0px 0px 0px 45px;"|✔ Ruby | ||
| + | |} | ||
| + | {| | ||
| + | |style="padding: 0px 0px 0px 45px;"|✔ RustDesk | ||
|} | |} | ||
{| | {| | ||
| Line 324: | Line 397: | ||
{| | {| | ||
|style="padding: 0px 0px 0px 45px;"|✔ SystemRescueCD | |style="padding: 0px 0px 0px 45px;"|✔ SystemRescueCD | ||
| + | |} | ||
| + | {| | ||
| + | |style="padding: 0px 0px 0px 45px;"|✔ TrueNAS SCALE | ||
|} | |} | ||
{| | {| | ||
|style="padding: 0px 0px 0px 45px;"|✔ Ubuntu | |style="padding: 0px 0px 0px 45px;"|✔ Ubuntu | ||
| + | |} | ||
| + | {| | ||
| + | |style="padding: 0px 0px 0px 45px;"|✔ virtIO Drivers | ||
|} | |} | ||
{| | {| | ||
|style="padding: 0px 0px 0px 45px;"|✔ VyOS | |style="padding: 0px 0px 0px 45px;"|✔ VyOS | ||
| + | |} | ||
| + | {| | ||
| + | |style="padding: 0px 0px 0px 45px;"|✔ WireGuard | ||
|} | |} | ||
{| | {| | ||
| Line 344: | Line 426: | ||
|} | |} | ||
{| | {| | ||
| − | |style="padding: 0px 0px 0px 45px;"|✔ Windows Server 2016 R2 | + | |style="padding: 0px 0px 0px 45px;"|✔ Windows Server 2016 |
| + | |} | ||
| + | {| | ||
| + | |style="padding: 0px 0px 0px 45px;"|✔ Windows Server 2012 R2 | ||
|} | |} | ||
{| | {| | ||
| Line 358: | Line 443: | ||
|} | |} | ||
{| | {| | ||
| − | |style="padding: 0px 0px 0px 30px;"|✔ Integrated With | + | |style="padding: 0px 0px 0px 30px;"|✔ Integrated With [https://www.modulesgarden.com/products/whmcs/advanced-billing Advanced Billing For WHMCS] - Actual Server Resource Usage Billing |
|} | |} | ||
{| | {| | ||
| − | |style="padding: 0px 0px 0px 30px;"|✔ Integrated With | + | |style="padding: 0px 0px 0px 30px;"|✔ Integrated With [https://www.modulesgarden.com/products/whmcs/server-allocator Server Allocator For WHMCS] - Automatic Assignment Of Most Suitable Servers To Products |
|} | |} | ||
{| | {| | ||
| − | |style="padding: 0px 0px 0px 30px;"|✔ Fully Integrated With [https://lagom.rsstudio.net/extensions/whmcs-modules-integration/hetzner- | + | |style="padding: 0px 0px 0px 30px;"|✔ Fully Integrated With [https://lagom.rsstudio.net/extensions/whmcs-modules-integration/hetzner-cloud-servers-by-modulesgarden Lagom WHMCS Client Theme] |
|} | |} | ||
{| | {| | ||
| Line 370: | Line 455: | ||
|} | |} | ||
{| | {| | ||
| − | |style="padding: 0px 0px 0px 30px;"|✔ Supports PHP | + | |style="padding: 0px 0px 0px 30px;"|✔ Supports PHP 8.3 Back To PHP 8.2 |
|} | |} | ||
{| | {| | ||
| Line 382: | Line 467: | ||
|} | |} | ||
{| | {| | ||
| − | |style="padding: 0px 0px 0px 30px;"|✔ Supports WHMCS V8. | + | |style="padding: 0px 0px 0px 30px;"|✔ Supports WHMCS V9.X Back To WHMCS V8.10 |
|} | |} | ||
{| | {| | ||
| − | |style="padding: 0px 0px 0px 30px;"|✔ Requires ionCube Loader | + | |style="padding: 0px 0px 0px 30px;"|✔ Requires ionCube Loader V14 Or Later |
|} | |} | ||
{| | {| | ||
| − | |style="padding: 0px 0px 30px 30px;"|✔ Easy Module Upgrade To [https://www.modulesgarden.com/products/whmcs/hetzner-vps#open-source-version Open Source Version] | + | |style="padding: 0px 0px 30px 30px;"|✔ Easy [https://www.docs.modulesgarden.com/How_To_Upgrade_WHMCS_Module Module Upgrade] To [https://www.modulesgarden.com/products/whmcs/hetzner-vps#open-source-version Open Source Version] |
|} | |} | ||
| Line 404: | Line 489: | ||
|} | |} | ||
{| | {| | ||
| − | |style="padding: 0px 0px 15px 15px;"|'''2 | + | |style="padding: 0px 0px 15px 15px;"|'''2. Extract and upload the extension into the main WHMCS directory.'''<br /> |
| − | + | ||
| − | + | ||
| − | + | ||
| − | + | ||
| − | + | ||
| − | + | ||
| − | + | ||
Extracted files in your WHMCS directory should look like this: | Extracted files in your WHMCS directory should look like this: | ||
|} | |} | ||
| Line 418: | Line 496: | ||
|} | |} | ||
{| | {| | ||
| − | |style="padding: 0px 0px 15px 15px;"|''' | + | |style="padding: 0px 0px 15px 15px;"|'''3. When you install Hetzner Cloud Servers For WHMCS for the first time, you have to rename the '' 'license_RENAME.php' '' file.'''<br /> |
The file is located in '' 'modules/servers/HetznerVPS/license_RENAME.php'. '' Rename it from '' 'license_RENAME.php' '' to '' 'license.php'. '' | The file is located in '' 'modules/servers/HetznerVPS/license_RENAME.php'. '' Rename it from '' 'license_RENAME.php' '' to '' 'license.php'. '' | ||
|} | |} | ||
| Line 425: | Line 503: | ||
|} | |} | ||
{| | {| | ||
| − | |style="padding: 0px 0px 15px 15px;"|''' | + | |style="padding: 0px 0px 15px 15px;"|'''4. In order to configure your license key, you have to edit the previously renamed '' 'license.php' '' file.'''<br /> |
Enter your license key between the quotation marks as presented on the following screen.<br /> | Enter your license key between the quotation marks as presented on the following screen.<br /> | ||
You can find your license key in our client area → '' 'My Products'. '' | You can find your license key in our client area → '' 'My Products'. '' | ||
| Line 433: | Line 511: | ||
|} | |} | ||
{| | {| | ||
| − | |style="padding: 0px 0px 15px 15px;"|''' | + | |style="padding: 0px 0px 15px 15px;"|'''5. Now, set up the '' 'storage' '' folder as recursively writable.'''<br /> |
This folder is available at '' '/your_whmcs/modules/servers/HetznerVPS/'. '' | This folder is available at '' '/your_whmcs/modules/servers/HetznerVPS/'. '' | ||
|} | |} | ||
| Line 440: | Line 518: | ||
|} | |} | ||
{| | {| | ||
| − | |style="padding: 0px 0px 30px 15px;"|''' | + | |style="padding: 0px 0px 30px 15px;"|'''6. The last step is setting up the tasks cron job.'''<br /> Remember that before you schedule the cron task, you must create a product/service first. If done the other way around, errors might occur.<br/> |
It is needed to: | It is needed to: | ||
* Check if volumes were successfully added to the panel after the '' 'Create' '' action. If not, the proper task to add volumes to the panel will be performed.<br/> | * Check if volumes were successfully added to the panel after the '' 'Create' '' action. If not, the proper task to add volumes to the panel will be performed.<br/> | ||
| Line 450: | Line 528: | ||
==Configuration of Server== | ==Configuration of Server== | ||
{| | {| | ||
| − | |style="padding: 10px 0px | + | |style="padding: 10px 0px 15px 0px;"|'''Before you can go on, you must generate your Hetzner API Token. You will need it to connect with the server successfully.'''<br/> |
Underneath you will find instructions on where to find your API details. | Underneath you will find instructions on where to find your API details. | ||
|} | |} | ||
| Line 461: | Line 539: | ||
|} | |} | ||
{| | {| | ||
| − | |style="padding: 0px 0px 20px 15px;"|'''8. In the side menu, find the '' 'Security' '' section and enter it. Then, proceed to '' 'API Tokens' '' | + | |style="padding: 0px 0px 20px 15px;"|'''8. In the side menu, find the '' 'Security' '' section and enter it. Then, proceed to '' 'API Tokens'.'' |
|} | |} | ||
{| | {| | ||
| Line 485: | Line 563: | ||
|} | |} | ||
{| | {| | ||
| − | |style="padding: 0px 0px 20px 15px;"|'''12. Now, log in to your WHMCS and proceed to '' ' | + | |style="padding: 0px 0px 20px 15px;"|'''12. Now, log in to your WHMCS and proceed to '' 'System Settings' '' → '' 'Servers' '' and press '' 'Add New Server'.'' |
|} | |} | ||
{| | {| | ||
| Line 491: | Line 569: | ||
|} | |} | ||
{| | {| | ||
| − | |style="padding: 0px 0px 15px 15px;"|'''13. Next, enter your server name, provide any data into the '' 'Hostname' '' or '' 'IP Address' '' and select '' 'Hetzner | + | |style="padding: 0px 0px 15px 15px;"|'''13. Next, enter your server name, provide any data into the '' 'Hostname' '' or '' 'IP Address' '' and select '' 'Hetzner Cloud Servers For WHMCS' '' from the '' 'Type' '' field.<br/> |
Now, provide the previously generated API token in the '' 'Password' '' field. Then check the connection, and if successful, save the changes.<br/> | Now, provide the previously generated API token in the '' 'Password' '' field. Then check the connection, and if successful, save the changes.<br/> | ||
| Line 502: | Line 580: | ||
|} | |} | ||
{| | {| | ||
| − | |style="padding: 0px 0px 20px 15px;"|'''14. It is time to create a server group. To do so, click on '' 'Create Server Group' '' | + | |style="padding: 0px 0px 20px 15px;"|'''14. It is time to create a server group. To do so, click on '' 'Create Server Group'.''''' |
|} | |} | ||
{| | {| | ||
| Line 508: | Line 586: | ||
|} | |} | ||
{| | {| | ||
| − | |style="padding: 0px 0px 20px 15px;"|'''15. Enter a name, click on your previously created server, press '' 'Add' '' and afterward '' 'Save Changes' '' | + | |style="padding: 0px 0px 20px 15px;"|'''15. Enter a name, click on your previously created server, press '' 'Add' '' and afterward '' 'Save Changes'.''''' |
|} | |} | ||
{| | {| | ||
| Line 516: | Line 594: | ||
==Configuration of Product== | ==Configuration of Product== | ||
{| | {| | ||
| − | |style="padding: 10px 0px 15px 15px;"|'''16. In order to create and configure a product, go to '' ' | + | |style="padding: 10px 0px 15px 15px;"|'''16. In order to create and configure a product, go to '' 'System Settings' '' → '' 'Products/Services'.'' '''<br /> |
Click on '' 'Create a New Group' ''. | Click on '' 'Create a New Group' ''. | ||
|} | |} | ||
| Line 523: | Line 601: | ||
|} | |} | ||
{| | {| | ||
| − | |style="padding: 0px 0px 20px 15px;"|'''17. Enter your product group name and press '' 'Save Changes' '' | + | |style="padding: 0px 0px 20px 15px;"|'''17. Enter your product group name and press '' 'Save Changes'.''''' |
|} | |} | ||
{| | {| | ||
| Line 551: | Line 629: | ||
{| | {| | ||
|style="padding: 0px 0px 15px 15px;"|'''21. Now, you can start configuring the settings of the server you sell.'''<br /> | |style="padding: 0px 0px 15px 15px;"|'''21. Now, you can start configuring the settings of the server you sell.'''<br /> | ||
| − | Just like when creating a new virtual machine in your Hetzner panel, here | + | Just like when creating a new virtual machine in your Hetzner panel, here you can also configure such options as: |
* '''Location''' - Select a location for the related server from the list. | * '''Location''' - Select a location for the related server from the list. | ||
* '''Data Center''' - Select the data center region. More distant server locations may increase the server's latency without providing any practical benefits to clients.<br/> If other than '' 'Auto' '' is selected, '' 'Location' '' will not be taken into account. | * '''Data Center''' - Select the data center region. More distant server locations may increase the server's latency without providing any practical benefits to clients.<br/> If other than '' 'Auto' '' is selected, '' 'Location' '' will not be taken into account. | ||
| − | * '''Image''' - Select the image of the system that will be installed on the server. | + | * '''Image''' - Select the image of the system or application that will be installed on the server. |
* '''Type''' - Choose a type from the list of available to be used on the server. | * '''Type''' - Choose a type from the list of available to be used on the server. | ||
| − | * '''Number of Floating | + | * '''Number of Floating IPv4 Addresses''' - Provide a number of '' 'Floating IPv4 Addresses' '' that should be created for your server. |
| + | |||
| + | * '''Number of Floating IPv6 Addresses''' - Provide a number of '' 'Floating IPv6 Addresses' '' that should be created for your server. | ||
* '''Additional Volume Size [GB]''' - Allows you to create and attach an additional SSD storage volume to the server in the provided size (in GB).<br/>If left empty or set to 0, then the volume will not be created and attached. | * '''Additional Volume Size [GB]''' - Allows you to create and attach an additional SSD storage volume to the server in the provided size (in GB).<br/>If left empty or set to 0, then the volume will not be created and attached. | ||
| − | * ''' | + | * '''Filesystem for Additional Volume Size''' - Select the desired filesystem for the additional volume size. |
| − | * '''User Data''' - Allows you to choose the file or Bash script | + | * '''User Data''' - Allows you to choose the file or Bash script that may be used to configure the server on the first boot.<br/> '''''Note:''' Please refer to the following article to find a '''list of supported [https://developers.whmcs.com/provisioning-modules/module-parameters/ module parameters]''' and their descriptions.'' |
| + | |||
| + | * '''Snapshots Limit [GB]''' - Define the size limit in gigabytes (how much of the space can be taken for creating snapshots by clients). Provide -1 value for unlimited. | ||
* '''Random Domain Prefix''' - Enter the domain prefix that will be used when a domain is not provided. | * '''Random Domain Prefix''' - Enter the domain prefix that will be used when a domain is not provided. | ||
| Line 578: | Line 660: | ||
* '''Total Limit of Firewall Rules''' - Enter the maximum number of total firewall rules or type in -1 to set it as unlimited. | * '''Total Limit of Firewall Rules''' - Enter the maximum number of total firewall rules or type in -1 to set it as unlimited. | ||
| − | * '''Reverse DNS Template''' - Enter here the reverse DNS template, you may use the available variables or leave empty to use default rDNS: | + | * '''Reverse DNS Template''' - Enter here the reverse DNS template, you may use the available variables or leave them empty to use default rDNS: |
**''{$ipaddress}mydomain.com'' e.g.: 123.123.123mydomain.com | **''{$ipaddress}mydomain.com'' e.g.: 123.123.123mydomain.com | ||
**''{$ipaddressdash}mydomain.com'' e.g.: 123-123-123-123mydomain.com | **''{$ipaddressdash}mydomain.com'' e.g.: 123-123-123-123mydomain.com | ||
**''{$ipaddresspart[X]}'' - where X is the index of IP's part (begin from 0), e.g.: ''{$ipaddresspart[1]}-{$ipaddresspart[2]}.mydomain.com'' will generate 123-102.mydomain.com | **''{$ipaddresspart[X]}'' - where X is the index of IP's part (begin from 0), e.g.: ''{$ipaddresspart[1]}-{$ipaddresspart[2]}.mydomain.com'' will generate 123-102.mydomain.com | ||
| − | * '''Enable Backups ''' - Turn on if you wish to enable | + | * '''Email Template after Rebuild Action''' - Select an email template to be sent after the '' 'Rebuild' '' action is performed.<br/> Generic '' 'Hetzner - Rebuild Server Information' '' template has been prepared. |
| + | |||
| + | * '''Enable Backups ''' - Turn it on if you wish to enable the creation of backups for the server. | ||
* '''Open Console in New Window''' - Enable to allow opening the console in a new window | * '''Open Console in New Window''' - Enable to allow opening the console in a new window | ||
| Line 592: | Line 676: | ||
{| | {| | ||
|style="padding: 0px 0px 15px 15px;"|'''22. The following section is dedicated to the Client Area Features.'''<br/> | |style="padding: 0px 0px 15px 15px;"|'''22. The following section is dedicated to the Client Area Features.'''<br/> | ||
| − | You will find here | + | You will find here several options that can be enabled and then will be available to your clients in their client area. These options are: |
| − | *'''Rebuild''' - | + | *'''Rebuild''' - If enabled, clients are allowed to rebuild their virtual machine in an adequate section. |
| − | + | ||
| − | + | ||
| − | *''' | + | *'''Console''' - If enabled, clients are granted access to the console. |
| − | *''' | + | *'''Reverse DNS''' - If enabled, clients will access the '' 'Reverse DNS' '' option which allows them to change the hostname that will appear when getting the hostname belonging to the primary IPs of their servers. |
| − | *''' | + | *'''Floating IP Addresses''' - If enabled, clients will access the '' 'Floating IP Addresses' '' area. |
| − | *''' | + | *'''Backups ''' - If enabled, clients will access the '' 'Backups' '' area. |
*'''Graphs''' - if enabled, clients will access the '' 'Graphs' '' area. | *'''Graphs''' - if enabled, clients will access the '' 'Graphs' '' area. | ||
| − | *'''Networks''' - | + | *'''Networks''' - If enabled, clients will access the '' 'Networks' '' area. |
| − | *''' | + | *'''Task History''' - If enabled, clients will access the '' 'Task History' '' area. |
| − | *''' | + | *'''Rescue Mode''' - If enabled, clients gain access to the rescue mode feature, allowing them to retrieve server details in the event of boot-related issues. |
| − | *''' | + | *'''Soft Reboot''' - If enabled, clients have the option to initiate a soft reboot of the server. For a successful reboot, the operating system must support ACPI and respond to the request;<br/> otherwise, the reboot will not be completed. |
| + | *'''Change Primary IP Address''' - If enabled, clients will be able to change their primary IP address. | ||
| + | *'''Reset Password''' - If enabled, clients will be able to reset their passwords. | ||
| + | |||
| + | *'''Snapshots''' - If enabled, clients can access the snapshots section, which allows them to easily take or restore snapshots of their virtual machines. | ||
| + | |||
| + | *'''ISO Images''' - If enabled, clients are able to mount or unmount provided ISO images to their virtual machine. | ||
| + | |||
| + | *'''Firewalls''' - If enabled, clients will access the '' 'Firewalls' '' area. | ||
| + | |||
| + | *'''Available Images To Rebuild''' - select OS/Application images from the available to allow the client to use them when rebuilding a virtual machine.<br/> Please note, that if you leave this field empty then all available OS images will be displayed in the client area to rebuild. | ||
*'''Available ISO Images''' - select ISO images provided by Hetnzer to allow the clients to mount them to their virtual machines to e.g. increase the number of available operating systems the customers can install on their own. | *'''Available ISO Images''' - select ISO images provided by Hetnzer to allow the clients to mount them to their virtual machines to e.g. increase the number of available operating systems the customers can install on their own. | ||
| Line 623: | Line 715: | ||
{| | {| | ||
|style="padding: 0px 0px 15px 15px;"|'''23. Adjust the content of the "Server Information" section visible in the client area.'''<br/> | |style="padding: 0px 0px 15px 15px;"|'''23. Adjust the content of the "Server Information" section visible in the client area.'''<br/> | ||
| − | Select here | + | Select here the fields that you wish to be visible for clients on the product overview page. |
|} | |} | ||
{| | {| | ||
| Line 629: | Line 721: | ||
|} | |} | ||
{| | {| | ||
| − | |style="padding: 0px 0px 15px 15px;"|'''24. Configure the automation settings | + | |style="padding: 0px 0px 15px 15px;"|'''24. Configure the automation settings:'''<br/> |
| − | + | * '''Action on Service Suspension''' - decide what happens with the virtual server after service suspension. | |
| + | * '''Action on Service Termination''' - decide what happens with the virtual server after service termination. | ||
| + | * '''Power Off VM Before Upgrade''' - enable this option to power off the VM before initiating an upgrade. It will help to prevent potential crashes and errors during the VM upgrade process. | ||
| + | * '''Static VM Domain Name''' - if enabled, a fixed VM Domain Name is set without automatic changes by the Hetzner API. | ||
|} | |} | ||
{| | {| | ||
| Line 683: | Line 778: | ||
{| | {| | ||
|style="padding: 10px 0px 15px 15px;"|''' Hetzner Cloud Servers For WHMCS allows you to monitor and manage your customer virtual machine from the admin area of your WHMCS system.'''<br /> | |style="padding: 10px 0px 15px 15px;"|''' Hetzner Cloud Servers For WHMCS allows you to monitor and manage your customer virtual machine from the admin area of your WHMCS system.'''<br /> | ||
| − | This includes supervision of such features | + | This includes supervision of such features as:<br /> |
| − | + | * Configurable options which enable you to view the chosen server resources.<br /> | |
| − | + | * Module commands to allow easy and quick management of the server. | |
| − | + | ||
| − | + | ||
|} | |} | ||
{| | {| | ||
| − | |style="padding: 0px 0px 20px 25px;"|[[File: | + | |style="padding: 0px 0px 20px 25px;"|[[File:HTZ_18_2.png]] |
| + | |} | ||
| + | {| | ||
| + | |style="padding: 0px 0px 15px 15px;"| | ||
| + | * Service actions, including Power on/off, Shut down, Reboot the server and Reset the password.<br /> | ||
| + | * Server information provides you with the current status, resources and options set for the virtual machine. | ||
| + | |} | ||
| + | {| | ||
| + | |style="padding: 0px 0px 20px 25px;"|[[File:HTZ_18_3.png]] | ||
|} | |} | ||
{| | {| | ||
| Line 699: | Line 800: | ||
|} | |} | ||
{| | {| | ||
| − | |style="padding: 0px 0px | + | |style="padding: 0px 0px 15px 15px;"|Below you will also find: <br/> |
| − | + | * A list of OS distributions available for rebuilding. <br/> | |
| − | + | * A list of ISO images that can be mounted to the virtual machine. <br/> | |
| − | + | * Floating IP Addresses. <br/> | |
| − | + | * Backups that were performed and SSH key, if it was provided during the order. <br/> | |
|} | |} | ||
{| | {| | ||
| Line 709: | Line 810: | ||
|} | |} | ||
{| | {| | ||
| − | |style="padding: 0px 0px 20px 15px;"| | + | |style="padding: 0px 0px 20px 15px;"|For available graphs, you may change settings to adjust the displayed data time frame to your needs. |
| + | |} | ||
| + | {| | ||
| + | |style="padding: 0px 0px 20px 25px;"|[[File:HTZ_19_3.png]] | ||
| + | |} | ||
| + | {| | ||
| + | |style="padding: 0px 0px 20px 15px;"|At the bottom, you will find the Task History. | ||
|} | |} | ||
{| | {| | ||
| − | |style="padding: 0px 0px 30px 25px;"|[[File: | + | |style="padding: 0px 0px 30px 25px;"|[[File:HTZ_19_4.png]] |
|} | |} | ||
| Line 729: | Line 836: | ||
{| | {| | ||
|style="padding: 10px 0px 15px 15px;"|In this section, you can find short instruction on how to connect one of your clients to your already existing server in the Hetzner panel. <br/> Take the following steps to make sure that the process will be carried out properly. <br/> | |style="padding: 10px 0px 15px 15px;"|In this section, you can find short instruction on how to connect one of your clients to your already existing server in the Hetzner panel. <br/> Take the following steps to make sure that the process will be carried out properly. <br/> | ||
| − | 1. Firstly, manually create an order for your customer in WHMCS. Choose a client and in the summary, view click on the '' ' Add New Order' '' button. Next, select a '' 'Product/Service' '' and press '' 'Submit Order' '' | + | 1. Firstly, manually create an order for your customer in WHMCS. Choose a client and in the summary, view click on the '' 'Add New Order' '' button. Next, select a '' 'Product/Service' '' and press '' 'Submit Order'.'' <br/> '''What is important, do not perform the '' 'Create' '' action.''' The status has to remain as '' 'Pending' ''. <br/> More info about placing orders can be found [https://docs.whmcs.com/Order_Management#Placing_an_Order here]<br/> |
2. Proceed to the newly created product's card in your admin area. Find the following empty field: | 2. Proceed to the newly created product's card in your admin area. Find the following empty field: | ||
*'''Server ID''' | *'''Server ID''' | ||
| Line 743: | Line 850: | ||
==Client Area== | ==Client Area== | ||
{| | {| | ||
| − | |style="padding: 10px 0px 15px 15px;"|Client area interface of Hetzner | + | |style="padding: 10px 0px 15px 15px;"|Client area interface of Hetzner Cloud Servers should look like the one on the screen below.<br/>As you can see, the control panel contains useful options required for managing a server.<br /> |
| − | The module allows your customers to easily power on/off, shut down and reboot their servers | + | The module allows your customers to easily power on/off, shut down and reboot their servers by pressing the corresponding buttons.<br /> |
Clients can also rebuild the server, access the console and view the current server parameters, resources and set options, as well as the assigned IP addresses. | Clients can also rebuild the server, access the console and view the current server parameters, resources and set options, as well as the assigned IP addresses. | ||
|} | |} | ||
| Line 759: | Line 866: | ||
===Backups=== | ===Backups=== | ||
{| | {| | ||
| − | |style="padding: 10px 0px 15px 15px;"|The first section available for clients grants ability to view the list of existing '' 'Backups' '' of your server. <br/> You may restore any of the available backups at any time you need, simply press the icon marked on the screen.<br/> Please remember that '' 'Backups' '' are assigned to a particular server and will be removed once the server is deleted. <br/> | + | |style="padding: 10px 0px 15px 15px;"|The first section available for clients grants the ability to view the list of existing '' 'Backups' '' of your server. <br/> You may restore any of the available backups at any time you need, simply press the icon marked on the screen.<br/> Please remember that '' 'Backups' '' are assigned to a particular server and will be removed once the server is deleted. <br/> |
|} | |} | ||
{| | {| | ||
| Line 822: | Line 929: | ||
===Floating IP Addresses=== | ===Floating IP Addresses=== | ||
{| | {| | ||
| − | |style="padding: 10px 0px | + | |style="padding: 10px 0px 20px 15px;"|In this section you can review all '' 'Floating IP Addresses' '' and edit them. |
|} | |} | ||
{| | {| | ||
| Line 852: | Line 959: | ||
===Networks=== | ===Networks=== | ||
{| | {| | ||
| − | |style="padding: 10px 0px 20px 15px;"|Networks section allows direct management of networks. They can create networks (1), subnets(2), routs(2), then attach resources and manage aliases. | + | |style="padding: 10px 0px 20px 15px;"|Networks section allows direct management of networks. They can create networks (1), subnets (2), routs (2), then attach resources and manage aliases. |
|} | |} | ||
{| | {| | ||
| Line 861: | Line 968: | ||
|} | |} | ||
{| | {| | ||
| − | |style="padding: 0px 0px 15px 15px;"|Once you have a set | + | |style="padding: 0px 0px 15px 15px;"|Once you have a set of networks created, you may move to creating subnets per each network. Move to the '' 'Subnets' (2)'' section.<br> There press '' 'Create Subnet' '' to create a new one. |
|} | |} | ||
{| | {| | ||
| Line 870: | Line 977: | ||
|} | |} | ||
{| | {| | ||
| − | |style="padding: 0px 0px | + | |style="padding: 0px 0px 20px 15px;"|Now, to each created subnet you may attach resources. You may select your own resource to attach or set a private IP address manually. |
|} | |} | ||
{| | {| | ||
| Line 879: | Line 986: | ||
|} | |} | ||
{| | {| | ||
| − | |style="padding: 0px 0px | + | |style="padding: 0px 0px 20px 15px;"|There is also an option to manage alias IP addresses. Use a comma if you want to add more than one alias at once. |
|} | |} | ||
{| | {| | ||
| Line 885: | Line 992: | ||
|} | |} | ||
{| | {| | ||
| − | |style="padding: 0px 0px 20px 15px;"|Next to '' 'Subents' '' (2) you will find section dedicated to '' 'Routs' '' (3) management. There you may | + | |style="padding: 0px 0px 20px 15px;"|Next to '' 'Subents' '' (2) you will find section dedicated to '' 'Routs' '' (3) management. There you may add a new route by providing its destination, CIDR and a gateway. |
|} | |} | ||
{| | {| | ||
| Line 941: | Line 1,048: | ||
{| | {| | ||
|style="padding: 0px 0px 30px 25px;"|[[File:HTZ_25.png]] | |style="padding: 0px 0px 30px 25px;"|[[File:HTZ_25.png]] | ||
| + | |} | ||
| + | ===Task History=== | ||
| + | {| | ||
| + | |style="padding: 10px 0px 15px 15px;"|Navigate to the "Task History" section to access a comprehensive list of completed actions, including their status and dates of completion, within the server activity. | ||
| + | |} | ||
| + | {| | ||
| + | |style="padding: 0px 0px 30px 25px;"|[[File:HTZ_25_0.png]] | ||
|} | |} | ||
| Line 949: | Line 1,063: | ||
{| | {| | ||
|style="padding: 0px 0px 30px 15px;"|2. The module allows the possibility to install a snapshot, that has been previously created in your Hetzner panel, as an OS image.<br/> All created snapshots are available in the dropdown list of the available images in the product's module settings. | |style="padding: 0px 0px 30px 15px;"|2. The module allows the possibility to install a snapshot, that has been previously created in your Hetzner panel, as an OS image.<br/> All created snapshots are available in the dropdown list of the available images in the product's module settings. | ||
| + | |} | ||
| + | ==How To Use Language Overrides== | ||
| + | {| | ||
| + | |style="padding: 10px 0px 15px 15px;"|'''Incorporating language customizations - the module readily accommodates language overrides, allowing you to tailor the language files to your preferences.'''<br/> The language file english.php remains unencoded and can be modified to suit your needs. However, it's recommended to avoid altering the core file itself, and instead, leverage the capability of using overrides.<br/> | ||
| + | |} | ||
| + | {| | ||
| + | |style="padding: 0px 0px 15px 15px;"|Here's how to apply language overrides: | ||
| + | * Navigate to the ''~/langs/'' directory located within the following ''yourWHMCS/modules/servers/moduleName/langs/'' path. | ||
| + | * Within this directory, create a new file or duplicate the language file you intend to modify. For instance, if you wish to create an override for the English language, establish the following directory structure: | ||
| + | ''~/langs/overrides/english.php''. | ||
| + | * Open the newly created override file to edit its contents. | ||
| + | * At the beginning of the file, indicate the used code, for instance, you can use: '''<?php''' for PHP code. | ||
| + | * Adapt the file content according to your requirements. You can either selectively modify specific variables or opt to revise the entire content of the language file. | ||
| + | |||
| + | For example: | ||
| + | |||
| + | '''Original ''yourWHMCS/modules/servers/moduleName/langs/english.php:''''' | ||
| + | |||
| + | $_LANG['Search'] = 'Search'; | ||
| + | |||
| + | '''Override ''yourWHMCS/modules/servers/moduleName/langs/overrides/english.php:''''' | ||
| + | |||
| + | $_LANG['Search'] = 'Look for'; | ||
| + | |} | ||
| + | {| | ||
| + | |style="padding: 0px 0px 15px 15px;"|By following these steps, you can seamlessly implement language customizations without altering the core language file, ensuring your changes will not be lost after every module update.<br/> | ||
| + | |||
| + | Remember that some of the modules have more than one language file, located under ''/addons'' and ''/servers'' paths. You may create the override files for both of them.<br/> Note that you do not need to paste all the original content of the lang file into the override file. Enter there only the lines that you wish to change, every other line will be fetched from the original module lang file.<br/> Consequently, the override lang file might include only one or just a few lines. | ||
|} | |} | ||
=Update Instructions= | =Update Instructions= | ||
{| | {| | ||
| − | |style="padding: 10px 0px 30px 15px;"|An essential guidance through the process of updating the module is offered '''[https://www.docs.modulesgarden.com/How_To_Update_WHMCS_Module here]'''.<br/><br/> | + | |style="padding: 10px 0px 30px 15px;"|An essential guidance through the process of updating the module is offered '''[https://www.docs.modulesgarden.com/How_To_Update_WHMCS_Module here]'''.<br/> |
| − | + | Ensure successful completion of the module update by carefully following each step, thereby preventing data loss or any unforeseen issues.<br/> Additionally, you will find a current list of supplementary actions necessary for a smooth update process there. | |
| − | + | |} | |
| + | =Upgrade Guide= | ||
| + | {| | ||
| + | |style="padding: 10px 0px 30px 15px;"|Seeking a solution that offers greater flexibility, customization tailored to your precise needs, and unrestricted availability?<br/> There is an option that not only proves to be cost-effective in the long run but also includes prioritized support services, making it a truly valuable investment.<br/> | ||
| + | |||
| + | Opt for the [https://www.modulesgarden.com/products/whmcs/hetzner-cloud-servers#open-source-version Open Source version] of your Hetzner Cloud Servers For WHMCS module to unlock these benefits.<br/> Simply click on either the '''Get Source Code''' or '''Upgrade To Lifetime''' button found on the product's page in our client area to complete the one-step upgrade process, with a '''dedicated discount''' already applied.<br/> | ||
| + | |||
| + | Follow a [https://www.docs.modulesgarden.com/How_To_Upgrade_WHMCS_Module comprehensive guide] covering the transition process, the advantages it brings, and step-by-step instructions on what to do next after the order has been successfully finalized. | ||
|} | |} | ||
| Line 963: | Line 1,112: | ||
|} | |} | ||
{| | {| | ||
| − | |style="padding: 0px 0px | + | |style="padding: 0px 0px 5px 15px;"|2. If you use '''WHMCS V7.8.X''' (or later), a fatal error may occur when trying to save server settings without providing any hostname or IP address details.<br/>Our module does not require this field to be filled out, but in that case, try to provide '''anything''' in the hostname field. Please note that this is a bug occurring in WHMCS, not the module itself. |
| + | |} | ||
| + | {| | ||
| + | |style="padding: 0px 0px 30px 15px;"|3. '''Error:''' ''422 Unprocessable Entity response: { "error": { "message": "image has incompatible architecture", "code": "invalid_input", "details": { (truncated...)''<br/> | ||
| + | If you encounter the above error when creating a server, the '''Image''' and '''Type''' fields in '' 'Configuration' '' section of the product settings are incorrectly set up.<br/> | ||
| + | The CPU architecture displayed in brackets next to the image name in the '''Image''' field should match the CPU architecture selected in the '''Type''' field. | ||
| + | * ''example 1:'' '''Image:''' "Ubuntu 20.04 (arm)" → '''Type:''' selected item name must begin with "CAX" | ||
| + | * ''example 2:'' '''Image:''' "Ubuntu 20.04 (x86)" → '''Type:''' selected item name must begin with "CX (Intel)" or "CPX (AMD)" | ||
|} | |} | ||
Latest revision as of 09:08, 9 February 2026
Contents |
[edit] About Hetzner Cloud Servers For WHMCS
| Hetzner Cloud Servers For WHMCS is a tool of great convenience for all those who wish to manage their Hetzner servers automatically. The module will allow your clients to remotely control the status of a server, access the console, and rebuild the machine. |
- Admin Area Features:
| ✔ Create/Suspend/Unsuspend/Terminate Server |
| ✔ Power On/Power Off/Shut Down/Reboot Server |
| ✔ View/Reset Server Password |
| ✔ Change Server Primary IP Address |
| ✔ View Server Status And Details |
| ✔ View Assigned IPv4 And IPv6 Addresses |
| ✔ Rebuild Server With Chosen OS Distribution |
| ✔ Mount/Unmount ISO Images |
| ✔ View/Manage Floating IP Addresses |
| ✔ View/Restore Automatic Backups |
| ✔ View CPU/Memory/Network Usage Graphs |
| ✔ View Task History |
| ✔ Configure Product Details: |
| ✔ Choose Location/Data Center |
| ✔ Choose OS Image |
| ✔ Choose Type |
| ✔ Number Of Floating IPv4 And IPv6 Addresses |
| ✔ Define Additional Volume Size And Filesystem |
| ✔ Define Snapshots Size Limit |
| ✔ Define Random Domain Prefix |
| ✔ Define Firewalls Limit |
| ✔ Define Firewall Rules Inbound/Outbound/Total Limits |
| ✔ Define Reverse DNS Template |
| ✔ Select Email Template Sent After Rebuild Action |
| ✔ Choose User Data |
| ✔ Enable Backups |
| ✔ Enable Opening Console In New Window |
| ✔ Choose Available Images To Rebuild |
| ✔ Choose Available ISO Images To Mount |
| ✔ Choose Features Available In Client Area: |
| ✔ Rebuild Server |
| ✔ Access Console |
| ✔ Reverse DNS |
| ✔ Floating IP Addresses |
| ✔ Backups |
| ✔ Graphs |
| ✔ Networks |
| ✔ Task History |
| ✔ Rescue Mode |
| ✔ Soft Reboot |
| ✔ Change Primary IP Address |
| ✔ Reset Password |
| ✔ Snapshots |
| ✔ ISO Images |
| ✔ Firewalls |
| ✔ Available Images To Rebuild |
| ✔ Available ISO Images |
| ✔ Select Server Information Fields Displayed In Client Area |
| ✔ Select Action On Service Suspension And Termination |
| ✔ Power Off VM Before Upgrade |
| ✔ Enable Static VM Domain Name |
| ✔ Generate Configurable Options |
| ✔ Run API Connection Test |
- Client Area Features:
| ✔ Power On/Power Off/Shut Down/Reboot Server |
| ✔ View/Reset Server Password |
| ✔ Change Server Primary IP Address |
| ✔ View Server Status And Details |
| ✔ View Assigned IPv4 And IPv6 Addresses |
| ✔ View/Restore Automatic Backups |
| ✔ Create/Manage Firewalls And Their Rules |
| ✔ Access Remote Console |
| ✔ View/Manage Floating IP Addresses |
| ✔ View CPU/Memory/Network Usage Graphs |
| ✔ Mount/Unmount ISO Images |
| ✔ Create/Manage Networks: |
| ✔ Create Subnets And Attach Resources |
| ✔ Add Routes |
| ✔ Rebuild Server With Chosen OS Distribution |
| ✔ Create/Manage IPv6 Reverse DNS Records |
| ✔ Create/Restore Snapshots |
| ✔ View Task History |
| ✔ Provide SSH Key During Order |
- Configurable Options:
| ✔ Location |
| ✔ Data Center |
| ✔ Image |
| ✔ Type |
| ✔ Additional Volume Size |
| ✔ Filesystem For Additional Volume Size |
| ✔ Snapshots Limit |
| ✔ User Data |
| ✔ Enable Backups |
| ✔ Number Of Floating IPv4 Addresses |
| ✔ Number Of Floating IPv6 Addresses |
| ✔ Firewalls Limit |
| ✔ Inbound Firewall Rules Limit |
| ✔ Outbound Firewall Rules Limit |
| ✔ Total Limit of Firewall Rules |
- Available Images:
| ✔ Linux OS And Solutions: |
| ✔ 3CX |
| ✔ AlmaLinux |
| ✔ Alpine Virtual |
| ✔ Archlinux |
| ✔ CentOS |
| ✔ Clonezilla |
| ✔ collab-tools |
| ✔ Debian |
| ✔ Docker |
| ✔ Fedora |
| ✔ FreeBSD |
| ✔ FreePBX |
| ✔ GitLab |
| ✔ Go |
| ✔ IPFire |
| ✔ Jitsi |
| ✔ Lamp |
| ✔ k3OS |
| ✔ Kali Linux |
| ✔ mfsBSD |
| ✔ NetBSD |
| ✔ Nextcloud |
| ✔ NixOS |
| ✔ OPNsense |
| ✔ OpenBSD |
| ✔ openSUSE |
| ✔ Oracle Linux |
| ✔ Owncast |
| ✔ pfSense CE |
| ✔ PhotoPrism |
| ✔ Prometheus Grafana |
| ✔ Proxmox Mail Gateway |
| ✔ Proxmox VE |
| ✔ RancherOS |
| ✔ Rocky Linux |
| ✔ Ruby |
| ✔ RustDesk |
| ✔ Securepoint UTM |
| ✔ SystemRescueCD |
| ✔ TrueNAS SCALE |
| ✔ Ubuntu |
| ✔ virtIO Drivers |
| ✔ VyOS |
| ✔ WireGuard |
| ✔ WordPress |
| ✔ Microsoft Windows: |
| ✔ Windows Server 2022 |
| ✔ Windows Server 2019 |
| ✔ Windows Server 2016 |
| ✔ Windows Server 2012 R2 |
| ✔ Windows VirtIO Drivers |
| ✔ Any Other OS Platforms And Solutions When Made Available By Hetzner |
- General Info:
| ✔ Supports Hetzner Cloud Solutions |
| ✔ Integrated With Advanced Billing For WHMCS - Actual Server Resource Usage Billing |
| ✔ Integrated With Server Allocator For WHMCS - Automatic Assignment Of Most Suitable Servers To Products |
| ✔ Fully Integrated With Lagom WHMCS Client Theme |
| ✔ Multi-Language Support |
| ✔ Supports PHP 8.3 Back To PHP 8.2 |
| ✔ Supports WHMCS Metric Billing - Integration: Cores, Memory, Disk |
| ✔ Supports WHMCS Server Sync Tool |
| ✔ Supports WHMCS Themes "Six" And "Twenty-One" |
| ✔ Supports WHMCS V9.X Back To WHMCS V8.10 |
| ✔ Requires ionCube Loader V14 Or Later |
| ✔ Easy Module Upgrade To Open Source Version |
[edit] Installation and Configuration
| This tutorial will show you how to successfully install and configure Hetzner Cloud Servers For WHMCS smoothly. We will guide you step by step through the whole process. |
[edit] Installation
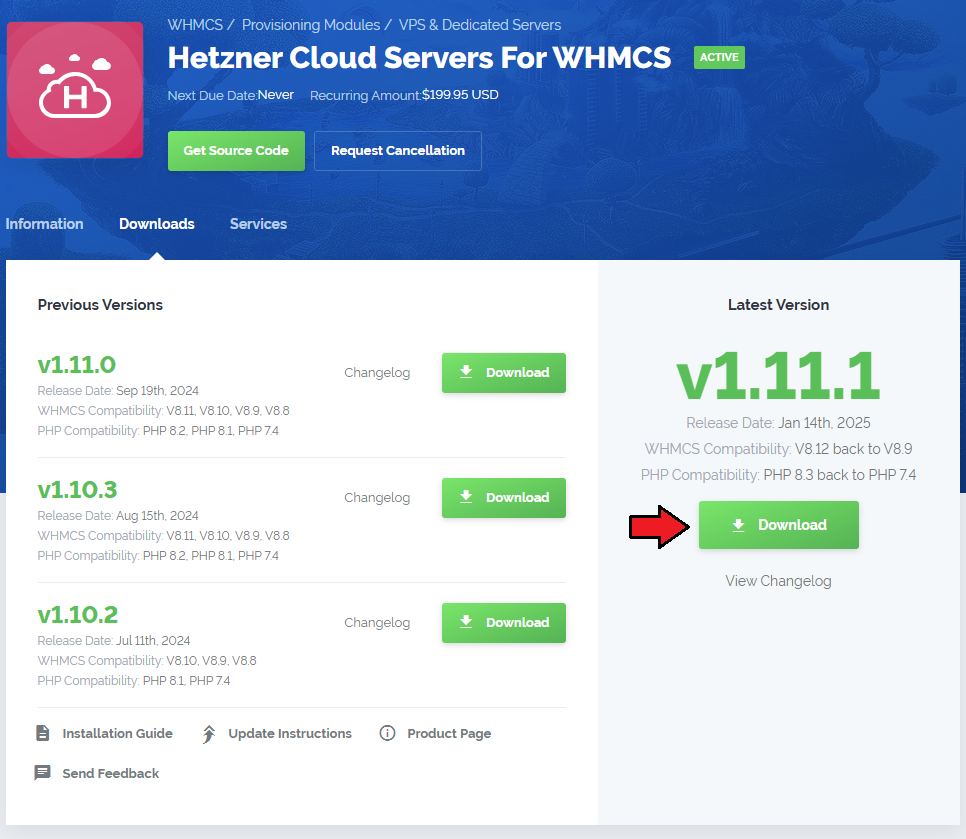
| 1. Log in to our client area and download the module. |
|
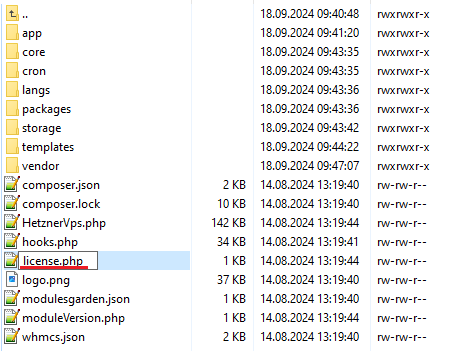
| 2. Extract and upload the extension into the main WHMCS directory. Extracted files in your WHMCS directory should look like this: |
| 3. When you install Hetzner Cloud Servers For WHMCS for the first time, you have to rename the 'license_RENAME.php' file. The file is located in 'modules/servers/HetznerVPS/license_RENAME.php'. Rename it from 'license_RENAME.php' to 'license.php'. |
|
| 4. In order to configure your license key, you have to edit the previously renamed 'license.php' file. Enter your license key between the quotation marks as presented on the following screen. |

|
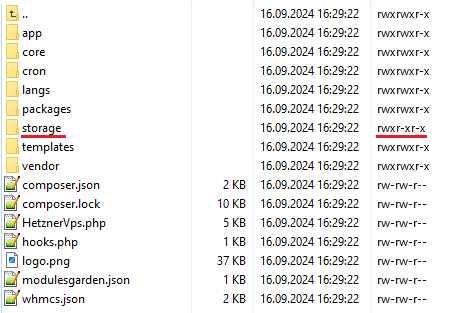
| 5. Now, set up the 'storage' folder as recursively writable. This folder is available at '/your_whmcs/modules/servers/HetznerVPS/'. |
|
| 6. The last step is setting up the tasks cron job. Remember that before you schedule the cron task, you must create a product/service first. If done the other way around, errors might occur. It is needed to:
We suggest that the cron should run every 5 minutes: php -q /your_whmcs/modules/servers/HetznerVps/cron/cron.php Tasks |
[edit] Configuration of Server
| Before you can go on, you must generate your Hetzner API Token. You will need it to connect with the server successfully. Underneath you will find instructions on where to find your API details. |
| 7. Firstly, log into your Hetzner account and enter this site: https://accounts.hetzner.com/login. Find and open your project. |

|
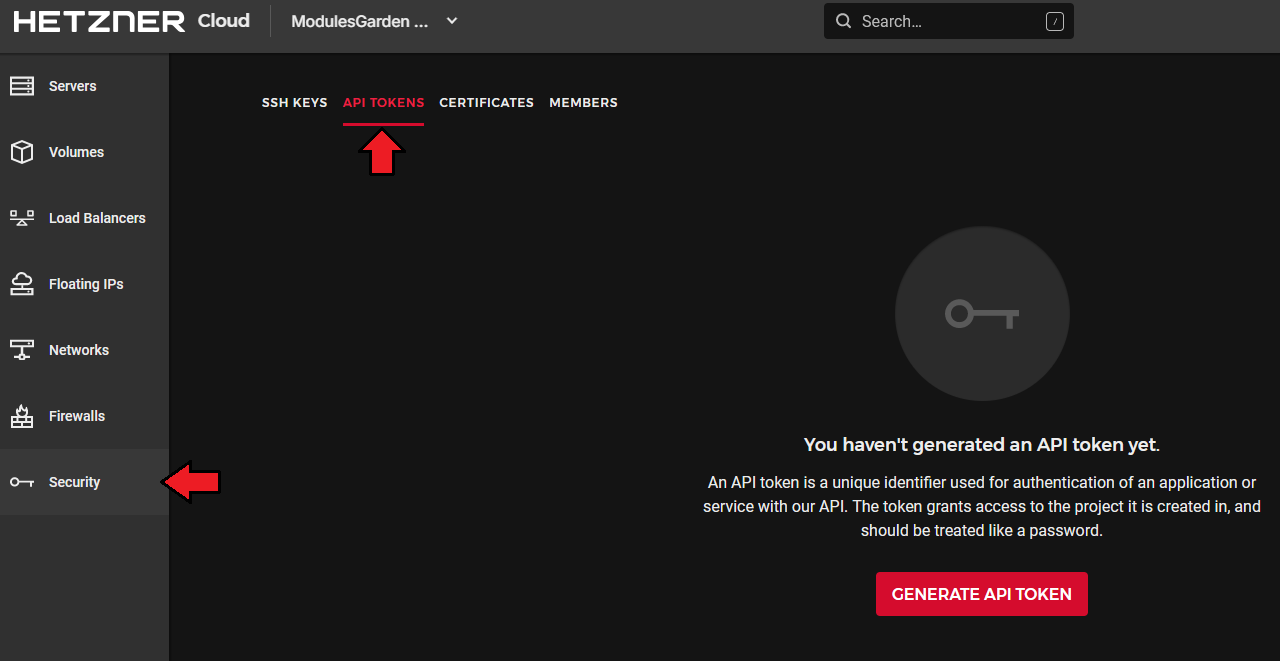
| 8. In the side menu, find the 'Security' section and enter it. Then, proceed to 'API Tokens'. |
|
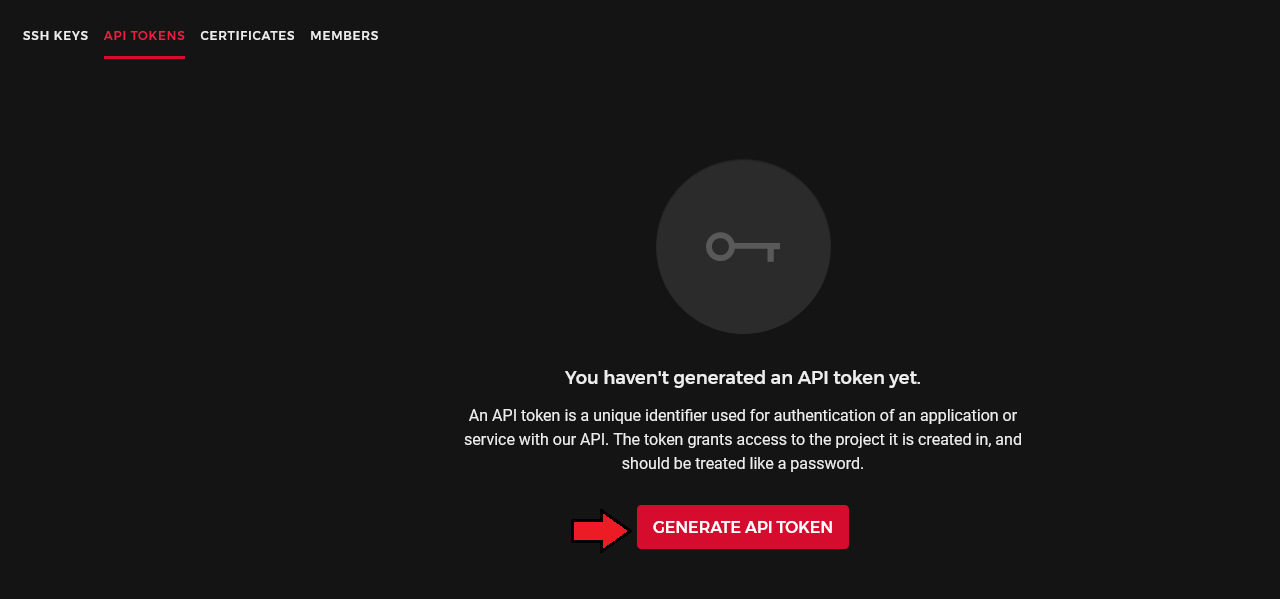
| 9. In the 'API Tokens' section, press the 'Generate API Token' button. |
|
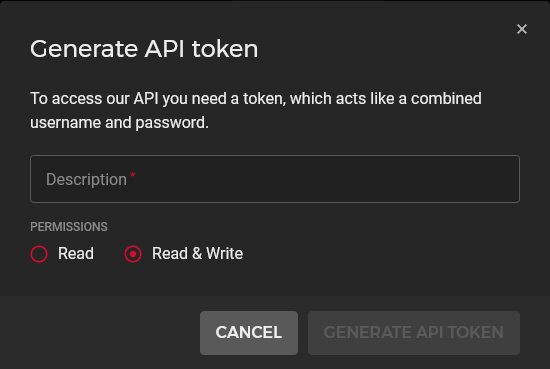
| 10. A new window will appear. Provide a description, choose appropriate permissions 'Read & Write' and press the 'Generate API Token' button again. |
|
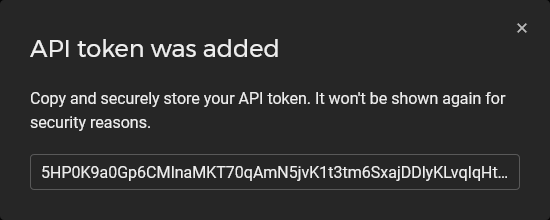
| 11. Now, you will see the newly generated 'API Token' . Copy it and keep safe as you will need in a moment to create a connection between WHMCS and the Hetzner server. |
|
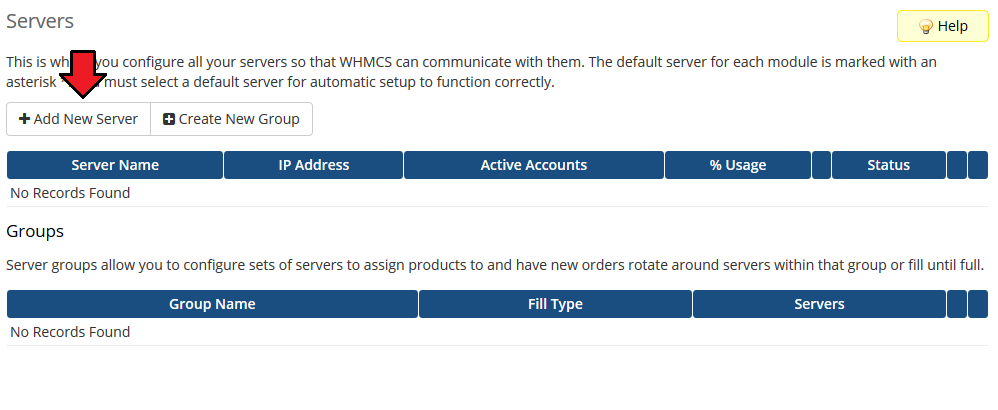
| 12. Now, log in to your WHMCS and proceed to 'System Settings' → 'Servers' and press 'Add New Server'. |
|
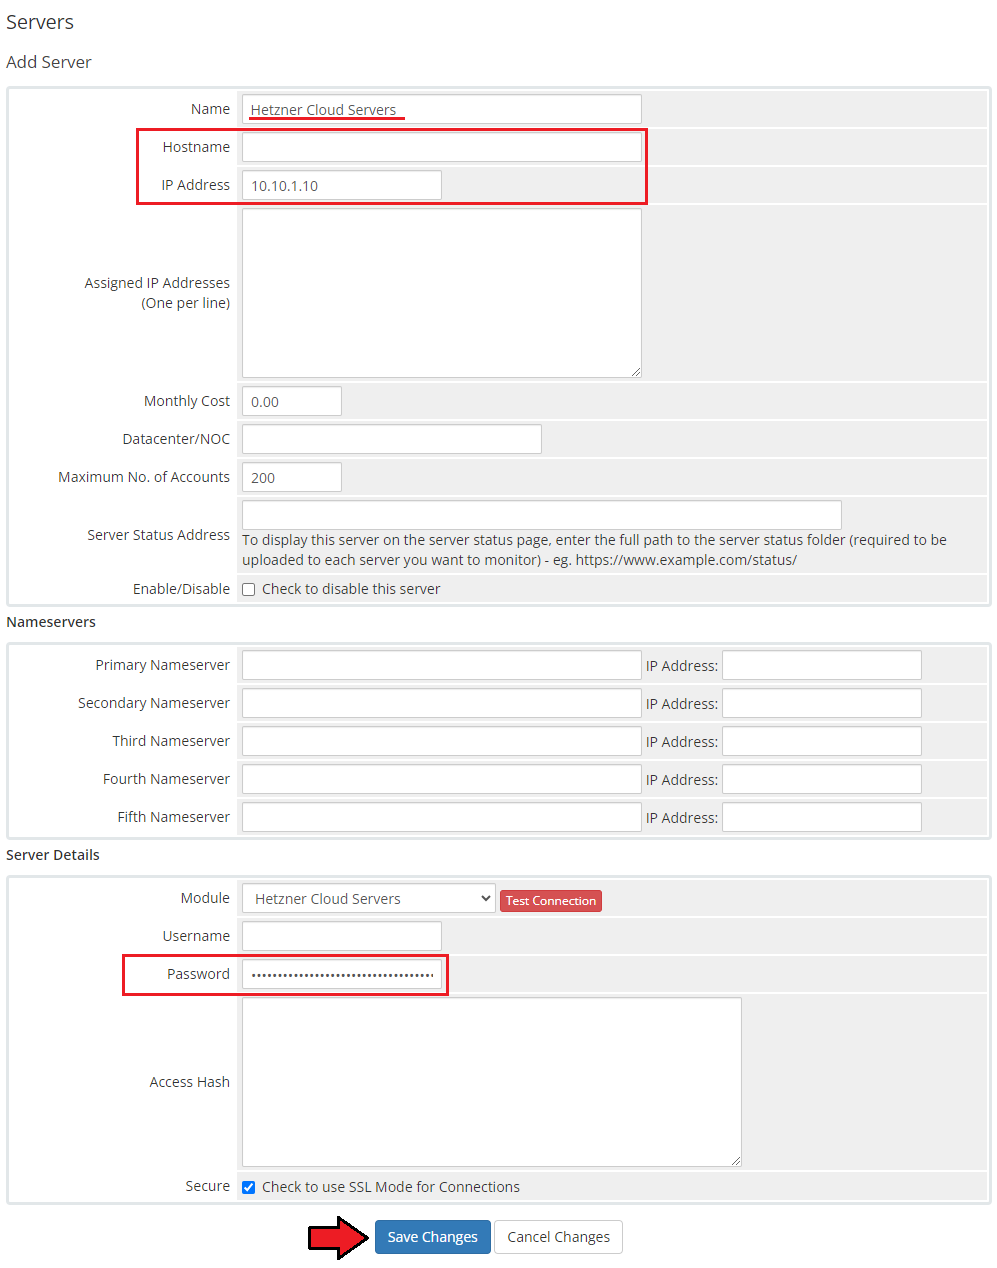
| 13. Next, enter your server name, provide any data into the 'Hostname' or 'IP Address' and select 'Hetzner Cloud Servers For WHMCS' from the 'Type' field. Now, provide the previously generated API token in the 'Password' field. Then check the connection, and if successful, save the changes. Note: The module requires neither the "Hostname" nor "IP Address", fill out one of the fields to avoid fatal errors. |
|
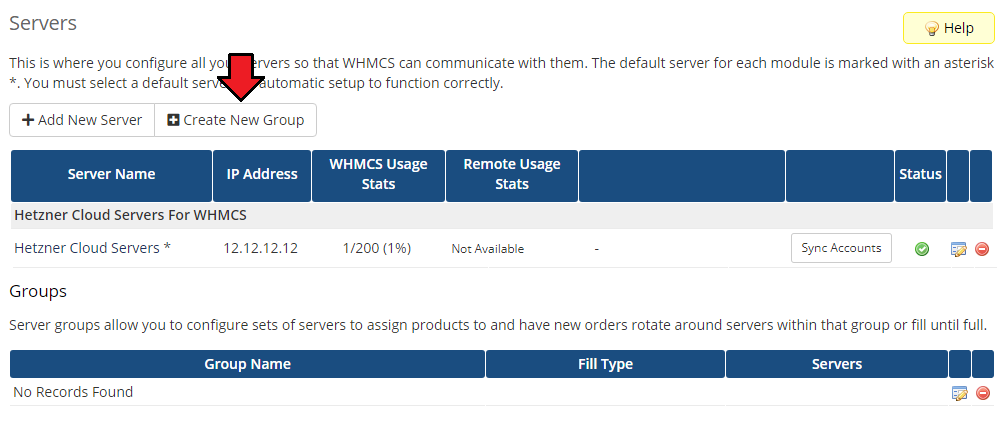
| 14. It is time to create a server group. To do so, click on 'Create Server Group'. |
|
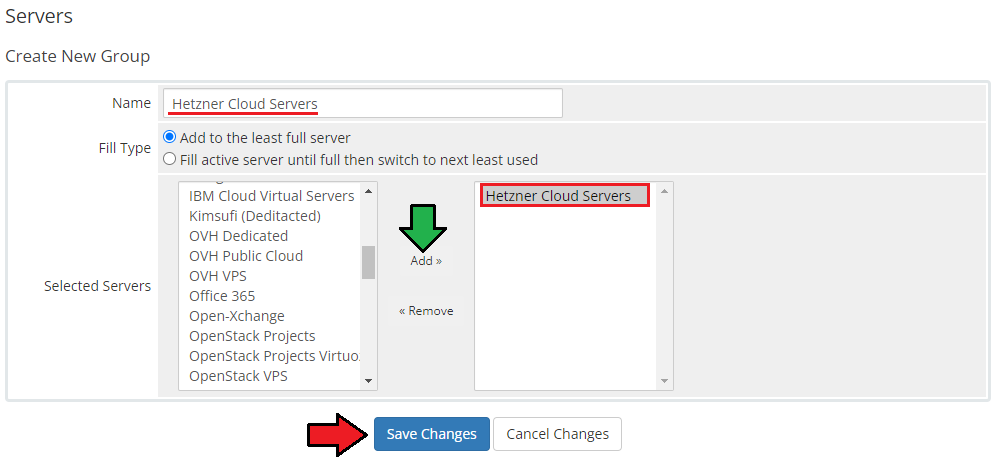
| 15. Enter a name, click on your previously created server, press 'Add' and afterward 'Save Changes'. |
|
[edit] Configuration of Product
| 16. In order to create and configure a product, go to 'System Settings' → 'Products/Services'. Click on 'Create a New Group' . |

|
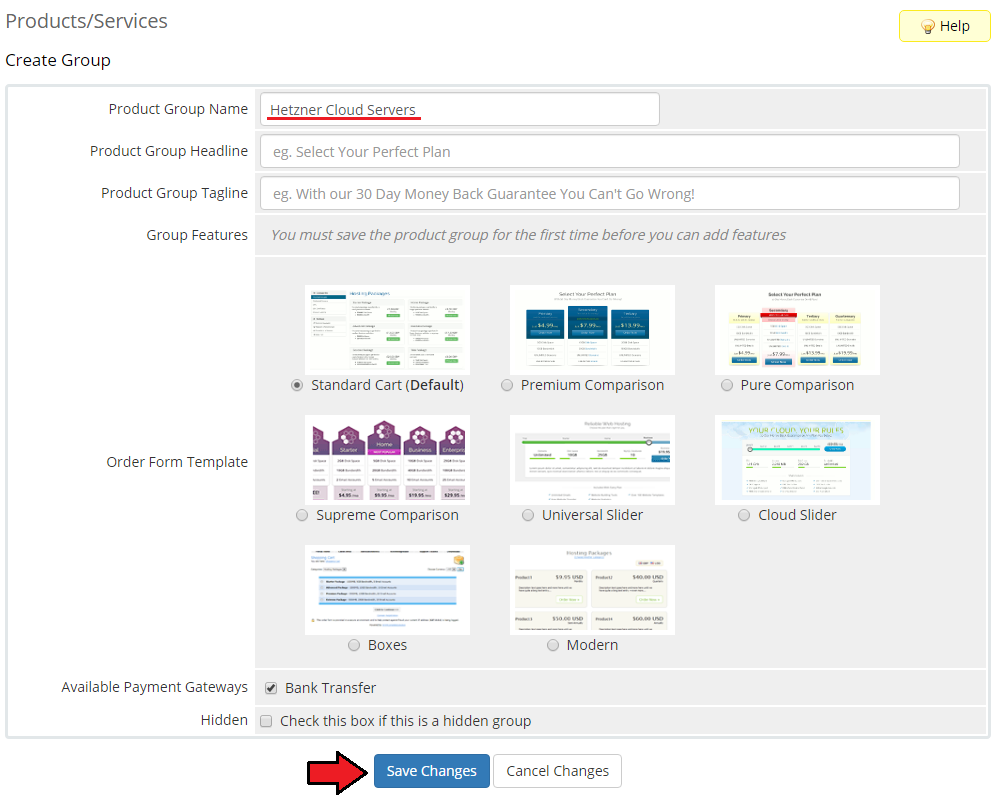
| 17. Enter your product group name and press 'Save Changes'. |
|
| 18. Once you have a product group, you can create a new product. To do so, first, click on 'Create a New Product' . |

|
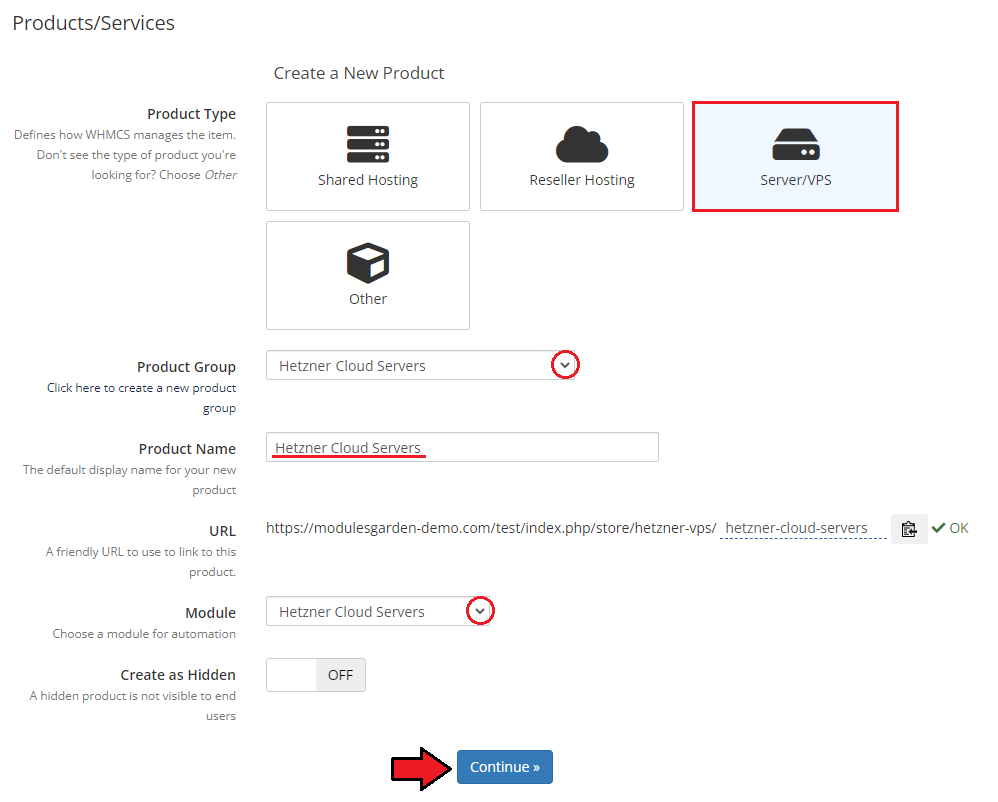
| 19. Afterward, choose your product type, enter your product name, choose the module and the product group from the dropdown menus. Press 'Continue'. |
|
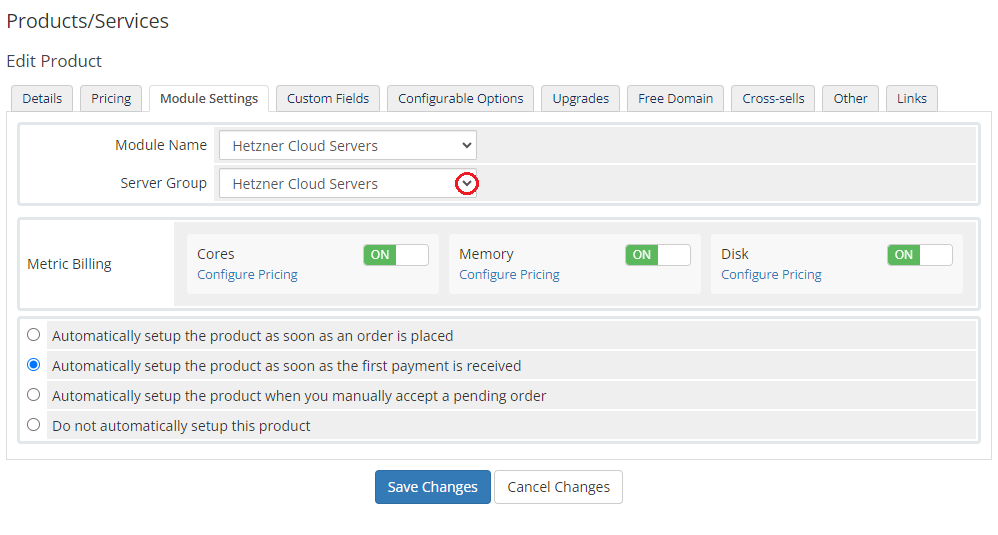
| 20. Now, go to the 'Module Settings' section, choose your previously created server group from the dropdown menu. The module should automatically save and reload the settings. If not, click on the 'Save Changes' option manually. |
|
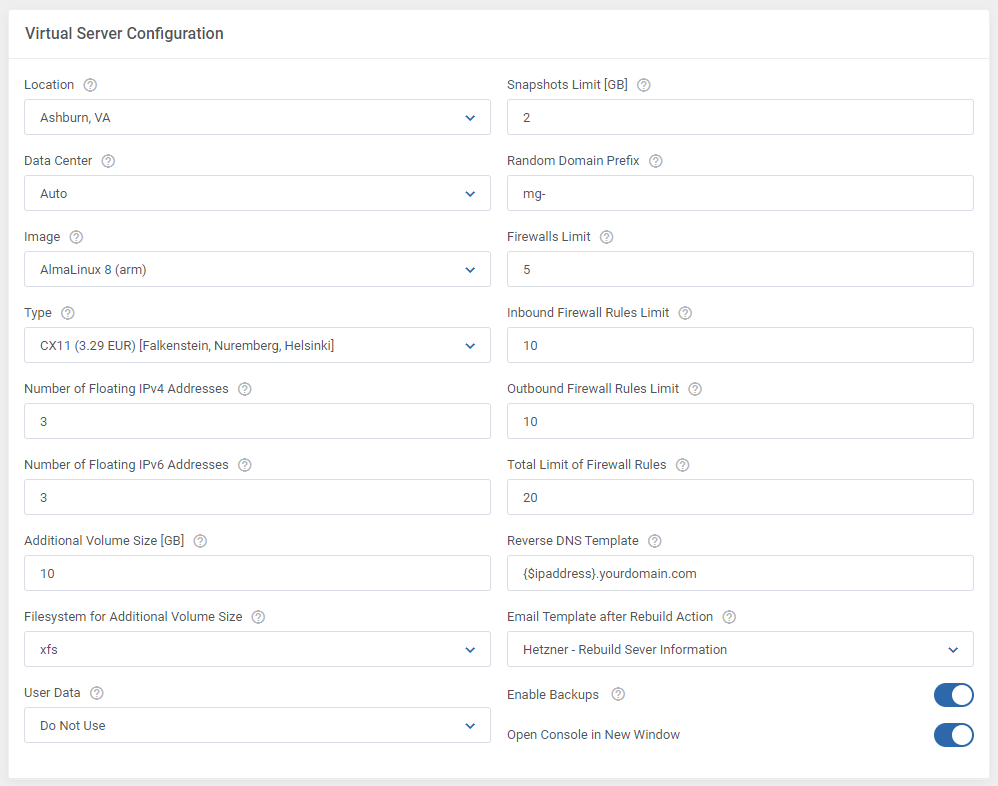
| 21. Now, you can start configuring the settings of the server you sell. Just like when creating a new virtual machine in your Hetzner panel, here you can also configure such options as:
|
|
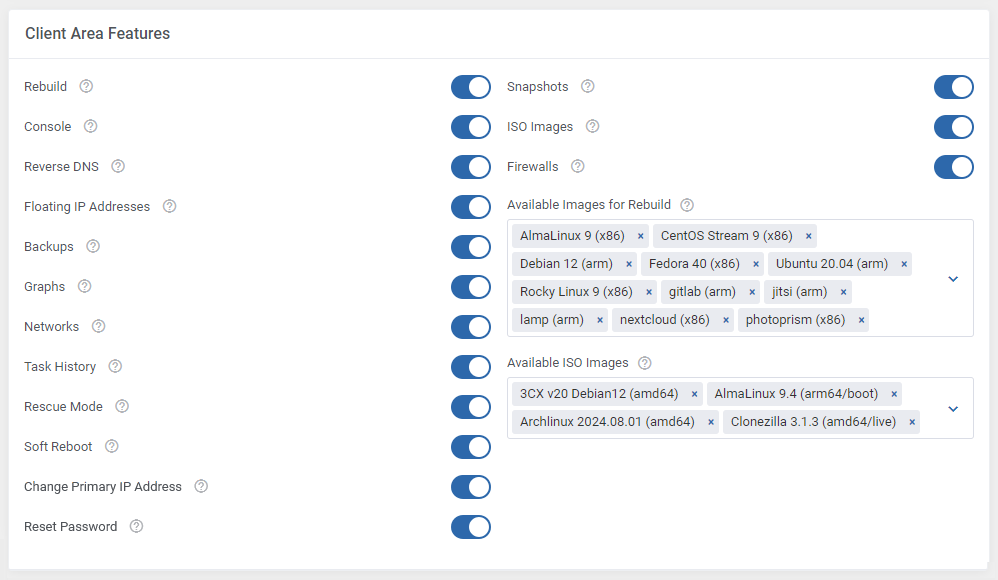
| 22. The following section is dedicated to the Client Area Features. You will find here several options that can be enabled and then will be available to your clients in their client area. These options are:
|
|
| 23. Adjust the content of the "Server Information" section visible in the client area. Select here the fields that you wish to be visible for clients on the product overview page. |

|
24. Configure the automation settings:
|

|
| 25. At the end of the configuration process, you can decide whether you want to generate configurable options for the product. Configurable options can be used by your clients to select each virtual machine parameters individually during order placement. |
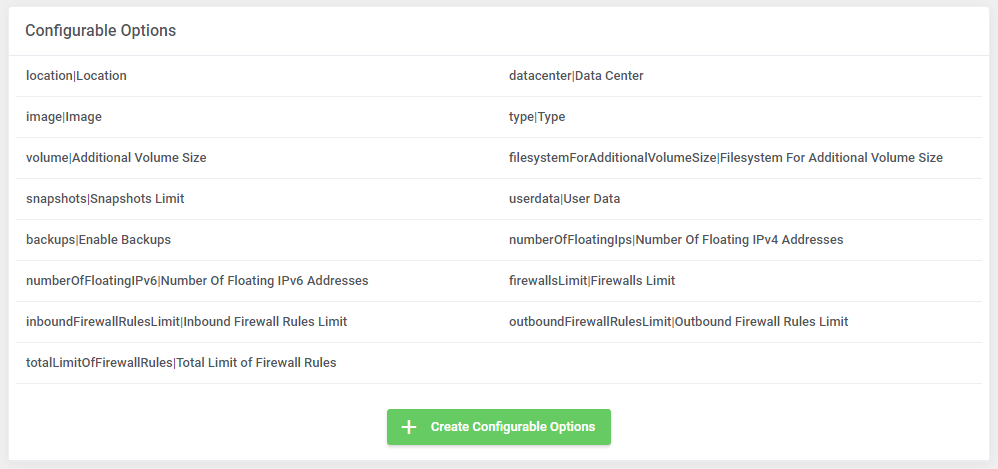
|
| If you decide to use configurable options, press on the 'Create' button and select which options you want to generate. Note that the configuration for disabled options will still be taken from the configuration of the main product. More information about how to use configurable options can be found here or in the official WHMCS documentation. |
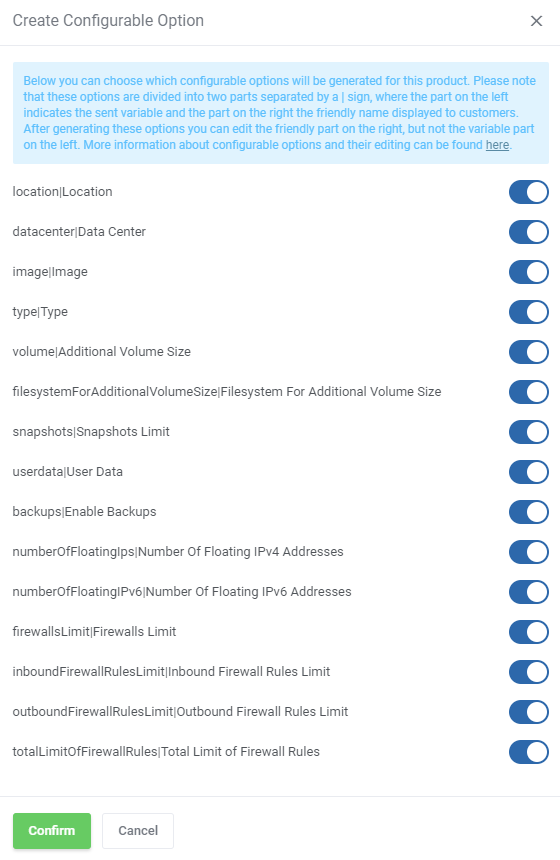
|
| Now that the product is ready, it is time to set up the corn job responsible for task executions. It is suggested that the cron should run every 5 minutes: php -q /your_whmcs/modules/servers/HetznerVps/cron/cron.php Tasks |

|
[edit] SSH Keys
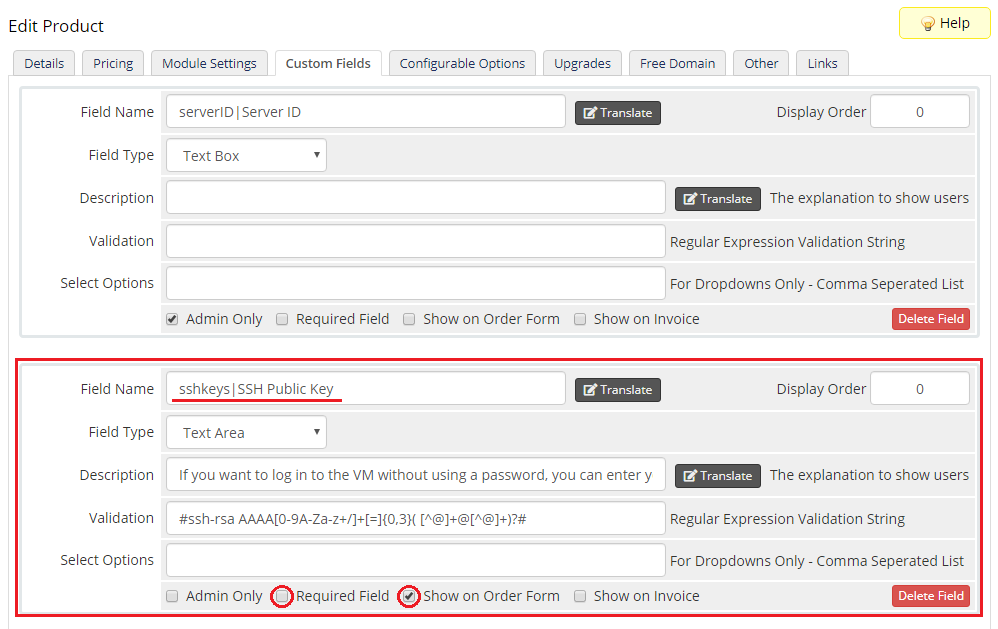
| In the 'Custom Fields' tab you will find a 'SSH Public Key' field which is displayed to clients on the order form by default. This field is optional. It allows your clients to insert their public key in order to be able to log in to the server without using a password.
If you would like to limit the possibility of entering the key e.g. only to the 'ssh-rsa' format, you can use the regular expression in the validation field, such as: #ssh-rsa AAAA[0-9A-Za-z+/]+[=]{0,3}( [^@]+@[^@]+)?#
More information about how Hetzner handles SSH keys and how to create them can be found here. |
|
[edit] Management
[edit] Admin Area
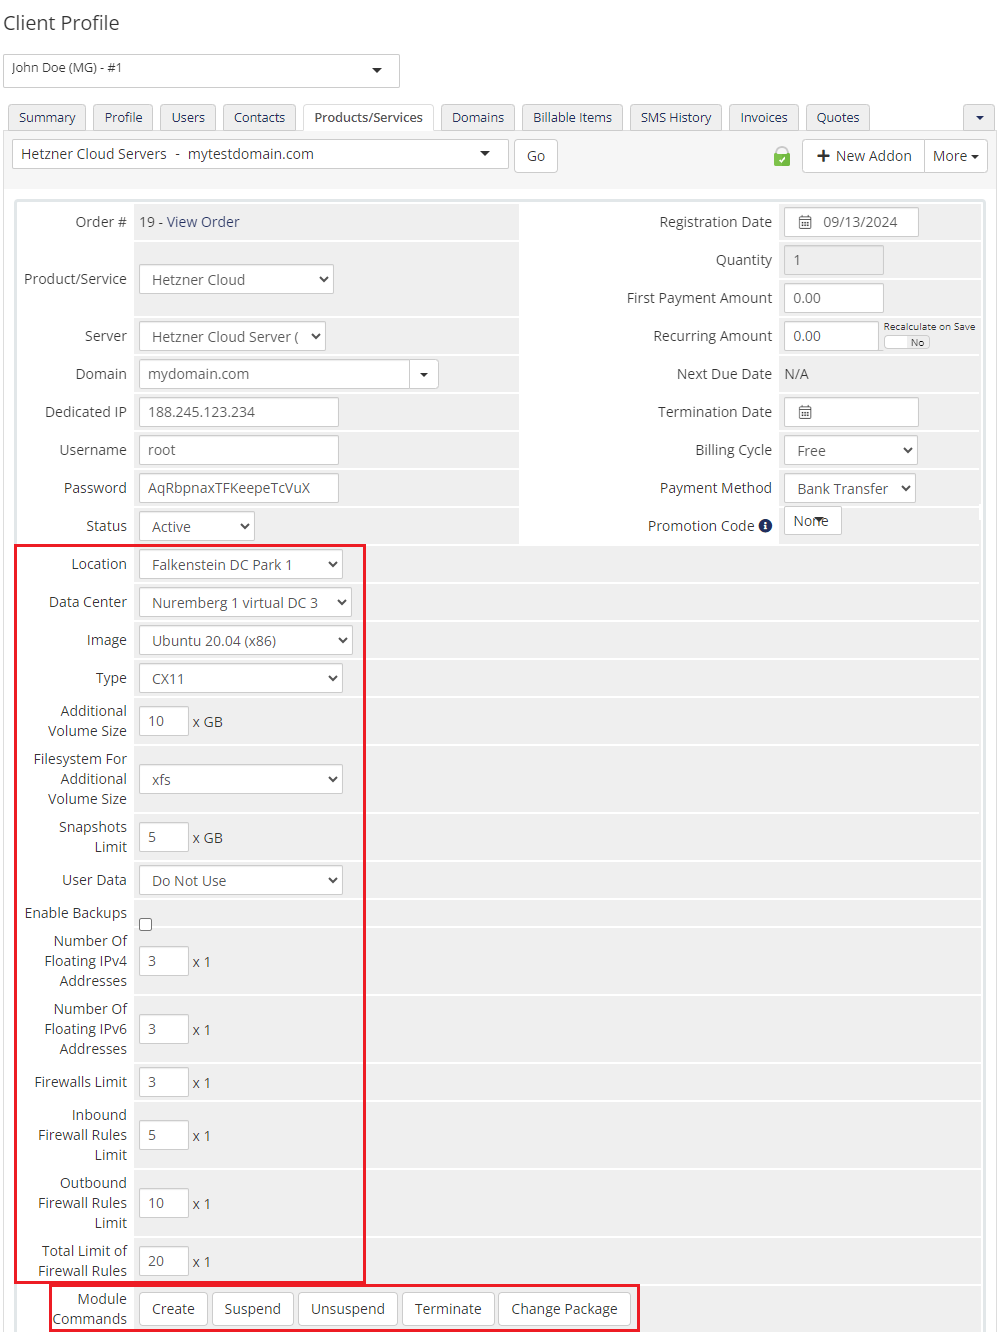
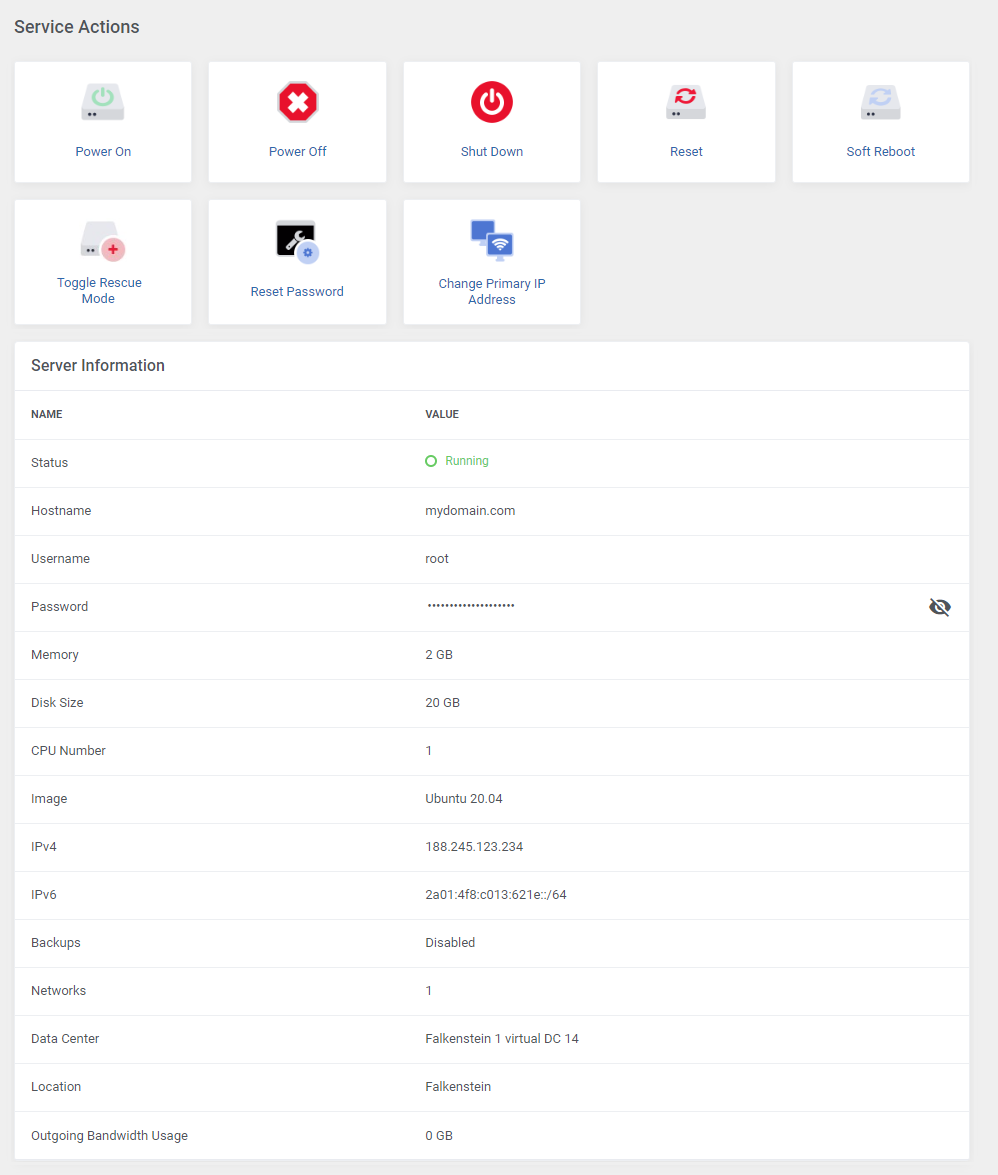
| Hetzner Cloud Servers For WHMCS allows you to monitor and manage your customer virtual machine from the admin area of your WHMCS system. This includes supervision of such features as:
|
|
|
|
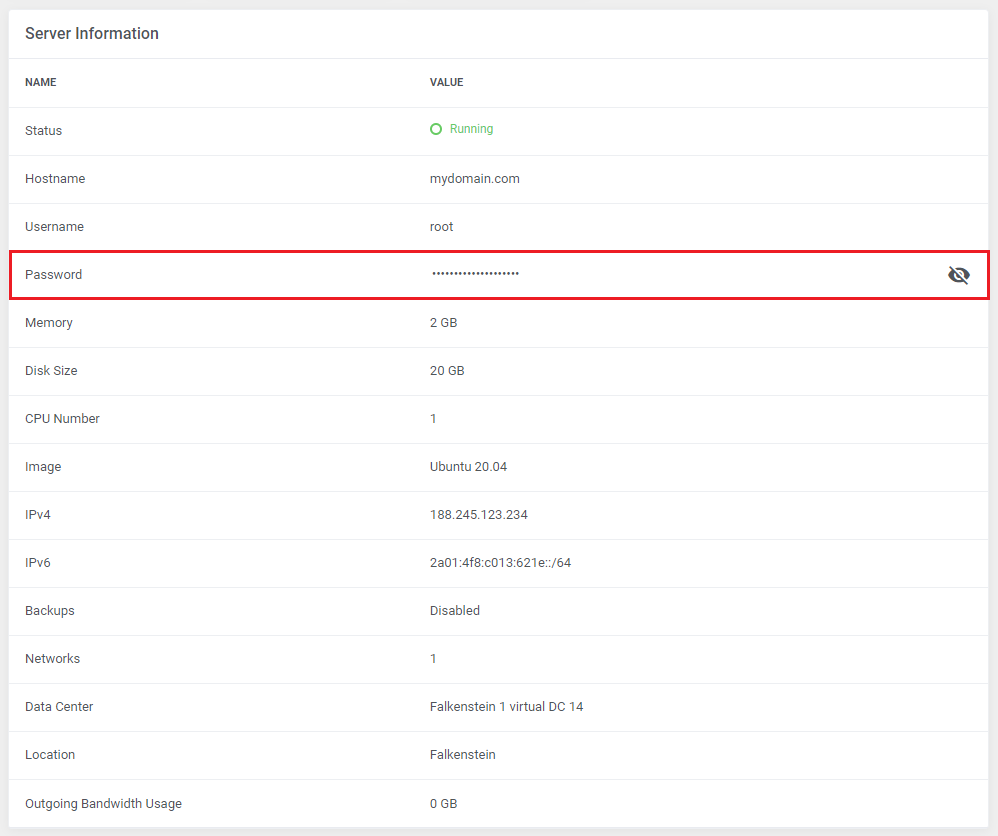
| Please note that in case the product had no SSH key provided while being created, the 'Password' field with the option to be changed is available among other Server Information. |
|
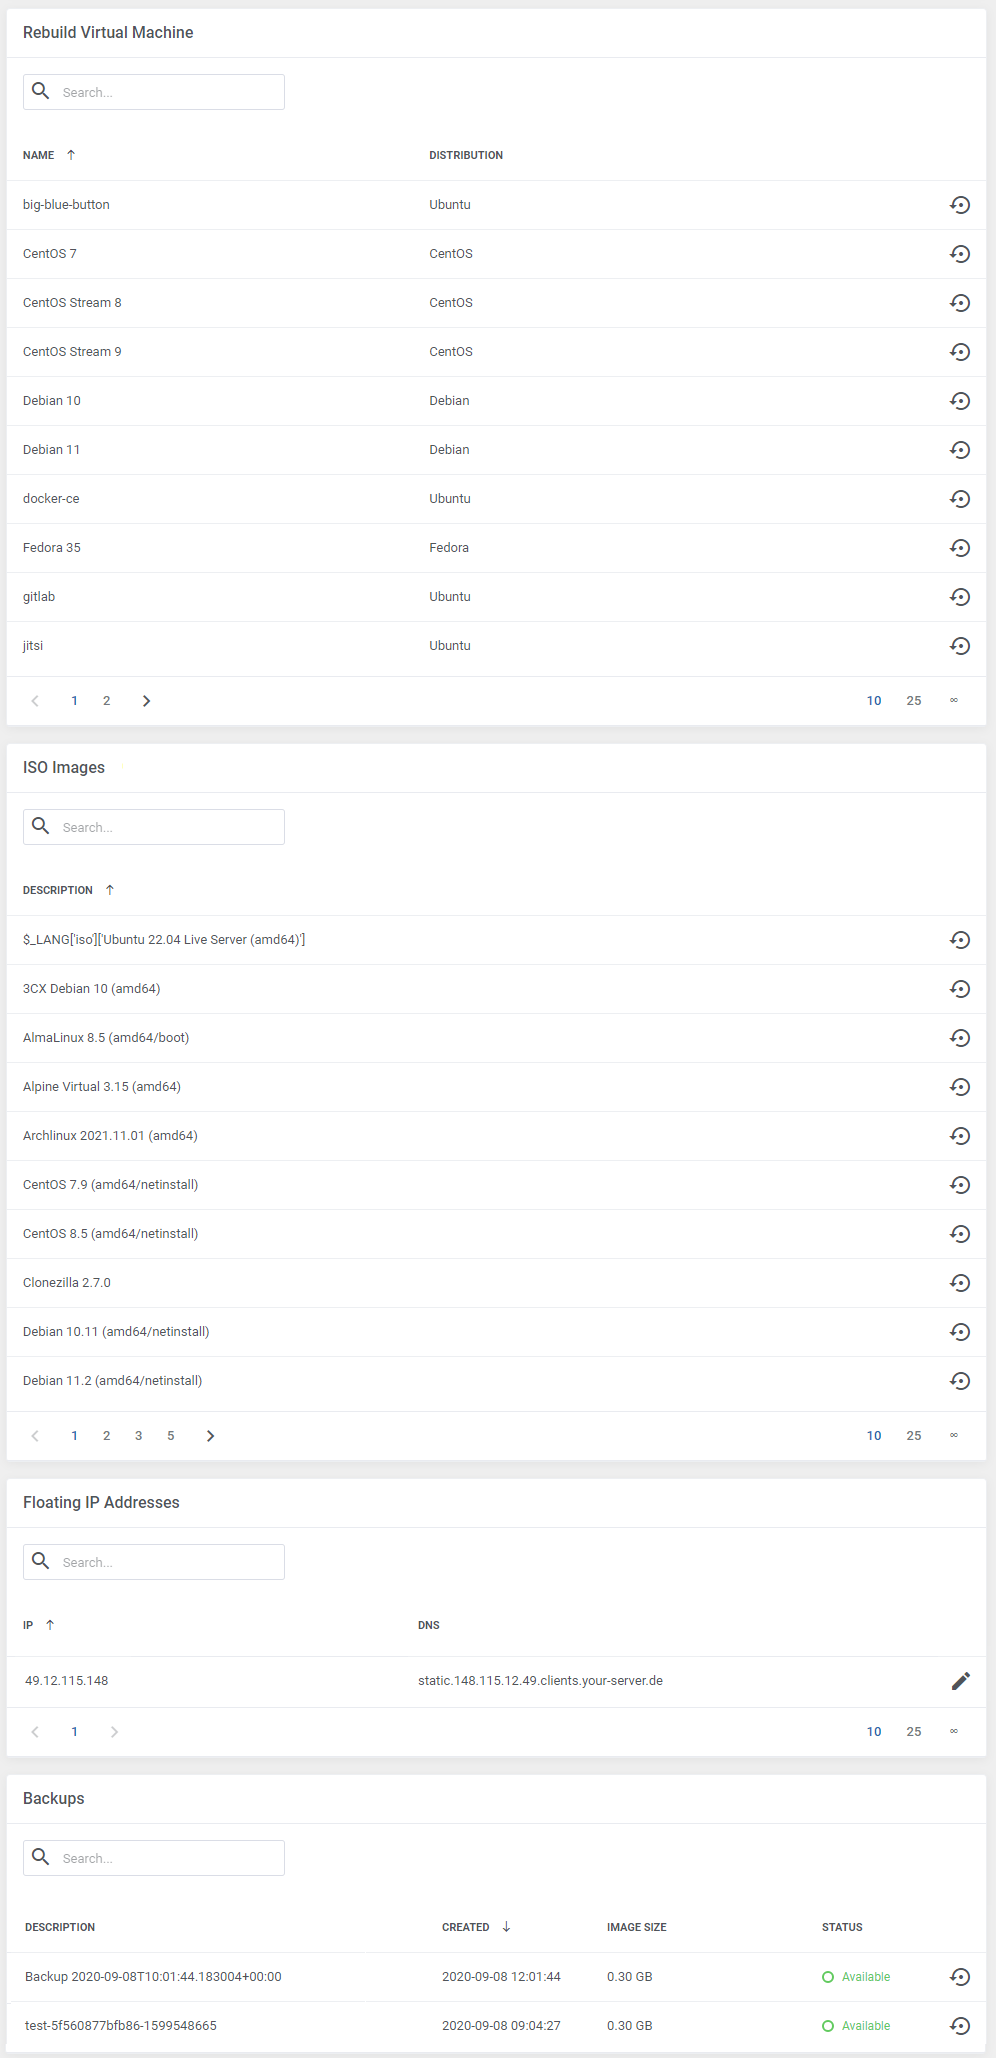
Below you will also find:
|
|
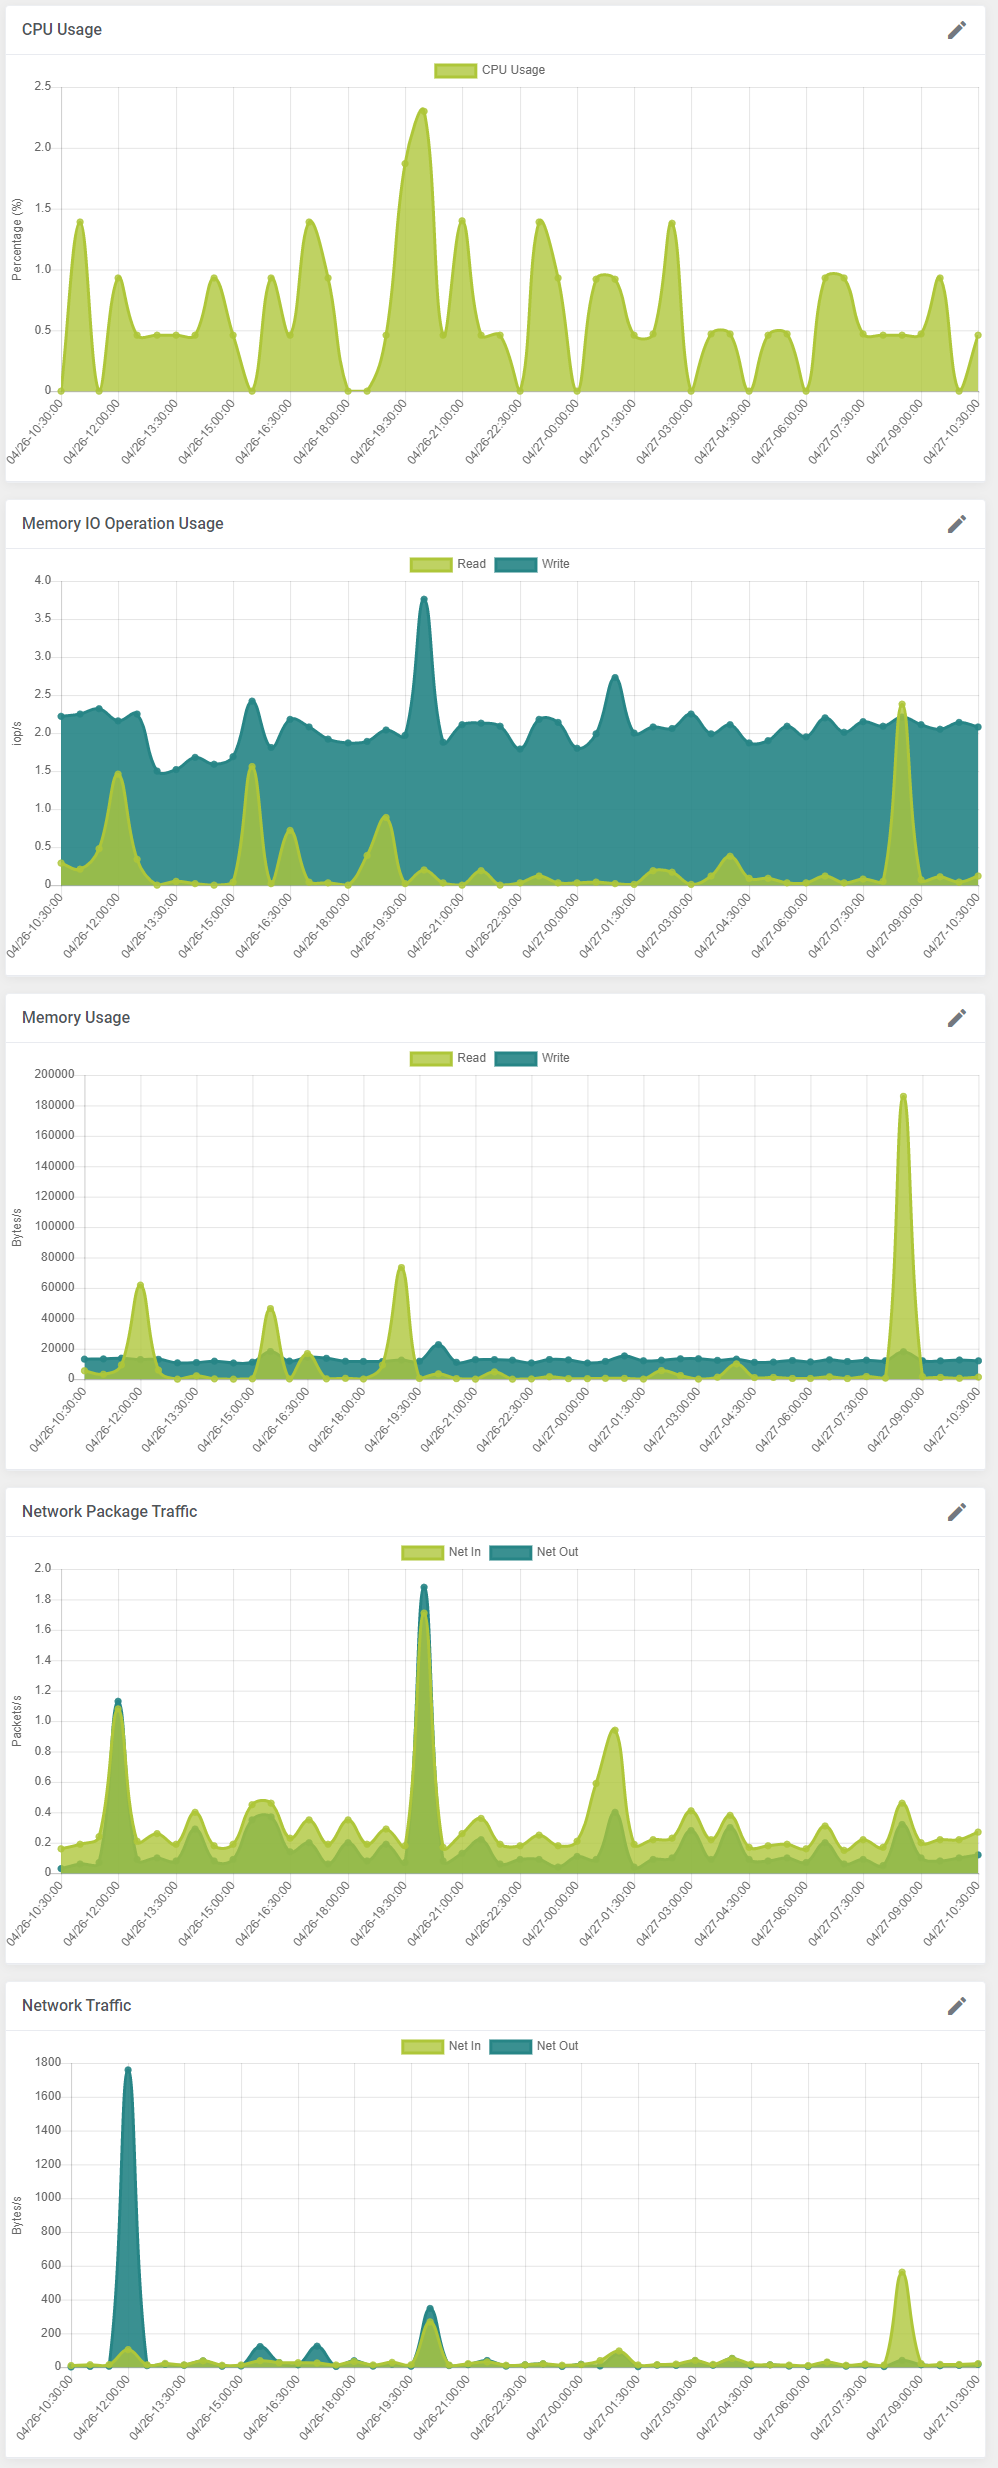
| For available graphs, you may change settings to adjust the displayed data time frame to your needs. |
|
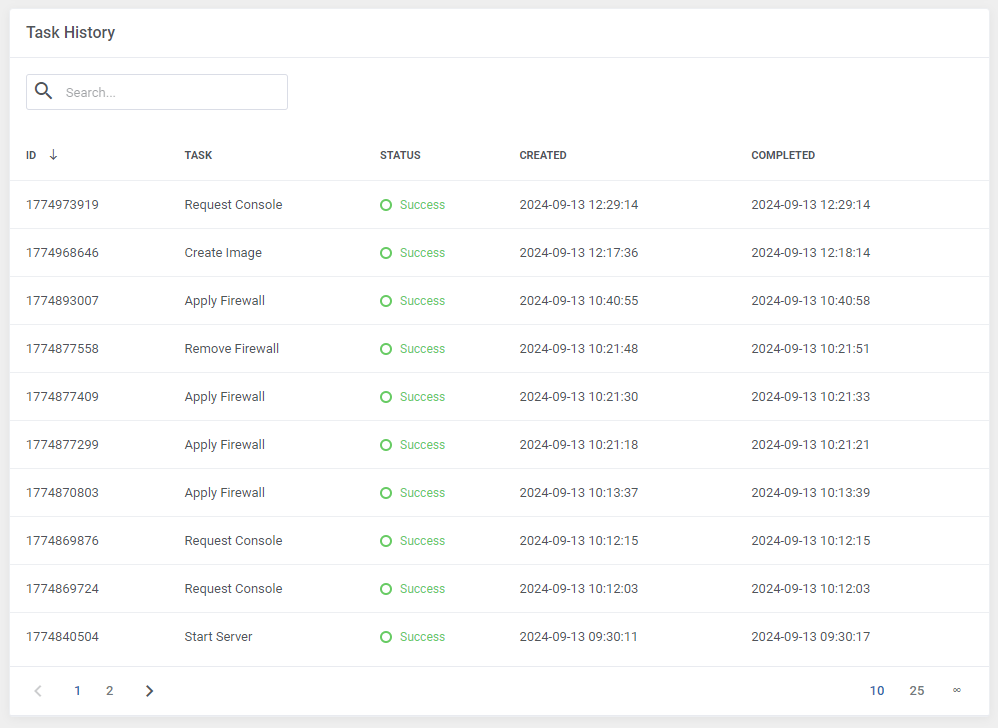
| At the bottom, you will find the Task History. |
|
[edit] Ordering
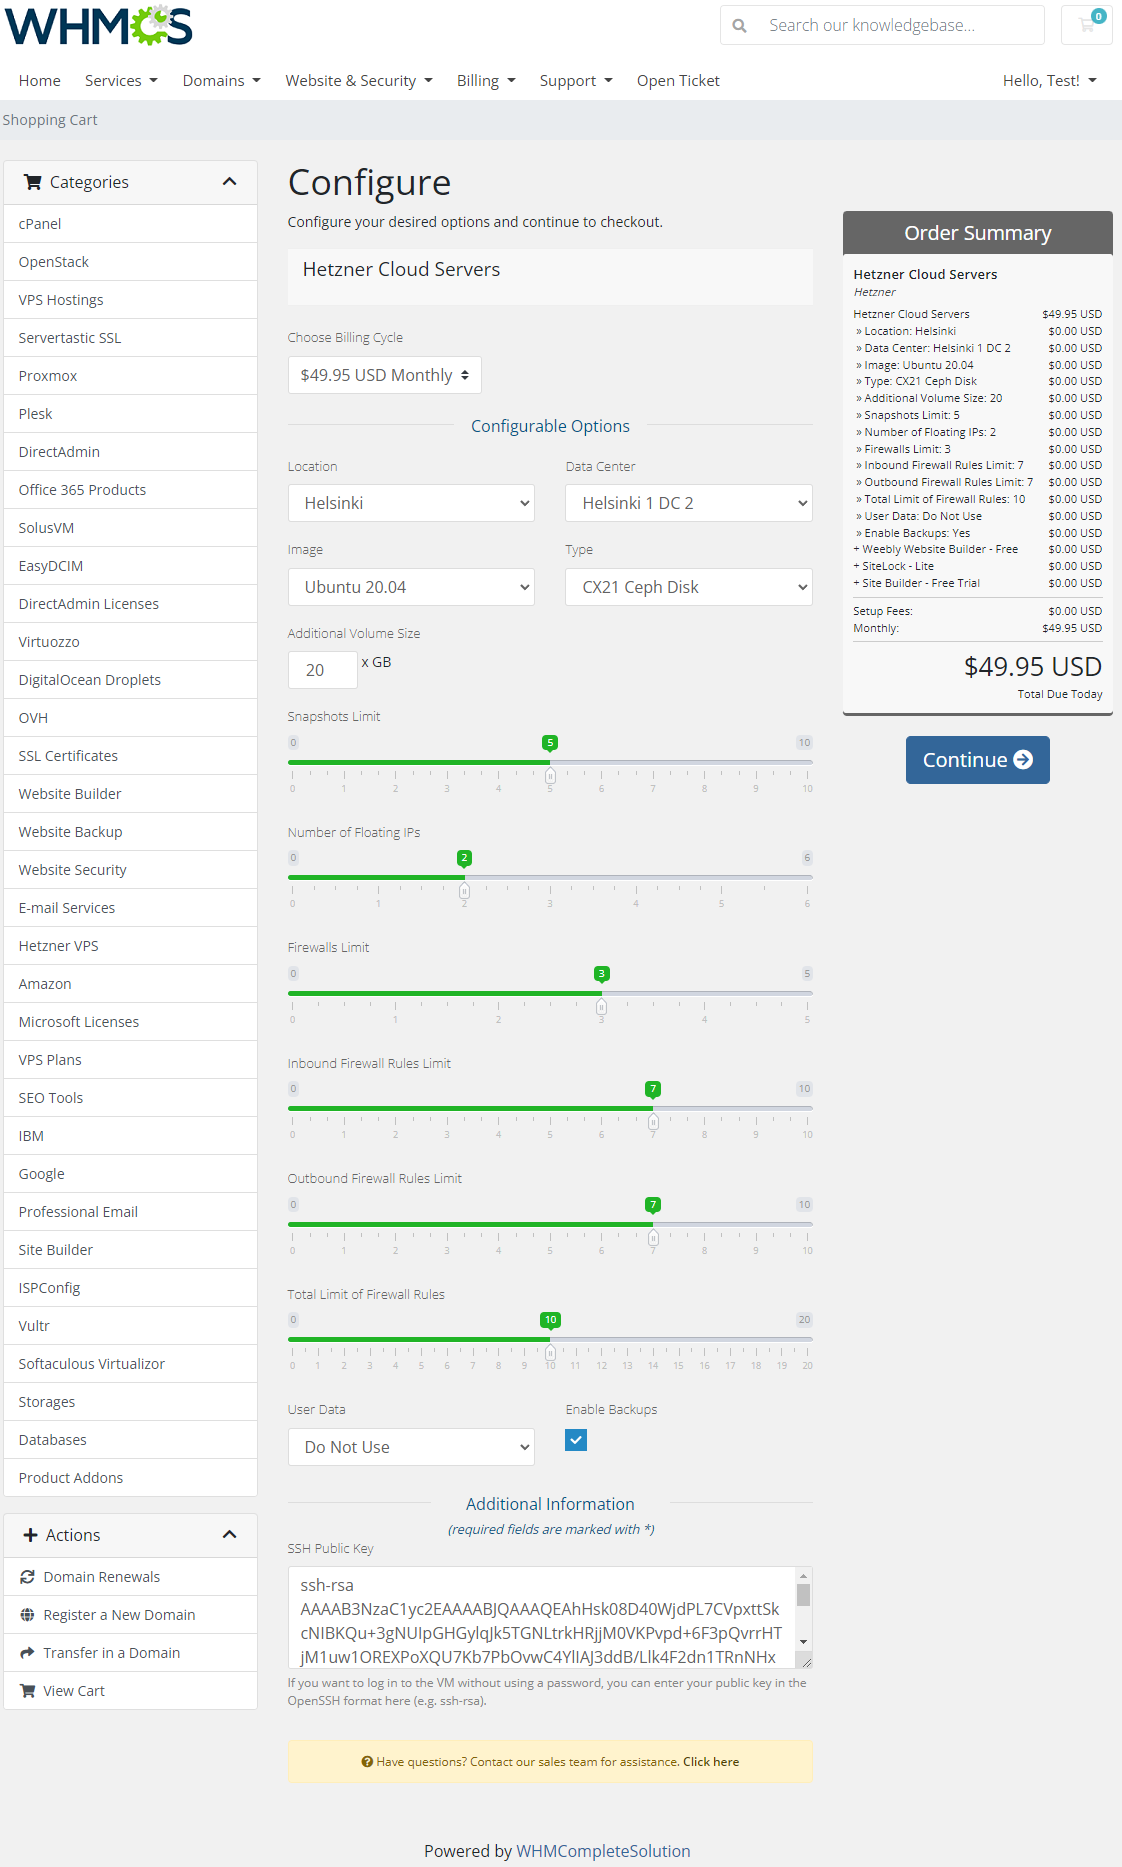
| Owing to configurable options, you are able to offer a product which your clients can tailor according to their needs. Additionally, you are able to set up pricing for each configurable option, which makes your offer even more competitive. Based on the custom SSH key field configuration, you might also insert your public SSH key, which will allow you to log in to a server without the need to use the password. After the order placement and successful VM creation, the server credentials will be sent to the client's email address according to the set cron execution intervals. |
|
[edit] Importing Existing Server
| In this section, you can find short instruction on how to connect one of your clients to your already existing server in the Hetzner panel. Take the following steps to make sure that the process will be carried out properly. 1. Firstly, manually create an order for your customer in WHMCS. Choose a client and in the summary, view click on the 'Add New Order' button. Next, select a 'Product/Service' and press 'Submit Order'.
The above-mentioned information has to be consistent with the data from your Hetzner panel. Now, complete this field as presented below. |
| 3. If the completed data is correct, after refreshing the page, you will see the attached server from Hetzner. Important! Remember to manually add other missing parameters of the instance such as credentials, configurable options, SSH Key, billing cycle, etc. so they match the parameters of the attached instance from Hetzner. |
[edit] Client Area
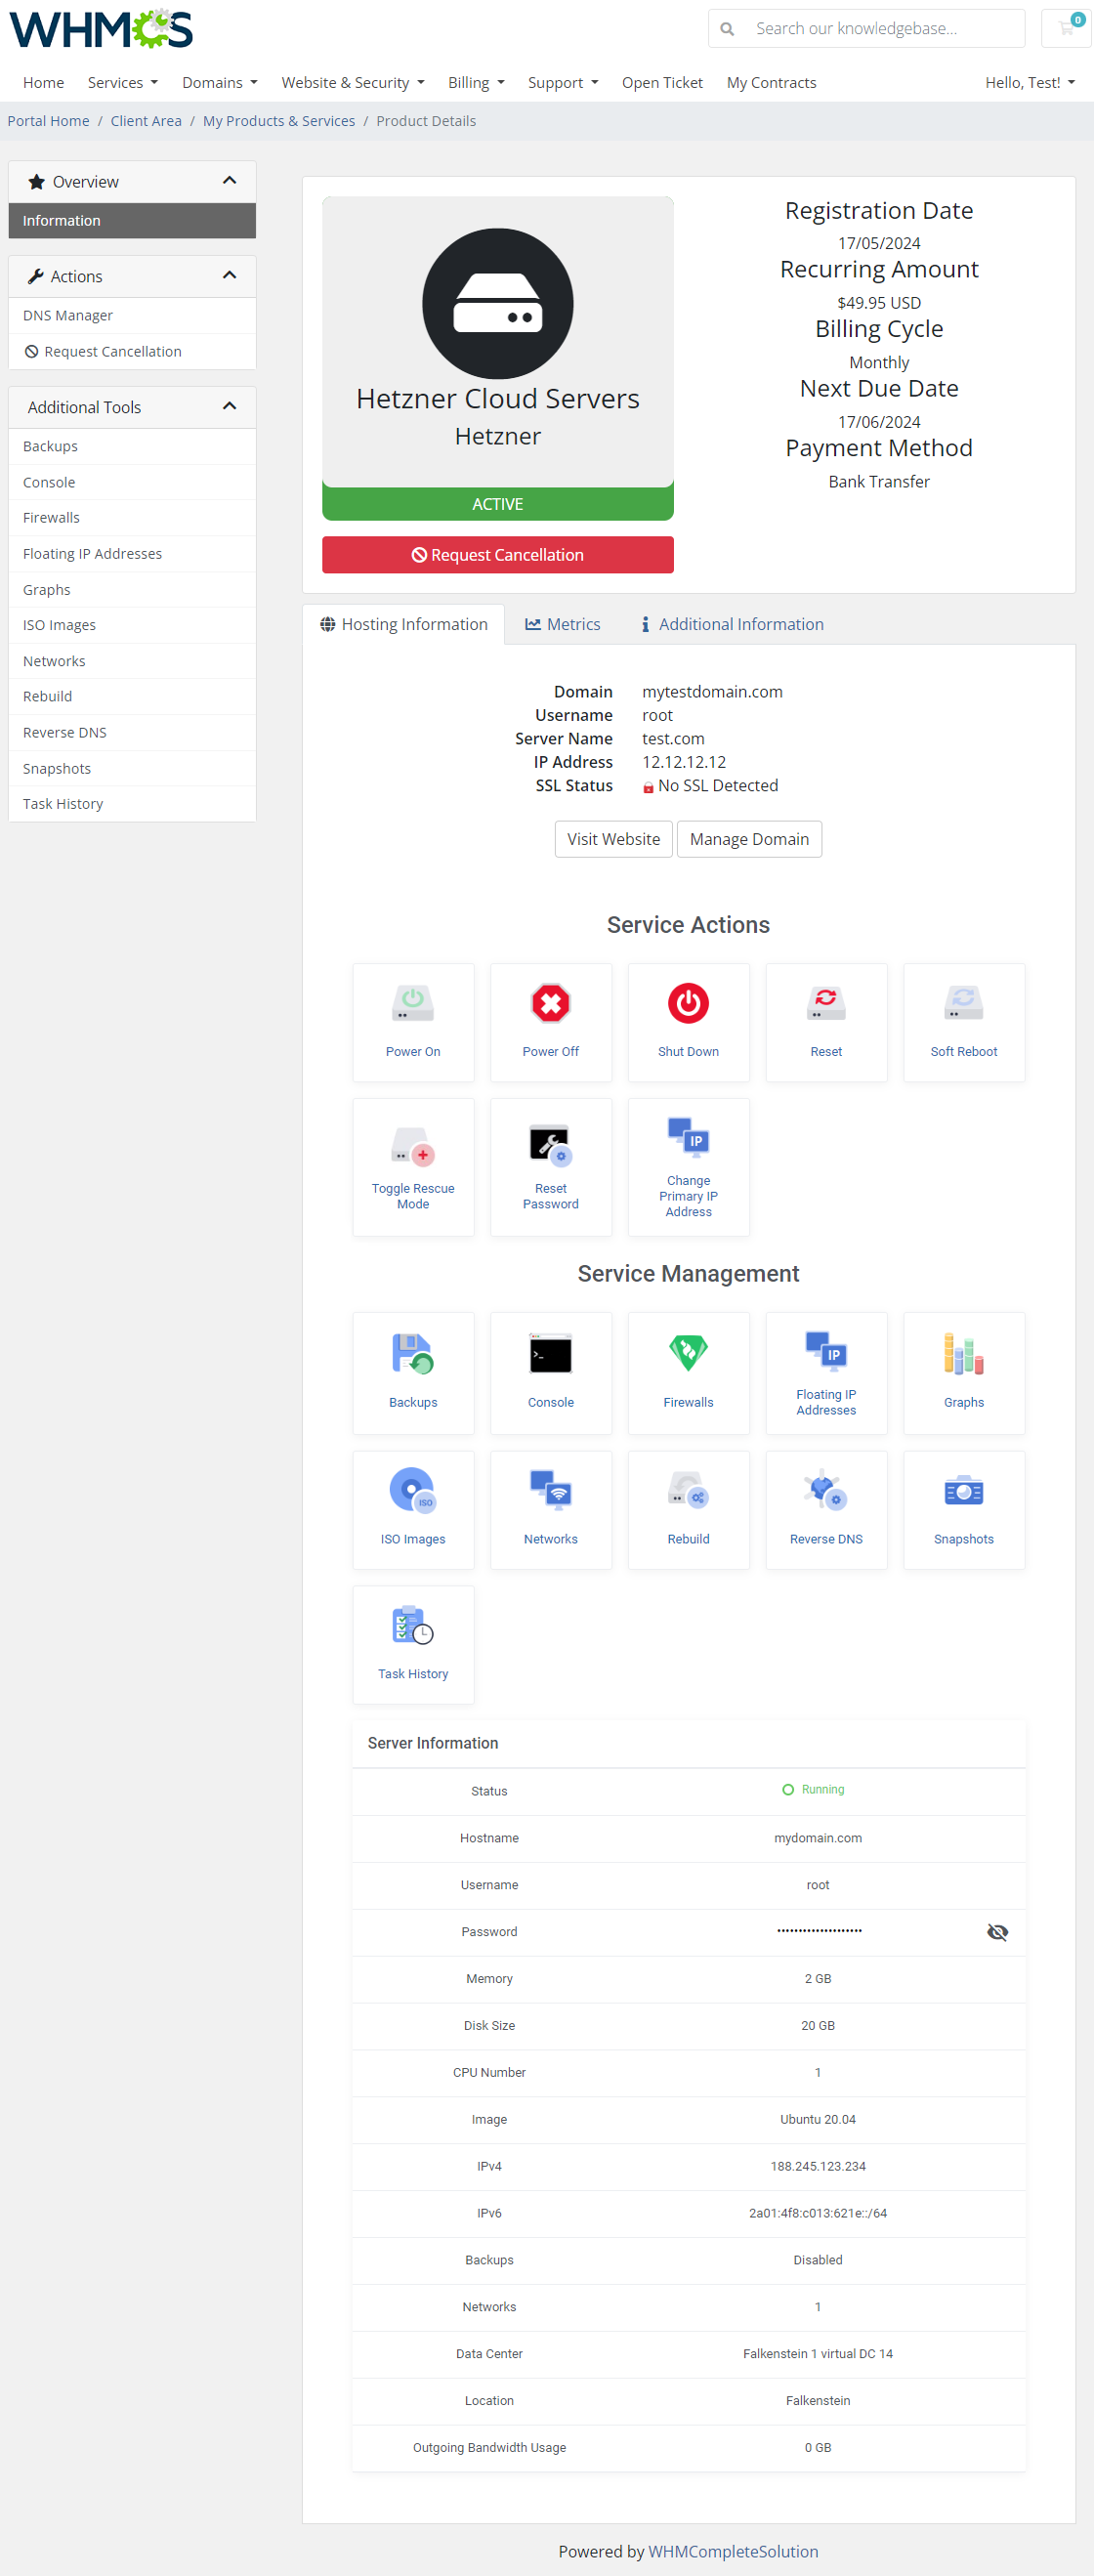
| Client area interface of Hetzner Cloud Servers should look like the one on the screen below. As you can see, the control panel contains useful options required for managing a server. The module allows your customers to easily power on/off, shut down and reboot their servers by pressing the corresponding buttons. |
|
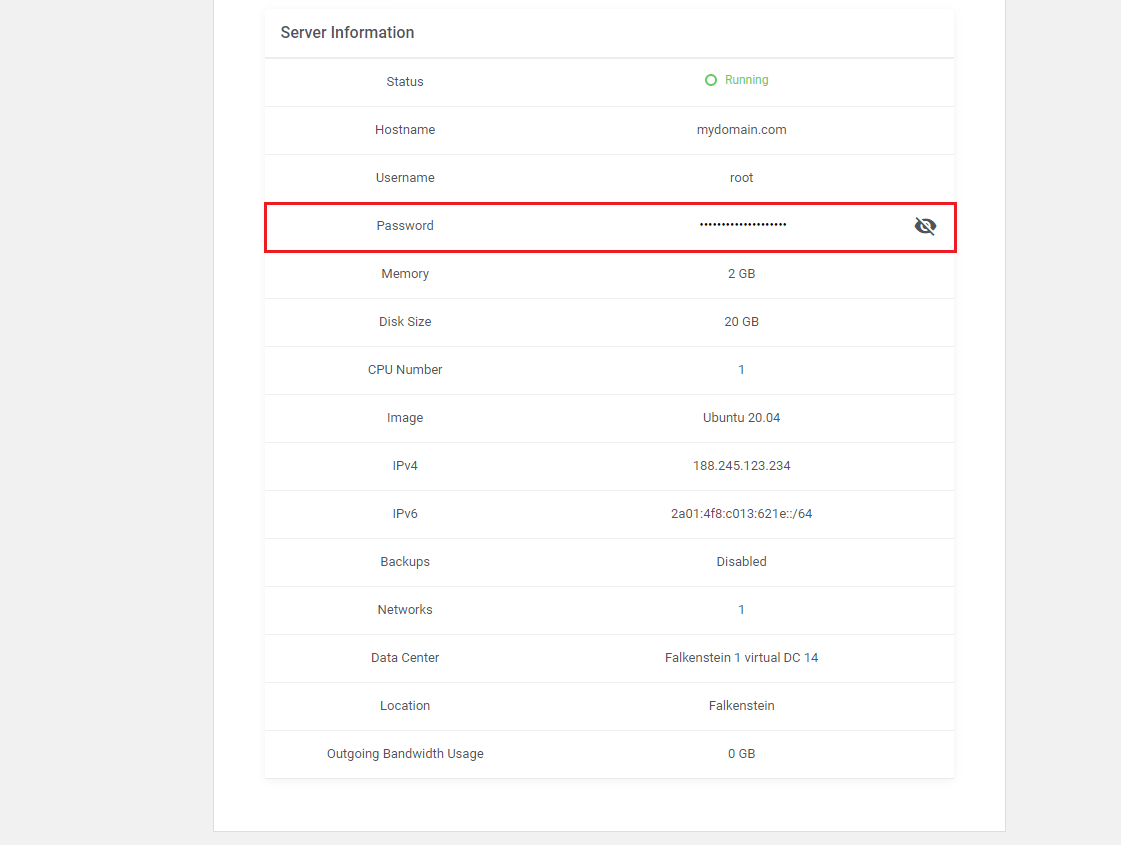
| In case the SSH Key has not been used when creating this virtual machine, a one time password, with the option to change it, will be available among other server information. |
|
[edit] Backups
| The first section available for clients grants the ability to view the list of existing 'Backups' of your server. You may restore any of the available backups at any time you need, simply press the icon marked on the screen. Please remember that 'Backups' are assigned to a particular server and will be removed once the server is deleted. |
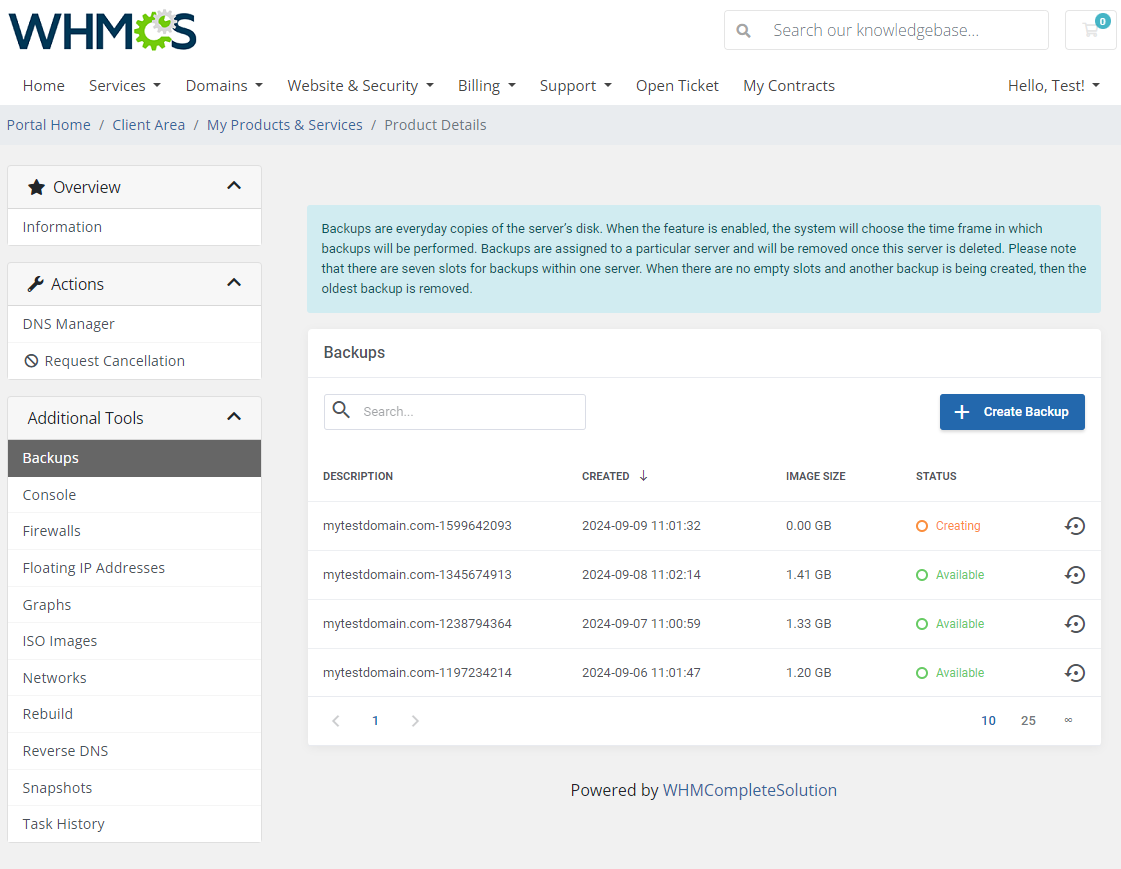
|
[edit] Console
| Clients may access console directly from the client area. It is the easiest and fastest possible way to connect to the server. |
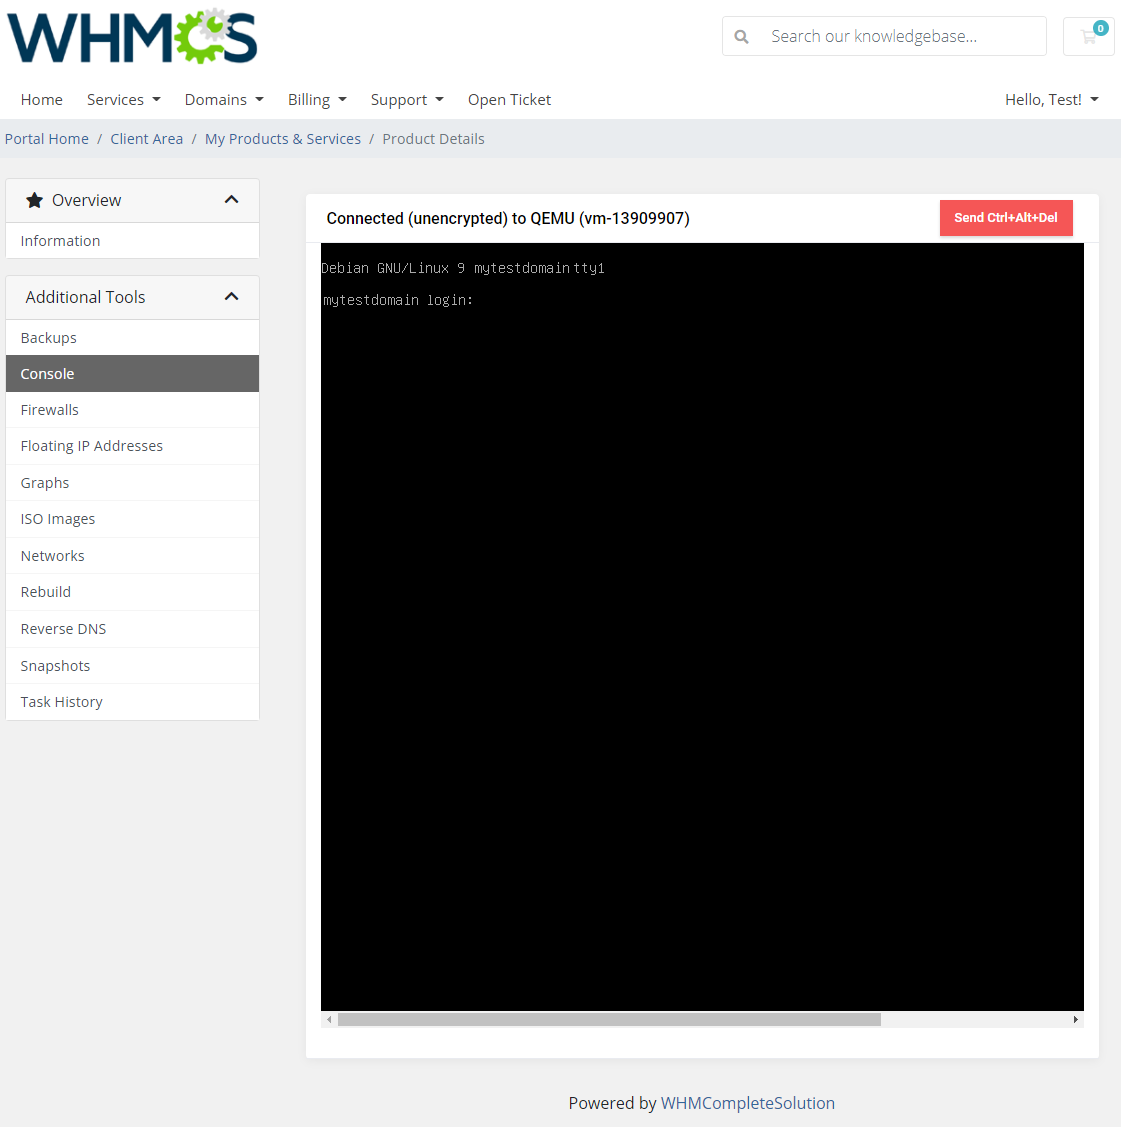
|
[edit] Firewalls
| 'Firewall' section allows your clients to view existing on the server firewalls and add new ones. To create a new firewall just press 'Create Firewall' button. |
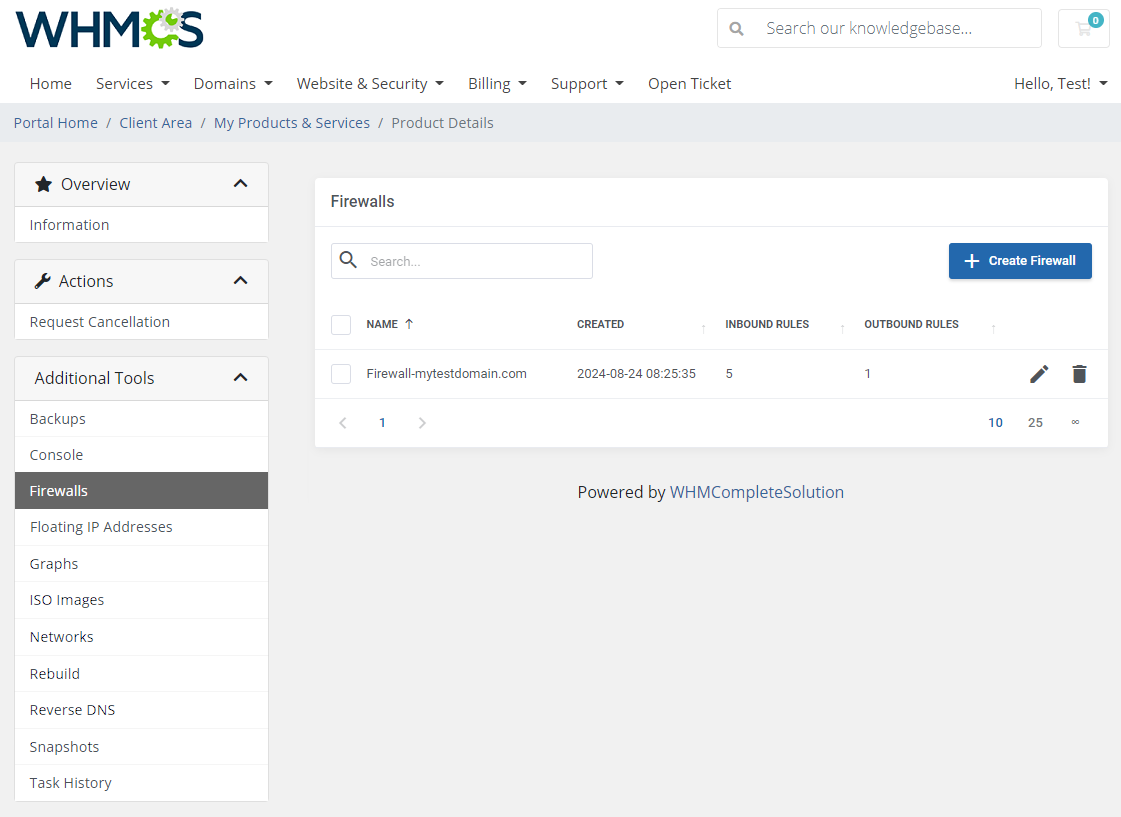
|
| Enter a firewall name and confirm the action by pressing the green button. |
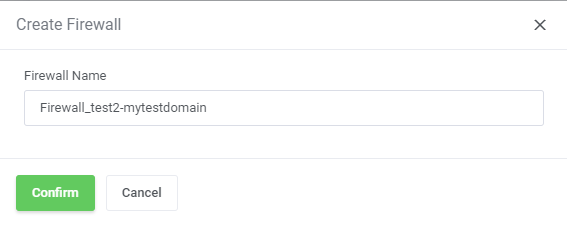
|
| Once you have the firewalls added, it is time to create required firewall rules. Press the edit icon next to the firewall to do so. |
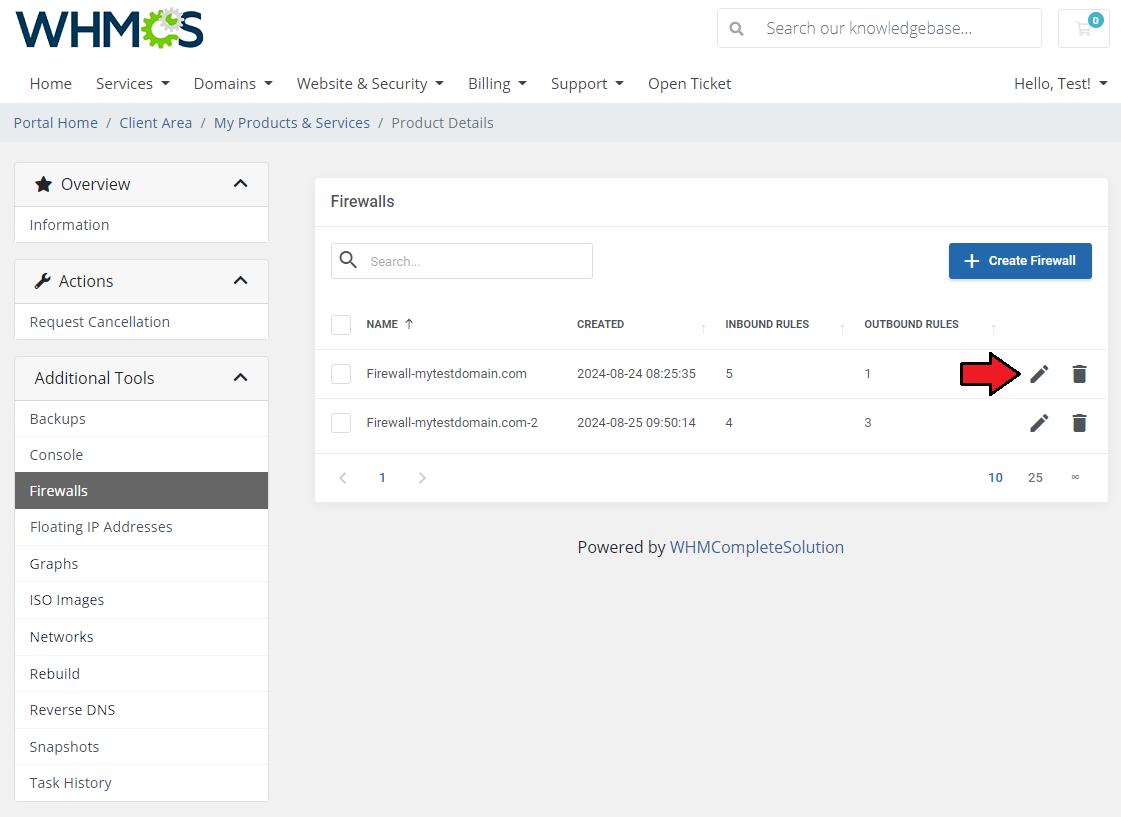
|
| Here you will find the list of existing rules if any have already been created. Press the button 'Create Rule' to add a new one. |
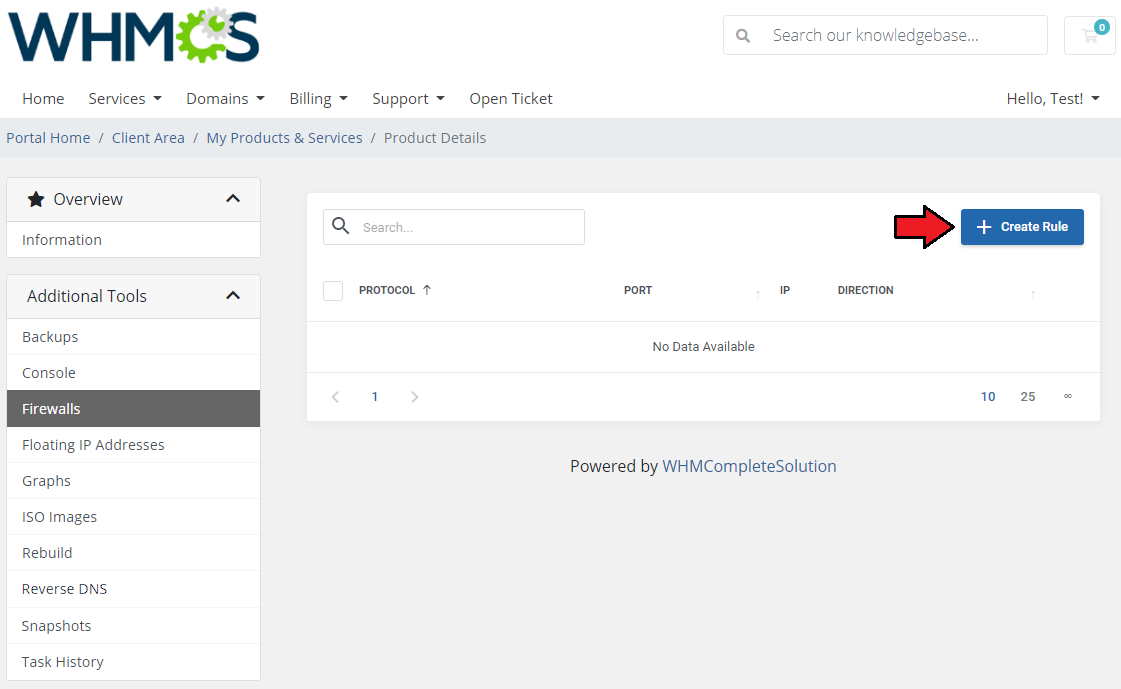
|
In order to add a new firewall rule please fill in the required fields:
|
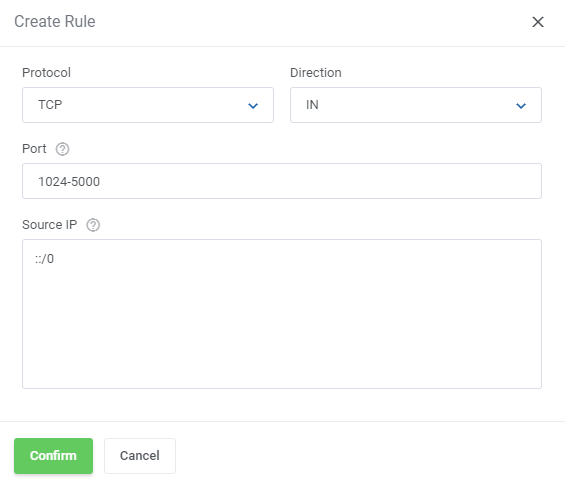
|
| As you can see, management of the existing rules is extremely easy. Edit or remove firewall rules by pressing adequate buttons. |
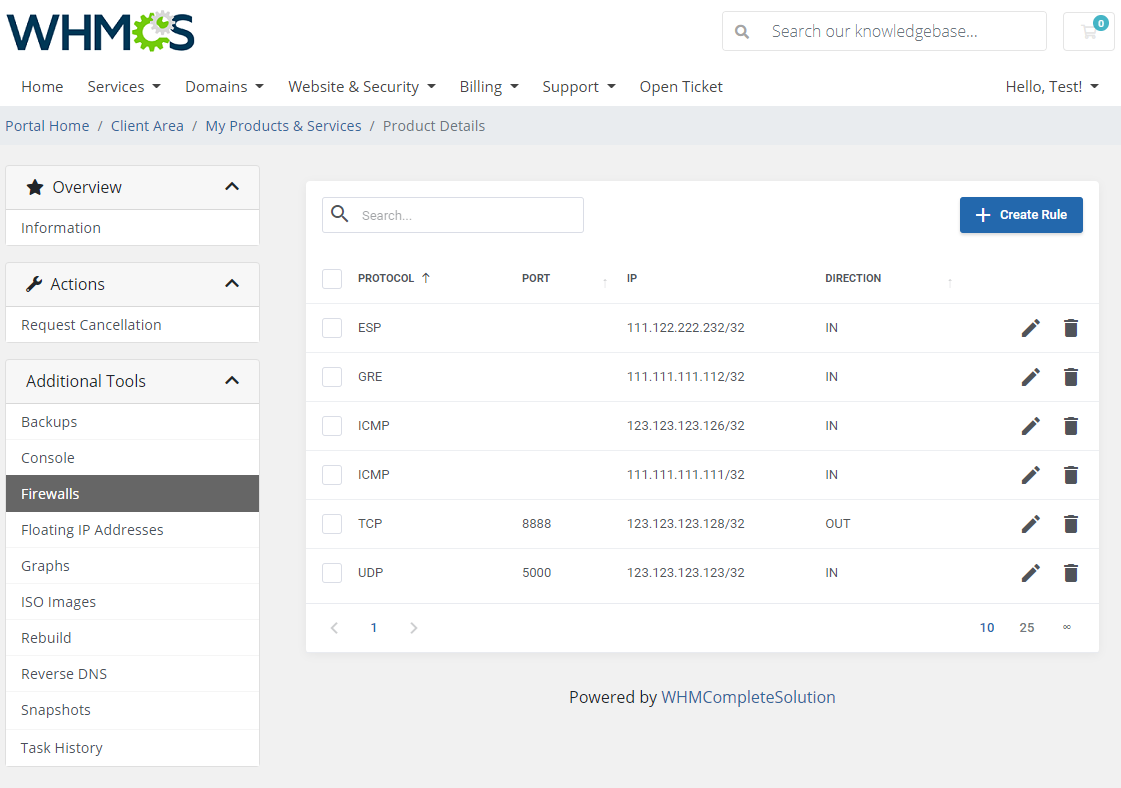
|
[edit] Floating IP Addresses
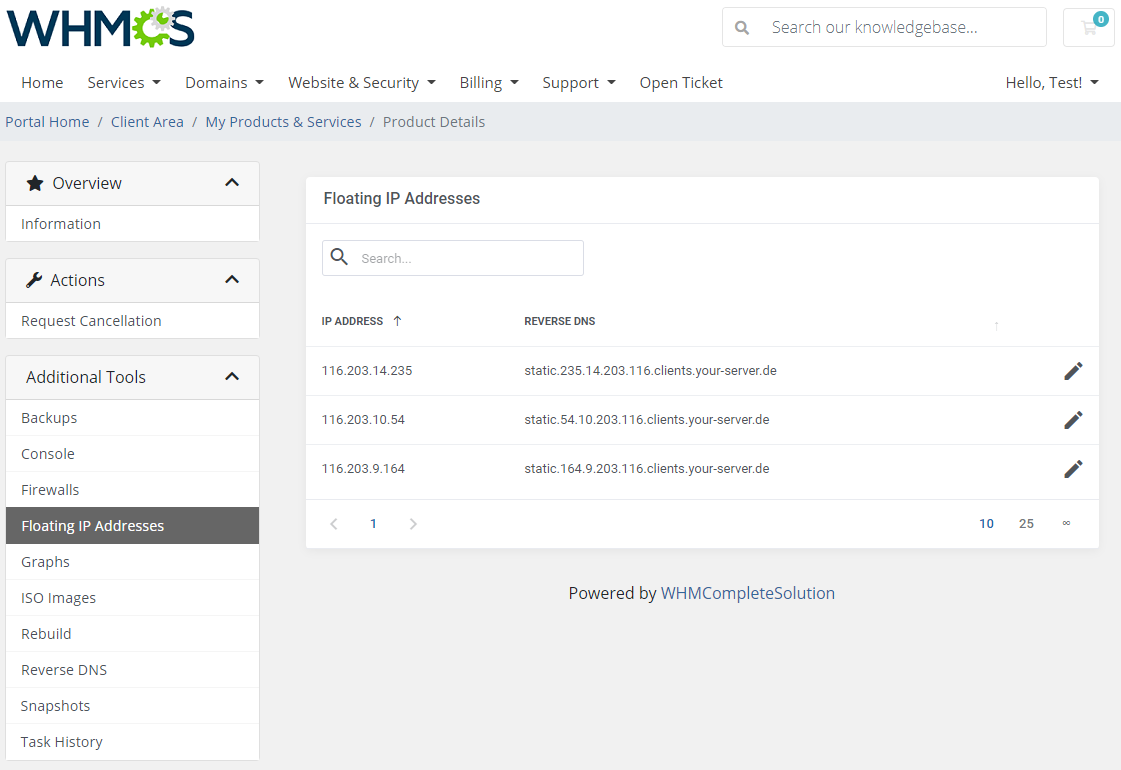
| In this section you can review all 'Floating IP Addresses' and edit them. |
|
[edit] Graphs
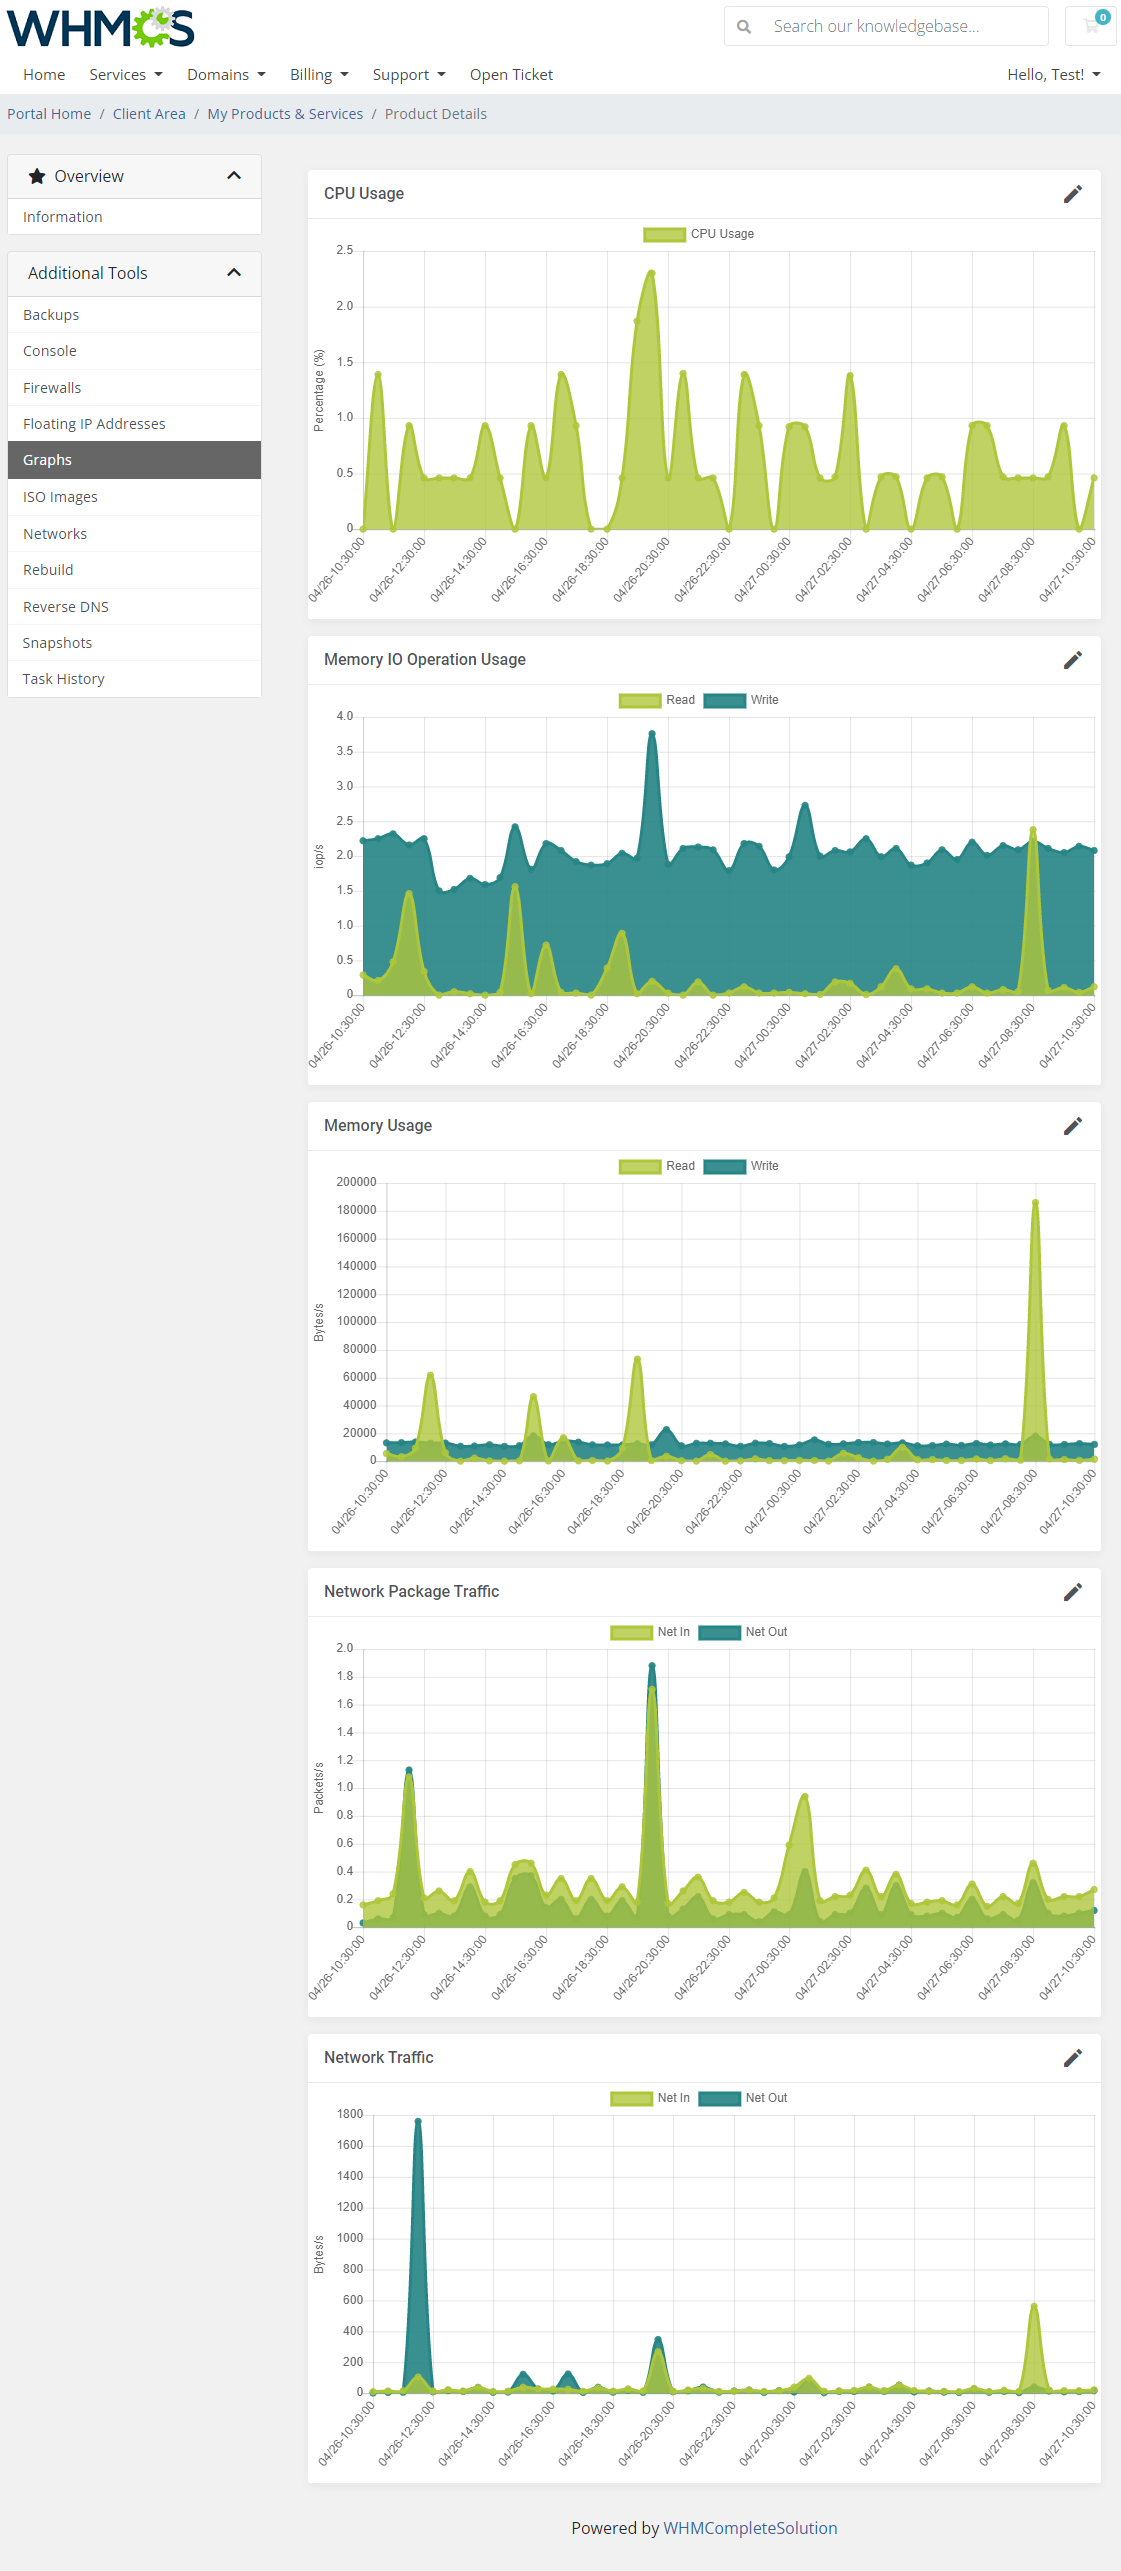
Once entering the 'Graphs' section, clients will be moved to the page with the generated graphs showing:
|
|
[edit] ISO Images
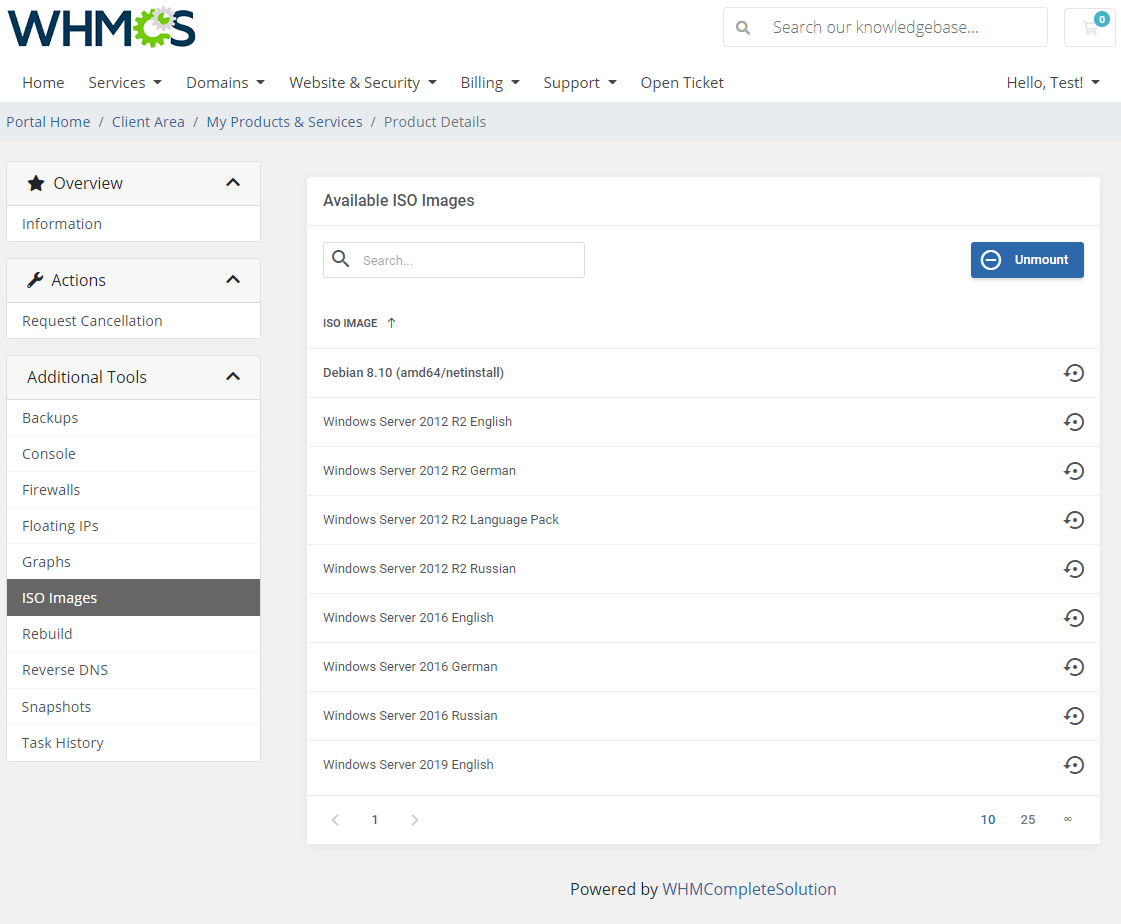
| In the 'ISO Images' section, a client can mount additional images that were selected by the administrator during the product configuration. Thanks to it, a client can easily install e.g. additional operating systems that are not available by default for the 'Rebuild' feature. Note: Currently mounted image is highlighted with the bolded font. Customers can unmount it at any time, or mount any other image from the list. |
|
[edit] Networks
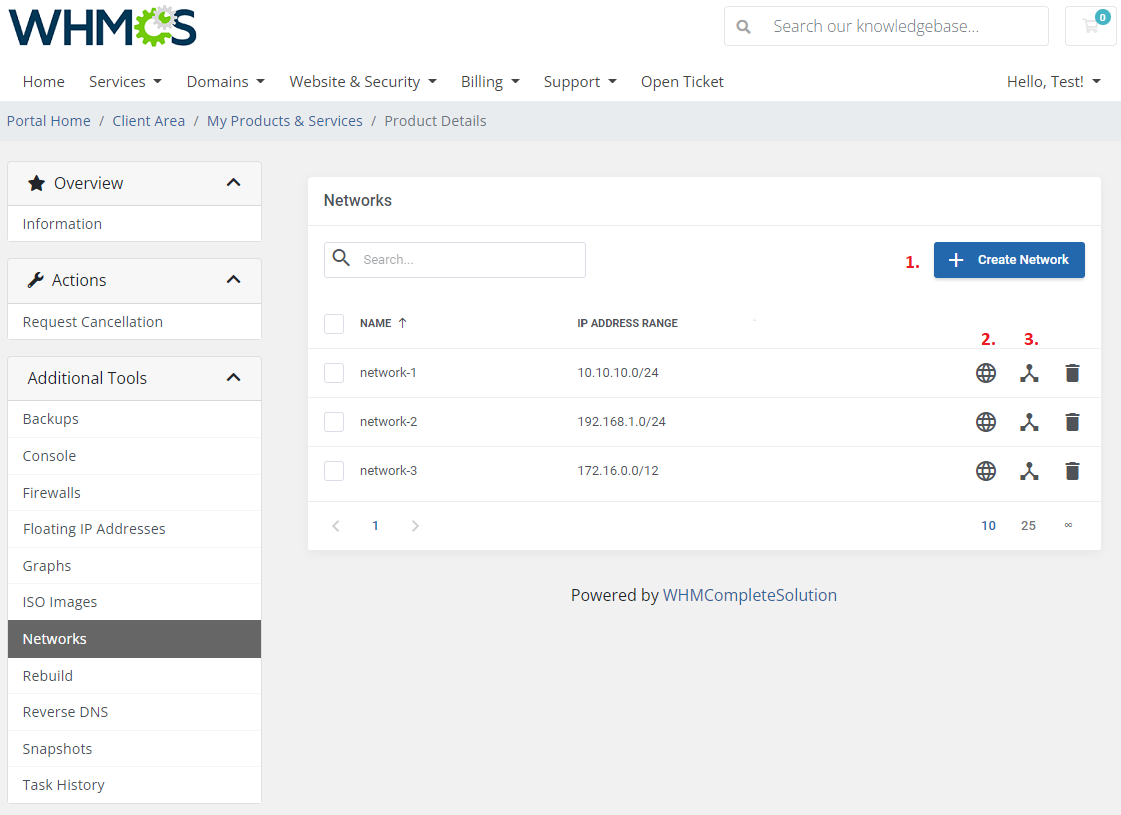
| Networks section allows direct management of networks. They can create networks (1), subnets (2), routs (2), then attach resources and manage aliases. |
|
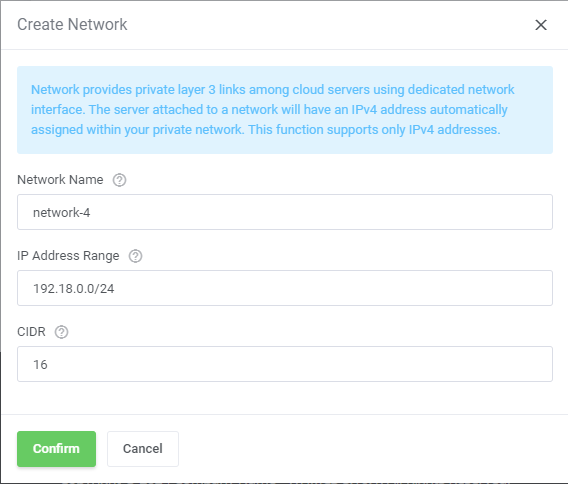
|
| Once you have a set of networks created, you may move to creating subnets per each network. Move to the 'Subnets' (2) section. There press 'Create Subnet' to create a new one. |
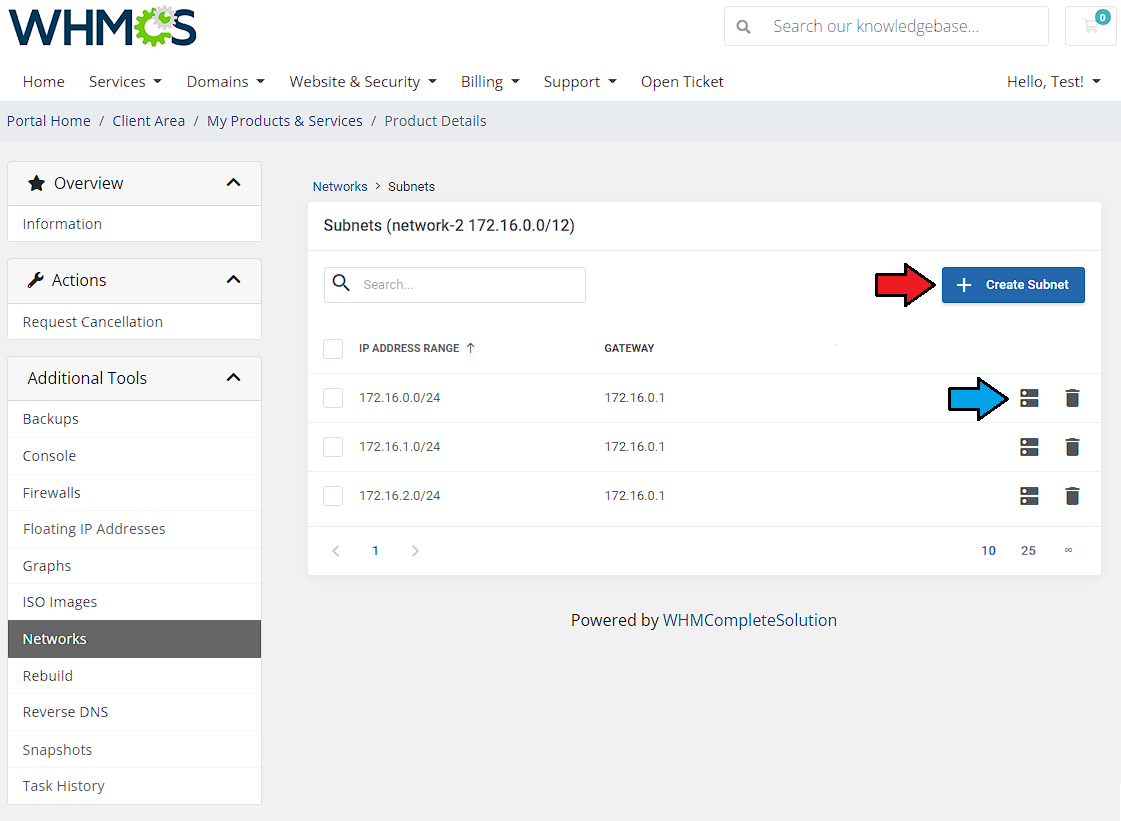
|
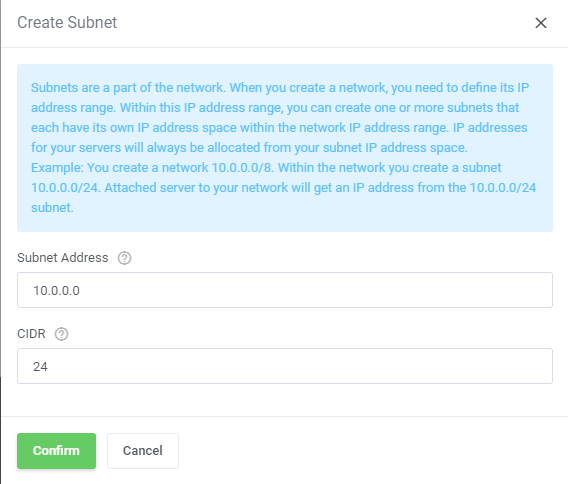
|
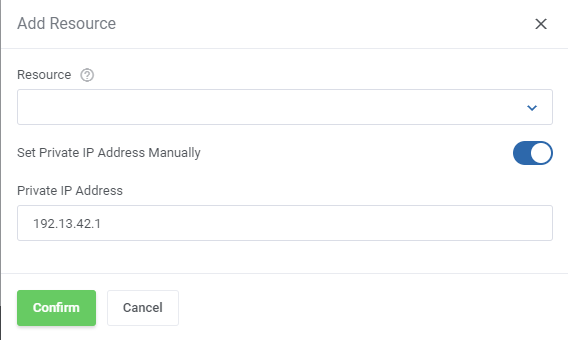
| Now, to each created subnet you may attach resources. You may select your own resource to attach or set a private IP address manually. |
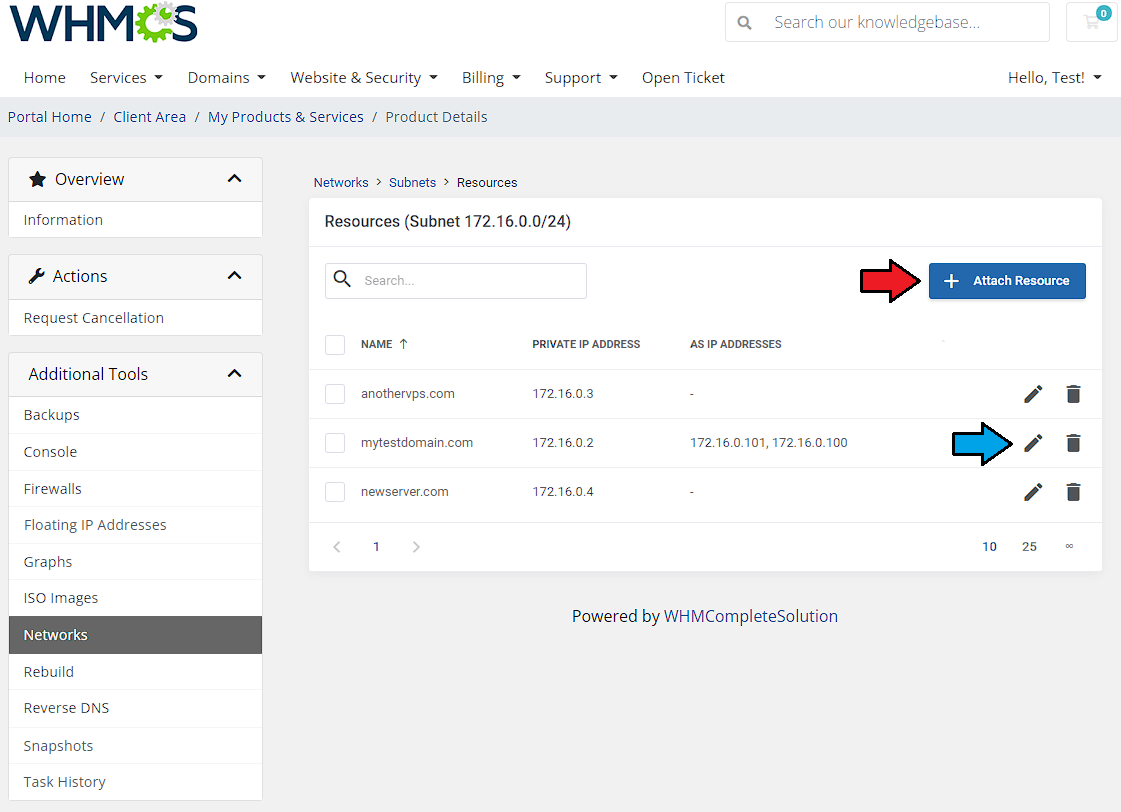
|
|
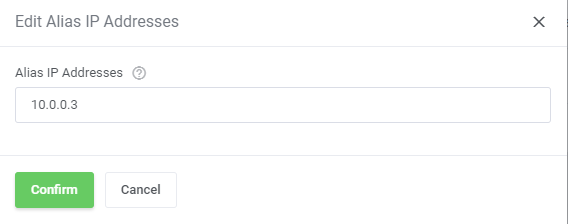
| There is also an option to manage alias IP addresses. Use a comma if you want to add more than one alias at once. |
|
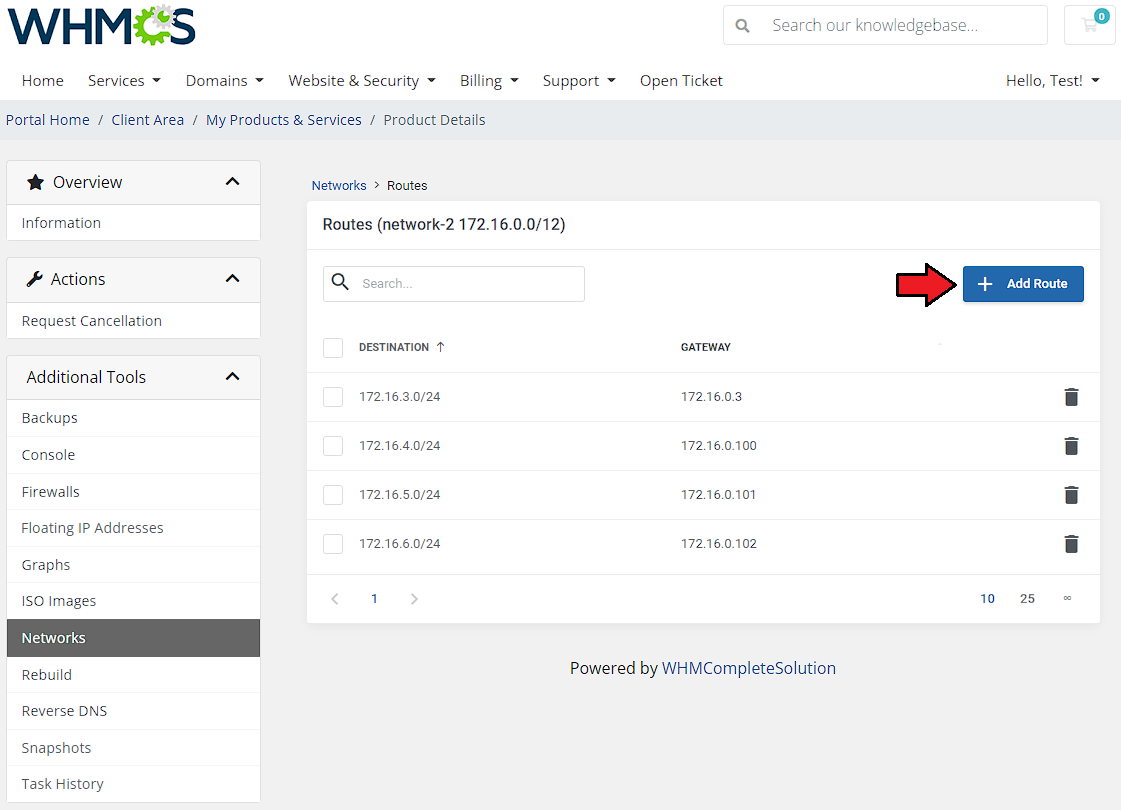
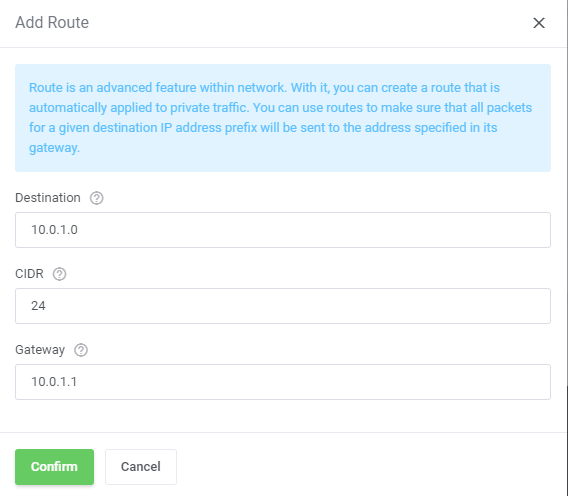
| Next to 'Subents' (2) you will find section dedicated to 'Routs' (3) management. There you may add a new route by providing its destination, CIDR and a gateway. |
|
|
[edit] Rebuild Server
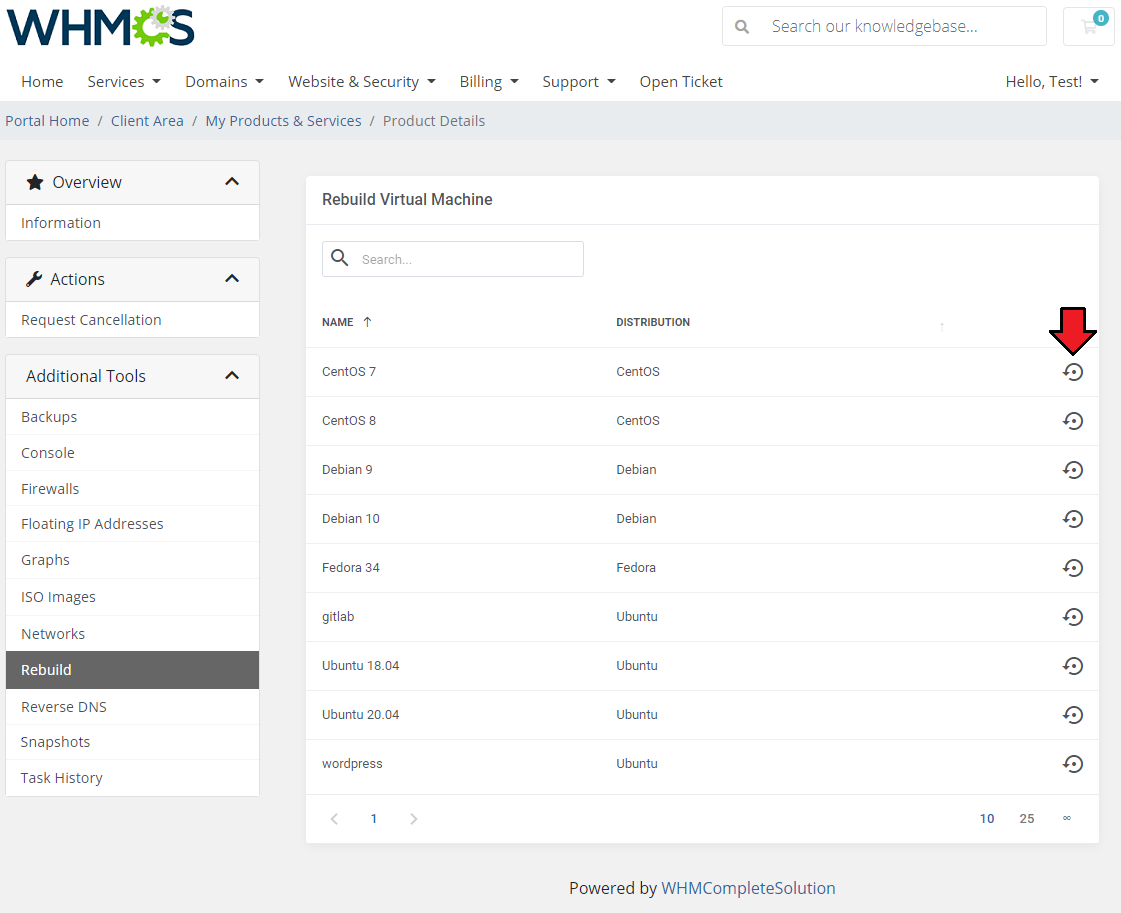
| This feature allows your clients to rebuild their virtual machine and change a server's OS image. Press the shown below button in order to reinstall your server to the chosen image and confirm your choice. |
|
| In case your machine has been created without the SSH key provided (read more here), a one time password will appear when the process of rebuilding the machine starts. Please copy it and keep safe to use. |
[edit] Reverse DNS
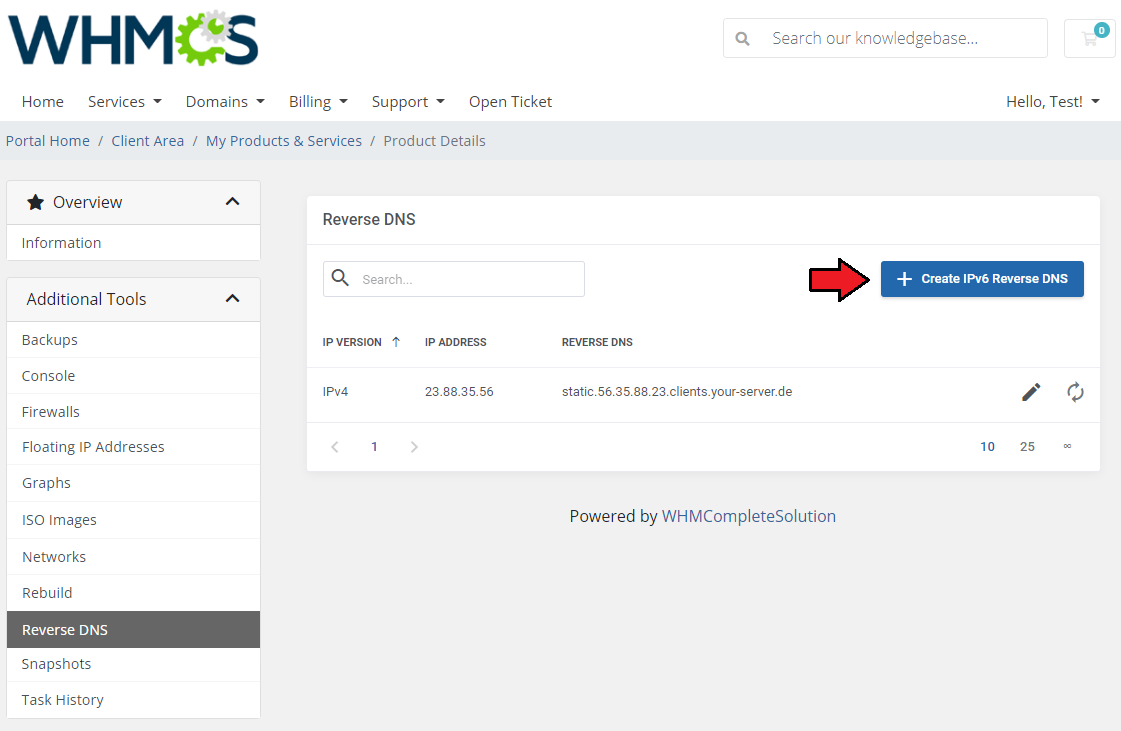
| In this section you can change the hostname that will appear when getting the hostname belonging to the primary IPs (IPv4 and IPv6) of your server. To do so, click on the button as presented below. |
|
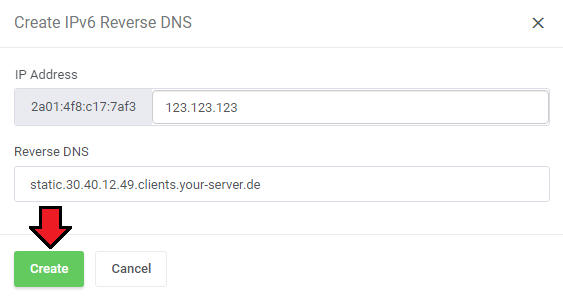
| When 'IP' and 'Reverse DNS' are provided, just save the changes. |
|
[edit] Snapshots
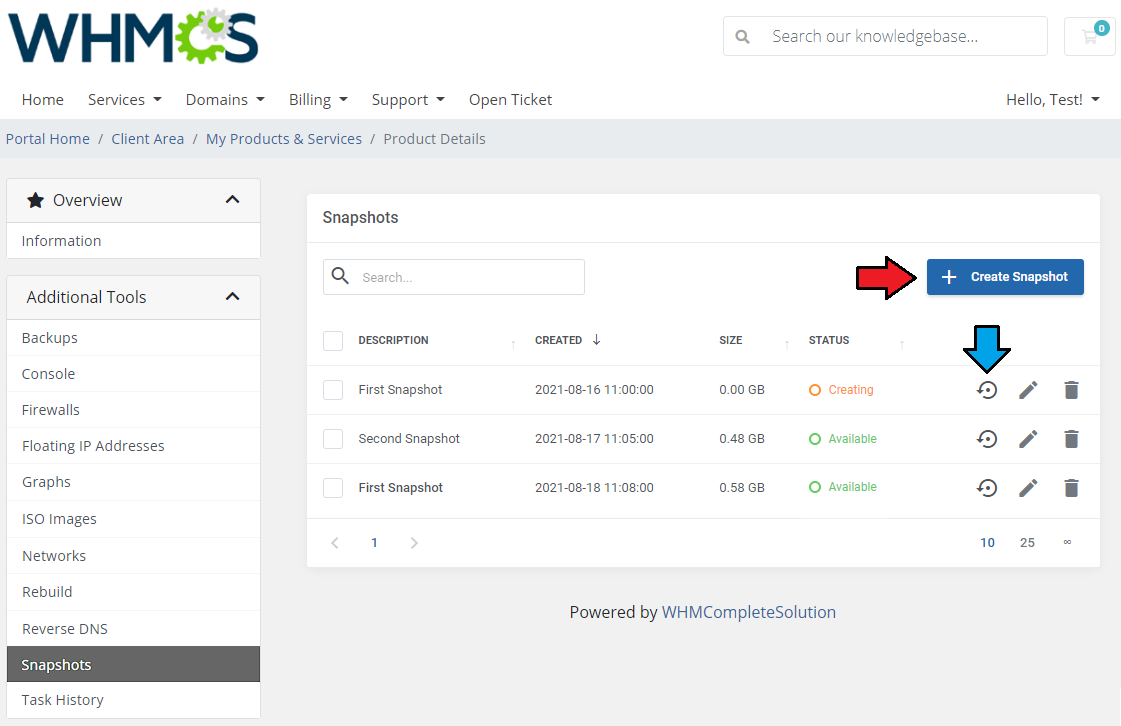
| Creating snapshots allows customers to quickly restore any changes to a virtual machine in case of any problems. Clients can create as many snapshots as they wish, providing that the total size of snapshots does not exceed the limit specified in the product configuration or chosen in the configurable option. Once the shutter has been created, the customer can restore it, change its description or delete it. |
|
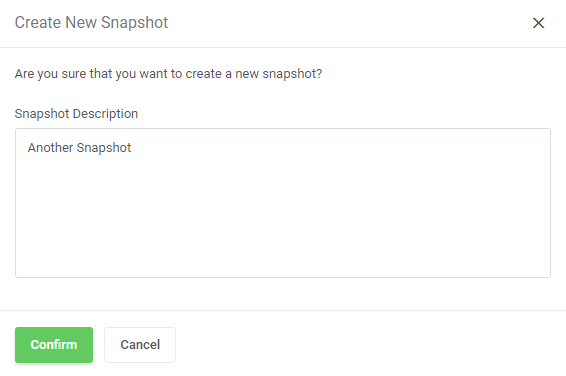
| After pressing the 'Create Snapshot' button, the new window will pop up along with the possibility to specify the snapshot description. Please note that taking a new snapshot may take a while to process. |
|
[edit] Task History
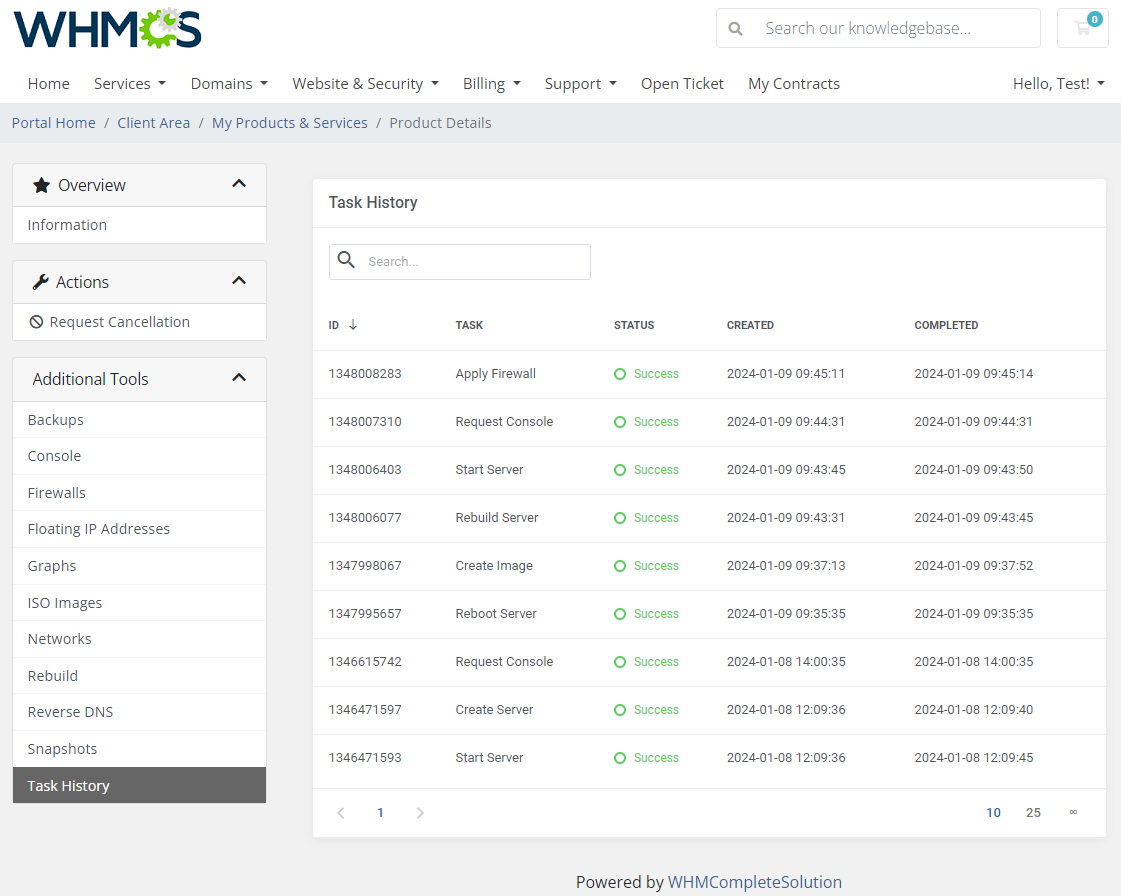
| Navigate to the "Task History" section to access a comprehensive list of completed actions, including their status and dates of completion, within the server activity. |
|
[edit] Tips
| 1. In the language file, you can customize the names of the displayed operating systems, and also add new ones on your own, if they appear in Hetzner. Simply add new records in the same way as the default ones. |
| 2. The module allows the possibility to install a snapshot, that has been previously created in your Hetzner panel, as an OS image. All created snapshots are available in the dropdown list of the available images in the product's module settings. |
[edit] How To Use Language Overrides
| Incorporating language customizations - the module readily accommodates language overrides, allowing you to tailor the language files to your preferences. The language file english.php remains unencoded and can be modified to suit your needs. However, it's recommended to avoid altering the core file itself, and instead, leverage the capability of using overrides. |
Here's how to apply language overrides:
~/langs/overrides/english.php.
For example: Original yourWHMCS/modules/servers/moduleName/langs/english.php: $_LANG['Search'] = 'Search'; Override yourWHMCS/modules/servers/moduleName/langs/overrides/english.php: $_LANG['Search'] = 'Look for'; |
| By following these steps, you can seamlessly implement language customizations without altering the core language file, ensuring your changes will not be lost after every module update. Remember that some of the modules have more than one language file, located under /addons and /servers paths. You may create the override files for both of them. |
[edit] Update Instructions
| An essential guidance through the process of updating the module is offered here. Ensure successful completion of the module update by carefully following each step, thereby preventing data loss or any unforeseen issues. |
[edit] Upgrade Guide
| Seeking a solution that offers greater flexibility, customization tailored to your precise needs, and unrestricted availability? There is an option that not only proves to be cost-effective in the long run but also includes prioritized support services, making it a truly valuable investment. Opt for the Open Source version of your Hetzner Cloud Servers For WHMCS module to unlock these benefits. Follow a comprehensive guide covering the transition process, the advantages it brings, and step-by-step instructions on what to do next after the order has been successfully finalized. |
[edit] Common Problems
| 1. When you have problems with connection, check whether your SELinux or firewall does not block ports. |
| 2. If you use WHMCS V7.8.X (or later), a fatal error may occur when trying to save server settings without providing any hostname or IP address details. Our module does not require this field to be filled out, but in that case, try to provide anything in the hostname field. Please note that this is a bug occurring in WHMCS, not the module itself. |
| 3. Error: 422 Unprocessable Entity response: { "error": { "message": "image has incompatible architecture", "code": "invalid_input", "details": { (truncated...) If you encounter the above error when creating a server, the Image and Type fields in 'Configuration' section of the product settings are incorrectly set up.
|