Servertastic SSL For cPanel
(→Configuration) |
|||
| (37 intermediate revisions by 5 users not shown) | |||
| Line 1: | Line 1: | ||
<meta name="keywords" content="servertastic ssl for cpanel, servertastic ssl configuration, cpanel servertastic ssl management, cpanel servertastic ssl installation, cpanel servertastic ssl common problems, about cpanel servertasticssl, cpanel servertastic ssl documentation, cpanel servertastic ssl faq, cpanel servertastic ssl help, cpanel servertastic ssl guide, cpanel servertastic ssl wiki, cpanel servertastic ssl tutorial, cpanel servertastic ssl tips, cpanel servertastic ssl wiki"></meta> | <meta name="keywords" content="servertastic ssl for cpanel, servertastic ssl configuration, cpanel servertastic ssl management, cpanel servertastic ssl installation, cpanel servertastic ssl common problems, about cpanel servertasticssl, cpanel servertastic ssl documentation, cpanel servertastic ssl faq, cpanel servertastic ssl help, cpanel servertastic ssl guide, cpanel servertastic ssl wiki, cpanel servertastic ssl tutorial, cpanel servertastic ssl tips, cpanel servertastic ssl wiki"></meta> | ||
<meta name="description" content="ModulesGarden Wiki Contains All The Information You Need About The Servertastic SSL For cPanel Module."></meta> | <meta name="description" content="ModulesGarden Wiki Contains All The Information You Need About The Servertastic SSL For cPanel Module."></meta> | ||
| − | |||
=About [https://www.modulesgarden.com/products/cpanel/servertastic-ssl Servertastic SSL For cPanel]= | =About [https://www.modulesgarden.com/products/cpanel/servertastic-ssl Servertastic SSL For cPanel]= | ||
{| | {| | ||
| − | |style="padding: 10px 0px 10px 0px;"|'''Servertastic For cPanel''' will allow your clients to automatically install | + | |style="padding: 10px 0px 10px 0px;"|'''Servertastic SSL For cPanel''' will allow your clients to automatically install SSL certificates on their websites.<br/> |
| − | You will easily trace the progress on SSL configuration | + | You will easily trace the progress on SSL configuration and handle other security features.<br/> |
| − | Your clients, at once, will be given the opportunity to supervise owned certificates | + | Your clients, at once, will be given the opportunity to supervise owned certificates directly in your cPanel area.<br/><br/> |
| + | The module is powered by '''Servertastic Limited''' in development partnership with ModulesGarden. | ||
|} | |} | ||
<!--a comment maybe? --> | <!--a comment maybe? --> | ||
| − | *'''WHM Area:''' | + | *'''WHM Area Features:''' |
{| | {| | ||
|style="padding: 10px 0px 0px 30px;"|✔ View List Of Domains With Installed Certificates | |style="padding: 10px 0px 0px 30px;"|✔ View List Of Domains With Installed Certificates | ||
|} | |} | ||
{| | {| | ||
| − | |style="padding: 0px 0px 0px 30px;"|✔ | + | |style="padding: 0px 0px 0px 30px;"|✔ Remove Installed Certificates |
|} | |} | ||
{| | {| | ||
| Line 28: | Line 28: | ||
{| | {| | ||
|style="padding: 0px 0px 0px 30px;"|✔ Define Limit Of Cron Retries | |style="padding: 0px 0px 0px 30px;"|✔ Define Limit Of Cron Retries | ||
| − | |||
| − | |||
| − | |||
|} | |} | ||
{| | {| | ||
|style="padding: 0px 0px 10px 30px;"|✔ Choose File Or DNS Method Of SSL Authentication | |style="padding: 0px 0px 10px 30px;"|✔ Choose File Or DNS Method Of SSL Authentication | ||
|} | |} | ||
| − | *'''cPanel Area:''' | + | *'''cPanel Area Features:''' |
{| | {| | ||
| − | |style="padding: 10px 0px 0px 30px;"|✔ Install | + | |style="padding: 10px 0px 0px 30px;"|✔ Install Certificates For Main And Addon Domains Using Pre-generated Tokens |
|} | |} | ||
{| | {| | ||
| − | |style="padding: 0px 0px 0px 30px;"|✔ View Basic | + | |style="padding: 0px 0px 0px 30px;"|✔ View Basic Certificates Details |
|} | |} | ||
{| | {| | ||
| − | |style="padding: 0px 0px 10px 30px;"|✔ | + | |style="padding: 0px 0px 10px 30px;"|✔ Remove Installed Certificates |
|} | |} | ||
*'''General Info''' | *'''General Info''' | ||
{| | {| | ||
| − | |style="padding: 10px 0px 0px 30px;"|✔ | + | |style="padding: 10px 0px 0px 30px;"|✔ Token Based Certificates Installation |
|} | |} | ||
{| | {| | ||
| − | |style="padding: | + | |style="padding: 00px 0px 0px 30px;"|✔ Requires [https://www.modulesgarden.com/products/whmcs/servertastic-ssl Servertastic SSL For WHMCS] Module |
|} | |} | ||
{| | {| | ||
| Line 56: | Line 53: | ||
|} | |} | ||
{| | {| | ||
| − | |style="padding: 0px 0px 30px 30px;"|✔ Supports cPanel & WHM | + | |style="padding: 00px 0px 0px 30px;"|✔ Supports cPanel Themes "Jupiter" And "Paper Lantern" |
| + | |} | ||
| + | {| | ||
| + | |style="padding: 0px 0px 30px 30px;"|✔ Supports cPanel & WHM 98 And Later | ||
|} | |} | ||
=Installation and Configuration= | =Installation and Configuration= | ||
{| | {| | ||
| − | |style="padding: 10px 0px 30px 0px;"|'''This tutorial will | + | |style="padding: 10px 0px 30px 0px;"|'''This tutorial will guide you through the process of installing and configuring [https://www.modulesgarden.com/products/cpanel/servertastic-ssl Servertastic SSL For cPanel].''' <br /> |
| − | + | Follow the steps below to complete the setup successfully. | |
|} | |} | ||
==Installation== | ==Installation== | ||
{| | {| | ||
| − | |style="padding: | + | |style="padding: 10px 0px 20px 15px;"|'''1. Log in to our client area and download the module.''' |
|} | |} | ||
{| | {| | ||
| Line 73: | Line 73: | ||
{| | {| | ||
|style="padding: 0px 0px 15px 15px;"|'''2. Upload and extract the module into the '''/root''' cPanel directory.'''<br /> | |style="padding: 0px 0px 15px 15px;"|'''2. Upload and extract the module into the '''/root''' cPanel directory.'''<br /> | ||
| − | Files in your cPanel ''/root/ | + | Files in your cPanel ''/root/ServerTasticSSL'' directory should resemble the following: |
|} | |} | ||
{| | {| | ||
| Line 79: | Line 79: | ||
|} | |} | ||
{| | {| | ||
| − | |style="padding: 0px 0px 15px 15px;"|'''3. Once the module is uploaded, | + | |style="padding: 0px 0px 15px 15px;"|'''3. Once the module is uploaded, open your server’s console and execute the following commands:<br /> |
| − | + | cd /root/ServerTasticSSL/ | |
| − | + | sudo sh install | |
| + | Follow the on-screen instructions. When prompted, type '''yes''' to confirm the installation. <br/>After a short while, a message will confirm that the plugin has been installed successfully. | ||
|} | |} | ||
{| | {| | ||
| Line 89: | Line 90: | ||
==Configuration== | ==Configuration== | ||
{| | {| | ||
| − | |style="padding: 10px 0px 15px 15px;"|'''4. In order to configure the plugin, | + | |style="padding: 10px 0px 15px 15px;"|'''4. In order to configure the plugin, navigate to: '' 'WHM' '' → '' 'Plugins' '' → '' 'Servertastic SSL'.'' ''' |
|} | |} | ||
{| | {| | ||
| Line 96: | Line 97: | ||
{| | {| | ||
| − | |style="padding: 0px 0px 15px 15px;"|'''5. Click the '' 'Configuration' '' and fill in the following | + | |style="padding: 0px 0px 15px 15px;"|'''5. Click the '' 'Configuration' '' button and fill in the following fields:''' |
| − | *API Key – | + | *'''API Key''' – Enter your API key to establish a connection with the API. To obtain your key, log in to your '[https://app.servertastic.com/ Reseller Panel]' and click '' 'View your API Key' '': |
| − | [[File: | + | |} |
| − | *Test Mode - select to connect | + | {| |
| − | *API Logs – | + | |style="padding: 0px 0px 20px 25px;"|[[File:STCP_10_1.png]] |
| − | *Cron Retry Limit – | + | |} |
| − | *Notifications Email – | + | {| |
| − | *Verification Method – | + | |style="padding: 0px 0px 15px 15px;"| |
| − | *Auto Renew – if selected, certificate will be automatically renewed 30 days before its expiration date. | + | <!--*Test Mode - select to connect to the [https://test-dashboard.servertastic.com/ test API].--> |
| − | When ready, test the connection and save the configuration. | + | *'''API Logs''' – Enable this option to log all API requests and responses in the ''Logs'' section. |
| + | *'''Cron Retry Limit''' – Specify the maximum number of retry attempts for a failed API request. | ||
| + | *'''Notifications Email''' – Enter the email address where notifications about issued certificates should be sent. | ||
| + | *'''Verification Method''' – Select the desired domain validation method: ''File'' or ''DNS''. | ||
| + | <!--już nieobsługiwane: | ||
| + | *'''Auto Renew''' – if selected, the certificate will be automatically renewed 30 days before its expiration date. | ||
| + | When ready, test the connection and save the configuration.--> | ||
|} | |} | ||
{| | {| | ||
| Line 111: | Line 118: | ||
|} | |} | ||
{| | {| | ||
| − | |style="padding: 0px 0px 30px 15px;"|''' | + | |style="padding: 0px 0px 30px 15px;"|'''Your module is almost ready to use.''' |
| + | |} | ||
| + | |||
| + | ==WHMCS Integration== | ||
| + | {| | ||
| + | |style="padding: 10px 0px 15px 15px;"|'''6. Since cPanel does not natively support direct customer transactions, you can integrate [https://www.modulesgarden.com/products/whmcs/servertastic-ssl Servertastic SSL For WHMCS] to sell paid SSL certificates.''' <br/> | ||
| + | Customers will be able to purchase certificate tokens through WHMCS, which they can then redeem to generate certificates in cPanel. | ||
| + | |} | ||
| + | {| | ||
| + | |style="padding: 0px 0px 20px 25px;"|[[File:ST_27.png]] | ||
| + | |} | ||
| + | {| | ||
| + | |style="padding: 0px 0px 30px 15px;"|Instructions for installing the WHMCS provisioning module can be found in the [https://www.docs.modulesgarden.com/Servertastic_SSL_For_WHMCS#cPanel_Integration Servertastic SSL For WHMCS] documentation. <br/> | ||
| + | Please follow the remaining steps as outlined in that guide once you're ready. | ||
|} | |} | ||
=Management= | =Management= | ||
{| | {| | ||
| − | |style="padding: 10px 0px 30px 15px;"|Servertastic SSL For cPanel allows you to offer | + | |style="padding: 10px 0px 30px 15px;"|'''Servertastic SSL For cPanel''' allows you to offer SSL certificates to your clients.<br /> |
| − | Additionally, you | + | Additionally, you can view certificate details and manage each provisioned SSL certificate. |
|} | |} | ||
==WHM Area== | ==WHM Area== | ||
{| | {| | ||
| − | |style="padding: 10px 0px | + | |style="padding: 10px 0px 30px 15px;"|In the WHM dmin area, you can: |
| − | + | * Track essential details of each certificate. | |
| + | * Monitor the status of SSL configurations. | ||
| + | * Explore '''Cron''' and '''API Logs''' for troubleshooting and auditing purposes. | ||
|} | |} | ||
===Domains=== | ===Domains=== | ||
{| | {| | ||
| − | |style="padding: | + | |style="padding: 10px 0px 15px 15px;"|In the Domains section, you will find: |
| − | You can | + | * A list of all domains available in WHM. |
| + | * Key information about installed certificates, including: | ||
| + | ** Certificate status | ||
| + | ** Certificate type | ||
| + | ** Expiration date<br/> | ||
| + | |||
| + | You can also: | ||
| + | * Remove certificates. | ||
| + | * View API error details by clicking the Error button. | ||
|} | |} | ||
{| | {| | ||
| Line 135: | Line 165: | ||
===Cron=== | ===Cron=== | ||
{| | {| | ||
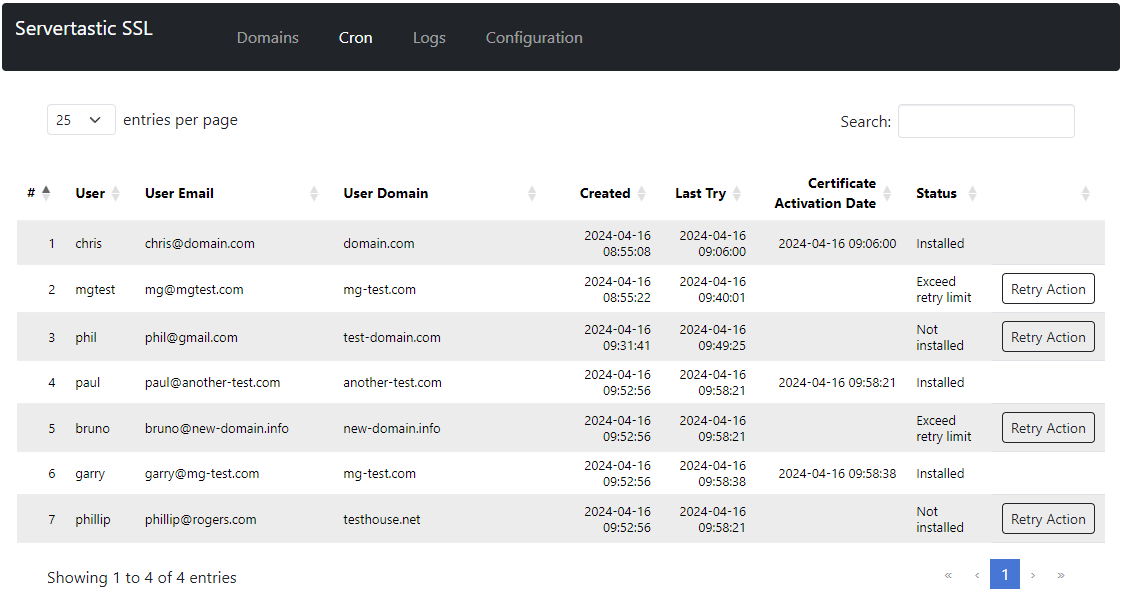
| − | |style="padding: 0px 0px 15px 15px;"| | + | |style="padding: 0px 0px 15px 15px;"|The Cron section displays all existing cron tasks. Tasks are automatically added when an error occurs during a certificate installation attempt.<br/> |
| − | + | Administrators can either: | |
| + | * Manually trigger the action. | ||
| + | * Wait for the next scheduled cron run (default interval: every 5 minutes). | ||
|} | |} | ||
{| | {| | ||
| Line 144: | Line 176: | ||
===Logs=== | ===Logs=== | ||
{| | {| | ||
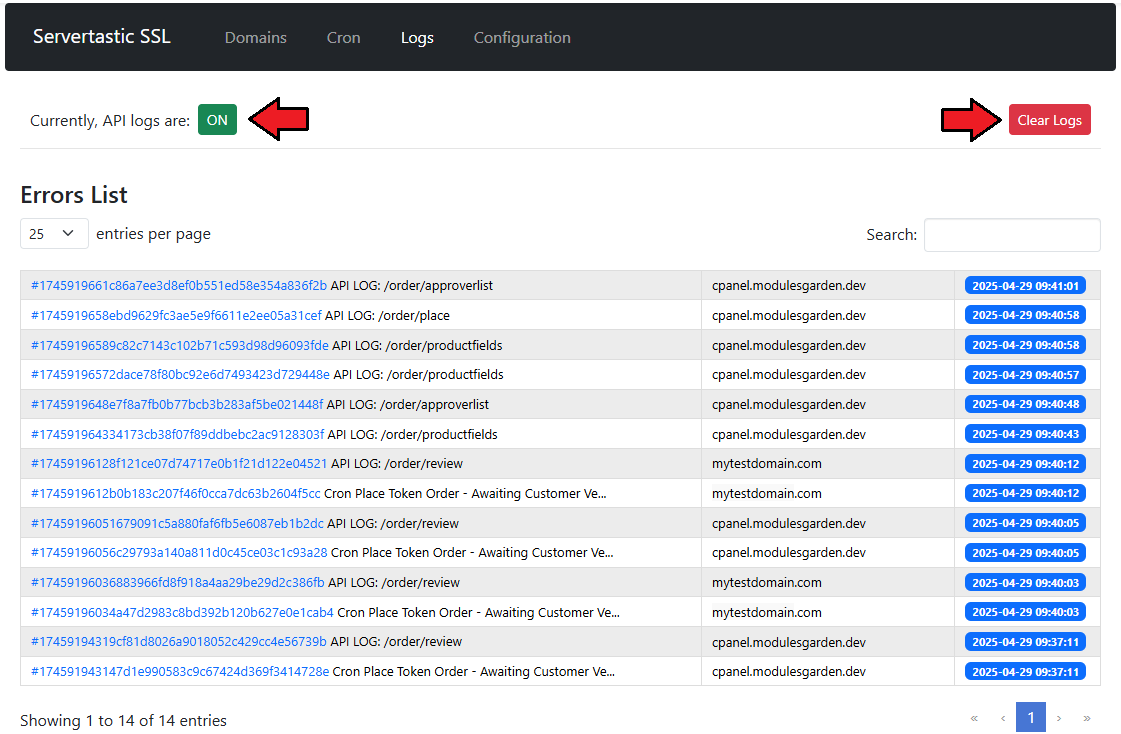
| − | |style="padding: 0px 0px | + | |style="padding: 0px 0px 15px 15px;"|The Logs section includes a list of all failed cron executions. You can '''clear the logs''' if necessary.<br /> |
| − | + | Logs can be disabled via the Configuration tab by switching the Logs setting from '''On''' to '''Off'''. | |
|} | |} | ||
{| | {| | ||
| Line 151: | Line 183: | ||
|} | |} | ||
{| | {| | ||
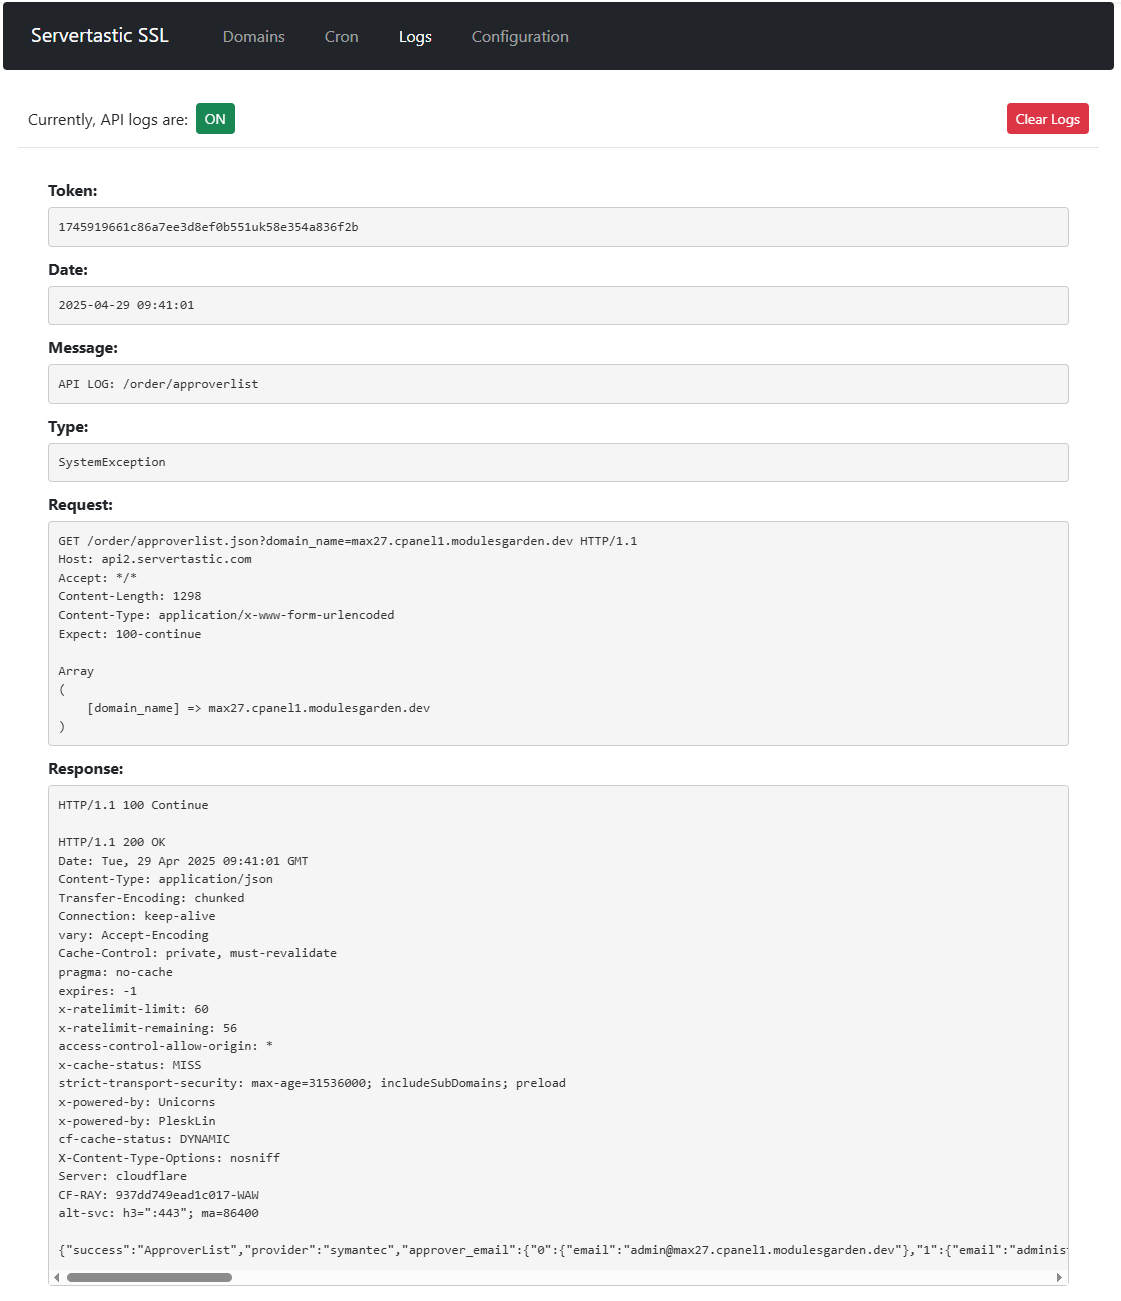
| − | |style="padding: 0px 0px 20px 15px;"|Clicking on | + | |style="padding: 0px 0px 20px 15px;"|Clicking on a '''Token number''' opens detailed API error logs, showing both request and response data. |
|} | |} | ||
{| | {| | ||
| − | |style="padding: 0px 0px 30px 25px;"|[[File:STCP_9.png | + | |style="padding: 0px 0px 30px 25px;"|[[File:STCP_9.png]] |
|} | |} | ||
==cPanel Area== | ==cPanel Area== | ||
{| | {| | ||
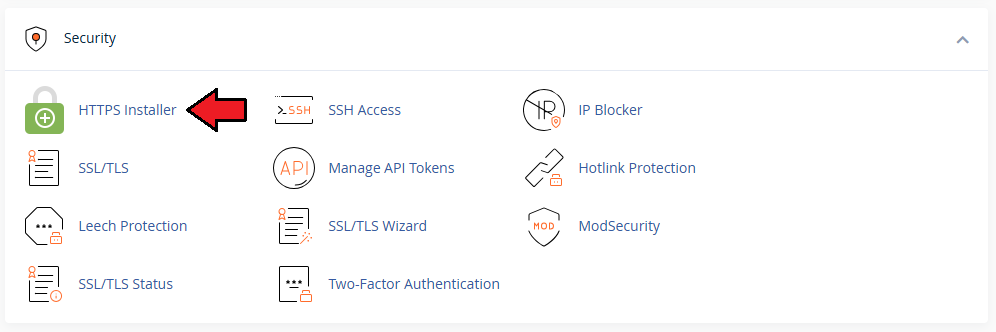
| − | |style="padding: 10px 0px 15px 15px;"|Servertastic SSL For cPanel allows | + | |style="padding: 10px 0px 15px 15px;"|'''Servertastic SSL For cPanel''' also allows end-users to set up and configure SSL certificates for their main or addon domains.<br /> |
| − | Log | + | Log in to your '''cPanel account'''. Then proceed to the '''Security → HTTPS Installer'''.<br/> |
|} | |} | ||
{| | {| | ||
| − | |style="padding: 0px 0px | + | |style="padding: 0px 0px 30px 25px;"|[[File:STCP_13.png]] |
|} | |} | ||
| + | |||
===Request=== | ===Request=== | ||
{| | {| | ||
| − | |style="padding: 10px 0px | + | |style="padding: 10px 0px 15px 15px;"|You can see the list of your domains with their current SSL status. Press ''Use Token'' next to a domain to submit a certificate request. |
| + | '' '''Note:'''To obtain a token, [[#WHMCS_Integration|WHMCS integration]] must be set up.'' | ||
|} | |} | ||
{| | {| | ||
| Line 173: | Line 207: | ||
|} | |} | ||
{| | {| | ||
| − | |style="padding: 0px 0px 15px 15px;"| | + | |style="padding: 0px 0px 15px 15px;"|Next, enter the obtained token and click the '' 'Add Certificate' '' button. |
| + | |} | ||
| + | {| | ||
| + | |style="padding: 0px 0px 20px 25px;"|[[File:STCP_14_1.png]] | ||
| + | |} | ||
| + | {| | ||
| + | |style="padding: 0px 0px 15px 15px;"|If the token is valid, you’ll be redirected to a form where you must: | ||
| + | * Fill in Admin, Tech, and Organization contact details. | ||
| + | * Choose an Approver Email and Hashing Algorithm.<br/> | ||
| + | '''''Note:''' The availability of certain fields may vary depending on the certificate type.''<br/> | ||
| + | Once completed, press ''Add Certificate''. | ||
| + | <!-- | ||
Please note that Technical contact details are automatically filled out with the same details as the Admin contact.<br /> | Please note that Technical contact details are automatically filled out with the same details as the Admin contact.<br /> | ||
| − | If you want to use different details, | + | If you want to use different details, feel free to change them. Press ''Add Certificate'' when ready. |
| + | --> | ||
|} | |} | ||
{| | {| | ||
| Line 183: | Line 229: | ||
===Management=== | ===Management=== | ||
{| | {| | ||
| − | |style="padding: 10px 0px 15px 15px;"|In case any issues occur while verifying the request, a cron task is automatically | + | |style="padding: 10px 0px 15px 15px;"|In case any issues occur while verifying the request, a cron task is automatically created to retry the action.<br /> |
The administrator may then trigger the action manually or wait until the system runs cron to process the request again. | The administrator may then trigger the action manually or wait until the system runs cron to process the request again. | ||
|} | |} | ||
| Line 190: | Line 236: | ||
|} | |} | ||
{| | {| | ||
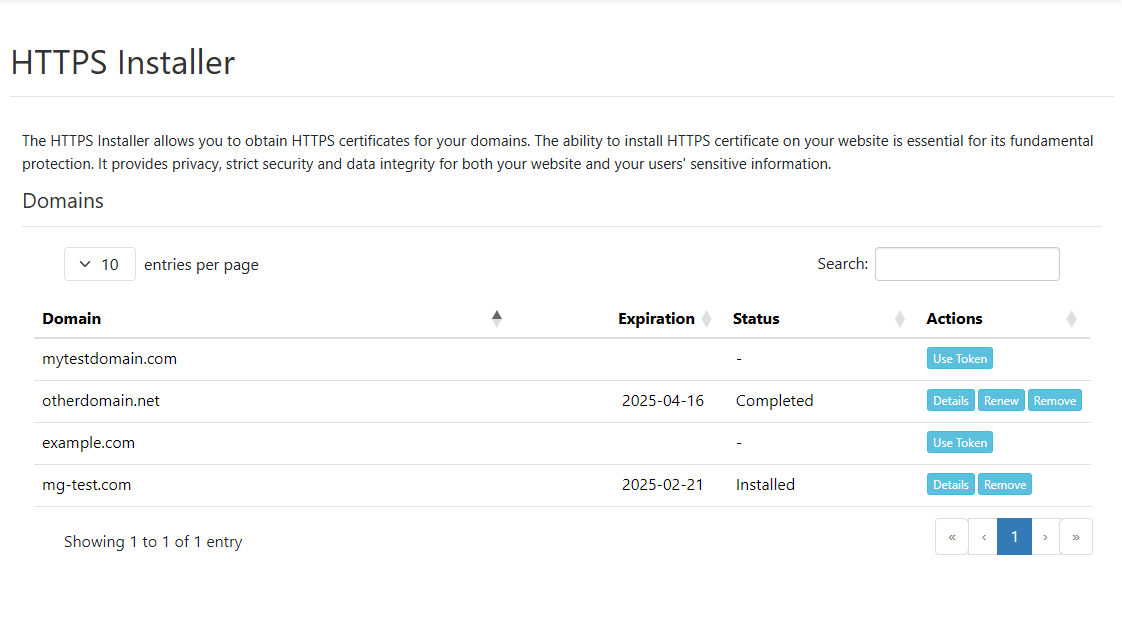
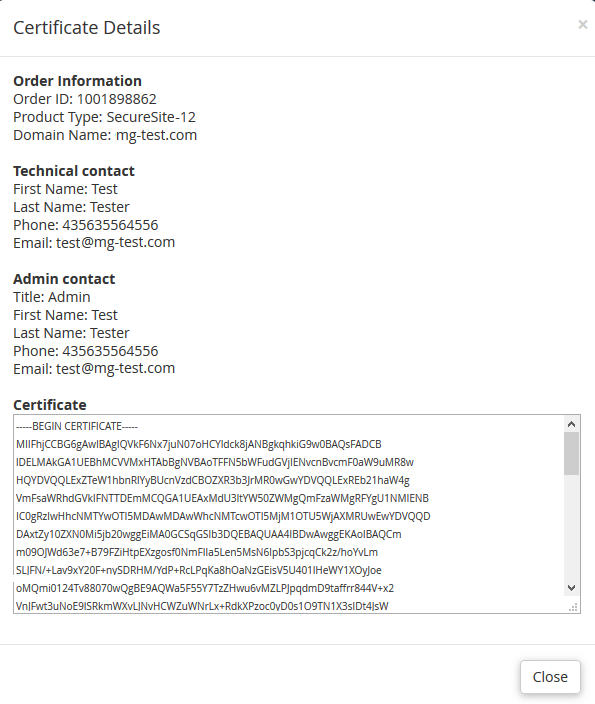
| − | |style="padding: 0px 0px 20px 15px;"| | + | |style="padding: 0px 0px 20px 15px;"|Once verification succeeds and the SSL certificate is installed, the following actions are available: |
| + | *View certificate '''Details''' | ||
| + | *'''Remove''' the certificate | ||
| + | *'''Renew''' the certificate | ||
|} | |} | ||
{| | {| | ||
| Line 196: | Line 245: | ||
|} | |} | ||
{| | {| | ||
| − | |style="padding: 0px | + | |style="padding: 0px 0px 30px 25px;"|[[File:STCP_19.png]] |
| − | + | ||
| − | + | ||
| − | + | ||
| − | + | ||
| − | + | ||
| − | + | ||
| − | + | ||
| − | + | ||
| − | + | ||
| − | + | ||
| − | + | ||
| − | + | ||
| − | + | ||
|} | |} | ||
| Line 215: | Line 251: | ||
{| | {| | ||
|style="padding: 10px 0px 5px 15px;"|1. When you want to update or uninstall plugin simply run the '' 'install' '' file again: | |style="padding: 10px 0px 5px 15px;"|1. When you want to update or uninstall plugin simply run the '' 'install' '' file again: | ||
| − | + | cd /root/ServerTasticSSL/ | |
| + | sudo sh install | ||
Then follow the instructions on the screen by choosing the first or second option: | Then follow the instructions on the screen by choosing the first or second option: | ||
|} | |} | ||
| Line 224: | Line 261: | ||
=Common Problems= | =Common Problems= | ||
{| | {| | ||
| − | |style="padding: 10px 0px | + | |style="padding: 10px 0px 10px 15px;"|'''1. When you have problems with connection, check whether your SELinux or firewall does not block ports.''' |
| + | |} | ||
| + | {| | ||
| + | |style="padding: 0px 0px 30px 15px;"|2. Due to the reason that ''Servertastic'' has dropped support for the free certificates, the module no longer supports them since version 1.1.0.<br/>Use the token system for sell paid certificates in [https://www.modulesgarden.com/products/whmcs/servertastic-ssl WHMCS module] instead. | ||
| + | |||
|} | |} | ||
Latest revision as of 12:16, 30 April 2025
Contents |
[edit] About Servertastic SSL For cPanel
| Servertastic SSL For cPanel will allow your clients to automatically install SSL certificates on their websites. You will easily trace the progress on SSL configuration and handle other security features. |
- WHM Area Features:
| ✔ View List Of Domains With Installed Certificates |
| ✔ Remove Installed Certificates |
| ✔ View Task Status Of Cron Executions |
| ✔ View Detailed Logs Of API Errors |
| ✔ Set Email For Notifications On Certificates Approvals |
| ✔ Define Limit Of Cron Retries |
| ✔ Choose File Or DNS Method Of SSL Authentication |
- cPanel Area Features:
| ✔ Install Certificates For Main And Addon Domains Using Pre-generated Tokens |
| ✔ View Basic Certificates Details |
| ✔ Remove Installed Certificates |
- General Info
| ✔ Token Based Certificates Installation |
| ✔ Requires Servertastic SSL For WHMCS Module |
| ✔ Multi-Language Support |
| ✔ Supports cPanel Themes "Jupiter" And "Paper Lantern" |
| ✔ Supports cPanel & WHM 98 And Later |
[edit] Installation and Configuration
| This tutorial will guide you through the process of installing and configuring Servertastic SSL For cPanel. Follow the steps below to complete the setup successfully. |
[edit] Installation
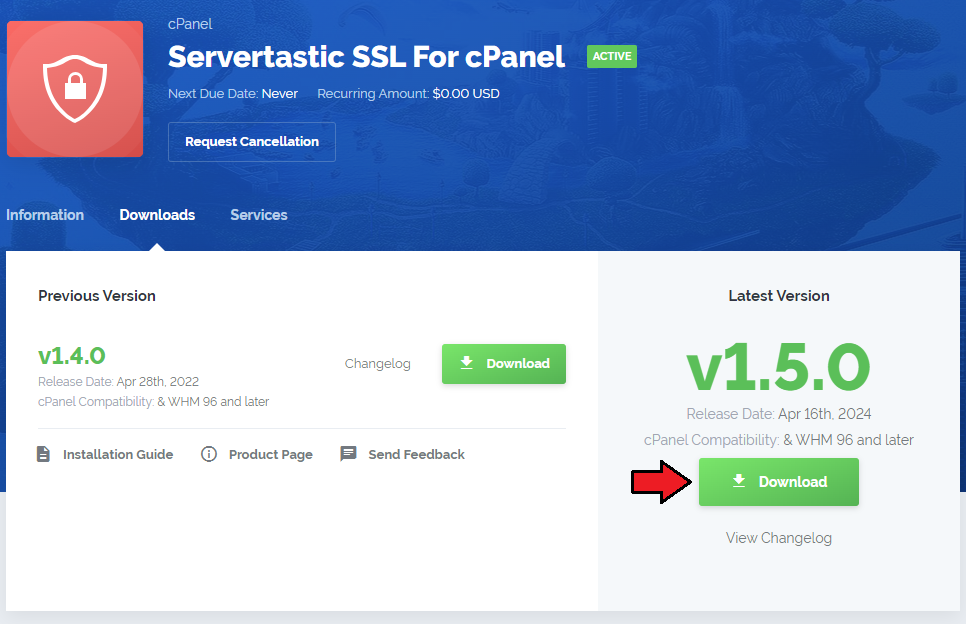
| 1. Log in to our client area and download the module. |
|
| 2. Upload and extract the module into the /root cPanel directory. Files in your cPanel /root/ServerTasticSSL directory should resemble the following: |

|
3. Once the module is uploaded, open your server’s console and execute the following commands:cd /root/ServerTasticSSL/ sudo sh install Follow the on-screen instructions. When prompted, type yes to confirm the installation. |

|
[edit] Configuration
| 4. In order to configure the plugin, navigate to: 'WHM' → 'Plugins' → 'Servertastic SSL'. |

|
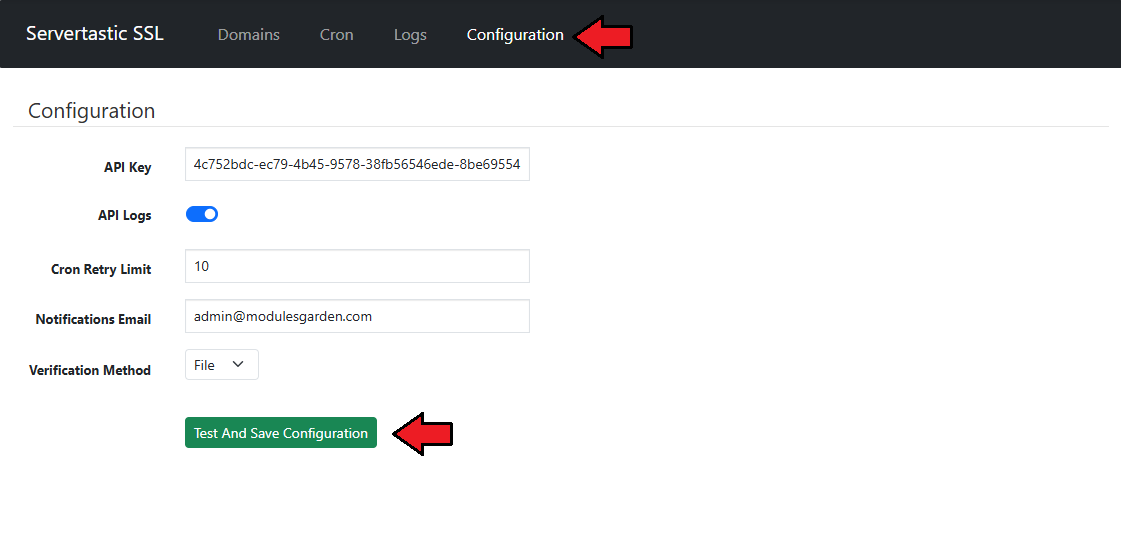
5. Click the 'Configuration' button and fill in the following fields:
|

|
|
|
| Your module is almost ready to use. |
[edit] WHMCS Integration
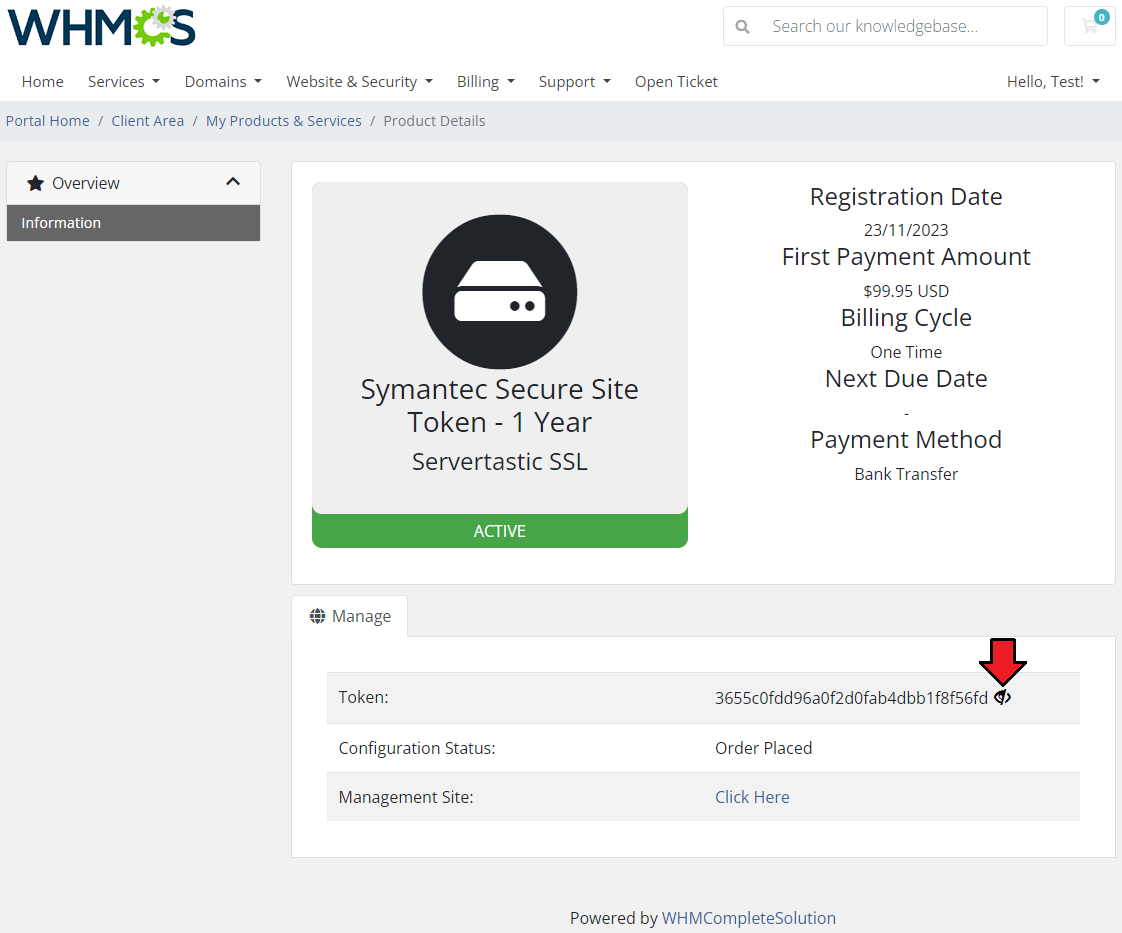
| 6. Since cPanel does not natively support direct customer transactions, you can integrate Servertastic SSL For WHMCS to sell paid SSL certificates. Customers will be able to purchase certificate tokens through WHMCS, which they can then redeem to generate certificates in cPanel. |
|
| Instructions for installing the WHMCS provisioning module can be found in the Servertastic SSL For WHMCS documentation. Please follow the remaining steps as outlined in that guide once you're ready. |
[edit] Management
| Servertastic SSL For cPanel allows you to offer SSL certificates to your clients. Additionally, you can view certificate details and manage each provisioned SSL certificate. |
[edit] WHM Area
In the WHM dmin area, you can:
|
[edit] Domains
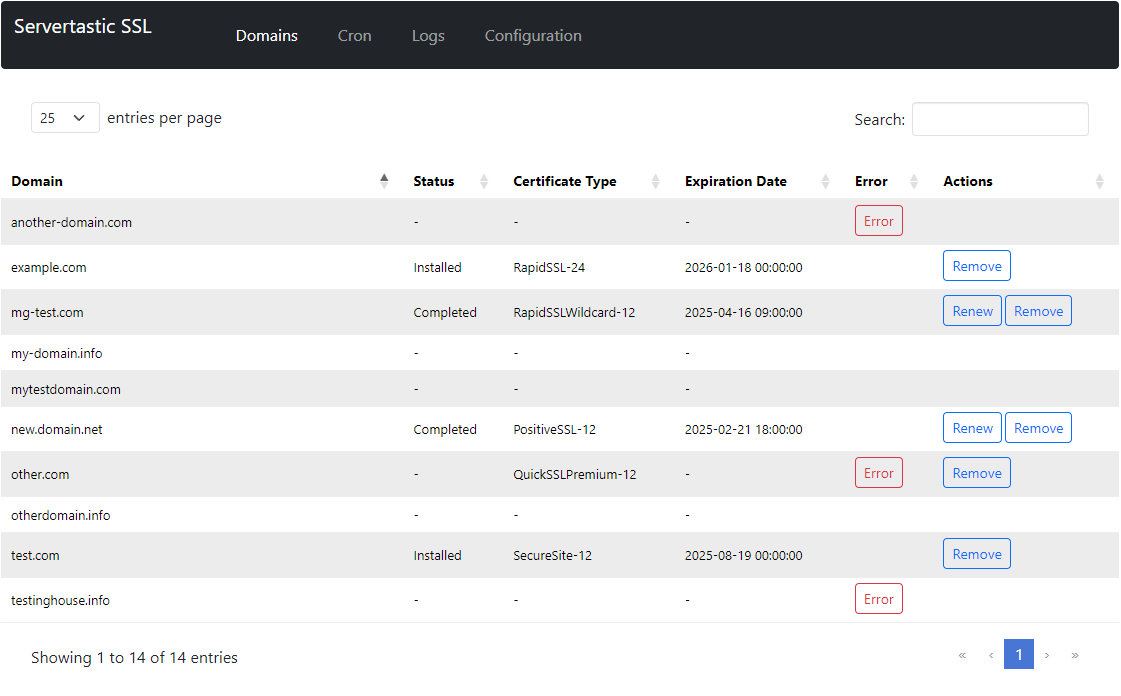
In the Domains section, you will find:
You can also:
|
|
[edit] Cron
| The Cron section displays all existing cron tasks. Tasks are automatically added when an error occurs during a certificate installation attempt. Administrators can either:
|
|
[edit] Logs
| The Logs section includes a list of all failed cron executions. You can clear the logs if necessary. Logs can be disabled via the Configuration tab by switching the Logs setting from On to Off. |
|
| Clicking on a Token number opens detailed API error logs, showing both request and response data. |
|
[edit] cPanel Area
| Servertastic SSL For cPanel also allows end-users to set up and configure SSL certificates for their main or addon domains. Log in to your cPanel account. Then proceed to the Security → HTTPS Installer. |
|
[edit] Request
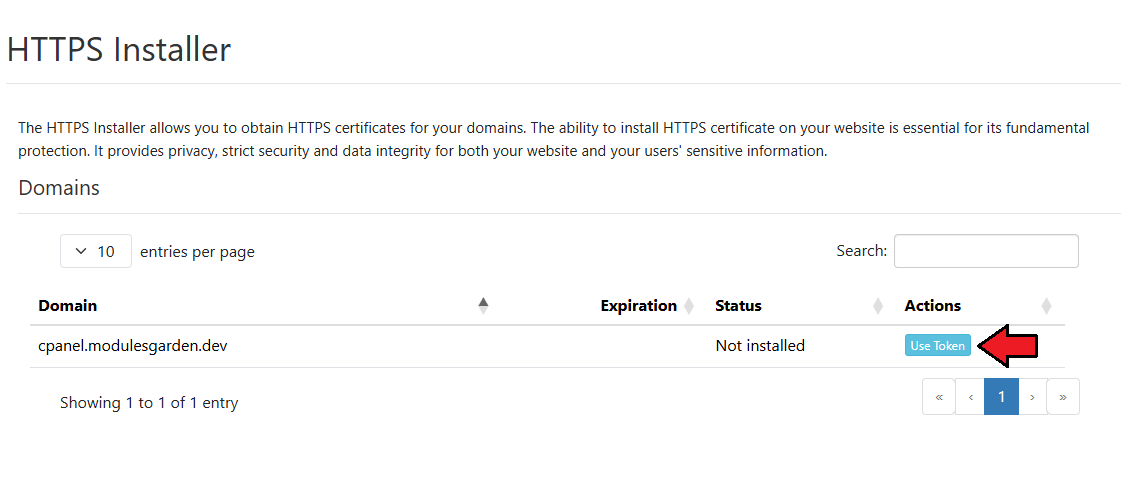
| You can see the list of your domains with their current SSL status. Press Use Token next to a domain to submit a certificate request.
Note:To obtain a token, WHMCS integration must be set up. |
|
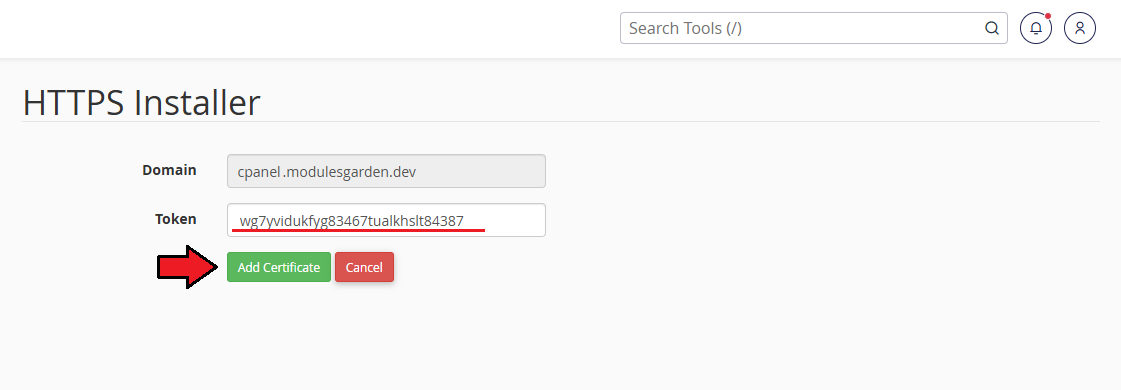
| Next, enter the obtained token and click the 'Add Certificate' button. |
|
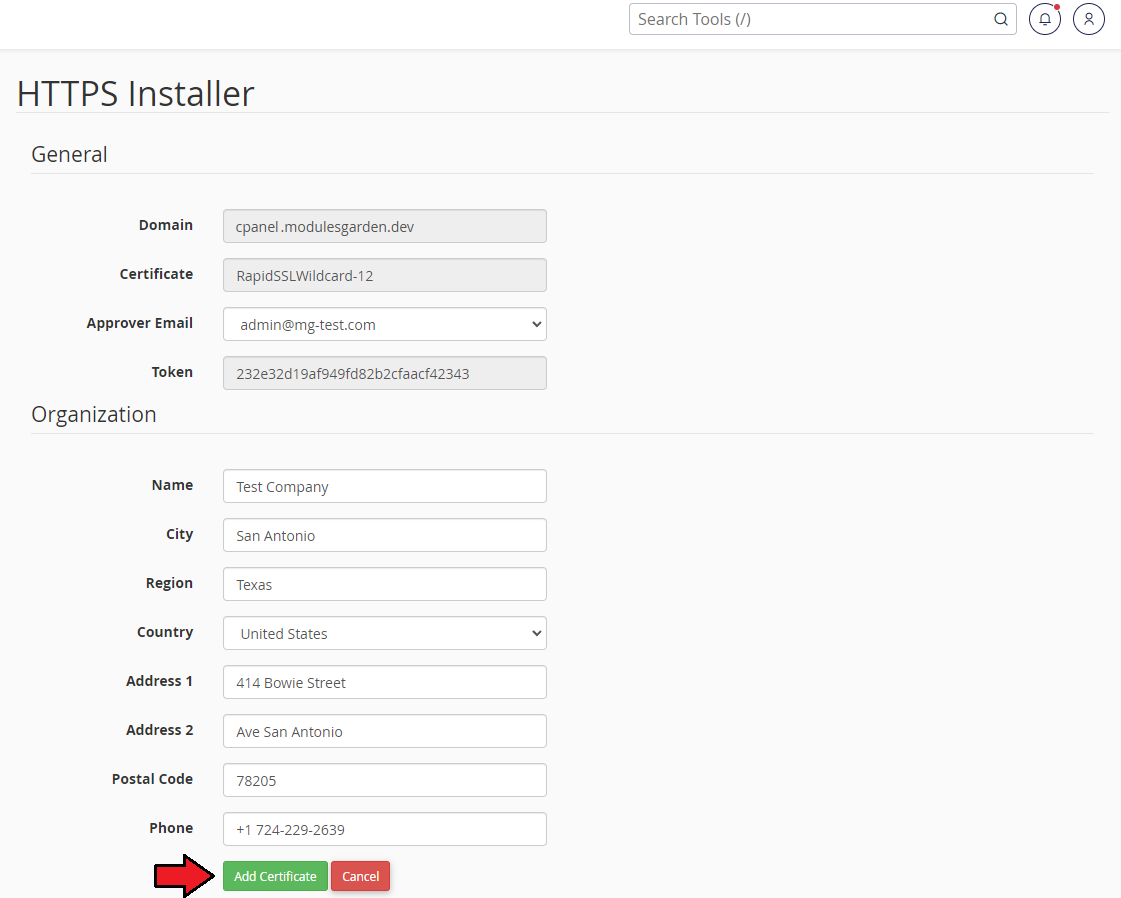
If the token is valid, you’ll be redirected to a form where you must:
Note: The availability of certain fields may vary depending on the certificate type. |
|
[edit] Management
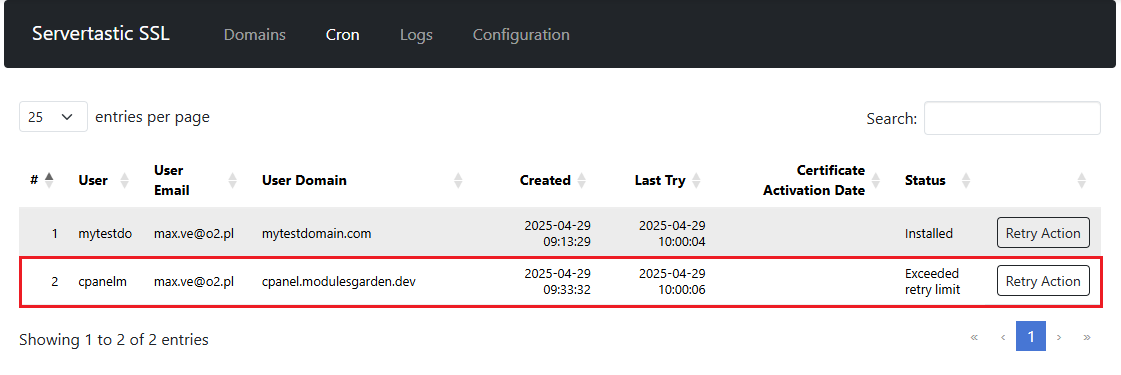
| In case any issues occur while verifying the request, a cron task is automatically created to retry the action. The administrator may then trigger the action manually or wait until the system runs cron to process the request again. |
|
Once verification succeeds and the SSL certificate is installed, the following actions are available:
|
|
|
[edit] Tips
1. When you want to update or uninstall plugin simply run the 'install' file again:
cd /root/ServerTasticSSL/ sudo sh install Then follow the instructions on the screen by choosing the first or second option: |

|
[edit] Common Problems
| 1. When you have problems with connection, check whether your SELinux or firewall does not block ports. |
| 2. Due to the reason that Servertastic has dropped support for the free certificates, the module no longer supports them since version 1.1.0. Use the token system for sell paid certificates in WHMCS module instead. |