Lagom One Step Order Form For WHMCS
(→About Lagom One Step Order Form For WHMCS) |
|||
| (82 intermediate revisions by 3 users not shown) | |||
| Line 46: | Line 46: | ||
|} | |} | ||
{| | {| | ||
| − | |style="padding: 0px 0px 0px 30px;"|✔ | + | |style="padding: 0px 0px 0px 30px;"|✔ Automatic Currency And Language Selection Based On Geolocation |
|} | |} | ||
{| | {| | ||
| − | |style="padding: 0px 0px 0px 30px;"|✔ | + | |style="padding: 0px 0px 0px 30px;"|✔ Prices Discounts Applied Due To [https://www.modulesgarden.com/products/whmcs/discount-center Discount Center For WHMCS] Integration |
|} | |} | ||
{| | {| | ||
| − | |style="padding: 0px 0px 0px 30px;"|✔ Support For | + | |style="padding: 0px 0px 0px 30px;"|✔ Fees And Discounts Applied Due To [https://www.modulesgarden.com/products/whmcs/payment-gateway-charges Payment Gateway Charges For WHMCS] Integration |
| + | |} | ||
| + | {| | ||
| + | |style="padding: 0px 0px 0px 30px;"|✔ Support For Ordering Features: | ||
|} | |} | ||
{| | {| | ||
| Line 132: | Line 135: | ||
|} | |} | ||
{| | {| | ||
| − | |style="padding: 0px 0px 0px 45px;"|✔ | + | |style="padding: 0px 0px 0px 45px;"|✔ Order Settings: |
|} | |} | ||
{| | {| | ||
| − | |style="padding: 0px 0px 0px | + | |style="padding: 0px 0px 0px 60px;"|✔ Disable Order Form Redirection |
|} | |} | ||
{| | {| | ||
| − | |style="padding: 0px 0px 0px | + | |style="padding: 0px 0px 0px 60px;"|✔ Enable WHMCS "View Cart" Page |
|} | |} | ||
{| | {| | ||
| − | |style="padding: 0px 0px 0px 45px;"|✔ Hide | + | |style="padding: 0px 0px 0px 60px;"|✔ Set SEO Title For Product Order Pages |
| + | |} | ||
| + | {| | ||
| + | |style="padding: 0px 0px 0px 45px;"|✔ Display Settings: | ||
| + | |} | ||
| + | {| | ||
| + | |style="padding: 0px 0px 0px 60px;"|✔ Hide IP Address Box | ||
| + | |} | ||
| + | {| | ||
| + | |style="padding: 0px 0px 0px 60px;"|✔ Hide Group Name From Suboption Name | ||
| + | |} | ||
| + | {| | ||
| + | |style="padding: 0px 0px 0px 60px;"|✔ Hide Hostname And Root Password Fields: | ||
| + | |} | ||
| + | {| | ||
| + | |style="padding: 0px 0px 0px 75px;"|✔ For All Products | ||
| + | |} | ||
| + | {| | ||
| + | |style="padding: 0px 0px 0px 75px;"|✔ For Selected Product Groups | ||
| + | |} | ||
| + | {| | ||
| + | |style="padding: 0px 0px 0px 45px;"|✔ Hide Nameservers Fields: | ||
| + | |} | ||
| + | {| | ||
| + | |style="padding: 0px 0px 0px 60px;"|✔ For All Products | ||
| + | |} | ||
| + | {| | ||
| + | |style="padding: 0px 0px 0px 60px;"|✔ For Selected Product Groups | ||
| + | |} | ||
| + | {| | ||
| + | |style="padding: 0px 0px 0px 45px;"|✔ Advanced Settings: | ||
| + | |} | ||
| + | {| | ||
| + | |style="padding: 0px 0px 0px 60px;"|✔ Remove Hidden Data From JSON | ||
|} | |} | ||
{| | {| | ||
| Line 147: | Line 183: | ||
|} | |} | ||
{| | {| | ||
| − | |style="padding: 0px 0px 0px 45px;"|✔ | + | |style="padding: 0px 0px 0px 45px;"|✔ General Layout Settings: |
|} | |} | ||
{| | {| | ||
| − | |style="padding: 0px 0px 0px | + | |style="padding: 0px 0px 0px 60px;"|✔ Select Order Fields Location |
|} | |} | ||
{| | {| | ||
| − | |style="padding: 0px 0px 0px 45px;"|✔ | + | |style="padding: 0px 0px 0px 45px;"|✔ Product Order Layout Settings: |
|} | |} | ||
{| | {| | ||
| − | |style="padding: 0px 0px 0px | + | |style="padding: 0px 0px 0px 60px;"|✔ Display Navigation Tabs |
|} | |} | ||
{| | {| | ||
| − | |style="padding: 0px 0px 0px | + | |style="padding: 0px 0px 0px 60px;"|✔ Use Simplified Order Summary |
| + | |} | ||
| + | {| | ||
| + | |style="padding: 0px 0px 0px 60px;"|✔ Display Package Slider | ||
| + | |} | ||
| + | {| | ||
| + | |style="padding: 0px 0px 0px 60px;"|✔ Mark Required Fields | ||
| + | |} | ||
| + | {| | ||
| + | |style="padding: 0px 0px 0px 45px;"|✔ Cart Layout Settings: | ||
| + | |} | ||
| + | {| | ||
| + | |style="padding: 0px 0px 0px 60px;"|✔ Select Promotion Code Field Location | ||
| + | |} | ||
| + | {| | ||
| + | |style="padding: 0px 0px 0px 60px;"|✔ Select Promotion Code Field Location - "View Cart" Mode | ||
|} | |} | ||
{| | {| | ||
| Line 169: | Line 220: | ||
{| | {| | ||
|style="padding: 0px 0px 0px 45px;"|✔ Show Domain Spotlights | |style="padding: 0px 0px 0px 45px;"|✔ Show Domain Spotlights | ||
| + | |} | ||
| + | {| | ||
| + | |style="padding: 0px 0px 0px 45px;"|✔ Select Domain Configuration Elements | ||
| + | |} | ||
| + | {| | ||
| + | |style="padding: 0px 0px 0px 45px;"|✔ Select Domain Configuration Elements (Logged In Users) | ||
|} | |} | ||
{| | {| | ||
| Line 174: | Line 231: | ||
|} | |} | ||
{| | {| | ||
| − | |style="padding: 0px 0px 0px 45px;"|✔ | + | |style="padding: 0px 0px 0px 45px;"|✔ Main Settings: |
|} | |} | ||
{| | {| | ||
| − | |style="padding: 0px 0px 0px | + | |style="padding: 0px 0px 0px 60px;"|✔ Display Price Suffix |
| + | |} | ||
| + | {| | ||
| + | |style="padding: 0px 0px 0px 60px;"|✔ Choose Currency Selector: | ||
| + | |} | ||
| + | {| | ||
| + | |style="padding: 0px 0px 0px 75px;"|✔ Always Displayed | ||
| + | |} | ||
| + | {| | ||
| + | |style="padding: 0px 0px 0px 75px;"|✔ Hide If One Currency Is Available | ||
| + | |} | ||
| + | {| | ||
| + | |style="padding: 0px 0px 0px 75px;"|✔ Hide Permanently | ||
| + | |} | ||
| + | {| | ||
| + | |style="padding: 0px 0px 0px 45px;"|✔ Zero Value Pricing Settings: | ||
| + | |} | ||
| + | {| | ||
| + | |style="padding: 0px 0px 0px 60px;"|✔ Display "0.00" Numeric Value | ||
| + | |} | ||
| + | {| | ||
| + | |style="padding: 0px 0px 0px 60px;"|✔ Display "Free" Phrase | ||
| + | |} | ||
| + | {| | ||
| + | |style="padding: 0px 0px 0px 60px;"|✔ Hide Values Completly (For Configurable Options And Product Addons) | ||
|} | |} | ||
{| | {| | ||
| Line 196: | Line 277: | ||
{| | {| | ||
|style="padding: 0px 0px 0px 45px;"|✔ Select Number Of Columns For Desktop View | |style="padding: 0px 0px 0px 45px;"|✔ Select Number Of Columns For Desktop View | ||
| + | |} | ||
| + | {| | ||
| + | |style="padding: 0px 0px 0px 30px;"|✔ Apply Billing Details Settings: | ||
| + | |} | ||
| + | {| | ||
| + | |style="padding: 0px 0px 0px 45px;"|✔ Hide VAT Number Field For Selected Countries | ||
| + | |} | ||
| + | {| | ||
| + | |style="padding: 0px 0px 0px 45px;"|✔ Hide Billing Details Optional Fields | ||
| + | |} | ||
| + | {| | ||
| + | |style="padding: 0px 0px 0px 45px;"|✔ Define Personal Information Fields Order | ||
| + | |} | ||
| + | {| | ||
| + | |style="padding: 0px 0px 0px 45px;"|✔ Define Billing Address Fields Order | ||
|} | |} | ||
{| | {| | ||
| Line 319: | Line 415: | ||
{| | {| | ||
|style="padding: 0px 0px 0px 45px;"|✔ Upload And Remove Custom Images Used In Order Form | |style="padding: 0px 0px 0px 45px;"|✔ Upload And Remove Custom Images Used In Order Form | ||
| + | |} | ||
| + | {| | ||
| + | |style="padding: 0px 0px 0px 30px;"|✔ Manage Geolocation Settings: | ||
| + | |} | ||
| + | {| | ||
| + | |style="padding: 0px 0px 0px 45px;"|✔ Enable Auto Location Detection Based On Client's Country IP Address | ||
| + | |} | ||
| + | {| | ||
| + | |style="padding: 0px 0px 0px 45px;"|✔ Bypass Client Location Detection Using Specified IP Address | ||
| + | |} | ||
| + | {| | ||
| + | |style="padding: 0px 0px 0px 45px;"|✔ Set Default Currency And Language | ||
| + | |} | ||
| + | {| | ||
| + | |style="padding: 0px 0px 0px 45px;"|✔ Set Custom Currencies And Languages Per Detected Countries | ||
|} | |} | ||
{| | {| | ||
| Line 346: | Line 457: | ||
*'''General Info:''' | *'''General Info:''' | ||
| + | |||
{| | {| | ||
| − | |style="padding: 10px 0px 0px 30px;"|✔ | + | |style="padding: 10px 0px 0px 30px;"|✔ Fully Integrated With [https://lagom.rsstudio.net/products/client-theme/ Lagom WHMCS Client Theme 2.1.0] And Later |
|} | |} | ||
{| | {| | ||
| − | |style="padding: 0px 0px 0px 30px;"|✔ | + | |style="padding: 0px 0px 0px 30px;"|✔ Integrated With [https://www.modulesgarden.com/products/whmcs/discount-center Discount Center For WHMCS For WHMCS] - Manage Discounts Applicable To Order Of Defined Combination Of Products |
| − | |} | + | |} |
{| | {| | ||
| − | |style="padding: 0px 0px 0px 30px;"|✔ | + | |style="padding: 0px 0px 0px 30px;"|✔ Integrated With [https://www.modulesgarden.com/products/whmcs/payment-gateway-charges Payment Gateway Charges For WHMCS] - Include Extra Fees And Discounts Based On Multiple Conditions |
|} | |} | ||
{| | {| | ||
| − | |style="padding: 0px 0px 0px 30px;"|✔ | + | |style="padding: 0px 0px 0px 30px;"|✔ Limited Integration With [https://www.docs.modulesgarden.com/Abandoned_Cart_For_WHMCS#Lagom_One_Step_Order_Form_Integration Abandoned Cart For WHMCS For WHMCS] |
| − | + | ||
| − | + | ||
| − | + | ||
|} | |} | ||
{| | {| | ||
| Line 365: | Line 474: | ||
|} | |} | ||
{| | {| | ||
| − | |style="padding: 0px 0px 0px 30px;"|✔ Supports PHP | + | |style="padding: 0px 0px 0px 30px;"|✔ Supports PHP 8.2 Back To PHP 8.1 |
|} | |} | ||
{| | {| | ||
| Line 371: | Line 480: | ||
|} | |} | ||
{| | {| | ||
| − | |style="padding: 0px 0px 0px 30px;"|✔ Supports WHMCS V8. | + | |style="padding: 0px 0px 0px 30px;"|✔ Supports WHMCS V8.12 Back To WHMCS V8.9 |
| + | |} | ||
| + | {| | ||
| + | |style="padding: 0px 0px 0px 30px;"|✔ InnoDB Engine Must Be Used By WHMCS Tables | ||
| + | |} | ||
| + | {| | ||
| + | |style="padding: 0px 0px 0px 30px;"|✔ Requires ionCube Loader V13 Or Later | ||
|} | |} | ||
{| | {| | ||
| − | |style="padding: 0px 0px 30px 30px;"|✔ Easy Module Upgrade To [https://www.modulesgarden.com/products/whmcs/lagom-one-step-order-form#open-source-version Open Source Version] | + | |style="padding: 0px 0px 30px 30px;"|✔ Easy [https://www.docs.modulesgarden.com/How_To_Upgrade_WHMCS_Module Module Upgrade] To [https://www.modulesgarden.com/products/whmcs/lagom-one-step-order-form#open-source-version Open Source Version] |
|} | |} | ||
| Line 412: | Line 527: | ||
|} | |} | ||
{| | {| | ||
| − | |style="padding: 0px 0px 15px 15px;"|''' | + | |style="padding: 0px 0px 15px 15px;"|'''5. Now, set up the '' 'storage' '' folder as recursively writable.'''<br /> This folder is available at '' 'your_whmcs/modules/addons/LagomOrderForm/'.'' <br/> |
| − | ''''Note:''' The folder permissions depend on your server configuration, please set it to either: 700, 755 or 777.'' | + | '''''Note:''' The folder permissions depend on your server configuration, please set it to either: 700, 755 or 777.'' |
|} | |} | ||
{| | {| | ||
| Line 419: | Line 534: | ||
|} | |} | ||
{| | {| | ||
| − | |style="padding: 0px 0px 5px 15px;"|''' | + | |style="padding: 0px 0px 5px 15px;"|'''6. Finally, set the '' 'htaccess' '' file rule'''<br /> |
Open the '' 'htaccess' '' file, you will find it in the main root directory. | Open the '' 'htaccess' '' file, you will find it in the main root directory. | ||
|} | |} | ||
{| | {| | ||
| − | |style="padding: 0px 0px 15px 15px;"|''' | + | |style="padding: 0px 0px 15px 15px;"|'''7. If you have '' 'fully friendly rewrite' '' set up, you will have to paste the below rule underneath '' 'RewriteBase /' '': |
RewriteBase / | RewriteBase / | ||
| Line 439: | Line 554: | ||
|} | |} | ||
{| | {| | ||
| − | |style="padding: 0px 0px 15px 15px;"|''' | + | |style="padding: 0px 0px 15px 15px;"|For a WHMCS installation located in a '''subfolder''', you must add the subfolder name before "order/".<br/> For example, if your subfolder is named "store," the modified code would be as follows: |
| + | |||
| + | RewriteBase / | ||
| + | |||
| + | #one-step-order | ||
| + | RewriteRule ^/order/(.*)$ store/order.php?m=OneStepOrder&gid=$1 [L] | ||
| + | |||
| + | |} | ||
| + | {| | ||
| + | |style="padding: 0px 0px 15px 15px;"|'''8. Make sure that all your WHMCS tables use "InnoDB Engine" '''<br/> | ||
Refer to [[#Tips|Tips]] section, point '''5'' to learn how to change the database tables engine. | Refer to [[#Tips|Tips]] section, point '''5'' to learn how to change the database tables engine. | ||
|} | |} | ||
{| | {| | ||
| − | |style="padding: 0px 0px 30px 15px;"|'''''* | + | |style="padding: 0px 0px 30px 15px;"|'''''*9. This step is optional:'' '''<br/> |
If you are using an ''NGINX'' server, it is advised to add the below lines into its configuration file. Otherwise, the module might not work properly. | If you are using an ''NGINX'' server, it is advised to add the below lines into its configuration file. Otherwise, the module might not work properly. | ||
| + | |||
| + | location /order { | ||
| + | rewrite ^/order/(.*)$ /order.php?m=OneStepOrder&gid=$1; | ||
| + | } | ||
| + | location /modules/addons/LagomOrderForm/api/ { | ||
| + | try_files $uri $uri/ /modules/addons/LagomOrderForm/api/index.php?$args; | ||
| + | } | ||
| + | |||
| + | In some cases the above code might not work well, in that situation, please use the below code instead ''("break" added):'' | ||
location /order { | location /order { | ||
| − | + | rewrite ^/order/(.*)$ /order.php?m=OneStepOrder&gid=$1 break; | |
} | } | ||
| − | + | location /modules/addons/LagomOrderForm/api/ { | |
| − | + | try_files $uri $uri/ /modules/addons/LagomOrderForm/api/index.php?$args; | |
} | } | ||
| Line 458: | Line 591: | ||
==Activation== | ==Activation== | ||
{| | {| | ||
| − | |style="padding: 10px 0px 15px 15px;"|''' | + | |style="padding: 10px 0px 15px 15px;"|'''10. Now, you have to activate the module in your WHMCS system.'''<br /> |
Log in to your WHMCS admin area and proceed to '' 'System Settings' '' → '' 'Addon Modules'. ''<br /> | Log in to your WHMCS admin area and proceed to '' 'System Settings' '' → '' 'Addon Modules'. ''<br /> | ||
Afterward, find '' 'Lagom One Step Order Form' '' and press the '' 'Activate' '' button. | Afterward, find '' 'Lagom One Step Order Form' '' and press the '' 'Activate' '' button. | ||
| Line 466: | Line 599: | ||
|} | |} | ||
{| | {| | ||
| − | |style="padding: 0px 0px 15px 15px;"|''' | + | |style="padding: 0px 0px 15px 15px;"|'''11. In the next step you need to permit access to this module.'''<br /> |
To do so, click on the '' 'Configure' '' button, tick checkboxes to assign desired admin roles. | To do so, click on the '' 'Configure' '' button, tick checkboxes to assign desired admin roles. | ||
|} | |} | ||
| Line 473: | Line 606: | ||
|} | |} | ||
{| | {| | ||
| − | |style="padding: 0px 0px 30px 15px;"|''' | + | |style="padding: 0px 0px 30px 15px;"|'''12. You have just successfully installed Lagom One Step Order Form For WHMCS!''' |
|} | |} | ||
| Line 531: | Line 664: | ||
|style="padding: 10px 0px 15px 15px;"|The second option to customize the template is dedicated to the location of the "Order Summary" element - '' 'Order Form Layout'.''<br/> | |style="padding: 10px 0px 15px 15px;"|The second option to customize the template is dedicated to the location of the "Order Summary" element - '' 'Order Form Layout'.''<br/> | ||
There are two possibilities to choose from: | There are two possibilities to choose from: | ||
| − | * Sidebar | + | * '''Sidebar''' |
| − | * Bottom<br/> | + | * '''Bottom''' - keep in mind that the bottom layout is '''not supported with the '' '[[#General_Settings|WHMCS "View Cart" Page]]' '' ''' mode used.<br/> |
Underneath you will find details of every possible choice with its visualization in the client area. | Underneath you will find details of every possible choice with its visualization in the client area. | ||
| Line 584: | Line 717: | ||
====General Settings==== | ====General Settings==== | ||
{| | {| | ||
| − | |style="padding: 10px 0px | + | |style="padding: 10px 0px 15px 15px;"|'''Order Settings:''' |
| − | * '''Disable Redirection''' - if enabled, automatic redirection from standard WHMCS cart and order pages will be turned off. When clients use a ready link to e.g. a cart, it will be displayed with a standard WHMCS view. | + | * '''Disable Order Redirection''' - if enabled, automatic redirection from standard WHMCS cart and order pages will be turned off. When clients use a ready link to e.g. a cart, it will be displayed with a standard WHMCS view. |
| + | |||
| + | * '''Enable WHMCS "View Cart" Page''' - When this option is enabled, the module will skip billing-related fields such as Billing Details, Domain Registrant, and Payment Details. This means that the entire checkout process will take place directly within WHMCS.<br/> Note that this option does not support the '' 'Bottom' '' page layout, as the '' 'Order Summary' '' is always displayed. <br/>For more details on this flow, please move to the dedicated article [[#WHMCS_View_Cart_Page_Mode|here]]. | ||
| + | |||
| + | * '''SEO Title for Product Order Pages''' - if you want to change the default title tag, enter here a new phrase, it will be visible in the title bar at the top of the browser window in the client area | ||
| + | |} | ||
| + | {| | ||
| + | |style="padding: 0px 0px 15px 15px;"|'''Display Settings:''' | ||
| + | * '''Hide IP Address Box''' - activate this setting to disable the display of the information box containing the client's IP address on the order page | ||
* '''Hide Group Name From Suboption Name''' - When activated, it will remove the duplicate "group name" from the "option name", for specific "option types" | * '''Hide Group Name From Suboption Name''' - When activated, it will remove the duplicate "group name" from the "option name", for specific "option types" | ||
| − | * ''' | + | * '''Hide Hostname and Root Password Fields''' - by enabling this option, you can prevent the "Hostname" and "Root Password" fields from appearing in the "Configure Server" section of the product configuration.<br/> You have the flexibility to hide these fields: |
| + | ** '''For All Products''' | ||
| + | ** '''For Product Groups''' - select specific product groups only | ||
| − | * '''Hide | + | * '''Hide Nameservers Fields''' - activate this feature to hide the "NS1 Prefix" and "NS2 Prefix" fields within the "Configure Server" section of the product configuration.<br/> This guarantees that users will not see these fields when configuring their server settings. You have the flexibility to hide these fields: |
| + | ** '''For All Products''' | ||
| + | ** '''For Product Groups''' - select specific product groups only | ||
| + | |} | ||
| + | {| | ||
| + | |style="padding: 0px 0px 15px 15px;"|'''Advanced Settings:''' | ||
| + | * '''Remove Hidden Data from JSON''' - activate to ensure that products and their product groups that are labeled as 'Hidden' in WHMCS will be excluded from view within the browser's developer tool.<br/> ''Note: This option is by default enabled, disable only if you are sure you need to display these data in JSON.'' | ||
|} | |} | ||
{| | {| | ||
| Line 597: | Line 746: | ||
|} | |} | ||
| − | ==== | + | ====Layout Settings==== |
{| | {| | ||
|style="padding: 10px 0px 30px 15px;"|Settings dedicated to the order page layout: | |style="padding: 10px 0px 30px 15px;"|Settings dedicated to the order page layout: | ||
| Line 605: | Line 754: | ||
|} | |} | ||
{| | {| | ||
| − | |style="padding: 0px 0px 20px 15px;"| | + | |style="padding: 0px 0px 15px 15px;"|'''General Layout Settings:''' |
| + | *'''Order Fields Location''' - Choose the location of WHMCS "Terms of Services" checkbox and other custom order fields, which can be configured in product addon management page. | ||
| + | ** '''Order Summary box''' - By default the "Terms of Services" checkbox and all custom order fields are displayed in the "Summary Box", however, you need to be aware that this location has limited space.<br/> That is why it is suggested to display maximum 2-3 order fields in this location. | ||
| + | ** '''Last section on order form''' - When this option is selected, all your order fields will be displayed on the last position on the order form.<br/> This location can include more custom order fields than the option described above.<br/> | ||
| + | The below screen represents the default '' 'Order Summary box' '' option: | ||
| + | |} | ||
| + | {| | ||
| + | |style="padding: 0px 0px 30px 25px;"|[[File:LOF_23_2.png]] | ||
| + | |} | ||
| + | {| | ||
| + | |style="padding: 0px 0px 20px 15px;"|'''Product Order Layout Settings:''' | ||
* '''Display Navigation Tabs''' - if this option is enabled, the additional navigation tabs are shown below the main header title. The navigation tabs include product groups, which previously must be configured in [https://docs.whmcs.com/Products_and_Services#Product_Groups WHMCS settings]. | * '''Display Navigation Tabs''' - if this option is enabled, the additional navigation tabs are shown below the main header title. The navigation tabs include product groups, which previously must be configured in [https://docs.whmcs.com/Products_and_Services#Product_Groups WHMCS settings]. | ||
|} | |} | ||
| Line 613: | Line 772: | ||
{| | {| | ||
|style="padding: 0px 0px 20px 15px;"| | |style="padding: 0px 0px 20px 15px;"| | ||
| − | * '''Simplified | + | * '''Simplified Summary''' - if enabled, the "Order Summary" box displays only '' 'Totals' '' and '' 'Total Due Today' '' values.<br/> It will not display any details about added products, domains or addons. |
|} | |} | ||
{| | {| | ||
| Line 631: | Line 790: | ||
|style="padding: 0px 0px 20px 25px;"|[[File:LOF_23.png]] | |style="padding: 0px 0px 20px 25px;"|[[File:LOF_23.png]] | ||
|} | |} | ||
| − | |||
{| | {| | ||
|style="padding: 0px 0px 15px 15px;"| | |style="padding: 0px 0px 15px 15px;"| | ||
*'''Mark Required Fields''' - if enabled, all the fields that are obligatory to be filled in before continuing, will be marked with the '' 'required' '' label. | *'''Mark Required Fields''' - if enabled, all the fields that are obligatory to be filled in before continuing, will be marked with the '' 'required' '' label. | ||
|} | |} | ||
| − | |||
{| | {| | ||
| − | |style="padding: 0px 0px 15px 15px;"| | + | |style="padding: 0px 0px 15px 15px;"|'''Cart Layout Settings:''' |
*'''Promotion Code Field Location''' - This option allows to change the location of the promotion field, to display it more prominently. | *'''Promotion Code Field Location''' - This option allows to change the location of the promotion field, to display it more prominently. | ||
** Below "Order Summary" - By default, the promotion code field is located under the summary box. The input field will be shown after clicking the "Have a promo code?" link. | ** Below "Order Summary" - By default, the promotion code field is located under the summary box. The input field will be shown after clicking the "Have a promo code?" link. | ||
| Line 649: | Line 806: | ||
|style="padding: 0px 0px 20px 25px;"|[[File:LOF_23_1.png]] | |style="padding: 0px 0px 20px 25px;"|[[File:LOF_23_1.png]] | ||
|} | |} | ||
| + | <!-- | ||
{| | {| | ||
|style="padding: 0px 0px 15px 15px;"| | |style="padding: 0px 0px 15px 15px;"| | ||
| − | *''' | + | *'''Promotion Code Field in View Cart''' - ............ |
| − | ** | + | ** Below View Cart Table - |
| − | ** | + | ** Below "Order Summary" - |
| − | The below screen | + | ** The end of view cart page - .... <br/> |
| + | The below screen shows the ''yz" Section'' position: | ||
|} | |} | ||
{| | {| | ||
| − | |style="padding: 0px 0px 30px 25px;"|[[File: | + | |style="padding: 0px 0px 30px 25px;"|[[File:LOF_23_1.png]] |
|} | |} | ||
| + | --> | ||
====Domain Search Box==== | ====Domain Search Box==== | ||
{| | {| | ||
| − | |style="padding: 10px 0px | + | |style="padding: 10px 0px 15px 15px;"| |
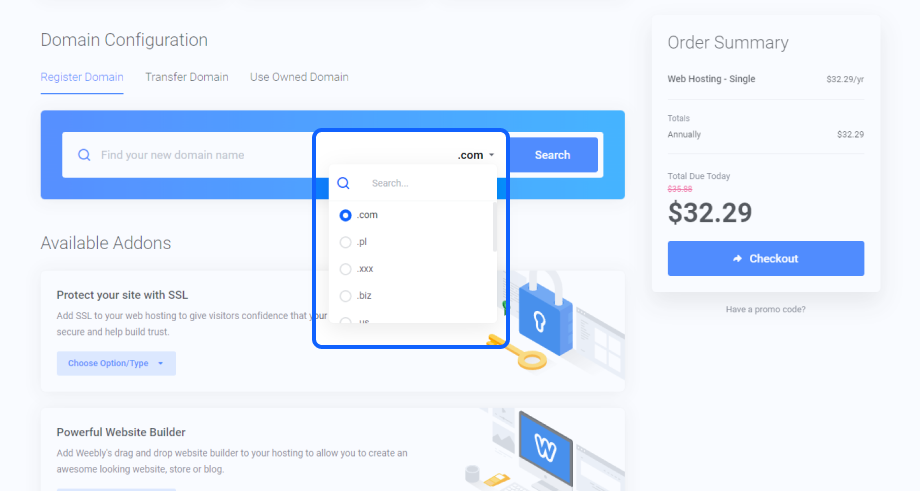
| − | *'''Show Domain TLDs Dropdown''' - This option allows to enable the domain TLDs selector, which will be shown in the domain search field. | + | *'''Show Domain TLDs Dropdown''' - This option allows the user to enable the domain TLDs selector, which will be shown in the domain search field. |
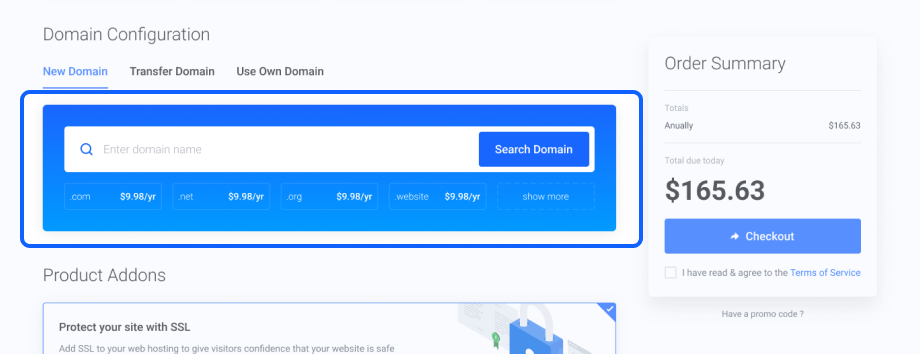
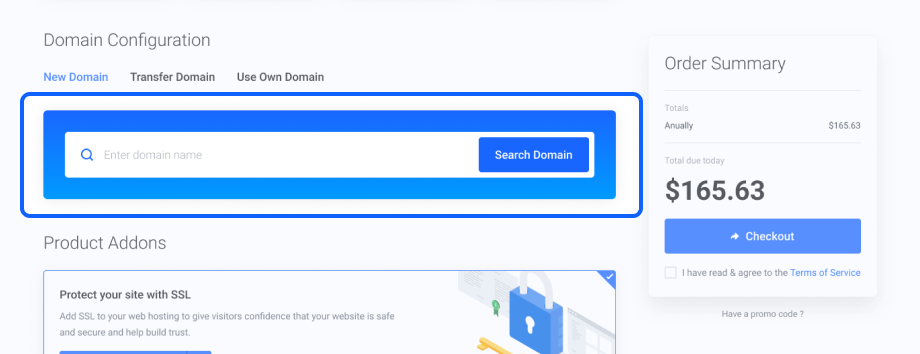
| + | * '''Show Domain Spotlights''' - Allows you to display "Spotlight TLDs" that have been previously configured in WHMCS settings.<br/> When the "Show Domain Spotlights" option is disabled, no domain TLDs are displayed below the domain search bar. | ||
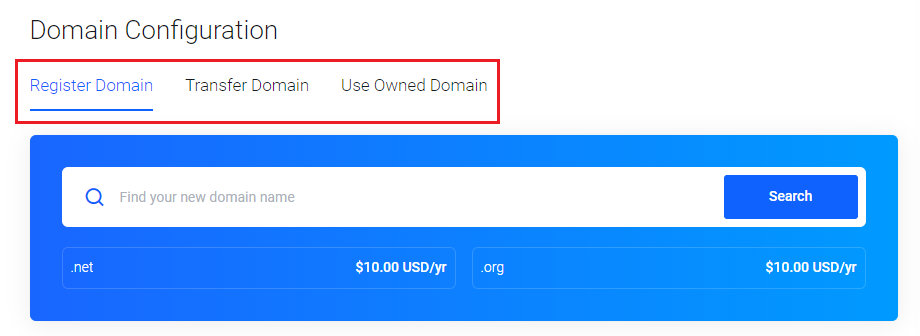
| + | * '''Domain Configuration Elements''' - Select specific elements for domain configuration to impose a customized selection and your preferred sequence.<br/> You have the flexibility to define the order in which these elements are presented and specify which of the available elements should be displayed.<br/> If the default WHMCS configuration is your preference, simply leave this field empty to seamlessly adopt the WHMCS standard settings. | ||
| + | * '''Domain Configuration Elements (Logged in Users)''' - Select the elements for domain configuration for clients who are logged in, and they will be displayed in the specified order.<br/> If you opt for the default WHMCS configuration, you can leave this field empty. | ||
| + | |} | ||
| + | {| | ||
| + | |style="padding: 0px 0px 20px 25px;"|[[File:LOF_21_01.png]] | ||
| + | |} | ||
| + | {| | ||
| + | |style="padding: 0px 0px 20px 15px;"| | ||
| + | *'''Show Domain TLDs Dropdown''' option enabled: | ||
|} | |} | ||
{| | {| | ||
| − | |style="padding: 0px 0px | + | |style="padding: 0px 0px 20px 25px;"|[[File:LOF_21_0.png]] |
|} | |} | ||
{| | {| | ||
|style="padding: 0px 0px 20px 15px;"| | |style="padding: 0px 0px 20px 15px;"| | ||
| − | * '''Show Domain Spotlights''' - | + | * '''Show Domain Spotlights''' - option enabled: |
|} | |} | ||
{| | {| | ||
| Line 677: | Line 847: | ||
|} | |} | ||
{| | {| | ||
| − | |style="padding: 0px 0px | + | |style="padding: 0px 0px 20px 25px;"|[[File:LOF_26.png]] |
| + | |} | ||
| + | {| | ||
| + | |style="padding: 0px 0px 20px 15px;"| | ||
| + | * '''Domain Configuration Elements''' in the client area - custom selection and changed order as defined in the addon | ||
| + | |} | ||
| + | {| | ||
| + | |style="padding: 0px 0px 20px 25px;"|[[File:LOF_26_1.png]] | ||
| + | |} | ||
| + | {| | ||
| + | |style="padding: 0px 0px 20px 15px;"| | ||
| + | *'''Domain Configuration Elements (Logged in Users)''' in the client area - view with '''default''' WHMCS elements (field in the addon is left empty) | ||
| + | |} | ||
| + | {| | ||
| + | |style="padding: 0px 0px 30px 25px;"|[[File:LOF_26_0.png]] | ||
|} | |} | ||
====Pricing Options==== | ====Pricing Options==== | ||
{| | {| | ||
| − | |style="padding: 10px 0px | + | |style="padding: 10px 0px 15px 15px;"|'''Main Settings:''' |
| − | + | * '''Display Price Suffix''' - if enabled, the currency suffix is shown next to the price.<br/> However, it is vital to previously configure the currency and its suffix details in your WHMCS admin area settings, based on their video tutorial | |
| − | * '''Display Price Suffix''' - if enabled, the currency suffix is shown next to the price.<br/> However, it is | + | * '''Currency Selector''' - choose how the currency selector behaves: |
| + | ** ''Always visible'' - ensure it remains consistently accessible | ||
| + | ** ''Hide permanently'' | ||
| + | ** ''Hide selector if one currency is available'' | ||
|} | |} | ||
{| | {| | ||
| − | |style="padding: 0px 0px | + | |style="padding: 0px 0px 20px 25px;"|[[File:LOF_21.png]] |
| + | |} | ||
| + | {| | ||
| + | |style="padding: 0px 0px 15px 15px;"|'''Zero Value Pricing''' - choose whether to display zero prices as a "Free" label or as a "0.00" numerical representation corresponding with currency format for: | ||
| + | * '''Product Packages''' | ||
| + | ** Show 0.00 values | ||
| + | ** Show "Free" instead of 0.00 values | ||
| + | * '''Product Billing Cycles''' | ||
| + | ** Show 0.00 values | ||
| + | ** Hide 0.00 values | ||
| + | ** Show "Free" instead of 0.00 values | ||
| + | |||
| + | * '''Domains''' | ||
| + | ** Show 0.00 values | ||
| + | ** Show "Free" instead of 0.00 values<br/> | ||
| + | |||
| + | In the case of configurable options and product addons, you may also completely hide the zero-value prices: | ||
| + | * '''Product Configurable Options''' | ||
| + | ** Show 0.00 values | ||
| + | ** Show "Free" instead of 0.00 values | ||
| + | ** Hide 0.00 values<br/> '''''Note:''''' These settings overwrite the 'Hide Zero Price' setting available for a single configurable option.'' | ||
| + | |||
| + | * '''Product Addons''' | ||
| + | ** Show 0.00 values | ||
| + | ** Show "Free" instead of 0.00 values | ||
| + | ** Hide 0.00 values | ||
| + | |} | ||
| + | {| | ||
| + | |style="padding: 0px 0px 30px 25px;"|[[File:LOF_21_02.png]] | ||
|} | |} | ||
====Billing Cycles==== | ====Billing Cycles==== | ||
{| | {| | ||
| − | |style="padding: 10px 0px 20px 15px;"| | + | |style="padding: 10px 0px 20px 15px;"|Billing cycles related configuration: |
| + | |} | ||
| + | {| | ||
| + | |style="padding: 0px 0px 20px 25px;"|[[File:LOF_25_04.png]] | ||
| + | |} | ||
| + | {| | ||
| + | |style="padding: 0px 0px 20px 15px;"| | ||
* '''Select The Longest Billing Cycle''' - When this option is activated, the option with the longest billing cycle will be automatically selected.<br/> Otherwise, the option with the shortest billing cycle will be chosen. | * '''Select The Longest Billing Cycle''' - When this option is activated, the option with the longest billing cycle will be automatically selected.<br/> Otherwise, the option with the shortest billing cycle will be chosen. | ||
|} | |} | ||
| Line 714: | Line 935: | ||
|} | |} | ||
| − | ==== | + | ====Billing Settings==== |
| + | {| | ||
| + | |style="padding: 10px 0px 15px 15px;"|'''Tax and VAT Settings:''' | ||
| + | * '''Hide VAT Number Field For''' - select countries for which the '' 'VAT Number' '' field in the account details will be hidden | ||
| + | |} | ||
| + | {| | ||
| + | |style="padding: 0px 0px 15px 15px;"|'''Billing Fields Settings:''' | ||
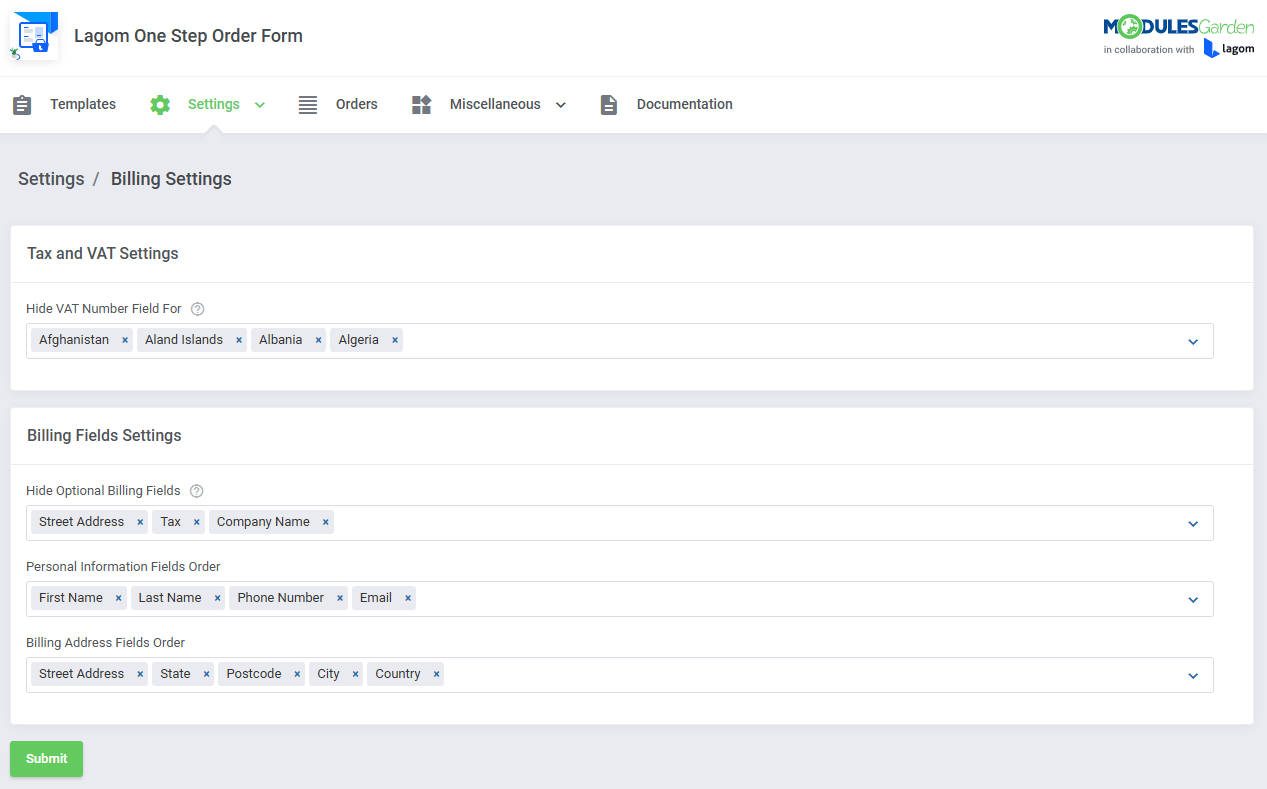
| + | * '''Hide Optional Billing Fields''' - select any fields, labeled as optional in your WHMCS, to prevent their appearance in the billing details section of the client area. | ||
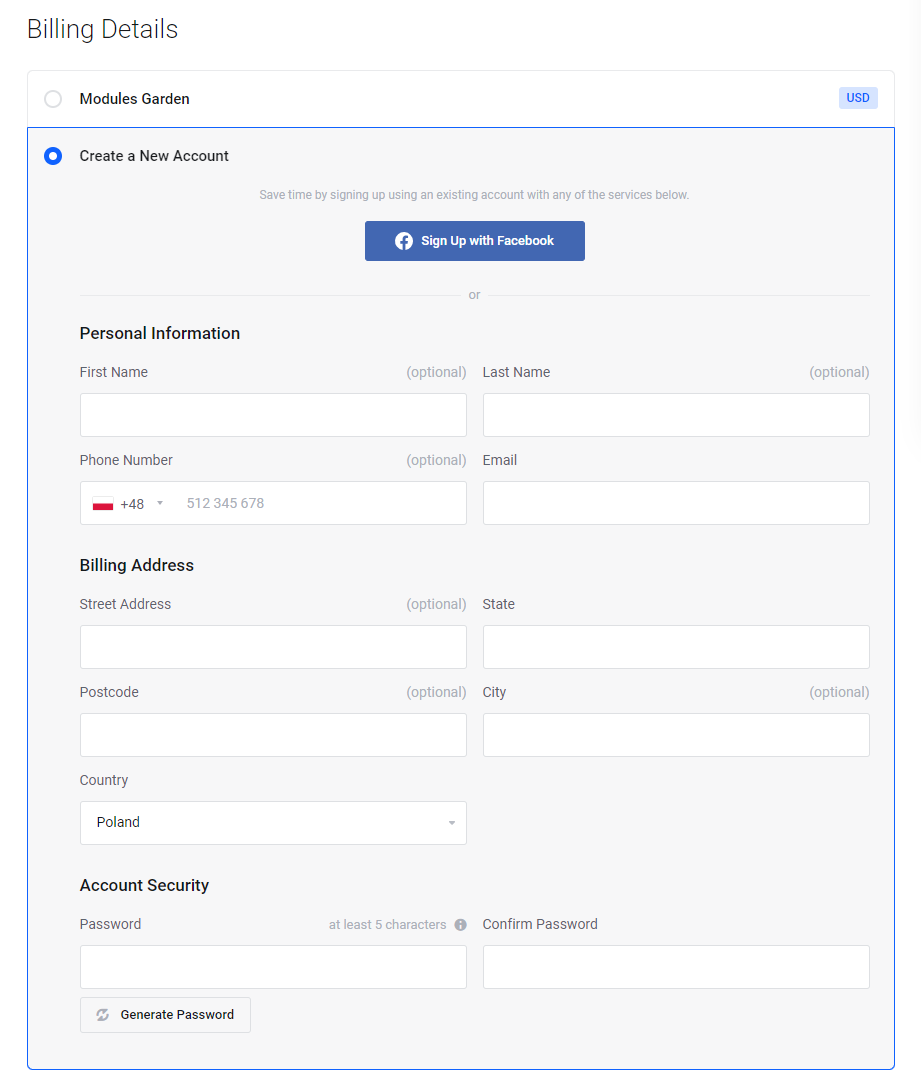
| + | * '''Personal Information Fields Order''' - Configure the order in which personal information fields will appear on the checkout | ||
| + | * '''Billing Address Fields Order''' - Configure the order in which client billing details fields will appear on the checkout | ||
| + | |} | ||
| + | {| | ||
| + | |style="padding: 0px 0px 20px 25px;"|[[File:LOF_25_6.png]] | ||
| + | |} | ||
| + | {| | ||
| + | |style="padding: 0px 0px 30px 25px;"|[[File:LOF_25_7.png]] | ||
| + | |} | ||
| + | ====CAPTCHA Settings==== | ||
{| | {| | ||
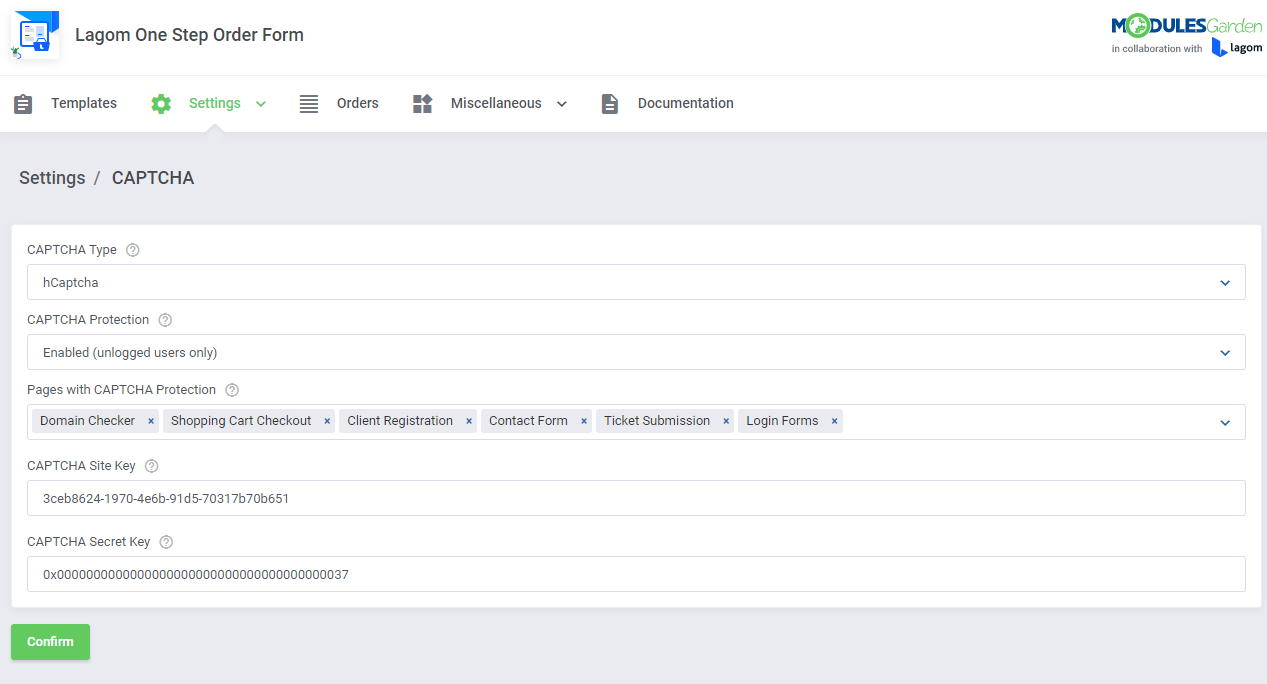
| − | |style="padding: 10px 0px | + | |style="padding: 10px 0px 5px 15px;"|Enhance your site security by enabling CAPTCHA form protection. |
* '''CAPTCHA Type''' - You may choose between two available captcha protection types. That is "Default" and "hCaptcha" | * '''CAPTCHA Type''' - You may choose between two available captcha protection types. That is "Default" and "hCaptcha" | ||
| − | ** '''Default''' - In case you choose this type, the standard WHMCS "Captcha Form Protection" will be enabled. You may manage it in your '' 'WHMCS admin area' → 'General Settings' → 'Security'.'' Select the type there, choose forms in the client area and enter your Site and Secret Keys. | + | ** '''Default''' - In case you choose this type, the standard WHMCS "Captcha Form Protection" will be enabled. You may manage it in your '' 'WHMCS admin area' → 'General Settings' → 'Security'.'' <br/>Select the type there, choose forms in the client area and enter your Site and Secret Keys. |
| − | * '''hCaptcha''' - For hCaptcha verification you will need to provide the full configuration with the connection details here in the addon. | + | ** '''hCaptcha''' - For hCaptcha verification you will need to provide the full configuration with the connection details here in the addon. |
* '''hCaptcha Protection''' - Enable protection for: | * '''hCaptcha Protection''' - Enable protection for: | ||
** all users | ** all users | ||
| Line 736: | Line 974: | ||
* '''hCaptcha Secret Key''' - Enter your hCaptcha Secret Key. | * '''hCaptcha Secret Key''' - Enter your hCaptcha Secret Key. | ||
| + | |} | ||
| + | {| | ||
| + | |style="padding: 10px 0px 15px 15px;"|'''Important:''' For '''WHMCS version 8.11 and above, CAPTCHA settings are controlled directly through WHMCS''', regardless of the CAPTCHA configuration set within the module.<br/> | ||
| + | For '''WHMCS versions earlier than 8.11, the CAPTCHA configuration within the module remains active''', allowing users on older WHMCS versions to manage hCaptcha settings directly through the module settings. <br/>This functionality is maintained to support compatibility with earlier versions of WHMCS and will be removed once the module compatibility with WHMCS versions below 8.11 is ceased. | ||
|} | |} | ||
{| | {| | ||
| Line 761: | Line 1,003: | ||
===Miscellaneous=== | ===Miscellaneous=== | ||
{| | {| | ||
| − | |style="padding: 10px 0px 15px 15px;"|Lagom WHMCS One Step Order Form has been designed to give flexibility for the clients and allow to configure it to specific business needs. Below we will describe all the customization options available in the current version | + | |style="padding: 10px 0px 15px 15px;"|Lagom WHMCS One Step Order Form has been designed to give flexibility for the clients and allow to configure it to specific business needs. Below we will describe all the customization options available in the current version. |
|} | |} | ||
====Payment Gateways==== | ====Payment Gateways==== | ||
| Line 804: | Line 1,046: | ||
** Dropdown | ** Dropdown | ||
| − | * Name - set the field name | + | * Name - set the field name. |
| − | * Required - choose whether this field should be required, or not | + | * Required - choose whether this field should be required, or not. |
| − | * Description - provide a more detailed description for the newly created field | + | * Description - provide a more detailed description for the newly created field. |
|} | |} | ||
{| | {| | ||
| Line 825: | Line 1,067: | ||
|} | |} | ||
{| | {| | ||
| − | |style="padding: 0px 0px | + | |style="padding: 0px 0px 30px 25px;"|[[File:LOF_33_3.png]] |
|} | |} | ||
====Configurable Options==== | ====Configurable Options==== | ||
{| | {| | ||
| − | |style="padding: 10px 0px 15px 15px;"| [https://lagom.rsstudio.net/docs/order-form/options-manager | + | |style="padding: 10px 0px 15px 15px;"| [https://lagom.rsstudio.net/docs/order-form/options-manager/ Configurable Options] management is an advanced tool, which introduces new features to customize and manage WHMCS product configurable options.<br/> You can now configure different configuration layouts for every WHMCS product. Learn how to use its functions in Config Options Manager documentation. |
|} | |} | ||
{| | {| | ||
| Line 837: | Line 1,079: | ||
{| | {| | ||
|style="padding: 0px 0px 30px 15px;"|Available management tools are described in a separate article, please refer to the following links: | |style="padding: 0px 0px 30px 15px;"|Available management tools are described in a separate article, please refer to the following links: | ||
| − | # [https://lagom.rsstudio.net/docs/order-form/options-manager | + | # [https://lagom.rsstudio.net/docs/order-form/options-manager/#configurable-option-groups Configurable Option Groups] |
| − | # [https://lagom.rsstudio.net/docs/order-form/options-manager | + | # [https://lagom.rsstudio.net/docs/order-form/options-manager/#configurable-options Configurable Options] |
| − | # [https://lagom.rsstudio.net/docs/order-form/options-manager | + | # [https://lagom.rsstudio.net/docs/order-form/options-manager/#option-management Options Management] |
| − | # [https://lagom.rsstudio.net/docs/order-form/options-manager | + | # [https://lagom.rsstudio.net/docs/order-form/options-manager/#option-types Options Types] |
| − | # [https://lagom.rsstudio.net/docs/order-form/options-manager | + | # [https://lagom.rsstudio.net/docs/order-form/options-manager/#exemplary-configuration Exemplary Configuration] |
| − | # [https://lagom.rsstudio.net/docs/order-form/options-manager | + | # [https://lagom.rsstudio.net/docs/order-form/options-manager/#additional-fields-translation Additional Fields Translation] |
|} | |} | ||
| Line 860: | Line 1,102: | ||
**Illustration | **Illustration | ||
**Small Illustration | **Small Illustration | ||
| − | *Color | + | *Color - Set background color. |
|} | |} | ||
{| | {| | ||
| − | |style="padding: 0px 0px | + | |style="padding: 0px 0px 30px 25px;"|[[File:LOF_33_2.png]] |
|} | |} | ||
====Media Library==== | ====Media Library==== | ||
{| | {| | ||
| − | |style="padding: 10px 0px 15px 15px;"|Upload and manage graphics | + | |style="padding: 10px 0px 15px 15px;"|Upload and manage graphics that can be assigned to configurable options or product addons. This page comes with a set of predefined graphics which you can download from [https://www.modulesgarden.com/client-area/dl.php?type=d&id=4952 here].<br/> |
| − | You may fetch the ready package and upload it into ''/modules/addons/LagomOrderForm/storage/gallery/'' directory. Keep in mind that all the graphics must be located directly under the '''/gallery/ catalog'''. | + | You may fetch the ready package and upload it into the ''/modules/addons/LagomOrderForm/storage/gallery/'' directory. Keep in mind that all the graphics must be located directly under the '''/gallery/ catalog'''. |
|} | |} | ||
{| | {| | ||
| − | |style="padding: 0px 0px | + | |style="padding: 0px 0px 30px 25px;"|[[File:LOF_34_0.png]] |
| + | |} | ||
| + | ====Geolocation==== | ||
| + | {| | ||
| + | |style="padding: 10px 0px 15px 15px;"|The Lagom One Step Order Form may smoothly detect the customer's location automatically and display the currency according to the detected country, providing an enhanced user experience.<br/> | ||
| + | |||
| + | To use the geolocation feature the most effectively, you need to update your geolocation database. Here you will find out how to do that: | ||
| + | # To download the free geolocation database you need to first create an account at the Maxmind portal, the instructions can be found at [https://dev.maxmind.com/geoip/geolite2-free-geolocation-data this site] | ||
| + | # Log in to your account, proceed to ''GeoIP2/ GeoLite2 → Download Files'', find '''GeoLite2 Country'' in the table, and download the file in ''.mmdb'' format | ||
| + | # Find the following file in your module files at ''/yourWHMCS/modules/addons/LagomOrderForm/app/Integrations/Geolocation/Submodules/GeoIP2/GeoLite2-Country.mmdb'' directory and overwrite it with the newly downloaded file. | ||
| + | |} | ||
| + | {| | ||
| + | |style="padding: 0px 0px 20px 25px;"|[[File:LOF_34_01.png]] | ||
| + | |} | ||
| + | {| | ||
| + | |style="padding: 0px 0px 15px 15px;"|'''Default Settings''' | ||
| + | * '''Enable Geolocation''' - enable to let the module automatically detect the client location and adjust the used language and currency to the location based on the configuration | ||
| + | * '''Custom IP Address''' - enter an IP address in this field and the module will ignore the client location and use the specified IP address to assign currency and language specific to that location.<br/> Leave this field empty to enable automatic geolocation based on the client's IP address | ||
| + | * '''Deafult Currency''' - select a currency in this field to be used for countries that do not have a specific currency assigned in the "Country Settings" section. This currency will act as a default option for those countries. | ||
| + | * '''Default Language''' - select a language in this field to be used for countries that do not have a specific language assigned in the "Country Settings" section. This language will act as a default option for those countries. | ||
| + | |} | ||
| + | {| | ||
| + | |style="padding: 0px 0px 20px 25px;"|[[File:LOF_34_1.png]] | ||
| + | |} | ||
| + | {| | ||
| + | |style="padding: 0px 0px 15px 15px;"|'''Country Settings'''<br/> | ||
| + | Define a specific language and currency per country. If the country is detected as the client location, the dedicated currency and language will be used in the client area. <br/> If you do not set any data per country, default settings will be used. For your comfort, you may use the mass action feature, to assign a single currency or language to numerous countries at once. | ||
| + | |} | ||
| + | {| | ||
| + | |style="padding: 0px 0px 20px 25px;"|[[File:LOF_34_2.png]] | ||
| + | |} | ||
| + | {| | ||
| + | |style="padding: 0px 0px 30px 25px;"|[[File:LOF_34_3.png]] | ||
|} | |} | ||
| Line 882: | Line 1,156: | ||
'''''Important:''' It is possible to use the '''Lagom One Step Order Form For WHMCS''' module without the '''[https://lagom.rsstudio.net/products/client-theme Lagom WHMCS Client Theme].''' The module remains fully usable and all available features are supported when the standard WHMCS "Twenty-One" theme is used. <br/> The only limitation concerns the number of supported styles and their color schemes. For "Twenty-One" theme, the "Modern" style with "blue" color scheme is used by default and there are no extra options to choose from.'' | '''''Important:''' It is possible to use the '''Lagom One Step Order Form For WHMCS''' module without the '''[https://lagom.rsstudio.net/products/client-theme Lagom WHMCS Client Theme].''' The module remains fully usable and all available features are supported when the standard WHMCS "Twenty-One" theme is used. <br/> The only limitation concerns the number of supported styles and their color schemes. For "Twenty-One" theme, the "Modern" style with "blue" color scheme is used by default and there are no extra options to choose from.'' | ||
| − | Take a look below to see | + | Take a look below to see what such ordering pages may look like.<br/> '''''Note:''' Please keep in mind that the "Lagom One Step Order Form" module currently only permits ordering one item per transaction, and it does not support multiple orders yet.'' <br/> |
Here you can see an example of a ''' "One Step" ''' order form view with the '' 'Package Slider' '' option turned on, '' 'Sidebar' '' order form layout and '' 'Default' '' package type. | Here you can see an example of a ''' "One Step" ''' order form view with the '' 'Package Slider' '' option turned on, '' 'Sidebar' '' order form layout and '' 'Default' '' package type. | ||
| Line 891: | Line 1,165: | ||
{| | {| | ||
|style="padding: 0px 0px 15px 15px;"|The next example illustrates the ''' "Two Steps" ''' order form view. <br/> | |style="padding: 0px 0px 15px 15px;"|The next example illustrates the ''' "Two Steps" ''' order form view. <br/> | ||
| − | In this option, the first | + | In this option, the first step is dedicated to selecting product packages: |
|} | |} | ||
{| | {| | ||
| Line 901: | Line 1,175: | ||
{| | {| | ||
|style="padding: 0px 0px 30px 25px;"|[[File:LOF_34.png]] | |style="padding: 0px 0px 30px 25px;"|[[File:LOF_34.png]] | ||
| + | |} | ||
| + | ===WHMCS View Cart Page Mode=== | ||
| + | {| | ||
| + | |style="padding: 10px 0px 15px 15px;"|The '''"View Cart" mode''' in the Lagom One Step Order Form For WHMCS module offers an alternative checkout flow that is similar to the standard WHMCS ordering process.<br/> This feature was introduced to '''support payment gateways that may not be fully compatible with single-page checkout''', ensuring that all available payment options remain accessible to users.<br/> | ||
| + | |||
| + | Lagom One Step Order Form For WHMCS works seamlessly with all payment gateways that are implemented according to [https://developers.whmcs.com/payment-gateways/getting-started/ WHMCS official documentation]. | ||
| + | |||
| + | When you are using a payment gateway that is not fully supported by the single-page checkout (such as PayPal), please always turn on the ''WHMCS "View Cart" Page'' option. | ||
| + | |} | ||
| + | {| | ||
| + | |style="padding: 0px 0px 20px 25px;"|[[File:LOF_35_0.png]] | ||
| + | |} | ||
| + | {| | ||
| + | |style="padding: 0px 0px 15px 15px;"|When "View Cart" mode is active, the checkout flow aligns with the default WHMCS ordering process, splitting order summary and checkout stages across separate pages.<br/> | ||
| + | The ordering process displays the '' 'Order Summary' '' on the left side of the screen. | ||
| + | |} | ||
| + | {| | ||
| + | |style="padding: 0px 0px 20px 25px;"|[[File:LOF_35_01.png]] | ||
| + | |} | ||
| + | {| | ||
| + | |style="padding: 0px 0px 15px 15px;"| Upon clicking '' 'Checkout' '', users are redirected to the '' 'Review & Checkout' '' page where they can: | ||
| + | * Review the order details, including any selected addons. | ||
| + | * Provide or confirm billing information for new or existing accounts. | ||
| + | * Select their preferred payment method to complete the purchase. | ||
| + | |} | ||
| + | {| | ||
| + | |style="padding: 0px 0px 30px 25px;"|[[File:LOF_35_02.png]] | ||
|} | |} | ||
| − | =Custom Hooks= | + | =Addtional Information= |
| + | ==Custom Hooks== | ||
{| | {| | ||
|style="padding: 10px 0px 30px 15px;"|'''This section includes a list of supported by the module custom hooks.''' | |style="padding: 10px 0px 30px 15px;"|'''This section includes a list of supported by the module custom hooks.''' | ||
| Line 911: | Line 1,213: | ||
<pre> | <pre> | ||
| − | add_hook('LagomOrderFormProductsList', function($ | + | add_hook('LagomOrderFormProductsList',1, function($productsList){ |
| − | return $productsList | + | return $productsList; |
| − | } | + | }); |
</pre> | </pre> | ||
| + | * ''ShoppingCartValidateProductUpdate'' - allows you to include your own validation and error messages when a product in the shopping cart is being updated.<br/> | ||
| + | |||
| + | Exemplary usage: | ||
| + | |||
| + | <pre> | ||
| + | add_hook('ShoppingCartValidateProductUpdate', 1, function($vars) { | ||
| + | return [ | ||
| + | 'Error message feedback error 1', | ||
| + | 'Error message feedback error 2', | ||
| + | ]; | ||
| + | }); | ||
| + | </pre> | ||
| + | |} | ||
| + | |||
| + | ==Editing Module Files== | ||
| + | {| | ||
| + | |style="padding: 10px 0px 30px 15px;"|You are allowed to modify three types of module files, these are: ''JS,'' ''TPL'' and ''CSS'' files <br/> | ||
| + | The ''JS'' files are compiled files which means that they are all bundled into one file. Consequently, if you decide to make any changes in a ''JS'' file, you have to additionally take one of the below-described steps to see your changes:<br/> | ||
| + | |||
| + | 1. '''Debug'''<br/> The module has a built-in system that allows you to build JS ad-hoc, to do this you need to create a '''.debug''' file ''(the dot at the beginning is required)'' in the '''''/modules/addons/LagomOrderForm''''' directory.<br/> Then you can edit the JS files, and the changes will be visible in the page source.<br/> | ||
| + | |||
| + | 2. '''Build'''<br/> If you choose this method, you have to pack all the files into one. Thanks to that, the page loads faster because HTML contains less code and JS is loaded as a separate file.<br/> | ||
| + | Required files: | ||
| + | *''package-lock.json'' | ||
| + | *''gulpfile.js''<br/> | ||
| + | '''Please contact us and we will provide you with the necessary files!''' <br/> | ||
| + | |||
| + | Next, upload these files into the main WHMCS directory and run the command: | ||
| + | docker run --rm -v $(pwd):/srv huli/gulp build | ||
| + | |||
| + | '''''Note:''' Before you run the above command you must install docker in your system.<br/> In case you do not want to use docker, you may simply [https://gulpjs.com/docs/en/getting-started/quick-start/ install gulp] with nodejs and run the following command:'' | ||
| + | gulp build | ||
|} | |} | ||
| Line 926: | Line 1,260: | ||
{| | {| | ||
|style="padding: 0px 0px 15px 15px;"|'''2. The module supports language Overrides.''' | |style="padding: 0px 0px 15px 15px;"|'''2. The module supports language Overrides.''' | ||
| − | The language file english.php is uncoded and can be freely modified. However, it is advised not to change this file itself, it is recommended to use overrides. | + | The language file english.php is uncoded and can be freely modified. However, it is advised not to change this file itself, it is recommended to use overrides so the changes persist through module updates. |
* Open the overrides within the ~/lang/ directory. | * Open the overrides within the ~/lang/ directory. | ||
| Line 971: | Line 1,305: | ||
Exemplary URL: <br/> | Exemplary URL: <br/> | ||
| − | <nowiki>https://mycompany.net/order/dedicated-servers/8? | + | <nowiki>https://mycompany.net/order/dedicated-servers/8?configoption[1]=5</nowiki> |
Where: | Where: | ||
| − | # '' | + | # ''configOption[1]'' - stands for the configurable option name |
| − | + | ||
# ''5'' - value, e.g. ID configurable option value | # ''5'' - value, e.g. ID configurable option value | ||
| + | |||
| + | Exemple 2: <br/> | ||
<nowiki>https://mycompany.net/order/dedicated-servers/8?domain=mytestdomain.com</nowiki> | <nowiki>https://mycompany.net/order/dedicated-servers/8?domain=mytestdomain.com</nowiki> | ||
| Line 986: | Line 1,321: | ||
{| | {| | ||
|style="padding: 0px 0px 30px 15px;"|'''5. The module requires the '''InnoDB Engine''' to be used by the WHMCS database table. Check how to change the database engine: | |style="padding: 0px 0px 30px 15px;"|'''5. The module requires the '''InnoDB Engine''' to be used by the WHMCS database table. Check how to change the database engine: | ||
| − | * | + | *Log in cPanel and open phpMyAdmin. |
*Look at the column on the left, you will find there a list of database tables, select the one whose storage engine you are going to change. | *Look at the column on the left, you will find there a list of database tables, select the one whose storage engine you are going to change. | ||
*Click on the "Operations" tab. | *Click on the "Operations" tab. | ||
| Line 1,001: | Line 1,336: | ||
After the query has been successfully executed, the database engine of the selected database table will be changed to "InnoDB".<br/> | After the query has been successfully executed, the database engine of the selected database table will be changed to "InnoDB".<br/> | ||
| − | '''''Note:''' In case you need a more detailed instruction with step by step illustrations, please refer to this [https://lagom.rsstudio.net/docs/order-form/installation | + | '''''Note:''' In case you need a more detailed instruction with step by step illustrations, please refer to this [https://lagom.rsstudio.net/docs/order-form/installation/#innodb-engine article].'' |
|} | |} | ||
| Line 1,019: | Line 1,354: | ||
|} | |} | ||
| − | == | + | ==Uninstallation Process== |
{| | {| | ||
| − | |style="padding: 10px 0px 30px 15px;"| | + | |style="padding: 10px 0px 30px 15px;"|If you no longer wish to use Lagom One Step Order Form For WHMCS, you may safely uninstall the module.<br/> |
| − | + | To successfully and safely remove the module from your system, follow these steps: <br/> | |
| + | |||
| + | # Deactivate the addon module: Navigate to System Settings → Addon Modules, and find ''Lagom One Step Order Form.'' Click on ''Deactivate.''<br/> | ||
| + | # Remove all tables that begin with ''LagomOrderForm_'' from the database.<br/> | ||
| + | # Next, delete all the listed below files: | ||
| + | #* The folder containing the Lagom One Step Order Form module: '''''modules/addons/LagomOrderForm''''' | ||
| + | #* The '''''order.php''''' file.<br/> | ||
| + | # Finally, remove the '''''RewriteBase''''' rule that you must have added to the htaccess file <br/>''(For additional information, please refer to the details provided in points 7 and 8 of the [[#Installation |installation instructions]])'' | ||
| + | |||
| + | That's it! The module is now completely uninstalled. | ||
| + | |} | ||
| + | |||
| + | =Upgrade Guide= | ||
| + | {| | ||
| + | |style="padding: 10px 0px 30px 15px;"|Seeking a solution that offers greater flexibility, customization tailored to your precise needs, and unrestricted availability?<br/> There is an option that not only proves to be cost-effective in the long run but also includes prioritized support services, making it a truly valuable investment.<br/> | ||
| + | |||
| + | Opt for the [https://www.modulesgarden.com/products/whmcs/lagom-one-step-order-form#open-source-version Open Source version] of your Lagom One Step Order Form For WHMCS module to unlock these benefits.<br/> Simply click on either the '''Get Source Code''' or '''Upgrade To Lifetime''' button found on the product's page in our client area to complete the one-step upgrade process, with a '''dedicated discount''' already applied.<br/> | ||
| + | |||
| + | Follow a [https://www.docs.modulesgarden.com/How_To_Upgrade_WHMCS_Module comprehensive guide] covering the transition process, the advantages it brings, and step-by-step instructions on what to do next after the order has been successfully finalized. | ||
|} | |} | ||
| Line 1,030: | Line 1,383: | ||
|} | |} | ||
{| | {| | ||
| − | |style="padding: 0px 0px | + | |style="padding: 0px 0px 5px 15px;"|2. '''Third-party modules''' that manipulate or affect the ordering process pages will '''NOT''' be compatible with '''Lagom One Step Order Form For WHMCS'''.<br/> '''Lagom One Step Order Form For WHMCS''' is a separate module, it works independently and it is NOT based on any default WHMCS order process template.<br/> |
The module is '''not yet''' compatible with the below modules from ModulesGarden offer: | The module is '''not yet''' compatible with the below modules from ModulesGarden offer: | ||
* Payment Gateway Allocator For WHMCS ''(compatible soon)'' | * Payment Gateway Allocator For WHMCS ''(compatible soon)'' | ||
| − | * Product Cross-Selling For WHMCS ''( | + | * Product Cross-Selling For WHMCS ''(EoS)'' |
* Domain Orders Extended For WHMCS | * Domain Orders Extended For WHMCS | ||
* Resellers Center For WHMCS | * Resellers Center For WHMCS | ||
* Multibrand For WHMCS | * Multibrand For WHMCS | ||
| − | * Stripe SEPA Payments For WHMCS | + | * Stripe SEPA Payments For WHMCS ''(EoS)'' |
| + | * Client Area Designer For WHMCS ''(this integration is not scheduled)'' | ||
| + | * SMS Center For WHMCS | ||
| + | * Product Free Trial Manager For WHMCS | ||
| + | * Recurring Contract Billing For WHMCS | ||
| + | |} | ||
| + | {| | ||
| + | |style="padding: 0px 0px 30px 15px;"|3. The module is compatible with WHMCS v8.8 yet please be aware that the new WHMCS '''On-Demand Renewals''' feature is not yet supported.<br/> Please follow the module changelog for information on the full compatibility. | ||
| + | |} | ||
Latest revision as of 16:27, 5 March 2025
Contents |
[edit] About Lagom One Step Order Form For WHMCS
| Lagom One Step Order Form For WHMCS is a one of a kind product built to simplify and attract the ordering process at the same time. You will be granted numerous options to customize the ordering pages, including the division into one or two pages and choose the page layout. |
- Client Area:
| ✔ Completely Redesigned Order Process |
| ✔ Attractive And Customized "Modern" Layout |
| ✔ Responsive Design With Mobile Support |
| ✔ Improved Order Conversion Rate |
| ✔ Reduced Shopping Cart Abandonment Rate |
| ✔ Order Process In One Or Two Steps |
| ✔ Quick Navigation Between Product Groups |
| ✔ Package Slider To Display Multiple Products |
| ✔ Domains And TLDs Showcased In Spotlights |
| ✔ Customized Order Fields With HTML Support |
| ✔ Customized Images, Colors And Styles For Configurable Options And Product Addons |
| ✔ Percentage Pricing Comparison Of Billing Cycles To The Shortest One |
| ✔ Automatic Currency And Language Selection Based On Geolocation |
| ✔ Prices Discounts Applied Due To Discount Center For WHMCS Integration |
| ✔ Fees And Discounts Applied Due To Payment Gateway Charges For WHMCS Integration |
| ✔ Support For Ordering Features: |
| ✔ Intuitive Products And Product Group Selection |
| ✔ Adding Products And Product Addons To Shopping Cart |
| ✔ Registering And Transferring Domains |
| ✔ Working With MarketConnect Products |
| ✔ Working With WHMCS Metric Billing |
| ✔ Applying Promo Codes |
| ✔ Changing Billing Cycles |
| ✔ Changing Currency |
| ✔ Customizing Configurable Options |
| ✔ Providing Client And Product Custom Fields |
| ✔ Support For All Payment Gateways |
| ✔ Login With Existing Account Or Creating New One |
| ✔ Compatible With WHMCS Built-in "Twenty-One" Theme And "Lagom WHMCS Client Theme" |
- Admin Area:
| ✔ Choose Available Templates: |
| ✔ Order Form Type: |
| ✔ One Step |
| ✔ Two Steps |
| ✔ Step By Step (Coming Soon) |
| ✔ Order Form Layout |
| ✔ Sidebar Summary |
| ✔ Bottom Summary |
| ✔ Package Type: |
| ✔ Default Style |
| ✔ Horizontal |
| ✔ Apply General Settings: |
| ✔ Order Settings: |
| ✔ Disable Order Form Redirection |
| ✔ Enable WHMCS "View Cart" Page |
| ✔ Set SEO Title For Product Order Pages |
| ✔ Display Settings: |
| ✔ Hide IP Address Box |
| ✔ Hide Group Name From Suboption Name |
| ✔ Hide Hostname And Root Password Fields: |
| ✔ For All Products |
| ✔ For Selected Product Groups |
| ✔ Hide Nameservers Fields: |
| ✔ For All Products |
| ✔ For Selected Product Groups |
| ✔ Advanced Settings: |
| ✔ Remove Hidden Data From JSON |
| ✔ Apply Layout Settings: |
| ✔ General Layout Settings: |
| ✔ Select Order Fields Location |
| ✔ Product Order Layout Settings: |
| ✔ Display Navigation Tabs |
| ✔ Use Simplified Order Summary |
| ✔ Display Package Slider |
| ✔ Mark Required Fields |
| ✔ Cart Layout Settings: |
| ✔ Select Promotion Code Field Location |
| ✔ Select Promotion Code Field Location - "View Cart" Mode |
| ✔ Apply Domain Search Box Settings: |
| ✔ Show Domain TLDs Dropdown |
| ✔ Show Domain Spotlights |
| ✔ Select Domain Configuration Elements |
| ✔ Select Domain Configuration Elements (Logged In Users) |
| ✔ Apply Pricing Options: |
| ✔ Main Settings: |
| ✔ Display Price Suffix |
| ✔ Choose Currency Selector: |
| ✔ Always Displayed |
| ✔ Hide If One Currency Is Available |
| ✔ Hide Permanently |
| ✔ Zero Value Pricing Settings: |
| ✔ Display "0.00" Numeric Value |
| ✔ Display "Free" Phrase |
| ✔ Hide Values Completly (For Configurable Options And Product Addons) |
| ✔ Apply Billing Cycles Settings: |
| ✔ Automatically Select The Longest Billing Cycle |
| ✔ Show Prices Comparison |
| ✔ Hide “Select” Buttons |
| ✔ Select Billing Cycles Order |
| ✔ Select Number Of Columns For Desktop View |
| ✔ Apply Billing Details Settings: |
| ✔ Hide VAT Number Field For Selected Countries |
| ✔ Hide Billing Details Optional Fields |
| ✔ Define Personal Information Fields Order |
| ✔ Define Billing Address Fields Order |
| ✔ Apply CAPTCHA Settings: |
| ✔ Enable hCaptcha Support |
| ✔ Select Protection: |
| ✔ For All Users |
| ✔ For Unlogged Users Only |
| ✔ Disabled |
| ✔ Select Pages For Protection: |
| ✔ Client Registration |
| ✔ Contact Form |
| ✔ Domain Checker |
| ✔ Login Forms |
| ✔ Shopping Cart Checkout |
| ✔ Ticket Submission |
| ✔ View And Manage Orders List With Created Order Fields |
| ✔ Customize Payment Gateways |
| ✔ Assign Custom Icons To Gateways |
| ✔ Use Prepared Icons From Library |
| ✔ Upload Custom Icons To Any Gateway |
| ✔ Add And Manage Custom Order Fields: |
| ✔ Select Order Field Type: |
| ✔ Checkbox |
| ✔ Dropdown |
| ✔ Input text |
| ✔ Provide Order Field Name And Description |
| ✔ Select Order Field Requirement |
| ✔ Manage Configurable Options: |
| ✔ Display In Single Section |
| ✔ Add Titles And Descriptions |
| ✔ Select Description Type |
| ✔ Select Display Type |
| ✔ Select Illustration Type |
| ✔ Add Customized Image |
| ✔ Define Color |
| ✔ Select Suboptions Groups |
| ✔ Hide Zero Prices |
| ✔ Manage Product Addons: |
| ✔ Add Customized Image |
| ✔ Select Image Display Form |
| ✔ Define Color |
| ✔ Manage Media Library: |
| ✔ Upload And Remove Custom Images Used In Order Form |
| ✔ Manage Geolocation Settings: |
| ✔ Enable Auto Location Detection Based On Client's Country IP Address |
| ✔ Bypass Client Location Detection Using Specified IP Address |
| ✔ Set Default Currency And Language |
| ✔ Set Custom Currencies And Languages Per Detected Countries |
| ✔ Additional Integration With "Lagom Client Theme": |
| ✔ Seamless Layouts Blending |
| ✔ Featured Additional Styles: |
| ✔ Default |
| ✔ Modern |
| ✔ Depth |
| ✔ Futuristic |
| ✔ Five Color Schemes Per Style |
- General Info:
| ✔ Fully Integrated With Lagom WHMCS Client Theme 2.1.0 And Later |
| ✔ Integrated With Discount Center For WHMCS For WHMCS - Manage Discounts Applicable To Order Of Defined Combination Of Products |
| ✔ Integrated With Payment Gateway Charges For WHMCS - Include Extra Fees And Discounts Based On Multiple Conditions |
| ✔ Limited Integration With Abandoned Cart For WHMCS For WHMCS |
| ✔ Multi-Language Support |
| ✔ Supports PHP 8.2 Back To PHP 8.1 |
| ✔ Supports WHMCS "Twenty-One" Theme |
| ✔ Supports WHMCS V8.12 Back To WHMCS V8.9 |
| ✔ InnoDB Engine Must Be Used By WHMCS Tables |
| ✔ Requires ionCube Loader V13 Or Later |
| ✔ Easy Module Upgrade To Open Source Version |
[edit] Installation and Configuration
| The below instructions will direct you through the whole installation and configuration process of Lagom One Step Order Form For WHMCS. Do not hesitate, just take a closer look at the screenshots and their descriptions to get clear directives and tips. |
[edit] Installation
| 1. Log in to our client area and download the module. |
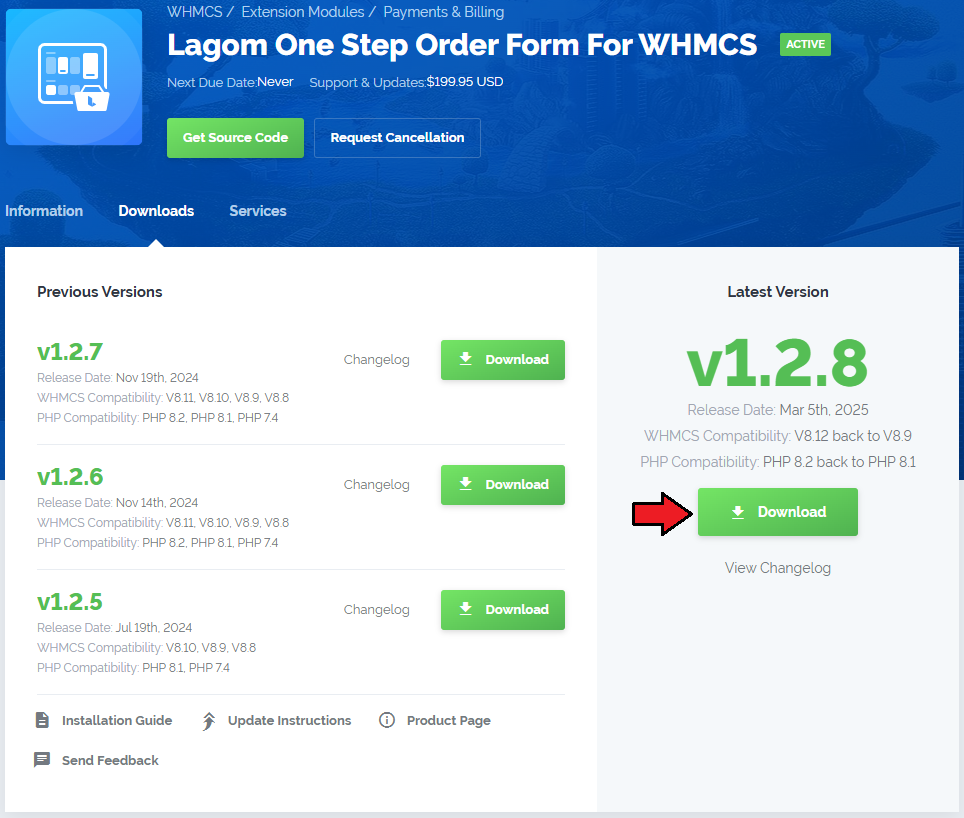
|
| 2. Upload and extract the extension into the main WHMCS directory. Extracted files in your WHMCS directory should look like this: |

|
| 3. When you install 'Lagom One Step Order Form' for the first time, you have to rename the 'license_RENAME.php' file. The file is located in 'modules/addons/LagomOrderForm/license_RENAME.php'. Rename it from 'license_RENAME.php' to 'license.php'. |
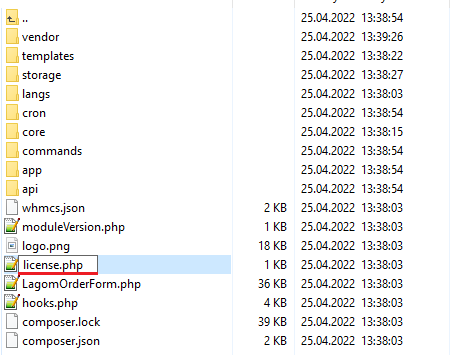
|
| 4. In order to configure your license key, you have to edit the previously renamed 'license.php' file. Enter your license key between quotation marks as presented on the following screen. You can find your license key in our client area → 'My Products'. |

|
| 5. Now, set up the 'storage' folder as recursively writable. This folder is available at 'your_whmcs/modules/addons/LagomOrderForm/'. Note: The folder permissions depend on your server configuration, please set it to either: 700, 755 or 777. |
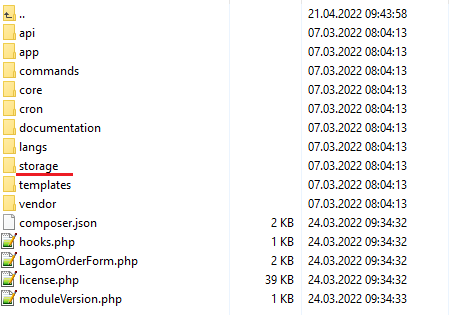
|
| 6. Finally, set the 'htaccess' file rule Open the 'htaccess' file, you will find it in the main root directory. |
7. If you have 'fully friendly rewrite' set up, you will have to paste the below rule underneath 'RewriteBase /' :
   RewriteBase /

   #one-step-order
   RewriteRule ^order/(.*)$ order.php?m=OneStepOrder&gid=$1 [L]
Otherwise, create the below rule above the WHMCS rules: RewriteBase / #one-step-order RewriteRule ^order/(.*)$ order.php?m=OneStepOrder&gid=$1 [L] |
| For a WHMCS installation located in a subfolder, you must add the subfolder name before "order/". For example, if your subfolder is named "store," the modified code would be as follows: RewriteBase / #one-step-order RewriteRule ^/order/(.*)$ store/order.php?m=OneStepOrder&gid=$1 [L] |
| 8. Make sure that all your WHMCS tables use "InnoDB Engine" Refer to Tips section, point '5 to learn how to change the database tables engine. |
| *9. This step is optional: If you are using an NGINX server, it is advised to add the below lines into its configuration file. Otherwise, the module might not work properly. location /order {
rewrite ^/order/(.*)$ /order.php?m=OneStepOrder&gid=$1;
}
location /modules/addons/LagomOrderForm/api/ {
try_files $uri $uri/ /modules/addons/LagomOrderForm/api/index.php?$args;
}
In some cases the above code might not work well, in that situation, please use the below code instead ("break" added): location /order {
rewrite ^/order/(.*)$ /order.php?m=OneStepOrder&gid=$1 break;
}
location /modules/addons/LagomOrderForm/api/ {
try_files $uri $uri/ /modules/addons/LagomOrderForm/api/index.php?$args;
}
Remember to adjust the above example to your WHMCS location. |
[edit] Activation
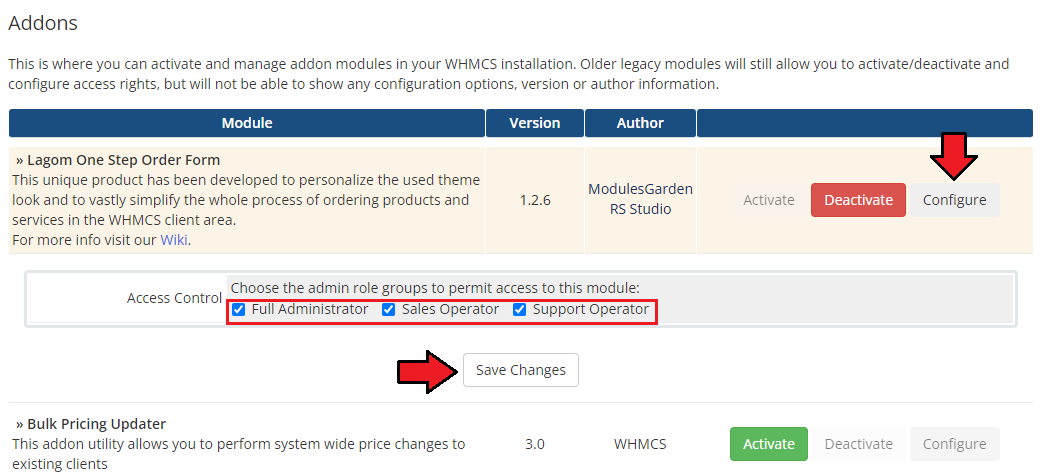
| 10. Now, you have to activate the module in your WHMCS system. Log in to your WHMCS admin area and proceed to 'System Settings' → 'Addon Modules'. |
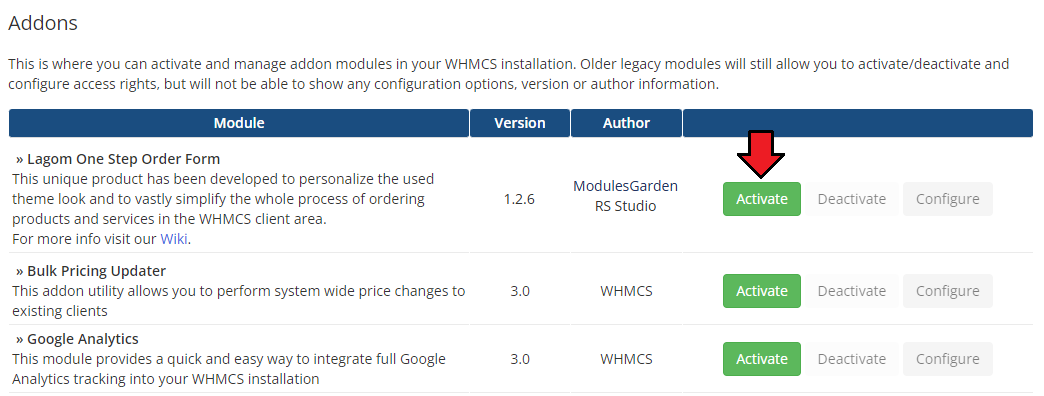
|
| 11. In the next step you need to permit access to this module. To do so, click on the 'Configure' button, tick checkboxes to assign desired admin roles. |
|
| 12. You have just successfully installed Lagom One Step Order Form For WHMCS! |
[edit] Management
| Lagom One Step Order Form For WHMCS has been designed to give flexibility for the clients and allow to configure it to specific business needs. Below we will describe all the available customization options. |
[edit] Addon Configuration
[edit] Templates
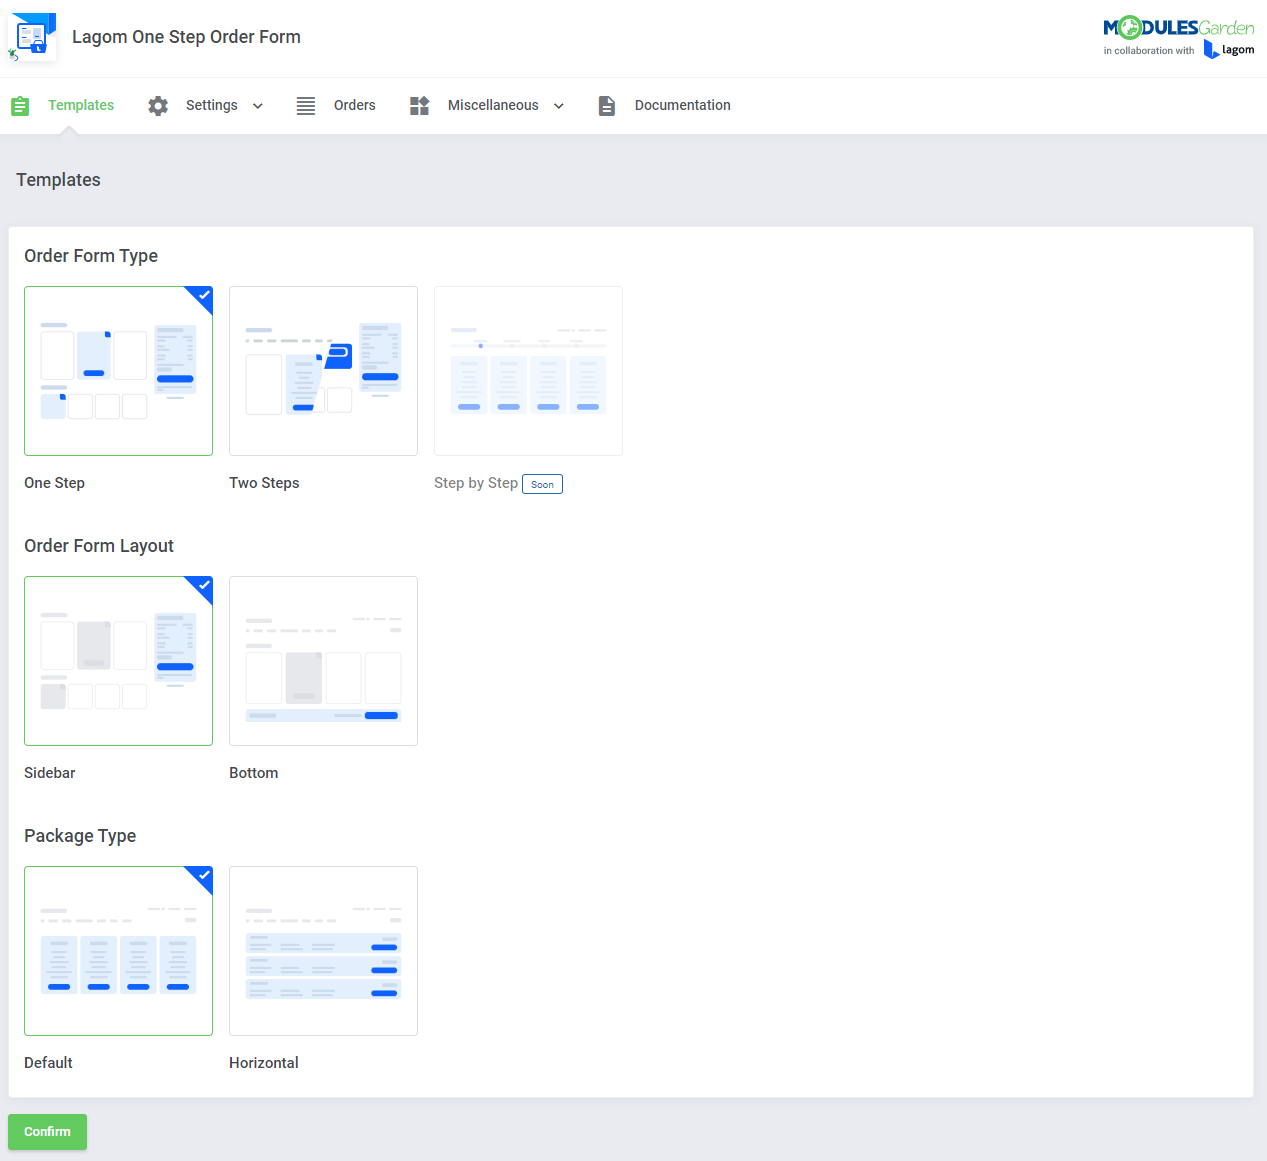
| Begin by navigating to the “Lagom One Step Order Form” addon in your WHMCS admin area, there the “Templates” section will be opened by default. |
|
[edit] Order Form Type
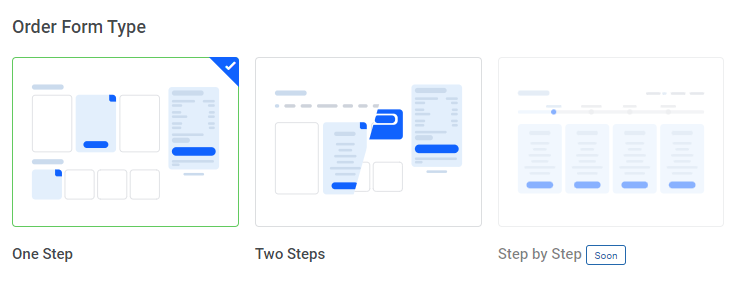
In the 'Order Form Type' section you may choose which of the available order types should be used in the client area. You may choose between three types, these are:
For detailed description with visualization in the client area look below. |
|
| The first one, called 'One Step' allows you to decide whether to show all of the product configuration options on a single page only. Note that at the beginning of the ordering process your client will be able to switch between different product packages within a specific product group. Client area view: |

|
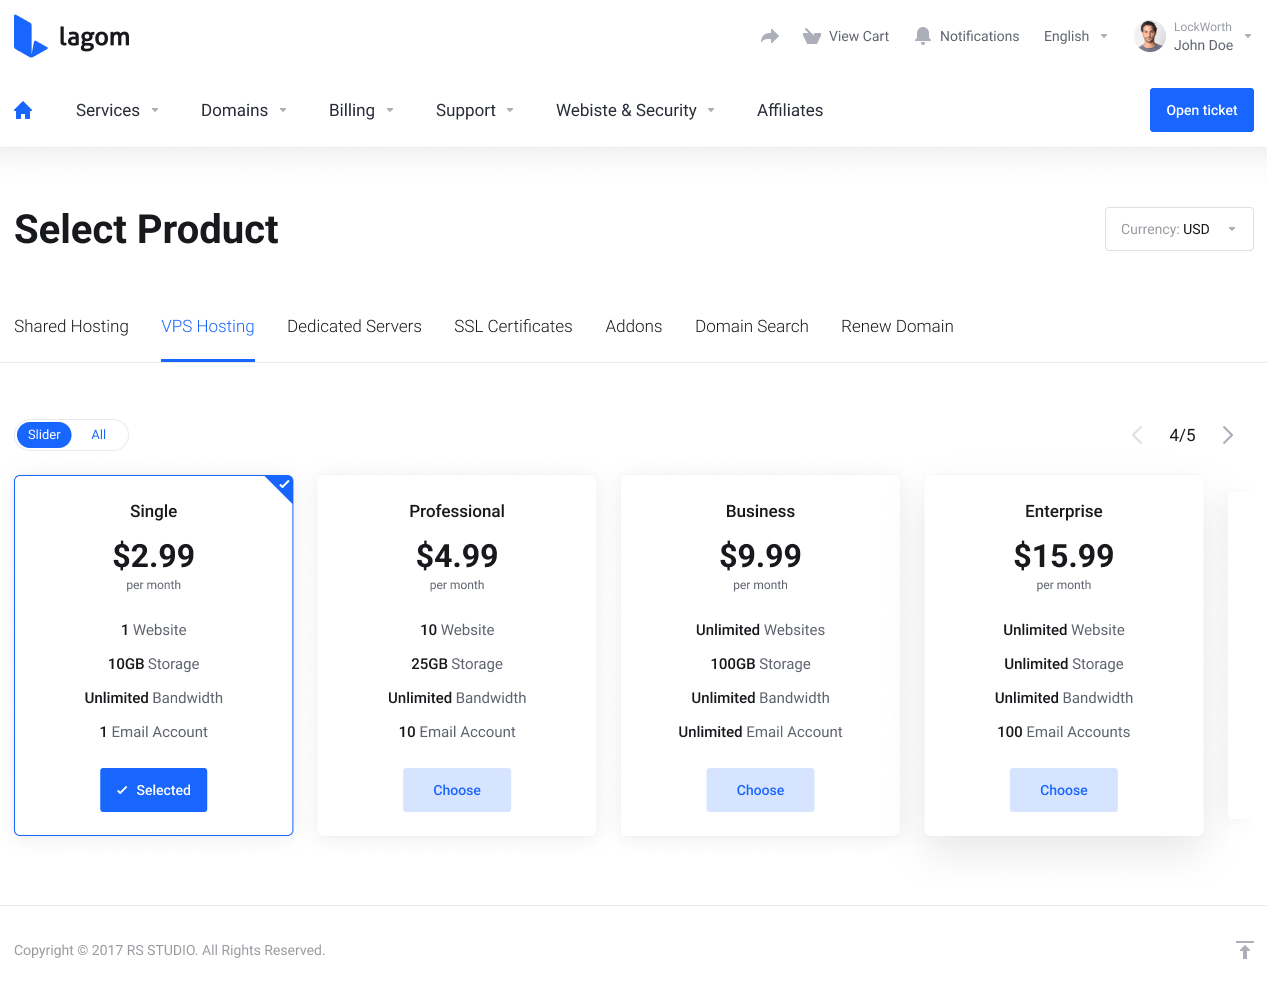
| When the 'Two Steps' option is selected, the order process is divided into two separate steps, where the first one allows you to choose a product to order. In the second step the configuration options available for the previously selected product are displayed. Note: It is not possible to switch between products if this order form type is selected. Client area 'Step 1' view: |
|
| Client area 'Step 2' view: |

|
| 'Step by Step' - this option is not yet available, it will be added to the module in one of its upcoming versions. |
[edit] Order Form Layout
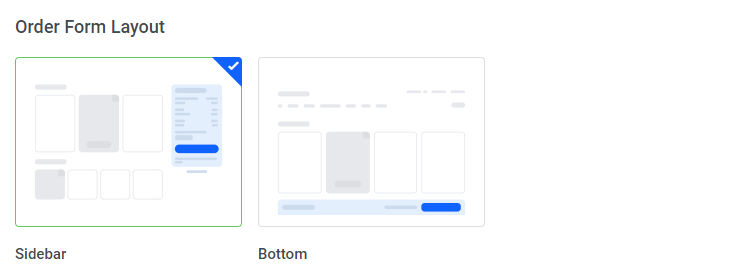
| The second option to customize the template is dedicated to the location of the "Order Summary" element - 'Order Form Layout'. There are two possibilities to choose from:
Underneath you will find details of every possible choice with its visualization in the client area. |
|
| Sidebar - if selected, the 'Order Summary' box is displayed on the right side in the client area order page. The summary box is always affixed to the top of the browser screen, so clients will also have quick access to the complete summary of the current order. |
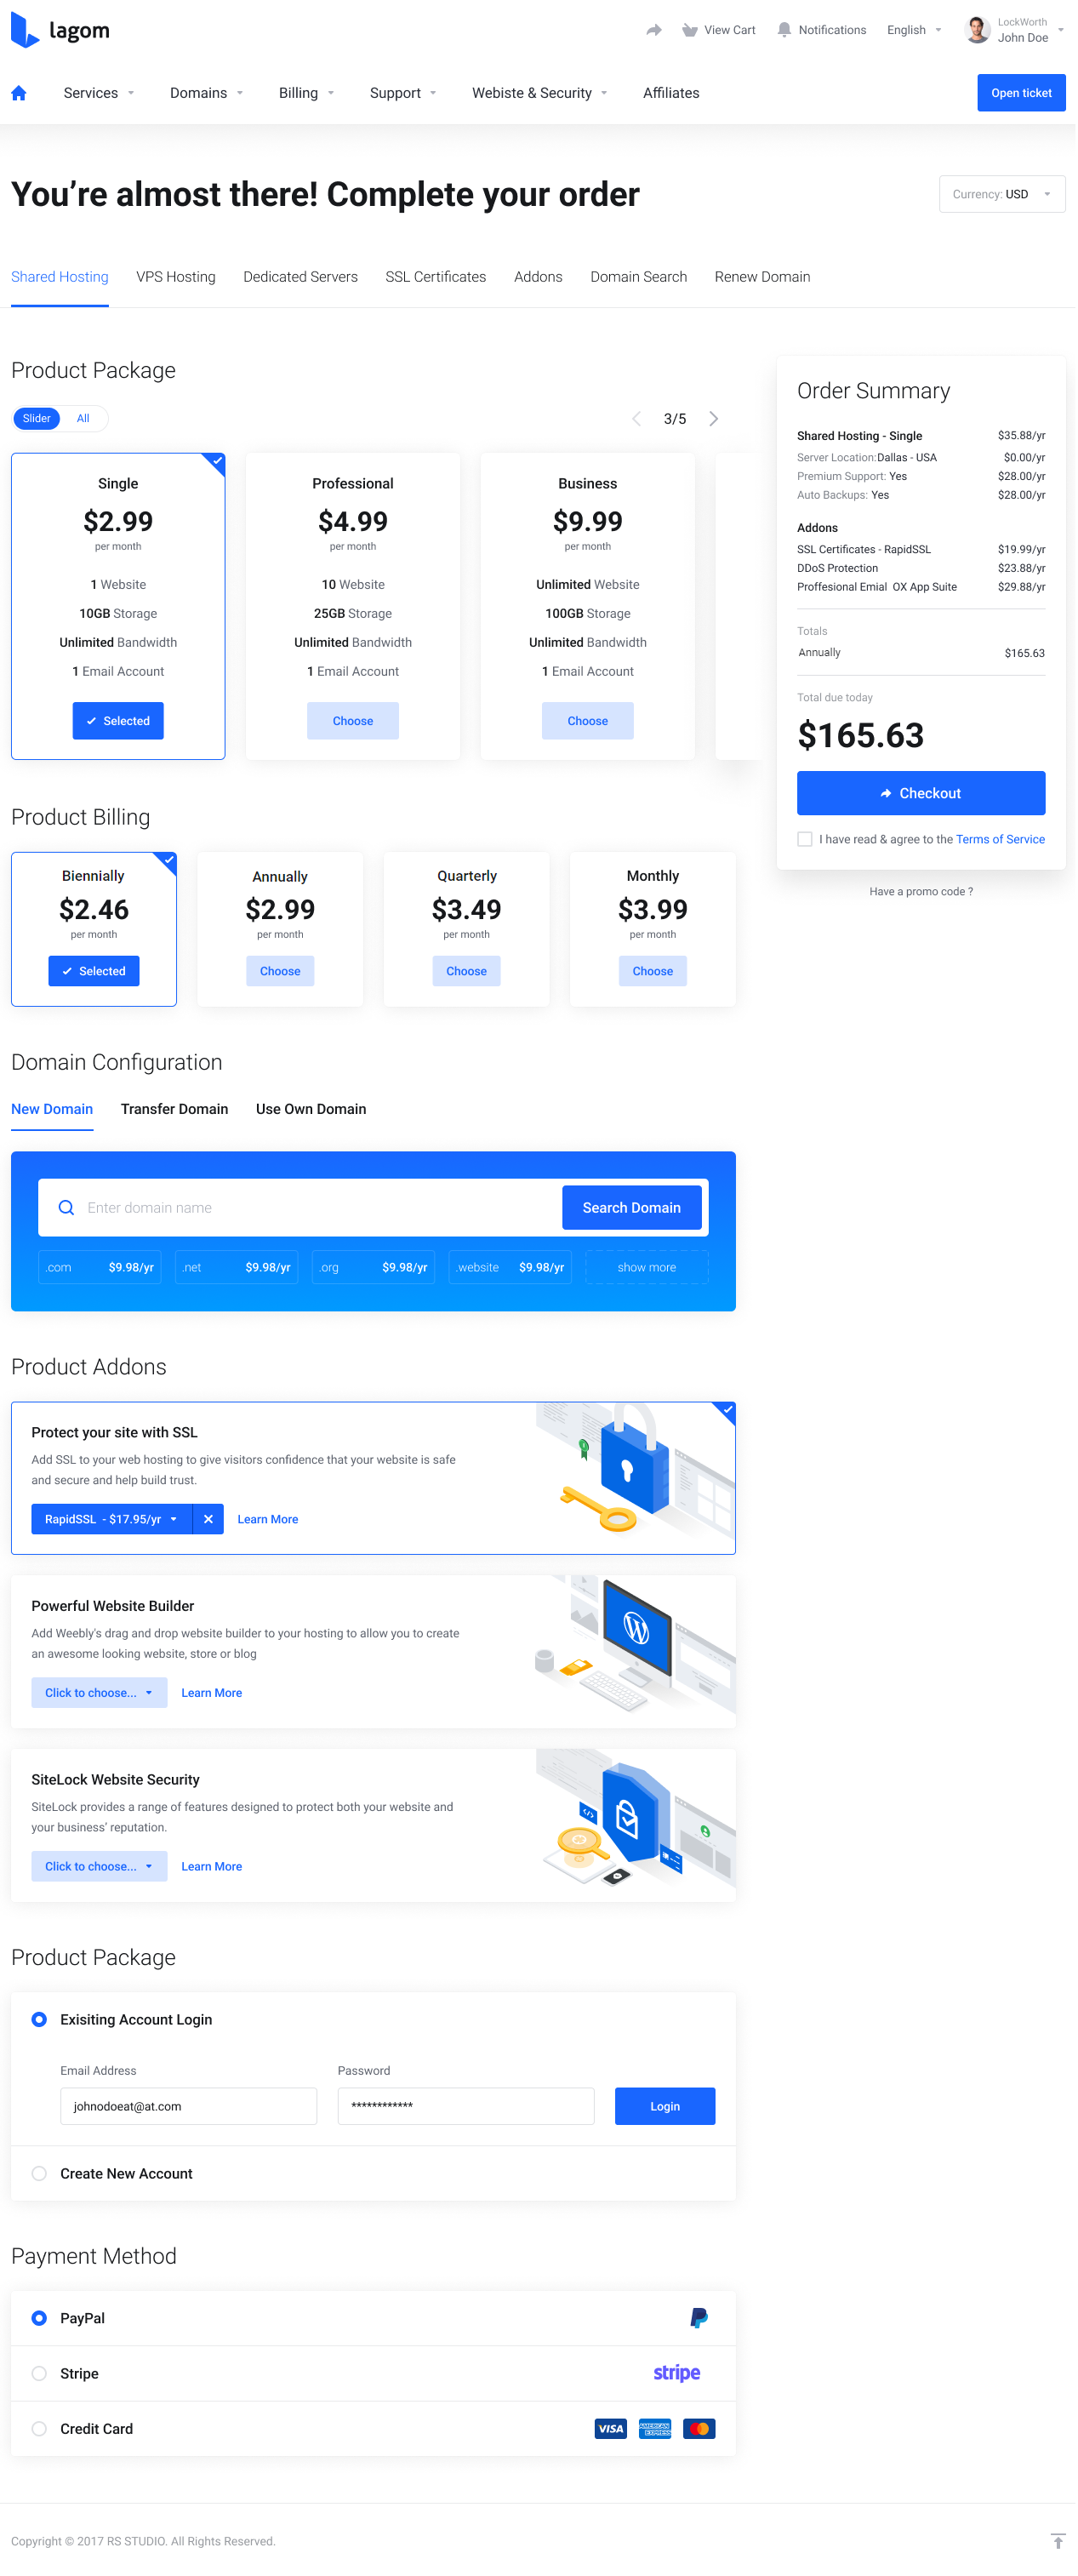
|
| When the 'Bottom' option is selected, the 'Order Summary' box will be displayed at the end of the order process. |
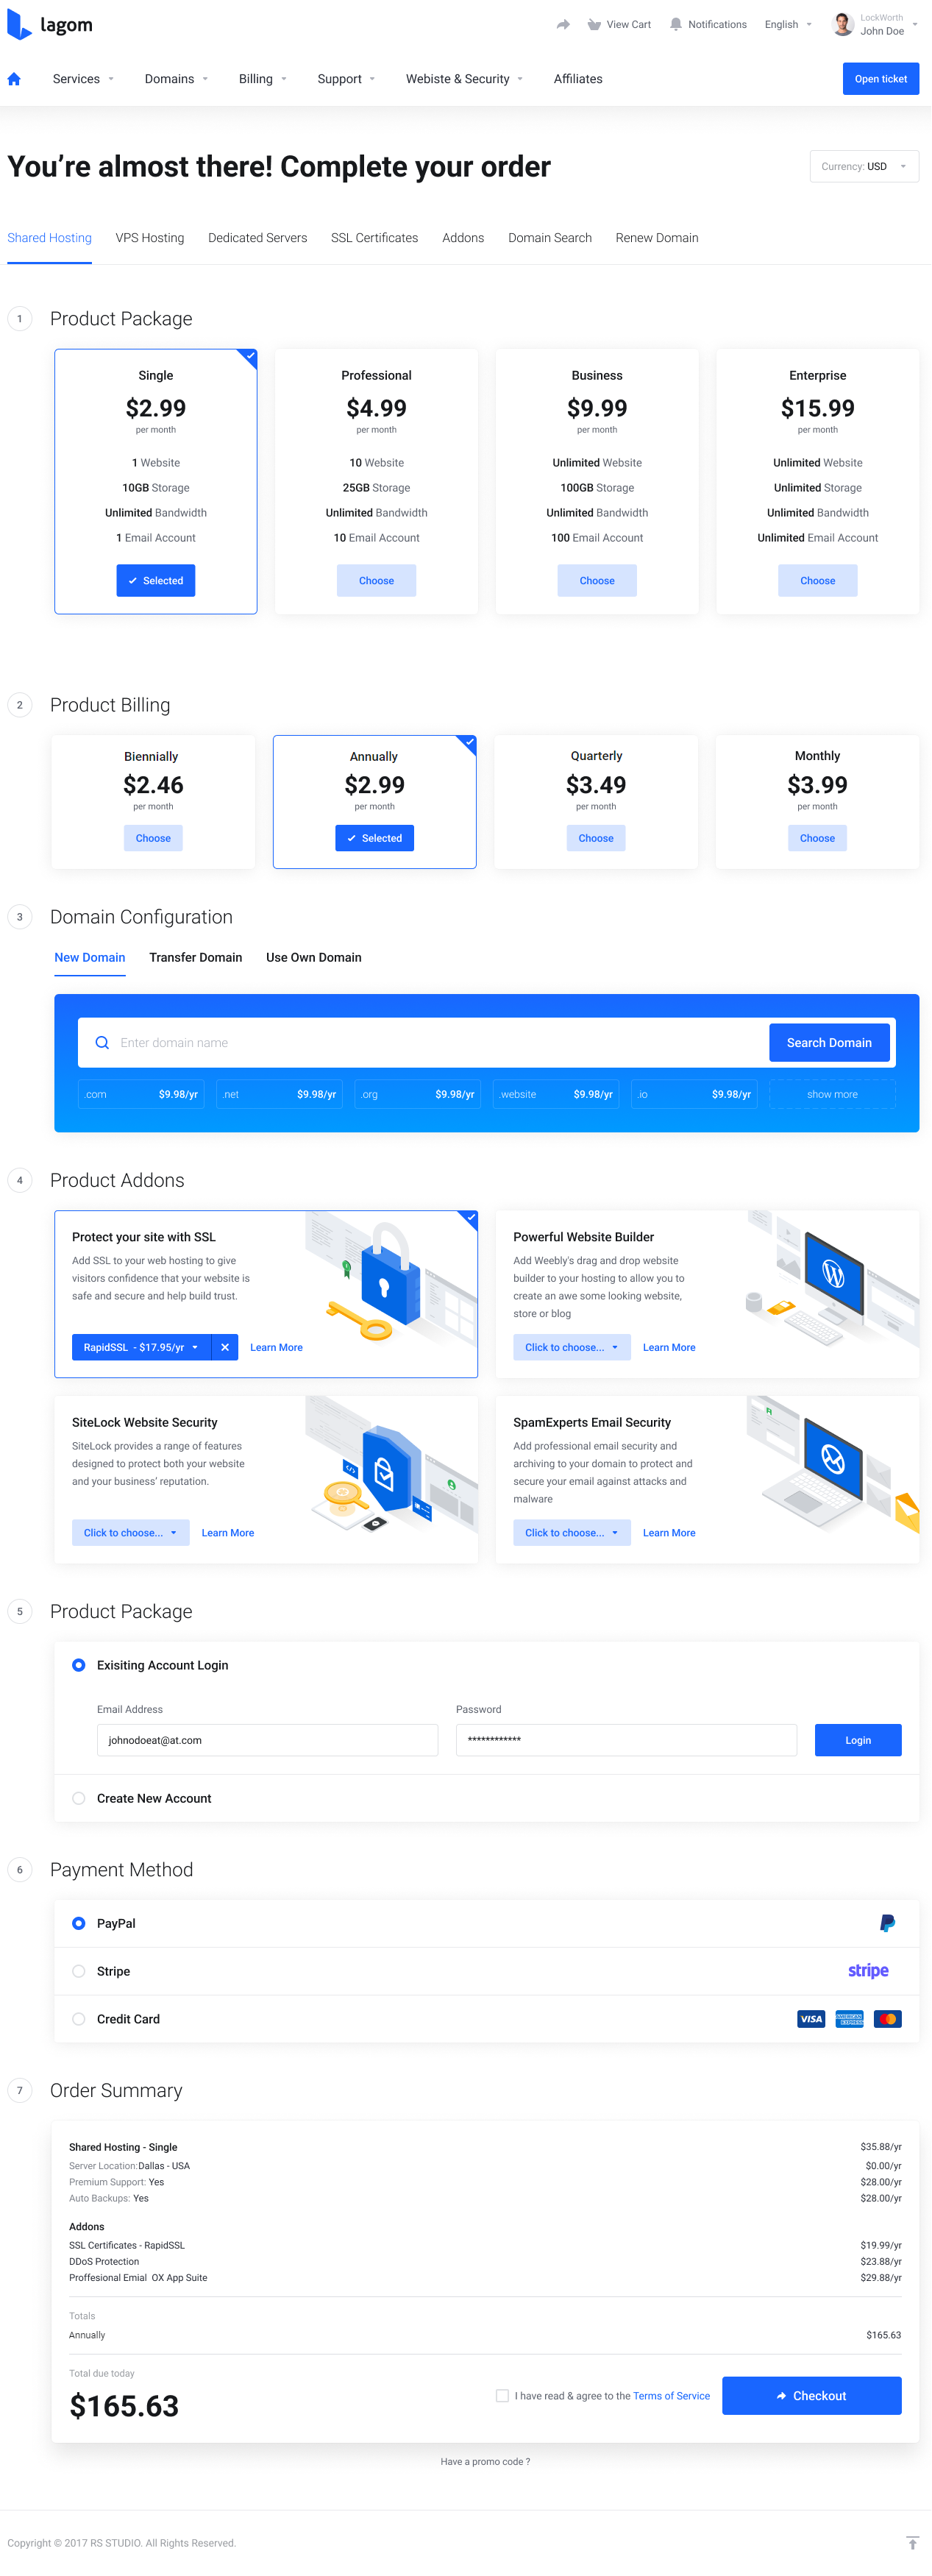
|
| In case of the 'Bottom' order form layout, a quick summary bar with the total amount and the checkout button will be available at the very bottom of the screen. |
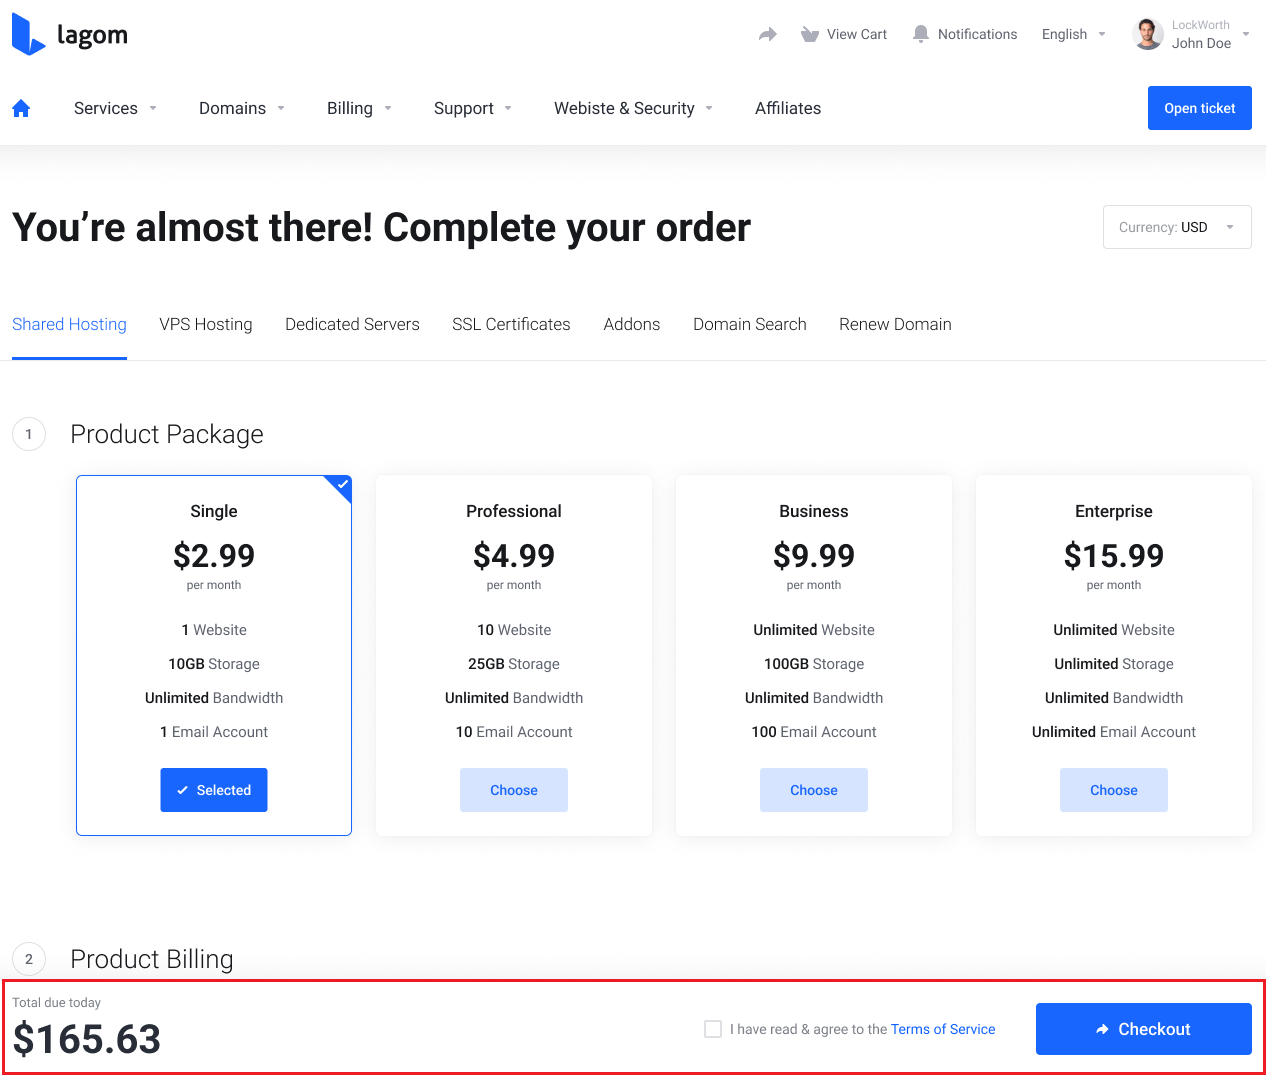
|
[edit] Package Type
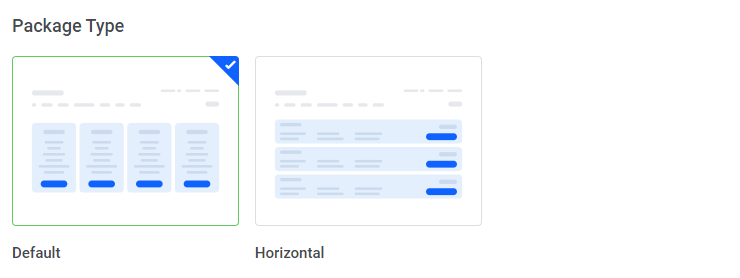
| This selection of the 'Template' setting, defines the layout of the product package that will be used. You can choose between two options: 'Default' and 'Horizontal'. |
|
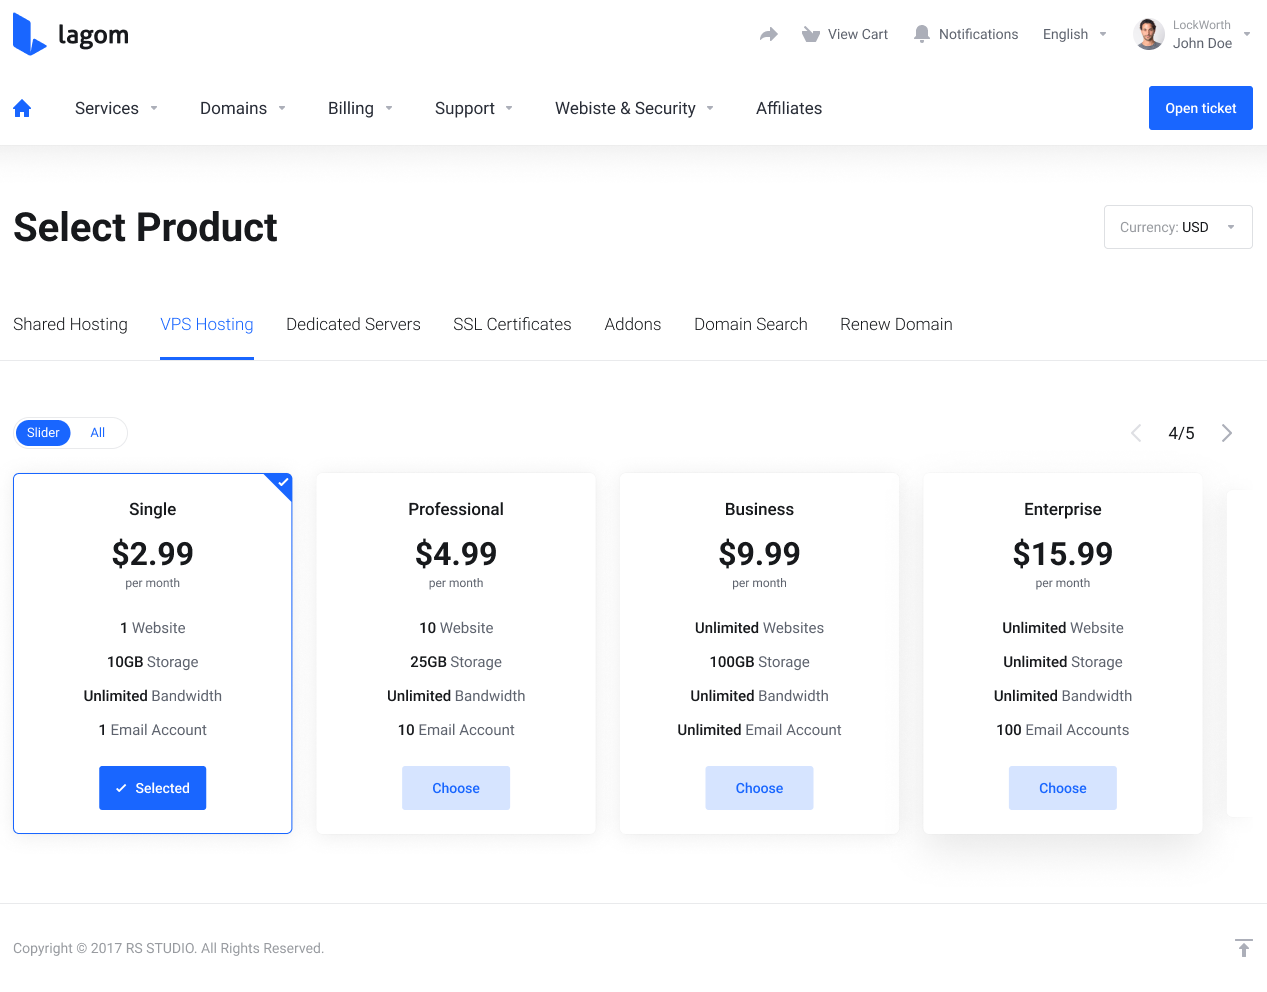
| Client area view of the 'Default' package type: |
|
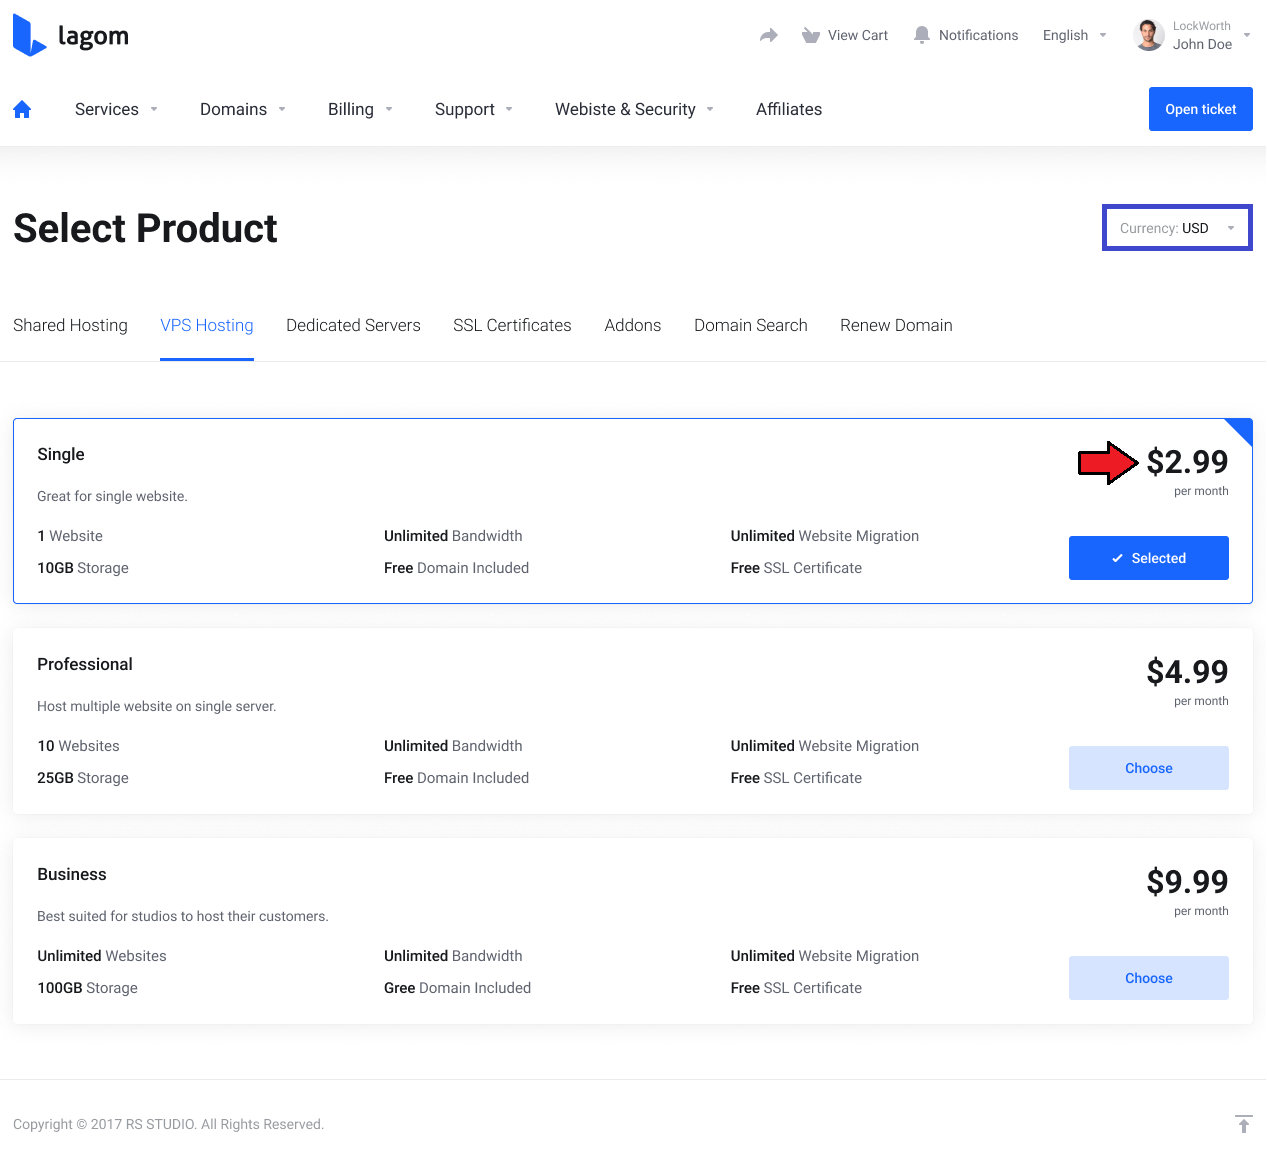
| Client area view of the 'Horizontal' package type: |
|
[edit] Settings
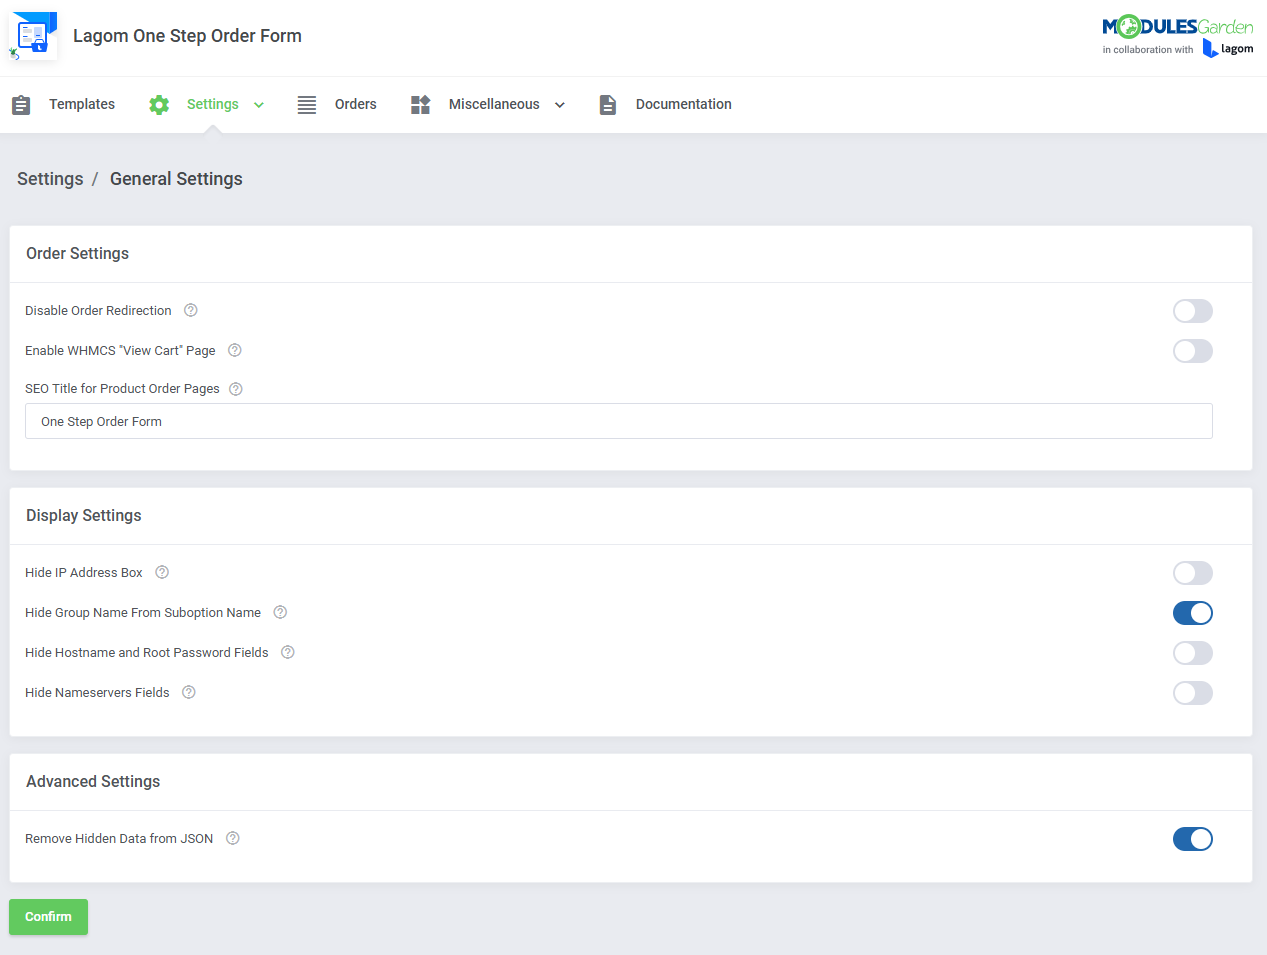
| Navigate to the 'Lagom One Step Order Form' addon, 'Settings' section. There you may manage all the extra layout settings. |
[edit] General Settings
Order Settings:
|
Display Settings:
|
Advanced Settings:
|
|
[edit] Layout Settings
| Settings dedicated to the order page layout: |
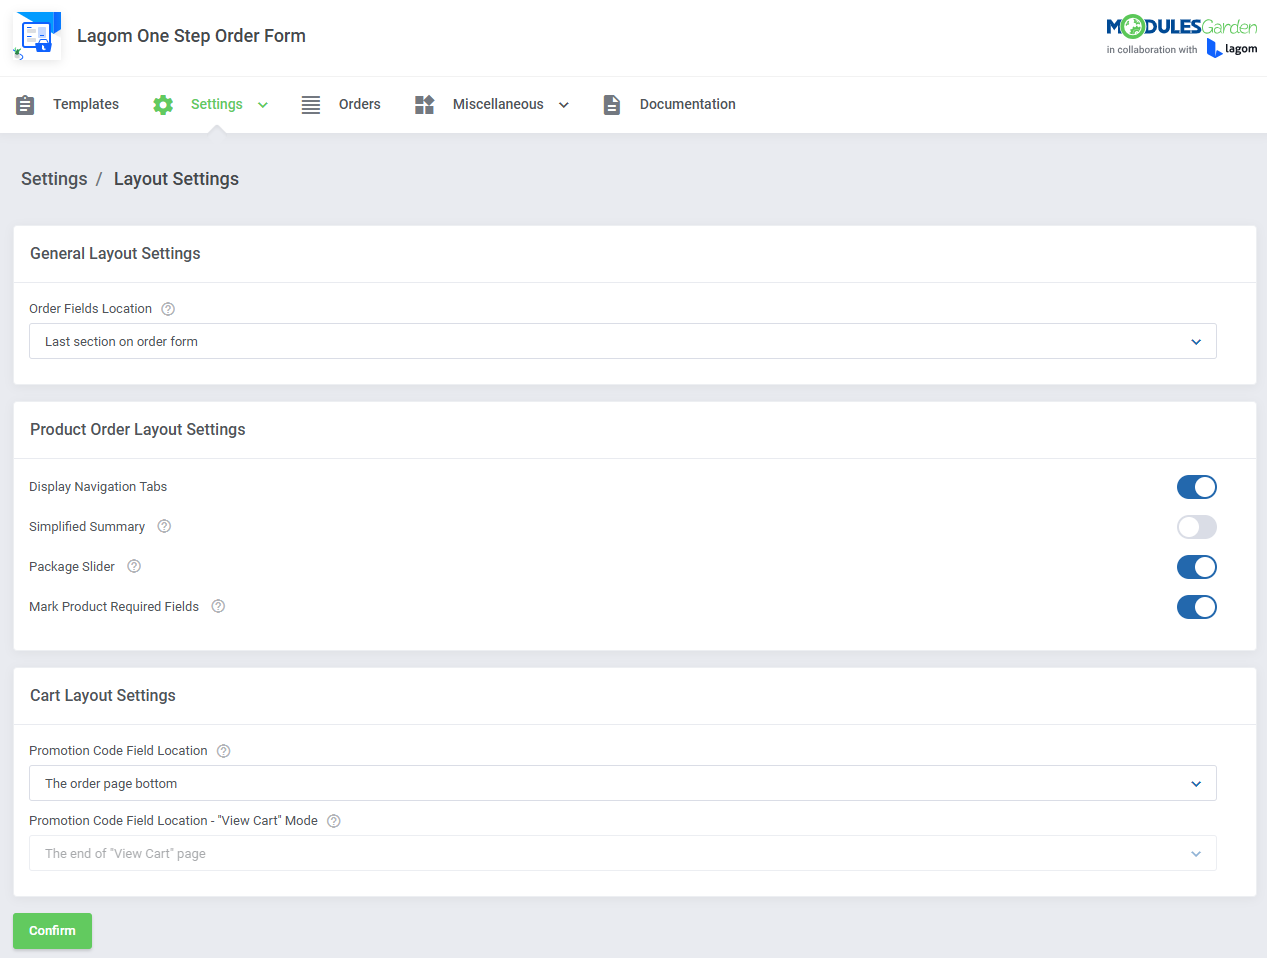
|
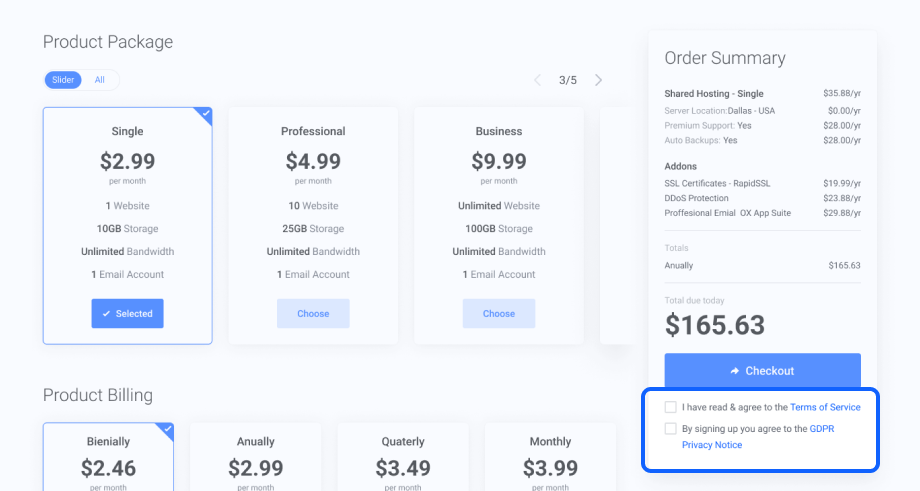
General Layout Settings:
The below screen represents the default 'Order Summary box' option: |
|
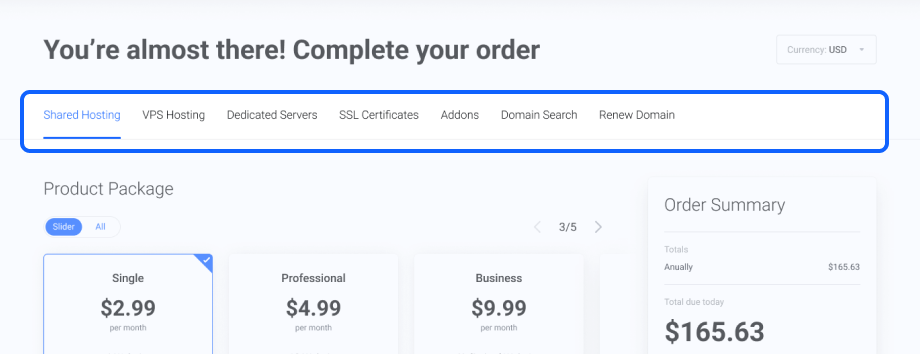
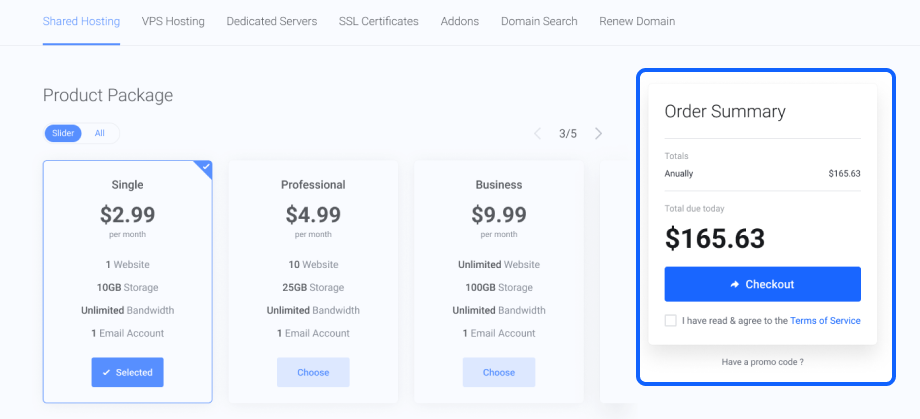
Product Order Layout Settings:
|
|
|
|
|
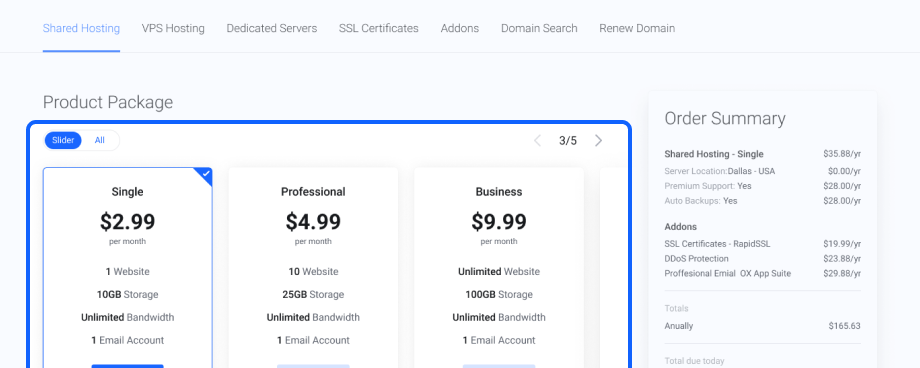
|
| Although the 'Slider' option is enabled, your clients still have the option to display all of the packages at once, without the need to scroll them horizontally. When All option is on, all products in the package are displayed in multiple rows. |
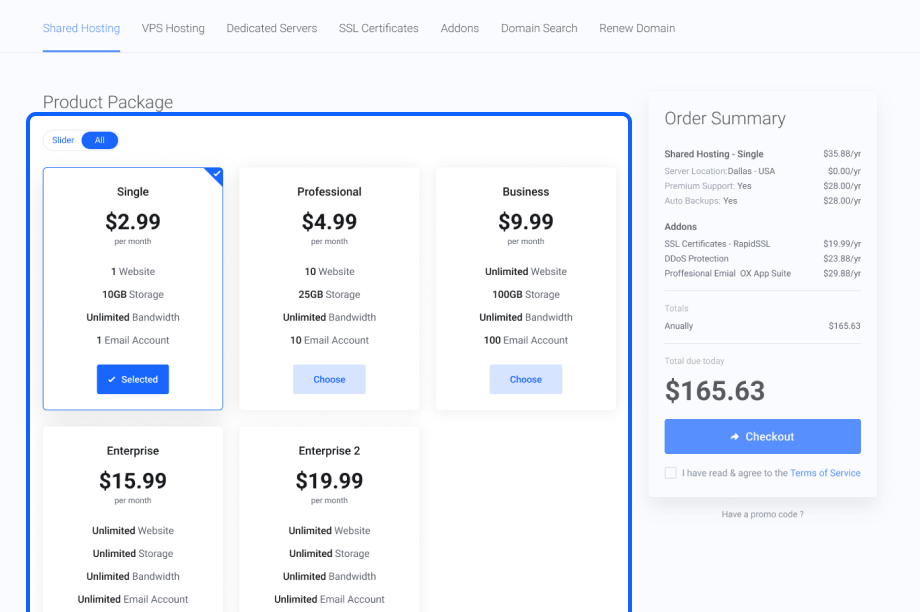
|
|
Cart Layout Settings:
The below screen shows the Above "Product Billing" Section position: |
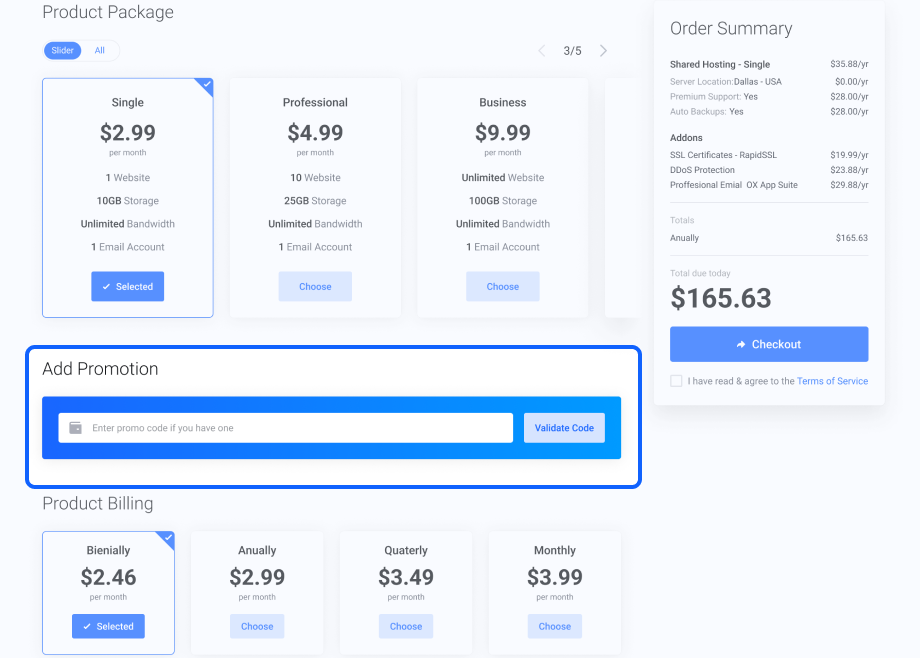
|
[edit] Domain Search Box
|
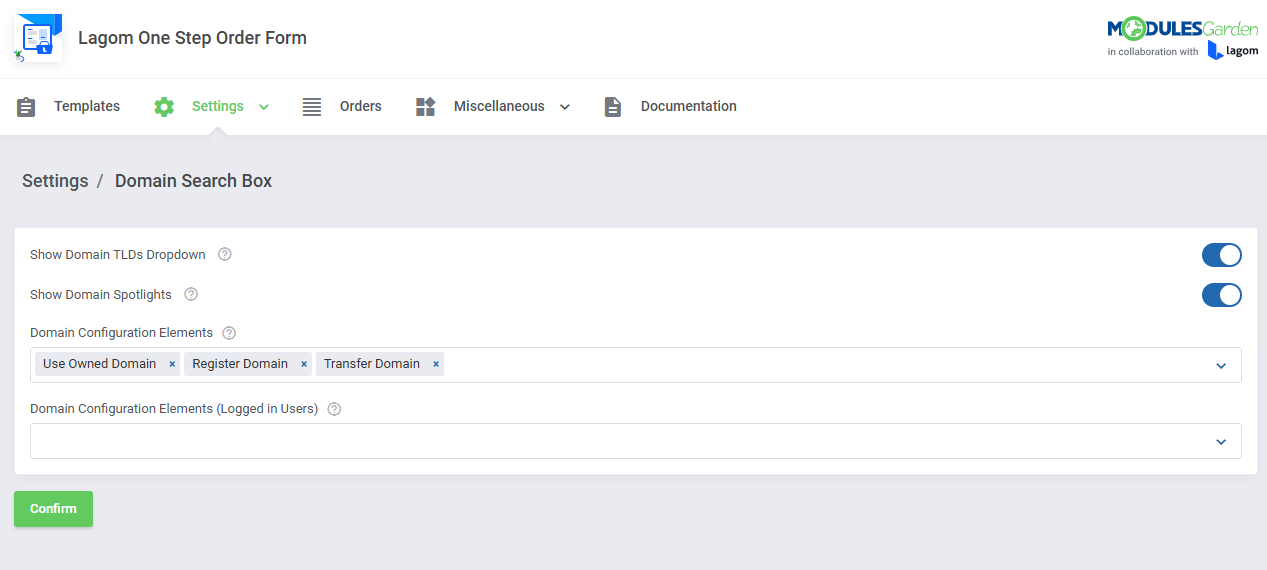
|
|
|
|
|
|
|

|
|
|
[edit] Pricing Options
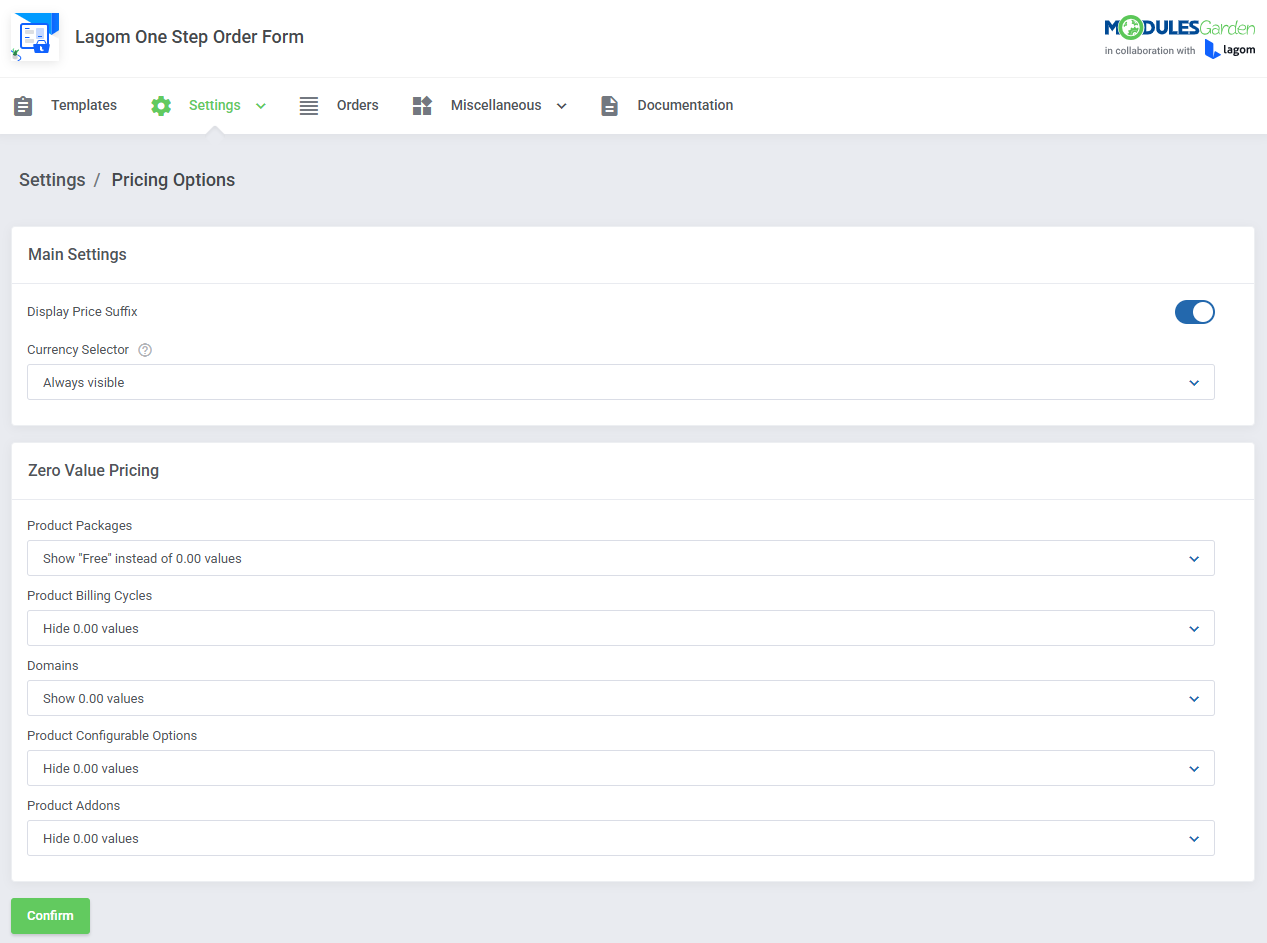
Main Settings:
|

|
Zero Value Pricing - choose whether to display zero prices as a "Free" label or as a "0.00" numerical representation corresponding with currency format for:
In the case of configurable options and product addons, you may also completely hide the zero-value prices:
|
|
[edit] Billing Cycles
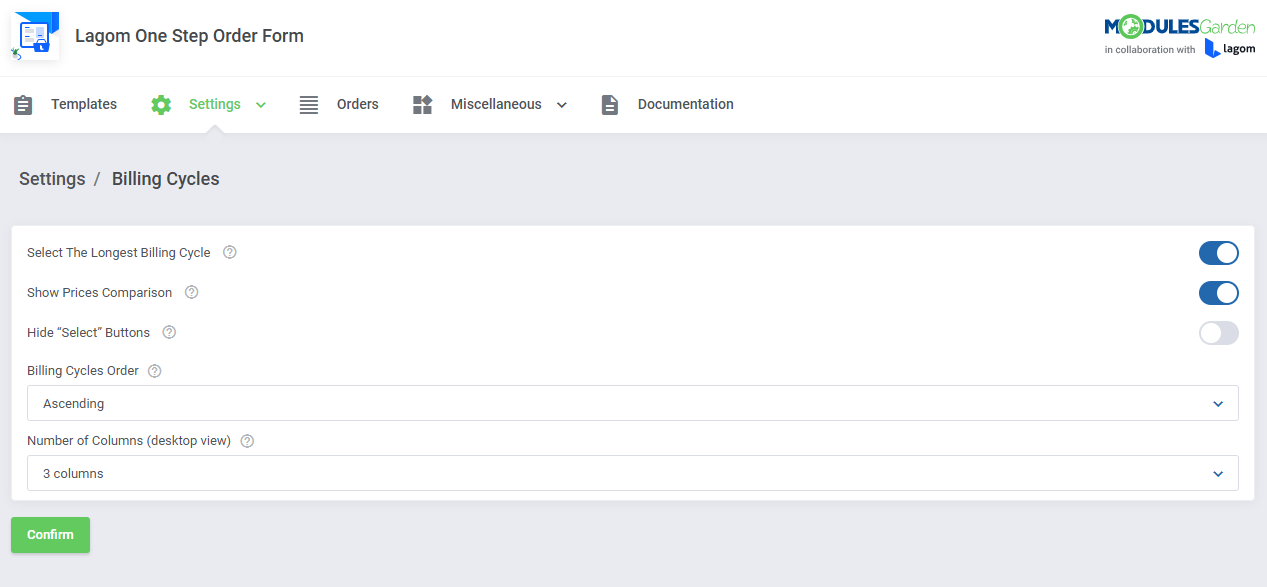
| Billing cycles related configuration: |
|
|
|
|
|
|
[edit] Billing Settings
Tax and VAT Settings:
|
Billing Fields Settings:
|
|
|
[edit] CAPTCHA Settings
Enhance your site security by enabling CAPTCHA form protection.
|
| Important: For WHMCS version 8.11 and above, CAPTCHA settings are controlled directly through WHMCS, regardless of the CAPTCHA configuration set within the module. For WHMCS versions earlier than 8.11, the CAPTCHA configuration within the module remains active, allowing users on older WHMCS versions to manage hCaptcha settings directly through the module settings. |
|
[edit] Orders
| Open this section to view a complete list of orders placed in your client area with the Lagom One Step Order Form module. |
| Order List
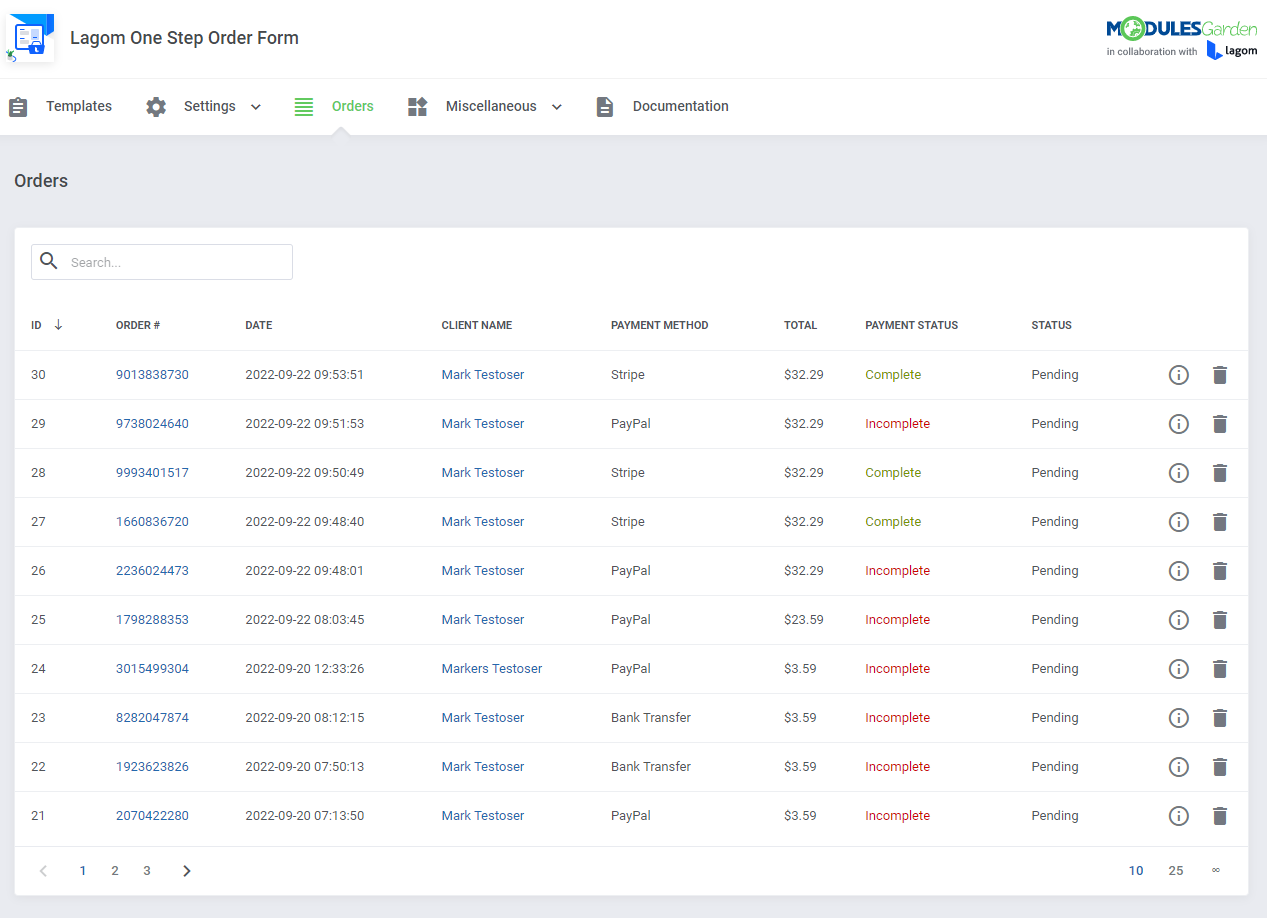
View the orders list directly from the addon module. The list includes all the details such as: order number, date of placement, client name payment details and status. |
|
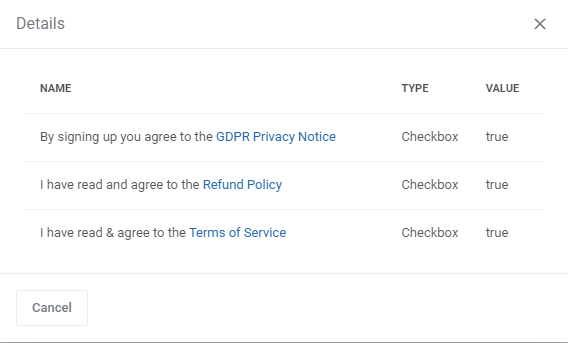
| Order Details - Press the "Details" icon to see all the information on the additional order fields. |
|
[edit] Miscellaneous
| Lagom WHMCS One Step Order Form has been designed to give flexibility for the clients and allow to configure it to specific business needs. Below we will describe all the customization options available in the current version. |
[edit] Payment Gateways
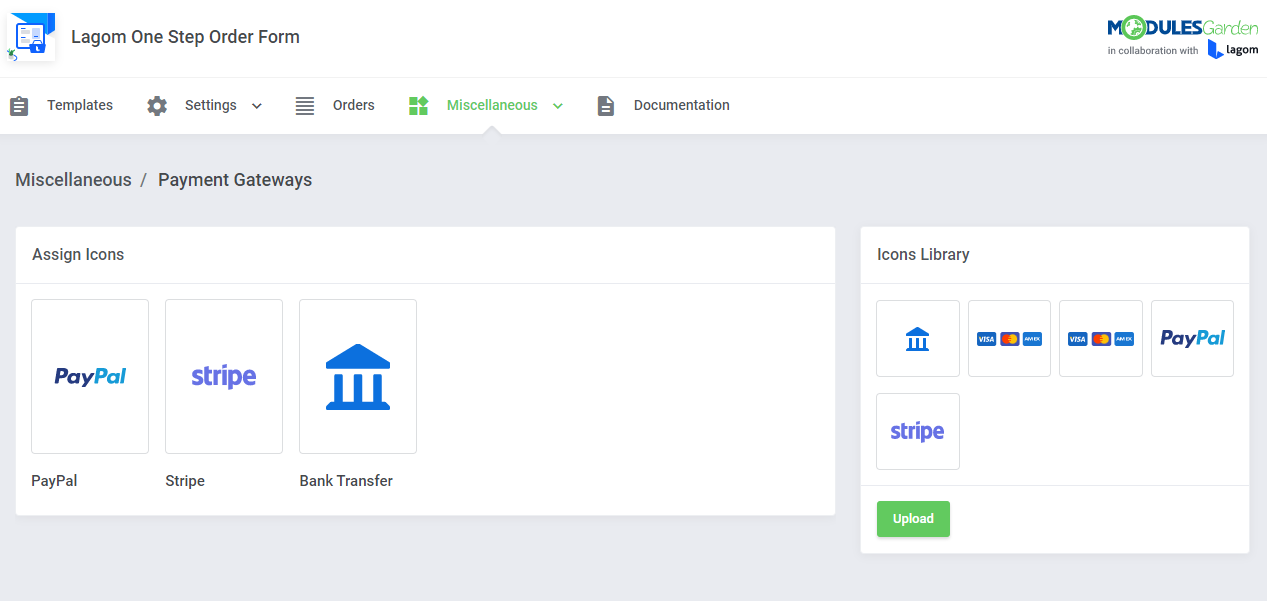
| The 'Payment Gateways' section is dedicated to super easy customization of your payment gateways. You can quickly upload new gateway logos and assign them to the order payment gateways with just a few simple clicks. |
|
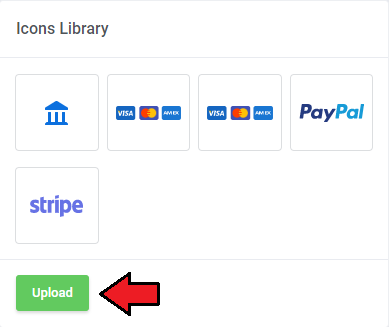
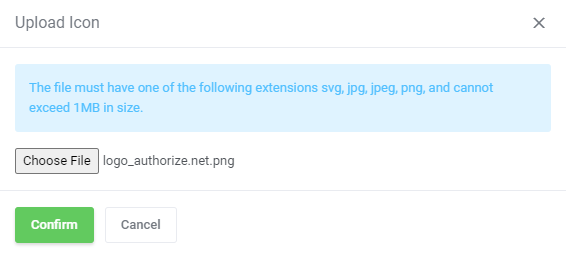
| In order to successfully upload a gateway logo, follow the below steps: 1. Upload a new icon in the "Icon Library" section |
|
|
| 2. Assign newly uploaded graphics to a specific gateway by pressing the "Click to assign icon" box. |
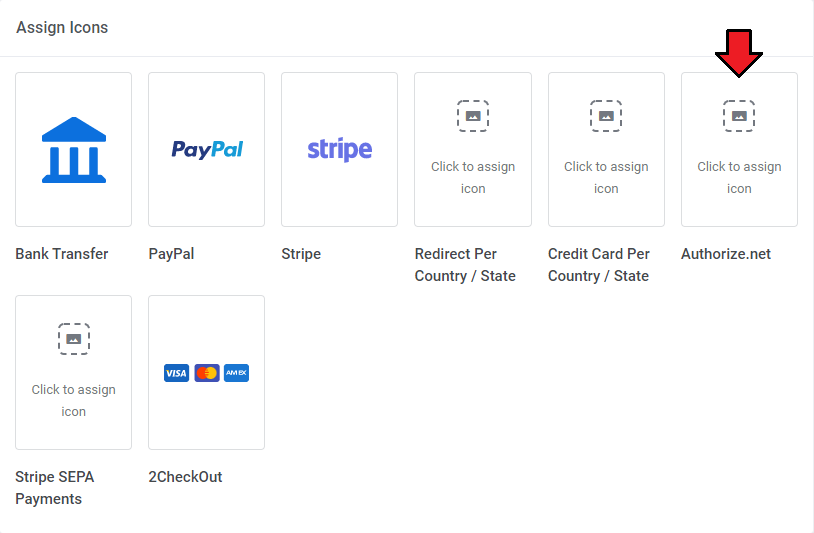
|
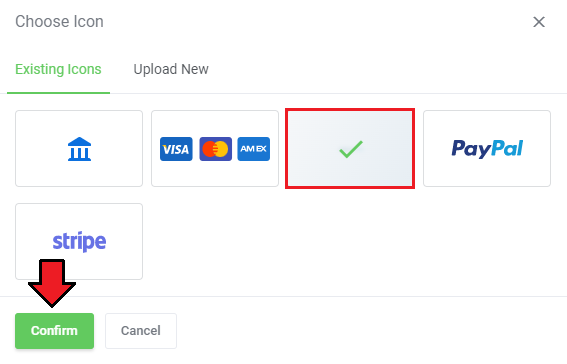
|
[edit] Order Fields
| Make your order process legally compliant with any country by adding needed fields to the order. These fields will be displayed below the default WHMCS "Terms of Services" checkbox. |
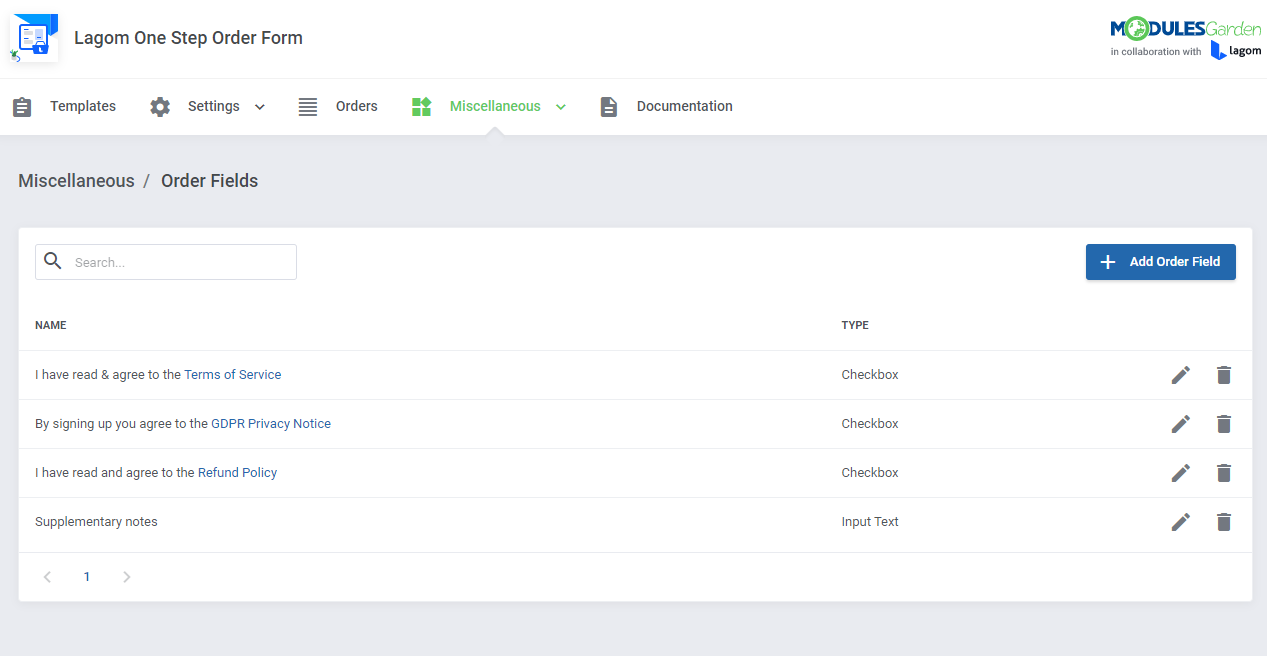
|
Add/Manage Order Fields:
|
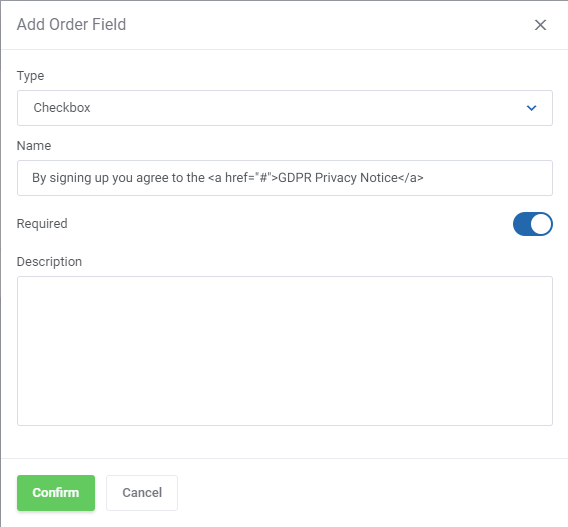
|
Fields Location can be managed using the "Order Fields Location" option in addon settings. You can choose from two different locations.
|
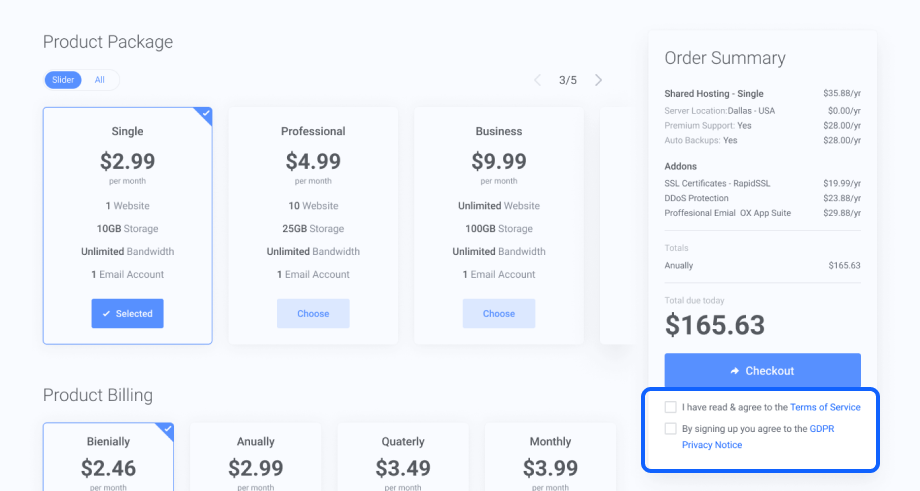
|
|
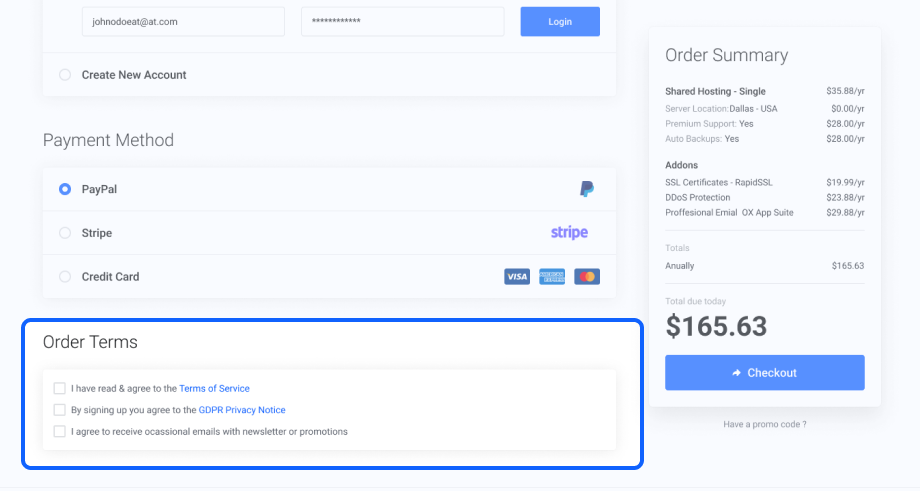
|
[edit] Configurable Options
| Configurable Options management is an advanced tool, which introduces new features to customize and manage WHMCS product configurable options. You can now configure different configuration layouts for every WHMCS product. Learn how to use its functions in Config Options Manager documentation. |
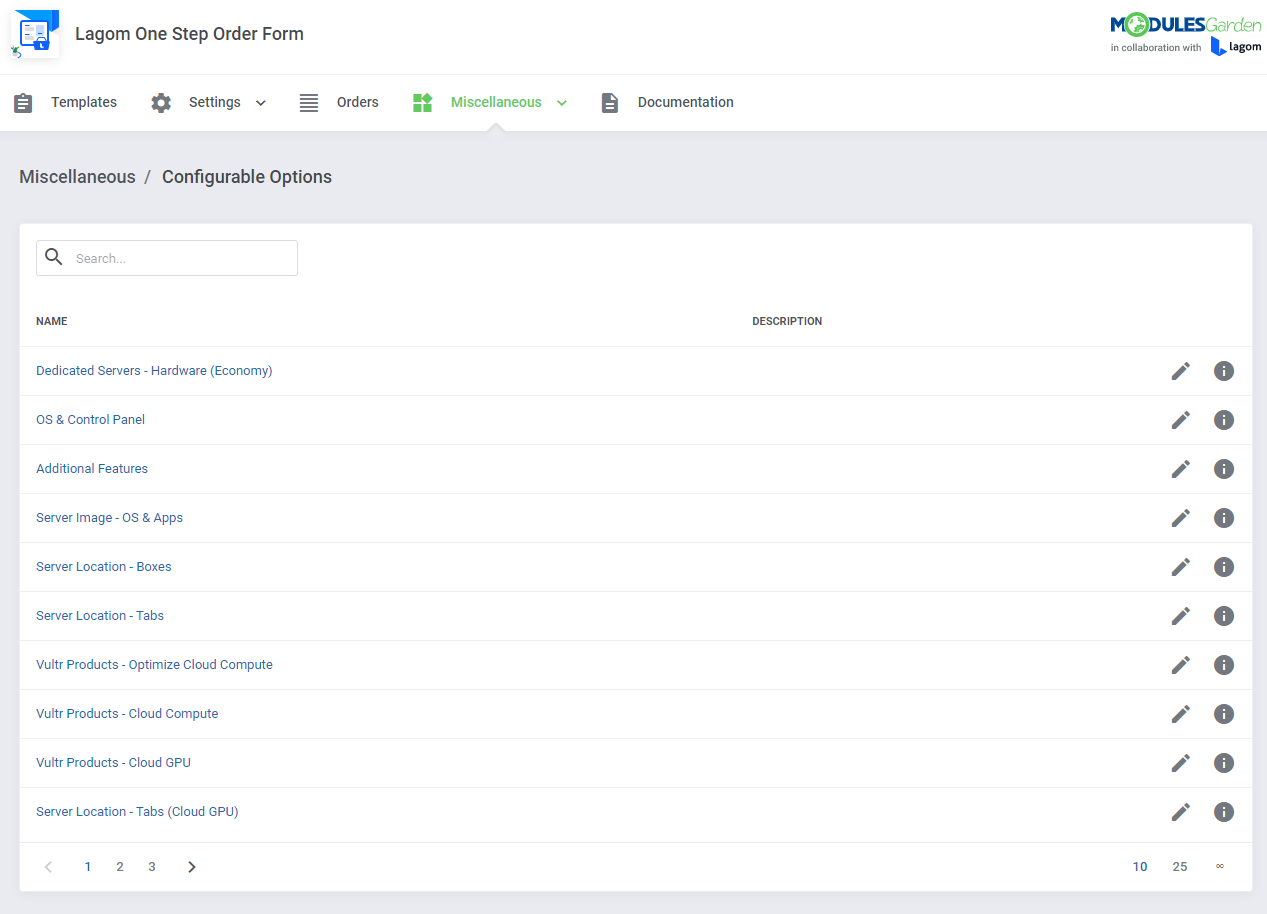
|
| Available management tools are described in a separate article, please refer to the following links: |
[edit] Product Addons
| Product Addons Manager introduces new options to manage and customize addons created in WHMCS system (opens new window). You are now able to assign a custom image to every product addon. |
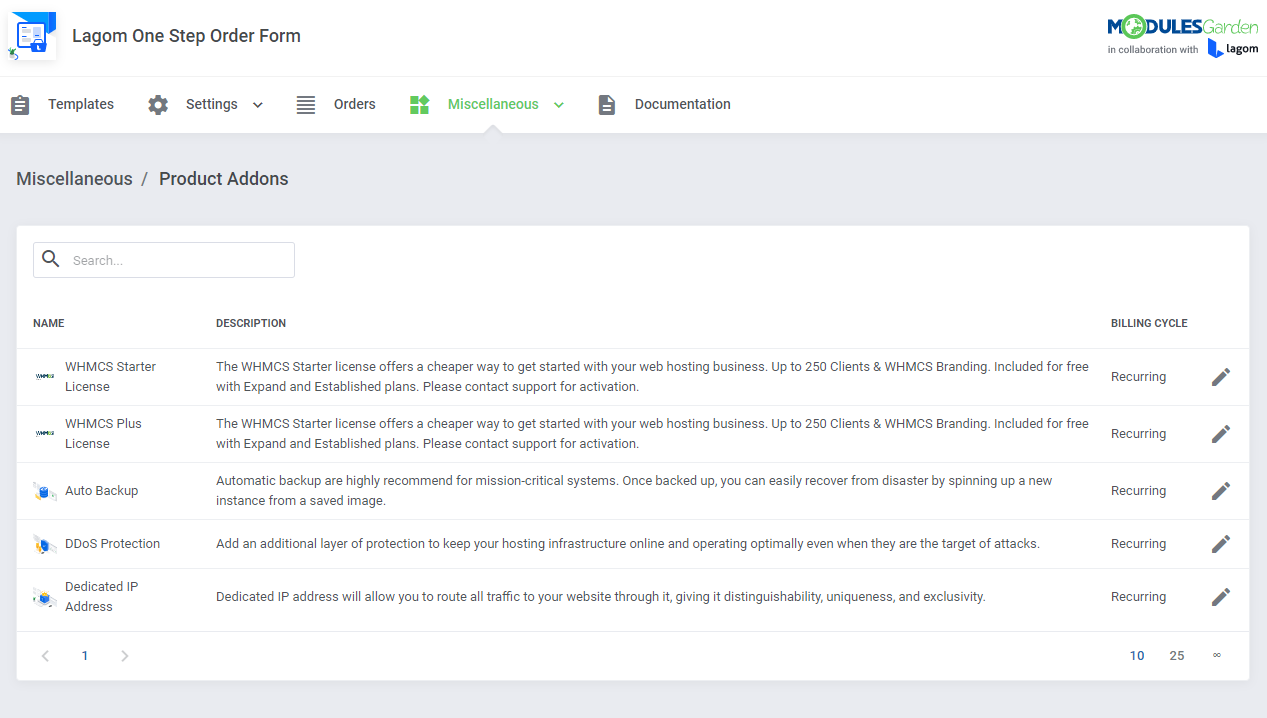
|
Manage Addons:
|
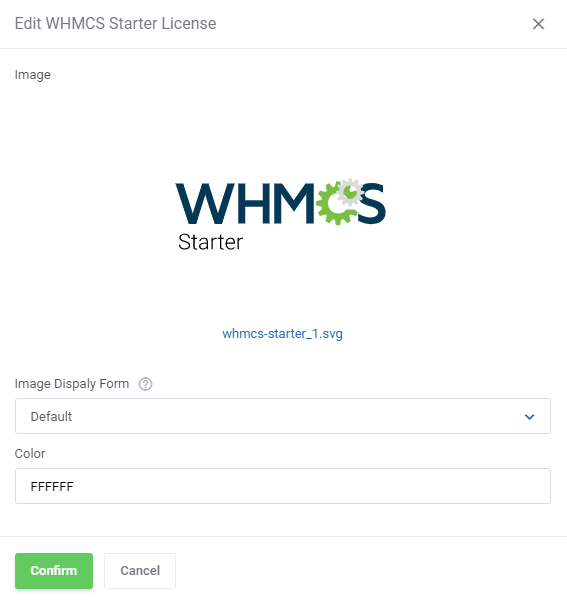
|
[edit] Media Library
| Upload and manage graphics that can be assigned to configurable options or product addons. This page comes with a set of predefined graphics which you can download from here. You may fetch the ready package and upload it into the /modules/addons/LagomOrderForm/storage/gallery/ directory. Keep in mind that all the graphics must be located directly under the /gallery/ catalog. |
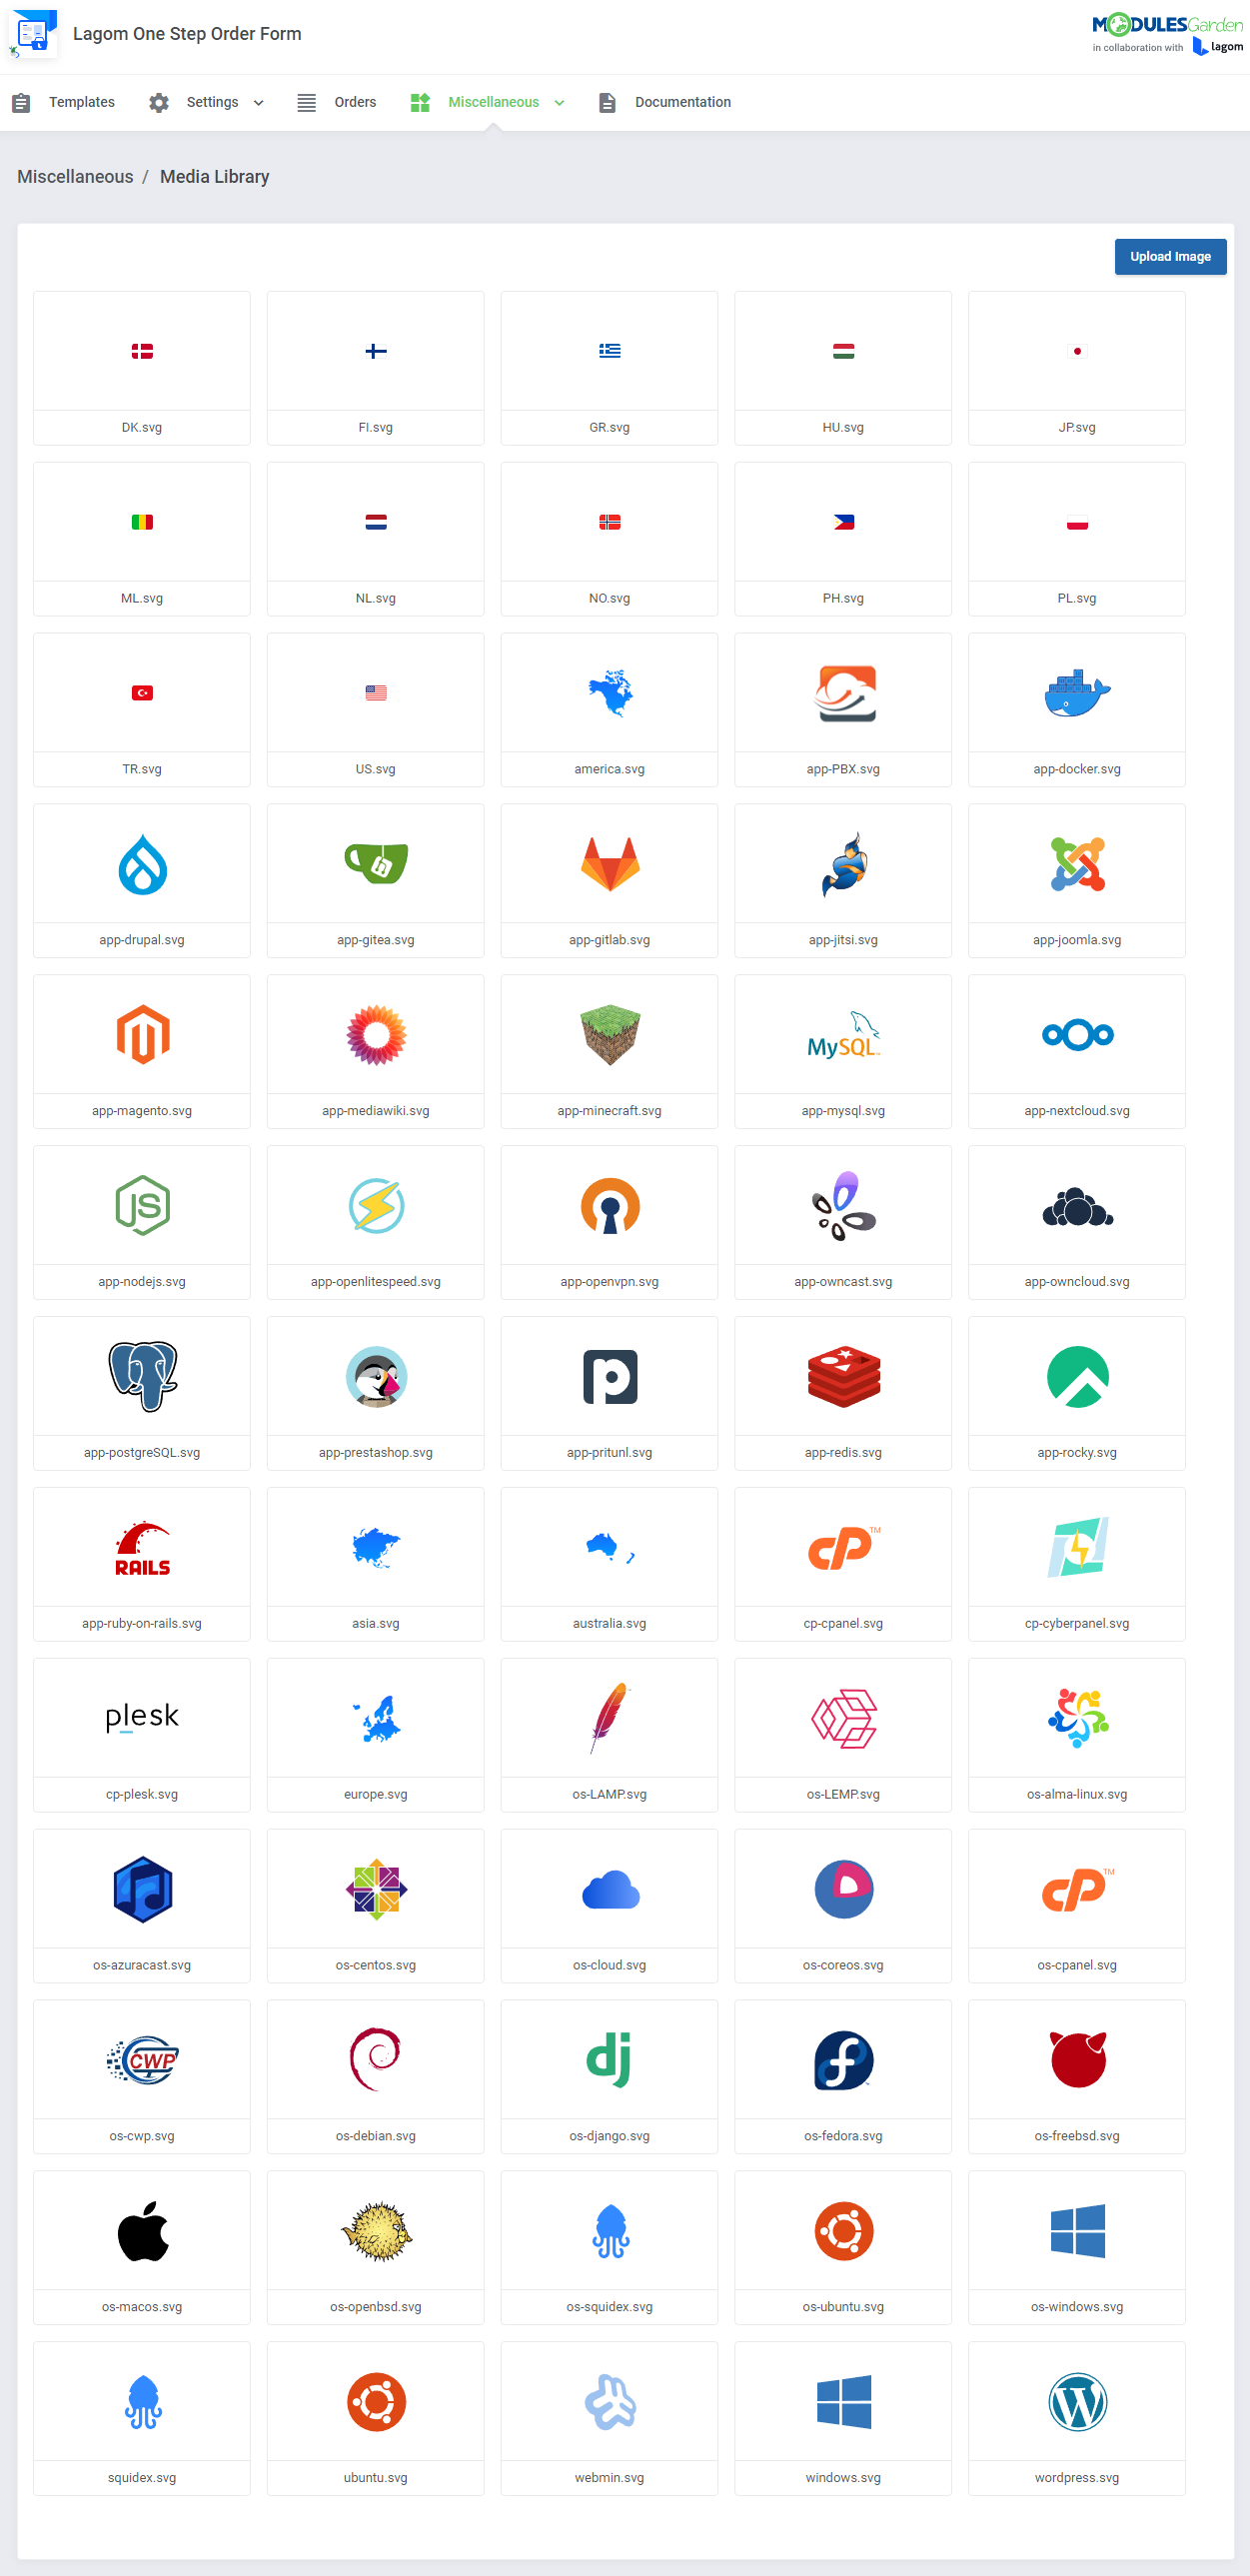
|
[edit] Geolocation
| The Lagom One Step Order Form may smoothly detect the customer's location automatically and display the currency according to the detected country, providing an enhanced user experience. To use the geolocation feature the most effectively, you need to update your geolocation database. Here you will find out how to do that:
|
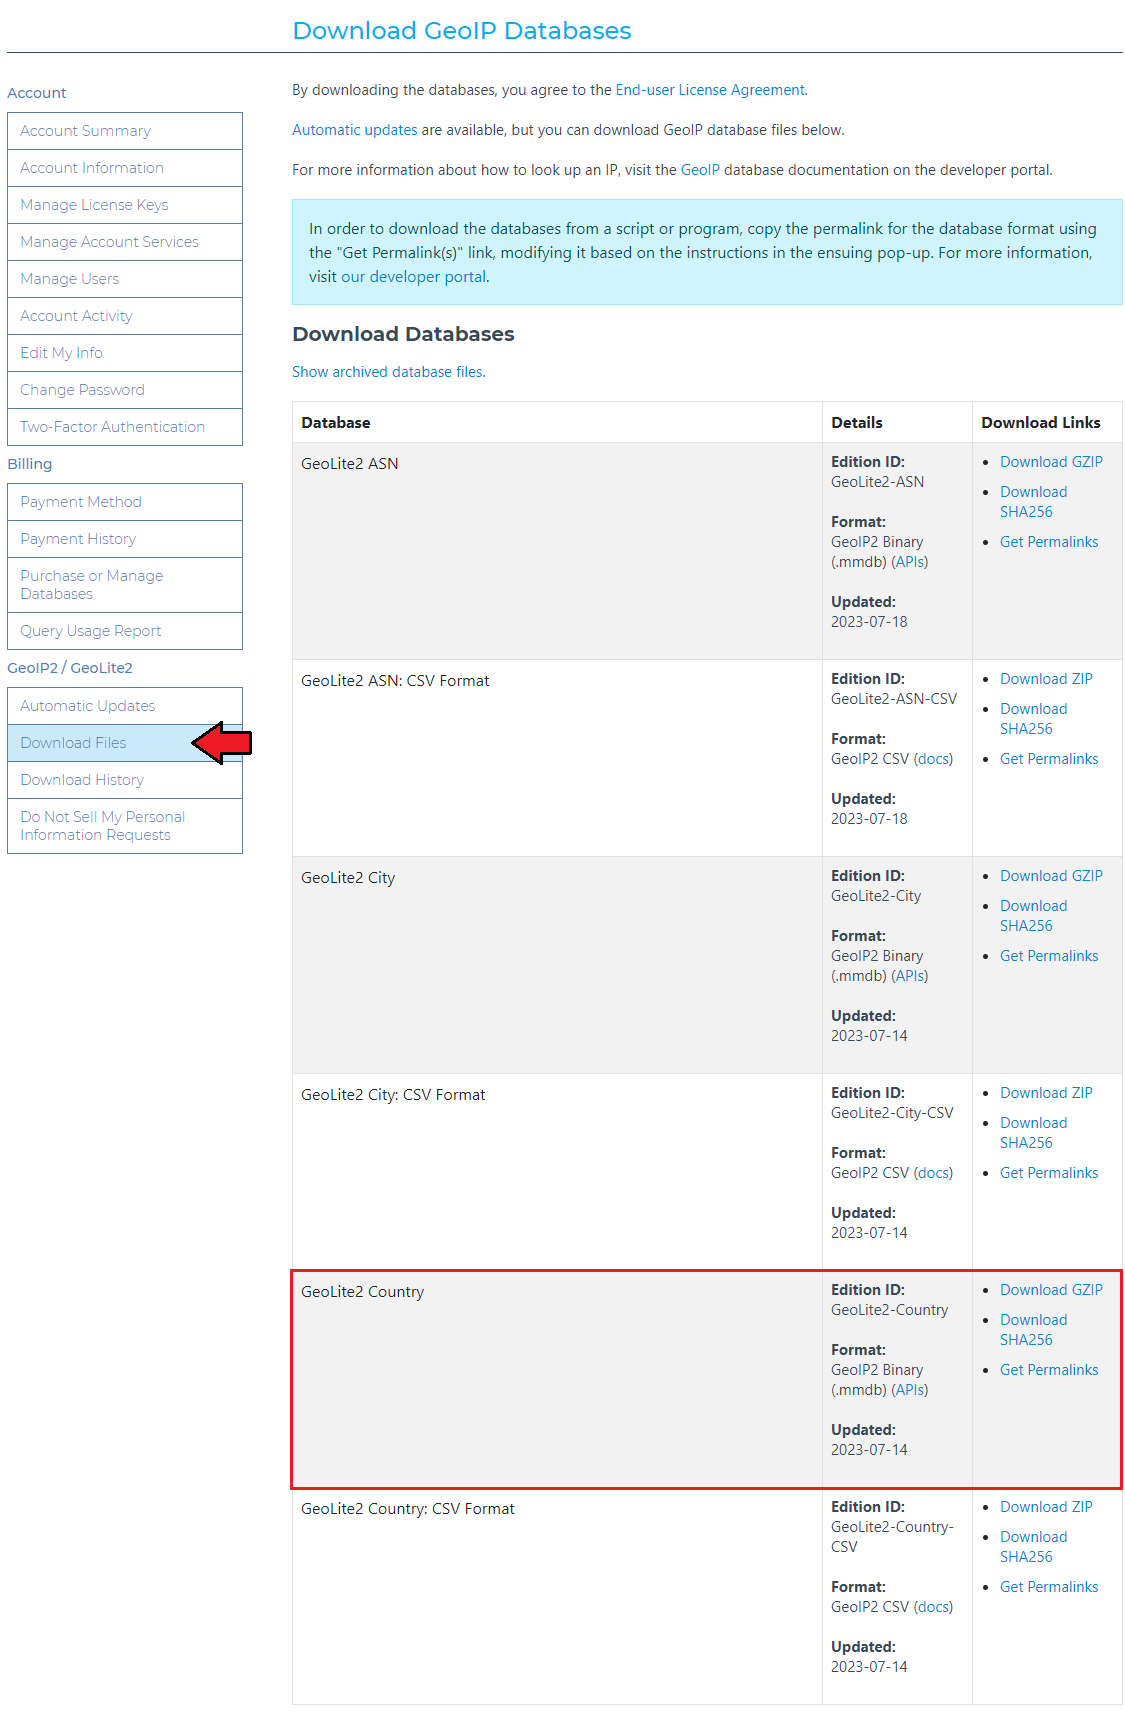
|
Default Settings
|
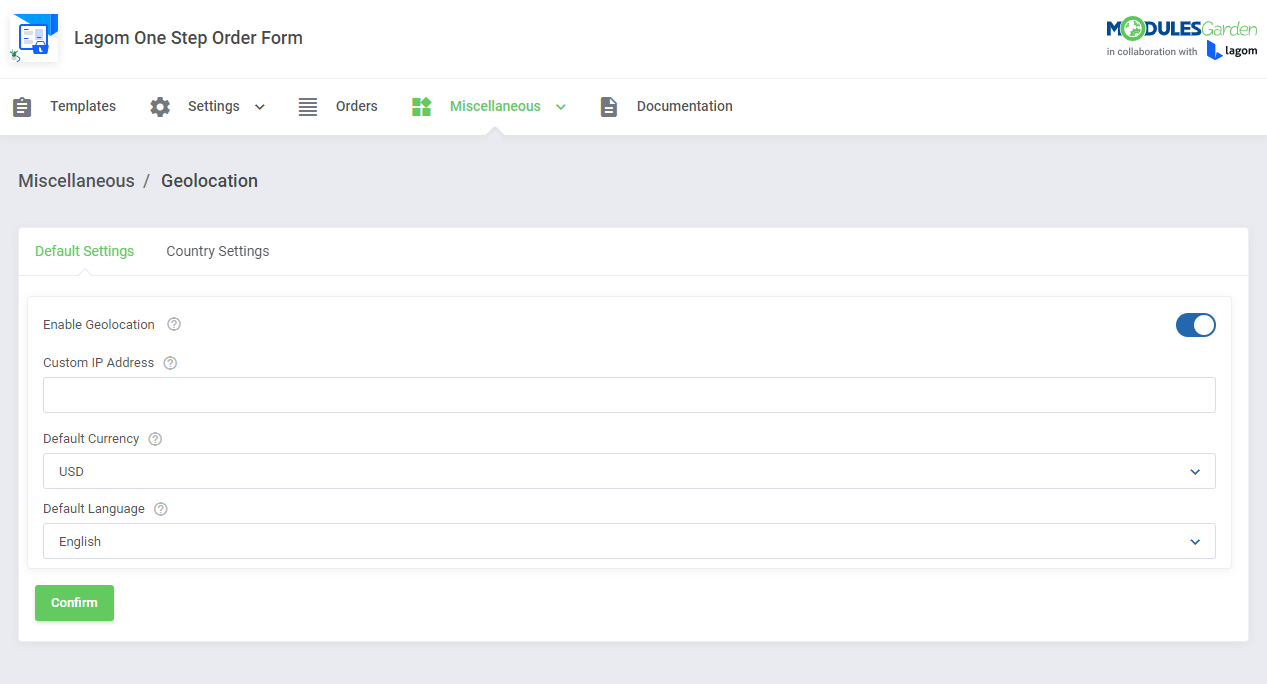
|
| Country Settings Define a specific language and currency per country. If the country is detected as the client location, the dedicated currency and language will be used in the client area. |
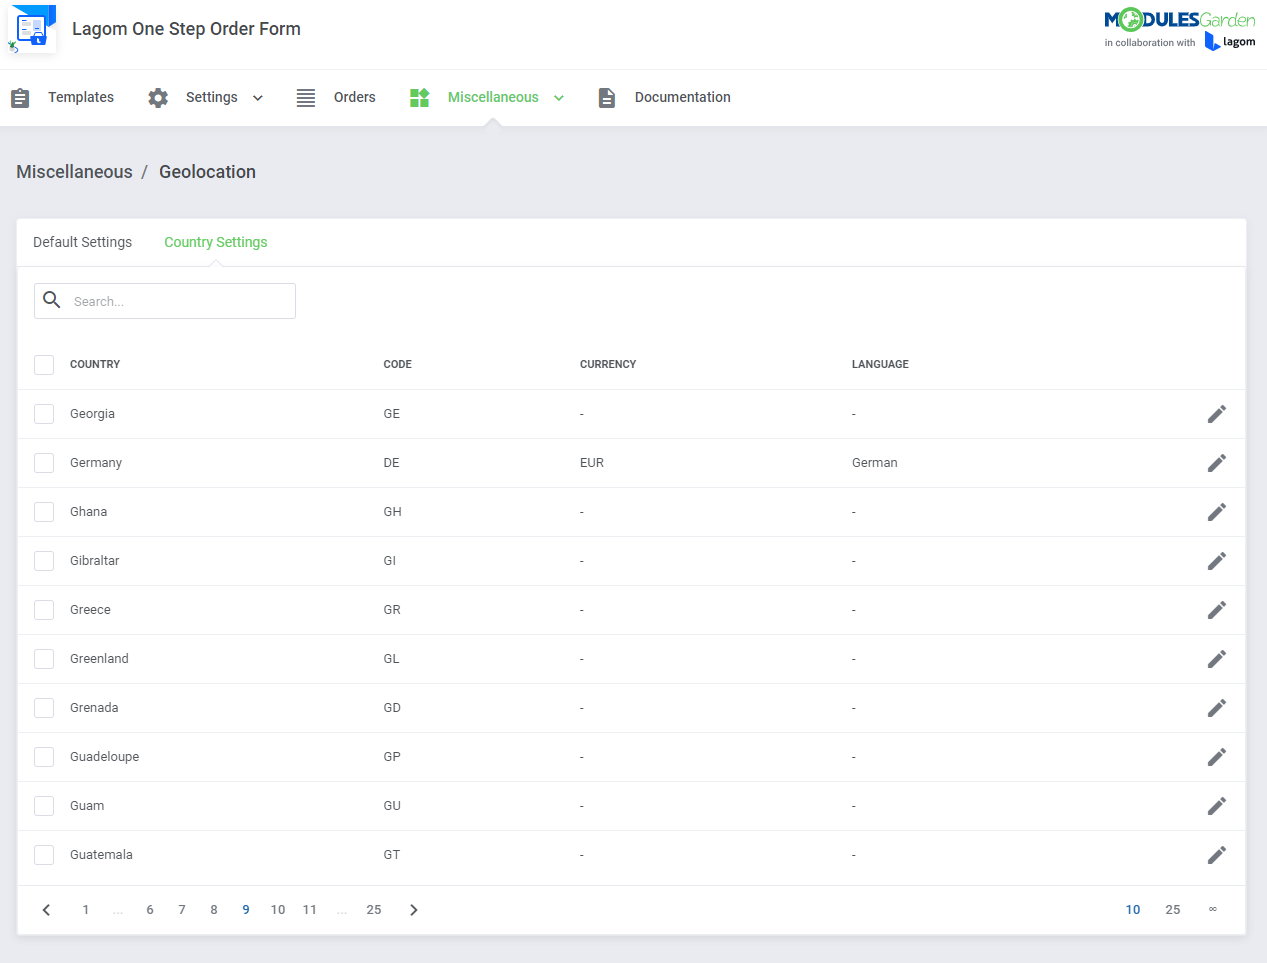
|
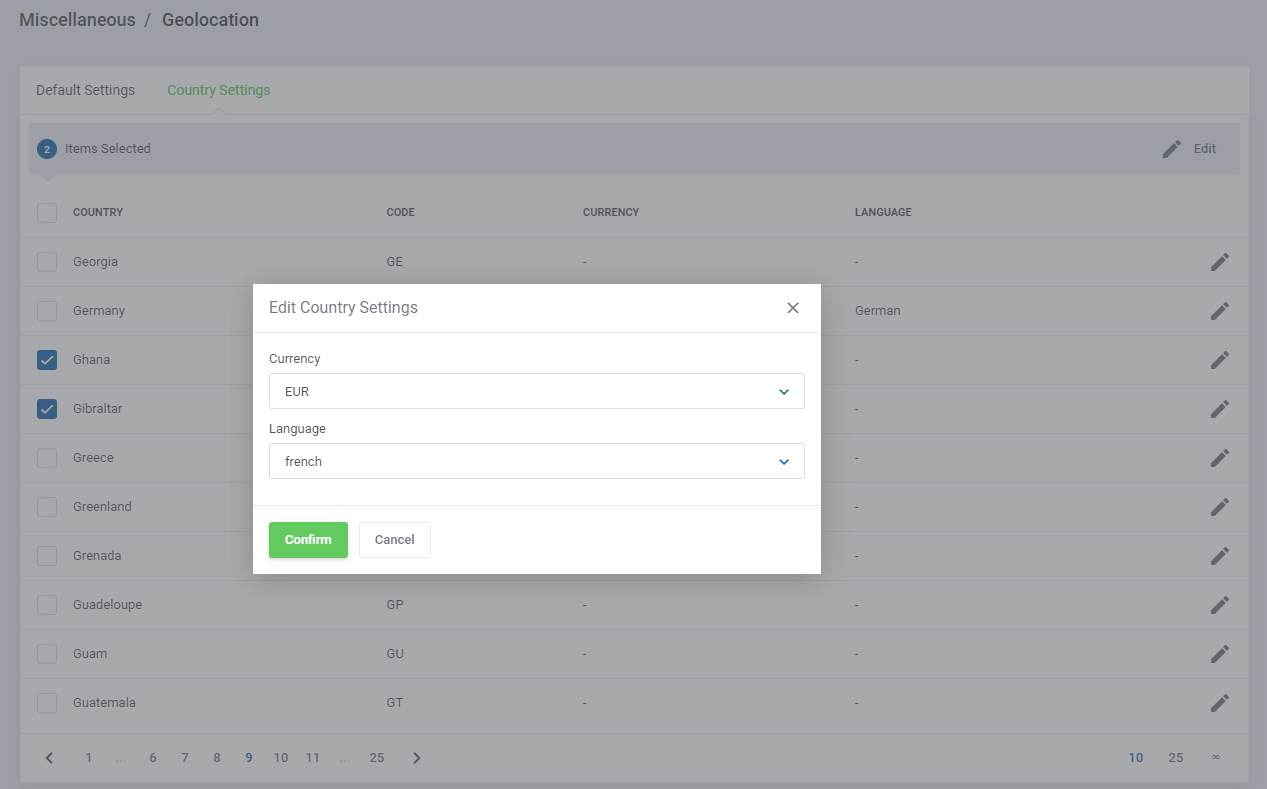
|
[edit] Client Area
| An exemplary ordering process in the client area where the 'Twenty-One' theme is used in the WHMCS system. Important: It is possible to use the Lagom One Step Order Form For WHMCS module without the Lagom WHMCS Client Theme. The module remains fully usable and all available features are supported when the standard WHMCS "Twenty-One" theme is used. Take a look below to see what such ordering pages may look like. Here you can see an example of a "One Step" order form view with the 'Package Slider' option turned on, 'Sidebar' order form layout and 'Default' package type. |

|
| The next example illustrates the "Two Steps" order form view. In this option, the first step is dedicated to selecting product packages: |
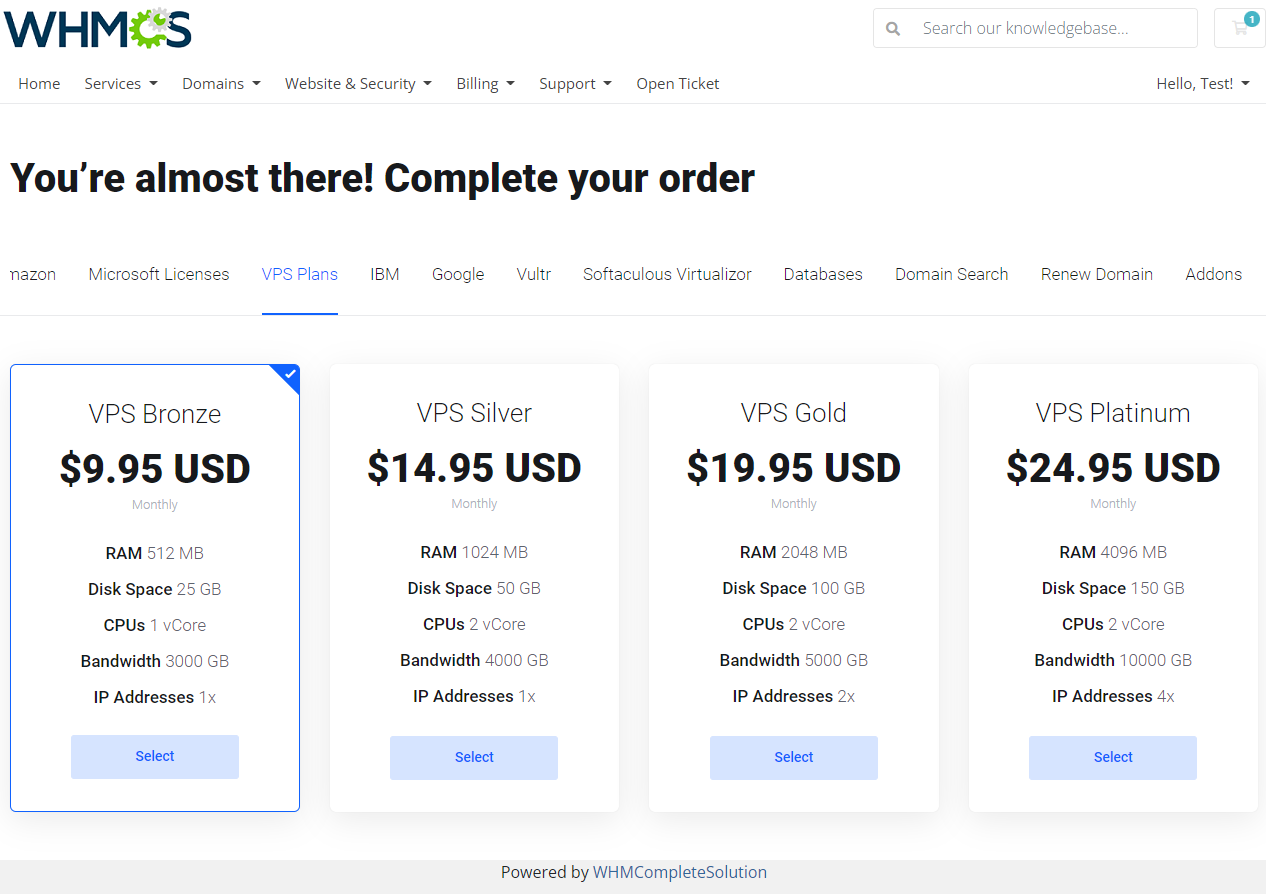
|
| In the second step, the rest of order configuration takes place. |
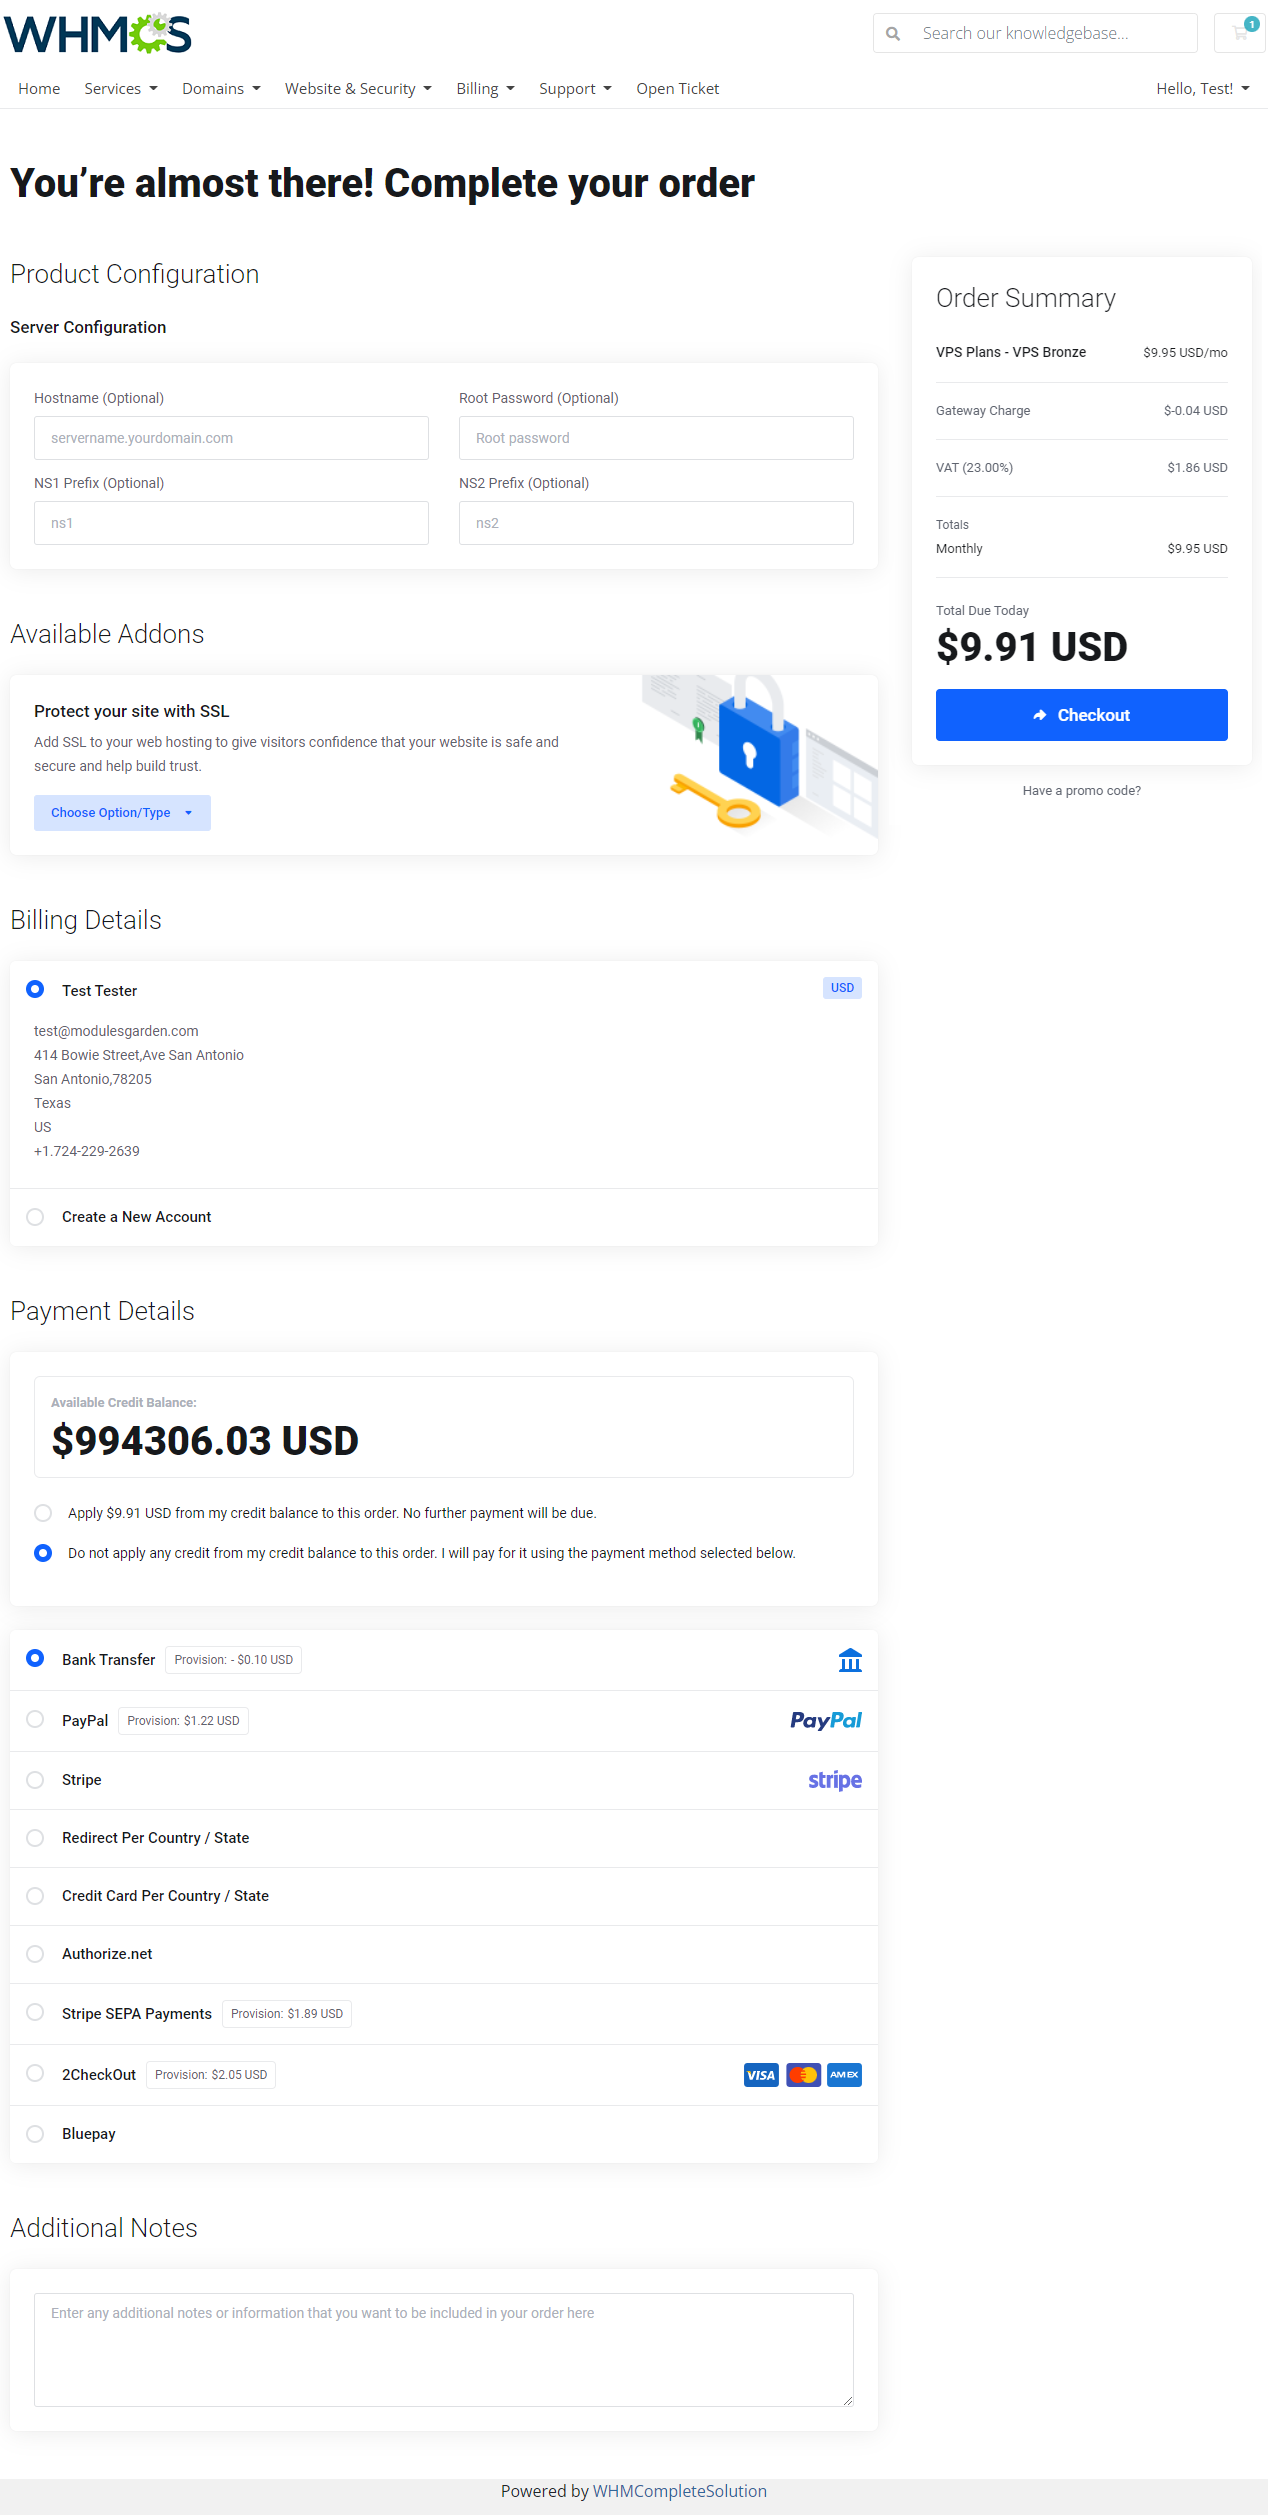
|
[edit] WHMCS View Cart Page Mode
| The "View Cart" mode in the Lagom One Step Order Form For WHMCS module offers an alternative checkout flow that is similar to the standard WHMCS ordering process. This feature was introduced to support payment gateways that may not be fully compatible with single-page checkout, ensuring that all available payment options remain accessible to users. Lagom One Step Order Form For WHMCS works seamlessly with all payment gateways that are implemented according to WHMCS official documentation. When you are using a payment gateway that is not fully supported by the single-page checkout (such as PayPal), please always turn on the WHMCS "View Cart" Page option. |
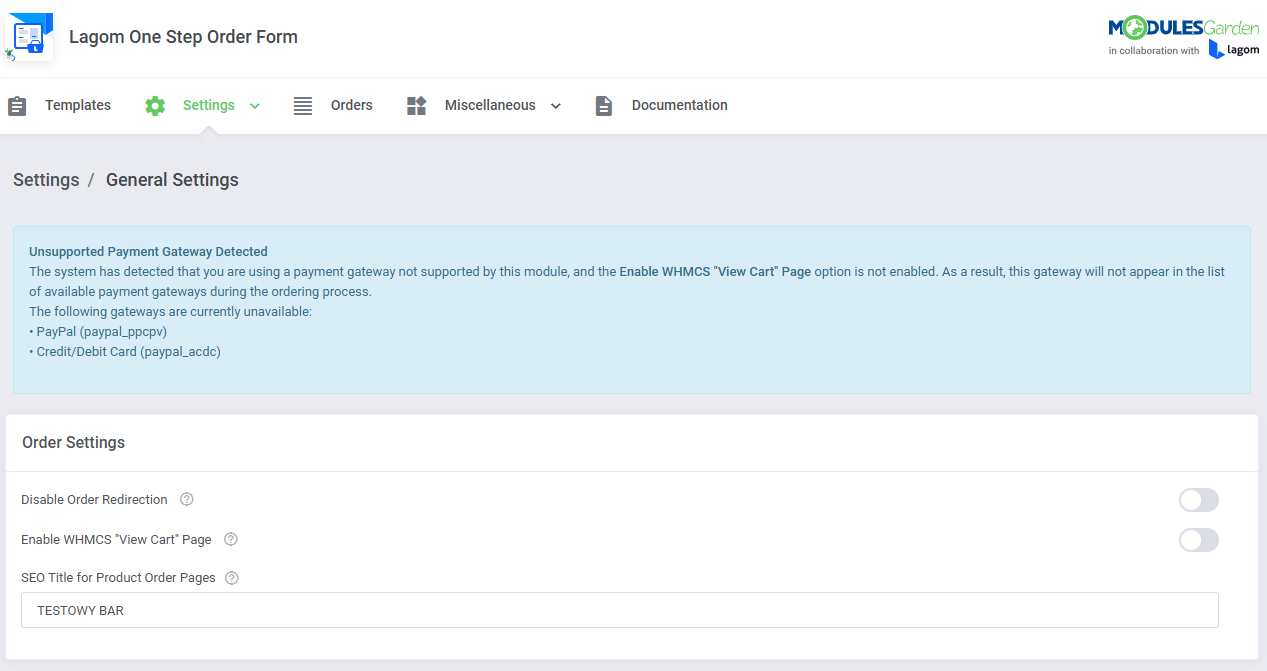
|
| When "View Cart" mode is active, the checkout flow aligns with the default WHMCS ordering process, splitting order summary and checkout stages across separate pages. The ordering process displays the 'Order Summary' on the left side of the screen. |
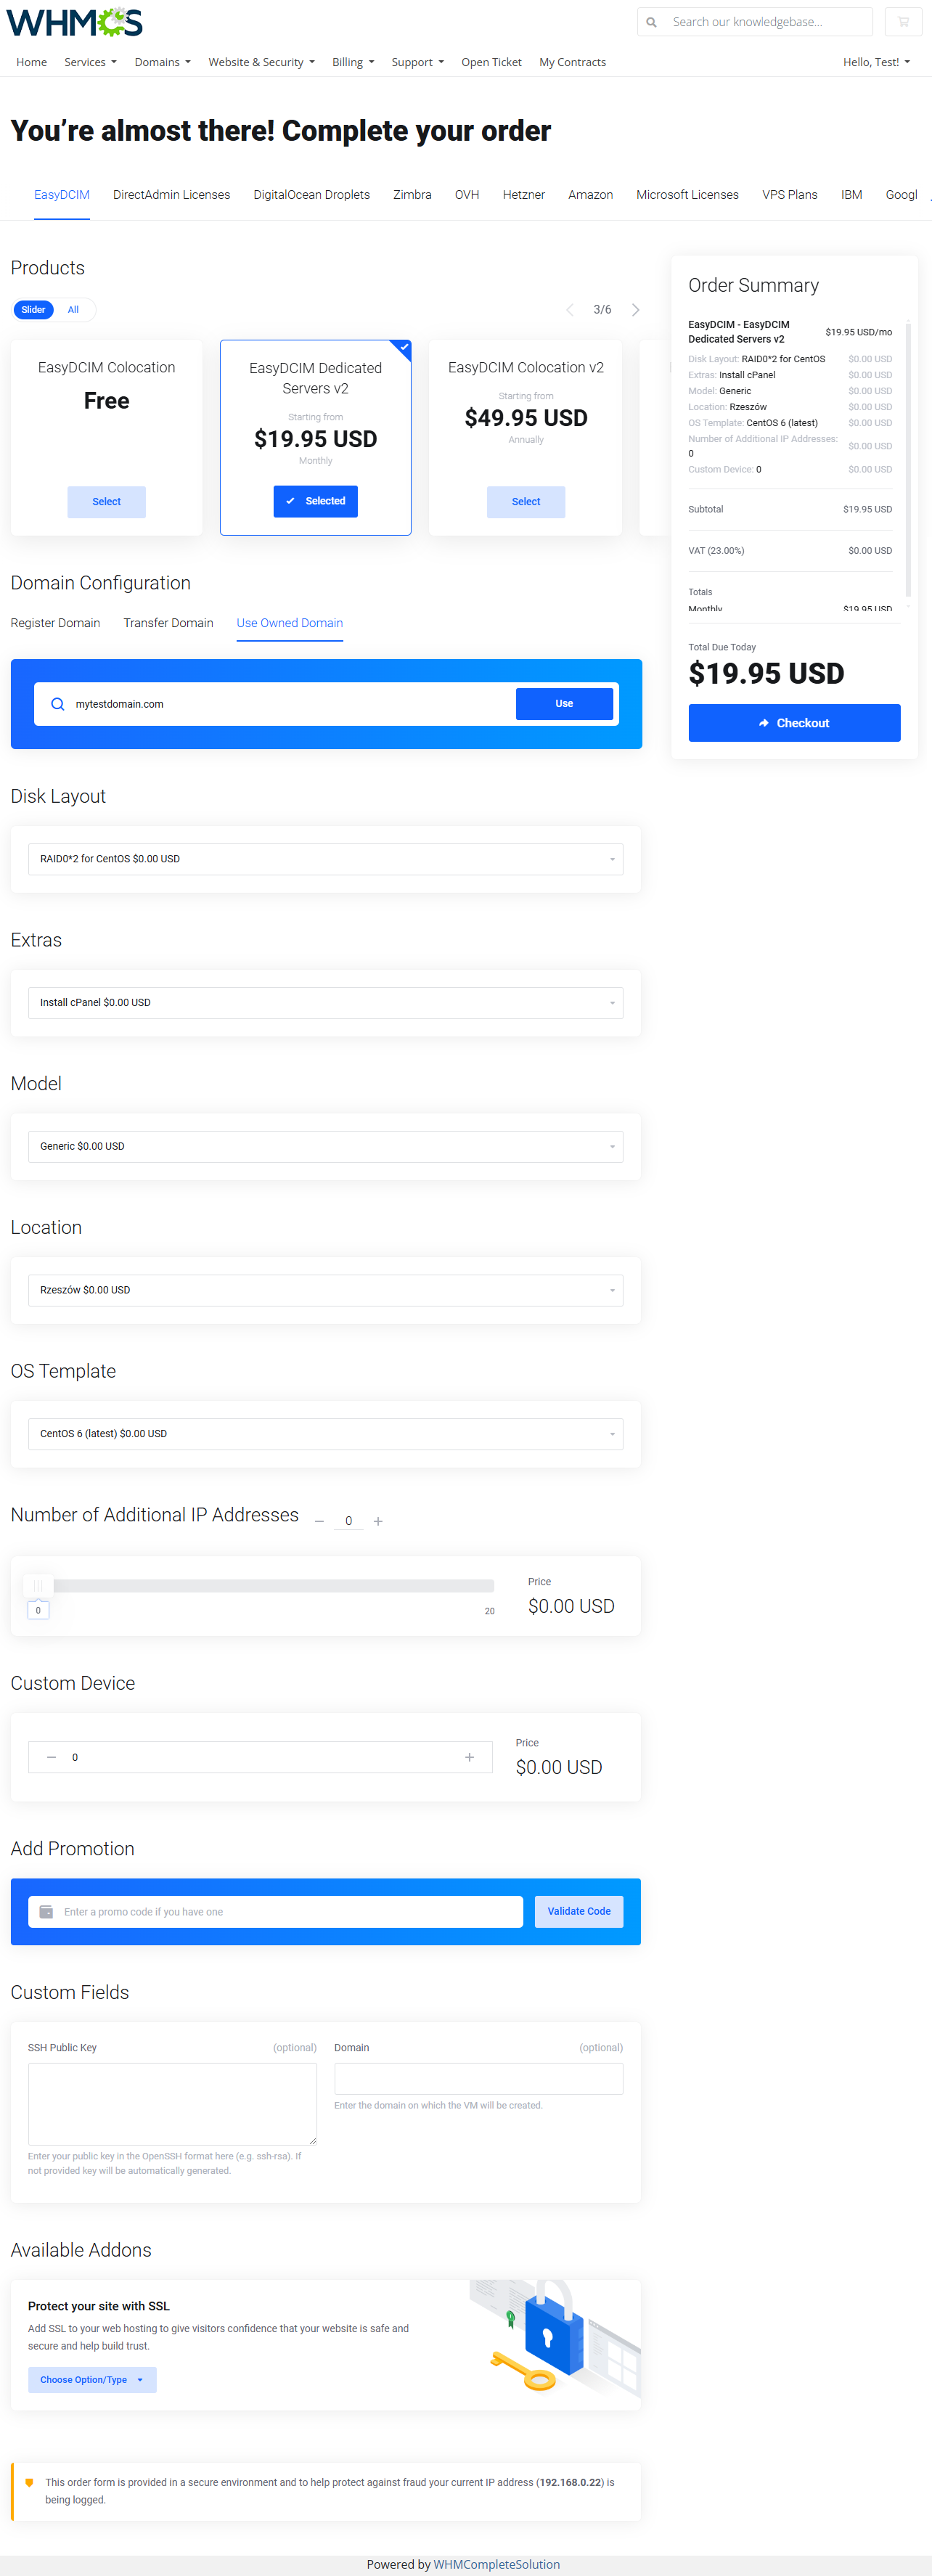
|
Upon clicking 'Checkout' , users are redirected to the 'Review & Checkout' page where they can:
|
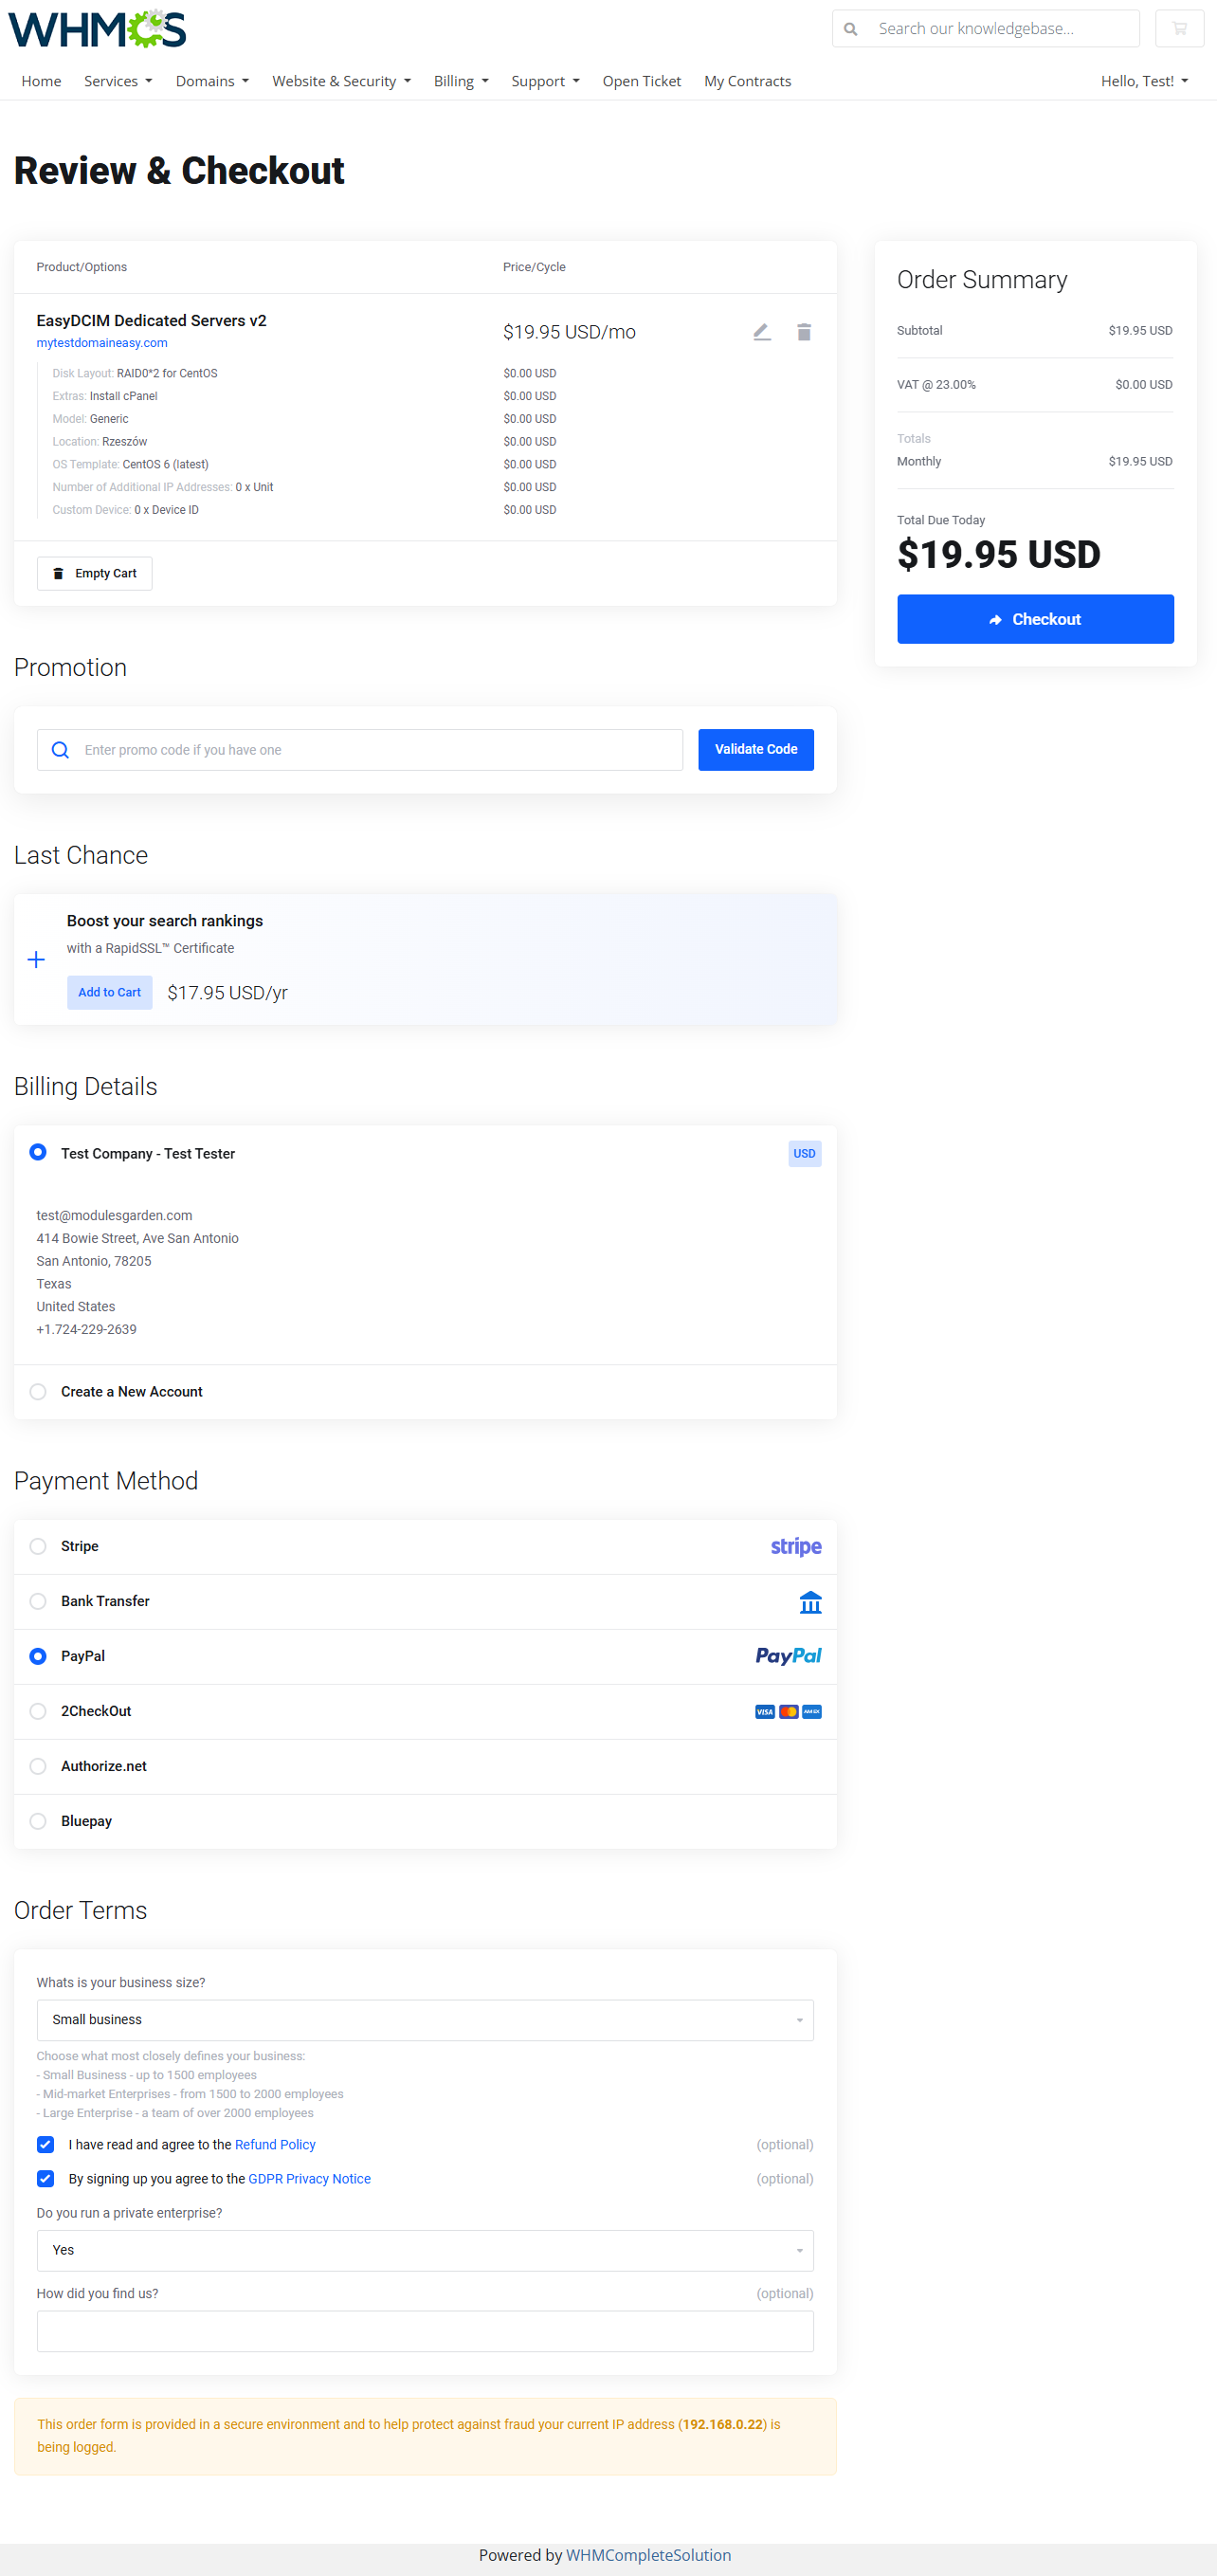
|
[edit] Addtional Information
[edit] Custom Hooks
This section includes a list of supported by the module custom hooks.
Exemplary usage:
add_hook('LagomOrderFormProductsList',1,  function($productsList){
return $productsList;
});
Exemplary usage:
add_hook('ShoppingCartValidateProductUpdate', 1, function($vars) {
    return [
        'Error message feedback error 1',
        'Error message feedback error 2',
    ];
});
|
[edit] Editing Module Files
| You are allowed to modify three types of module files, these are: JS, TPL and CSS files The JS files are compiled files which means that they are all bundled into one file. Consequently, if you decide to make any changes in a JS file, you have to additionally take one of the below-described steps to see your changes: 1. Debug 2. Build
Please contact us and we will provide you with the necessary files! Next, upload these files into the main WHMCS directory and run the command: docker run --rm -v $(pwd):/srv huli/gulp build Note: Before you run the above command you must install docker in your system. gulp build |
[edit] Tips
| 1. Adding a new language.
If you want to change the WHMCS module language, go to the following folder: /modules/addons/LagomOrderForm/langs Copy english.php file and rename the newly copied directory with your desired language, for example italian.php. Then, open your personalized file now and replace particular sentences. |
| 2. The module supports language Overrides.
The language file english.php is uncoded and can be freely modified. However, it is advised not to change this file itself, it is recommended to use overrides so the changes persist through module updates.
~/lang/overrides/english.php.
For example: ~/lang/english.php: $_LANG['order_new_product'] = 'You’re almost there! Complete your order'; ~/lang/overrides/english.php: $_LANG['order_new_product'] = 'Complete the order'; |
| 3. Additional URLs used as direct shopping cart links. Linking to WHMCS with additional URLs is supported by the module, yet only the two below formats are allowed, make sure you do not use any other format: &promocode:
&billingcycle:
&addons:
Exemplary supported links with additional variables used:
|
| 4. The module supports URLs leading to a product page with specified configurable options and currency. Exemplary URL: https://mycompany.net/order/dedicated-servers/8?configoption[1]=5 Where:
Exemple 2: https://mycompany.net/order/dedicated-servers/8?domain=mytestdomain.com Where:
|
5. The module requires the InnoDB Engine to be used by the WHMCS database table. Check how to change the database engine:
Alternatively, you may run the below SQL query after selecting the desired database from phpMyAdmin (step "2"). ALTER TABLE `table_name` ENGINE = InnoDB After the query has been successfully executed, the database engine of the selected database table will be changed to "InnoDB". Note: In case you need a more detailed instruction with step by step illustrations, please refer to this article. |
[edit] Update Instructions
| An essential guidance through the process of updating the module is offered here. Make sure that the Lagom One Step Order Form version, which you are going to install, is compatible with your WHMCS and Lagom WHMCS Client Theme installations!
|
[edit] Uninstallation Process
| If you no longer wish to use Lagom One Step Order Form For WHMCS, you may safely uninstall the module. To successfully and safely remove the module from your system, follow these steps:
That's it! The module is now completely uninstalled. |
[edit] Upgrade Guide
| Seeking a solution that offers greater flexibility, customization tailored to your precise needs, and unrestricted availability? There is an option that not only proves to be cost-effective in the long run but also includes prioritized support services, making it a truly valuable investment. Opt for the Open Source version of your Lagom One Step Order Form For WHMCS module to unlock these benefits. Follow a comprehensive guide covering the transition process, the advantages it brings, and step-by-step instructions on what to do next after the order has been successfully finalized. |
[edit] Common Problems
| 1. When you have problems with connection, check whether your SELinux or firewall does not block ports. |
| 2. Third-party modules that manipulate or affect the ordering process pages will NOT be compatible with Lagom One Step Order Form For WHMCS. Lagom One Step Order Form For WHMCS is a separate module, it works independently and it is NOT based on any default WHMCS order process template. The module is not yet compatible with the below modules from ModulesGarden offer:
|
| 3. The module is compatible with WHMCS v8.8 yet please be aware that the new WHMCS On-Demand Renewals feature is not yet supported. Please follow the module changelog for information on the full compatibility. |