Password Manager For WHMCS
(→Access Details List) |
(→Other) |
||
| (40 intermediate revisions by 4 users not shown) | |||
| Line 1: | Line 1: | ||
<meta name="keywords" content="password manager for whmcs, password manager configuration, whmcs password manager management, whmcs password manager installation, whmcs password manager common problems, about whmcs password manager, whmcs password manager documentation, whmcs password manager faq, whmcs password manager help, whmcs password manager guide, whmcs password manager wiki, whmcs password manager tutorial, whmcs password manager tips, whmcs password manager wiki"></meta> | <meta name="keywords" content="password manager for whmcs, password manager configuration, whmcs password manager management, whmcs password manager installation, whmcs password manager common problems, about whmcs password manager, whmcs password manager documentation, whmcs password manager faq, whmcs password manager help, whmcs password manager guide, whmcs password manager wiki, whmcs password manager tutorial, whmcs password manager tips, whmcs password manager wiki"></meta> | ||
<meta name="description" content="ModulesGarden Wiki Contains All The Information You Need About The Password Manager For WHMCS Module."></meta> | <meta name="description" content="ModulesGarden Wiki Contains All The Information You Need About The Password Manager For WHMCS Module."></meta> | ||
| − | |||
| − | |||
| − | |||
=About [https://www.modulesgarden.com/products/whmcs/password-manager Password Manager For WHMCS]= | =About [https://www.modulesgarden.com/products/whmcs/password-manager Password Manager For WHMCS]= | ||
| Line 9: | Line 6: | ||
|style="padding: 10px 0px 10px 0px;"|'''Password Manager For WHMCS''' gives you the possibility to store fragile data and share them safely with your staff and clients.<br /> | |style="padding: 10px 0px 10px 0px;"|'''Password Manager For WHMCS''' gives you the possibility to store fragile data and share them safely with your staff and clients.<br /> | ||
The module offers various mechanisms allowing you to smoothly manage sensitive data such as passwords or license keys, in the case of resellers, send email reminders or integrate with your WHMCS client area.<br /> | The module offers various mechanisms allowing you to smoothly manage sensitive data such as passwords or license keys, in the case of resellers, send email reminders or integrate with your WHMCS client area.<br /> | ||
| − | Owing to the implementation of advanced two way encryption, Password Manager For WHMCS provides a high security level for your and your customers' critical data. | + | Owing to the implementation of advanced two-way encryption, Password Manager For WHMCS provides a high-security level for your and your customers' critical data. |
|} | |} | ||
<!-- fixed --> | <!-- fixed --> | ||
| − | *''' | + | *'''Admin Area Features:''' |
{| | {| | ||
|style="padding: 10px 0px 0px 30px;"|✔ Create Private Access Details | |style="padding: 10px 0px 0px 30px;"|✔ Create Private Access Details | ||
| Line 20: | Line 17: | ||
|} | |} | ||
{| | {| | ||
| − | |style="padding: 0px 0px 0px 30px;"|✔ Display | + | |style="padding: 0px 0px 0px 30px;"|✔ Display Client Access Details In Clients Summary And Clients Tickets |
|} | |} | ||
{| | {| | ||
| − | |style="padding: 0px 0px 0px 30px;"|✔ Define Access To Clients | + | |style="padding: 0px 0px 0px 30px;"|✔ Define Access To Clients Passwords: |
|} | |} | ||
{| | {| | ||
| Line 35: | Line 32: | ||
|} | |} | ||
{| | {| | ||
| − | |style="padding: 0px 0px 0px 30px;"|✔ Store All Access Details In Encrypted Format | + | |style="padding: 0px 0px 0px 30px;"|✔ Store All Access Details In Encrypted Format: |
|} | |} | ||
{| | {| | ||
| − | |style="padding: 0px 0px 0px 30px;"|✔ Add Notes To | + | |style="padding: 0px 0px 0px 45px;"|✔ Use Public Keys To Encrypt Passwords |
| + | |} | ||
| + | {| | ||
| + | |style="padding: 0px 0px 0px 45px;"|✔ Use Private Keys Or Secrets To Decrypt Passwords | ||
| + | |} | ||
| + | {| | ||
| + | |style="padding: 0px 0px 0px 30px;"|✔ Add Tags To Passwords | ||
| + | |} | ||
| + | {| | ||
| + | |style="padding: 0px 0px 0px 30px;"|✔ Add Notes To Passwords | ||
| + | |} | ||
| + | {| | ||
| + | |style="padding: 0px 0px 0px 30px;"|✔ Copy Usernames And Passwords Into Clipboard | ||
|} | |} | ||
{| | {| | ||
| Line 45: | Line 54: | ||
{| | {| | ||
|style="padding: 0px 0px 0px 30px;"|✔ Display Password Owner | |style="padding: 0px 0px 0px 30px;"|✔ Display Password Owner | ||
| + | |} | ||
| + | {| | ||
| + | |style="padding: 0px 0px 0px 30px;"|✔ Add And Manage Encryption Keys | ||
| + | |} | ||
| + | {| | ||
| + | |style="padding: 0px 0px 0px 30px;"|✔ Organize Passwords Using: | ||
| + | |} | ||
| + | {| | ||
| + | |style="padding: 0px 0px 0px 45px;"|✔ Categories | ||
| + | |} | ||
| + | {| | ||
| + | |style="padding: 0px 0px 0px 45px;"|✔ Tags | ||
|} | |} | ||
{| | {| | ||
| Line 74: | Line 95: | ||
|} | |} | ||
{| | {| | ||
| − | |style="padding: 0px 0px | + | |style="padding: 0px 0px 0px 30px;"|✔ Define Time Period For Password Change Reminder |
| + | |} | ||
| + | {| | ||
| + | |style="padding: 0px 0px 0px 30px;"|✔ Customize Module Language Files With "Translations" Tool | ||
| + | |} | ||
| + | {| | ||
| + | |style="padding: 0px 0px 0px 30px;"|✔ Control Staff Access Level To Specific Resources With ACL | ||
| + | |} | ||
| + | {| | ||
| + | |style="padding: 0px 0px 10px 30px;"|✔ View And Manage Logs | ||
|} | |} | ||
*'''Client Area Features:''' | *'''Client Area Features:''' | ||
| Line 85: | Line 115: | ||
{| | {| | ||
|style="padding: 0px 0px 0px 30px;"|✔ Generate Random Passwords | |style="padding: 0px 0px 0px 30px;"|✔ Generate Random Passwords | ||
| + | |} | ||
| + | {| | ||
| + | |style="padding: 0px 0px 0px 30px;"|✔ Copy Usernames And Passwords Into Clipboard | ||
| + | |} | ||
| + | {| | ||
| + | |style="padding: 0px 0px 0px 30px;"|✔ Import And Export Access Details In CSV Format | ||
|} | |} | ||
{| | {| | ||
| Line 104: | Line 140: | ||
|} | |} | ||
{| | {| | ||
| − | |style="padding: 0px 0px 0px 30px;"|✔ Multi-Language Support | + | |style="padding: 0px 0px 0px 30px;"|✔ Multi-Language Support With Custom Translations Tool |
| + | |} | ||
| + | {| | ||
| + | |style="padding: 0px 0px 0px 30px;"|✔ Supports PHP 8.2 Back To PHP 8.1 | ||
|} | |} | ||
{| | {| | ||
| − | |style="padding: 0px 0px 0px 30px;"|✔ Supports | + | |style="padding: 0px 0px 0px 30px;"|✔ Supports WHMCS Themes "Six", "Twenty-One", "Lara" And "Lagom WHMCS Client Theme" |
|} | |} | ||
{| | {| | ||
| − | |style="padding: 0px 0px 0px 30px;"|✔ Supports WHMCS | + | |style="padding: 0px 0px 0px 30px;"|✔ Supports WHMCS V8.12 Back To WHMCS V8.9 |
|} | |} | ||
{| | {| | ||
| − | |style="padding: 0px 0px 0px 30px;"|✔ | + | |style="padding: 0px 0px 0px 30px;"|✔ Requires ionCube Loader V13 Or Later |
|} | |} | ||
{| | {| | ||
| − | |style="padding: 0px 0px 30px 30px;"|✔ Easy Module Upgrade To [https://www.modulesgarden.com/products/whmcs/password-manager#open-source-version Open Source Version] | + | |style="padding: 0px 0px 30px 30px;"|✔ Easy [https://www.docs.modulesgarden.com/How_To_Upgrade_WHMCS_Module Module Upgrade] To [https://www.modulesgarden.com/products/whmcs/password-manager#open-source-version Open Source Version] |
|} | |} | ||
| Line 140: | Line 179: | ||
{| | {| | ||
|style="padding: 0px 0px 15px 15px;"|'''Previous updates of the module may contain two packages dedicated to various PHP versions.'''<br/> | |style="padding: 0px 0px 15px 15px;"|'''Previous updates of the module may contain two packages dedicated to various PHP versions.'''<br/> | ||
| − | The first one | + | The first one supports PHP 5.6 up to PHP 7.1, and the second one addressed to PHP 7.2 up to PHP 7.4.<br/> |
| − | '''''Note:''' Keep in mind that PHP versions 5.6 up to 7.1 are no longer officially supported and their security issues are not fixed or released | + | '''''Note:''' Keep in mind that PHP versions 5.6 up to 7.1 are no longer officially supported and their security issues are not fixed or released anymore. Find more info [http://php.net/supported-versions.php here].'' |
|} | |} | ||
{| | {| | ||
| Line 171: | Line 210: | ||
|} | |} | ||
{| | {| | ||
| − | |style="padding: 0px 0px | + | |style="padding: 0px 0px 20px 15px;"|'''5. Remove all files from the '' 'templates_c' '' folder located in your WHMCS root directory.''' |
| + | |} | ||
| + | {| | ||
| + | |style="padding: 0px 0px 15px 15px;"|'''6. Now, set up the '' 'storage' '' folder as recursively writable.'''<br /> | ||
| + | This folder is available at '' '/yourWHMCS/modules/addons/PasswordManager/'. '' | ||
| + | |} | ||
| + | {| | ||
| + | |style="padding: 0px 0px 30px 25px;"|[[File:PM_4_1.png]] | ||
| + | |} | ||
| + | {| | ||
| + | |style="padding: 0px 0px 15px 15px;"|'''7. Now you have to activate the module in your WHMCS system.'''<br /> | ||
Log in to your WHMCS administrator area. Go to '' 'System Settings' '' → '' 'Addon Modules'. ''<br /> | Log in to your WHMCS administrator area. Go to '' 'System Settings' '' → '' 'Addon Modules'. ''<br /> | ||
Afterwards, find '' 'Password Manager' '' and press '' 'Activate' '' button. | Afterwards, find '' 'Password Manager' '' and press '' 'Activate' '' button. | ||
| Line 179: | Line 228: | ||
|} | |} | ||
{| | {| | ||
| − | |style="padding: 0px 0px 15px 15px;"|''' | + | |style="padding: 0px 0px 15px 15px;"|'''8. In the next step, you need to permit access to the module.'''<br /> |
| − | To do so, click on '' 'Configure' '' button, select administrator groups | + | To do so, click on the'' 'Configure' '' button, select administrator groups that should have access to this addon, and press '' 'Save Changes'. '' |
|} | |} | ||
{| | {| | ||
| Line 186: | Line 235: | ||
|} | |} | ||
{| | {| | ||
| − | |style="padding: 0px 0px 15px 15px;"|''' | + | |style="padding: 0px 0px 15px 15px;"|'''9. You have just successfully installed Password Manager For WHMCS!'''<br /> |
You can access your module under '' 'Addons' '' → '' 'Password Manager'. '' | You can access your module under '' 'Addons' '' → '' 'Password Manager'. '' | ||
|} | |} | ||
| Line 196: | Line 245: | ||
{| | {| | ||
|style="padding: 10px 0px 30px 15px;"|'''Password Manager For WHMCS allows to safely store and share fragile data within your WHMCS.'''<br /> | |style="padding: 10px 0px 30px 15px;"|'''Password Manager For WHMCS allows to safely store and share fragile data within your WHMCS.'''<br /> | ||
| − | In this short guide we will present you all the possibilities of our module. | + | In this short guide, we will present you all the possibilities of our module. |
|} | |} | ||
| − | |||
| − | |||
| − | |||
| − | |||
| − | |||
| − | |||
| − | |||
| − | |||
| − | |||
| − | |||
| − | |||
| − | |||
| − | |||
| − | |||
| − | |||
| − | |||
| − | |||
| − | |||
==Configuration== | ==Configuration== | ||
{| | {| | ||
| − | |style="padding: 10px 0px 30px 15px;"|Before you start your work with our ''Password Manager For | + | |style="padding: 10px 0px 30px 15px;"|Before you start your work with our ''Password Manager For WHMCS,'' please move to '' 'Settings' '' tab, where you will configure access restrictions to product passwords, define email notifications and manage security settings. |
|} | |} | ||
===Products/Services Password=== | ===Products/Services Password=== | ||
{| | {| | ||
| − | |style="padding: 10px 0px 15px 15px;"|First of all, decide whether you wish to allow to display a full list of client's products and services login details by selecting option: '' 'Client Products/Services Password'. ''<br/> If enabled, access details to client's products and services will be displayed in the client area → '' 'Password Manager'. ''<br /> | + | |style="padding: 10px 0px 15px 15px;"|First of all, decide whether you wish to allow to display of a full list of the client's products and services' login details by selecting the option: '' 'Client Products/Services Password'. ''<br/> If enabled, access details to client's products and services will be displayed in the client area → '' 'Password Manager'. ''<br /> |
| − | '' 'Exclude Client Groups' '' - enter any client group name to disable product's access details from being displayed for clients in these groups.<br /> | + | *'''Exclude Client Groups''' - enter any client group name to disable the product's access details from being displayed for clients in these groups.<br /> |
| − | '' 'Exclude Clients' '' - disable product access details for pointed here clients.<br/> | + | *'''Exclude Clients''' - disable product access details for pointed here clients.<br/> |
| − | '' 'Exclude Product Groups' '' - enter any product group names, to which access details will not be shown.<br/> | + | *'''Exclude Product Groups''' - enter any product group names, to which access details will not be shown.<br/> |
| − | '' 'Exclude Products' '' - access details for products, | + | *'''Exclude Products''' - access details for products, that are entered here, will be disabled.<br /> |
|} | |} | ||
{| | {| | ||
| Line 235: | Line 266: | ||
{| | {| | ||
|style="padding: 10px 0px 15px 15px;"|The next section is dedicated to the management of private passwords of clients.<br/> If you wish to allow your clients to manage their personal access details, select the '' 'Client's Private Passwords' '' option.<br />Your clients can be also permitted to set their own '' 'Master Password' '' to provide additional protection for their stored passwords. Next, move to the specific configuration:<br /> | |style="padding: 10px 0px 15px 15px;"|The next section is dedicated to the management of private passwords of clients.<br/> If you wish to allow your clients to manage their personal access details, select the '' 'Client's Private Passwords' '' option.<br />Your clients can be also permitted to set their own '' 'Master Password' '' to provide additional protection for their stored passwords. Next, move to the specific configuration:<br /> | ||
| − | + | *'''Excluded Client Groups''' - disabling private access details management for selected client groups here.<br /> | |
| − | + | *'''Excluded Clients''' - disable management of private access details for pointed here clients.<br /> | |
| − | + | *'''Passwords Limit Per Client''' - set up the limit for private access details for one client.<br /> | |
| − | + | *'''Clients Excluded From Limit''' - enter clients for which the setup above limit will not be effective.<br /> | |
|} | |} | ||
{| | {| | ||
| Line 247: | Line 278: | ||
{| | {| | ||
|style="padding: 10px 0px 15px 15px;"|This section allows you to define email notification templates that will be sent by the module on specific actions to clients and administrators.<br /> | |style="padding: 10px 0px 15px 15px;"|This section allows you to define email notification templates that will be sent by the module on specific actions to clients and administrators.<br /> | ||
| − | + | *'''Password Change Reminder''' - select an email template that will be used to remind clients or administrators about the need to change the password.<br /> | |
| − | + | *'''Password Change Notification''' - select an email template that will be used to notify clients and about a password being changed.<br /> | |
| − | Please note that you have to select templates for clients and administrators separately. If you want to disable any of the | + | Please note that you have to select templates for clients and administrators separately. If you want to disable any of the notifications, simply select '' 'Unassigned' '' from dropdown menu. |
|} | |} | ||
{| | {| | ||
| Line 257: | Line 288: | ||
===Security Settings=== | ===Security Settings=== | ||
{| | {| | ||
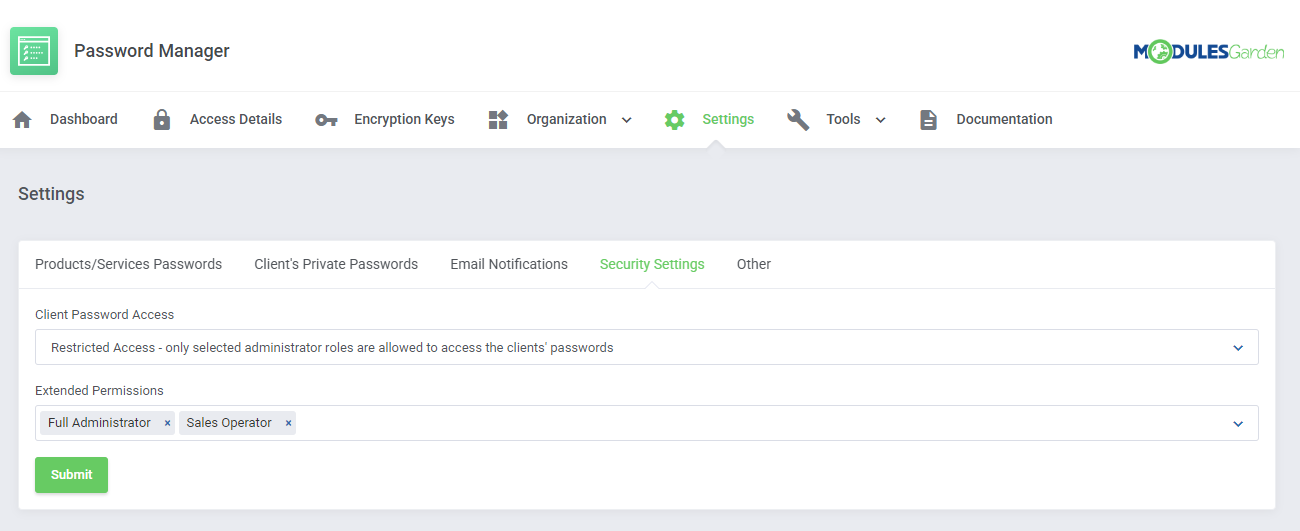
| − | |style="padding: 10px 0px 15px 15px;"|Under '' 'Security Settings' '' tab, you have to define the level of access to clients' passwords for administrators and grant them | + | |style="padding: 10px 0px 15px 15px;"|Under the'' 'Security Settings' '' tab, you have to define the level of access to clients' passwords for administrators and grant them extended permissions.<br /> |
You may grant your administrators:<br/> | You may grant your administrators:<br/> | ||
| − | *Full | + | *'''Full Access''' to clients' passwords - any administrator will be allowed to view clients' passwords. |
| − | *Restricted | + | *'''Restricted Access''' - only administrators with chosen roles will get access to the passwords. |
| − | *Shared | + | *'''Shared Access''' - only passwords marked as '' 'Shared' '' will be visible for chosen administrator roles.<br/> |
| − | You may also select | + | You may also select the administrator groups which will be granted '' 'Extended Permissions'.'' <br/>It means that administrators from these groups will be allowed to view clients' access details when '' 'Visibility For Administrators:' '' is checked. |
|} | |} | ||
{| | {| | ||
|style="padding: 0px 0px 30px 25px;"|[[File:PM2_11_2.png]] | |style="padding: 0px 0px 30px 25px;"|[[File:PM2_11_2.png]] | ||
|} | |} | ||
| + | |||
===Other=== | ===Other=== | ||
{| | {| | ||
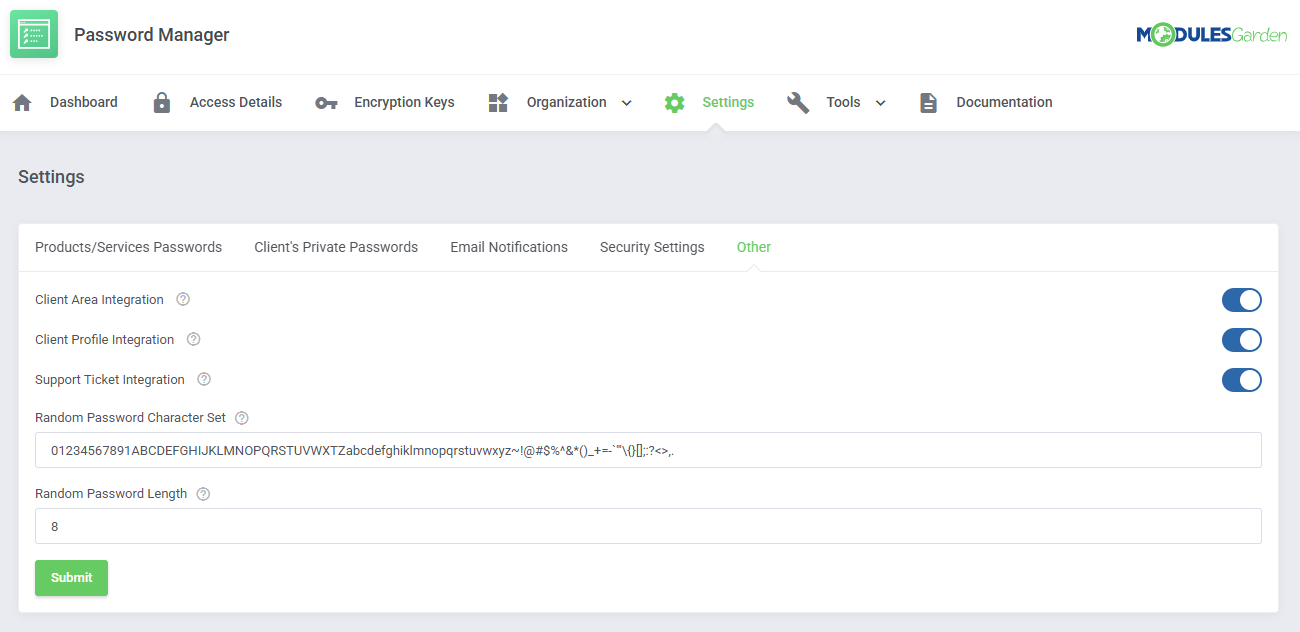
|style="padding: 10px 0px 15px 15px;"|In the very last section you may manage additional options that '' 'Password Manager For WHMCS'' ' has to offer.<br/> | |style="padding: 10px 0px 15px 15px;"|In the very last section you may manage additional options that '' 'Password Manager For WHMCS'' ' has to offer.<br/> | ||
| − | * ''' | + | * '''Client Area Integration''' - select to enable access to '' 'Password Manager' '' for your clients in their client area.<br/> |
| − | * '''Profile | + | * '''Client Profile Integration''' - select this option to add the'' 'Passwords' '' tab in the client's profile in the administrator area.<br/> |
| − | * '''Support | + | * '''Support Ticket Integration''' - if you select this option, '' 'Passwords' '' tab will be available on the support tickets site.<br/> |
| − | * '''Password | + | * '''Random Password Character Set''' - define a set of characters to be used for random password generation. |
| − | * '''Password | + | * '''Random Password Length''' - define the length of randomly generated passwords. <br/> |
| − | + | Do not forget to submit the changes when you finish configuring the settings. | |
| − | <br/> | + | |
| − | Do not forget to | + | |
|} | |} | ||
{| | {| | ||
| Line 283: | Line 313: | ||
|} | |} | ||
| − | ==Categories== | + | ==Access Details== |
| + | {| | ||
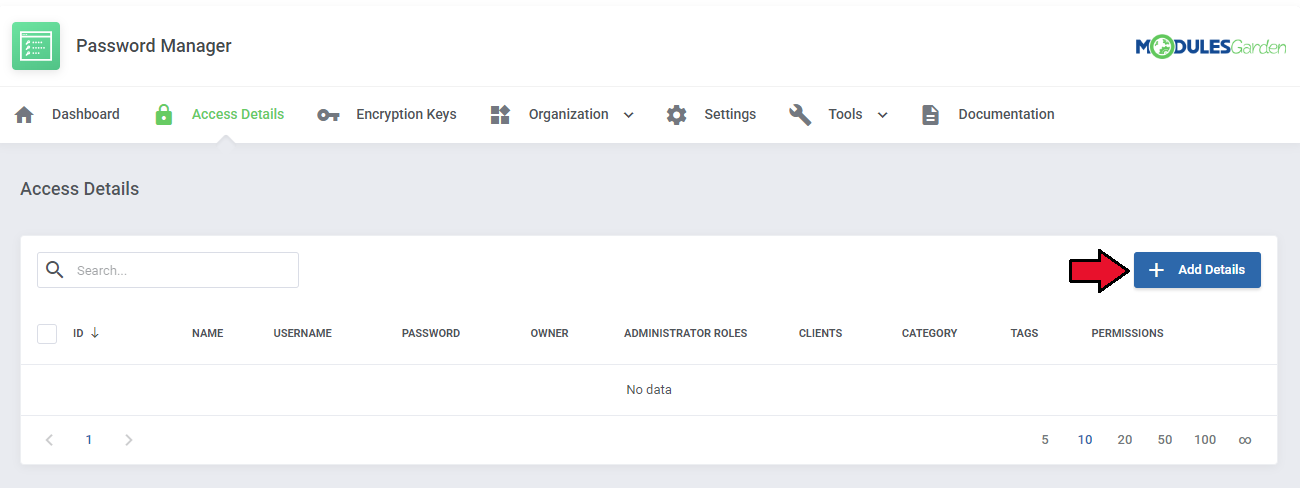
| + | |style="padding: 10px 0px 15px 15px;"|'' 'Access Details' '' section includes a list of provided access details. Here you can create new access details and decide who can view them.<br /> | ||
| + | Press '' 'Add Details' '' to begin. | ||
| + | |} | ||
| + | {| | ||
| + | |style="padding: 0px 0px 20px 25px;"|[[File:PM2_11_6.png]] | ||
| + | |} | ||
| + | {| | ||
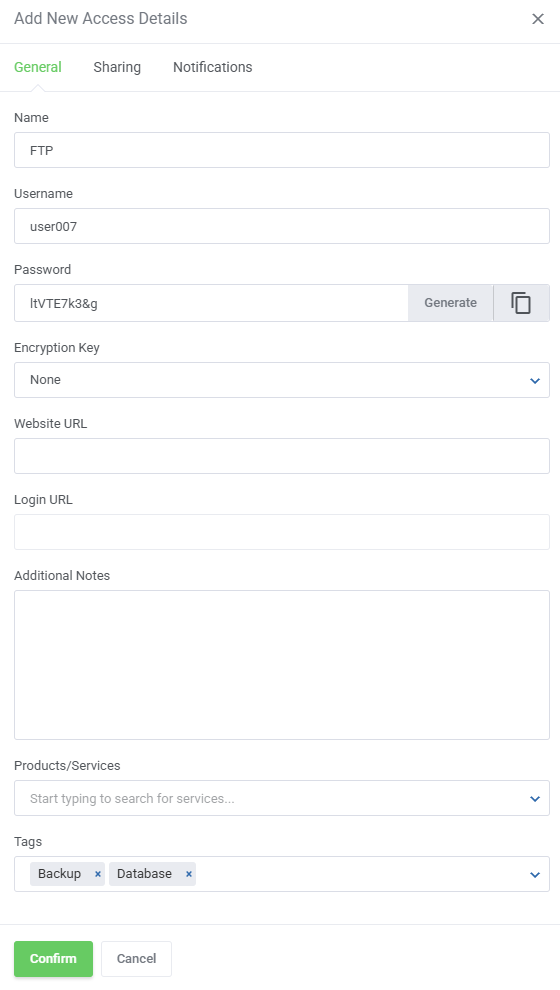
| + | |style="padding: 0px 0px 15px 15px;"|Fill in '' 'Name', '' enter access details into '' 'Username' '' and '' 'Password'. ''<br /> | ||
| + | You can also make your logging in easier by entering the website URL and website login URL consecutively into '' 'Website URL' '' and '' 'Login URL'. ''<br /> | ||
| + | To leave a note associated with access details you are creating, type it into '' 'Additional Notes' '' textbox. <br/> | ||
| + | Move to the'' 'Sharing' '' part to continue. | ||
| + | |} | ||
| + | {| | ||
| + | |style="padding: 0px 0px 20px 25px;"|[[File:PM2_12.png]] | ||
| + | |} | ||
| + | {| | ||
| + | |style="padding: 0px 0px 15px 15px;"|In this section choose '' 'Category' '' and select '' 'Administrators', 'Administrator Roles' '' and '' 'Clients' '' who should have access to this details.<br /> | ||
| + | ''Note: There is [https://en.wikipedia.org/wiki/Logical_disjunction disjunction] relation between 'Administrators' and 'Administrator Roles'.''<br /> | ||
| + | ''For example, if you assign administrators X and Z and administrator role Y in which administrator X is, then all administrators assigned to group Y will see these access details together with administrator Z.''<br/> | ||
| + | Here, you may also allow clients to edit or delete these details, simply mark the'' 'Permissions' '' checkbox. '' 'Permissions' '' allows you to define clients/administrators/category members privileges.<br /> | ||
| + | ''Note: If you leave the 'Clients' checkbox unmarked, your client will not see these access details even if they are chosen in the 'Clients' option.''<br/> | ||
| + | When ready, proceed to the'' 'Notifications' '' section. | ||
| + | |} | ||
| + | {| | ||
| + | |style="padding: 0px 0px 20px 25px;"|[[File:PM2_13.png]] | ||
| + | |} | ||
| + | {| | ||
| + | |style="padding: 0px 0px 15px 15px;"|Finally, you can set up notifications rules.<br /> | ||
| + | *'''Allow To Change Password''' - message is sent upon password being changed.<br /> | ||
| + | *'''Change Password Reminder''' - a notification is sent to remind about the necessity to change the password for security reasons.<br/> | ||
| + | You can inject the passwords into each of them (depending on the selected email template).<br/><br/> | ||
| + | Press the'' 'Confirm' '' button to finish the process and confirm the creation of access details. | ||
| + | |} | ||
| + | {| | ||
| + | |style="padding: 0px 0px 30px 25px;"|[[File:PM2_14.png]] | ||
| + | |} | ||
| + | ===Access Details List=== | ||
| + | {| | ||
| + | |style="padding: 10px 0px 15px 15px;"|On the list of access details you will see some basic info, such as ID and name, username and password with the possibility to view the password (press the hidden password to make it visible).<br/> Press the "Copy" icon and the password or username will be copied to the clipboard.<br/> There is also information on the access details owner and administrator groups allowed, list of clients allowed, and category assigned. | ||
| + | |} | ||
| + | {| | ||
| + | |style="padding: 0px 0px 20px 25px;"|[[File:PM2_16.png]] | ||
| + | |} | ||
| + | {| | ||
| + | |style="padding: 0px 0px 15px 15px;"|Use action buttons to manage the entered access details. | ||
| + | #Log into your website (if URL has been provided) <br/> | ||
| + | #See access details <br/> | ||
| + | #Edit access details <br/> | ||
| + | #Delete access details | ||
| + | |} | ||
| + | {| | ||
| + | |style="padding: 0px 0px 30px 25px;"|[[File:PM2_15.png]] | ||
| + | |} | ||
| + | |||
| + | ==Encryption Keys== | ||
| + | {| | ||
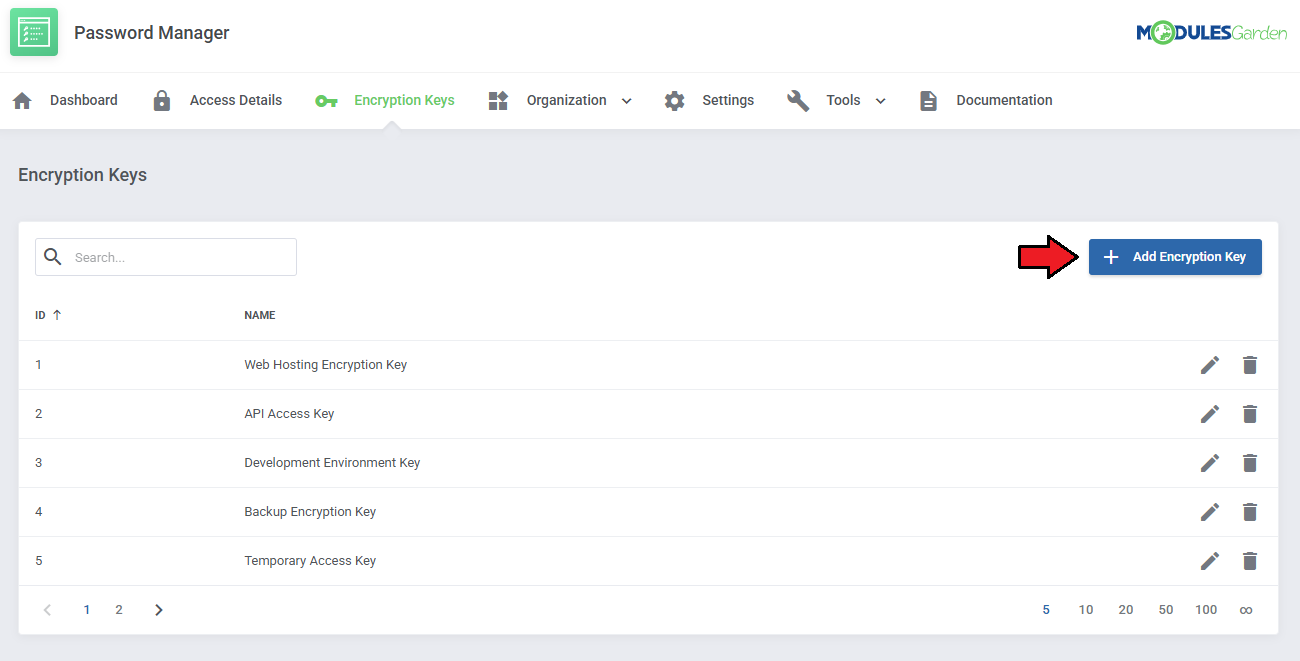
| + | |style="padding: 10px 0px 15px 15px;"|Encryption Keys are an essential security feature for protecting sensitive data. They allow for the secure encryption and decryption of access details using a public-private key pair. <br/>Your data remains encrypted and inaccessible, even in the event of unauthorized access. <br/> | ||
| + | Click '' 'Add Encryption Key' '' to register a new key. | ||
| + | |} | ||
| + | {| | ||
| + | |style="padding: 0px 0px 20px 25px;"|[[File:PM2_10_1.png]] | ||
| + | |} | ||
| + | {| | ||
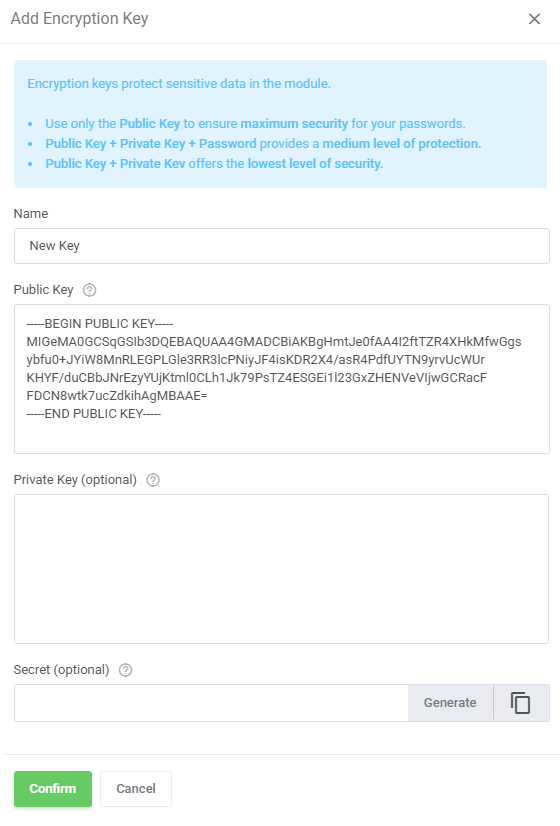
| + | |style="padding: 0px 0px 15px 15px;"|The following window includes these fields: | ||
| + | *'''Name''' - provide a name for the key. | ||
| + | *'''Public Key''' - enter the public key. Clients will have to provide the matching private key when deciphering passwords unless the private key is provided in the field below. | ||
| + | *'''Private Key''' - optionally, enter the matching private key. This way the private key will be stored in the database and used automatically. | ||
| + | *'''Secret''' - optionally, set an additional password for the private key. The secret can be used instead of the private key when decrypting. | ||
| + | There are three possible configurations you can use: | ||
| + | *'''Public Key only''' - this will require the user to provide the matching private key on their own. <br/>This option is the most secure since there is only one way to decipher the password, and the private key is not stored in the database. | ||
| + | *'''Public Key + Private Key + Secret''' - the user can use a much shorter and simpler '' 'Secret' '' to decipher their password, making it much easier to access but also less secure. <br/>The private key has to be stored in the database. | ||
| + | *'''Public Key + Private Key''' - the password will be automatically deciphered on request, with no need to provide any private keys or secrets. <br/>While still more secure than not using encryption keys at all, this provides the least security out of the three options. | ||
| + | |} | ||
| + | {| | ||
| + | |style="padding: 0px 0px 20px 25px;"|[[File:PM2_10_2.png]] | ||
| + | |} | ||
| + | {| | ||
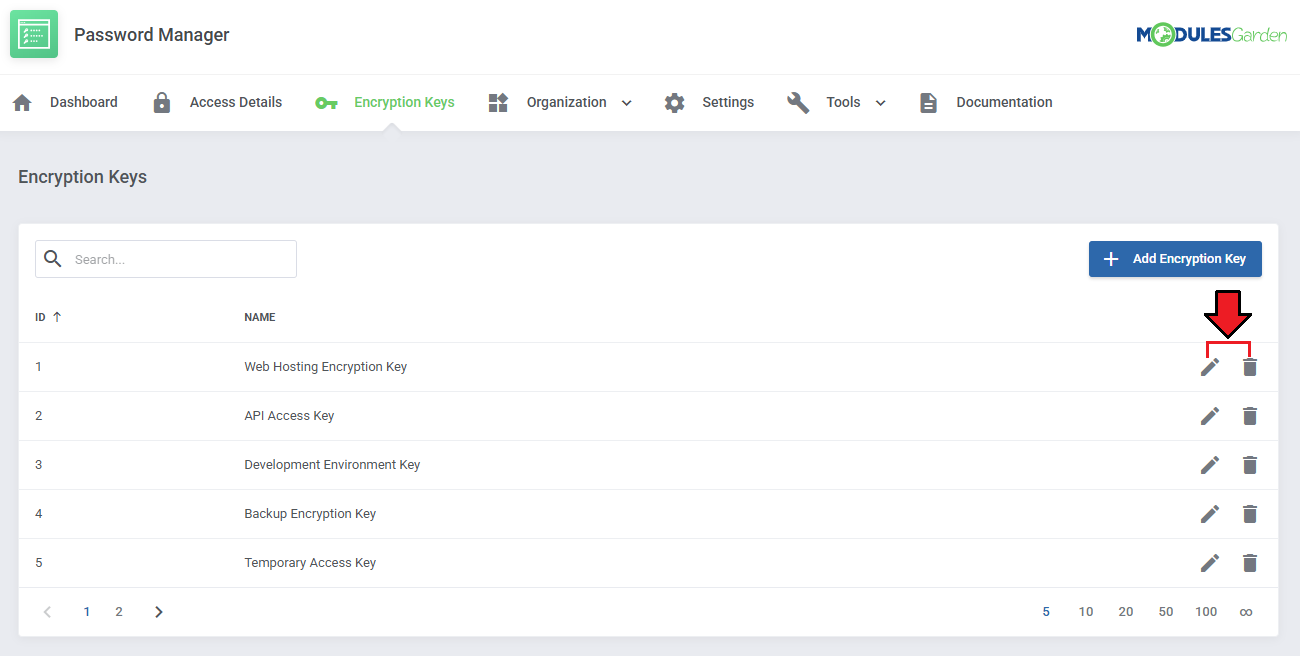
| + | |style="padding: 0px 0px 20px 15px;"|Edit or delete the keys using the action buttons. | ||
| + | |} | ||
| + | {| | ||
| + | |style="padding: 0px 0px 20px 25px;"|[[File:PM2_10_3.png]] | ||
| + | |} | ||
| + | {| | ||
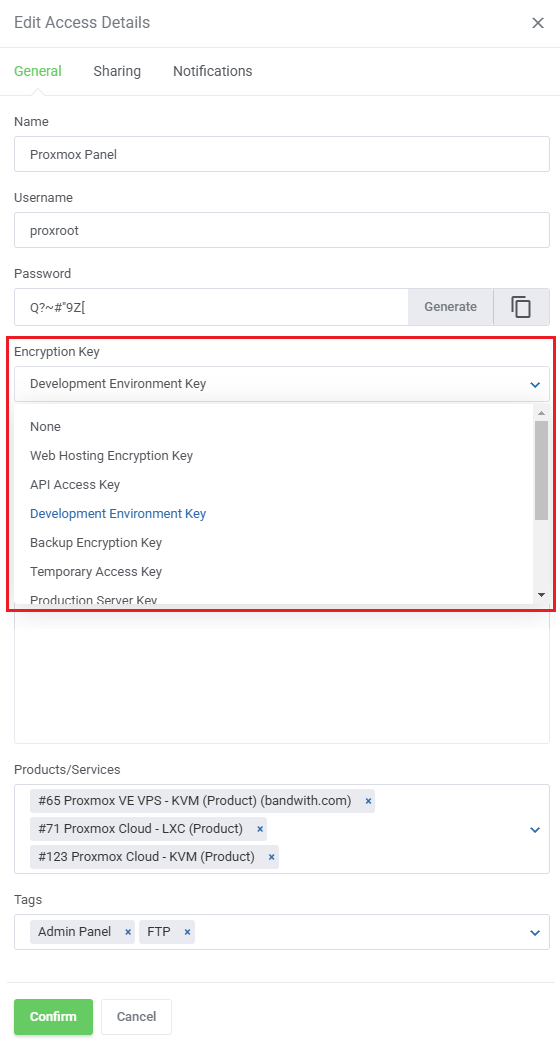
| + | |style="padding: 0px 0px 20px 15px;"|Encryption keys can be attached to specific access details when you create/edit them. | ||
| + | |} | ||
| + | {| | ||
| + | |style="padding: 0px 0px 20px 25px;"|[[File:PM2_10_3_1.png]] | ||
| + | |} | ||
| + | {| | ||
| + | |style="padding: 0px 0px 15px 15px;"|When attempting to reveal the password, the client/admin will see different windows depending on how the encryption key is set up. | ||
| + | * '''Public Key Only (Most secure):'''<br/> Provide the private key to decipher the password with the module, or copy the command and decrypt the password in your terminal. | ||
| + | |} | ||
| + | {| | ||
| + | |style="padding: 0px 0px 20px 25px;"|[[File:PM2_10_4.png]] | ||
| + | |} | ||
| + | {| | ||
| + | |style="padding: 0px 0px 15px 15px;"| | ||
| + | *'''Public Key + Private Key + Secret:'''<br/> Provide either the private key or the secret to decipher the password with the module, or copy the command and decrypt the password in your terminal. | ||
| + | |} | ||
| + | {| | ||
| + | |style="padding: 0px 0px 20px 25px;"|[[File:PM2_10_5.png]] | ||
| + | |} | ||
| + | {| | ||
| + | |style="padding: 0px 0px 15px 15px;"| | ||
| + | * '''Public Key + Private Key (Least secure):'''<br/> Click on '' 'Confirm' '' to decipher the password with the private key stored in the database. | ||
| + | |} | ||
| + | {| | ||
| + | |style="padding: 0px 0px 30px 25px;"|[[File:PM2_10_6.png]] | ||
| + | |} | ||
| + | |||
| + | ==Organization== | ||
| + | ===Categories=== | ||
{| | {| | ||
|style="padding: 10px 0px 15px 15px;"|Categories allow you to prepare predefined sets of clients and administrators.<br /> | |style="padding: 10px 0px 15px 15px;"|Categories allow you to prepare predefined sets of clients and administrators.<br /> | ||
| − | + | By assigning a category to a password, clients and administrators from that category are granted permission to view this password.<br /> | |
| − | Move to '' 'Categories' → 'Administrator Categories' '' where you can add new sets, press '' ' | + | Move to '' 'Categories' → 'Administrator Categories' '' where you can add new sets, press '' 'Add Category' '' to begin. |
|} | |} | ||
{| | {| | ||
| Line 293: | Line 436: | ||
|} | |} | ||
{| | {| | ||
| − | |style="padding: 0px 0px 15px 15px;"|Now, fill out the form with category name and description.<br /> | + | |style="padding: 0px 0px 15px 15px;"|Now, fill out the form with the category name and description.<br /> |
Assign desired clients and administrators to the category and press '' 'Confirm'. ''<br /> | Assign desired clients and administrators to the category and press '' 'Confirm'. ''<br /> | ||
|} | |} | ||
| Line 300: | Line 443: | ||
|} | |} | ||
{| | {| | ||
| − | |style="padding: 0px 0px 15px 15px;"|The list of administrator categories with any details such as listed clients and administrators allowed to access the details is now visible.<br/> You may always edit the category or delete if needed. Use the action buttons to do so. | + | |style="padding: 0px 0px 15px 15px;"|The list of administrator categories with any details such as listed clients and administrators allowed to access the details is now visible.<br/> You may always edit the category or delete it if needed. Use the action buttons to do so. |
|} | |} | ||
{| | {| | ||
| − | |style="padding: 0px 0px | + | |style="padding: 0px 0px 30px 25px;"|[[File:PM2_11_5.png]] |
|} | |} | ||
| − | == | + | ===Tags=== |
{| | {| | ||
| − | |style="padding: 10px 0px | + | |style="padding: 10px 0px 15px 15px;"|Tags are customizable labels that allow you to organize and categorize access details. <br/>Unlike categories, tags provide a more flexible way to group and filter credentials according to specific attributes or use cases. <br/>Clients will not have access to your tags. |
| − | + | ||
|} | |} | ||
{| | {| | ||
| − | |style="padding: 0px 0px 20px 25px;"|[[File: | + | |style="padding: 0px 0px 20px 25px;"|[[File:PM2_11_7.png]] |
|} | |} | ||
{| | {| | ||
| − | |style="padding: 0px 0px | + | |style="padding: 0px 0px 20px 15px;"|Tags can be added to access details when you create/edit them. |
| − | + | ||
| − | + | ||
| − | + | ||
|} | |} | ||
{| | {| | ||
| − | |style="padding: 0px 0px 20px 25px;"|[[File: | + | |style="padding: 0px 0px 20px 25px;"|[[File:PM2_11_7_3.png]] |
|} | |} | ||
{| | {| | ||
| − | |style="padding: 0px 0px | + | |style="padding: 0px 0px 20px 15px;"|The '' 'Show Access Details' '' button will display a list of all access details with the specific tag assigned to it. |
| − | + | ||
| − | + | ||
| − | + | ||
| − | + | ||
| − | + | ||
|} | |} | ||
{| | {| | ||
| − | |style="padding: 0px 0px 20px 25px;"|[[File: | + | |style="padding: 0px 0px 20px 25px;"|[[File:PM2_11_7_1.png]] |
|} | |} | ||
{| | {| | ||
| − | |style="padding: 0px 0px | + | |style="padding: 0px 0px 20px 15px;"|The filtered access details can be managed just as they are in the '' '[[#Access_Details|Access Details]]' '' tab. |
| − | + | ||
| − | + | ||
| − | + | ||
| − | + | ||
|} | |} | ||
{| | {| | ||
| − | |style="padding: 0px 0px 20px 25px;"|[[File: | + | |style="padding: 0px 0px 20px 25px;"|[[File:PM2_11_7_2.png]] |
|} | |} | ||
| − | |||
{| | {| | ||
| − | |style="padding: | + | |style="padding: 0px 0px 20px 15px;"|The other action buttons allow you to change the tag's name or delete it. |
|} | |} | ||
{| | {| | ||
| − | |style="padding: 0px 0px | + | |style="padding: 0px 0px 20px 25px;"|[[File:PM2_11_8.png]] |
|} | |} | ||
{| | {| | ||
| − | |style="padding: 0px 0px | + | |style="padding: 0px 0px 20px 15px;"|Multiple tags can be deleted at once using the multi-select option. |
| − | + | ||
| − | + | ||
| − | + | ||
| − | + | ||
|} | |} | ||
{| | {| | ||
| − | |style="padding: 0px 0px 30px 25px;"|[[File: | + | |style="padding: 0px 0px 20px 25px;"|[[File:PM2_11_9.png]] |
| + | |} | ||
| + | {| | ||
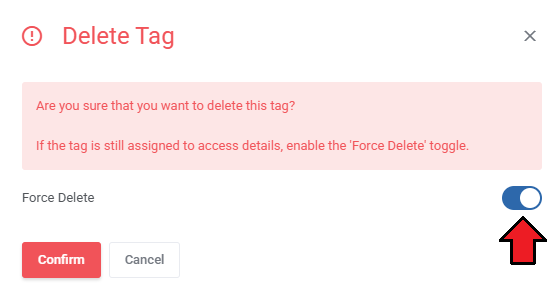
| + | |style="padding: 0px 0px 20px 15px;"|If you want to delete a tag, that is still associated with an access detail, you will have to toggle the '' 'Force Delete' '' option. | ||
| + | |} | ||
| + | {| | ||
| + | |style="padding: 0px 0px 30px 25px;"|[[File:PM2_11_10.png]] | ||
|} | |} | ||
| − | + | ==Tools== | |
| − | == | + | ===[https://www.docs.modulesgarden.com/Translations_Tool Translations]=== |
{| | {| | ||
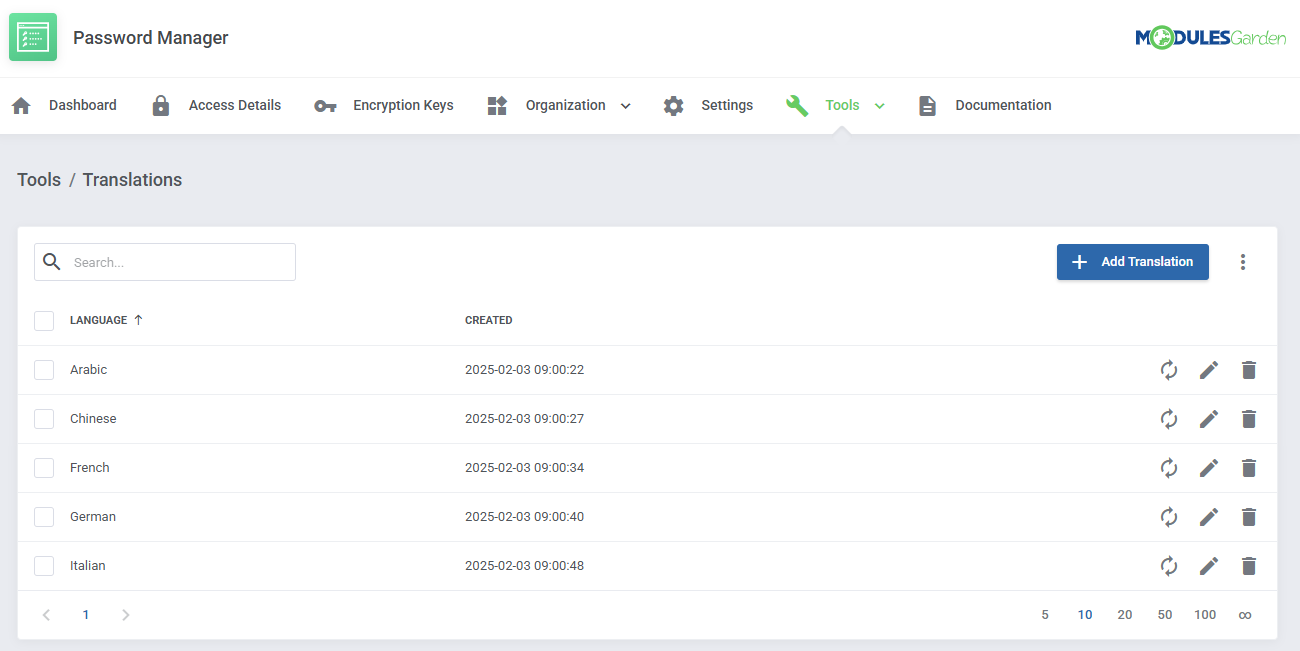
| − | |style="padding: 10px 0px | + | |style="padding: 10px 0px 15px 15px;"|Customizing language files is now extremely easy with the '' "Translations" '' tool that is now available directly in the addon.<br.> Its user-friendly design makes managing various language file tweaks a smooth and efficient process. <br/> |
| + | Prepare translations for the original English files with this handy built-in tool. For specific instruction on how to use this tool please refer to its dedicated article, you will find it [https://www.docs.modulesgarden.com/Translations_Tool here]. | ||
|} | |} | ||
{| | {| | ||
| − | |style="padding: 0px 0px | + | |style="padding: 0px 0px 30px 25px;"|[[File:PM2_16_0.png]] |
|} | |} | ||
| + | |||
| + | ===Access Control=== | ||
{| | {| | ||
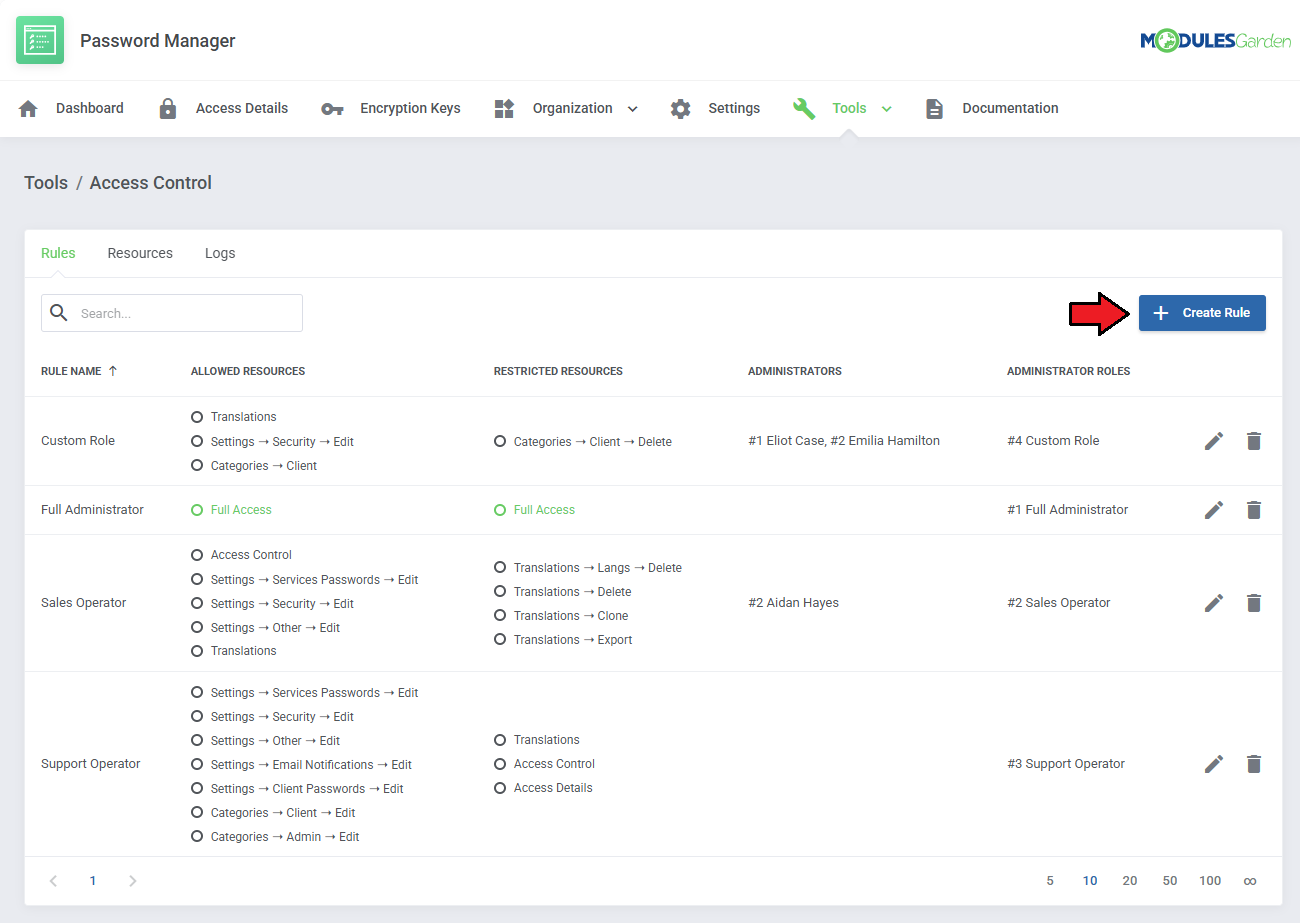
| − | |style="padding: 10px 0px | + | |style="padding: 10px 0px 15px 15px;"|The '' 'Access Control' '' tool allows you to manage and restrict admin access to specific sections and features within the module.<br/> You can create rules to grant or deny access to resources, ensuring each team member has appropriate permissions.<br/> It also tracks admin activity through detailed logs, offering clear accountability. This tool is available in several WHMCS addons.<br/> |
| + | For detailed instructions, refer to the dedicated article [https://www.docs.modulesgarden.com/Access_Control_Tool here]. | ||
|} | |} | ||
{| | {| | ||
| − | |style="padding: 0px 0px 30px 25px;"|[[File: | + | |style="padding: 0px 0px 30px 25px;"|[[File:PM2_17_0.png]] |
| + | |} | ||
| + | |||
| + | ===[https://www.docs.modulesgarden.com/Logs Logs]=== | ||
| + | {| | ||
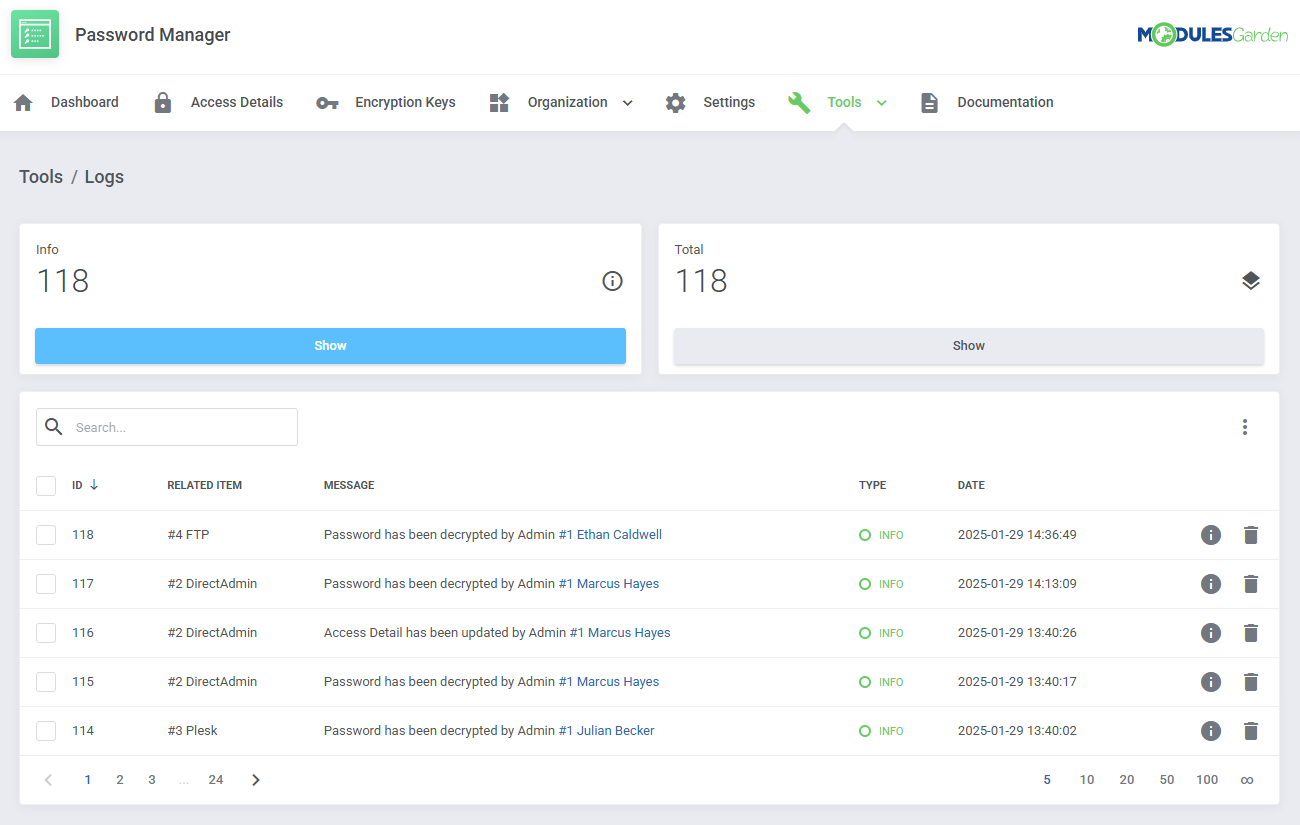
| + | |style="padding: 10px 0px 15px 15px;"|The '' 'Logs' '' tool provides a structured way to track and manage module activity.<br/> | ||
| + | It allows filtering logs by type, viewing detailed records, exporting data, and configuring automatic deletion rules. A bulk delete option is also available for easier management.<br/> | ||
| + | |||
| + | For detailed instructions on using this tool, refer to its dedicated article [https://www.docs.modulesgarden.com/Logs here]. | ||
| + | |} | ||
| + | {| | ||
| + | |style="padding: 0px 0px 30px 25px;"|[[File:PM2_L.png]] | ||
|} | |} | ||
| − | |||
==Dashboard== | ==Dashboard== | ||
{| | {| | ||
| − | |style="padding: 10px 0px 20px 15px;"|A short summary | + | |style="padding: 10px 0px 20px 15px;"|For fresh users, the dashboard includes a first-time configuration guide, make sure to read it if you need a reminder. |
| + | |} | ||
| + | {| | ||
| + | |style="padding: 0px 0px 20px 25px;"|[[File:PM2_16_1.png]] | ||
| + | |} | ||
| + | {| | ||
| + | |style="padding: 0px 0px 20px 15px;"|If you wish, you can hide the guide under '' 'Additional Actions' '' → '' 'Settings'.'' | ||
| + | |} | ||
| + | {| | ||
| + | |style="padding: 0px 0px 20px 25px;"|[[File:PM2_16_2.png]] | ||
| + | |} | ||
| + | {| | ||
| + | |style="padding: 0px 0px 20px 15px;"|A short summary of the clients' and administrators' access details and categories is available on the dashboard as well. | ||
|} | |} | ||
{| | {| | ||
| − | |style="padding: 0px 0px 30px 25px;"|[[File: | + | |style="padding: 0px 0px 30px 25px;"|[[File:PM2_16_3.png]] |
|} | |} | ||
==Administrator Area Integration== | ==Administrator Area Integration== | ||
{| | {| | ||
| − | |style="padding: 10px 0px 15px 15px;"|Our module integrates with your administrator area as well as client area.<br /> | + | |style="padding: 10px 0px 15px 15px;"|Our module integrates with your administrator area as well as the client area.<br /> |
| − | Passwords of any client can be viewed | + | Passwords of any client can be viewed on the summary page as it is shown below, but only if you enable this option in '' 'Settings' '' section in the addon. <br/> You may add new passwords directly from this site, simply press '' 'Add Details' '' and you will be moved to the '' 'New Access Details' '' form. |
|} | |} | ||
{| | {| | ||
| Line 395: | Line 552: | ||
|} | |} | ||
{| | {| | ||
| − | |style="padding: 0px 0px 15px 15px;"|Your support operators are also able to access clients passwords from within ticket.<br /> | + | |style="padding: 0px 0px 15px 15px;"|Your support operators are also able to access clients' passwords from within the ticket.<br /> |
| − | As you may have noticed, these places allow them not only to see passwords | + | As you may have noticed, these places allow them not only to see passwords but also to create new ones.<br/> |
| − | Note: this tab is available only if option has been enabled in the addon. | + | Note: this tab is available only if the dedicated option has been enabled in the addon. |
|} | |} | ||
{| | {| | ||
| Line 406: | Line 563: | ||
{| | {| | ||
|style="padding: 10px 0px 15px 15px;"|Your clients can access client area password management page through '' 'Password Manager' '' button in navigation bar.<br /> | |style="padding: 10px 0px 15px 15px;"|Your clients can access client area password management page through '' 'Password Manager' '' button in navigation bar.<br /> | ||
| − | To allow integration with client area, a proper option must be enabled in '' 'Addon' → 'Settings' → 'Other'. '' | + | To allow integration with the client area, a proper option must be enabled in '' 'Addon' → 'Settings' → 'Other'. '' |
|} | |} | ||
{| | {| | ||
| Line 412: | Line 569: | ||
|} | |} | ||
{| | {| | ||
| − | |style="padding: 0px 0px 15px 15px;"|In '' 'Password Manager', '' your clients can view access details depending on the settings configured by the administrator and level of access allowed for the client.<br/> Underneath you can see a client's area with full access to any option given.<br/> | + | |style="padding: 0px 0px 15px 15px;"|In '' 'Password Manager', '' your clients can view access details depending on the settings configured by the administrator and the level of access allowed for the client.<br/> Underneath you can see a client's area with full access to any option given.<br/> |
| − | As you can see, there are | + | As you can see, there are four sections available: '' 'Owned Passwords', 'Shared Passwords', 'Products/Services Passwords' '' and '' 'Categories'.'' |
|} | |} | ||
{| | {| | ||
| − | |style="padding: 0px 0px | + | |style="padding: 0px 0px 30px 25px;"|[[File:PM2_19.png]] |
|} | |} | ||
===Owned Passwords=== | ===Owned Passwords=== | ||
{| | {| | ||
| − | |style="padding: 0px | + | |style="padding: 10px 0px 15px 15px;"|If you enabled '' 'Client Private Passwords' '' your clients will be allowed to view, manage and create their own access details.<br /> |
Please note that '' 'Shared' '' column with information on whether the details are allowed for administrators or not is available only if you select '' 'Shared Access' '' in the addon's settings. | Please note that '' 'Shared' '' column with information on whether the details are allowed for administrators or not is available only if you select '' 'Shared Access' '' in the addon's settings. | ||
|} | |} | ||
| Line 428: | Line 585: | ||
{| | {| | ||
|style="padding: 0px 0px 15px 15px;"|Preview the password and use action buttons to manage the access details: | |style="padding: 0px 0px 15px 15px;"|Preview the password and use action buttons to manage the access details: | ||
| − | + | #Log into URL<br/> | |
| − | + | #See the details<br/> | |
| − | + | #Edit the details<br/> | |
| − | + | #Remove the access details | |
|} | |} | ||
{| | {| | ||
| Line 438: | Line 595: | ||
====Add Access Details==== | ====Add Access Details==== | ||
{| | {| | ||
| − | |style="padding: 10px 0px 20px 15px;"|To create access details, press '' 'Add | + | |style="padding: 10px 0px 20px 15px;"|To create access details, press '' 'Add Password' '' button as shown on the following screen. |
|} | |} | ||
{| | {| | ||
| Line 444: | Line 601: | ||
|} | |} | ||
{| | {| | ||
| − | |style="padding: 0px 0px 15px 15px;"|Type the new password name and enter access details into '' 'Username' '' and '' 'Password'. ''You can also generate random password.<br /> | + | |style="padding: 0px 0px 15px 15px;"|Type the new password name and enter access details into '' 'Username' '' and '' 'Password'. ''You can also generate a random password.<br /> |
| − | Optionally, provide '' 'Website URL' '' and '' ' | + | Optionally, provide '' 'Website URL' '' and '' 'Login URL' '' to be allowed to log into your site directly from the'' 'Password Manager' '' page. <br/> |
| − | Leave a note if you need. | + | Leave a note if you need it. |
|} | |} | ||
{| | {| | ||
| Line 452: | Line 609: | ||
|} | |} | ||
{| | {| | ||
| − | |style="padding: 0px 0px 15px 15px;"|You may now move to '' 'Sharing' '' section. There, you can decide which category the new access details will be assigned to.<br/> Choose one from the dropdown menu or select '' ' | + | |style="padding: 0px 0px 15px 15px;"|You may now move to '' 'Sharing' '' section. There, you can decide which category the new access details will be assigned to.<br/> Choose one from the dropdown menu or select '' 'Unassigned' '' to leave it without any category. Depending on the category you select, the access details will be available for those specified in its configuration.<br/> |
Additionally, define which actions can be made on shared passwords.<br/> | Additionally, define which actions can be made on shared passwords.<br/> | ||
Moreover, you can specify custom email addresses to share your credentials with other customers. | Moreover, you can specify custom email addresses to share your credentials with other customers. | ||
| Line 461: | Line 618: | ||
{| | {| | ||
|style="padding: 0px 0px 15px 15px;"|Finally, in '' ' Notifications' '' section, set up conditions of delivering password notifications. Enable this option if needed and define when the reminders should be sent.<br/> You can also define whether you wish to receive the new password in the message.<br/> | |style="padding: 0px 0px 15px 15px;"|Finally, in '' ' Notifications' '' section, set up conditions of delivering password notifications. Enable this option if needed and define when the reminders should be sent.<br/> You can also define whether you wish to receive the new password in the message.<br/> | ||
| − | Do not forget to press '' ' | + | Do not forget to press '' 'Save Changes' '' to finish. |
|} | |} | ||
{| | {| | ||
| − | |style="padding: 0px 0px | + | |style="padding: 0px 0px 30px 25px;"|[[File:PM2_25.png]] |
|} | |} | ||
| + | |||
| + | ====Additional Actions==== | ||
{| | {| | ||
| − | |style="padding: | + | |style="padding: 10px 0px 20px 15px;"|If the administrator has enabled the '' 'Master Password' '' option in '' [[#Client.27s_Private_Passwords|'Client's Private Passwords']] '', the clients will have the ability to set additional protection for their owned passwords. |
|} | |} | ||
{| | {| | ||
| Line 474: | Line 633: | ||
{| | {| | ||
|style="padding: 0px 0px 15px 15px;"|Simply provide and confirm a new password that will protect the access to owned passwords.<br/> | |style="padding: 0px 0px 15px 15px;"|Simply provide and confirm a new password that will protect the access to owned passwords.<br/> | ||
| − | ''Note - if you lose or forget this password, you will also lose | + | ''Note - if you lose or forget this password, you will also lose access to your saved credentials in this section!'' |
|} | |} | ||
{| | {| | ||
| Line 480: | Line 639: | ||
|} | |} | ||
{| | {| | ||
| − | |style="padding: 0px 0px 20px 15px;"|From now on, access to the '' 'Owned Passwords' '' section will require the master password. | + | |style="padding: 0px 0px 20px 15px;"|From now on, access to the '' 'Owned Passwords' '' section will require the master password. |
|} | |} | ||
{| | {| | ||
| Line 489: | Line 648: | ||
|} | |} | ||
{| | {| | ||
| − | |style="padding: 0px 0px | + | |style="padding: 0px 0px 20px 25px;"|[[File:PM2_37_1.png]] |
| + | |} | ||
| + | {| | ||
| + | |style="padding: 0px 0px 20px 15px;"|Among the additional actions you will also find a feature that allows you to export the passwords to a file. Press and the generated file will be saved on your disk. | ||
| + | |} | ||
| + | {| | ||
| + | |style="padding: 0px 0px 20px 25px;"|[[File:PM2_37_2.png]] | ||
| + | |} | ||
| + | {| | ||
| + | |style="padding: 0px 0px 15px 15px;"|You may also import your private passwords. Press the button and find a ready file to upload the passwords to the group of '' 'Owned Passwords'. ''<br/> | ||
| + | You may upload files in a CSV format only. | ||
| + | |} | ||
| + | {| | ||
| + | |style="padding: 0px 0px 20px 25px;"|[[File:PM2_37_3.png]] | ||
| + | |} | ||
| + | {| | ||
| + | |style="padding: 0px 0px 30px 25px;"|[[File:PM2_37_4.png]] | ||
|} | |} | ||
===Shared Passwords=== | ===Shared Passwords=== | ||
{| | {| | ||
| − | |style="padding: | + | |style="padding: 10px 0px 20px 15px;"|Under '' 'Shared Passwords' '' your clients can view and manage access details that administrators shared with them, permitted to view. |
|} | |} | ||
{| | {| | ||
| Line 501: | Line 676: | ||
{| | {| | ||
|style="padding: 0px 0px 15px 15px;"|Preview the password and use action buttons to manage the access details: | |style="padding: 0px 0px 15px 15px;"|Preview the password and use action buttons to manage the access details: | ||
| − | + | #Log into the URL if it has been provided<br/> | |
| − | + | #See the details<br/> | |
| − | + | #Edit the details ''(General/Sharing/Notifications)''<br/> | |
| − | + | #Remove the details<br/> | |
| + | #Copy the password/ username to the clipboard | ||
|} | |} | ||
{| | {| | ||
| Line 510: | Line 686: | ||
|} | |} | ||
| − | ===Product Passwords=== | + | ===Product/Services Passwords=== |
{| | {| | ||
| − | |style="padding: 0px | + | |style="padding: 10px 0px 15px 15px;"|'' 'Products/Services Passwords' '' section includes any access details to your client's products that they own.<br/>For convenience, clients can also assign additional passwords to selected services similarly like in '' 'Owned Passwords' ''section.<br/> |
| − | Remember that as an administrator, you have to enable this option in the '' 'Addon' → 'Settings'→ ' | + | Remember that as an administrator, you have to enable this option in the '' 'Addon' → 'Settings'→ 'Products/Services Passwords'. '' |
|} | |} | ||
{| | {| | ||
| − | |style="padding: 0px 0px | + | |style="padding: 0px 0px 20px 25px;"|[[File:PM2_28.png]] |
| + | |} | ||
| + | {| | ||
| + | |style="padding: 0px 0px 20px 15px;"|Furthermore, you may export the passwords bundle into a file or, the other way round, import your passwords from a CSV file to the module. | ||
| + | |} | ||
| + | {| | ||
| + | |style="padding: 0px 0px 30px 25px;"|[[File:PM2_28_1.png]] | ||
|} | |} | ||
===Categories=== | ===Categories=== | ||
{| | {| | ||
| − | |style="padding: 10px 0px | + | |style="padding: 10px 0px 15px 15px;"|Move to '' 'Categories' '' tab. There is a list of the created by the client categories which are used to allocate passwords for sharing.<br/> |
| − | To create a new one, press '' 'Add Category' '' button. | + | To create a new one, press the'' 'Add Category' '' button. |
|} | |} | ||
{| | {| | ||
| Line 535: | Line 717: | ||
|} | |} | ||
{| | {| | ||
| − | |style="padding: 0px 0px | + | |style="padding: 0px 0px 20px 15px;"|Clients may edit their categories, and delete and add new ones any time they wish. |
|} | |} | ||
{| | {| | ||
| Line 541: | Line 723: | ||
|} | |} | ||
{| | {| | ||
| − | |style="padding: 0px 0px | + | |style="padding: 0px 0px 20px 15px;"|Any categories created by clients will be automatically visible for administrators in the addon where you can manage them. |
|} | |} | ||
{| | {| | ||
|style="padding: 0px 0px 30px 25px;"|[[File:PM2_32.png]] | |style="padding: 0px 0px 30px 25px;"|[[File:PM2_32.png]] | ||
|} | |} | ||
| − | + | ||
| − | = | + | =Tips= |
{| | {| | ||
| − | |style="padding: 10px 0px | + | |style="padding: 10px 0px 5px 15px;"|1. Some additional options under '' 'Addons' → 'Passwords Manager' → 'Settings' → 'Other' '' are by default enabled on the module activation.<br> |
| − | + | :If you change any of these settings you will lose access to some of the module's functionalities. | |
|} | |} | ||
{| | {| | ||
| − | |style="padding: 0px 0px | + | |style="padding: 0px 0px 5px 15px;"|2. Password Manager For WHMCS ensures full protection of your access details using its own security tools and WHMCS internal two-way encryption system. |
| + | :Note: the custom encryption key is stored in the'' 'configuration.php' '' file. | ||
|} | |} | ||
{| | {| | ||
| − | |style="padding: 0px 0px | + | |style="padding: 0px 0px 10px 15px;"|3. As this module supports a template system, any changes made in the module's template files will be saved after the upgrade process. |
|} | |} | ||
{| | {| | ||
| − | |style="padding: 0px 0px 30px | + | |style="padding: 0px 0px 30px 15px;"|4. Password Manager For WHMCS module is a perfect solution for all resellers whose aim is to provide license keys to their clients in the most secure way possible. |
|} | |} | ||
| − | |||
| − | = | + | =Update Instructions= |
{| | {| | ||
| − | |style="padding: 10px 0px | + | |style="padding: 10px 0px 30px 15px;"|An essential guidance through the process of updating the module is offered '''[https://www.docs.modulesgarden.com/How_To_Update_WHMCS_Module here]'''.<br/> |
| − | + | Ensure successful completion of the module update by carefully following each step, thereby preventing data loss or any unforeseen issues.<br/> Additionally, you will find a current list of supplementary actions necessary for a smooth update process there. | |
|} | |} | ||
| + | ==Module Upgrade From V3.3.X to V3.4.X== | ||
{| | {| | ||
| − | |style="padding: 0px | + | |style="padding: 10px 0px 30px 15px;"|Upgrading from version V3.3.X to 3.4.X requires additional steps due to the changes in the module structure. Please follow the instructions carefully to ensure a smooth transition. |
| − | + | # Optionally backup your language files and license.<br/> | |
| − | + | # Delete all old module files.<br/> | |
| − | + | # Upload new module files from version 3.4.X.<br/> | |
| − | + | # Run the upgrade command: <pre>php -q whmcs/modules/addons/PasswordManager/cron/cron.php upgrade run "3.4.0" </pre> | |
| − | + | ||
| − | + | ||
| − | + | ||
|} | |} | ||
| − | = | + | =Upgrade Guide= |
{| | {| | ||
| − | |style="padding: 10px 0px 30px 15px;"| | + | |style="padding: 10px 0px 30px 15px;"|Seeking a solution that offers greater flexibility, customization tailored to your precise needs, and unrestricted availability?<br/> There is an option that not only proves to be cost-effective in the long run but also includes prioritized support services, making it a truly valuable investment.<br/> |
| − | + | ||
| − | + | Opt for the [https://www.modulesgarden.com/products/whmcs/password-manager#open-source-version Open Source version] of your Password Manager For WHMCS module to unlock these benefits.<br/> Simply click on either the '''Get Source Code''' or '''Upgrade To Lifetime''' button found on the product's page in our client area to complete the one-step upgrade process, with a '''dedicated discount''' already applied.<br/> | |
| + | |||
| + | Follow a [https://www.docs.modulesgarden.com/How_To_Upgrade_WHMCS_Module comprehensive guide] covering the transition process, the advantages it brings, and step-by-step instructions on what to do next after the order has been successfully finalized. | ||
|} | |} | ||
| + | |||
=Common Problems= | =Common Problems= | ||
{| | {| | ||
|style="padding: 10px 0px 30px 15px;"|'''1. When you have problems with connection, check whether your SELinux or firewall does not block ports.''' | |style="padding: 10px 0px 30px 15px;"|'''1. When you have problems with connection, check whether your SELinux or firewall does not block ports.''' | ||
|} | |} | ||
Latest revision as of 16:08, 11 February 2025
Contents |
[edit] About Password Manager For WHMCS
| Password Manager For WHMCS gives you the possibility to store fragile data and share them safely with your staff and clients. The module offers various mechanisms allowing you to smoothly manage sensitive data such as passwords or license keys, in the case of resellers, send email reminders or integrate with your WHMCS client area. |
- Admin Area Features:
| ✔ Create Private Access Details |
| ✔ Share Access Details With Clients & Administrators |
| ✔ Display Client Access Details In Clients Summary And Clients Tickets |
| ✔ Define Access To Clients Passwords: |
| ✔ Full Access - Any Administrator Can View Any Password |
| ✔ Restricted Access - Allowed Administrators Can View Any Password |
| ✔ Shared Access - Allowed Administrators Can View Shared Passwords |
| ✔ Store All Access Details In Encrypted Format: |
| ✔ Use Public Keys To Encrypt Passwords |
| ✔ Use Private Keys Or Secrets To Decrypt Passwords |
| ✔ Add Tags To Passwords |
| ✔ Add Notes To Passwords |
| ✔ Copy Usernames And Passwords Into Clipboard |
| ✔ Set Direct Links To Website Or Login Page With Password Used |
| ✔ Display Password Owner |
| ✔ Add And Manage Encryption Keys |
| ✔ Organize Passwords Using: |
| ✔ Categories |
| ✔ Tags |
| ✔ Toggle Availability Of Private Passwords And Product Passwords For Clients |
| ✔ Forbid Password Management For Chosen Clients/Client Groups |
| ✔ Exclude Products/Product Groups From Being Displayed |
| ✔ Allow Clients To Set Master Password For Owned Passwords |
| ✔ Define Client Passwords Limit Per User |
| ✔ Adjust Length And Characters For Random Password Generation |
| ✔ Notify Upon Password Change |
| ✔ Send Password Change Reminder |
| ✔ Define Email Templates For Reminder And Notification |
| ✔ Define Time Period For Password Change Reminder |
| ✔ Customize Module Language Files With "Translations" Tool |
| ✔ Control Staff Access Level To Specific Resources With ACL |
| ✔ View And Manage Logs |
- Client Area Features:
| ✔ Display And Manage Access Details |
| ✔ Display And Add Additional Access Details Of Owned Services |
| ✔ Generate Random Passwords |
| ✔ Copy Usernames And Passwords Into Clipboard |
| ✔ Import And Export Access Details In CSV Format |
| ✔ Share Access Details With Administrators And Clients |
| ✔ Create Shared Categories |
| ✔ Assign Categories To Access Details |
| ✔ Restrict Access To Owned Passwords Using Master Password |
- General Info:
| ✔ High-Level Security With Advanced Two-Way Encryption |
| ✔ Multi-Language Support With Custom Translations Tool |
| ✔ Supports PHP 8.2 Back To PHP 8.1 |
| ✔ Supports WHMCS Themes "Six", "Twenty-One", "Lara" And "Lagom WHMCS Client Theme" |
| ✔ Supports WHMCS V8.12 Back To WHMCS V8.9 |
| ✔ Requires ionCube Loader V13 Or Later |
| ✔ Easy Module Upgrade To Open Source Version |
[edit] Installation
| This tutorial will show you how to successfully install Password Manager For WHMCS. We will guide you step by step through the whole installation and configuration process. |
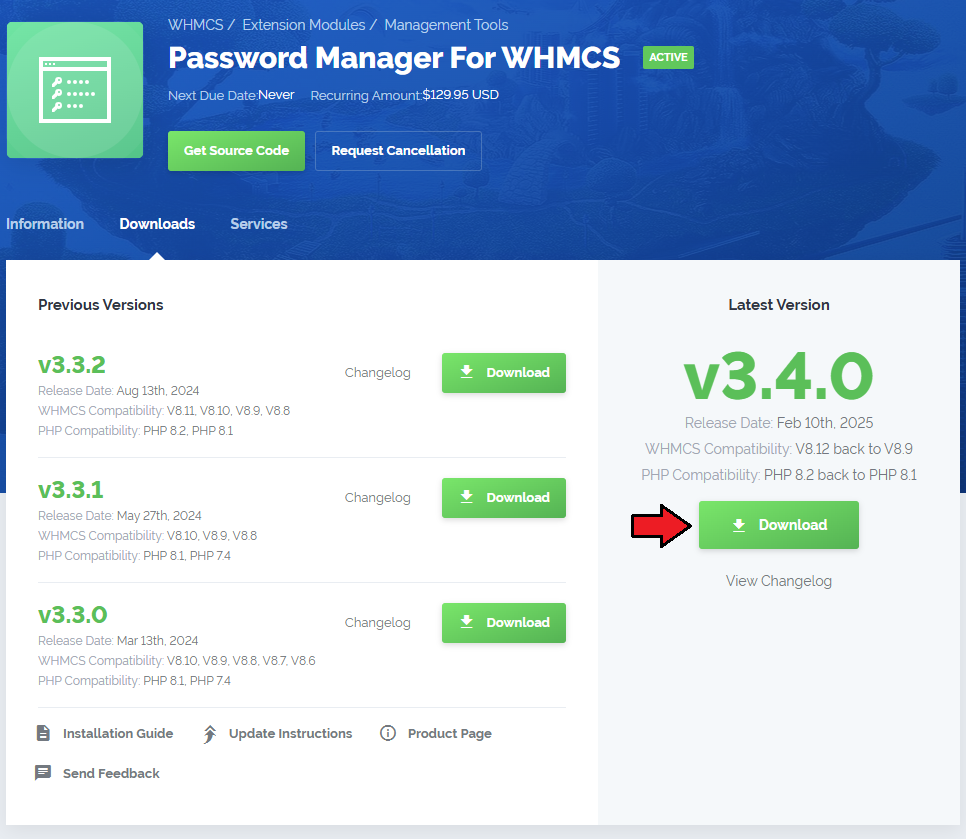
| 1. Log in to our client area and download the module. |
|
| 2. Extract the package and upload its content into the main WHMCS directory. The content of the package to upload should look like this. |
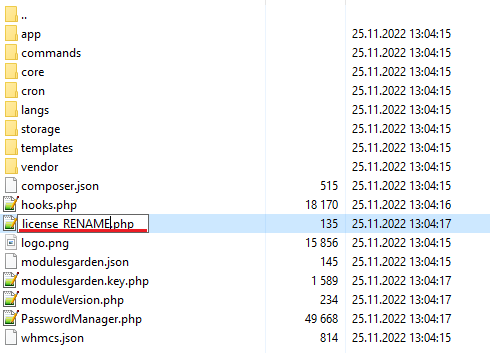
| 3. When you install Password Manager For WHMCS for the first time you have to rename 'license_RENAME.php' file. File is located in 'modules/addons/PasswordManager/license_RENAME.php'. Rename it from 'license_RENAME.php' to 'license.php'. |
|
| 4. In order to configure your license key, you have to edit a previously renamed 'license.php' file. Enter your license key between quotation marks as presented on the following screen. You can find your license key in our client area → 'My Products'. |

|
| 5. Remove all files from the 'templates_c' folder located in your WHMCS root directory. |
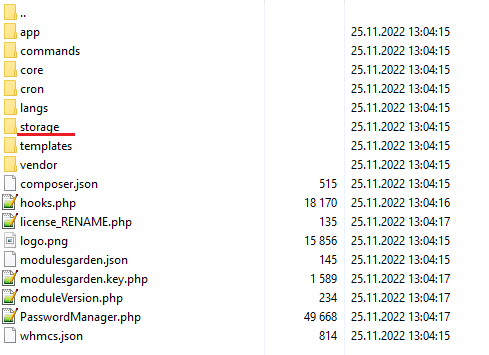
| 6. Now, set up the 'storage' folder as recursively writable. This folder is available at '/yourWHMCS/modules/addons/PasswordManager/'. |
|
| 7. Now you have to activate the module in your WHMCS system. Log in to your WHMCS administrator area. Go to 'System Settings' → 'Addon Modules'. |

|
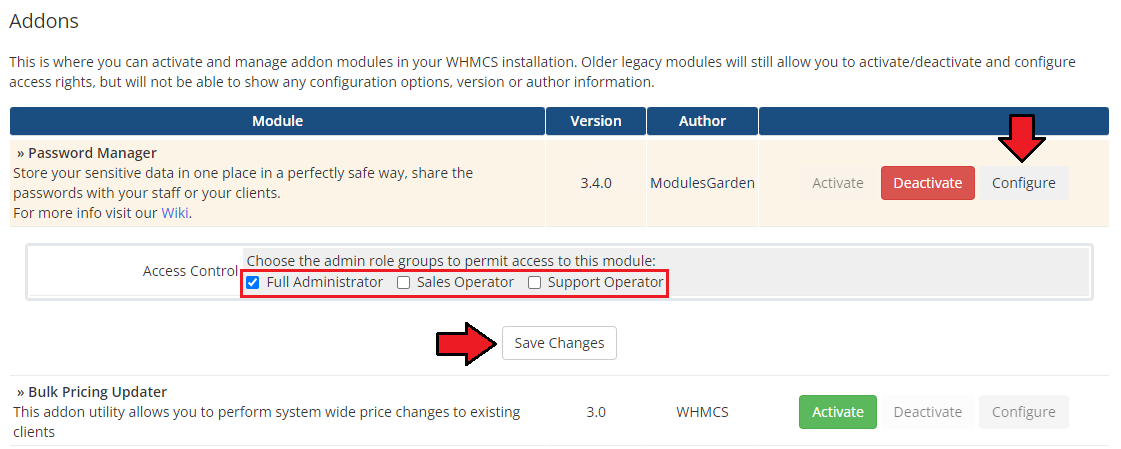
| 8. In the next step, you need to permit access to the module. To do so, click on the 'Configure' button, select administrator groups that should have access to this addon, and press 'Save Changes'. |
|
| 9. You have just successfully installed Password Manager For WHMCS! You can access your module under 'Addons' → 'Password Manager'. |
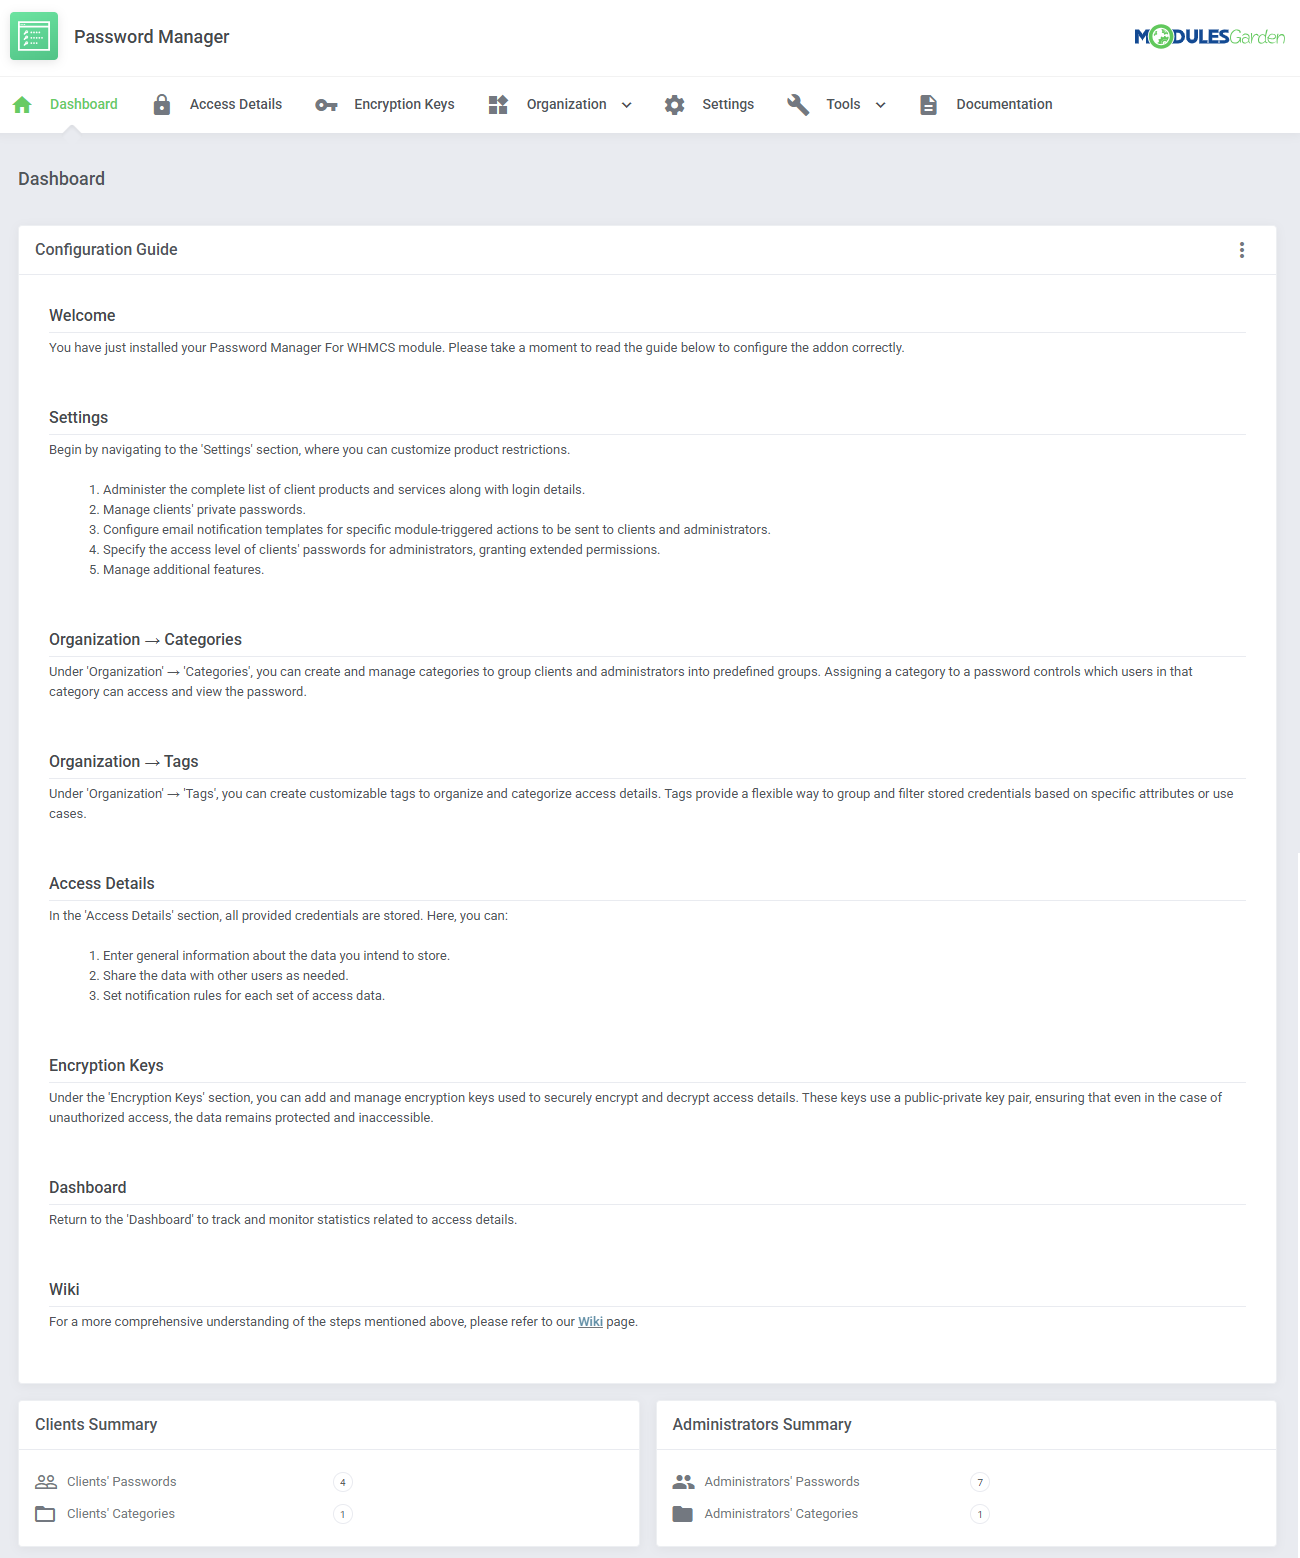
|
[edit] Configuration and Management
| Password Manager For WHMCS allows to safely store and share fragile data within your WHMCS. In this short guide, we will present you all the possibilities of our module. |
[edit] Configuration
| Before you start your work with our Password Manager For WHMCS, please move to 'Settings' tab, where you will configure access restrictions to product passwords, define email notifications and manage security settings. |
[edit] Products/Services Password
| First of all, decide whether you wish to allow to display of a full list of the client's products and services' login details by selecting the option: 'Client Products/Services Password'. If enabled, access details to client's products and services will be displayed in the client area → 'Password Manager'.
|
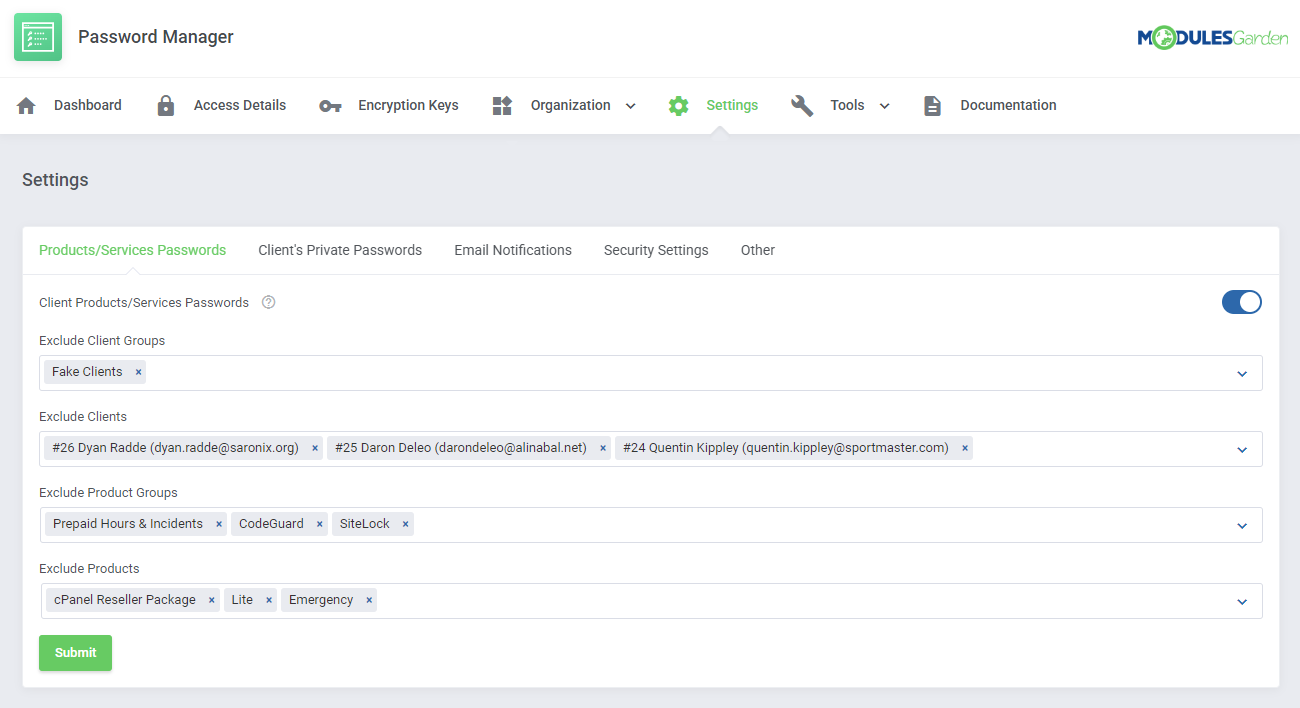
|
[edit] Client's Private Passwords
| The next section is dedicated to the management of private passwords of clients. If you wish to allow your clients to manage their personal access details, select the 'Client's Private Passwords' option. Your clients can be also permitted to set their own 'Master Password' to provide additional protection for their stored passwords. Next, move to the specific configuration:
|
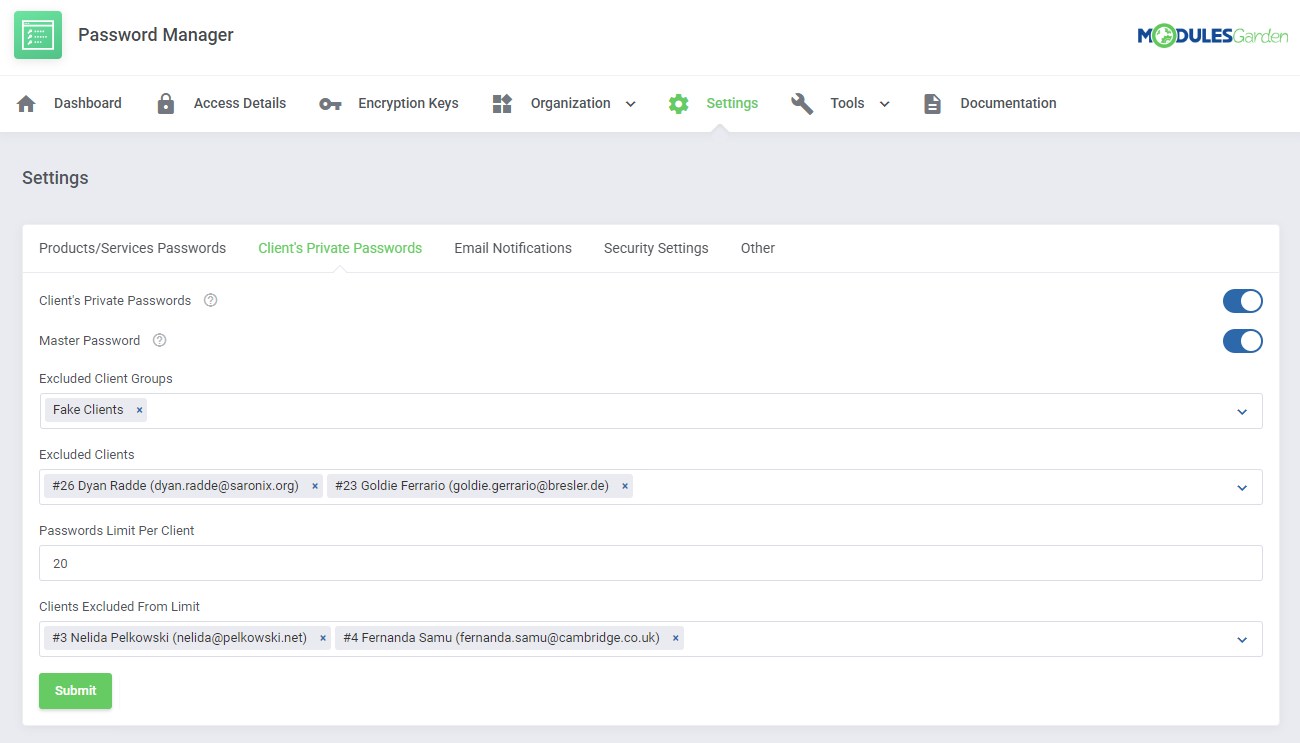
|
[edit] Email Notifications
This section allows you to define email notification templates that will be sent by the module on specific actions to clients and administrators.
Please note that you have to select templates for clients and administrators separately. If you want to disable any of the notifications, simply select 'Unassigned' from dropdown menu. |
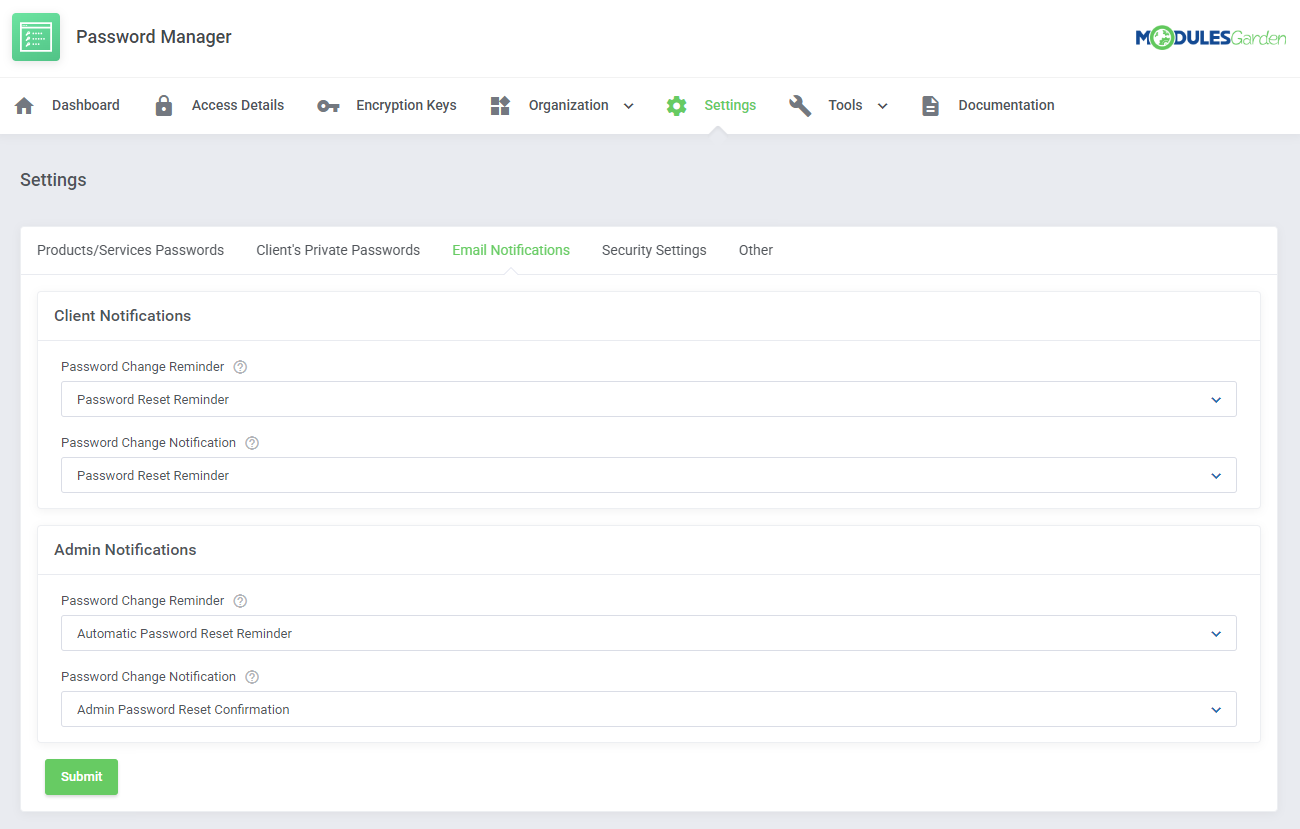
|
[edit] Security Settings
| Under the 'Security Settings' tab, you have to define the level of access to clients' passwords for administrators and grant them extended permissions. You may grant your administrators:
You may also select the administrator groups which will be granted 'Extended Permissions'. |
|
[edit] Other
In the very last section you may manage additional options that 'Password Manager For WHMCS ' has to offer.
Do not forget to submit the changes when you finish configuring the settings. |
|
[edit] Access Details
| 'Access Details' section includes a list of provided access details. Here you can create new access details and decide who can view them. Press 'Add Details' to begin. |
|
| Fill in 'Name', enter access details into 'Username' and 'Password'. You can also make your logging in easier by entering the website URL and website login URL consecutively into 'Website URL' and 'Login URL'. |
|
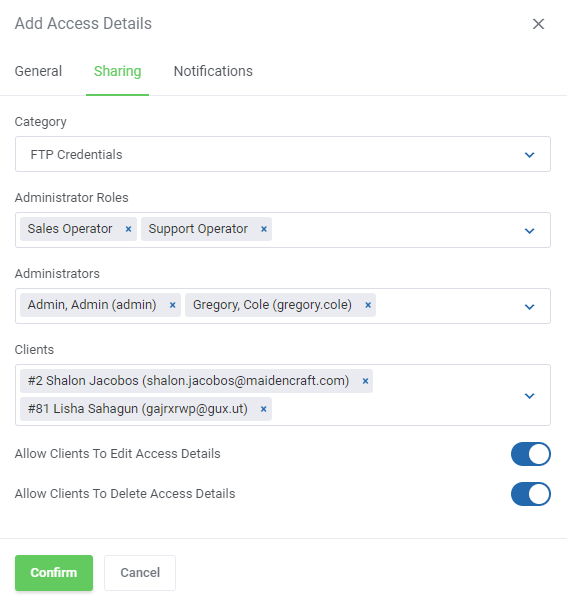
| In this section choose 'Category' and select 'Administrators', 'Administrator Roles' and 'Clients' who should have access to this details. Note: There is disjunction relation between 'Administrators' and 'Administrator Roles'. |
|
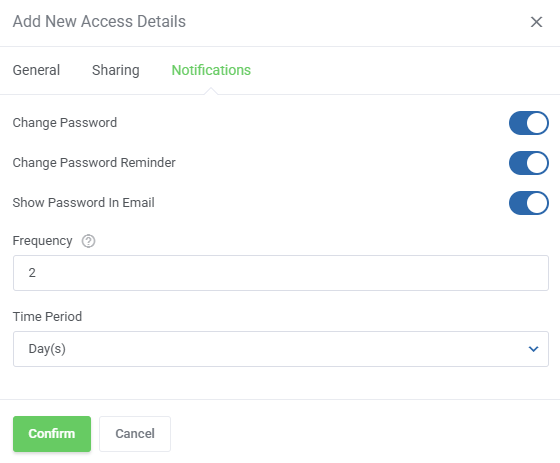
Finally, you can set up notifications rules.
You can inject the passwords into each of them (depending on the selected email template). |
|
[edit] Access Details List
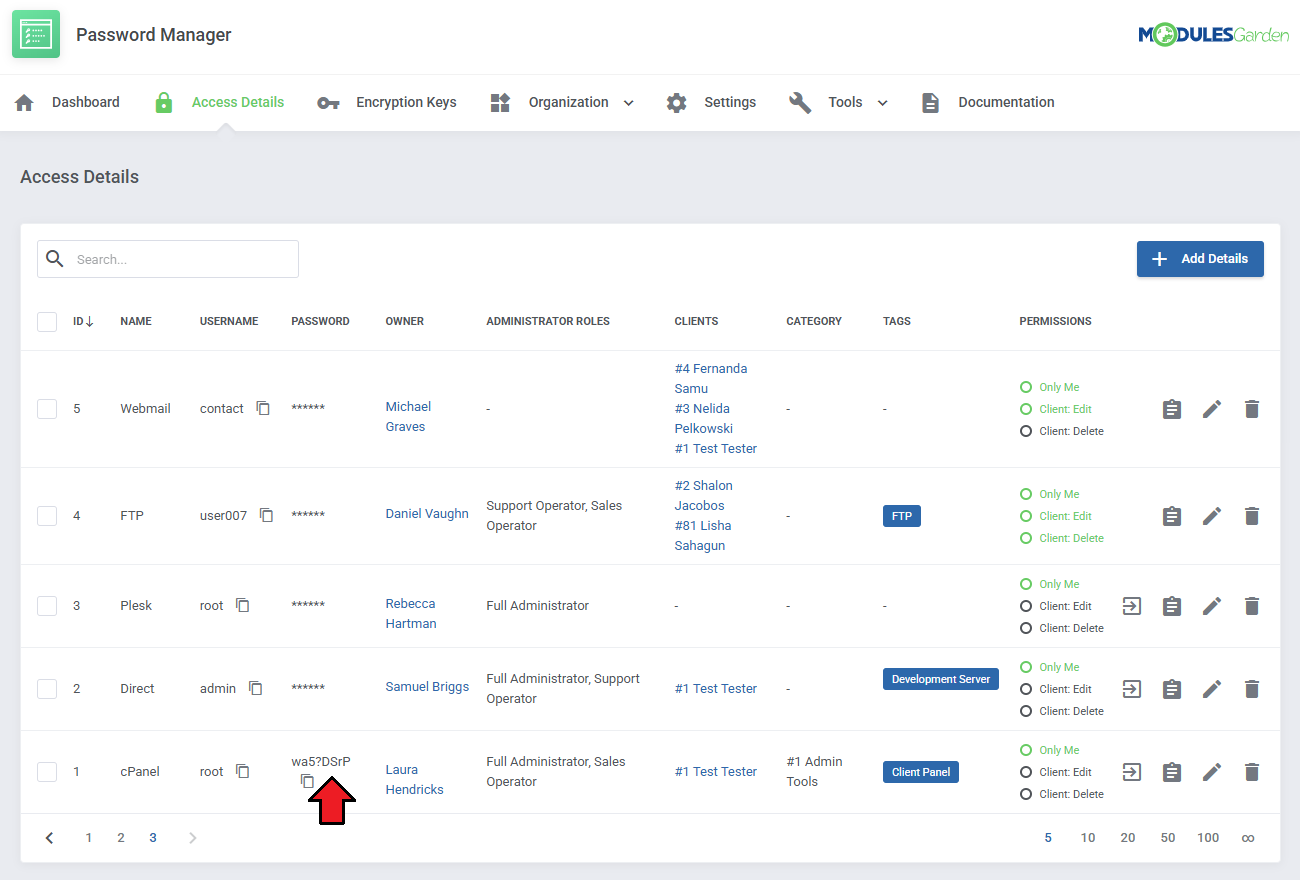
| On the list of access details you will see some basic info, such as ID and name, username and password with the possibility to view the password (press the hidden password to make it visible). Press the "Copy" icon and the password or username will be copied to the clipboard. There is also information on the access details owner and administrator groups allowed, list of clients allowed, and category assigned. |
|
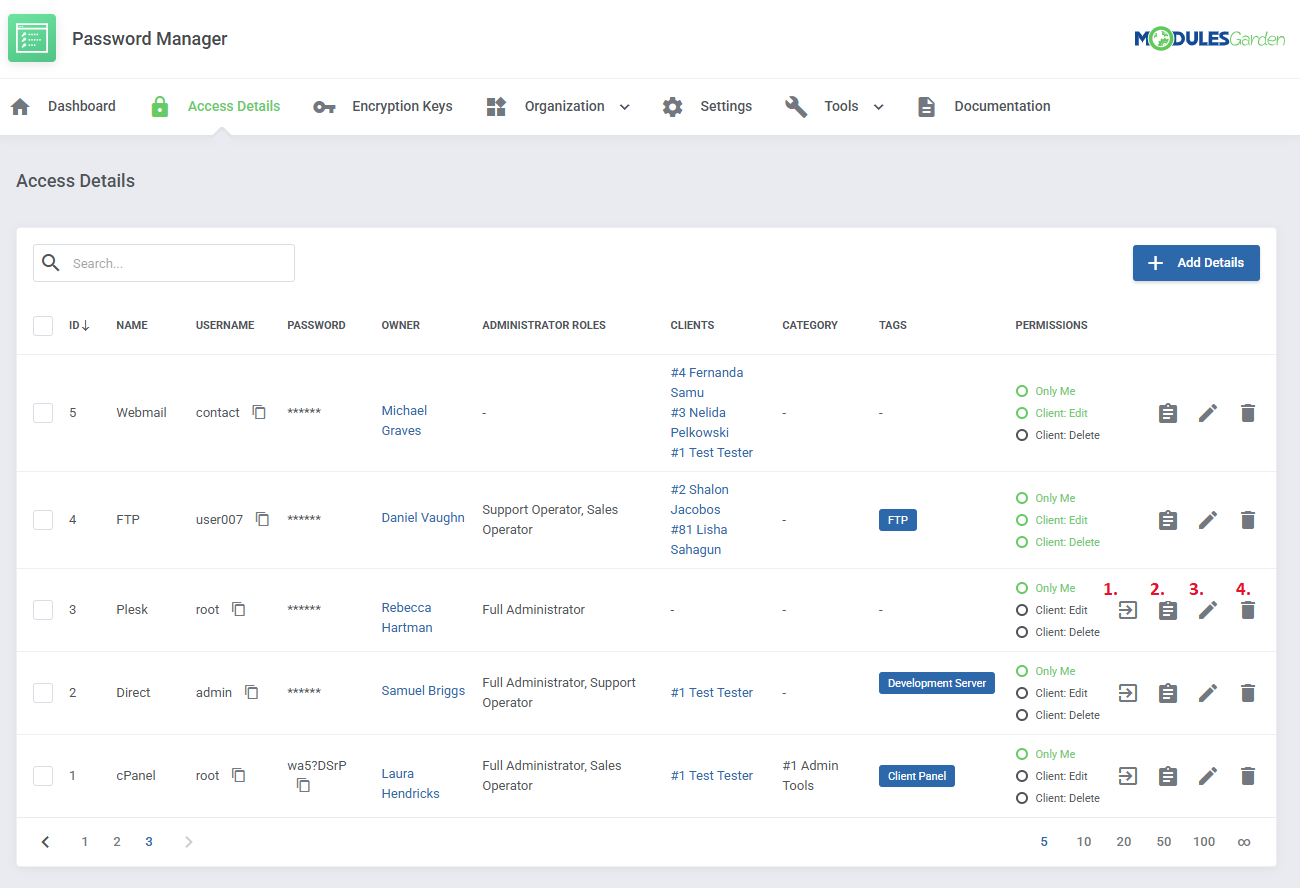
Use action buttons to manage the entered access details.
|
|
[edit] Encryption Keys
| Encryption Keys are an essential security feature for protecting sensitive data. They allow for the secure encryption and decryption of access details using a public-private key pair. Your data remains encrypted and inaccessible, even in the event of unauthorized access. Click 'Add Encryption Key' to register a new key. |
|
The following window includes these fields:
There are three possible configurations you can use:
|
|
| Edit or delete the keys using the action buttons. |
|
| Encryption keys can be attached to specific access details when you create/edit them. |
|
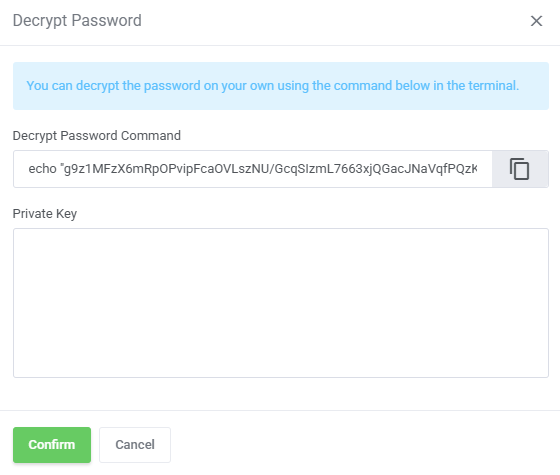
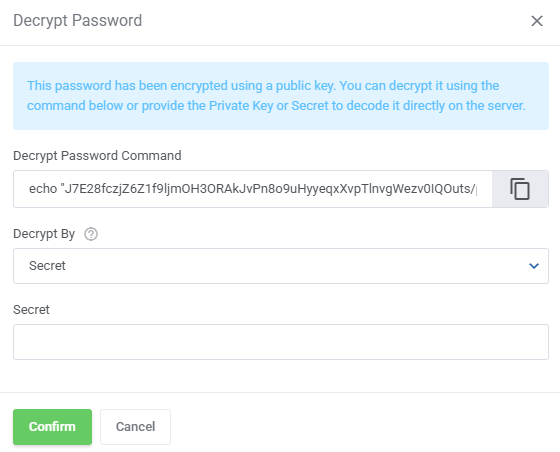
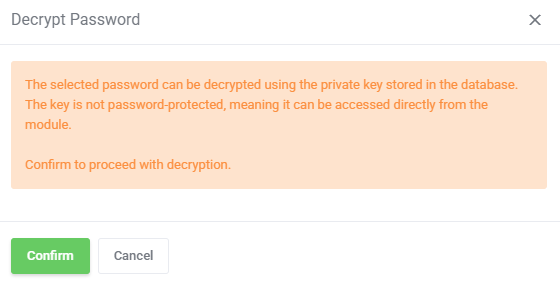
When attempting to reveal the password, the client/admin will see different windows depending on how the encryption key is set up.
|
|
|
|
|
|
[edit] Organization
[edit] Categories
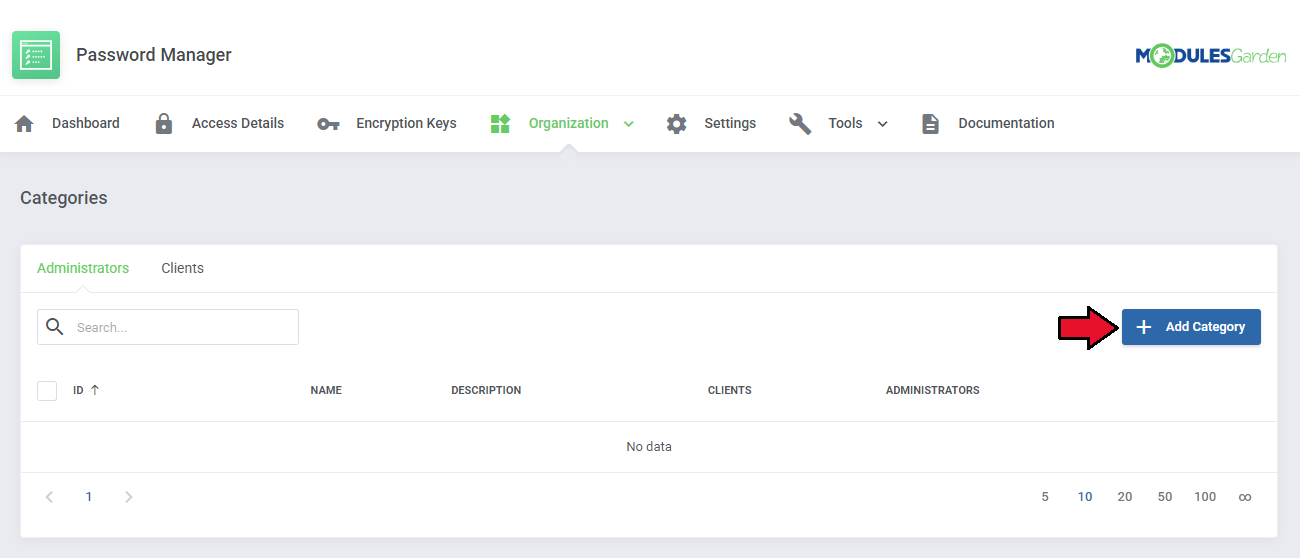
| Categories allow you to prepare predefined sets of clients and administrators. By assigning a category to a password, clients and administrators from that category are granted permission to view this password. |
|
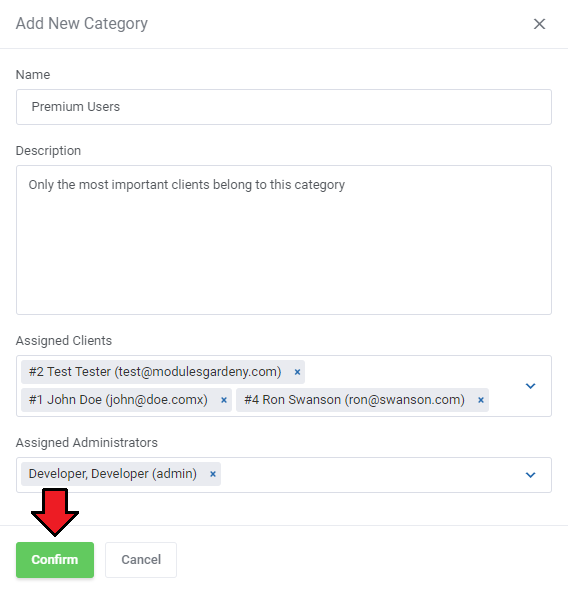
| Now, fill out the form with the category name and description. Assign desired clients and administrators to the category and press 'Confirm'. |
|
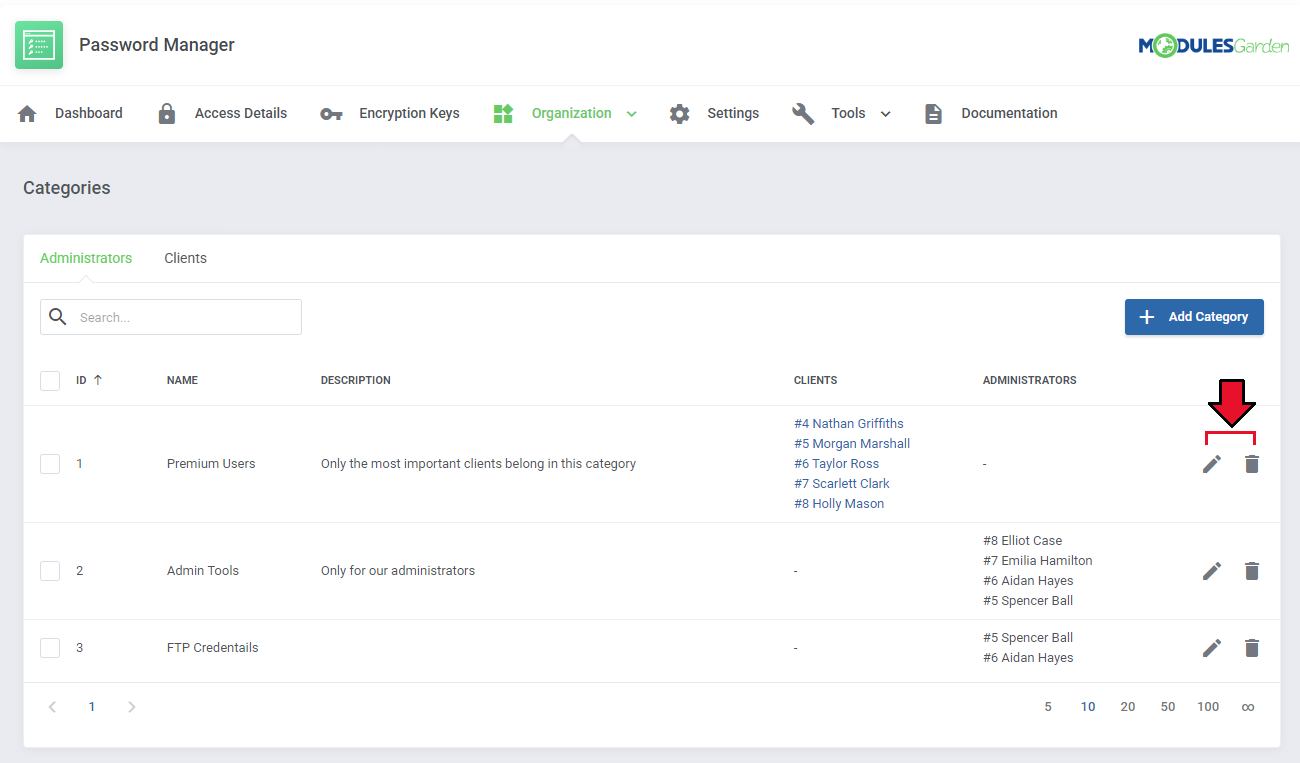
| The list of administrator categories with any details such as listed clients and administrators allowed to access the details is now visible. You may always edit the category or delete it if needed. Use the action buttons to do so. |
|
[edit] Tags
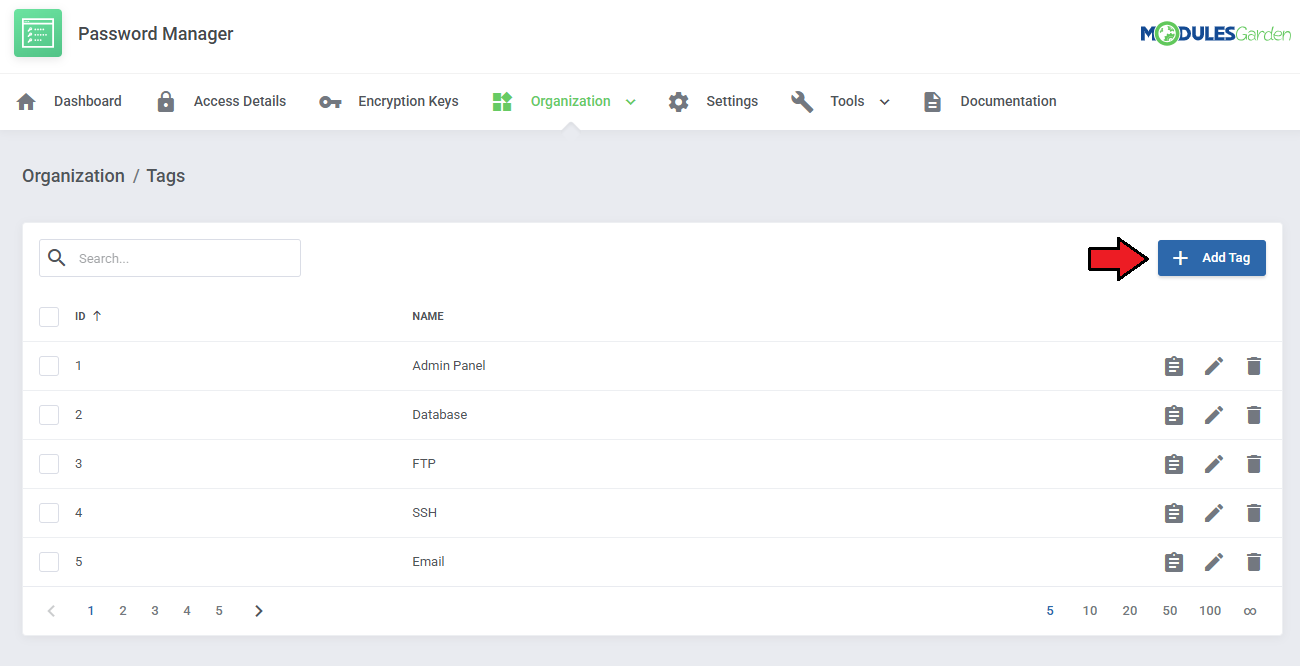
| Tags are customizable labels that allow you to organize and categorize access details. Unlike categories, tags provide a more flexible way to group and filter credentials according to specific attributes or use cases. Clients will not have access to your tags. |
|
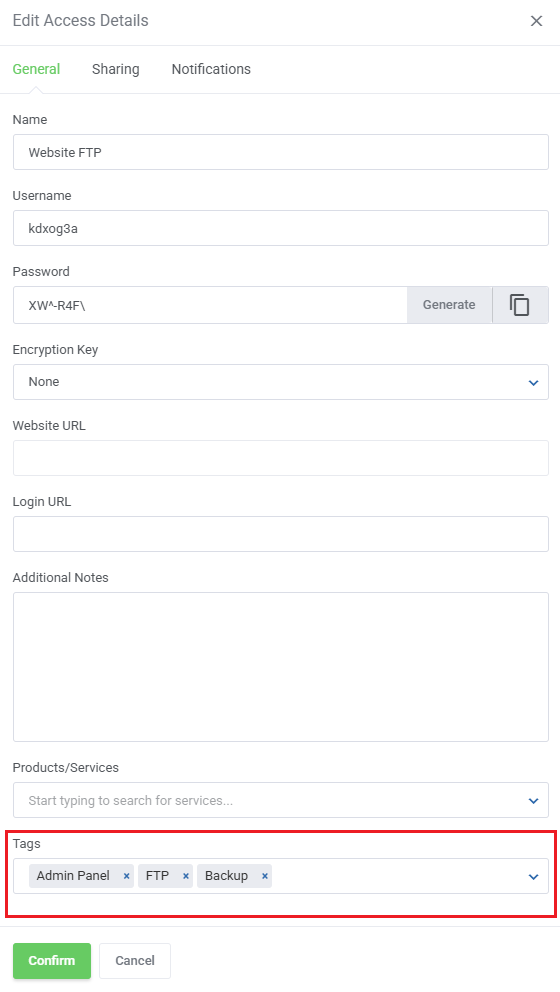
| Tags can be added to access details when you create/edit them. |
|
| The 'Show Access Details' button will display a list of all access details with the specific tag assigned to it. |
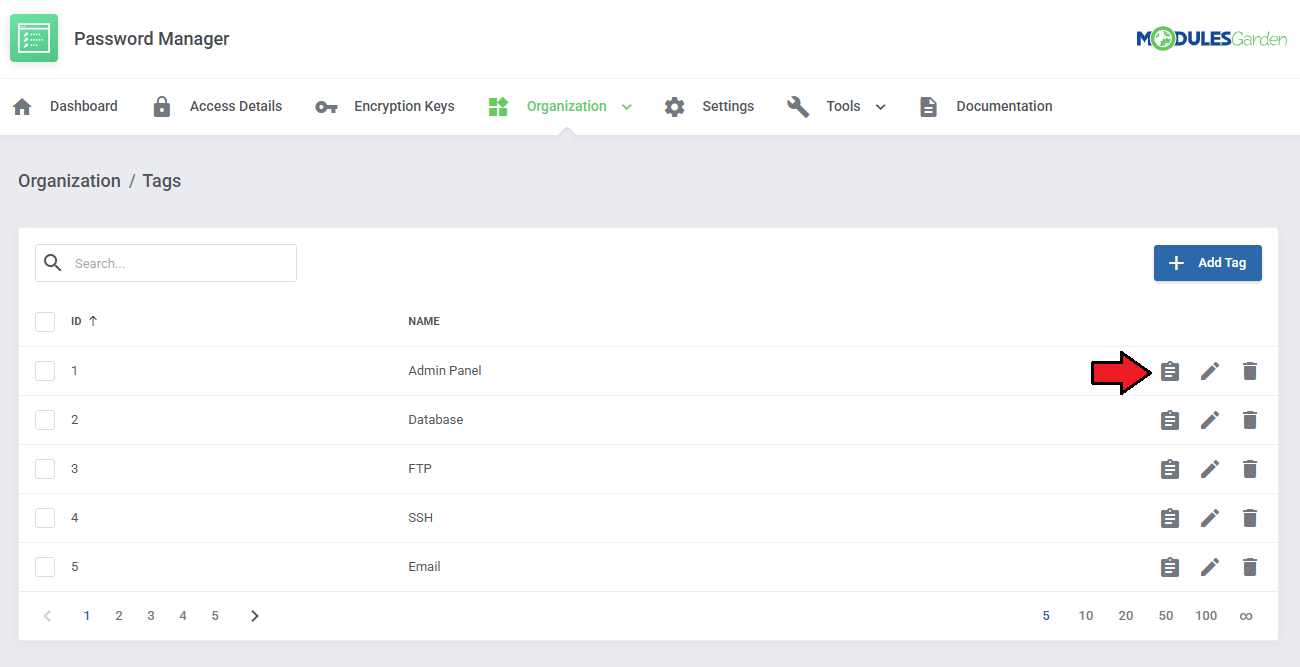
|
| The filtered access details can be managed just as they are in the 'Access Details' tab. |
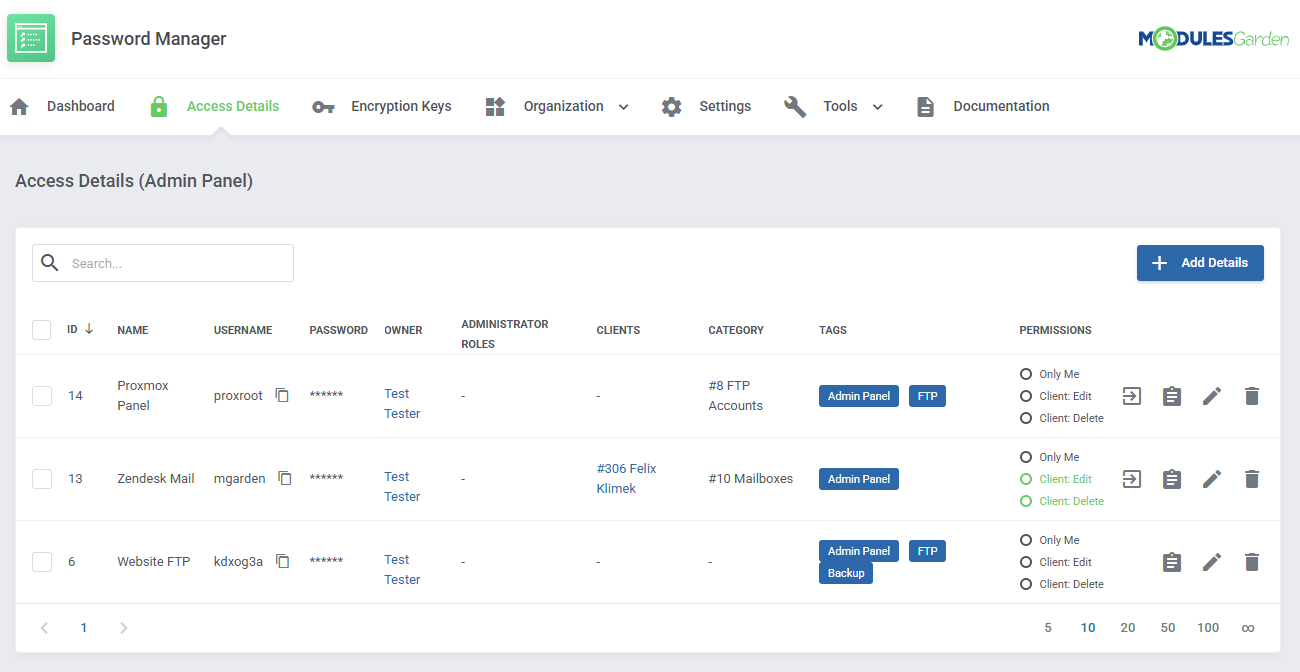
|
| The other action buttons allow you to change the tag's name or delete it. |
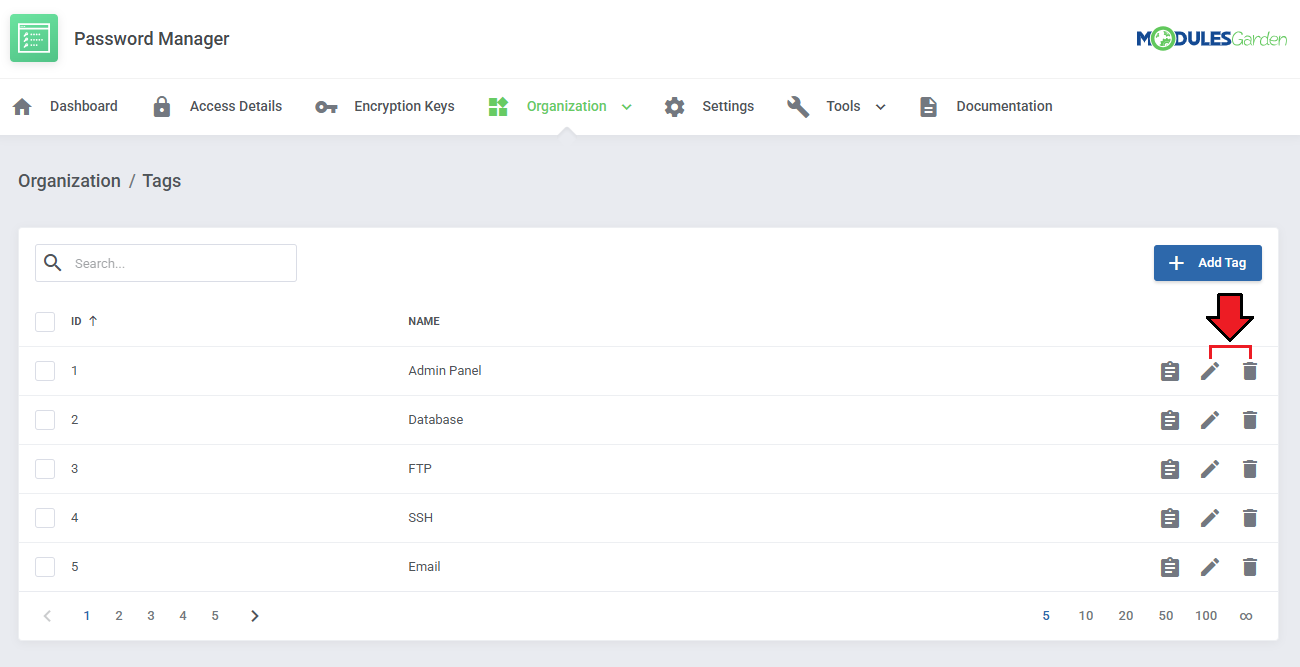
|
| Multiple tags can be deleted at once using the multi-select option. |
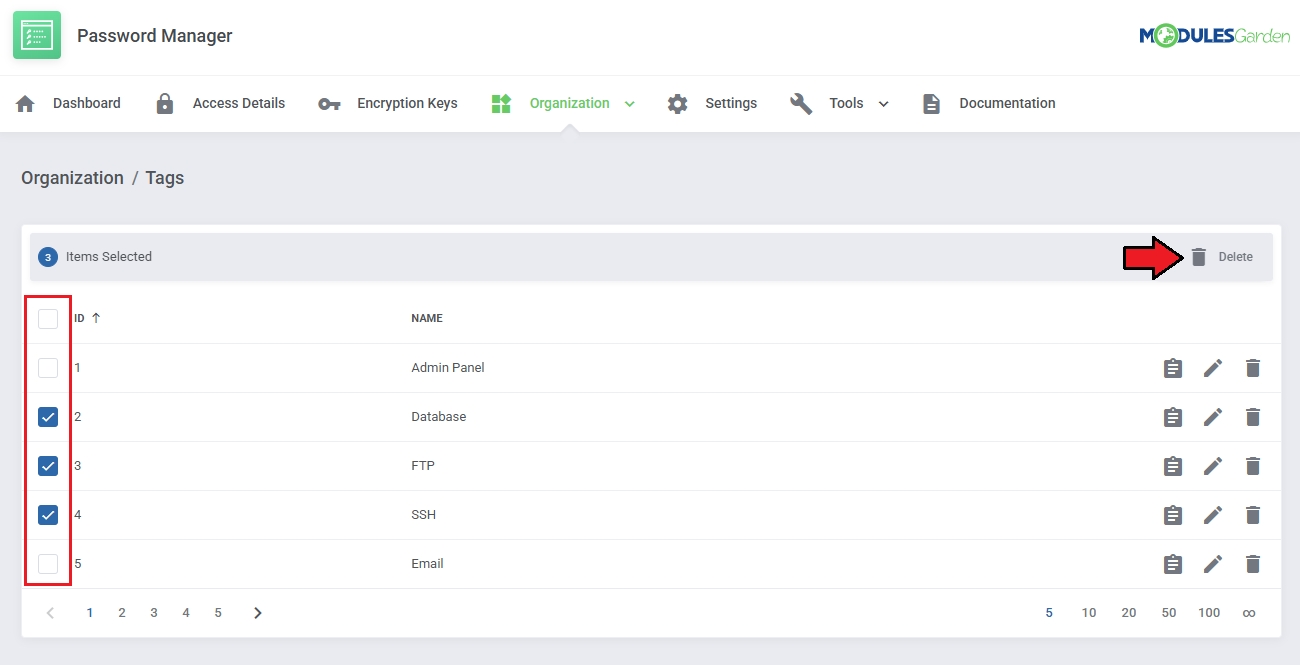
|
| If you want to delete a tag, that is still associated with an access detail, you will have to toggle the 'Force Delete' option. |
|
[edit] Tools
[edit] Translations
| Customizing language files is now extremely easy with the "Translations" tool that is now available directly in the addon. Its user-friendly design makes managing various language file tweaks a smooth and efficient process. Prepare translations for the original English files with this handy built-in tool. For specific instruction on how to use this tool please refer to its dedicated article, you will find it here. |
|
[edit] Access Control
| The 'Access Control' tool allows you to manage and restrict admin access to specific sections and features within the module. You can create rules to grant or deny access to resources, ensuring each team member has appropriate permissions. It also tracks admin activity through detailed logs, offering clear accountability. This tool is available in several WHMCS addons. For detailed instructions, refer to the dedicated article here. |
|
[edit] Logs
| The 'Logs' tool provides a structured way to track and manage module activity. It allows filtering logs by type, viewing detailed records, exporting data, and configuring automatic deletion rules. A bulk delete option is also available for easier management. For detailed instructions on using this tool, refer to its dedicated article here. |
|
[edit] Dashboard
| For fresh users, the dashboard includes a first-time configuration guide, make sure to read it if you need a reminder. |
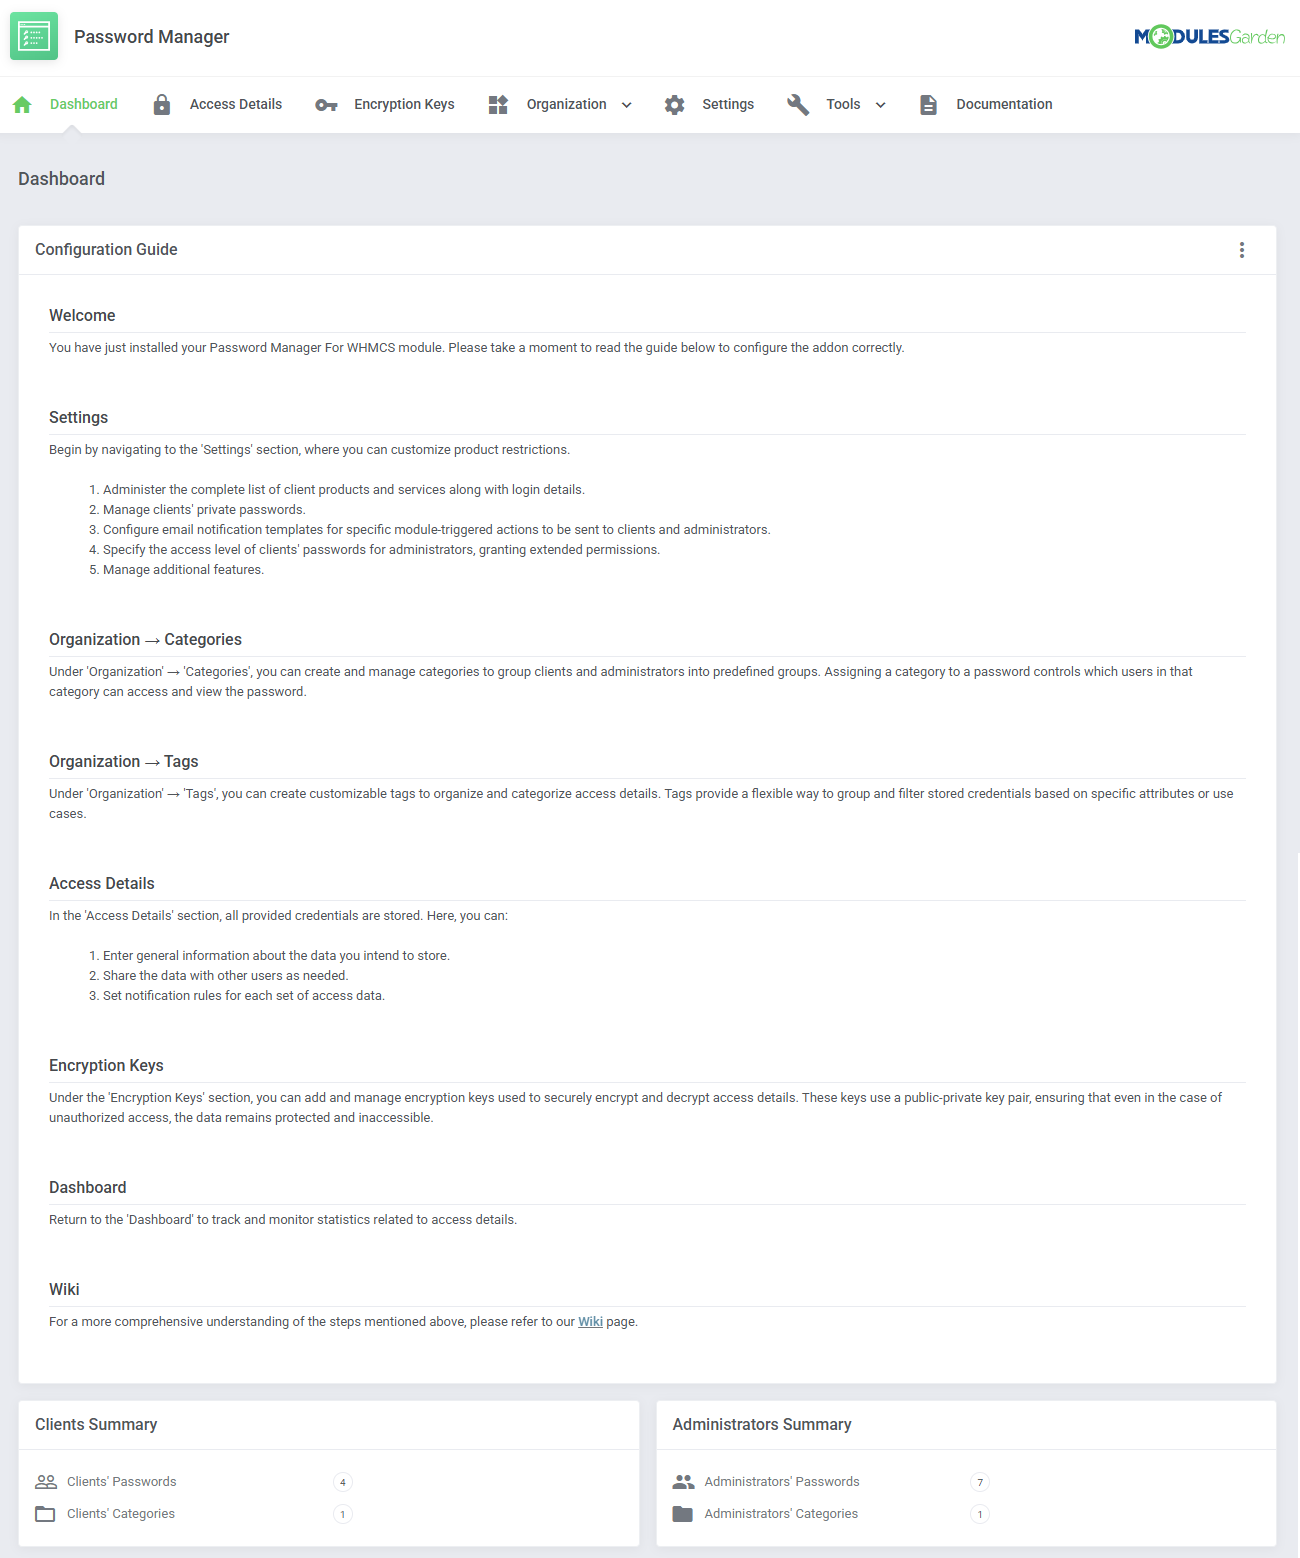
|
| If you wish, you can hide the guide under 'Additional Actions' → 'Settings'. |
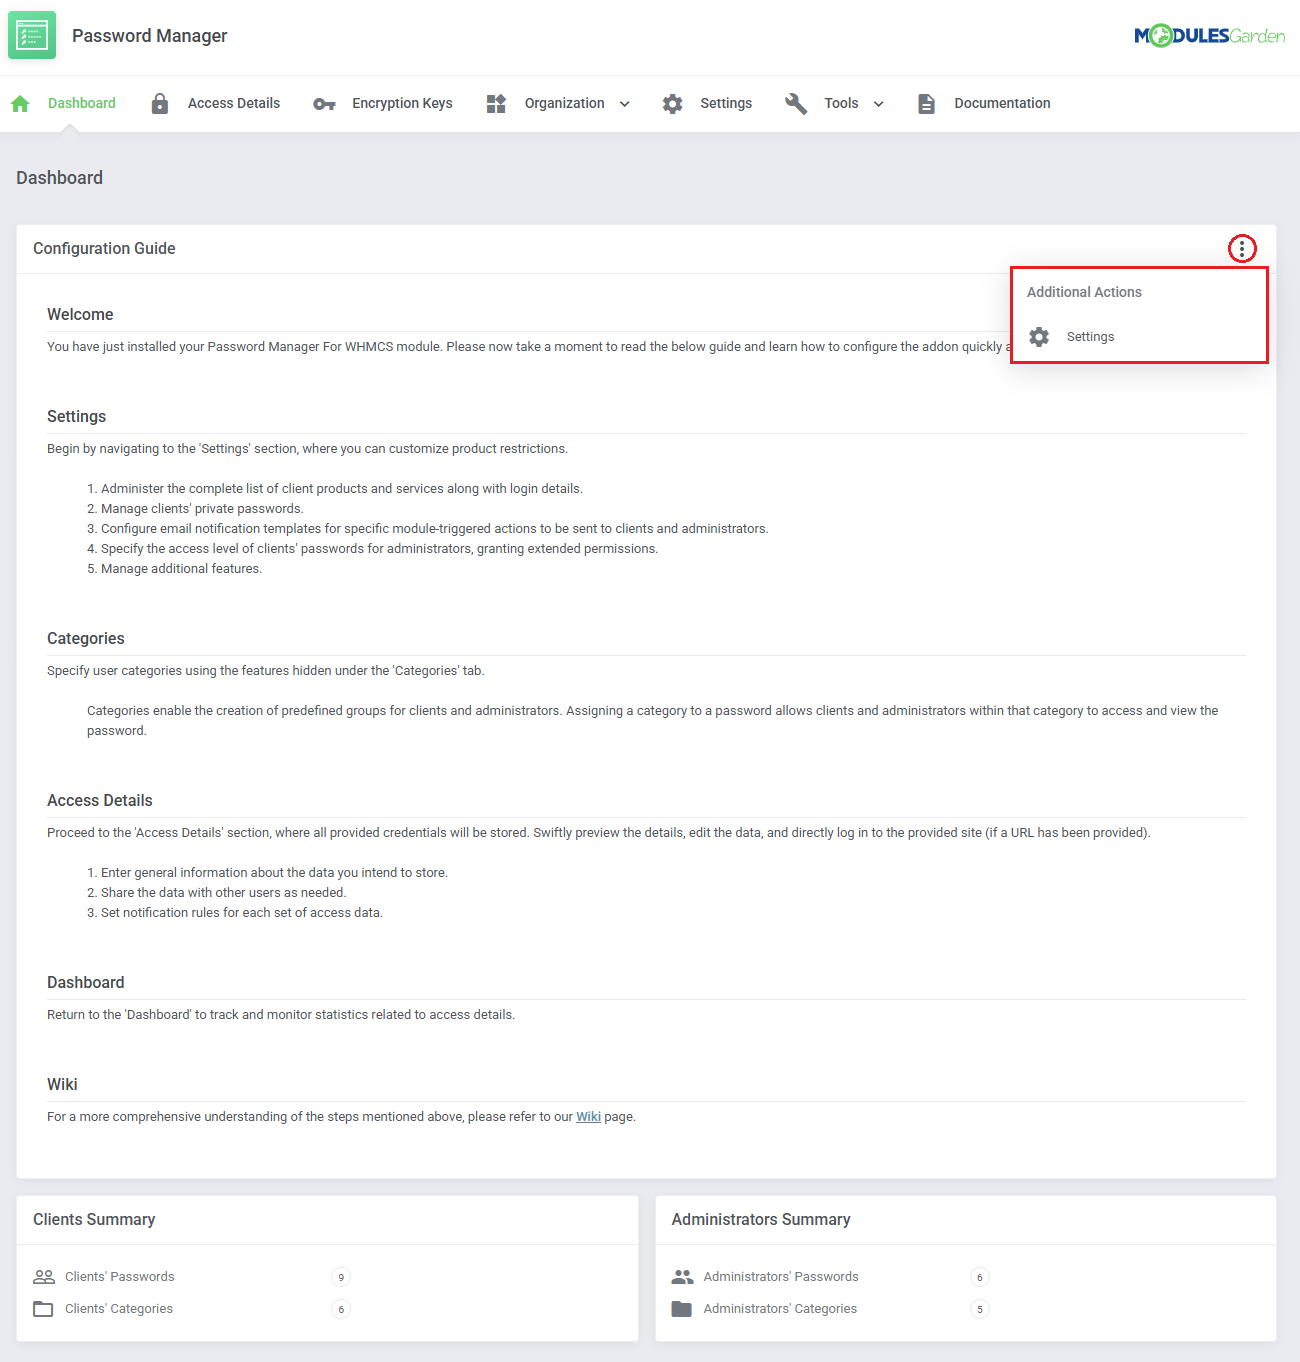
|
| A short summary of the clients' and administrators' access details and categories is available on the dashboard as well. |
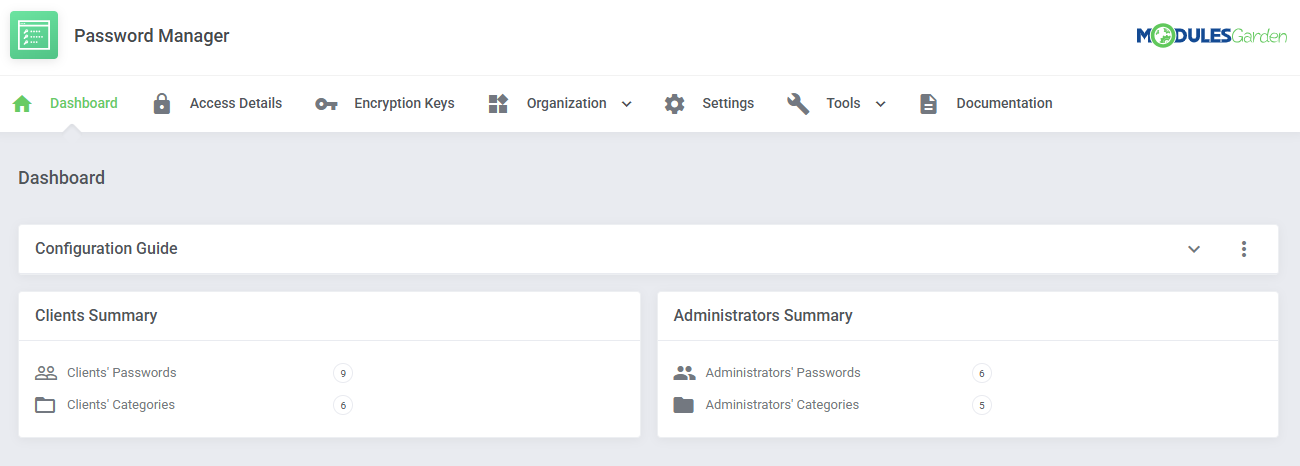
|
[edit] Administrator Area Integration
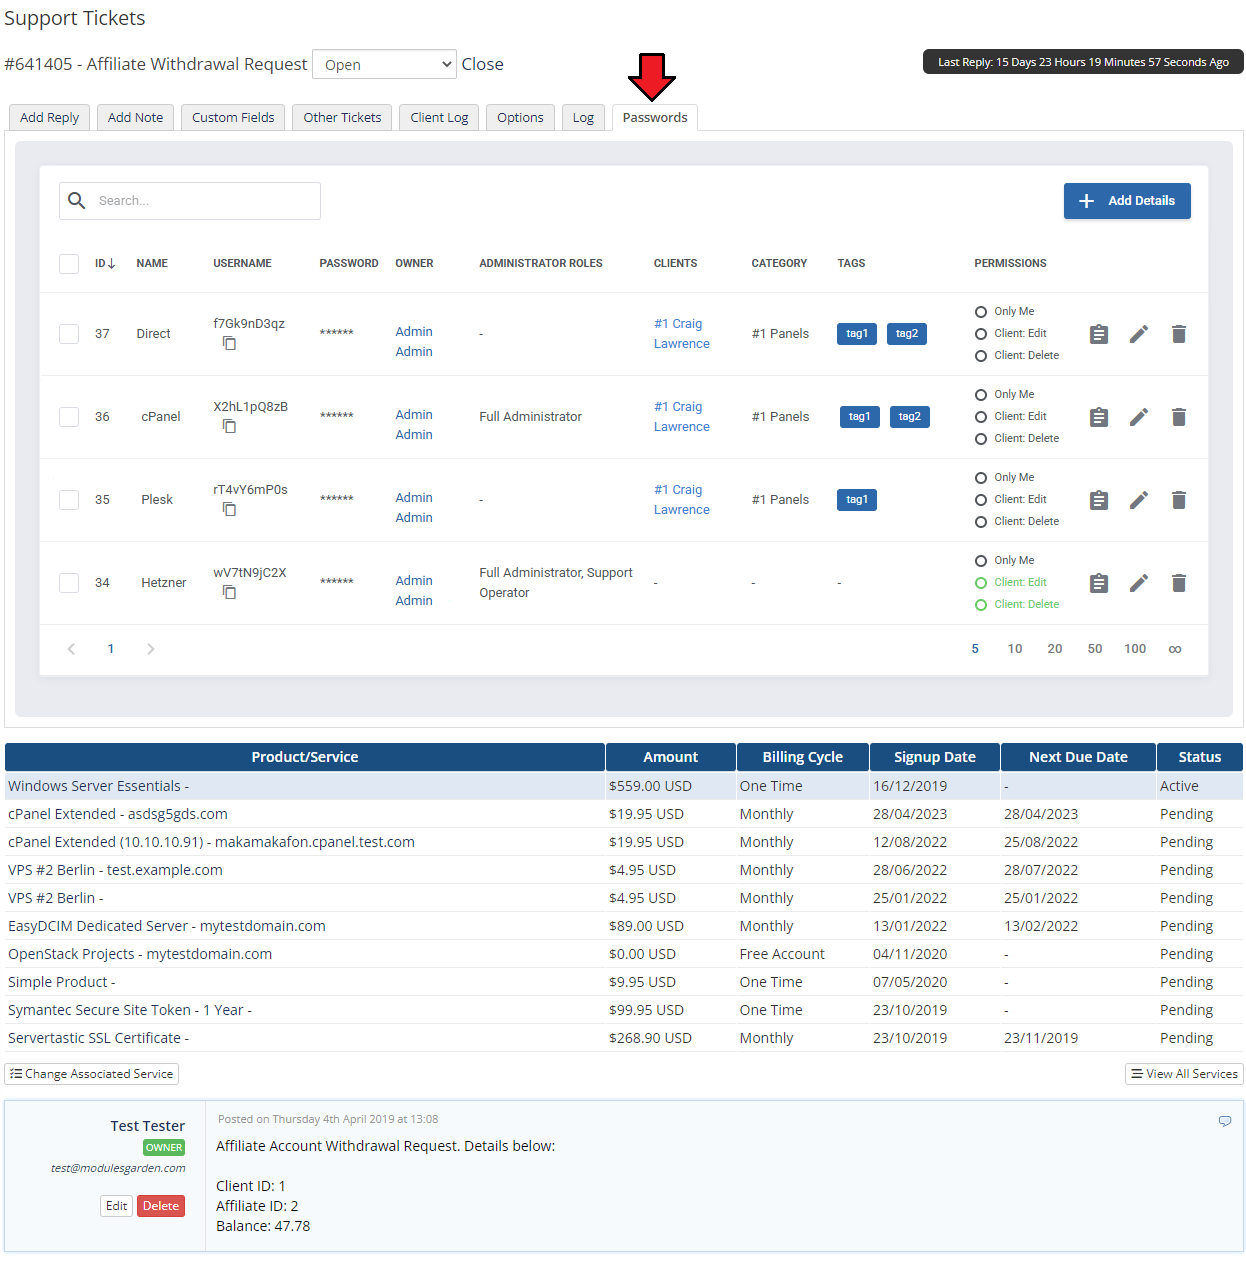
| Our module integrates with your administrator area as well as the client area. Passwords of any client can be viewed on the summary page as it is shown below, but only if you enable this option in 'Settings' section in the addon. |
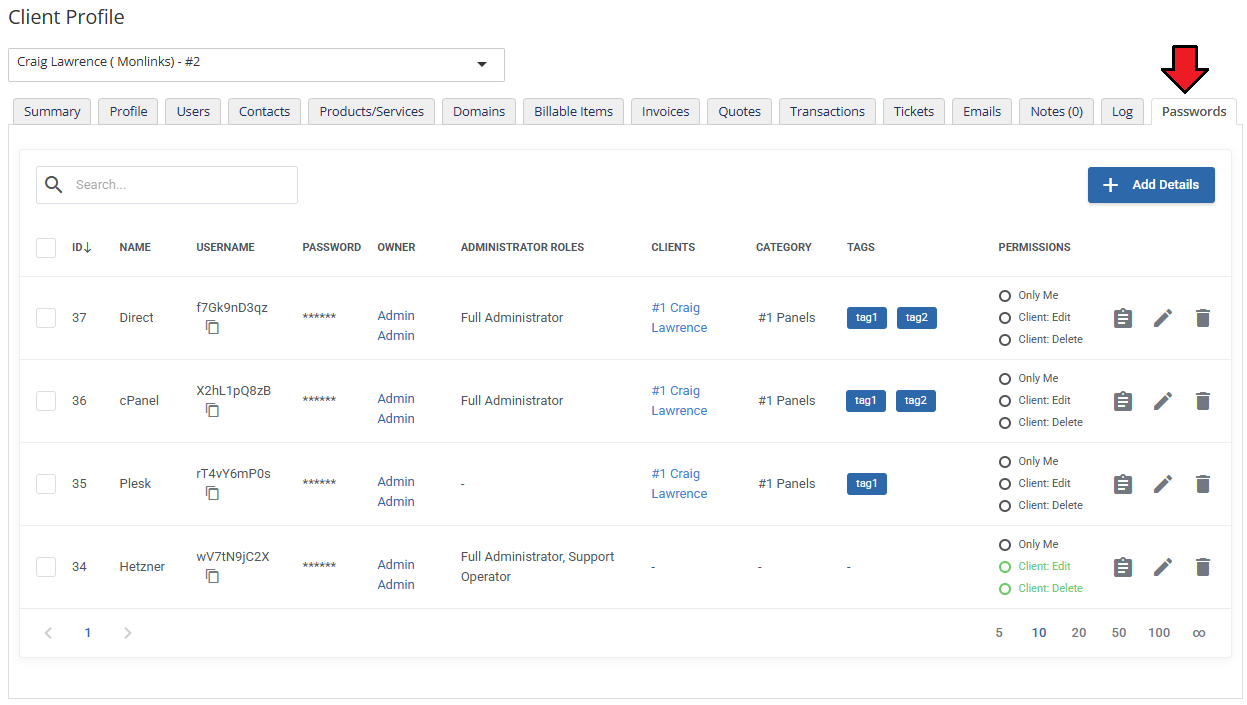
|
| Your support operators are also able to access clients' passwords from within the ticket. As you may have noticed, these places allow them not only to see passwords but also to create new ones. |
|
[edit] Client Area
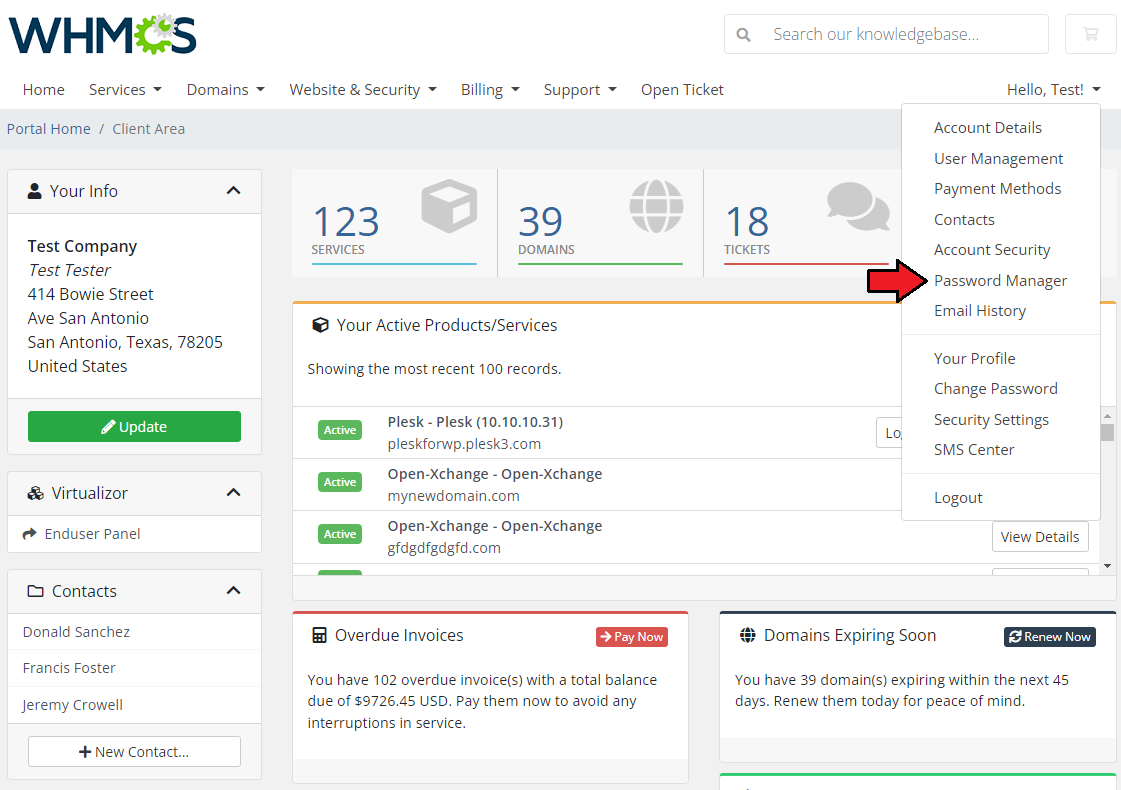
| Your clients can access client area password management page through 'Password Manager' button in navigation bar. To allow integration with the client area, a proper option must be enabled in 'Addon' → 'Settings' → 'Other'. |
|
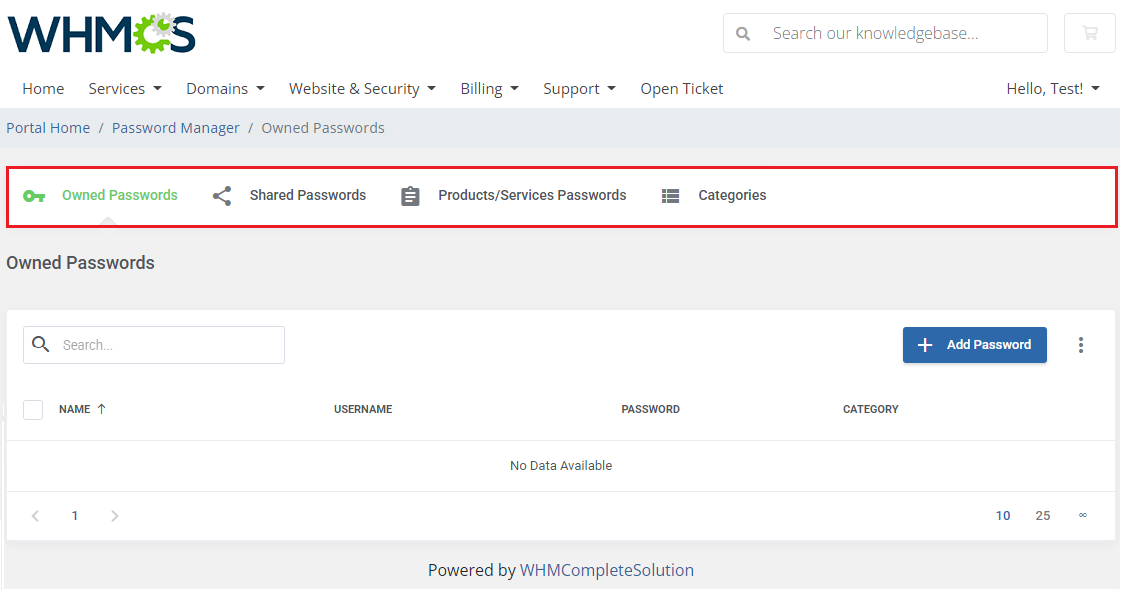
| In 'Password Manager', your clients can view access details depending on the settings configured by the administrator and the level of access allowed for the client. Underneath you can see a client's area with full access to any option given. As you can see, there are four sections available: 'Owned Passwords', 'Shared Passwords', 'Products/Services Passwords' and 'Categories'. |
|
[edit] Owned Passwords
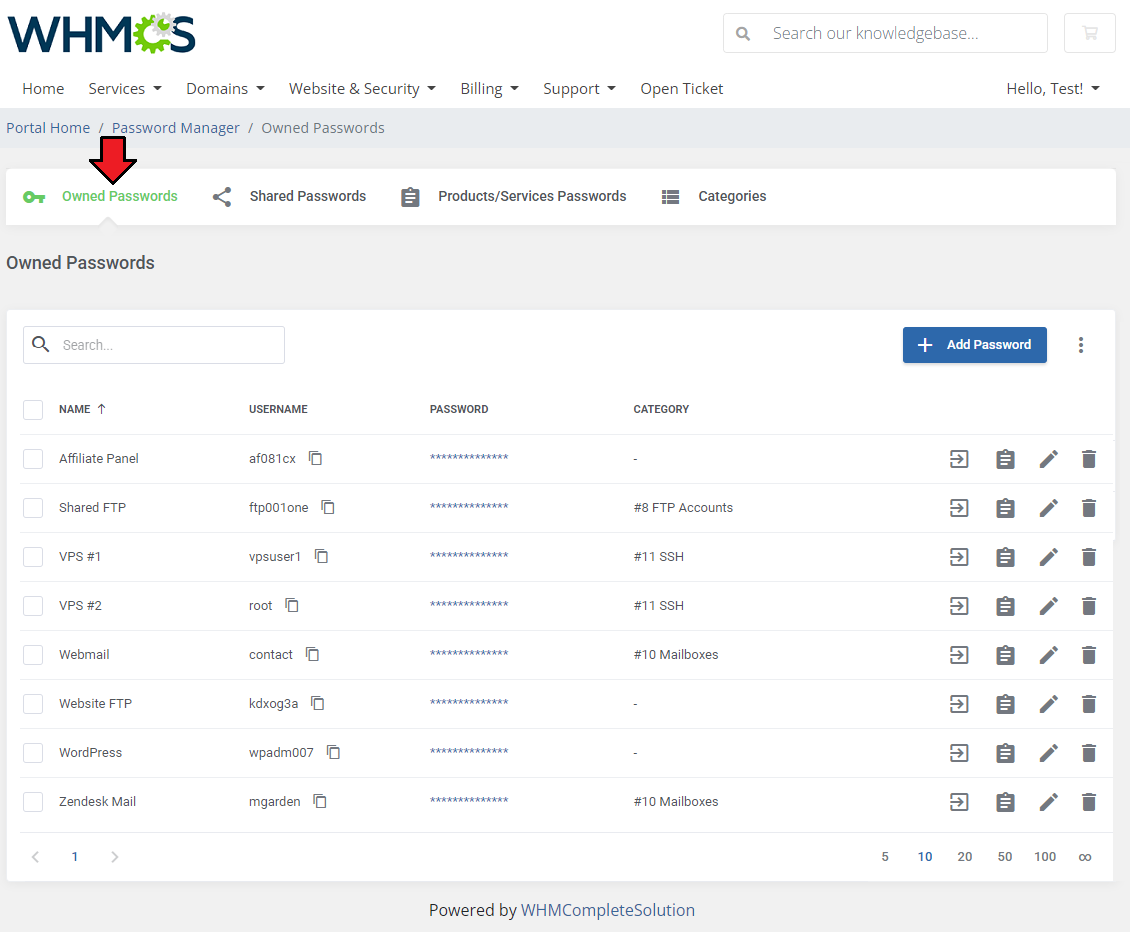
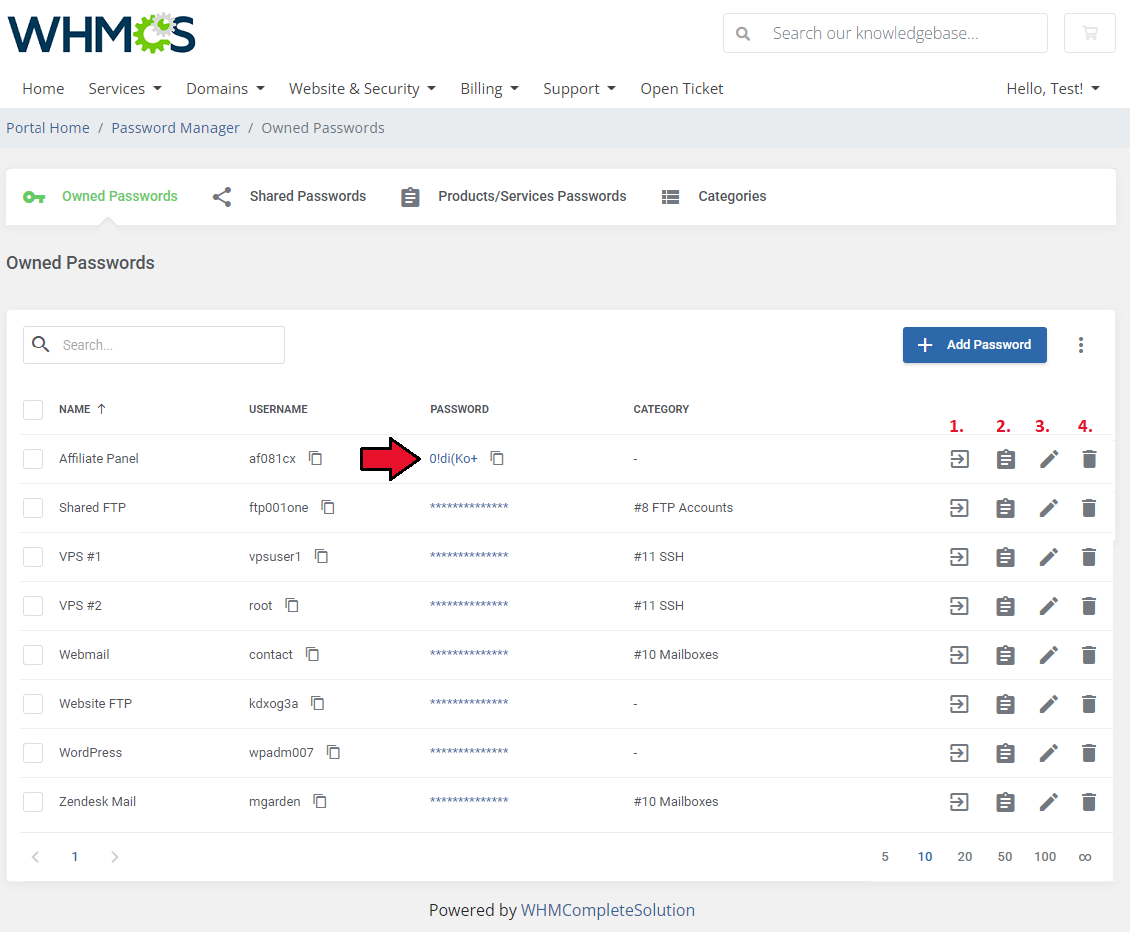
| If you enabled 'Client Private Passwords' your clients will be allowed to view, manage and create their own access details. Please note that 'Shared' column with information on whether the details are allowed for administrators or not is available only if you select 'Shared Access' in the addon's settings. |
|
Preview the password and use action buttons to manage the access details:
|
|
[edit] Add Access Details
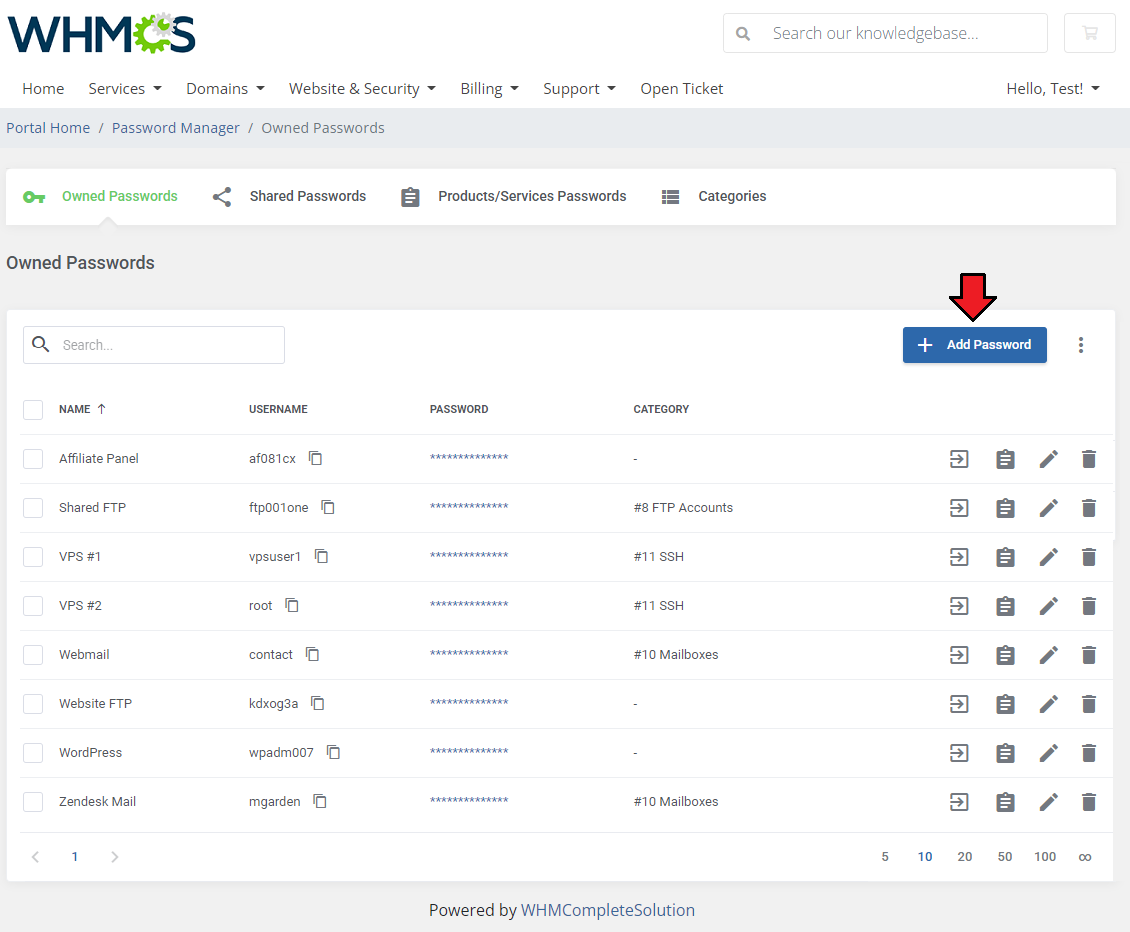
| To create access details, press 'Add Password' button as shown on the following screen. |
|
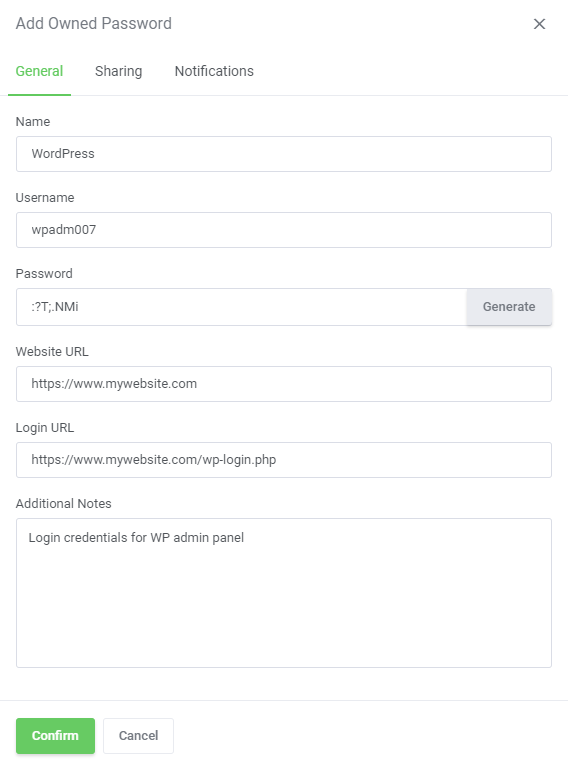
| Type the new password name and enter access details into 'Username' and 'Password'. You can also generate a random password. Optionally, provide 'Website URL' and 'Login URL' to be allowed to log into your site directly from the 'Password Manager' page. |
|
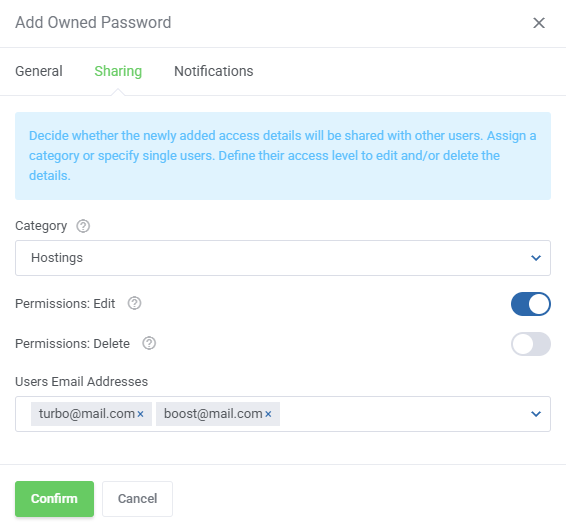
| You may now move to 'Sharing' section. There, you can decide which category the new access details will be assigned to. Choose one from the dropdown menu or select 'Unassigned' to leave it without any category. Depending on the category you select, the access details will be available for those specified in its configuration. Additionally, define which actions can be made on shared passwords. |
|
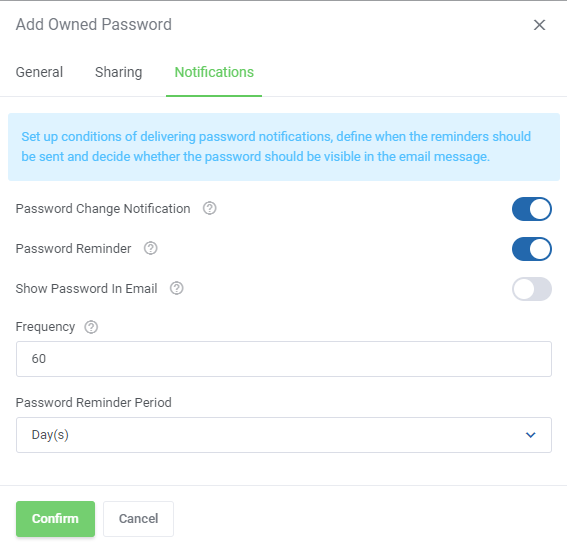
| Finally, in ' Notifications' section, set up conditions of delivering password notifications. Enable this option if needed and define when the reminders should be sent. You can also define whether you wish to receive the new password in the message. Do not forget to press 'Save Changes' to finish. |
|
[edit] Additional Actions
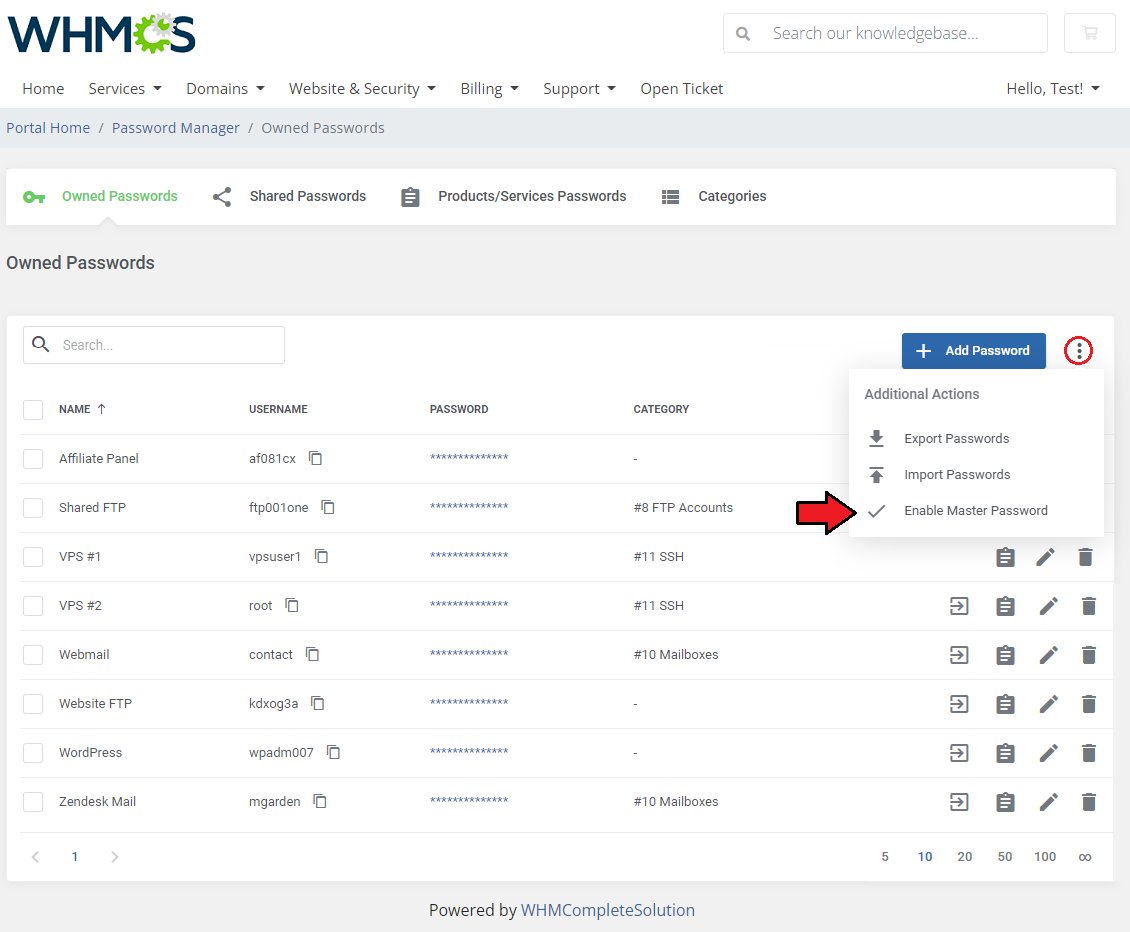
| If the administrator has enabled the 'Master Password' option in 'Client's Private Passwords' , the clients will have the ability to set additional protection for their owned passwords. |
|
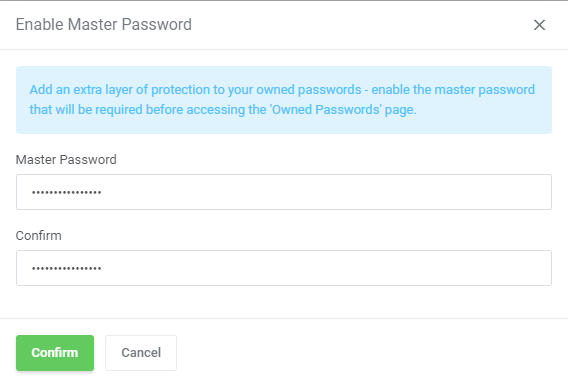
| Simply provide and confirm a new password that will protect the access to owned passwords. Note - if you lose or forget this password, you will also lose access to your saved credentials in this section! |
|
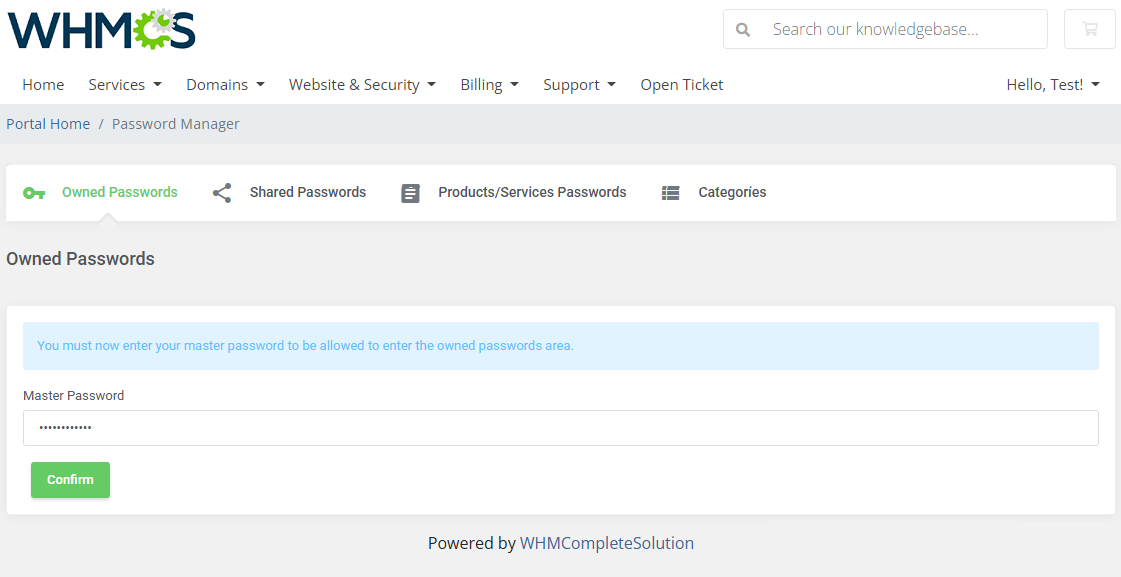
| From now on, access to the 'Owned Passwords' section will require the master password. |
|
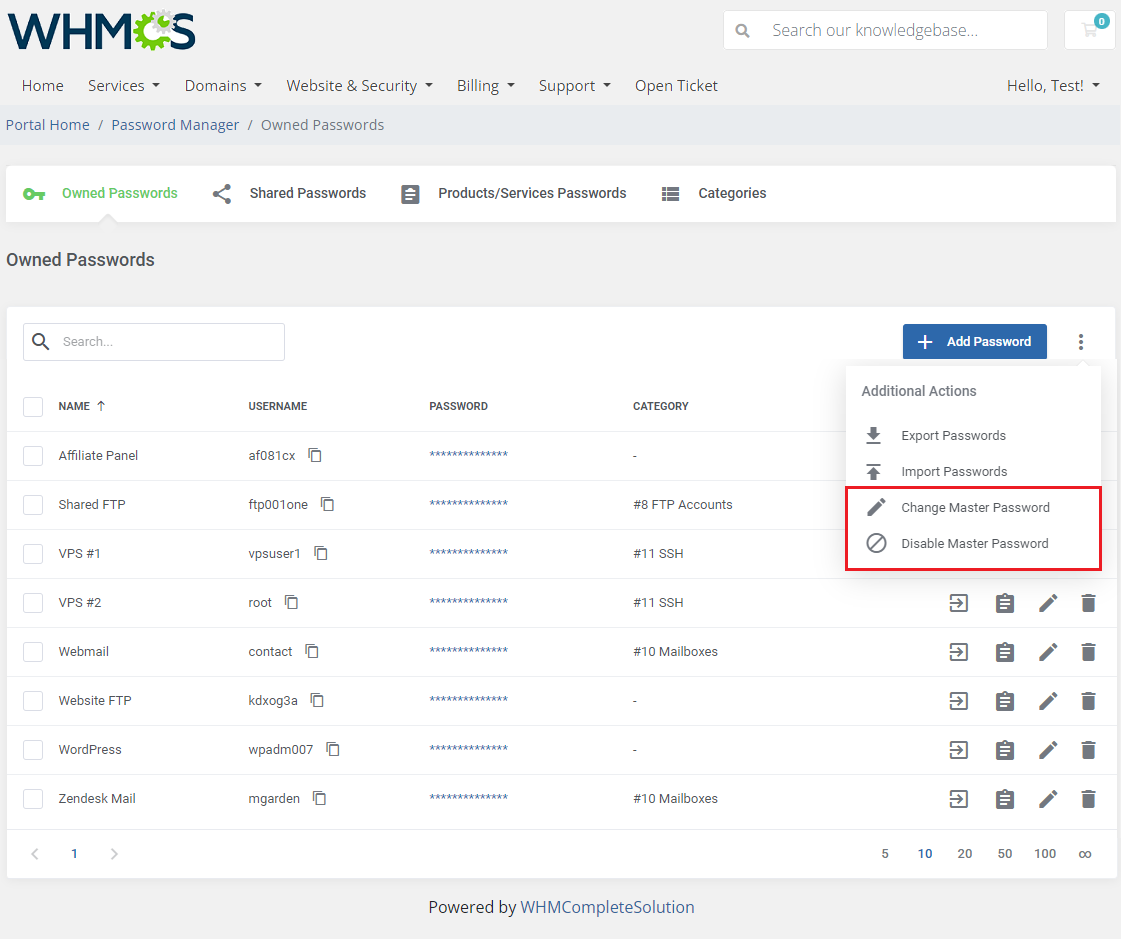
| You may change the password or disable this option at any time. |
|
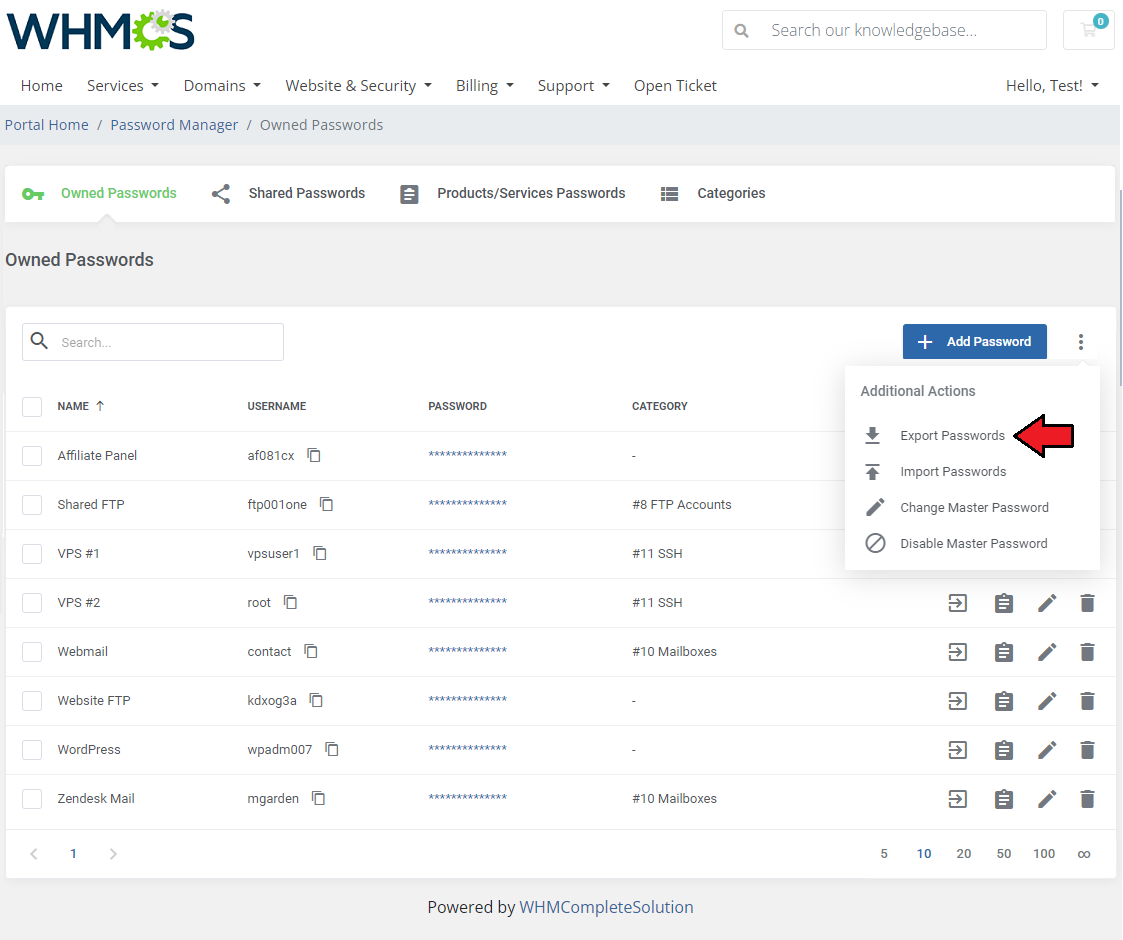
| Among the additional actions you will also find a feature that allows you to export the passwords to a file. Press and the generated file will be saved on your disk. |
|
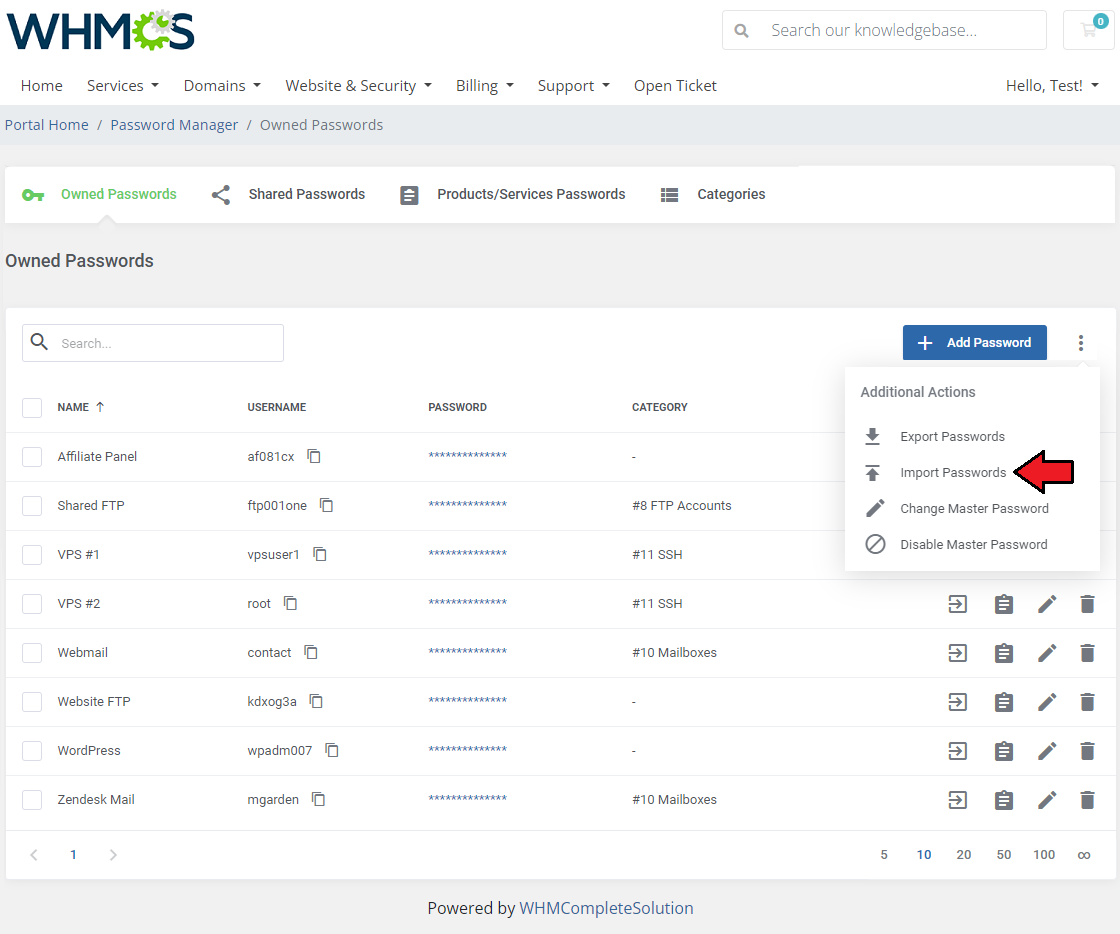
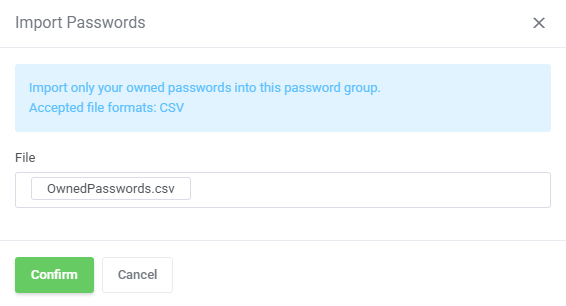
| You may also import your private passwords. Press the button and find a ready file to upload the passwords to the group of 'Owned Passwords'. You may upload files in a CSV format only. |
|
|
[edit]
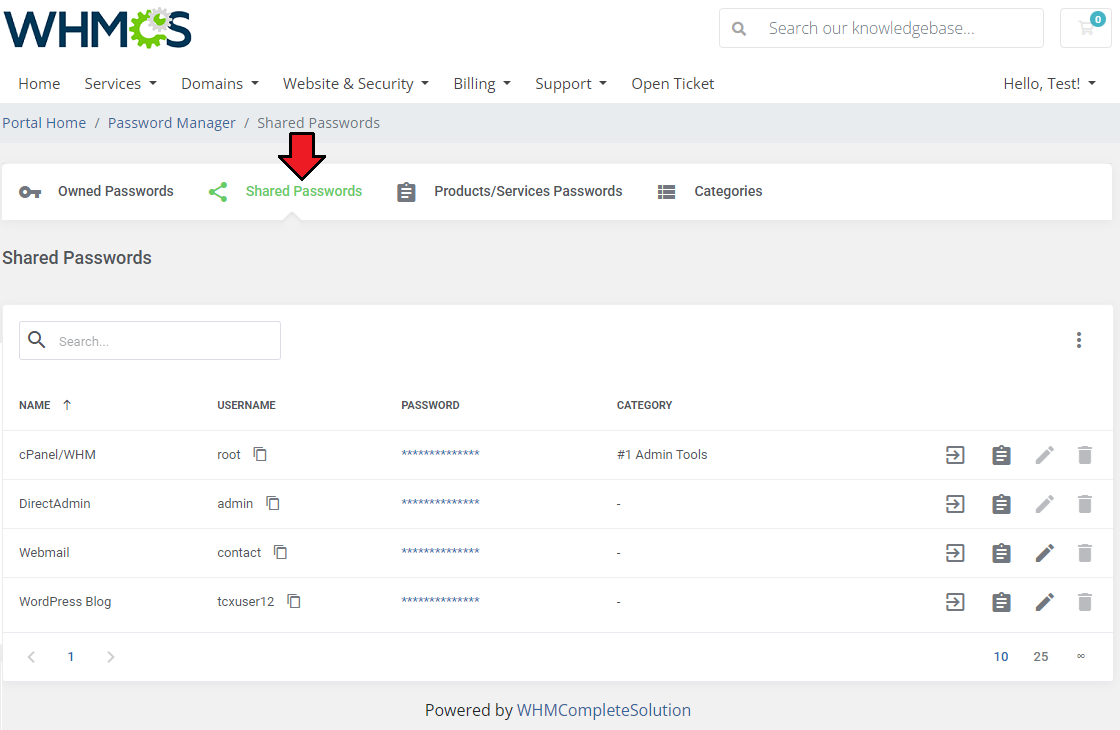
| Under 'Shared Passwords' your clients can view and manage access details that administrators shared with them, permitted to view. |
|
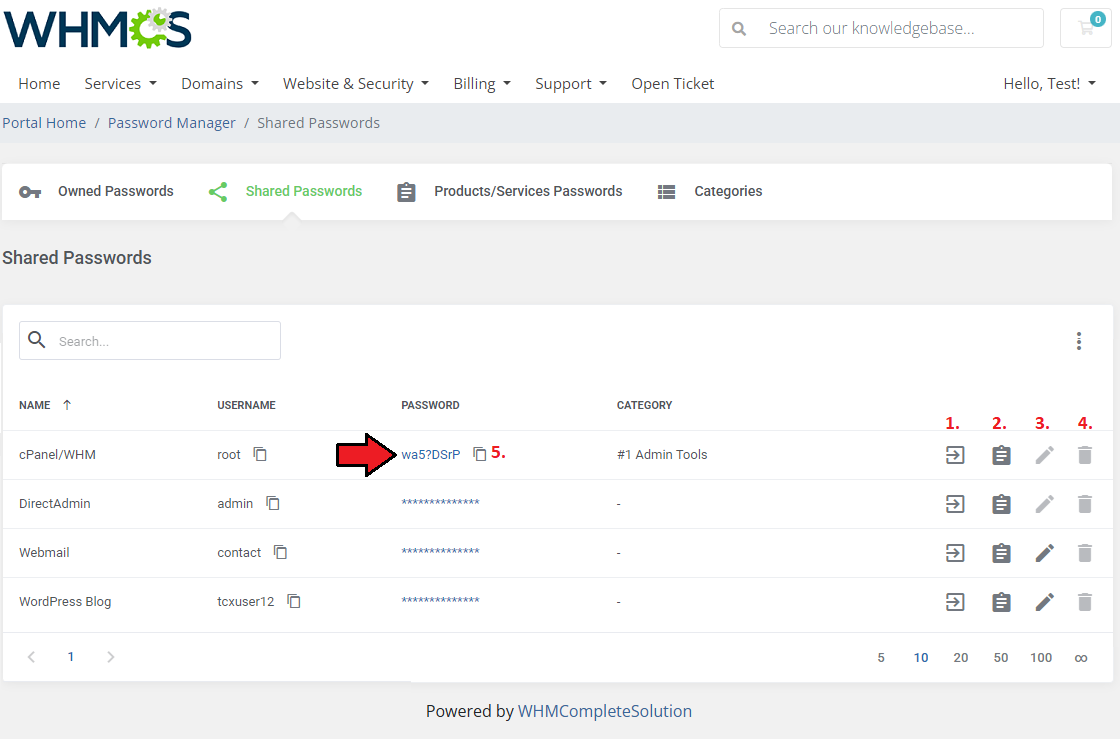
Preview the password and use action buttons to manage the access details:
|
|
[edit] Product/Services Passwords
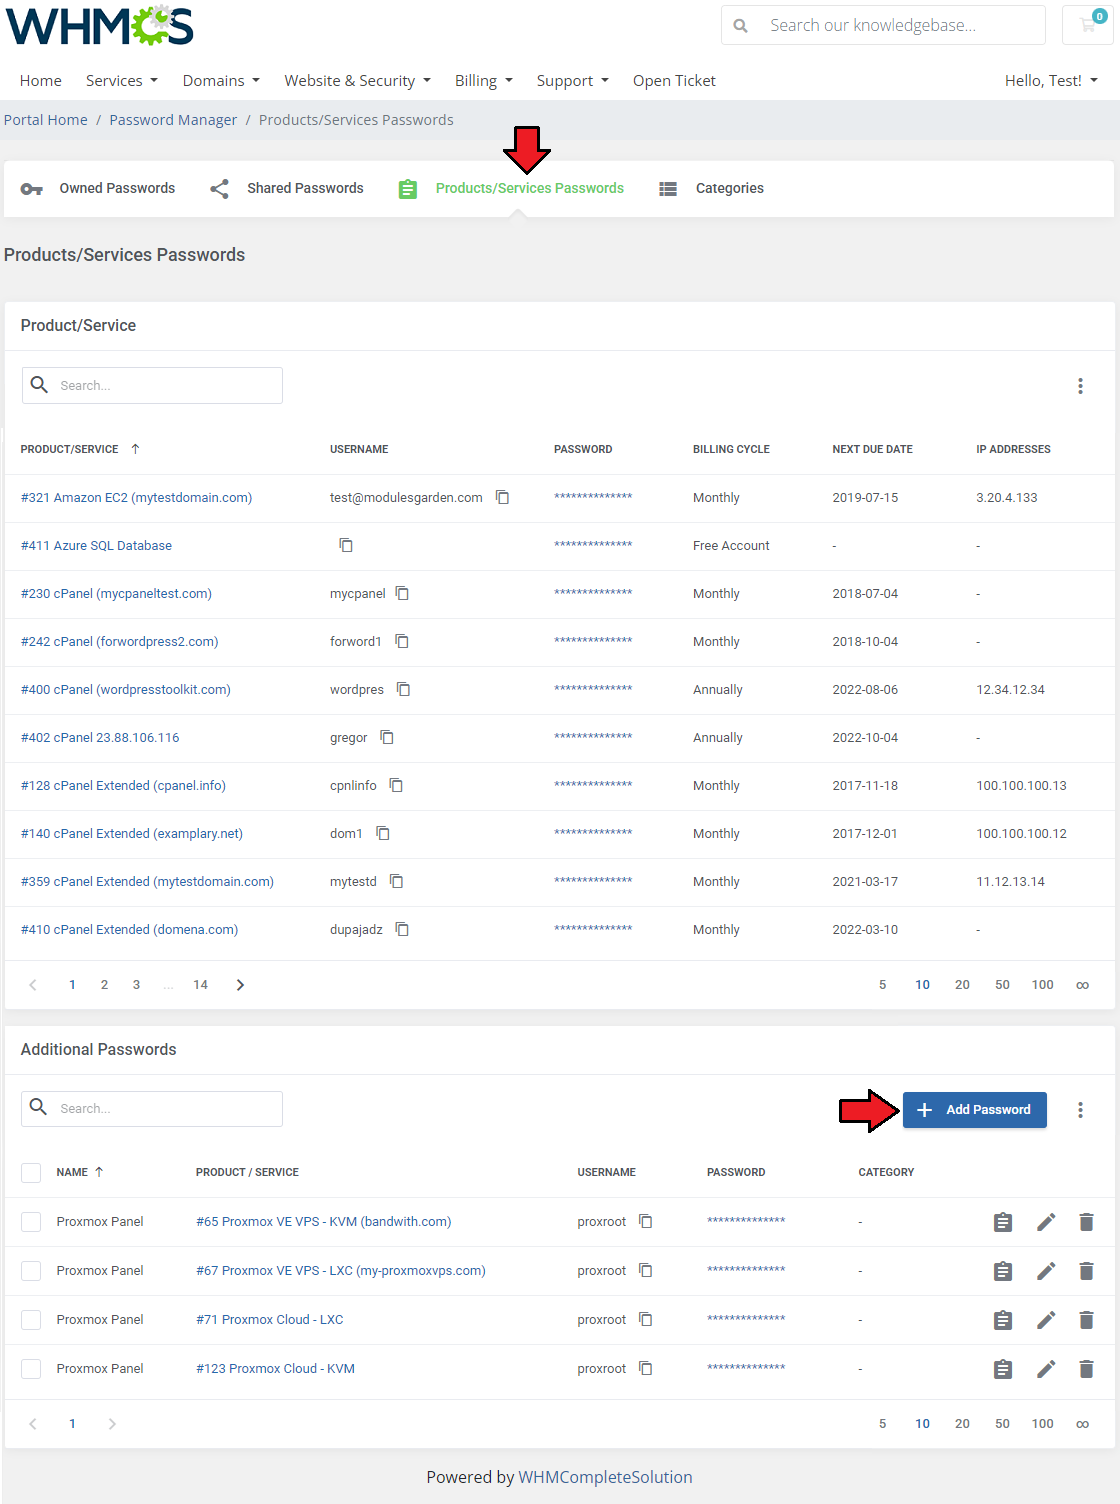
| 'Products/Services Passwords' section includes any access details to your client's products that they own. For convenience, clients can also assign additional passwords to selected services similarly like in 'Owned Passwords' section. Remember that as an administrator, you have to enable this option in the 'Addon' → 'Settings'→ 'Products/Services Passwords'. |
|
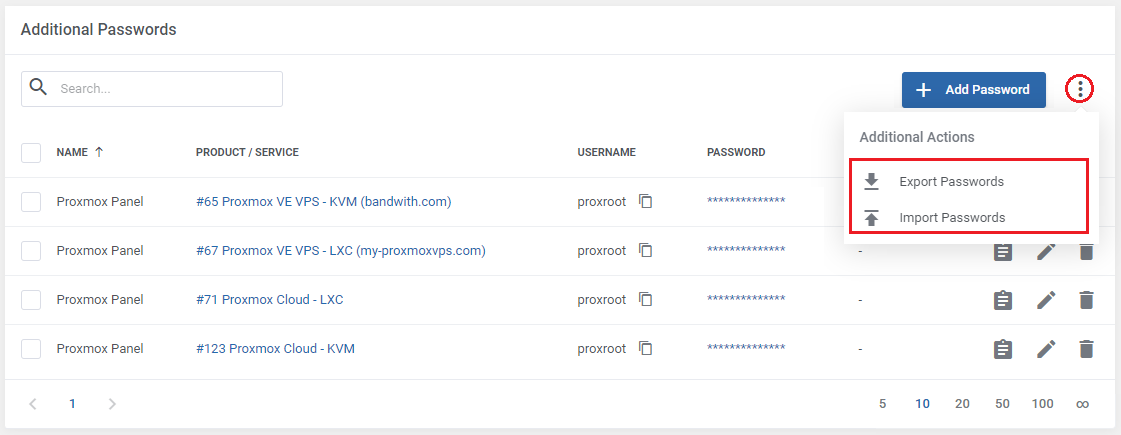
| Furthermore, you may export the passwords bundle into a file or, the other way round, import your passwords from a CSV file to the module. |
|
[edit] Categories
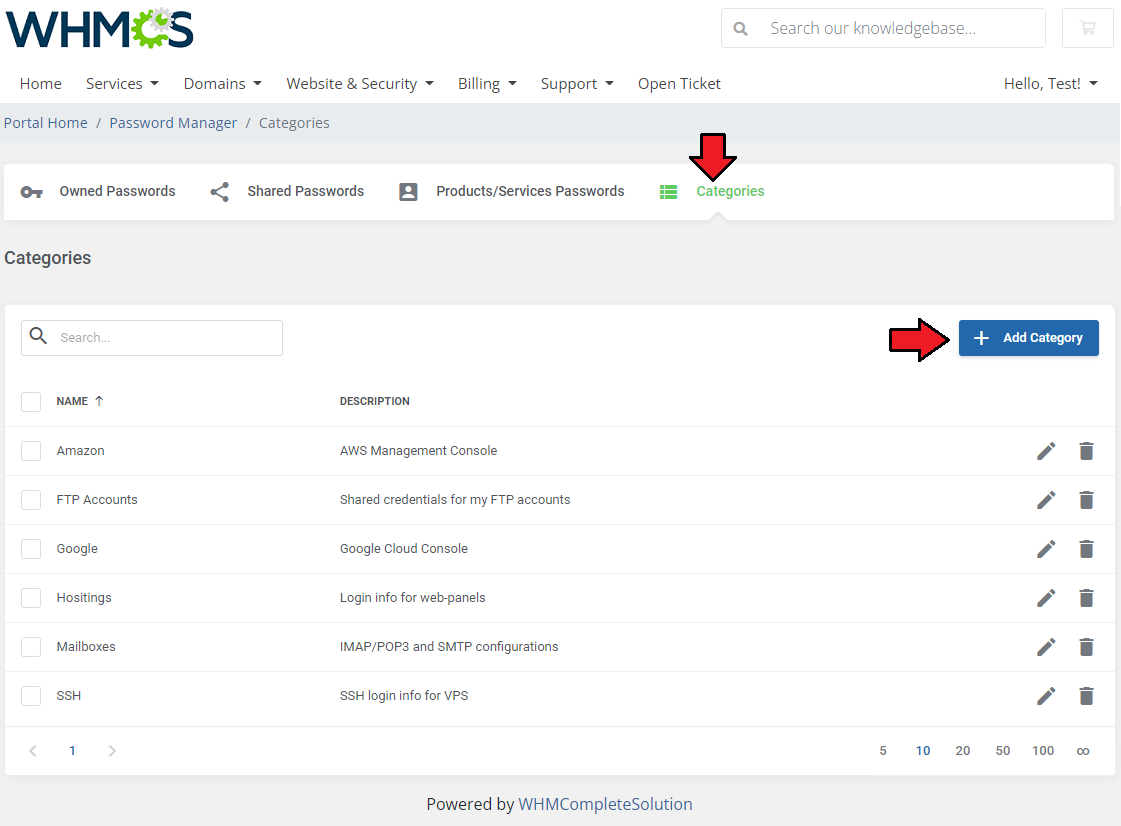
| Move to 'Categories' tab. There is a list of the created by the client categories which are used to allocate passwords for sharing. To create a new one, press the 'Add Category' button. |
|
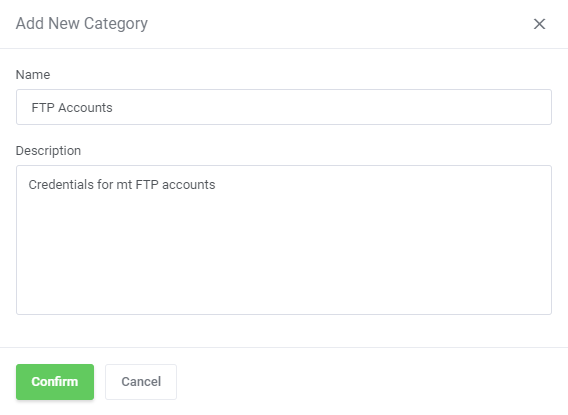
| Fill in category name and description and press 'Add'. Created category can be seen by this client as well as administrators in the administrator area. |
|
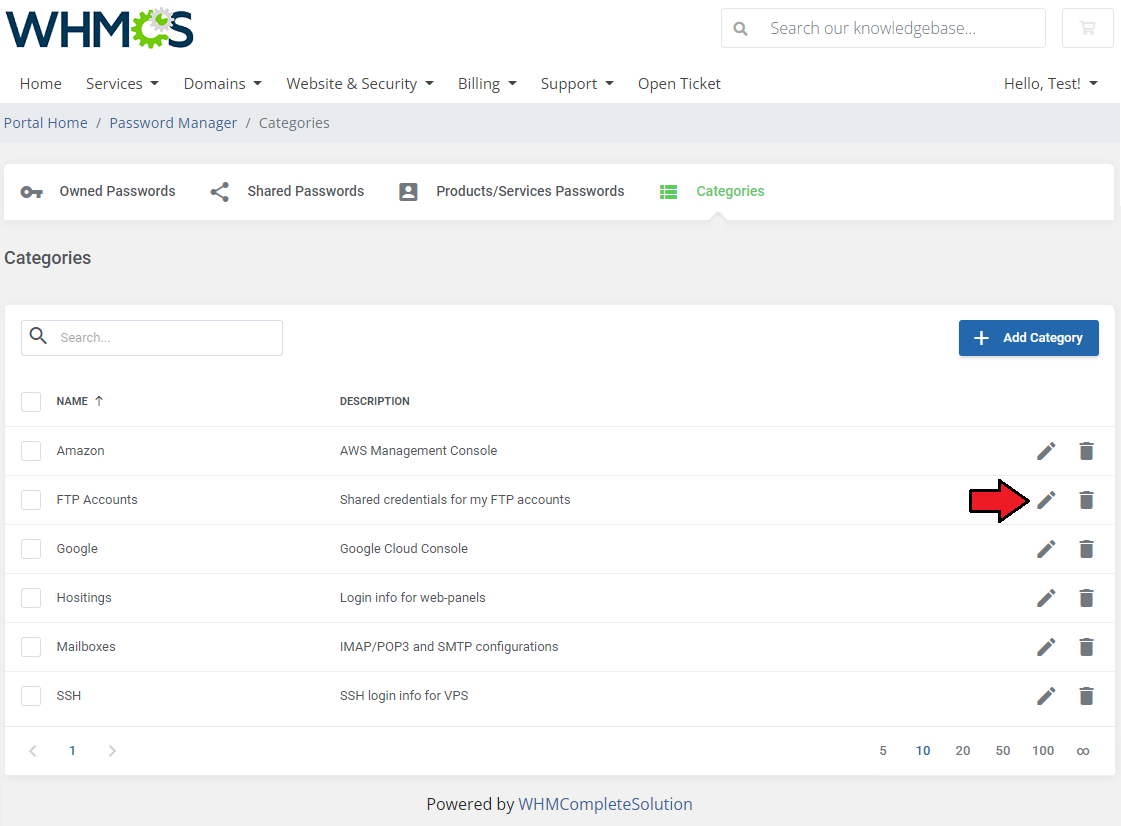
| Clients may edit their categories, and delete and add new ones any time they wish. |
|
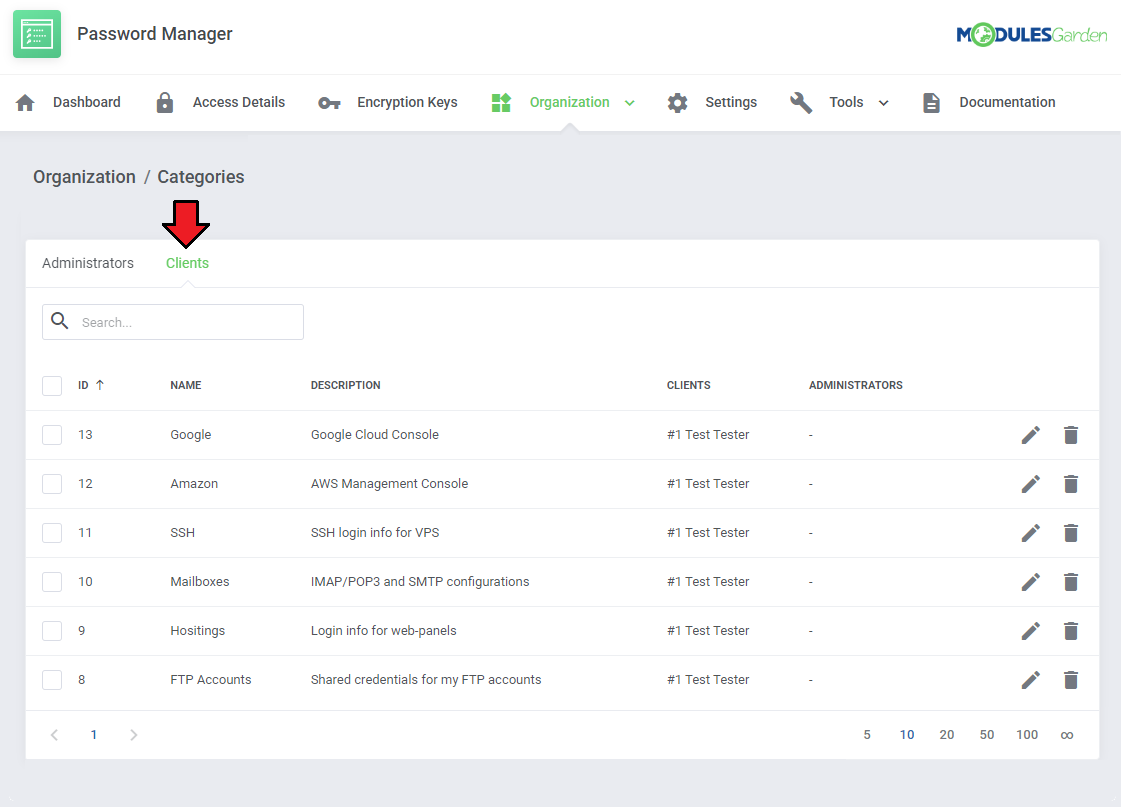
| Any categories created by clients will be automatically visible for administrators in the addon where you can manage them. |
|
[edit] Tips
1. Some additional options under 'Addons' → 'Passwords Manager' → 'Settings' → 'Other' are by default enabled on the module activation.
|
2. Password Manager For WHMCS ensures full protection of your access details using its own security tools and WHMCS internal two-way encryption system.
|
| 3. As this module supports a template system, any changes made in the module's template files will be saved after the upgrade process. |
| 4. Password Manager For WHMCS module is a perfect solution for all resellers whose aim is to provide license keys to their clients in the most secure way possible. |
[edit] Update Instructions
| An essential guidance through the process of updating the module is offered here. Ensure successful completion of the module update by carefully following each step, thereby preventing data loss or any unforeseen issues. |
[edit] Module Upgrade From V3.3.X to V3.4.X
Upgrading from version V3.3.X to 3.4.X requires additional steps due to the changes in the module structure. Please follow the instructions carefully to ensure a smooth transition.
|
[edit] Upgrade Guide
| Seeking a solution that offers greater flexibility, customization tailored to your precise needs, and unrestricted availability? There is an option that not only proves to be cost-effective in the long run but also includes prioritized support services, making it a truly valuable investment. Opt for the Open Source version of your Password Manager For WHMCS module to unlock these benefits. Follow a comprehensive guide covering the transition process, the advantages it brings, and step-by-step instructions on what to do next after the order has been successfully finalized. |
[edit] Common Problems
| 1. When you have problems with connection, check whether your SELinux or firewall does not block ports. |