PKNIC Domain Registrar For WHMCS
(→Client Area) |
|||
| (34 intermediate revisions by 3 users not shown) | |||
| Line 1: | Line 1: | ||
| − | <meta name="keywords" content="pknic registrar for whmcs, | + | <meta name="keywords" content="pknic domain registrar for whmcs, pknic domain registrar configuration, whmcs pknic domain registrar management, whmcs pakistan domain registrar installation, whmcs pknic domain registrar common problems, about whmcs pknic domain registrar, whmcs pknic domain registrar documentation, whmcs pknic domain registrar faq, whmcs pknic domain registrar help, whmcs pknic domain registrar guide, whmcs pknic domain registrar wiki, whmcs pknic domain registrar tutorial, whmcs pknic domain registrar tips, whmcs pakistan domain registrar wiki"></meta> |
<meta name="description" content="ModulesGarden Wiki Contains All The Information You Need About The PKNIC Domain Registrar For WHMCS Module."></meta> | <meta name="description" content="ModulesGarden Wiki Contains All The Information You Need About The PKNIC Domain Registrar For WHMCS Module."></meta> | ||
| + | |||
| + | <p style="border: 1px solid #6f0000; padding: 8px 14px; display: inline-block; font-size: 16px; color: #6f0000;"><strong>PKNIC Domain Registrar For WHMCS</strong> has reached <strong>End of Support (EOS)</strong> and is no longer actively maintained. The module remains available for purchase, including the Open Source version and License Upgrade at a <strong>discounted price</strong>. Current license subscriptions continue and stay valid for future renewals.</p> | ||
=About [https://www.modulesgarden.com/products/whmcs/pknic-domain-registrar PKNIC Domain Registrar For WHMCS]= | =About [https://www.modulesgarden.com/products/whmcs/pknic-domain-registrar PKNIC Domain Registrar For WHMCS]= | ||
{| | {| | ||
| − | |style="padding: 10px 0px 10px 0px;"|'''PKNIC Registrar For WHMCS''' is a domain registrar module that | + | |style="padding: 10px 0px 10px 0px;"|'''PKNIC Registrar For WHMCS''' is a domain registrar module that brings automated provisioning and management of Pakistan (.pk) domains within the WHMCS environment.<br /> |
| − | + | This module empowers your clients to effortlessly manage Pakistani domains directly within your client area. | |
|} | |} | ||
<!--a comment maybe? --> | <!--a comment maybe? --> | ||
| − | |||
| − | |||
| − | |||
| − | |||
| − | |||
| − | |||
| − | |||
| − | |||
| − | |||
| − | |||
| − | |||
| − | |||
| − | |||
*'''Admin Area Features:''' | *'''Admin Area Features:''' | ||
{| | {| | ||
| − | |style="padding: 10px 0px 0px 30px;"|✔ Register | + | |style="padding: 10px 0px 0px 30px;"|✔ Register And Renew .PK ccTLD Domains |
|} | |} | ||
{| | {| | ||
| Line 29: | Line 18: | ||
|} | |} | ||
{| | {| | ||
| − | |style="padding: 0px 0px 0px 30px;"|✔ | + | |style="padding: 0px 0px 0px 30px;"|✔ Update Nameservers |
|} | |} | ||
{| | {| | ||
| − | |style="padding: 0px 0px 0px 30px;"|✔ | + | |style="padding: 0px 0px 0px 30px;"|✔ Toggle Domain Auto Renewal |
|} | |} | ||
{| | {| | ||
| − | |style="padding: 0px 0px | + | |style="padding: 0px 0px 10px 30px;"|✔ Monitor Account Credit Balance With Dashboard Widget |
|} | |} | ||
| + | *'''Client Area Features:''' | ||
{| | {| | ||
| − | |style="padding: 0px 0px | + | |style="padding: 10px 0px 0px 30px;"|✔ Register .PK ccTLD Domains |
|} | |} | ||
| − | |||
{| | {| | ||
| − | |style="padding: | + | |style="padding: 0px 0px 0px 30px;"|✔ Toggle Domain Auto Renewal |
|} | |} | ||
{| | {| | ||
| Line 48: | Line 37: | ||
|} | |} | ||
{| | {| | ||
| − | |style="padding: 0px 0px | + | |style="padding: 0px 0px 10px 30px;"|✔ Update Contact Details |
| − | + | ||
| − | + | ||
| − | + | ||
|} | |} | ||
*'''General Info:''' | *'''General Info:''' | ||
{| | {| | ||
| − | |style="padding: 10px 0px 0px 30px;"|✔ Supports PHP 8. | + | |style="padding: 10px 0px 0px 30px;"|✔ Supports PHP 8.2 Back To PHP 7.4 |
|} | |} | ||
{| | {| | ||
| − | |style="padding: 0px 0px 0px 30px;"|✔ Supports WHMCS | + | |style="padding: 0px 0px 0px 30px;"|✔ Supports WHMCS Themes "Six" And "Twenty-One" |
|} | |} | ||
{| | {| | ||
| − | |style="padding: 0px 0px 0px 30px;"|✔ Supports WHMCS V8. | + | |style="padding: 0px 0px 0px 30px;"|✔ Supports WHMCS V8.11 Back To WHMCS V8.8 |
|} | |} | ||
{| | {| | ||
| − | |style="padding: 0px 0px 0px 30px;"|✔ Requires ionCube Loader | + | |style="padding: 0px 0px 0px 30px;"|✔ Requires ionCube Loader V13 Or Later |
|} | |} | ||
{| | {| | ||
| − | |style="padding: 0px 0px 30px 30px;"|✔ Easy Module Upgrade To [https://www.modulesgarden.com/products/whmcs/ | + | |style="padding: 0px 0px 30px 30px;"|✔ Easy [https://www.docs.modulesgarden.com/How_To_Upgrade_WHMCS_Module Module Upgrade] To [https://www.modulesgarden.com/products/whmcs/pknic-domain-registrar#open-source-version Open Source Version] |
|} | |} | ||
=Installation= | =Installation= | ||
| + | |||
| + | <p style="border: 1px solid #6f0000; padding: 8px 14px; display: inline-block; font-size: 16px; color: #6f0000;"><strong>PKNIC Domain Registrar For WHMCS</strong> has reached <strong>End of Support (EOS)</strong> and is no longer actively maintained. The module remains available for purchase, including the Open Source version and License Upgrade at a <strong>discounted price</strong>. Current license subscriptions continue and stay valid for future renewals.</p> | ||
| + | |||
{| | {| | ||
|style="padding: 10px 0px 0px 0px;"|'''This tutorial will show you how to successfully install [https://www.modulesgarden.com/products/whmcs/pknic-domain-registrar PKNIC Domain Registrar For WHMCS.]''' <br /> | |style="padding: 10px 0px 0px 0px;"|'''This tutorial will show you how to successfully install [https://www.modulesgarden.com/products/whmcs/pknic-domain-registrar PKNIC Domain Registrar For WHMCS.]''' <br /> | ||
| Line 82: | Line 71: | ||
|} | |} | ||
{| | {| | ||
| − | |style="padding: 0px 0px 15px 15px;"|'''2 | + | |style="padding: 0px 0px 15px 15px;"|'''2. Extract the package and upload its content into the main WHMCS directory. <br/> |
| − | + | ||
| − | + | ||
| − | + | ||
| − | + | ||
| − | + | ||
| − | + | ||
| − | + | ||
The content of the package to upload should look like this. | The content of the package to upload should look like this. | ||
|} | |} | ||
| Line 96: | Line 78: | ||
|} | |} | ||
{| | {| | ||
| − | |style="padding: 0px 0px 15px 15px;"|''' | + | |style="padding: 0px 0px 15px 15px;"|'''3. When you install PKINC Domain Registrar For WHMCS for the first time you have to rename '' 'license_RENAME.php' '' file.'''<br /> |
| − | + | The file is located in '' 'modules/registrars/pknic_domain/license_RENAME.php'. '' Rename it from '' 'license_RENAME.php' '' to '' 'license.php'. '' | |
|} | |} | ||
{| | {| | ||
| Line 103: | Line 85: | ||
|} | |} | ||
{| | {| | ||
| − | |style="padding: 0px 0px 15px 15px;"|''' | + | |style="padding: 0px 0px 15px 15px;"|'''4. In order to configure your license key, you have to edit a previously renamed '' 'license.php' '' file.'''<br /> |
Enter your license key between quotation marks as presented on the following screen. You can find your license key in our client area → '' 'My Products'. '' | Enter your license key between quotation marks as presented on the following screen. You can find your license key in our client area → '' 'My Products'. '' | ||
|} | |} | ||
| Line 110: | Line 92: | ||
|} | |} | ||
{| | {| | ||
| − | |style="padding: 0px 0px 15px 15px;"|''' | + | |style="padding: 0px 0px 15px 15px;"|'''5. Now you have to activate the module in your WHMCS system.'''<br /> |
Log in to your WHMCS admin area. Go to '' 'Setup' '' → '' 'Products/Services' '' → '' 'Domain Registrars'. ''<br /> | Log in to your WHMCS admin area. Go to '' 'Setup' '' → '' 'Products/Services' '' → '' 'Domain Registrars'. ''<br /> | ||
Afterwards, find '' 'EURid' '' and press '' 'Activate' '' button. | Afterwards, find '' 'EURid' '' and press '' 'Activate' '' button. | ||
| Line 118: | Line 100: | ||
|} | |} | ||
{| | {| | ||
| − | |style="padding: 0px 0px 15px 15px;"|''' | + | |style="padding: 0px 0px 15px 15px;"|'''6. In the next step, you need to set up access to the PKNIC panel API.'''<br /> |
| − | To do so, fill in '' ' | + | To do so, fill in '' 'API Endpoint', 'API Username' '' and '' 'API Token' '' fields with your PKNIC reseller's account details.<br /> |
| − | + | ||
| − | Next, confirm | + | '''''Important:''' If you cannot locate the access credentials within your reseller panel, consider reaching out to '''[email protected]''' for assistance in obtaining them.''<br/> |
| + | |||
| + | Next, confirm by clicking the 'Save Changes' button. | ||
|} | |} | ||
{| | {| | ||
| Line 127: | Line 111: | ||
|} | |} | ||
{| | {| | ||
| − | |style="padding: 0px 0px | + | |style="padding: 0px 0px 30px 15px;"|'''7. You have just successfully installed PKNIC Domain Registrar For WHMCS!''' |
| − | + | ||
| − | + | ||
| − | + | ||
| − | + | ||
| − | + | ||
| − | + | ||
|} | |} | ||
=Configuration and Management= | =Configuration and Management= | ||
{| | {| | ||
| − | |style="padding: 10px 0px 30px 15px;"|'''PKNIC Domain Registrar For WHMCS | + | |style="padding: 10px 0px 30px 15px;"|'''PKNIC Domain Registrar For WHMCS enables you to offer .pk ccTLDs from PKNIC through the WHMCS system.'''<br/> |
| − | + | Furthermore, PKNIC Domain For WHMCS empowers your customers to oversee their domains directly from the WHMCS client area. | |
|} | |} | ||
==Management of TLDs== | ==Management of TLDs== | ||
{| | {| | ||
| − | |style="padding: 10px 0px 15px 15px;"| | + | |style="padding: 10px 0px 15px 15px;"|Adding a new TLD is a straightforward process. Follow these steps: |
| − | + | # Navigate to "System Settings" → "Domain Pricing". | |
| − | + | # Enter the desired .pk TLD to add | |
| − | + | # From the "Auto Registration" dropdown menu, select 'PKNIC Domain Registrar For WHMCS' as displayed on the screen. | |
| + | # You can also determine whether to provide additional features to your customers, such as ID Protection | ||
| + | # Finally, click '' 'Save Changes' '' to confirm your settings. | ||
|} | |} | ||
{| | {| | ||
| Line 152: | Line 132: | ||
|} | |} | ||
{| | {| | ||
| − | |style="padding: 0px 0px 20px 15px;"| | + | |style="padding: 0px 0px 20px 15px;"|Navigate to the '' 'Pricing' '' section and configure the pricing for the domain TLD. |
|} | |} | ||
{| | {| | ||
| Line 158: | Line 138: | ||
|} | |} | ||
{| | {| | ||
| − | |style="padding: 0px 0px 20px 15px;"|In | + | |style="padding: 0px 0px 20px 15px;"|In the newly opened window, you have the opportunity to customize your pricing. Be sure to save your changes once your configuration is complete! |
|} | |} | ||
{| | {| | ||
| Line 164: | Line 144: | ||
|} | |} | ||
{| | {| | ||
| − | |style="padding: 0px 0px 30px 15px;"| | + | |style="padding: 0px 0px 30px 15px;"|That is all! Your customers can now begin ordering '' '.pk' '' domains directly from your WHMCS client area. |
|} | |} | ||
| − | ==Ordering== | + | ==Ordering Process== |
{| | {| | ||
| − | |style="padding: 10px 0px | + | |style="padding: 10px 0px 15px 15px;"|The process of ordering a PKNIC domain is similar to ordering any other domain.<br/> Simply search to see if the domain is available, add it to your cart, and mange the created set of nameservers. Then, proceed to complete the order.<br/> |
| + | '''''Important:''' When registering a new domain, a set of nameservers is created and assigned to the just registered domain.<br/> In case the domain is not registered by the module but is '''imported into WHMCS''', please ensure, before importing, that this domain has its own dedicated set of nameservers, which are not shared with other domains.'' | ||
|} | |} | ||
{| | {| | ||
| Line 177: | Line 158: | ||
==Domain Management== | ==Domain Management== | ||
{| | {| | ||
| − | |style="padding: 10px 0px 15px 15px;"|In the admin area client overview | + | |style="padding: 10px 0px 15px 15px;"|In the admin area, under the client overview, navigate to the '' 'Domains' '' tab, where you can oversee all aspects of the domain.<br/> In addition to basic actions such as '' 'Register' '' and '' 'Renew','' you also have access to the '' 'Modify Contact Details'. ''<br/> |
| − | + | Please note that in order to get the EPP code, you will have to contact ''[email protected]'' for any specific information. | |
|} | |} | ||
{| | {| | ||
| Line 184: | Line 165: | ||
|} | |} | ||
{| | {| | ||
| − | |style="padding: 0px 0px 15px 15px;"|You | + | |style="padding: 0px 0px 15px 15px;"|You have the flexibility to control your management tools by enabling or disabling the following options: |
| − | + | * DNS Management | |
| + | * Email Forwarding | ||
| + | * ID Protection | ||
| + | * Auto Renew <br/> | ||
| + | Simply toggle the corresponding button for each option. Once yo have made your selections, confirm the changes by clicking the '' 'Save Changes' '' button. | ||
|} | |} | ||
{| | {| | ||
| Line 193: | Line 178: | ||
==Client Area== | ==Client Area== | ||
{| | {| | ||
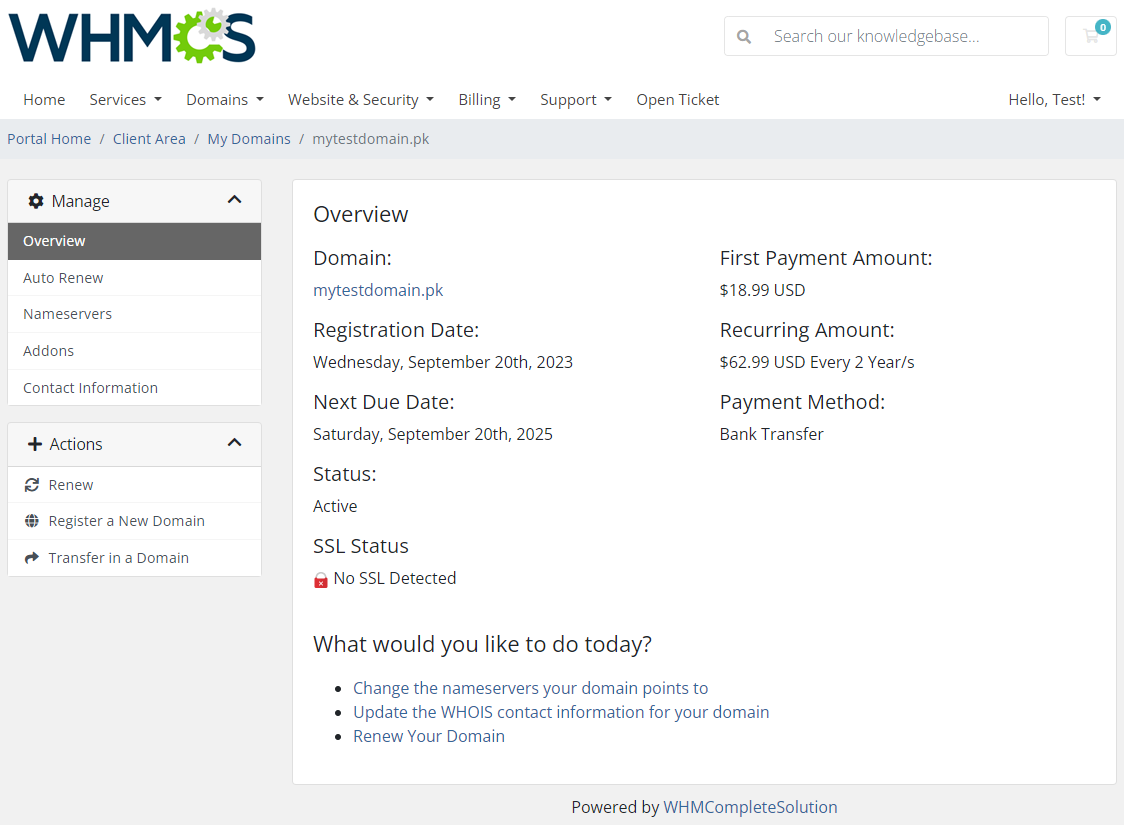
| − | |style="padding: 10px 0px 15px 15px;"|Your customers can | + | |style="padding: 10px 0px 15px 15px;"|Your customers can perform various actions on their Pakistani ''(.pk)'' domain in the client area.<br /> |
| − | + | Let's start by overviewing the basic information related to the domain. | |
|} | |} | ||
{| | {| | ||
| Line 200: | Line 185: | ||
|} | |} | ||
{| | {| | ||
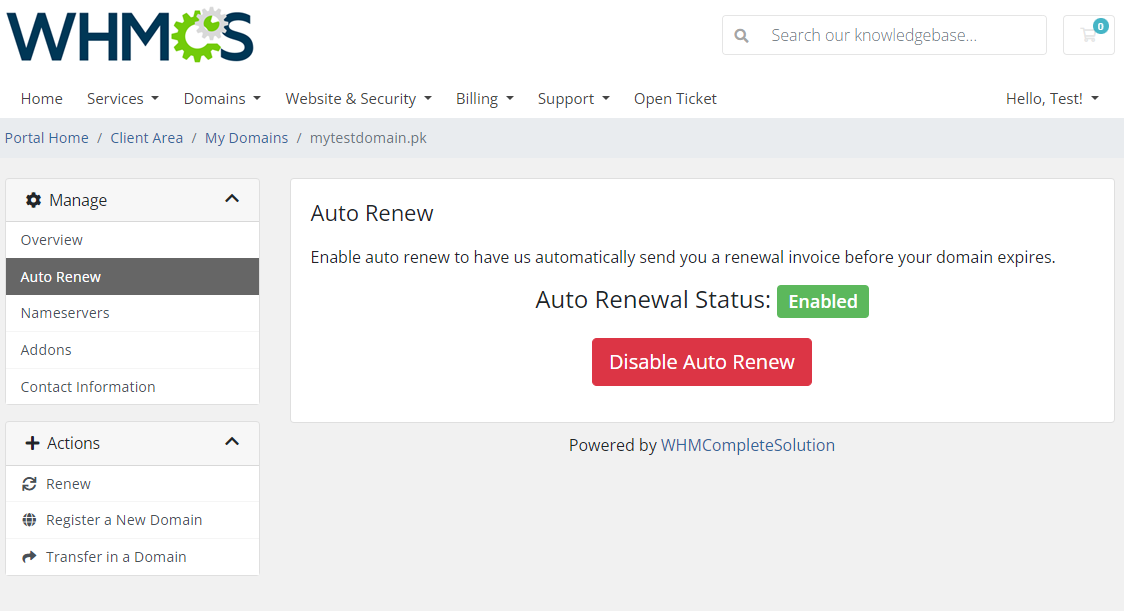
| − | |style="padding: 0px 0px 20px 15px;"| | + | |style="padding: 0px 0px 20px 15px;"|On the '' 'Auto Renew' '' tab, clients can easily toggle auto-renewal on or off by clicking the '' 'Enable Auto Renew' '' or '' 'Disable Auto Renew' '' button. |
|} | |} | ||
{| | {| | ||
| Line 206: | Line 191: | ||
|} | |} | ||
{| | {| | ||
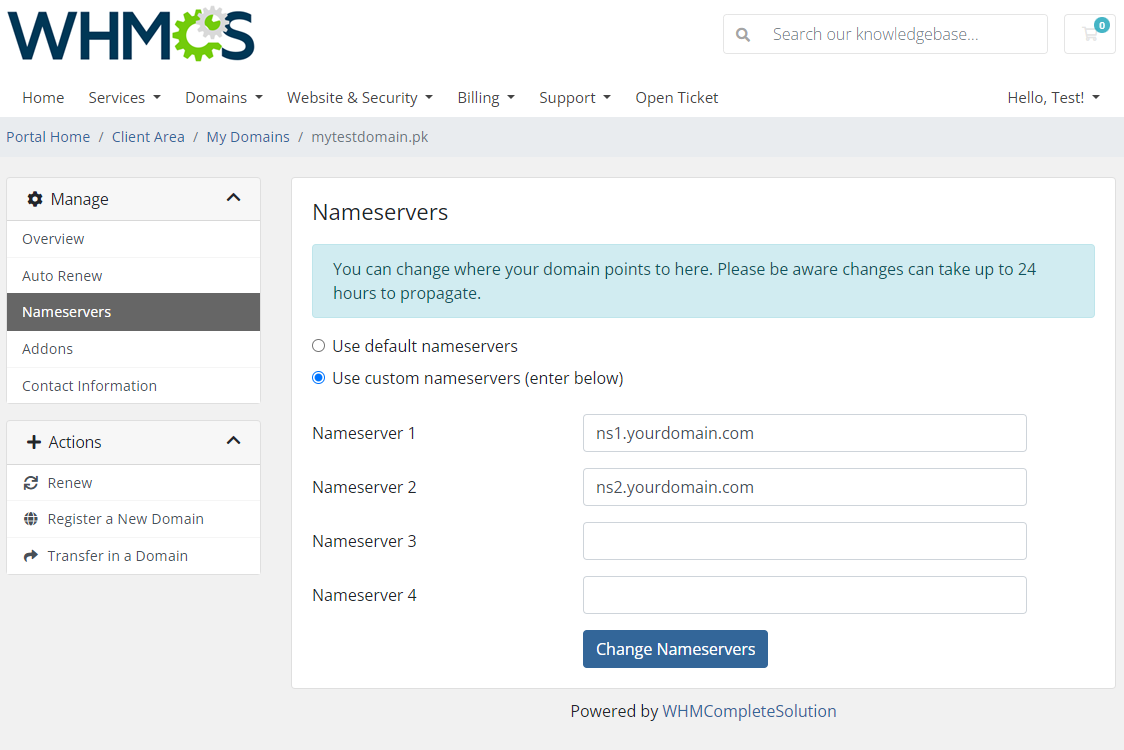
| − | |style="padding: 0px 0px 20px 15px;"| | + | |style="padding: 0px 0px 20px 15px;"|The 'Nameservers' tab allows clients to update and change the nameservers used by their domain. |
|} | |} | ||
{| | {| | ||
| Line 212: | Line 197: | ||
|} | |} | ||
{| | {| | ||
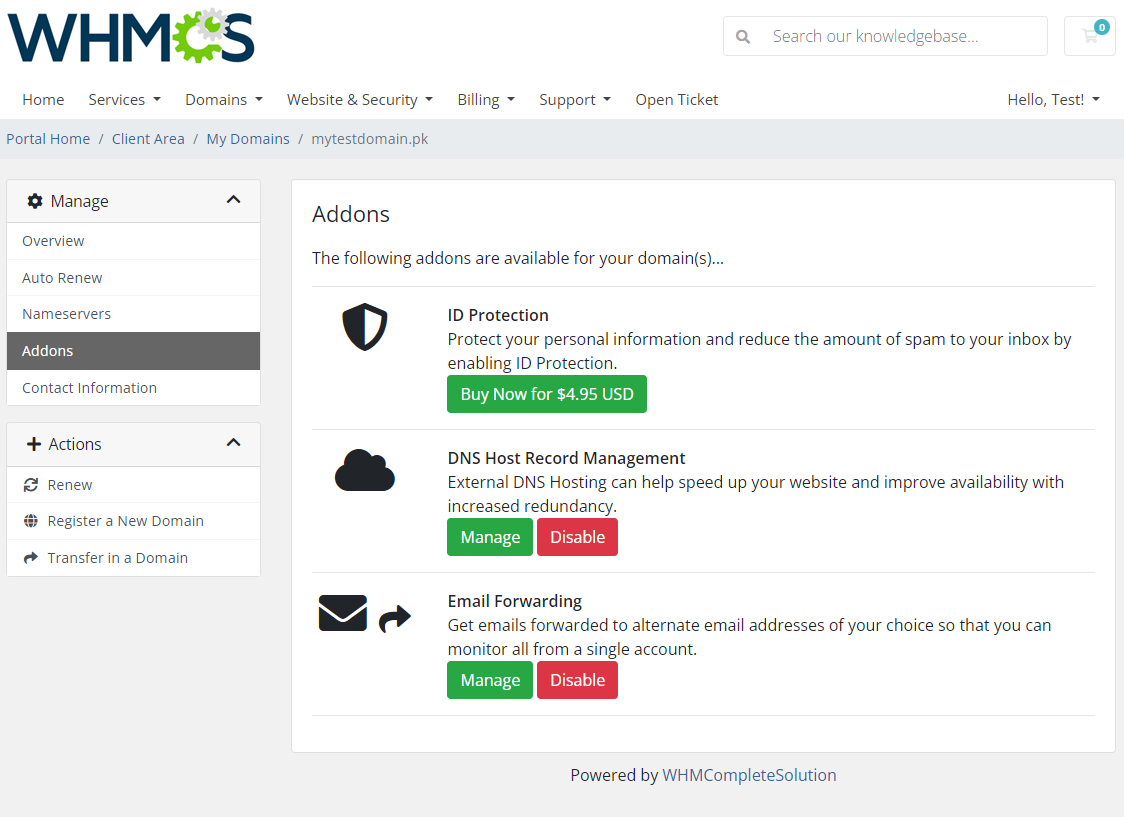
| − | |style="padding: 0px 0px 20px 15px;"|Under '' ' | + | |style="padding: 0px 0px 20px 15px;"|Under '' 'Addons' '' section, clients can conveniently purchase available addons and manage the ones they already own. |
| − | + | ||
|} | |} | ||
{| | {| | ||
| Line 219: | Line 203: | ||
|} | |} | ||
{| | {| | ||
| − | |style="padding: 0px 0px 20px 15px;"| | + | |style="padding: 0px 0px 20px 15px;"|Under '' 'Contact Information' '' section, your clients have the option to view and update the technical and billing contact information. |
|} | |} | ||
{| | {| | ||
| Line 225: | Line 209: | ||
|} | |} | ||
| − | = | + | ==Widget Management== |
{| | {| | ||
| − | |style="padding: 10px 0px | + | |style="padding: 10px 0px 15px 15px;"|Thanks to an inbuilt widget, you can keep track of the current credit balance through a handy widget on the dashboard.<br/> |
| + | Proceed to '' 'WHMCS Dashboard' → 'Show/Hide Widget Setting' '' Find on the list and enable the '' 'PKNIC Registrar Balance' '' widget. | ||
|} | |} | ||
{| | {| | ||
| − | |style="padding: 0px 0px | + | |style="padding: 0px 0px 20px 25px;"|[[File:PDR_19.png]] |
|} | |} | ||
{| | {| | ||
| − | |style="padding: 0px 0px | + | |style="padding: 0px 0px 15px 15px;"|Monitor the current credit balance per the following account types: '' 'I'/'L'/'LD':'' |
| − | + | ||
| − | + | ||
| − | + | ||
| − | + | ||
|} | |} | ||
{| | {| | ||
| − | |style="padding: 0px 0px | + | |style="padding: 0px 0px 30px 25px;"|[[File:PDR_20.png]] |
|} | |} | ||
| + | |||
| + | =Tips= | ||
{| | {| | ||
| − | |style="padding: | + | |style="padding: 10px 0px 30px 15px;"|1. As soon as a domain expires in the panel, its status in the WHMCS system is synchronized. |
| − | + | ||
| − | + | ||
| − | + | ||
| − | + | ||
| − | + | ||
| − | + | ||
| − | + | ||
| − | + | ||
| − | + | ||
| − | + | ||
|} | |} | ||
=Update Instructions= | =Update Instructions= | ||
{| | {| | ||
| − | |style="padding: 10px 0px 30px 15px;"| | + | |style="padding: 10px 0px 30px 15px;"|An essential guidance through the process of updating the module is offered '''[https://www.docs.modulesgarden.com/How_To_Update_WHMCS_Module here]'''.<br/> |
| − | + | Ensure successful completion of the module update by carefully following each step, thereby preventing data loss or any unforeseen issues.<br/> Additionally, you will find a current list of supplementary actions necessary for a smooth update process there. | |
| − | + | ||
|} | |} | ||
| − | = | + | =Upgrade Guide= |
{| | {| | ||
| − | |style="padding: 10px 0px | + | |style="padding: 10px 0px 30px 15px;"|Seeking a solution that offers greater flexibility, customization tailored to your precise needs, and unrestricted availability?<br/> There is an option that not only proves to be cost-effective in the long run but also includes prioritized support services, making it a truly valuable investment.<br/> |
| − | + | ||
| − | + | Opt for the [https://www.modulesgarden.com/products/whmcs/pknic-domain-registrar#open-source-version Open Source version] of your PKNIC Domain Registrar For WHMCS module to unlock these benefits.<br/> Simply click on either the '''Get Source Code''' or '''Upgrade To Lifetime''' button found on the product's page in our client area to complete the one-step upgrade process, with a '''dedicated discount''' already applied.<br/> | |
| − | + | ||
| − | + | Follow a [https://www.docs.modulesgarden.com/How_To_Upgrade_WHMCS_Module comprehensive guide] covering the transition process, the advantages it brings, and step-by-step instructions on what to do next after the order has been successfully finalized. | |
| − | + | ||
| − | + | ||
| − | + | ||
| − | + | ||
| − | + | ||
| − | + | ||
| − | + | ||
| − | + | ||
| − | + | ||
| − | + | ||
|} | |} | ||
| + | |||
| + | =Common Problems= | ||
{| | {| | ||
| − | |style="padding: | + | |style="padding: 10px 0px 30px 15px;"|'''1. When you have problems with connection, check whether your SELinux or firewall does not block ports.''' |
|} | |} | ||
Latest revision as of 14:41, 31 January 2025
PKNIC Domain Registrar For WHMCS has reached End of Support (EOS) and is no longer actively maintained. The module remains available for purchase, including the Open Source version and License Upgrade at a discounted price. Current license subscriptions continue and stay valid for future renewals.
Contents |
[edit] About PKNIC Domain Registrar For WHMCS
| PKNIC Registrar For WHMCS is a domain registrar module that brings automated provisioning and management of Pakistan (.pk) domains within the WHMCS environment. This module empowers your clients to effortlessly manage Pakistani domains directly within your client area. |
- Admin Area Features:
| ✔ Register And Renew .PK ccTLD Domains |
| ✔ Modify Contact Details |
| ✔ Update Nameservers |
| ✔ Toggle Domain Auto Renewal |
| ✔ Monitor Account Credit Balance With Dashboard Widget |
- Client Area Features:
| ✔ Register .PK ccTLD Domains |
| ✔ Toggle Domain Auto Renewal |
| ✔ Manage Nameservers |
| ✔ Update Contact Details |
- General Info:
| ✔ Supports PHP 8.2 Back To PHP 7.4 |
| ✔ Supports WHMCS Themes "Six" And "Twenty-One" |
| ✔ Supports WHMCS V8.11 Back To WHMCS V8.8 |
| ✔ Requires ionCube Loader V13 Or Later |
| ✔ Easy Module Upgrade To Open Source Version |
[edit] Installation
PKNIC Domain Registrar For WHMCS has reached End of Support (EOS) and is no longer actively maintained. The module remains available for purchase, including the Open Source version and License Upgrade at a discounted price. Current license subscriptions continue and stay valid for future renewals.
| This tutorial will show you how to successfully install PKNIC Domain Registrar For WHMCS. We will guide you step by step through the whole installation and configuration process. |
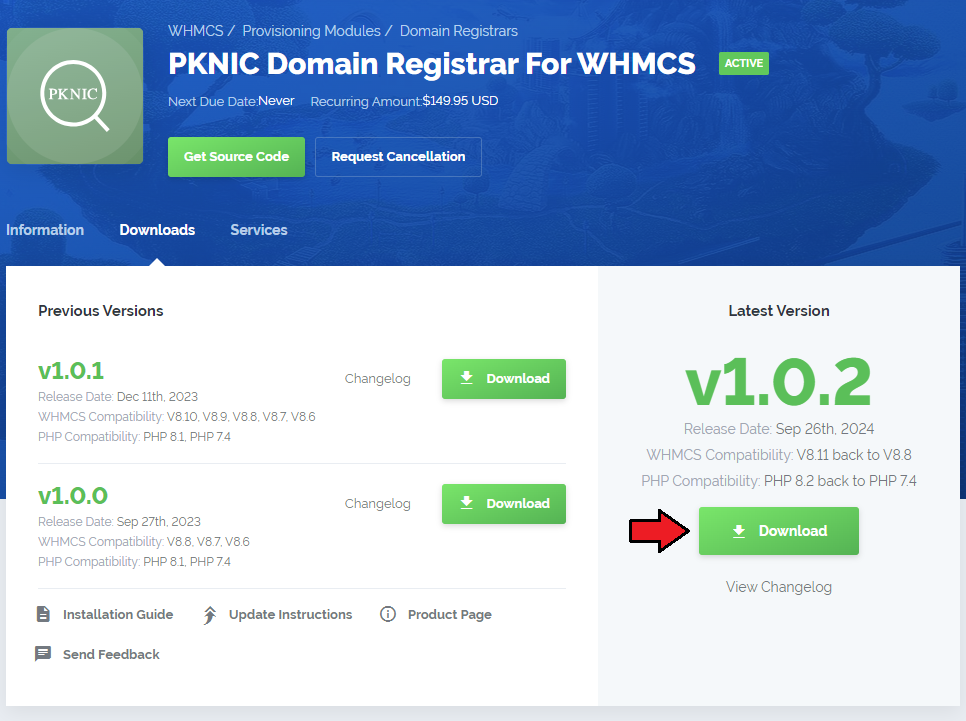
| 1. Log in to our client area and download the module. |
|
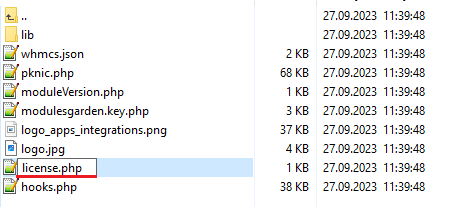
| 2. Extract the package and upload its content into the main WHMCS directory. The content of the package to upload should look like this. |

|
| 3. When you install PKINC Domain Registrar For WHMCS for the first time you have to rename 'license_RENAME.php' file. The file is located in 'modules/registrars/pknic_domain/license_RENAME.php'. Rename it from 'license_RENAME.php' to 'license.php'. |
|
| 4. In order to configure your license key, you have to edit a previously renamed 'license.php' file. Enter your license key between quotation marks as presented on the following screen. You can find your license key in our client area → 'My Products'. |

|
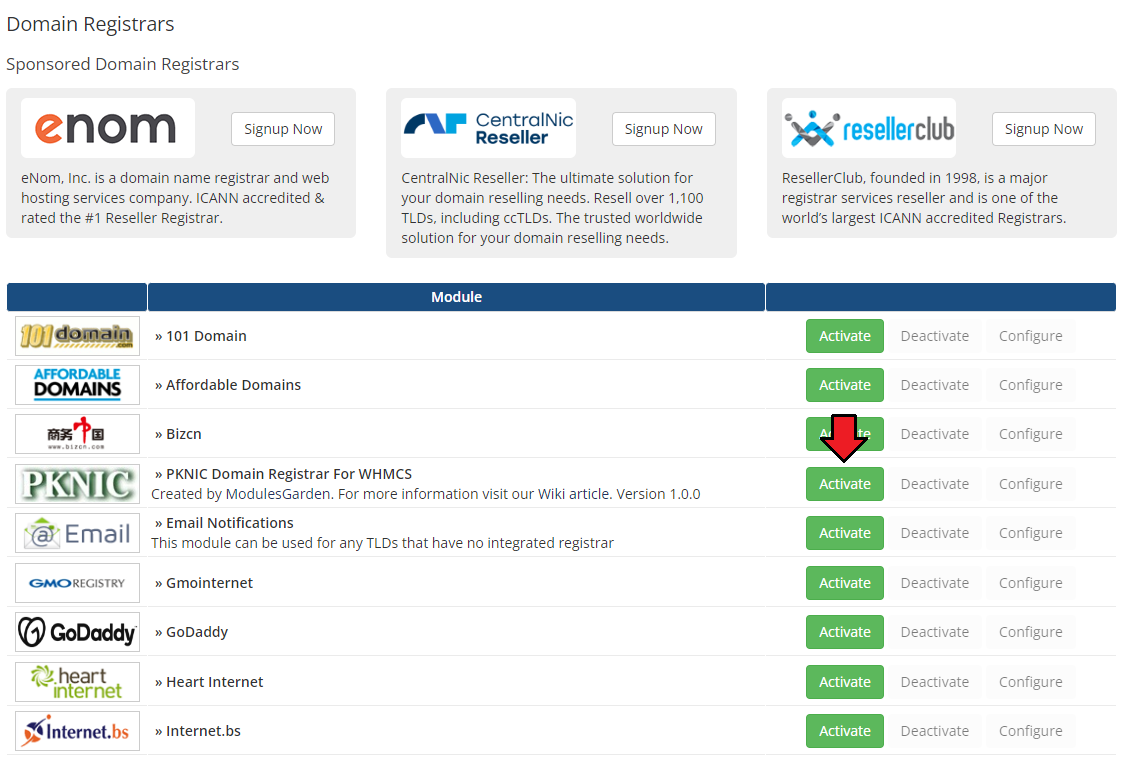
| 5. Now you have to activate the module in your WHMCS system. Log in to your WHMCS admin area. Go to 'Setup' → 'Products/Services' → 'Domain Registrars'. |
|
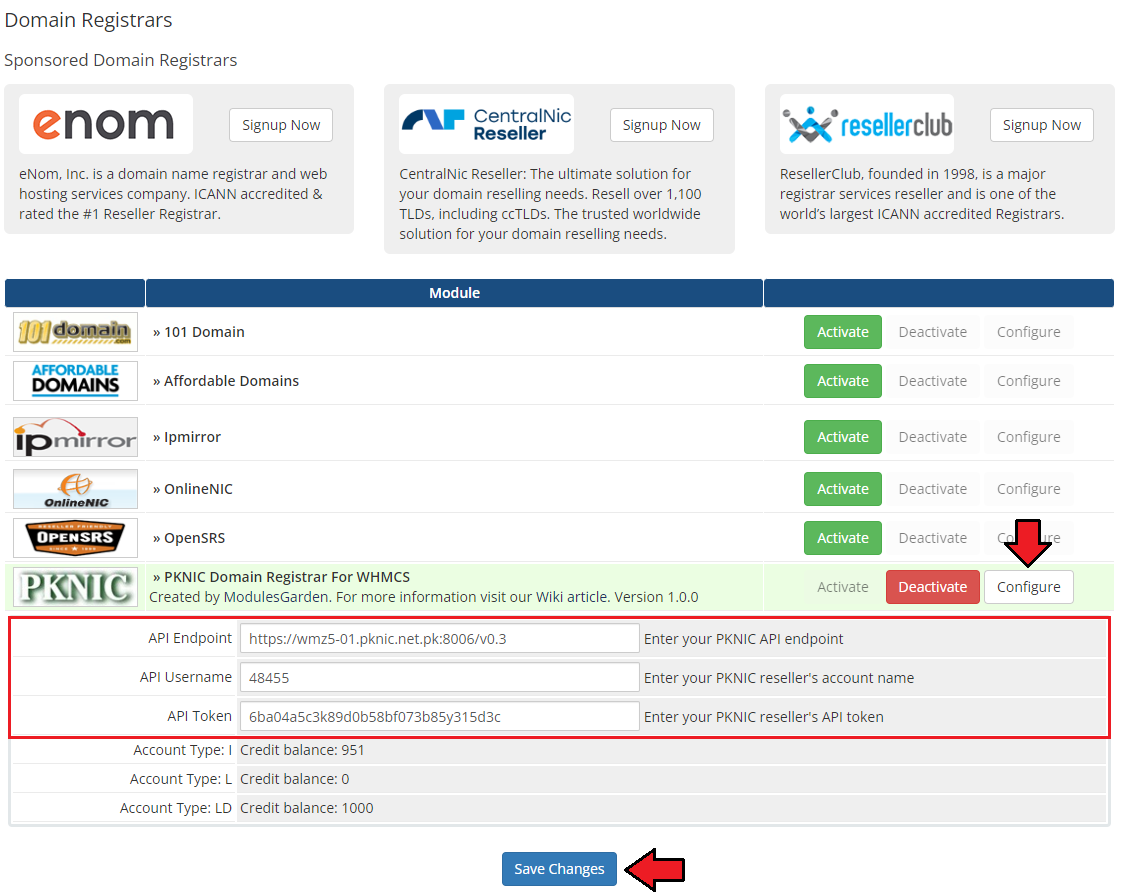
| 6. In the next step, you need to set up access to the PKNIC panel API. To do so, fill in 'API Endpoint', 'API Username' and 'API Token' fields with your PKNIC reseller's account details. Important: If you cannot locate the access credentials within your reseller panel, consider reaching out to [email protected] for assistance in obtaining them. Next, confirm by clicking the 'Save Changes' button. |
|
| 7. You have just successfully installed PKNIC Domain Registrar For WHMCS! |
[edit] Configuration and Management
| PKNIC Domain Registrar For WHMCS enables you to offer .pk ccTLDs from PKNIC through the WHMCS system. Furthermore, PKNIC Domain For WHMCS empowers your customers to oversee their domains directly from the WHMCS client area. |
[edit] Management of TLDs
Adding a new TLD is a straightforward process. Follow these steps:
|

|
| Navigate to the 'Pricing' section and configure the pricing for the domain TLD. |

|
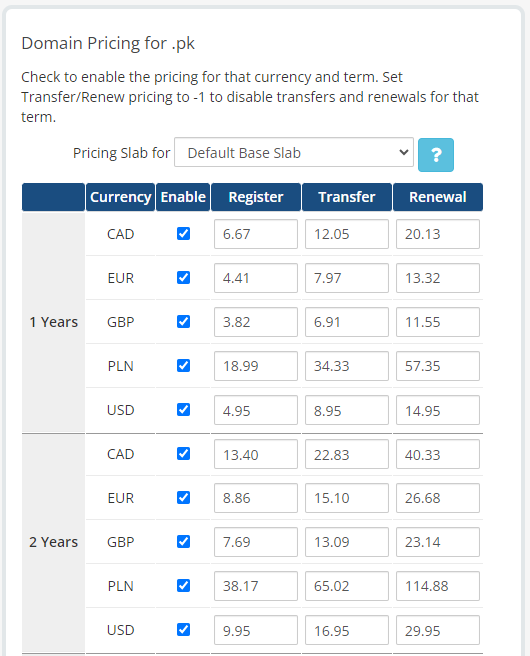
| In the newly opened window, you have the opportunity to customize your pricing. Be sure to save your changes once your configuration is complete! |
|
| That is all! Your customers can now begin ordering '.pk' domains directly from your WHMCS client area. |
[edit] Ordering Process
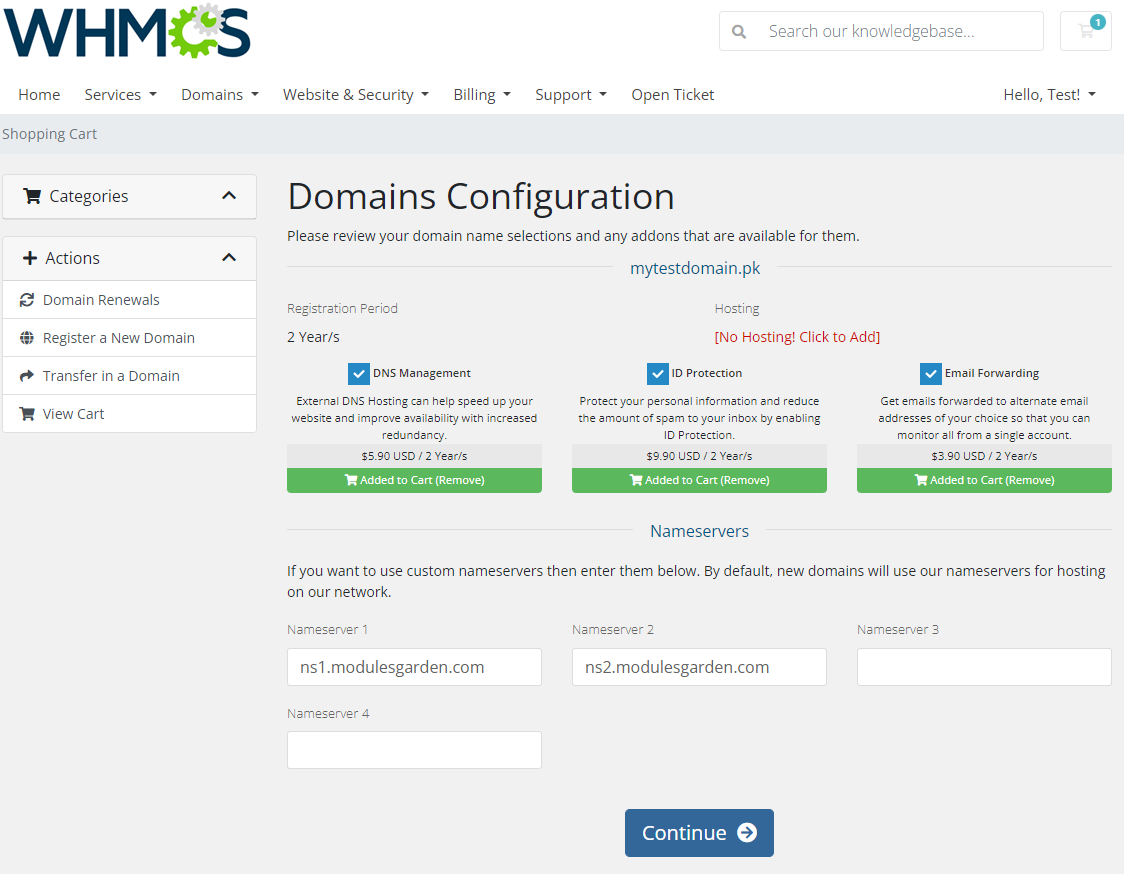
| The process of ordering a PKNIC domain is similar to ordering any other domain. Simply search to see if the domain is available, add it to your cart, and mange the created set of nameservers. Then, proceed to complete the order. Important: When registering a new domain, a set of nameservers is created and assigned to the just registered domain. |
|
[edit] Domain Management
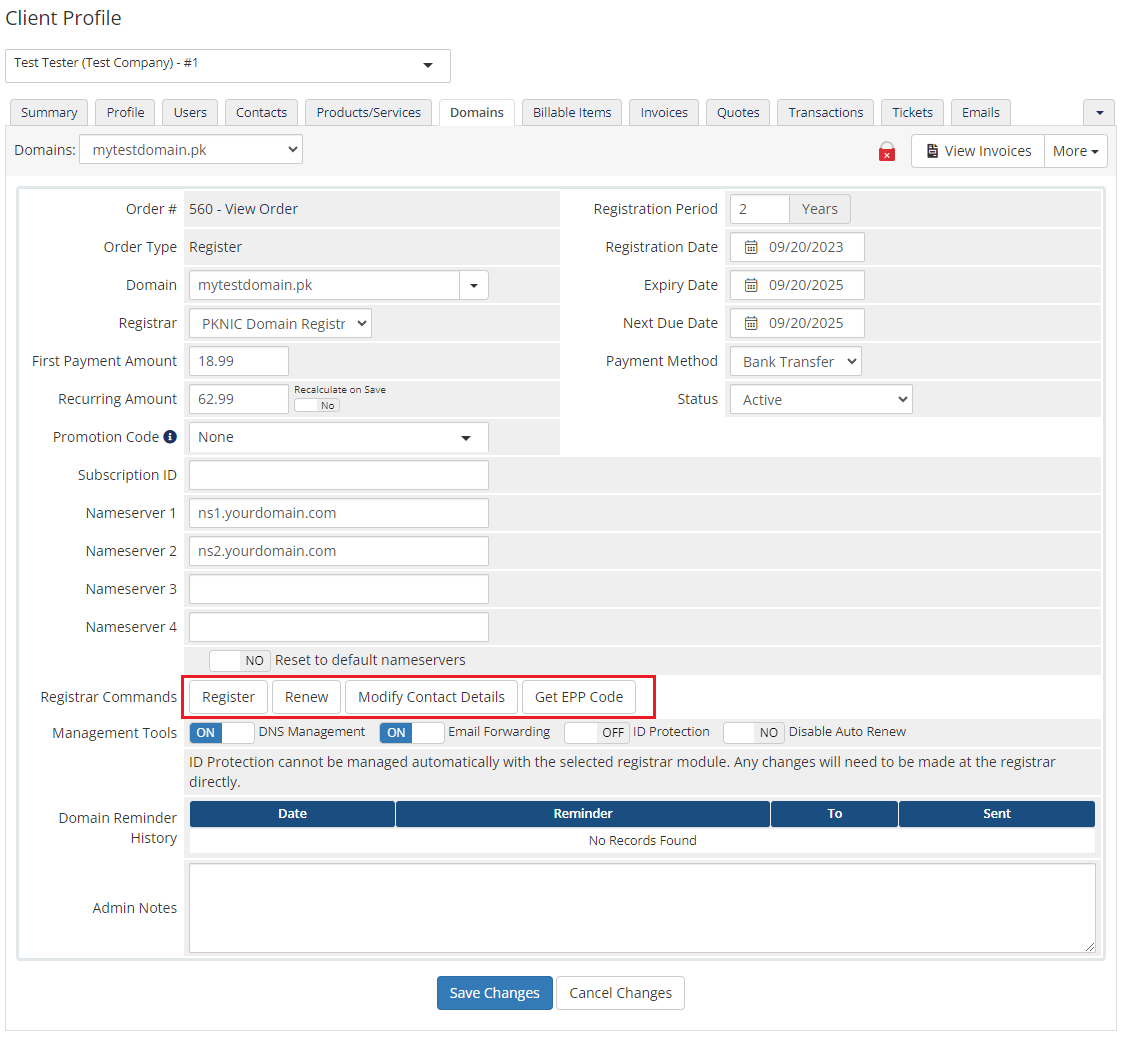
| In the admin area, under the client overview, navigate to the 'Domains' tab, where you can oversee all aspects of the domain. In addition to basic actions such as 'Register' and 'Renew', you also have access to the 'Modify Contact Details'. Please note that in order to get the EPP code, you will have to contact [email protected] for any specific information. |
|
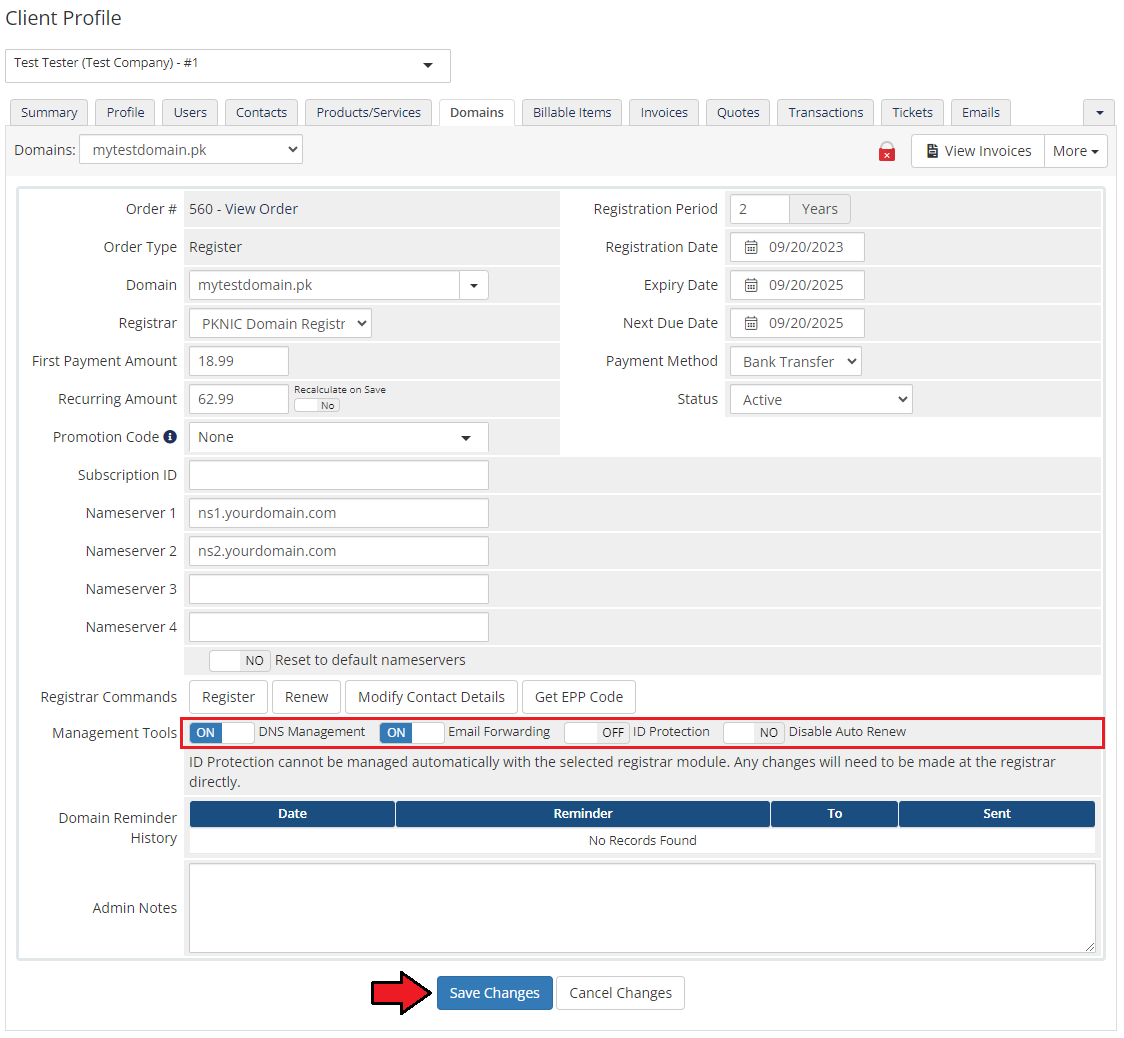
You have the flexibility to control your management tools by enabling or disabling the following options:
Simply toggle the corresponding button for each option. Once yo have made your selections, confirm the changes by clicking the 'Save Changes' button. |
|
[edit] Client Area
| Your customers can perform various actions on their Pakistani (.pk) domain in the client area. Let's start by overviewing the basic information related to the domain. |
|
| On the 'Auto Renew' tab, clients can easily toggle auto-renewal on or off by clicking the 'Enable Auto Renew' or 'Disable Auto Renew' button. |
|
| The 'Nameservers' tab allows clients to update and change the nameservers used by their domain. |
|
| Under 'Addons' section, clients can conveniently purchase available addons and manage the ones they already own. |
|
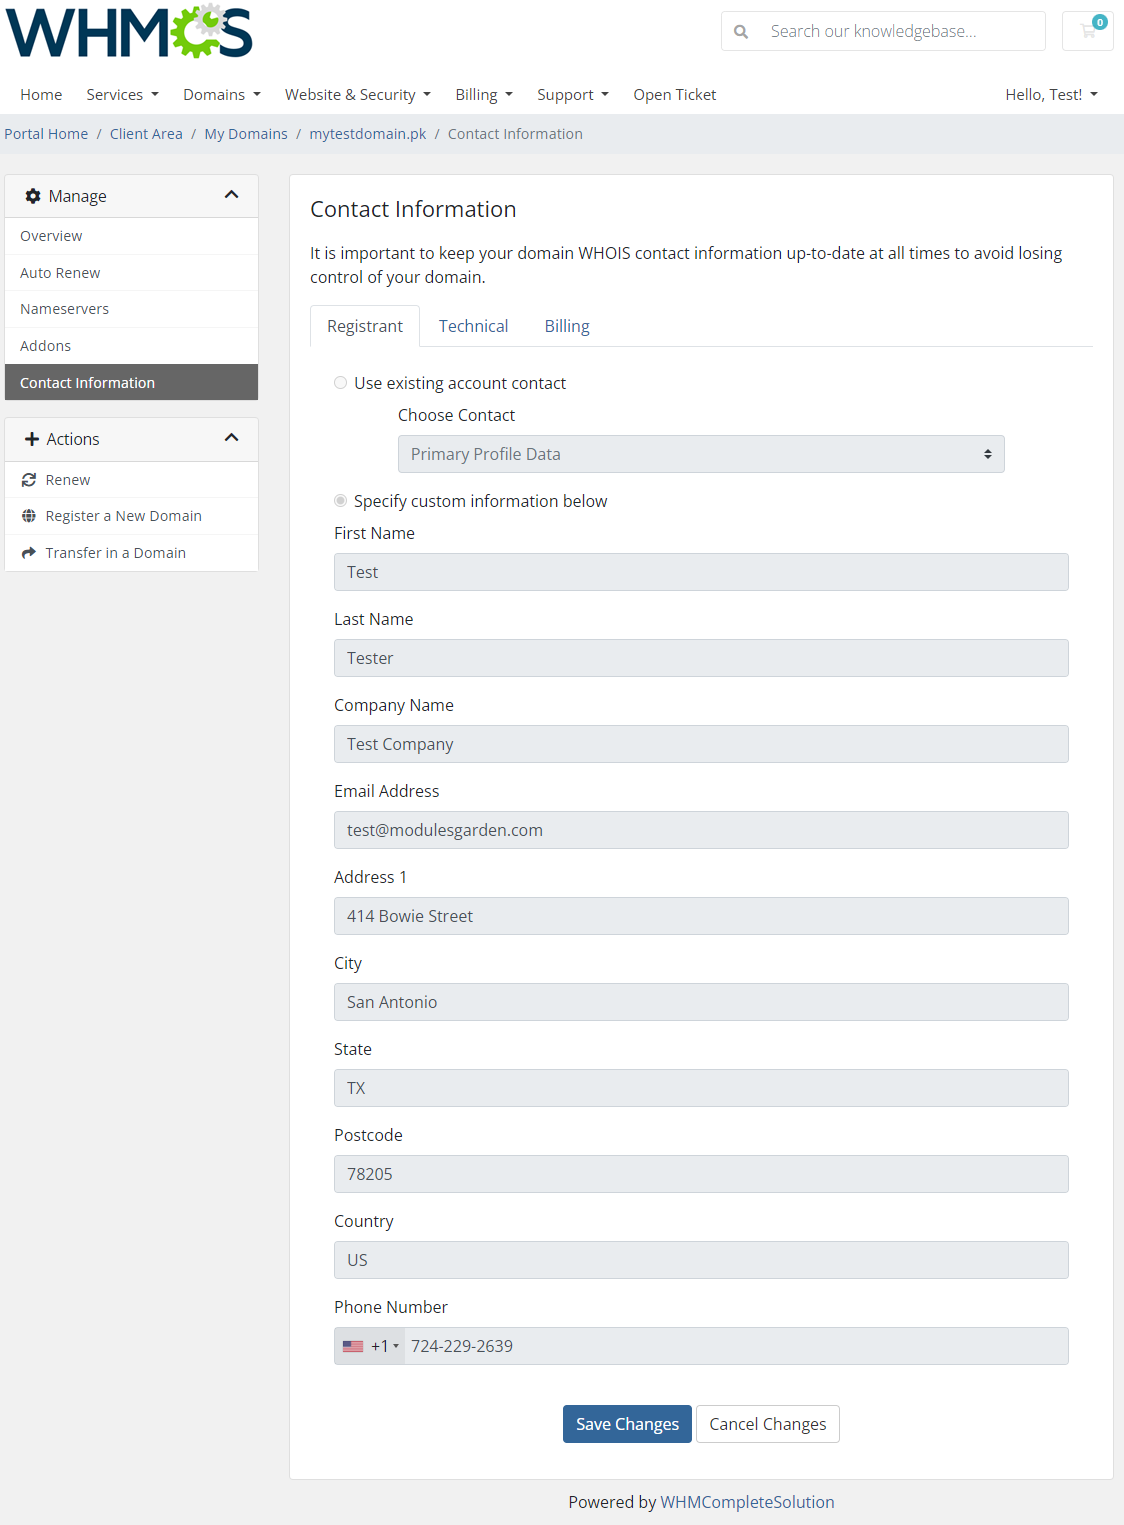
| Under 'Contact Information' section, your clients have the option to view and update the technical and billing contact information. |
|
[edit] Widget Management
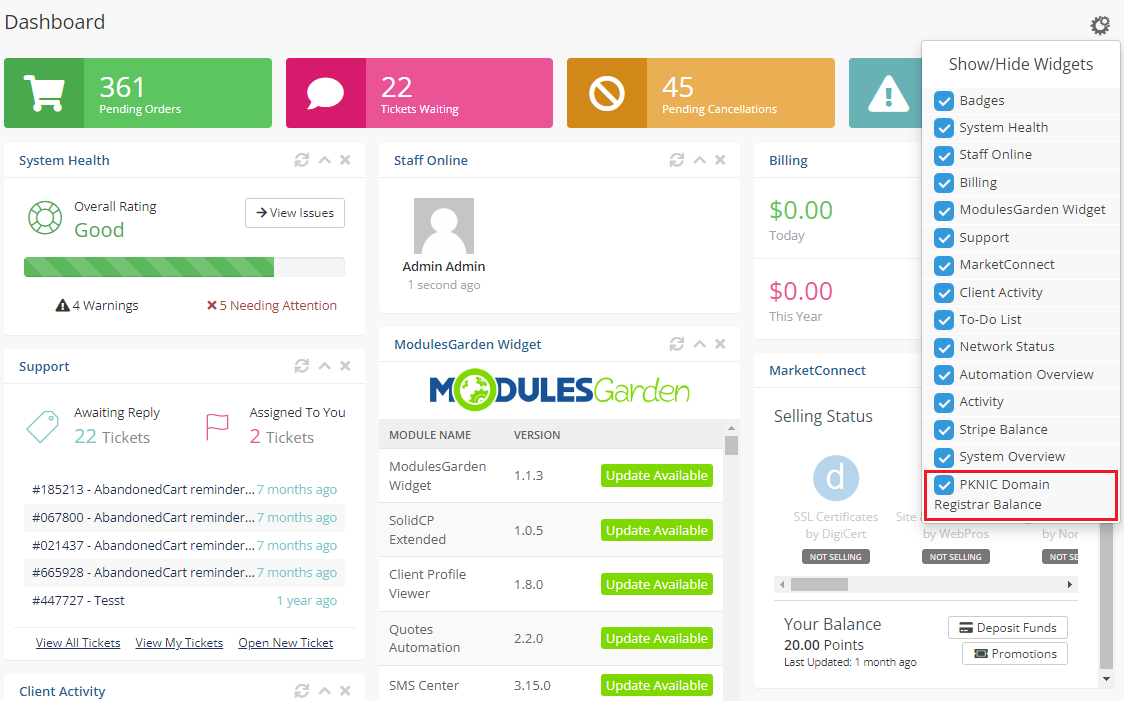
| Thanks to an inbuilt widget, you can keep track of the current credit balance through a handy widget on the dashboard. Proceed to 'WHMCS Dashboard' → 'Show/Hide Widget Setting' Find on the list and enable the 'PKNIC Registrar Balance' widget. |
|
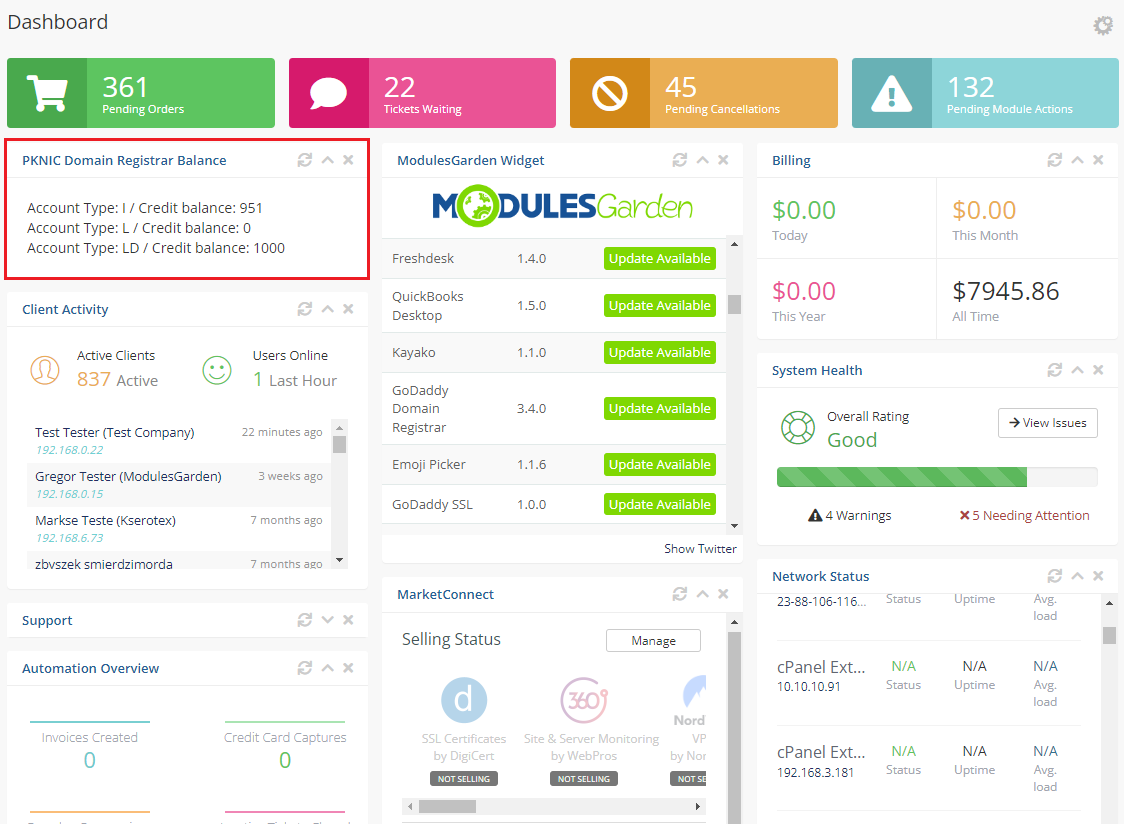
| Monitor the current credit balance per the following account types: 'I'/'L'/'LD': |
|
[edit] Tips
| 1. As soon as a domain expires in the panel, its status in the WHMCS system is synchronized. |
[edit] Update Instructions
| An essential guidance through the process of updating the module is offered here. Ensure successful completion of the module update by carefully following each step, thereby preventing data loss or any unforeseen issues. |
[edit] Upgrade Guide
| Seeking a solution that offers greater flexibility, customization tailored to your precise needs, and unrestricted availability? There is an option that not only proves to be cost-effective in the long run but also includes prioritized support services, making it a truly valuable investment. Opt for the Open Source version of your PKNIC Domain Registrar For WHMCS module to unlock these benefits. Follow a comprehensive guide covering the transition process, the advantages it brings, and step-by-step instructions on what to do next after the order has been successfully finalized. |
[edit] Common Problems
| 1. When you have problems with connection, check whether your SELinux or firewall does not block ports. |