Google Analytics For WHMCS
From ModulesGarden Wiki
(Difference between revisions)
|
|
| Line 360: |
Line 360: |
| | =Common Problems= | | =Common Problems= |
| | {| | | {| |
| − | |style="padding: 10px 0px 20px 15px;"|'''1. When you have problems with connection, check whether your SELinux or firewall does not block ports.''' | + | |style="padding: 10px 0px 10px 15px;"|'''1. When you have problems with connection, check whether your SELinux or firewall does not block ports.''' |
| | |} | | |} |
| | {| | | {| |
| − | |style="padding: 0px 0px 30px 15px;"|'''2. Google Analytics API calculates the value of an event without shipping or tax, so if the value seems off, make sure you keep this in mind.''' | + | |style="padding: 0px 0px 30px 15px;"|2. Google Analytics API calculates the value of an event without shipping or tax, so if the value seems off, make sure you keep this in mind. |
| | |} | | |} |
Revision as of 13:54, 15 July 2024
Google Analytics For WHMCS integrates your WHMCS data into Google Analytics, providing deep insights into customer behavior and engagement.
Access a wide range of client activities, from shopping cart actions to account interactions and support ticket changes, all within your Google Analytics account.
Use this powerful module to constantly monitor your customers' actions and respond to their needs immediately.
|
| ✔ Track WHMCS User Actions:
|
| ✔ View Dashboard Statistics And Graphs:
|
| ✔ Configure Google Analytics Integration:
|
| ✔ Choose Data Sending Method:
|
| ✔ Requests To API Immediately
|
| ✔ Add Requests To Cron Queue
|
| ✔ Provide Conversion ID And Conversion Label
|
| ✔ Enable Google Tag Manager Integration
|
| ✔ Select Client Properties Sent To Google Analytics
|
| ✔ Select Client Actions Sent To Google Analytics
|
| ✔ View And Manage Queue Tasks
|
| ✔ Supports Google Analytics 4
|
| ✔ Supports WHMCS V8.10 Back To WHMCS V8.8
|
| ✔ Requires ionCube Loader V12 Or Later
|
Installation
This tutorial will show you how to successfully install and authenticate Google Analytics For WHMCS.
We will guide you step by step through the whole installation and authentication process.
|
| 1. Log in to our client area and download the module.
|
2. Extract the package and upload its content into the main WHMCS directory.
The content of the package to upload should look like this.
|
3. When you install Google Analytics For WHMCS for the first time, you have to rename the 'license_RENAME.php' file.
The file is located in 'modules/addons/GoogleAnalytics/license_RENAME.php'. Rename it from 'license_RENAME.php' to 'license.php'.
|
4. In order to configure your license key you have to edit the previously renamed 'license.php' file.
Enter your license key between the quotation marks as presented on the following screen. You can find your license key in our client area → 'My Products'.
|
5. Optionally, add a cron job as shown below (5-minute intervals are recommended).
php -q /your_whmcs/modules/addons/GoogleAnalytics/cron/cron.php queue
This cron makes sure data is sent automatically when using the 'Add Requests to Cron Queue' Data Sending Method.
Do not forget to replace 'your_whmcs' with your WHMCS root location. The cron can also be executed every single minute to perform the action more often.
|
Connection and API Configuration
| 6. Log in to Google Analytics and create an account for your website if you have not already.
|
7. Copy the 'Measurement ID' and 'API Secret' .
The web stream details page should open automatically, if it does not, you can find it under 'Admin' → 'Property Settings' → 'Data collection and modification' → 'Data Streams'.
|
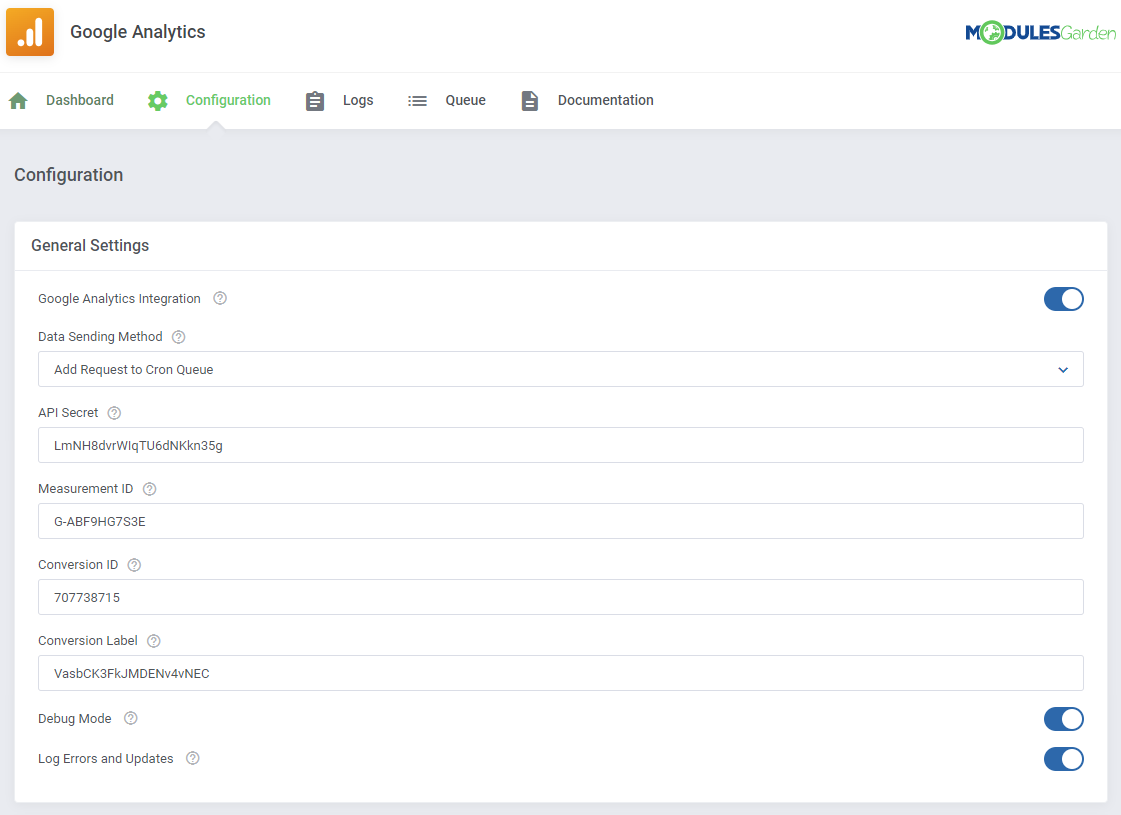
| 8. Paste them in under 'Configuration' → 'General Settings'.
|
| 9. Go to 'Property details' and find the 'Property ID' .
|
| 10. Copy it into the respective field under 'Dashboard' .
|
| 12. Download your 'credentails.json' file and paste its contents into the Credentials field.
|
13. Find client_email and copy the address.
|
| 14. Go back to Google Analytics. Navigate to 'Admin' → 'Account' → 'Account access management' and use the copied email to create a new user.
|
15. The last step is to enable the integration, select what user customer data and which actions you want the module to send to Google Analytics, and submit the configuration.
Only selected actions will be displayed on the dashboard.
|
| You have successfully installed Google Analytics For WHMCS and connected it with the Google Analytics platform.
|
Configuration and Management
With the connection between the Google Analytics For WHMCS module and Google Analytics established, the basic functionality is already active.
You will be able to see your WHMCS data in the Google Analytics panel, and the module's dashboard will provide crucial information at a glance without needing to leave the WHMCS environment.
See the instructions below for more details on the module's configuration and management.
Note: It might take the Google Analytics API about a day to send the updated data back to WHMCS.
|
Advanced Configuration
Under the 'Configuration' tab you will be able to specify additional details regarding the module's functionality.
First, focus on 'General Settings'.
- Data Sending Method - choose how the data is sent to Google Analytics. You can either send API requests immediately or use the cron queue system, potentially reducing the load on WHMCS.
The cron itself can be found in the Queue tab.
- Conversion ID - a unique identifier assigned to a specific conversion action in Google Ads. It tracks and reports activities that lead to achieving conversion goals, such as purchases, sign-ups, or other valuable interactions.
You can find it in the conversion settings in Google Ads.
- Conversion Label - a unique tag assigned to a specific conversion action in Google Ads. It allows for more detailed categorization and tracking of different types of conversions, such as various products or services.
You can configure it in the conversion settings in Google Ads to better understand the effectiveness of your ad campaigns.
- Debug Mode - allows you to preview the content and queries directly in Google Analytics in the DebugView tab without passing them to reports.
- Log Errors and Updates - allows you to monitor queries sent to Google Analytics and view their content and possible errors in the 'Logs' tab of the module.
|
|
Moreover, you may integrate Google Tags Manager with Google Analytics For WHMCS.
To do so, provide the Container ID. You will find it by logging in to your Google Tag Manager account and opening a container.
In the top right corner (next to the Submit and Preview buttons) you'll see some short text that starts with 'GTM-', which is your Container ID.
|
Dashboard
This section provides a comprehensive overview of your website traffic and client actions, offering valuable insights into user behavior and engagement on your site.
The dashboard includes:
- Event Statistics Graph - illustrating various actions your clients perform on your website.
- New Users Graph - showing the number of your new clients.
- Active Users Graph - displaying the number of active user visits.
- Page Views Graph - representing the general traffic on the website.
- Event Statistics Table - highlighting client actions just as the graph, but in the form of a table.
|
You can change the scope of each dashboard element by clicking on the 'Change Settings' icon next to it.
For 'Event Statistics' pick the events that are of interest to you, separate selections can be made for the graph and the table.
|
Logs
| All errors and module activity can be found in the 'Logs' section. You can view the details of each log or delete it by using the action buttons.
|
| Multiple logs can be deleted at once with the mass action function.
|
| Moreover additional actions include deleting specific logs, exporting the logs into a '.csv' file and setting up the auto prune system.
|
Queue
If you are using the 'Add Requests to Cron Queue' Data Sensing Method, the 'Queue' section is where the requests can be managed.
You will find the information on the cron itself at the top of this section.
|
| The list of the queued requests can be viewed, inspected, and managed manually. Use the action buttons to see each request's details, manually run it, or delete it.
|
| Multiple tasks can be deleted at once via the mass selection feature.
|
The auto prune system can be set up to automatically delete tasks after a specified time.
This feature can be found under additional actions.
|
Tips
| 1. Once you turn the debug mode in the addon on, you will be able to track all API requests sent to Google Analytics under 'Admin' → 'Data display' → 'DebugView'.
|
| 2. You may use these requests to create custom definitions under 'Admin' → 'Data display' → 'Custom definitions'.
|
Update Instructions
An essential guidance through the process of updating the module is offered here.
Ensure successful completion of the module update by carefully following each step, thereby preventing data loss or any unforeseen issues.
Additionally, you will find a current list of supplementary actions necessary for a smooth update process there.
|
Upgrade Guide
Seeking a solution that offers greater flexibility, customization tailored to your precise needs, and unrestricted availability?
There is an option that not only proves to be cost-effective in the long run but also includes prioritized support services, making it a truly valuable investment.
Opt for the Open Source version of your Google Analytics For WHMCS module to unlock these benefits.
Simply click on either the Get Source Code or Upgrade To Lifetime button found on the product's page in our client area to complete the one-step upgrade process, with a dedicated discount already applied.
Follow a comprehensive guide covering the transition process, the advantages it brings, and step-by-step instructions on what to do next after the order has been successfully finalized.
|
Common Problems
| 1. When you have problems with connection, check whether your SELinux or firewall does not block ports.
|
| 2. Google Analytics API calculates the value of an event without shipping or tax, so if the value seems off, make sure you keep this in mind.
|


