Lagom One Step Order Form For WHMCS
From ModulesGarden Wiki
(Difference between revisions)
|
|
| Line 6: |
Line 6: |
| | |style="padding: 10px 0px 5px 0px;"|'''Lagom One Step Order Form For WHMCS''' is a one of a kind module built to simplify and attract the ordering process at the same time.<br/> | | |style="padding: 10px 0px 5px 0px;"|'''Lagom One Step Order Form For WHMCS''' is a one of a kind module built to simplify and attract the ordering process at the same time.<br/> |
| | You will be granted numerous options to customize the ordering pages, including the division into one or two pages and choose the page layout. <br/> | | You will be granted numerous options to customize the ordering pages, including the division into one or two pages and choose the page layout. <br/> |
| − | If integrated with [https://lagom.rsstudio.net/products/client-theme Lagom WHMCS Client Theme], your client area will boost with endless eye pleasing options. | + | If integrated with [https://lagom.rsstudio.net/products/client-theme Lagom WHMCS Client Theme], your order pages will boost with some extra eye pleasing options. |
| | |} | | |} |
| | *'''Client Area:''' | | *'''Client Area:''' |
Revision as of 14:22, 20 April 2022
Lagom One Step Order Form For WHMCS is a one of a kind module built to simplify and attract the ordering process at the same time.
You will be granted numerous options to customize the ordering pages, including the division into one or two pages and choose the page layout.
If integrated with Lagom WHMCS Client Theme, your order pages will boost with some extra eye pleasing options.
|
| ✔ Requires Freshdesk "Pro" Pricing Plan Or Higher
|
| ✔ Custom Templates Support
|
| ✔ Integrated With Payment Gateway Charges For WHMCS
|
| ✔ Supports PHP 7.2 Up To PHP 7.4
|
| ✔ Supports WHMCS Themes "Six" And "Twenty-One"
|
| ✔ Supports WHMCS V8.0 And Later
|
Installation and Configuration
This tutorial will show you how to successfully install and configure [one-step-order-page One Step Order Page For WHMCS.]
We will guide you step by step through the whole installation and configuration process.
|
Installation
| 1. Log in to our client area and download the module.
|
| 2. Extract the '.zip' folder that has been downloaded from the client area.
|
3. Upload the '/php71+/' content to your FTP server.
Make sure that during the upload process all the files have been correctly uploaded and no errors occurred.
|
4.When you install 'Lagom One Step Order Form' for the first time, you have to rename the 'license_RENAME.php' file.
The file is located in 'modules/addons/OneStepOrder/license_RENAME.php'. Rename it from 'license_RENAME.php' to 'license.php'.
|
5. In order to configure your license key, you have to edit the previously renamed 'license.php' file.
Enter your license key between quotation marks as presented on the following screen. You can find your license key in our client area → 'My Products'.
|
6. Now, set up the 'storage' folder as recursively writable.
This folder is available at 'your_whmcs/modules/addons/OneStepOrder/'.
|
7. Finally, set the 'htaccess' file rule
Open the 'htaccess' file, you will find it in the main root directory.
|
8. If you have 'fully friendly rewrite' set up, you will have to paste the below rule underneath 'RewriteBase /' :
   RewriteBase /

   #one-step-order
   RewriteRule ^order/(.*)$ order.php?m=OneStepOrder&gid=$1 [L]
Otherwise, create the below rule above the WHMCS rules:
  RewriteBase /

  #one-step-order
  RewriteRule ^order/(.*)$ order.php?m=OneStepOrder&gid=$1 [L]
|
Activation
9. Now, you have to activate the module in your WHMCS system.
Log in to your WHMCS admin area and proceed to 'System Settings' → 'Addon Modules'.
Afterward, find 'One Step Order Form' and press the 'Activate' button.
|
10. In the next step you need to permit access to this module.
To do so, click on the 'Configure' button, tick checkboxes to assign desired admin roles.
|
| 11. You have just successfully installed One Step Order Form For WHMCS!
|
Management
One Step Order Form For WHMCS has been designed to give flexibility for the clients and allow to configure it to specific business needs.
Below we will describe all the available customization options.
|
Addon Configuration
Templates
| Begin by navigating to the “One Step Order Form” addon in your WHMCS admin area, there the “Templates” section will be opened by default.
|
Order Form Type
In the 'Order Form Type' section you may choose which of the available order types should be used in the client area. You may choose between three types, these are:
- One Step
- Two Steps
- Step by Step* (available soon)
For detailed description with visualization in client area look below.
|
The first one, called 'One Step' allows you to decide whether to show all of the product configuration options on a single page only.
Note that at the beginning of the ordering process your client will be able to switch between different product packages within a specific product group.
Client area view:
|
When the 'Two Steps' option is selected, the order process is divided into two separate steps, where the first one allows you to choose a product to order.
In the second step the configuration options available for the previously selected product are displayed.
Note: It is not possible to switch between products if this order form type is selected.
|
| Client area view 'Step 1'
|
| Client area view 'Step 2'
|
| 'Step by Step' - this option is not yet available, it will be added to the module in one of its upcoming versions.
|
Order Form Layout
The second option to customize the template is dedicated to the location of the "Order Summary" element - 'Order Form Layout'.
There are two possibilities to choose from:
Underneath you will find details of every possible choice with its visualization in the client area.
|
Sidebar - if selected, the 'Order Summary' box is displayed on the right side in the client area order page.
The summary box is always affixed to the top of the browser screen, so clients will also have quick access to the complete summary of the current order.
|
| When the 'Bottom' option is selected, the 'Order Summary' box will be displayed at the end of the order process.
|
| In case of the 'Bottom' order form layout, a quick summary bar with the total amount and the checkout button will be available at the very bottom of the screen.
|
Package Type
| This selection of the 'Template' setting, defines the layout of the product package that will be used. You can choose between two options: 'Default' and 'Horizontal'.
|
| Client area view of the 'Default' package type:
|
| Client area view of the 'Horizontal' package type:
|
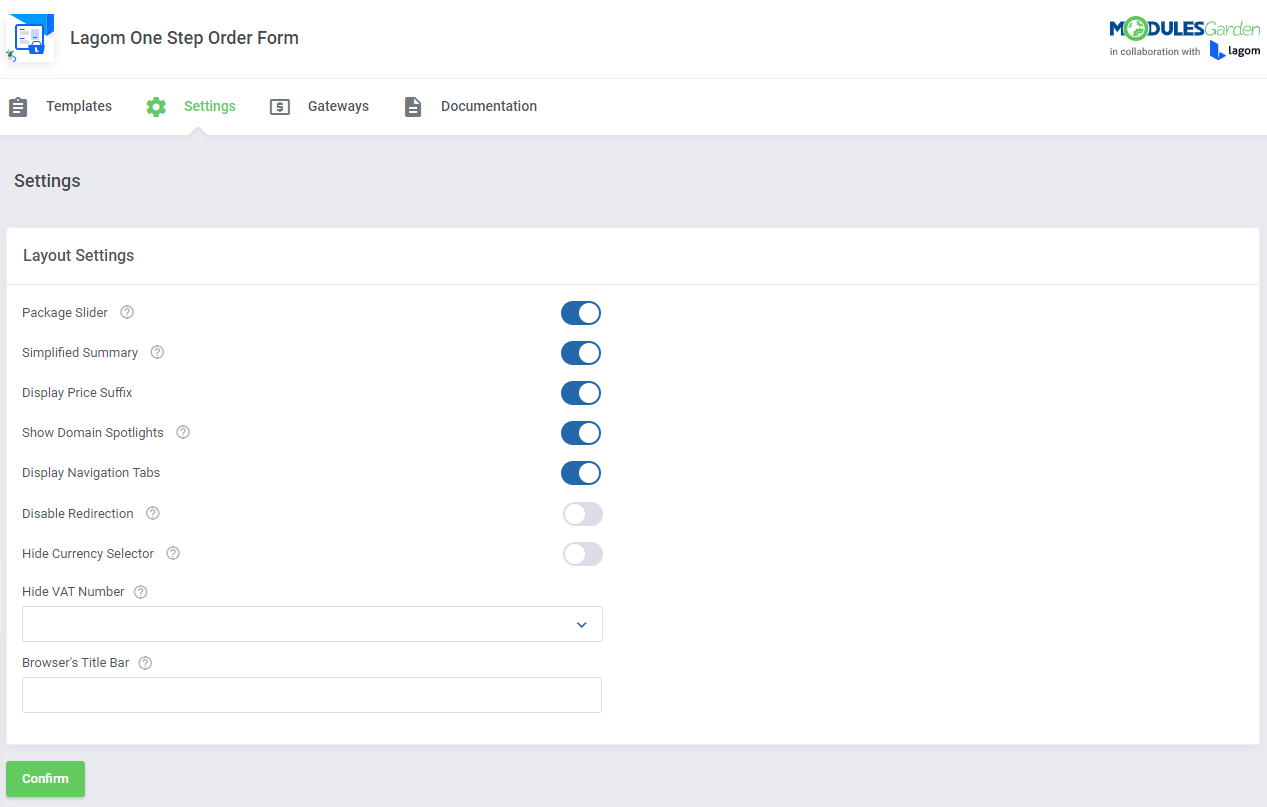
Settings
Navigate to the 'One Step Order Form' addon, 'Settings' tab. There you may manage all the extra layout settings:
- Package Slider - decide whether you would like to use a slider to view the content of a product group that contains more than three packages in the case of the 'Sidebar' order layout,
and more than four packages in the case of the 'Bottom' order layout.
- Simplified Summary - if enabled, the "Order Summary" box displays only 'Totals' and 'Total Due Today' values.
It will not display any details about added products, domains or addons.
- Display Price Suffix - if enabled, the currency suffix is shown next to the price.
However, it is important to previously configure the currency and its suffix details in your WHMCS admin area settings, based on their video tutorial
- Show Domain Spotlights - allows you to display "Spotlight TLDs" which have been previously configured in WHMCS settings.
- Display Navigation Tabs - option is enabled, the additional navigation tabs are shown below the main header title.
|
|
Package Slider - decide whether you would like to use a slider to view the content of a product group that contains more than three packages in the case of the 'Sidebar' order layout,
and more than four packages in the case of the 'Bottom' order layout.
|
Although the 'Slider' option is enabled, your clients still have the option to display all of the packages at once, without the need to scroll them horizontally.
When All option is on, all products in the package are displayed in multiple rows.
|
When the Simplified Summary option is enabled, the "Order Summary" box displays only 'Totals' and 'Total Due Today' values.
It will not display any details about added products, domains or addons.
|
When the Display Price Suffix is enabled, the currency suffix is shown next to the price.
However, it is important to previously configure the currency and its suffix details in your WHMCS admin area settings, based on their video tutorial
|
Show Domain Spotlights allows you to display "Spotlight TLDs" which have been previously configured in WHMCS settings.
When the Show Domain Spotlights option is disabled, no domain TLDs are displayed below the domain search bar.
|
When the Display Navigation Tabs option is enabled, the additional navigation tabs are shown below the main header title.
The navigation tabs include the product groups, which previously must be configured in WHMCS settings.
|
Gateways
The 'Gateways' section is dedicated to super easy customization of your payment gateways.
You can quickly upload new gateway logos and assign them to the order payment gateways with just a few simple clicks.
|
In order to successfully upload a gateway logo, follow the below steps:
1. Upload a new icon in the "Icon Library" section
|
| 2. Assign newly uploaded graphics to a specific gateway by pressing the "Click to assign icon" box.
|
Client Area
An exemplary ordering process where the 'Twenty-One' theme is used in the WHMCS system.
Important: It is possible to use the Lagom One Step Order Form For WHMCS module without the Lagom WHMCS Client Theme. The module remains fully usable and all available features are supported when the standard WHMCS "Twenty-One" theme is used.
The only limitation concerns the number of supported styles and their color schemes. For "Twenty-One" theme, the "Modern" style with "blue" color scheme is used by default and there are no extra options to choose from.
Take a look below to see how such ordering pages may look like.
"One Step" order form view:
|
| "Two Steps" order form view:
|
Tips
| 1. Adding a new language:
If you want to change the WHMCS module language, go to the following folder:
/modules/addons/LagomOrderForm/langs
Copy english.php file and rename the newly copied directory with your desired language, for example italian.php. Then, open your personalized file now and replace particular sentences.
|
| 2. The module supports language Overrides:
The language file english.php is uncoded and can be freely modified. However, it is advised not to change this file itself, it is recommended to use overrides.
- Open the overrides within the ~/lang/ directory.
- Next, create or copy the language file you are going to change. If you want to, for example, create an override for the English language, you will have to create the following directory:
~/lang/overrides/english.php.
- Open the just created file to edit its content.
- At the top of the file you must point the used code, for example: <?php for PHP code.
- Change the file content according to your needs. You may enter only single variables to be overridden or change all the lines in the language file.
For example:
~/lang/english.php:
$_LANG['order_new_product'] = 'You’re almost there! Complete your order';
~/lang/overrides/english.php:
$_LANG['order_new_product'] = 'Complete the order';
|
Update Instructions
An essential guidance through the process of updating the module is offered here.
Make sure that the Lagom One Step Order Form version, which you are going to install, is compatible with your WHMCS and Lagom WHMCS Client Theme installations!
- Create a backup copy of your WHMCS files and database.
- Download the latest version of the module from our client area
- Remove all the files of the previous module version from the WHMCS root directory (except the license.php file).
- Extract the `.zip` folder that has been downloaded from the client area.
- Upload the `/php71+/` content to your FTP server.
- Make sure that during the upload process all the files have been correctly uploaded and no errors occurred.
- Clear your browser and server cache (for example Cloudflare).
- Clear the WHMCS template cache in: Utilities → System → System Cleanup → "Go" → "Empty Template Cache".
|
Upgrade Instructions
Keep in mind there is a quick and easy option in our client area that will let you upgrade the license of your module to an open source version at any time - and at a lower price!
To take advantage of it, simply use the License Upgrade button located on the product's page and a discounted invoice will be generated automatically.
|
Common Problems
| 1. When you have problems with connection, check whether your SELinux or firewall does not block ports.
|


