Hosting Quota Notifications 1.X For WHMCS
From ModulesGarden Wiki
(Difference between revisions)
|
|
| Line 565: |
Line 565: |
| | |} | | |} |
| | {| | | {| |
| − | |style="padding: 0px 0px 30px 25px;"|[[File:CRM2_41.png]] | + | |style="padding: 0px 0px 30px 25px;"|[[File:CRM_P32.png]] |
| | |} | | |} |
| | {| | | {| |
| Line 571: |
Line 571: |
| | |} | | |} |
| | {| | | {| |
| − | |style="padding: 0px 0px 30px 25px;"|[[File:CRM2_41_1.png]] | + | |style="padding: 0px 0px 30px 25px;"|[[File:CRM_P33.png]] |
| | |} | | |} |
| | {| | | {| |
| Line 577: |
Line 577: |
| | |} | | |} |
| | {| | | {| |
| − | |style="padding: 0px 0px 30px 25px;"|[[File:CRM2_41_2.png]] | + | |style="padding: 0px 0px 30px 25px;"|[[File:CRM_P34.png]] |
| | |} | | |} |
| | ===Campaigns List=== | | ===Campaigns List=== |
| Line 588: |
Line 588: |
| | |} | | |} |
| | {| | | {| |
| − | |style="padding: 0px 0px 30px 25px;"|[[File:CRM2_41_3.png]] | + | |style="padding: 0px 0px 30px 25px;"|[[File:CRM_P35.png]] |
| | |} | | |} |
| | | | |
Revision as of 08:30, 27 June 2016
An update of this article will be available soon, please watch out for broken links and unclear descriptions!
We are sorry for the inconvenience caused.
CRM For PrestaShop will introduce customer relationship management into your eCommerce platform to let you handle your contacts and follow-ups automatically.
You will be able to create leads and potentials, organize campaigns, send notifications, add notes, upload files, manage mailboxes and many more.
What is more, the module allows the option to import/export details on your contacts to backup the data or migrate them between PrestaShop systems.
|
| ✔ Contacts From Chosen Campaigns
|
| ✔ Convert Contact Types Between Lead And Potential
|
| ✔ Assign Client Account To Contact
|
| ✔ Assign Administrator To Contact
|
| ✔ Quickly Edit Contact Details
|
| ✔ Add And Manage Contact's Follow-ups
|
| ✔ Add And Manage Contact's Notes
|
| ✔ Create And Manage Email Templates
|
| ✔ Send Email From Template Or Custom Message - Include Files
|
| ✔ Create And Manage Outgoing Mailboxes
|
| ✔ Upload And Manage Files From Contact Profile
|
| ✔ View Announcements For Administrators
|
| ✔ View Logs Concerning Contact
|
| ✔ View Dashboard Containing Incoming Follow-ups
|
| ✔ View Calendar With All Reminders Sorted By Type
|
| ✔ View CRM Statistics And Graphs Concerning Contacts
|
| ✔ Import Contacts In Chosen File Formats: CSV, XSL, XSLX and ODS
|
| ✔ Export Contacts In Chosen File Formats: CSV, XSL, XSLX, ODS and PDF
|
| ✔ Upon Removing, Contact Is Moved To Archive Where They Can Be Restored From If Needed
|
| ✔ 3 Types Of Notifications: Now, On Follow-up Date, Before Follow-up Date - Both For Administrators And Clients
|
| ✔ Follow-up Type - Easier Determination Of Follow-up Purpose
|
| ✔ Administrator To Notify - Defines Included Administrators Per Notification Type
|
| ✔ Notify Administrator via Email
|
| ✔ Use Email Template Or Place Custom Message
|
| ✔ Define Campaign Duration Time
|
| ✔ Assign Leads To Campaign Using Filters
|
| ✔ Manually Assign Campaign To Lead
|
| ✔ Display Dashboard Per Campaign
|
| ✔ Display Campaign Description Inside Of Assigned Lead Profile
|
- Module Settings Features:
| ✔ View Module Status - Contains Status Of CRM Key Elements
|
| ✔ Define Whether To Use Quotes And Administrator Assignment
|
| ✔ Define Follow-up Types And Default Notifications On Follow-up Reschedule
|
| ✔ Define Temporary And Permanent Notifications For Administrators
|
| ✔ Define If Notification Needs To Be Acknowledged By Administrators
|
| ✔ Create Custom Fields - Text, Textarea, Checkbox, Radio And Select
|
| ✔ Add Description To Custom Field
|
| ✔ Add Validators To Custom Fields
|
| ✔ Define Custom Contact Types:
|
| ✔ Define Contact Type Color And Icon
|
| ✔ Define Contact Type Visibility On Navigation
|
| ✔ Define Permissions Per Administrator Role Group
|
| ✔ Define Personal Settings:
|
| ✔ Define Visible Fields And Their Order For Leads, Potentials And Dashboard
|
| ✔ Configure Default View Of Leads And Potentials Lists - Visibility And Order In Columns
|
| ✔ Create CRM Email Templates
|
| ✔ View Information About CRM Cron
|
| ✔ Requires Ioncube Loaders V4.0 or Later
|
| ✔ Standalone Mode - Display CRM Outside Of PrestaShop
|
| ✔ Display Any Page Or Panel In Full Screen Mode
|
| ✔ Supports PrestaShop 1.6.1.2 and Later
|
Installation
This tutorial will show you how to successfully install and configure CRM For PrestaShop.
We will guide you step by step through the whole installation and configuration process.
|
Installation
| 1. Log in to your client area and download CRM For PrestaShop.
|
2. Upload and extract the module into the main PrestaShop directory.
Files in your PrestaShop directory should look like on the following screen.
|
3. When you install CRM for the first time you have to rename 'license_RENAME.php' file.
File is located in 'modules/mgCRM2/license_RENAME.php'. Rename it from 'license_RENAME.php' to 'license.php'.
|
4. In order to configure your license key, you have to edit the previously renamed 'license.php' file.
Enter your license key between quotation marks as presented on the following screen. You can find your license key in your client area → 'My Products'.
|
Activate The Addon
5. Now you have to activate the module on your PrestaShop platform.
Log in to your PrestaShop admin area. Go to 'Modules and Services' → 'Modules and Services'. Afterwards, find 'MG CRM2' on the list of modules and install it.
|
6. Confirm the installation.
|
7. In the next step you need to configure permission settings.
To do so, click on 'Configure' button. select desired admin roles and save the changes.
|
8. Select desired admin roles and save the changes.
|
7. Now, you have to set up a cron job, which can be found in 'CRM' → 'Settings' → 'General' → 'System Overview'.
We advise to set up the cron as frequently as possible to send email notifications, 5 minutes interval is recommended.
|
8. You have just successfully installed CRM For PrestaShop!
You can access your module in 'PrestaShop' → 'CRM'.
|
Configuration and Management
| CRM For WHMCS is a module which allows you and your staff to manage relations with your current as well as possible clients in one place.
|
Dashboard
| When you proceed to 'Addons' → 'CRMv2', you are automatically moved to the application dashboard.
From there you have a quick preview of the most important information in your CRM.
View follow-ups on calendar, list of latest leads/potentials and last activities.
|
It is possible to adjust the dashboard view according to applied filters. Choose dashboard view of CRM for a selected administrator.
Select '--Any' if you want to show all content. Select 'Not Applied' if you want to clear the filtering.
|
Contacts
Create Contact
| To create a new contact press button marked on the screen below.
|
You are moved to a contact creation form. As you can see below, fields are divided into two sections: Options and Information.
Fill out the form and press 'Add' to add the contact to the list. There may be visible some custom fields if they have been added and enabled.
Note: Only staff members with full privileges can assign admins to the contacts.
|
Immediately, after a new contact is added you are moved to its summary, where you can find/edit some additional data.
Read more about them in the following section.
|
Manage Contacts
In 'Actions' column you can find various useful operations which can be performed on a contact.
As you can see, in dropdown menu, actions such as 'Convert To Potential' and 'Move To Archive' can be found.
'Note: 'Call Out' functionality is available as well if you have Asterisk VoIP Center For WHMCS installed and configured properly.
|
Now, let's proceed to the contact itself.
Press pencil icon to move to the contact's summary page.
|
Summary
To edit any of the options in the contact summary page, simply press a pencil icon that appears when you hover you mouse cursor on the option.
In this way you may reassign the administrator, alter the name and change the current status. Mark appropriate number of stars to change the contacts priority:
- Low
- Medium
- Important
- Urgent
|
Aa mentioned above, when you press the pencil icon, you may select current status, choose from:
- Pending
- New
- Active
- Closed
- Urgent
Every time you are editing any information please press the green confirmation button to save teh changes.
|
In the area marked on the following screen, you can find fields where an existing client can be assigned,
ticket from which the contact was created, its basic details and campaigns if this contact belongs to any.
|
Module allows assignment of a client account to the contact.
This can be done in two ways, by creating a new client from a contact or by selecting an existing client to a contact.
|
| In the same way you may assign a support ticket to a contact. Then, you can easily and quickly find details of the contact background.
|
When you hover over email address, two icons appear. Press the first one and you will be redirected to a section where you can send email messages from.
When you decide to edit (2.), simply type in the new address.
|
Just like in case of any other option in this section, you may assign your contact to any campaign if such exists.
When assigned, campaign details appear in a separate widget.
|
In 'Summary' page you may also find a brief conclusion on cerated notes, list of flow-ups and quickly do actions like:
- adding new notes
- sending emails
- adding follow-ups
- sending tickets responses (if assigned)
|
Follow-ups
Follow-ups allow you to send email templates or text messages to contacts and staff members, and create ToDo entries.
Any follow-up can be rescheduled (1.) or removed (2.) using buttons in the 'Actions' column.
You can search for the desired follow-up using search box and sorting by one of the columns.
|
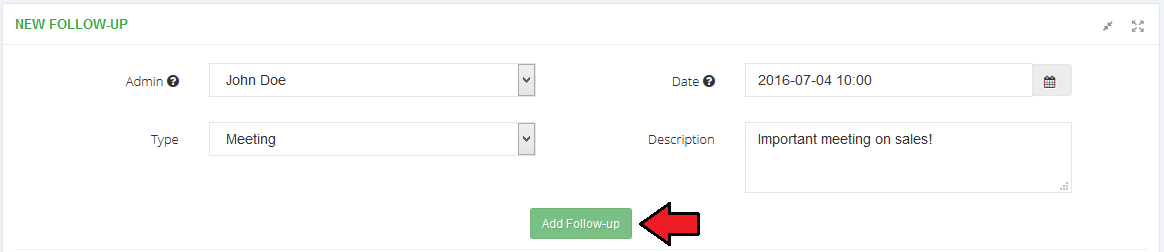
To add a new follow-up, fill out the 'New Follow-up' form.
Here you can define:
- Date - (required) time when the notifications will be sent.
- Description - (required) short description of a follow-up, it will be afterwards visible in the follow-up list.
- Follow-up Type - allows you to define the type of a follow-up for easier determination of its purpose.
- Admin - admin whom ToDo entry will be assigned.
|
|
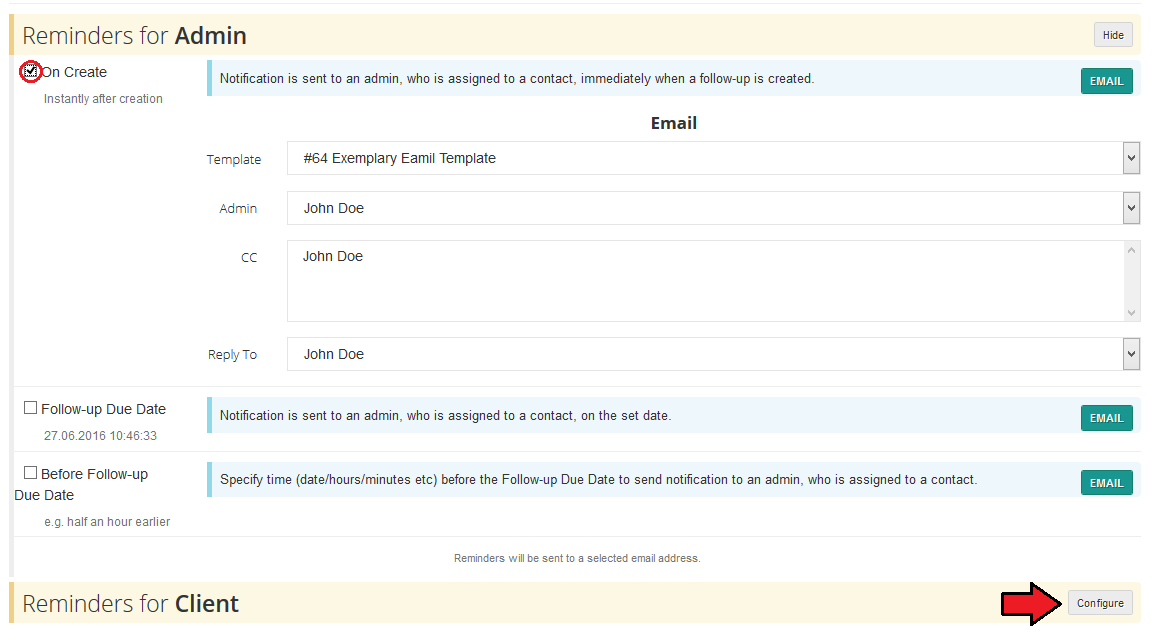
| The last step is defining reminders, we will discuss each of them below.
Reminders for Administrators
- 'On Create' - Notification is sent to an admin, who is assigned to a Lead/Potential, immediately when a follow-up is created.
- 'Follow-up Due Date ' - notification is sent to an admin, who is assigned to a Lead/Potential, on the set date.
- 'Before Follow-up Due Date ' - Specify time (date/hours/minutes etc) before the Follow-up Due Date to send notification to an admin, who is assigned to a Lead/Potential.
Reminders for Clients
- 'On Create' - Notification is sent to a client, who is assigned to a Lead/Potential, immediately when a follow-up is created.
- 'Follow-up Due Date ' - Notification is sent to a client, who is assigned to a Lead/Potential, on the set date.
- 'Before Follow-up Due Date ' - Specify time (date/hours/minutes etc) before the Follow-up Due Date to send notification to a client, who is assigned to a Lead/Potential.
Choose whether you wish to send reminders via email or SMS (if SMS Center for WHMCS is activated) or perhaps both.
Once option is marked and path chosen, you will have to fill out the details for chosen reminder, separate for emails and separate for SMS.
Press 'Add Follow-up' to finalize the process.
|
|
| Added follow-up will turn up on the list of all follow-ups of the lead. Use action buttons to delete the follow up, reschedule and edit.
|
| In order to reschedule a follow-up you must always give the reason!
|
Edit follow-up details:
- edit details
- add reminders
- manage existing reminders
|
Notes
'Notes' enables you to make and manage notes about the contact.
On the following screen you can see how to add an exemplary note.
|
| Any existing note can be modified and hiden as presented below.
|
Please note that only hidden notes can be deleted.
To show hidden notes press 'Display Hidden'.
|
Emails
Any staff member can send an email from the contact's profile.
As you can see, you can manually fill out email subject and content.
|
Alternatively, you can choose one of email templates to send.
Whatever way you choose, you can choose address to send from, as well as attach files and quotes.
|
Orders
Move to orders page where you can place orders for the contact. When you press 'Add New Order' and you will be redirected to your WHMCS page where order can be placed.
Preview details of all orders and edit them if required.
|
Files
'Files' tab allows you to upload and manage files related to your contact.
To upload a new file, select file to upload and describe it shortly, press 'Upload'.
|
Any uploaded file can be downloaded from the CRM by pressing its name or using actions icons.
It can be also removed by clicking on dustbin icon.
|
Logs
To view the latest actions performed on the contact, go to 'Logs' tab.
As you can see, it contains all details you might want to find in the logs.
|
'Logs' page, apart form displaying all the logs concerning the contact, contains searchbox.
Using the search option you can find logs of actions performed by specific administrators, at desired time and concerning desired actions.
On the following screen we were searching logs of associated with any event on client.
|
Calendar
Access calendar tab and you will find a fully manageable and adjustable calendar.
Switch between days, moths and week views to have a clear and precise view on your scheduled events (click on a selected day to see details).
Month view:
|
Under the calendar, there is a detailed legend of visible items with enumerated types of follow-ups.
Click on any follow-up to see its details.
|
Campaigns
Another functionality that CRM For WHMCS has to offer is the possibility to create customized campaigns.
If you decide to apply this option, you will be able to create many and varied campings with selected contacts included and filtered according to your personal configurations.
Let's check how this functionality works.
|
Add Campaign
| In order to add a new campaign use 'Create Campaigns' button.
|
Start with filling out some basic data about the campaign such as its name and descriptions. Select color that will be used to distinguish items.
Assign admins who will have access to the campaign entries and declare beginning and ending dates.
|
In the second part you need to select filters to assign wanted record to this campaign. You may use both predefined system fields and your custom fields.
Finally 'Add Campaign'.
|
Campaigns List
Find all the created campaigns stored together on a convenient list with the most crucial data close at hand.
Use Action buttons to:
1. Manually force record reassignment
2. Move to edition page
3. Delete unused campaign
|
Settings
Due to the wide variety of possible configurations, 'Settings' section has been moved to underneath to make the presentation more precise.
In 'Settings' → 'General' page of the module you can check current module status, enable major features and define follow-ups' settings.
|
General
System Overview
Under System Overview you can find information about:
- Integration with Asterisk VoIP Center For WHMCS
- Integration with SMS Center
- Cron job setup
- Number of CRM email templates
- Storage folder used by the module
|
| In 'Cron Details', you can find all the information about the cron such as its path, last execution date and interval between cron runs.
|
Options
| In Additional Options quotations may be enabled for leads and potentials as well as possibility to assign leads to administrators.
|
Follow-ups
In the next section of General Settings there are basic options to configure follow-ups.
In settings part, you may enable follow-up per day (it means that a follow-up can be added within a day, not a specific hour)
and choose email template used to notify admins about a follow-up being rescheduled.
|
| Add new follow-up type by entering its name, assigning a color and finally enabling it to use. Once added you will see in the list of available underneath.
|
API Connection
| You may easily connect with our module through its own API. To learn more details please visit this page.
|
Personal
Personal Settings
| Provide a URL to your avatar to personalize your CRM as you only wish!
|
Fields' View
In this place you may decide which columns exactly and even in what order they will appear in each of the possible sections
(Contact's page and Dashboard). Click on each section one by one to set its view.
Drag and drop available fields to create a perfect configuration.
|
Fields
Manage 'Fields' fully, add new fields, group them, define statuses and map existing fields.
|
List Of Fields
Each field, regardless of its type, has its name, description, assigned group and obviously its type.
Available types and validators for each of the types (seen when editing existing field)
- text: required, min, max, email, url, ip, regex
- textarea: required, min, max, regex
- radio: required, min, max
- checkbox: required, min, max
- select: required, min, max
On the following screen you can see an example of a dropdown type custom field.
To add a field, press 'Create Field'.
|
Groups
Place where groups to segregate fields are created. Once you already know how you want to group your fields, create an adequate groups.
Name them, assign a color and enable to start using it.
|
Status
Exactly, just like in case of groups, you may add hare statuses that later on will be used to segregate fields.
Name the new status, assign a color and enable to start using it.
|
Fields Mapping
'Fields Mapping' option allows you to bond CRM fields with WHMCS standard or client custom fields.
This way during creation a lead from client's ticket or a client from lead, mapped fields will be automatically filled out.
|
Contact Types
'Leads' and 'Potentials' are the only predefined contact types that are available from the beginning you start using your CRM.
However, to make our CRM for WHMCS even more customizable and user friendly we have implemented a function which allows creating new contact types and their full management.
|
Add New
To add a new type simply fill out the visible on the screen below form.
- Enter its name and choose color
- Enter icon code - the icon will be always visible next to this contact type name, remember to use available formats, e.g.: 'fa fa-empire', 'fa fa-plus-circle '
- Visibility in navigation bar - choose whether you wish to have the new contact type visible on the main navigation menu and submenu (under 'Contacts' tab)
- Dashboard - if you select this option, the new type will be visible on dashboard, and you will be able to filter the view by this type.
Press 'Add' button to finish the process.
|
Contacts Management
Under the creation form, there is a list of all available in your CRM contact types, together with the predefined 'Leads' and 'Potentials'.
Here you can fully customize your contact by:
- changing assigned color or icon,
- turning on/off its availability in navigation menus and dashboard
- activating/deactivating the contact
- deleting useless types.
Important!
Any changes made in this section require reloading the page or clearing browser cache! Changes to contact types are not instant.
|
If you want to delete a contact type, you will be asked to choose another type to which any contacts of the deleted type will be reassigned to.
If you do not want to reassign the contacts to another type, you can move them to the archive, to do so, simply select 'Move to Archive' option.
Still, you will have to choose a type for contacts. It will be used in case you decide in future to restore these contacts from the archive.
|
Permissions
| The last section in 'Settings' is responsible for assigning permissions to certain roles of group of administrators.
Select permissions for each existing role.
|
Once you have added a new role, use actions buttons to move the page where you can choose single permission rights for the group.
Select the one you need and 'Update' the settings.
|
Import/Export
Export File
In order to export a file from your CRM system, simply choose a target file format (CSV, xls, xlsx, ods or pdf) and press 'Export' button.
A file with a list of contacts available in your system with their details such as name, type, priority, phone etc will download shortly.
A list of available fields that can be included in the file to either import or export are available underneath.
Important!
It is required that you use only the fields that are visible underneath. In case you name your columns in any other way, the import action will fail!
|
Import File
In order to import a file to your CRM system, simply select a file from your disc and press 'Upload' button.
A file with uploaded list of contacts will be available shortly.
Note: you can upload files of 'pdf', 'csv', 'xls', 'xlsx' or 'ods' format only.
|
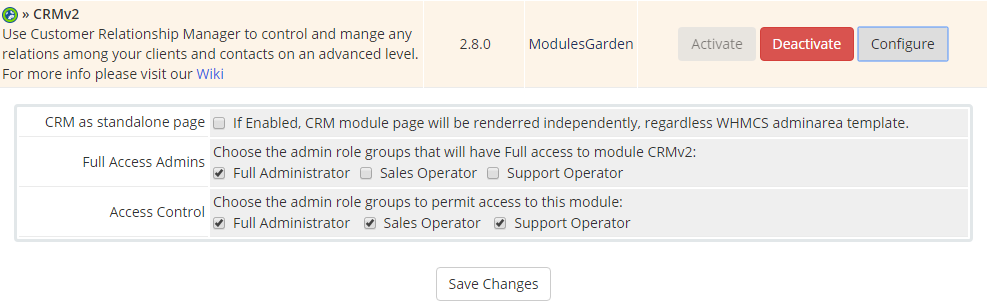
Utilities
Statistics
| 'Statistics' contains graph concerning your leads and potentials.
Among the graphs, there can be distinguished graphs showing for example: the number of Leads and Potentials per status, new contacts per admin, per month and per day.
Additionally, administrators with extended permissions are able to view statistics of chosen administrators.
In 'Statistics' you can find the overall information such as graphs on Leads and Potentials of chosen status.
See a list of recently added leads/potentials with details such as assigned admins, status or creation date.
|
| There are graphs and statistics tables presenting number of leads/potentials added within certain periods of time (year/month)
|
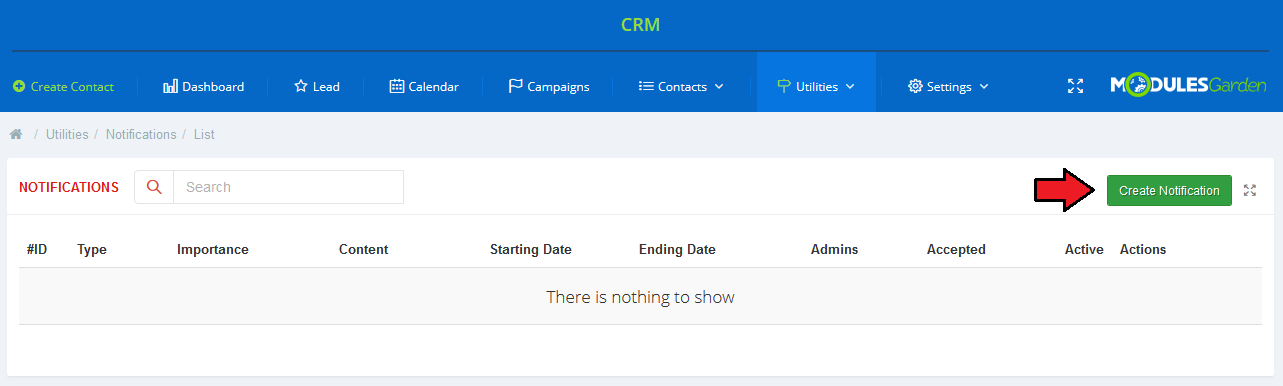
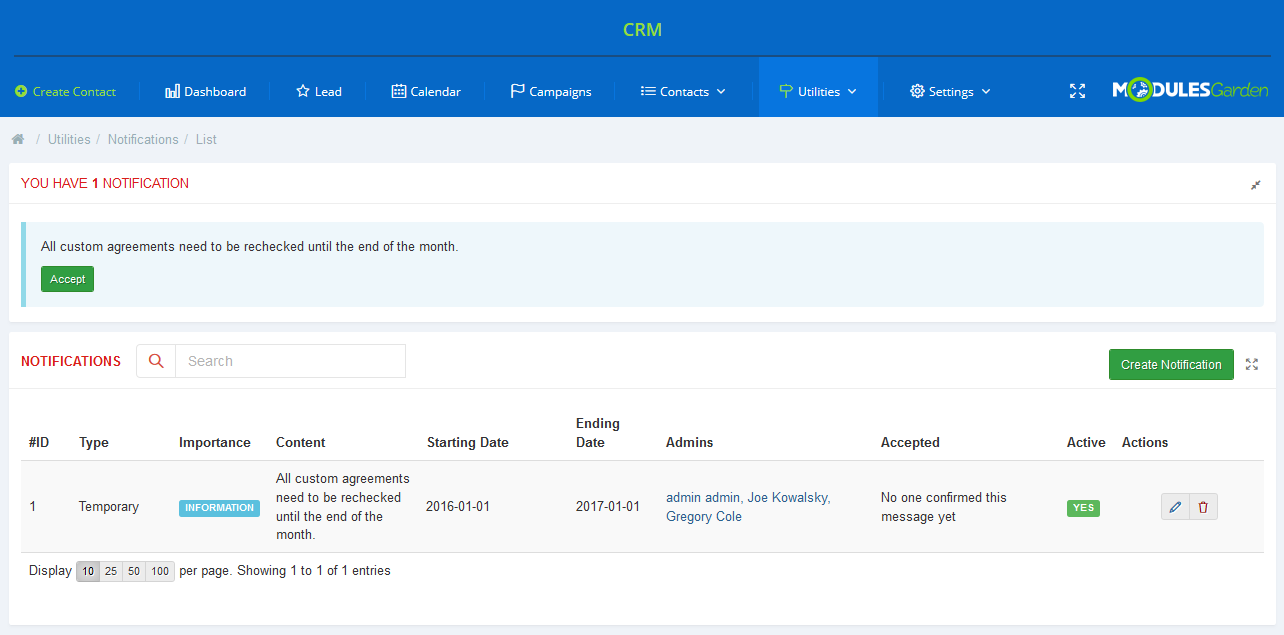
Notifications
In this part you can manage any notifications that shall be delivered to any administrator depending on the configuration.
Let's check how it works. Press 'Create Notification' to begin.
|
|
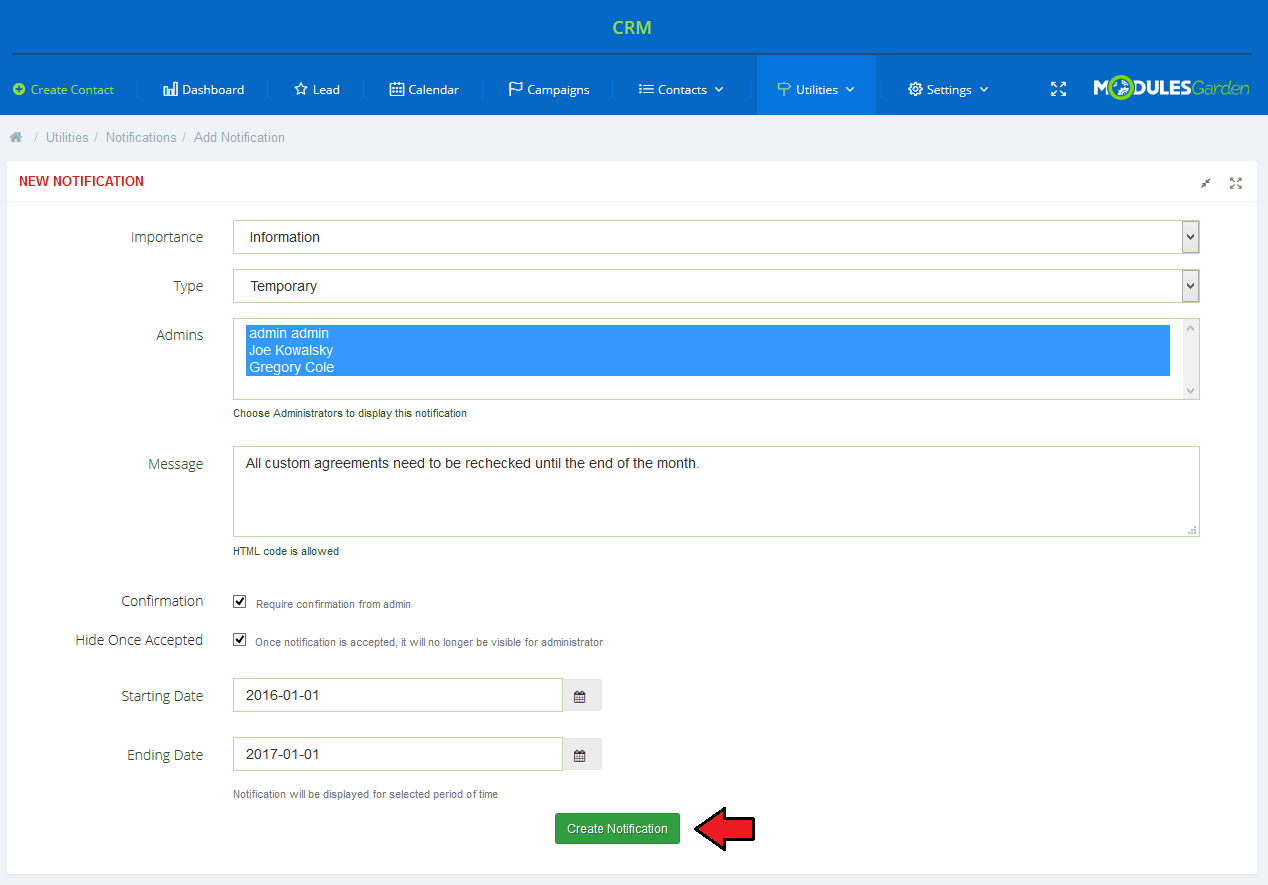
You are moved to 'New Notification' creation form. Fill out the data to tailor the notification base perfectly in accordance with your needs.
- Choose its 'Type' from 'Temporary' and 'Permanent'.
- Select importance: 'Normal', 'Information', 'Warning' and 'Danger'.
- Mark administrators that this notification will be displayed to. You may surely select more than one admin.
- In 'Message' field simply type in the text of the notification. It is allowed to use HTML code here.
- Select 'Starting' and 'Ending' dates for 'Temporary' notifications
- 'Confirmation' - if you select this box, administrator will have to confirm reading such notification by pressing 'Accept' button.
- The button will be visible on the notification
- 'Hide Once Accepted' - decide whether accepted notification should disappear from the widget
'Create Notification'.
|
|
A newly created notification form is now visible on the list of all notifications in the system.
You may easily edit the notification (you will be moved to creation form where you can make any changes) or delete useless notification.
You will see here information if notifications have been accepted by administrators (if required) and by which ones exactly.
|
|
Created notifications are visible for selected in the configuration admins on any page of their CRM system.
'Accept' your notifications if it is required. Such info boxes like on the screen below will be visible until the specified in the configuration 'Ending Date',
or once accepted if 'Hide Once Accepted' option has been selected.
You may easily hide it by pressing icon in the top right corner of the widget.
|
Mass Messages
Configure mass messages templates that can be used in your campaigns!
Press 'Create Mass Message' and fill out the template form.
|
- Choose a group the messages will be delivered to, these can be single users, groups of users or campaigns.
- Select message type: email or SMS (if integrated with SMS Center For WHMCS)
- Enter subject of the message
- Select date when messages will be placed on the list to send (triggered by cron)
- Select user groups/users or campaigns (depending in the chosen target)
- Describe the template shortly
- Create the message
- Enter the main content of the message, use an advanced tool to edit the input (email only) and available merge fields.
|
Once added, mass message template will be visible on the list. You will find there short info on each template.
Use action buttons to edit or remove a template.
|
Archive
| List of unused leads/potentials. Use action buttons to edit entries and convert them back to lead or potential from the archive.
|
Migration
If you have already used any of the previous versions of CRM, the very first thing that you need to do with your module before moving to any further steps
is migrating data from old CRM to CRM V2.0.0. To do so, move to 'Addons' → 'CRM' → 'Settings' → 'Migrator'.
You need to note that not all data can be migrated due to some incompatibility between systems.
These are:
- follow-ups
- uploaded files
Important! Before you proceed to migration itself, you must always make a backup copy of your database for safety reasons.
In case of any unpredicted issues you will not lose any data and will be able to restore the previous version.
If you fulfill all conditions, press 'Begin Migration' to start the process.
|
Prepare mapping of statuses used in CRM V 1.2.4 that you wish to map to CRM V2.0.0.
Confirm that you have done the mapping correctly and then move to custom fields mapping configuration.
|
| Map fields used in CRM V 1.2.4, confirm proper configuration and move to the last step.
|
| Read carefully all the information about migration consequences, if you agree with them, start the migration.
|
Congratulations! You have successfully migrated your database from old CRM to the latest version!
Now, you can enjoy a much improved management of your contacts with potential clients.
|
Tickets
Our module offers additional integration in your WHMCS support tickets system.
As you can see on the screen below, your support operators can convert tickets directly into Lead.
This way you can track relations with your valuable clients.
|
Any ticket of such client will be displayed with contact name, status and assigned staff member.
Additionally, after pressing 'Lead Details' / 'Potential Details' extended information about the contact will be displayed in a popup.
Note: Any contact can be transferred between being lead and potential from the ticketing system as shown below (blue arrow).
|
| Your staff will be also able to quickly move to the contact profile in CRM For WHMCS by pressing 'Show Lead' / 'Show Potential' .
|
Asterisk VoIP Center For WHMCS Integration
Integration with Asterisk VoIP Center For WHMCS extends your possibilities with ability to originate calls to your CRM contacts.
As soon as you install the module, you can originate a call by pressing 'Call Out' button.
If everything is set up correctly, you should see something similar to the screen below.
|
Workflow
In order to familiarize you with the module even more, we are presenting here an example workflow.
In the beginning, let's point the differences between privileges groups:
- Full Privileges Group - access to everything. 'Settings' tab is available only for this group.
- Sales Manager - ability to manage each Lead and Potential. Additionally, access to the dashboard with stats of each staff member and ability to export contacts.
- Sales Person - he can maintain only his own Leads and Potentials. Dashboard with only his stats.
On the following screen you can see the settings for each of the groups.
- Full Administrator - Full Privileges Group
- Sales Manager - Sales Manager
- Sales Person - Sales Person
|
|
Storytelling
Let's say we have admin X with full privileges and admin Y who has sales person privileges.
1. Admin X obtains a new contact, which is called Company X and creates Lead profile in CRM.
Additionally, he assigns admin Y to the Company X and leaves some notes in the profile.
2. Admin Y can now read these notes and choose newsletters and promotion notifications from email templates.
He sets them as a follow-ups spread over the next two weeks. Luckily, one of the newsletters draws the attention of Company X.
3. They respond to the newsletter, so that, admin Y changes this contact type to Potential.
This way he can track the relation with that contact better.
4. After a few emails with Company X, admin Y decides to prepare an interesting offer for the contact in the form of a quote.
5. Once the quote has been accepted, admin Y creates client account for the contact.
Additionally, owing to the integration with Quotes Automation For WHMCS, he is able to quickly generate the invoice & the order from the quote.
6. The following month a few more offers are accepted, and both your company and Company X benefit from it.
7. All the time admins X and Y can easily track their contact with Company X.
Thanks to the quotes in the contact profile they can see current offers made for Company X.
While notes and files can give more information about progress in making current agreements.
|
|


