OpenStack VPS And Cloud For WHMCS
Important: Please read the upgrade guide before updating to version 3.0.
This release requires manually starting the migration tool to begin the process properly.
Thank you for your understanding!
Contents
|
About OpenStack VPS & Cloud For WHMCS
| OpenStack VPS & Cloud For WHMCS is a powerful module that automates the provisioning of virtual servers for your customers. It enables them to order and manage their instances, backups, and other resources directly from your WHMCS client area. |
- Admin Area Features:
| ✔ Create/Suspend/Unsuspend/Terminate Server |
| ✔ Change Package - Supports Configurable Options And Volume Resizing |
| ✔ Change Password |
| ✔ Start/Stop/Pause/Unpause/Resume Server |
| ✔ Soft/Hard Reboot Server |
| ✔ Rescue/Unrescue Server |
| ✔ Toggle VM Protection From Reinstallation |
| ✔ Access RDP, Serial, SPICE, Or VNC Console |
| ✔ View Instance Status And Details |
| ✔ View Interfaces Details |
| ✔ View Volumes Information |
| ✔ Reinstall Server With Virtual Machine Image |
| ✔ View/Add/Delete Custom Firewall Rules |
| ✔ Create/Restore/Delete Backups |
| ✔ View And Run Scheduled Tasks |
| ✔ Provide Product Configurations: |
| ✔ Project Settings: |
| ✔ Choose Default VM Image/Flavor/Region |
| ✔ Provide Random Domain Prefix |
| ✔ Set Availability Zone |
| ✔ Toggle Debug Mode |
| ✔ Network Settings: |
| ✔ Choose Fixed/Floating Networks |
| ✔ Define Default Number Of IP Addresses |
| ✔ Enable Single Network Interface |
| ✔ Backup Settings: |
| ✔ Enable Backups Rotation |
| ✔ Enable Scheduled Backups |
| ✔ Define Backups Quantity Limit |
| ✔ Define Backups Minimum Time Interval |
| ✔ Snapshot Settings (For Volumes Only) |
| ✔ Define Default Snapshot Files Limit |
| ✔ Virtual Machines Settings: |
| ✔ Enable Auto-generation SSH Key |
| ✔ Define Default Volume Size And Type |
| ✔ Set Security Groups |
| ✔ Enable Password Management |
| ✔ Choose RDP/Serial/SPICE/VNC Console Type |
| ✔ Select Rescue Image |
| ✔ Toggle VM Protection After Creation |
| ✔ Toggle SSH Private Key Deletion Once Displayed |
| ✔ Firewall Settings: |
| ✔ Apply Custom Rules |
| ✔ Define Inbound/Outbound/Total Firewall Rules Limits |
| ✔ Console Settings: |
| ✔ Open Console In New Window |
| ✔ Configure Client Area Features Per Product |
| ✔ Configure Admin Area Features Per Product |
| ✔ Define Custom Flavor Specification |
| ✔ Define Metadata |
| ✔ Execute Custom Scripts On Boot |
| ✔ Choose Welcome Email For VM Creation |
| ✔ Generate Configurable Options |
- Addon Module Features:
| ✔ Configure App Templates: |
| ✔ Virtual Machine Images |
| ✔ Create Application Groups And Assign App Templates |
| ✔ Manage Media Library With Logotypes For App Templates |
| ✔ View Queue Of Scheduled Tasks And Details |
| ✔ View And Manage Logs |
| ✔ Customize Module Language Files With "Translations" Tool |
- Client Area Features:
| ✔ View Server Status And Details |
| ✔ Start/Stop/Pause/Unpause/Resume Server |
| ✔ Soft/Hard Reboot Server |
| ✔ Rescue/Unrescue Server |
| ✔ Change Server Protection Status |
| ✔ Toggle VM Protection From Reinstallation |
| ✔ Change Password |
| ✔ Create/Restore/Delete Backups |
| ✔ Pin Backups For Overwriting Protection |
| ✔ Toggle Scheduled Backups And Define Time Interval |
| ✔ Access RDP, Serial, SPICE, Or VNC Console |
| ✔ View/Add/Delete Custom Firewall Rules: |
| ✔ TCP |
| ✔ UDP |
| ✔ ICMP |
| ✔ Other Protocols |
| ✔ Reinstall Server With Predefined Virtual Machine From Images |
| ✔ Create/Restore/Delete Volume Snapshots |
| ✔ Download Public & Private SSH Keys |
| ✔ View Volumes Information |
| ✔ View List Of Scheduled Tasks |
| ✔ Receive Email Notification After VM Creation |
- Configurable Options:
| ✔ Flavor |
| ✔ VM Image |
| ✔ IP Addresses |
| ✔ Volume Size |
| ✔ Backups Files Limit |
| ✔ Snapshots Files Limit |
| ✔ Volume Type |
| ✔ Disk |
| ✔ RAM |
| ✔ VCPUs |
| ✔ Total Firewall Rules Limit |
| ✔ Inbound Firewall Rules Limit |
| ✔ Outbound Firewall Rules Limit |
| ✔ Region |
| ✔ Custom Script Files |
| ✔ Availability Zone |
- Supported Providers:
| ✔ Atlancis Private Cloud |
| ✔ Binero Public Cloud |
| ✔ Bluvalt |
| ✔ China Unicom Cloud |
| ✔ China Telecom Cloud |
| ✔ Cleura Public Cloud & Private Cloud |
| ✔ Cloud & Heat Cloud Services |
| ✔ DevStack Cloud Service |
| ✔ ELASTX OpenStack |
| ✔ FishOS Private Cloud |
| ✔ Infomaniak Public Cloud |
| ✔ Limestone Networks Private Cloud |
| ✔ Linaro Developer Cloud |
| ✔ NETWAYS Cloud |
| ✔ NIPA Cloud Enterprise (NCE) |
| ✔ OpenMetal |
| ✔ Open Telekom Cloud |
| ✔ ORockCloud |
| ✔ OVHcloud Public Cloud |
| ✔ PlanetHoster Private Cloud |
| ✔ Rackspace Public Cloud |
| ✔ Safespring Public Cloud & Private Cloud |
| ✔ ScaleUp Cloud |
| ✔ Sharktech Cloud Services |
| ✔ stc Cloud |
| ✔ Taikun Cloud |
| ✔ VEXXHOST Public Cloud & Private Cloud |
| ✔ Other Providers That Grant Access To OpenStack API On Project Admin Level |
- Required Components:
| ✔ Keystone |
| ✔ Glance |
| ✔ Nova |
| ✔ Neutron |
| ✔ Gnocchi (Required For Billing) |
- General Info:
| ✔ Automated Generation Of SSH Keys - Public SSH Key Is Injected To VM Automatically |
| ✔ Integrated With Advanced Billing For WHMCS - Actual Server Resource Usage Billing |
| ✔ Integrated With Server Allocator For WHMCS - Automatic Assignment Of Most Suitable Servers To Products |
| ✔ Multi-Language Support |
| ✔ Supports Cloud-Init Scripts With WHMCS Variables |
| ✔ Supports Stable OpenStack Versions From Epoxy |
| ✔ Supports OpenStack Gnocchi |
| ✔ Supports Virtuozzo Hybrid Infrastructure (VHI) |
| ✔ Supports Limestone Networks Cloud Hosting Solutions |
| ✔ Supports PHP 8.3 Back To PHP 8.1 |
| ✔ Supports WHMCS Themes "Six", "Twenty-One" And "Lagom WHMCS Client Theme" |
| ✔ Supports WHMCS V8.13 Back To WHMCS V8.10 |
| ✔ Requires ionCube Loader V14 Or Later |
| ✔ Easy Module Upgrade To Open Source Version |
Installation and Configuration
| This tutorial will show you how to successfully install and configure OpenStack VPS & Cloud For WHMCS. We will guide you step by step through the whole installation and configuration process. |
Installation
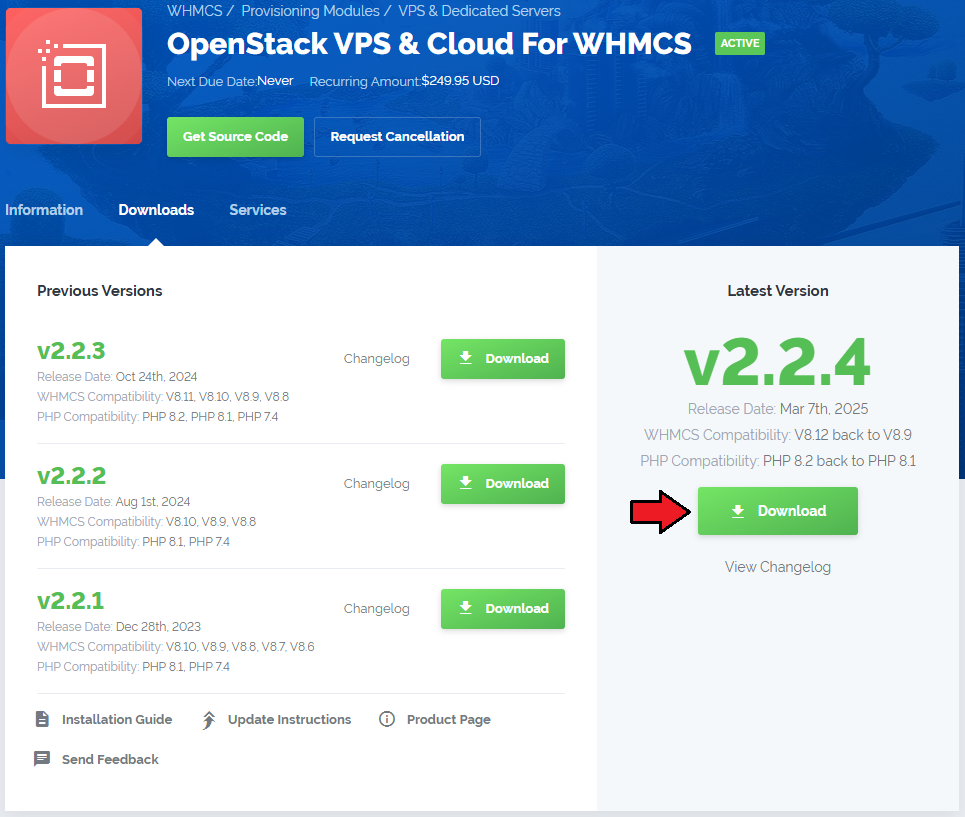
| 1. Log in to our client area and download the module. |
|
| 2. Extract the package and upload its content into the main WHMCS directory.
The content of the package to upload should look like this. |

|
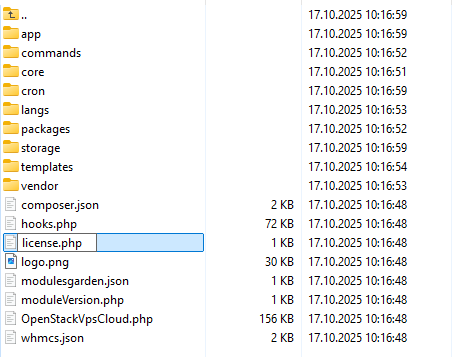
| 3. When you install OpenStack VPS & Cloud For WHMCS for the first time you have to rename the 'license_RENAME.php' file. The file is located in 'modules/servers/OpenStackVpsCloud/license_RENAME.php' . Rename it from 'license_RENAME.php' to 'license.php' . |
|
| 4. In order to configure your license key, you have to edit the previously renamed 'license.php' file. Enter your license key between quotation marks as presented on the following screen. |

|
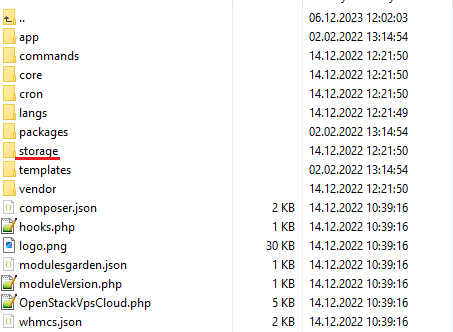
| 5. In the next step, set up the 'storage' folder as recursively writable. This folder is available at 'your_whmcs/modules/servers/OpenStackVpsCloud' . |
|
| 6. The last step is setting up a cron job (each 5 minutes suggested). Use cron job below but switch the 'your_whmcs' with your root WHMCS path. php -q /yourWHMCS/modules/servers/OpenStackVpsCloud/cron/cron.php queue |
Addon Activation
| 7. Activate the OpenStack VPS & Cloud addon. To do so, log in to your WHMCS and navigate to 'System Settings' →'Addon Modules'. Find 'OpenStack VPS & Cloud' and press 'Activate'. |

|
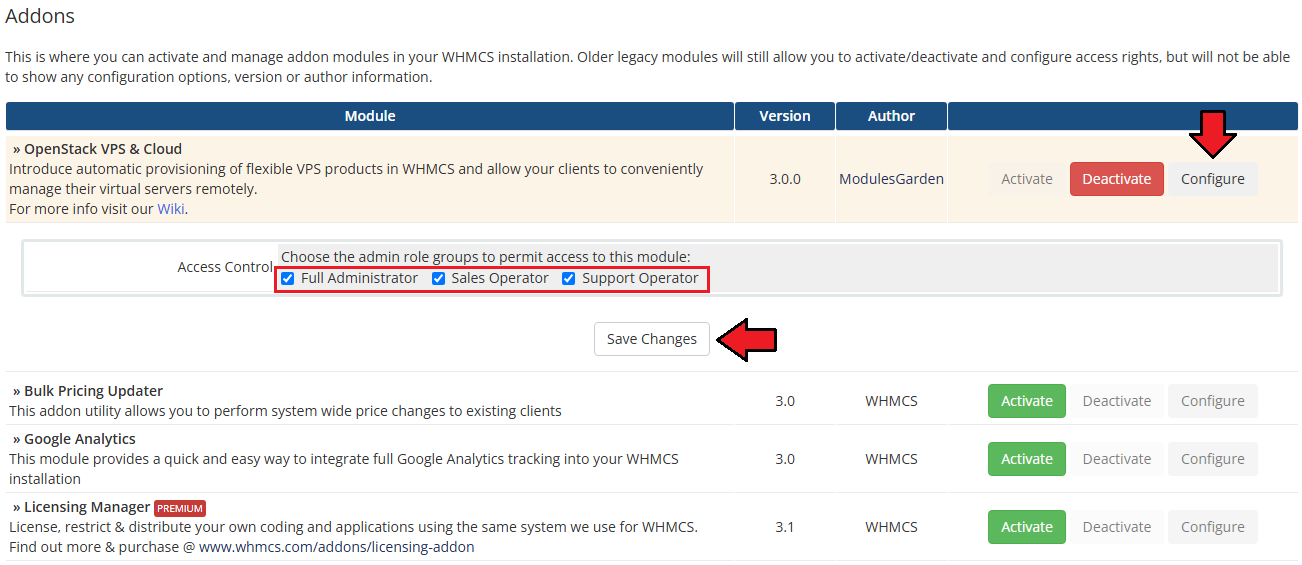
| 8. In the next step, you need to grant access to this module. To do so, click on the Configure button, select Full Administrator, and then press Save Changes. |
|
Configuration of Server
| 9. Now, we will show you how to configure a new product. Go to the 'Setup' → 'Products/Services' → 'Servers' and press 'Add New Server'. |
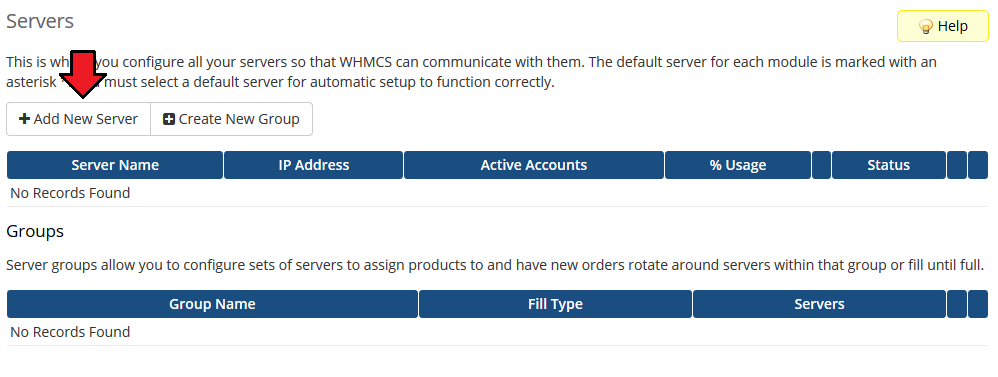
|
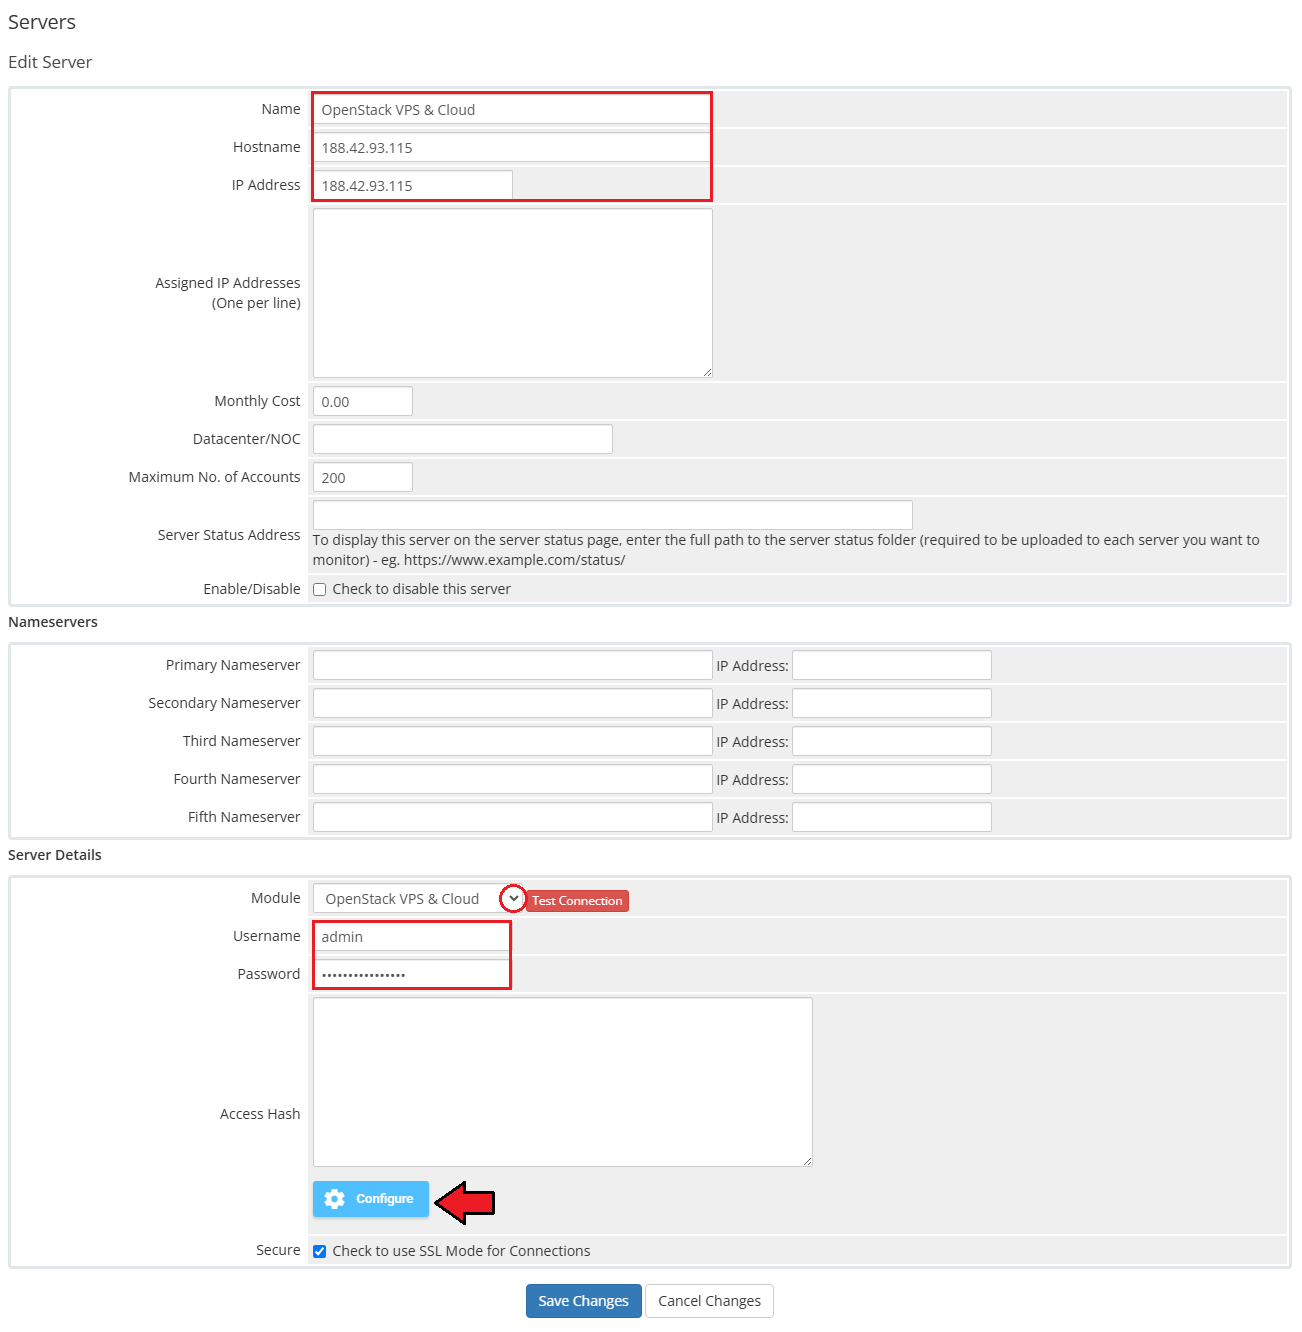
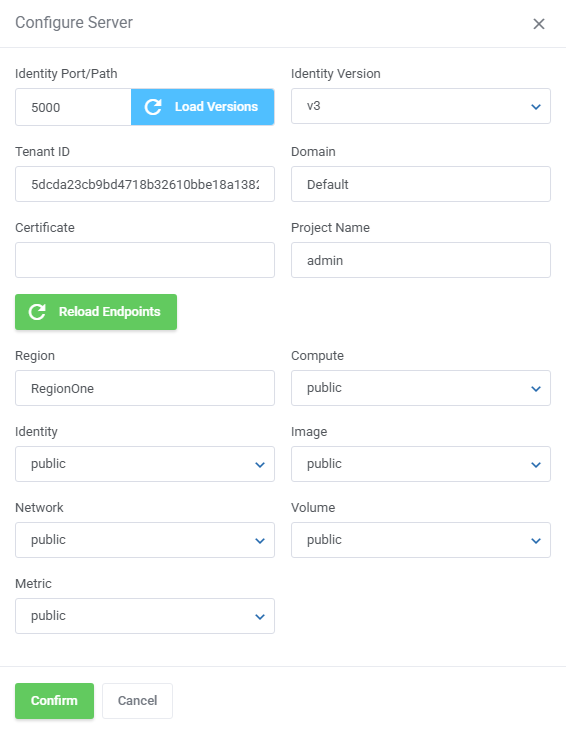
| 10. Next, enter your server name and connection details. Important: The module supports OpenStack providers that allow access to the OpenStack API with project admin-level permissions or higher.
Finally, click Confirm - the system will automatically generate the Access Hash used for server communication. |
|
|
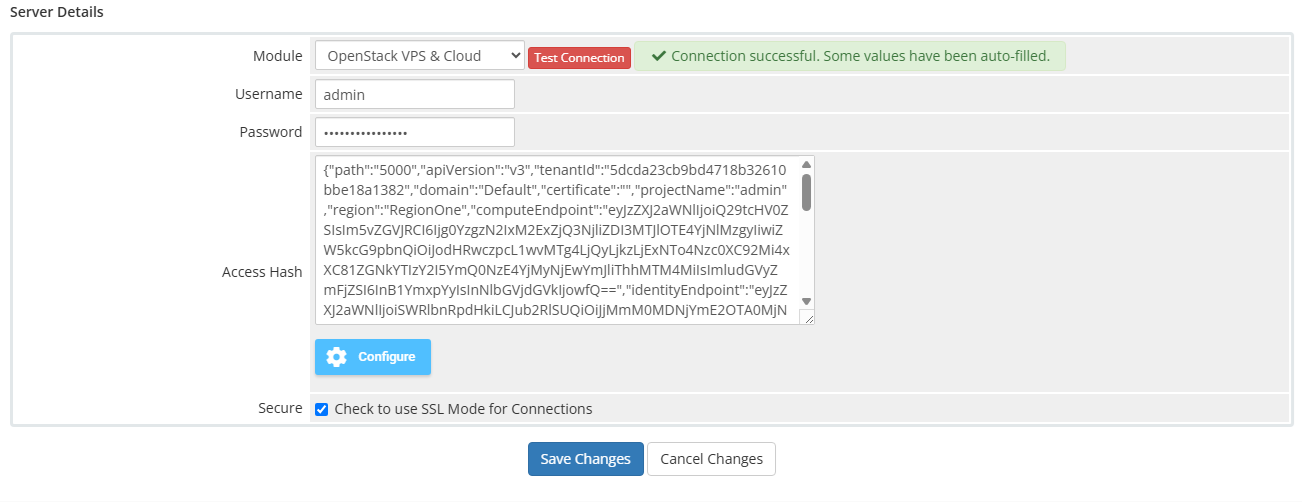
| 11. After you have configured your server correctly, you can check the connection with the OpenStack server. Simply, edit the previously created server and press 'Test Connection' as shown on the screen below.
|
|
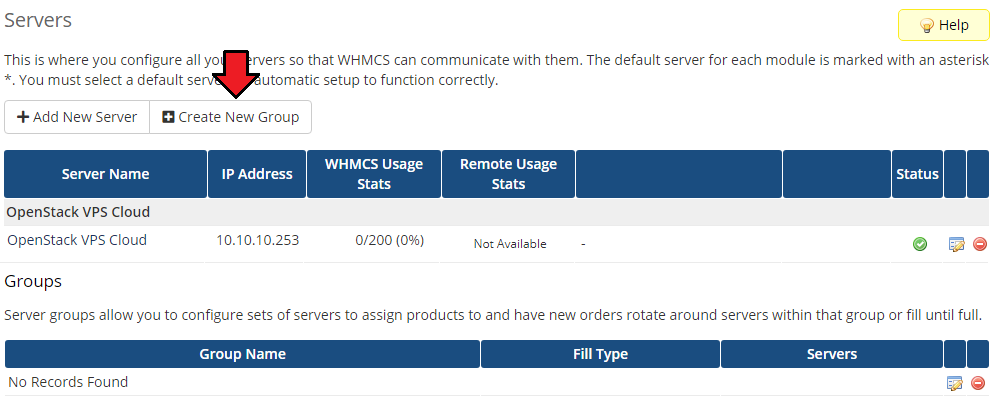
| 12. It is time to create a server group. To do so, click on 'Create New Group'. |
|
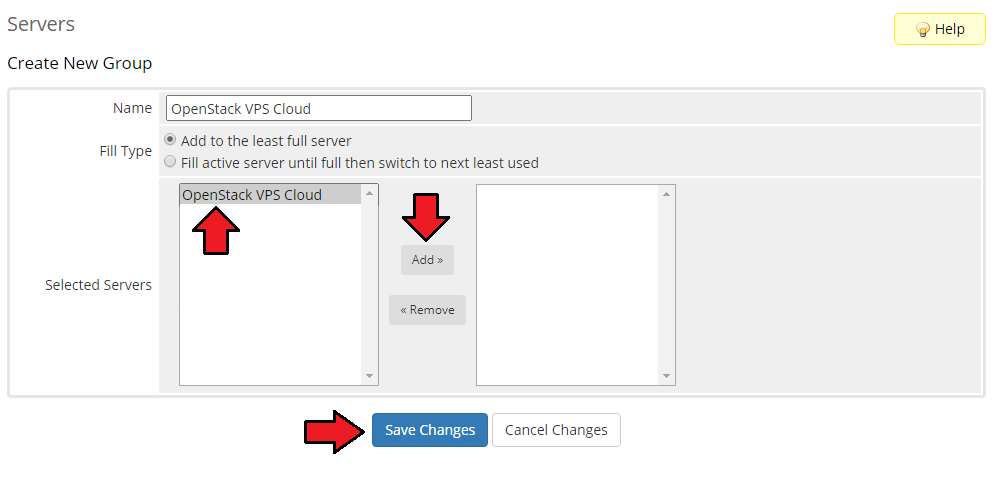
| 13. Enter a name, click on your previously created server, press 'Add' and afterward 'Save Changes'. |
|
Configuration of Product
| 14. In order to create and configure a product, go to 'Setup' → 'Products/Services' → 'Products/Services'. Click on 'Create a New Group' . |

|
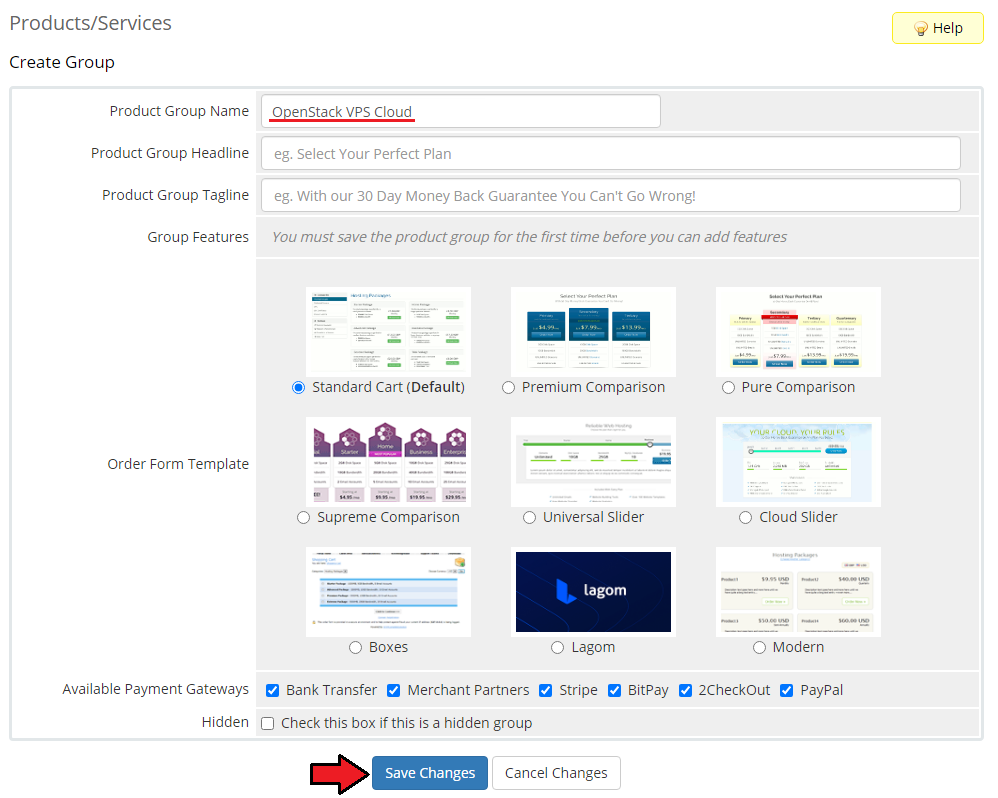
| 15. Enter a product group name and press 'Save Changes'. |
|
| 16. When you have a product group, you can create your product. To create a product click on 'Create a New Product' . |

|
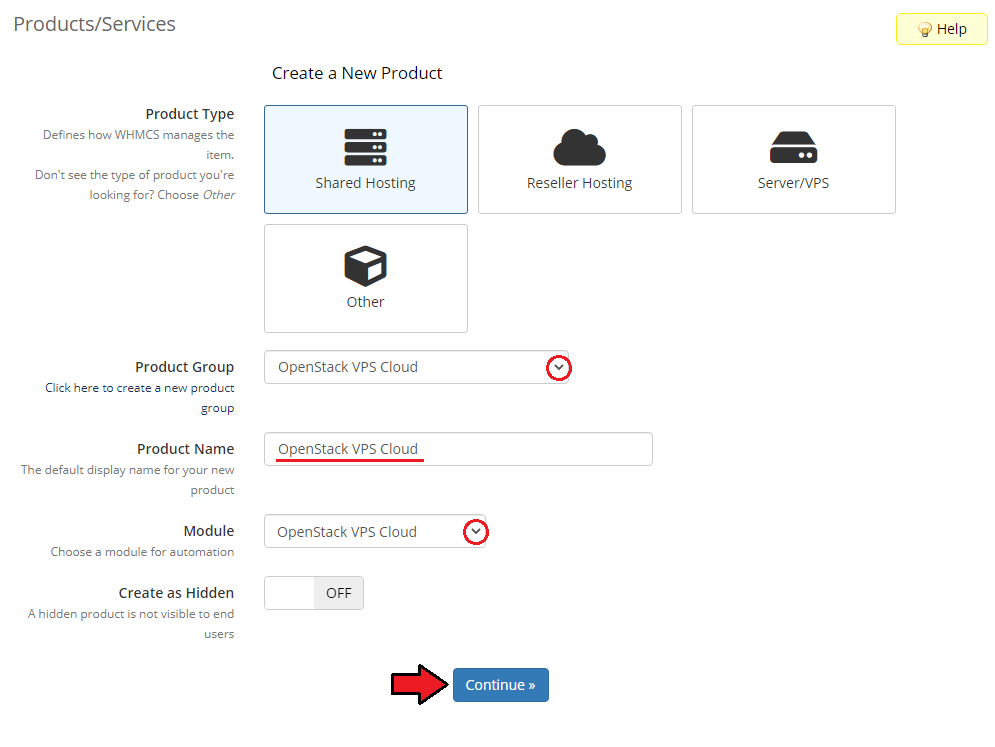
| 17. Afterward, choose your product group and type from the dropdown menus, enter your product name and press 'Continue'. 'Product Type' should be set to 'Shared Hosting'. |
|
App Templates
| Before continuing to the product's settings, you must ensure you have at least one application or group of applications ready to use. Proceed to the addon module → App Templates section and follow below to create a ready application that will be installed by default on the server. The App Templates section allows you to manage OpenStack images that clients can deploy to their virtual machines directly from the client area. |
Applications
This section allows you to load available templates (Virtual Machine Images) from your connected OpenStack environment and manage them within WHMCS.
|
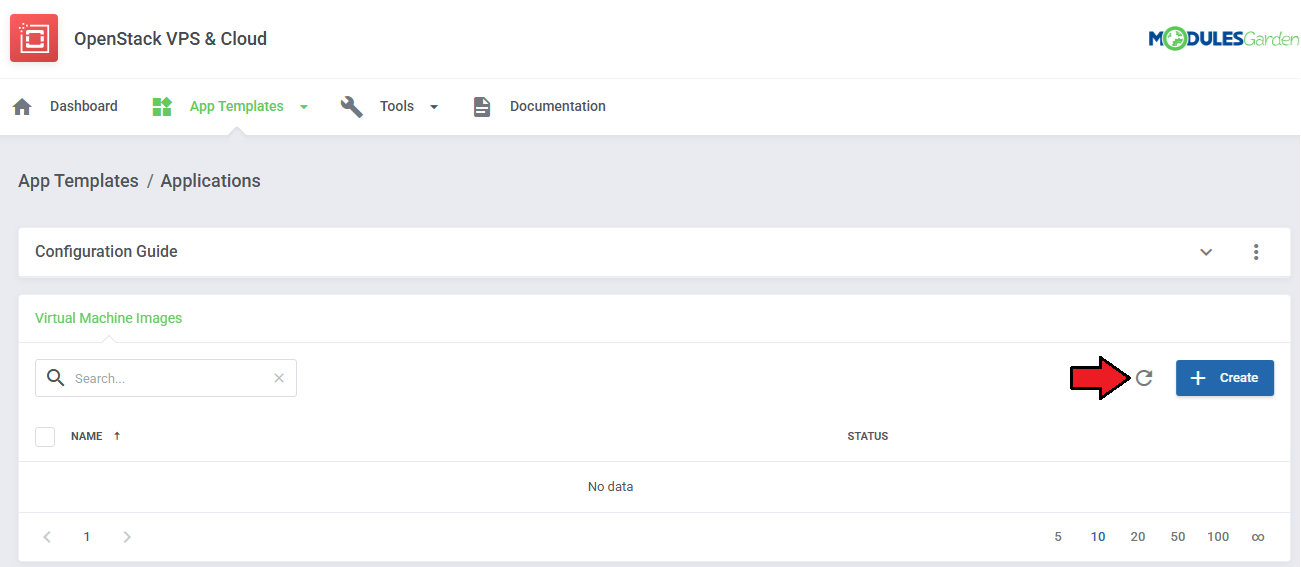
|
| Once templates are imported, you can use action buttons to edit, duplicate, or delete them. Mass actions are also available for bulk management. |
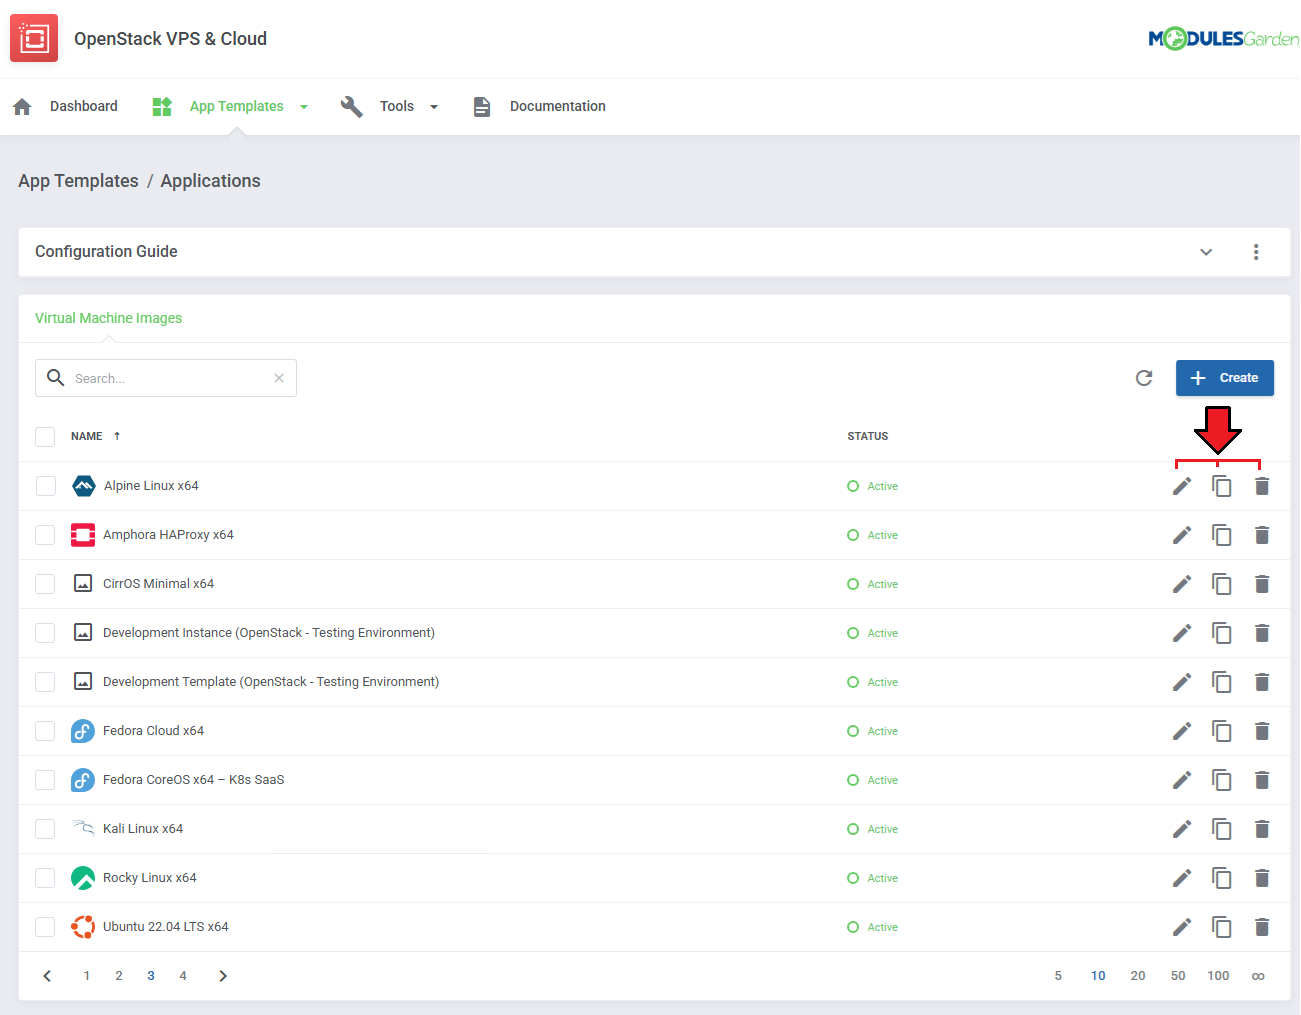
|
Groups
| With the templates ready, all that is left is to gather them into groups and include said groups into products. Navigate to 'App Templates' → 'Groups' and click on the 'Create' button. |
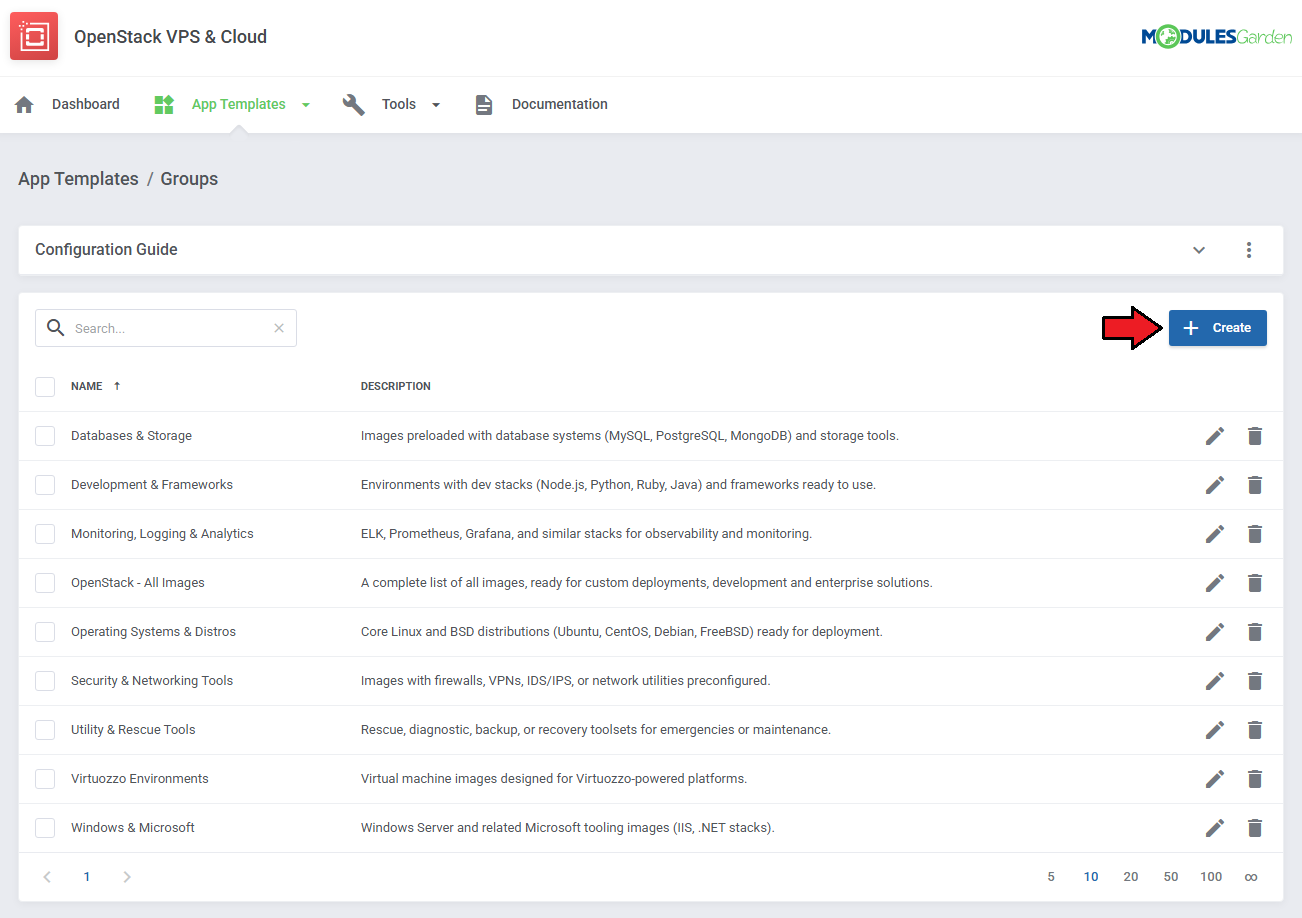
|
Read the information, then provide the group with:
|
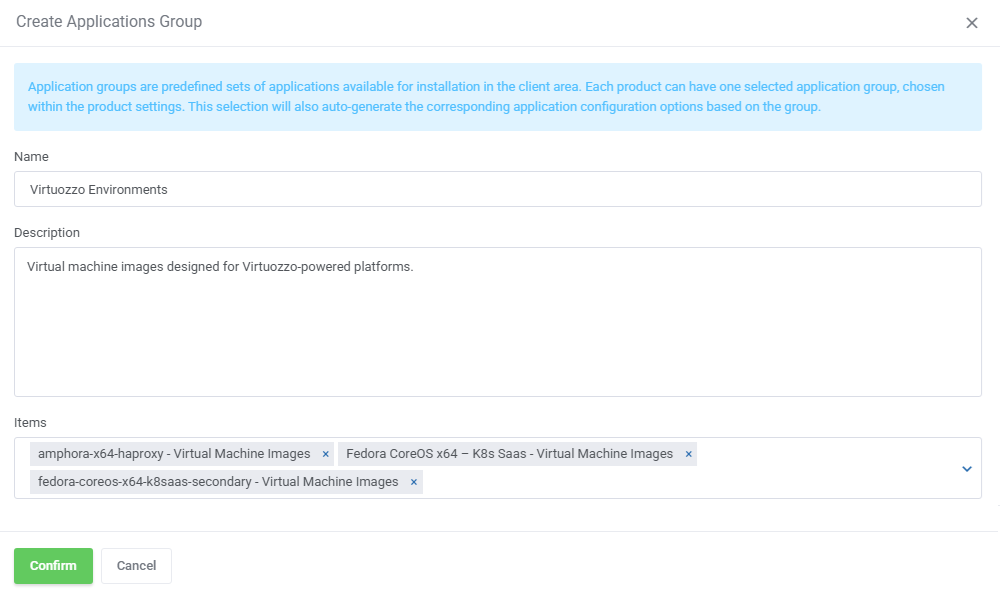
|
| You can use the action button and the mass action function to edit and delete template groups. |
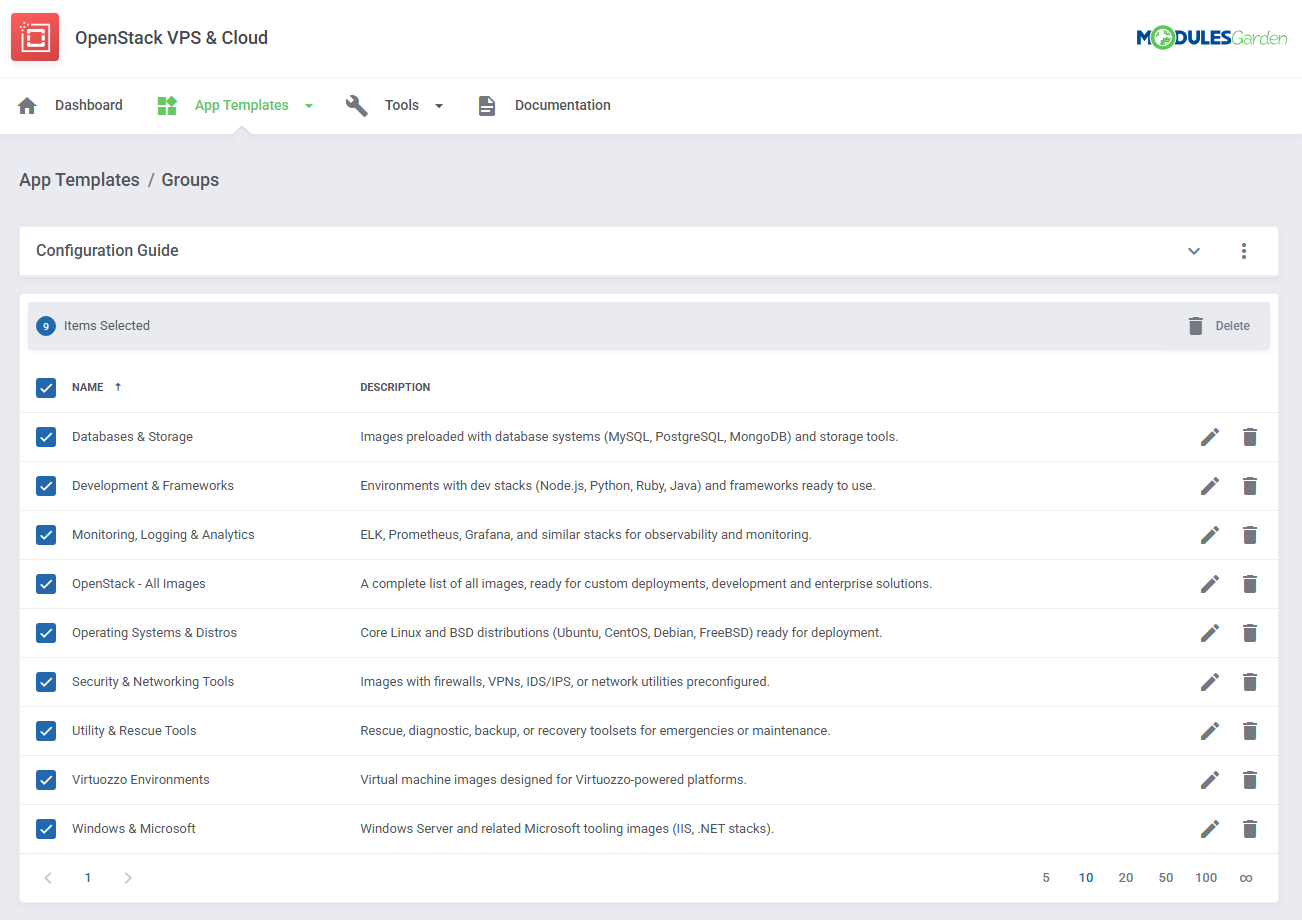
|
| Your basic configuration of App Templates is now ready. For more advanced configuration, manual creation guides please refer to App Templates Advanced Configuration section in this documentation. For now, go back to your product's module settings and complete the configuration there. |
Module Settings
| 18. Now, go to the 'Module Settings' section, choose your previously created server group from the dropdown menu. The module should automatically save and reload settings. If not, click on 'Save Changes' manually. |
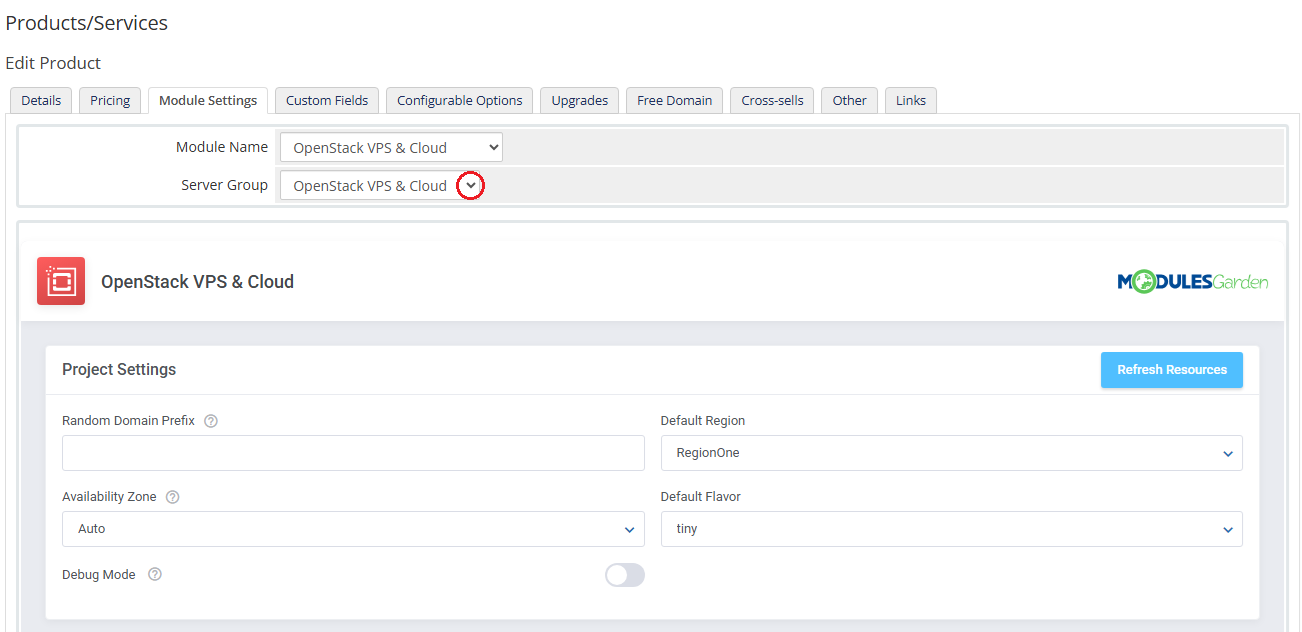
|
| 19. Start from defining 'Project Settings' |

|
| 20. Proceed with 'App Templates Configuration'.
App Templates Configuration - To create instances based on operating systems or applications, you must first configure the App Templates in the module's addon.
|

|
| 21. Afterward, set up a network. Choose 'Fixed Network' , 'Floating Network' and 'Default Number Of IP Addresses'. You can set up a network in two ways. You can find more information about the configuration here. |

|
22. At this step you can configure the backup and snapshot settings.
Enable 'Backups Rotation' if you want to allow replacing the oldest backup with a new one when the backup files limit has been reached. You may also let your clients define the backups tasks, they will be then created automatically according to the defined time interval.
Define a default number of allowed snapshots. Enter '-1' to set it to 'Unlimited'. |
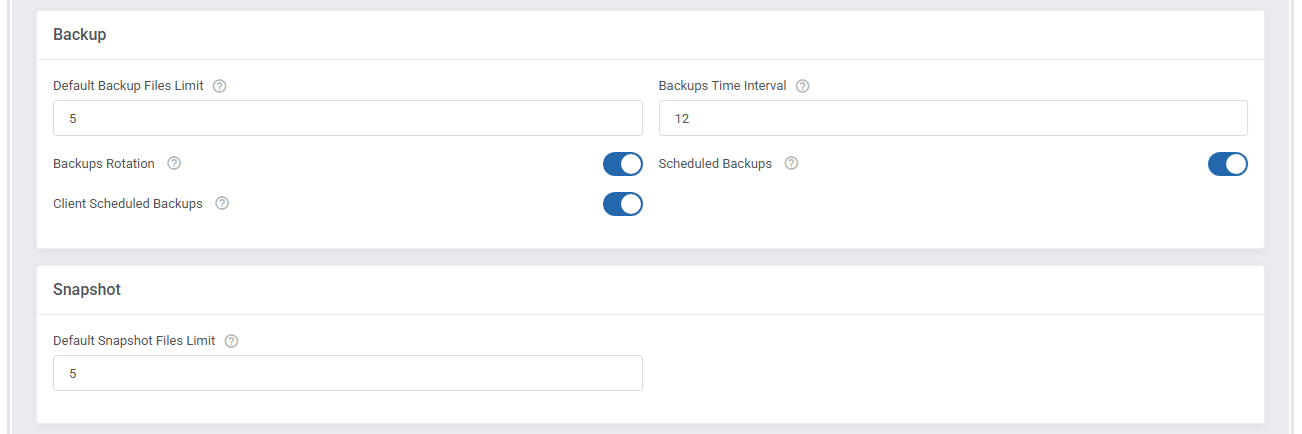
|
23. Define the virtual machine settings.
Full list of supported features can be found here.
|

|
| 24. You can also take advantage of the dedicated Volume and set it as the location of your Virtual Machine Disk,
To do so, make sure to tick the 'Use Volumes' checkbox and enter the desired number into the 'Default Volume Size' field. |
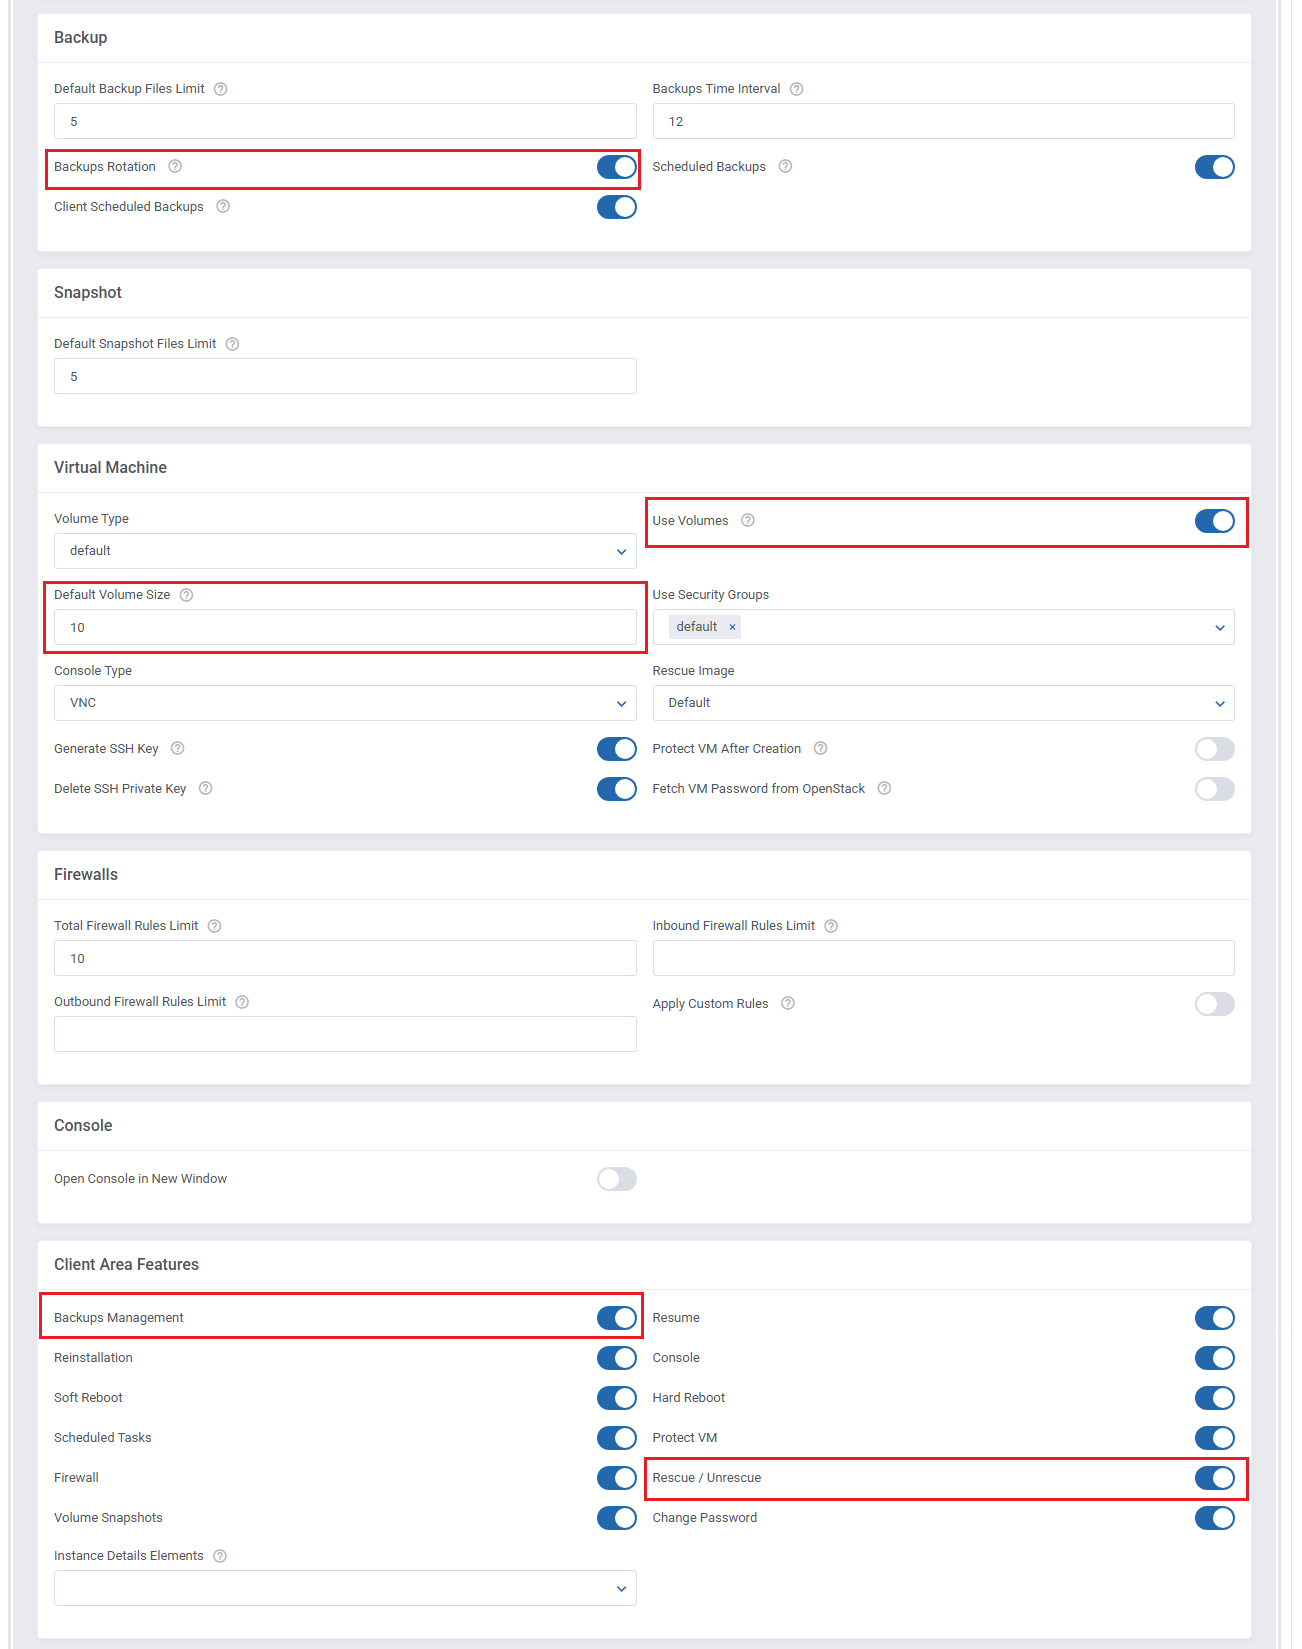
|
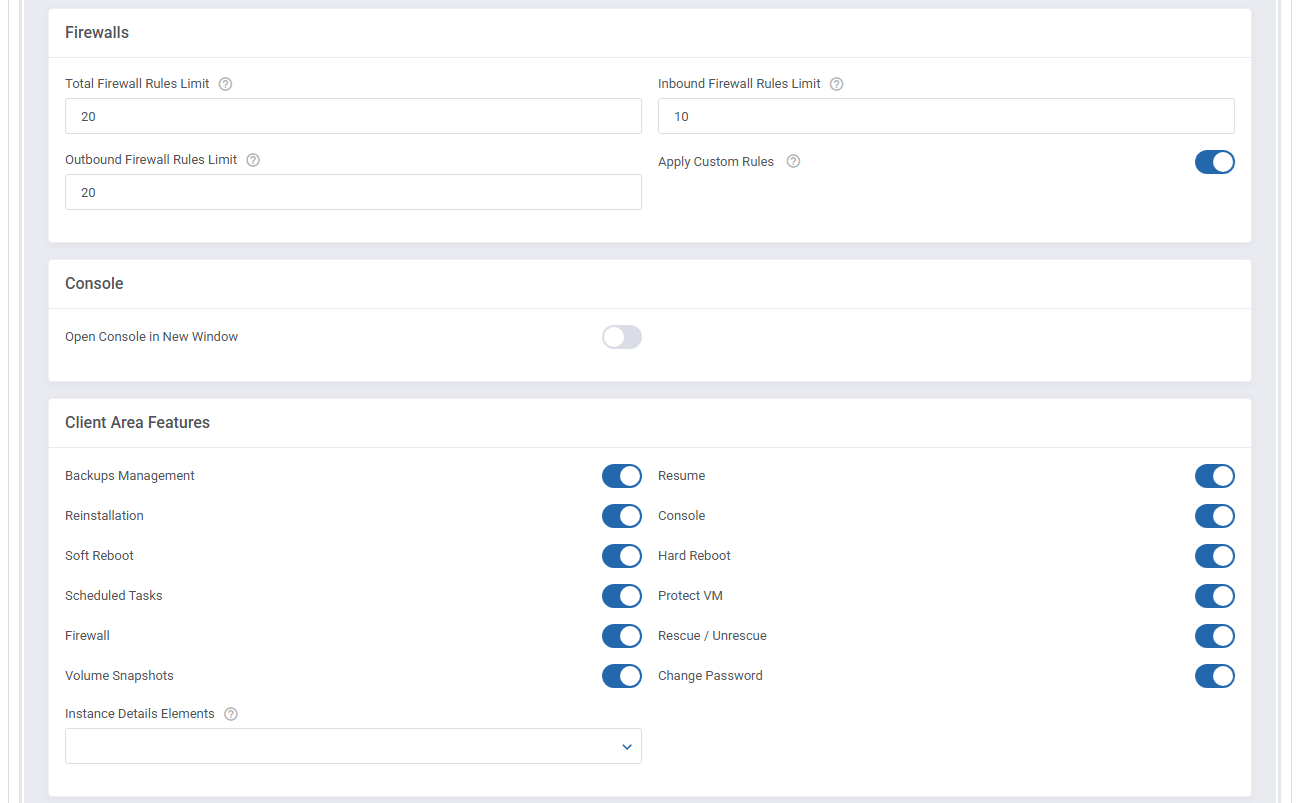
| 25. In the next step you may define the firewall rules settings. Enter the firewall inbound, outbound and total rules limits. When the limit is reached, the client will not be able to create a new rule until one of the existing rules has been removed. |

|
| 26. Next, select features available at the client area. You can also decide which images used to rebuild the server will be available to your customers. |
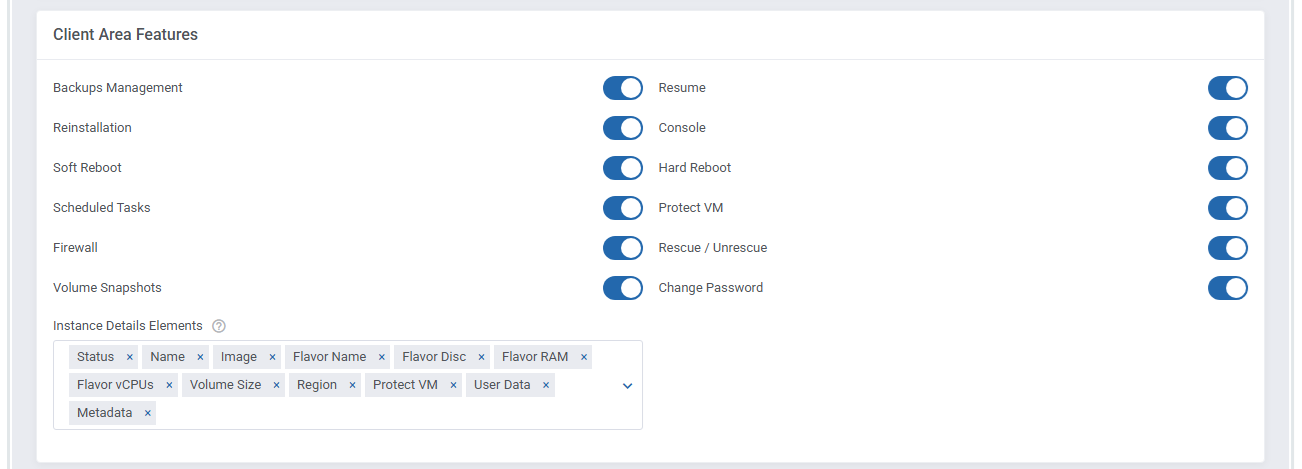
|
| 27. Finally, enable features available for the administrator on the service page. |
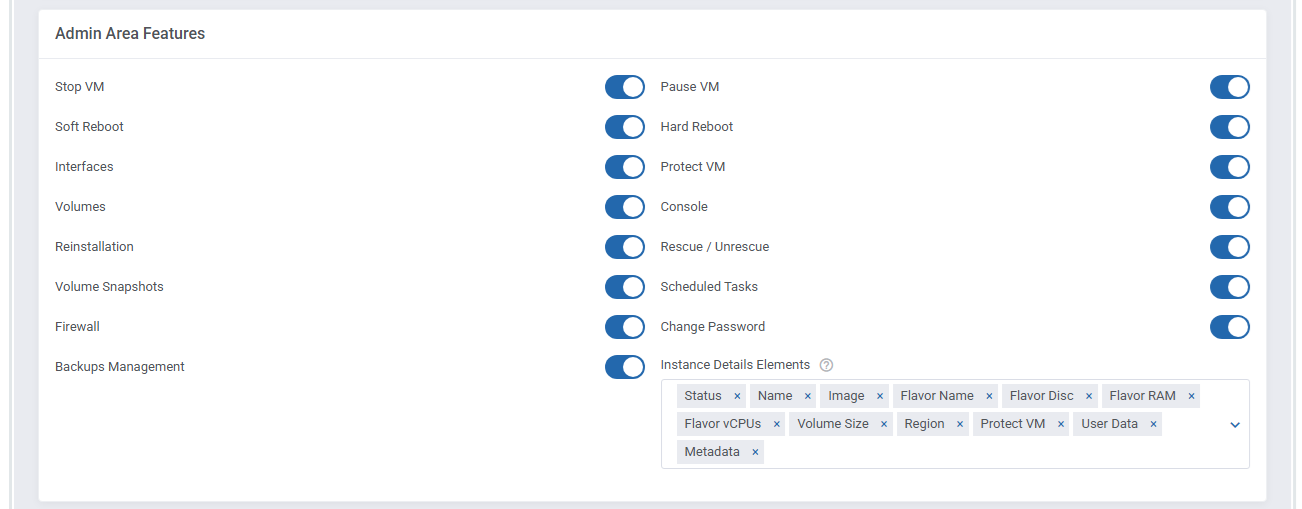
|
| 28. In addition, you can also choose whether you want to send a welcome email after the VM has been successfully created by cron. This feature can prove useful if you want clients to receive the notification once their VM is ready rather than immediately after product activation. |

|
VPS With Predefined Resources
| Our module allows you to offer OpenStack VPS & Cloud to your clients in two ways, with either predefined or configurable resources. In this section, we will show you the configuration of a VPS with predefined resources. |
| 26. Select a 'Default Flavor' and 'Default Application' . 'Default Flavour' defines resources assigned to a VM, while 'Default Application' allows you to choose the VM image used to create a new VM. |
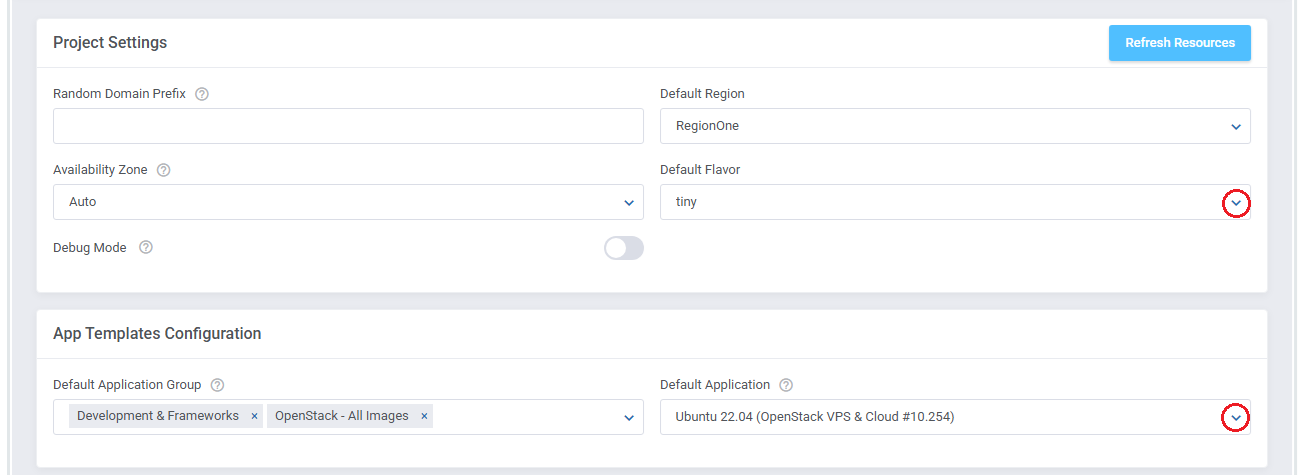
|
| Congratulations! You have just finished the installation and configuration of the module with predefined resources. |
VPS With Configurable Resources
| 27. Preparing VPS with configurable options consists of pressing 'Create Configurable Options' as shown on the following screen. It will prepare default configurable options which can be easily edited afterward as described in this article.
Note: The second and the third options result in the creation of a new flavor on your server each time a new order is made. |
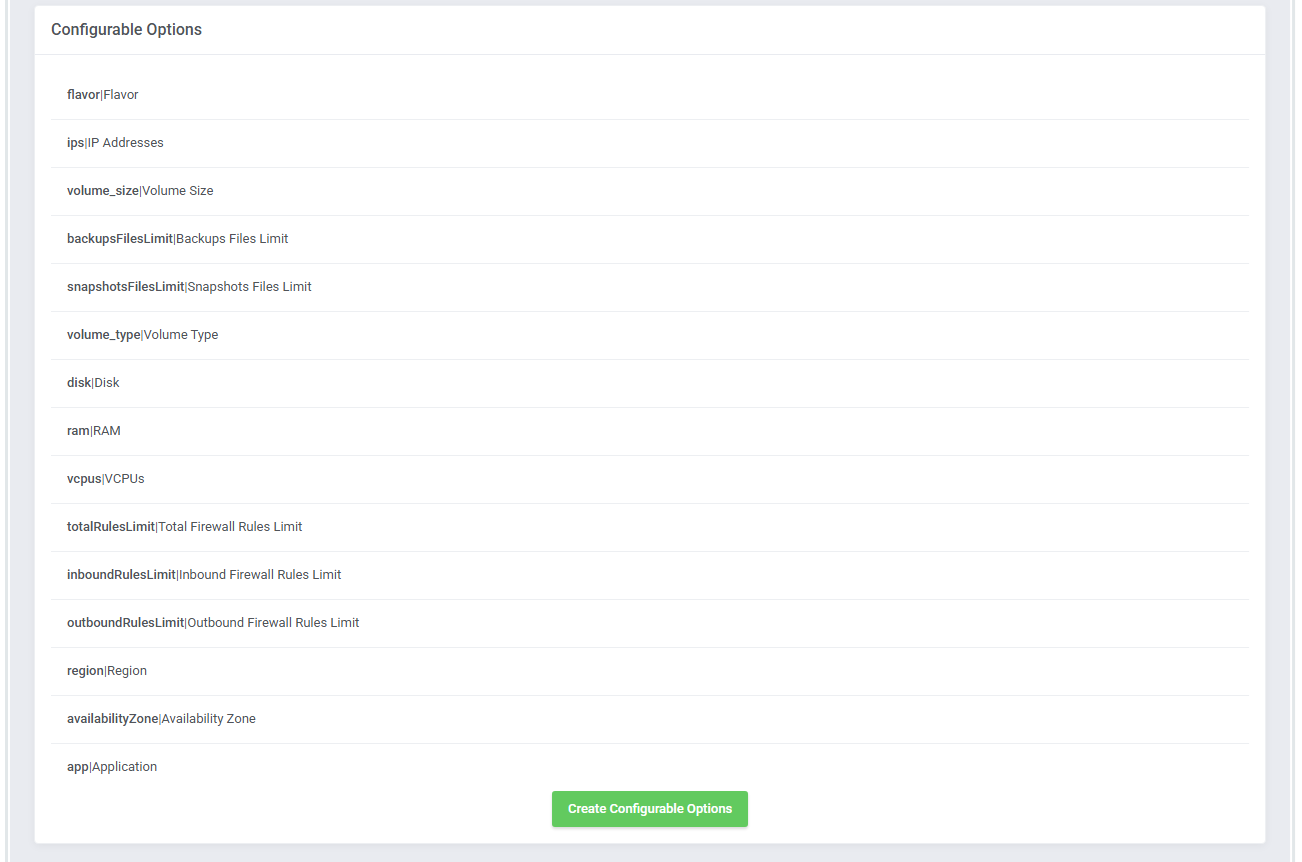
|
| You can now decide which options should be included in configurable options. |
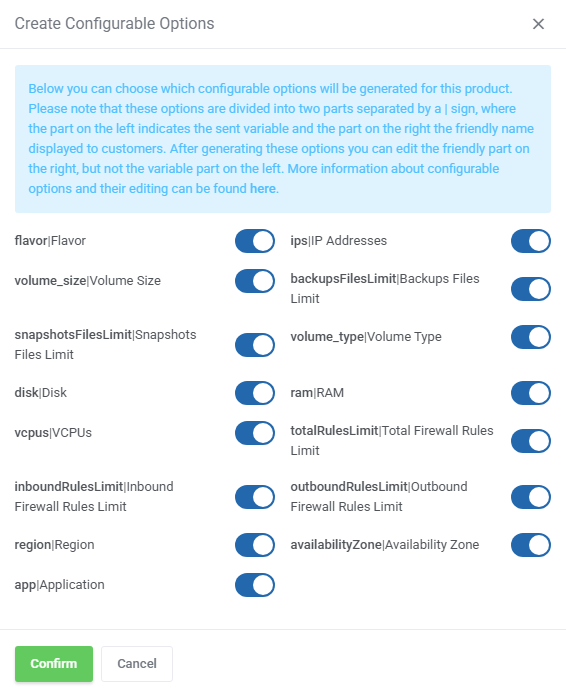
|
Custom Flavor Specification
| 28. You may also use a customized 'Flavor Specification' as key and pair property of your product configuration. Supported 'Custom Flavor Specification' format: key1=value1 key2=value2 for example: hw:cpu_sockets = 3 CIM_PASD_ProcessorArchitecture=x86 |

|
Custom Security Group
| 29. Optionally, you may create a custom security group with customized rules that will be added while creating the virtual machine. Select 'Apply Custom Rules' option at Virtual Machine Settings and enable 'Firewall' option in the client area. |
|
| Edit the additionalRules.json_sample file content located at modules/servers/OpenStackVpsCloud/app/Config/additionalRules.json_sample directory. Start with renaming it from additionalRules.json_sample to additionalRules.json. That is what a default content of the additionalRules.json file looks like: |
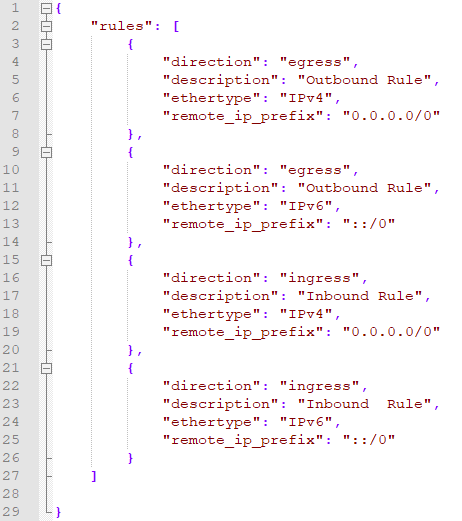
|
Customize the rules according to your needs by providing:
|
| Now, that your file is ready, a new security group will be created in your OpenStack panel and visible in the product's Module Settings under 'Use Security Groups' on the product creation. The rules are visible for the client in the 'Firewall' section. If you terminate the product, this group will be deleted as well. Important: When you are updating your module, and you do not want to overwrite your personalized additionalRules.json file you do not have to do anything. |
Management
Addon Configuration
| Let’s begin by exploring the key features available in the addon. To access it, navigate to 'Addons' → 'OpenStack VPS & Cloud' in your WHMCS. |
Dashboard
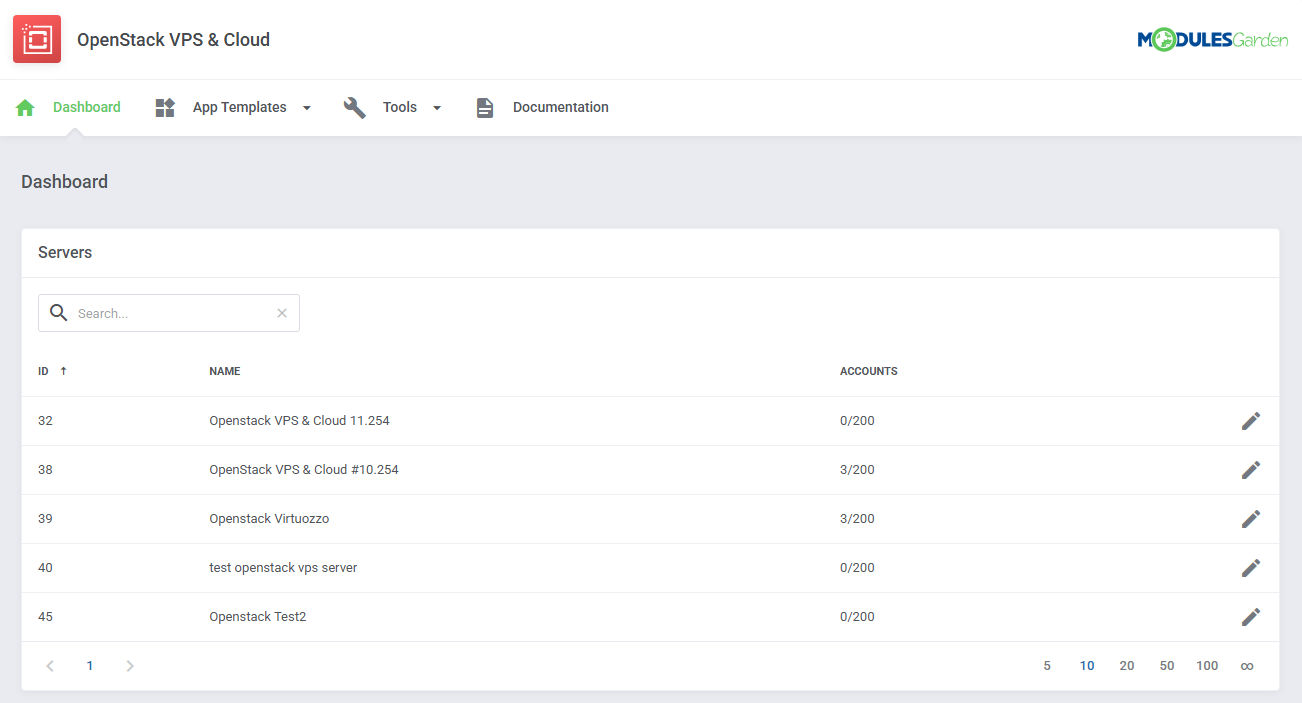
| The 'Dashboard' section ufdsfsdfdsfsd |
|
App Templates Advanced Configuration
| Before you proceed, make sure you’ve reviewed the App Templates section for basic configuration steps. This section is intended for advanced users and administrators who want to manually manage imported virtul machine images. |
| Images are created and maintained directly in your OpenStack control panel. The module automatically pulls this data and displays it in the App Templates section of the addon module. To import or refresh templates in WHMCS:
Once imported, the image templates can be grouped and assigned to specific products within WHMCS, no further manual steps are required. Important! Only images that already exist in OpenStack are supported. There is no need to create templates manually in WHMCS. |
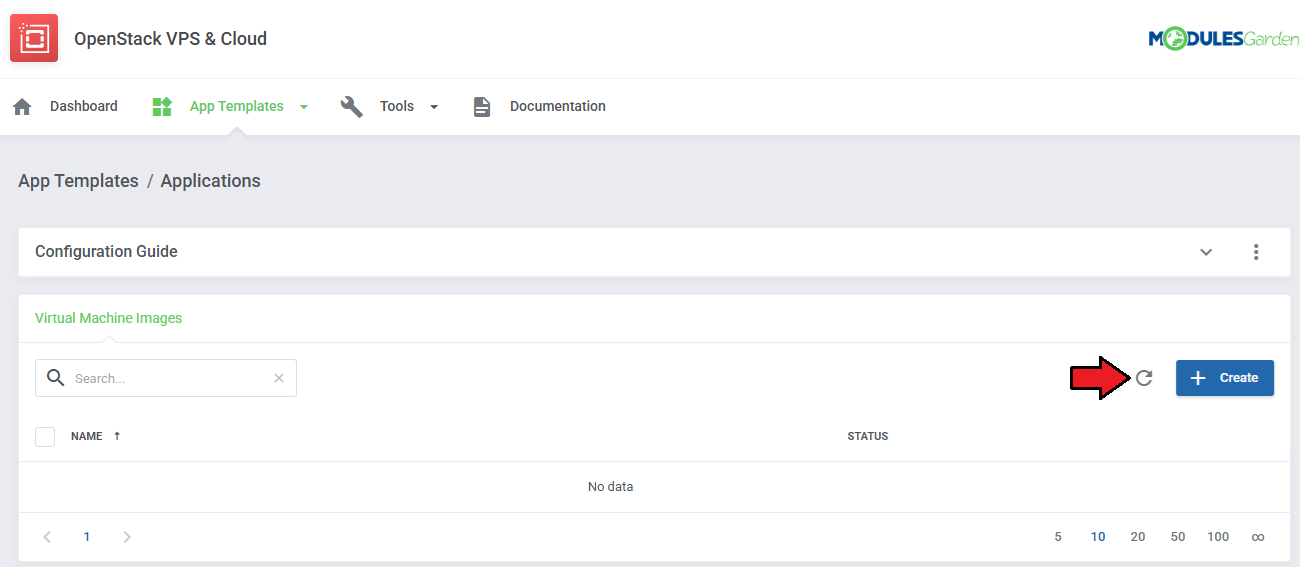
|
Once imported, templates can be:
No additional manual configuration is required for them to be used in provisioning. |
Editing Imported Templates
To view or update template details:
|
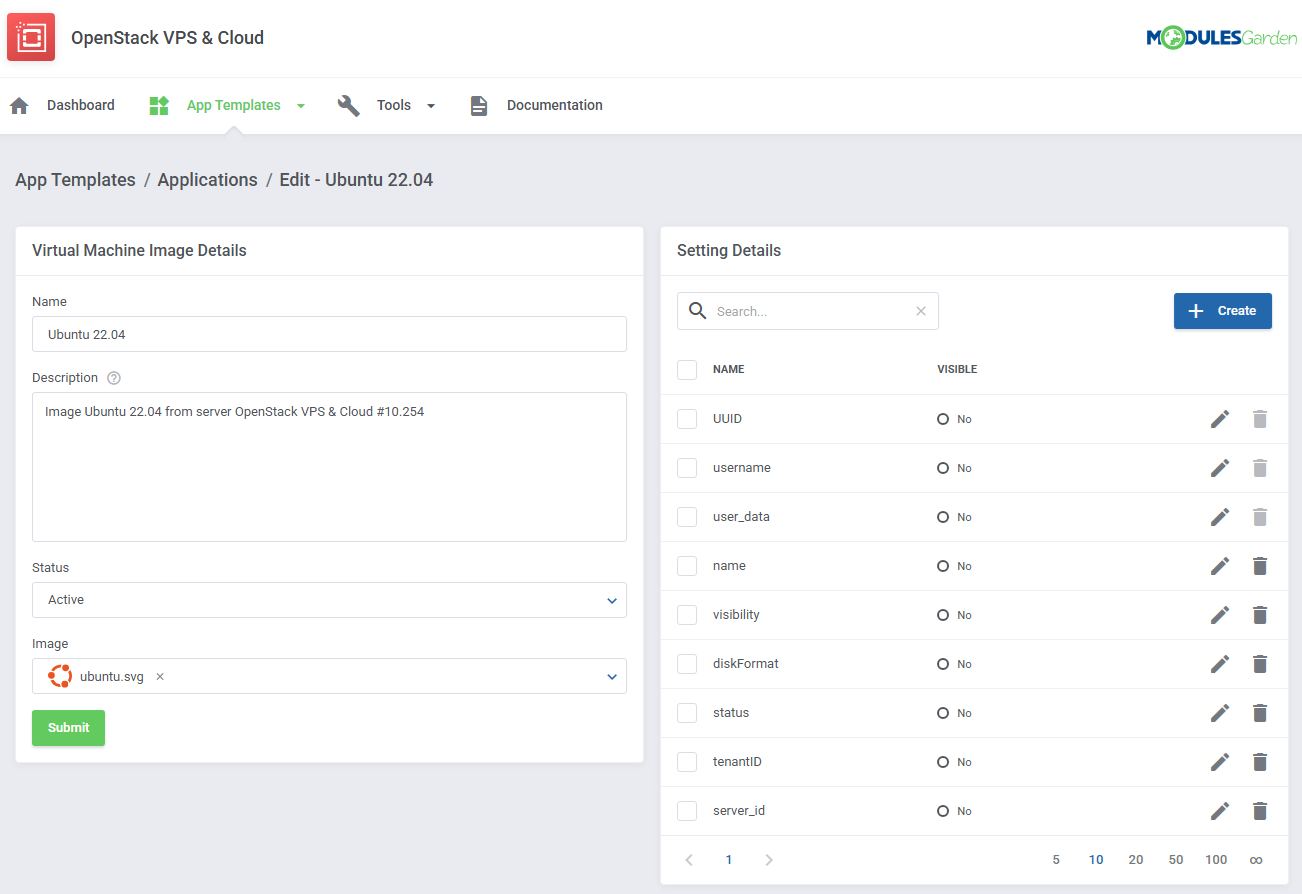
|
| These setting detils are automatically assigned by the module. Do not modify these values unless you are an advanced user who understands OpenStack internal mechanics. |
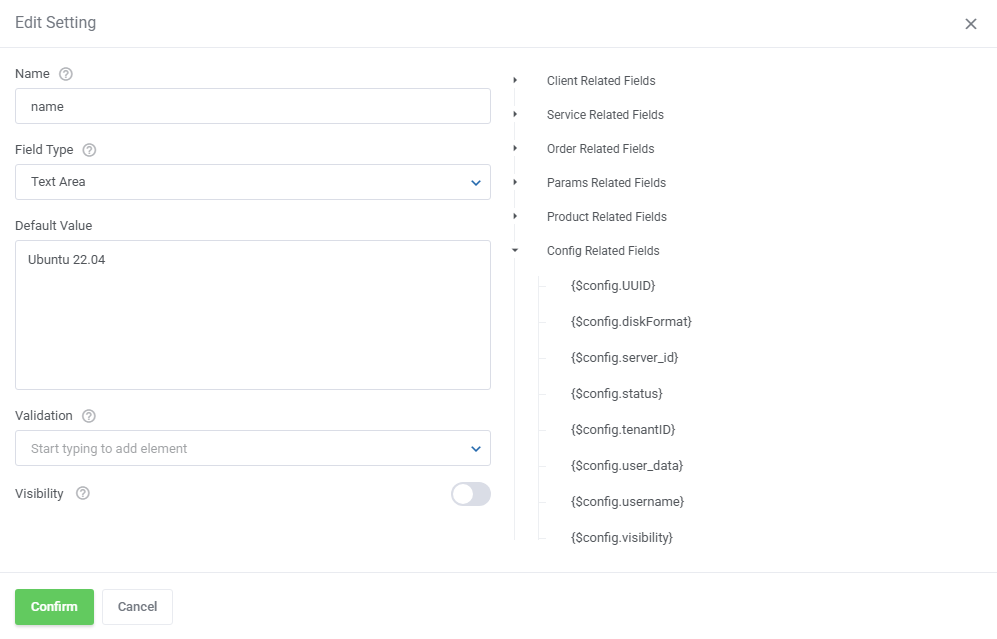
|
Custom Metadata in App Templates
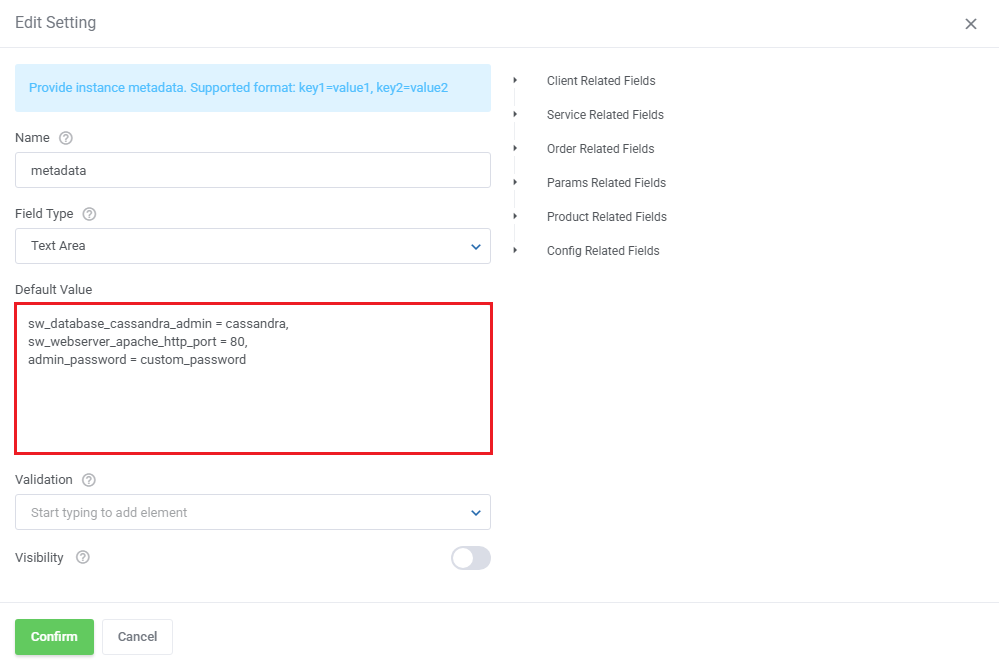
| Starting from version 3.0.0, metadata handling has been moved from the module settings to the App Templates section. You will now find a dedicated metadata field within each template. Metadata is now applied per individual application (image) instead of per product as in previous versions. If needed, simply fill in the metadata details as shown in the example below. |
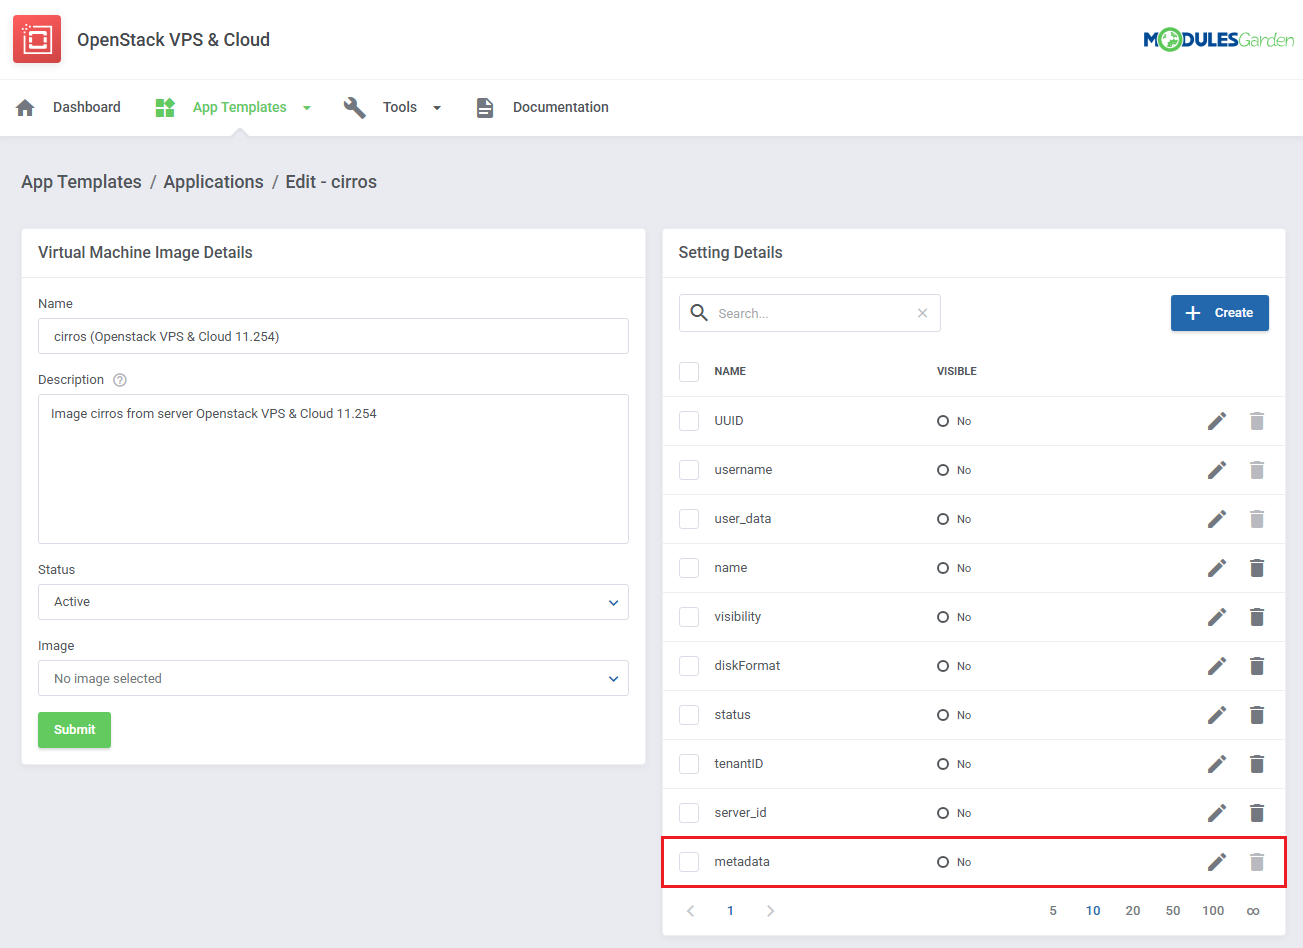
|
| Supported Metadata format that can be added:
|
|
Custom Scripts in App Templates
|
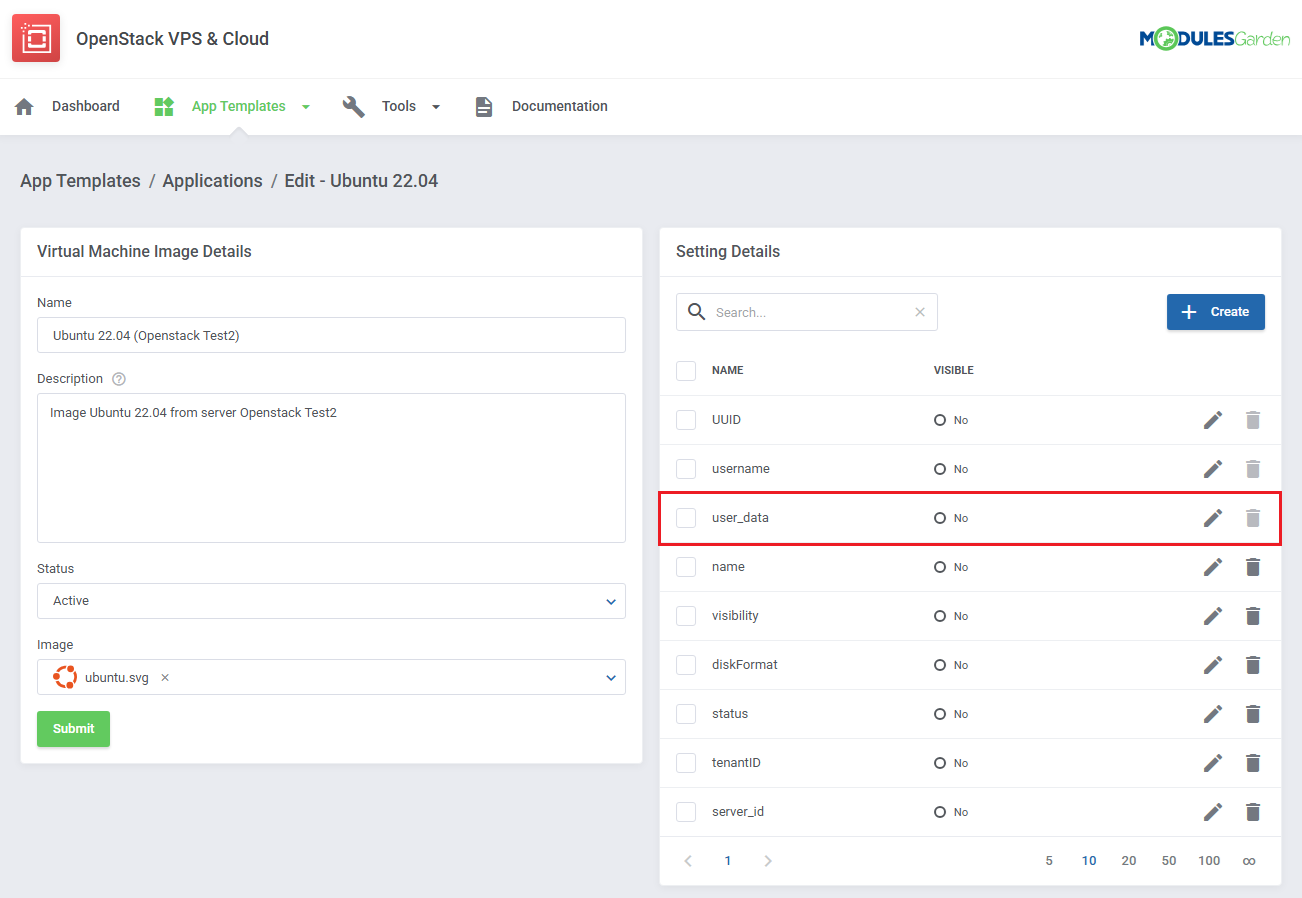
The configuration of custom initialization scripts (Cloud-Init) has been moved from the module settings to the App Templates section in the addon module. |
|
Important notes:
|
|
|
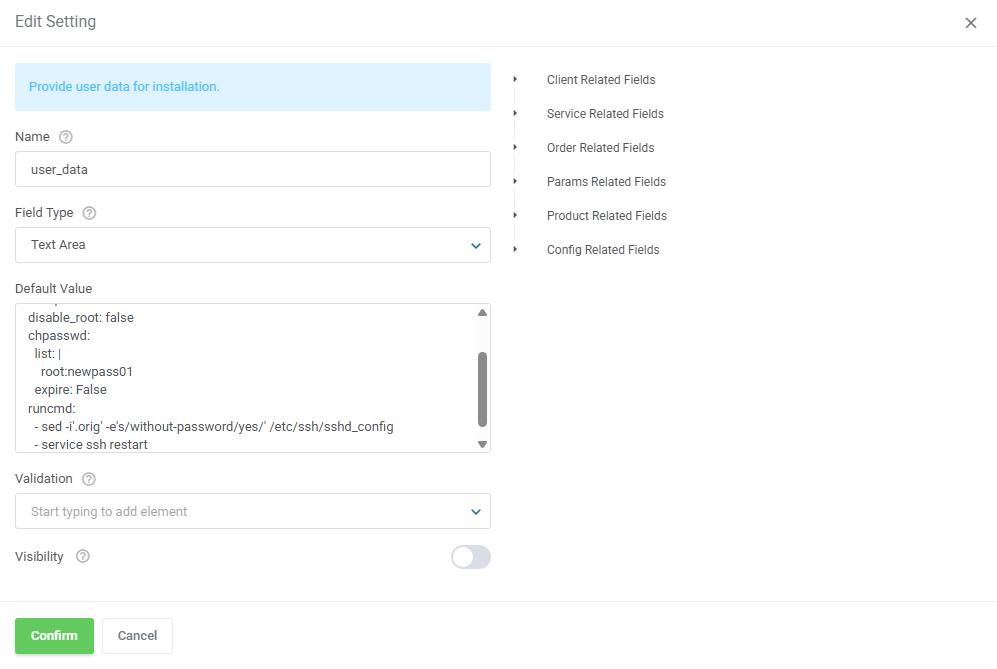
Below is an example of a simple Cloud-Init script defined in the user_data field that sets a new root password for Ubuntu:
#cloud-config
debug: True
ssh_pwauth: True
disable_root: false
chpasswd:
  list: |
    root:newpass01
  expire: False
runcmd:
  - sed -i'.orig' -e's/without-password/yes/' /etc/ssh/sshd_config
  - service ssh restart
This configuration ensures that the root password is updated and SSH access is properly enabled when the instance starts. |
|
|
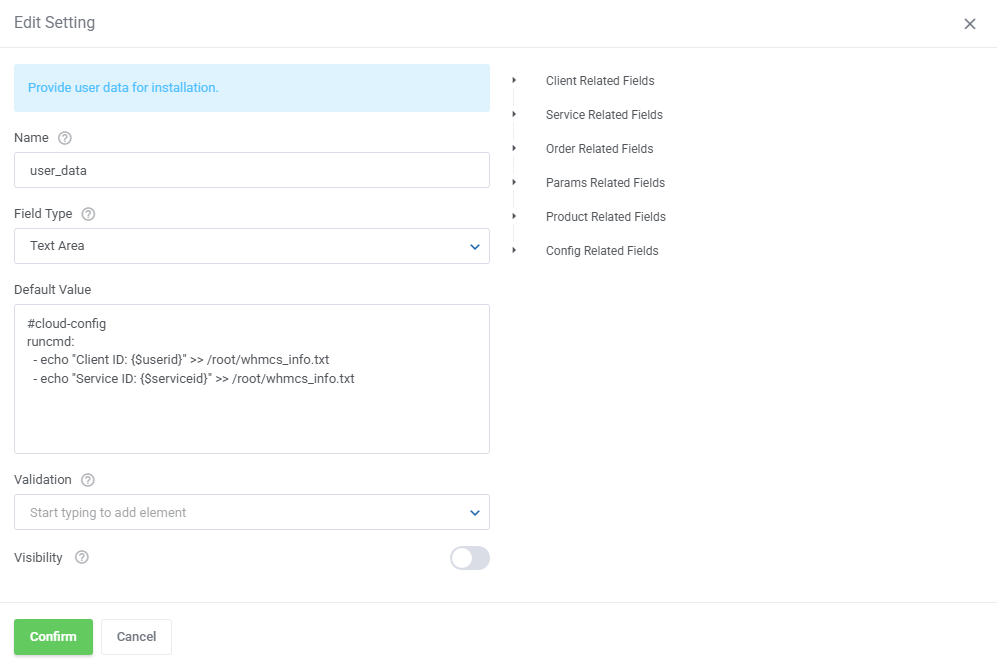
You can use the Related Field inside the user_data script to dynamically pass product or client information.
#cloud-config
runcmd:
  - echo "Client ID: {$userid}" >> /root/whmcs_info.txt
  - echo "Service ID: {$serviceid}" >> /root/whmcs_info.txt
Important: If you want to use braces { } in your script without including a variable, wrap them with {literal}{/literal} to avoid template parsing errors. |
|
Media Library
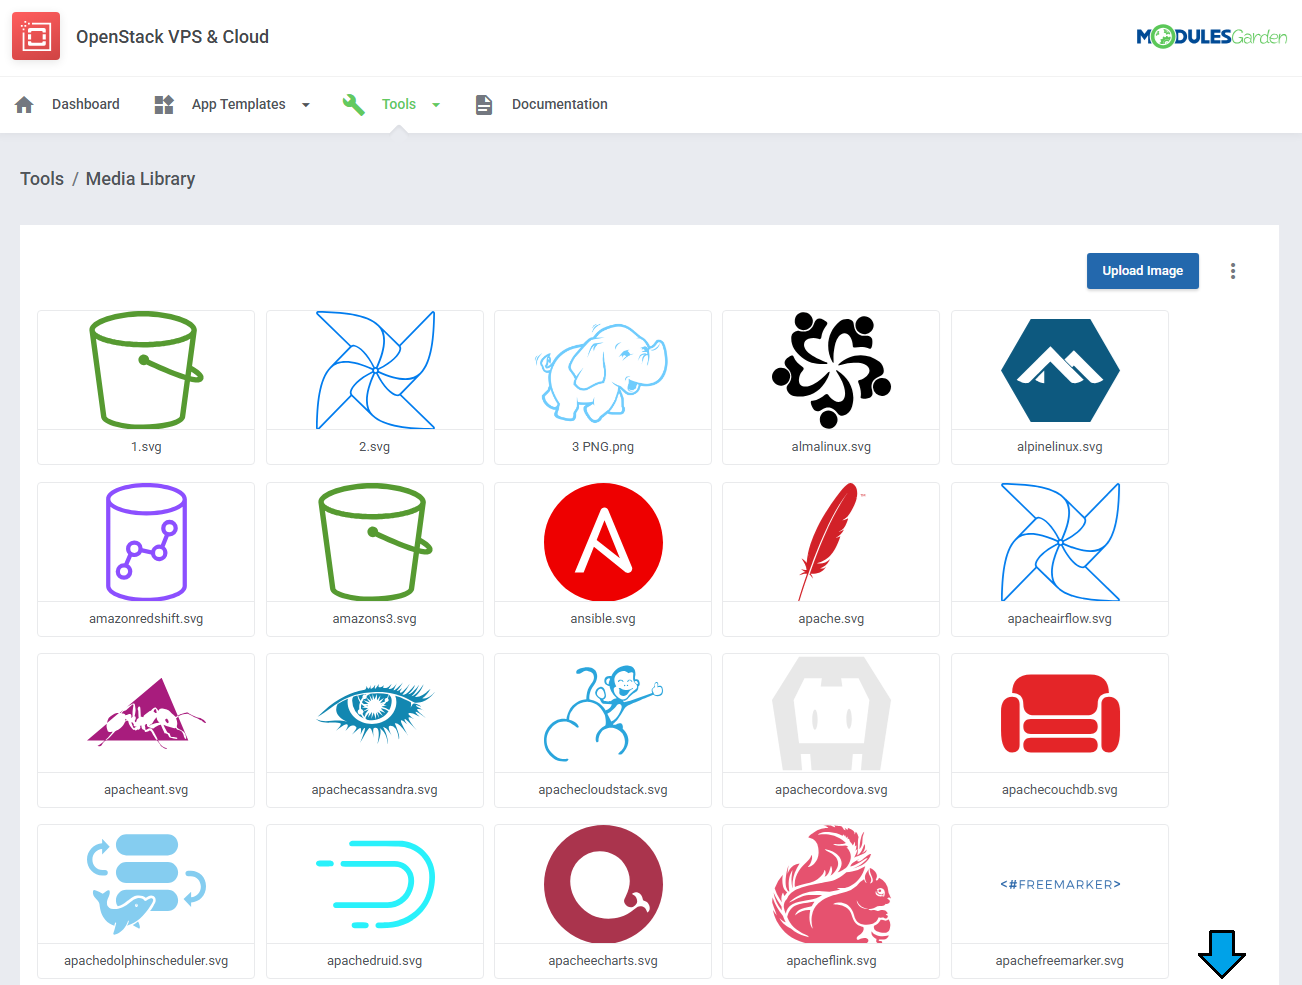
| The 'Media Library' section stores images that can be used as thumbnails for your operating system and application images. Use the Additional Actions to delete all images at once. |
|
Task Queue Tool
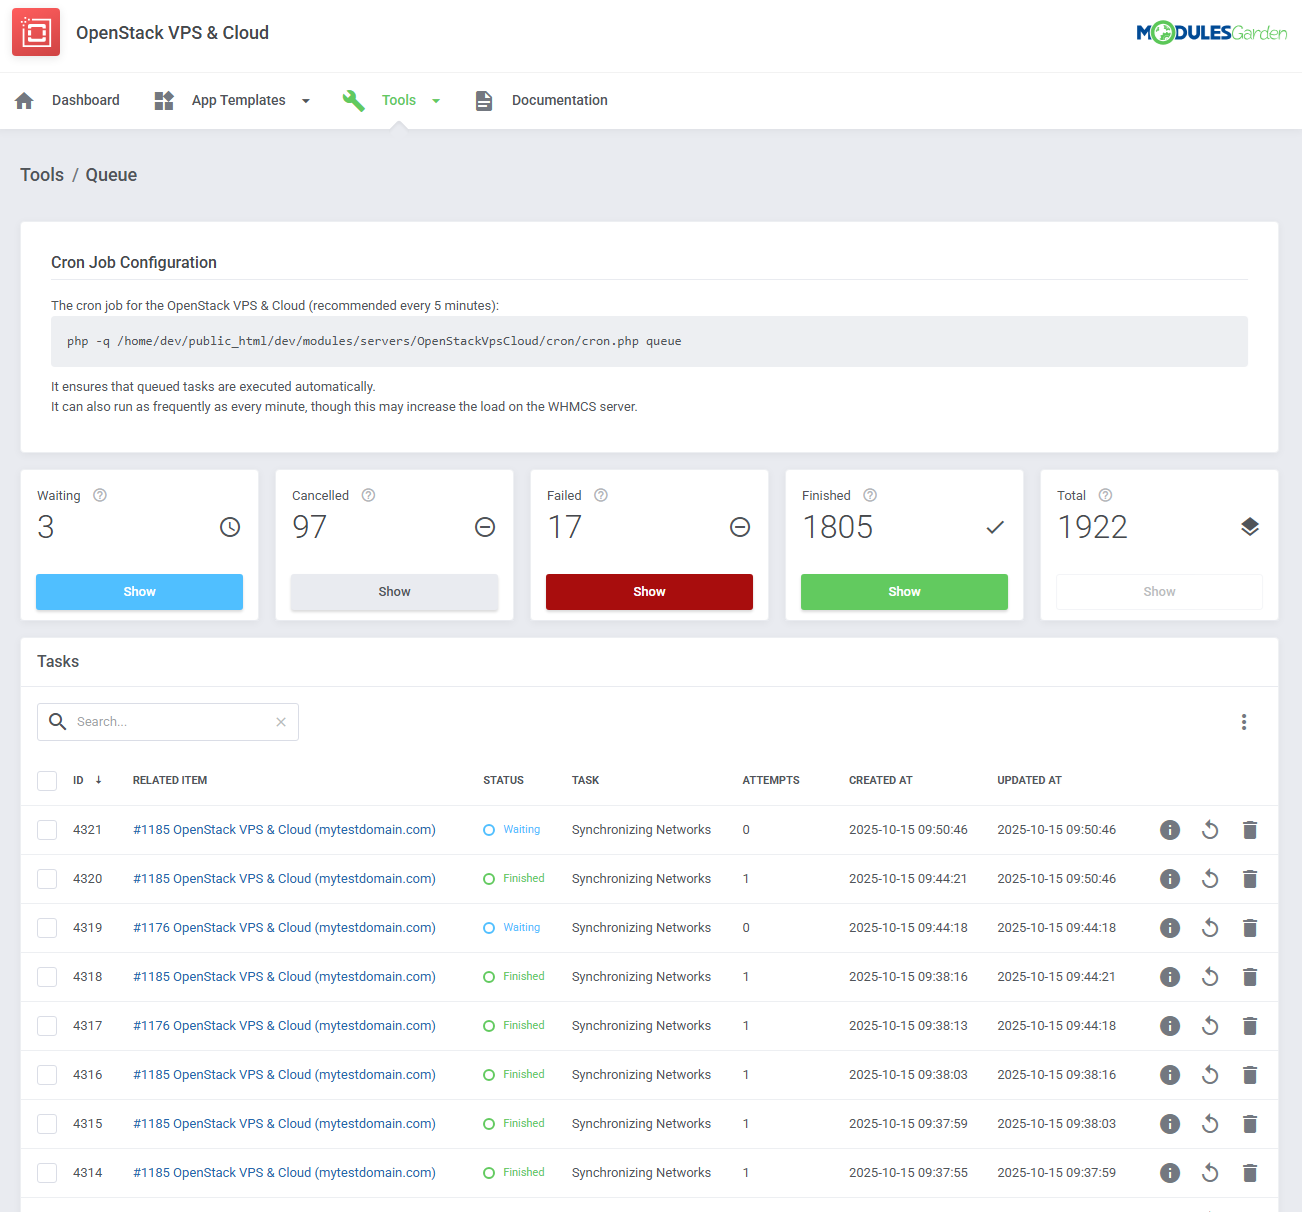
| The "Queue" tool helps you track and manage the tasks created by the module. It allows you to view and interact with task details, including task IDs, statuses, and related items. |
|
Translations
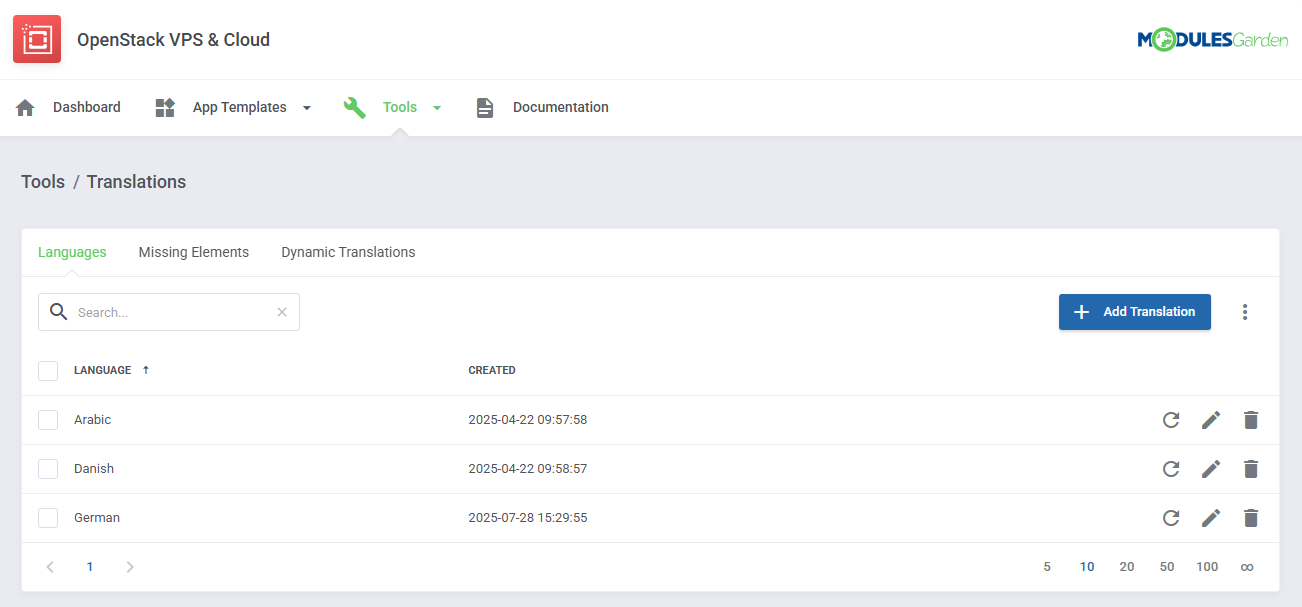
| Customizing language files is now extremely easy with the "Translations" tool that is now available directly in the addon. Its user-friendly design makes managing various language file tweaks a smooth and efficient process. Prepare translations for the original English files with this handy built-in tool. For specific instructions on how to use this tool please refer to its dedicated article, you will find it here. |
|
Logs
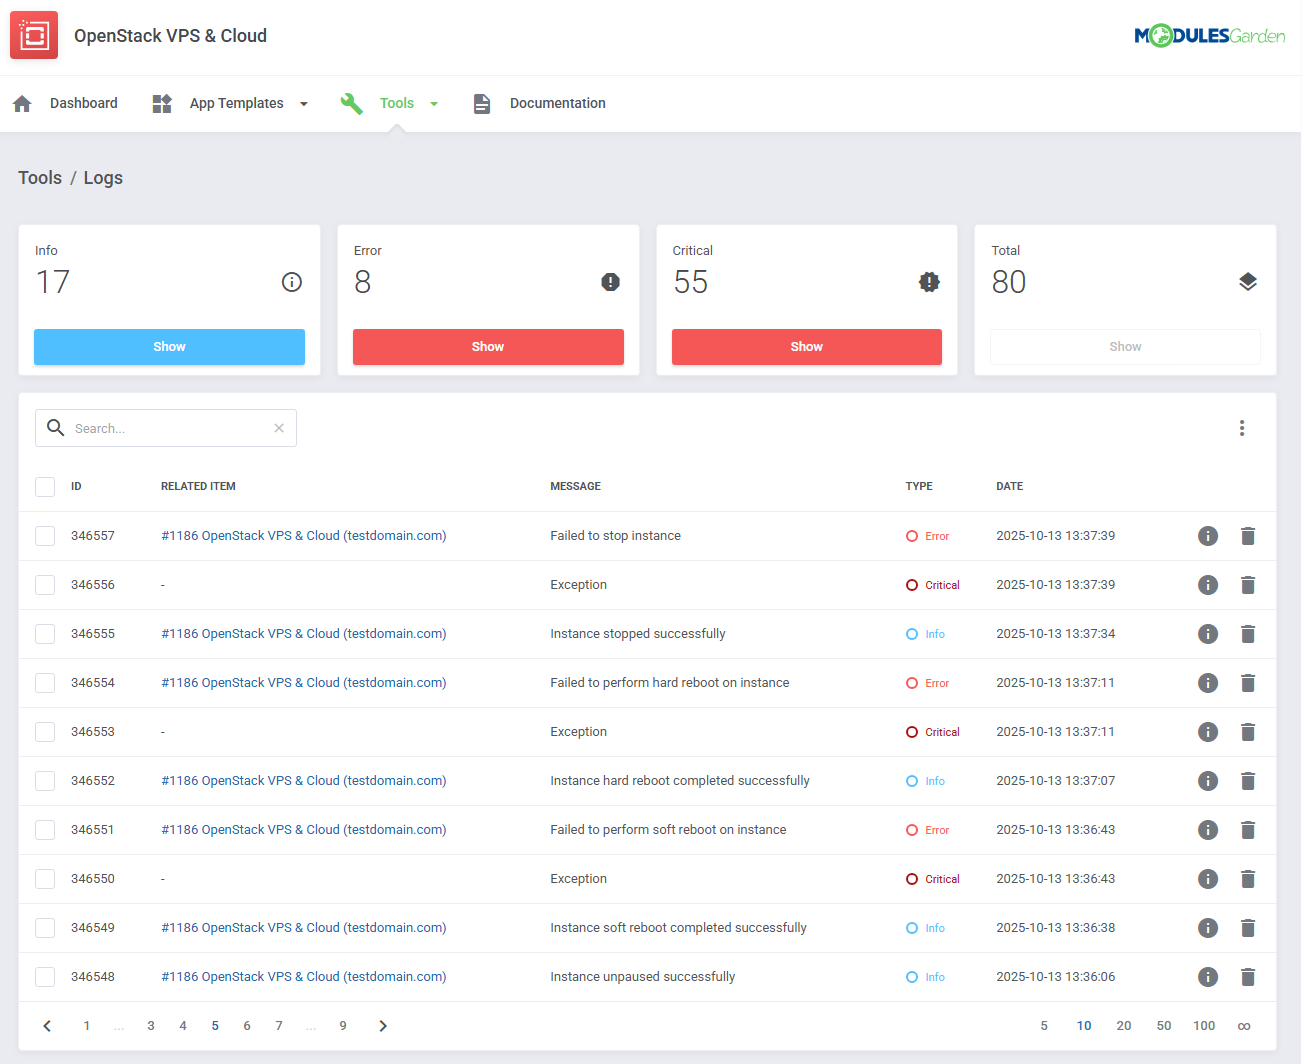
| The 'Logs' section under the 'Tools' tab is where the module logs are stored. You can filter the module logs by type with the 'Show' buttons. For precise details on Logs, please refer to our dedicated documentation article, which you may find here. |
|
Admin Area View
| OpenStack VPS & Cloud For WHMCS allows your customers to manage their servers via the client area in your WHMCS system. You can monitor and manage each product from your WHMCS admin area.
|

|
Ordering
| Owing to configurable options, you are able to offer a product which your clients can tailor according to their needs. Additionally, you are able to set up pricing for each configurable option, which make your offer even more competitive. |
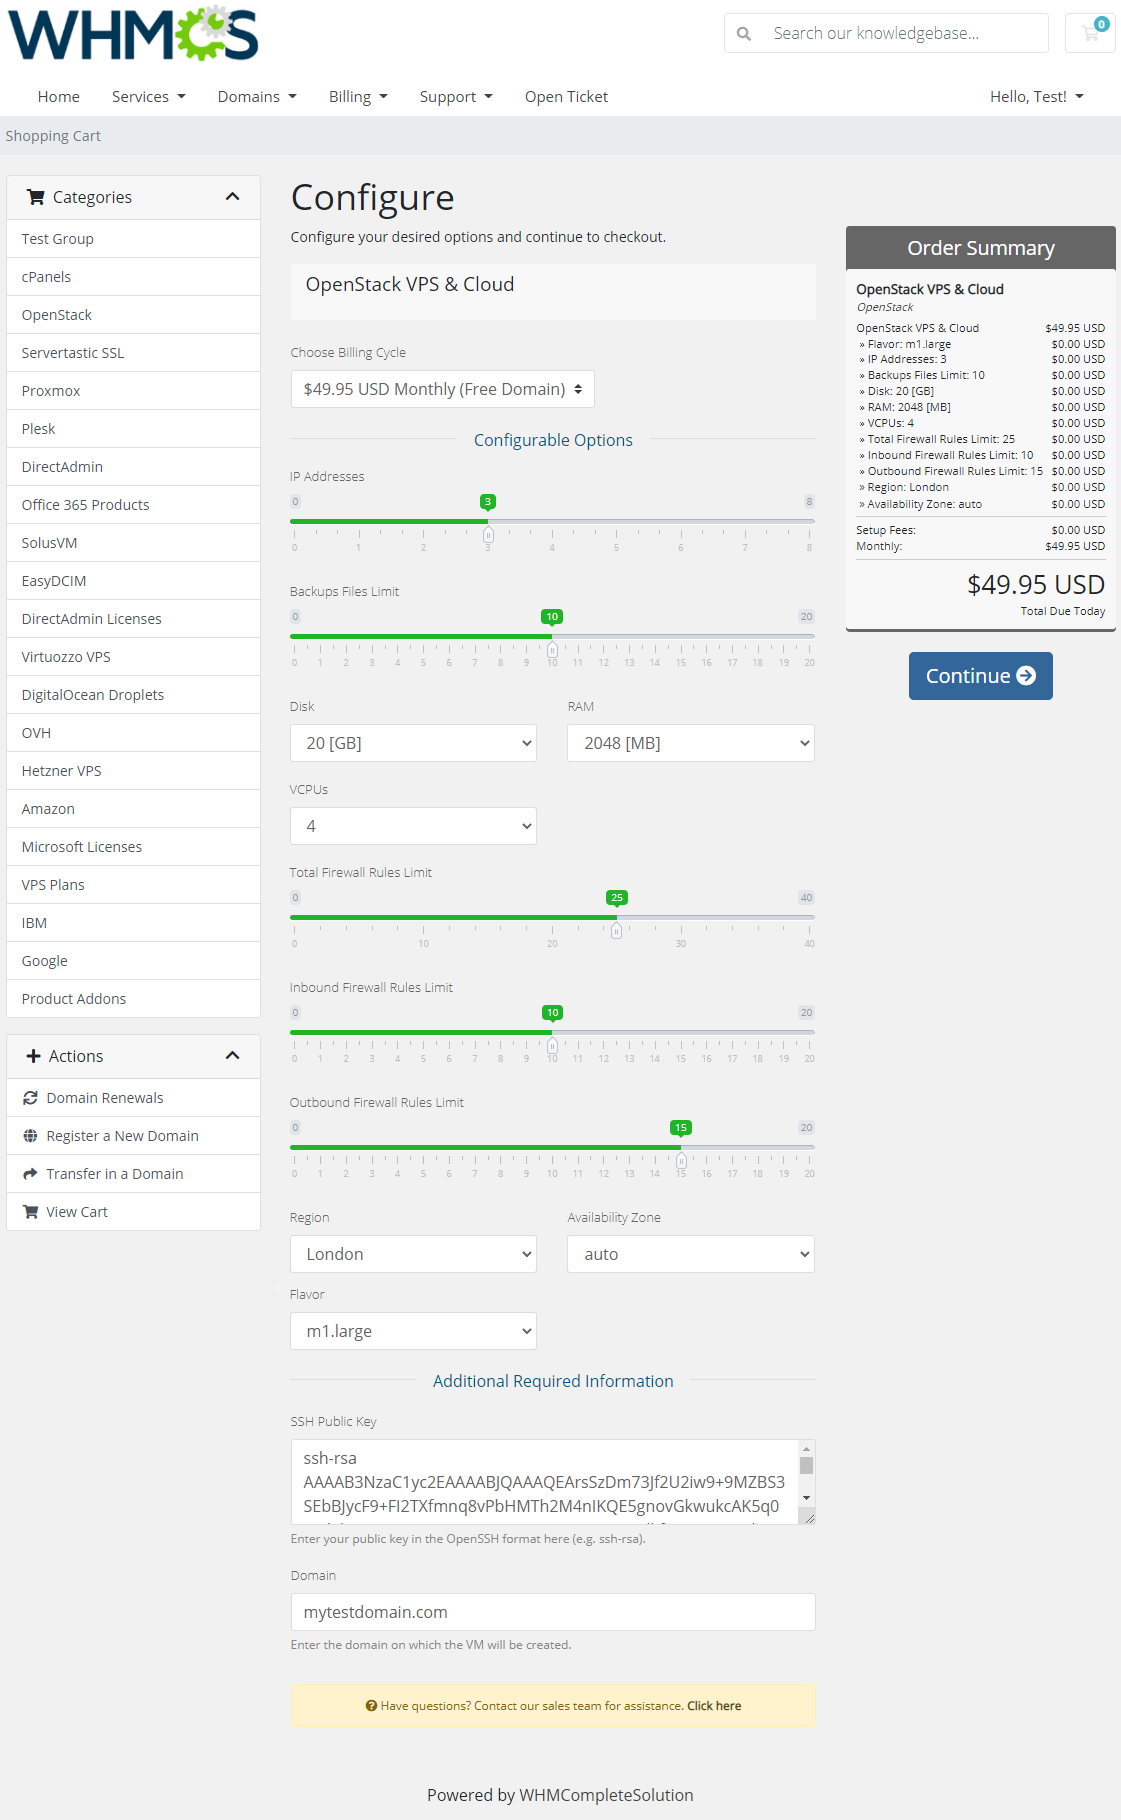
|
Importing Existing Instance
| In this section, you can find short instruction on how to connect one of your clients to your already existing instance in the OpenStack panel. Take the following steps to make sure that the process will be carried out properly. 1. Firstly, manually create an order for your customer in WHMCS. Choose a client and in the summary view, click on the ' Add New Order' button. Next, select a 'Product/Service' and press 'Submit Order' .
The above-mentioned information has to be consistent with the data from your OpenStack panel. Now, complete these fields as presented below. |
| 3. If the completed data is correct, after refreshing the page, you will see the attached instance from OpenStack. Important! Remember to manually add other missing parameters of the instance such as domains, credentials, IP Addresses, configurable options, SSH Key, billing cycle, etc. so they match the parameters of the attached instance from OpenStack. |
Client Area
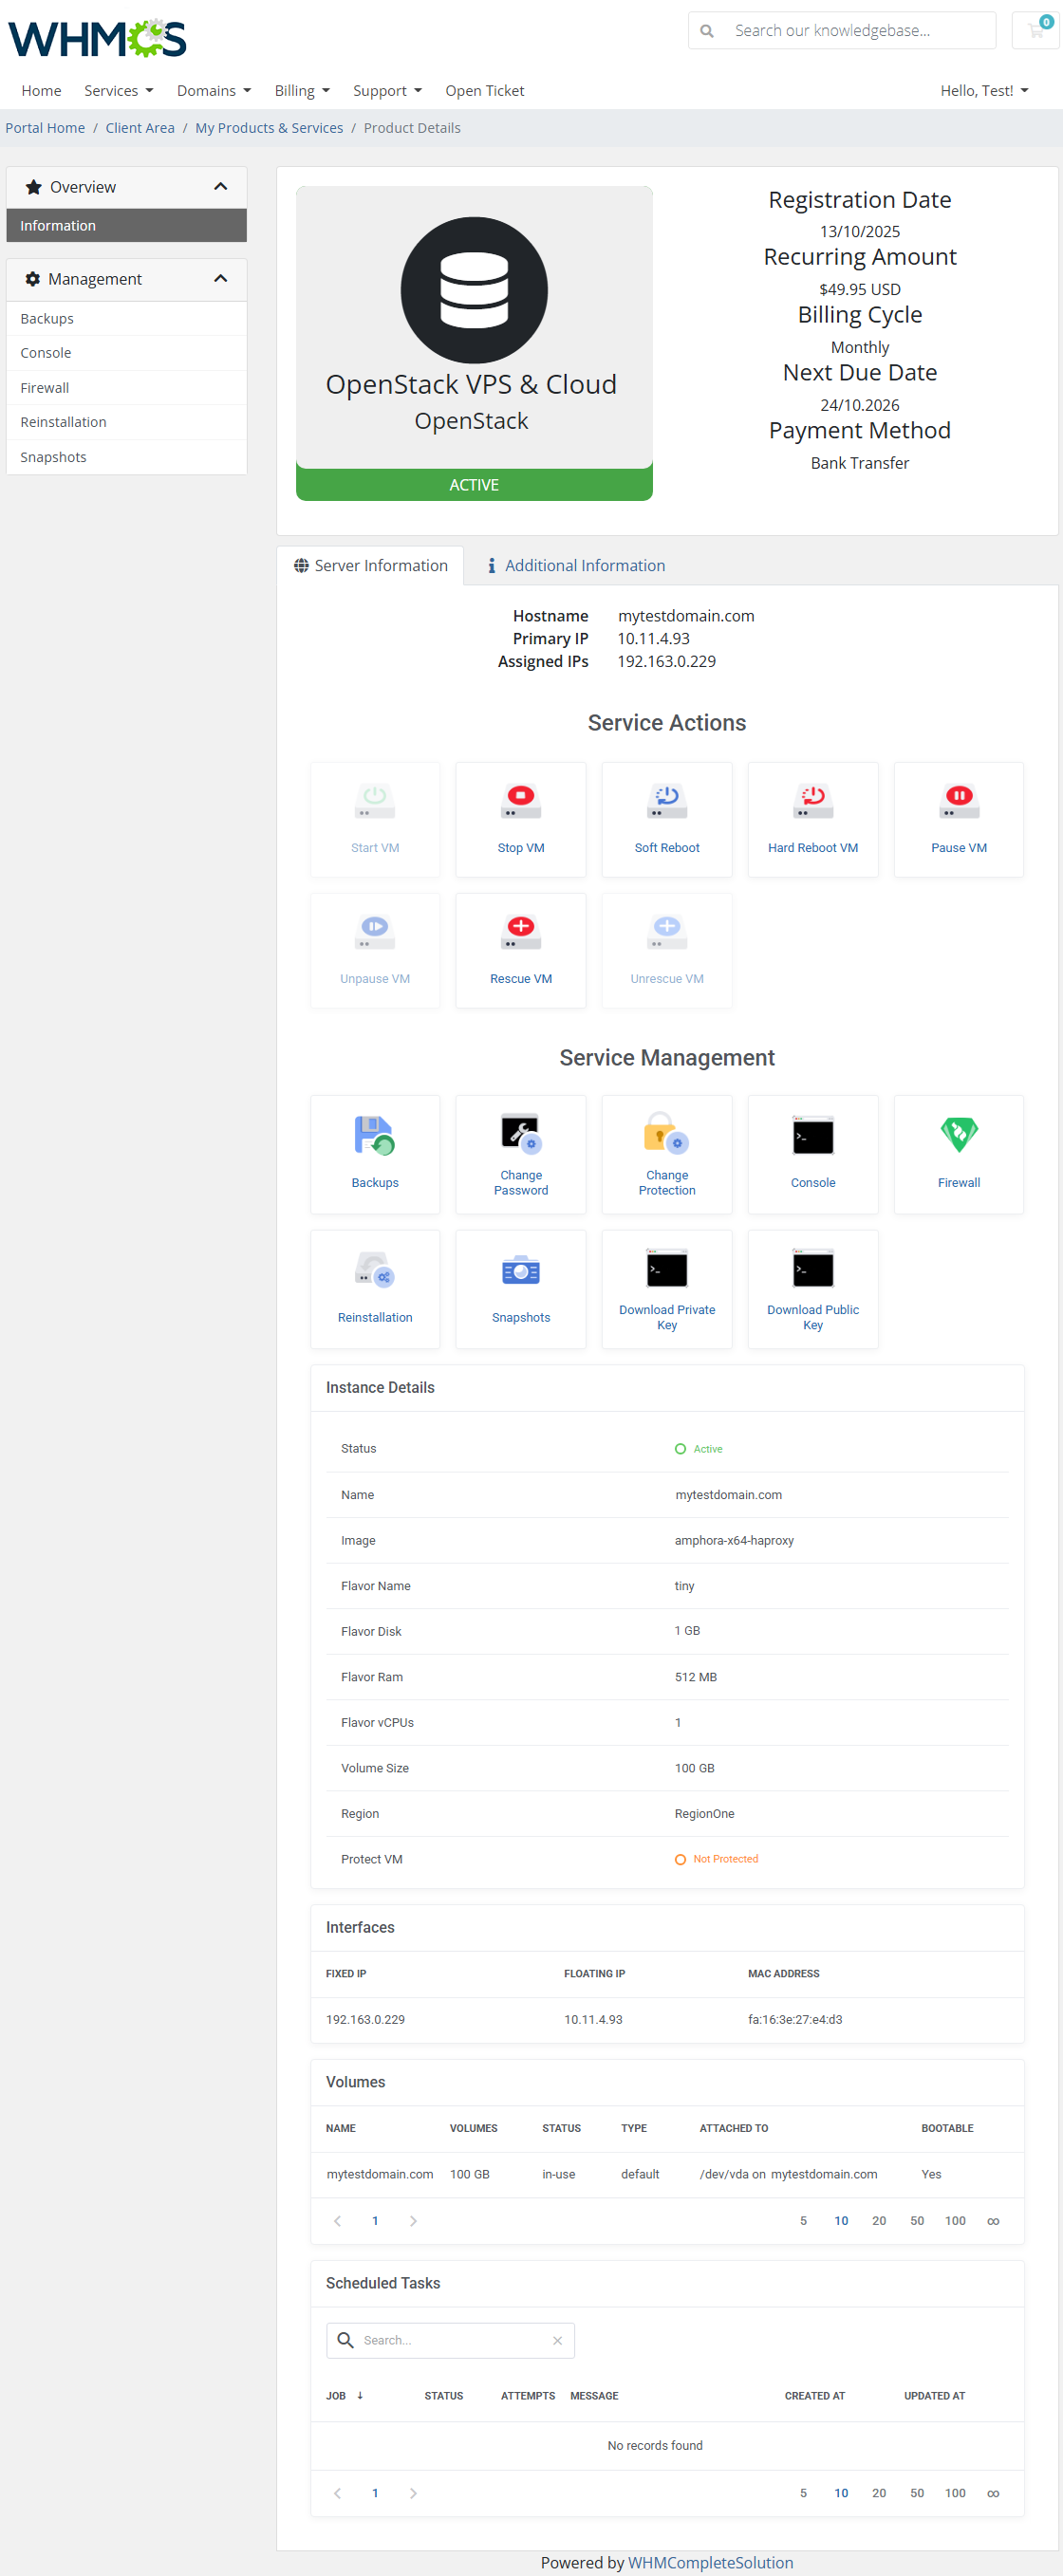
| Client area interface of OpenStack VPS & Cloud should look like the one on the screen below. As you can see, the control panel contains useful options needed for managing a virtual machine. The module enables your customers to easily start/stop, pause/unpause, resume, soft reboot, and hard reboot their servers by pressing the corresponding button. |
|
Volumes
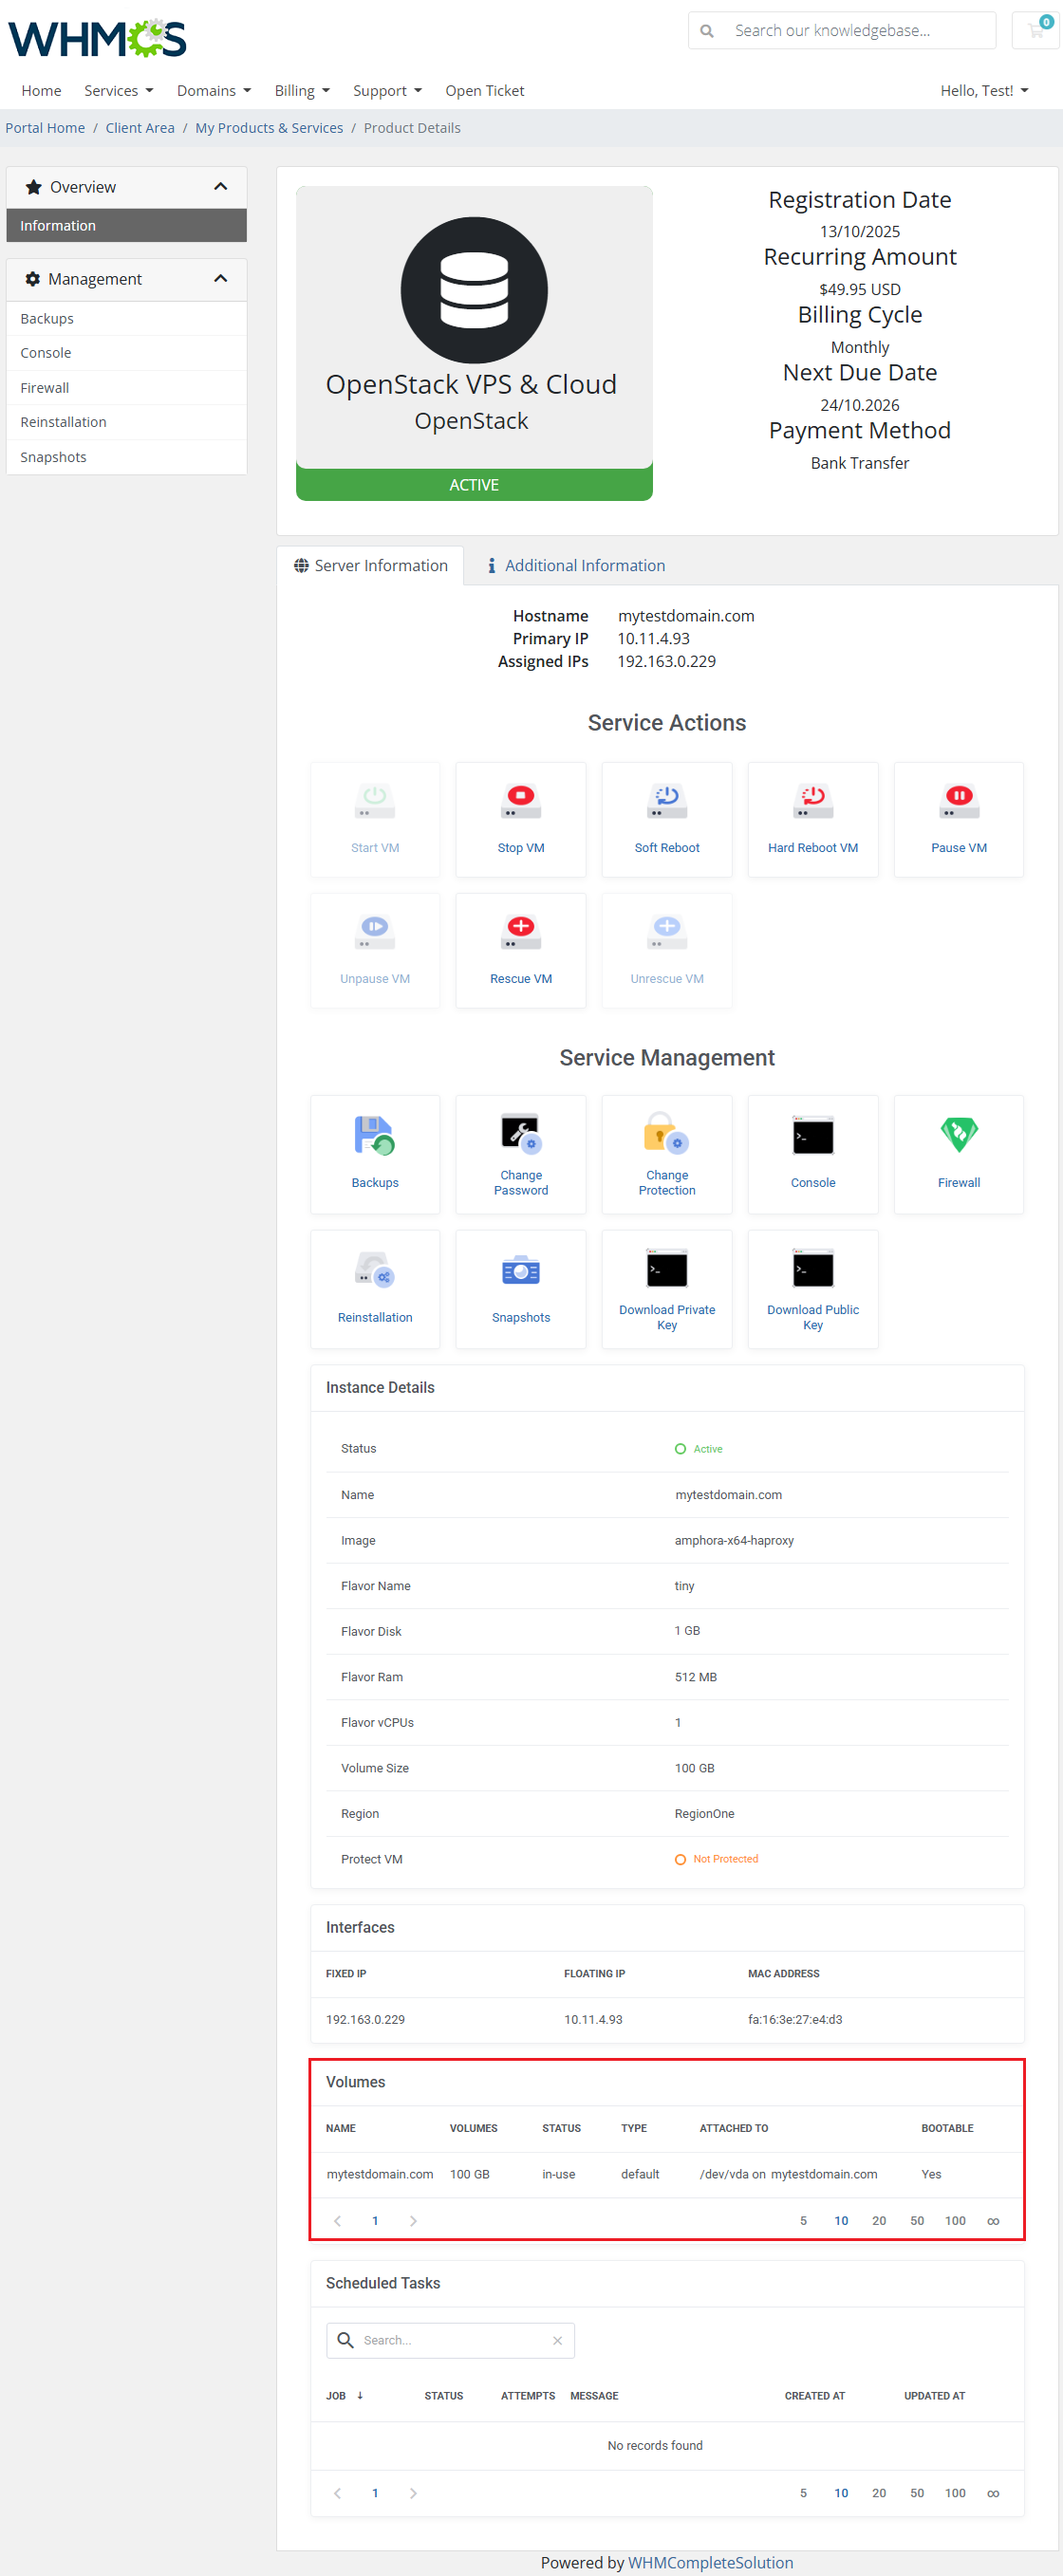
| In case your OpenStack VPS & Cloud is running with the 'Use Volumes' option, the client area may look a bit different. It will now include an additional section named Volumes. |
|
Reinstallation
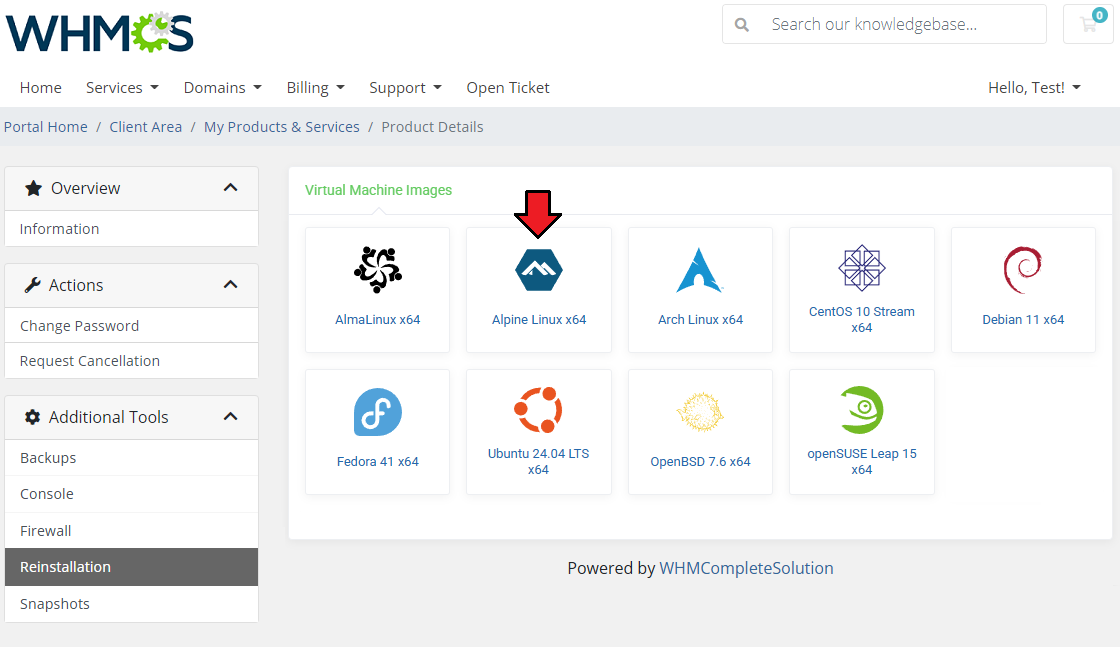
| The reinstallation option allows your clients to change a server image. To reinstall your server, choose an image and confirm through pressing the 'Reinstallation' button and confirm the action. |
|
Rescue Mode
| The rescue mode provides a mechanism for a VM access even in case the VM's image renders the instance inaccessible - e.g. if instance's filesystem becomes corrupted. The rescue VM will be launched to permit the user to fix their VM. When you want to disable the rescue mode, click the 'Unrescue' button. The VM status will then also return to 'ACTIVE'. |
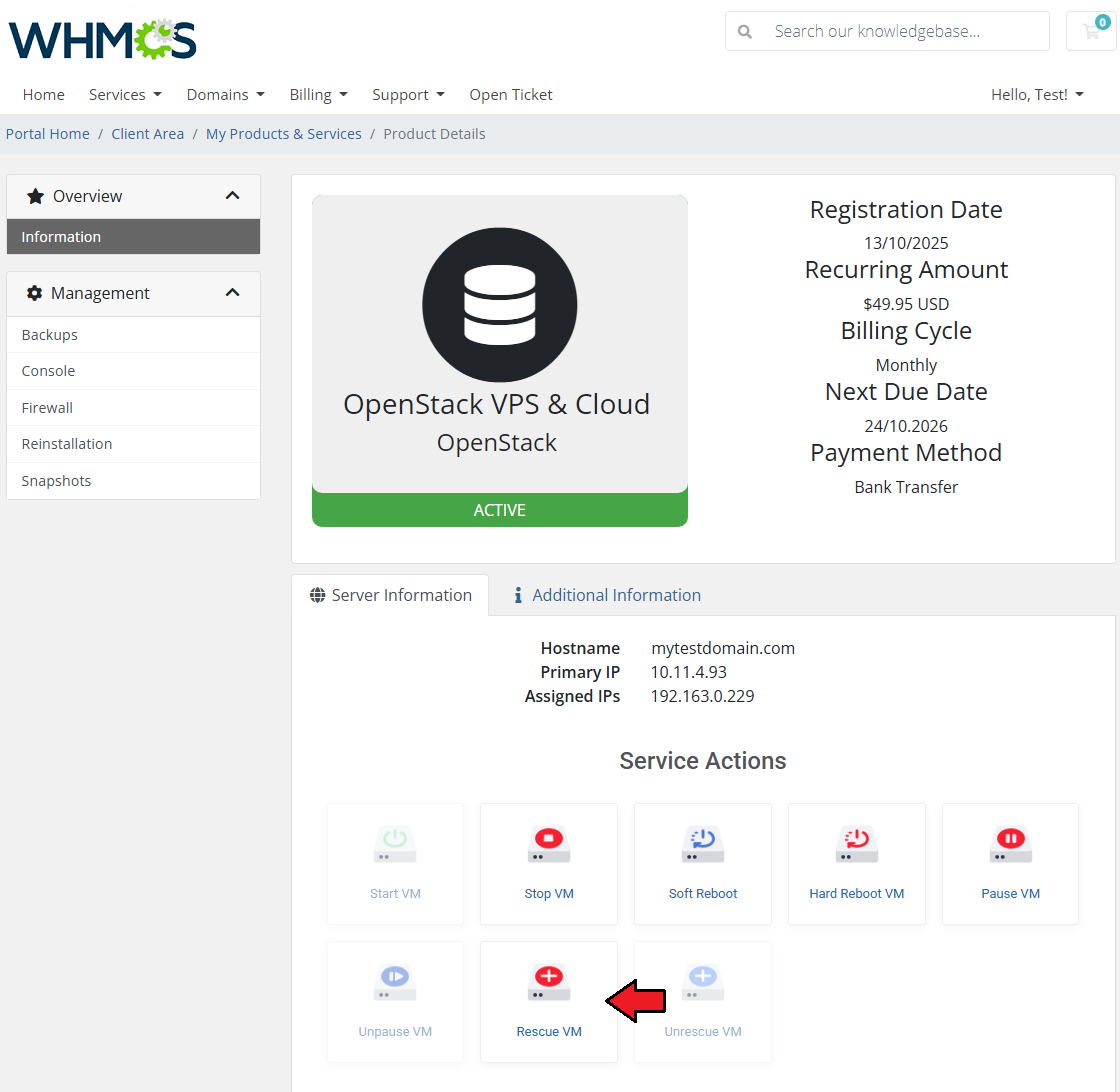
|
| Before you continue, please note that the rescue VM will be set up with the same network configuration as the real VM. Moreover, a new root password will be generated and the VM status will change to 'RESCUE'. |
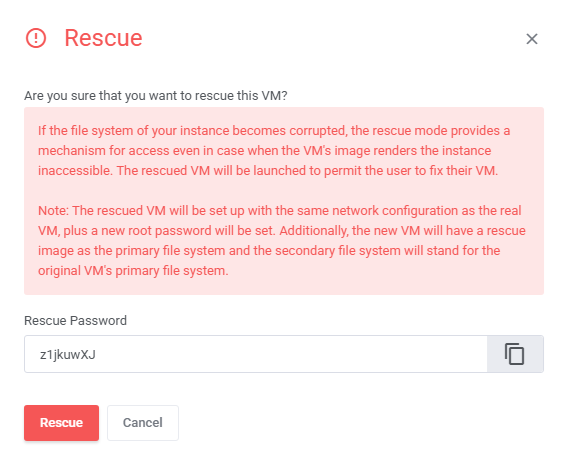
|
Backups
| Your customers can also create backups of their resources. To do so, press the 'Create Backup' button. In this section, you will find three different categories related to backups and their management. Manual backups can be created on:
Scheduled backups can be created on:
|
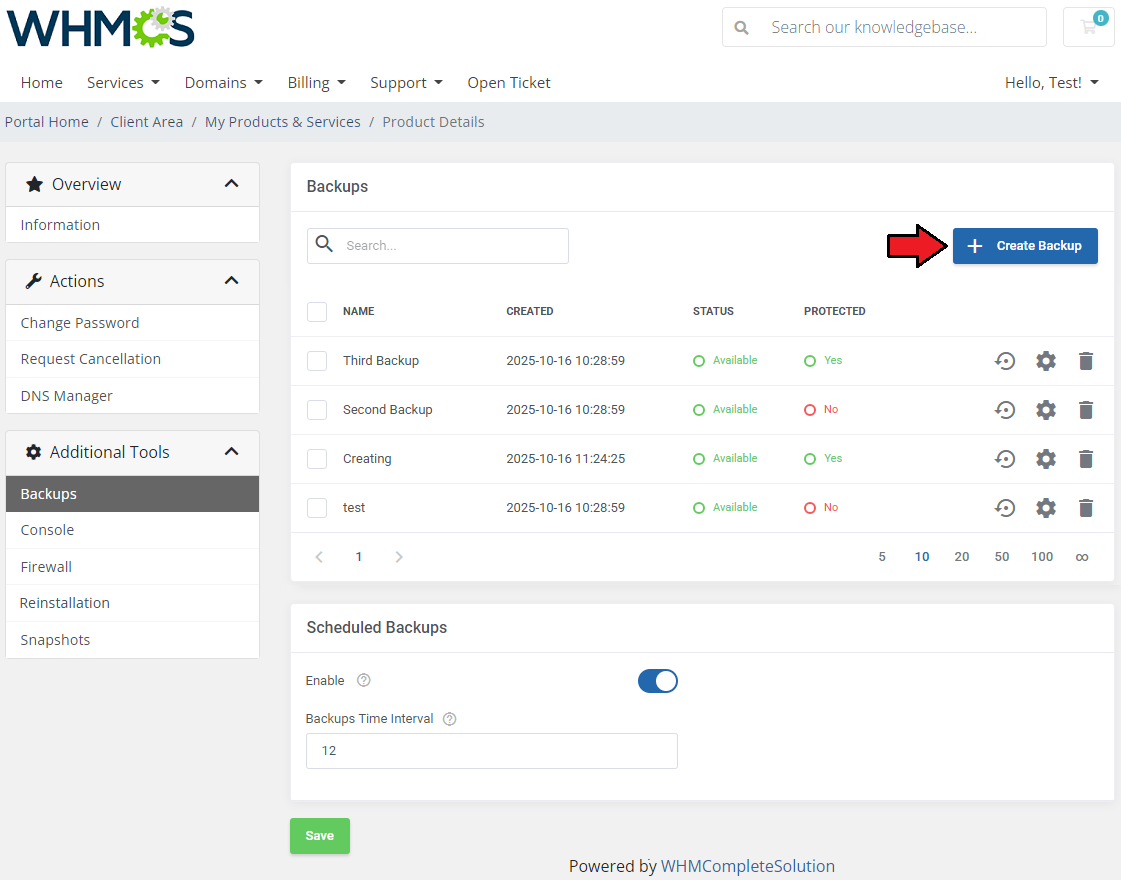
|
| Simply, type in a custom name of your backup and press the 'Confirm' button. Note 1: Sometimes it may take up to several dozen minutes to finish creating the backup. Please wait until the process is complete. |
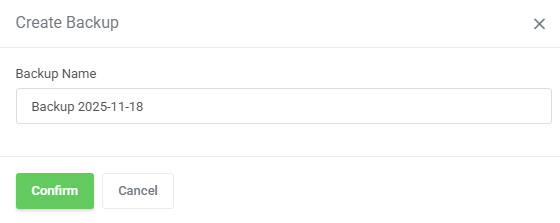
|
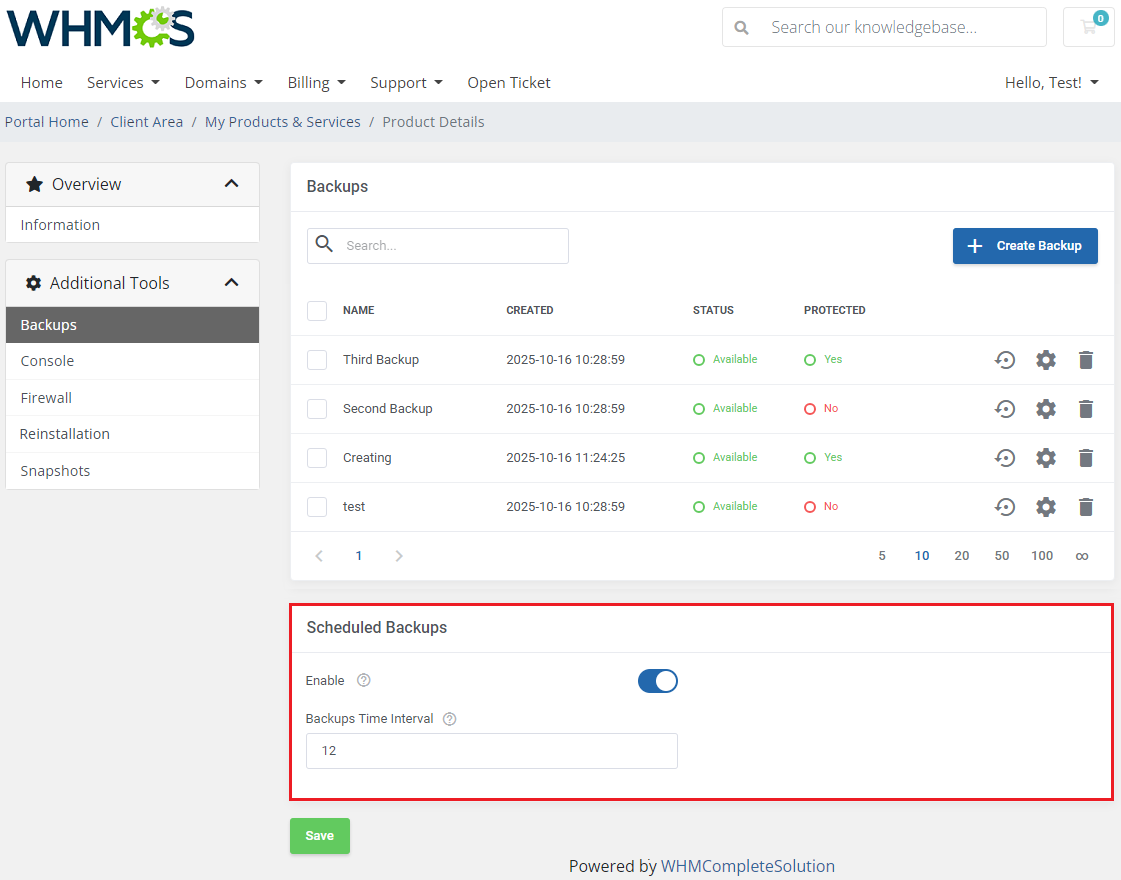
| Clients are also given the opportunity to create backups automatically by enabling the option: 'Schedule Backups'. When enabled, provide a time interval to wait until the next backup is created to define the task's routine. The entered time interval must be higher than or equal to the limit specified by your administrator. |
|
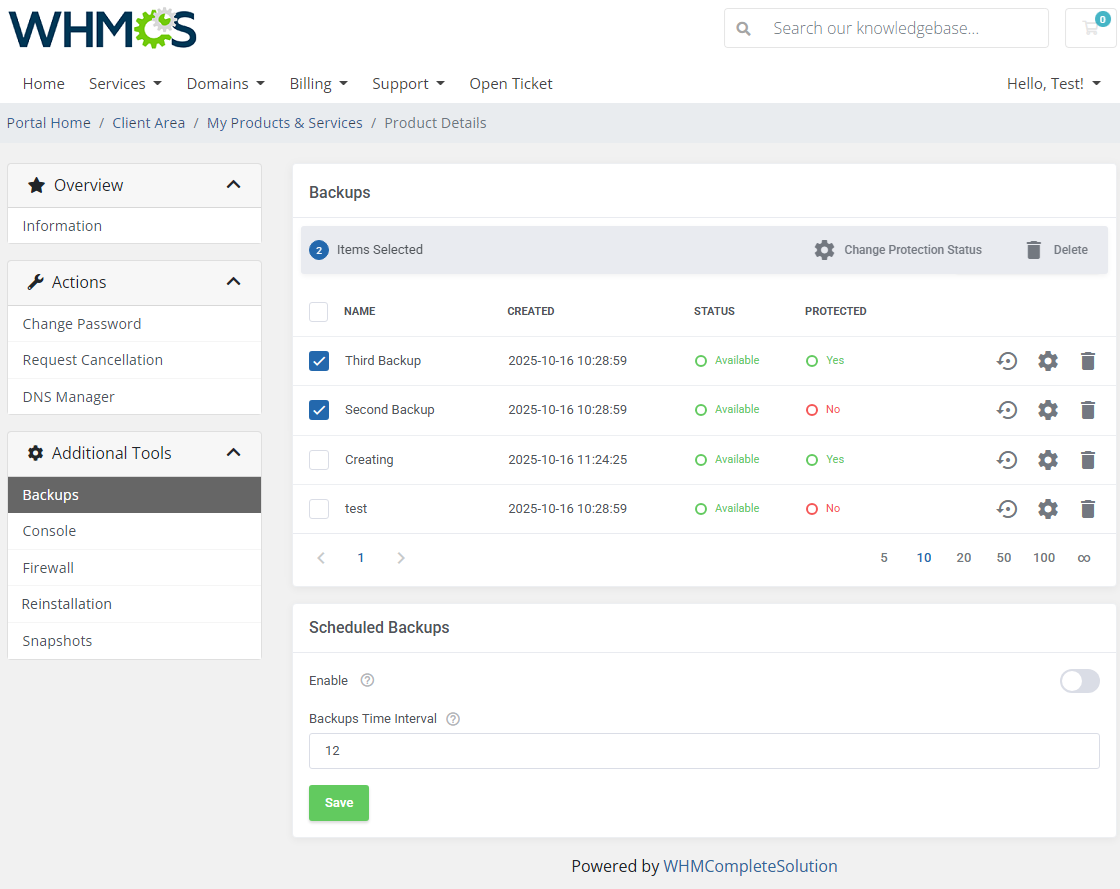
| To restore a VPS from backup, simply press the 'Restore' button next to it. If selected backups are no longer needed, you may easily delete them. |
|
VNC Console
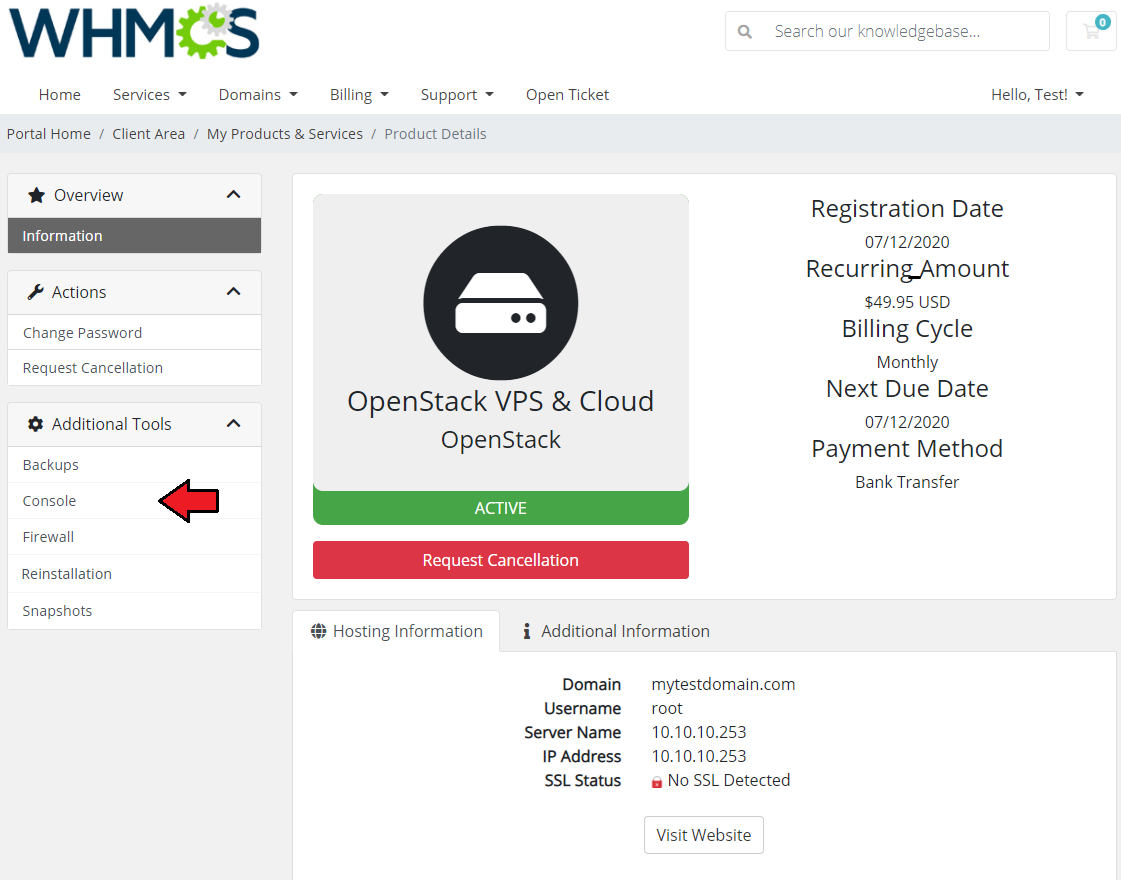
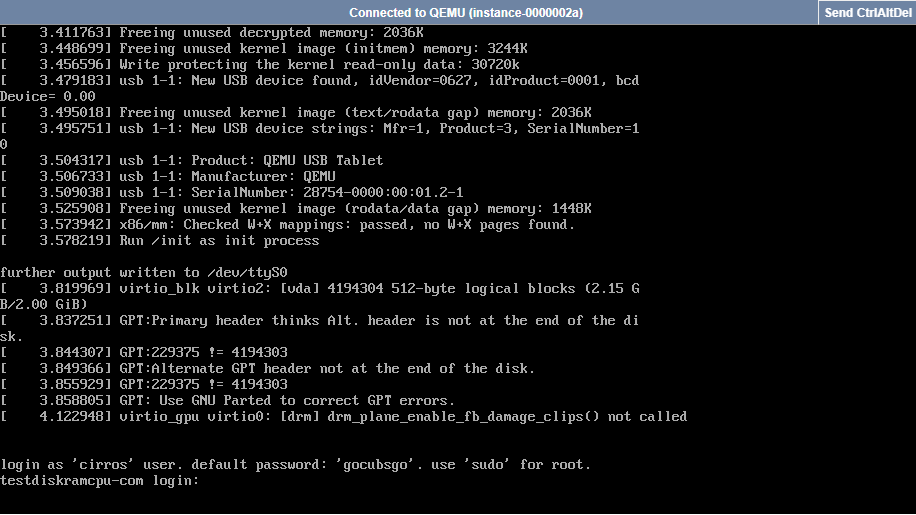
| One of the most interesting functionality is a VNC console where your clients can remotely manage their servers. To access it, simply click on the 'Console' button. |
|
| VNC is a browser based VNC client. It was implemented using HTML5 Canvas and WebSockets. |
|
VM Protection
| In the product configuration page you can enable the 'Protect VM After Creation' option which prevents the rebuilt of VM. The selected status of this protection will be applied to both admin area and client area. |
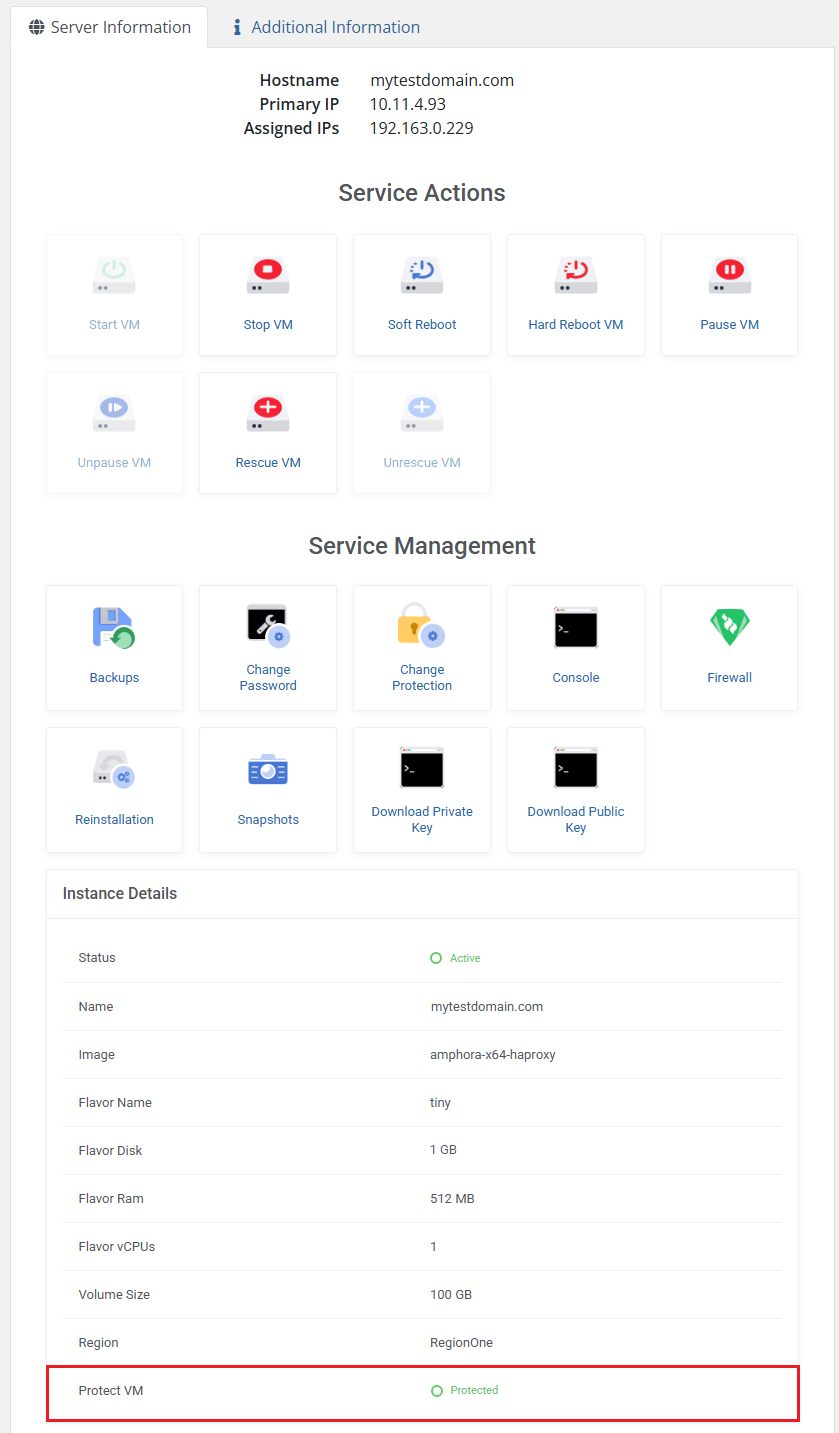
|
| Moreover, if the 'Protect VM' option is enabled in the client area, the client will be empowered to toggle the current protection status. |
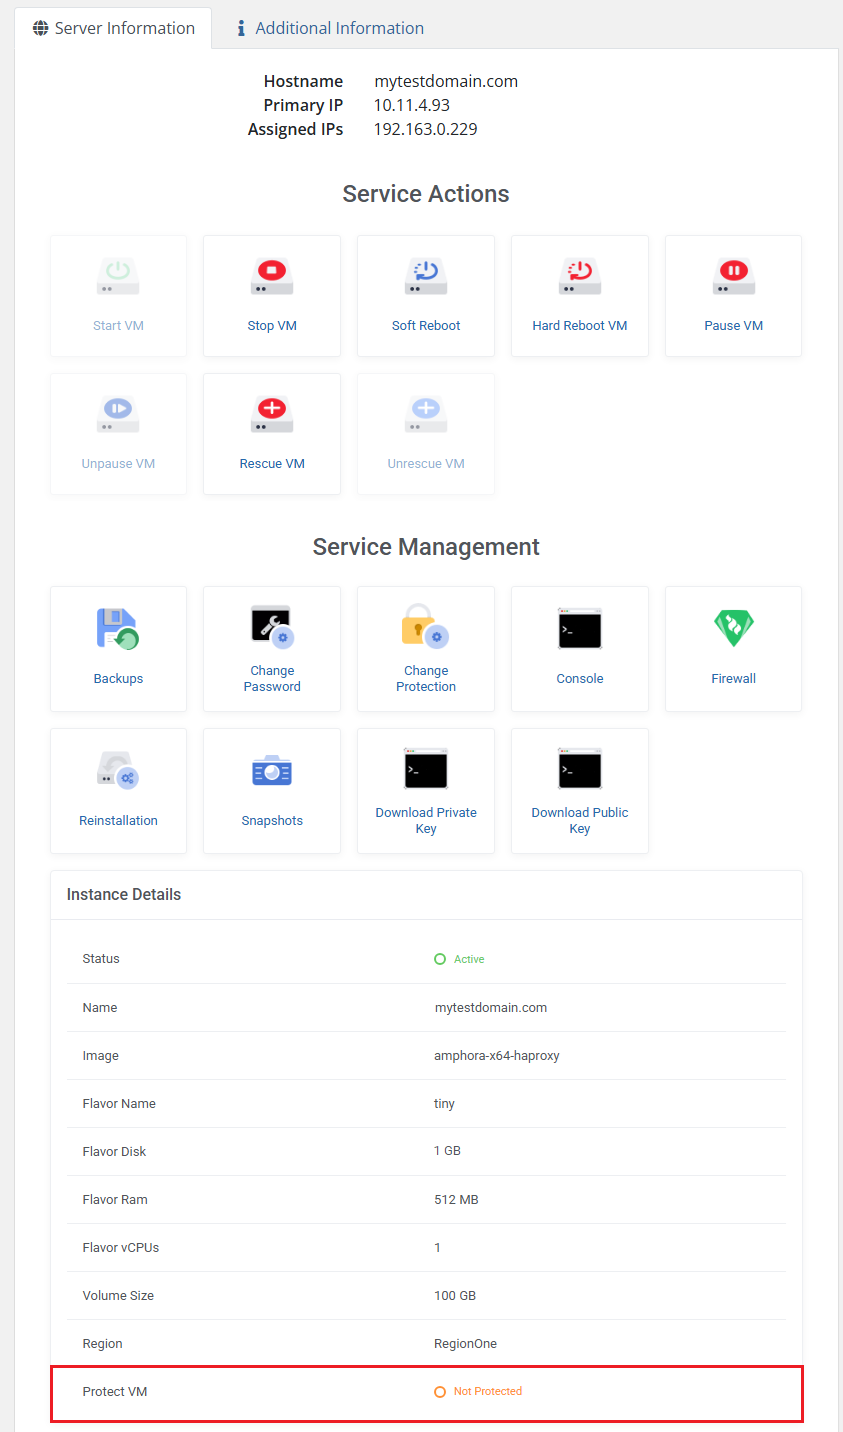
|
Firewall
| The firewall management page allows your customers to view, add or delete existing rules on a security group assigned to the product. To add a new firewall rule, use the button marked on the following screen. |
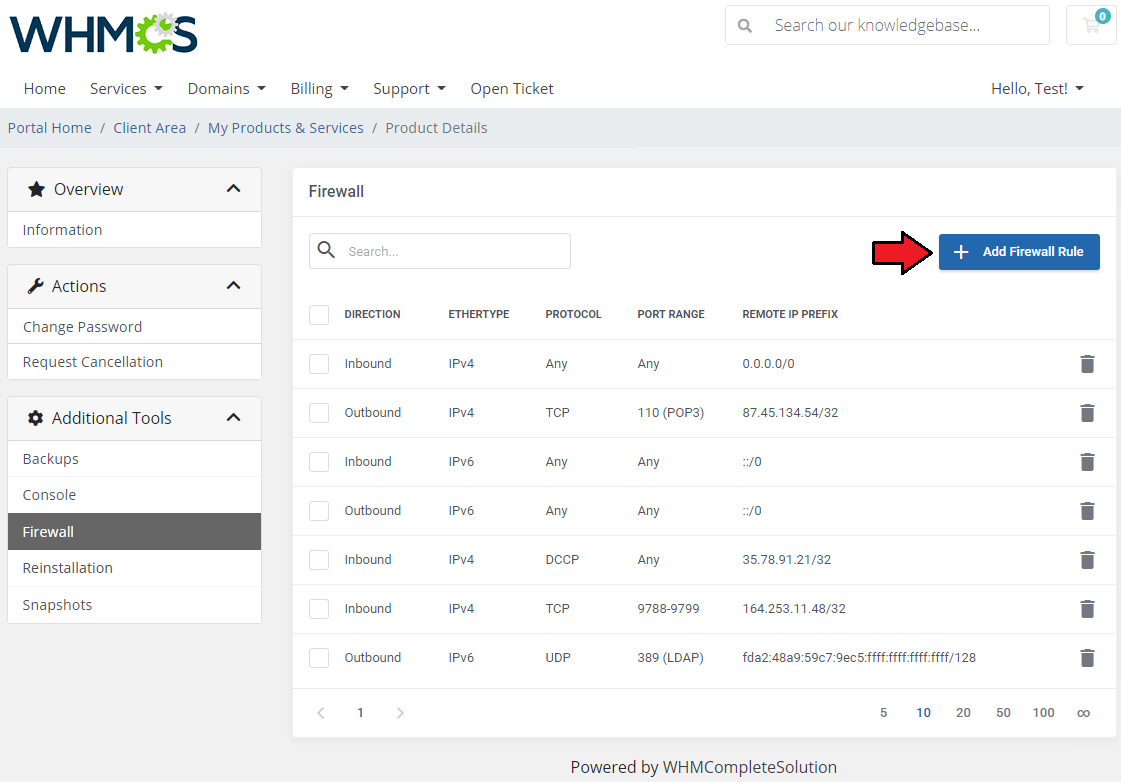
|
| Next, choose the rule type (TCP, UDP, ICMP or Other Protocols), direction (inbound or outbound) and ether type (IPv4 or IPv6). Depending on the port you choose, you will be able to add a rule for a single port only, a range of ports or all ports at once. You can also select one of the predefined ports or use a custom one. Finally, provide a single IP address or specify the range of addresses using the CIDR format (e.g. 10.10.10.1/24). Press 'Confirm' when ready. |
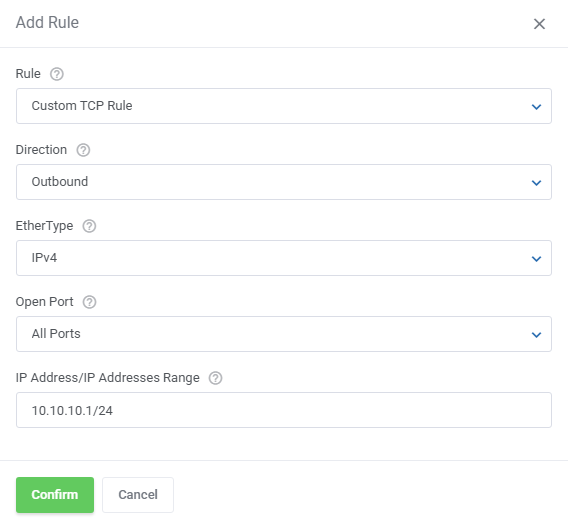
|
Snapshots
| Creating snapshots allows customers to quickly restore any changes to a virtual machine in case of any problems. Clients can create as many snapshots as they are allowed by the admin in the product configuration or chosen in the configurable option. Once the shutter has been created, the customer can restore it, change its description or delete it. |
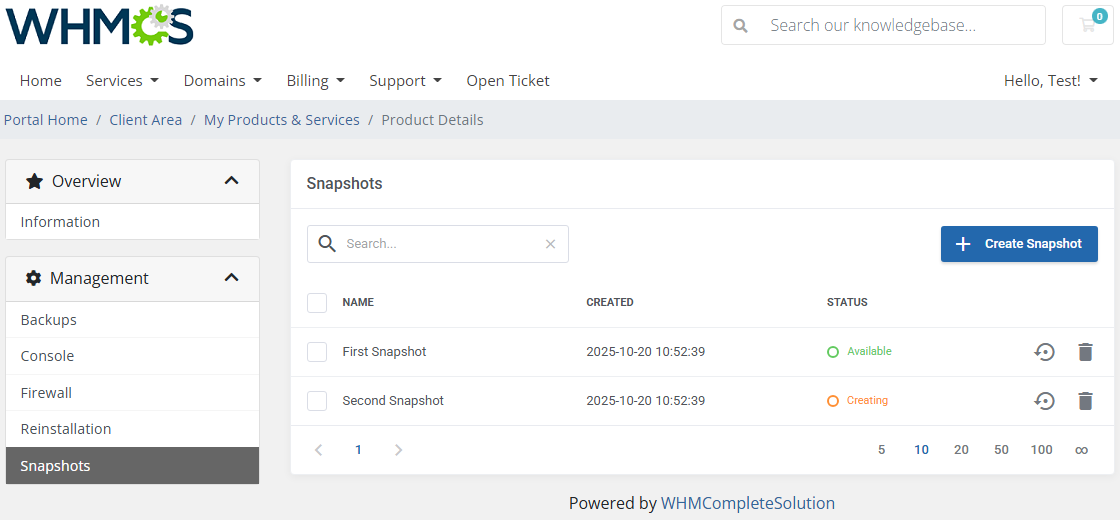
|
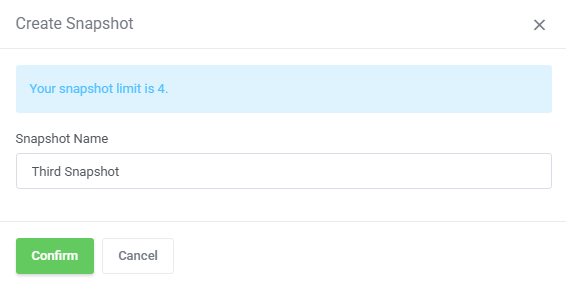
| After pressing the 'Create Snapshot' button, the new window will pop up along with your limit number and the possibility to specify the snapshot name. Please note that taking a new snapshot may take a while to process. |
|
Network Configuration Cases
| OpenStack VPS & Cloud For WHMCS allows you to set up two types of network. The first one is a network without a floating IP address. |

|
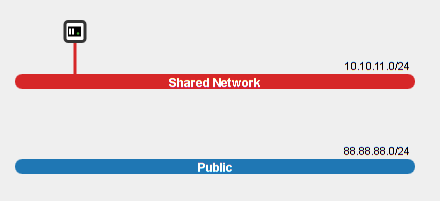
| The second type of network is the network with a floating IP address. Select 'Shared Network' as 'Fixed Network' and 'Public' as 'Floating Network' . |
|
Configurable Options
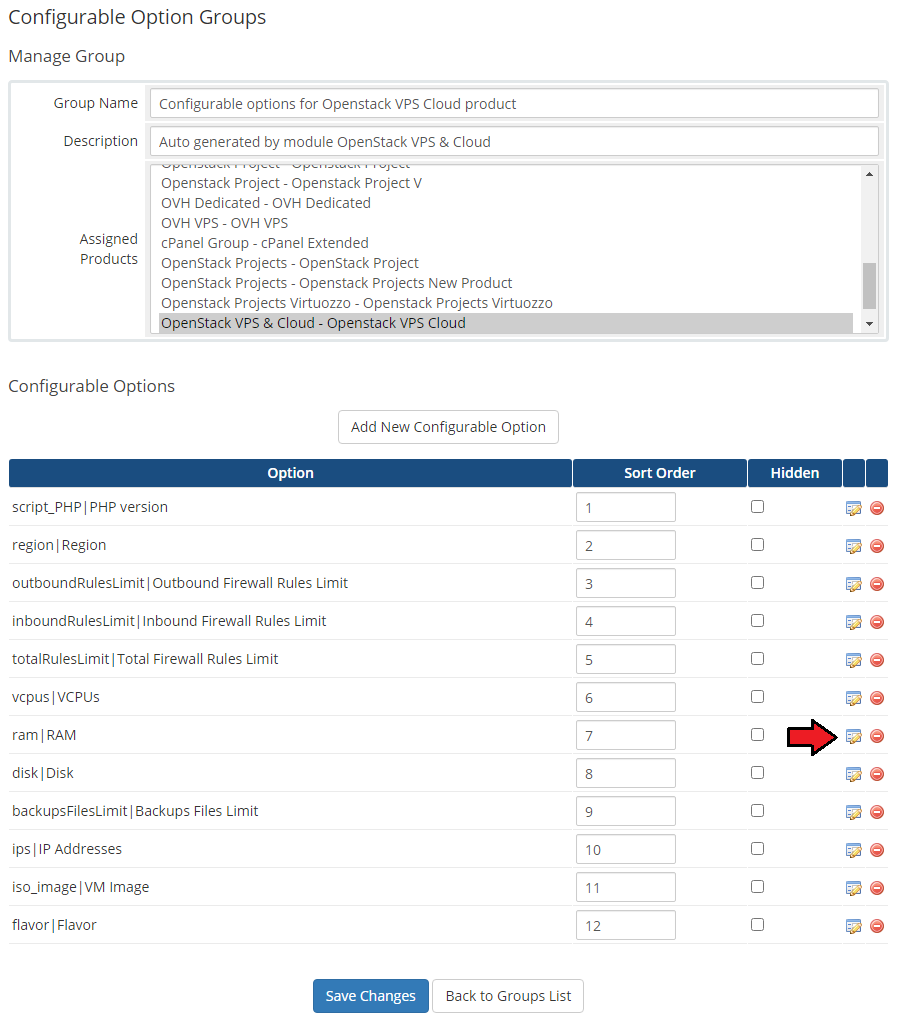
| In case that standard configuration does not meet your needs, you can adjust it through configurable options. To do so, go to 'Setup' → 'Products/Services' → 'Configurable Option' and press the edit button next to a configurable option used by your product. |

|
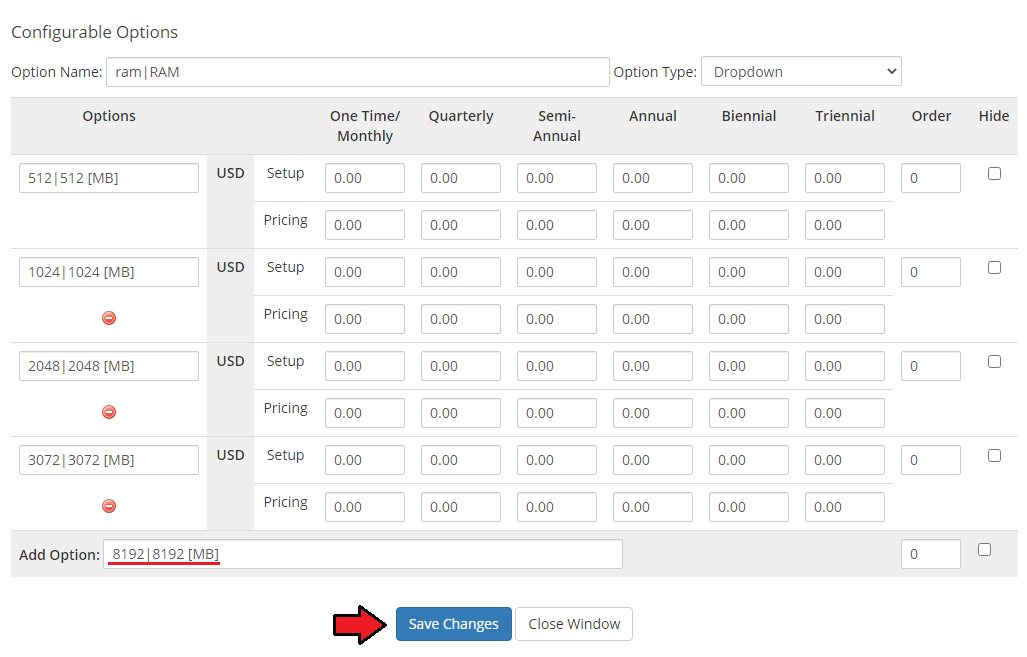
| Here you can view the products that this configurable option group is assigned to. Now we will show you how to edit options. Let's say that you want to add an option to order VPS with 8GB (8192 MB) RAM. |
|
| You will see a popup window, so make sure that your browser will not block it. To add a new option, enter it in a textbox under all other options. If you want to replace it with an option you currently have, simply edit its text box. |
|
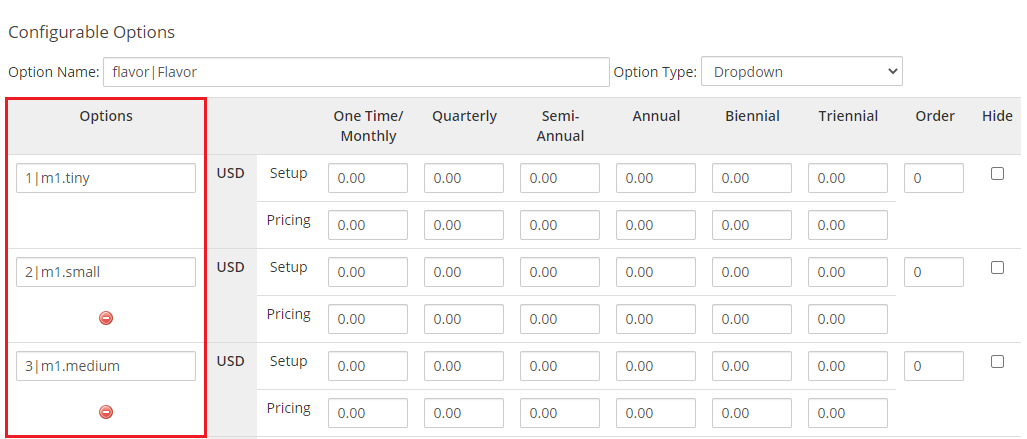
| Please remember that names of 'Options' for configurable options such as 'Flavor' , 'Network' as well as 'Image' should NOT be modified in WHMCS. These names should remain the same as in your OpenStack panel. |
|
Tips
| 1. The module supports OpenStack providers that grant access to the OpenStack API on project admin level or higher. To ensure proper operation, use an account with the necessary rights to perform actions through the API. For more details, see the OpenStack API documentation. |
| 2. Due to some requests may take time to be completed, we implemented 'Scheduled Tasks' . Tasks visible at 'Scheduled Tasks' are subsequently performed by a cron job. |
| 3. Important: module has to use admin endpoints instead of public endpoints. In a properly configured OpenStack server, wget from WHMCS server should be able to get any data from any admin endpoint. wget openstack:9292 --2014-03-31 09:35:24-- http://openstack:9292/ Resolving openstack(openstack)... 192.168.1.222 Connecting to openstack(openstack)|192.168.1.222|:9292... connected. HTTP request sent, awaiting response... 300 Multiple Choices Length: 520 [application/json] Saving to: `index.html' 100%[==========================================================>] 520 --.-K/s in 0s 2014-03-31 09:35:24 (118 MB/s) - `index.html' saved [520/520] wget openstack:8777 --2014-03-31 09:41:05-- http://openstack:8777/ Resolving openstack(openstack)... 192.168.1.222 Connecting to openstack(openstack)|192.168.1.222|:8777... connected. HTTP request sent, awaiting response... 401 Unauthorized Authorization failed. |
| 4. A primary IP address is always assigned by the OpenStack server when a VM is created. Therefore, if you decide to order 2 IP addresses, then 3 addresses will be assigned. The primary one and the two additionally ordered. If you wish only one IP address to be assigned to a single product, please set the filed 'Default Number Of IP Addresses' to '0' or leave it empty in the product's 'Module Settings'. |
| 5. 'Scheduled Backups' functionality is available also for VPS using volumens since 2.0.0 module version and later. |
| 6. How to set up a password to a VM: When creating a VM:
When resetting a VM:
|
7. How to set up the username based on the used image:
image name (use name displayed in the databse): 'newUsername' For example: ca6628a6-f627-480f-8aeb-07fdc372712a: 'cirros' Take a look at the screen to see how an exemplary, correctly modified file content might look like: |

|
Update Instructions
| An essential guidance through the process of updating the module is offered here.
|
Migration To Version 3.X
| The migration process from version 2.X. to 3.X is fully automated. You only need to follow the steps described in the following article: Update Guide. All your existing settings, products, and client data will be preserved during the update. 1. Make sure all tasks are completed. php -q /YOUR_WHMCS/modules/servers/OpenStackVpsCloud/cron/cron.php upgrade run 3.0.0 6. After a successful migration, run the php -q /YOUR_WHMCS/modules/servers/OpenStackVpsCloud/cron/cron.php synchronize:networks |
Upgrade Guide
| Seeking a solution that offers greater flexibility, customization tailored to your precise needs, and unrestricted availability? There is an option that not only proves to be cost-effective in the long run but also includes prioritized support services, making it a truly valuable investment. Opt for the Open Source version of your OpenStack VPS & Cloud For WHMCS module to unlock these benefits. Follow a comprehensive guide covering the transition process, the advantages it brings, and step-by-step instructions on what to do next after the order has been successfully finalized. |
Common Problems
| 1. When you have problems with connection, check whether your SELinux or firewall does not block ports. |
2. In case of persisting connection problems, please make sure you have the following ports open:
8774, 35357, 9292, 5000, 8777, 9696, 8776 |
| 3. If you come across an error with downloading endpoints during the server configuration process, please save the incomplete configuration, refresh a page and then try to finish your server configuration again. |
4. In case you encounter any issues with the cloud-int script or it seems not to be working please follow the below steps:
cloud-init --debug init |
| 5. If you come across the "This flavor - flavor_name_or_id - is not available in the region region_name." error when creating a VM, you should refresh the server configuration page and update Configurable Options. If this error is still occurring, please make sure that you have the same flavor names set for all regions. |
| 6. If you encounter a connection error in the module settings: 'Error:Connection Error: No route to host (Action: GET https://compute-api.svc.vstoragedomain.:8784/v2.1/5dcda23cb9bd4718b32610bbe18a1382/os-availability-zone). Check WHMCS module log for more information' Please make sure the API IP address is public or there is a domain setup. For more details please refer to the official Virtuozzo Hybrid Infrastructure documentation. |