Zimbra Email For WHMCS
(→About Zimbra Email For WHMCS) |
(→Upgrade Guide) |
||
| (81 intermediate revisions by 7 users not shown) | |||
| Line 1: | Line 1: | ||
<meta name="keywords" content="zimbra email for whmcs, zimbra email configuration, zimbra email management, zimbra email installation, zimbra email common problems, about zimbra email, zimbra email documentation, zimbra email faq, zimbra email help, zimbra email guide, modulesgarden zimbra email, zimbra email wiki, zimbra email tutorial, zimbra email tips, zimbra module wiki"></meta> | <meta name="keywords" content="zimbra email for whmcs, zimbra email configuration, zimbra email management, zimbra email installation, zimbra email common problems, about zimbra email, zimbra email documentation, zimbra email faq, zimbra email help, zimbra email guide, modulesgarden zimbra email, zimbra email wiki, zimbra email tutorial, zimbra email tips, zimbra module wiki"></meta> | ||
<meta name="description" content="ModulesGarden Wiki Contains All The Information You Need About The Zimbra Email For WHMCS Module."></meta> | <meta name="description" content="ModulesGarden Wiki Contains All The Information You Need About The Zimbra Email For WHMCS Module."></meta> | ||
| + | |||
=About [https://www.modulesgarden.com/products/whmcs/zimbra-email Zimbra Email For WHMCS]= | =About [https://www.modulesgarden.com/products/whmcs/zimbra-email Zimbra Email For WHMCS]= | ||
{| | {| | ||
|style="padding: 10px 0px 10px 0px;"|'''Zimbra Email For WHMCS''' is a module which allows your customers to manage email accounts of your domain directly in WHMCS.<br /> | |style="padding: 10px 0px 10px 0px;"|'''Zimbra Email For WHMCS''' is a module which allows your customers to manage email accounts of your domain directly in WHMCS.<br /> | ||
| − | Your clients will be able to conveniently manage mailboxes, aliases and quickly | + | Your clients will be able to conveniently manage mailboxes, email and domain aliases and quickly move to their webmails.<br /> |
Our product is simple in use and offers everything you need to conveniently manage Zimbra accounts. | Our product is simple in use and offers everything you need to conveniently manage Zimbra accounts. | ||
|} | |} | ||
<!-- fixed --> | <!-- fixed --> | ||
| + | |||
*'''Admin Area Features:''' | *'''Admin Area Features:''' | ||
{| | {| | ||
| Line 22: | Line 24: | ||
|} | |} | ||
{| | {| | ||
| − | |style="padding: 0px 0px 0px 30px;"|✔ Log In To | + | |style="padding: 0px 0px 0px 30px;"|✔ Go To Zimbra Webmail |
| + | |} | ||
| + | {| | ||
| + | |style="padding: 0px 0px 0px 30px;"|✔ Define Products Configuration: | ||
| + | |} | ||
| + | {| | ||
| + | |style="padding: 0px 0px 0px 45px;"|✔ Set Zimbra Account Settings | ||
| + | |} | ||
| + | {| | ||
| + | |style="padding: 0px 0px 0px 45px;"|✔ Use Class Of Service As: | ||
| + | |} | ||
| + | {| | ||
| + | |style="padding: 0px 0px 0px 60px;"|✔ Fixed Choice | ||
| + | |} | ||
| + | {| | ||
| + | |style="padding: 0px 0px 0px 60px;"|✔ Allowed Single Choice By Clients | ||
| + | |} | ||
| + | {| | ||
| + | |style="padding: 0px 0px 0px 60px;"|✔ Allowed Multiple Choices Of Quota Per Account | ||
| + | |} | ||
| + | {| | ||
| + | |style="padding: 0px 0px 0px 60px;"|✔ Custom Settings | ||
| + | |} | ||
| + | {| | ||
| + | |style="padding: 0px 0px 0px 45px;"|✔ Select Essential Features | ||
| + | |} | ||
| + | {| | ||
| + | |style="padding: 0px 0px 0px 45px;"|✔ Select General Features | ||
| + | |} | ||
| + | {| | ||
| + | |style="padding: 0px 0px 0px 45px;"|✔ Select Mail Service Features | ||
| + | |} | ||
| + | {| | ||
| + | |style="padding: 0px 0px 0px 45px;"|✔ Select Contact/Calendar/Search/S/MIME Features | ||
| + | |} | ||
| + | {| | ||
| + | |style="padding: 0px 0px 0px 45px;"|✔ Set Requirements For Passwords | ||
| + | |} | ||
| + | {| | ||
| + | |style="padding: 0px 0px 0px 45px;"|✔ Select Access To Client Area Features | ||
| + | |} | ||
| + | {| | ||
| + | |style="padding: 0px 0px 0px 45px;"|✔ Generate Default Configurable Options | ||
| + | |} | ||
| + | {| | ||
| + | |style="padding: 0px 0px 0px 45px;"|✔ Enable Metric Billing | ||
| + | |} | ||
| + | {| | ||
| + | |style="padding: 0px 0px 10px 30px;"|✔ Log In To Zimbra Administrator Panel On Click | ||
| + | |} | ||
| + | |||
| + | *'''Client Area Features:''' | ||
| + | {| | ||
| + | |style="padding: 10px 0px 0px 30px;"|✔ Manage Email Accounts: | ||
| + | |} | ||
| + | {| | ||
| + | |style="padding: 0px 0px 0px 45px;"|✔ Create/Edit/Delete | ||
| + | |} | ||
| + | {| | ||
| + | |style="padding: 0px 0px 0px 45px;"|✔ View Creation/Last Login Date | ||
| + | |} | ||
| + | {| | ||
| + | |style="padding: 0px 0px 0px 45px;"|✔ View Mailbox Quota | ||
|} | |} | ||
{| | {| | ||
| − | |style="padding: 0px 0px 0px | + | |style="padding: 0px 0px 0px 45px;"|✔ View/Change Mailbox Status |
|} | |} | ||
{| | {| | ||
| − | |style="padding: 0px 0px | + | |style="padding: 0px 0px 0px 45px;"|✔ Change Account Password |
|} | |} | ||
| − | |||
{| | {| | ||
| − | |style="padding: | + | |style="padding: 0px 0px 0px 45px;"|✔ Log In To Mailbox |
|} | |} | ||
{| | {| | ||
| − | |style="padding: 0px 0px 0px 30px;"|✔ Manage Aliases | + | |style="padding: 0px 0px 0px 30px;"|✔ Manage Email Aliases |
|} | |} | ||
{| | {| | ||
| Line 41: | Line 104: | ||
|} | |} | ||
{| | {| | ||
| − | |style="padding: 0px 0px 0px 30px;"|✔ | + | |style="padding: 0px 0px 0px 30px;"|✔ Manage Domain Aliases |
|} | |} | ||
{| | {| | ||
| − | |style="padding: 0px 0px 0px 30px;"|✔ | + | |style="padding: 0px 0px 0px 30px;"|✔ Upgrade / Downgrade Account |
|} | |} | ||
{| | {| | ||
| − | |style="padding: 0px 0px 10px 30px;"|✔ | + | |style="padding: 0px 0px 10px 30px;"|✔ Go To Zimbra Webmail |
|} | |} | ||
| + | |||
*'''Configurable Options:''' | *'''Configurable Options:''' | ||
{| | {| | ||
| − | |style="padding: 10px 0px 0px 30px;"|✔ Accounts | + | |style="padding: 10px 0px 0px 30px;"|✔ Email Accounts Limit |
|} | |} | ||
{| | {| | ||
| − | |style="padding: 0px 0px 0px 30px;"|✔ Account Size | + | |style="padding: 0px 0px 0px 30px;"|✔ Email Account Size |
|} | |} | ||
{| | {| | ||
| − | |style="padding: 0px 0px 0px 30px;"|✔ Aliases Limit | + | |style="padding: 0px 0px 0px 30px;"|✔ Email Aliases Limit |
|} | |} | ||
{| | {| | ||
| Line 63: | Line 127: | ||
|} | |} | ||
{| | {| | ||
| − | |style="padding: 0px 0px | + | |style="padding: 0px 0px 0px 30px;"|✔ Domain Aliases Limit |
|} | |} | ||
| + | {| | ||
| + | |style="padding: 0px 0px 10px 30px;"|✔ Class Of Service | ||
| + | |} | ||
| + | |||
*'''General Info:''' | *'''General Info:''' | ||
{| | {| | ||
| Line 70: | Line 138: | ||
|} | |} | ||
{| | {| | ||
| − | |style="padding: 0px 0px 0px 30px;"|✔ Integrated With | + | |style="padding: 0px 0px 0px 30px;"|✔ Integrated With [https://www.modulesgarden.com/products/whmcs/advanced-billing Advanced Billing For WHMCS] - Actual Server Resource Usage Billing |
| + | |} | ||
| + | {| | ||
| + | |style="padding: 0px 0px 0px 30px;"|✔ Integrated With [https://www.modulesgarden.com/products/whmcs/server-allocator Server Allocator For WHMCS] - Automatic Assignment Of Most Suitable Servers To Products | ||
|} | |} | ||
{| | {| | ||
| Line 76: | Line 147: | ||
|} | |} | ||
{| | {| | ||
| − | |style="padding: 0px 0px 0px 30px;"|✔ Supports Zimbra 8.5.0 | + | |style="padding: 0px 0px 0px 30px;"|✔ Supports Zimbra 8.5.0 And Later |
|} | |} | ||
{| | {| | ||
| − | |style="padding: 0px 0px 0px 30px;"|✔ Supports PHP | + | |style="padding: 0px 0px 0px 30px;"|✔ Supports PHP 8.1 Back To PHP 7.4 |
|} | |} | ||
{| | {| | ||
| − | |style="padding: 0px 0px 0px 30px;"|✔ Supports WHMCS | + | |style="padding: 0px 0px 0px 30px;"|✔ Supports WHMCS Metric Billing - Integration: Email Accounts, Email Aliases, Distribution Lists, Domain Aliases, Storage |
|} | |} | ||
{| | {| | ||
| − | |style="padding: 0px 0px 30px 30px;"|✔ Supports WHMCS | + | |style="padding: 0px 0px 0px 30px;"|✔ Supports WHMCS Server Sync Tool |
| + | |} | ||
| + | {| | ||
| + | |style="padding: 0px 0px 0px 30px;"|✔ Supports WHMCS Themes "Six", "Twenty-One" And "Lagom WHMCS Client Theme" | ||
| + | |} | ||
| + | {| | ||
| + | |style="padding: 0px 0px 0px 30px;"|✔ Supports WHMCS V8.8 Back To WHMCS V8.6 | ||
| + | |} | ||
| + | {| | ||
| + | |style="padding: 0px 0px 0px 30px;"|✔ Requires ionCube Loader V12 Or Later | ||
| + | |} | ||
| + | {| | ||
| + | |style="padding: 0px 0px 30px 30px;"|✔ Easy [https://www.docs.modulesgarden.com/How_To_Upgrade_WHMCS_Module Module Upgrade] To [https://www.modulesgarden.com/products/whmcs/zimbra#open-source-version Open Source Version] | ||
|} | |} | ||
=Installation and Configuration= | =Installation and Configuration= | ||
{| | {| | ||
| − | |style="padding: 10px 0px 30px 15px;"|'''This tutorial will show you how to successfully install and configure Zimbra Email For WHMCS.'''<br /> | + | |style="padding: 10px 0px 30px 15px;"|'''This tutorial will show you how to successfully install and configure [https://www.modulesgarden.com/products/whmcs/zimbra-email Zimbra Email For WHMCS.]'''<br /> |
| − | We will guide you step by step through the whole installation process. | + | We will guide you step by step through the whole installation process.<br/> |
| + | |||
| + | '' '''Note:''' If you still use any of the module's previous versions '''prior to v2.X''', [https://www.docs.modulesgarden.com/Zimbra_Email_1.X_For_WHMCS follow these instructions].'' | ||
|} | |} | ||
==Installation== | ==Installation== | ||
| Line 98: | Line 183: | ||
|} | |} | ||
{| | {| | ||
| − | |style="padding: 0px 0px 20px 25px;"|[[File: | + | |style="padding: 0px 0px 20px 25px;"|[[File:ZE2_1.png]] |
| + | |} | ||
| + | {| | ||
| + | |style="padding: 0px 0px 15px 15px;"|'''2. In the downloaded file you might find one or two packages that support different PHP versions.'''<br/> | ||
| + | In the most recent versions of the module, you will find only one package that supports PHP 7.4 and later.<br/> <!-- If you need a package for the previous versions of PHP, please [https://www.modulesgarden.com/support/ticket/general-support contact our support]. --> | ||
| + | |} | ||
| + | {| | ||
| + | |style="padding: 0px 0px 20px 25px;"|[[File:PHP74_81.png]] | ||
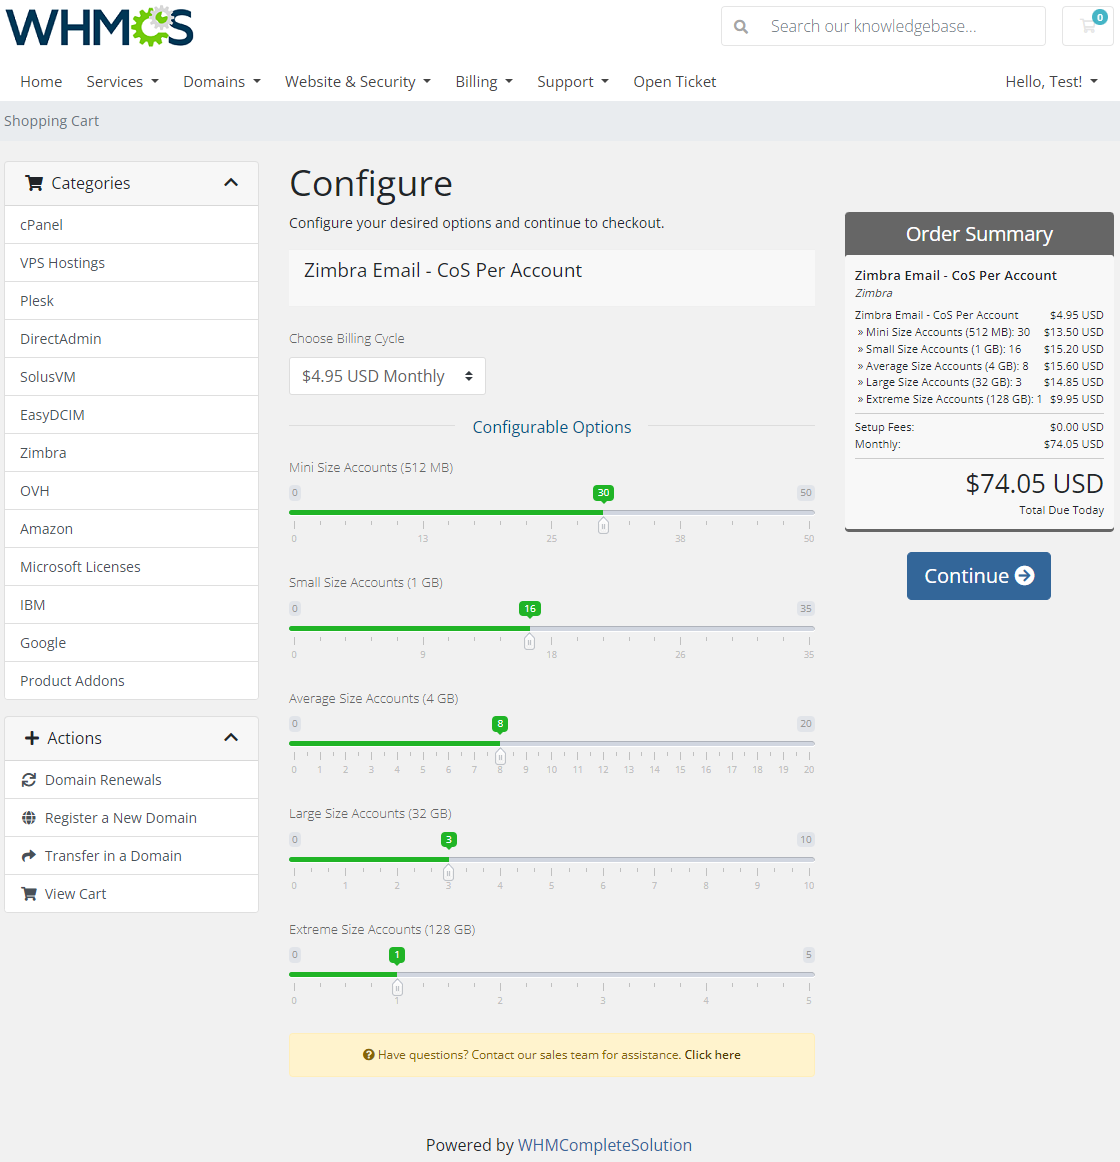
| + | |} | ||
| + | {| | ||
| + | |style="padding: 0px 0px 15px 15px;"|'''Previous updates of the module may contain two packages dedicated to various PHP versions.'''<br/> | ||
| + | The first one that supports PHP 5.6 up to PHP 7.3, and the second one addressed to PHP 7.4 up to PHP 8.1.<br/> | ||
| + | '''''Note:''' Keep in mind that PHP versions 5.6 up to 7.3 are no longer officially supported and their security issues are not fixed or released any more. Find more info [http://php.net/supported-versions.php here].'' | ||
|} | |} | ||
{| | {| | ||
| − | |style="padding: 0px 0px | + | |style="padding: 0px 0px 20px 25px;"|[[File:PHP56_74_81.png]] |
| − | + | ||
|} | |} | ||
{| | {| | ||
| − | |style="padding: 0px 0px | + | |style="padding: 0px 0px 10px 15px;"| <!-- '' '''Important''': This situation does not affect [https://www.modulesgarden.com/products/whmcs/zimbra#open-source-version '''the open source version'''] of this module which can be applied to any PHP from version 5.6 and later.''<br/>'' --> '''Note''': You can check the current PHP version in your WHMCS. To do so, proceed to ''' 'Utilities' → 'System' → 'PHP Info'.''' |
|} | |} | ||
{| | {| | ||
| − | |style="padding: 0px 0px 15px 15px;"|'''3. Extract the | + | |style="padding: 0px 0px 15px 15px;"|'''3. Extract the package and upload its content into the main WHMCS directory. <br/> |
| − | The content of | + | The content of the package to upload should look like this. |
|} | |} | ||
{| | {| | ||
| − | |style="padding: 0px 0px 20px 25px;"|[[File: | + | |style="padding: 0px 0px 20px 25px;"|[[File:ZE2_2_2.png]] |
|} | |} | ||
{| | {| | ||
| − | |style="padding: 0px 0px 15px 15px;"|'''4. When you install Zimbra Email For WHMCS for the first time you have to rename '' 'license_RENAME.php' '' file.'''<br /> | + | |style="padding: 0px 0px 15px 15px;"|'''4. When you install Zimbra Email For WHMCS for the first time, you have to rename the '' 'license_RENAME.php' '' file.'''<br /> |
| − | + | The file is located in '' 'modules/servers/zimbraEmail/license_RENAME.php'. '' Rename it from '' 'license_RENAME.php' '' to '' 'license.php'. '' | |
|} | |} | ||
{| | {| | ||
| − | |style="padding: 0px 0px 20px 25px;"|[[File: | + | |style="padding: 0px 0px 20px 25px;"|[[File:ZE2_3.png]] |
|} | |} | ||
{| | {| | ||
| − | |style="padding: 0px 0px 15px 15px;"|'''5. In order to configure your license key you have to edit | + | |style="padding: 0px 0px 15px 15px;"|'''5. In order to configure your license key you have to edit the previously renamed '' 'license.php' '' file.'''<br /> |
Enter your license key between quotation marks as presented on the following screen. You can find your license key in our client area → '' 'My Products'. '' | Enter your license key between quotation marks as presented on the following screen. You can find your license key in our client area → '' 'My Products'. '' | ||
|} | |} | ||
{| | {| | ||
| − | |style="padding: 0px 0px 30px 25px;"|[[File: | + | |style="padding: 0px 0px 20px 25px;"|[[File:ZE2_4.png]] |
| + | |} | ||
| + | {| | ||
| + | |style="padding: 0px 0px 15px 15px;"|'''6. The last step is to set up the '' 'storage' '' folder as recursively writable.'''<br /> | ||
| + | This folder is available at '' '/yourWHMCS/modules/servers/zimbraEmail/'. '' | ||
| + | |} | ||
| + | {| | ||
| + | |style="padding: 0px 0px 30px 25px;"|[[File:ZE2_4_1.png]] | ||
|} | |} | ||
==Server Configuration== | ==Server Configuration== | ||
{| | {| | ||
| − | |style="padding: 10px 0px 15px 15px;"|''' | + | |style="padding: 10px 0px 15px 15px;"|'''7. Now let's configure a new product. Log in to your WHMCS, press '' 'Setup' '' → '' 'Products/Services' '' → '' 'Servers'. '' '''<br/> |
| − | Afterwards press '' 'Add New Server'. '' | + | Afterwards, press '' 'Add New Server'. '' |
|} | |} | ||
{| | {| | ||
| − | |style="padding: 0px 0px 20px 25px;"|[[File: | + | |style="padding: 0px 0px 20px 25px;"|[[File:ZE2_4_2.png]] |
|} | |} | ||
{| | {| | ||
| − | |style="padding: 0px 0px 15px 15px;"|''' | + | |style="padding: 0px 0px 15px 15px;"|'''8. Next, enter your server name and Zimbra server hostname or IP address. <br /> |
| − | + | Choose '' 'ZimbraEmail' '' from a dropdown menu and type in your username and password used to log in to Zimbra server.'''<br /> | |
| − | Keep in mind that value of client area button '' ' | + | Select '' 'Secure' '' if you use SSL for connection. Next, test your connection and press '' 'Save Changes' '' if successful.<br /> |
| − | Here you can also provide other server details like nameservers or maximum number of accounts. | + | |
| + | Keep in mind that value of client area button '' 'Go To Webmail' '' is taken from the '' 'Hostname' '' field. If the field is empty, it is taken from the '' 'IP Address' '' field.<br /> | ||
| + | Here you can also provide other server details like nameservers or maximum number of accounts.<br/> | ||
| + | Optionally, you may also set custom ports using the '' 'Override with Custom Port' '' field. Otherwise the default '''7071''' will be used. | ||
|} | |} | ||
{| | {| | ||
| − | |style="padding: 0px 0px 20px 25px;"|[[File: | + | |style="padding: 0px 0px 20px 25px;"|[[File:ZE2_5.png]] |
|} | |} | ||
{| | {| | ||
| − | |style="padding: 0px 0px 15px 15px;"|''' | + | |style="padding: 0px 0px 15px 15px;"|'''9. After you configure your server correctly, you will see the following screen.'''<br /> |
Now you need to create a new group for your server. For that purpose press '' 'Create New Group'. '' | Now you need to create a new group for your server. For that purpose press '' 'Create New Group'. '' | ||
|} | |} | ||
{| | {| | ||
| − | |style="padding: 0px 0px 20px 25px;"|[[File: | + | |style="padding: 0px 0px 20px 25px;"|[[File:ZE2_6.png]] |
|} | |} | ||
{| | {| | ||
| − | |style="padding: 0px 0px 20px 15px;"|''' | + | |style="padding: 0px 0px 20px 15px;"|'''10. Enter name, click on your previously created server, press '' 'Add' '' then '' 'Save Changes'. ''''' |
|} | |} | ||
{| | {| | ||
| − | |style="padding: 0px 0px 30px 25px;"|[[File: | + | |style="padding: 0px 0px 30px 25px;"|[[File:ZE2_7.png]] |
|} | |} | ||
| + | |||
==Product Configuration== | ==Product Configuration== | ||
{| | {| | ||
| − | |style="padding: 10px 0px 15px 15px;"|''' | + | |style="padding: 10px 0px 15px 15px;"|'''11. In order to create and configure product, click on '' 'Setup' '' → '' 'Products/Services' '' → '' 'Products/Services'. '''''<br /> |
| − | If you do not have a product group, click on '' 'Create a New Group'. '' If you do, simply move to step | + | If you do not have a product group, click on '' 'Create a New Group'. '' If you do, simply move to step 12. |
|} | |} | ||
{| | {| | ||
| − | |style="padding: 0px 0px 20px 25px;"|[[File: | + | |style="padding: 0px 0px 20px 25px;"|[[File:ZE2_7_1.png]] |
|} | |} | ||
{| | {| | ||
| − | |style="padding: 0px 0px 20px 15px;"|''' | + | |style="padding: 0px 0px 20px 15px;"|'''12. Enter a product group name and press '' 'Create Group'. ''''' |
|} | |} | ||
{| | {| | ||
| − | |style="padding: 0px 0px 20px 25px;"|[[File: | + | |style="padding: 0px 0px 20px 25px;"|[[File:ZE2_8.png]] |
|} | |} | ||
{| | {| | ||
| − | |style="padding: 0px 0px 15px 15px;"|''' | + | |style="padding: 0px 0px 15px 15px;"|'''13. When you have a product group, you can create your product and assign it to Zimbra Email. If you already have a product, go to step 14.'''<br /> |
To create a product click on '' 'Create a New Product'. '' | To create a product click on '' 'Create a New Product'. '' | ||
|} | |} | ||
{| | {| | ||
| − | |style="padding: 0px 0px 20px 25px;"|[[File: | + | |style="padding: 0px 0px 20px 25px;"|[[File:ZE2_9.png]] |
|} | |} | ||
{| | {| | ||
| − | |style="padding: 0px 0px 20px 15px;"|''' | + | |style="padding: 0px 0px 20px 15px;"|'''14. Afterwards, choose your product type and product group from dropdown menus, enter your product name and press '' 'Continue'. ''''' |
|} | |} | ||
{| | {| | ||
| − | |style="padding: 0px 0px 20px 25px;"|[[File: | + | |style="padding: 0px 0px 20px 25px;"|[[File:ZE2_10.png]] |
|} | |} | ||
{| | {| | ||
| − | |style="padding: 0px 0px 20px 15px;"|''' | + | |style="padding: 0px 0px 20px 15px;"|'''15. Now, go to the '' 'Module Settings' '' section, and choose the previously created server group from dropdown menu.''' |
|} | |} | ||
{| | {| | ||
| − | |style="padding: 0px 0px 20px 25px;"|[[File: | + | |style="padding: 0px 0px 20px 25px;"|[[File:ZE2_11.png]] |
|} | |} | ||
{| | {| | ||
| − | |style="padding: 0px 0px 15px 15px;"|''' | + | |style="padding: 0px 0px 15px 15px;"|'''16. Afterwards, define settings of the module and press '' 'Save Changes'.'' '''<br /> |
| − | ''Note 1: If you choose 'Use Custom Settings' from ' | + | '''''Note 1:''' If you choose 'Use Custom Settings' from the 'Class Of Service Name' dropdown menu, you can define your own set of user permissions using sections below.''<br/> |
| − | ''Note 2: If you choose 'Allow clients to choose | + | '''''Note 2:''' If you choose 'Allow clients to choose Class Of Service', additional configurable options can also be generated after saving product changes.<br/> Clients will be allowed to set Class Of Service while ordering your product.'' |
|} | |} | ||
{| | {| | ||
| − | |style="padding: 0px 0px 20px 25px;"|[[File: | + | |style="padding: 0px 0px 20px 25px;"|[[File:ZE2_12.png]] |
|} | |} | ||
{| | {| | ||
| − | |style="padding: 0px 0px 15px 15px;"|''' | + | |style="padding: 0px 0px 15px 15px;"|'''17. If you select '' 'Allow Clients to choose Class Of Service Quota Per Account' '' in Class Of Service Name, the new 'Class Of Service For Mailbox Accounts' settings will appear.'''<br /> |
| + | Define the number of the accounts limit for each available size. Your clients will be allowed to order a product with limits defined in configurable options and create mailboxes within the defined quota size. | ||
| + | <br/> | ||
| + | '' '''Note:''' The new 'Configurable Options' based on the above settings will be also available to generate, but they will appear only '''after''' saving product changes first!'' | ||
| + | |} | ||
| + | {| | ||
| + | |style="padding: 0px 0px 20px 25px;"|[[File:ZE2_12_1.png]] | ||
| + | |} | ||
| + | {| | ||
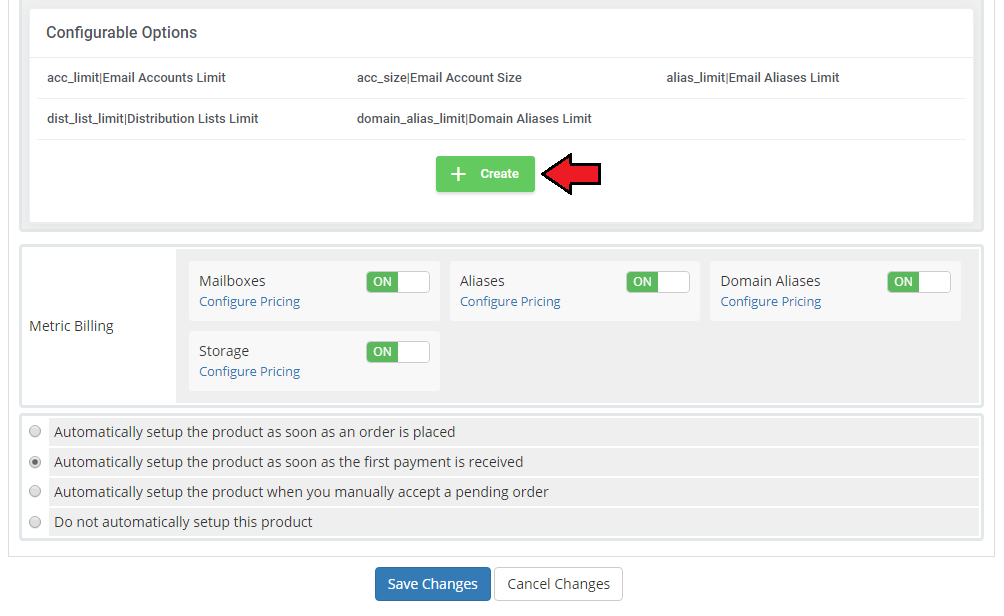
| + | |style="padding: 0px 0px 15px 15px;"|'''18. Additionally, you can replace the module static limit with dynamic one in the form of configurable options.<br /> | ||
Press '' 'Generate Default' '' near '' 'Configurable Options' '' to generate default set of them.<br /> | Press '' 'Generate Default' '' near '' 'Configurable Options' '' to generate default set of them.<br /> | ||
| − | More about management of configurable options can be found [ | + | More about management of configurable options can be found [https://www.docs.modulesgarden.com/General#How_To_Use_Configurable_Options here]. |
|} | |} | ||
{| | {| | ||
| − | |style="padding: 0px 0px 20px 25px;"|[[File: | + | |style="padding: 0px 0px 20px 25px;"|[[File:ZE2_13.png]] |
|} | |} | ||
{| | {| | ||
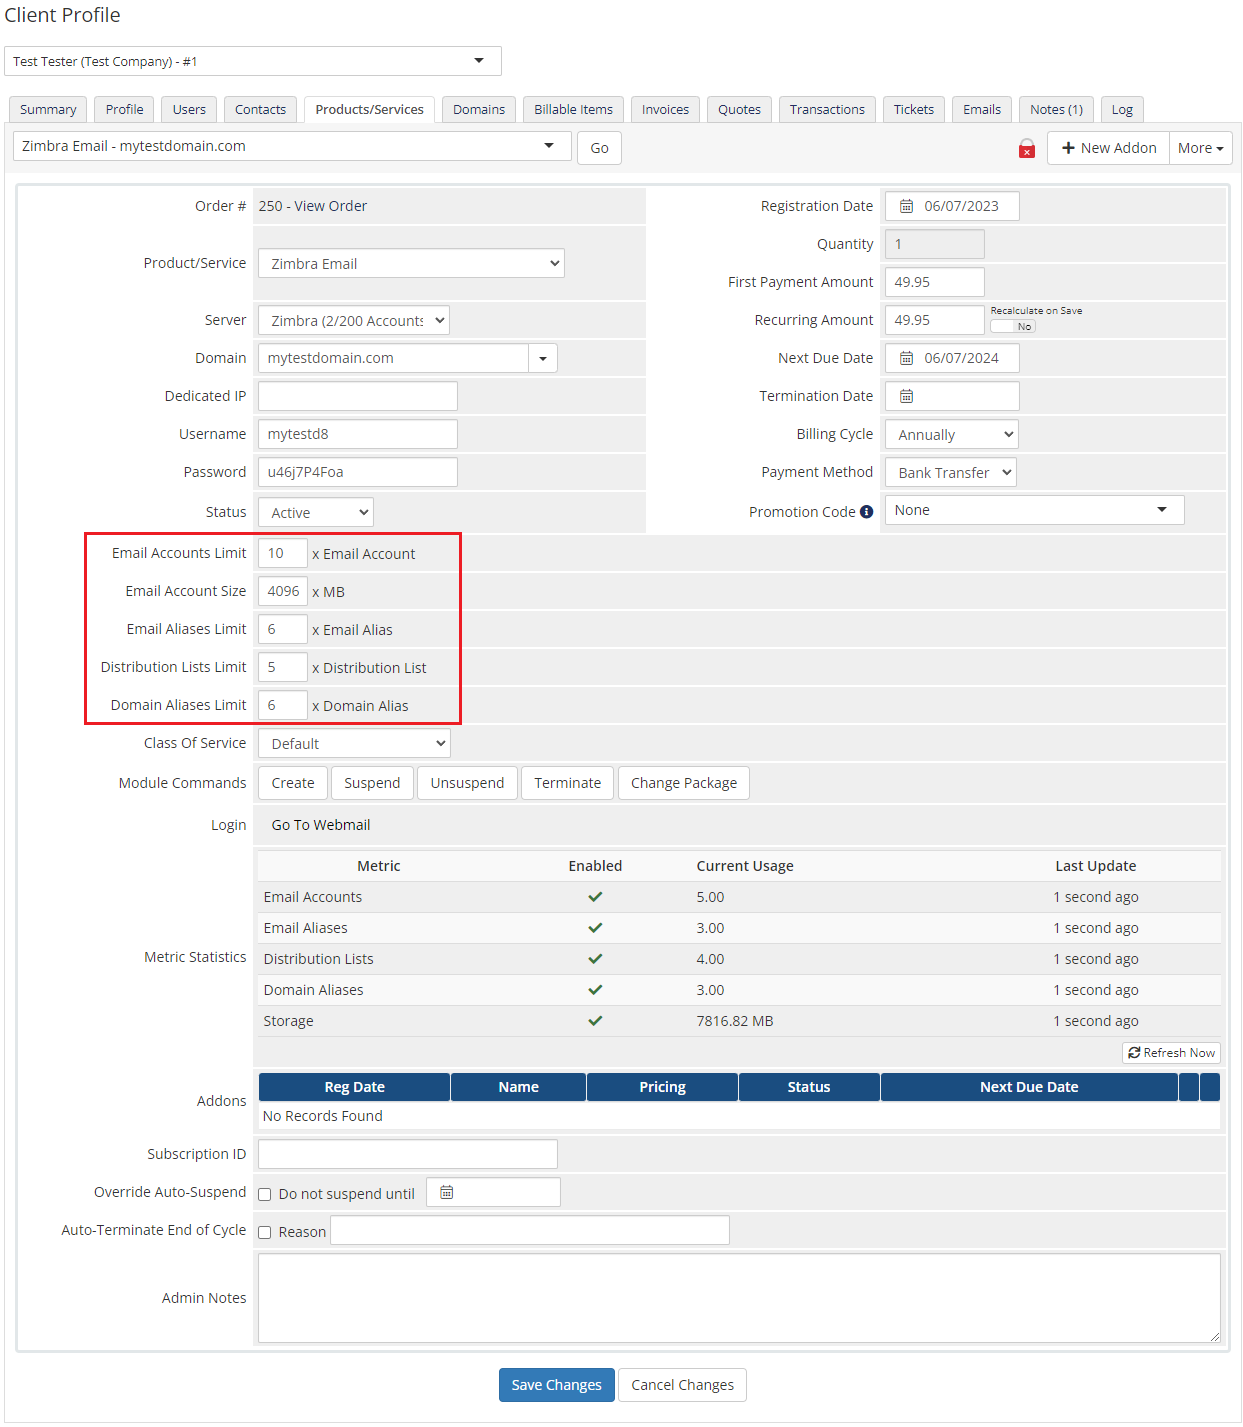
| − | |style="padding: 0px 0px 20px 15px;"|This is | + | |style="padding: 0px 0px 20px 15px;"|This is what a properly created and configured product should look like from the administrator site. |
|} | |} | ||
{| | {| | ||
| − | |style="padding: 0px 0px 30px 25px;"|[[File: | + | |style="padding: 0px 0px 30px 25px;"|[[File:ZE2_14.png]] |
|} | |} | ||
| Line 221: | Line 337: | ||
==Admin Area== | ==Admin Area== | ||
{| | {| | ||
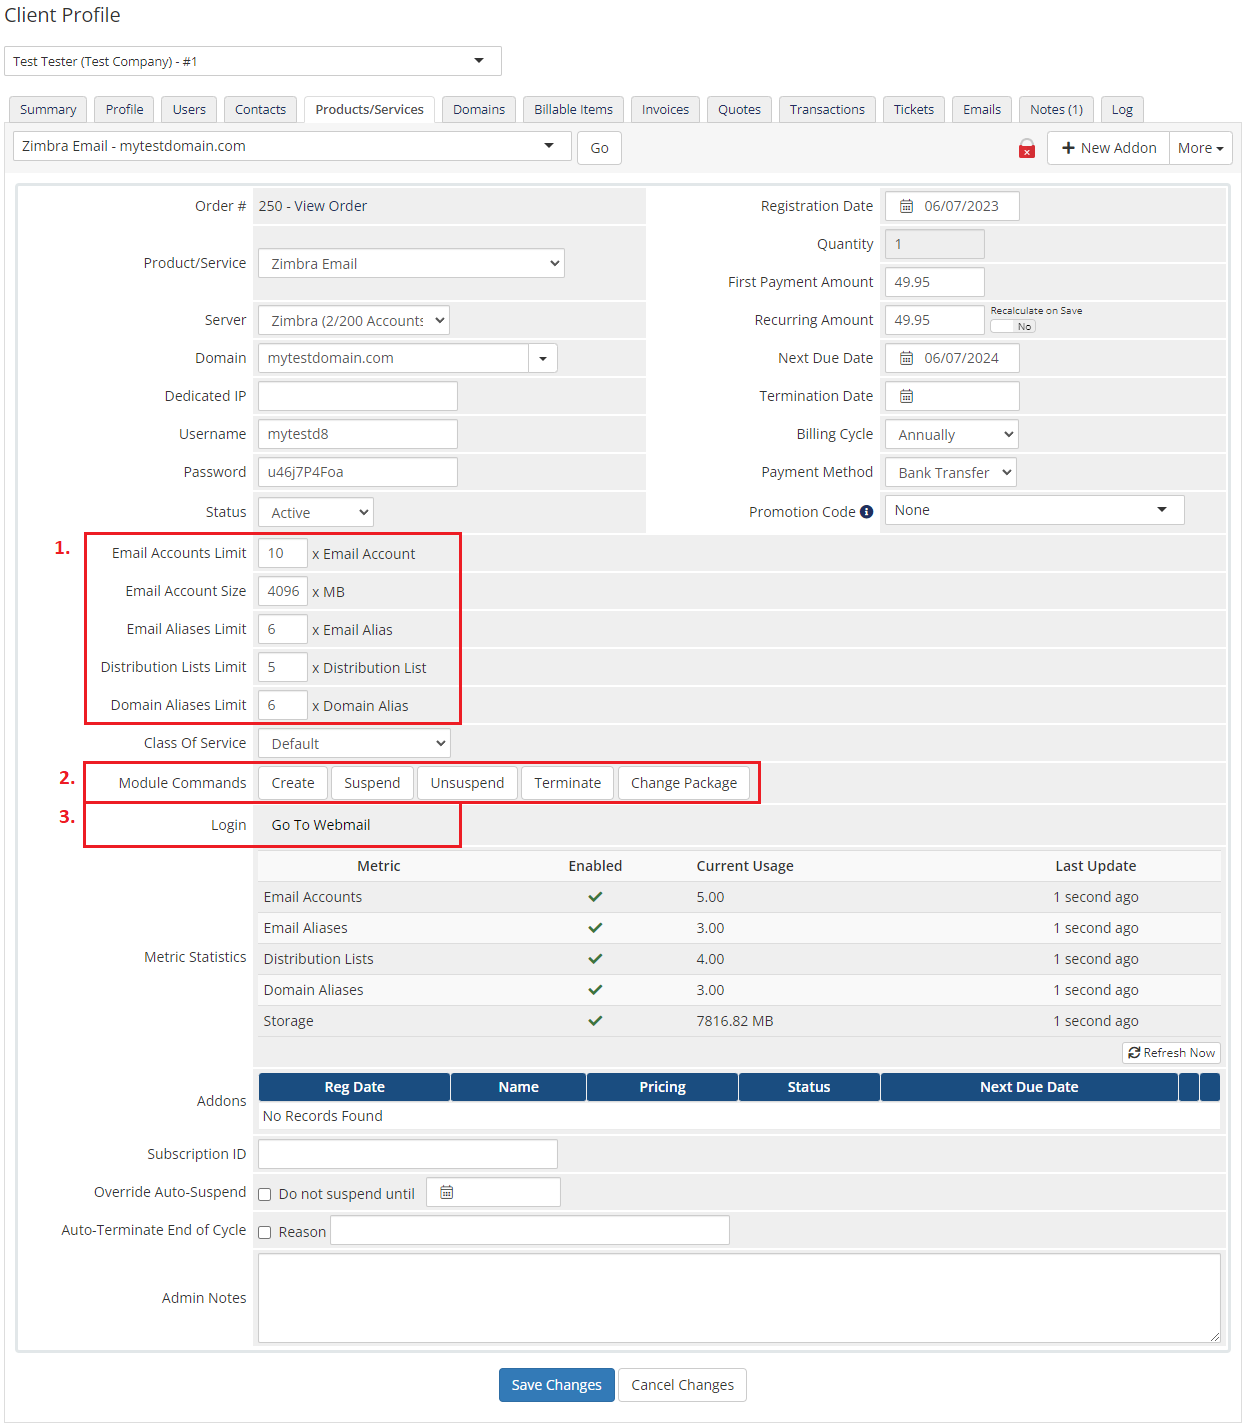
| − | |style="padding: 10px 0px | + | |style="padding: 10px 0px 15px 15px;"|Zimbra Email product management site: |
| + | #Go To Webmail | ||
#Edit configurable options values - available options depend on configuration in '' 'Module Settings' '' | #Edit configurable options values - available options depend on configuration in '' 'Module Settings' '' | ||
#Module Commands: | #Module Commands: | ||
| Line 228: | Line 345: | ||
#*Terminate | #*Terminate | ||
#*Change Package | #*Change Package | ||
| − | |||
|} | |} | ||
{| | {| | ||
| − | |style="padding: 0px 0px 30px 25px;"|[[File: | + | |style="padding: 0px 0px 30px 25px;"|[[File:ZE2_14_1.png]] |
|} | |} | ||
==Client Area== | ==Client Area== | ||
| + | ===Ordering Process=== | ||
{| | {| | ||
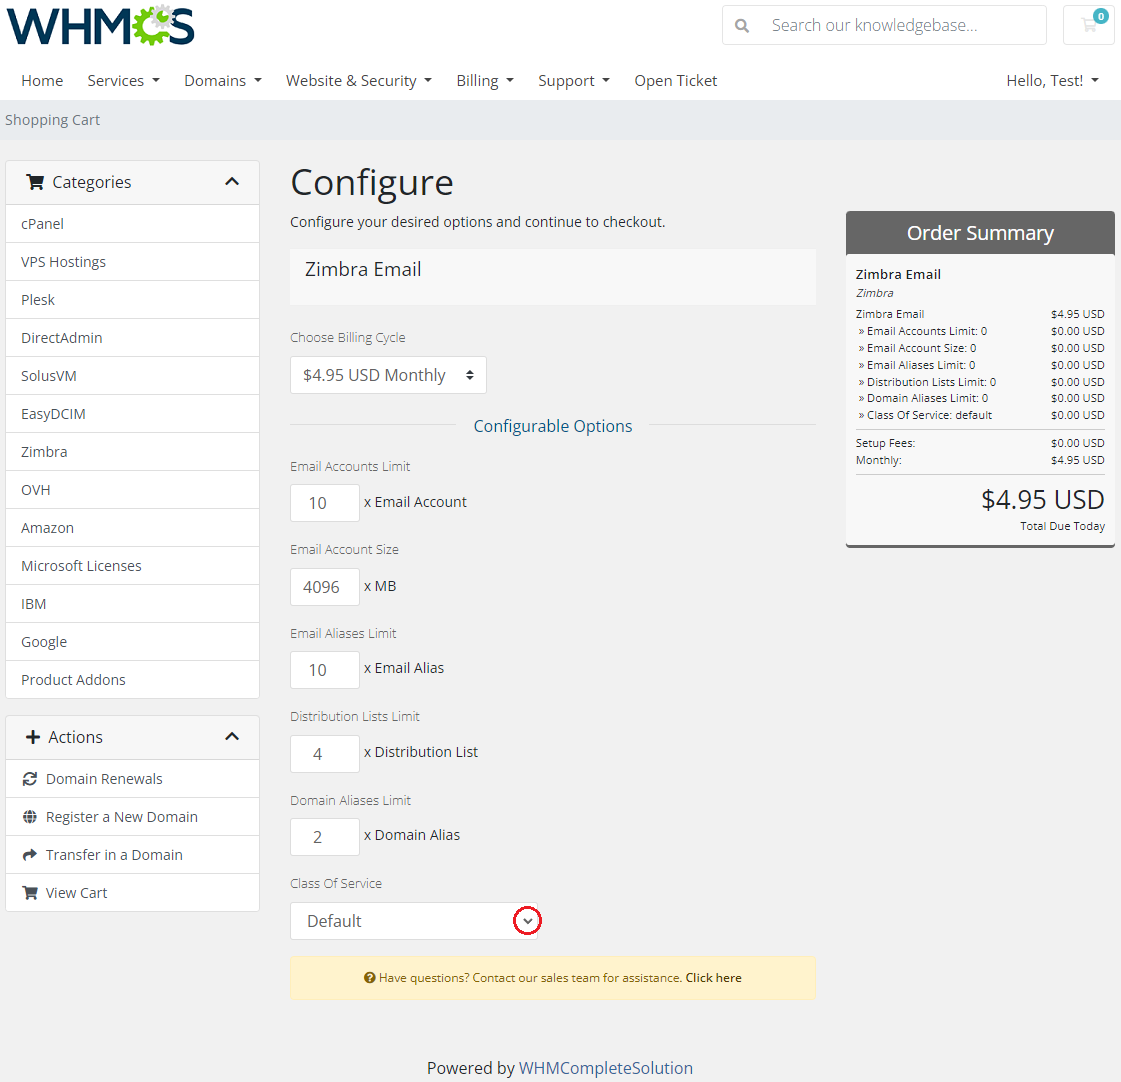
| − | |style="padding: 10px 0px | + | |style="padding: 10px 0px 20px 15px;"|Order page view of a product with the '' 'Allow clients to choose Class Of Service' '' option selected: |
| − | + | ||
|} | |} | ||
{| | {| | ||
| − | |style="padding: 0px 0px | + | |style="padding: 0px 0px 20px 25px;"|[[File:ZE2_15_1.png]] |
|} | |} | ||
| − | |||
{| | {| | ||
| − | |style="padding: | + | |style="padding: 0px 0px 20px 15px;"|Order page view of a product with the '' 'Allow Clients to choose Class Of Service Quota Per Account' '' option selected: |
|} | |} | ||
{| | {| | ||
| − | |style="padding: 0px 0px | + | |style="padding: 0px 0px 30px 25px;"|[[File:ZE2_15_2.png]] |
|} | |} | ||
| + | |||
| + | ===Management=== | ||
{| | {| | ||
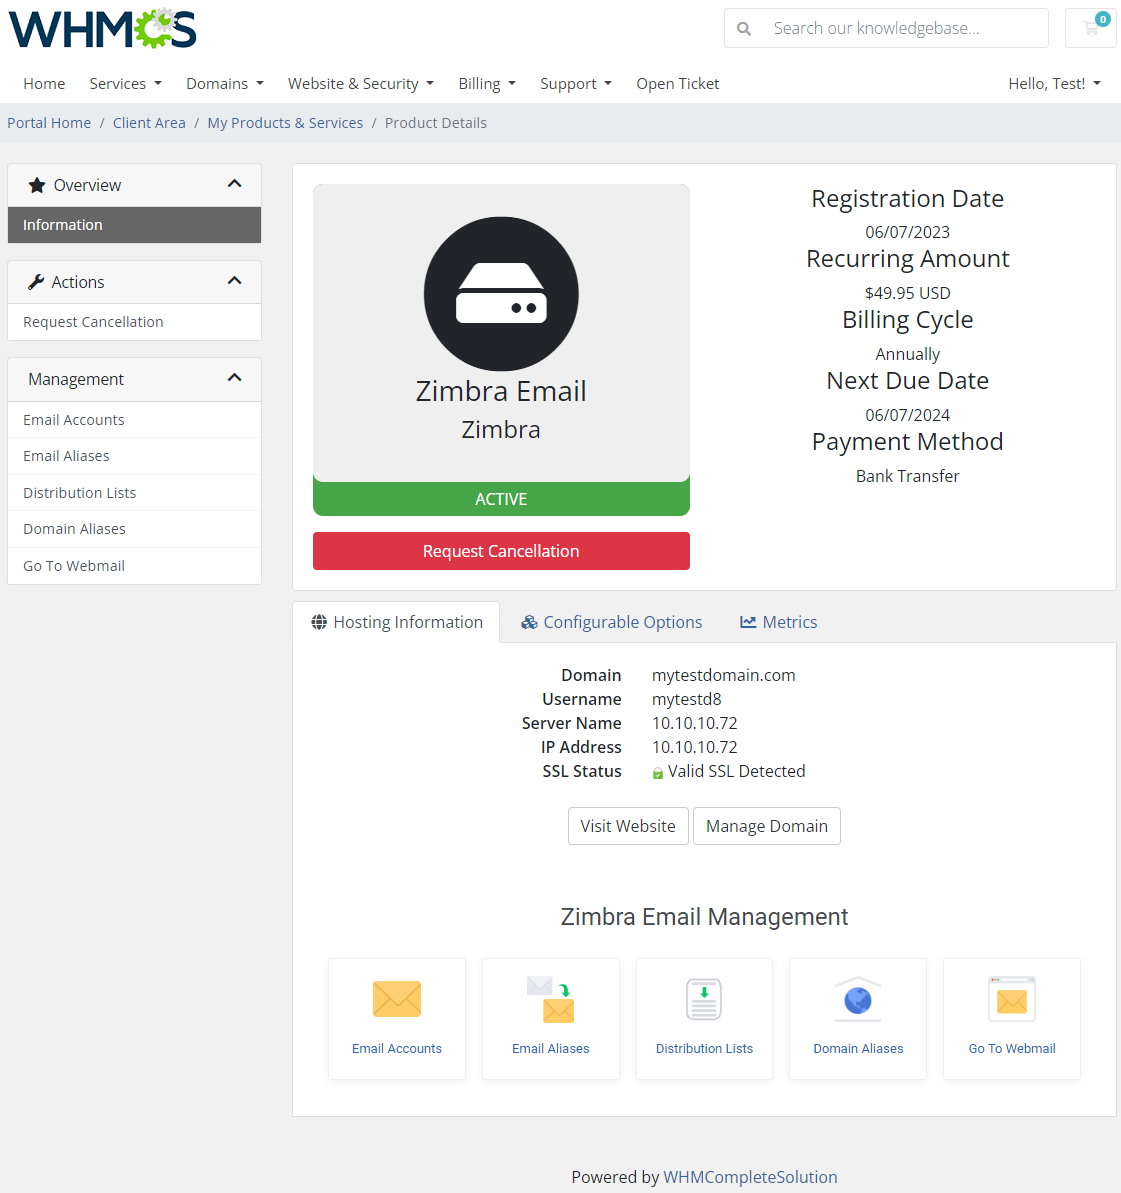
| − | |style="padding: | + | |style="padding: 10px 0px 15px 15px;"|Zimbra Email allows your customers to manage their Zimbra email accounts from your WHMCS client area.<br /> |
| − | + | This is what its management page looks like in the client area. Move to the below sections to learn more details. | |
|} | |} | ||
{| | {| | ||
| − | |style="padding: 0px 0px | + | |style="padding: 0px 0px 30px 25px;"|[[File:ZE2_15.png]] |
|} | |} | ||
| + | ====Email Accounts==== | ||
{| | {| | ||
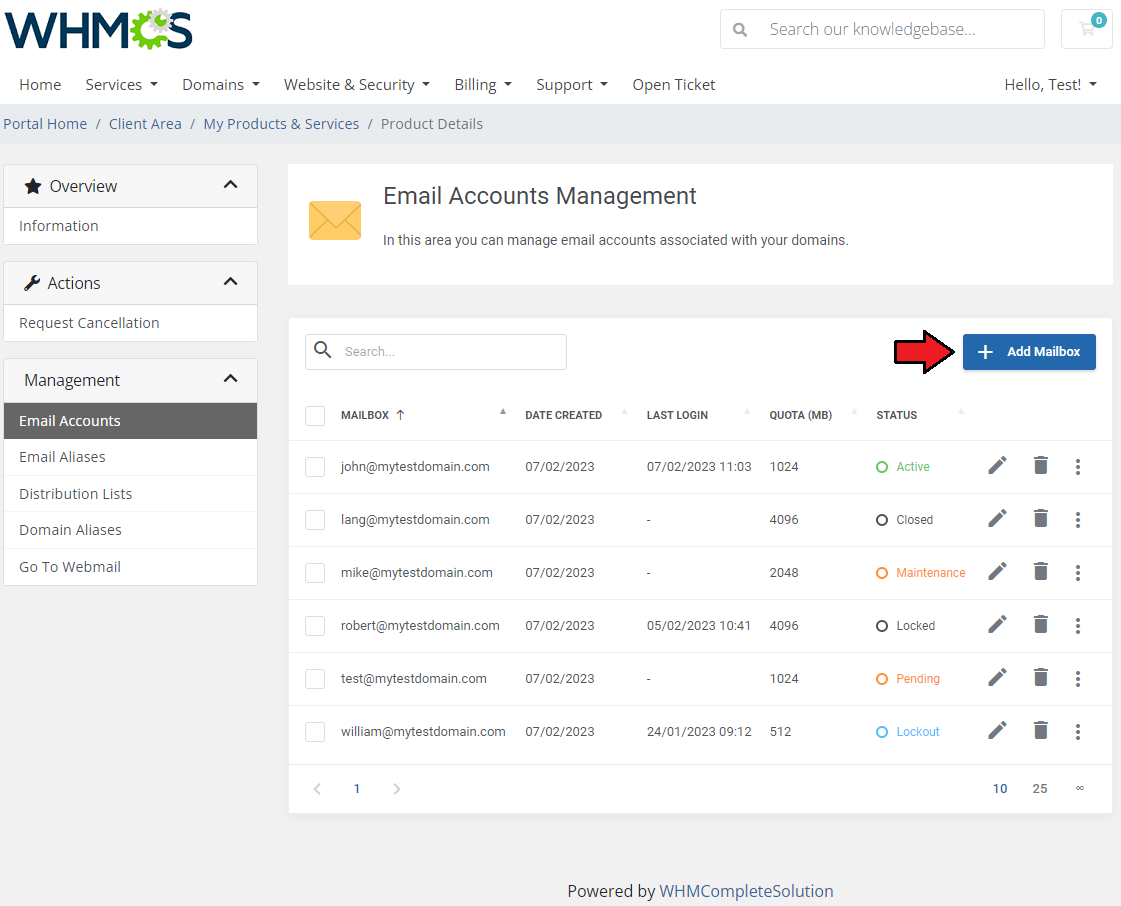
| − | |style="padding: | + | |style="padding: 10px 0px 15px 15px;"|Email Accounts section enables full management of accounts associated with your domain.<br/> |
| − | + | You may edit existing accounts with a wide range of options and create new ones within defined limits. | |
|} | |} | ||
{| | {| | ||
| − | |style="padding: 0px 0px | + | |style="padding: 0px 0px 20px 25px;"|[[File:ZE2_16.png]] |
|} | |} | ||
| + | {| | ||
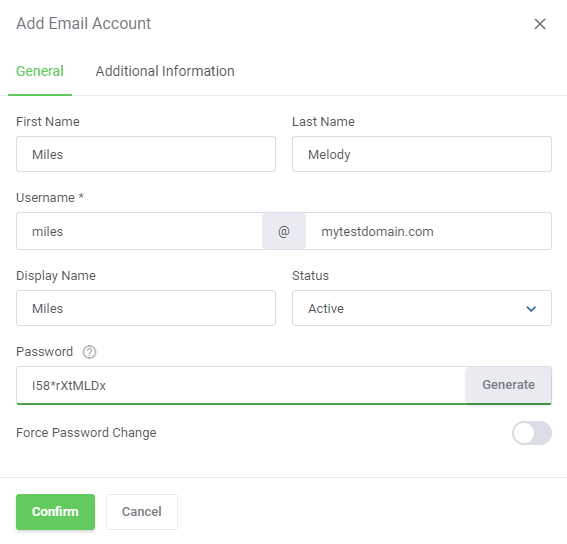
| + | |style="padding: 0px 0px 15px 15px;"|Press '' 'Add Mailbox' '' to create a new account.<br /> | ||
| + | Fill out the fields to provide any details on the account owner. Only fields marked with an asterisk are obligatory.<br> | ||
| + | '''''Note:''' The 'Quota' field is available to select only if Class of service 'Quota Per Account' is used for the product. If the limit has been reached, the client will not be able to create an account.''<br/> | ||
| + | '''''Important:''' Remember that password is also verified by Zimbra. It is advised to set up default limits in Zimbra panel, within which the password settings can be modified in the module. '' | ||
| + | |} | ||
| + | {| | ||
| + | |style="padding: 0px 0px 20px 25px;"|[[File:ZE2_17_1.png]] | ||
| + | |} | ||
| + | {| | ||
| + | |style="padding: 0px 0px 20px 15px;"|If you wish, you can provide more details of a new account in the '' 'Additional Information' '' tab, although it is not required for the account creation. | ||
| + | |} | ||
| + | {| | ||
| + | |style="padding: 0px 0px 20px 25px;"|[[File:ZE2_17_2.png]] | ||
| + | |} | ||
| + | {| | ||
| + | |style="padding: 0px 0px 15px 15px;"|You can order various operations on a single account using buttons marked on the screen .<br /> | ||
| + | You are allowed to change the account's status and password, log in directly to a mailbox, edit its details or delete it.<br/> | ||
| + | Alternatively, you can select multiple accounts and issue command on them as well using buttons above the list of accounts. <br /> | ||
| − | + | '' '''Note:''' The 'Last Login' column shows only the date of the last '''manual''' login. When using the "Log In To Mailbox" feature, its date is not registered by the API here.'' | |
| + | |} | ||
{| | {| | ||
| − | |style="padding: | + | |style="padding: 0px 0px 30px 25px;"|[[File:ZE2_18.png]] |
|} | |} | ||
| + | |||
| + | ====Email Aliases==== | ||
{| | {| | ||
| − | |style="padding: 0px | + | |style="padding: 10px 0px 15px 15px;"|Email Aliases enable you to create and use additional address for the same e-mail account.<br/> |
| + | '''''Note:''' Email aliases are created within the same email domain.''<br/> | ||
| + | ''Read more about '''[[#Domain_Aliases|Domain Aliases]]''' below.'' | ||
|} | |} | ||
{| | {| | ||
| − | |style="padding: 0px 0px 20px | + | |style="padding: 0px 0px 20px 25px;"|[[File:ZE2_19.png]] |
|} | |} | ||
{| | {| | ||
| − | |style="padding: 0px 0px 30px 25px;"|[[File: | + | |style="padding: 0px 0px 20px 25px;"|[[File:ZE2_19_1.png]] |
| + | |} | ||
| + | {| | ||
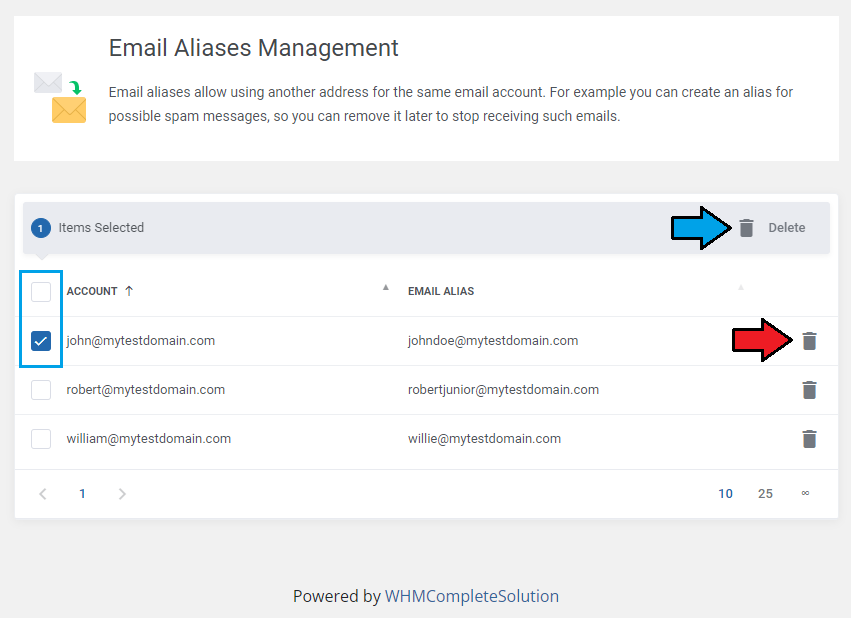
| + | |style="padding: 0px 0px 20px 15px;"|Any aliases can be quickly removed through pressing an adequate icon or using mass actions. | ||
| + | |} | ||
| + | {| | ||
| + | |style="padding: 0px 0px 30px 25px;"|[[File:ZE2_20.png]] | ||
|} | |} | ||
| − | ===Distribution Lists=== | + | ====Distribution Lists==== |
{| | {| | ||
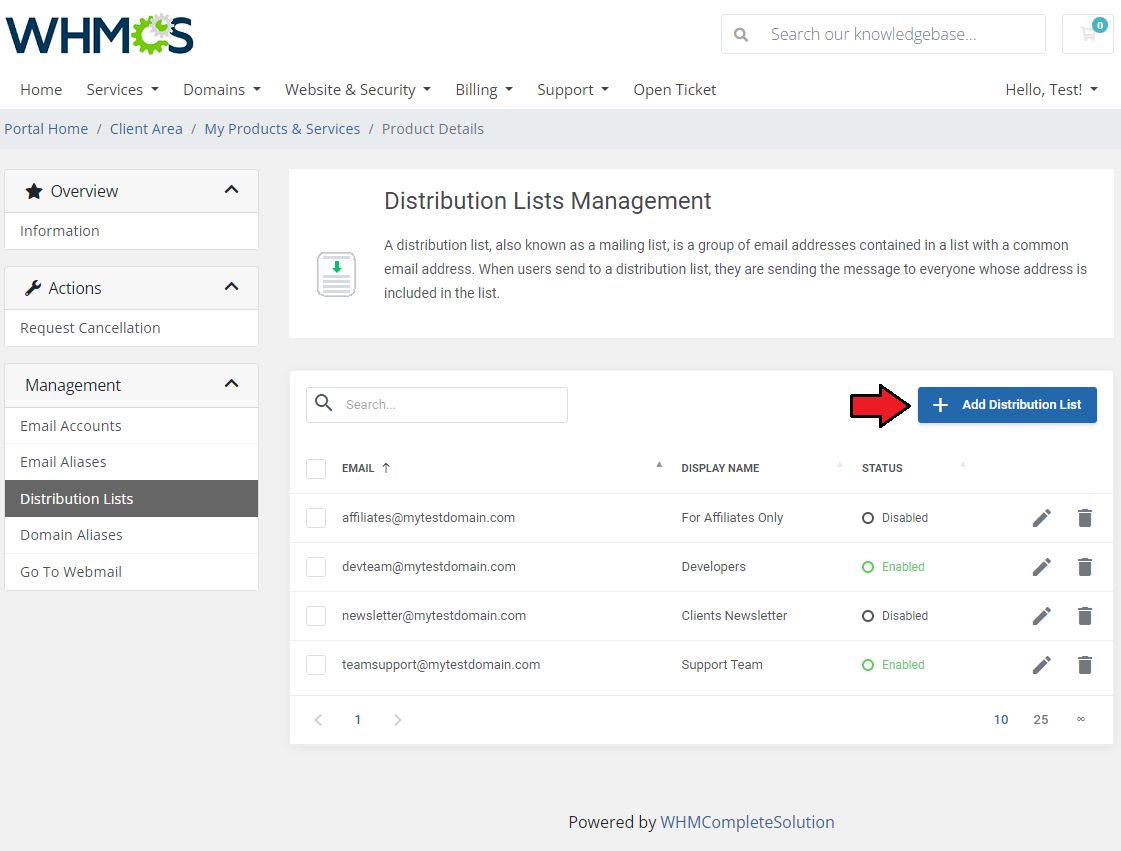
| − | |style="padding: 10px 0px 20px 15px;"|Distribution lists enable you to create and manage them without the necessity to log | + | |style="padding: 10px 0px 20px 15px;"|Distribution lists enable you to create and manage them without the necessity to log in to Zimbra panel. |
|} | |} | ||
{| | {| | ||
| − | |style="padding: 0px 0px 20px 25px;"|[[File: | + | |style="padding: 0px 0px 20px 25px;"|[[File:ZE2_21.png]] |
|} | |} | ||
{| | {| | ||
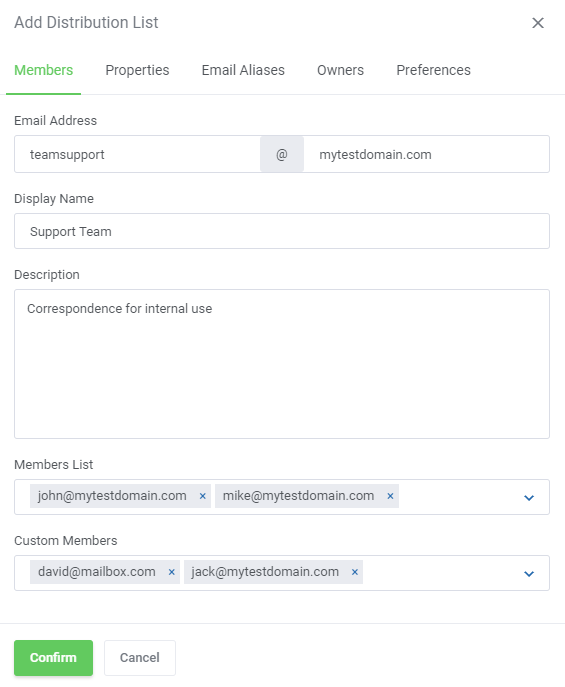
| − | |style="padding: 0px 0px | + | |style="padding: 0px 0px 15px 15px;"|Create them in the same way you would do that in Zimbra panel. Start with entering an email address, then move to assigning members to the list.<br/> |
| + | Proceed with setting detailed options. | ||
|} | |} | ||
{| | {| | ||
| − | |style="padding: 0px 0px 20px 25px;"|[[File: | + | |style="padding: 0px 0px 20px 25px;"|[[File:ZE2_22.png]] |
|} | |} | ||
{| | {| | ||
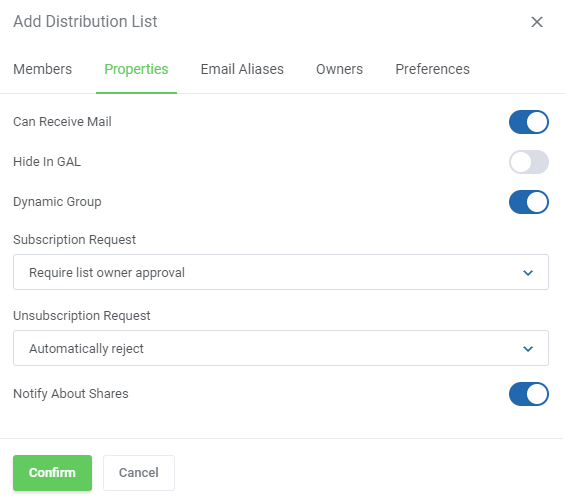
| − | |style="padding: 0px 0px 20px | + | |style="padding: 0px 0px 20px 15px;"|Remember that in order to enable the distribution list on its creation, you must select option '' 'Can Receive Mail' '' in the '' 'Properties' '' section. |
|} | |} | ||
{| | {| | ||
| − | |style="padding: 0px 0px 20px 25px;"|[[File: | + | |style="padding: 0px 0px 20px 25px;"|[[File:ZE2_23.png]] |
|} | |} | ||
{| | {| | ||
| − | |style="padding: 0px 0px 20px | + | |style="padding: 0px 0px 20px 15px;"|Assign email aliases if you have any. |
|} | |} | ||
{| | {| | ||
| − | |style="padding: 0px 0px 20px | + | |style="padding: 0px 0px 20px 25px;"|[[File:ZE2_24.png]] |
|} | |} | ||
{| | {| | ||
| − | |style="padding: 0px 0px 20px 25px;"|[[File: | + | |style="padding: 0px 0px 20px 15px;"|You may also add/remove owners of the list. |
| + | |} | ||
| + | {| | ||
| + | |style="padding: 0px 0px 20px 25px;"|[[File:ZE2_25.png]] | ||
| + | |} | ||
| + | {| | ||
| + | |style="padding: 0px 0px 20px 15px;"|As soon as you set the last preferences, press '' 'Confirm' '' to finally create the distribution list. | ||
| + | |} | ||
| + | {| | ||
| + | |style="padding: 0px 0px 20px 25px;"|[[File:ZE2_26.png]] | ||
|} | |} | ||
{| | {| | ||
| Line 310: | Line 468: | ||
|} | |} | ||
{| | {| | ||
| − | |style="padding: 0px 0px 30px 25px;"|[[File: | + | |style="padding: 0px 0px 30px 25px;"|[[File:ZE2_27.png]] |
|} | |} | ||
| + | |||
| + | ====Domain Aliases==== | ||
| + | {| | ||
| + | |style="padding: 10px 0px 15px 15px;"|Domain Aliases option allows you to create more than one domain name that will refer to the same account.<br /> | ||
| + | Add a new domain alias, like on the below screen, and no matter which address used, emails will be delivered to the same mailbox. | ||
| + | |} | ||
| + | {| | ||
| + | |style="padding: 0px 0px 20px 25px;"|[[File:ZE2_27_1.png]] | ||
| + | |} | ||
| + | {| | ||
| + | |style="padding: 0px 0px 20px 25px;"|[[File:ZE2_27_2.png]] | ||
| + | |} | ||
| + | {| | ||
| + | |style="padding: 0px 0px 20px 15px;"|When a domain alias is no longer needed, simply delete it by pressing an icon. | ||
| + | |} | ||
| + | {| | ||
| + | |style="padding: 0px 0px 30px 25px;"|[[File:ZE2_27_3.png]] | ||
| + | |} | ||
| + | |||
==Management of Billing== | ==Management of Billing== | ||
{| | {| | ||
| − | |style="padding: 10px 0px 20px 15px;"|When you combine Zimbra Email For WHMCS with [ | + | |style="padding: 10px 0px 20px 15px;"|When you combine Zimbra Email For WHMCS with [https://www.modulesgarden.com/products/whmcs/advanced-billing Advanced Billing For WHMCS], you will be able to set up additional billing options. |
|} | |} | ||
{| | {| | ||
| − | |style="padding: 0px 0px 20px 25px;"|[[File: | + | |style="padding: 0px 0px 20px 25px;"|[[File:ZE2_28.png]] |
|} | |} | ||
{| | {| | ||
| − | |style="padding: 0px 0px | + | |style="padding: 0px 0px 15px 15px;"|Module allows you to charge your customers basing on the server resources used by them.<br/> |
| + | For more detailed information on the configuration please refer to our [https://www.docs.modulesgarden.com/Advanced_Billing_For_WHMCS Advanced Billing For WHMCS] documentation. | ||
|} | |} | ||
{| | {| | ||
| − | |style="padding: 0px 0px 20px 25px;"|[[File: | + | |style="padding: 0px 0px 20px 25px;"|[[File:ZE2_28_1.png]] |
|} | |} | ||
{| | {| | ||
| Line 329: | Line 507: | ||
|} | |} | ||
{| | {| | ||
| − | |style="padding: 0px 0px 30px 25px;"|[[File: | + | |style="padding: 0px 0px 30px 25px;"|[[File:ZE2_29.png]] |
|} | |} | ||
=Tips= | =Tips= | ||
{| | {| | ||
| − | |style="padding: 10px 0px | + | |style="padding: 10px 0px 10px 15px;"|1. Zimbra Email For WHMCS requires SOAP installed on your server. |
| + | |} | ||
| + | {| | ||
| + | |style="padding: 0px 0px 5px 15px;"|2. You can set your own custom ports which will be applied only by clients in order to connect to their accounts when the '' 'Log In To Mailbox' '' option is used.<br/> | ||
| + | To do so, please go to the file located here '''<whmcs>/modules/servers/zimbraEmail/app/Config/configuration.yml'''. <br/> Find the '' 'clientPortSecure' '' and '' 'clientPort' '' fields and provide the ports used by clients. <br/> Please remember that these ports will be used regardless of the custom port specified in the WHMCS server configuration with Zimbra connection. | ||
| + | |} | ||
| + | {| | ||
| + | |style="padding: 0px 0px 30px 15px;"|3. To update the '' 'diskusage' '' table in '' 'tblhosting' '', you need to run the following cron command.<br/> | ||
| + | <pre> php -q /your_whmcs/crons/cron.php do --UpdateServerUsage </pre> | ||
| + | |} | ||
| + | |||
| + | ==How To Use Language Overrides== | ||
| + | {| | ||
| + | |style="padding: 10px 0px 15px 15px;"|'''Incorporating language customizations - the module readily accommodates language overrides, allowing you to tailor the language files to your preferences.'''<br/> The language file english.php remains unencoded and can be modified to suit your needs. However, it's recommended to avoid altering the core file itself, and instead, leverage the capability of using overrides.<br/> | ||
| + | |} | ||
| + | {| | ||
| + | |style="padding: 0px 0px 15px 15px;"|Here's how to apply language overrides: | ||
| + | * Navigate to the ''~/langs/'' directory located within the following ''yourWHMCS/modules/servers/moduleName/langs/'' path. | ||
| + | * Within this directory, create a new file or duplicate the language file you intend to modify. For instance, if you wish to create an override for the English language, establish the following directory structure: | ||
| + | ''~/langs/overrides/english.php''. | ||
| + | * Open the newly created override file to edit its contents. | ||
| + | * At the beginning of the file, indicate the used code, for instance, you can use: '''<?php''' for PHP code. | ||
| + | * Adapt the file content according to your requirements. You can either selectively modify specific variables or opt to revise the entire content of the language file. | ||
| + | |||
| + | For example: | ||
| + | |||
| + | '''Original ''yourWHMCS/modules/servers/moduleName/langs/english.php:''''' | ||
| + | |||
| + | $_LANG['Search'] = 'Search'; | ||
| + | |||
| + | '''Override ''yourWHMCS/modules/servers/moduleName/langs/overrides/english.php:''''' | ||
| + | |||
| + | $_LANG['Search'] = 'Look for'; | ||
| + | |} | ||
| + | {| | ||
| + | |style="padding: 0px 0px 15px 15px;"|By following these steps, you can seamlessly implement language customizations without altering the core language file, ensuring your changes will not be lost after every module update.<br/> | ||
| + | |||
| + | Remember that some of the modules have more than one language file, located under ''/addons'' and ''/servers'' paths. You may create the override files for both of them.<br/> Note that you do not need to paste all the original content of the lang file into the override file. Enter there only the lines that you wish to change, every other line will be fetched from the original module lang file.<br/> Consequently, the override lang file might include only one or just a few lines. | ||
|} | |} | ||
=Update Instructions= | =Update Instructions= | ||
{| | {| | ||
| − | |style="padding: 10px 0px 30px 15px;"| | + | |style="padding: 10px 0px 30px 15px;"|An essential guidance through the process of updating the module is offered '''[https://www.docs.modulesgarden.com/How_To_Update_WHMCS_Module here]'''.<br/><br/> |
| − | + | ||
| − | + | '''Important:''' If you migrate the module '''from version 1.X to version 2.X''', the following steps are needed to be performed additionally:<br/> | |
| + | # Open any of your Zimbra product configuration and go to the '' 'Modules Settings' '' tab | ||
| + | # Then connect to your WHMCS server through the terminal and go to the following directory using '''cd''' command in console: <br/><pre>yourWHMCS/modules/servers/zimbraEmail/commands</pre> | ||
| + | # Now run the migration script using the command below: <br/><pre>php commands.php migration:v1_v2</pre> | ||
| + | |} | ||
| + | =Upgrade Guide= | ||
| + | {| | ||
| + | |style="padding: 10px 0px 30px 15px;"|Seeking a solution that offers greater flexibility, customization tailored to your precise needs, and unrestricted availability?<br/> There is an option that not only proves to be cost-effective in the long run but also includes prioritized support services, making it a truly valuable investment.<br/> | ||
| + | |||
| + | Opt for the [https://www.modulesgarden.com/products/whmcs/zimbra-email#open-source-version Open Source version] of your Zimbra Email For WHMCS module to unlock these benefits.<br/> Simply click on either the '''Get Source Code''' or '''Upgrade To Lifetime''' button found on the product's page in our client area to complete the one-step upgrade process, with a '''dedicated discount''' already applied.<br/> | ||
| + | |||
| + | Follow a [https://www.docs.modulesgarden.com/How_To_Upgrade_WHMCS_Module comprehensive guide] covering the transition process, the advantages it brings, and step-by-step instructions on what to do next after the order has been successfully finalized. | ||
|} | |} | ||
| Line 349: | Line 575: | ||
|} | |} | ||
{| | {| | ||
| − | |style="padding: | + | |style="padding: 0px 0px 10px 15px;"|2. If you got '' 'A problem with module occurred. Please contact the administration' '' error, please validate the correctness of your module license key first and you may also try to reissue key in your ModulesGarden control panel. |
|} | |} | ||
{| | {| | ||
|style="padding: 0px 0px 15px 15px;"| | |style="padding: 0px 0px 15px 15px;"| | ||
3. The error '' 'Could not connect to host' '' is connected with SOAP. To fix it, make sure that port default '''7071''' is open.<br/> | 3. The error '' 'Could not connect to host' '' is connected with SOAP. To fix it, make sure that port default '''7071''' is open.<br/> | ||
| − | Otherwise you can change the communication port by | + | Otherwise you can change the communication port by selecting 'Override with Custom Port' in the Zimbra server configuration.<br/> |
| + | |||
| + | '' '''Note:''' If you upgraded a module prior to 2.X version, the custom port was given in the 'Access Hash' field, which will '''no longer''' be used after the upgrade to 2.X version. | ||
|} | |} | ||
{| | {| | ||
| − | |style="padding: 0px 0px 30px 25px;"|[[File: | + | |style="padding: 0px 0px 30px 25px;"|[[File:ZE2_30.png]] |
|} | |} | ||
Latest revision as of 13:09, 19 April 2024
Contents |
[edit] About Zimbra Email For WHMCS
| Zimbra Email For WHMCS is a module which allows your customers to manage email accounts of your domain directly in WHMCS. Your clients will be able to conveniently manage mailboxes, email and domain aliases and quickly move to their webmails. |
- Admin Area Features:
| ✔ Create Account |
| ✔ Terminate Account |
| ✔ Change Package |
| ✔ Change Password |
| ✔ Go To Zimbra Webmail |
| ✔ Define Products Configuration: |
| ✔ Set Zimbra Account Settings |
| ✔ Use Class Of Service As: |
| ✔ Fixed Choice |
| ✔ Allowed Single Choice By Clients |
| ✔ Allowed Multiple Choices Of Quota Per Account |
| ✔ Custom Settings |
| ✔ Select Essential Features |
| ✔ Select General Features |
| ✔ Select Mail Service Features |
| ✔ Select Contact/Calendar/Search/S/MIME Features |
| ✔ Set Requirements For Passwords |
| ✔ Select Access To Client Area Features |
| ✔ Generate Default Configurable Options |
| ✔ Enable Metric Billing |
| ✔ Log In To Zimbra Administrator Panel On Click |
- Client Area Features:
| ✔ Manage Email Accounts: |
| ✔ Create/Edit/Delete |
| ✔ View Creation/Last Login Date |
| ✔ View Mailbox Quota |
| ✔ View/Change Mailbox Status |
| ✔ Change Account Password |
| ✔ Log In To Mailbox |
| ✔ Manage Email Aliases |
| ✔ Manage Distribution Lists |
| ✔ Manage Domain Aliases |
| ✔ Upgrade / Downgrade Account |
| ✔ Go To Zimbra Webmail |
- Configurable Options:
| ✔ Email Accounts Limit |
| ✔ Email Account Size |
| ✔ Email Aliases Limit |
| ✔ Distribution List Limit |
| ✔ Domain Aliases Limit |
| ✔ Class Of Service |
- General Info:
| ✔ Configurable Options Support |
| ✔ Integrated With Advanced Billing For WHMCS - Actual Server Resource Usage Billing |
| ✔ Integrated With Server Allocator For WHMCS - Automatic Assignment Of Most Suitable Servers To Products |
| ✔ Multi-Language Support |
| ✔ Supports Zimbra 8.5.0 And Later |
| ✔ Supports PHP 8.1 Back To PHP 7.4 |
| ✔ Supports WHMCS Metric Billing - Integration: Email Accounts, Email Aliases, Distribution Lists, Domain Aliases, Storage |
| ✔ Supports WHMCS Server Sync Tool |
| ✔ Supports WHMCS Themes "Six", "Twenty-One" And "Lagom WHMCS Client Theme" |
| ✔ Supports WHMCS V8.8 Back To WHMCS V8.6 |
| ✔ Requires ionCube Loader V12 Or Later |
| ✔ Easy Module Upgrade To Open Source Version |
[edit] Installation and Configuration
| This tutorial will show you how to successfully install and configure Zimbra Email For WHMCS. We will guide you step by step through the whole installation process. Note: If you still use any of the module's previous versions prior to v2.X, follow these instructions. |
[edit] Installation
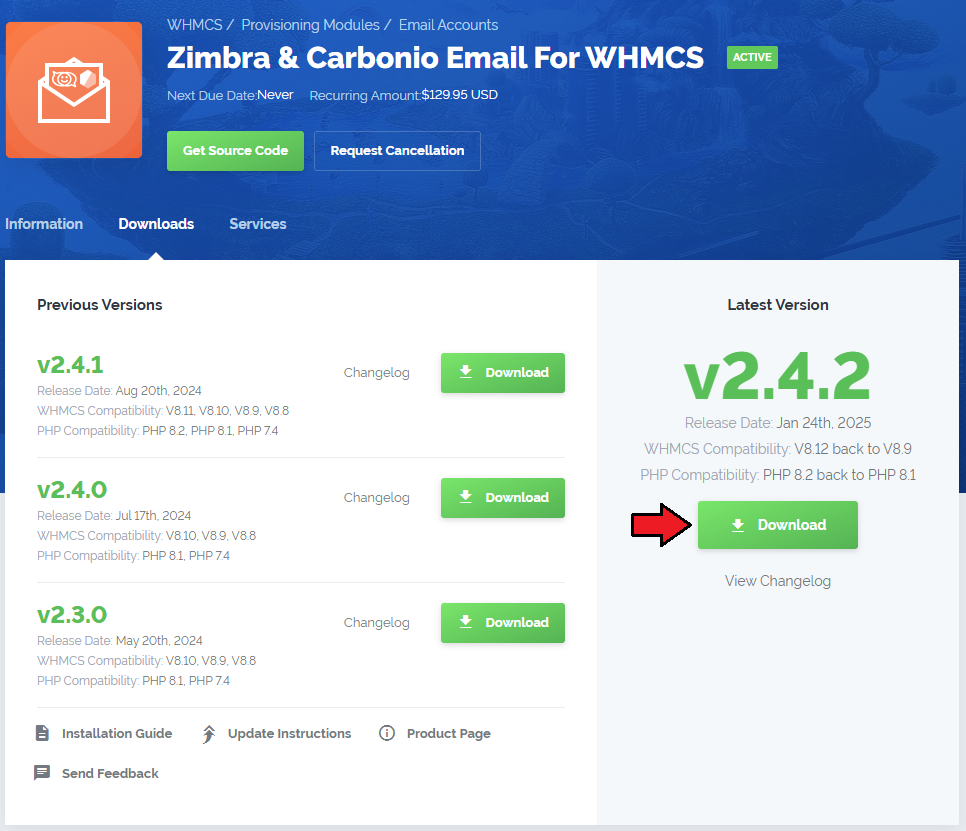
| 1. Log in to our client area and download the module. |
|
| 2. In the downloaded file you might find one or two packages that support different PHP versions. In the most recent versions of the module, you will find only one package that supports PHP 7.4 and later. |
| Previous updates of the module may contain two packages dedicated to various PHP versions. The first one that supports PHP 5.6 up to PHP 7.3, and the second one addressed to PHP 7.4 up to PHP 8.1. |

|
| Note: You can check the current PHP version in your WHMCS. To do so, proceed to 'Utilities' → 'System' → 'PHP Info'. |
| 3. Extract the package and upload its content into the main WHMCS directory. The content of the package to upload should look like this. |
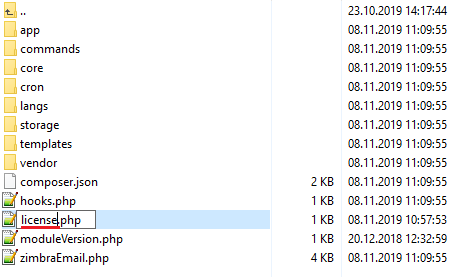
| 4. When you install Zimbra Email For WHMCS for the first time, you have to rename the 'license_RENAME.php' file. The file is located in 'modules/servers/zimbraEmail/license_RENAME.php'. Rename it from 'license_RENAME.php' to 'license.php'. |
|
| 5. In order to configure your license key you have to edit the previously renamed 'license.php' file. Enter your license key between quotation marks as presented on the following screen. You can find your license key in our client area → 'My Products'. |

|
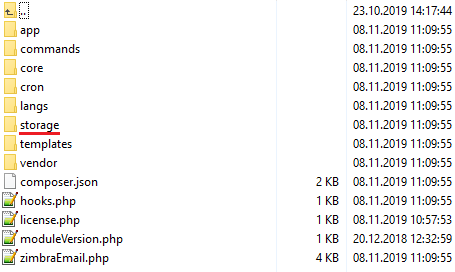
| 6. The last step is to set up the 'storage' folder as recursively writable. This folder is available at '/yourWHMCS/modules/servers/zimbraEmail/'. |
|
[edit] Server Configuration
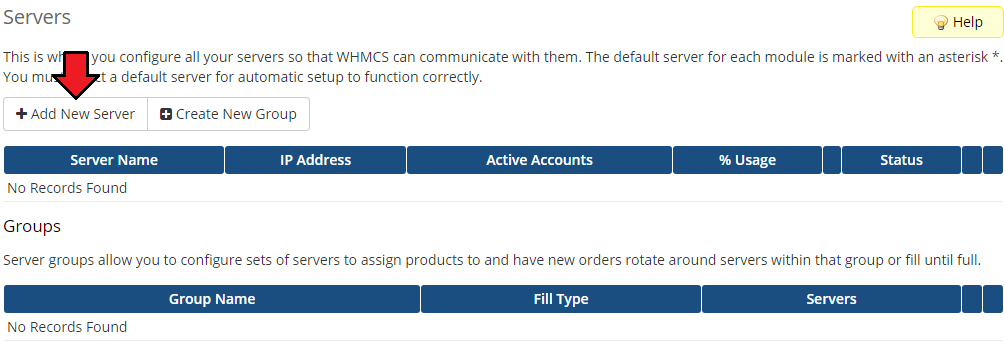
| 7. Now let's configure a new product. Log in to your WHMCS, press 'Setup' → 'Products/Services' → 'Servers'. Afterwards, press 'Add New Server'. |
|
| 8. Next, enter your server name and Zimbra server hostname or IP address. Choose 'ZimbraEmail' from a dropdown menu and type in your username and password used to log in to Zimbra server. Keep in mind that value of client area button 'Go To Webmail' is taken from the 'Hostname' field. If the field is empty, it is taken from the 'IP Address' field. |
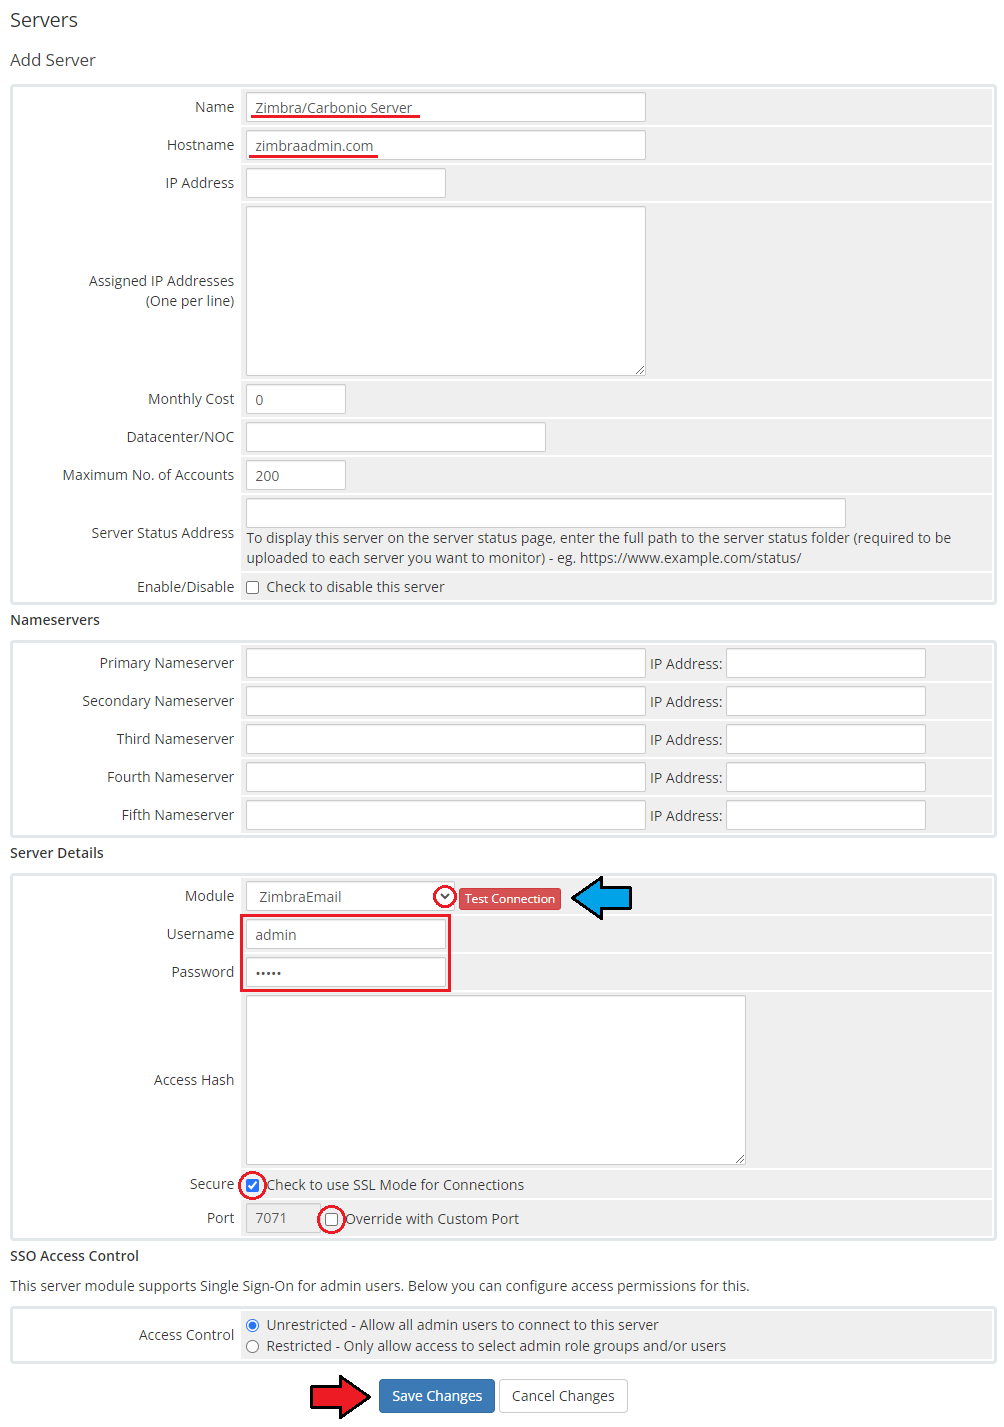
|
| 9. After you configure your server correctly, you will see the following screen. Now you need to create a new group for your server. For that purpose press 'Create New Group'. |
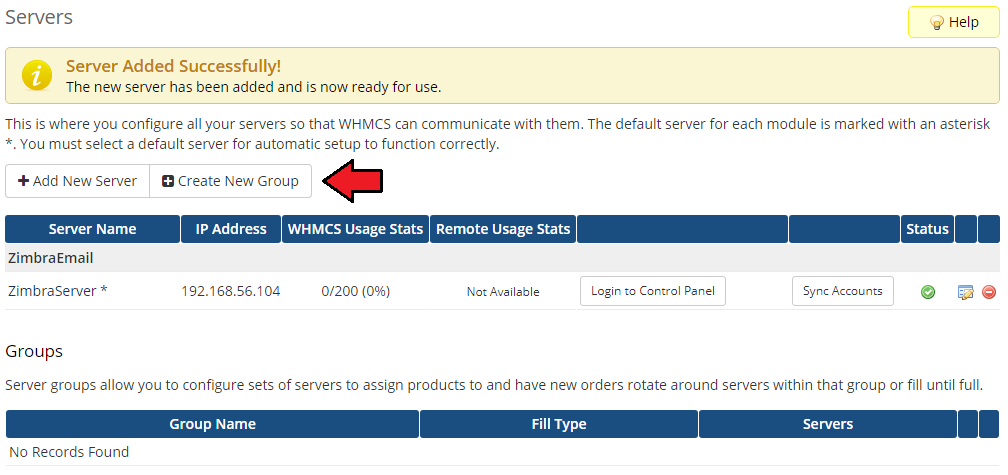
|
| 10. Enter name, click on your previously created server, press 'Add' then 'Save Changes'. |
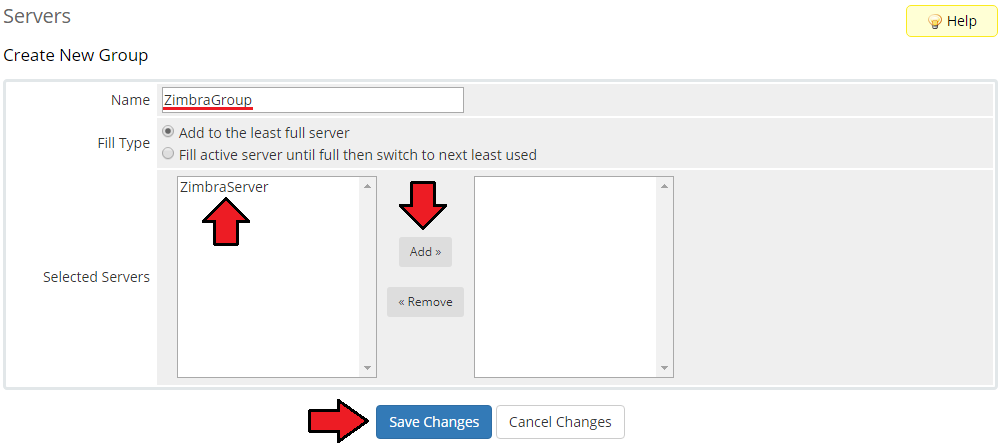
|
[edit] Product Configuration
| 11. In order to create and configure product, click on 'Setup' → 'Products/Services' → 'Products/Services'. If you do not have a product group, click on 'Create a New Group'. If you do, simply move to step 12. |

|
| 12. Enter a product group name and press 'Create Group'. |
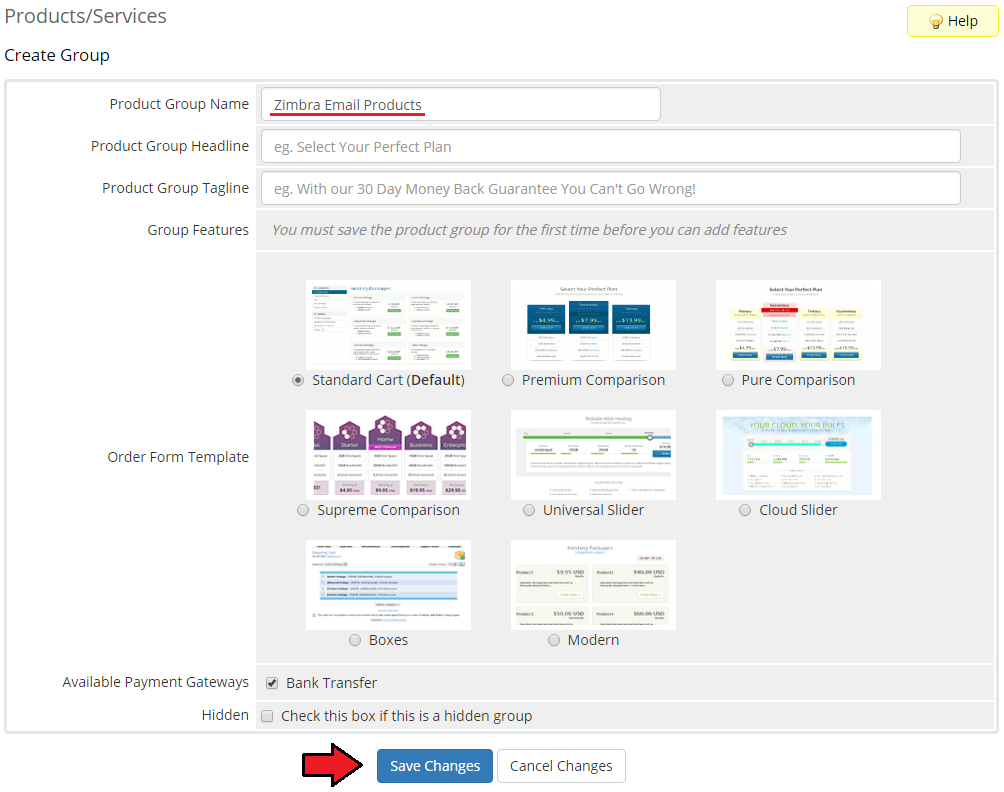
|
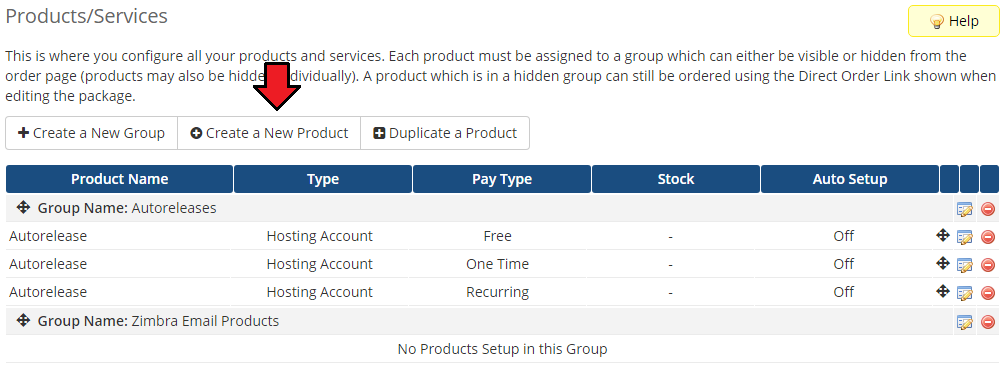
| 13. When you have a product group, you can create your product and assign it to Zimbra Email. If you already have a product, go to step 14. To create a product click on 'Create a New Product'. |
|
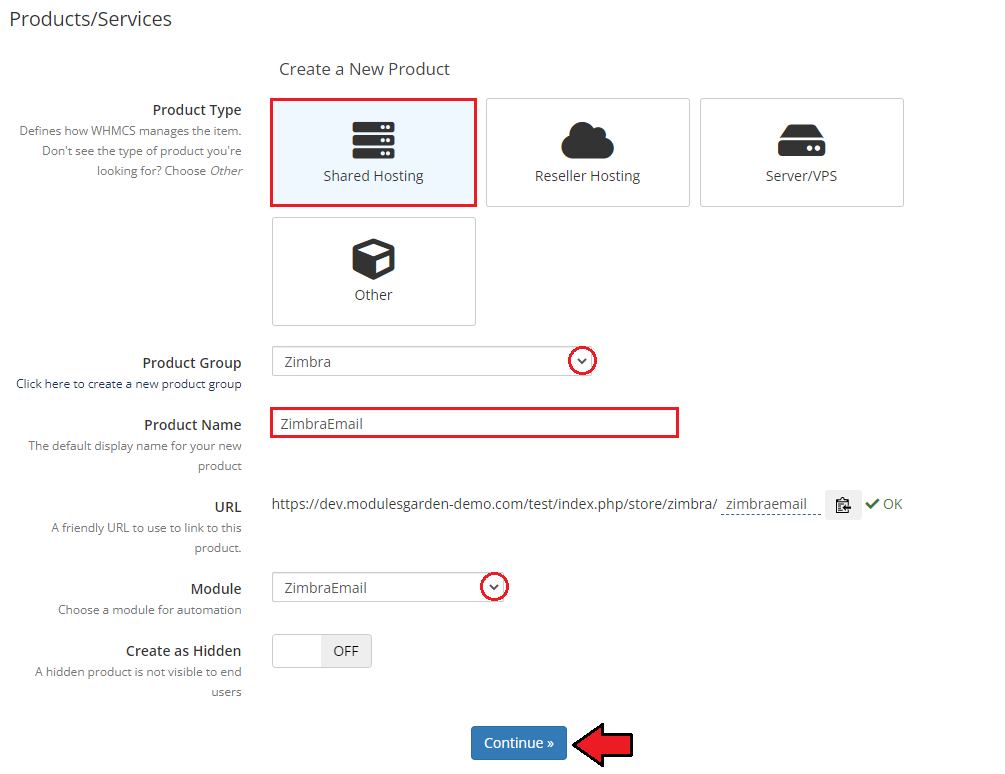
| 14. Afterwards, choose your product type and product group from dropdown menus, enter your product name and press 'Continue'. |
|
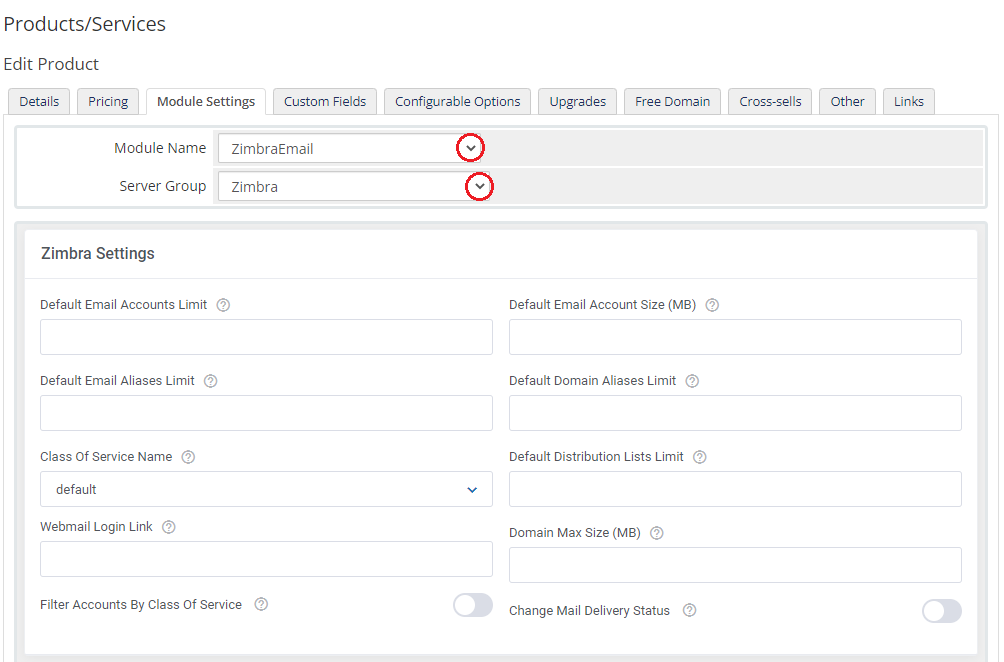
| 15. Now, go to the 'Module Settings' section, and choose the previously created server group from dropdown menu. |
|
| 16. Afterwards, define settings of the module and press 'Save Changes'. Note 1: If you choose 'Use Custom Settings' from the 'Class Of Service Name' dropdown menu, you can define your own set of user permissions using sections below. |

|
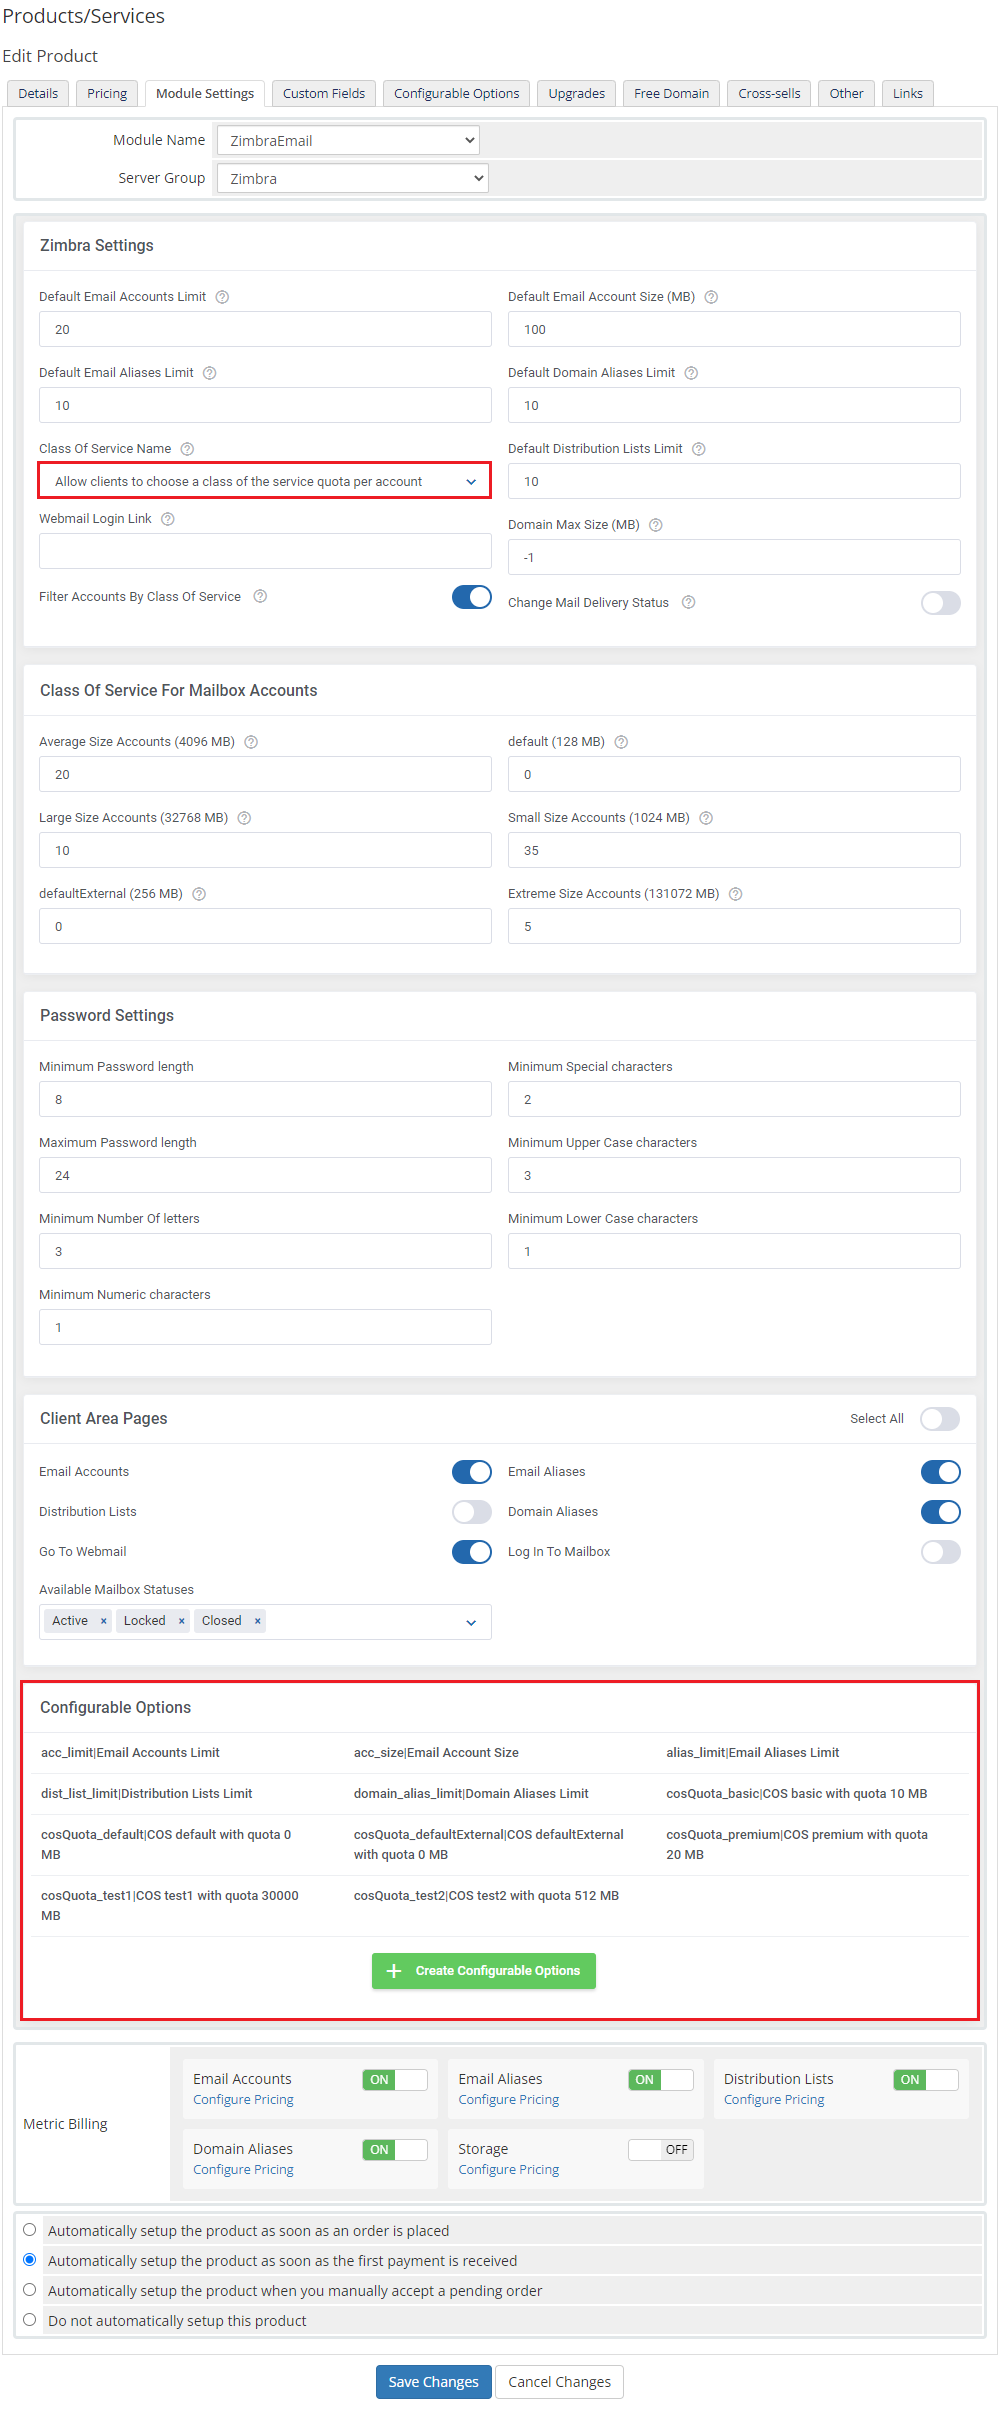
| 17. If you select 'Allow Clients to choose Class Of Service Quota Per Account' in Class Of Service Name, the new 'Class Of Service For Mailbox Accounts' settings will appear. Define the number of the accounts limit for each available size. Your clients will be allowed to order a product with limits defined in configurable options and create mailboxes within the defined quota size.
|
|
| 18. Additionally, you can replace the module static limit with dynamic one in the form of configurable options. Press 'Generate Default' near 'Configurable Options' to generate default set of them. |
|
| This is what a properly created and configured product should look like from the administrator site. |
|
[edit] Management
| Let's customize your Zimbra Email For WHMCS and see what features it has in offer. |
[edit] Admin Area
Zimbra Email product management site:
|
|
[edit] Client Area
[edit] Ordering Process
| Order page view of a product with the 'Allow clients to choose Class Of Service' option selected: |
|
| Order page view of a product with the 'Allow Clients to choose Class Of Service Quota Per Account' option selected: |
|
[edit] Management
| Zimbra Email allows your customers to manage their Zimbra email accounts from your WHMCS client area. This is what its management page looks like in the client area. Move to the below sections to learn more details. |
|
[edit] Email Accounts
| Email Accounts section enables full management of accounts associated with your domain. You may edit existing accounts with a wide range of options and create new ones within defined limits. |
|
| Press 'Add Mailbox' to create a new account. Fill out the fields to provide any details on the account owner. Only fields marked with an asterisk are obligatory. |
|
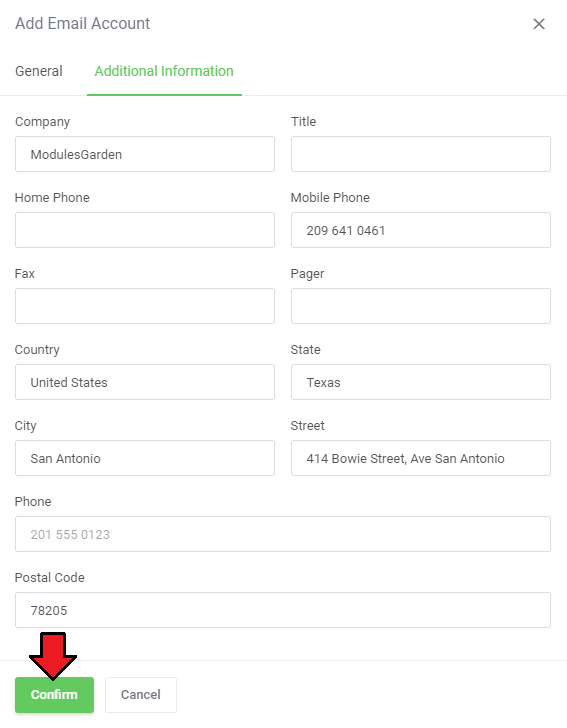
| If you wish, you can provide more details of a new account in the 'Additional Information' tab, although it is not required for the account creation. |
|
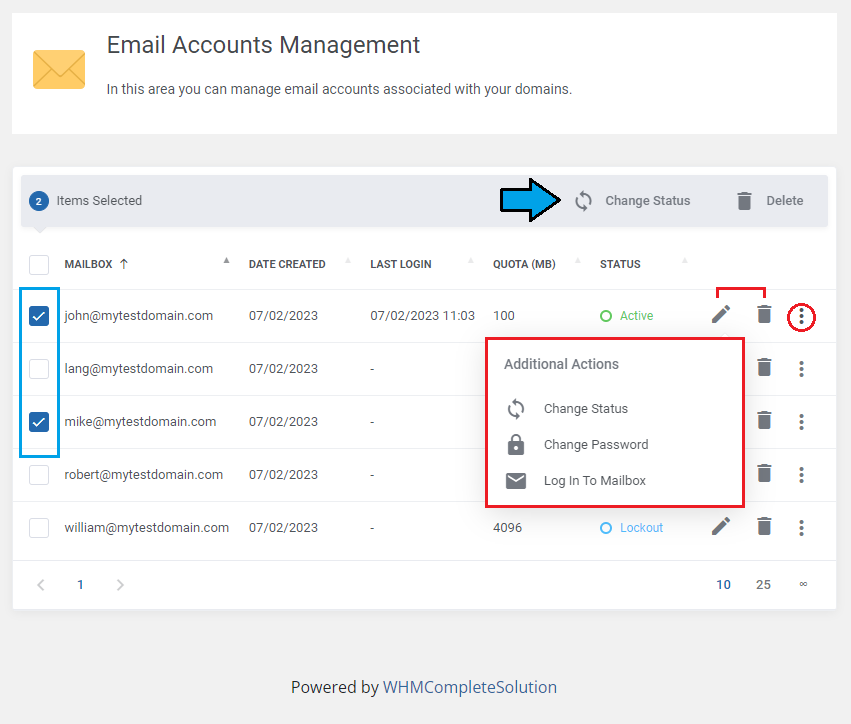
| You can order various operations on a single account using buttons marked on the screen . You are allowed to change the account's status and password, log in directly to a mailbox, edit its details or delete it. Note: The 'Last Login' column shows only the date of the last manual login. When using the "Log In To Mailbox" feature, its date is not registered by the API here. |
|
[edit] Email Aliases
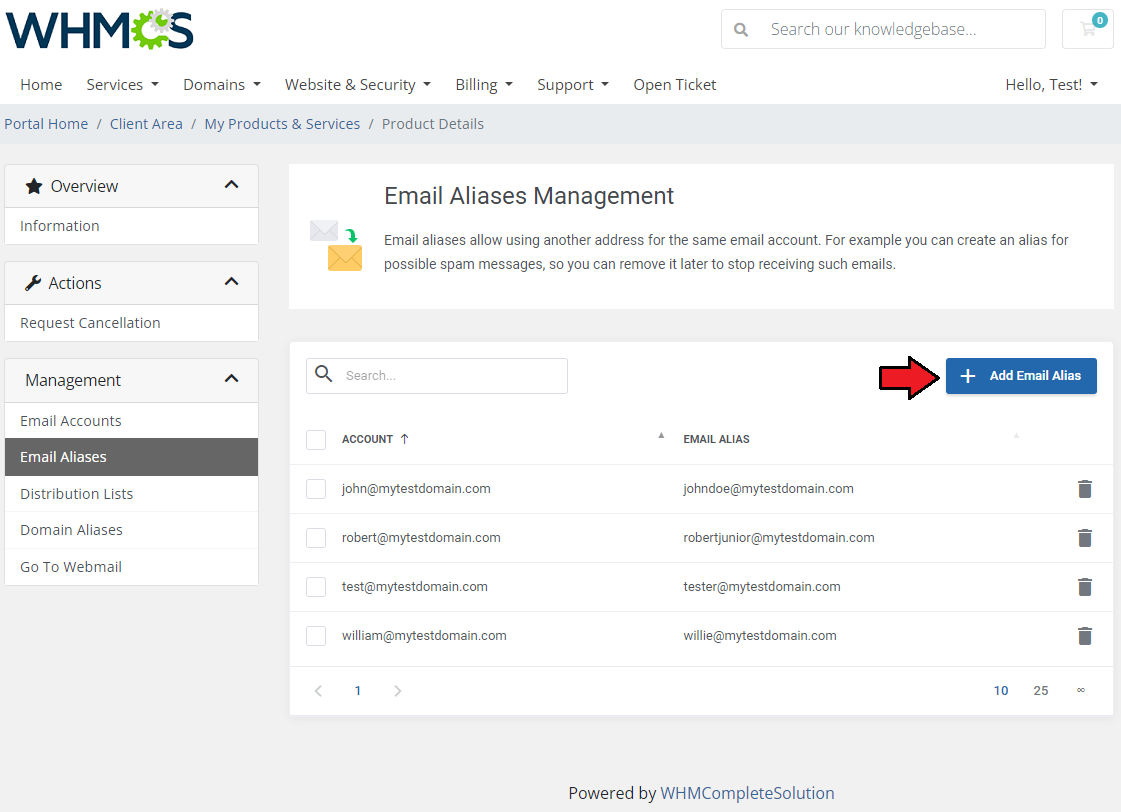
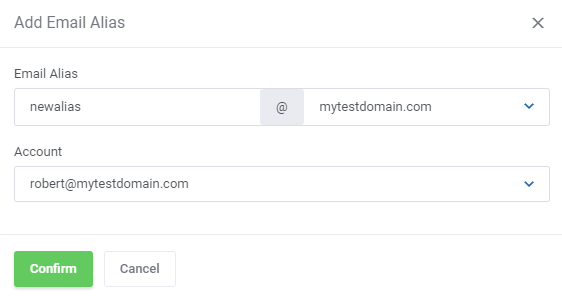
| Email Aliases enable you to create and use additional address for the same e-mail account. Note: Email aliases are created within the same email domain. |
|
|
| Any aliases can be quickly removed through pressing an adequate icon or using mass actions. |
|
[edit] Distribution Lists
| Distribution lists enable you to create and manage them without the necessity to log in to Zimbra panel. |
|
| Create them in the same way you would do that in Zimbra panel. Start with entering an email address, then move to assigning members to the list. Proceed with setting detailed options. |
|
| Remember that in order to enable the distribution list on its creation, you must select option 'Can Receive Mail' in the 'Properties' section. |
|
| Assign email aliases if you have any. |
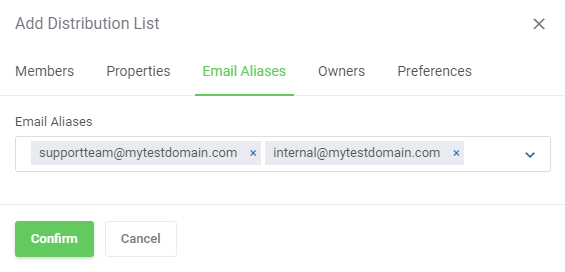
|
| You may also add/remove owners of the list. |
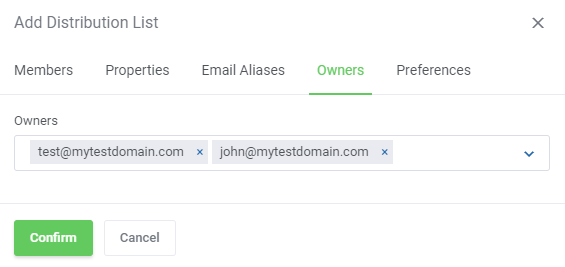
|
| As soon as you set the last preferences, press 'Confirm' to finally create the distribution list. |
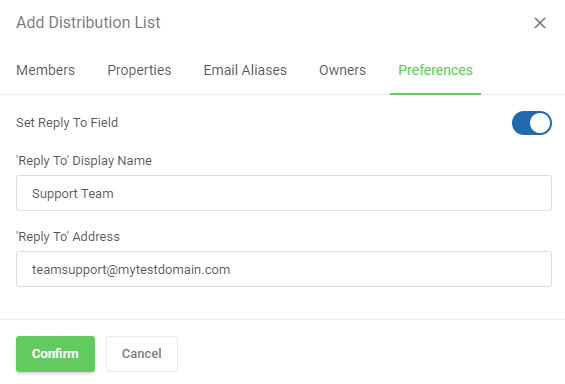
|
| If you made a mistake while creating a list, you can quickly edit it or remove it completely. |
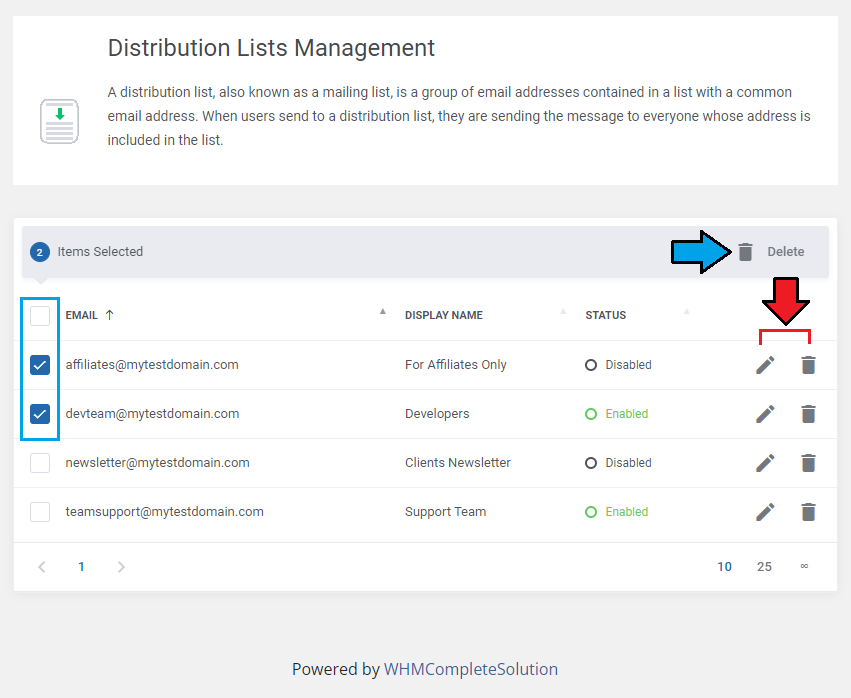
|
[edit] Domain Aliases
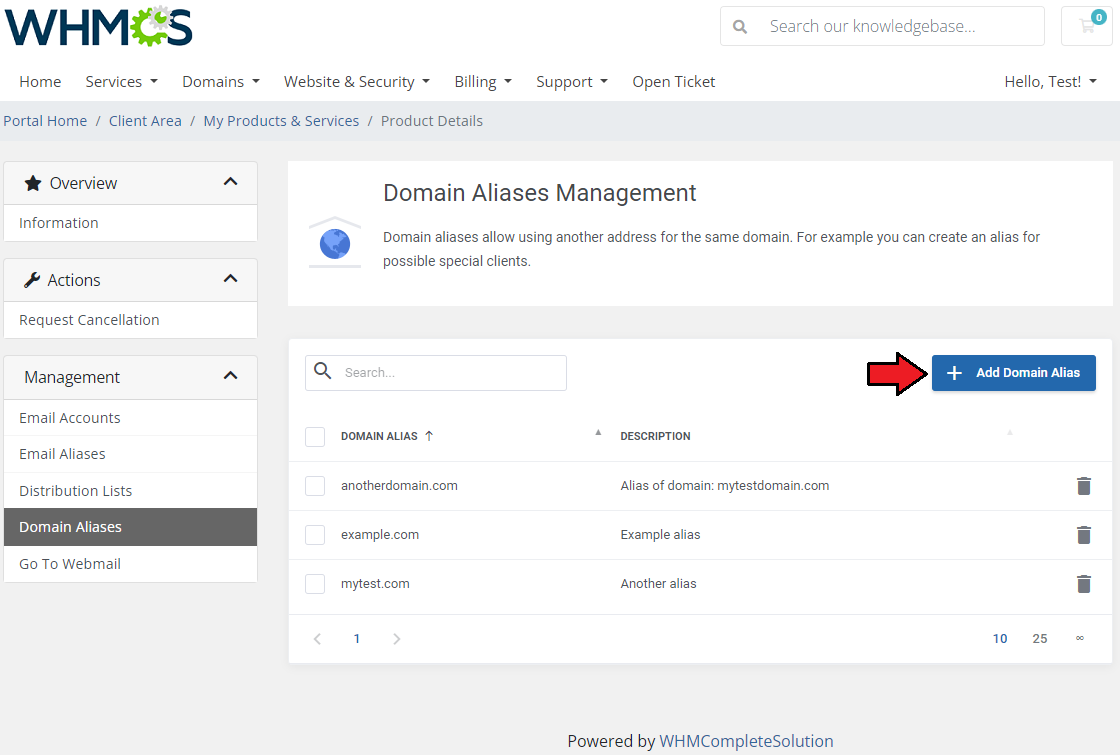
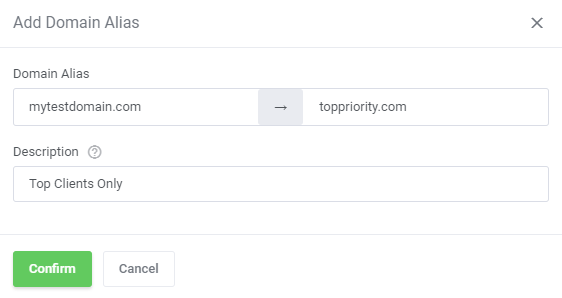
| Domain Aliases option allows you to create more than one domain name that will refer to the same account. Add a new domain alias, like on the below screen, and no matter which address used, emails will be delivered to the same mailbox. |
|
|
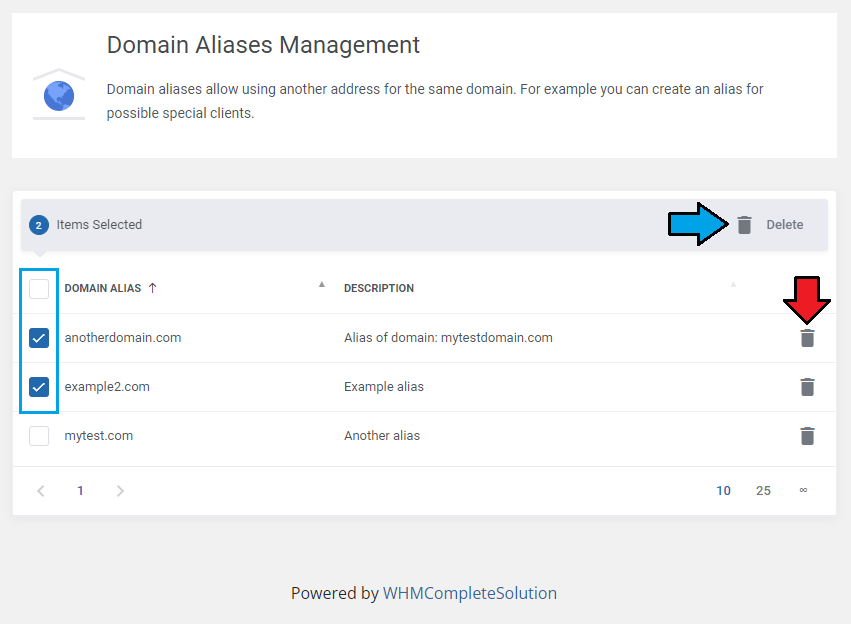
| When a domain alias is no longer needed, simply delete it by pressing an icon. |
|
[edit] Management of Billing
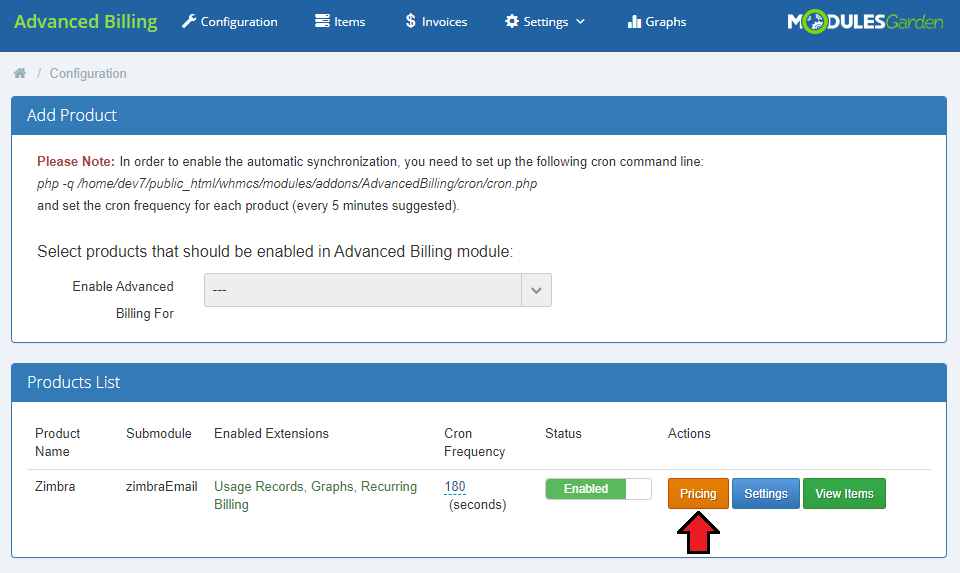
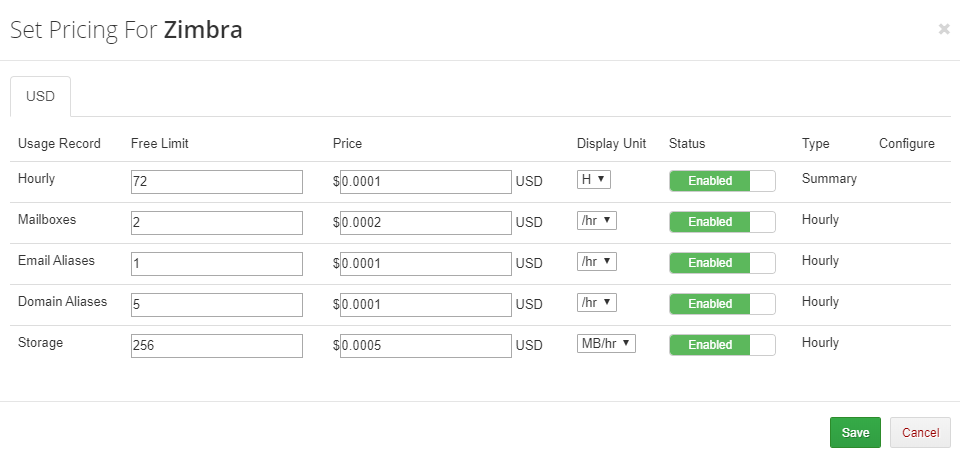
| When you combine Zimbra Email For WHMCS with Advanced Billing For WHMCS, you will be able to set up additional billing options. |
|
| Module allows you to charge your customers basing on the server resources used by them. For more detailed information on the configuration please refer to our Advanced Billing For WHMCS documentation. |
|
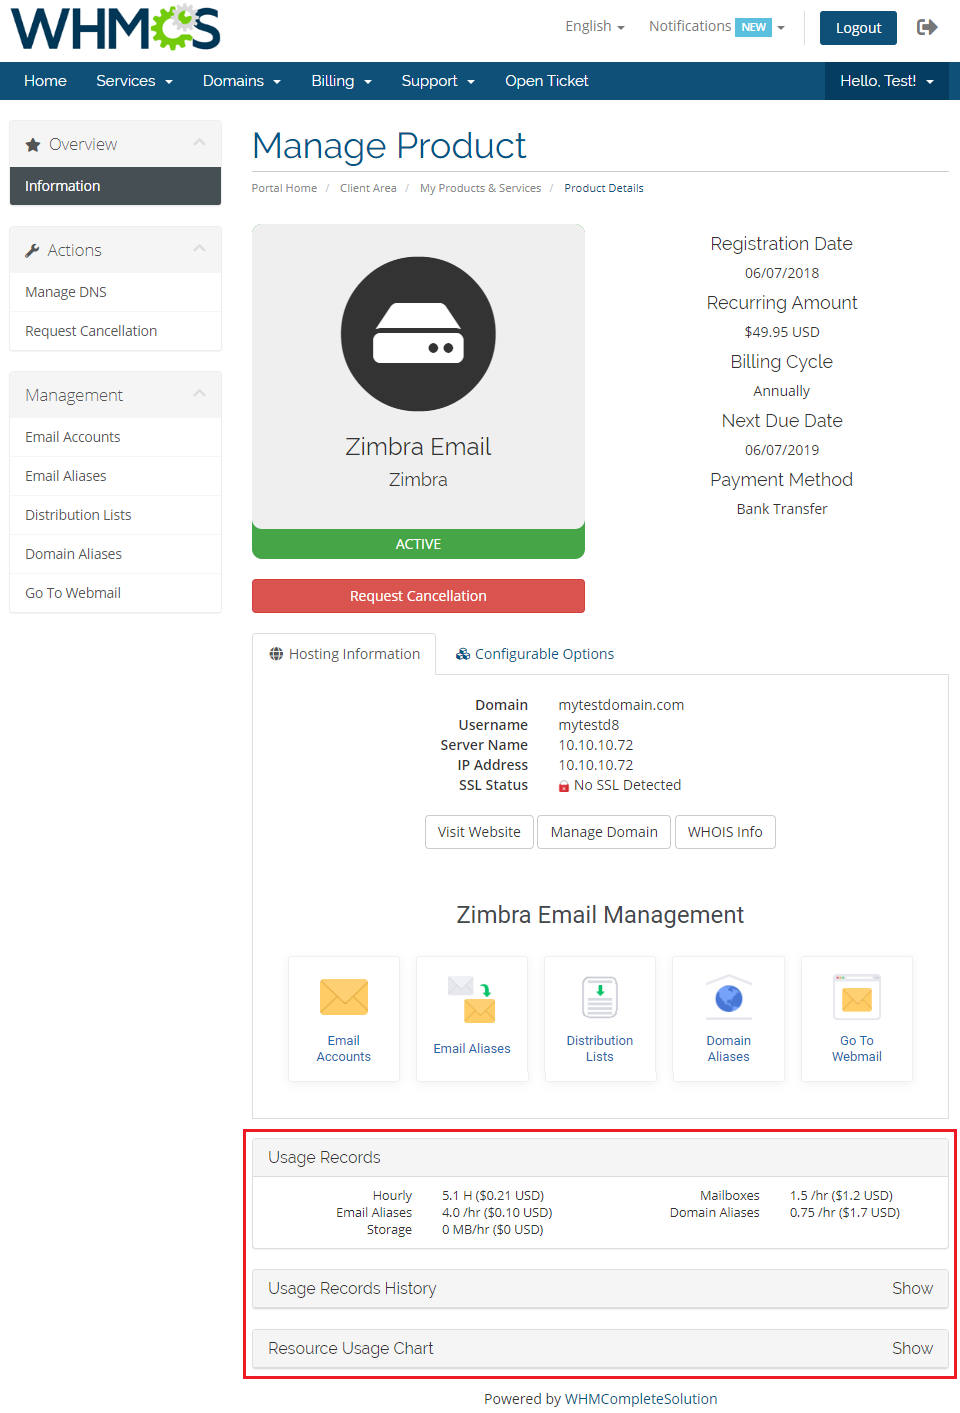
| With Advanced Billing module, you can also display the current server resource usage and their cost and let your customers see it. |
|
[edit] Tips
| 1. Zimbra Email For WHMCS requires SOAP installed on your server. |
| 2. You can set your own custom ports which will be applied only by clients in order to connect to their accounts when the 'Log In To Mailbox' option is used. To do so, please go to the file located here <whmcs>/modules/servers/zimbraEmail/app/Config/configuration.yml. |
3. To update the 'diskusage' table in 'tblhosting' , you need to run the following cron command.php -q /your_whmcs/crons/cron.php do --UpdateServerUsage |
[edit] How To Use Language Overrides
| Incorporating language customizations - the module readily accommodates language overrides, allowing you to tailor the language files to your preferences. The language file english.php remains unencoded and can be modified to suit your needs. However, it's recommended to avoid altering the core file itself, and instead, leverage the capability of using overrides. |
Here's how to apply language overrides:
~/langs/overrides/english.php.
For example: Original yourWHMCS/modules/servers/moduleName/langs/english.php: $_LANG['Search'] = 'Search'; Override yourWHMCS/modules/servers/moduleName/langs/overrides/english.php: $_LANG['Search'] = 'Look for'; |
| By following these steps, you can seamlessly implement language customizations without altering the core language file, ensuring your changes will not be lost after every module update. Remember that some of the modules have more than one language file, located under /addons and /servers paths. You may create the override files for both of them. |
[edit] Update Instructions
| An essential guidance through the process of updating the module is offered here. Important: If you migrate the module from version 1.X to version 2.X, the following steps are needed to be performed additionally:
|
[edit] Upgrade Guide
| Seeking a solution that offers greater flexibility, customization tailored to your precise needs, and unrestricted availability? There is an option that not only proves to be cost-effective in the long run but also includes prioritized support services, making it a truly valuable investment. Opt for the Open Source version of your Zimbra Email For WHMCS module to unlock these benefits. Follow a comprehensive guide covering the transition process, the advantages it brings, and step-by-step instructions on what to do next after the order has been successfully finalized. |
[edit] Common Problems
| 1. When you have problems with connection, check whether your SELinux or firewall does not block ports. |
| 2. If you got 'A problem with module occurred. Please contact the administration' error, please validate the correctness of your module license key first and you may also try to reissue key in your ModulesGarden control panel. |
|
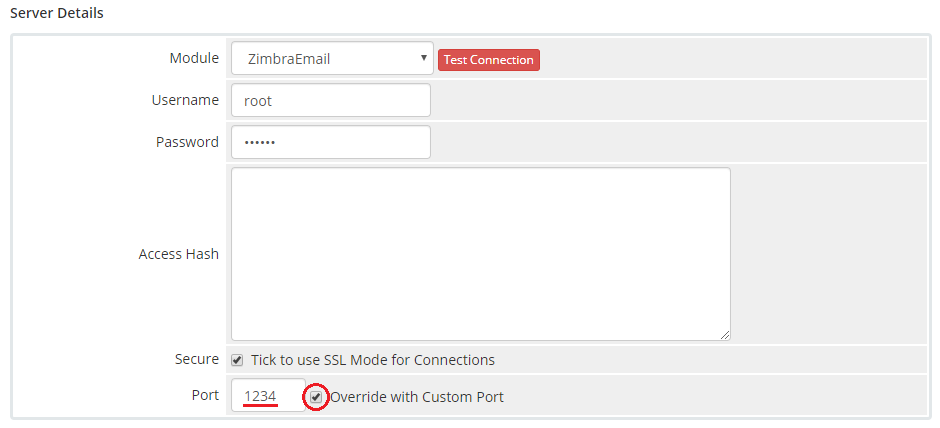
3. The error 'Could not connect to host' is connected with SOAP. To fix it, make sure that port default 7071 is open. Note: If you upgraded a module prior to 2.X version, the custom port was given in the 'Access Hash' field, which will no longer be used after the upgrade to 2.X version. |
|