Zendesk For WHMCS
From ModulesGarden Wiki
(Difference between revisions)
| Line 2: | Line 2: | ||
<meta name="description" content="ModulesGarden Zendesk For WHMCS Wiki Contains Comprehensive Information About Module Installation And Configuration."></meta> | <meta name="description" content="ModulesGarden Zendesk For WHMCS Wiki Contains Comprehensive Information About Module Installation And Configuration."></meta> | ||
| − | =About | + | =About Zendesk For WHMCS= |
{| | {| | ||
| − | |style="padding: 10px 0px 10px 0px;"| | + | |style="padding: 10px 0px 10px 0px;"| |
| − | + | ||
| − | + | ||
| − | + | ||
|} | |} | ||
*'''Management features:''' | *'''Management features:''' | ||
{| | {| | ||
| − | |style="padding: 10px 0px 0px 30px;"|✔ | + | |style="padding: 10px 0px 0px 30px;"|✔ |
|} | |} | ||
{| | {| | ||
| − | |style="padding: 0px 0px 0px 30px;"|✔ | + | |style="padding: 0px 0px 0px 30px;"|✔ |
|} | |} | ||
{| | {| | ||
| − | |style="padding: 0px 0px 0px 30px;"|✔ | + | |style="padding: 0px 0px 0px 30px;"|✔ |
|} | |} | ||
{| | {| | ||
| − | |style="padding: 0px 0px 0px 30px;"|✔ | + | |style="padding: 0px 0px 0px 30px;"|✔ |
|} | |} | ||
{| | {| | ||
| − | |style="padding: 0px 0px 0px 30px;"|✔ | + | |style="padding: 0px 0px 0px 30px;"|✔ |
|} | |} | ||
{| | {| | ||
| − | |style="padding: 0px 0px 0px 30px;"|✔ | + | |style="padding: 0px 0px 0px 30px;"|✔ |
|} | |} | ||
{| | {| | ||
| − | |style="padding: 0px 0px 0px 30px;"|✔ | + | |style="padding: 0px 0px 0px 30px;"|✔ |
|} | |} | ||
{| | {| | ||
| − | |style="padding: 0px 0px 0px 30px;"|✔ | + | |style="padding: 0px 0px 0px 30px;"|✔ |
|} | |} | ||
{| | {| | ||
| − | |style="padding: 0px 0px 10px 30px;"|✔ | + | |style="padding: 0px 0px 10px 30px;"|✔ |
|} | |} | ||
*'''Additionally:''' | *'''Additionally:''' | ||
{| | {| | ||
| − | |style="padding: 10px 0px 0px 30px;"|✔ | + | |style="padding: 10px 0px 0px 30px;"|✔ |
|} | |} | ||
{| | {| | ||
| − | |style="padding: 0px 0px 0px 30px;"|✔ | + | |style="padding: 0px 0px 0px 30px;"|✔ |
|} | |} | ||
{| | {| | ||
| − | |style="padding: 0px 0px 0px 30px;"|✔ | + | |style="padding: 0px 0px 0px 30px;"|✔ |
|} | |} | ||
{| | {| | ||
| − | |style="padding: 0px 0px 0px 30px;"|✔ | + | |style="padding: 0px 0px 0px 30px;"|✔ |
|} | |} | ||
{| | {| | ||
| − | |style="padding: 0px 0px 0px 30px;"|✔ | + | |style="padding: 0px 0px 0px 30px;"|✔ |
|} | |} | ||
{| | {| | ||
| − | |style="padding: 0px 0px 30px 30px;"|✔ | + | |style="padding: 0px 0px 30px 30px;"|✔ |
|} | |} | ||
Revision as of 15:09, 14 February 2013
Contents |
About Zendesk For WHMCS
- Management features:
| ✔ |
| ✔ |
| ✔ |
| ✔ |
| ✔ |
| ✔ |
| ✔ |
| ✔ |
| ✔ |
- Additionally:
| ✔ |
| ✔ |
| ✔ |
| ✔ |
| ✔ |
| ✔ |
Installation and Configuration
| This tutorial will show you how to successfully install and configure Plesk Extended For WHMCS. We will guide you step by step through the whole installation and configuration process. |
| 1. Login to your clientarea and download Plesk Extended For WHMCS. |
| File:PE1.png |
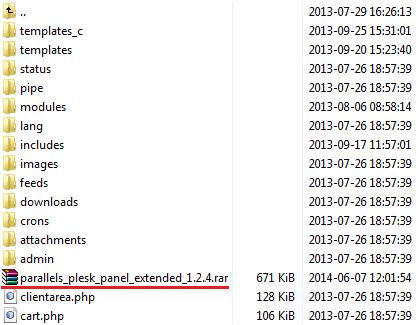
| 2. Upload and extract the module into the main WHMCS directory. |
| Files in your WHMCS directory should look like this. |

|
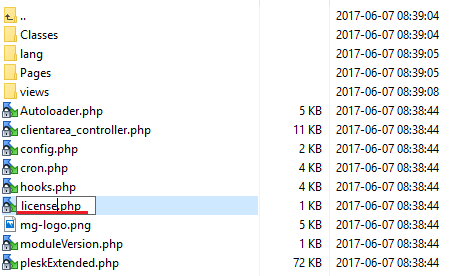
| 3. When you install Plesk Extended for the first time you have to rename 'license_RENAME.php' file. |
| File is located at 'modules/servers/plesk_extended/license_RENAME.php' . Rename it from 'license_RENAME.php' to 'license.php' . |

|
| 4. In order to configure your license key you have to edit a previously renamed 'license.php' file. |
| Enter your licence key between quotation marks as presented on the following screen. You can find your license key at your clientarea → 'My Products' . |

|
| 5. Now you have to activate the module in your WHMCS system. |
| Login to your WHMCS admin area. Click 'Setup' then choose 'Addon Modules' . |
| Afterwards find 'Plesk Extended Functions' and press Activate button. |
| File:PE5.png |
| 6. In next step you need to permit access to this module. |
| To do so choose 'Full Administrator' and press 'Save Changes' . |
| File:PE6.png |
| 7. You have just successfully installed Plesk Extended For WHMCS! Now in your WHMCS system press 'Addons' then press 'Plesk Extended Functions' . |
| You will see a following screen. Let's proceed to configuration of your freshly installed module. |
| File:PE7.png |
| 8. Now we will show you how to configure a new product. |
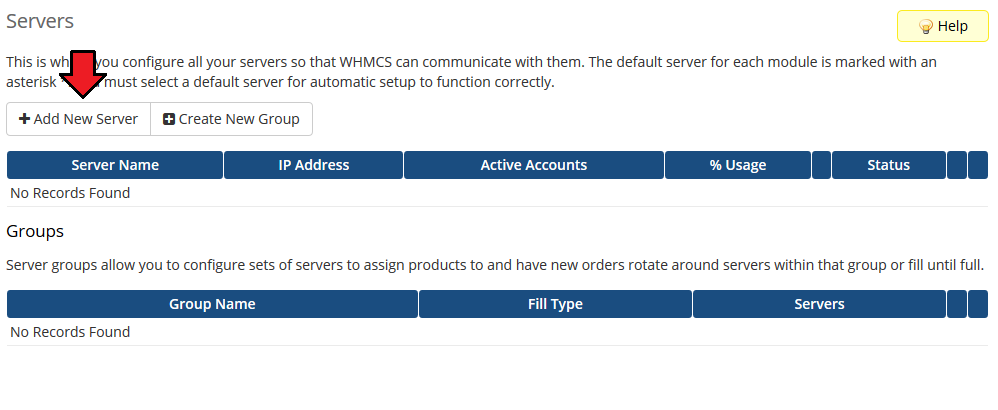
| To do so log in into your WHMCS. Now press 'Setup' → 'Products/Services' → 'Servers' (or 'Setup' → 'Servers' in WHMCS v4.x). |
| Afterwards press 'Add New Server' . |

|
| 9. Next, enter your server name, IP adress, username and password. Choose 'Plesk_extended' from a dropdown menu and press 'Save Changes' . |
| Here you can also provide other server details like nameservers or maximum number of accounts. |
| File:PE9.png |
| 10. After you configure your server correctly, you will see a following screen. |
| Now you need to create a new group for your server. For that purpose press 'Create New Group' . |
| File:PE10.1.png |
| 11. Enter name, click on your previously created server, press 'Add' then press 'Save Changes' . |
| File:PE10.2.png |
| 12. In order to create and configure product click on 'Setup' → 'Products/Services' → 'Products/Services' . |
| If you don't have a product group, click on 'Create a New Group' . If you do, simply go to step 14. |

|
| 13. Enter product group name and press 'Create Group' . |
| File:PE10.png |
| 14. When you have a product group, you can create your product and assign it with Plesk Extended. If you already have a product, go to step 16. |
| To create a product click on 'Create a New Product' . |
| File:CP12.1.png |
| 15. Afterwards choose your product type and product group from a dropdown menus, enter your product name and press 'Continue' . |
| File:PE11.png |
| 16. Now go to 'Module Settings' section, choose both 'Plesk_extended' and your previously created server group from a dropdown menus. Remember to add your 'Service Plan Name' or 'Reseller Plan Name' . Plesk Extended won't work properly without specified plan name. Don't forget to press 'Save Changes' . |
| File:PE12.png |
| 17. Good job! You have just correctly created and customized new product which will appear in Plesk Extended admin area. To verify whether everything is working as it should, click on 'Addons' → 'Plesk Extended Functions' in your WHMCS. Your previously created product should appear on the list. |
| File:PE13.png |
| 18. Tick 'Check All' and press 'Save Changes' . |
| File:PE13.1.png |
| 19. That's all, from now on all your clients who ordered previously created 'Golden Plan' will be able to manage their accounts without even entering Plesk. |
| File:PE14.png |
| This is what your customers should see in their clientarea: |
| File:PE.14.2.png |
Management
| Plesk Extended allows your customers to manage their Parallels Plesk Accounts via clientarea in your WHMCS system. |
| In this short guide we will present you the management possibilities of our module. |
Management of FTP Accounts
| 1. On Windows based server you can manage your FTP accounts through creating, modifying and deleting. On Linux based server you can change your FTP password. |
| File:PE14.1.png |
Management of Emails
| 2. You can manage all aspects related to e-mail accounts. |
| File:PE15.png |
Management of Databases
| 3. Owing to MySQL Databases Management you can create/delete new databases and users. You can also add users to particular databases. |
| File:PE16.png |
Management of Subdomains
| 4. You can create and manage your subdomains. |
| File:PE17.png |
Management of Domain Aliases
| 5. You can also add and manage domain aliases. |
| File:PE18.png |
Management of Domains Forwarders
| 6. Easy access to domain forwarders is very useful. Within a few seconds, you can redirect the page to point to another. |
| File:PE19.png |
Management of DNS
| 7. Your customers are going to love this feature! Here you can manage DNS of your account. |
| File:PE20.png |
Log In To Plesk
| 8. With a single click of a button 'Login to Plesk' you can log in to your Parallels Panel. |
| File:PE21.png |
Log In To Webmail
| 9. You can quickly access your webmail through pressing 'Login to Webmail' button. |
| File:PE22.png |
Tips
Common Problems
| 1. If you will see an error as shown on the screen below that means you didn't provide your service plan name nor reseller plan name in product's 'Module Settings'. After you enter the name, problem will dissapear. |
| File:PE23.png |