Vultr VPS For WHMCS
(→Configuration of Server) |
(→About Vultr VPS For WHMCS) |
||
| (96 intermediate revisions by 4 users not shown) | |||
| Line 4: | Line 4: | ||
=About [https://www.modulesgarden.com/products/whmcs/vultr-vps Vultr VPS For WHMCS]= | =About [https://www.modulesgarden.com/products/whmcs/vultr-vps Vultr VPS For WHMCS]= | ||
{| | {| | ||
| − | |style="padding: 10px 0px 10px 0px;"|'''Vultr VPS For WHMCS''' is a module which allows | + | |style="padding: 10px 0px 10px 0px;"|'''Vultr VPS For WHMCS''' is a module which allows fully automated management of Vultr VPS servers. <br/> |
| − | The module will allow your clients to remotely control the status of a server, access the console, | + | The module will allow your clients to remotely control the status of a server, access the console, rebuild the VPS and many others.<br/> |
| − | + | You will be also allowed to adjust your offer to even the most demanding needs of your clients with the wide range of configurable options. | |
|} | |} | ||
<!--a comment maybe? --> | <!--a comment maybe? --> | ||
| Line 14: | Line 14: | ||
|} | |} | ||
{| | {| | ||
| − | |style="padding: 0px 0px 0px 30px;"|✔ Change Package | + | |style="padding: 0px 0px 0px 30px;"|✔ Change Package |
|} | |} | ||
{| | {| | ||
| − | |style="padding: 0px 0px 0px 30px;"|✔ | + | |style="padding: 0px 0px 0px 30px;"|✔ Start/Stop/Reboot/Reinstall Server |
|} | |} | ||
{| | {| | ||
| − | |style="padding: 0px 0px 0px 30px;"|✔ | + | |style="padding: 0px 0px 0px 30px;"|✔ Access noVNC Console |
|} | |} | ||
{| | {| | ||
| − | |style="padding: 0px 0px 0px 30px;"|✔ | + | |style="padding: 0px 0px 0px 30px;"|✔ View Instance Status And Details |
|} | |} | ||
{| | {| | ||
| − | |style="padding: 0px 0px 0px 30px;"|✔ | + | |style="padding: 0px 0px 0px 30px;"|✔ View Assigned Public IPv4 And IPv6 Network Details |
|} | |} | ||
{| | {| | ||
| − | |style="padding: 0px 0px 0px 30px;"|✔ | + | |style="padding: 0px 0px 0px 30px;"|✔ View/Schedule/Restore Automatic Backups |
|} | |} | ||
{| | {| | ||
| − | |style="padding: 0px 0px 0px 30px;"|✔ | + | |style="padding: 0px 0px 0px 30px;"|✔ View/Create Firewall Rules |
|} | |} | ||
{| | {| | ||
| − | |style="padding: 0px 0px 0px 30px;"|✔ View | + | |style="padding: 0px 0px 0px 30px;"|✔ View/Create/Restore Snapshots |
|} | |} | ||
{| | {| | ||
| − | |style="padding: 0px 0px 0px 30px;"|✔ View | + | |style="padding: 0px 0px 0px 30px;"|✔ View/Create/Manage Reverse DNS Records |
|} | |} | ||
{| | {| | ||
| − | |style="padding: 0px 0px 0px 30px;"|✔ View | + | |style="padding: 0px 0px 0px 30px;"|✔ View Assigned Reserved IP Addresses |
|} | |} | ||
{| | {| | ||
| − | |style="padding: 0px 0px 0px 30px;"|✔ | + | |style="padding: 0px 0px 0px 30px;"|✔ Configure Product Details: |
|} | |} | ||
{| | {| | ||
| − | |style="padding: 0px 0px 0px | + | |style="padding: 0px 0px 0px 45px;"|✔ Choose Region |
|} | |} | ||
{| | {| | ||
| − | |style="padding: 0px 0px 0px 45px;"|✔ | + | |style="padding: 0px 0px 0px 45px;"|✔ Choose Plan |
|} | |} | ||
{| | {| | ||
| − | |style="padding: 0px 0px 0px | + | |style="padding: 0px 0px 0px 45px;"|✔ Choose Operation System |
|} | |} | ||
{| | {| | ||
| − | |style="padding: 0px 0px 0px | + | |style="padding: 0px 0px 0px 45px;"|✔ Choose ISO Image |
|} | |} | ||
{| | {| | ||
| − | |style="padding: 0px 0px 0px | + | |style="padding: 0px 0px 0px 45px;"|✔ Choose Snapshot |
|} | |} | ||
{| | {| | ||
| − | |style="padding: 0px 0px 0px 45px;"|✔ | + | |style="padding: 0px 0px 0px 45px;"|✔ Choose Application |
|} | |} | ||
{| | {| | ||
| − | |style="padding: 0px 0px 0px | + | |style="padding: 0px 0px 0px 45px;"|✔ Toggle Automatic Backups |
|} | |} | ||
{| | {| | ||
| − | |style="padding: 0px 0px 0px | + | |style="padding: 0px 0px 0px 45px;"|✔ Toggle IPv6 Address |
|} | |} | ||
{| | {| | ||
| − | |style="padding: 0px 0px 0px 45px;"|✔ | + | |style="padding: 0px 0px 0px 45px;"|✔ Toggle DDOS Protection |
|} | |} | ||
{| | {| | ||
| − | |style="padding: 0px 0px 0px | + | |style="padding: 0px 0px 0px 45px;"|✔ Use Hostname In Label Field |
|} | |} | ||
{| | {| | ||
| − | |style="padding: 0px 0px 0px | + | |style="padding: 0px 0px 0px 45px;"|✔ Enable White Label noVNC Console |
|} | |} | ||
{| | {| | ||
| − | |style="padding: 0px 0px 0px | + | |style="padding: 0px 0px 0px 45px;"|✔ Provide Random Domain Prefix |
|} | |} | ||
{| | {| | ||
| − | |style="padding: 0px 0px 0px | + | |style="padding: 0px 0px 0px 45px;"|✔ Provide Default Reverse DNS Template |
|} | |} | ||
{| | {| | ||
| − | |style="padding: 0px 0px 0px 45px;"|✔ | + | |style="padding: 0px 0px 0px 45px;"|✔ Provide Cloud-Init User-Data Initiation Script |
|} | |} | ||
{| | {| | ||
| − | |style="padding: 0px 0px 0px | + | |style="padding: 0px 0px 0px 30px;"|✔ Choose Features Available In Client Area: |
|} | |} | ||
{| | {| | ||
| − | |style="padding: 0px 0px 0px | + | |style="padding: 0px 0px 0px 45px;"|✔ Backups |
|} | |} | ||
{| | {| | ||
| − | |style="padding: 0px 0px 0px | + | |style="padding: 0px 0px 0px 45px;"|✔ Firewall |
|} | |} | ||
{| | {| | ||
| − | |style="padding: 0px 0px 0px | + | |style="padding: 0px 0px 0px 45px;"|✔ Rebuild |
|} | |} | ||
{| | {| | ||
| − | |style="padding: 0px 0px 0px | + | |style="padding: 0px 0px 0px 45px;"|✔ Reverse DNS |
|} | |} | ||
{| | {| | ||
| − | |style="padding: 0px 0px 0px | + | |style="padding: 0px 0px 0px 45px;"|✔ User Data |
|} | |} | ||
{| | {| | ||
| − | |style="padding: 0px 0px 0px | + | |style="padding: 0px 0px 0px 45px;"|✔ Available Images To Rebuild |
|} | |} | ||
{| | {| | ||
| − | |style="padding: 0px 0px 0px 45px;"|✔ | + | |style="padding: 0px 0px 0px 45px;"|✔ Console |
|} | |} | ||
{| | {| | ||
| − | |style="padding: 0px 0px 0px | + | |style="padding: 0px 0px 0px 45px;"|✔ Graphs |
|} | |} | ||
{| | {| | ||
| − | |style="padding: 0px 0px 0px | + | |style="padding: 0px 0px 0px 45px;"|✔ Snapshots |
|} | |} | ||
{| | {| | ||
| − | |style="padding: 0px 0px 0px 45px;"|✔ | + | |style="padding: 0px 0px 0px 45px;"|✔ Reserved IPs |
|} | |} | ||
{| | {| | ||
| − | |style="padding: 0px 0px 0px 45px;"|✔ | + | |style="padding: 0px 0px 0px 45px;"|✔ Custom ISO |
|} | |} | ||
{| | {| | ||
| − | |style="padding: 0px 0px 0px 45px;"|✔ | + | |style="padding: 0px 0px 0px 45px;"|✔ Available ISO Images To Mount |
|} | |} | ||
{| | {| | ||
| − | |style="padding: 0px 0px | + | |style="padding: 0px 0px 0px 30px;"|✔ Enable Instance Block Storage With Defined Type And Size |
|} | |} | ||
| − | |||
{| | {| | ||
| − | |style="padding: | + | |style="padding: 0px 0px 0px 30px;"|✔ Enable Reserved IPv4 And IPv6 Addresses Within Defined Limits |
|} | |} | ||
{| | {| | ||
| − | |style="padding: 0px 0px 0px 30px;"|✔ | + | |style="padding: 0px 0px 0px 30px;"|✔ Generate Configurable Options |
|} | |} | ||
{| | {| | ||
| − | |style="padding: 0px 0px | + | |style="padding: 0px 0px 10px 30px;"|✔ Run API Connection Test |
|} | |} | ||
| + | |||
| + | *'''Client Area Features:''' | ||
{| | {| | ||
| − | |style="padding: | + | |style="padding: 10px 0px 0px 30px;"|✔ Start/Stop/Reboot/Reinstall Server |
|} | |} | ||
{| | {| | ||
| − | |style="padding: 0px 0px 0px 30px;"|✔ | + | |style="padding: 0px 0px 0px 30px;"|✔ Access noVNC Console |
|} | |} | ||
{| | {| | ||
| − | |style="padding: 0px 0px 0px 30px;"|✔ | + | |style="padding: 0px 0px 0px 30px;"|✔ View Instance Status And Details |
|} | |} | ||
{| | {| | ||
| − | |style="padding: 0px 0px 0px 30px;"|✔ | + | |style="padding: 0px 0px 0px 30px;"|✔ View Assigned Public IPv4 And IPv6 Network Details |
|} | |} | ||
{| | {| | ||
| − | |style="padding: 0px 0px 0px 30px;"|✔ | + | |style="padding: 0px 0px 0px 30px;"|✔ View/Schedule/Restore Automatic Backups |
|} | |} | ||
{| | {| | ||
| − | |style="padding: 0px 0px 0px 30px;"|✔ | + | |style="padding: 0px 0px 0px 30px;"|✔ Mount Custom ISO Images |
|} | |} | ||
{| | {| | ||
| − | |style="padding: 0px 0px 0px 30px;"|✔ | + | |style="padding: 0px 0px 0px 30px;"|✔ View/Create Firewall Rules |
|} | |} | ||
{| | {| | ||
| − | |style="padding: 0px 0px 0px 30px;"|✔ | + | |style="padding: 0px 0px 0px 30px;"|✔ View Bandwidth Usage Graph |
|} | |} | ||
{| | {| | ||
| − | |style="padding: 0px 0px 0px 30px;"|✔ | + | |style="padding: 0px 0px 0px 30px;"|✔ Rebuild Server With Chosen OS Distribution |
|} | |} | ||
{| | {| | ||
| − | |style="padding: 0px 0px 0px | + | |style="padding: 0px 0px 0px 30px;"|✔ View Assigned Reserved IP Addresses |
|} | |} | ||
{| | {| | ||
| − | |style="padding: 0px 0px 0px | + | |style="padding: 0px 0px 0px 30px;"|✔ View/Create/Manage Reverse DNS Records |
|} | |} | ||
{| | {| | ||
| − | |style="padding: 0px 0px 0px | + | |style="padding: 0px 0px 0px 30px;"|✔ View/Create/Restore/Delete Snapshots |
|} | |} | ||
{| | {| | ||
| − | |style="padding: 0px 0px | + | |style="padding: 0px 0px 10px 30px;"|✔ Provide Cloud-Init User-Data Initiation Script |
|} | |} | ||
| + | |||
| + | *'''Configurable Options:''' | ||
{| | {| | ||
| − | |style="padding: | + | |style="padding: 10px 0px 0px 30px;"|✔ Application |
|} | |} | ||
{| | {| | ||
| − | |style="padding: 0px 0px 0px 30px;"|✔ | + | |style="padding: 0px 0px 0px 30px;"|✔ Backups |
|} | |} | ||
{| | {| | ||
| − | |style="padding: 0px 0px 0px 30px;"|✔ | + | |style="padding: 0px 0px 0px 30px;"|✔ Block Storage Size |
|} | |} | ||
{| | {| | ||
| − | |style="padding: 0px 0px | + | |style="padding: 0px 0px 0px 30px;"|✔ Block Storage Type |
|} | |} | ||
| − | |||
| − | |||
{| | {| | ||
| − | |style="padding: | + | |style="padding: 0px 0px 0px 30px;"|✔ DDOS Protection |
|} | |} | ||
{| | {| | ||
| − | |style="padding: 0px 0px 0px 30px;"|✔ | + | |style="padding: 0px 0px 0px 30px;"|✔ IPv6 |
|} | |} | ||
{| | {| | ||
| − | |style="padding: 0px 0px 0px 30px;"|✔ | + | |style="padding: 0px 0px 0px 30px;"|✔ ISO Image |
|} | |} | ||
{| | {| | ||
| − | |style="padding: 0px 0px 0px 30px;"|✔ | + | |style="padding: 0px 0px 0px 30px;"|✔ Operating System or Application |
|} | |} | ||
{| | {| | ||
| − | |style="padding: 0px 0px 0px 30px;"|✔ | + | |style="padding: 0px 0px 0px 30px;"|✔ Operating System |
|} | |} | ||
{| | {| | ||
| − | |style="padding: 0px 0px 0px 30px;"|✔ | + | |style="padding: 0px 0px 0px 30px;"|✔ Plan |
|} | |} | ||
{| | {| | ||
| − | |style="padding: 0px 0px 0px 30px;"|✔ | + | |style="padding: 0px 0px 0px 30px;"|✔ Region |
|} | |} | ||
{| | {| | ||
| − | |style="padding: 0px 0px 0px 30px;"|✔ | + | |style="padding: 0px 0px 0px 30px;"|✔ Reserved IPv4 |
|} | |} | ||
{| | {| | ||
| − | |style="padding: 0px 0px 0px 30px;"|✔ | + | |style="padding: 0px 0px 0px 30px;"|✔ Reserved IPv6 |
|} | |} | ||
{| | {| | ||
| − | |style="padding: 0px 0px | + | |style="padding: 0px 0px 10px 30px;"|✔ Snapshot |
|} | |} | ||
| + | |||
| + | *'''Available Images And Applications:''' | ||
{| | {| | ||
| − | |style="padding: | + | |style="padding: 10px 0px 0px 30px;"|✔ Linux OS: |
|} | |} | ||
{| | {| | ||
| − | |style="padding: 0px 0px | + | |style="padding: 0px 0px 0px 45px;"|✔ AlmaLinux |
|} | |} | ||
| − | |||
{| | {| | ||
| − | |style="padding: | + | |style="padding: 0px 0px 0px 45px;"|✔ Arch Linux |
|} | |} | ||
{| | {| | ||
| − | |style="padding: 0px 0px 0px | + | |style="padding: 0px 0px 0px 45px;"|✔ CentOS |
|} | |} | ||
{| | {| | ||
| − | |style="padding: 0px 0px 0px | + | |style="padding: 0px 0px 0px 45px;"|✔ Debian |
|} | |} | ||
{| | {| | ||
| − | |style="padding: 0px 0px 0px | + | |style="padding: 0px 0px 0px 45px;"|✔ Fedora |
|} | |} | ||
{| | {| | ||
| − | |style="padding: 0px 0px 0px | + | |style="padding: 0px 0px 0px 45px;"|✔ Fedora CoreOS |
|} | |} | ||
{| | {| | ||
| − | |style="padding: 0px 0px 0px | + | |style="padding: 0px 0px 0px 45px;"|✔ FreeBSD |
|} | |} | ||
{| | {| | ||
| − | |style="padding: 0px 0px 0px | + | |style="padding: 0px 0px 0px 45px;"|✔ OpenBSD |
|} | |} | ||
{| | {| | ||
| − | |style="padding: 0px 0px 0px | + | |style="padding: 0px 0px 0px 45px;"|✔ Rocky Linux |
|} | |} | ||
{| | {| | ||
| − | |style="padding: 0px 0px 0px | + | |style="padding: 0px 0px 0px 45px;"|✔ Ubuntu |
|} | |} | ||
{| | {| | ||
| − | |style="padding: 0px 0px 0px | + | |style="padding: 0px 0px 0px 45px;"|✔ VzLinux |
|} | |} | ||
{| | {| | ||
| − | |style="padding: 0px 0px 0px 30px;"|✔ | + | |style="padding: 0px 0px 0px 30px;"|✔ Microsoft Windows: |
|} | |} | ||
{| | {| | ||
| − | |style="padding: 0px 0px 0px | + | |style="padding: 0px 0px 0px 45px;"|✔ Windows Core 2022 |
|} | |} | ||
{| | {| | ||
| − | |style="padding: 0px 0px 0px | + | |style="padding: 0px 0px 0px 45px;"|✔ Windows Core 2019 |
|} | |} | ||
{| | {| | ||
| − | |style="padding: 0px 0px 0px | + | |style="padding: 0px 0px 0px 45px;"|✔ Windows Core 2016 |
|} | |} | ||
{| | {| | ||
| − | |style="padding: 0px 0px 0px | + | |style="padding: 0px 0px 0px 45px;"|✔ Windows Server 2022 |
|} | |} | ||
{| | {| | ||
| − | |style="padding: 0px 0px 0px | + | |style="padding: 0px 0px 0px 45px;"|✔ Windows Server 2019 |
|} | |} | ||
{| | {| | ||
| − | |style="padding: 0px 0px 0px | + | |style="padding: 0px 0px 0px 45px;"|✔ Windows Server 2016 |
|} | |} | ||
{| | {| | ||
| − | |style="padding: 0px 0px | + | |style="padding: 0px 0px 0px 45px;"|✔ Windows Server 2012 RS |
|} | |} | ||
| − | |||
| − | |||
{| | {| | ||
| − | |style="padding: | + | |style="padding: 0px 0px 0px 30px;"|✔ Marketplace Apps: |
|} | |} | ||
{| | {| | ||
| − | |style="padding: 0px 0px 0px | + | |style="padding: 0px 0px 0px 45px;"|✔ 3DKit |
|} | |} | ||
{| | {| | ||
| − | |style="padding: 0px 0px 0px | + | |style="padding: 0px 0px 0px 45px;"|✔ AIDungeon2 |
|} | |} | ||
{| | {| | ||
| − | |style="padding: 0px 0px 0px | + | |style="padding: 0px 0px 0px 45px;"|✔ Anaconda |
|} | |} | ||
{| | {| | ||
| − | |style="padding: 0px 0px | + | |style="padding: 0px 0px 0px 45px;"|✔ Ant Media Server (Community Edition/Enterprise Edition) |
|} | |} | ||
| − | |||
{| | {| | ||
| − | |style="padding: | + | |style="padding: 0px 0px 0px 45px;"|✔ Asp.net |
|} | |} | ||
{| | {| | ||
| − | |style="padding: 0px 0px 0px | + | |style="padding: 0px 0px 0px 45px;"|✔ AzuraCast |
|} | |} | ||
{| | {| | ||
| − | |style="padding: 0px 0px 0px | + | |style="padding: 0px 0px 0px 45px;"|✔ Bitnami via Vultr (Jenkins/Magento/PrestaShop) |
|} | |} | ||
{| | {| | ||
| − | |style="padding: 0px 0px 0px | + | |style="padding: 0px 0px 0px 45px;"|✔ BotGuard Ingress Controller |
|} | |} | ||
{| | {| | ||
| − | |style="padding: 0px 0px 0px | + | |style="padding: 0px 0px 0px 45px;"|✔ CentOS Web Panel |
|} | |} | ||
{| | {| | ||
| − | |style="padding: 0px 0px 0px | + | |style="padding: 0px 0px 0px 45px;"|✔ Chevereto |
|} | |} | ||
{| | {| | ||
| − | |style="padding: 0px 0px 0px | + | |style="padding: 0px 0px 0px 45px;"|✔ CloudHub |
|} | |} | ||
{| | {| | ||
| − | |style="padding: 0px 0px 0px | + | |style="padding: 0px 0px 0px 45px;"|✔ CloudPanel 2 |
|} | |} | ||
{| | {| | ||
| − | |style="padding: 0px 0px 0px | + | |style="padding: 0px 0px 0px 45px;"|✔ Cloudron |
|} | |} | ||
{| | {| | ||
| − | |style="padding: 0px 0px 0px | + | |style="padding: 0px 0px 0px 45px;"|✔ ClusterControl |
|} | |} | ||
{| | {| | ||
| − | |style="padding: 0px 0px 0px | + | |style="padding: 0px 0px 0px 45px;"|✔ Coder |
|} | |} | ||
{| | {| | ||
| − | |style="padding: 0px 0px 0px | + | |style="padding: 0px 0px 0px 45px;"|✔ cPanel |
|} | |} | ||
{| | {| | ||
| − | |style="padding: 0px 0px | + | |style="padding: 0px 0px 0px 45px;"|✔ CyberPanel |
|} | |} | ||
| − | |||
| − | |||
{| | {| | ||
| − | |style="padding: | + | |style="padding: 0px 0px 0px 45px;"|✔ Docker |
| − | + | ||
|} | |} | ||
| − | |||
{| | {| | ||
| − | |style="padding: | + | |style="padding: 0px 0px 0px 45px;"|✔ Drupal |
|} | |} | ||
{| | {| | ||
| − | |style="padding: 0px 0px | + | |style="padding: 0px 0px 0px 45px;"|✔ Easypanel |
|} | |} | ||
{| | {| | ||
| − | |style="padding: 0px 0px | + | |style="padding: 0px 0px 0px 45px;"|✔ FASTPANEL |
| − | + | ||
|} | |} | ||
{| | {| | ||
| − | |style="padding: 0px 0px | + | |style="padding: 0px 0px 0px 45px;"|✔ FileCloud |
|} | |} | ||
{| | {| | ||
| − | |style="padding: 0px 0px | + | |style="padding: 0px 0px 0px 45px;"|✔ Gitea |
| − | + | ||
|} | |} | ||
{| | {| | ||
| − | |style="padding: 0px 0px | + | |style="padding: 0px 0px 0px 45px;"|✔ GitLab |
|} | |} | ||
{| | {| | ||
| − | |style="padding: 0px 0px | + | |style="padding: 0px 0px 0px 45px;"|✔ Helpy Pro |
| − | + | ||
| − | + | ||
|} | |} | ||
{| | {| | ||
| − | |style="padding: 0px 0px | + | |style="padding: 0px 0px 0px 45px;"|✔ Jamulus |
|} | |} | ||
{| | {| | ||
| − | |style="padding: 0px 0px | + | |style="padding: 0px 0px 0px 45px;"|✔ Jelastic DevOps PaaS |
| − | + | ||
| − | + | ||
|} | |} | ||
| − | |||
| − | |||
{| | {| | ||
| − | |style="padding: | + | |style="padding: 0px 0px 0px 45px;"|✔ Jitsi |
| − | + | ||
|} | |} | ||
{| | {| | ||
| − | |style="padding: 0px 0px | + | |style="padding: 0px 0px 0px 45px;"|✔ Joomla |
| − | + | ||
|} | |} | ||
{| | {| | ||
| − | |style="padding: 0px 0px | + | |style="padding: 0px 0px 0px 45px;"|✔ Keitaro |
|} | |} | ||
{| | {| | ||
| − | |style="padding: 0px 0px | + | |style="padding: 0px 0px 0px 45px;"|✔ LAMP |
|} | |} | ||
{| | {| | ||
| − | |style="padding: 0px 0px | + | |style="padding: 0px 0px 0px 45px;"|✔ LEMP |
|} | |} | ||
{| | {| | ||
| − | |style="padding: 0px 0px | + | |style="padding: 0px 0px 0px 45px;"|✔ Lume Web DNS Relay |
|} | |} | ||
{| | {| | ||
| − | |style="padding: 0px 0px | + | |style="padding: 0px 0px 0px 45px;"|✔ Mediawiki |
|} | |} | ||
{| | {| | ||
| − | |style="padding: 0px 0px | + | |style="padding: 0px 0px 0px 45px;"|✔ Microweber Website Builder |
|} | |} | ||
{| | {| | ||
| − | |style="padding: 0px 0px | + | |style="padding: 0px 0px 0px 45px;"|✔ Minecraft (Bedrock/Forge/PaperSpigot/Vanilla) |
|} | |} | ||
{| | {| | ||
| − | |style="padding: 0px 0px | + | |style="padding: 0px 0px 0px 45px;"|✔ Miniconda |
|} | |} | ||
{| | {| | ||
| − | |style="padding: 0px 0px | + | |style="padding: 0px 0px 0px 45px;"|✔ Mist Community Edition |
|} | |} | ||
{| | {| | ||
| − | |style="padding: 0px 0px | + | |style="padding: 0px 0px 0px 45px;"|✔ MLDev/MLDev Basic |
| − | + | ||
| − | + | ||
|} | |} | ||
{| | {| | ||
| − | |style="padding: 0px 0px | + | |style="padding: 0px 0px 0px 45px;"|✔ Nextcloud |
|} | |} | ||
{| | {| | ||
| − | |style="padding: 0px 0px | + | |style="padding: 0px 0px 0px 45px;"|✔ NirvaShare |
| − | + | ||
|} | |} | ||
{| | {| | ||
| − | |style="padding: 0px 0px | + | |style="padding: 0px 0px 0px 45px;"|✔ NodeJS |
|} | |} | ||
{| | {| | ||
| − | |style="padding: 0px 0px | + | |style="padding: 0px 0px 0px 45px;"|✔ NVIDIA Docker |
|} | |} | ||
{| | {| | ||
| − | |style="padding: 0px 0px | + | |style="padding: 0px 0px 0px 45px;"|✔ ONLYOFFICE (Docs/Workspace) |
|} | |} | ||
{| | {| | ||
| − | |style="padding: 0px 0px | + | |style="padding: 0px 0px 0px 45px;"|✔ OpenLiteSpeed (Django/Drupal/Joomla/NodeJS/Rails/WordPress) |
|} | |} | ||
{| | {| | ||
| − | |style="padding: 0px 0px | + | |style="padding: 0px 0px 0px 45px;"|✔ OpenVPN Access Server |
|} | |} | ||
| − | |||
| − | |||
{| | {| | ||
| − | |style="padding: | + | |style="padding: 0px 0px 0px 45px;"|✔ Owncast |
| − | + | ||
|} | |} | ||
{| | {| | ||
| − | |style="padding: 0px 0px | + | |style="padding: 0px 0px 0px 45px;"|✔ ownCloud |
|} | |} | ||
{| | {| | ||
| − | |style="padding: 0px 0px | + | |style="padding: 0px 0px 0px 45px;"|✔ Plesk (Web Admin SE/Web Host/Web Pro) |
|} | |} | ||
{| | {| | ||
| − | |style="padding: 0px 0px | + | |style="padding: 0px 0px 0px 45px;"|✔ PrestaShop |
|} | |} | ||
{| | {| | ||
| − | |style="padding: 0px 0px | + | |style="padding: 0px 0px 0px 45px;"|✔ Pritunl |
| − | + | ||
|} | |} | ||
{| | {| | ||
| − | |style="padding: 0px 0px | + | |style="padding: 0px 0px 0px 45px;"|✔ PyboxTech-Med |
|} | |} | ||
{| | {| | ||
| − | |style="padding: 0px 0px | + | |style="padding: 0px 0px 0px 45px;"|✔ Restyaboard |
| − | + | ||
|} | |} | ||
{| | {| | ||
| − | |style="padding: 0px 0px | + | |style="padding: 0px 0px 0px 45px;"|✔ Roxy-WI |
|} | |} | ||
{| | {| | ||
| − | |style="padding: 0px 0px | + | |style="padding: 0px 0px 0px 45px;"|✔ RunCloud Nginx |
| − | + | ||
|} | |} | ||
{| | {| | ||
| − | |style="padding: 0px 0px | + | |style="padding: 0px 0px 0px 45px;"|✔ ServerWand |
|} | |} | ||
{| | {| | ||
| − | |style="padding: 0px 0px | + | |style="padding: 0px 0px 0px 45px;"|✔ Squidex |
|} | |} | ||
{| | {| | ||
| − | |style="padding: 0px 0px | + | |style="padding: 0px 0px 0px 45px;"|✔ Steam |
|} | |} | ||
{| | {| | ||
| − | |style="padding: 0px 0px | + | |style="padding: 0px 0px 0px 45px;"|✔ Ubuntu Desktop (Gnome/KDE/XFCE) |
| − | + | ||
| − | + | ||
| − | + | ||
|} | |} | ||
{| | {| | ||
| − | |style="padding: 0px 0px | + | |style="padding: 0px 0px 0px 45px;"|✔ UTunnel VPN |
|} | |} | ||
{| | {| | ||
| − | |style="padding: 0px 0px | + | |style="padding: 0px 0px 0px 45px;"|✔ VDev |
| − | + | ||
| − | + | ||
| − | + | ||
| − | + | ||
| − | + | ||
|} | |} | ||
{| | {| | ||
| − | |style="padding: 0px 0px | + | |style="padding: 0px 0px 0px 45px;"|✔ VitalPBX |
|} | |} | ||
{| | {| | ||
| − | |style="padding: 0px 0px | + | |style="padding: 0px 0px 0px 45px;"|✔ WarpSpeed VPN |
| − | + | ||
| − | + | ||
| − | + | ||
| − | + | ||
| − | + | ||
| − | + | ||
| − | + | ||
|} | |} | ||
{| | {| | ||
| − | |style="padding: 0px 0px | + | |style="padding: 0px 0px 0px 45px;"|✔ Webmin |
|} | |} | ||
{| | {| | ||
| − | |style="padding: 0px 0px | + | |style="padding: 0px 0px 0px 45px;"|✔ WooCommerce |
| − | + | ||
| − | + | ||
|} | |} | ||
{| | {| | ||
| − | |style="padding: 0px 0px | + | |style="padding: 0px 0px 0px 45px;"|✔ WordPress |
|} | |} | ||
{| | {| | ||
| − | |style="padding: 0px 0px | + | |style="padding: 0px 0px 0px 45px;"|✔ Yarn |
| − | + | ||
|} | |} | ||
{| | {| | ||
| − | |style="padding: 0px 0px | + | |style="padding: 0px 0px 0px 30px;"|✔ ISO Library To Mount: |
|} | |} | ||
{| | {| | ||
| − | |style="padding: 0px 0px | + | |style="padding: 0px 0px 0px 45px;"|✔ Finnix |
| − | + | ||
|} | |} | ||
{| | {| | ||
| − | |style="padding: 0px 0px | + | |style="padding: 0px 0px 0px 45px;"|✔ GParted |
|} | |} | ||
{| | {| | ||
| − | |style="padding: 0px 0px | + | |style="padding: 0px 0px 0px 45px;"|✔ Hiren's BootCD PE |
| − | + | ||
| − | + | ||
| − | + | ||
|} | |} | ||
{| | {| | ||
| − | |style="padding: 0px 0px | + | |style="padding: 0px 0px 0px 45px;"|✔ SystemRescue |
|} | |} | ||
| − | |||
| − | |||
{| | {| | ||
| − | |style="padding: | + | |style="padding: 0px 0px 10px 30px;"|✔ Any Other OS Platforms And Solutions When Made Available By Vultr |
| − | + | ||
| − | + | ||
|} | |} | ||
| + | |||
| + | *'''General Info:''' | ||
{| | {| | ||
| − | |style="padding: 0px 0px | + | |style="padding: 10px 0px 0px 30px;"|✔ Fully Integrated With [https://lagom.rsstudio.net/extensions/whmcs-modules-integration/vultr-vps-by-modulesgarden Lagom WHMCS Client Theme] |
| − | + | ||
|} | |} | ||
{| | {| | ||
| − | |style="padding: 0px 0px | + | |style="padding: 0px 0px 0px 30px;"|✔ Multi-Language Support |
|} | |} | ||
{| | {| | ||
| − | |style="padding: 0px 0px 30px | + | |style="padding: 0px 0px 0px 30px;"|✔ Supports PHP 8.1 Back To PHP 7.4 |
|} | |} | ||
| − | |||
| − | |||
{| | {| | ||
| − | |style="padding: | + | |style="padding: 0px 0px 0px 30px;"|✔ Supports WHMCS Themes "Six" And "Twenty-One" |
| − | + | ||
| − | + | ||
| − | + | ||
| − | + | ||
| − | + | ||
| − | + | ||
| − | + | ||
|} | |} | ||
{| | {| | ||
| − | |style="padding: 0px 0px | + | |style="padding: 0px 0px 0px 30px;"|✔ Supports WHMCS V8.10 Back To WHMCS V8.6 |
|} | |} | ||
{| | {| | ||
| − | |style="padding: | + | |style="padding: 0px 0px 0px 30px;"|✔ Requires ionCube Loader V12 Or Later |
|} | |} | ||
{| | {| | ||
| − | |style="padding: 0px 0px 30px | + | |style="padding: 0px 0px 30px 30px;"|✔ Easy [https://www.docs.modulesgarden.com/How_To_Upgrade_WHMCS_Module Module Upgrade] To [https://www.modulesgarden.com/products/whmcs/vultr-vps#open-source-version Open Source Version] |
|} | |} | ||
| − | = | + | =Installation and Configuration= |
{| | {| | ||
| − | |style="padding: 10px 0px | + | |style="padding: 10px 0px 30px 0px;"|'''This tutorial will show you how to successfully install and configure [https://www.modulesgarden.com/products/whmcs/vultr-vps Vultr VPS For WHMCS.]''' <br /> |
| − | + | We will guide you step by step through the whole installation and configuration process. | |
|} | |} | ||
| + | ==Installation== | ||
{| | {| | ||
| − | |style="padding: | + | |style="padding: 10px 0px 20px 15px;"|'''1. Log in to our client area and download the module.''' |
|} | |} | ||
{| | {| | ||
| − | |style="padding: 0px 0px | + | |style="padding: 0px 0px 20px 25px;"|[[File:VT_1.png]] |
| − | + | ||
|} | |} | ||
{| | {| | ||
| − | |style="padding: 0px 0px | + | |style="padding: 0px 0px 15px 15px;"|'''2. Extract the package and upload its content into the main WHMCS directory. |
| + | The content of the package to upload should look like this. | ||
|} | |} | ||
{| | {| | ||
| − | |style="padding: 0px 0px | + | |style="padding: 0px 0px 20px 25px;"|[[File:VT_2.png]] |
| − | + | ||
| − | + | ||
| − | + | ||
| − | + | ||
| − | + | ||
| − | + | ||
| − | + | ||
| − | + | ||
| − | + | ||
| − | + | ||
| − | + | ||
| − | + | ||
| − | + | ||
|} | |} | ||
{| | {| | ||
| − | |style="padding: 0px 0px | + | |style="padding: 0px 0px 15px 15px;"|'''4. When you install Vultr VPS For WHMCS for the first time you have to rename the '' 'license_RENAME.php' '' file.'''<br /> |
| + | The file is located in '' 'modules/servers/VultrVps/license_RENAME.php' ''. Rename it from '' 'license_RENAME.php' '' to '' 'license.php' ''. | ||
|} | |} | ||
| − | |||
| − | |||
{| | {| | ||
| − | |style="padding: | + | |style="padding: 0px 0px 20px 25px;"|[[File:VT_3.png]] |
| − | + | ||
| − | + | ||
| − | + | ||
| − | + | ||
| − | + | ||
| − | + | ||
|} | |} | ||
{| | {| | ||
| − | |style="padding: 0px 0px | + | |style="padding: 0px 0px 15px 15px;"|'''5. In order to configure your license key, you have to edit the previously renamed '' 'license.php' '' file.'''<br /> |
| + | Enter your license key between quotation marks as presented on the following screen.<br /> | ||
| + | You can find your license key in our client area → '' 'My Products'.'' | ||
|} | |} | ||
{| | {| | ||
| − | |style="padding: 0px 0px | + | |style="padding: 0px 0px 20px 25px;"|[[File:VT_3_1.png]] |
| − | + | ||
| − | + | ||
| − | + | ||
| − | + | ||
| − | + | ||
|} | |} | ||
{| | {| | ||
| − | |style="padding: 0px 0px | + | |style="padding: 0px 0px 15px 15px;"|'''6. Now, set up the '' 'storage' '' folder as recursively writable.'''<br /> |
| + | This folder is available at '' '/yourWHMCS/modules/servers/VultrVps/'. '' | ||
|} | |} | ||
{| | {| | ||
| − | |style="padding: 0px 0px | + | |style="padding: 0px 0px 20px 25px;"|[[File:VT_4.png]] |
| − | + | ||
| − | + | ||
| − | + | ||
| − | + | ||
|} | |} | ||
{| | {| | ||
| − | |style="padding: 0px 0px | + | |style="padding: 0px 0px 30px 15px;"|'''7. The final step of the module instillation is setting up a cron command that is required for several module features to work properly.'''<br/> |
| + | '''''Note:''' The cron execution is required for products in version 1.1.0 and later.''<br/> | ||
| + | |||
| + | php -q /yourWHMCS/modules/servers/VultrVps/cron/cron.php queue | ||
| + | |||
| + | Remember to replace "yourWHMCS" with a proper directory. <br/> | ||
| + | Suggested time interval for cron execution is 5 minutes. | ||
|} | |} | ||
| + | |||
| + | ==Configuration of Server== | ||
{| | {| | ||
| − | |style="padding: | + | |style="padding: 10px 0px 20px 0px;"|'''Before you can go on, you must generate your Vultr API Token. You will need it to connect with the server successfully.'''<br/> |
| + | Underneath you will find instructions where to find your API details. | ||
|} | |} | ||
{| | {| | ||
| − | |style="padding: 0px 0px 20px | + | |style="padding: 0px 0px 20px 15px;"|'''7. Firstly, log into your Vultr account at: ''https://my.vultr.com/''. |
|} | |} | ||
{| | {| | ||
| − | |style="padding: 0px 0px | + | |style="padding: 0px 0px 20px 25px;"|[[File:VT_5.png]] |
| − | + | ||
| − | + | ||
| − | + | ||
| − | + | ||
| − | + | ||
| − | + | ||
| − | + | ||
| − | + | ||
| − | + | ||
| − | + | ||
|} | |} | ||
{| | {| | ||
| − | |style="padding: 0px 0px 15px 15px;"|''' | + | |style="padding: 0px 0px 15px 15px;"|'''8. Move to the '' 'API' '' details section under your account.''' |
| − | + | There find the '' 'Personal Access Token' '' section and generate your API Key.''' <br/> | |
| − | + | You must previously enable API to be able to generate the API key. Copy the key as you will need in the next steps of the server configuration. | |
| − | + | ||
| − | + | ||
| − | + | ||
| − | + | ||
| − | + | ||
| − | + | ||
| − | + | ||
| − | + | ||
| − | + | ||
| − | + | ||
| − | + | ||
| − | + | ||
| − | + | ||
| − | + | ||
| − | + | ||
| − | + | ||
|} | |} | ||
| − | + | {| | |
| − | {| | + | |style="padding: 0px 0px 20px 25px;"|[[File:VT_6.png]] |
| − | + | ||
| − | + | ||
| − | + | ||
| − | + | ||
| − | + | ||
| − | | | + | |
| − | + | ||
| − | + | ||
| − | + | ||
| − | + | ||
| − | + | ||
| − | + | ||
| − | + | ||
| − | + | ||
| − | + | ||
| − | + | ||
| − | + | ||
| − | + | ||
| − | + | ||
| − | + | ||
| − | + | ||
| − | + | ||
| − | + | ||
| − | + | ||
| − | + | ||
| − | + | ||
| − | + | ||
| − | + | ||
| − | + | ||
| − | + | ||
| − | + | ||
| − | + | ||
| − | + | ||
| − | + | ||
| − | + | ||
| − | + | ||
| − | + | ||
| − | + | ||
| − | + | ||
| − | + | ||
| − | + | ||
| − | + | ||
| − | + | ||
| − | + | ||
| − | + | ||
| − | + | ||
| − | + | ||
| − | + | ||
| − | + | ||
| − | + | ||
| − | + | ||
| − | + | ||
| − | + | ||
| − | + | ||
| − | + | ||
| − | + | ||
| − | + | ||
| − | + | ||
| − | + | ||
| − | + | ||
| − | + | ||
| − | + | ||
| − | + | ||
| − | + | ||
| − | + | ||
| − | + | ||
| − | + | ||
| − | + | ||
| − | + | ||
| − | + | ||
| − | + | ||
| − | + | ||
| − | + | ||
| − | + | ||
| − | + | ||
| − | + | ||
| − | + | ||
| − | + | ||
| − | + | ||
| − | + | ||
| − | + | ||
| − | + | ||
| − | + | ||
| − | + | ||
| − | + | ||
| − | + | ||
| − | + | ||
| − | + | ||
| − | + | ||
| − | + | ||
| − | + | ||
| − | + | ||
| − | + | ||
| − | + | ||
| − | + | ||
| − | + | ||
| − | + | ||
| − | + | ||
| − | + | ||
| − | + | ||
| − | + | ||
| − | + | ||
| − | + | ||
| − | + | ||
| − | + | ||
| − | + | ||
| − | + | ||
| − | + | ||
| − | + | ||
| − | + | ||
| − | + | ||
| − | + | ||
| − | + | ||
| − | + | ||
| − | + | ||
| − | + | ||
| − | + | ||
| − | + | ||
| − | + | ||
| − | + | ||
| − | + | ||
| − | + | ||
| − | + | ||
| − | + | ||
| − | + | ||
| − | + | ||
| − | + | ||
| − | + | ||
| − | + | ||
| − | + | ||
| − | + | ||
| − | + | ||
| − | + | ||
| − | + | ||
| − | + | ||
| − | + | ||
| − | + | ||
| − | + | ||
| − | + | ||
| − | + | ||
| − | + | ||
| − | + | ||
| − | + | ||
| − | + | ||
| − | + | ||
| − | + | ||
| − | + | ||
| − | + | ||
| − | + | ||
| − | + | ||
| − | + | ||
| − | + | ||
| − | + | ||
| − | + | ||
| − | + | ||
| − | + | ||
| − | + | ||
| − | + | ||
| − | + | ||
| − | + | ||
| − | + | ||
| − | + | ||
| − | + | ||
| − | + | ||
| − | + | ||
| − | + | ||
| − | + | ||
|} | |} | ||
| − | |||
{| | {| | ||
| − | |style="padding: | + | |style="padding: 0px 0px 20px 15px;"|'''9. Now, log in to your WHMCS and proceed to '' 'System Settings' '' → '' 'Servers' '' and press '' 'Add New Server'.'' |
| − | + | ||
| − | + | ||
| − | + | ||
| − | + | ||
| − | + | ||
|} | |} | ||
{| | {| | ||
| − | |style="padding: 0px 0px | + | |style="padding: 0px 0px 20px 25px;"|[[File:VT_7.png]] |
|} | |} | ||
| − | |||
| − | |||
{| | {| | ||
| − | |style="padding: | + | |style="padding: 0px 0px 15px 15px;"|'''10. Next, enter your server name and a hostname or an IP address. Then select '' 'Vultr VPS' '' from the '' 'Type' '' field.<br/> |
| − | + | Now, provide the previously generated API token in the '' 'Password' '' field. Then check the connection, if successful, save the changes. | |
| − | ''' | + | |
|} | |} | ||
{| | {| | ||
| − | |style="padding: 0px 0px | + | |style="padding: 0px 0px 20px 25px;"|[[File:VT_8.png]] |
|} | |} | ||
| − | |||
{| | {| | ||
| − | |style="padding: | + | |style="padding: 0px 0px 20px 15px;"|'''11. It is time to create a server group. To do so, click on '' 'Create Server Group'.'' ''' |
| − | + | ||
| − | + | ||
| − | + | ||
| − | + | ||
|} | |} | ||
{| | {| | ||
| − | |style="padding: 0px 0px 20px 25px;"|[[File: | + | |style="padding: 0px 0px 20px 25px;"|[[File:VT_9.png]] |
|} | |} | ||
{| | {| | ||
| − | |style="padding: 0px 0px | + | |style="padding: 0px 0px 20px 15px;"|'''12. Enter a name, click on your previously created server, press '' 'Add' '' and afterward '' 'Save Changes'.'' ''' |
| + | |} | ||
| + | {| | ||
| + | |style="padding: 0px 0px 30px 25px;"|[[File:VT_10.png]] | ||
|} | |} | ||
| − | == | + | ==Configuration of Product== |
{| | {| | ||
| − | |style="padding: 10px 0px 15px 15px;"| | + | |style="padding: 10px 0px 15px 15px;"|'''13. In order to create and configure a product, go to '' 'System Settings' '' → '' 'Products/Services'.'' '''<br /> |
| − | + | Click on '' 'Create a New Group' ''. | |
| − | + | ||
| − | + | ||
| − | + | ||
|} | |} | ||
{| | {| | ||
| − | |style="padding: 0px 0px | + | |style="padding: 0px 0px 20px 25px;"|[[File:VT_11.png]] |
|} | |} | ||
| − | |||
{| | {| | ||
| − | |style="padding: | + | |style="padding: 0px 0px 20px 15px;"|'''14. Enter a product group name and press '' 'Save Changes'.''''' |
|} | |} | ||
{| | {| | ||
| − | |style="padding: 0px 0px | + | |style="padding: 0px 0px 20px 25px;"|[[File:VT_12.png]] |
|} | |} | ||
| − | |||
| − | |||
{| | {| | ||
| − | |style="padding: | + | |style="padding: 0px 0px 15px 15px;"|'''15. When you have a product group, you can create your product.'''<br /> |
| − | To | + | To create a product click on '' 'Create a New Product' ''. |
|} | |} | ||
{| | {| | ||
| − | |style="padding: 0px 0px | + | |style="padding: 0px 0px 20px 25px;"|[[File:VT_13.png]] |
|} | |} | ||
| − | |||
| − | |||
{| | {| | ||
| − | |style="padding: | + | |style="padding: 0px 0px 15px 15px;"|'''16. Afterward, choose your product group and type from the dropdown menus, enter your product name and press '' 'Continue'. '' '''<br /> |
| − | + | '' 'Product Type' '' should be set to '' 'Shared Hosting'. '' | |
|} | |} | ||
{| | {| | ||
| − | |style="padding: 0px 0px 20px 25px;"|[[File: | + | |style="padding: 0px 0px 20px 25px;"|[[File:VT_14.png]] |
|} | |} | ||
{| | {| | ||
| − | |style="padding: 0px 0px 15px 15px;"| | + | |style="padding: 0px 0px 15px 15px;"|'''17. Now, go to the '' 'Module Settings' '' section, choose both '' 'Vultr VPS' '' and your previously created server group from the dropdown menus.'''<br /> |
| − | + | The module should automatically save and reload settings. If not, click on '' 'Save Changes' '' manually.''' | |
| − | + | ||
| − | The | + | |
|} | |} | ||
{| | {| | ||
| − | |style="padding: 0px 0px 20px 25px;"|[[File: | + | |style="padding: 0px 0px 20px 25px;"|[[File:VT_15.png]] |
|} | |} | ||
{| | {| | ||
| − | |style="padding: 0px 0px | + | |style="padding: 0px 0px 15px 15px;"|'''18. Start from defining the '' 'Configuration' '' details.<br/> |
| + | * '''Region''' - choose one of the geographical areas with the preferred predefined set of resource for your VPS<br/> | ||
| + | Set one of the below four options: '''Operating System''', '''ISO''', '''Snapshot''' or '''Application.''' Leave the other three as '' 'Disabled'.'' | ||
| + | * '''Operating System''' - you may choose one of the operating systems to be used when creating your virtual machine | ||
| + | * '''ISO''' - use an ISO that you have previously created in your Vultr panel to install the virtual machine | ||
| + | * '''Snapshot''' - you may also install the virtual machine using one of the existing snapshots <br/> | ||
| + | * '''Application''' - select an application to install it automatically upon the instance creation.<br/> | ||
| + | Move to setting up the rest of of configuration options: | ||
| + | * '''IPv6''' - turn on IPv6 type of IP addresses for the VPS | ||
| + | * '''DDOS Protection''' - add an extra layer of security by enabling DDOS protection | ||
| + | * '''Plan''' - choose a plan to install the virtual machine | ||
| + | * '''User Data''' - enter the user data to run common configuration tasks when your instance starts. You can run cloud-init directives or shell scripts for Linux images. You may use smarty variables, e.g. ''{$password}.''<br/> '''''Note:''' Please refer to the following article to find a '''list of supported [https://developers.whmcs.com/provisioning-modules/module-parameters/ module parameters]''' and their descriptions.'' | ||
| + | * '''Random Domain Prefix''' - enter the domain prefix that will be used when a domain is not provided | ||
| + | * '''Automatic Backups''' - turn on aromatic backups creation | ||
| + | * '''IPv6''' - enable to use the IPv6 addresses type for the VPS | ||
| + | * '''Use Hostname in Label Field''' - enable this option to be allowed to provide the hostname into the Label field | ||
| + | * '''Enable White Label noVNC Console''' - toggle this option to enable the noVNC console '''without any Vultr labels.'''<br/> '''''Important:''' To use a white-label console, please contact the Vultr support first!'' | ||
|} | |} | ||
{| | {| | ||
| − | |style="padding: 0px 0px | + | |style="padding: 0px 0px 20px 25px;"|[[File:VT_16.png]] |
|} | |} | ||
| − | |||
| − | |||
{| | {| | ||
| − | |style="padding: | + | |style="padding: 0px 0px 15px 15px;"|'''19. Next, select features available at the client area.'''<br /> |
| − | + | You can also decide which images used to rebuild the server will be available to your customers. | |
| − | + | ||
| − | + | ||
|} | |} | ||
{| | {| | ||
| − | |style="padding: 0px 0px 20px 25px;"|[[File: | + | |style="padding: 0px 0px 20px 25px;"|[[File:VT_17.png]] |
|} | |} | ||
{| | {| | ||
| − | |style="padding: 0px 0px 15px 15px;"| | + | |style="padding: 0px 0px 15px 15px;"|'''20. Enable additional options and set up configuration per each one of them:'''<br /> |
| + | * '''Block Storage''' - define the storage size between 10 and 10 000 GB, note that if you also decide to enable this configurable option, it will overwrite the general product settings<br/> '''''Important:''' It is impossible to successfully downgrade block storage.'' | ||
| − | ''''' | + | * '''Reserved IPs''' - define the limit of IPv4 and IPv6 addresses that can be added to the bundle of reserved IPs |
| − | + | ||
|} | |} | ||
{| | {| | ||
| − | |style="padding: 0px 0px 20px 25px;"|[[File: | + | |style="padding: 0px 0px 20px 25px;"|[[File:VT_17_1.png]] |
|} | |} | ||
{| | {| | ||
| − | |style="padding: 0px 0px 15px 15px;"| | + | |style="padding: 0px 0px 15px 15px;"|'''21. At the end of the configuration process, you can decide whether you want to generate configurable options for the product.'''<br/> |
| + | Configurable options can be used by your clients to select each virtual machine parameters individually during order placement.<br/>Otherwise, if configurable options are not defined, then the fixed parameters specified in the earlier configuration will be used instead. | ||
| + | |} | ||
| + | {| | ||
| + | |style="padding: 0px 0px 20px 25px;"|[[File:VT_18.png]] | ||
| + | |} | ||
| + | {| | ||
| + | |style="padding: 0px 0px 15px 15px;"|If you decide to use configurable options, press the '' 'Create' '' button and select which options you want to generate.<br/> | ||
| + | Remember that only one of the four options: 'osapp_id|Operating System or Application' 'os_id|Operating System', 'iso_id|ISO', 'snapshot_id|Snapshot', 'app_id|Application' can be used at once!<br/> In case more than just one option is left for the client to select, they will be taken into consideration in the following manner: | ||
| + | #'' 'osapp_id|Operating System or Application' '' | ||
| + | #'' 'os_id|Operating System' '' | ||
| + | #'' 'Snapshot' '' | ||
| + | #'' 'ISO' '' | ||
| + | #'' 'Application' '' as the last one.<br/> | ||
| − | + | Note that the configuration for disabled options will still be taken from the configuration of the main product.<br/> More information about how to use configurable options can be found [https://www.docs.modulesgarden.com/General#How_To_Use_Configurable_Options here] or in the official WHMCS [https://docs.whmcs.com/Addons_and_Configurable_Options documentation]. | |
| − | + | ||
|} | |} | ||
{| | {| | ||
| − | |style="padding: 0px 0px | + | |style="padding: 0px 0px 30px 25px;"|[[File:VT_19.png]] |
|} | |} | ||
| + | |||
| + | =Management= | ||
| + | ==Admin Area== | ||
{| | {| | ||
| − | |style="padding: | + | |style="padding: 10px 0px 15px 15px;"|'''Vultr VPS For WHMCS allows your customers to manage their servers via the client area in your WHMCS system.'''<br /> |
| − | + | You can monitor and manage each product from your WHMCS admin area.<br /> | |
| + | 1. Configurable options which enable you to view current resources and change specifications through changing configurable options and pressing '' 'Change Package' ''<br /> | ||
| + | 2. Module commands ''(Create, Suspend/Unsuspend, Change Package)''<br /> | ||
| + | 3. Scheduled tasks - list of task to be performed with the cron execution | ||
| + | 4. Service actions ''(Start/Stop VM, Reboot, Reinstall, Access Console)''<br /> | ||
| + | 5. Instance details along with Public Network IPv4 and IPv6 details ''(the latter one is available only if you enable it in the product's configuration)''<br/> | ||
| + | 6. Backups, firewall rules, snapshots management sections<br/> | ||
| + | 7. Reverse DNS management and preview of reserved IP addresses. | ||
|} | |} | ||
{| | {| | ||
| − | |style="padding: 0px 0px 30px 25px;"|[[File: | + | |style="padding: 0px 0px 30px 25px;"|[[File:VT_21.png]] |
|} | |} | ||
| − | == | + | ==Ordering== |
{| | {| | ||
| − | |style="padding: 10px 0px 15px 15px;"| | + | |style="padding: 10px 0px 15px 15px;"|Owing to configurable options, you are able to offer a product which your clients can tailor according to their needs.<br /> |
| − | + | Additionally, you are able to set up pricing for each configurable option, which make your offer even more competitive.<br /> | |
| + | '''Important: VPS is not created immediately after pressing '' 'Create' ''. Therefore, it is wise to inform your clients about the delay.''' | ||
|} | |} | ||
{| | {| | ||
| − | |style="padding: 0px 0px | + | |style="padding: 0px 0px 30px 25px;"|[[File:VT_22.png]] |
|} | |} | ||
| + | ===Importing Existing Instance=== | ||
{| | {| | ||
| − | |style="padding: 0px | + | |style="padding: 10px 0px 15px 15px;"|In this section, you can find short instruction on how to connect one of your clients to your already existing instance in the Vultr panel. <br/> Take the following steps to make sure that the process will be carried out properly. <br/> |
| + | 1. Firstly, manually create an order for your customer in WHMCS. Choose a client and in the summary, view click on the '' ' Add New Order' '' button. Next, select a '' 'Product/Service' '' and press '' 'Submit Order' ''. <br/> '''What is important, do not perform the '' 'Create' '' action.''' The status has to remain as '' 'Pending' ''. <br/> More info about placing orders can be found [https://docs.whmcs.com/Order_Management#Placing_an_Order here]<br/> | ||
| + | 2. Proceed to the newly created product's card in your admin area. Find the following empty field: | ||
| + | *'''Instance ID''' | ||
| + | The above-mentioned information has to be consistent with the data from your Vultr panel. Now, complete this field as presented below. <br/> '''Important!''' Remember to make sure that the format of the provided data is compatible with the format supported by the module. You can preview it for another product of the module you have already created and enter it in a similar way. <br/> If you completed the required data, now change the status from '' 'Pending' '' to '' 'Active' '' and '' 'Save Changes'.'' | ||
|} | |} | ||
{| | {| | ||
| − | |style="padding: 0px 0px | + | |style="padding: 0px 0px 20px 25px;"|[[File:Vultr_import.png]] |
| + | |} | ||
| + | {| | ||
| + | |style="padding: 0px 0px 30px 15px;"|3. If the completed data is correct, after refreshing the page, you will see the attached instance from Vultr. <br/> '''Important!''' Remember to manually add other missing parameters of the instance such as domains, credentials, IP Addresses, configurable options, etc. so they match the parameters of the attached instance from Vultr panel. | ||
|} | |} | ||
| − | == | + | ==Client Area== |
{| | {| | ||
| − | |style="padding: 10px 0px 15px 15px;"| | + | |style="padding: 10px 0px 15px 15px;"|Client area interface of Vultr VPS should look like the one on the screen below. As you can see, the control panel contains useful options needed for managing a virtual machine.<br /> |
| − | The | + | The module allows your customers to easily start/stop, reboot or reinstall their servers by pressing the specific button.<br /> |
| + | Clients can also access the VNC console, manage backups, view bandwidth graph and many others. | ||
|} | |} | ||
{| | {| | ||
| − | |style="padding: 0px 0px | + | |style="padding: 0px 0px 30px 25px;"|[[File:VT_23.png]] |
|} | |} | ||
| + | |||
| + | ===Backups=== | ||
{| | {| | ||
| − | |style="padding: 0px | + | |style="padding: 10px 0px 15px 15px;"|The first section available for clients grants ability to view the list of existing '' 'Backups' '' of your server. <br/> Please remember that '' 'Backups' '' are assigned to a particular server and will be removed once the server is deleted. <br/> |
| + | '''''Note:''' There is a limit of maximum two backups per server. Once a new backup is created, the oldest one is automatically removed.'' | ||
|} | |} | ||
{| | {| | ||
| − | |style="padding: 0px 0px | + | |style="padding: 0px 0px 20px 25px;"|[[File:VT_24.png]] |
|} | |} | ||
| − | |||
| − | |||
{| | {| | ||
| − | |style="padding: | + | |style="padding: 0px 0px 15px 15px;"|Clients are also given the opportunity to schedule incoming backup by pressing the '' 'Schedule Backups' '' button.<br/> |
| − | + | Provide a time details to wait until the next backup is created. | |
|} | |} | ||
{| | {| | ||
| − | |style="padding: 0px 0px 20px 25px;"|[[File: | + | |style="padding: 0px 0px 20px 25px;"|[[File:VT_25.png]] |
|} | |} | ||
{| | {| | ||
| − | |style="padding: 0px 0px 15px 15px;"| | + | |style="padding: 0px 0px 15px 15px;"|To restore a VPS from backup, simply press the '' 'Restore' '' button next to it.<br /> |
| − | + | If selected backups are no longer needed, you may easily delete them. | |
|} | |} | ||
{| | {| | ||
| − | |style="padding: 0px 0px 30px 25px;"|[[File: | + | |style="padding: 0px 0px 30px 25px;"|[[File:VT_26.png]] |
|} | |} | ||
| − | == | + | ===Custom ISO=== |
{| | {| | ||
| − | |style="padding: 10px 0px 15px 15px;"| | + | |style="padding: 10px 0px 15px 15px;"|"Custom ISO" feature allows clients to pick a single ISO and mount it to the machine. <br/> |
| − | + | '''''Note:''' Mounting a custom ISO requires rebooting the machine.'' | |
| − | + | |} | |
| − | + | {| | |
| + | |style="padding: 0px 0px 30px 25px;"|[[File:VT_36.png]] | ||
|} | |} | ||
| + | |||
| + | ===Firewall=== | ||
{| | {| | ||
| − | |style="padding: 0px | + | |style="padding: 10px 0px 15px 15px;"|The firewall management page allows your customers to view, add or delete existing rules on a security group assigned to the product.<br/> |
| + | To add a new firewall rule, use the button marked on the following screen.<br/> | ||
| + | '''''Note:''' Please remember that there is a limit of 50 firewall rules. If you reach this limit, you will not be allowed to create new ones before removing any existing ones.'' | ||
|} | |} | ||
{| | {| | ||
| − | |style="padding: 0px 0px | + | |style="padding: 0px 0px 20px 25px;"|[[File:VT_27.png]] |
| − | + | ||
|} | |} | ||
{| | {| | ||
| − | |style="padding: 0px 0px 30px 25px;"|[[File: | + | |style="padding: 0px 0px 15px 15px;"|Next, fill out the rule details to create it: |
| + | *'''Type'''- choose between ''IPv4'' and''IPv6'' | ||
| + | *'''Protocol''' - select among ''TCP, UDP, ICMP, GRE, ESP'' and ''AH'' | ||
| + | *'''Port''' - you may specify a port number or a port range ''(TCP/UDP only)'' | ||
| + | *'''Source''': specify a custom source or cloudflare | ||
| + | *'''Subnet''' and the '''Subnet Size''' | ||
| + | *You may also add any '''Notes''' in the end if you need<br/> | ||
| + | |||
| + | Press '' 'Confirm' '' when ready. | ||
| + | |} | ||
| + | {| | ||
| + | |style="padding: 0px 0px 30px 25px;"|[[File:VT_28.png]] | ||
|} | |} | ||
| − | == | + | ===Graphs=== |
{| | {| | ||
| − | |style="padding: 10px 0px | + | |style="padding: 10px 0px 20px 15px;"|Once entering the '' 'Graphs' '' section, clients will be moved to the page with the generated graphs showing the '' 'Bandwidth' '' usage. |
| − | + | ||
| − | + | ||
|} | |} | ||
{| | {| | ||
| − | |style="padding: 0px 0px | + | |style="padding: 0px 0px 30px 25px;"|[[File:VT_29.png]] |
|} | |} | ||
| + | |||
| + | <!-- | ||
| + | ===Private Network=== | ||
{| | {| | ||
| − | |style="padding: | + | |style="padding: 10px 0px 15px 15px;"|The next section allows assigning private network to a machine. Simply press the button marked on the screen and select from the dropdown list.<br/> |
| − | + | Confirm the action. | |
| − | + | ||
|} | |} | ||
{| | {| | ||
| − | |style="padding: 0px 0px | + | |style="padding: 0px 0px 30px 25px;"|[[File:VT_37.png]] |
|} | |} | ||
| + | --> | ||
| + | |||
| + | ===Rebuild=== | ||
{| | {| | ||
| − | |style="padding: | + | |style="padding: 10px 0px 15px 15px;"|The rebuild feature allows your clients to change a server image.<br /> |
| − | To | + | To reinstall your server, choose an image and confirm through pressing the '' 'Rebuild' '' button. |
| − | + | ||
|} | |} | ||
{| | {| | ||
| − | |style="padding: 0px 0px | + | |style="padding: 0px 0px 30px 25px;"|[[File:VT_30.png]] |
|} | |} | ||
| + | |||
| + | ===Reserved IPs=== | ||
{| | {| | ||
| − | |style="padding: | + | |style="padding: 10px 0px 15px 15px;"|This section includes a list of all existing in the panel reserved IP addresses. <br/> |
| + | *on the account creations the IP addresses are automatically added to the group | ||
| + | *on the change package action ''(downgrade/upgrade)'' the IPs are added or removed accordingly | ||
| + | *on termination, all IPs are removed | ||
|} | |} | ||
{| | {| | ||
| − | |style="padding: 0px 0px 30px 25px;"|[[File: | + | |style="padding: 0px 0px 30px 25px;"|[[File:VT_34.png]] |
|} | |} | ||
| − | == | + | ===Reverse DNS=== |
{| | {| | ||
| − | |style="padding: 10px 0px 15px 15px;"| | + | |style="padding: 10px 0px 15px 15px;"|Reverse DNS option allows your clients to manage reverseDNS of the IP addresses assigned to the machine.<br/> |
| − | + | You can change the hostname that will appear when getting the hostname belonging to the primary IPs (IPv4 and IPv6) of your server.<br/> To do so, just click on the button presented below.<br/> | |
| − | ''Note: | + | '''''Note:''' IPv4 addresses are already added on the list and cannot be deleted'' |
|} | |} | ||
{| | {| | ||
| − | |style="padding: 0px 0px 20px 25px;"|[[File: | + | |style="padding: 0px 0px 20px 25px;"|[[File:VT_33_1.png]] |
|} | |} | ||
{| | {| | ||
| − | |style="padding: 0px 0px | + | |style="padding: 0px 0px 15px 15px;"|When '' 'IP' '' and '' 'Reverse DNS' '' are provided, just confirm the action. |
|} | |} | ||
{| | {| | ||
| − | |style="padding: 0px 0px 30px 25px;"|[[File: | + | |style="padding: 0px 0px 20px 25px;"|[[File:VT_33_2.png]] |
| + | |} | ||
| + | {| | ||
| + | |style="padding: 0px 0px 30px 25px;"|[[File:VT_33_3.png]] | ||
|} | |} | ||
| − | = | + | ===Snapshots=== |
{| | {| | ||
| − | |style="padding: 10px 0px | + | |style="padding: 10px 0px 15px 15px;"|Creating snapshots allows customers to quickly restore any changes to a virtual machine in case of any problems.<br/> |
| − | + | Once the shutter has been created, the customer can restore it (1), change its description (2) or delete it (3). | |
| − | + | ||
|} | |} | ||
{| | {| | ||
| − | |style="padding: 0px 0px | + | |style="padding: 0px 0px 20px 25px;"|[[File:VT_31.png]] |
| − | + | ||
| − | + | ||
| − | + | ||
| − | + | ||
| − | + | ||
| − | + | ||
| − | + | ||
| − | + | ||
| − | + | ||
| − | + | ||
| − | + | ||
| − | + | ||
| − | + | ||
| − | + | ||
| − | + | ||
| − | + | ||
| − | + | ||
| − | + | ||
| − | + | ||
| − | + | ||
| − | + | ||
|} | |} | ||
{| | {| | ||
| − | |style="padding: 0px 0px | + | |style="padding: 0px 0px 15px 15px;"|After pressing the '' 'Create Snapshot' '' button, the new window will pop up along with the possibility to specify the snapshot description.<br/> |
| + | Please note that taking a new snapshot may take a while to process. | ||
|} | |} | ||
{| | {| | ||
| − | |style="padding: 0px 0px 30px | + | |style="padding: 0px 0px 30px 25px;"|[[File:VT_32.png]] |
|} | |} | ||
| − | = | + | ===User Data=== |
{| | {| | ||
| − | |style="padding: 10px 0px | + | |style="padding: 10px 0px 20px 15px;"|User data can be freely altered in the client area. Remember that after introducing any changes, the machine restart is required to apply the changes.<br/> |
| + | '''''Note:''' User data supports smarty variables, such as '{$password}'. Follow to this article to find a full '''list of supported [https://developers.whmcs.com/provisioning-modules/module-parameters/ module parameters]''' and their descriptions. | ||
| + | |} | ||
| + | {| | ||
| + | |style="padding: 0px 0px 30px 25px;"|[[File:VT_35.png]] | ||
| + | |} | ||
| − | + | ===Console=== | |
| − | + | {| | |
| − | + | |style="padding: 10px 0px 15px 15px;"|One of the most interesting functionality is a noVNC console where your clients can remotely manage their servers.<br /> To access it, simply click on the '' 'Console' '' button.<br/> | |
| − | + | '''''Note:''' Vultr offers a generic VNC URL that serves as a white-label URL. If you wish to use a white-label console with the Vulr VPS For WHMCS module, please contact the '''Vultr support''' via their official ticketing system.'' | |
|} | |} | ||
{| | {| | ||
| − | |style="padding: 0px 0px 30px | + | |style="padding: 0px 0px 30px 25px;"|[[File:VT_33.png]] |
| − | + | ||
| − | + | ||
| − | + | ||
| − | + | ||
| − | + | ||
| − | + | ||
| − | + | ||
| − | + | ||
| − | + | ||
| − | + | ||
| − | + | ||
| − | + | ||
| − | + | ||
| − | + | ||
| − | + | ||
| − | + | ||
|} | |} | ||
| − | = | + | =Tips= |
{| | {| | ||
| − | |style="padding: 10px 0px | + | |style="padding: 10px 0px 10px 15px;"| 1. Vultr offers a generic VNC URL that serves as a white-label URL. If you wish to use a white-label console with the Vulr VPS For WHMCS module, please contact the Vultr support team via their official ticketing system. |
|} | |} | ||
{| | {| | ||
| − | |style="padding: 0px 0px | + | |style="padding: 0px 0px 30px 15px;"| 2. If you may choose among all four configurable options to configure your VPS when placing an order, they will be prioritized in the following manner: |
| − | + | '' 'Operating System' → 'Snapshot' → 'ISO' '' and '' 'Application' '' as the least one on the list. | |
|} | |} | ||
| + | |||
| + | =Update Instructions= | ||
{| | {| | ||
| − | |style="padding: 0px | + | |style="padding: 10px 0px 30px 15px;"|An essential guidance through the process of updating the module is offered '''[https://www.docs.modulesgarden.com/How_To_Update_WHMCS_Module here]'''.<br/> |
| + | Ensure successful completion of the module update by carefully following each step, thereby preventing data loss or any unforeseen issues.<br/> Additionally, you will find a current list of supplementary actions necessary for a smooth update process there. | ||
|} | |} | ||
| + | =Upgrade Guide= | ||
| + | {| | ||
| + | |style="padding: 10px 0px 30px 15px;"|Seeking a solution that offers greater flexibility, customization tailored to your precise needs, and unrestricted availability?<br/> There is an option that not only proves to be cost-effective in the long run but also includes prioritized support services, making it a truly valuable investment.<br/> | ||
| + | |||
| + | Opt for the [https://www.modulesgarden.com/products/whmcs/vultr-vps#open-source-version Open Source version] of your Vultr VPS For WHMCS module to unlock these benefits.<br/> Simply click on either the '''Get Source Code''' or '''Upgrade To Lifetime''' button found on the product's page in our client area to complete the one-step upgrade process, with a '''dedicated discount''' already applied.<br/> | ||
| + | |||
| + | Follow a [https://www.docs.modulesgarden.com/How_To_Upgrade_WHMCS_Module comprehensive guide] covering the transition process, the advantages it brings, and step-by-step instructions on what to do next after the order has been successfully finalized. | ||
| + | |} | ||
| + | |||
| + | =Common Problems= | ||
{| | {| | ||
| − | |style="padding: | + | |style="padding: 10px 0px 10px 15px;"|'''1. When you have problems with connection, check whether your SELinux or firewall does not block ports.''' |
| − | + | ||
| − | + | ||
| − | + | ||
| − | + | ||
| − | + | ||
|} | |} | ||
{| | {| | ||
| − | |style="padding: 0px 0px | + | |style="padding: 0px 0px 30px 15px;"|2. Downgrading virtual machine with block storage is impossible. Move to the official [https://www.vultr.com/docs/block-storage#How_to_Downgrade_Block_Storage Vultr documentation] to find out more. |
|} | |} | ||
Latest revision as of 14:08, 26 April 2024
Contents |
[edit] About Vultr VPS For WHMCS
| Vultr VPS For WHMCS is a module which allows fully automated management of Vultr VPS servers. The module will allow your clients to remotely control the status of a server, access the console, rebuild the VPS and many others. |
- Admin Area Features:
| ✔ Create/Suspend/Unsuspend/Terminate Server |
| ✔ Change Package |
| ✔ Start/Stop/Reboot/Reinstall Server |
| ✔ Access noVNC Console |
| ✔ View Instance Status And Details |
| ✔ View Assigned Public IPv4 And IPv6 Network Details |
| ✔ View/Schedule/Restore Automatic Backups |
| ✔ View/Create Firewall Rules |
| ✔ View/Create/Restore Snapshots |
| ✔ View/Create/Manage Reverse DNS Records |
| ✔ View Assigned Reserved IP Addresses |
| ✔ Configure Product Details: |
| ✔ Choose Region |
| ✔ Choose Plan |
| ✔ Choose Operation System |
| ✔ Choose ISO Image |
| ✔ Choose Snapshot |
| ✔ Choose Application |
| ✔ Toggle Automatic Backups |
| ✔ Toggle IPv6 Address |
| ✔ Toggle DDOS Protection |
| ✔ Use Hostname In Label Field |
| ✔ Enable White Label noVNC Console |
| ✔ Provide Random Domain Prefix |
| ✔ Provide Default Reverse DNS Template |
| ✔ Provide Cloud-Init User-Data Initiation Script |
| ✔ Choose Features Available In Client Area: |
| ✔ Backups |
| ✔ Firewall |
| ✔ Rebuild |
| ✔ Reverse DNS |
| ✔ User Data |
| ✔ Available Images To Rebuild |
| ✔ Console |
| ✔ Graphs |
| ✔ Snapshots |
| ✔ Reserved IPs |
| ✔ Custom ISO |
| ✔ Available ISO Images To Mount |
| ✔ Enable Instance Block Storage With Defined Type And Size |
| ✔ Enable Reserved IPv4 And IPv6 Addresses Within Defined Limits |
| ✔ Generate Configurable Options |
| ✔ Run API Connection Test |
- Client Area Features:
| ✔ Start/Stop/Reboot/Reinstall Server |
| ✔ Access noVNC Console |
| ✔ View Instance Status And Details |
| ✔ View Assigned Public IPv4 And IPv6 Network Details |
| ✔ View/Schedule/Restore Automatic Backups |
| ✔ Mount Custom ISO Images |
| ✔ View/Create Firewall Rules |
| ✔ View Bandwidth Usage Graph |
| ✔ Rebuild Server With Chosen OS Distribution |
| ✔ View Assigned Reserved IP Addresses |
| ✔ View/Create/Manage Reverse DNS Records |
| ✔ View/Create/Restore/Delete Snapshots |
| ✔ Provide Cloud-Init User-Data Initiation Script |
- Configurable Options:
| ✔ Application |
| ✔ Backups |
| ✔ Block Storage Size |
| ✔ Block Storage Type |
| ✔ DDOS Protection |
| ✔ IPv6 |
| ✔ ISO Image |
| ✔ Operating System or Application |
| ✔ Operating System |
| ✔ Plan |
| ✔ Region |
| ✔ Reserved IPv4 |
| ✔ Reserved IPv6 |
| ✔ Snapshot |
- Available Images And Applications:
| ✔ Linux OS: |
| ✔ AlmaLinux |
| ✔ Arch Linux |
| ✔ CentOS |
| ✔ Debian |
| ✔ Fedora |
| ✔ Fedora CoreOS |
| ✔ FreeBSD |
| ✔ OpenBSD |
| ✔ Rocky Linux |
| ✔ Ubuntu |
| ✔ VzLinux |
| ✔ Microsoft Windows: |
| ✔ Windows Core 2022 |
| ✔ Windows Core 2019 |
| ✔ Windows Core 2016 |
| ✔ Windows Server 2022 |
| ✔ Windows Server 2019 |
| ✔ Windows Server 2016 |
| ✔ Windows Server 2012 RS |
| ✔ Marketplace Apps: |
| ✔ 3DKit |
| ✔ AIDungeon2 |
| ✔ Anaconda |
| ✔ Ant Media Server (Community Edition/Enterprise Edition) |
| ✔ Asp.net |
| ✔ AzuraCast |
| ✔ Bitnami via Vultr (Jenkins/Magento/PrestaShop) |
| ✔ BotGuard Ingress Controller |
| ✔ CentOS Web Panel |
| ✔ Chevereto |
| ✔ CloudHub |
| ✔ CloudPanel 2 |
| ✔ Cloudron |
| ✔ ClusterControl |
| ✔ Coder |
| ✔ cPanel |
| ✔ CyberPanel |
| ✔ Docker |
| ✔ Drupal |
| ✔ Easypanel |
| ✔ FASTPANEL |
| ✔ FileCloud |
| ✔ Gitea |
| ✔ GitLab |
| ✔ Helpy Pro |
| ✔ Jamulus |
| ✔ Jelastic DevOps PaaS |
| ✔ Jitsi |
| ✔ Joomla |
| ✔ Keitaro |
| ✔ LAMP |
| ✔ LEMP |
| ✔ Lume Web DNS Relay |
| ✔ Mediawiki |
| ✔ Microweber Website Builder |
| ✔ Minecraft (Bedrock/Forge/PaperSpigot/Vanilla) |
| ✔ Miniconda |
| ✔ Mist Community Edition |
| ✔ MLDev/MLDev Basic |
| ✔ Nextcloud |
| ✔ NirvaShare |
| ✔ NodeJS |
| ✔ NVIDIA Docker |
| ✔ ONLYOFFICE (Docs/Workspace) |
| ✔ OpenLiteSpeed (Django/Drupal/Joomla/NodeJS/Rails/WordPress) |
| ✔ OpenVPN Access Server |
| ✔ Owncast |
| ✔ ownCloud |
| ✔ Plesk (Web Admin SE/Web Host/Web Pro) |
| ✔ PrestaShop |
| ✔ Pritunl |
| ✔ PyboxTech-Med |
| ✔ Restyaboard |
| ✔ Roxy-WI |
| ✔ RunCloud Nginx |
| ✔ ServerWand |
| ✔ Squidex |
| ✔ Steam |
| ✔ Ubuntu Desktop (Gnome/KDE/XFCE) |
| ✔ UTunnel VPN |
| ✔ VDev |
| ✔ VitalPBX |
| ✔ WarpSpeed VPN |
| ✔ Webmin |
| ✔ WooCommerce |
| ✔ WordPress |
| ✔ Yarn |
| ✔ ISO Library To Mount: |
| ✔ Finnix |
| ✔ GParted |
| ✔ Hiren's BootCD PE |
| ✔ SystemRescue |
| ✔ Any Other OS Platforms And Solutions When Made Available By Vultr |
- General Info:
| ✔ Fully Integrated With Lagom WHMCS Client Theme |
| ✔ Multi-Language Support |
| ✔ Supports PHP 8.1 Back To PHP 7.4 |
| ✔ Supports WHMCS Themes "Six" And "Twenty-One" |
| ✔ Supports WHMCS V8.10 Back To WHMCS V8.6 |
| ✔ Requires ionCube Loader V12 Or Later |
| ✔ Easy Module Upgrade To Open Source Version |
[edit] Installation and Configuration
| This tutorial will show you how to successfully install and configure Vultr VPS For WHMCS. We will guide you step by step through the whole installation and configuration process. |
[edit] Installation
| 1. Log in to our client area and download the module. |
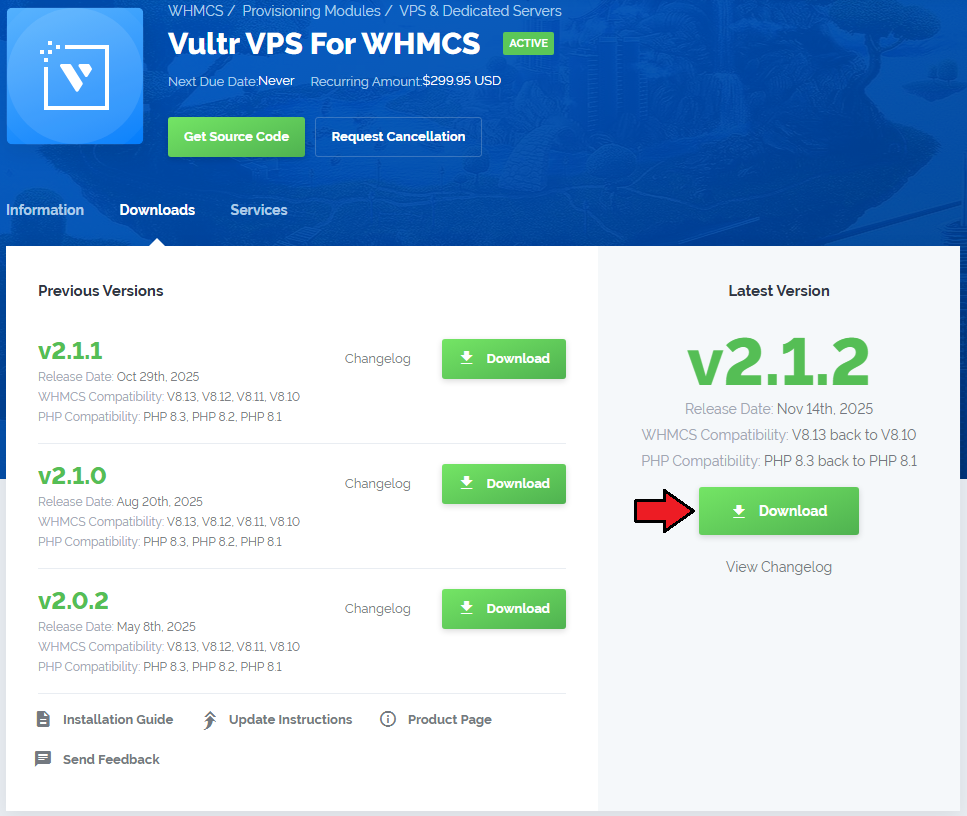
|
| 2. Extract the package and upload its content into the main WHMCS directory.
The content of the package to upload should look like this. |
| 4. When you install Vultr VPS For WHMCS for the first time you have to rename the 'license_RENAME.php' file. The file is located in 'modules/servers/VultrVps/license_RENAME.php' . Rename it from 'license_RENAME.php' to 'license.php' . |
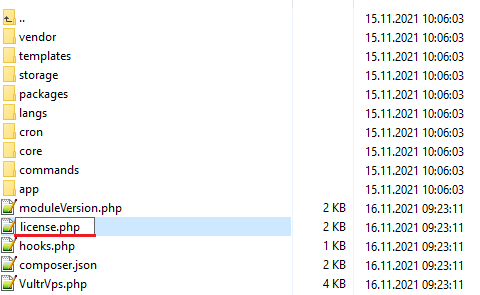
|
| 5. In order to configure your license key, you have to edit the previously renamed 'license.php' file. Enter your license key between quotation marks as presented on the following screen. |

|
| 6. Now, set up the 'storage' folder as recursively writable. This folder is available at '/yourWHMCS/modules/servers/VultrVps/'. |
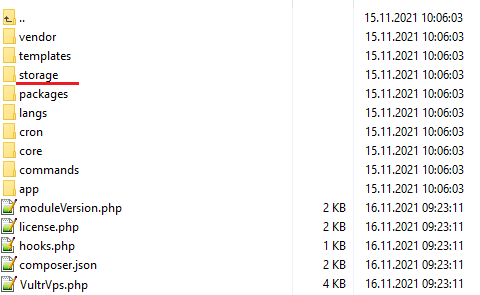
|
| 7. The final step of the module instillation is setting up a cron command that is required for several module features to work properly. Note: The cron execution is required for products in version 1.1.0 and later. php -q /yourWHMCS/modules/servers/VultrVps/cron/cron.php queue Remember to replace "yourWHMCS" with a proper directory. |
[edit] Configuration of Server
| Before you can go on, you must generate your Vultr API Token. You will need it to connect with the server successfully. Underneath you will find instructions where to find your API details. |
| 7. Firstly, log into your Vultr account at: https://my.vultr.com/. |
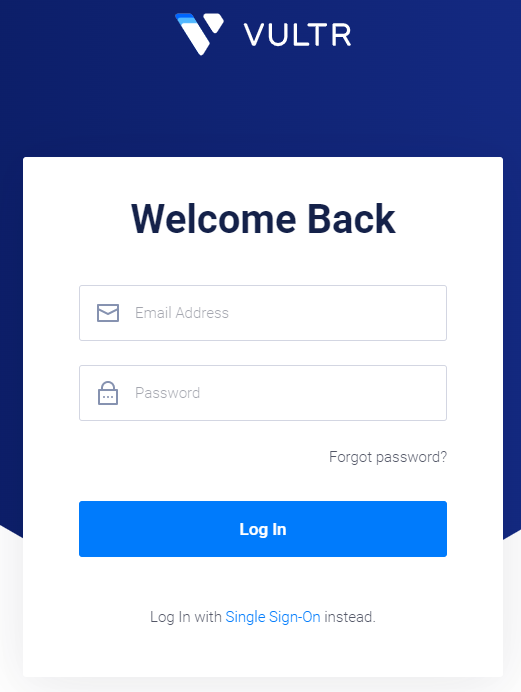
|
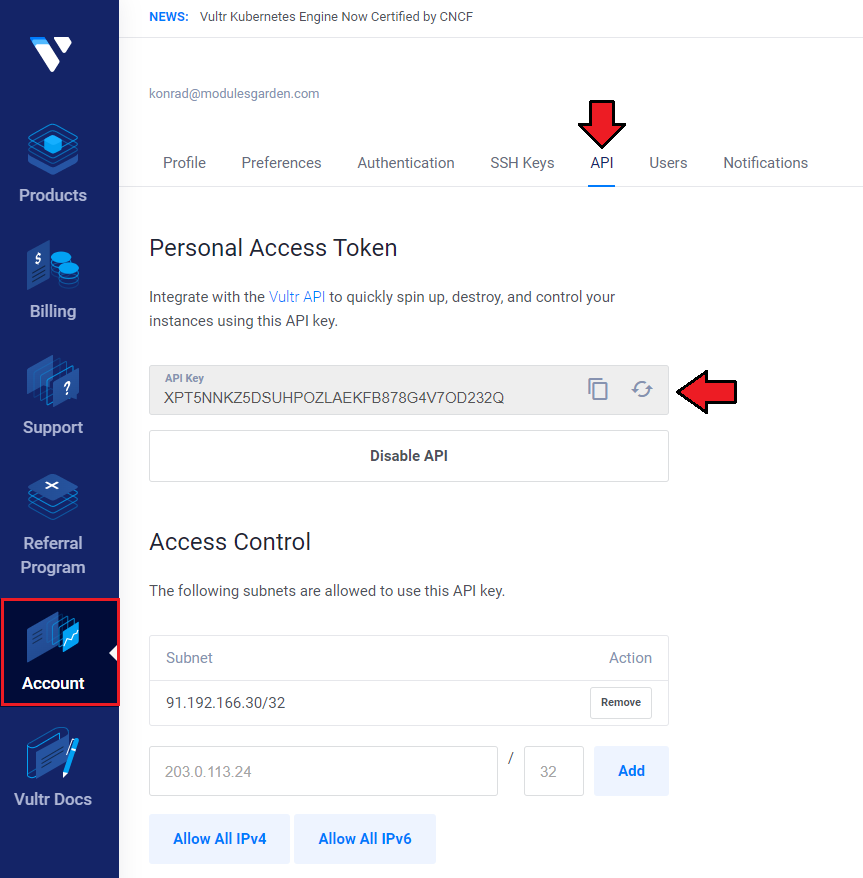
| 8. Move to the 'API' details section under your account.
There find the 'Personal Access Token' section and generate your API Key. |
|
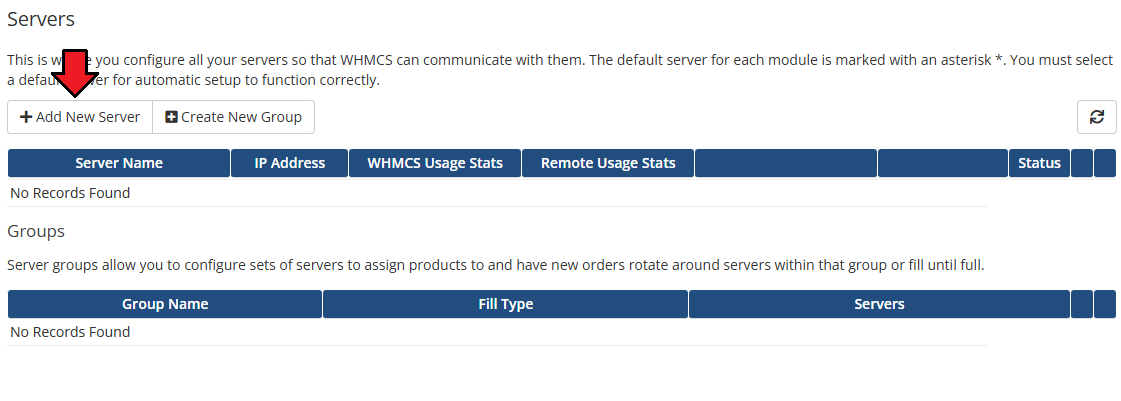
| 9. Now, log in to your WHMCS and proceed to 'System Settings' → 'Servers' and press 'Add New Server'. |
|
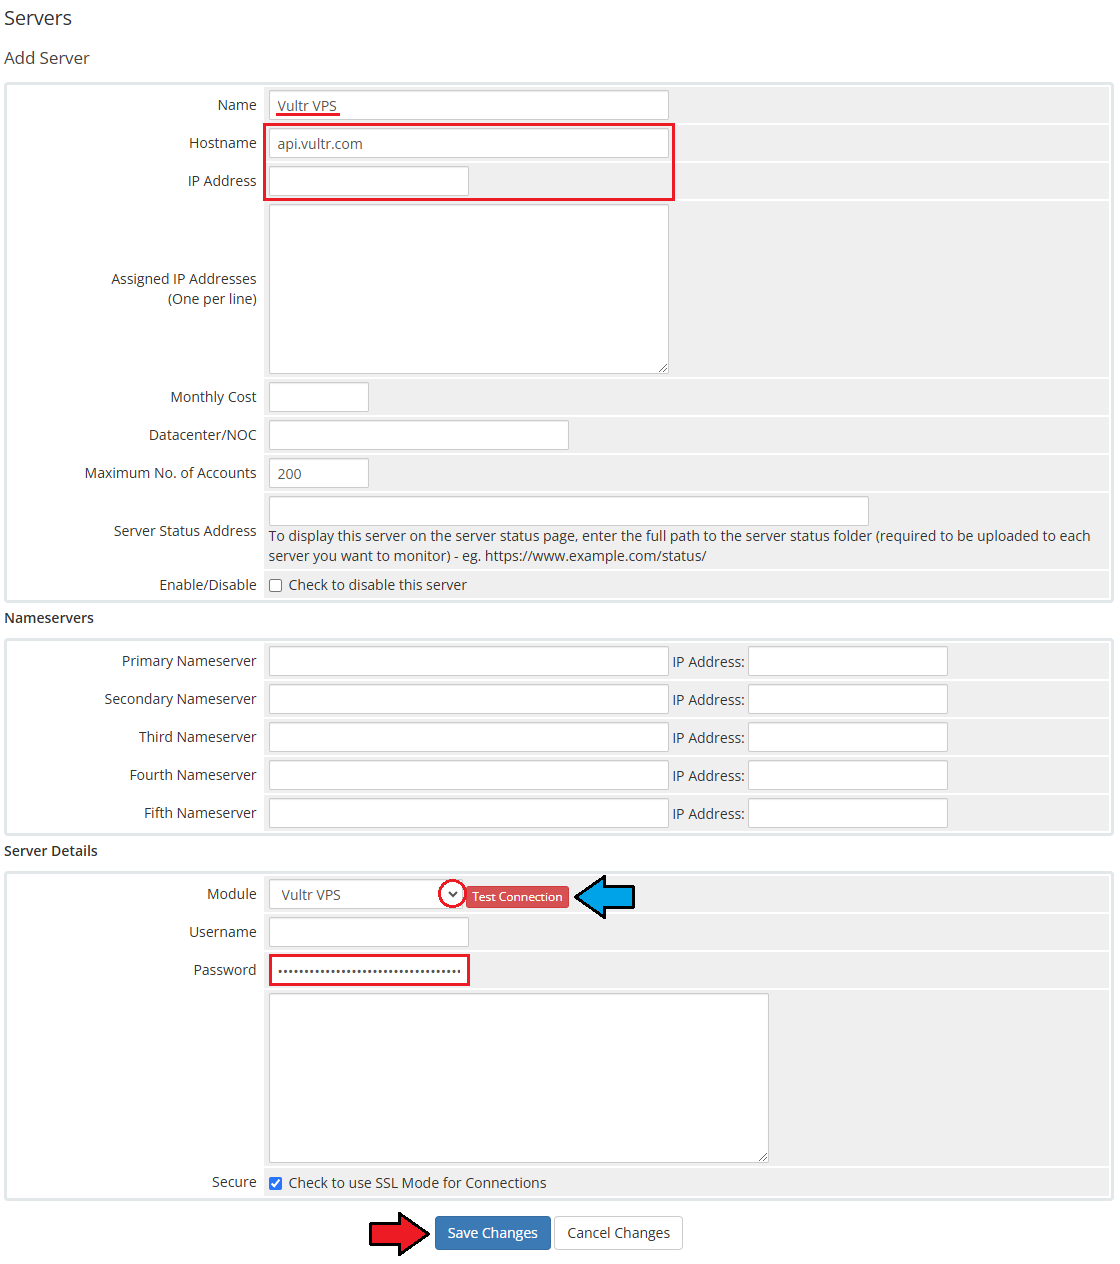
| 10. Next, enter your server name and a hostname or an IP address. Then select 'Vultr VPS' from the 'Type' field. Now, provide the previously generated API token in the 'Password' field. Then check the connection, if successful, save the changes. |
|
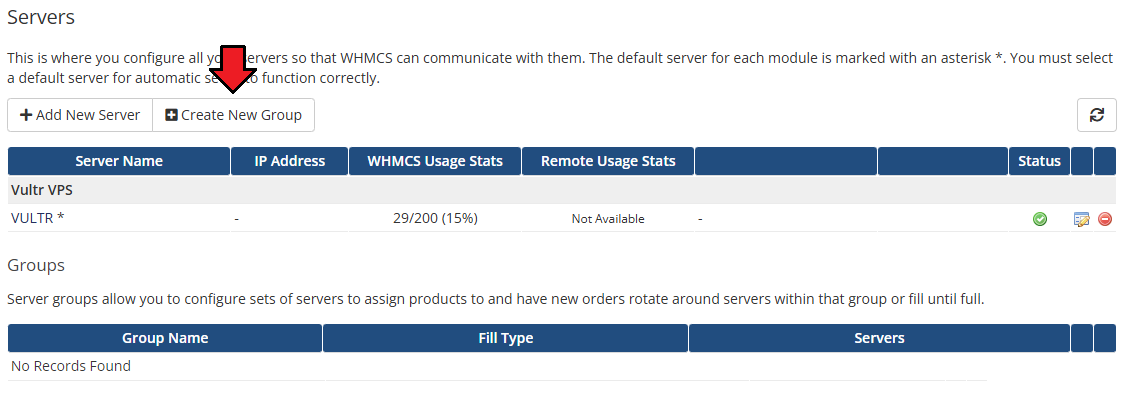
| 11. It is time to create a server group. To do so, click on 'Create Server Group'. |
|
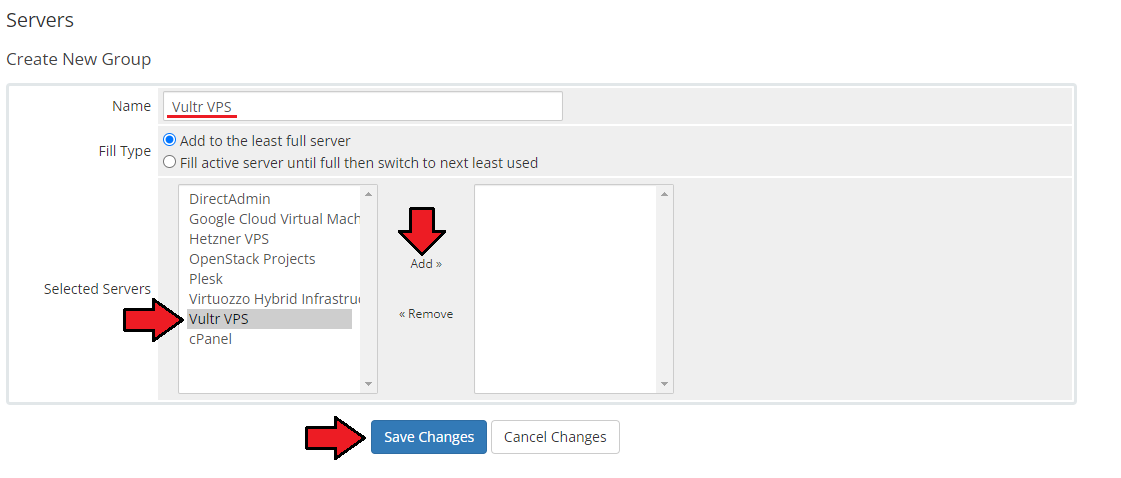
| 12. Enter a name, click on your previously created server, press 'Add' and afterward 'Save Changes'. |
|
[edit] Configuration of Product
| 13. In order to create and configure a product, go to 'System Settings' → 'Products/Services'. Click on 'Create a New Group' . |

|
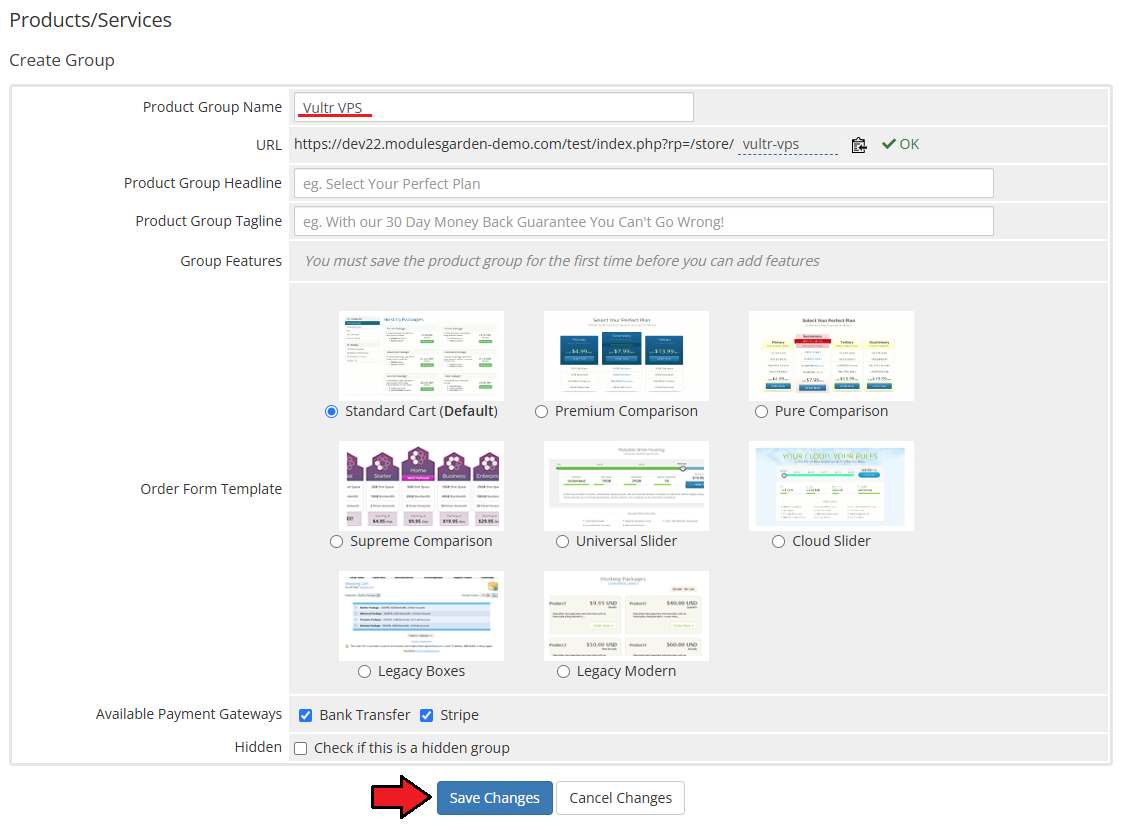
| 14. Enter a product group name and press 'Save Changes'. |
|
| 15. When you have a product group, you can create your product. To create a product click on 'Create a New Product' . |

|
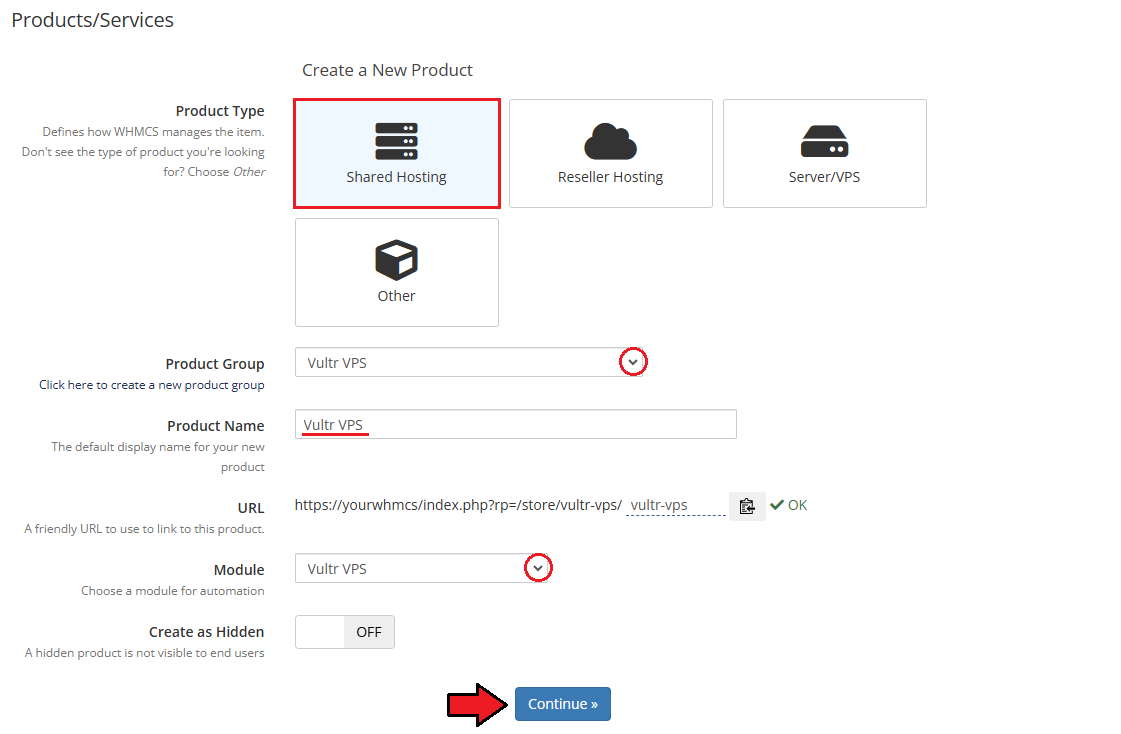
| 16. Afterward, choose your product group and type from the dropdown menus, enter your product name and press 'Continue'. 'Product Type' should be set to 'Shared Hosting'. |
|
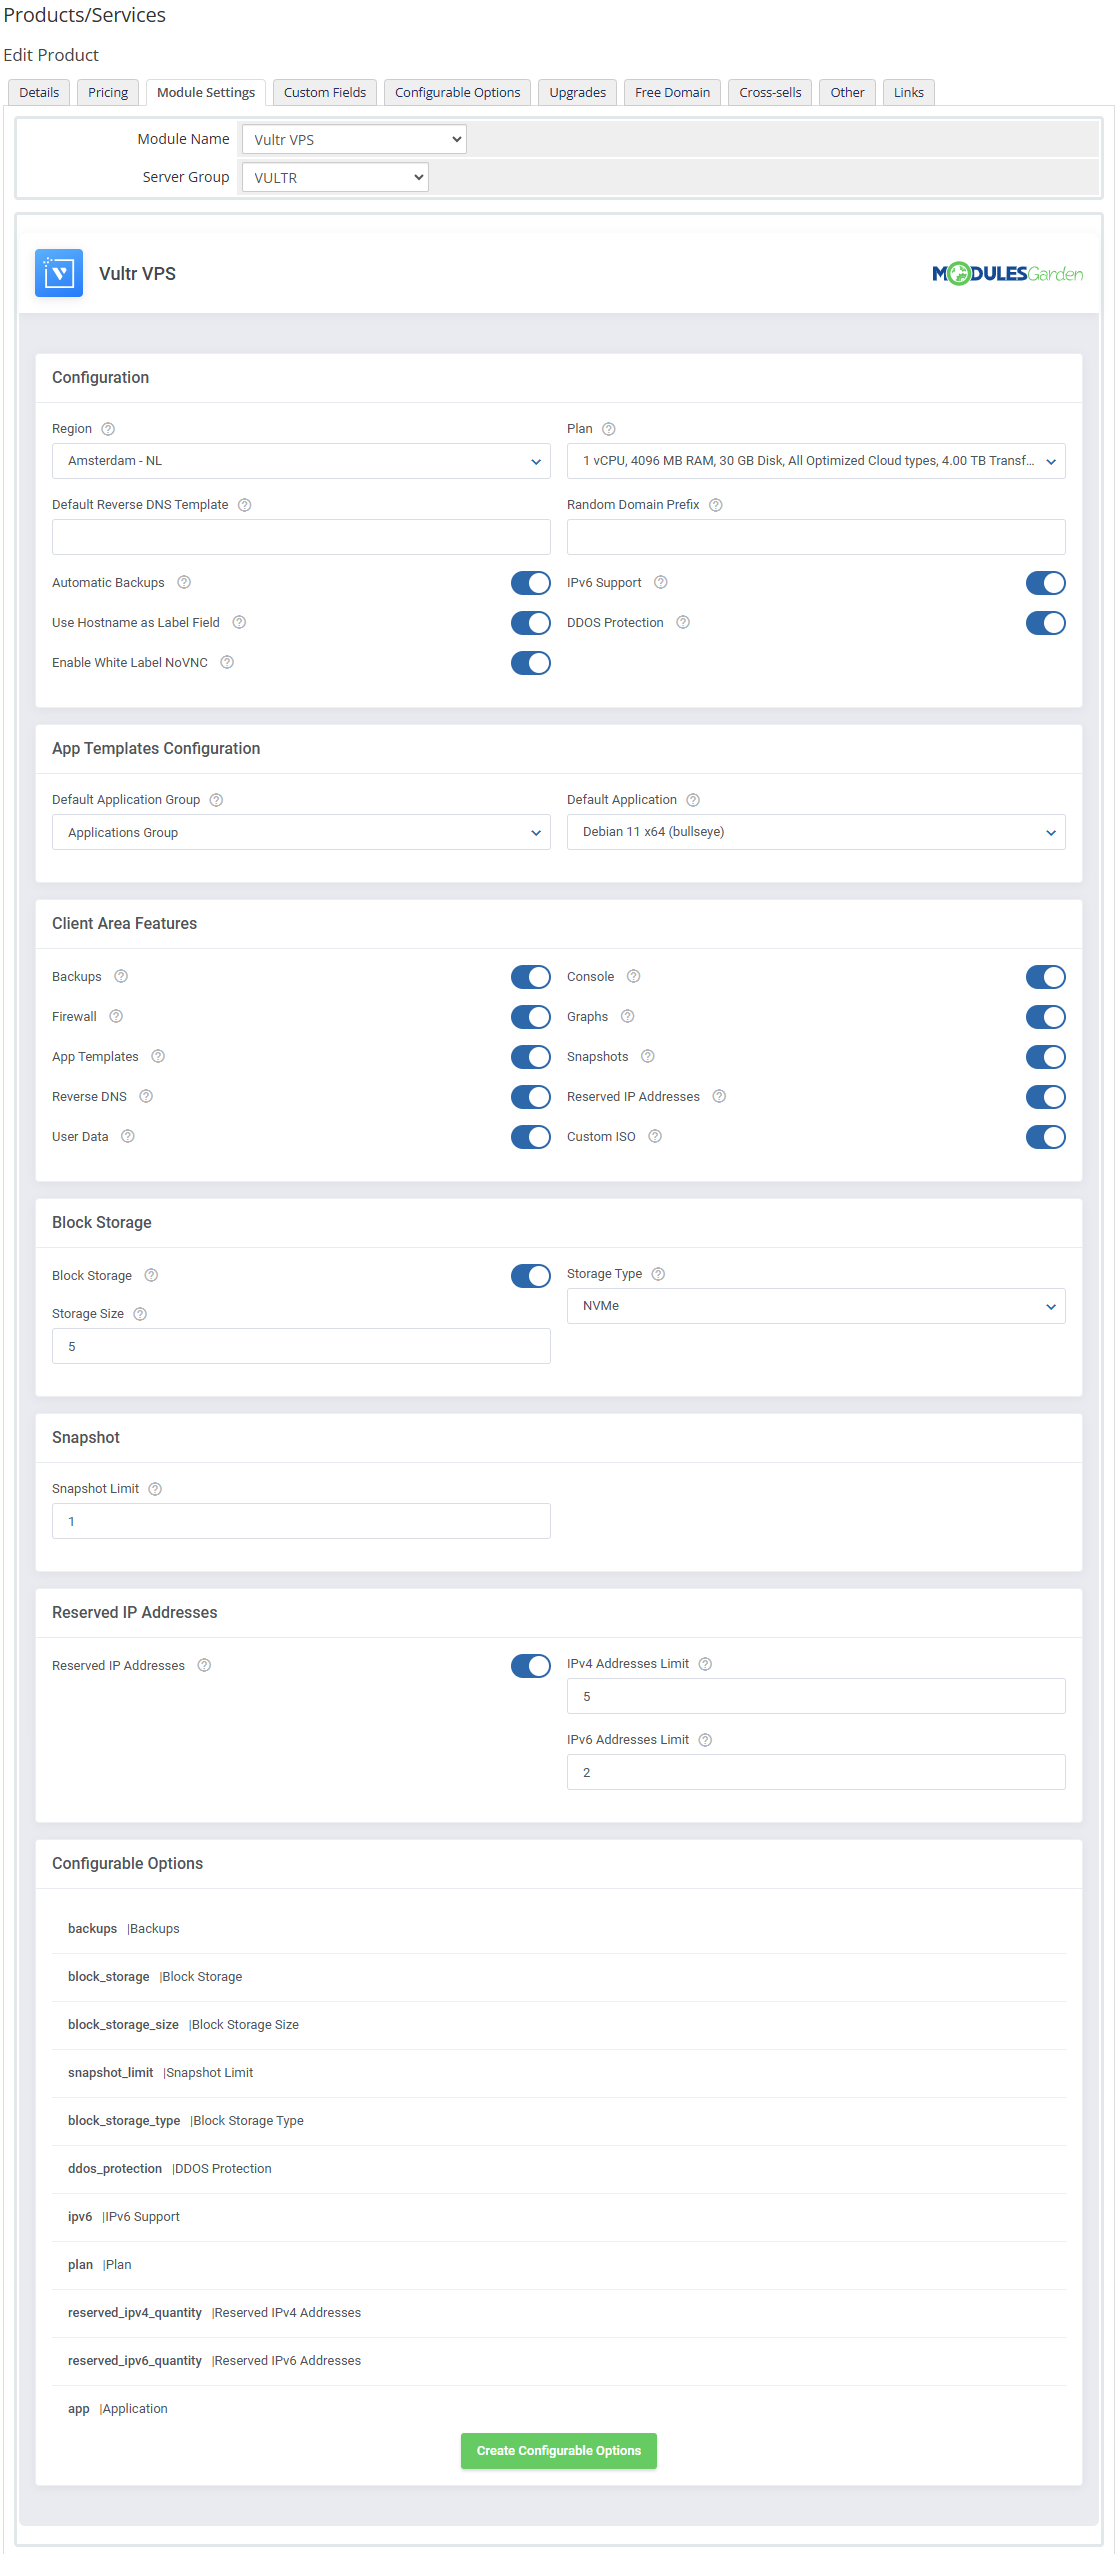
| 17. Now, go to the 'Module Settings' section, choose both 'Vultr VPS' and your previously created server group from the dropdown menus. The module should automatically save and reload settings. If not, click on 'Save Changes' manually. |
|
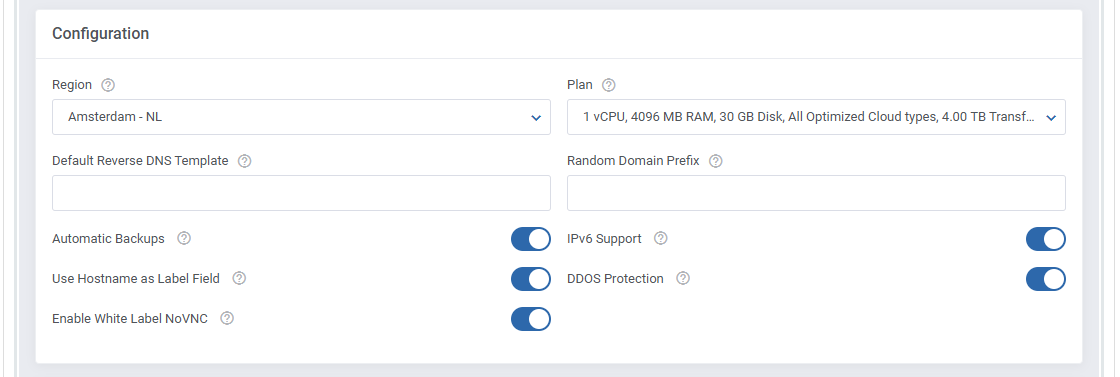
18. Start from defining the 'Configuration' details.
Set one of the below four options: Operating System, ISO, Snapshot or Application. Leave the other three as 'Disabled'.
Move to setting up the rest of of configuration options:
|
|
| 19. Next, select features available at the client area. You can also decide which images used to rebuild the server will be available to your customers. |

|
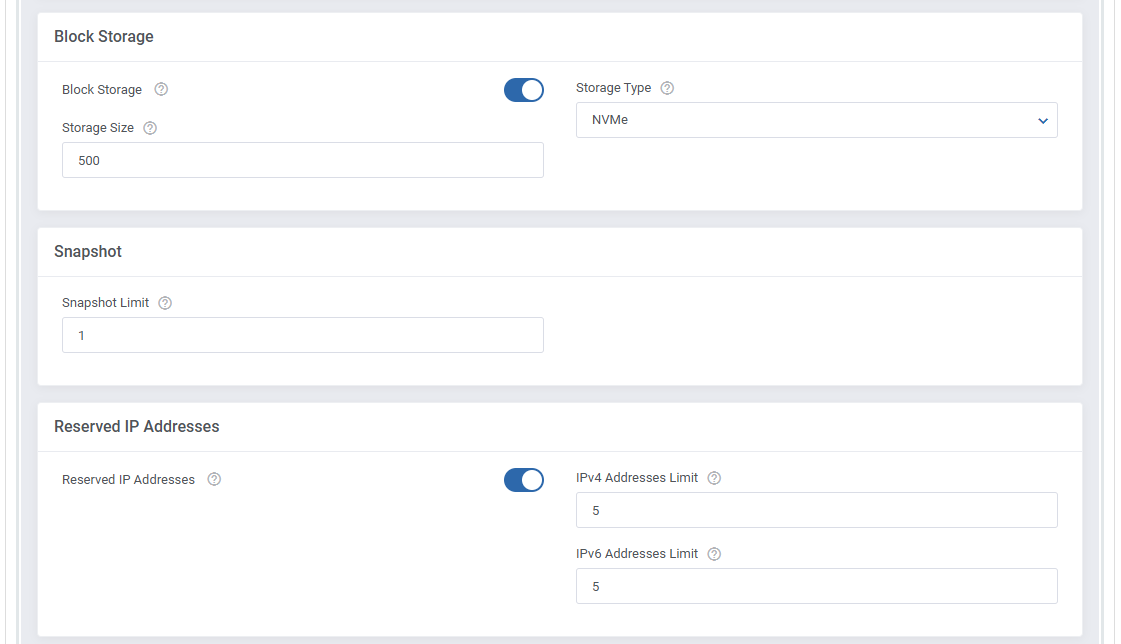
20. Enable additional options and set up configuration per each one of them:
|
|
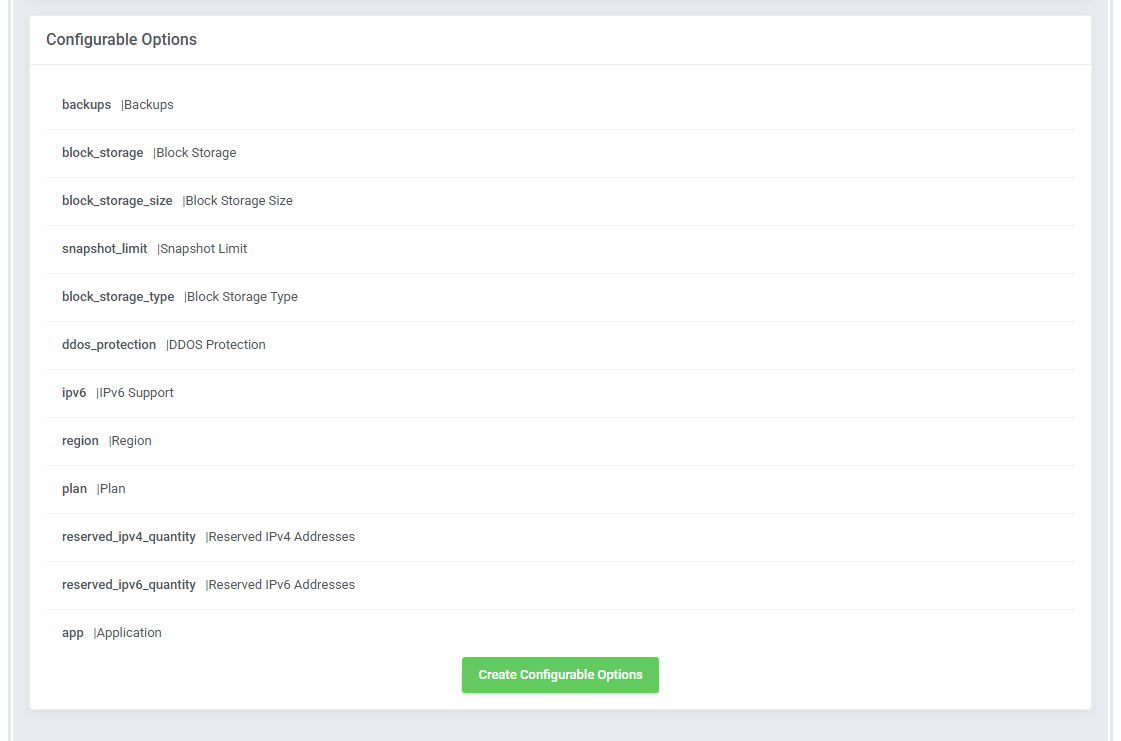
| 21. At the end of the configuration process, you can decide whether you want to generate configurable options for the product. Configurable options can be used by your clients to select each virtual machine parameters individually during order placement. |
|
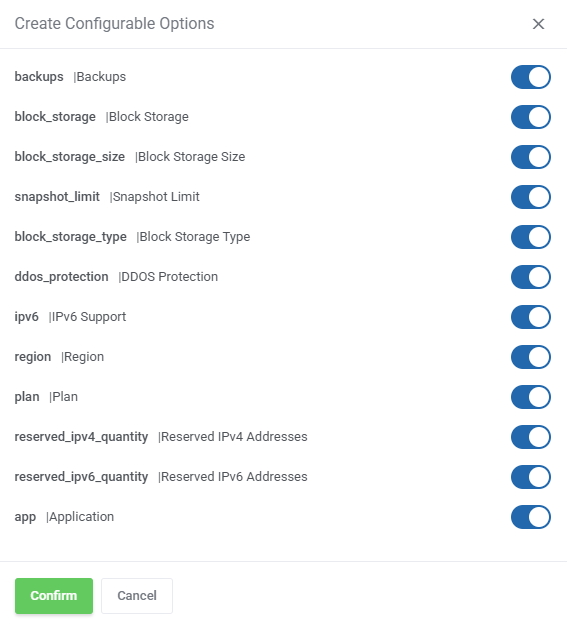
| If you decide to use configurable options, press the 'Create' button and select which options you want to generate. Remember that only one of the four options: 'osapp_id|Operating System or Application' 'os_id|Operating System', 'iso_id|ISO', 'snapshot_id|Snapshot', 'app_id|Application' can be used at once!
Note that the configuration for disabled options will still be taken from the configuration of the main product. |
|
[edit] Management
[edit] Admin Area
| Vultr VPS For WHMCS allows your customers to manage their servers via the client area in your WHMCS system. You can monitor and manage each product from your WHMCS admin area. |

|
[edit] Ordering
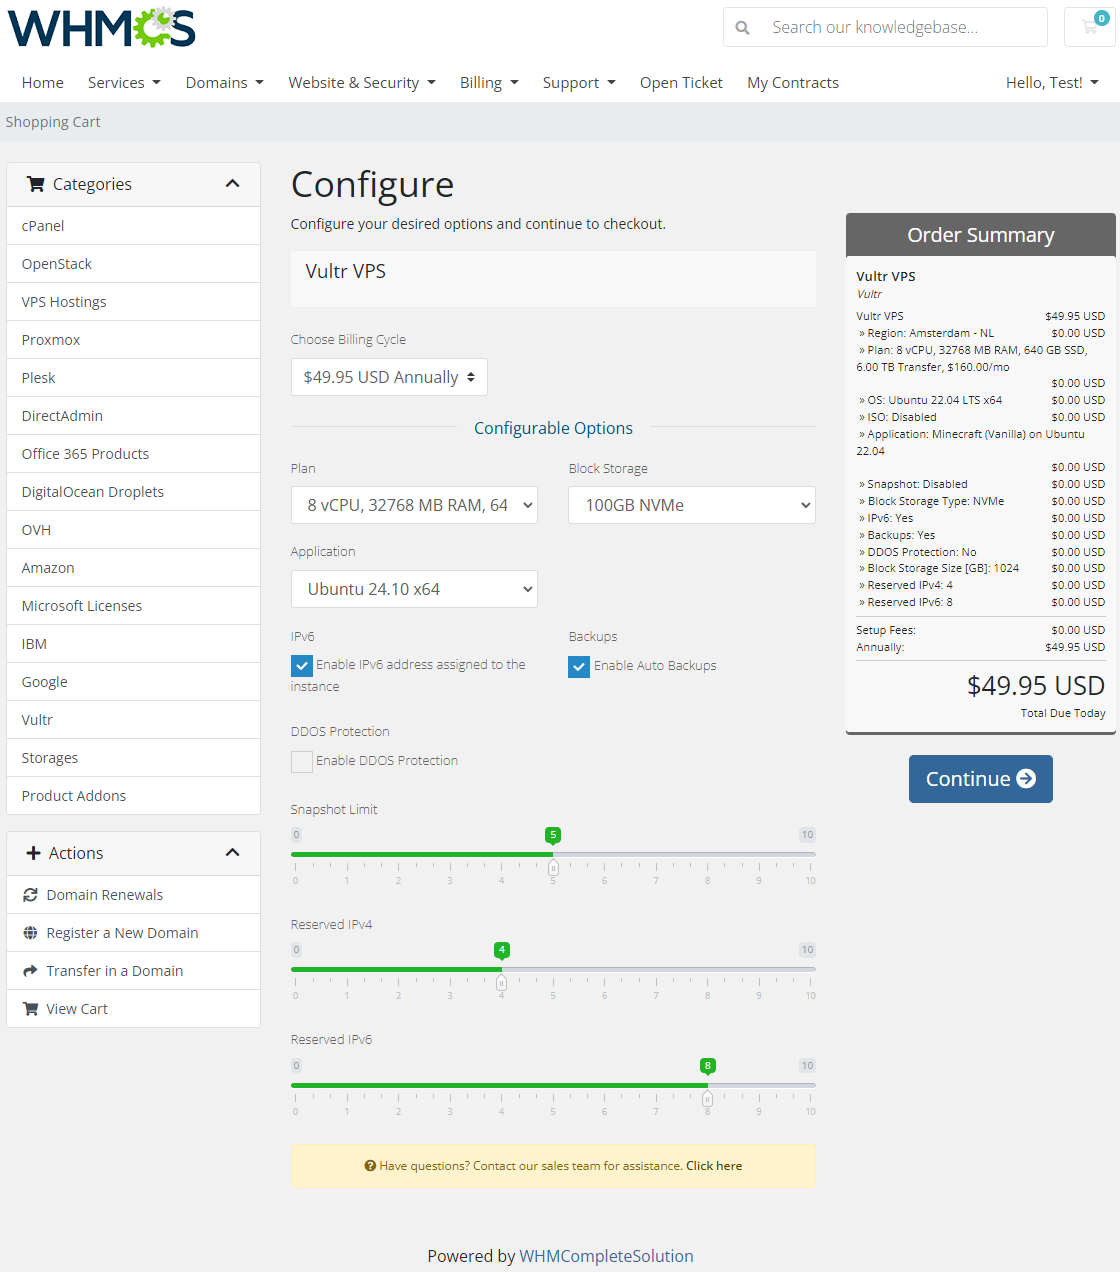
| Owing to configurable options, you are able to offer a product which your clients can tailor according to their needs. Additionally, you are able to set up pricing for each configurable option, which make your offer even more competitive. |
|
[edit] Importing Existing Instance
| In this section, you can find short instruction on how to connect one of your clients to your already existing instance in the Vultr panel. Take the following steps to make sure that the process will be carried out properly. 1. Firstly, manually create an order for your customer in WHMCS. Choose a client and in the summary, view click on the ' Add New Order' button. Next, select a 'Product/Service' and press 'Submit Order' .
The above-mentioned information has to be consistent with the data from your Vultr panel. Now, complete this field as presented below. |

|
| 3. If the completed data is correct, after refreshing the page, you will see the attached instance from Vultr. Important! Remember to manually add other missing parameters of the instance such as domains, credentials, IP Addresses, configurable options, etc. so they match the parameters of the attached instance from Vultr panel. |
[edit] Client Area
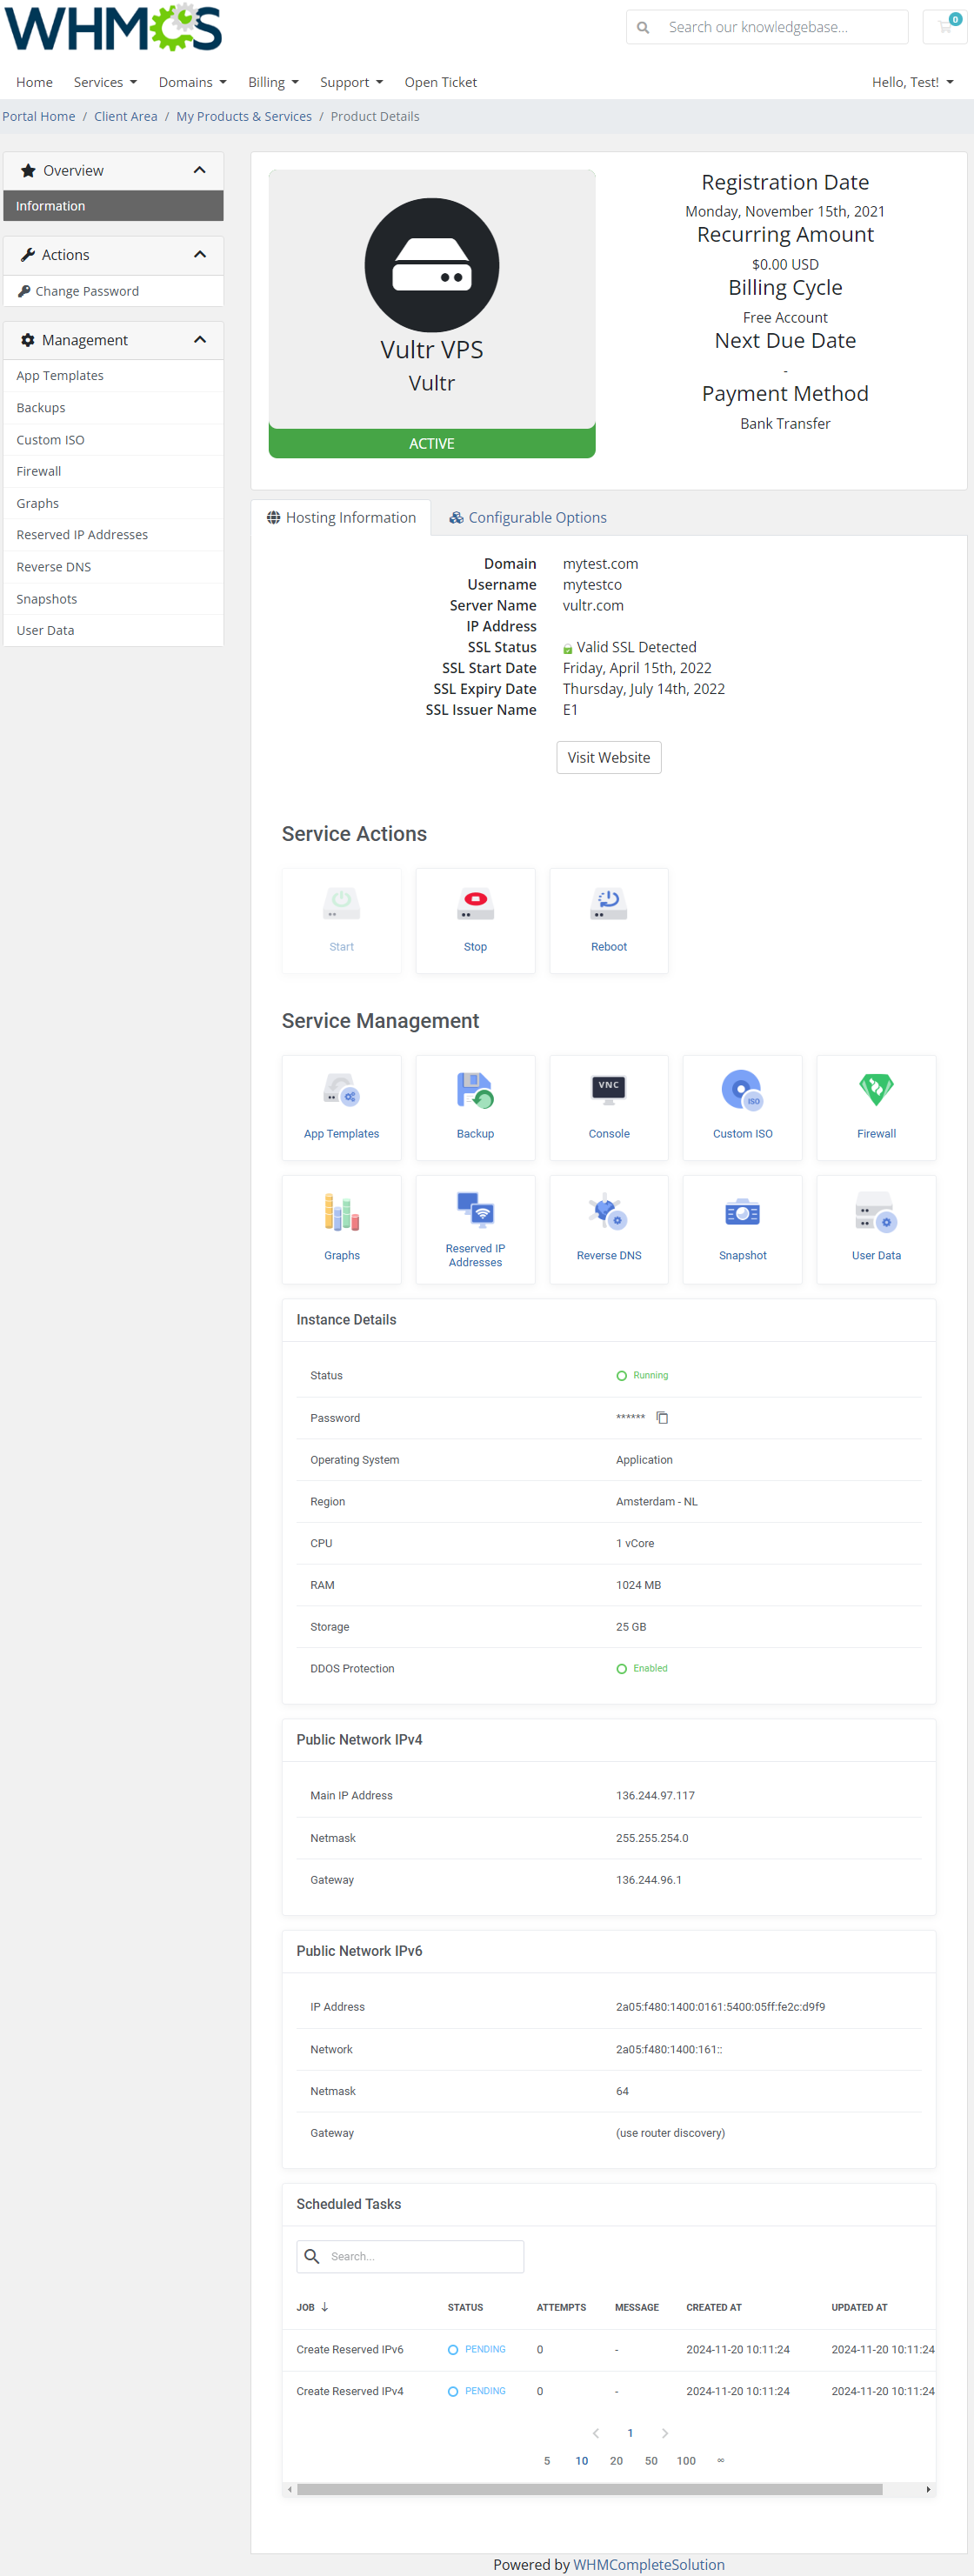
| Client area interface of Vultr VPS should look like the one on the screen below. As you can see, the control panel contains useful options needed for managing a virtual machine. The module allows your customers to easily start/stop, reboot or reinstall their servers by pressing the specific button. |
|
[edit] Backups
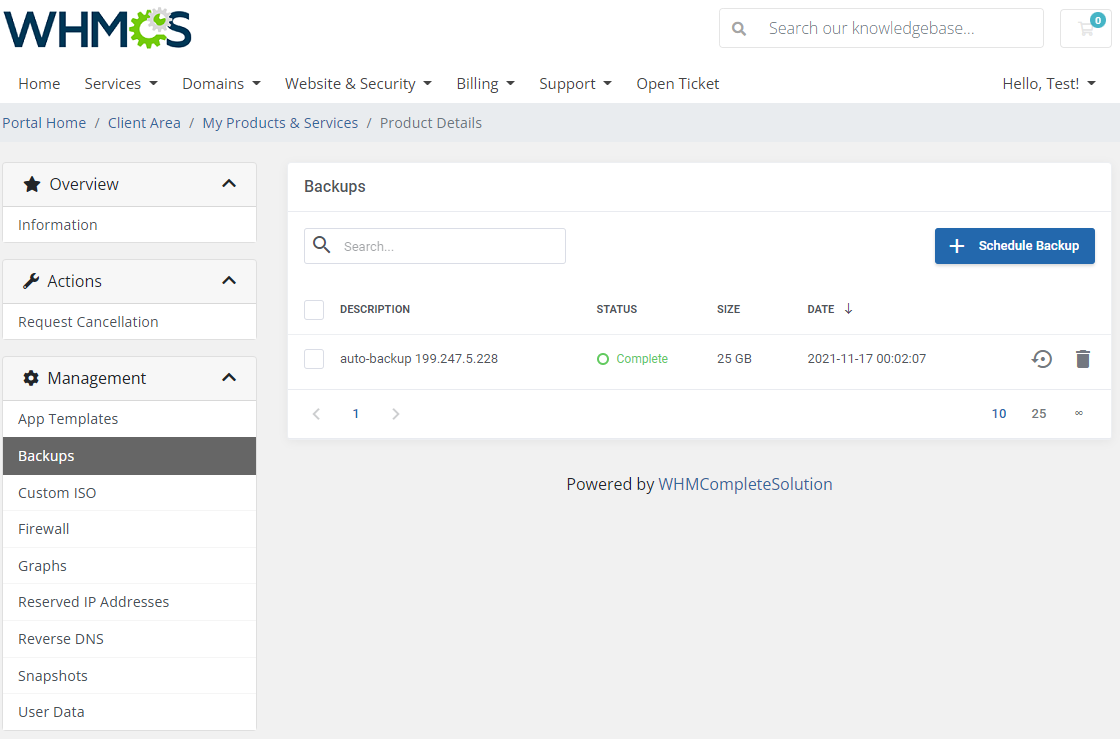
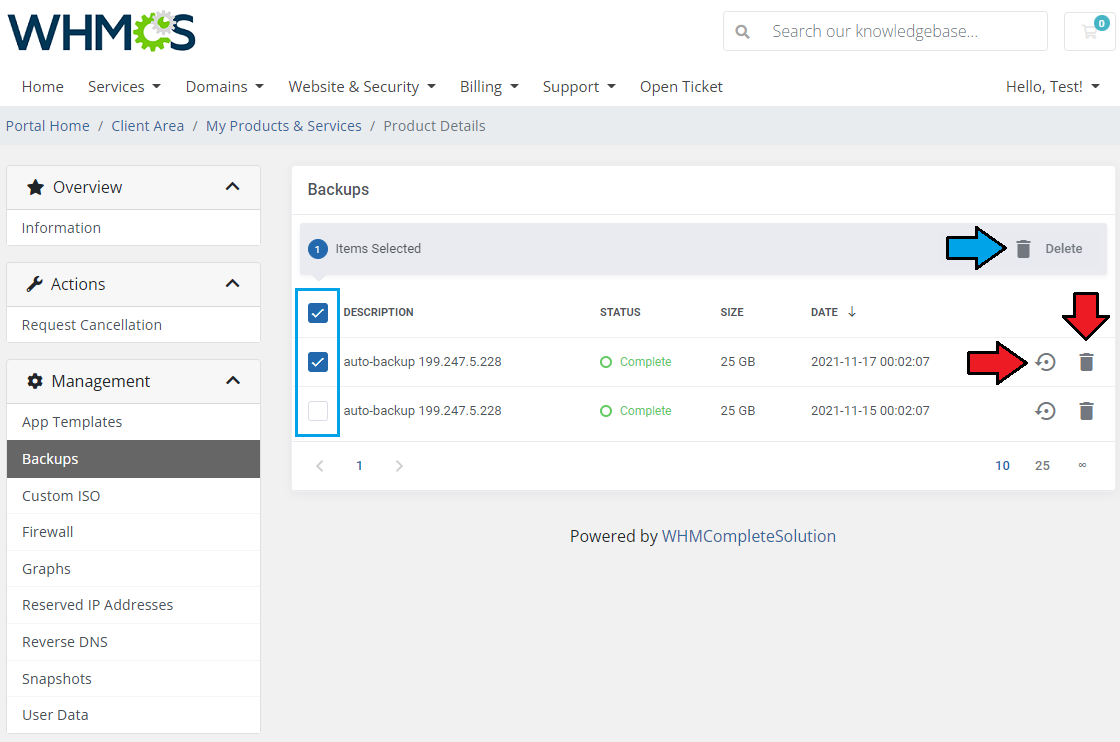
| The first section available for clients grants ability to view the list of existing 'Backups' of your server. Please remember that 'Backups' are assigned to a particular server and will be removed once the server is deleted. Note: There is a limit of maximum two backups per server. Once a new backup is created, the oldest one is automatically removed. |
|
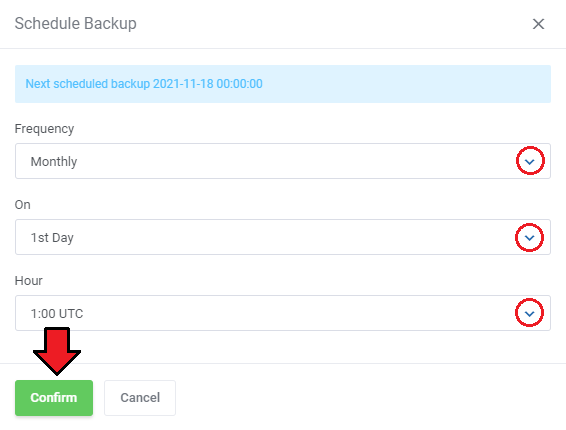
| Clients are also given the opportunity to schedule incoming backup by pressing the 'Schedule Backups' button. Provide a time details to wait until the next backup is created. |
|
| To restore a VPS from backup, simply press the 'Restore' button next to it. If selected backups are no longer needed, you may easily delete them. |
|
[edit] Custom ISO
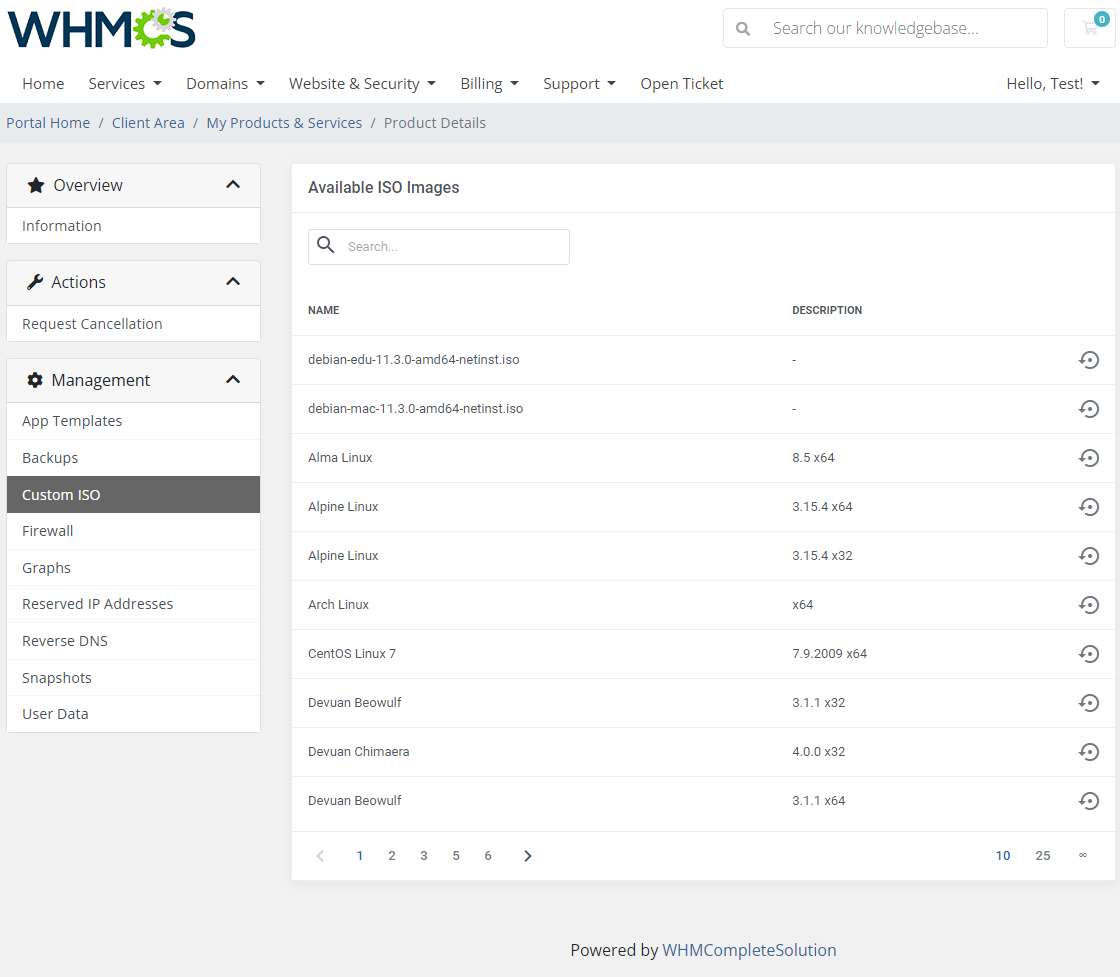
| "Custom ISO" feature allows clients to pick a single ISO and mount it to the machine. Note: Mounting a custom ISO requires rebooting the machine. |
|
[edit] Firewall
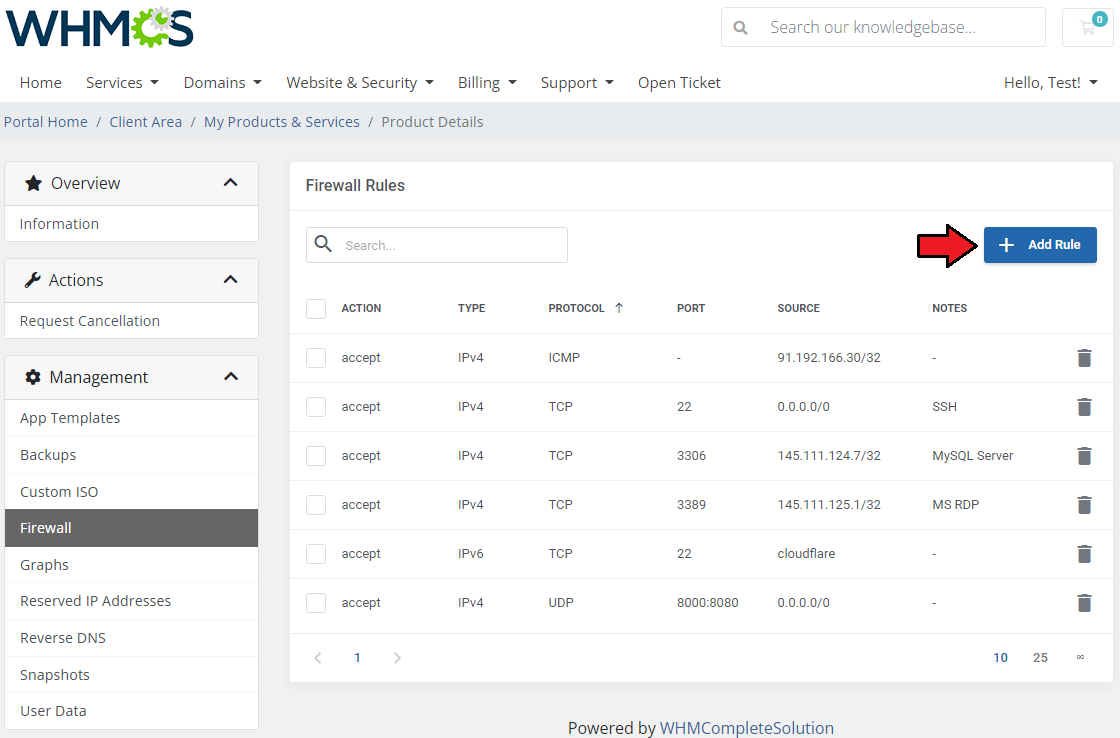
| The firewall management page allows your customers to view, add or delete existing rules on a security group assigned to the product. To add a new firewall rule, use the button marked on the following screen. |
|
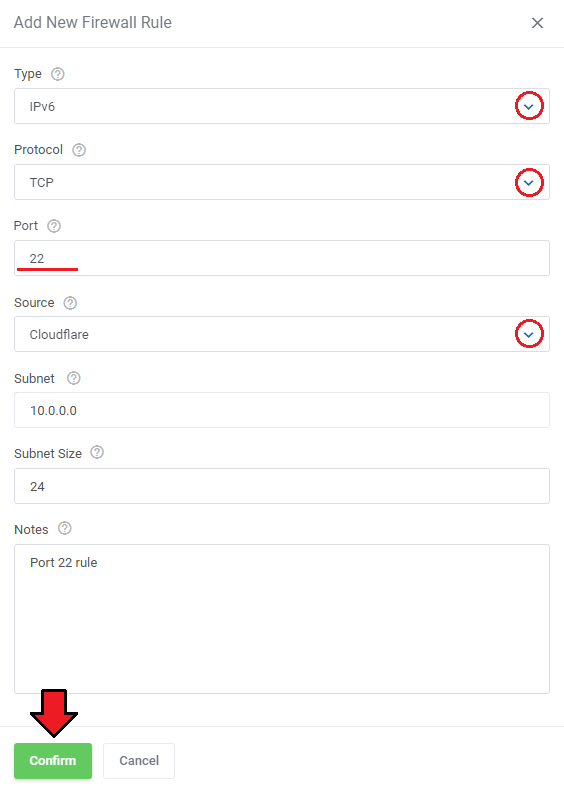
Next, fill out the rule details to create it:
Press 'Confirm' when ready. |
|
[edit] Graphs
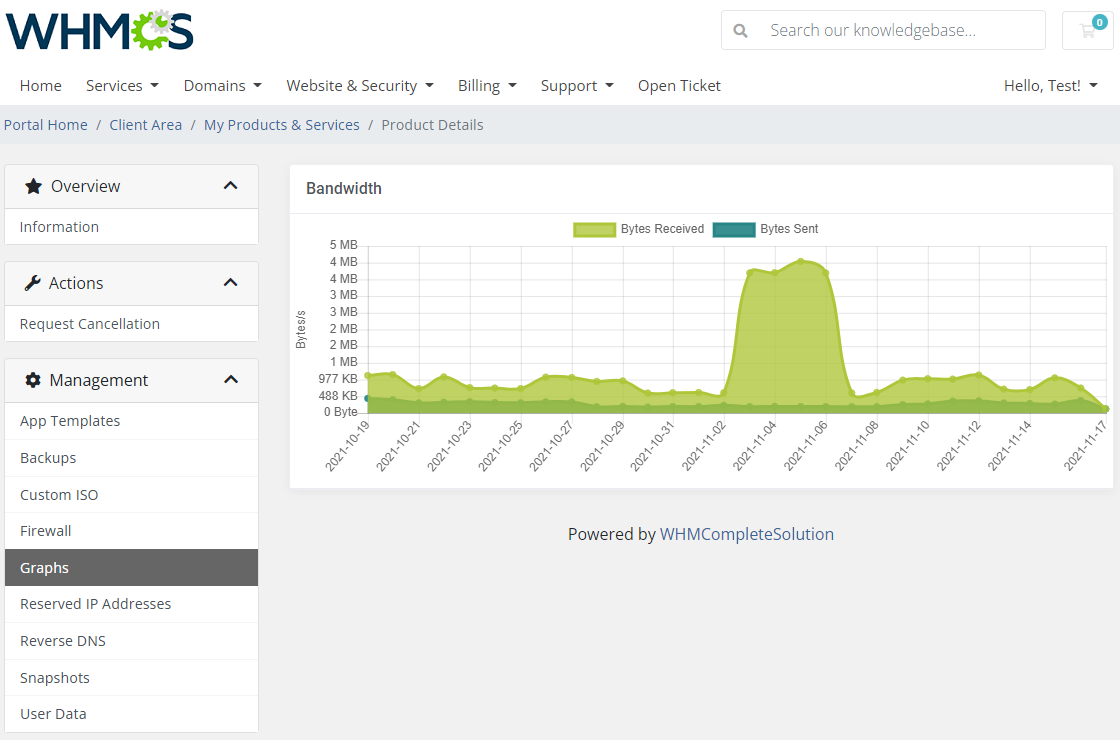
| Once entering the 'Graphs' section, clients will be moved to the page with the generated graphs showing the 'Bandwidth' usage. |
|
[edit] Rebuild
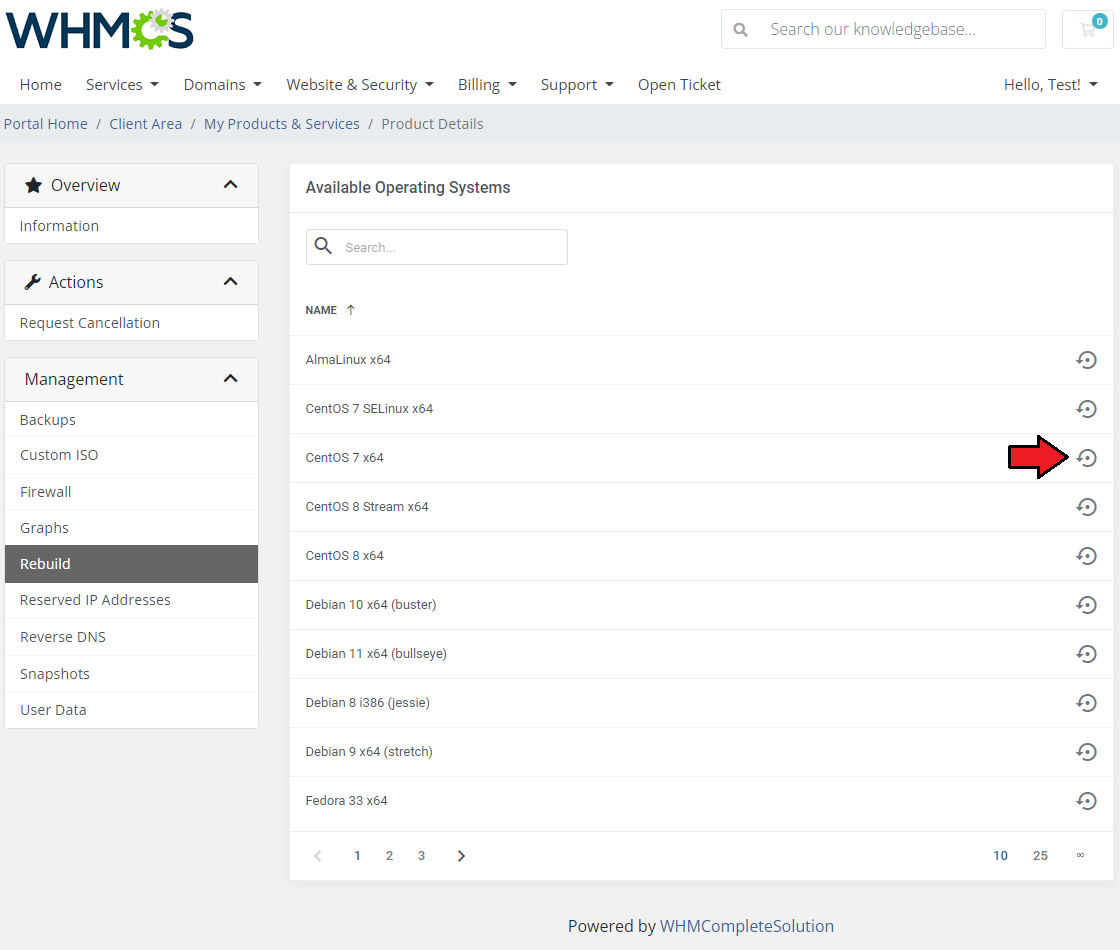
| The rebuild feature allows your clients to change a server image. To reinstall your server, choose an image and confirm through pressing the 'Rebuild' button. |
|
[edit] Reserved IPs
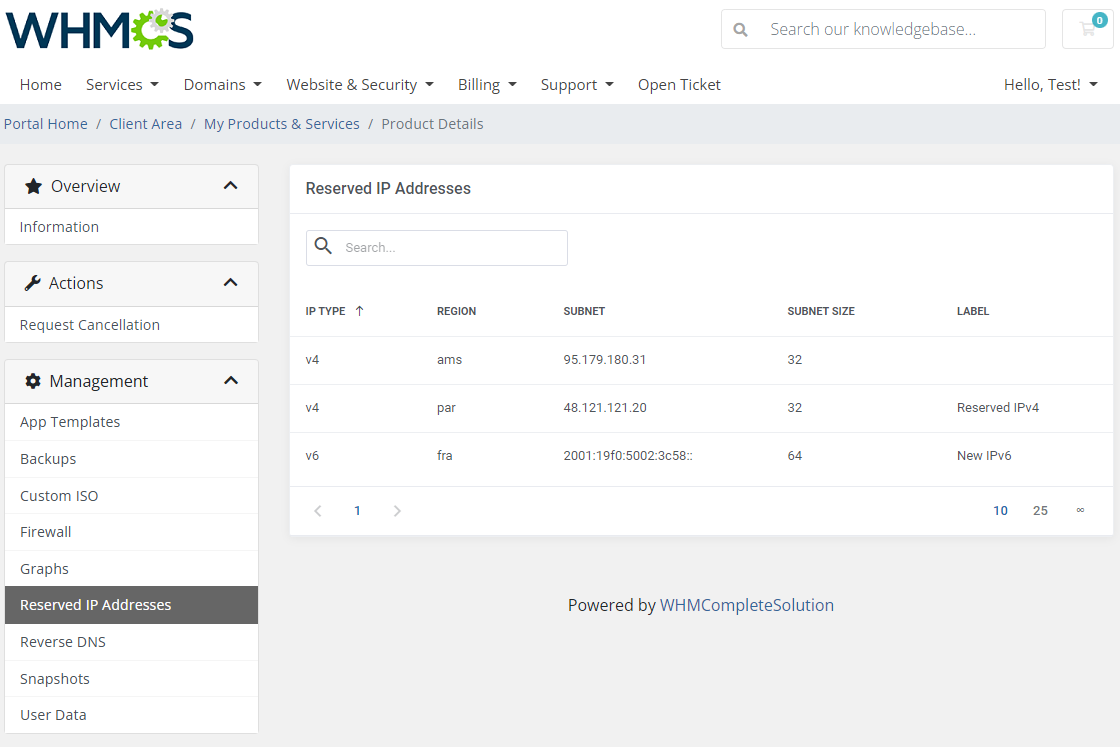
This section includes a list of all existing in the panel reserved IP addresses.
|
|
[edit] Reverse DNS
| Reverse DNS option allows your clients to manage reverseDNS of the IP addresses assigned to the machine. You can change the hostname that will appear when getting the hostname belonging to the primary IPs (IPv4 and IPv6) of your server. |
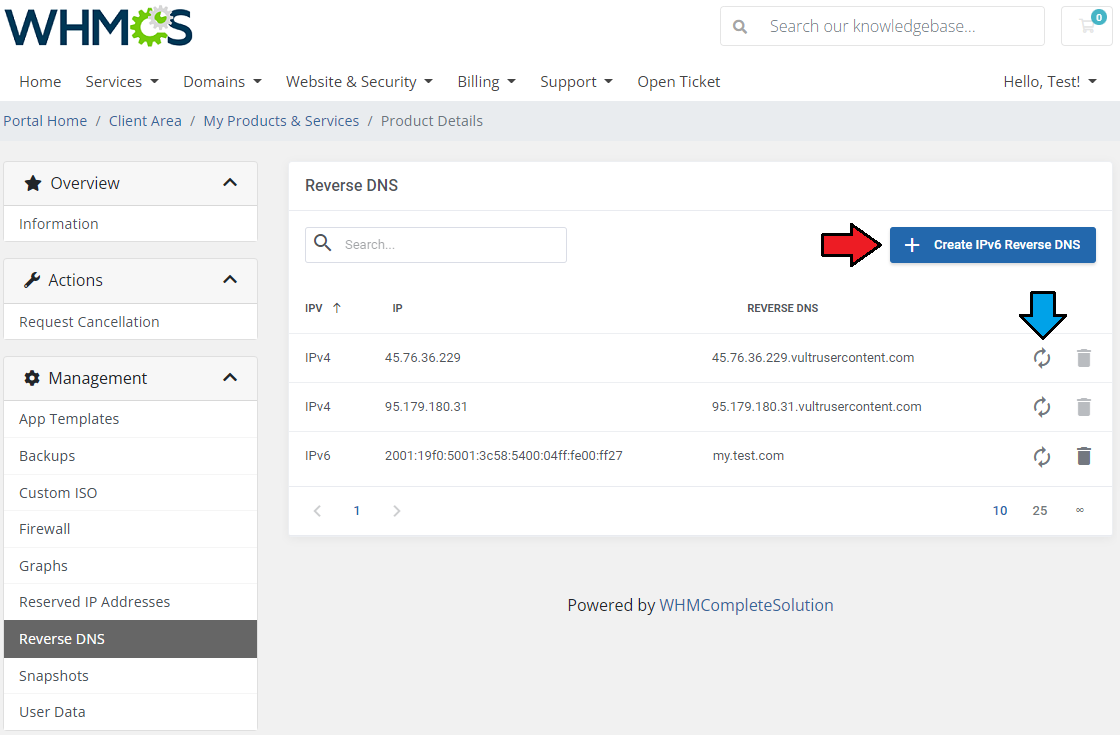
|
| When 'IP' and 'Reverse DNS' are provided, just confirm the action. |
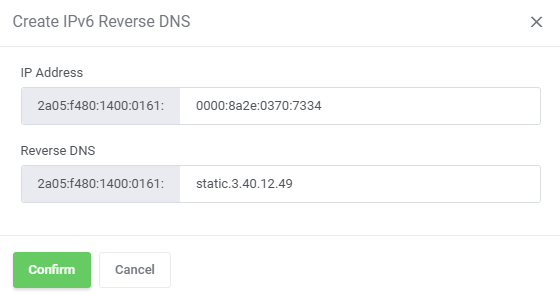
|
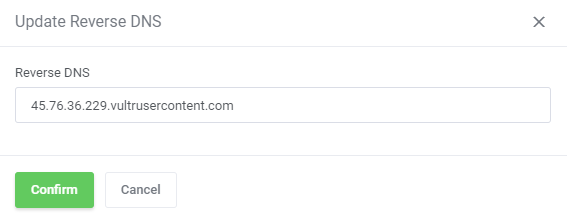
|
[edit] Snapshots
| Creating snapshots allows customers to quickly restore any changes to a virtual machine in case of any problems. Once the shutter has been created, the customer can restore it (1), change its description (2) or delete it (3). |
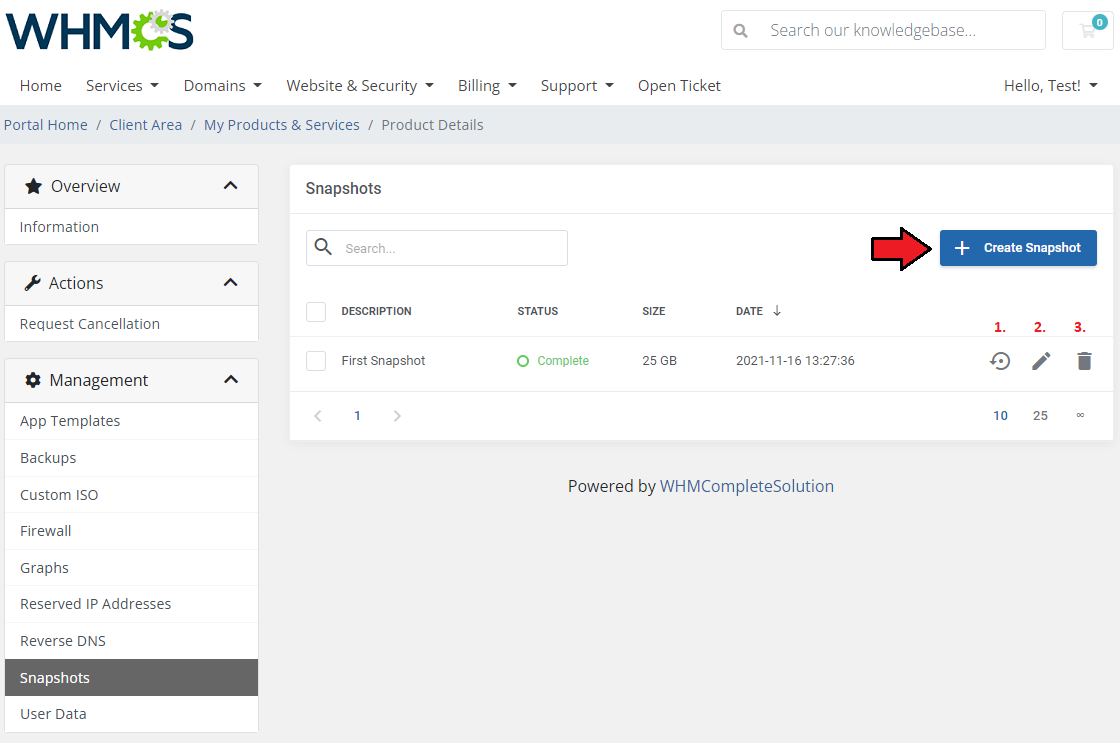
|
| After pressing the 'Create Snapshot' button, the new window will pop up along with the possibility to specify the snapshot description. Please note that taking a new snapshot may take a while to process. |
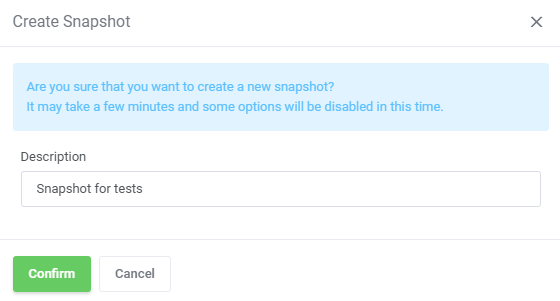
|
[edit] User Data
| User data can be freely altered in the client area. Remember that after introducing any changes, the machine restart is required to apply the changes. Note: User data supports smarty variables, such as '{$password}'. Follow to this article to find a full list of supported module parameters and their descriptions. |
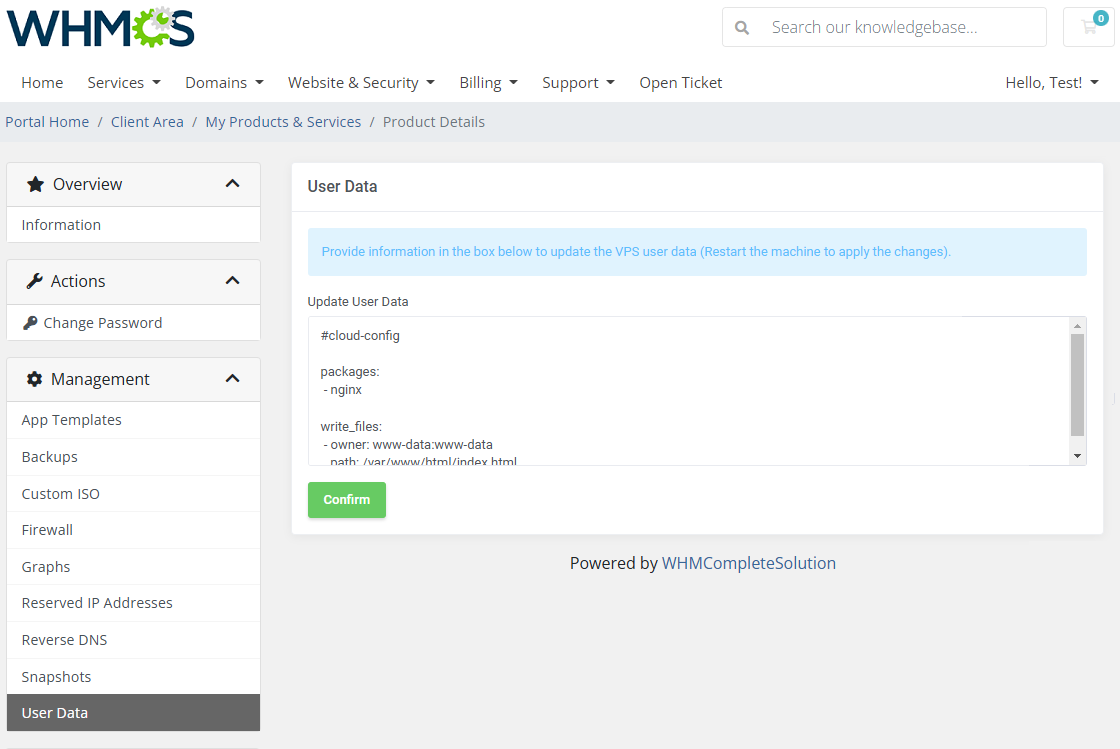
|
[edit] Console
| One of the most interesting functionality is a noVNC console where your clients can remotely manage their servers. To access it, simply click on the 'Console' button. Note: Vultr offers a generic VNC URL that serves as a white-label URL. If you wish to use a white-label console with the Vulr VPS For WHMCS module, please contact the Vultr support via their official ticketing system. |
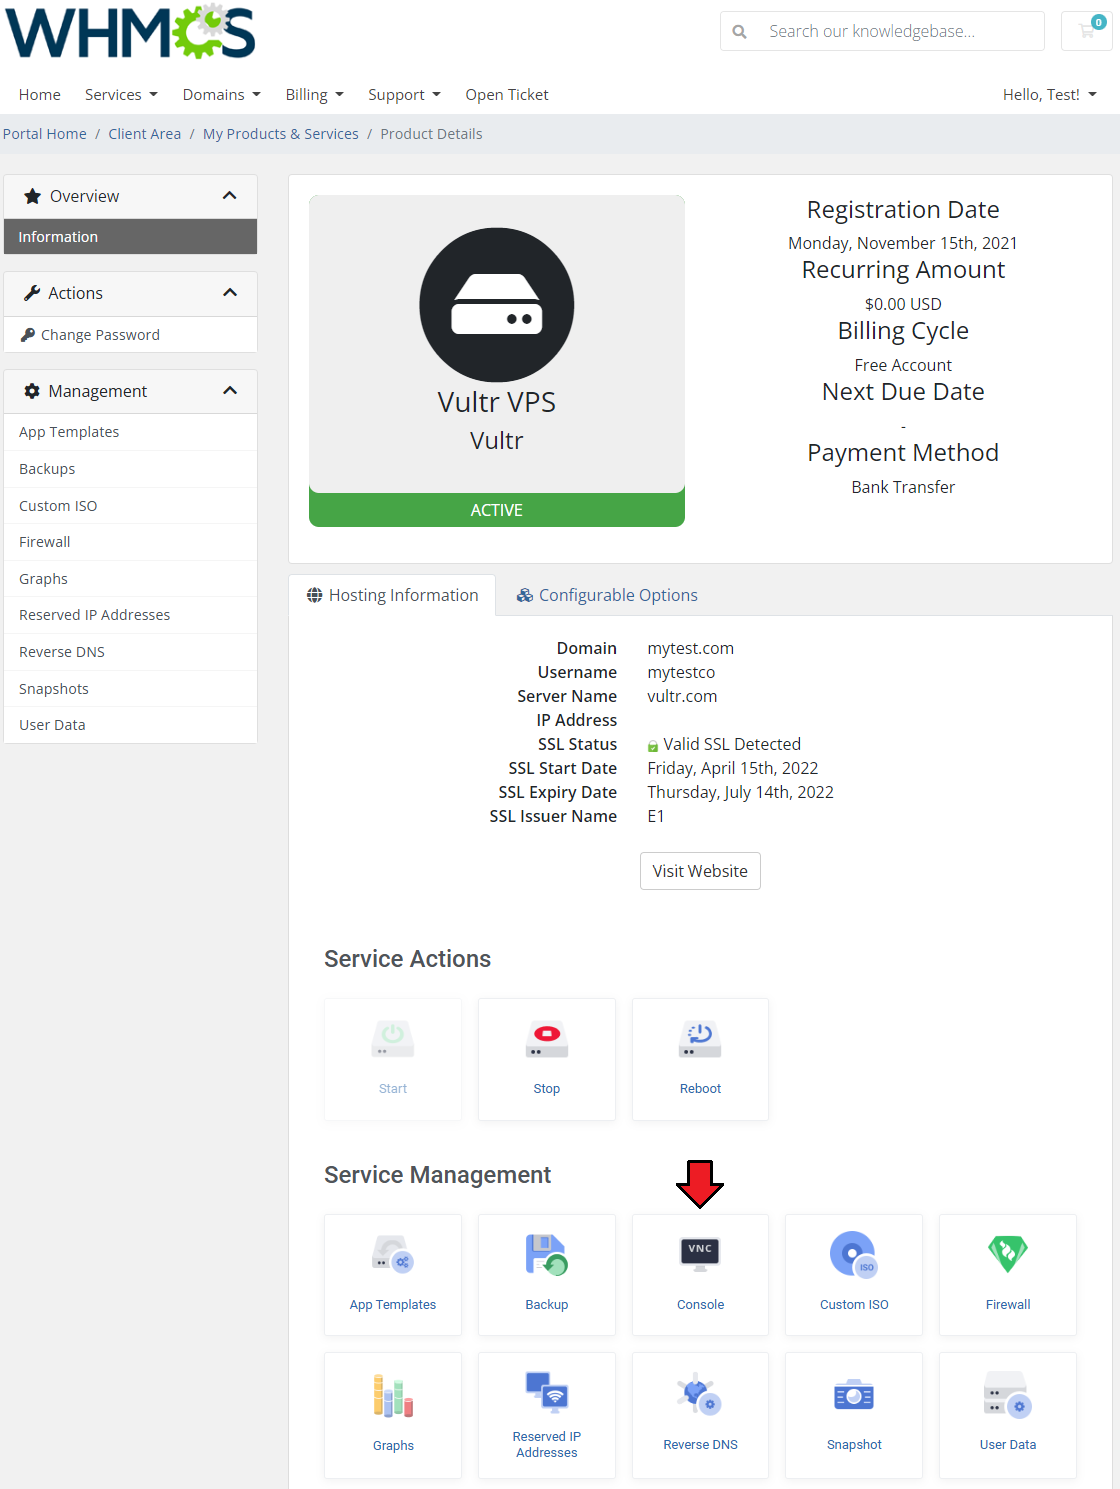
|
[edit] Tips
| 1. Vultr offers a generic VNC URL that serves as a white-label URL. If you wish to use a white-label console with the Vulr VPS For WHMCS module, please contact the Vultr support team via their official ticketing system. |
| 2. If you may choose among all four configurable options to configure your VPS when placing an order, they will be prioritized in the following manner:
'Operating System' → 'Snapshot' → 'ISO' and 'Application' as the least one on the list. |
[edit] Update Instructions
| An essential guidance through the process of updating the module is offered here. Ensure successful completion of the module update by carefully following each step, thereby preventing data loss or any unforeseen issues. |
[edit] Upgrade Guide
| Seeking a solution that offers greater flexibility, customization tailored to your precise needs, and unrestricted availability? There is an option that not only proves to be cost-effective in the long run but also includes prioritized support services, making it a truly valuable investment. Opt for the Open Source version of your Vultr VPS For WHMCS module to unlock these benefits. Follow a comprehensive guide covering the transition process, the advantages it brings, and step-by-step instructions on what to do next after the order has been successfully finalized. |
[edit] Common Problems
| 1. When you have problems with connection, check whether your SELinux or firewall does not block ports. |
| 2. Downgrading virtual machine with block storage is impossible. Move to the official Vultr documentation to find out more. |