Virtuozzo Hybrid Infrastructure S3 For WHMCS
(→Configuration of Server) |
(→About Virtuozzo Hybrid Infrastructure S3 For WHMCS) |
||
| (22 intermediate revisions by 2 users not shown) | |||
| Line 18: | Line 18: | ||
|} | |} | ||
{| | {| | ||
| − | |style="padding: 0px 0px 0px 30px;"|✔ View User Limits | + | |style="padding: 0px 0px 0px 30px;"|✔ View Set User Limits |
|} | |} | ||
{| | {| | ||
| Line 63: | Line 63: | ||
|} | |} | ||
{| | {| | ||
| − | |style="padding: 0px 0px 0px 30px;"|✔ Set User Quota | + | |style="padding: 0px 0px 0px 30px;"|✔ Set Quota Management Details: |
| + | |} | ||
| + | {| | ||
| + | |style="padding: 0px 0px 0px 45px;"|✔ Define User Quota Usage Limit | ||
| + | |} | ||
| + | {| | ||
| + | |style="padding: 0px 0px 0px 45px;"|✔ Select Bandwidth Usage Calculation Method | ||
|} | |} | ||
{| | {| | ||
| Line 112: | Line 118: | ||
|} | |} | ||
{| | {| | ||
| − | |style="padding: 0px 0px | + | |style="padding: 0px 0px 0px 30px;"|✔ Bandwidth Out [Mb/s] |
| + | |} | ||
| + | {| | ||
| + | |style="padding: 0px 0px 10px 30px;"|✔ User Quota [GB] | ||
|} | |} | ||
| Line 123: | Line 132: | ||
|} | |} | ||
{| | {| | ||
| − | |style="padding: 0px 0px 0px 30px;"|✔ Supports PHP | + | |style="padding: 0px 0px 0px 30px;"|✔ Supports PHP 8.1 Back To PHP 7.4 |
|} | |} | ||
{| | {| | ||
| Line 132: | Line 141: | ||
|} | |} | ||
{| | {| | ||
| − | |style="padding: 0px 0px 0px 30px;"|✔ Supports WHMCS V8. | + | |style="padding: 0px 0px 0px 30px;"|✔ Supports WHMCS V8.10 Back To WHMCS V8.7 |
| + | |} | ||
| + | {| | ||
| + | |style="padding: 0px 0px 0px 30px;"|✔ Requires ionCube Loader V12 Or Later | ||
|} | |} | ||
{| | {| | ||
| − | |style="padding: 0px 0px 30px 30px;"|✔ Easy Module Upgrade To [https://www.modulesgarden.com/products/whmcs/virtuozzo-hybrid-infrastructure-s3#open-source-version Open Source Version] | + | |style="padding: 0px 0px 30px 30px;"|✔ Easy [https://www.docs.modulesgarden.com/How_To_Upgrade_WHMCS_Module Module Upgrade] To [https://www.modulesgarden.com/products/whmcs/virtuozzo-hybrid-infrastructure-s3#open-source-version Open Source Version] |
|} | |} | ||
| Line 189: | Line 201: | ||
ostor-s3-admin create-user -e [email protected] -S -V 0100000000000002 | ostor-s3-admin create-user -e [email protected] -S -V 0100000000000002 | ||
| − | |||
Follow instructions that are visible in your console.<br/> | Follow instructions that are visible in your console.<br/> | ||
| Line 294: | Line 305: | ||
|style="padding: 0px 0px 15px 15px;"|The next section is dedicated to quota management: | |style="padding: 0px 0px 15px 15px;"|The next section is dedicated to quota management: | ||
* '''User Quota [GB]''' - define the storage usage limit per user in gigabytes | * '''User Quota [GB]''' - define the storage usage limit per user in gigabytes | ||
| + | * '''Bandwidth Usage Calculation''' - select the bandwidth usage calculation method: include the uploads or downloads only, or both. | ||
|} | |} | ||
{| | {| | ||
|style="padding: 0px 0px 20px 25px;"|[[File:VHI_18.png]] | |style="padding: 0px 0px 20px 25px;"|[[File:VHI_18.png]] | ||
| + | |} | ||
| + | {| | ||
| + | |style="padding: 0px 0px 15px 15px;"|In the next section the units of "disk space" and "bandwidth" configurable options shall be defined: | ||
| + | * '''Disk Space''' - specify the unit in which the "disk space" configurable option will be offered: MG, GB, TB | ||
| + | * '''Bandwidth''' - specify the unit in which the "bandwidth" configurable option will be offered: MG, GB, TB | ||
| + | |} | ||
| + | {| | ||
| + | |style="padding: 0px 0px 20px 25px;"|[[File:VHI_18_1.png]] | ||
| + | |} | ||
| + | {| | ||
| + | |style="padding: 0px 0px 15px 15px;"| To set up the quota and bandwidth limits via the "disk space" and "bandwidth" configurable options you must configure them as well.<br/> Please refer to the official [https://docs.whmcs.com/Disk_Space_and_Bandwidth_Overage_Billing#Custom_Fields_and_Configurable_Options WHMCS documentation] for precise instructions on how to do that, as the two configurable options are not automatically generated by the module. <br/>'' | ||
| + | If you decide to set up the limits in the module settings, please manually create new configurable options and assign them to the product.<br/> | ||
| + | '''''Note:''' When setting up limits remember to use whole numbers for GB and MB, and integer numbers for TB. If you add 0.5TB then 1GB is displayed in User Limits.'' | ||
| + | |} | ||
| + | {| | ||
| + | |style="padding: 0px 0px 20px 25px;"|[[File:VHI_18_2.png]] | ||
| + | |} | ||
| + | {| | ||
| + | |style="padding: 0px 0px 20px 25px;"|[[File:VHI_18_3.png]] | ||
|} | |} | ||
{| | {| | ||
| Line 328: | Line 359: | ||
* '' 'Last Month Usage Items' '' table | * '' 'Last Month Usage Items' '' table | ||
* '' 'User Limits' '' table | * '' 'User Limits' '' table | ||
| − | * Metric Statistics - the section is completed with all metrics the module can observe | + | * Metric Statistics - the section is completed with all metrics the module can observe; please note that you must previously enable the statistics on your S3 gateway to allow the module to collect them.<br/> Please refer to the [[#Tips|Tips]] section, tip number '''5''' to learn how to do that. |
|} | |} | ||
{| | {| | ||
| Line 360: | Line 391: | ||
|} | |} | ||
{| | {| | ||
| − | |style="padding: 0px 0px | + | |style="padding: 0px 0px 20px 25px;"|[[File:VHI_25.png]] |
|} | |} | ||
{| | {| | ||
| Line 370: | Line 401: | ||
{| | {| | ||
|style="padding: 0px 0px 30px 25px;"|[[File:VHI_23_1.png]] | |style="padding: 0px 0px 30px 25px;"|[[File:VHI_23_1.png]] | ||
| + | |} | ||
| + | |||
| + | ==[https://www.modulesgarden.com/products/whmcs/hosting-quota-notifications Hosting Quota Notifications For WHMCS] Integration== | ||
| + | |||
| + | {| | ||
| + | |style="padding: 10px 0px 15px 15px;"|'''Smooth integration with the [https://www.docs.modulesgarden.com/Hosting_Quota_Notifications_For_WHMCS Hosting Quota Notifications For WHMCS] module allows to keep constant and comfortable control over the used resources.'''<br/> | ||
| + | If you decide to use the two modules together, you will be granted numerous advantages. <br/> First and foremost, you will be allowed to automatize the system of informing your clients about exceeding or just being close exceed set up limits of bandwidth and disk usage via an email and/or a ticket. | ||
| + | |} | ||
| + | {| | ||
| + | |style="padding: 0px 0px 20px 25px;"|[[File:VHI_28_0.png]] | ||
| + | |} | ||
| + | {| | ||
| + | |style="padding: 0px 0px 20px 25px;"|[[File:VHI_28.png]] | ||
| + | |} | ||
| + | {| | ||
| + | |style="padding: 0px 0px 15px 15px;"|The contents of the ticket message can be easily changed, customized and translated to perfectly fit your needs.<br/> You may do that straight in the Hosting Quota Notifications addon: ''' "Ticket Templates" ''' section. | ||
| + | |} | ||
| + | {| | ||
| + | |style="padding: 0px 0px 20px 25px;"|[[File:VHI_29.png]] | ||
| + | |} | ||
| + | {| | ||
| + | |style="padding: 0px 0px 15px 15px;"|Furthermore, you may set up dedicated rules according to which the resource usage of the selected VHI S3 service will be checked.<br/> Decide whether the service shall be automatically suspended or terminated once the limit is exceeded.<br/> | ||
| + | For details on how to configure the rules, follow the Hosting Quota Notification module [https://www.docs.modulesgarden.com/Hosting_Quota_Notifications_For_WHMCS#Rule_Configuration documentation]. | ||
| + | |} | ||
| + | {| | ||
| + | |style="padding: 0px 0px 20px 25px;"|[[File:VHI_30.png]] | ||
| + | |} | ||
| + | {| | ||
| + | |style="padding: 0px 0px 15px 15px;"|The module also allows to check the details of the current resource usage of the [https://www.docs.modulesgarden.com/Hosting_Quota_Notifications_For_WHMCS#Services service] per each day.<br/> View the statistics on the disk and bandwidth usages per single product directly in the addon: ''Services → Usage'' section. | ||
| + | |} | ||
| + | {| | ||
| + | |style="padding: 0px 0px 30px 25px;"|[[File:VHI_31.png]] | ||
|} | |} | ||
| Line 377: | Line 440: | ||
|} | |} | ||
{| | {| | ||
| − | |style="padding: 0px 0px 10px 15px;"|2. Metrics can be calculated | + | |style="padding: 0px 0px 10px 15px;"|2. Metrics can be calculated based on '''total''' or '''average usage''' for a given period of time. You can edit this in the following file: |
<pre>/yourWHMCS/modules/servers/VirtuozzoHybridInfrastructureS3/app/Config/configuration.yml</pre> | <pre>/yourWHMCS/modules/servers/VirtuozzoHybridInfrastructureS3/app/Config/configuration.yml</pre> | ||
| − | Find the 'averageBilling' option and set: | + | Find the 'averageBilling' option and set it: |
*'false' for total usage | *'false' for total usage | ||
*'true' for average usage | *'true' for average usage | ||
| Line 390: | Line 453: | ||
|} | |} | ||
{| | {| | ||
| − | |style="padding: 0px 0px | + | |style="padding: 0px 0px 10px 15px;"|4. It is possible to verify if the usage statistics displayed in the product details are correctly calculated. Please run the below cron command in your console to do so: |
php -q /home/yourWHMCS/modules/servers/VirtuozzoHybridInfrastructureS3/cron/cron.php metrics:fetch | php -q /home/yourWHMCS/modules/servers/VirtuozzoHybridInfrastructureS3/cron/cron.php metrics:fetch | ||
| − | Remember to replace '' 'yourWHMCS' '' with correct WHMCS directory. | + | Remember to replace '' 'yourWHMCS' '' with the correct WHMCS directory. |
| + | |} | ||
| + | {| | ||
| + | |style="padding: 0px 0px 30px 15px;"|5. You need to enable the statistics collection on your S3 gateway to allow the module to collect data and display them in the "Metric Statistics" in the admin area. <br/> | ||
| + | * Create a file on every S3 storage node: '''/var/lib/ostor/local/gw.conf'''<br/> Content of the newly created files: | ||
| + | |||
| + | # Enable usage statistics collection. | ||
| + | S3_GW_COLLECT_STAT=1 | ||
| + | |||
| + | * Restart the S3 storage service to apply the configuration changes. Run the following command on all S3 storage nodes: | ||
| + | |||
| + | # systemctl restart ostor-agentd.service | ||
| + | |||
|} | |} | ||
=Update Instructions= | =Update Instructions= | ||
{| | {| | ||
| − | |style="padding: 10px 0px 30px 15px;"|An essential guidance through the process of updating the module is offered '''[https://www.docs.modulesgarden.com/How_To_Update_WHMCS_Module here]'''.<br/><br/> | + | |style="padding: 10px 0px 30px 15px;"|An essential guidance through the process of updating the module is offered '''[https://www.docs.modulesgarden.com/How_To_Update_WHMCS_Module here]'''.<br/> |
| − | + | Ensure successful completion of the module update by carefully following each step, thereby preventing data loss or any unforeseen issues.<br/> Additionally, you will find a current list of supplementary actions necessary for a smooth update process there. | |
| − | + | |} | |
| + | =Upgrade Guide= | ||
| + | {| | ||
| + | |style="padding: 10px 0px 30px 15px;"|Seeking a solution that offers greater flexibility, customization tailored to your precise needs, and unrestricted availability?<br/> There is an option that not only proves to be cost-effective in the long run but also includes prioritized support services, making it a truly valuable investment.<br/> | ||
| + | |||
| + | Opt for the [https://www.modulesgarden.com/products/whmcs/virtuozzo-hybrid-infrastructure-s3#open-source-version Open Source version] of your Virtuozzo Hybrid Infrastructure S3 For WHMCS module to unlock these benefits.<br/> Simply click on either the '''Get Source Code''' or '''Upgrade To Lifetime''' button found on the product's page in our client area to complete the one-step upgrade process, with a '''dedicated discount''' already applied.<br/> | ||
| + | |||
| + | Follow a [https://www.docs.modulesgarden.com/How_To_Upgrade_WHMCS_Module comprehensive guide] covering the transition process, the advantages it brings, and step-by-step instructions on what to do next after the order has been successfully finalized. | ||
|} | |} | ||
Latest revision as of 11:48, 26 April 2024
Contents |
[edit] About Virtuozzo Hybrid Infrastructure S3 For WHMCS
| Virtuozzo Hybrid Infrastructure S3 For WHMCS is a module that allows quick and easy creation as well as management of S3 user accounts. You will be given a chance to create new accounts with predefined limits as well as let your clients set the limits by themselves. Use this great module to automate the accounts management and keep track of the usage calculations' in a convenient and eye-friendly way. |
- Admin Area Features:
| ✔ Create/Suspend/Unsuspend/Terminate S3 User Account |
| ✔ Change Package |
| ✔ View Last Month Usage Items |
| ✔ View Set User Limits |
| ✔ Set Up User Account Configuration: |
| ✔ Use User Or Custom Email For Accounts |
| ✔ Provide Login URL To Panel |
| ✔ Provide API Endpoint |
| ✔ Provide API Documentation URL |
| ✔ Set Up User Limits For: |
| ✔ Operations Per Seconds: |
| ✔ Default [kilo ops/min] |
| ✔ DELETE [kilo ops/min] |
| ✔ GET [kilo ops/min] |
| ✔ LIST [kilo ops/min] |
| ✔ PUT [kilo ops/min] |
| ✔ Bandwidth: |
| ✔ Out [Mb/s] |
| ✔ Set Quota Management Details: |
| ✔ Define User Quota Usage Limit |
| ✔ Select Bandwidth Usage Calculation Method |
| ✔ Choose Admin Area Features: |
| ✔ Show Last Month Usage Records Table |
| ✔ Show User Limits Table |
| ✔ Generate Configurable Options |
- Client Area Features:
| ✔ View/Generate/Revoke Panel Access Keys |
| ✔ View API Information: |
| ✔ Endpoint |
| ✔ Documentation URL |
| ✔ Log In To Panel |
- Configurable Options:
| ✔ OPS Default [kilo ops/min] |
| ✔ OPS DELETE [kilo ops/min] |
| ✔ OPS GET [kilo ops/min] |
| ✔ OPS LIST [kilo ops/min] |
| ✔ OPS PUT [kilo ops/min] |
| ✔ Bandwidth Out [Mb/s] |
| ✔ User Quota [GB] |
- General Info:
| ✔ Integrated With Advanced Billing For WHMCS - Actual User Account Resource Usage Billing |
| ✔ Multi-Language Support |
| ✔ Supports PHP 8.1 Back To PHP 7.4 |
| ✔ Supports WHMCS Metric Billing - Integration: OPS Other, OPS GET, OPS PUT, OPS LIST, OPS Total, Uploaded, Downloaded, Storage |
| ✔ Supports WHMCS Themes "Six" And "Twenty-One" |
| ✔ Supports WHMCS V8.10 Back To WHMCS V8.7 |
| ✔ Requires ionCube Loader V12 Or Later |
| ✔ Easy Module Upgrade To Open Source Version |
[edit] Installation and Configuration
| The below tutorial will guide you step by step through the installation and configuration of the Virtuozzo Hybrid Infrastructure S3 For WHMCS module. Read the instructions carefully to collect as much information as possible and quickly start using the module in your everyday business. |
[edit] Installation
| 1. Log in to our client area and download the module. |
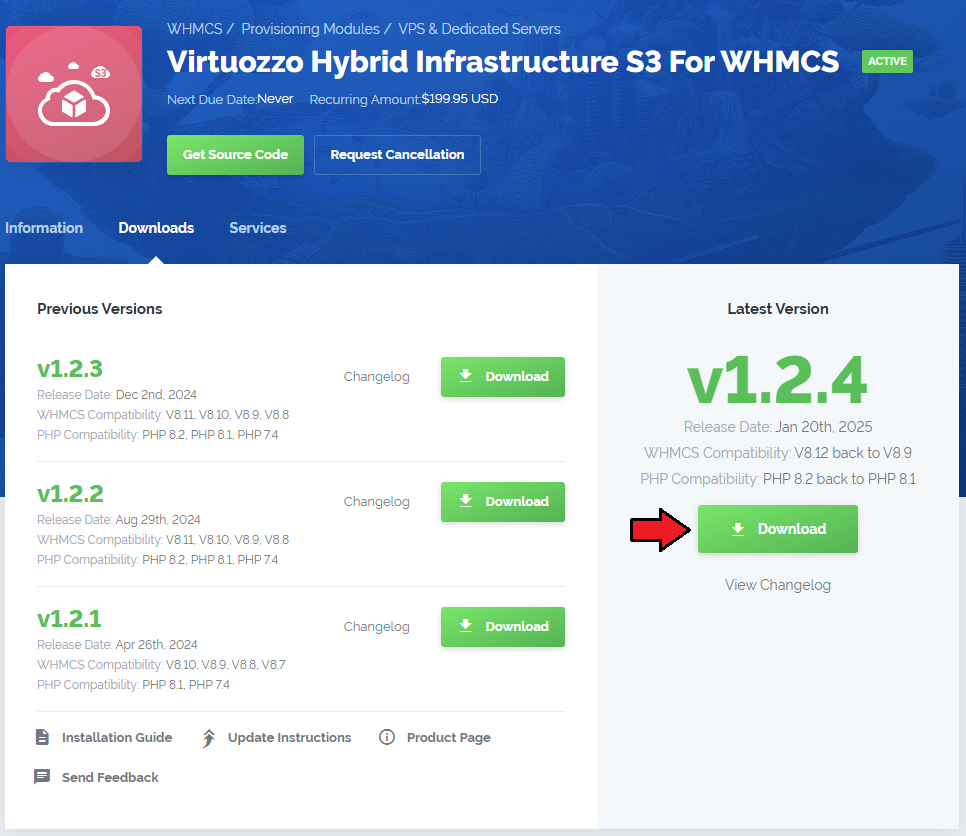
|
| 2. Upload and extract the extension into the main WHMCS directory. Extracted files in your WHMCS directory should look like this: |
| 3. When you install Virtuozzo Hybrid Infrastructure S3 For WHMCS for the first time, you have to rename the 'license_RENAME.php' file. The file is located in '/yourWHMCS/modules/servers/VirtuozzoHybridInfrastructureS3/license_RENAME.php'. Rename it from 'license_RENAME.php' to 'license.php'. |
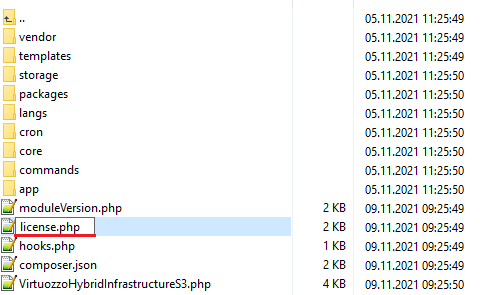
|
| 4. In order to configure your license key, you have to edit the previously renamed 'license.php' file. Enter your license key between the quotation marks as presented on the following screen. |

|
| 5. Now, set up the 'storage' folder as recursively writable. This folder is available at '/yourWHMCS/modules/servers/VirtuozzoHybridInfrastructureS3/'. |
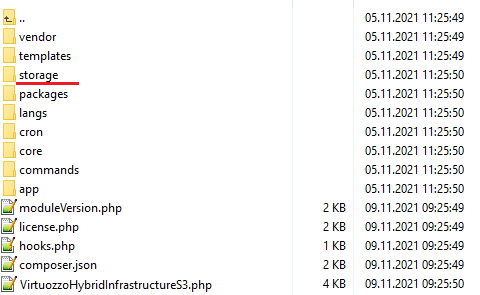
|
[edit] Configuration of Server
| Before you can go on, you need to generate the user ID and the API key pair, they will be necessary to successfully connect to the VHI server. Please follow the below steps to generate the access data:
ostor-s3-admin create-user -e [email protected] -S -V 0100000000000002 Follow instructions that are visible in your console. Please refer to the official Virtuozzo documentation Creating S3 User to get detailed instruction. |
| 6. Now, log in to your WHMCS and proceed to 'System Settings' → 'Products/Services' → 'Servers' and press 'Add New Server'. |
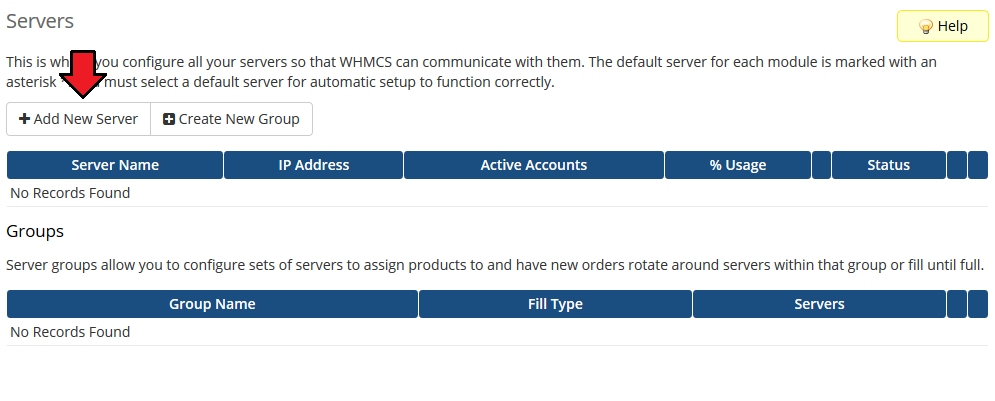
|
| 7. Next, enter your server 'Name' , 'Hostname' and select 'Virtuozzo Hybrid Infrastructure S3' from the 'Module' field. Now, provide your 'VirtuozzoHybridInfrastructureS3' API details that you generated in the previous step:
Make sure that your server connection is correct and save the changes. |
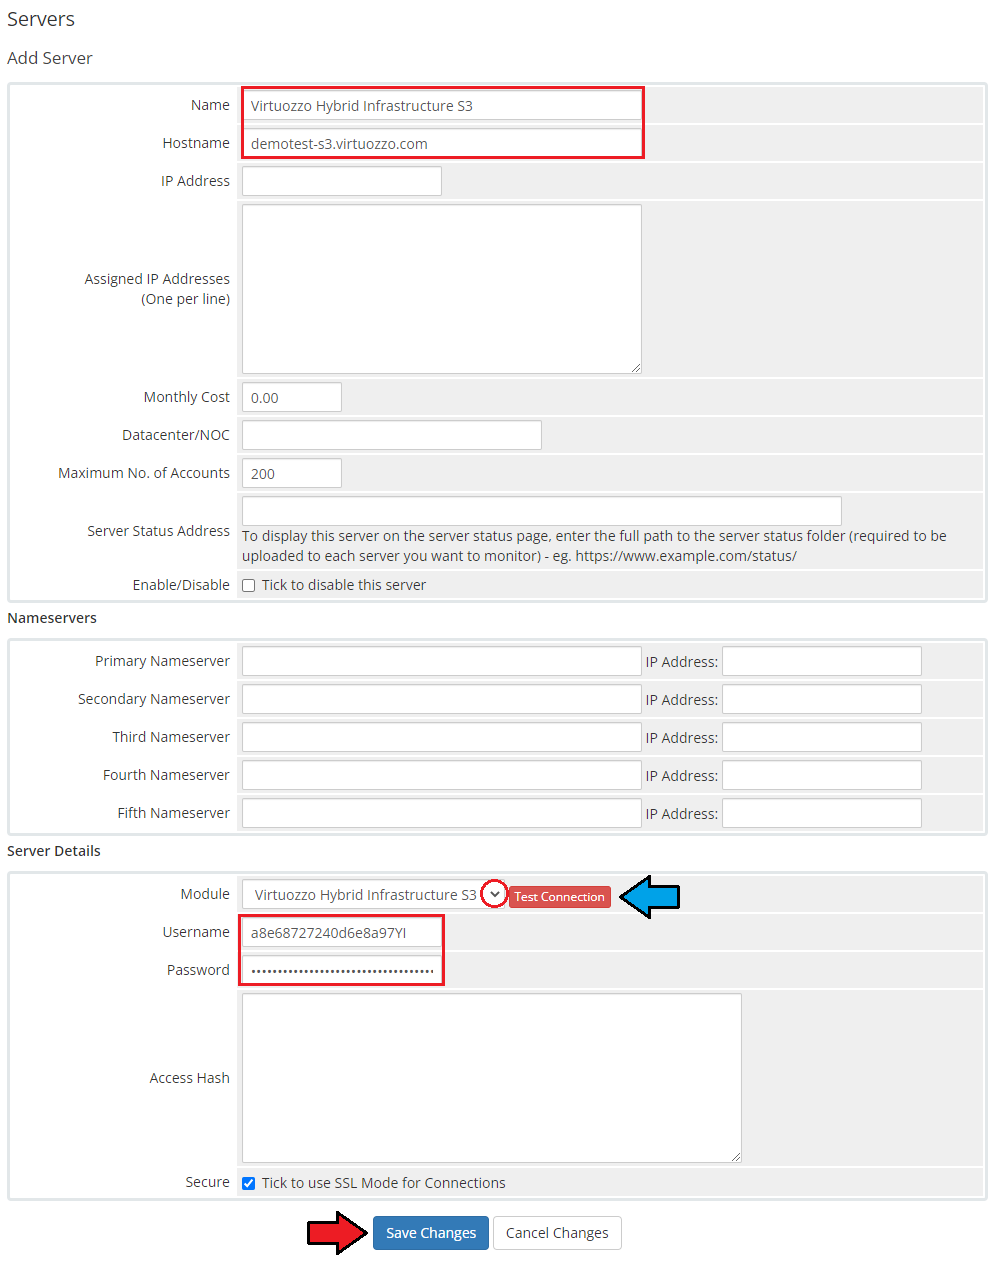
|
| 8. It is time to create a server group. To do so, click on 'Create New Group'. |
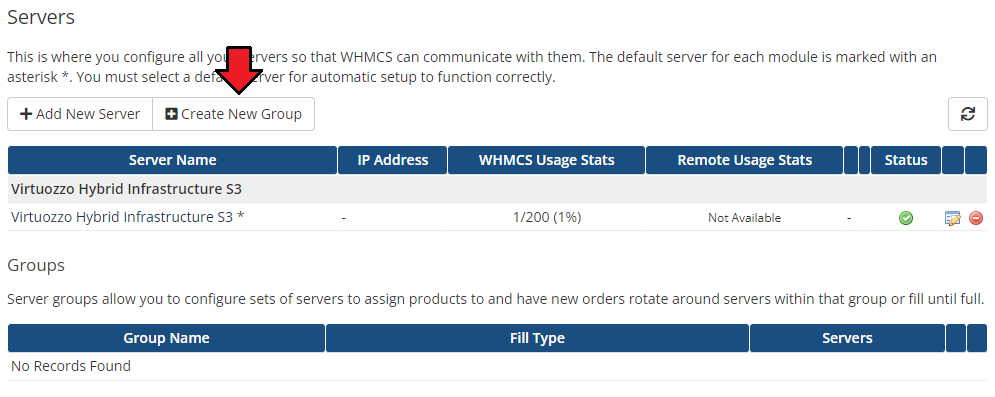
|
| 9. Enter a name, click on your previously created server, press 'Add' and afterward 'Save Changes'. |
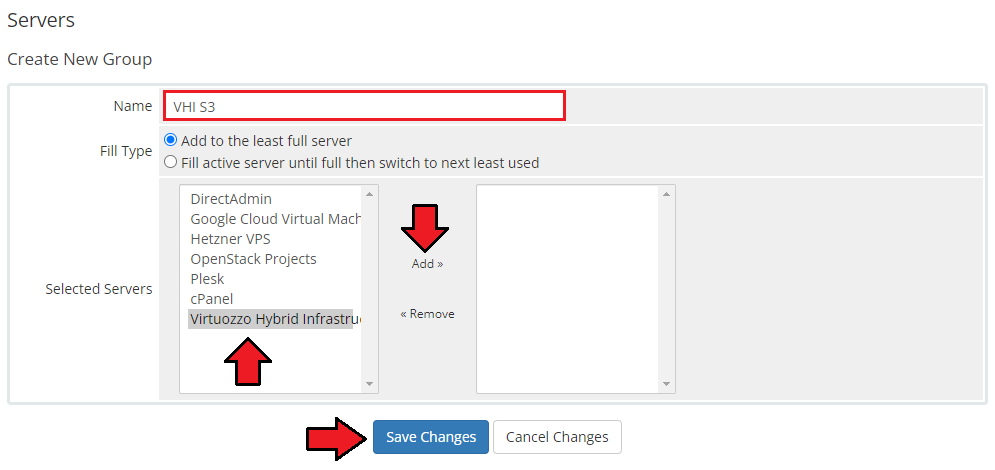
|
[edit] Configuration of Product
| 10. In order to create and configure a product, go to 'System Settings' → 'Products/Services' → 'Products/Services'. Click on 'Create a New Group'. |

|
| 11. Enter your product group name and press 'Save Changes'. |
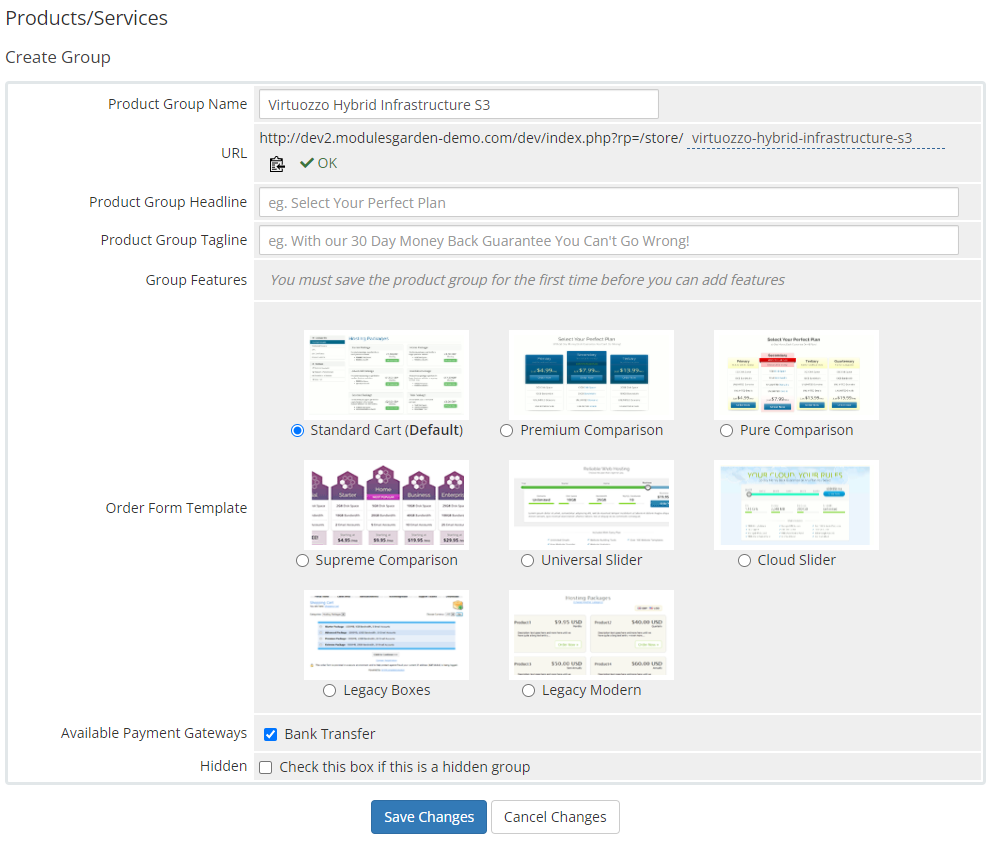
|
| 12. Once you have a product group, you can create a new product. To do so, first click on 'Create a New Product'. |

|
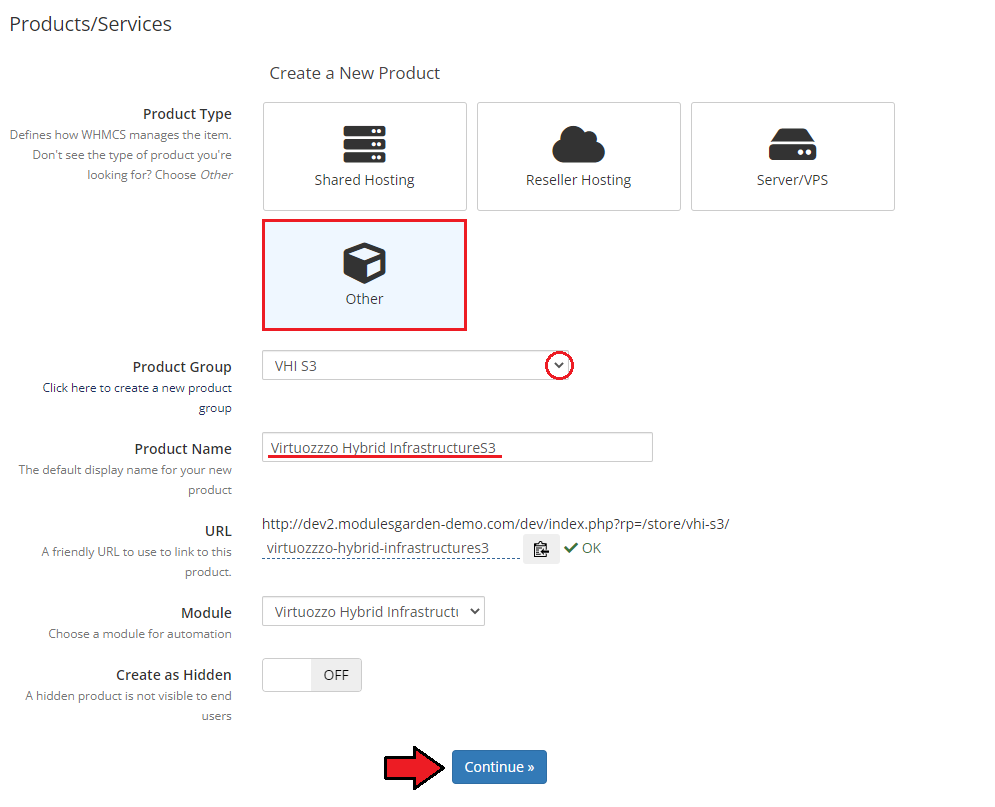
| 13. Afterward, choose your product type, enter your product name, choose module and the product group from the dropdown menus. Press 'Continue'. |
|
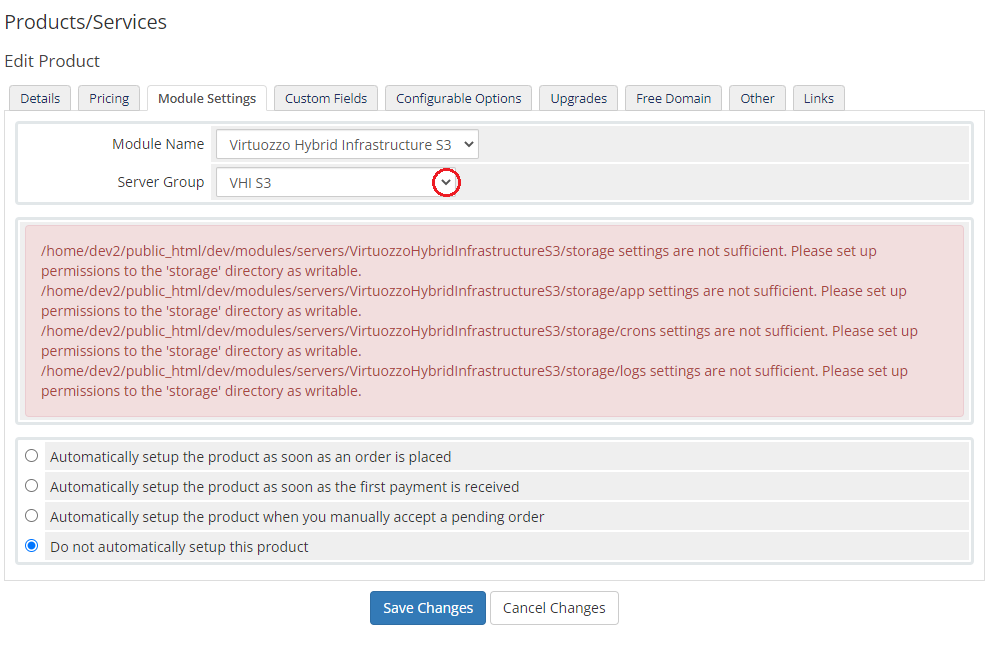
| 14. Now, go to the 'Module Settings' section, choose your previously created server group from the dropdown menu. If you did not set the proper permissions, you will be asked to do it now. |
|
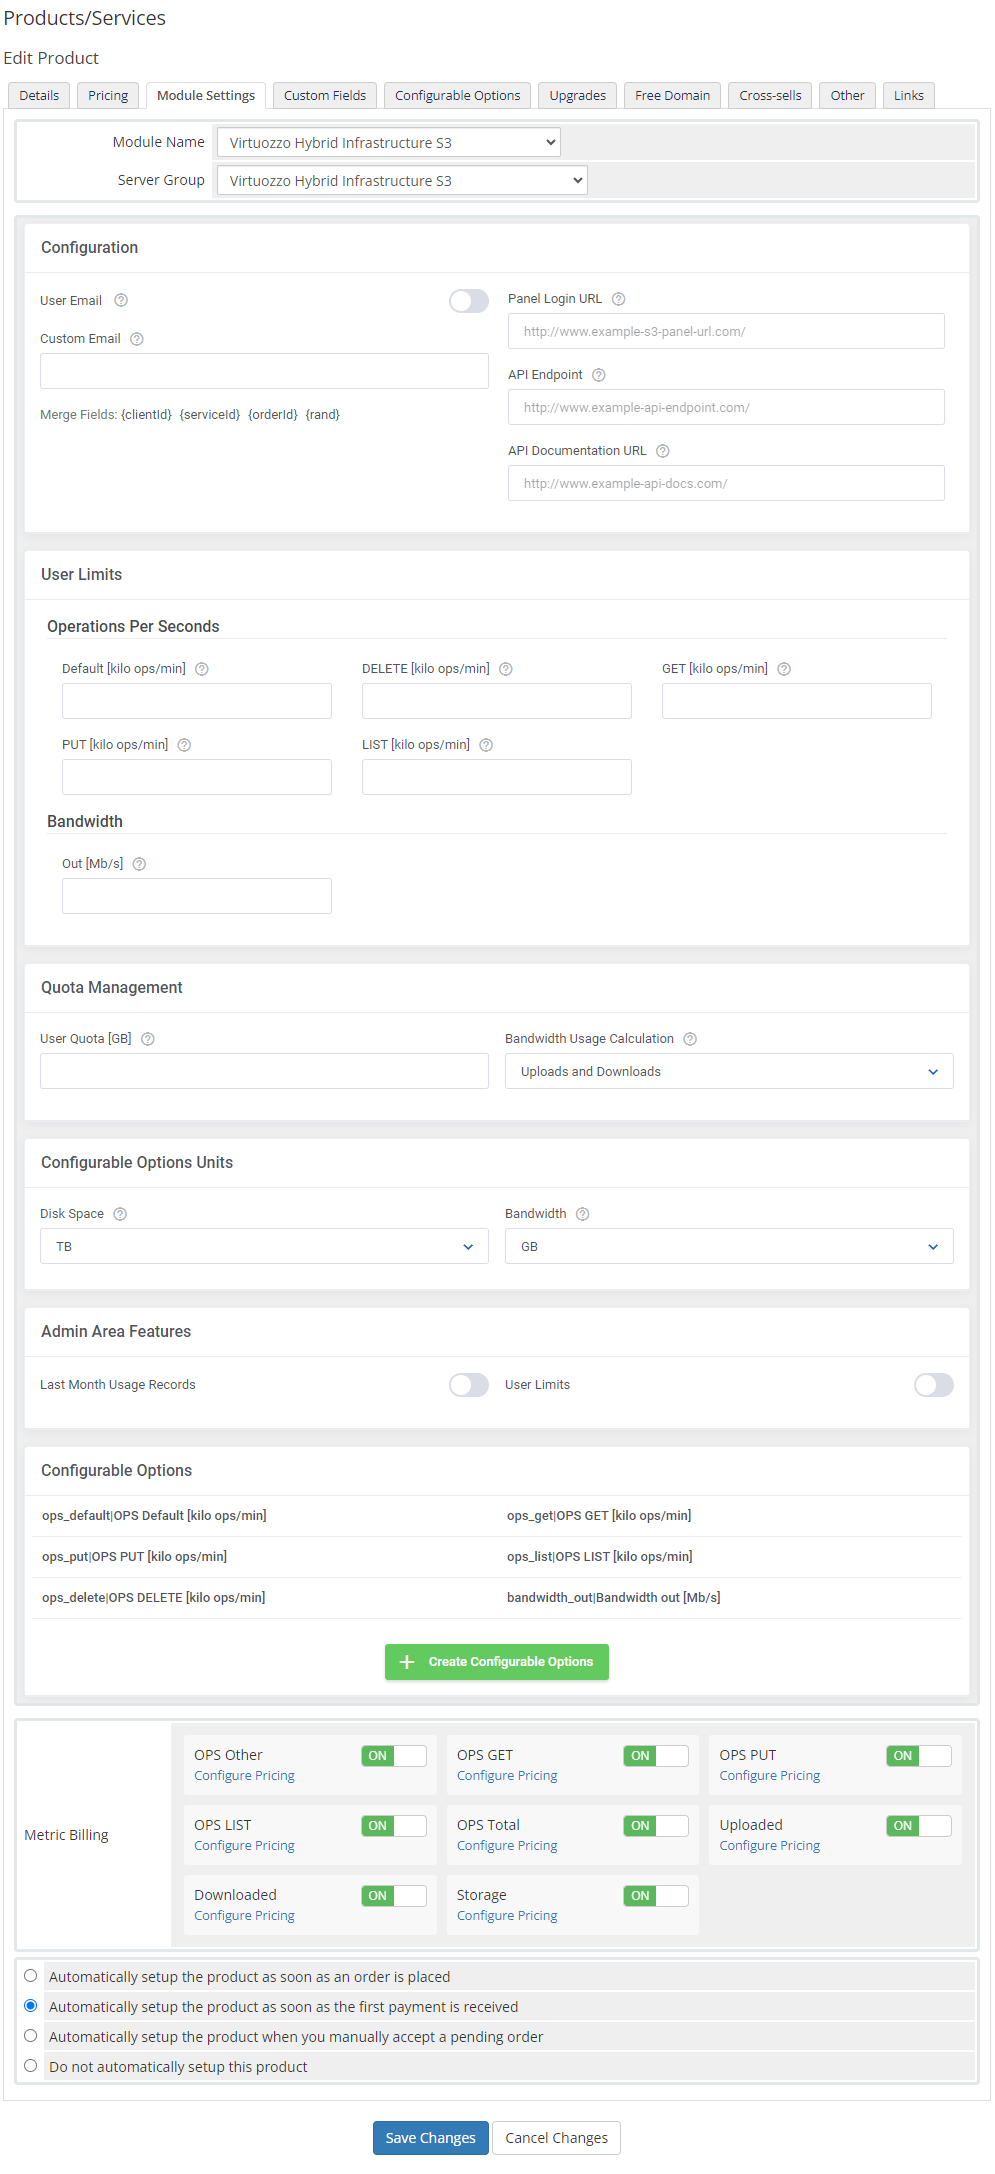
| 15. Now, let's start configuring the product settings. |
|
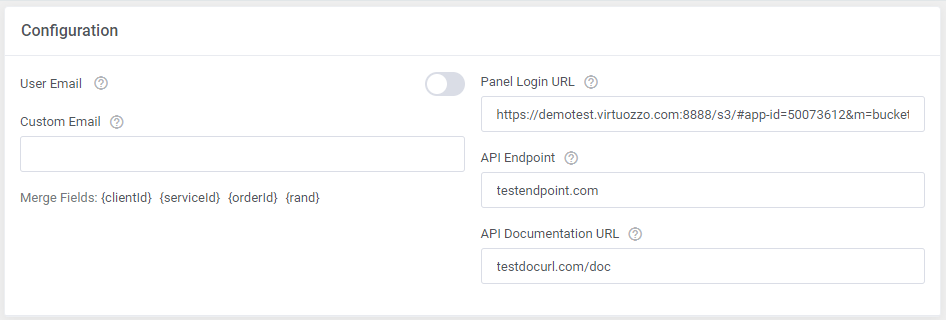
The first section is dedicated to basic product configuration, select email type that will be used to create the service, provide all the required data:
|
|
| Next move to setting the user limits, define the operations limit and bandwidth. Operations Per Seconds
Bandwidth
|
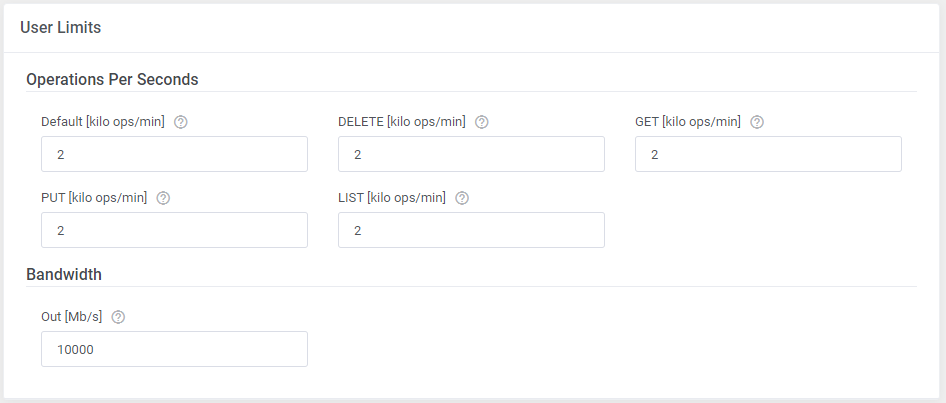
|
The next section is dedicated to quota management:
|

|
In the next section the units of "disk space" and "bandwidth" configurable options shall be defined:
|

|
| To set up the quota and bandwidth limits via the "disk space" and "bandwidth" configurable options you must configure them as well. Please refer to the official WHMCS documentation for precise instructions on how to do that, as the two configurable options are not automatically generated by the module. If you decide to set up the limits in the module settings, please manually create new configurable options and assign them to the product. |
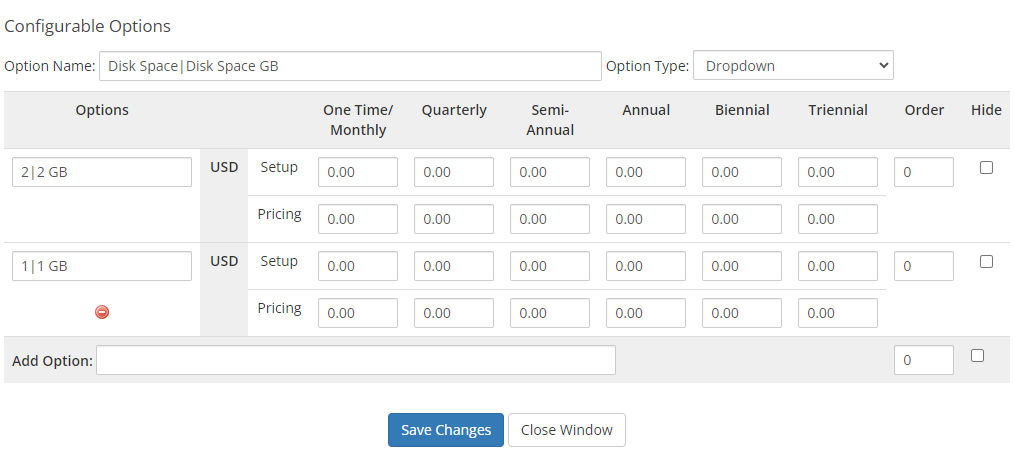
|
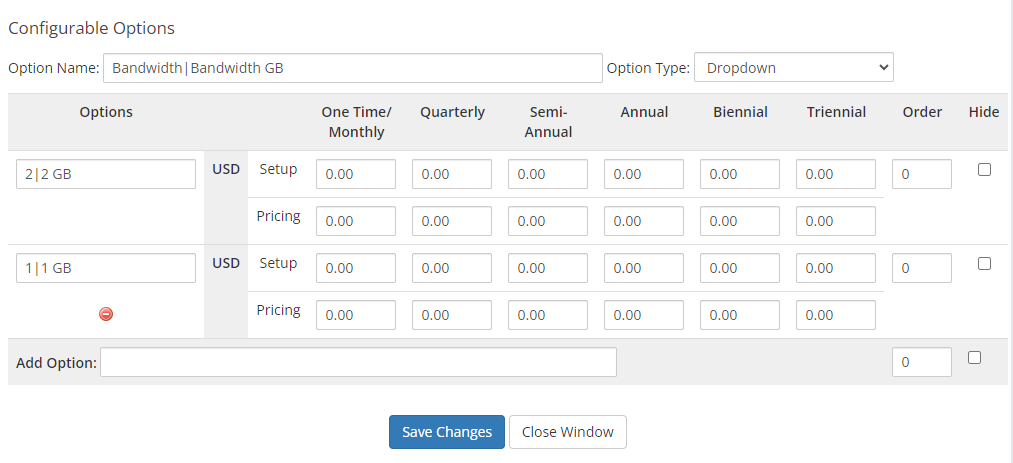
|
In 'Admin Area Features' select options that will be visible under the product details:
|

|
| Now, select which options you want to generate and confirm by clicking 'Create' . Note that the configuration for disabled options will still be taken from the configuration of the main product. More information about how to use configurable options can be found here or in the official WHMCS documentation. |

|
[edit] Management
[edit] Admin Area
| Virtuozzo Hybrid Infrastructure S3 For WHMCS allows you to manage the user account from the admin area of your WHMCS system. This includes supervision of such features as:
|
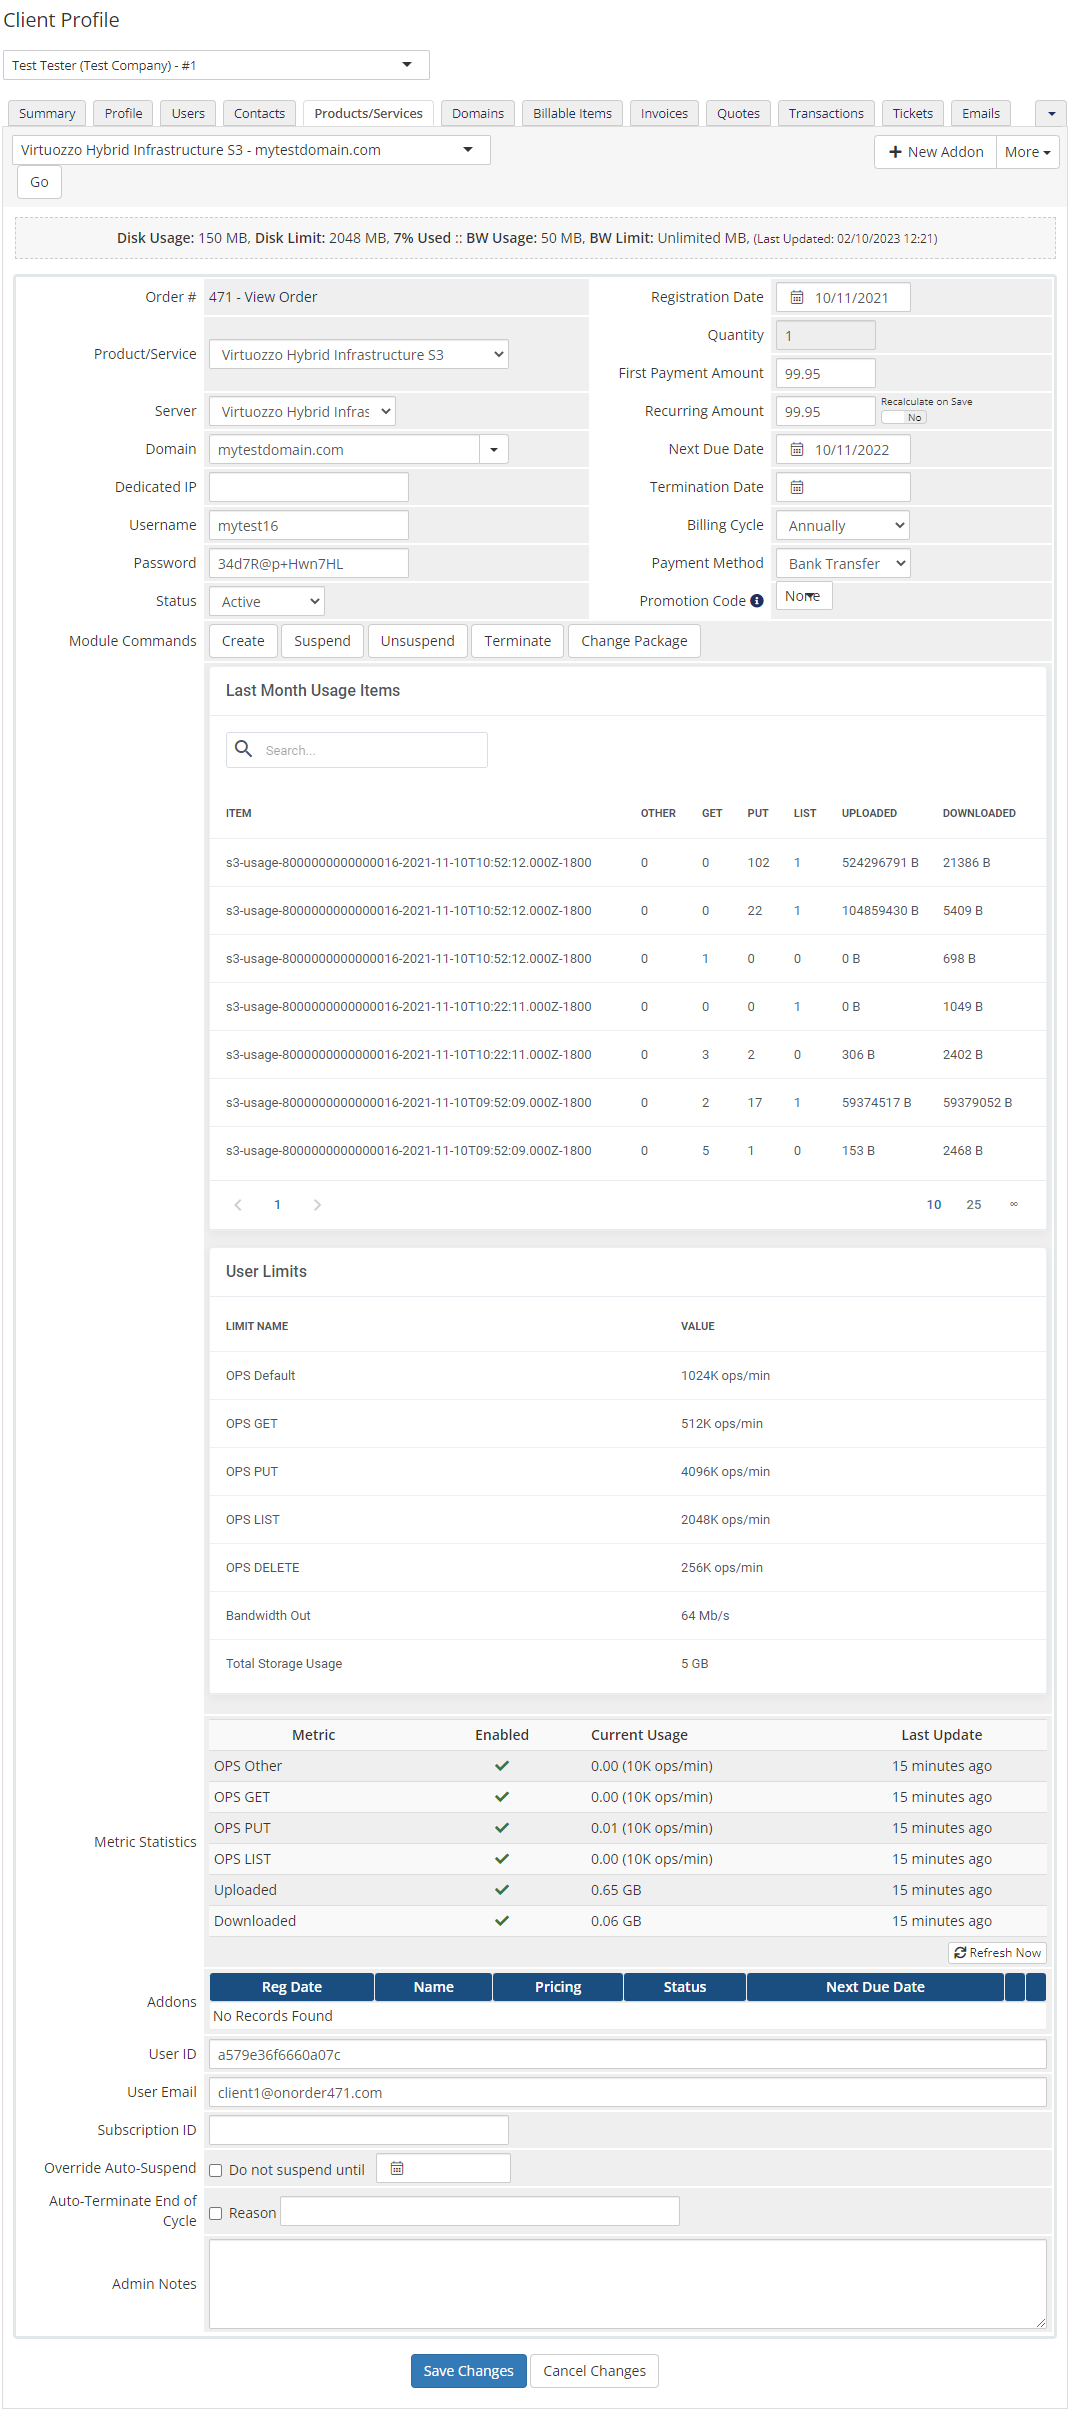
|
[edit] Ordering
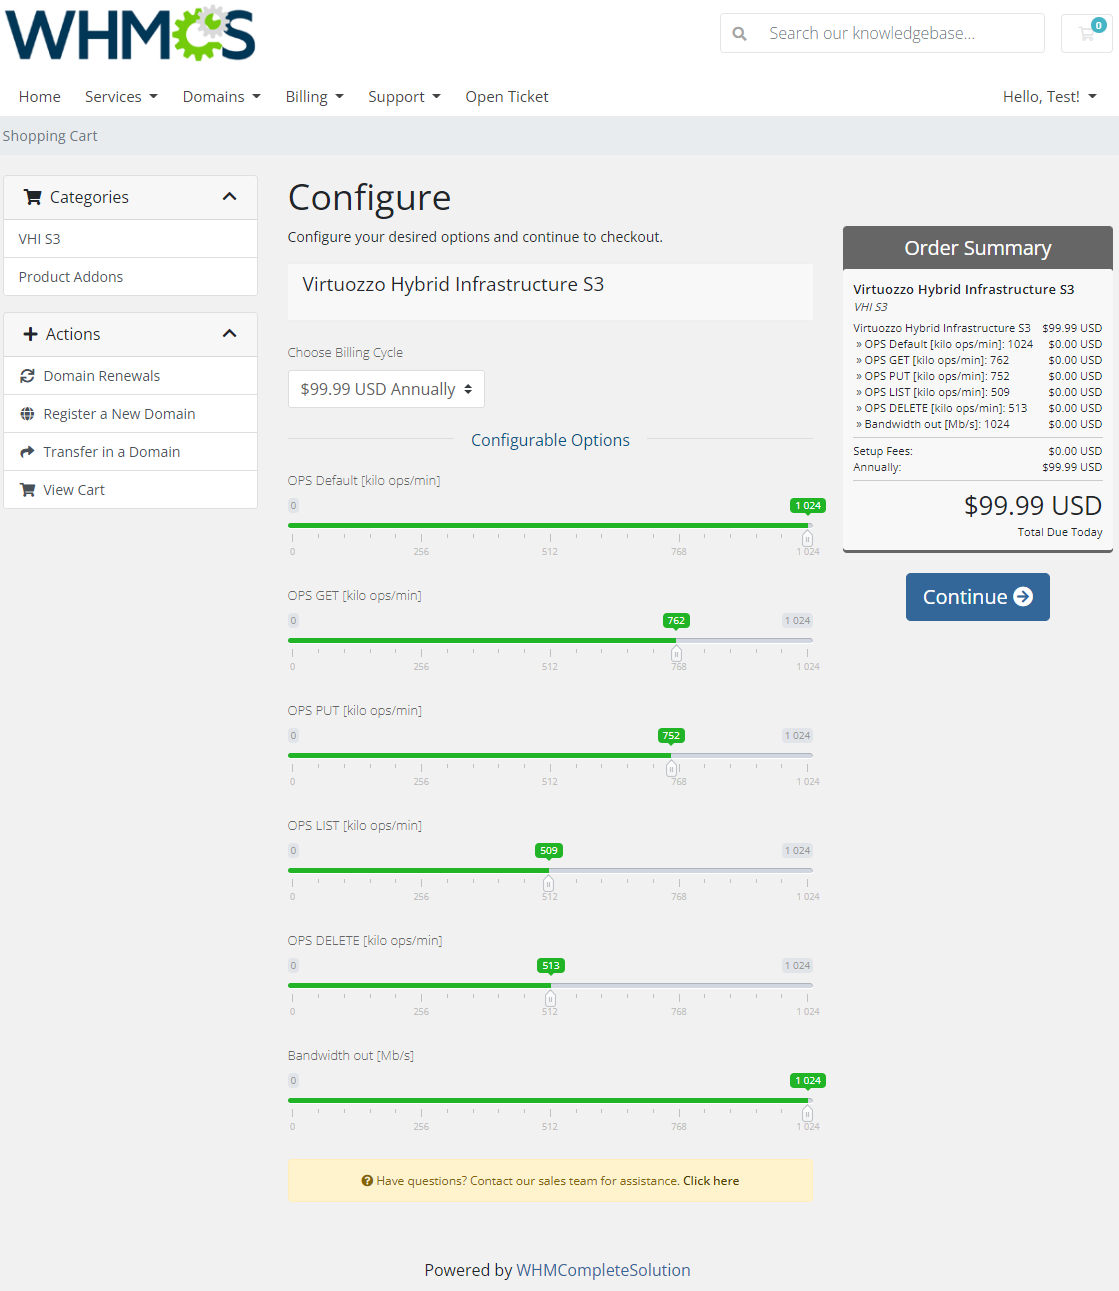
| Thanks to configurable options, your clients are allowed to adjust the account limits already on the order level. Additionally, you are able to set up pricing for each configurable option, which makes your offer more flexible. |
|
[edit] Client Area
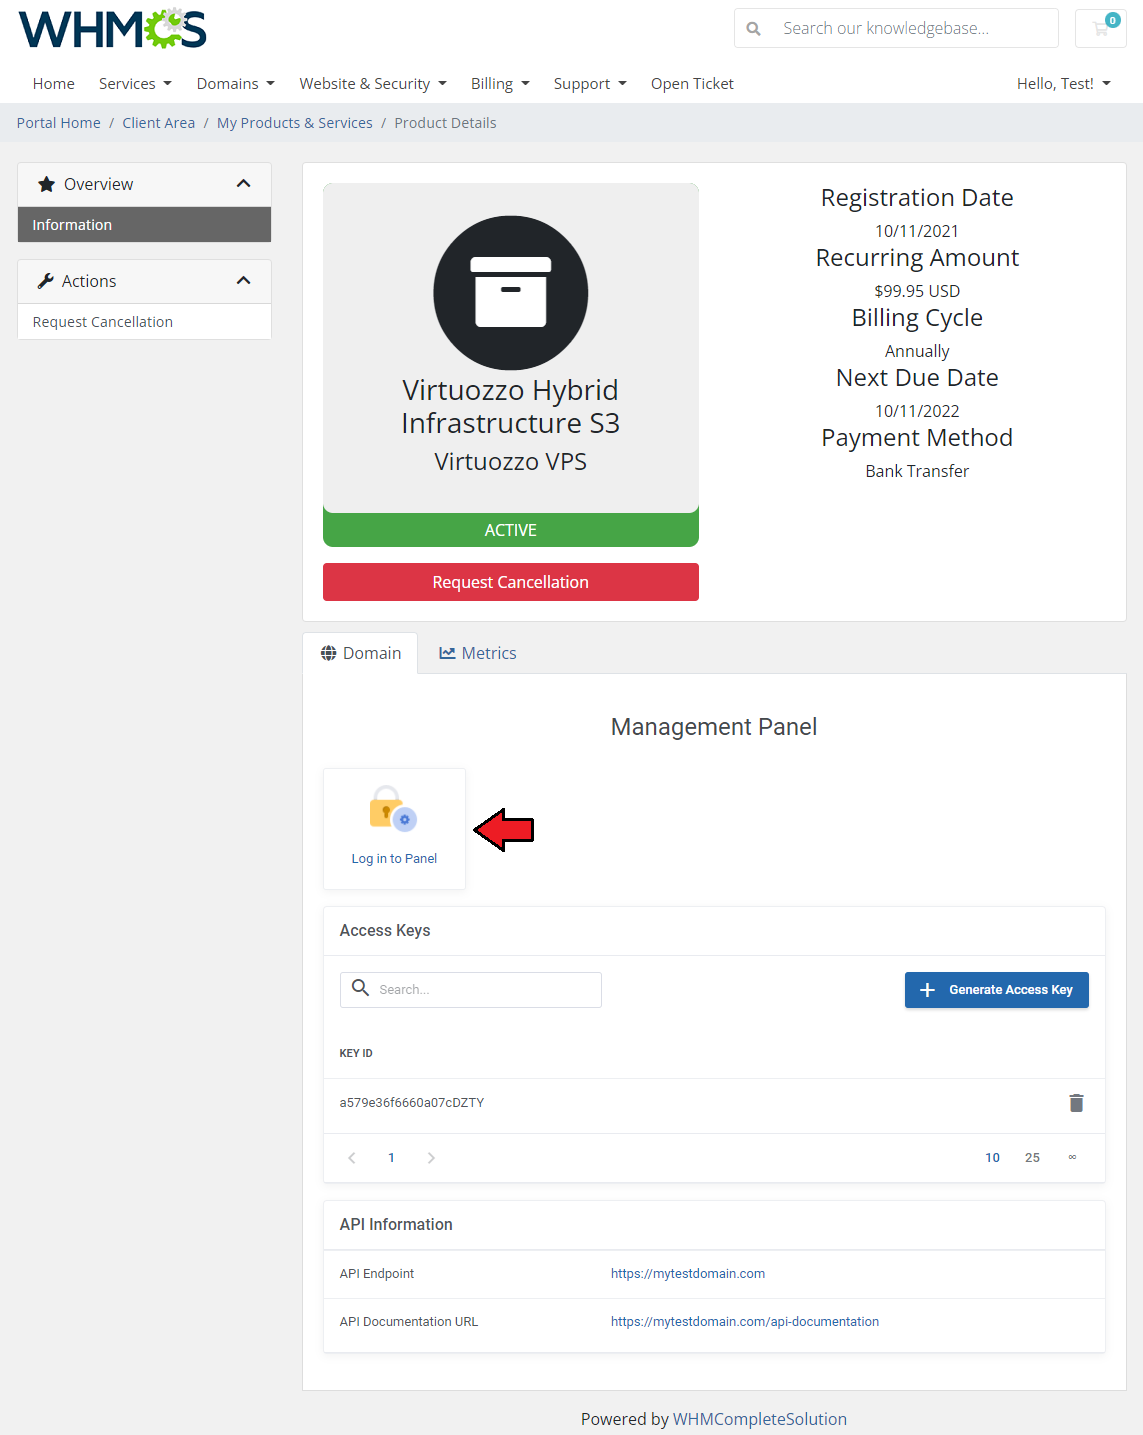
| The client area interface of Virtuozzo Hybrid Infrastructure S3 For WHMCS looks like below. As you can see, you may easily redirect to your 'Virtuozzo Hybrid Infrastructure S3' bucket via a direct login, just press the 'Log in to Panel' icon. |
|
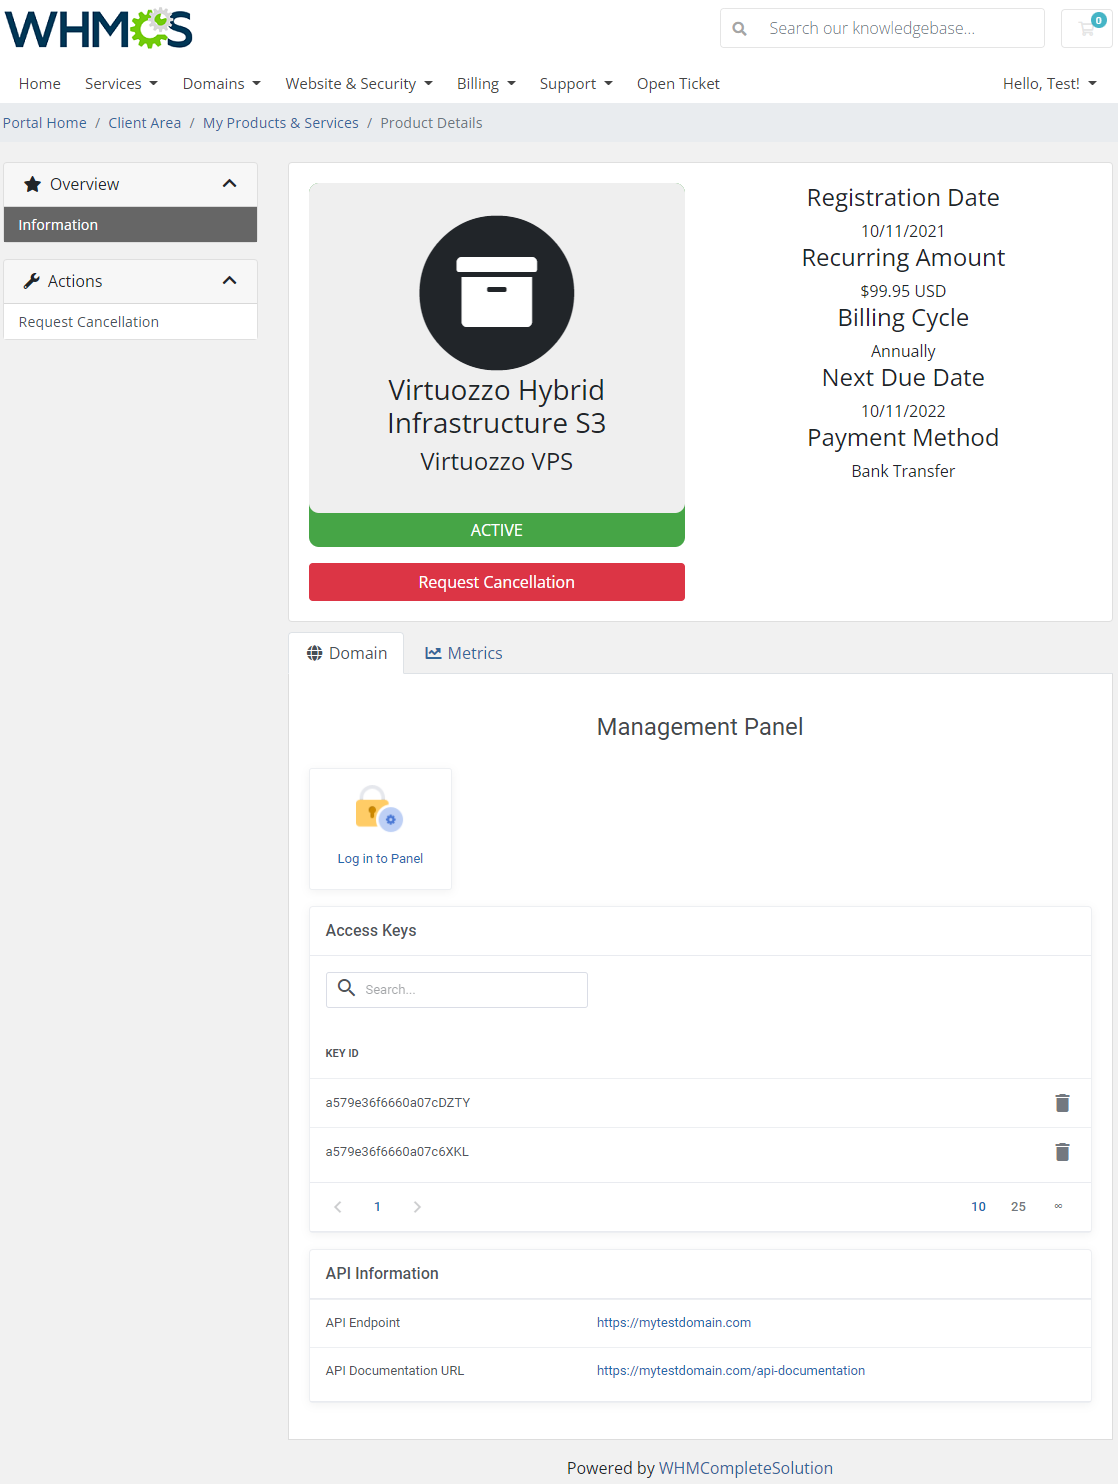
| Under the 'Access Keys ' section you will find the IDs of the already generated key pairs. Please remember that only IDs are visible as true credentials were displayed only once when generated. There is a limit of two key pairs to be generated, you may always delete any of the generated API credentials, and then, the option to create a new one will be reverted. |
|
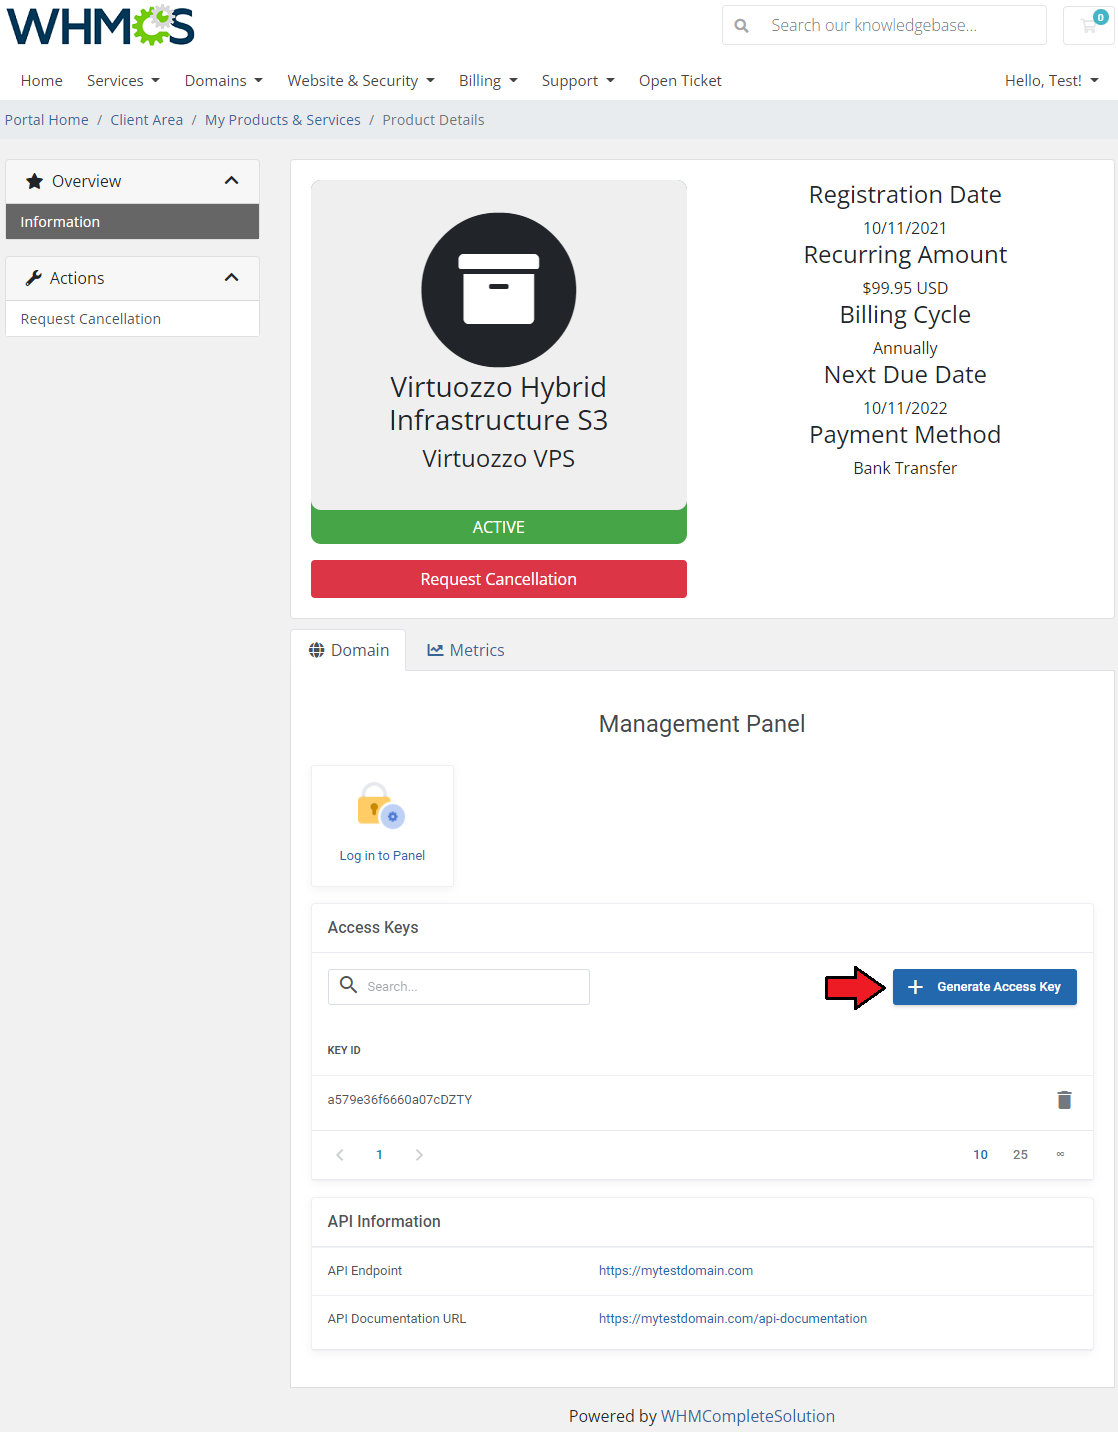
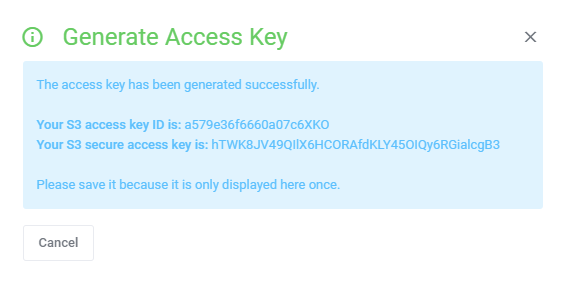
| Press the 'Generate Access Key' button, you will see a modal with generated S3 access key ID and an S3 secure access key. It is important to copy and save the keys in a secure place as there is no way to preview them again. When you reach the limit of two pairs generated, the option to 'Generate Access Key' will be suspended. |
|
|
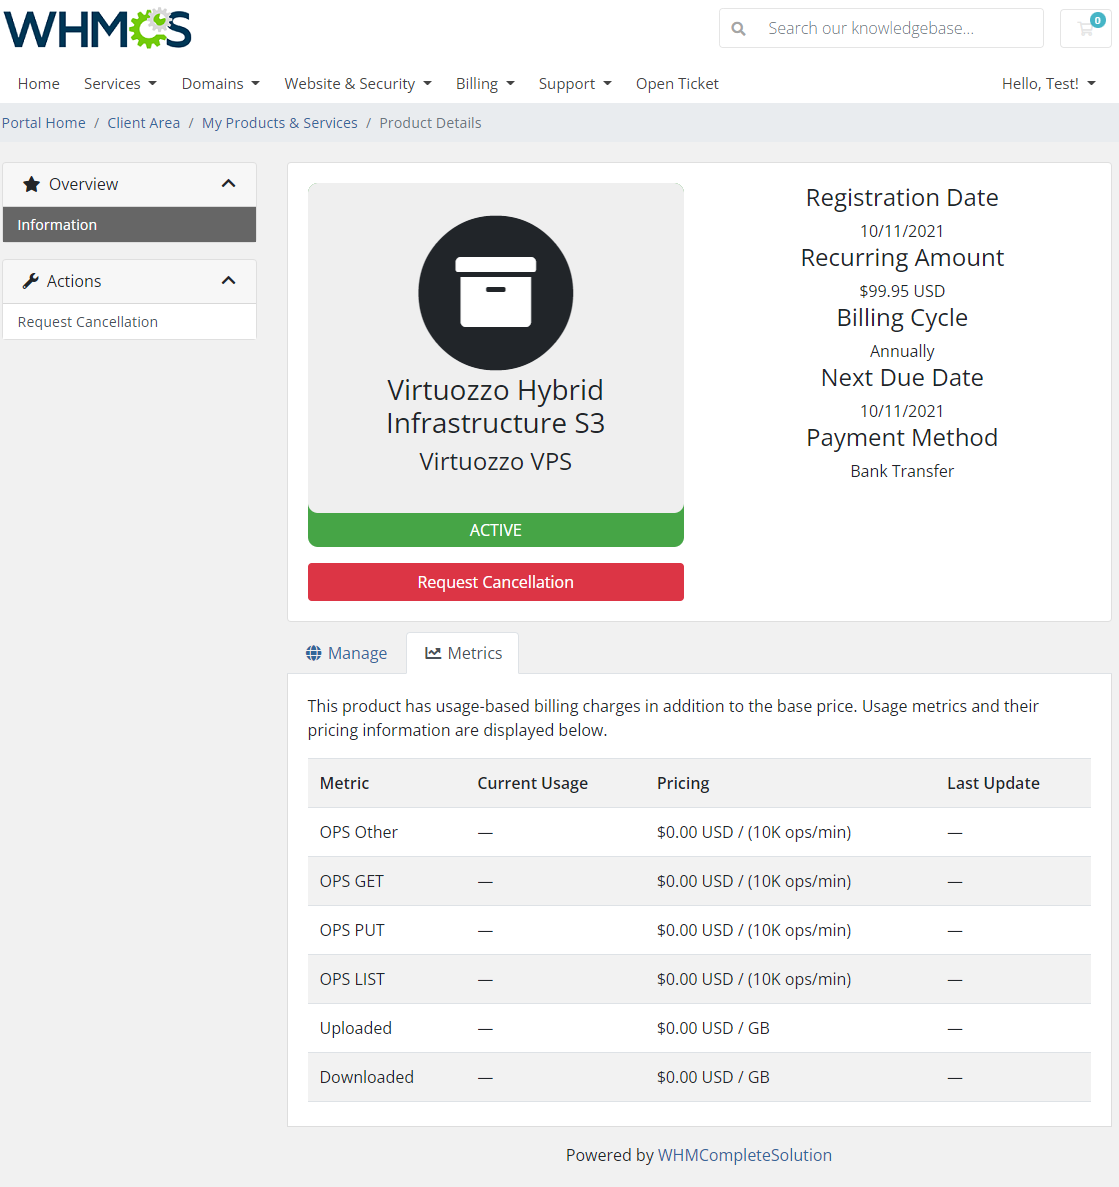
| Moreover, you can check the WHMCS 'Metrics Billing' in the adequate section. |
|
[edit] Hosting Quota Notifications For WHMCS Integration
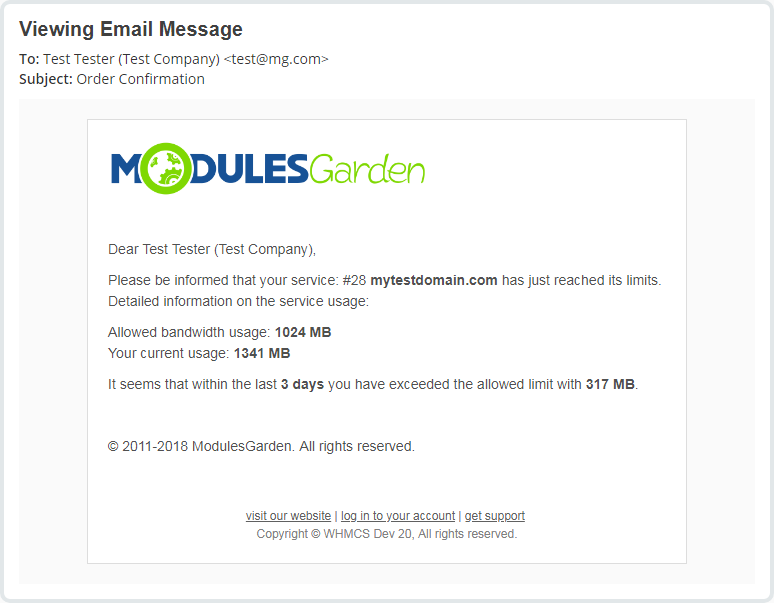
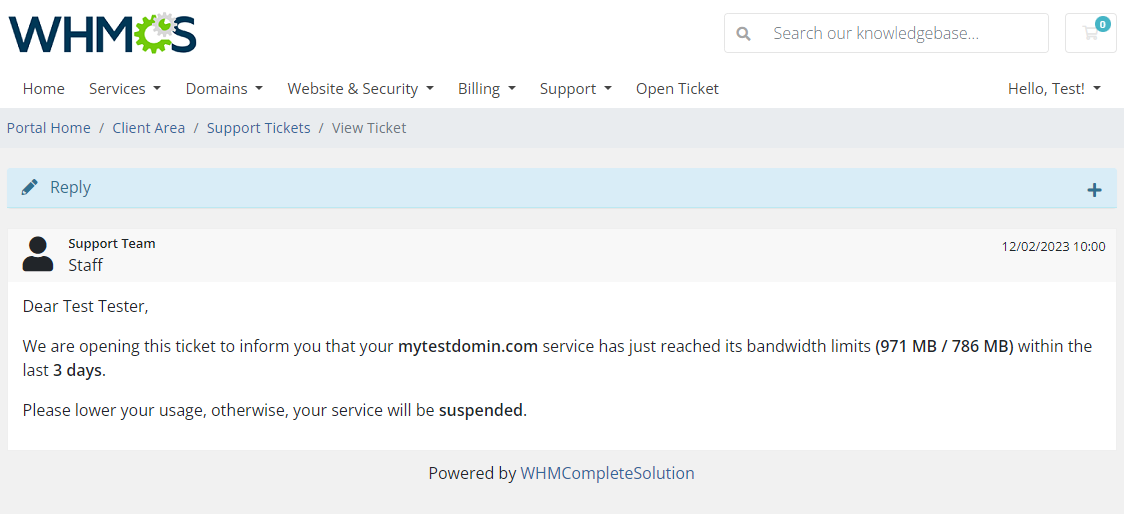
| Smooth integration with the Hosting Quota Notifications For WHMCS module allows to keep constant and comfortable control over the used resources. If you decide to use the two modules together, you will be granted numerous advantages. |
|
|
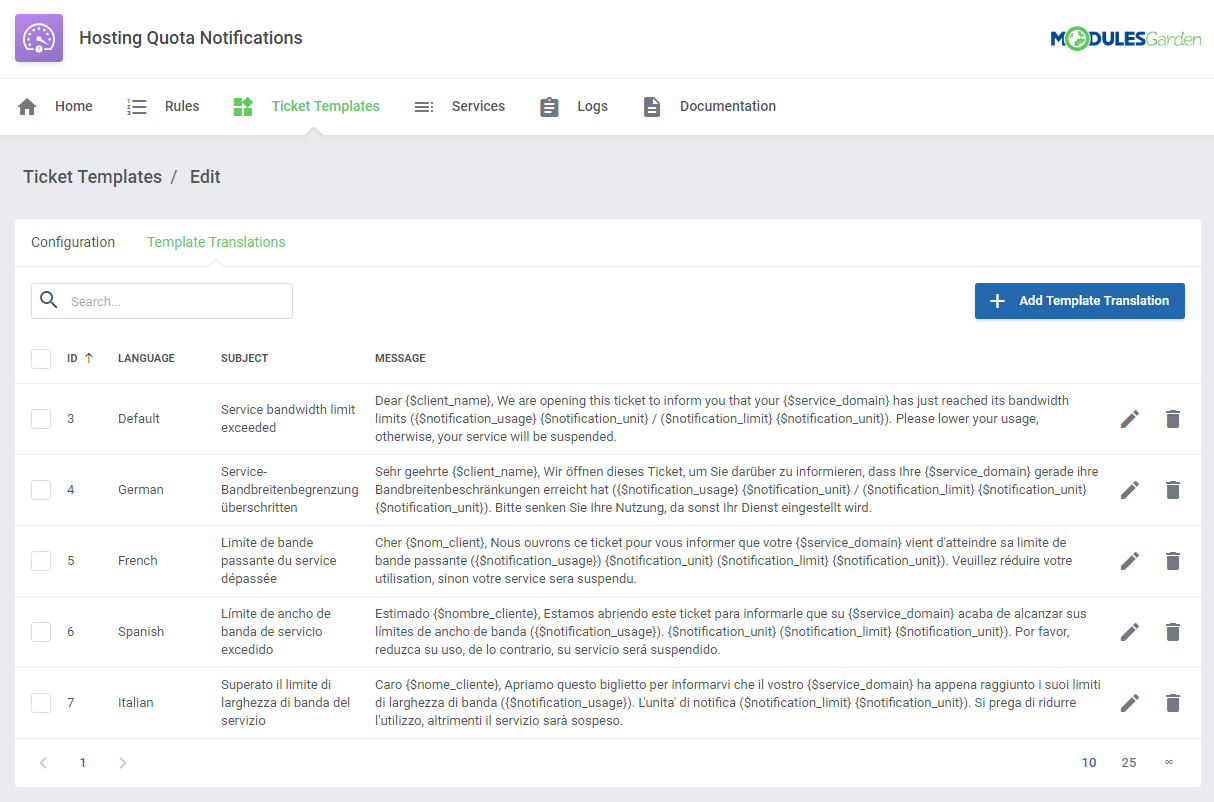
| The contents of the ticket message can be easily changed, customized and translated to perfectly fit your needs. You may do that straight in the Hosting Quota Notifications addon: "Ticket Templates" section. |
|
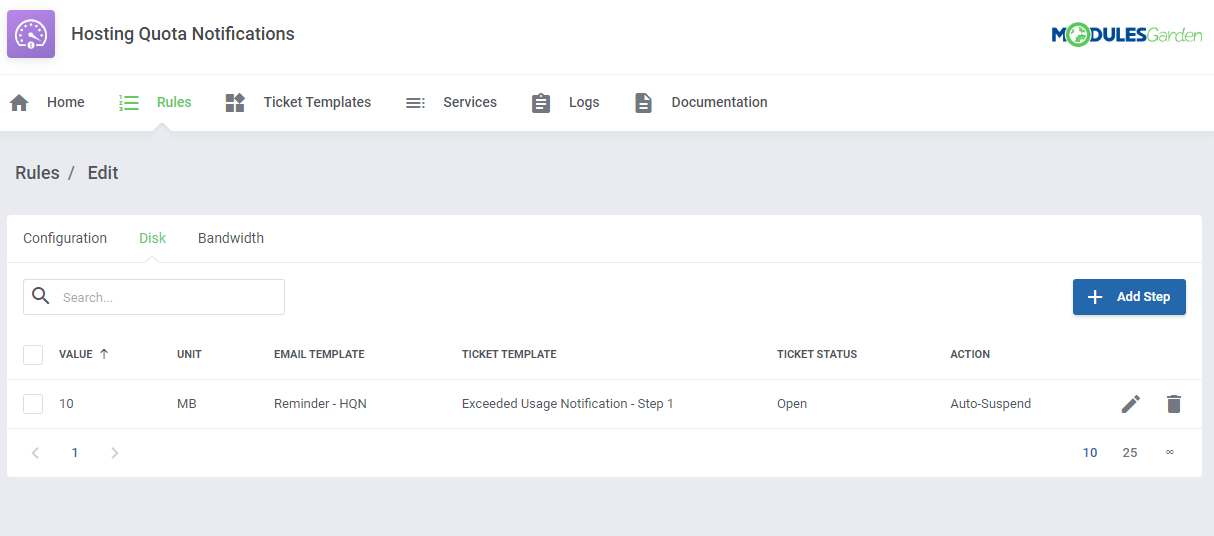
| Furthermore, you may set up dedicated rules according to which the resource usage of the selected VHI S3 service will be checked. Decide whether the service shall be automatically suspended or terminated once the limit is exceeded. For details on how to configure the rules, follow the Hosting Quota Notification module documentation. |
|
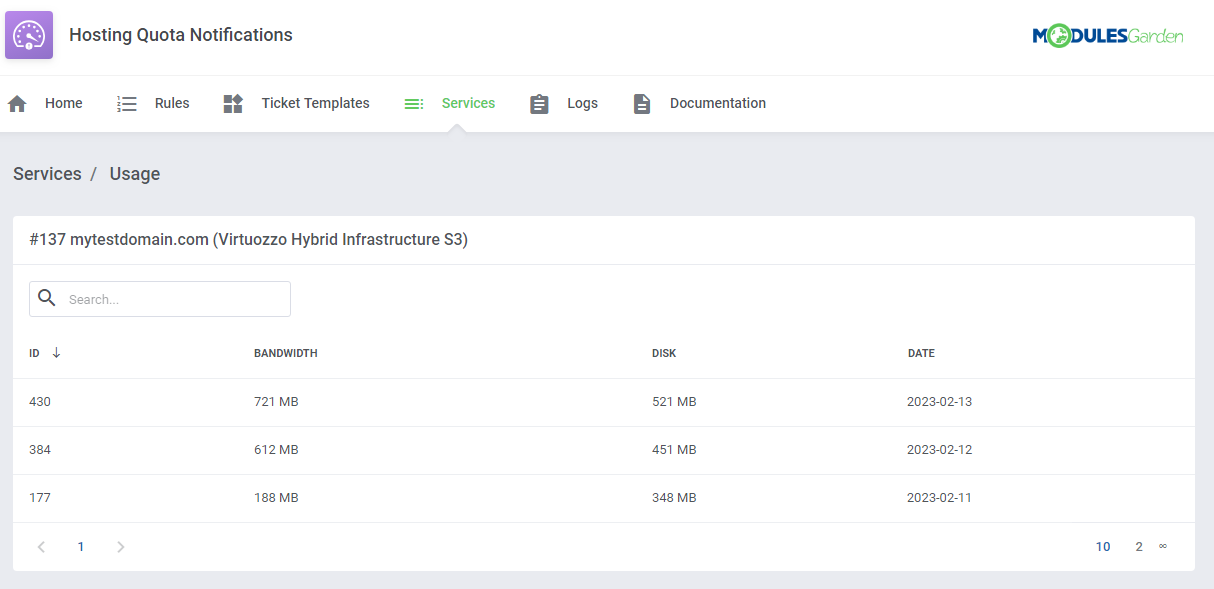
| The module also allows to check the details of the current resource usage of the service per each day. View the statistics on the disk and bandwidth usages per single product directly in the addon: Services → Usage section. |
|
[edit] Tips
| 1. Please remember that if you integrate Virtuozzo Hybrid Infrastructure S3 For WHMCS with Advanced Billing For WHMCS, the cron task should be set no more than once for an hour. |
2. Metrics can be calculated based on total or average usage for a given period of time. You can edit this in the following file:
/yourWHMCS/modules/servers/VirtuozzoHybridInfrastructureS3/app/Config/configuration.yml Find the 'averageBilling' option and set it:
|

|
| 3. Although the module does not require any domain to work properly, you will need to use one to allow WHMCS metrics to be correctly fetched and displayed. |
4. It is possible to verify if the usage statistics displayed in the product details are correctly calculated. Please run the below cron command in your console to do so:
php -q /home/yourWHMCS/modules/servers/VirtuozzoHybridInfrastructureS3/cron/cron.php metrics:fetch Remember to replace 'yourWHMCS' with the correct WHMCS directory. |
5. You need to enable the statistics collection on your S3 gateway to allow the module to collect data and display them in the "Metric Statistics" in the admin area.
 # Enable usage statistics collection.
 S3_GW_COLLECT_STAT=1
# systemctl restart ostor-agentd.service |
[edit] Update Instructions
| An essential guidance through the process of updating the module is offered here. Ensure successful completion of the module update by carefully following each step, thereby preventing data loss or any unforeseen issues. |
[edit] Upgrade Guide
| Seeking a solution that offers greater flexibility, customization tailored to your precise needs, and unrestricted availability? There is an option that not only proves to be cost-effective in the long run but also includes prioritized support services, making it a truly valuable investment. Opt for the Open Source version of your Virtuozzo Hybrid Infrastructure S3 For WHMCS module to unlock these benefits. Follow a comprehensive guide covering the transition process, the advantages it brings, and step-by-step instructions on what to do next after the order has been successfully finalized. |
[edit] Common Problems
| 1. When you have problems with connection, check whether your SELinux or firewall does not block ports. |
| 2. If you encounter a module command error: 'API Error: The bucket you tried to delete is not empty' Please remove all the bucket content before terminating it. The bucket must be empty to run the 'Terminate' action successfully. |