Virtuozzo Hybrid Infrastructure S3 For WHMCS
(Created page with "first draft") |
|||
| Line 1: | Line 1: | ||
| − | first | + | <meta name="keywords" content="<meta name="keywords" content="openstack projects for whmcs, openstack projects configuration, whmcs openstack projects management, whmcs openstack projects installation, whmcs openstack projects common problems, about whmcs openstack projects, whmcs openstack projects documentation, whmcs openstack projects faq, whmcs openstack projects help, whmcs openstack projects guide, whmcs openstack projects wiki, whmcs openstack projects tutorial, whmcs openstack projects tips, whmcs openstack projects wiki"> |
| + | <meta name="description" content="ModulesGarden Wiki Contains All The Information You Need About The OpenStack Projects For WHMCS Module."></meta> | ||
| + | |||
| + | =About [https://www.modulesgarden.com/products/whmcs/openstack-projects OpenStack Projects For WHMCS]= | ||
| + | {| | ||
| + | |style="padding: 10px 0px 10px 0px;"|'''OpenStack Projects For WHMCS''' is a module that will allow you to provision virtual projects to your customers in a fully automatic manner. <br/> The module has been designed in such a way that your customers can place orders and overview them in the client area. <br/>As an administrator, you are equipped with all key features to keep track of your customers’ projects. | ||
| + | |} | ||
| + | |||
| + | *'''Admin Area Features:''' | ||
| + | {| | ||
| + | |style="padding: 10px 0px 0px 30px;"|✔ Create/Suspend/Unsuspend/Terminate OpenStack Projects | ||
| + | |} | ||
| + | {| | ||
| + | |style="padding: 0px 0px 0px 30px;"|✔ Change Package | ||
| + | |} | ||
| + | {| | ||
| + | |style="padding: 0px 0px 0px 30px;"|✔ Log In To Panel | ||
| + | |} | ||
| + | {| | ||
| + | |style="padding: 0px 0px 0px 30px;"|✔ View Created Project/User/Domain IDs | ||
| + | |} | ||
| + | {| | ||
| + | |style="padding: 0px 0px 0px 30px;"|✔ Set Up Project Configuration: | ||
| + | |} | ||
| + | {| | ||
| + | |style="padding: 0px 0px 0px 45px;"|✔ Define Default Domain | ||
| + | |} | ||
| + | {| | ||
| + | |style="padding: 0px 0px 0px 45px;"|✔ Define User Roles | ||
| + | |} | ||
| + | {| | ||
| + | |style="padding: 0px 0px 0px 45px;"|✔ Define Client Projects Mode: | ||
| + | |} | ||
| + | {| | ||
| + | |style="padding: 0px 0px 0px 60px;"|✔ Default | ||
| + | |} | ||
| + | {| | ||
| + | |style="padding: 0px 0px 0px 60px;"|✔ Only One Domain Per Client | ||
| + | |} | ||
| + | {| | ||
| + | |style="padding: 0px 0px 0px 60px;"|✔ Only One Domain And User Per Client | ||
| + | |} | ||
| + | {| | ||
| + | |style="padding: 0px 0px 0px 45px;"|✔ Provide OpenStack Panel Web Address | ||
| + | |} | ||
| + | {| | ||
| + | |style="padding: 0px 0px 0px 45px;"|✔ Provide Default Project/User Name | ||
| + | |} | ||
| + | {| | ||
| + | |style="padding: 0px 0px 0px 45px;"|✔ Toggle WHMCS Domain Overwriting | ||
| + | |} | ||
| + | {| | ||
| + | |style="padding: 0px 0px 0px 45px;"|✔ Toggle Displaying Domain For Clients | ||
| + | |} | ||
| + | {| | ||
| + | |style="padding: 0px 0px 0px 45px;"|✔ Toggle Logging API Requests | ||
| + | |} | ||
| + | {| | ||
| + | |style="padding: 0px 0px 0px 30px;"|✔ Set Up Limits For: | ||
| + | |} | ||
| + | {| | ||
| + | |style="padding: 0px 0px 0px 45px;"|✔ Compute | ||
| + | |} | ||
| + | {| | ||
| + | |style="padding: 0px 0px 0px 45px;"|✔ Block-Storage | ||
| + | |} | ||
| + | {| | ||
| + | |style="padding: 0px 0px 0px 45px;"|✔ Network | ||
| + | |} | ||
| + | {| | ||
| + | |style="padding: 0px 0px 0px 45px;"|✔ Load Balancer | ||
| + | |} | ||
| + | {| | ||
| + | |style="padding: 0px 0px 0px 45px;"|✔ Container Infrastructure | ||
| + | |} | ||
| + | {| | ||
| + | |style="padding: 0px 0px 0px 45px;"|✔ Kubernetes | ||
| + | |} | ||
| + | {| | ||
| + | |style="padding: 0px 0px 0px 45px;"|✔ Traits (OpenStack) / Placement Groups (Virtuozzo) | ||
| + | |} | ||
| + | {| | ||
| + | |style="padding: 0px 0px 0px 30px;"|✔ Set Up Module Custom Webhooks | ||
| + | |} | ||
| + | {| | ||
| + | |style="padding: 0px 0px 0px 30px;"|✔ Generate Configurable Options | ||
| + | |} | ||
| + | {| | ||
| + | |style="padding: 0px 0px 10px 30px;"|✔ Run Server Connection Test | ||
| + | |} | ||
| + | |||
| + | *'''Client Area Features:''' | ||
| + | {| | ||
| + | |style="padding: 10px 0px 0px 30px;"|✔ View Project Details: | ||
| + | |} | ||
| + | {| | ||
| + | |style="padding: 0px 0px 0px 45px;"|✔ Domain | ||
| + | |} | ||
| + | {| | ||
| + | |style="padding: 0px 0px 0px 45px;"|✔ Username | ||
| + | |} | ||
| + | {| | ||
| + | |style="padding: 0px 0px 0px 45px;"|✔ Password | ||
| + | |} | ||
| + | {| | ||
| + | |style="padding: 0px 0px 10px 30px;"|✔ Log In To Panel | ||
| + | |} | ||
| + | |||
| + | *'''Configurable Options:''' | ||
| + | {| | ||
| + | |style="padding: 10px 0px 0px 30px;"|✔ Backup Gigabytes | ||
| + | |} | ||
| + | {| | ||
| + | |style="padding: 0px 0px 0px 30px;"|✔ Backups | ||
| + | |} | ||
| + | {| | ||
| + | |style="padding: 0px 0px 0px 30px;"|✔ Cores | ||
| + | |} | ||
| + | {| | ||
| + | |style="padding: 0px 0px 0px 30px;"|✔ Fixed IPs | ||
| + | |} | ||
| + | {| | ||
| + | |style="padding: 0px 0px 0px 30px;"|✔ Floating IP | ||
| + | |} | ||
| + | {| | ||
| + | |style="padding: 0px 0px 0px 30px;"|✔ Floating IPs | ||
| + | |} | ||
| + | {| | ||
| + | |style="padding: 0px 0px 0px 30px;"|✔ Gigabytes | ||
| + | |} | ||
| + | {| | ||
| + | |style="padding: 0px 0px 0px 30px;"|✔ Groups | ||
| + | |} | ||
| + | {| | ||
| + | |style="padding: 0px 0px 0px 30px;"|✔ Hard Limit | ||
| + | |} | ||
| + | {| | ||
| + | |style="padding: 0px 0px 0px 30px;"|✔ Heath Monitor | ||
| + | |} | ||
| + | {| | ||
| + | |style="padding: 0px 0px 0px 30px;"|✔ Injected File Content [Bytes] | ||
| + | |} | ||
| + | {| | ||
| + | |style="padding: 0px 0px 0px 30px;"|✔ Injected File Path [Bytes] | ||
| + | |} | ||
| + | {| | ||
| + | |style="padding: 0px 0px 0px 30px;"|✔ Injected Files | ||
| + | |} | ||
| + | {| | ||
| + | |style="padding: 0px 0px 0px 30px;"|✔ Instances | ||
| + | |} | ||
| + | {| | ||
| + | |style="padding: 0px 0px 0px 30px;"|✔ Key Pairs | ||
| + | |} | ||
| + | {| | ||
| + | |style="padding: 0px 0px 0px 30px;"|✔ Listener | ||
| + | |} | ||
| + | {| | ||
| + | |style="padding: 0px 0px 0px 30px;"|✔ Load Balancer | ||
| + | |} | ||
| + | {| | ||
| + | |style="padding: 0px 0px 0px 30px;"|✔ Member | ||
| + | |} | ||
| + | {| | ||
| + | |style="padding: 0px 0px 0px 30px;"|✔ Metadata Items | ||
| + | |} | ||
| + | {| | ||
| + | |style="padding: 0px 0px 0px 30px;"|✔ Network | ||
| + | |} | ||
| + | {| | ||
| + | |style="padding: 0px 0px 0px 30px;"|✔ Per Volume Gigabytes | ||
| + | |} | ||
| + | {| | ||
| + | |style="padding: 0px 0px 0px 30px;"|✔ Pool | ||
| + | |} | ||
| + | {| | ||
| + | |style="padding: 0px 0px 0px 30px;"|✔ Port | ||
| + | |} | ||
| + | {| | ||
| + | |style="padding: 0px 0px 0px 30px;"|✔ RAM [MB] | ||
| + | |} | ||
| + | {| | ||
| + | |style="padding: 0px 0px 0px 30px;"|✔ Role-based Access Control Policy (RBAC Policy) | ||
| + | |} | ||
| + | {| | ||
| + | |style="padding: 0px 0px 0px 30px;"|✔ Router | ||
| + | |} | ||
| + | {| | ||
| + | |style="padding: 0px 0px 0px 30px;"|✔ Security Group | ||
| + | |} | ||
| + | {| | ||
| + | |style="padding: 0px 0px 0px 30px;"|✔ Security Group Rule | ||
| + | |} | ||
| + | {| | ||
| + | |style="padding: 0px 0px 0px 30px;"|✔ Security Group Rules | ||
| + | |} | ||
| + | {| | ||
| + | |style="padding: 0px 0px 0px 30px;"|✔ Security Groups | ||
| + | |} | ||
| + | {| | ||
| + | |style="padding: 0px 0px 0px 30px;"|✔ Server Group Members | ||
| + | |} | ||
| + | {| | ||
| + | |style="padding: 0px 0px 0px 30px;"|✔ Server Groups | ||
| + | |} | ||
| + | {| | ||
| + | |style="padding: 0px 0px 0px 30px;"|✔ Snapshots | ||
| + | |} | ||
| + | {| | ||
| + | |style="padding: 0px 0px 0px 30px;"|✔ Subnet | ||
| + | |} | ||
| + | {| | ||
| + | |style="padding: 0px 0px 0px 30px;"|✔ Subnet Pool | ||
| + | |} | ||
| + | {| | ||
| + | |style="padding: 0px 0px 0px 30px;"|✔ Traits (OpenStack) / Placement Groups (Virtuozzo) | ||
| + | |} | ||
| + | {| | ||
| + | |style="padding: 0px 0px 10px 30px;"|✔ Volumes | ||
| + | |} | ||
| + | |||
| + | *'''Required Components:''' | ||
| + | {| | ||
| + | |style="padding: 10px 0px 10px 30px;"|✔ Gnocchi (Required For Billing) | ||
| + | |} | ||
| + | |||
| + | *'''General Info:''' | ||
| + | {| | ||
| + | |style="padding: 10px 0px 0px 30px;"|✔ Integrated With [https://www.modulesgarden.com/products/whmcs/advanced-billing Advanced Billing For WHMCS] - Actual Project Resource Usage Billing | ||
| + | |} | ||
| + | {| | ||
| + | |style="padding: 0px 0px 0px 30px;"|✔ Integrated With [https://www.modulesgarden.com/products/whmcs/products-reseller Products Reseller For WHMCS] - End-To-End Solution For Products And Servers Reselling | ||
| + | |} | ||
| + | {| | ||
| + | |style="padding: 0px 0px 0px 30px;"|✔ Multi-Language Support | ||
| + | |} | ||
| + | {| | ||
| + | |style="padding: 0px 0px 0px 30px;"|✔ Supports OpenStack Victoria and Previous | ||
| + | |} | ||
| + | {| | ||
| + | |style="padding: 0px 0px 0px 30px;"|✔ Supports OpenStack Gnocchi | ||
| + | |} | ||
| + | {| | ||
| + | |style="padding: 0px 0px 0px 30px;"|✔ Supports Virtuozzo Hybrid Infrastructure | ||
| + | |} | ||
| + | {| | ||
| + | |style="padding: 0px 0px 0px 30px;"|✔ Supports PHP 7.2 Up To PHP 7.4 | ||
| + | |} | ||
| + | {| | ||
| + | |style="padding: 0px 0px 0px 30px;"|✔ Supports WHMCS Metric Billing - Integration: CPU, Compute Instance Booting Time, Disk Device Read Bytes, Disk Device Read Requests, Disk Device Write Bytes, Disk Device Write Requests, Disk Ephemeral Size, Disk Root Size, Memory,<br/> Memory Usage, Network Incoming Bytes, Network Incoming Packets, Network Outgoing Bytes, Network Outgoing Packets, OS Images, VCPUs, Volume Size, Volumes Usage | ||
| + | |} | ||
| + | {| | ||
| + | |style="padding: 0px 0px 0px 30px;"|✔ Supports WHMCS Themes "Six" And "Twenty-One" | ||
| + | |} | ||
| + | {| | ||
| + | |style="padding: 0px 0px 0px 30px;"|✔ Supports WHMCS V8.0 And Later | ||
| + | |} | ||
| + | {| | ||
| + | |style="padding: 0px 0px 30px 30px;"|✔ Easy Module Upgrade To [https://www.modulesgarden.com/products/whmcs/openstack-projects#open-source-version Open Source Version] | ||
| + | |} | ||
| + | |||
| + | =Installation and Configuration= | ||
| + | {| | ||
| + | |style="padding: 10px 0px 30px 0px;"|'''This tutorial will show you how to successfully install and configure [https://www.modulesgarden.com//products/whmcs/openstack-projects OpenStack Projects For WHMCS] smoothly.''' <br /> | ||
| + | We will guide you step by step through the whole installation and configuration process. | ||
| + | |} | ||
| + | ==Installation== | ||
| + | {| | ||
| + | |style="padding: 10px 0px 20px 15px;"|'''1. Log in to our client area and download the module.''' | ||
| + | |} | ||
| + | {| | ||
| + | |style="padding: 0px 0px 20px 25px;"|[[File:OSP_1.png]] | ||
| + | |} | ||
| + | {| | ||
| + | |style="padding: 0px 0px 15px 15px;"|'''2. Upload and extract the extension into the main WHMCS directory.<br /> | ||
| + | Extracted files in your WHMCS directory should look like this: | ||
| + | |} | ||
| + | {| | ||
| + | |style="padding: 0px 0px 20px 25px;"|[[File:OSP_2.png]] | ||
| + | |} | ||
| + | {| | ||
| + | |style="padding: 0px 0px 15px 15px;"|'''3. When you install OpenStack Projects For WHMCS for the first time, you have to rename the '' 'license_RENAME.php' '' file.'''<br /> | ||
| + | The file is located in '' '/yourWHMCS/modules/servers/OpenStackProjects/license_RENAME.php'. '' Rename it from '' 'license_RENAME.php' '' to '' 'license.php'. '' | ||
| + | |} | ||
| + | {| | ||
| + | |style="padding: 0px 0px 20px 25px;"|[[File:OSP_3.png]] | ||
| + | |} | ||
| + | {| | ||
| + | |style="padding: 0px 0px 15px 15px;"|'''4. In order to configure your license key, you have to edit the previously renamed '' 'license.php' '' file.'''<br /> | ||
| + | Enter your license key between the quotation marks as presented on the following screen.<br /> | ||
| + | You can find your license key in our client area → '' 'My Products'. '' | ||
| + | |} | ||
| + | {| | ||
| + | |style="padding: 0px 0px 20px 25px;"|[[File:OSP_4.png]] | ||
| + | |} | ||
| + | {| | ||
| + | |style="padding: 0px 0px 15px 15px;"|'''5. Now, set up the '' 'storage' '' folder as recursively writable.'''<br /> | ||
| + | This folder is available at '' '/yourWHMCS/modules/servers/OpenStackProjects/'. '' | ||
| + | |} | ||
| + | {| | ||
| + | |style="padding: 0px 0px 30px 25px;"|[[File:OSP_5.png]] | ||
| + | |} | ||
| + | |||
| + | ==Configuration of Server== | ||
| + | {| | ||
| + | |style="padding: 10px 0px 20px 0px;"|'''Before you can go on, you need to copy your '' 'API Details' ''. You will need them to connect with the server successfully.'''<br/> | ||
| + | Proceed to your '' 'OpenStack' '' panel. All necessary information will be found in the '' 'View Credentials' '' section under '' 'API Access' ''. <br/> | ||
| + | |} | ||
| + | {| | ||
| + | |style="padding: 0px 0px 20px 25px;"|[[File:OSP_6.png]] | ||
| + | |} | ||
| + | {| | ||
| + | |style="padding: 0px 0px 20px 15px;"|'''6. Now, log in to your WHMCS and proceed to '' 'Setup' '' → '' 'Products/Services' '' → '' 'Servers' '' and press '' 'Add New Server'.'' | ||
| + | |} | ||
| + | {| | ||
| + | |style="padding: 0px 0px 20px 25px;"|[[File:OSP_7.png]] | ||
| + | |} | ||
| + | {| | ||
| + | |style="padding: 0px 0px 15px 15px;"|'''7. Next, enter your server '' 'Name' '', '' 'Hostname' '', '' 'IP Address' '' and select '' 'Openstack Projects' '' from the '' 'Module' '' field.'''<br/> | ||
| + | Now, provide your '' 'OpenStack Server Details' ''. To download the '' 'Identity Version' '', you need to click '' 'Get Versions' '' next to '' 'Identity Port/Path' '' . <br/> Make sure that your server connection is correct and save changes. | ||
| + | |} | ||
| + | {| | ||
| + | |style="padding: 0px 0px 20px 25px;"|[[File:OSP_8.png]] | ||
| + | |} | ||
| + | {| | ||
| + | |style="padding: 0px 0px 20px 15px;"|'''8. It is time to create a server group. To do so, click on '' 'Create New Group' ''.''' | ||
| + | |} | ||
| + | {| | ||
| + | |style="padding: 0px 0px 20px 25px;"|[[File:OSP_9.png]] | ||
| + | |} | ||
| + | {| | ||
| + | |style="padding: 0px 0px 20px 15px;"|'''9. Enter a name, click on your previously created server, press '' 'Add' '' and afterward '' 'Save Changes' ''.''' | ||
| + | |} | ||
| + | {| | ||
| + | |style="padding: 0px 0px 30px 25px;"|[[File:OSP_10.png]] | ||
| + | |} | ||
| + | |||
| + | ==Configuration of Product== | ||
| + | {| | ||
| + | |style="padding: 10px 0px 15px 15px;"|'''10. In order to create and configure a product, go to '' 'Setup' '' → '' 'Products/Services' '' → '' 'Products/Services'.'''''<br /> | ||
| + | Click on '' 'Create a New Group'.'' | ||
| + | |} | ||
| + | {| | ||
| + | |style="padding: 0px 0px 20px 25px;"|[[File:OSP_11.png]] | ||
| + | |} | ||
| + | {| | ||
| + | |style="padding: 0px 0px 20px 15px;"|'''11. Enter your product group name and press '' 'Save Changes'.''''' | ||
| + | |} | ||
| + | {| | ||
| + | |style="padding: 0px 0px 20px 25px;"|[[File:OSP_12.png]] | ||
| + | |} | ||
| + | {| | ||
| + | |style="padding: 0px 0px 15px 15px;"|'''12. Once you have a product group, you can create a new product.'''<br /> | ||
| + | To do so, first click on '' 'Create a New Product'.'' | ||
| + | |} | ||
| + | {| | ||
| + | |style="padding: 0px 0px 20px 25px;"|[[File:OSP_13.png]] | ||
| + | |} | ||
| + | {| | ||
| + | |style="padding: 0px 0px 15px 15px;"|'''13. Afterward, choose your product type, enter your product name, choose module and the product group from the dropdown menus. Press '' 'Continue'. '' '''<br /> | ||
| + | <!-- '' 'Product Type' '' should be set to '' 'Server/VPS'. '' --> | ||
| + | |} | ||
| + | {| | ||
| + | |style="padding: 0px 0px 20px 25px;"|[[File:OSP_14.png]] | ||
| + | |} | ||
| + | {| | ||
| + | |style="padding: 0px 0px 15px 15px;"|'''14. Now, go to the '' 'Module Settings' '' section, choose your previously created server group from the dropdown menu.'''<br /> | ||
| + | If you did not set the proper permissions, you will be asked to do it now. | ||
| + | |} | ||
| + | {| | ||
| + | |style="padding: 0px 0px 20px 25px;"|[[File:OSP_15.png]] | ||
| + | |} | ||
| + | {| | ||
| + | |style="padding: 0px 0px 15px 15px;"|'''15. Now, let's start configuring the settings.'''<br /> | ||
| + | '' '''Configuration:''' '' | ||
| + | * '''Default Domain''' - choose a default domain for new projects based on this product. | ||
| + | * '''User Roles''' - define default roles for a new user. | ||
| + | * '''Client Projects Mode''' - select a preferred mode that defines how new hostings will be created. | ||
| + | * '''OpenStack Panel Web Address''' - is the web address for the login page to the OpenStack panel. | ||
| + | * '''Default Domain''' - enter a domain that will be used when the domain name is not provided. Available variables: ''{clientId}, {serviceId}'' and ''{rand}'' | ||
| + | * '''Default Project Name''' - enter a project name that will be used when creating a new project. If left empty, the domain name will be used instead. Available variables: ''{clientId}, {serviceId}'' and ''{rand}'' | ||
| + | * '''Default User Name''' - enter a user name that will be used when creating a new user. Available variables: ''{clientId}, {serviceId}'' and ''{rand}'' | ||
| + | * '''Overwrite WHMCS Domain''' - if enabled, during create action, the domain assigned to hosting in WHMCS will be overwritten with the domain name assigned to the project in the OpenStack panel. | ||
| + | * '''Show Domain ''' - if you enable, the domain will be visible in the client area. | ||
| + | * '''Log API Requests''' - if you enable, information on API requests will be stored in the 'Module Log' section in your WHMCS <br/> | ||
| + | |} | ||
| + | {| | ||
| + | |style="padding: 0px 0px 20px 25px;"|[[File:OSP_16.png]] | ||
| + | |} | ||
| + | {| | ||
| + | |style="padding: 0px 0px 15px 15px;"| | ||
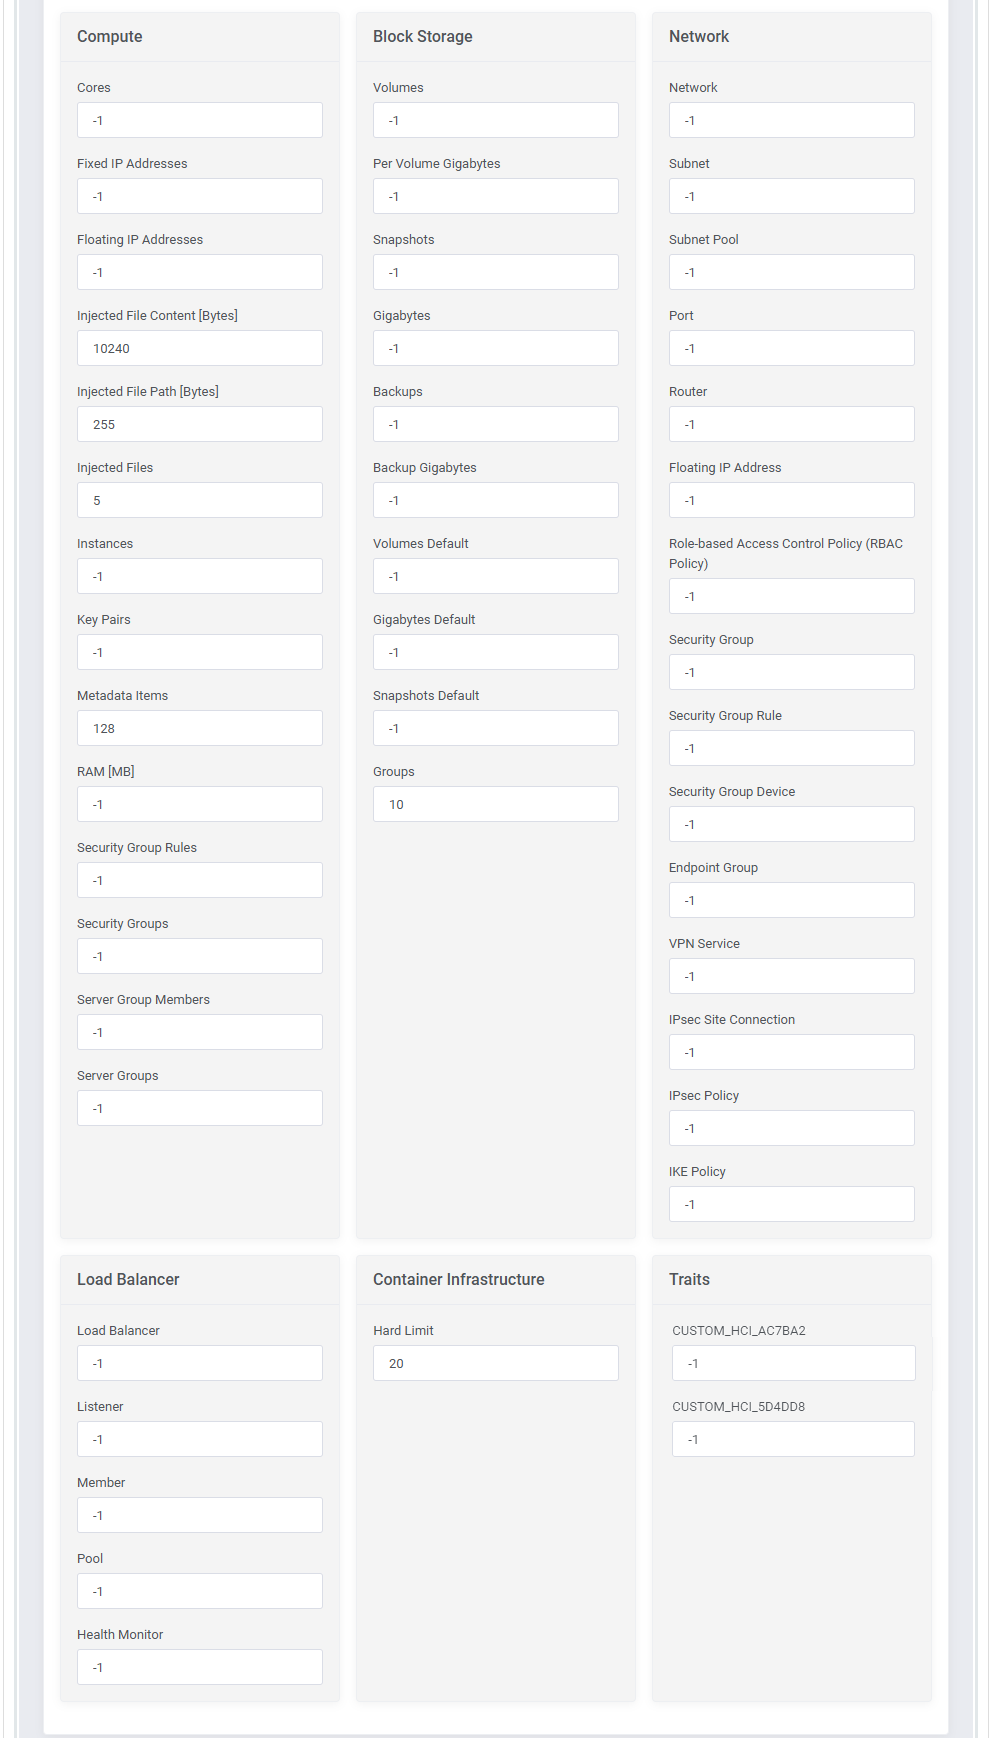
| + | '' '''Compute, Block-Storage, Network, Load Balancer, Container Infrastructure, Traits''' '' - these sections may vary depending on the project, some of them might be unavailable for your OpenStack project.<br/> You may easily adjust your product to your needs by modifying the available options. Type '' '-1' '' for unlimited.<br/> | ||
| + | '''''Note:''' Keep in mind that in the case of Virtuozzo server 'Traits' stand for 'Placement Groups' endpoints.'' | ||
| + | |} | ||
| + | {| | ||
| + | |style="padding: 0px 0px 20px 25px;"|[[File:OSP_16_1.png]] | ||
| + | |} | ||
| + | {| | ||
| + | |style="padding: 0px 0px 20px 15px;"| | ||
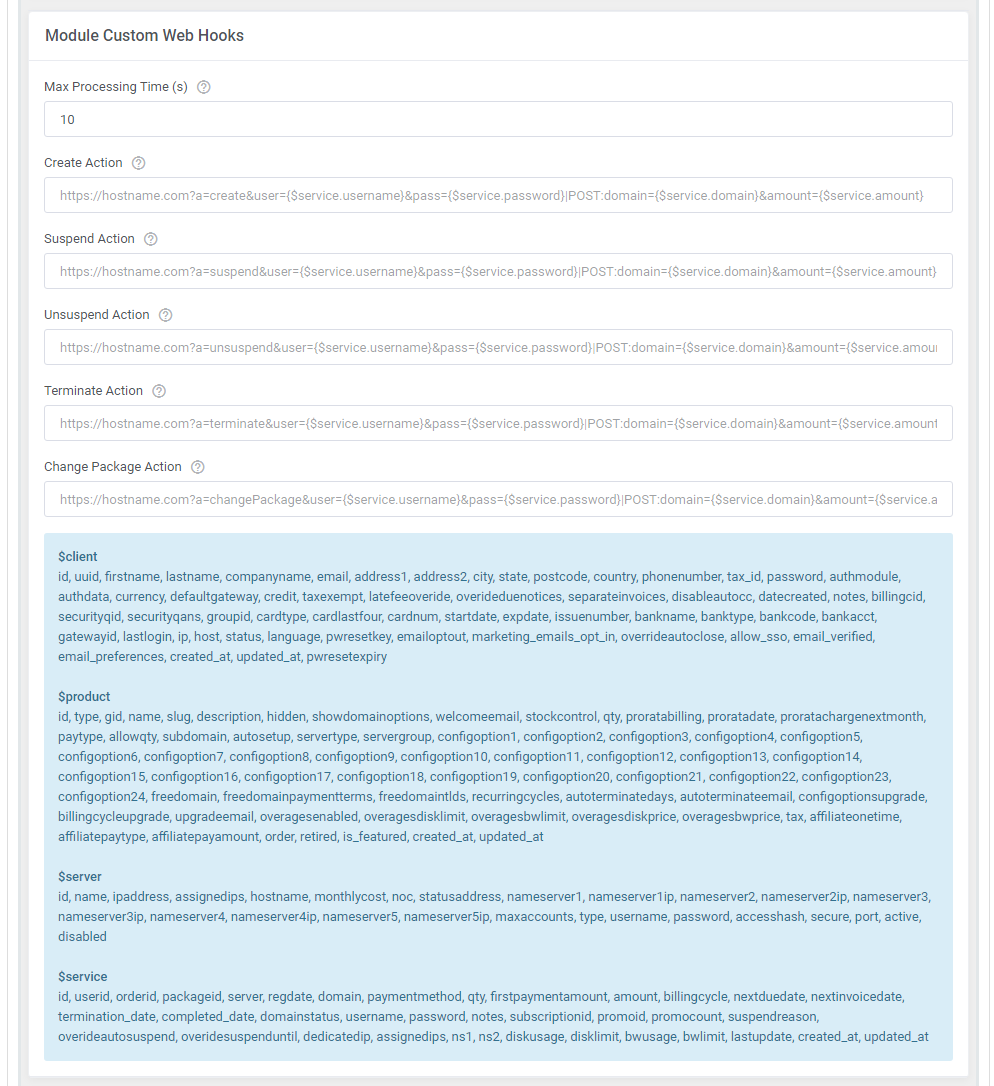
| + | '' '''Module Custom Web Hooks''' '' - here you may add the URL with WHMCS parameters to perform additional actions after the ''create/suspend/unsuspend/terminate/change package'' actions. | ||
| + | |} | ||
| + | {| | ||
| + | |style="padding: 0px 0px 20px 25px;"|[[File:OSP_16_2.png]] | ||
| + | |} | ||
| + | {| | ||
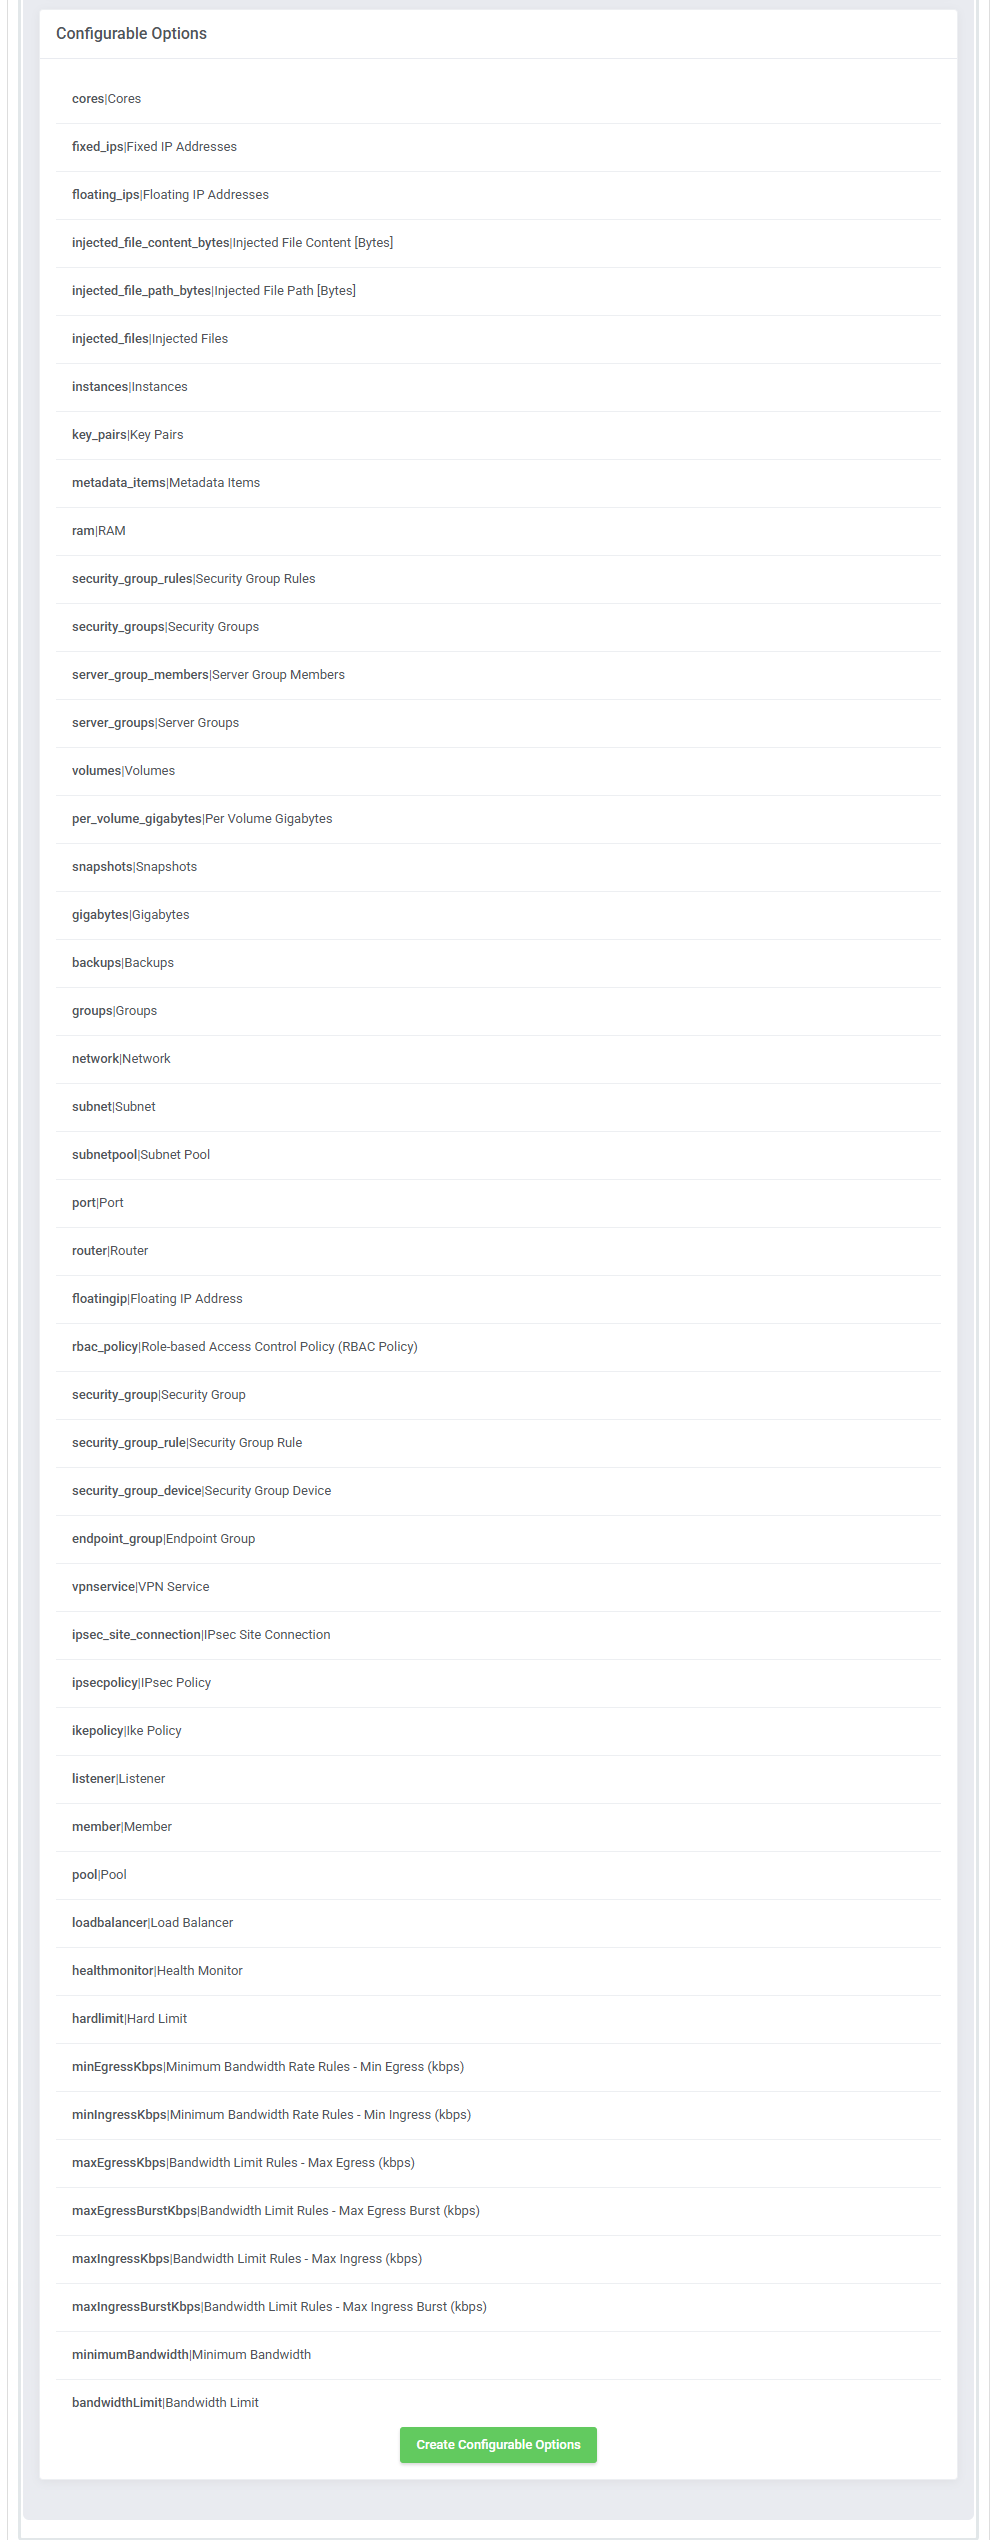
| + | |style="padding: 0px 0px 15px 15px;"|'''16. At the end of the configuration process, you can enable the '' 'Metric Billing' '' and decide whether you want to generate configurable options for the product.'''<br/> | ||
| + | Configurable options can be used by your clients to select each virtual machine parameters individually during order placement.<br/>Otherwise, if configurable options are not defined, then the fixed parameters specified in the earlier configuration will be used instead.<br/> | ||
| + | If you decide to use configurable options, select the configurable options unit and then press the 'Create Configurable Options' button. | ||
| + | |} | ||
| + | {| | ||
| + | |style="padding: 0px 0px 20px 25px;"|[[File:OSP_16_3.png]] | ||
| + | |} | ||
| + | {| | ||
| + | |style="padding: 0px 0px 20px 25px;"|[[File:OSP_17.png]] | ||
| + | |} | ||
| + | {| | ||
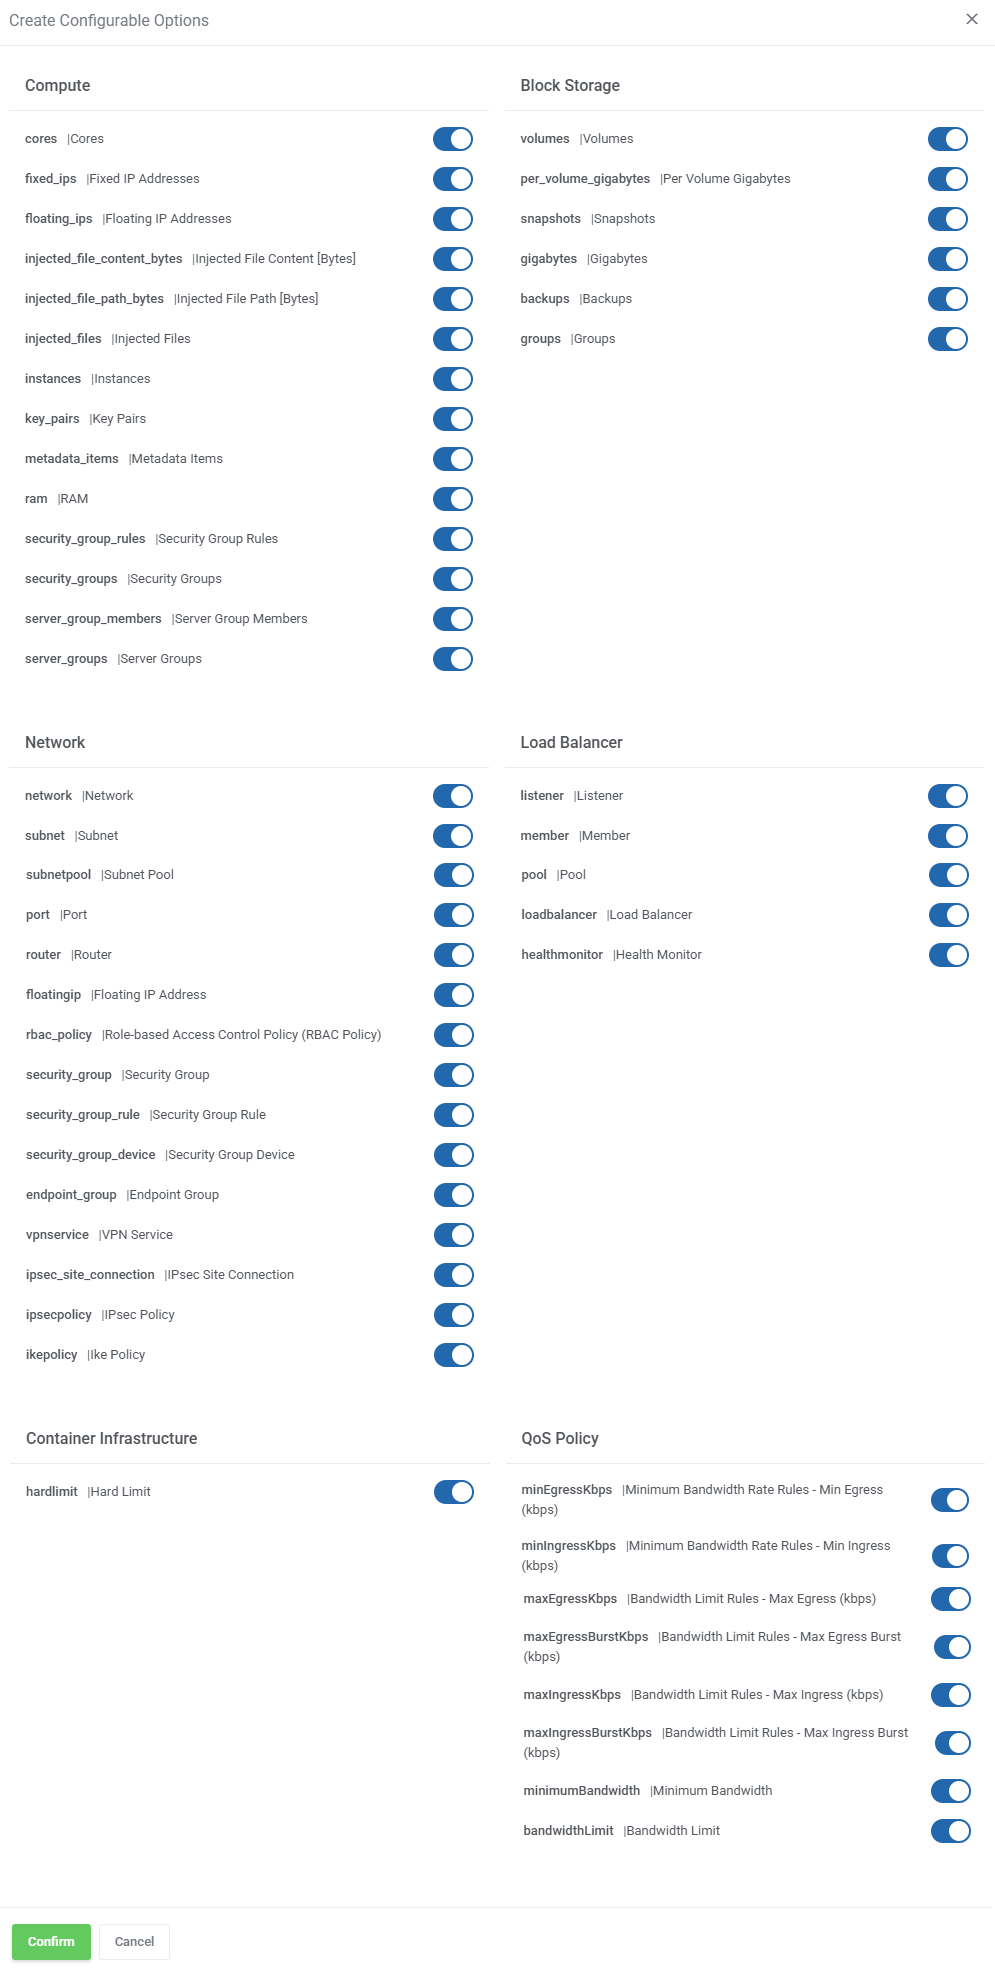
| + | |style="padding: 0px 0px 15px 15px;"| Now, select which options you want to generate and confirm by clicking '' 'Create' ''.<br/> Note that the configuration for disabled options will still be taken from the configuration of the main product.<br/>More information about how to use configurable options can be found [https://www.docs.modulesgarden.com/General#How_To_Use_Configurable_Options here] or in the official WHMCS [https://docs.whmcs.com/Addons_and_Configurable_Options documentation]. | ||
| + | |} | ||
| + | {| | ||
| + | |style="padding: 0px 0px 30px 25px;"|[[File:OSP_18.png]] | ||
| + | |} | ||
| + | |||
| + | =Management= | ||
| + | ==Admin Area== | ||
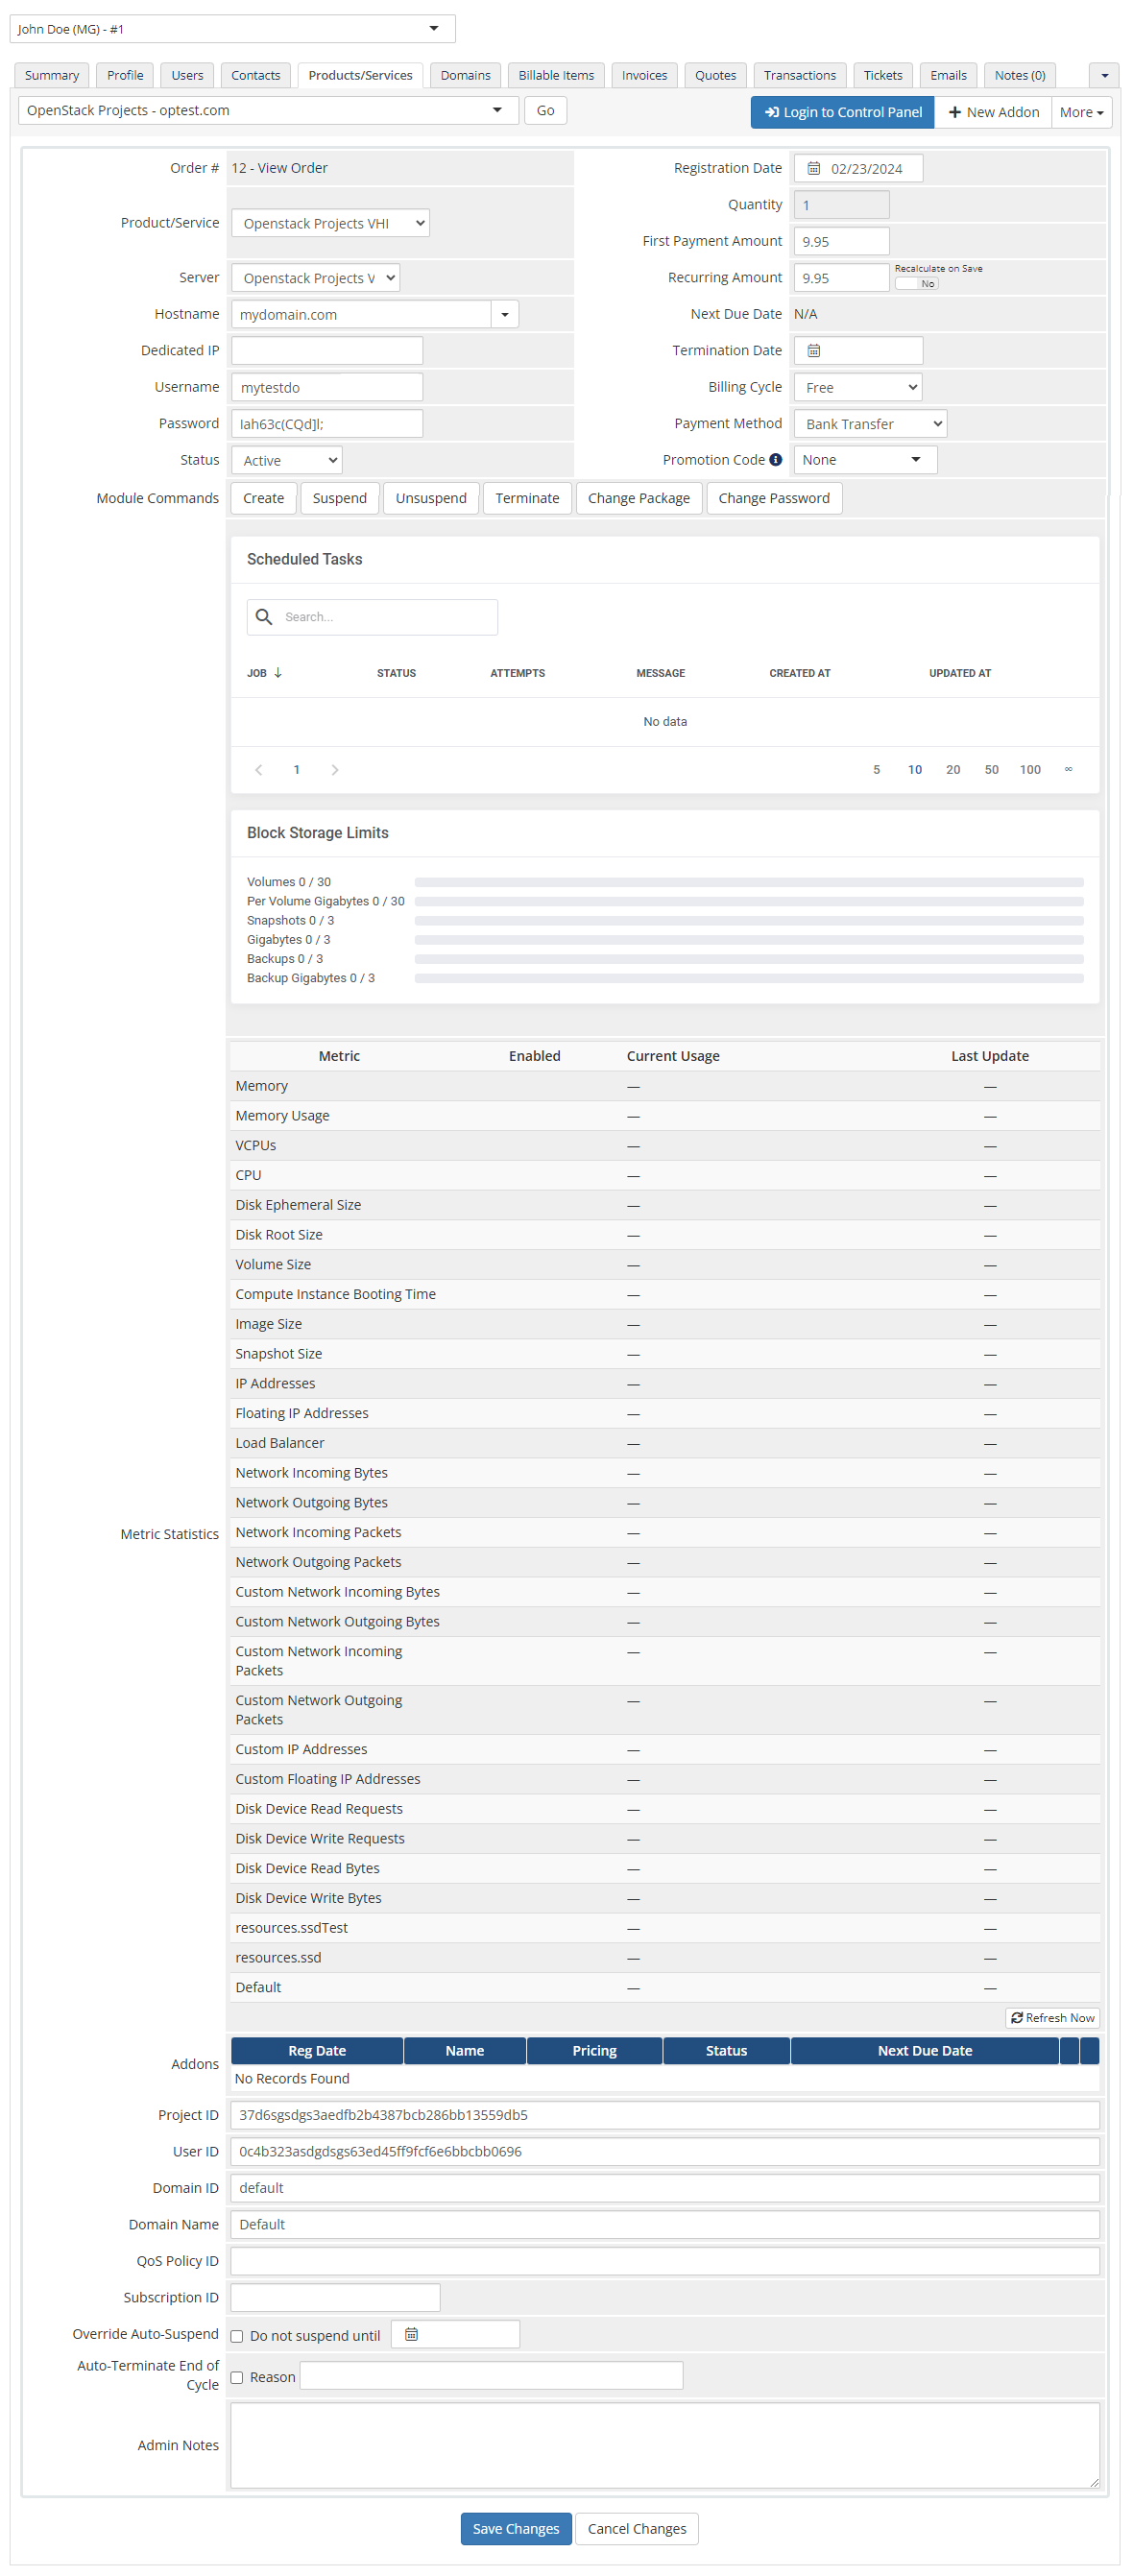
| + | {| | ||
| + | |style="padding: 10px 0px 15px 15px;"|''' OpenStack Projects For WHMCS allows you to supervise and manage your customer products from the admin area of your WHMCS system.'''<br /> | ||
| + | This includes supervision of such features as: | ||
| + | * Log In To Control Panel – redirecting to the OpenStack login page. | ||
| + | * Configurable options which enable you to view the chosen server details | ||
| + | * Module commands to allow easy and quick management of the server<br/> | ||
| + | ** Create – creating a new user, a new project with a set of limits. | ||
| + | ** Suspend – unassigning a project from the user to prevent a user from managing their resources. | ||
| + | ** Unsuspend – assigning back a project from a user. | ||
| + | ** Terminate – removing a project and removing a user (if they do not have any other projects assigned at OpenStack).<br/> '''Important!''' From the 1.1.0 version of the module, the following cron command is required to terminate a project ('''5-minute interval suggested'''). <br/> Do not forget to replace 'yourWHMCS' with your WHMCS root location. <pre> php -q /yourWHMCS/modules/servers/OpenstackProjects/cron/cron.php queue </pre> | ||
| + | ** Change Package – upgrading resources of the project. | ||
| + | * Scheduled Tasks - data on all scheduled tasks, their status, attempts, and dates | ||
| + | * Metric Statistics - the section is completed with all metrics the module can observe. | ||
| + | |} | ||
| + | {| | ||
| + | |style="padding: 0px 0px 30px 25px;"|[[File:OSP_19.png]] | ||
| + | |} | ||
| + | |||
| + | ==Ordering== | ||
| + | {| | ||
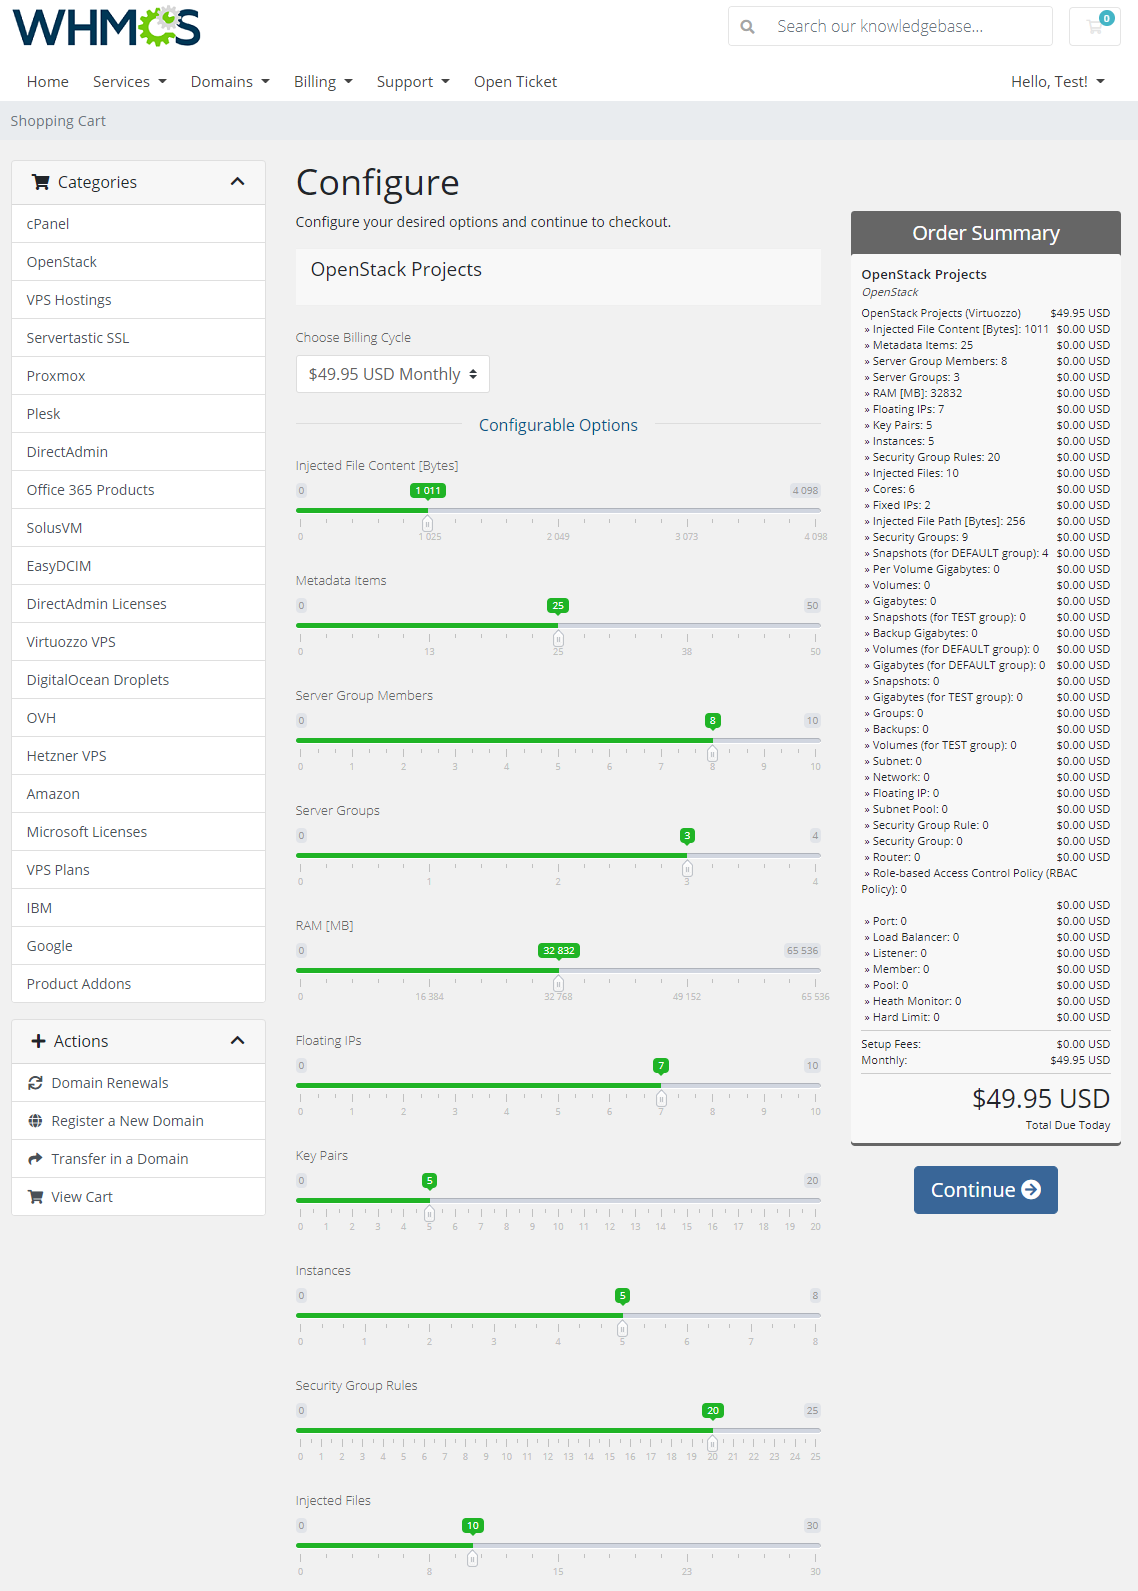
| + | |style="padding: 10px 0px 15px 15px;"|Thanks to configurable options, you are able to offer a product which your clients can match to their needs.<br />Additionally, you are able to set up pricing for each configurable option, which makes your offer even more competitive.<br/> | ||
| + | |||
| + | |} | ||
| + | {| | ||
| + | |style="padding: 0px 0px 30px 25px;"|[[File:OSP_20.png]] | ||
| + | |} | ||
| + | ==Client Area== | ||
| + | {| | ||
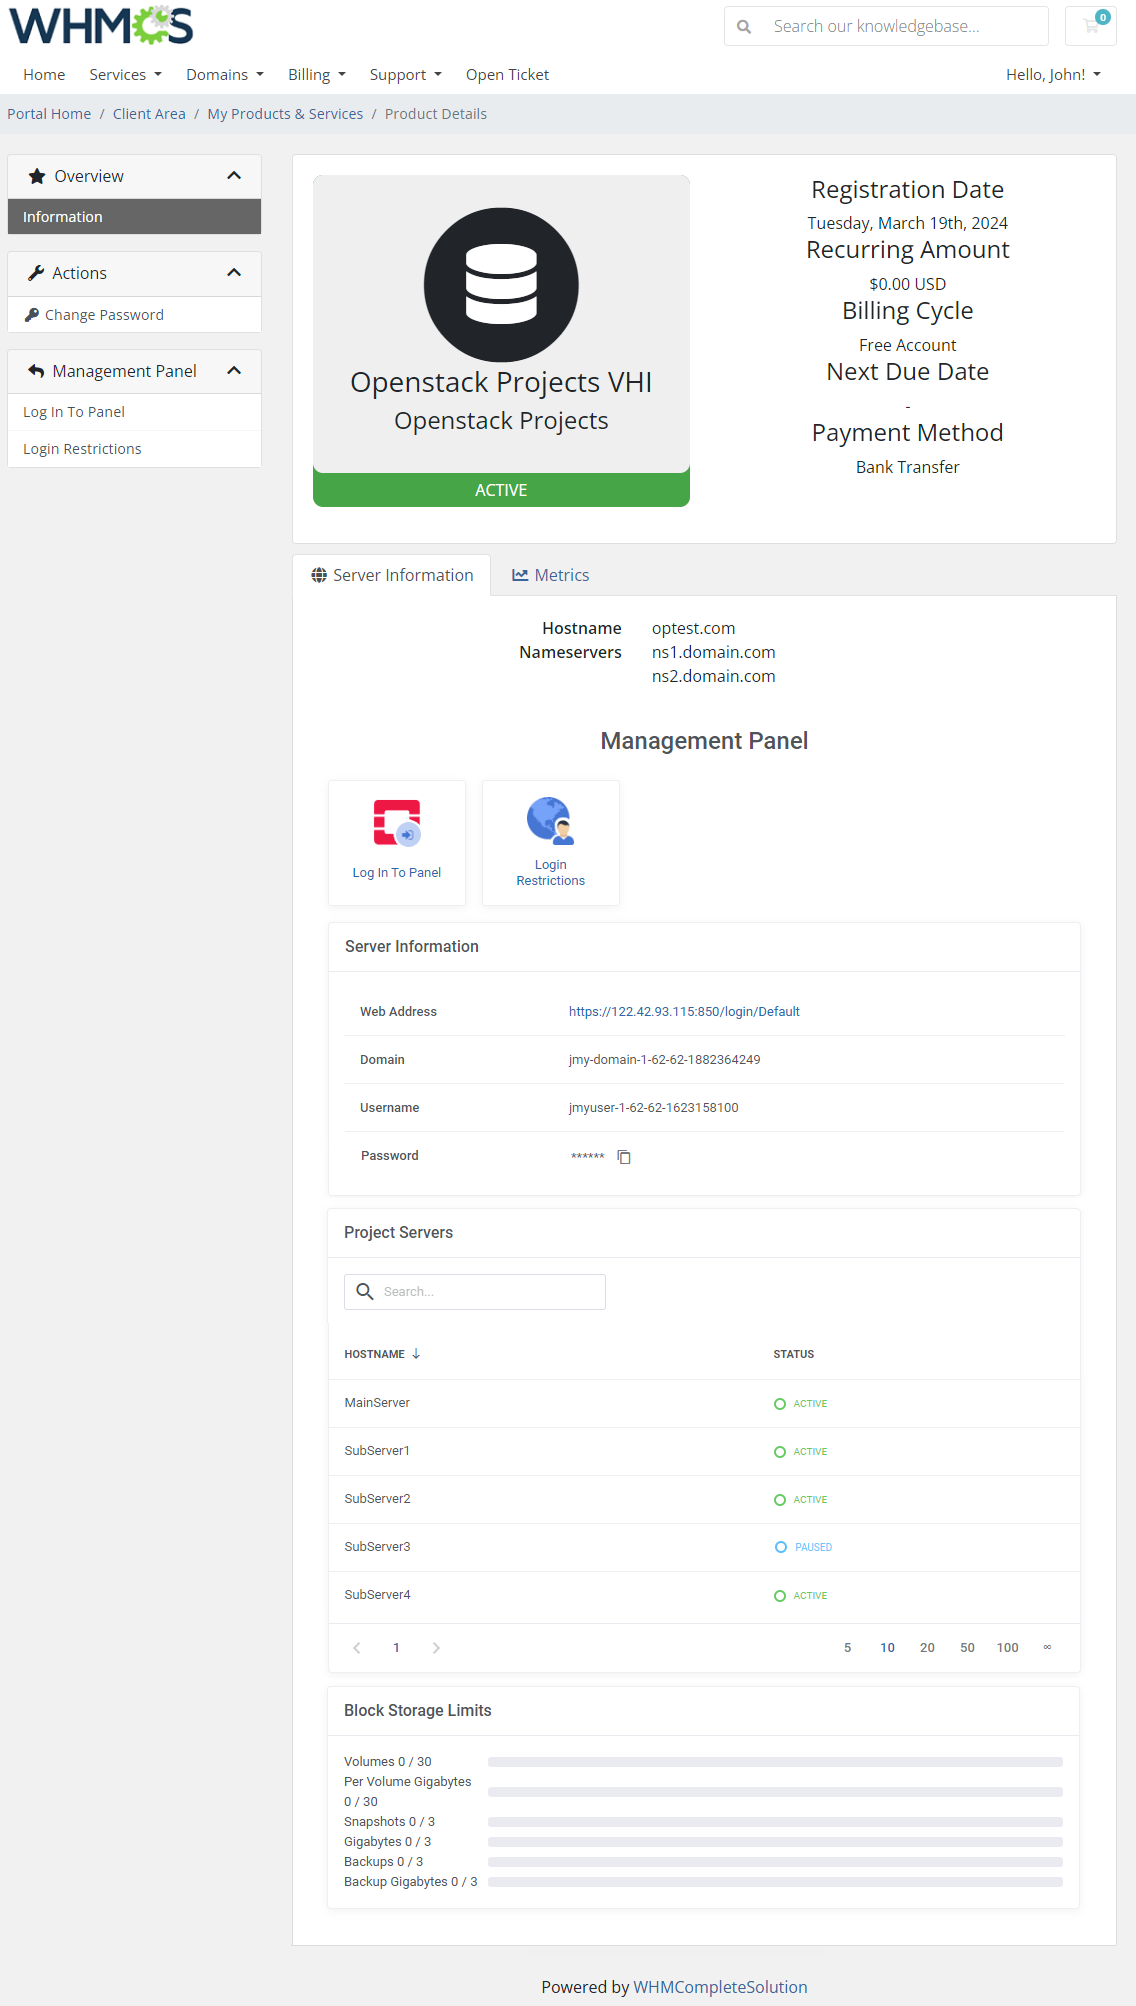
| + | |style="padding: 10px 0px 15px 15px;"|The client area interface of OpenStack Projects For WHMCS looks like below.<br/>As you can see, you may easily redirect to the '' 'OpenStack' '' login page. Moreover, you can check the '' 'Configurable Options'' ' and '' 'Metrics Billing' ''<br /> | ||
| + | |} | ||
| + | {| | ||
| + | |style="padding: 0px 0px 30px 25px;"|[[File:OSP_21.png]] | ||
| + | |} | ||
| + | |||
| + | =Tips= | ||
| + | {| | ||
| + | |style="padding: 10px 0px 15px 15px;"|1. Please remember that if you integrate OpenStack Projects For WHMCS with [https://www.modulesgarden.com/products/whmcs/advanced-billing Advanced Billing For WHMCS], the cron task should be set no more than once for an hour. | ||
| + | |} | ||
| + | {| | ||
| + | |style="padding: 0px 0px 15px 15px;"|2. Metrics can be calculated basing on '''total''' or '''average usage''' for a given period of time. You can edit this in the following file: | ||
| + | <pre>/yourWHMCS/modules/servers/OpenstackProjects/app/Config/configuration.yml</pre> | ||
| + | Find the 'averageBilling' option and set: | ||
| + | *'false' for total usage | ||
| + | *'true' for average usage | ||
| + | |} | ||
| + | {| | ||
| + | |style="padding: 0px 0px 30px 25px;"|[[File:OSP_22.png]] | ||
| + | |} | ||
| + | |||
| + | =Update Instructions= | ||
| + | {| | ||
| + | |style="padding: 10px 0px 30px 15px;"|An essential guidance through the process of updating the module is offered '''[https://www.docs.modulesgarden.com/How_To_Update_WHMCS_Module here]'''.<br/><br/> | ||
| + | Keep in mind there is a quick and easy option in our client area that will let you upgrade the license of your module to an open source version at any time - and at a lower price!<br/> | ||
| + | To take advantage of it, simply use the '''License Upgrade''' button located on the product's page and a discounted invoice will be generated automatically.<br/> | ||
| + | |} | ||
| + | |||
| + | =Common Problems= | ||
| + | {| | ||
| + | |style="padding: 10px 0px 30px 15px;"|'''1. When you have problems with connection, check whether your SELinux or firewall does not block ports.''' | ||
| + | |} | ||
Revision as of 13:49, 5 November 2021
Contents |
About OpenStack Projects For WHMCS
| OpenStack Projects For WHMCS is a module that will allow you to provision virtual projects to your customers in a fully automatic manner. The module has been designed in such a way that your customers can place orders and overview them in the client area. As an administrator, you are equipped with all key features to keep track of your customers’ projects. |
- Admin Area Features:
| ✔ Create/Suspend/Unsuspend/Terminate OpenStack Projects |
| ✔ Change Package |
| ✔ Log In To Panel |
| ✔ View Created Project/User/Domain IDs |
| ✔ Set Up Project Configuration: |
| ✔ Define Default Domain |
| ✔ Define User Roles |
| ✔ Define Client Projects Mode: |
| ✔ Default |
| ✔ Only One Domain Per Client |
| ✔ Only One Domain And User Per Client |
| ✔ Provide OpenStack Panel Web Address |
| ✔ Provide Default Project/User Name |
| ✔ Toggle WHMCS Domain Overwriting |
| ✔ Toggle Displaying Domain For Clients |
| ✔ Toggle Logging API Requests |
| ✔ Set Up Limits For: |
| ✔ Compute |
| ✔ Block-Storage |
| ✔ Network |
| ✔ Load Balancer |
| ✔ Container Infrastructure |
| ✔ Kubernetes |
| ✔ Traits (OpenStack) / Placement Groups (Virtuozzo) |
| ✔ Set Up Module Custom Webhooks |
| ✔ Generate Configurable Options |
| ✔ Run Server Connection Test |
- Client Area Features:
| ✔ View Project Details: |
| ✔ Domain |
| ✔ Username |
| ✔ Password |
| ✔ Log In To Panel |
- Configurable Options:
| ✔ Backup Gigabytes |
| ✔ Backups |
| ✔ Cores |
| ✔ Fixed IPs |
| ✔ Floating IP |
| ✔ Floating IPs |
| ✔ Gigabytes |
| ✔ Groups |
| ✔ Hard Limit |
| ✔ Heath Monitor |
| ✔ Injected File Content [Bytes] |
| ✔ Injected File Path [Bytes] |
| ✔ Injected Files |
| ✔ Instances |
| ✔ Key Pairs |
| ✔ Listener |
| ✔ Load Balancer |
| ✔ Member |
| ✔ Metadata Items |
| ✔ Network |
| ✔ Per Volume Gigabytes |
| ✔ Pool |
| ✔ Port |
| ✔ RAM [MB] |
| ✔ Role-based Access Control Policy (RBAC Policy) |
| ✔ Router |
| ✔ Security Group |
| ✔ Security Group Rule |
| ✔ Security Group Rules |
| ✔ Security Groups |
| ✔ Server Group Members |
| ✔ Server Groups |
| ✔ Snapshots |
| ✔ Subnet |
| ✔ Subnet Pool |
| ✔ Traits (OpenStack) / Placement Groups (Virtuozzo) |
| ✔ Volumes |
- Required Components:
| ✔ Gnocchi (Required For Billing) |
- General Info:
| ✔ Integrated With Advanced Billing For WHMCS - Actual Project Resource Usage Billing |
| ✔ Integrated With Products Reseller For WHMCS - End-To-End Solution For Products And Servers Reselling |
| ✔ Multi-Language Support |
| ✔ Supports OpenStack Victoria and Previous |
| ✔ Supports OpenStack Gnocchi |
| ✔ Supports Virtuozzo Hybrid Infrastructure |
| ✔ Supports PHP 7.2 Up To PHP 7.4 |
| ✔ Supports WHMCS Metric Billing - Integration: CPU, Compute Instance Booting Time, Disk Device Read Bytes, Disk Device Read Requests, Disk Device Write Bytes, Disk Device Write Requests, Disk Ephemeral Size, Disk Root Size, Memory, Memory Usage, Network Incoming Bytes, Network Incoming Packets, Network Outgoing Bytes, Network Outgoing Packets, OS Images, VCPUs, Volume Size, Volumes Usage |
| ✔ Supports WHMCS Themes "Six" And "Twenty-One" |
| ✔ Supports WHMCS V8.0 And Later |
| ✔ Easy Module Upgrade To Open Source Version |
Installation and Configuration
| This tutorial will show you how to successfully install and configure OpenStack Projects For WHMCS smoothly. We will guide you step by step through the whole installation and configuration process. |
Installation
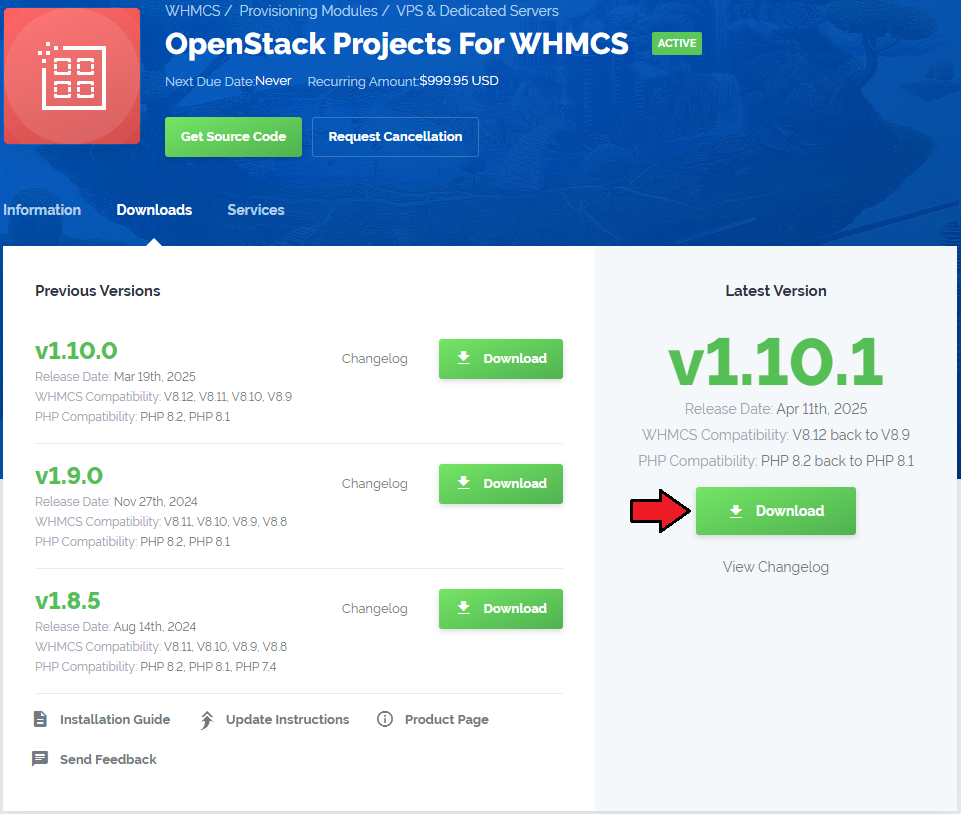
| 1. Log in to our client area and download the module. |
|
| 2. Upload and extract the extension into the main WHMCS directory. Extracted files in your WHMCS directory should look like this: |
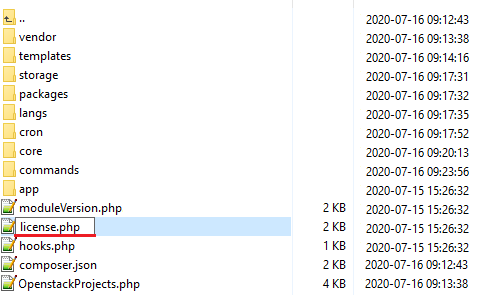
| 3. When you install OpenStack Projects For WHMCS for the first time, you have to rename the 'license_RENAME.php' file. The file is located in '/yourWHMCS/modules/servers/OpenStackProjects/license_RENAME.php'. Rename it from 'license_RENAME.php' to 'license.php'. |
|
| 4. In order to configure your license key, you have to edit the previously renamed 'license.php' file. Enter your license key between the quotation marks as presented on the following screen. |

|
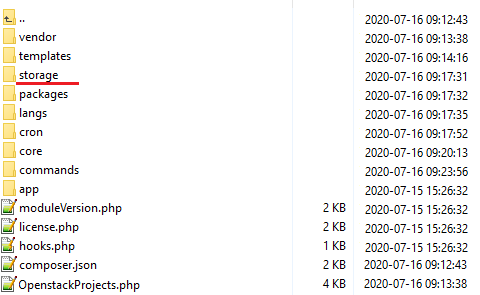
| 5. Now, set up the 'storage' folder as recursively writable. This folder is available at '/yourWHMCS/modules/servers/OpenStackProjects/'. |
|
Configuration of Server
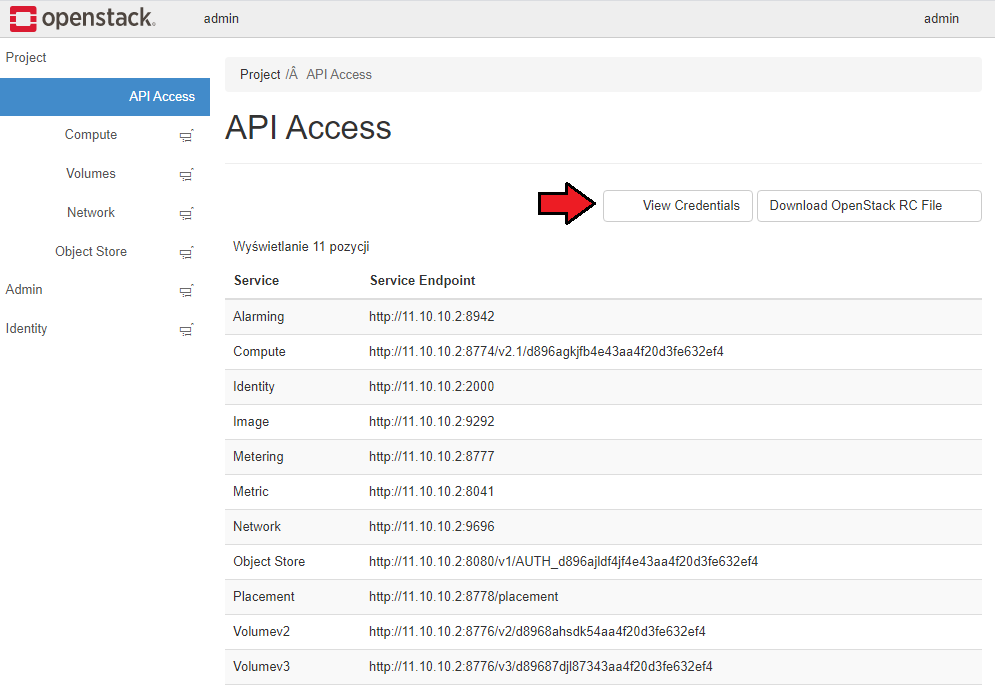
| Before you can go on, you need to copy your 'API Details' . You will need them to connect with the server successfully. Proceed to your 'OpenStack' panel. All necessary information will be found in the 'View Credentials' section under 'API Access' . |
|
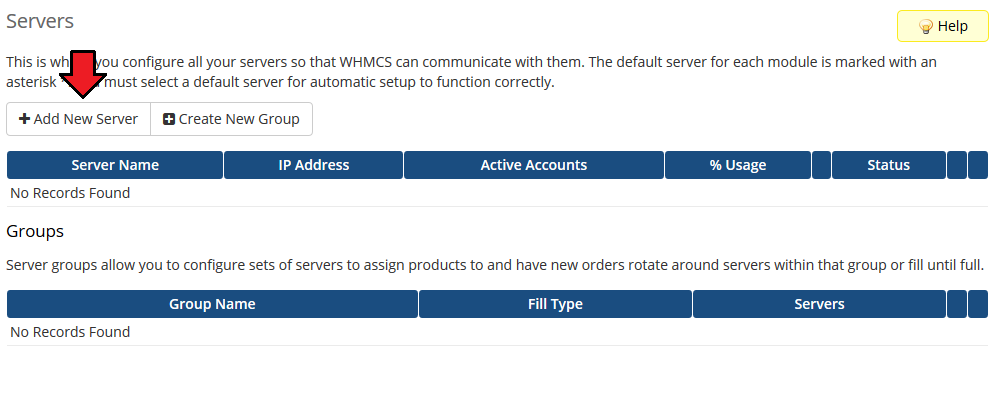
| 6. Now, log in to your WHMCS and proceed to 'Setup' → 'Products/Services' → 'Servers' and press 'Add New Server'. |
|
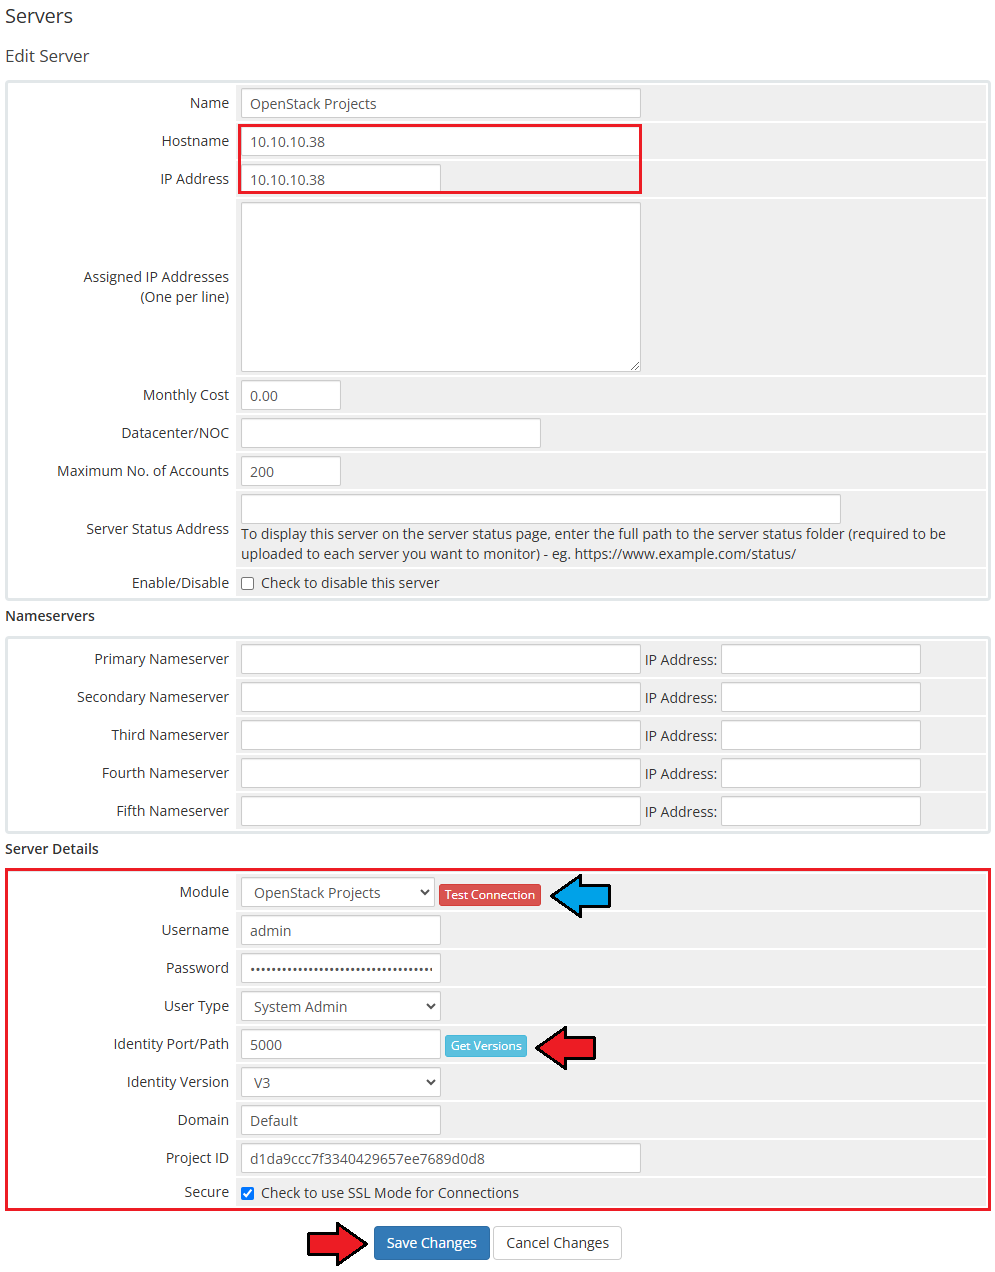
| 7. Next, enter your server 'Name' , 'Hostname' , 'IP Address' and select 'Openstack Projects' from the 'Module' field. Now, provide your 'OpenStack Server Details' . To download the 'Identity Version' , you need to click 'Get Versions' next to 'Identity Port/Path' . |
|
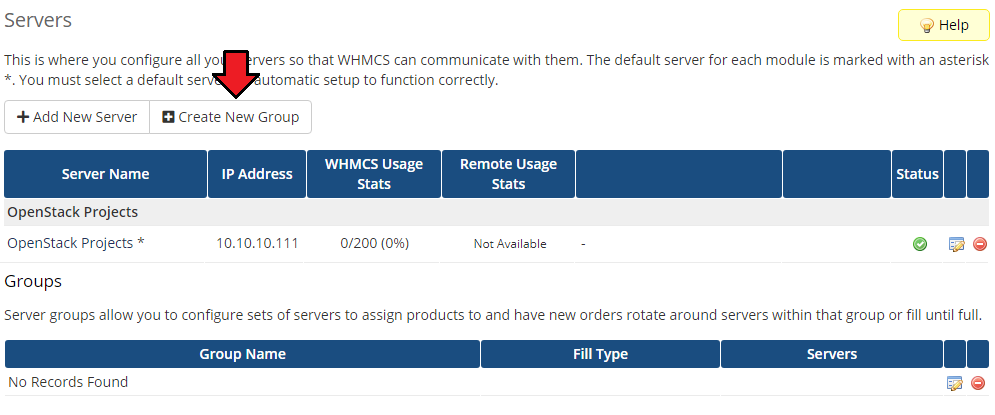
| 8. It is time to create a server group. To do so, click on 'Create New Group' . |
|
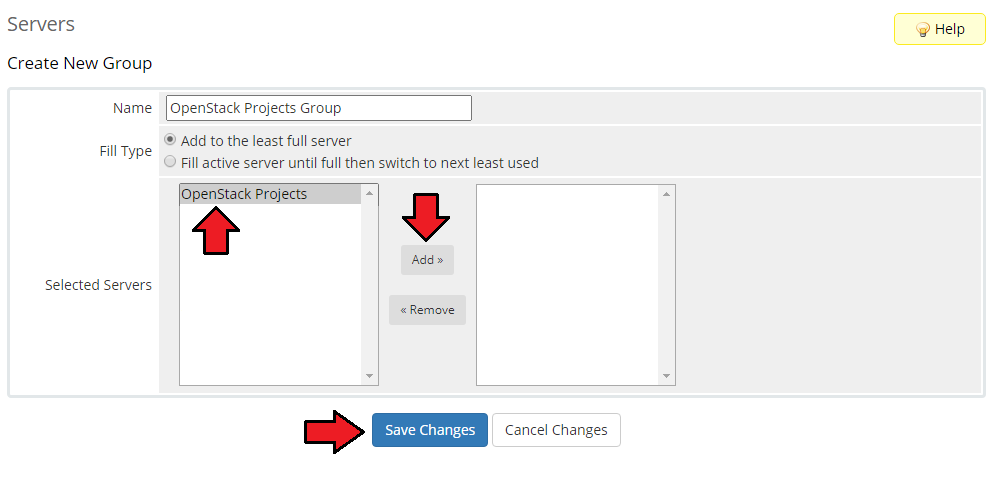
| 9. Enter a name, click on your previously created server, press 'Add' and afterward 'Save Changes' . |
|
Configuration of Product
| 10. In order to create and configure a product, go to 'Setup' → 'Products/Services' → 'Products/Services'. Click on 'Create a New Group'. |

|
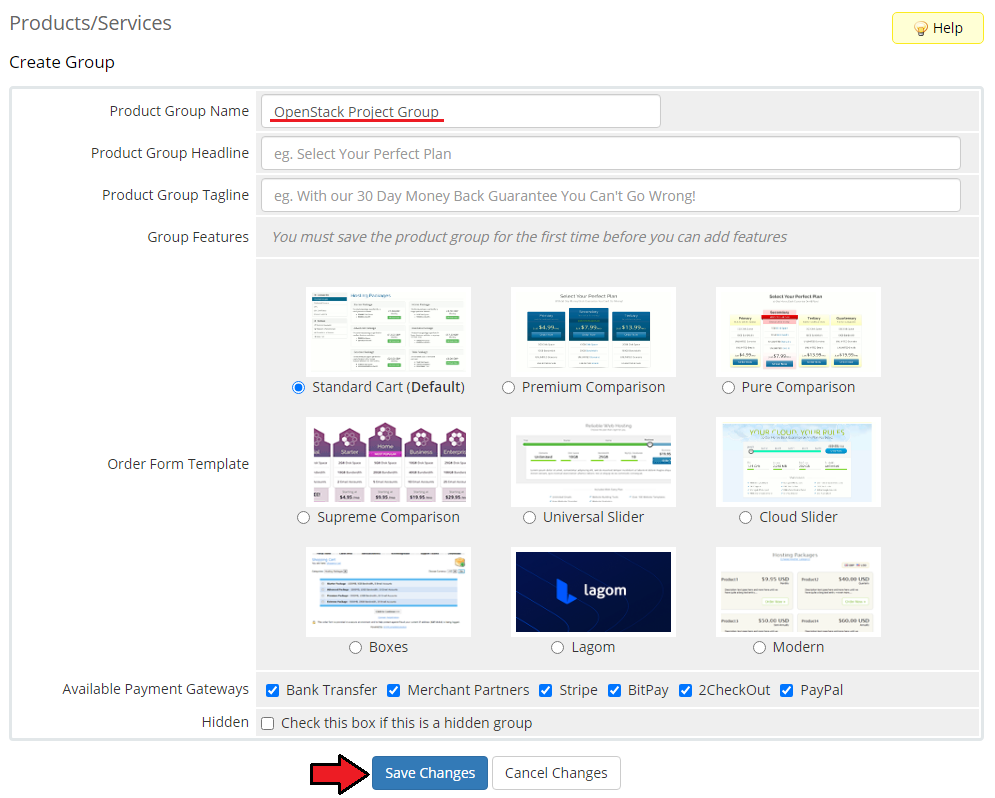
| 11. Enter your product group name and press 'Save Changes'. |
|
| 12. Once you have a product group, you can create a new product. To do so, first click on 'Create a New Product'. |

|
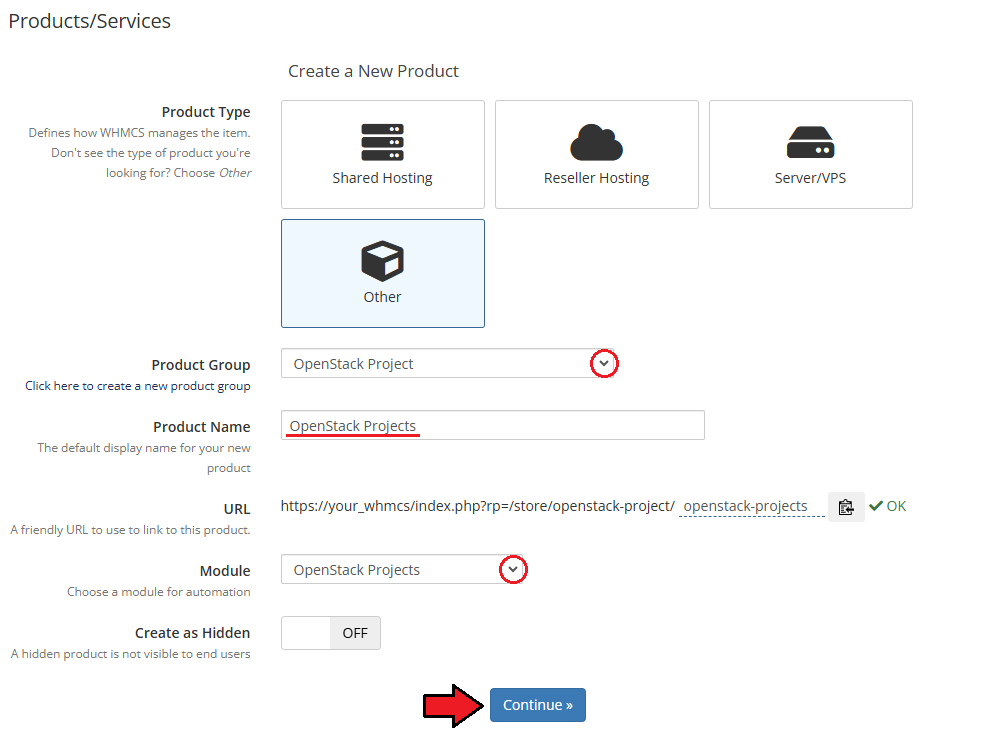
| 13. Afterward, choose your product type, enter your product name, choose module and the product group from the dropdown menus. Press 'Continue'. |
|
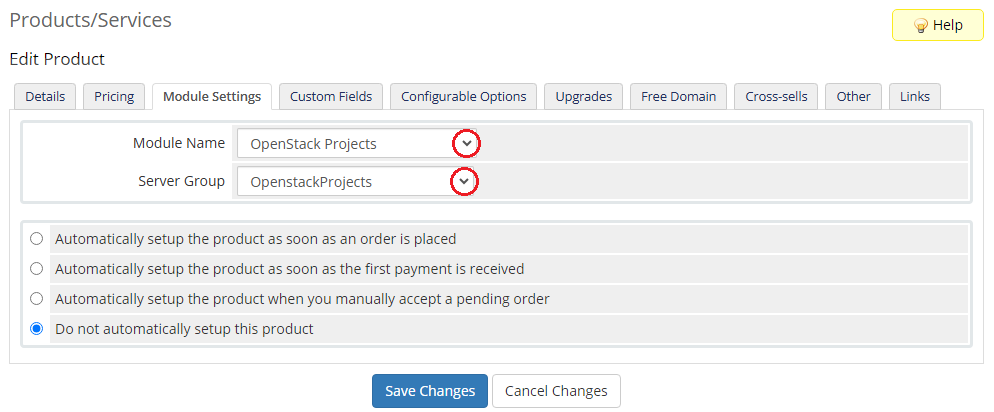
| 14. Now, go to the 'Module Settings' section, choose your previously created server group from the dropdown menu. If you did not set the proper permissions, you will be asked to do it now. |
|
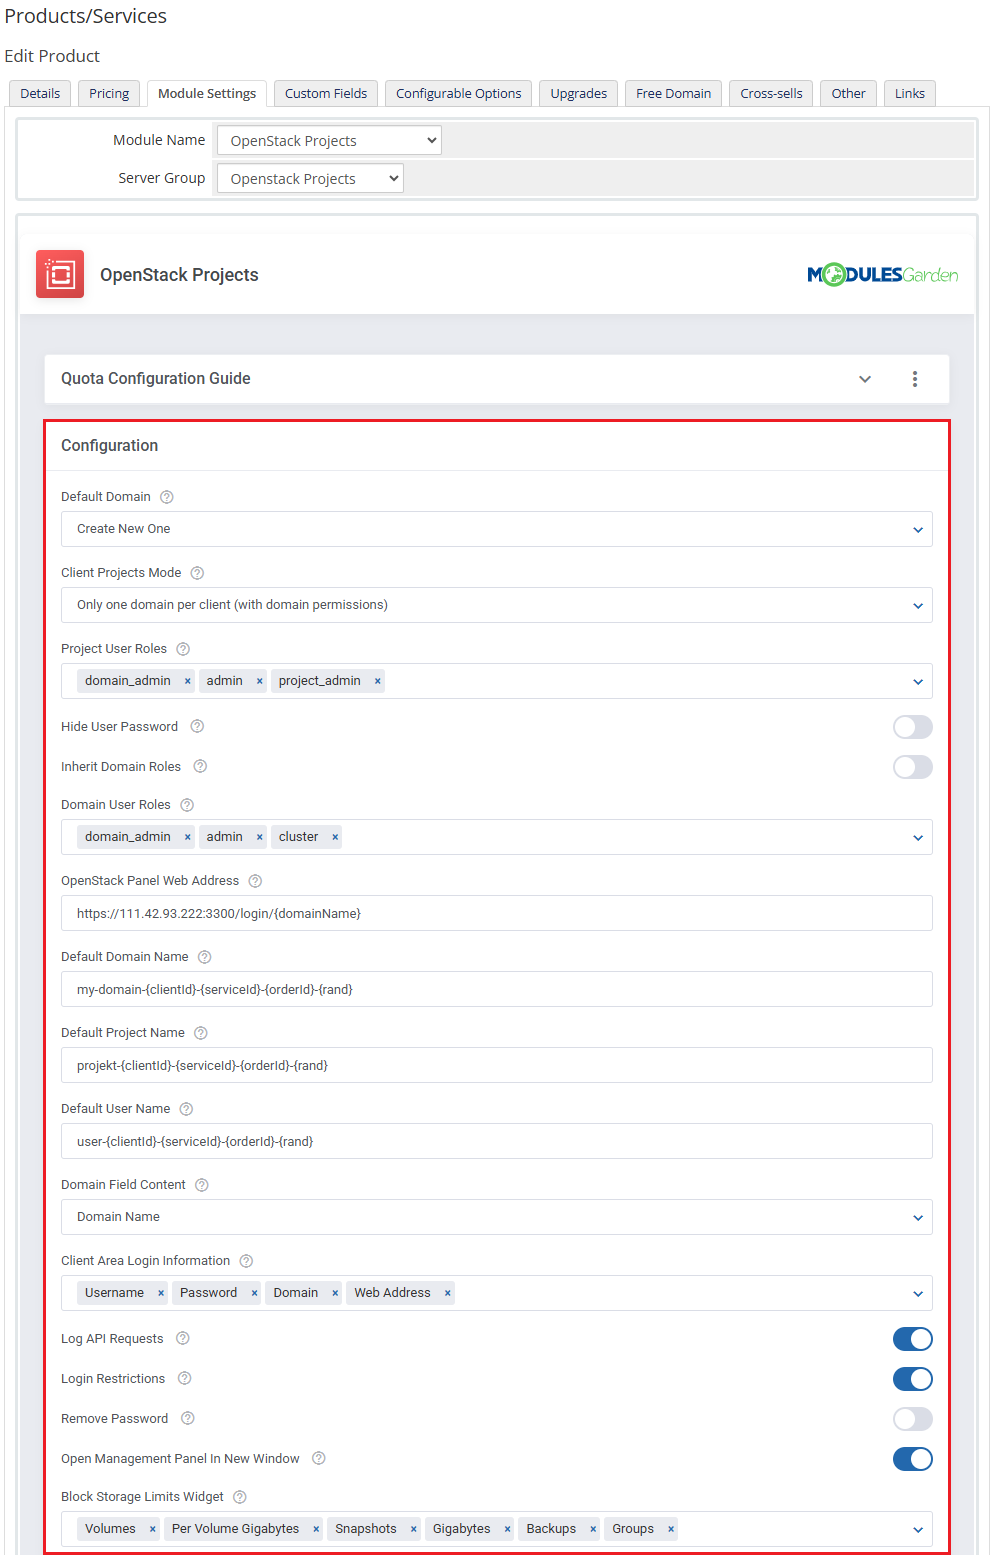
| 15. Now, let's start configuring the settings. Configuration:
|
|
|
Compute, Block-Storage, Network, Load Balancer, Container Infrastructure, Traits - these sections may vary depending on the project, some of them might be unavailable for your OpenStack project. |
|
|
Module Custom Web Hooks - here you may add the URL with WHMCS parameters to perform additional actions after the create/suspend/unsuspend/terminate/change package actions. |
|
| 16. At the end of the configuration process, you can enable the 'Metric Billing' and decide whether you want to generate configurable options for the product. Configurable options can be used by your clients to select each virtual machine parameters individually during order placement. |

|
|
| Now, select which options you want to generate and confirm by clicking 'Create' . Note that the configuration for disabled options will still be taken from the configuration of the main product. More information about how to use configurable options can be found here or in the official WHMCS documentation. |
|
Management
Admin Area
| OpenStack Projects For WHMCS allows you to supervise and manage your customer products from the admin area of your WHMCS system. This includes supervision of such features as:
|
|
Ordering
| Thanks to configurable options, you are able to offer a product which your clients can match to their needs. Additionally, you are able to set up pricing for each configurable option, which makes your offer even more competitive. |
|
Client Area
| The client area interface of OpenStack Projects For WHMCS looks like below. As you can see, you may easily redirect to the 'OpenStack' login page. Moreover, you can check the 'Configurable Options ' and 'Metrics Billing' |
|
Tips
| 1. Please remember that if you integrate OpenStack Projects For WHMCS with Advanced Billing For WHMCS, the cron task should be set no more than once for an hour. |
2. Metrics can be calculated basing on total or average usage for a given period of time. You can edit this in the following file:
/yourWHMCS/modules/servers/OpenstackProjects/app/Config/configuration.yml Find the 'averageBilling' option and set:
|

|
Update Instructions
| An essential guidance through the process of updating the module is offered here. Keep in mind there is a quick and easy option in our client area that will let you upgrade the license of your module to an open source version at any time - and at a lower price! |
Common Problems
| 1. When you have problems with connection, check whether your SELinux or firewall does not block ports. |