Stripe SEPA Payments For WHMCS
(→Agile Gateway Widget) |
(→Upgrade Guide) |
||
| (256 intermediate revisions by 7 users not shown) | |||
| Line 1: | Line 1: | ||
| − | <meta name="keywords" content=" | + | <meta name="keywords" content="stripe sepa payments, stripe sepa payments configuration, stripe sepa payments management, stripe sepa payments installation, stripe sepa payments common problems, aboutstripe sepa payments, stripe sepa payments documentation, whmcs stripe sepa payments faq, whmcs agile payment gateway help, stripe sepa payments guide, whmcs stripe sepa payments wiki, whmcs stripe sepa payments tutorial, whmcs stripe sepa payments tips, whmcs stripe sepa payments wiki"></meta> |
<meta name="description" content="ModulesGarden Wiki Contains All The Information You Need About The Stripe SEPA Payments For WHMCS Module."></meta> | <meta name="description" content="ModulesGarden Wiki Contains All The Information You Need About The Stripe SEPA Payments For WHMCS Module."></meta> | ||
| − | =About [https://www.modulesgarden.com/products/whmcs/ | + | |
| + | =About [https://www.modulesgarden.com/products/whmcs/stripe-sepa-payments Stripe SEPA Payment Gateway For WHMCS]= | ||
{| | {| | ||
| − | |style="padding: 10px 0px 5px 0px;"|'''Stripe SEPA Payments For WHMCS''' has been designed to | + | |style="padding: 10px 0px 5px 0px;"|'''Stripe SEPA Payments For WHMCS''' has been designed in order to boost your payment capabilities by implementing Stripe payment gateway to your WHMCS system.<br/> |
| − | + | Thanks to this module, you will be able to secure SEPA Direct Debit payments from your clients, handle recurring deals and perform refunds.<br/> | |
|} | |} | ||
| + | <!-- This is a comment --> | ||
| + | *'''Payment Gateway:''' | ||
{| | {| | ||
| − | |style="padding: 0px 0px | + | |style="padding: 10px 0px 0px 30px;"|✔ Accept SEPA (Single Euro Payments Area) Direct Debit Payments |
| − | + | ||
| − | + | ||
|} | |} | ||
| − | |||
| − | |||
{| | {| | ||
| − | |style="padding: | + | |style="padding: 0px 0px 0px 30px;"|✔ Collect IBAN Number To Debit Customer Payments |
|} | |} | ||
{| | {| | ||
| − | |style="padding: 0px 0px 0px 30px;"|✔ Attempt | + | |style="padding: 0px 0px 0px 30px;"|✔ Attempt To Capture Payment From Customer Bank Account |
|} | |} | ||
{| | {| | ||
| − | |style="padding: 0px 0px 0px 30px;"|✔ | + | |style="padding: 0px 0px 0px 30px;"|✔ Enter Company Name To Be Used In Mandate Authorization |
|} | |} | ||
{| | {| | ||
| − | |style="padding: 0px 0px 0px 30px;"|✔ | + | |style="padding: 0px 0px 0px 30px;"|✔ Display Payment Capture Notification In Invoice Creation Emails And PDF Invoices |
|} | |} | ||
{| | {| | ||
| − | |style="padding: 0px 0px 0px 30px;"|✔ | + | |style="padding: 0px 0px 0px 30px;"|✔ One-Time And Recurring Payments Support |
|} | |} | ||
{| | {| | ||
|style="padding: 0px 0px 10px 30px;"|✔ Refund Transaction | |style="padding: 0px 0px 10px 30px;"|✔ Refund Transaction | ||
|} | |} | ||
| − | *''' | + | *'''Client Area:''' |
{| | {| | ||
| − | |style="padding: 10px 0px 0px 30px;"|✔ | + | |style="padding: 10px 0px 0px 30px;"|✔ Provide Bank Account Details On Order Checkout |
|} | |} | ||
{| | {| | ||
| − | |style="padding: 0px 0px 0px | + | |style="padding: 0px 0px 0px 45px;"|✔ Full Name |
|} | |} | ||
{| | {| | ||
| − | |style="padding: 0px 0px 0px 45px;"|✔ | + | |style="padding: 0px 0px 0px 45px;"|✔ Address |
|} | |} | ||
{| | {| | ||
| − | |style="padding: 0px 0px 0px 45px;"|✔ | + | |style="padding: 0px 0px 0px 45px;"|✔ IBAN Number |
|} | |} | ||
{| | {| | ||
| − | |style="padding: 0px 0px 0px 30px;"|✔ | + | |style="padding: 0px 0px 0px 30px;"|✔ Edit Bank Details In Account Menu |
|} | |} | ||
{| | {| | ||
| − | |style="padding: 0px 0px 0px 30px;"|✔ | + | |style="padding: 0px 0px 0px 30px;"|✔ Read And Accept Mandate For Debit Authorization |
|} | |} | ||
{| | {| | ||
| − | |style="padding: 0px 0px 10px 30px;"|✔ | + | |style="padding: 0px 0px 10px 30px;"|✔ Delete Mandate |
|} | |} | ||
| − | *''' | + | *'''Addon Module:''' |
{| | {| | ||
| − | |style="padding: 10px 0px 0px 30px;"|✔ View | + | |style="padding: 10px 0px 0px 30px;"|✔ View Invoice Status |
|} | |} | ||
{| | {| | ||
| − | |style="padding: 0px 0px 0px 30px;"|✔ View | + | |style="padding: 0px 0px 0px 30px;"|✔ View Capture Status |
|} | |} | ||
{| | {| | ||
| − | |style="padding: 0px 0px 0px 30px;"|✔ View | + | |style="padding: 0px 0px 0px 30px;"|✔ View Mandate |
|} | |} | ||
{| | {| | ||
| − | |style="padding: 0px 0px | + | |style="padding: 0px 0px 0px 30px;"|✔ Payment ID |
|} | |} | ||
| − | |||
{| | {| | ||
| − | |style="padding: | + | |style="padding: 0px 0px 0px 30px;"|✔ View Seller Message |
|} | |} | ||
{| | {| | ||
| − | |style="padding: 0px 0px 0px 30px;"|✔ | + | |style="padding: 0px 0px 0px 30px;"|✔ View Charge Status |
|} | |} | ||
{| | {| | ||
| − | |style="padding: 0px 0px | + | |style="padding: 0px 0px 10px 30px;"|✔ View Integration Code |
|} | |} | ||
| + | *'''Supported Currencies:''' | ||
{| | {| | ||
| − | |style="padding: 0px 0px 10px 30px;"|✔ | + | |style="padding: 10px 0px 0px 30px;"|✔ Euro - Default Payment Currency |
| + | |} | ||
| + | {| | ||
| + | |style="padding: 0px 0px 10px 30px;"|✔ Other Currencies - Will Be Automatically Converted To Euro | ||
|} | |} | ||
*'''General Info:''' | *'''General Info:''' | ||
{| | {| | ||
| − | |style="padding: 10px 0px 0px 30px;"|✔ Supports | + | |style="padding: 10px 0px 0px 30px;"|✔ Supports PHP 8.1 Back To PHP 7.4 |
| + | |} | ||
| + | {| | ||
| + | |style="padding: 0px 0px 0px 30px;"|✔ Supports WHMCS Themes "Six" And "Twenty-One" | ||
| + | |} | ||
| + | {| | ||
| + | |style="padding: 0px 0px 0px 30px;"|✔ Supports WHMCS V8.9 Back To WHMCS V8.6 | ||
|} | |} | ||
{| | {| | ||
| − | |style="padding: 0px 0px 0px 30px;"|✔ | + | |style="padding: 0px 0px 0px 30px;"|✔ Requires ionCube Loader V12 Or Later |
|} | |} | ||
{| | {| | ||
| − | |style="padding: 0px 0px 30px 30px;"|✔ | + | |style="padding: 0px 0px 30px 30px;"|✔ Easy [https://www.docs.modulesgarden.com/How_To_Upgrade_WHMCS_Module Module Upgrade] To [https://www.modulesgarden.com/products/whmcs/stripe-sepa-payments#open-source-version Open Source Version] |
|} | |} | ||
=Installation and Configuration= | =Installation and Configuration= | ||
{| | {| | ||
| − | |style="padding: 10px 0px 30px 15px;"|'''This tutorial will show you how to successfully install and configure Stripe SEPA Payments for WHMCS.'''<br/> | + | |style="padding: 10px 0px 30px 15px;"|'''This tutorial will show you how to successfully install and configure [https://www.modulesgarden.com/products/whmcs/stripe-sepa-payments Stripe SEPA Payments for WHMCS.]'''<br/> |
We will guide you step by step through the whole installation and configuration process. | We will guide you step by step through the whole installation and configuration process. | ||
|} | |} | ||
==Installation== | ==Installation== | ||
{| | {| | ||
| − | |style="padding: 10px 0px 20px 15px;"|'''1. Log in to | + | |style="padding: 10px 0px 20px 15px;"|'''1. Log in to our client area and download the module.''' |
|} | |} | ||
{| | {| | ||
| − | |style="padding: 0px 0px 20px 25px;"|[[File: | + | |style="padding: 0px 0px 20px 25px;"|[[File:SSP___2_1.png]] |
|} | |} | ||
{| | {| | ||
| − | |style="padding: 0px 0px | + | |style="padding: 0px 0px 10px 15px;"|'''2. In the downloaded file you might find one or two packages that support different PHP versions.'''<br/> |
| − | + | In the most recent versions of the module, you will find only one package that supports PHP 7.2 and later.<br/> <!-- If you need a package for the previous versions of PHP, please [https://www.modulesgarden.com/support/ticket/general-support contact our support]. --> | |
|} | |} | ||
{| | {| | ||
| − | |style="padding: 0px 0px 20px 25px;"|[[File: | + | |style="padding: 0px 0px 20px 25px;"|[[File:PHP72_74.png]] |
|} | |} | ||
{| | {| | ||
| − | |style="padding: 0px 0px 15px 15px;"|''' | + | |style="padding: 0px 0px 15px 15px;"|'''Previous updates of the module may contain two packages dedicated to various PHP versions.'''<br/> |
| − | + | The first one that supports PHP 5.6 up to PHP 7.1, and the second one addressed to PHP 7.2 up to PHP 7.4.<br/> | |
| + | '''''Note:''' Keep in mind that PHP versions 5.6 up to 7.1 are no longer officially supported and their security issues are not fixed or released any more. Find more info [http://php.net/supported-versions.php here].'' | ||
|} | |} | ||
{| | {| | ||
| − | |style="padding: 0px 0px | + | |style="padding: 0px 0px 20px 25px;"|[[File:PHP56_74.png]] |
|} | |} | ||
| − | |||
| − | |||
{| | {| | ||
| − | |style="padding: | + | |style="padding: 0px 0px 10px 15px;"|<!--'' '''Important''': This situation does not affect [https://www.modulesgarden.com/products/whmcs/stripe-sepa-payments#open-source-version '''the open source version'''] of this module which can be applied to any PHP from version 5.6 and later.''<br/>''--> '''Note''': You can check the current PHP version in your WHMCS. To do so, proceed to ''' 'Utilities' → 'System' → 'PHP Info'.''' |
| − | + | ||
| − | + | ||
|} | |} | ||
{| | {| | ||
| − | |style="padding: 0px 0px | + | |style="padding: 0px 0px 15px 15px;"|'''3. Extract the package and upload its content into the main WHMCS directory. |
| + | The content of the package to upload should look like this. | ||
|} | |} | ||
{| | {| | ||
| − | |style="padding: 0px 0px | + | |style="padding: 0px 0px 20px 25px;"|[[File:SSP____1_2.png]] |
| − | + | ||
| − | + | ||
| − | + | ||
| − | + | ||
| − | + | ||
| − | + | ||
| − | + | ||
| − | + | ||
| − | + | ||
| − | + | ||
| − | + | ||
| − | + | ||
|} | |} | ||
{| | {| | ||
| − | |style="padding: 0px 0px | + | |style="padding: 0px 0px 15px 15px;"|'''4. When you install Stripe SEPA Payments For WHMCS for the first time you have to rename 'license_RENAME.php' file.'''<br /> |
| + | You can find it in '' 'modules/addons/stripesepa/license_RENAME.php'. '' Rename it from '' 'license_RENAME.php' '' to '' 'license.php'. '' | ||
|} | |} | ||
{| | {| | ||
| − | |style="padding: 0px 0px | + | |style="padding: 0px 0px 20px 25px;"|[[File:SSP____2.png]] |
| − | + | ||
| − | + | ||
| − | + | ||
| − | + | ||
| − | + | ||
| − | + | ||
| − | + | ||
| − | + | ||
| − | + | ||
| − | + | ||
| − | + | ||
| − | + | ||
| − | + | ||
| − | + | ||
|} | |} | ||
{| | {| | ||
| − | |style="padding: 0px 0px | + | |style="padding: 0px 0px 15px 15px;"|'''5. In order to configure your license key, you have to edit the previously renamed '' 'license.php' '' file.'''<br /> |
| + | Enter your license key between quotation marks as presented on the following screen. You can find your license key in our client area → '' 'My Products'. '' | ||
|} | |} | ||
{| | {| | ||
| − | |style="padding: 0px 0px 30px | + | |style="padding: 0px 0px 30px 25px;"|[[File:SSP____2_1_1.png]] |
|} | |} | ||
| − | = | + | ==Activation of Addon== |
{| | {| | ||
| − | |style="padding: | + | |style="padding: 0px 0px 15px 15px;"|'''6. Now you have to activate the module in your WHMCS system. '''<br /> |
| − | + | Log in to your WHMCS admin area. Go to '' 'Setup' '' → '' 'Addon Modules'. '' Afterward, find '' 'Stripe SEPA Payments' '' and press the '' 'Activate' '' button. | |
|} | |} | ||
| − | |||
| − | |||
{| | {| | ||
| − | |style="padding: | + | |style="padding: 0px 0px 20px 25px;"|[[File:SSP___5.png]] |
| − | + | ||
| − | + | ||
| − | + | ||
|} | |} | ||
{| | {| | ||
| − | |style="padding: 0px 0px | + | |style="padding: 0px 0px 15px 15px;"|'''7. In the next step you need to permit access to this module.'''<br /> |
| + | To do so, click on the '' 'Configure' '' button, tick the checkboxes to assign desired admin roles.<br /> | ||
| + | |||
| + | '''Company Name''' - enter the company name, it will appear during the acceptance. Click [https://www.docs.modulesgarden.com/images/2/24/SPP_XX.png here] to see the screenshot.<br /> | ||
| + | '''Access Control''' - select admin groups that will have access to your module.<br /> | ||
| + | Now, press '' 'Save Changes'. '' | ||
|} | |} | ||
{| | {| | ||
| − | |style="padding: 0px 0px | + | |style="padding: 0px 0px 30px 25px;"|[[File:SSP___6.png]] |
| − | + | ||
| − | + | ||
|} | |} | ||
| + | |||
| + | ===Integration Code=== | ||
{| | {| | ||
| − | |style="padding: 0px | + | |style="padding: 10px 0px 15px 15px;"|'''8. The '' 'Integration' '' page contains three different codes required to create custom messages on invoices.'''<br /> |
| + | '' '''Note:''' The integration code path may vary depending on the template you are using.'' | ||
|} | |} | ||
{| | {| | ||
| − | |style="padding: 0px 0px 20px | + | |style="padding: 0px 0px 20px 25px;"|[[File:SSP_21.png]] |
|} | |} | ||
{| | {| | ||
| − | |style="padding: 0px 0px | + | |style="padding: 0px 0px 15px 15px;"|The first code allows you to display the charges on the Invoice Created email.<br/> This is how your edited template should look like. |
|} | |} | ||
{| | {| | ||
| − | |style="padding: 0px 0px | + | |style="padding: 0px 0px 20px 25px;"|[[File:SSP_21_1.png]] |
| − | + | ||
| − | + | ||
| − | + | ||
| − | + | ||
| − | + | ||
|} | |} | ||
{| | {| | ||
| − | |style="padding: 0px 0px 20px | + | |style="padding: 0px 0px 20px 15px;"|If the code has been typed in correctly, the sample Invoice Created email should include the following element. |
|} | |} | ||
{| | {| | ||
| − | |style="padding: 0px 0px | + | |style="padding: 0px 0px 20px 25px;"|[[File:SSP_22.png]] |
| + | |} | ||
| + | {| | ||
| + | |style="padding: 0px 0px 20px 15px;"|The second one is responsible for adding the charges on a PDF invoice linked to the Invoice Created email. | ||
| + | |} | ||
| + | {| | ||
| + | |style="padding: 0px 0px 20px 25px;"|[[File:SSP_23.png]] | ||
| + | |} | ||
| + | {| | ||
| + | |style="padding: 0px 0px 20px 15px;"|Thanks to the final code, you can display the charges on the preview of an invoice. See the picture below. | ||
| + | |} | ||
| + | {| | ||
| + | |style="padding: 0px 0px 20px 25px;"|[[File:SSP_24.png]] | ||
| + | |} | ||
| + | {| | ||
| + | |style="padding: 0px 0px 15px 15px;"|'' '''Note''': The added sections will appear on all the HTML and PDF invoices if they still have the 'Pending Payment' status.''<br/> | ||
| + | ''Once the invoice is paid, the additional pieces of information will no longer appear.'' | ||
| + | |} | ||
| + | {| | ||
| + | |style="padding: 0px 0px 30px 15px;"|You can now access your module under 'Addons' → 'Stripe SEPA Payments'. | ||
|} | |} | ||
| − | == | + | ==Configuration of Webhook== |
{| | {| | ||
| − | |style="padding: 10px 0px | + | |style="padding: 10px 0px 20px 15px;"|'''9. Now you have to configure the webhook in your WHMCS system.'''<br/> |
| − | + | Open your [https://dashboard.stripe.com/ Stripe dashboard] and open the '' 'Developers' '' mode. There navigate to the '''API keys''' section.<br/> | |
| + | Copy both your ''Publishable'' and ''Secret'' keys as they will come in handy later on.<br/> | ||
|} | |} | ||
{| | {| | ||
| − | |style="padding: 0px 0px 20px 25px;"|[[File: | + | |style="padding: 0px 0px 20px 25px;"|[[File:SSP_31.png]] |
|} | |} | ||
{| | {| | ||
| − | |style="padding: 0px 0px | + | |style="padding: 0px 0px 20px 15px;"|Next, navigate to the '''Webhooks''' tab. Press '' 'Add Endpoint' '' button as marked on the screen. |
| − | + | ||
| − | + | ||
| − | + | ||
| − | + | ||
| − | + | ||
| − | + | ||
| − | Press '' ' | + | |
| − | + | ||
|} | |} | ||
{| | {| | ||
| − | |style="padding: 0px 0px 20px 25px;"|[[File: | + | |style="padding: 0px 0px 20px 25px;"|[[File:SSP_41.png]] |
|} | |} | ||
{| | {| | ||
| − | |style="padding: 0px 0px | + | |style="padding: 0px 0px 15px 15px;"|Now, enter the full URL to your Stripe callback PHP file. For example: |
| + | <pre>https://www.examplesite.com/modules/gateways/callback/stripesepa.php</pre> | ||
| + | Before you click the '' 'Add endpoint' '' button once more you have to select events to listen to. Select all events and confirm the action.<br/> Now you can press the '' 'Add endpoint' '' button.<br/> | ||
| + | |||
| + | '' '''Note:''' You can validate your URL by sending test calls to previously configured Webhook and checking Module Log in your WHMCS'' | ||
|} | |} | ||
{| | {| | ||
| − | |style="padding: 0px 0px 20px | + | |style="padding: 0px 0px 20px 25px;"|[[File:SSP_42.png]] |
|} | |} | ||
{| | {| | ||
| − | |style="padding: 0px 0px 20px 25px;"|[[File: | + | |style="padding: 0px 0px 20px 25px;"|[[File:SSP_42_1.png]] |
|} | |} | ||
{| | {| | ||
| − | |style="padding: 0px 0px | + | |style="padding: 0px 0px 20px 15px;"|Once a new endpoint is successfully created, open the Webhook details and reveal the signing secret. Copy the generated ''Signing Secret Key'' for future use. |
| − | + | ||
|} | |} | ||
{| | {| | ||
| − | |style="padding: 0px 0px 30px 25px;"|[[File: | + | |style="padding: 0px 0px 30px 25px;"|[[File:SSP_43.png]] |
|} | |} | ||
| − | == | + | ==Configuration of Gateway== |
{| | {| | ||
| − | |style="padding: 10px 0px 15px 15px;"| | + | |style="padding: 10px 0px 15px 15px;"|'''10. Now you have to activate the gateways in your WHMCS system.'''<br/> |
| − | + | Log in to your WHMCS admin area. Go to '' 'System Settings' '' → '' 'Payment Gateways'. ''<br/> | |
| − | + | Search for and activate the '' 'Stripesepa' '' gateway. | |
|} | |} | ||
{| | {| | ||
| − | |style="padding: 0px 0px 20px 25px;"|[[File: | + | |style="padding: 0px 0px 20px 25px;"|[[File:SSP____3.png]] |
|} | |} | ||
{| | {| | ||
| − | |style="padding: 0px 0px | + | |style="padding: 0px 0px 15px 15px;"|'''11. Afterward, configure your new gateway's settings. Check '' 'Show on Order Form' '' and rename it if you wish.<br/> |
| + | '''Stripe SEPA Payments:'''<br/> | ||
| + | # Display Name - name of the gateway that appears after selecting it during the checkout<br/> | ||
| + | # Publishable Key - enter your previously generated publishable key<br/> | ||
| + | # Secret Key- enter your secret key here (see step [https://www.docs.modulesgarden.com/Stripe_SEPA_Payments_For_WHMCS#Configuration_of_Webhook 8].)<br/> | ||
| + | # Signing Key - enter the signing secret key for webhook here<br/> | ||
| + | # Base Auth Login - enter the base authorization login in case your site uses one<br/> | ||
| + | # Base Auth Password - enter the base authorization password if your site requires it<br/> | ||
| + | # '''Select EUR currency''' to convert to if you are using other currencies! | ||
| + | '' '''Important:''' EUR currency needs to be pre-configured in your [https://docs.whmcs.com/Currencies WHMCS currencies] settings in order to use the module correctly.<br/> | ||
| + | ''Payments made in other currencies through this gateway will be automatically converted into Euro at a specified conversion rate.''<br/><br/> | ||
| + | Save the changes when ready | ||
|} | |} | ||
{| | {| | ||
| − | |style="padding: 0px 0px 20px 25px;"|[[File: | + | |style="padding: 0px 0px 20px 25px;"|[[File:SSP___4.png]] |
|} | |} | ||
{| | {| | ||
| − | |style="padding: 0px 0px | + | |style="padding: 0px 0px 30px 15px;"|'''12. You have just successfully installed and configured Stripe SEPA Payments!''' |
|} | |} | ||
| + | |||
| + | =Management= | ||
{| | {| | ||
| − | |style="padding: 0px | + | |style="padding: 10px 0px 30px 15px;"|'''In this section we will show you the possibilities of Stripe SEPA Payments For WHMCS.'''<br/> |
| + | Collect SEPA Direct Debit payments from your clients using the Stripe gateway. | ||
|} | |} | ||
| + | ==Setting Bank Details== | ||
{| | {| | ||
| − | |style="padding: 0px | + | |style="padding: 10px 0px 20px 15px;"|First, log in as a client and navigate to the ''Edit Bank Details'' tab. |
| − | + | ||
| − | + | ||
| − | + | ||
| − | + | ||
| − | + | ||
|} | |} | ||
{| | {| | ||
| − | |style="padding: 0px 0px 20px | + | |style="padding: 0px 0px 20px 25px;"|[[File:SSP___6_12.png]] |
| − | + | ||
| − | + | ||
| − | + | ||
| − | + | ||
| − | + | ||
|} | |} | ||
{| | {| | ||
| − | |style="padding: 0px 0px 30px 25px;"|[[File: | + | |style="padding: 0px 0px 15px 15px;"|Enter account details, then click on ''Save Account Details''.<br/> |
| + | Module will validate IBAN and if it turns out to be invalid, a special message will be displayed and the user will not be able to set it. | ||
| + | |} | ||
| + | {| | ||
| + | |style="padding: 0px 0px 30px 25px;"|[[File:SSP____71.png]] | ||
| + | |} | ||
| + | |||
| + | ==Performing Payment== | ||
| + | {| | ||
| + | |style="padding: 10px 0px 15px 15px;"|Stripe SEPA Payments For WHMCS is generally used to pay invoices for placed orders. In order to illustrate its functionalities we have placed an exemplary order.<br/> | ||
| + | As you can see on the below screenshot, apart from the Stripe SEPA there are other gateways available as well.<br/> | ||
| + | Check '' 'Stripe SEPA Payments' '' and complete the order.<br/> | ||
| + | |} | ||
| + | {| | ||
| + | |style="padding: 0px 0px 20px 25px;"|[[File:SSP___6_1.png]] | ||
| + | |} | ||
| + | {| | ||
| + | |style="padding: 0px 0px 20px 15px;"|Note that only the last four digits of IBAN will be displayed.'' | ||
| + | |} | ||
| + | {| | ||
| + | |style="padding: 0px 0px 20px 25px;"|[[File:SSP____7.png]] | ||
| + | |} | ||
| + | {| | ||
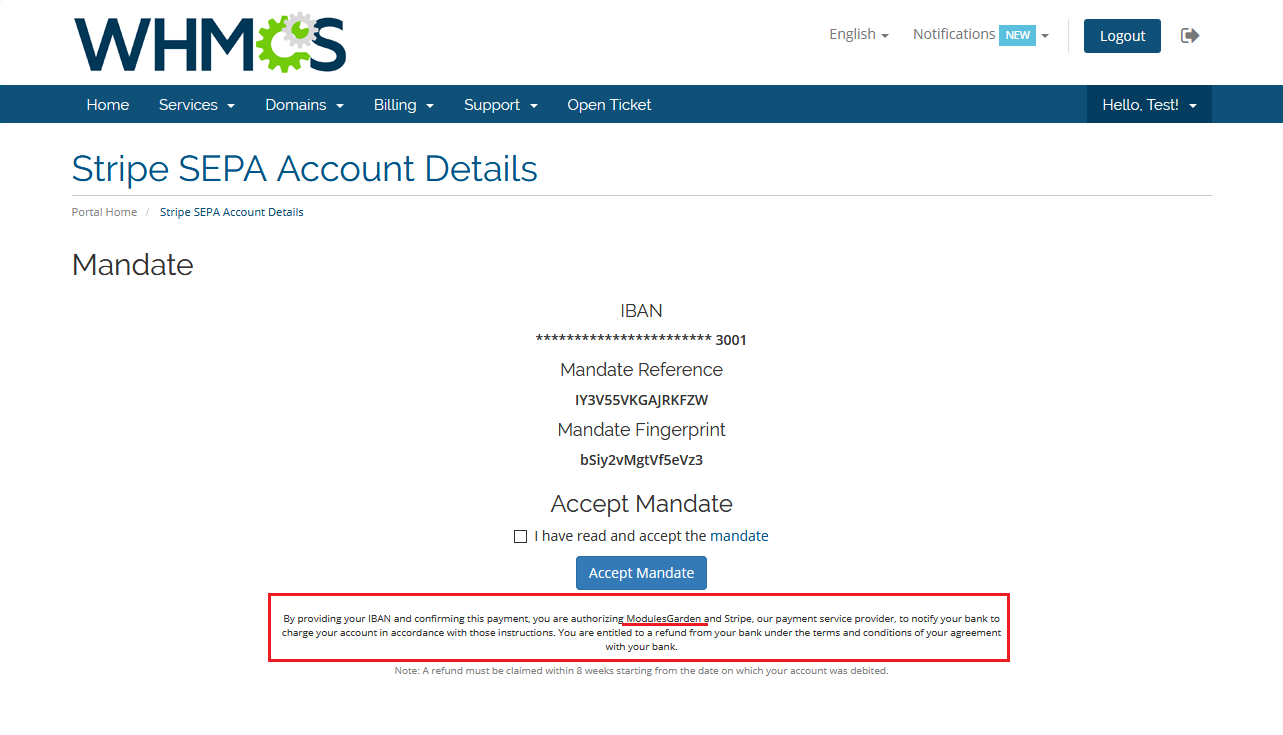
| + | |style="padding: 0px 0px 20px 15px;"|Now, make sure to check the box marked on the screen and press ''Accept Mandate''. | ||
| + | |} | ||
| + | {| | ||
| + | |style="padding: 0px 0px 20px 25px;"|[[File:SSP_7_0.png]] | ||
| + | |} | ||
| + | {| | ||
| + | |style="padding: 0px 0px 20px 15px;"|As a confirmation of your payment you will see the following screen. | ||
| + | |} | ||
| + | {| | ||
| + | |style="padding: 0px 0px 20px 25px;"|[[File:SSP____7_1.png]] | ||
| + | |} | ||
| + | {| | ||
| + | |style="padding: 0px 0px 15px 15px;"|Once your payment has been registered, the processing time may last from a couple of hours up to a few days.<br/> | ||
| + | Within that period the invoice will remain marked as ''Pending Payment'' | ||
| + | |} | ||
| + | {| | ||
| + | |style="padding: 0px 0px 20px 25px;"|[[File:SSP____7_121.png]] | ||
| + | |} | ||
| + | {| | ||
| + | |style="padding: 0px 0px 20px 15px;"|If you want to pay an unpaid invoice, then view that invoice, choose the payment method and press '' 'Pay Now'.'' | ||
| + | |} | ||
| + | {| | ||
| + | |style="padding: 0px 0px 20px 25px;"|[[File:SSP____8.png]] | ||
| + | |} | ||
| + | {| | ||
| + | |style="padding: 0px 0px 20px 15px;"|Stripe SEPA addon additionally allows you to track the history of payments, their ''Charge Status'' and view your mandate. | ||
| + | |} | ||
| + | {| | ||
| + | |style="padding: 0px 0px 20px 15px;"|[[File:SSP____117.png]] | ||
| + | |} | ||
| + | {| | ||
| + | |style="padding: 0px 0px 30px 25px;"|'' '''Note''': All payments here are displayed in Euro currency. Even if a customer paid using a different currency, the amount will be displayed in Euro after currency conversion.'' | ||
|} | |} | ||
=Tips= | =Tips= | ||
{| | {| | ||
| − | |style="padding: 10px 0px | + | |style="padding: 10px 0px 10px 15px;"|1. If you do not want to let your clients choose between payment methods when purchasing some products, unselect this payment option for the group of products in its details. |
|} | |} | ||
{| | {| | ||
| − | |style="padding: 0px 0px 10px 25px;"|[[File: | + | |style="padding: 0px 0px 10px 25px;"|[[File:SSP____13.png]] |
|} | |} | ||
{| | {| | ||
| − | |style="padding: 0px 0px 10px 15px;"|2. If you | + | |style="padding: 0px 0px 10px 15px;"|2. If logs are enabled you can see detailed info about each Stripe API call. You can find them in 'System Logs' → 'Logs' → 'Module Log' in your WHMCS admin area. |
|} | |} | ||
{| | {| | ||
| − | |style="padding: 0px 0px | + | |style="padding: 0px 0px 10px 15px;"|3. Stripe SEPA Payments For WHMCS module besides single and recurring payments fully supports refunds functionality.<br/> If you need to quickly refund a transaction then just use the built-in refunds section in an invoice details site to refund a given payment straight to a customer bank account.<br/>Click [https://docs.whmcs.com/Invoicing#Refunding_Transactions here] to read the detailed explanation devoted to ''Refunds''. |
| + | |} | ||
| + | {| | ||
| + | |style="padding: 0px 0px 30px 15px;"|4.If cron is configured in WHMCS, then once a day, the module will check every invoice in search of unpaid Stripe SEPA invoices with the due date less than or equaling to today's date. <br/>Subsequently, the module will attempt to charge clients based on these invoices. | ||
|} | |} | ||
=Update Instructions= | =Update Instructions= | ||
{| | {| | ||
| − | |style="padding: 10px 0px 30px 15px;"| | + | |style="padding: 10px 0px 30px 15px;"|An essential guidance through the process of updating the module is offered '''[https://www.docs.modulesgarden.com/How_To_Update_WHMCS_Module here]'''.<br/> |
| − | + | Ensure successful completion of the module update by carefully following each step, thereby preventing data loss or any unforeseen issues.<br/> Additionally, you will find a current list of supplementary actions necessary for a smooth update process there. | |
| − | + | ||
|} | |} | ||
| + | =Upgrade Guide= | ||
| + | {| | ||
| + | |style="padding: 10px 0px 30px 15px;"|Seeking a solution that offers greater flexibility, customization tailored to your precise needs, and unrestricted availability?<br/> There is an option that not only proves to be cost-effective in the long run but also includes prioritized support services, making it a truly valuable investment.<br/> | ||
| + | |||
| + | Opt for the [https://www.modulesgarden.com/products/whmcs/stripe-sepa-payments#open-source-version Open Source version] of your Stripe SEPA Payments For WHMCS module to unlock these benefits.<br/> Simply click on either the '''Get Source Code''' or '''Upgrade To Lifetime''' button found on the product's page in our client area to complete the one-step upgrade process, with a '''dedicated discount''' already applied.<br/> | ||
| + | |||
| + | Follow a [https://www.docs.modulesgarden.com/How_To_Upgrade_WHMCS_Module comprehensive guide] covering the transition process, the advantages it brings, and step-by-step instructions on what to do next after the order has been successfully finalized. | ||
| + | |} | ||
| + | |||
=Common Problems= | =Common Problems= | ||
{| | {| | ||
| Line 318: | Line 381: | ||
|} | |} | ||
{| | {| | ||
| − | |style="padding: 0px 0px | + | |style="padding: 0px 0px 10px 15px;"|2. If you encounter any problems with making a payment, please refer to '' 'Billing' → 'Gateway Log' '' for detailed information. |
| + | |} | ||
| + | {| | ||
| + | |style="padding: 0px 0px 30px 15px;"|3. When API returns the following message '''"Failure The type `sepa_debit` is not a valid source type"''', you probably do not have the '' 'SEPA Direct Debit' '' service activated. <br/> In your Stripe panel, simply proceed to '' 'Settings → Payment Methods' '' and press '' 'Activate' '' next to '' 'SEPA Direct Debit' '' and contact with the support chat to request for activation. | ||
|} | |} | ||
Revision as of 13:08, 19 April 2024
Contents |
About Stripe SEPA Payment Gateway For WHMCS
| Stripe SEPA Payments For WHMCS has been designed in order to boost your payment capabilities by implementing Stripe payment gateway to your WHMCS system. Thanks to this module, you will be able to secure SEPA Direct Debit payments from your clients, handle recurring deals and perform refunds. |
- Payment Gateway:
| ✔ Accept SEPA (Single Euro Payments Area) Direct Debit Payments |
| ✔ Collect IBAN Number To Debit Customer Payments |
| ✔ Attempt To Capture Payment From Customer Bank Account |
| ✔ Enter Company Name To Be Used In Mandate Authorization |
| ✔ Display Payment Capture Notification In Invoice Creation Emails And PDF Invoices |
| ✔ One-Time And Recurring Payments Support |
| ✔ Refund Transaction |
- Client Area:
| ✔ Provide Bank Account Details On Order Checkout |
| ✔ Full Name |
| ✔ Address |
| ✔ IBAN Number |
| ✔ Edit Bank Details In Account Menu |
| ✔ Read And Accept Mandate For Debit Authorization |
| ✔ Delete Mandate |
- Addon Module:
| ✔ View Invoice Status |
| ✔ View Capture Status |
| ✔ View Mandate |
| ✔ Payment ID |
| ✔ View Seller Message |
| ✔ View Charge Status |
| ✔ View Integration Code |
- Supported Currencies:
| ✔ Euro - Default Payment Currency |
| ✔ Other Currencies - Will Be Automatically Converted To Euro |
- General Info:
| ✔ Supports PHP 8.1 Back To PHP 7.4 |
| ✔ Supports WHMCS Themes "Six" And "Twenty-One" |
| ✔ Supports WHMCS V8.9 Back To WHMCS V8.6 |
| ✔ Requires ionCube Loader V12 Or Later |
| ✔ Easy Module Upgrade To Open Source Version |
Installation and Configuration
| This tutorial will show you how to successfully install and configure Stripe SEPA Payments for WHMCS. We will guide you step by step through the whole installation and configuration process. |
Installation
| 1. Log in to our client area and download the module. |

|
| 2. In the downloaded file you might find one or two packages that support different PHP versions. In the most recent versions of the module, you will find only one package that supports PHP 7.2 and later. |
| Previous updates of the module may contain two packages dedicated to various PHP versions. The first one that supports PHP 5.6 up to PHP 7.1, and the second one addressed to PHP 7.2 up to PHP 7.4. |

|
| Note: You can check the current PHP version in your WHMCS. To do so, proceed to 'Utilities' → 'System' → 'PHP Info'. |
| 3. Extract the package and upload its content into the main WHMCS directory.
The content of the package to upload should look like this. |
| 4. When you install Stripe SEPA Payments For WHMCS for the first time you have to rename 'license_RENAME.php' file. You can find it in 'modules/addons/stripesepa/license_RENAME.php'. Rename it from 'license_RENAME.php' to 'license.php'. |

|
| 5. In order to configure your license key, you have to edit the previously renamed 'license.php' file. Enter your license key between quotation marks as presented on the following screen. You can find your license key in our client area → 'My Products'. |

|
Activation of Addon
| 6. Now you have to activate the module in your WHMCS system. Log in to your WHMCS admin area. Go to 'Setup' → 'Addon Modules'. Afterward, find 'Stripe SEPA Payments' and press the 'Activate' button. |

|
| 7. In the next step you need to permit access to this module. To do so, click on the 'Configure' button, tick the checkboxes to assign desired admin roles. Company Name - enter the company name, it will appear during the acceptance. Click here to see the screenshot. |

|
Integration Code
| 8. The 'Integration' page contains three different codes required to create custom messages on invoices. Note: The integration code path may vary depending on the template you are using. |

|
| The first code allows you to display the charges on the Invoice Created email. This is how your edited template should look like. |

|
| If the code has been typed in correctly, the sample Invoice Created email should include the following element. |

|
| The second one is responsible for adding the charges on a PDF invoice linked to the Invoice Created email. |

|
| Thanks to the final code, you can display the charges on the preview of an invoice. See the picture below. |

|
| Note: The added sections will appear on all the HTML and PDF invoices if they still have the 'Pending Payment' status. Once the invoice is paid, the additional pieces of information will no longer appear. |
| You can now access your module under 'Addons' → 'Stripe SEPA Payments'. |
Configuration of Webhook
| 9. Now you have to configure the webhook in your WHMCS system. Open your Stripe dashboard and open the 'Developers' mode. There navigate to the API keys section. |

|
| Next, navigate to the Webhooks tab. Press 'Add Endpoint' button as marked on the screen. |

|
Now, enter the full URL to your Stripe callback PHP file. For example:
https://www.examplesite.com/modules/gateways/callback/stripesepa.php Before you click the 'Add endpoint' button once more you have to select events to listen to. Select all events and confirm the action. Note: You can validate your URL by sending test calls to previously configured Webhook and checking Module Log in your WHMCS |

|

|
| Once a new endpoint is successfully created, open the Webhook details and reveal the signing secret. Copy the generated Signing Secret Key for future use. |

|
Configuration of Gateway
| 10. Now you have to activate the gateways in your WHMCS system. Log in to your WHMCS admin area. Go to 'System Settings' → 'Payment Gateways'. |

|
| 11. Afterward, configure your new gateway's settings. Check 'Show on Order Form' and rename it if you wish. Stripe SEPA Payments:
Important: EUR currency needs to be pre-configured in your WHMCS currencies settings in order to use the module correctly. |

|
| 12. You have just successfully installed and configured Stripe SEPA Payments! |
Management
| In this section we will show you the possibilities of Stripe SEPA Payments For WHMCS. Collect SEPA Direct Debit payments from your clients using the Stripe gateway. |
Setting Bank Details
| First, log in as a client and navigate to the Edit Bank Details tab. |

|
| Enter account details, then click on Save Account Details. Module will validate IBAN and if it turns out to be invalid, a special message will be displayed and the user will not be able to set it. |

|
Performing Payment
| Stripe SEPA Payments For WHMCS is generally used to pay invoices for placed orders. In order to illustrate its functionalities we have placed an exemplary order. As you can see on the below screenshot, apart from the Stripe SEPA there are other gateways available as well. |

|
| Note that only the last four digits of IBAN will be displayed. |

|
| Now, make sure to check the box marked on the screen and press Accept Mandate. |

|
| As a confirmation of your payment you will see the following screen. |

|
| Once your payment has been registered, the processing time may last from a couple of hours up to a few days. Within that period the invoice will remain marked as Pending Payment |

|
| If you want to pay an unpaid invoice, then view that invoice, choose the payment method and press 'Pay Now'. |

|
| Stripe SEPA addon additionally allows you to track the history of payments, their Charge Status and view your mandate. |

|
| Note: All payments here are displayed in Euro currency. Even if a customer paid using a different currency, the amount will be displayed in Euro after currency conversion. |
Tips
| 1. If you do not want to let your clients choose between payment methods when purchasing some products, unselect this payment option for the group of products in its details. |

|
| 2. If logs are enabled you can see detailed info about each Stripe API call. You can find them in 'System Logs' → 'Logs' → 'Module Log' in your WHMCS admin area. |
| 3. Stripe SEPA Payments For WHMCS module besides single and recurring payments fully supports refunds functionality. If you need to quickly refund a transaction then just use the built-in refunds section in an invoice details site to refund a given payment straight to a customer bank account. Click here to read the detailed explanation devoted to Refunds. |
| 4.If cron is configured in WHMCS, then once a day, the module will check every invoice in search of unpaid Stripe SEPA invoices with the due date less than or equaling to today's date. Subsequently, the module will attempt to charge clients based on these invoices. |
Update Instructions
| An essential guidance through the process of updating the module is offered here. Ensure successful completion of the module update by carefully following each step, thereby preventing data loss or any unforeseen issues. |
Upgrade Guide
| Seeking a solution that offers greater flexibility, customization tailored to your precise needs, and unrestricted availability? There is an option that not only proves to be cost-effective in the long run but also includes prioritized support services, making it a truly valuable investment. Opt for the Open Source version of your Stripe SEPA Payments For WHMCS module to unlock these benefits. Follow a comprehensive guide covering the transition process, the advantages it brings, and step-by-step instructions on what to do next after the order has been successfully finalized. |
Common Problems
| 1. When you have problems with connection, check whether your SELinux or firewall does not block ports. |
| 2. If you encounter any problems with making a payment, please refer to 'Billing' → 'Gateway Log' for detailed information. |
| 3. When API returns the following message "Failure The type `sepa_debit` is not a valid source type", you probably do not have the 'SEPA Direct Debit' service activated. In your Stripe panel, simply proceed to 'Settings → Payment Methods' and press 'Activate' next to 'SEPA Direct Debit' and contact with the support chat to request for activation. |