SolusVM Extended Cloud For WHMCS
(→About SolusVM Extended Cloud For WHMCS) |
(→Upgrade Guide) |
||
| (138 intermediate revisions by 9 users not shown) | |||
| Line 2: | Line 2: | ||
<meta name="description" content="ModulesGarden Wiki Contains All The Information You Need About The SolusVM Extended Cloud For WHMCS Module."></meta> | <meta name="description" content="ModulesGarden Wiki Contains All The Information You Need About The SolusVM Extended Cloud For WHMCS Module."></meta> | ||
| − | =About [ | + | =About [https://www.modulesgarden.com/products/whmcs/solusvm-extended-cloud SolusVM Extended Cloud For WHMCS] = |
| − | + | ||
| − | + | ||
{| | {| | ||
| − | |style="padding: 10px 0px 10px 0px;"|'''SolusVM Extended Cloud For WHMCS''' | + | |style="padding: 10px 0px 10px 0px;"|'''SolusVM Extended Cloud For WHMCS''' will allow your clients to manage multiple virtual servers directly in your WHMCS.<br/> |
| − | + | Your customers will be able to freely add, resize and upgrade their servers within the limits of resources defined by you.<br/> | |
| − | + | They will be also able to boot, rebuild or shut their servers down in your client area, as well as access consoles and monitor graphs showing the resource usage. | |
|} | |} | ||
<!-- fixed --> | <!-- fixed --> | ||
| − | *''' | + | *'''Admin Area Features:''' |
{| | {| | ||
| − | |style="padding: 10px 0px 0px 30px;"|✔ Create | + | |style="padding: 10px 0px 0px 30px;"|✔ Create/Suspend/Unsuspend/Terminate User Account |
|} | |} | ||
{| | {| | ||
| − | |style="padding: 0px 0px 0px 30px;"|✔ | + | |style="padding: 0px 0px 0px 30px;"|✔ View Server Status |
|} | |} | ||
{| | {| | ||
| − | |style="padding: 0px 0px 0px 30px;"|✔ | + | |style="padding: 0px 0px 0px 30px;"|✔ View Graphs: Traffic, Load, Memory |
|} | |} | ||
{| | {| | ||
| − | |style="padding: 0px 0px | + | |style="padding: 0px 0px 0px 30px;"|✔ Change Server Password |
|} | |} | ||
| − | |||
{| | {| | ||
| − | |style="padding: | + | |style="padding: 0px 0px 0px 30px;"|✔ Toggle PXE |
|} | |} | ||
{| | {| | ||
| − | |style="padding: 0px 0px 0px 30px;"|✔ | + | |style="padding: 0px 0px 0px 30px;"|✔ Reconfigure Network |
|} | |} | ||
{| | {| | ||
| − | |style="padding: 0px 0px 0px 30px;"|✔ | + | |style="padding: 0px 0px 0px 30px;"|✔ Define Product Total Resource Limits: |
|} | |} | ||
{| | {| | ||
| − | |style="padding: 0px 0px 0px | + | |style="padding: 0px 0px 0px 45px;"|✔ Dynamically - Using Configurable Options |
|} | |} | ||
{| | {| | ||
| − | |style="padding: 0px 0px 0px | + | |style="padding: 0px 0px 0px 45px;"|✔ Statically - Using 'Module Settings' Fields |
|} | |} | ||
{| | {| | ||
| − | |style="padding: 0px 0px 0px 30px;"|✔ | + | |style="padding: 0px 0px 0px 30px;"|✔ Define Resource Range For VPS Creation |
|} | |} | ||
{| | {| | ||
| − | |style="padding: 0px 0px | + | |style="padding: 0px 0px 0px 30px;"|✔ Configure Client Area Features Per Product |
| + | |} | ||
| + | {| | ||
| + | |style="padding: 0px 0px 0px 30px;"|✔ Define OS Templates Available For Rebuild | ||
| + | |} | ||
| + | {| | ||
| + | |style="padding: 0px 0px 0px 30px;"|✔ Select Kernels For Rescue Mode | ||
| + | |} | ||
| + | {| | ||
| + | |style="padding: 0px 0px 0px 30px;"|✔ Configure Friendly Names For OS Templates And Nodes | ||
| + | |} | ||
| + | {| | ||
| + | |style="padding: 0px 0px 0px 30px;"|✔ Toggle Root Password Storing In System Database | ||
| + | |} | ||
| + | {| | ||
| + | |style="padding: 0px 0px 0px 30px;"|✔ Toggle Root Password Change After Server Creation | ||
| + | |} | ||
| + | {| | ||
| + | |style="padding: 0px 0px 10px 30px;"|✔ Run API Connection Test | ||
|} | |} | ||
*'''Client Area Features:''' | *'''Client Area Features:''' | ||
{| | {| | ||
| − | |style="padding: 10px 0px 0px 30px;"|✔ Create/Delete Server | + | |style="padding: 10px 0px 0px 30px;"|✔ Create/Edit/Delete Server |
|} | |} | ||
{| | {| | ||
| − | |style="padding: 0px 0px 0px 30px;"|✔ Boot/Reboot/Shutdown/Rebuild Server | + | |style="padding: 0px 0px 0px 30px;"|✔ Boot/Reboot/Shutdown/Rebuild Server |
|} | |} | ||
{| | {| | ||
| − | |style="padding: 0px 0px 0px 30px;"|✔ | + | |style="padding: 0px 0px 0px 30px;"|✔ View Available Resources |
|} | |} | ||
{| | {| | ||
| − | |style="padding: 0px 0px 0px 30px;"|✔ | + | |style="padding: 0px 0px 0px 30px;"|✔ Toggle TUN/TAP And PAE |
|} | |} | ||
{| | {| | ||
| − | |style="padding: 0px 0px 0px 30px;"|✔ | + | |style="padding: 0px 0px 0px 30px;"|✔ Toggle PXE (Preboot Execution Environment) |
|} | |} | ||
{| | {| | ||
| − | |style="padding: 0px 0px 0px 30px;"|✔ | + | |style="padding: 0px 0px 0px 30px;"|✔ Toggle Rescue Mode With Chosen Kernel |
|} | |} | ||
{| | {| | ||
| − | |style="padding: 0px 0px 0px 30px;"|✔ | + | |style="padding: 0px 0px 0px 30px;"|✔ Reconfigure Network |
|} | |} | ||
{| | {| | ||
| − | |style="padding: 0px 0px 0px 30px;"|✔ | + | |style="padding: 0px 0px 0px 30px;"|✔ Change Password: Root, Client, SSH Console And VNC Console |
|} | |} | ||
{| | {| | ||
| − | |style="padding: 0px 0px 0px 30px;"|✔ | + | |style="padding: 0px 0px 0px 30px;"|✔ Change Boot Order |
|} | |} | ||
{| | {| | ||
| − | |style="padding: 0px 0px 0px 30px;"|✔ | + | |style="padding: 0px 0px 0px 30px;"|✔ View Server Status |
|} | |} | ||
{| | {| | ||
| − | |style="padding: 0px 0px 0px 30px;"|✔ | + | |style="padding: 0px 0px 0px 30px;"|✔ View Graphs: Traffic, Load, Memory |
|} | |} | ||
{| | {| | ||
| − | |style="padding: 0px 0px 0px 30px;"|✔ | + | |style="padding: 0px 0px 0px 30px;"|✔ Access SSH Console - OpenVZ And Xen Only |
|} | |} | ||
{| | {| | ||
| − | |style="padding: 0px 0px 0px 30px;"|✔ | + | |style="padding: 0px 0px 0px 30px;"|✔ Access VNC Console - KVM And Xen HVM Only |
|} | |} | ||
{| | {| | ||
| − | |style="padding: 0px 0px | + | |style="padding: 0px 0px 0px 30px;"|✔ Access NoVNC HTML5 Console - KVM And Xen HVM Only |
|} | |} | ||
| − | |||
{| | {| | ||
| − | |style="padding: | + | |style="padding: 0px 0px 0px 30px;"|✔ Access HTML5 Serial Console - OpenVZ And Xen Only |
|} | |} | ||
{| | {| | ||
| − | |style="padding: 0px 0px 0px 30px;"|✔ | + | |style="padding: 0px 0px 0px 30px;"|✔ Log In To Control Panel |
|} | |} | ||
{| | {| | ||
| − | |style="padding: 0px 0px 0px 30px;"|✔ | + | |style="padding: 0px 0px 0px 30px;"|✔ View Friendly Names Of OS Templates |
|} | |} | ||
{| | {| | ||
| − | |style="padding: 0px 0px 0px 30px;"|✔ | + | |style="padding: 0px 0px 0px 30px;"|✔ Send Email Templates After Creation Of Server Based On Its Type |
|} | |} | ||
{| | {| | ||
| − | |style="padding: 0px 0px 10px 30px;"|✔ | + | |style="padding: 0px 0px 10px 30px;"|✔ Choose Server Resources While Ordering And Upgrade/Downgrade Them Freely |
|} | |} | ||
*'''Available Configurable Options:''' | *'''Available Configurable Options:''' | ||
| Line 119: | Line 133: | ||
|} | |} | ||
{| | {| | ||
| − | |style="padding: 0px 0px | + | |style="padding: 0px 0px 0px 30px;"|✔ IPv4 Addresses Limit |
| + | |} | ||
| + | {| | ||
| + | |style="padding: 0px 0px 10px 30px;"|✔ Network Speed | ||
| + | |} | ||
| + | *'''General Info:''' | ||
| + | {| | ||
| + | |style="padding: 10px 0px 0px 30px;"|✔ Supports OpenVZ, Xen And KVM Virtualization | ||
| + | |} | ||
| + | {| | ||
| + | |style="padding: 0px 0px 0px 30px;"|✔ Integrated With <u>DNS Manager For WHMCS</u> - Supports PowerDNS [https://www.modulesgarden.com/products/whmcs/dns-manager/features (read more)] | ||
| + | |} | ||
| + | {| | ||
| + | |style="padding: 0px 0px 0px 30px;"|✔ Integrated With <u>Advanced Billing For WHMCS</u> - Actual Server Resource Usage Billing [https://www.modulesgarden.com/products/whmcs/advanced-billing/features (read more)] | ||
| + | |} | ||
| + | {| | ||
| + | |style="padding: 0px 0px 0px 30px;"|✔ Multi-Language Support | ||
| + | |} | ||
| + | {| | ||
| + | |style="padding: 0px 0px 0px 30px;"|✔ Supports SolusVM 1.0 (Compatibility With SolusVM 2 Coming Soon) | ||
| + | |} | ||
| + | {| | ||
| + | |style="padding: 0px 0px 0px 30px;"|✔ Supports PHP 8.1 Back To PHP 7.4 | ||
| + | |} | ||
| + | {| | ||
| + | |style="padding: 0px 0px 0px 30px;"|✔ Supports WHMCS Themes "Six" And "Twenty-One" | ||
| + | |} | ||
| + | {| | ||
| + | |style="padding: 0px 0px 0px 30px;"|✔ Supports WHMCS V8.8 Back To WHMCS V8.6 | ||
| + | |} | ||
| + | {| | ||
| + | |style="padding: 0px 0px 0px 30px;"|✔ Requires ionCube Loader V12 Or Later | ||
| + | |} | ||
| + | {| | ||
| + | |style="padding: 0px 0px 30px 30px;"|✔ Easy [https://www.docs.modulesgarden.com/How_To_Upgrade_WHMCS_Module Module Upgrade] To [https://www.modulesgarden.com/products/whmcs/solusvm-extended-cloud#open-source-version Open Source Version] | ||
|} | |} | ||
=Installation and Configuration= | =Installation and Configuration= | ||
{| | {| | ||
| − | |style="padding: 10px 0px | + | |style="padding: 10px 0px 15px 15px;"|'''In this tutorial we will show you how to successfully install [https://www.modulesgarden.com/products/whmcs/solusvm-extended-cloud SolusVM Extended Cloud For WHMCS.]'''<br/> |
We will guide you step by step through the whole installation and configuration process. | We will guide you step by step through the whole installation and configuration process. | ||
|} | |} | ||
{| | {| | ||
| − | |style="padding: | + | |style="padding: 0px 0px 20px 15px;"|'''1. Log in to our client area and download the module.''' |
|} | |} | ||
{| | {| | ||
| Line 134: | Line 182: | ||
|} | |} | ||
{| | {| | ||
| − | |style="padding: 0px 0px 15px 15px;"|'''2. | + | |style="padding: 0px 0px 15px 15px;"|'''2. In the downloaded file you might find one or two packages that support different PHP versions.'''<br/> |
| − | + | In the most recent versions of the module, you will find only one package that supports PHP 7.2 and later.<br/> <!-- If you need a package for the previous versions of PHP, please [https://www.modulesgarden.com/support/ticket/general-support contact our support]. --> | |
|} | |} | ||
{| | {| | ||
| − | |style="padding: 0px 0px 20px 25px;"|[[File: | + | |style="padding: 0px 0px 20px 25px;"|[[File:PHP72_74.png]] |
|} | |} | ||
{| | {| | ||
| − | |style="padding: 0px 0px 15px 15px;"|'''3. When you install SolusVM Extended Cloud for the first time you have to rename '' 'license_RENAME.php' '' file.'''<br /> | + | |style="padding: 0px 0px 15px 15px;"|'''Previous updates of the module may contain two packages dedicated to various PHP versions.'''<br/> |
| − | + | The first one that supports PHP 5.6 up to PHP 7.1, and the second one addressed to PHP 7.2 up to PHP 7.4.<br/> | |
| + | '''''Note:''' Keep in mind that PHP versions 5.6 up to 7.1 are no longer officially supported and their security issues are not fixed or released any more. Find more info [http://php.net/supported-versions.php here].'' | ||
| + | |} | ||
| + | {| | ||
| + | |style="padding: 0px 0px 20px 25px;"|[[File:PHP56_74.png]] | ||
| + | |} | ||
| + | {| | ||
| + | |style="padding: 0px 0px 10px 15px;"| <!-- '' '''Important''': This situation does not affect [[https://www.modulesgarden.com/products/whmcs/solusvm-extended-cloud#open-source-version '''the open source version'''] of this module which can be applied to any PHP from version 5.6 and later.''<br/>'' --> '''Note''': You can check the current PHP version in your WHMCS. To do so, proceed to ''' 'Utilities' → 'System' → 'PHP Info'.''' | ||
| + | |} | ||
| + | {| | ||
| + | |style="padding: 0px 0px 15px 15px;"|'''3. Extract the package and upload its content into the main WHMCS directory. <br/> | ||
| + | The content of the package to upload should look like this. | ||
| + | |} | ||
| + | {| | ||
| + | |style="padding: 0px 0px 20px 25px;"|[[File:SC2_1.png]] | ||
| + | |} | ||
| + | {| | ||
| + | |style="padding: 0px 0px 15px 15px;"|'''4. When you install SolusVM Extended Cloud For WHMCS for the first time you have to rename the '' 'license_RENAME.php' '' file.'''<br/> | ||
| + | The file is located in '' 'modules/servers/solusvmExtendedCloud/license_RENAME.php'. '' Rename it from '' 'license_RENAME.php' '' to '' 'license.php'. '' | ||
|} | |} | ||
{| | {| | ||
| Line 148: | Line 214: | ||
|} | |} | ||
{| | {| | ||
| − | |style="padding: 0px 0px 15px 15px;"|''' | + | |style="padding: 0px 0px 15px 15px;"|'''5. In order to configure your license key you have to edit the previously renamed '' 'license.php' '' file.'''<br/> |
| − | Enter your license key between quotation marks as presented on the following screen. You can find your license key in | + | Enter your license key between quotation marks as presented on the following screen. You can find your license key in our client area → '' 'My Products'.'' |
|} | |} | ||
{| | {| | ||
| − | |style="padding: 0px 0px | + | |style="padding: 0px 0px 20px 25px;"|[[File:SC4.png]] |
|} | |} | ||
| + | {| | ||
| + | |style="padding: 0px 0px 30px 15px;"|'''6. Finally, it is suggested to set a cron task in the crontab in order to update the current usage (once per hour suggested).''' | ||
| + | @hourly php -q /your_whmcs/modules/servers/solusvmExtendedCloud/cron/cron.php | ||
| + | |} | ||
| + | |||
==Configuration of API Access== | ==Configuration of API Access== | ||
{| | {| | ||
| − | |style="padding: 10px 0px 15px 15px;"|''' | + | |style="padding: 10px 0px 15px 15px;"|'''7. Now, we will show you how to configure a new product.'''<br/> |
Firstly, log in to your SolusVM admin area, go to '' 'Configuration' '' → '' 'API Access' '' and press '' 'Add API User'.'' | Firstly, log in to your SolusVM admin area, go to '' 'Configuration' '' → '' 'API Access' '' and press '' 'Add API User'.'' | ||
|} | |} | ||
| Line 163: | Line 234: | ||
|} | |} | ||
{| | {| | ||
| − | |style="padding: 0px 0px 20px 15px;"|''' | + | |style="padding: 0px 0px 20px 15px;"|'''8. Enter your current IP and once again click on the '' 'Add API User' '' button.''' |
|} | |} | ||
{| | {| | ||
| Line 171: | Line 242: | ||
==Configuration of Server== | ==Configuration of Server== | ||
{| | {| | ||
| − | |style="padding: 10px 0px 15px 15px;"|''' | + | |style="padding: 10px 0px 15px 15px;"|'''9. Now, log in to your WHMCS admin area and go to '' 'System Settings' '' → '' 'Servers'. '''''<br/> |
| − | Afterwards, press '' 'Add New Server' '' | + | Afterwards, press '' 'Add New Server'.'' |
|} | |} | ||
{| | {| | ||
| Line 178: | Line 249: | ||
|} | |} | ||
{| | {| | ||
| − | |style="padding: 0px 0px 15px 15px;"|''' | + | |style="padding: 0px 0px 15px 15px;"|'''10. Enter your server name and IP address.''' |
*'''Username''' - fill in with API User ID | *'''Username''' - fill in with API User ID | ||
*'''Password''' - fill in with API User Key | *'''Password''' - fill in with API User Key | ||
| − | Choose '' 'SolusvmExtendedCloud' '' from a dropdown menu and press '' 'Save Changes' '' | + | Choose '' 'SolusvmExtendedCloud' '' from a dropdown menu and press '' 'Save Changes'.'' |
|} | |} | ||
{| | {| | ||
| Line 187: | Line 258: | ||
|} | |} | ||
{| | {| | ||
| − | |style="padding: 0px 0px 15px 15px;"|''' | + | |style="padding: 0px 0px 15px 15px;"|'''11. After you configure your server correctly, you will see the following screen.'''<br/> |
| − | Test your connection | + | Test your connection by pressing '' 'Test Connection'.''<br/> |
| − | Now, you need to create a new group for your server. For that purpose press '' 'Create New Group' '' | + | Now, you need to create a new group for your server. For that purpose press '' 'Create New Group'.'' |
|} | |} | ||
{| | {| | ||
| Line 195: | Line 266: | ||
|} | |} | ||
{| | {| | ||
| − | |style="padding: 0px 0px | + | |style="padding: 0px 0px 15px 15px;"|'''12. Enter name, click on a previously created server and press '' 'Add'. '''''<br/> |
| − | Afterwards, confirm | + | Afterwards, confirm by pressing '' 'Save Changes'.'' |
|} | |} | ||
{| | {| | ||
| Line 204: | Line 275: | ||
==Configuration of Product== | ==Configuration of Product== | ||
{| | {| | ||
| − | |style="padding: 10px 0px 15px 15px;"|''' | + | |style="padding: 10px 0px 15px 15px;"|'''13. In order to create and configure a product, click on '' 'System Settings' '' → '' 'Products/Services'. '''''<br/> |
| − | + | Press '' 'Create a New Group'.'' | |
|} | |} | ||
{| | {| | ||
| Line 211: | Line 282: | ||
|} | |} | ||
{| | {| | ||
| − | |style="padding: 0px 0px 20px 15px;"|''' | + | |style="padding: 0px 0px 20px 15px;"|'''14. Enter a product group name and press '' 'Save Changes'.''''' |
|} | |} | ||
{| | {| | ||
| Line 217: | Line 288: | ||
|} | |} | ||
{| | {| | ||
| − | |style="padding: 0px 0px 15px 15px;"|''' | + | |style="padding: 0px 0px 15px 15px;"|'''15. When you have a product group, you can create your product and assign it to SolusVM Extended Cloud.<br/> |
| − | To create a product click on '' 'Create a New Product' '' | + | To create a product click on '' 'Create a New Product'.'' |
|} | |} | ||
{| | {| | ||
| Line 224: | Line 295: | ||
|} | |} | ||
{| | {| | ||
| − | |style="padding: 0px 0px 20px 15px;"|''' | + | |style="padding: 0px 0px 20px 15px;"|'''16. Afterwards, choose a product type and product group from dropdown menus, enter your product name and press '' 'Continue'.''''' |
|} | |} | ||
{| | {| | ||
| Line 230: | Line 301: | ||
|} | |} | ||
{| | {| | ||
| − | |style="padding: 0px 0px 15px 15px;"|''' | + | |style="padding: 0px 0px 15px 15px;"|'''17. Now, go to '' 'Module Settings' '' section, choose both '' 'SolusvmExtendedCloud' '' and a previously created server group from dropdown menus.'''<br/> |
| − | Afterwards, press '' 'Save Changes' '' | + | Afterwards, press '' 'Save Changes'.'' |
|} | |} | ||
{| | {| | ||
| Line 237: | Line 308: | ||
|} | |} | ||
{| | {| | ||
| − | |style="padding: 0px 0px 15px 15px;"|''' | + | |style="padding: 0px 0px 15px 15px;"|'''18. Select desired virtualization and press '' 'Save Changes'. '''''<br/> |
| − | All options | + | All options of the selected virtualization will be loaded. Note that options availability differs according to a chosen virtualization! |
|} | |} | ||
{| | {| | ||
| Line 244: | Line 315: | ||
|} | |} | ||
{| | {| | ||
| − | |style="padding: 0px 0px 15px 15px;"|''' | + | |style="padding: 0px 0px 15px 15px;"|'''19. Now, fill out '' 'Product Configuration' '' section. |
| − | + | *'''Node''' - SolusVM node to be applied | |
| + | *'''Plan''' - SolusVM plan will be used | ||
| + | *'''Internal IP''' - should internal IP address be allowed | ||
| + | *'''Username Prefix''' - prefix added to SolusVM usernames | ||
| + | *'''Console Port''' - port used to connect to the console | ||
| + | *'''noVNC Encryption''' - select encryption type | ||
| + | *'''Update Usage Each''' - choose hourly or daily cron | ||
| + | *'''Overages Usage''' - choose action when usage limits are exceeded | ||
|} | |} | ||
{| | {| | ||
| Line 251: | Line 329: | ||
|} | |} | ||
{| | {| | ||
| − | |style="padding: 0px 0px 15px 15px;"|''' | + | |style="padding: 0px 0px 15px 15px;"|'''20. Under the '' 'Client Area Features' '' section you can define which features will be available for your clients.'''<br/> |
| − | + | A feature is enabled when a checkbox next to it has been marked.<br/> | |
| − | '''Important 1:''' It is | + | Additionally, you can define available OS templates and ISO images.<br/> |
| − | '''Important 2:''' Keep in mind that the root password is generated automatically | + | '''Important 1:''' It is advised to disable features which are not supported by the chosen virtualization.<br/> |
| − | There is no possibility to set your own password due to SolusVM API limitations | + | '''Important 2:''' Keep in mind that the root password is generated automatically for KVM virtualization upon its creation and reset.<br/> |
| + | There is no possibility to set your own password due to SolusVM API limitations to KVM virtualization. | ||
|} | |} | ||
{| | {| | ||
| Line 263: | Line 342: | ||
==Product With Dynamic Resources== | ==Product With Dynamic Resources== | ||
{| | {| | ||
| − | |style="padding: 10px 0px 15px 15px;"|''' | + | |style="padding: 10px 0px 15px 15px;"|'''21. In order to set up a product with dynamic resources, press '' 'Generate Default' '' as shown on the following screen.'''<br/> |
| − | Configurable options allow your clients to pick product with resources tailored to | + | Configurable options allow your clients to pick product with resources tailored to their needs.<br/> |
| − | Configurable options can be edited and each option can be priced. Follow to [ | + | Configurable options can be edited and each option can be priced. Follow to [https://www.docs.modulesgarden.com/SolusVM_Extended_Cloud_For_WHMCS#Dynamic_Server_Resources_Setup_With_Configurable_Options this article] for more information. |
|} | |} | ||
{| | {| | ||
| Line 272: | Line 351: | ||
==Product With Static Resources== | ==Product With Static Resources== | ||
{| | {| | ||
| − | |style="padding: 10px 0px 15px 15px;"|''' | + | |style="padding: 10px 0px 15px 15px;"|'''22. You can also provide your clients with static resources.'''<br/> |
| − | Simply, fill out fields marked on the screen below with desired limits and press '' 'Save Changes' '' | + | Simply, fill out the fields marked on the screen below with desired limits and press '' 'Save Changes'. ''<br/> |
| − | ''Note: Make sure that this product | + | ''Note: Make sure that this product does not have any configurable options assigned, otherwise they will overwrite limits provided in this step.'' |
|} | |} | ||
{| | {| | ||
|style="padding: 0px 0px 20px 25px;"|[[File:SC17_4.png]] | |style="padding: 0px 0px 20px 25px;"|[[File:SC17_4.png]] | ||
| + | |} | ||
| + | {| | ||
| + | |style="padding: 0px 0px 15px 15px;"|'''23. Define resource range limits for new VPS.'''<br/> | ||
| + | Set limits on clients who will be allowed to create their virtual machines. It will let you impose some borders on the created VPS. | ||
| + | |} | ||
| + | {| | ||
| + | |style="padding: 0px 0px 20px 25px;"|[[File:SC17_5.png]] | ||
|} | |} | ||
{| | {| | ||
| Line 285: | Line 371: | ||
=Management= | =Management= | ||
{| | {| | ||
| − | |style="padding: 10px 0px 30px | + | |style="padding: 10px 0px 30px 15px;"|'''SolusVM Extended Cloud For WHMCS is very simple and convenient in use. Your customers are only a few clicks away from creating their own servers.'''<br/> |
| − | The module will allow your customers to manage multiple servers and freely change their resources. Everything within your own WHMCS client area.<br /> | + | The module will allow your customers to manage multiple servers and freely change their resources. Everything within your own WHMCS client area.<br/> |
| − | Owing to integration with Advanced Billing For WHMCS you can even offer product, | + | Owing to integration with Advanced Billing For WHMCS you can even offer a product, which your client will be billed for depending on its usage. |
| − | + | ||
|} | |} | ||
==Interface== | ==Interface== | ||
{| | {| | ||
| − | |style="padding: 10px 0px 15px 15px;"|Now, let's check the interface of the module in the client area where | + | |style="padding: 10px 0px 15px 15px;"|Now, let's check the interface of the module in the client area where your customers can create and manage virtual servers.<br/> |
| − | ''Note: | + | ''Note: The screen below presents the module right after the product creation. More features will be displayed after creating a server.'' |
|} | |} | ||
{| | {| | ||
| Line 299: | Line 385: | ||
|} | |} | ||
{| | {| | ||
| − | |style="padding: 0px 0px 15px 15px;"|You can manage each product from your WHMCS admin area.<br /> | + | |style="padding: 0px 0px 15px 15px;"|You can manage each product from your WHMCS admin area.<br/> |
In addition to that, each VPS created by your clients can be easily monitored. | In addition to that, each VPS created by your clients can be easily monitored. | ||
|} | |} | ||
| Line 308: | Line 394: | ||
==Management of Servers== | ==Management of Servers== | ||
{| | {| | ||
| − | |style="padding: 10px 0px 20px 15px;"|Let's start by creating a new virtual server. To do so, click on '' 'Create Virtual Server' '' button. | + | |style="padding: 10px 0px 20px 15px;"|Let's start by creating a new virtual server. To do so, click on the '' 'Create Virtual Server' '' button. |
|} | |} | ||
{| | {| | ||
| Line 314: | Line 400: | ||
|} | |} | ||
{| | {| | ||
| − | |style="padding: 0px 0px 20px 15px;"|Set server | + | |style="padding: 0px 0px 20px 15px;"|Set server resources and click on the '' 'Add New Virtual Server' '' button. |
|} | |} | ||
{| | {| | ||
| Line 320: | Line 406: | ||
|} | |} | ||
{| | {| | ||
| − | |style="padding: 0px 0px 15px 15px;"|As you can see on the screen below, virtual server has been | + | |style="padding: 0px 0px 15px 15px;"|As you can see on the screen below, the virtual server has been created successfully.<br/> |
| − | Now let's see how | + | Now let's see how we can manage our new server. To proceed, click on the '' 'Manage' '' button. |
|} | |} | ||
{| | {| | ||
| Line 327: | Line 413: | ||
|} | |} | ||
{| | {| | ||
| − | |style="padding: 0px 0px 15px 15px;"| | + | |style="padding: 0px 0px 15px 15px;"|One of the most interesting and useful options offered to the users is the upgrade.<br/> |
| − | Upgrade allows your customers to request | + | Upgrade allows your customers to request changes of virtual server resources. |
| − | + | ||
|} | |} | ||
{| | {| | ||
| Line 335: | Line 420: | ||
|} | |} | ||
{| | {| | ||
| − | |style="padding: 0px 0px | + | |style="padding: 0px 0px 15px 15px;"|Set details of server upgrade and click on the '' 'Upgrade' '' button.<br /> |
| + | Upgrade is done automatically, no e-mail notifications or confirmation are sent. | ||
|} | |} | ||
{| | {| | ||
| Line 341: | Line 427: | ||
|} | |} | ||
{| | {| | ||
| − | |style="padding: 0px 0px 20px 15px;"|As you can see on the following screen, virtual server has been upgraded. | + | |style="padding: 0px 0px 20px 15px;"|As you can see on the following screen, the virtual server has been upgraded. |
|} | |} | ||
{| | {| | ||
| − | |style="padding: 0px 0px | + | |style="padding: 0px 0px 20px 25px;"|[[File:SC25.png]] |
|} | |} | ||
| − | |||
| − | |||
{| | {| | ||
| − | |style="padding: | + | |style="padding: 0px 0px 15px 15px;"|Right next to '' 'Upgrade' '' option, there are '' 'Graphs'. ''<br/> |
| − | + | Press it to see generated statistics on '' 'Network Traffic', 'Load Average' '' and '' 'Memory Usage'.'' | |
| − | + | ||
|} | |} | ||
{| | {| | ||
| − | |style="padding: 0px 0px 20px 25px;"|[[File: | + | |style="padding: 0px 0px 20px 25px;"|[[File:SC25_1.png]] |
|} | |} | ||
{| | {| | ||
| − | |style="padding: 0px 0px | + | |style="padding: 0px 0px 30px 15px;"|For more information about management of already created virtual server visit [https://www.docs.modulesgarden.com/SolusVM_Extended_VPS_For_WHMCS#Management_of_Server SolusVM Extended VPS For WHMCS Wiki] |
|} | |} | ||
| + | |||
| + | ==Dynamic Server Resources Setup With Configurable Options== | ||
{| | {| | ||
| − | |style="padding: 0px | + | |style="padding: 10px 0px 15px 15px;"|If you want to allow your clients to dynamically set servers with resources they choose, follow these steps.<br/> |
| + | Firstly, you should have a ready product. For more information on how to create one, head to the '' '[https://www.docs.modulesgarden.com/SolusVM_Extended_VPS_For_WHMCS#Configuration_of_Product Configuration of Product]' '' instruction.<br/> | ||
| + | If automatically generated configurable options do not fulfill your clients' needs, you can edit them using [https://www.docs.modulesgarden.com/General#How_To_Use_Configurable_Options this guide]. | ||
| + | <br/> | ||
| + | The final result visible on the order form should be similar to the one presented on the screen below. | ||
|} | |} | ||
{| | {| | ||
| − | |style="padding: 0px 0px 20px 15px;"|If you decide to set pricing per server resource ordered, you can find instruction | + | |style="padding: 0px 0px 20px 25px;"|[[File:SC28_1.png]] |
| + | |} | ||
| + | {| | ||
| + | |style="padding: 0px 0px 20px 15px;"|If you decide to set pricing per server resource ordered, you can find instruction for it [https://www.docs.modulesgarden.com/General#Setting_Up_Pricing_For_Configurable_Options here]. | ||
|} | |} | ||
{| | {| | ||
| Line 369: | Line 461: | ||
|} | |} | ||
{| | {| | ||
| − | |style="padding: 0px 0px 30px 15px;"|If you prefer to charge your clients for server resources they actually use, you can use our [ | + | |style="padding: 0px 0px 30px 15px;"|If you prefer to charge your clients for server resources they actually use, you can use our [https://www.modulesgarden.com/products/whmcs/advanced_billing/features Advanced Billing For WHMCS] module. |
|} | |} | ||
==Management of DNS== | ==Management of DNS== | ||
{| | {| | ||
| − | |style="padding: 10px 0px 15px 15px;"|When you combine SolusVM Extended Cloud For WHMCS | + | |style="padding: 10px 0px 15px 15px;"|When you combine SolusVM Extended Cloud For WHMCS with [https://www.docs.modulesgarden.com/index.php?title=DNS_Manager_For_WHMCS&oldid=19472 DNS Manager For WHMCS], your clients will be able to manage PowerDNS zones and records from the client area.<br/> |
| − | DNS Manager For WHMCS will allow your customers to manage DNS zones, records and ReverseDNS.<br /> | + | DNS Manager For WHMCS will allow your customers to manage DNS zones, records and ReverseDNS.<br/>'' '''Important:''' SolusVM Extended Cloud For WHMCS is compatible with DNS Manager For WHMCS V2.x.x.'' |
| − | To connect both modules, go to '' ' | + | |} |
| + | {| | ||
| + | |style="padding: 0px 0px 20px 15px;"|To connect both modules, go to the '' 'Settings' → 'Packages' '' section of DNS Manager and add a new package. | ||
| + | |} | ||
| + | {| | ||
| + | |style="padding: 0px 0px 20px 25px;"|[[File:SC2_26.png]] | ||
| + | |} | ||
| + | {| | ||
| + | |style="padding: 0px 0px 20px 15px;"|Name the package and provide any details you find useful. Then proceed to the '' 'Item' '' section. | ||
| + | |} | ||
| + | {| | ||
| + | |style="padding: 0px 0px 20px 25px;"|[[File:SC2_27_1.png]] | ||
| + | |} | ||
| + | {| | ||
| + | |style="padding: 0px 0px 20px 15px;"|Select SolusVM Extended Cloud from the list of products and click on '' 'Add' ''. | ||
| + | |} | ||
| + | {| | ||
| + | |style="padding: 0px 0px 20px 25px;"|[[File:SC2_27.png]] | ||
| + | |} | ||
| + | {| | ||
| + | |style="padding: 0px 0px 20px 15px;"|Your package should now appear on the list. To change its status click on the button as shown below. | ||
| + | |} | ||
| + | {| | ||
| + | |style="padding: 0px 0px 20px 25px;"|[[File:SC2_28.png]] | ||
| + | |} | ||
| + | {| | ||
| + | |style="padding: 0px 0px 20px 15px;"|Once done, you will see a proper note. | ||
|} | |} | ||
{| | {| | ||
| − | |style="padding: 0px 0px 20px 25px;"|[[File: | + | |style="padding: 0px 0px 20px 25px;"|[[File:SC2_29.png]] |
|} | |} | ||
{| | {| | ||
| Line 385: | Line 503: | ||
|} | |} | ||
{| | {| | ||
| − | |style="padding: 0px 0px 20px 25px;"|[[File: | + | |style="padding: 0px 0px 20px 25px;"|[[File:SC2_30.png]] |
|} | |} | ||
{| | {| | ||
| − | |style="padding: 0px 0px 20px 15px;"| | + | |style="padding: 0px 0px 20px 15px;"|You can find the '' 'Manage DNS' '' option also in the left menu. |
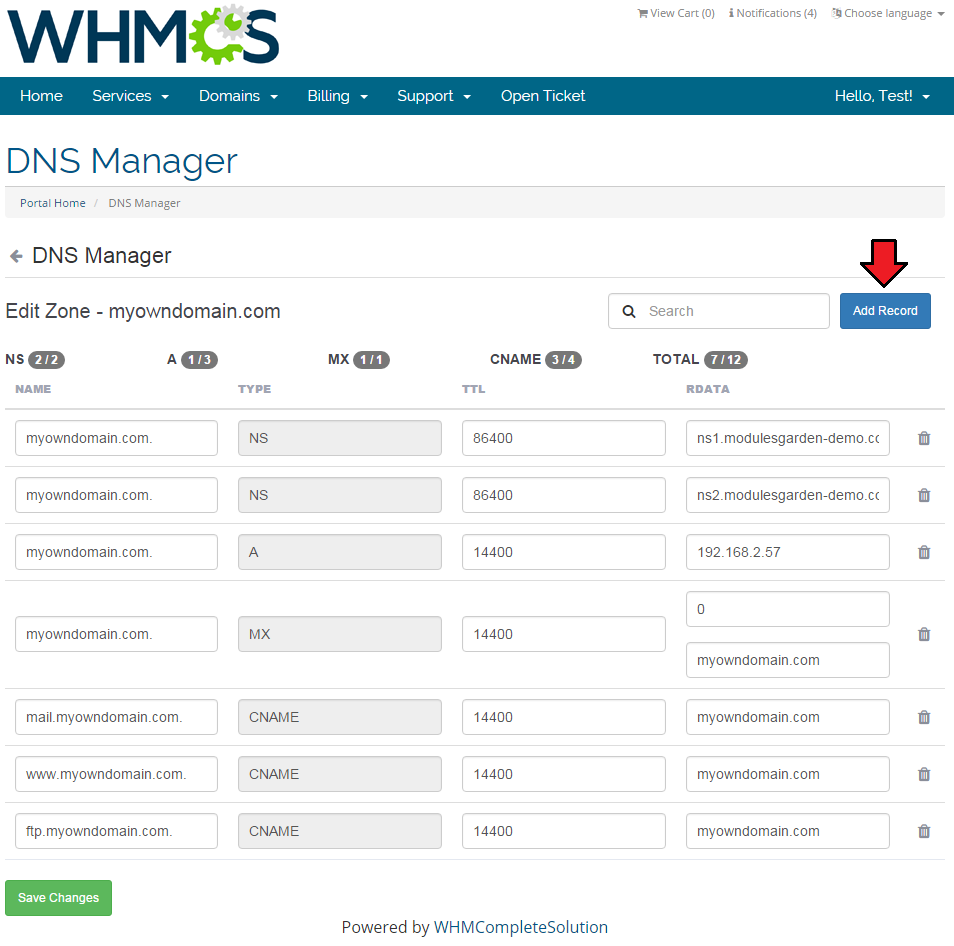
|} | |} | ||
{| | {| | ||
| − | |style="padding: 0px 0px 20px 25px;"|[[File: | + | |style="padding: 0px 0px 20px 25px;"|[[File:SC2_30_1.png]] |
|} | |} | ||
{| | {| | ||
| − | |style="padding: 0px 0px 20px 15px;"| | + | |style="padding: 0px 0px 20px 15px;"|Depending on previously chosen settings, your customers will be able to add and remove DNS zones. |
|} | |} | ||
{| | {| | ||
| − | |style="padding: 0px 0px 30px 25px;"|[[File: | + | |style="padding: 0px 0px 30px 25px;"|[[File:SC2_31.png]] |
|} | |} | ||
==Management of Billing== | ==Management of Billing== | ||
{| | {| | ||
| − | |style="padding: 10px 0px 15px 15px;"|When you combine SolusVM Extended Cloud For WHMCS with [ | + | |style="padding: 10px 0px 15px 15px;"|When you combine SolusVM Extended Cloud For WHMCS with [https://www.docs.modulesgarden.com/Advanced_Billing_For_WHMCS Advanced Billing For WHMCS], you will be able to set up additional billing options.<br/>Enable '' 'Usage Records' '' extension for Solus Cloud products. |
| − | + | ||
|} | |} | ||
{| | {| | ||
| Line 409: | Line 526: | ||
|} | |} | ||
{| | {| | ||
| − | |style="padding: 0px 0px 20px 15px;"|With Advanced Billing module, you can also display | + | |style="padding: 10px 0px 20px 15px;"|The module allows you to charge your customers basing on the server resources used by them. Set free limits and pricing for used records. |
| + | |} | ||
| + | {| | ||
| + | |style="padding: 0px 0px 20px 25px;"|[[File:SC29_1.png]] | ||
| + | |} | ||
| + | {| | ||
| + | |style="padding: 0px 0px 20px 15px;"|With Advanced Billing module, you can also display the current server resource usage and its cost for your customers. | ||
|} | |} | ||
{| | {| | ||
|style="padding: 0px 0px 30px 25px;"|[[File:SC30.png]] | |style="padding: 0px 0px 30px 25px;"|[[File:SC30.png]] | ||
|} | |} | ||
| − | == | + | ==Management of Email Templates== |
{| | {| | ||
| − | |style="padding: 10px 0px | + | |style="padding: 10px 0px 15px 15px;"|You can automatically send your customers emails with details of newly created virtual servers.<br/> |
| − | + | To do so, create a new email template with the '' 'Product' '' type and '' 'Unique Name' '' specified in [https://documentation.solusvm.com/display/DOCS/Email+Templates SolusVM Documentation], in our case it is '' 'KVM Virtual Server'.''<br/> | |
| − | + | '''Usage of unique names other than specified in the above documentation makes it impossible to send emails.'''<br/> | |
| − | + | ''Note: The only supported email template unique names are: 'OpenVZ Virtual Server', 'Xen PV Virtual Server', 'Xen HVM' and 'KVM Virtual Server'.'' | |
| − | + | ||
| − | + | ||
|} | |} | ||
| + | {| | ||
| + | |style="padding: 0px 0px 20px 25px;"|[[File:SV30.png]] | ||
| + | |} | ||
| + | {| | ||
| + | |style="padding: 0px 0px 15px 15px;"|You can paste the email content from SolusVM Documentation or create your own. Owing to our module, you can also use variables: | ||
| + | *{$service_custom_field_rootpassword} | ||
| + | *{$service_custom_field_vncip} | ||
| + | *{$service_custom_field_vncport} | ||
| + | *{$service_custom_field_vncpassword}. | ||
| + | |} | ||
| + | {| | ||
| + | |style="padding: 0px 0px 30px 25px;"|[[File:SV31.png]] | ||
| + | |} | ||
| + | |||
==Debug Mode== | ==Debug Mode== | ||
{| | {| | ||
| − | |style="padding: 10px 0px 15px 15px;"|SolusVM Extended Cloud is very complex module. Therefore many things might go wrong.<br /> | + | |style="padding: 10px 0px 15px 15px;"|SolusVM Extended Cloud is a very complex module. Therefore many things might go wrong.<br/> |
| − | To help you quickly solve various problems usually connected with WHMCS product/server configuration and SolusVM server configuration, we created | + | To help you quickly solve various problems usually connected with WHMCS product/server configuration and SolusVM server configuration, we created '' 'Debug Mode'.''<br/> |
To enable it, go to '' 'Module Settings' '' of your product and tick '' 'Debug Mode' '' as shown on the screen below. | To enable it, go to '' 'Module Settings' '' of your product and tick '' 'Debug Mode' '' as shown on the screen below. | ||
|} | |} | ||
| Line 433: | Line 568: | ||
|} | |} | ||
{| | {| | ||
| − | |style="padding: 0px 0px 15px 15px;"|Afterwards, go to '' 'Utilities' '' → '' 'Logs' '' → '' 'Module Log' '' and click on '' 'Enable Debug Logging' '' in order to enable it. | + | |style="padding: 0px 0px 15px 15px;"|Afterwards, go to '' 'Utilities' '' → '' 'Logs' '' → '' 'Module Log' '' and click on '' 'Enable Debug Logging' '' in order to enable it. The button should change its value to '' 'Disable Debug Logging'. ''<br/> |
| − | From that moment, each action performed by module will be recorded in the log.<br /> | + | From that moment, each action performed by the module will be recorded in the log.<br /> |
| − | In that way, you can easily check whether module correctly fetches the information about virtual servers, nodes, templates, plans etc.<br /> | + | In that way, you can easily check whether module correctly fetches the information about virtual servers, nodes, templates, plans etc.<br/> |
| − | If it does not, that indicates a problem with WHMCS product/server configuration or problem with your SolusVM server.<br /> | + | If it does not, that indicates a problem with WHMCS product/server configuration or problem with your SolusVM server.<br/> |
| − | The following screen presents exemplary module log. | + | The following screen presents an exemplary module log. |
|} | |} | ||
{| | {| | ||
| Line 444: | Line 579: | ||
{| | {| | ||
|style="padding: 0px 0px 30px 15px;"|Remember to turn off Debug Mode after you fix the problem. | |style="padding: 0px 0px 30px 15px;"|Remember to turn off Debug Mode after you fix the problem. | ||
| + | |} | ||
| + | ==Locations Management== | ||
| + | {| | ||
| + | |style="padding: 10px 0px 5px 15px;"|Underneath, you will find a short description of a real life example of managing and rotating between locations with SolusVM Extended Cloud For WHMCS.<br/> | ||
| + | Take a quick look at it and note the flow. | ||
| + | |} | ||
| + | {| | ||
| + | |style="padding: 0px 0px 30px 15px;"|Let's assume that Mr Smith has one master server called '' 'Master'. '' This is the server Mr Smith configured and connects with from WHMCS with the help of our module.<br/> This server contains 3 slave servers configured in his SolusVM environment. These are: | ||
| + | *USA | ||
| + | *Europe1 | ||
| + | *Asia1<br/> | ||
| + | These three slave servers are server nodes. In this configuration example, all of Mr Smith's clients order products on '' 'Master' '' server and so they receive resources available on server 1, 2, 3.<br/> Now, when they log in to WHMCS client area, they are able to create a VPS and pick server 1, 2 or 3 from the Location field. | ||
|} | |} | ||
| Line 449: | Line 596: | ||
{| | {| | ||
|style="padding: 10px 0px 5px 15px;"|1. We made every effort to make our module as easy to install, configure and use, as possible. Therefore we paid special attention to displayed messages.<br /> | |style="padding: 10px 0px 5px 15px;"|1. We made every effort to make our module as easy to install, configure and use, as possible. Therefore we paid special attention to displayed messages.<br /> | ||
| − | Read carefully each message, follow the instructions and you | + | Read carefully each message, follow the instructions and you will have no problems using the module. |
|} | |} | ||
{| | {| | ||
| − | |style="padding: 0px 0px | + | |style="padding: 0px 0px 10px 15px;"|2. Operations performed on the virtual servers are not executed immediately. Give your SolusVM server some time to process the request and execute the operation. |
| + | |} | ||
| + | {| | ||
| + | |style="padding: 0px 0px 10px 15px;"|3. As this module supports templates system, any changes made in the module's templates files will be saved after the upgrade process. | ||
| + | |} | ||
| + | {| | ||
| + | |style="padding: 0px 0px 30px 15px;"|4. You must be aware that '''SolusVM Extended Cloud does not''' support importing existing instances. In order to import an existing account will need to use SolusVM Extended VPS module.<br/> | ||
| + | It means you need to own [https://www.modulesgarden.com/products/whmcs/solusvm-extended-vps SolusVM VPS For WHMCS] module to perform such an operation.<br/> | ||
| + | Please refer to [https://www.docs.modulesgarden.com/SolusVM_Extended_VPS_For_WHMCS#Importing_Existing_VPS this article] to learn how to perform such an import. | ||
| + | |} | ||
| + | |||
| + | =Update Instructions= | ||
| + | {| | ||
| + | |style="padding: 10px 0px 30px 15px;"|An essential guidance through the process of updating the module is offered '''[https://www.docs.modulesgarden.com/How_To_Update_WHMCS_Module here]'''.<br/> | ||
| + | Ensure successful completion of the module update by carefully following each step, thereby preventing data loss or any unforeseen issues.<br/> Additionally, you will find a current list of supplementary actions necessary for a smooth update process there. | ||
| + | |} | ||
| + | ==Update of Products== | ||
| + | {| | ||
| + | |style="padding: 10px 0px 30px 15px;"|Our module is entirely compatible with [https://github.com/solusio/SolusVM-WHMCS-Module SolusVM WHMCS Module] ''(previously known as "SolusVM Pro")'' and you can easily upgrade your existing products without losing your settings.<br/> | ||
| + | 1. Go to '' 'System Settings' '' → '' 'Products/Services' '' → '' 'Module Settings' '' of your product and switch '' 'Module Name' '' from '' 'Solusvmpro' '' to '' 'SolusvmExtendedCloud' ''.<br/> | ||
| + | 2. Proceed to '' 'System Settings' '' → '' 'Servers' '' and switch your server type from '' 'Solusvmpro' '' to '' 'SolusvmExtendedCloud' ''.<br/> | ||
| + | 3. Now, click '' 'System Settings' '' → '' 'Products/Services' '' → '' 'Module Settings' '' of your product and make sure that '' 'Server Group' '' is set up correctly.<br/> | ||
| + | 4. The last step is generating default configurable options and custom fields through clicking on the '' 'Generate default' '' button.<br/> | ||
| + | Your SolusVM Extended Cloud product is ready to use! | ||
| + | |} | ||
| + | =Upgrade Guide= | ||
| + | {| | ||
| + | |style="padding: 10px 0px 30px 15px;"|Seeking a solution that offers greater flexibility, customization tailored to your precise needs, and unrestricted availability?<br/> There is an option that not only proves to be cost-effective in the long run but also includes prioritized support services, making it a truly valuable investment.<br/> | ||
| + | |||
| + | Opt for the [https://www.modulesgarden.com/products/whmcs/solusvm-extended-cloud#open-source-version Open Source version] of your SolusVM Extended Cloud For WHMCS module to unlock these benefits.<br/> Simply click on either the '''Get Source Code''' or '''Upgrade To Lifetime''' button found on the product's page in our client area to complete the one-step upgrade process, with a '''dedicated discount''' already applied.<br/> | ||
| + | |||
| + | Follow a [https://www.docs.modulesgarden.com/How_To_Upgrade_WHMCS_Module comprehensive guide] covering the transition process, the advantages it brings, and step-by-step instructions on what to do next after the order has been successfully finalized. | ||
|} | |} | ||
| Line 460: | Line 638: | ||
|} | |} | ||
{| | {| | ||
| − | |style="padding: 0px 0px | + | |style="padding: 0px 0px 5px 15px;"|2. The vast majority of problems are connected with misconfigured SolusVM server or misconfigured servers/products in your WHMCS.<br /> |
Firstly, make sure that your SolusVM server has properly configured virtual servers, nodes, node groups, templates, plans and API access.<br /> | Firstly, make sure that your SolusVM server has properly configured virtual servers, nodes, node groups, templates, plans and API access.<br /> | ||
| − | '''In most cases, appropriate SolusVM server configuration guarantees correct operation of the module.'''<br /> | + | '''In most cases, an appropriate SolusVM server configuration guarantees correct operation of the module.'''<br /> |
| − | Afterwards, check your WHMCS server connection and | + | Afterwards, check your WHMCS server connection and product settings. If you are certain that everything is correct, use our [[#Debug Mode|Debug Mode]]. |
|} | |} | ||
{| | {| | ||
| − | |style="padding: | + | |style="padding: 0px 0px 30px 15px;"|3. By default, our module connects with SolusVM server on port 5353. If you use different port, you need to specify it in the '' 'Hostname' '' field.<br /> |
| − | + | The default port for SSL connections is 5656. To connect on that port, enter your hostname as follows: '' 'yourhostname.com:5656'.'' Keep in mind that you can connect on any port.<br /> | |
| − | + | The '' 'Tick to use SSL Mode for Connections' ''field below switches the connection type between http and https. Note that this is something different from choosing the port to connect. | |
|} | |} | ||
Latest revision as of 13:08, 19 April 2024
Contents |
[edit] About SolusVM Extended Cloud For WHMCS
| SolusVM Extended Cloud For WHMCS will allow your clients to manage multiple virtual servers directly in your WHMCS. Your customers will be able to freely add, resize and upgrade their servers within the limits of resources defined by you. |
- Admin Area Features:
| ✔ Create/Suspend/Unsuspend/Terminate User Account |
| ✔ View Server Status |
| ✔ View Graphs: Traffic, Load, Memory |
| ✔ Change Server Password |
| ✔ Toggle PXE |
| ✔ Reconfigure Network |
| ✔ Define Product Total Resource Limits: |
| ✔ Dynamically - Using Configurable Options |
| ✔ Statically - Using 'Module Settings' Fields |
| ✔ Define Resource Range For VPS Creation |
| ✔ Configure Client Area Features Per Product |
| ✔ Define OS Templates Available For Rebuild |
| ✔ Select Kernels For Rescue Mode |
| ✔ Configure Friendly Names For OS Templates And Nodes |
| ✔ Toggle Root Password Storing In System Database |
| ✔ Toggle Root Password Change After Server Creation |
| ✔ Run API Connection Test |
- Client Area Features:
| ✔ Create/Edit/Delete Server |
| ✔ Boot/Reboot/Shutdown/Rebuild Server |
| ✔ View Available Resources |
| ✔ Toggle TUN/TAP And PAE |
| ✔ Toggle PXE (Preboot Execution Environment) |
| ✔ Toggle Rescue Mode With Chosen Kernel |
| ✔ Reconfigure Network |
| ✔ Change Password: Root, Client, SSH Console And VNC Console |
| ✔ Change Boot Order |
| ✔ View Server Status |
| ✔ View Graphs: Traffic, Load, Memory |
| ✔ Access SSH Console - OpenVZ And Xen Only |
| ✔ Access VNC Console - KVM And Xen HVM Only |
| ✔ Access NoVNC HTML5 Console - KVM And Xen HVM Only |
| ✔ Access HTML5 Serial Console - OpenVZ And Xen Only |
| ✔ Log In To Control Panel |
| ✔ View Friendly Names Of OS Templates |
| ✔ Send Email Templates After Creation Of Server Based On Its Type |
| ✔ Choose Server Resources While Ordering And Upgrade/Downgrade Them Freely |
- Available Configurable Options:
| ✔ Memory Limit |
| ✔ Storage Limit |
| ✔ Bandwidth Limit |
| ✔ CPU Cores Limit |
| ✔ IPv4 Addresses Limit |
| ✔ Network Speed |
- General Info:
| ✔ Supports OpenVZ, Xen And KVM Virtualization |
| ✔ Integrated With DNS Manager For WHMCS - Supports PowerDNS (read more) |
| ✔ Integrated With Advanced Billing For WHMCS - Actual Server Resource Usage Billing (read more) |
| ✔ Multi-Language Support |
| ✔ Supports SolusVM 1.0 (Compatibility With SolusVM 2 Coming Soon) |
| ✔ Supports PHP 8.1 Back To PHP 7.4 |
| ✔ Supports WHMCS Themes "Six" And "Twenty-One" |
| ✔ Supports WHMCS V8.8 Back To WHMCS V8.6 |
| ✔ Requires ionCube Loader V12 Or Later |
| ✔ Easy Module Upgrade To Open Source Version |
[edit] Installation and Configuration
| In this tutorial we will show you how to successfully install SolusVM Extended Cloud For WHMCS. We will guide you step by step through the whole installation and configuration process. |
| 1. Log in to our client area and download the module. |
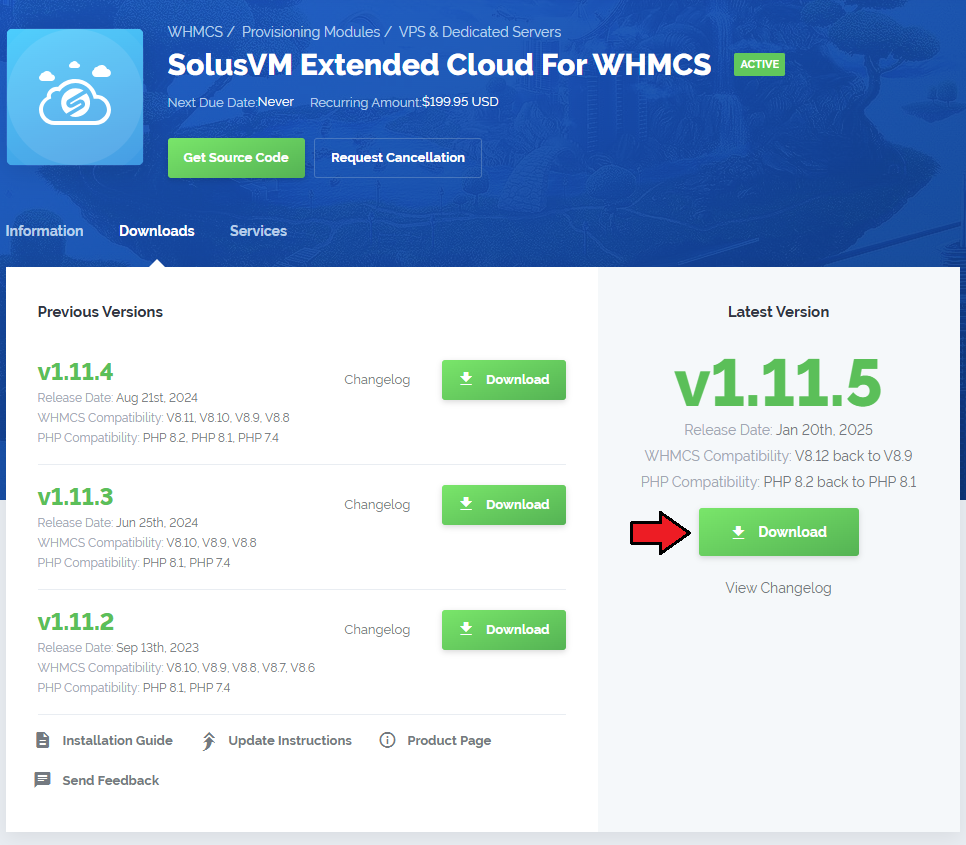
|
| 2. In the downloaded file you might find one or two packages that support different PHP versions. In the most recent versions of the module, you will find only one package that supports PHP 7.2 and later. |
| Previous updates of the module may contain two packages dedicated to various PHP versions. The first one that supports PHP 5.6 up to PHP 7.1, and the second one addressed to PHP 7.2 up to PHP 7.4. |

|
| Note: You can check the current PHP version in your WHMCS. To do so, proceed to 'Utilities' → 'System' → 'PHP Info'. |
| 3. Extract the package and upload its content into the main WHMCS directory. The content of the package to upload should look like this. |

|
| 4. When you install SolusVM Extended Cloud For WHMCS for the first time you have to rename the 'license_RENAME.php' file. The file is located in 'modules/servers/solusvmExtendedCloud/license_RENAME.php'. Rename it from 'license_RENAME.php' to 'license.php'. |
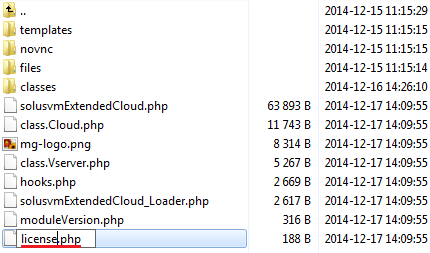
|
| 5. In order to configure your license key you have to edit the previously renamed 'license.php' file. Enter your license key between quotation marks as presented on the following screen. You can find your license key in our client area → 'My Products'. |

|
6. Finally, it is suggested to set a cron task in the crontab in order to update the current usage (once per hour suggested).
@hourly php -q /your_whmcs/modules/servers/solusvmExtendedCloud/cron/cron.php |
[edit] Configuration of API Access
| 7. Now, we will show you how to configure a new product. Firstly, log in to your SolusVM admin area, go to 'Configuration' → 'API Access' and press 'Add API User'. |

|
| 8. Enter your current IP and once again click on the 'Add API User' button. |

|
[edit] Configuration of Server
| 9. Now, log in to your WHMCS admin area and go to 'System Settings' → 'Servers'. Afterwards, press 'Add New Server'. |
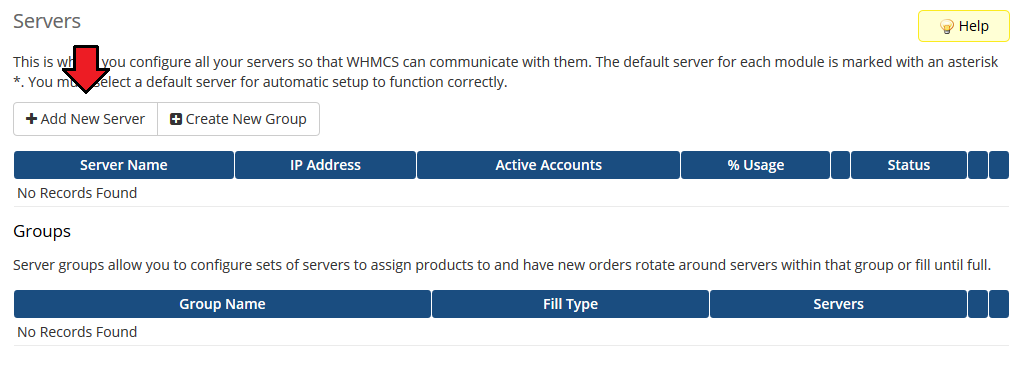
|
10. Enter your server name and IP address.
Choose 'SolusvmExtendedCloud' from a dropdown menu and press 'Save Changes'. |
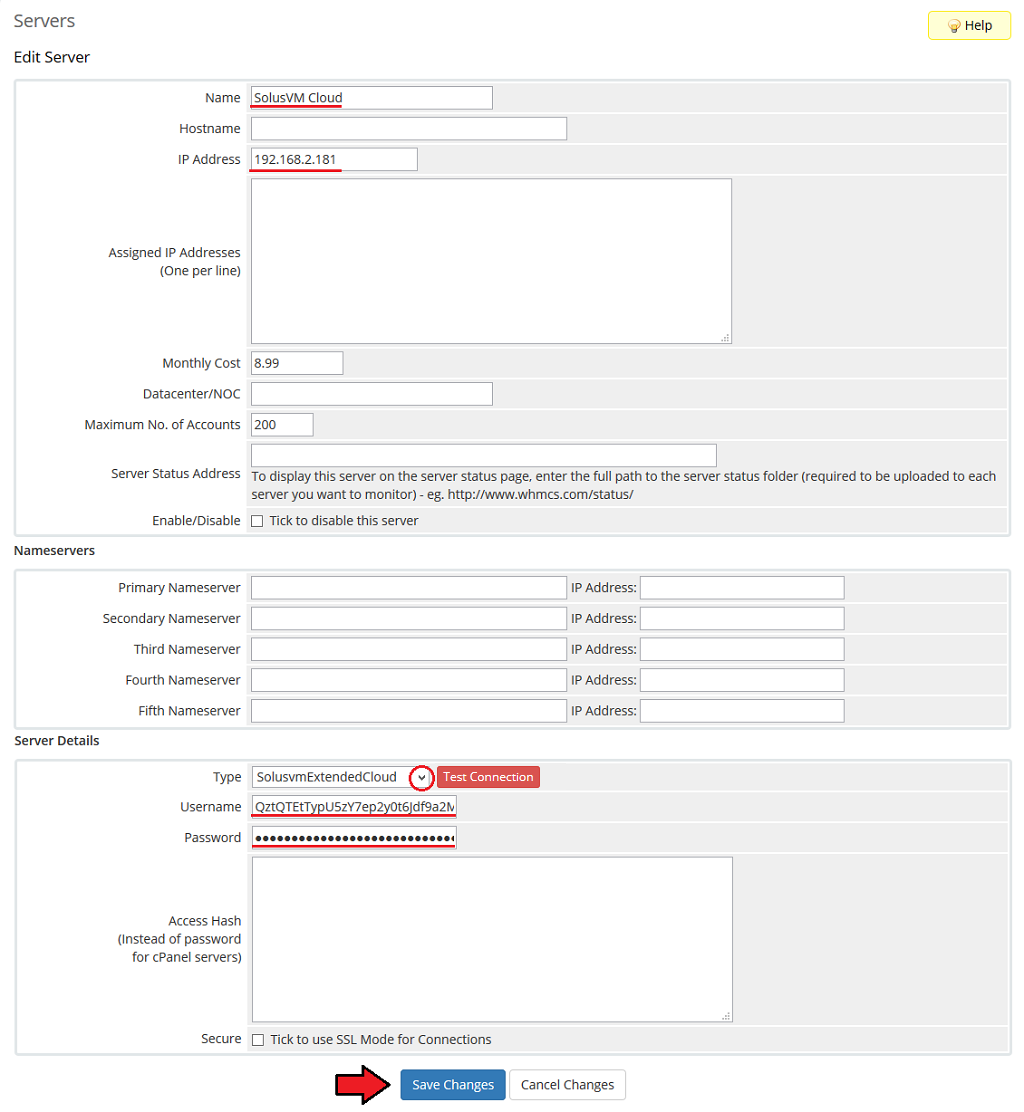
|
| 11. After you configure your server correctly, you will see the following screen. Test your connection by pressing 'Test Connection'. |
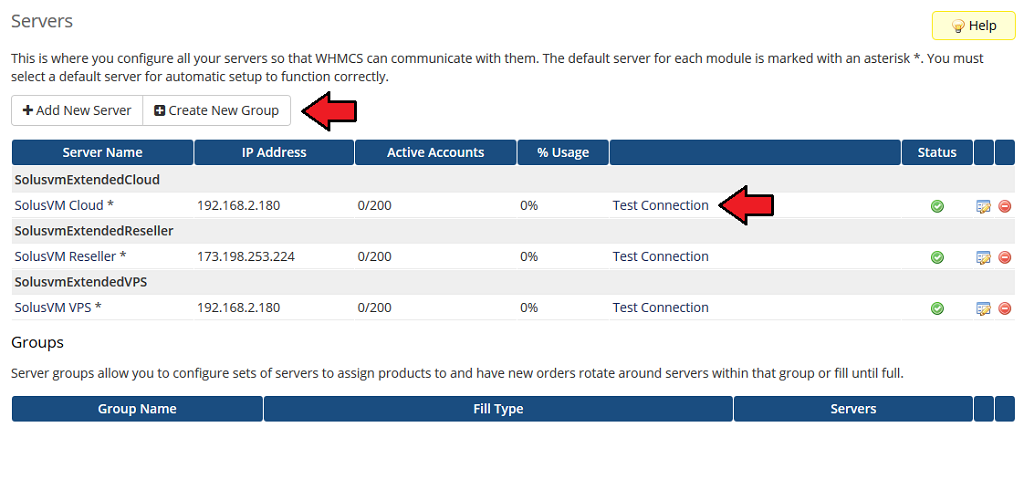
|
| 12. Enter name, click on a previously created server and press 'Add'. Afterwards, confirm by pressing 'Save Changes'. |
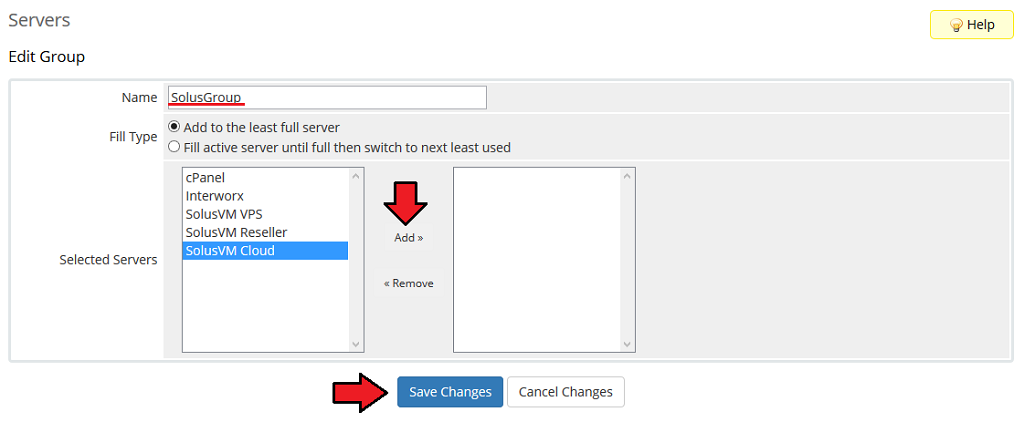
|
[edit] Configuration of Product
| 13. In order to create and configure a product, click on 'System Settings' → 'Products/Services'. Press 'Create a New Group'. |

|
| 14. Enter a product group name and press 'Save Changes'. |
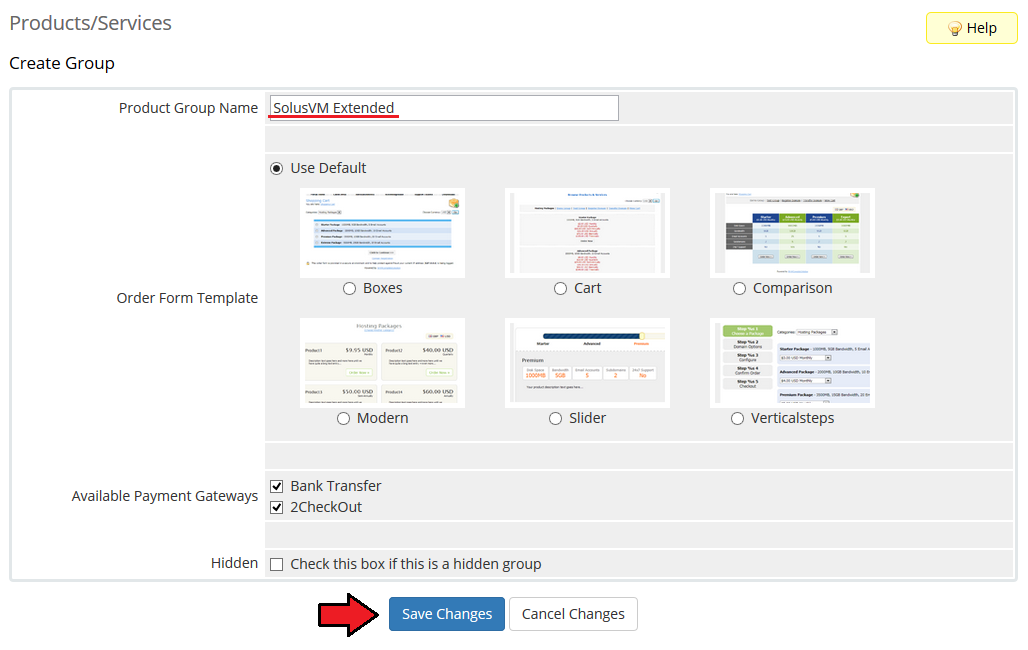
|
| 15. When you have a product group, you can create your product and assign it to SolusVM Extended Cloud. To create a product click on 'Create a New Product'. |

|
| 16. Afterwards, choose a product type and product group from dropdown menus, enter your product name and press 'Continue'. |

|
| 17. Now, go to 'Module Settings' section, choose both 'SolusvmExtendedCloud' and a previously created server group from dropdown menus. Afterwards, press 'Save Changes'. |
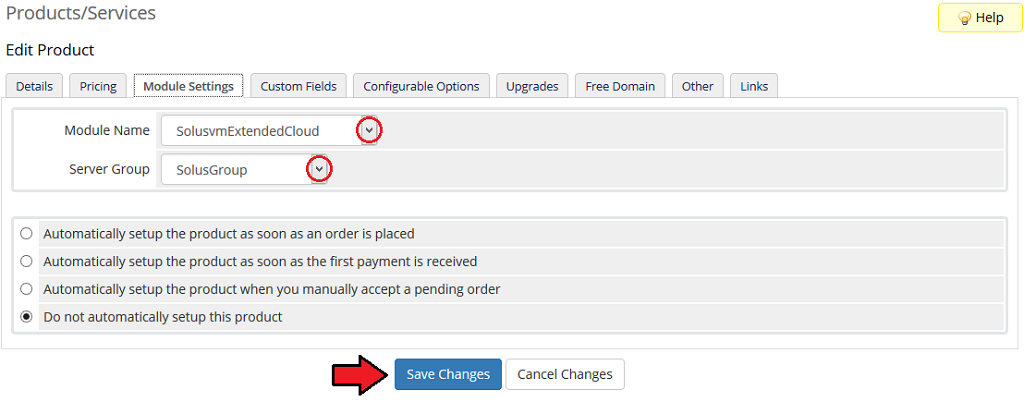
|
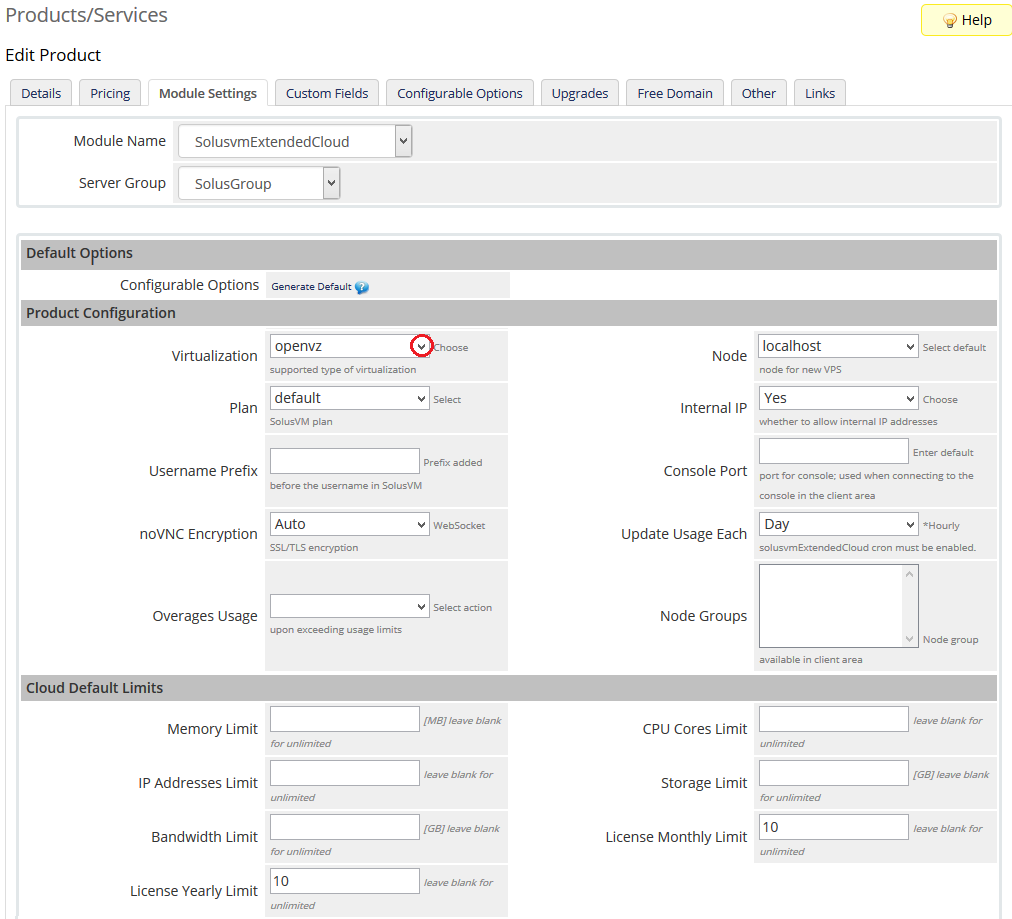
| 18. Select desired virtualization and press 'Save Changes'. All options of the selected virtualization will be loaded. Note that options availability differs according to a chosen virtualization! |
|
19. Now, fill out 'Product Configuration' section.
|
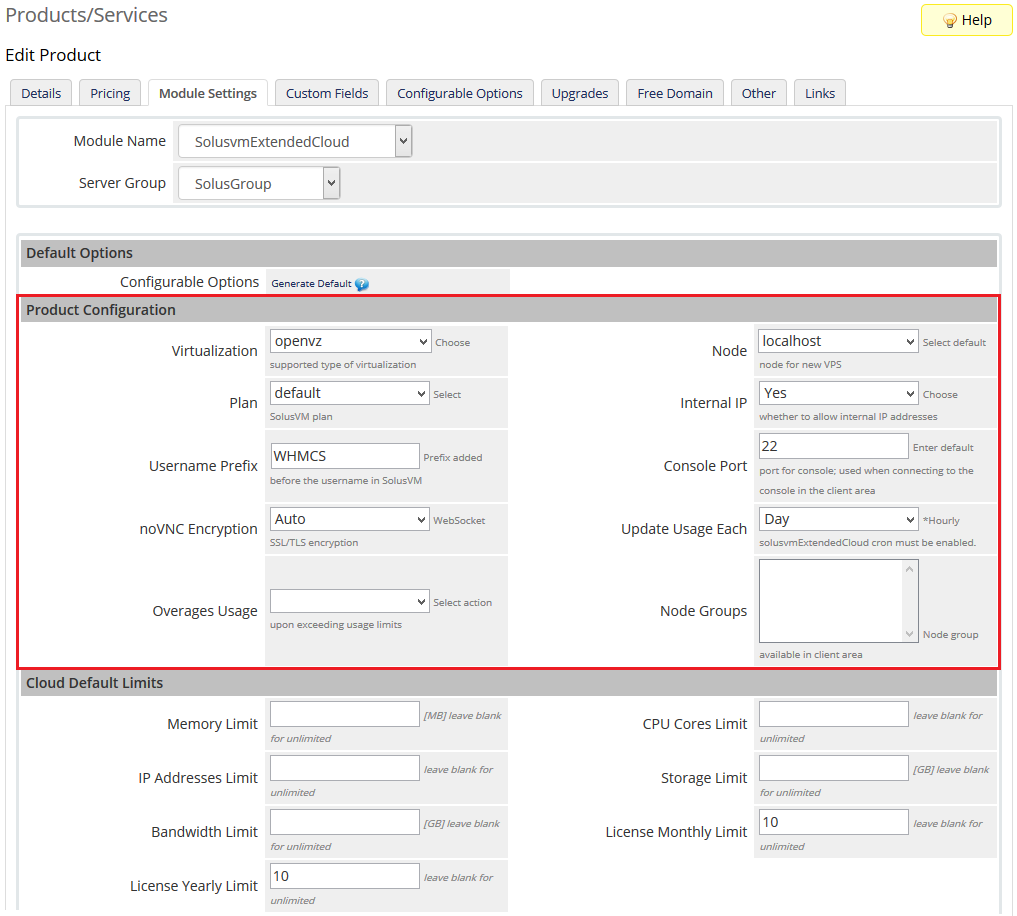
|
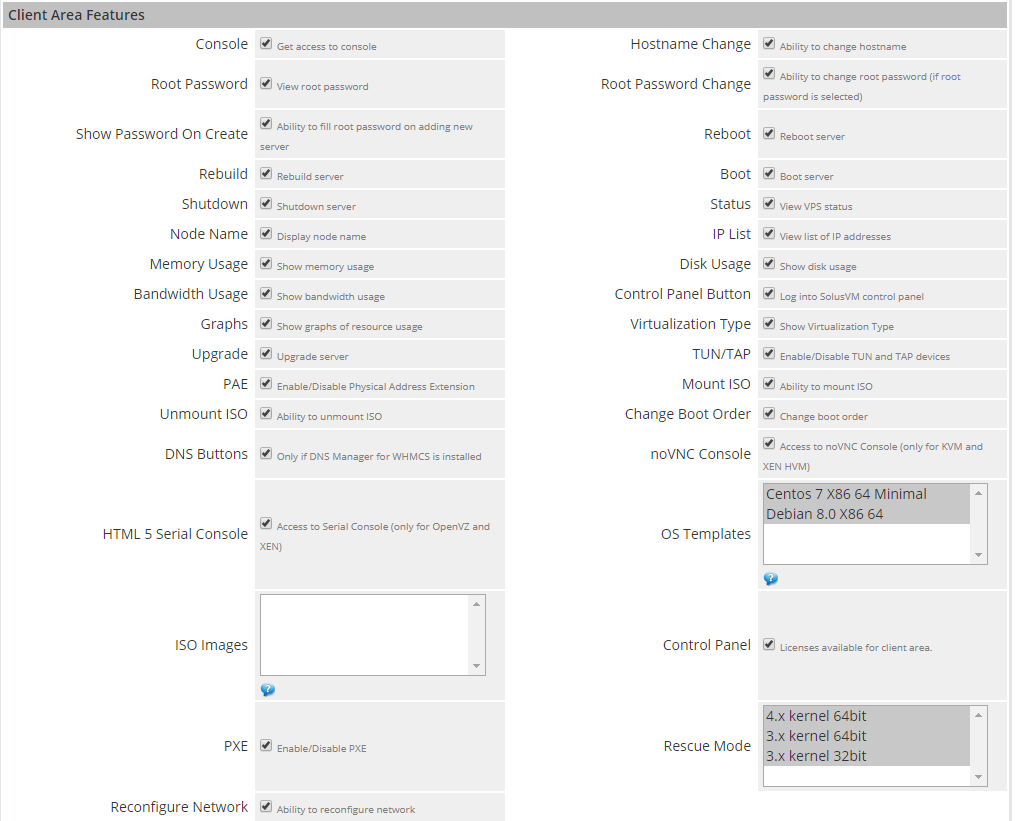
| 20. Under the 'Client Area Features' section you can define which features will be available for your clients. A feature is enabled when a checkbox next to it has been marked. |
|
[edit] Product With Dynamic Resources
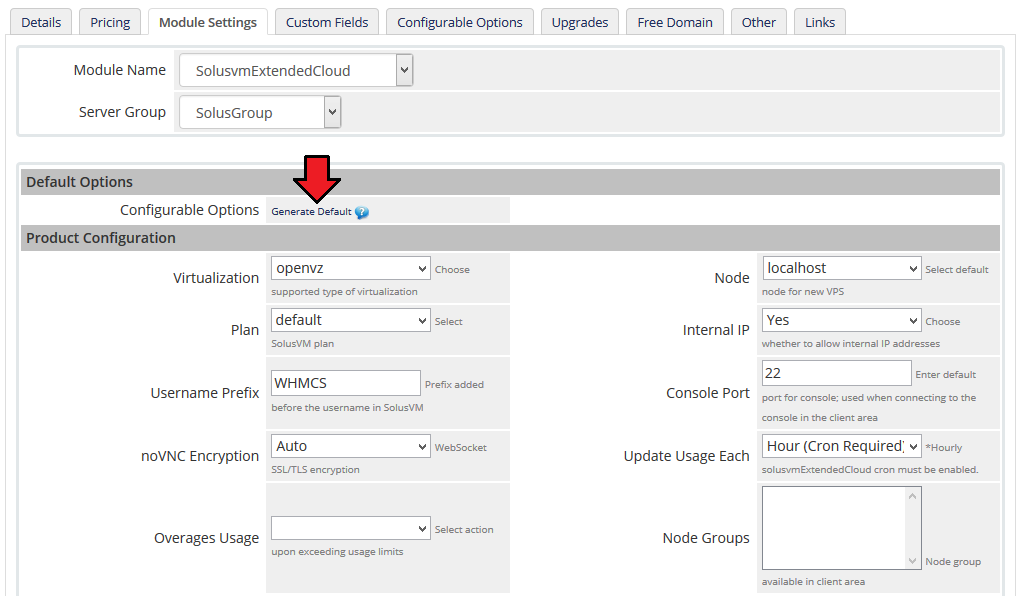
| 21. In order to set up a product with dynamic resources, press 'Generate Default' as shown on the following screen. Configurable options allow your clients to pick product with resources tailored to their needs. |
|
[edit] Product With Static Resources
| 22. You can also provide your clients with static resources. Simply, fill out the fields marked on the screen below with desired limits and press 'Save Changes'. |
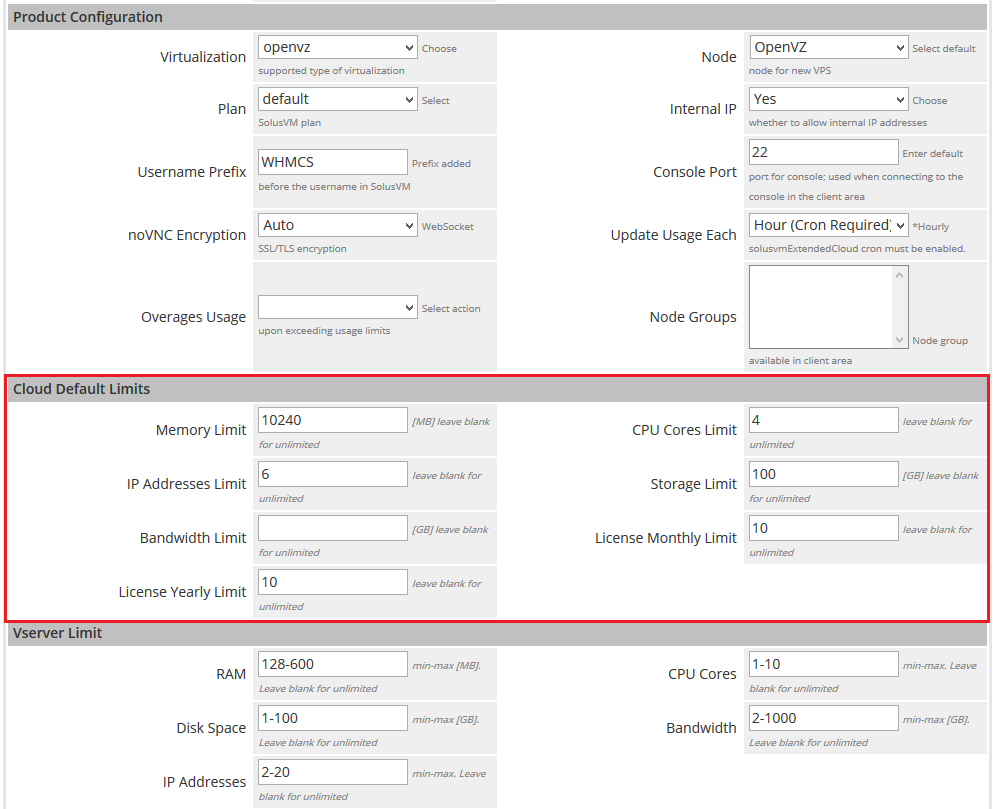
|
| 23. Define resource range limits for new VPS. Set limits on clients who will be allowed to create their virtual machines. It will let you impose some borders on the created VPS. |
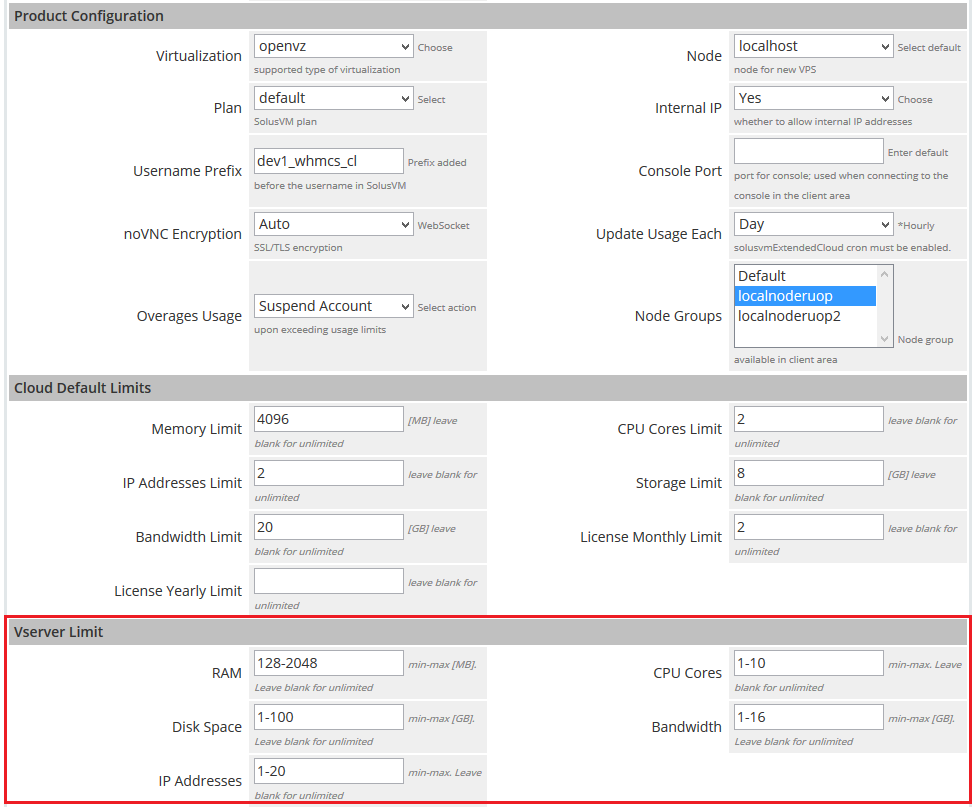
|
| You have just finished the installation and configuration of the module! |
[edit] Management
| SolusVM Extended Cloud For WHMCS is very simple and convenient in use. Your customers are only a few clicks away from creating their own servers. The module will allow your customers to manage multiple servers and freely change their resources. Everything within your own WHMCS client area. |
[edit] Interface
| Now, let's check the interface of the module in the client area where your customers can create and manage virtual servers. Note: The screen below presents the module right after the product creation. More features will be displayed after creating a server. |
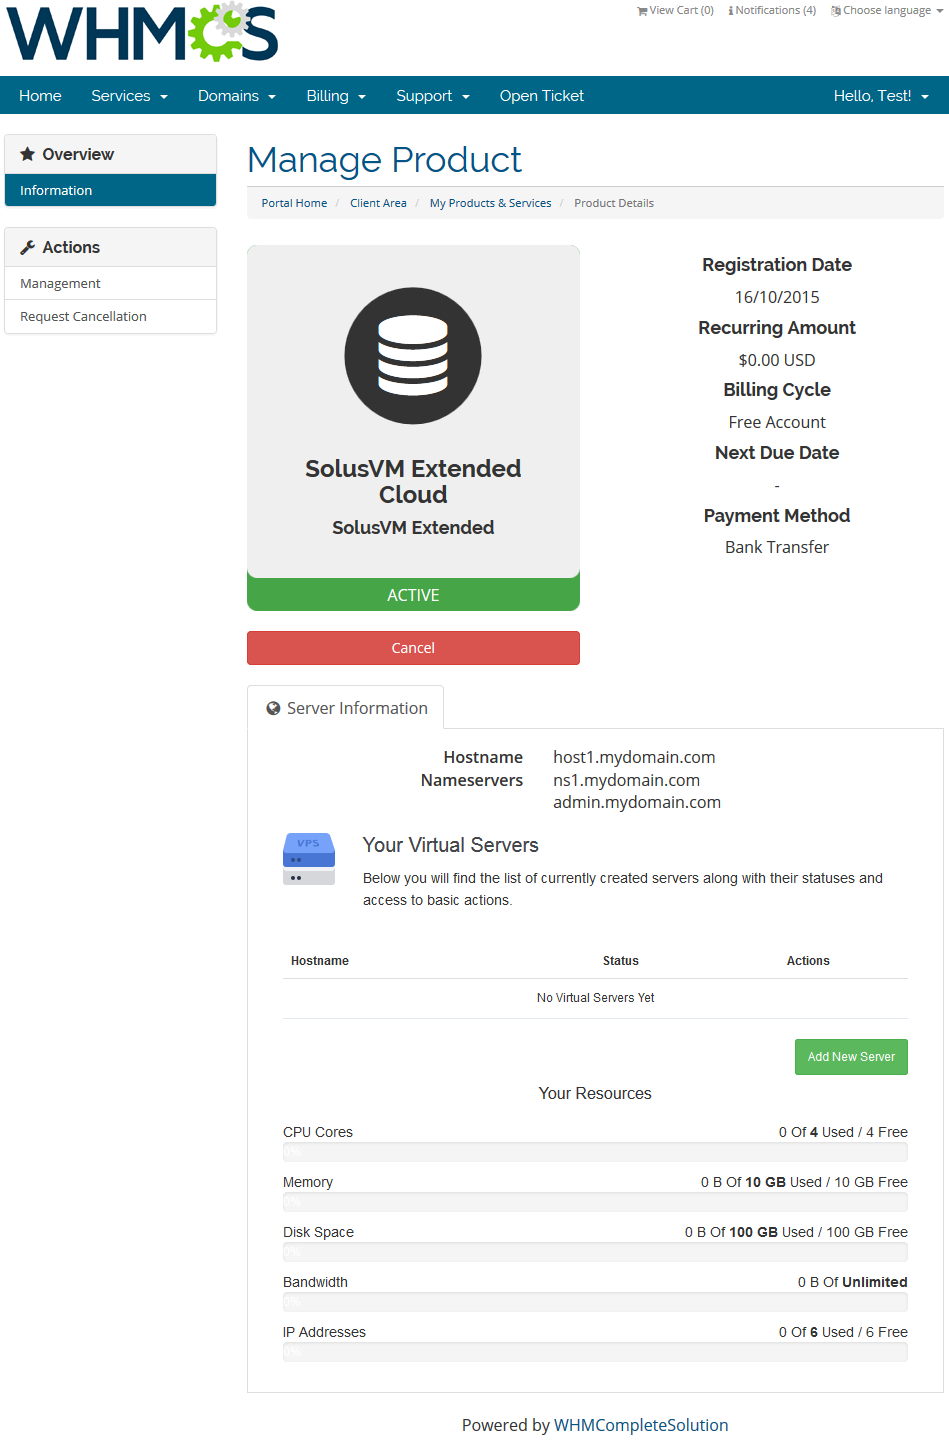
|
| You can manage each product from your WHMCS admin area. In addition to that, each VPS created by your clients can be easily monitored. |
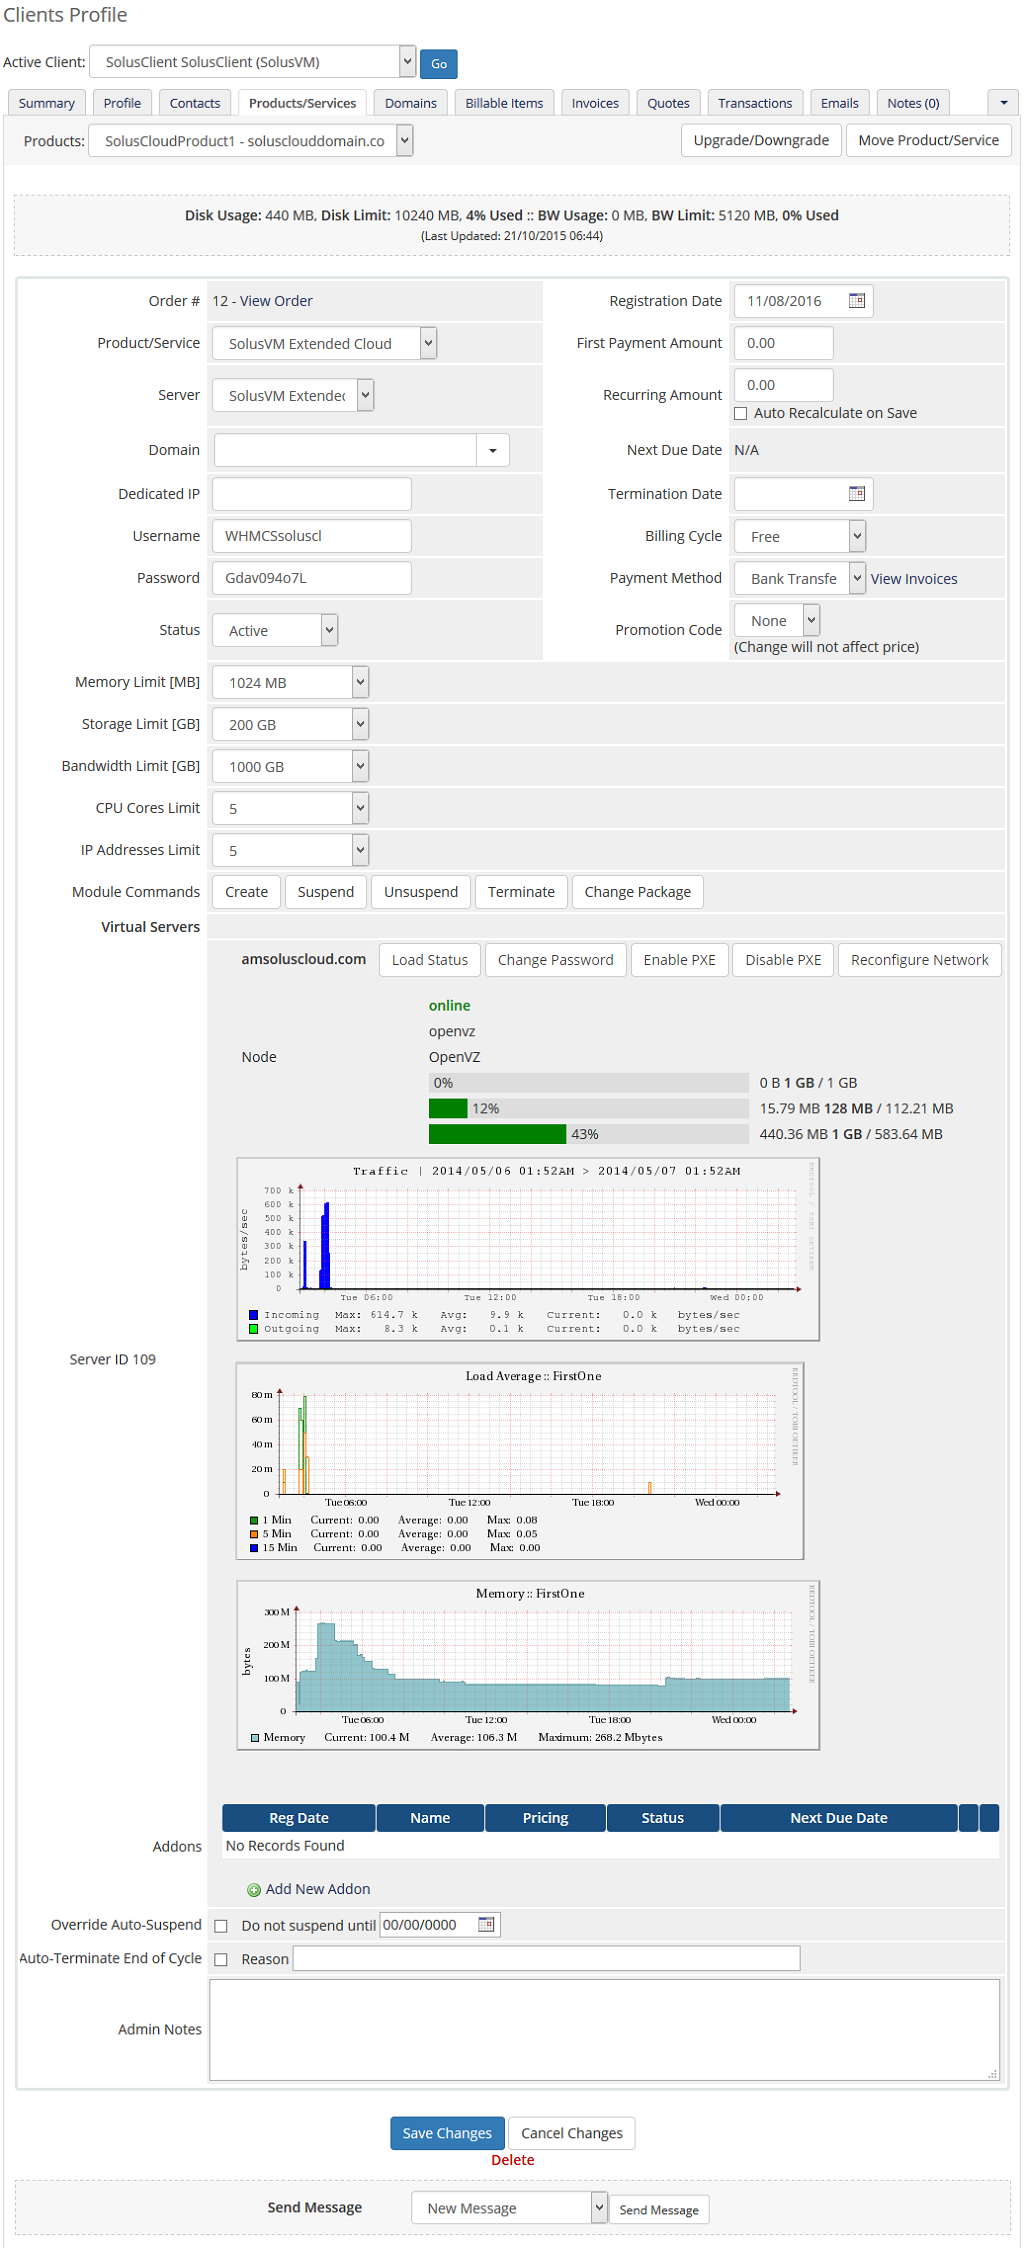
|
[edit] Management of Servers
| Let's start by creating a new virtual server. To do so, click on the 'Create Virtual Server' button. |
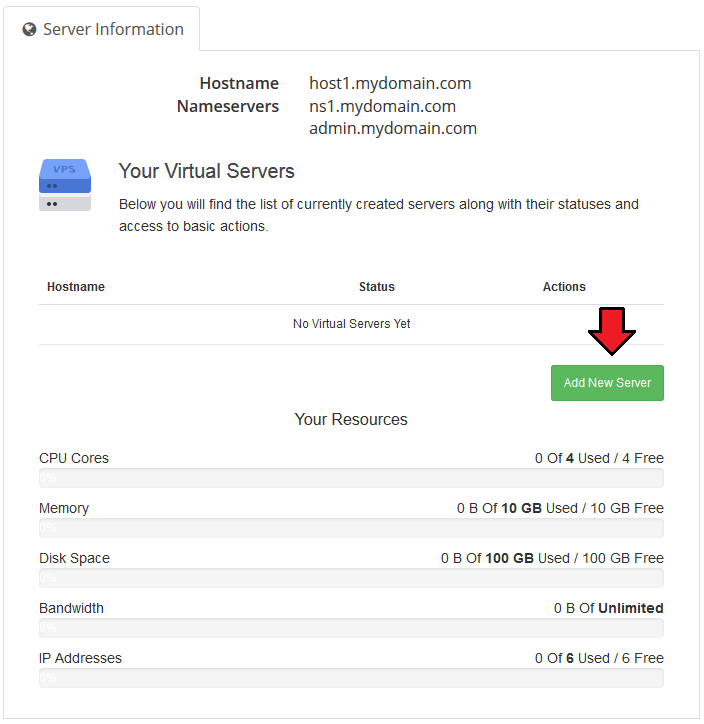
|
| Set server resources and click on the 'Add New Virtual Server' button. |
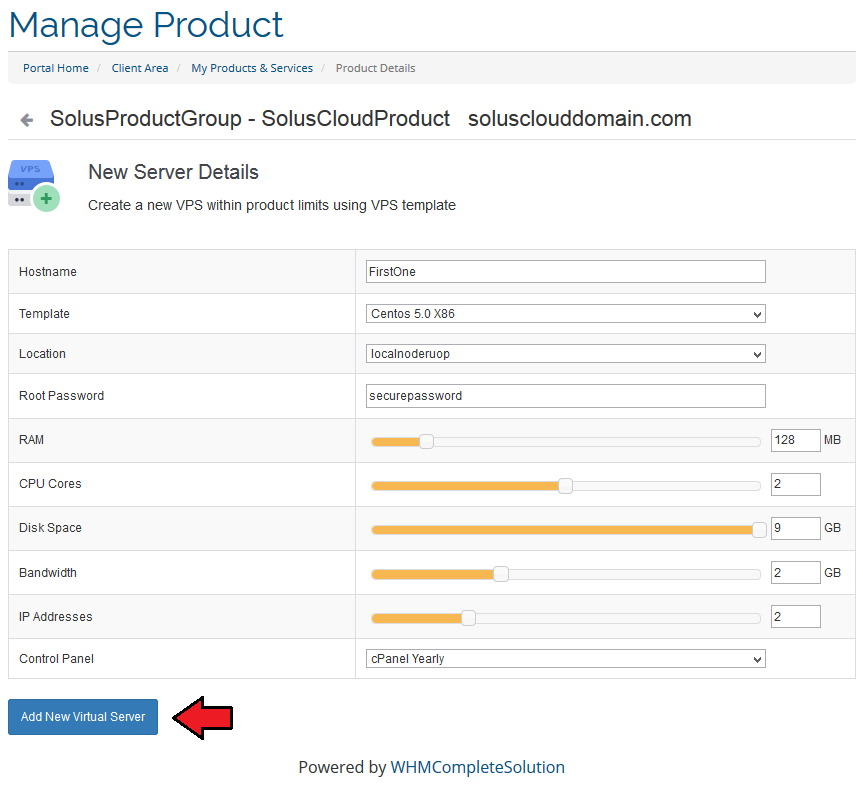
|
| As you can see on the screen below, the virtual server has been created successfully. Now let's see how we can manage our new server. To proceed, click on the 'Manage' button. |
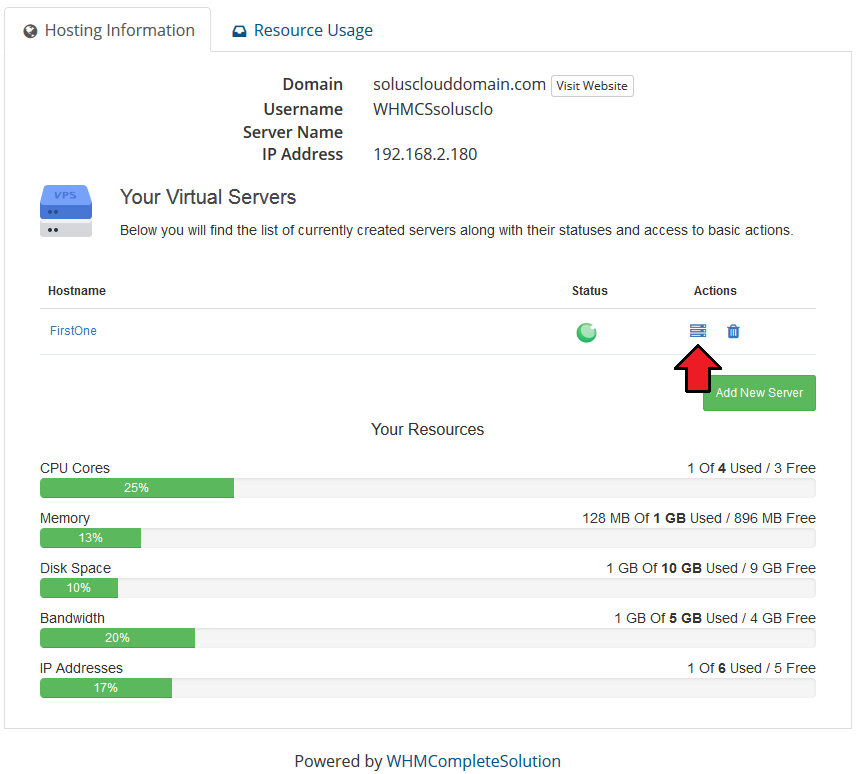
|
| One of the most interesting and useful options offered to the users is the upgrade. Upgrade allows your customers to request changes of virtual server resources. |
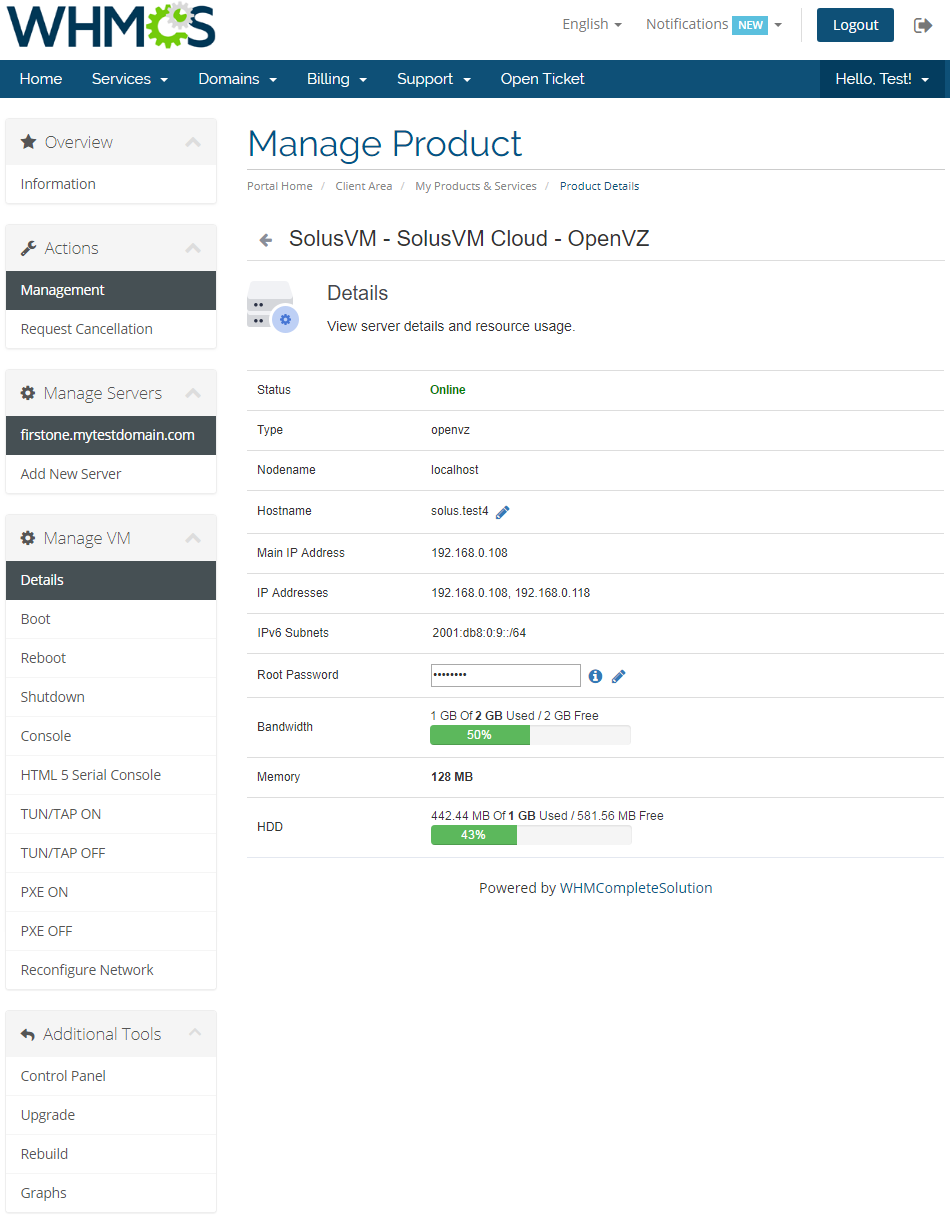
|
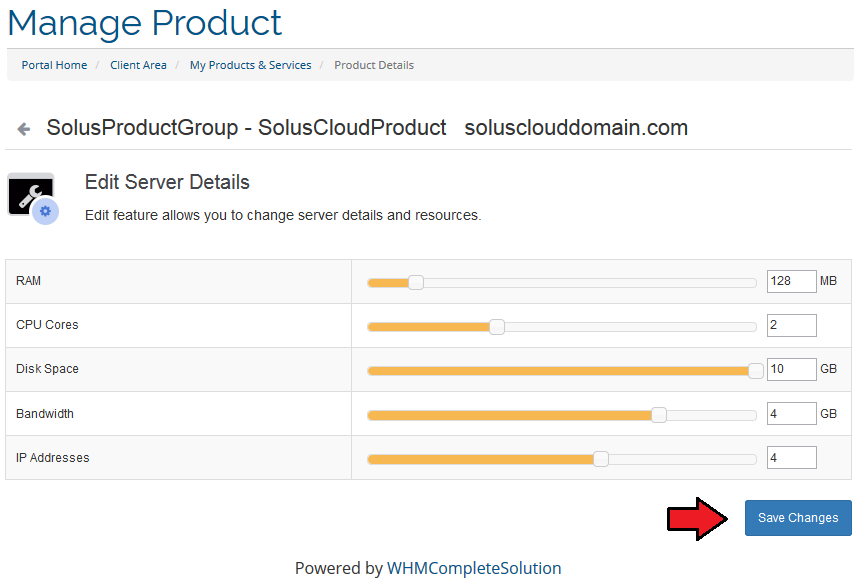
| Set details of server upgrade and click on the 'Upgrade' button. Upgrade is done automatically, no e-mail notifications or confirmation are sent. |
|
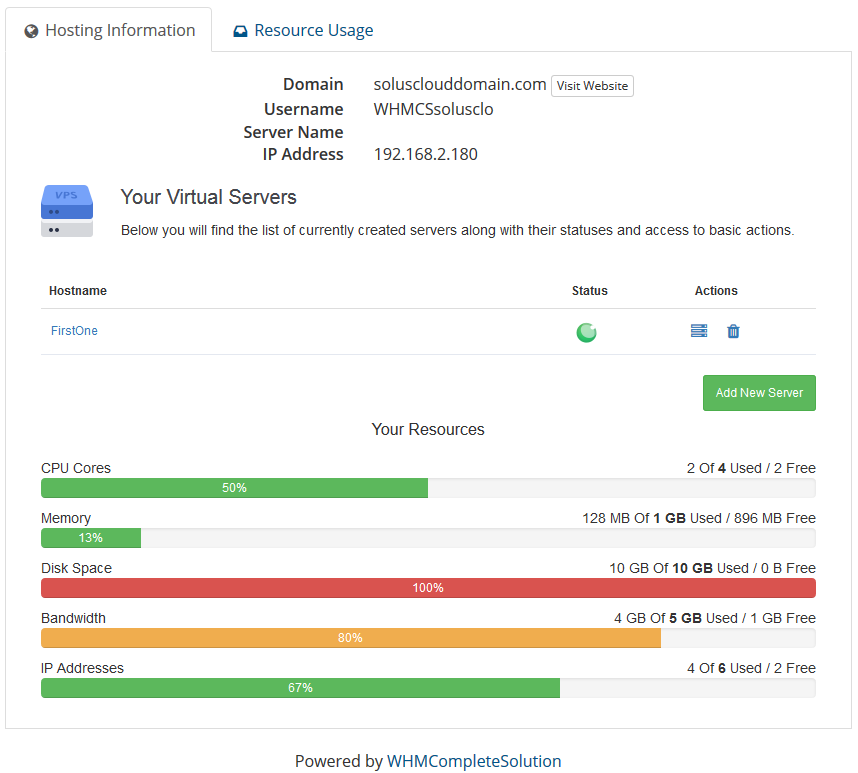
| As you can see on the following screen, the virtual server has been upgraded. |
|
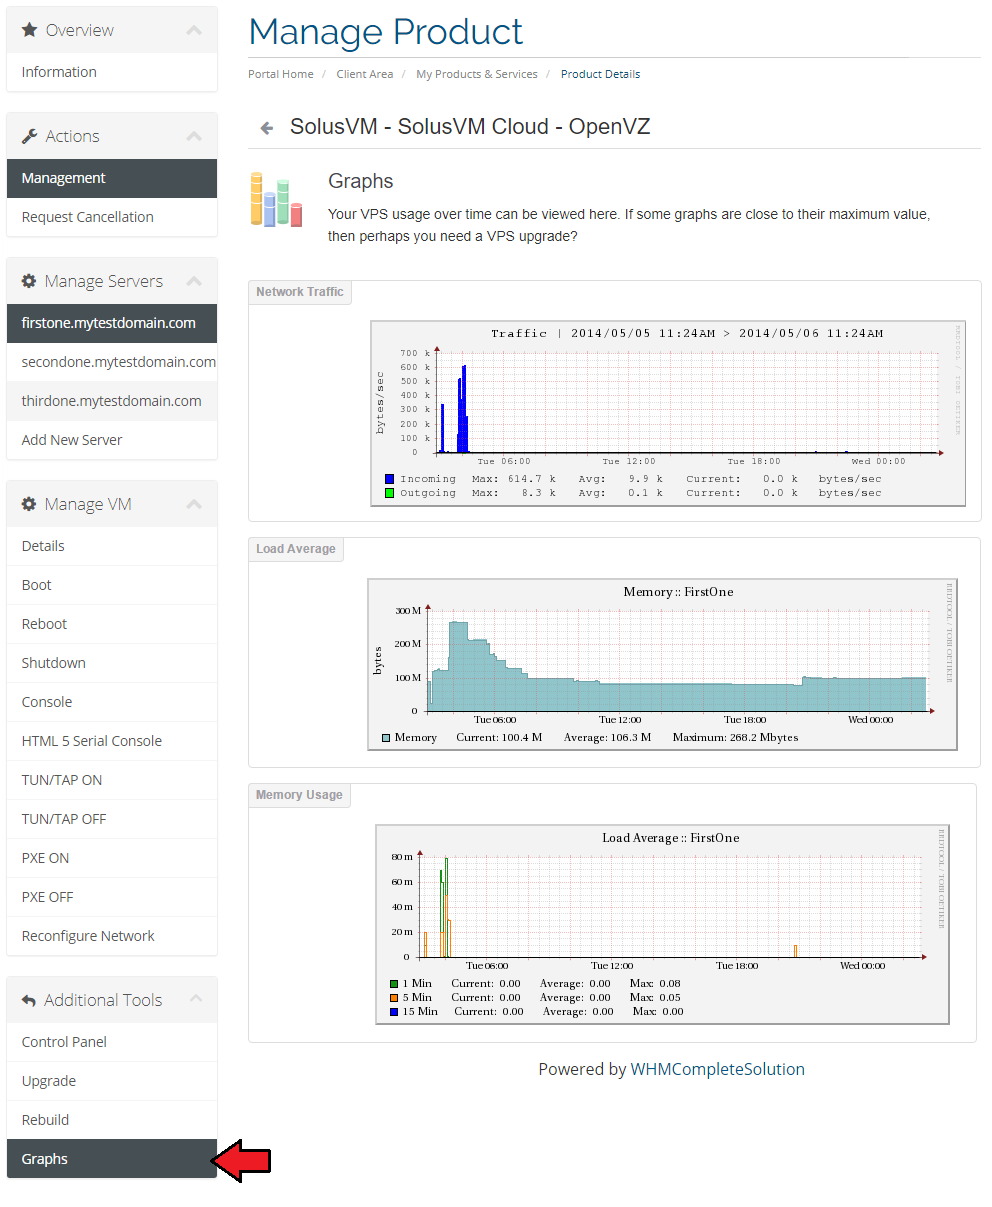
| Right next to 'Upgrade' option, there are 'Graphs'. Press it to see generated statistics on 'Network Traffic', 'Load Average' and 'Memory Usage'. |
|
| For more information about management of already created virtual server visit SolusVM Extended VPS For WHMCS Wiki |
[edit] Dynamic Server Resources Setup With Configurable Options
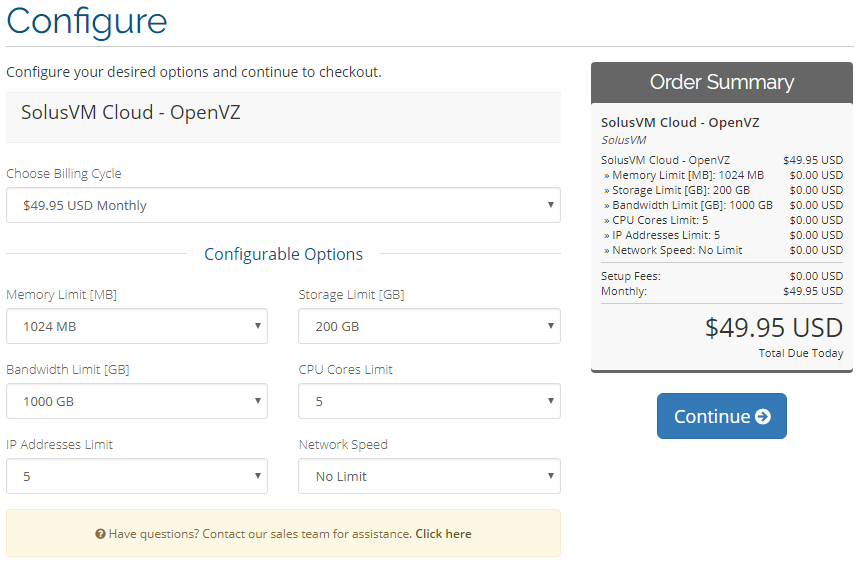
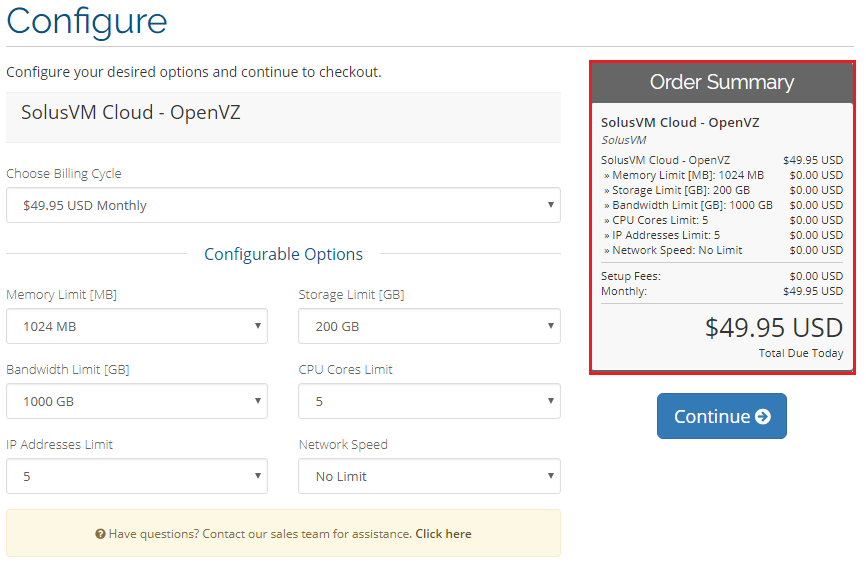
| If you want to allow your clients to dynamically set servers with resources they choose, follow these steps. Firstly, you should have a ready product. For more information on how to create one, head to the 'Configuration of Product' instruction. |
|
| If you decide to set pricing per server resource ordered, you can find instruction for it here. |
|
| If you prefer to charge your clients for server resources they actually use, you can use our Advanced Billing For WHMCS module. |
[edit] Management of DNS
| When you combine SolusVM Extended Cloud For WHMCS with DNS Manager For WHMCS, your clients will be able to manage PowerDNS zones and records from the client area. DNS Manager For WHMCS will allow your customers to manage DNS zones, records and ReverseDNS. |
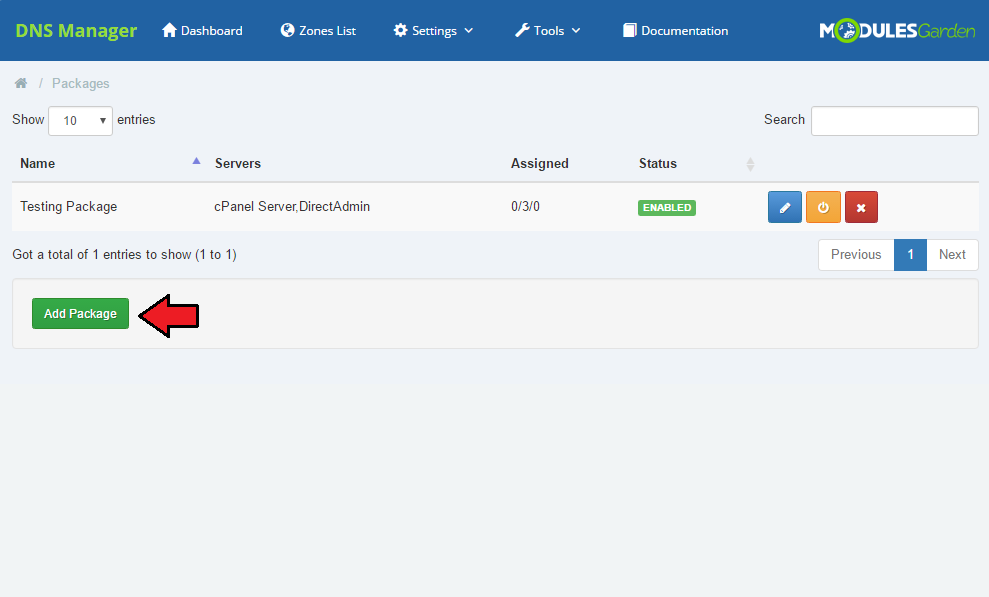
| To connect both modules, go to the 'Settings' → 'Packages' section of DNS Manager and add a new package. |
|
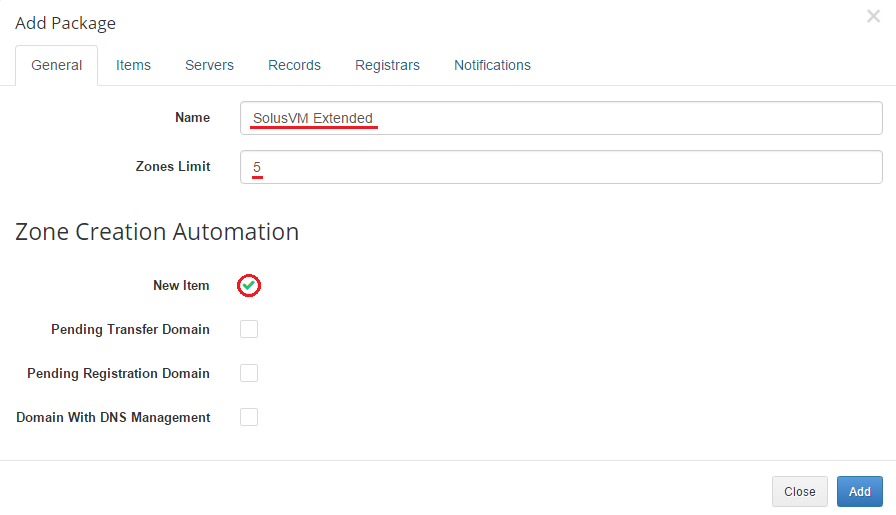
| Name the package and provide any details you find useful. Then proceed to the 'Item' section. |
|
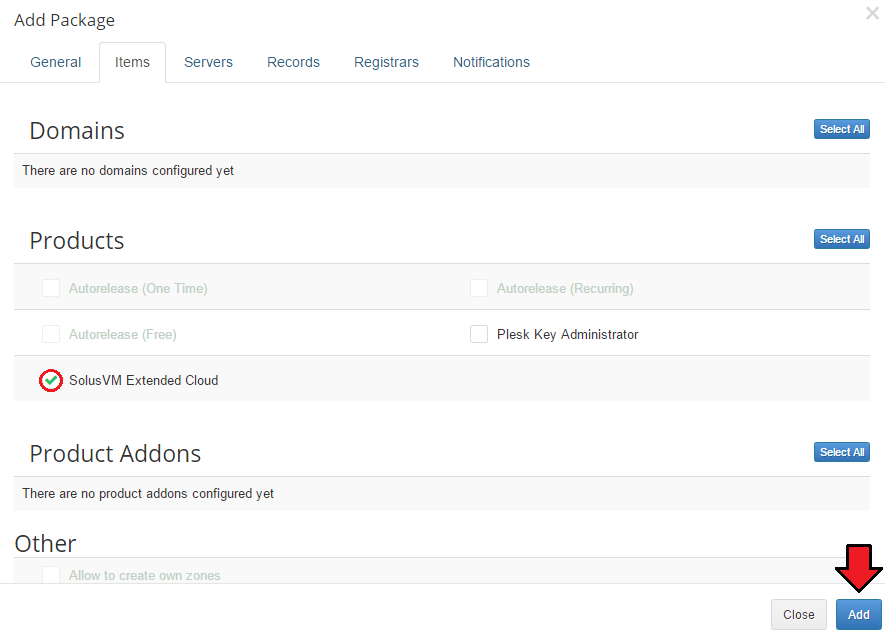
| Select SolusVM Extended Cloud from the list of products and click on 'Add' . |
|
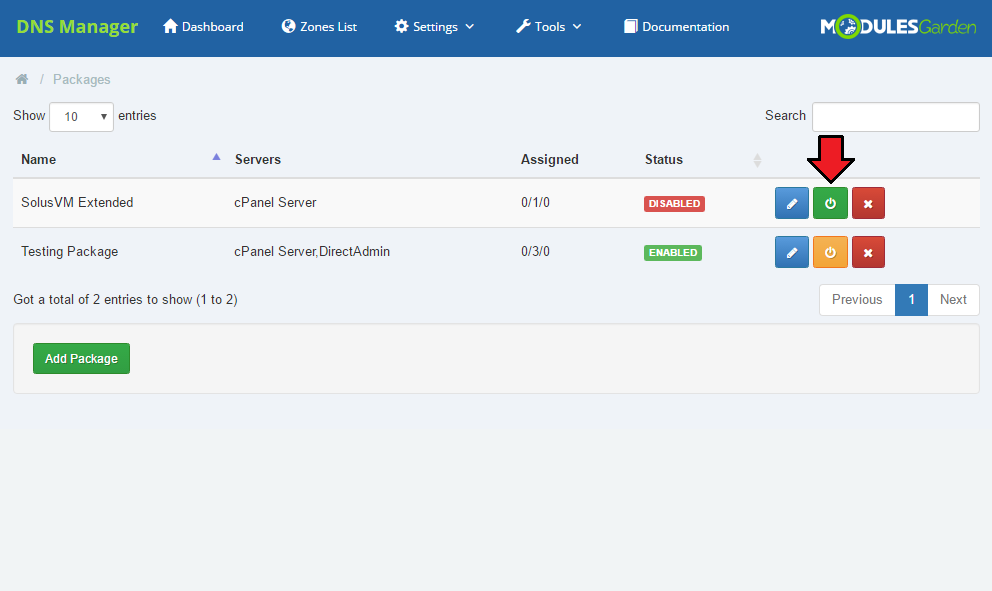
| Your package should now appear on the list. To change its status click on the button as shown below. |
|
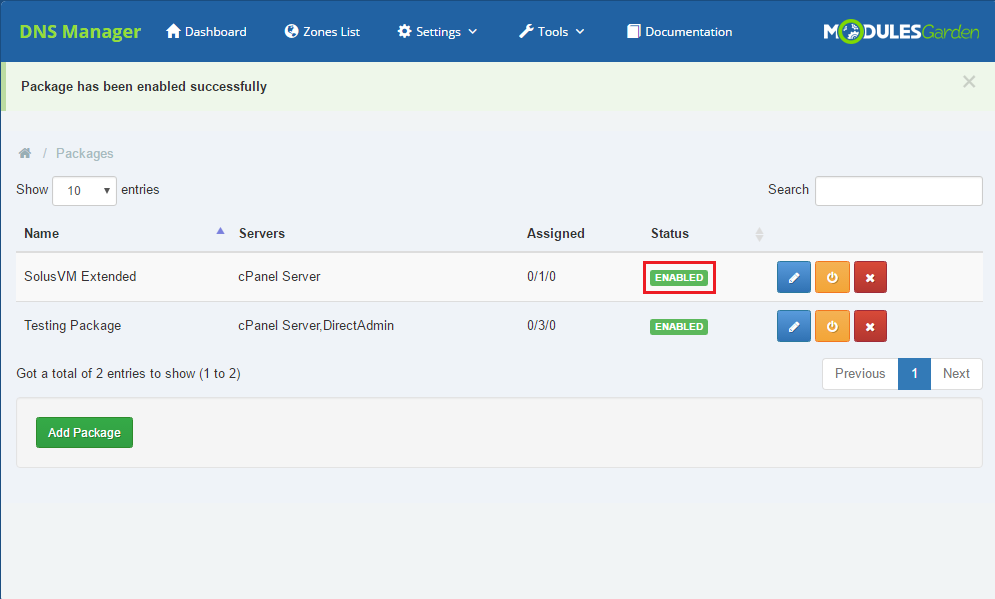
| Once done, you will see a proper note. |
|
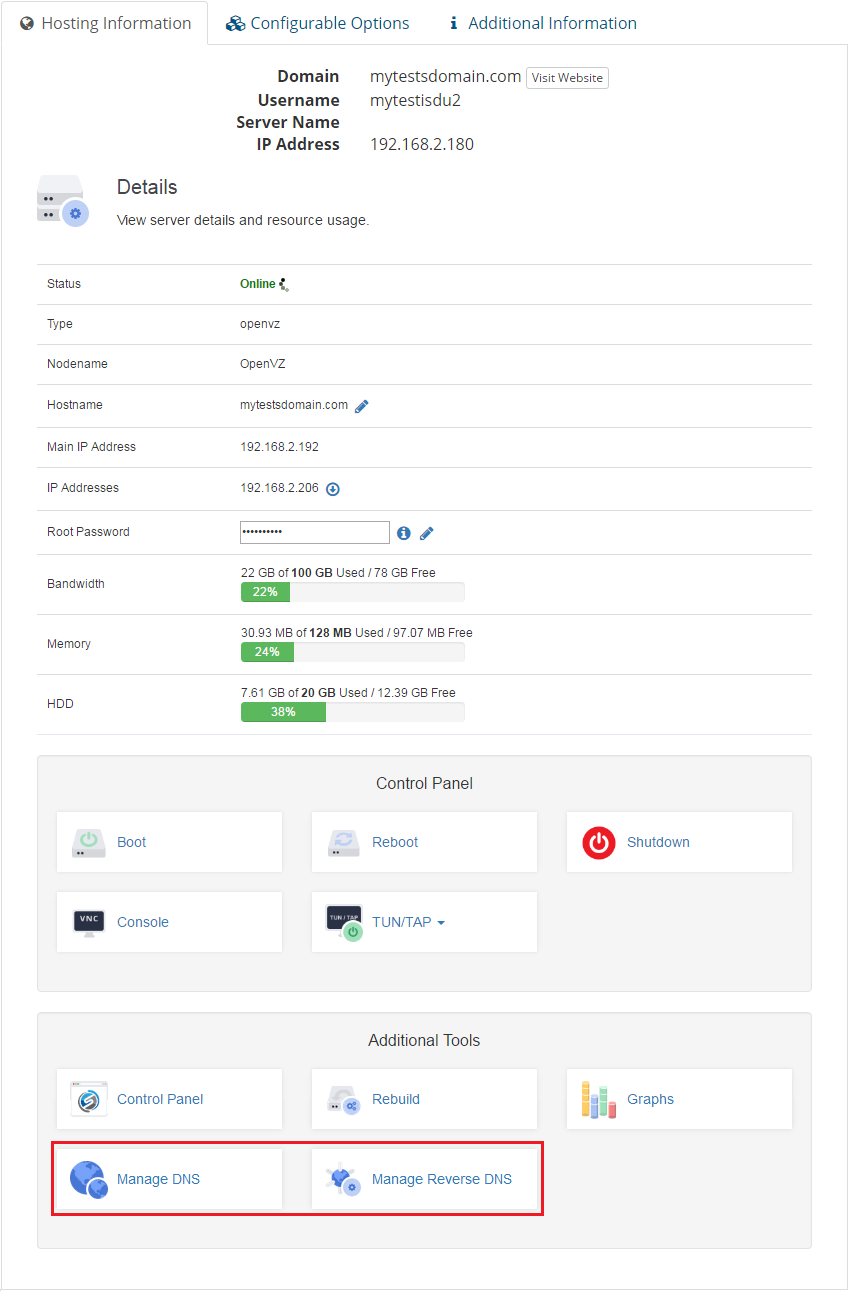
| Afterwards, buttons 'Manage DNS' and 'Manage Reverse DNS' will appear in the client area as shown on the screen below. |
|
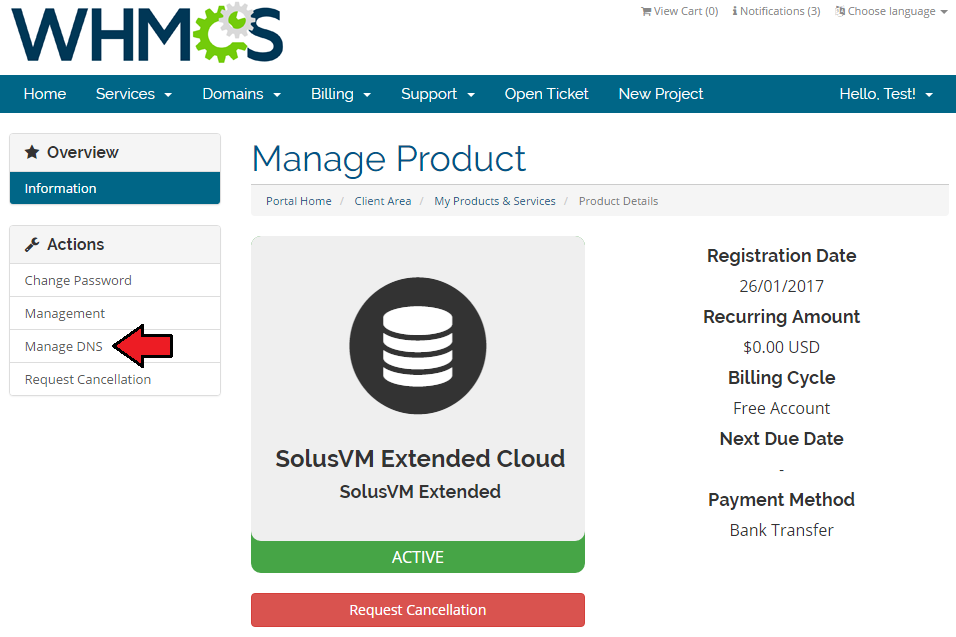
| You can find the 'Manage DNS' option also in the left menu. |
|
| Depending on previously chosen settings, your customers will be able to add and remove DNS zones. |
|
[edit] Management of Billing
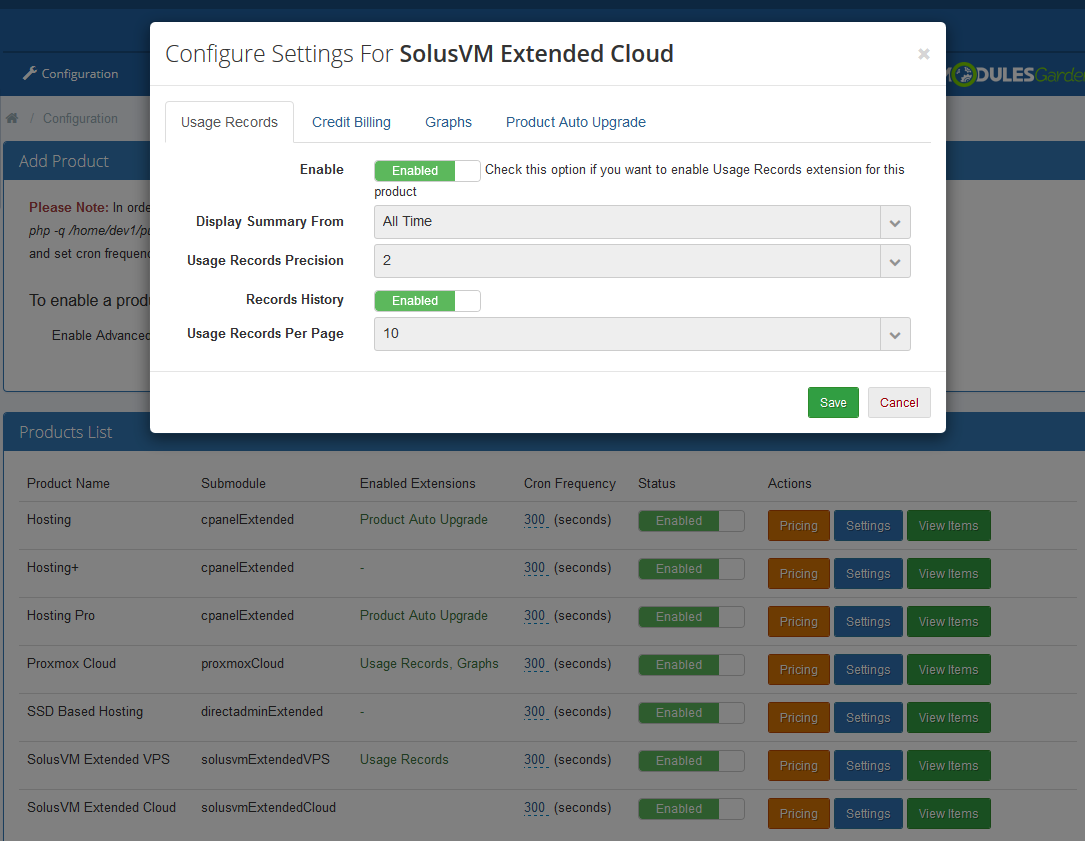
| When you combine SolusVM Extended Cloud For WHMCS with Advanced Billing For WHMCS, you will be able to set up additional billing options. Enable 'Usage Records' extension for Solus Cloud products. |
|
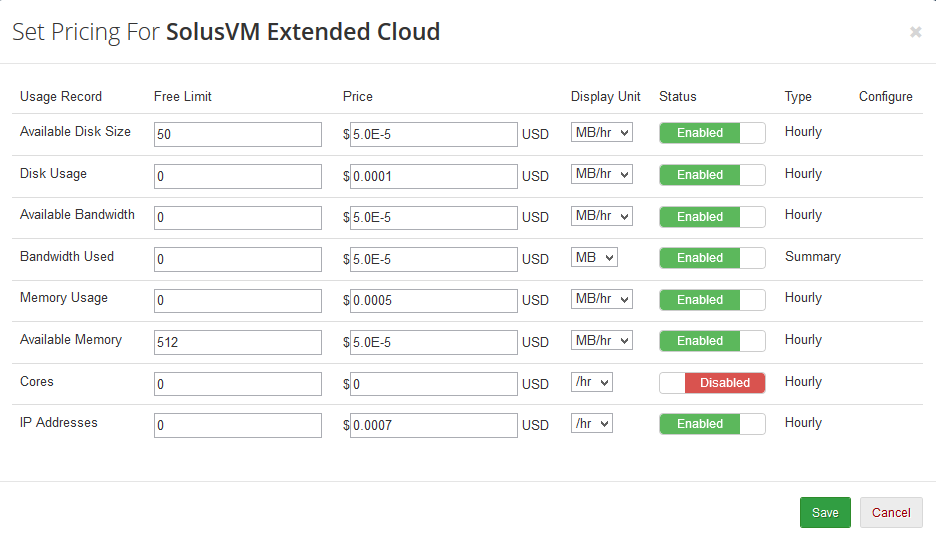
| The module allows you to charge your customers basing on the server resources used by them. Set free limits and pricing for used records. |
|
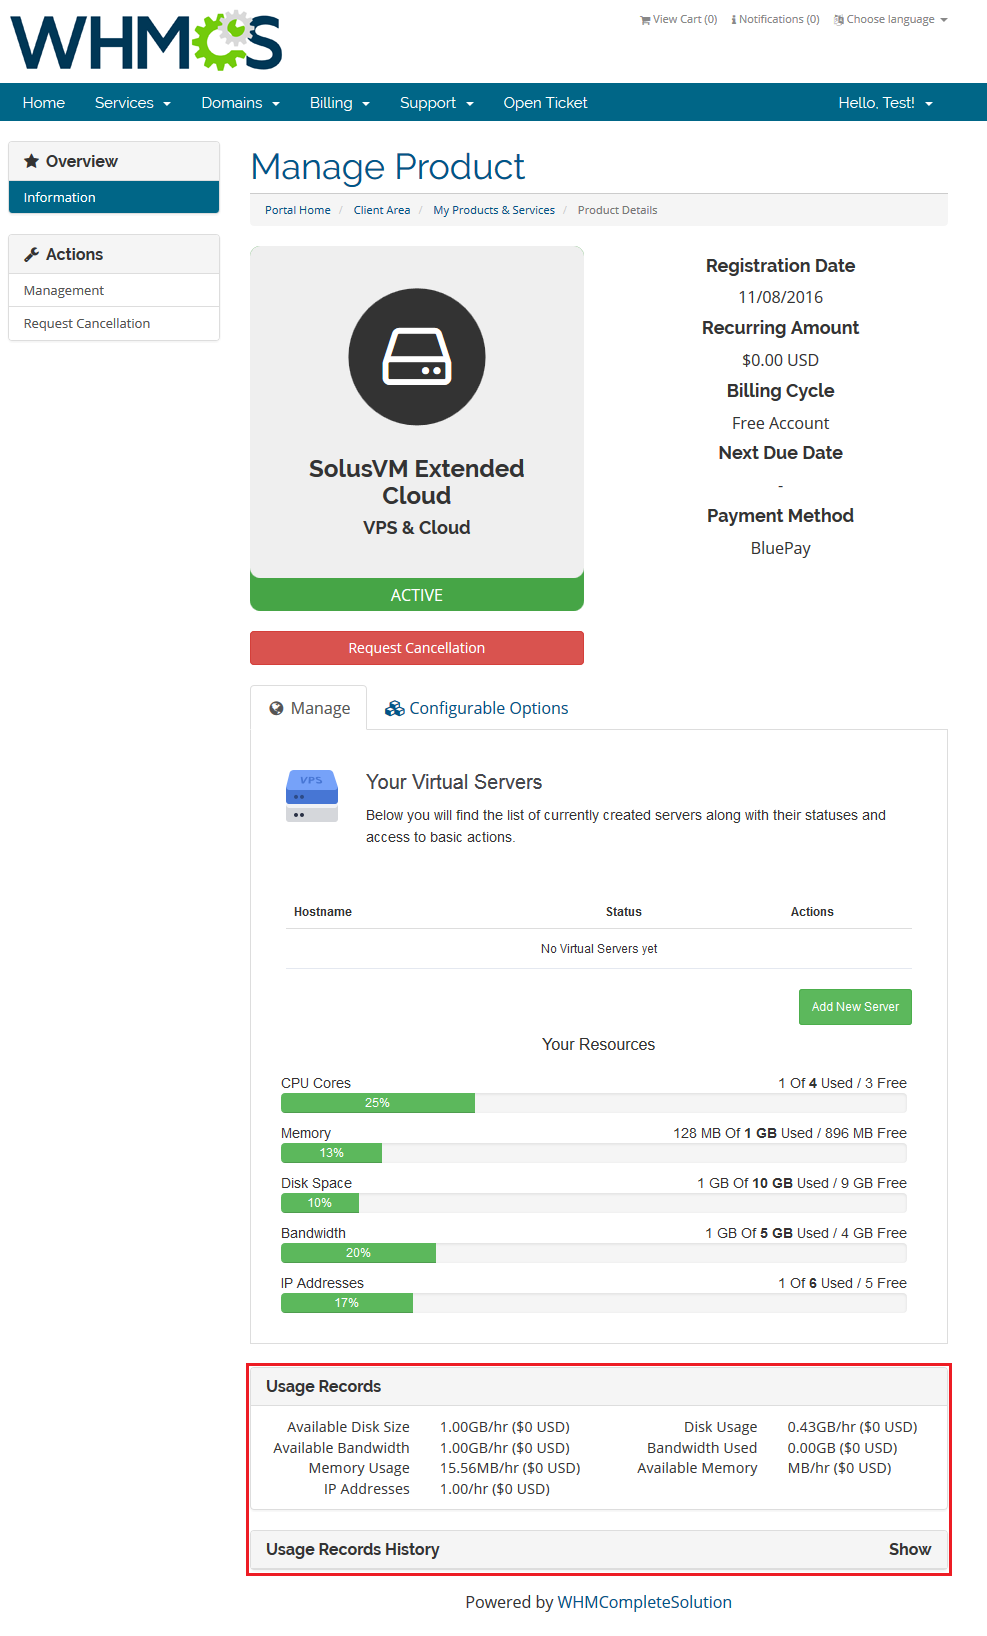
| With Advanced Billing module, you can also display the current server resource usage and its cost for your customers. |
|
[edit] Management of Email Templates
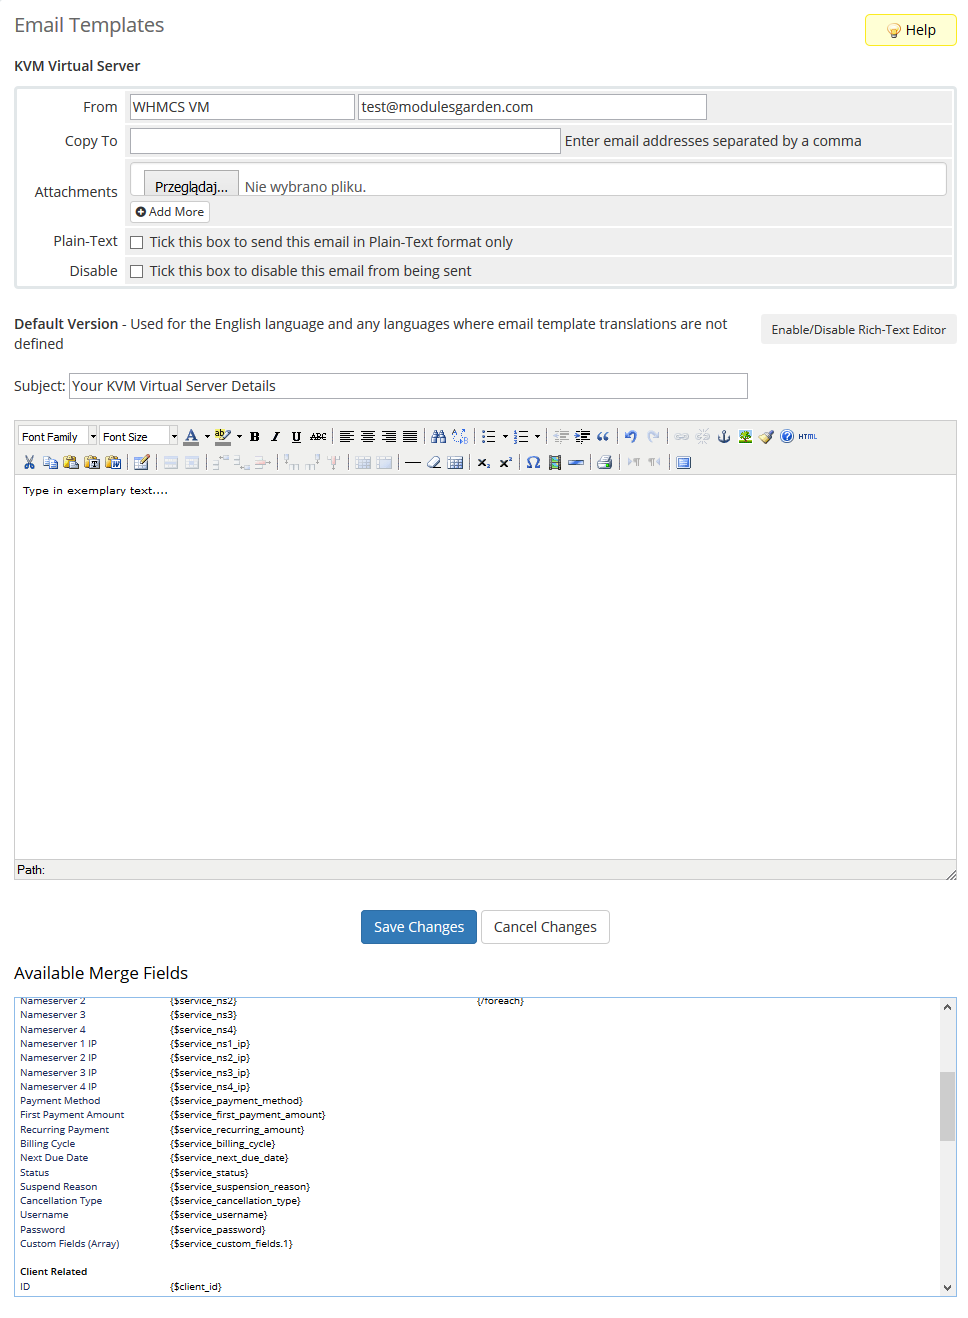
| You can automatically send your customers emails with details of newly created virtual servers. To do so, create a new email template with the 'Product' type and 'Unique Name' specified in SolusVM Documentation, in our case it is 'KVM Virtual Server'. |

|
You can paste the email content from SolusVM Documentation or create your own. Owing to our module, you can also use variables:
|
|
[edit] Debug Mode
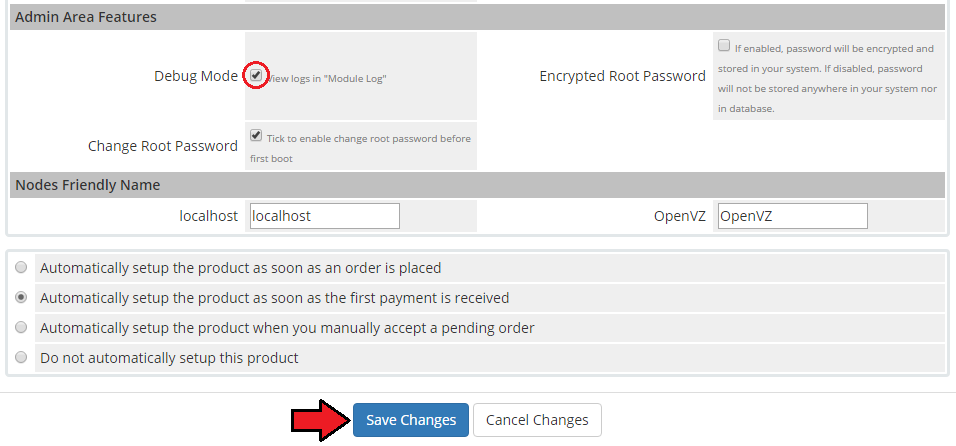
| SolusVM Extended Cloud is a very complex module. Therefore many things might go wrong. To help you quickly solve various problems usually connected with WHMCS product/server configuration and SolusVM server configuration, we created 'Debug Mode'. |
|
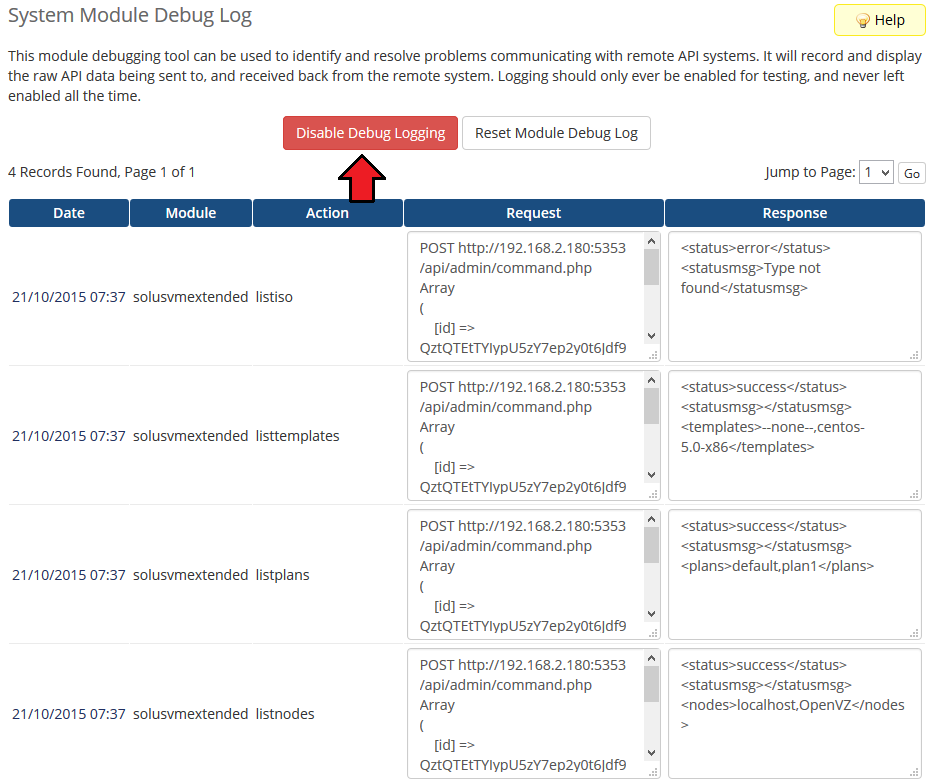
| Afterwards, go to 'Utilities' → 'Logs' → 'Module Log' and click on 'Enable Debug Logging' in order to enable it. The button should change its value to 'Disable Debug Logging'. From that moment, each action performed by the module will be recorded in the log. |
|
| Remember to turn off Debug Mode after you fix the problem. |
[edit] Locations Management
| Underneath, you will find a short description of a real life example of managing and rotating between locations with SolusVM Extended Cloud For WHMCS. Take a quick look at it and note the flow. |
| Let's assume that Mr Smith has one master server called 'Master'. This is the server Mr Smith configured and connects with from WHMCS with the help of our module. This server contains 3 slave servers configured in his SolusVM environment. These are:
These three slave servers are server nodes. In this configuration example, all of Mr Smith's clients order products on 'Master' server and so they receive resources available on server 1, 2, 3. |
[edit] Tips
| 1. We made every effort to make our module as easy to install, configure and use, as possible. Therefore we paid special attention to displayed messages. Read carefully each message, follow the instructions and you will have no problems using the module. |
| 2. Operations performed on the virtual servers are not executed immediately. Give your SolusVM server some time to process the request and execute the operation. |
| 3. As this module supports templates system, any changes made in the module's templates files will be saved after the upgrade process. |
| 4. You must be aware that SolusVM Extended Cloud does not support importing existing instances. In order to import an existing account will need to use SolusVM Extended VPS module. It means you need to own SolusVM VPS For WHMCS module to perform such an operation. |
[edit] Update Instructions
| An essential guidance through the process of updating the module is offered here. Ensure successful completion of the module update by carefully following each step, thereby preventing data loss or any unforeseen issues. |
[edit] Update of Products
| Our module is entirely compatible with SolusVM WHMCS Module (previously known as "SolusVM Pro") and you can easily upgrade your existing products without losing your settings. 1. Go to 'System Settings' → 'Products/Services' → 'Module Settings' of your product and switch 'Module Name' from 'Solusvmpro' to 'SolusvmExtendedCloud' . |
[edit] Upgrade Guide
| Seeking a solution that offers greater flexibility, customization tailored to your precise needs, and unrestricted availability? There is an option that not only proves to be cost-effective in the long run but also includes prioritized support services, making it a truly valuable investment. Opt for the Open Source version of your SolusVM Extended Cloud For WHMCS module to unlock these benefits. Follow a comprehensive guide covering the transition process, the advantages it brings, and step-by-step instructions on what to do next after the order has been successfully finalized. |
[edit] Common Problems
| 1. When you have problems with connection, check whether your SELinux or firewall does not block ports. |
| 2. The vast majority of problems are connected with misconfigured SolusVM server or misconfigured servers/products in your WHMCS. Firstly, make sure that your SolusVM server has properly configured virtual servers, nodes, node groups, templates, plans and API access. |
| 3. By default, our module connects with SolusVM server on port 5353. If you use different port, you need to specify it in the 'Hostname' field. The default port for SSL connections is 5656. To connect on that port, enter your hostname as follows: 'yourhostname.com:5656'. Keep in mind that you can connect on any port. |