Social Media Login For WHMCS
(→About Social Media Login For WHMCS) |
(→Client Area) |
||
| (26 intermediate revisions by 5 users not shown) | |||
| Line 1: | Line 1: | ||
<meta name="keywords" content="social media login for whmcs, social media login configuration, whmcs social media login management, whmcs social media login installation, whmcs social media login common problems, about whmcs social media login, whmcs social media login documentation, whmcs social media login faq, whmcs social media login help, whmcs social media login guide, whmcs social media login wiki, whmcs social media login tutorial, whmcs social media login tips, whmcs social media login wiki"></meta> | <meta name="keywords" content="social media login for whmcs, social media login configuration, whmcs social media login management, whmcs social media login installation, whmcs social media login common problems, about whmcs social media login, whmcs social media login documentation, whmcs social media login faq, whmcs social media login help, whmcs social media login guide, whmcs social media login wiki, whmcs social media login tutorial, whmcs social media login tips, whmcs social media login wiki"></meta> | ||
<meta name="description" content="ModulesGarden Wiki Contains All The Information You Need About The Social Media Login For WHMCS Module."></meta> | <meta name="description" content="ModulesGarden Wiki Contains All The Information You Need About The Social Media Login For WHMCS Module."></meta> | ||
| − | |||
=About [https://www.modulesgarden.com/products/whmcs/social-media-login Social Media Login For WHMCS]= | =About [https://www.modulesgarden.com/products/whmcs/social-media-login Social Media Login For WHMCS]= | ||
{| | {| | ||
| Line 12: | Line 11: | ||
|} | |} | ||
{| | {| | ||
| − | |style="padding: 0px 0px 0px 30px;"|✔ Load Your Own Sets | + | |style="padding: 0px 0px 0px 30px;"|✔ Load Your Own Icon Sets |
|} | |} | ||
{| | {| | ||
| Line 21: | Line 20: | ||
|} | |} | ||
{| | {| | ||
| − | |style="padding: 0px 0px 0px 30px;"|✔ Define | + | |style="padding: 0px 0px 0px 30px;"|✔ Define Order Of Available Providers |
|} | |} | ||
{| | {| | ||
|style="padding: 0px 0px 0px 30px;"|✔ View Statistics On Registered Accounts | |style="padding: 0px 0px 0px 30px;"|✔ View Statistics On Registered Accounts | ||
| + | |} | ||
| + | {| | ||
| + | |style="padding: 0px 0px 0px 30px;"|✔ Manage Users With Linked Providers | ||
|} | |} | ||
{| | {| | ||
| Line 34: | Line 36: | ||
*'''Client Area Features:''' | *'''Client Area Features:''' | ||
{| | {| | ||
| − | |style="padding: 10px 0px 0px 30px;"|✔ | + | |style="padding: 10px 0px 0px 30px;"|✔ Use Single Sign-On With Social Media Platform Credentials On: |
| + | |} | ||
| + | {| | ||
| + | |style="padding: 0px 0px 0px 45px;"|✔ Login Page | ||
| + | |} | ||
| + | {| | ||
| + | |style="padding: 0px 0px 0px 45px;"|✔ Registration Page | ||
| + | |} | ||
| + | {| | ||
| + | |style="padding: 0px 0px 0px 45px;"|✔ Checkout Page | ||
| + | |} | ||
| + | {| | ||
| + | |style="padding: 0px 0px 0px 30px;"|✔ Automatically Fill Available Client Details Into WHMCS Account | ||
|} | |} | ||
{| | {| | ||
|style="padding: 0px 0px 0px 30px;"|✔ Link Existing WHMCS Account With Social Media Platform | |style="padding: 0px 0px 0px 30px;"|✔ Link Existing WHMCS Account With Social Media Platform | ||
| + | |} | ||
| + | {| | ||
| + | |style="padding: 0px 0px 0px 30px;"|✔ Manage Providers Linked With Account | ||
|} | |} | ||
{| | {| | ||
| Line 45: | Line 62: | ||
{| | {| | ||
|style="padding: 10px 0px 0px 30px;"|✔ Amazon | |style="padding: 10px 0px 0px 30px;"|✔ Amazon | ||
| + | |} | ||
| + | {| | ||
| + | |style="padding: 0px 0px 0px 30px;"|✔ Azure | ||
| + | |} | ||
| + | {| | ||
| + | |style="padding: 0px 0px 0px 30px;"|✔ Discord | ||
|} | |} | ||
{| | {| | ||
| Line 51: | Line 74: | ||
{| | {| | ||
|style="padding: 0px 0px 0px 30px;"|✔ Dropbox | |style="padding: 0px 0px 0px 30px;"|✔ Dropbox | ||
| + | |} | ||
| + | {| | ||
| + | |style="padding: 0px 0px 0px 30px;"|✔ Epic Games | ||
|} | |} | ||
{| | {| | ||
| Line 78: | Line 104: | ||
{| | {| | ||
|style="padding: 0px 0px 0px 30px;"|✔ Reddit | |style="padding: 0px 0px 0px 30px;"|✔ Reddit | ||
| + | |} | ||
| + | {| | ||
| + | |style="padding: 0px 0px 0px 30px;"|✔ Steam | ||
|} | |} | ||
{| | {| | ||
| Line 89: | Line 118: | ||
|} | |} | ||
{| | {| | ||
| − | |style="padding: 0px 0px 0px 30px;"|✔ Twitter | + | |style="padding: 0px 0px 0px 30px;"|✔ X (Twitter) |
|} | |} | ||
{| | {| | ||
| Line 111: | Line 140: | ||
|} | |} | ||
{| | {| | ||
| − | |style="padding: 0px 0px 0px 30px;"|✔ Supports PHP | + | |style="padding: 0px 0px 0px 30px;"|✔ Supports PHP 8.1 Back To PHP 7.4 |
|} | |} | ||
{| | {| | ||
| − | |style="padding: 0px 0px 0px 30px;"|✔ Supports WHMCS | + | |style="padding: 0px 0px 0px 30px;"|✔ Supports WHMCS Themes "Six", "Twenty-One" And "Lagom WHMCS Client Theme" |
|} | |} | ||
{| | {| | ||
| − | |style="padding: 0px 0px 0px 30px;"|✔ Supports WHMCS | + | |style="padding: 0px 0px 0px 30px;"|✔ Supports WHMCS V8.9 Back To WHMCS V8.6 |
|} | |} | ||
{| | {| | ||
| − | |style="padding: 0px 0px 30px 30px;"|✔ Easy Module Upgrade To [https://www.modulesgarden.com/products/whmcs/social-media-login#open-source-version Open Source Version] | + | |style="padding: 0px 0px 0px 30px;"|✔ Requires ionCube Loader V12 Or Later |
| + | |} | ||
| + | {| | ||
| + | |style="padding: 0px 0px 30px 30px;"|✔ Easy [https://www.docs.modulesgarden.com/How_To_Upgrade_WHMCS_Module Module Upgrade] To [https://www.modulesgarden.com/products/whmcs/social-media-login#open-source-version Open Source Version] | ||
|} | |} | ||
| Line 136: | Line 168: | ||
{| | {| | ||
|style="padding: 0px 0px 15px 15px;"|'''2. In the downloaded file you might find one or two packages that support different PHP versions.'''<br/> | |style="padding: 0px 0px 15px 15px;"|'''2. In the downloaded file you might find one or two packages that support different PHP versions.'''<br/> | ||
| − | In the most recent versions of the module, you will find only one package that supports PHP 7. | + | In the most recent versions of the module, you will find only one package that supports PHP 7.2 and later.<br/> <!-- If you need a package for the previous versions of PHP, please [https://www.modulesgarden.com/support/ticket/general-support contact our support]. --> |
|} | |} | ||
{| | {| | ||
| − | |style="padding: 0px 0px 20px 25px;"|[[File: | + | |style="padding: 0px 0px 20px 25px;"|[[File:PHP72_74.png]] |
|} | |} | ||
{| | {| | ||
|style="padding: 0px 0px 15px 15px;"|'''Previous updates of the module may contain two packages dedicated to various PHP versions.'''<br/> | |style="padding: 0px 0px 15px 15px;"|'''Previous updates of the module may contain two packages dedicated to various PHP versions.'''<br/> | ||
| − | The first one that supports PHP 5.6 up to PHP 7. | + | The first one that supports PHP 5.6 up to PHP 7.1, and the second one addressed to PHP 7.2 up to PHP 7.4.<br/> |
| − | '''''Note:''' Keep in mind that PHP versions 5.6 up to 7. | + | '''''Note:''' Keep in mind that PHP versions 5.6 up to 7.1 are no longer officially supported and their security issues are not fixed or released any more. Find more info [http://php.net/supported-versions.php here].'' |
|} | |} | ||
{| | {| | ||
| − | |style="padding: 0px 0px 20px 25px;"|[[File: | + | |style="padding: 0px 0px 20px 25px;"|[[File:PHP56_74.png]] |
|} | |} | ||
{| | {| | ||
| − | |style="padding: 0px 0px 10px 15px;"|'' '''Important''': This situation does not affect [https://www.modulesgarden.com/products/whmcs/social-media-login#open-source-version '''the open source version'''] of this module which can be applied to any PHP from version 5.6 and later.''<br/>'' '''Note''': You can check the current PHP version in your WHMCS. To do so, proceed to ''' 'Utilities' → 'System' → 'PHP Info'.''' | + | |style="padding: 0px 0px 10px 15px;"| <!-- '' '''Important''': This situation does not affect [https://www.modulesgarden.com/products/whmcs/social-media-login#open-source-version '''the open source version'''] of this module which can be applied to any PHP from version 5.6 and later.''<br/>'' --> '''Note''': You can check the current PHP version in your WHMCS. To do so, proceed to ''' 'Utilities' → 'System' → 'PHP Info'.''' |
|} | |} | ||
{| | {| | ||
| − | |style="padding: 0px 0px 15px 15px;"|'''3. | + | |style="padding: 0px 0px 15px 15px;"|'''3. Extract the package and upload its content into the main WHMCS directory.<br/> |
| − | The content of the | + | The content of the package to upload should look like this. |
|} | |} | ||
{| | {| | ||
| Line 189: | Line 221: | ||
{| | {| | ||
|style="padding: 0px 0px 15px 15px;"|'''8. Now you need to correctly insert integration codes.'''<br /> | |style="padding: 0px 0px 15px 15px;"|'''8. Now you need to correctly insert integration codes.'''<br /> | ||
| − | Move to '' 'Addons' → 'Social Media Login' → 'Integration Codes','' you will find there detailed | + | Move to '' 'Addons' → 'Social Media Login' → 'Integration Codes','' you will find there detailed instructions on how to perform the integration.<br /> |
The integration must be performed in two different files as logging with social media platform can be done from more than one place.<br />Please make sure you are pasting the code snippets in all of your currently used templates and order form. <br /> | The integration must be performed in two different files as logging with social media platform can be done from more than one place.<br />Please make sure you are pasting the code snippets in all of your currently used templates and order form. <br /> | ||
|} | |} | ||
| Line 195: | Line 227: | ||
|style="padding: 0px 0px 20px 25px;"|[[File:SML_7.png]] | |style="padding: 0px 0px 20px 25px;"|[[File:SML_7.png]] | ||
|} | |} | ||
| + | <!-- | ||
{| | {| | ||
|style="padding: 0px 0px 15px 15px;"|'''''Note:''' if you are using WHMCS V7.2 up to V7.5. the searched line in case of 'chackout.tpl' file will be:'' | |style="padding: 0px 0px 15px 15px;"|'''''Note:''' if you are using WHMCS V7.2 up to V7.5. the searched line in case of 'chackout.tpl' file will be:'' | ||
| Line 203: | Line 236: | ||
</pre> | </pre> | ||
|} | |} | ||
| + | --> | ||
{| | {| | ||
|style="padding: 0px 0px 15px 15px;"|'''9. You have just successfully installed Social Media Login For WHMCS!'''<br /> | |style="padding: 0px 0px 15px 15px;"|'''9. You have just successfully installed Social Media Login For WHMCS!'''<br /> | ||
| Line 218: | Line 252: | ||
==Configuration== | ==Configuration== | ||
{| | {| | ||
| − | |style="padding: 10px 0px 30px 15px;"|The module is integrated with | + | |style="padding: 10px 0px 30px 15px;"|The module is integrated with 24 external platforms.<br /> Follow the instruction placed in configuration part of each provider to successfully create a link between the provider and the application that will allow a quick login action. |
|} | |} | ||
===Providers=== | ===Providers=== | ||
| Line 306: | Line 340: | ||
|} | |} | ||
{| | {| | ||
| − | |style="padding: 0px 0px 15px 15px;"|An examplary result of such changes will be as on | + | |style="padding: 0px 0px 15px 15px;"|An examplary result of such changes will be as on the screen below.<br/> |
| − | '''''Note:''' The buttons | + | '''''Note:''' The buttons layout is already customized, move to [[#Tips|Tips]] and learn how to do that.'' |
|} | |} | ||
{| | {| | ||
| Line 321: | Line 355: | ||
! style="width:150px; text-align:center;" | Icon And Text Color | ! style="width:150px; text-align:center;" | Icon And Text Color | ||
|- | |- | ||
| − | | Amazon | + | | Amazon || #e8aa4f || #ffc266 || #ffffff |
| − | | #e8aa4f | + | |
| − | | #ffc266 | + | |
| − | | #ffffff | + | |
|- | |- | ||
| − | | | + | | Azure || #2779ba || #4794d8 || #ffffff |
| − | | # | + | |
| − | | # | + | |
| − | | #ffffff | + | |
|- | |- | ||
| − | | | + | | Discord || #5865f2 || #7c86fa || #ffffff |
| − | | # | + | |
| − | | # | + | |
| − | | #ffffff | + | |
|- | |- | ||
| − | | | + | | Disqus || #2e9fff || #5bb6ff || #ffffff |
| − | | # | + | |
| − | | # | + | |
| − | | #ffffff | + | |
|- | |- | ||
| − | | | + | | Dropbox || #0882e6 || #098af4 || #ffffff |
| − | | # | + | |
| − | | # | + | |
| − | | #ffffff | + | |
|- | |- | ||
| − | | | + | | Epic Games || #363435 || #585454 || #ffffff |
| − | | # | + | |
| − | | # | + | |
| − | | #ffffff | + | |
|- | |- | ||
| − | | | + | | Facebook || #3b5998 || #4569b2 || #ffffff |
| − | | # | + | |
| − | | # | + | |
| − | | #ffffff | + | |
|- | |- | ||
| − | | | + | | GitHub || #464646 || #5a5a5a || #ffffff |
| − | | # | + | |
| − | | # | + | |
| − | | #ffffff | + | |
|- | |- | ||
| − | | | + | | Google || #dd4b39 || #fa503a || #ffffff |
| − | | # | + | |
| − | | # | + | |
| − | | #ffffff | + | |
|- | |- | ||
| − | | | + | | Instagram || #7f30be || #983be2 || #ffffff |
| − | | # | + | |
| − | | # | + | |
| − | | #ffffff | + | |
|- | |- | ||
| − | | | + | | LinkedIn || #007bb5 || #0098e5 || #ffffff |
| − | | # | + | |
| − | | # | + | |
| − | | #ffffff | + | |
|- | |- | ||
| − | | | + | | Microsoft || #0078d7 || #018eff || #ffffff |
| − | | # | + | |
| − | | # | + | |
| − | | #ffffff | + | |
|- | |- | ||
| − | | | + | | Paypal || #0070ba || #0184d9 || #ffffff |
| − | | # | + | |
| − | | # | + | |
| − | | #ffffff | + | |
|- | |- | ||
| − | | | + | | Pinterest || #cb2027 || #e62129 || #ffffff |
| − | | # | + | |
| − | | # | + | |
| − | | #ffffff | + | |
|- | |- | ||
| − | | | + | | Reddit || #ff4500 || #fd8254 || #ffffff |
| − | | # | + | |
| − | | # | + | |
| − | | #ffffff | + | |
|- | |- | ||
| − | | | + | | Steam || #282e22 || #353d2f || #ffffff |
| − | | # | + | |
| − | | # | + | |
| − | | #ffffff | + | |
|- | |- | ||
| − | | | + | | Stripe || #3583cd || #358adb || #ffffff |
| − | | # | + | |
| − | | # | + | |
| − | | #ffffff | + | |
|- | |- | ||
| − | | | + | | Tumblr || #35465c || #4c6585 || #ffffff |
| − | | # | + | |
| − | | # | + | |
| − | | #ffffff | + | |
|- | |- | ||
| − | | | + | | Twitch || #613fab || #8953f5 || #ffffff |
| − | | # | + | |
| − | | # | + | |
| − | | #ffffff | + | |
|- | |- | ||
| − | | | + | | VK || #087bff || #2a90ff || #ffffff |
| − | | # | + | |- |
| − | | # | + | | Vimeo || #19b7ea || #22c8fb || #ffffff |
| − | | #ffffff | + | |- |
| + | | WordPress || #4c4948 || #6a6969 || #ffffff | ||
| + | |- | ||
| + | | X (Twitter) || #080808 || #212121 || #ffffff | ||
| + | |- | ||
| + | | Yahoo || #6509d4 || #730fea || #ffffff | ||
|} | |} | ||
| Line 426: | Line 408: | ||
{| | {| | ||
|style="padding: 10px 0px 15px 15px;"|'' 'Dashboard' '' of the addon includes only a short guide that is placed to help you quickly move through the configuration.<br /> | |style="padding: 10px 0px 15px 15px;"|'' 'Dashboard' '' of the addon includes only a short guide that is placed to help you quickly move through the configuration.<br /> | ||
| − | There is also a box with the last five error log entries for your quick view and charts of | + | There is also a box with the last five error log entries for your quick view and charts of account statistics. |
|} | |} | ||
{| | {| | ||
|style="padding: 0px 0px 30px 25px;"|[[File:SML_19.png]] | |style="padding: 0px 0px 30px 25px;"|[[File:SML_19.png]] | ||
| + | |} | ||
| + | ===Users=== | ||
| + | {| | ||
| + | |style="padding: 10px 0px 15px 15px;"|Every client that logs in using an external platform thanks to the '''Social Media Login for WHMCS''' will be visible in the '' 'Users' '' tab.<br /> | ||
| + | The same client can be included multiple times if they use more than one provider to log in to their WHMCS account. Each entry in the table represents an '' 'account connection'.'' | ||
| + | |} | ||
| + | {| | ||
| + | |style="padding: 0px 0px 20px 25px;"|[[File:SML_19_1.png]] | ||
| + | |} | ||
| + | {| | ||
| + | |style="padding: 0px 0px 30px 15px;"|The information within the table include: | ||
| + | * '''Id''' - identification number of an account connection, unique to each entry | ||
| + | * '''Client''' - name and email address of the client | ||
| + | * '''Provider''' - name of the provider (e.g., Google, Reddit) | ||
| + | * '''Connected At''' - date of the first login, or when the accounts were first connected | ||
| + | * '''Status''' - status of the connection, if set to '' 'Blocked' '' the login method is disabled | ||
| + | You can change the status of each account connection between '' 'Active' ''and'' 'Blocked' '' by clicking on the left button in the Action column.<br /> | ||
| + | If you set the status to '' 'Blocked' '' the user will not be able to log in with the specific platform.<br /> | ||
| + | The other action button will disconnect the linked accounts, saved credentials will be deleted and re-registration will be required if the connection is to be established again.<br /> | ||
| + | To find a specific client or their account connection, you can use the search function located above the table. | ||
|} | |} | ||
| Line 435: | Line 437: | ||
{| | {| | ||
|style="padding: 10px 0px 15px 15px;"|Under '' 'Logs' '' tab you will find all log entries.<br /> | |style="padding: 10px 0px 15px 15px;"|Under '' 'Logs' '' tab you will find all log entries.<br /> | ||
| − | There are details on failed actions in the module and | + | There are details on failed actions in the module and successful logins. Check it out any time you need to find some details on the actions taken.<br />Press '' 'Delete All Entries'' ' to clear all logs or delete single ones. |
|} | |} | ||
{| | {| | ||
| Line 468: | Line 470: | ||
|} | |} | ||
{| | {| | ||
| − | |style="padding: 0px 0px | + | |style="padding: 0px 0px 15px 15px;"|The process is extremely simple, for example press the '' 'Facebook' '' button (look at the screen above).<br />You will be redirected to the login page of the social media platform (if currently logged out) and you will have to log in there.<br /> Next you will be asked if you agree to share your account details with the external platform. |
|} | |} | ||
{| | {| | ||
| Line 481: | Line 483: | ||
|} | |} | ||
{| | {| | ||
| − | |style="padding: 0px 0px | + | |style="padding: 0px 0px 15px 15px;"|If a user has no account in WHMCS, and chooses to '' 'Register New Account','' any available in the platform data is immediately transferred to WHMCS.<br />You may edit it and provide new information as well. |
|} | |} | ||
{| | {| | ||
| Line 487: | Line 489: | ||
|} | |} | ||
{| | {| | ||
| − | |style="padding: 0px 0px 30px 15px;"|Note that some providers may not share all personal data, for example Instagram email address. In this case, the user will be prompted to enter the email address manually. <br /> | + | |style="padding: 0px 0px 30px 15px;"|Note that some providers may not share all personal data, for example, Instagram email address. In this case, the user will be prompted to enter the email address manually. <br /> |
| − | If the email address returned by the provider already exists in WHMCS system, the client will be asked to enter a different address<br /> | + | If the email address returned by the provider already exists in the WHMCS system, the client will be asked to enter a different address<br /> |
or link their account with the existing e-mail address (sign in again and select '' 'Connect With My Account' ''). | or link their account with the existing e-mail address (sign in again and select '' 'Connect With My Account' ''). | ||
| + | |} | ||
| + | ===Account Connections=== | ||
| + | {| | ||
| + | |style="padding: 10px 0px 15px 15px;"|Once users log in using a new platform for the first time, a new account connection will be established. Those connections can be viewed in the '' 'Account Connections' '' tab. <br /> The new tab can be found in the profile menu, as seen on the screen below. | ||
| + | |} | ||
| + | {| | ||
| + | |style="padding: 0px 0px 20px 25px;"|[[File:SML_31.png]] | ||
| + | |} | ||
| + | {| | ||
| + | |style="padding: 0px 0px 15px 15px;"| The user will find a table containing all of their account connections. The information includes: | ||
| + | * '''Provider''' - the name of the provider (e.g., Google, GitHub) | ||
| + | * '''Connected at''' - the date the connection has been established | ||
| + | * '''Status''' - state of the connection (Active or Blocked) | ||
| + | Most importantly, under the 'Action' column the users can: | ||
| + | * '''Change Status''' - set to 'Blocked' to disable the ability to log in using the connected account without deleting the connection altogether, set to 'Active' to make it available | ||
| + | * '''Disconnect''' - disconnect the WHMCS account and the connected account (it can be connected again by following the steps in [[#Quick_Login| Quick Login]]) | ||
| + | |} | ||
| + | {| | ||
| + | |style="padding: 0px 0px 30px 25px;"|[[File:SML_32.png]] | ||
|} | |} | ||
| Line 504: | Line 525: | ||
|} | |} | ||
{| | {| | ||
| − | |style="padding: 0px 0px 10px 15px;"|'''4. This is | + | |style="padding: 0px 0px 10px 15px;"|'''4. This is what a default layout of the buttons on the login page looks like:''' |
|} | |} | ||
{| | {| | ||
| Line 510: | Line 531: | ||
|} | |} | ||
{| | {| | ||
| − | |style="padding: 0px 0px 5px 15px;"|If you want to change it and make look like in our presentation you will need to adjust your | + | |style="padding: 0px 0px 5px 15px;"|If you want to change it and make look like in our presentation you will need to adjust your custom stylesheet. |
Open the ''WHMCS/templates/six/css/custom.css'' file and paste the below code snippets in it: <br/> | Open the ''WHMCS/templates/six/css/custom.css'' file and paste the below code snippets in it: <br/> | ||
<pre> | <pre> | ||
Revision as of 15:43, 26 March 2024
Contents |
About Social Media Login For WHMCS
| Social Media Login For WHMCS will help you facilitate the process of logging in to your client area. Enable any of the social media providers such as Facebook, Google, Microsoft or any other available platform. Your clients will get a chance to register and then regularly log in with just a single click on their preferable external platform button. |
- Admin Area Features:
| ✔ Configure And Enable Social Media Platforms |
| ✔ Load Your Own Icon Sets |
| ✔ Define Custom Colors Of Login Buttons - Per Provider Or Global |
| ✔ Define Custom Names Of Login Buttons |
| ✔ Define Order Of Available Providers |
| ✔ View Statistics On Registered Accounts |
| ✔ Manage Users With Linked Providers |
| ✔ View Integration Instructions |
| ✔ View Error Logs |
- Client Area Features:
| ✔ Use Single Sign-On With Social Media Platform Credentials On: |
| ✔ Login Page |
| ✔ Registration Page |
| ✔ Checkout Page |
| ✔ Automatically Fill Available Client Details Into WHMCS Account |
| ✔ Link Existing WHMCS Account With Social Media Platform |
| ✔ Manage Providers Linked With Account |
| ✔ Log In Using Social Media Platform - Single Click Only |
- Supported Platforms:
| ✔ Amazon |
| ✔ Azure |
| ✔ Discord |
| ✔ Disqus |
| ✔ Dropbox |
| ✔ Epic Games |
| ✔ GitHub |
| ✔ Microsoft |
| ✔ PayPal |
| ✔ Steam |
| ✔ Stripe |
| ✔ Tumblr |
| ✔ Twitch |
| ✔ X (Twitter) |
| ✔ Vimeo |
| ✔ VK (VKontakte) |
| ✔ WordPress |
| ✔ Yahoo! |
- General Info:
| ✔ Integrated With Multibrand For WHMCS (read more) And Resellers Center For WHMCS (read more) - Allow Clients To Log In Via Social Media Per Brand |
| ✔ Multi-Language Support |
| ✔ Supports PHP 8.1 Back To PHP 7.4 |
| ✔ Supports WHMCS Themes "Six", "Twenty-One" And "Lagom WHMCS Client Theme" |
| ✔ Supports WHMCS V8.9 Back To WHMCS V8.6 |
| ✔ Requires ionCube Loader V12 Or Later |
| ✔ Easy Module Upgrade To Open Source Version |
Installation
| This tutorial will show you how to successfully install and configure Social Media Login For WHMCS. We will guide you step by step through the whole installation and configuration process. |
| 1. Log in to our client area and download the module. |
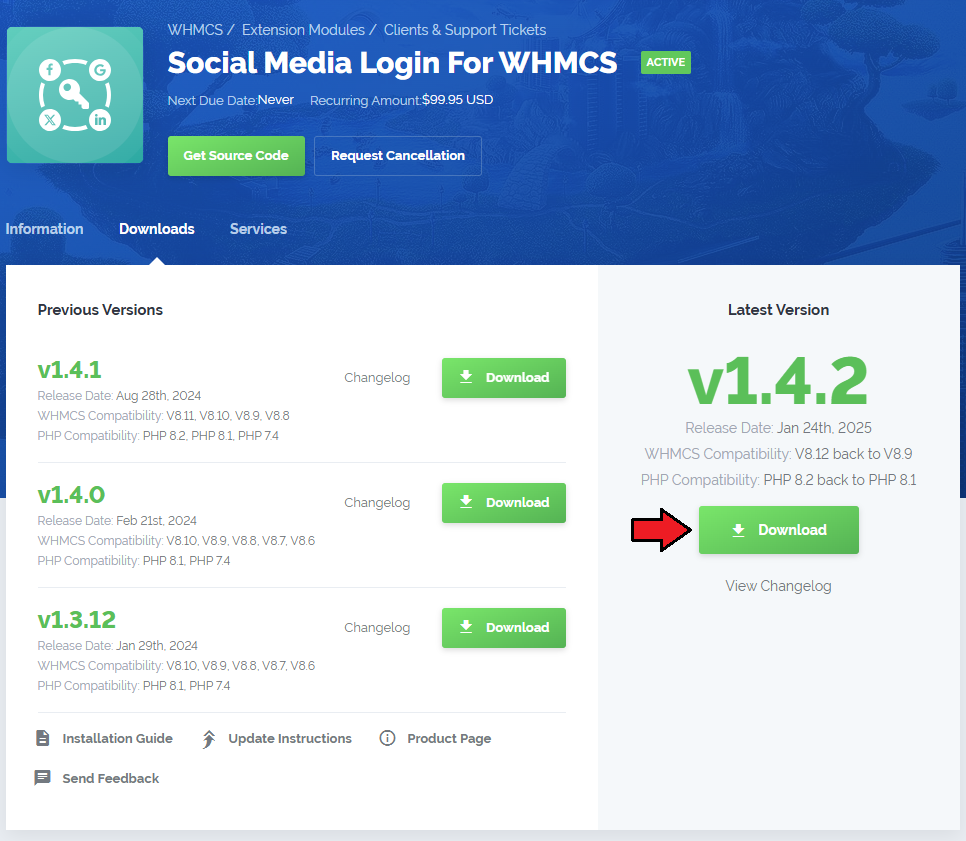
|
| 2. In the downloaded file you might find one or two packages that support different PHP versions. In the most recent versions of the module, you will find only one package that supports PHP 7.2 and later. |
| Previous updates of the module may contain two packages dedicated to various PHP versions. The first one that supports PHP 5.6 up to PHP 7.1, and the second one addressed to PHP 7.2 up to PHP 7.4. |

|
| Note: You can check the current PHP version in your WHMCS. To do so, proceed to 'Utilities' → 'System' → 'PHP Info'. |
| 3. Extract the package and upload its content into the main WHMCS directory. The content of the package to upload should look like this. |

|
| 4. When you install Social Media Login For WHMCS for the first time you have to rename 'license_RENAME.php' file. File is located in 'modules/addons/SocialMediaLogin/license_RENAME.php'. Rename it from 'license_RENAME.php' to 'license.php'. |
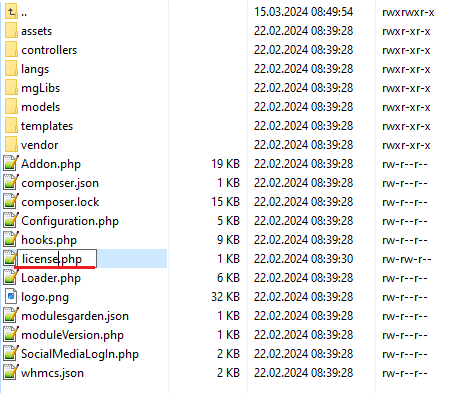
|
| 5. In order to configure your license key, you have to edit the previously renamed 'license.php' file. Enter your license key between quotation marks as presented on the following screen. You can find your license key in our client area → 'My Products'. |

|
| 6. Now you have to activate the module in your WHMCS system. Log in to your WHMCS admin area. Go to 'Setup' → 'Addon Modules'. Afterwards, find 'Social Media Login' and press 'Activate' button. |
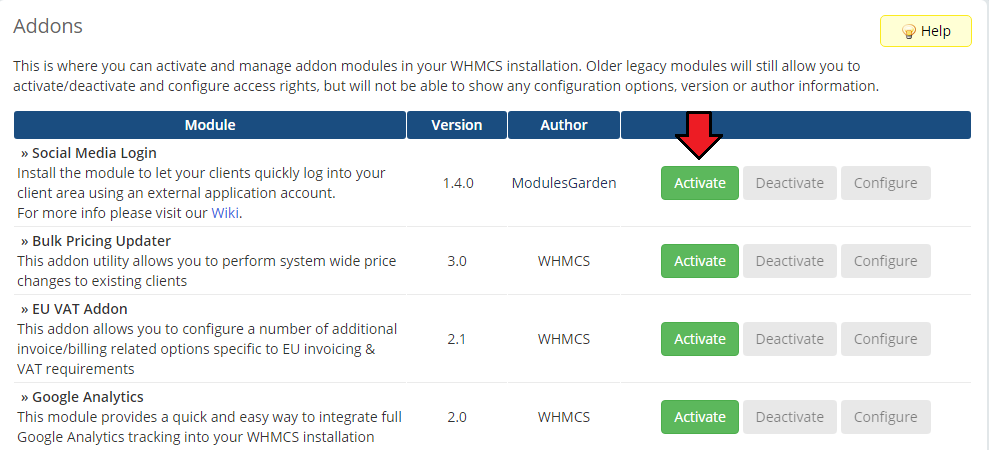
|
| 7. In the next step you need to permit access to this module. To do so, click on 'Configure' button, select administrator roles and press 'Save Changes'. |
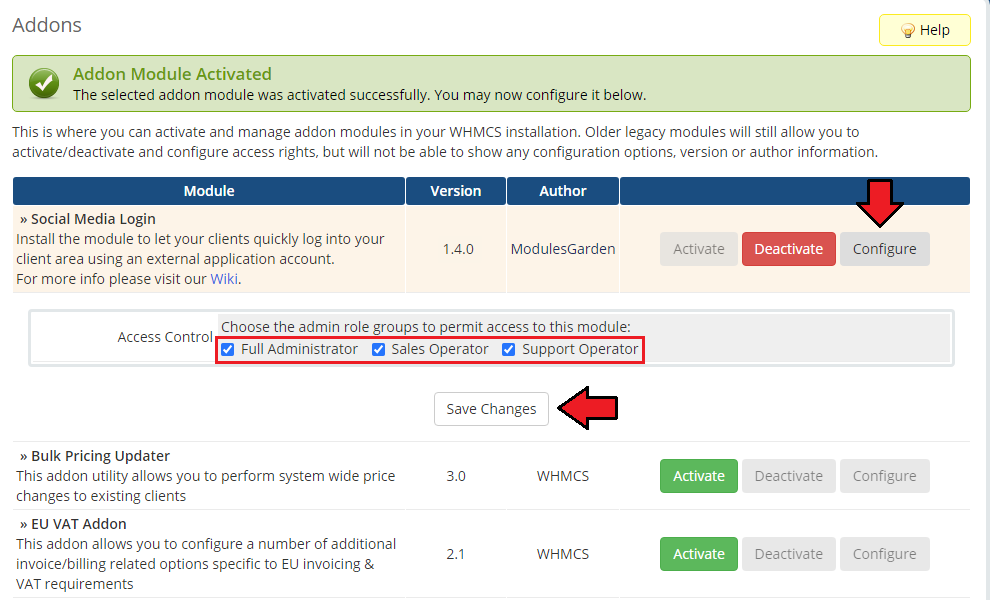
|
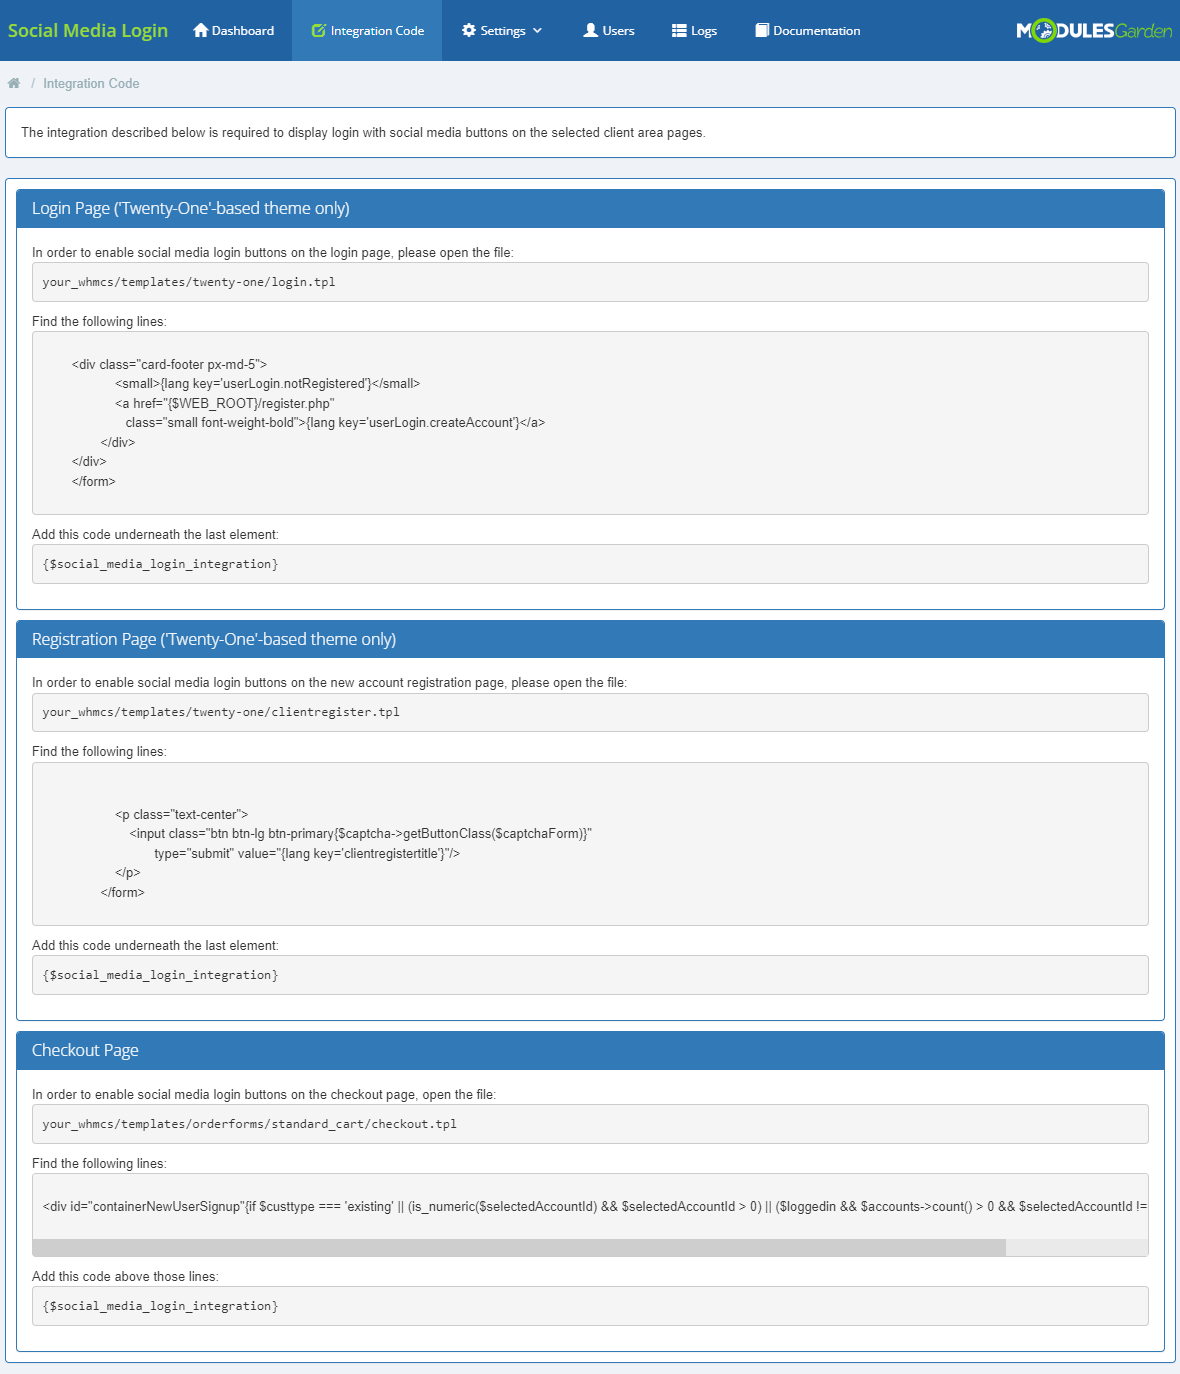
| 8. Now you need to correctly insert integration codes. Move to 'Addons' → 'Social Media Login' → 'Integration Codes', you will find there detailed instructions on how to perform the integration. |
|
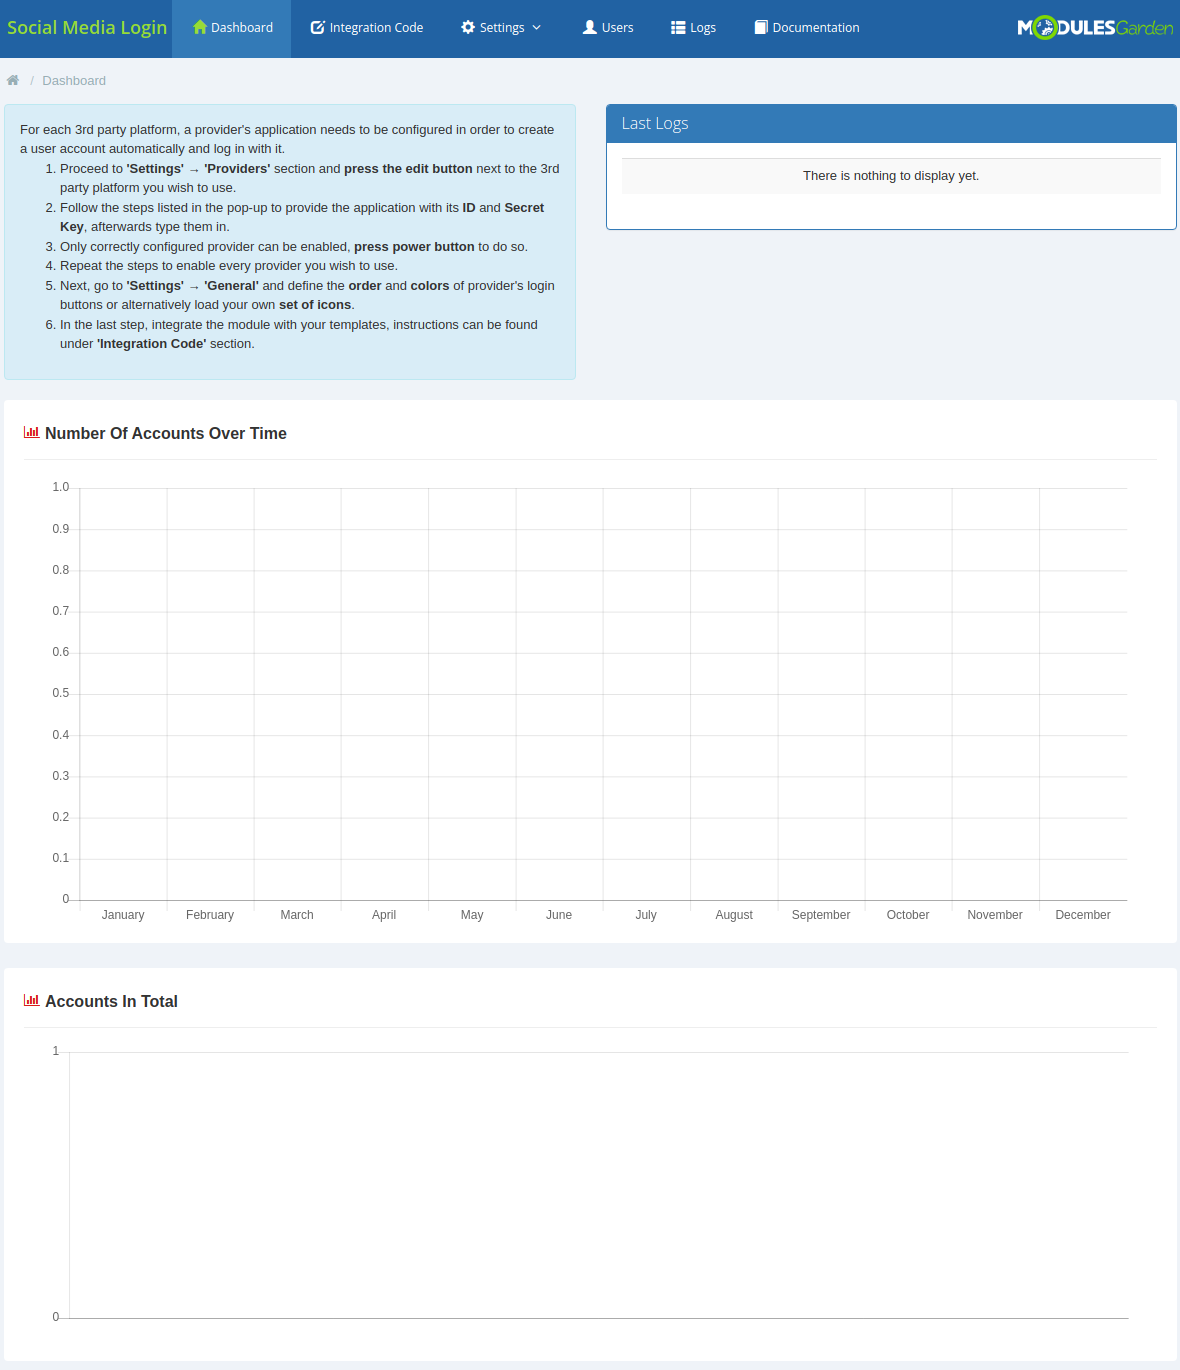
| 9. You have just successfully installed Social Media Login For WHMCS! You can access your module under 'Addons' → 'Social Media Login'. |
|
Configuration and Management
| Social Media Login For WHMCS brings modern, user-friendly and common solution to your WHMCS to make the usage more enjoyable for your clients. Underneath, you will find a complete guide which will show you how to take full advantage of the module. |
Configuration
| The module is integrated with 24 external platforms. Follow the instruction placed in configuration part of each provider to successfully create a link between the provider and the application that will allow a quick login action. |
Providers
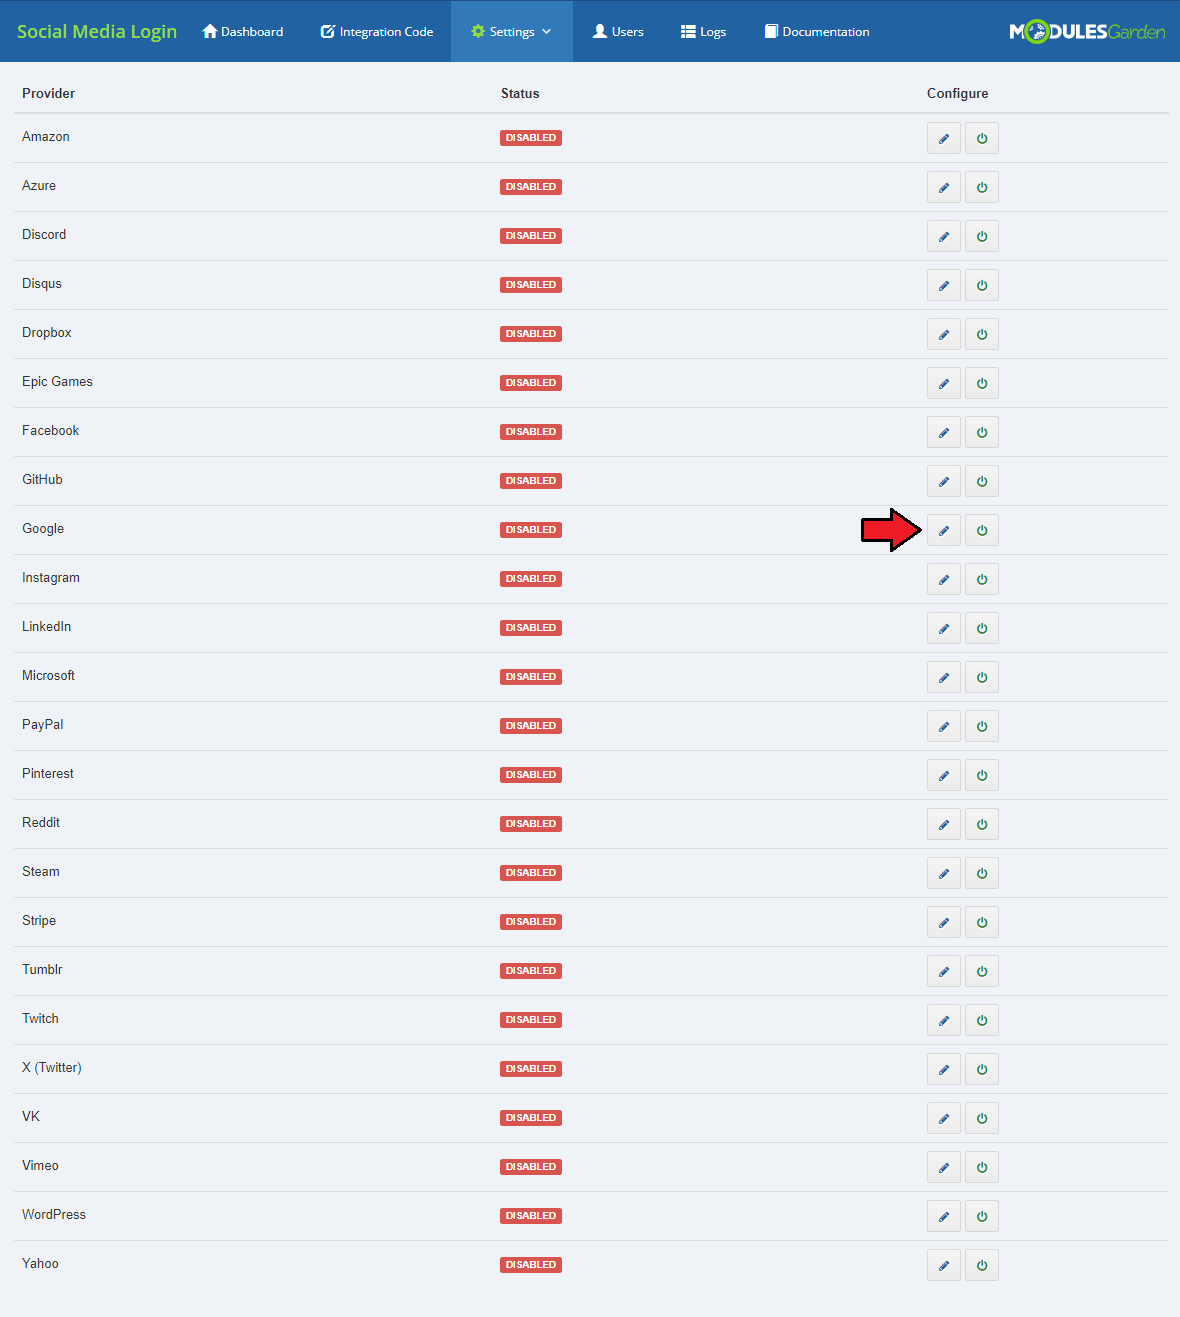
| Under 'Settings' → 'Providers' tab, there is a full list of supported providers. In this part you may select which of them you wish to enable. However, before you enable any, first you must configure it. Press appropriate button next to the desired provider. |
|
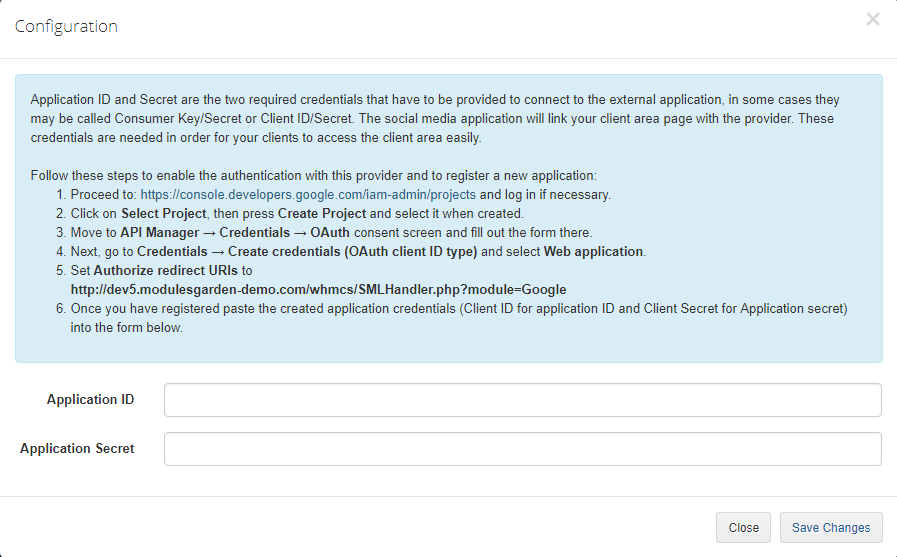
| As you can see, all details that must be typed in are 'Application ID' and 'Application Secret'. Above the form you will find a precise instruction on how to create the application and generate required data. Please remember, that the process is individual for each provider. Follow the instructions carefully to successfully generate the application. |
|
| Underneath, we will show you an exemplary configuration of a Facebook provider. Take a while to read it and see how the process looks like in practice. |
Exemplary Application
| To show how to proceed with the authentication process, we will describe the registration of a new Facebook application. |
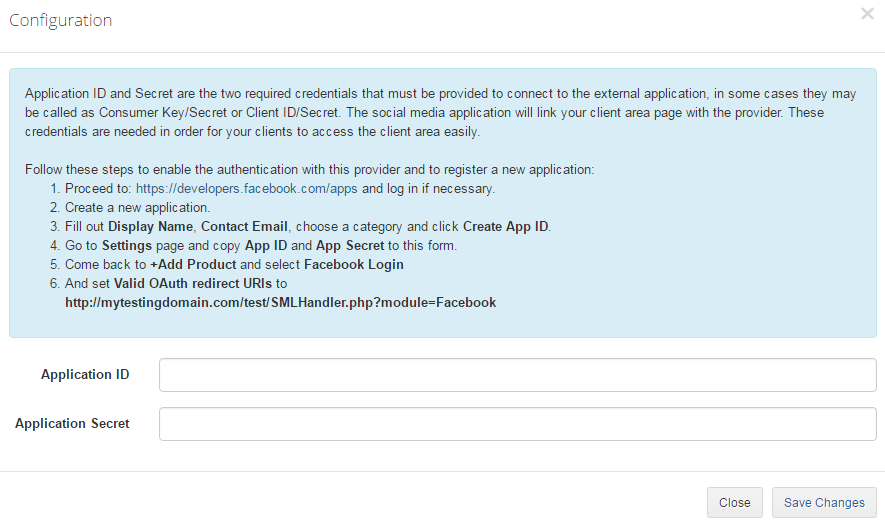
|
| According to the instruction placed in the provider configuration, firstly you have to move to https://developers.facebook.com/apps site and log in if necessary. Then, you will have to register as a Facebook developer if you are not one yet. |
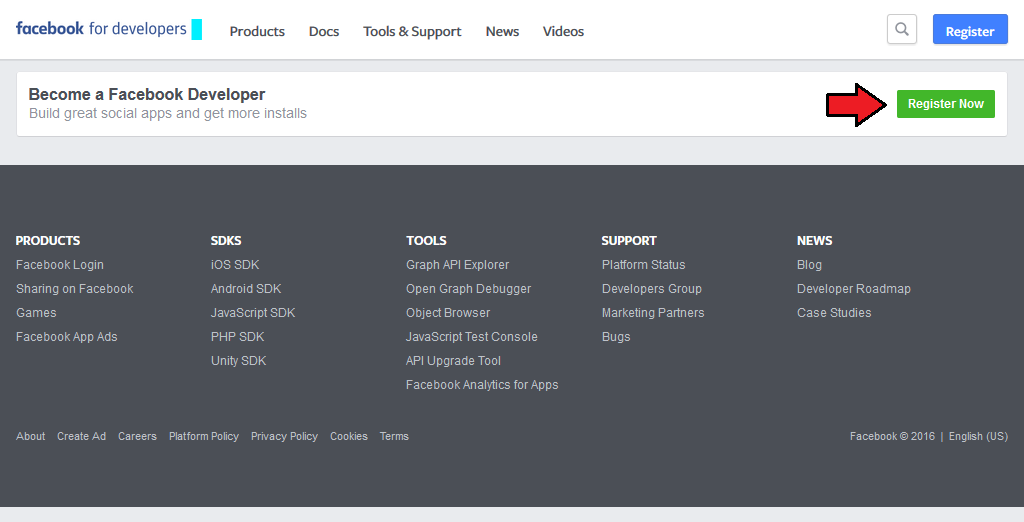
|
| Accept Facebook platform policy and Facebook privacy policy, then verify your account by providing your phone number or a credit card. Next, name your application and type in an email address for contact. Press 'Create App ID'. |
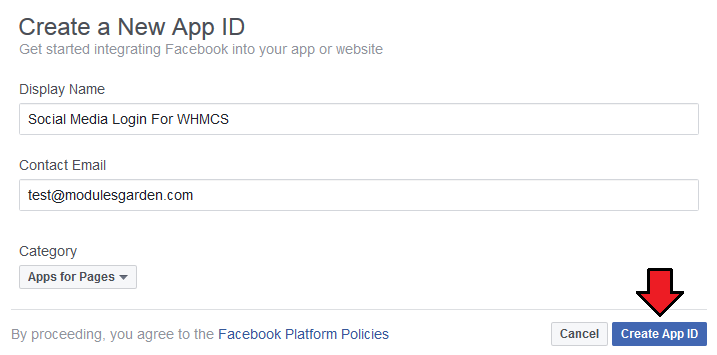
|
| Under 'Settings' section you will find the details that you need the most. Copy application ID and secret (press 'Show' to see it) and save for later use. |
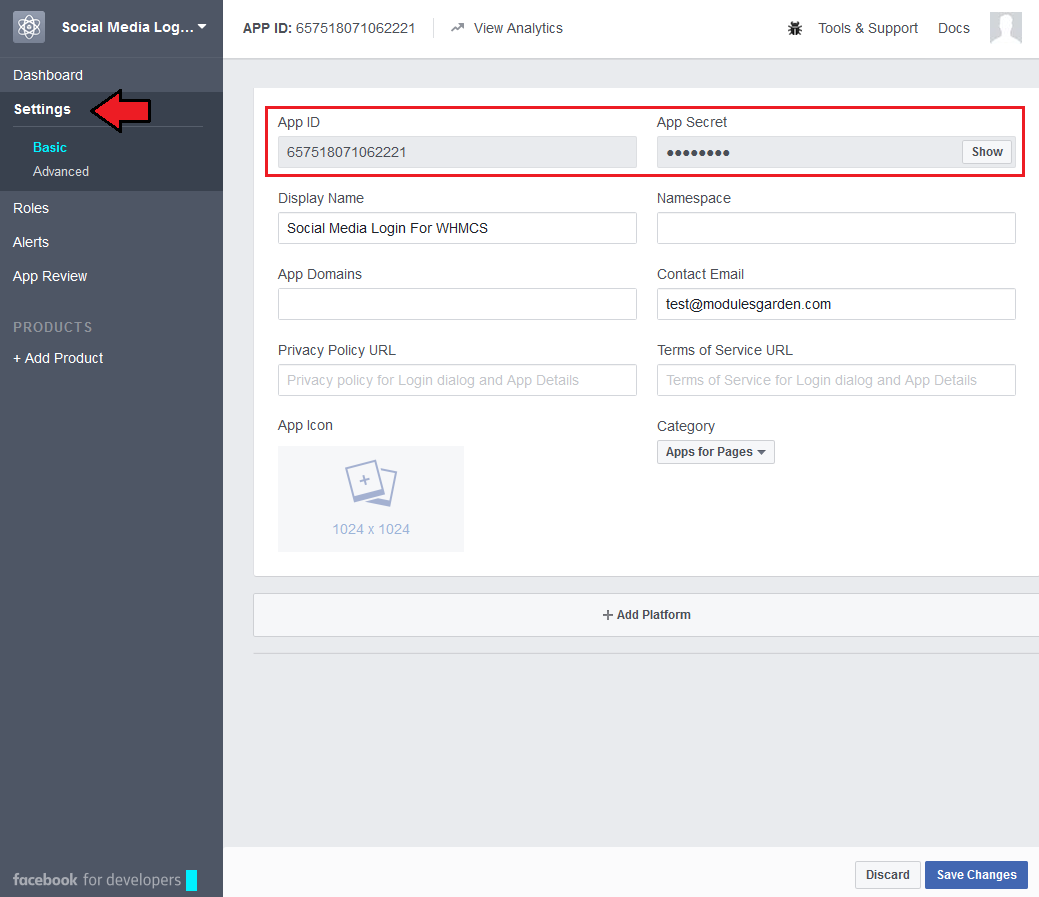
|
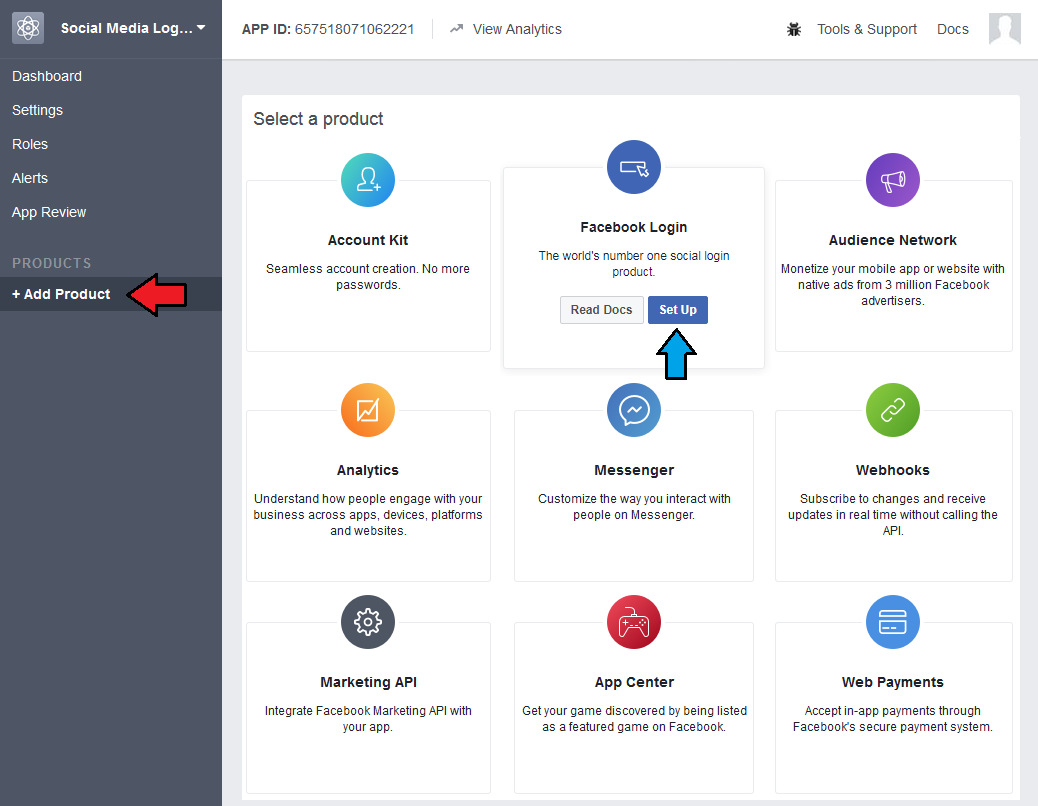
| Now, move to '+ Add Product' and find 'Facebook Login ' on the list. Choose 'Set Up'. |
|
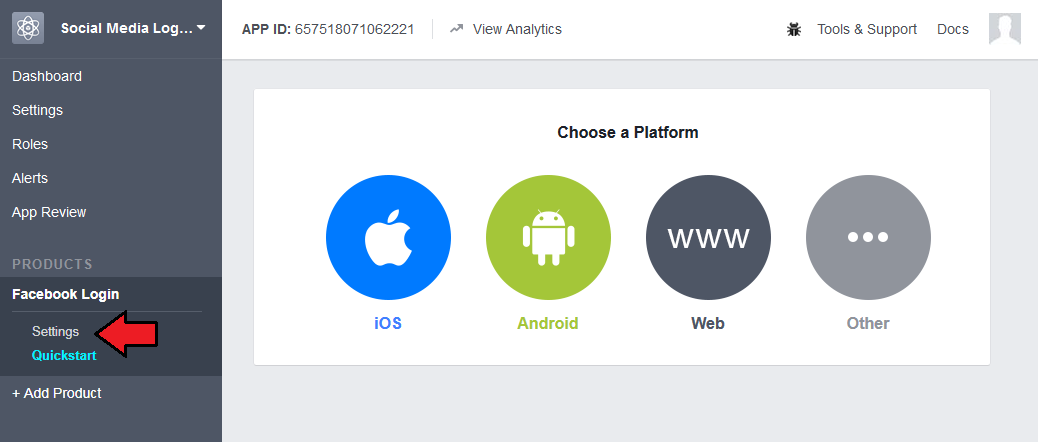
| Next, proceed directly to 'Facebook Login' → 'Settings' menu. |
|
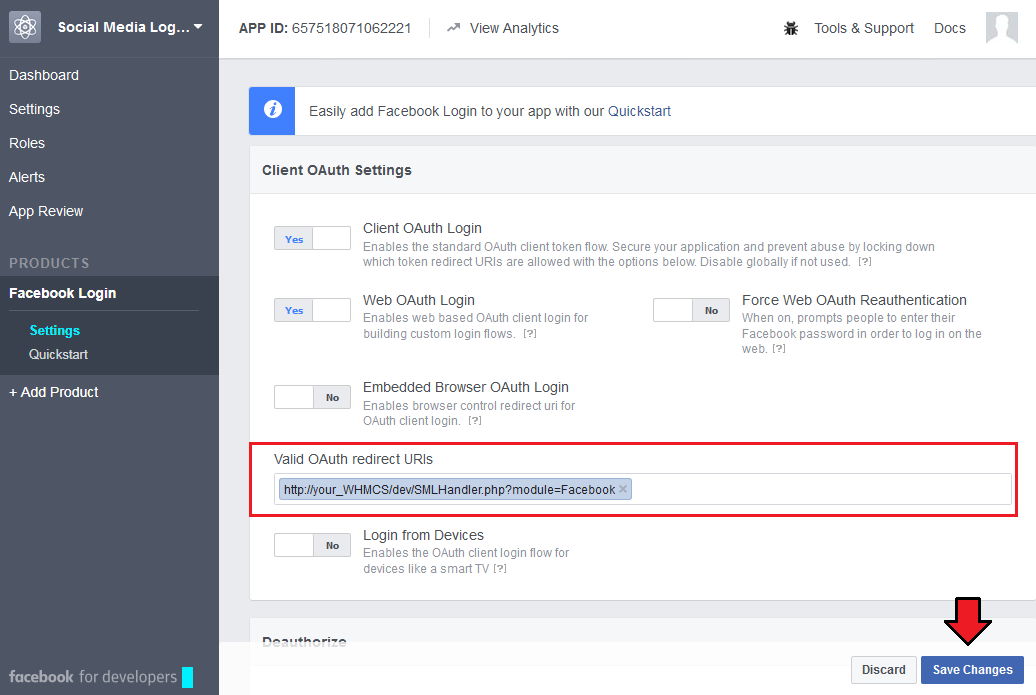
| Finally, provide 'Valid OAuth redirect URIs'. You will find a ready one in the addon under the configuration instructions of the provider. Save the changes and come back to the addon. |
|
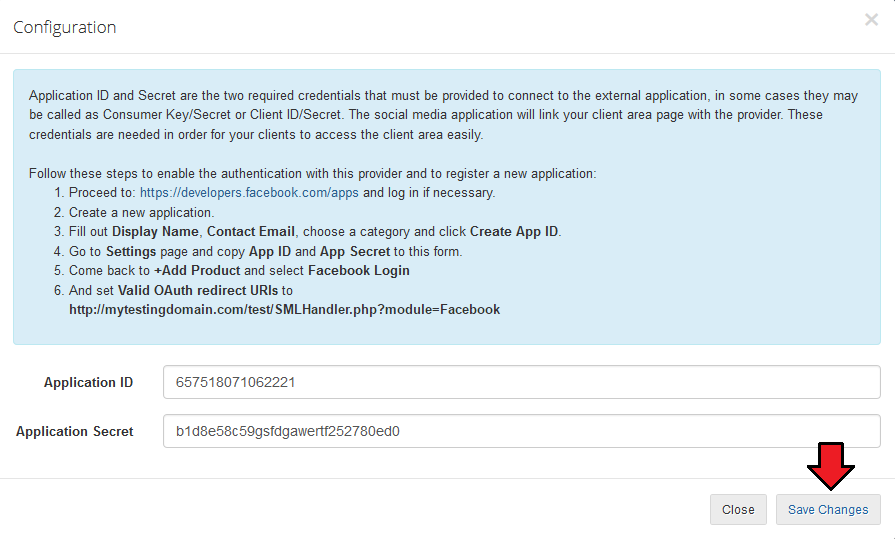
| Paste the generated Application ID and Secret into the appropriate fields and save the changes. |
|
| Now you can enable the provider. That is all! If you need more options, see the 'General' tab. |
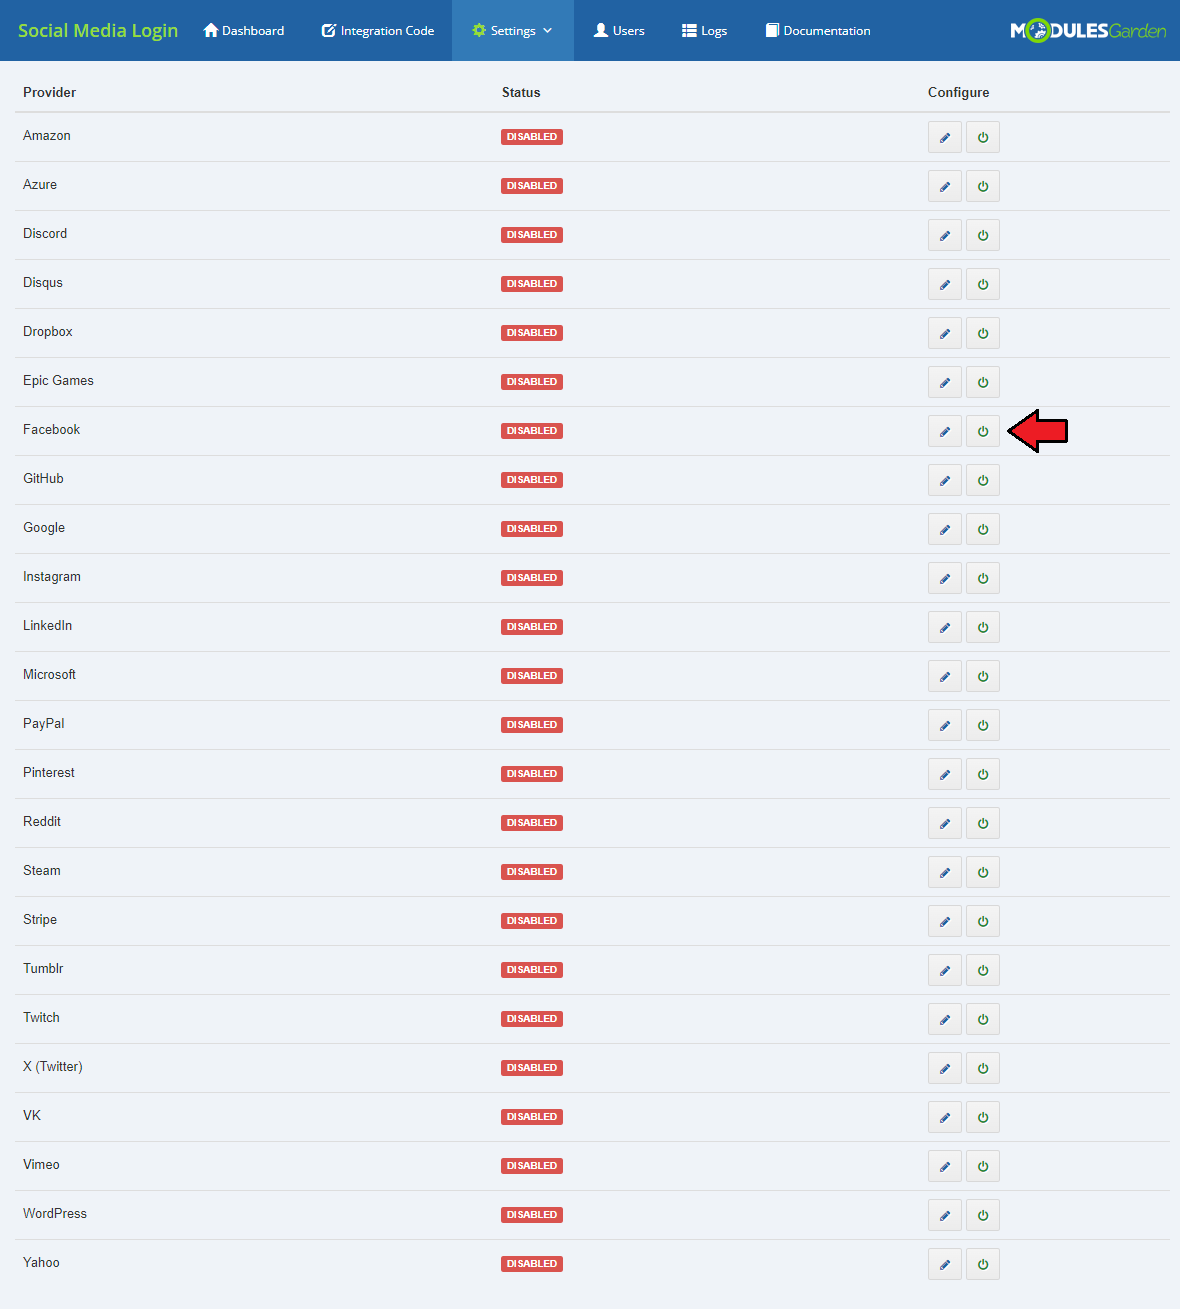
|
General
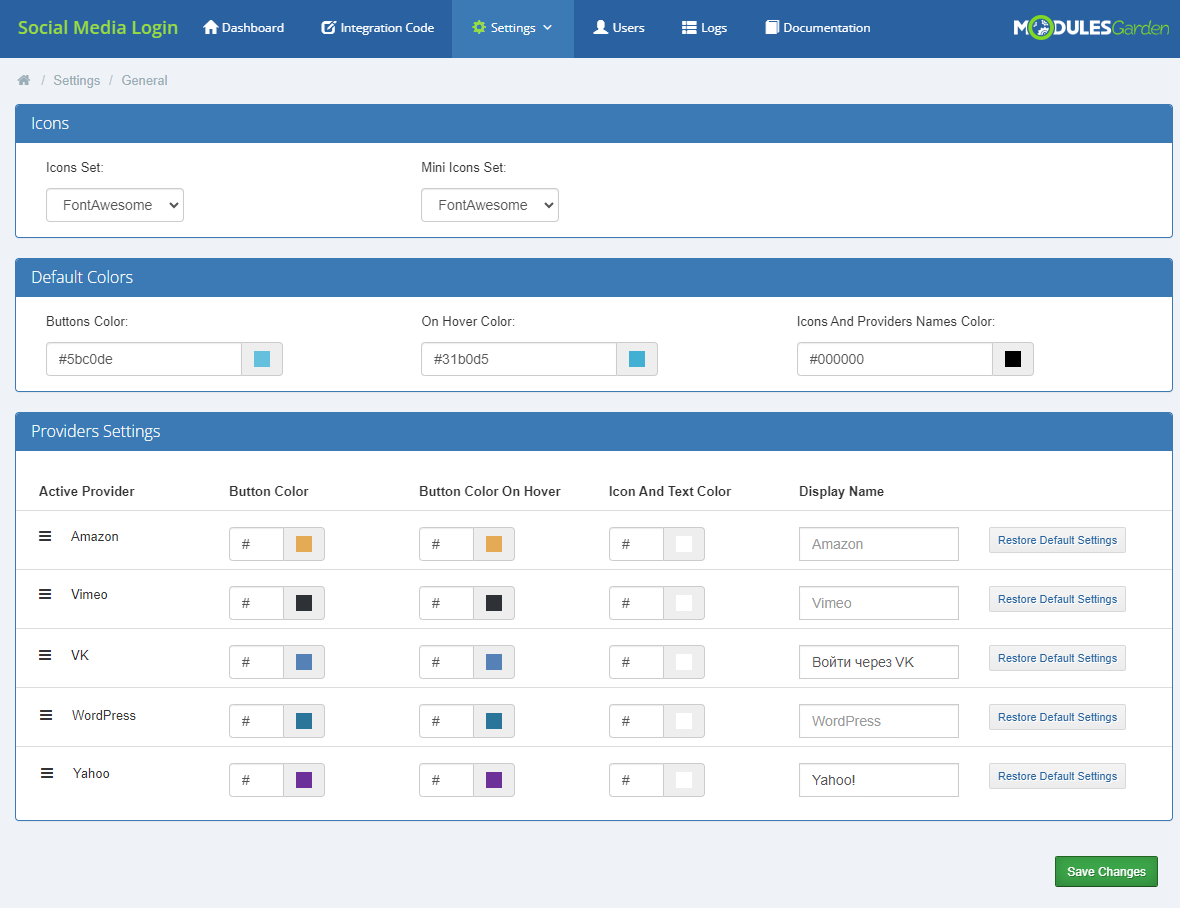
'General' settings allow you to change default provider icon sets or colors of provider buttons to your own.
|
|
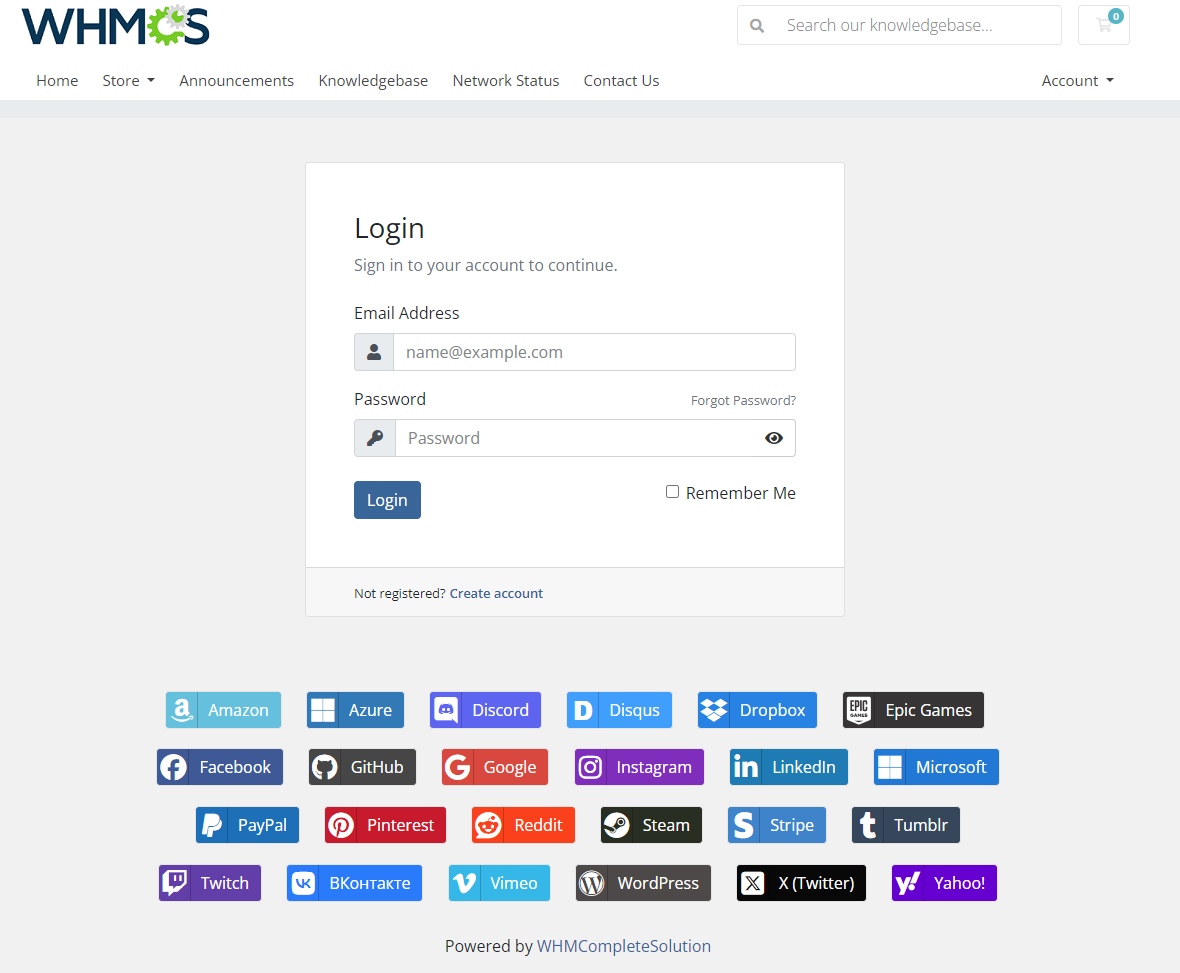
| An examplary result of such changes will be as on the screen below. Note: The buttons layout is already customized, move to Tips and learn how to do that. |
|
| If you would like to achieve a result similar to the above one, you may use the following colors: |
| Provider | Button Color | Button Color On Hover | Icon And Text Color |
|---|---|---|---|
| Amazon | #e8aa4f | #ffc266 | #ffffff |
| Azure | #2779ba | #4794d8 | #ffffff |
| Discord | #5865f2 | #7c86fa | #ffffff |
| Disqus | #2e9fff | #5bb6ff | #ffffff |
| Dropbox | #0882e6 | #098af4 | #ffffff |
| Epic Games | #363435 | #585454 | #ffffff |
| #3b5998 | #4569b2 | #ffffff | |
| GitHub | #464646 | #5a5a5a | #ffffff |
| #dd4b39 | #fa503a | #ffffff | |
| #7f30be | #983be2 | #ffffff | |
| #007bb5 | #0098e5 | #ffffff | |
| Microsoft | #0078d7 | #018eff | #ffffff |
| Paypal | #0070ba | #0184d9 | #ffffff |
| #cb2027 | #e62129 | #ffffff | |
| #ff4500 | #fd8254 | #ffffff | |
| Steam | #282e22 | #353d2f | #ffffff |
| Stripe | #3583cd | #358adb | #ffffff |
| Tumblr | #35465c | #4c6585 | #ffffff |
| Twitch | #613fab | #8953f5 | #ffffff |
| VK | #087bff | #2a90ff | #ffffff |
| Vimeo | #19b7ea | #22c8fb | #ffffff |
| WordPress | #4c4948 | #6a6969 | #ffffff |
| X (Twitter) | #080808 | #212121 | #ffffff |
| Yahoo | #6509d4 | #730fea | #ffffff |
Other
Dashboard
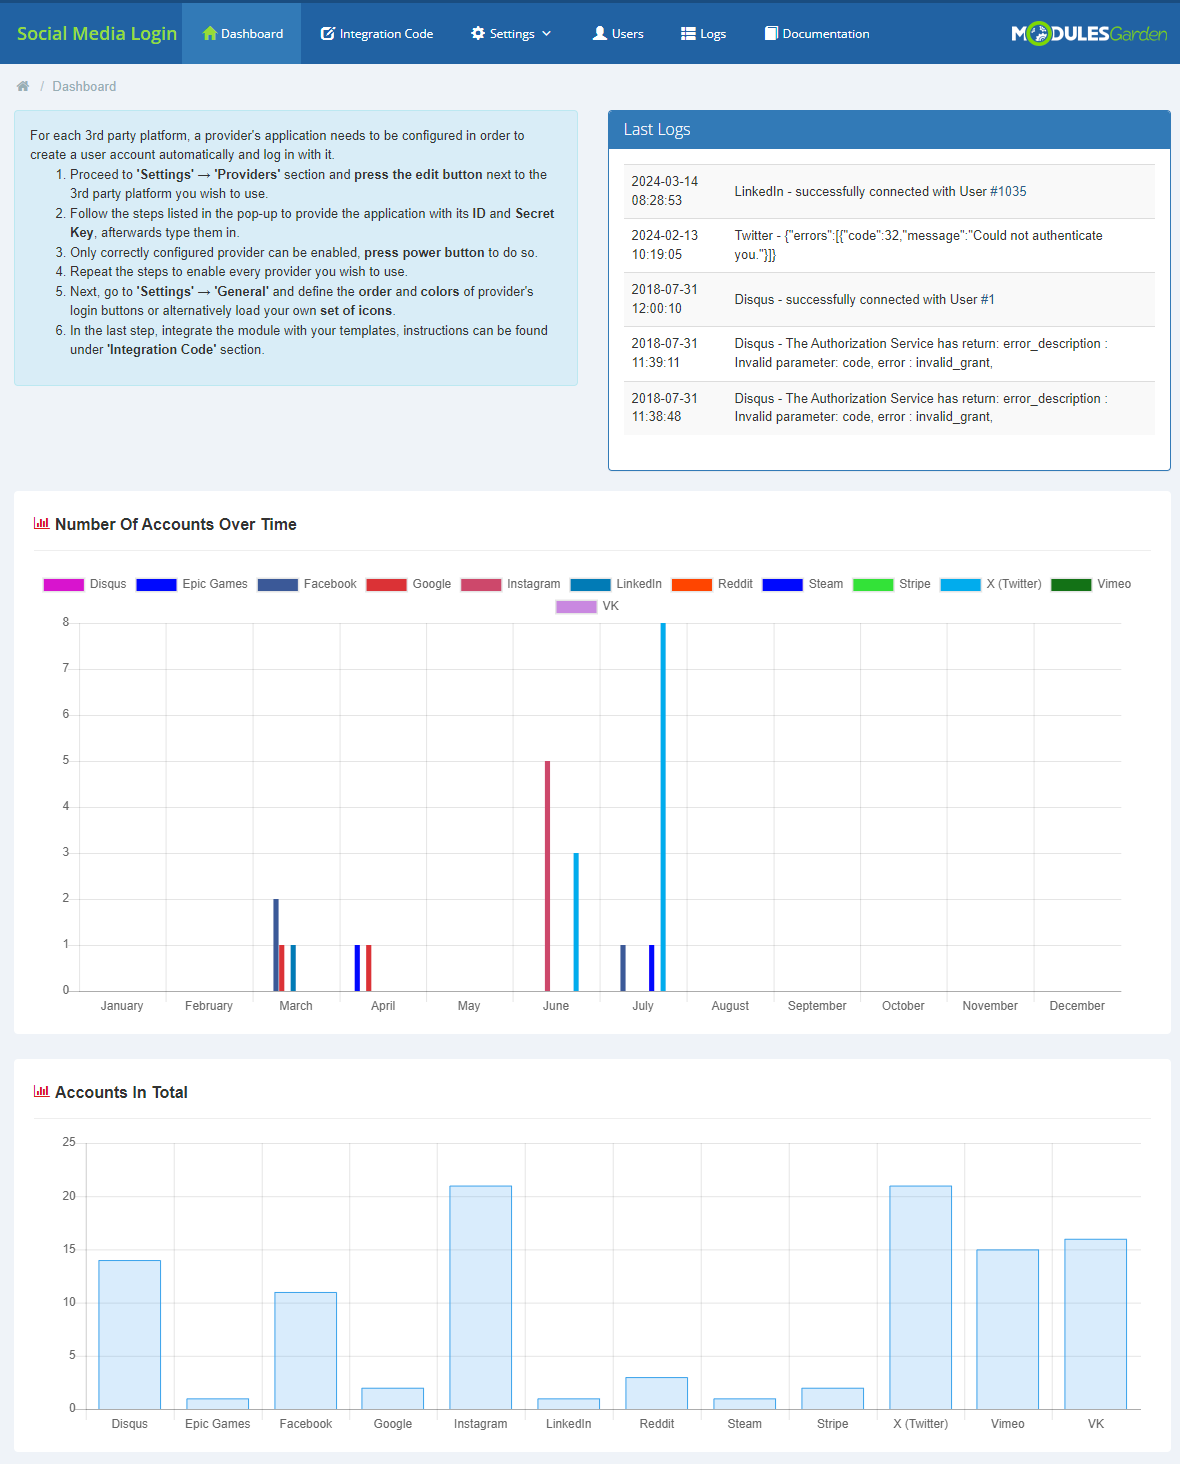
| 'Dashboard' of the addon includes only a short guide that is placed to help you quickly move through the configuration. There is also a box with the last five error log entries for your quick view and charts of account statistics. |
|
Users
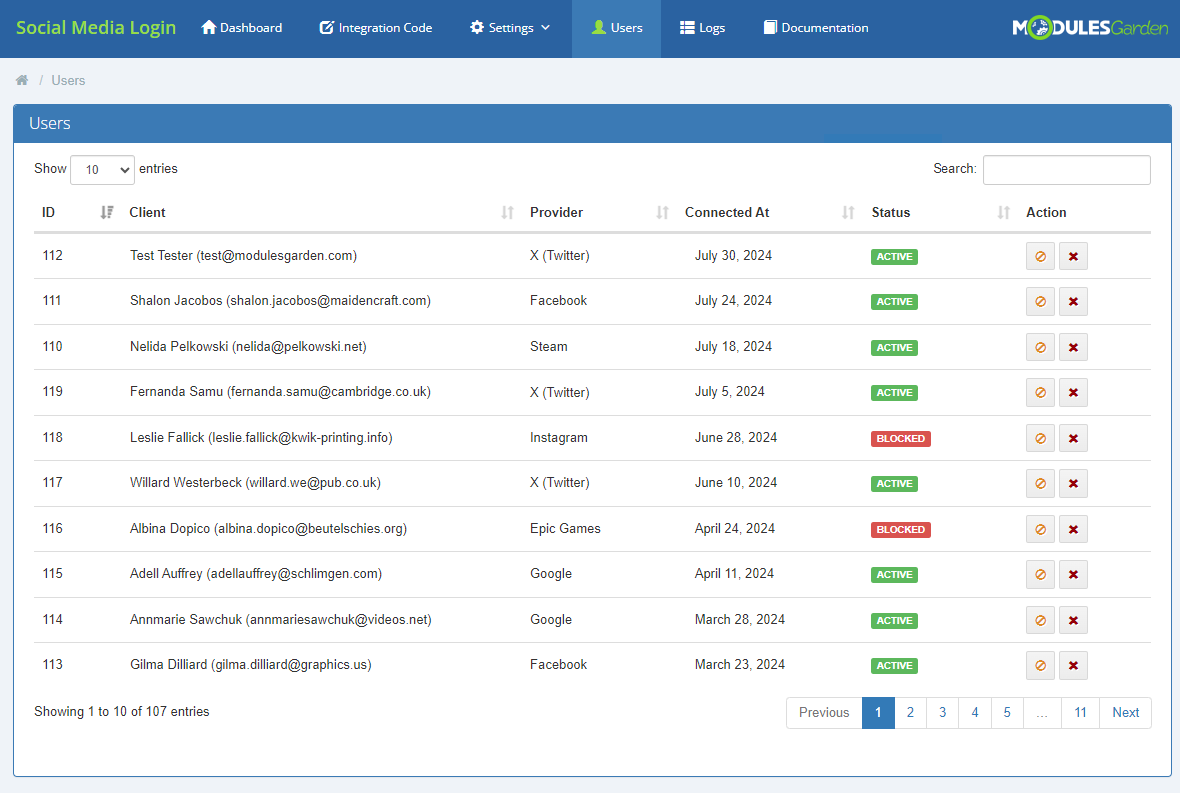
| Every client that logs in using an external platform thanks to the Social Media Login for WHMCS will be visible in the 'Users' tab. The same client can be included multiple times if they use more than one provider to log in to their WHMCS account. Each entry in the table represents an 'account connection'. |
|
The information within the table include:
You can change the status of each account connection between 'Active' and 'Blocked' by clicking on the left button in the Action column. |
Logs
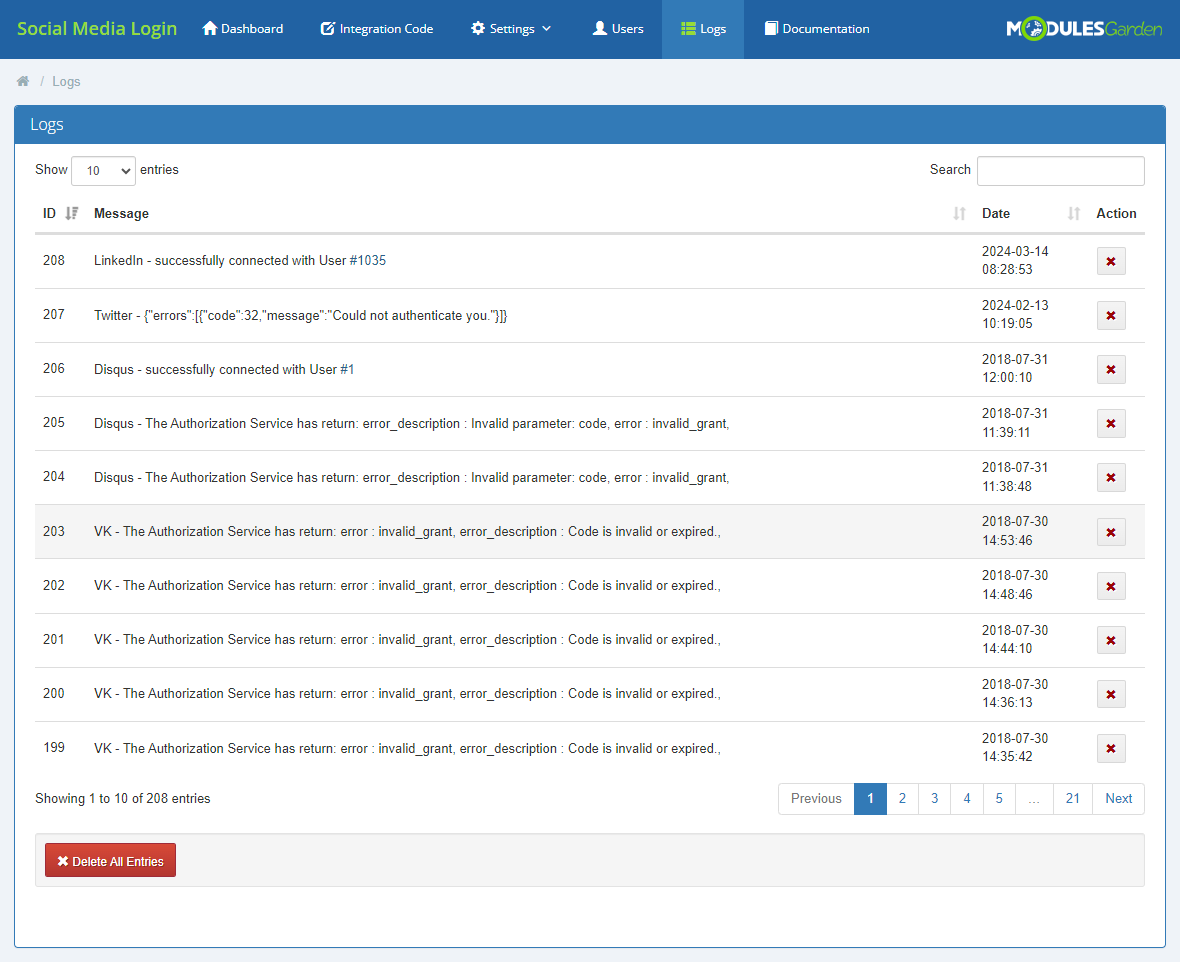
| Under 'Logs' tab you will find all log entries. There are details on failed actions in the module and successful logins. Check it out any time you need to find some details on the actions taken. |
|
Documentation
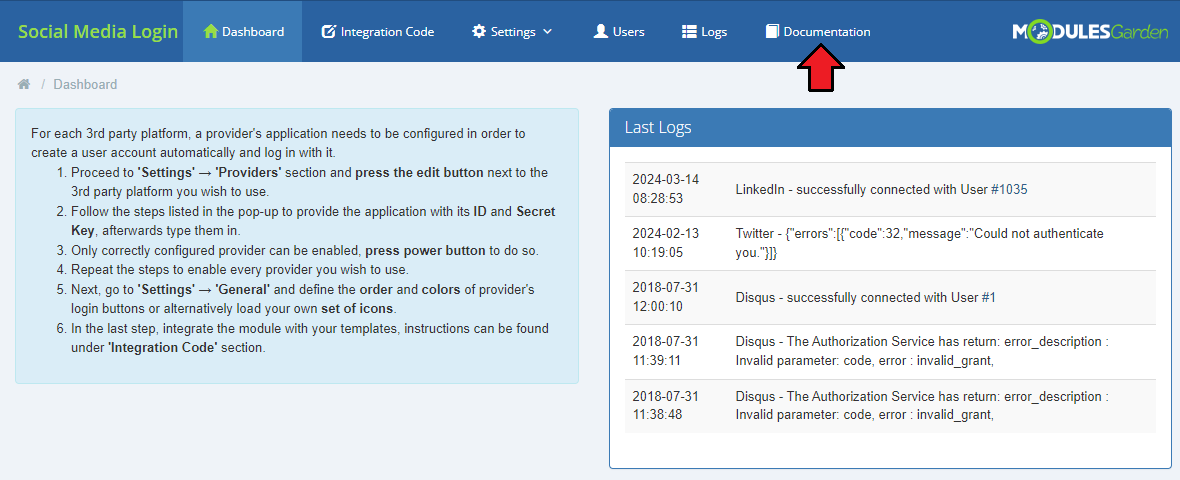
| The last position in your navigation menu, when pressed, redirects to the article you are currently reading. |
|
Client Area
| Social Media Login For WHMCS interferes with the client area login pages. To allow a full and proper performance of the module you must have previously pasted the integration codes to display the 3rd party platform buttons. |
Quick Login
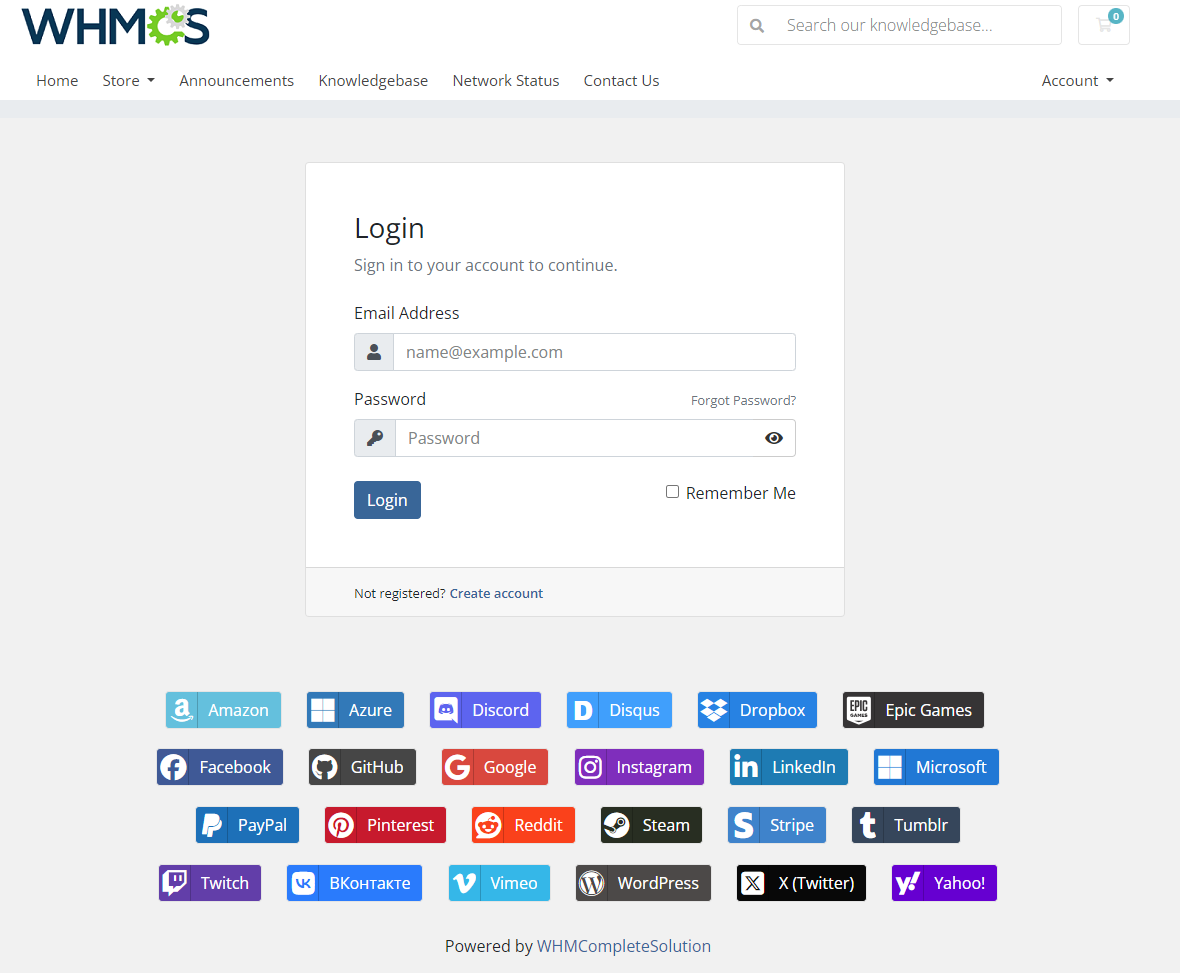
| The main page is the first place, where users may register and then log in with a single click on the application button. Users may choose whether they wish to log in with standard details - WHMCS email address and password, or with their favorite platform. |
|
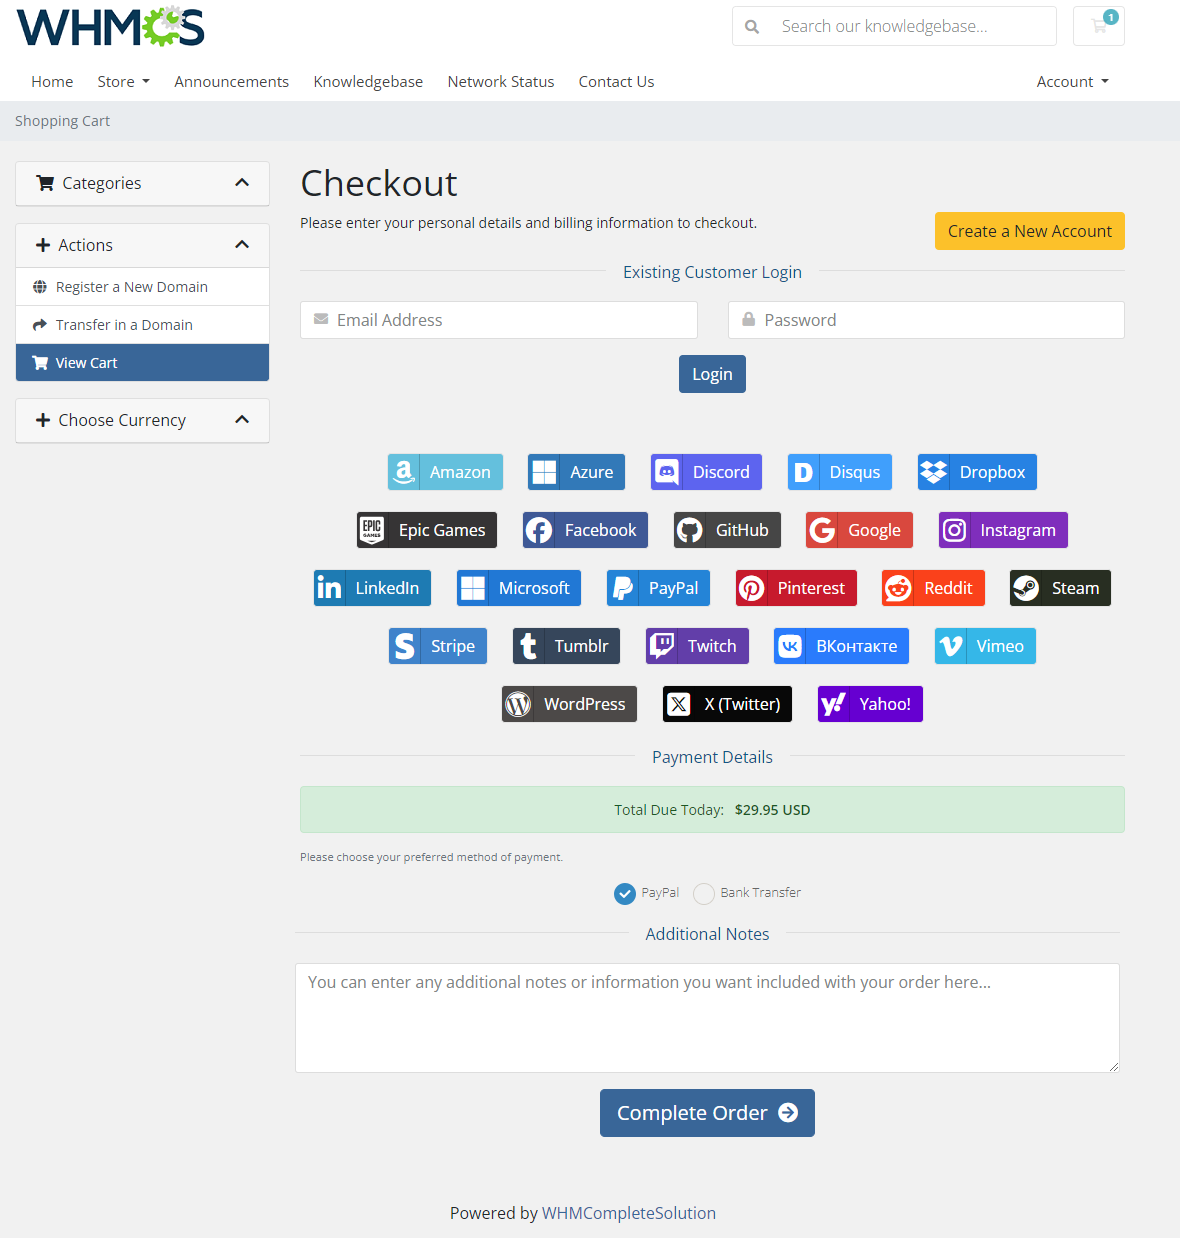
| Users may log in with any allowed social media when placing an order. |
|
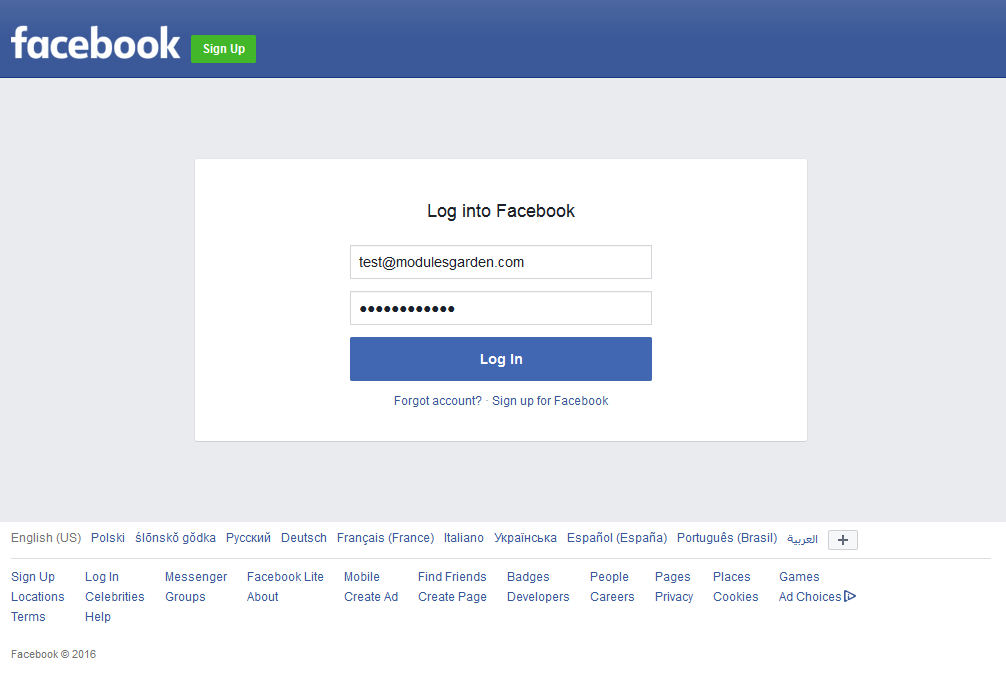
| The process is extremely simple, for example press the 'Facebook' button (look at the screen above). You will be redirected to the login page of the social media platform (if currently logged out) and you will have to log in there. Next you will be asked if you agree to share your account details with the external platform. |
|
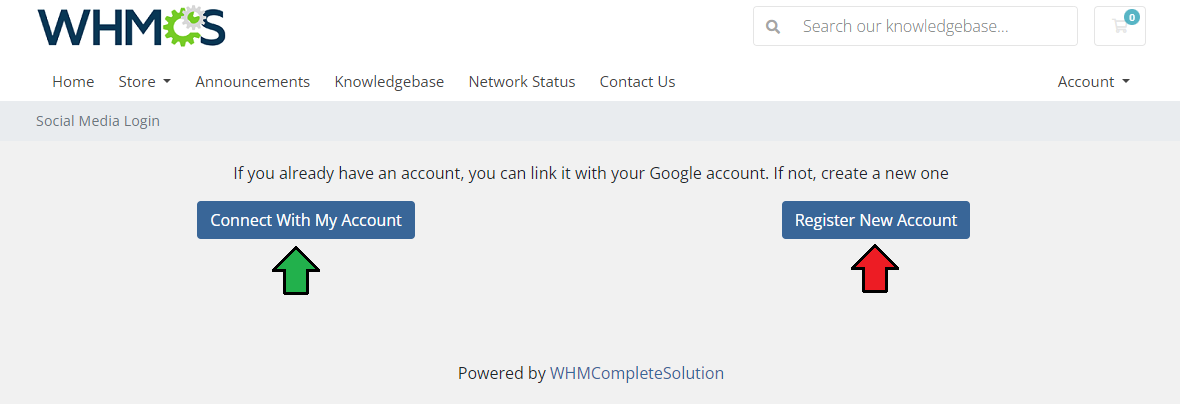
| If you agree, then in WHMCS you may connect your Facebook account with the WHMCS account, press 'Connect With My Account'. If you do not have a WHMCS account yet, create one now. |
|
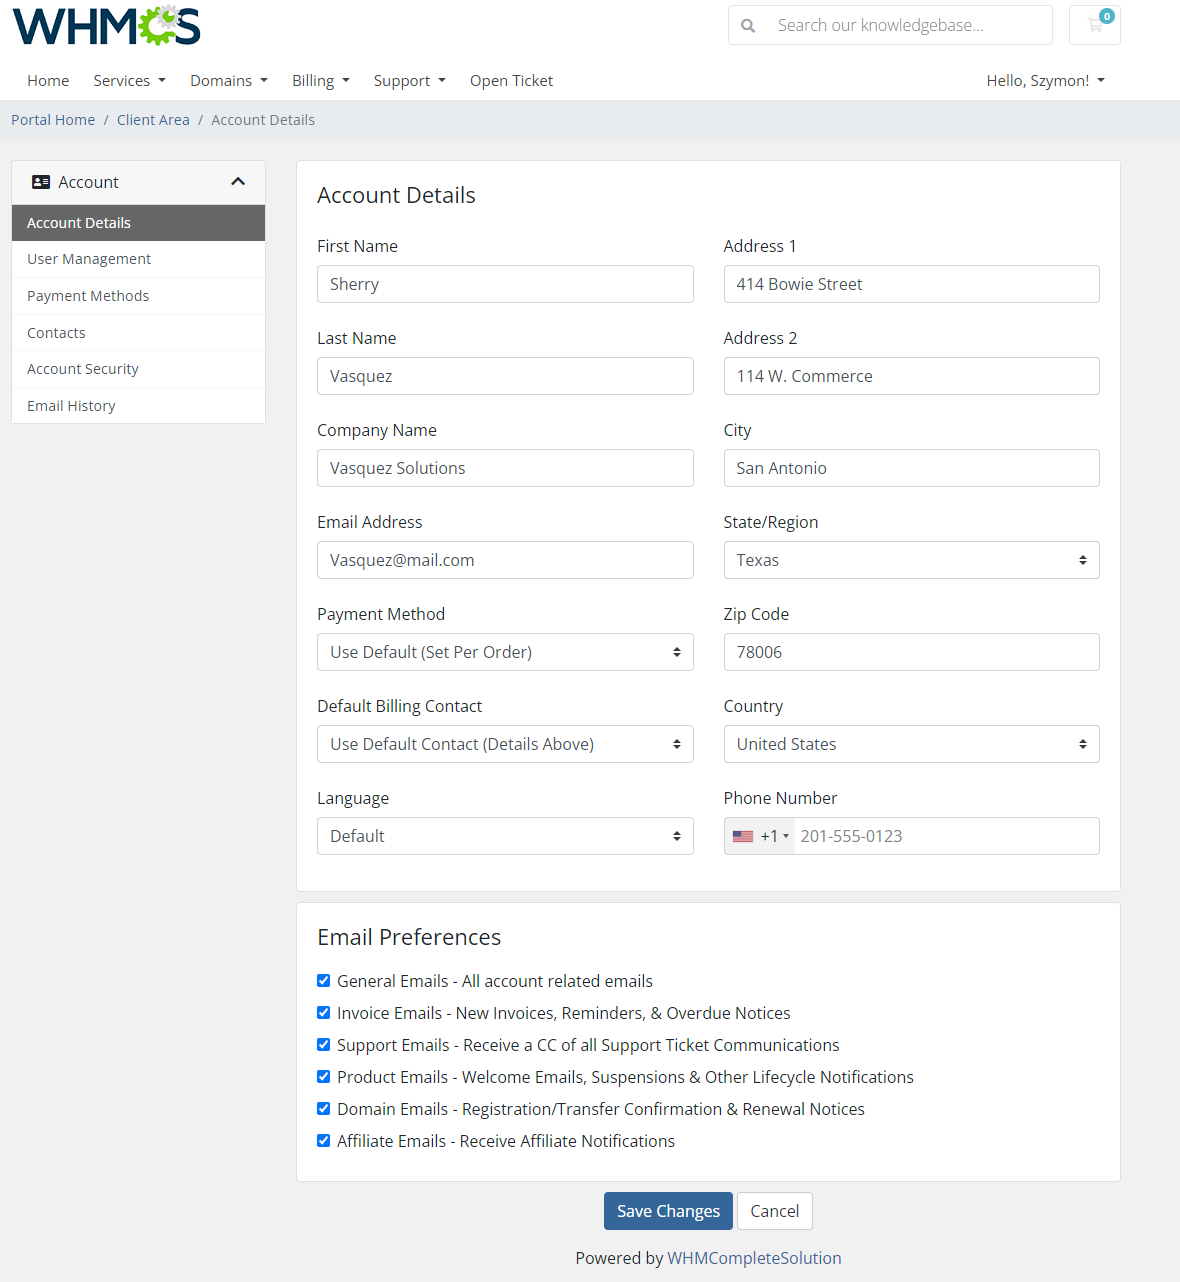
| If a user has no account in WHMCS, and chooses to 'Register New Account', any available in the platform data is immediately transferred to WHMCS. You may edit it and provide new information as well. |
|
| Note that some providers may not share all personal data, for example, Instagram email address. In this case, the user will be prompted to enter the email address manually. If the email address returned by the provider already exists in the WHMCS system, the client will be asked to enter a different address |
Account Connections
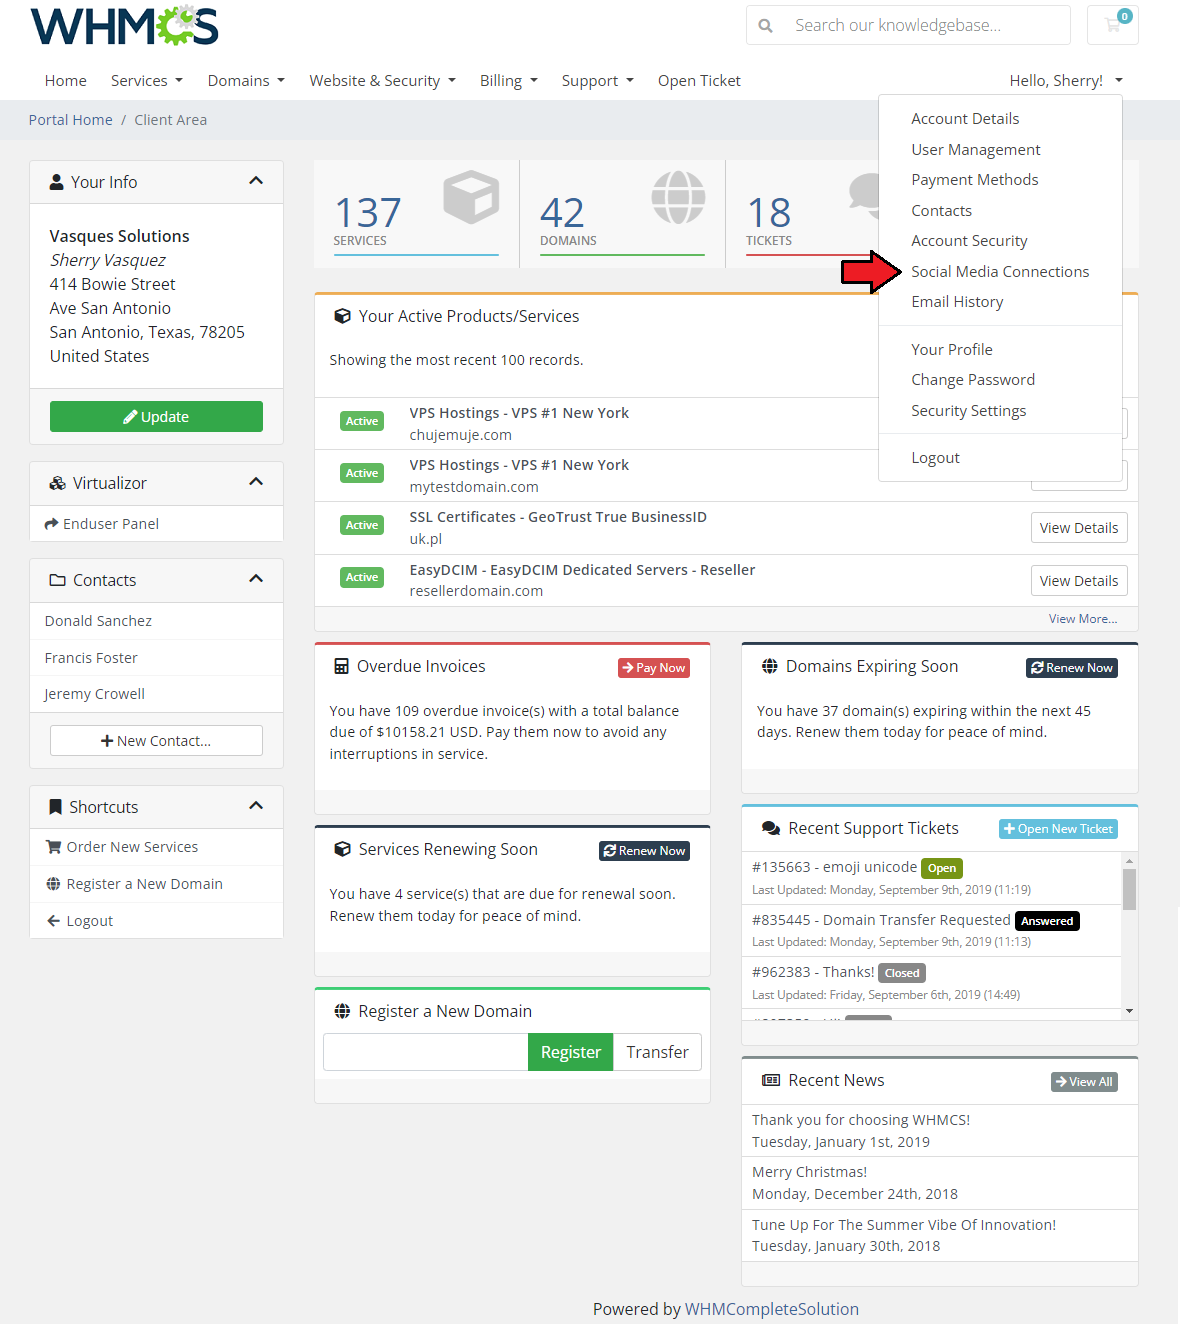
| Once users log in using a new platform for the first time, a new account connection will be established. Those connections can be viewed in the 'Account Connections' tab. The new tab can be found in the profile menu, as seen on the screen below. |
|
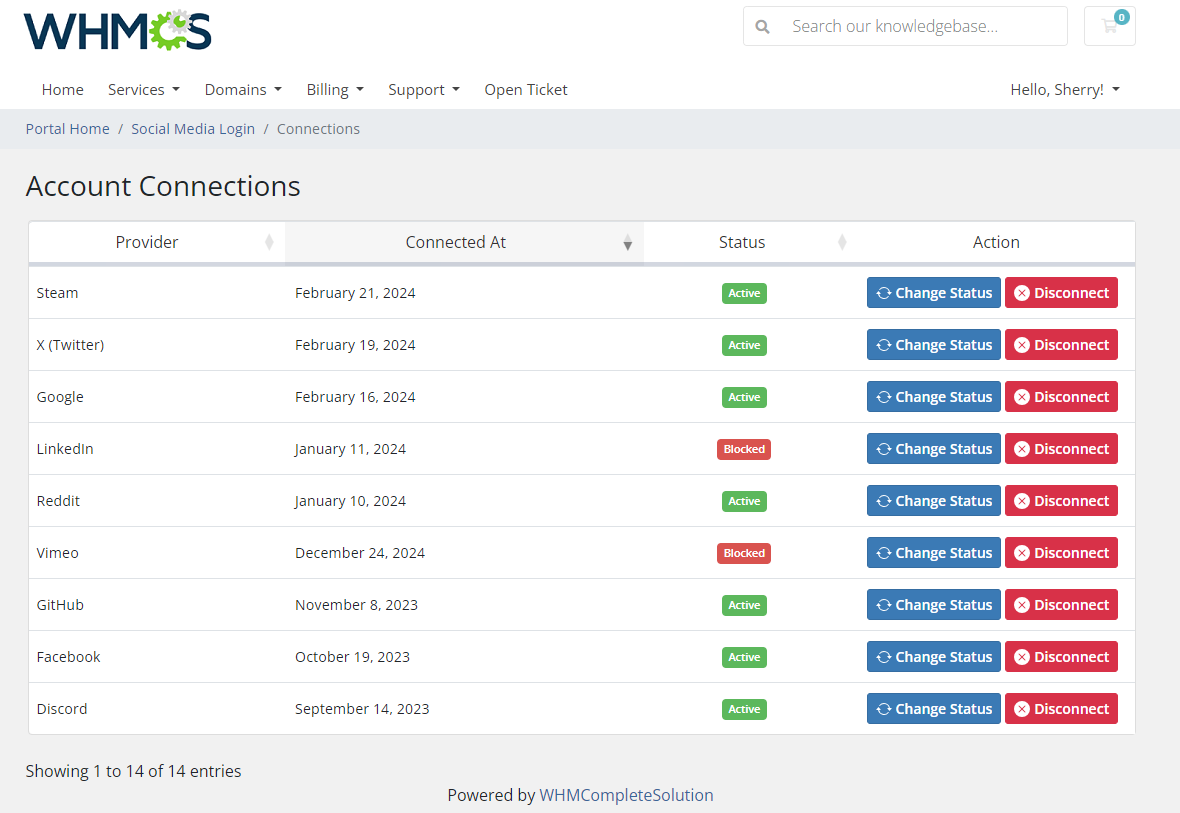
The user will find a table containing all of their account connections. The information includes:
Most importantly, under the 'Action' column the users can:
|
|
Tips
| 1. If you decided to use Login with Twitter option, make sure your application is whitelisted by the platform administrators. |
| 2. Your customers may use several social media platforms to log in. Since 1.2.0 module version it is no longer required for used in the platform email address to be the same as the one saved in user WHMCS account. |
| 3. As this module supports templates system, any changes made in the module's templates files will be saved after the upgrade process. |
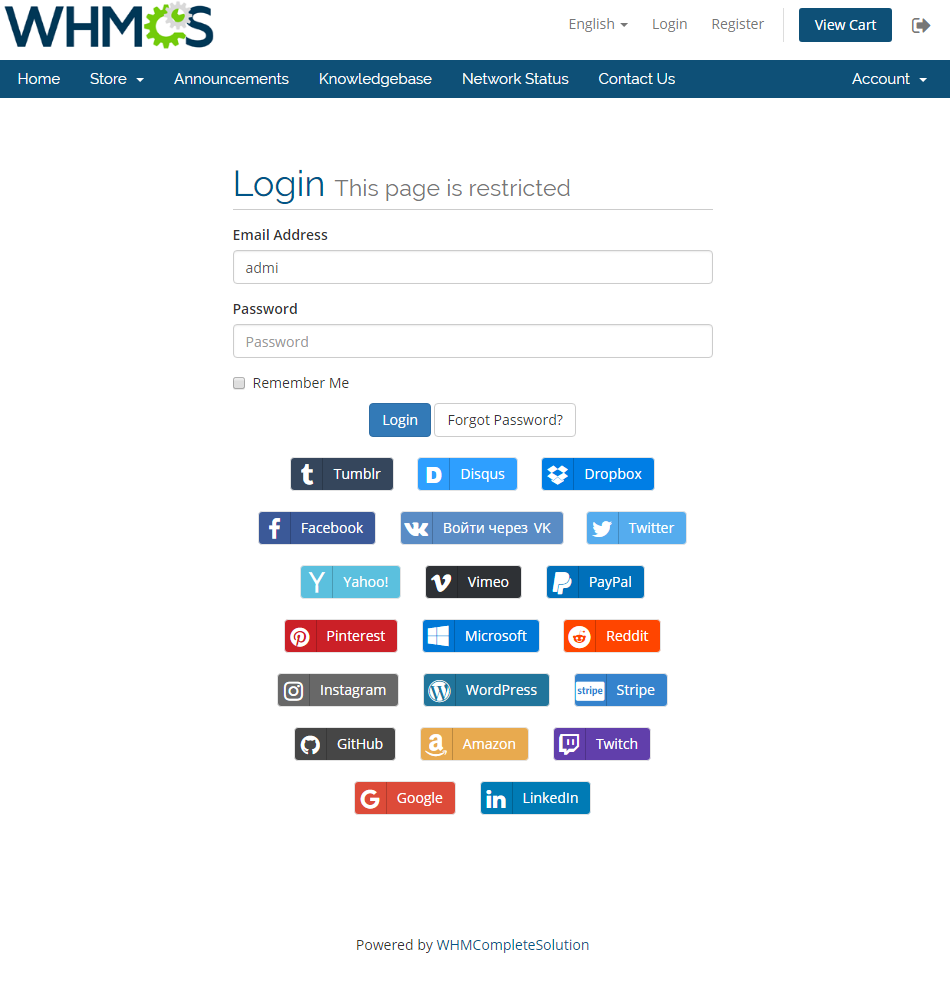
| 4. This is what a default layout of the buttons on the login page looks like: |
|
| If you want to change it and make look like in our presentation you will need to adjust your custom stylesheet.
Open the WHMCS/templates/six/css/custom.css file and paste the below code snippets in it:
	.logincontainer {
    max-width: 100% !important;
}

.login-form{
    margin: 0px auto 10px auto;
    max-width: 500px;
}

.logincontainer > .header-lined
{
    margin: 10px auto 0px auto;
    max-width: 500px;
}

.logincontainer .alert {
    margin: 0px auto 10px auto;
    max-width: 500px;
}
|
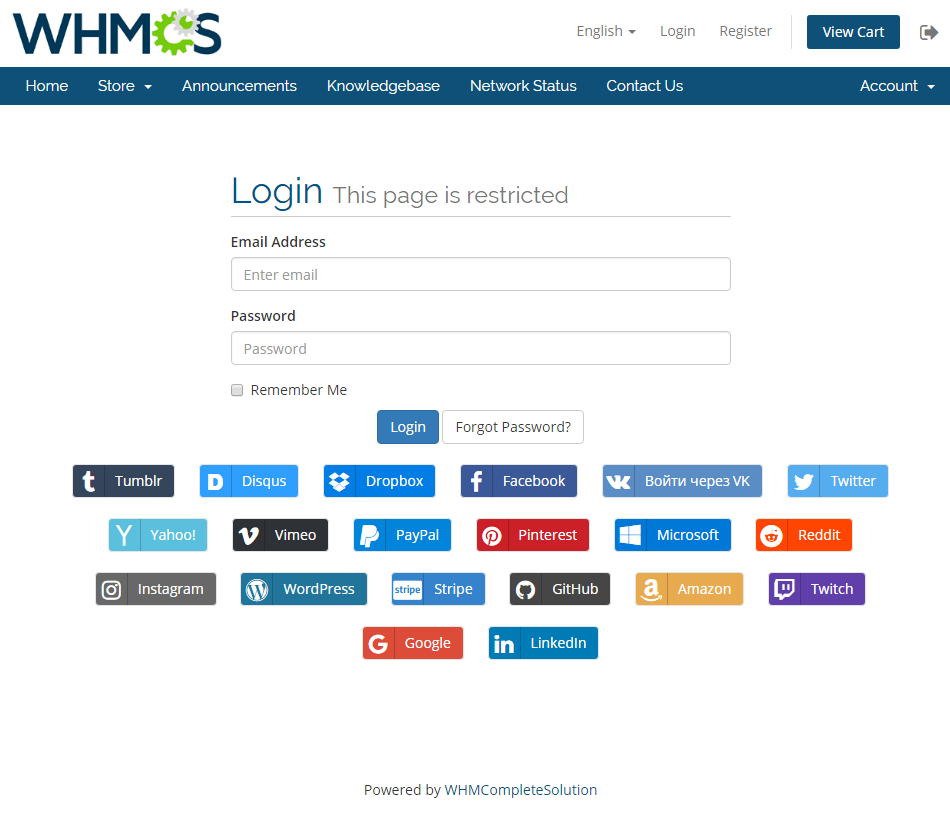
| This is how the buttons will be arranged on the login page once the custom stylesheet has been adjusted: |
|
Update Instructions
| Essential guidance through the process of updating the module is offered here. Keep in mind there is a quick and easy option in our client area that will let you upgrade the license of your module to an open source version at any time - and at a lower price! |
Common Problems
| 1. When you have problems with connection, check whether your SELinux or firewall does not block ports. |