Recurring Contract Billing For WHMCS
(→Admin Area) |
|||
| (55 intermediate revisions by 3 users not shown) | |||
| Line 1: | Line 1: | ||
<meta name="keywords" content="recurring contract billing for whmcs, recurring contract billing configuration, whmcs recurring contract billing management, whmcs recurring contract billing installation, whmcs contract billing extended common problems, about whmcs recurring contract billing, whmcs recurring contract billing documentation, whmcs recurring contract billing faq, whmcs recurring contract billing help, whmcs recurring contract billing guide, whmcs recurring contract billing wiki, whmcs recurring contract billing tutorial, whmcs recurring contract billing tips, whmcs recurring contract billing wiki"></meta> | <meta name="keywords" content="recurring contract billing for whmcs, recurring contract billing configuration, whmcs recurring contract billing management, whmcs recurring contract billing installation, whmcs contract billing extended common problems, about whmcs recurring contract billing, whmcs recurring contract billing documentation, whmcs recurring contract billing faq, whmcs recurring contract billing help, whmcs recurring contract billing guide, whmcs recurring contract billing wiki, whmcs recurring contract billing tutorial, whmcs recurring contract billing tips, whmcs recurring contract billing wiki"></meta> | ||
<meta name="description" content="ModulesGarden Wiki Contains All The Information You Need About The Recurring Contract Billing For WHMCS Module."></meta> | <meta name="description" content="ModulesGarden Wiki Contains All The Information You Need About The Recurring Contract Billing For WHMCS Module."></meta> | ||
| − | |||
| − | |||
| − | |||
=About [https://www.modulesgarden.com/products/whmcs/recurring-contract-billing Recurring Contract Billing For WHMCS]= | =About [https://www.modulesgarden.com/products/whmcs/recurring-contract-billing Recurring Contract Billing For WHMCS]= | ||
{| | {| | ||
| − | |style="padding: 10px 0px 5px 0px;"|'''Recurring Contract Billing For WHMCS''' will allow you to draw up fixed-term contracts for your clients | + | |style="padding: 10px 0px 5px 0px;"|'''Recurring Contract Billing For WHMCS''' will allow you to draw up fixed-term contracts for your clients concerning the offered products and services.<br /> |
You will be able to define which products require contract acceptance, then set the time span of each contract along with its possible discount and penalty amount.<br /> | You will be able to define which products require contract acceptance, then set the time span of each contract along with its possible discount and penalty amount.<br /> | ||
| − | The module will also let you preview vital statistics and logs gathered in transparent manner on the dashboard. | + | The module will also let you preview vital statistics and logs gathered in a transparent manner on the dashboard. |
|} | |} | ||
<!-- fixed --> | <!-- fixed --> | ||
*'''Admin Area Features:''' | *'''Admin Area Features:''' | ||
{| | {| | ||
| − | |style="padding: 10px 0px 0px 30px;"|✔ Create | + | |style="padding: 10px 0px 0px 30px;"|✔ Create, View And Manage Signed Contracts |
|} | |} | ||
{| | {| | ||
| − | |style="padding: 0px 0px 0px 30px;"|✔ | + | |style="padding: 0px 0px 0px 30px;"|✔ Create Multiple Contracts Per Product |
|} | |} | ||
{| | {| | ||
| − | |style="padding: 0px 0px 0px 30px;"|✔ | + | |style="padding: 0px 0px 0px 30px;"|✔ Request Contract Signing For Selected Service |
|} | |} | ||
{| | {| | ||
| − | |style="padding: 0px 0px 0px 30px;"|✔ | + | |style="padding: 0px 0px 0px 30px;"|✔ View Recently Signed And Ended Contracts |
|} | |} | ||
{| | {| | ||
| − | |style="padding: 0px 0px 0px 30px;"|✔ | + | |style="padding: 0px 0px 0px 30px;"|✔ View Contracts And Revenue Summaries |
| + | |} | ||
| + | {| | ||
| + | |style="padding: 0px 0px 0px 30px;"|✔ Configure Contract Content | ||
| + | |} | ||
| + | {| | ||
| + | |style="padding: 0px 0px 0px 30px;"|✔ Configure Contract Signature Types | ||
| + | |} | ||
| + | {| | ||
| + | |style="padding: 0px 0px 0px 30px;"|✔ Define Time Of Notifications Before Contract Expiration | ||
|} | |} | ||
{| | {| | ||
| Line 32: | Line 38: | ||
|} | |} | ||
{| | {| | ||
| − | |style="padding: 0px 0px 10px 30px;"|✔ View Logs | + | |style="padding: 0px 0px 0px 30px;"|✔ Define Services Suspension Rules |
| + | |} | ||
| + | {| | ||
| + | |style="padding: 0px 0px 0px 30px;"|✔ Configure Sign Types | ||
| + | |} | ||
| + | {| | ||
| + | |style="padding: 0px 0px 0px 30px;"|✔ Customize Module Language Files With "Translations" Tool | ||
| + | |} | ||
| + | {| | ||
| + | |style="padding: 0px 0px 10px 30px;"|✔ View And Manage Logs | ||
|} | |} | ||
*'''Contact Features:''' | *'''Contact Features:''' | ||
{| | {| | ||
| − | |style="padding: 10px 0px 0px 30px;"|✔ Define Contract Content In Multiple Languages | + | |style="padding: 10px 0px 0px 30px;"|✔ Define Contract Content In Multiple Languages: |
| + | |} | ||
| + | {| | ||
| + | |style="padding: 0px 0px 0px 45px;"|✔ Create Contract Content With WYSIWYG Editor | ||
| + | |} | ||
| + | {| | ||
| + | |style="padding: 0px 0px 0px 45px;"|✔ Use Merge Fields For Contract Template | ||
| + | |} | ||
| + | {| | ||
| + | |style="padding: 0px 0px 0px 30px;"|✔ Create Contract Templates: | ||
| + | |} | ||
| + | {| | ||
| + | |style="padding: 0px 0px 0px 45px;"|✔ Assign Product To Contract Template | ||
| + | |} | ||
| + | {| | ||
| + | |style="padding: 0px 0px 0px 45px;"|✔ Define Discounts And Penalty Types | ||
| + | |} | ||
| + | {| | ||
| + | |style="padding: 0px 0px 0px 45px;"|✔ Define Multiple Contracts Sets For Specified Currencies And Billing Cycles: | ||
| + | |} | ||
| + | {| | ||
| + | |style="padding: 0px 0px 0px 60px;"|✔ Define Contract Length - Up To 5 Years | ||
|} | |} | ||
{| | {| | ||
| − | |style="padding: 0px 0px 0px | + | |style="padding: 0px 0px 0px 60px;"|✔ Define Discount And Penalty Amounts |
|} | |} | ||
{| | {| | ||
| − | |style="padding: 0px 0px 0px | + | |style="padding: 0px 0px 0px 60px;"|✔ Define Days Before Expiration To Cancel Contract Without Penalty |
|} | |} | ||
{| | {| | ||
| − | |style="padding: 0px 0px 0px | + | |style="padding: 0px 0px 0px 60px;"|✔ Define Trial Period Length |
|} | |} | ||
{| | {| | ||
| − | |style="padding: 0px 0px 0px | + | |style="padding: 0px 0px 0px 60px;"|✔ Define Time To Send Renewal Notification |
|} | |} | ||
{| | {| | ||
| − | |style="padding: 0px 0px 0px | + | |style="padding: 0px 0px 0px 60px;"|✔ View Total And Recurring Prices |
|} | |} | ||
{| | {| | ||
| − | |style="padding: 0px 0px 0px | + | |style="padding: 0px 0px 0px 60px;"|✔ View Amount Of Penalty |
|} | |} | ||
{| | {| | ||
| − | |style="padding: 0px 0px 0px 45px;"|✔ | + | |style="padding: 0px 0px 0px 45px;"|✔ Choose Contract Signature Type: |
|} | |} | ||
{| | {| | ||
| − | |style="padding: 0px 0px 0px | + | |style="padding: 0px 0px 0px 60px;"|✔ Adobe Sign |
|} | |} | ||
{| | {| | ||
| − | |style="padding: 0px 0px 0px | + | |style="padding: 0px 0px 0px 60px;"|✔ Checkbox |
|} | |} | ||
{| | {| | ||
| − | |style="padding: 0px 0px 0px | + | |style="padding: 0px 0px 0px 60px;"|✔ DocuSign |
|} | |} | ||
{| | {| | ||
| − | |style="padding: 0px 0px 0px | + | |style="padding: 0px 0px 0px 60px;"|✔ Dropbox Sign |
|} | |} | ||
{| | {| | ||
| − | |style="padding: 0px 0px 0px | + | |style="padding: 0px 0px 0px 60px;"|✔ File Upload |
|} | |} | ||
{| | {| | ||
| − | |style="padding: 0px 0px 0px | + | |style="padding: 0px 0px 0px 60px;"|✔ SignNow |
|} | |} | ||
{| | {| | ||
| − | |style="padding: 0px 0px 0px | + | |style="padding: 0px 0px 0px 30px;"|✔ Define Contract Length Selection Type: |
|} | |} | ||
{| | {| | ||
| − | |style="padding: 0px 0px 0px 45px;"|✔ | + | |style="padding: 0px 0px 0px 45px;"|✔ Dropdown Menu |
|} | |} | ||
{| | {| | ||
| Line 107: | Line 143: | ||
{| | {| | ||
|style="padding: 0px 0px 0px 30px;"|✔ View Contract Content Before Accepting It | |style="padding: 0px 0px 0px 30px;"|✔ View Contract Content Before Accepting It | ||
| + | |} | ||
| + | {| | ||
| + | |style="padding: 0px 0px 0px 30px;"|✔ Sign Contract Using Configured Signature Type | ||
|} | |} | ||
{| | {| | ||
| Line 112: | Line 151: | ||
|} | |} | ||
{| | {| | ||
| − | |style="padding: 0px 0px | + | |style="padding: 0px 0px 0px 30px;"|✔ View History Of Any Signed Contract |
| + | |} | ||
| + | {| | ||
| + | |style="padding: 0px 0px 10px 30px;"|✔ Receive Contract Email Notification Upon Order Creation | ||
|} | |} | ||
*'''General Info:''' | *'''General Info:''' | ||
{| | {| | ||
| − | |style="padding: 10px 0px 0px 30px;"|✔ | + | |style="padding: 10px 0px 0px 30px;"|✔ Multi-Language Support With Custom Translations Tool |
|} | |} | ||
{| | {| | ||
| − | |style="padding: 0px 0px 0px 30px;"|✔ Supports PHP | + | |style="padding: 0px 0px 0px 30px;"|✔ Supports PHP 8.1 |
|} | |} | ||
{| | {| | ||
| − | |style="padding: 0px 0px 0px 30px;"|✔ Supports WHMCS Themes "Six" | + | |style="padding: 0px 0px 0px 30px;"|✔ Supports WHMCS Themes "Six", "Twenty-One" And "Lagom WHMCS Client Theme" |
|} | |} | ||
{| | {| | ||
| − | |style="padding: 0px 0px 0px 30px;"|✔ Supports WHMCS V8. | + | |style="padding: 0px 0px 0px 30px;"|✔ Supports WHMCS V8.10 Back To WHMCS V8.7 |
|} | |} | ||
{| | {| | ||
| − | |style="padding: 0px 0px 30px 30px;"|✔ Easy Module Upgrade To [https://www.modulesgarden.com/products/whmcs/recurring-contract-billing#open-source-version Open Source Version] | + | |style="padding: 0px 0px 0px 30px;"|✔ Requires ionCube Loader V12 Or Later |
| + | |} | ||
| + | {| | ||
| + | |style="padding: 0px 0px 30px 30px;"|✔ Easy [https://www.docs.modulesgarden.com/How_To_Upgrade_WHMCS_Module Module Upgrade] To [https://www.modulesgarden.com/products/whmcs/recurring-contract-billing#open-source-version Open Source Version] | ||
|} | |} | ||
| − | =Installation= | + | =Installation and Activation= |
{| | {| | ||
|style="padding: 10px 0px 30px 15px;"|'''This tutorial will show you how to successfully install and configure [https://www.modulesgarden.com/products/whmcs/recurring-contract-billing Recurring Contract Billing For WHMCS.]''' <br /> | |style="padding: 10px 0px 30px 15px;"|'''This tutorial will show you how to successfully install and configure [https://www.modulesgarden.com/products/whmcs/recurring-contract-billing Recurring Contract Billing For WHMCS.]''' <br /> | ||
| − | We will guide you step by step through the whole installation and configuration process. | + | We will guide you step by step through the whole installation and configuration process.<br/><br/> |
| + | '' '''Note:''' If you are still using any versions of Recurring Contract Billing For WHMCS '''prior to v2.x''', [https://www.docs.modulesgarden.com/Recurring_Contract_Billing_1.5.X_For_WHMCS read about it here].'' | ||
| + | |||
|} | |} | ||
==Installation== | ==Installation== | ||
| Line 141: | Line 188: | ||
|} | |} | ||
{| | {| | ||
| − | |style="padding: 0px 0px 20px 25px;"|[[File: | + | |style="padding: 0px 0px 20px 25px;"|[[File:RB2_1.png]] |
|} | |} | ||
{| | {| | ||
| − | |style="padding: 0px 0px 15px 15px;"|'''2 | + | |style="padding: 0px 0px 15px 15px;"|'''2. Extract the package and upload its content into the main WHMCS directory. |
| − | + | ||
| − | + | ||
| − | + | ||
| − | + | ||
| − | + | ||
| − | + | ||
| − | + | ||
| − | + | ||
| − | + | ||
| − | + | ||
| − | + | ||
| − | + | ||
| − | + | ||
| − | + | ||
| − | + | ||
| − | + | ||
| − | + | ||
| − | + | ||
The content of the package to upload should look like this. | The content of the package to upload should look like this. | ||
|} | |} | ||
{| | {| | ||
| − | |style="padding: 0px 0px 20px 25px;"|[[File: | + | |style="padding: 0px 0px 20px 25px;"|[[File:RB2_4.png]] |
|} | |} | ||
{| | {| | ||
| − | |style="padding: 0px 0px 15px 15px;"|''' | + | |style="padding: 0px 0px 15px 15px;"|'''3. When you install Recurring Contract Billing For WHMCS for the first time you have to rename '' 'license_RENAME.php' '' file.'''<br /> |
| − | + | The file is located in '' 'modules/addons/recurring_billing/license_RENAME.php'.'' Rename it from '' 'license_RENAME.php' '' to '' 'license.php'. '' | |
|} | |} | ||
{| | {| | ||
| − | |style="padding: 0px 0px 20px 25px;"|[[File: | + | |style="padding: 0px 0px 20px 25px;"|[[File:RB2_5.png]] |
|} | |} | ||
{| | {| | ||
| − | |style="padding: 0px 0px 15px 15px;"|''' | + | |style="padding: 0px 0px 15px 15px;"|'''4. To configure your license key, you have to edit the previously renamed '' 'license.php' file. '' '''<br /> |
| − | + | Enter your license key between quotation marks as presented on the following screen. You can find your license key in our client area → '' 'My Products'. '' | |
|} | |} | ||
{| | {| | ||
| − | |style="padding: 0px 0px | + | |style="padding: 0px 0px 20px 25px;"|[[File:RB2_6.png]] |
|} | |} | ||
{| | {| | ||
| − | |style="padding: 0px 0px 15px 15px;"|''' | + | |style="padding: 0px 0px 15px 15px;"|'''5. The next step is setting up '' 'storage' '' folder as recursively writable.'''<br /> |
| − | + | It is located in '' 'your_whmcs/modules/addons/RecurringContractBilling/'.'' | |
|} | |} | ||
{| | {| | ||
| − | |style="padding: 0px 0px 30px 25px;"|[[File: | + | |style="padding: 0px 0px 30px 25px;"|[[File:RB2_7.png]] |
|} | |} | ||
| Line 197: | Line 226: | ||
|} | |} | ||
{| | {| | ||
| − | |style="padding: 0px 0px 20px 25px;"|[[File: | + | |style="padding: 0px 0px 20px 25px;"|[[File:RB2_8.png]] |
|} | |} | ||
{| | {| | ||
| − | |style="padding: 0px 0px 15px 15px;"|'''8. In the next step you need to permit access to this module.'''<br /> | + | |style="padding: 0px 0px 15px 15px;"|'''8. In the next step, you need to permit access to this module.'''<br /> |
To do so, click on '' 'Configure' '' button, tick checkboxes to assign desired admin roles.<br /> | To do so, click on '' 'Configure' '' button, tick checkboxes to assign desired admin roles.<br /> | ||
Press '' 'Save Changes'. '' | Press '' 'Save Changes'. '' | ||
|} | |} | ||
{| | {| | ||
| − | |style="padding: 0px 0px 20px 25px;"|[[File: | + | |style="padding: 0px 0px 20px 25px;"|[[File:RB2_9.png]] |
|} | |} | ||
| + | <!-- | ||
{| | {| | ||
| − | |style="padding: 0px 0px 15px 15px;"|'''9. Now it is time to insert proper integration codes. | + | |style="padding: 0px 0px 15px 15px;"|'''9. Now it is time to insert proper integration codes.'''<br/> |
| − | + | The module requires alterations into your order form template. Open your currently used order form and follow the instructions.<br/> | |
| − | + | You will find it in: '' '''yourWHMCS/templates/orderforms/'''yourOrderForm'''/checkout.tpl''' ''<br/><br/> | |
| − | You will find it in: '' ''' | + | |
Find line: | Find line: | ||
| − | < | + | <div class="sub-heading"> |
| − | { | + | <span>{$LANG.orderForm.paymentDetails}</span> |
| − | </ | + | </div> |
Insert this code snippet above that line: | Insert this code snippet above that line: | ||
<pre> | <pre> | ||
<div class="sub-heading" id="recurring-biling-contracts"> | <div class="sub-heading" id="recurring-biling-contracts"> | ||
| − | + | <span>{$contractTitle}</span> | |
| − | </div> | + | </div> |
| − | {$contractOutput} | + | {$contractOutput} |
</pre> | </pre> | ||
This is how a properly inserted code should look like:<br/> | This is how a properly inserted code should look like:<br/> | ||
| Line 229: | Line 258: | ||
|} | |} | ||
{| | {| | ||
| − | |style="padding: 0px 0px 20px 15px;"|''Note: For illustration purposes we have used ''' | + | |style="padding: 0px 0px 20px 15px;"|'''''Note''': For illustration purposes we have used '''standard_cart''' order form, please make changes in the form you are using!<br/> Remember that the content of other order forms may slightly vary from the description above!<br/>Check the 'Utilities' → 'Integration Code' tab in your module for valid code.''<br/> |
| + | '''''Note:''' In case you are going to use '''Lagom WHMCS Client Theme''', please check the [[#Tips|Tips]] section to find a dedicated integration code.''<br/> | ||
| + | '''''Note 2:''' In case there is no "checkout.tpl" file in your order form, please look for the template "parent" in the theme.yaml file. Place the integration code in that parent file.'' | ||
|} | |} | ||
| − | + | --> | |
{| | {| | ||
| − | |style="padding: 0px 0px 15px 15px;"| | + | |style="padding: 0px 0px 15px 15px;"|'''9. Finally, set up the cron command line provided below and define its frequency (1 day interval is suggested).''' |
| − | + | php -q /yourWHMCS/modules/addons/RecurringContractBilling/cron/cron.php dailyCron | |
| − | + | The cron features multiple commands: | |
| − | You | + | * dailyCron – Includes every option in one cron, so there is no need to set up the other ones. |
| − | + | * contractNotifications – Sends out notifications to the clients whose contracts are about to expire. You can define the timing in the [[#Module_Configuration|'' 'module configuration' '']]. | |
| − | + | * finishContracts – Necessary to automatically finalize a contract when it ends. How long a contract lasts can be defined while setting up [[#Contract_Templates|'' 'contract lengths,' '']] which the client can choose between while ordering a product. | |
| − | + | * generatePenaltyInvoices – Generates invoices when a contract is breached, you can specify the penalty when setting up a [[#Contract_Templates|'' 'contract template' '']]. | |
| − | + | * suspendNotContractedServices – Suspend services without an active contract when that is required. It will automatically suspend any active service that requires a contract if no signed contract is detected. | |
| − | + | You can set up each function as a separate cron, or set up '' 'dailyCron' '' to utilize all functions at once. | |
| − | + | ||
| − | + | ||
| − | + | ||
|} | |} | ||
| − | |||
| − | |||
| − | |||
| − | |||
| − | |||
| − | |||
| − | |||
| − | |||
| − | |||
| − | |||
| − | |||
| − | |||
| − | |||
| − | |||
| − | |||
| − | |||
| − | |||
| − | |||
| − | |||
| − | |||
| − | |||
| − | |||
| − | |||
{| | {| | ||
|style="padding: 0px 0px 30px 15px;"|'''10. You have just successfully installed Recurring Contract Billing For WHMCS!''' | |style="padding: 0px 0px 30px 15px;"|'''10. You have just successfully installed Recurring Contract Billing For WHMCS!''' | ||
| Line 276: | Line 281: | ||
{| | {| | ||
|style="padding: 10px 0px 30px 15px;"|'''Once you have properly installed and activated the product you may move to its actual configuration.'''<br/> | |style="padding: 10px 0px 30px 15px;"|'''Once you have properly installed and activated the product you may move to its actual configuration.'''<br/> | ||
| − | Read the below sections to learn how to use '''Recurring Billing | + | Read the below sections to learn how to use '''Recurring Contract Billing For WHMCS''' completely. |
|} | |} | ||
==Configuration== | ==Configuration== | ||
{| | {| | ||
| − | |style="padding: 10px 0px 15px 15px;"|In order to start using your Recurring Billing | + | |style="padding: 10px 0px 15px 15px;"|In order to start using your Recurring Contract Billing For WHMCS move to '' 'Addons → Recurring Contract Billing'. ''<br/> |
| − | By default, you will be moved to the addon's dashboard with a guide opened. You will find | + | By default, you will be moved to the addon's dashboard with a guide opened. You will find short notes on how to configure the product there.<br/> |
| − | In this article we will expand these instructions a bit more. | + | In this article, we will expand these instructions a bit more. |
|} | |} | ||
{| | {| | ||
| − | |style="padding: 0px 0px 20px 25px;"|[[File: | + | |style="padding: 0px 0px 20px 25px;"|[[File:RB2_10.png]] |
|} | |} | ||
{| | {| | ||
| − | |style="padding: 0px 0px 30px 15px;"|Hide the guide when you have completed the configuration and learned how to reconstruct the process. | + | |style="padding: 0px 0px 30px 15px;"|Hide the guide when you have completed the configuration and learned how to reconstruct the process. You can do that under '' 'Utilities' '' → '' 'Configuration.' '' |
|} | |} | ||
===Contract Content=== | ===Contract Content=== | ||
{| | {| | ||
| − | |style="padding: 10px 0px 20px 15px;"|First | + | |style="padding: 10px 0px 20px 15px;"|First of all, create your first contract's content. To do so, move to the '' 'Contracts' '' → '' 'Contract Content' '' section and press the'' 'Create Content' '' button. Decide on a name for your contract content and press '' 'Confirm.' '' |
|} | |} | ||
{| | {| | ||
| − | |style="padding: 0px 0px 20px 25px;"|[[File: | + | |style="padding: 0px 0px 20px 25px;"|[[File:RB2_11.png]] |
|} | |} | ||
{| | {| | ||
| − | |style="padding: 0px 0px 20px 15px;"|Here you can compose the content of a contract.<br/> | + | |style="padding: 0px 0px 20px 15px;"|You will be automatically moved to the content editing page. Here you can compose the content of a contract.<br/> |
| − | + | Fill out the field with ''''' 'Content', ''''' you may use ''''' 'Merge Fields' ''''' to do so, those are categorized into: | |
| − | + | *''Product Fields'' | |
| − | **'' | + | *''Hosting Fields'' |
| − | + | *''Client Fields'' | |
| − | + | *''Contract Fields'' | |
| − | + | Use the advanced edition tool to perfectly shape the contract. <br/> | |
| − | + | ||
| − | + | ||
|} | |} | ||
{| | {| | ||
| − | |style="padding: 0px 0px 20px 25px;"|[[File: | + | |style="padding: 0px 0px 20px 25px;"|[[File:RB2_12.png]] |
|} | |} | ||
{| | {| | ||
| − | |style="padding: 0px 0px 15px 15px;"| | + | |style="padding: 0px 0px 15px 15px;"| |
| − | + | You can also change the content's name in the '' 'Name' '' bracket. Moreover, you may compose the contract translation.<br/>Select the pen icon to add or remove languages. | |
| + | Do not forget to '' 'Confirm' '' the changes once you have finished. | ||
|} | |} | ||
{| | {| | ||
| − | |style="padding: 0px 0px | + | |style="padding: 0px 0px 20px 25px;"|[[File:RB2_12_1.png]] |
|} | |} | ||
| + | {| | ||
| + | |style="padding: 0px 0px 15px 15px;"| | ||
| + | Use action buttons to edit the contract again or delete it if you are sure it is no longer needed. | ||
| + | |} | ||
| + | {| | ||
| + | |style="padding: 0px 0px 30px 25px;"|[[File:RB2_13.png]] | ||
| + | |} | ||
| + | |||
===Sign Types=== | ===Sign Types=== | ||
{| | {| | ||
| − | |style="padding: 10px 0px | + | |style="padding: 10px 0px 15px 15px;"|Under '' 'Utilities' '' → '' 'Sign Types' '' you can configure the methods of signing contracts, which you will then be able to use for creating a contract template.<br/>You can configure the following methods: |
*Adobe Sign | *Adobe Sign | ||
| + | *DropboxSign | ||
*DocuSign | *DocuSign | ||
| + | *SignNow | ||
*File Upload | *File Upload | ||
| − | '' '''Note:''' The checkbox sign method does not require any configuration | + | '' '''Note:''' The checkbox sign method does not require any configuration, but you will still be able to select it when creating a [[#Contract_Templates|contract template]]. |
|} | |} | ||
{| | {| | ||
| − | |style="padding: 0px 0px 20px 25px;"|[[File: | + | |style="padding: 0px 0px 20px 25px;"|[[File:RB2_14.png]] |
|} | |} | ||
====Adobe Sign==== | ====Adobe Sign==== | ||
{| | {| | ||
| − | |style="padding: | + | |style="padding: 10px 0px 15px 15px;"|The Enterprise plan of ''' ''[https://acrobat.adobe.com/us/en/sign.html Adobe Sign]'' ''' is required to use this option. Take the following steps to set it up:<br /> |
1. [https://secure.echosign.com/public/login Log in] to your Adobe Sign profile.<br /> | 1. [https://secure.echosign.com/public/login Log in] to your Adobe Sign profile.<br /> | ||
| − | 2. Go to the | + | 2. Go to the '' 'Account' '' tab.<br /> |
| − | 3. Choose the [https://secure.eu1.echosign.com/account/accountSettingsPage#pageId::API_APPLICATIONS API Applications] from the menu on the left and press the '''+''' button | + | 3. Choose the [https://secure.eu1.echosign.com/account/accountSettingsPage#pageId::API_APPLICATIONS API Applications] from the menu on the left and press the '''+''' button. |
|} | |} | ||
{| | {| | ||
| Line 342: | Line 356: | ||
|style="padding: 0px 0px 15px 15px;"| | |style="padding: 0px 0px 15px 15px;"| | ||
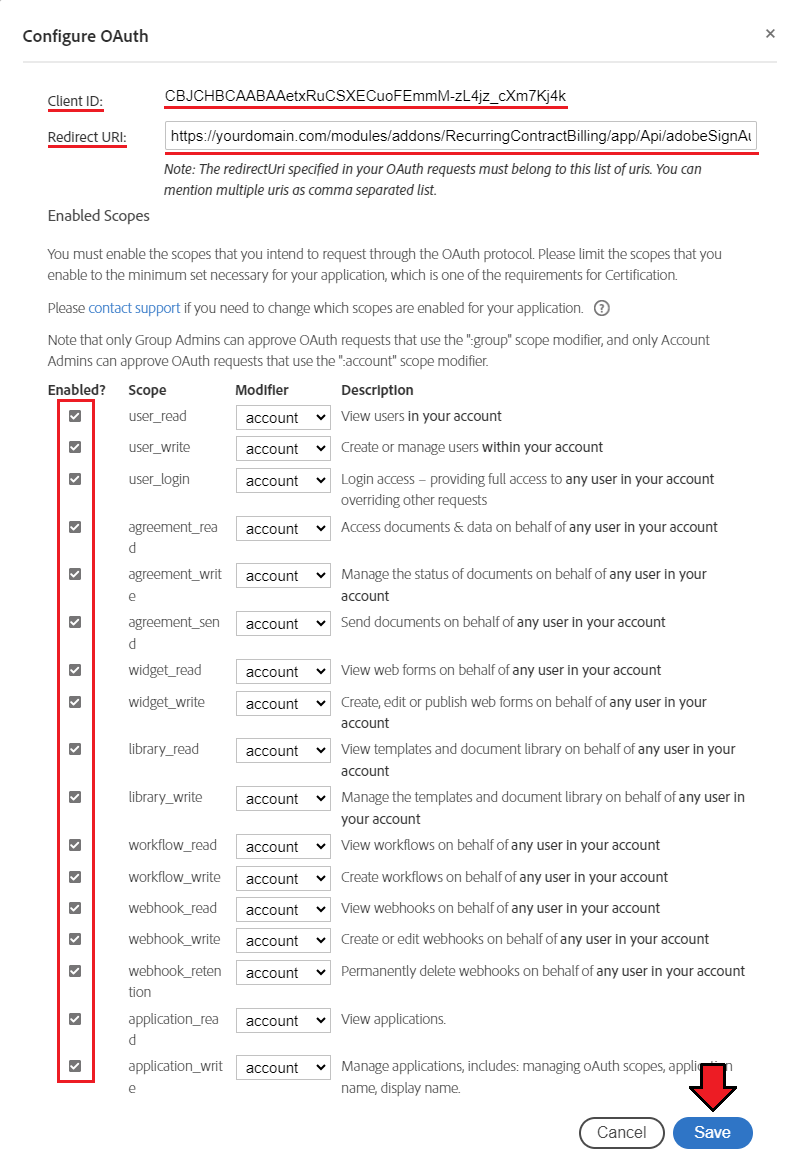
4. Enter the '' 'Name' '' and '' 'Display Name' '' of your application and select '' 'CUSTOMER' '' domain. Press '' 'Save' '' when ready.<br /> | 4. Enter the '' 'Name' '' and '' 'Display Name' '' of your application and select '' 'CUSTOMER' '' domain. Press '' 'Save' '' when ready.<br /> | ||
| − | 5. Now, select the created application in the list and click on '' ' | + | 5. Now, select the created application in the list and click on '' 'View/Edit.' ''<br /> |
6. While there, you will find your '' 'Client ID' '' and '' 'Client Secret' '' which are required for the configuration. '''Please keep them safe'''.<br /> | 6. While there, you will find your '' 'Client ID' '' and '' 'Client Secret' '' which are required for the configuration. '''Please keep them safe'''.<br /> | ||
| − | 7. Next, you need to provide a proper callback ''' '' 'Redirect URIs' '' ''' from your WHMCS installation in the following format:<br /> | + | 7. Next, enter '' 'Configure OAuth for Application,' '' you need to provide a proper callback ''' '' 'Redirect URIs' '' ''' from your WHMCS installation in the following format:<br /> |
| − | <nowiki>https://yourdomain.com/ | + | <nowiki>https://yourdomain.com/modules/addons/RecurringContractBilling/app/Api/adobeSignAuthorize.php</nowiki> |
| − | '' '''Note:''' Provided URI also has to start with ''' https:// ''' | + | '' '''Note:''' Provided URI also has to start with '''''https:// '''.''<br /> |
8. Finally you have to enable '''all''' the scopes. Press '' 'Save' '' when ready. | 8. Finally you have to enable '''all''' the scopes. Press '' 'Save' '' when ready. | ||
|} | |} | ||
{| | {| | ||
| − | |style="padding: 0px 0px 20px 25px;"|[[File: | + | |style="padding: 0px 0px 20px 25px;"|[[File:RB2_141.png]] |
|} | |} | ||
{| | {| | ||
| Line 356: | Line 370: | ||
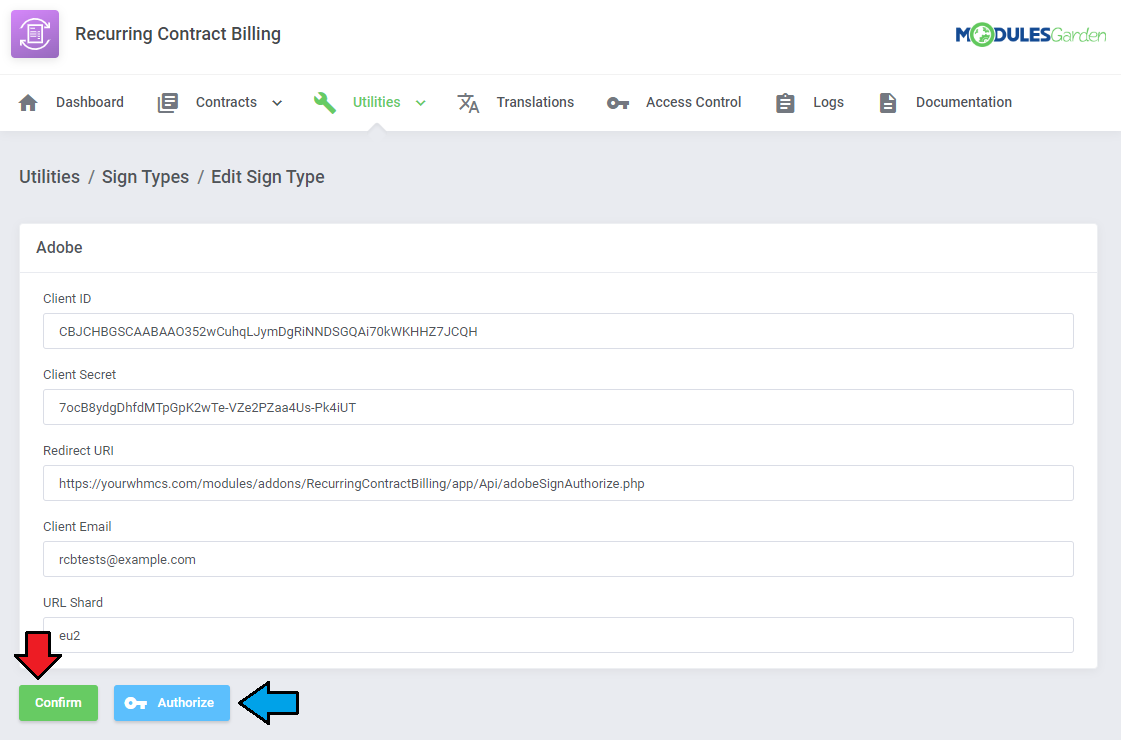
9. Now return to the configuration of the WHMCS module and enter the previously obtained data. <br/> | 9. Now return to the configuration of the WHMCS module and enter the previously obtained data. <br/> | ||
As the '' 'Client Email' '' use the one from your ''Adobe Sign'' login. The '' 'URL Shard' '' field contains your region identification. To find it, you need to log in to your Adobe Sign. <br/> The environment identifier is found in the URL address, just before the ''echosign.com'' (or ''adobesign.com'') portion. For more info, please click [https://helpx.adobe.com/sign/using/identify-account-shard.html here]<br/> | As the '' 'Client Email' '' use the one from your ''Adobe Sign'' login. The '' 'URL Shard' '' field contains your region identification. To find it, you need to log in to your Adobe Sign. <br/> The environment identifier is found in the URL address, just before the ''echosign.com'' (or ''adobesign.com'') portion. For more info, please click [https://helpx.adobe.com/sign/using/identify-account-shard.html here]<br/> | ||
| − | Do not forget to '' ' | + | Do not forget to '' 'Confirm' '' the settings first because only then you will be able to click the '' 'Authorization' '' button. |
|} | |} | ||
{| | {| | ||
| − | |style="padding: 0px 0px | + | |style="padding: 0px 0px 20px 25px;"|[[File:RB2_15.png]] |
|} | |} | ||
{| | {| | ||
| Line 370: | Line 384: | ||
{| | {| | ||
|style="padding: 0px 0px 30px 15px;"| | |style="padding: 0px 0px 30px 15px;"| | ||
| − | + | 11. Finally, if you provided all data correctly you should receive the notice that authorization has been completed successfully. | |
| + | |} | ||
| + | |||
| + | ====DropboxSign==== | ||
| + | {| | ||
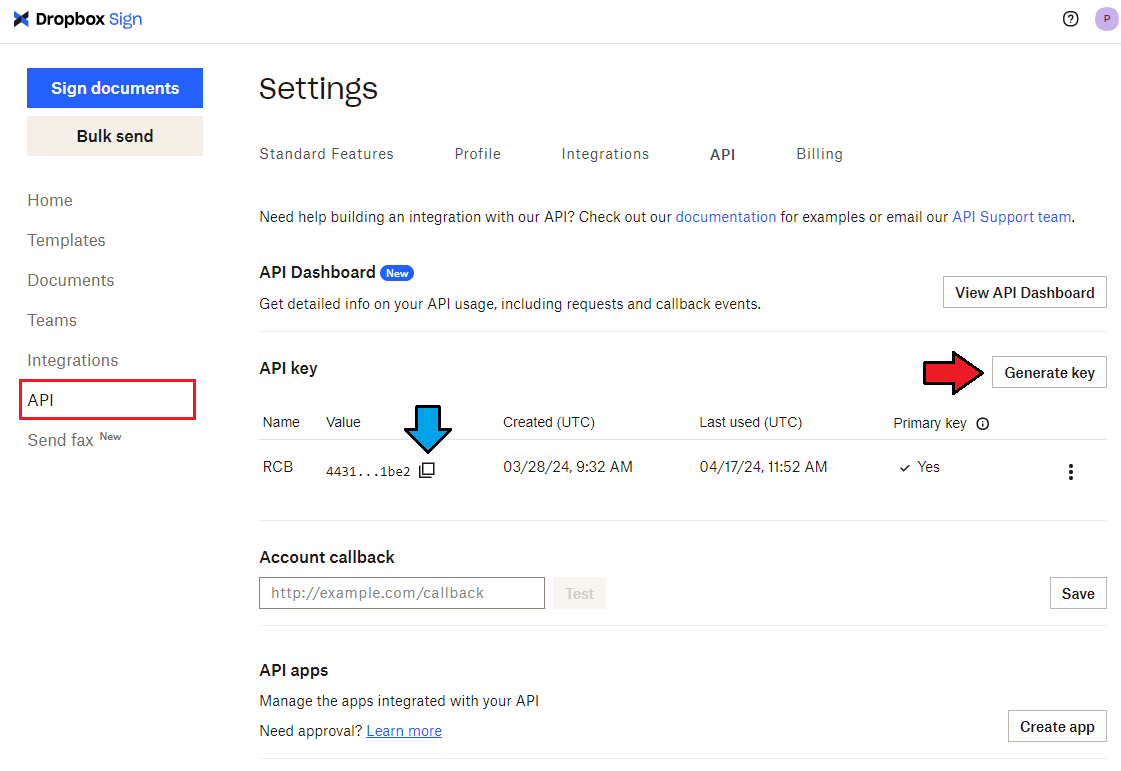
| + | |style="padding: 10px 0px 15px 15px;"|An ''' ''[https://www.dropbox.com/sign Adobe Sign]'' ''' standard account is required to use this option. Please take the following steps to set it up:<br /> | ||
| + | 1. [https://app.hellosign.com/account/logIn Log in] to your DropboxSign profile.<br /> | ||
| + | 2. Go to the '' 'API' '' tab.<br /> | ||
| + | 3. Find the '' 'Generate Key' '' button, click on it, and give the key a name.<br /> | ||
| + | 4. Copy the key. | ||
| + | |} | ||
| + | {| | ||
| + | |style="padding: 0px 0px 20px 25px;"|[[File:RB2_15_1.png]] | ||
| + | |} | ||
| + | |||
| + | {| | ||
| + | |style="padding: 0px 0px 15px 15px;"| | ||
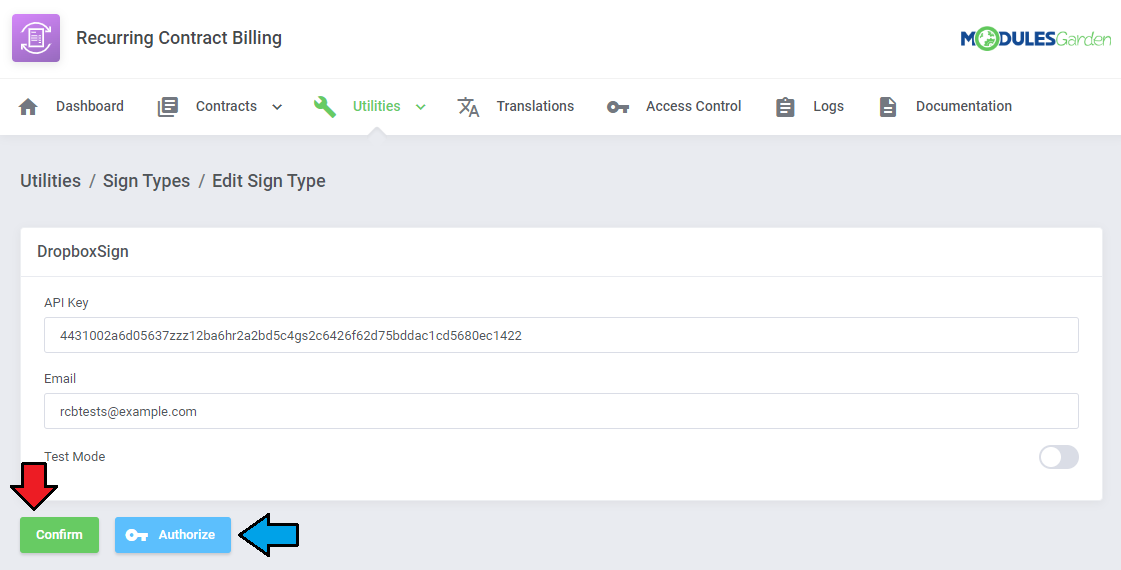
| + | 5. Now return to the configuration of the WHMCS module and enter the API Key and your DropboxSign login email. <br/> | ||
| + | If you have a demo DropboxSign account, enable the test mode. <br/> | ||
| + | When ready, click '' 'Confirm' '' first, then '' 'Authorize.' | ||
| + | |} | ||
| + | {| | ||
| + | |style="padding: 0px 0px 20px 25px;"|[[File:RB2_15_3.png]] | ||
| + | |} | ||
| + | {| | ||
| + | |style="padding: 0px 0px 30px 15px;"| | ||
| + | 6. Finally, if you provided all data correctly you should receive the notice that authorization has been completed successfully. | ||
|} | |} | ||
====DocuSign==== | ====DocuSign==== | ||
{| | {| | ||
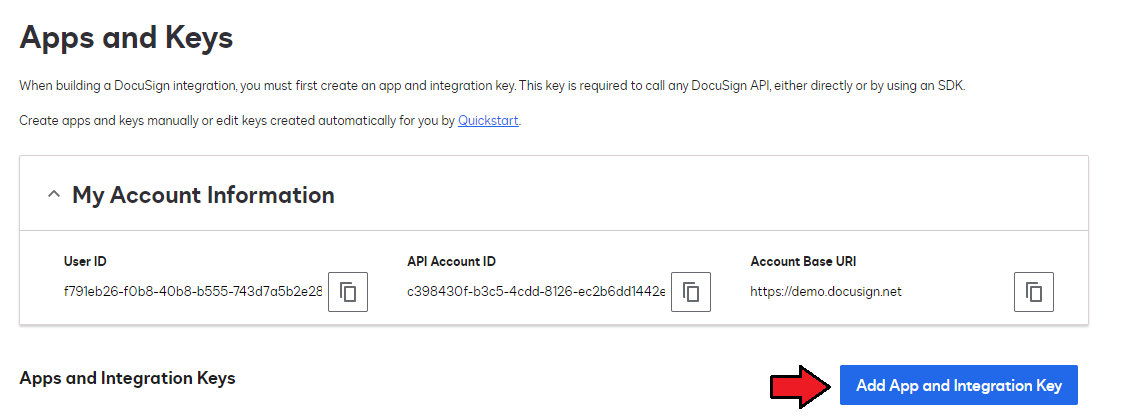
| − | |style="padding: | + | |style="padding: 10px 0px 15px 15px;"|You need to have at least the Basic API plan of ''' ''[https://www.docusign.com/ DocuSign]'' ''' to use this option.<br /> |
1. You can set it up in to ways: | 1. You can set it up in to ways: | ||
* for the ''' '' 'Demo' '' ''' environment, log in [https://admindemo.docusign.com/ here]. | * for the ''' '' 'Demo' '' ''' environment, log in [https://admindemo.docusign.com/ here]. | ||
* for the ''' '' 'Live' '' ''' environment, log in [https://admin.docusign.com/ here]. | * for the ''' '' 'Live' '' ''' environment, log in [https://admin.docusign.com/ here]. | ||
| − | 2. After successful login to the selected environment, select '' ' | + | 2. After successful login to the selected environment, select '' 'Apps and Keys' '' tab under the '' 'Integrations' '' section on the left side menu.<br /> |
| − | 3. Now press the '' ' | + | 3. Now press the '' 'Add App and Integration Key' '' button as presented below.<br /> |
'' '''Important:''' Integrator keys can be created only through a developer demo account. To go live with your API integration, you need a live DocuSign production account to promote the key to!'' | '' '''Important:''' Integrator keys can be created only through a developer demo account. To go live with your API integration, you need a live DocuSign production account to promote the key to!'' | ||
|} | |} | ||
| Line 388: | Line 428: | ||
{| | {| | ||
|style="padding: 0px 0px 15px 15px;"| | |style="padding: 0px 0px 15px 15px;"| | ||
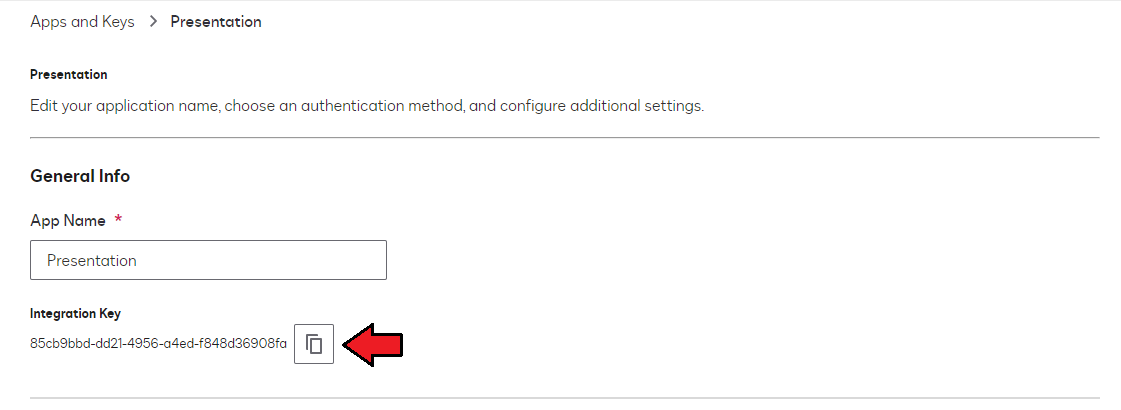
| − | 4. | + | 4. Name the app/key.<br /> |
| + | 5. You should now see the '' 'Integration Key'.'' Save the '' 'Integration Key' '' for later use. | ||
|} | |} | ||
{| | {| | ||
| − | |style="padding: 0px 0px 20px 25px;"|[[File: | + | |style="padding: 0px 0px 20px 25px;"|[[File:RB_48.png]] |
|} | |} | ||
{| | {| | ||
| − | |style="padding: 0px 0px 15px 15px;"| | + | |style="padding: 0px 0px 15px 15px;"|6. Generate your Private Key, to do so press "Generate RSA" under '' 'Service Integration'.'' Once ready a new window with generated keys will appear, copy the private key.<br/> |
| − | + | ||
| − | + | ||
7. In '' 'Redirect URIs' '' tab press '' 'ADD URI' '' button. There, you need to provide a proper callback ''' '' 'Redirect URIs' '' ''' from your WHMCS installation in the following format:<br /> | 7. In '' 'Redirect URIs' '' tab press '' 'ADD URI' '' button. There, you need to provide a proper callback ''' '' 'Redirect URIs' '' ''' from your WHMCS installation in the following format:<br /> | ||
| − | <nowiki>https://yourdomain.com/ | + | <nowiki>https://yourdomain.com/modules/addons/RecurringContractBilling/app/Api/docuSignAuthorize.php</nowiki> |
| − | '' '''Note:''' | + | '' '''Note:''' Provided URI also has to start with '''''https:// '''.'' |
|} | |} | ||
{| | {| | ||
| − | |style="padding: 0px 0px 20px 25px;"|[[File: | + | |style="padding: 0px 0px 20px 25px;"|[[File:RB_48_1.png]] |
| + | |} | ||
| + | {| | ||
| + | |style="padding: 0px 0px 20px 15px;"|8. You will also need your '' 'User ID:'' | ||
| + | |} | ||
| + | {| | ||
| + | |style="padding: 0px 0px 20px 25px;"|[[File:RB_48_2.png]] | ||
|} | |} | ||
{| | {| | ||
|style="padding: 0px 0px 15px 15px;"| | |style="padding: 0px 0px 15px 15px;"| | ||
| − | + | 9. Now return to the configuration of the WHMCS module where you can enter the previously obtained data.<br /> | |
| − | + | Provide: | |
| − | *''' | + | *'''Impersonated User ID''' - it is your '' 'User ID.' '' |
| − | *''' | + | *'''Integration Key''' - you saved the '' 'Integration Key' '' earlier. |
| − | *''' | + | *'''RSA Key''' - the '' 'Private Key' '' you have generated. |
| − | *''' | + | *'''Redirect URI''' - the '' 'Redirect URI' '' you included before. |
| − | Do not forget to '' ' | + | Choose if you are using a demo environment <br/> |
| + | Do not forget to '' 'Confirm' '' first because only then you can click the '' 'Authorization' '' button. | ||
|} | |} | ||
{| | {| | ||
| − | |style="padding: 0px 0px | + | |style="padding: 0px 0px 20px 25px;"|[[File:RB2_16.png]] |
|} | |} | ||
{| | {| | ||
| Line 427: | Line 473: | ||
|style="padding: 0px 0px 30px 15px;"| | |style="padding: 0px 0px 30px 15px;"| | ||
11. Finally, if you provided all data correctly you should receive notice that authorization has been completed successfully. | 11. Finally, if you provided all data correctly you should receive notice that authorization has been completed successfully. | ||
| + | |} | ||
| + | |||
| + | ====SignNow==== | ||
| + | {| | ||
| + | |style="padding: 10px 0px 15px 15px;"|A''' ''[https://www.signnow.com/ SignNow]'' ''' account is required to use this option. Take the following steps to set it up:<br /> | ||
| + | 1. [https://app.signnow.com/rctapp/login Log in] to your SignNow profile.<br /> | ||
| + | 2. Go to the '' 'API' '' section. You can find it at the bottom of the left-side menu.<br /> | ||
| + | 3. Click on the '' 'Add Application' '' button and name the application. | ||
| + | |} | ||
| + | {| | ||
| + | |style="padding: 0px 0px 20px 25px;"|[[File:RB2_16_1.png]] | ||
| + | |} | ||
| + | {| | ||
| + | |style="padding: 0px 0px 15px 15px;"| | ||
| + | 4. Copy your '' 'Basic Authorization Token'.'' | ||
| + | |} | ||
| + | {| | ||
| + | |style="padding: 0px 0px 20px 25px;"|[[File:RB2_16_2.png]] | ||
| + | |} | ||
| + | {| | ||
| + | |style="padding: 0px 0px 15px 15px;"| | ||
| + | 9. Now return to the configuration of the WHMCS module and enter the following fields. <br/> | ||
| + | *Username - Your SignNow username. | ||
| + | *Password - Your SignNow password. | ||
| + | *Bacic Auth Token - The token you just copied. | ||
| + | *Email - Any email, it will be used as SignNow email signature. | ||
| + | If you are using a trial SignNow account, enable the demo mode.<br/> | ||
| + | Do not forget to '' 'Confirm' '' the settings first because only then you can click the '' 'Authorization' '' button. | ||
| + | |} | ||
| + | {| | ||
| + | |style="padding: 0px 0px 20px 25px;"|[[File:RB2_16_3.png]] | ||
| + | |} | ||
| + | {| | ||
| + | |style="padding: 0px 0px 30px 15px;"| | ||
| + | 11. Finally, if you provided all data correctly you should receive the notice that authorization has been completed successfully. | ||
|} | |} | ||
====File Upload==== | ====File Upload==== | ||
{| | {| | ||
| − | |style="padding: | + | |style="padding: 10px 0px 15px 15px;"|Here you can configure the minimum and maximum size of files uploaded by your clients as contract signs. <br /> |
'' '''Note:''' Currently all image, MS Word and PDF formats are supported for upload.<br /><br /> | '' '''Note:''' Currently all image, MS Word and PDF formats are supported for upload.<br /><br /> | ||
| − | The values provided here must be given as | + | The values provided here must be given as kilobyte (KB) units. E.g.: |
| − | *1024 | + | *1024 KB = 1MB |
| − | + | *1048576 KB = 1024 MB = 1 GB | |
| − | * | + | So, if you want to allow uploaded files e.g. being in between ''1'' and ''8'' megabytes in size provide '' '1024' '' and '' '8192' '' values accordingly. <br /> |
| − | So, if you want to allow uploaded files e.g. being in between ''1'' and ''8'' megabytes in size provide '' ' | + | If you do not want to limit the uploaded file sizes, leave the'' '0' '' value. <br /><br /> |
| − | If you do not want to limit the uploaded file sizes, leave '' '0' '' value. <br /><br /> | + | |
'' '''Important:''' The maximum value of the uploaded file size also depends on the configuration of these values in the '''php.ini''' file of the server.''<br /> | '' '''Important:''' The maximum value of the uploaded file size also depends on the configuration of these values in the '''php.ini''' file of the server.''<br /> | ||
''If you want to give a higher value, you must also increase the 'upload_max_filesize' and 'upload_max_filesize' in php.ini file accordingly.''<br /> | ''If you want to give a higher value, you must also increase the 'upload_max_filesize' and 'upload_max_filesize' in php.ini file accordingly.''<br /> | ||
| Line 445: | Line 525: | ||
|} | |} | ||
{| | {| | ||
| − | |style="padding: 0px 0px 30px 25px;"|[[File: | + | |style="padding: 0px 0px 30px 25px;"|[[File:RB2_17.png]] |
|} | |} | ||
===Contract Templates=== | ===Contract Templates=== | ||
{| | {| | ||
| − | |style="padding: 10px 0px 15px 15px;"|Now, that you have a contract's content draft, move to '' 'Contract Templates'. ''<br /> | + | |style="padding: 10px 0px 15px 15px;"|Now, that you have a contract's content draft, move to '' 'Contracts' '' → '' 'Contract Templates'. ''<br /> |
| − | In this section you can predefine which contract content draft a specific product a template will refer to.<br/> | + | In this section, you can predefine which contract content draft a specific product a template will refer to.<br/> |
| − | Press '' ' | + | Press '' 'Create Template' '' to begin. |
|} | |} | ||
{| | {| | ||
| − | |style="padding: 0px 0px 20px 25px;"|[[File: | + | |style="padding: 0px 0px 20px 25px;"|[[File:RB2_18.png]] |
|} | |} | ||
{| | {| | ||
| − | |style="padding: 0px 0px 15px 15px;"|Fill out the contract template form. Name the template | + | |style="padding: 0px 0px 15px 15px;"|Fill out the contract template form. Name the template and choose content names from the ones you prepared previously (see the [[#Contract_Content|'' 'Contract Content' '']] section).<br/> Select the product that this template will be available with.<br/> '' '''Note:''' You can assign only one template to a single product, it is not possible to alter the product assignment once you save the changes!''<br/> |
Define one of the methods by which your customers will be able to sign contracts. Choose from the following: | Define one of the methods by which your customers will be able to sign contracts. Choose from the following: | ||
*Adobe Sign | *Adobe Sign | ||
| − | |||
*DocuSign | *DocuSign | ||
| + | *DropboxSign | ||
| + | *SignNow | ||
*File Upload | *File Upload | ||
| + | *Checkbox | ||
'' '''Note:''' Don't forget to set up their initial [https://www.docs.modulesgarden.com/Recurring_Billing_Extended_For_WHMCS#Sign_Types configuration].''<br/> | '' '''Note:''' Don't forget to set up their initial [https://www.docs.modulesgarden.com/Recurring_Billing_Extended_For_WHMCS#Sign_Types configuration].''<br/> | ||
| − | Choose ''Fixed'' or ''Percentage'' values for | + | Choose ''Fixed'' or ''Percentage'' values for Discount and Penalty amounts.<br/> |
Define contract renewal option: | Define contract renewal option: | ||
*Renew with contract | *Renew with contract | ||
| Line 471: | Line 553: | ||
*Cancel<br/> | *Cancel<br/> | ||
| − | Finally, you may decide whether | + | Finally, you may decide whether to allow your clients to cancel the contract while it is active or not.<br/> |
| − | Once ready, remember to '' ' | + | Once ready, remember to '' 'Confirm' '' the changes. |
|} | |} | ||
{| | {| | ||
| − | |style="padding: 0px 0px 20px 25px;"|[[File: | + | |style="padding: 0px 0px 20px 25px;"|[[File:RB2_19.png]] |
|} | |} | ||
{| | {| | ||
| − | |style="padding: 0px 0px 15px 15px;"| | + | |style="padding: 0px 0px 15px 15px;"|In the case of the '''DocuSign''' template, you may also define the exact position of the signature on the contract together with the page number and sign phrase. <br/> Please refer to the following [https://developers.docusign.com/docs/esign-rest-api/esign101/concepts/tabs/fixed/ article] to learn how to position the signature. If you cannot see the relevant section, make sure to choose '''DocuSign''' as '''Sign Type''' and confirm changes.<br/> If you wish to provide the phrase under which a client will sign a contract (this phrase has to be included in its content), please use the '' 'Sign Phrase' '' configuration field. <br/> |
| − | + | '''''Note:''' If you cannot see the relevant 'Signature' section next to the 'Template' section, try clicking on 'Confirm' first and see if it appears. | |
| − | + | ||
|} | |} | ||
{| | {| | ||
| − | |style="padding: 0px 0px 20px 25px;"|[[File: | + | |style="padding: 0px 0px 20px 25px;"|[[File:RB2_20.png]] |
| + | |} | ||
| + | {| | ||
| + | |style="padding: 0px 0px 15px 15px;"|Once you have added a new template, you have to create '' 'Contract Lengths'.'' An appropriate box should appear next to the template form.<br/> Pick a currency and billing circle. Once those are specified, click on '' 'Create Length' '' to begin. | ||
| + | |} | ||
| + | {| | ||
| + | |style="padding: 0px 0px 20px 25px;"|[[File:RB2_21.png]] | ||
|} | |} | ||
{| | {| | ||
|style="padding: 0px 0px 20px 15px;"|In this form you can define: | |style="padding: 0px 0px 20px 15px;"|In this form you can define: | ||
| − | *Length - how long such contract shall last | + | *Length - how long such a contract shall last. If you want, you can include '' 'Order Without Contract,' '' to allow clients to make orders, without signing a contract. |
| − | * | + | *Discount Amount - a fixed amount or percentage for the discount, depending on the previously selected type in the template form. |
| − | *Penalty Amount - | + | *Penalty Amount - a fixed amount or percentage, depending on the previously selected type in the template form. |
| − | *Days To Cancel - number of days to the end of the contract from which the customer will no longer have to pay a cancellation penalty | + | <!-- *Days To Cancel - number of days to the end of the contract from which the customer will no longer have to pay a cancellation penalty. --> |
| − | *Trial Period - number of days when a client may resign from the | + | *Trial Period - number of days when a client may resign from the contract without any consequences or giving the reason for resignation. |
| − | *Notice Time - define time when a renewal notification will be sent<br/> | + | *Notice Time - define the time when a renewal notification will be sent.<br/> |
| − | Next to each of the options ''(except 'Trial Period') '' there will appear counted pricing of product.<br/> | + | Click on '' 'Confirm' '' when finished. |
| − | + | <!-- Next to each of the options ''(except 'Trial Period') '' there will appear counted pricing of product.<br/> --> | |
|} | |} | ||
{| | {| | ||
| − | |style="padding: 0px 0px 30px 25px;"|[[File: | + | |style="padding: 0px 0px 30px 25px;"|[[File:RB2_22.png]] |
|} | |} | ||
| − | ===Configuration=== | + | ===Module Configuration=== |
{| | {| | ||
| − | |style="padding: 10px 0px 20px 15px;"|The last step mentioned in the '' 'Guide' '' is setting up '' 'Notifications' '' | + | |style="padding: 10px 0px 20px 15px;"|The last step mentioned in the '' 'Guide' '' is setting up '' 'Notifications,' '' '' 'Default Penalty Grace Period,' '' and '' 'Service Suspension Rules'. '' These options can be found under '' 'Configuration' '' tab in '' 'Utilities' '' section.<br/> Select which email notifications you want your clients to receive and enter the number of days before the due date to send the notification. |
|} | |} | ||
{| | {| | ||
| − | |style="padding: 0px 0px 20px 25px;"|[[File: | + | |style="padding: 0px 0px 20px 25px;"|[[File:RB2_23.png]] |
|} | |} | ||
{| | {| | ||
| − | |style="padding: 0px 0px 15px 15px;"| | + | |style="padding: 0px 0px 15px 15px;"| |
| − | Move to '' ' | + | Move to '' 'System Settings' → 'System' → 'Email Templates' → 'General Messages' '' in your WHMCS to view and edit the notifications. You will find them under '' 'Ending Contract Notification' '' name.<br/> |
| − | Enabled notifications are sent automatically with daily cron run. | + | Enabled notifications are sent automatically with the daily cron run. |
|} | |} | ||
{| | {| | ||
| Line 516: | Line 603: | ||
|} | |} | ||
{| | {| | ||
| − | |style="padding: 0px 0px 20px 15px;"|Define | + | |style="padding: 0px 0px 20px 15px;"| Define how the '' 'Contract Lengths' '' will be displayed in the Client Area, by choosing the '' 'Field Type.' '' |
|} | |} | ||
{| | {| | ||
| − | |style="padding: 0px 0px 20px 25px;"|[[File: | + | |style="padding: 0px 0px 20px 25px;"|[[File:RB2_24.png]] |
|} | |} | ||
{| | {| | ||
| − | |style="padding: 0px 0px 15px 15px;"| | + | |style="padding: 0px 0px 20px 15px;"|Define number of days when a client can be late with payment.<br/> If a client misses making payment for longer than the number of days specified here, a penalty will be imposed on such client.<br/> '''''Note:''' Penalty type and amount are specified in the 'Contract Template' details.'' |
| + | |} | ||
| + | {| | ||
| + | |style="padding: 0px 0px 20px 25px;"|[[File:RB2_25.png]] | ||
| + | |} | ||
| + | {| | ||
| + | |style="padding: 0px 0px 15px 15px;"|You may decide if services shall be automatically suspended after the provided number of days pass, without the client signing the contract.<br/> You may exclude services ordered before a certain date from this option. | ||
| + | |} | ||
| + | {| | ||
| + | |style="padding: 0px 0px 20px 25px;"|[[File:RB2_26.png]] | ||
| + | |} | ||
| + | {| | ||
| + | |style="padding: 0px 0px 20px 15px;"|Finally, you can turn off the guide or turn it on again once you have hidden it.<br/> | ||
'' 'Save' '' the changes once your configuration is ready. | '' 'Save' '' the changes once your configuration is ready. | ||
|} | |} | ||
{| | {| | ||
| − | |style="padding: 0px 0px 30px 25px;"|[[File: | + | |style="padding: 0px 0px 30px 25px;"|[[File:RB2_27.png]] |
|} | |} | ||
==Management== | ==Management== | ||
{| | {| | ||
| − | |style="padding: 10px 0px 30px 15px;"|In the following sections we will try to explain how previously configured contracts are | + | |style="padding: 10px 0px 30px 15px;"|In the following sections we will try to explain how previously configured contracts are imposed on clients. |
|} | |} | ||
===Client Area=== | ===Client Area=== | ||
====Place Order==== | ====Place Order==== | ||
{| | {| | ||
| − | |style="padding: 10px 0px | + | |style="padding: 10px 0px 15px 15px;"|To illustrate the process, let's say a client orders one of your products with recurring payment ''(it is important that you have previously prepared a contract for this product).''<br/> |
| + | Once the client reaches checkout, the contract field appears. They may choose the contract length from available options, view the contract and sign in. | ||
|} | |} | ||
{| | {| | ||
| − | |style="padding: 0px 0px 20px 25px;"|[[File: | + | |style="padding: 0px 0px 20px 25px;"|[[File:RB2_28.png]] |
|} | |} | ||
{| | {| | ||
| − | |style="padding: 0px 0px 20px 15px;"| | + | |style="padding: 0px 0px 20px 15px;"|If the client tries to complete the order without signing the contract, this error message will be displayed. <br/> |
| + | '''''Note:''' You can add an option to order the product without signing the contract by choosing 'Order Without Contract' while adding [[#Contract_Templates|'Contract Lengths']] in the module addon.'' | ||
|} | |} | ||
{| | {| | ||
| − | |style="padding: 0px 0px | + | |style="padding: 0px 0px 30px 25px;"|[[File:RB2_29.png]] |
|} | |} | ||
| + | |||
| + | ====Service Contracts==== | ||
{| | {| | ||
| − | |style="padding: | + | |style="padding: 10px 0px 20px 15px;"|To view all accepted contracts, find the '' 'My Contracts' '' tab. |
|} | |} | ||
{| | {| | ||
| − | |style="padding: 0px 0px 20px 25px;"|[[File: | + | |style="padding: 0px 0px 20px 25px;"|[[File:RB2_30.png]] |
|} | |} | ||
{| | {| | ||
| − | |style="padding: 0px 0px | + | |style="padding: 0px 0px 15px 15px;"|There is a full list of client's contracts with the most important information about them.<br/> Including: '' 'Product/Service Name,' '' '' 'Recurring Amount,' '' '' 'Sign Date,' '' '' 'Contract Length' '' and '' 'End Date' '' as well as its '' 'Status.' ''<br/> |
| + | Use action buttons to: | ||
| + | *View the contract details page. | ||
| + | *Download a PDF version of the contract. | ||
| + | *See the contract content changes history. | ||
|} | |} | ||
{| | {| | ||
| − | |style="padding: 0px 0px 20px 25px;"|[[File: | + | |style="padding: 0px 0px 20px 25px;"|[[File:RB2_31.png]] |
|} | |} | ||
{| | {| | ||
| − | |style="padding: 0px 0px | + | |style="padding: 0px 0px 15px 15px;"|View the contract's details. Press '' 'Show' '' to see its details directly in the client area or press '' 'Download' '' to obtain its PDF version.<br/> |
| − | '' ''' | + | If conditions are met, at the bottom of the contract the client will find buttons to renew or cancel the contract. <br/> |
| + | The conditions are: | ||
| + | *''The contract is active. '' | ||
| + | *''The notice time, specified while creating the length, has passed.'' | ||
| + | *''The contract renewal type is set to: 'Renew With Contract.''' | ||
|} | |} | ||
{| | {| | ||
| − | |style="padding: 0px 0px 20px 25px;"|[[File: | + | |style="padding: 0px 0px 20px 25px;"|[[File:RB2_32.png]] |
|} | |} | ||
{| | {| | ||
| − | |style="padding: 0px 0px | + | |style="padding: 0px 0px 15px 15px;"|History of any changes in the contract content:<br/> |
| + | ''Click on the 'Page' icon to see the previous version of the contract.'' | ||
|} | |} | ||
{| | {| | ||
| − | |style="padding: 0px 0px | + | |style="padding: 0px 0px 30px 25px;"|[[File:RB2_33.png]] |
|} | |} | ||
| + | |||
| + | <!-- | ||
| + | ===Admin Area=== | ||
{| | {| | ||
| − | |style="padding: 0px | + | |style="padding: 10px 0px 15px 15px;"|Come back to your admin area and find the new product page. <br/> |
| + | After submitting a new order from the admin area, an email with a link to view and accept the contract will be sent to the client if only the service has a contract template assigned.<br/> You can resend the email from here. | ||
|} | |} | ||
{| | {| | ||
| − | |style="padding: 0px 0px | + | |style="padding: 0px 0px 20px 25px;"|[[File:RB2_34.png]] |
|} | |} | ||
| − | |||
| − | |||
{| | {| | ||
| − | |style="padding: | + | |style="padding: 0px 0px 30px 15px;"|Now, go back to the addon view to manage signed contracts. |
| − | + | ||
|} | |} | ||
| + | --> | ||
| + | ====Signed Contracts==== | ||
{| | {| | ||
| − | |style="padding: 0px | + | |style="padding: 10px 0px 15px 15px;"|In '' 'Signed Contracts' '' section under '' 'Contracts' '' you will find a list of all contracts accepted by your clients.<br/> |
| + | On the main page, you can see the name of the client with the service used, the recurring payment amount for their product, and contract details such as signing and ending dates, length and status. <br/> | ||
| + | Use action buttons to edit, cancel or delete contracts. If you use the edit button, you will be moved to a full view of the contract. | ||
|} | |} | ||
{| | {| | ||
| − | |style="padding: 0px 0px | + | |style="padding: 0px 0px 20px 25px;"|[[File:RB2_35.png]] |
| − | + | ||
| − | + | ||
| − | + | ||
| − | + | ||
|} | |} | ||
{| | {| | ||
| − | |style="padding: 0px 0px | + | |style="padding: 0px 0px 15px 15px;"|On this page, you can once again see details of a contract accepted between you and the client. <br/> |
| + | You are allowed to modify the content, status and details of this very contract. Note that used '' 'Contract Content' '' will not be altered, only the signed item. | ||
|} | |} | ||
{| | {| | ||
| − | |style="padding: 0px 0px 20px | + | |style="padding: 0px 0px 20px 25px;"|[[File:RB2_36.png]] |
|} | |} | ||
{| | {| | ||
| − | |style="padding: 0px 0px | + | |style="padding: 0px 0px 15px 15px;"|In case you decide to make any changes to the contract, the previous (before changes) version of the contract is added to the '' 'History'. '' <br/> |
| + | Thanks to that, you may always come back to the original.<br/> In this step you may also add notes for future reference. Make sure to save changes. | ||
|} | |} | ||
{| | {| | ||
| − | |style="padding: 0px 0px | + | |style="padding: 0px 0px 30px 25px;"|[[File:RB2_37.png]] |
|} | |} | ||
| + | =====Create Contract===== | ||
{| | {| | ||
| − | |style="padding: | + | |style="padding: 10px 0px 20px 15px;"|Above the list of '' 'Signed Contracts','' you will find 2 buttons. '' 'Create Contract,' '' and '' 'Request Signing.' '' |
|} | |} | ||
{| | {| | ||
| − | |style="padding: 0px 0px | + | |style="padding: 0px 0px 20px 25px;"|[[File:RB2_37_1.png]] |
| − | + | ||
|} | |} | ||
{| | {| | ||
| − | |style="padding: 0px 0px | + | |style="padding: 0px 0px 15px 15px;"|Let us cover '' 'Create Contract' '' first. Clicking on the button will redirect you to the form where existing contracts, for example, signed manually, can be uploaded into the module and managed. <br/> |
| + | First of all, select the client. Then pick the service the uploaded contract is related to, or select none if your contract is an independent document.<br/> | ||
| + | Choose the contract length: strict period or a custom length; note that the ending date is selected automatically based on the contract length. <br/> | ||
| + | Select the contract's status and renewal type. Specify if cancellation is allowed. If you have the contract in the form of a file, you can upload it here. <br/> Finally, you may also add your private notes. Confirm changes to finalize the action. | ||
|} | |} | ||
| − | |||
{| | {| | ||
| − | |style="padding: | + | |style="padding: 0px 0px 20px 25px;"|[[File:RB2_37_2.png]] |
|} | |} | ||
| − | |||
{| | {| | ||
| − | |style="padding: | + | |style="padding: 0px 0px 30px 15px;"|'' 'Request Signing' '' allows you to send emails directly to your clients requesting them, to sign a contract for a specific product and specific length. |
| − | + | ||
| − | + | ||
|} | |} | ||
| + | |||
| + | ====Dashboard==== | ||
{| | {| | ||
| − | |style="padding: 0px | + | |style="padding: 10px 0px 15px 15px;"|On the Dashboard of your addon you will find the most important information in a nutshell.<br/> |
| + | These are: | ||
| + | *Recently Signed Contracts | ||
| + | *Recently Ended Contracts (including finished, canceled and broken ones) | ||
| + | *Contract Summary | ||
| + | *Revenue Summary | ||
|} | |} | ||
{| | {| | ||
| − | |style="padding: 0px 0px | + | |style="padding: 0px 0px 30px 25px;"|[[File:RB2_38.png]] |
|} | |} | ||
| + | |||
| + | ===[https://www.docs.modulesgarden.com/Translations_Tool Translations]=== | ||
{| | {| | ||
| − | |style="padding: 0px | + | |style="padding: 10px 0px 15px 15px;"|Customizing language files is now extremely easy with the '' "Translations" '' tool that is now available directly in the addon.<br.> Its user-friendly design makes managing various language file tweaks a smooth and efficient process. <br/> |
| + | Prepare translations for the original English files with this handy built-in tool. For specific instructions on how to use this tool please refer to its dedicated article, you will find it [https://www.docs.modulesgarden.com/Translations_Tool here]. | ||
|} | |} | ||
{| | {| | ||
| − | |style="padding: 0px 0px | + | |style="padding: 0px 0px 30px 25px;"|[[File:RB2_35_1.png]] |
|} | |} | ||
| + | |||
| + | ====Logs==== | ||
{| | {| | ||
| − | |style="padding: 0px | + | |style="padding: 10px 0px 10px 15px;"|In the '' 'Logs' '' section any attempted actions on any contract are recorded and stored for your convenience. <br/> |
| + | Use the action buttons to see details or delete each log entry. Multiple logs can be deleted at once by utilizing the mass selection function. | ||
|} | |} | ||
{| | {| | ||
| − | |style="padding: 0px 0px | + | |style="padding: 0px 0px 20px 25px;"|[[File:RB2_39.png]] |
| − | + | ||
|} | |} | ||
{| | {| | ||
| − | |style="padding: 0px | + | |style="padding: 10px 0px 20px 15px;"|Furthermore, the logs feature additional action. Changing the logs' settings, exporting the logs to a '' '.csv' '' file, and a way to delete specific log types. |
|} | |} | ||
| − | |||
| − | |||
{| | {| | ||
| − | |style="padding: | + | |style="padding: 0px 0px 20px 25px;"|[[File:RB2_40.png]] |
| − | + | ||
| − | + | ||
| − | + | ||
| − | + | ||
| − | + | ||
|} | |} | ||
{| | {| | ||
| − | |style="padding: 0px | + | |style="padding: 10px 0px 20px 15px;"|In the settings you can specify which log types should be recorded, and whether they should be deleted automatically after a specific time. |
|} | |} | ||
| − | |||
{| | {| | ||
| − | |style="padding: | + | |style="padding: 0px 0px 20px 25px;"|[[File:RB2_41.png]] |
|} | |} | ||
{| | {| | ||
| − | |style="padding: 0px | + | |style="padding: 10px 0px 20px 15px;"|While exporting you will pick a time frame and the log types to export. |
|} | |} | ||
| + | {| | ||
| + | |style="padding: 0px 0px 20px 25px;"|[[File:RB2_42.png]] | ||
| + | |} | ||
| + | {| | ||
| + | |style="padding: 10px 0px 20px 15px;"|Here you can decide which log types to delete, you can also specify how old the logs have to be to qualify for deletion. Leave the first field empty to delete all logs. | ||
| + | |} | ||
| + | {| | ||
| + | |style="padding: 0px 0px 30px 25px;"|[[File:RB2_43.png]] | ||
| + | |} | ||
| + | |||
==Advanced Billing For WHMCS Integration== | ==Advanced Billing For WHMCS Integration== | ||
{| | {| | ||
| − | |style="padding: 10px 0px 15px 15px;"|It is possible to combine your Recurring Billing For WHMCS module with one of our most favored products | + | |style="padding: 10px 0px 15px 15px;"|It is possible to combine your Recurring Contract Billing For WHMCS module with one of our most favored products: Advanced Billing For WHMCS.<br/> |
In order to configure the two modules to work together move to '' 'Advanced Billing addon' → 'Configuration' '' and find the product you want to work with. <br/>Move to '' 'Settings' → 'Recurring Billing' '' section, as billing type select ''''' 'Bill On Invoice Generation' ''''' option.<br/> | In order to configure the two modules to work together move to '' 'Advanced Billing addon' → 'Configuration' '' and find the product you want to work with. <br/>Move to '' 'Settings' → 'Recurring Billing' '' section, as billing type select ''''' 'Bill On Invoice Generation' ''''' option.<br/> | ||
Learn more about Advanced Billing configuration [https://www.docs.modulesgarden.com/Advanced_Billing_For_WHMCS#Recurring_Billing here]. | Learn more about Advanced Billing configuration [https://www.docs.modulesgarden.com/Advanced_Billing_For_WHMCS#Recurring_Billing here]. | ||
| Line 678: | Line 806: | ||
|} | |} | ||
{| | {| | ||
| − | |style="padding: 0px 0px 20px 15px;"|When ready, Recurring Billing For WHMCS will be in constant cooperation with the other module within the configured product. If you want to combine the functionalities<br/> of the two modules for more than one product, please remember to select '' 'Bill On Invoice Generation' '' option for all of them | + | |style="padding: 0px 0px 20px 15px;"|When ready, Recurring Contract Billing For WHMCS will be in constant cooperation with the other module within the configured product. If you want to combine the functionalities<br/> of the two modules for more than one product, please remember to select the'' 'Bill On Invoice Generation' '' option for all of them. |
|} | |} | ||
<!-- | <!-- | ||
| Line 688: | Line 816: | ||
=Tips= | =Tips= | ||
| + | <!-- | ||
{| | {| | ||
| − | |style="padding: 10px 0px 10px 15px;"|1. If you | + | |style="padding: 10px 0px 10px 15px;"|1. If you include '' 'Order Without Contract' '' in the contract template, while placing an order a client will be allowed<br/>to select '' 'I do not want to sign a contract' '' option form '' 'Contract Length'.''<br/> No '' 'Terms of Use' '' will have to be accepted then and the client will not be charged according to the contract's details. |
|} | |} | ||
{| | {| | ||
|style="padding: 0px 0px 20px 25px;"|[[File:RB_39.png]] | |style="padding: 0px 0px 20px 25px;"|[[File:RB_39.png]] | ||
|} | |} | ||
| + | --> | ||
{| | {| | ||
| − | |style="padding: 0px 0px 5px 15px;"| | + | |style="padding: 0px 0px 5px 15px;"|1. The contracts are automatically broken in two cases: |
*The invoice has not been paid - module counts the number of days set up in configuration '' 'penalty after x days' '' until the moment the payment is noted in the system. | *The invoice has not been paid - module counts the number of days set up in configuration '' 'penalty after x days' '' until the moment the payment is noted in the system. | ||
| − | * | + | *The client has sent a cancellation request for the product. |
|} | |} | ||
{| | {| | ||
| − | |style="padding: 0px 0px | + | |style="padding: 0px 0px 10px 15px;"|2. As this module supports a template system, any changes made in the module's template files will be saved after the update process. |
|} | |} | ||
| + | <!-- | ||
{| | {| | ||
| − | |style="padding: 0px 0px | + | |style="padding: 0px 0px 30px 15px;"|3. Please remember that the '' 'Accept Contract' '' checkbox with the possibility to view the contract in the preview of placing an order is visible only for logged-in users. <br/> For not logged-in users, it will be visible when they proceed to the checkout step. |
|} | |} | ||
| + | |||
{| | {| | ||
| − | |style="padding: 0px 0px 30px 15px;"| | + | |style="padding: 0px 0px 30px 15px;"|4. To assure correct integration of the module with the '' 'Lagom Client Theme', '' the following integration code must be added into '' ' viewcart.tpl'.''<br/> |
| − | Open the '' ' viewcart.tpl' '' file at ''/templates/orderforms/lagom2/viewcart.tpl'' directory, find following line | + | Open the '' ' viewcart.tpl' '' file at ''/templates/orderforms/lagom2/viewcart.tpl'' directory, find following line: |
| − | + | <pre> <input type="hidden" name="submit" value="true" /> | |
| + | </pre> | ||
Insert the following code below that line: | Insert the following code below that line: | ||
| Line 734: | Line 867: | ||
|} | |} | ||
| + | --> | ||
=Update Instructions= | =Update Instructions= | ||
{| | {| | ||
| − | |style="padding: 10px 0px | + | |style="padding: 10px 0px 15px 15px;"|An essential guidance through the process of updating the module is offered '''[https://www.docs.modulesgarden.com/How_To_Update_WHMCS_Module here]'''.<br/> |
| − | + | Ensure successful completion of the module update by carefully following each step, thereby preventing data loss or any unforeseen issues.<br/> Additionally, you will find a current list of supplementary actions necessary for a smooth update process there. <br/> | |
| − | + | ||
|} | |} | ||
| + | {| | ||
| + | |style="padding: 0px 0px 30px 15px;"|'''''Important:''' If you are updating the module to version 2.0.0, you '''must deactivate the old addon module and delete its files before performing the update.''' <br/> | ||
| + | This will ensure all potential conflicts are avoided. Your data will be migrated to the new version of the module after its activation. <br/> | ||
| + | However, the '''connection between the module and the sign providers will need to be re-established''', because of new redirect URIs.<br/>You can find instructions on how to do this in the [[#Sign_Types|Sign Types]] section.'' | ||
| + | |} | ||
| + | <!-- | ||
| + | {| | ||
| + | |style="padding: 0px 0px 30px 15px;"|The module rebranding from Recurring Billing For WHMCS to Recurring Contract Billing For WHMCS caused changes in the module file naming.<br/> If you are updating the module from version 1.3.x or lower to 1.4.0 or higher, you must remember to delete the previous module's files from your WHMCS directory. Keeping both ''recurringBilling'' and ''recurringContractBilling'' will cause errors. | ||
| + | |} | ||
| + | --> | ||
| − | = | + | =Upgrade Guide= |
{| | {| | ||
| − | |style="padding: 10px 0px | + | |style="padding: 10px 0px 30px 15px;"|Seeking a solution that offers greater flexibility, customization tailored to your precise needs, and unrestricted availability?<br/> There is an option that not only proves to be cost-effective in the long run but also includes prioritized support services, making it a truly valuable investment.<br/> |
| + | |||
| + | Opt for the [https://www.modulesgarden.com/products/whmcs/recurring-contract-billing#open-source-version Open Source version] of your Recurring Contract Billing For WHMCS module to unlock these benefits.<br/> Simply click on either the '''Get Source Code''' or '''Upgrade To Lifetime''' button found on the product's page in our client area to complete the one-step upgrade process, with a '''dedicated discount''' already applied.<br/> | ||
| + | |||
| + | Follow a [https://www.docs.modulesgarden.com/How_To_Upgrade_WHMCS_Module comprehensive guide] covering the transition process, the advantages it brings, and step-by-step instructions on what to do next after the order has been successfully finalized. | ||
|} | |} | ||
| + | |||
| + | =Common Problems= | ||
{| | {| | ||
| − | |style="padding: | + | |style="padding: 10px 0px 10px 15px;"|'''1. When you have problems with connection, check whether your SELinux or firewall does not block ports.''' |
|} | |} | ||
{| | {| | ||
| − | |style="padding: 0px 0px | + | |style="padding: 0px 0px 30px 15px;"|2. Remember that Recurring Contract Billing For WHMCS contracts can be applied to products with recurring payment type only. |
|} | |} | ||
Latest revision as of 11:41, 26 April 2024
Contents |
[edit] About Recurring Contract Billing For WHMCS
| Recurring Contract Billing For WHMCS will allow you to draw up fixed-term contracts for your clients concerning the offered products and services. You will be able to define which products require contract acceptance, then set the time span of each contract along with its possible discount and penalty amount. |
- Admin Area Features:
| ✔ Create, View And Manage Signed Contracts |
| ✔ Create Multiple Contracts Per Product |
| ✔ Request Contract Signing For Selected Service |
| ✔ View Recently Signed And Ended Contracts |
| ✔ View Contracts And Revenue Summaries |
| ✔ Configure Contract Content |
| ✔ Configure Contract Signature Types |
| ✔ Define Time Of Notifications Before Contract Expiration |
| ✔ Define Time After Which Contract Is Defined As Broken |
| ✔ Define Services Suspension Rules |
| ✔ Configure Sign Types |
| ✔ Customize Module Language Files With "Translations" Tool |
| ✔ View And Manage Logs |
- Contact Features:
| ✔ Define Contract Content In Multiple Languages: |
| ✔ Create Contract Content With WYSIWYG Editor |
| ✔ Use Merge Fields For Contract Template |
| ✔ Create Contract Templates: |
| ✔ Assign Product To Contract Template |
| ✔ Define Discounts And Penalty Types |
| ✔ Define Multiple Contracts Sets For Specified Currencies And Billing Cycles: |
| ✔ Define Contract Length - Up To 5 Years |
| ✔ Define Discount And Penalty Amounts |
| ✔ Define Days Before Expiration To Cancel Contract Without Penalty |
| ✔ Define Trial Period Length |
| ✔ Define Time To Send Renewal Notification |
| ✔ View Total And Recurring Prices |
| ✔ View Amount Of Penalty |
| ✔ Choose Contract Signature Type: |
| ✔ Adobe Sign |
| ✔ Checkbox |
| ✔ DocuSign |
| ✔ Dropbox Sign |
| ✔ File Upload |
| ✔ SignNow |
| ✔ Define Contract Length Selection Type: |
| ✔ Dropdown Menu |
| ✔ Allow Orders Without Contract |
| ✔ Define Renewal Type |
| ✔ Renewal Without Contract |
| ✔ Renewal With Contract |
| ✔ Cancel |
| ✔ Toggle Availability Of Cancellation Request |
- Client Area Features:
| ✔ Choose Contract Length During Order |
| ✔ View Contract Content Before Accepting It |
| ✔ Sign Contract Using Configured Signature Type |
| ✔ View Details Of All Signed Contracts |
| ✔ View History Of Any Signed Contract |
| ✔ Receive Contract Email Notification Upon Order Creation |
- General Info:
| ✔ Multi-Language Support With Custom Translations Tool |
| ✔ Supports PHP 8.1 |
| ✔ Supports WHMCS Themes "Six", "Twenty-One" And "Lagom WHMCS Client Theme" |
| ✔ Supports WHMCS V8.10 Back To WHMCS V8.7 |
| ✔ Requires ionCube Loader V12 Or Later |
| ✔ Easy Module Upgrade To Open Source Version |
[edit] Installation and Activation
| This tutorial will show you how to successfully install and configure Recurring Contract Billing For WHMCS. We will guide you step by step through the whole installation and configuration process. |
[edit] Installation
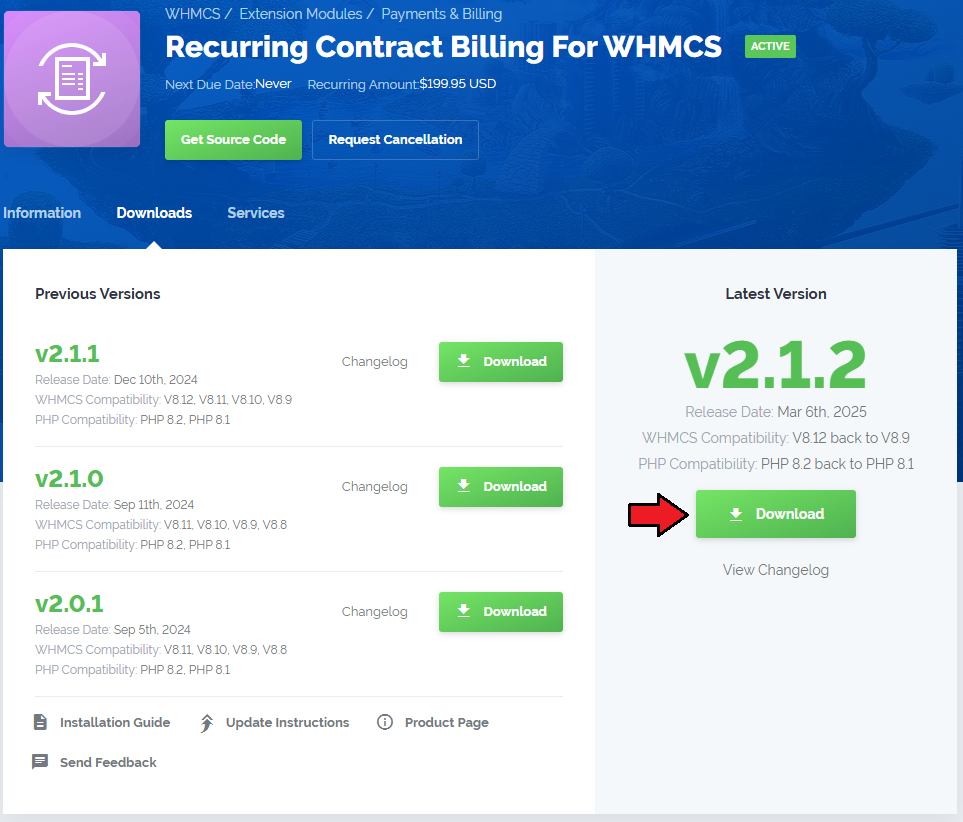
| 1. Log in to our client area and download the module. |
|
| 2. Extract the package and upload its content into the main WHMCS directory.
The content of the package to upload should look like this. |
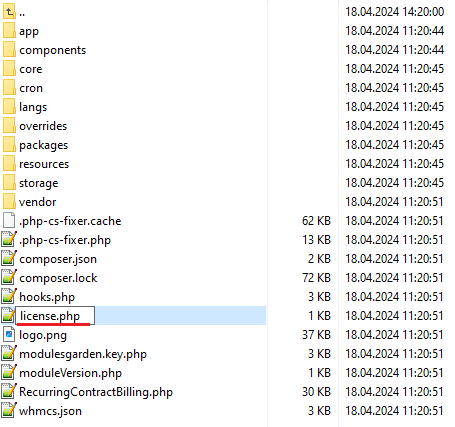
| 3. When you install Recurring Contract Billing For WHMCS for the first time you have to rename 'license_RENAME.php' file. The file is located in 'modules/addons/recurring_billing/license_RENAME.php'. Rename it from 'license_RENAME.php' to 'license.php'. |
|
| 4. To configure your license key, you have to edit the previously renamed 'license.php' file. Enter your license key between quotation marks as presented on the following screen. You can find your license key in our client area → 'My Products'. |

|
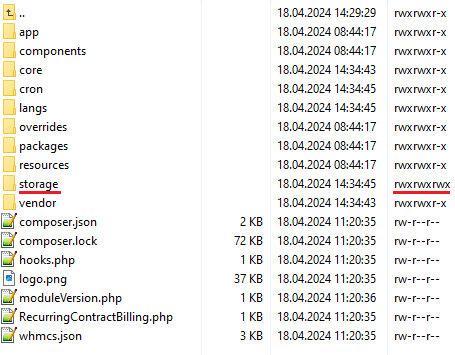
| 5. The next step is setting up 'storage' folder as recursively writable. It is located in 'your_whmcs/modules/addons/RecurringContractBilling/'. |
|
[edit] Activation
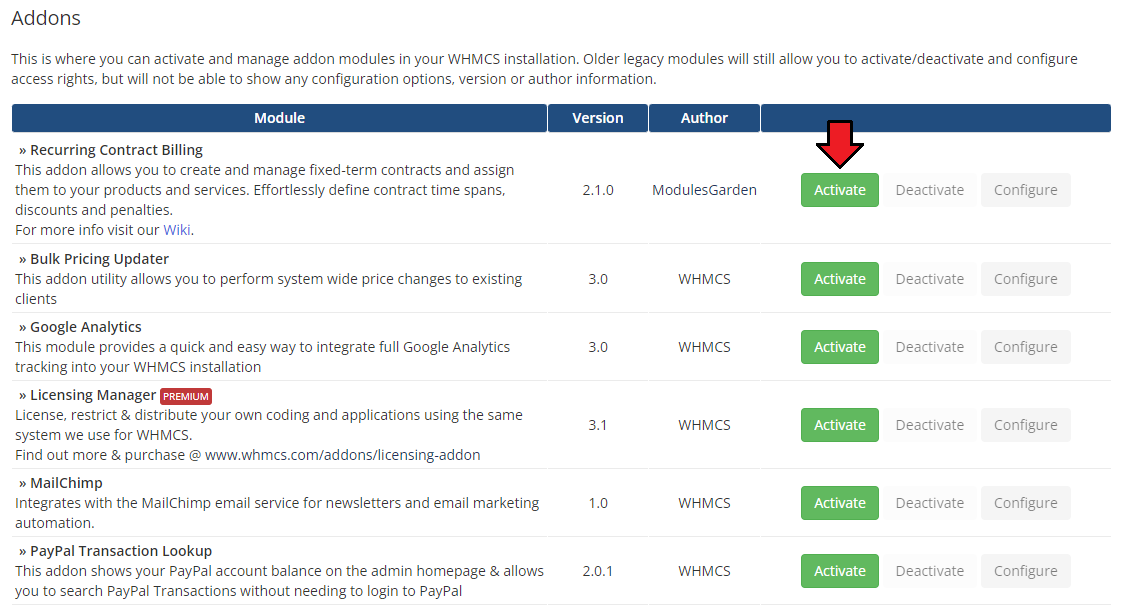
| 7. Now, you have to activate the module in your WHMCS system. Log in to your WHMCS admin area and proceed to 'Setup' → 'Addon Modules'. |
|
| 8. In the next step, you need to permit access to this module. To do so, click on 'Configure' button, tick checkboxes to assign desired admin roles. |
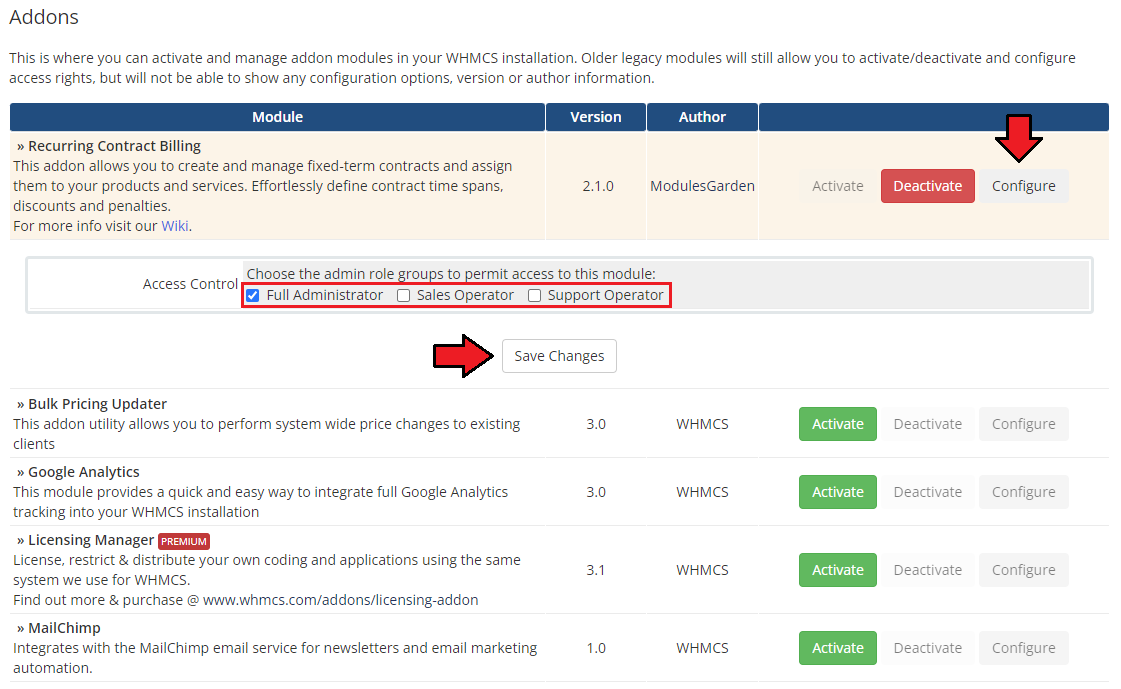
|
9. Finally, set up the cron command line provided below and define its frequency (1 day interval is suggested).
php -q /yourWHMCS/modules/addons/RecurringContractBilling/cron/cron.php dailyCron The cron features multiple commands:
You can set up each function as a separate cron, or set up 'dailyCron' to utilize all functions at once. |
| 10. You have just successfully installed Recurring Contract Billing For WHMCS! |
[edit] Configuration and Management
| Once you have properly installed and activated the product you may move to its actual configuration. Read the below sections to learn how to use Recurring Contract Billing For WHMCS completely. |
[edit] Configuration
| In order to start using your Recurring Contract Billing For WHMCS move to 'Addons → Recurring Contract Billing'. By default, you will be moved to the addon's dashboard with a guide opened. You will find short notes on how to configure the product there. |
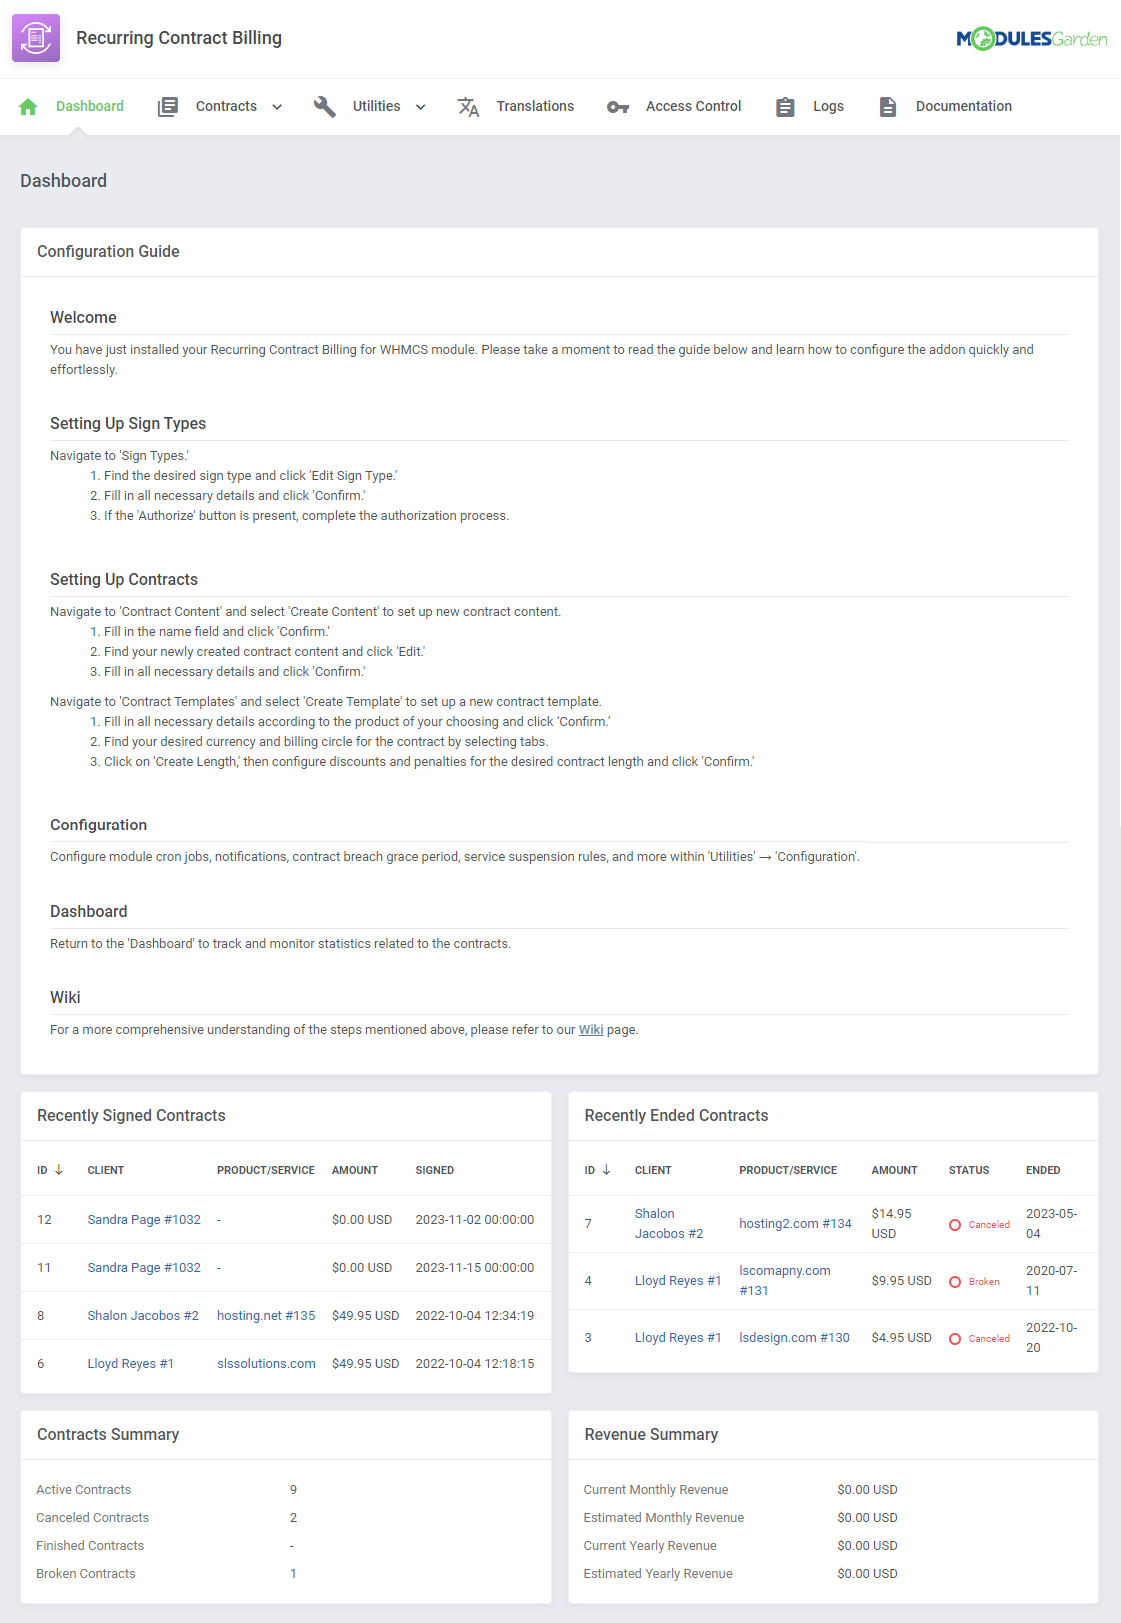
|
| Hide the guide when you have completed the configuration and learned how to reconstruct the process. You can do that under 'Utilities' → 'Configuration.' |
[edit] Contract Content
| First of all, create your first contract's content. To do so, move to the 'Contracts' → 'Contract Content' section and press the 'Create Content' button. Decide on a name for your contract content and press 'Confirm.' |
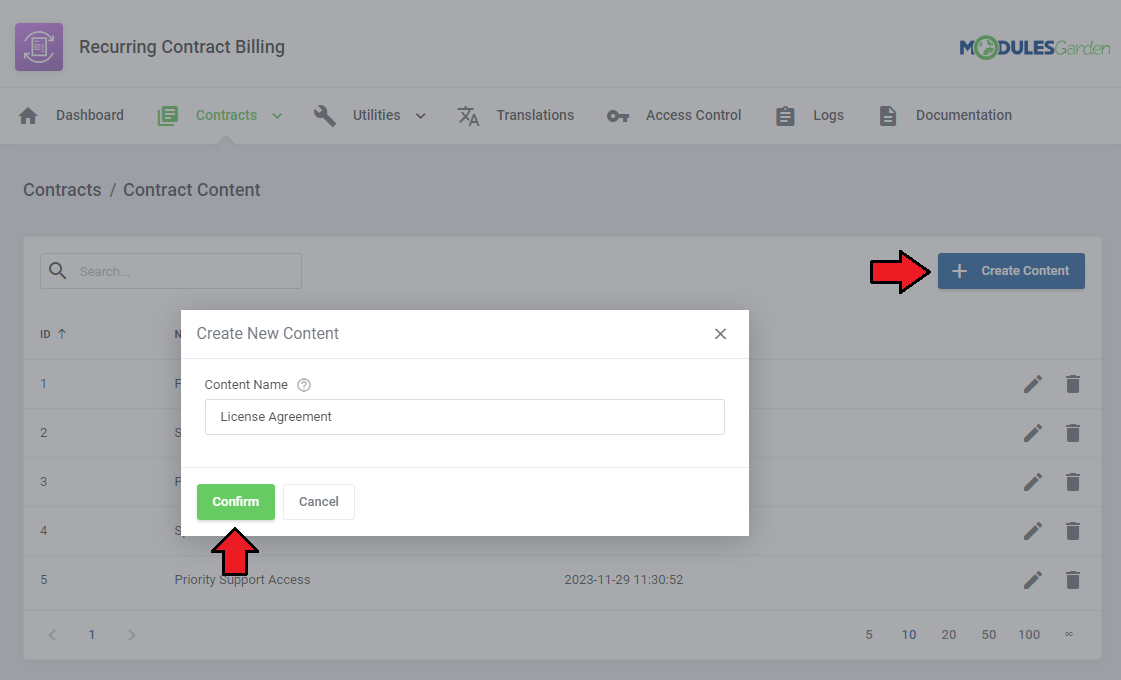
|
| You will be automatically moved to the content editing page. Here you can compose the content of a contract. Fill out the field with 'Content', you may use 'Merge Fields' to do so, those are categorized into:
Use the advanced edition tool to perfectly shape the contract. |
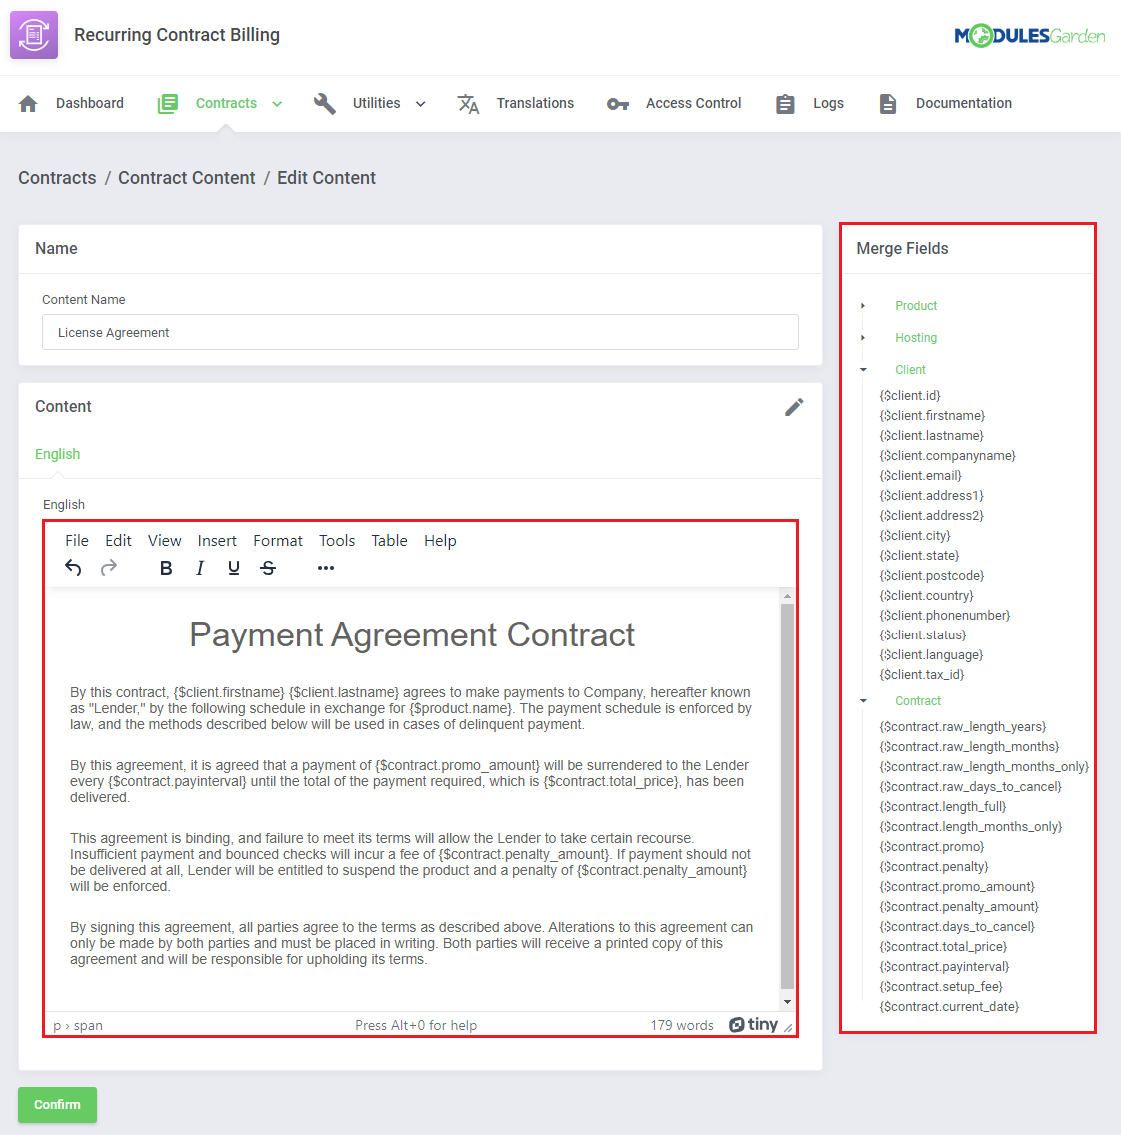
|
|
You can also change the content's name in the 'Name' bracket. Moreover, you may compose the contract translation. |
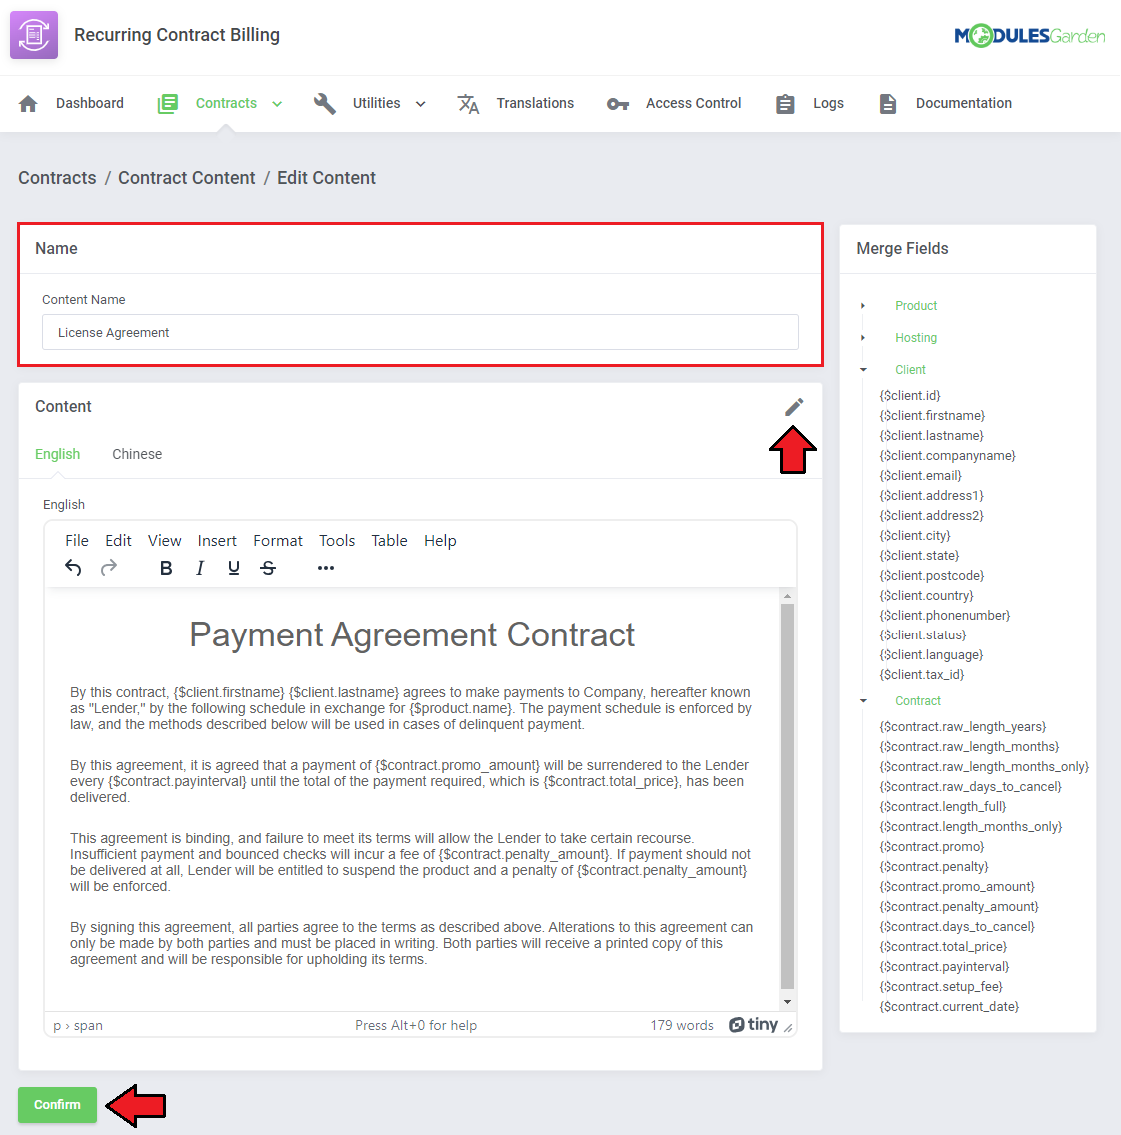
|
|
Use action buttons to edit the contract again or delete it if you are sure it is no longer needed. |
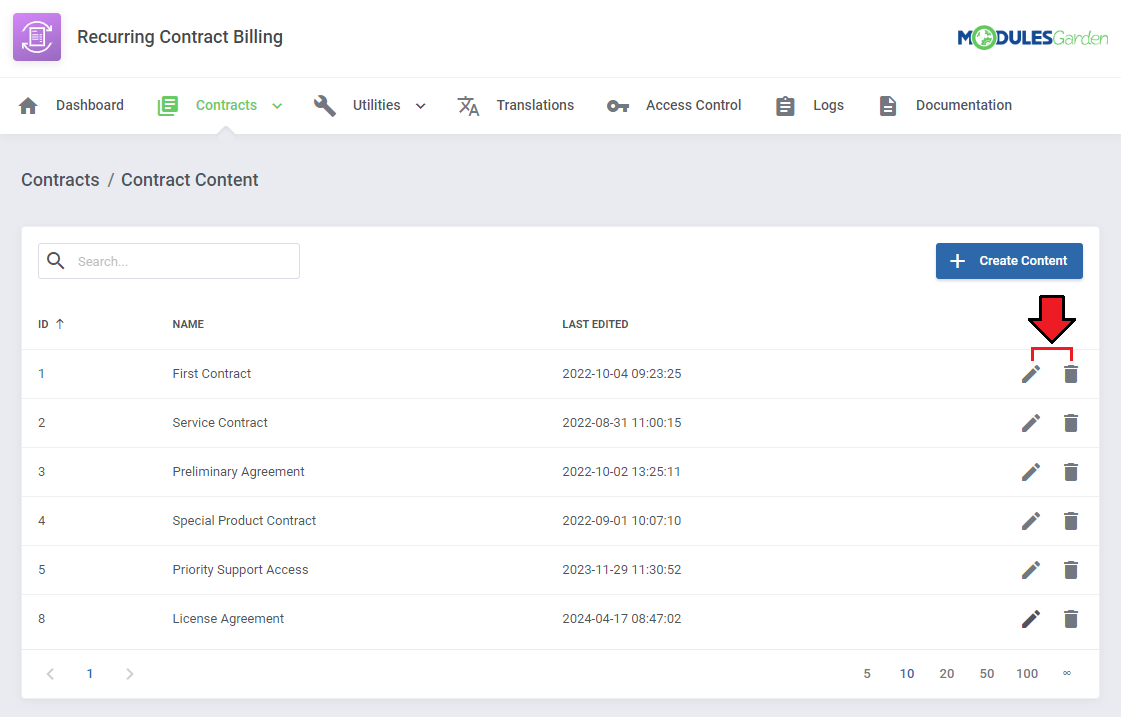
|
[edit] Sign Types
| Under 'Utilities' → 'Sign Types' you can configure the methods of signing contracts, which you will then be able to use for creating a contract template. You can configure the following methods:
Note: The checkbox sign method does not require any configuration, but you will still be able to select it when creating a contract template. |
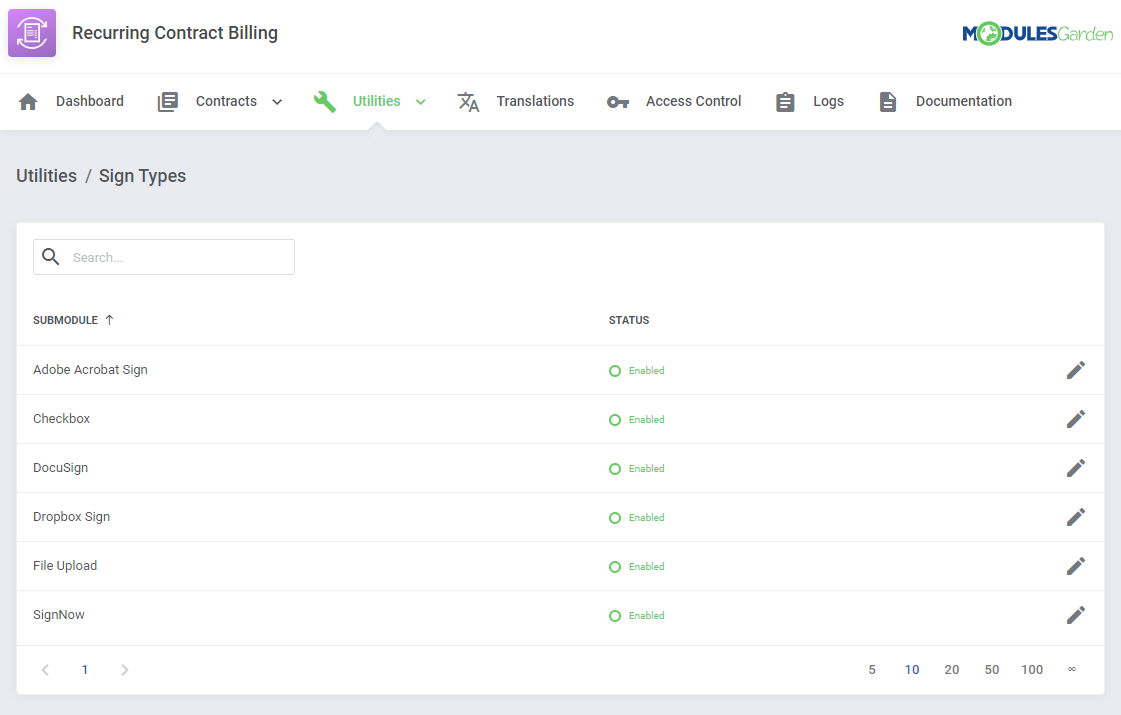
|
[edit] Adobe Sign
| The Enterprise plan of Adobe Sign is required to use this option. Take the following steps to set it up: 1. Log in to your Adobe Sign profile. |
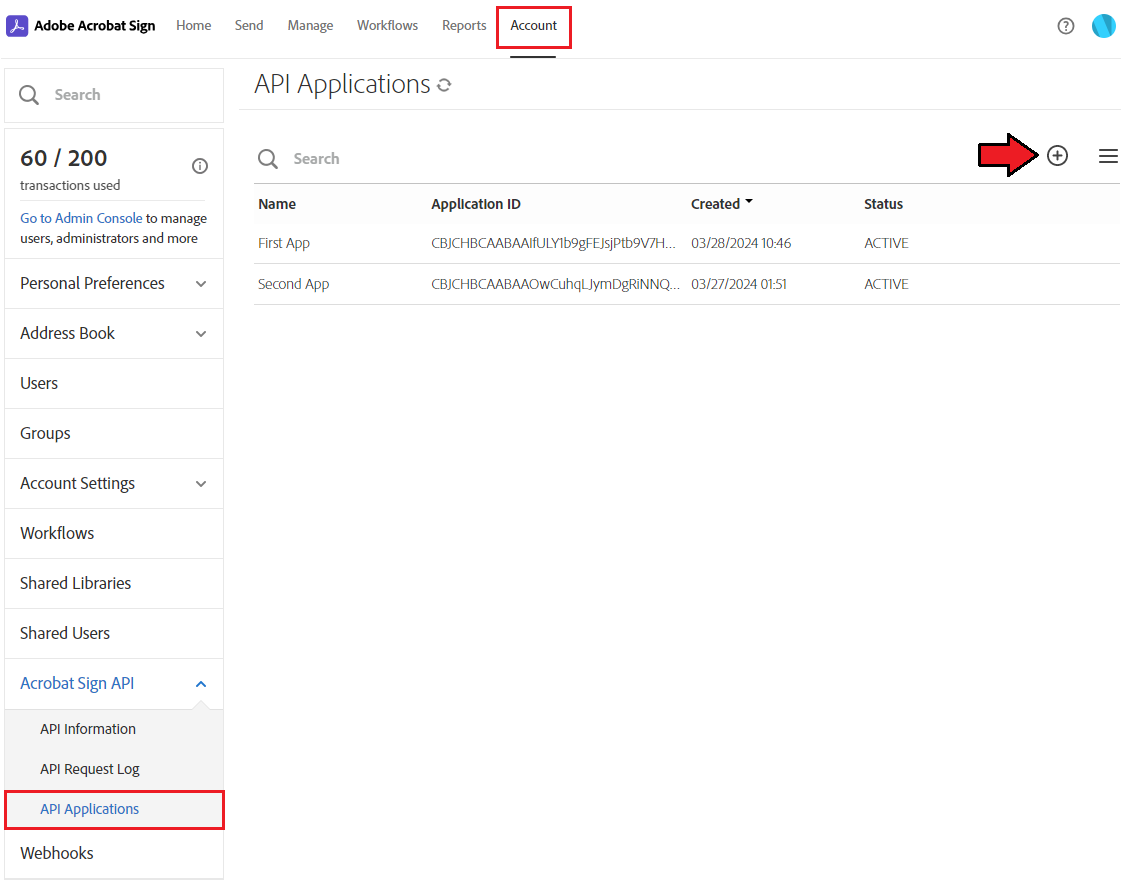
|
|
4. Enter the 'Name' and 'Display Name' of your application and select 'CUSTOMER' domain. Press 'Save' when ready. https://yourdomain.com/modules/addons/RecurringContractBilling/app/Api/adobeSignAuthorize.php Note: Provided URI also has to start with https:// . |
|
|
9. Now return to the configuration of the WHMCS module and enter the previously obtained data. |
|
|
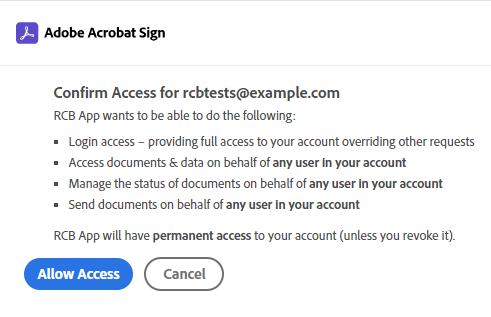
10. You will have to confirm your access to the authorization for Adobe Sign. |
|
|
11. Finally, if you provided all data correctly you should receive the notice that authorization has been completed successfully. |
[edit] DropboxSign
| An Adobe Sign standard account is required to use this option. Please take the following steps to set it up: 1. Log in to your DropboxSign profile. |
|
|
5. Now return to the configuration of the WHMCS module and enter the API Key and your DropboxSign login email. |
|
|
6. Finally, if you provided all data correctly you should receive the notice that authorization has been completed successfully. |
[edit] DocuSign
| You need to have at least the Basic API plan of DocuSign to use this option. 1. You can set it up in to ways: 2. After successful login to the selected environment, select 'Apps and Keys' tab under the 'Integrations' section on the left side menu. |
|
|
4. Name the app/key. |
|
| 6. Generate your Private Key, to do so press "Generate RSA" under 'Service Integration'. Once ready a new window with generated keys will appear, copy the private key. 7. In 'Redirect URIs' tab press 'ADD URI' button. There, you need to provide a proper callback 'Redirect URIs' from your WHMCS installation in the following format: https://yourdomain.com/modules/addons/RecurringContractBilling/app/Api/docuSignAuthorize.php Note: Provided URI also has to start with https:// . |
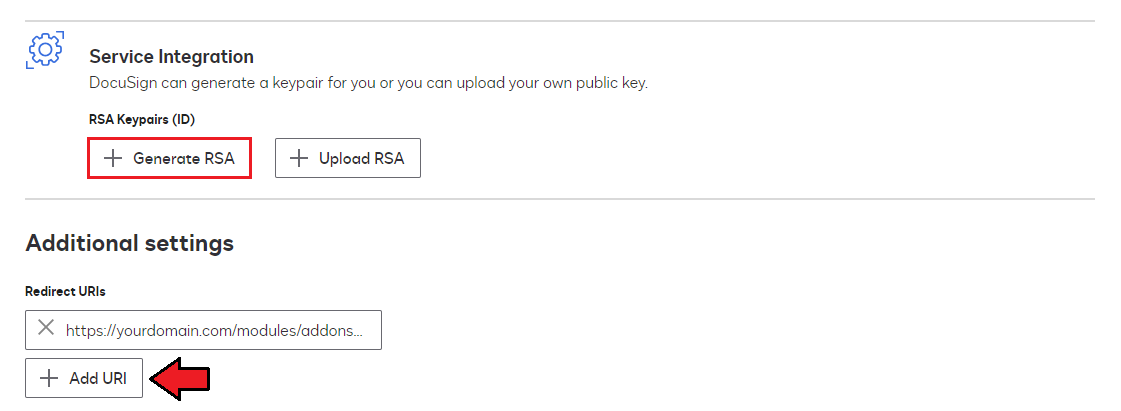
|
| 8. You will also need your 'User ID: |
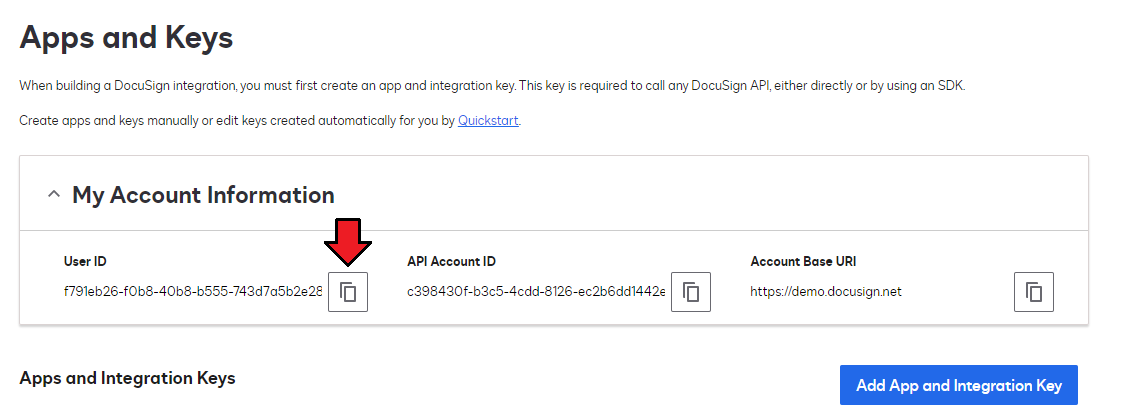
|
|
9. Now return to the configuration of the WHMCS module where you can enter the previously obtained data.
Choose if you are using a demo environment |
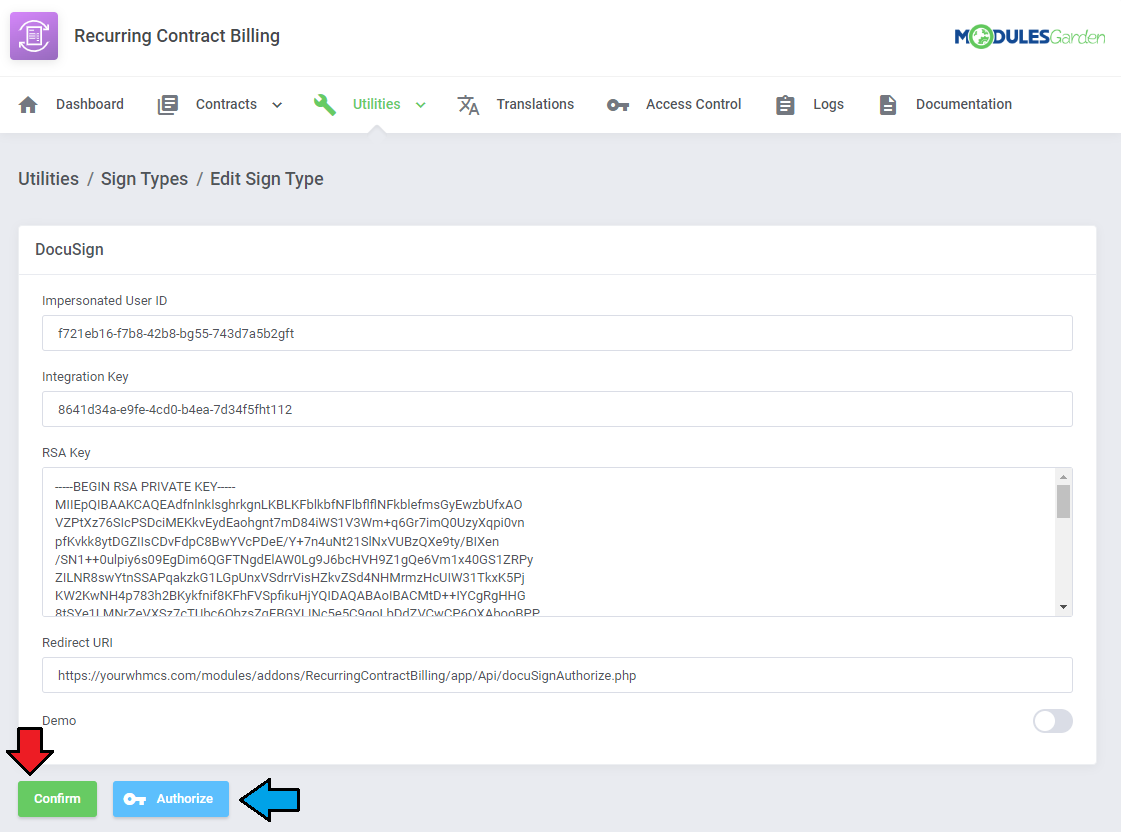
|
|
10. You will have to confirm your access authorization for DocuSign. |
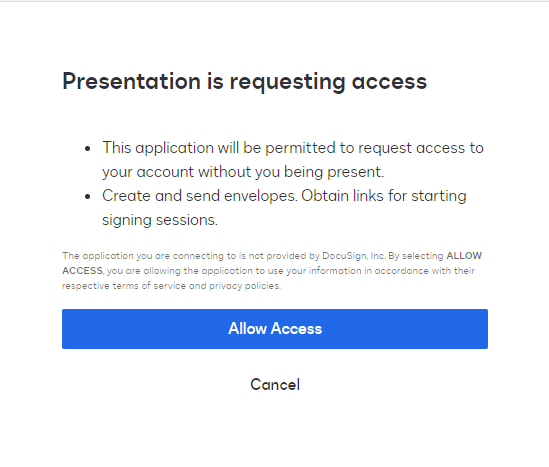
|
|
11. Finally, if you provided all data correctly you should receive notice that authorization has been completed successfully. |
[edit] SignNow
| A SignNow account is required to use this option. Take the following steps to set it up: 1. Log in to your SignNow profile. |
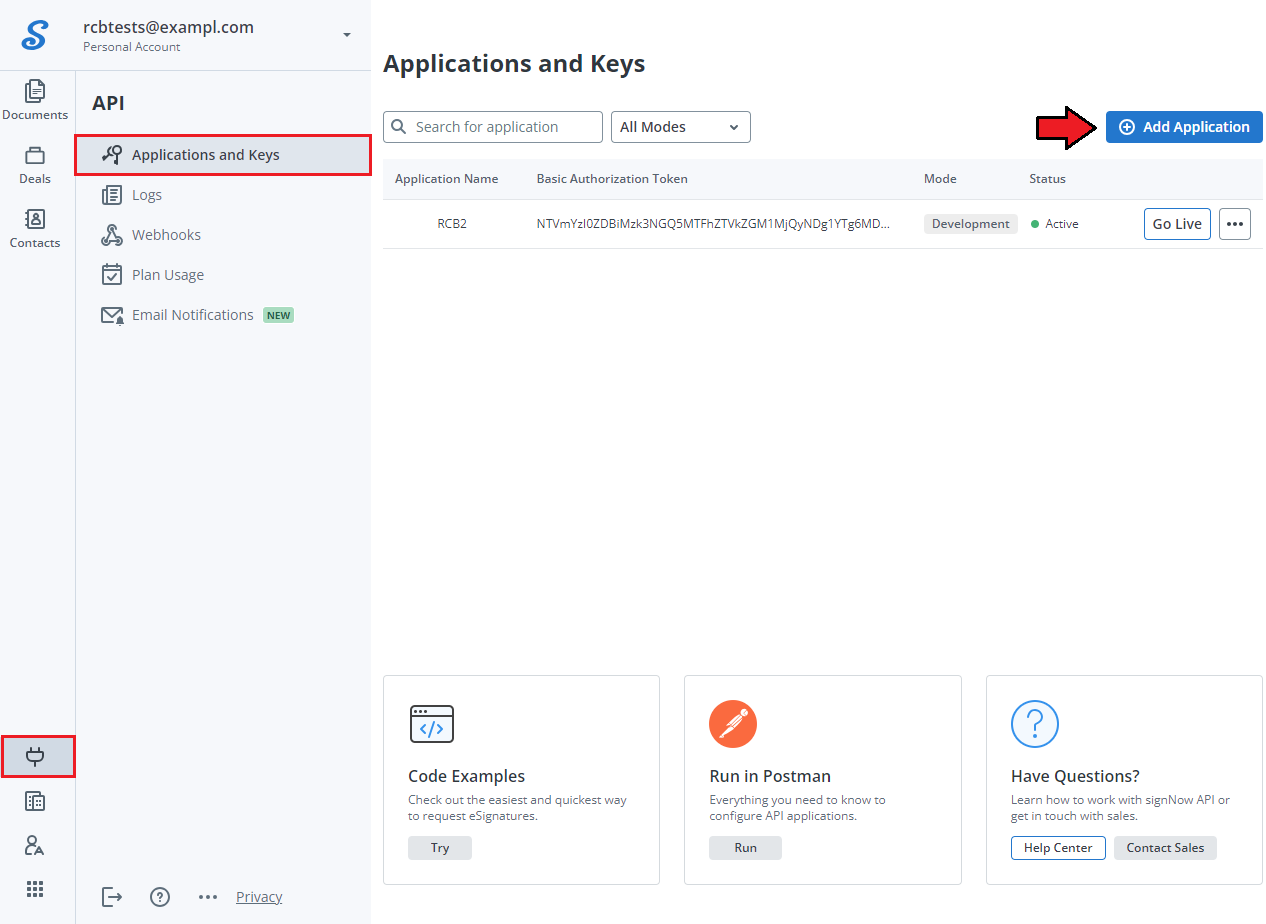
|
|
4. Copy your 'Basic Authorization Token'. |
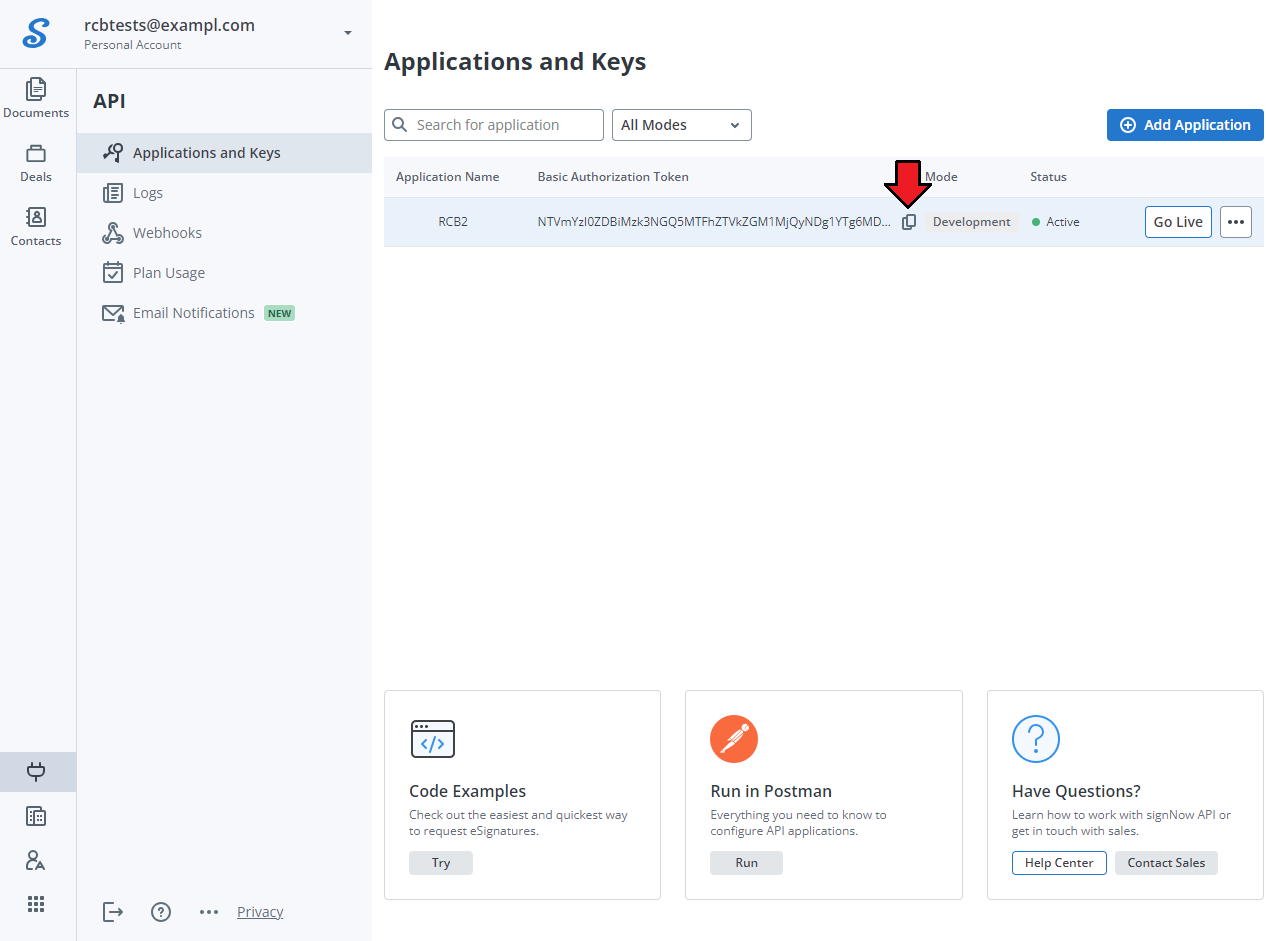
|
|
9. Now return to the configuration of the WHMCS module and enter the following fields.
If you are using a trial SignNow account, enable the demo mode. |
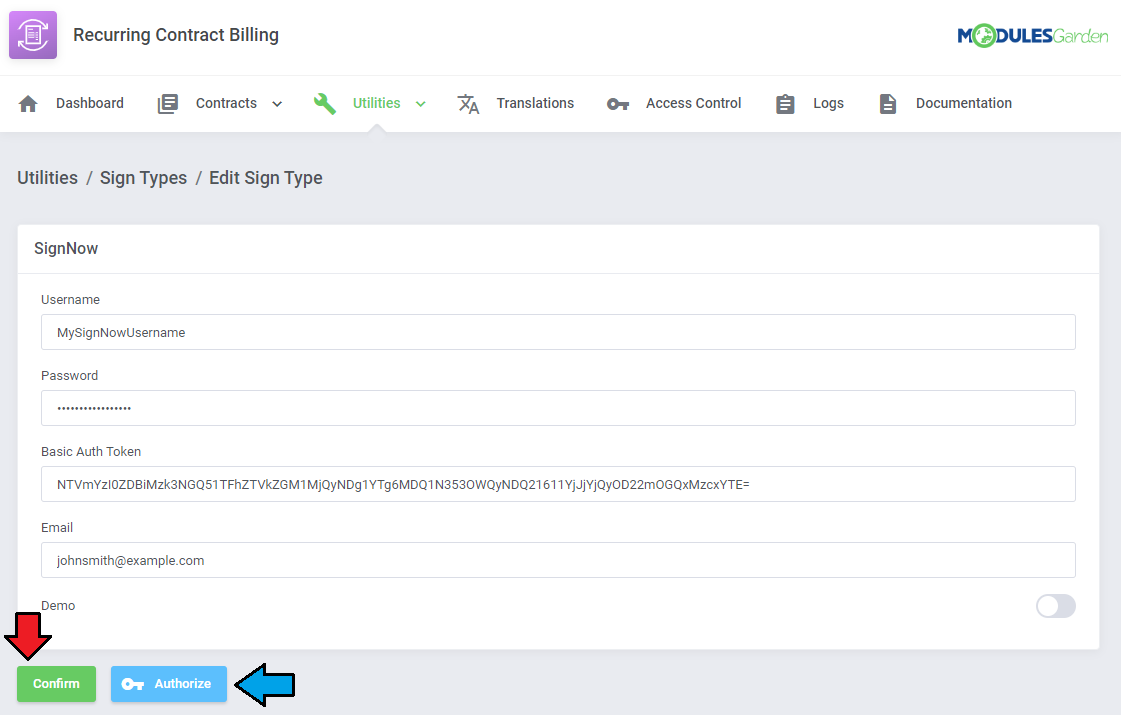
|
|
11. Finally, if you provided all data correctly you should receive the notice that authorization has been completed successfully. |
[edit] File Upload
| Here you can configure the minimum and maximum size of files uploaded by your clients as contract signs. Note: Currently all image, MS Word and PDF formats are supported for upload.
So, if you want to allow uploaded files e.g. being in between 1 and 8 megabytes in size provide '1024' and '8192' values accordingly. |
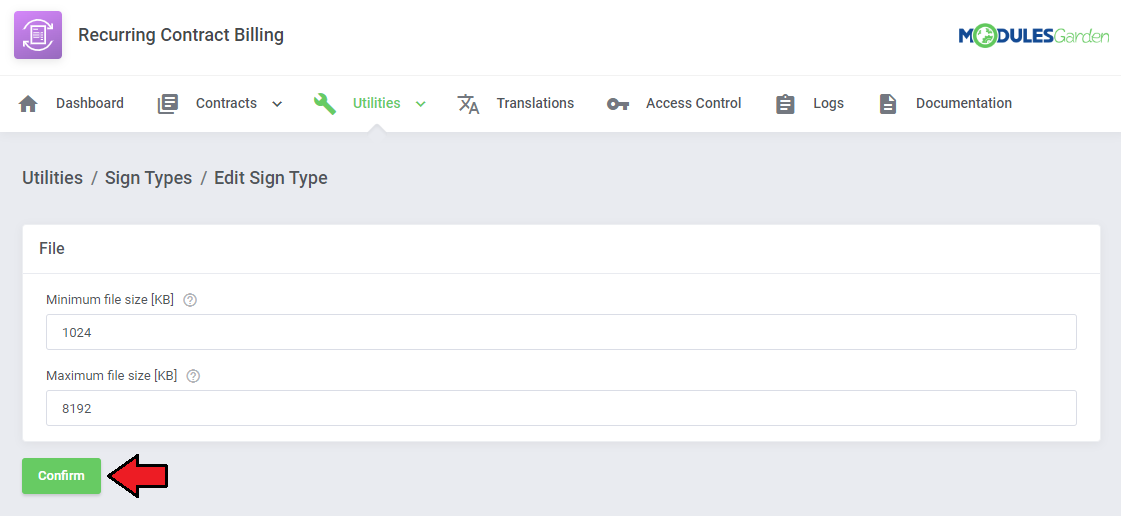
|
[edit] Contract Templates
| Now, that you have a contract's content draft, move to 'Contracts' → 'Contract Templates'. In this section, you can predefine which contract content draft a specific product a template will refer to. |
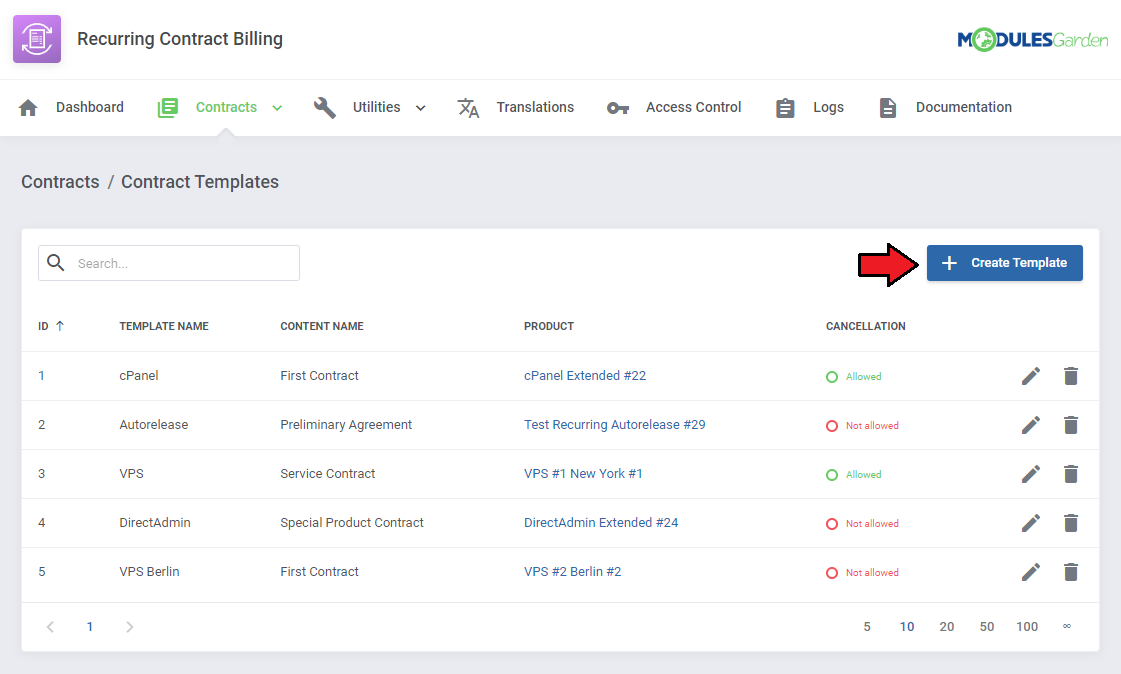
|
| Fill out the contract template form. Name the template and choose content names from the ones you prepared previously (see the 'Contract Content' section). Select the product that this template will be available with. Note: You can assign only one template to a single product, it is not possible to alter the product assignment once you save the changes! Define one of the methods by which your customers will be able to sign contracts. Choose from the following:
Note: Don't forget to set up their initial configuration.
Finally, you may decide whether to allow your clients to cancel the contract while it is active or not. |
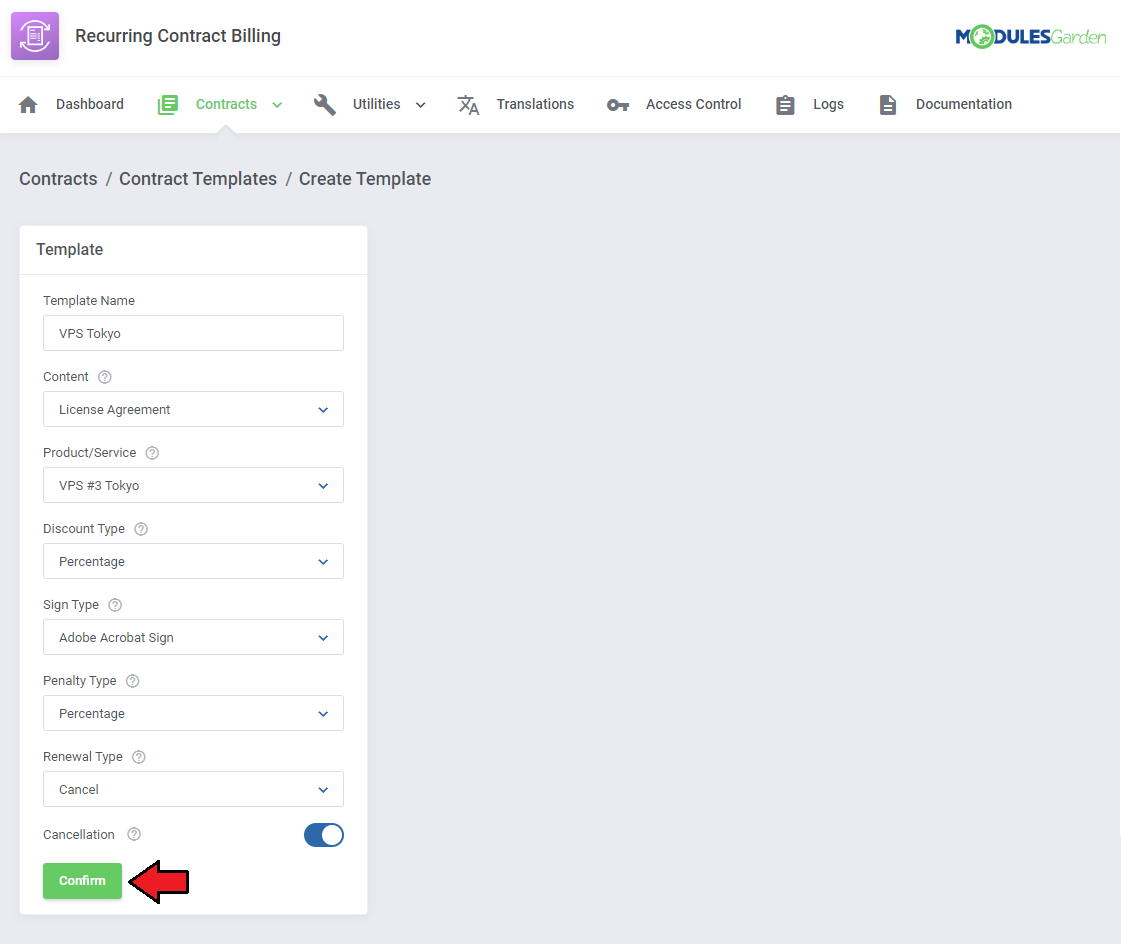
|
| In the case of the DocuSign template, you may also define the exact position of the signature on the contract together with the page number and sign phrase. Please refer to the following article to learn how to position the signature. If you cannot see the relevant section, make sure to choose DocuSign as Sign Type and confirm changes. If you wish to provide the phrase under which a client will sign a contract (this phrase has to be included in its content), please use the 'Sign Phrase' configuration field. Note: If you cannot see the relevant 'Signature' section next to the 'Template' section, try clicking on 'Confirm' first and see if it appears. |
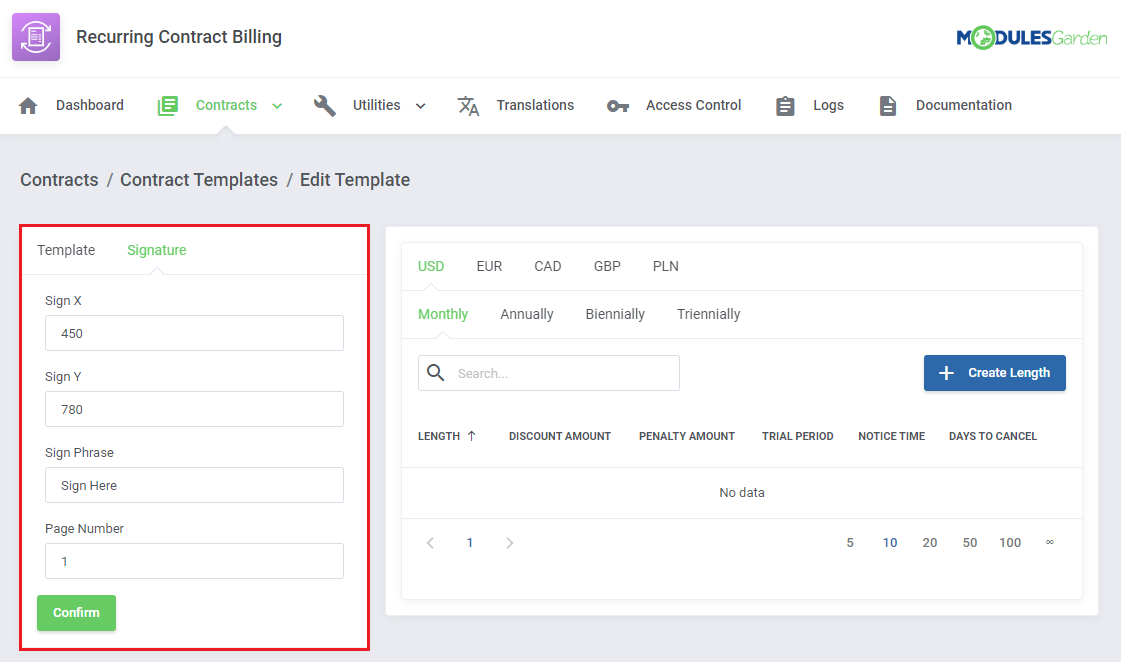
|
| Once you have added a new template, you have to create 'Contract Lengths'. An appropriate box should appear next to the template form. Pick a currency and billing circle. Once those are specified, click on 'Create Length' to begin. |
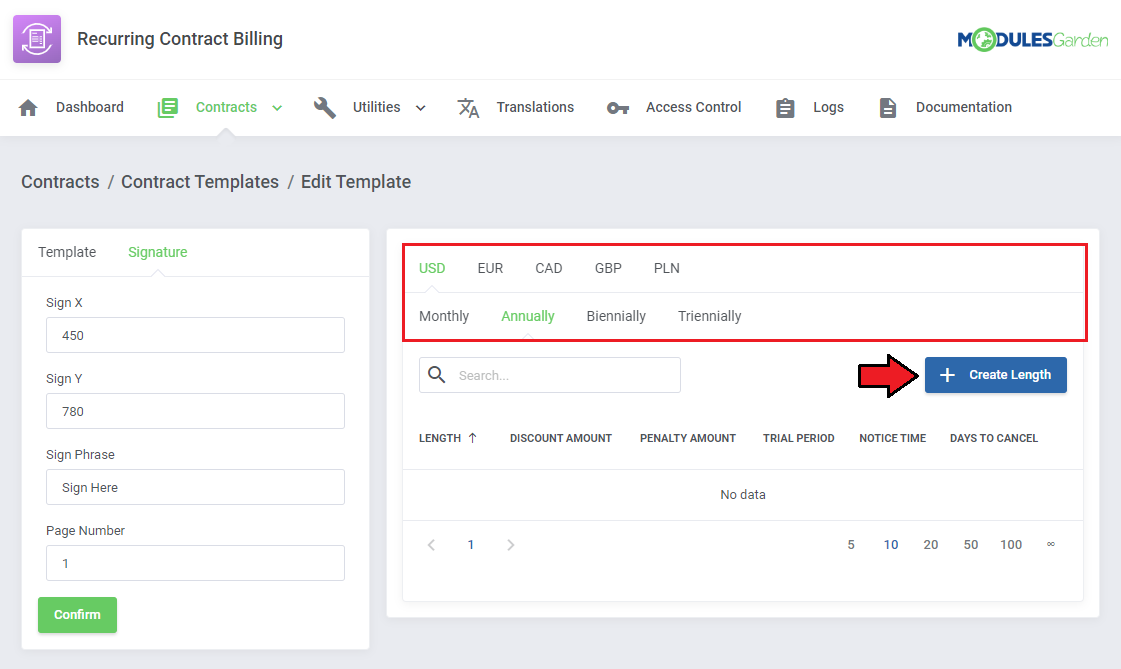
|
In this form you can define:
Click on 'Confirm' when finished. |
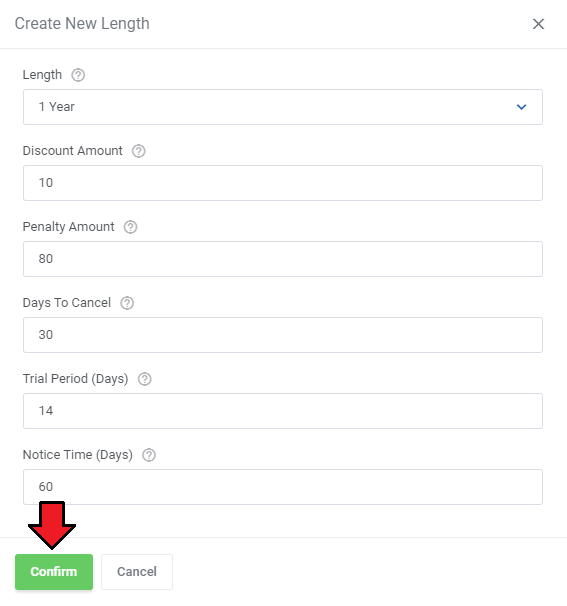
|
[edit] Module Configuration
| The last step mentioned in the 'Guide' is setting up 'Notifications,' 'Default Penalty Grace Period,' and 'Service Suspension Rules'. These options can be found under 'Configuration' tab in 'Utilities' section. Select which email notifications you want your clients to receive and enter the number of days before the due date to send the notification. |
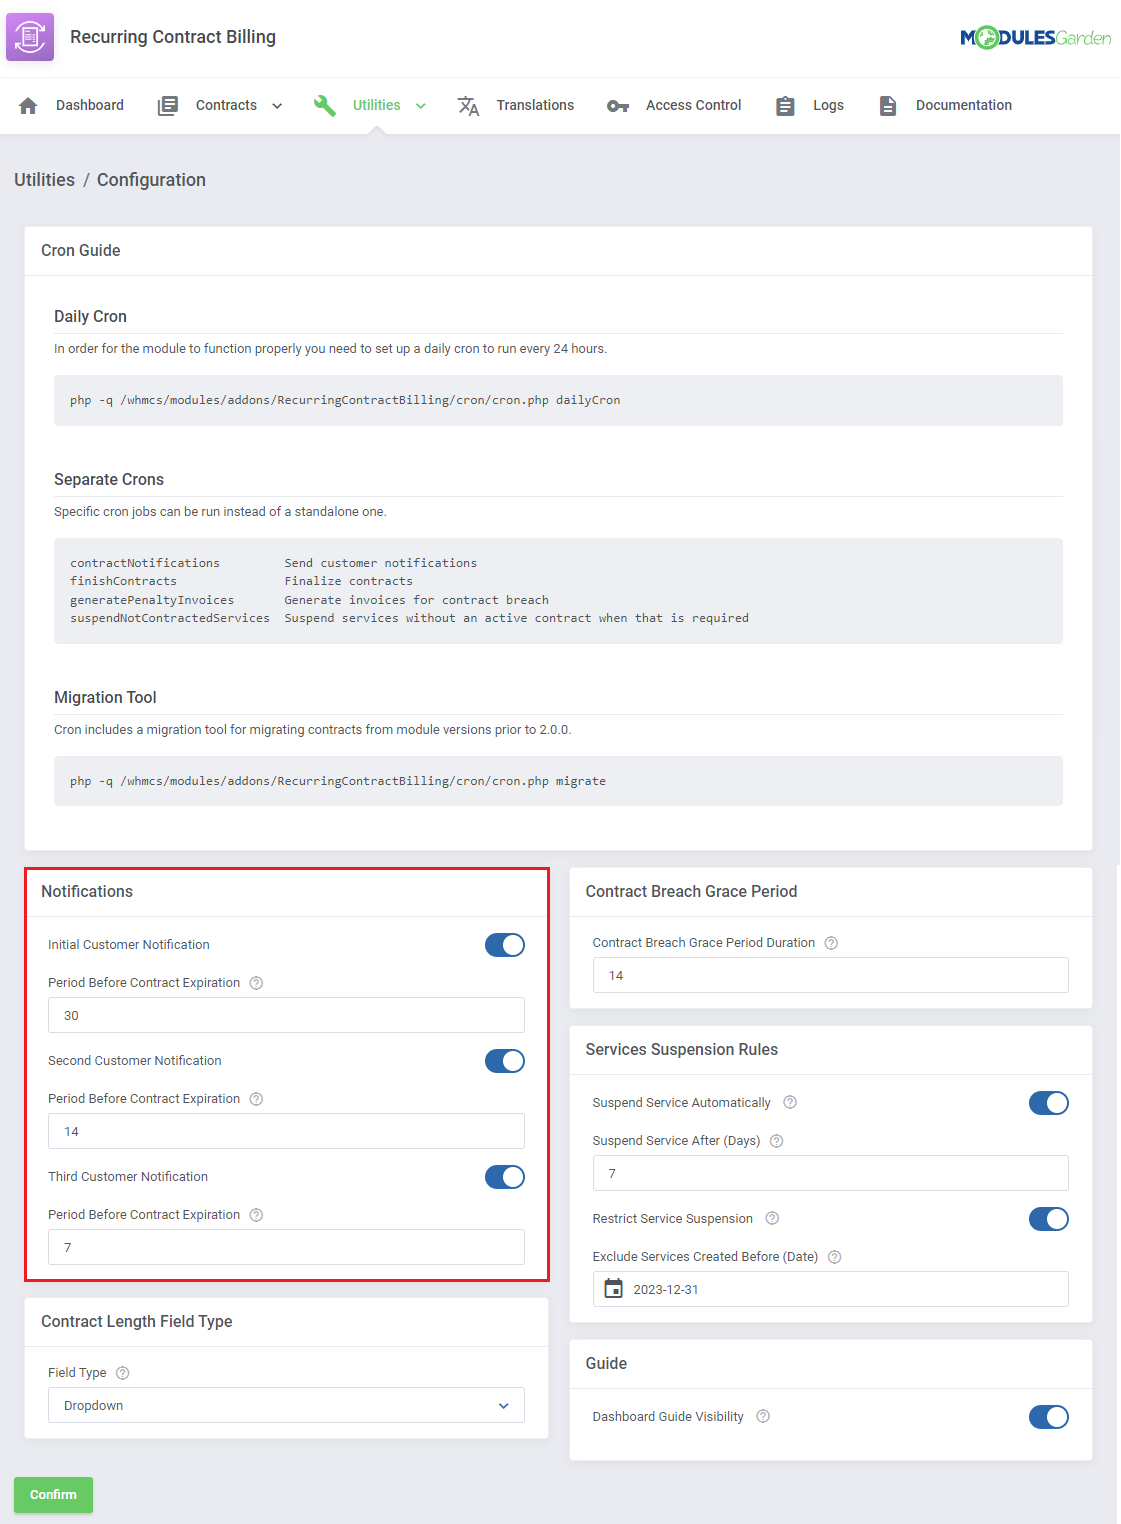
|
|
Move to 'System Settings' → 'System' → 'Email Templates' → 'General Messages' in your WHMCS to view and edit the notifications. You will find them under 'Ending Contract Notification' name. |
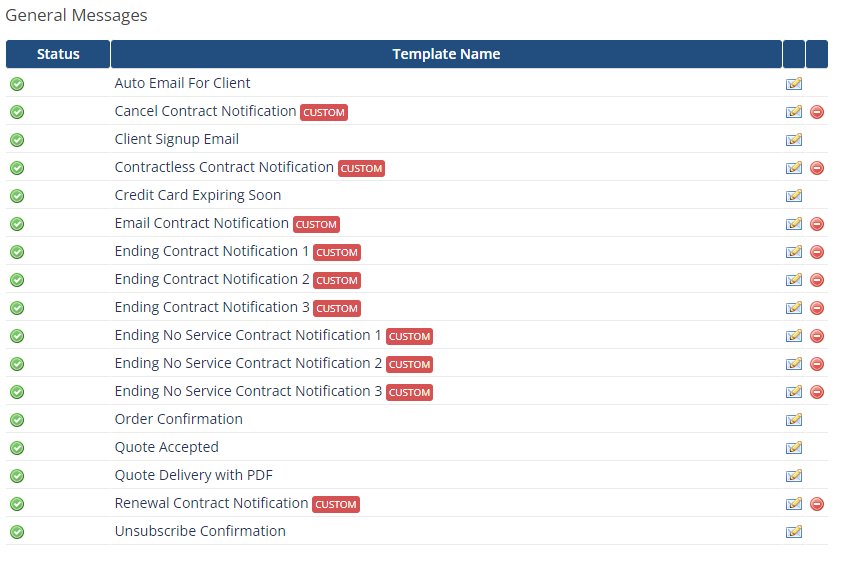
|
| Define how the 'Contract Lengths' will be displayed in the Client Area, by choosing the 'Field Type.' |
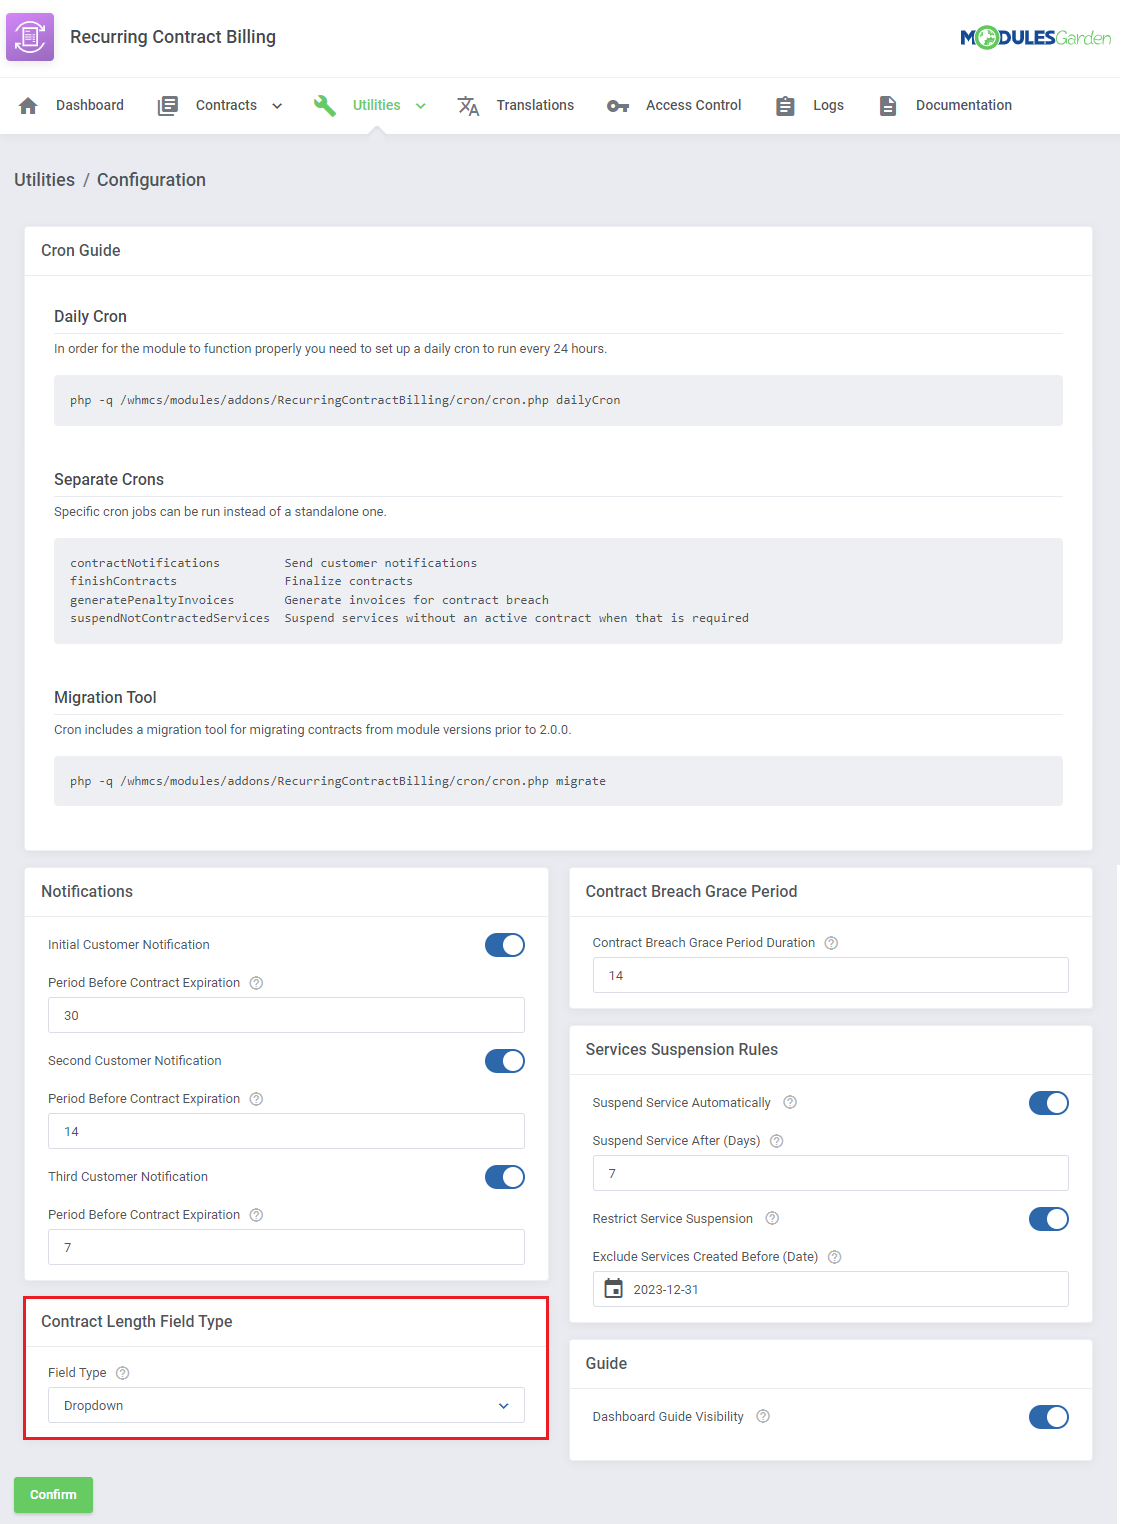
|
| Define number of days when a client can be late with payment. If a client misses making payment for longer than the number of days specified here, a penalty will be imposed on such client. Note: Penalty type and amount are specified in the 'Contract Template' details. |
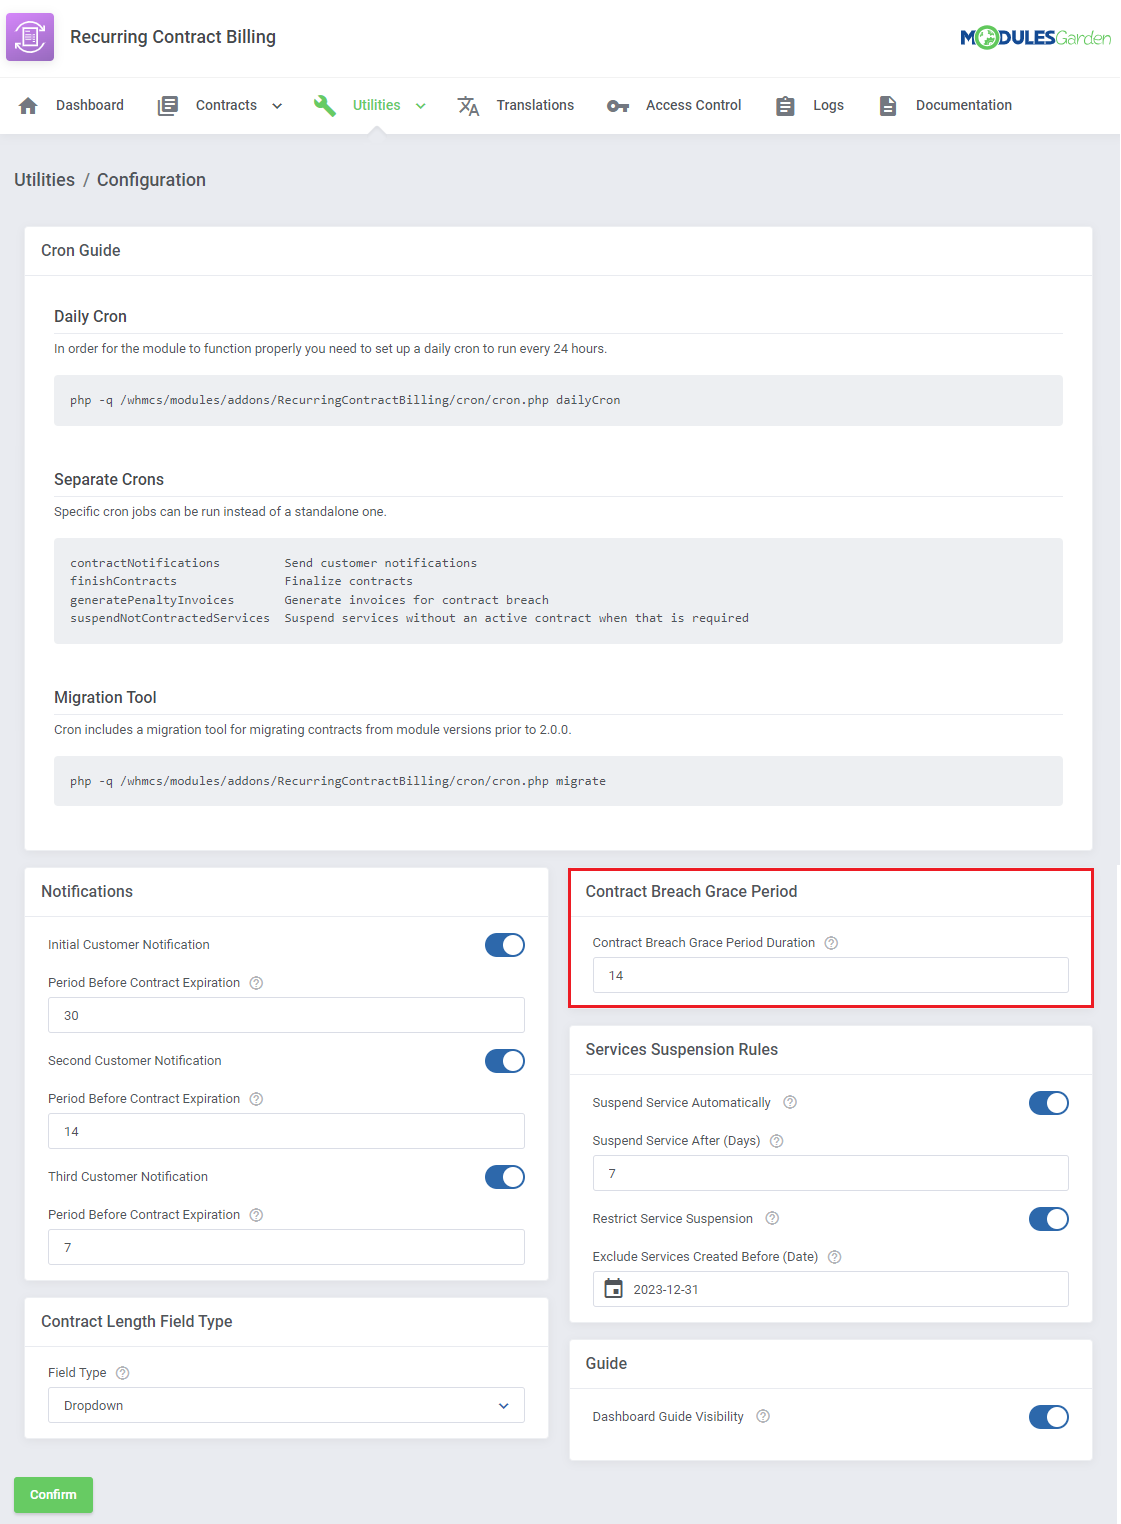
|
| You may decide if services shall be automatically suspended after the provided number of days pass, without the client signing the contract. You may exclude services ordered before a certain date from this option. |
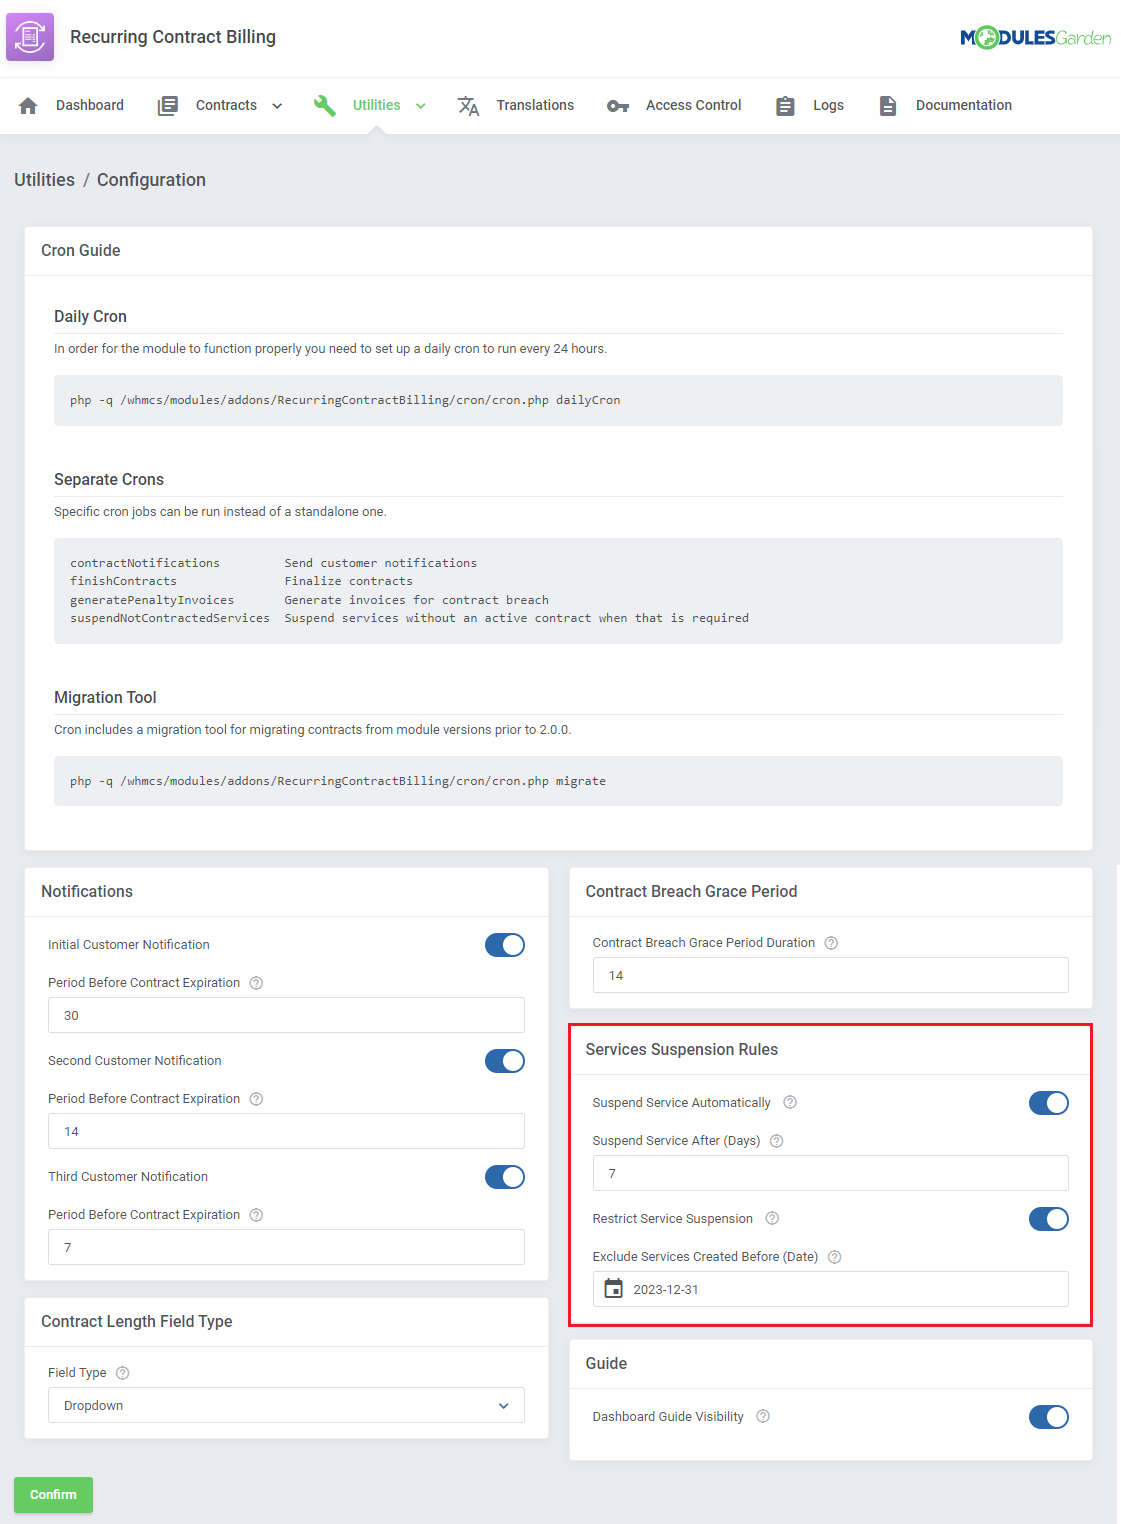
|
| Finally, you can turn off the guide or turn it on again once you have hidden it. 'Save' the changes once your configuration is ready. |
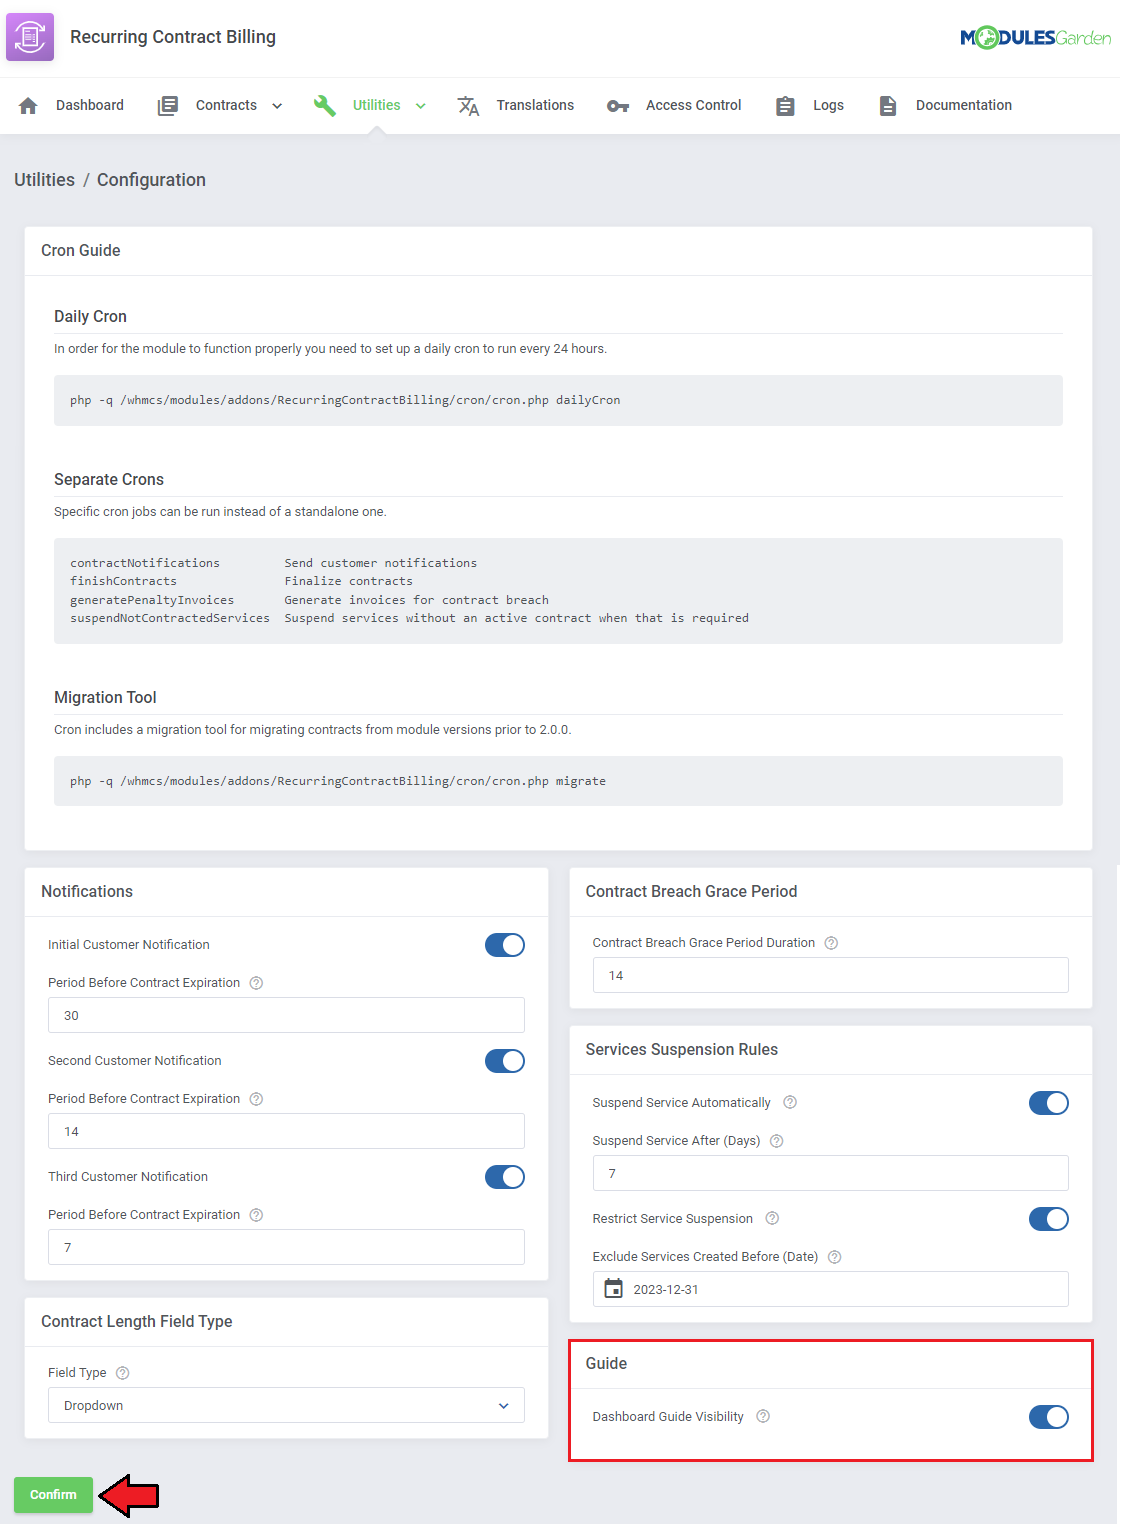
|
[edit] Management
| In the following sections we will try to explain how previously configured contracts are imposed on clients. |
[edit] Client Area
[edit] Place Order
| To illustrate the process, let's say a client orders one of your products with recurring payment (it is important that you have previously prepared a contract for this product). Once the client reaches checkout, the contract field appears. They may choose the contract length from available options, view the contract and sign in. |
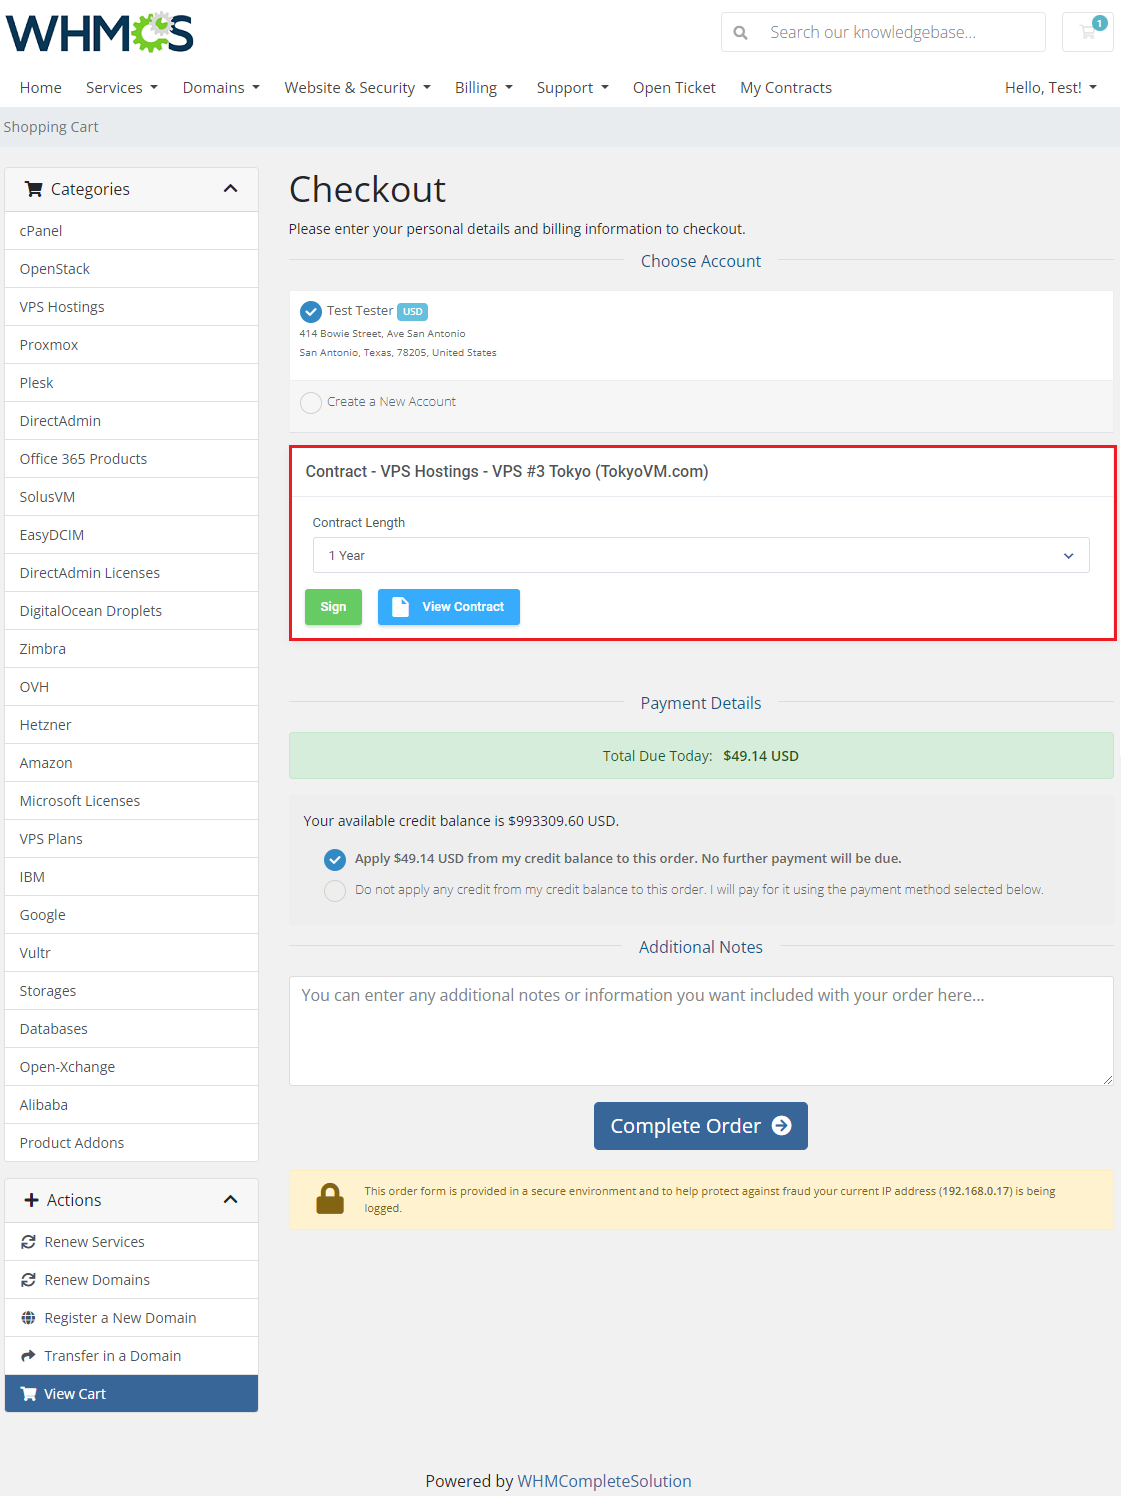
|
| If the client tries to complete the order without signing the contract, this error message will be displayed. Note: You can add an option to order the product without signing the contract by choosing 'Order Without Contract' while adding 'Contract Lengths' in the module addon. |
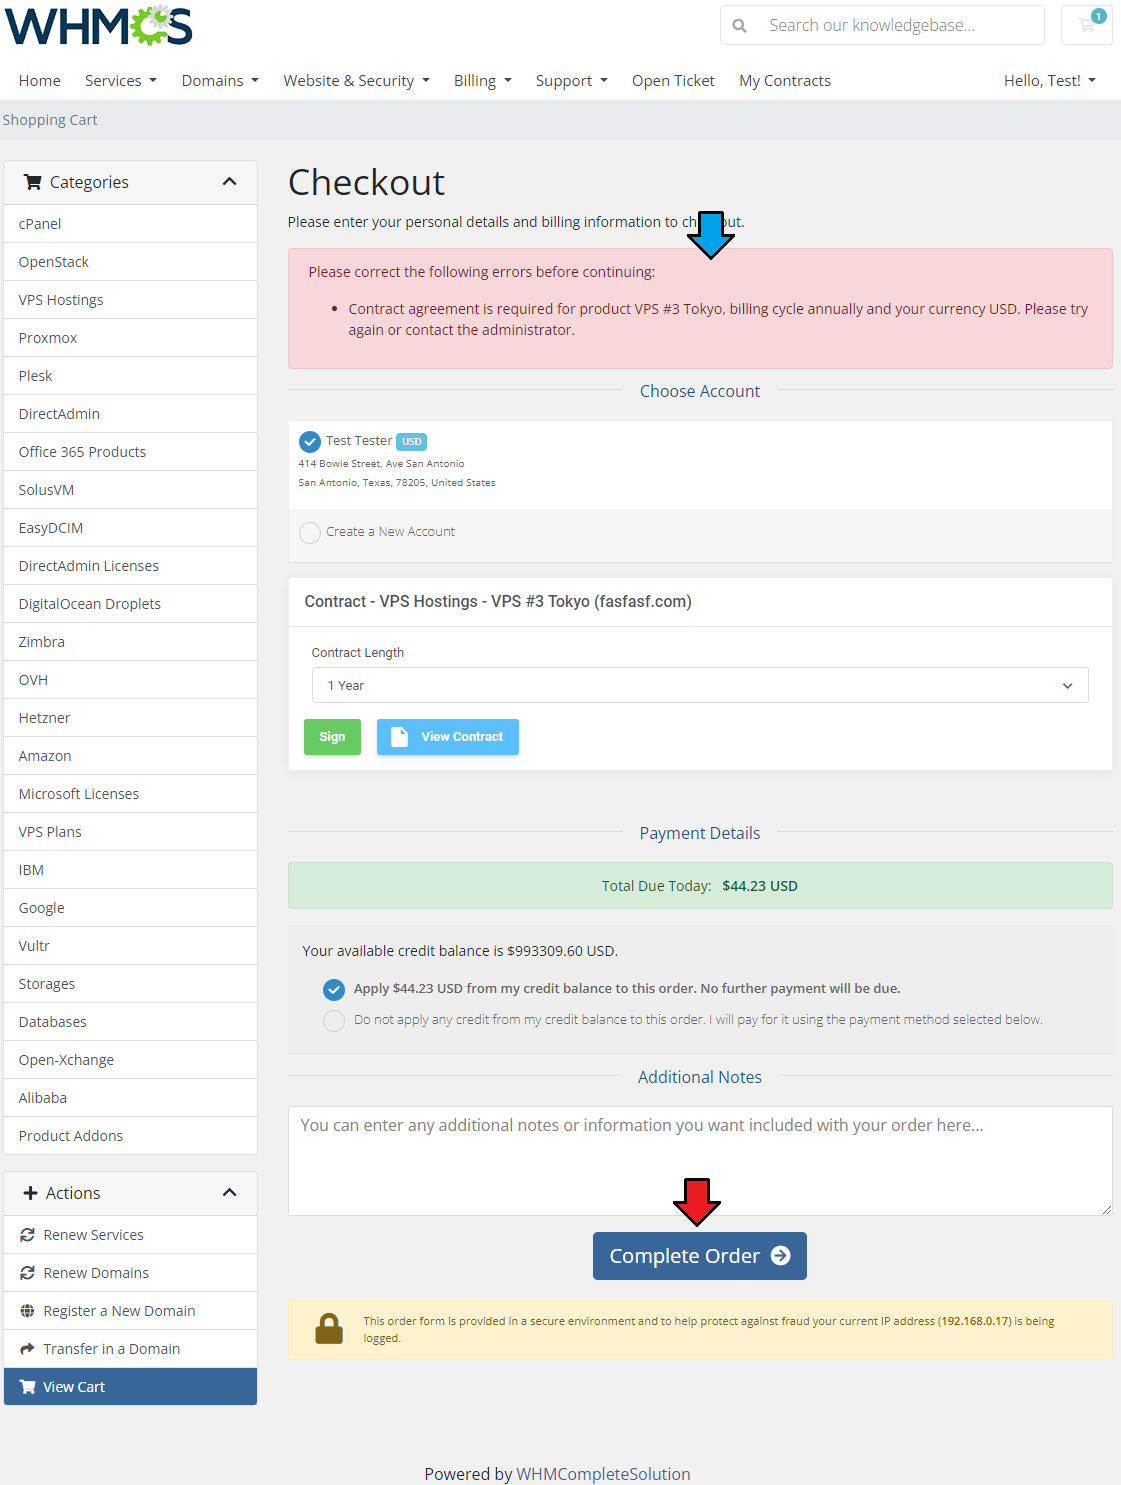
|
[edit] Service Contracts
| To view all accepted contracts, find the 'My Contracts' tab. |
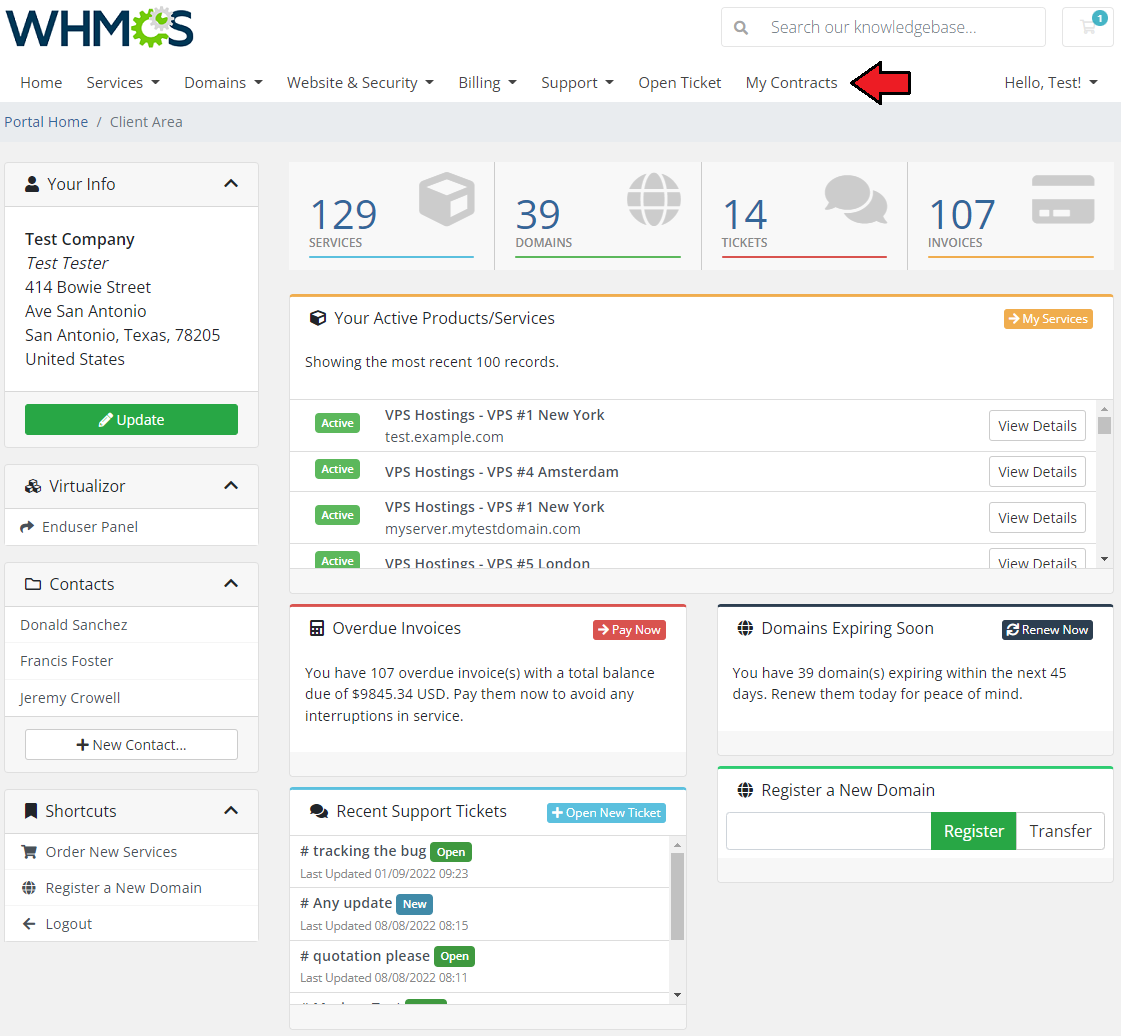
|
| There is a full list of client's contracts with the most important information about them. Including: 'Product/Service Name,' 'Recurring Amount,' 'Sign Date,' 'Contract Length' and 'End Date' as well as its 'Status.' Use action buttons to:
|
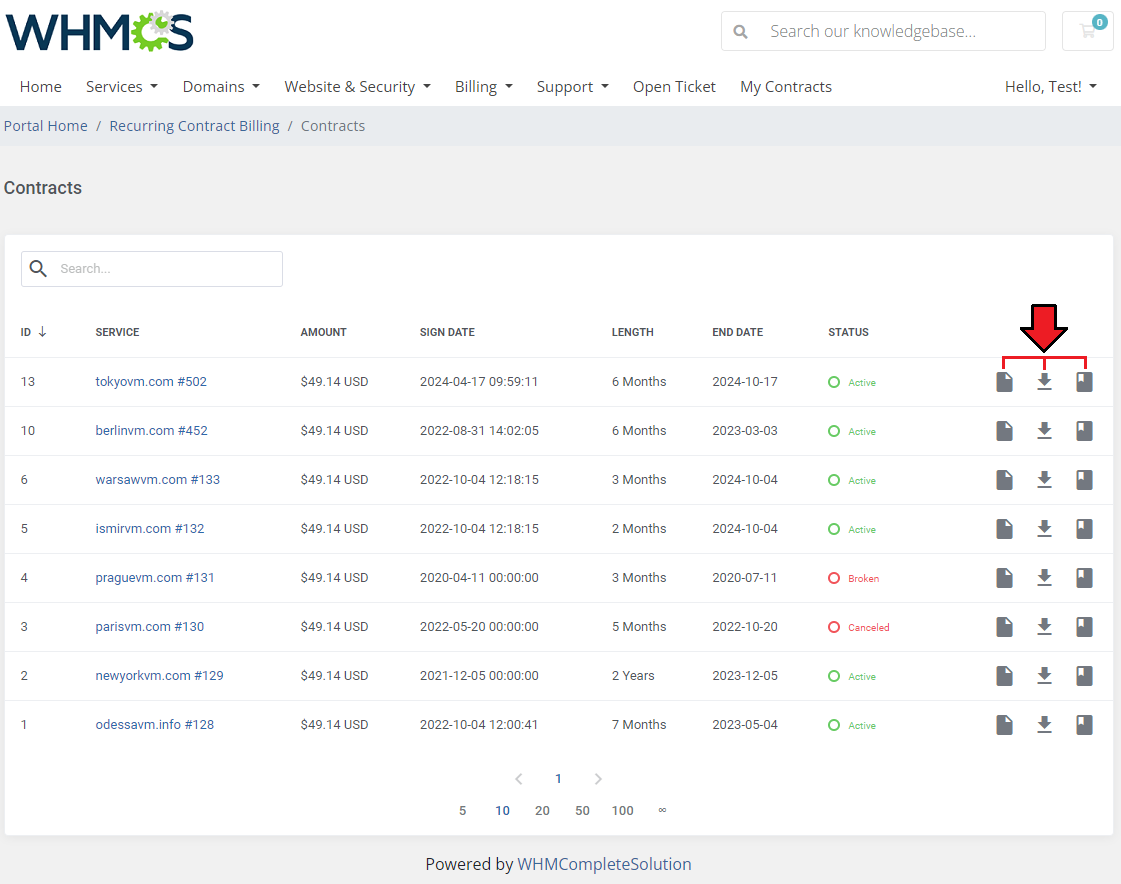
|
| View the contract's details. Press 'Show' to see its details directly in the client area or press 'Download' to obtain its PDF version. If conditions are met, at the bottom of the contract the client will find buttons to renew or cancel the contract.
|
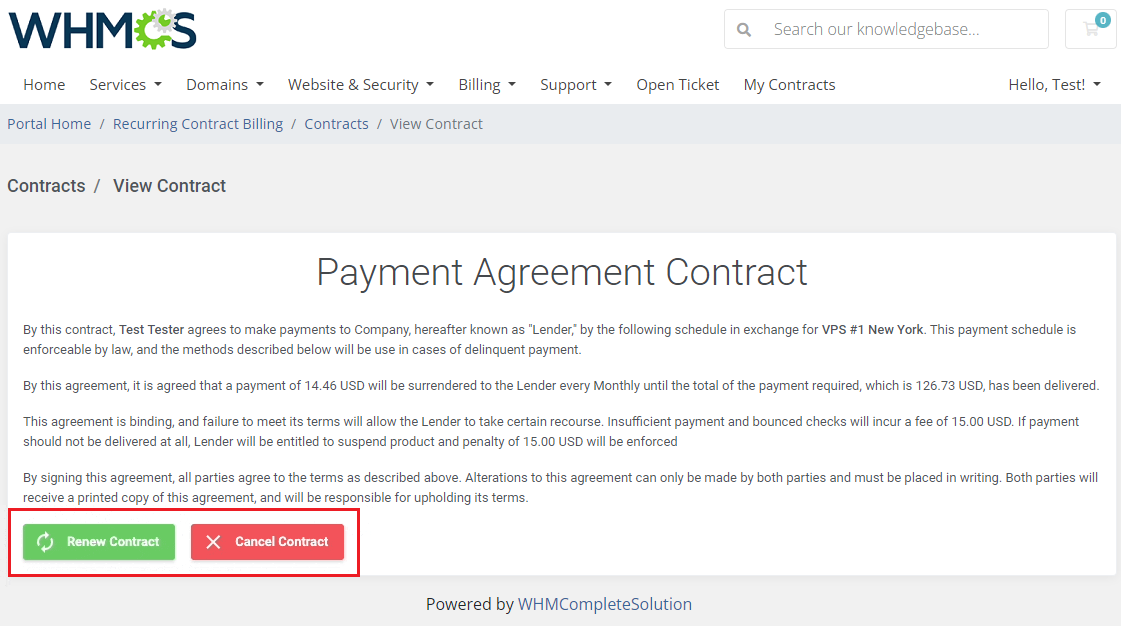
|
| History of any changes in the contract content: Click on the 'Page' icon to see the previous version of the contract. |
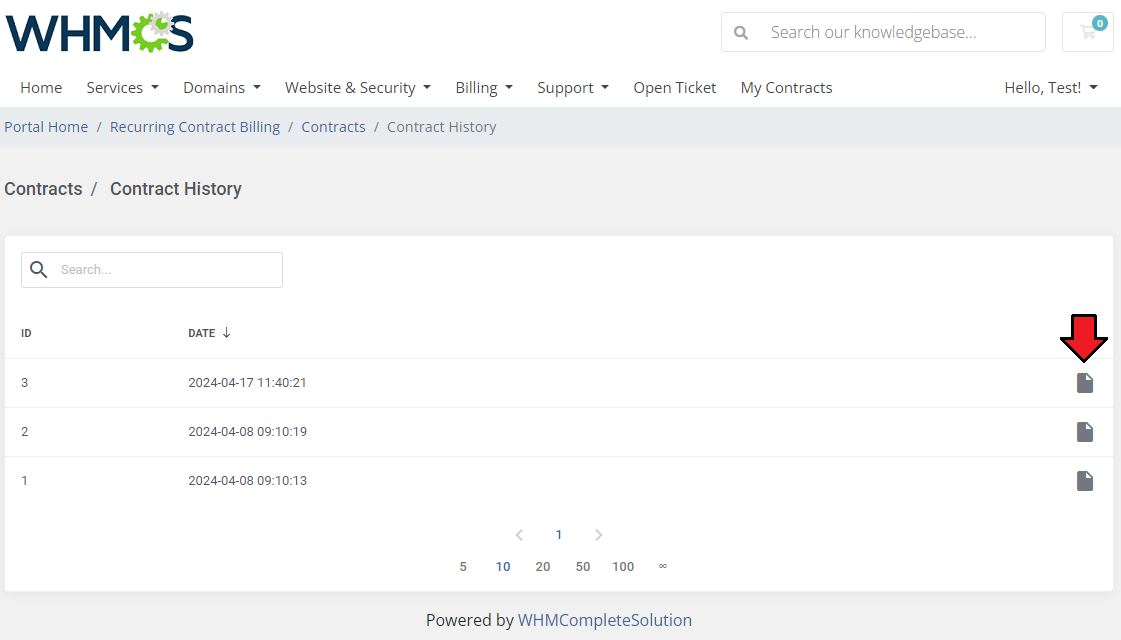
|
[edit] Signed Contracts
| In 'Signed Contracts' section under 'Contracts' you will find a list of all contracts accepted by your clients. On the main page, you can see the name of the client with the service used, the recurring payment amount for their product, and contract details such as signing and ending dates, length and status. |
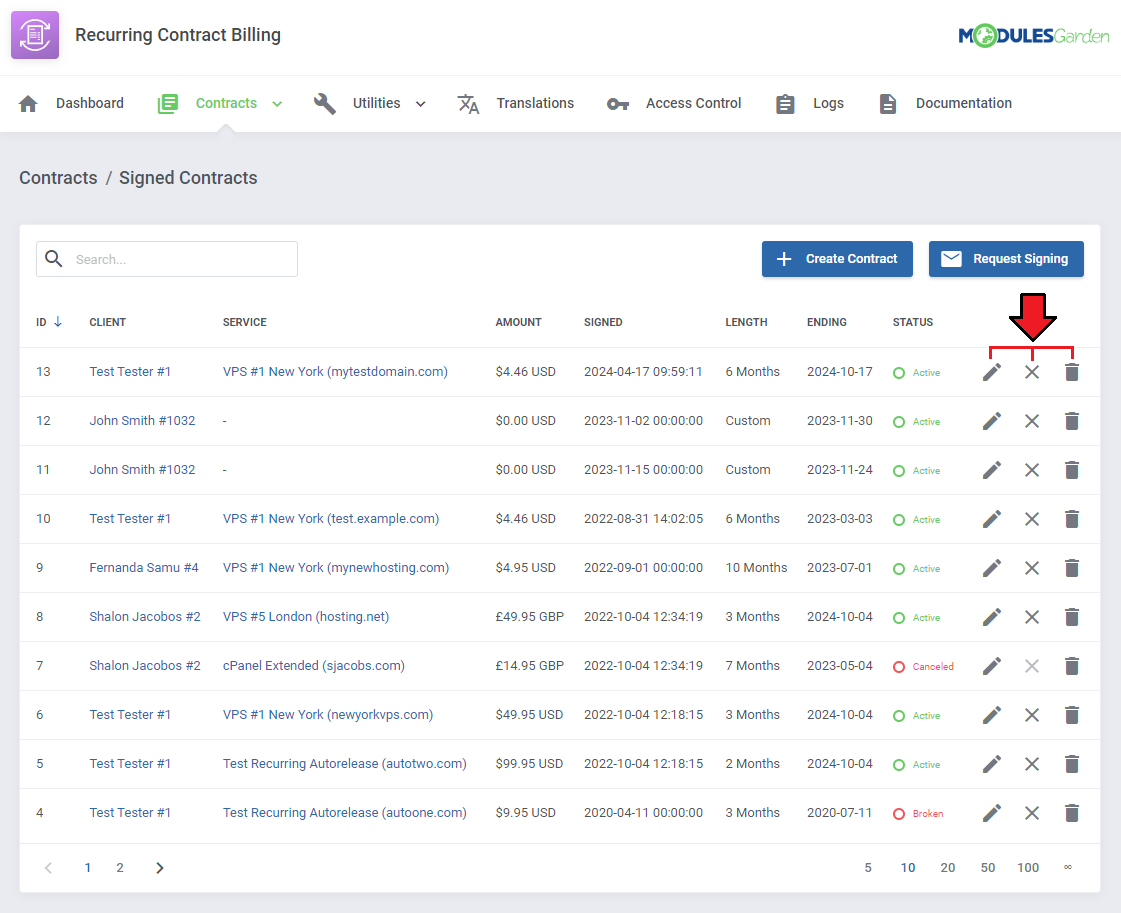
|
| On this page, you can once again see details of a contract accepted between you and the client. You are allowed to modify the content, status and details of this very contract. Note that used 'Contract Content' will not be altered, only the signed item. |
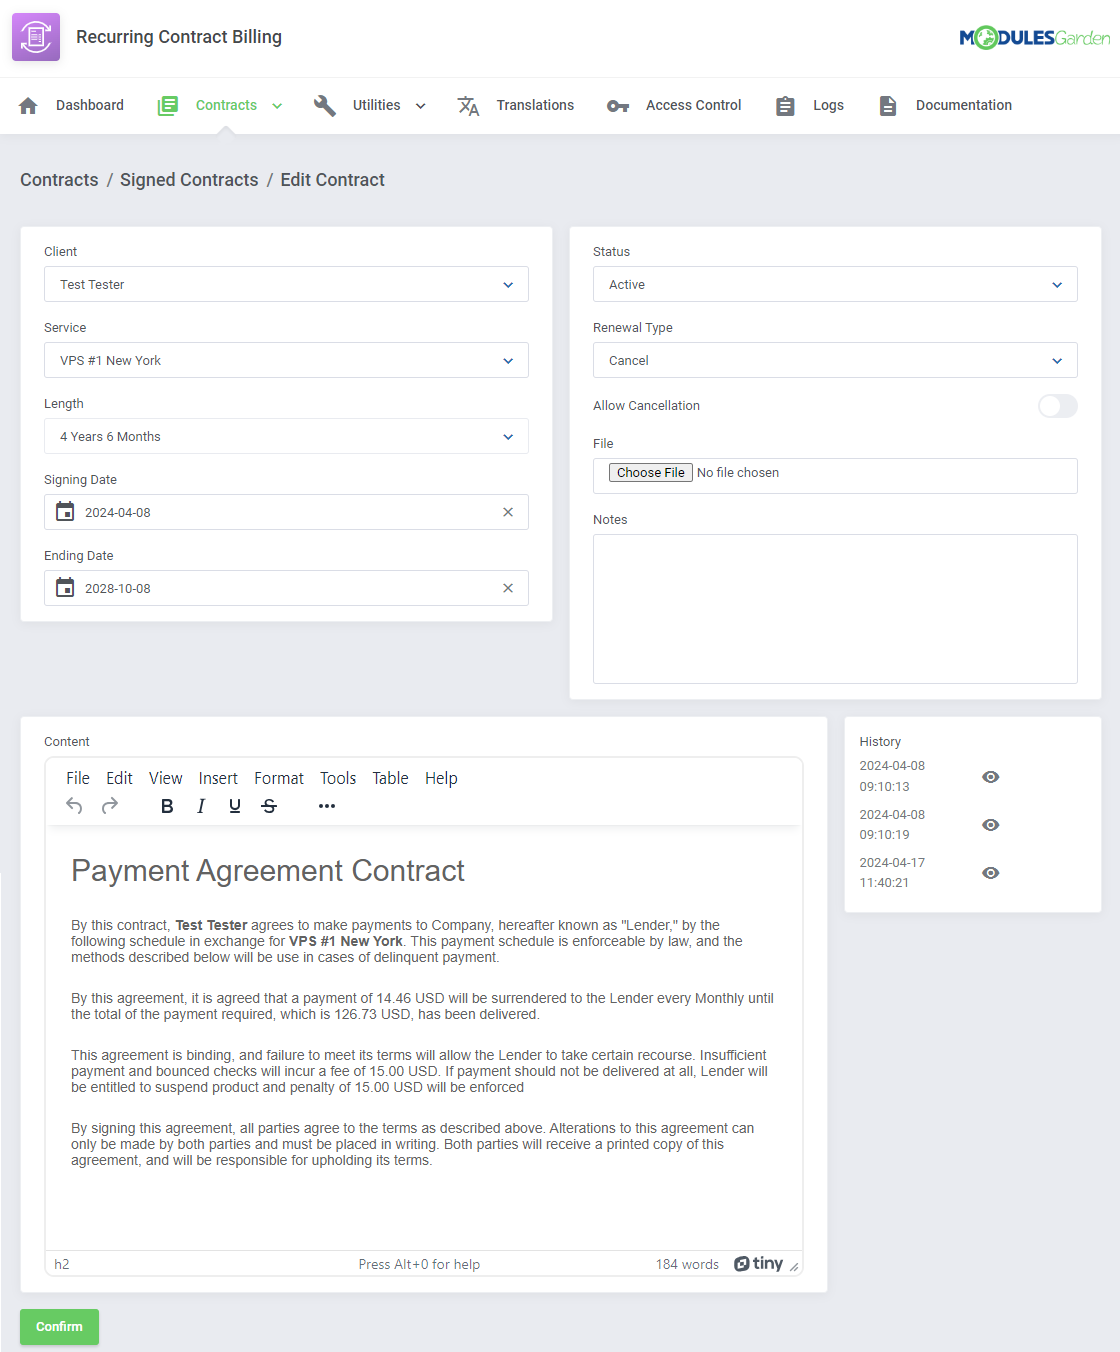
|
| In case you decide to make any changes to the contract, the previous (before changes) version of the contract is added to the 'History'. Thanks to that, you may always come back to the original. |
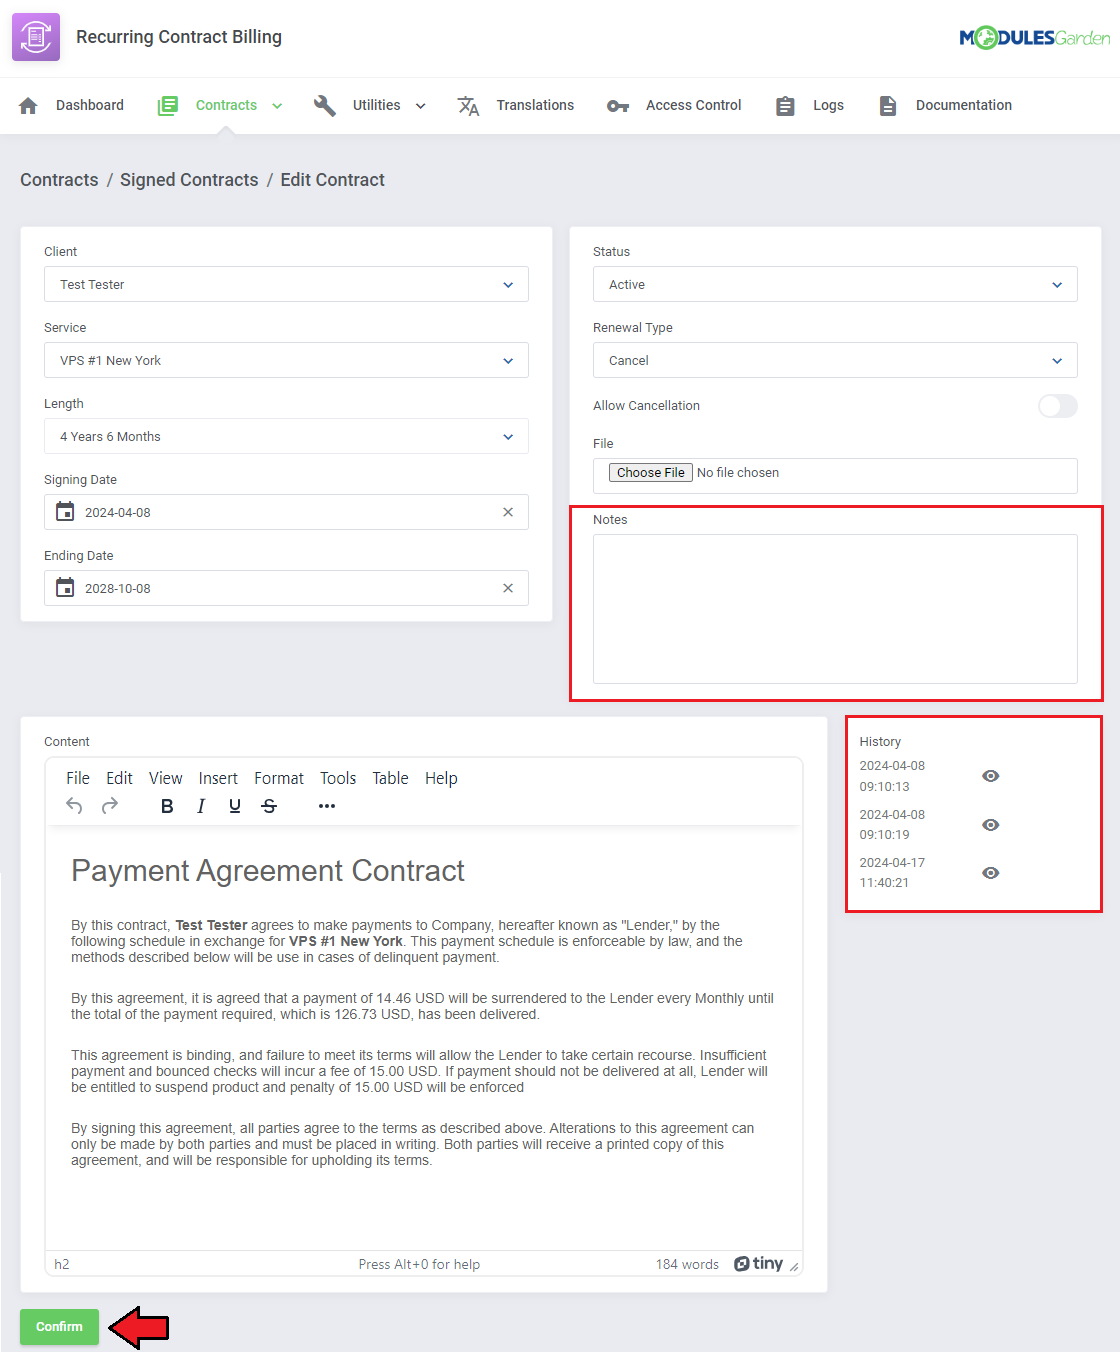
|
[edit] Create Contract
| Above the list of 'Signed Contracts', you will find 2 buttons. 'Create Contract,' and 'Request Signing.' |
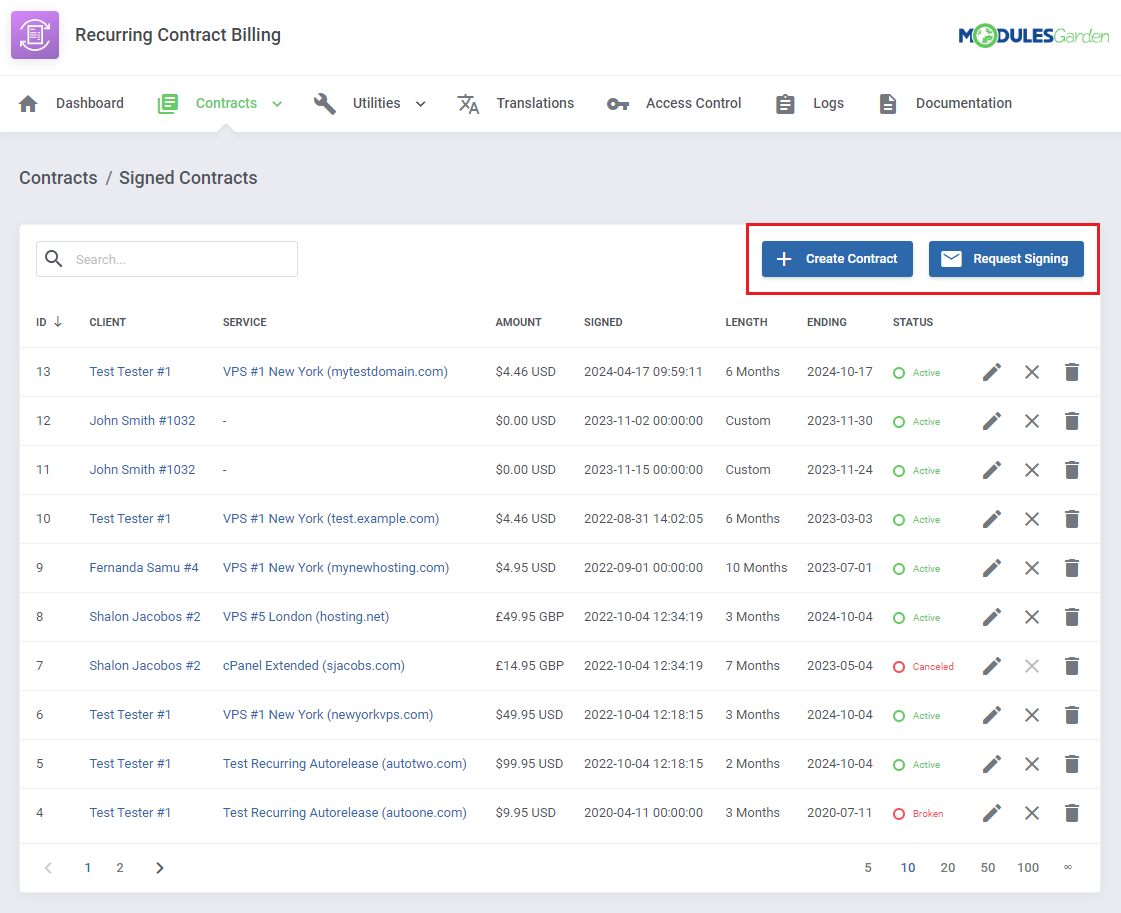
|
| Let us cover 'Create Contract' first. Clicking on the button will redirect you to the form where existing contracts, for example, signed manually, can be uploaded into the module and managed. First of all, select the client. Then pick the service the uploaded contract is related to, or select none if your contract is an independent document. |
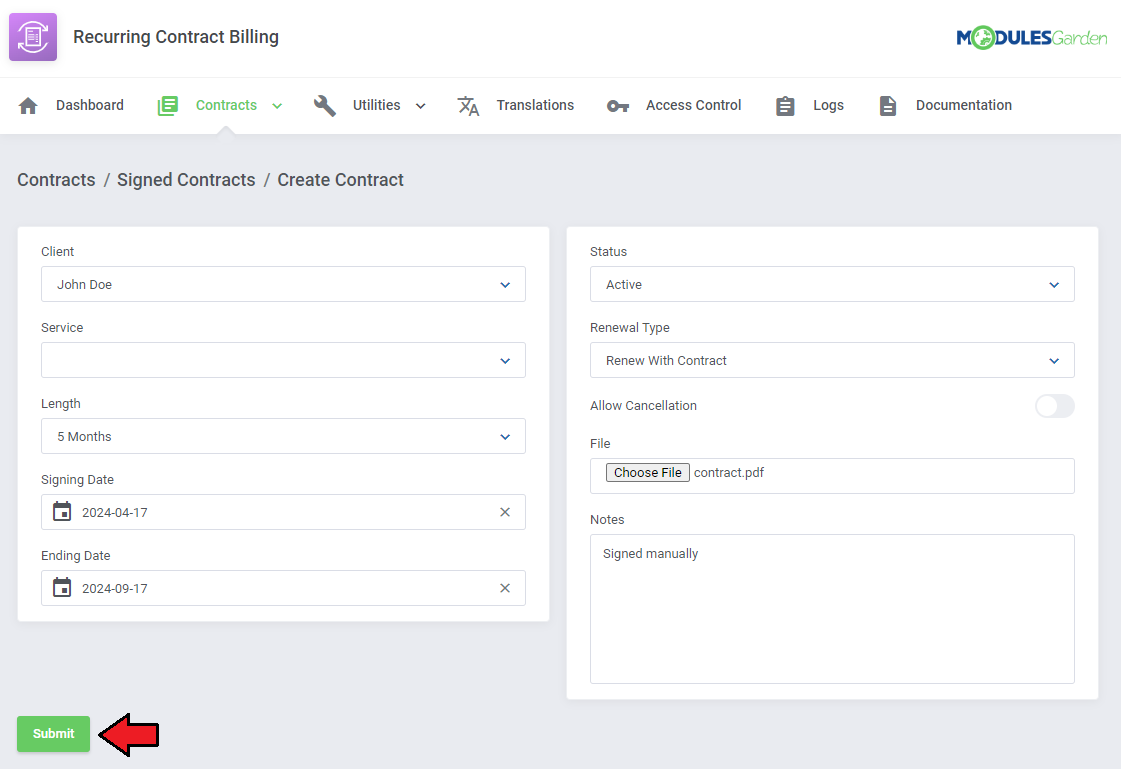
|
| 'Request Signing' allows you to send emails directly to your clients requesting them, to sign a contract for a specific product and specific length. |
[edit] Dashboard
| On the Dashboard of your addon you will find the most important information in a nutshell. These are:
|
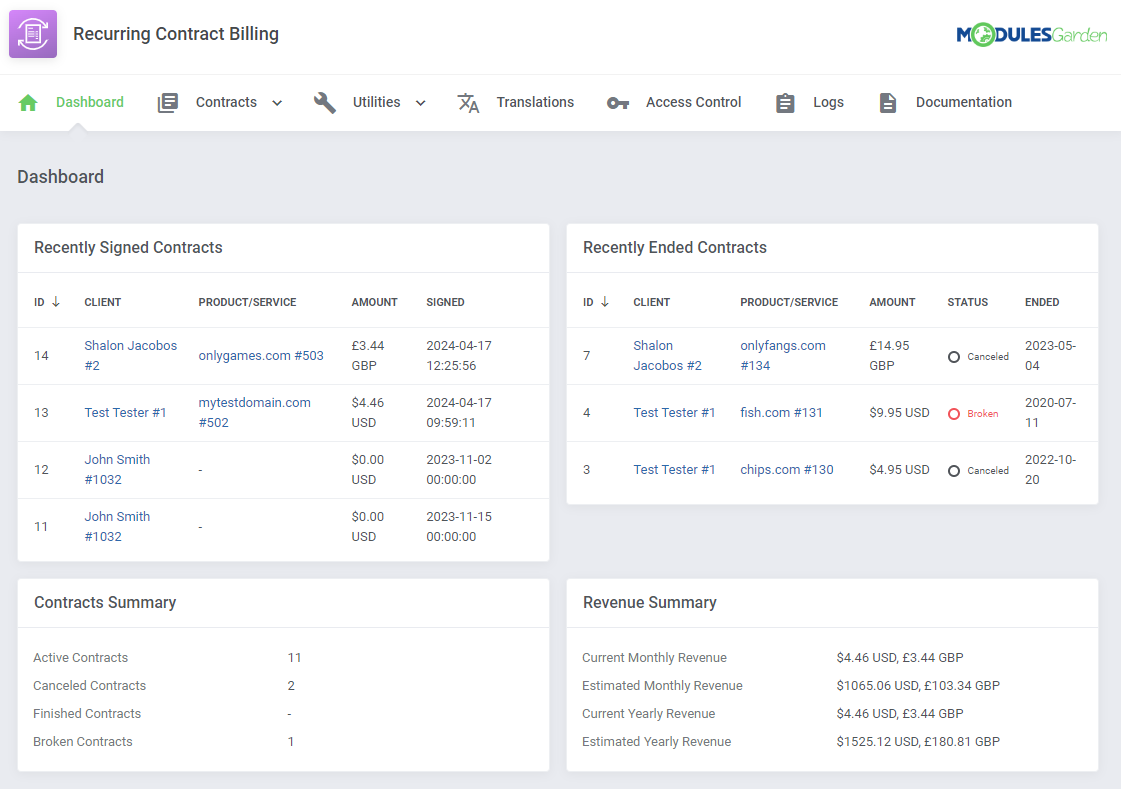
|
[edit] Translations
| Customizing language files is now extremely easy with the "Translations" tool that is now available directly in the addon. Its user-friendly design makes managing various language file tweaks a smooth and efficient process. Prepare translations for the original English files with this handy built-in tool. For specific instructions on how to use this tool please refer to its dedicated article, you will find it here. |
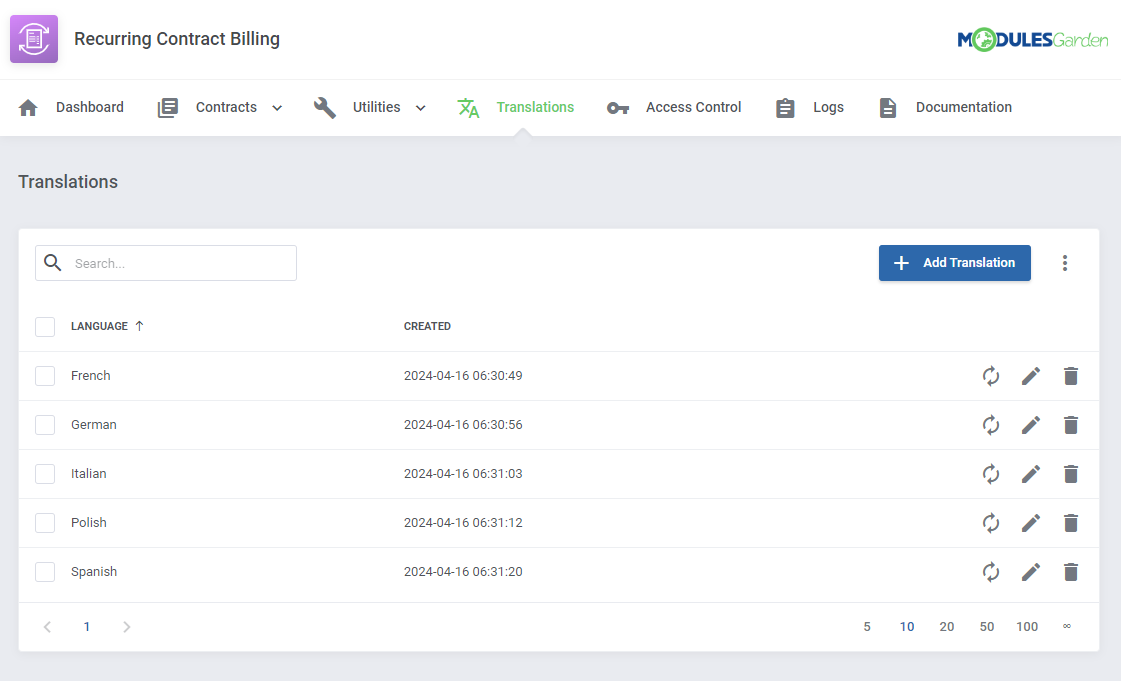
|
[edit] Logs
| In the 'Logs' section any attempted actions on any contract are recorded and stored for your convenience. Use the action buttons to see details or delete each log entry. Multiple logs can be deleted at once by utilizing the mass selection function. |
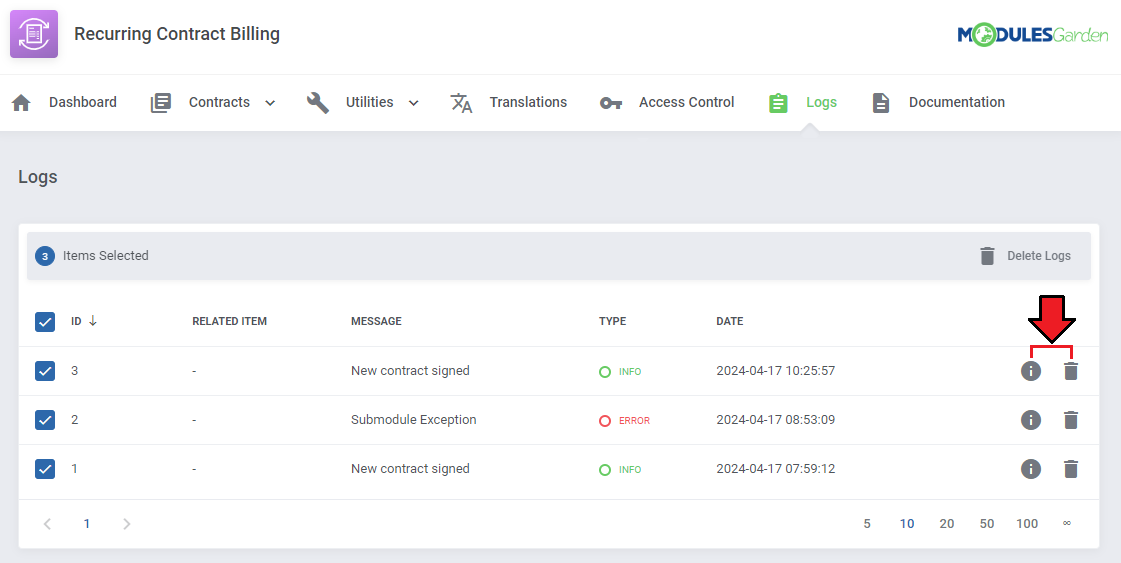
|
| Furthermore, the logs feature additional action. Changing the logs' settings, exporting the logs to a '.csv' file, and a way to delete specific log types. |
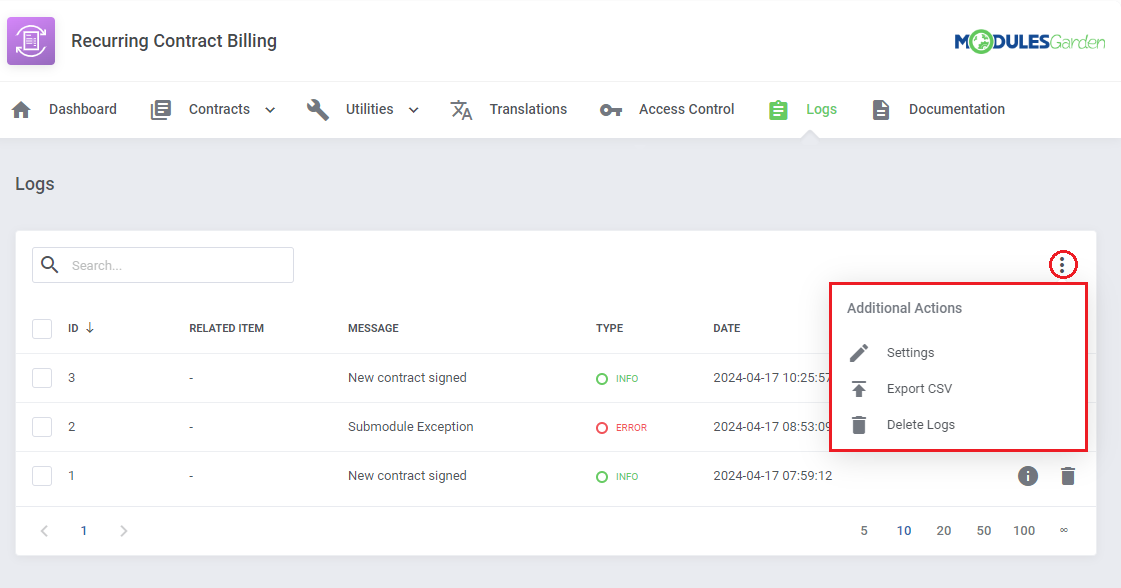
|
| In the settings you can specify which log types should be recorded, and whether they should be deleted automatically after a specific time. |
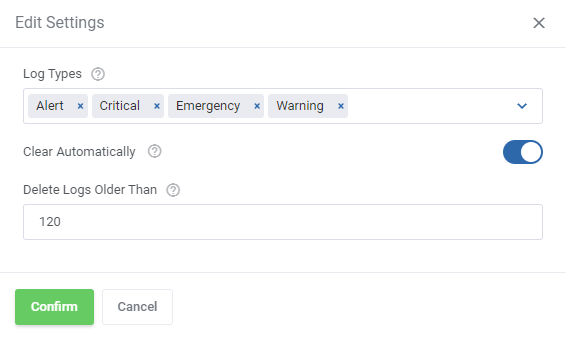
|
| While exporting you will pick a time frame and the log types to export. |
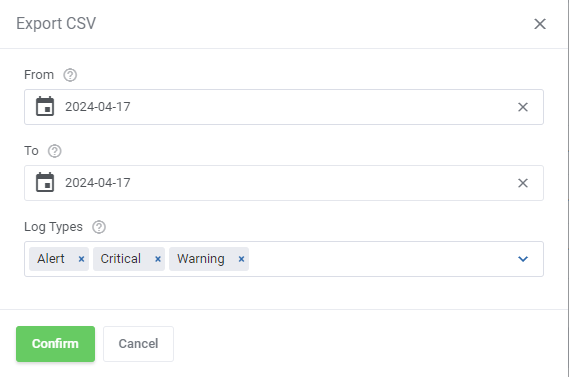
|
| Here you can decide which log types to delete, you can also specify how old the logs have to be to qualify for deletion. Leave the first field empty to delete all logs. |
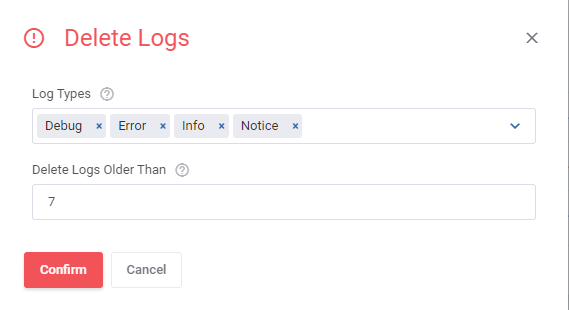
|
[edit] Advanced Billing For WHMCS Integration
| It is possible to combine your Recurring Contract Billing For WHMCS module with one of our most favored products: Advanced Billing For WHMCS. In order to configure the two modules to work together move to 'Advanced Billing addon' → 'Configuration' and find the product you want to work with. |
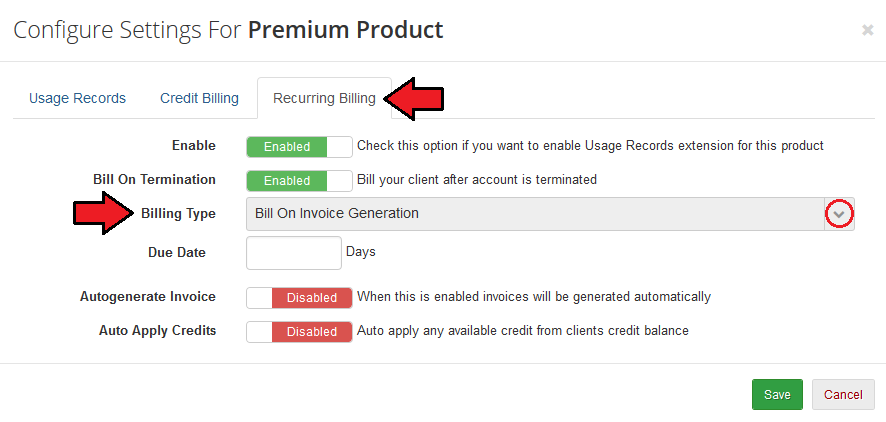
|
| When ready, Recurring Contract Billing For WHMCS will be in constant cooperation with the other module within the configured product. If you want to combine the functionalities of the two modules for more than one product, please remember to select the 'Bill On Invoice Generation' option for all of them. |
[edit] Tips
1. The contracts are automatically broken in two cases:
|
| 2. As this module supports a template system, any changes made in the module's template files will be saved after the update process. |
[edit] Update Instructions
| An essential guidance through the process of updating the module is offered here. Ensure successful completion of the module update by carefully following each step, thereby preventing data loss or any unforeseen issues. |
| Important: If you are updating the module to version 2.0.0, you must deactivate the old addon module and delete its files before performing the update. This will ensure all potential conflicts are avoided. Your data will be migrated to the new version of the module after its activation. |
[edit] Upgrade Guide
| Seeking a solution that offers greater flexibility, customization tailored to your precise needs, and unrestricted availability? There is an option that not only proves to be cost-effective in the long run but also includes prioritized support services, making it a truly valuable investment. Opt for the Open Source version of your Recurring Contract Billing For WHMCS module to unlock these benefits. Follow a comprehensive guide covering the transition process, the advantages it brings, and step-by-step instructions on what to do next after the order has been successfully finalized. |
[edit] Common Problems
| 1. When you have problems with connection, check whether your SELinux or firewall does not block ports. |
| 2. Remember that Recurring Contract Billing For WHMCS contracts can be applied to products with recurring payment type only. |