R1Soft Backups For WHMCS
From ModulesGarden Wiki
(Difference between revisions)
|
|
| Line 121: |
Line 121: |
| | |} | | |} |
| | {| | | {| |
| − | |style="padding: 0px 0px 0px 30px;"|✔ Supports WHMCS Template Six | + | |style="padding: 0px 0px 0px 30px;"|✔ Supports WHMCS Themes "Six" And "Twenty-One" |
| | |} | | |} |
| | {| | | {| |
| − | |style="padding: 0px 0px 0px 30px;"|✔ Supports WHMCS V7.8 And Later | + | |style="padding: 0px 0px 0px 30px;"|✔ Supports WHMCS V7.10 And Later |
| | |} | | |} |
| | {| | | {| |
Revision as of 10:58, 26 May 2021
R1Soft Backups For WHMCS will let you sell and manage R1Soft Server Backup Manager accounts right in your WHMCS system.
Your customers will be able to use different configurable options in order to adjust their products to satisfy all their needs.
Moreover, they will be allowed to monitor the disk usage, choose its compression type and access the control panel with a single click.
|
| ✔ Create/Terminate Account
|
| ✔ View Disk Usage Statistics
|
| ✔ View And Manage Account Credentials
|
| ✔ Log In To Control Panel
|
| ✔ Replication Frequency Limit
|
| ✔ ZLib (Three Levels Available: Low, Medium, High)
|
| ✔ Maximum Number Of Agents
|
| ✔ Maximum Number Of MySQL Addons
|
| ✔ Size (Total Or Divided Into 'Soft Quota' And 'Hard Quota')
|
| ✔ Replication Frequency Limit
|
| ✔ Configurable Options Support
|
| ✔ Integrated With Server Allocator For WHMCS - Automatic Assignment Of Most Suitable Servers To Products (read more)
|
| ✔ Supports PHP 7.2 Up To PHP 7.4
|
| ✔ Supports WHMCS Themes "Six" And "Twenty-One"
|
| ✔ Supports WHMCS V7.10 And Later
|
Installation and Configuration
This tutorial will show you how to successfully install and configure R1Soft Backups For WHMCS.
We will guide you step by step through the whole installation and configuration process.
|
Installation
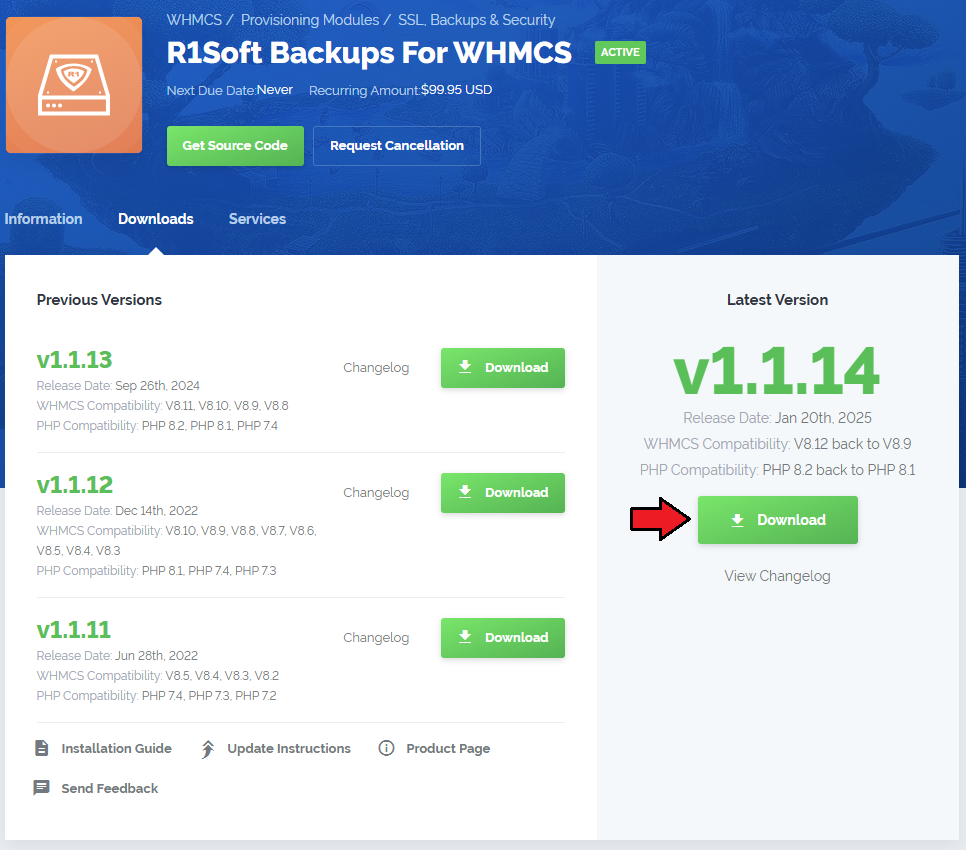
| 1. Log in to our client area and download the module.
|
2. In the downloaded file you might find one or two packages that support different PHP versions.
In the most recent versions of the module, you will find only one package that supports PHP 7.2 and later.
|
Previous updates of the module may contain two packages dedicated to various PHP versions.
The first one that supports PHP 5.6 up to PHP 7.1, and the second one addressed to PHP 7.2 up to PHP 7.4.
Note: Keep in mind that PHP versions 5.6 up to 7.1 are no longer officially supported and their security issues are not fixed or released any more. Find more info here.
|
| Note: You can check the current PHP version in your WHMCS. To do so, proceed to 'Utilities' → 'System' → 'PHP Info'.
|
3. Extract the package and upload its content into the main WHMCS directory.
The content of the package to upload should look like this.
|
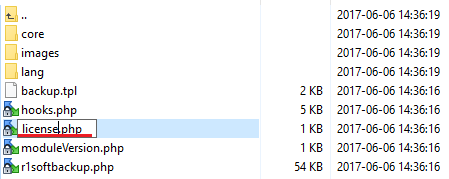
4. When you install R1Soft Backups For WHMCS for the first time you have to rename 'license_RENAME.php' file.
File is located in 'modules/servers/R1SoftBackups/license_RENAME.php'. Rename it from 'license_RENAME.php' to 'license.php'.
|
5. In order to configure your license key, you have to edit a previously renamed 'license.php' file.
Enter your license key between quotation marks as presented on the following screen.
You can find your license key in our client area → 'My Products'.
|
Configuration of Server
6. Now, we will show you how to configure a new product.
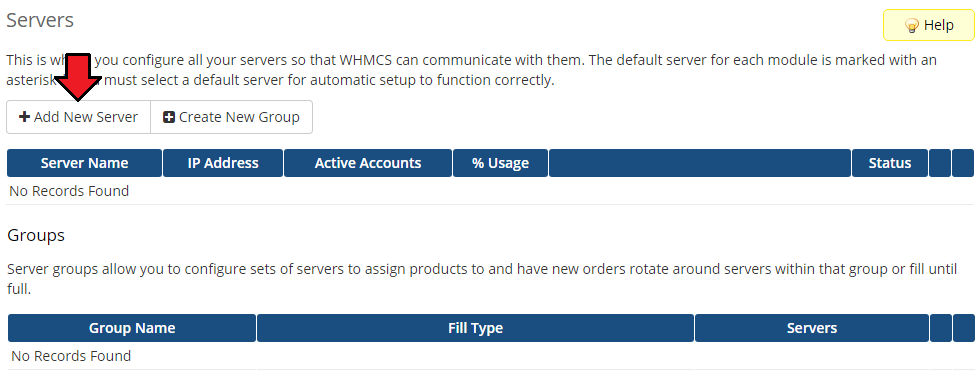
Go to 'Setup' → 'Products/Services' → 'Servers' and press 'Add New Server'.
|
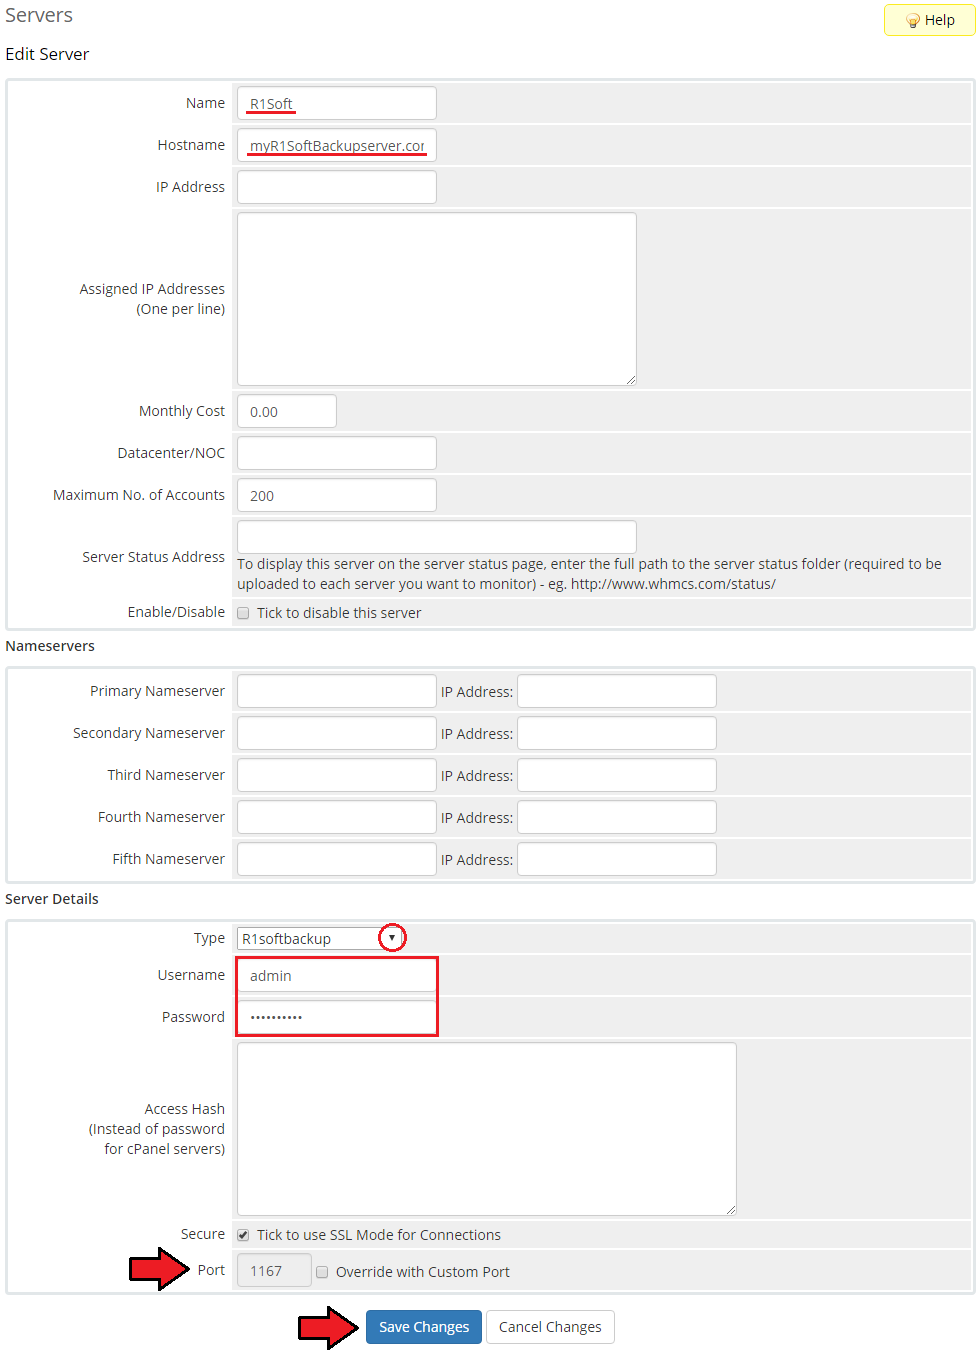
7. Next, enter your server name, IP address/hostname, username and password.
Choose 'R1softbackup' from a dropdown menu and press 'Save Changes'.
Note: Here you may also provide your custom port to connect with your server.
|
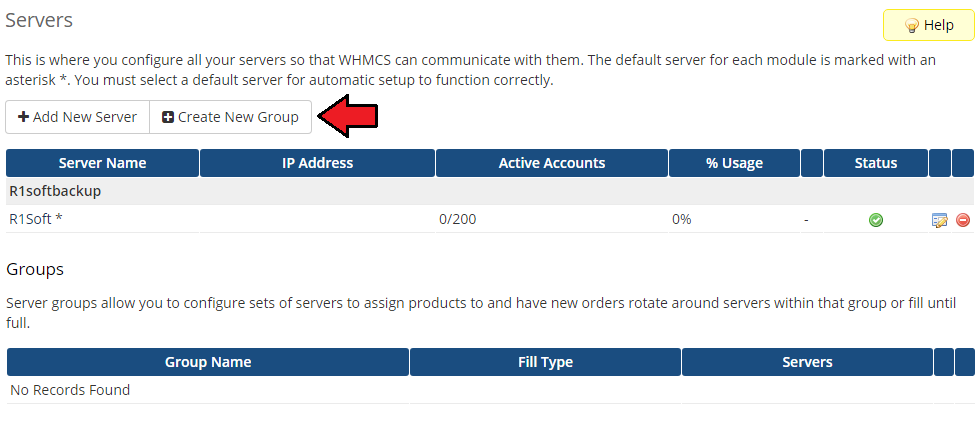
| 8. It is time to create a server group. To do so, click on 'Create Server Group'.
|
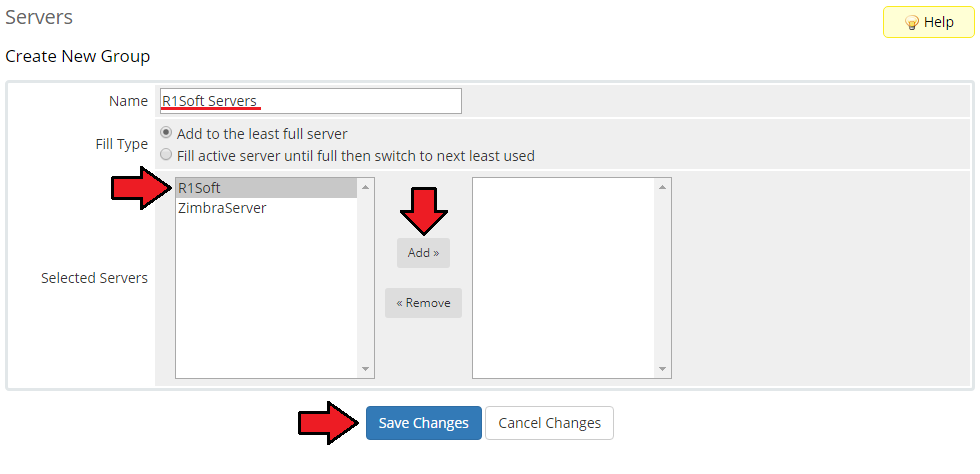
| 9. Enter name, click on your previously created server, press 'Add' and afterwards 'Save Changes'.
|
Configuration of Product
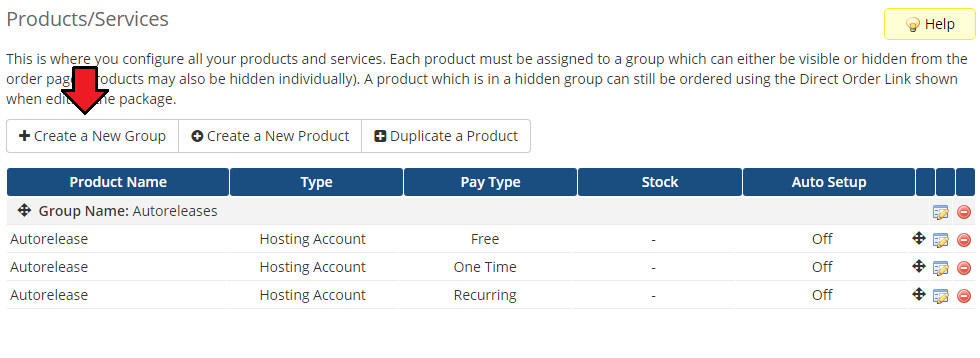
10. In order to create and configure a product, go to 'Setup' → 'Products/Services' → 'Products/Services'.
Click on 'Create a New Group'.
|
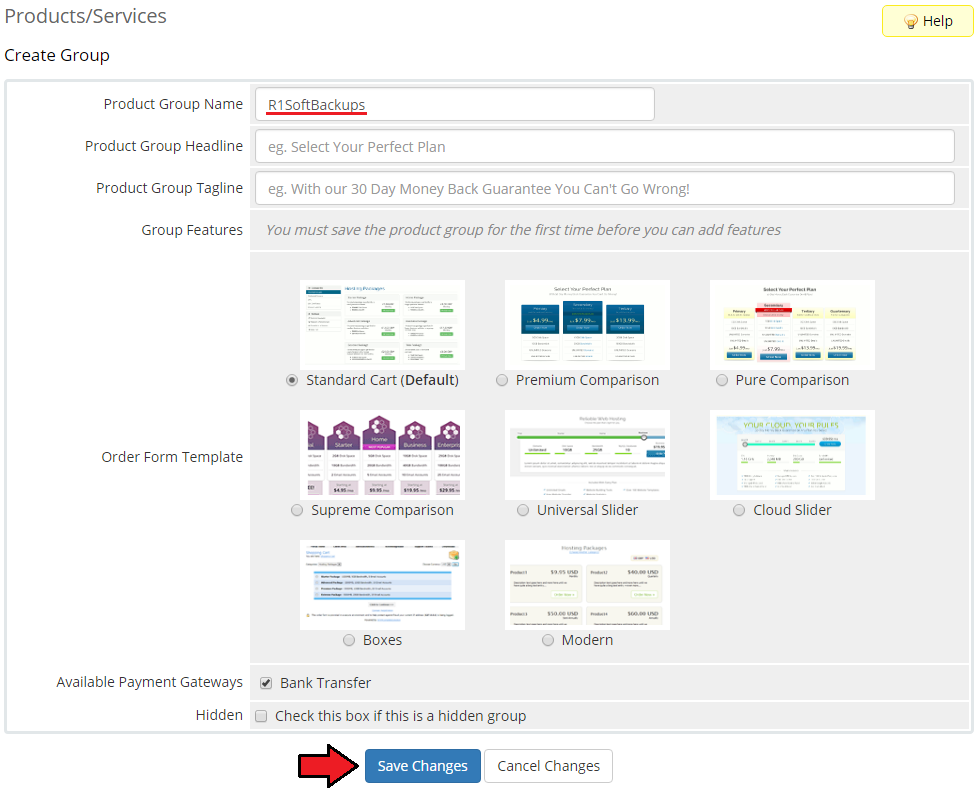
| 11. Enter product group name and press 'Save Changes'.
|
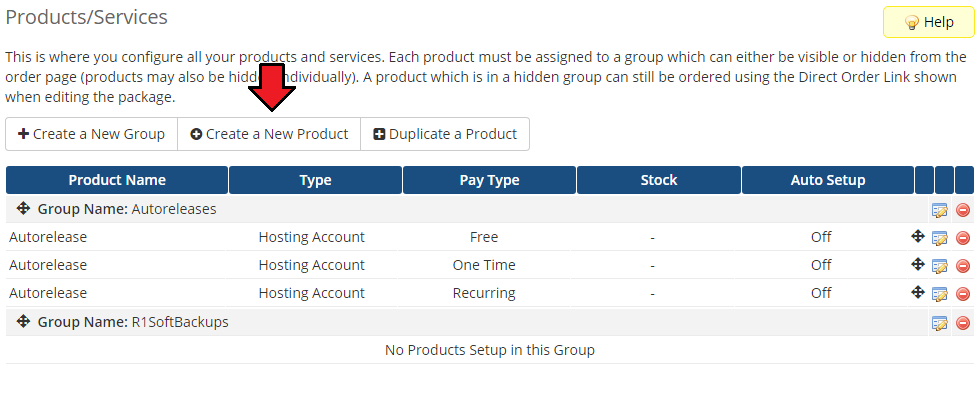
12. When you have a product group, you can create your product.
To create a product click on 'Create a New Product'.
|
| 13. Afterwards, choose your product group and type from dropdown menus, enter your product name and press 'Continue'.
|
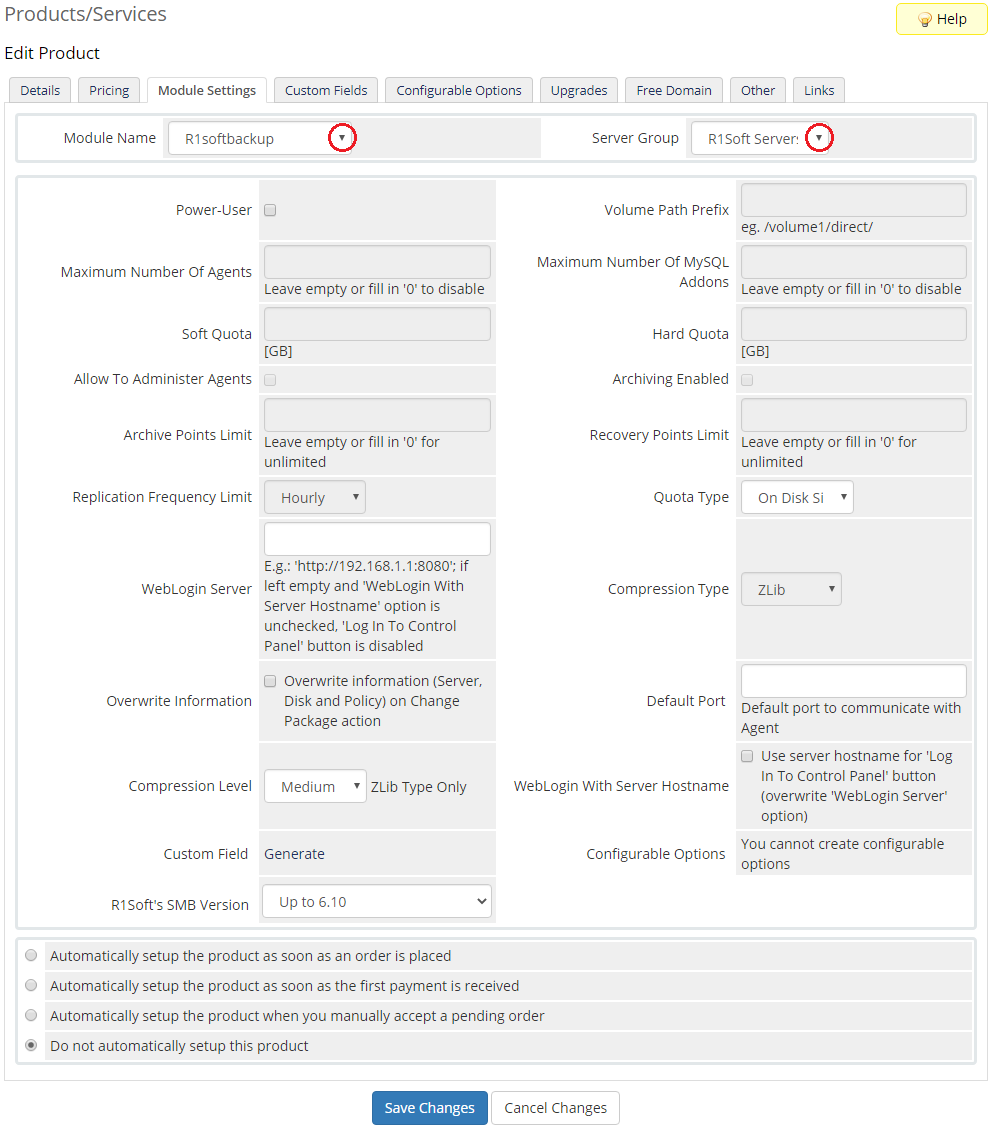
14. Now, go to 'Module Settings' section, choose both 'R1softbackups' and your previously created server group from dropdown menus.
Save changes.
|
|
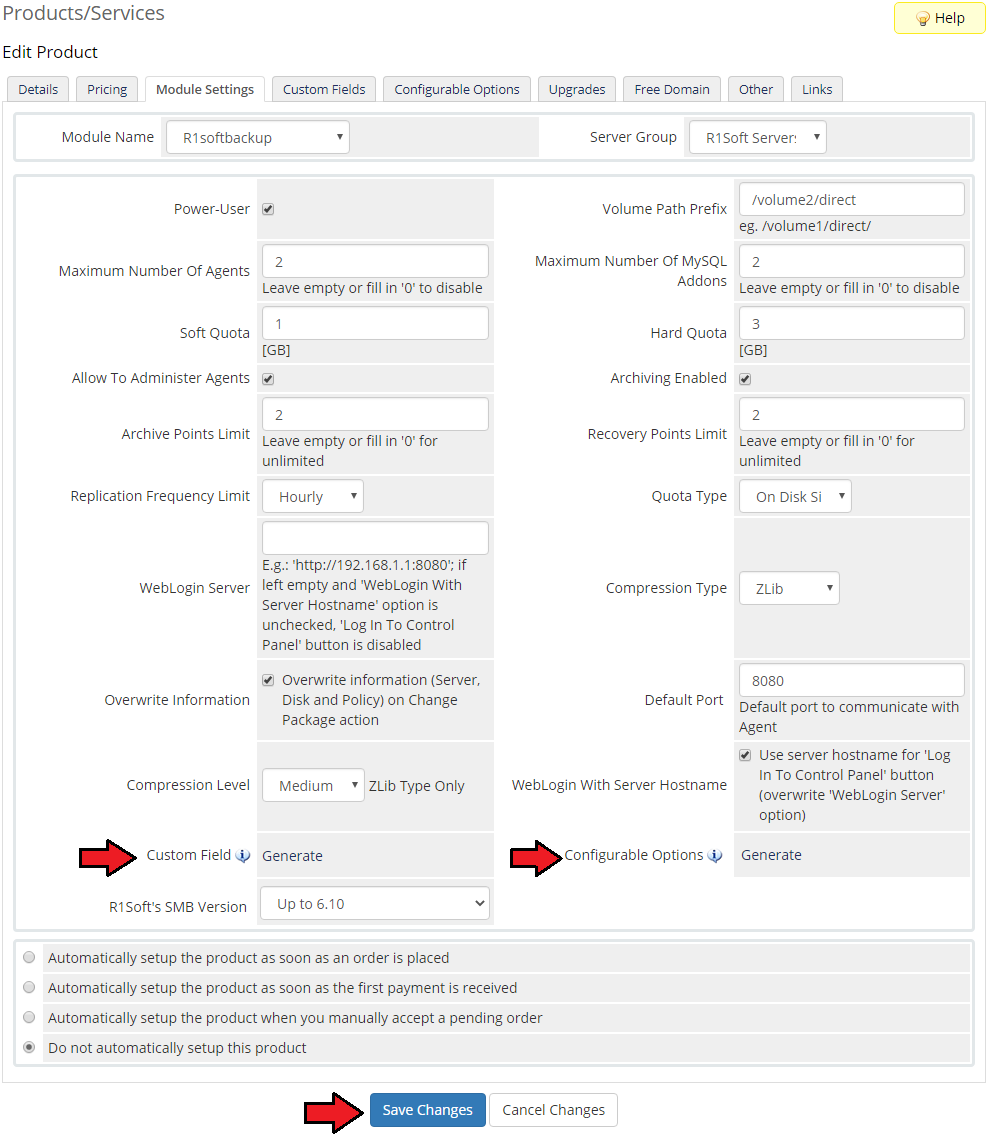
15. Take a moment to set up all the available module's options:
First of all, you need to enable Power-User as only then you will be able to manage Module Settings fully.
- enter volume path prefix
- define the Maximum Number of Agents - can be overwritten by a configurable option
- define the Maximum Number of MySQL Addons - can be replaced by a configurable option
- Soft Quota - a warning level when users are informed that they are close to reach their effective limit
- Hard Quota - maximum resources allowed to be occupied by data, its value should exceed the soft quota value
- 'Soft Quota' and 'Hard Quota' can be overwritten by a configurable option 'Size' which defines the general range of usage
- allow the user to create and Administer Agents
- enable Archiving
- define the Limit of Archive Points
- define the Limit of Recovery Points
- select Replication Frequency Limit: 'Hourly,' 'Daily,' 'Weekly,' or 'Monthly' - can be replaced by a configurable option
- choose Quota Type: 'On Disk Size' or 'Deltas in Disk Safe' - can be replaced by a configurable option
- enter WebLogin Server link, remember to use a whole http:// address - if left empty, the button will not be available
- WebLogin With Server Hostname - if checked, server hostname will be used instead of the 'WebLogin Server' link
- select Compression Type to save space: 'ZLib', QuickLZ' or set to 'None' to disable this option
- if 'ZLib' has been selected, then choose Compression Level: 'Low', 'Medium' or 'High'
- Default Port - define default port to communicate with Backup Server Agent - can be replaced by a custom field
- R1Soft's SMB Version - choose the preferred version from the dropdown menu
Remember to save the changes in the end.
Use 'Generate' buttons to automatically generate custom fields and configurable options for the product.
Note: It is recommended to edit configurable options to suit your needs, more about management of configurable options can be found here.
|
|
Management
R1Soft Backups For WHMCS allows reselling and accessing an external backups management server directly from your WHMCS.
Read the below section to find out how contributing the product can be to your business.
|
Ordering
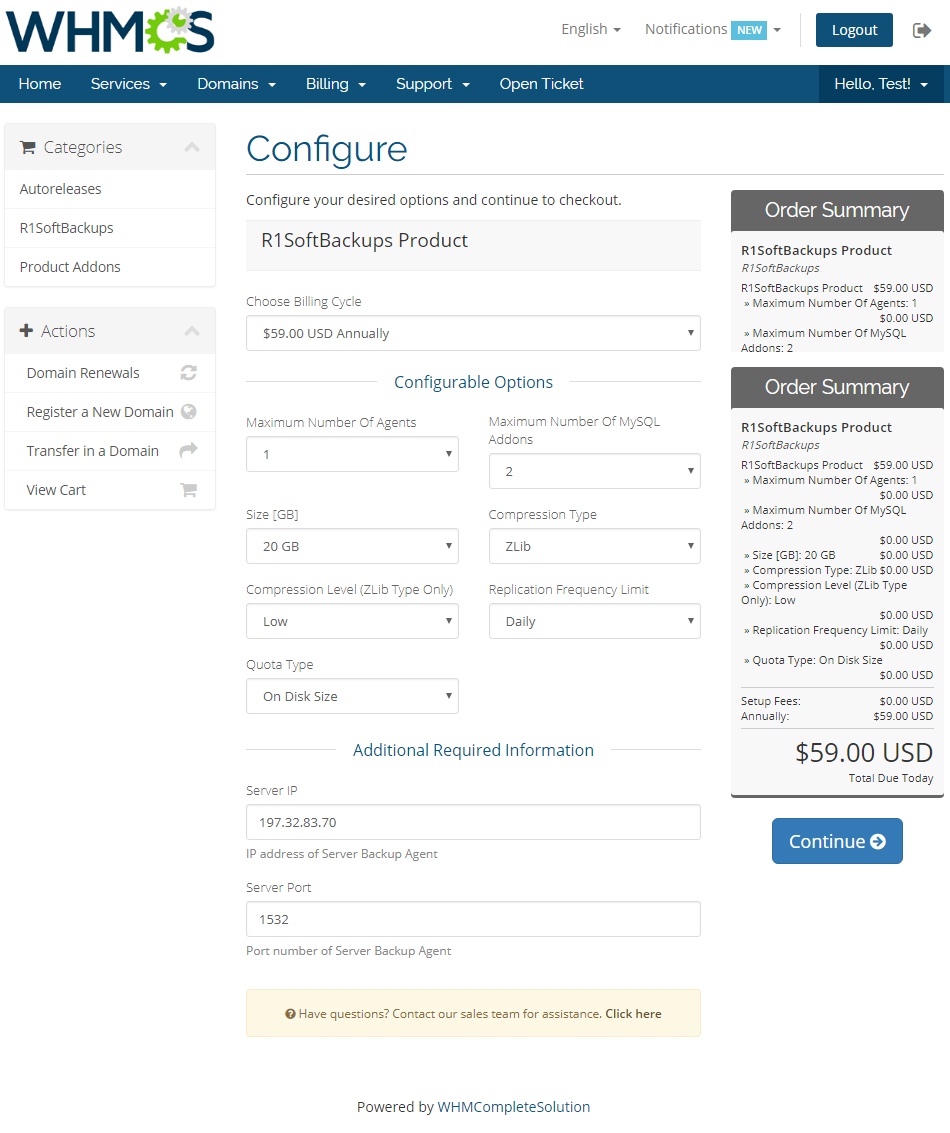
R1Soft Backups For WHMCS is ordered by clients as any other product. However, there is one thing to pay attention to.
While completing the order for the product, a client needs to fill in Additional Required Information, which is:
- Server IP - this is an IP address of Backup Manager agent's server.
- Server Port - defined port number used to connect to server of Backup Manager agent - unless otherwise configured by the administrator.
Additionally, depending on configurable option, client can define account limits.
|
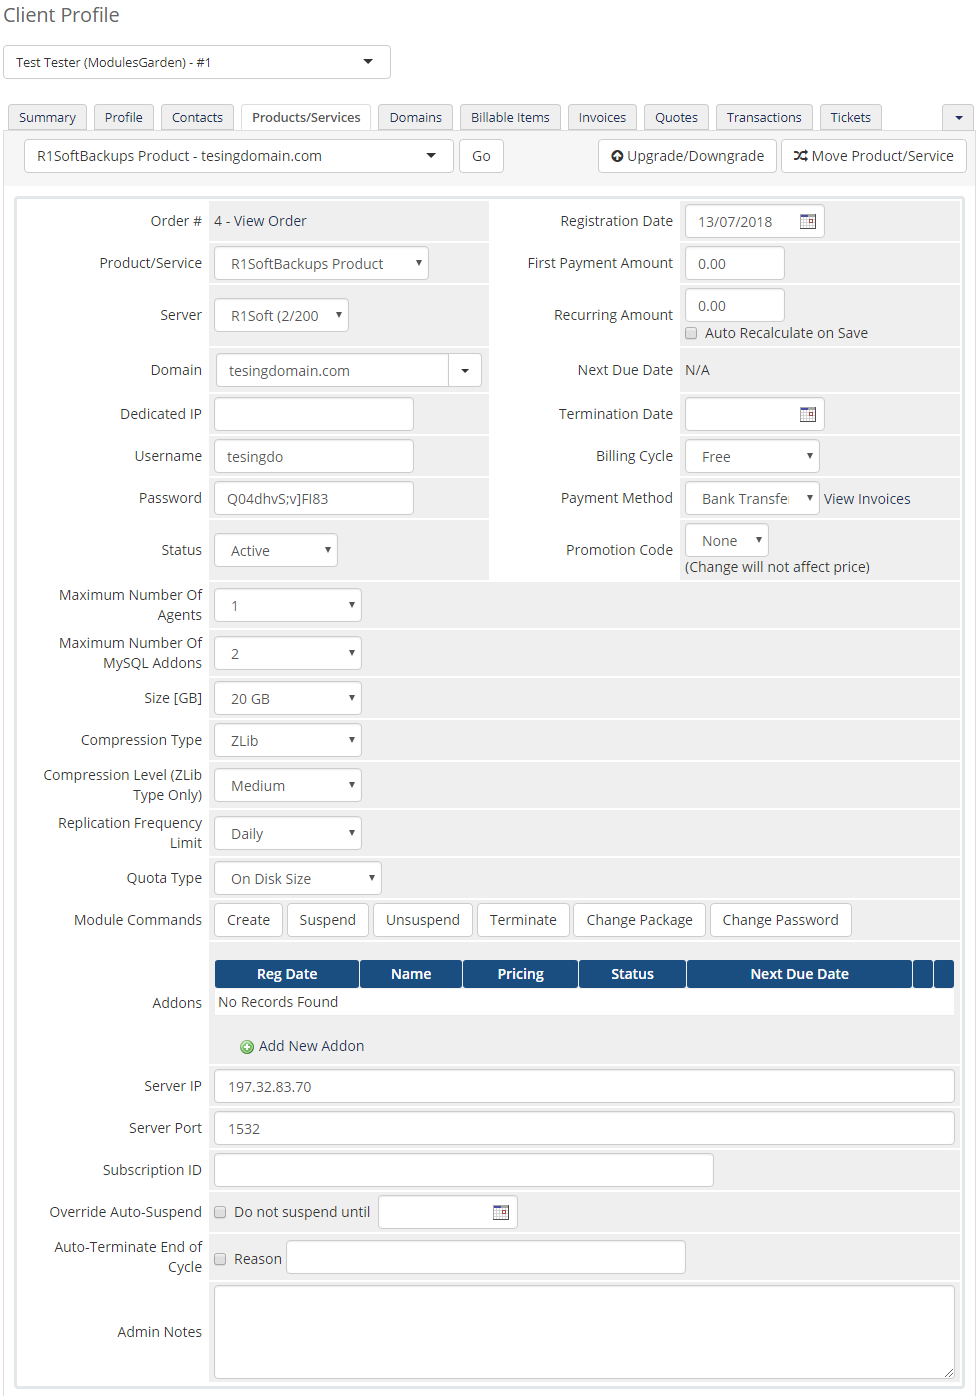
From the admin area you can order actions such as:
'Create', 'Suspend', 'Unsuspend', 'Terminate', 'Change Package' and 'Change Password'.
Underneath the buttons, there are also 'Server IP' and 'Server Port' details available.
|
Client Area
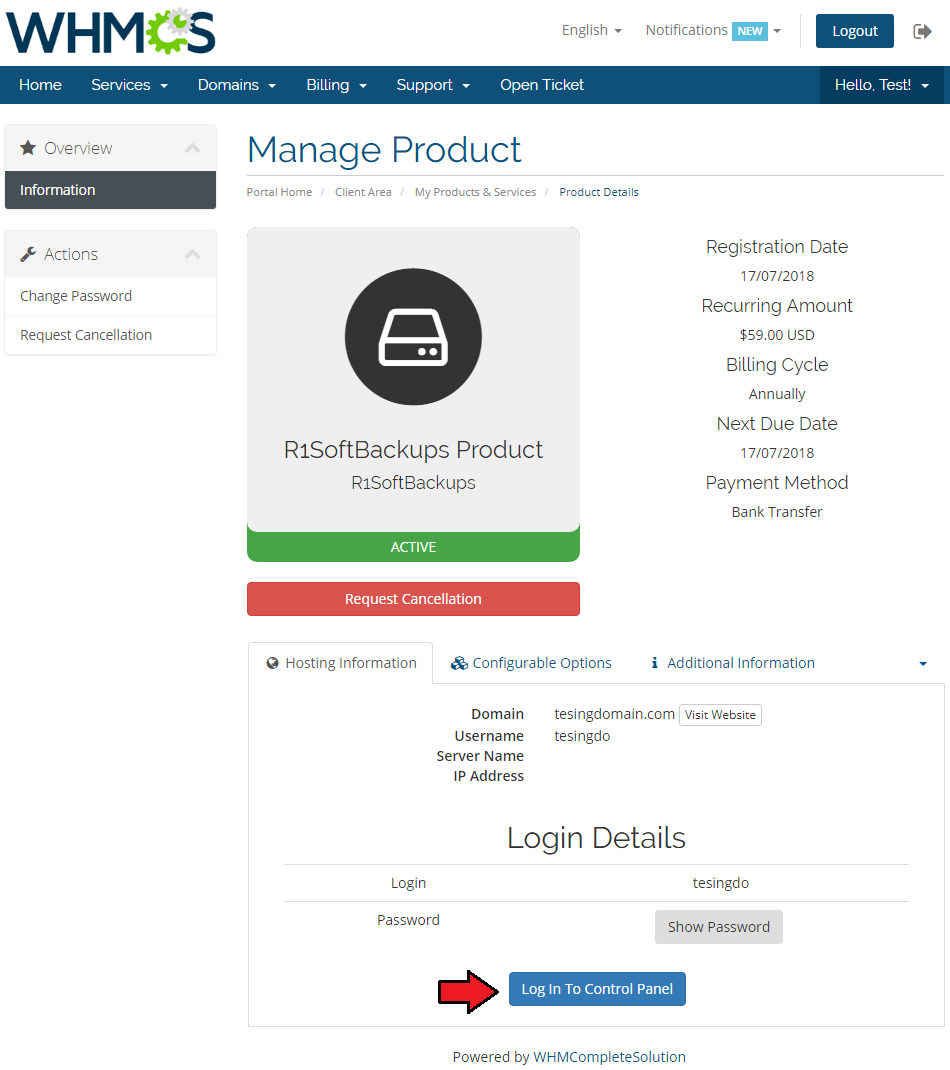
Your client can log in to the outside R1Soft account from your WHMCS client area.
Link to the server must have been entered in Module Settings (look at point 14 for more information).
|
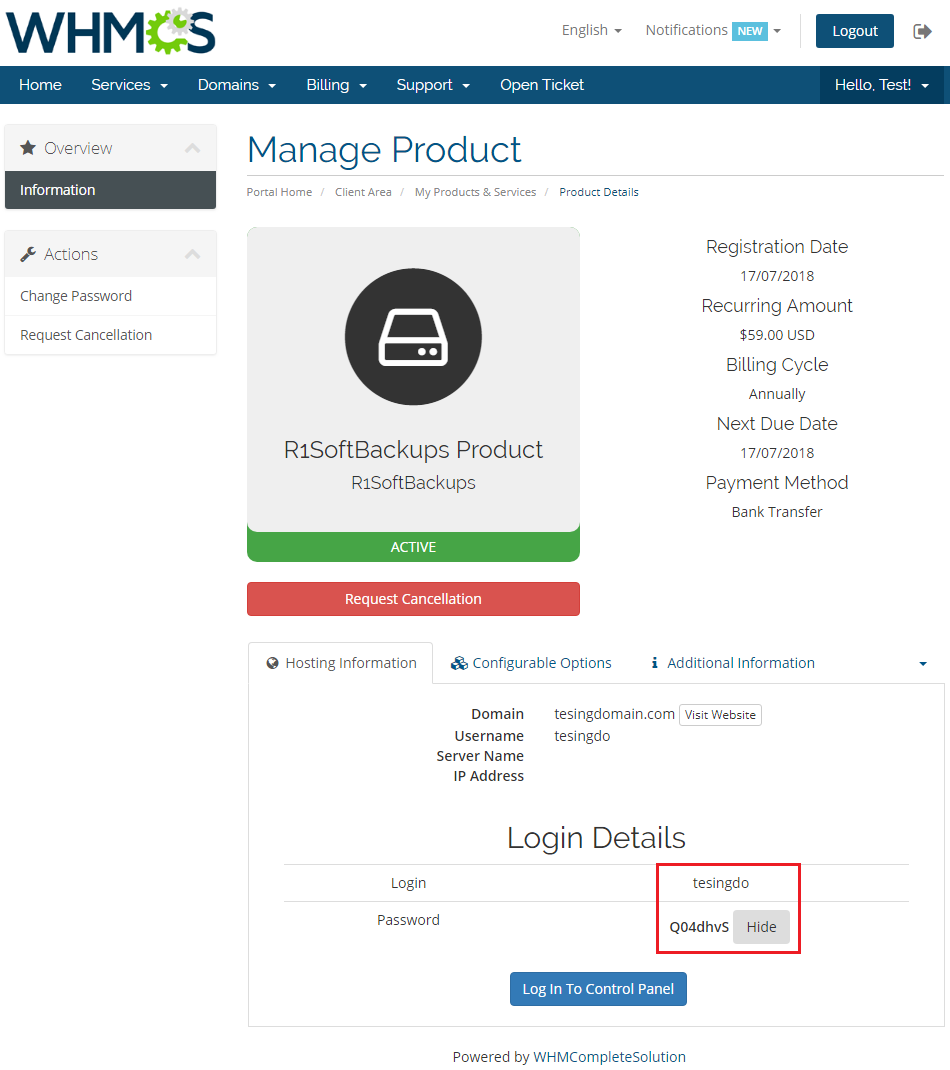
Apart from the direct login button, there are also 'Login Details'.
View your R1Soft server login and show/hide password.
|
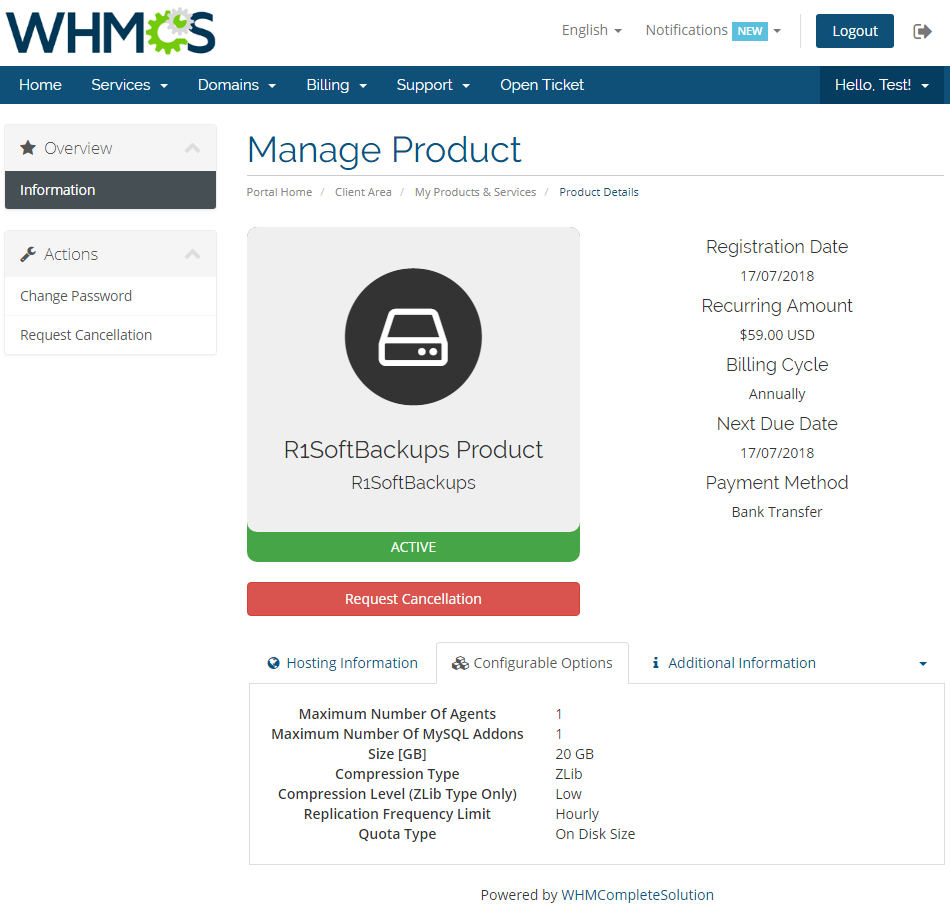
| Quick look at your product details, as stated while placing an order at Configurable Options section.
|
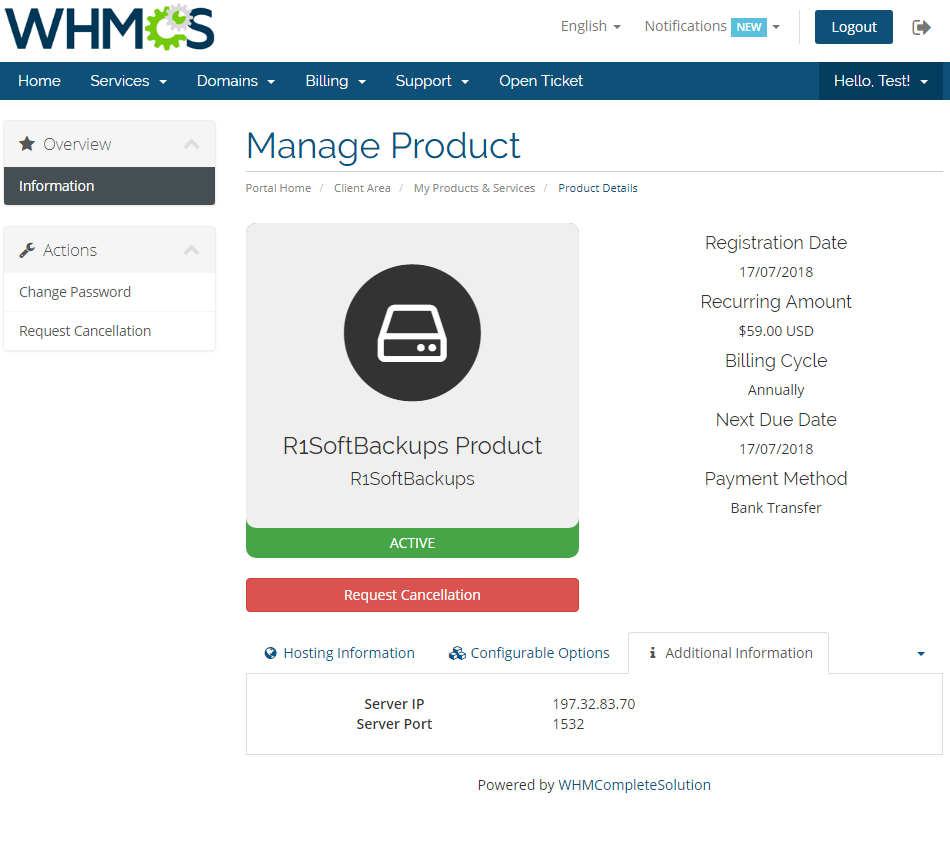
| In Additional Information section, you may preview defined Server IP and Port.
|
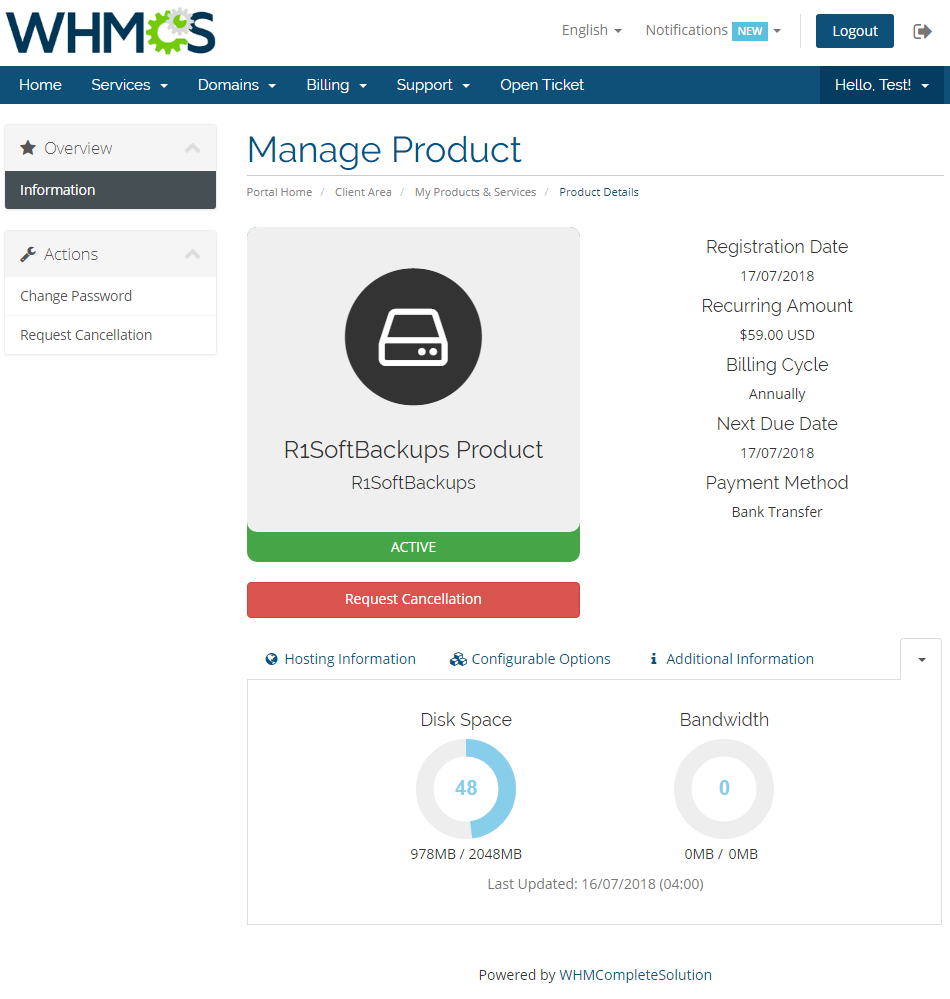
Resource Usage includes a graph that displays information on the currently used disk space.
Note: Bandwitdh graph is a WHMCS option and is not managed by the module.
|
Tips
| 1. If you do not want your clients to provide a backup agent port, then modify according custom field and define default port to communicate with agent in Module Settings.
|
Update Instructions
Essential guidance through the process of updating the module is offered here.
Keep in mind there is a quick and easy option in our client area that will let you upgrade the license of your module to an open source version at any time - and at a lower price!
To take advantage of it, simply use the License Upgrade button located on the product's page and a discounted invoice will be generated automatically.
|
Common Problems
| 1. When you have problems with connection, check whether your SELinux or firewall does not block ports.
|
