Quotes Automation For WHMCS
(→About Quotes Automation For WHMCS) |
|||
| Line 186: | Line 186: | ||
{| | {| | ||
|style="padding: 10px 0px 0px 0px;"|'''This tutorial will show you how to successfully install and configure Quotes Automation For WHMCS.''' <br /> | |style="padding: 10px 0px 0px 0px;"|'''This tutorial will show you how to successfully install and configure Quotes Automation For WHMCS.''' <br /> | ||
| − | We will guide you step by step through the whole installation and configuration process. | + | We will guide you step by step through the whole installation and configuration process. <br/><br/> |
| + | '' '''Note:''' If you are still using any of the module's previous versions '''prior to v2.x''', [https://www.docs.modulesgarden.com/Quotes_Automation_1.X_For_WHMCS follow these instructions].'' | ||
|} | |} | ||
{| | {| | ||
| Line 196: | Line 197: | ||
{| | {| | ||
|style="padding: 0px 0px 10px 15px;"|'''2. In the downloaded file you will find two packages that support different PHP versions.'''<br/>As presented on the screen below, the first one is dedicated to PHP 5.6 up to PHP 7.0, while the second one is aimed at PHP 7.1 up to PHP 7.2.<br/>It does not apply to open source versions.<br/> | |style="padding: 0px 0px 10px 15px;"|'''2. In the downloaded file you will find two packages that support different PHP versions.'''<br/>As presented on the screen below, the first one is dedicated to PHP 5.6 up to PHP 7.0, while the second one is aimed at PHP 7.1 up to PHP 7.2.<br/>It does not apply to open source versions.<br/> | ||
| − | '' '''Note''': You can check the current PHP version in your WHMCS. To do so, proceed to ''' 'Utilities' | + | '' '''Note''': You can check the current PHP version in your WHMCS. To do so, proceed to ''' 'Utilities' → 'System' → 'PHP Info'.''' |
|} | |} | ||
{| | {| | ||
| Line 206: | Line 207: | ||
|} | |} | ||
{| | {| | ||
| − | |style="padding: 0px 0px 20px 25px;"|[[File: | + | |style="padding: 0px 0px 20px 25px;"|[[File:QA3_1.png]] |
|} | |} | ||
{| | {| | ||
| Line 213: | Line 214: | ||
|} | |} | ||
{| | {| | ||
| − | |style="padding: 0px 0px 20px 25px;"|[[File: | + | |style="padding: 0px 0px 20px 25px;"|[[File:QA3_2.png]] |
|} | |} | ||
{| | {| | ||
| Line 220: | Line 221: | ||
|} | |} | ||
{| | {| | ||
| − | |style="padding: 0px 0px 20px 25px;"|[[File: | + | |style="padding: 0px 0px 20px 25px;"|[[File:QA3_3.png]] |
| + | |} | ||
| + | {| | ||
| + | |style="padding: 0px 0px 15px 15px;"|'''6. In the next step, set up the '' 'storage' '' folder as recursively writable.'''<br /> | ||
| + | This folder is available at '' 'yourWHMCS/modules/addons/quotes_automation/' ''. | ||
| + | |} | ||
| + | {| | ||
| + | |style="padding: 0px 0px 30px 25px;"|[[File:QA3_4.png]] | ||
|} | |} | ||
| + | ==Addon Activation== | ||
{| | {| | ||
| − | |style="padding: 0px 0px 15px 15px;"|''' | + | |style="padding: 0px 0px 15px 15px;"|'''7. Now you have to activate the module in your WHMCS system. '''<br /> |
Log in to your WHMCS admin area. Go to '' 'Setup' '' → '' 'Addon Modules'. '' Afterwards, find '' 'Quotes Automation' '' and press '' 'Activate' '' button. | Log in to your WHMCS admin area. Go to '' 'Setup' '' → '' 'Addon Modules'. '' Afterwards, find '' 'Quotes Automation' '' and press '' 'Activate' '' button. | ||
|} | |} | ||
{| | {| | ||
| − | |style="padding: 0px 0px 20px 25px;"|[[File: | + | |style="padding: 0px 0px 20px 25px;"|[[File:QA3_5.png]] |
|} | |} | ||
{| | {| | ||
| − | |style="padding: 0px 0px 15px 15px;"|''' | + | |style="padding: 0px 0px 15px 15px;"|'''8. In the next step you need to permit access to this module.'''<br /> |
To do so, click on '' 'Configure' '' button, tick '' 'Full Administrator' '' and press '' 'Save Changes'. '' | To do so, click on '' 'Configure' '' button, tick '' 'Full Administrator' '' and press '' 'Save Changes'. '' | ||
|} | |} | ||
{| | {| | ||
| − | |style="padding: 0px 0px 20px 25px;"|[[File: | + | |style="padding: 0px 0px 20px 25px;"|[[File:QA3_6.png]] |
|} | |} | ||
{| | {| | ||
| − | |style="padding: 0px 0px | + | |style="padding: 0px 0px 30px 15px;"|'''9. You have just successfully installed Quotes Automation For WHMCS!'''<br /> |
You can access your module at '' 'Addons' '' → '' 'Quotes Automation'. '' | You can access your module at '' 'Addons' '' → '' 'Quotes Automation'. '' | ||
| − | |||
| − | |||
| − | |||
|} | |} | ||
=Configuration and Management= | =Configuration and Management= | ||
{| | {| | ||
| − | |style="padding: 10px 0px 30px 15px;"|'''Quotes Automation For WHMCS is a module which allows you to create and use quote templates as well as | + | |style="padding: 10px 0px 30px 15px;"|'''Quotes Automation For WHMCS is a module which allows you to create and use quote templates as well as automate the ordering process. |
|} | |} | ||
| − | == | + | ==Addon== |
| + | ===Home=== | ||
{| | {| | ||
| − | |style="padding: 10px 0px 30px 15px;"|In '' ' | + | |style="padding: 10px 0px 30px 15px;"|In '' 'Home' '' section you can find a short description of the module as well as the link to this Wiki article.<br /> |
Move to '' 'Settings' '' tab to configure your addon according to your needs. | Move to '' 'Settings' '' tab to configure your addon according to your needs. | ||
|} | |} | ||
| + | {| | ||
| + | |style="padding: 0px 0px 30px 25px;"|[[File:QA3_7_1.png]] | ||
| + | |} | ||
| + | ===Settings=== | ||
| + | {| | ||
| + | |style="padding: 10px 0px 15px 15px;"|This tab allows you to define behavior of the module. <br/> | ||
| + | In order to set up the behavior of the module, mark checkboxes and press '' 'Save Changes'. ''<br /> | ||
| − | + | 1. '''Accept Quote & Order''' - If marked, as soon as your client accepts a quote, it will be converted into an invoice and an order.<br /> | |
| + | 2. '''Redirect To Invoice''' - When selected, after accepting a quote, the client is automatically redirected to the invoice if such was created. | ||
| + | |} | ||
{| | {| | ||
| − | |style="padding: | + | |style="padding: 0px 0px 30px 25px;"|[[File:QA3_8.png]] |
|} | |} | ||
| − | === | + | |
| + | ===Templates=== | ||
{| | {| | ||
| − | |style="padding: 10px 0px | + | |style="padding: 10px 0px 15px 15px;"| Move to '' 'Addons' → 'Quotes Automation' → 'Templates'. ''<br/> You will find there a list of all created quote templates. <br /> |
| − | + | Let's see now how the process of creating a quote template looks like. Strat by clicking the '' 'Add New Template' '' button. | |
| − | + | ||
| − | + | ||
| − | + | ||
|} | |} | ||
| + | {| | ||
| + | |style="padding: 0px 0px 20px 25px;"|[[File:QA3_9.png]] | ||
| + | |} | ||
| + | {| | ||
| + | |style="padding: 0px 0px 20px 15px;"|Give your template a unique name. | ||
| + | |} | ||
| + | {| | ||
| + | |style="padding: 0px 0px 20px 25px;"|[[File:QA3_10.png]] | ||
| + | |} | ||
| + | {| | ||
| + | |style="padding: 0px 0px 15px 15px;"|You will be moved to the template edit form. This part is divided into two sections: '' 'General' '' and '' 'Items'. '' We will take a look at the first one.<br/> | ||
| + | Here, you must specify the basic information that will be used in a quote such as: | ||
| − | + | *Quote subject | |
| + | |||
| + | *Stage - Draft/Delivered/On Hold/Accepted/Lost/Dead | ||
| + | |||
| + | *Currency that will be used in the quote | ||
| + | |||
| + | *validity period - enter a number of days the quote will remain valid once delivered | ||
| + | |||
| + | *Proposal Text - used as a header | ||
| + | |||
| + | *Customer Notes - used as a footer | ||
| + | |||
| + | *Admin Notes - not included in the final quote<br/> | ||
| + | |||
| + | Save the changes when ready. | ||
| + | |} | ||
{| | {| | ||
| − | |style="padding: | + | |style="padding: 0px 0px 20px 25px;"|[[File:QA3_11.png]] |
| − | + | ||
| − | + | ||
| − | + | ||
| − | + | ||
| − | + | ||
|} | |} | ||
{| | {| | ||
| − | |style="padding: 0px 0px | + | |style="padding: 0px 0px 20px 15px;"|Now move to the '' 'Items' '' part. There is a list of all already added items to this template. Press '' 'Add Item' '' to start. |
|} | |} | ||
| + | {| | ||
| + | |style="padding: 0px 0px 20px 25px;"|[[File:QA3_12.png]] | ||
| + | |} | ||
| + | {| | ||
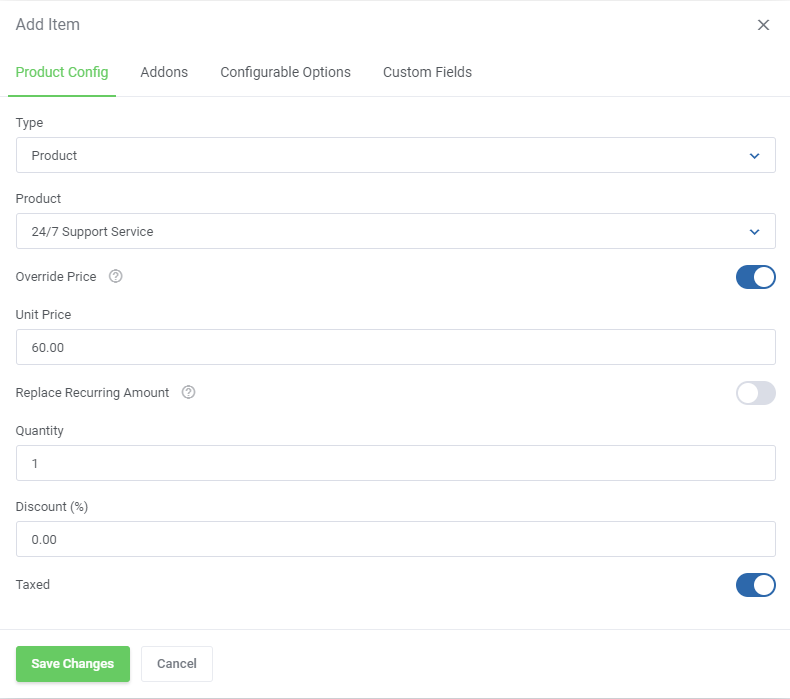
| + | |style="padding: 0px 0px 20px 15px;"|In the beginning you need to select the item type: product, domain, addon or a custom. then: | ||
| + | *select the actual item | ||
| − | + | *depending on the selected type, appropriate options to choose will appear (TLD, addon name, etc.) | |
| − | + | ||
| + | *Override Price - if selected a new ''unit price'' will be bound to the item in this template only | ||
| + | **Replace Recurring Amount - toggle to apply pricing changes the billing cycle price, not only the first payment | ||
| + | |||
| + | *Discount - you may also add a discount to the item, just provide a percentage value | ||
| + | |||
| + | *Taxed - toggle this option to tax the item<br/> | ||
| + | |||
| + | Save the changes when ready. | ||
| + | |} | ||
{| | {| | ||
| − | |style="padding: | + | |style="padding: 0px 0px 20px 25px;"|[[File:QA3_13.png]] |
| − | + | ||
| − | + | ||
|} | |} | ||
{| | {| | ||
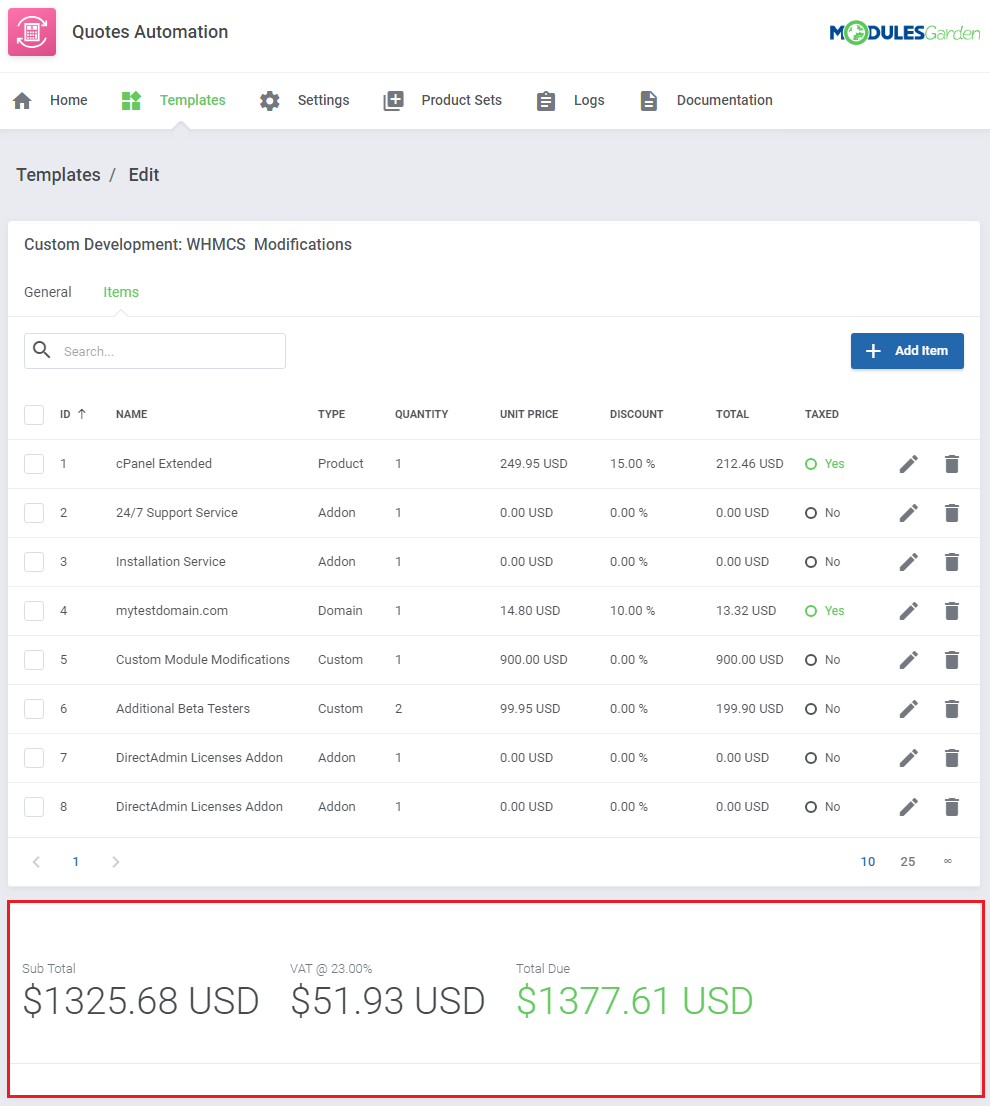
| − | |style="padding: 0px 0px | + | |style="padding: 0px 0px 15px 15px;"|Below the configuration there is a summary view of the sub total, tax and total due amounts of the template items. |
|} | |} | ||
{| | {| | ||
| − | |style="padding: 0px 0px | + | |style="padding: 0px 0px 30px 25px;"|[[File:QA3_14.png]] |
| − | + | ||
| − | + | ||
|} | |} | ||
{| | {| | ||
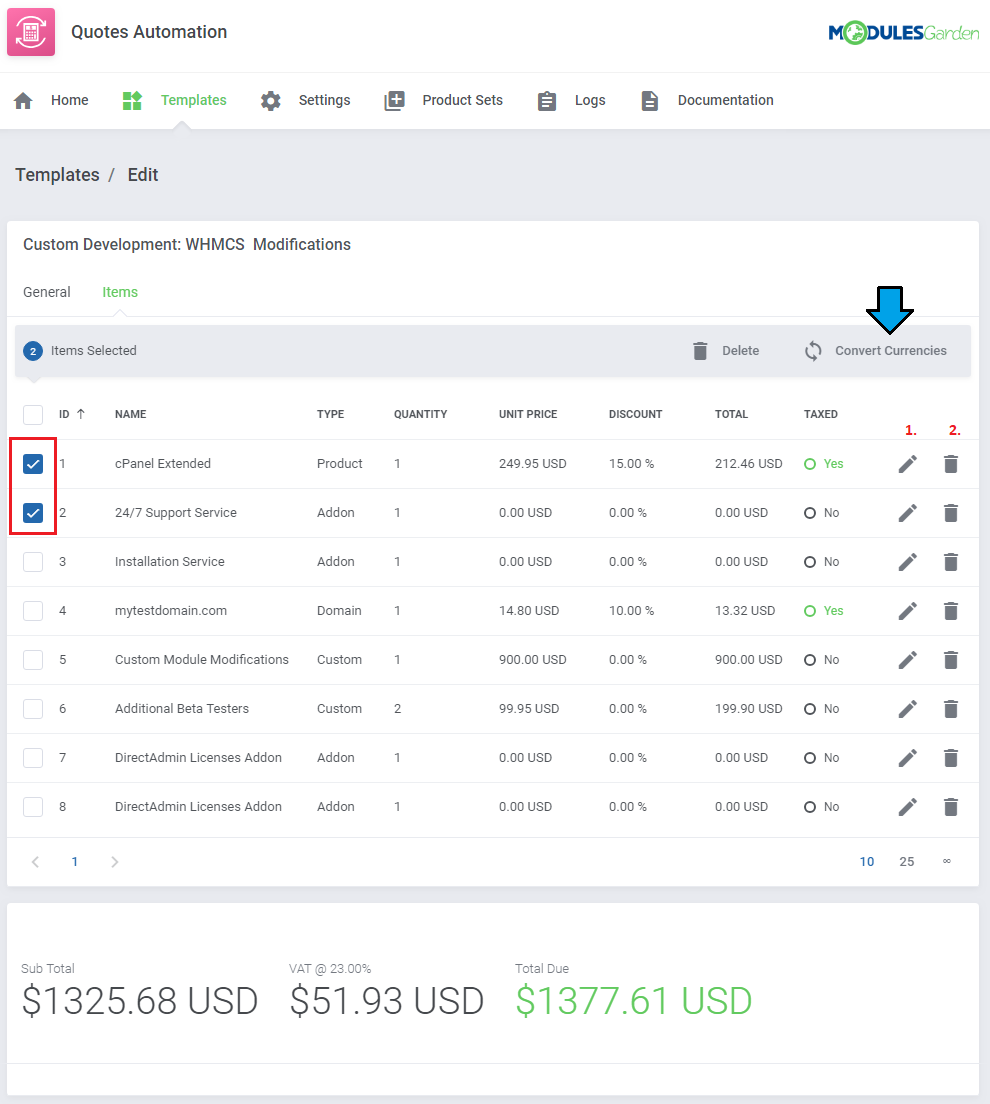
| − | |style="padding: 0px 0px | + | |style="padding: 0px 0px 15px 15px;"|You may add several different items to one template of course. Use action buttons to: (1.) edit an item and (2.) delete the item.<br/> Select numerous items if you want to convert their currency and recalculate the final price. <br/> |
| + | |||
| + | Keep in mind that templates, once loaded to a quote still can be modified and items added or removed.<br/> | ||
|} | |} | ||
{| | {| | ||
| − | |style="padding: 0px 0px | + | |style="padding: 0px 0px 20px 25px;"|[[File:QA3_15.png]] |
| − | + | ||
| − | + | ||
|} | |} | ||
{| | {| | ||
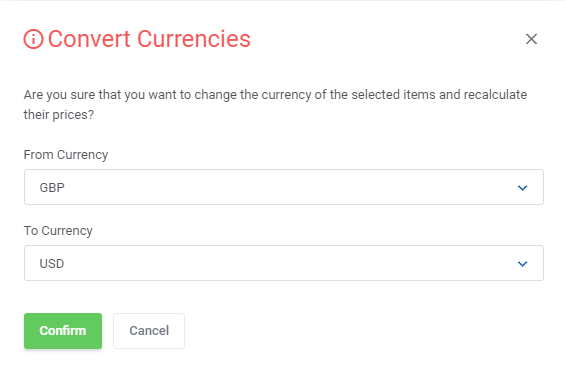
| − | |style="padding: 0px 0px 30px 25px;"|[[File: | + | |style="padding: 0px 0px 20px 15px;"|Select the initial currency and the one that shall be used for the selected items. The items price will be automatically recalculated adequately. |
| + | |} | ||
| + | {| | ||
| + | |style="padding: 0px 0px 30px 25px;"|[[File:QA3_15_1.png]] | ||
|} | |} | ||
| − | === | + | ===Logs=== |
{| | {| | ||
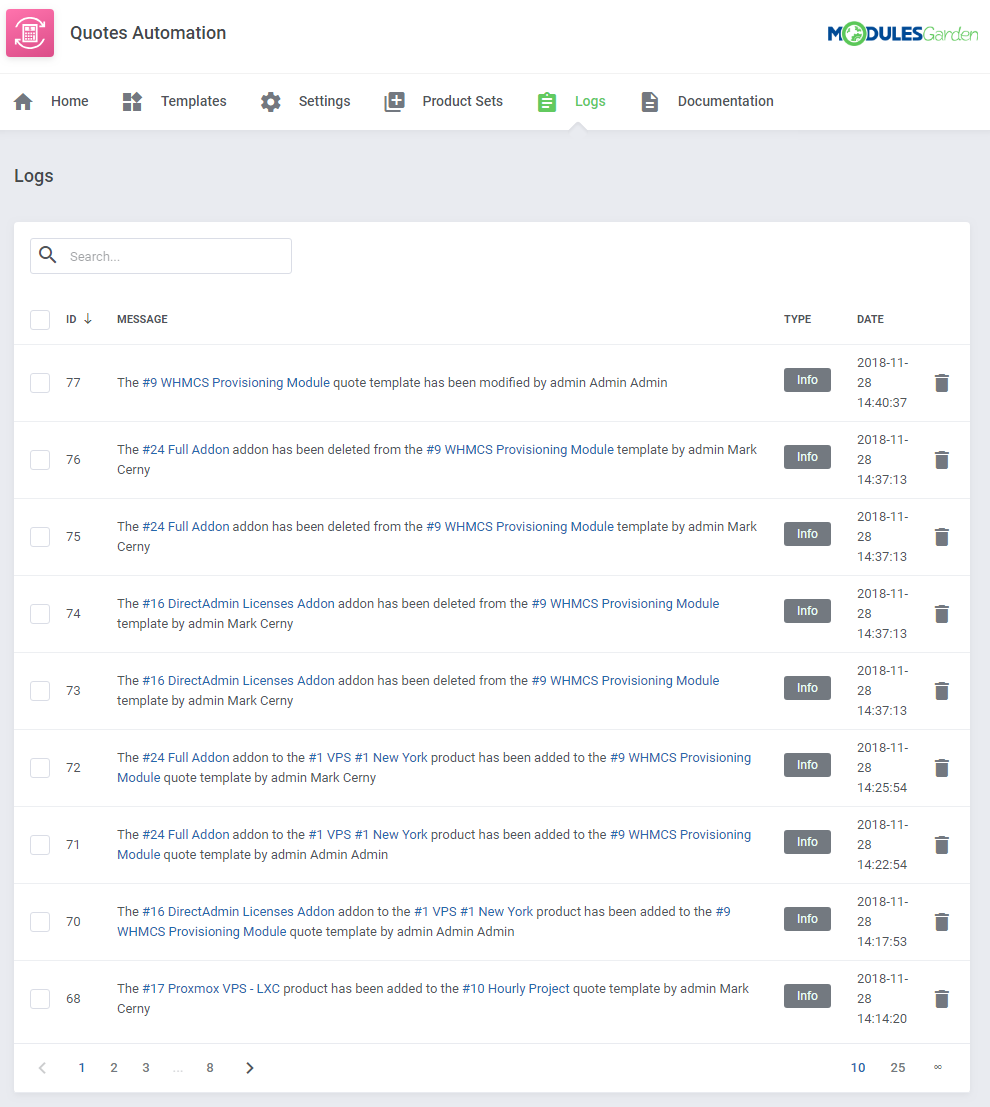
| − | |style="padding: 10px 0px 15px 15px;"| | + | |style="padding: 10px 0px 15px 15px;"| The last section in the addon gives detailed information on any actions with templates. Check logs to follow all the processes. |
| − | + | ||
| − | + | ||
| − | + | ||
|} | |} | ||
{| | {| | ||
| − | |style="padding: 0px 0px 20px 25px;"|[[File: | + | |style="padding: 0px 0px 20px 25px;"|[[File:QA3_16.png]] |
|} | |} | ||
| + | |||
| + | ==Quotes== | ||
| + | ===Load Quote=== | ||
{| | {| | ||
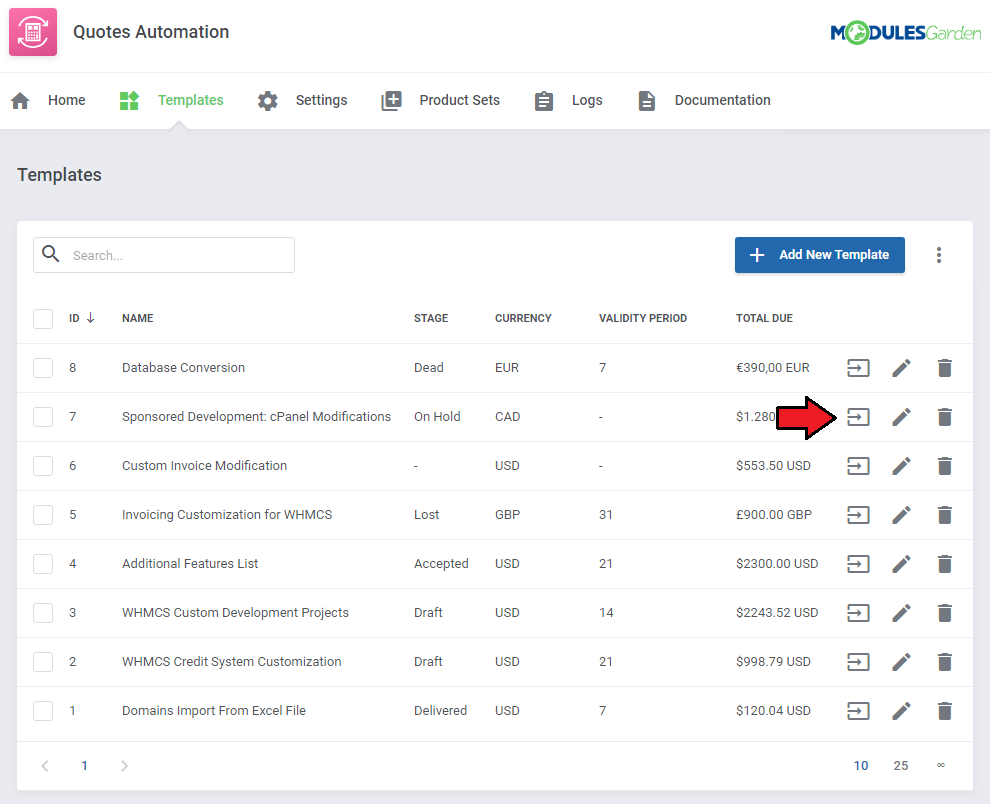
| − | |style="padding: | + | |style="padding: 10px 0px 15px 15px;"|There are two ways to load a template as quote. <br/> |
| − | + | First way - directly from the addon - Templates section, press '' 'Load To Template' '' button next to a desired draft.<br/> You will be automatically redirected to the WHMCS quote page. | |
| − | + | ||
|} | |} | ||
{| | {| | ||
| − | |style="padding: 0px 0px 20px 25px;"|[[File: | + | |style="padding: 0px 0px 20px 25px;"|[[File:QA3_17.png]] |
|} | |} | ||
{| | {| | ||
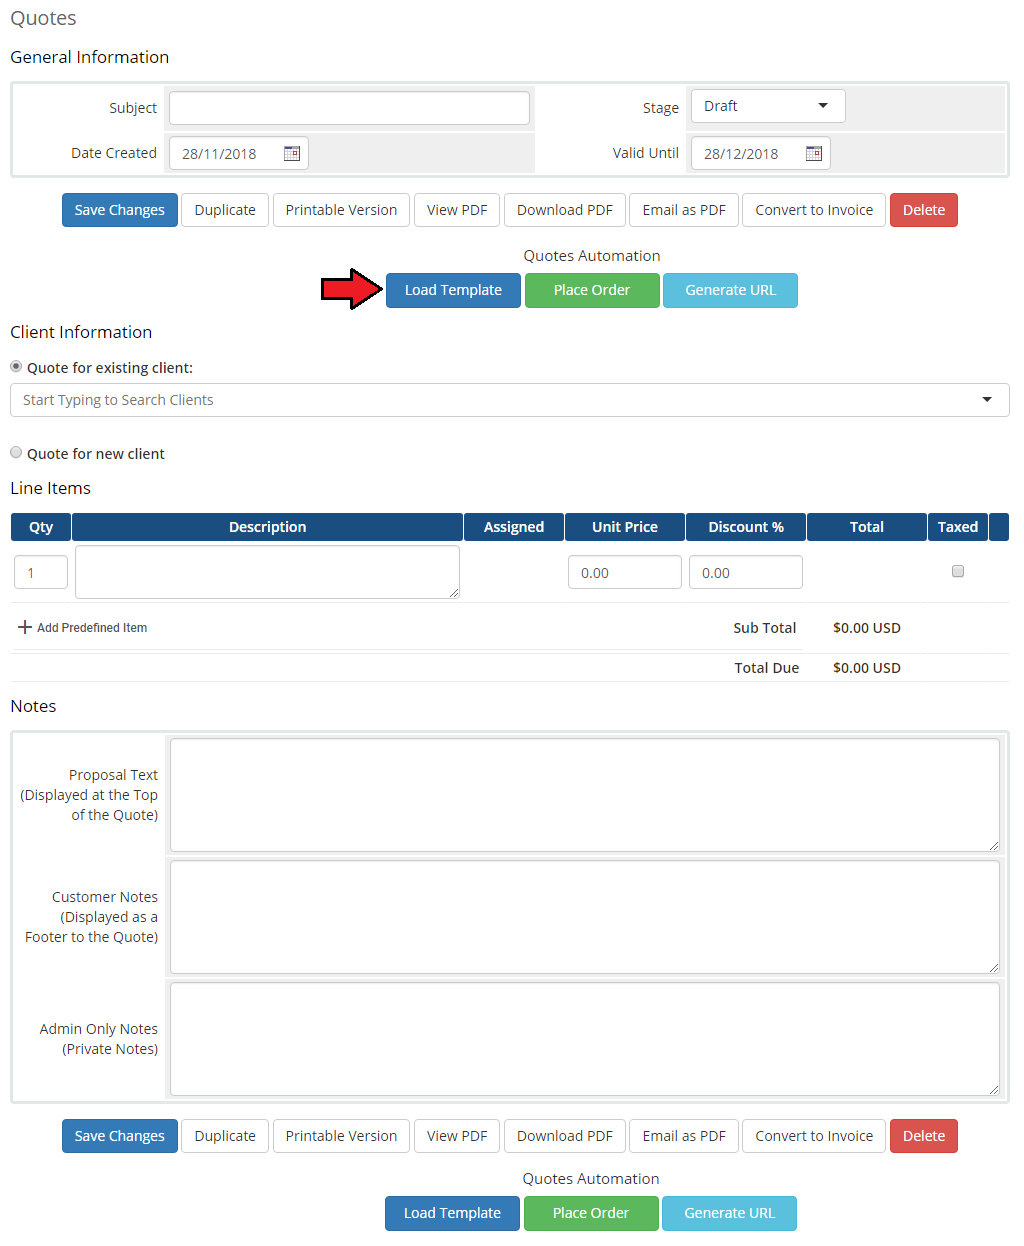
| − | |style="padding: 0px 0px 15px 15px;"| | + | |style="padding: 0px 0px 15px 15px;"|Alternatively, move to '' 'WHMCS' → 'Billing' → 'Quotes' → 'Create New Quote'.'' <br/> There you will see the Quotes Automation dedicated buttons: '' 'Load Template' '' and '' 'Place Order'. '' |
| + | Press the former one. | ||
|} | |} | ||
{| | {| | ||
| − | |style="padding: 0px 0px 20px 25px;"|[[File: | + | |style="padding: 0px 0px 20px 25px;"|[[File:QA3_18.png]] |
|} | |} | ||
{| | {| | ||
| − | |style="padding: 0px 0px 15px 15px;"| | + | |style="padding: 0px 0px 15px 15px;"|A new window where you may select from the module templates will appear. Choose a quote draft of your need. <br/>At this point you may also Override the already existing items on the quote (if any have already been added). |
| − | + | ||
|} | |} | ||
{| | {| | ||
| − | |style="padding: 0px 0px 30px 25px;"|[[File: | + | |style="padding: 0px 0px 30px 25px;"|[[File:QA3_19.png]] |
|} | |} | ||
| − | === | + | |
| + | ===Manage Quote=== | ||
{| | {| | ||
| − | |style="padding: 10px 0px 15px 15px;"| | + | |style="padding: 10px 0px 15px 15px;"|A template draft has been loaded to a quote. Underneath the client details, all items included in the template are visible, with unit price and applied discounts if and have been set up for the items.<br/> At the very bottom, there are all notes and proposal text which surely can be still modified. |
|} | |} | ||
{| | {| | ||
| − | |style="padding: 0px 0px 20px 25px;"|[[File: | + | |style="padding: 0px 0px 20px 25px;"|[[File:QA3_20.png]] |
|} | |} | ||
{| | {| | ||
| − | |style="padding: 0px 0px 15px 15px;"|Use | + | |style="padding: 0px 0px 15px 15px;"|Use '' 'Add Predefined Item' '' button to add more items to the list. |
|} | |} | ||
{| | {| | ||
| − | |style="padding: 0px 0px 20px 25px;"|[[File: | + | |style="padding: 0px 0px 20px 25px;"|[[File:QA3_21.png]] |
|} | |} | ||
{| | {| | ||
| − | |style="padding: 0px 0px 15px 15px;"| | + | |style="padding: 0px 0px 15px 15px;"|A new window where items can be composed with all module options will appear. |
|} | |} | ||
{| | {| | ||
| − | |style="padding: 0px 0px 30px 25px;"|[[File: | + | |style="padding: 0px 0px 30px 25px;"|[[File:QA3_22.png]] |
| + | |} | ||
| + | {| | ||
| + | |style="padding: 0px 0px 15px 15px;"|The module offers also the option to assign additional custom items to those already on the list. | ||
| + | |} | ||
| + | {| | ||
| + | |style="padding: 0px 0px 30px 25px;"|[[File:QA3_23.png]] | ||
| + | |} | ||
| + | {| | ||
| + | |style="padding: 0px 0px 15px 15px;"|Prepare the item to be assigned and press '' 'Confirm' '' when ready. <br/> In case you no longer want to assign any item to that product, simply leave the item type field as '' 'Not Assigned'. '' | ||
| + | |} | ||
| + | {| | ||
| + | |style="padding: 0px 0px 30px 25px;"|[[File:QA3_24.png]] | ||
| + | |} | ||
| + | {| | ||
| + | |style="padding: 0px 0px 15px 15px;"| | ||
| + | |} | ||
| + | {| | ||
| + | |style="padding: 0px 0px 30px 25px;"|[[File:QA3_25.png]] | ||
|} | |} | ||
| Line 361: | Line 429: | ||
{| | {| | ||
|style="padding: 10px 0px 15px 15px;"|As soon as the customer accepts the quote, you can quickly create an invoice and an order from it. Press '' 'Place Order'. ''<br /> | |style="padding: 10px 0px 15px 15px;"|As soon as the customer accepts the quote, you can quickly create an invoice and an order from it. Press '' 'Place Order'. ''<br /> | ||
| − | ''Note:'' The quote visible on the screen below has one product with a 50% discount. | + | '''''Note:''' The quote visible on the screen below has one product with a 50% discount. 'Replace recurring amount' option has been marked when added. |
|} | |} | ||
{| | {| | ||
| − | |style="padding: 0px 0px 20px 25px;"|[[File: | + | |style="padding: 0px 0px 20px 25px;"|[[File:QA3_26.png]] |
|} | |} | ||
{| | {| | ||
| Line 371: | Line 439: | ||
|} | |} | ||
{| | {| | ||
| − | |style="padding: 0px 0px 20px 25px;"|[[File: | + | |style="padding: 0px 0px 20px 25px;"|[[File:QA3_27.png]] |
|} | |} | ||
{| | {| | ||
| Line 377: | Line 445: | ||
|} | |} | ||
{| | {| | ||
| − | |style="padding: 0px 0px 30px 25px;"|[[File: | + | |style="padding: 0px 0px 30px 25px;"|[[File:QA3_28.png]] |
|} | |} | ||
==Client Area== | ==Client Area== | ||
{| | {| | ||
| − | |style="padding: 10px 0px 15px 15px;"|If you have marked '' 'Accept Quote & | + | |style="padding: 10px 0px 15px 15px;"|If you have marked '' 'Accept Quote & Order', '' the module will alter the quotes in the client area.<br /> |
Find your quotes and view the ones you want to accept and place order instantly. | Find your quotes and view the ones you want to accept and place order instantly. | ||
|} | |} | ||
{| | {| | ||
| − | |style="padding: 0px 0px 20px 25px;"|[[File: | + | |style="padding: 0px 0px 20px 25px;"|[[File:QA3_29.png]] |
|} | |} | ||
===Accept & Order=== | ===Accept & Order=== | ||
{| | {| | ||
| − | |style="padding: 10px 0px 15px 15px;"|Additional actions will be made upon pressing '' 'Accept Quote' '' | + | |style="padding: 10px 0px 15px 15px;"|Additional actions will be made upon pressing '' 'Accept Quote & Place Order' '' on the order itself.<br /> |
| − | This way | + | This way, the module automatically generates the invoice and the order from the quote. |
|} | |} | ||
{| | {| | ||
| − | |style="padding: 0px 0px 20px 25px;"|[[File: | + | |style="padding: 0px 0px 20px 25px;"|[[File:QA3_30.png]] |
|} | |} | ||
{| | {| | ||
| Line 400: | Line 468: | ||
|} | |} | ||
{| | {| | ||
| − | |style="padding: 0px 0px 20px 25px;"|[[File: | + | |style="padding: 0px 0px 20px 25px;"|[[File:QA3_31.png]] |
|} | |} | ||
{| | {| | ||
| − | |style="padding: 0px 0px 15px 15px;"|You can find now a new invoice to pay on | + | |style="padding: 0px 0px 15px 15px;"|You can find now a new invoice to pay on the list of invoices. |
|} | |} | ||
{| | {| | ||
| − | |style="padding: 0px 0px 30px 25px;"|[[File: | + | |style="padding: 0px 0px 30px 25px;"|[[File:QA3_32.png]] |
|} | |} | ||
| Line 413: | Line 481: | ||
|style="padding: 10px 0px 30px 15px;"|1. Before you choose a product, an addon or a domain to add to a quote, always make sure it is properly configured in the system to avoid any confusion. | |style="padding: 10px 0px 30px 15px;"|1. Before you choose a product, an addon or a domain to add to a quote, always make sure it is properly configured in the system to avoid any confusion. | ||
|} | |} | ||
| − | |||
=Update Instructions= | =Update Instructions= | ||
{| | {| | ||
| − | |style="padding: 10px 0px | + | |style="padding: 10px 0px 10px 15px;"|Essential guidance through the process of updating the module is offered '''[https://www.docs.modulesgarden.com/How_To_Update_WHMCS_Module here]'''.<br/><br/> |
Keep in mind there is a quick and easy option in our client area that will let you upgrade the license of your module to an open source version at any time - and at a lower price!<br/> | Keep in mind there is a quick and easy option in our client area that will let you upgrade the license of your module to an open source version at any time - and at a lower price!<br/> | ||
To take advantage of it, simply use the '''License Upgrade''' button located on the product's page and a discounted invoice will be generated automatically.<br/> | To take advantage of it, simply use the '''License Upgrade''' button located on the product's page and a discounted invoice will be generated automatically.<br/> | ||
| + | |} | ||
| + | {| | ||
| + | |style="padding: 0px 0px 30px 15px;"|Please be informed that when migrating the module from '''version 1.x to 2.0''' and later, all your existing templates, items and addon settings are migrated. <br/>You shall lose no data during the process. | ||
|} | |} | ||
Revision as of 10:15, 29 November 2018
Article update is ongoing on this page, watch out for broken links, unclear descriptions and images!
We are sorry for the inconvenience caused.
Contents |
About Quotes Automation For WHMCS
| Quotes Automation For WHMCS will allow you to create templates for quotes. You will be able to add, edit and delete templates as well as manage included products. The module will also simplify the process of placing an order. Once a quote is ready, both you and your clients will be able to place an order directly from a quote page. |
- Admin Area:
| ✔ Create Quote Templates: |
| ✔ Add Template Name And Quote Subject |
| ✔ Choose Quote Default Stage |
| ✔ Set Quote Currency |
| ✔ Define Validity Period |
| ✔ Add Proposal Text |
| ✔ Add Customer And Admin Only Notes |
| ✔ Add Items To Quote Template: |
| ✔ Choose Item Type: |
| ✔ Product |
| ✔ Addon |
| ✔ Domain |
| ✔ Custom |
| ✔ Assign WHMCS Product/Addon/Domain To Item |
| ✔ Define Billing Cycle/Configurable Options/Custom Fields Of Product Item |
| ✔ Define Name/TLD/Registration Type/Registration Period/Addons Of Domain Item |
| ✔ Add Custom Item |
| ✔ Use Assigned Item Unit Price Or Override It With Custom Price |
| ✔ Define Whether To Apply Overridden Product Price To First Payment Only Or To Recurring Price |
| ✔ Define Item Quantity |
| ✔ Define Item Percentage Discount |
| ✔ Toggle Tax For Item |
| ✔ View Quote Template Sub Total, Tax, And Total Due Value |
| ✔ Convert Currency Of Items Prices |
| ✔ Create Quote Directly From Templates List |
| ✔ Define Whether To Enable "Accept Quote & Order" Functionality In Client Area |
| ✔ Define Whether To Redirect Client To Invoice After Quote Acceptance |
| ✔ View Module Logs |
- Quote Management:
| ✔ Load Template To Existing Quote: |
| ✔ Replace Already Added Items |
| ✔ Append To Existing Items |
| ✔ Add/Change/Remove Quote Items Assignment To WHMCS Products/Addons/Domains |
| ✔ Add Additional Predefined Items To Quote: |
| ✔ Choose Item Type: |
| ✔ Product |
| ✔ Addon |
| ✔ Domain |
| ✔ Custom |
| ✔ Assign WHMCS Product/Addon/Domain With Item |
| ✔ Define Billing Cycle/Configurable Option/Custom Fields Of Product Item |
| ✔ Define Name/TLD/Registration Type/Registration Period/Addons Of Domain Item |
| ✔ Add Custom Item |
| ✔ Use Assigned Item Unit Price Or Override It With Custom Price |
| ✔ Define Whether To Apply Overridden Product Price To First Payment Only Or To Recurring Price |
| ✔ Define Item Quantity |
| ✔ Define Item Percentage Discount |
| ✔ Toggle Tax For Item |
| ✔ Place Order And Create Invoice On Quote Page |
| ✔ View Quote Custom Items On Order Summary |
- Client Area Features:
| ✔ Create Orders And Invoices Automatically On Quote Acceptance |
| ✔ Override Product/Domain Price With Price Shown On Quote |
- General Info:
| ✔ Multi-Language Support |
| ✔ Supports PHP 5.6 Up To PHP 7.2 |
| ✔ Supports WHMCS Template Six |
| ✔ Supports WHMCS V7.2 And Later |
Installation
| This tutorial will show you how to successfully install and configure Quotes Automation For WHMCS. We will guide you step by step through the whole installation and configuration process. |
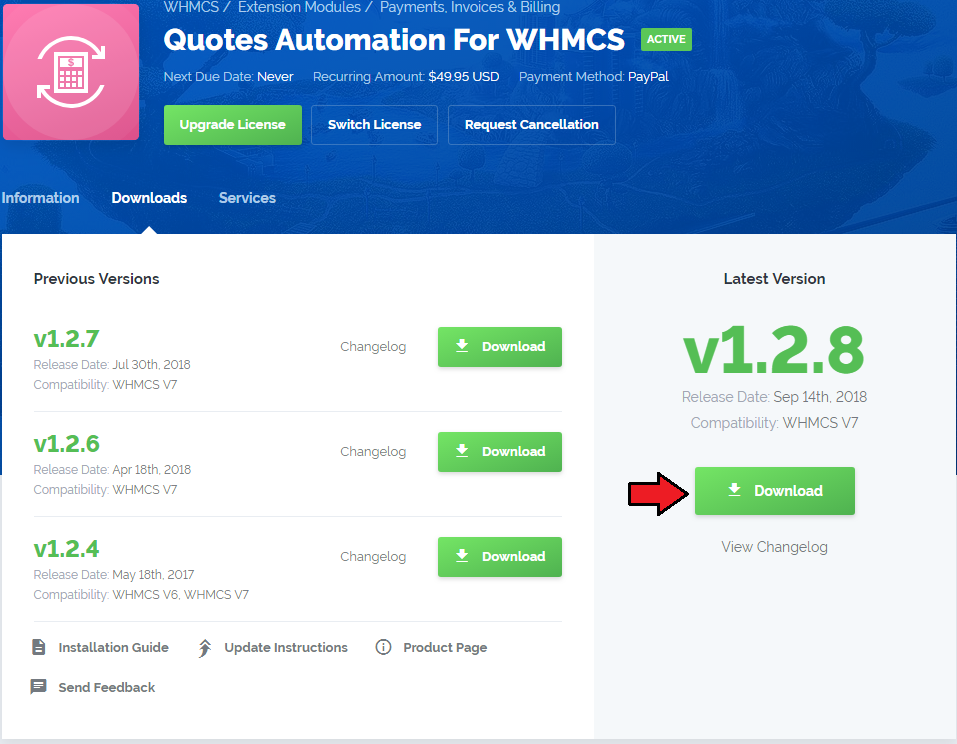
| 1. Log in to our client area and download the module. |
|
| 2. In the downloaded file you will find two packages that support different PHP versions. As presented on the screen below, the first one is dedicated to PHP 5.6 up to PHP 7.0, while the second one is aimed at PHP 7.1 up to PHP 7.2. It does not apply to open source versions. Note: You can check the current PHP version in your WHMCS. To do so, proceed to 'Utilities' → 'System' → 'PHP Info'. |

|
| 3. Extract the downloaded file and choose the one with the right PHP version. Upload and extract the PHP file into the main WHMCS directory. The content of PHP version files should look like this. |

|
| 4. When you install Quotes Automation For WHMCS for the first time you have to rename 'license_RENAME.php' file. File is located in 'modules/addons/quotes_automation/license_RENAME.php'. Rename it from 'license_RENAME.php' to 'license.php'. |

|
| 5. In order to configure your license key, you have to edit the previously renamed 'license.php' file. Enter your license key between quotation marks as presented on the following screen. You can find your license key in our client area → 'My Products'. |

|
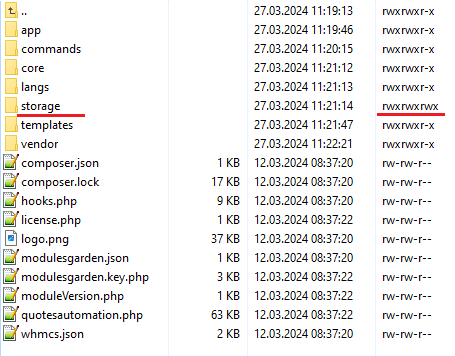
| 6. In the next step, set up the 'storage' folder as recursively writable. This folder is available at 'yourWHMCS/modules/addons/quotes_automation/' . |
|
Addon Activation
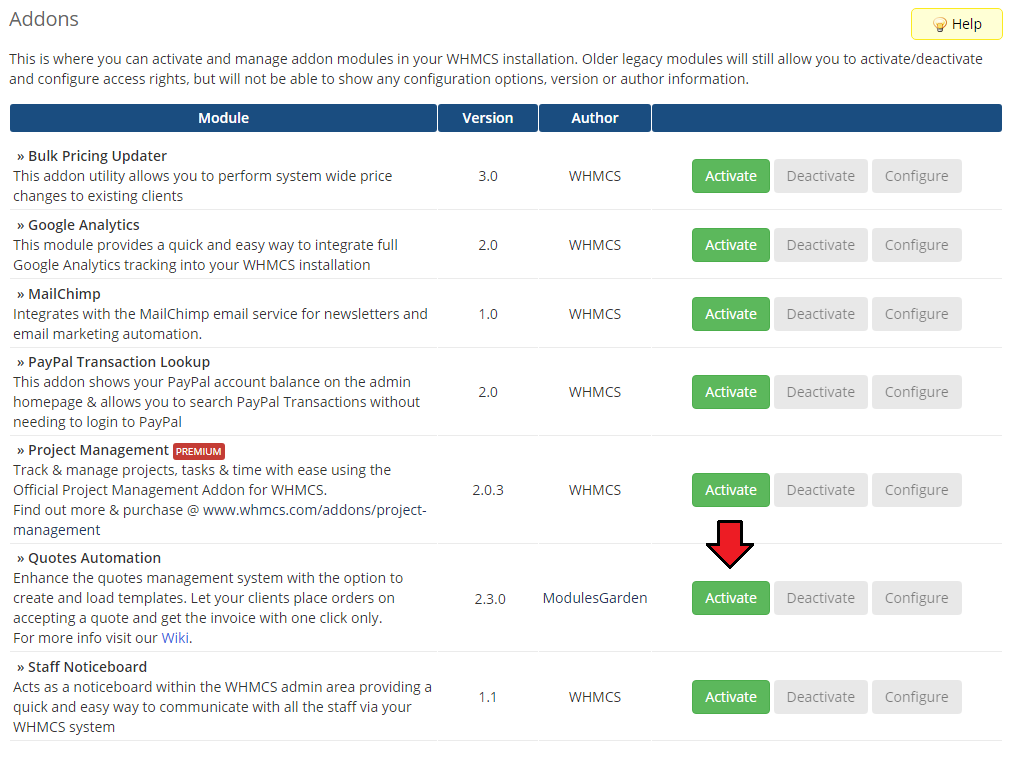
| 7. Now you have to activate the module in your WHMCS system. Log in to your WHMCS admin area. Go to 'Setup' → 'Addon Modules'. Afterwards, find 'Quotes Automation' and press 'Activate' button. |
|
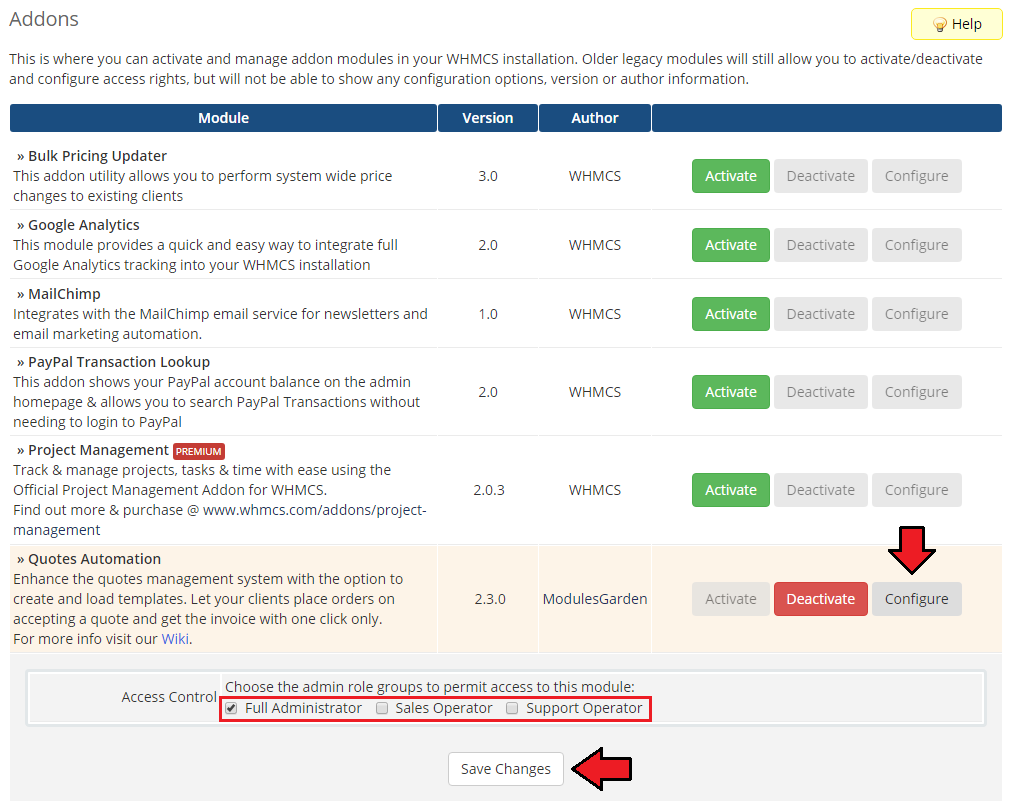
| 8. In the next step you need to permit access to this module. To do so, click on 'Configure' button, tick 'Full Administrator' and press 'Save Changes'. |
|
| 9. You have just successfully installed Quotes Automation For WHMCS! You can access your module at 'Addons' → 'Quotes Automation'. |
Configuration and Management
| Quotes Automation For WHMCS is a module which allows you to create and use quote templates as well as automate the ordering process. |
Addon
Home
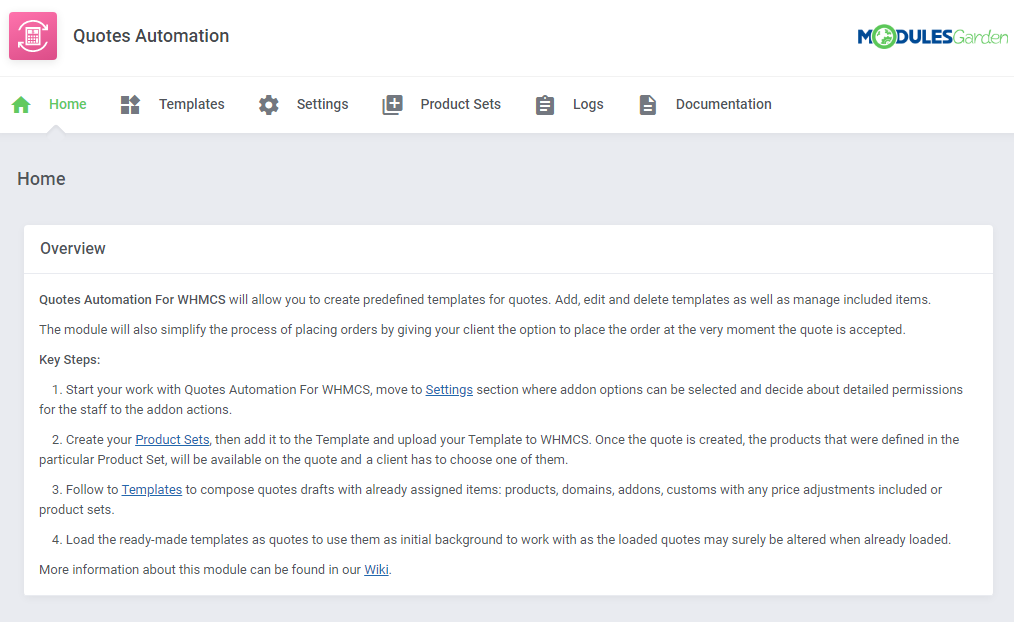
| In 'Home' section you can find a short description of the module as well as the link to this Wiki article. Move to 'Settings' tab to configure your addon according to your needs. |
|
Settings
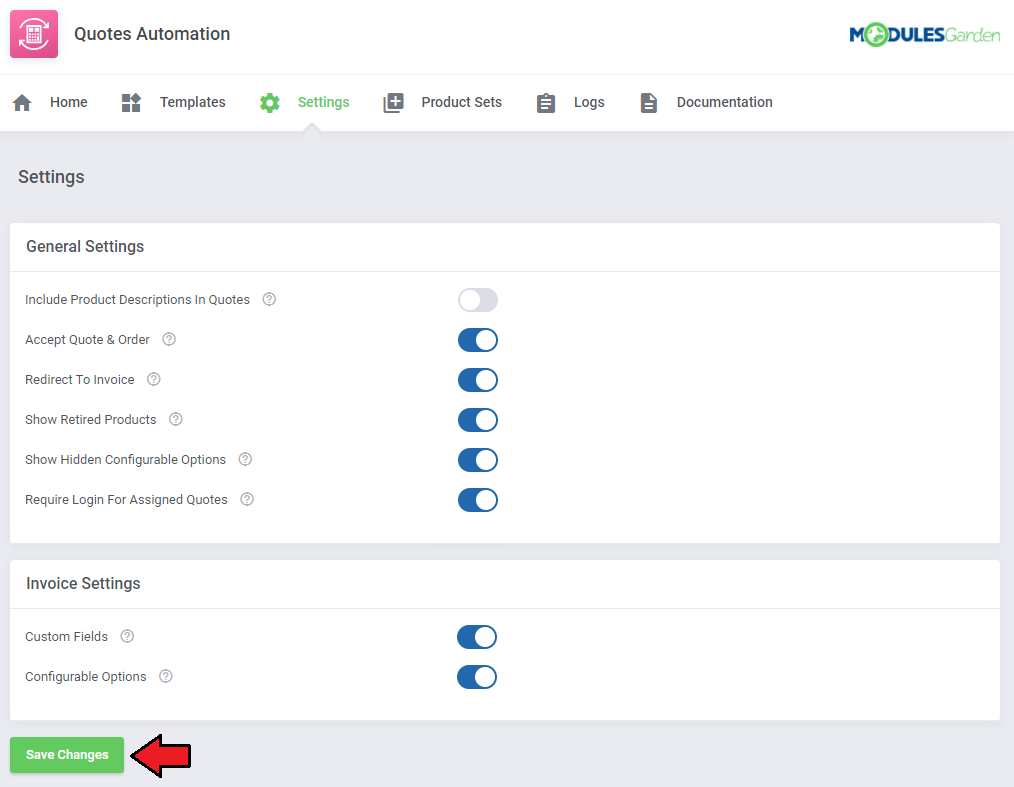
| This tab allows you to define behavior of the module. In order to set up the behavior of the module, mark checkboxes and press 'Save Changes'. 1. Accept Quote & Order - If marked, as soon as your client accepts a quote, it will be converted into an invoice and an order. |
|
Templates
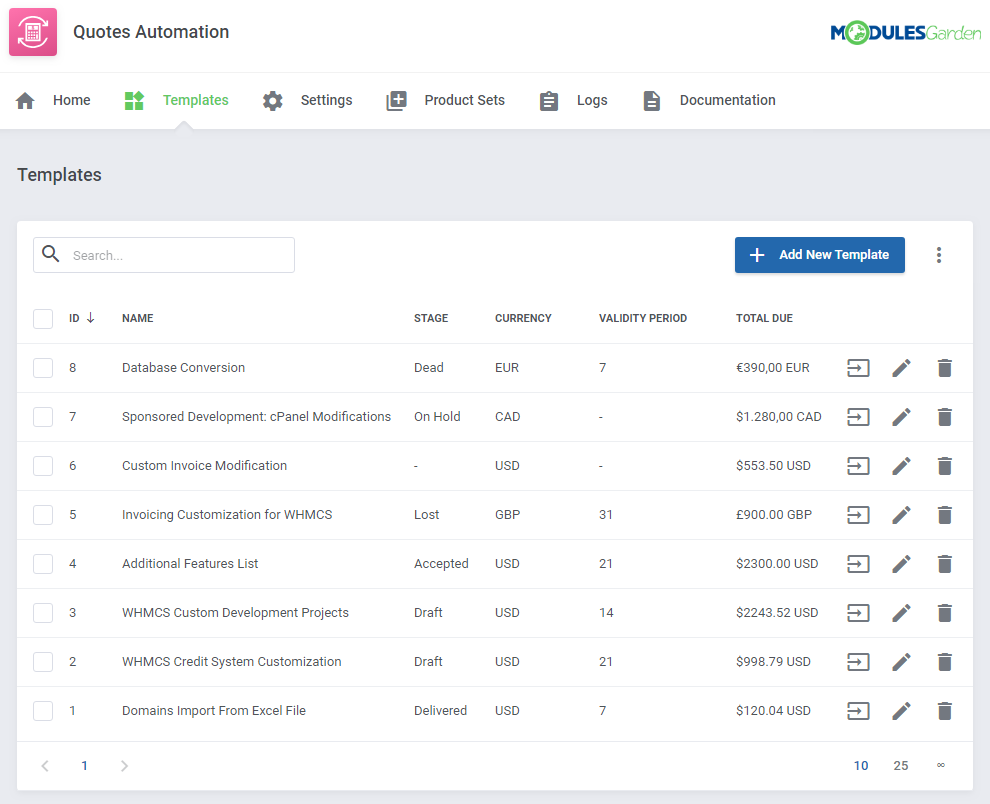
| Move to 'Addons' → 'Quotes Automation' → 'Templates'. You will find there a list of all created quote templates. Let's see now how the process of creating a quote template looks like. Strat by clicking the 'Add New Template' button. |
|
| Give your template a unique name. |

|
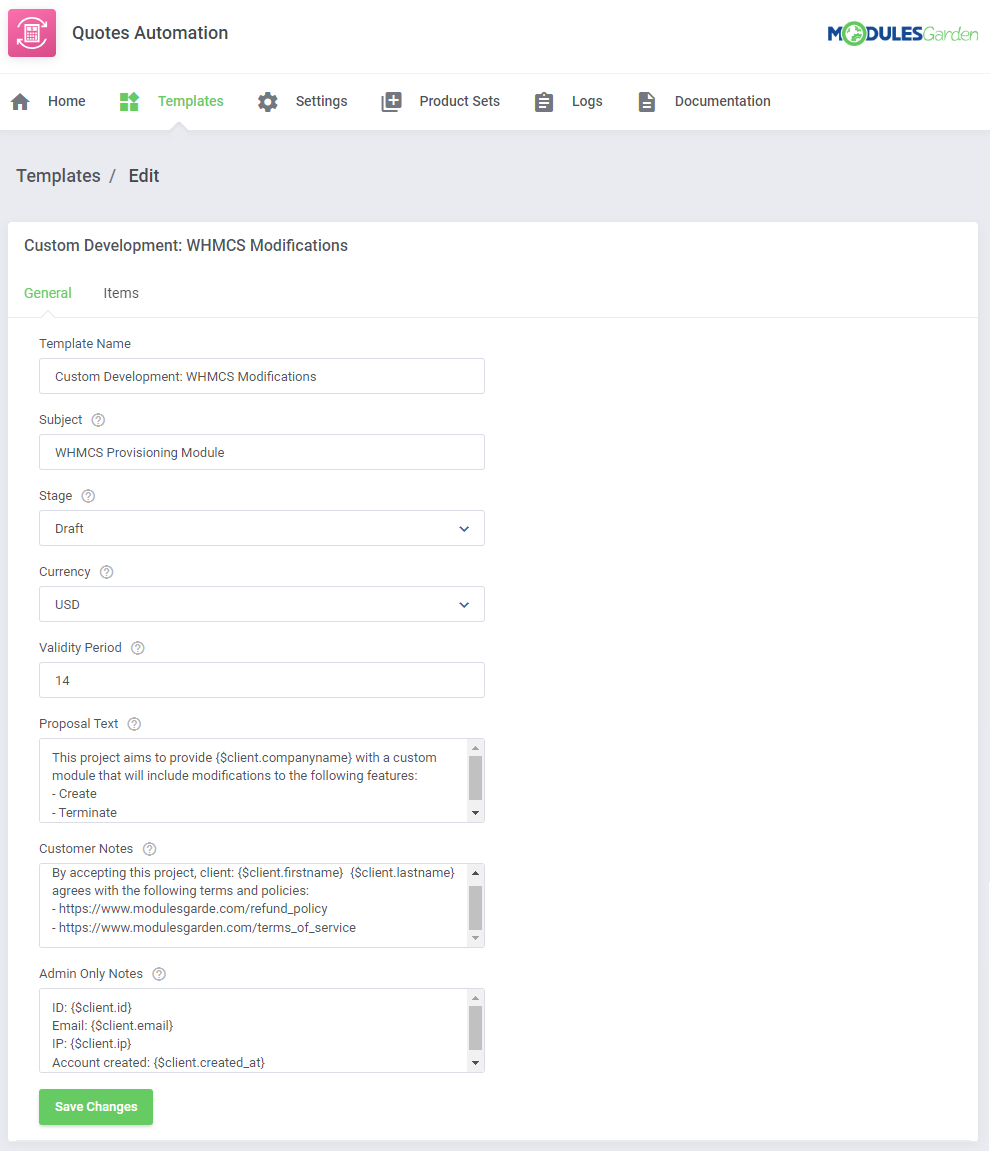
| You will be moved to the template edit form. This part is divided into two sections: 'General' and 'Items'. We will take a look at the first one. Here, you must specify the basic information that will be used in a quote such as:
Save the changes when ready. |
|
| Now move to the 'Items' part. There is a list of all already added items to this template. Press 'Add Item' to start. |
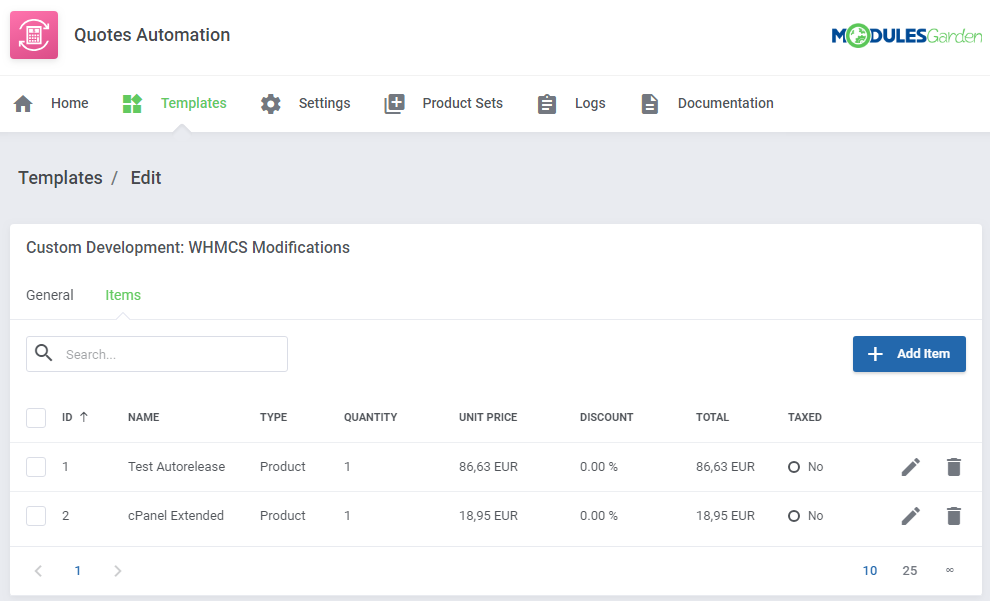
|
In the beginning you need to select the item type: product, domain, addon or a custom. then:
Save the changes when ready. |
|
| Below the configuration there is a summary view of the sub total, tax and total due amounts of the template items. |
|
| You may add several different items to one template of course. Use action buttons to: (1.) edit an item and (2.) delete the item. Select numerous items if you want to convert their currency and recalculate the final price. Keep in mind that templates, once loaded to a quote still can be modified and items added or removed. |
|
| Select the initial currency and the one that shall be used for the selected items. The items price will be automatically recalculated adequately. |
|
Logs
| The last section in the addon gives detailed information on any actions with templates. Check logs to follow all the processes. |
|
Quotes
Load Quote
| There are two ways to load a template as quote. First way - directly from the addon - Templates section, press 'Load To Template' button next to a desired draft. |
|
| Alternatively, move to 'WHMCS' → 'Billing' → 'Quotes' → 'Create New Quote'. There you will see the Quotes Automation dedicated buttons: 'Load Template' and 'Place Order'. Press the former one. |
|
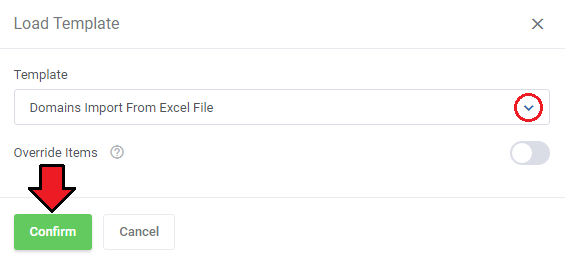
| A new window where you may select from the module templates will appear. Choose a quote draft of your need. At this point you may also Override the already existing items on the quote (if any have already been added). |
|
Manage Quote
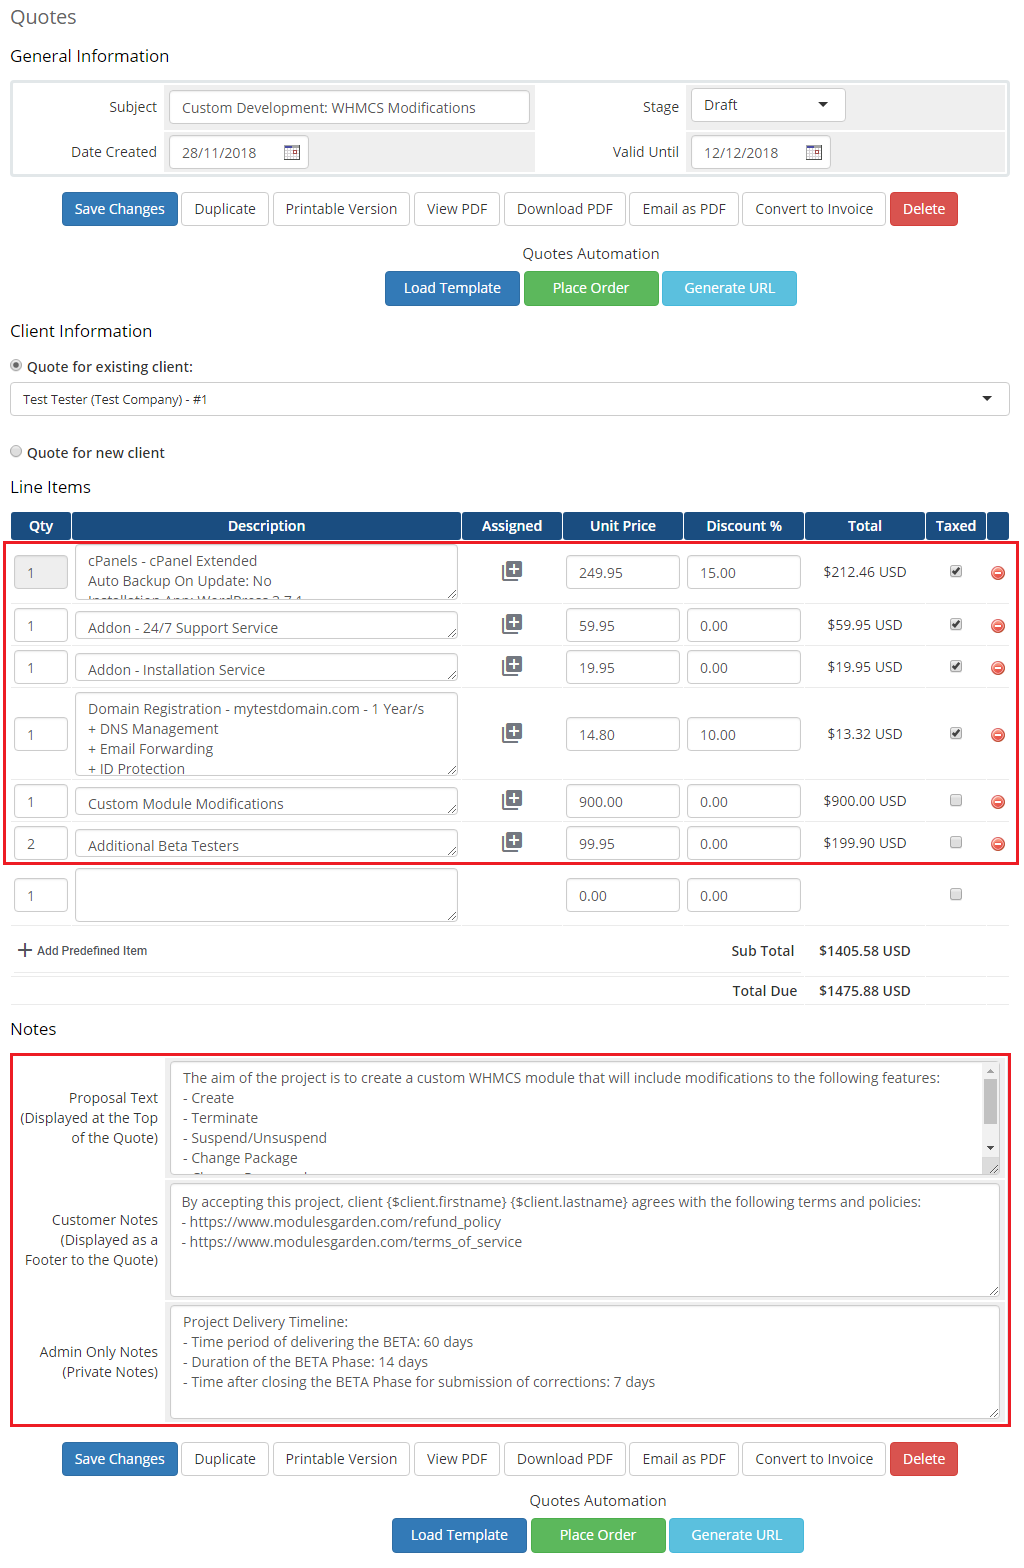
| A template draft has been loaded to a quote. Underneath the client details, all items included in the template are visible, with unit price and applied discounts if and have been set up for the items. At the very bottom, there are all notes and proposal text which surely can be still modified. |
|
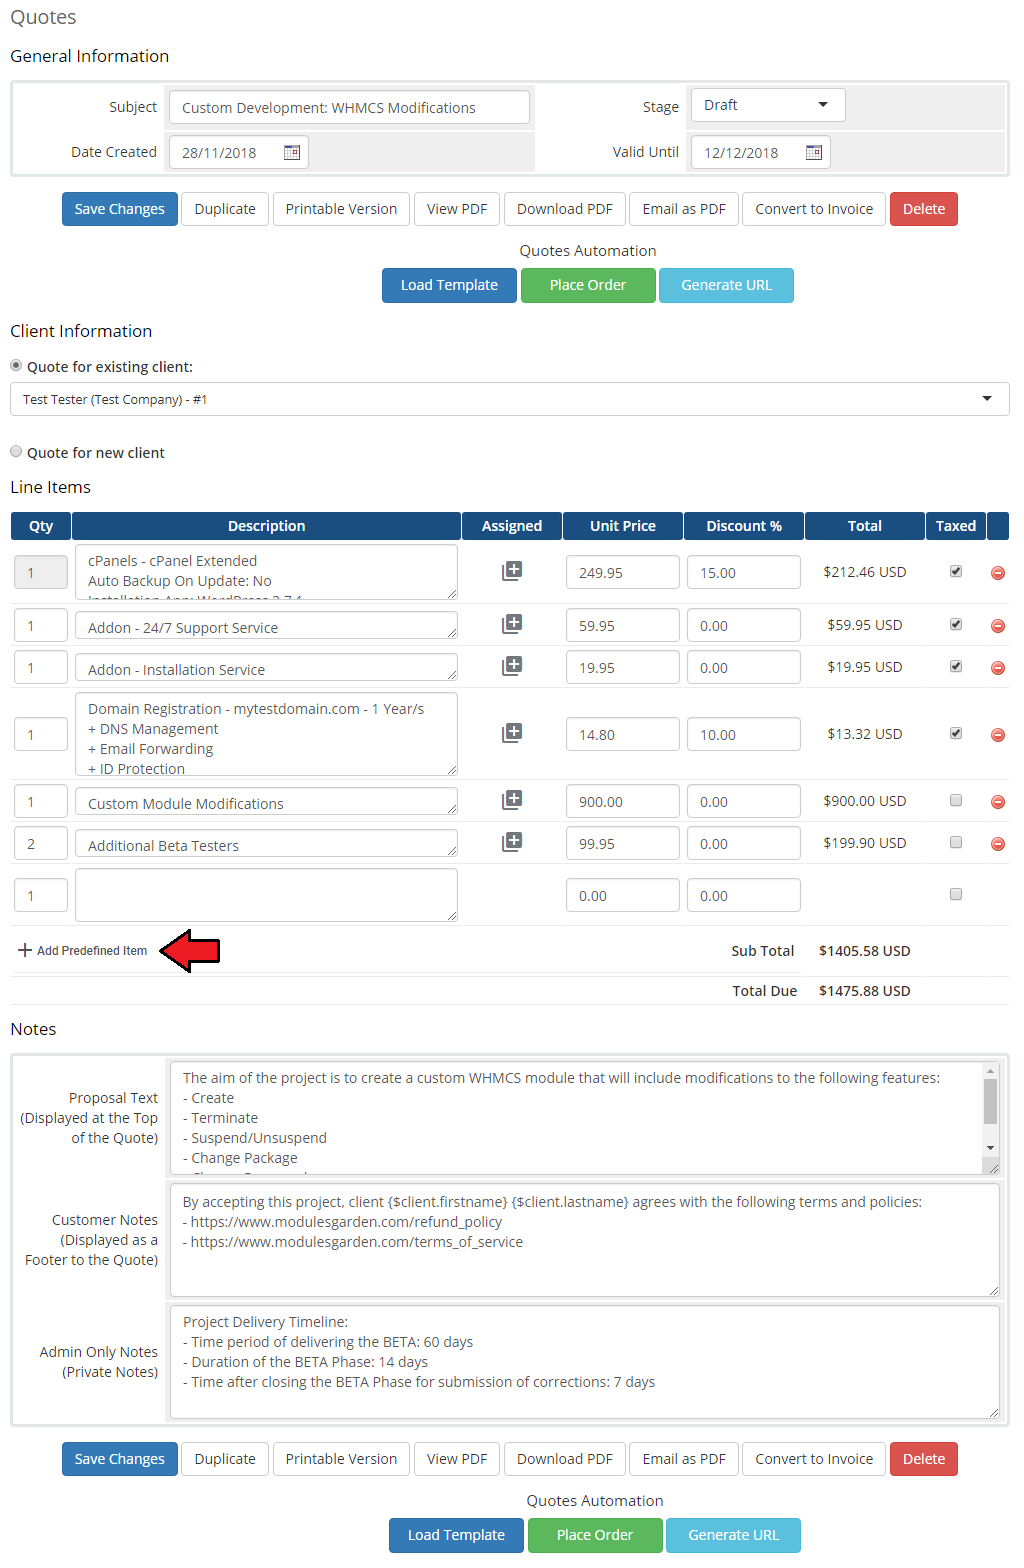
| Use 'Add Predefined Item' button to add more items to the list. |
|
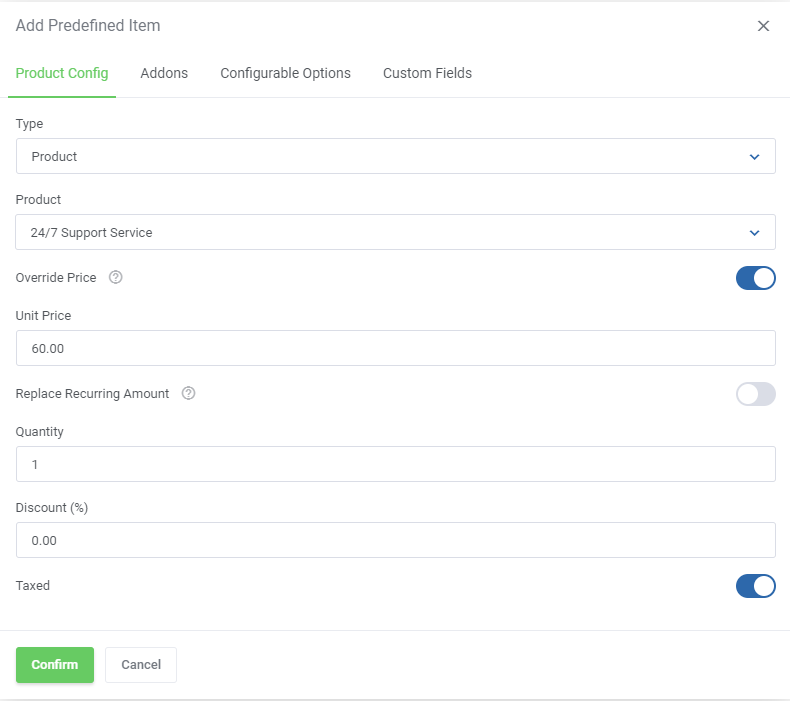
| A new window where items can be composed with all module options will appear. |
|
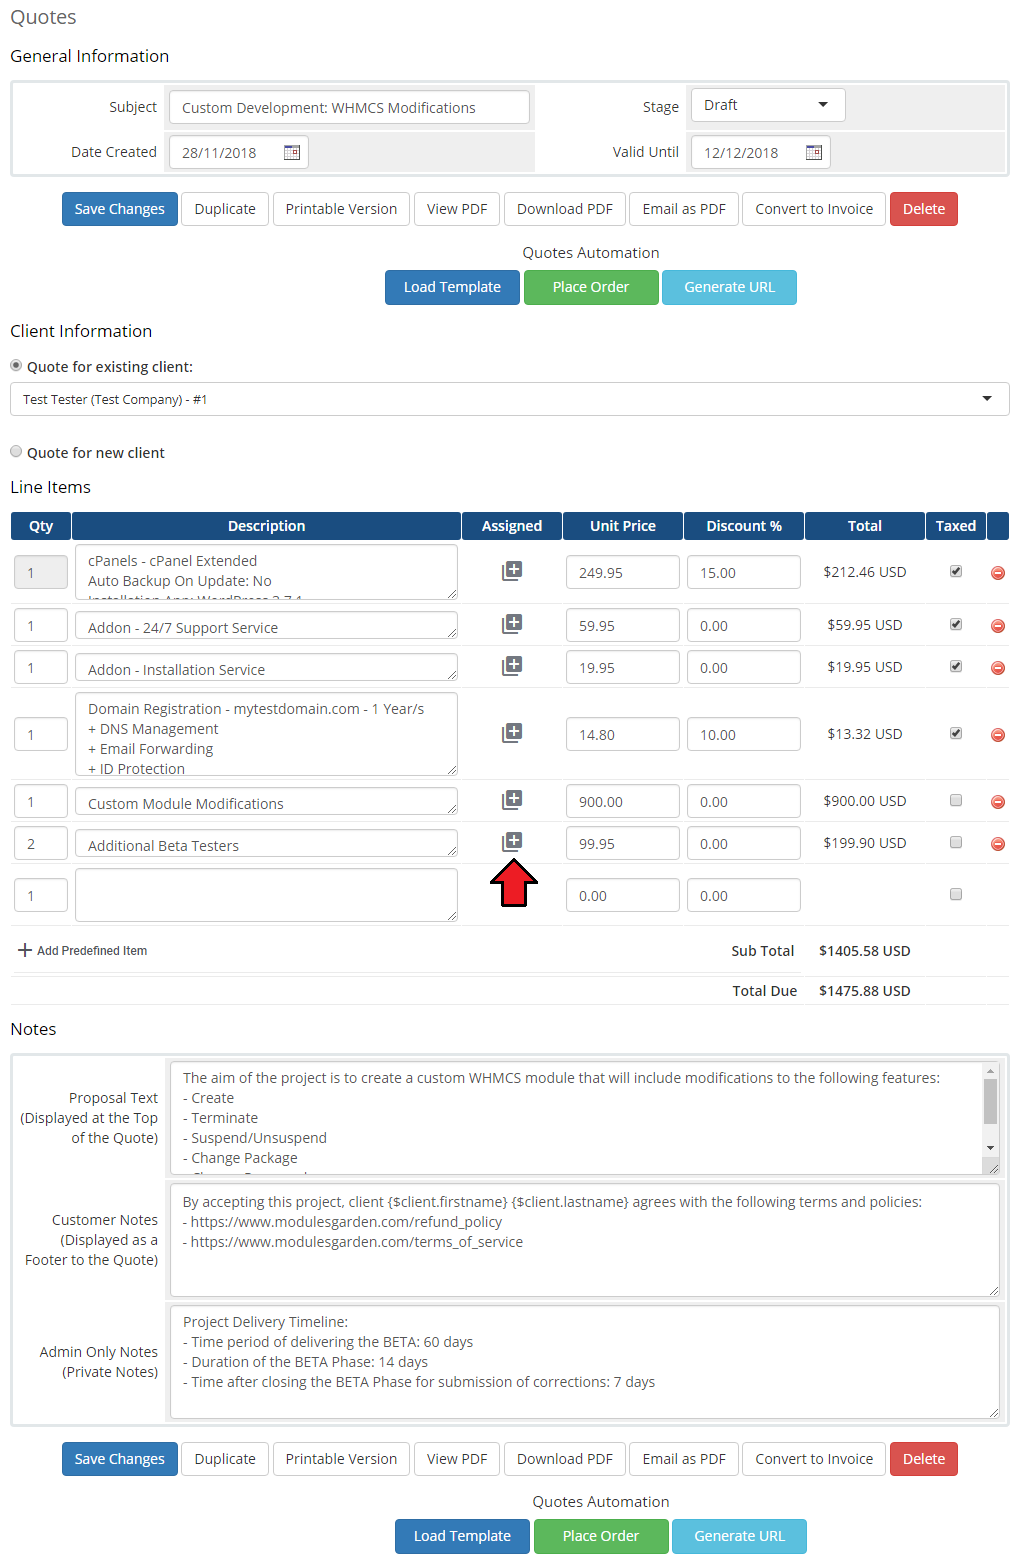
| The module offers also the option to assign additional custom items to those already on the list. |
|
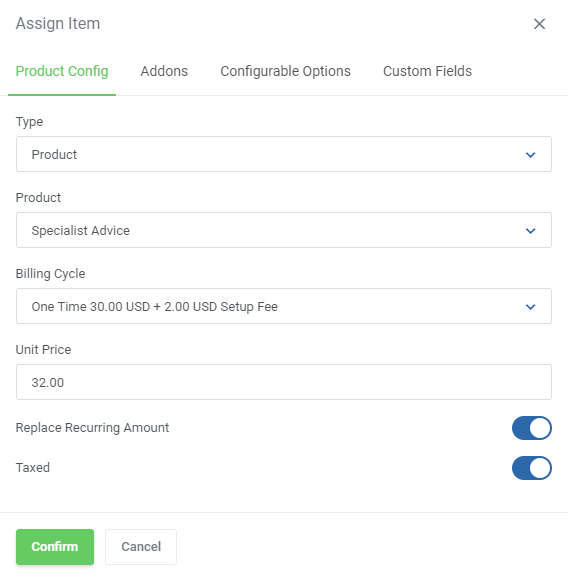
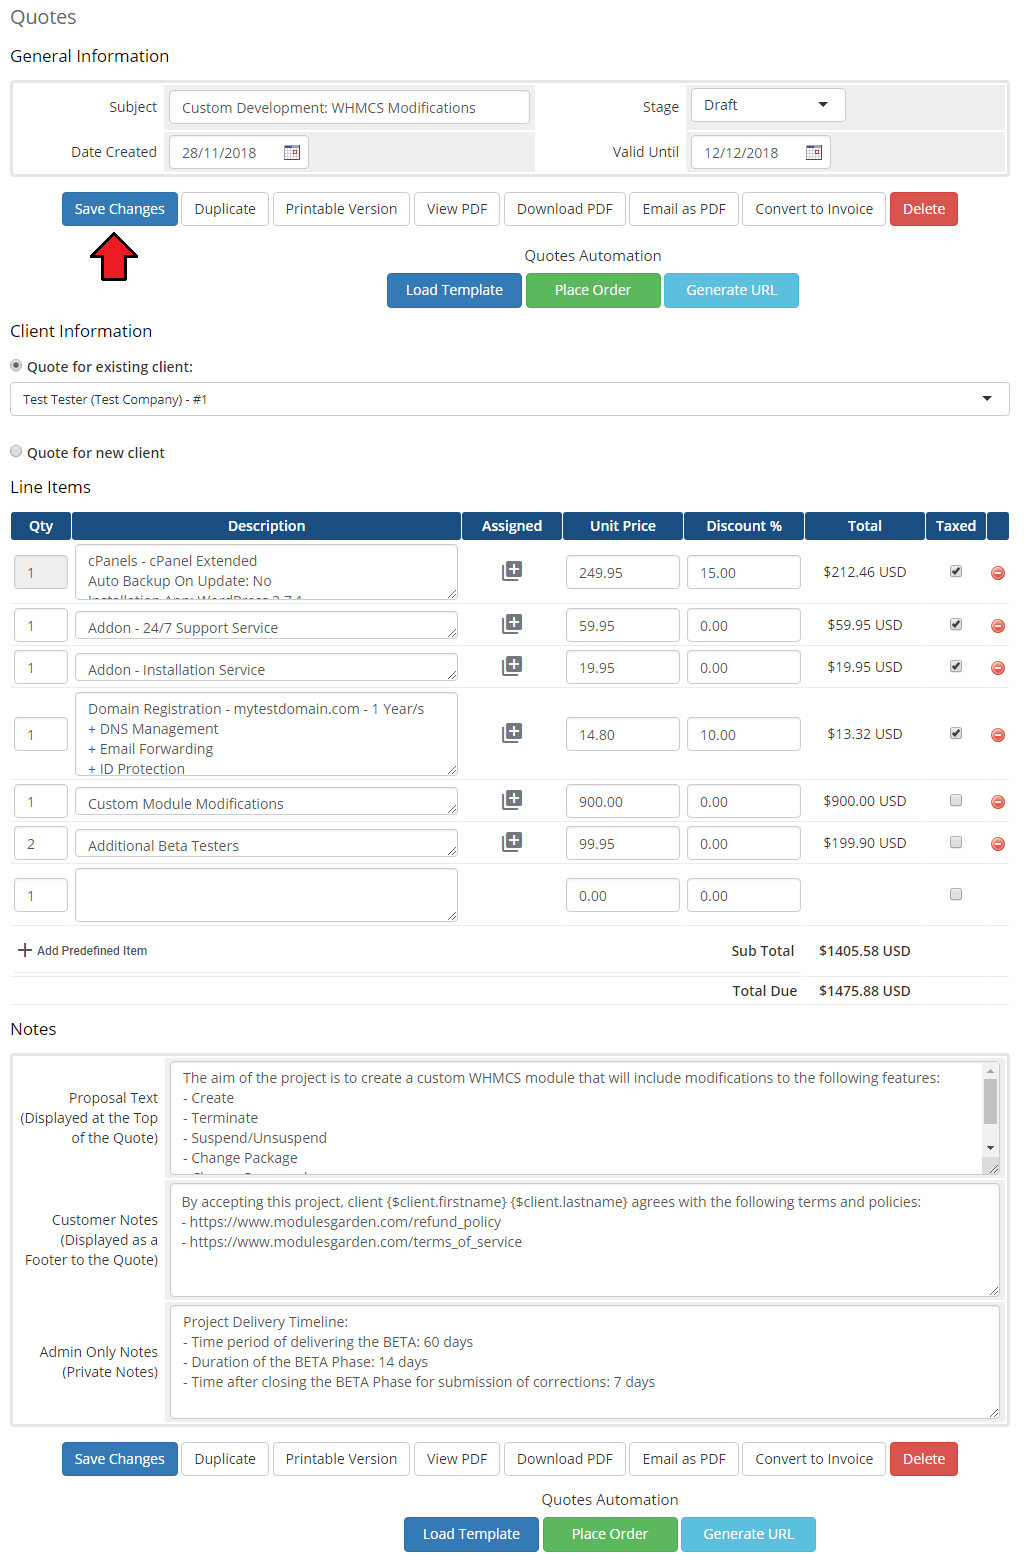
| Prepare the item to be assigned and press 'Confirm' when ready. In case you no longer want to assign any item to that product, simply leave the item type field as 'Not Assigned'. |
|
|
Convert Quote To Order
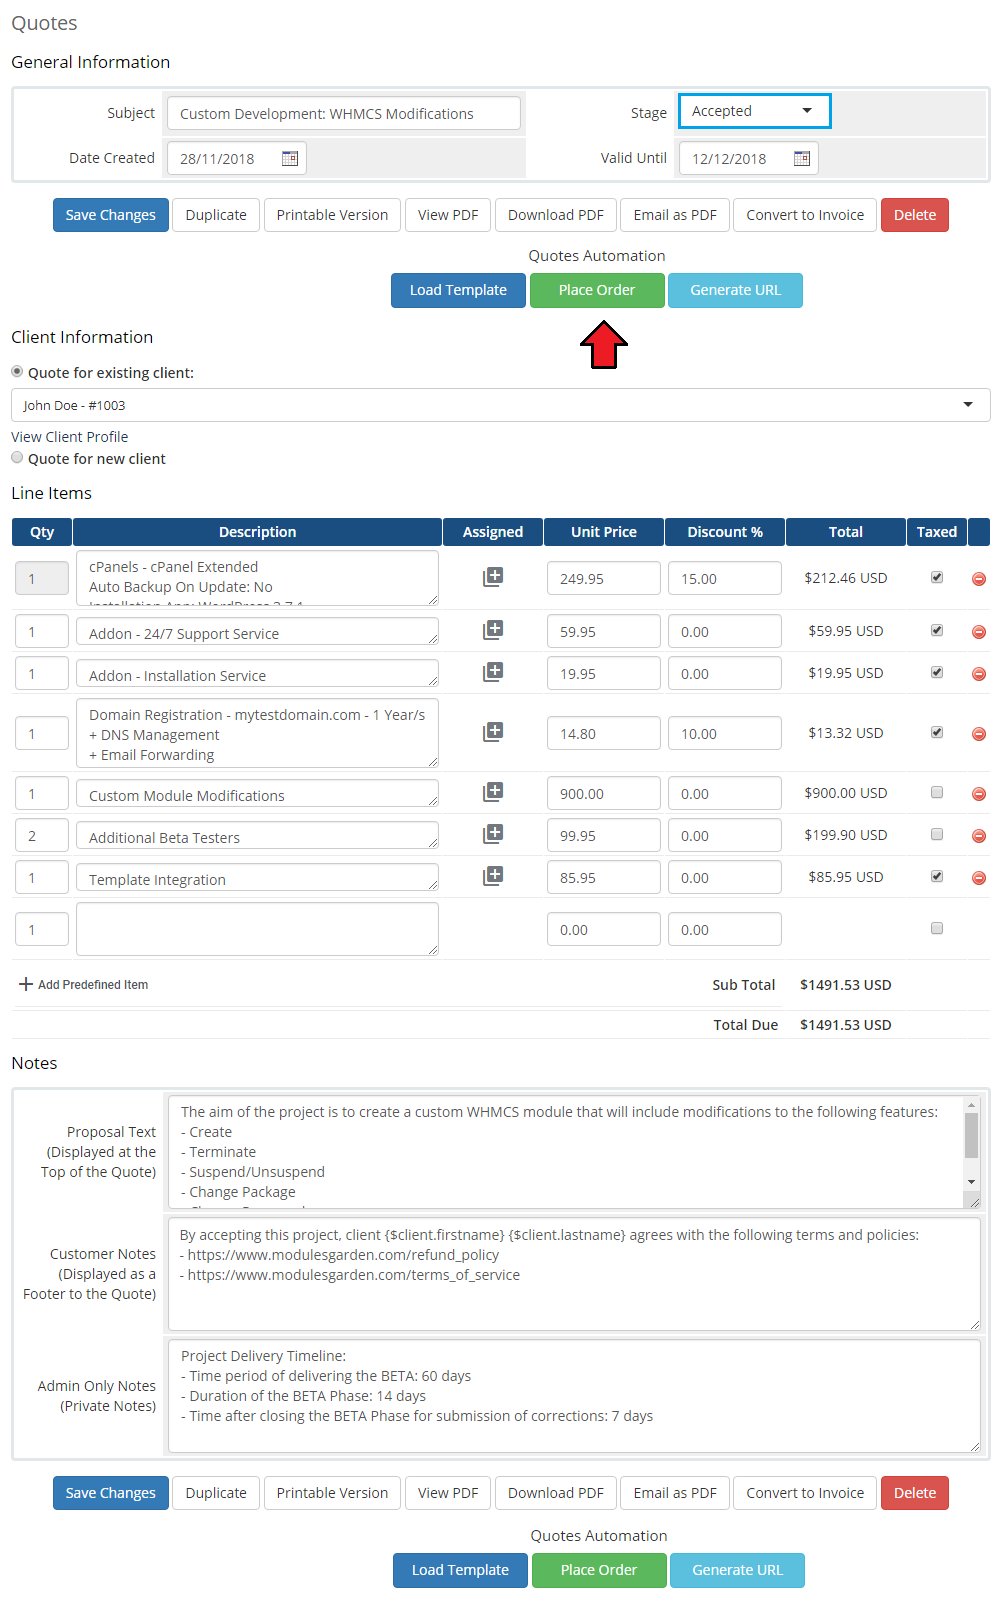
| As soon as the customer accepts the quote, you can quickly create an invoice and an order from it. Press 'Place Order'. Note: The quote visible on the screen below has one product with a 50% discount. 'Replace recurring amount' option has been marked when added. |
|
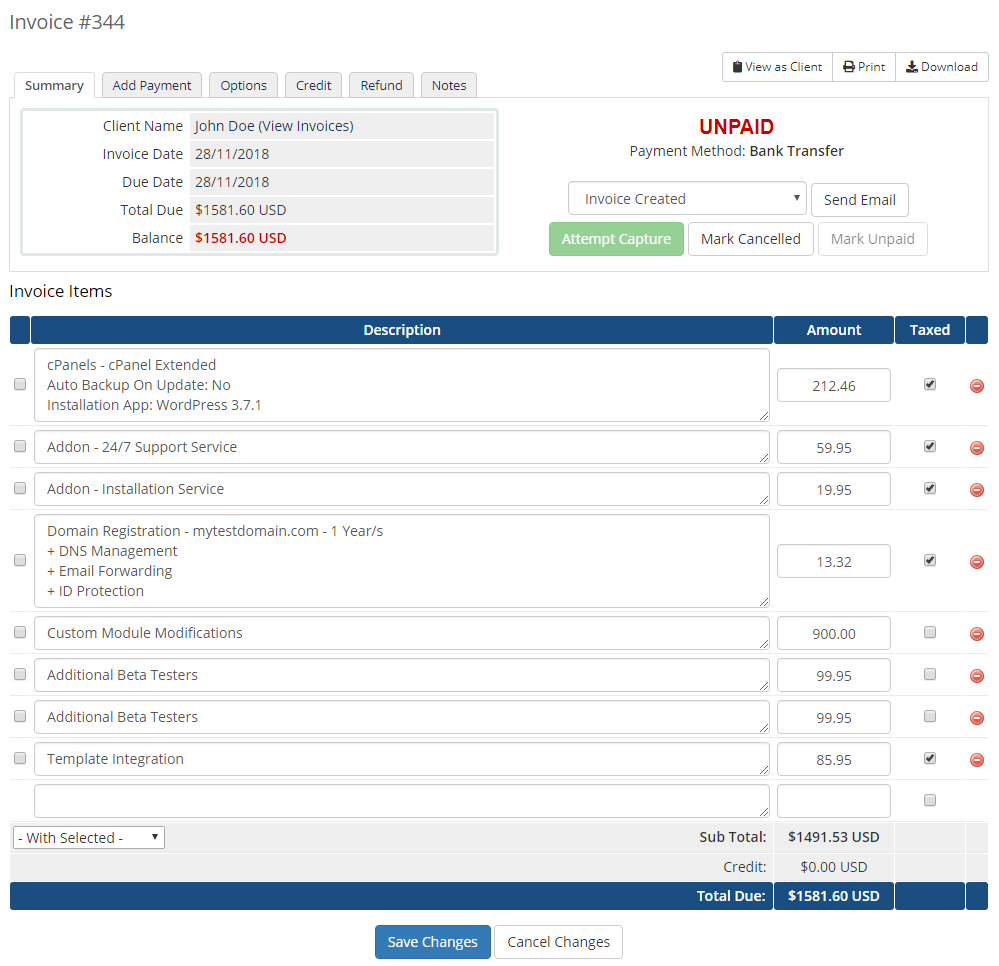
| On the screen below you can see the invoice. As you can see, the 50% discount was applied to the product 'Product X'. |
|
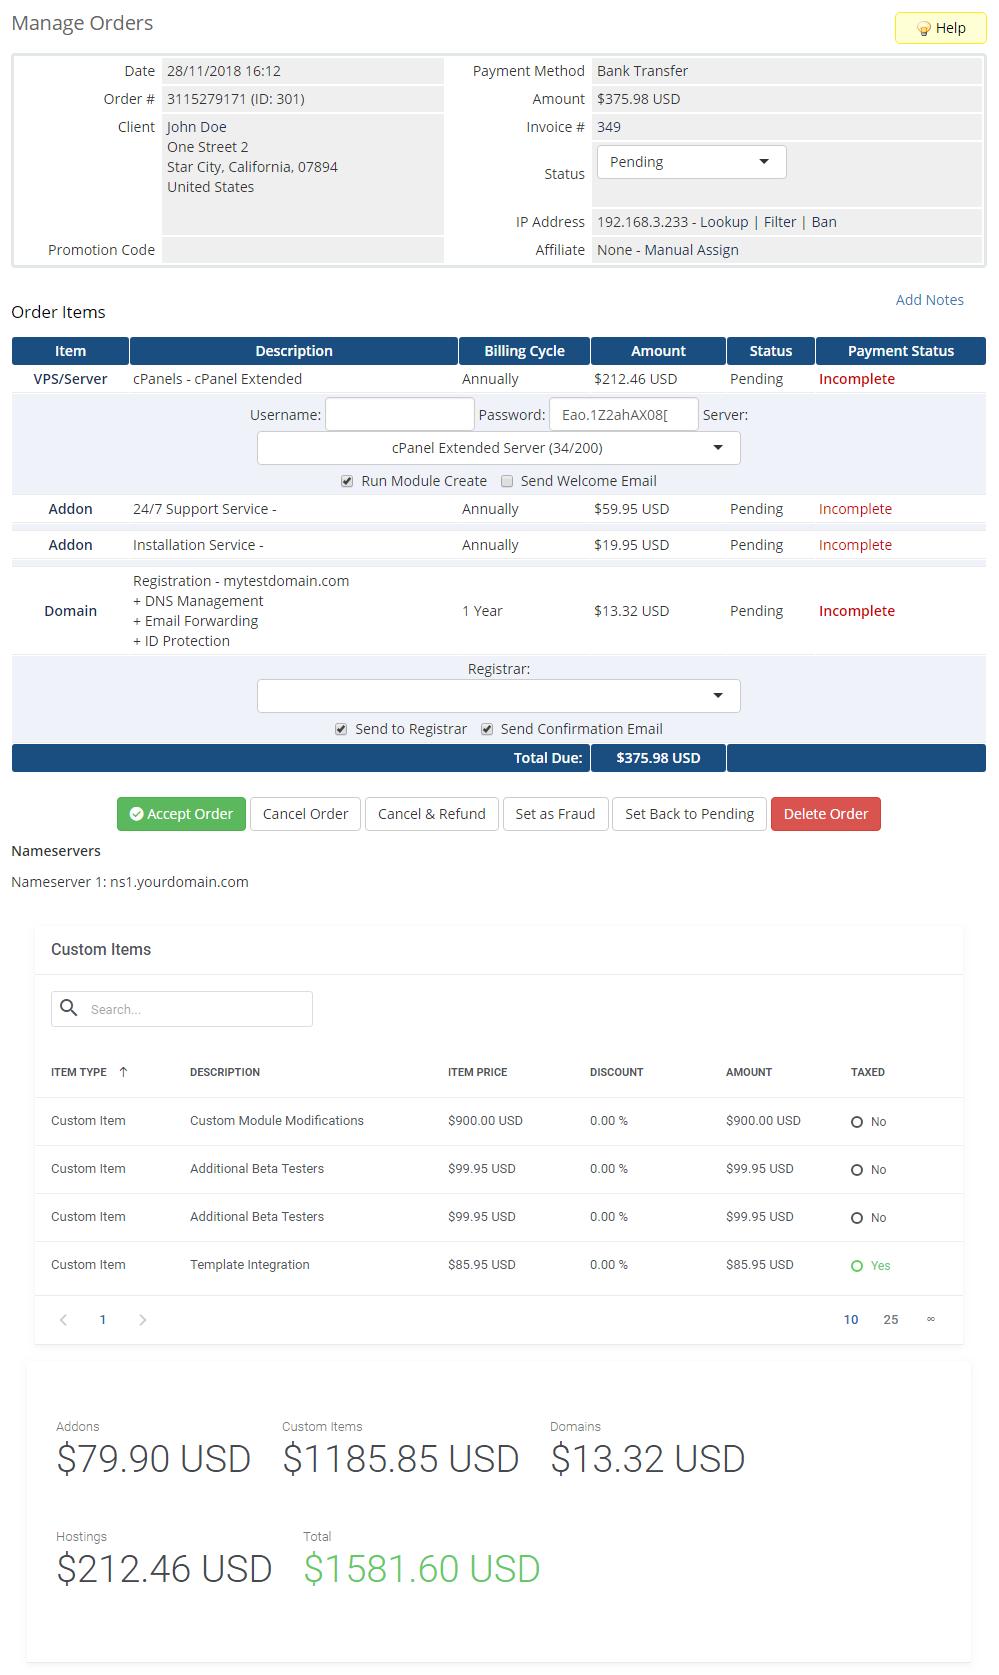
| The order is also made right away with the specified price. |
|
Client Area
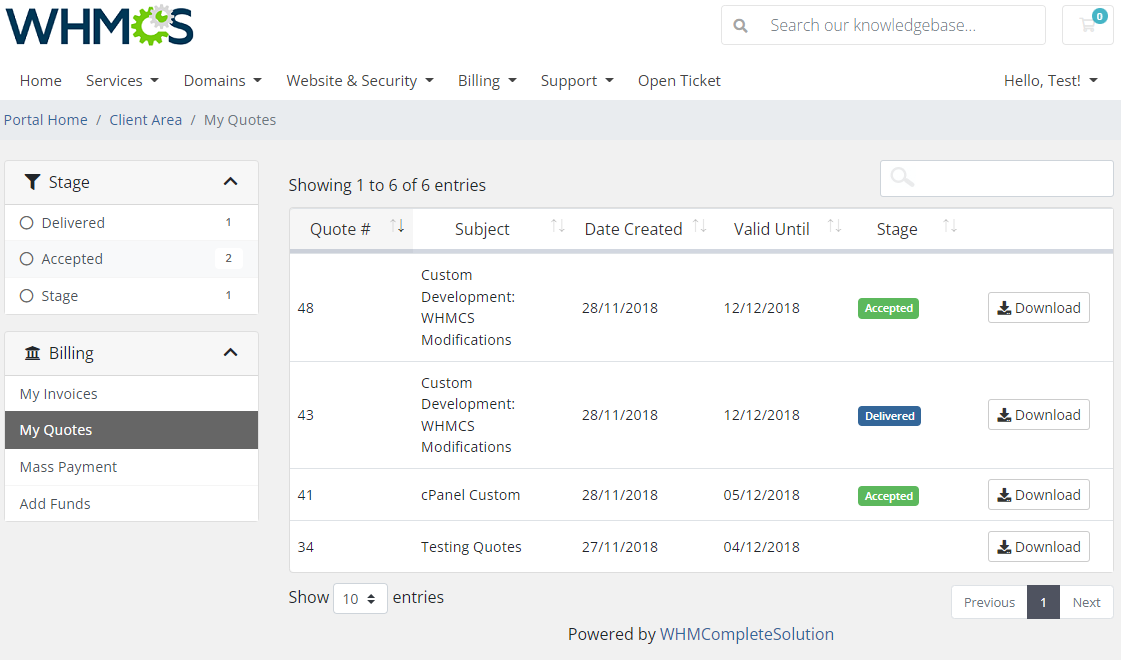
| If you have marked 'Accept Quote & Order', the module will alter the quotes in the client area. Find your quotes and view the ones you want to accept and place order instantly. |
|
Accept & Order
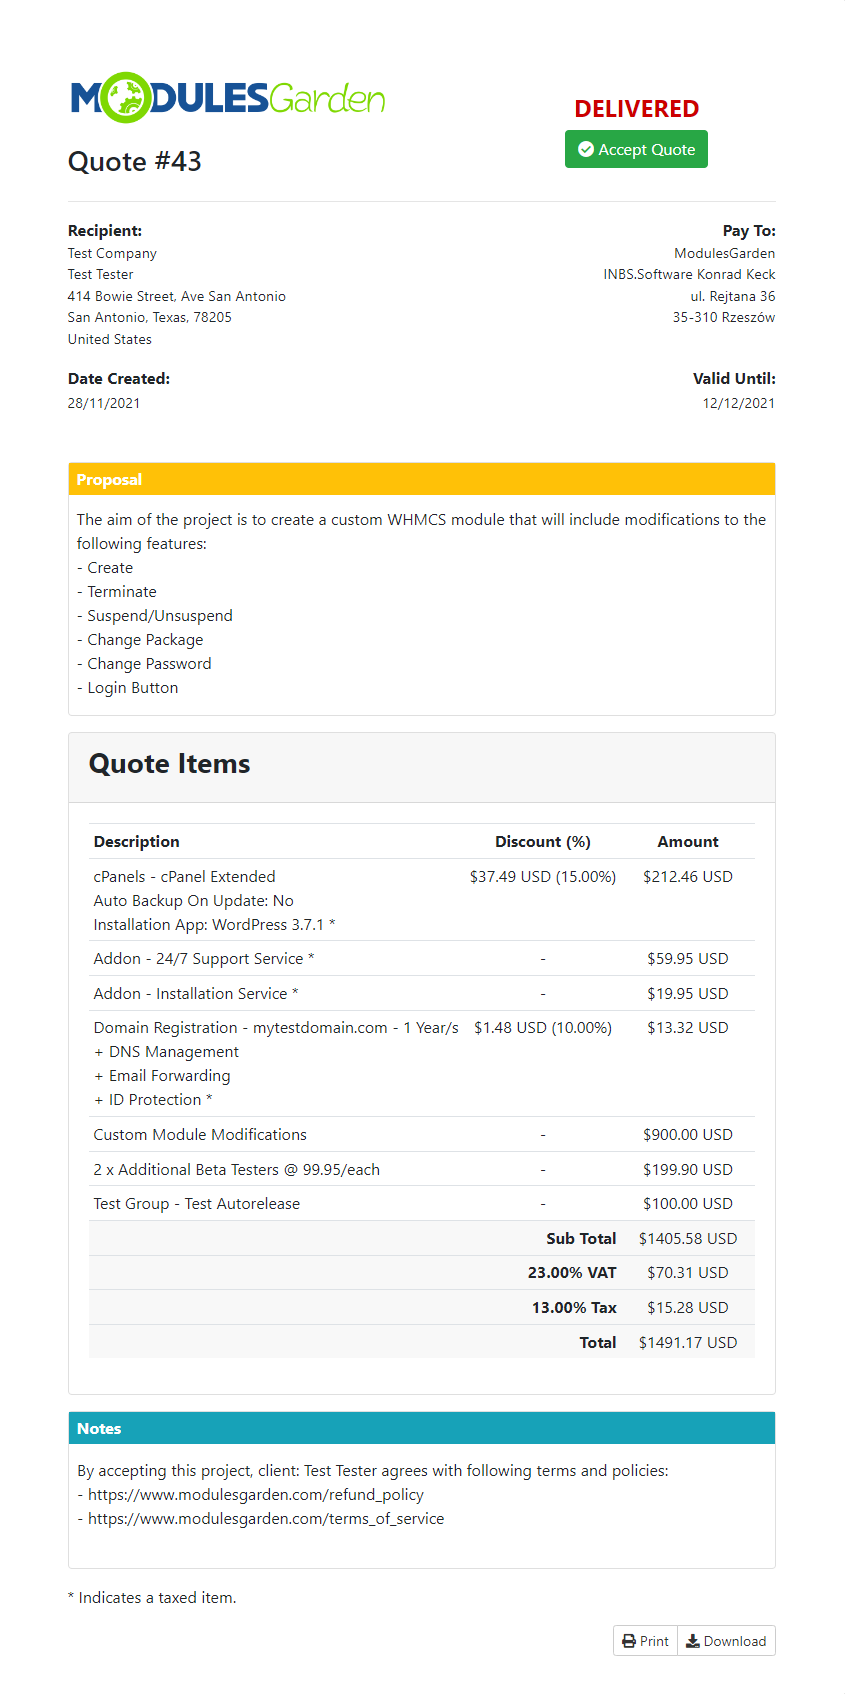
| Additional actions will be made upon pressing 'Accept Quote & Place Order' on the order itself. This way, the module automatically generates the invoice and the order from the quote. |
|
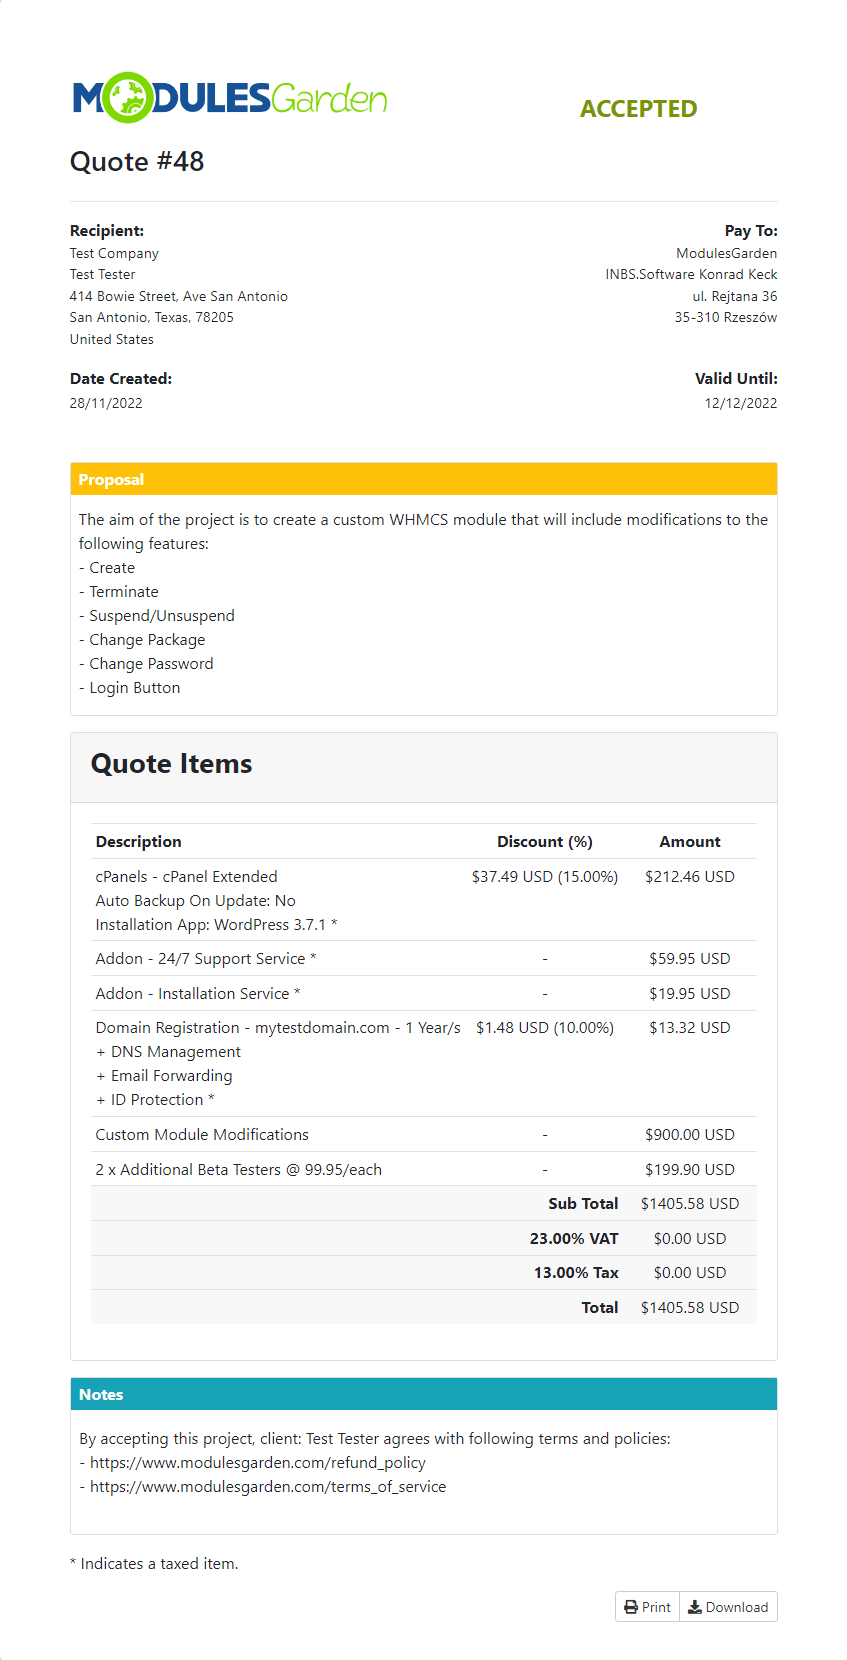
| As you can see the status has changed immediately after the quote has been accepted. |
|
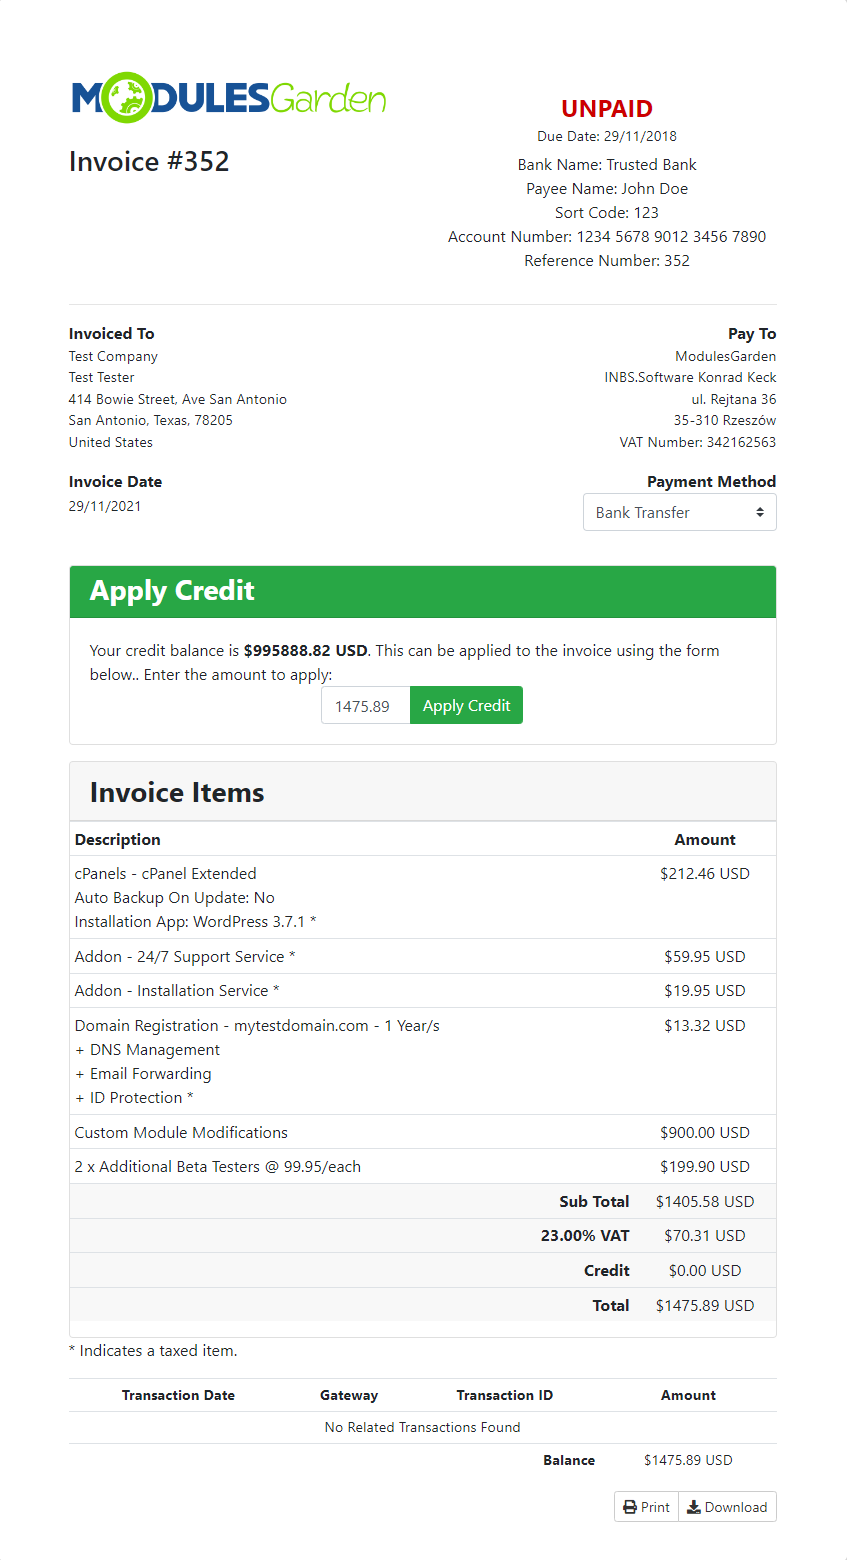
| You can find now a new invoice to pay on the list of invoices. |
|
Tips
| 1. Before you choose a product, an addon or a domain to add to a quote, always make sure it is properly configured in the system to avoid any confusion. |
Update Instructions
| Essential guidance through the process of updating the module is offered here. Keep in mind there is a quick and easy option in our client area that will let you upgrade the license of your module to an open source version at any time - and at a lower price! |
| Please be informed that when migrating the module from version 1.x to 2.0 and later, all your existing templates, items and addon settings are migrated. You shall lose no data during the process. |
Common Problems
| 1. When you have problems with connection, check whether your SELinux or firewall does not block ports. |