QuickBooks Online For WHMCS
(→API Keys) |
|||
| (146 intermediate revisions by 7 users not shown) | |||
| Line 21: | Line 21: | ||
{| | {| | ||
|style="padding: 0px 0px 0px 45px;"|✔ Transactions | |style="padding: 0px 0px 0px 45px;"|✔ Transactions | ||
| + | |} | ||
| + | {| | ||
| + | |style="padding: 0px 0px 0px 45px;"|✔ User Credits | ||
|} | |} | ||
{| | {| | ||
| Line 27: | Line 30: | ||
{| | {| | ||
|style="padding: 0px 0px 0px 45px;"|✔ Clients | |style="padding: 0px 0px 0px 45px;"|✔ Clients | ||
| + | |} | ||
| + | {| | ||
| + | |style="padding: 0px 0px 0px 45px;"|✔ Invoices | ||
| + | |} | ||
| + | {| | ||
| + | |style="padding: 0px 0px 0px 45px;"|✔ Transactions | ||
| + | |} | ||
| + | {| | ||
| + | |style="padding: 0px 0px 0px 45px;"|✔ User Credits | ||
| + | |} | ||
| + | {| | ||
| + | |style="padding: 0px 0px 0px 30px;"|✔ Import Manually via Cron: | ||
| + | |} | ||
| + | {| | ||
| + | |style="padding: 0px 0px 0px 45px;"|✔ Customers | ||
|} | |} | ||
{| | {| | ||
| Line 59: | Line 77: | ||
|} | |} | ||
{| | {| | ||
| − | |style="padding: 0px 0px 0px | + | |style="padding: 0px 0px 0px 45px;"|✔ Transactions |
|} | |} | ||
{| | {| | ||
| − | |style="padding: 0px 0px 0px | + | |style="padding: 0px 0px 0px 45px;"|✔ User Credits |
|} | |} | ||
{| | {| | ||
| − | |style="padding: 0px 0px 0px | + | |style="padding: 0px 0px 0px 45px;"|✔ Create Own Custom Rules |
|} | |} | ||
{| | {| | ||
| − | |style="padding: 0px 0px 0px 30px;"|✔ | + | |style="padding: 0px 0px 0px 30px;"|✔ Set Relations Automatically Or Manually |
|} | |} | ||
{| | {| | ||
| − | |style="padding: 0px 0px 0px 30px;"|✔ | + | |style="padding: 0px 0px 0px 30px;"|✔ Force Update And Lock Status Of: |
|} | |} | ||
{| | {| | ||
| − | |style="padding: 0px 0px 0px | + | |style="padding: 0px 0px 0px 45px;"|✔ Clients |
|} | |} | ||
{| | {| | ||
| − | |style="padding: 0px 0px 0px 30px;"|✔ | + | |style="padding: 0px 0px 0px 45px;"|✔ Invoices |
| + | |} | ||
| + | {| | ||
| + | |style="padding: 0px 0px 0px 45px;"|✔ Transactions | ||
| + | |} | ||
| + | {| | ||
| + | |style="padding: 0px 0px 0px 45px;"|✔ Credits | ||
| + | |} | ||
| + | {| | ||
| + | |style="padding: 0px 0px 0px 30px;"|✔ Toggle Update Of Invoice Item Relation On Its Edition | ||
|} | |} | ||
{| | {| | ||
| Line 83: | Line 110: | ||
|} | |} | ||
{| | {| | ||
| − | |style="padding: 0px 0px | + | |style="padding: 0px 0px 0px 30px;"|✔ Define Automatic Export Settings Of: |
|} | |} | ||
| − | |||
{| | {| | ||
| − | |style="padding: | + | |style="padding: 0px 0px 0px 45px;"|✔ Client |
|} | |} | ||
{| | {| | ||
| − | |style="padding: 0px 0px 0px | + | |style="padding: 0px 0px 0px 45px;"|✔ Invoice |
|} | |} | ||
{| | {| | ||
| − | |style="padding: 0px 0px 0px | + | |style="padding: 0px 0px 0px 45px;"|✔ Payment |
|} | |} | ||
{| | {| | ||
| − | |style="padding: 0px 0px 0px | + | |style="padding: 0px 0px 0px 45px;"|✔ Refund |
|} | |} | ||
{| | {| | ||
| − | |style="padding: 0px 0px 0px | + | |style="padding: 0px 0px 0px 45px;"|✔ Credit |
|} | |} | ||
{| | {| | ||
| − | |style="padding: 0px 0px | + | |style="padding: 0px 0px 0px 30px;"|✔ Define Default Products Item |
|} | |} | ||
| − | |||
{| | {| | ||
| − | |style="padding: | + | |style="padding: 0px 0px 0px 30px;"|✔ Define Default Addons Item |
|} | |} | ||
{| | {| | ||
| − | |style="padding: 0px 0px | + | |style="padding: 0px 0px 0px 30px;"|✔ Define Default Domains Item |
|} | |} | ||
| − | |||
| − | |||
{| | {| | ||
| − | |style="padding: | + | |style="padding: 0px 0px 0px 30px;"|✔ Define Default Refund Receipt Item |
| − | + | ||
|} | |} | ||
{| | {| | ||
| − | |style="padding: 0px 0px | + | |style="padding: 0px 0px 0px 30px;"|✔ Define Default Promotional Item |
|} | |} | ||
{| | {| | ||
| − | |style="padding: 0px 0px | + | |style="padding: 0px 0px 0px 30px;"|✔ Define Default Credits Item |
|} | |} | ||
{| | {| | ||
| − | |style="padding: 0px 0px | + | |style="padding: 0px 0px 0px 30px;"|✔ Define Tax Zero-Rated |
| − | + | ||
|} | |} | ||
{| | {| | ||
| − | |style="padding: 0px 0px | + | |style="padding: 0px 0px 0px 30px;"|✔ Define Tax Type |
|} | |} | ||
{| | {| | ||
| − | |style="padding: 0px 0px | + | |style="padding: 0px 0px 0px 30px;"|✔ Define Client Name Display Format |
| − | + | ||
|} | |} | ||
{| | {| | ||
| − | |style="padding: 0px 0px | + | |style="padding: 0px 0px 0px 30px;"|✔ Define Customer Tax ID Custom Field |
|} | |} | ||
{| | {| | ||
| − | |style="padding: 0px 0px | + | |style="padding: 0px 0px 0px 30px;"|✔ Define Gateway Fee Account |
| − | + | ||
|} | |} | ||
{| | {| | ||
| − | |style="padding: 0px 0px | + | |style="padding: 0px 0px 0px 30px;"|✔ Define Fee Gateways |
|} | |} | ||
{| | {| | ||
| − | |style="padding: 0px 0px | + | |style="padding: 0px 0px 0px 30px;"|✔ Define Shorten Transaction ID Method |
| − | + | ||
|} | |} | ||
{| | {| | ||
| − | |style="padding: 0px 0px | + | |style="padding: 0px 0px 0px 30px;"|✔ Define Webhooks Token |
|} | |} | ||
{| | {| | ||
| − | |style="padding: 0px 0px | + | |style="padding: 0px 0px 0px 30px;"|✔ Define Synchronization Settings |
| − | + | ||
|} | |} | ||
{| | {| | ||
| − | |style="padding: 0px 0px | + | |style="padding: 0px 0px 0px 30px;"|✔ Toggle Debug Mode |
|} | |} | ||
{| | {| | ||
| − | |style="padding: 0px 0px | + | |style="padding: 0px 0px 0px 30px;"|✔ Configure Failure Notifications |
| − | + | ||
|} | |} | ||
{| | {| | ||
| − | |style="padding: 0px 0px | + | |style="padding: 0px 0px 0px 30px;"|✔ View Logs |
|} | |} | ||
{| | {| | ||
| − | |style="padding: 0px 0px 30px | + | |style="padding: 0px 0px 10px 30px;"|✔ View Revision History |
| − | + | |} | |
| + | *'''General Info:''' | ||
| + | {| | ||
| + | |style="padding: 10px 0px 0px 30px;"|✔ Multi-Currency Support | ||
| + | |} | ||
| + | {| | ||
| + | |style="padding: 0px 0px 0px 30px;"|✔ Refunds Support | ||
| + | |} | ||
| + | {| | ||
| + | |style="padding: 0px 0px 0px 30px;"|✔ Can Work Along Other Systems On Single QuickBooks Account | ||
| + | |} | ||
| + | {| | ||
| + | |style="padding: 0px 0px 0px 30px;"|✔ Multi-Language Support | ||
| + | |} | ||
| + | {| | ||
| + | |style="padding: 0px 0px 0px 30px;"|✔ Supports OAuth 2.0 | ||
| + | |} | ||
| + | {| | ||
| + | |style="padding: 0px 0px 0px 30px;"|✔ Supports PHP 8.1 Back To PHP 7.4 | ||
| + | |} | ||
| + | {| | ||
| + | |style="padding: 0px 0px 0px 30px;"|✔ Supports WHMCS V8.10 Back To WHMCS V8.7 | ||
| + | |} | ||
| + | {| | ||
| + | |style="padding: 0px 0px 10px 30px;"|✔ Easy [https://www.docs.modulesgarden.com/How_To_Upgrade_WHMCS_Module Module Upgrade] To [https://www.modulesgarden.com/products/whmcs/quickbooks-online#open-source-version Open Source Version] | ||
|} | |} | ||
| − | + | *'''Requirements:''' | |
{| | {| | ||
| − | |style="padding: 10px 0px 30px | + | |style="padding: 10px 0px 0px 30px;"|✔ QuickBooks Online Account |
| − | + | ||
| − | + | ||
|} | |} | ||
| − | |||
{| | {| | ||
| − | |style="padding: | + | |style="padding: 0px 0px 0px 30px;"|✔ ionCube Loader V12 Or Later |
| − | + | ||
| − | + | ||
|} | |} | ||
{| | {| | ||
| − | |style="padding: 0px 0px | + | |style="padding: 0px 0px 30px 30px;"|✔ OAuth PHP Library - Connect Using Secure Protocol |
|} | |} | ||
| + | |||
| + | =Installation= | ||
{| | {| | ||
| − | |style="padding: 0px | + | |style="padding: 10px 0px 15px 15px;"|'''This tutorial will show you how to successfully install and configure [https://www.modulesgarden.com/products/whmcs/quickbooks-online QuickBooks Online For WHMCS.]''' <br /> |
| + | We will guide you step by step through the whole installation and configuration process. | ||
|} | |} | ||
{| | {| | ||
| − | |style="padding: 0px 0px 20px | + | |style="padding: 0px 0px 20px 15px;"|'''1. Log in to our client area and download the module.''' |
|} | |} | ||
{| | {| | ||
| − | |style="padding: 0px 0px 20px | + | |style="padding: 0px 0px 20px 25px;"|[[File:QB2_1.png]] |
|} | |} | ||
{| | {| | ||
| − | |style="padding: 0px 0px | + | |style="padding: 0px 0px 15px 15px;"|'''2. In the downloaded file you find a package that supports PHP 7.3 up to 8.1. version.'''<br/> |
| + | '''Note''': You can check the current PHP version in your WHMCS. To do so, proceed to ''' 'Utilities' → 'System' → 'PHP Info'.''' | ||
|} | |} | ||
{| | {| | ||
| − | |style="padding: 0px 0px 20px | + | |style="padding: 0px 0px 20px 25px;"|[[File:PHP72_81.png]] |
|} | |} | ||
| + | <!-- | ||
{| | {| | ||
| − | |style="padding: 0px 0px | + | |style="padding: 0px 0px 15px 15px;"|'''Previous updates of the module may contain two packages dedicated to various PHP versions.'''<br/> |
| + | The first one that supports PHP 5.6 up to PHP 7.1, and the second one addressed to PHP 7.2 up to PHP 7.4.<br/> | ||
| + | '''''Note:''' Keep in mind that PHP versions 5.6 up to 7.1 are no longer officially supported and their security issues are not fixed or released any more. Find more info [http://php.net/supported-versions.php here].'' | ||
|} | |} | ||
{| | {| | ||
| − | |style="padding: 0px 0px 20px | + | |style="padding: 0px 0px 20px 25px;"|[[File:PHP56_81.png]] |
|} | |} | ||
| + | --> | ||
{| | {| | ||
| − | |style="padding: 0px 0px | + | |style="padding: 0px 0px 10px 15px;"| |
|} | |} | ||
{| | {| | ||
| − | |style="padding: 0px 0px 15px 15px;"|''' | + | |style="padding: 0px 0px 15px 15px;"|'''3. Extract the package and upload its content into the main WHMCS directory. |
| − | + | The content of the package to upload should look like this. | |
|} | |} | ||
{| | {| | ||
| − | |style="padding: 0px 0px 20px 25px;"|[[File: | + | |style="padding: 0px 0px 20px 25px;"|[[File:bnvng.png]] |
|} | |} | ||
{| | {| | ||
| − | |style="padding: 0px 0px | + | |style="padding: 0px 0px 15px 15px;"|'''4. When you install QuickBooks Online For WHMCS for the first time you have to rename the '' 'license_RENAME.php' '' file.'''<br /> |
| − | + | The file is located in '' 'modules/addons/QuickBooks/license_RENAME.php'. '' Rename it from '' 'license_RENAME.php' '' to '' 'license.php'. '' | |
| − | + | ||
| − | + | ||
| − | + | ||
|} | |} | ||
{| | {| | ||
| − | |style="padding: 0px 0px | + | |style="padding: 0px 0px 20px 25px;"|[[File:QB_3.png]] |
| + | |} | ||
| + | {| | ||
| + | |style="padding: 0px 0px 15px 15px;"|'''5. In order to configure your license key, you have to edit the previously renamed '' 'license.php' file.'' '''<br /> | ||
| + | Enter your license key between quotation marks as presented on the following screen. You can find your license key in our client area → '' 'My Products'. '' | ||
| + | |} | ||
| + | {| | ||
| + | |style="padding: 0px 0px 20px 25px;"|[[File:QB_4.png]] | ||
| + | |} | ||
| + | {| | ||
| + | |style="padding: 0px 0px 15px 15px;"|'''6. Now you have to activate the module in your WHMCS system. '''<br /> | ||
| + | Log in to your WHMCS admin area. Go to '' 'Setup' '' → '' 'Addon Modules'. '' Afterwards, find '' 'QuickBooks' '' and press the '' 'Activate' '' button. | ||
| + | |} | ||
| + | {| | ||
| + | |style="padding: 0px 0px 20px 25px;"|[[File:QB2_5.png]] | ||
| + | |} | ||
| + | {| | ||
| + | |style="padding: 0px 0px 15px 15px;"|'''7. In the next step you need to permit access to this module.'''<br /> | ||
| + | To do so, click on the '' 'Configure' '' button, check the required group of administrators and press '' 'Save Changes'. '' | ||
| + | |} | ||
| + | {| | ||
| + | |style="padding: 0px 0px 20px 25px;"|[[File:Q2B_6.png]] | ||
| + | |} | ||
| + | {| | ||
| + | |style="padding: 0px 0px 30px 15px;"|'''8. You have just successfully installed QuickBooks Online For WHMCS!'''<br /> | ||
| + | You can access your module under '' 'Addons' '' → '' 'QuickBooks'. '' | ||
| + | |} | ||
| + | |||
| + | =Configuration and Management= | ||
| + | {| | ||
| + | |style="padding: 10px 0px 30px 15px;"|'''QuickBooks Online For WHMCS is a module which allows you to export any data on clients, invoices and payments directly to QuickBooks. <br/>Read the below manual to learn about all the possibilities that the module offers.''' | ||
|} | |} | ||
| − | |||
==API Keys== | ==API Keys== | ||
{| | {| | ||
| − | |style="padding: 10px 0px 15px 15px;"|Before you move to the essential configuration of the module, you need to generate some data directly in QuickBooks. | + | |style="padding: 10px 0px 15px 15px;"|Before you move to the essential configuration of the module, you need to generate some data directly in QuickBooks. Please follow the steps below.<br /> |
'''1. Log in to:''' https://developer.intuit.com/ <br> | '''1. Log in to:''' https://developer.intuit.com/ <br> | ||
:Use your QuickBooks account details to sign in. | :Use your QuickBooks account details to sign in. | ||
| Line 238: | Line 307: | ||
|} | |} | ||
{| | {| | ||
| − | |style="padding: 0px 0px 20px 15px;"|'''2. Once you are logged in, find '' ' | + | |style="padding: 0px 0px 20px 15px;"|'''2. Once you are logged in, move to '' 'Dashboard' '' and find the '' 'Apps' '' tab on the '' 'My Apps Dashboard','' press '' 'Create an app'. '' ''' |
|} | |} | ||
{| | {| | ||
| Line 244: | Line 313: | ||
|} | |} | ||
{| | {| | ||
| − | |style="padding: 0px 0px 20px 15px;"|'''3. | + | |style="padding: 0px 0px 20px 15px;"|'''3. Select the following platform: '' 'QuickBooks Online and Payments' '' '''. |
|} | |} | ||
{| | {| | ||
| Line 250: | Line 319: | ||
|} | |} | ||
{| | {| | ||
| − | |style="padding: 0px 0px 20px 15px;"|'''4. Then | + | |style="padding: 0px 0px 20px 15px;"|'''4. Then provide a name of your app and choose the '' 'Accounting' '' scope on the list. ''' |
|} | |} | ||
{| | {| | ||
| Line 256: | Line 325: | ||
|} | |} | ||
{| | {| | ||
| − | |style="padding: 0px 0px | + | |style="padding: 0px 0px 15px 15px;"|'''5. Now, go to the '' 'Production Settings' '' tab and provide the '' 'End User License Agreement URL' '' along with '' 'Privacy Policy URL' '' in the '' 'Terms of Service Links' '' section. |
| + | *Fill out domain and applicable URLs in '' 'App URLs' '' section. | ||
| + | *Categorize your application | ||
| + | *Tell about regulated industries that use your application | ||
| + | *Define the country where your app is hosted<br/> | ||
| + | Save the changes when all data is provided. | ||
|} | |} | ||
{| | {| | ||
|style="padding: 0px 0px 20px 25px;"|[[File:QB_2_0_23.png]] | |style="padding: 0px 0px 20px 25px;"|[[File:QB_2_0_23.png]] | ||
|} | |} | ||
| + | |||
{| | {| | ||
| − | |style="padding: 0px 0px 15px 15px;"|'''6. Then, | + | |style="padding: 0px 0px 15px 15px;"|'''6. Then, proceed to the '' 'Keys & Credentials' '' section where you will be asked to fill out a 30 min questionnaire.'''<br /> |
| − | + | Only once ready you will get access to your Keys & Credentials section. | |
| − | + | ||
|} | |} | ||
{| | {| | ||
| − | |style="padding: 0px 0px 20px 25px;"|[[File: | + | |style="padding: 0px 0px 20px 25px;"|[[File:QB_2_0_25.png]] |
|} | |} | ||
{| | {| | ||
| − | |style="padding: 0px 0px | + | |style="padding: 0px 0px 20px 25px;"|[[File:QB_2_0_26.png]] |
| − | + | ||
|} | |} | ||
{| | {| | ||
| − | |style="padding: 0px 0px | + | |style="padding: 0px 0px 15px 15px;"|'''7. You need to provide a proper callback QuickBooks URI from your WHMCS installation in the following format:'''<br /> |
| − | + | <nowiki>https://yourdomain.com/admin/addonmodules.php?quickBooksCallbackOauth2</nowiki> | |
| − | + | '' Note that your ''' 'admin' ''' folder might have a different name than the default one. The provided URL also has to start with ''' https:// '''.<br /> You will find the already customized address in your module configuration.''<br /> | |
| − | + | Keep in mind that the presented URLs are only exemplary and you need to use the details provided in your QuickBooks Online panel.<br />The ''Launch URL'' and ''Disconnect URL'' fields are optional since the module does not use them.<br /> | |
| − | + | Note that your application data need to be complete to make it work on the production mode.<br /> | |
| − | + | '''In this section you will also find:''' | |
| − | + | ||
| − | + | ||
*Client ID | *Client ID | ||
*Client Secret | *Client Secret | ||
| − | These keys are very important, you will need them in the very next step of the module configuration. '''Please keep them safe'''.<br /> | + | These keys are very important, you will need them in the very next step of the module configuration. '''Please keep them safe'''.<br /> |
| − | + | ||
| − | + | ||
| − | + | ||
|} | |} | ||
{| | {| | ||
| − | |style="padding: 0px 0px | + | |style="padding: 0px 0px 20px 25px;"|[[File:QB3_27.png]] |
|} | |} | ||
| + | {| | ||
| + | |style="padding: 0px 0px 15px 15px;"|'''8. Now move to the '' 'Webhooks' '' tab.'''<br/> | ||
| + | Here you will have to generate a token that will be used to enable Webhooks for synchronization.<br/> | ||
| − | + | First of all, provide a valid Endpoint URL to the '' 'webhooks.php' '' file. That is what such URL may look like. Please remove '' 'yourdomain.com' '' and insert your actual address. | |
| + | |||
| + | <nowiki>https://yourdomain.com/modules/addons/QuickBooks/webhooks.php</nowiki> | ||
| + | |||
| + | '''''Note:''' The provided URL has to start with ''' https:// '''.''<br/> | ||
| + | |||
| + | Then select required events that will be triggered.<br/> | ||
| + | |} | ||
{| | {| | ||
| − | |style="padding: | + | |style="padding: 0px 0px 20px 25px;"|[[File:QB2_01.png]] |
|} | |} | ||
{| | {| | ||
| − | |style="padding: 0px 0px | + | |style="padding: 0px 0px 15px 15px;"|'''8. Copy adequate Verifier token.'''<br/> |
| − | + | It will be necessary during the module configuration. | |
| − | + | ||
| − | + | ||
| − | + | ||
|} | |} | ||
{| | {| | ||
| − | |style="padding: 0px 0px 30px 25px;"|[[File: | + | |style="padding: 0px 0px 30px 25px;"|[[File:QB2_02.png]] |
|} | |} | ||
==Configuration== | ==Configuration== | ||
{| | {| | ||
| − | |style="padding: 10px 0px | + | |style="padding: 10px 0px 10px 15px;"| In order to configure your module properly, proceed to '' 'Addons' '' → '' 'QuickBooks Online' '' → '' 'Configuration'. '' |
|} | |} | ||
{| | {| | ||
|style="padding: 0px 0px 15px 15px;"|'''1. Start with API configuration,''' since this part is very basic and absolutely necessary to take any further steps.<br /> | |style="padding: 0px 0px 15px 15px;"|'''1. Start with API configuration,''' since this part is very basic and absolutely necessary to take any further steps.<br /> | ||
| − | Currently, your '' 'Connection Status' '' is '' 'Not Connected'. '' In order to establish connection with QuickBooks Online, press the button | + | Currently, your '' 'Connection Status' '' is '' 'Not Connected'. '' In order to establish connection with QuickBooks Online, press the connection button: |
|} | |} | ||
{| | {| | ||
| Line 322: | Line 397: | ||
|style="padding: 0px 0px 15px 15px;"|A box will appear where you will have to type in all the previously generated data. <br /> | |style="padding: 0px 0px 15px 15px;"|A box will appear where you will have to type in all the previously generated data. <br /> | ||
It will allow the module to authenticate your identity in QuickBooks system and let your WHMCS connect with it. <br /> | It will allow the module to authenticate your identity in QuickBooks system and let your WHMCS connect with it. <br /> | ||
| − | These are your QuickBooks keys that you have generated in the previous step: | + | These are your QuickBooks keys that you have generated in the previous step: |
| − | + | ||
*Client ID | *Client ID | ||
*Client Secret | *Client Secret | ||
*Sandbox - if you have used '' 'Production' '' to generate '' 'Keys,' '' unmark this checkbox. | *Sandbox - if you have used '' 'Production' '' to generate '' 'Keys,' '' unmark this checkbox. | ||
| − | |||
| − | |||
| − | |||
| − | |||
| − | |||
| − | |||
| − | |||
| − | |||
| − | |||
| − | |||
|} | |} | ||
{| | {| | ||
| Line 349: | Line 413: | ||
|} | |} | ||
{| | {| | ||
| − | |style="padding: 0px 0px | + | |style="padding: 0px 0px 10px 15px;"|You have to do this step only once. Entering the token and consumer keys will not be required again, even if the module is deactivated in the meantime. |
| − | + | ||
| − | + | ||
| − | + | ||
|} | |} | ||
{| | {| | ||
| − | |style="padding: 0px 0px 15px 15px;"|'''2. | + | |style="padding: 0px 0px 15px 15px;"|'''2. Webhooks Token''' - enter the token to maintain synchronization.<br /> |
| − | + | Use the token generated as explained in steps 7 and 8 in the [[#API Keys|API Keys]] section.<br/> | |
| − | *The | + | Keep in mind that you must use an adequate token. '' 'Development' '' Webhooks - when sandbox is used and '' 'Production' '' Webhooks token when used in the live environment. |
| − | + | |} | |
| + | {| | ||
| + | |style="padding: 0px 0px 20px 25px;"|[[File:QB2_9_1.png]] | ||
| + | |} | ||
| + | {| | ||
| + | |style="padding: 0px 0px 15px 15px;"|'''3. Cron configuration''' - set up cron jobs.<br /> | ||
| + | |||
| + | *The first cron job is run only once. It exports all clients, invoices and transactions to QuickBooks as soon as our module is activated in your WHMCS.<br/> You may also modify this cron command and export clients and invoices from selected time range. The cron line will look like the one below: | ||
| + | php -q modules/addons/QuickBooks/cron/synchronization.php --export --invoices-from= | ||
| + | for example: | ||
| + | php -q modules/addons/QuickBooks/cron/synchronization.php --export --invoices-from=2018-01-01 | ||
| + | |||
| + | In the above case, clients with their invoices since 01.01.2018 will be exported to QuickBooks. | ||
| + | |||
| + | *The second cron is '''optional''' to run - it will check if there are any invoices in QuickBooks panel that were manually paid.<br/> If yes, the relevant transactions will be also added to the corresponding invoices in WHMCS and thus they will also be automatically marked as paid.<br/> | ||
| + | |||
| + | '''''Note:''' Please refer to the [[#Tips|Tips]] section to learn how to '''import''' the QuickBooks clients, invoices, and their transactions into the WHMCS system using the CLI cron job commands.'' | ||
|} | |} | ||
{| | {| | ||
| Line 364: | Line 441: | ||
|} | |} | ||
{| | {| | ||
| − | |style="padding: 0px 0px 15px 15px;"|''' | + | |style="padding: 0px 0px 15px 15px;"|'''4. Multi-Currency''' configuration.<br/> |
| − | If connection with QuickBooks has been properly | + | If the connection with QuickBooks has been set up properly, currency details will be visible. |
*View ''Home Currency'' | *View ''Home Currency'' | ||
*''MultiCurrency'' status<br/> | *''MultiCurrency'' status<br/> | ||
| Line 374: | Line 451: | ||
|} | |} | ||
{| | {| | ||
| − | |style="padding: 0px 0px 15px 15px;"|''' | + | |style="padding: 0px 0px 15px 15px;"|'''5. Synchronization Settings''' - decide which of the possible synchronization options you want to enable. <br /> |
Simply tick the ones you are interested in. | Simply tick the ones you are interested in. | ||
|} | |} | ||
| Line 382: | Line 459: | ||
*Create - performed on client's creation | *Create - performed on client's creation | ||
*Update - takes place when client account has been updated | *Update - takes place when client account has been updated | ||
| + | *Synchronize Client Statuses - when selected, the client status in QuickBooks will be automatically changed to the corresponding one after that has beed changed in WHMCS | ||
| + | |||
'''Invoices''' synchronization: | '''Invoices''' synchronization: | ||
*Create - performed on invoice creation | *Create - performed on invoice creation | ||
*Update - takes place when an invoice has been updated or altered | *Update - takes place when an invoice has been updated or altered | ||
*Delete - takes place when an invoice has been deleted | *Delete - takes place when an invoice has been deleted | ||
| + | *Delete Cancelled - tick to remove the already canceled WHMCS invoices from QuickBooks Online | ||
*Add Funds Invoice - if checked, the synchronization of 'Add Funds' (Add Credit) invoices will be disabled | *Add Funds Invoice - if checked, the synchronization of 'Add Funds' (Add Credit) invoices will be disabled | ||
| − | * | + | *Zero Invoice - if checked, the synchronization for invoices that amount to 0 will be disabled |
| + | *Prevent Duplication - this option will block the attempt to send the WHMCS invoice to QuickBooks if the same '''invoice ID already exists''' in the QuickBooks Online panel.<br/> This option should '''not''' be used in case there are more than one WHMCS or other systems synchronized with the single QuickBooks Online account as well as the '' 'Synchronize Invoice Number' '' option '''cannot''' be selected. | ||
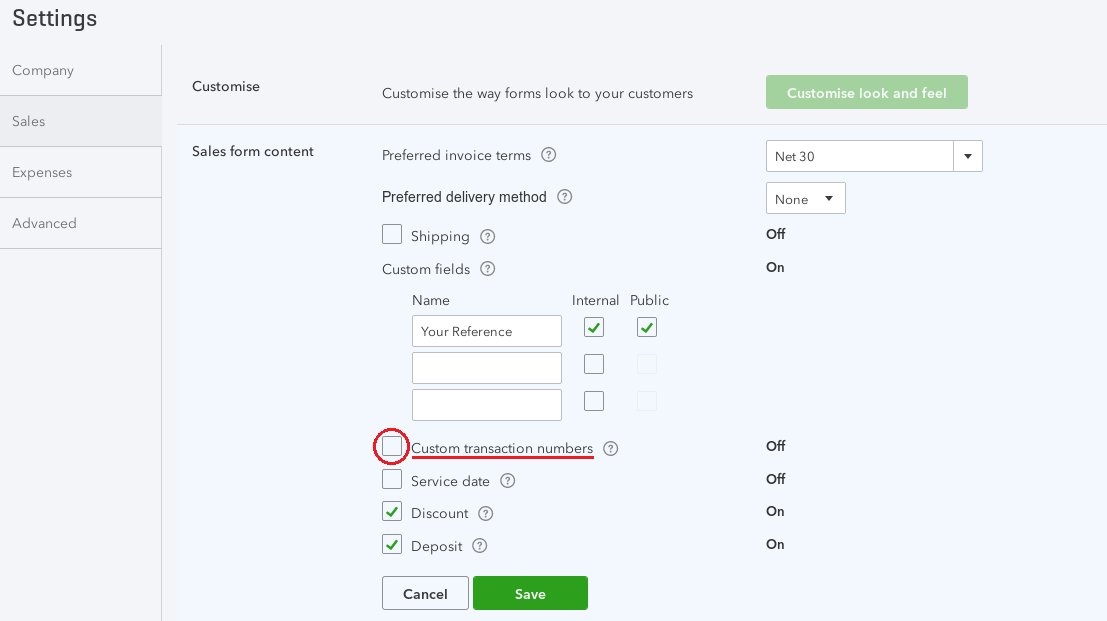
| + | *Synchronize Invoice Number - before assigning the next subsequent WHMCS invoice number, the module will first export that invoice to QuickBooks, where the subsequent invoice number will be generated by QuickBooks itself.<br/> This number will be then assigned as the subsequent number to the WHMCS invoice. To use this invoice synchronization with QuickBooks, the '' 'Custom transaction numbers'' ' option located in '' '[https://www.docs.modulesgarden.com/images/e/e4/Custom_transaction_numbers.png Settings' → 'Sales]' '' of QuickBooks Online configuration panel must be '''disabled'''.<br/> Moreover, this option also '''cannot''' be used along with the '' 'Prevent Duplication' '' feature of module configuration. Thanks to this feature you can also use the module along with more than one WHMCS or other systems synchronized with the single QuickBooks Online account. | ||
'''Payments''' synchronization: | '''Payments''' synchronization: | ||
*Create - performed when a transaction has been completed | *Create - performed when a transaction has been completed | ||
*Delete - takes place when a transaction has been deleted by an admin | *Delete - takes place when a transaction has been deleted by an admin | ||
| + | |||
'''Refunds''' synchronization: | '''Refunds''' synchronization: | ||
*Create - performed when a refund has been completed | *Create - performed when a refund has been completed | ||
*Delete - takes place when a refund has been deleted by an admin | *Delete - takes place when a refund has been deleted by an admin | ||
| − | * | + | *Please note that both payments and refunds are handled together and are displayed as one point on the dashboard called '' 'Payments' '' |
| + | |||
| + | '''Credit''' synchronization: | ||
| + | *Create - performed when the invoice credit has been created | ||
| + | *Update - synchronization is performed when the credit is updated via the "Manage Credits" option | ||
| + | *Delete - synchronization when the credit is deleted via the "Manage Credits" option | ||
| + | *Negative Amount - synchronization of negative amount of credits | ||
| + | *Add - synchronization when the credit is added to invoice | ||
| + | *Remove - synchronization when the credit is removed from invoice | ||
| + | *Create Payment - a payment to deposit is created in QuickBooks when the invoice credit is created | ||
| + | *Delete Payment - the payment to deposit is deleted from QuickBooks when the invoice credit is deleted in the admin area | ||
| + | |} | ||
| + | {| | ||
| + | |style="padding: 0px 0px 20px 25px;"|[[File:QB_10.png]] | ||
|} | |} | ||
{| | {| | ||
| − | |style="padding: 0px 0px 15px 15px;"|Apart from choosing required synchronization options, you have to decide which items from QuickBooks, '' 'Products ', '' '' ' | + | |style="padding: 0px 0px 15px 15px;"|<div id="Gateway Fee"></div>Apart from choosing required synchronization options, you have to decide which items from QuickBooks, '' 'Products ', 'Addons', 'Domains', 'Refund Receipt & Credits Item' '' and '' 'Promotional Item' '' will be associated with.<br />''Note: Default Product will be used only when there is no relation set for the selected product in 'Relation: Product' section.''<br/> |
Choose other options from the dropdown menu to set up. | Choose other options from the dropdown menu to set up. | ||
*Tax Zero-Rated - used when a charged item is not taxed | *Tax Zero-Rated - used when a charged item is not taxed | ||
*Tax Type: | *Tax Type: | ||
| − | * | + | **Exclusive - tax is added to the price |
| − | * | + | **Inclusive 0 - price includes the tax |
| − | * | + | **Out of scope of GTS <br/> '''''Note:''' Keep in mind that by default there is a WHMCS tax type pre-selected.'' |
*Client Display Name Format - use available tag fields to adjust the displayed name view. | *Client Display Name Format - use available tag fields to adjust the displayed name view. | ||
| − | * | + | *Customer Tax ID Custom Field - select the custom field with Tax ID value, it will be synchronized with the QuickBooks "Tax Registration Number" field |
| − | + | *Gateway Fee Account - define the relation between WHMCS transaction fees and the QuickBooks deposit account. For more info on bank deposit configuration please refer to this [https://quickbooks.intuit.com/learn-support/en-us/bank-deposits/record-and-make-bank-deposits-in-quickbooks-online/00/185563 article]. | |
| + | *Fee Gateways - Select single gateways that will be excluded from transaction fees. If a client pays with a payment gateway other than chosen here, transaction fees will be added to the account selected in the above-mentioned '' Gateway Fee Account.''<br/> Leave this field blank to enable fee deposits for all gateways. | ||
| + | *Shorten Transaction ID - select this option to cut every payment Transaction ID that is longer than 21 characters (limit of signs allowed by QuickBooks Online).<br/>In case the transaction ID in WHMCS is longer, it will be cut to allow successful export of such transaction.<!-- See [https://quickbooks.intuit.com/learn-support/en-us/help-article/printing-preferences/character-limitations-fields-quickbooks/L7eIy5gE3_US_en_US documentation] to learn more.--> | ||
| + | *Debug Mode - if selected, logs will be stored in the ' ''Module Log' '' section | ||
|} | |} | ||
{| | {| | ||
| − | |style="padding: 0px 0px 30px 25px;"|[[File: | + | |style="padding: 0px 0px 20px 25px;"|[[File:QB_10_1.png]] |
| + | |} | ||
| + | {| | ||
| + | |style="padding: 0px 0px 15px 15px;"|Thanks to the '' 'Failure Notifications' '' you can select one administrator who will receive an email notification (in either hourly or daily intervals) about failures in the selected items. <br/> | ||
| + | '''Note:''' If you want to enable these notifications you also have to set up the following '''additional''' cron job runs ''hourly'' or ''daily'' depending on the chosen '' 'Time' '' option: | ||
| + | |||
| + | php -q /your_whmcs/modules/addons/QuickBooks/cron/cron.php --failureNotifications | ||
| + | |||
| + | Remember to '' 'Save Changes' '' when your configuration is ready. | ||
| + | |} | ||
| + | {| | ||
| + | |style="padding: 0px 0px 30px 25px;"|[[File:QB_10_2.png]] | ||
|} | |} | ||
==Management== | ==Management== | ||
{| | {| | ||
| − | |style="padding: 10px 0px 30px 15px;"|''' | + | |style="padding: 10px 0px 30px 15px;"|'''In this section, we will show you the possibilities of QuickBooks Online For WHMCS.'''<br /> |
Once the module has been properly connected with QuickBooks and the entire configuration is complete, we can move on to the '' 'Export' '' section. | Once the module has been properly connected with QuickBooks and the entire configuration is complete, we can move on to the '' 'Export' '' section. | ||
|} | |} | ||
| Line 425: | Line 535: | ||
====Clients==== | ====Clients==== | ||
{| | {| | ||
| − | |style="padding: 10px 0px | + | |style="padding: 10px 0px 15px 15px;"|The first option offered by our module is the export of clients from WHMCS to QuickBooks, proceed to '' 'Export' → 'Clients'. '' If you are using QuickBooks Online For WHMCS for the first time,<br /> you will see here a list of all clients who exist in your WHMCS and have not been synchronized with QuickBooks yet.<br /> Use the filter to find clients with their account created within the period of time specified in the filter. |
|} | |} | ||
{| | {| | ||
| Line 431: | Line 541: | ||
|} | |} | ||
{| | {| | ||
| − | |style="padding: 0px 0px | + | |style="padding: 0px 0px 15px 15px;"|Now, you can manually export all of the clients available on the list or choose only some of them.<br /> Check boxes next to the clients you are going to export and press the '' 'Export' '' button as marked on the screen.<br /> If you want to export only one client you can do it by pressing the '' 'Export' '' button located in the '' 'Action' '' column next to the name of the client. |
|} | |} | ||
{| | {| | ||
| Line 439: | Line 549: | ||
|style="padding: 0px 0px 30px 15px;"|If a client has already been exported from WHMCS to QuickBooks, they will no longer be visible on the list. <br/> All clients newly added to WHMCS will be automatically synchronized with QuickBooks, unless set otherwise in '' 'Synchronization Settings'. '' | |style="padding: 0px 0px 30px 15px;"|If a client has already been exported from WHMCS to QuickBooks, they will no longer be visible on the list. <br/> All clients newly added to WHMCS will be automatically synchronized with QuickBooks, unless set otherwise in '' 'Synchronization Settings'. '' | ||
|} | |} | ||
| + | |||
====Invoices==== | ====Invoices==== | ||
{| | {| | ||
| − | |style="padding: 10px 0px | + | |style="padding: 10px 0px 15px 15px;"|The other choice is the export of invoices. <br /> Proceed to '' 'Export' → 'Invoices' '' and you will find a list of all invoices existing in our WHMCS that have not been synchronized with QuickBooks yet.<br /> In details, you will find the information on the invoice: |
*ID | *ID | ||
*date when it was created | *date when it was created | ||
| Line 450: | Line 561: | ||
|} | |} | ||
{| | {| | ||
| − | |style="padding: 0px 0px | + | |style="padding: 0px 0px 15px 15px;"|Just like in case of clients: |
| − | *press '' 'Toggle Filters' '' to use filter to find invoices from the specified period | + | *press '' 'Toggle Filters' '' to use filter to find invoices from the specified period of time |
*perform mass export of all checked invoices | *perform mass export of all checked invoices | ||
*export individual invoices to QuickBooks. | *export individual invoices to QuickBooks. | ||
| Line 466: | Line 577: | ||
|} | |} | ||
{| | {| | ||
| − | |style="padding: 0px 0px 30px 15px;"|Keep in mind that all invoices | + | |style="padding: 0px 0px 30px 15px;"|Keep in mind that all invoices added after the first usage of QuickBooks Online For WHMCS are automatically synchronized and exported to QuickBooks unless otherwise stated in '' 'Synchronization Settings'. '' |
|} | |} | ||
| + | |||
| + | ====Transactions==== | ||
| + | {| | ||
| + | |style="padding: 10px 0px 15px 15px;"|The next choice is the export of transactions. <br /> Proceed to '' 'Export' → 'Transactions' '' and find a list of all transactions in our WHMCS that have not been synchronized with QuickBooks yet.<br /> | ||
| + | |||
| + | '''''Note:''' Only transactions with already exported invoices are on the list of available to export.''<br/> | ||
| + | |} | ||
| + | {| | ||
| + | |style="padding: 0px 0px 15px 15px;"|In details, you will find the information on the transaction: | ||
| + | *ID | ||
| + | *Client assigned | ||
| + | *Date when it was created | ||
| + | *Payment Method | ||
| + | *Description | ||
| + | *Amount In and Out | ||
| + | *Fee | ||
| + | |} | ||
| + | {| | ||
| + | |style="padding: 0px 0px 15px 15px;"|Allowed actions: | ||
| + | *'' 'Toggle Filters' '' to use filter to find transactions from the specified period if time | ||
| + | *perform mass export of all checked transactions | ||
| + | *export individual transactions to QuickBooks. | ||
| + | |} | ||
| + | {| | ||
| + | |style="padding: 0px 0px 20px 25px;"|[[File:QB_13_1.png]] | ||
| + | |} | ||
| + | {| | ||
| + | |style="padding: 0px 0px 30px 15px;"|Keep in mind that all transactions added after the first usage of QuickBooks Online For WHMCS are automatically synchronized and exported to QuickBooks unless otherwise stated in '' 'Synchronization Settings'. '' | ||
| + | |} | ||
| + | ====User Credits==== | ||
| + | {| | ||
| + | |style="padding: 10px 0px 15px 15px;"|Finally, the last section is dedicated to the export of user credits. Proceed to '' 'Export' → 'User Credits' '' and find a list of credits per user, existing in your WHMCS that have not been synchronized with QuickBooks yet. | ||
| + | |} | ||
| + | {| | ||
| + | |style="padding: 0px 0px 15px 15px;"|In details, you will find the information on: | ||
| + | *ID | ||
| + | *Amount | ||
| + | *User First and Last name | ||
| + | *Company name | ||
| + | *Date of creating | ||
| + | *Associated currency | ||
| + | |} | ||
| + | {| | ||
| + | |style="padding: 0px 0px 15px 15px;"|Allowed actions: | ||
| + | *'' 'Toggle Filters' '' to use filter to find transactions from the specified period if time | ||
| + | *perform mass export of all checked transactions | ||
| + | *export individual transactions to QuickBooks. | ||
| + | |} | ||
| + | {| | ||
| + | |style="padding: 0px 0px 20px 25px;"|[[File:QB_13_3.png]] | ||
| + | |} | ||
| + | {| | ||
| + | |style="padding: 0px 0px 30px 15px;"|Keep in mind that all user credits added after the first usage of QuickBooks Online For WHMCS are automatically synchronized and exported to QuickBooks unless otherwise stated in '' 'Synchronization Settings'. '' | ||
| + | |} | ||
| + | |||
===Relation=== | ===Relation=== | ||
{| | {| | ||
|style="padding: 10px 0px 30px 15px;"|It is possible to manually declare relations between WHMCS clients, products as well as invoices and corresponding to them QuickBooks elements.<br /> | |style="padding: 10px 0px 30px 15px;"|It is possible to manually declare relations between WHMCS clients, products as well as invoices and corresponding to them QuickBooks elements.<br /> | ||
This feature is especially helpful when you need to avoid confusion and misunderstandings.<br /> | This feature is especially helpful when you need to avoid confusion and misunderstandings.<br /> | ||
| − | ''Please note that this is an extra option, which gives the possibility to | + | ''Please note that this is an extra option, which gives the possibility to configure relations either manually or automatically.'' |
|} | |} | ||
====Relation: Clients==== | ====Relation: Clients==== | ||
| Line 480: | Line 646: | ||
|} | |} | ||
{| | {| | ||
| − | |style="padding: 0px 0px | + | |style="padding: 0px 0px 20px 25px;"|[[File:QB_30.png]] |
|} | |} | ||
| + | {| | ||
| + | |style="padding: 0px 0px 15px 15px;"|The action buttons give you more control over record updates. | ||
| + | *'''Update Record''' - this button can be used to update a relation manually. If the item has been changed in the QuickBooks Online panel, but that change has not been reflected in the module, the update will be aborted.<br/> You can choose to ignore the difference and potentially overwrite the change by enabling the '' 'Force Update' '' option. This is to prevent unintentional overwriting of changes made in the panel. | ||
| + | *'''Change Lock Status''' - this button can be used to lock or unlock automatic changes to the record. When an attempt to change a locked record is made, the attempt will be blocked and an appropriate notification will be displayed in the logs.<br/>'''All imported items will be locked by default, as showcased in this [[#Importing_QuickBooks_Items|use case]].''' | ||
| + | |} | ||
| + | {| | ||
| + | |style="padding: 0px 0px 30px 25px;"|[[File:QB_30_1.png]] | ||
| + | |} | ||
| + | |||
====Relation: Products==== | ====Relation: Products==== | ||
{| | {| | ||
|style="padding: 10px 0px 15px 15px;"|Products relations can be declared manually and for each product separately along with those declared in '' 'Configuration' → 'Synchronization Settings'.''<br /> | |style="padding: 10px 0px 15px 15px;"|Products relations can be declared manually and for each product separately along with those declared in '' 'Configuration' → 'Synchronization Settings'.''<br /> | ||
| − | Proceed to '' 'Relation' → 'Products', '' you will find there a list of all products with their type and payment standard. <br /> In the last column, there is a dropdown menu with all QuickBooks items that can be assigned to exported products. | + | Proceed to '' 'Relation' → 'Products', '' you will find there a list of all products with their type and payment standard. <br /> In the last column, there is a dropdown menu with all QuickBooks items that can be assigned to exported products.<br/> |
| + | Select the item manually and save the changes or use the '' 'Match Products' '' option to automatically find relations. | ||
|} | |} | ||
{| | {| | ||
| Line 491: | Line 667: | ||
|} | |} | ||
{| | {| | ||
| − | |style="padding: 0px 0px 20px 15px;"|If you need, you can add new products to QuickBooks' items list, just press '' 'New Product' '' button marked on the screen below. | + | |style="padding: 0px 0px 20px 15px;"|When looking for matches automatically, you will get a full view of searched items with positive or negative results. |
| + | |} | ||
| + | {| | ||
| + | |style="padding: 0px 0px 20px 25px;"|[[File:QB_31_2.png]] | ||
| + | |} | ||
| + | {| | ||
| + | |style="padding: 0px 0px 20px 15px;"|If you need, you can add new products to QuickBooks' items list, just press the '' 'New Product' '' button marked on the screen below. | ||
|} | |} | ||
{| | {| | ||
| Line 518: | Line 700: | ||
====Relation: Addons==== | ====Relation: Addons==== | ||
{| | {| | ||
| − | |style="padding: 10px 0px | + | |style="padding: 10px 0px 15px 15px;"|You can assign addons to the items already existing in QuickBooks. Just go to '' 'Relation' → 'Addons' '' directory and choose the addon from a dropdown menu.<br/> Remember to save changes. |
|} | |} | ||
{| | {| | ||
| Line 527: | Line 709: | ||
|} | |} | ||
{| | {| | ||
| − | |style="padding: 0px 0px | + | |style="padding: 0px 0px 20px 25px;"|[[File:QB_37_1.png]] |
| + | |} | ||
| + | {| | ||
| + | |style="padding: 0px 0px 20px 15px;"|Use the '' 'Match Addons' '' button to find any matches automatically. | ||
| + | |} | ||
| + | {| | ||
| + | |style="padding: 0px 0px 30px 25px;"|[[File:QB_37_2.png]] | ||
|} | |} | ||
| Line 536: | Line 724: | ||
|} | |} | ||
{| | {| | ||
| − | |style="padding: 0px 0px | + | |style="padding: 0px 0px 20px 25px;"|[[File:QB_34_1.png]] |
|} | |} | ||
| + | {| | ||
| + | |style="padding: 0px 0px 15px 15px;"|The action buttons give you more control over record updates. | ||
| + | *'''Update Record''' - this button can be used to update a relation manually. If the item has been changed in the QuickBooks Online panel, but that change has not been reflected in the module, the update will be aborted.<br/> You can choose to ignore the difference and potentially overwrite the change by enabling the '' 'Force Update' '' option. This is to prevent unintentional overwriting of changes made in the panel.<br />By default, updating invoice relations will not affect the relations of the items on that invoice. You can, however, enable this option by clicking on '' 'Update Items Relations.' '' | ||
| + | *'''Change Lock Status''' - this button can be used to lock or unlock automatic changes to the record. When an attempt to change a locked record is made, the attempt will be blocked and an appropriate notification will be displayed in the logs.<br/>'''All imported items will be locked by default, as showcased in this [[#Importing_QuickBooks_Items|use case]].''' | ||
| + | |} | ||
| + | {| | ||
| + | |style="padding: 0px 0px 30px 25px;"|[[File:QB_34_2.png]] | ||
| + | |} | ||
| + | |||
====Relation: Tax Rules==== | ====Relation: Tax Rules==== | ||
{| | {| | ||
| − | |style="padding: 10px 0px | + | |style="padding: 10px 0px 15px 15px;"|In '' 'Relation' → 'Tax Rules' '' directory, you will find a list of defined tax rules.<br/> Assign each rule to a specific QuickBooks tax. Select one from a dropdown menu and save changes. |
|} | |} | ||
{| | {| | ||
| Line 547: | Line 744: | ||
====Relation: Payment Gateways==== | ====Relation: Payment Gateways==== | ||
{| | {| | ||
| − | |style="padding: 10px 0px 20px 15px;"|In '' 'Relation' → 'Payment Gateways', '' there is a list of | + | |style="padding: 10px 0px 20px 15px;"|In '' 'Relation' → 'Payment Gateways', '' there is a list of active payment gateways, select a QuickBooks Payment Method for each of the gateways. Save the changes when ready.<br/> |
| + | When you click the button in the '' 'Action' '' section, you can set relations for the previously chosen payment method. | ||
|} | |} | ||
{| | {| | ||
| Line 553: | Line 751: | ||
|} | |} | ||
{| | {| | ||
| − | |style="padding: 0px 0px | + | |style="padding: 0px 0px 20px 15px;"|Define the relation by assigning one of the QuickBooks payment deposits to a single currency. |
| − | + | ||
|} | |} | ||
{| | {| | ||
| Line 560: | Line 757: | ||
|} | |} | ||
{| | {| | ||
| − | |style="padding: 0px 0px | + | |style="padding: 0px 0px 15px 15px;"|In this way, the relation between the payment method and the payment deposit, per currency, has been set.<br/> |
| + | '''''Note:''' In order to be able to assign an account to a currency, this currency must be previously properly configured in the QuickBooks Online panel → 'Account'.'' | ||
| + | |} | ||
| + | {| | ||
| + | |style="padding: 0px 0px 30px 15px;"|'''Transaction Fees'''<br/> | ||
| + | It is possible to configure the payment gateway account where transaction fees will be delivered.<br/> | ||
| + | In order to properly configure gateway fees, go back to '' 'Configuration' → '[[#Gateway Fee|Synchronization Settings]]','' there select an account in '' 'Gateway Fee Account'.'' <br/>Make sure you have selected your account that is related to WHMCS transactions. Once an invoice is exported, a transaction fee will be stored on the selected account.<br/> You may check logs to see if the action has been completed successfully. | ||
|} | |} | ||
| − | === | + | ====Relation: Transactions==== |
| + | {| | ||
| + | |style="padding: 10px 0px 15px 15px;"|In '' 'Relation' → 'Transactions', '' there is a list of transactions. Select the one you wish to use from a dropdown menu. Save changes.<br/> | ||
| + | Use the '' 'Match Transactions' '' button to automatically find an existing relation in QuickBooks without a manual search for every single transaction.<br/>You will get an extended list with information for which of the transactions a match has been found. | ||
| + | |} | ||
| + | {| | ||
| + | |style="padding: 0px 0px 20px 25px;"|[[File:QB_38_2.png]] | ||
| + | |} | ||
| + | {| | ||
| + | |style="padding: 0px 0px 15px 15px;"|The action buttons give you more control over record updates. | ||
| + | *'''Update Record''' - this button can be used to update a relation manually. If the item has been changed in the QuickBooks Online panel, but that change has not been reflected in the module, the update will be aborted.<br/> You can choose to ignore the difference and potentially overwrite the change by enabling the '' 'Force Update' '' option. This is to prevent unintentional overwriting of changes made in the panel. | ||
| + | *'''Change Lock Status''' - this button can be used to lock or unlock automatic changes to the record. When an attempt to change a locked record is made, the attempt will be blocked and an appropriate notification will be displayed in the logs.<br/>'''All imported items will be locked by default, as showcased in this [[#Importing_QuickBooks_Items|use case]].''' | ||
| + | |} | ||
| + | {| | ||
| + | |style="padding: 0px 0px 30px 25px;"|[[File:QB_38_2_1.png]] | ||
| + | |} | ||
| + | |||
| + | ====Relation: User Credits==== | ||
| + | {| | ||
| + | |style="padding: 10px 0px 15px 15px;"|Finally, in '' 'Relation' → 'User Credits' '' section, you may find a list of existing credits. Select the QuickBooks credit equivalent per single credit from a dropdown menu and then save the changes.<br> | ||
| + | Use the '' 'Match Credits' '' button to automatically find an existing relation in QuickBooks without a manual search for every single credit. | ||
| + | |} | ||
| + | {| | ||
| + | |style="padding: 0px 0px 20px 25px;"|[[File:QB_38_6.png]] | ||
| + | |} | ||
| + | {| | ||
| + | |style="padding: 0px 0px 15px 15px;"|The action buttons give you more control over record updates. | ||
| + | *'''Update Record''' - this button can be used to update a relation manually. If the item has been changed in the QuickBooks Online panel, but that change has not been reflected in the module, the update will be aborted.<br/> You can choose to ignore the difference and potentially overwrite the change by enabling the '' 'Force Update' '' option. This is to prevent unintentional overwriting of changes made in the panel. | ||
| + | *'''Change Lock Status''' - this button can be used to lock or unlock automatic changes to the record. When an attempt to change a locked record is made, the attempt will be blocked and an appropriate notification will be displayed in the logs. | ||
| + | |} | ||
| + | {| | ||
| + | |style="padding: 0px 0px 30px 25px;"|[[File:QB_38_7.png]] | ||
| + | |} | ||
| + | |||
| + | ====Relation: Custom Rules==== | ||
| + | {| | ||
| + | |style="padding: 10px 0px 15px 15px;"|The last on the list of '' 'Relations' → 'Custom Rules','' allows creating and management of existing custom rules. Its aim is to manage items that exist on the invoice but have no relation. <br/> The rule task checks if these items have any matching type in QuickBooks.<br/> | ||
| + | Press ' ''Add New' '' button to create a custom rule.<br/> | ||
| + | '''Important!''' Please remember that '' 'Custom Rules' '' are based on regular PHP expressions. An exemplary '' 'Custom Rule' '' is '''car(.*)''' | ||
| + | |} | ||
| + | {| | ||
| + | |style="padding: 0px 0px 20px 25px;"|[[File:QB_38_3.png]] | ||
| + | |} | ||
| + | {| | ||
| + | |style="padding: 0px 0px 15px 15px;"|Provide necessary details of the created rule to make it work properly. These are: | ||
| + | *Name - a friendly name of the rule | ||
| + | *Custom Rule → for example ''car(.*)'' which is a regular PHP expression | ||
| + | *Priority - the higher the number, the lower the priority, use integers only | ||
| + | *QuickBooks Service - select service that will be checked with the rule<br/> | ||
| + | Press '' 'Save Changes' '' when ready. | ||
| + | |} | ||
| + | {| | ||
| + | |style="padding: 0px 0px 30px 25px;"|[[File:QB_38_4.png]] | ||
| + | |} | ||
| + | {| | ||
| + | |style="padding: 0px 0px 15px 15px;"|A new rule appears on the list immediately.<br/> | ||
| + | You may edit its specification at any moment, just press the marked on the screen icon (1). <br/> Delete (2) unused rules from the list. | ||
| + | |} | ||
| + | {| | ||
| + | |style="padding: 0px 0px 30px 25px;"|[[File:QB_38_5.png]] | ||
| + | |} | ||
| + | |||
| + | ====Automatically Match Relations==== | ||
| + | {| | ||
| + | |style="padding: 10px 0px 15px 15px;"|As you have noticed in the above sections, there is an option to find appropriate matches in QuickBooks and set the relations between the items within one group (e.g. Products or Domains) automatically.<br/> | ||
| + | All you have to do is press the '' 'Match Products/Domains/Invoices' '' etc. button. You will be asked to confirm the action and soon after that the process of looking for matches stars.<br/> | ||
| + | Once ready, you will see a full list with results. Successfully found matches in green and no match found for an item in red.<br/> | ||
| + | Found relations will be set automatically. | ||
| + | |} | ||
| + | {| | ||
| + | |style="padding: 0px 0px 20px 25px;"|[[File:QB_39_1.png]] | ||
| + | |} | ||
| + | {| | ||
| + | |style="padding: 0px 0px 15px 15px;"|Here you can find a detailed list of items taken into consideration by the module when looking for a match in QuickBooks: | ||
| + | |} | ||
| + | {| class="wikitable" style="margin-left: 25px; width: 15%;" | ||
| + | ! WHMCS Item | ||
| + | ! Matched Feature | ||
| + | |- | ||
| + | | style="font-weight:bold; background-color:#efefef; color:#333333;" | Clients | ||
| + | | Email | ||
| + | |- | ||
| + | | style="font-weight:bold; background-color:#efefef; color:#333333;" | Products | ||
| + | | Name | ||
| + | |- | ||
| + | | style="font-weight:bold; background-color:#efefef; color:#333333;" | Domains | ||
| + | | Name | ||
| + | |- | ||
| + | | style="font-weight:bold; background-color:#efefef; color:#333333;" | Addons | ||
| + | | Name | ||
| + | |- | ||
| + | | style="font-weight:bold; background-color:#efefef; color:#333333;" | Invoices | ||
| + | | Invoice ID | ||
| + | |- | ||
| + | | style="font-weight:bold; background-color:#efefef; color:#333333;" | Transactions | ||
| + | | Transaction ID | ||
| + | |- | ||
| + | | style="font-weight:bold; background-color:#efefef; color:#333333;" | User Credits | ||
| + | | Amount, Date of Creation | ||
| + | |} | ||
{| | {| | ||
| − | |style="padding: | + | |style="padding: 0px 0px 30px 15px;"| |
| − | + | *Email - keep in mind that email addresses must be identical (only 1:1 match) | |
| − | + | *Name - keep in mind that names must be identical (only 1:1 match) | |
| + | *ID - 1:1 match only, when the ID is shortened, the relation must be set up manually ''('Shorten Transaction ID' option is on)'' | ||
|} | |} | ||
| − | === | + | ===Utilities=== |
{| | {| | ||
| − | |style="padding: 10px 0px | + | |style="padding: 10px 0px 30px 15px;"| The module features additional utilities that can assist you in various ways. Each tool serves a unique purpose, as detailed in the section below.<br/>By utilizing these additional utilities, you can easily understand the inner workings of the module on the elementary level. |
| + | |} | ||
| + | ====Logs==== | ||
| + | {| | ||
| + | |style="padding: 10px 0px 15px 15px;"|In the '' 'Logs' '' tab there are enumerated '''ALL''' actions on clients, invoices and transactions. <br />Regardless if they were taken manually in the module, automatically or by a cron job. <br /> A list of all entries with precisely described details and an exact date of the action can be found there. | ||
|} | |} | ||
{| | {| | ||
| Line 578: | Line 885: | ||
|} | |} | ||
{| | {| | ||
| − | |style="padding: 0px 0px 30px 15px;"|Clear all the entries or delete only some of them. Use buttons marked on the screen above. | + | |style="padding: 0px 0px 30px 15px;"|Clear all the entries or delete only some of them. Use the buttons marked on the screen above. |
|} | |} | ||
| + | |||
| + | ====Revision History==== | ||
| + | {| | ||
| + | |style="padding: 10px 0px 15px 15px;"| All changes made by the module to the QuickBooks Online platform are stored here, so you can easily compare any differences made with each update. <br/> | ||
| + | Use the action button to see related items. | ||
| + | |} | ||
| + | {| | ||
| + | |style="padding: 0px 0px 30px 25px;"|[[File:QB_16_1.png]] | ||
| + | |} | ||
| + | |||
===Dashboard=== | ===Dashboard=== | ||
{| | {| | ||
| Line 592: | Line 909: | ||
{| | {| | ||
|style="padding: 10px 0px 30px 15px;"|The very last tab '' 'Documentation' '' will, once clicked, redirect you to the article you are currently reading. | |style="padding: 10px 0px 30px 15px;"|The very last tab '' 'Documentation' '' will, once clicked, redirect you to the article you are currently reading. | ||
| + | |} | ||
| + | |||
| + | =Use Cases= | ||
| + | {| | ||
| + | |style="padding: 10px 0px 30px 15px;"|'''This section provides real-world examples of how the module can be used.'''<br/> | ||
| + | It includes specific scenarios that illustrate typical use cases and explains how the module's features can be applied in practice.<br/> Reviewing these scenarios will give you a better understanding of how to use the module effectively. | ||
| + | |} | ||
| + | ==Importing QuickBooks Items== | ||
| + | {| | ||
| + | |style="padding: 10px 0px 5px 15px;"|'''QuickBooks Online For WHMCS''' has a complex solution for existing QuickBooks Online panel users that already have a robust database of clients, invoices and transactions.<br /> | ||
| + | There is no need to start over because you can import everything effortlessly and reliably. See the instructions below to learn how. | ||
| + | |} | ||
| + | {| | ||
| + | |style="padding: 0px 0px 5px 15px;"|First, we need to run a cron command that will import clients, invoices and transactions for us.<br /> | ||
| + | Here is a list of commands: | ||
| + | * ''importClients'' | ||
| + | * ''importInvoices'' | ||
| + | * ''importTransactions'' | ||
| + | And the cron itself: | ||
| + | php -q /yourWHMCS/modules/addons/QuickBooks/cron/synchronization.php --importInvoices --from='2022-09-09' | ||
| + | Run the cron with each of the commands as needed, the date modifier is optional, if it is not included, '''all''' items from the category will be imported. | ||
| + | |} | ||
| + | {| | ||
| + | |style="padding: 0px 0px 10px 15px;"|Once the data is imported, you should notice that each entity has the update lock '''ON''' by default. This is the case for each of the imported entities (Clients, Invoices, Transactions). | ||
| + | |} | ||
| + | {| | ||
| + | |style="padding: 0px 0px 20px 25px;"|[[File:QB2_19.png]] | ||
| + | |} | ||
| + | {| | ||
| + | |style="padding: 0px 0px 20px 15px;"|If we change the data in WHMCS, in this case, the company name and try to update the new information into the QuickBooks Online panel, the attempt will be blocked. | ||
| + | |} | ||
| + | {| | ||
| + | |style="padding: 0px 0px 20px 25px;"|[[File:QB2_20.png]] | ||
| + | |} | ||
| + | {| | ||
| + | |style="padding: 0px 0px 20px 15px;"|The lock can be disabled, allowing admins to freely upload the changes to the QuickBooks Online panel. | ||
| + | |} | ||
| + | {| | ||
| + | |style="padding: 0px 0px 20px 25px;"|[[File:QB2_21.png]] | ||
| + | |} | ||
| + | {| | ||
| + | |style="padding: 0px 0px 20px 15px;"|However, if we generally want to keep the details from being edited, but still want to change something specific, we can force the update and ignore the restrictions. | ||
| + | |} | ||
| + | {| | ||
| + | |style="padding: 0px 0px 30px 25px;"|[[File:QB2_22.png]] | ||
|} | |} | ||
=Tips= | =Tips= | ||
{| | {| | ||
| − | |style="padding: 10px 0px | + | |style="padding: 10px 0px 15px 15px;"|1. The status of the invoice in QuickBooks may differ from the one visible in WHMCS. It will be marked as paid only if it is associated with payments of exactly the same amount.<br/> |
| − | + | If there was no such real payment, the invoice will be marked as '' 'Unpaid'. '' | |
| − | + | ||
|} | |} | ||
| + | {| | ||
| + | |style="padding: 0px 0px 30px 15px;"|2. It is possible to '''import''' QuickBooks '''clients, invoices,''' and their '''transactions''' into the WHMCS system using the CLI cron job commands. '''Relations of the imported items will be locked by default.'''<br/>Use the following commands to run tasks: | ||
| + | *''importClients'' | ||
| + | *''importInvoices'' | ||
| + | *''importTransactions''<br/> | ||
| + | for example: | ||
| + | <pre> | ||
| + | php -q /yourWHMCS/modules/addons/QuickBooks/cron/synchronization.php --importInvoices --from='2022-09-09' | ||
| + | </pre> | ||
| + | or without a specified date: | ||
| + | |||
| + | <pre> | ||
| + | php -q /yourWHMCS/modules/addons/QuickBooks/cron/synchronization.php --importTransactions | ||
| + | </pre> | ||
| + | |} | ||
| + | <!-- | ||
| + | doszła opcja Credits q Configuracji | ||
| + | {| | ||
| + | |style="padding: 0px 0px 30px 15px;"|2. If you add a single transaction in WHMCS using the '' 'Add to Client's Credit Balance' '' option, a transaction corresponding to this one will be also created in QuickBooks.<br/> | ||
| + | Afterward, when the customer pays the invoice using WHMCS credits, this invoice will also be added to the previously created transaction in QuickBooks (provided that there are sufficient funds in this transaction). | ||
| + | |} | ||
| + | --> | ||
=Update Instructions= | =Update Instructions= | ||
{| | {| | ||
| − | |style="padding: 10px 0px 30px 15px;"| | + | |style="padding: 10px 0px 30px 15px;"|An essential guidance through the process of updating the module is offered '''[https://www.docs.modulesgarden.com/How_To_Update_WHMCS_Module here]'''.<br/> |
| − | + | Ensure successful completion of the module update by carefully following each step, thereby preventing data loss or any unforeseen issues.<br/> Additionally, you will find a current list of supplementary actions necessary for a smooth update process there. | |
| − | + | |} | |
| + | =Upgrade Guide= | ||
| + | {| | ||
| + | |style="padding: 10px 0px 30px 15px;"|Seeking a solution that offers greater flexibility, customization tailored to your precise needs, and unrestricted availability?<br/> There is an option that not only proves to be cost-effective in the long run but also includes prioritized support services, making it a truly valuable investment.<br/> | ||
| + | |||
| + | Opt for the [https://www.modulesgarden.com/products/whmcs/quickbooks-online#open-source-version Open Source version] of your QuickBooks Online For WHMCS module to unlock these benefits.<br/> Simply click on either the '''Get Source Code''' or '''Upgrade To Lifetime''' button found on the product's page in our client area to complete the one-step upgrade process, with a '''dedicated discount''' already applied.<br/> | ||
| + | |||
| + | Follow a [https://www.docs.modulesgarden.com/How_To_Upgrade_WHMCS_Module comprehensive guide] covering the transition process, the advantages it brings, and step-by-step instructions on what to do next after the order has been successfully finalized. | ||
|} | |} | ||
| Line 619: | Line 1,009: | ||
|} | |} | ||
{| | {| | ||
| − | |style="padding: 0px 0px 10px 15px;"|4. In case you encounter any issues with installation and configuration please make sure you have OAuth PHP Class installed.<br/> | + | |style="padding: 0px 0px 10px 15px;"|4. In case you encounter any issues with installation and configuration please make sure you have OAuth PHP Class installed.<br/>Without that, the module will not work properly. |
| − | + | |} | |
| + | {| | ||
| + | |style="padding: 0px 0px 10px 15px;"|5. You may encounter the API ''' '#OAuthException' ''' error with ''' 'making the request failed (dunno why)' ''' message during configuration.<br />If so, first try to enable ''' 'allow_url_fopen' ''' option in your PHP configuration by setting up the '' 'allow_url_fopen = on' '' line in '' 'php.ini' '' file and restart the apache2 server. If you need more information you may check it [https://www.a2hosting.com/kb/developer-corner/php/using-php.ini-directives/php-allow-url-fopen-directive here]. | ||
| + | |} | ||
| + | {| | ||
| + | |style="padding: 0px 0px 10px 15px;"|6. It may happen that the following error occurs when attempting to connect QuickBooks Online service: '' '[https://www.docs.modulesgarden.com/images/0/08/QB_39.png We're sorry! We're experiencing some problems. Please try again later.]' '' <br/>In that case, make sure you have set up the '' 'Redirect URI' '' correctly, as described [https://www.docs.modulesgarden.com/QuickBooks_Online_For_WHMCS#For_OAuth_2.0 here]. | ||
| + | |} | ||
| + | {| | ||
| + | |style="padding: 0px 0px 10px 15px;"|7. Applications created before July 17th, 2017 which are still using OAuth 1.0 authentication method are no longer supported by the module.<br/> Please create a new application that will support OAuth 2.0 or contact Intuit support to migrate your old application to OAuth 2.0 at https://intuit.me/intuit-oauth2. | ||
|} | |} | ||
{| | {| | ||
| − | |style="padding: 0px 0px | + | |style="padding: 0px 0px 5px 15px;"|8. If you encounter an error:<br/> |
| − | + | '' 'Required param missing, need to supply the required value for the API Required parameter TxnTaxDetail.TaxLineDetail.TaxLine.TaxRateRef is missing in the request.' ''<br/> | |
| + | '''Solution:''' Make sure that relations for the [[#Relation:_Tax_Rules|tax rules]] are set up correctly. | ||
|} | |} | ||
{| | {| | ||
| − | |style="padding: 0px 0px 30px 15px;"| | + | |style="padding: 0px 0px 30px 15px;"|9. If, after adding credits to a WHMCS invoice, you encountered problems with synchronizing the status of that invoice in the QuickBooks panel, please make sure that the option ''"Add - synchronization when the credit is added to invoice"'' is enabled in our addon.<br/> Otherwise, the invoice will be still marked as "Unpaid" although credits have been applied. |
| − | + | ||
|} | |} | ||
Latest revision as of 14:07, 30 April 2024
[edit] About QuickBooks Online For WHMCS
| QuickBooks Online For WHMCS is responsible for data synchronization between your system and QuickBooks, it is a comprehensive, accounting software solution. The module will let you manage the integration of your clients details, invoices and transactions into QuickBooks database. |
- Module Features:
| ✔ Export Manually: |
| ✔ Clients |
| ✔ Invoices |
| ✔ Transactions |
| ✔ User Credits |
| ✔ Export Automatically: |
| ✔ Clients |
| ✔ Invoices |
| ✔ Transactions |
| ✔ User Credits |
| ✔ Import Manually via Cron: |
| ✔ Customers |
| ✔ Invoices |
| ✔ Transactions |
| ✔ Manage Relations: |
| ✔ Clients |
| ✔ Products |
| ✔ Domains |
| ✔ Addons |
| ✔ Invoices |
| ✔ Tax Rules |
| ✔ Payment Gateways - Including Currencies And Payment Deposits |
| ✔ Transactions |
| ✔ User Credits |
| ✔ Create Own Custom Rules |
| ✔ Set Relations Automatically Or Manually |
| ✔ Force Update And Lock Status Of: |
| ✔ Clients |
| ✔ Invoices |
| ✔ Transactions |
| ✔ Credits |
| ✔ Toggle Update Of Invoice Item Relation On Its Edition |
| ✔ View Export And Cron Run Summary |
| ✔ Define Automatic Export Settings Of: |
| ✔ Client |
| ✔ Invoice |
| ✔ Payment |
| ✔ Refund |
| ✔ Credit |
| ✔ Define Default Products Item |
| ✔ Define Default Addons Item |
| ✔ Define Default Domains Item |
| ✔ Define Default Refund Receipt Item |
| ✔ Define Default Promotional Item |
| ✔ Define Default Credits Item |
| ✔ Define Tax Zero-Rated |
| ✔ Define Tax Type |
| ✔ Define Client Name Display Format |
| ✔ Define Customer Tax ID Custom Field |
| ✔ Define Gateway Fee Account |
| ✔ Define Fee Gateways |
| ✔ Define Shorten Transaction ID Method |
| ✔ Define Webhooks Token |
| ✔ Define Synchronization Settings |
| ✔ Toggle Debug Mode |
| ✔ Configure Failure Notifications |
| ✔ View Logs |
| ✔ View Revision History |
- General Info:
| ✔ Multi-Currency Support |
| ✔ Refunds Support |
| ✔ Can Work Along Other Systems On Single QuickBooks Account |
| ✔ Multi-Language Support |
| ✔ Supports OAuth 2.0 |
| ✔ Supports PHP 8.1 Back To PHP 7.4 |
| ✔ Supports WHMCS V8.10 Back To WHMCS V8.7 |
| ✔ Easy Module Upgrade To Open Source Version |
- Requirements:
| ✔ QuickBooks Online Account |
| ✔ ionCube Loader V12 Or Later |
| ✔ OAuth PHP Library - Connect Using Secure Protocol |
[edit] Installation
| This tutorial will show you how to successfully install and configure QuickBooks Online For WHMCS. We will guide you step by step through the whole installation and configuration process. |
| 1. Log in to our client area and download the module. |

|
| 2. In the downloaded file you find a package that supports PHP 7.3 up to 8.1. version. Note: You can check the current PHP version in your WHMCS. To do so, proceed to 'Utilities' → 'System' → 'PHP Info'. |
| 3. Extract the package and upload its content into the main WHMCS directory.
The content of the package to upload should look like this. |
| 4. When you install QuickBooks Online For WHMCS for the first time you have to rename the 'license_RENAME.php' file. The file is located in 'modules/addons/QuickBooks/license_RENAME.php'. Rename it from 'license_RENAME.php' to 'license.php'. |

|
| 5. In order to configure your license key, you have to edit the previously renamed 'license.php' file. Enter your license key between quotation marks as presented on the following screen. You can find your license key in our client area → 'My Products'. |

|
| 6. Now you have to activate the module in your WHMCS system. Log in to your WHMCS admin area. Go to 'Setup' → 'Addon Modules'. Afterwards, find 'QuickBooks' and press the 'Activate' button. |

|
| 7. In the next step you need to permit access to this module. To do so, click on the 'Configure' button, check the required group of administrators and press 'Save Changes'. |

|
| 8. You have just successfully installed QuickBooks Online For WHMCS! You can access your module under 'Addons' → 'QuickBooks'. |
[edit] Configuration and Management
| QuickBooks Online For WHMCS is a module which allows you to export any data on clients, invoices and payments directly to QuickBooks. Read the below manual to learn about all the possibilities that the module offers. |
[edit] API Keys
| Before you move to the essential configuration of the module, you need to generate some data directly in QuickBooks. Please follow the steps below. 1. Log in to: https://developer.intuit.com/
|

|
| 2. Once you are logged in, move to 'Dashboard' and find the 'Apps' tab on the 'My Apps Dashboard', press 'Create an app'. |

|
| 3. Select the following platform: 'QuickBooks Online and Payments' . |

|
| 4. Then provide a name of your app and choose the 'Accounting' scope on the list. |

|
5. Now, go to the 'Production Settings' tab and provide the 'End User License Agreement URL' along with 'Privacy Policy URL' in the 'Terms of Service Links' section.
Save the changes when all data is provided. |

|
| 6. Then, proceed to the 'Keys & Credentials' section where you will be asked to fill out a 30 min questionnaire. Only once ready you will get access to your Keys & Credentials section. |

|

|
7. You need to provide a proper callback QuickBooks URI from your WHMCS installation in the following format:https://yourdomain.com/admin/addonmodules.php?quickBooksCallbackOauth2 Note that your 'admin' folder might have a different name than the default one. The provided URL also has to start with https:// .
These keys are very important, you will need them in the very next step of the module configuration. Please keep them safe. |

|
| 8. Now move to the 'Webhooks' tab. Here you will have to generate a token that will be used to enable Webhooks for synchronization. First of all, provide a valid Endpoint URL to the 'webhooks.php' file. That is what such URL may look like. Please remove 'yourdomain.com' and insert your actual address. https://yourdomain.com/modules/addons/QuickBooks/webhooks.php Note: The provided URL has to start with https:// . Then select required events that will be triggered. |

|
| 8. Copy adequate Verifier token. It will be necessary during the module configuration. |

|
[edit] Configuration
| In order to configure your module properly, proceed to 'Addons' → 'QuickBooks Online' → 'Configuration'. |
| 1. Start with API configuration, since this part is very basic and absolutely necessary to take any further steps. Currently, your 'Connection Status' is 'Not Connected'. In order to establish connection with QuickBooks Online, press the connection button: |

|
| A box will appear where you will have to type in all the previously generated data. It will allow the module to authenticate your identity in QuickBooks system and let your WHMCS connect with it.
|

|
| If the entered data are correct, you will be redirected to QuickBooks where you will have to agree to authenticate the connection. Only then the connection status in your module will change to 'Connected,' the data on your company will be automatically downloaded from QuickBooks and filled out here. From now on, you will be able to use your QuickBooks Online For WHMCS module. |

|
| You have to do this step only once. Entering the token and consumer keys will not be required again, even if the module is deactivated in the meantime. |
| 2. Webhooks Token - enter the token to maintain synchronization. Use the token generated as explained in steps 7 and 8 in the API Keys section. |

|
3. Cron configuration - set up cron jobs.
php -q modules/addons/QuickBooks/cron/synchronization.php --export --invoices-from= for example: php -q modules/addons/QuickBooks/cron/synchronization.php --export --invoices-from=2018-01-01 In the above case, clients with their invoices since 01.01.2018 will be exported to QuickBooks.
Note: Please refer to the Tips section to learn how to import the QuickBooks clients, invoices, and their transactions into the WHMCS system using the CLI cron job commands. |

|
| 4. Multi-Currency configuration. If the connection with QuickBooks has been set up properly, currency details will be visible.
The above data are synchronized with your QuickBooks account. |

|
| 5. Synchronization Settings - decide which of the possible synchronization options you want to enable. Simply tick the ones you are interested in. |
| There are: Clients synchronization:
Invoices synchronization:
Payments synchronization:
Refunds synchronization:
Credit synchronization:
|

|
| Apart from choosing required synchronization options, you have to decide which items from QuickBooks, 'Products ', 'Addons', 'Domains', 'Refund Receipt & Credits Item' and 'Promotional Item' will be associated with. Note: Default Product will be used only when there is no relation set for the selected product in 'Relation: Product' section. Choose other options from the dropdown menu to set up.
|

|
| Thanks to the 'Failure Notifications' you can select one administrator who will receive an email notification (in either hourly or daily intervals) about failures in the selected items. Note: If you want to enable these notifications you also have to set up the following additional cron job runs hourly or daily depending on the chosen 'Time' option: php -q /your_whmcs/modules/addons/QuickBooks/cron/cron.php --failureNotifications Remember to 'Save Changes' when your configuration is ready. |

|
[edit] Management
| In this section, we will show you the possibilities of QuickBooks Online For WHMCS. Once the module has been properly connected with QuickBooks and the entire configuration is complete, we can move on to the 'Export' section. |
[edit] Export
| Our module enables several ways to export any data gathered in your WHMCS. Read the below points to learn what data can be synchronized with QuickBooks and what are the possible means of such synchronization. |
[edit] Clients
| The first option offered by our module is the export of clients from WHMCS to QuickBooks, proceed to 'Export' → 'Clients'. If you are using QuickBooks Online For WHMCS for the first time, you will see here a list of all clients who exist in your WHMCS and have not been synchronized with QuickBooks yet. Use the filter to find clients with their account created within the period of time specified in the filter. |

|
| Now, you can manually export all of the clients available on the list or choose only some of them. Check boxes next to the clients you are going to export and press the 'Export' button as marked on the screen. If you want to export only one client you can do it by pressing the 'Export' button located in the 'Action' column next to the name of the client. |

|
| If a client has already been exported from WHMCS to QuickBooks, they will no longer be visible on the list. All clients newly added to WHMCS will be automatically synchronized with QuickBooks, unless set otherwise in 'Synchronization Settings'. |
[edit] Invoices
| The other choice is the export of invoices. Proceed to 'Export' → 'Invoices' and you will find a list of all invoices existing in our WHMCS that have not been synchronized with QuickBooks yet. In details, you will find the information on the invoice:
|
Just like in case of clients:
|

|
| Once you have exported some of the invoices, you will see their number along with the number of any transactions connected with them in the 'Summary' table on the dashboard. |

|
| Keep in mind that all invoices added after the first usage of QuickBooks Online For WHMCS are automatically synchronized and exported to QuickBooks unless otherwise stated in 'Synchronization Settings'. |
[edit] Transactions
| The next choice is the export of transactions. Proceed to 'Export' → 'Transactions' and find a list of all transactions in our WHMCS that have not been synchronized with QuickBooks yet. Note: Only transactions with already exported invoices are on the list of available to export. |
In details, you will find the information on the transaction:
|
Allowed actions:
|

|
| Keep in mind that all transactions added after the first usage of QuickBooks Online For WHMCS are automatically synchronized and exported to QuickBooks unless otherwise stated in 'Synchronization Settings'. |
[edit] User Credits
| Finally, the last section is dedicated to the export of user credits. Proceed to 'Export' → 'User Credits' and find a list of credits per user, existing in your WHMCS that have not been synchronized with QuickBooks yet. |
In details, you will find the information on:
|
Allowed actions:
|

|
| Keep in mind that all user credits added after the first usage of QuickBooks Online For WHMCS are automatically synchronized and exported to QuickBooks unless otherwise stated in 'Synchronization Settings'. |
[edit] Relation
| It is possible to manually declare relations between WHMCS clients, products as well as invoices and corresponding to them QuickBooks elements. This feature is especially helpful when you need to avoid confusion and misunderstandings. |
[edit] Relation: Clients
| The first possible relations to be declared are relations of WHMCS clients towards the client's account in QuickBooks. Proceed to 'Relation' → 'Clients', you will find there a list of all clients, with their email addresses, that exist in WHMCS, |

|
The action buttons give you more control over record updates.
|

|
[edit] Relation: Products
| Products relations can be declared manually and for each product separately along with those declared in 'Configuration' → 'Synchronization Settings'. Proceed to 'Relation' → 'Products', you will find there a list of all products with their type and payment standard. |

|
| When looking for matches automatically, you will get a full view of searched items with positive or negative results. |

|
| If you need, you can add new products to QuickBooks' items list, just press the 'New Product' button marked on the screen below. |

|
| Name the new item, you can describe it shortly in addition, state its price/rate and choose account. Once you save changes, the new item will be visible on the QuickBooks item dropdown menu. You can now use it to assign WHMCS products to it. |

|
| For different billing cycle you can also assign the item that will have its own cycle in QuickBooks. Just press the action button, select one form dropdown menu and save changes. |

|
[edit] Relation: Domains
| In 'Relation' → 'Domains' tab, you will find a list of all WHMCS domains with their TLD. Assigning a WHMCS domain to another QuickBooks item is possible. Just choose such a domain from a dropdown menu and save changes. |

|
[edit] Relation: Addons
| You can assign addons to the items already existing in QuickBooks. Just go to 'Relation' → 'Addons' directory and choose the addon from a dropdown menu. Remember to save changes. |

|
| It is also possible to add a new addon. To do so, just click the button as shown above and provide some details. Name the new item, you can also describe it shortly, state its price/rate and choose an account. Once you save changes, the new addon will be visible on the QuickBooks item dropdown menu. You can now use it to assign WHMCS products to it. |

|
| Use the 'Match Addons' button to find any matches automatically. |

|
[edit] Relation: Invoices
| In 'Relation' → 'Invoices' directory, you will find a list of all WHMCS invoices with their ID, date of creation, assigned client, total sum on it and status. It is possible to assign the WHMCS invoice to another invoice already exported to QuickBooks. Just choose such an invoice from a dropdown menu and save changes. |

|
The action buttons give you more control over record updates.
|

|
[edit] Relation: Tax Rules
| In 'Relation' → 'Tax Rules' directory, you will find a list of defined tax rules. Assign each rule to a specific QuickBooks tax. Select one from a dropdown menu and save changes. |

|
[edit] Relation: Payment Gateways
| In 'Relation' → 'Payment Gateways', there is a list of active payment gateways, select a QuickBooks Payment Method for each of the gateways. Save the changes when ready. When you click the button in the 'Action' section, you can set relations for the previously chosen payment method. |

|
| Define the relation by assigning one of the QuickBooks payment deposits to a single currency. |

|
| In this way, the relation between the payment method and the payment deposit, per currency, has been set. Note: In order to be able to assign an account to a currency, this currency must be previously properly configured in the QuickBooks Online panel → 'Account'. |
| Transaction Fees It is possible to configure the payment gateway account where transaction fees will be delivered. |
[edit] Relation: Transactions
| In 'Relation' → 'Transactions', there is a list of transactions. Select the one you wish to use from a dropdown menu. Save changes. Use the 'Match Transactions' button to automatically find an existing relation in QuickBooks without a manual search for every single transaction. |

|
The action buttons give you more control over record updates.
|

|
[edit] Relation: User Credits
| Finally, in 'Relation' → 'User Credits' section, you may find a list of existing credits. Select the QuickBooks credit equivalent per single credit from a dropdown menu and then save the changes. Use the 'Match Credits' button to automatically find an existing relation in QuickBooks without a manual search for every single credit. |

|
The action buttons give you more control over record updates.
|

|
[edit] Relation: Custom Rules
| The last on the list of 'Relations' → 'Custom Rules', allows creating and management of existing custom rules. Its aim is to manage items that exist on the invoice but have no relation. The rule task checks if these items have any matching type in QuickBooks. Press ' Add New' button to create a custom rule. |

|
Provide necessary details of the created rule to make it work properly. These are:
Press 'Save Changes' when ready. |

|
| A new rule appears on the list immediately. You may edit its specification at any moment, just press the marked on the screen icon (1). |

|
[edit] Automatically Match Relations
| As you have noticed in the above sections, there is an option to find appropriate matches in QuickBooks and set the relations between the items within one group (e.g. Products or Domains) automatically. All you have to do is press the 'Match Products/Domains/Invoices' etc. button. You will be asked to confirm the action and soon after that the process of looking for matches stars. |

|
| Here you can find a detailed list of items taken into consideration by the module when looking for a match in QuickBooks: |
| WHMCS Item | Matched Feature |
|---|---|
| Clients | |
| Products | Name |
| Domains | Name |
| Addons | Name |
| Invoices | Invoice ID |
| Transactions | Transaction ID |
| User Credits | Amount, Date of Creation |
|
[edit] Utilities
| The module features additional utilities that can assist you in various ways. Each tool serves a unique purpose, as detailed in the section below. By utilizing these additional utilities, you can easily understand the inner workings of the module on the elementary level. |
[edit] Logs
| In the 'Logs' tab there are enumerated ALL actions on clients, invoices and transactions. Regardless if they were taken manually in the module, automatically or by a cron job. A list of all entries with precisely described details and an exact date of the action can be found there. |

|
| Clear all the entries or delete only some of them. Use the buttons marked on the screen above. |
[edit] Revision History
| All changes made by the module to the QuickBooks Online platform are stored here, so you can easily compare any differences made with each update. Use the action button to see related items. |

|
[edit] Dashboard
| 'Dashboard' includes two useful and user-friendly tables. The first one - 'Summary' - contains data on the number of exported clients, invoices and payments together with refunds. |

|
[edit] Documentation
| The very last tab 'Documentation' will, once clicked, redirect you to the article you are currently reading. |
[edit] Use Cases
| This section provides real-world examples of how the module can be used. It includes specific scenarios that illustrate typical use cases and explains how the module's features can be applied in practice. |
[edit] Importing QuickBooks Items
| QuickBooks Online For WHMCS has a complex solution for existing QuickBooks Online panel users that already have a robust database of clients, invoices and transactions. There is no need to start over because you can import everything effortlessly and reliably. See the instructions below to learn how. |
| First, we need to run a cron command that will import clients, invoices and transactions for us. Here is a list of commands:
And the cron itself: php -q /yourWHMCS/modules/addons/QuickBooks/cron/synchronization.php --importInvoices --from='2022-09-09' Run the cron with each of the commands as needed, the date modifier is optional, if it is not included, all items from the category will be imported. |
| Once the data is imported, you should notice that each entity has the update lock ON by default. This is the case for each of the imported entities (Clients, Invoices, Transactions). |

|
| If we change the data in WHMCS, in this case, the company name and try to update the new information into the QuickBooks Online panel, the attempt will be blocked. |

|
| The lock can be disabled, allowing admins to freely upload the changes to the QuickBooks Online panel. |

|
| However, if we generally want to keep the details from being edited, but still want to change something specific, we can force the update and ignore the restrictions. |

|
[edit] Tips
| 1. The status of the invoice in QuickBooks may differ from the one visible in WHMCS. It will be marked as paid only if it is associated with payments of exactly the same amount. If there was no such real payment, the invoice will be marked as 'Unpaid'. |
| 2. It is possible to import QuickBooks clients, invoices, and their transactions into the WHMCS system using the CLI cron job commands. Relations of the imported items will be locked by default. Use the following commands to run tasks:
for example: php -q /yourWHMCS/modules/addons/QuickBooks/cron/synchronization.php --importInvoices --from='2022-09-09' or without a specified date: php -q /yourWHMCS/modules/addons/QuickBooks/cron/synchronization.php --importTransactions |
[edit] Update Instructions
| An essential guidance through the process of updating the module is offered here. Ensure successful completion of the module update by carefully following each step, thereby preventing data loss or any unforeseen issues. |
[edit] Upgrade Guide
| Seeking a solution that offers greater flexibility, customization tailored to your precise needs, and unrestricted availability? There is an option that not only proves to be cost-effective in the long run but also includes prioritized support services, making it a truly valuable investment. Opt for the Open Source version of your QuickBooks Online For WHMCS module to unlock these benefits. Follow a comprehensive guide covering the transition process, the advantages it brings, and step-by-step instructions on what to do next after the order has been successfully finalized. |
[edit] Common Problems
| 1. When you have problems with connection, check whether your SELinux or firewall does not block ports. |
| 2. Should you have problems with upgrading QuickBooks Online product to version 1.3.0, set again the relations of payment deposits in the 'Payment Gateways' section. |
| 3. It may happen that taxes are counted incorrectly for invoices with multiple items where part of the items is taxed and some are not. Please, be careful! |
| 4. In case you encounter any issues with installation and configuration please make sure you have OAuth PHP Class installed. Without that, the module will not work properly. |
| 5. You may encounter the API '#OAuthException' error with 'making the request failed (dunno why)' message during configuration. If so, first try to enable 'allow_url_fopen' option in your PHP configuration by setting up the 'allow_url_fopen = on' line in 'php.ini' file and restart the apache2 server. If you need more information you may check it here. |
| 6. It may happen that the following error occurs when attempting to connect QuickBooks Online service: 'We're sorry! We're experiencing some problems. Please try again later.' In that case, make sure you have set up the 'Redirect URI' correctly, as described here. |
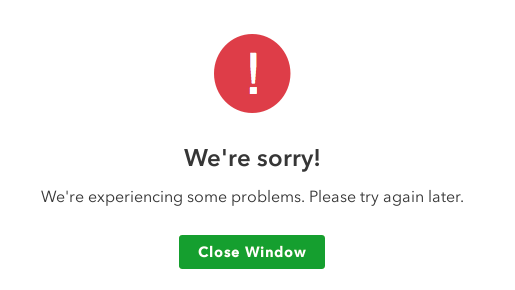
| 7. Applications created before July 17th, 2017 which are still using OAuth 1.0 authentication method are no longer supported by the module. Please create a new application that will support OAuth 2.0 or contact Intuit support to migrate your old application to OAuth 2.0 at https://intuit.me/intuit-oauth2. |
| 8. If you encounter an error: 'Required param missing, need to supply the required value for the API Required parameter TxnTaxDetail.TaxLineDetail.TaxLine.TaxRateRef is missing in the request.' |
| 9. If, after adding credits to a WHMCS invoice, you encountered problems with synchronizing the status of that invoice in the QuickBooks panel, please make sure that the option "Add - synchronization when the credit is added to invoice" is enabled in our addon. Otherwise, the invoice will be still marked as "Unpaid" although credits have been applied. |