Proxmox Cloud 2.X For WHMCS
| Line 1: | Line 1: | ||
| − | |||
| − | |||
| − | |||
<meta name="keywords" content="proxmox cloud for whmcs, proxmox cloud configuration, whmcs proxmox cloud management, whmcs proxmox cloud installation, whmcs proxmox cloud common problems, about whmcs proxmox cloud, whmcs proxmox cloud documentation, whmcs proxmox cloud faq, whmcs proxmox cloud help, whmcs proxmox cloud guide, whmcs proxmox cloud wiki, whmcs proxmox cloud tutorial, whmcs proxmox cloud tips, whmcs proxmox cloud wiki"></meta> | <meta name="keywords" content="proxmox cloud for whmcs, proxmox cloud configuration, whmcs proxmox cloud management, whmcs proxmox cloud installation, whmcs proxmox cloud common problems, about whmcs proxmox cloud, whmcs proxmox cloud documentation, whmcs proxmox cloud faq, whmcs proxmox cloud help, whmcs proxmox cloud guide, whmcs proxmox cloud wiki, whmcs proxmox cloud tutorial, whmcs proxmox cloud tips, whmcs proxmox cloud wiki"></meta> | ||
<meta name="description" content="ModulesGarden Wiki Contains All The Information You Need About The Proxmox Cloud For WHMCS Module."></meta> | <meta name="description" content="ModulesGarden Wiki Contains All The Information You Need About The Proxmox Cloud For WHMCS Module."></meta> | ||
| − | |||
=About [https://www.modulesgarden.com/products/whmcs/proxmox-cloud Proxmox Cloud For WHMCS]= | =About [https://www.modulesgarden.com/products/whmcs/proxmox-cloud Proxmox Cloud For WHMCS]= | ||
{| | {| | ||
| − | |style="padding: 10px 0px 10px 0px;"|'''Proxmox Cloud For WHMCS''' offers your clients the | + | |style="padding: 10px 0px 10px 0px;"|'''Proxmox Cloud For WHMCS''' offers your clients the flexibility to create, remove and freely resize their own virtual servers within resource limits defined by you. |
| − | + | Your customers will be able to single-handedly create as many servers as they need and manage aspects like backups, network devices or firewall.<br /> | |
| − | + | The module supports Cloud-Init for the KVM virtualization type and features Proxmox Addon allowing you to easily manage servers, IP addresses and clusters. | |
|} | |} | ||
<!--comments are awesome --> | <!--comments are awesome --> | ||
| Line 110: | Line 106: | ||
|} | |} | ||
{| | {| | ||
| − | |style="padding: 0px 0px 0px 30px;"|✔ Boot/Reboot/Stop/Shutdown | + | |style="padding: 0px 0px 0px 30px;"|✔ Boot/Reboot/Stop/Shutdown Server |
| + | |} | ||
| + | {| | ||
| + | |style="padding: 0px 0px 0px 30px;"|✔ Reinstall Server Using Templates (KVM) And ISO Images | ||
|} | |} | ||
{| | {| | ||
| Line 181: | Line 180: | ||
{| | {| | ||
|style="padding: 0px 0px 0px 45px;"|✔ CPU Cores Limit | |style="padding: 0px 0px 0px 45px;"|✔ CPU Cores Limit | ||
| + | |} | ||
| + | {| | ||
| + | |style="padding: 0px 0px 0px 45px;"|✔ CPU Limit | ||
|} | |} | ||
{| | {| | ||
| Line 189: | Line 191: | ||
|} | |} | ||
{| | {| | ||
| − | |style="padding: 0px 0px 0px 45px;"|✔ | + | |style="padding: 0px 0px 0px 45px;"|✔ SWAP Limit |
|} | |} | ||
{| | {| | ||
| − | |style="padding: 0px 0px 0px 45px;"|✔ | + | |style="padding: 0px 0px 0px 45px;"|✔ Storage Limit |
|} | |} | ||
{| | {| | ||
| Line 199: | Line 201: | ||
{| | {| | ||
|style="padding: 0px 0px 0px 45px;"|✔ IPv6 Addresses Limit | |style="padding: 0px 0px 0px 45px;"|✔ IPv6 Addresses Limit | ||
| + | |} | ||
| + | {| | ||
| + | |style="padding: 0px 0px 0px 45px;"|✔ Bandwidth Limit | ||
|} | |} | ||
{| | {| | ||
| Line 204: | Line 209: | ||
|} | |} | ||
{| | {| | ||
| − | |style="padding: 0px 0px | + | |style="padding: 0px 0px 0px 45px;"|✔ Backups Files Limit |
| + | |} | ||
| + | {| | ||
| + | |style="padding: 0px 0px 0px 45px;"|✔ Private Networks Limit | ||
| + | |} | ||
| + | {| | ||
| + | |style="padding: 0px 0px 0px 45px;"|✔ VCPUs Limit | ||
| + | |} | ||
| + | {| | ||
| + | |style="padding: 0px 0px 10px 45px;"|✔ Network Rate Limit | ||
|} | |} | ||
{| | {| | ||
|style="padding: 5px 0px 0px 30px;"|✔ '''LXC''': | |style="padding: 5px 0px 0px 30px;"|✔ '''LXC''': | ||
| + | |} | ||
| + | {| | ||
| + | |style="padding: 0px 0px 0px 45px;"|✔ CPU Sockets Limit | ||
|} | |} | ||
{| | {| | ||
| Line 213: | Line 230: | ||
|} | |} | ||
{| | {| | ||
| − | |style="padding: 0px 0px 0px 45px;"|✔ CPU | + | |style="padding: 0px 0px 0px 45px;"|✔ CPU Limit |
|} | |} | ||
{| | {| | ||
| − | |style="padding: 0px 0px 0px 45px;"|✔ | + | |style="padding: 0px 0px 0px 45px;"|✔ CPU Weight Limit |
|} | |} | ||
{| | {| | ||
| Line 222: | Line 239: | ||
|} | |} | ||
{| | {| | ||
| − | |style="padding: 0px 0px 0px 45px;"|✔ | + | |style="padding: 0px 0px 0px 45px;"|✔ SWAP Limit |
|} | |} | ||
{| | {| | ||
| − | |style="padding: 0px 0px 0px 45px;"|✔ | + | |style="padding: 0px 0px 0px 45px;"|✔ Storage Limit |
|} | |} | ||
{| | {| | ||
| Line 232: | Line 249: | ||
{| | {| | ||
|style="padding: 0px 0px 0px 45px;"|✔ IPv6 Addresses Limit | |style="padding: 0px 0px 0px 45px;"|✔ IPv6 Addresses Limit | ||
| + | |} | ||
| + | {| | ||
| + | |style="padding: 0px 0px 0px 45px;"|✔ Bandwidth Limit | ||
|} | |} | ||
{| | {| | ||
| Line 237: | Line 257: | ||
|} | |} | ||
{| | {| | ||
| − | |style="padding: 0px 0px | + | |style="padding: 0px 0px 0px 45px;"|✔ Backups Files Limit |
|} | |} | ||
| + | {| | ||
| + | |style="padding: 0px 0px 0px 45px;"|✔ Private Networks Limit | ||
| + | |} | ||
| + | {| | ||
| + | |style="padding: 0px 0px 0px 45px;"|✔ VCPUs Limit | ||
| + | |} | ||
| + | {| | ||
| + | |style="padding: 0px 0px 10px 45px;"|✔ Network Rate Limit | ||
| + | |} | ||
| + | |||
*'''General Info:''' | *'''General Info:''' | ||
{| | {| | ||
| − | |style="padding: 10px 0px 0px 30px;"|✔ Supports PVE And PAM Authentication | + | |style="padding: 10px 0px 0px 30px;"|✔ Supports Cloud-Init (KVM) |
| + | |} | ||
| + | {| | ||
| + | |style="padding: 0px 0px 0px 30px;"|✔ Supports PVE And PAM Authentication | ||
|} | |} | ||
{| | {| | ||
| Line 291: | Line 324: | ||
{| | {| | ||
| − | |style="padding: 0px 0px 10px 15px;"|'''2. In the downloaded file you will find two packages that support different PHP versions.'''<br/>As presented on the screen below, the first one is dedicated to PHP 5.6 up to PHP 7.0, while the second one is aimed at PHP 7.1 up to PHP 7.2.<br/>It does not apply to open source versions.<br/> | + | |style="padding: 0px 0px 10px 15px;"|'''2. In the downloaded file, you will find two packages that support different PHP versions.'''<br/>As presented on the screen below, the first one is dedicated to PHP 5.6 up to PHP 7.0, while the second one is aimed at PHP 7.1 up to PHP 7.2.<br/>It does not apply to open source versions.<br/> |
'' '''Note''': You can check the current PHP version in your WHMCS. To do so, proceed to ''' 'Utilities' › 'System' › 'PHP Info'.''' | '' '''Note''': You can check the current PHP version in your WHMCS. To do so, proceed to ''' 'Utilities' › 'System' › 'PHP Info'.''' | ||
|} | |} | ||
| Line 305: | Line 338: | ||
|} | |} | ||
{| | {| | ||
| − | |style="padding: 0px 0px 15px 15px;"|'''4. Open '' 'UploadOnProxmoxServer' '' and upload content of proper version on all Proxmox servers into the '' '/usr/share/novnc-pve/' '' folder.'''<br />You should upload these files not only during the first installation of the module, but also each time you update it.<br/> | + | |style="padding: 0px 0px 15px 15px;"|'''4. Open '' 'UploadOnProxmoxServer' '' and upload content of the proper version on all Proxmox servers into the '' '/usr/share/novnc-pve/' '' folder.'''<br />You should upload these files not only during the first installation of the module, but also each time you update it.<br/> |
''Note: If you wish to allow noVNC consoles, you need to configure a product using the PVE realm and set user permissions to 'PVEVMUser.' '' | ''Note: If you wish to allow noVNC consoles, you need to configure a product using the PVE realm and set user permissions to 'PVEVMUser.' '' | ||
|} | |} | ||
{| | {| | ||
| − | |style="padding: 0px 0px 15px 15px;"|'''5. When you install Proxmox Cloud For WHMCS for the first time you have to rename '' 'license_RENAME.php' '' file.'''<br /> | + | |style="padding: 0px 0px 15px 15px;"|'''5. When you install Proxmox Cloud For WHMCS for the first time, you have to rename the '' 'license_RENAME.php' '' file.'''<br /> |
| − | + | This file is located in '' 'modules/servers/proxmoxCloud/license_RENAME.php'. '' Rename it from '' 'license_RENAME.php' '' to '' 'license.php'. '' | |
|} | |} | ||
{| | {| | ||
| Line 329: | Line 362: | ||
To do so, log in into your WHMCS and press '' 'Setup' → 'Addon Modules'. '' Find'' 'Proxmox Addon' ''and press'' 'Activate'. ''<br/><br/> | To do so, log in into your WHMCS and press '' 'Setup' → 'Addon Modules'. '' Find'' 'Proxmox Addon' ''and press'' 'Activate'. ''<br/><br/> | ||
| − | '' '''Note:''' The Proxmox addon version might '''not''' | + | '' '''Note:''' The Proxmox addon version might '''not match''' the current version of the provisioning module itself. This is completely normal due to the specific structure of the product.'' |
|} | |} | ||
{| | {| | ||
| Line 335: | Line 368: | ||
|} | |} | ||
{| | {| | ||
| − | |style="padding: 0px 0px 15px 15px;"|'''8. In the next step you need to permit access to this module.'''<br /> | + | |style="padding: 0px 0px 15px 15px;"|'''8. In the next step, you need to permit access to this module.'''<br /> |
| − | To do so, click on '' 'Configure' '' button. Tick '' 'Full Administrator' '' and press '' 'Save Changes'. '' | + | To do so, click on the '' 'Configure' '' button. Tick '' 'Full Administrator' '' and press '' 'Save Changes'. '' |
|} | |} | ||
{| | {| | ||
| Line 354: | Line 387: | ||
Choose '' 'ProxmoxCloud' '' from a dropdown menu and press '' 'Save Changes'. '''''<br /> | Choose '' 'ProxmoxCloud' '' from a dropdown menu and press '' 'Save Changes'. '''''<br /> | ||
The last step is choosing authentication from the '' 'Authentication' '' dropdown menu.<br /> | The last step is choosing authentication from the '' 'Authentication' '' dropdown menu.<br /> | ||
| − | ''Note: Authentication depends on the realm used by | + | ''Note: Authentication depends on the realm used by the user on a Proxmox server.'' |
|} | |} | ||
{| | {| | ||
| Line 360: | Line 393: | ||
|} | |} | ||
{| | {| | ||
| − | |style="padding: 0px 0px 15px 15px;"|'''11. After you | + | |style="padding: 0px 0px 15px 15px;"|'''11. After you have configured your server correctly, you will see the following screen.'''<br /> |
| − | You can check connection with Proxmox server. To do so, simply press '' 'Test Connection' '' as shown on the screen below. | + | You can check connection with the Proxmox server. To do so, simply press '' 'Test Connection' '' as shown on the screen below. |
|} | |} | ||
{| | {| | ||
| Line 381: | Line 414: | ||
==Configuration of Product== | ==Configuration of Product== | ||
{| | {| | ||
| − | |style="padding: 10px 0px 15px 15px;"|'''14. In order to create and configure a product go to '' 'Setup' → 'Products/Services' → 'Products/Services'. '''''<br /> | + | |style="padding: 10px 0px 15px 15px;"|'''14. In order to create and configure a product, go to '' 'Setup' → 'Products/Services' → 'Products/Services'. '''''<br /> |
Click on '' 'Create a New Group'. '' | Click on '' 'Create a New Group'. '' | ||
|} | |} | ||
| Line 388: | Line 421: | ||
|} | |} | ||
{| | {| | ||
| − | |style="padding: 0px 0px 20px 15px;"|'''15. Enter product group name and press '' 'Save Changes'. ''''' | + | |style="padding: 0px 0px 20px 15px;"|'''15. Enter the product group name and press '' 'Save Changes'. ''''' |
|} | |} | ||
{| | {| | ||
| Line 395: | Line 428: | ||
{| | {| | ||
|style="padding: 0px 0px 15px 15px;"|'''16. When you have a product group, you are able to create your product.'''<br /> | |style="padding: 0px 0px 15px 15px;"|'''16. When you have a product group, you are able to create your product.'''<br /> | ||
| − | To create a product click on '' 'Create a New Product'. '' | + | To create a product, click on '' 'Create a New Product'. '' |
|} | |} | ||
{| | {| | ||
| Line 403: | Line 436: | ||
|style="padding: 0px 0px 15px 15px;"|'''17. Afterwards, choose your product group and type from dropdown menus, enter your product name and press '' 'Continue'. '''''<br /> | |style="padding: 0px 0px 15px 15px;"|'''17. Afterwards, choose your product group and type from dropdown menus, enter your product name and press '' 'Continue'. '''''<br /> | ||
'' 'Product Type' '' can be set to '' 'Dedicated/VPS Server' '' but nameservers will have to be added later.<br/> | '' 'Product Type' '' can be set to '' 'Dedicated/VPS Server' '' but nameservers will have to be added later.<br/> | ||
| − | If you do not want to be forced to fill | + | If you do not want to be forced to fill in nameservrs data, please select '' 'Hosting Account' instead. '' |
|} | |} | ||
{| | {| | ||
| Line 409: | Line 442: | ||
|} | |} | ||
{| | {| | ||
| − | |style="padding: 0px 0px 15px 15px;"|'''18. Now, go to '' 'Module Settings' '' section, choose both '' 'ProxmoxCloud' '' and your previously created server group from dropdown menus.<br /> | + | |style="padding: 0px 0px 15px 15px;"|'''18. Now, go to the '' 'Module Settings' '' section, choose both '' 'ProxmoxCloud' '' and your previously created server group from dropdown menus.<br /> |
Next, click on '' 'Save Changes'. ''''' | Next, click on '' 'Save Changes'. ''''' | ||
|} | |} | ||
| Line 416: | Line 449: | ||
|} | |} | ||
{| | {| | ||
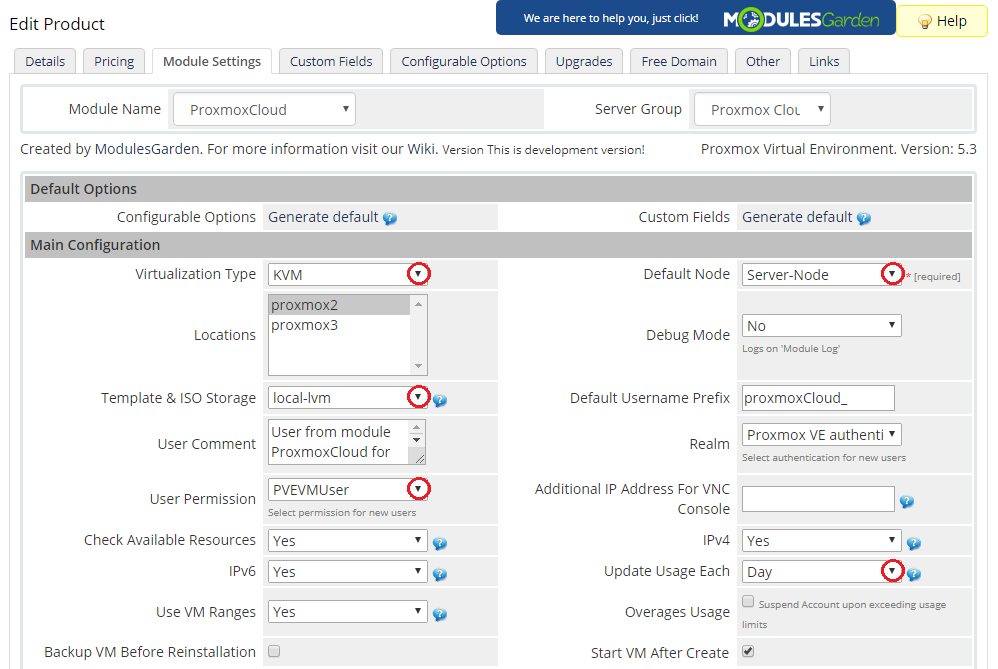
| − | |style="padding: 0px 0px 15px 15px;"|'''19. | + | |style="padding: 0px 0px 15px 15px;"|'''19. Choose '' 'Virtualization Type', 'Default Node', 'Template & ISO Storage' '' and '' 'User Permission' from dropdown menus. ''<br /> |
Available virtualization types:<br/> | Available virtualization types:<br/> | ||
| − | '''KVM'''<br/> | + | *'''KVM'''<br/> |
| − | '''LXC''' ''(supported by Proxmox VE 4.0 and later)''<br/> | + | *'''LXC''' ''(supported by Proxmox VE 4.0 and later)''<br/> |
| − | '''OpenVZ''' ''(supported by Proxmox VE 3.4 and earlier, prior to Proxmox | + | *'''OpenVZ''' ''(supported by Proxmox VE 3.4 and earlier, prior to Proxmox Cloud For WHMCS 2.3.0)''<br/> |
| − | You can also choose how often bandwidth usage should be | + | You can also choose how often the bandwidth usage should be calculated.<br /> |
Afterwards, press '' 'Save Changes'. ''<br /> | Afterwards, press '' 'Save Changes'. ''<br /> | ||
''Note: If you choose 'Auto-Node' as 'Default Note', new virtual servers will be created on the least used node.'' | ''Note: If you choose 'Auto-Node' as 'Default Note', new virtual servers will be created on the least used node.'' | ||
| Line 428: | Line 461: | ||
|style="padding: 0px 0px 20px 25px;"|[[File:PXC2__17.png]] | |style="padding: 0px 0px 20px 25px;"|[[File:PXC2__17.png]] | ||
|} | |} | ||
| + | ===KVM Virtualization Type=== | ||
{| | {| | ||
| − | |style="padding: 0px 0px 15px 15px;"|'''20. Setting of KVM virtualization type (skip | + | |style="padding: 0px 0px 15px 15px;"|'''20. Setting of the KVM virtualization type (skip this step if you have chosen the LXC virtualization type).'''<br/> |
| − | From dropdown menus choose '' 'KVM OS Type', 'Default Storage', 'Disk Type' '' and '' 'CD/DVD-ROM Type'. ''<br /> | + | From dropdown menus, choose '' 'KVM OS Type', 'Default Storage', 'Disk Type' '' and '' 'CD/DVD-ROM Type'. ''<br /> |
Choose ISO images available for your clients by marking them in '' 'ISO Image'. ''<br/><br/> | Choose ISO images available for your clients by marking them in '' 'ISO Image'. ''<br/><br/> | ||
| − | Set network through selecting from '' 'Network Mode', 'Network Model', '' and '' 'Bridge' '' dropdown menus.<br /> | + | Set the network through selecting from the '' 'Network Mode', 'Network Model', '' and '' 'Bridge' '' dropdown menus.<br /> |
| − | If you are going to allow your clients to manage their private networks, you | + | If you are going to allow your clients to manage their private networks, you have to select '' 'Private Bridge' '' and set up VLAN TAG Range.<br/> |
| − | Type your VM description in '' 'Container Description', '' set backup location in '' 'Storage' '' dropdown menu and click '' 'Save Changes'. ''<br/> | + | Type in your VM description in '' 'Container Description', '' set the backup location in the '' 'Storage' '' dropdown menu and click '' 'Save Changes'. ''<br/> |
| − | + | You may also decide whether you wish to use DHCP software to automatically assign IP addresses - if yes, simply select the option 'ISC DHCP Server'.<br/> Read more about its installation [http://www.docs.modulesgarden.com/Proxmox_Cloud_For_WHMCS#Automatic_IP_Address_Assignment here]. | |
|} | |} | ||
{| | {| | ||
|style="padding: 0px 0px 20px 25px;"|[[File:PXC2__18.png]] | |style="padding: 0px 0px 20px 25px;"|[[File:PXC2__18.png]] | ||
|} | |} | ||
| + | ===LXC Virtualization Type=== | ||
{| | {| | ||
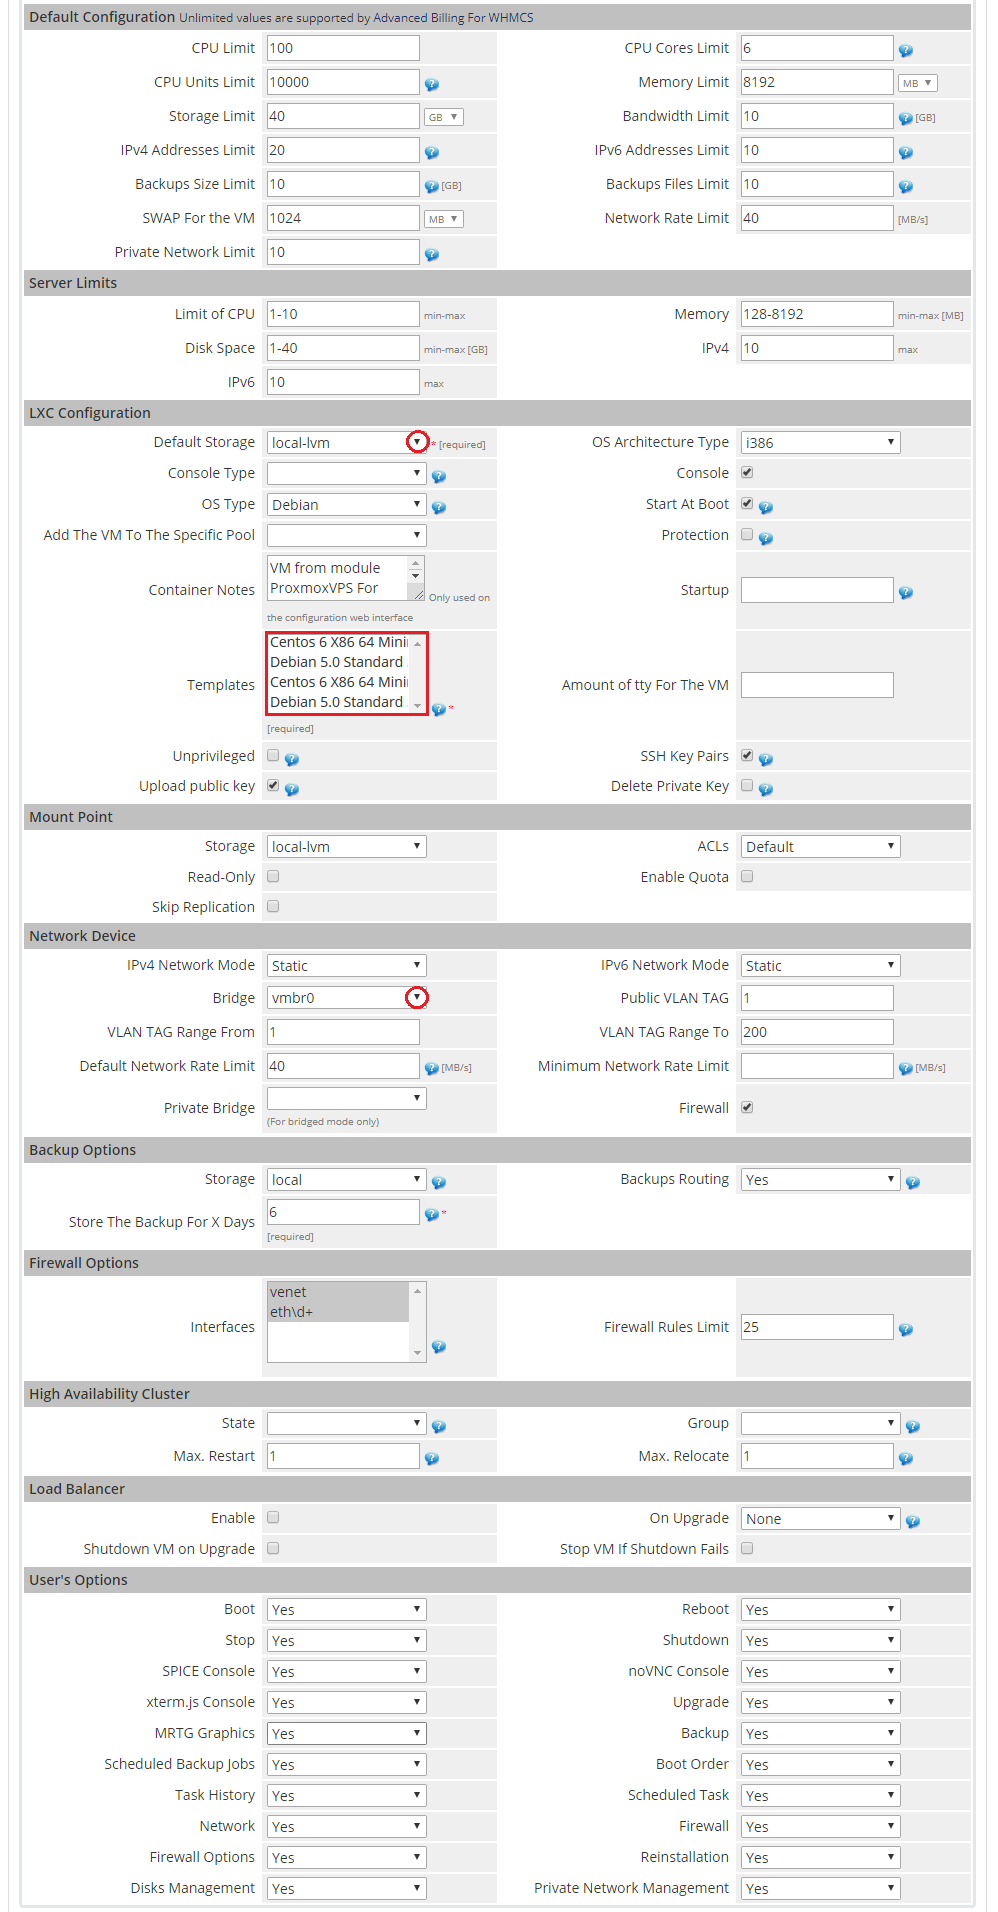
| − | |style="padding: 0px 0px 15px 15px;"|'''21. Setting of LXC virtualization type (skip | + | |style="padding: 0px 0px 15px 15px;"|'''21. Setting of the LXC virtualization type (skip this step if you have chosen the KVM virtualization type).'''<br/> |
| − | From dropdown menus choose '' 'Default Storage', 'Template' '' and '' 'Bridge'. ''<br /> | + | From dropdown menus, choose '' 'Default Storage', 'Template' '' and '' 'Bridge'. ''<br /> |
| − | Enter your virtual | + | Enter your virtual server description in '' 'Container Description' '' and press '' 'Save Changes'. ''<br/><br/> |
'''Remember! This virtualization type is supported only by Proxmox VE 4.0. and later.'''<br/> | '''Remember! This virtualization type is supported only by Proxmox VE 4.0. and later.'''<br/> | ||
| − | If you are using | + | If you are using the previous version of a Proxmox server, you will not be able to start this virtualization. |
|} | |} | ||
{| | {| | ||
|style="padding: 0px 0px 20px 25px;"|[[File:PXC2__18_1.png]] | |style="padding: 0px 0px 20px 25px;"|[[File:PXC2__18_1.png]] | ||
|} | |} | ||
| + | ===OpenVZ Virtualization Type=== | ||
{| | {| | ||
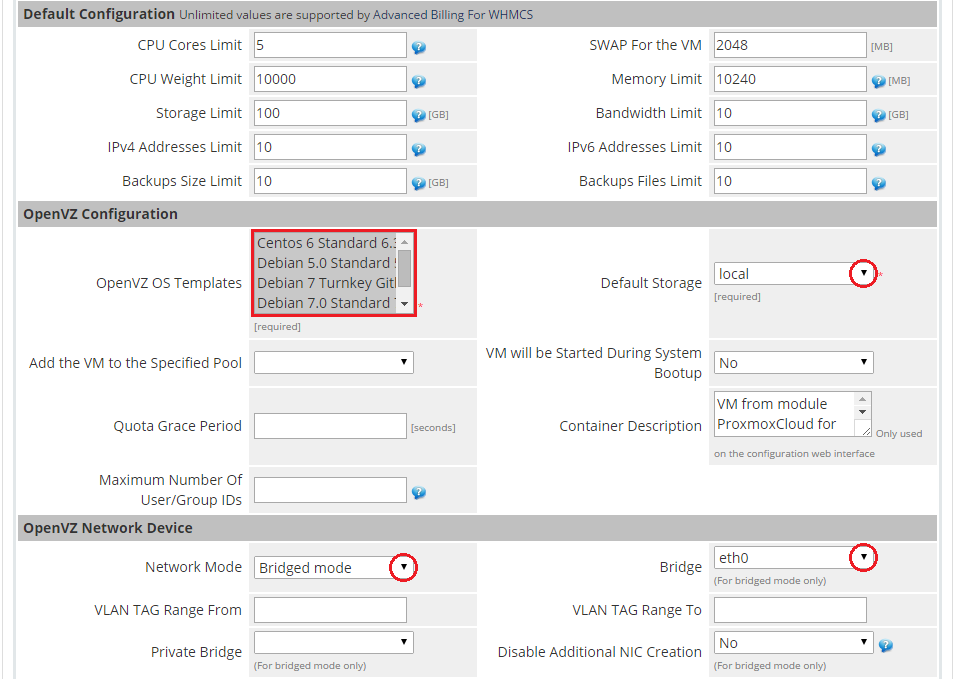
| − | |style="padding: 0px 0px 15px 15px;"|'''22. Setting OpenVZ virtualization type (skip | + | |style="padding: 0px 0px 15px 15px;"|'''22. Setting of the OpenVZ virtualization type (skip this step if you have chosen the KVM virtualization type).'''<br /> |
| − | ''Please note that only versions | + | ''Please note that only Proxmox versions prior to v.2.3.0 support OpenVZ virtualization.''<br/> |
| − | From dropdown menus choose '' 'OpenVZ OS Templates', 'Default Storage', 'Network Mode' '' and '' 'Bridge'. ''<br /> | + | From dropdown menus, choose '' 'OpenVZ OS Templates', 'Default Storage', 'Network Mode' '' and '' 'Bridge'. ''<br /> |
| − | Type in your virtual | + | Type in your virtual server description in '' 'Container Description' '' and press '' 'Save Changes'. ''<br/><br/> |
| − | '''Remember! This virtualization type is supported only by Proxmox VE 3.4 | + | '''Remember! This virtualization type is supported only by Proxmox VE 3.4 and previous.'''<br/> |
| − | If you are using the latest version of Proxmox server, you will not be able to start this virtualization. | + | If you are using the latest version of a Proxmox server, you will not be able to start this virtualization. |
|} | |} | ||
{| | {| | ||
|style="padding: 0px 0px 20px 25px;"|[[File:PXC2__19.png]] | |style="padding: 0px 0px 20px 25px;"|[[File:PXC2__19.png]] | ||
|} | |} | ||
| + | ===Finalizing The Configuration=== | ||
{| | {| | ||
| − | |style="padding: 0px 0px 15px 15px;"|'''23. Private Network Management - to allow clients manage their private networks | + | |style="padding: 0px 0px 15px 15px;"|'''23. Private Network Management - in order to allow clients to manage their private networks, set up the '' 'Network Device' '' section properly.<br/> |
*Select '' 'Private Bridge' '' | *Select '' 'Private Bridge' '' | ||
*Select '' 'Private Network Model' '' | *Select '' 'Private Network Model' '' | ||
*Enter ranges for VLAN TAG<br/> | *Enter ranges for VLAN TAG<br/> | ||
| − | '' | + | ''Note: Configure these three options for the KVM and LXC virtualization.''<br/> |
| − | If you skip this step, clients will not | + | If you skip this step, clients will not be allowed to add private networks.<br/> |
|} | |} | ||
{| | {| | ||
| Line 474: | Line 511: | ||
|} | |} | ||
{| | {| | ||
| − | |style="padding: 0px 0px 15px 15px;"|'''24. The next step is setting up configuration of backups.'''<br /> | + | |style="padding: 0px 0px 15px 15px;"|'''24. The next step is setting up the configuration of backups.'''<br /> |
| − | Define backup settings in '' 'Backups' '' section through selecting values from '' 'Storage' '' and '' 'Backups Routing' '' dropdown menus.<br /> | + | Define backup settings in the '' 'Backups' '' section through selecting values from the '' 'Storage' '' and '' 'Backups Routing' '' dropdown menus.<br /> |
| − | Backups routing automatically removes the oldest backup when a new backup is created and | + | Backups routing automatically removes the oldest backup when a new backup is created and the established backup limit is reached.<br /> |
| − | Additionally, you can limit the time period for storing backups by providing the number of days into '' 'Store The Backup For N Days' '' field.<br /> | + | Additionally, you can limit the time period for storing backups by providing the number of days into the '' 'Store The Backup For N Days' '' field.<br /> |
| − | Furthermore, you can define firewall rules | + | Furthermore, you can define the limit of firewall rules and the interface to apply the rules to.<br /> |
| − | Finish configuration | + | Finish the configuration in the '' 'Module Settings' '' tab through pressing '' 'Save Changes'. ''<br /> |
| − | '''Important: Keep in mind that the root password is generated automatically for KVM virtualization upon its creation and reset. | + | '' '''Important: Keep in mind that the root password is generated automatically for the KVM virtualization upon its creation and reset.<br />If you want to be able to set your own password on the KVM virtualization, go check the [https://www.docs.modulesgarden.com/Proxmox_Cloud_For_WHMCS#Configuration_of_SSH_Keys_.28KVM.29 Configuration of SSH Keys] or the [https://www.docs.modulesgarden.com/Proxmox_Cloud_For_WHMCS#Cloud-Init Cloud-Init] section.''' '' |
| − | + | ||
|} | |} | ||
{| | {| | ||
| Line 493: | Line 529: | ||
|} | |} | ||
{| | {| | ||
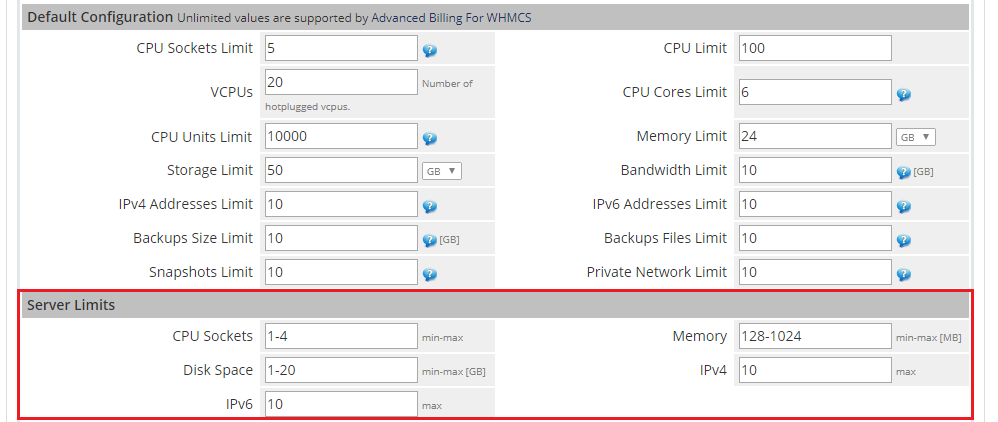
| − | |style="padding: 0px 0px 15px 15px;"|'''26. The final step is generating custom fields and deciding whether to set up product with static or configurable resources.<br /> | + | |style="padding: 0px 0px 15px 15px;"|'''26. The final step is generating custom fields and deciding whether to set up the product with static or configurable resources.<br /> |
Press '' 'Generate default' '' next to '' 'Custom Fields'. ''<br /> | Press '' 'Generate default' '' next to '' 'Custom Fields'. ''<br /> | ||
| − | '''Static Resources:''' Fill in the fields in '' 'Default Configuration' '' section with desired values.<br /> | + | '''Static Resources:''' Fill in the fields in located in the '' 'Default Configuration' '' section with desired values.<br /> |
'''Configurable Resources:''' Click on '' 'Generate Default' '' next to '' 'Configurable Options'. ''<br /> | '''Configurable Resources:''' Click on '' 'Generate Default' '' next to '' 'Configurable Options'. ''<br /> | ||
Press '' 'Save Changes' '' at the bottom of the page.<br/> | Press '' 'Save Changes' '' at the bottom of the page.<br/> | ||
| − | '' Note | + | '' Note: While generating 'Configurable Options', it is advisable to delete the ones you do not use, e.g. the swap option or IPv6 for the KVM virtualization.'' |
|} | |} | ||
{| | {| | ||
| Line 504: | Line 540: | ||
|} | |} | ||
{| | {| | ||
| − | |style="padding: 0px 0px 20px 15px;"|'''27. In the end of the product configuration you have to add cron job that is shown below (5 minutes interval suggested). | + | |style="padding: 0px 0px 20px 15px;"|'''27. In the end of the product configuration, you have to add a cron job that is shown below (5 minutes interval suggested). |
php -q /your_whmcs/modules/servers/proxmoxCloud/cron/cron.php | php -q /your_whmcs/modules/servers/proxmoxCloud/cron/cron.php | ||
Do not forget to replace '' 'your_whmcs' '' with your WHMCS root location. | Do not forget to replace '' 'your_whmcs' '' with your WHMCS root location. | ||
| Line 515: | Line 551: | ||
{| | {| | ||
|style="padding: 10px 0px 15px 15px;"|'''28. Add a new IP address.'''<br /> | |style="padding: 10px 0px 15px 15px;"|'''28. Add a new IP address.'''<br /> | ||
| − | In order to create a new product you have to add a dedicated IP pool to '' 'IP Addresses' '' list in '' 'Proxmox' '' addon module.<br /> | + | In order to create a new product, you have to add a dedicated IP pool to '' 'IP Addresses' '' list in '' 'Proxmox' '' addon module.<br /> |
To do so, go to '' 'Addons' '' → '' 'Proxmox Addon' '' → '' 'IP Management' '' and press '' 'New IP Addresses'. ''<br /> | To do so, go to '' 'Addons' '' → '' 'Proxmox Addon' '' → '' 'IP Management' '' and press '' 'New IP Addresses'. ''<br /> | ||
''Note: You can add both IPv4 and IPv6 addresses.'' | ''Note: You can add both IPv4 and IPv6 addresses.'' | ||
| Line 524: | Line 560: | ||
{| | {| | ||
|style="padding: 0px 0px 15px 15px;"|'''29. Type in the desired IP and mask in '' 'IP Pool' '' and choose server from '' 'Server' '' dropdown menu.'''<br /> | |style="padding: 0px 0px 15px 15px;"|'''29. Type in the desired IP and mask in '' 'IP Pool' '' and choose server from '' 'Server' '' dropdown menu.'''<br /> | ||
| − | Select '' 'Private Address' '' if added address is such, clients will be allowed | + | Select '' 'Private Address' '' if the added address is of such a kind, clients will be then allowed to add, remove and configure their private network.<br/> Afterwards, press '' 'Add'. ''<br/> |
| − | ''Note | + | ''Note: Automatic IP assignment works only for OpenVZ/LXC machines.''<br/> |
| − | ''In case of KVM virtualization IP addresses | + | ''In case of the KVM virtualization, IP addresses have to be manually added to the pool in Proxmox addon or IP Manager to allow their automatic assignment.''<br/> |
| − | '''Important:''' Private IP addresses are not downloaded for IP Manager module. | + | '''Important:''' Private IP addresses are not downloaded for the IP Manager module. |
|} | |} | ||
{| | {| | ||
| Line 533: | Line 569: | ||
|} | |} | ||
{| | {| | ||
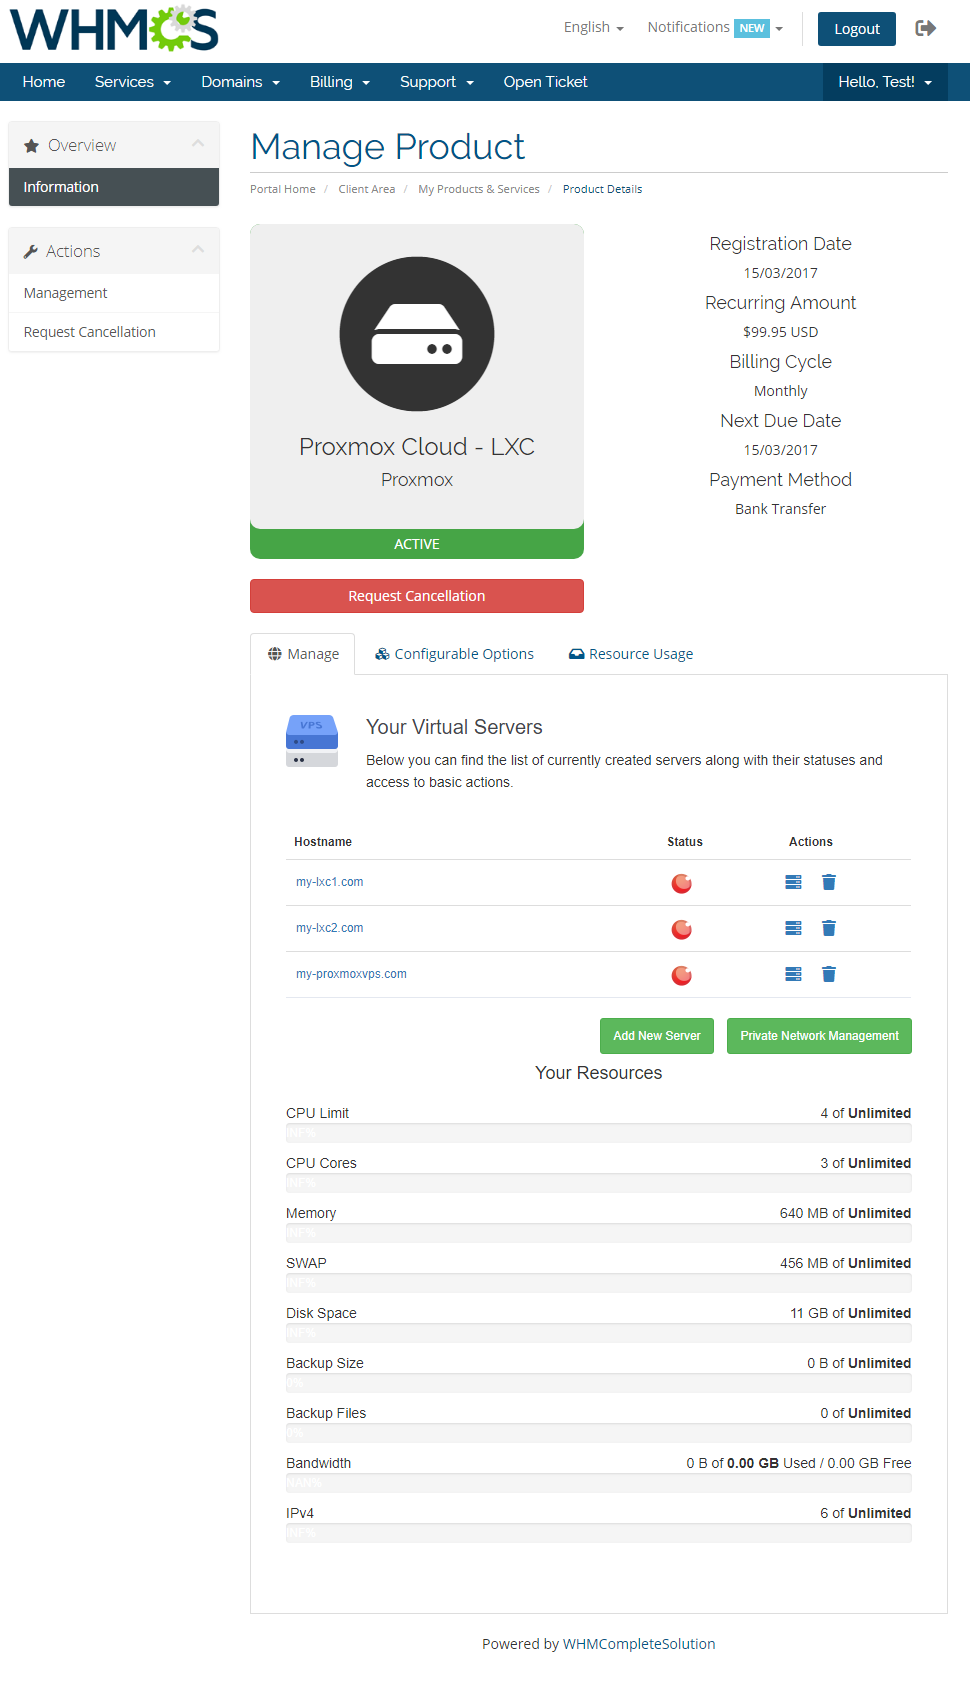
| − | |style="padding: 0px 0px 15px 15px;"|'''30. You are now able to create new virtual machines at product.'''<br /> | + | |style="padding: 0px 0px 15px 15px;"|'''30. You are now able to create new virtual machines at the product.'''<br /> |
| − | If you used KVM virtualization type, the client area of successfully created product should look similar to the one on the screen below. | + | If you used the KVM virtualization type, the client area of a successfully created product should look similar to the one presented on the screen below. |
|} | |} | ||
{| | {| | ||
| Line 540: | Line 576: | ||
|} | |} | ||
{| | {| | ||
| − | |style="padding: 0px 0px 20px 15px;"|'''31. The client area of product using LXC virtualization type looks quite similar.''' | + | |style="padding: 0px 0px 20px 15px;"|'''31. The client area of a product using the LXC virtualization type looks quite similar.''' |
|} | |} | ||
{| | {| | ||
| Line 546: | Line 582: | ||
|} | |} | ||
{| | {| | ||
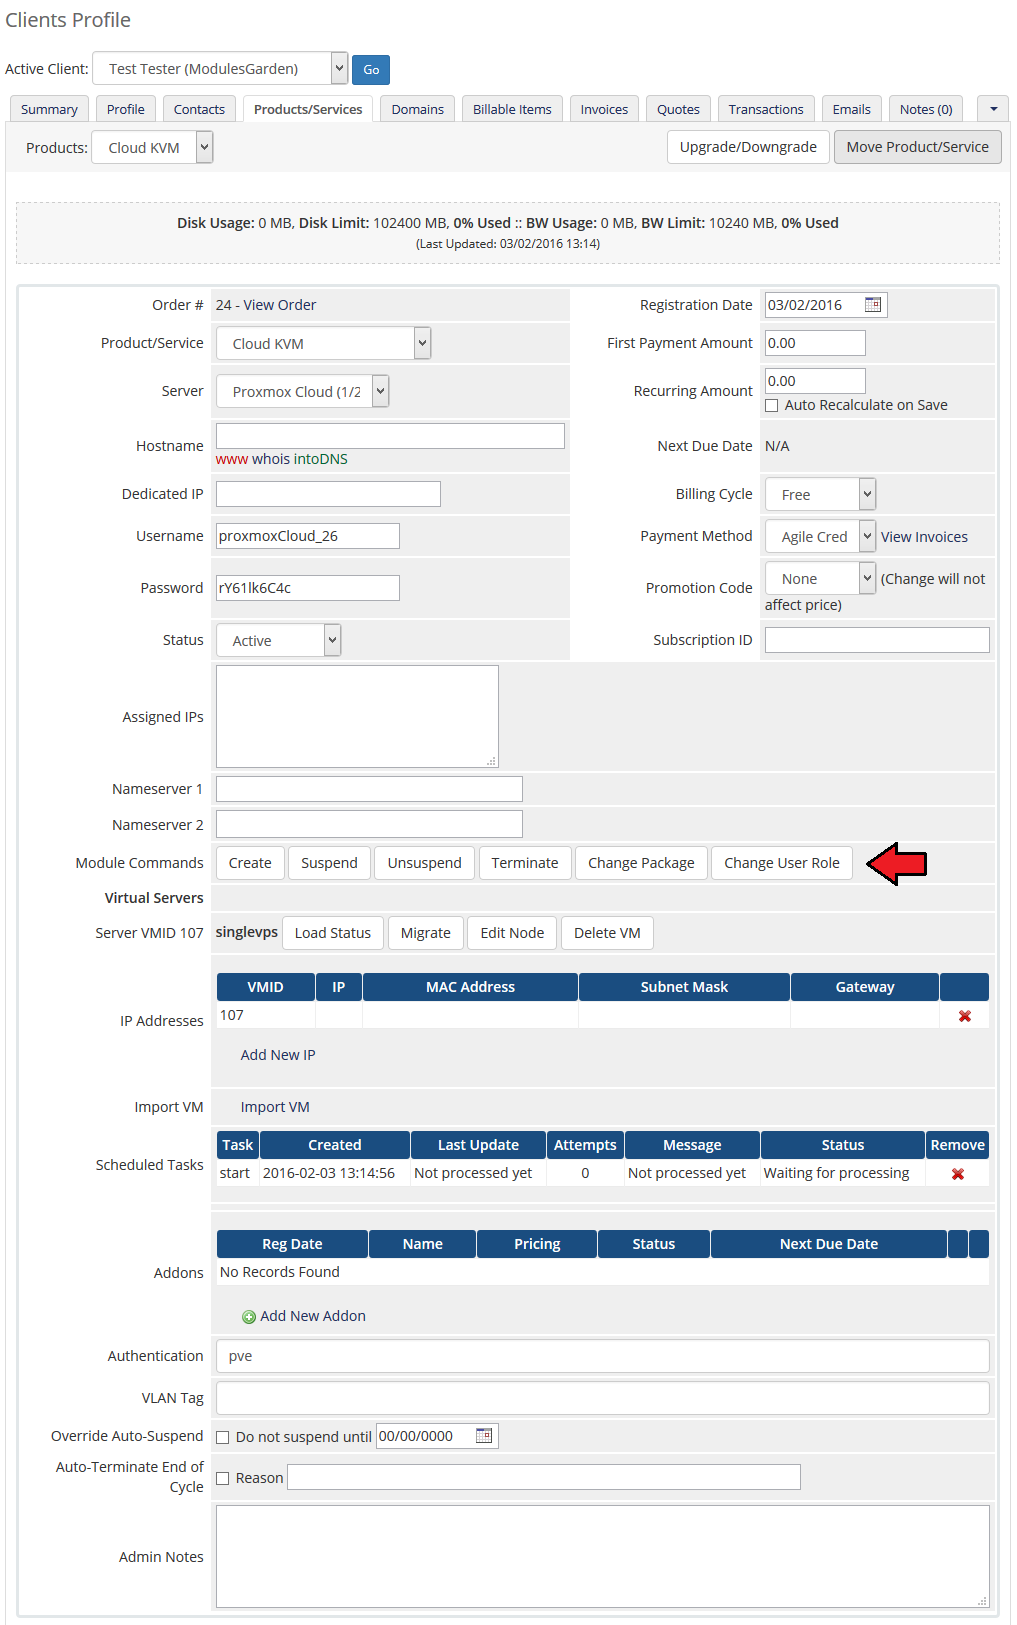
| − | |style="padding: 0px 0px 20px 15px;"|'''32. This is how an exemplary product | + | |style="padding: 0px 0px 20px 15px;"|'''32. This is how an exemplary product details look like in the admin area.'''<br/> |
Allowed actions: | Allowed actions: | ||
*Create | *Create | ||
| Line 559: | Line 595: | ||
==Configuration of SSH Keys (KVM)== | ==Configuration of SSH Keys (KVM)== | ||
{| | {| | ||
| − | |style="padding: 10px 0px 15px 15px;"|'''SSH keys are required to enable the automatic resizing of partition upon the disk upgrade as well as the change of passwords for KVM virtualization type.'''<br /> | + | |style="padding: 10px 0px 15px 15px;"|<span style="color:#ff0000"> '' '''Important!''' Since the 2.5.0 version of the module, if you are using Proxmox VE 5.2 or later, we highly recommended using the [https://www.docs.modulesgarden.com/Proxmox_VPS_For_WHMCS#Cloud-Init Cloud-Init] feature instead of following instructions described in this section.''</span> |
| − | '' '''Note''' - 'Resize Partition' and 'Change Root Password' will only work for '''newly created VMs'''. We recommend using this option only for new products.'' | + | <br/> |
| + | '''SSH keys are required to enable the automatic resizing of a partition upon the disk upgrade as well as the change of passwords for the KVM virtualization type.'''<br /> | ||
| + | '' '''Note''' - 'Resize Partition', and 'Change Root Password' will only work for '''newly created VMs with ISC DHCP and Internet access configuration'''.<br/>We recommend using this option only for new products.'' | ||
|} | |} | ||
{| | {| | ||
| Line 579: | Line 617: | ||
|} | |} | ||
{| | {| | ||
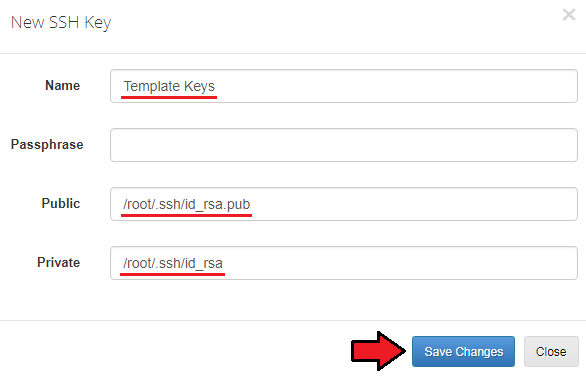
| − | |style="padding: 0px 0px 20px 15px;"|'''35. Enter the name and location to the key pairs located on your WHMCS server.''' | + | |style="padding: 0px 0px 20px 15px;"|'''35. Enter the name and location to the key pairs located on your WHMCS server.'''<br/> |
| + | Optionally, you can add a passphrase to increase security. | ||
|} | |} | ||
{| | {| | ||
| − | |style="padding: 0px 0px 20px 25px;"|[[File: | + | |style="padding: 0px 0px 20px 25px;"|[[File:PX2_64.png]] |
|} | |} | ||
{| | {| | ||
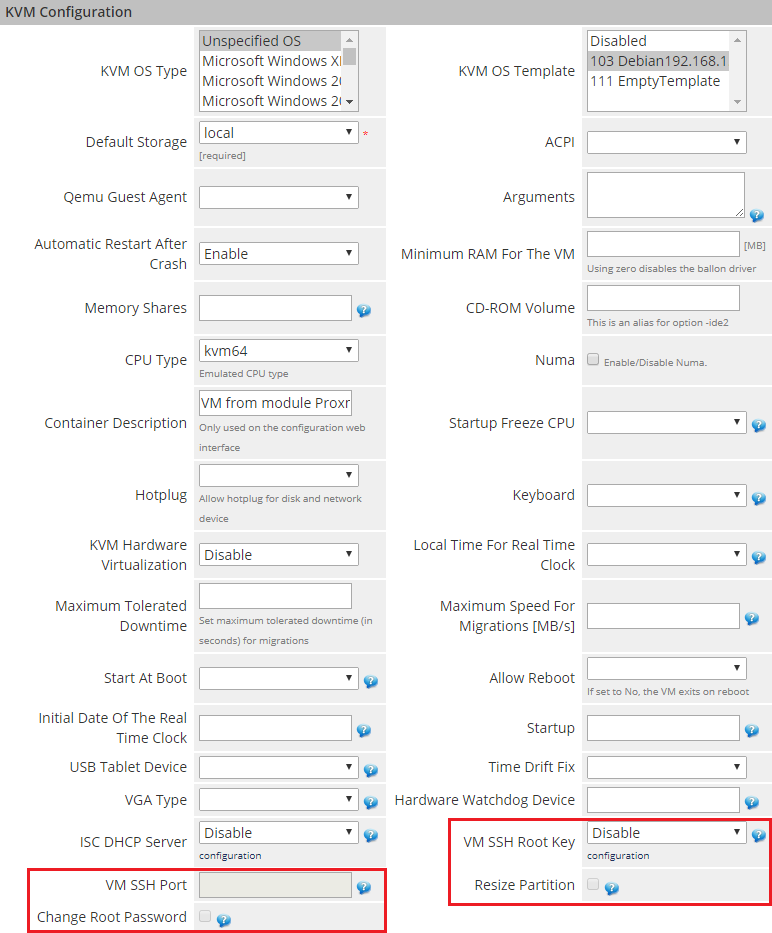
| − | |style="padding: 0px 0px 15px 15px;"|'''36. | + | |style="padding: 0px 0px 15px 15px;"|'''36. Next, go back to the product configuration and, in ' ''KVM Configuration' '' → '' 'VM SSH Root Key' '', select the pair of keys you want to use. '''<br /> Enter the SSH communication port and select the preferred features.<br />Make sure '''they match''' the '' 'KVM OS Template' '' that will be used. |
|} | |} | ||
{| | {| | ||
| Line 591: | Line 630: | ||
|} | |} | ||
{| | {| | ||
| − | |style="padding: 0px 0px 15px 15px;"|'''37. Now, '' 'Resize Partition' '' | + | |style="padding: 0px 0px 15px 15px;"|'''37. Now, the '' 'Resize Partition' '', '' 'Change Root Password' '' and '' 'Delete VM SSH Root Key' '' options should be available.''' |
| − | * ''' Resize Partition ''' - if a customer upgrades a VM by changing the disk size to a larger one, the size of the last partition in that disk will be automatically increased | + | * ''' Resize Partition ''' - if a customer upgrades a VM by changing the disk size to a larger one, the size of the last partition in that disk will be automatically increased by the newly added value. <br /> The feature deletes a current partition table, then creates a new one, according to a new disk size, and reboots the VM. <br/>These partition types have to be standard, e.g. '' 'Linux Extended' (Ext2/Ext3/Ext4...), 'Linux SWAP' '', '' 'Solaris' '' or '' 'LVM' ''.<br/>'''Important - in case of any failure, all data available on the resized partition might be lost!''' '' |
| − | * ''' Change Root Password ''' - this option is responsible for the automatic reset of | + | * ''' Change Root Password ''' - this option is responsible for the automatic reset of the password after the VM creation. It also allows users to generate a new root password while using the VM. |
| − | '' ''' | + | * ''' Delete VM SSH Root Key ''' - it will automatically remove the default SSH key after the VM creation. Use this component to increase security or leave unchecked for resizing partition feature.<br/>'' '''Important''' - if a customer decides to remove the public key from the VM on their own or the 'Delete VM SSH Root Key' is enabled, it will make the 'Resize Partition' and 'Change Root Password' options no longer working!'' |
| − | + | <br /> | |
| − | From now on, | + | From now on, clients will be able to set their own password for newly created VMs. |
|} | |} | ||
{| | {| | ||
| Line 610: | Line 649: | ||
=Management= | =Management= | ||
{| | {| | ||
| − | |style="padding: 10px 0px 15px 15px;"|''' Proxmox Cloud For WHMCS allows your customers to manage their PVE servers | + | |style="padding: 10px 0px 15px 15px;"|''' Proxmox Cloud For WHMCS allows your customers to manage their PVE servers in the WHMCS client area.'''<br /> |
| − | + | At the same time, you can monitor and handle each product from your WHMCS admin area.<br /> | |
| − | To view VM details(1), migrate VM(2), update VMs node(3) or delete VM(4) press a specific button.<br /> | + | To view VM details(1), migrate VM(2), update VMs node(3) or delete VM(4), press a specific button.<br /> |
| − | To view details of virtual server created by your client simply press '' 'Load Status' '' button. | + | To view details of a virtual server created by your client, simply press the '' 'Load Status' '' button. |
|} | |} | ||
{| | {| | ||
| Line 619: | Line 658: | ||
|} | |} | ||
{| | {| | ||
| − | |style="padding: 0px 0px 15px 15px;"|On the following screen you can see loaded details of the VM as well as opened migration popup.<br /> | + | |style="padding: 0px 0px 15px 15px;"|On the following screen, you can see loaded details of the VM as well as opened migration popup.<br /> |
| − | Migration is useful when you want to request migration from the WHMCS admin area, while editing node is | + | Migration is useful when you want to request migration from the WHMCS admin area, while editing node is practical for updating details after migrating the virtual machine from the Proxmox panel. |
|} | |} | ||
{| | {| | ||
| Line 634: | Line 673: | ||
:Total - full RAM on server | :Total - full RAM on server | ||
:Free - difference between Server Total RAM and RAM Assigned | :Free - difference between Server Total RAM and RAM Assigned | ||
| − | '''Suspended''' - number of suspended accounts per their size in MB<br/> ''i.e. (1/500 MB) when there is only one suspended account (size: 500MB of that account) assigned to Proxmox server VPS.''<br/> | + | '''Suspended''' - the number of suspended accounts per their size in MB<br/> ''i.e. (1/500 MB) when there is only one suspended account (size: 500MB of that account) assigned to Proxmox server VPS.''<br/> |
You can quickly define VM ID ranges for those servers, press '' 'Manage' '' to do so.<br /> | You can quickly define VM ID ranges for those servers, press '' 'Manage' '' to do so.<br /> | ||
| − | ''Note: VM ID range allows you to sort | + | ''Note: VM ID range allows you to sort the created virtual machines depending on the server they were created from. |
|} | |} | ||
{| | {| | ||
| Line 642: | Line 681: | ||
|} | |} | ||
{| | {| | ||
| − | |style="padding: 0px 0px 20px 15px;"|Define ID range and save changes. | + | |style="padding: 0px 0px 20px 15px;"|Define the ID range and save changes. |
|} | |} | ||
{| | {| | ||
| Line 648: | Line 687: | ||
|} | |} | ||
{| | {| | ||
| − | |style="padding: 0px 0px 30px 15px;"| | + | |style="padding: 0px 0px 30px 15px;"|Upon pressing '' 'Edit' '', you will be moved to the server edit page. |
|} | |} | ||
====VMs List==== | ====VMs List==== | ||
{| | {| | ||
| − | |style="padding: 10px 0px 15px 15px;"|In '' 'Addons' '' → '' 'Proxmox Addon' '' → '' 'Servers' '' → '' 'VMs List' '' you can find details on any | + | |style="padding: 10px 0px 15px 15px;"|In '' 'Addons' '' → '' 'Proxmox Addon' '' → '' 'Servers' '' → '' 'VMs List' '' you can find details on any Proxmox product.<br /> |
|} | |} | ||
{| | {| | ||
| Line 659: | Line 698: | ||
|} | |} | ||
{| | {| | ||
| − | |style="padding: 0px 0px 20px 15px;"|Use '' 'Toggle Filters' '' button to find entries you are interested in | + | |style="padding: 0px 0px 20px 15px;"|Use the '' 'Toggle Filters' '' button to find entries that you are interested in. |
|} | |} | ||
{| | {| | ||
| Line 668: | Line 707: | ||
{| | {| | ||
|style="padding: 10px 0px 15px 15px;"|In '' 'Addons' '' → '' 'Proxmox Addon' '' → '' 'Servers' '' → '' 'recovery VM List' '' you can find configured Proxmox servers.<br /> | |style="padding: 10px 0px 15px 15px;"|In '' 'Addons' '' → '' 'Proxmox Addon' '' → '' 'Servers' '' → '' 'recovery VM List' '' you can find configured Proxmox servers.<br /> | ||
| − | Run '' 'recovery cron job' '' to create and store full backups of | + | Run '' 'recovery cron job' '' to create and store full backups of VM configuration.<br/> |
| − | Use '' 'Export to File' '' button to save information of the cron execution. | + | Use the '' 'Export to File' '' button to save information of the cron execution. |
|} | |} | ||
{| | {| | ||
| Line 677: | Line 716: | ||
===IP Management=== | ===IP Management=== | ||
{| | {| | ||
| − | |style="padding: 10px 0px 20px 15px;"| | + | |style="padding: 10px 0px 20px 15px;"|In the '' 'IP Management' '' tab, you can add, edit and remove IP addresses of Proxmox products. |
|} | |} | ||
{| | {| | ||
| Line 683: | Line 722: | ||
|} | |} | ||
{| | {| | ||
| − | |style="padding: 0px 0px 10px 15px;"|Fill out the required fields. Here you may also define private IP addresses | + | |style="padding: 0px 0px 10px 15px;"|Fill out the required fields. Here you may also define private IP addresses, simply mark the adequate field. <br/> |
| − | + | Clients may manage their private networks and assign IP addresses to VM only if some private IP addresses are added. | |
|} | |} | ||
{| | {| | ||
| Line 692: | Line 731: | ||
===Clusters=== | ===Clusters=== | ||
{| | {| | ||
| − | |style="padding: 10px 0px 20px 15px;"|'' 'Clusters' '' tab contains the list of clusters. To view information about a cluster simply press its name. | + | |style="padding: 10px 0px 20px 15px;"|'' 'Clusters' '' tab contains the list of clusters. To view information about a cluster, simply press its name. |
|} | |} | ||
{| | {| | ||
| Line 698: | Line 737: | ||
|} | |} | ||
{| | {| | ||
| − | |style="padding: 0px 0px 20px 15px;"|Here you can find various information about a cluster, from available | + | |style="padding: 0px 0px 20px 15px;"|Here you can find various information about a cluster, from the available resources to usage graphs. |
|} | |} | ||
{| | {| | ||
| Line 705: | Line 744: | ||
===Templates List=== | ===Templates List=== | ||
{| | {| | ||
| − | |style="padding: 10px 0px 20px 15px;"| | + | |style="padding: 10px 0px 20px 15px;"|On this page, you can view the list of templates and delete the unused ones. |
|} | |} | ||
{| | {| | ||
| Line 713: | Line 752: | ||
===Create Templates=== | ===Create Templates=== | ||
{| | {| | ||
| − | |style="padding: 10px 0px 15px 15px;"|You can easily convert any | + | |style="padding: 10px 0px 15px 15px;"|You can easily convert any virtual machine on your server to a template.<br /> |
| − | In order to convert | + | In order to convert the virtual machine, go to '' 'Proxmox Addon' '' → '' 'Templates' '' → '' 'Create Template'. ''<br /> |
| − | Choose server on which | + | Choose the server on which the virtual machine that should be converted into a template exists and press '' 'Next Step'. ''<br /> |
| − | '''Important: | + | '''Important: The virtual machine will be destroyed in the process.''' |
|} | |} | ||
{| | {| | ||
| Line 722: | Line 761: | ||
|} | |} | ||
{| | {| | ||
| − | |style="padding: 0px 0px 15px 15px;"|Next, choose node and | + | |style="padding: 0px 0px 15px 15px;"|Next, choose the node and the virtual machine to convert.<br /> |
Fill in '' 'Template Friendly Name' '' and press '' 'Save Changes'. '' | Fill in '' 'Template Friendly Name' '' and press '' 'Save Changes'. '' | ||
|} | |} | ||
| Line 730: | Line 769: | ||
===General Settings=== | ===General Settings=== | ||
{| | {| | ||
| − | |style="padding: 10px 0px 15px 15px;"|'' 'Minimal VMID' '' allows you to define minimal ID of | + | |style="padding: 10px 0px 15px 15px;"|'' 'Minimal VMID' '' allows you to define the minimal ID of a virtual machine created from the server, which does not have the VMID range defined.<br /> |
| − | Cron job user synchronization - if you change user role in the product settings, this cron job changes the roles of existing users.<br/> | + | Cron job user synchronization - if you change the user role in the product settings, this cron job changes the roles of existing users.<br/> |
| − | Cron job recovery VM synchronization - run regularly, responsible for updating list of recovered VMs, allows downloading results. | + | Cron job recovery VM synchronization - run regularly, responsible for updating the list of recovered VMs, allows downloading results. |
|} | |} | ||
{| | {| | ||
| Line 740: | Line 779: | ||
===VM Cleaner=== | ===VM Cleaner=== | ||
{| | {| | ||
| − | |style="padding: 10px 0px 20px 15px;"|VM Cleaner allows you to track | + | |style="padding: 10px 0px 20px 15px;"|VM Cleaner allows you to track virtual machines existing only on your Proxmox server and that are not visible in your WHMCS.<br/> Consequently, you are allowed here to sort and delete only those virtual machines that are not managed from your WHMCS. |
|} | |} | ||
{| | {| | ||
| Line 753: | Line 792: | ||
{| | {| | ||
|style="padding: 0px 0px 30px 25px;"|[[File:PX2_35_2.png]] | |style="padding: 0px 0px 30px 25px;"|[[File:PX2_35_2.png]] | ||
| + | |} | ||
| + | ===Cloud-Init=== | ||
| + | {| | ||
| + | |style="padding: 10px 0px 30px 15px;"|Use Cloud-Init to configure the system during installation, first-boot and package change.<br/>Cloud-Init was initially developed to provide early initialization of cloud instances.<br/>Click [https://access.redhat.com/documentation/en-us/red_hat_enterprise_linux_atomic_host/7/html/installation_and_configuration_guide/setting_up_cloud_init here] to learn more about Cloud-Init configuration. | ||
| + | <br/> | ||
| + | '' '''Note:''' Cloud-Init functionality is supported for the '''KVM''' virtualization only. | ||
| + | |} <!-- Na razie bez tej notki and requires CloudInit version '''17.1 or later'''.'' | ||
| + | --> | ||
| + | ====Scripts Configurations==== | ||
| + | {| | ||
| + | |style="padding: 10px 0px 15px 15px;"|In the '' 'Settings' '' -> '' 'Cloud Init' '' section you will find your scripts configurations which are built by default by accessing the addon configuration.<br/><br/> | ||
| + | '' '''Important:''' These are only '''exemplary''' configuration scripts and may '''not''' work on your Proxmox server configuration!<br/>Before using, please first adjust them to your needs and make sure they are configured correctly.'' | ||
| + | |} | ||
| + | {| | ||
| + | |style="padding: 0px 0px 20px 25px;"|[[File:PX2_49.png]] | ||
| + | |} | ||
| + | {| | ||
| + | |style="padding: 0px 0px 15px 15px;"|You can also add your own configuration or edit existing ones by pressing corresponding buttons.<br/> | ||
| + | [http://cloudinit.readthedocs.io/en/latest/topics/examples.html Here] you can find some cloud config examples. | ||
| + | |} | ||
| + | {| | ||
| + | |style="padding: 0px 0px 30px 25px;"|[[File:PX2_50.png]] | ||
| + | |} | ||
| + | --> | ||
| + | ====Configuration Of Product==== | ||
| + | {| | ||
| + | |style="padding: 10px 0px 15px 15px;"|To to allow you clients to use cloud-init you need to enable it in the Proxmox product configuration.<br/> | ||
| + | Before you start we recommend to learn the details about cloud-init configuration on your Proxmox server - click [https://pve.proxmox.com/wiki/Cloud-Init_Support here] for more details.<br/> | ||
| + | Once you get familiar with Proxmox cloud-init proceed to Cloud-Init group of your KVM configuration where you can enable it and set the following: | ||
| + | *'''Allow To Set Username''' - if enabled the client can set its own username during VM creation. Otherwise it will remain unchanged and be set by default as in the template or set from the '' 'Default User' '' field if provided. | ||
| + | *'''Allow To Set Password''' - if enabled the client can set its own password during VM creation Otherwise it will remain unchanged and be set by default as in the template. | ||
| + | *'''Allow To Set SSH Public Key''' - if enabled the client can upload its own public SSH key in OpenSSH format during VM creation. This will then allow client to log in to VM using their private key instead of password. | ||
| + | *'''Default User''' - provide the username that wille be used for VM instead of using the '' 'Service Username' '' field or image's configured default user. Othewise leave empty. | ||
| + | *'''Allow To Set DNS Domain''' - if enabled the client can provide its own DNS domain for a container. During VM creation, the provided setting will be automatically used if neither a search domain nor a nameserver is set. | ||
| + | *'''Allow To Set Nameservers''' - if enabled the client can set its own nameservers for the VM. Otherwise they will remain unchanged and be set by default as in the template. | ||
| + | <!-- | ||
| + | *'''Cloud Init''' - select what scripts will be executed on VM create or change package. If you are using the configurable options you can also define the '' 'cloudInit|Cloud Init' '' option (Proxmox VPS only).<br/>'' '''Important:''' If you use multiple scripts configuration of the same type (e.g. 'Network Config'), remember that they will be connected into '''one script''' before sent to the server.<br/>Therefore, make sure that these scrips can work properly with each other.'' | ||
| + | *'''CD/DVD-ROM Type''' - an additional CD-ROM in which the ISO image is mounted with a ready-to-use script for the VM | ||
| + | *'''Storage''' - the directory on which the CD-ROM ISO image is stored | ||
| + | --> | ||
| + | |} | ||
| + | {| | ||
| + | |style="padding: 0px 0px 20px 25px;"|[[File:PXC2_51_new.png]] | ||
| + | |} | ||
| + | {| | ||
| + | |style="padding: 0px 0px 20px 15px;"|This is how the above settings will look like in the client area during VM creation. | ||
| + | |} | ||
| + | {| | ||
| + | |style="padding: 0px 0px 30px 25px;"|[[File:PXC2_55.png]] | ||
| + | |} | ||
| + | <!-- | ||
| + | {| | ||
| + | |style="padding: 0px 0px 20px 15px;"|Please also note the server configuration for that product must use the '' 'root' '' account and '' 'Linux PAM standard authentication' ''. | ||
| + | |} | ||
| + | {| | ||
| + | |style="padding: 0px 0px 30px 25px;"|[[File:PX2_52.png]] | ||
| + | |} | ||
| + | --> | ||
| + | |||
| + | ====Configuration Of Proxmox Server ==== | ||
| + | <!-- | ||
| + | {| | ||
| + | |style="padding: 10px 0px 15px 15px;"|1. 'genisoimage' is required for cloud-init to be installed on your '''Proxmox server'''. To install it execute the in terminal: | ||
| + | apt-get update && apt-get install genisoimage | ||
| + | Otherwise you will get '' 'genisoimage: command not found' '' error. | ||
| + | |} | ||
| + | {| | ||
| + | |style="padding: 0px 0px 15px 15px;"|2. To make KVM virtual machine ready for could-init on a Proxmox server do the following: | ||
| + | *Download and install system ISO image, e.g. [https://www.ubuntu.com/download/alternative-downloads Ubuntu] | ||
| + | *Install cloud-init by executing in the terminal: <pre>apt-get install cloud-init</pre> | ||
| + | *Or module requires cloud-init version '' '''17.1 or higher''' ''. After installation you can validate it version using <pre>cloud-init -v</pre> | ||
| + | *Shutdown the machine and [http://git.mglocal/whmcs-products/Proxmox/uploads/994fd04f9a2a5cf03533c24aacfef0fc/image.png convert it to template.] | ||
| + | *Finally from the product configuration or configurable options chose the created '' 'VM Template' ''. | ||
| + | |} | ||
| + | {| | ||
| + | |style="padding: 0px 0px 20px 25px;"|[[File:PX2_57.png]] | ||
| + | |} | ||
| + | --> | ||
| + | {| | ||
| + | |style="padding: 10px 0px 30px 15px;"|The process of setting up Cloud-Init on the Proxmox server is described [https://pve.proxmox.com/wiki/Cloud-Init_Support here].<br/> | ||
| + | Additionally you can use the following commands that can be useful for debugging. | ||
| + | *Re-run cloud init scripts | ||
| + | <pre>rm -rf /var/lib/cloud/sem/* /var/lib/cloud/instance /var/lib/cloud/instances/* && | ||
| + | cloud-init init && | ||
| + | cloud-init modules -m final</pre> | ||
| + | *Logs | ||
| + | <pre>cat /var/log/cloud-init.log | ||
| + | cat /var/log/cloud-init-output.log</pre> | ||
| + | <!-- | ||
| + | *If you need more information about cloud-init installation you can follow [https://support.telefonicaopencloud.com/en-us/usermanual/ims/en-us_topic_0030730603.html#EN-US_TOPIC_0030730603__li38478451154018 this guide.] | ||
| + | --> | ||
|} | |} | ||
| Line 885: | Line 1,015: | ||
==Client Area - Additional Tools== | ==Client Area - Additional Tools== | ||
| + | ===Reinstall=== | ||
| + | {| | ||
| + | |style="padding: 10px 0px 15px 15px;"|Reinstall feature can be used to reinstall a new OS on the VM by the clients on their own. <br/> | ||
| + | You can provide your clients to either select a new OS from a provided KVM templates to automatically system replacement, or let them choose the ISO image for manual system installation. | ||
| + | <br/><br/> | ||
| + | '' '''Note:''' The ISO images can only be used for the KVM virtualization type, while VM templates can be used either for KVM or LXC.<br/> Additionally the new OS password for the KVM OS reinstallation will be set based on the previous service password while for the LXC user can define it before the new installation.'' | ||
| + | |} | ||
| + | {| | ||
| + | |style="padding: 0px 0px 20px 25px;"|[[File:PXC2_38_1.png]] | ||
| + | |} | ||
| + | {| | ||
| + | |style="padding: 0px 0px 20px 15px;"|You can configure the available '' 'KVM OS Templates' '' for clients in the '' 'KVM Configuration' ''. | ||
| + | |} | ||
| + | {| | ||
| + | |style="padding: 0px 0px 20px 25px;"|[[File:PXC2_38_2.png]] | ||
| + | |} | ||
| + | {| | ||
| + | |style="padding: 0px 0px 20px 15px;"|In the same way choose available '' 'ISO Images' '' from the can configure the '' 'CD/DVD-ROM Drive' ''. | ||
| + | |} | ||
| + | {| | ||
| + | |style="padding: 0px 0px 20px 25px;"|[[File:PXC2_38_3.png]] | ||
| + | |} | ||
| + | {| | ||
| + | |style="padding: 0px 0px 20px 15px;"|Remember to also gain your clients access to selected reinstallation types in the '' 'User's Options' ''. | ||
| + | |} | ||
| + | {| | ||
| + | |style="padding: 0px 0px 30px 25px;"|[[File:PXC2_38_4.png]] | ||
| + | |} | ||
| + | |||
===Backups=== | ===Backups=== | ||
{| | {| | ||
| Line 905: | Line 1,064: | ||
|style="padding: 0px 0px 30px 25px;"|[[File:PXC2__49.png]] | |style="padding: 0px 0px 30px 25px;"|[[File:PXC2__49.png]] | ||
|} | |} | ||
| + | |||
===Backup Jobs=== | ===Backup Jobs=== | ||
{| | {| | ||
| Line 1,207: | Line 1,367: | ||
|} | |} | ||
{| | {| | ||
| − | |style="padding: 0px 0px | + | |style="padding: 0px 0px 5px 15px;"|7. If you currently use the module in the 2.3.2 version or previous, and would like to migrate to '''Proxmox VE V5.X''', you need to update the files on your Proxmox server to the new version from the ''' 'UploadOnProxmoxServer' ''' folder. |
| + | |} | ||
| + | |||
| + | {| | ||
| + | |style="padding: 0px 0px 5px 15px;"|8. You can use the '' 'IPSet IP Filter' '' option for firewall to prevent IP spoofing. Click [https://pve.proxmox.com/wiki/Firewall#pve_firewall_ip_sets here] to read more about IP Sets. | ||
| + | |} | ||
| + | {| | ||
| + | |style="padding: 0px 0px 5px 15px;"|9. '' 'Minimum Network Rate Limit' '' option allows you to change the previously entered '' 'Default Network Rate Limit' '' value to a new one if the current '' 'Bandwidth Limit' '' is already exhausted.<br/>Note that the '' 'Bandwidth Limit' '' can also be used for WHMCS overage billing calculation as described [https://docs.whmcs.com/Disk_Space_and_Bandwidth_Overage_Billing here]. | ||
| + | |} | ||
| + | {| | ||
| + | |style="padding: 0px 0px 30px 25px;"|[[File:PXC2_70_1.png]] | ||
|} | |} | ||
Revision as of 09:34, 4 June 2018
About Proxmox Cloud For WHMCS
| Proxmox Cloud For WHMCS offers your clients the flexibility to create, remove and freely resize their own virtual servers within resource limits defined by you.
Your customers will be able to single-handedly create as many servers as they need and manage aspects like backups, network devices or firewall. |
- Admin Area Features:
| ✔ Create/Suspend/Unsuspend/Terminate User Account |
| ✔ Change Package |
| ✔ Change User Role |
| ✔ Migrate/Import/Delete Server |
| ✔ Edit Server Node |
| ✔ View Server Status, Details And Statistics |
| ✔ View Graphs - With Ability To Change Time Scale of MRTG Graphs |
| ✔ Display Disk And Bandwidth Usage Of Each Product |
| ✔ Display CPU, SWAP and Memory Usage Of Each Product |
| ✔ Select Server Locations Available For Clients |
| ✔ Configure Client Area Features Per Product |
| ✔ Define Static Or Dynamic Resource Limits |
| ✔ Define Server Minimum And Maximum Resource Values |
| ✔ Import IP Address To Hosting IP Addresses Table |
| ✔ Return IP Address To IP Addresses Subnet |
| ✔ Add Additional IP Address To VM |
| ✔ Enable Backups Routing |
| ✔ Enable Auto VM Backups Before Reinstallation |
- Proxmox Addon Features:
| ✔ Display Servers List Per VPS And Cloud |
| ✔ Manage Public & Private IP Addresses Per Server, VLAN, Tag And Node |
| ✔ Add Additional DHCP Server |
| ✔ Display Servers Clusters |
| ✔ Display KVM Templates |
| ✔ Convert KVM VPS To KVM Template |
| ✔ Set Minimum VM ID For Product Without ID Ranges Defined |
| ✔ Synchronize Users Permissions |
| ✔ VM Cleaner - Manage VM Not Existing In Your WHMCS |
| ✔ Create And Store Full Backup Of VMs Configuration |
| ✔ Manage SSH Key Pairs For KVM Template |
| ✔ View Tasks History |
- Client Area Features:
| ✔ Create/Edit/Delete Servers |
| ✔ Boot/Reboot/Stop/Shutdown Server |
| ✔ Reinstall Server Using Templates (KVM) And ISO Images |
| ✔ Choose Location For New Servers |
| ✔ View Available Resources |
| ✔ Access noVNC And SPICE Console |
| ✔ Create/Restore/Delete Backups |
| ✔ Manage Backups Within Defined Limits (Max Number Of Files & Max Size Of Files) |
| ✔ Manage Backup Jobs Within Defined Limits (Max Number Of Files & Max Size Of Files) |
| ✔ Create/Upload/Download Public And Private SSH Keys (LXC) |
| ✔ View Graphs - With Ability To Change Time Scale of MRTG Graphs |
| ✔ View Task History |
| ✔ View Network Devices and Manage Private Interface |
| ✔ Manage Private Networks And Assign Them To Multiple Servers |
| ✔ Create Server Snapshots (KVM) |
| ✔ Create VM Template From Server - KVM Virtualization Only |
| ✔ Manage Firewall |
| ✔ View Server Status, Details And Statistics |
| ✔ Display Disk And Bandwidth Usage |
| ✔ Display CPU, SWAP and Memory Usage |
| ✔ Change Boot Order (KVM) |
| ✔ Change ISO Image (KVM) |
| ✔ Choose Server Resources While Ordering And Upgrade/Downgrade Them Freely |
- Configurable Options:
| ✔ KVM: |
| ✔ CPU Sockets Limit |
| ✔ CPU Cores Limit |
| ✔ CPU Limit |
| ✔ CPU Weight Limit |
| ✔ Memory Limit |
| ✔ SWAP Limit |
| ✔ Storage Limit |
| ✔ IPv4 Addresses Limit |
| ✔ IPv6 Addresses Limit |
| ✔ Bandwidth Limit |
| ✔ Backups Size Limit |
| ✔ Backups Files Limit |
| ✔ Private Networks Limit |
| ✔ VCPUs Limit |
| ✔ Network Rate Limit |
| ✔ LXC: |
| ✔ CPU Sockets Limit |
| ✔ CPU Cores Limit |
| ✔ CPU Limit |
| ✔ CPU Weight Limit |
| ✔ Memory Limit |
| ✔ SWAP Limit |
| ✔ Storage Limit |
| ✔ IPv4 Addresses Limit |
| ✔ IPv6 Addresses Limit |
| ✔ Bandwidth Limit |
| ✔ Backups Size Limit |
| ✔ Backups Files Limit |
| ✔ Private Networks Limit |
| ✔ VCPUs Limit |
| ✔ Network Rate Limit |
- General Info:
| ✔ Supports Cloud-Init (KVM) |
| ✔ Supports PVE And PAM Authentication |
| ✔ Supports KVM and LXC Virtualization |
| ✔ Integrated With Advanced Billing For WHMCS - Actual Server Resource Usage Billing (read more) |
| ✔ Integrated With Proxmox Cloud Autoscaling For WHMCS - Automated Servers Resizing (read more) |
| ✔ Integrated With IP Manager For WHMCS - Complete Management of IP Subnets (read more) |
| ✔ Multi-Language Support |
| ✔ Supports Proxmox VE Up To 5.X |
| ✔ Supports IPv4 and IPv6 |
| ✔ Supports Custom Hooks |
| ✔ Supports PHP 5.6 Up To PHP 7.2 |
| ✔ Supports WHMCS Template Six |
| ✔ Supports WHMCS V7 |
Installation and Configuration
| This tutorial will show you how to successfully install and configure Proxmox Cloud For WHMCS. We will guide you step by step through the whole installation and configuration process. |
Installation
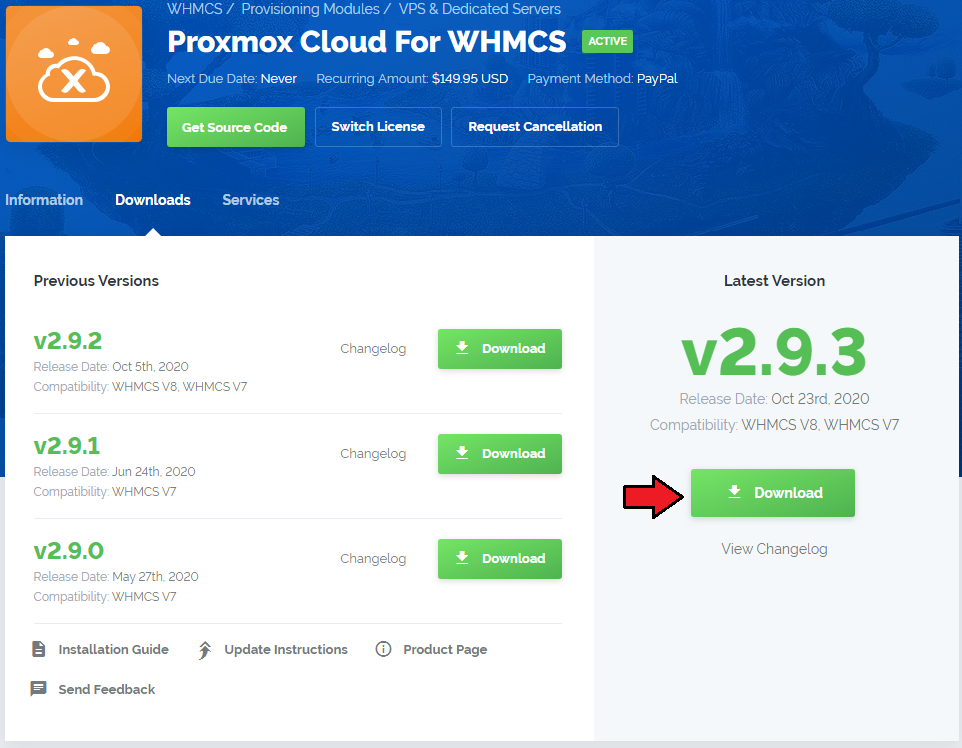
| 1. Log in to our client area and download the module. |
|
| 2. In the downloaded file, you will find two packages that support different PHP versions. As presented on the screen below, the first one is dedicated to PHP 5.6 up to PHP 7.0, while the second one is aimed at PHP 7.1 up to PHP 7.2. It does not apply to open source versions. Note: You can check the current PHP version in your WHMCS. To do so, proceed to 'Utilities' › 'System' › 'PHP Info'. |

|
| 3. Extract the downloaded file and choose the one with the right PHP version. Upload and extract the PHP file into the main WHMCS directory. The content of PHP version files should look like this. |

|
| 4. Open 'UploadOnProxmoxServer' and upload content of the proper version on all Proxmox servers into the '/usr/share/novnc-pve/' folder. You should upload these files not only during the first installation of the module, but also each time you update it. Note: If you wish to allow noVNC consoles, you need to configure a product using the PVE realm and set user permissions to 'PVEVMUser.' |
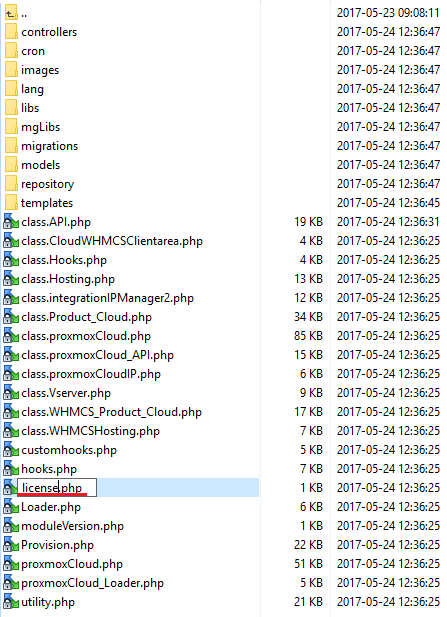
| 5. When you install Proxmox Cloud For WHMCS for the first time, you have to rename the 'license_RENAME.php' file. This file is located in 'modules/servers/proxmoxCloud/license_RENAME.php'. Rename it from 'license_RENAME.php' to 'license.php'. |
|
| 6. In order to configure your license key, you have to edit a previously renamed 'license.php' file. Enter your license key between quotation marks as presented on the following screen. |

|
Activation of Proxmox Addon
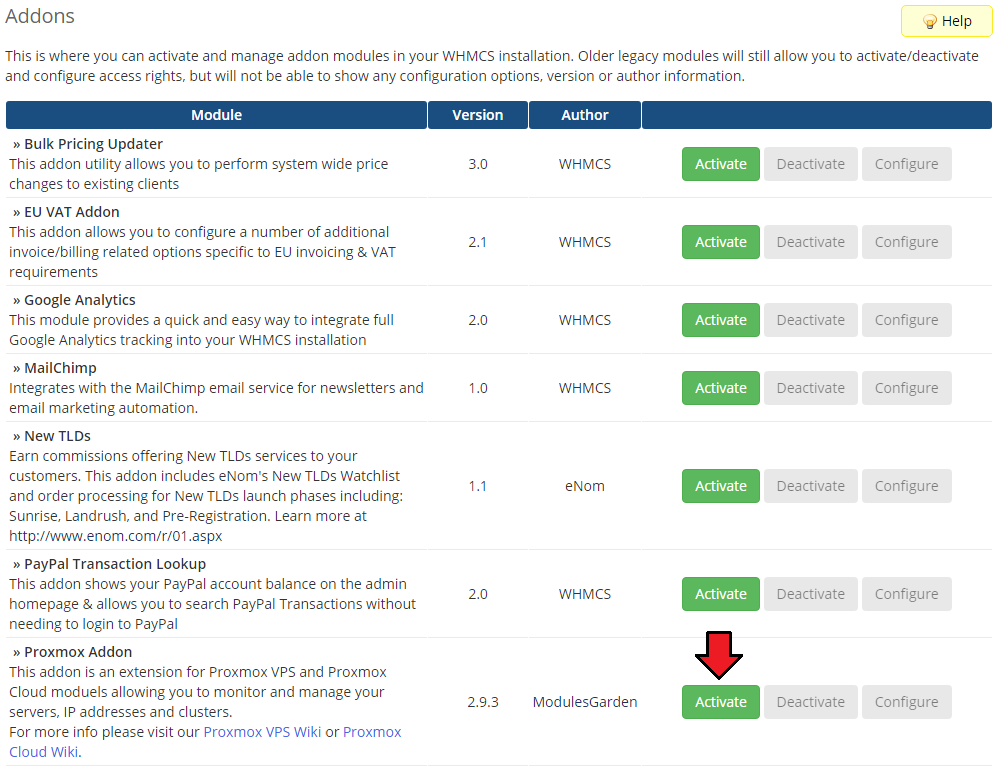
| 7. Firstly, you should activate Proxmox Addon. To do so, log in into your WHMCS and press 'Setup' → 'Addon Modules'. Find 'Proxmox Addon' and press 'Activate'. Note: The Proxmox addon version might not match the current version of the provisioning module itself. This is completely normal due to the specific structure of the product. |
|
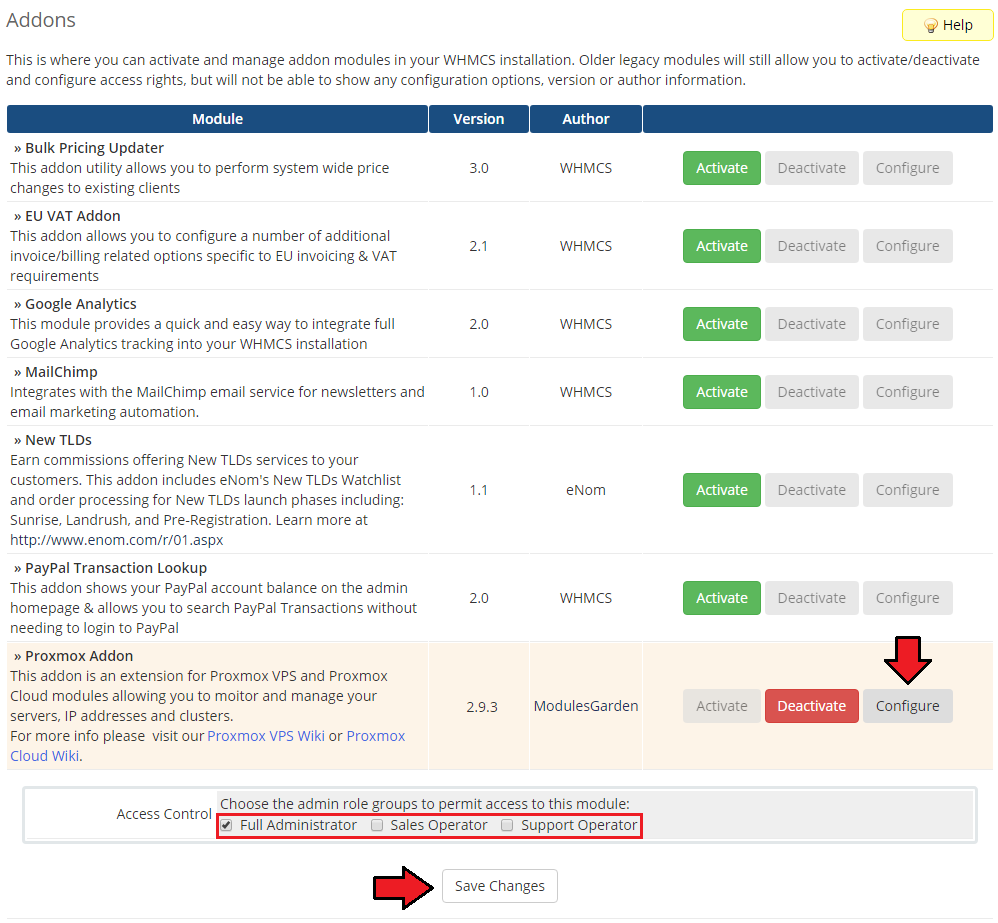
| 8. In the next step, you need to permit access to this module. To do so, click on the 'Configure' button. Tick 'Full Administrator' and press 'Save Changes'. |
|
Configuration of Server
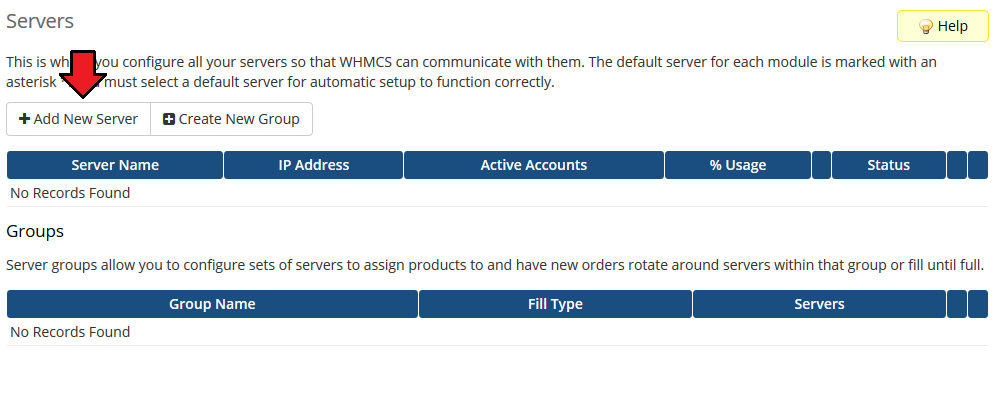
| 9. Now, we will show you how to configure a new product. Go to 'Setup' → 'Products/Services' → 'Servers' and press 'Add New Server'. |
|
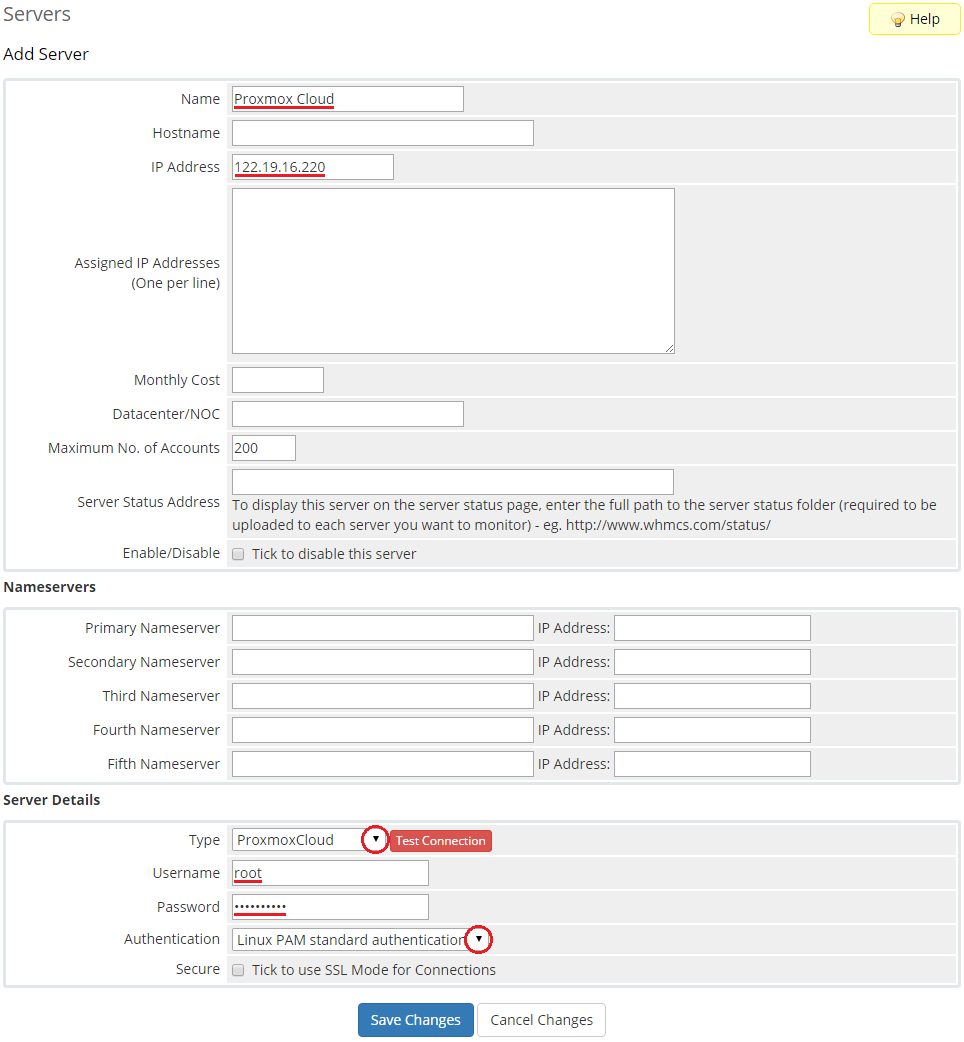
| 10. Next, enter your server name, IP address, username and password. Choose 'ProxmoxCloud' from a dropdown menu and press 'Save Changes'. |
|
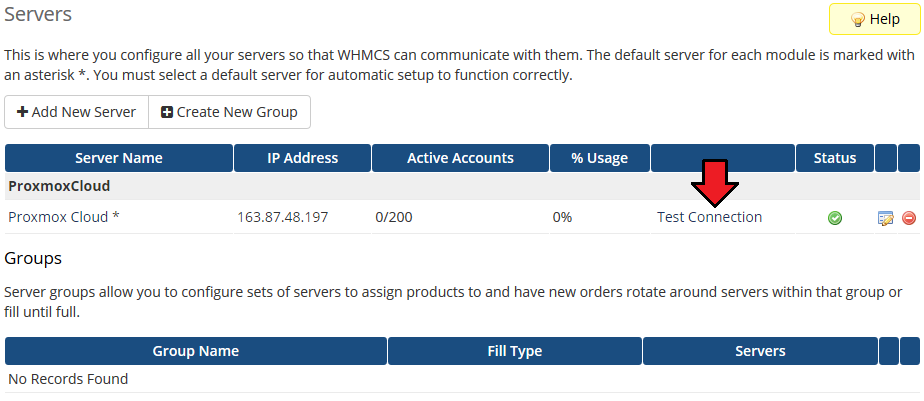
| 11. After you have configured your server correctly, you will see the following screen. You can check connection with the Proxmox server. To do so, simply press 'Test Connection' as shown on the screen below. |
|
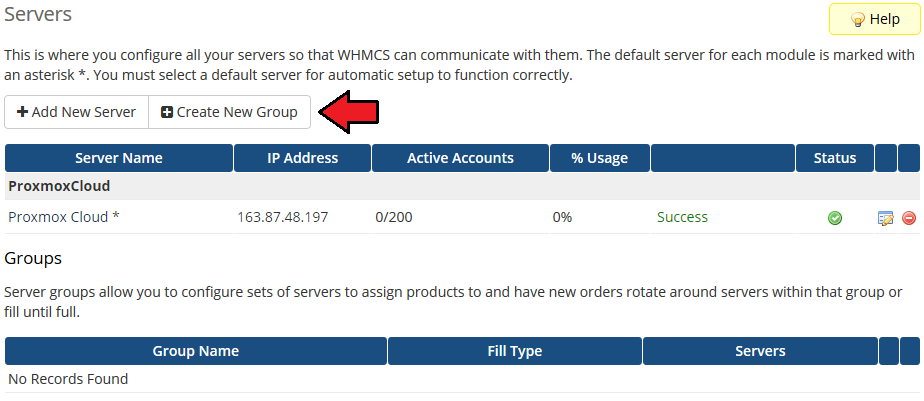
| 12. It is time to create a server group. To do so, click on 'Create New Group'. |
|
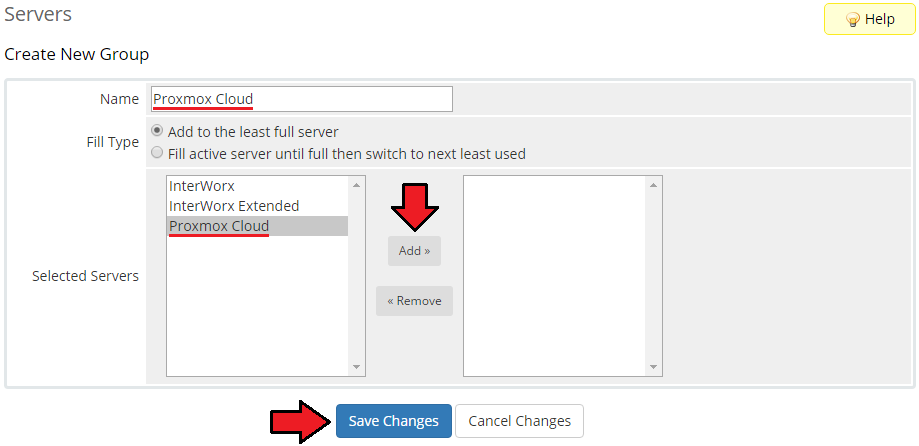
| 13. Enter name, click on your previously created server, press 'Add' and afterwards 'Save Changes'. |
|
Configuration of Product
| 14. In order to create and configure a product, go to 'Setup' → 'Products/Services' → 'Products/Services'. Click on 'Create a New Group'. |

|
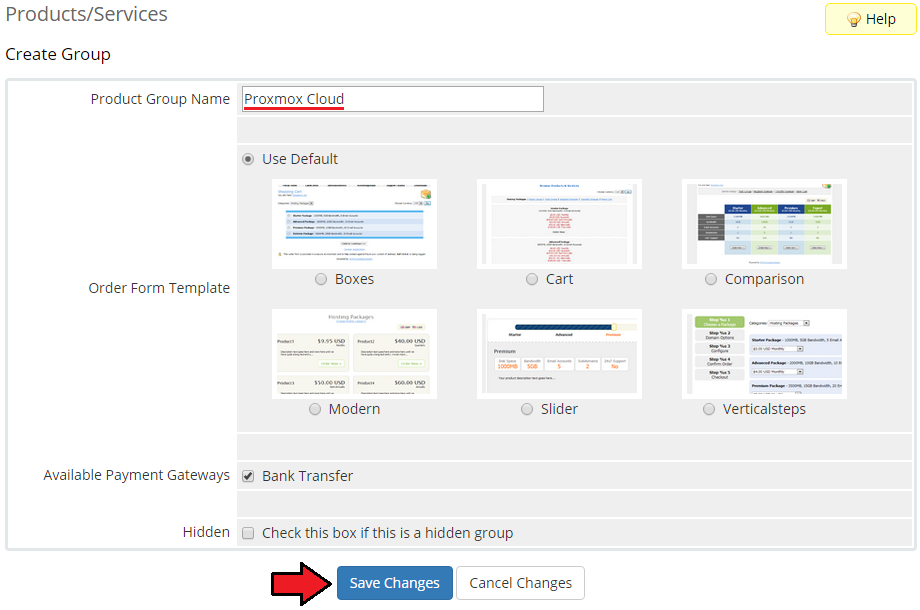
| 15. Enter the product group name and press 'Save Changes'. |
|
| 16. When you have a product group, you are able to create your product. To create a product, click on 'Create a New Product'. |

|
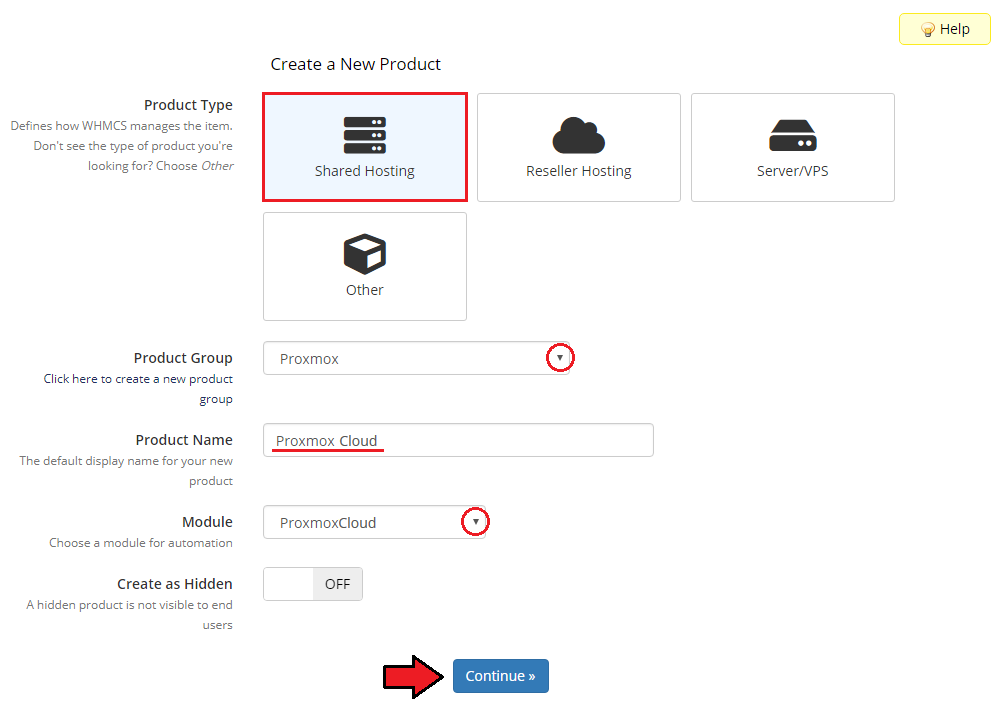
| 17. Afterwards, choose your product group and type from dropdown menus, enter your product name and press 'Continue'. 'Product Type' can be set to 'Dedicated/VPS Server' but nameservers will have to be added later. |
|
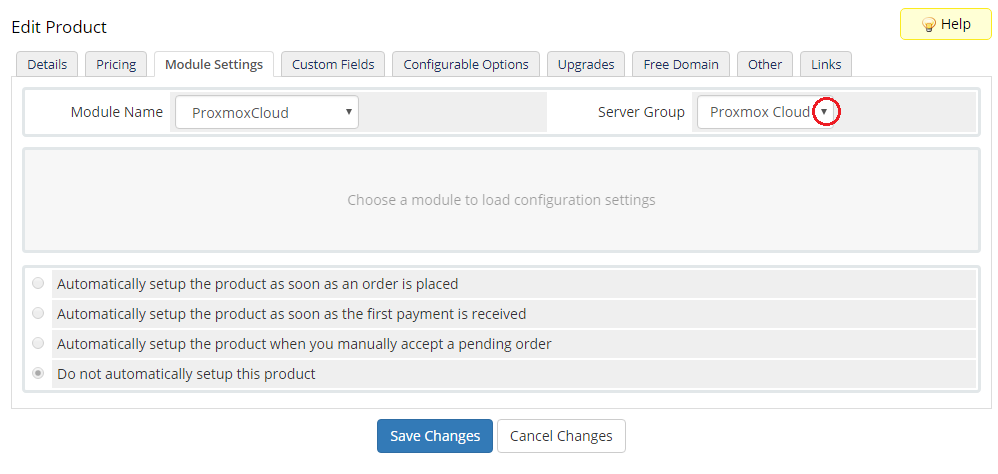
| 18. Now, go to the 'Module Settings' section, choose both 'ProxmoxCloud' and your previously created server group from dropdown menus. Next, click on 'Save Changes'. |
|
| 19. Choose 'Virtualization Type', 'Default Node', 'Template & ISO Storage' and 'User Permission' from dropdown menus. Available virtualization types:
You can also choose how often the bandwidth usage should be calculated. |
|
KVM Virtualization Type
| 20. Setting of the KVM virtualization type (skip this step if you have chosen the LXC virtualization type). From dropdown menus, choose 'KVM OS Type', 'Default Storage', 'Disk Type' and 'CD/DVD-ROM Type'. |

|
LXC Virtualization Type
| 21. Setting of the LXC virtualization type (skip this step if you have chosen the KVM virtualization type). From dropdown menus, choose 'Default Storage', 'Template' and 'Bridge'. |
|
OpenVZ Virtualization Type
| 22. Setting of the OpenVZ virtualization type (skip this step if you have chosen the KVM virtualization type). Please note that only Proxmox versions prior to v.2.3.0 support OpenVZ virtualization. From dropdown menus, choose 'OpenVZ OS Templates', 'Default Storage', 'Network Mode' and 'Bridge'. |
|
Finalizing The Configuration
23. Private Network Management - in order to allow clients to manage their private networks, set up the 'Network Device' section properly.
Note: Configure these three options for the KVM and LXC virtualization. |

|
| 24. The next step is setting up the configuration of backups. Define backup settings in the 'Backups' section through selecting values from the 'Storage' and 'Backups Routing' dropdown menus. |

|
| 25. Set up server limits to control the size of created servers. |
|
| 26. The final step is generating custom fields and deciding whether to set up the product with static or configurable resources. Press 'Generate default' next to 'Custom Fields'. |
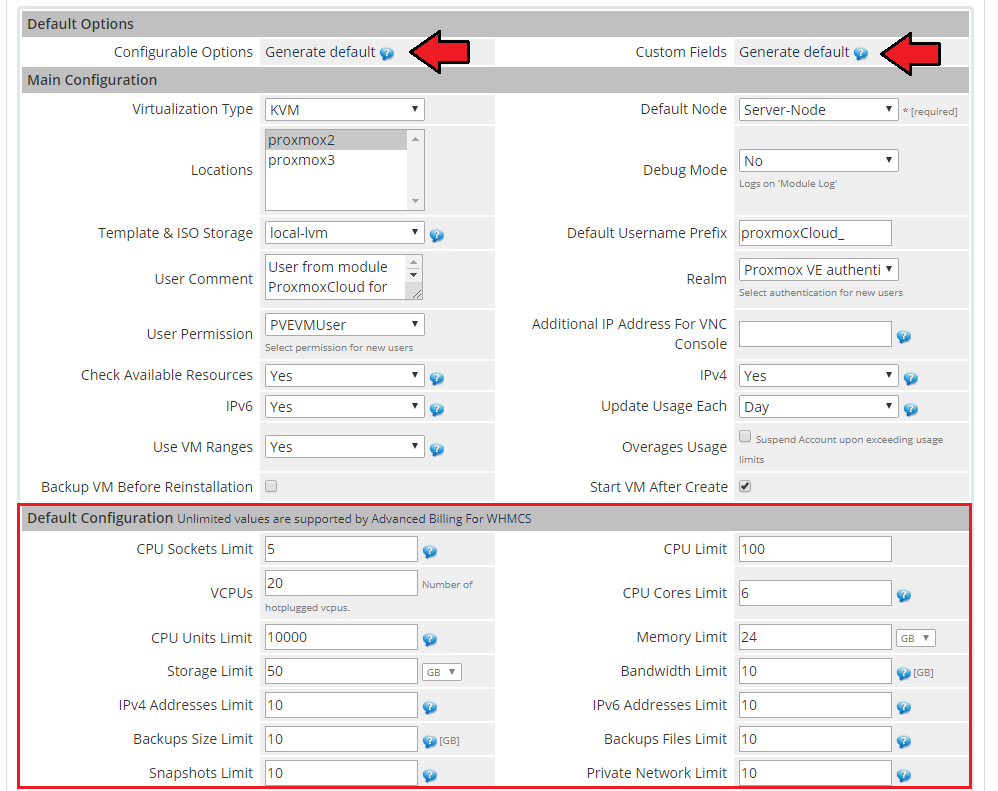
|
27. In the end of the product configuration, you have to add a cron job that is shown below (5 minutes interval suggested).
php -q /your_whmcs/modules/servers/proxmoxCloud/cron/cron.php Do not forget to replace 'your_whmcs' with your WHMCS root location. |
| Congratulations! You have just finished the installation and configuration of the module. |
Configuration of Addon
| 28. Add a new IP address. In order to create a new product, you have to add a dedicated IP pool to 'IP Addresses' list in 'Proxmox' addon module. |
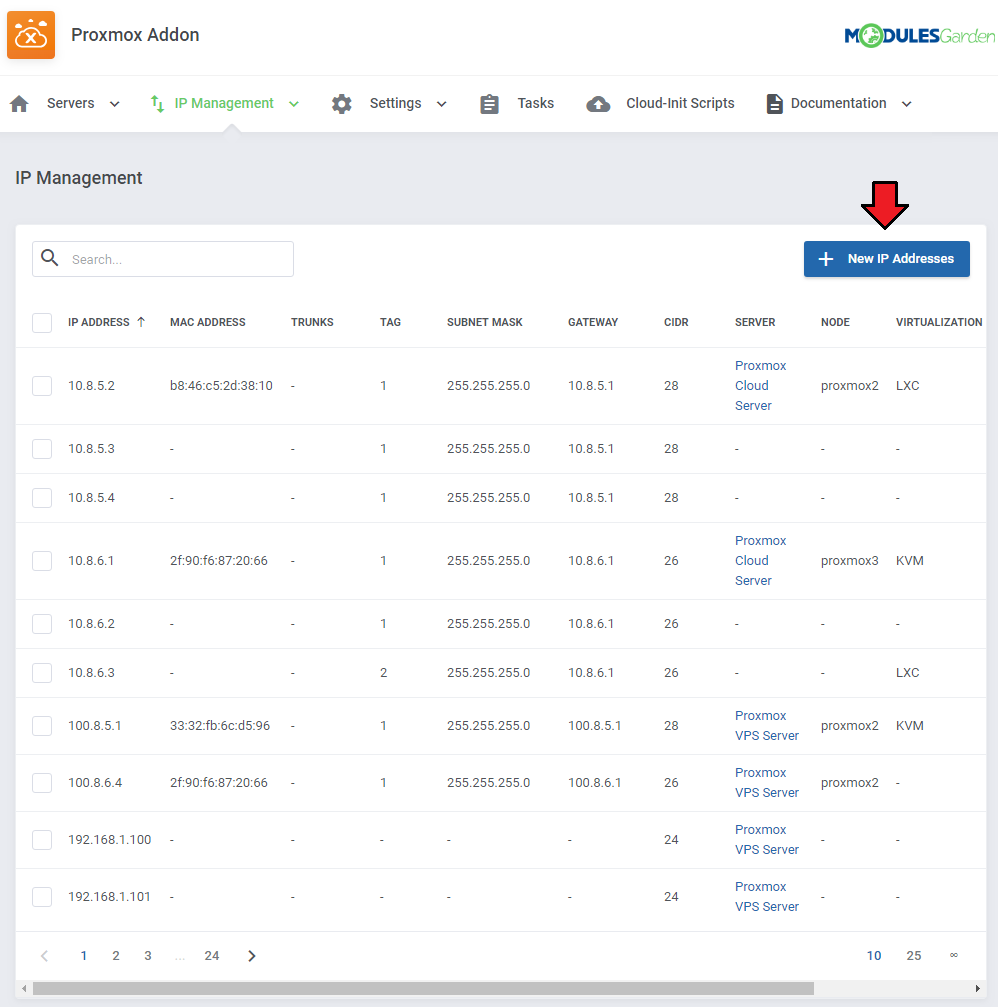
|
| 29. Type in the desired IP and mask in 'IP Pool' and choose server from 'Server' dropdown menu. Select 'Private Address' if the added address is of such a kind, clients will be then allowed to add, remove and configure their private network. |
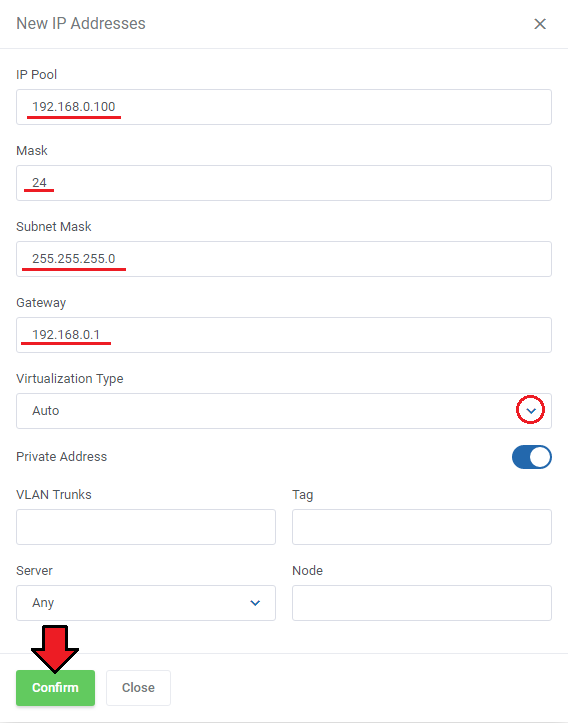
|
| 30. You are now able to create new virtual machines at the product. If you used the KVM virtualization type, the client area of a successfully created product should look similar to the one presented on the screen below. |
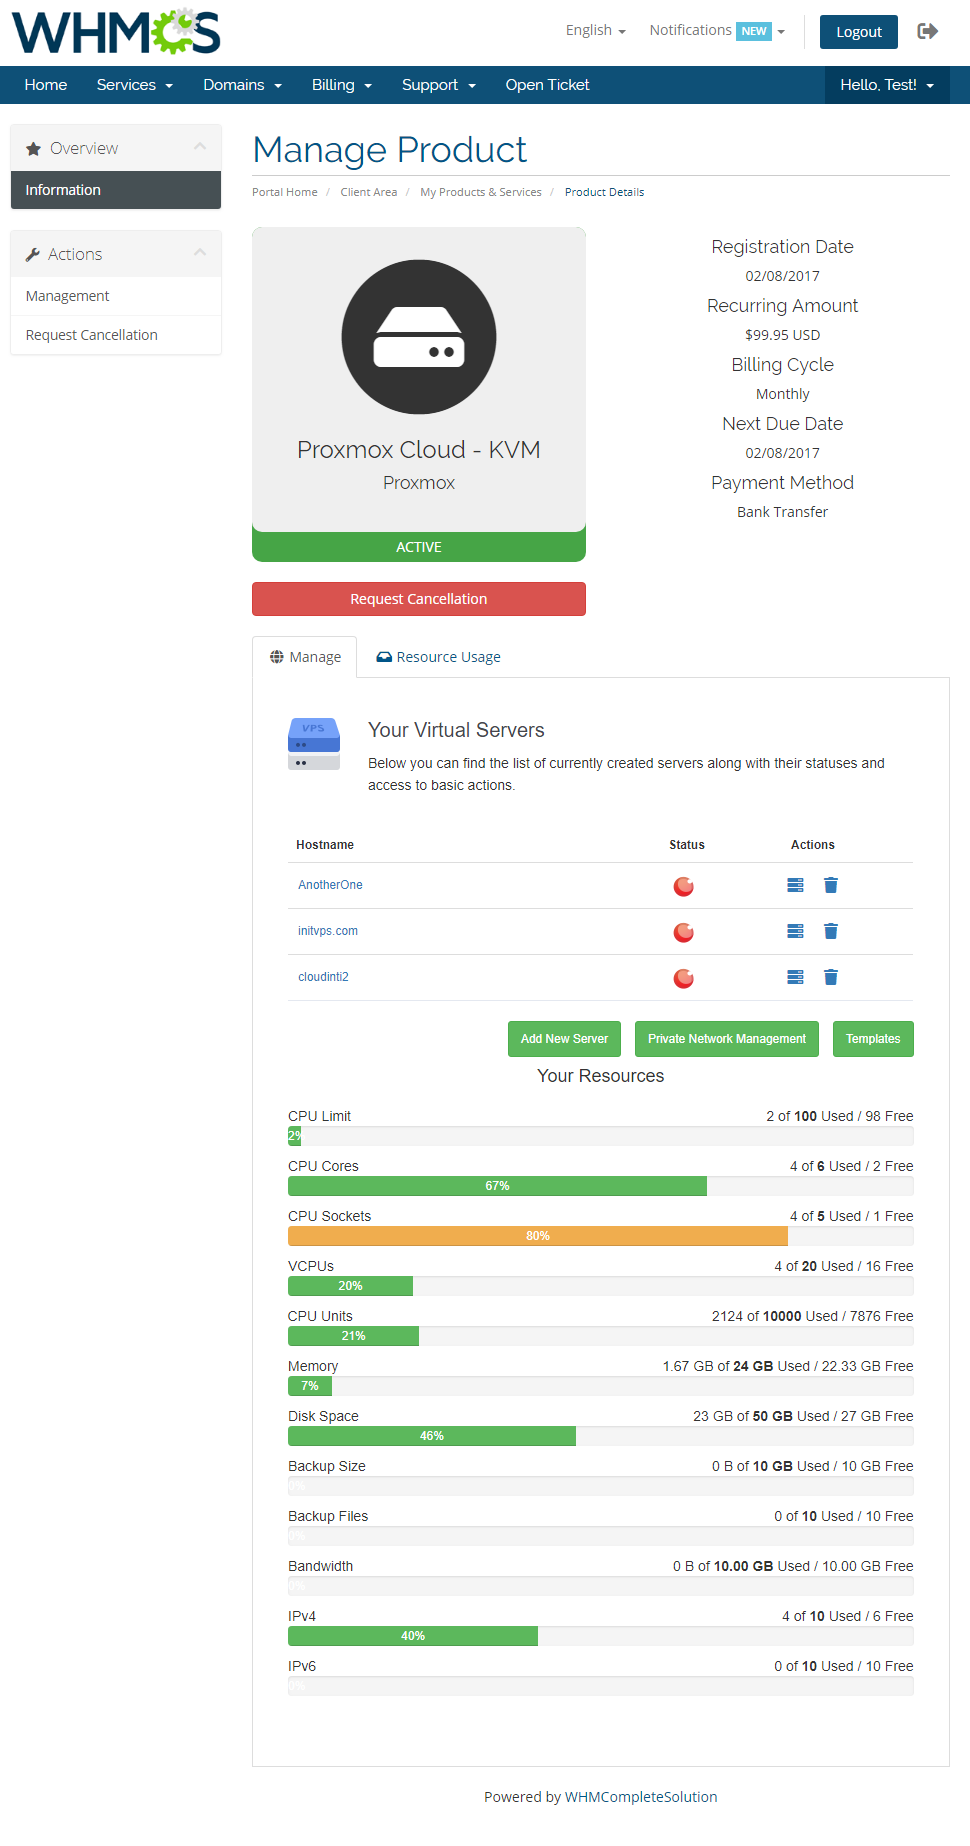
|
| 31. The client area of a product using the LXC virtualization type looks quite similar. |
|
| 32. This is how an exemplary product details look like in the admin area. Allowed actions:
|
|
Configuration of SSH Keys (KVM)
| Important! Since the 2.5.0 version of the module, if you are using Proxmox VE 5.2 or later, we highly recommended using the Cloud-Init feature instead of following instructions described in this section.
|
|
| 33. First, create a new VM Template that you will use for the KVM image. Then, generate SSH keys and add the public key to the root account on the newly created VM image. Moreover, upload both ( public and private ) keys on your WHMCS server in a secure location. |

|
| 34. Next, while in your WHMCS, go to the 'Proxmox Addon' → 'Settings' → 'SSH Keys' and press 'Add' button. |

|
| 35. Enter the name and location to the key pairs located on your WHMCS server. Optionally, you can add a passphrase to increase security. |
|
| 36. Next, go back to the product configuration and, in ' KVM Configuration' → 'VM SSH Root Key' , select the pair of keys you want to use. Enter the SSH communication port and select the preferred features. Make sure they match the 'KVM OS Template' that will be used. |

|
37. Now, the 'Resize Partition' , 'Change Root Password' and 'Delete VM SSH Root Key' options should be available.
|
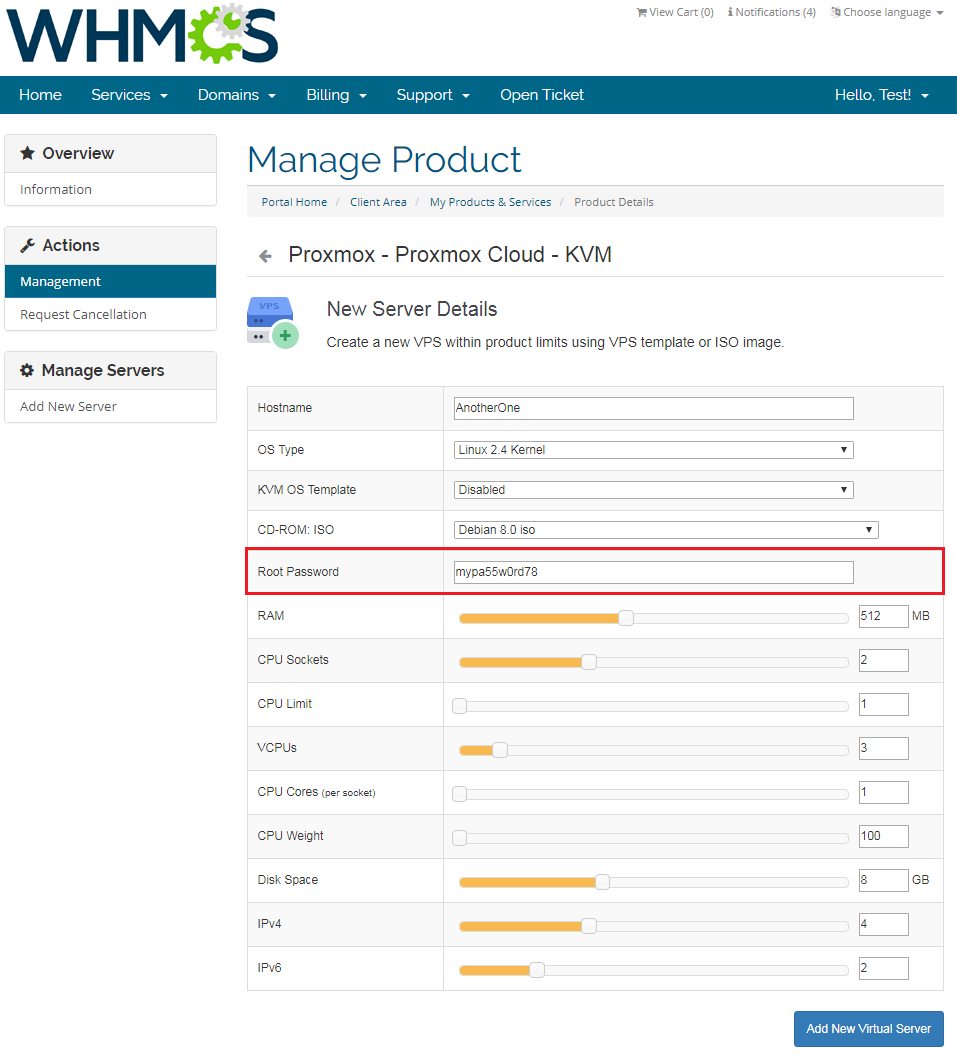
|
| The partition will be also automatically resized during the VM upgrade if a disk size is different than the one set as default in the template. |
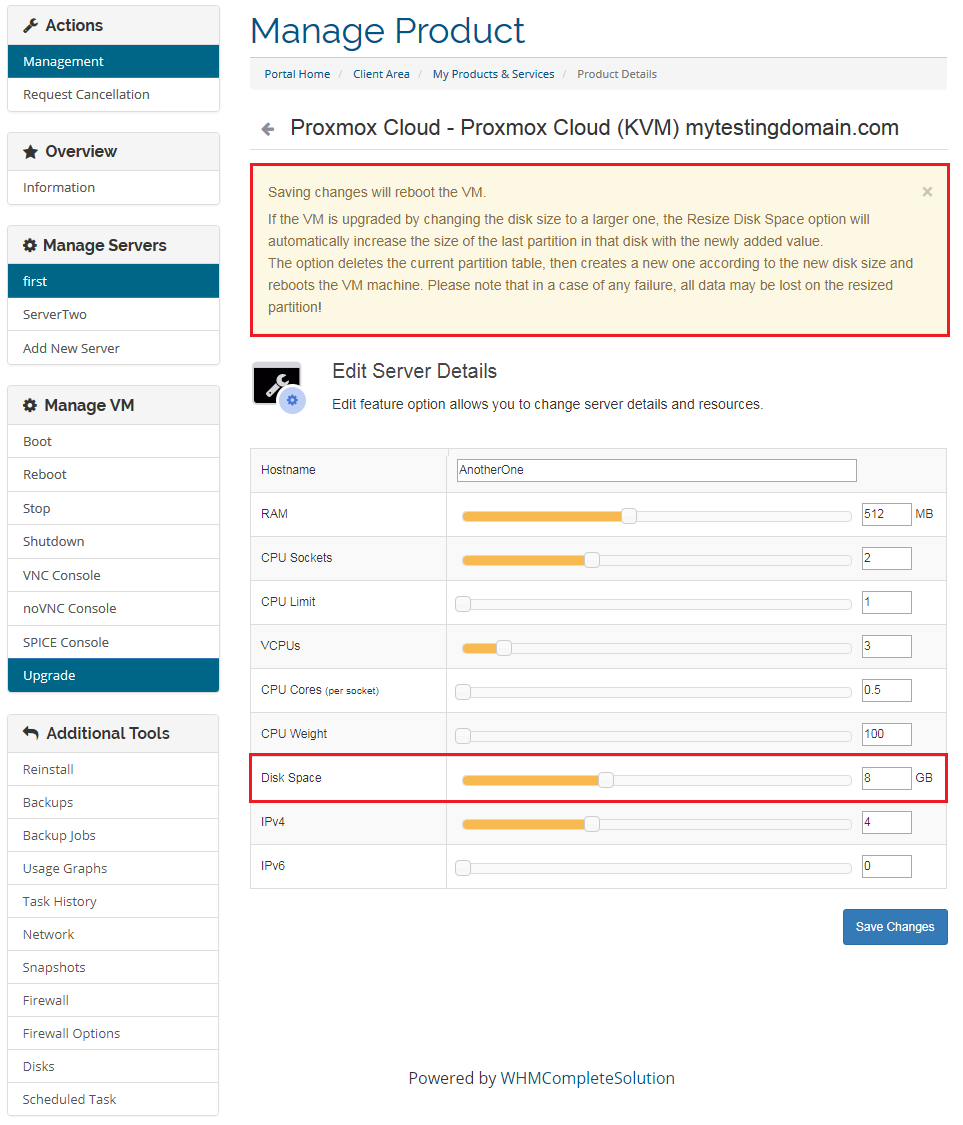
|
Management
| Proxmox Cloud For WHMCS allows your customers to manage their PVE servers in the WHMCS client area. At the same time, you can monitor and handle each product from your WHMCS admin area. |
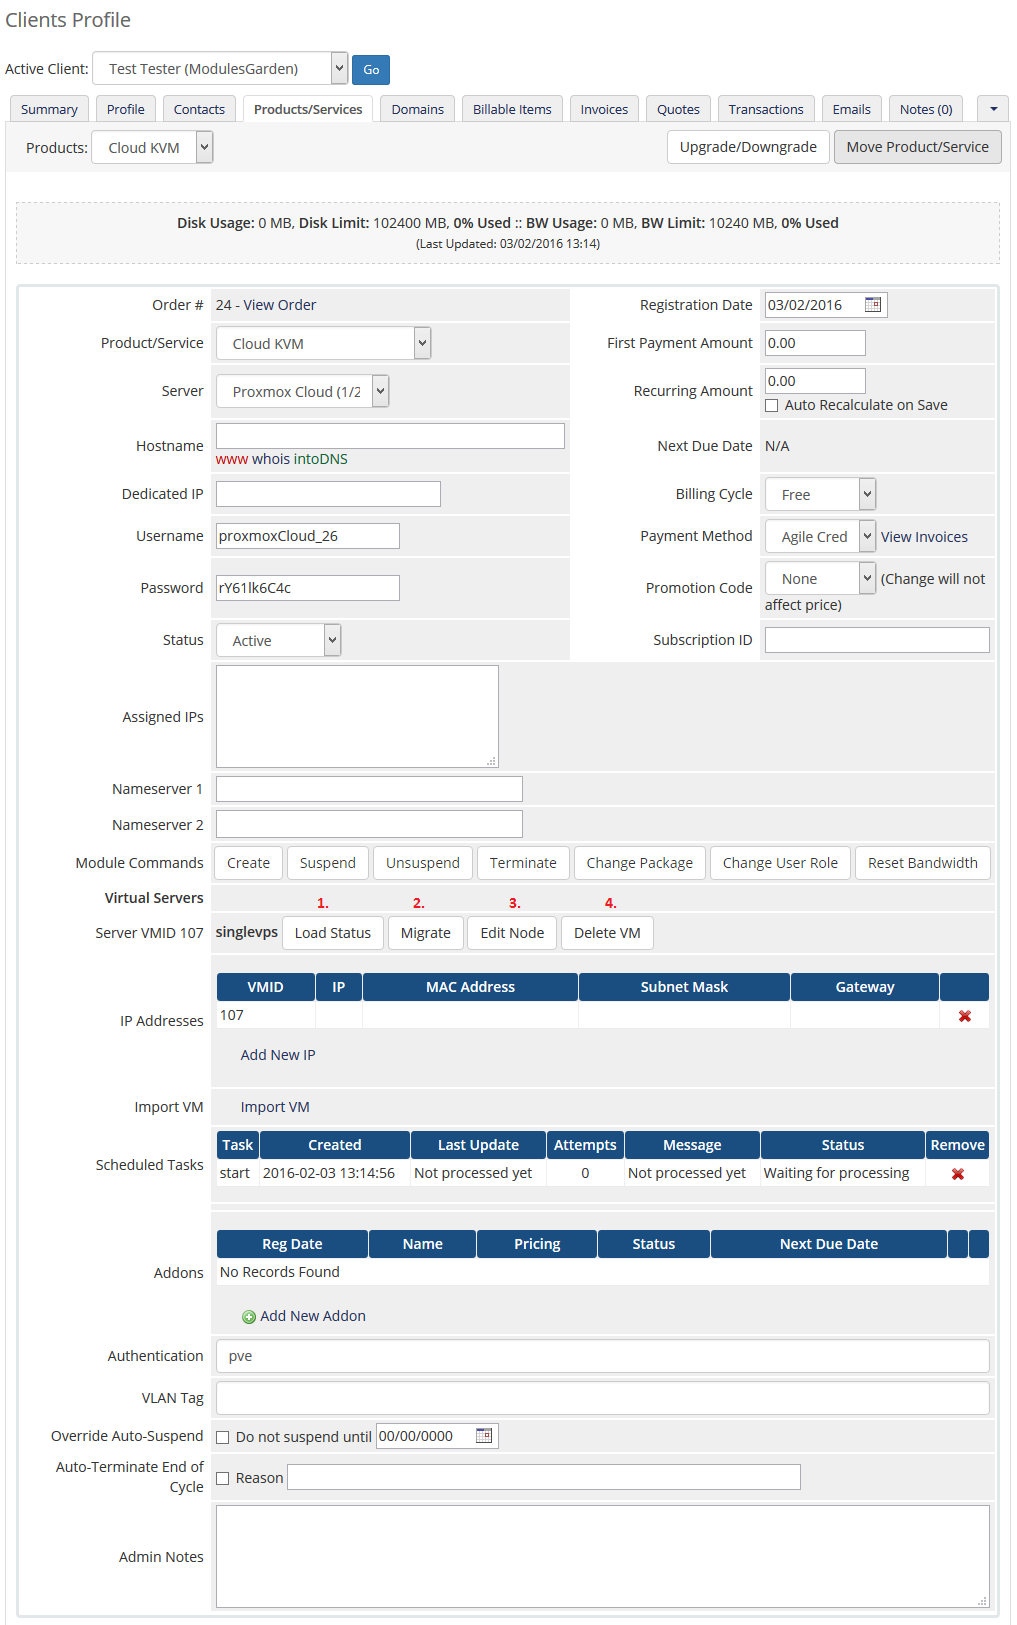
|
| On the following screen, you can see loaded details of the VM as well as opened migration popup. Migration is useful when you want to request migration from the WHMCS admin area, while editing node is practical for updating details after migrating the virtual machine from the Proxmox panel. |
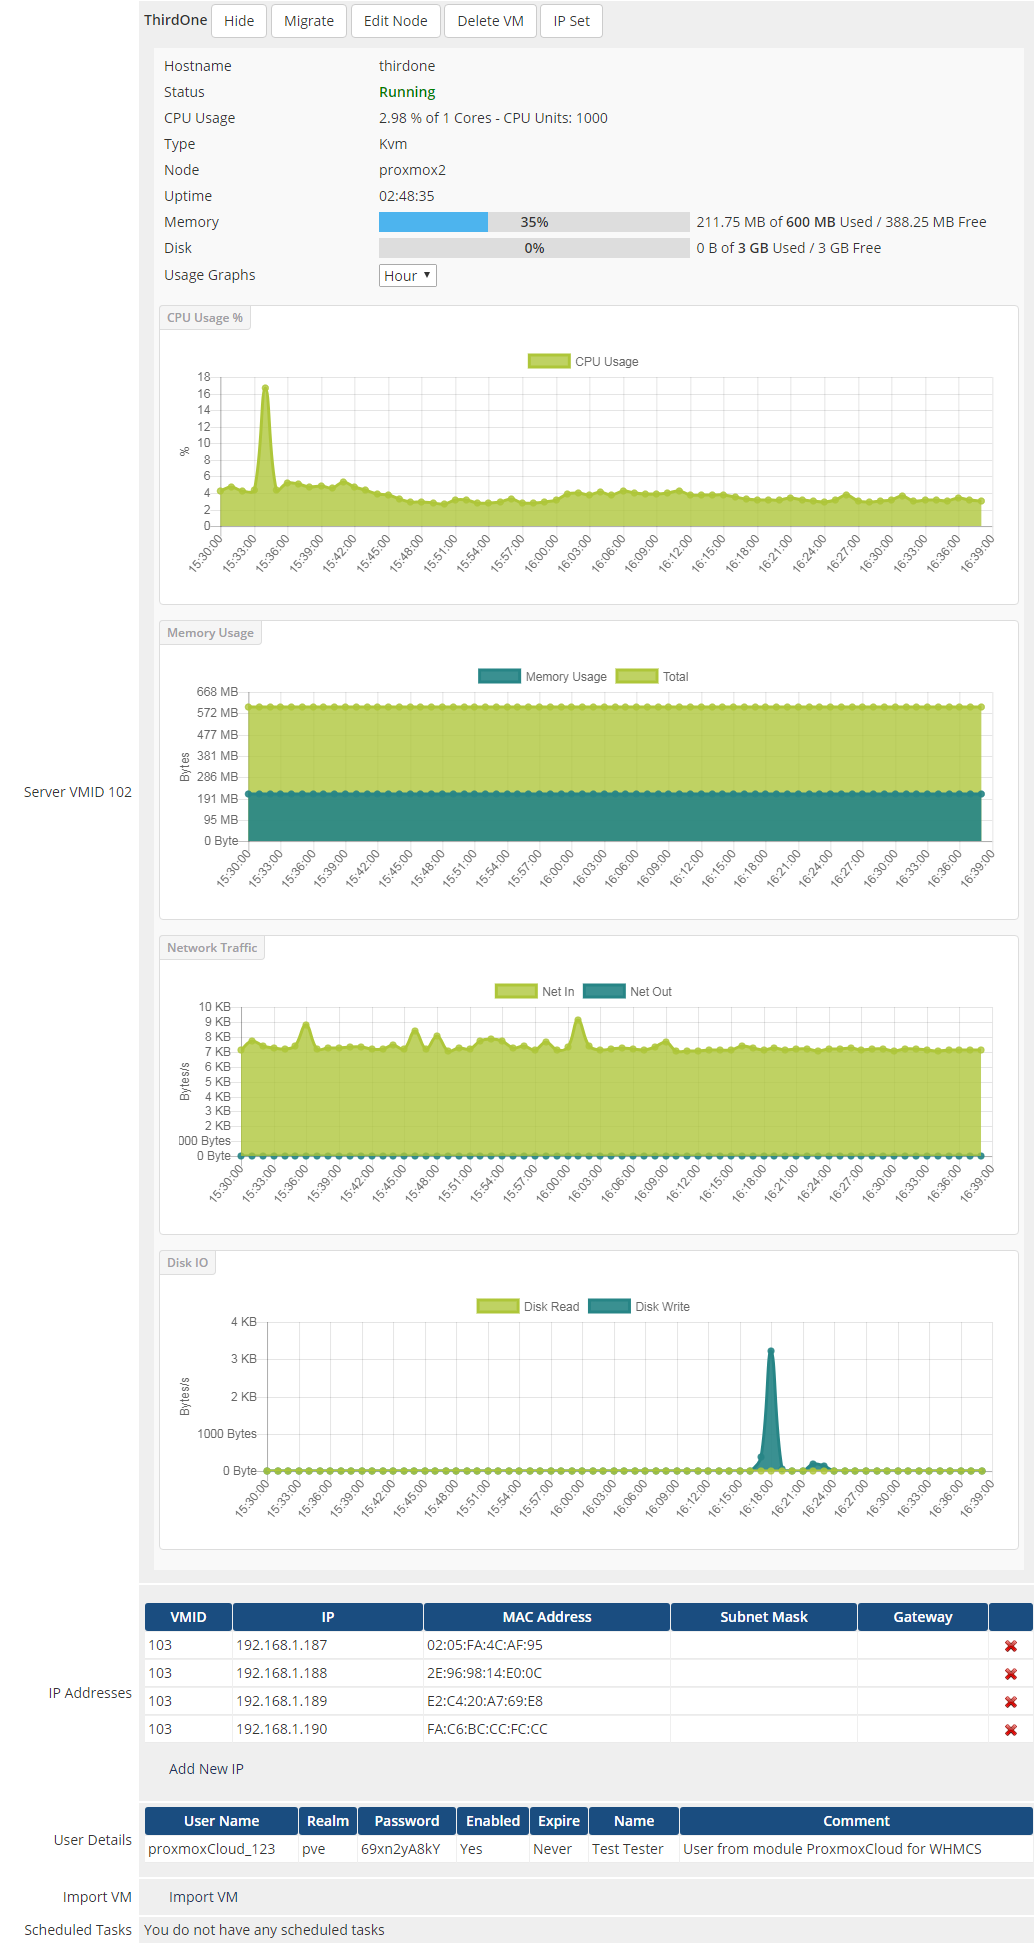
|
Management of Addon
Servers Management
Server List
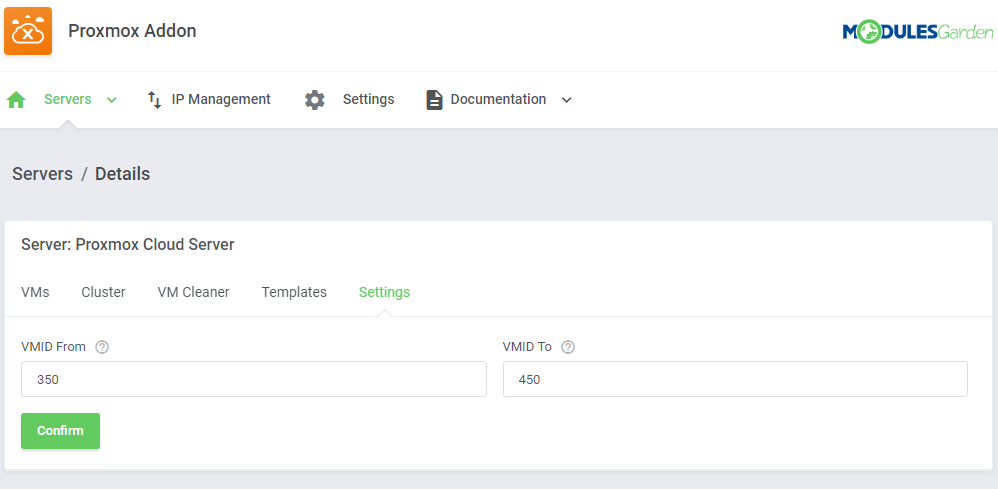
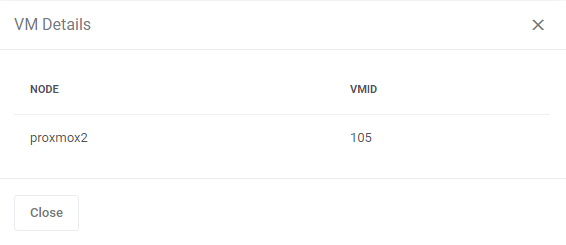
| In 'Addons' → 'Proxmox Addon' → 'Servers' → 'Servers List' you can find configured Proxmox servers. RAM details:
Suspended - the number of suspended accounts per their size in MB |
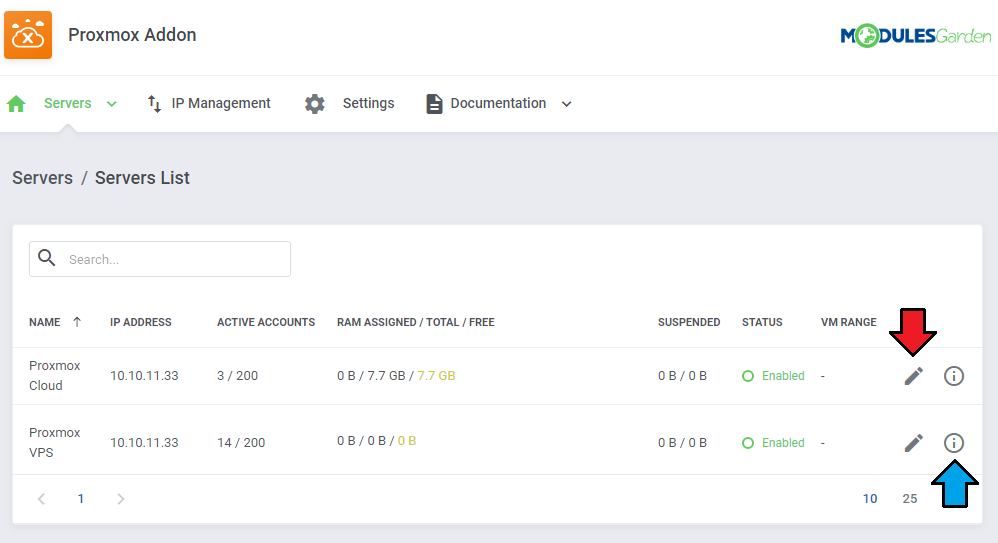
|
| Define the ID range and save changes. |
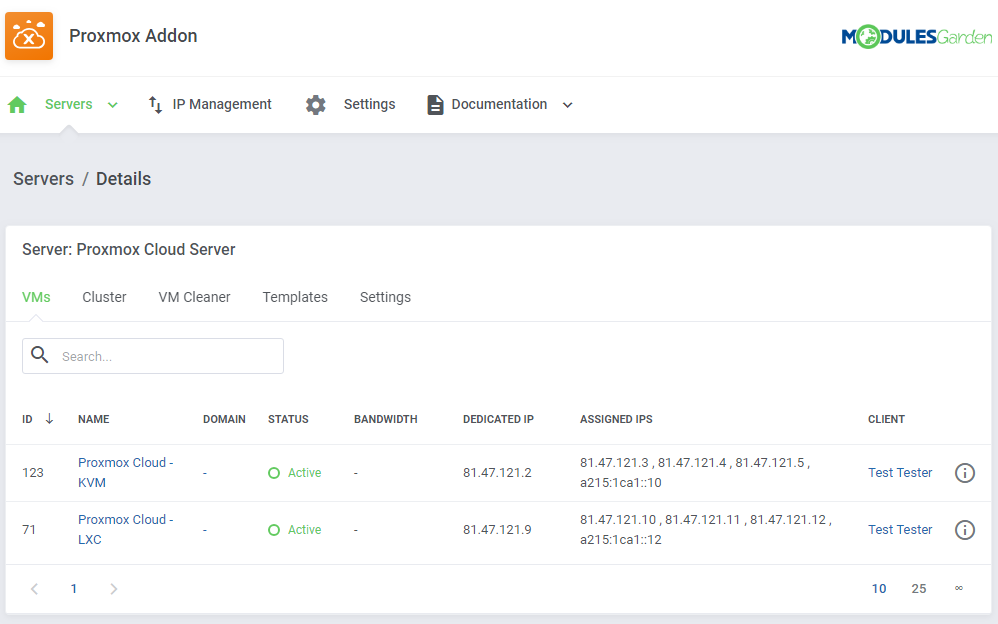
|
| Upon pressing 'Edit' , you will be moved to the server edit page. |
VMs List
| In 'Addons' → 'Proxmox Addon' → 'Servers' → 'VMs List' you can find details on any Proxmox product. |
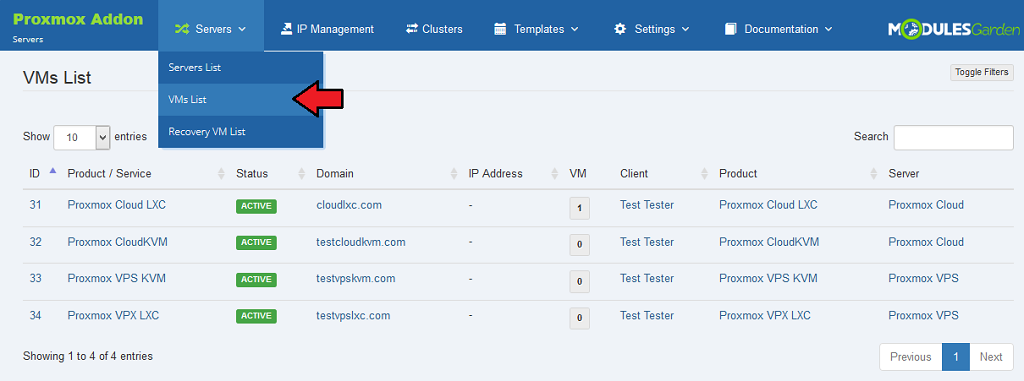
|
| Use the 'Toggle Filters' button to find entries that you are interested in. |
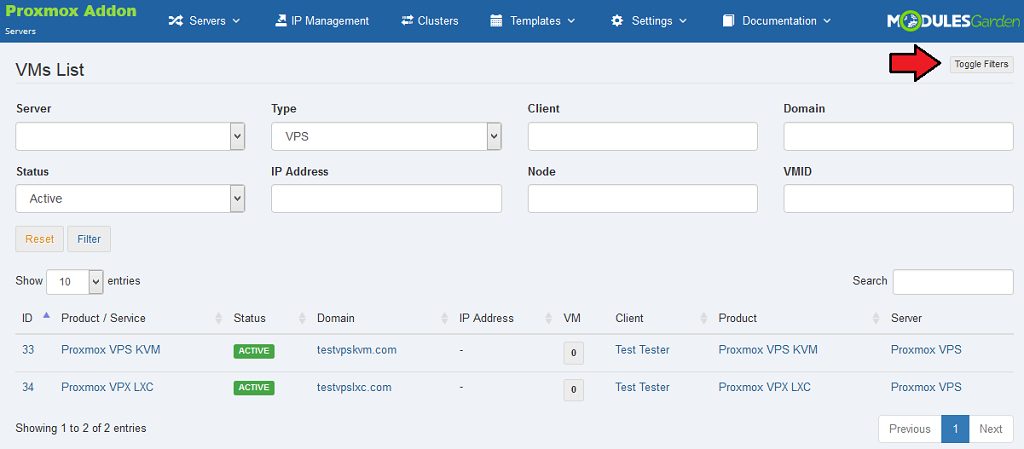
|
Recovery VM Lists
| In 'Addons' → 'Proxmox Addon' → 'Servers' → 'recovery VM List' you can find configured Proxmox servers. Run 'recovery cron job' to create and store full backups of VM configuration. |

|
IP Management
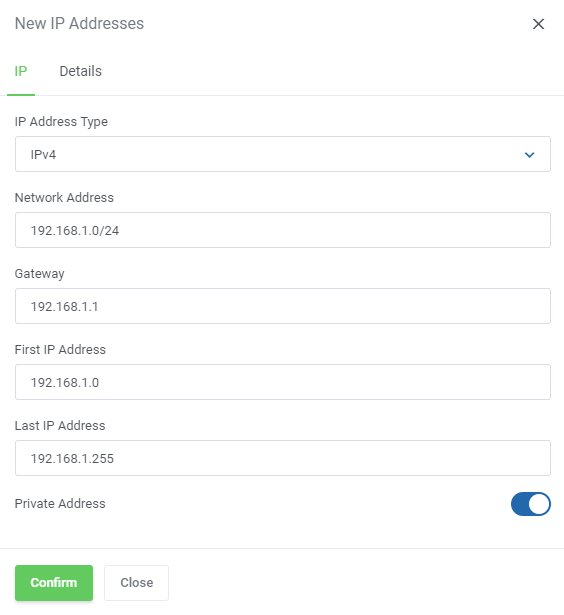
| In the 'IP Management' tab, you can add, edit and remove IP addresses of Proxmox products. |

|
| Fill out the required fields. Here you may also define private IP addresses, simply mark the adequate field. Clients may manage their private networks and assign IP addresses to VM only if some private IP addresses are added. |
|
Clusters
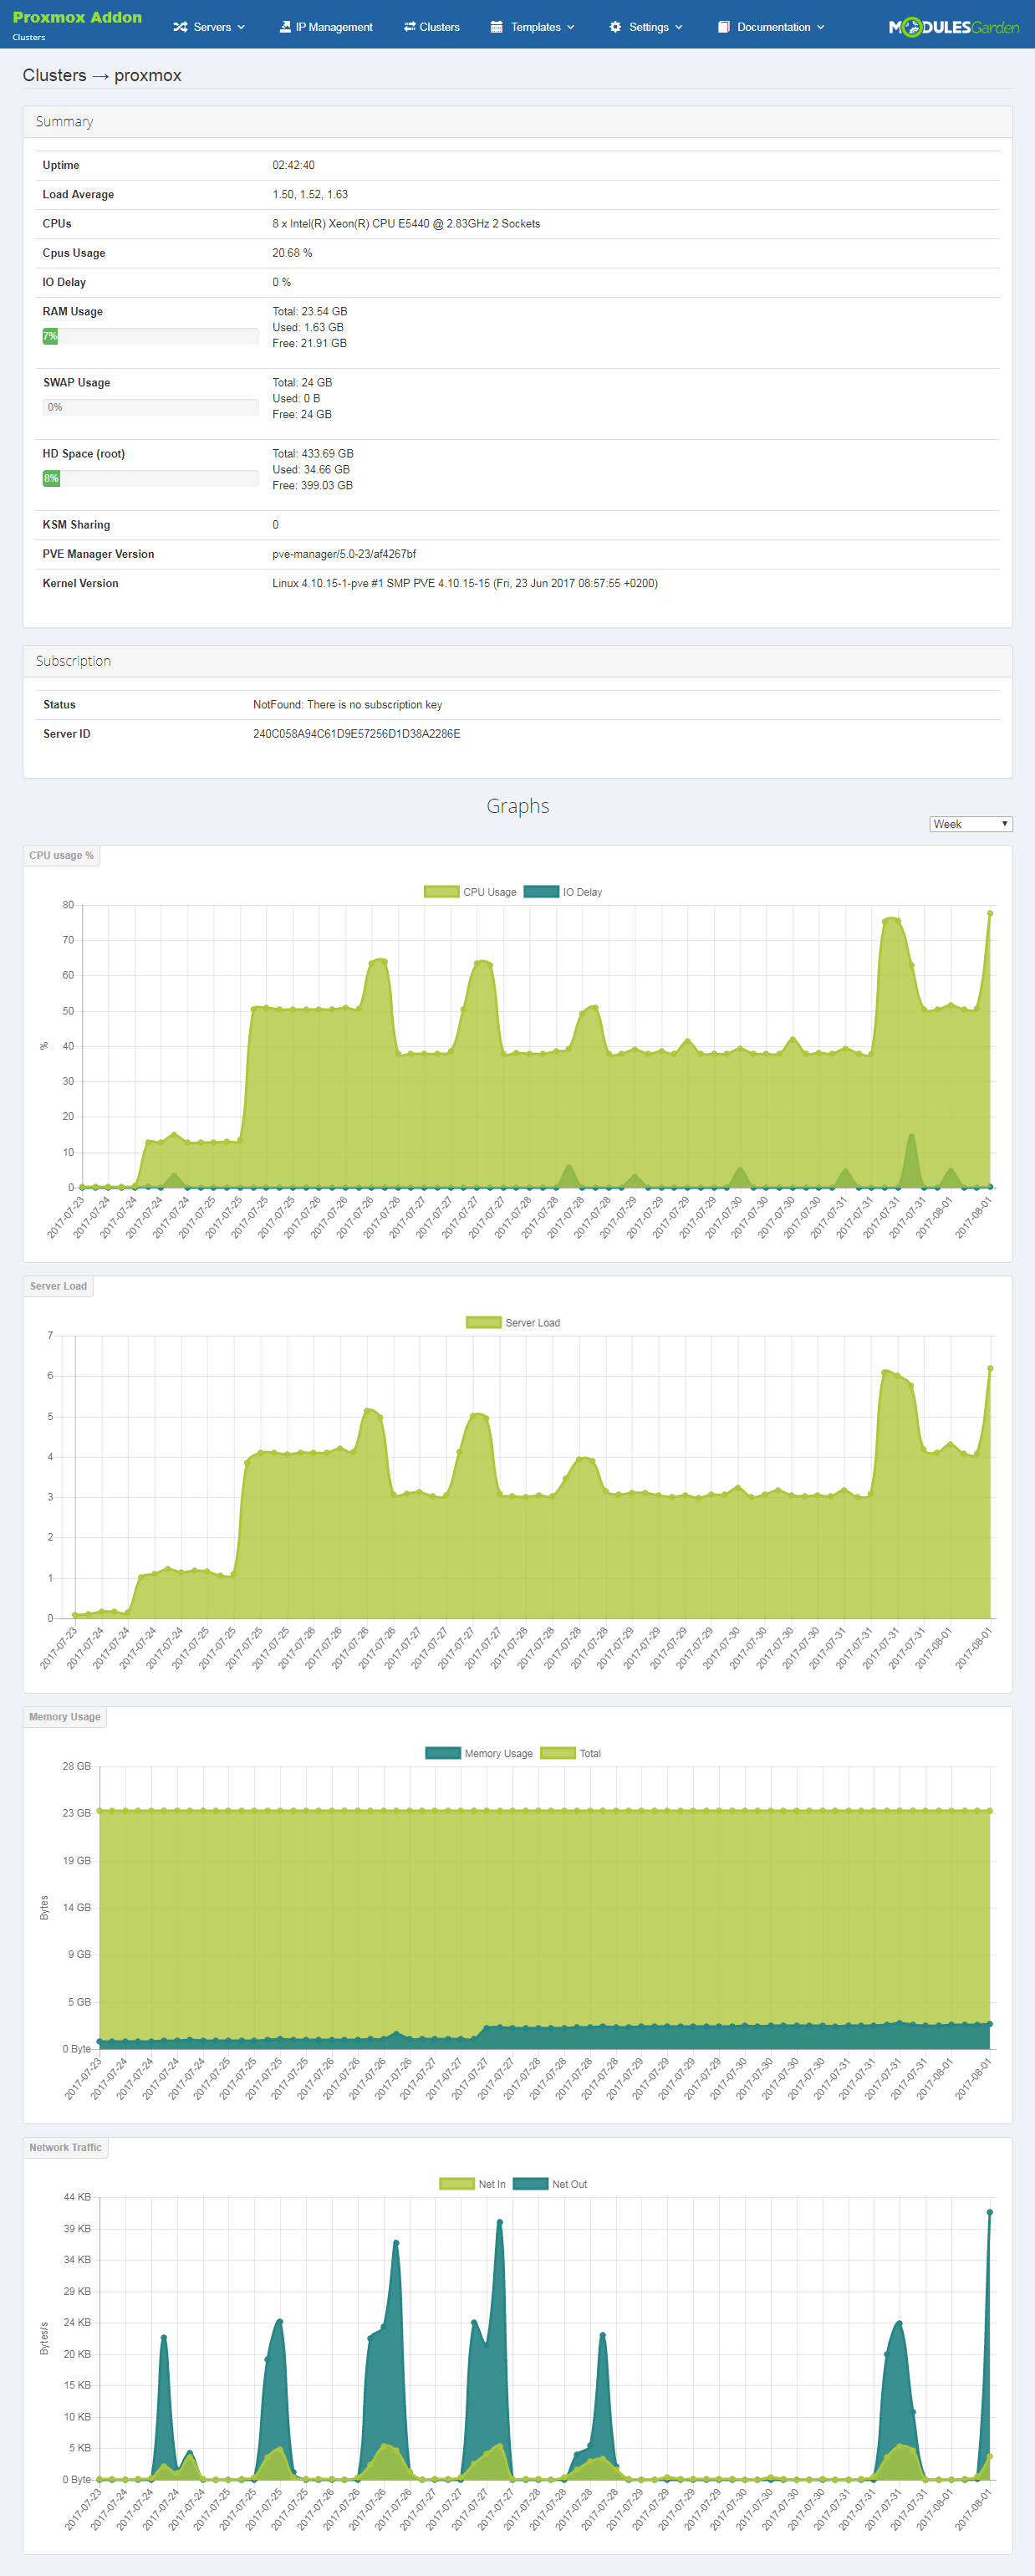
| 'Clusters' tab contains the list of clusters. To view information about a cluster, simply press its name. |

|
| Here you can find various information about a cluster, from the available resources to usage graphs. |
|
Templates List
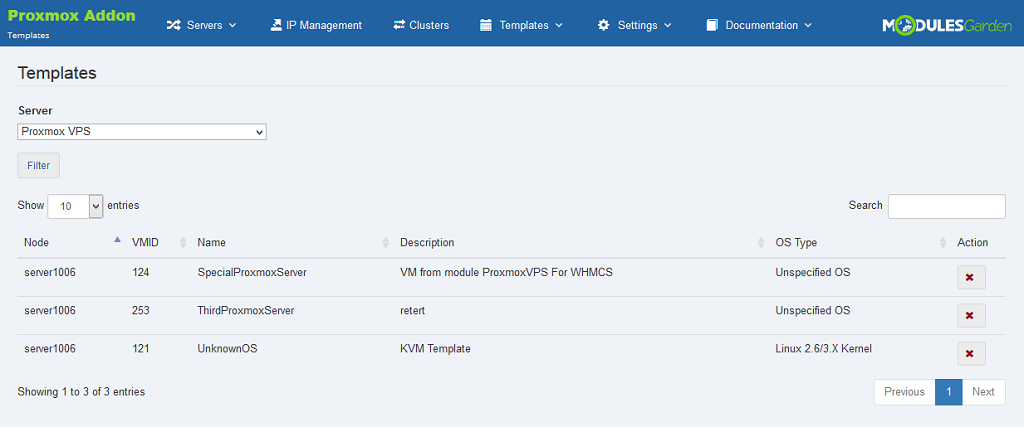
| On this page, you can view the list of templates and delete the unused ones. |
|
Create Templates
| You can easily convert any virtual machine on your server to a template. In order to convert the virtual machine, go to 'Proxmox Addon' → 'Templates' → 'Create Template'. |

|
| Next, choose the node and the virtual machine to convert. Fill in 'Template Friendly Name' and press 'Save Changes'. |
|
General Settings
| 'Minimal VMID' allows you to define the minimal ID of a virtual machine created from the server, which does not have the VMID range defined. Cron job user synchronization - if you change the user role in the product settings, this cron job changes the roles of existing users. |
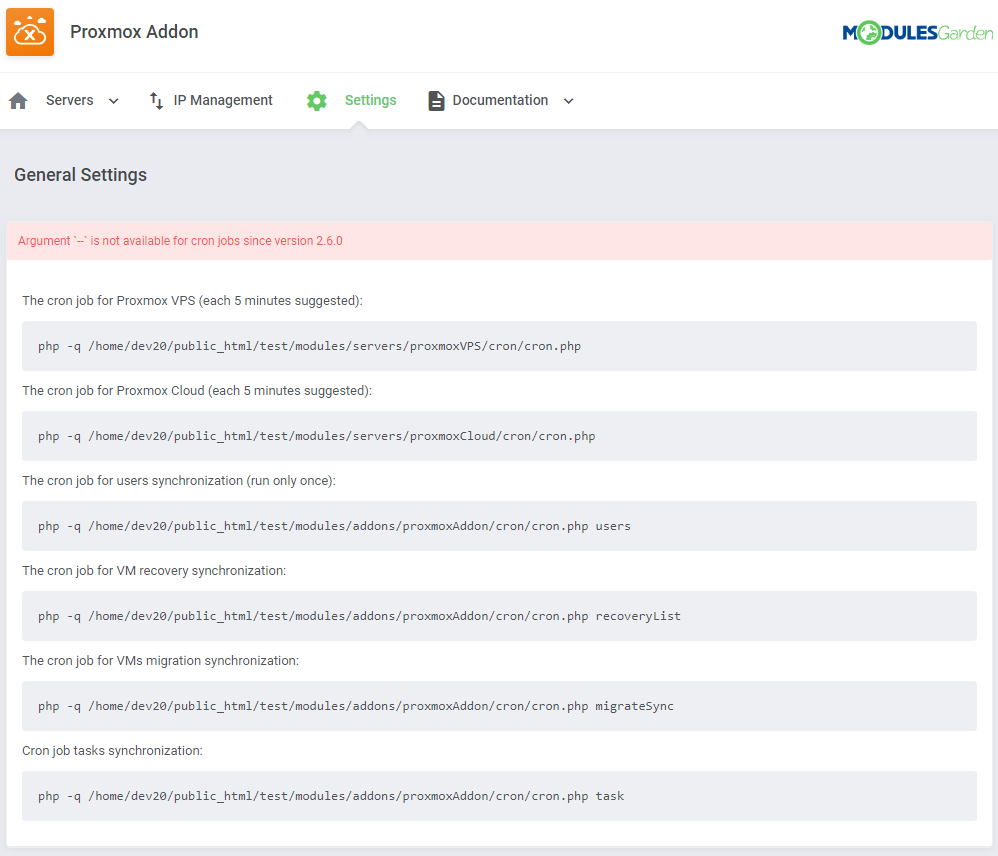
|
VM Cleaner
| VM Cleaner allows you to track virtual machines existing only on your Proxmox server and that are not visible in your WHMCS. Consequently, you are allowed here to sort and delete only those virtual machines that are not managed from your WHMCS. |
|
SSH Keys
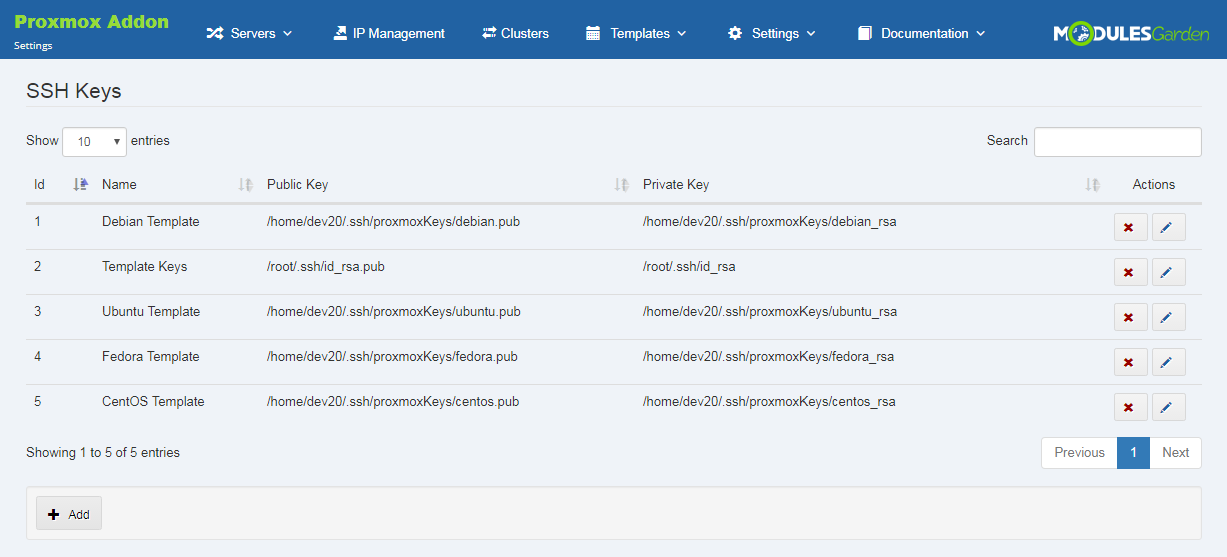
| SSH Keys section allows you to manage your SSH key pairs that will be used for your KVM virtualization. These keys will be next used to enable the automatic resizing of a partition upon the disk upgrade as well as the change of a root password on the VM. |
|
Cloud-Init
| Use Cloud-Init to configure the system during installation, first-boot and package change. Cloud-Init was initially developed to provide early initialization of cloud instances. Click here to learn more about Cloud-Init configuration.
|
Scripts Configurations
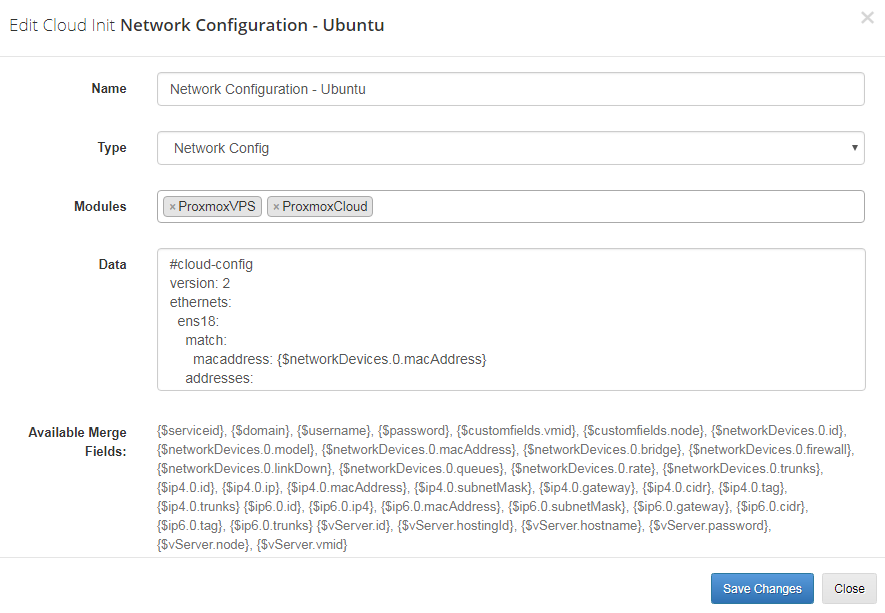
| In the 'Settings' -> 'Cloud Init' section you will find your scripts configurations which are built by default by accessing the addon configuration. Important: These are only exemplary configuration scripts and may not work on your Proxmox server configuration! |
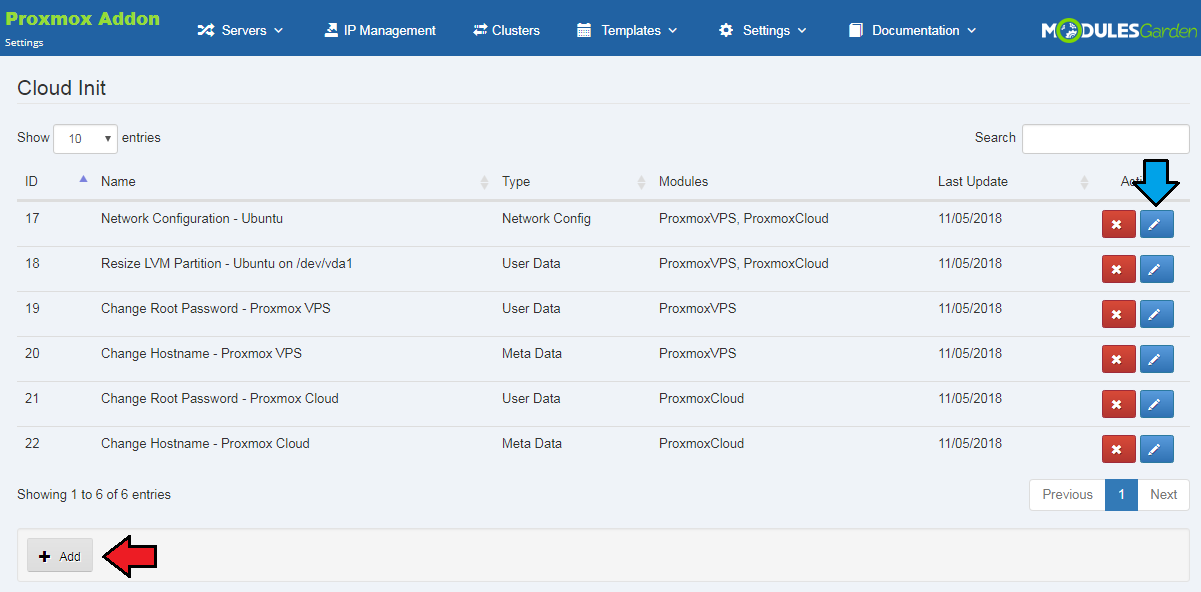
|
| You can also add your own configuration or edit existing ones by pressing corresponding buttons. Here you can find some cloud config examples. |
|
-->
Configuration Of Product
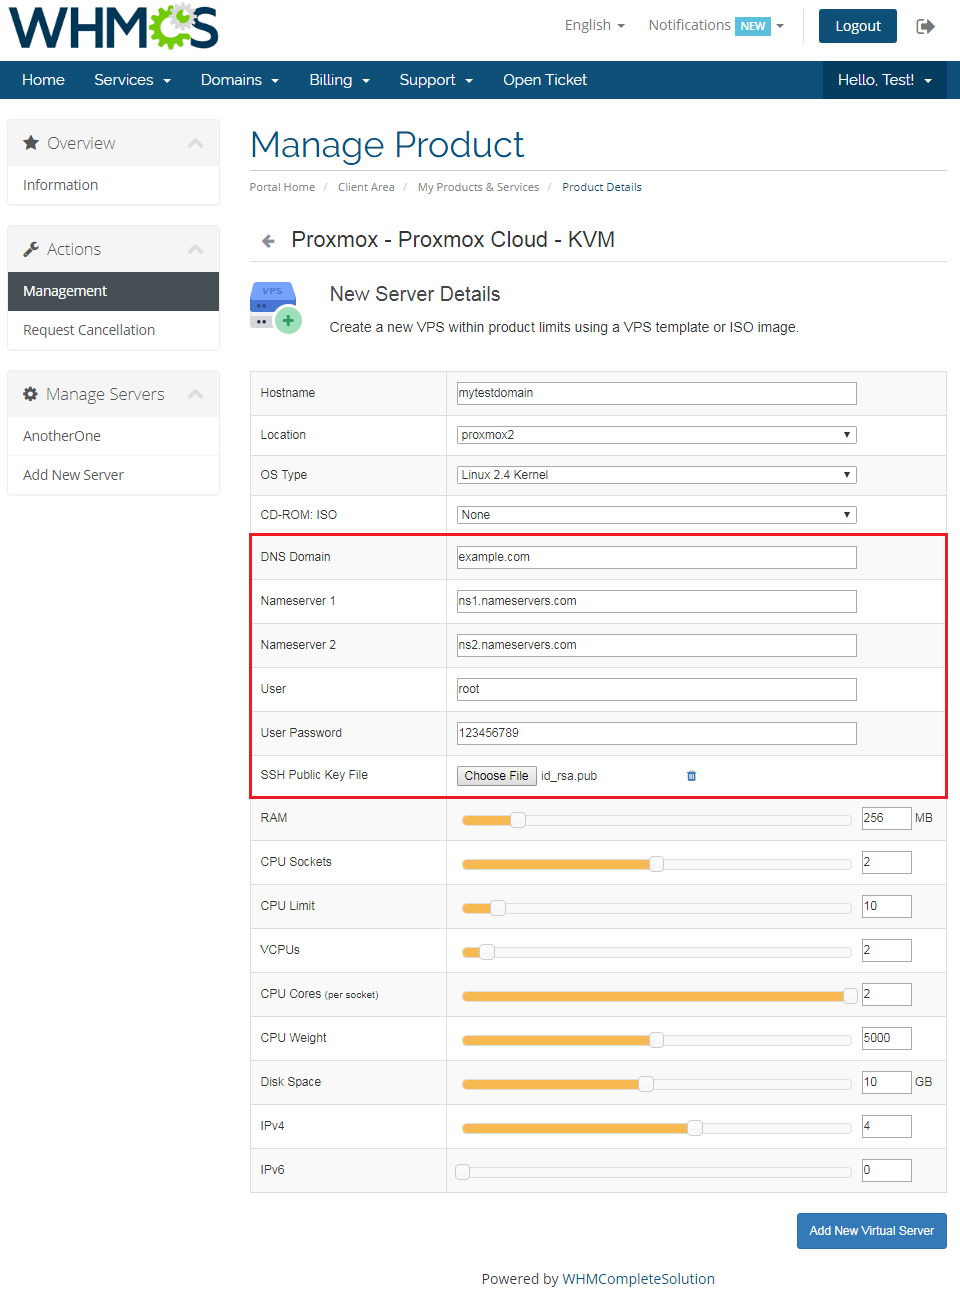
| To to allow you clients to use cloud-init you need to enable it in the Proxmox product configuration. Before you start we recommend to learn the details about cloud-init configuration on your Proxmox server - click here for more details.
|

|
| This is how the above settings will look like in the client area during VM creation. |
|
Configuration Of Proxmox Server
| The process of setting up Cloud-Init on the Proxmox server is described here. Additionally you can use the following commands that can be useful for debugging.
rm -rf /var/lib/cloud/sem/* /var/lib/cloud/instance /var/lib/cloud/instances/* &&
cloud-init init  &&
cloud-init modules -m final
cat /var/log/cloud-init.log cat /var/log/cloud-init-output.log |
Client Area
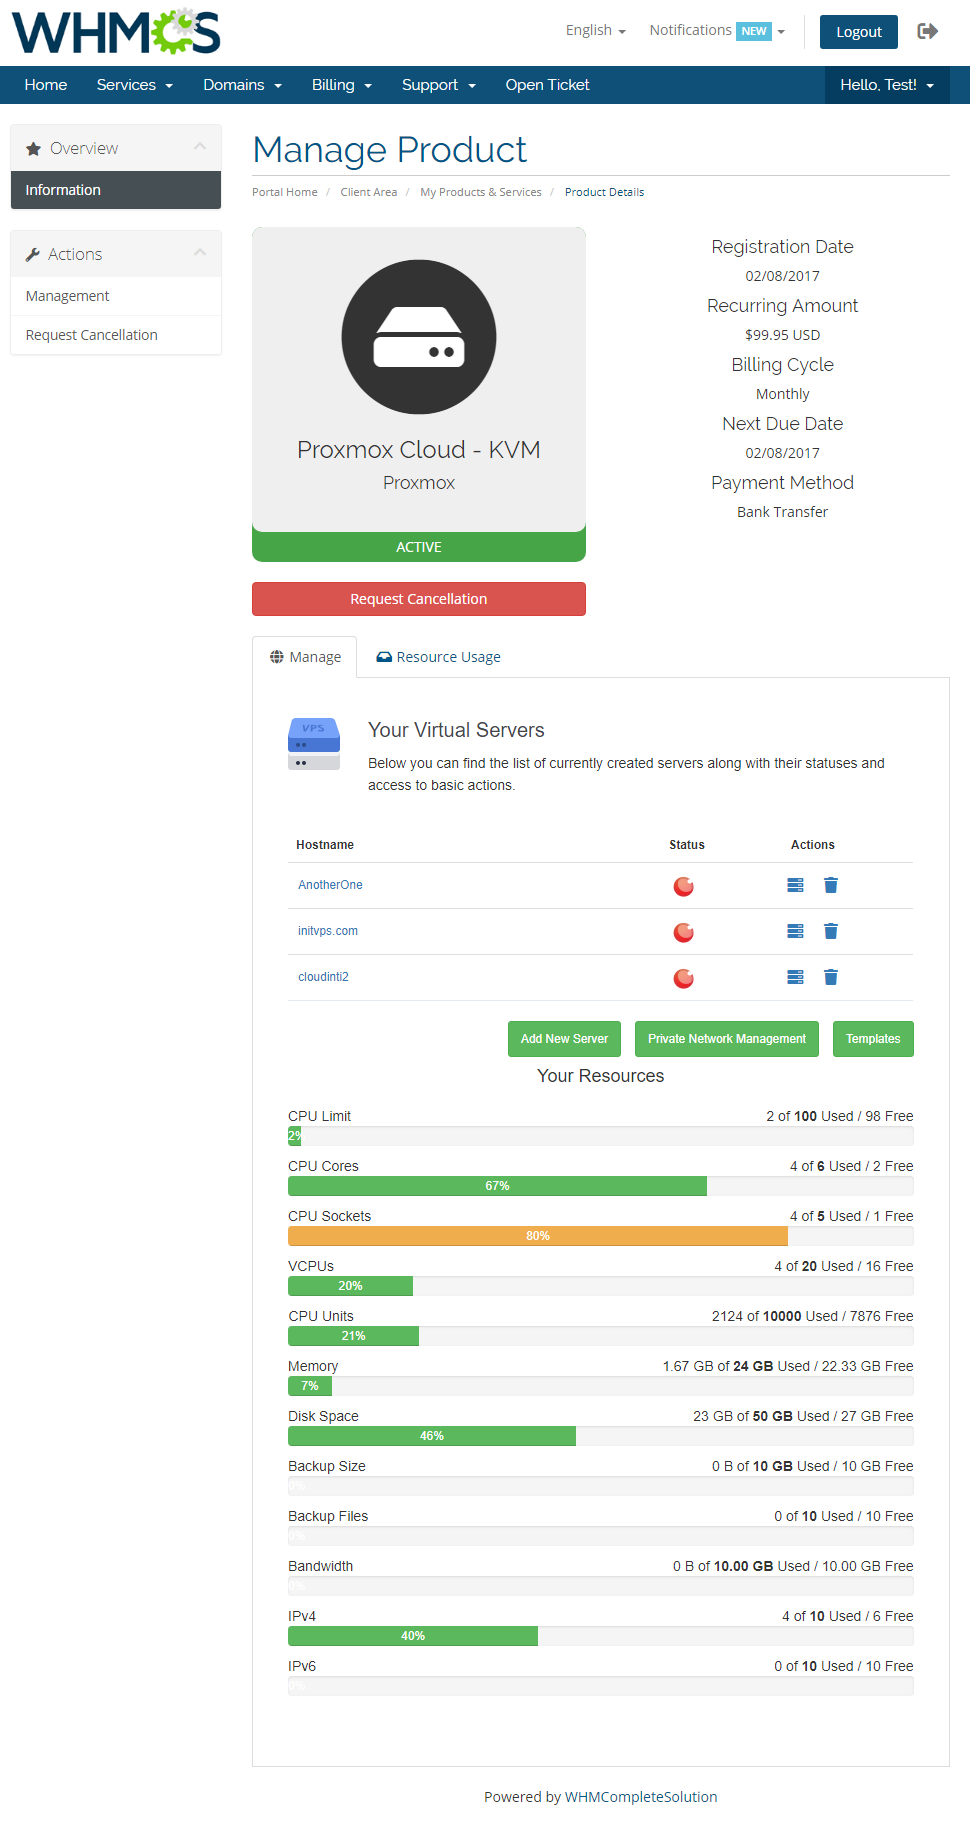
| Client area interface of Proxmox Cloud For WHMCS allows your clients to create their own virtual servers. They can also view resources used and manage existing virtual servers. |
|
New Server
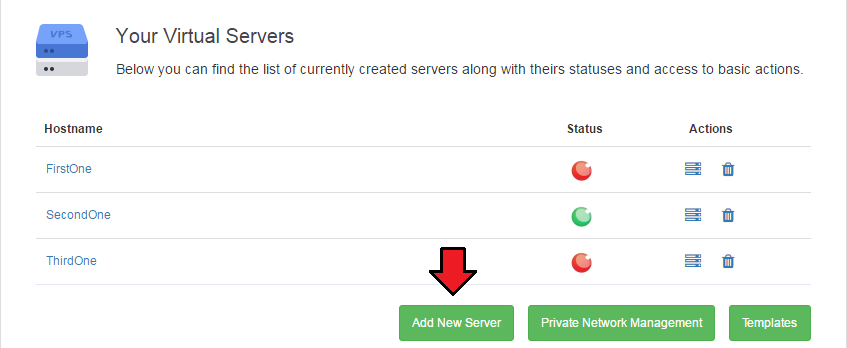
| In order to add a new server, press 'Add New Server' button. |
|
| Afterwards, enter 'Hostname', choose 'OS Type' and select resources for your server by using sliders. Instead of using the sliders you can also enter resources values into textboxes. |
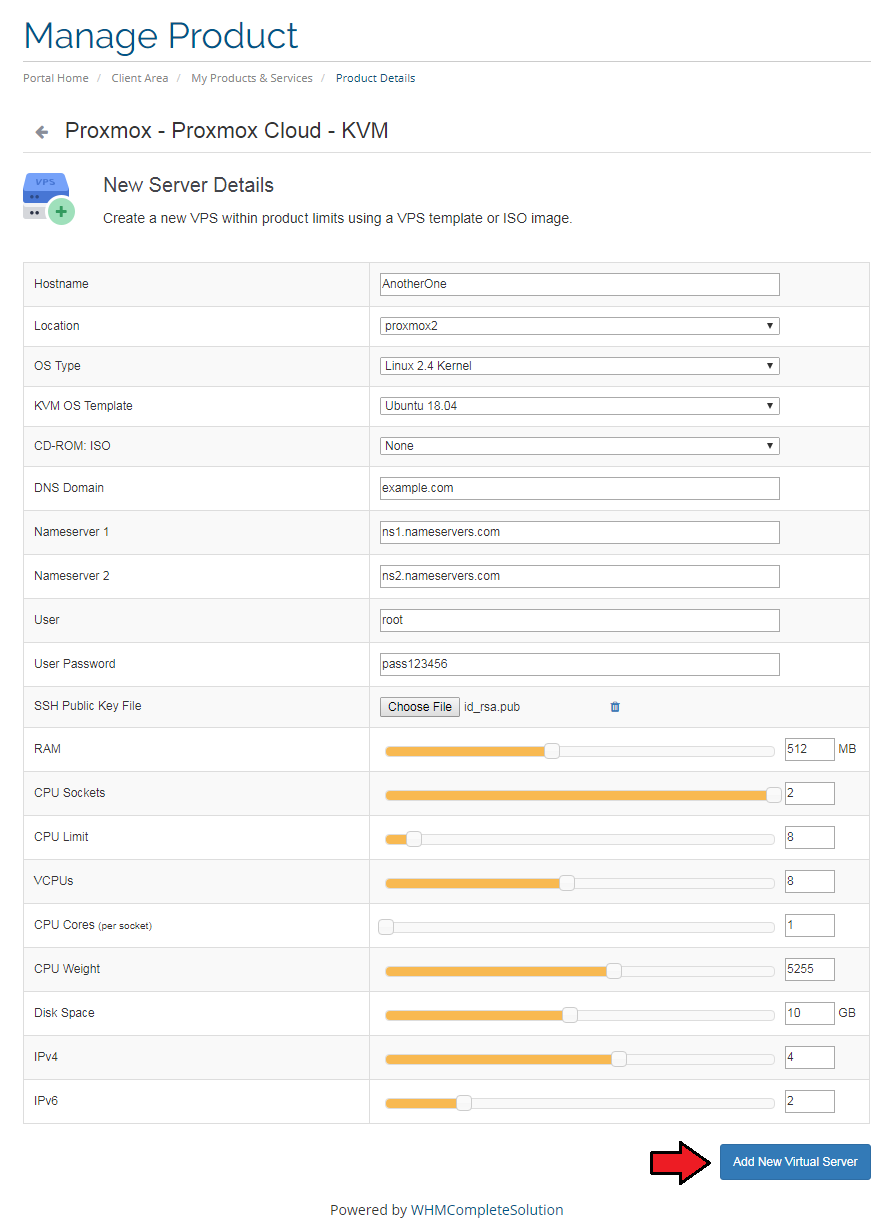
|
| To manage your virtual server simply press 'Manage' button next to it. You can find information about managing your virtual servers in next section. |
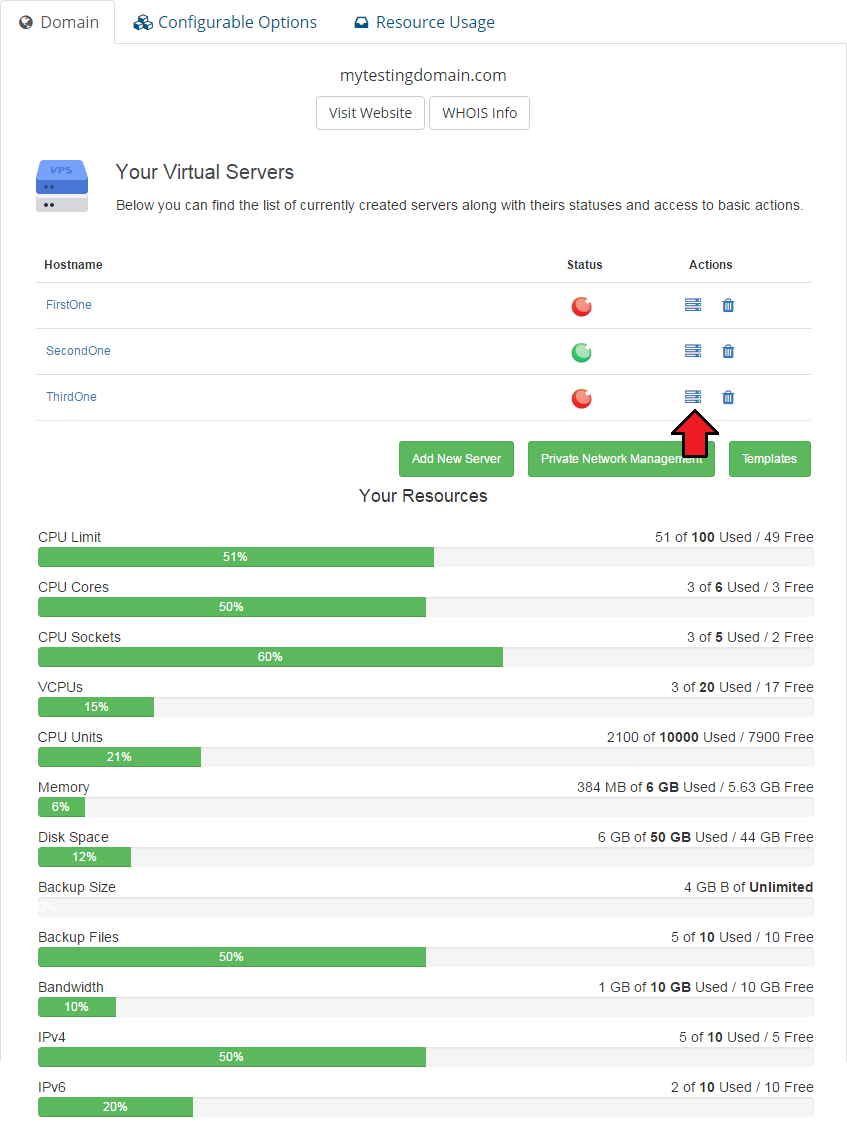
|
| If you do not need a particular virtual server anymore, press 'Delete' button to remove it. |
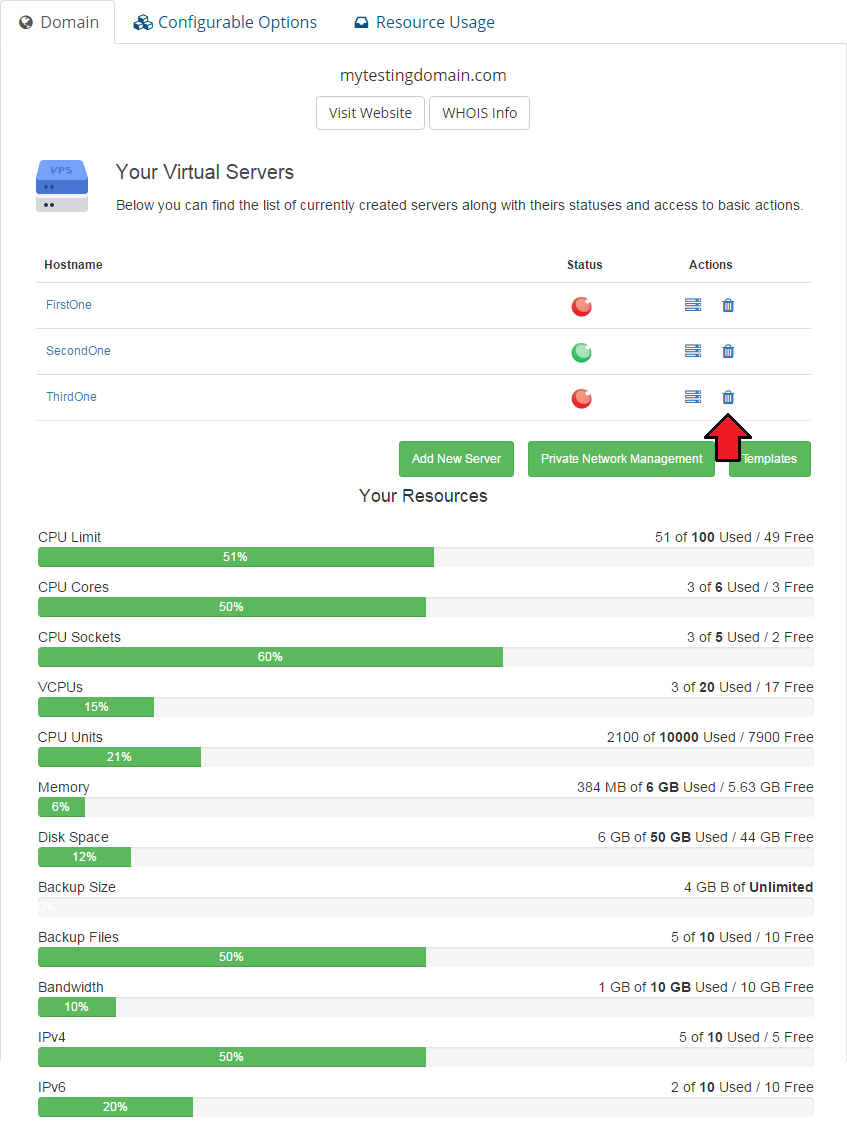
|
Private Network Management
| Move to 'Private Network Management' to add, delete and edit your private networks. Please keep in mind that this option must be enabled by administrator in your product's 'Module Settings' previously and a private IP address must be added in the Proxmox Addon. |
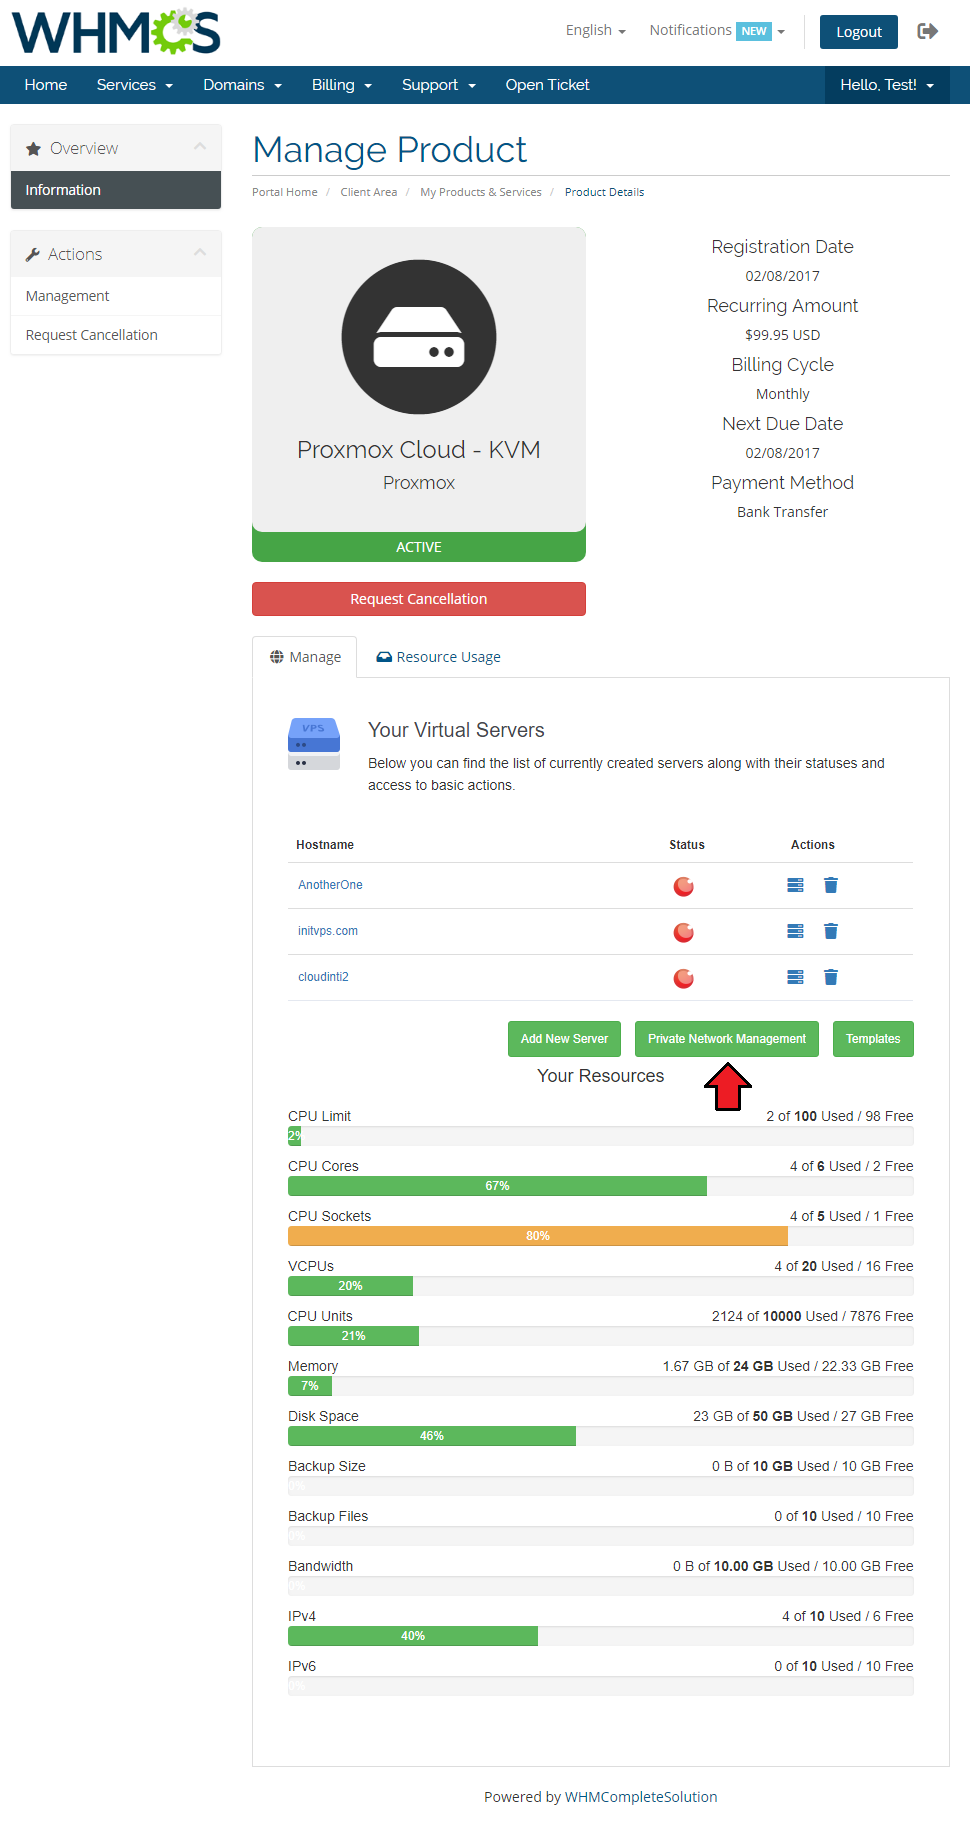
|
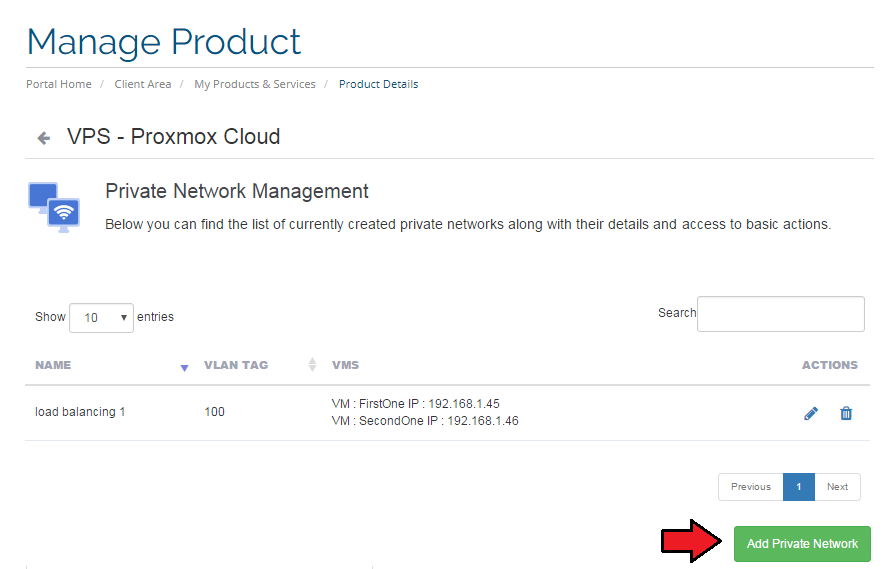
| In that section you will find all existing private networks with any details such as assigned virtual machines. To create a new network press 'Add Private Network'. |
|
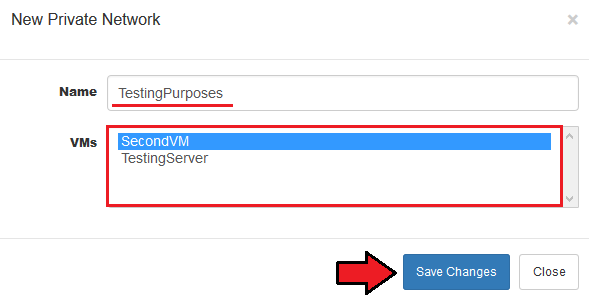
| Type in the name and select virtual machines from available that will have the private IP Addresses assigned. |
|
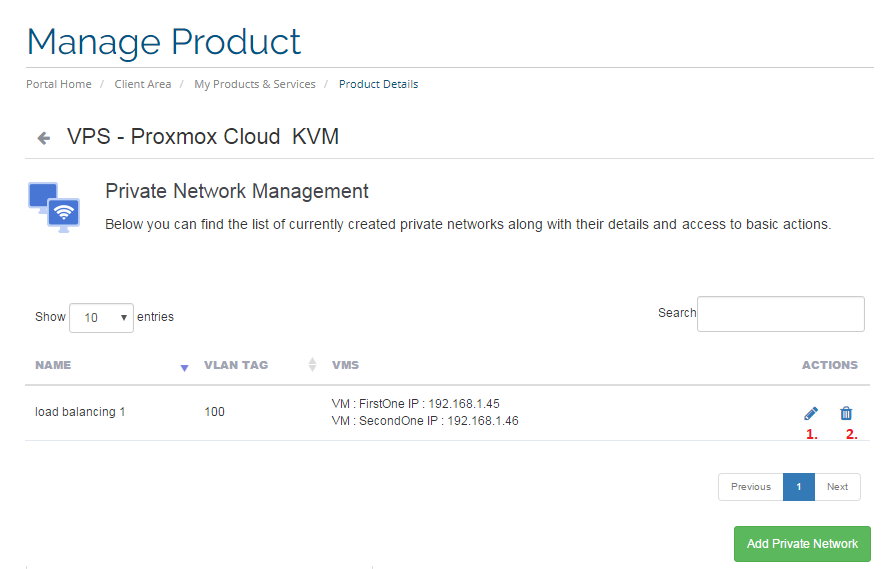
| New private network automatically appears on the list. You may edit (1) it or delete (2) whenever needed. |
|
Templates Management (KVM Only)
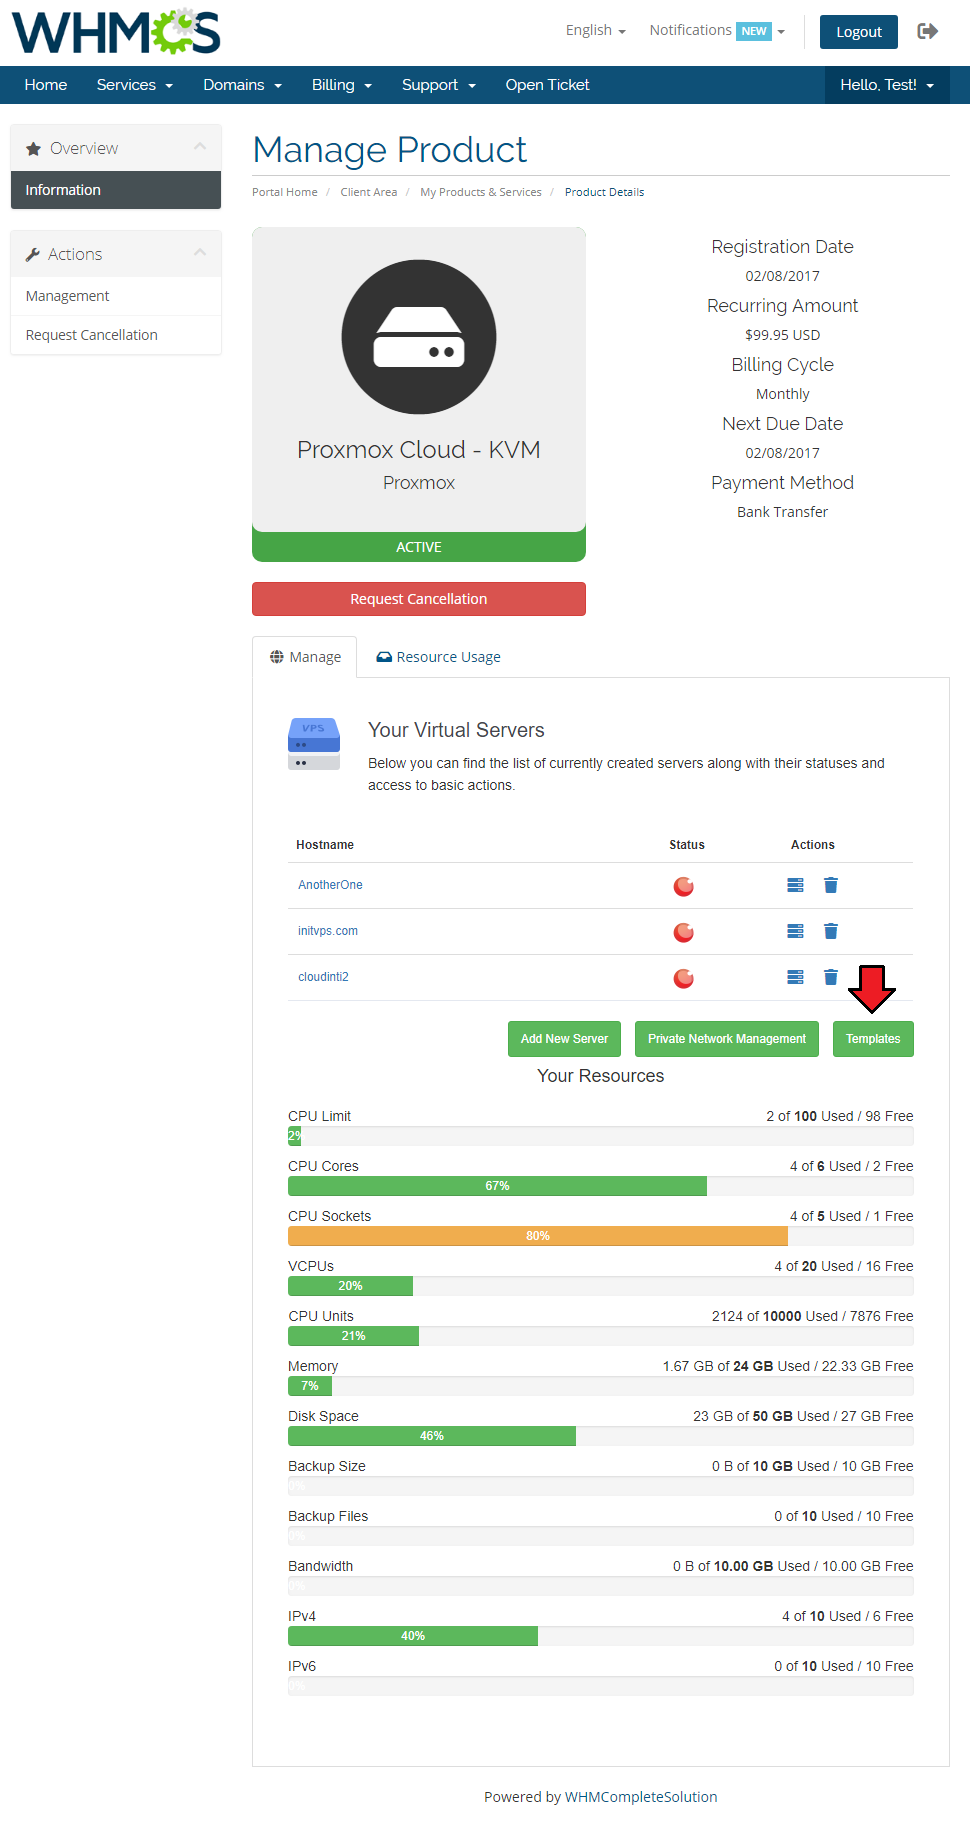
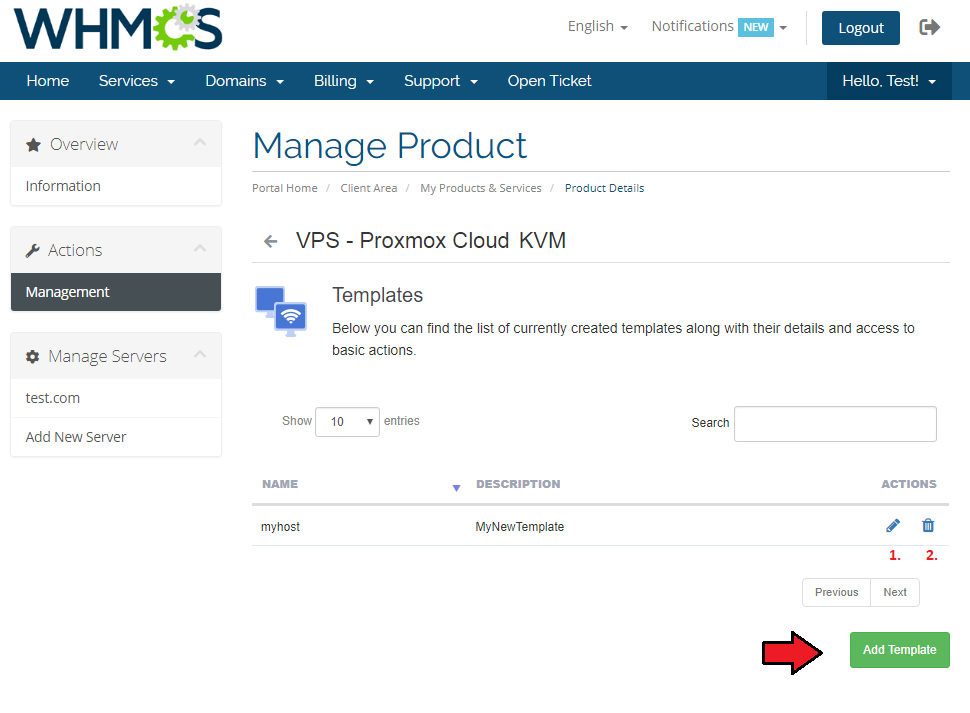
| Press 'Templates', you will be redirected to a site where you will find the list of currently created templates along with their details and access to basic actions. |
|
| You may edit or delete existing templates. To add a new one, simply press 'Add Template' button. OS templates do not consume any resources such as CPU sockets, memory etc. |
|
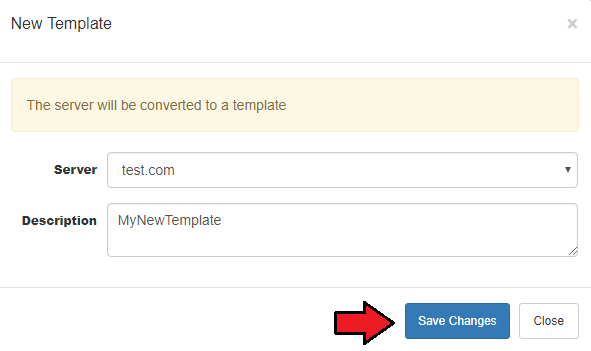
| Select server from dropdown menu and type in its short description. Save changes when ready. |
|
Client Area - VM Management
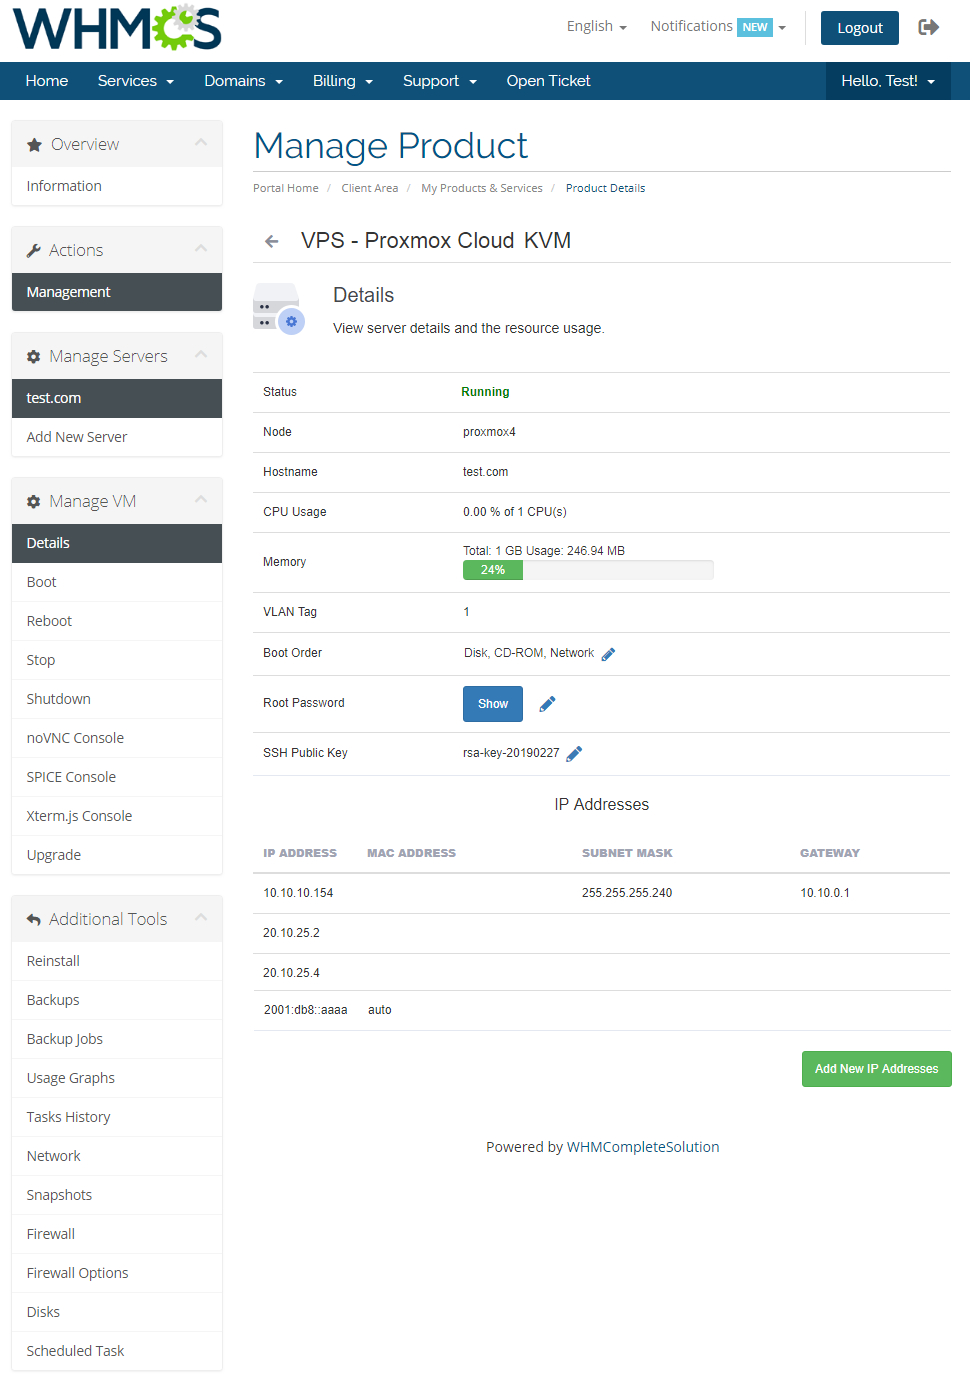
| Client area interface of virtual server should look like the one on the screen below. As you can see, control panel contains useful options needed for managing VPS. |
|
VNC Console
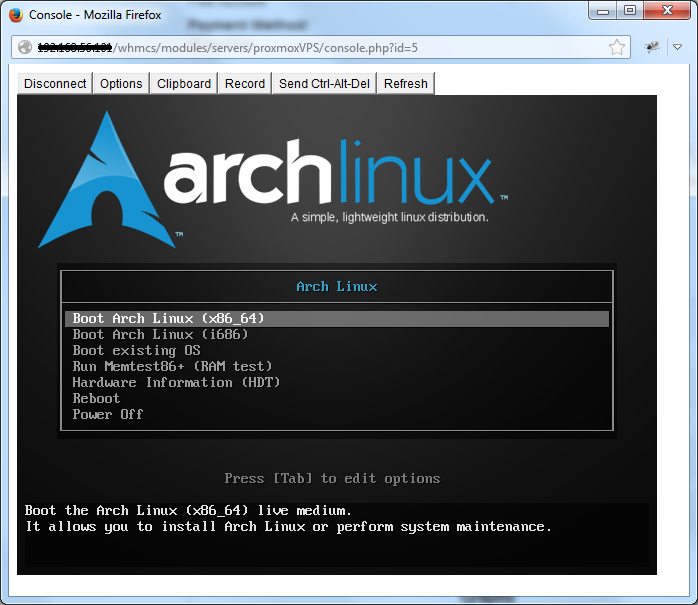
| VNC console allows your clients to remotely manage the server. To access it, simply press the 'VNC Console' button. Console requires Java software and you need to accept security risk to run it. |
|
noVNC Console
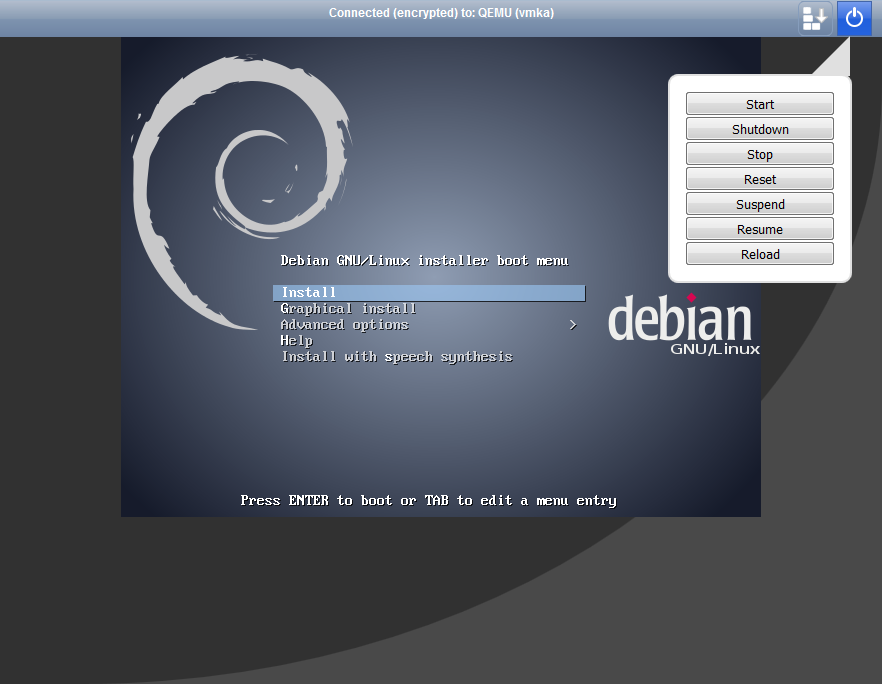
| noVNC console allows your clients to connect with their server in the easiest possible way. |
|
SPICE Console
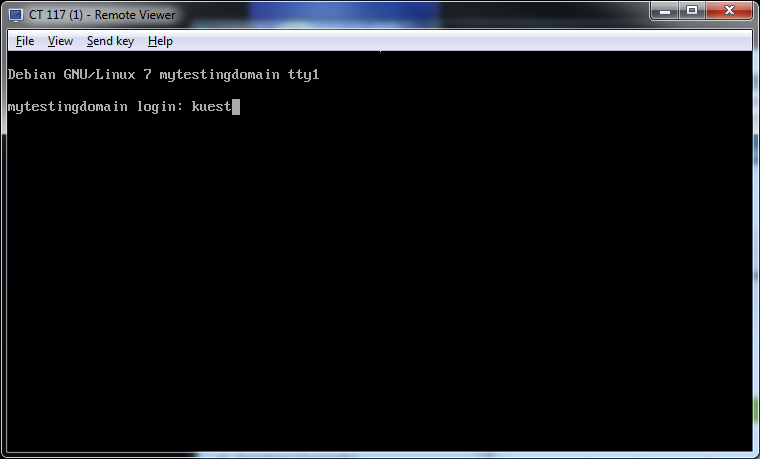
| Spice console enables you to connect with virtual machine using SPICE. Note: Your client needs to download and install client side SPICE application in order to connect with VM. |
|
Upgrade
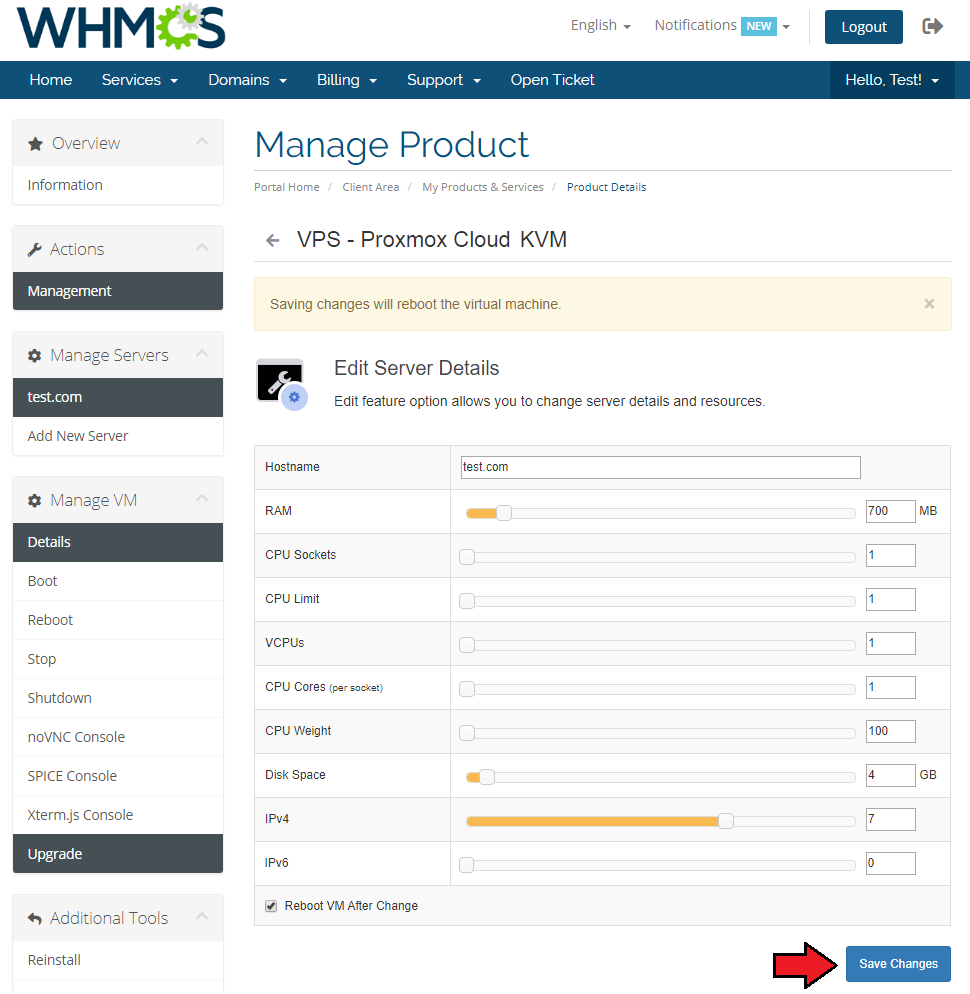
| Upgrade feature allows you to change server details and resources except 'Template' and 'Password' . To edit your server, click 'Upgrade' button. Afterwards, alter options you desire and confirm through pressing 'Save Changes' button. |
|
Client Area - Additional Tools
Reinstall
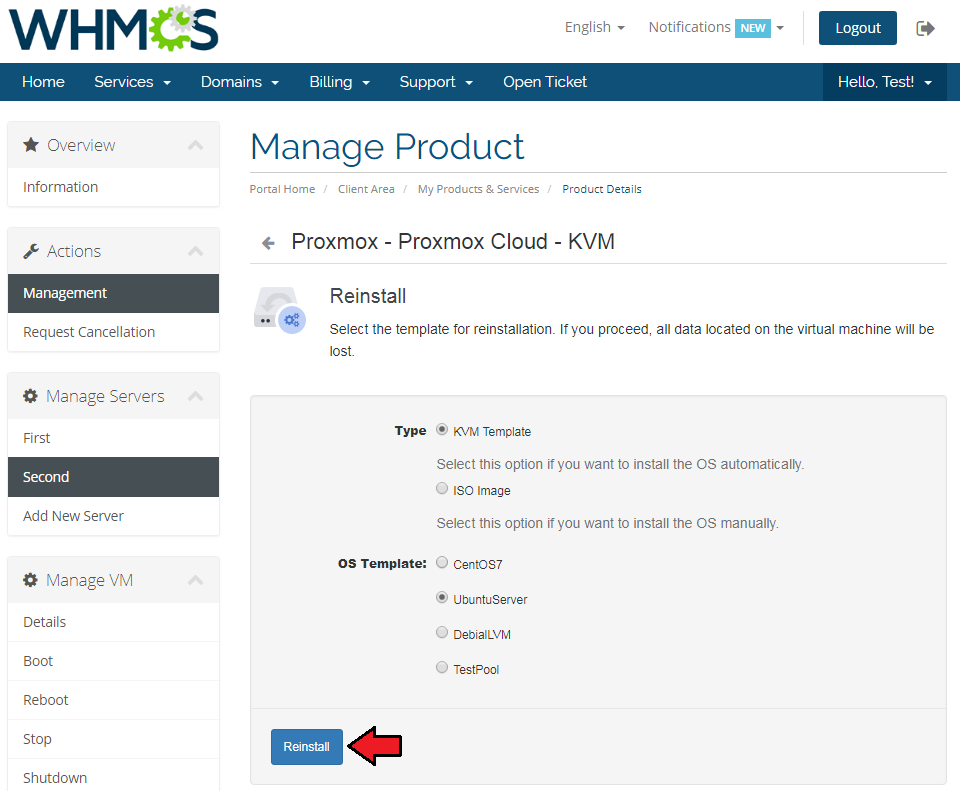
| Reinstall feature can be used to reinstall a new OS on the VM by the clients on their own. You can provide your clients to either select a new OS from a provided KVM templates to automatically system replacement, or let them choose the ISO image for manual system installation.
|
|
| You can configure the available 'KVM OS Templates' for clients in the 'KVM Configuration' . |

|
| In the same way choose available 'ISO Images' from the can configure the 'CD/DVD-ROM Drive' . |

|
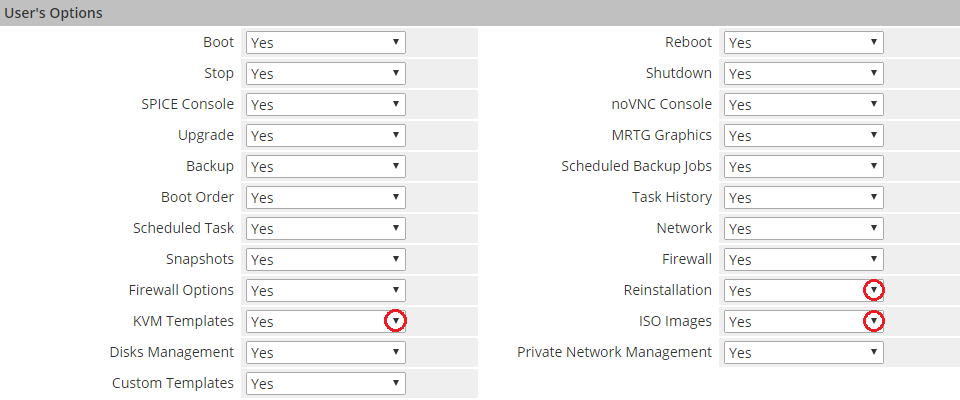
| Remember to also gain your clients access to selected reinstallation types in the 'User's Options' . |
|
Backups
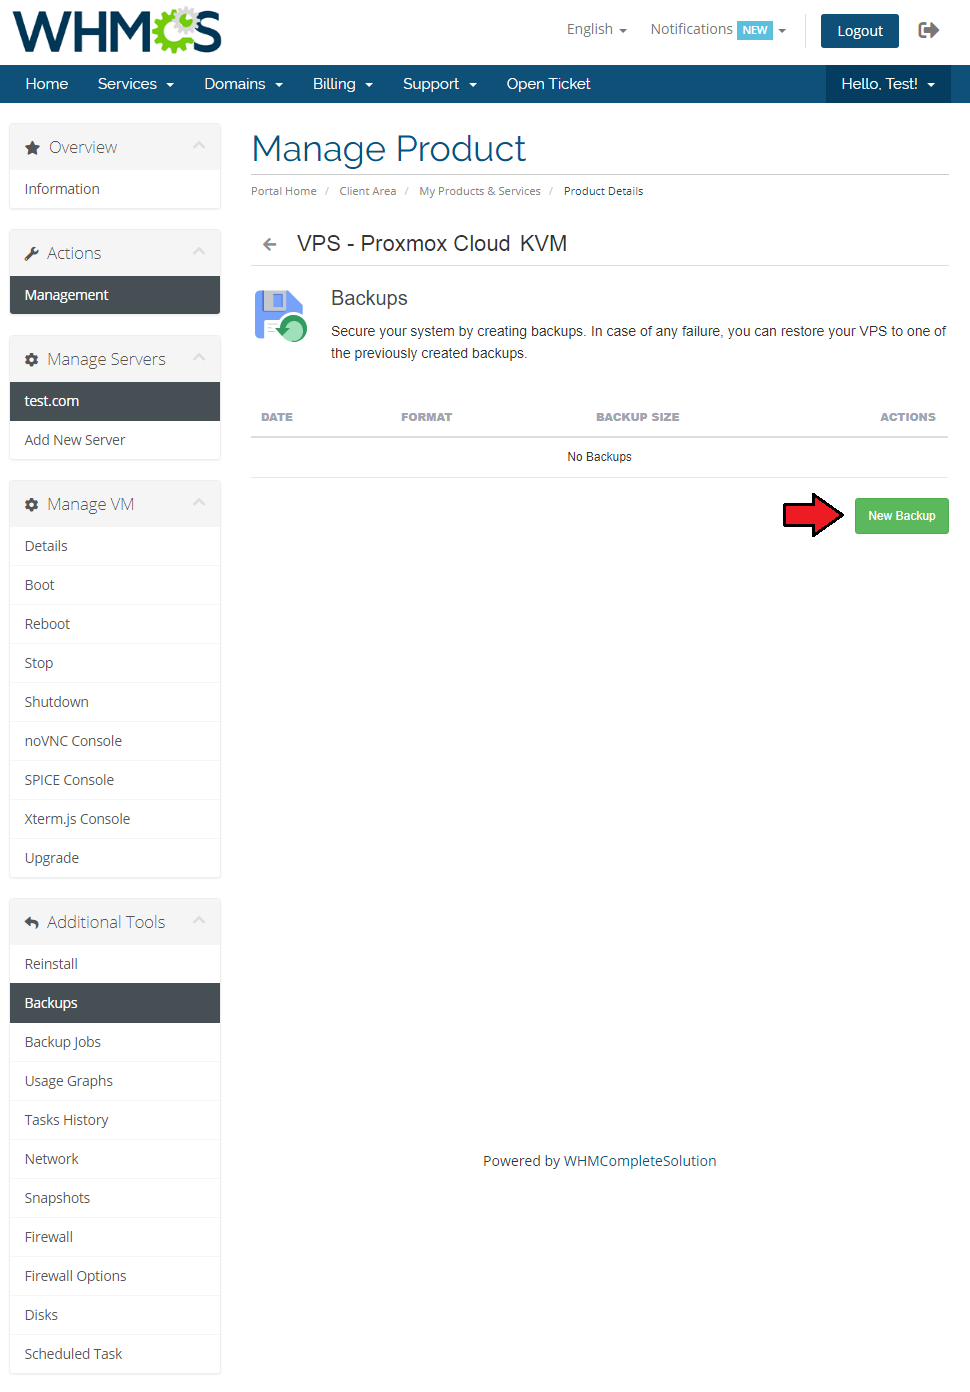
| To create a single backup, proceed to 'Backups' section and click 'New Backup' as shown on the following screen. |
|
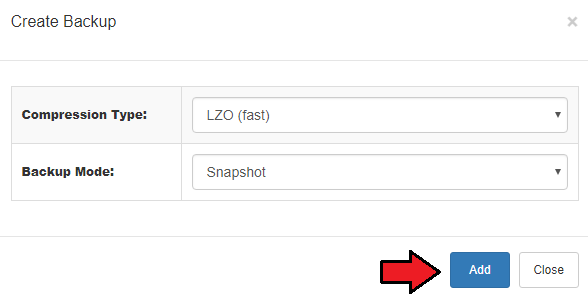
| Now choose 'Compress Dump File' and 'Backup Mode' from dropdown menus. Afterwards, press 'Add' button. |
|
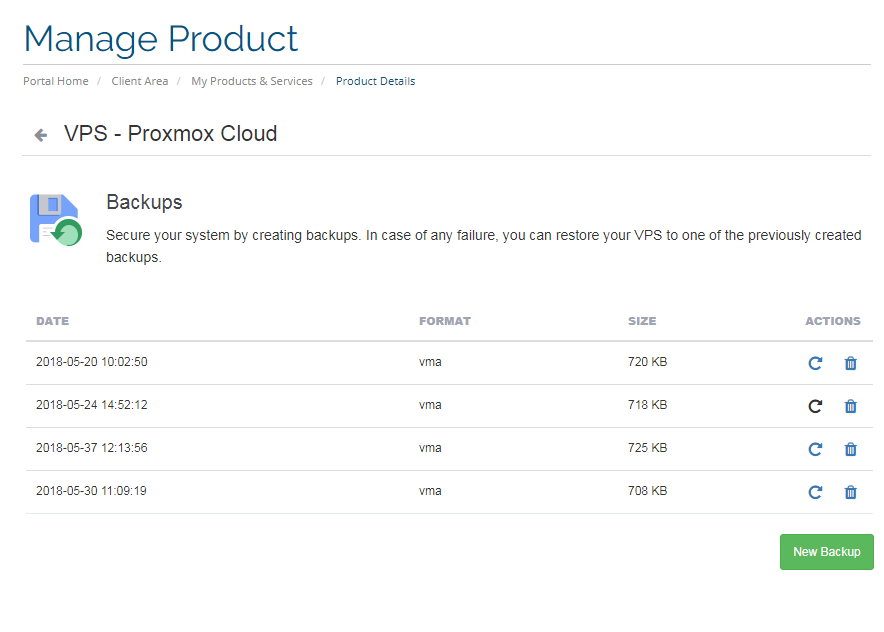
| To restore VM from a backup simply press 'Restore' and then click 'OK' button in a popup window to confirm. |
|
Backup Jobs
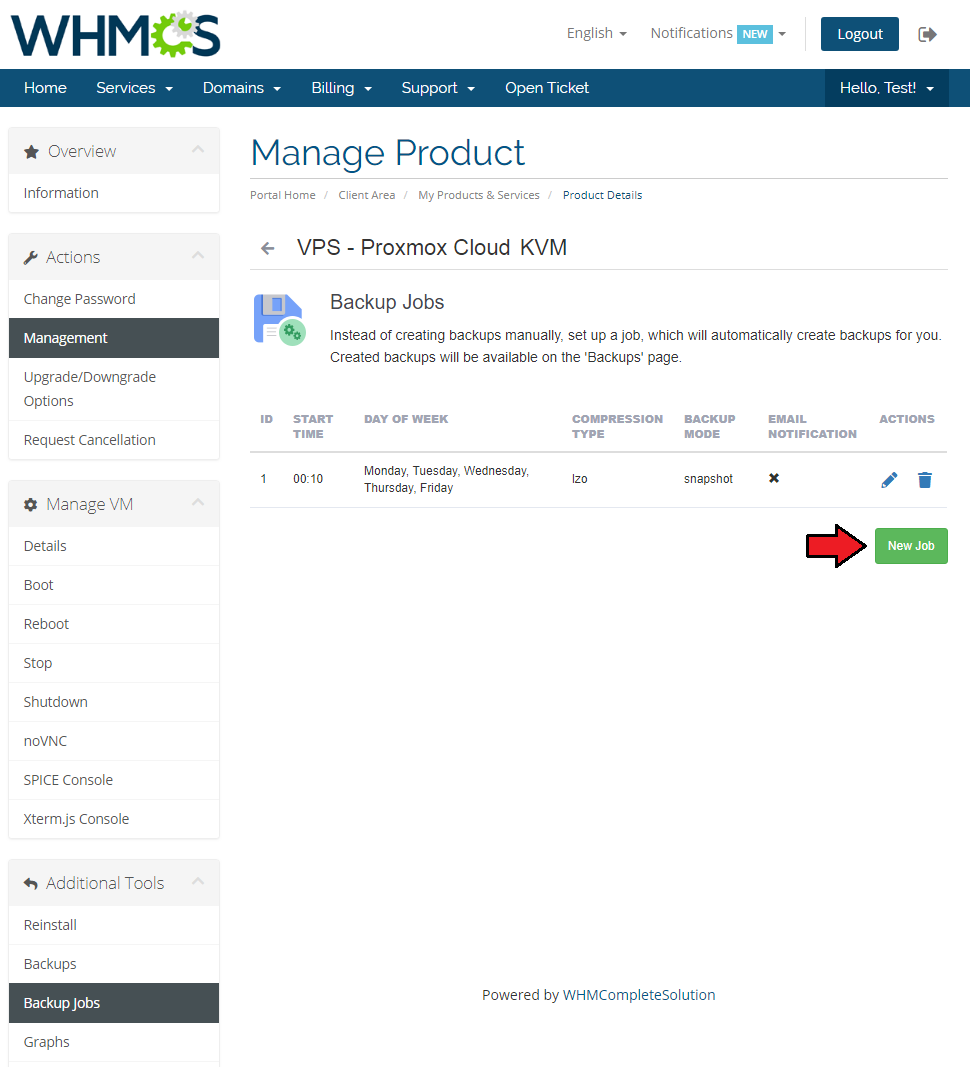
| By pressing 'Backup Jobs' in the client area, you will be carried to a backup jobs management page. To add a new backup job press 'New Job' as shown on the following screen. |
|
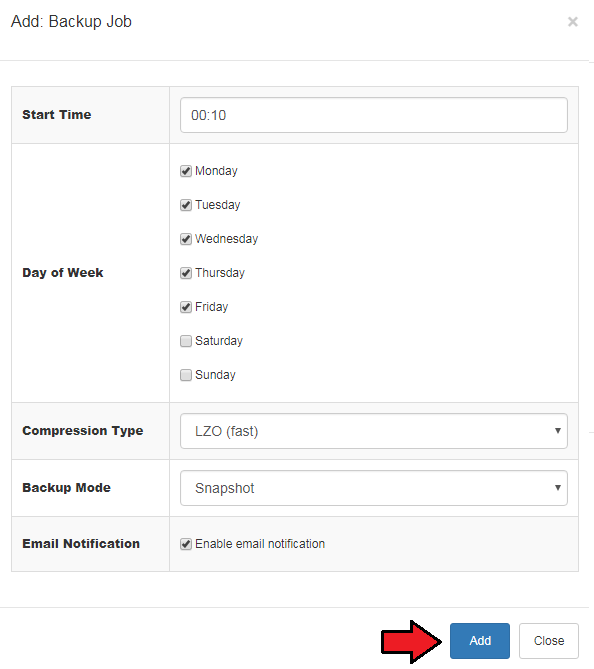
| Now, define backup time, mark days to run it and choose 'Compression Dump File' and 'Backup Mode' from dropdown menus. Next, press 'Add' button. You may also enable email notifications here. |
|
Usage Graphs
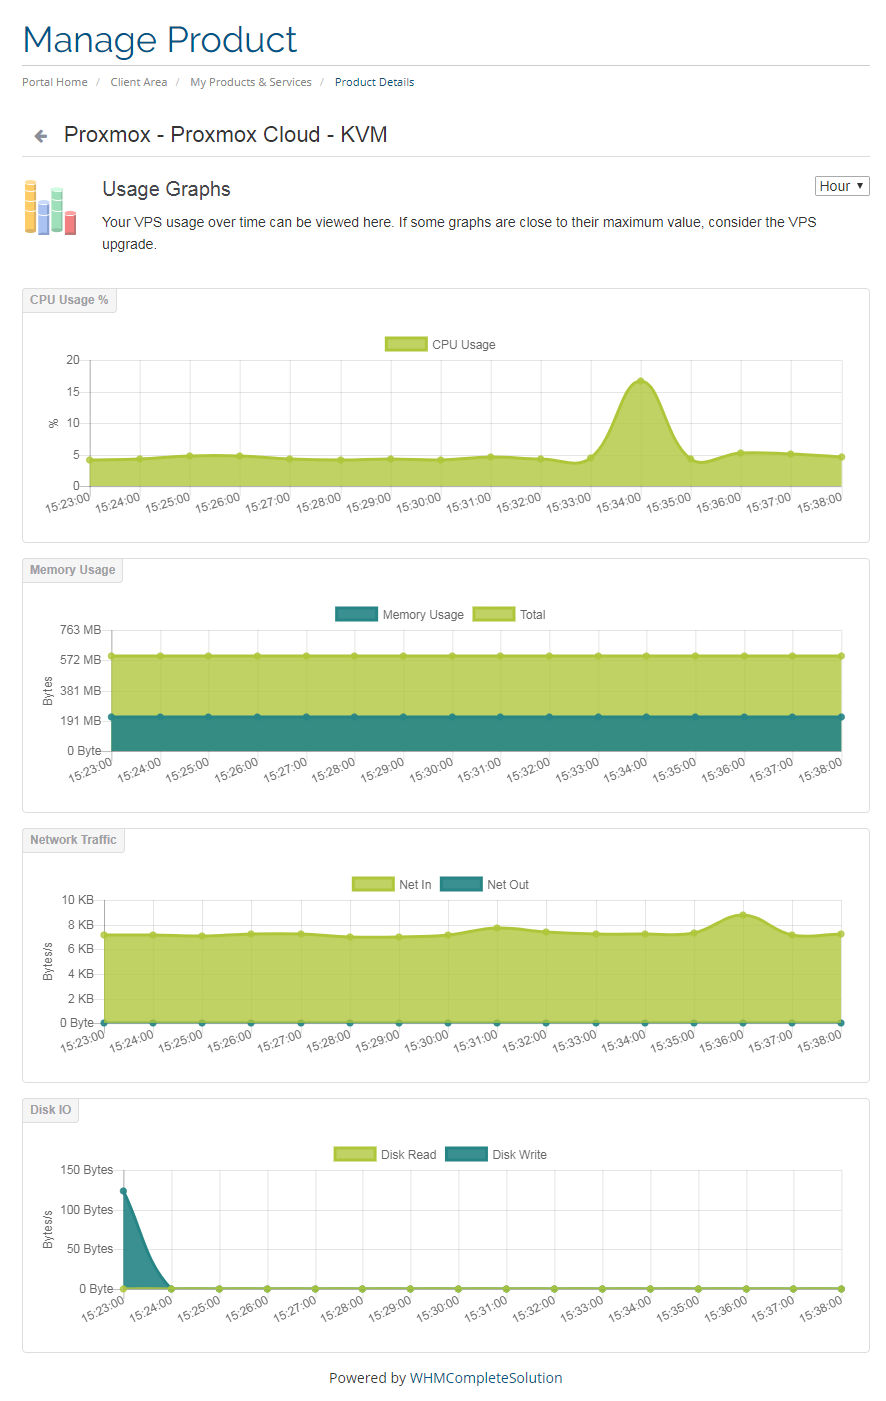
| Under 'Usage Graphs' page, a client can find graph with CPU usage, memory usage, network traffic and disc I/O. They can also switch the timeline of the graphs by choosing it from a dropdown menu pointed on the following screen. |
|
Task History
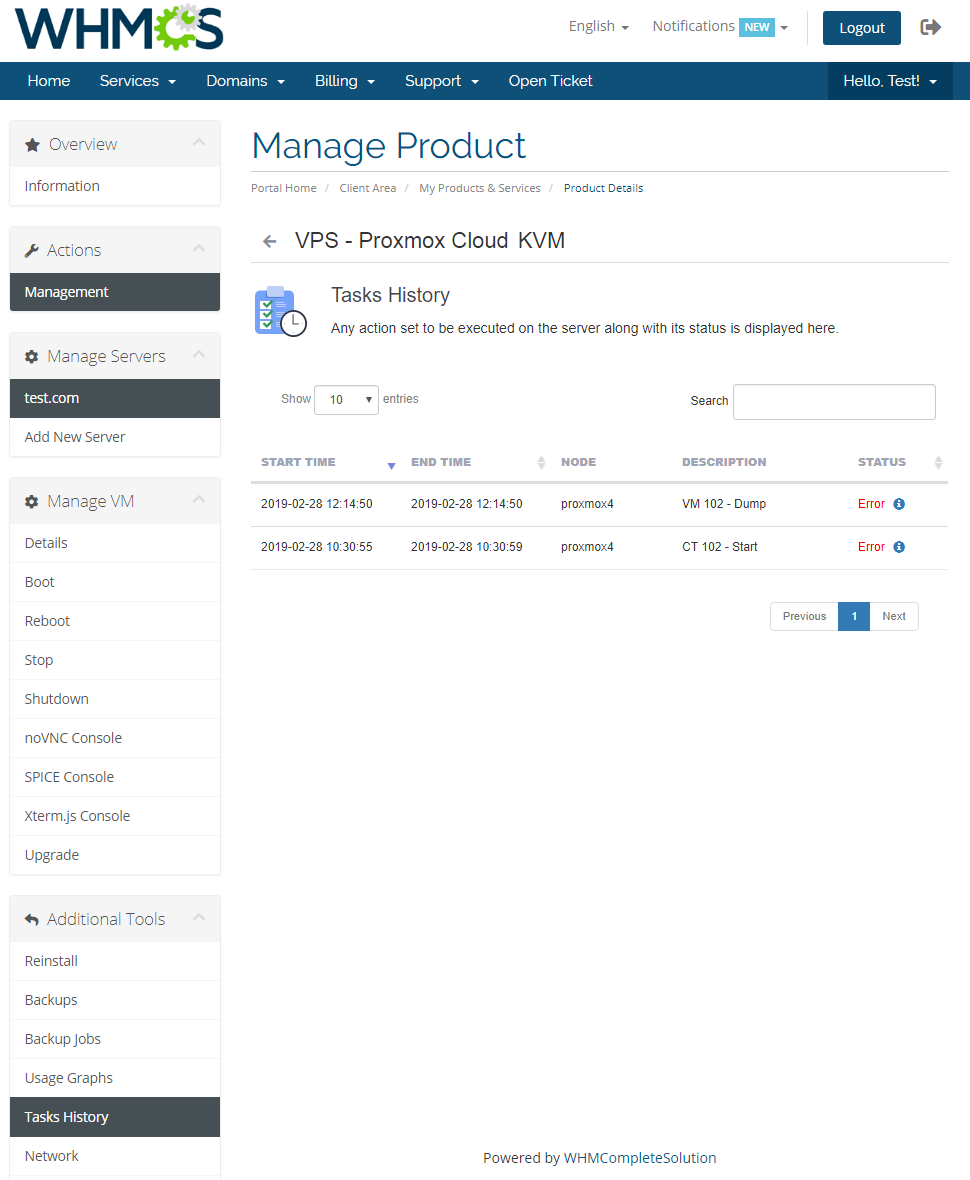
| All changes of VM status are listed in 'Task History'. Additionally, each access to the VM through SPICE console is shown here. |
|
Network
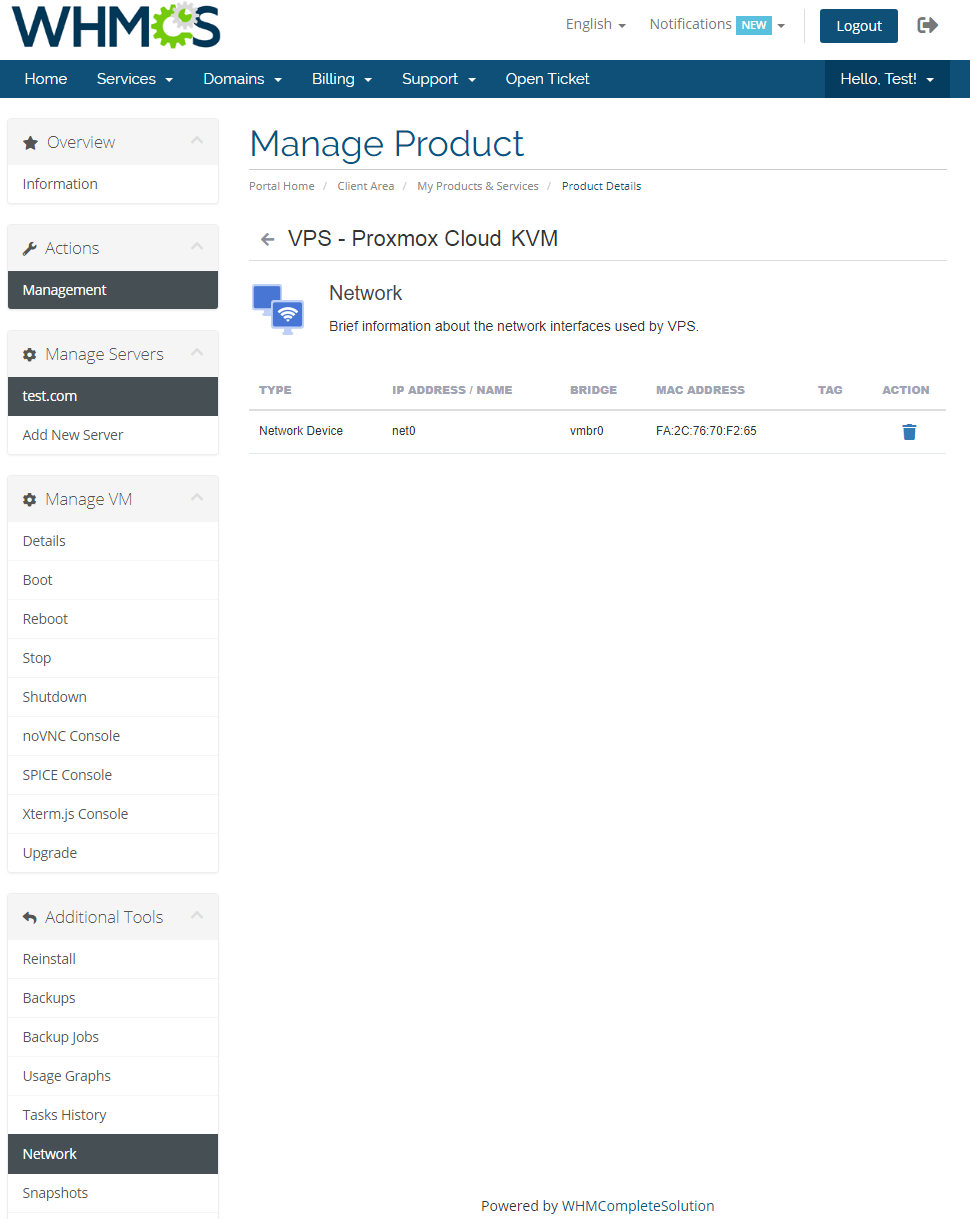
| 'Network' section allows your clients to view their VM's network interface. Depending on the settings of the product (private network is used), they can also create/remove them. This feature is optional. |
|
Snapshots (KVM only)
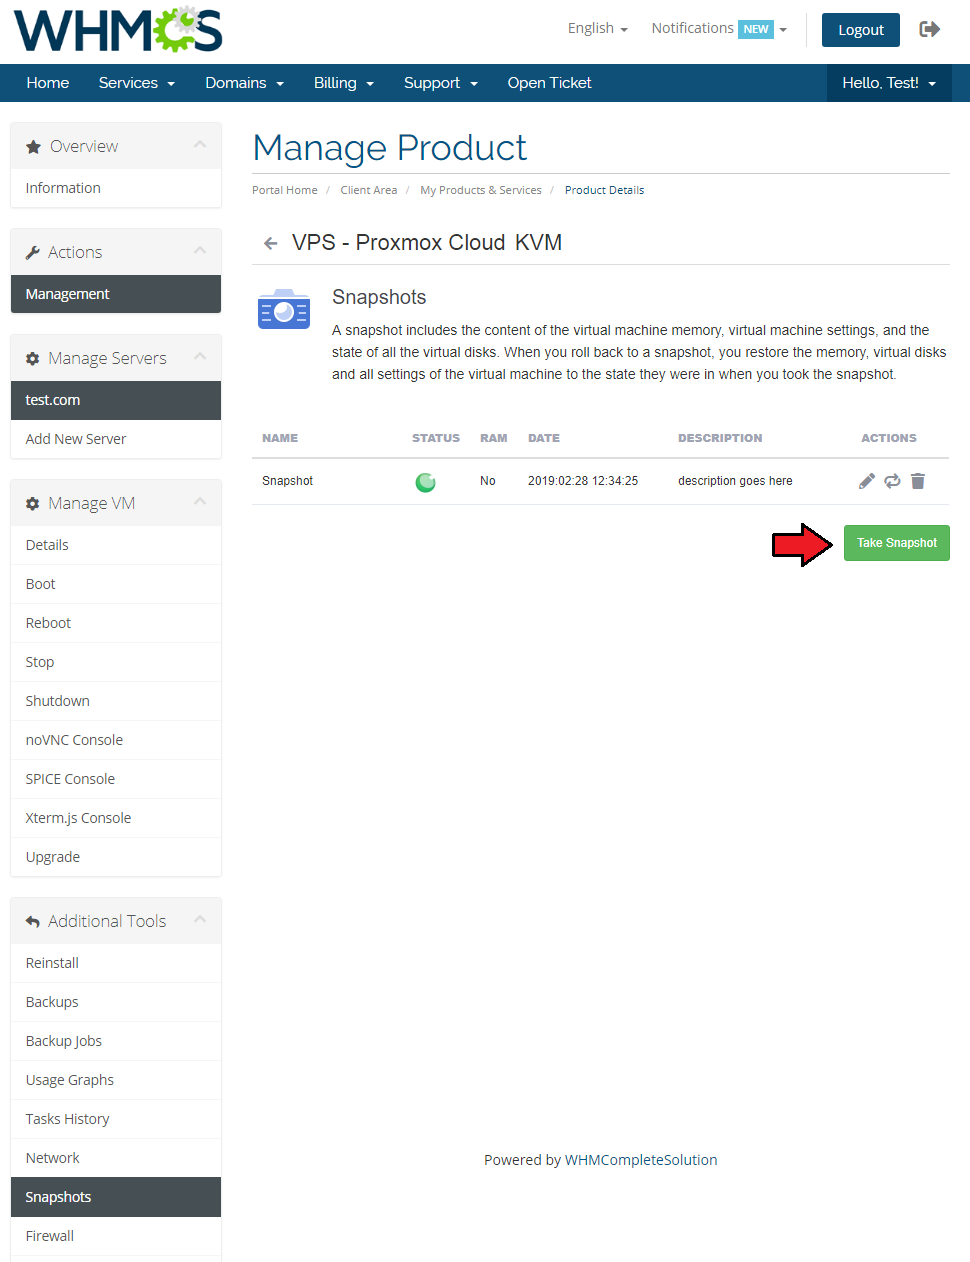
| Use snapshot to remember the contents of virtual machine memory current state. You may use them later to restore the VM settings. |
|
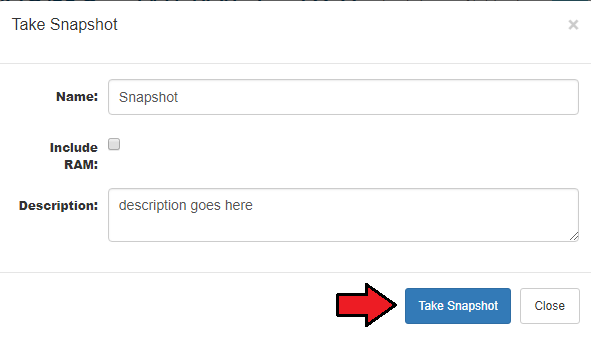
| Press 'Take Snapshot' button and fill out the form to take a snapshot. Name it (use alphabetical characters only), choose whether to include RAM and add some description. |
|
Firewall
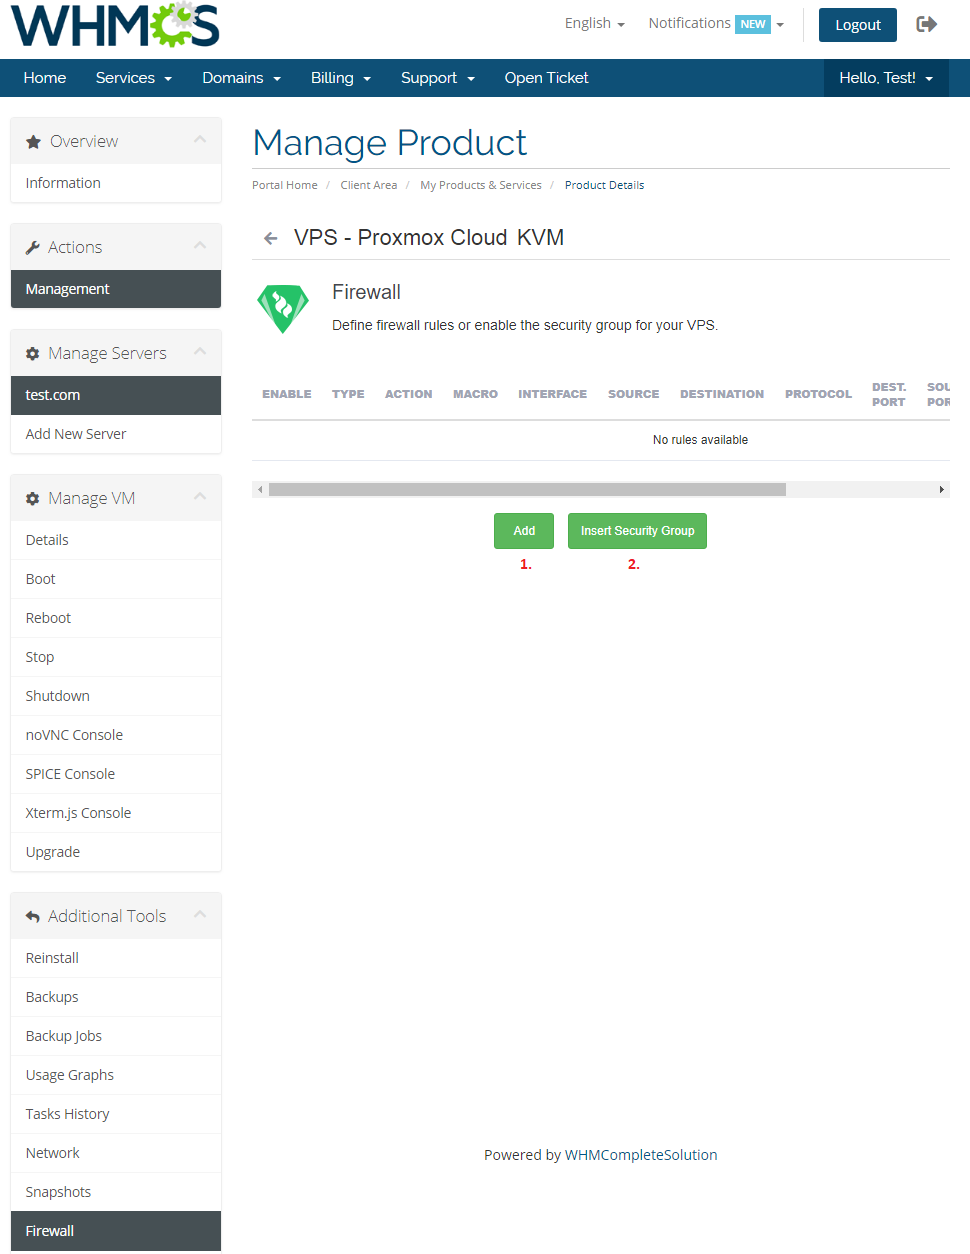
| Owing to 'Firewall' page, your clients can set up firewall rules and enable security group for theirs servers from your WHMCS client area. As you can see, you can easily modify and remove previously added rules and security groups. |
|
| You can add a firewall rule in two ways. Both of them require choosing direction, action, interface, source and destination. The first way (red) is by choosing macro from a 'Macro' dropdown field. |
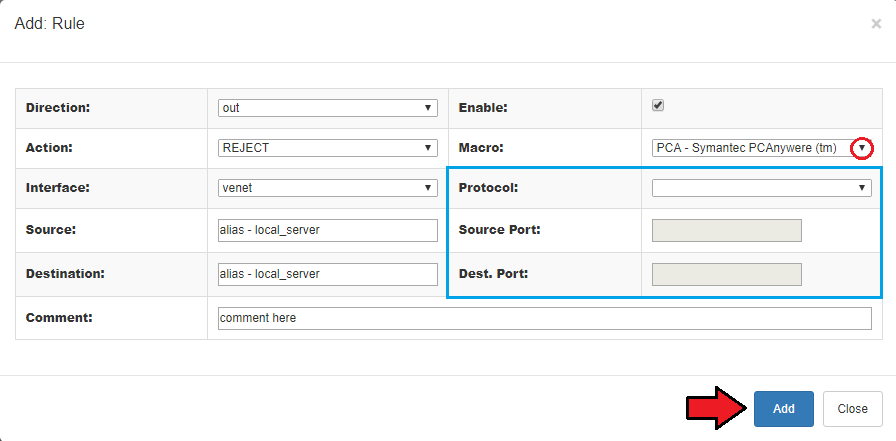
|
| Inserting a security group consists of choosing security group and interface on which group has to be used. Additionally, you can enable security group and add a comment to it. |
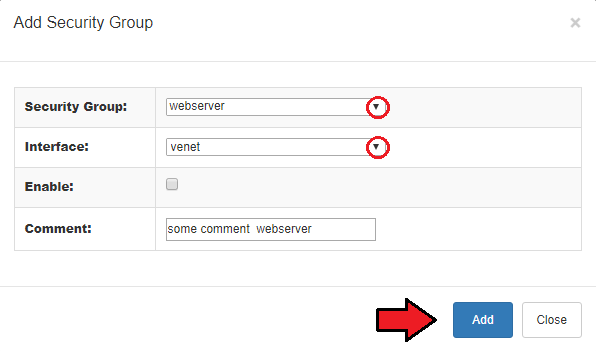
|
Disks (KVM only)
| View and manage hard disk within defined limits, add new one or remove additional disks if you wish. |
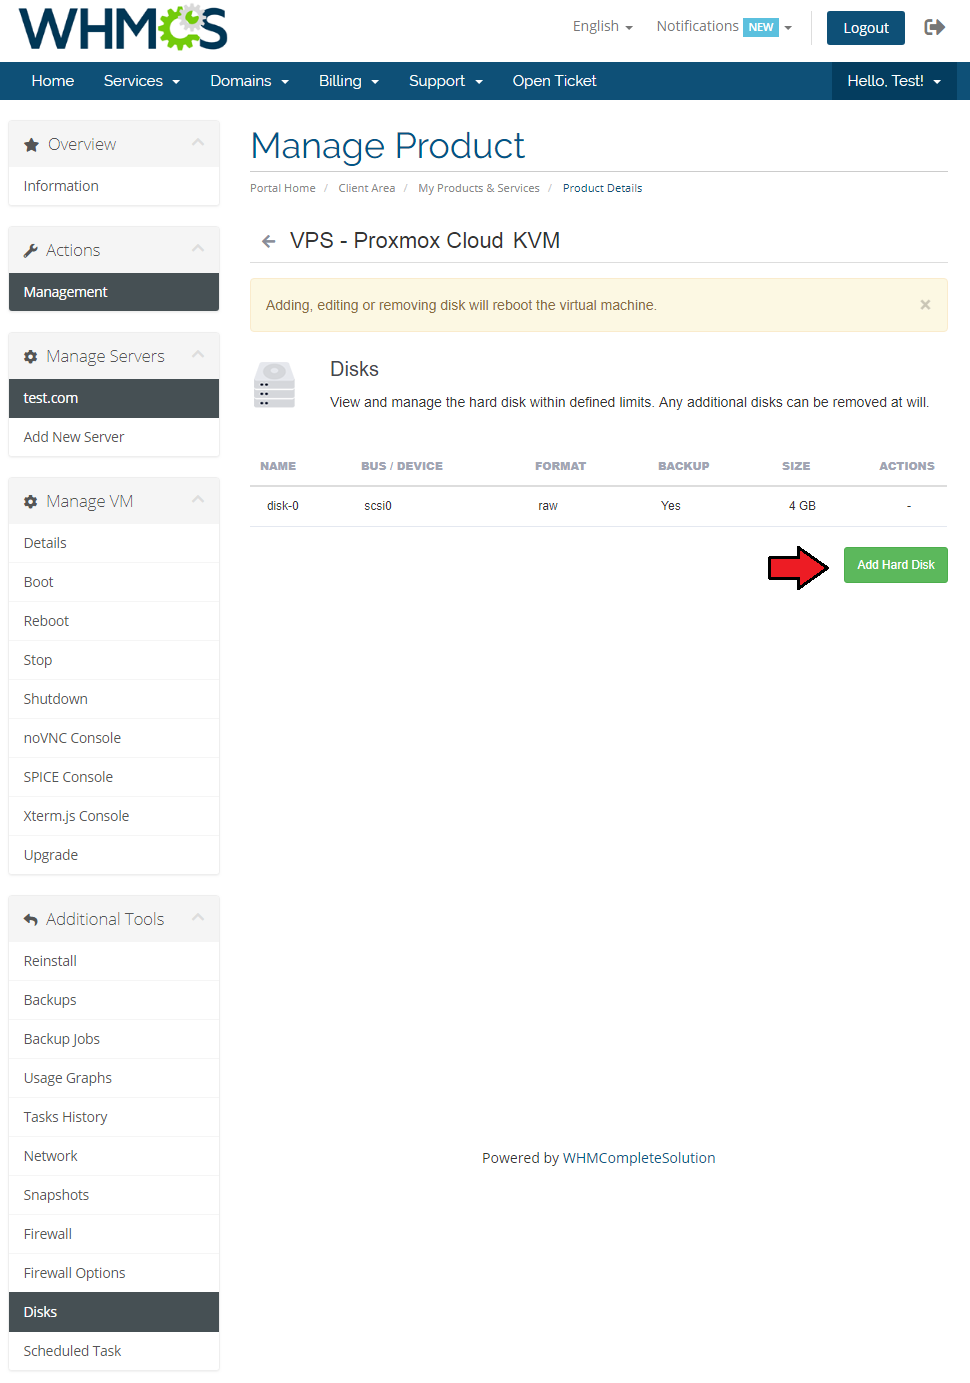
|
Scheduled Task
| Proceed to 'Scheduled Tasks' section to view details on any current task. |
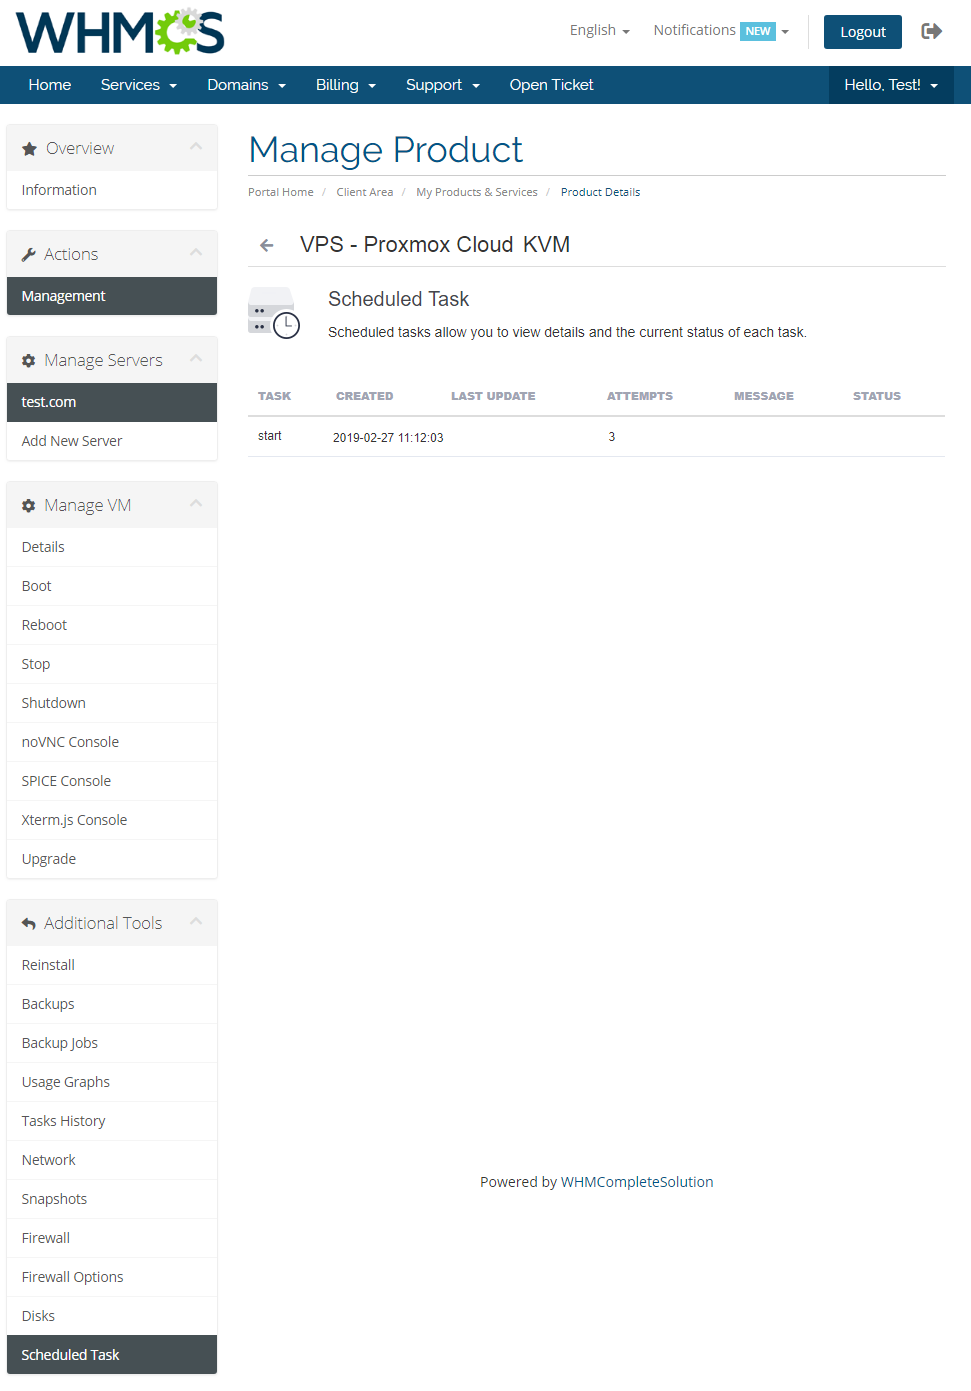
|
Automatic IP Address Assignment
| Automatic IP address assignment can be applied to your Proxmox module, all you need to do is to install 'DHCP' (Dynamic Host Configuration Protocol). IP addresses will be then automatically requested from a DHCP server. Consequently, the need to manually configure them will be reduced to a minimum. Important! This option is available only for 'KVM' virtualization type. |
| 1. First of all, you need to install SSH2 package. You will find precise instructions on how to do that here. |
2. Now, you may move to ISC DHCP installation and configuration. Follow the steps below:
sudo apt-get install isc-dhcp-server
sudo nano /etc/dhcp/dhcpd.conf Below there is an exemplary content of properly created file: /etc/dhcp/dhcpd.conf.
# Sample /etc/dhcpd.conf
# (add your comments here)
default-lease-time 600;
max-lease-time 7200;
option subnet-mask 255.255.255.0;
option broadcast-address 192.168.1.255;
option routers 192.168.1.254;
option domain-name-servers 192.168.1.1, 192.168.1.2;
option domain-name "mydomain.example";
subnet 192.168.1.0 netmask 255.255.255.0 {
#ProxmoxIPv4
host 1 {hardware ethernet 32:62:39:64:33:33;fixed-address 192.168.1.2;}
host 2 {hardware ethernet 32:39:61:31:33:66;fixed-address 192.168.1.3;}
}
|
| 3. Turn on ISC DHCP.
To use automatic IP addresses assignment feature, select 'ISC DHCP Server' option in 'Module Settings' under 'KVM Configuration' section. |
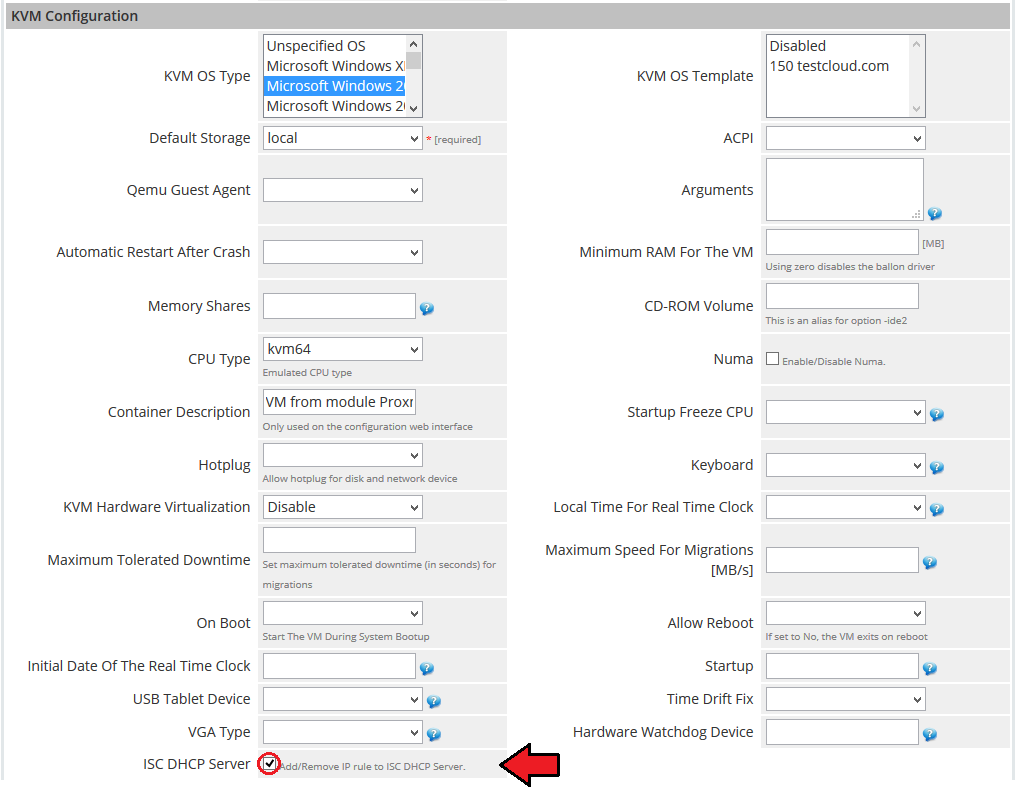
|
IP Manager Integration
| Owing to integration with IP Manager For WHMCS you are able to easily create IP addresses subnets and assign them to desired products. Note: This integration works for LXC and KVM virtualization type. OpenVZ is no logner supported.
|
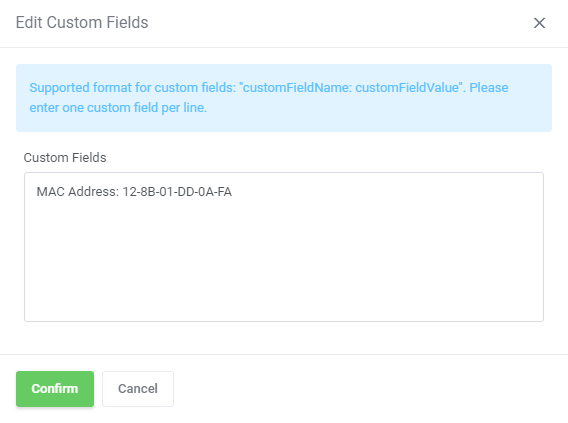
|
| 3. Afterwards, create a new configuration and assign a previously created subnet to it. Note: Multiple IP addresses subnets can be assigned to a single configuration. |
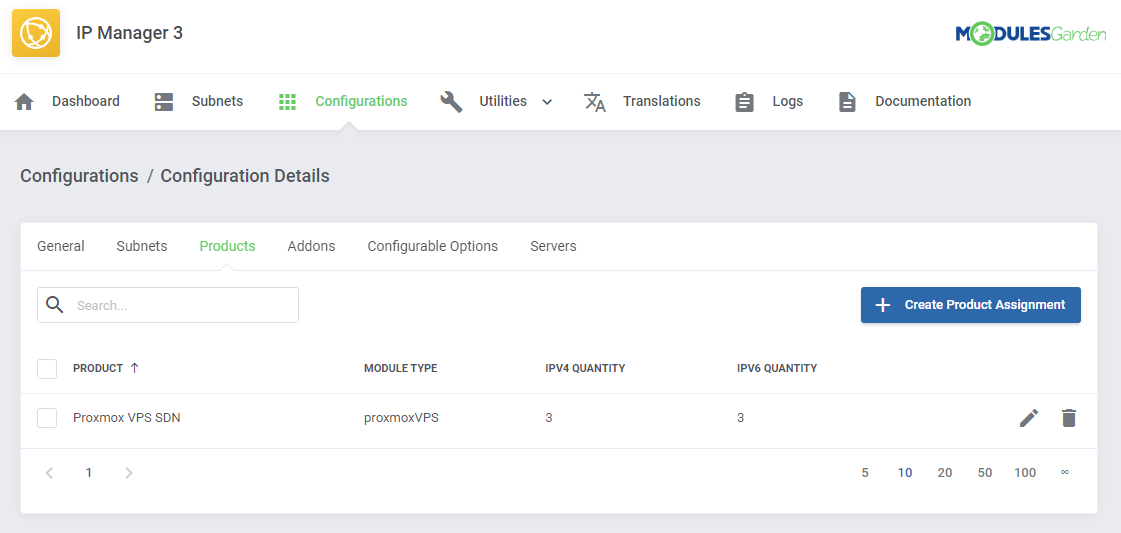
|
| 5. Now, enable integration by proceeding to '3rd Party Integration' tab. Press 'Activate' next to 'proxmoxCloud' module type as shown on the following screen. |
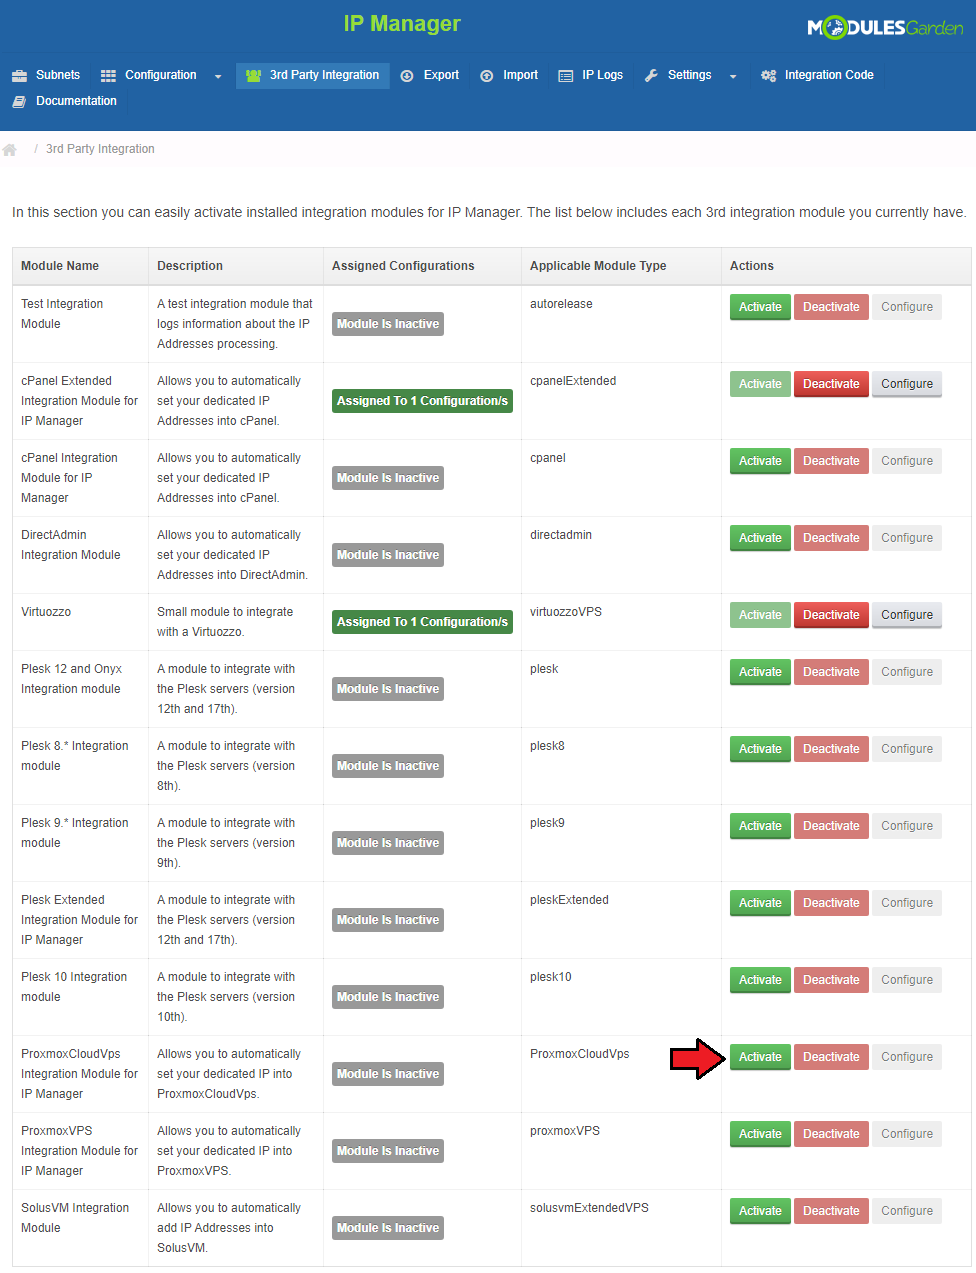
|
| 6. Next, assign a previously created configuration to the submodule. Press 'Configure', choose the configuration and press 'Save Changes'. |
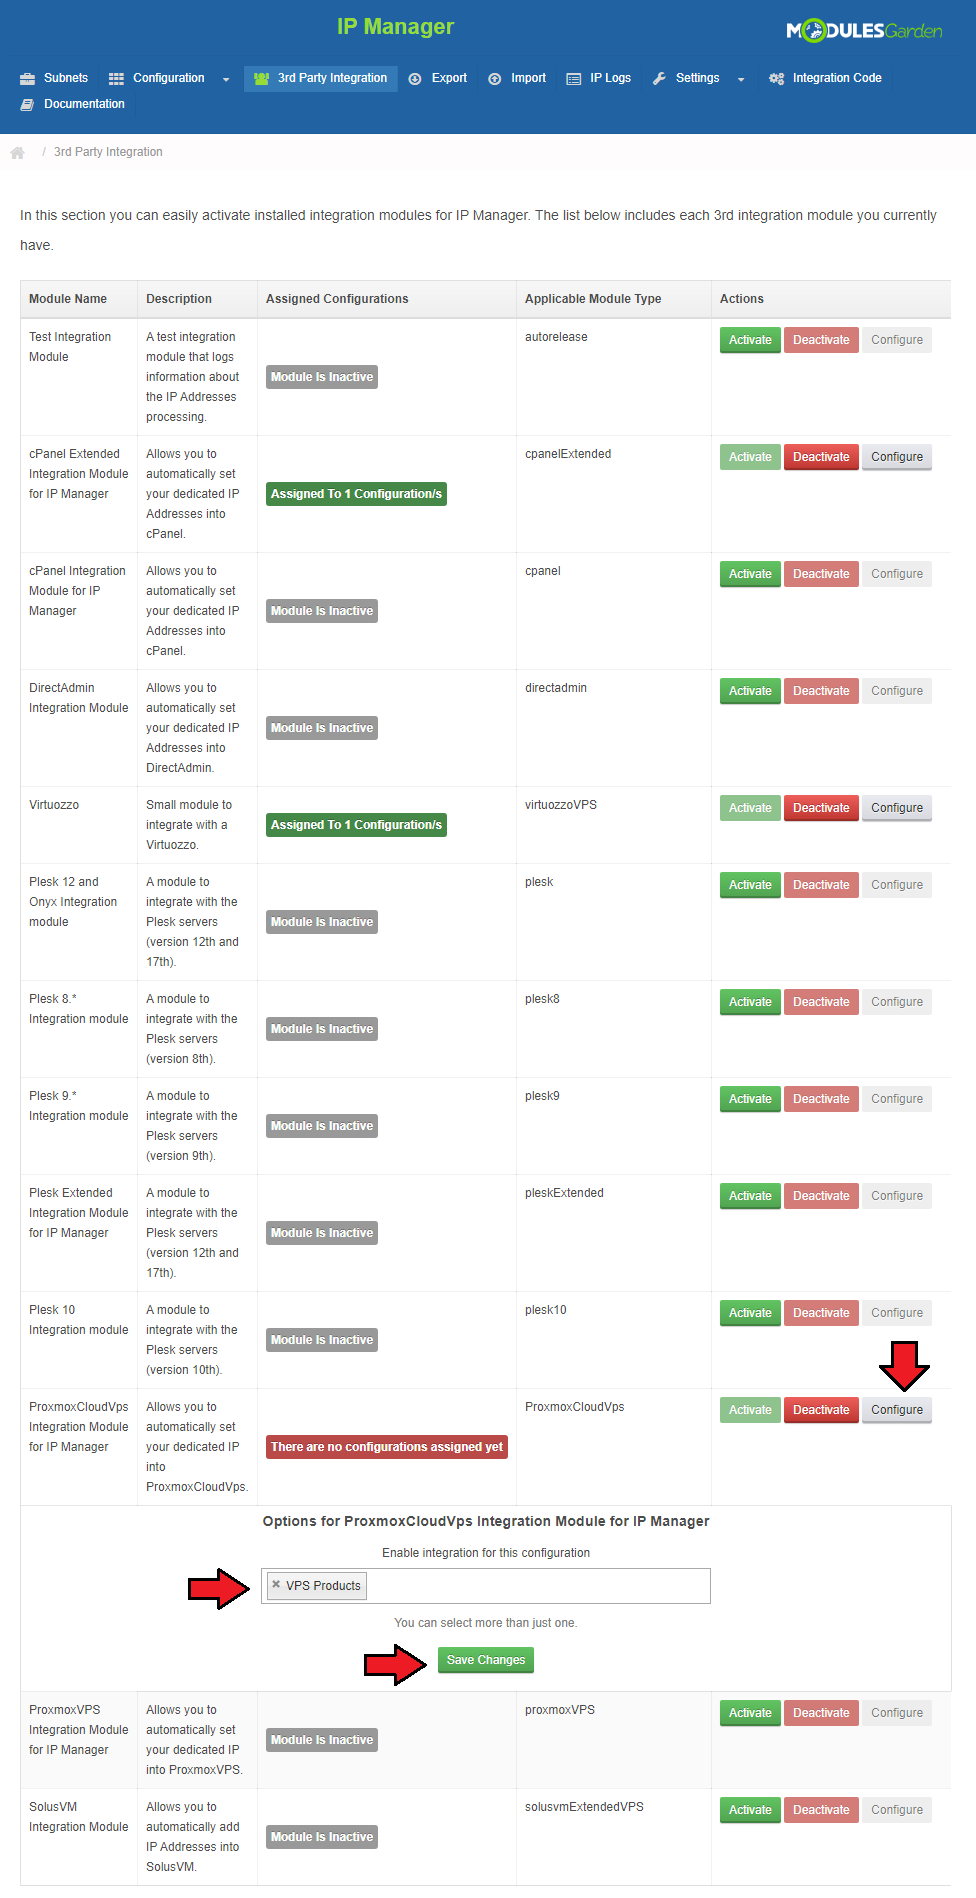
|
Importing VM
| Our module allows you to easily import VM into your cloud product. To do so, press 'Import VM' as shown on the following screen. |
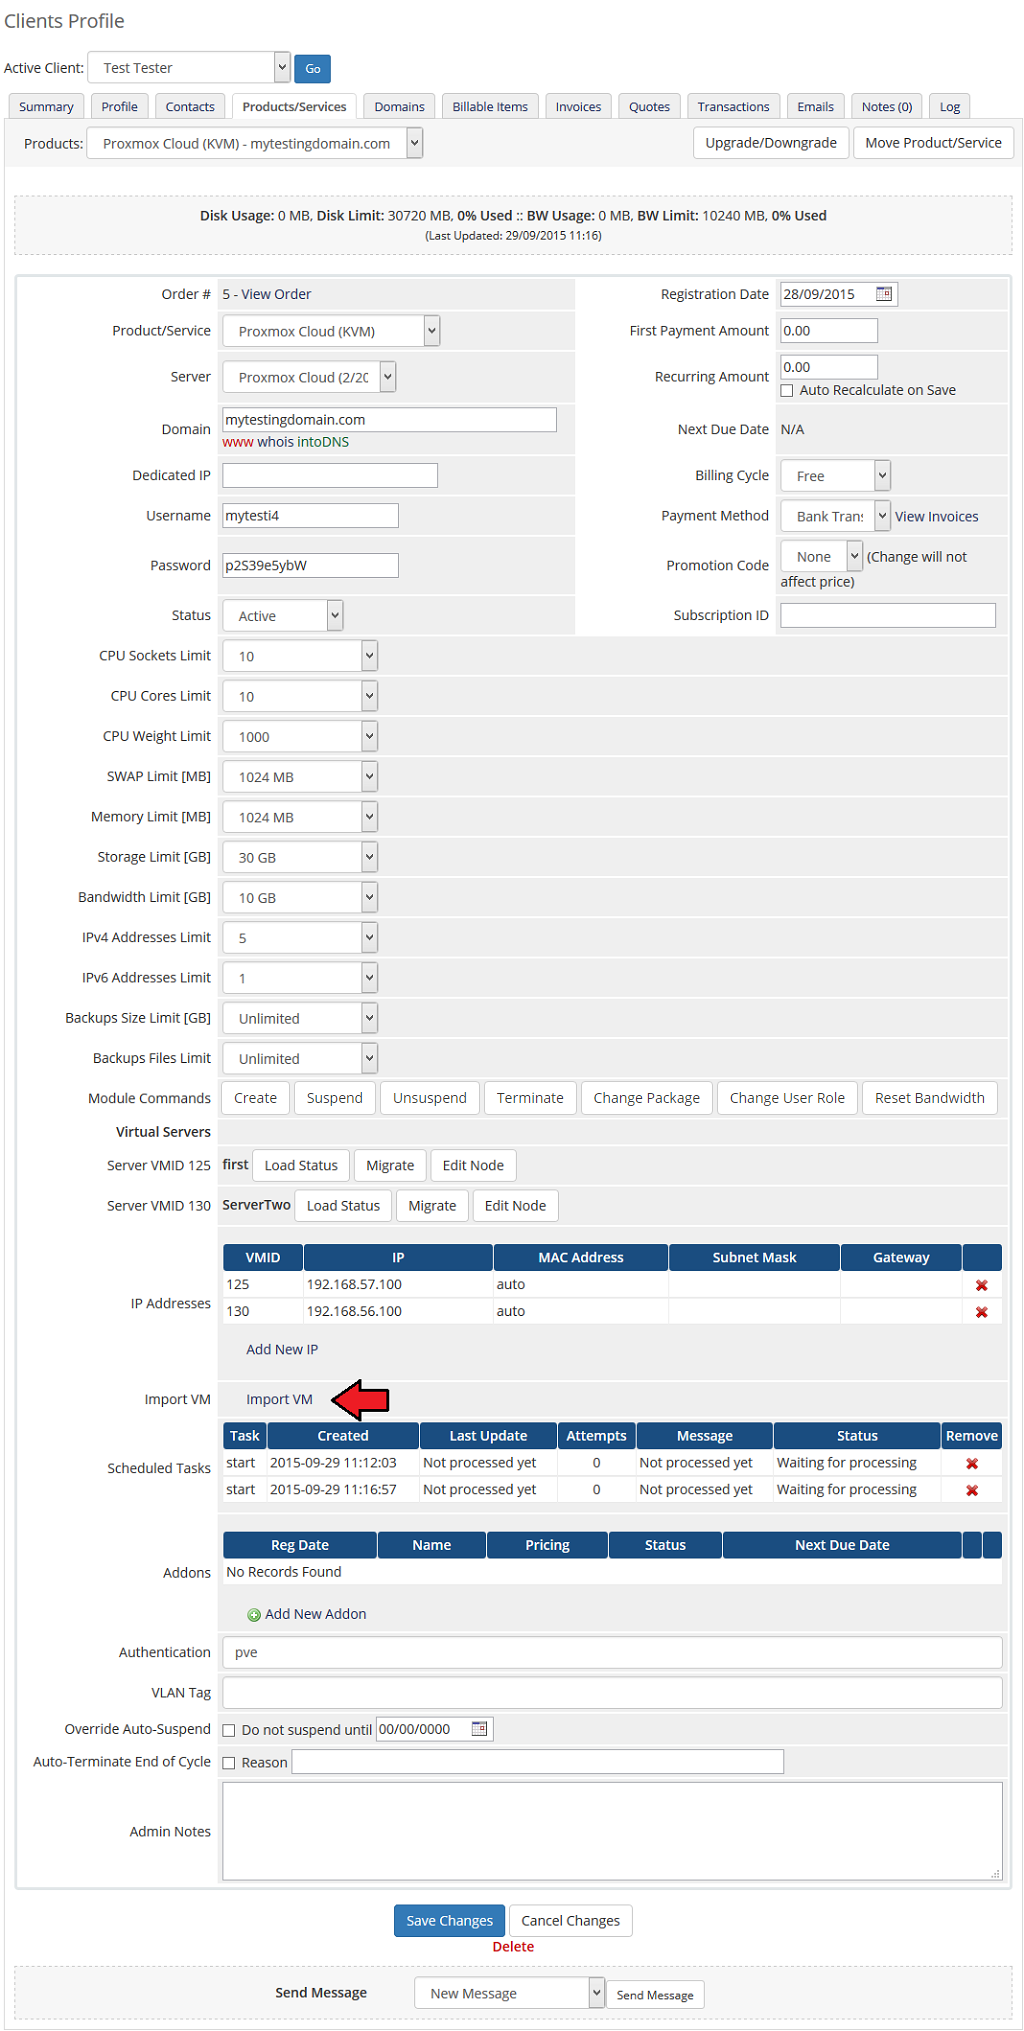
|
| Afterwards, select the node on which the server exists and fill in 'VMID' field. Confirm importing through pressing 'Save Changes' button. |
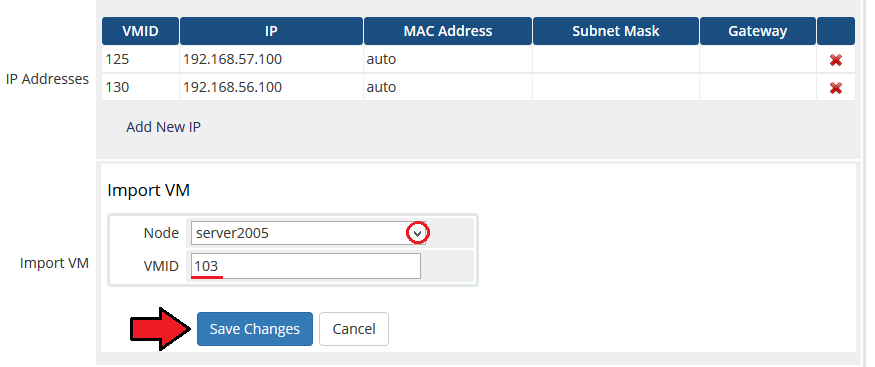
|
Custom Hooks
| Our module allows you to use custom hooks, all you need is knowledge of PHP programming language. Custom hooks are placed in 'your_whmcs/modules/servers/proxmoxCloud/customhooks.php' . proxmoxCloud_beforeCreateVM proxmoxCloud_afterCreateVM proxmoxCloud_beforeTerminateVM proxmoxCloud_afterTerminateVM proxmoxCloud_beforeCreate proxmoxCloud_afterCreate proxmoxCloud_beforeTerminate proxmoxCloud_afterTerminate proxmoxCloud_afterSuspend proxmoxCloud_afterUnsuspend proxmoxCloud_afterIPAdditionByAdmin proxmoxCloud_afterIPDeletionByAdmin proxmoxCloud_afterIPAdditionByUpgrade |
Configurable Options
| When you successfully set up a product, your clients can order it by choosing from the default configurable options. Note! If automatically generated configurable options do not seem to fulfill your clients needs, you can edit them using this guide. |
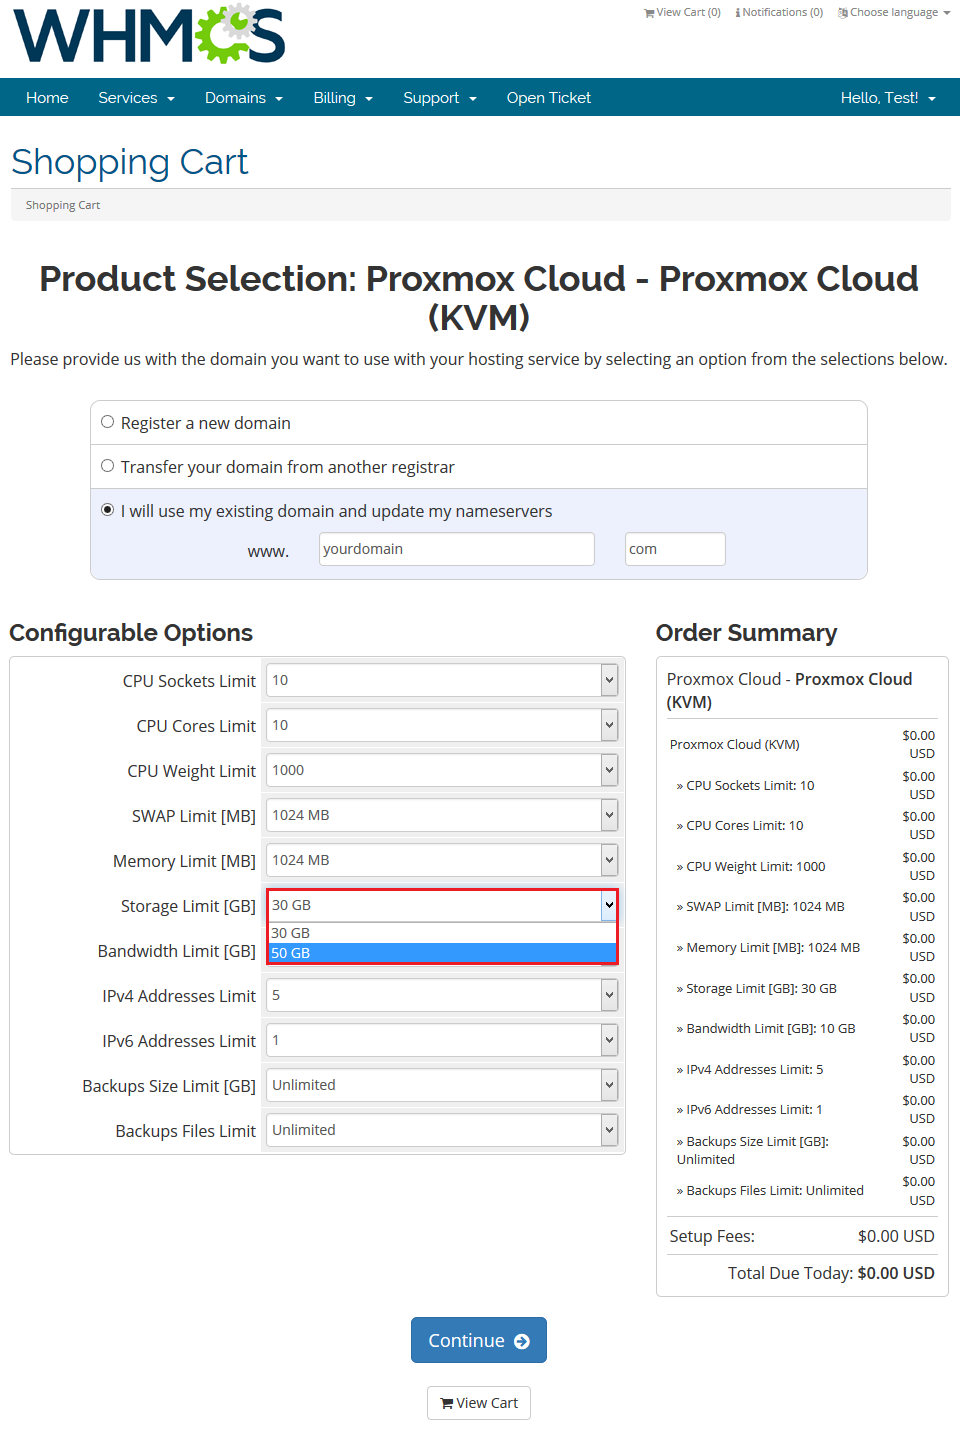
|
| If you decide to set up pricing per server resource ordered, you can find instruction to proceed here. |
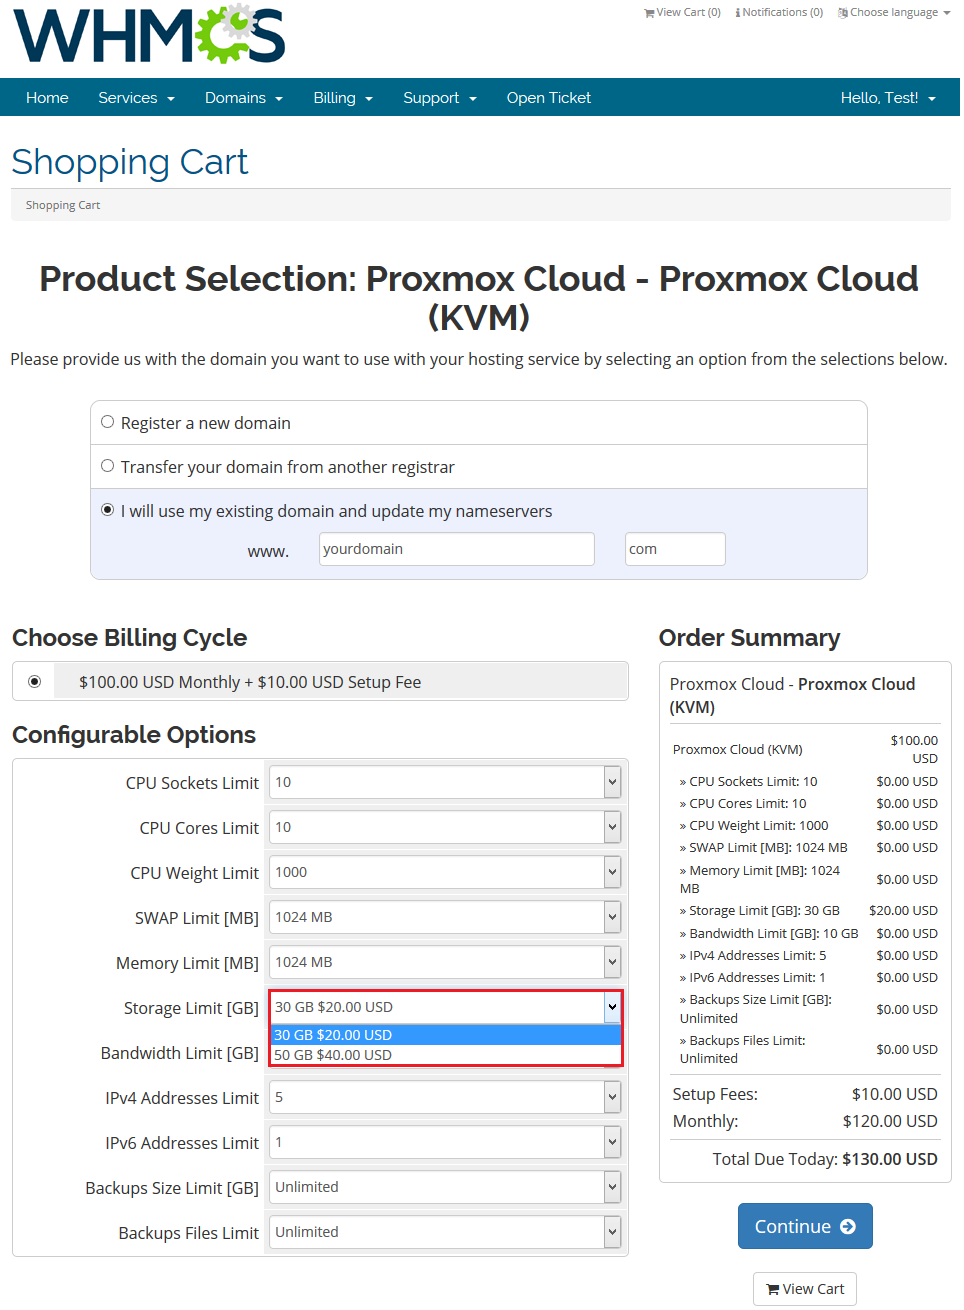
|
Management of Billing
| When you combine Proxmox Cloud For WHMCS with Advanced Billing For WHMCS, you will be able to set up additional billing options. Module allows you to charge your customers basing on the server resources used by them. |
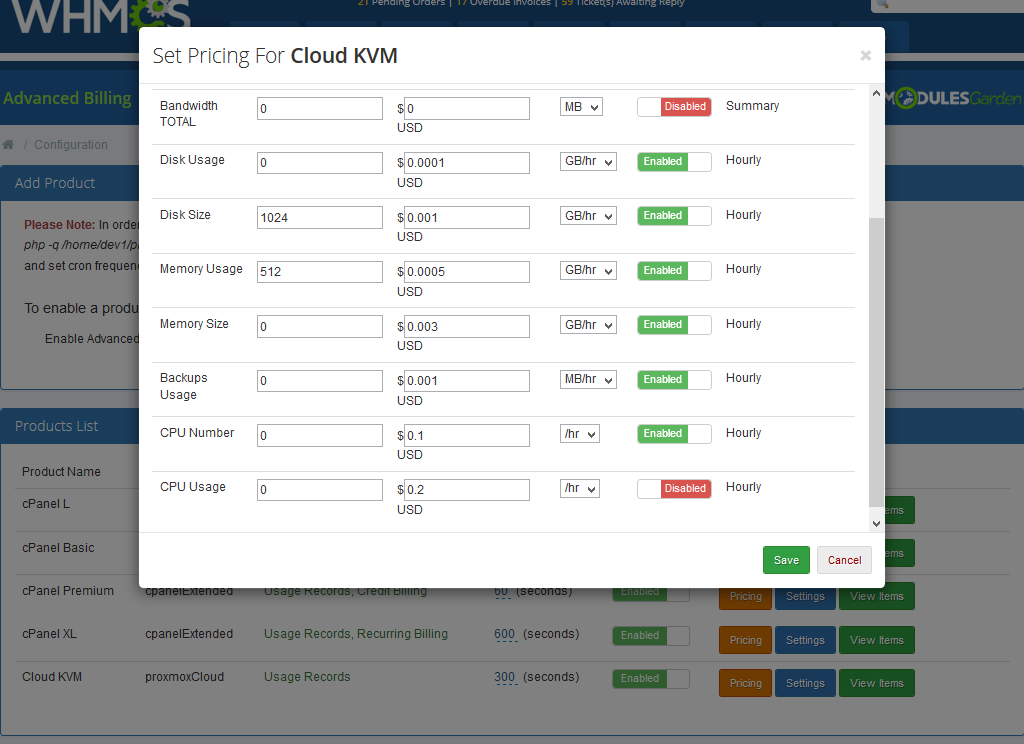
|
| With Advanced Billing For WHMCS module, you can also display your customers current server resource usage and their cost. |
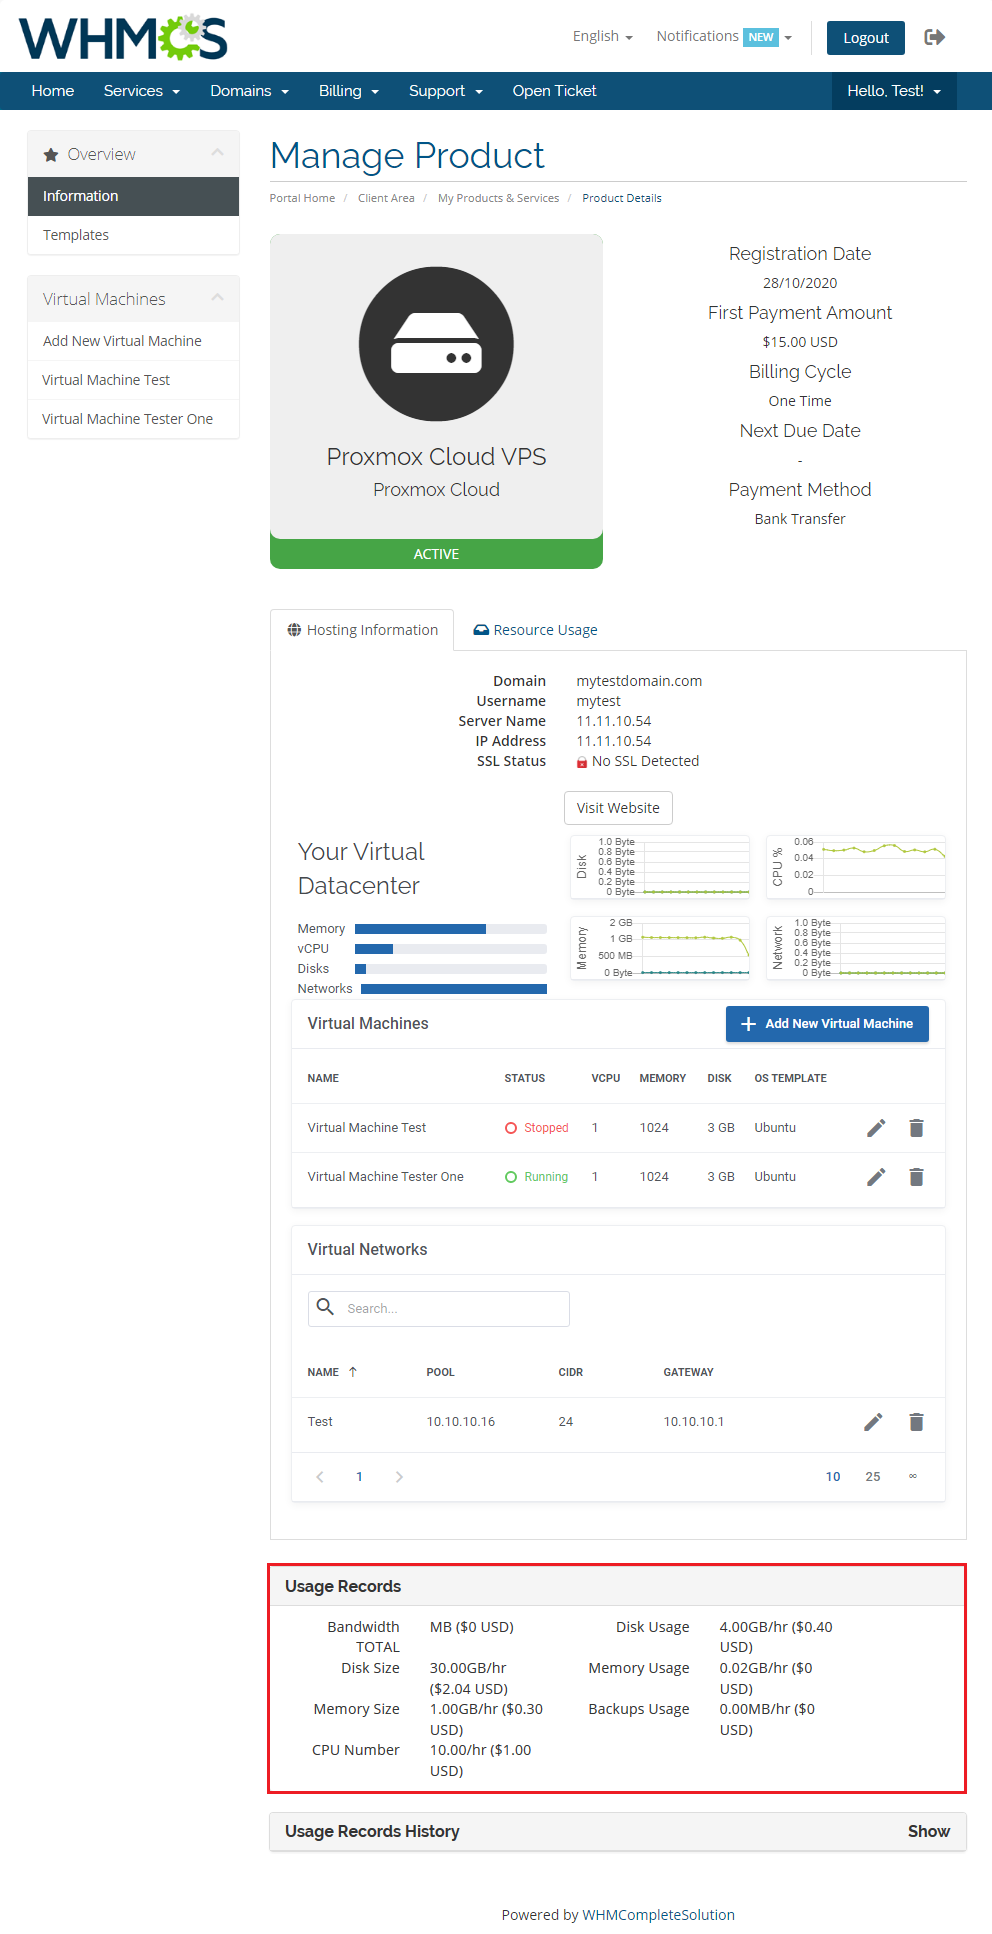
|
Products Autoscaling
| If you want to meet the needs of your clients then give them the possibility to scale provisioned servers according to their current load automatically. To achieve that you need our Proxmox Cloud Autoscaling extension with Advanced Billing For WHMCS product. |
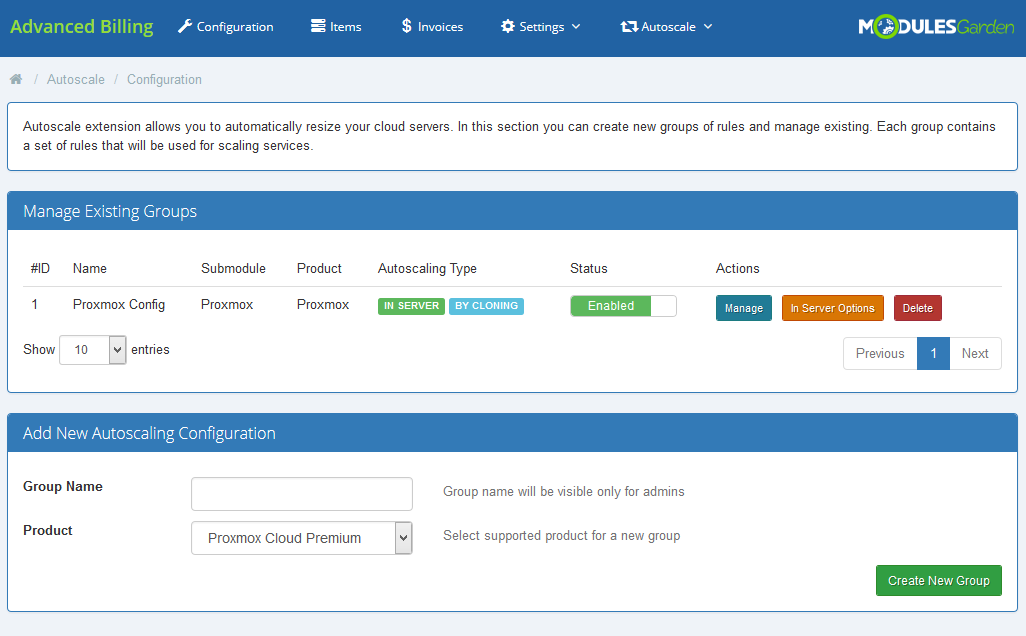
|
| With the combination of these three items, you will be able to formulate a set of rules basing on which specified servers will be modified at the right time. Advanced Billing For WHMCS will bill your clients for the currently used servers and its extension, Proxmox Cloud Autoscaling, will adjust the size of Cloud product to the current needs. |
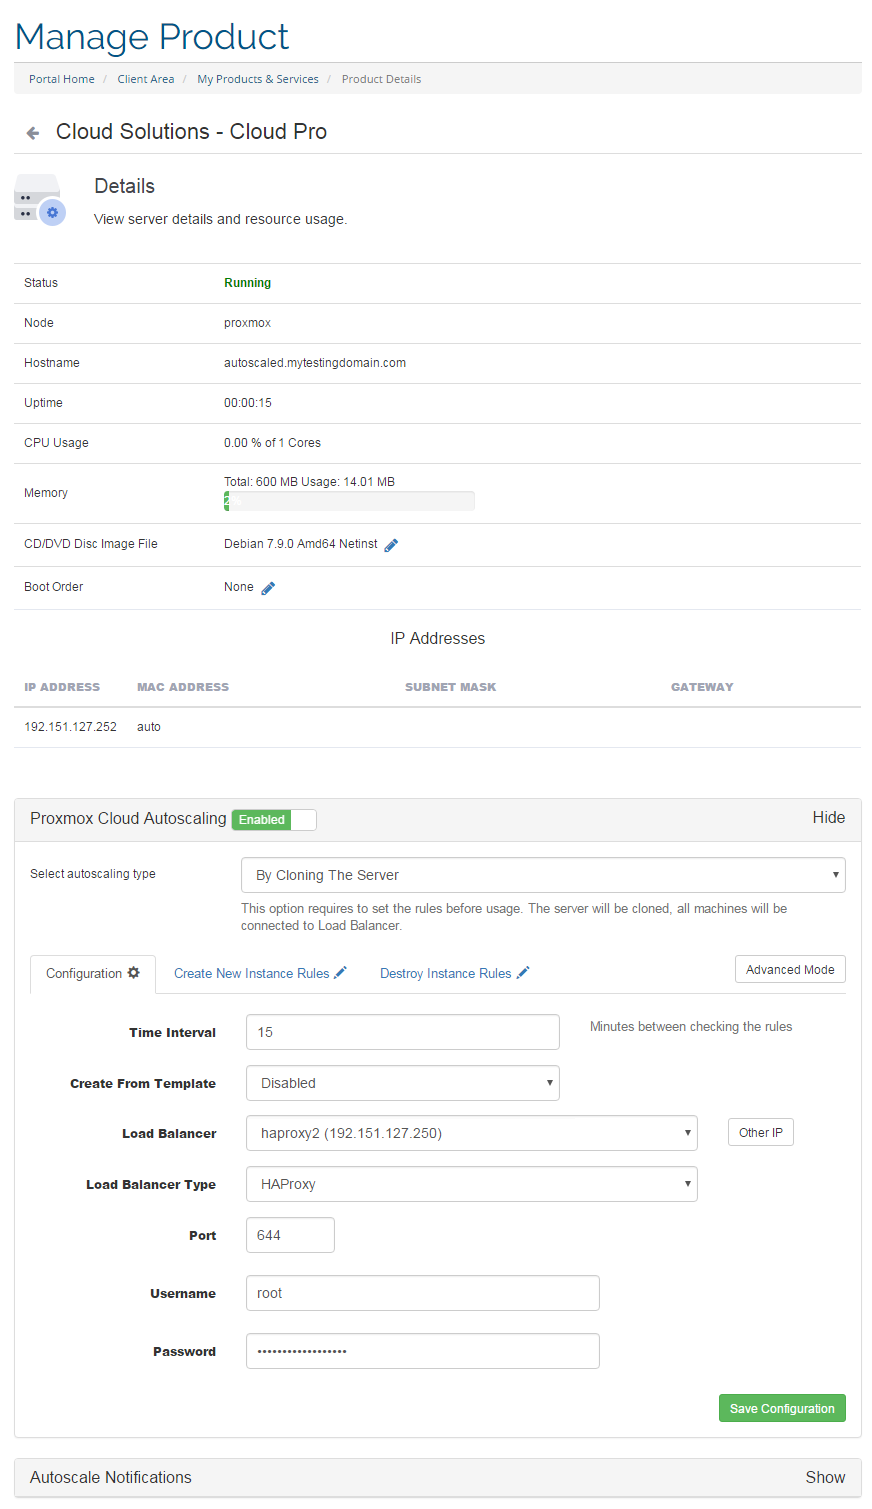
|
Tips
| 1. Operations performed on the virtual servers are not executed immediately. Give your Proxmox Virtual Environment some time for processing the request and execution of operation. |
| 2. Multiple physical Proxmox servers can be joined into one cluster. When they are joined into one cluster, you can access all of them by connecting to any of them. |
| 3. OS Templates are not automatically downloaded while configuring a product. For each virtualization type, templates are downloaded from the Proxmox server depending on which one of them they are generated for. |
4. To name the location accordingly to your needs, within the module change the lang into:
$_LANG['node_X']='Your friendly name for node_X'; |
| 5. When PAM authentication is used it is necessary to create a client first in order to change the password correctly. Read more about it here. |
| 6. As this module supports templates system, any changes made in the module's templates files will be saved after the upgrade process. |
| 7. If you currently use the module in the 2.3.2 version or previous, and would like to migrate to Proxmox VE V5.X, you need to update the files on your Proxmox server to the new version from the 'UploadOnProxmoxServer' folder. |
| 8. You can use the 'IPSet IP Filter' option for firewall to prevent IP spoofing. Click here to read more about IP Sets. |
| 9. 'Minimum Network Rate Limit' option allows you to change the previously entered 'Default Network Rate Limit' value to a new one if the current 'Bandwidth Limit' is already exhausted. Note that the 'Bandwidth Limit' can also be used for WHMCS overage billing calculation as described here. |
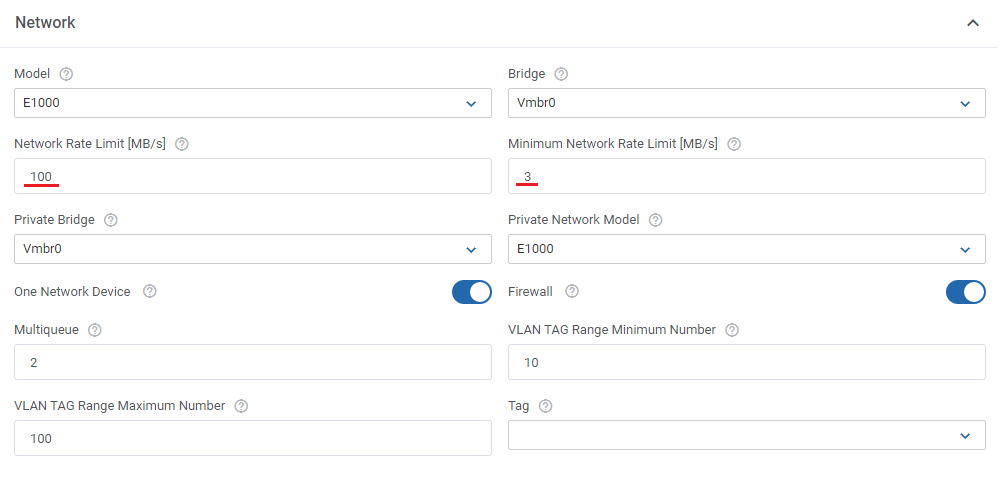
|
Update Instructions
| Essential guidance through the process of updating the module is offered here. Keep in mind there is a quick and easy option in our client area that will let you upgrade the license of your module to an open source version at any time - and at a lower price! |
Common Problems
| 1. When you have problems with connection, check whether your SELinux or firewall does not block ports. |
| 2. Error 'Could not create PVE2_API object' during connecting via noVNC console. Reason: User account does not have permission to access noVNC console. |
| 3. Error 'This connection is untrusted' during connecting via noVNC console. Reason: Your certificate is not valid. |
| 4. Blank page during connecting via noVNC console. Reason: You have not uploaded the additional files on the Proxmox server. |
| 5. Error 'Function "ssh2_connect" does not exist. Please Install SSH2 PECL before you start using the script.' Reason: You have not updated php.ini file |
| 6. After you have updated your Proxmox Cloud For WHMCS to Proxmox Cloud For WHMCS V2.0.0, it is always required to save your product configuration in module settings again. |
| 7. If you see an error: 'Invalid VLAN TAG Range' configuration or other when trying to add a new private network, please make sure you have completed all required options in Module Settings. These are: 'Network Device' → 'Private Bridge', 'VLAN TAG Range From' and 'VLAN TAG Range To'. |
| 8. 'OS Architecture Type ' option for LXC virtualization type is currently not supported as it not implemented in Proxmox itself. We are sorry for inconvenience. |