Product Linker For WHMCS
From ModulesGarden Wiki
(Difference between revisions)
|
|
| Line 337: |
Line 337: |
| | {| | | {| |
| | |style="padding: 10px 0px 15px 15px;"|In these steps we will show you linking Parallels Key Administrator to Parallels Cloud Server through product addon.<br /> | | |style="padding: 10px 0px 15px 15px;"|In these steps we will show you linking Parallels Key Administrator to Parallels Cloud Server through product addon.<br /> |
| − | It is required to set key type in your Parallels Key Administrator to '' 'PARALLELS-CLOUD-SERVER' '', only this way linked product will create license for Parallels Cloud Server product.<br /> | + | It is required to set key type in your Parallels Key Administrator to '' 'PARALLELS-CLOUD-SERVER' ''.<br /> |
| | + | Only this way linked product will create license for Parallels Cloud Server product.<br /> |
| | ''Note 1: You can also link these products using configurable options.''<br /> | | ''Note 1: You can also link these products using configurable options.''<br /> |
| | ''Note 2: In order to create license successfully, you also have to select feature.''<br /> | | ''Note 2: In order to create license successfully, you also have to select feature.''<br /> |
Revision as of 12:23, 29 January 2014
Product Linker For WHMCS allows you to sell your products in bundles.
Product bundles content is defined by clients through chosen addons or configurable options.
Module will also allow you to view, filter and delete existing connections used by your customers.
|
| ✔ Create A Single Or Multiple Relations Between Your WHMCS Products, Addons And Configurable Options
|
| ✔ Allow Your Clients To Purchase Multiple Products, Addons And Configurable Options Through Ordering Just One Of Them
|
| ✔ Dependencies Between Module Actions - Every Action: Create, Terminate, Suspend Or Unsuspend Called On The Main Product Will Result With The Same Action Performed On The Child Products
|
| ✔ Product Updates With Automatic Email Notifications To Admin
|
| ✔ View And Delete Existing Connections
|
| ✔ Flexible Filtering Of Existing Connections
|
| ✔ Integrated With cPanel Manage2 For WHMCS - Easy Reselling Of cPanel Licenses (read more)
|
| ✔ Integrated With DirectAdmin Licenses For WHMCS - Easy DirectAdmin Licenses Reselling (read more)
|
| ✔ Integrated With Parallels Key Administrator For WHMCS - Easy Parallels Licenses Reselling (read more)
|
| ✔ Improved Update Of Products
|
| ✔ Supports WHMCS V5 and Later
|
Installation
This tutorial will show you how to successfully install Product Linker For WHMCS.
We will guide you step by step through the whole installation and configuration process.
|
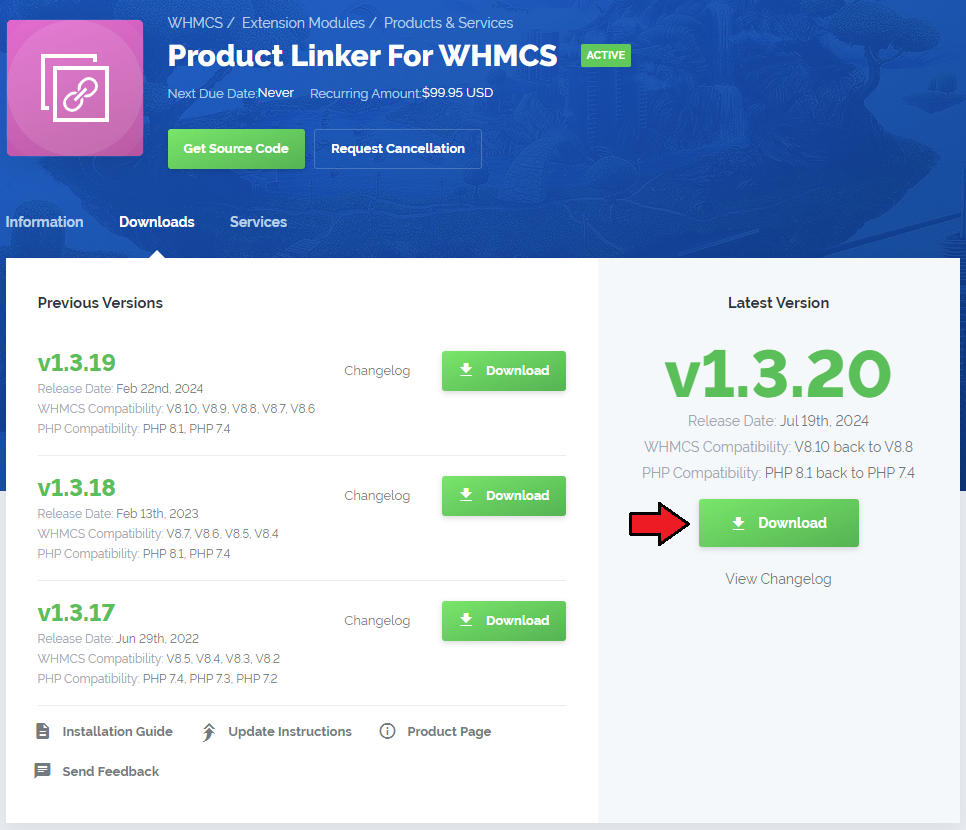
| 1. Log in to your client area and download Product Linker For WHMCS.
|
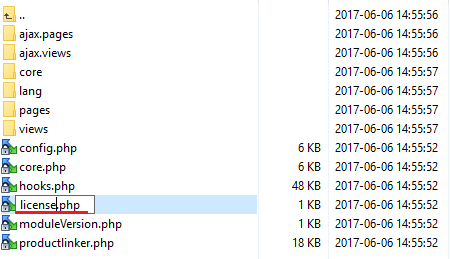
2. Upload and extract the module into the main WHMCS directory.
Files in your WHMCS directory should look like this.
|
3. When you install Product Linker for the first time you have to rename 'license_RENAME.php' file.
File is located at 'modules/addons/productlinker/license_RENAME.php' . Rename it from 'license_RENAME.php' to 'license.php' .
|
4. In order to configure your license key, you have to edit a previously renamed 'license.php' file.'
Enter your license key between quotation marks as presented on the following screen. You can find your license key at your client area → 'My Products' .
|
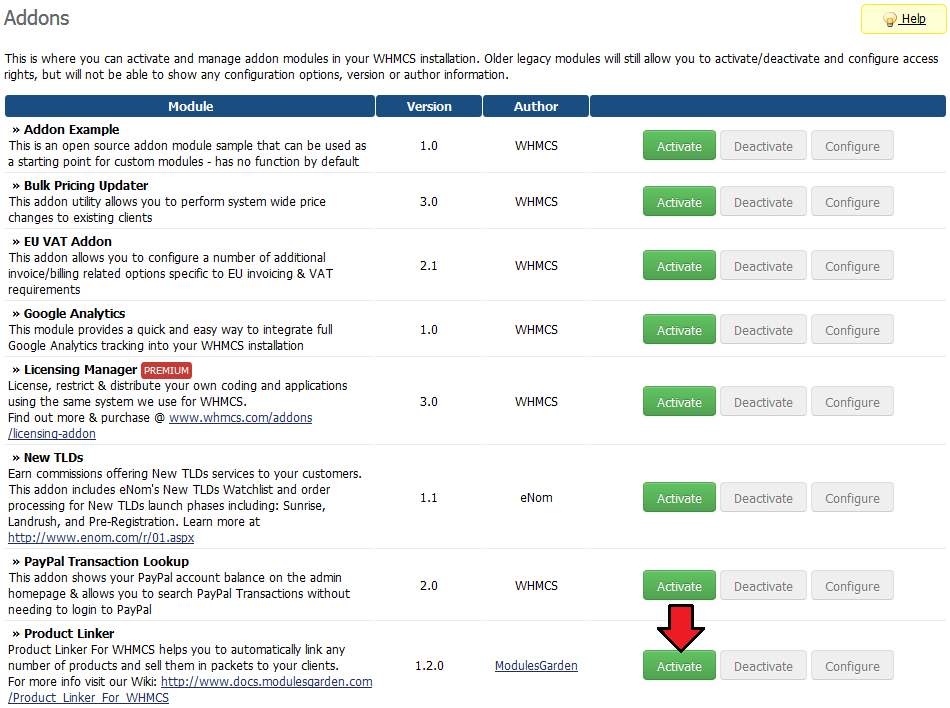
5. Now you have to activate the module in your WHMCS system.
Log in to your WHMCS admin area. Go to 'Setup' → 'Addon Modules' . Afterwards, find 'Product Linker' and press 'Activate' button.
|
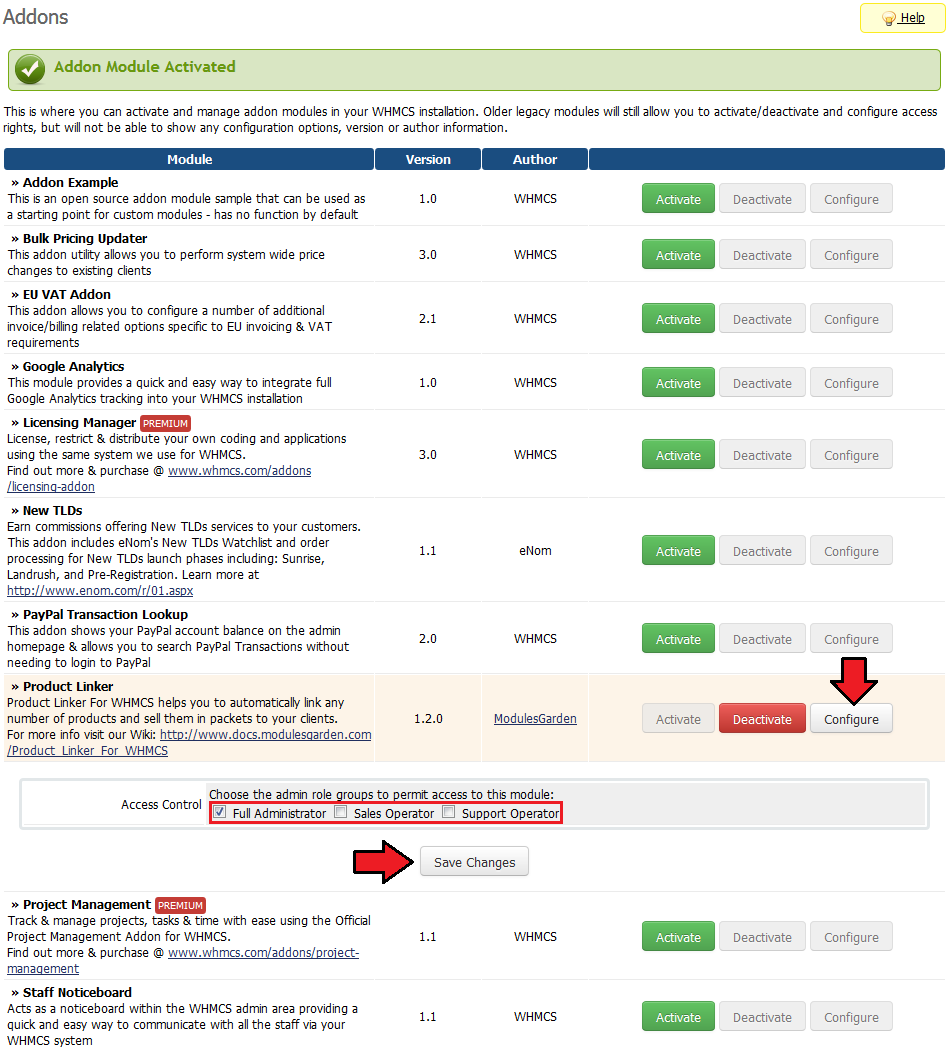
6. In the next step you need to permit access to this module.
To do so, click on 'Configure' button, select administrator groups which should have access to this addon and press 'Save Changes' .
|
7. To enable logs from failed actions, go to 'Utilities' → 'Logs' → 'Module Log' .
Afterwards, press 'Enable Debug Logging' .
|
8. You have just successfully installed Product Linker For WHMCS!
You can access your module at 'Addons' → 'Product Linker' .
|
Configuration and Management
Product Linker For WHMCS allows to sell bundle of products through ordering one product with specific product addons and configurable options.
It also automatically forwards basic commands ordered by admin on main product to all linked products.
You can define link between product by product addon or configurable options. You will find more information about it in 'Add Relation' section.
|
Relation Management
At 'Relation Management' tab you can define links between products.
They will be triggered as soon as your client will make an order for product with product addon/configurable option chosen at relation.
|
Add Relation
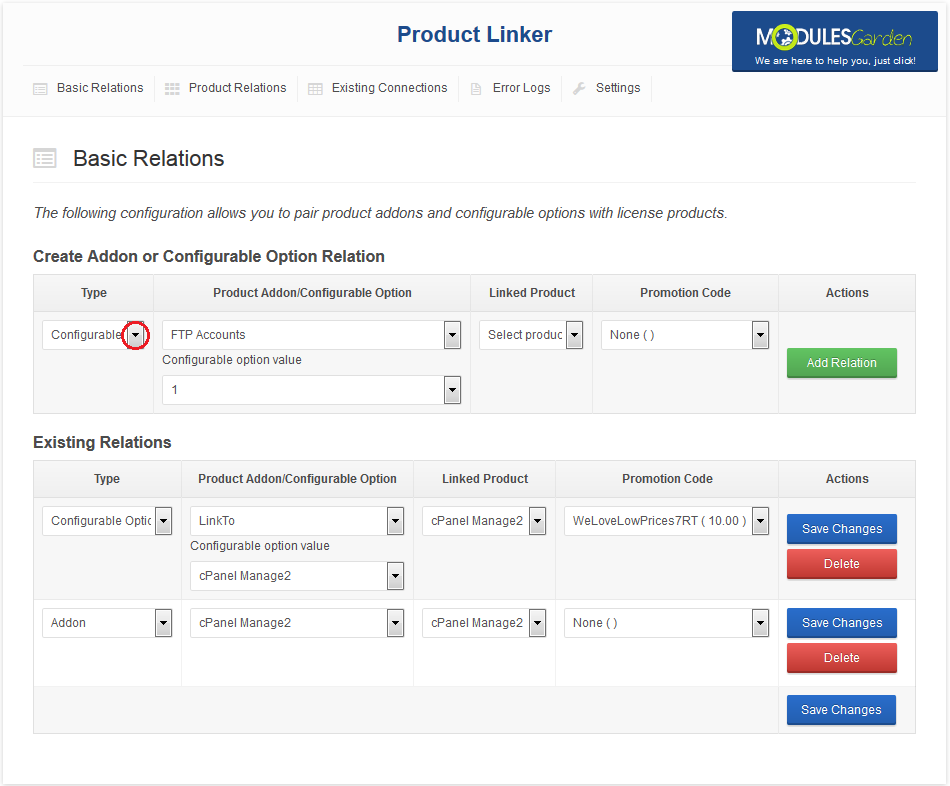
To add new relation, go to 'Product Linker' → 'Relation Management' and find table 'Create' .
Select relation type from 'Type' dropdown menu, you can choose between relation triggered by product addon or configurable option.
|
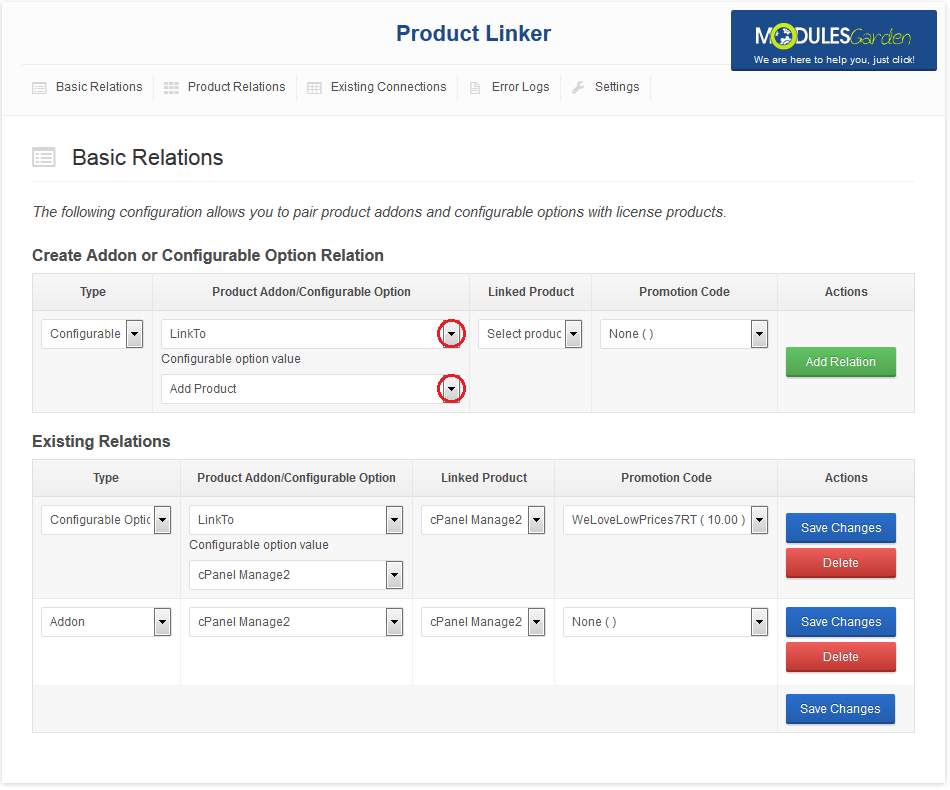
Next, select addon name or configurable option name from 'Product Addon/Configurable Option' dropdown menu.
If you have chosen 'Configurable option' relation type, additionally you have to select configurable option value.
|
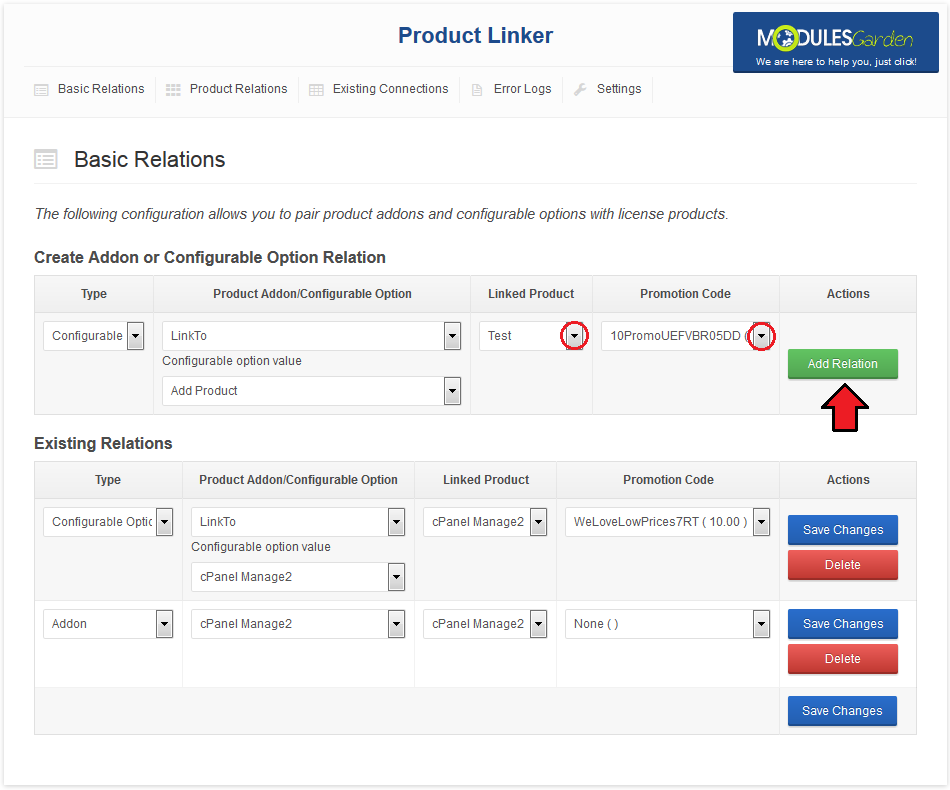
Finish through selecting product which will be linked by triggering this relation.
Save relation through pressing 'Add Relation' button.
|
Edit Relation
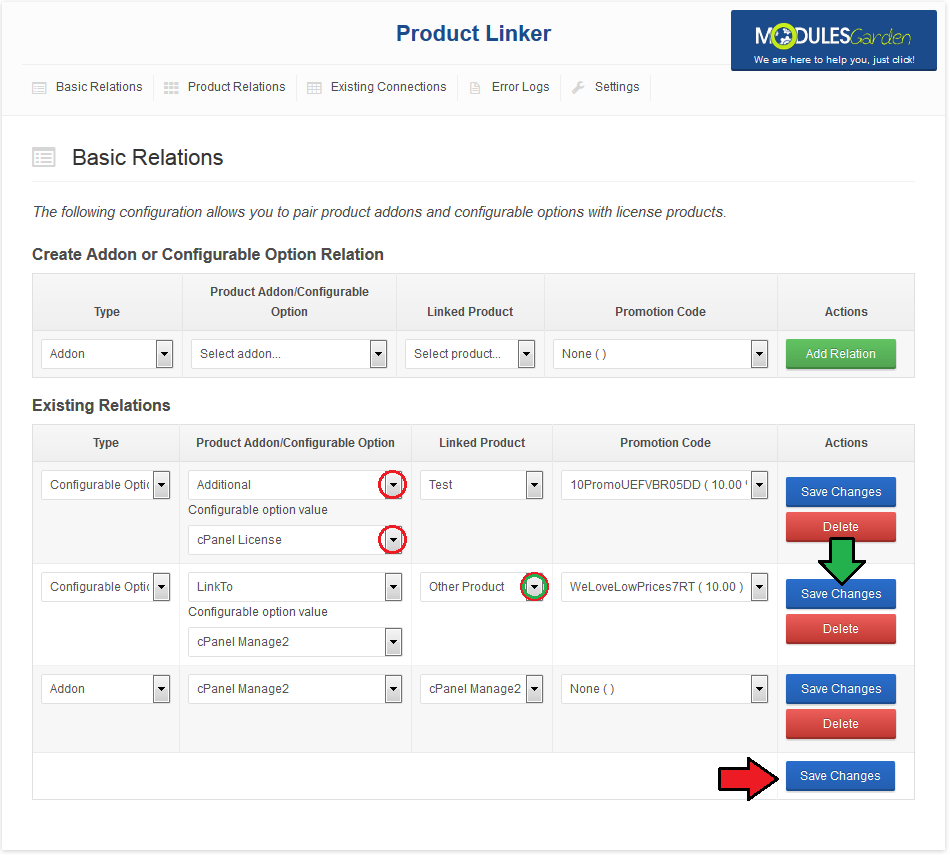
Editing relations is quite easy, go to 'Relation Management' tab and start making changes.
You can alter one relation or multiple relations simultaneously, the difference is button used to save changes.
If you are making changes in only one relation, press 'Save Changes' button next to it (green arrow), otherwise use 'Save Changes' at the bottom of the page (red arrow).
|
Existing Connections
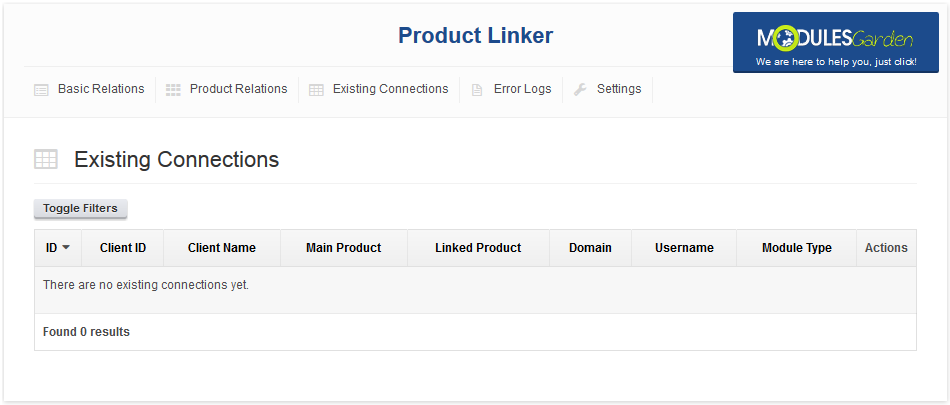
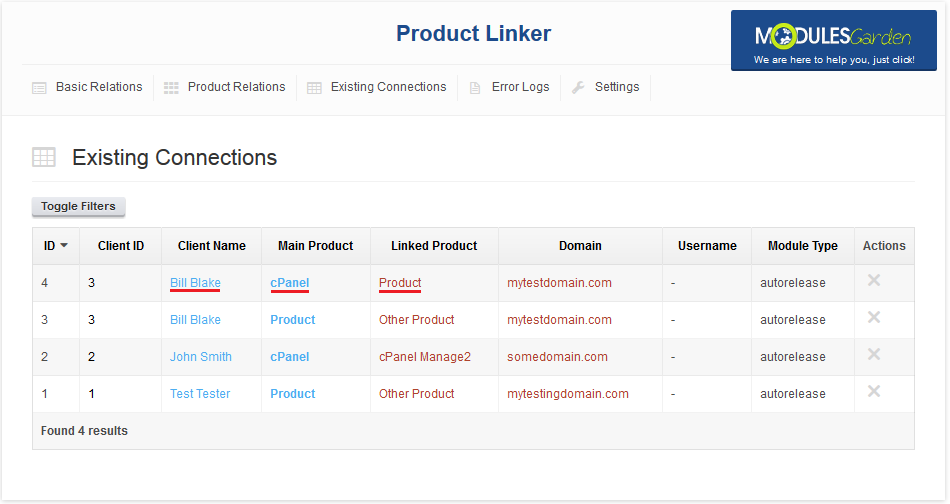
'Existing Connections' tab allows you to view list of all products ordered by your clients for which relation was triggered.
You can find all information related to created link, like for example main product, linked product, their owner or domain which both products use.
You can quickly move to user or any of his product by simply clicking on client/product name.
|
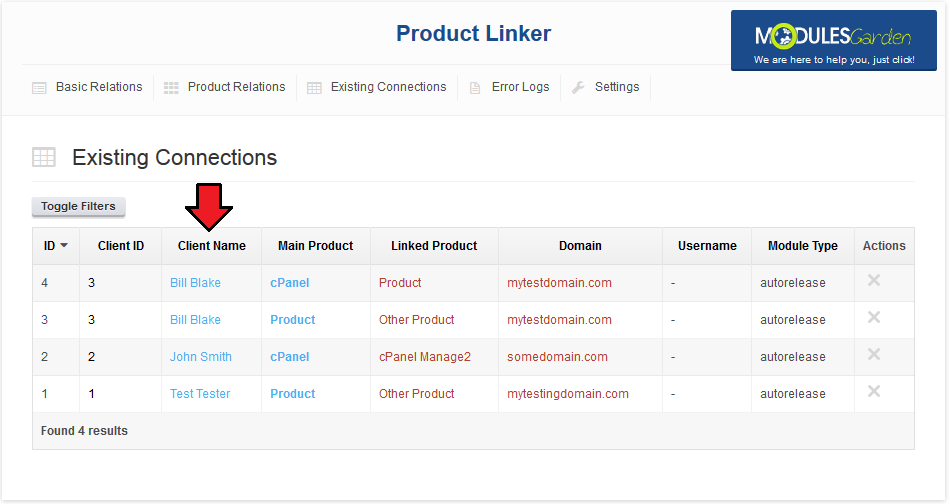
Module also allows you to order records on list by selected column through pressing on its headline.
For example, to order by client name, press on 'Client Name' column header as shown on the following screen.
|
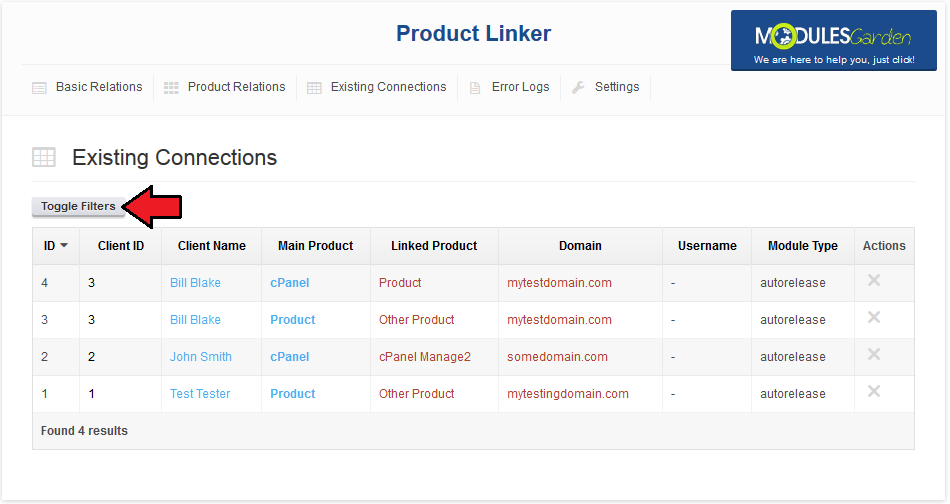
To display only specific records you can use filters.
To open filters form, press 'Toggle Filters' .
|
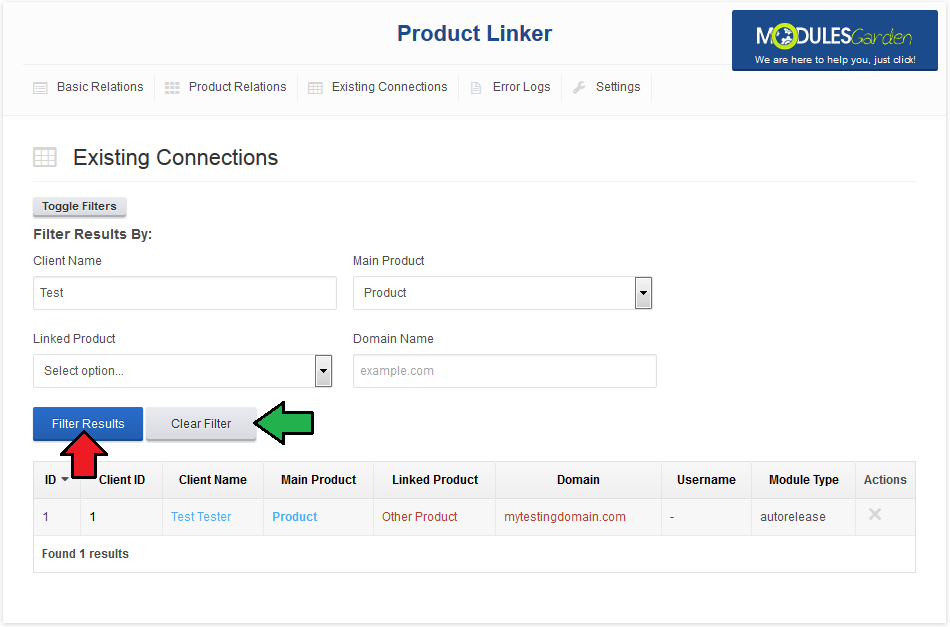
You are able to set up filtering by client name, both main and linked products and domain.
When you select values you desire, click 'Filter Results' button (red arrow).
If you decide to clear filters you have set up earlier, open filters form and press 'Clear Filter' (green arrow).
|
Module Logs
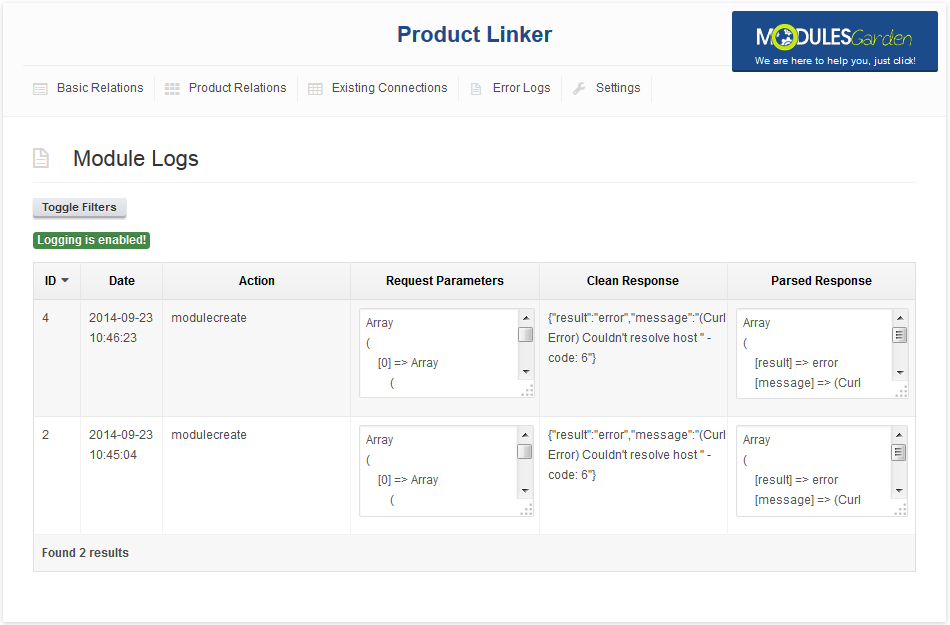
If there was any trouble with linked products, information about error will appear in 'Module Logs' tab.
Error message can be found at 'Clean Response' and 'Parsed Response' column.
To locate products for which error occurred, you can use data in 'Request Parameters' column.
For example, '[accountid]' and '[domain]' should be enough to quickly localize products.
Note: Module also checks if module log is turn on and provides link to it.
|
You can look for product with details you found in previous step, but way quicker way is to use a link.
All you have to do is enter value of '[accountid]' in place of account_id in link below.
your_whmcs/admin/clientsservices.php?id=account_id
To confirm if you are looking at right product, check if domain in product matches domain you found in error log.
|
Examplary Connections
At 'Examplary Connections' we will show you how to set up relations between specific products.
One of the many possibilities is connecting cPanel Manage2 For WHMCS, DirectAdmin Licenses For WHMCS and Parallels Key Administrator For WHMCS with other products.
This will allow you to automatically provision ready to use licenses for clients once they order a product of your choice, e.g. a VPS server. This is a great convenience!
Note: Before following any of examplary configurations below, make sure that both products you will be using in the configuration are set up correctly.
Additionally, product linked to main product should be set to hidden and free. You will set his price at product addon.
|
cPanel Extended + cPanel Manage2
In these steps we will show you linking cPanel Manage2 to cPanel Extended through product addon.
Note: You can also link them using configurable options.
1. Start from creating 'IP' custom field at main product visible on order form.
To do so, go to 'Setup' → 'Products/Services' → 'Products/Services' and edit your cPanel Extended product.
|
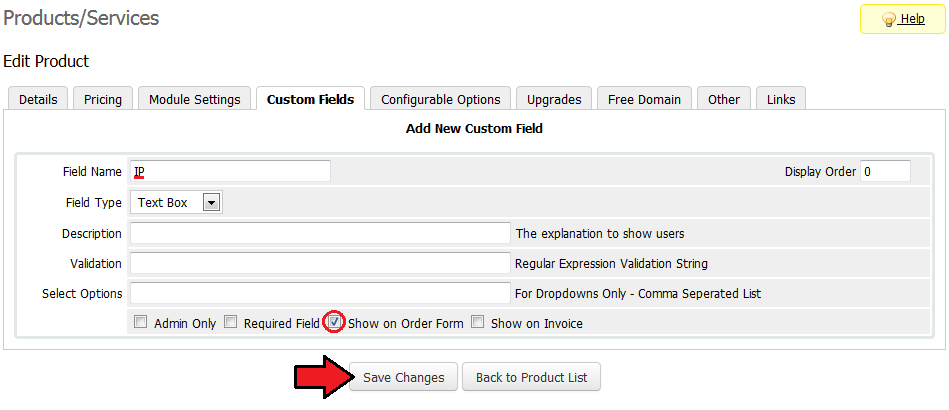
2. Open 'Custom Fields' tab, enter 'IP' into 'Field Name' and mark 'Show on Order Form' checkbox.
Confirm changes through pressing 'Save Changes' , you successfully created 'IP' custom field.
|
3. Afterwards, it is time to create product addon which will trigger relation.
Go to 'Setup' → 'Products/Services' → 'Products Addons' and press 'Add New Addon' .
|
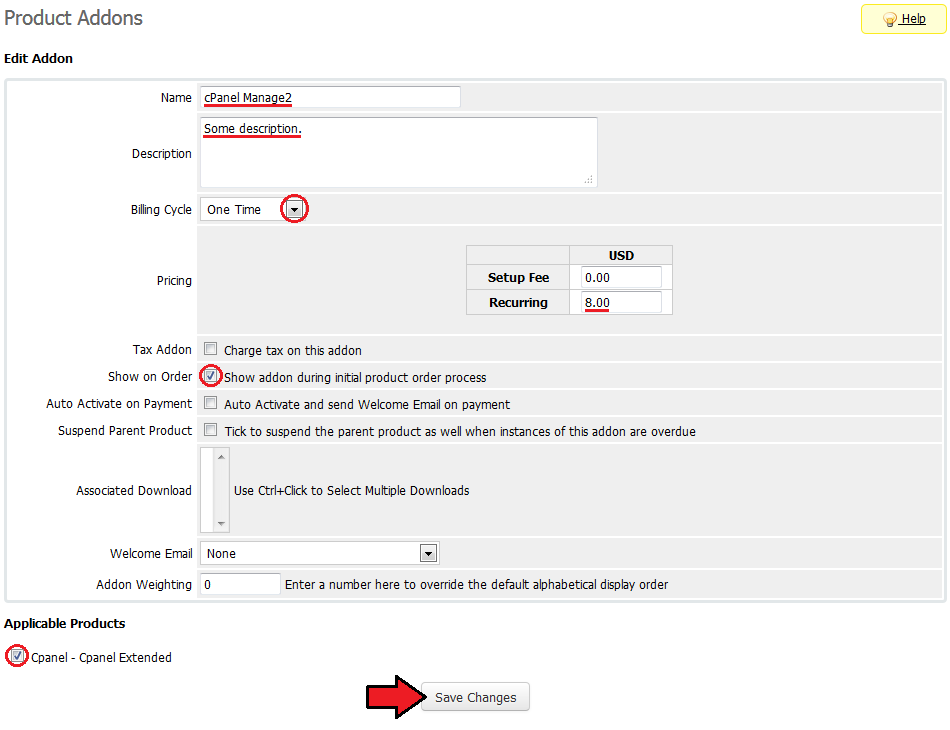
4. Enter addon name, description and recurring price.
Choose billing cycle from 'Billing Cycle' dropdown menu.
It is adviced to set up same billing cycle as in the main product.
You also have to mark 'Show on Order' checkbox and checkbox next to main product. In this example it will be 'Cpanel - cPanel Extended' .
Next, press 'Save Changes' .
|
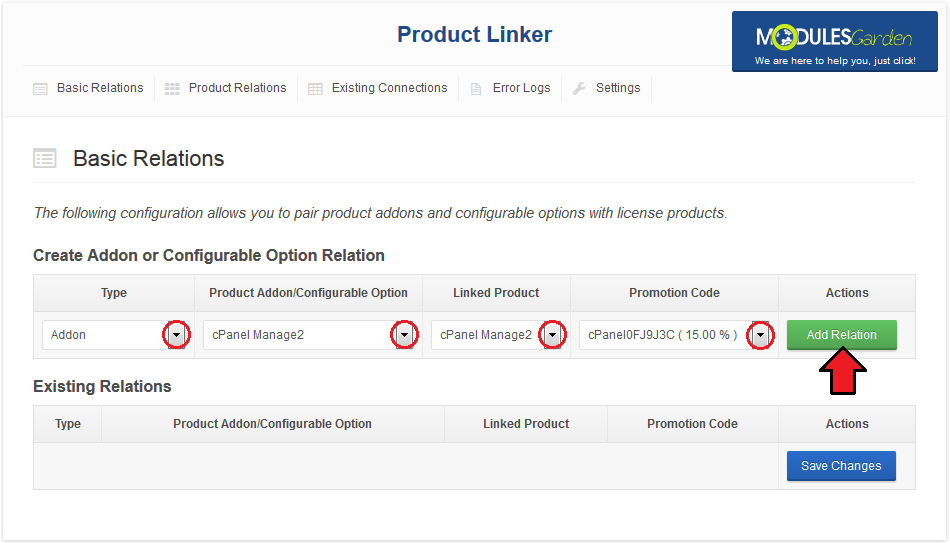
| 5. Now, create relation at your 'Product Linker' → 'Relation Management' .
|
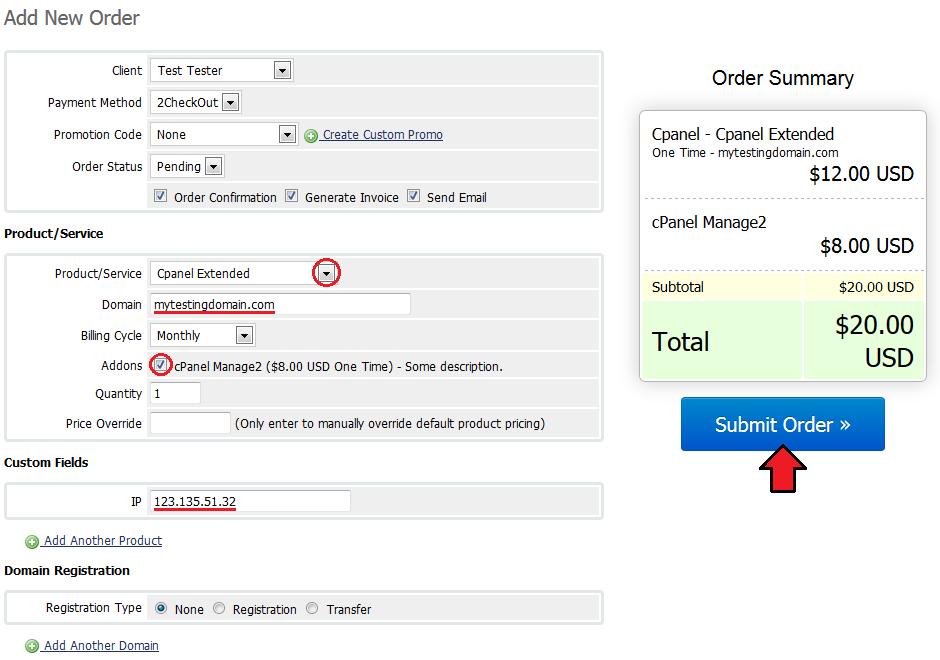
To check if relation works as it should, place an order from the admin area for main product with addon triggering relation.
Do not forget to type domain and IP address. Afterwards, press 'Submit Order' .
|
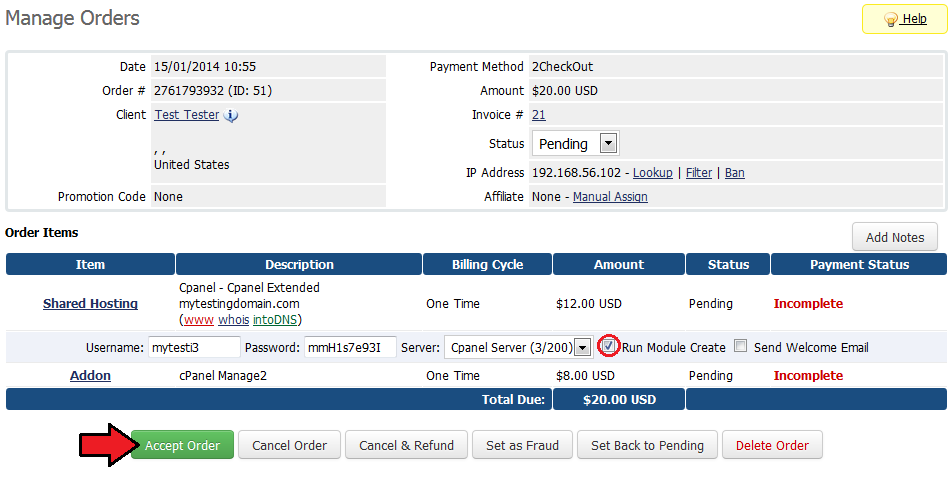
| Select 'Run Module Create' and press 'Accept Order' .
|
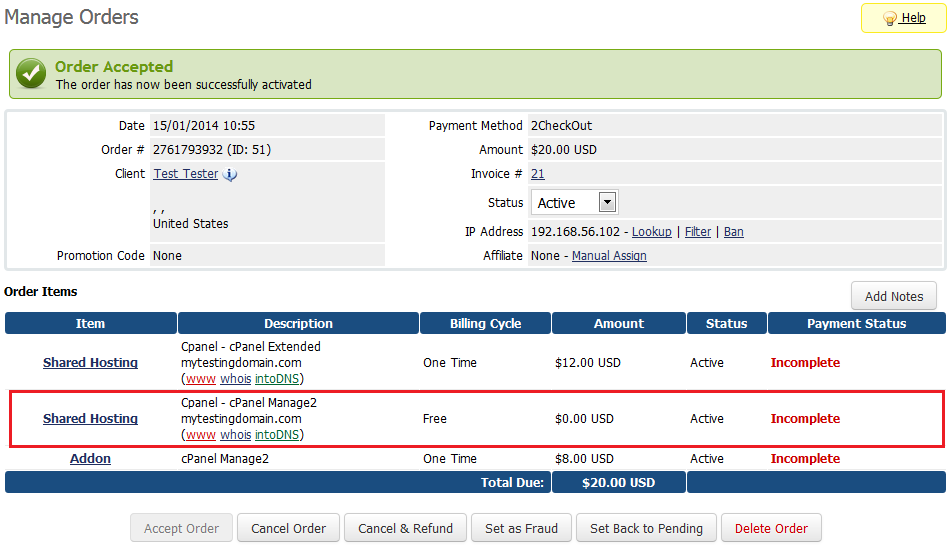
| If new entry appeared as the one marked on the following screen, you have successfully configured both products and linked them through the addon.
|
DirectAdmin Extended + DirectAdmin Licenses
In these steps we will show you linking DirectAdmin Licenses to DirectAdmin Extended through product addon.
Note: You can also link them using configurable options.
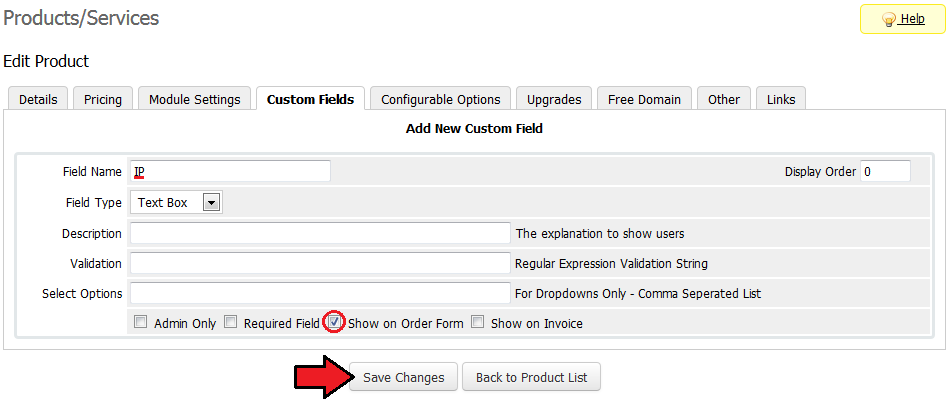
1. Start from creating 'IP' custom field at main product visible on order form.
To do so, go to 'Setup' → 'Products/Services' → 'Products/Services' and edit your DirectAdmin Extended product.
|
2. Open 'Custom Fields' tab, enter 'IP' into 'Field Name' and mark 'Show on Order Form' checkbox.
Confirm changes through pressing 'Save Changes' , you successfully created 'IP' custom field.
|
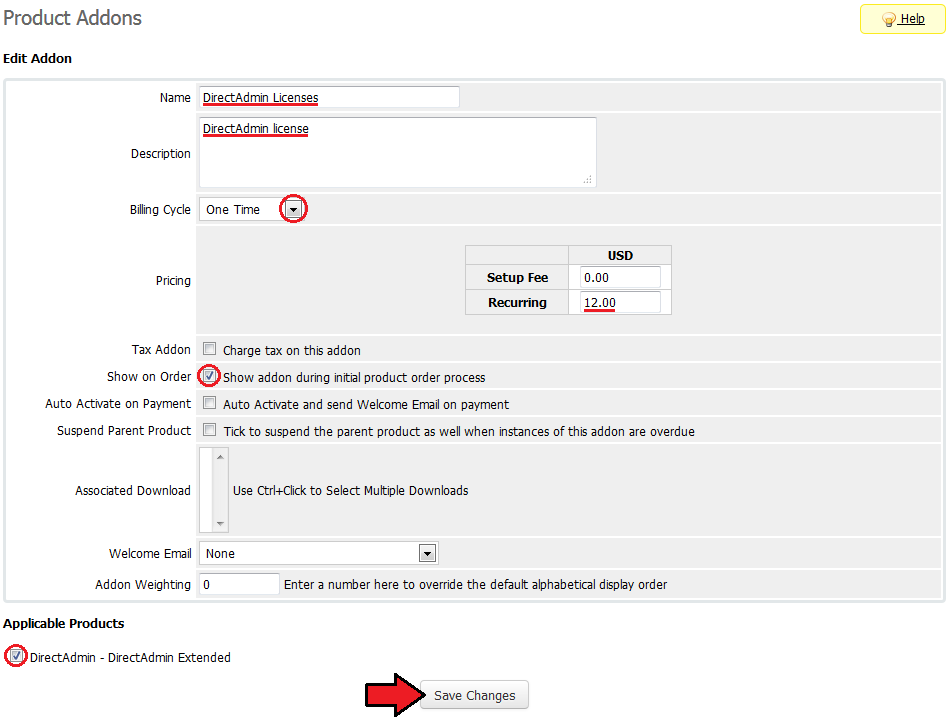
3. Afterwards, it is time to create product addon which will trigger relation.
Go to 'Setup' → 'Products/Services' → 'Products Addons' and press 'Add New Addon' .
|
4. Enter addon name, description and recurring price.
Choose billing cycle from 'Billing Cycle' dropdown menu.
It is adviced to set up same billing cycle as in the main product.
You also have to mark 'Show on Order' checkbox and checkbox next to main product. In this example it will be 'DirectAdmin - DirectAdmin Extended' .
Next, press 'Save Changes' .
|
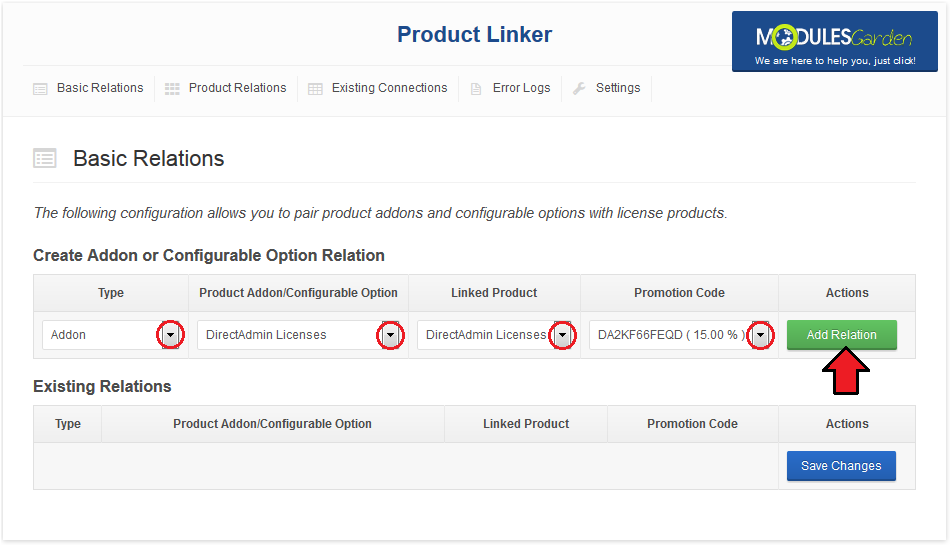
| 5. Now, create relation at your 'Product Linker' → 'Relation Management' .
|
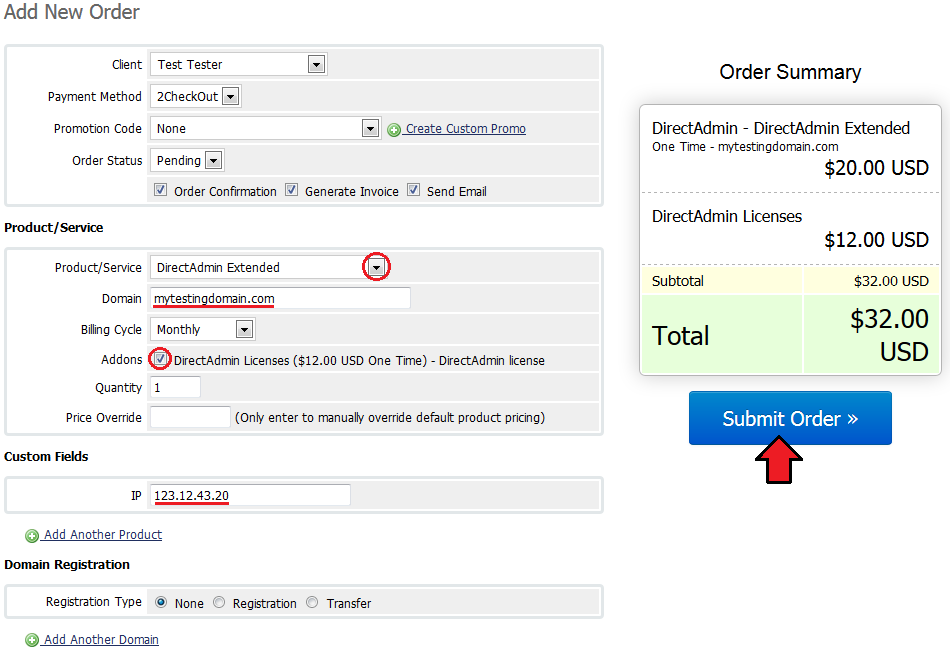
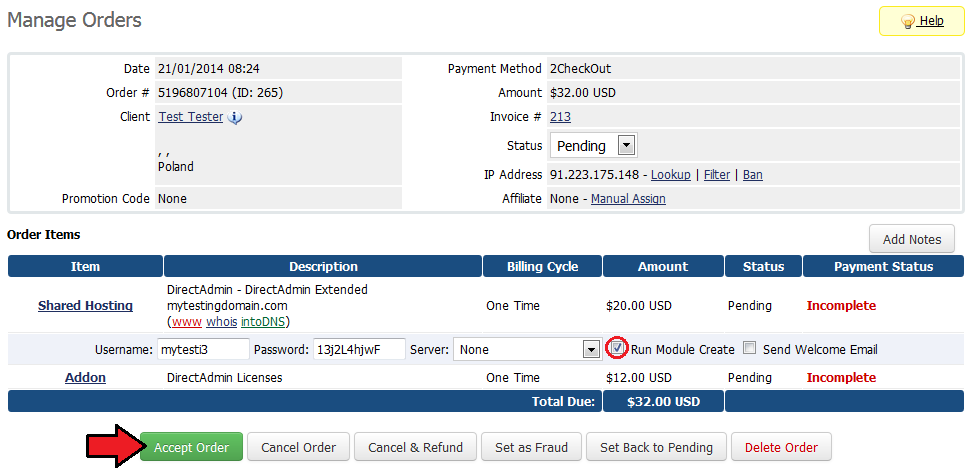
To check if relation works as it should, place an order from the admin area for main product with addon triggering relation.
Do not forget to type domain and IP address. Afterwards, press 'Submit Order' .
|
| Select 'Run Module Create' and press 'Accept Order' .
|
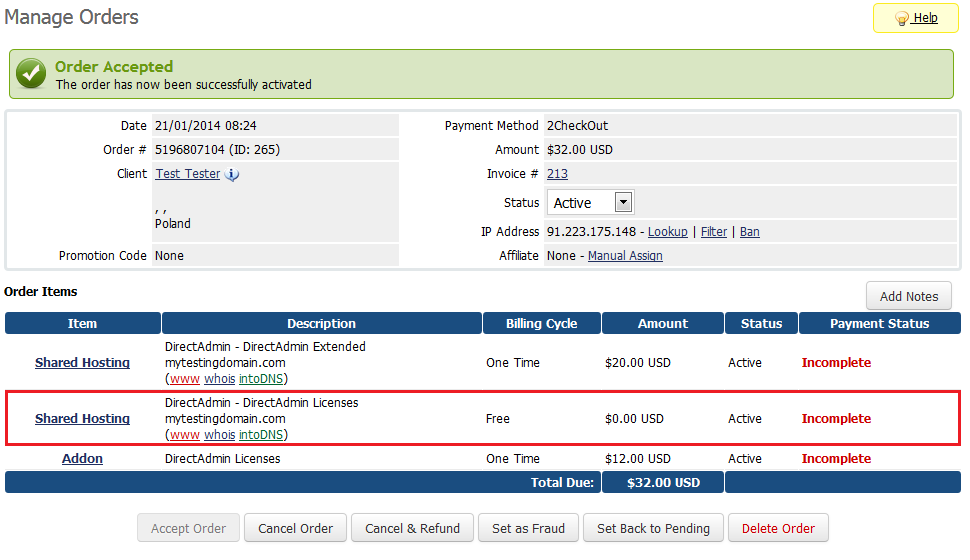
| If new entry appeared as the one marked on the following screen, you have successfully configured both products and linked them through the addon.
|
Parallels Cloud Server + Parallels Key Administrator
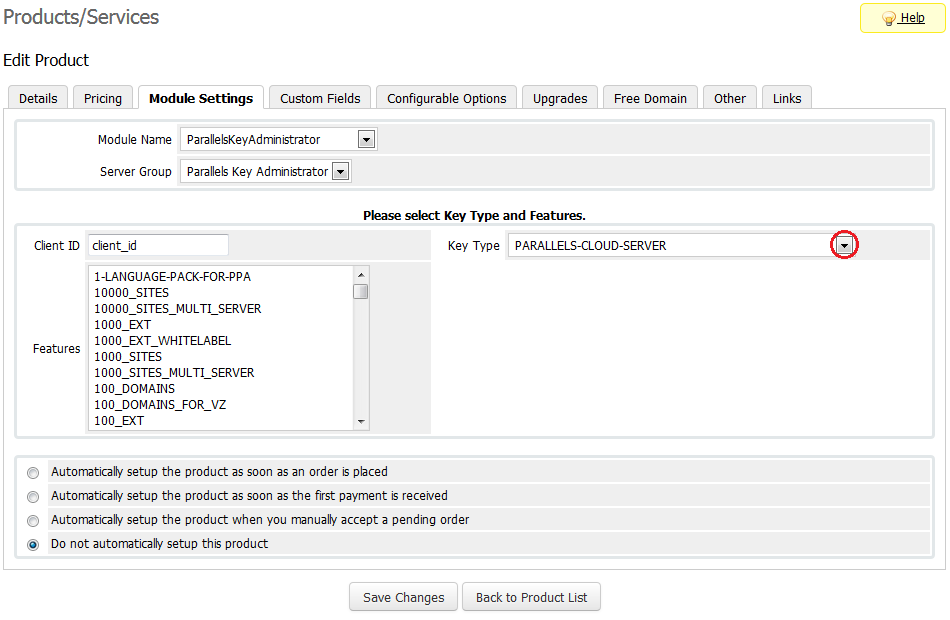
In these steps we will show you linking Parallels Key Administrator to Parallels Cloud Server through product addon.
It is required to set key type in your Parallels Key Administrator to 'PARALLELS-CLOUD-SERVER' .
Only this way linked product will create license for Parallels Cloud Server product.
Note 1: You can also link these products using configurable options.
Note 2: In order to create license successfully, you also have to select feature.
|
1. Start from creating 'IP' custom field at main product visible on order form.
To do so, go to 'Setup' → 'Products/Services' → 'Products/Services' and edit your Parallels Cloud Server product.
|
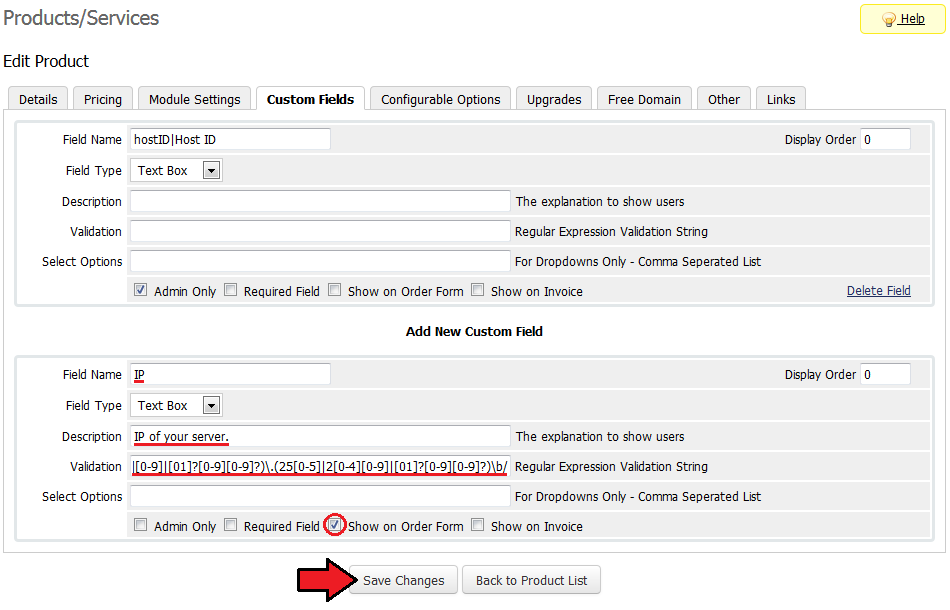
2. Open 'Custom Fields' tab, enter 'IP' into 'Field Name' and mark 'Show on Order Form' checkbox.
Additionally, you can enter description of this custom field and set up this field validation (it is one line validation, do not split it into two line):
/\b(25[0-5]|2[0-4][0-9]|[01]?[0-9][0-9]?)\.(25[0-5]|2[0-4][0-9]|[01]?[0-9][0-9]?)

\.(25[0-5]|2[0-4][0-9]|[01]?[0-9][0-9]?)\.(25[0-5]|2[0-4][0-9]|[01]?[0-9][0-9]?)\b/
Confirm changes through pressing 'Save Changes' , you successfully created 'IP' custom field.
|
3. Afterwards, it is time to create product addon which will trigger relation.
Go to 'Setup' → 'Products/Services' → 'Products Addons' and press 'Add New Addon' .
|
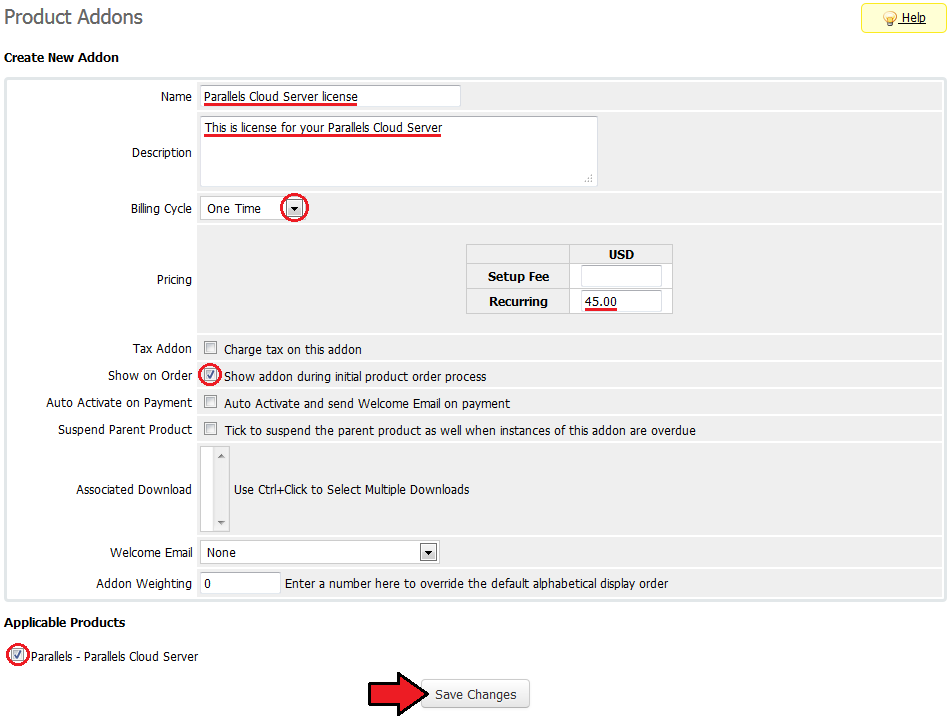
4. Enter addon name, description and recurring price.
Choose billing cycle from 'Billing Cycle' dropdown menu. It is adviced to set up same billing cycle as in the main product.
You also have to mark 'Show on Order' checkbox and checkbox next to main product. In this example it will be 'Parallels - Parallels Cloud Server' .
Next, press 'Save Changes' .
|
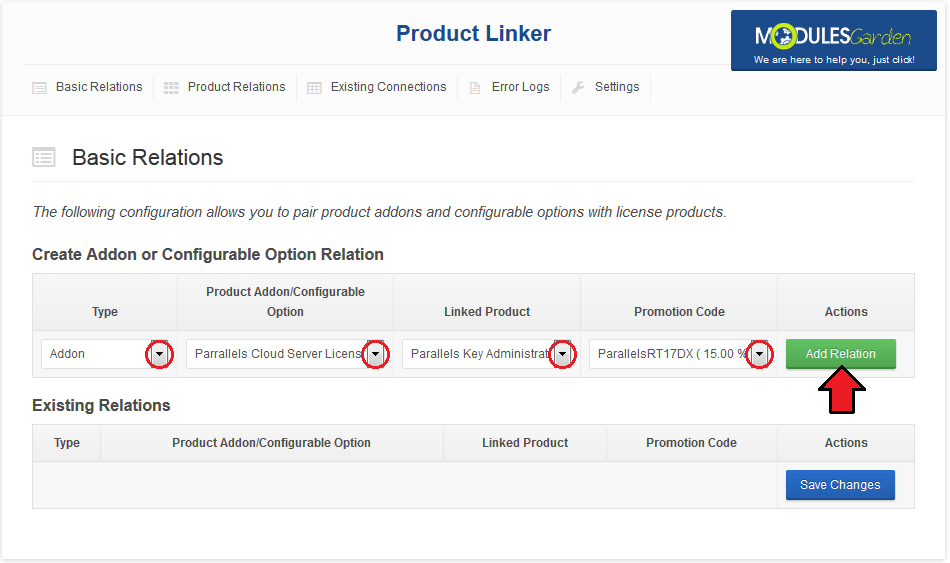
| 5. Now, create relation at your 'Product Linker' → 'Relation Management' .
|
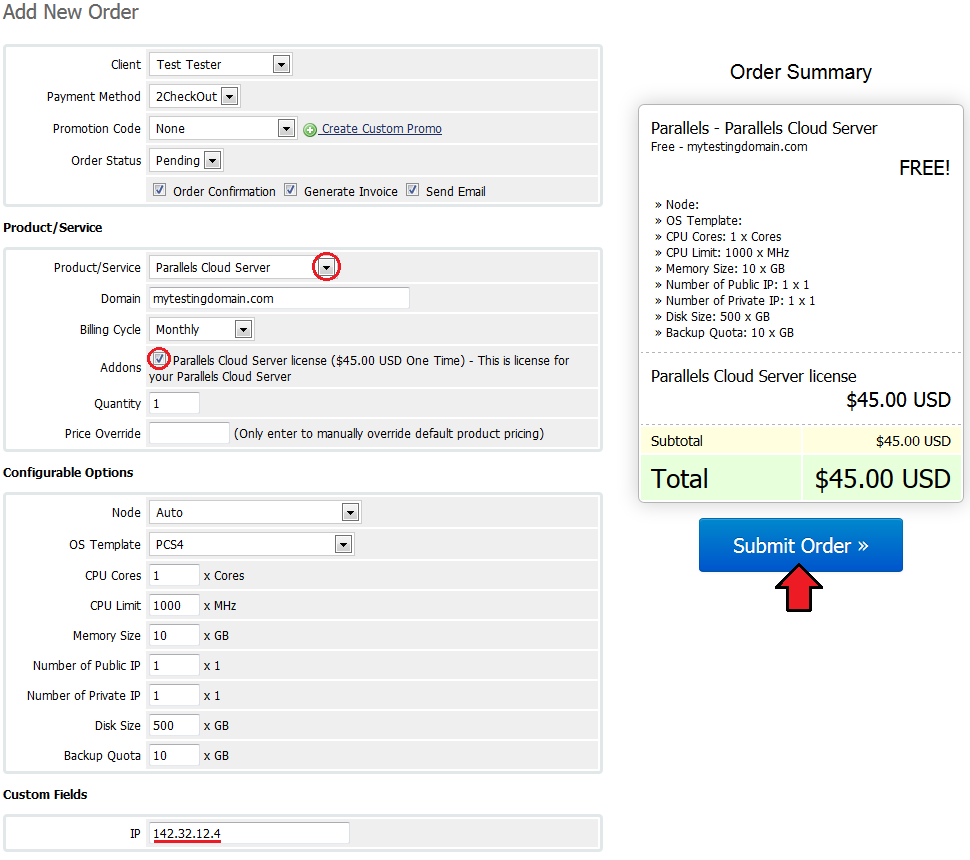
To check if relation works as it should, place an order from the admin area for main product with addon triggering relation.
Do not forget to type IP address. Afterwards, press 'Submit Order' .
|
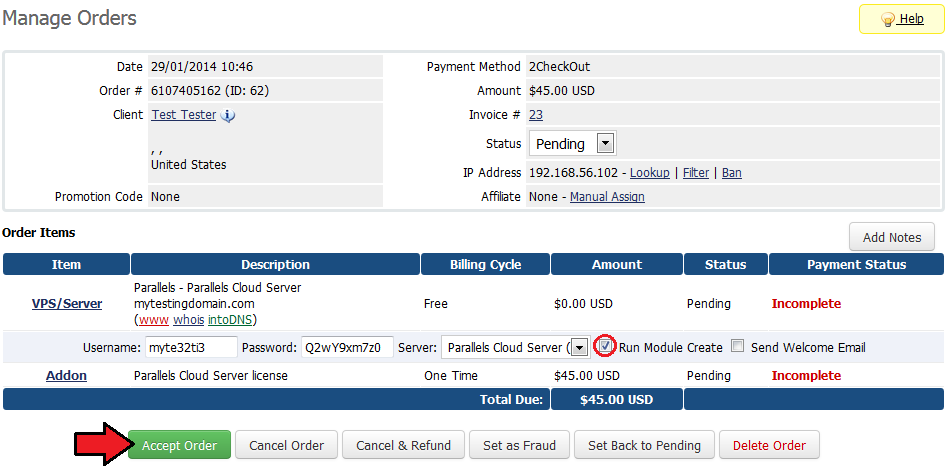
| Select 'Run Module Create' and press 'Accept Order' .
|
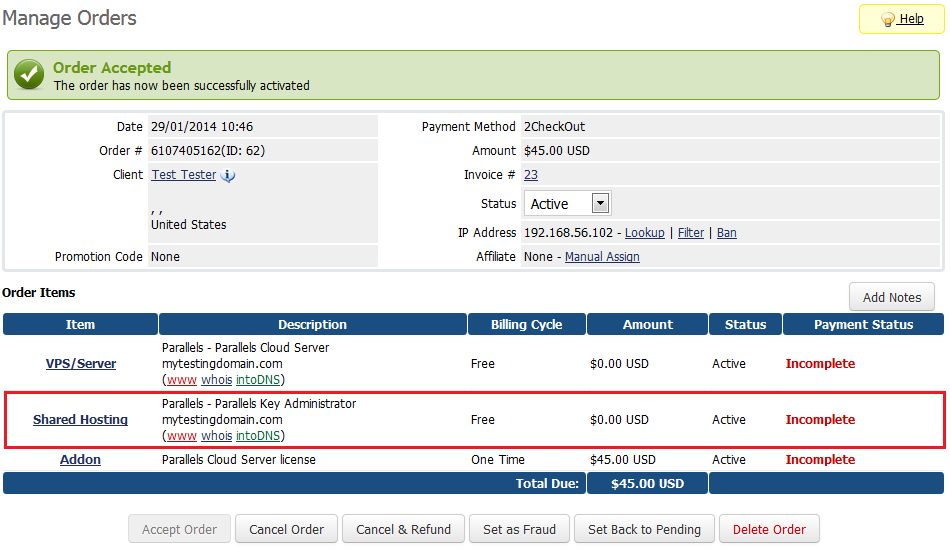
| If new entry appeared as the one marked on the following screen, you have successfully configured both products and linked them through the addon.
|
Tips
| 1. If your client orders a product with settings triggering two relations to the same product, only one product will be created.
|
2. If your client orders product configurable options upgrade/downgrade, old linked product bound by previous configurable option will stay active.
You need to remove the link between old linked product and main product in addon, and terminate old linked product manually.
|
Common Problems
| 1. When you have problems with connection, check whether your SELinux or firewall is not blocking ports.
|
