Plesk Extended For WHMCS
From ModulesGarden Wiki
(Difference between revisions)
|
|
| Line 7: |
Line 7: |
| | =About [https://www.modulesgarden.com/products/whmcs/plesk-extended Plesk Extended For WHMCS]= | | =About [https://www.modulesgarden.com/products/whmcs/plesk-extended Plesk Extended For WHMCS]= |
| | {| | | {| |
| − | |style="padding: 10px 0px 10px 0px;"|'''Plesk Extended For WHMCS''' is a module which allows your customers to manage their web hosting accounts directly from the client area.<br /> | + | |style="padding: 10px 0px 10px 0px;"|'''Plesk Extended For WHMCS''' is a module which empowers your customers to manage their web hosting accounts directly from the client area.<br /> |
| − | Our product increases your comfort of management and simplifies web hosting account handling for your customers.<br />
| + | They will be able to manage their FTP accounts, backups, databases, mailboxes, spam filters, DNS settings and other key aspects in a fully remote manner.<br /> |
| − | Let your web hosting users manage their Plesk accounts in your own WHMCS. Achieve all of these and set it up within a few minutes time!
| + | The module also offers the choice of three Auto Installers - Softaculous, Installatron and Plesk Application to allow clients add their favorite applications in just a few clicks.<br /> |
| | |} | | |} |
| | <!-- fixed --> | | <!-- fixed --> |
Revision as of 13:57, 21 June 2018
Article update is ongoing on this page, watch out for broken links, unclear descriptions and images!
We are sorry for the inconvenience caused.
Plesk Extended For WHMCS is a module which empowers your customers to manage their web hosting accounts directly from the client area.
They will be able to manage their FTP accounts, backups, databases, mailboxes, spam filters, DNS settings and other key aspects in a fully remote manner.
The module also offers the choice of three Auto Installers - Softaculous, Installatron and Plesk Application to allow clients add their favorite applications in just a few clicks.
|
| ✔ Create/Suspend/Unsuspend/Terminate Account
|
| ✔ Change Package And Password Of Account
|
| ✔ Configure Client Area Features Per Product
|
| ✔ Log In To Plesk Administrator Panel On Click
|
| ✔ Define Service Plan Name Per Product
|
| ✔ Define Reseller Plan Name Per Product
|
| ✔ Enable And Configure Application Auto Installer To Use Per Product:
|
| ✔ Default Plesk App Installer
|
| ✔ View All Plesk Extended Products In One Place
|
| ✔ View All Plesk Extended Server Configurations In One Place
|
| ✔ Toggle 'Power User' Plesk Panel View
|
| ✔ Define Custom URL Of Panel And Webmail
|
| ✔ Remote Access And Management Of:
|
| ✔ Databases - MySQL And PostgreSQL Databases Support
|
| ✔ Change Account Password
|
- Application Auto Installer Features:
| ✔ Auto Install Chosen Application After Account Creation
|
| ✔ Auto Install Application Chosen By Client During Order - With Configurable Options
|
| ✔ Allow Custom Settings Of Auto Installed Application - With Custom Fields
|
| ✔ Install New Applications With Installatron, Softaculous Or Default Plesk App Installer
|
| ✔ View And Manage Installed Applications
|
| ✔ Backup Installed Applications
|
| ✔ Perform Auto Backups Upon Application Updates By Installatron
|
| ✔ View And Manage Created Backups
|
| ✔ Restore Applications From Backups
|
| ✔ Delete Applications Along With Their Backups
|
| ✔ Utilizes Ajax Loaded Pages
|
| ✔ Supports SSO Into Panel And Webmail
|
| ✔ Integrated With Advanced Billing For WHMCS - Actual Server Resource Usage Billing (read more)
|
| ✔ Integrated With Server Allocator For WHMCS - Automatic Assignment Of Specified Servers To Products (read more)
|
| ✔ Supports Windows & Linux
|
| ✔ Supports Plesk 9 up To Plesk Onyx 17.8
|
| ✔ Supports PHP 5.6 Up To PHP 7.2
|
| ✔ Supports WHMCS Template Six
|
| ✔ Supports WHMCS V7.2 And Later
|
Installation and Configuration
Installation
This tutorial will show you how to successfully install and configure Plesk Extended For WHMCS.
We will guide you step by step through the whole installation and configuration process.
|
| 1. Log in to our client area and download the module.
|
2. In the downloaded file you will find two packages that support different PHP versions.
As presented on the screen below, the first one is dedicated to PHP 5.6 up to PHP 7.0, while the second one is aimed at PHP 7.1 up to PHP 7.2.
It does not apply to open source versions.
Note: You can check the current PHP version in your WHMCS. To do so, proceed to 'Utilities' › 'System' › 'PHP Info'.
|
3. Extract the downloaded file and choose the one with the right PHP version. Upload and extract the PHP file into the main WHMCS directory.
The content of PHP version files should look like this.
|
4. When you install Plesk Extended For WHMCS for the first time you have to rename 'license_RENAME.php' file.
File is located in 'modules/servers/pleskExtended/license_RENAME.php'. Rename it from 'license_RENAME.php' to 'license.php'.
|
5. In order to configure your license key you have to edit a previously renamed 'license.php' file.
Enter your license key between quotation marks as presented on the following screen. You can find your license key in our client area → 'My Products'.
|
6. In the next step, set up the 'storage' folder as recursively writable.
This folder is available at two locations:
- your_whmcs/modules/addons/PleskExtended/
- your_whmcs/modules/servers/PleskExtended/
|
Activation of Addon
7. Now you have to activate the module in your WHMCS system.
Login to your WHMCS admin area. Click 'Setup' then choose 'Addon Modules'.
Afterward, find 'Plesk Extended Center' and press the 'Activate' button.
|
8. In the next step you need to permit access to this module.
To do so, press 'Configure'. Afterward, select required administrator roles and press 'Save Changes' .
|
9. You have just successfully installed Plesk Extended For WHMCS!
|
Configuration of Server
10. Now, we will show you how to configure a new server.
To do so, log in into your WHMCS. Press 'Setup' → 'Products/Services' → 'Servers'. Afterward, press 'Add New Server'.
|
11. Next, enter your server name, hostname/IP address, username and password. Choose 'PleskExtended' from the dropdown menu and press 'Save Changes'.
Here you can also provide other server details like nameservers or maximum number of accounts. Finally press 'Test Connection' to check if the provided credentials are valid.
Important: Due to changes in the original WHMCS Plesk module, it may be required to additionally enter the IP address into the Hostname field even if you have already provided it in the below IP Address field.
Otherwise, the "Could not resolve host" error may occur.
|
12. After you configure your server correctly, you will see the following screen.
Now, you need to create a new group for your server. For that purpose press 'Create New Group'.
|
| 13. Enter a name, click on your previously created server, press 'Add' then 'Save Changes'.
|
Configuration of Product
14. In order to create and configure the product, click on 'Setup' → 'Products/Services' → 'Products/Services'.
If you do not have a product group, 'Create a New Group'.
|
| 15. Enter product group name and press 'Save Changes'.
|
16. When you have a product group, you can create your product and assign it to Plesk Extended.
To create a product press 'Create a New Product'.
|
17. Afterward, choose your product type and a product group from the dropdown menus, enter your product name and press 'Save Changes'.
Please note that you may select only between 'Hosting Account' and 'Reseller Account' when choosing the product type as only those are supported by Plesk module.
|
18. Now, move to the 'Module Settings' section, choose both 'PleskExtended' and your previously created server group from the dropdown menus.
Remember to add your 'Client Template Name' or 'Service Plan Name'. Plesk Extended will not work properly without a specified plan name.
Decide on the way Plesk will assign IP addresses in the accounts creation process, using the 'IP Address Types' dropdown list.
Here you may also enable the 'Power User' view. Do not forget to 'Save Changes' .
|
| 19. Good job! You have just correctly created and customized your new product which will appear in Plesk Extended Center admin area.
|
Configuration of Addon
20. You have just correctly created and customized a new product.
Go to 'Addons' → 'Plesk Extended' in your WHMCS.
You will find there dashboard with a short guide where you will find a few steps described to start your successful work with our module.
There are also precise data on available products and servers:
- See the number of active/suspended/terminated accounts
- See the list of configured Plesk products and servers
- Go directly to the product and server configuration
- Log in to Plesk panel from server configuration with one click
- Easily upgrade the already configured Plesk product to Plesk Extended
|
| 21. Proceed to the 'Features' section and find the product you are interested in and press the 'Configuration' button next to it.
|
22. You should find here boxes dedicated to 'Features' and 'Applications'.
To show you an example, we will set the configuration from the beginning, without using other configuration options of the product.
Select the features you would like to activate for your customers.
|
23. Next toggle 'Install Application' that will be used to install applications by your clients.
In 'Autoinstaller Type' you are free to choose between 'Installatron' , 'Softaculus' and 'Default' autoinstallers.
|
24. You may also introduce installing one of the selected applications automatically, once an order is created.
Use 'Autoinstall On Create' switch and select the default option from the 'Apps / Configurable Options' list.
You can also choose the desired language of the applications by typing in its two-letter code in the 'Language' field. A complete list of language codes can be found here.
If the field is left blank, a default value, which is 'en' (English) will be used.
Moreover, you can permit your clients to toggle automatic backups for application updates or enable them for the first chosen application after the initial order.
Note: You can also create a configurable option with an app to be installed. You can find the instruction to do that here.
|
| 25. You are free to leave the application selection issue to your clients to be effected during ordering process by using the 'Use Configurable Options' switch and choosing the appropriate option from the list.
|
Subsequently, you will notice a download button appearing next to the dropdown list on features products list.
Its purpose is to download the available application list in a text format that can be then used for configurable options.
More information about the available configurable options and custom fields can be found here.
|
26. If you already have another product configured, you may copy its configuration.
Find the 'Copy' button on the list with products or select multiple item at once.
Then choose the product configuration whose settings you wish to copy into the selected products.
|
27. In the next step, move to 'Server Configuration' to set up a connection.
Press the ' Configuration' button next to a desired server.
|
Enter proper domains or IP addresses to allow a connection with Plesk panel and Webmail accordingly.
Do not forget to 'Save' changes once it is ready!
|
28. From now on, all your clients who ordered a previously created product will be able to manage their Plesk accounts via your WHMCS system.
Here is a view of the ordered product summary in admin area. Available actions:
- Log In To Control Panel
- Use Module Commands: 'Create', 'Suspend', 'Unsuspend', 'Terminate' the product; 'Change Package' and 'Change Password'.
|
Upgrade Plesk to Plesk Extended Product
Once you have already configured the standard Plesk products, you can easily upgrade them to the Plesk Extended products.
Note: Before you start, make sure that you have already configured the Plesk Extended server.
To start, proceed to the 'Dashboard' in the Plesk Extended addon. Next, find your standard Plesk product on the list and press the 'Upgrade Product' button.
|
| Now, select the new server group configured for the Plesk Extended module.
Note: Make sure that this server configuration is exactly the same as the standard cPanel server configuration.
Press 'Confirm' to proceed with the product upgrade. After completion, the product will switch its module settings to the ones from the Plesk Extended module and server.
|
Management
Plesk Extended allows your customers to manage their accounts via client area in your WHMCS system.
In this short guide we will present you the management possibilities of our module.
|
Client Area
Addon Domains
Addon domains allow you to link the domain to a subdirectory of your account.
You can view and manage addon domains, edit document root and make redirections.
Note: Make sure this feature is allowed for your account before using
|
Press the 'Create Addon Domain' button and enter the desired details.
Please note that an FTP account will not be automatically created with the domain.
|
Applications
Install your favorite applications in a few seconds without even accessing Plesk.
Use Plesk Extended For WHMCS to:
- Install applications
- Edit/delete applications
- Create and restore backups
To start, simply proceed to 'Applications' , and then find the 'Install New' section.
|
Afterwards, you will see an extensive menu with application categories.
For presentation purposes we will install 'PrestaShop' located in the 'E-Commerce And Business' category. Find 'PrestaShop' and click on it.
|
| Now, you have to enter necessary installation details and then press 'Install Application' to follow. Wait for the 'Success' notification.
|
View the list of your installed applications by clicking on the 'Installed Applications' tab and manage the application.
Here you will the name of the application, its path, size and available actions:
- Create backup
- Delete application
|
Application Backups
| You can also create a backup of your installation. To do so, simply press the 'Create Backup' button next to the installed application.
|
| Confirm the action and backup generation will start immediately.
|
After a moment you should receive the 'The backup has been created successfully' message confirming that the operation has been performed successfully.
Once you have created a backup of your application, proceed to the 'Backups' tab.
There you will find a lit of created application backups along with the date when they were created.
Use action buttons marked on the screen to restore and delete a chosen backup.
|
If you use the Installatron plugin, you can also let your customers create automatic backups for application updates.
To do this, go to 'Addons' → 'Plesk Extended' → 'Features' → 'Configuration' and enable Auto Update Backups.
|
| Then, when a client installs a new application, it will be possible to toggle the option for automatic update backups and restore them if the application update fails.
|
Backups
| All available backups are displayed under the 'Backups' section. To add a new one press 'Create Backup' button
|
| Next add prefix and backup description, choose split size, backup content type and decide whether to make backup 'locally' on Plesk server or on your 'remote' FTP storage.
|
The backup creation might take a while. When ready it can be downloaded by client or deleted from the server.
Important: For a large backup files we strongly recommend to increase the 'max_execution_time' setting in your server's 'php.ini' configuration.
|
| If you want to use the 'remote' backup type you will also need to provide the 'FTP Storage Settings' .
|
Provide your FTP server IP address or hostname, access credentials, mode, and the directory path to which the backup will be uploaded.
Then, the next time you creating the backup, select the remote type to upload it directly to your FTP server.
|
Databases
| Owing to 'Databases' management you can create/delete new databases and users. Press 'Create Database' to add a new one.
|
To create a new database, type in its name, into the appropriate field and select its type.
Optionally, you can also create a user directly assigned to the database.
Note: that only 'MySQL' and 'PostgreSQL' databases can currently be supported and must be available in your Plesk panel firts.
|
| You can also delete already assigned users as well ass a add new ones to particular databases by choosing 'Create Database User' in the 'Users' tab.
|
Domain Aliases
Here you can add and manage your domain aliases.
This allows you to read content of one domain from another domain name.
To create a new redirection press 'Create Domain Alias' .
Note: that domains should be registered with a valid registrar and point to your DNS server.
|
| Next provide your alias domain, chose domain redirections as well as toggle the remaining options.
|
| After alias creation, you can also rename it, change its settings or delete it.
|
DNS Settings
| Here you can add and manage DNS records to define the structure and content of the chosen domain name space.
|
| Add records by selecting the type and providing their hostname and value.
|
Email Accounts
| View and edit email accounts that are associated with your domains. Use filter to find required email addresses, preview its selected quota or delete manage the account.
|
| Press 'Add Email Account' and select to which domain it shall be added, type or generate password and define limited or unlimited quota.
|
Email Forwarders
| In this section you can set up email forwarders and choose from several destination options to adjust mail forwarding perfectly to your needs.
|
| Press the 'Create Email Forwarder' button, specify the forwarded email and define the destination address.
|
FTP Access
In the very first section you are given the possibility to manage your FTP access or create new FTP accounts.
FTP access management is dependent on the system your Plesk panel is set up on.
|
Add and configure FTP Accounts in the easiest way possible.
Just type in your login on a domain, provide or generate a secure password, define directory access and declare available quota.
Note: if you have some other addon domains, creating a FTP account on the main domain will also add it to these other domains.
|
Spam Filter
| The 'Spam Filter' powered by SpamAssassin is designed to identify spam messages among emails sent to mailboxes hosted on your Plesk server.
|
Enable and configure the filter as desired for the selected mailbox.
You can also adjust sensitivity - by default it might be set to 7 so all messages with that score or more points are classified as spam.
If mailboxes receive lots of spam messages with the current setting, to make the filter more sensitive, try setting a lesser value, for example, 6.
If they are missing emails because spam filter thinks they are junk, try reducing the filter's sensitivity by setting a higher value, for example, 8.
You can also add email messages to white list that won't be checked by the spam filter or black list that from coming from senders will always be blocked.
Simply type domain names, one domain name per line. Addresses can also contain "*" and "?" wildcard characters, for example, *@domain.com, user?@*.com.
|
SSL Certificates
| This section will allow you to generate or paste ready SSL certificates and private keys.
|
Choose 'Generate Certificate' fill out required fields. You can also decide whether you want the private key to be automatically generated or you want to provide your own key.
Once ready, you will see it on the list of ready certificates.
Note: the current Plesk API does not give the possibility to preview the automatically generated private key. To do this, you need to login directly into the Plesk panel.
|
If you already have certificate you can provide it by choosing 'Upload Certificate' form the more actions menu.
Next provide the certificate and domain name, and paste the content of yours 'Private Key (*.key)' , 'Certificate (*.crt)' and 'CA Certificate (*-ca.crt)' files.
Once ready, you should see provided certificate on the list.
|
Subdomains
| Create subdomains for different parts of your website by pressing the 'Create Subdomain' button.
|
| Choose the domain for your available subdomain from the list and provide document root.
|
Web Users
| Add and manage the list of web users that have personal pages on your website.
|
| Provide login name and its password and and decide whether to provide support for PHP and FastCGI.
|
One Click Login
Log In To Panel
With a single click on the button 'Log In To Panel' you can be redirected to your Plesk Panel account.
Note that you must have a proper IP address or domain entered in the admin area panel to use this button.
|
Log In To Webmail
You can quickly access your webmail through pressing the 'Log In To Webmail' button.
Note that you must have a proper IP address or domain entered in the admin area panel to use this button.
|
Applications Configuration
Configurable Options For Application Auto Install
Let your clients decide which application they would like to install on their new Plesk account.
While placing an order your customer chooses an application and along with account creation this very application will be installed on the account.
There is nothing else you need to do. Application will be instantly ready to use!
To set up this feature, come back to your product's configuration, find the 'Applications' section, activate 'Install Applications' , choose 'Autoinstaller Type' and activate 'Autoinstall On Create' with 'Use Configurable Options' .
|
| Next go back to te features lists and click on the download icon to view the list of applications.
|
These are the names of values that you can enter in configurable options' fields, we will configure them in the next step.
For example, if you would like to set up 'Drupal 8.3.2' in your applications list, you will need to enter 'Drupal' or 'Drupal|Drupal 8.3.2' into the value field.
1. If you have made a mistake with the application name, the auto installer will not work.
2. In the current version for variable you have to enter only application name (without application version number) and only the latest version available on the application list will be installed.
Now, when you know what values should be entered in configurable options, we can proceed further.
|
| Go to your 'WHMCS' → 'Setup' → 'Products/Services' → 'Configurable Options' and press 'Create a New Group' .
|
| Enter 'Group Name' of your choice, select product you want to assign configurable options to, then press 'Save Changes' .
|
| Now click on 'Add New Configurable Option' .
|
This moment is very important. As 'Option Name' , you have to enter 'Installation App' . Otherwise the entire functionality will not work.
Here you can set up as many applications as you want. To do so, enter a value name e.g. 'Wordress |WordPress 4.7.5' and press 'Save Changes' .
Repeat this as many times as you need and do not forget to set 'Option Type' to 'Dropdown' .
Remember that you cannot type the application version number as variable! Only the latest version available will be installed.
|
As you can see on the following screen we decided to offer our customers 5 applications.
When you finish adding applications, press 'Save Changes' and 'Close Window'.
|
From the module's version 3.1.0 you can also create a new configurable option Auto Backup On Update with the 'Yes/No' option type.
This option is used to enable the creation of auto update backups for a firstly chosen application after the initial order in WHMCS.
Please note that this option works only with the Installatron plugin and Auto Update Backup Enabled By Default On Order setting in the module addon features has to be disabled to make this configurable option work properly.
|
Afterward, come back to 'Plesk Extended Features' → 'Configuration' → 'Applications' , activate 'Use Configurable Options' and choose 'Apps / Configurable Options' from the dropdown menu.
Please note that you can have more configurable options groups. Press 'Save' and that's it. You have just successfully assigned configurable options to the application autoinstall.
|
Let's check out what your customers are going to see in their client area while placing the order.
As you can see, a dropdown menu with the previously configured applications has shown up.
|
Assignment of Custom Fields To Application Autoinstall
Now, when you know how to allow your customers to choose which application they would like to install on their account, we can proceed one step further.
Until that moment applications had been installed with use of default details like e.g. directory names or database name.
Those details are sent to each customer's email.
Allowing your customers to choose their own installation paths, usernames and others is a safer and recommended solution.. Let's see how can we do that.
In the beginning, go to 'Product/Services' , find your product using 'Plesk Extended' module and enter 'Custom Fields' category.
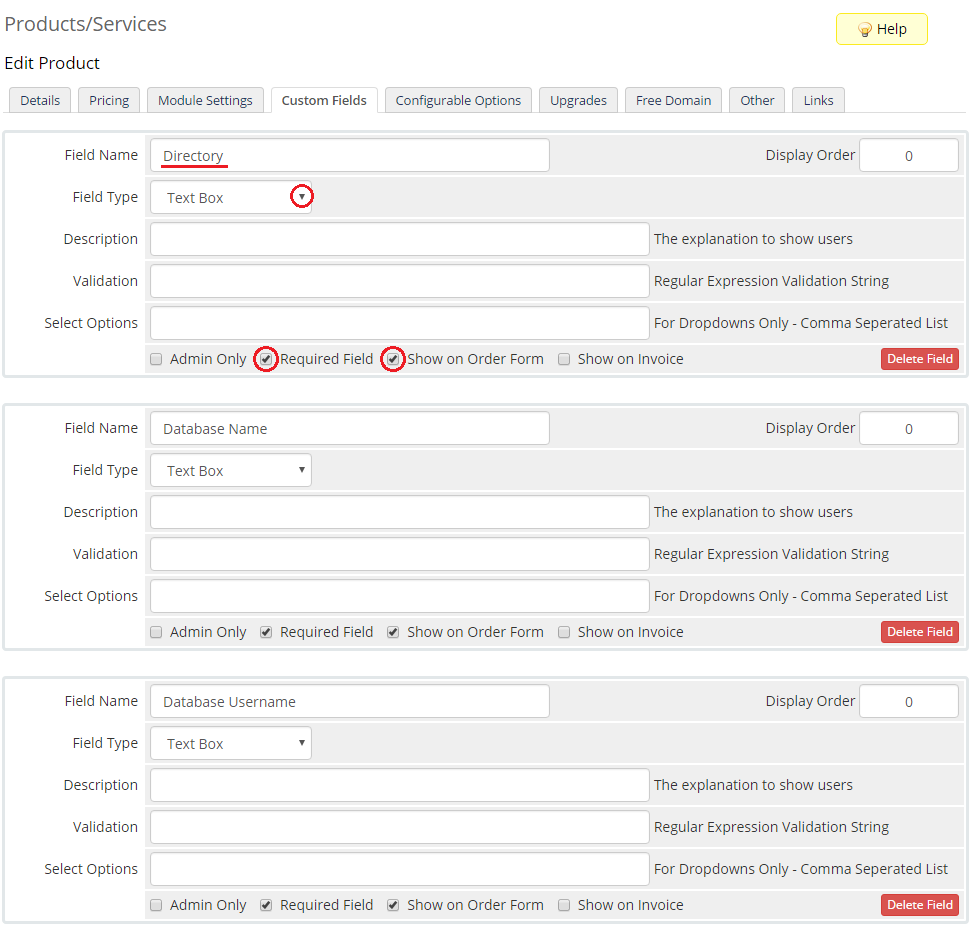
You will need to add 12 custom fields, the first 8 are:
- Directory
- Database Name
- Database Username
- Database Password
- Table Prefix
- Site Name
- Site Description
- Language
Remember to set each field type as 'Text Box' , tick 'Required Field ' and 'Show on Order Form'.
Everything is shown on the screen below.
|
|
The next 3 fields are:
- Admin Username
- Admin Password
- Admin Email
Set them as 'Text Box' and tick 'Show on Order Form'.
|
| The last field is:
Set it as 'Drop Down' , enter 'Yes, No' into 'Select Options' , tick 'Required Field ' and 'Show on Order Form'.
|
Once you add all the custom fields they will appear while placing an order.
Voila! Now your customers can personalize each application without the necessity of installing it later.
|
Custom Installatron Application Language
We will show you how to quickly set a custom language for Installatron web applications.
For this purpose you need to add a new custom field for your product. The field should be called 'Language' .
|
Afterward go to your 'Products/Services' and check whether the 'Language' field has appeared.
In order to change the default application language for a certain account enter here the appropriate value.
|
From now on the new field will be visible for your customers as well. While installing a new application they can choose a desired language by entering its value into the field.
Here you will find a complete list of language codes.
|
Management of Existing Products
You can easily use Plesk Extended module with your already configured Plesk products.
To do so change the type of servers and module names of products from 'Plesk' to 'PleskExtended'.
Additional information about how to correctly configure your servers and products can be found at points 8-16 of the 'Installation and Configuration' section.
|
Billing Management
| The module allows you to charge your customers basing on the server resources used by them.
|
| With Advanced Billing module, you can also display your customers the current server resource usage and their cost.
|
Tips
1. To set up an existing customer's account in your Plesk Extended, create a new WHMCS order with the same username, password and email address.
Then set the account status to active.
|
| 2. As this module supports templates system, any changes made in the module's templates files will be saved after the upgrade process.
|
Update Instructions
Essential guidance through the process of updating the module is offered here.
Important: If you are upgrading from Plesk Extended 2.X to 3.X module version, you have to delete the old /modules/servers/pleskExtended/ folder (started with a lower case letter) before you start using a new version.
You also need to set recursively writable permissions for storage directories in these two locations:
- your_whmcs/modules/addons/PleskExtended/
- your_whmcs/modules/servers/PleskExtended/
Then after activation of the new addon version, the all data from the old version of the addon and the products configurations will be automatically migrated to the new version.
In addition, remember to reissue your license due to a changes in the folder names.
Note: since 3.0.0 module version the cron execution is also no longer required.
Keep in mind there is a quick and easy option in our client area that will let you upgrade the license of your module to an open source version at any time - and at a lower price!
To take advantage of it, simply use the License Upgrade button located on the product's page and a discounted invoice will be generated automatically.
|
Common Problems
| 1. When you have problems with connection, check whether your SELinux or firewall does not block ports.
|
2. If you see an error as shown on the screen below, it means that you haven't provided your service plan name or reseller plan name in product's 'Module Settings'.
Once you enter the name, the problem will disappear.
|
3. If you are unable to connect with your Plesk server or client area functionalities don't work properly, then make sure that you are connecting with your server on port 8443.
Here you can find more information on how to change default port in Linux and Windows
|
4. CURL Error: [6] Could not resolve host.
Try enter your Plesk IP address into the Hostname field in the server configuration.
|
5. Unable to get the version number from the server. CURL Error: 7 - couldn't connect to host. Check server connection details.
Check connection details and the connection itself between WHMCS and server.
|
6. Unable to get the version number from the server. Permission denied. You have to set admin account access details.
You need admin account access to use PPPE module, reseller account API is not supported.
|
7. Blank page at 'Applications'.
Reason: Some libraries may be missing.
Solution: Make sure you have installed php-xml library.
|
8. If you have problems with your license, please make sure that the content of the file is correct.
Please note that for Plesk Extended For WHMCS V2.0.0 and later the license key begins with:
$plesk_extended_licensekey="ModulesGarden_PleskEX_LicenseKey";
Not as it was for the previous versions:
$parallels_plesk_panel_extended_licensekey="ModulesGarden_PleskEX_LicenseKey";
|
9. In case you see an error: 'Request Is Invalid: Error In Line 5: Element 'owner-id' is not a valid value of the atomic type 'int'.' while creating the product, please verify your product type.
Most probably it is set to 'Dedicated/VPS Server' or 'Other' which are not supported. See point 17 of installation for more info.
|
10. If you see an error similar to: 'Unable to find appropriate manager for this version of Panel. Plesk should be at least 8.0 version.' while creating the product please verify your server configuration.
Make sure that you have SSL 'Secure' ticked in your server configuration, depending on your Plesk settings.
|
| 11. Plesk Extended For WHMCS functions only on the administrator account.
|
12. For a large backup files we recommend to increase the 'max_execution_time' setting in your server's 'php.ini' configuration.
Otherwise, fatal errors like 'Allowed memory size of 134217728 bytes exhausted (tried to allocate 100401152 bytes)' may occur when trying to download local backups.
|
13. Due to removed support for 'XML API' by Plesk, Plesk Onyx from version 17.8 is only partial supported.
This means the following functionalities:
- Backups
- Spam Filter (SpamAssassin)
- Web Users
will not work anymore and even the more features may become incompatible with further versions of Plesk. If you need full compatibility please use the the last compatible Plesk 17.5 version.
|


