Payment Gateway Charges For WHMCS
(→Installation) |
(→About Payment Gateway Charges For WHMCS) |
||
| (92 intermediate revisions by 9 users not shown) | |||
| Line 4: | Line 4: | ||
=About [https://www.modulesgarden.com/products/whmcs/payment-gateway-charges Payment Gateway Charges For WHMCS]= | =About [https://www.modulesgarden.com/products/whmcs/payment-gateway-charges Payment Gateway Charges For WHMCS]= | ||
{| | {| | ||
| − | |style="padding: 10px 0px 5px 0px;"|'''Payment Gateway Charges For WHMCS''' allows you to charge additional fees and set up discounts for usage of a chosen payment gateway.<br /> | + | |style="padding: 10px 0px 5px 0px;"|'''Payment Gateway Charges For WHMCS''' allows you to charge additional fees and set up discounts for the usage of a chosen payment gateway.<br /> |
| − | With this module you can easily set products, addons | + | With this module you can easily set products, addons and TLDs that should require an additional fee, and select clients who will be exempt from fees and discounts.<br /> |
| − | + | On top of that, you will also be empowered to define multiple steps of charges as well as discounts which shall be taken depending on the invoice amount.<br /> | |
| + | Finally, the module will enable you to lay down your own conditions for the application of charges and discounts involving client groups, countries and currencies. | ||
|} | |} | ||
<!-- fixed --> | <!-- fixed --> | ||
*'''Features:''' | *'''Features:''' | ||
| − | {| | + | {| |
| − | |style="padding: 10px 0px 0px 30px;"|✔ | + | |style="padding: 10px 0px 0px 30px;"|✔ Display Charge Or Discount Rates Depending On Available Gateways |
|} | |} | ||
| − | {| | + | {| |
| − | |style="padding: 0px 0px 0px 30px;"|✔ | + | |style="padding: 0px 0px 0px 30px;"|✔ Display Calculated Rates For Chosen Gateways |
|} | |} | ||
| − | {| | + | {| |
| − | |style="padding: 0px 0px 0px 30px;"|✔ | + | |style="padding: 0px 0px 0px 30px;"|✔ Create Multiple Billing Rules For Gateways |
|} | |} | ||
| + | {| | ||
| + | |style="padding: 0px 0px 0px 30px;"|✔ Copy Existing Rules Between Gateways | ||
| + | |} | ||
| + | {| | ||
| + | |style="padding: 0px 0px 0px 30px;"|✔ Choose Calculation Method For Charge Or Discount Per Rule: | ||
| + | |} | ||
| + | {| | ||
| + | |style="padding: 0px 0px 0px 45px;"|✔ Percentage | ||
| + | |} | ||
| + | {| | ||
| + | |style="padding: 0px 0px 0px 45px;"|✔ Fixed Amount | ||
| + | |} | ||
| + | {| | ||
| + | |style="padding: 0px 0px 0px 30px;"|✔ Toggle Charging After Tax Application | ||
| + | |} | ||
| + | {| | ||
| + | |style="padding: 0px 0px 0px 30px;"|✔ Toggle Tax Application To Charge | ||
| + | |} | ||
| + | {| | ||
| + | |style="padding: 0px 0px 0px 30px;"|✔ Toggle Charging After Promo Code Application | ||
| + | |} | ||
| + | {| | ||
| + | |style="padding: 0px 0px 0px 30px;"|✔ Set Billing Calculation Methods: | ||
| + | |} | ||
| + | {| | ||
| + | |style="padding: 0px 0px 0px 45px;"|✔ Standard | ||
| + | |} | ||
| + | {| | ||
| + | |style="padding: 0px 0px 0px 45px;"|✔ Alternative (e.g. PayPal) | ||
| + | |} | ||
| + | {| | ||
| + | |style="padding: 0px 0px 0px 45px;"|✔ PayPalV2 | ||
| + | |} | ||
| + | {| | ||
| + | |style="padding: 0px 0px 0px 30px;"|✔ Create Multiple Steps With Minimum Invoice Value To Apply Fees And Discounts | ||
| + | |} | ||
| + | {| | ||
| + | |style="padding: 0px 0px 0px 30px;"|✔ Create Multiple Rule Activation Conditions For: | ||
| + | |} | ||
| + | {| | ||
| + | |style="padding: 0px 0px 0px 45px;"|✔ All Clients | ||
| + | |} | ||
| + | {| | ||
| + | |style="padding: 0px 0px 0px 45px;"|✔ Chosen Clients | ||
| + | |} | ||
| + | {| | ||
| + | |style="padding: 0px 0px 0px 45px;"|✔ Chosen Client Groups | ||
| + | |} | ||
| + | {| | ||
| + | |style="padding: 0px 0px 0px 45px;"|✔ Clients Or Groups With Specific Currencies | ||
| + | |} | ||
| + | {| | ||
| + | |style="padding: 0px 0px 0px 45px;"|✔ Clients Or Groups With Specific Countries | ||
| + | |} | ||
| + | {| | ||
| + | |style="padding: 0px 0px 0px 30px;"|✔ Perform Bulk Actions To Mark As Chargeable: | ||
| + | |} | ||
| + | {| | ||
| + | |style="padding: 0px 0px 0px 45px;"|✔ Clients | ||
| + | |} | ||
| + | {| | ||
| + | |style="padding: 0px 0px 0px 45px;"|✔ Products | ||
| + | |} | ||
| + | {| | ||
| + | |style="padding: 0px 0px 0px 45px;"|✔ Addons | ||
| + | |} | ||
| + | {| | ||
| + | |style="padding: 0px 0px 0px 45px;"|✔ TLDs (Register/Transfer/Renew) | ||
| + | |} | ||
| + | {| | ||
| + | |style="padding: 0px 0px 0px 45px;"|✔ Other: | ||
| + | |} | ||
| + | {| | ||
| + | |style="padding: 0px 0px 0px 60px;"|✔ Adding Funds To Credit Deposit | ||
| + | |} | ||
| + | {| | ||
| + | |style="padding: 0px 0px 0px 60px;"|✔ Late Fee Invoice Items | ||
| + | |} | ||
| + | {| | ||
| + | |style="padding: 0px 0px 0px 60px;"|✔ Custom Invoice Items | ||
| + | |} | ||
| + | {| | ||
| + | |style="padding: 0px 0px 0px 30px;"|✔ Toggle Visibility Of Charge Rates In Client Area | ||
| + | |} | ||
| + | {| | ||
| + | |style="padding: 0px 0px 0px 30px;"|✔ Define Charge Format Displayed On Invoice | ||
| + | |} | ||
| + | {| | ||
| + | |style="padding: 0px 0px 0px 30px;"|✔ Define Div Tag For Custom Order Template Integration | ||
| + | |} | ||
| + | {| | ||
| + | |style="padding: 0px 0px 0px 30px;"|✔ Toggle Redundant Logs Deletion After Defined Period | ||
| + | |} | ||
| + | {| | ||
| + | |style="padding: 0px 0px 10px 30px;"|✔ Access Module Logs | ||
| + | |} | ||
| + | *'''Supported Order Form Templates:''' | ||
| + | {| | ||
| + | |style="padding: 10px 0px 0px 30px;"|✔ Cloud Slider | ||
| + | |} | ||
| + | {| | ||
| + | |style="padding: 0px 0px 0px 30px;"|✔ Legacy Boxes | ||
| + | |} | ||
| + | {| | ||
| + | |style="padding: 0px 0px 0px 30px;"|✔ Legacy Modern | ||
| + | |} | ||
| + | {| | ||
| + | |style="padding: 0px 0px 0px 30px;"|✔ Premium Comparison | ||
| + | |} | ||
| + | {| | ||
| + | |style="padding: 0px 0px 0px 30px;"|✔ Pure Comparison | ||
| + | |} | ||
| + | {| | ||
| + | |style="padding: 0px 0px 0px 30px;"|✔ Standard Cart | ||
| + | |} | ||
| + | {| | ||
| + | |style="padding: 0px 0px 0px 30px;"|✔ Supreme Comparison | ||
| + | |} | ||
| + | {| | ||
| + | |style="padding: 0px 0px 0px 30px;"|✔ Universal Slider | ||
| + | |} | ||
| + | {| | ||
| + | |style="padding: 0px 0px 10px 30px;"|✔ Other Custom Templates | ||
| + | |} | ||
| + | *'''General Info:''' | ||
{| | {| | ||
| − | |style="padding: | + | |style="padding: 10px 0px 0px 30px;"|✔ Integrated With [https://www.modulesgarden.com/products/whmcs/lagom-one-step-order-form Lagom One Step Order Form For WHMCS] - Apply Custom Discounts And Fees Based On Payment Gateway Chosen During Ordering |
| + | |} | ||
| + | {| | ||
| + | |style="padding: 0px 0px 0px 30px;"|✔ Supports All Payment Gateways | ||
| + | |} | ||
| + | {| | ||
| + | |style="padding: 0px 0px 0px 30px;"|✔ Supports Mass Payment Functionality | ||
| + | |} | ||
| + | {| | ||
| + | |style="padding: 0px 0px 0px 30px;"|✔ Supports Prorata Billing | ||
| + | |} | ||
| + | {| | ||
| + | |style="padding: 0px 0px 0px 30px;"|✔ Integrated With All Order Form Templates | ||
| + | |} | ||
| + | {| | ||
| + | |style="padding: 0px 0px 0px 30px;"|✔ Multi-Language Support | ||
| + | |} | ||
| + | {| | ||
| + | |style="padding: 0px 0px 0px 30px;"|✔ Supports PHP 8.1 Back To PHP 7.4 | ||
| + | |} | ||
| + | {| | ||
| + | |style="padding: 0px 0px 0px 30px;"|✔ Supports WHMCS Themes "Six", "Twenty-One" And "Lagom WHMCS Client Theme" | ||
| + | |} | ||
| + | {| | ||
| + | |style="padding: 0px 0px 0px 30px;"|✔ Supports WHMCS V8.10 Back To WHMCS V8.6 | ||
|} | |} | ||
{| | {| | ||
| − | |style="padding: 0px 0px 0px 30px;"|✔ | + | |style="padding: 0px 0px 0px 30px;"|✔ Requires ionCube Loader V12 Or Later |
|} | |} | ||
{| | {| | ||
| − | |style="padding: | + | |style="padding: 0px 0px 30px 30px;"|✔ Easy [https://www.docs.modulesgarden.com/How_To_Upgrade_WHMCS_Module Module Upgrade] To [https://www.modulesgarden.com/products/whmcs/payment-gateway-charges#open-source-version Open Source Version] |
|} | |} | ||
| + | |||
| + | =Installation= | ||
{| | {| | ||
| − | |style="padding: 0px 0px 0px | + | |style="padding: 10px 0px 0px 0px;"|'''This tutorial will show you how to successfully install and configure [https://www.modulesgarden.com/products/whmcs/payment-gateway-charges Payment Gateway Charges For WHMCS.]''' <br /> |
| + | We will guide you step by step through the whole installation and configuration process. <br/><br/> | ||
| + | '' '''Note:''' If you are using Payment Gateway Charges For WHMCS in any version '''prior to v2.x''', [https://www.docs.modulesgarden.com/Payment_Gateway_Charges_1.X_For_WHMCS read about it here].'' | ||
|} | |} | ||
{| | {| | ||
| − | |style="padding: 0px | + | |style="padding: 20px 0px 20px 15px;"|'''1. Log in to our client area and download the module.''' |
|} | |} | ||
{| | {| | ||
| − | |style="padding: 0px 0px | + | |style="padding: 0px 0px 20px 25px;"|[[File:PGC1.png]] |
|} | |} | ||
{| | {| | ||
| − | |style="padding: 0px 0px | + | |style="padding: 0px 0px 15px 15px;"|'''2. In the downloaded file you might find one or two packages that support different PHP versions.'''<br/> |
| + | In the most recent versions of the module, you will find only one package that supports PHP 7.2 and later.<br/> <!-- If you need a package for the previous versions of PHP, please [https://www.modulesgarden.com/support/ticket/general-support contact our support]. --> | ||
|} | |} | ||
{| | {| | ||
| − | |style="padding: 0px 0px | + | |style="padding: 0px 0px 20px 25px;"|[[File:PHP72_74.png]] |
|} | |} | ||
{| | {| | ||
| − | |style="padding: 0px 0px | + | |style="padding: 0px 0px 15px 15px;"|'''Previous updates of the module may contain two packages dedicated to various PHP versions.'''<br/> |
| + | The first one that supports PHP 5.6 up to PHP 7.1, and the second one addressed to PHP 7.2 up to PHP 7.4.<br/> | ||
| + | '''''Note:''' Keep in mind that PHP versions 5.6 up to 7.1 are no longer officially supported and their security issues are not fixed or released any more. Find more info [http://php.net/supported-versions.php here].'' | ||
|} | |} | ||
{| | {| | ||
| − | |style="padding: 0px 0px | + | |style="padding: 0px 0px 20px 25px;"|[[File:PHP56_74.png]] |
|} | |} | ||
{| | {| | ||
| − | |style="padding: 0px 0px | + | |style="padding: 0px 0px 10px 15px;"| <!-- '' '''Important''': This situation does not affect [https://www.modulesgarden.com/products/whmcs/payment-gateway-charges#open-source-version '''the open source version'''] of this module which can be applied to any PHP from version 5.6 and later.''<br/>'' --> '''Note''': You can check the current PHP version in your WHMCS. To do so, proceed to ''' 'Utilities' → 'System' → 'PHP Info'.''' |
|} | |} | ||
{| | {| | ||
| − | |style="padding: 0px 0px | + | |style="padding: 0px 0px 15px 15px;"|'''3. Extract the package and upload its content into the main WHMCS directory. |
| + | The content of the package to upload should look like this. | ||
|} | |} | ||
| − | |||
{| | {| | ||
| − | |style="padding: | + | |style="padding: 0px 0px 20px 25px;"|[[File:PGC2.png]] |
|} | |} | ||
{| | {| | ||
| − | |style="padding: 0px 0px | + | |style="padding: 0px 0px 15px 15px;"|'''4. When installing Payment Gateway Charges For WHMCS for the first time, you have to rename the '' 'license_RENAME.php' '' file.'''<br /> |
| + | The file is located in '' 'your_whmcs/modules/addons/PaymentGatewayCharges/license_RENAME.php'. '' Rename it from '' 'license_RENAME.php' '' to '' 'license.php'. '' | ||
|} | |} | ||
{| | {| | ||
| − | |style="padding: 0px 0px | + | |style="padding: 0px 0px 20px 25px;"|[[File:PGC3.png]] |
|} | |} | ||
{| | {| | ||
| − | |style="padding: 0px 0px | + | |style="padding: 0px 0px 15px 15px;"|'''5. In order to configure your license key, you have to edit the previously renamed '' 'license.php' '' file.'''<br /> |
| + | Enter your license key between the quotation marks as presented on the following screen. You can find your license key in our client area'' → 'My Products'. '' | ||
|} | |} | ||
{| | {| | ||
| − | |style="padding: 0px 0px | + | |style="padding: 0px 0px 20px 25px;"|[[File:PGC4.png]] |
|} | |} | ||
{| | {| | ||
| − | |style="padding: 0px 0px | + | |style="padding: 0px 0px 15px 15px;"|'''6. Now, set up the '' 'storage' '' folder as recursively writable.'''<br /> |
| + | This folder is available at '' 'your_whmcs/modules/addons/PaymentGatewayCharges/' '' . | ||
|} | |} | ||
{| | {| | ||
| − | |style="padding: 0px 0px | + | |style="padding: 0px 0px 20px 25px;"|[[File:PGC4_4.png]] |
|} | |} | ||
{| | {| | ||
| − | |style="padding: 0px 0px | + | |style="padding: 0px 0px 15px 15px;"|'''7. Now you have to activate the module in your WHMCS system.'''<br /> |
| + | Log in to your WHMCS admin area. Go to '' 'Setup' '' → '' 'Addon Modules'. '' Afterwards, find '' 'Payment Gateway Charges' '' and press the '' 'Activate' '' button. | ||
|} | |} | ||
{| | {| | ||
| − | |style="padding: 0px 0px | + | |style="padding: 0px 0px 20px 25px;"|[[File:PGC5.png]] |
|} | |} | ||
{| | {| | ||
| − | |style="padding: 0px 0px | + | |style="padding: 0px 0px 15px 15px;"|'''8. In the next step you need to permit access to this module.'''<br /> |
| + | To do so, click on the '' 'Configure' '' button, tick '' 'Full Administrator' '' and press '' 'Save Changes'. '' | ||
|} | |} | ||
{| | {| | ||
| − | |style="padding: 0px 0px | + | |style="padding: 0px 0px 20px 25px;"|[[File:PGC6.png]] |
|} | |} | ||
{| | {| | ||
| − | |style="padding: 0px 0px | + | |style="padding: 0px 0px 15px 15px;"|'''9. Congratulations, you have just successfully installed Payment Gateway Charges For WHMCS!'''<br /> |
| + | You can now access your module from '' 'Addons' '' → '' 'Payment Gateway Charges'. '' | ||
|} | |} | ||
{| | {| | ||
| − | |style="padding: | + | |style="padding: 0px 0px 30px 25px;"|[[File:PGC7.png]] |
|} | |} | ||
| + | |||
| + | =Configuration and Management= | ||
{| | {| | ||
| − | |style="padding: 0px | + | |style="padding: 10px 0px 30px 15px;"|'''Payment Gateway Charges For WHMCS allows your customers to manage additional charges in your WHMCS system.'''<br /> |
| + | In this short guide we will present you the possibilities of our module. | ||
|} | |} | ||
| − | + | ||
| + | ==Gateways Settings== | ||
{| | {| | ||
| − | |style="padding: 10px 0px | + | |style="padding: 10px 0px 15px 15px;"|Once you access the addon, you will be moved directly to its configuration. Here you can decide for which gateways the additional charges or discounts will be applied, according to their settings and rules.<br/> |
| + | Start by selecting '' 'Settings' ''.<br/> | ||
|} | |} | ||
{| | {| | ||
| − | |style="padding: 0px 0px | + | |style="padding: 0px 0px 20px 25px;"|[[File:PGC8.png]] |
|} | |} | ||
{| | {| | ||
| − | |style="padding: 0px 0px | + | |style="padding: 0px 0px 15px 15px;"|Here you can define the following settings: |
| + | *'''Status''' - toggle to enable or disable charges for a chosen payment gateway | ||
| + | *'''Charge After Taxing''' - if enabled, the charge will be applied to an already taxed item | ||
| + | *'''Apply Tax To Charge''' - enable to impose taxes on charges. ''Note: taxes will not be applied for discount rules'' | ||
| + | *'''Charge After Applying Promo Code''' - enable to charge once the final price has been lowered by a promo code'' | ||
| + | *'''Billing Type''' - choose between '' 'Standard' '', '' 'Alternative (e.g. PayPal model)' '' or '' 'PayPalV2' '' - the differences are explained in the further part of documentation | ||
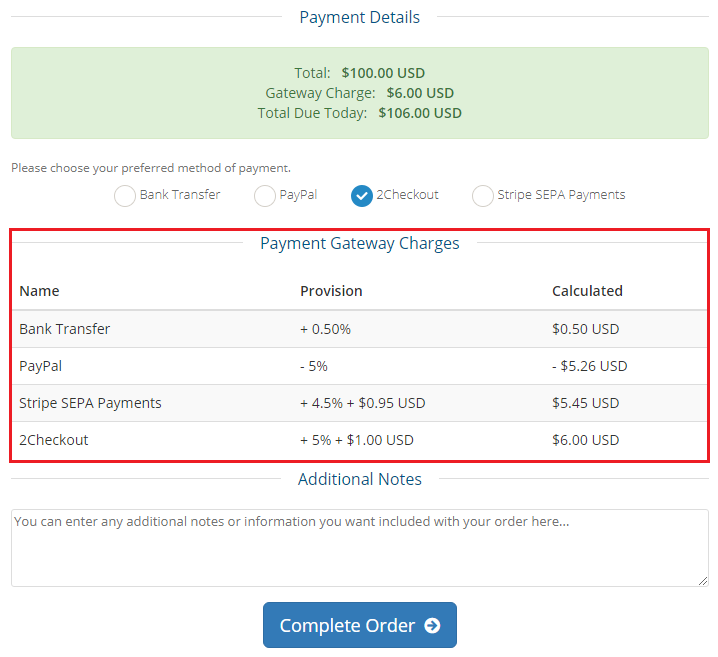
| + | *'''Show In Charges Table''' - if enabled, the charges and discounts configured in the rules of this gateway will be displayed in the table at the checkout. | ||
|} | |} | ||
{| | {| | ||
| − | |style="padding: 0px 0px | + | |style="padding: 0px 0px 20px 25px;"|[[File:PGC9.png]] |
|} | |} | ||
{| | {| | ||
| − | |style="padding: 0px 0px | + | |style="padding: 0px 0px 15px 15px;"|''' '' 'Charge After Taxing' '' and '' 'Apply Tax To Charge' '' explanation: ''' <br/> |
| + | * Charge Type no.1 <br/> | ||
| + | The '' 'Charge After Taxing' '' and '' 'Apply Tax To Charge' '' options are disabled. <br/> With this method, the module calculates the additional fee only for the base price: <br/> | ||
| + | Base Price = 63£ <br/> | ||
| + | PP charge (4,4% + 0.2£) = 2,97£ <br/> | ||
| + | TAX 20% - 12,6 (Tax is only calculated for the base price, not for the charge because the option '' 'Apply Tax To Charge' '' is disabled).<br/> | ||
| + | Total = Base Price + Tax + Charge = 63£ + 12,6£ + 2,97£ = 78.57£ <br/> <br/> | ||
| + | * Charge Type no.2 <br/> | ||
| + | The charge with enabled option '' 'Charge After Taxing' '' and disabled option '' 'Apply Tax To Charge' ''. <br/> | ||
| + | In this case, the module calculates charge after applying the tax to the base price. The tax is not counted for the charge. <br/> | ||
| + | Base Price = 63£ <br/> | ||
| + | Tax 20 % = 12,6£ <br/> | ||
| + | PP charge (4,4% + 0.2£) = 3,53£ ( The charge is calculated from the price 75,6£ (63£ + 12,6£)) <br/> | ||
| + | Total = Base Price + Tax + Charge = 63£ + 12,6£ + 3,53£ = 79,13 <br/> <br/> | ||
| + | * Charge Type no.3 | ||
| + | The '' 'Charge After Taxing' '' and '' 'Apply Tax To Charge' '' options are enabled. <br/> | ||
| + | Now the tax is enabled for the base price and for the charge, and the charge is calculated for the base price with the tax. <br/> | ||
| + | Base Price = 63£ <br/> | ||
| + | Tax for Base Price 20 % = 12,6£ <br/> | ||
| + | PP charge (4,4% + 0.2£) = 3,53£ (The charge is calculated from the price 75,6£ (63£ + 12,6£)) <br/> | ||
| + | Tax for Charge 20 % = 0,71£ <br/> | ||
| + | Full Tax = 12,6£ + 0,71£ = 13,31£ <br/> | ||
| + | Total = Base Price + Full Tax + Charge = 63£ + 3,53£ + 13,31£ = 79,84£ <br/> <br/> | ||
| + | *Charge Type no.4 <br/> | ||
| + | The charge with enabled option '' 'Apply Tax To Charge' '' and disabled option '' 'Charge After Taxing' ''. <br/> | ||
| + | In this case, the module applies the tax to the base price and to the charge. The charge is counted from the base price without the tax. <br/> | ||
| + | Base Price = 63£ <br/> | ||
| + | PP charge (4,4% + 0.2£) = 2,97£ <br/> | ||
| + | Tax for Base Price 20 % = 12,6£ <br/> | ||
| + | Tax for Charge 20 % = 0,59£ <br/> | ||
| + | FULL TAX 20% (Base Price + Charge) = 12,6£ + 0,59£ = 13.19£ <br/> | ||
| + | Total = Base Price + Full Tax + Charge = 63£ + 2,97£ + 13,19£ = 79,16£ <br/> | ||
|} | |} | ||
{| | {| | ||
| − | |style="padding: 0px 0px | + | |style="padding: 0px 0px 15px 15px;"|'''Billing types explanation:'''<br/> |
| + | *'''''Standard''''' - when this type is selected, the total fee will be calculated in a standard manner, taking account of the full amount charged for the products in the cart.<br/> | ||
| + | *'''''Alternative (e.g. PayPal model)''''' - when this method is selected, the fee will be calculated in such a way so that it matches e.g. the PayPal's method of charge calculation.<br/>This method is based on the following calculation formula:<br/><pre>Final Amount = (Initial Amount / ( 1 - (Percentage / 100)) - Initial Amount) + Fixed Amount</pre> | ||
| + | *'''''PayPalV2 model''''' - when this method is selected, the method will be based on the following calculation formula:<br/><pre>Final Amount = ( Initial Amount + Fixed Amount ) / ( 1 - ( Percent / 100 ))</pre> | ||
| + | '' '''Note:''' when one of these PayPal methods is selected, then this billing type will be applied to every activated payment gateway, not only PayPal. | ||
|} | |} | ||
{| | {| | ||
| − | |style="padding: 0px 0px | + | |style="padding: 0px 0px 10px 15px;"|Let's see how the '' 'Standard' '' and '' 'Alternative (e.g. PayPal model)' '' calculation methods differ in practice.<br/> |
| + | Please notice at the table below that the final price which a client is obliged to pay and the amount that will be sent e.g. to PayPal slightly vary between the two presented methods.<br/> | ||
| + | '' '''Note: '''the following example does not include a comparison with the 'PayPalV2' method which was introduced in the 3.0.1 version of the module.'' | ||
|} | |} | ||
| − | |||
| − | |||
{| | {| | ||
| − | |style="padding: | + | |style="padding: 0px 0px 15px 15px;"| |
| − | + | ''' ''E.g.:'' ''' <br/> | |
| + | '''Product Price:''' $124.00 <br/> | ||
| + | '''Gateway Fee:''' 5%<br/> | ||
| + | {| class="wikitable" | ||
| + | | style="padding: 0px 10px 0px 15px;"|'''Method''' | ||
| + | |style="padding: 0px 10px 0px 15px;"|'''Base Fee''' | ||
| + | |style="padding: 0px 10px 0px 15px;"|'''Total Amount With Charge''' | ||
| + | |- | ||
| + | | style="padding: 0px 10px 0px 15px;"|'''Standard''' | ||
| + | |style="padding: 0px 10px 0px 15px;"|124 * 0.05 = $6.20 | ||
| + | |style="padding: 0px 10px 0px 15px;"|124 + 6,20 = $130.20 | ||
| + | |- | ||
| + | | style="padding: 0px 10px 0px 15px;"|'''Alternative''' | ||
| + | |style="padding: 0px 10px 0px 15px;"|(124/0.95) - 124 = $6.53 | ||
| + | |style="padding: 0px 10px 0px 15px;"|124 + 6,53 = $130.53 | ||
| + | |} | ||
|} | |} | ||
{| | {| | ||
| − | |style="padding: | + | |style="padding: 0px 0px 10px 15px;"|So, the total amount to be paid by the client would be $130.20 for the standard method and $130.53 for the alternative, PayPal method. |
| + | Now, let us see in reverse how these total fee amounts would look like if both were the result of calculations using an alternative method only.<br/> | ||
| + | This will help you better understand why it is advised to choose the alternative method for some payment gateways like PayPal. | ||
|} | |} | ||
{| | {| | ||
| − | |style="padding: 0px 0px | + | |style="padding: 0px 0px 15px 15px;"| |
| + | {| class="wikitable" | ||
| + | | style="padding: 0px 10px 0px 15px;"|'''Total Calculation Method''' | ||
| + | |style="padding: 0px 10px 0px 15px;"|'''5% Fee From Total Amount With Charge''' | ||
| + | |- | ||
| + | | style="padding: 0px 10px 0px 15px;"|'''From Standard''' | ||
| + | |style="padding: 0px 10px 0px 15px;"|130.20 * 0,05 = $6.51 | ||
| + | |- | ||
| + | | style="padding: 0px 10px 0px 15px;"|'''From Alternative''' | ||
| + | |style="padding: 0px 10px 0px 15px;"|130.53 * 0.05 = $6.53 | ||
| + | |} | ||
|} | |} | ||
{| | {| | ||
| − | |style="padding: 0px 0px 10px 15px;"|''' | + | |style="padding: 0px 0px 10px 15px;"|So, if you are using PayPal and want to receive a full $124.00 amount for a product with a 5% gateway fee, a payment of '''$130.53''' should be sent to PayPal gateway.<br/>$6.53 will cover PayPal fees which is 5% of the total amount to be paid by the client. <br/> |
| − | '' ''' | + | In case of the '''$130.20''' amount calculated using the standard method, the 5% PayPal fee would be $6.51, which, after deducting from the total, would result in $123.69 amount for the product itself. |
|} | |} | ||
{| | {| | ||
| − | |style="padding: 0px 0px | + | |style="padding: 0px 0px 30px 15px;"| |
| + | {| class="wikitable" | ||
| + | | style="padding: 0px 10px 0px 15px;"|'''Method''' | ||
| + | |style="padding: 0px 10px 0px 15px;"|'''Amount With Charge''' | ||
| + | |style="padding: 0px 10px 0px 15px;"|'''5% Fee''' | ||
| + | |style="padding: 0px 10px 0px 15px;"|'''Amount Which Would Be Received''' | ||
| + | |- | ||
| + | | style="padding: 0px 10px 0px 15px;"|'''Standard''' | ||
| + | |style="padding: 0px 10px 0px 15px;"|$130.20 | ||
| + | |style="padding: 0px 10px 0px 15px;"|$6.51 | ||
| + | |style="padding: 0px 10px 0px 15px;"|130.20 - 6.51 = $123.69 | ||
| + | |- | ||
| + | | style="padding: 0px 10px 0px 15px;"|'''Alternative''' | ||
| + | |style="padding: 0px 10px 0px 15px;"|$130.53 | ||
| + | |style="padding: 0px 10px 0px 15px;"|$6.53 | ||
| + | |style="padding: 0px 10px 0px 15px;"|130.53 - 6.53 = $124.00 | ||
|} | |} | ||
| + | |} | ||
| + | |||
| + | ===Gateways Rules=== | ||
{| | {| | ||
| − | |style="padding: 0px 0px | + | |style="padding: 0px 0px 5px 15px;"| |
| − | + | {| class="wikitable" | |
| + | ! style="text-align: center; font-weight:bold; color:#cb0000;" |This step is obligatory, the module will not work properly without correctly set up rules. | ||
| + | |} | ||
|} | |} | ||
{| | {| | ||
| − | |style="padding: 0px | + | |style="padding: 10px 0px 15px 15px;"|In the rules section, you can set a percentage or a fixed amount of billed charges or discounts.<br/> |
| + | To set the rules, first press '' 'Show Rules' '' located next to the chosen payment gateway. | ||
|} | |} | ||
{| | {| | ||
| − | |style="padding: 0px 0px | + | |style="padding: 0px 0px 20px 25px;"|[[File:PGC11.png]] |
| − | File | + | |
|} | |} | ||
{| | {| | ||
| − | |style="padding: 0px 0px 20px | + | |style="padding: 0px 0px 20px 15px;"|Next, press the '' 'Add Rule' '' button. |
|} | |} | ||
{| | {| | ||
| − | |style="padding: 0px 0px | + | |style="padding: 0px 0px 20px 25px;"|[[File:PGC12.png]] |
| − | + | ||
|} | |} | ||
{| | {| | ||
| − | |style="padding: 0px 0px 20px | + | |style="padding: 0px 0px 20px 15px;"|Here you can name the rule and define a charge for the gateway in a percent form, fixed amount or both. |
|} | |} | ||
{| | {| | ||
| − | |style="padding: 0px 0px | + | |style="padding: 0px 0px 20px 25px;"|[[File:PGC13.png]] |
| − | + | ||
|} | |} | ||
{| | {| | ||
| − | |style="padding: 0px 0px | + | |style="padding: 0px 0px 15px 15px;"|'' '''Important: ''' At least one gateway condition must be added to the rule for it to work. You can find a description of adding conditions to rules [[#Gateways Conditions|here]].<br/>The following examples assume that gateway conditions have already been created.''<br/><br/> |
| + | |||
| + | The result of the above rule will be a 5% charge of the product price (which in this example is $100.00) with additional $1.00 charge for the selected ''2Checkout'' payment gateway (using '' 'Standard' '' billing type method). | ||
|} | |} | ||
{| | {| | ||
| − | |style="padding: 0px 0px | + | |style="padding: 0px 0px 20px 25px;"|[[File:PGC14.png]] |
| − | + | |} | |
| + | {| | ||
| + | |style="padding: 0px 0px 20px 15px;"|You can also set negative amounts. Then, a discount will be applied to a chosen gateway instead of charging an additional fee. | ||
|} | |} | ||
{| | {| | ||
| − | |style="padding: 0px 0px 20px 25px;"|[[File: | + | |style="padding: 0px 0px 20px 25px;"|[[File:PGC15.png]] |
|} | |} | ||
{| | {| | ||
| − | |style="padding: 0px 0px | + | |style="padding: 0px 0px 20px 15px;"|The result of the above rule will be a 5% discount of the product price (which in this example is $100.00) with additional $1.00 reduction for the selected ''2Checkout'' payment gateway (using '' 'Standard' '' billing type method). |
| − | + | ||
|} | |} | ||
{| | {| | ||
| − | |style="padding: 0px 0px 30px 25px;"|[[File: | + | |style="padding: 0px 0px 30px 25px;"|[[File:PGC16.png]] |
|} | |} | ||
| − | = | + | |
| + | ====Steps Rules==== | ||
{| | {| | ||
| − | |style="padding: 10px 0px | + | |style="padding: 10px 0px 15px 15px;"|You can also add additional steps to your rules and define above which minimum amount on the invoice the additional fee or set discount will be applied.<br/> |
| − | + | To start, press '' 'Show Steps' '' next to the created rule. | |
|} | |} | ||
| − | |||
| − | |||
{| | {| | ||
| − | |style="padding: | + | |style="padding: 0px 0px 20px 25px;"|[[File:PGC17.png]] |
| − | + | ||
| − | + | ||
| − | + | ||
| − | + | ||
| − | + | ||
| − | + | ||
| − | + | ||
|} | |} | ||
{| | {| | ||
| − | |style="padding: 0px 0px 20px | + | |style="padding: 0px 0px 20px 15px;"|Now, you need to add your first step. Press the '' 'Add Step' '' button. |
|} | |} | ||
| − | |||
{| | {| | ||
| − | |style="padding: 0px 0px 20px | + | |style="padding: 0px 0px 20px 25px;"|[[File:PGC18.png]] |
| − | + | ||
|} | |} | ||
{| | {| | ||
| − | |style="padding: 0px 0px | + | |style="padding: 0px 0px 15px 15px;"|To create a rule, enter the percentage or fixed amount of the desired charge or discount.<br/> |
| + | Then, specify the minimum required amount that will trigger the rule. | ||
|} | |} | ||
{| | {| | ||
| − | |style="padding: 0px 0px 20px | + | |style="padding: 0px 0px 20px 25px;"|[[File:PGC19.png]] |
|} | |} | ||
{| | {| | ||
| − | |style="padding: 0px 0px 20px | + | |style="padding: 0px 0px 20px 15px;"|You can create as many steps as you want. Each of these step rules will be activated only after the minimum invoice amount has been achieved.<br/> |
| + | '' '''Note''' that only one step rule can be active at a time. Also, if none of the step rules is met, then the main rule created in the previous section will be applied. In this example, it is the rule for orders below $50.00 amount.'' | ||
|} | |} | ||
{| | {| | ||
| − | |style="padding: 0px 0px | + | |style="padding: 0px 0px 30px 25px;"|[[File:PGC20.png]] |
|} | |} | ||
| + | |||
| + | ====Gateways Conditions==== | ||
{| | {| | ||
| − | |style="padding: 0px | + | |style="padding: 10px 0px 15px 15px;"|You can also specify multiple conditions that will affect activation of the rule.<br/>'' '''Note''' that '''at least one''' condition has to be created to make the rule applicable.''<br/> |
| + | Start by choosing the '' 'Show Conditions' '' button next to the selected rule. | ||
|} | |} | ||
{| | {| | ||
| − | |style="padding: 0px 0px | + | |style="padding: 0px 0px 20px 25px;"|[[File:PGC21.png]] |
|} | |} | ||
| − | |||
| − | |||
{| | {| | ||
| − | |style="padding: 0px 0px | + | |style="padding: 0px 0px 20px 15px;"|There is one default condition that has been created when adding the first gateway. You may modify it, delete and create new conditions here. |
| − | + | ||
| − | + | ||
| − | + | ||
| − | + | ||
| − | + | ||
|} | |} | ||
{| | {| | ||
| − | |style="padding: 0px 0px 20px 25px;"|[[File: | + | |style="padding: 0px 0px 20px 25px;"|[[File:PGC21_1.png]] |
|} | |} | ||
{| | {| | ||
| − | |style="padding: 0px 0px 20px | + | |style="padding: 0px 0px 20px 25px;"|[[File:PGC21_2.png]] |
|} | |} | ||
{| | {| | ||
| − | |style="padding: 0px 0px | + | |style="padding: 0px 0px 20px 15px;"|Press the '' 'Add Condition' '' button to create a new condition within this gateway. |
|} | |} | ||
| − | |||
| − | |||
{| | {| | ||
| − | |style="padding: 0px 0px | + | |style="padding: 0px 0px 20px 25px;"|[[File:PGC22.png]] |
|} | |} | ||
{| | {| | ||
| − | |style="padding: 0px 0px | + | |style="padding: 0px 0px 15px 15px;"|You can select one of several conditions that will determine the activation of the rule.<br/> |
| + | Choose between the following types: | ||
| + | *'''User:''' | ||
| + | **'''Client''' - activate the rule only for a selected client | ||
| + | *'''Group:''' | ||
| + | **'''Clients Group''' - activate the rule for selected client groups | ||
| + | **'''Currency''' - you can also specify which currency should be used by the selected group | ||
| + | **'''Country''' - optionally, choose from countries that the selected group of clients should come from | ||
| + | *'''All''' - by choosing this condition, you will make the rule applicable to all of your customers. '''Optionally''' you can also add to this rule: | ||
| + | **'''Currency''' - the rule will be triggered for every client with the selected currency | ||
| + | **'''Country''' - apply the rule for every client from the selected country | ||
|} | |} | ||
| − | |||
| − | |||
| − | |||
{| | {| | ||
| − | |style="padding: | + | |style="padding: 0px 0px 20px 25px;"|[[File:PGC23.png]] |
| − | + | ||
|} | |} | ||
{| | {| | ||
| − | |style="padding: 0px 0px 15px 15px;"| | + | |style="padding: 0px 0px 15px 15px;"|'''Important:''' some conditions may be combined with one another to provide more possibilities for triggering the rule, but they should not overlap.<br/> |
| − | + | If you encounter a validation error when adding a condition, make sure that there are '''no conflicts''' with conditions configured under '''this''' or '''other''' rules. | |
| − | + | ||
|} | |} | ||
{| | {| | ||
| − | |style="padding: 0px 0px 20px 25px;"|[[File: | + | |style="padding: 0px 0px 20px 25px;"|[[File:PGC24.png]] |
|} | |} | ||
| − | |||
| − | |||
{| | {| | ||
| − | |style="padding: 0px 0px | + | |style="padding: 0px 0px 20px 15px;"|Once you have ready rules and conditions prepared per gateway, you may either configure them per every existing gateway or simply copy all the settings to another gateway.<br/> Press the marked button and then select from which gateway you want to copy the rules together with its steps and conditions. <br/> |
| + | '''''Note:''' Keep in mind that if there were any rules in the gateway, all of them will be removed and overwritten by the new, copied settings.'' | ||
|} | |} | ||
{| | {| | ||
| − | |style="padding: 0px 0px 20px 25px;"|[[File: | + | |style="padding: 0px 0px 20px 25px;"|[[File:PGC20_1.png]] |
|} | |} | ||
{| | {| | ||
| − | |style="padding: 0px 0px | + | |style="padding: 0px 0px 30px 25px;"|[[File:PGC20_2.png]] |
| − | + | ||
| − | + | ||
| − | + | ||
| − | + | ||
| − | + | ||
| − | + | ||
| − | + | ||
| − | + | ||
| − | + | ||
|} | |} | ||
| + | |||
| + | ==Management of Items== | ||
{| | {| | ||
| − | |style="padding: | + | |style="padding: 10px 0px 15px 15px;"|To enable or disable gateway charges and discounts for products, addons or TLDs, go to the '' 'Items' '' section.<br/>Then, select the category of items and simply toggle the '' 'chargeable' '' status next to the selected item.<br/> |
| − | + | '' '''Note:''' For convenience, all new and already existing items are set to 'chargeable' by default.'' | |
| − | + | ||
| − | + | ||
|} | |} | ||
{| | {| | ||
| − | |style="padding: 0px 0px | + | |style="padding: 0px 0px 20px 25px;"|[[File:PGC25.png]] |
|} | |} | ||
{| | {| | ||
| − | |style="padding: 0px 0px | + | |style="padding: 0px 0px 20px 15px;"| You can also toggle multiple '' 'chargeable' '' statuses at once by selecting items and using bulk action. |
| − | ''' | + | |
| − | + | ||
| − | + | ||
| − | + | ||
| − | + | ||
| − | + | ||
| − | + | ||
| − | + | ||
| − | + | ||
| − | + | ||
| − | + | ||
| − | + | ||
| − | + | ||
| − | + | ||
| − | + | ||
| − | + | ||
| − | + | ||
|} | |} | ||
| + | {| | ||
| + | |style="padding: 0px 0px 30px 25px;"|[[File:PGC26.png]] | ||
| + | |} | ||
| + | ===Other Options=== | ||
| + | {| | ||
| + | |style="padding: 10px 0px 15px 15px;"|Enable or disable gateway charges and discounts for selected options<br/> | ||
| + | *Adding Funds To Credit Deposit - if set to chargeable, the charge will be calculated when adding funds to the client's credit deposit | ||
| + | |||
| + | *Late Fee Invoice Items - if this option is set to chargeable, then the charge will be calculated for late fee items on the invoice as well | ||
| + | |||
| + | *Custom Invoice Items - if this option is set to chargeable, the charge will be calculated for all added to a custom invoice items<br/> | ||
| + | |||
| + | '' '''Note:''' Again, all available options are set to 'chargeable' by default.'' | ||
|} | |} | ||
{| | {| | ||
| − | |style="padding: | + | |style="padding: 0px 0px 20px 25px;"|[[File:PGC26_1.png]] |
|} | |} | ||
{| | {| | ||
| − | |style="padding: 0px 0px 20px 15px;"| | + | |style="padding: 0px 0px 20px 15px;"| You can also toggle multiple '' 'chargeable' '' statuses at once by selecting items and using bulk action. |
|} | |} | ||
{| | {| | ||
| − | |style="padding: 0px 0px 30px 25px;"|[[File: | + | |style="padding: 0px 0px 30px 25px;"|[[File:PGC26_2.png]] |
|} | |} | ||
==Management of Clients== | ==Management of Clients== | ||
{| | {| | ||
| − | |style="padding: 10px 0px | + | |style="padding: 10px 0px 15px 15px;"|To enable or disable gateway charges and discounts for your customers, go to the '' 'Clients' '' section.<br/>Then, simply toggle the '' 'chargeable' '' status next to the selected client.<br/> |
| + | '' '''Note:''' For convenience, all new and already existing clients items are set to 'chargeable' by default.'' | ||
|} | |} | ||
{| | {| | ||
| − | |style="padding: 0px 0px 20px 25px;"|[[File: | + | |style="padding: 0px 0px 20px 25px;"|[[File:PGC27.png]] |
|} | |} | ||
{| | {| | ||
| − | |style="padding: 0px 0px | + | |style="padding: 0px 0px 20px 15px;"| You can also toggle multiple '' 'chargeable' '' statuses at once by selecting clients and using bulk action. |
| − | + | ||
|} | |} | ||
{| | {| | ||
| − | |style="padding: 0px 0px 30px 25px;"|[[File: | + | |style="padding: 0px 0px 30px 25px;"|[[File:PGC28.png]] |
|} | |} | ||
| − | == | + | ==Settings== |
{| | {| | ||
| − | |style="padding: 10px 0px | + | |style="padding: 10px 0px 15px 15px;"|In this section you can customize the basics of the module's settings such as: |
| + | * '''Show Charge''' - toggle to show charge on the order for a client. Click [https://www.docs.modulesgarden.com/images/6/66/PGC29_1.png here] to see the example. | ||
| + | * '''Show Charges Table''' - if toggled on, the box with gateways details of additional payments on the order form will be visible for a client. Click [https://www.docs.modulesgarden.com/images/5/57/PGC29_2.png here] to see the example. | ||
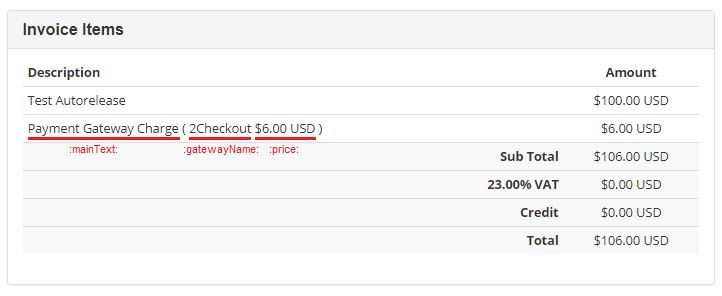
| + | * '''Charge Format''' - here you can define the format of the discount or charges displayed on the invoice. Click [https://www.docs.modulesgarden.com/images/e/ef/PGC29_3.png here] to see the example.<br/>You can use these variables to define it: | ||
| + | ** ''':mainText:''' - by default displayed as '' 'Payment Gateway Charge' '' or '' 'Payment Gateway Discount' '' depending on the gateway rule configuration.<br/>You can change the displayed text in a language file by editing '' 'InvoiceItemTextCharge' '' and '' 'InvoiceItemTextDiscount' '' records. | ||
| + | ** ''':gatewayName:''' - the name of the payment gateway to which a charge or discount was applied. | ||
| + | ** ''':discount:''' - the calculated discount amount | ||
| + | ** ''':price:''' - the calculated charge amount. ''Note: if applied, this amount will also include the tax''. | ||
| + | ** ''':priceWithoutTax:''' - the calculated charge amount without any tax applied | ||
| + | ** ''':tax1:''' - calculated level 1 tax of the charge | ||
| + | ** ''':tax2:''' - calculated level 2 tax of the charge | ||
| + | ** ''':fullTax:''' - the sum of calculated level 1 and level 2 tax of the charge | ||
| + | ** ''':percentage:''' - the percentage of billed charges or discounts | ||
| + | ** ''':fixedAmount:''' - the fixed amount of billed charges or discounts | ||
| + | * '''Select Template''' - choose the order templates you use to determine where the charges table is displayed.<br/>If you are using custom template, please select '' 'Use Charges Table Tag' '' and set the field below. | ||
| + | * '''Charges Table Tag''' - if you are using custom template, here you can determine where the charges table will be displayed.<br/>In that case, define the custom tag element from your template, after which the charges table will appear, e. g. ''div#creditCardInputFields''.<br/>'' '''Note''' that the provided tag name should be unique in your template! Otherwise, the integration may be injected into uncontrolled positions. More information you can find [[#Custom Template Integration|here]].'' | ||
| + | * '''Disable Logs''' - if you disable logs, that are by default enabled, they will no longer be stored in the database. | ||
|} | |} | ||
{| | {| | ||
| − | |style="padding: 0px 0px | + | |style="padding: 0px 0px 30px 25px;"|[[File:PGC29.png]] |
|} | |} | ||
| + | |||
| + | ==Logs== | ||
{| | {| | ||
| − | |style="padding: | + | |style="padding: 10px 0px 20px 15px;"|In the logs section you can see which invoices have been calculated with additional discounts or charges resulting from the module's configuration. |
|} | |} | ||
{| | {| | ||
| − | |style="padding: 0px 0px 20px 25px;"|[[File: | + | |style="padding: 0px 0px 20px 25px;"|[[File:PGC30.png]] |
|} | |} | ||
{| | {| | ||
| − | |style="padding: 0px 0px 20px 15px;"| | + | |style="padding: 0px 0px 20px 15px;"|Note that you can also delete multiple logs at once. |
|} | |} | ||
{| | {| | ||
| − | |style="padding: 0px 0px | + | |style="padding: 0px 0px 30px 25px;"|[[File:PGC31.png]] |
|} | |} | ||
| + | |||
| + | =Custom Template Integration= | ||
{| | {| | ||
| − | |style="padding: 0px | + | |style="padding: 10px 0px 15px 15px;"|To add an integration to your custom template, first you need to choose the place where you want the charges table to be placed. <br/>It is recommended to position it under a unique tag, e.g.: |
| + | div#a_unique_element_in_which_the_table_will_be_located | ||
| + | Now, go to the module settings and select '' 'Use Charges Table Tag' '' from the '' 'Select Template' '' dropdown menu.<br/> | ||
| + | Next, put the name of your chosen tag in the '' 'Charges Table Tag' '' field, and save settings. | ||
|} | |} | ||
{| | {| | ||
| − | |style="padding: 0px 0px | + | |style="padding: 0px 0px 20px 25px;"|[[File:PGC32.png]] |
|} | |} | ||
| − | |||
| − | |||
{| | {| | ||
| − | |style="padding: | + | |style="padding: 0px 0px 30px 15px;"|Next, you need to learn the name of your custom '''orderform''' template. <br/>Note that you can find all orderforms templates in '' 'yourWHMCS/templates/orderforms/' '' location.<br/> |
| − | ''' | + | For this example we will assume that your custom oderform template is simply named as '' ''' 'custom_template' ''' ''. |
| − | + | <br/><br/> | |
| − | + | Now, you need to edit the '' ''' 'script.tpl' ''' '' file located in the '' 'yourWHMCS/modules/addons/PaymentGatewayCharges/templates/client/default/pages/charge/assets/' '' .<br/> | |
| − | ''' | + | Update the following lines with the name of your '' ''' 'custom_template' ''' '' oderform.<br/> |
| − | ''' | + | |
| + | 1. The code '''between lines 10-19''' to update the charge values: | ||
| + | <pre> | ||
| + | {/literal}{elseif $template eq 'custom_template'}{literal} | ||
| + | $('div#where_the_charge_price_value_is_replaced').html(data.data.string); | ||
| + | </pre> | ||
| + | |||
| + | 2. The code '''between lines 42-75''' provides you with a possibility to define table display: | ||
| + | <pre> | ||
| + | {/literal}{elseif $template eq 'custom_template'}{literal} | ||
| + | $('input[name=applycredit]').on('change', function(event){ // event to check if the 'Apply Credit' value has been changed | ||
| + | mgLoadCharge(); | ||
| + | }); | ||
| + | $('input[name=paymentmethod]').on('change', function(event){ // event to check if the 'Payment Method' has been changed | ||
| + | mgLoadCharge(); | ||
| + | }); | ||
| + | $('select[name=country]').on('change', function(event){ // event to check if the 'Country' value has been changed | ||
| + | mgLoadCharge(); | ||
| + | }); | ||
| + | </pre> | ||
| + | After completing this procedure and applying the right code, you should have a working layout in your client area. | ||
|} | |} | ||
| − | = | + | =Tips= |
{| | {| | ||
| − | |style="padding: 10px 0px | + | |style="padding: 10px 0px 10px 15px;"|1. For your convenience, payment gateway charges are enabled by default for clients, products, addons and domains. |
| − | + | ||
|} | |} | ||
{| | {| | ||
| − | |style="padding: 0px 0px | + | |style="padding: 0px 0px 10px 15px;"|2. Taxes will not be applied to gateway discount rules even if '' 'Apply Tax To Charge' '' option is enabled. |
|} | |} | ||
{| | {| | ||
| − | |style="padding: 0px 0px | + | |style="padding: 0px 0px 5px 15px;"|3. You can easily change all names of module elements displayed in the client area, admin area or invoices in a language file.<br/> |
| + | To do so, go to the '' 'your_whmcs/modules/addons/PaymentGatewayCharges/langs' '' directory, open the language file (e.g. ''english.php'') and edit desired records. | ||
|} | |} | ||
{| | {| | ||
| − | |style="padding: 0px 0px | + | |style="padding: 0px 0px 10px 15px;"|4. In case there is more than one rule that matches a single client, the one with the most precise conditions, concerning that client, will be taken into account when calculating the final discount. |
|} | |} | ||
{| | {| | ||
| − | |style="padding: 0px 0px | + | |style="padding: 0px 0px 10px 15px;"|5. If you have installed the [https://lagom.rsstudio.net/ Lagom] WHMCS theme, use the following '' 'Charges Table Tag' '' for the [[#Custom Template Integration|custom template integration]]: |
| + | div#paymentGatewaysDetails | ||
|} | |} | ||
{| | {| | ||
| − | |style="padding: 0px 0px | + | |style="padding: 0px 0px 5px 15px;"|6. If you are an experienced administrator, you may take advantage of an extra (hidden) tab '' 'Debug Logs'. '' See details of performed calculations with information on used conditions and the '' 'before' '' and '' 'after' '' prices.<br/> |
| + | In order to enter the debug logs section, you need to manually add to '' 'your_whmcs/your_admin_path/' '' URL:<br/> | ||
| + | addonmodules.php?module=PaymentGatewayCharges&mg-page=DebugLogs | ||
|} | |} | ||
| − | |||
| − | |||
{| | {| | ||
| − | |style="padding: | + | |style="padding: 0px 0px 15px 15px;"|7. Note that you may always change the default translations to more friendly names. Just open the ''english.php'' file, find lines: <br/> |
| + | $_LANG['InvoiceItemTextCharge'] = 'Payment Gateway Charge'; | ||
| + | $_LANG['addonCA']['charge']['chargeCheckout'] = 'Gateway Charge'; | ||
| + | $_LANG['addonCA']['charge']['discountCheckout'] = 'Gateway Discount'; | ||
| + | $_LANG['addonCA']['charge']['paymentGatewayCharges'] = 'Payment Gateway Charges'; | ||
| + | and change the content here: '' ='your_friendly_name' '' in any of the above if you only wish.<br/> | ||
| + | See below how a custom naming may present: | ||
|} | |} | ||
{| | {| | ||
| − | |style="padding: 0px 0px | + | |style="padding: 0px 0px 20px 25px;"|[[File:PGC33.png]] |
| − | + | ||
|} | |} | ||
{| | {| | ||
| − | |style="padding: 0px 0px | + | |style="padding: 0px 0px 30px 25px;"|[[File:PGC34.png]] |
| − | + | ||
| − | + | ||
|} | |} | ||
| + | ==How To Use Language Overrides== | ||
{| | {| | ||
| − | |style="padding: 0px | + | |style="padding: 10px 0px 15px 15px;"|'''Incorporating language customizations - the module readily accommodates language overrides, allowing you to tailor the language files to your preferences.'''<br/> The language file english.php remains unencoded and can be modified to suit your needs. However, it's recommended to avoid altering the core file itself, and instead, leverage the capability of using overrides.<br/> |
| − | + | ||
| − | + | ||
|} | |} | ||
{| | {| | ||
| − | |style="padding: 0px 0px | + | |style="padding: 0px 0px 15px 15px;"|Here's how to apply language overrides: |
| + | * Navigate to the ''~/langs/'' directory located within the following ''yourWHMCS/modules/servers/moduleName/langs/'' path. | ||
| + | * Within this directory, create a new file or duplicate the language file you intend to modify. For instance, if you wish to create an override for the English language, establish the following directory structure: | ||
| + | ''~/langs/overrides/english.php''. | ||
| + | * Open the newly created override file to edit its contents. | ||
| + | * At the beginning of the file, indicate the used code, for instance, you can use: '''<?php''' for PHP code. | ||
| + | * Adapt the file content according to your requirements. You can either selectively modify specific variables or opt to revise the entire content of the language file. | ||
| + | |||
| + | For example: | ||
| + | |||
| + | '''Original ''yourWHMCS/modules/servers/moduleName/langs/english.php:''''' | ||
| + | |||
| + | $_LANG['Search'] = 'Search'; | ||
| + | |||
| + | '''Override ''yourWHMCS/modules/servers/moduleName/langs/overrides/english.php:''''' | ||
| + | |||
| + | $_LANG['Search'] = 'Look for'; | ||
|} | |} | ||
{| | {| | ||
| − | |style="padding: 0px 0px | + | |style="padding: 0px 0px 15px 15px;"|By following these steps, you can seamlessly implement language customizations without altering the core language file, ensuring your changes will not be lost after every module update.<br/> |
| + | |||
| + | Remember that some of the modules have more than one language file, located under ''/addons'' and ''/servers'' paths. You may create the override files for both of them.<br/> Note that you do not need to paste all the original content of the lang file into the override file. Enter there only the lines that you wish to change, every other line will be fetched from the original module lang file.<br/> Consequently, the override lang file might include only one or just a few lines. | ||
|} | |} | ||
| + | |||
| + | =Update Instructions= | ||
{| | {| | ||
| − | |style="padding: | + | |style="padding: 10px 0px 30px 15px;"|An essential guidance through the process of updating the module is offered '''[https://www.docs.modulesgarden.com/How_To_Update_WHMCS_Module here]'''.<br/> |
| + | Ensure successful completion of the module update by carefully following each step, thereby preventing data loss or any unforeseen issues.<br/> Additionally, you will find a current list of supplementary actions necessary for a smooth update process there. | ||
|} | |} | ||
| + | ==Migration== | ||
{| | {| | ||
| − | |style="padding: | + | |style="padding: 10px 0px 30px 15px;"| Note that while using the 1.X version of our module, no data can be migrated. This is due to the fact that we did not implement the migration from any of the previous versions of Payment Gateway Charges, so the module needs to be configured from scratch.<br /> |
| − | 1. | + | '' '''Note:''' Remember that if you wish to switch to the latest version, you need to reissue your license first.'' |
| − | + | |} | |
| − | + | =Upgrade Guide= | |
| − | + | {| | |
| + | |style="padding: 10px 0px 30px 15px;"|Seeking a solution that offers greater flexibility, customization tailored to your precise needs, and unrestricted availability?<br/> There is an option that not only proves to be cost-effective in the long run but also includes prioritized support services, making it a truly valuable investment.<br/> | ||
| − | + | Opt for the [https://www.modulesgarden.com/products/whmcs/payment-gateway-charges#open-source-version Open Source version] of your Payment Gateway Charges For WHMCS module to unlock these benefits.<br/> Simply click on either the '''Get Source Code''' or '''Upgrade To Lifetime''' button found on the product's page in our client area to complete the one-step upgrade process, with a '''dedicated discount''' already applied.<br/> | |
| − | + | ||
| − | + | ||
| − | + | ||
| − | + | ||
| − | + | ||
| − | + | ||
| − | + | ||
| − | + | ||
| − | + | ||
| − | + | ||
| − | + | ||
| − | + | ||
| − | + | ||
| − | + | ||
| − | + | Follow a [https://www.docs.modulesgarden.com/How_To_Upgrade_WHMCS_Module comprehensive guide] covering the transition process, the advantages it brings, and step-by-step instructions on what to do next after the order has been successfully finalized. | |
| − | + | ||
| − | + | ||
| − | + | ||
|} | |} | ||
=Common Problems= | =Common Problems= | ||
{| | {| | ||
| − | |style="padding: 10px 0px | + | |style="padding: 10px 0px 10px 15px;"|'''1. When you have problems with connection, check whether your SELinux or firewall does not block ports.''' |
| + | |} | ||
| + | {| | ||
| + | |style="padding: 0px 0px 5px 15px;"|2. In the current version, if a promotional code is used by the client, the amount of charge will not be changed as it will continue to be calculated from the basing item price.<br/>The ability to recalculate the charge after using a promo code will be restored in future versions. | ||
| + | |} | ||
| + | {| | ||
| + | |style="padding: 0px 0px 5px 15px;"|3. In case none of your payment gateways is visible on the list, make sure that collations in the database are correctly configured.<br/> For more information on collations please refer to the WHMCS official [https://docs.whmcs.com/System_Health_Status documentation], point: '' 'Database Collations'.'' | ||
| + | |} | ||
| + | {| | ||
| + | |style="padding: 0px 0px 5px 15px;"|4. We do not recommend using '''Payment Gateway Charges For WHMCS''' with the '''Resellers Center For WHMCS''' module due to the fact that both of these modules manipulate the invoices, which are the source of serious conflicts. | ||
| + | |} | ||
| + | <div id="PayPal_Payments_Limitations"></div> | ||
| + | {| | ||
| + | |style="padding: 0px 0px 30px 15px;"|'''5. PayPal Payments Limitations'''<br/> | ||
| + | Take a look to learn about any predicted discrepancies connected with PayPal payments for recurring subscriptions and the limited functionality cases: | ||
| + | # '''Tax Support''' feature - this option ''('WHMCS Admin Area' → 'System Settings' → 'Tax Configuration' → 'General Settings')'' must be '''ALWAYS ON''', otherwise the PayPal subscriptions will be calculated incorrectly. | ||
| + | # '''Charge After Applying Prmo Code''' - no matter if the option is enabled or disabled ''('Payment Gateway Charges' → 'Gateways' → 'Settings')'', the module will behave as if it was '''turned on''' for recurring payments. | ||
| + | # Other inconsistencies might occur due to the fact that the module must rebuild invoices and calculate the charge for the first payment when the gateway is changed. In the case of PayPal recurring payments, a new charge is calculated the moment the button confirming the payment is pressed.<br/> Therefore, there will be discrepancies when you change the settings in the module but do not change the payment gateway to allow the invoice to be rebuilt ''(for example PayPal → Bank Transfer → PayPal).'' <br/>Possible scenarios:<br/> | ||
| + | #* ''Charge After Taxing:'' OFF, ''Apply Tax To Charge:'' OFF - '''no discrepancies detected''' | ||
| + | #* ''Charge After Taxing:'' ON, ''Apply Tax To Charge:'' OFF - discrepancies may appear | ||
| + | #* ''Charge After Taxing:'' ON, ''Apply Tax To Charge:'' ON - discrepancies may appear | ||
| + | #* ''Charge After Taxing:'' OFF, ''Apply Tax To Charge:'' ON - discrepancies may appear<br/> | ||
| + | '''''Important:''' It is advised to '''change the default payment gateway from PayPal to any other available one''', then the invoices will be rebuilt correctly for''' recurring payments'''.'' | ||
|} | |} | ||
Latest revision as of 13:58, 26 April 2024
Contents |
[edit] About Payment Gateway Charges For WHMCS
| Payment Gateway Charges For WHMCS allows you to charge additional fees and set up discounts for the usage of a chosen payment gateway. With this module you can easily set products, addons and TLDs that should require an additional fee, and select clients who will be exempt from fees and discounts. |
- Features:
| ✔ Display Charge Or Discount Rates Depending On Available Gateways |
| ✔ Display Calculated Rates For Chosen Gateways |
| ✔ Create Multiple Billing Rules For Gateways |
| ✔ Copy Existing Rules Between Gateways |
| ✔ Choose Calculation Method For Charge Or Discount Per Rule: |
| ✔ Percentage |
| ✔ Fixed Amount |
| ✔ Toggle Charging After Tax Application |
| ✔ Toggle Tax Application To Charge |
| ✔ Toggle Charging After Promo Code Application |
| ✔ Set Billing Calculation Methods: |
| ✔ Standard |
| ✔ Alternative (e.g. PayPal) |
| ✔ PayPalV2 |
| ✔ Create Multiple Steps With Minimum Invoice Value To Apply Fees And Discounts |
| ✔ Create Multiple Rule Activation Conditions For: |
| ✔ All Clients |
| ✔ Chosen Clients |
| ✔ Chosen Client Groups |
| ✔ Clients Or Groups With Specific Currencies |
| ✔ Clients Or Groups With Specific Countries |
| ✔ Perform Bulk Actions To Mark As Chargeable: |
| ✔ Clients |
| ✔ Products |
| ✔ Addons |
| ✔ TLDs (Register/Transfer/Renew) |
| ✔ Other: |
| ✔ Adding Funds To Credit Deposit |
| ✔ Late Fee Invoice Items |
| ✔ Custom Invoice Items |
| ✔ Toggle Visibility Of Charge Rates In Client Area |
| ✔ Define Charge Format Displayed On Invoice |
| ✔ Define Div Tag For Custom Order Template Integration |
| ✔ Toggle Redundant Logs Deletion After Defined Period |
| ✔ Access Module Logs |
- Supported Order Form Templates:
| ✔ Cloud Slider |
| ✔ Legacy Boxes |
| ✔ Legacy Modern |
| ✔ Premium Comparison |
| ✔ Pure Comparison |
| ✔ Standard Cart |
| ✔ Supreme Comparison |
| ✔ Universal Slider |
| ✔ Other Custom Templates |
- General Info:
| ✔ Integrated With Lagom One Step Order Form For WHMCS - Apply Custom Discounts And Fees Based On Payment Gateway Chosen During Ordering |
| ✔ Supports All Payment Gateways |
| ✔ Supports Mass Payment Functionality |
| ✔ Supports Prorata Billing |
| ✔ Integrated With All Order Form Templates |
| ✔ Multi-Language Support |
| ✔ Supports PHP 8.1 Back To PHP 7.4 |
| ✔ Supports WHMCS Themes "Six", "Twenty-One" And "Lagom WHMCS Client Theme" |
| ✔ Supports WHMCS V8.10 Back To WHMCS V8.6 |
| ✔ Requires ionCube Loader V12 Or Later |
| ✔ Easy Module Upgrade To Open Source Version |
[edit] Installation
| This tutorial will show you how to successfully install and configure Payment Gateway Charges For WHMCS. We will guide you step by step through the whole installation and configuration process. |
| 1. Log in to our client area and download the module. |

|
| 2. In the downloaded file you might find one or two packages that support different PHP versions. In the most recent versions of the module, you will find only one package that supports PHP 7.2 and later. |
| Previous updates of the module may contain two packages dedicated to various PHP versions. The first one that supports PHP 5.6 up to PHP 7.1, and the second one addressed to PHP 7.2 up to PHP 7.4. |

|
| Note: You can check the current PHP version in your WHMCS. To do so, proceed to 'Utilities' → 'System' → 'PHP Info'. |
| 3. Extract the package and upload its content into the main WHMCS directory.
The content of the package to upload should look like this. |
| 4. When installing Payment Gateway Charges For WHMCS for the first time, you have to rename the 'license_RENAME.php' file. The file is located in 'your_whmcs/modules/addons/PaymentGatewayCharges/license_RENAME.php'. Rename it from 'license_RENAME.php' to 'license.php'. |

|
| 5. In order to configure your license key, you have to edit the previously renamed 'license.php' file. Enter your license key between the quotation marks as presented on the following screen. You can find your license key in our client area → 'My Products'. |

|
| 6. Now, set up the 'storage' folder as recursively writable. This folder is available at 'your_whmcs/modules/addons/PaymentGatewayCharges/' . |

|
| 7. Now you have to activate the module in your WHMCS system. Log in to your WHMCS admin area. Go to 'Setup' → 'Addon Modules'. Afterwards, find 'Payment Gateway Charges' and press the 'Activate' button. |

|
| 8. In the next step you need to permit access to this module. To do so, click on the 'Configure' button, tick 'Full Administrator' and press 'Save Changes'. |

|
| 9. Congratulations, you have just successfully installed Payment Gateway Charges For WHMCS! You can now access your module from 'Addons' → 'Payment Gateway Charges'. |

|
[edit] Configuration and Management
| Payment Gateway Charges For WHMCS allows your customers to manage additional charges in your WHMCS system. In this short guide we will present you the possibilities of our module. |
[edit] Gateways Settings
| Once you access the addon, you will be moved directly to its configuration. Here you can decide for which gateways the additional charges or discounts will be applied, according to their settings and rules. Start by selecting 'Settings' . |

|
Here you can define the following settings:
|

|
'Charge After Taxing' and 'Apply Tax To Charge' explanation:
The 'Charge After Taxing' and 'Apply Tax To Charge' options are disabled.
The charge with enabled option 'Charge After Taxing' and disabled option 'Apply Tax To Charge' .
The 'Charge After Taxing' and 'Apply Tax To Charge' options are enabled.
The charge with enabled option 'Apply Tax To Charge' and disabled option 'Charge After Taxing' . |
Billing types explanation:
Note: when one of these PayPal methods is selected, then this billing type will be applied to every activated payment gateway, not only PayPal. |
| Let's see how the 'Standard' and 'Alternative (e.g. PayPal model)' calculation methods differ in practice. Please notice at the table below that the final price which a client is obliged to pay and the amount that will be sent e.g. to PayPal slightly vary between the two presented methods. |
|
E.g.:
|
| So, the total amount to be paid by the client would be $130.20 for the standard method and $130.53 for the alternative, PayPal method.
Now, let us see in reverse how these total fee amounts would look like if both were the result of calculations using an alternative method only. |
|
| So, if you are using PayPal and want to receive a full $124.00 amount for a product with a 5% gateway fee, a payment of $130.53 should be sent to PayPal gateway. $6.53 will cover PayPal fees which is 5% of the total amount to be paid by the client. In case of the $130.20 amount calculated using the standard method, the 5% PayPal fee would be $6.51, which, after deducting from the total, would result in $123.69 amount for the product itself. |
|
[edit] Gateways Rules
|
| In the rules section, you can set a percentage or a fixed amount of billed charges or discounts. To set the rules, first press 'Show Rules' located next to the chosen payment gateway. |

|
| Next, press the 'Add Rule' button. |

|
| Here you can name the rule and define a charge for the gateway in a percent form, fixed amount or both. |

|
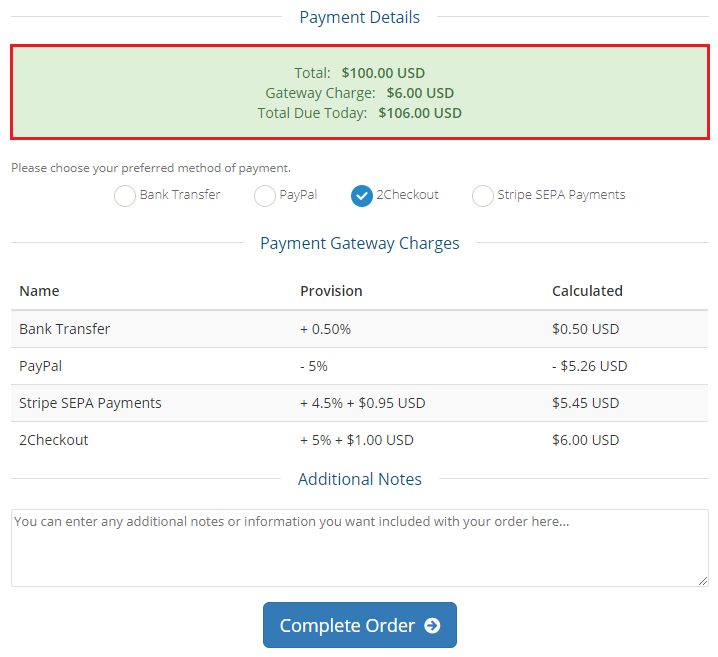
| Important: At least one gateway condition must be added to the rule for it to work. You can find a description of adding conditions to rules here. The following examples assume that gateway conditions have already been created. The result of the above rule will be a 5% charge of the product price (which in this example is $100.00) with additional $1.00 charge for the selected 2Checkout payment gateway (using 'Standard' billing type method). |

|
| You can also set negative amounts. Then, a discount will be applied to a chosen gateway instead of charging an additional fee. |

|
| The result of the above rule will be a 5% discount of the product price (which in this example is $100.00) with additional $1.00 reduction for the selected 2Checkout payment gateway (using 'Standard' billing type method). |

|
[edit] Steps Rules
| You can also add additional steps to your rules and define above which minimum amount on the invoice the additional fee or set discount will be applied. To start, press 'Show Steps' next to the created rule. |

|
| Now, you need to add your first step. Press the 'Add Step' button. |

|
| To create a rule, enter the percentage or fixed amount of the desired charge or discount. Then, specify the minimum required amount that will trigger the rule. |

|
| You can create as many steps as you want. Each of these step rules will be activated only after the minimum invoice amount has been achieved. Note that only one step rule can be active at a time. Also, if none of the step rules is met, then the main rule created in the previous section will be applied. In this example, it is the rule for orders below $50.00 amount. |

|
[edit] Gateways Conditions
| You can also specify multiple conditions that will affect activation of the rule. Note that at least one condition has to be created to make the rule applicable. Start by choosing the 'Show Conditions' button next to the selected rule. |

|
| There is one default condition that has been created when adding the first gateway. You may modify it, delete and create new conditions here. |

|

|
| Press the 'Add Condition' button to create a new condition within this gateway. |

|
| You can select one of several conditions that will determine the activation of the rule. Choose between the following types:
|

|
| Important: some conditions may be combined with one another to provide more possibilities for triggering the rule, but they should not overlap. If you encounter a validation error when adding a condition, make sure that there are no conflicts with conditions configured under this or other rules. |

|
| Once you have ready rules and conditions prepared per gateway, you may either configure them per every existing gateway or simply copy all the settings to another gateway. Press the marked button and then select from which gateway you want to copy the rules together with its steps and conditions. Note: Keep in mind that if there were any rules in the gateway, all of them will be removed and overwritten by the new, copied settings. |

|

|
[edit] Management of Items
| To enable or disable gateway charges and discounts for products, addons or TLDs, go to the 'Items' section. Then, select the category of items and simply toggle the 'chargeable' status next to the selected item. Note: For convenience, all new and already existing items are set to 'chargeable' by default. |

|
| You can also toggle multiple 'chargeable' statuses at once by selecting items and using bulk action. |

|
[edit] Other Options
Enable or disable gateway charges and discounts for selected options
Note: Again, all available options are set to 'chargeable' by default. |

|
| You can also toggle multiple 'chargeable' statuses at once by selecting items and using bulk action. |

|
[edit] Management of Clients
| To enable or disable gateway charges and discounts for your customers, go to the 'Clients' section. Then, simply toggle the 'chargeable' status next to the selected client. Note: For convenience, all new and already existing clients items are set to 'chargeable' by default. |

|
| You can also toggle multiple 'chargeable' statuses at once by selecting clients and using bulk action. |

|
[edit] Settings
In this section you can customize the basics of the module's settings such as:
|

|
[edit] Logs
| In the logs section you can see which invoices have been calculated with additional discounts or charges resulting from the module's configuration. |

|
| Note that you can also delete multiple logs at once. |

|
[edit] Custom Template Integration
| To add an integration to your custom template, first you need to choose the place where you want the charges table to be placed. It is recommended to position it under a unique tag, e.g.: div#a_unique_element_in_which_the_table_will_be_located Now, go to the module settings and select 'Use Charges Table Tag' from the 'Select Template' dropdown menu. |

|
| Next, you need to learn the name of your custom orderform template. Note that you can find all orderforms templates in 'yourWHMCS/templates/orderforms/' location. For this example we will assume that your custom oderform template is simply named as 'custom_template' .
1. The code between lines 10-19 to update the charge values:
{/literal}{elseif $template eq 'custom_template'}{literal}
    $('div#where_the_charge_price_value_is_replaced').html(data.data.string);
2. The code between lines 42-75 provides you with a possibility to define table display:
{/literal}{elseif $template eq 'custom_template'}{literal}
    $('input[name=applycredit]').on('change', function(event){ // event to check if the 'Apply Credit' value has been changed
          mgLoadCharge();
    });
    $('input[name=paymentmethod]').on('change', function(event){ // event to check if the 'Payment Method' has been changed
          mgLoadCharge();
    });
    $('select[name=country]').on('change', function(event){ // event to check if the 'Country' value has been changed
          mgLoadCharge();
    });
After completing this procedure and applying the right code, you should have a working layout in your client area. |
[edit] Tips
| 1. For your convenience, payment gateway charges are enabled by default for clients, products, addons and domains. |
| 2. Taxes will not be applied to gateway discount rules even if 'Apply Tax To Charge' option is enabled. |
| 3. You can easily change all names of module elements displayed in the client area, admin area or invoices in a language file. To do so, go to the 'your_whmcs/modules/addons/PaymentGatewayCharges/langs' directory, open the language file (e.g. english.php) and edit desired records. |
| 4. In case there is more than one rule that matches a single client, the one with the most precise conditions, concerning that client, will be taken into account when calculating the final discount. |
5. If you have installed the Lagom WHMCS theme, use the following 'Charges Table Tag' for the custom template integration:
div#paymentGatewaysDetails |
| 6. If you are an experienced administrator, you may take advantage of an extra (hidden) tab 'Debug Logs'. See details of performed calculations with information on used conditions and the 'before' and 'after' prices. In order to enter the debug logs section, you need to manually add to 'your_whmcs/your_admin_path/' URL: addonmodules.php?module=PaymentGatewayCharges&mg-page=DebugLogs |
7. Note that you may always change the default translations to more friendly names. Just open the english.php file, find lines: $_LANG['InvoiceItemTextCharge'] = 'Payment Gateway Charge'; $_LANG['addonCA']['charge']['chargeCheckout'] = 'Gateway Charge'; $_LANG['addonCA']['charge']['discountCheckout'] = 'Gateway Discount'; $_LANG['addonCA']['charge']['paymentGatewayCharges'] = 'Payment Gateway Charges'; and change the content here: ='your_friendly_name' in any of the above if you only wish. |

|

|
[edit] How To Use Language Overrides
| Incorporating language customizations - the module readily accommodates language overrides, allowing you to tailor the language files to your preferences. The language file english.php remains unencoded and can be modified to suit your needs. However, it's recommended to avoid altering the core file itself, and instead, leverage the capability of using overrides. |
Here's how to apply language overrides:
~/langs/overrides/english.php.
For example: Original yourWHMCS/modules/servers/moduleName/langs/english.php: $_LANG['Search'] = 'Search'; Override yourWHMCS/modules/servers/moduleName/langs/overrides/english.php: $_LANG['Search'] = 'Look for'; |
| By following these steps, you can seamlessly implement language customizations without altering the core language file, ensuring your changes will not be lost after every module update. Remember that some of the modules have more than one language file, located under /addons and /servers paths. You may create the override files for both of them. |
[edit] Update Instructions
| An essential guidance through the process of updating the module is offered here. Ensure successful completion of the module update by carefully following each step, thereby preventing data loss or any unforeseen issues. |
[edit] Migration
| Note that while using the 1.X version of our module, no data can be migrated. This is due to the fact that we did not implement the migration from any of the previous versions of Payment Gateway Charges, so the module needs to be configured from scratch. Note: Remember that if you wish to switch to the latest version, you need to reissue your license first. |
[edit] Upgrade Guide
| Seeking a solution that offers greater flexibility, customization tailored to your precise needs, and unrestricted availability? There is an option that not only proves to be cost-effective in the long run but also includes prioritized support services, making it a truly valuable investment. Opt for the Open Source version of your Payment Gateway Charges For WHMCS module to unlock these benefits. Follow a comprehensive guide covering the transition process, the advantages it brings, and step-by-step instructions on what to do next after the order has been successfully finalized. |
[edit] Common Problems
| 1. When you have problems with connection, check whether your SELinux or firewall does not block ports. |
| 2. In the current version, if a promotional code is used by the client, the amount of charge will not be changed as it will continue to be calculated from the basing item price. The ability to recalculate the charge after using a promo code will be restored in future versions. |
| 3. In case none of your payment gateways is visible on the list, make sure that collations in the database are correctly configured. For more information on collations please refer to the WHMCS official documentation, point: 'Database Collations'. |
| 4. We do not recommend using Payment Gateway Charges For WHMCS with the Resellers Center For WHMCS module due to the fact that both of these modules manipulate the invoices, which are the source of serious conflicts. |
| 5. PayPal Payments Limitations Take a look to learn about any predicted discrepancies connected with PayPal payments for recurring subscriptions and the limited functionality cases:
Important: It is advised to change the default payment gateway from PayPal to any other available one, then the invoices will be rebuilt correctly for recurring payments. |