Password Manager For WHMCS
From ModulesGarden Wiki
(Difference between revisions)
|
|
| Line 137: |
Line 137: |
| | {| | | {| |
| | |style="padding: 10px 0px 15px 15px;"|1.'' 'Display Products Access Details' '' - If enabled, access details to clients products and services will be displayed at client area → '' 'Password Manager' ''.<br /> | | |style="padding: 10px 0px 15px 15px;"|1.'' 'Display Products Access Details' '' - If enabled, access details to clients products and services will be displayed at client area → '' 'Password Manager' ''.<br /> |
| − | 2. '' 'Exclude Client Groups' '' - This field allows you to define which group of clients can not see access details enabled through marking '' 'Allow Products Login Details' ''.<br /> | + | 2. '' 'Exclude Client Groups' '' - Disable display of products access details for client groups which IDs are entered in '' 'Exclude Client Groups' '' field.<br /> |
| − | 3. '' 'Exclude Products' '' - By using this field, you can define which products details will not be displayed at client area → '' 'Password Manager' ''.<br /> | + | 3. '' 'Exclude Products' '' - Disable display of access details to products which IDs are entered in '' 'Exclude Products' '' field.<br /> |
| | 4. '' 'Exclude Clients' '' - Disable product access details at client area → '' 'Password Manager' '' for selected clients. | | 4. '' 'Exclude Clients' '' - Disable product access details at client area → '' 'Password Manager' '' for selected clients. |
| | |} | | |} |
Revision as of 14:01, 8 January 2014
| Password Manager For WHMCS allows you to store your passwords and share passwords safely inside your staff and with your clients.
|
| ✔ Share Access Details With Multiple Clients
|
| ✔ Share Access Details With Administrators With Specific Admin Roles
|
| ✔ Store Personal Access Details, Which Are Only Visible To You
|
| ✔ Stores Access Details In Encrypted Format
|
| ✔ Extended Permissions For Admin Role - Allow Access To All Non-Personal Passwords
|
| ✔ Revoke Access (Visibility) Of The Password From Clients/Administrators - With One Click
|
| ✔ Normal Administrators With 'Configure Addon Modules' Permission Are Unable To Change Extended Permissions
|
| ✔ Adding Note To The Password
|
| ✔ Provides A Colorized Display Of Access Details Within The Admin Area
|
| ✔ Links To The Website Or The Login Page Of The Password
|
| ✔ Displays Owner Of Password
|
| ✔ Supports WHMCS V5 and Later
|
Installation
This tutorial will show you how to successfully install Password Manager For WHMCS.
We will guide you step by step through the whole installation and configuration process.
|
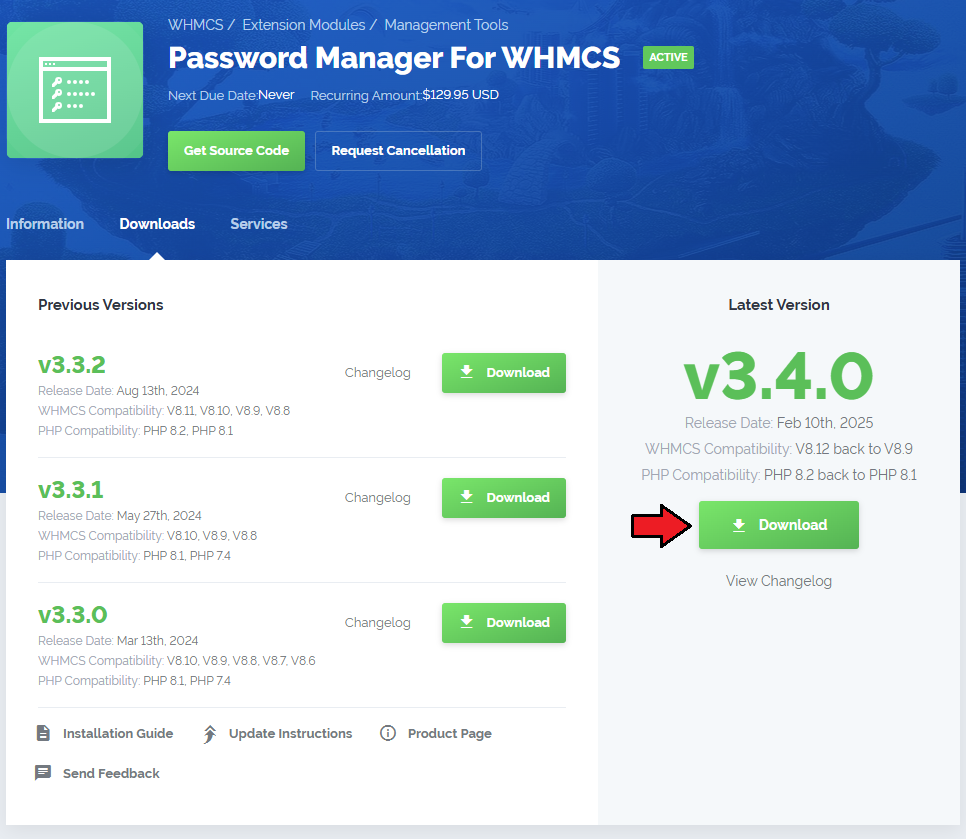
| 1. Log in to your client area and download Password Manager For WHMCS.
|
2. Upload and extract the module into the main WHMCS directory.
Files in your WHMCS directory should look like this.
|
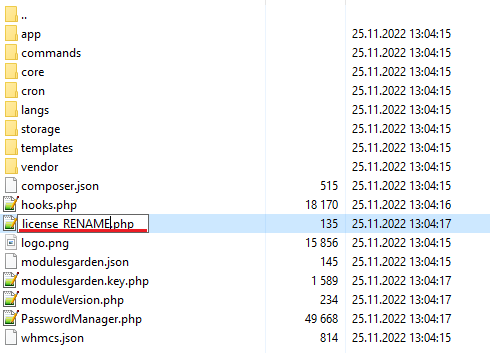
3. When you install Password Manager for the first time you have to rename 'license_RENAME.php' file.
File is located at 'modules/addons/PasswordManager/license_RENAME.php' . Rename it from 'license_RENAME.php' to 'license.php' .
|
4. In order to configure your license key, you have to edit a previously renamed 'license.php' file.'
Enter your license key between quotation marks as presented on the following screen. You can find your license key at your client area → 'My Products' .
|
5. Now you have to activate the module in your WHMCS system.
Log in to your WHMCS admin area. Go to 'Setup' → 'Addon Modules' . Afterwards, find 'Password Manager' and press 'Activate' button.
|
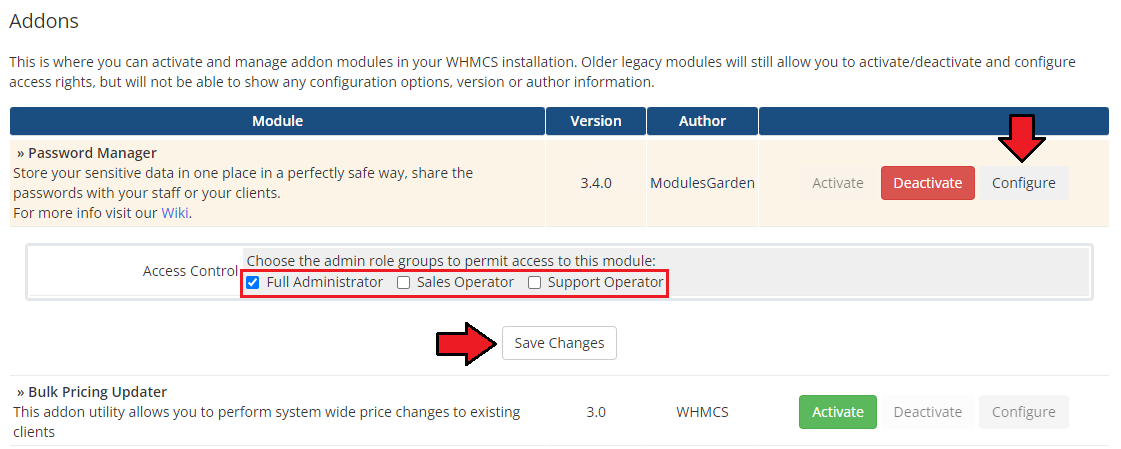
6. In the next step you need to permit access to this module.
To do so, click on 'Configure' button, select administrator groups which should have access to this addon and press 'Save Changes' .
|
7. You have just successfully installed Password Manager For WHMCS!
You can access your module at 'Addons' → 'Password Manager' .
|
Configuration and Management
Password Manager For WHMCS allows to share passwords in your WHMCS.
In this short guide we will present you the possibilities of our module.
|
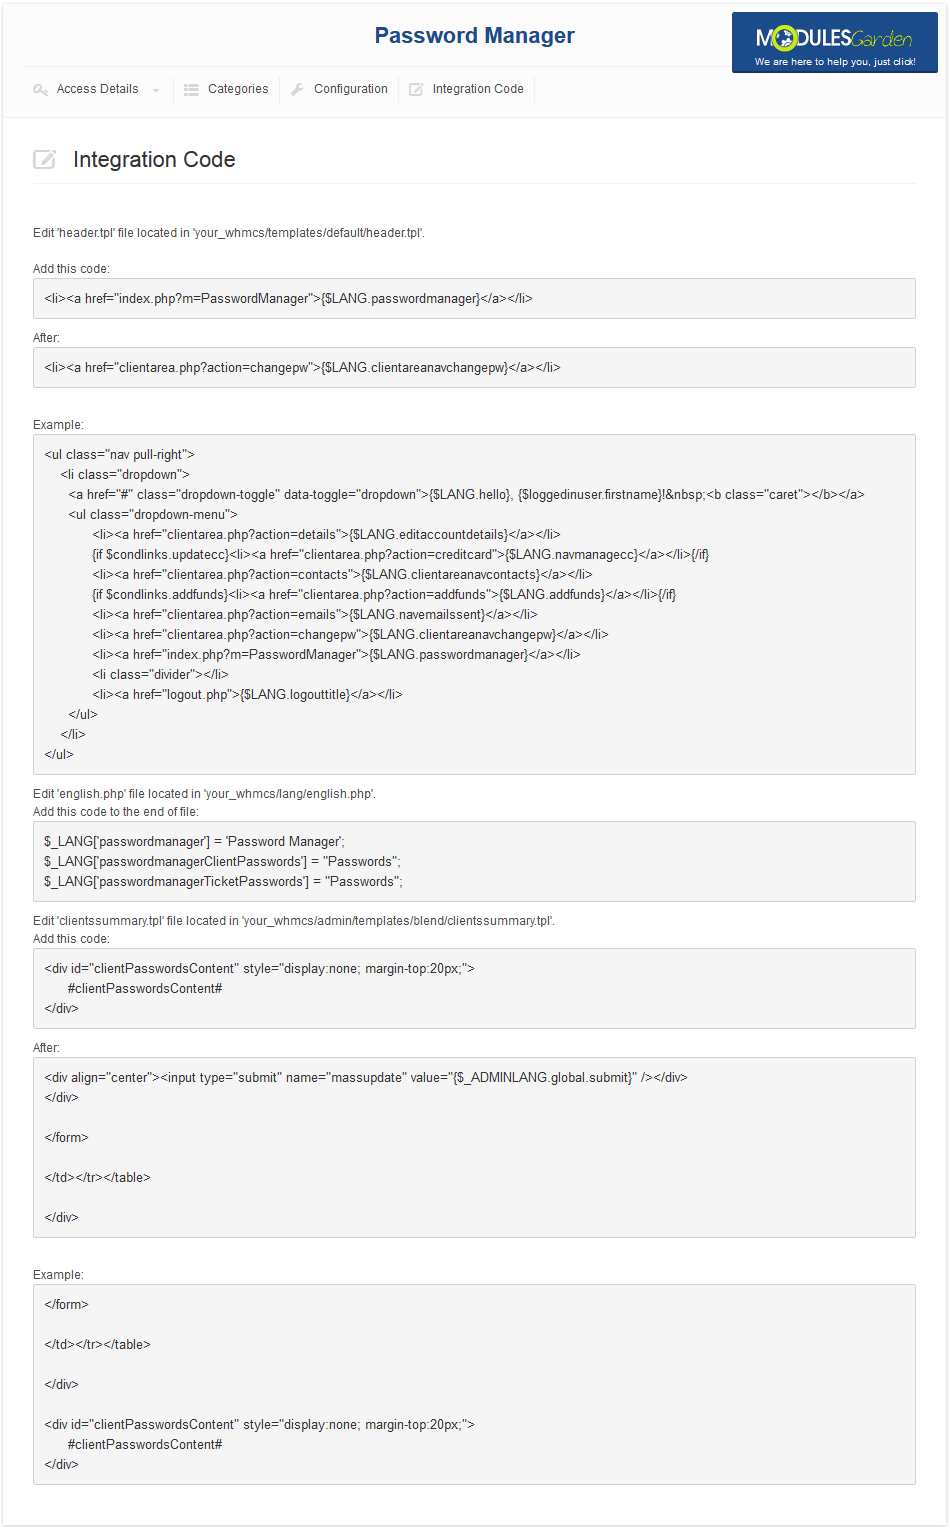
Integration Code
Integration described below is not obligatory.
Module allows your customers to view passwords shared with them and manage their own passwords.
We implemented easy integration which will add button leading to password management at the client area.
You can find integration code at 'Addons' → 'Password Manager' → 'Integration Code' .
|
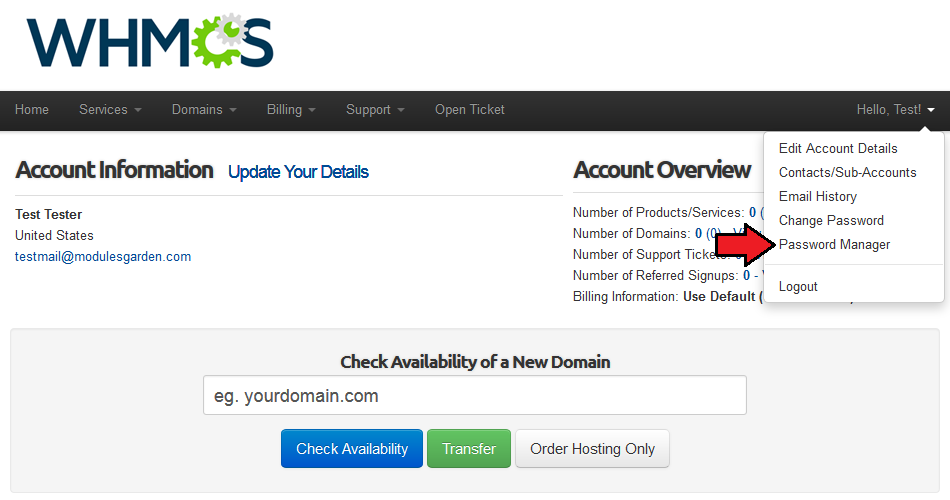
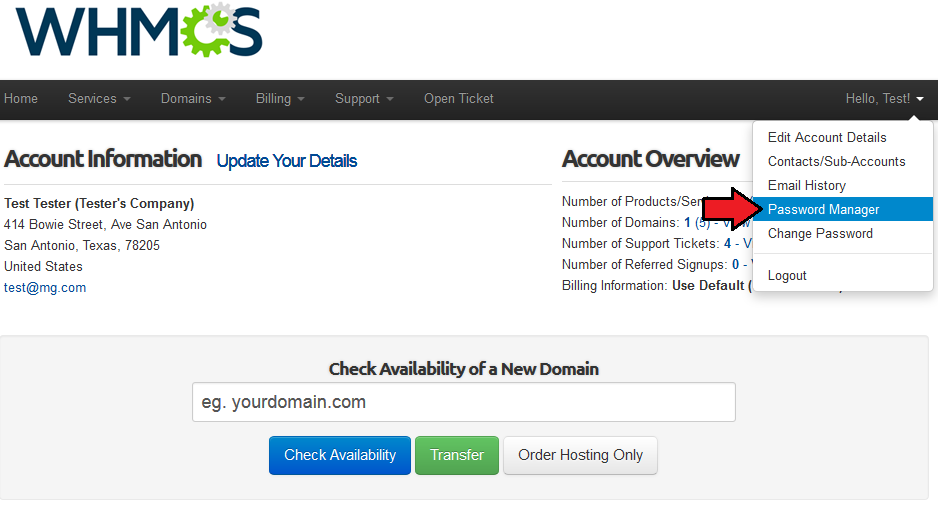
| In the client area you will find button marked on the following screen.
|
Configuration
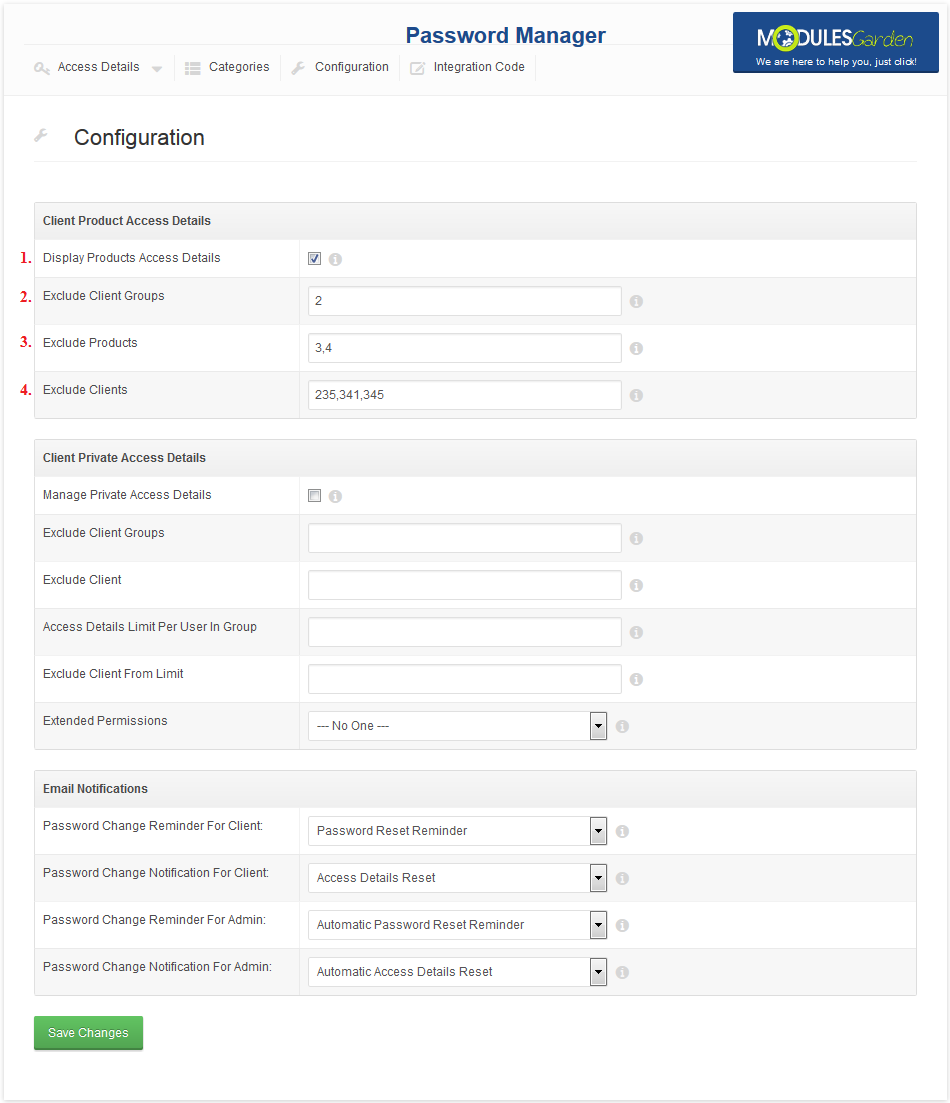
At 'Configuration' tab you can define if your clients can see their products access details while excluding specific products, clients or client groups.
You can also decide, if your clients can manage their private access details while excluding right for selected clients or client groups.
Additionally, you are able to set limits to number of access details created by your clients.
|
Products Access Details
1. 'Display Products Access Details' - If enabled, access details to clients products and services will be displayed at client area → 'Password Manager' .
2. 'Exclude Client Groups' - Disable display of products access details for client groups which IDs are entered in 'Exclude Client Groups' field.
3. 'Exclude Products' - Disable display of access details to products which IDs are entered in 'Exclude Products' field.
4. 'Exclude Clients' - Disable product access details at client area → 'Password Manager' for selected clients.
|
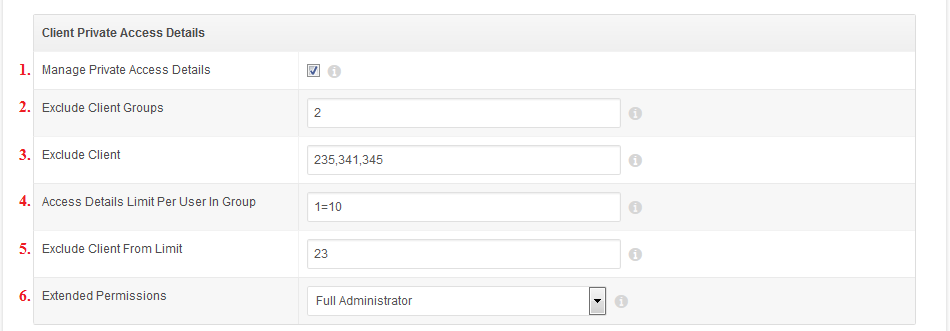
Private Access Details
1. 'Manage Private Access Details' - Allow to manage private passwords by clients.
2. 'Exclude Client Groups' - Disable private access details management for selected client groups.
3. 'Exclude Client' - Disable management of private access details for typed clients.
4. 'Access Details Limit Per User In Group' - Allows to limit private access details quantity per client. You have to enter it in format 'client group ID=access details limit'.
5. 'Exclude Client From Limit' - Disable access details limit for selected clients.
6. 'Extended Permissions' - Allows to view clients access details with checked 'Visibility For Admins:' .
|
Add Access Details
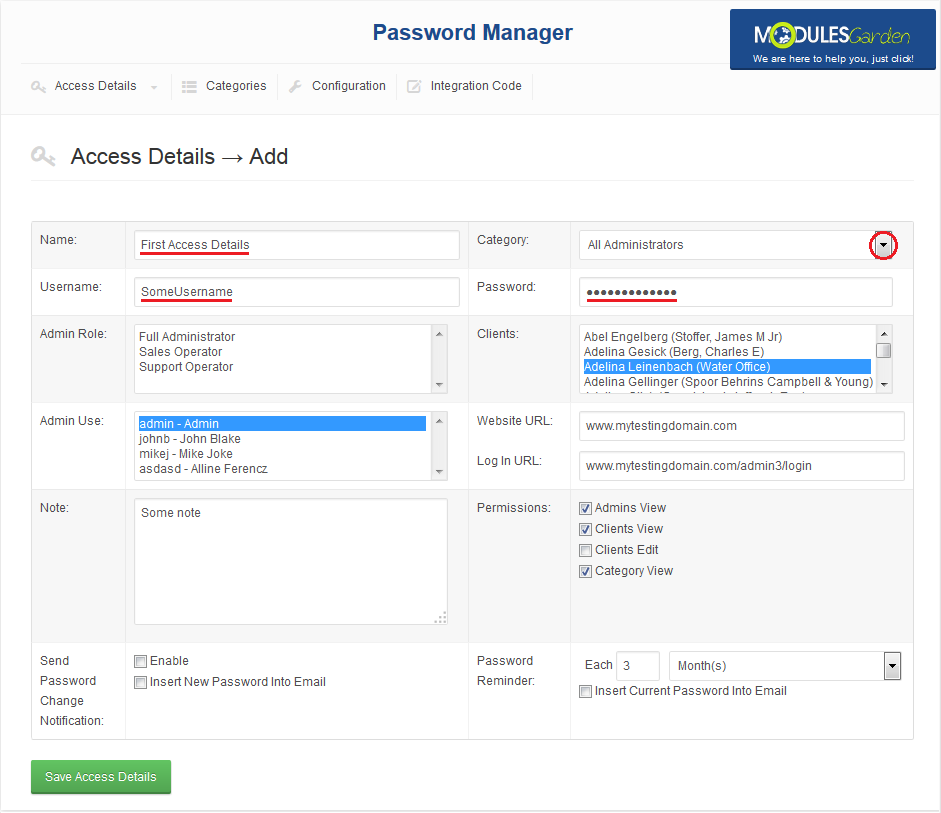
'Add Access Details' tab allows you to create new access details and decide who can view it.
Into 'Name' textbox enter name of password you are creating and enter access details into 'Username' and 'Password' .
|
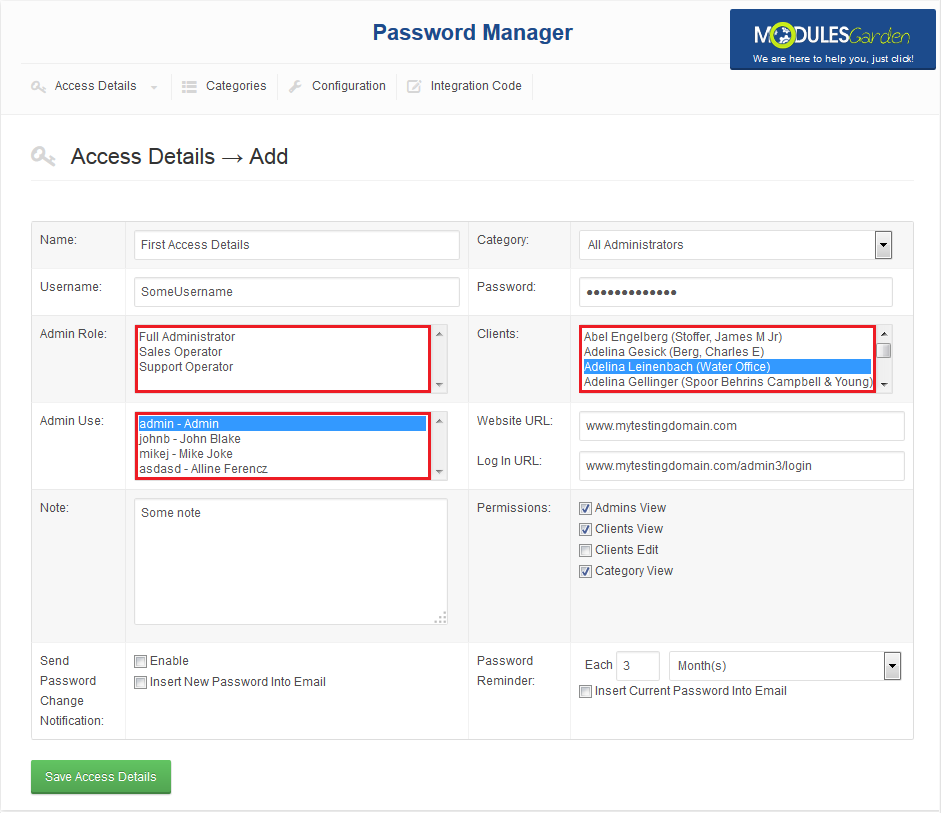
Afterwards select 'Admins' , 'Admin Groups' and 'Clients' which should see these access details (Ctrl + click to mark more than one entry).
Note: There is disjunction relation between 'Admins' and 'Admin Groups'.
For example, if you assign admins X and Z and admin group Y in which admin X is, then all admins assigned to group X will see these access details as well as admin Z.
|
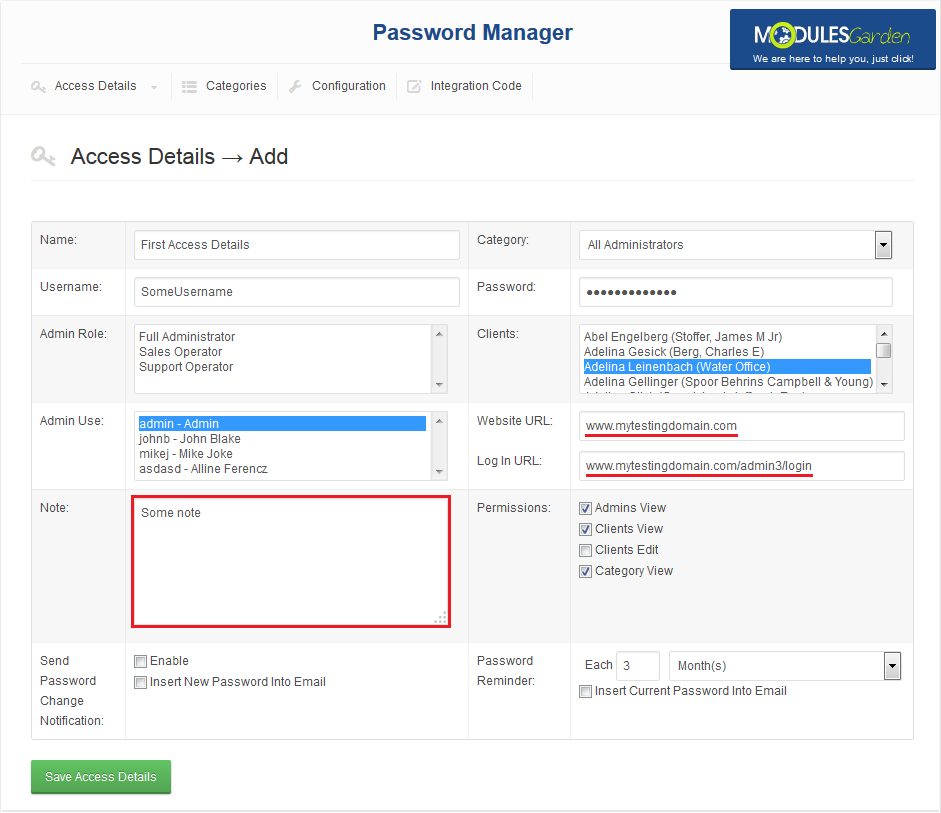
You can also make your logging in easier through entering website URL and website logging in URL consecutively into 'Website' and 'Login URL' .
To leave a note associated to access details you are creating, type it into 'Note' textbox.
|
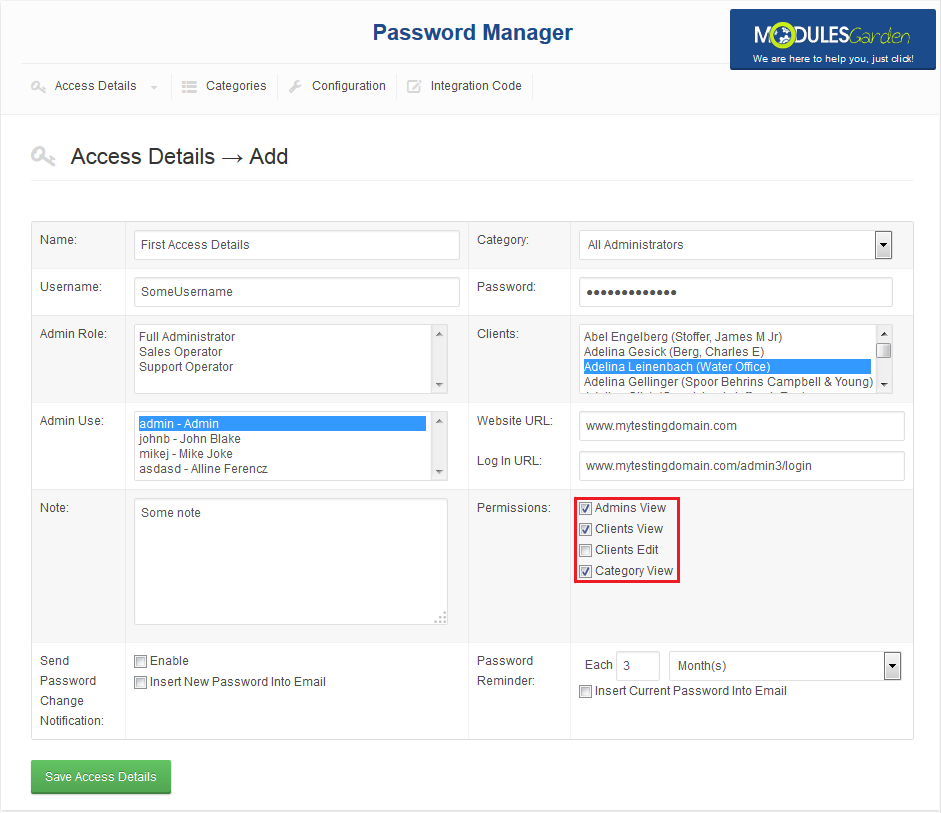
At 'Visibility' you can define which functionalities are available.
Press 'Save Changes' button to confirm creation of access details.
Note: If 'Clients' are left unchecked, your clients will not see this access details even if he is assigned at 'Clients' option.
|
Access Details List
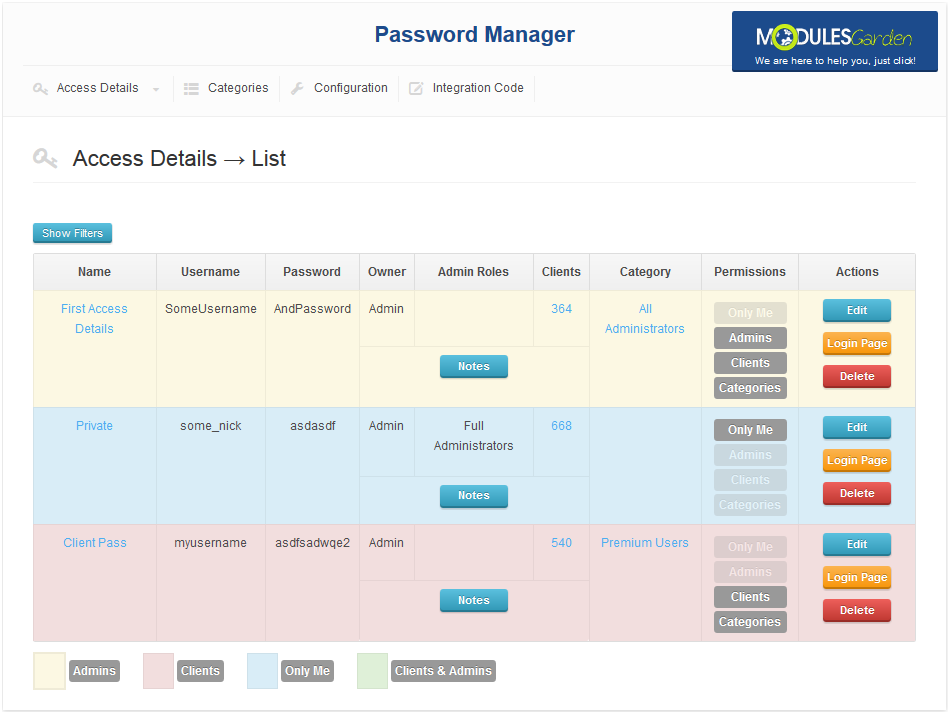
You can find your access details and those shared with you at 'Access Details List' tab.
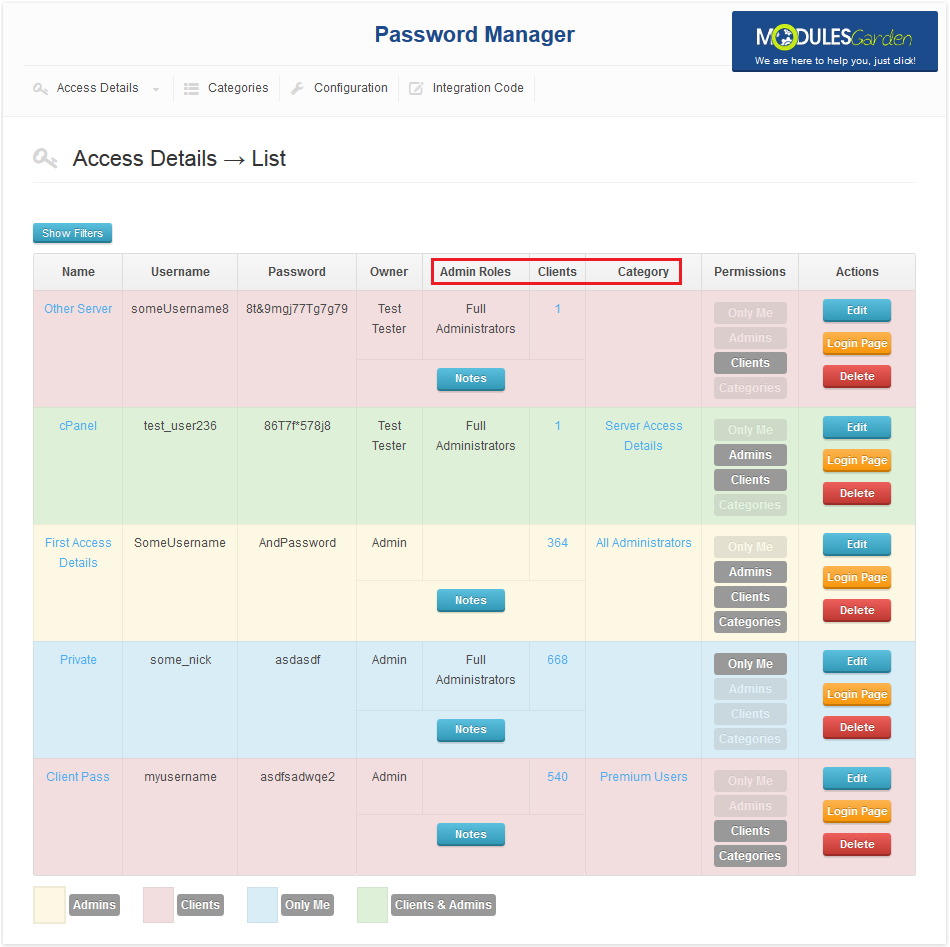
As you can see, password visibility is bounded with color.
Next to access details you can find information about its owner, shared admins and clients.
|
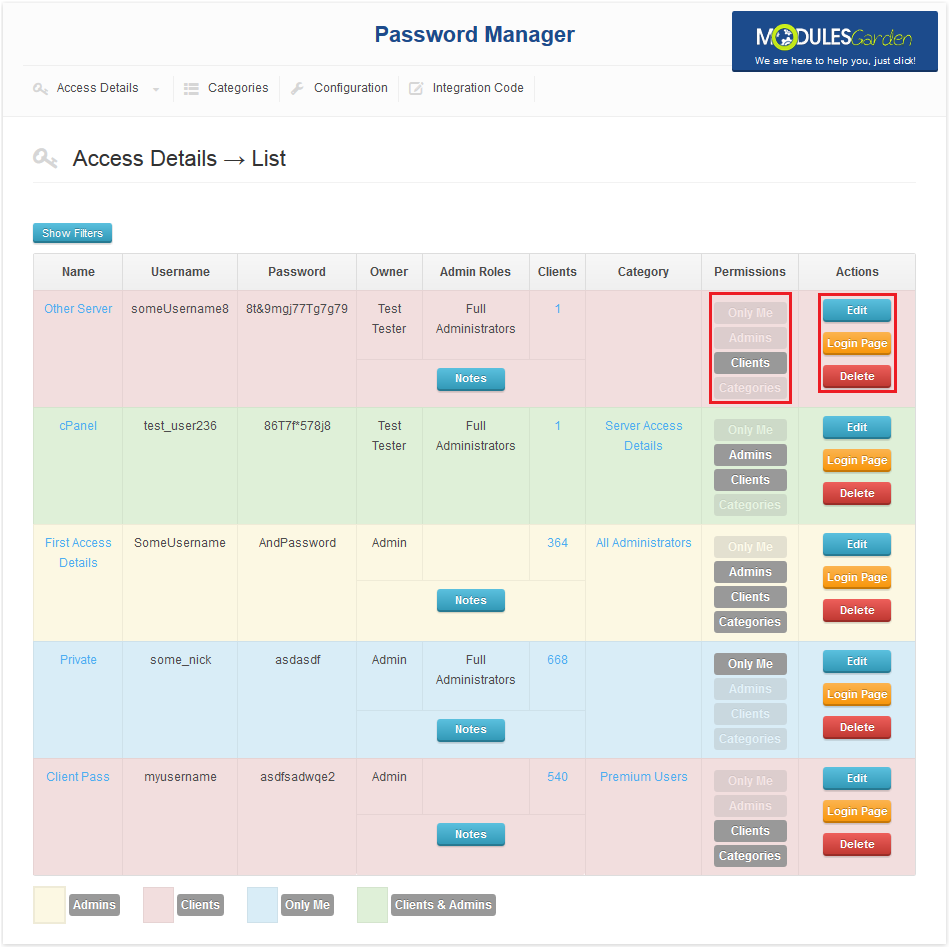
You can also switch access details visibility with one click and manage them through 'Edit' and 'Delete' buttons.
If you entered website URL and URL to login page, you can easily jump to them.
You can jump to these places through pressing on access details name (jump to website URL) or 'Login Page' button (jump to login page).
|
Client Area
Your clients can access client area password management through 'Password Manager' button in navigation bar.
If you did not entered integration code, they have to add '/index.php?m=PasswordManager' to WHMCS URL in order to access 'Password Manager' .
|
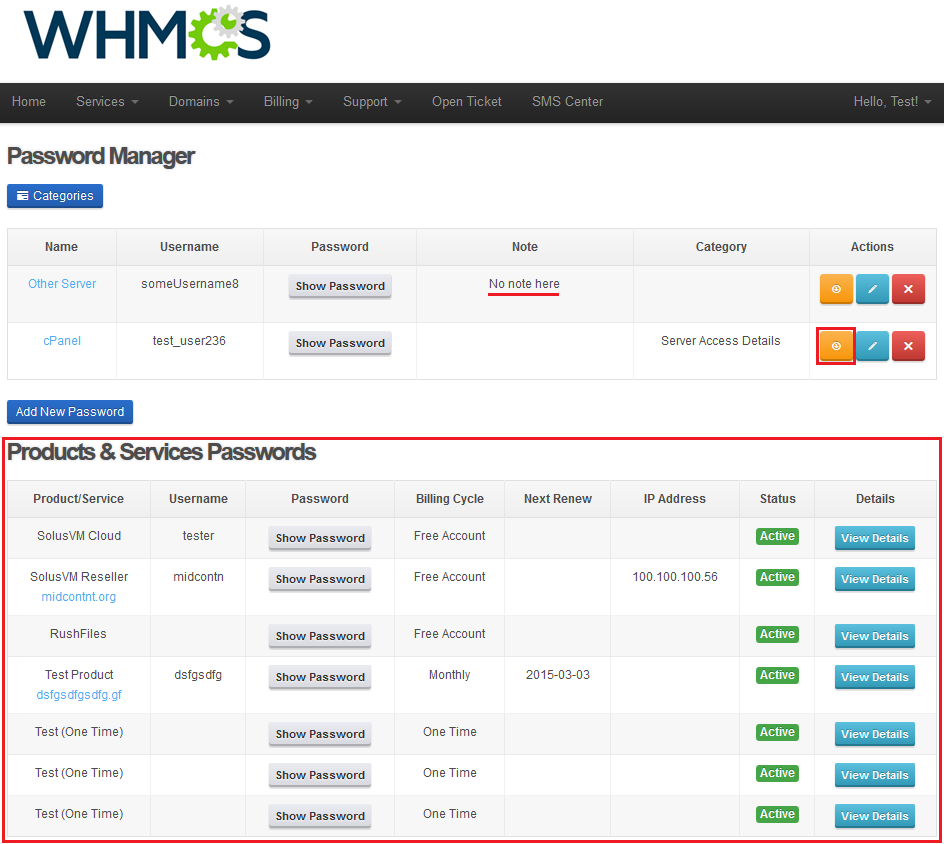
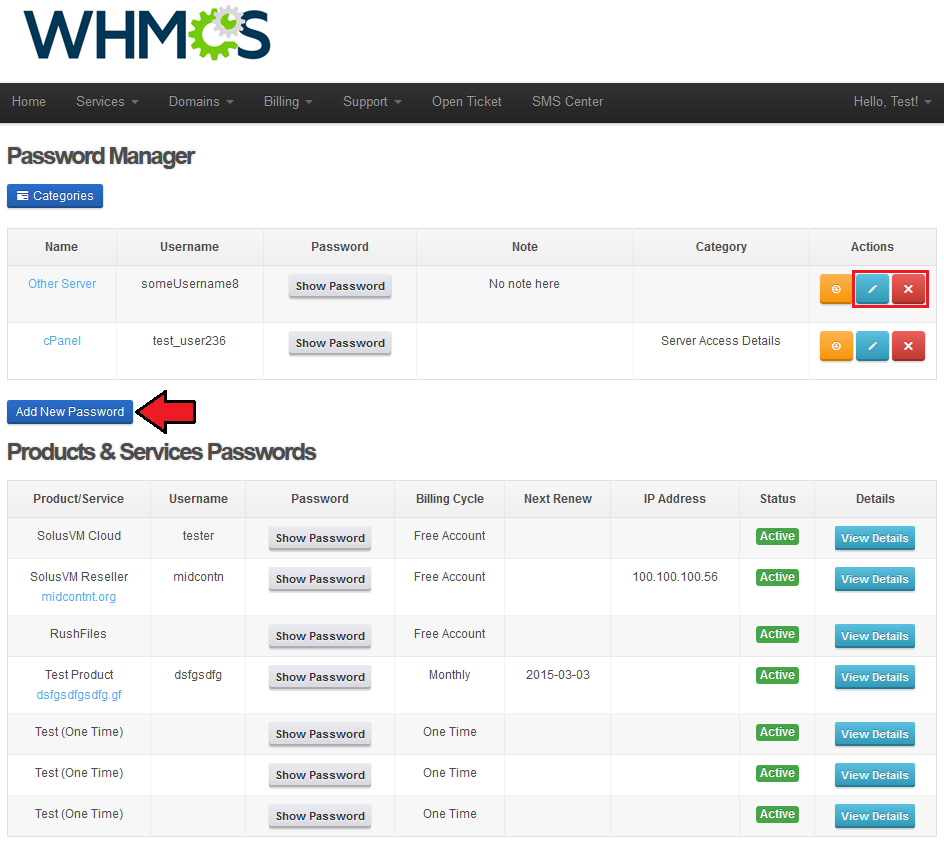
At 'Password Manager' , your clients can view access details shared with them.
They can also go to access details login page (through pressing 'Login Page' button) or view a note assigned to access details.
If you marked 'Display Products Access Details' , your clients can also view access details to all of their active products.
|
If you enabled 'Manage Private Access Details' your clients can also create and share their own access details.
To create access details they need to press 'Add New Password' button as shown on the following screen.
Clients can manage their own access details through 'Edit' and 'Remove' buttons.
|
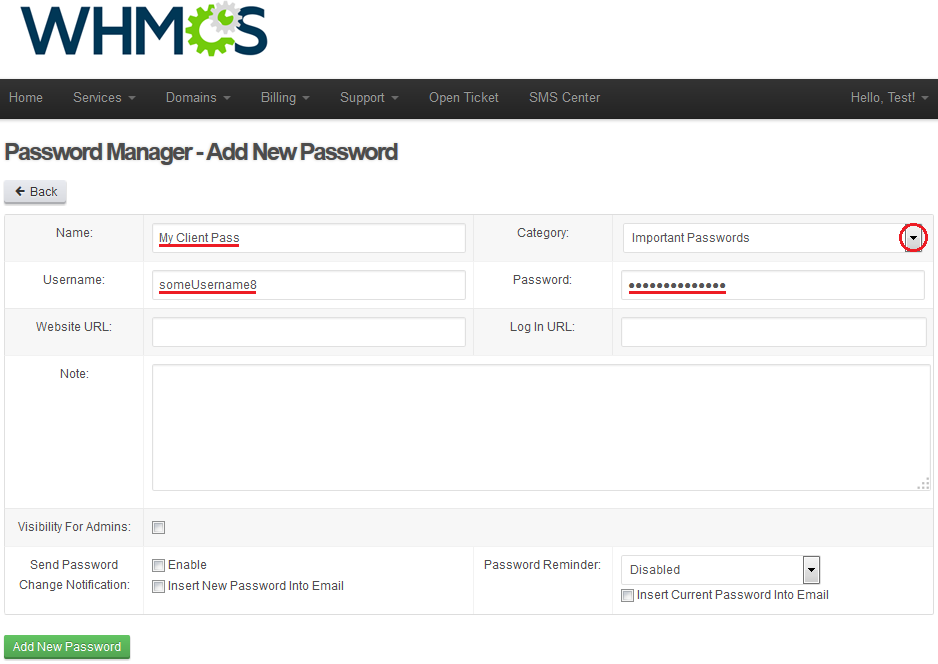
Adding Access Details
Creating access details from client area is simple.
It starts from typing its name and entering access details into 'Username' and 'Password' .
|
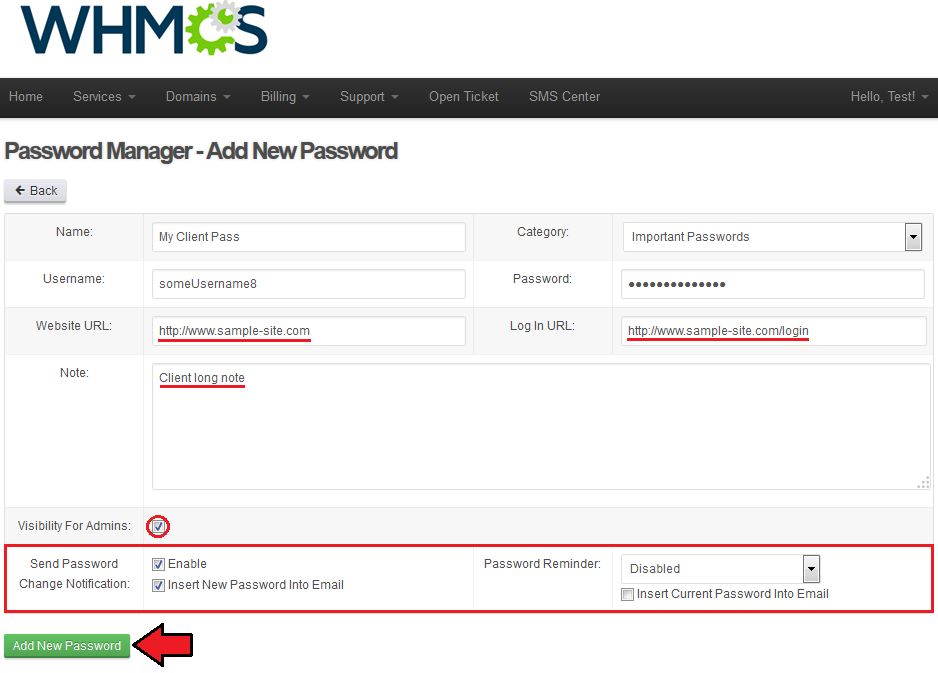
Afterwards, you can type website URL and website login URL as well as leave a note.
If there is an admin group with 'Extended Permissions' , your clients can make his access details visible for this admin group.
It can be done through marking 'Visibility For Admins' checkbox.
Setting up URLs, note and visibility for admins is optional.
Clients confirm creation of access details through pressing 'Add New Password' button.
|
Tips
Common Problems
| 1. When you have problems with connection, check whether your SELinux or firewall is not blocking ports.
|
