OX WHMCS Module
From ModulesGarden Wiki
(Difference between revisions)
|
|
| Line 159: |
Line 159: |
| | =Installation and Configuration= | | =Installation and Configuration= |
| | {| | | {| |
| − | |style="padding: 10px 0px 30px 15px;"|'''This tutorial will show you how to successfully install and configure [https://www.modulesgarden.com/products/whmcs/ox-whmcs-module OX WHMCS Module.]'''<br /> | + | |style="padding: 10px 0px 30px 15px;"|'''The below tutorial will show you how to successfully install and configure [https://www.modulesgarden.com/products/whmcs/ox-whmcs-module OX WHMCS Module.]'''<br /> |
| | We will guide you step by step through the whole installation process. | | We will guide you step by step through the whole installation process. |
| | |} | | |} |
Revision as of 11:53, 20 September 2022
OX WHMCS Module has been developed to allow quick and easy management of the OX account directly from the WHMCS client area.
Establish connection between your WHMCS and Open-Xchange to get access to email accounts, aliases forwarders and many more.
Use the addon module to master the theme branding on your account directly in in the panel.
|
| ✔ Create/Suspend/Unsuspend/Terminate Context
|
| ✔ View Service Information:
|
| ✔ Context Username And Password
|
| ✔ Set Limit Of Email Accounts Per Context
|
| ✔ Set Limit Of Email Aliases Per Context
|
| ✔ Set Limit Of Email Forwarders Per Context
|
| ✔ Define Maximum Quota Per Email Account [MB]
|
| ✔ Define Maximum Quota Per Context [MB]
|
| ✔ Toggle Using WHMCS Own Domain Only
|
| ✔ Allow Users To Change Password
|
| ✔ View Service Information:
|
| ✔ Context Username And Password
|
| ✔ Access And Management Of:
|
| ✔ View MX Records For Mail Domains
|
| ✔ Allow To Change Password
|
| ✔ Configurable Options Support
|
| ✔ Supports PHP 7.2 Up To PHP 7.4
|
| ✔ Supports WHMCS Themes "Six" And "Twenty-One"
|
| ✔ Supports WHMCS V8.2 And Later
|
Installation and Configuration
The below tutorial will show you how to successfully install and configure OX WHMCS Module.
We will guide you step by step through the whole installation process.
|
Installation
| 1. Log in to our client area and download the module.
|
2. Extract the package and upload its content into the main WHMCS directory.
The content of the package to upload should look like this.
|
4. When you install OX WHMCS Module for the first time, you have to rename the 'license_RENAME.php' file.
The file is located in 'modules/servers/oxWHMCSModule/license_RENAME.php'. Rename it from 'license_RENAME.php' to 'license.php'.
|
5. In order to configure your license key you have to edit the previously renamed 'license.php' file.
Enter your license key between quotation marks as presented on the following screen. You can find your license key in our client area → 'My Products'.
|
6. The last step is to set up the 'storage' folder as recursively writable.
This folder is available at '/yourWHMCS/modules/servers/oxWHMCSmodule/'.
|
Server Configuration
7. Now let's configure a new product. Log in to your WHMCS, proceed to 'System Settings' → 'Products/Services' → 'Servers'.
Afterwards, press 'Add New Server'.
|
8. Next, enter your server name and Open Xchange server hostname or IP address.
Choose 'oxWHMCAModule' from a dropdown menu and type in your username and password used to log in to OX server.
Select 'Secure' if you use SSL for connection. Next, test your connection and press 'Save Changes' if successful.
|
9. After you configure your server correctly, you will see the following screen.
Now you need to create a new group for your server. For that purpose press 'Create New Group'.
|
| 10. Enter name, click on your previously created server, press 'Add' then 'Save Changes'.
|
Product Configuration
11. In order to create and configure product, click on 'System Settings' → 'Products/Services'.
If you do not have a product group yet, click on 'Create a New Group' button.
|
| 12. Next, enter your new product group name and press 'Create Group'.
|
13. You can create your product now and assign it to the previously created product group.
click on 'Create a New Product'.
|
14. Afterwards, choose your product type and product group from dropdown menu, enter the product name and select 'oxWHMCSModule' module.
You may 'Continue' to the next step now.
|
| 15. Now, go to the 'Module Settings' section, choose both 'oxWHMCSModule' and your previously created server group from dropdown menus.
|
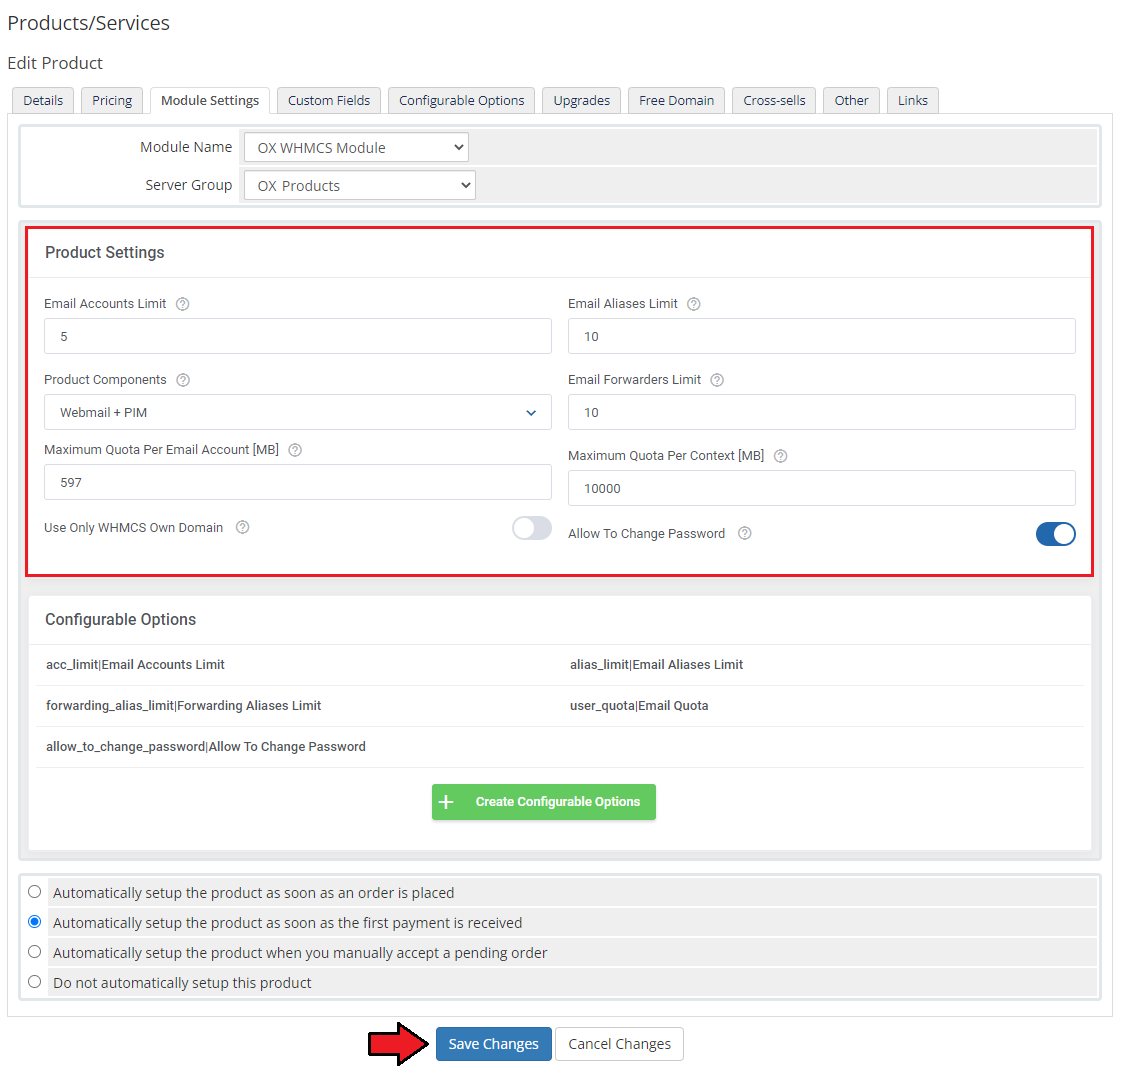
16. In this section you can define the limit settings per product.
- Email Accounts Limit - the maximum allowed number of email accounts per context is 500
- Email Aliases Limit - the maximum allowed number of email aliases per email account is 50
- Email Forwarders Limit - note that only one redirection is allowed per one forwarding alias
- Product Components - select the combination of modules and addons the client will have access to
- Maximum Quota Per Email Account [MB] - set the maximum quota for single email account [MB]
- Maximum Quota Per Context [MB] - the maximum quota value cannot be lower than 10 000 MB (10 GB)
- Use Only WHMCS Own Domain - only users with with an active domain on WHMCS will be able to manage this product
- Allow To Change Password - the option to change the password in the client area will be unlocked for all users
|
|
18. Additionally, you can replace the module static limit with dynamic one in the form of configurable options.
Press 'Create Configurable Options' to generate default set of them.
More about management of configurable options can be found here.
|
19. That's all, you have just correctly created and customized a new product, now you can check the results.
This is what your customers should see in your client area.
|
| Here is the view of a properly created and configured product from the administrator site.
|
Management
| OX WHMCS Module allows your customers to manage their Open-Xchange accounts directly in your WHMCS client area.
Read through the next chapters which illustrate all the possibilities of our addon module.
|
Admin Area
From now on, all your clients who ordered a previously created product will be able to manage their OX accounts via your WHMCS system.
The screen below presents a summary view of the ordered product in admin area. Among the available actions you will find:
- Module Commands: 'Create', 'Suspend'/'Unsuspend', 'Terminate' the product and 'Change Package' action
- Change configurable options values - available options depend on configuration in 'Module Settings'
|
Client Area
|
In the below section, you will find basic tools used to manage your OX account shown and described.
Analyze them carefully to enjoy full and easy management.
|
Ordering Process
| Order page view of a product with the configurable options generated:
|
| Order page view of a product with static limits setup:
|
Management
OX WHMCS Module allows your customers to manage their OX email accounts from your WHMCS client area.
This is what its management page looks like in the client area. Move to the below sections to learn more details.
|
Email Accounts
Email Accounts section enables full management of accounts associated with your domain.
You may edit existing accounts with a wide range of options and create new ones within defined limits.
|
Press 'Add Mailbox' to create a new account.
Fill out the fields to provide any details on the account owner. Only fields marked with an asterisk are obligatory.
Note: The 'Quota' field is available to select only if Class of service 'Quota Per Account' is used for the product. If the limit has been reached, the client will not be able to create an account.
Important: Remember that password is also verified by Zimbra. It is advised to set up default limits in Zimbra panel, within which the password settings can be modified in the module.
|
| If you wish, you can provide more details of a new account in the 'Additional Information' tab, although it is not required for the account creation.
|
You can order various operations on a single account using buttons marked on the screen .
You are allowed to change the account's status and password, log in directly to a mailbox, edit its details or delete it.
Alternatively, you can select multiple accounts and issue command on them as well using buttons above the list of accounts.
Note: The 'Last Login' column shows only the date of the last manual login. When using the "Log In To Mailbox" feature, its date is not registered by the API here.
|
Email Aliases
Email Aliases enable you to create and use additional address for the same e-mail account.
Note: Email aliases are created within the same email domain.
Read more about Domain Aliases below.
|
| Any aliases can be quickly removed through pressing an adequate icon or using mass actions.
|
Email Forwarders
| In this section you can set up email forwarders and choose from several destination options to adjust mail forwarding perfectly to your needs.
|
| Press the 'Create Forwarder' button, specify the forwarded email and define the destination emails.
You may add more than one forwarder name and destination emails, use a comma to separate them.
|
Email Catch-All
| Catch All Email' is a feature that allows you to forward emails that are sent to the non-existent email address of your domain name.
|
MX Records
| This page enables you to manage your MX records for each of your domains.
First, you need to choose the desired domain.
|
Tips
Common Problems
| 1. When you have problems with connection, check whether your SELinux or firewall does not block ports.
|


