Multibrand 1.X For WHMCS
(→New Brand) |
(→Installation) |
||
| Line 129: | Line 129: | ||
=Installation= | =Installation= | ||
{| | {| | ||
| − | |style="padding: 10px 0px | + | |style="padding: 10px 0px 30px 15px;"|'''This tutorial will show you how to successfully install and configure Multibrand For WHMCS.''' <br /> |
We will guide you step by step through the whole installation and configuration process. | We will guide you step by step through the whole installation and configuration process. | ||
|} | |} | ||
| + | ==Installation== | ||
{| | {| | ||
| − | |style="padding: | + | |style="padding: 10px 0px 20px 15px;"|'''1. Log in to your client area and download Multibrand For WHMCS.''' |
|} | |} | ||
{| | {| | ||
| Line 157: | Line 158: | ||
|} | |} | ||
{| | {| | ||
| − | |style="padding: 0px 0px | + | |style="padding: 0px 0px 30px 25px;"|[[File:MB_4.png]] |
|} | |} | ||
| + | ==Activating Addon Module== | ||
{| | {| | ||
| − | |style="padding: | + | |style="padding: 10px 0px 15px 15px;"|'''5. Now you have to activate the module in your WHMCS system.'''<br /> |
Log in to your WHMCS admin area. Go to '' 'Setup' '' → '' 'Addon Modules' ''. Afterwards, find '' 'Multibrand' '' and press '' 'Activate' '' button. | Log in to your WHMCS admin area. Go to '' 'Setup' '' → '' 'Addon Modules' ''. Afterwards, find '' 'Multibrand' '' and press '' 'Activate' '' button. | ||
|} | |} | ||
| Line 171: | Line 173: | ||
|} | |} | ||
{| | {| | ||
| − | |style="padding: 0px 0px | + | |style="padding: 0px 0px 30px 25px;"|[[File:MB_6.png]] |
|} | |} | ||
| + | ==Additional Settings== | ||
{| | {| | ||
| − | |style="padding: | + | |style="padding: 10px 0px 15px 15px;"|'''7. Now, set up '' 'logos' '' folder as writable.'''<br /> |
Folder is located in '' 'you_whmcs/modules/addons/MultibrandFunctionality/storage/' ''. | Folder is located in '' 'you_whmcs/modules/addons/MultibrandFunctionality/storage/' ''. | ||
|} | |} | ||
{| | {| | ||
|style="padding: 0px 0px 20px 25px;"|[[File:MB_7.png]] | |style="padding: 0px 0px 20px 25px;"|[[File:MB_7.png]] | ||
| + | |} | ||
| + | {| | ||
| + | |style="padding: 10px 0px 15px 15px;"|'''8. The last step is replacing '' 'invoicepdf.tpl' '' file with '' 'invoicepdf_RENAME.tpl for each of the templates used.<br /> | ||
| + | '' 'invoicepdf_RENAME.tpl' '' is located in '' 'your_whmcs/templates/default/' ''.<br /> | ||
| + | Simply, remove default '' 'invoicepdf.tpl' '' file from template folder, copy '' 'invoicepdf_RENAME.tpl' '' into the folder and rename the file to '' 'invoicepdf.tpl' ''. | ||
| + | |} | ||
| + | {| | ||
| + | |style="padding: 0px 0px 20px 25px;"|[[File:MB_7_1.png]] | ||
|} | |} | ||
{| | {| | ||
Revision as of 15:56, 20 November 2014
Contents
|
About Multibrand For WHMCS
| Multibrand For WHMCS will allow you to manage multiple brands on multiple websites while using just a single WHMCS installation.
You will be able to customize your brand through modifying factors like client area template, logo or brand language, and preview the changes with just a single click. |
- Admin Area Features:
| ✔ User Friendly Management Of Multiple Brands |
| ✔ Easy Modification Of Existing Brands |
| ✔ Assign/Unassign Clients To Brands |
| ✔ Migrate Clients Between Brands |
| ✔ Assign/Unassign Multibranded Status To Clients |
| ✔ Assign Products To Brands |
| ✔ Assign Ticket Departments To Brands |
| ✔ Configure Payment Gateways For Each Brand Separately - PayPal And 2CheckOut (beta) |
| ✔ Display Active Clients, Invoices, Orders, Tickets And Services Associated To Brands |
| ✔ Quick Preview Of The Branded Client Area |
| ✔ Publish/Unpublish Brands On Click |
| ✔ Set Brand As Default - Automatic Assignment Of New Clients |
| ✔ View Brand Reports - The List Of Clients, Invoices, Orders, Tickets And Services |
| ✔ View Dynamic Brands Comparison Reports - Various Graph Types |
| ✔ Generate Separate Email Templates For Each Brand |
- Admin Area Features:
| ✔ Order Branded Products |
| ✔ Generate Branded Invoices |
| ✔ Create Branded Invoices Manually |
- Client Area Features:
| ✔ Displayed Client Area Template And Default Language Depend On The Brand |
| ✔ Access To Products, Invoices, Ticket Departments and Payment Gateways Assigned To The Brand |
| ✔ Receive Branded Emails And Invoices |
| ✔ Unbranded Clients Can Only Log Into The Default Brand |
| ✔ Branded Clients Can Only Log Into The Brand They Are Assigned To |
| ✔ Multibranded Clients Can Log Into All Existing Brands With The Same Access Details |
- Brand Configuration:
| ✔ Default Brand For New Accounts |
| ✔ Brand Name |
| ✔ Company Name |
| ✔ Brand URL Address |
| ✔ Brand Logo |
| ✔ Brand Language |
| ✔ Brand Template |
| ✔ Brand Address |
| ✔ Brand Email |
| ✔ Brand Graph Color |
| ✔ Brand Terms Of Service URL |
- General Info:
| ✔ Multi-Language Support |
| ✔ Supports WHMCS V5 and Later |
Installation
| This tutorial will show you how to successfully install and configure Multibrand For WHMCS. We will guide you step by step through the whole installation and configuration process. |
Installation
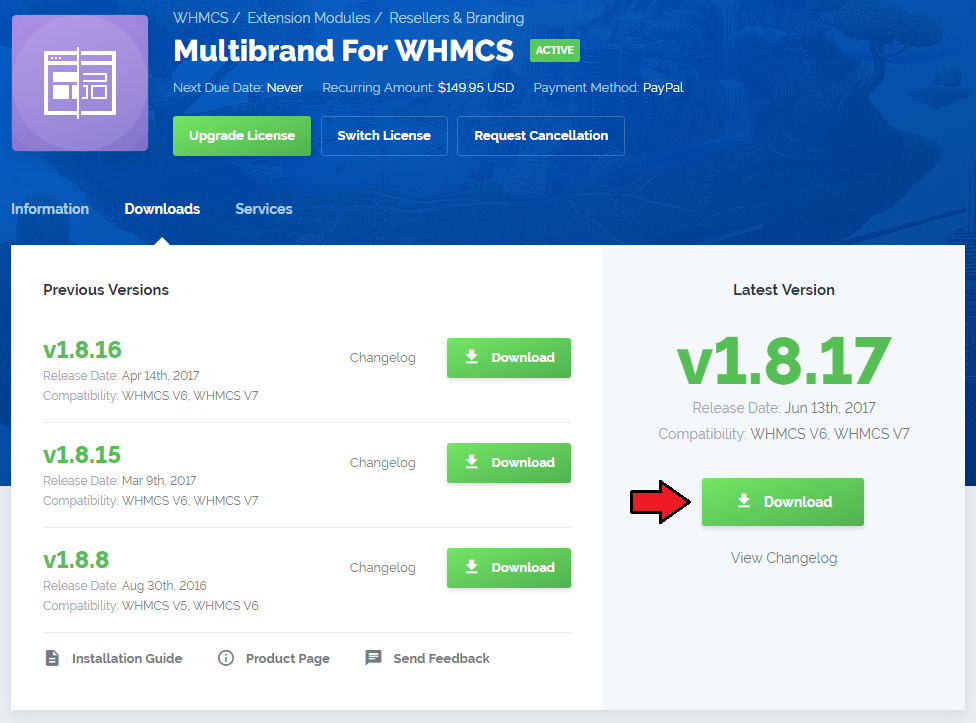
| 1. Log in to your client area and download Multibrand For WHMCS. |
|
| 2. Upload and extract the module into the main WHMCS directory. Files in your WHMCS directory should look like this. |

|
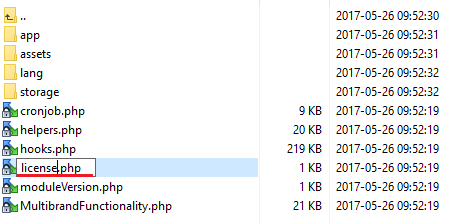
| 3. When you install Multibrand for the first time you have to rename 'license_RENAME.php' file. File is located in 'modules/addons/MultibrandFunctionality/license_RENAME.php' . Rename it from 'license_RENAME.php' to 'license.php' . |
|
| 4. In order to configure your license key, you have to edit a previously renamed 'license.php' file. Enter your license key between quotation marks as presented on the following screen. You can find your license key in your client area → 'My Products' . |

|
Activating Addon Module
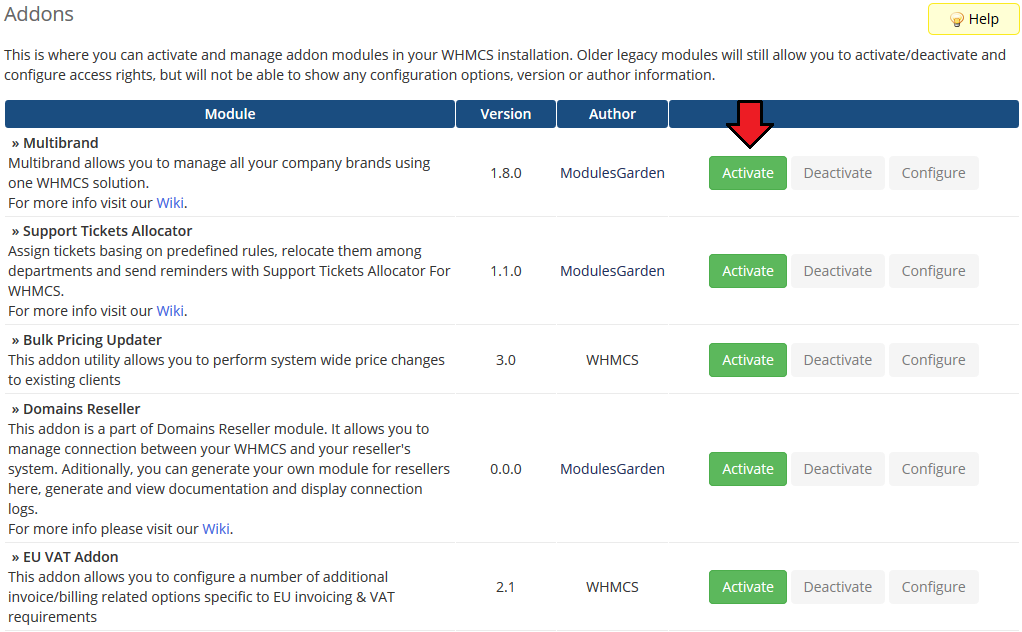
| 5. Now you have to activate the module in your WHMCS system. Log in to your WHMCS admin area. Go to 'Setup' → 'Addon Modules' . Afterwards, find 'Multibrand' and press 'Activate' button. |
|
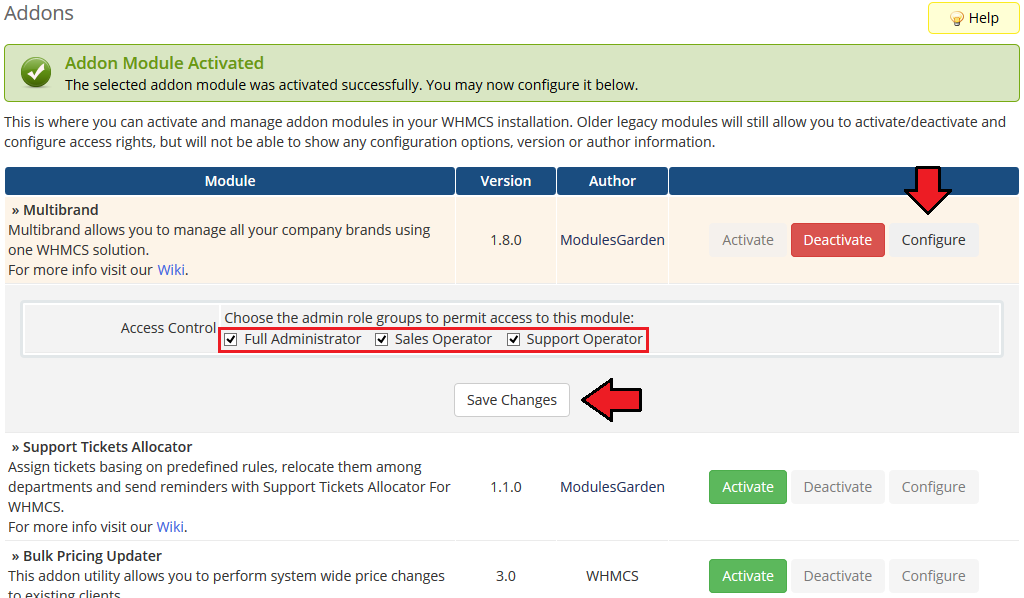
| 6. In the next step you need to permit access to this module. To do so click on 'Configure' button, tick 'Access Control' near required admin role groups and press 'Save Changes' . |
|
Additional Settings
| 7. Now, set up 'logos' folder as writable. Folder is located in 'you_whmcs/modules/addons/MultibrandFunctionality/storage/' . |

|
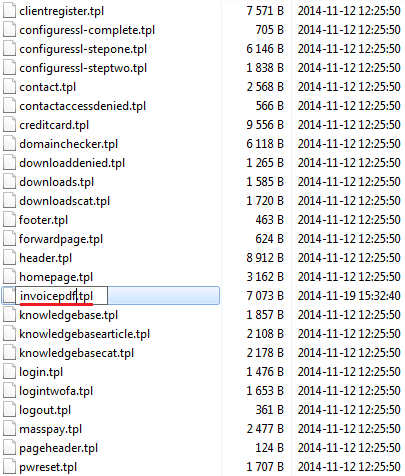
| '8. The last step is replacing 'invoicepdf.tpl' file with 'invoicepdf_RENAME.tpl for each of the templates used. 'invoicepdf_RENAME.tpl' is located in 'your_whmcs/templates/default/' . |
|
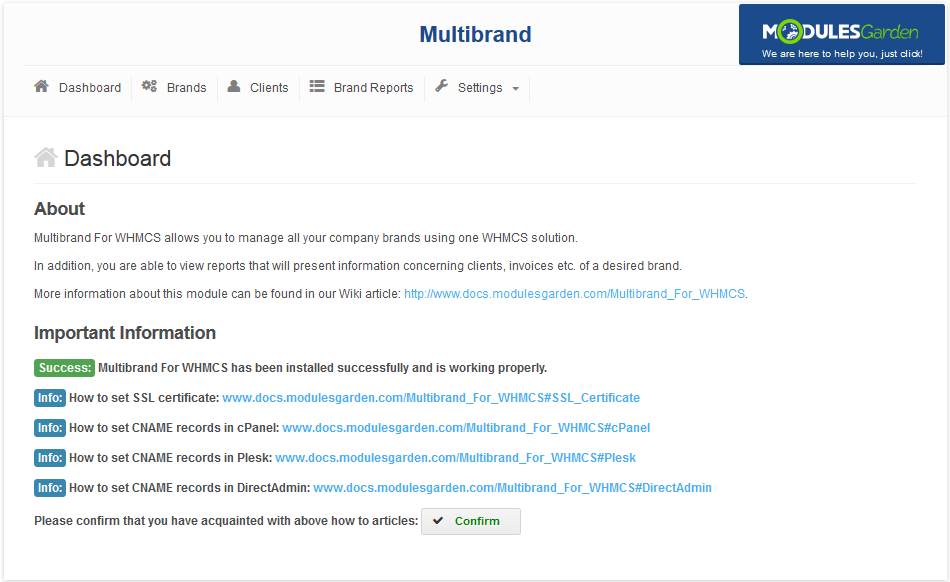
| 8. You have just successfully installed Multibrand For WHMCS! You can access your module in 'Addons' → 'Multibrand' . |
|
Configuration and Management
| In this section we will show you how to properly set up and use Multibrand For WHMCS. |
Dashboard
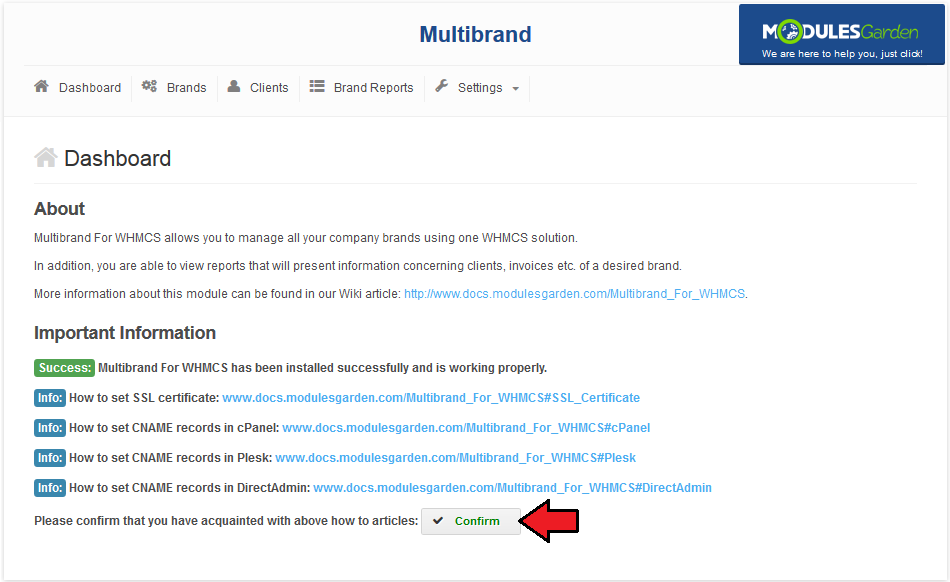
| Under 'Dashboard' you can find basic information about the module and current status of 'logos' folder. It is required to set up 'logos' folder as writable in order to upload logos of your brands. |
|
Brands Management
| 'Brands Management' tab allows you to create and manage your brands using a single instance of WHMCS solution. Important 1: Unbranded clients will be able to log into the main client area until you set up any brand as published. |
New Brand
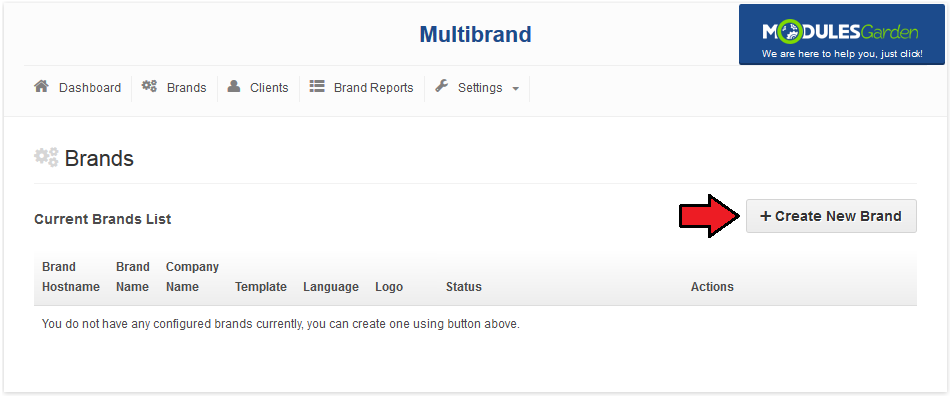
| Let's start by creating a new brand. For that purpose go to 'Brands Management' tab and press 'Create New Brand' button. |
|
Now, fill out 'Brand Base URL' , 'Brand Email' , 'Brand Name' , 'Company Name' , 'Address' and 'Terms of Service URL' with desired values.
|
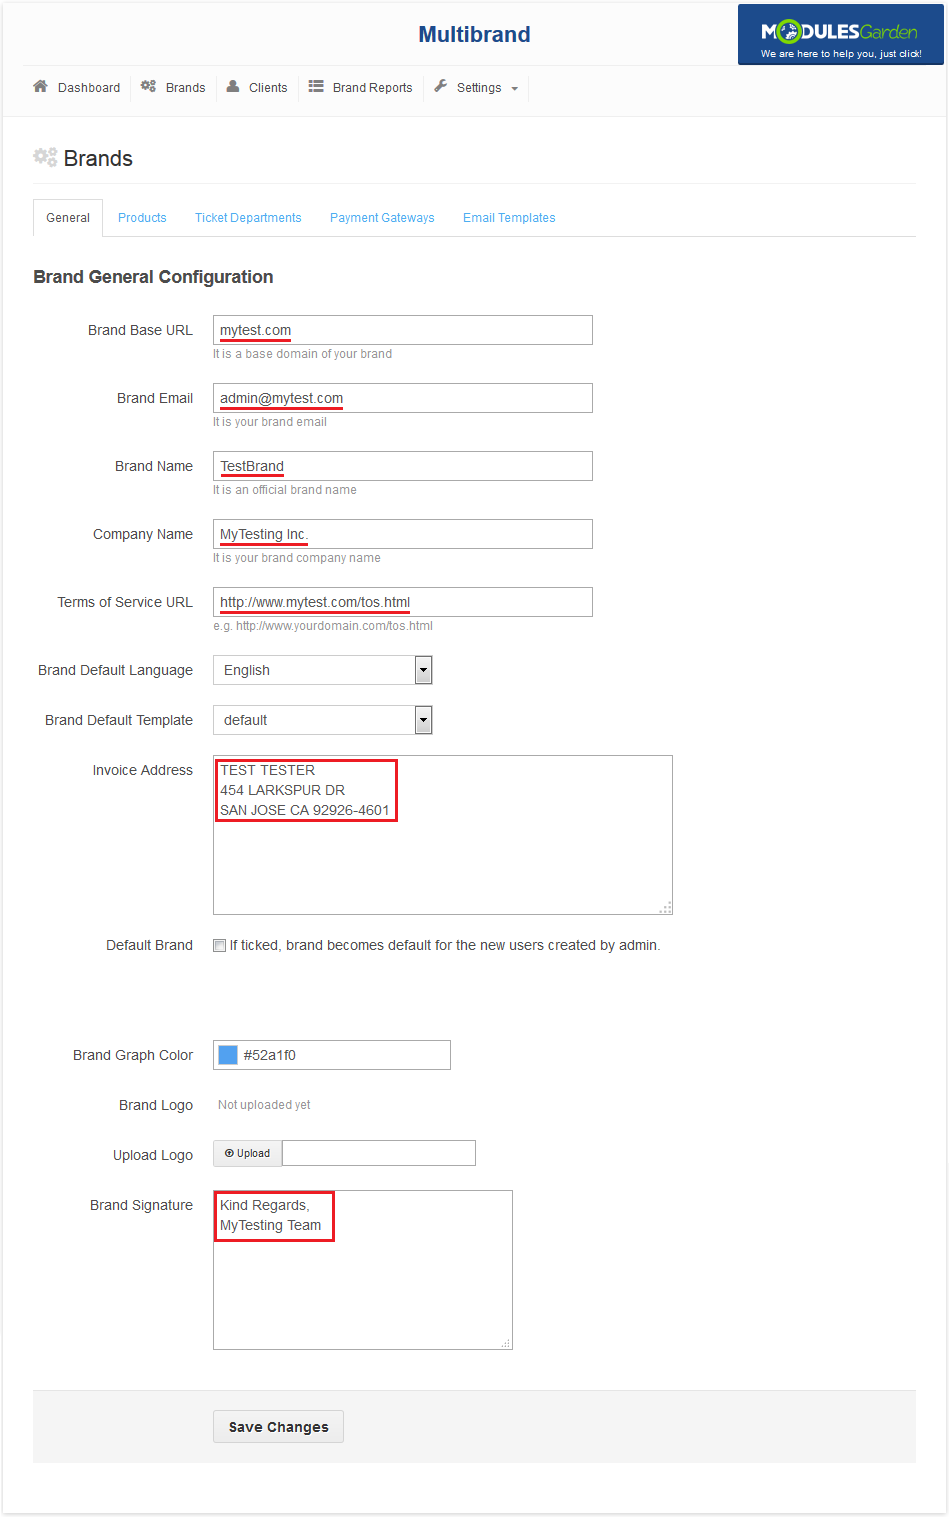
|
| Afterwards, select desired brand language, template and brand colour. Additionally, upload the logo which will be used in branded invoices, emails and client area. |
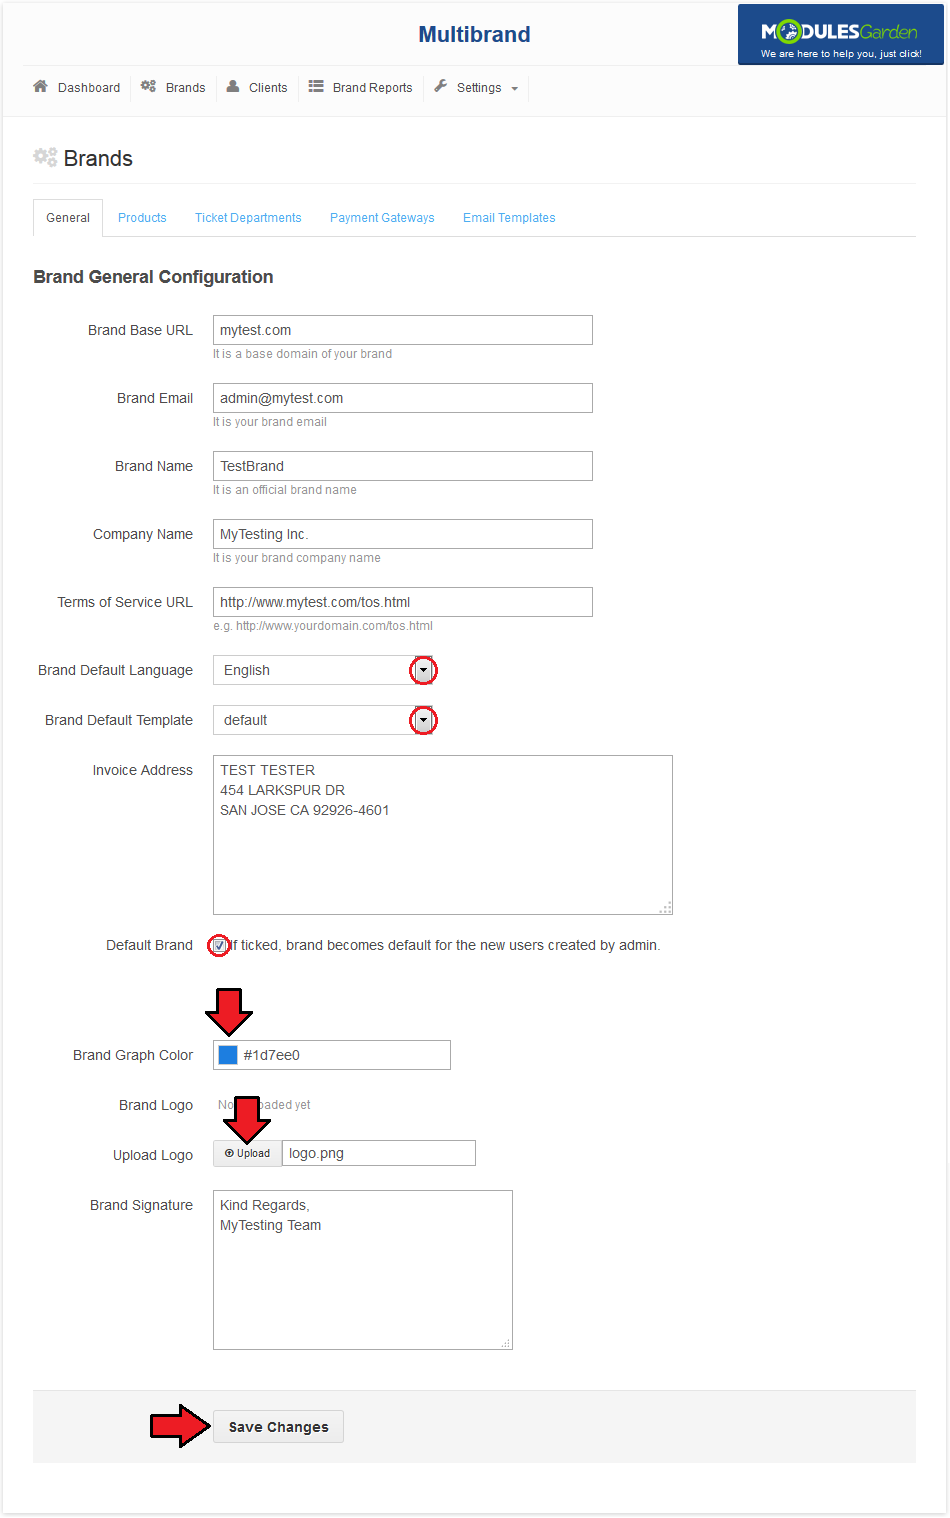
|
| The last step is setting up DNS record, which will point from branded domain towards your main domain used by WHMCS. To learn more about setting up CNAME records, proceed to Creating CNAME Records section. |
Management of Existing Brands
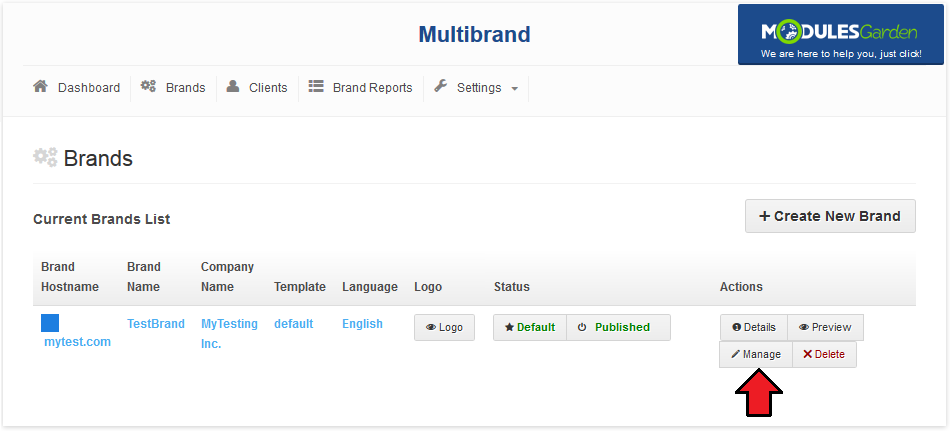
| To manage your brand, press 'Manage' button next to it as shown on the following screen. |
General
| General tab contains configuration of the brand. You can modify your brand at any time, simply alter wanted parameters and press 'Save Changes' . |
|
Products
| This tab allows you to assign products configured in your system to the brand. Note: Product can be assigned to multiple brands at the same time. |
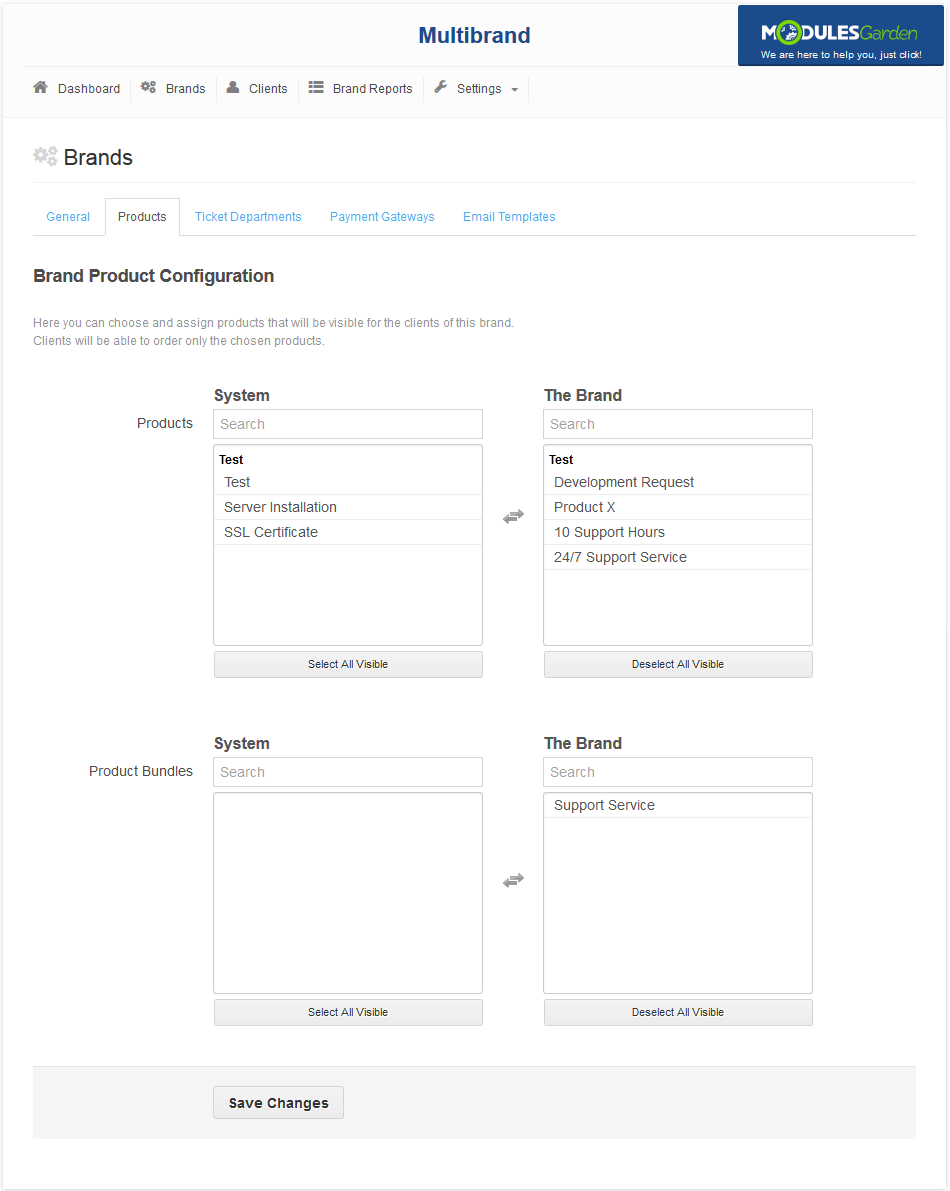
|
Ticket Department
| Here you can choose ticket departments available in the brand. |
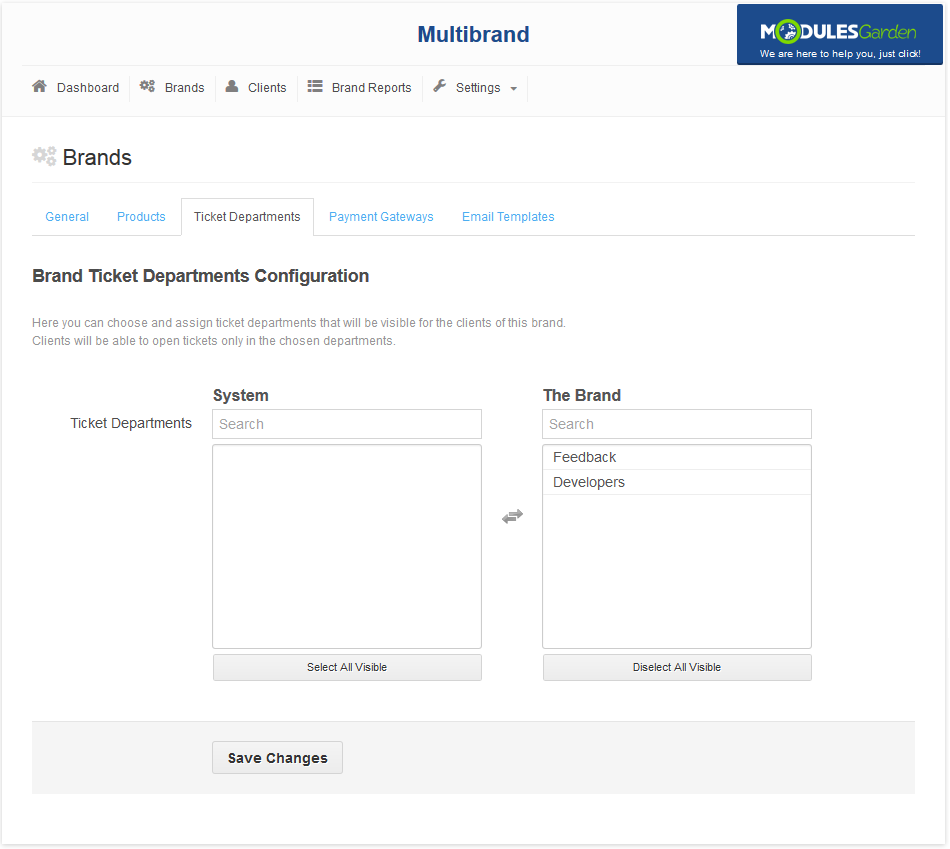
|
Client
| 'Client' tab allows you to assign unbranded clients to the brand. |
| File:MB 16.png |
Migrations
| While 'Client' enables you to brand unbranded clients, 'Migrations' allows you to move clients between brands. As you can see on the following screen, the brand to which a client is assigned is displayed next to their name. |
| File:MB 17.png |
Payment Gateway
| This tab allows you to configure payment gateway for the brand. To enable payment gateway, mark checkbox next to it, fill out required details and press 'Save Changes' . |
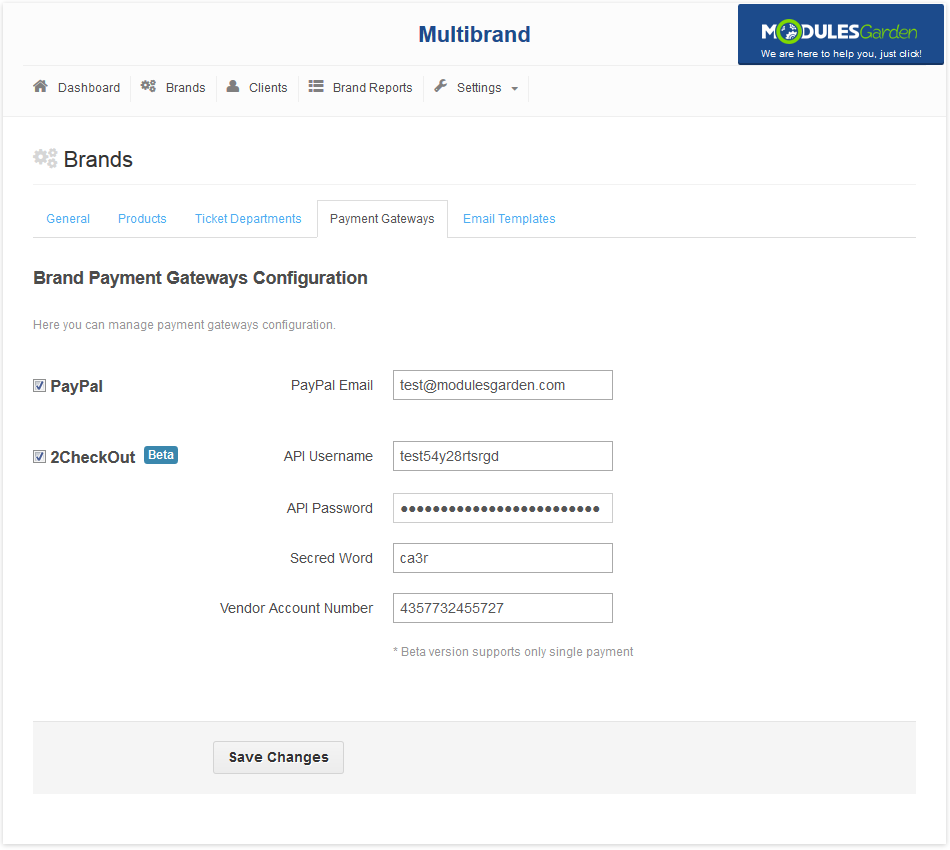
|
Email Templates
| Here you are able to generate email templates for the brand only. Check 'Create Brand Templates' and press 'Save Changes' to create them. |
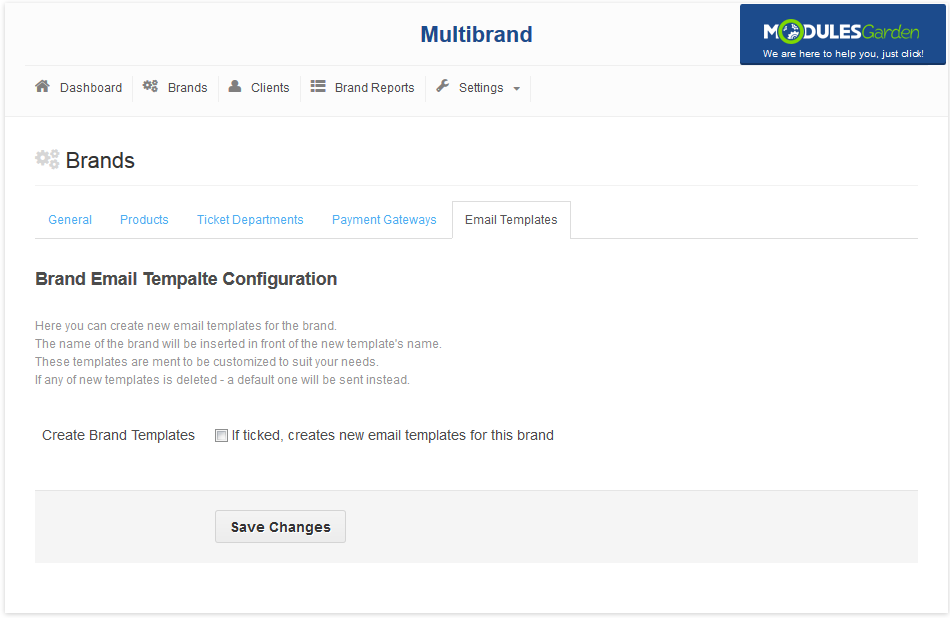
|
Back To Brand Management
| Alternatively, you can edit brand values visible in 'Brand Management' tab by pressing them. Choose/type in the desired value and confirm changes. |
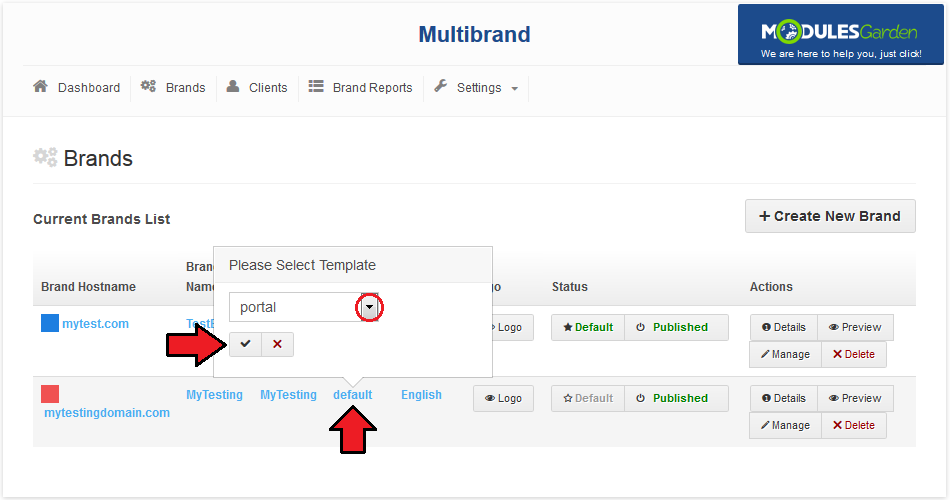
|
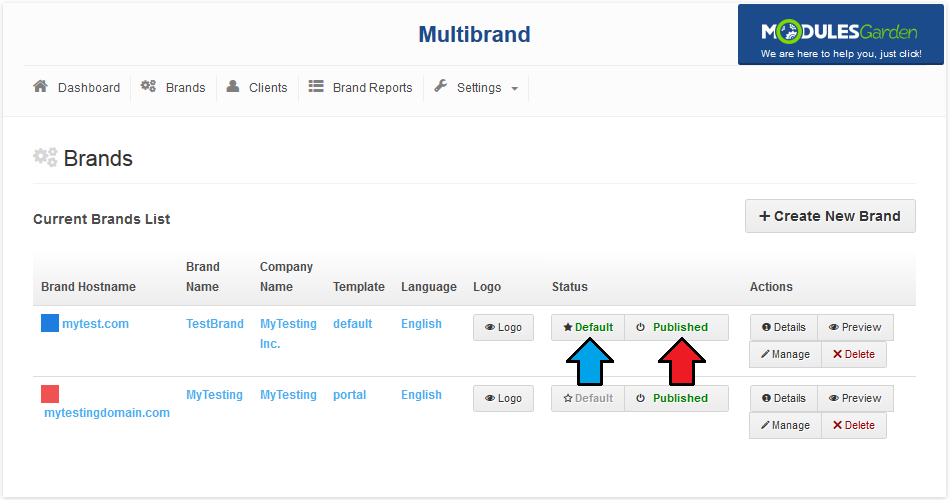
| Each brand can be disabled/enabled through pressing 'Published'/'Unpublished' (red) or set up as default through clicking on 'Default' (blue) button. Both of them are placed in 'Change Status' column as shown on the screen below. |
|
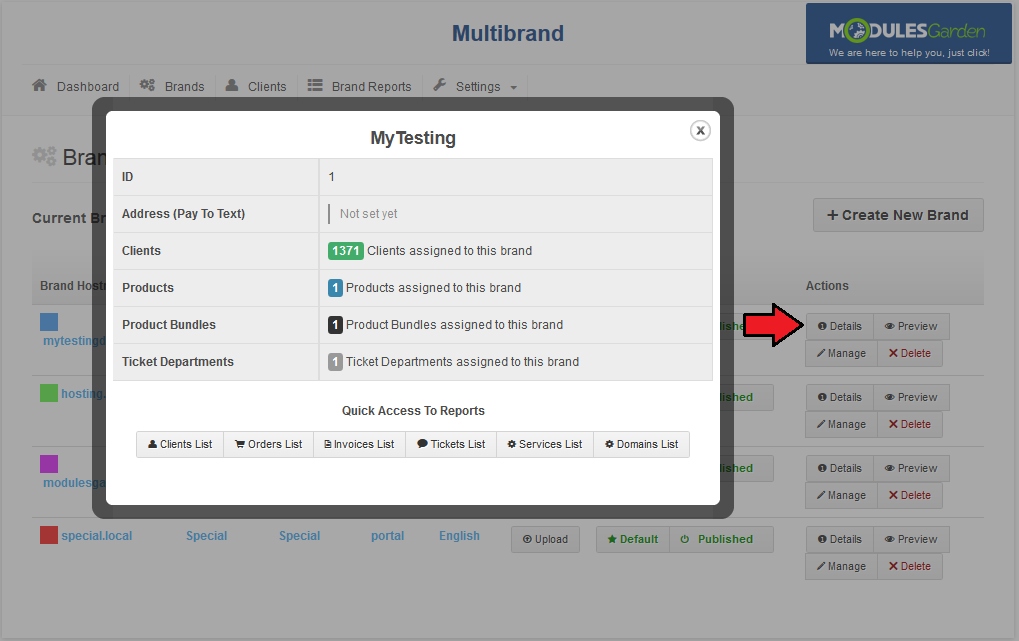
| In order to view the details of a brand, press 'Toggle Details' button next to the brand. Here you can find basic information about the brand as well as quick access links to the brand reports. |
|
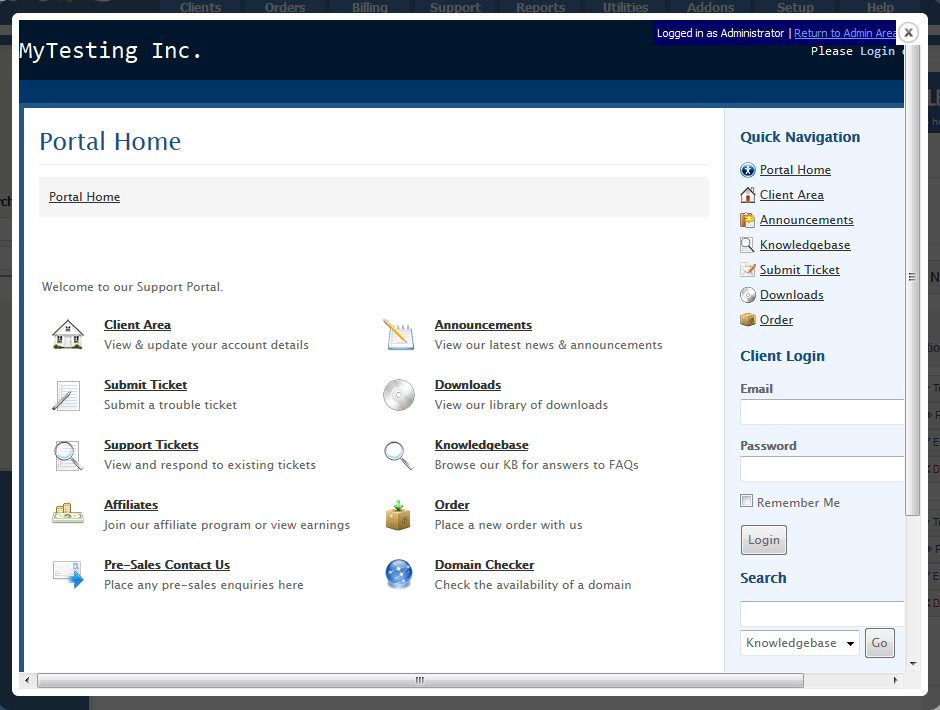
| You can also view the client area of the brand through pressing 'Preview' button. The client area should appear in a popup window as shown on the following screen. |
|
Brand Reports
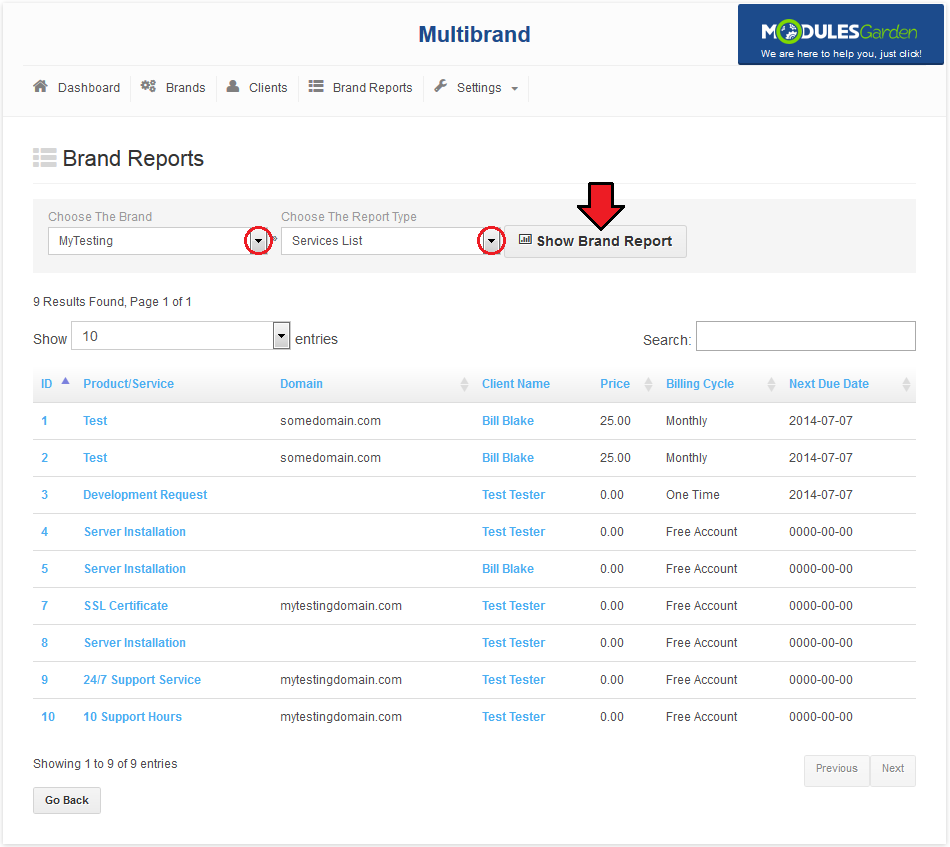
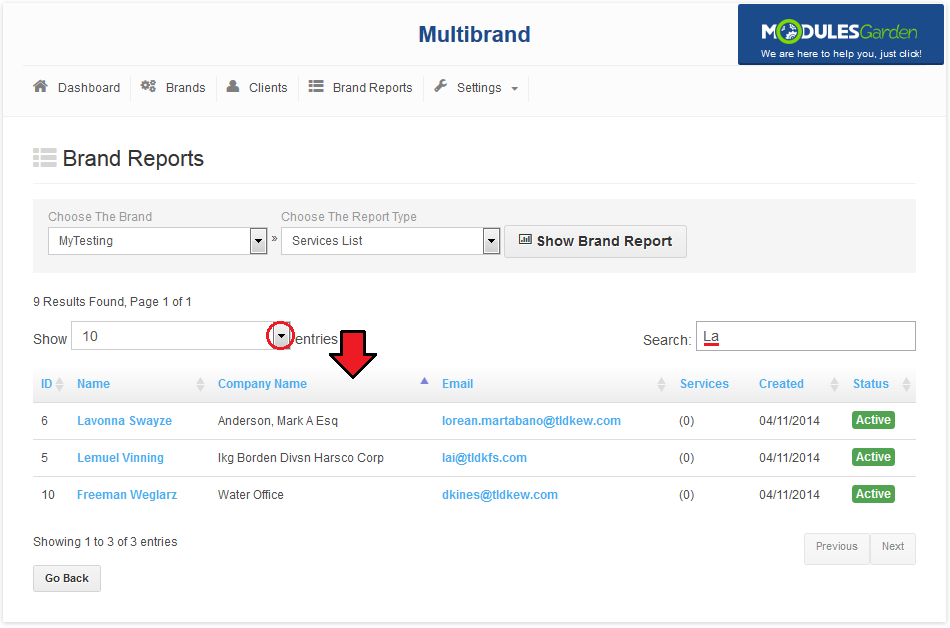
| In 'Brand Reports' tab you can easily view the reports concerning specified brands. You can view the reports of clients, invoices, orders, tickets and services bounded to the selected brand. |
|
| In addition, you can select the quantity of records per page, search a specified record and sort records by selected column. |
|
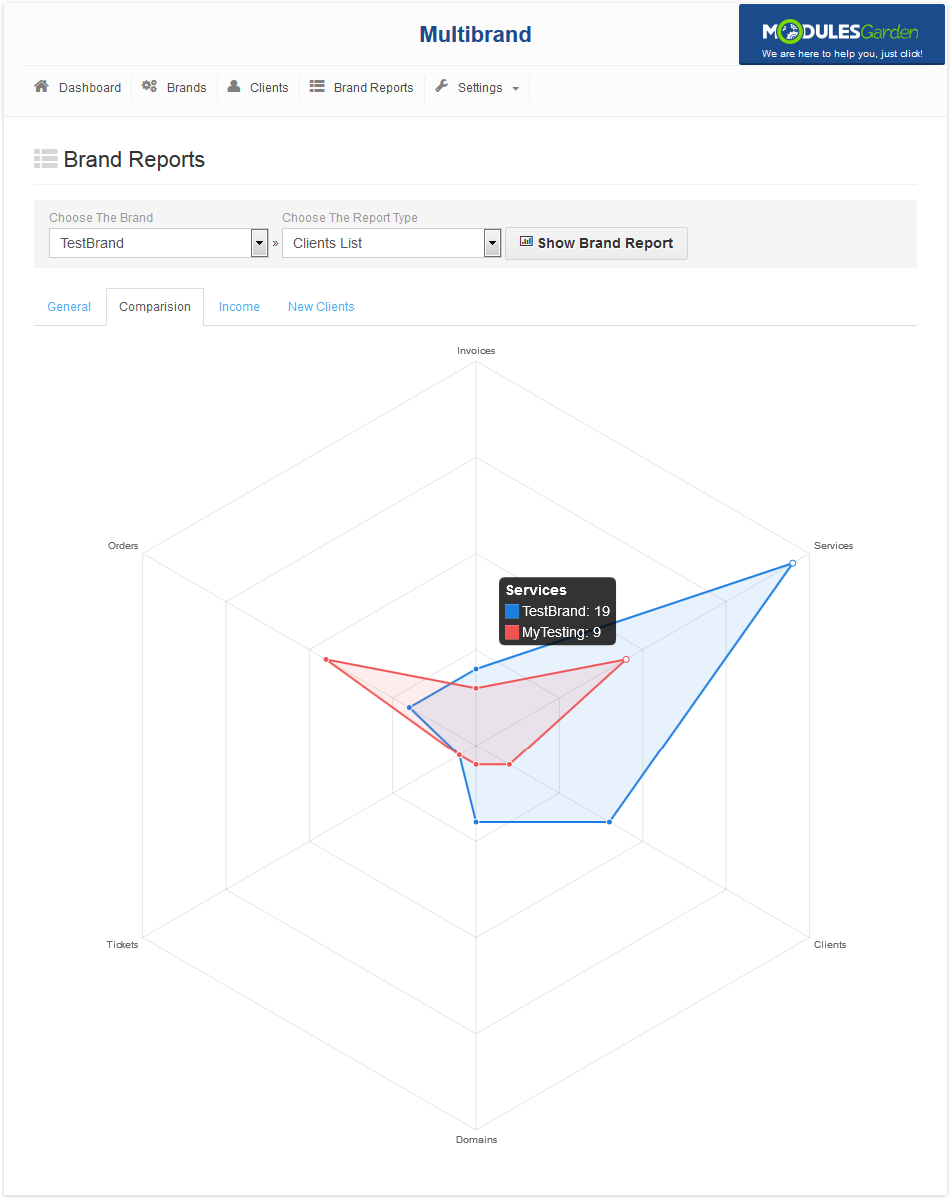
| You can also compare all your brands using tabs marked on the following screen. Here you can compare them by the amount of clients, orders, services, tickets, invoices, domains and income with various graph types. |
|
Membership In The Admin Area
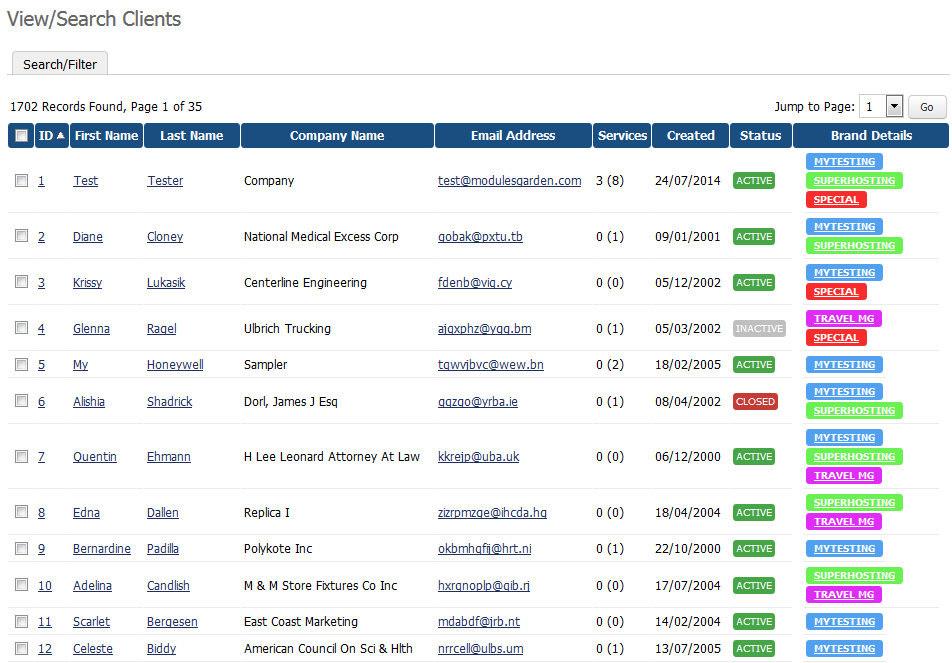
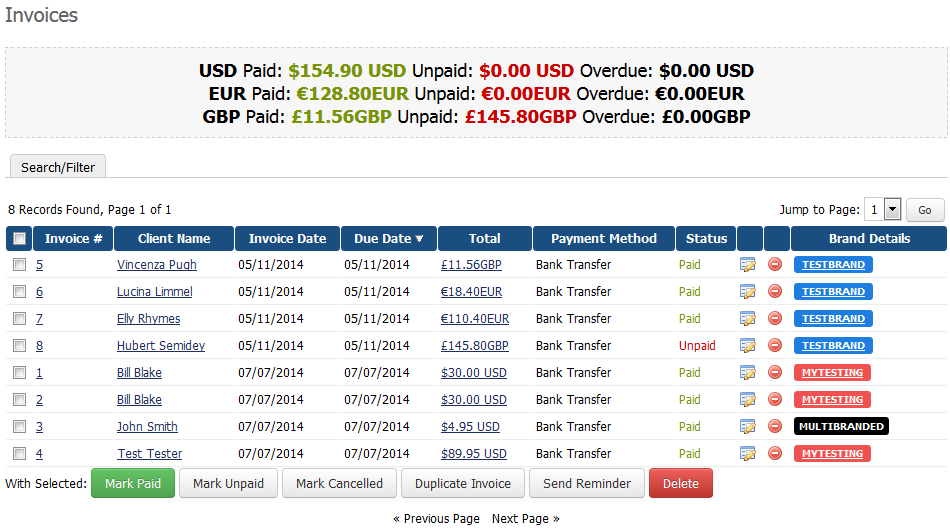
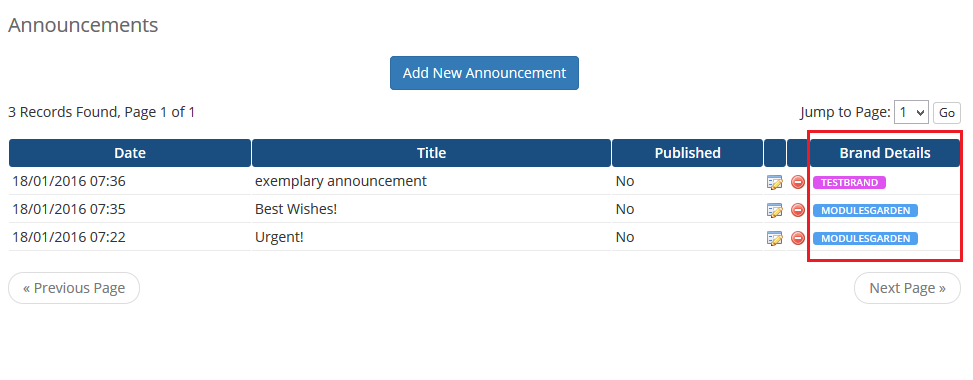
| Multibrand For WHMCS makes management of WHMCS easier through introducing 'Brand Details' column. 'Brand Details' column informs you about membership of clients, invoices, tickets, orders or services in certain brand. |
|
| In 'Order List' it looks similar. Through pressing a brand name, you will be moved directly to a report page of that brand. |
|
Branded Client Area
| Multibrand For WHMCS offers multiple client areas in one solution and lets you have your clients assigned to them. |
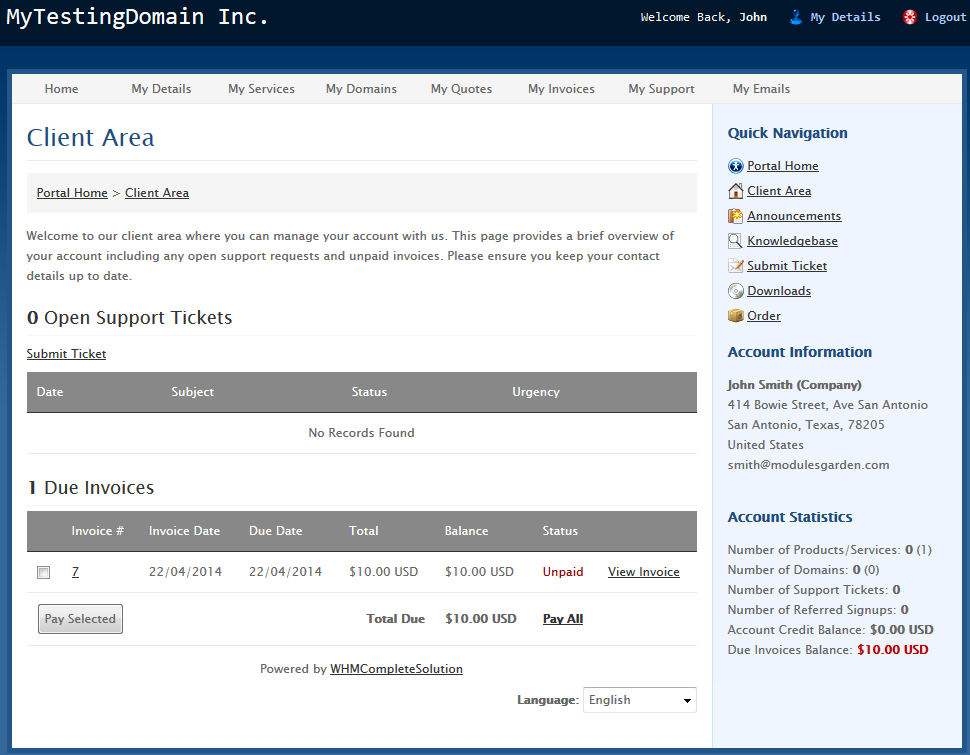
|
| On the following screen you can see invoices generated for a brand. |
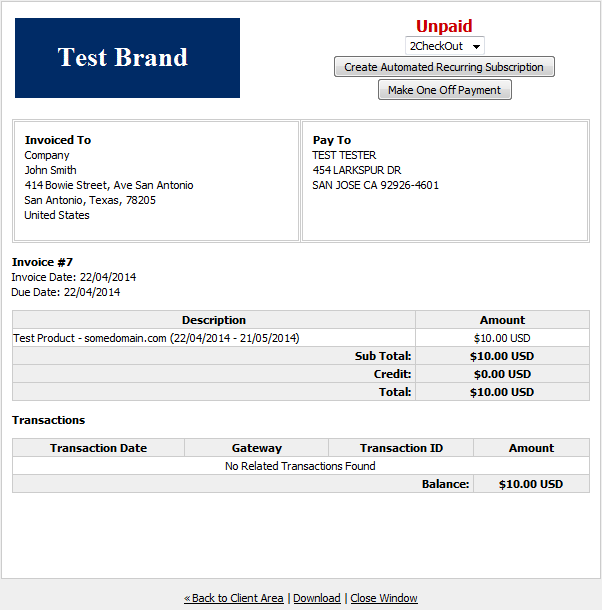
|
Branded Email Templates
| Brand settings also apply to emails sent to clients. On the following screen you can see an example of an order email. |
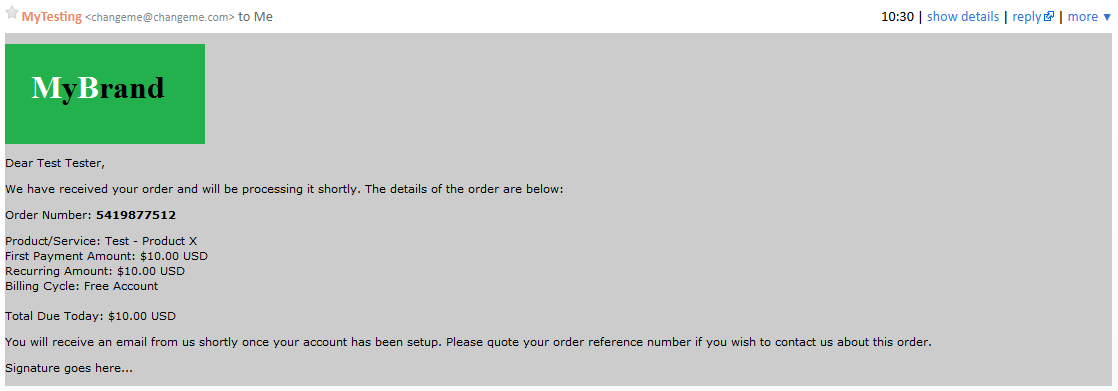
|
Creating CNAME Records
| In this section you will find guides on how to create CNAME record in popular control panels. For instance, if your branded domain is reseller.com and domain with your WHMCS is whmcs.domain.com, your CNAME will be 'www.reseller.com. CNAME whmcs.domain.com.'. |
cPanel
| 1. Log into your cPanel. |
| 2. Press 'Simple DNS Zone Editor' under 'Domains' section. |
| 3. Select the domain you wish to manage from the menu. Note: This step is required only if you own more than one domain. |
| 4. Fill in 'Name' and 'CNAME' record and press 'Add CNAME Record' . Note: To define record's TTL, you have to use 'Advanced DNS Zone Editor'. |
DirectAdmin
| 1. Log into your DirectAdmin. |
| 2. Click the 'DNS Administration' . |
| 3. Afterwards, press select the desired domain. |
| 4. Fill in the full domain/subdomain into the CNAME record and press 'Add' next to it. Note: Do not forget to place a dot at the end. |
Plesk
| 1. Log into your Plesk panel. |
| 2. Press 'Domains' under 'Hosting Services' section. |
| 3. Find the domain to be edited, and click on the corresponding Control Panel link. Afterwards, proceed to 'Websites & Domains' tab and press 'DNS Settings' . |
| 4. Find the domain to be edited, and click on the corresponding Control Panel link. Afterwards, proceed to 'Websites & Domains' tab and press 'DNS Settings' . |
| 5. Add a new record or edit an existing one. |
| 6. Now, change the record type to 'CNAME' and fill in both 'Domain name' and 'Canonical name' . Finish by pressing 'Ok' . |
SSL Certificate
| In this section you will find all information related to SSL certificate in WHMCS using Multibrand. If your branded domains or WHMCS domain are using SSL connection, all of them need to have the same certificate.
This is due the way in which WHMCS works. It is not the limitation of our module. require_once dirname(__FILE__).'/includes/MultiBrandSSLFixer.php';
$SSLFixer = new MultiBrandSSLFixer();
if($SSLFixer->shouldBeInSSL()){
if(! $SSLFixer->isInSSL()){
$SSLFixer->forceRedirect(true);
}
}else{
if($SSLFixer->isInSSL()){
$SSLFixer->forceRedirect(false);
}
}
|
cPanel
| Installing SSL certificate for a domains managed from cPanel consists from these steps: |
| 1. Log into your cPanel and press 'SSL/TSLS Manager' under 'Security' section. |
| 2. Click on 'Manage SSL sites' under 'Install and Manage SSL for your site(HTTPS)'. |
| 3a. (installing the certificate) Select the domain, paste certificate and private key and save the settings. 3b. (using already installed certificate) Select it from 'Browse Certificates' and save the settings. |
Multibranded Clients
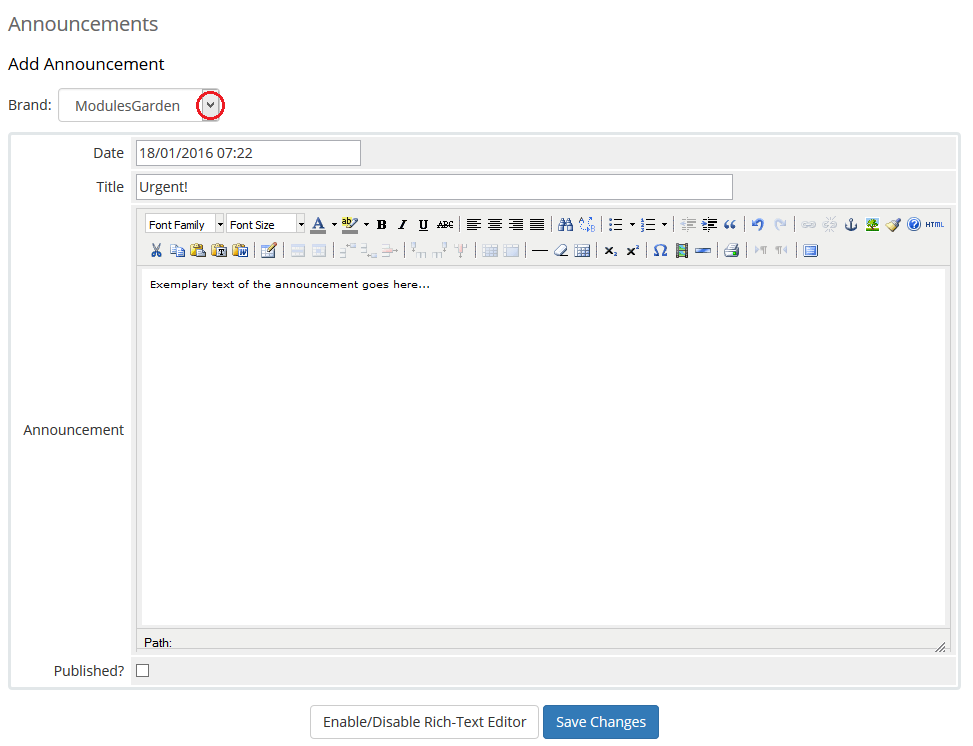
| You can set up a client as 'Multibranded' , this status allows clients to log into all brands. To benefit from this, you need to set up client's custom field. |
| 1. Proceed to 'Setup' → 'Custom Client Fields' . |
|
| 2. Type 'MultiBranded' into 'Field Name' , choose 'Tick Box' field type and mark 'Admin Only' . Afterwards, press 'Save Changes' . |
|
Setting A Client As Multibranded
| Now, to allow a client to log into all brands follow these steps. Proceed to client's profile → 'Profile' , mark 'MultiBranded' and press 'Save Changes' . |
|
| Now, your client can benefit from the multibranded status. |
Tips
| 1. The logo image is usually hard coded into the WHMCS template files. In order to use logo file provided in the 'Multibrand For WHMCS' module, find proper line at the template file and replace it with '{$logo}' variable. |
Common Problems
| 1. When you have problems with connection, check whether your SELinux or firewall does not block ports. |
2. Using 'Login as Client' functionality returns:
The page isn't redirecting properly Solution: This issue will be solved in the next version of module. |
| 3. If your CNAME record is not working, remember that first domain name in CNAME record should be branded domain. The second one is the domain on which you have your WHMCS. The redirection goes from the first domain to the second. |
| 4. If your branded domain or WHMCS domain are using SSL connection, both of them need to have the same certificate. If both of them are using the same domain, you will need a wildcard certificate. |